

Page 1

TFT-2402
USER MANUAL
For more information and support, please visit www.lenco.eu
Page 2

Table of contents
PRECAUTONS…………………………………………………………………………………… E3
CONTROLS ……………………………………………………………………………………… E4
USING THE TV FOR THE FIRST TIME ……………………………………………………… E7
BASIC OPERATIONS…………………………………………………………………………… E8
OSD MENU SETTING …………………………………………………………………………… E9
MAINTENANCE ………………………………………………………………………………… E12
TROUBLE SHOOTING ……………………………………………………………………… E12
SPECIFICATIONS ……………………………………………………………………………… E13
Page 3

Dear Customer:
OK
FAV
TTX
HOLD
ASPECT
SIZE
MIX
CANCEL
INDEX
REVEAL
SUBPAGE
MENU
Thank you for purchasing this LCD TV. When opening the box for the first time, please check whether all the accessories are
present. Before connecting parts and power, please carefully read the user manual and always keep these instructions handy and
close by your LCD TV.
FAV
MENU
OK
ASPECT
MIX
CANCEL
HOLD
SIZE
TTX
SUBPAGE
REVEAL
INDEX
Remote control X 1
Batteries X 2
Instruction Manual X 1
Power cord X 1
Please check the accessories when open the package. If anything damaged or lacked, consult with your local dealer .
Note:
This handling description is printed prior to product development.
When a part of the product specifi cation must be changed to improve operability or other functions, priority is given to the
product specifi cation itself. In such instances, the instruction manual may not entirely match all the functions of the actual
product.
Therefore, the actual product and packaging, as well as the name and illustration, may differ from the manual.
The screen shown as an example in this manual may be different from the actual screen display.
If at any time in the future you should need to dispose of this product, please note that: Waste
electrical products should not be disposed of with household waste. Please recycle where
facilities exist. Check with your Local Authority or retailer for recycling advice (Waste Electrical
and Electronic Equipment).
E2
Page 4
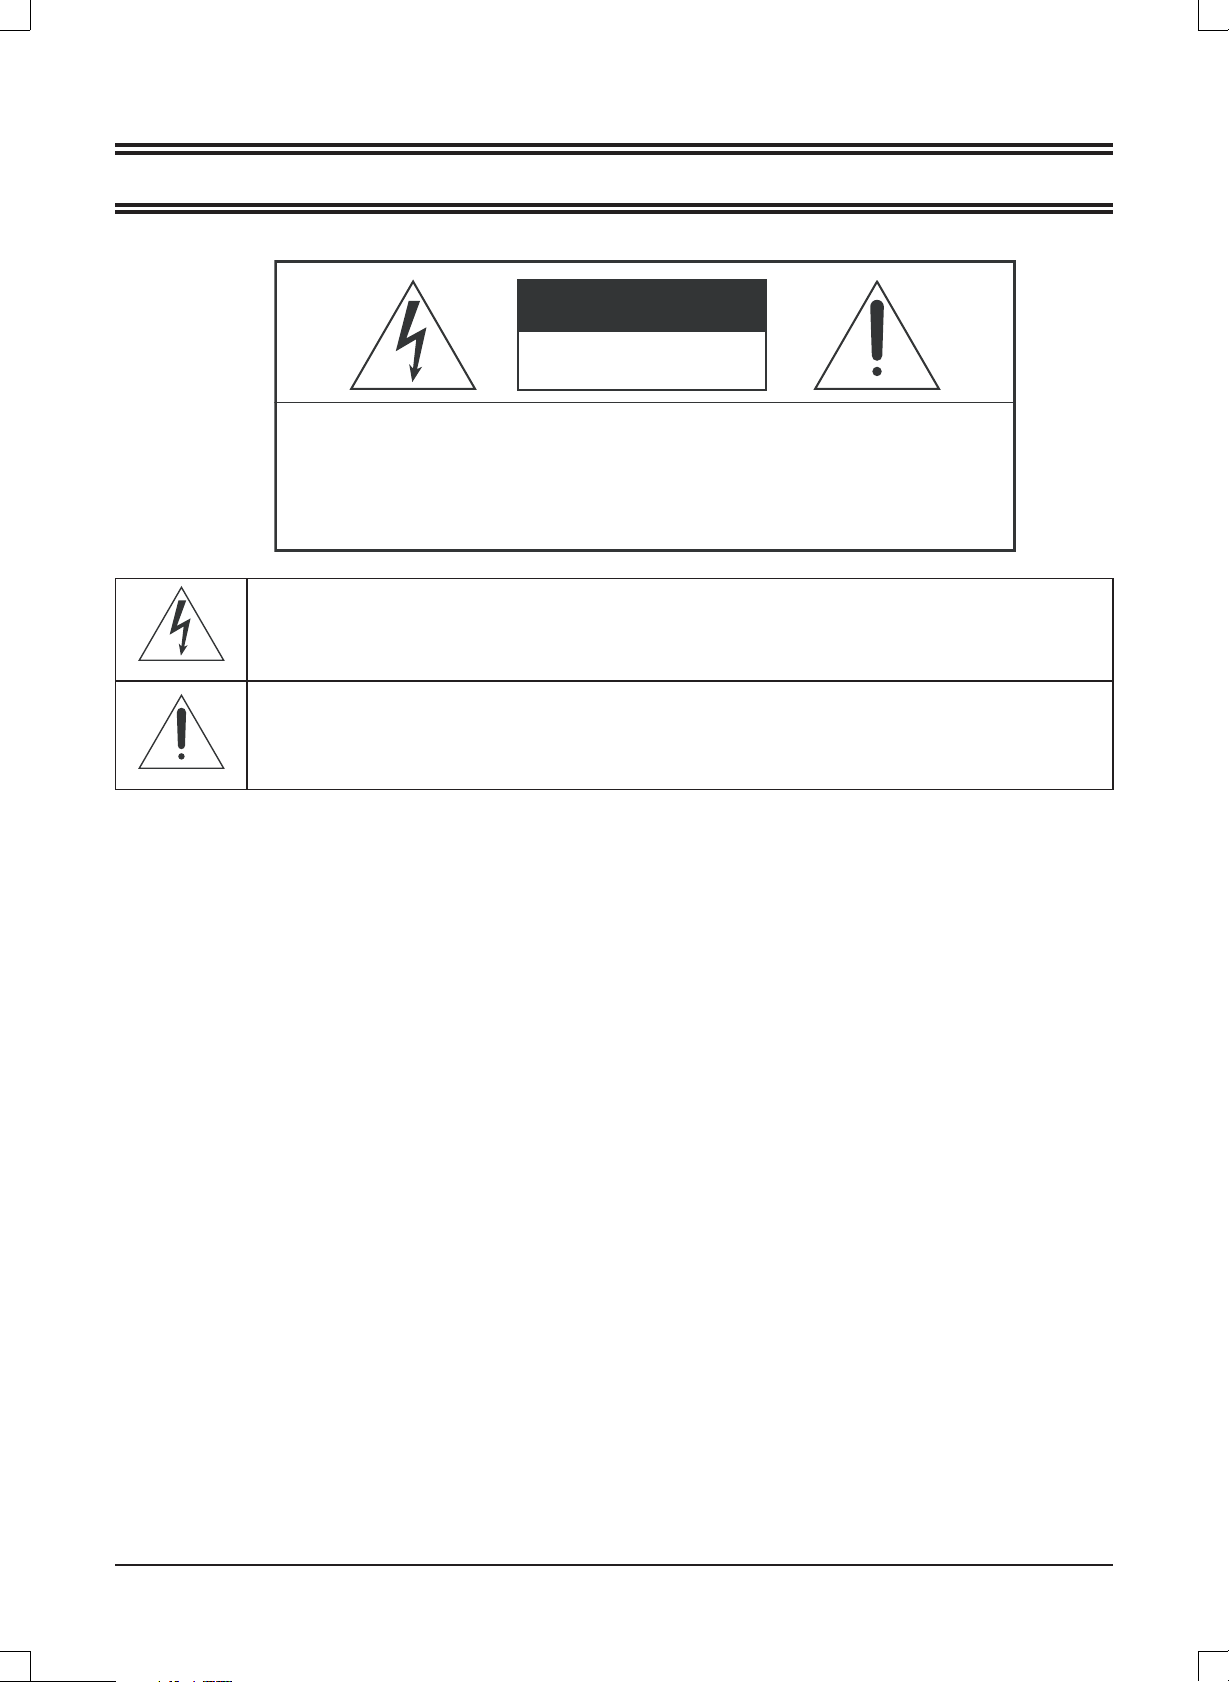
PRECAUTIONS
CAUTION
RISK OF ELECTRIC SHOCK
DO NOT OPEN
CAUTION: TO PREVENT THE RISK OF ELECTRIC
SHOCK, DO NOT REMOVE COVER (OR BACK).
NO USER-SERVICEABLE PARTS INSIDE.
REFER SERVICING TO QUALIFIED SERVICE PERSONNEL.
This symbol indicates that dangerous voltage constituting a risk of electric shock is present within
this unit.
This symbol indicates that there are important operating and maintenance instructions in the
literature accompanying this unit.
CAUTION
TO ENSURE CONTINUED SAFETY DO NOT REMOVE ANY COVERS OR ATTEMPT TO GAIN ACCESS TO THE INSIDE
OF THE PRODUCT.
REFER ALL SERVICING TO QUALIFIED PERSONNEL.
TO PREVENT FIRE OR SHOCK HAZARD, DO NOT EXPOSE THIS APPARATUS TO RAIN OR MOISTURE.
Do not install the unit in an unstable space.
•
Do not exposed the unit to where there are extremes of temperature (below 5°C or exceeding 35°C) or moisture.
•
Do not expose the unit to directly sunlight or heat nearby.
•
Do not install this unit in a confi ned space, such as a bookcase or built-in cabinet.
•
at least 20 cm distance around the apparatus.
•
The ventilation should not be impeded by covering the ventilation openings with items, such as newspapers, table-cloths,
curtains, etc..
•
Do not place this unit in any liquid.
•
Do not insert any tiny object into the unit through the ventilation.
•
The apparatus shall not be exposed to dropping or splashing. No object fi lled with liquids, such as vases, shall be placed
on the apparatus.
•
No naked fl ame sources, such as lighted candles, should be placed on the apparatus.
•
Never touch the TV screen or antenna / power cord during thunderstorms. Stop use it during thunderstorms.
•
Do not step on the power cord, or twist the power cord wire.
•
This product should not be adjusted or repaired by anyone except properly qualifi ed personal when an abnormal condition
or trouble happens. Please consult with the qualifi ed service person.
•
Always remove the batteries and store in a dry place if the remote control is not to be used for a long time.
•
Avoid drop down the remote control and damage it.
•
Always power this unit from an outlet with the same rating (voltage and frequency) as indicated on the rating label at the
back of this unit.
•
When not in use, disconnect the power cord from the outlet. Grasp the plug, not the cord, when disconnecting the unit.
•
This CLASS 1 device should be connected to the AC power plug with earthed-protective, and place the AC power plug at
the position easy to plug in and out.
•
Where the MAINS plug or an appliance coupler is used as the disconnect device, the disconnect device shall remain
readily operable.
For suffi cent ventilation, there should be
E3
Page 5
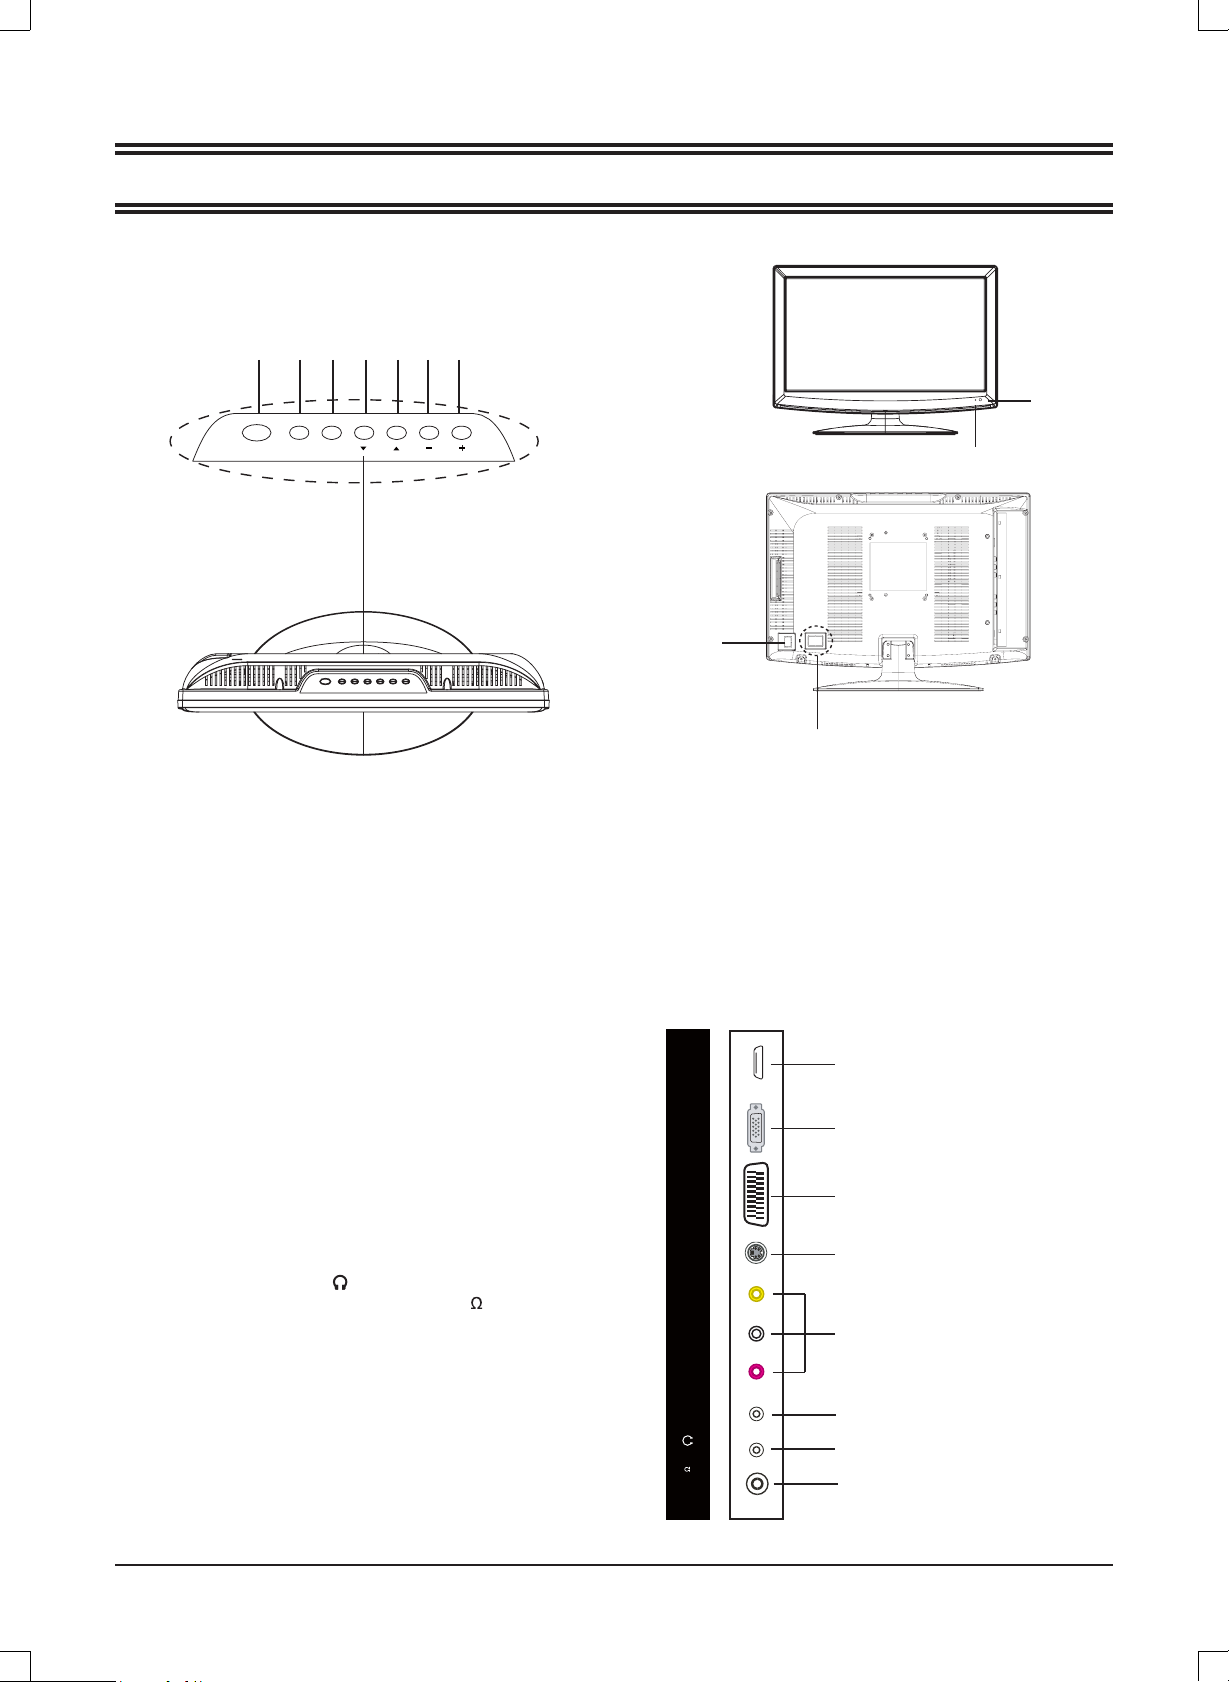
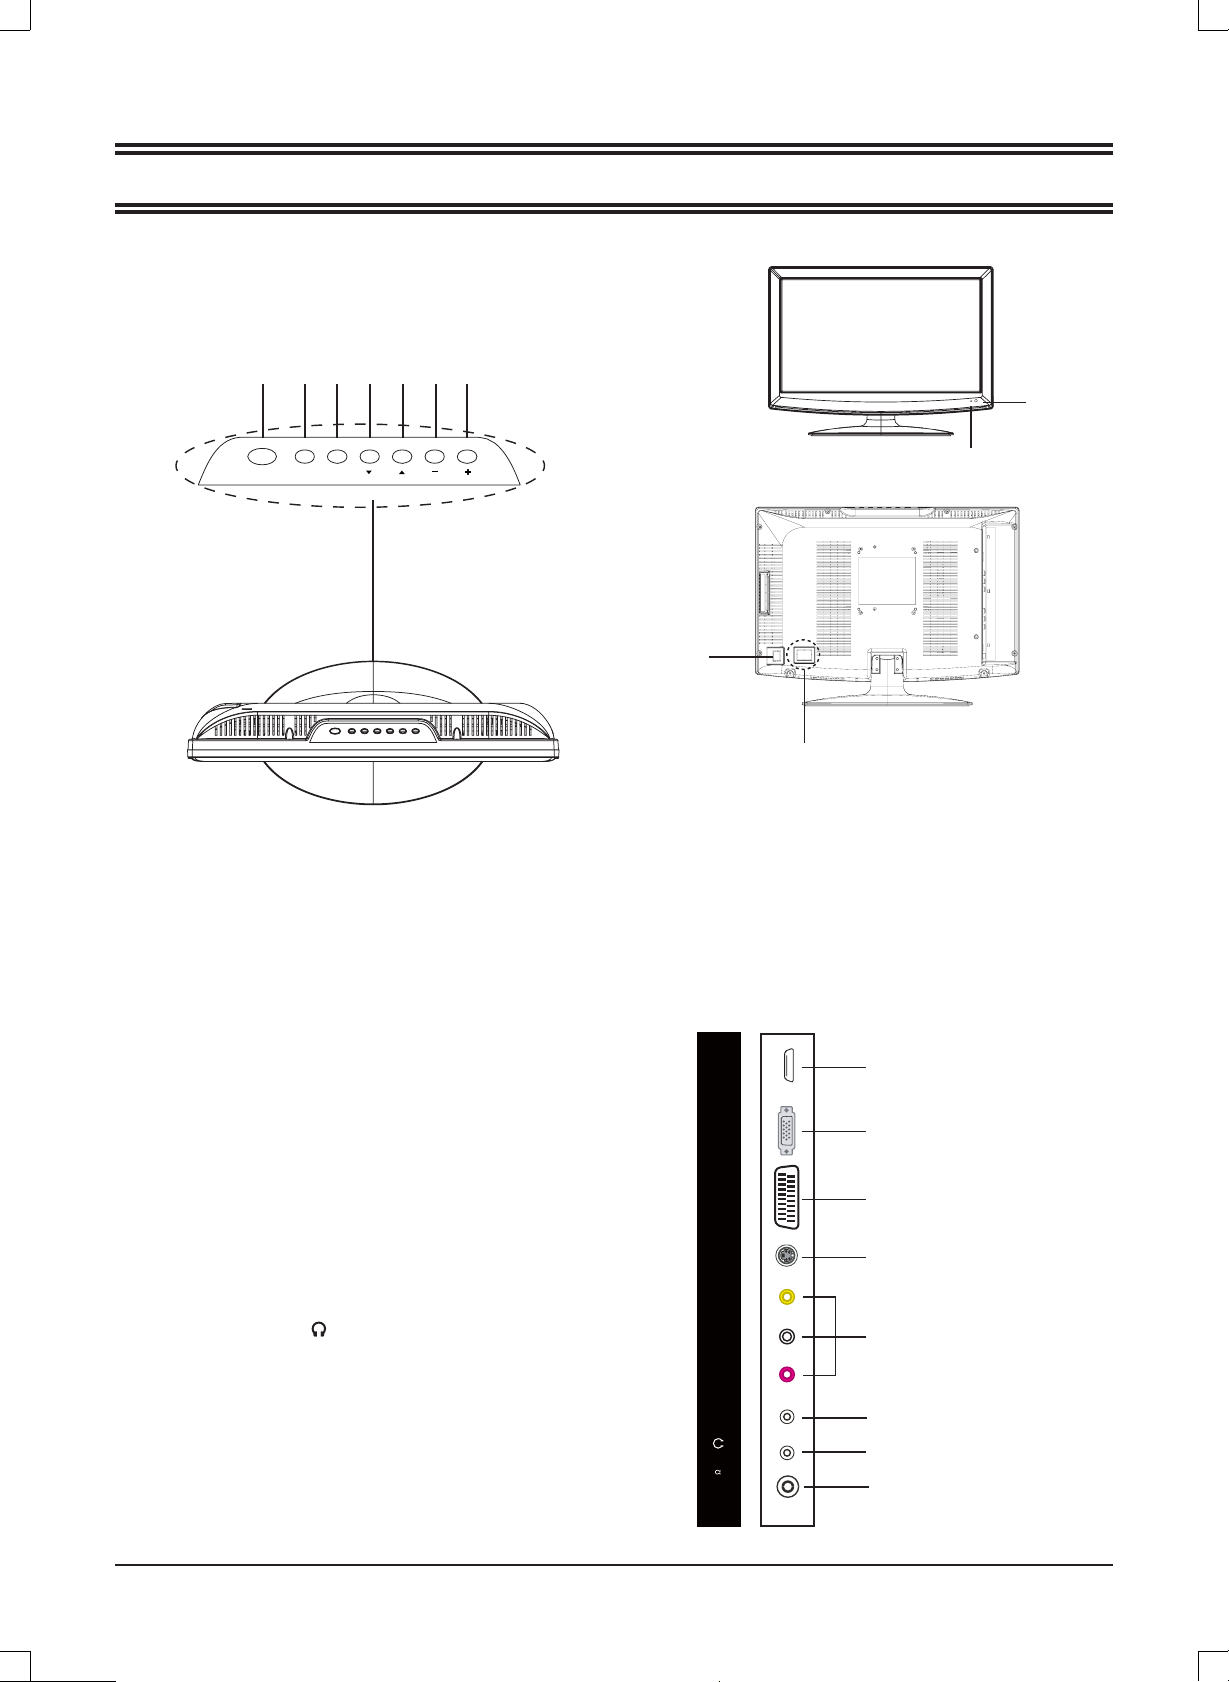
MAIN UNIT
Control buttons
CONTROLS
3245671
9
MENUPOWER
SOURCE
General control buttons
1.
2.
3.
4.
5.
6.
7.
8.
9.
10.
Power/Standby button
Input source select button !DŽSOURCE)
Menu button (MENU)
Channel down button
Channel up button (CH o )
Volume decrease button ( - VOL)
Volume increase button (VOL +)
Power indicator
Remote sensor
Power on/off button
!!!!!!
!
CH
VOL
POWER
(
( p CH)
8
10
Power Supply: Obey the same voltage and
*
frequency indication on the rating label of the
main unit.
)
Jacks (Rear Panel)
1.
2.
3.
4.
5.
6.
7.
8.
High-Defi nition Multimedia interface input plug (HDMI)
VGA interface input plug!DŽVGA)
SCART input plug!DŽSCART)
S-video input plug!DŽS-VIDEO)
Composite audio & video input plug !DŽR/L/VIDEO)
PC audio input plug
Audio ouput plug!DŽ )
Antenna/Cable TV input plug
!DŽPC!
AUDIO )
!!)
RF 75 )
1
AGV IMDH
2
!
SCART
S-VIDEOVIDEOLR
CP
)
5
7(
F
R
OIDUA
3
4
5
6
7
8
E4
Page 6
OK
FAV
TTX
HOLD
ASPECT
SIZE
MIX
CANCEL
INDEX
REVEAL
SUBPAGE
MENU
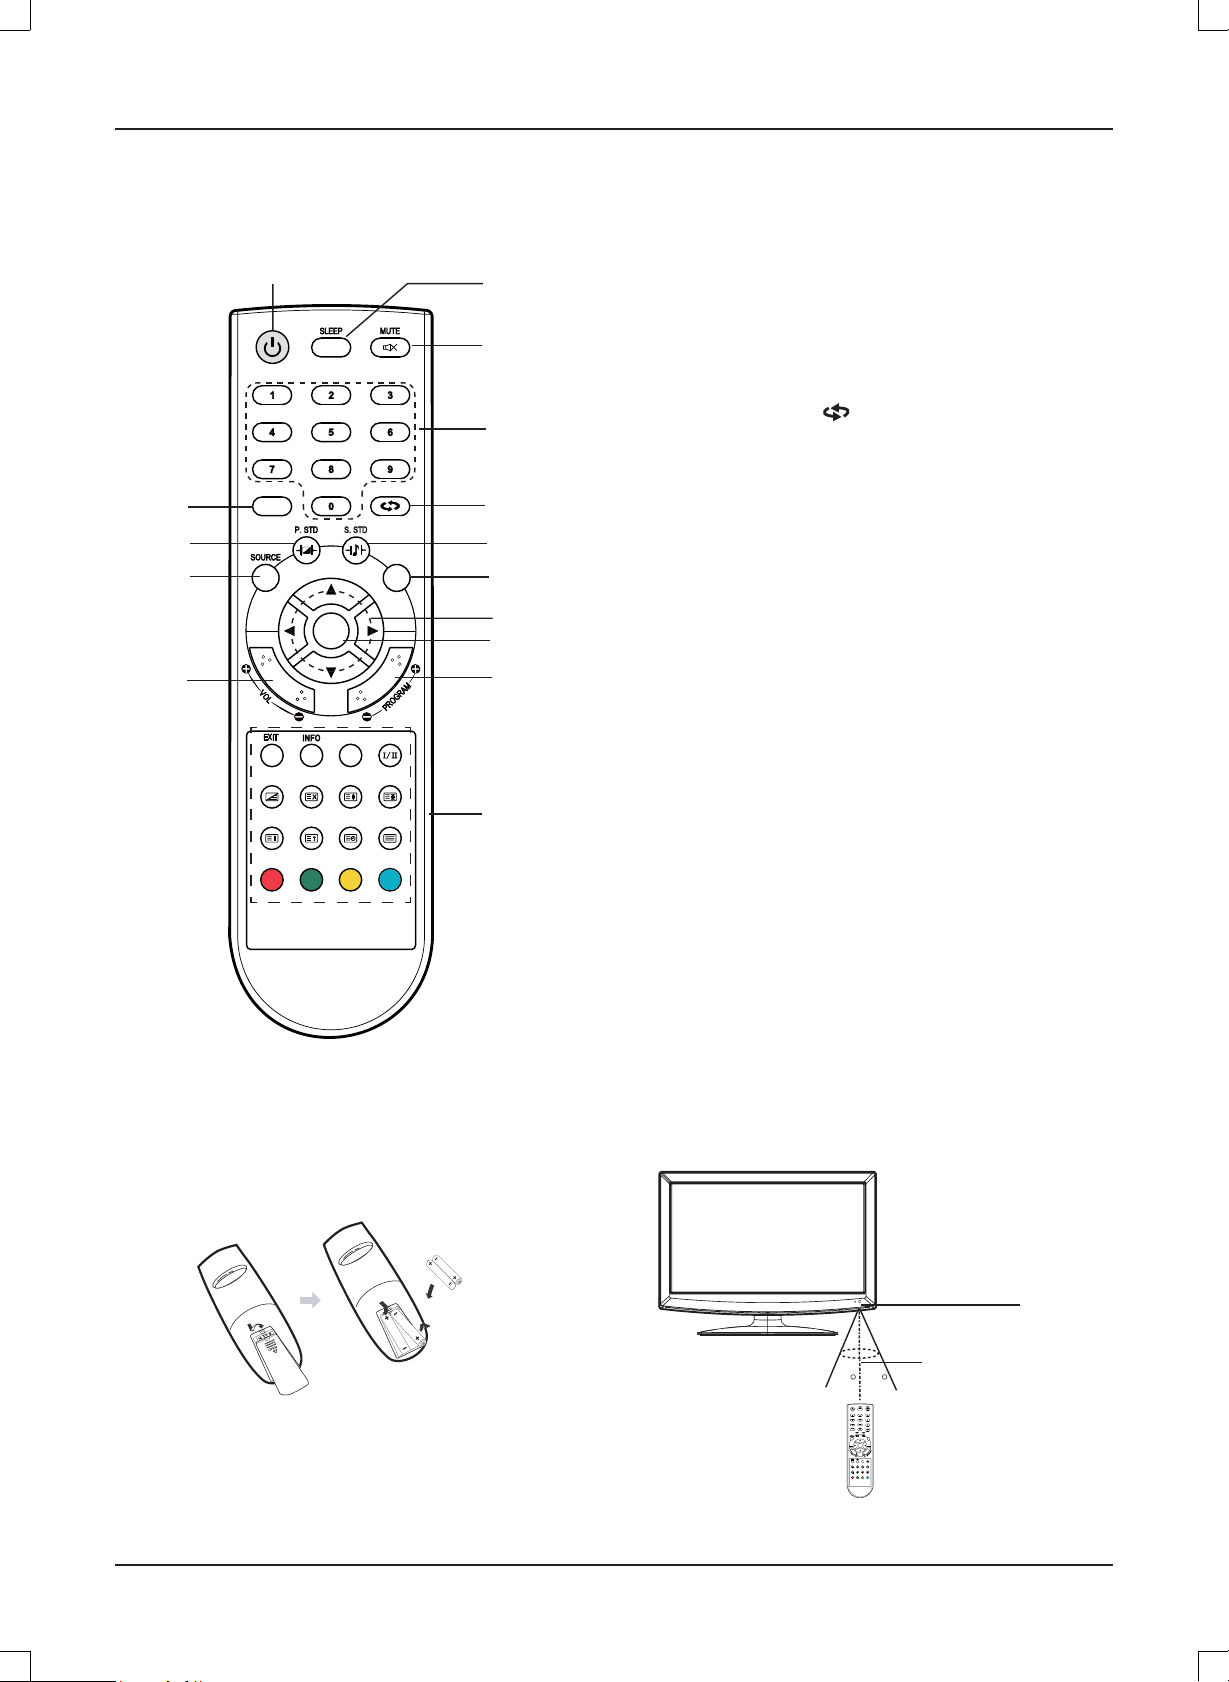
REMOTE CONTROL
OK
FAV
TTX
HOLD
ASPECT
SIZE
MIX
CANCEL
INDEX
REVEAL
SUBPAGE
MENU
Control buttons
14
13
12
11
1
FAV
MIX
INDEX
CANCEL
REVEAL
OK
ASPECT
SIZE
SUBPAGE
MENU
HOLD
TTX
2
1. Power/Standby button (z)
3
2. Sleep timer button (SLEEP)
3. Mute button (MUTE)
4. Number buttons (0, 1~9)
5. Previous channel button ( )
4
6. Sound mode button (S.STD)
7. Menu button (MENU)
5
6
7
8
9
10
8. Navigation keys (o, a, p, b)
9. Confi rm button (OK)
10. Channel select buttons (- PROGRAM +)
11. Volume control buttons (- VOL +)
12. Source select button (SOURCE)
13. Picture mode button (P.STD)
14. Favorite program list button
*. Special buttons:
EXIT: Menu exit button
INFO: Information display button
ASPECT: Display mode select button
I/II: NICAM mode select button
MIX: Teletext mix button
CANCEL: Teletext cancel button
*
SIZE: Teletext size/zoom button
HOLD: Teletext hold button
INDEX: Teletext index display button
REVEAL: Teletext reveal button
SUBPAGE: Teletext subpage button
TTX: Teletext on/off button
Inserting Batteries
Control Range
Two “LR03/AAA” batteries
Remote
sensor
Within approx. 8 metres
Note:
Bright Sunlight or lighting may cause erratic remote operation.
•
Always remove batteries if the remote control is not to be used for more than a month. Batteries left in it may cause damage.
•
The buttons on the remote control perform similar function to similarly marked buttons on the main unit.
•
30 30
FAV
OK
ASPECT
MIX
CANCEL
SIZE
SUBPAGE
REVEAL
INDEX
MENU
HOLD
TTX
E5
Page 7
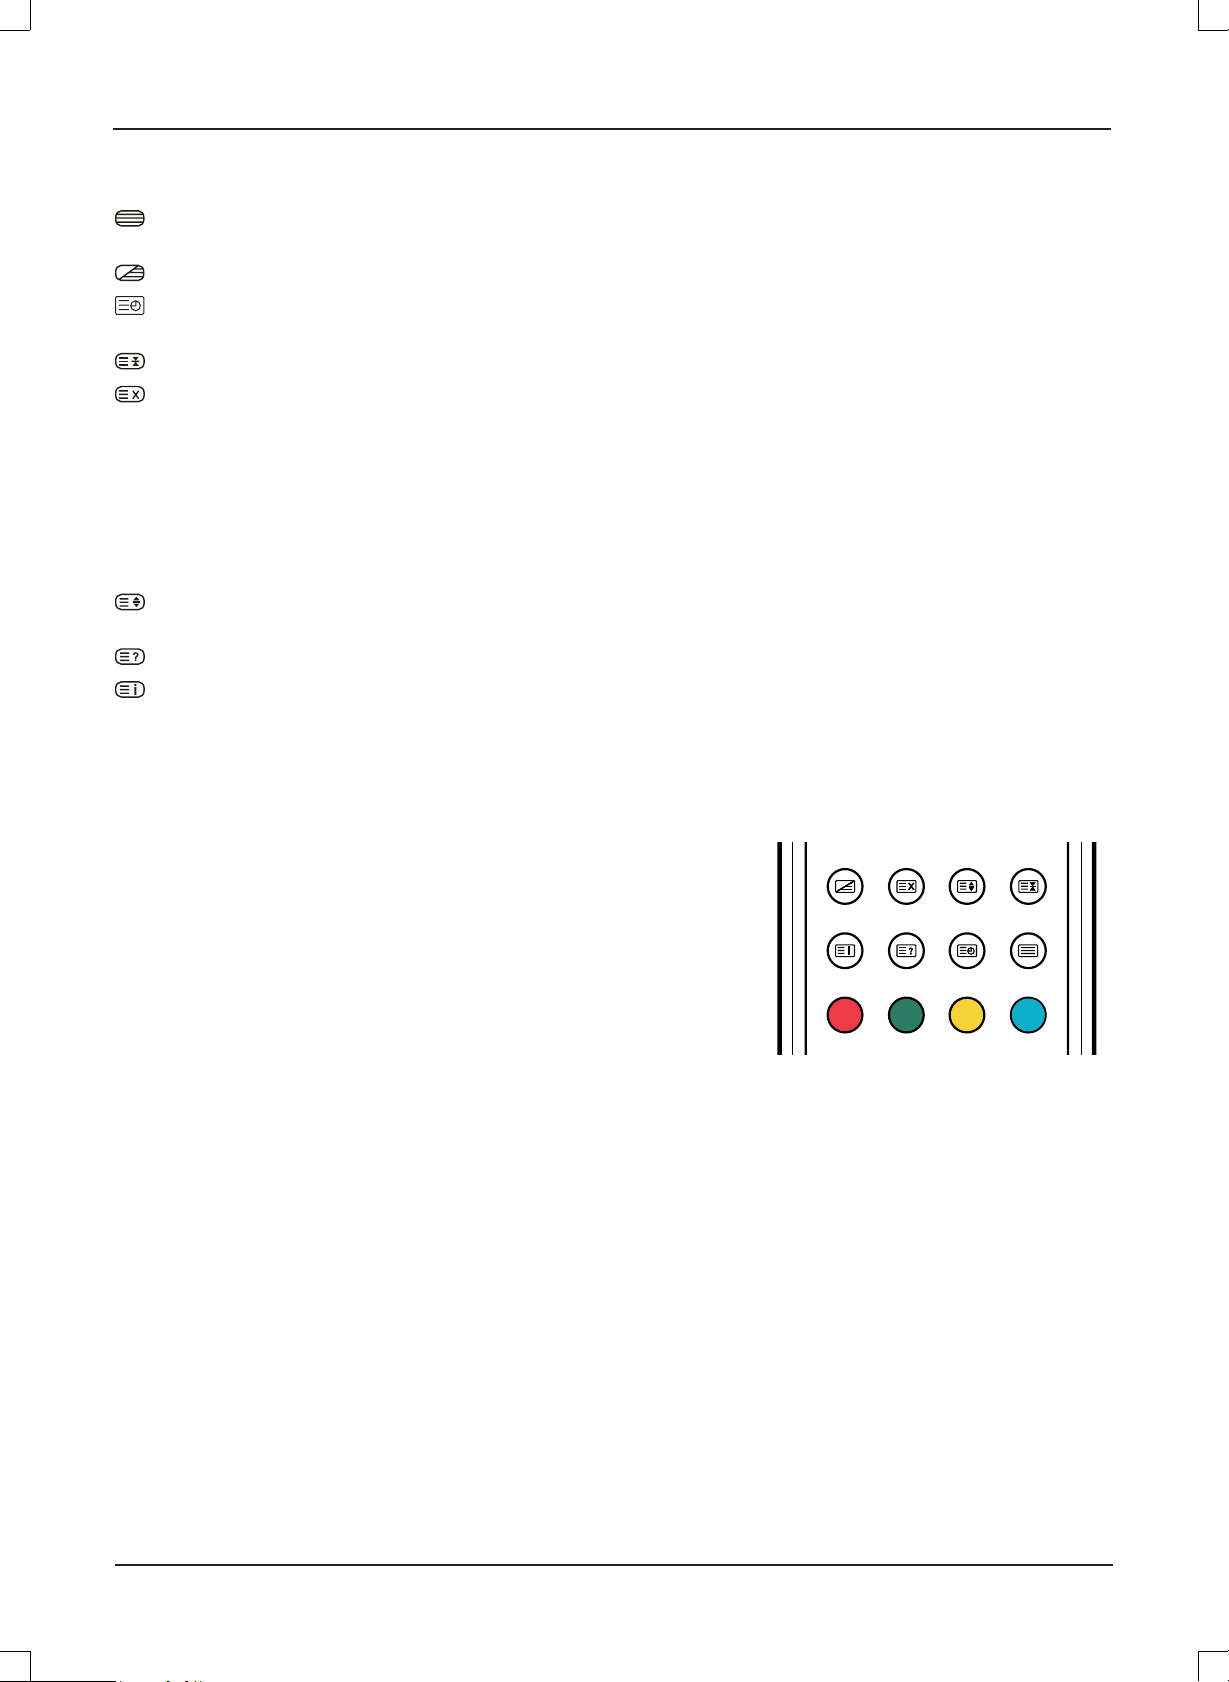
Teletext Function
OK
FAV
TTX
HOLD
ASPECT
SIZE
MIX
CANCEL
INDEX
REVEAL
SUBPAGE
MENU
: Press this button to enter teletext state and display teletext page. If you want to exit teletext state, press this button
again. When teletext page is displayed on the screen, you can select relevant function by using the remote control.
: If you want to display image and teletext page at the same time, press this button. Press it agin to release it.
: It is refer to the subpage of teletext page, i.e subcode page. When it is pressed, the screen display the requirement of
subpage code entry. If there is no subpage, it will not be displayed. In most case, there is no subpage.
: Press this button if you want to keep the displaying of the page and press it again to exit hold state.
:
Press this button if you do not want to display the content of the page, but only the channel image.
Press it again to display the content of the page again.
Number buttons 0~9 on the remote control can be used to get to a certain page. "o/p" button on the remote control can be
used to display the content of previous or next page.
Press the RED/GREEN/YELLOW/CYAN button on the remote control, the page of relevant color displayed on the lower part
of the screen will be displayed.
: Press this button if you want to enlarge the content on the upper part of the page, and press the second time to enlarge
the content on the lower part of the page, and the third time to resume normal display of all the contents on the page.
: Press this button if you want to display the concealed text. Press it again to close the display of concealed text.
: Press this button if you want to display the index for all the teletext page.
FAST TEXT:
The RED, GREEN, YELLOW & CYAN buttons are used for quick access to color coded pages transmitted by FAST TEXT
broadcast.
Example:
RED selects CITY INFORMATION,
CYAN selects TRAVEL INFORMATION,
GREEN selects WEATHER INFORMATION,
YELLOW selects TV PROGRAMMING.
MIX
INDEX
CANCEL
REVEAL
SIZE
SUBPAGE
HOLD
TTX
E6
Page 8
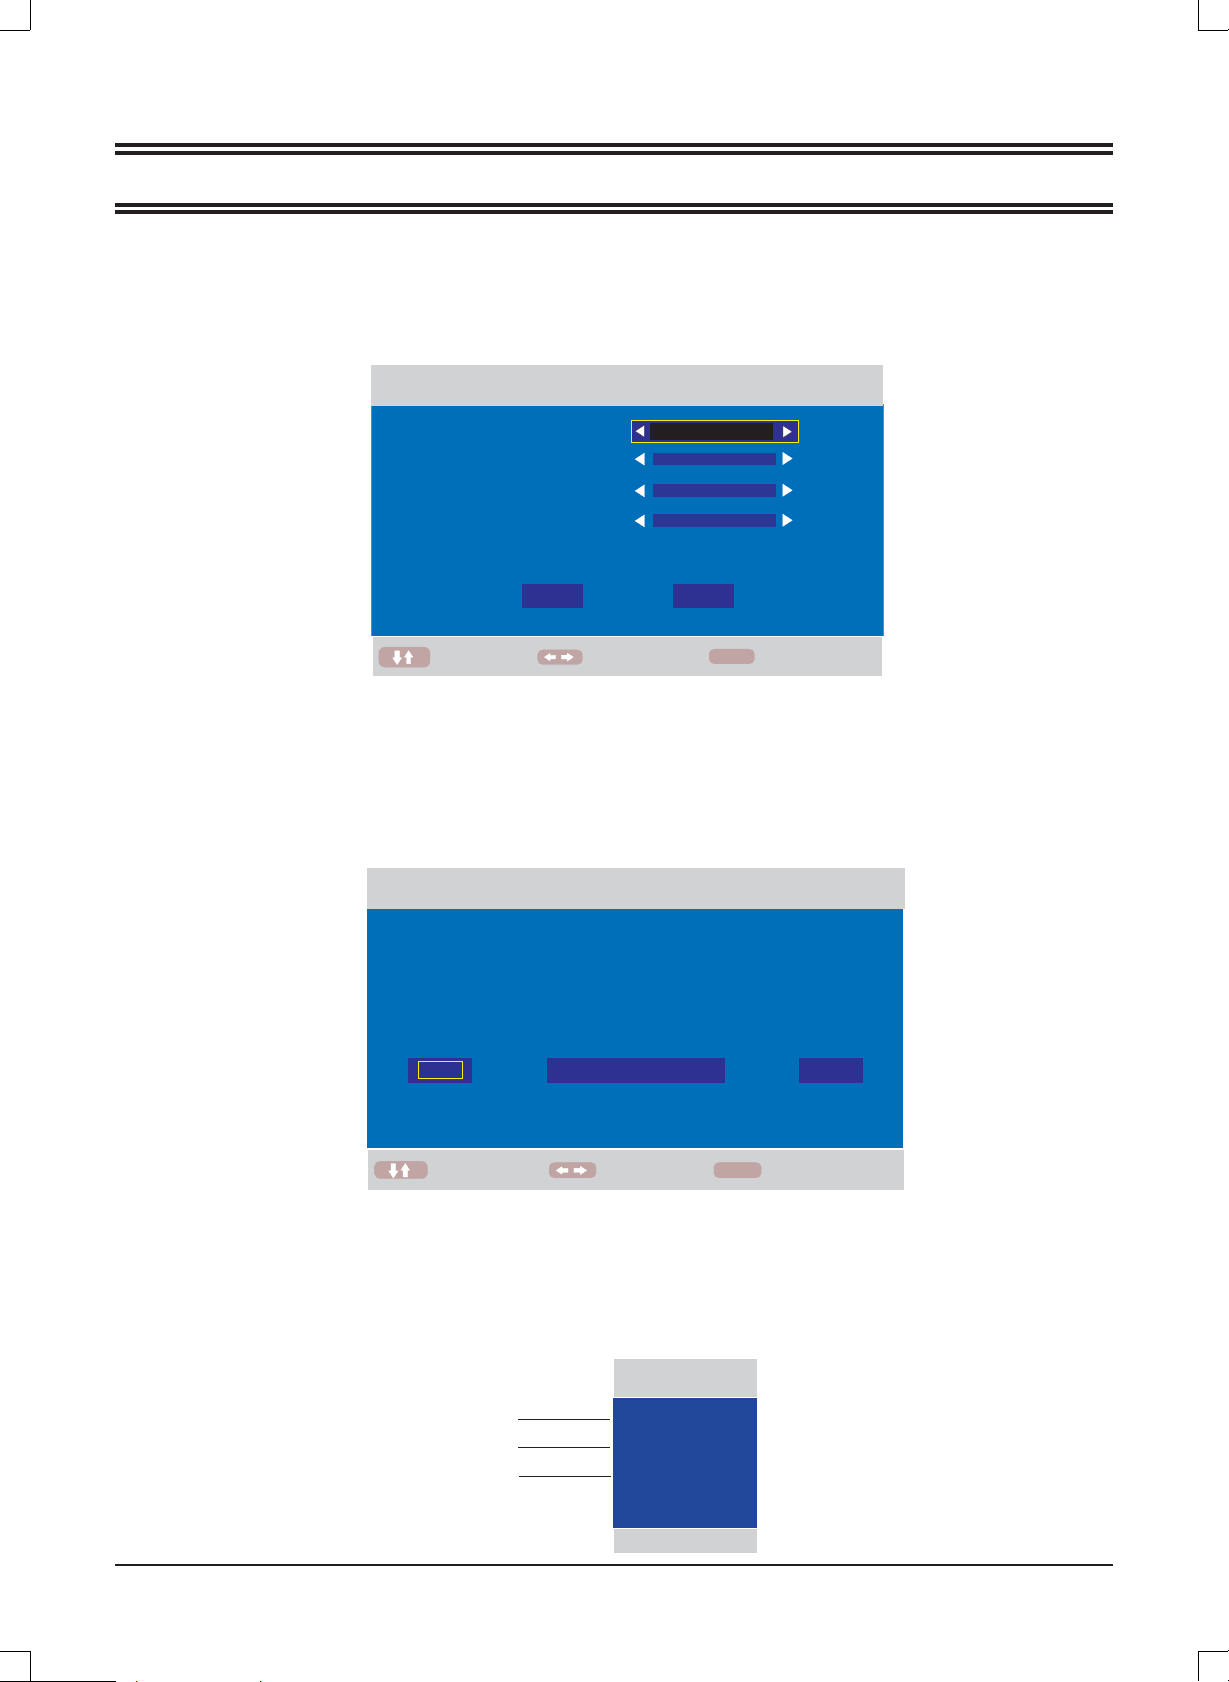
USING THE TV FOR THE FIRST TIME
1.
Connect the antenna to the RF 75Ω socket .
2.
Turn on the TV unit.
3
The Installing Guide screen appears as below:
.
FIRST TIME INST ALLATION
COUNTRY
LANGUAGE
DELETE PROGRAM
SEARCH PROGRAM
4.
Press [o] or [p] to select the desired settings.
5.
Press [b] or [a] to adjust the desired settings.
6.
Press [p] to select "YES", and press [OK] to confi rm.
MOVE
YES
ADJUST
OTHER
ENGLISH
YES
YES
NO
MENU
EXIT
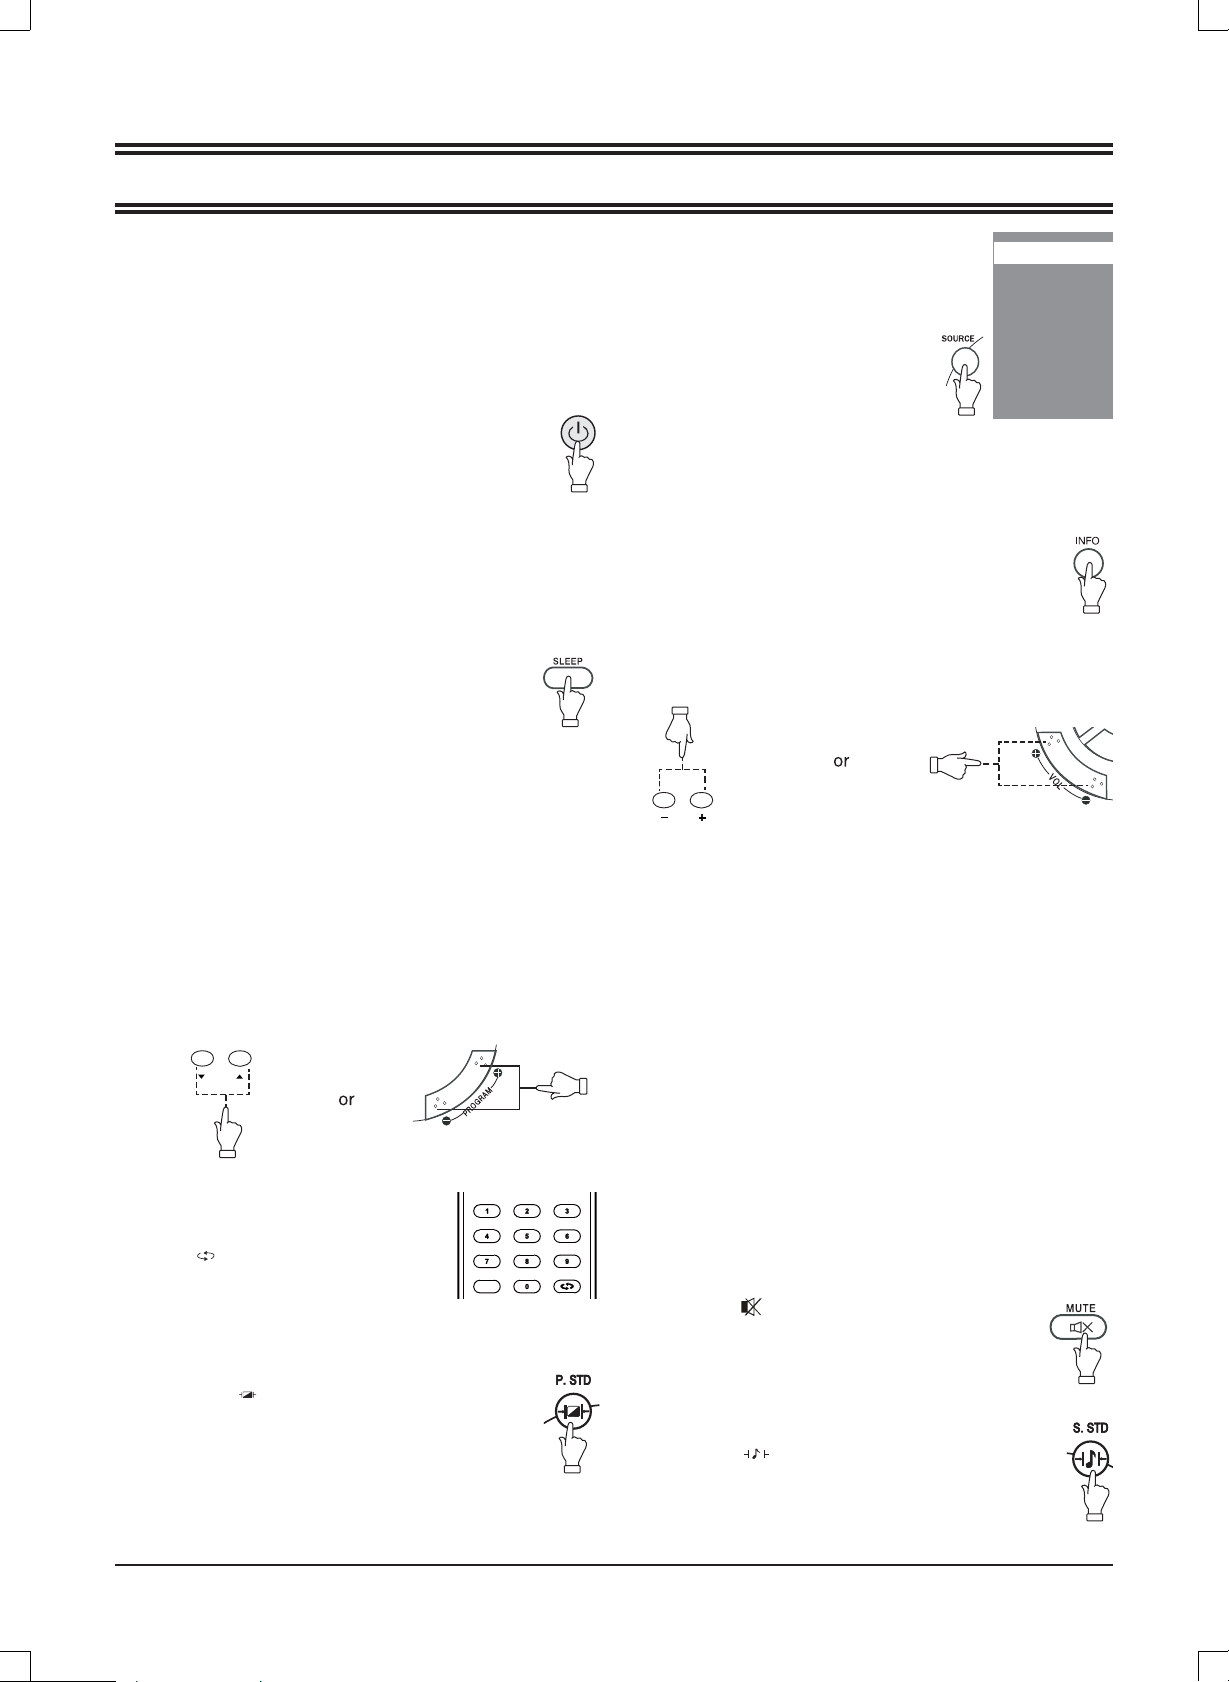
Note:
To cancel the fi rst time installation during it's installation process, press [p] to select "NO", below screen appears:
To cancel clearing channel search , press [MENU].
FIRST TIME INST ALLATION
First time installation is not finished!
Are you sure to exit?
YES
MOVE
DO IT NEXT TIME NO
MENU
EXIT ADJUST
Note:
The fi rst time installation screen appears again, when the "reset" operation has been done, and then turn off and turn on the
main unit.
TV information
Press [INFO] to diaplay the program information
Program number
Color system
Sound system
.
TV
001
PAL
BG
E7
Page 9
BASIC OPERATIONS
FAV
Make sure all necessary connections are correctly
connected before turn on the power.
The power indicator turns red and the unit is in the standby
mode.
Turn on the power
Press [z] to turn on the main unit.
The power indicator turns blue.
Turn off the power
Press [z] again can turn off the main unit.
The unit is automatically set standby mode.
The power indicator turns red.
Using the Sleep Timer
The sleep timer automatically switches off the power after a
preset time has elapsed. There are 9 time periods available,
press [SLEEP] on the remote control repeatedly to
select the desired sleep time:
0 Min
v60 Min v 75 Min v 90 Min v 105 Min
(The sleep timer starts when the setting is fi nished.)
To check the remain sleep time
Press [SLEEP] on the remote control, the remain sleep time
appears on the screen for a few seconds.
v
15 Min
v
30 Min
v
45 Min
v
120 Min
Select the TV channel
After selected "ATV" as input source, you can do either one
of followings to select your channel.
Press [p CH] or [CH o] (or [-PROGRAM] or [PROGRAM+]
•
on the main unit).
CH
Press [0, 1~9] to input the channel
•
number directly.
Press [ ] to go back the previous
•
channel you've watched last time.
FAV
Selecting the picture mode
Press [P.STD ] repeatedly on the remote
control to select the desired picture mode.
Select the input source
Turn on the connected necessary external
device. Press [SOURCE] to select the
proper input source.
The input source menu appears.
1. Press [o/p] to move the high-lighted
bar to the desired source item.
2. Press [OK] ( or [b/a] )to confi rm.
Information of the selected source name appears on the TV
for a few seconds.
TV
AV
S-VIDEO
SCART
HDMI
PC
Information display
Press [INFO] on the remote control, the related
information of current source appears on the screen
automatically.
Adjusting the volume
Press [ - VOL] to reduce the volume.
Press [VOL+ ] to increase the volume.
VOL
NICAM Function
Press [I/II] on the remote control when input source is "TV".
This operation do no effect to the channels without NICAM
signal.
Once [I/II] is pressed, it alternates in the different sound
options such as mono, stereo, dual I, dual II.
Selecting the OSD language
The factory setting of OSD (On Screen Display) language is
"English". To edit the OSD.
1. Press [MENU], OSD menu appears.
2. Press [p] until "Function" menu appears.
3. Press [a] to enter the setting menu, and "Language" is
high-lighted.
4. Press [b/a] to set the language to your desired language.
5. Press [MENU] to exit the submenu.
Mute function
Press [MUTE ] on the remote control to switch off
the sound temporarily.
Press this button again (or [VOL+]), the sound
comes back.
Selecting the sound mode
Press [S.STD ] repeatedly on the remote control to
select the desired sound mode.
E8
Page 10
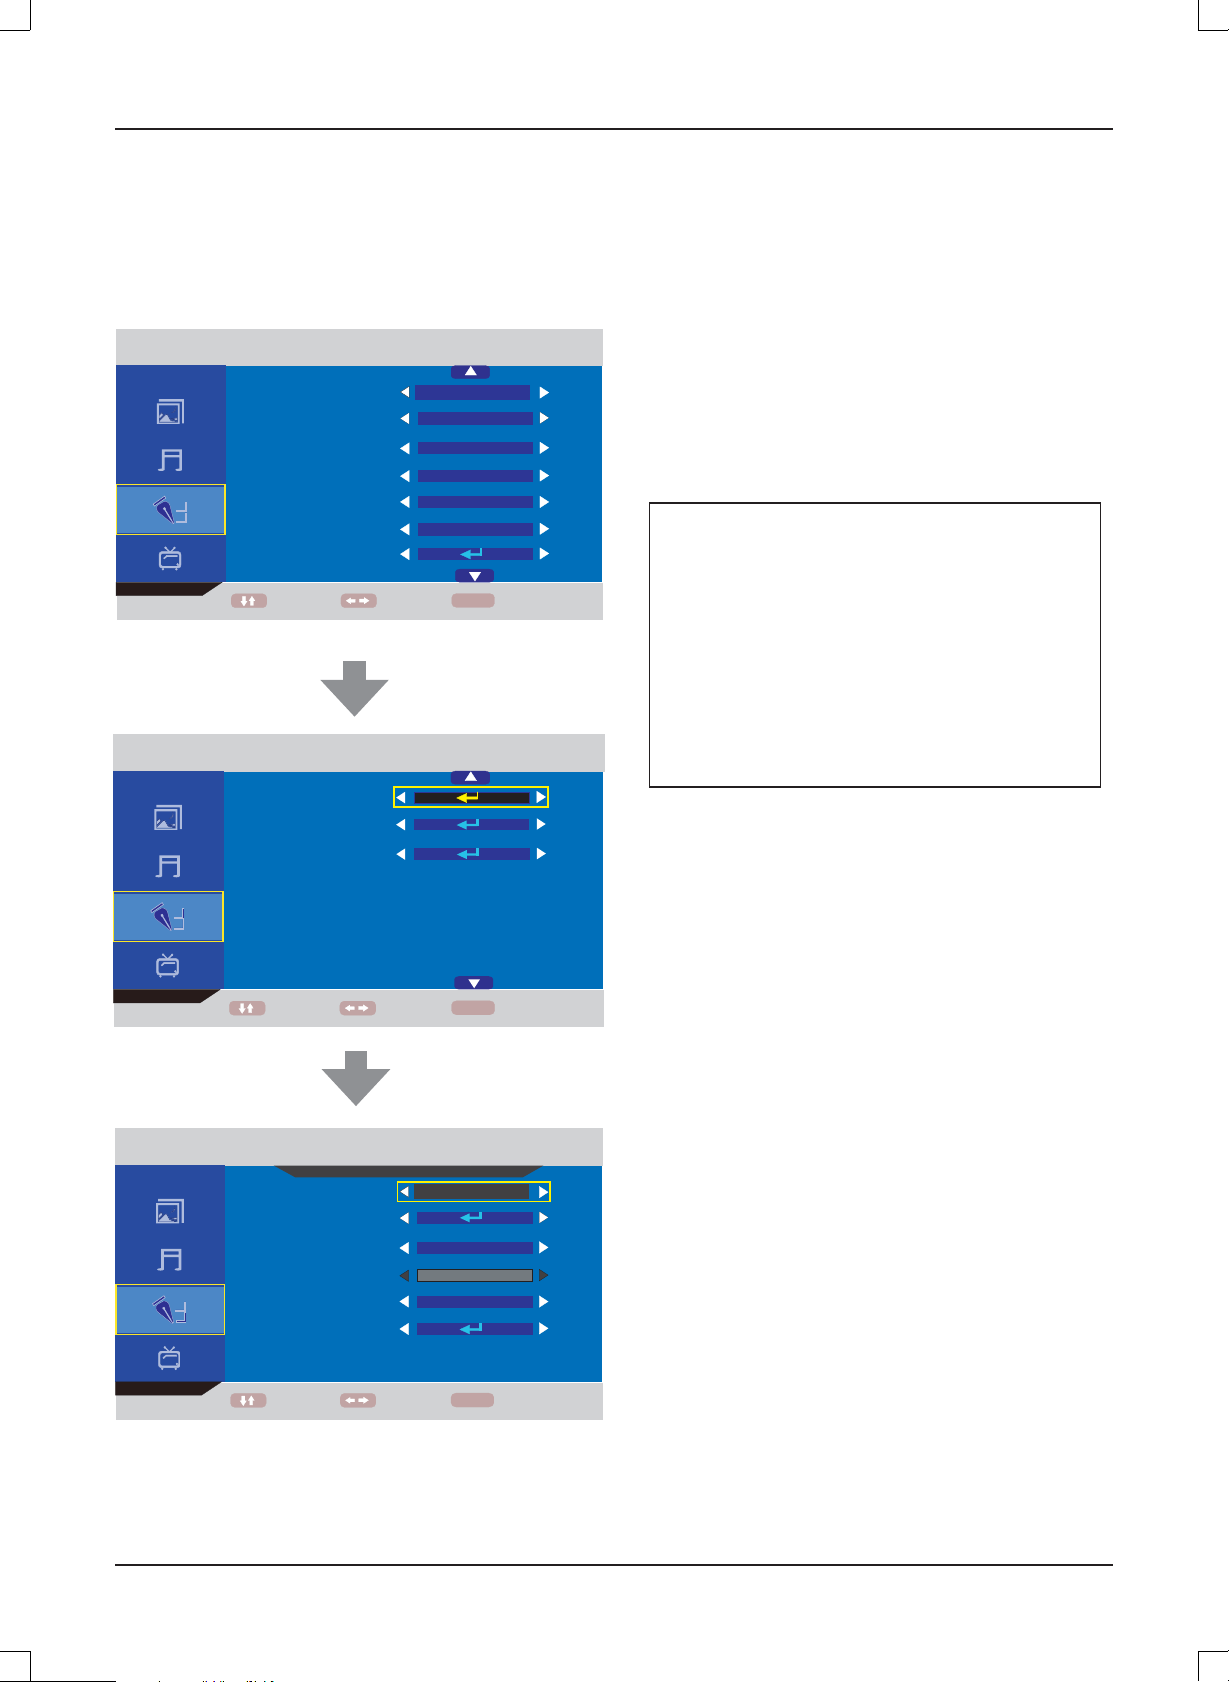
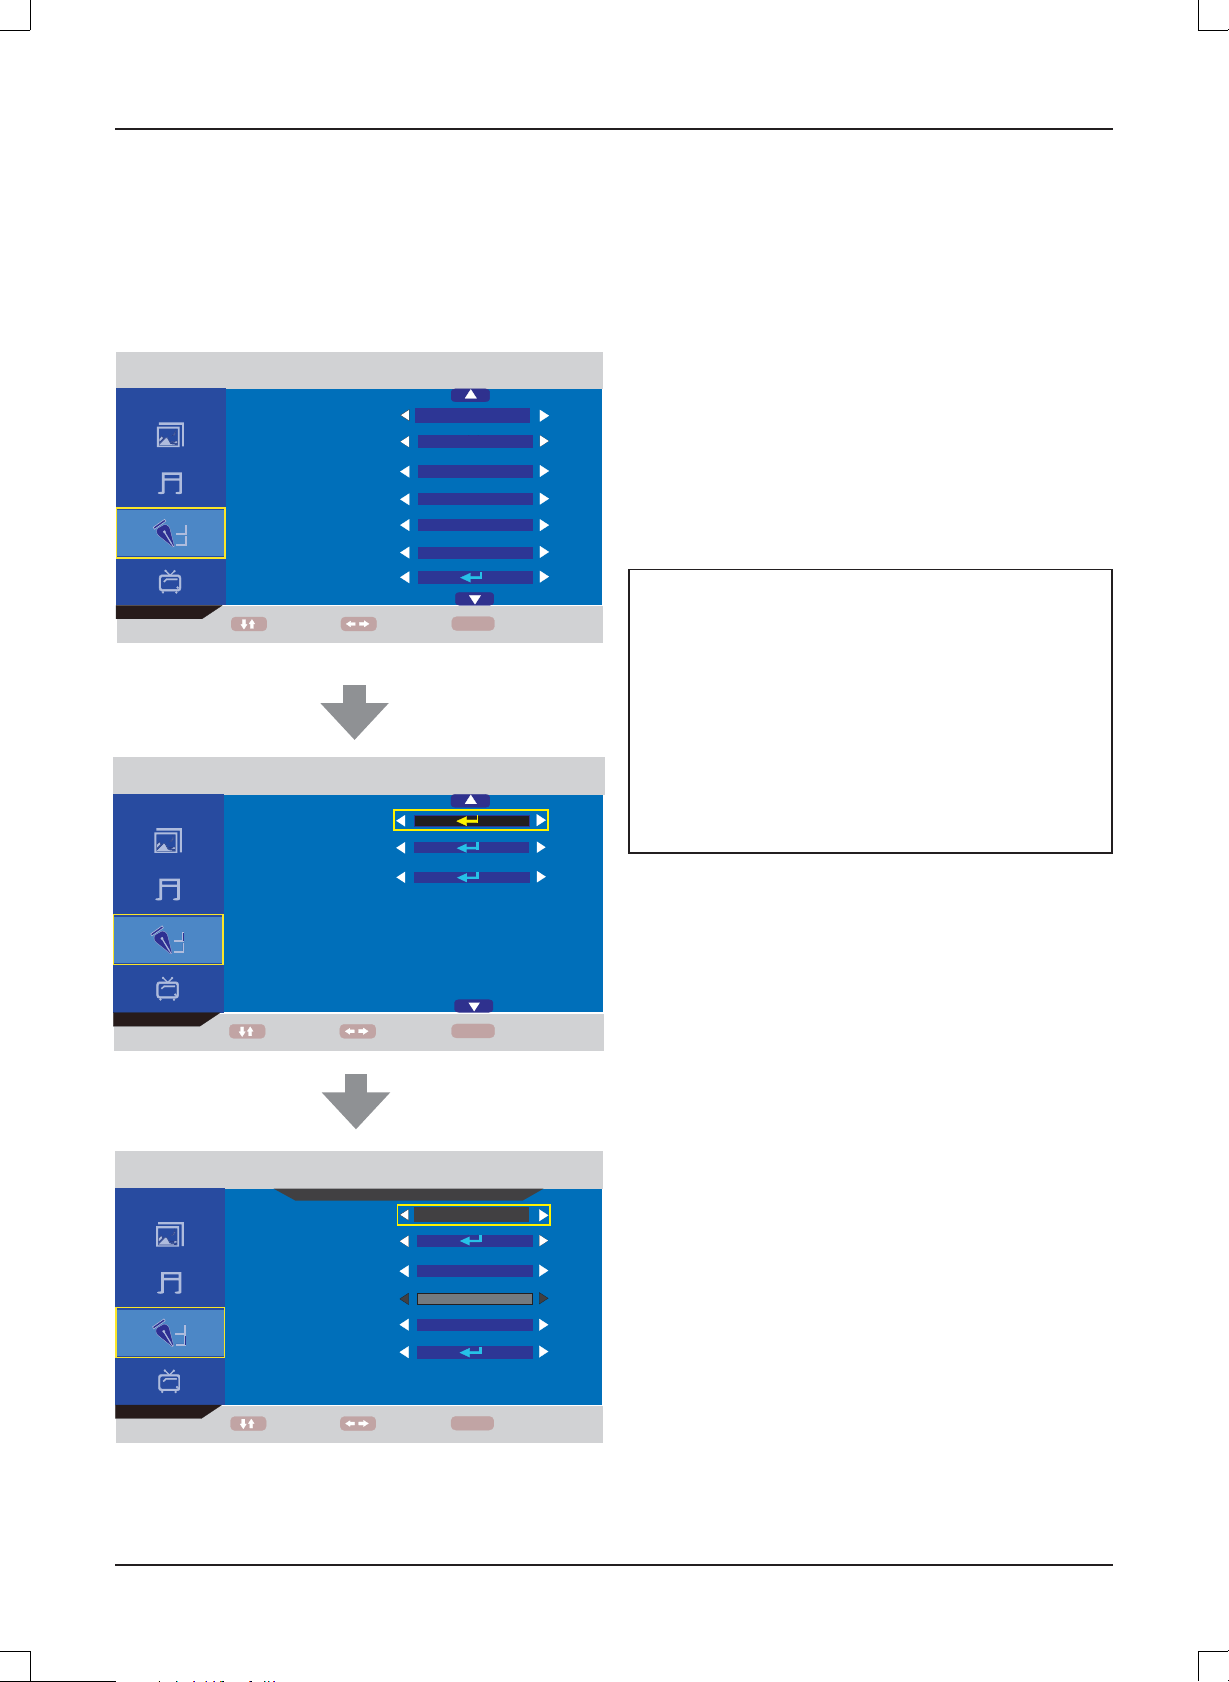
OSD MENU SETTING
Navigating through menus
Press [MENU], OSD main menu appears.
Press [p], the main menu displays sequentially:
PICTURE v SOUND v FUNCTION vTV v …
When some menu option is gray displayed, that means the option is not available in current setting mode.
Common procedure of operation:
For each menu, press [o, p] on the remote control to select the options of the main menu.
y
Press [b, a, o, p] on the remote control to change or confi rm your settings.
y
(Follow the tips at the bottom of the related OSD screens.)
After setting of an option is fi nished, press [MENU] to exit stage by stage, while press [EXIT] to turn off OSD screen
y
directly.
Structure of OSD menu:
PICTURE
SOUND
TV
Picture Mode
Brightness
Contrast
Colour
Sharpness
Tint
Colour Temperature
Sound Mode
Bass
Treble
Balance
AVC
Country
Auto Tuning
Manual Tuning
FUNCTION
Child Lock
Key Lock
Change Code
Language
Video Size
TT Language
Sleep Timer
OSD Timer
Blue Screen
Reset
Child Lock
Installation
Hotel Mode
Country
Language
Delete Program
Search Program
Channel Edit
Channel
Sound System
Colour System
AFT
Manual Tuning
Hotel Lock
Source Lock
Default Source
Default Prog
Max Volume
Clear Lock
E9
Page 11
TINT 50
COL
OUR TEMPERATURE
Main OSD :
TINT 50
COLOUR TEMPERATURE
50
PICTURE MENU
PICTURE MODE
BRIGHTNESS 50
CONTRAST 50
COLOUR
SHARPNESS 5
OUR TEMPERATURE
MOVE ADJUST
TV MENU
COUNTRY
AUTO TUNING
MANUAL
CHANNEL EDIT
PICTURE
TUNING
TV
PERSONAL
NORMAL
OTHER
SOUND MENU
SOUND
SOUND MODE
BASS 50
TREBLE 50
50
EXIT MENU
BALANCE 0
AVC
MOVE ADJUST
TV
MANUAL TUNING
CHANNEL
SOUND SYSTEM
COLOR SYSTEM
AFT
MANUAL TUNING
PERSONAL
OFF
MENU
001
BG
AUTO
OFF
860.25MHz
EXIT
MENU
MOVE ADJUST
EXIT
(TV Menu is not available when "AV/S-VIDEO" is selected as input source.)
FUNCTION MENU
LANGUAGE
VIDEO SIZE
TT LANGUAGE
SLEEP TIMER
OSD TIMER
BLUE SCREEN
RESET
FUNCTION
ENGLISH
16:9
FULL
WEST EURO
OFF
60 SECONDS
ON
MOVE ADJUST
MENU
EXIT
MOVE ADJUST
FUNCTION
CHILD LOCK
INSTALLATION
HOTEL MODE
MOVE ADJUST
MENU
MENU
BACK
EXIT
E10
Page 12
About the Hotel Lock function
Expand the sub-menu stage by stage in turn:
FUNCTION v Hotel Mode v Hotel Lock v …
FUNCTION
LANGUAGE
VIDEO SIZE
TT LANGUAGE
SLEEP TIMER
OSD TIMER
BLUE SCREEN
RESET
MOVE ADJUST
FUNCTION
ENGLISH
16:9
FULL
WEST EURO
OFF
60 SECONDS
ON
MENU
EXIT
Hotel Lock: Have the priority than other options below. To
set below options, this item must be set to "ON" fi rstly.
When it is set to "On", all options below it are available.
Source Lock: Set the lock to the input source (E.g.: TV,
HDMI...) you want to set.
Default Source: Set an input source channel as default
while turning on the TV unit.
Default Prog: Set a TV programme number as default
while alternate into "ATV".
Max Volume: To set the maximum volume value.
Clear Lock: Clear the locks.
About the PIN Code
:
(The default setting is “0000”.)
If you forget the password...
Input “2008” to enter it.
Avoid young kids know this
password.
CHILD LOCK
INSTALLATION
HOTEL MODE
MOVE ADJUST
FUNCTION
HOTEL LOCK
HOTEL LOCK
SOURCE LOCK
DEFAULT SOURCE
DEFAULT PROG
MAX VOLUME
CLEAR LOCK
MOVE ADJUST
MENU
OFF
16:9
OFF
1
100
MENU
EXIT
EXIT
E11
Page 13

MAINTENANCE
WARNING:
FOR YOUR PERSONAL SAFETY, BE SURE TO DISCONNECT THE AC POWER CORD BEFORE
PROCEEDING WITH ANY MAINTENANCE OR CLEANING.
Cleaning the LCD Panel
The LCD panel should not be toughed with sharp objects. If dust and fi ngerprints is on the LCD panel surface, wipe them off
with a clean soft cloth.
Wipe in a straight motion from the center to the outside of the LCD panel.
Never use chemicals such as record cleaning sprays, antistatic sprays or fl uids, benzene or thinner to clean the LCD panel.
Cleaning the Main Unit
Clean the outside of the unit with a clean soft cloth moistened with luke-warm water. Do not use benzene, thinner or alcohol
since they will mar the fi nish of the surface.
TROUBLESHOOTING
Symptom
Possible cause
Corrective active
No Picture and sound.
Power cord is not correctly connected with the main unit.
Connected the power cord with the main unit.
Power cord is not plugged into an AC outlet.
Plug the power cord into an AC outlet.
The wrong input source is selected.
Select a correct input source.
The input source is failed to connect with the TV.
Make correct connections.
No sound only.
Volume control is set to minimum.
Press the VOL+ button to increase the volume.
button on the remote control is pressed.
The
Press the
An incorrect sound system mode is setted.
Set a correct sound system from the main menu to
match your TV.
Note:
A few bright dots and dark dots may appear on the TV screen, that is normal appearance.
(or VOL+/-) button to release the volume.
Symptom
Possible cause
Corrective active
No picture only, or monochrome picture.
The color system setting doesn't match the program.
Set the proper color system setting.
The sound system setting doesn't match the program.
Set the proper sound system setting.
Interfered sound or picture.
Some equipment that brings interference is nearby the TV.
Keep these things away from the TV.
Multi devices plug into the same one AC outlet collections.
Plug the power cord into another AC outlet.
An incorrect sound system mode is setted.
Set a correct sound system from the main menu to
match your TV.
E12
Page 14

TFT-2402
Display Features
Display Type LCD
Screen Size 23.6 inch
Aspect ratio 16:9
Active Area 521 (H) X 293 (V)
Panel Resolution 1366 (H) X 768 (V)
Brightness 500 cd/m
Contrast Ratio 1000:1
Dot Pitch 0.272 (H) X 0.272 (V) mm
Maximum Color 16.7 M
Response Time 8 ms
2
SPECIFICATIONS
Connections
Input:
TV Tuner (RF 75Ω) 1
Video Input (AV) 1
S-Video Input (S-VIDEO) 1
SCART 1
VGA Input (VGA) 1
PC audio Input (PC AUDIO) 1
HDMI input (HDMI) 1
Output:
Earphone (
) 1
Features
HD compatible 480I, 480P, 576I, 576P, 720P, 1080I, 1080P
Wall mounting VESA 100
TV Reception
TV System: PAL / SECAM
Sound System B/G , I, D/K, L/L'
Antenna Impedance: 75 Ohm
Tuner receiving range:
ATV 49MHz – 863MHz
Power Requirements
Power Input 100-240V ~ 50/60 Hz
Power Consumption
Maximum < 80W
VGA Resolutions Supported
up to 1360 x 768
Dimension(WxHxD)
Unit W/stand/speakers 587 x 438 x 196 mm
Unit W/O stand 587 x 395 x 78 mm
Weight(N.W.)
Unit W/stand/speakers 5.7 Kg
Environment
Operating Temperature 0°C-40°C
Operating Humidity 20%-80%
Note:
Specifi cations subject to change without notice.
E13
Page 15

TFT-2402
BENUTZERHANDBUCH
Für weitere Informationen und Support besuchen die Sie Webseite www.lenco.eu
Page 16

Inhalt
VORSICHTSMASSNAHMEN .............................................................................................. G3
BEDIENELEMENTE ............................................................................................................ G4
INBETRIEBNAHME ............................................................................................................. G7
GRUNDLEGENDE BEDIENUNG ........................................................................................ G8
OSD-MENÜEINSTELLUNGEN ........................................................................................... G9
WARTUNG ........................................................................................................................G12
FEHLERBEHEBUNG ........................................................................................................ G12
TECHNISCHE DATEN ...................................................................................................... G13
G1
Page 17

Lieber Kunde,
OK
FAV
TTX
HOLD
ASPECT
SIZE
MIX
CANCEL
INDEX
REVEAL
SUBPAGE
MENU
Vielen Dank für den Kauf dieses LCD-Fernsehers. Wenn Sie das erste Mal die Verpackung aufmachen, vergewissern Sie sich bitte,
dass alle Zubehörteile vorhanden sind. Bevor Sie das Gerät an den Strom anschließen, lesen Sie sich bitte das Benutzerhandbuch
durch und halten Sie es immer griffbereit in der Nähe des LCD-Fernsehers.
FAV
MENU
OK
ASPECT
MIX
CANCEL
HOLD
SIZE
TTX
SUBPAGE
REVEAL
INDEX
Bedienungsanleitung X 1
Fernbedienung X 1
Batterien X 2
Netzkabel X 1
Überprüfen Sie bitte alle Zubehörteile, wenn Sie die Verpackung öffnen. Falls etwas beschädigt ist oder fehlt, wenden Sie
sich bitte an Ihren Händler.
Hinweis:
Diese Anleitung wurde vor der Herstellung des Produkt geschrieben.
Es ist deshalb möglich, dass bestimmte Produktspezifi kationen sich geändert haben, um die Bedienung oder andere Funktio-
nen zu verbessern. In diesem Fall, kann es vorkommen, dass die Bedienungsanleitung nicht vollständig mit den Funktionen
des eigentlichen Produkts übereinstimmt.
Das Produkt und die Verpackung, sowie Beschreibungen und Abbildungen können dann von denen in der Bedienungsanleitung abweichen.
Das folgende Beispiel zeigt in welcher Weise die Bedienungsanleitung von der Bildschirmangezeige abweichen kann.
Sollten Sie dieses Produkt zu einem späteren Zeitpunkt entsorgen müssen, beachten Sie bitte:
Elektro- und Elektronik-Altgeräte dürfen nicht mit dem Hausmüll entsorgt werden. Bitte wiederverwerten, falls entsprechende Einrichtungen vorhanden sind. Für Hinweise zur Wiederverwertung wenden Sie sich an die zuständigen örtlichen Stellen oder Ihren Händler. (Richtlinie über
Elektro- und Elektronik-Altgeräte)
G2
Page 18

VORSICHTSMASSNAHMEN
CAUTION
RISK OF ELECTRIC SHOCK
DO NOT OPEN
CAUTION: TO PREVENT THE RISK OF ELECTRIC
SHOCK, DO NOT REMOVE COVER (OR BACK).
NO USER-SERVICEABLE PARTS INSIDE.
REFER SERVICING TO QUALIFIED SERVICE PERSONNEL.
Das nebenstehende Symbol weist auf Stromschlaggefahr durch gefährliche Spannungen im Inneren
des Geräts hin.
Dieses Symbol verweist auf wichtige Bedienungs- und Wartungshinweise in der dem Gerät beigelegten Bedienungsanleitung.
ACHTUNG
UM EINE FORTLAUFENDE BETRIEBSSICHERHEIT ZU GEWÄHRLEISTEN, ÖFFNEN SIE NIEMALS DAS GERÄT UND
VERSUCHEN SIE NICHT AUF DAS INNERE DES GERÄTS ZUZUGREIFEN.
WENDEN SIE SICH IM WARTUNGSFALL IMMER AN AUSGEBILDETES WARTUNGSPERSONAL.
ZUR VERMEIDUNG VON FEUER- ODER STROMSCHLAGGEFAHR, SETZEN SIE DIESES GERÄT BITTE NIEMALS REGEN ODER STARKER FEUCHTIGKEIT AUS.
Stellen Sie das Gerät niemals an einem instabilen Ort auf.
•
Stellen Sie das Gerät nicht an Orte, an denen es Extremtemperaturen (unter 5°C oder über 35°C) oder starker Feuchtig-
•
keit ausgesetzt werden kann.
Vermeiden Sie direkte Sonneneinwirkung oder Heizquellen in der Nähe des Geräts.
•
Stellen Sie das Gerät nicht in abgeschlossenen Orten auf, wie z.B. Bücherregale oder Einbauschränke. Um eine ausrei-
•
chende Ventilation zu gewährleisten, sollte mindestens ein Abstand von 20 cm um das Gerät herum beibehalten werden.
Vergewissern Sie sich, dass keine der Ventilationsöffnungen durch Gegenstände wie z.B. Zeitungen, Tischtücher, Vorhän-
•
ge o.ä abgedeckt ist.
Tauchen Sie die das Gerät niemals in Flüssigkeiten.
•
Führen Sie keine Fremdgegenstände in die Ventilationsöffnungen des Geräts ein.
•
Setzen Sie das Gerät niemals Wassertropfen oder -spritzern aus. Gegenstände die mit Flüssigkeiten gefüllt sind, wie z.B.
•
Vasen sollten niemals auf das Gerät gestellt werden.
Gegenstände mit offenen Flammen wie z.B. Kerzen sollten niemals auf das Gerät gestellt werden.
•
Berühren Sie den Fernsehbildschirm bzw. die Antenne und das Netzkabel niemals während eines Gewitters. Benutzen Sie
•
das Gerät nicht während eines Gewitters.
Achten Sie darauf, dass Sie nicht auf das Netzkabel treten und knicken Sie es nicht.
•
Dieses Produkt sollte nur durch entsprechend ausgebildetes Wartungspersonal eingestellt bzw. repariert werden, falls
•
Funktionsstörungen oder Probleme auftreten. Wenden Sie sich nur an ausgebildetes Wartungspersonal.
Wenn die Fernbedienung für längere Zeit nicht benutzt wird, entfernen Sie bitte die Batterien.
•
Vermeiden es die Fernbedienung fallen zu lassen, um Beschädigungen vorzugeuben.
•
Achten Sie darauf, dass dieses Produkt an eine Steckdose mit den gleichen Spezifi kationen (Spannung und Frequenz) an-
•
geschlossen wird, die auf der Rückseite des Geräts angegeben sind.
Ziehen Sie den Stecker aus der Steckdose, wenn das Gerät nicht benutzt wird. Ziehen Sie immer am Stecker, wenn Sie
•
das Gerät vom Strom abtrennen wollen.
Dieses Gerät der Laserklasse 1 muss an eine ordungsgemäß geerdete Steckdose angeschlossen werden, die jederzeit
•
erreichbar ist.
Wenn eine Steckdose mit Schalter zum ein- und ausschalten des Geräts benutzt wird, achten Sie bitte immer darauf, dass
•
die Steckdose immer durch den Benutzer erreichbar bleibt.
G3
Page 19

HAUPTGERÄT
Bedientasten
BEDIENELEMENTE
3245671
9
MENUPOWER
SOURCE
CH
Allgemeine Bedientasten
1.
2.
3.
4.
5.
6.
7.
8.
9.
10.
Ein/Aus / Bereitschaftstaste (POWER)
Eingangssignaltaste (SOURCE)
Menütaste (MENU)
Kanal zurück ( p CH )
Kanal vor ( CH o )
Lautstärke verringern ( - VOL)
Lautstärke erhöhen (VOL + )
Kontrolllampe
Infrarot-Sensor
Ein/Aus-Schalter
VOL
10
Stromversorgung: Richten Sie sich nach den
*
8
Spannungs- und Frequenzangaben auf dem Typenschild des Hauptgeräts.
1
Anschlüsse (Geräterückseite)
1.
2.
3.
4.
5.
6.
7.
8.
High-Defi nition-Multimedia-Interface-Eingang (HDMI)
VGA-Eingang (VGA)
SCART-Eingang (SCART)
S-Video-Eingang (S-VIDEO)
Composite-AV-Eingang (R/L/VIDEO)
PC-Audioeingang (PC AUDIO)
Audioausgang ( )
Antennen-/Kabel-TV-Eingang (RF 75 )
G4
AGV IMDH
SCART
S-VIDEOVIDEOLR
OIDUA
CP
)
5
7(
F
R
2
3
4
5
6
7
8
Page 20

OK
FAV
TTX
HOLD
ASPECT
SIZE
MIX
CANCEL
INDEX
REVEAL
SUBPAGE
MENU
FERNBEDIENUNG
OK
FAV
TTX
HOLD
ASPECT
SIZE
MIX
CANCEL
INDEX
REVEAL
SUBPAGE
MENU
Bedientasten
14
13
12
11
1
FAV
MIX
INDEX
CANCEL
REVEAL
OK
ASPECT
SIZE
SUBPAGE
MENU
HOLD
TTX
2
3
4
5
6
7
8
9
10
*
1. Ein / Aus / Bereitschaftstaste (z)
2. Einschlaftimer (SLEEP)
3. Ton Aus (MUTE)
4. Nummerntasten (0, 1 ~ 9)
5. Kanal zurück ( )
6. Soundmodus (S.STD)
7. Menütaste (MENU)
8. Navigationstasten (o, a, p, b)
9. Bestätigungstaste (OK)
10. Kanalauswahl (-PROGRAM+)
11. Lautstärke (-VOL+)
12. Eingangssignal (SOURCE)
13. Bildmodus (P.STD)
14. Favoritenliste
*. Sondertasten:
EXIT: Menü verlassen
INFO: Informationsanzeige
ASPECT: Anzeigemodus
I/II: NICAM-Modus
MIX: Fernsehtext-Mix
CANCEL: Fernsehtext Abbrechen
SIZE: Fernsehtext Größe / Zoom
HOLD: Fernsehtext Seitenstopp
INDEX: Fernsehtext Seitenindex
REVEAL: Versteckte Inhalte Anzeigen (Fernsehtext)
SUBPAGE: Unterseite (Fernsehtext)
TTX: Fernsehtext Ein/Aus
Reichweite
30 30
FAV
OK
ASPECT
MIX
CANCEL
SIZE
SUBPAGE
REVEAL
INDEX
Innerhalb eines Bereichs
von ca. 8 Metern
MENU
HOLD
TTX
Infrarot-Sensor
Einlegen der Batterien
Zwei Batterien des Typs LR03/AAA
Hinweis:
Helles Sonnenlicht oder andere Beleuchtung kann zu Funktionsstörungen in der Bedienung der Fernbedienung führen.
•
Nehmen Sie die Batterien heraus, wenn der Player für längere Zeit nicht benutzt wird. Ansonsten können die Batterien Schäden verursa-
•
chen.
Die Tasten auf der Fernbedienung haben die gleichen Funktionen, wie die entsprechend markierten Tasten auf dem Hauptgerät.
•
G5
Page 21

Fernsehtextfunktion
OK
FAV
TTX
HOLD
ASPECT
SIZE
MIX
CANCEL
INDEX
REVEAL
SUBPAGE
MENU
: Mithilfe dieser Taste können Sie den Fernsehtextmodus aufrufen. Betätigen Sie die Taste erneut, um den Fernsehtext-
modus wieder zu verlassen. Sie können Sie mithilfe der Fernbedienung auf weitere Funktionen zugreifen, wenn die Fernsehtextseite auf dem Bildschirm angezeigt wird.
: Wenn Sie das Fernsehbild zusammen mit Fernsehtext anzeigen wollen, betätigen Sie diese Taste. Betätigen Sie die
Taste erneut, um zur normalen Anzeige zurückzukehren.
: Dies bezieht sich auf vorhandene Unterseiten der Fernsehtextseiten. Wenn diese Taste betätigt wird, werden Sie auf
dem Bildschirm aufgefordert eine Unterseite zu wählen. Wenn keine Unterseite vorhanden ist, erscheint keine Anzeige. In
den meisten Fällen ist keine Unterseite vorhanden.
: Betätigen Sie diese Taste, um den Seitenwechsel zu stoppen. Betätigen Sie die Taste erneut, wenn Sie mit dem Seiten-
wechsel fortfahren möchten.
:
Betätigen Sie diese Taste, wenn Sie den Seiteninhalt nicht anzeigen wollen, sondern nur das Kanalbild.
Betätigen Sie diese Taste ein zweites Mal, um den Seiteninhalt wieder anzuzeigen.
Benutzen Sie die Zifferntasten 0~9 auf der Fernbedienung, um den Inhalt einer bestimmten Seite anzuzeigen. "o/p" auf der
Fernbedienung können Sie benutzen, um den Inhalt der vorigen oder nächsten Seite anzuzeigen.
Mithilfe der Farbtasten auf der Fernbedienung können Sie auf Seiten zugreifen, die über einen Farbcode verfügen.
: Betätigen Sie diese Taste, um die obere Seitenhälfte zu vergrößern. Betätigen Sie die Taste ein zweites Mal, um die un-
tere Seitenhälfte zu vergrößern. Mit einer dritten Betätigung kehren Sie wieder zur normalen Anzeige zurück.
: Betätigen Sie diese Taste zur Anzeige versteckter Informationen. Betätigen Sie diese Taste ein zweites Mal, um den
Seiteninhalt wieder zu verstecken.
: Betätigen Sie diese Taste im Fernsehtextmodus zur Anzeige der Inhaltsseite.
FAST TEXT:
Die FARBTASTEN werden für den Schnellzugriff auf Seiten mit Farbcode benutzt, die mithilfe von FAST TEXT übertragen
werden.
Beispiel:
ROT für Stadtinformationen,
CYAN für Reiseinformationen,
GRÜN fü Wetterinformationen,
GELB für Fernsehprogramme.
MIX
INDEX
CANCEL
REVEAL
SIZE
SUBPAGE
HOLD
TTX
G6
Page 22

INBETRIEBNAHME
1.
Schließen Sie die Antenne am 75Ω-Antennenanschluss an.
2.
Schalten Sie den Fernseher ein.
3
Der folgende Installationsdialog erscheint auf dem Bildschirm:
.
FIRST TIME INST ALLATION
COUNTRY
LANGUAGE
DELETE PROGRAM
SEARCH PROGRAM
YES
MOVE
4.
Benutzen Sie [o] oder [p] zur Auswahl der gewünschten Einstellungen.
5.
Benutzen Sie [b] oder [a] zur Verändern der Einstellungen.
6.
Betätigen Sie [p] zur Auswahl von „YES“ und betätigen Sie [OK] zur Bestätigung.
ADJUST
OTHER
ENGLISH
YES
YES
NO
MENU
EXIT
Hinweis:
Um den Installationsvorgang abzubrechen, betätigen Sie [p] zur Auswahl von „NO“ und der folgende Dialog erscheint:
Betätigen Sie die [MENU] zum Löschen der Kanäle.
FIRST TIME INST ALLATION
First time installation is not finished!
Are you sure to exit?
YES
MOVE
DO IT NEXT TIME NO
MENU
EXIT ADJUST
Hinweis:
Der Installationsdialog erscheint jedesmal, nachdem Sie einen Reset durchgeführt haben. Schalten Sie das Gerät danach
aus und wieder ein.
TV-Informationen
Betätigen Sie [INFO], um die Programminformationen anzuzeigen.
TV
Programmnummer
Farbsystem
Klangsystem
G7
001
PAL
BG
Page 23

GRUNDLEGENDE BEDIENUNG
FAV
Vergewissern Sie sich, dass alle notwendigen Anschlüsse
richtig verbunden sind, bevor Sie das Gerät einschalten.
Die Kontrolllampe leuchtet dann rot auf und das Gerät geht
in den Bereitschaftsbetrieb.
Einschalten des Geräts
Betätigen Sie [z], auf dem Hauptgerät.
Die Kontrolllampe leuchtet blau auf.
Ausschalten des Geräts
Betätigen Sie erneut [z] auf dem Hauptgerät, um das Gerät
auszuschalten.
Das Gerät geht automatisch in den Bereitschaftsbetrieb.
Die Kontrolllampe leuchtet rot auf.
Einstellen der automatischen Ausschaltzeit
Die Schlaffunktion schaltet das Gerät automatisch nach Ablauf der eingestellten Wartezeit ab. Es stehen 9 Zeiteinstellungen zur Verfügung. Betätigen Sie [SLEEP]
auf der Fernbedienung zur Auswahl der gewünschten Einschlafzeit:
0 Min.
v
(Der Einschlaf-Timer wird aktiviert, sobald Sie mit der Einstellung fertig sind.)
Überprüfen der verbleibenden Ausschaltzeit:
Betätigen Sie [SLEEP] auf der Fernbedienung für eine kurzzeitige Anzeige der verbleibenden Ausschaltzeit.
v
75 Min.
15 Min.
v
v
90 Min.
30 Min.
v
45 Min. v60 Min.
v
105 Min.
v
120 Min.
Auswahl eines TV-Senders
Nachdem Sie „ATV“ als Eingangssignal gewählt haben,
können Sie eine der folgenden Methoden zur Auswahl eines
Senders benutzen.
• Betätigen Sie [p CH] oder [CH o ] (bzw. [-PROGRAM]
oder [PROGRAM+] auf dem Hauptgerät).
CH
oder
• Betätigen Sie direkt eine Ziffer von 0-9, um zu Ihrem be-
vorzugten Kanal zu schalten.
• Betätigen Sie [ ] , um zum zuletzt
gewählten Kanal zu wechseln.
FAV
Auswahl des Bildmodus
Betätigen Sie die Taste [P.STD ] auf der Fernbedienung zur Auswahl des gewünschten Bildmodus.
Auswahl des Eingangssignals
Schalten Sie eventuell angeschlossene
externe Gerät ein. Benutzen Sie die Taste
[SOURCE] zur Auswahl des korrekten Eingangssignals.
Das Eingangssignalmenü erscheint.
1. Betätigen Sie [o/p], um die Auswahlbalken auf das gewünschte
Eingangssignal zu bewegen.
2. Betätigen Sie OK (oder [b/a]), zur Bestätigung.
Informationen zum gewählten Eingangssignal erscheinen für ein paar Sekunden auf dem Fernsehbildschirm.
TV
AV
S-VIDEO
SCART
HDMI
PC
Informationsanzeige
Betätigen Sie die Taste [INFO] auf der Fernbedienung, um detaillierte Informationen zum aktuellen
Einsgangssignal auf dem Bildschirm anzuzeigen.
Einstellen der Lautstärke
Benutzen Sie die Taste [ - VOL] zum Verringern der Lautstärke.
Benutzen Sie die Taste [VOL+ ] zum Erhöhen der Lautstärke.
oder
VOL
NICAM-Funktion
Betätigen Sie [I/II] auf der Fernbedienung, wenn das Eingangssignal auf „TV“ steht.
Diese Funktion hat keinen Effekt, wenn der entsprechende
Kanal über kein NICAM-Signal verfügt.
Sobald Sie die Taste [I/II] betätigt haben, können Sie zwischen verschiedenen Tonoptionen, wie z. B. Mono, Stereo,
Dual I oder Dual II wählen.
Einstellen der Anzeigesprache
Die Anzeigesprache ist werksmäßig auf „English“ eingestellt.
Ändern der Anzeigesprache:
1. Betätigen Sie die Taste [MENU] zur Anzeige des Bildschirmmenüs.
2. Betätigen Sie die Taste [p] solange, bis das Funktionsmenüs erscheint.
3. Betätigen Sie [a] zum Aufrufen des Einstellungsmenüs
und gehen Sie auf „Language“.
4. Benutzen Sie die Navigationstasten [b/a] zur Auswahl
der gewünschten Sprache.
5. Betätigen Sie die Taste [MENU] zum Verlassen des Untermenüs.
Ton aus
Betätigen Sie [MUTE ] auf der Fernbedienung, um
den Ton vorübergehend auszuschalten.
Betätigen Sie die Taste erneut (bzw. [VOL+]), um den
Ton wieder anzuschalten.
Auswahl des Soundmodus
Betätigen Sie die Taste [S.STD ] auf der Fernbedienung zur Auswahl des gewünschten Soundmodus.
G8
Page 24

OSD-MENÜEINSTELLUNGEN
Menünavigation
Betätigen Sie die Taste [MENU] zur Anzeige des Bildschirmmenüs.
Betätigen Sie im Hauptmenü [p] zur Anzeige (in sequenzieller Reihenfolge) von:
BILD v TON v FUNKTION
Wenn bestimmte Menüoptionen in schattiert angezeigt werden, bedeutet dies, dass diese Optionen im momentanen Einstellungsmodus nicht zur Verfügung stehen.
Allgemeine Bedienungweisen:
Bei jedem Menü können Sie mithilfe der Tasten [o, p] auf der Fernbedienung Optionen wählen.
y
Benutzen Sie die Tasten [b, a, o, p] auf der Fernbedienung zum Ändern oder Bestätigen Ih-
y
rer Einstellungen (achten Sie auf die Hinweise im unteren Teil der Bildschirmanzeige).
Nachdem Sie mit der Einstellung einer Option fertig sind, betätigen Sie die Taste [MENU], um das Menü Schritt
y
für Schritt zu verlassen. Wenn Sie die Taste [EXIT] betätigen, können Sie das Bildschirmmenü direkt verlassen.
Bildschirmmenüaufbau:
v
TV v …
PICTURE
SOUND
TV
Picture Mode
Brightness
Contrast
Colour
Sharpness
Tint
Colour Temperature
Sound Mode
Bass
Treble
Balance
AVC
Country
Auto Tuning
Manual Tuning
FUNCTION
Child Lock
Key Lock
Change Code
Language
Video Size
TT Language
Sleep Timer
OSD Timer
Blue Screen
Reset
Child Lock
Installation
Hotel Mode
Country
Language
Delete Program
Search Program
Channel Edit
Channel
Sound System
Colour System
AFT
Manual Tuning
Hotel Lock
Source Lock
Default Source
Default Prog
Max Volume
Clear Lock
G9
Page 25

Bildschirmmenü:
TINT 50
COL
OUR TEMPERATURE
TINT 50
COL
OUR TEMPERATURE
50
BILDMENÜ
PICTURE MODE
BRIGHTNESS 50
CONTRAST 50
COLOUR
SHARPNESS 5
OUR TEMPERATURE
MOVE ADJUST
FERNSEHMENÜ
COUNTRY
AUTO TUNING
MANUAL
CHANNEL EDIT
PICTURE
TUNING
TV
PERSONAL
NORMAL
OTHER
AUDIOMENÜ
SOUND
SOUND MODE
BASS 50
TREBLE 50
50
EXIT MENU
BALANCE 0
AVC
MOVE ADJUST
TV
MANUAL TUNING
CHANNEL
SOUND SYSTEM
COLOR SYSTEM
AFT
MANUAL TUNING
PERSONAL
OFF
MENU
001
BG
AUTO
OFF
860.25MHz
EXIT
MOVE ADJUST
MENU
EXIT
MOVE ADJUST
(Das Fernsehmenü ist nicht verfügbar, wenn „AV/S-VIDEO als Eingangssignal gewählt wurde.)
Funktionsmenü
FUNCTION
LANGUAGE
VIDEO SIZE
TT LANGUAGE
SLEEP TIMER
OSD TIMER
BLUE SCREEN
RESET
MOVE ADJUST
ENGLISH
16:9
FULL
WEST EURO
OFF
60 SECONDS
ON
MENU
EXIT
CHILD LOCK
INSTALLATION
HOTEL MODE
FUNCTION
MOVE ADJUST
MENU
MENU
BACK
EXIT
G10
Page 26

Hotelsicherungsfunktion
Sie können auf die Untermenüs in folgender Reihenfolge zugreifen:
FUNCTION v Hotelmodus v Hotelsicherung v …
FUNCTION
LANGUAGE
VIDEO SIZE
TT LANGUAGE
SLEEP TIMER
OSD TIMER
BLUE SCREEN
RESET
MOVE ADJUST
FUNCTION
ENGLISH
16:9
FULL
WEST EURO
OFF
60 SECONDS
ON
MENU
EXIT
Hotel Lock (Hotelsicherung): Hat Priorität über die beiden
untenstehenden Optionen. Um die untenstehenden Optionen benutzen zu können, müssen Sie zunächst diese
Funktion aktivieren.
Wenn die Funktion aktiviert ist, erhalten Sie Zugriff auf
die anderen Optionen.
Source Lock (Signalsicherung): Stellen Sie hier ein Ein-
gangssignal (z. B. TV oder HDMI) ein, dass Sie sperren
wollen.
Default source (Standardsignal): Stellen Sie hier ein Ein-
gangssignal ein, dass als Standardsignal beim Einschalten des Fernsehers benutzt werden soll.
Default Prog (Standardprogramm): Stellen Sie hier ein
Fernsehprogramm für die Benutzung mit ATV ein.
Max Volume (Max. Lautstärke): Stellen Sie hier die maxi-
male Lautstärke ein.
Clear Lock (Sicherung aufheben): Aufheben aller Sperren.
PIN-Code:
(Die Standardeinstellung ist „0000“.)
Wenn Sie das Passwort vergessen ...
Geben Sie „2008“ als PIN ein.
Halten Sie das Passwort vor Ihren
Kindern geheim.
CHILD LOCK
INSTALLATION
HOTEL MODE
MOVE ADJUST
FUNCTION
HOTEL LOCK
HOTEL LOCK
SOURCE LOCK
DEFAULT SOURCE
DEFAULT PROG
MAX VOLUME
CLEAR LOCK
MOVE ADJUST
MENU
OFF
16:9
OFF
1
100
MENU
EXIT
EXIT
G11
Page 27

WARTUNG
WARNUNG:
FÜR IHRE EIGENE SICHERHEIT SOLLTEN SIE DAS GERÄT VOR ALLEN REINIGUNGS- UND WARTUNGS-
ARBEITEN VON STROM ABTRENNEN.
Reinigung des LCD-Bildschirms
Der LCD-Bildschirm darf nicht mit scharfkantigen Gegenständen berührt werden. Falls Sie Staub oder Fingerabdrücke auf
der Bildschirmoberfl äche wiederfi nden, wischen Sie sie mit einem weichen, sauberen Tuch ab.
Wischen Sie den Bildschirm immer in einer geraden Linie von Innen nach Außen ab.
Benutzen Sie niemals Chemikalien, wie z. B. Plattenreiniger, Antistatik-Sprays, Benzin oder Verdünnungsmittel zur Reinigung des LCDBildschirms.
Reinigung des Hauptgeräts
Reinigen Sie die Außenseite des Geräts mit einem weichen, sauberen, mit etwas lauwarmen Wasser angefeuchteten Tuch.
Benutzen Sie niemals Benzin, Verdünnungsmittel oder Alkohol, da diese Flüssigkeiten die Oberfl äche beschädigen können.
FEHLERBEHEBUNG
Erscheinungsbild
Mögliche Ursache
Behebung
Kein Bild und Ton
Das Netzkabel ist nicht richtig am Hauptgerät angeschlossen.
Schließen Sie das Netzkabel am Hauptgerät an.
Das Netzkabel ist nicht an einer Steckdose angeschlossen.
Verbinden Sie das Netzkabel mit einer Steckdose.
Es wurde das falsche Eingangssignal gewählt.
Wählen die das korrekte Eingangssignal.
Das gewünschte Eingangssignal ist nicht vorhanden.
Überprüfen Sie die Anschlüsse.
Kein Ton
Die Lautstärke wurde auf Null gestellt.
Benutzen Sie VOL+ Taste zum Erhöhen der Lautstärke.
Die Taste
Betätigen Sie die Taste
wieder einzuschalten.
Es wurde das falsche Tonsystem gewählt.
Wählen Sie im Hauptmenü das korrekte Tonsystem für
Ihren Fernseher.
auf der Fernbedienung wurde betätigt.
(oder VOL+/-), um den Ton
Erscheinungsbild
Mögliche Ursache
Behebung
Kein Bild oder schwarzweißes Bild
Das eingestellte Farbsystem ist nicht für das Programm
geeignet.
Stellen Sie das korrekte Farbsystem ein.
Das eingestellte Tonsystem ist nicht für das Programm
geeignet.
Stellen Sie das korrekte Tonsystem ein.
Bild- oder Tonstörungen
Bestimmte Geräte können zu Interferenzen führen, wenn
sie in der Nähe des Fernsehers aufgestellt werden.
Stellen Sie diese Geräte in außreichender Entfernung
zum Fernseher auf.
Mehrere Geräte sind an der gleichen Steckdose
angeschlossen.
Verbinden Sie das Netzkabel mit einer anderen
Steckdose.
Es wurde das falsche Tonsystem gewählt.
Wählen Sie im Hauptmenü das korrekte Tonsystem für
Ihren Fernseher.
Hinweis:
Wenn ein paar helle oder dunkle Flecken auf dem Fernsehbildschirm auftauchen, ist dies vollkommen normal.
G12
Page 28

TECHNISCHE DATEN
TFT-2402
Bildschirm
Bildschirmtyp LCD
Bildschirmgröße 23.6 cm
Bildseitenverhältnis 16:9
Anzeigebereich 521 (H) X 293 (V)
Bildaufl ösung 1366 (H) X 768 (V)
Helligkeit 500 cd/m
Kontrastverhältnis 1000:1
Lochmaske 0.272 (H) X 0.272 (V) mm
Farben 16.7 M
Reaktionszeit 8 ms
2
Anschluss
Eingänge:
TV-Tuner (RF 75Ω) 1
Videoeingang (AV) 1
S-Videoeingang (S-VIDEO) 1
SCART 1
VGA-Eingang (VGA) 1
PC-Audioeingang (PC AUDIO) 1
HDMI-Eingang (HDMI) 1
Ausgänge:
Kopfhörerausgang ( ) 1
Eigenschaften und Funktionen
HDMI-Kompatibel 480I, 480P, 576I, 576P, 720P,
1080I, 1080P
Wandaufhängung VESA 100
TV-Empfang
Farbsystem: PAL / SECAM
Tonsystem B/G , I, D/K, L/L'
Antennenimpedanz: 75 Ohm
Tuner-Frequenzbereich:
ATV 49MHz – 863MHz
Stromnetzanforderungen
Stromversorgung 100-240V ~ 50/60 Hz
Stromverbrauch
maximal < 80W
Unterstützte VGA-Aufl ösungen
bis zu 1360 x 768
Abmessungen (B x H x T)
Gerät mit Standfuß und Lautsprechern 587 x 438 x 196 mm
Gerät ohne Standfuß 587 x 395 x 78 mm
Nettogewicht
Gerät mit Standfuß und Lautsprechern 5.7 Kg
Betriebsbedingungen
Betriebstemperatur 0°C-40°C
Betriebsluftfeuchtigkeit 20%-80%
Hinweis:
Änderungen der technischen Daten sind vorbehalten.
G13
Page 29

TFT-2402
GEBRUIKERSHANDLEIDING
Voor meer informatie en ondersteuning verwijzen wij u naar www.lenco.eu
Page 30

Inhoudsopgave
VOORZORGSMAATREGELEN .......................................................................................... D3
BEDIENING ......................................................................................................................... D4
DE EERSTE KEER DE TV GEBRUIKEN ............................................................................ D7
BASIS BEDIENING ............................................................................................................. D8
OSD MENU INSTELLING ................................................................................................... D9
ONDERHOUD ................................................................................................................... D12
PROBLEMEN OPLOSSEN ............................................................................................... D12
SPECIFICATIES ................................................................................................................ D13
D1
Page 31

Beste Klant,
OK
FAV
TTX
HOLD
ASPECT
SIZE
MIX
CANCEL
INDEX
REVEAL
SUBPAGE
MENU
Bedankt voor de aanschaf van deze LCD TV. Wanneer u de doos voor de eerste keer opent, controleer dan of alle accessoires
aanwezig zijn. Lees voor het verbinden van de stekker en de onderdelen de gebruikershandleiding zorgvuldig door en bewaar de
instructies altijd handig en dicht bij uw LCD TV.
FAV
MENU
OK
ASPECT
MIX
CANCEL
HOLD
SIZE
TTX
SUBPAGE
REVEAL
INDEX
Gebruikershandleiding X 1
Afstandsbediening X 1
Batterijen X 2
Netsnoer X 1
Controleer de accessoires wanneer u de verpakking opent. Als er iets beschadigd is of ontbreekt, neem dan contact op met
uw dealer.
Opmerking:
Deze handelingsbeschrijving is voorafgaand aan de productontwikkeling afgedrukt.
Wanneer een deel van de productspecifi caties moeten worden veranderd om operabiliteit of andere functies te verbeteren,
wordt prioriteit gegeven aan het productspecifi caties zelf. In dergelijke gevallen is het mogelijk dat de handleiding niet hele-
maal overeenkomt met alle functies van het eigenlijke product.
Daarom kan het werkelijke product en de verpakking, evenals de naam en illustratie, afwijken van de handleiding.
Het scherm dat wordt weergegeven als voorbeeld in deze handleiding kan afwijken van het werkelijke scherm.
Indien u zich in de toekomst van dit toestel wenst te ontdoen, let er dan op dat elektrisch afvalmateriaal niet met het huishoudelijk afval mag worden verwijderd. Breng het toestel naar een kringloopwinkel of andere voorziening voor recycling. Neem contact op met uw plaatselijke autoriteit
of winkelier indien u meer informatie wenst over recycling. (Richtlijn voor Afval van Elektrische
en Elektronische Apparaten, AEEA).
D2
Page 32

VOORZORGSMAATREGELEN
CAUTION
RISK OF ELECTRIC SHOCK
DO NOT OPEN
CAUTION: TO PREVENT THE RISK OF ELECTRIC
SHOCK, DO NOT REMOVE COVER (OR BACK).
NO USER-SERVICEABLE PARTS INSIDE.
REFER SERVICING TO QUALIFIED SERVICE PERSONNEL.
Dit symbool geeft aan dat gevaarlijke spanning, die een gevaar op elektrische schokken vormt, aanwezig is binnen dit toestel.
Dit symbool geeft aan dat er belangrijke bedienings- en onderhoudsvoorschriften staan in de literatuur bij dit toestel.
VOORZICHTIG
VERWIJDER OM VEILIGHEIDSREDENEN GEEN BEHUIZING EN PROBEER NIET OM TOEGANG TE KRIJGEN TOT DE
BINNENKANT VAN HET PRODUCT.
LAAT ONDERHOUD OVER AAN GEKWALIFICEERD PERSONEEL.
OM BRAND OF ELEKTRISCHE SCHOK TE VOORKOMEN, DIENT U HET APPARAAT NIET BLOOT TE STELLEN AAN
REGEN OF VOCHT.
Installeer het toestel niet in een onstabiele ruimte.
•
Stel het apparaat niet bloot aan extreme temperaturen (beneden 5 ° C of meer dan 35 ° C) of vocht.
•
Stel het apparaat niet bloot aan direct zonlicht of hitte.
•
Installeer dit apparaat niet in een beperkte ruimte, zoals een boekenkast of ingebouwde kast. Voor voldoende ventilatie,
•
moet er ten minste 20 cm ruimte rond het apparaat zijn.
De ventilatie mag niet worden belemmerd door de ventilatieopeningen te blokkeren met voorwerpen, zoals kranten, tafel-
•
kleden, gordijnen, etc. te bedekken.
Zet dit apparaat niet in een vloeistof.
•
Steek geen kleine voorwerpen in het apparaat via de ventilatieopeningen.
•
Het apparaat mag niet worden blootgesteld aan vallend, of spattend water. Plaats geen objecten gevuld met vloeistof, zo-
•
als vazen, op het apparaat.
Plaats geen naakte vlammen, zoals brandende kaarsen, op het apparaat.
•
Raak nooit het tv-scherm of antenne / stopcontact aan tijdens onweer. Stop het gebruik tijdens onweersbuien.
•
Ga niet op het netsnoer staan en draai de netsnoerdraad niet.
•
Dit product dient door niemand te worden aangepast of gerepareerd, behalve door juist gekwalifi ceerd personeel, waneer
•
het apparaat niet normaal functioneert of er zich problemen voordoen. Neem contact op met gekwalifi ceerd service perso-
neel wanneer dit gebeurt.
Verwijder altijd de batterijen en sla deze op op een droge plaats als de afstandsbediening niet wordt gebruikt voor een lan-
•
ge tijd.
Beschadig de afstandsbediening niet door hem te laten vallen.
•
Voorzie dit apparaat altijd van stroom door een stopcontact met dezelfde rating (spanning en frequentie) zoals aangegeven
•
op het typeplaatje op de achterkant van dit apparaat.
Wanneer het apparaat niet in gebruik is, haalt u het netsnoer uit het stopcontact. Gebruik de stekker, niet het snoer, bij het
•
loskoppelen van het apparaat.
Dit KLASSE 1 apparaat moet worden aangesloten op een geaarde stekker, en plaats de stekker op een positie die gemak-
•
kelijk aan- en af te koppelen is.
Wanneer de stekker- of een toestelkoppeling wordt gebruikt als het loskoppelapparaat, moet deze gemakkelijk bereikbaar
•
blijven.
D3
Page 33
HOOFDAPPARAAT
Bedieningsknoppen
3245671
BEDIENING
9
SOURCE
MENUPOWER
CH
VOL
Algemene bedieningsknoppen
1.
2.
3.
4.
5.
6.
7.
8.
9.
10.
Power/Standby knop (POWER)
Invoerbron selectie knop (SOURCE)
Menu knop (MENU)
Kanaal omlaag knop ( p CH )
Kanaal omhoog knop ( CH o )
Volume omlaag knop ( -VOL)
Volume omhoog knop (VOL +)
Power indicator
Afstandssensor
Aan/uit knop
8
10
Voeding: Gebruik dezelfde spanning en fre-
*
quentie als vermeld op het typeplaatje van het
toestel.
1
Stekkeringangen (Achterpaneel)
1.
2.
3.
4.
5.
6.
7.
8.
High-Defi nition Multimedia interface ingang (HDMI)
VGA interface ingang (VGA)
SCART ingang (SCART)
S-video ingang (S-VIDEO)
Composiet audio & video ingang (R/L/VIDEO)
PC audio ingang (PC AUDIO )
Audio uitgang DŽ )
Antenne/Kabel TV ingang (RF 75 )
D4
AGV IMDH
SCART
S-VIDEOVIDEOLR
OIDUA
CP
)
5
7(
F
R
2
3
4
5
6
7
8
Page 34

AFSTANDSBEDIENING
OK
FAV
TTX
HOLD
ASPECT
SIZE
MIX
CANCEL
INDEX
REVEAL
SUBPAGE
MENU
OK
FAV
TTX
HOLD
ASPECT
SIZE
MIX
CANCEL
INDEX
REVEAL
SUBPAGE
MENU
Bedieningsknoppen
14
13
12
11
1
FAV
MIX
INDEX
CANCEL
REVEAL
OK
ASPECT
SIZE
SUBPAGE
MENU
HOLD
TTX
2
3
4
5
6
7
8
9
10
*
1. Power/Standby knop (z)
2. Slaaptimer knop (SLEEP)
3. Mute knop (MUTE)
4. Nummerknoppen (0, 1 ~ 9)
5. Vorige kanaal knop ( )
6. Geluidsmodus knop (S.STD)
7. Menu knop (MENU)
8. Navigatietoetsen (o, a, p, b)
9. Bevestig knop (OK)
10. Kanaal selectie knoppen (-PROGRAM+)
11. Volume bedien knoppen (-VOL+)
12. Bronselectie knop (SOURCE)
13. Beeldmodus knop (P.STD)
14. Favoriete programmalijst knop
*. Speciale knoppen:
EXIT: Menu verlaat knop
INFO: Informatie tonen knop
ASPECT: Displaymodus selectie
I/II: NICAM modus selectie knop
MIX
: Teletekst mix knop
CANCEL: Teletekst annuleer knop
SIZE: Teletekst grootte/zoom knop
HOLD: Teletekst hold knop
INDEX: Teletekst index tonen knop
REVEAL: Teletekst onthul knop
SUBPAGE: Teletekst subpagina knop
TTX: Teletekst aan/uit knop
Batterijen Plaatsen
Twee batterijen van het type LR03/AAA
Bedieningsbereik
Sensor voor
afstands-
bediening
30 30
FAV
OK
ASPECT
MIX
CANCEL
SIZE
SUBPAGE
REVEAL
INDEX
MENU
HOLD
TTX
Ca. 8 meter
Opmerking:
Fel Zonlicht of felle verlichting kan zorgen voor onzuivere bediening op afstand.
•
Verwijder altijd de batterijen uit de afstandsbediening als deze voor meer dan een maand niet gebruikt wordt. Batterijen kunnen mogelijk
•
voor schade zorgen.
De knoppen op de afstandsbediening hebben eenzelfde werking als de knoppen met een gelijke markering op het hoofdapparaat.
•
D5
Page 35

Teletekst Functie
OK
FAV
TTX
HOLD
ASPECT
SIZE
MIX
CANCEL
INDEX
REVEAL
SUBPAGE
MENU
: Druk op deze knop om teletekst te tonen. Als u teletekst wilt uitschakelen, druk dan nogmaals op deze knop. Wanneer
een teletekstpagina wordt getoond op het scherm, dan kunt u een relevante functie selecteren met behulp van de afstandsbediening.
: Als u het beeld en de teletekstpagina tegelijk wilt tonen, druk dan op deze knop. Druk nogmaals om het effect te annuleren.
: Dit verwijst naar subpagina’s op teletekst. Wanneer op deze knop wordt gedrukt, dan zal het scherm de gewenste subpagina tonen. Als er geen subpagina is, dan zal deze niet weergegeven worden. In de meeste gevallen is er geen subpagina.
: Druk op deze knop als u de huidige pagina wilt blijven tonen en druk nogmaals om de hold-staat te verlaten.
:
Druk op deze knop als u het beeld van het kanaal wilt zien, en niet de inhoud van de teletekstpagina. Druk nogmaals om de
teletekstpagina weer te tonen.
Nummerknoppen 0~9 op de afstandsbediening kunnen worden gebruikt om naar een bepaalde pagina te gaan. De "o/p"
knop op de afstandsbediening kan worden gebruikt om de inhoud van de vorige of volgende pagina te tonen.
Druk op de RODE/GROENE/GELE/CYAAN knop op de afstandsbediening, de pagina die bij de kleur hoort, getoond aan de
onderkant van het scherm, zal getoond worden.
: Druk op deze knop als u het bovenste deel van de pagina wilt vergroten, en druk een tweede keer om het onderste deel
van de pagina te vergroten. Druk een derde keer om het normaal tonen van de inhoud op te pagina te hervatten.
: Druk op deze knop als u de verborgen tekst wilt tonen. Druk nogmaals om de verborgen tekst weer te verbergen.
: Druk op deze knop als u de index voor alle pagina’s wilt tonen.
FAST TEXT:
De RODE, GROENE, GELE & CYAAN knoppen worden gebruikt voor snelle toegang tot kleur gecodeerde pagina’s uitgezonden door FAST TEXT uitzendingen.
Voorbeeld:
ROOD selecteert STADSINFORMATIE,
CYAAN selecteert REISINFORMATIE,
GROEN selecteert WEERINFORMATIE,
GEEL selecteert TV PROGRAMMERING.
MIX
INDEX
CANCEL
REVEAL
SIZE
SUBPAGE
HOLD
TTX
D6
Page 36

DE EERSTE KEER DE TV GEBRUIKEN
1.
Verbind de antenne met de RF 75Ω ingang.
2.
Zet de TV aan.
3
Het Installeergids scherm verschijnt, zoals hieronder:
.
FIRST TIME INST ALLATION
COUNTRY
LANGUAGE
DELETE PROGRAM
SEARCH PROGRAM
YES
MOVE
4.
Druk op [o] of [p] om de gewenste instellingen te selecteren.
5.
Druk op [b] of [a] om de gewenste instellingen aan te passen.
6.
Druk op [p] om "YES" te selecteren, en druk op [OK] om te bevestigen.
ADJUST
OTHER
ENGLISH
YES
YES
NO
MENU
EXIT
Opmerking:
Om de eerste installatie te annuleren tijden het installatieproces, drukt u op [p] om "NO" te selecteren, het onderstaande
scherm verschijnt:
Om het wissen van het zoeken naar kanalen te annuleren, drukt u op [MENU].
FIRST TIME INST ALLATION
First time installation is not finished!
Are you sure to exit?
YES
MOVE
DO IT NEXT TIME NO
MENU
EXIT ADJUST
Opmerking:
Het eerste installatiescherm verschijnt nogmaals, wanneer u gebruikt heeft gemaakt van de "reset" operatie en het hoofdapparaat aan en uit heeft gezet.
TV informatie
Druk op [INFO] om de zenderinformatie te tonen.
TV
Programmanummer
Kleursysteem
Geluidssysteem
D7
001
PAL
BG
Page 37

BASISBEDIENING
FAV
Zorg ervoor dat alle benodigde aansluitingen correct zijn
verbonden voor het aanzetten.
De power indicator zal rood worden en het apparaat is in
standby-modus.
Het apparaat aanzetten
Druk op [z] om het hoofdapparaat aan te zetten.
De power indicator wordt blauw.
Het apparaat uitzetten
Druk nogmaals op [z] om het hoofdapparaat uit te zetten.
Het apparaat wordt automatisch in standby-modus gezet.
De power indicator wordt rood.
Gebruik maken van de Slaaptimer
De slaaptimer zet het apparaat automatisch uit nadat teen
vooraf ingestelde tijd is verstreken. Er zijn 9 tijdsperioden beschikbaar, druk herhaaldelijk op [SLEEP]
op de afstandsbediening om de gewenste slaaptijd
te selecteren:
0 Min.
v
(De slaaptimer start wanneer de instelling is ingesteld.)
Om de resterende slaaptijd te controleren
Druk op [SLEEP] op de afstandsbediening, de resterende
slaaptijd verschijnt voor een aantal seconden op het scherm.
v
75 Min.
15 Min.
v
v
90 Min.
30 Min.
v
45 Min. v60 Min.
v
105 Min.
v
120 Min.
Selecteer het TV kanaal
Na het selecteren van "ATV" als invoerbron, kunt u een van
de volgende dingen doen om het kanaal te selecteren.
• Druk op [p CH] of [CH o] (of [-PROGRAM] of [PRO-
GRAM+] op het hoofdapparaat).
CH
of
• Druk op [0, 1~9] om het kanaalnummer rechtstreeks in te
voeren.
• Druk op [
het vorige kanaal waar u naar gekeken
heeft.
] om terug te gaan naar
FAV
Selecteer de invoerbron
Zet het benodigde extern apparaat aan. Druk
op [SOURCE] om de juiste invoerbron te selecteren.
Het invoerbron menu verschijnt.
1. Druk op [o/p] om de selectiebalk naar het gewenste
bron-item te verplaatsen.
2. Druk op [OK] ( of [b/a]) om te bevestigen.
Informatie van de geselecteerde bron verschijnt voor een paar seconden op de TV.
TV
AV
S-VIDEO
SCART
HDMI
PC
Informatie tonen
Druk op [INFO] op de afstandsbediening, de gerelateerde informatie van de huidige bron zal automatisch
op het scherm verschijnen.
Het volume aanpassen
Druk op [-VOL] om het volume te verlagen.
Druk op [VOL+] om het volume te verhogen.
of
VOL
NICAM Functie
Druk op [NICAM] op de afstandsbediening wanneer de invoerbron “TV” is.
Deze operatie heeft geen effect op kanalen zonder signaal.
Wanneer [NICAM] is ingedrukt, dan zal dit door de verschillende geluidsopties, zoals mono, stereo, dual I en dual II
bladeren.
Selecteren van de OSD-taal
De fabrieksinstelling van OSD (Op Scherm Display) taal is
"English". Om het OSD te bewerken:
1. Druk op [MENU], OSD-menu verschijnt.
2. Druk op [p] tot "Function" menu verschijnt.
3. Druk op [a] om het instellingsmenu te betreden en “Language” is geselecteerd.
4. Druk op [b/a] om de gewenste taal in te stellen.
5. Druk op [MENU] om het submenu te verlaten.
Mute functie
Druk op [MUTE ] op de afstandsbediening om het
geluid tijdelijk uit te schakelen.
Druk nogmaals op deze knop (of [VOL+]), het geluid
komt nu terug.
Selecteren van de beeldmodus
Druk herhaaldelijk op [P.STD ] op de afstandsbediening om de gewenste beeldmodus te selecteren.
Selecteren van de geluidsmodus
Druk herhaaldelijk op [S.STD ] op de afstandsbediening om de gewenste geluidsmodus te selecteren.
D8
Page 38

OSD-MENU INSTELLING
Navigeren door menu’s
Druk op [MENU], het OSD hoofdmenu verschijnt.
Druk op [p], het hoofdmenu toont in volgorde:
PICTURE v SOUND v FUNCTION
Wanneer een menuoptie grijs getoond wordt, dan betekent dit dat deze optie niet beschikbaar is in de huidige instelmodus.
Normale bedieningsprocedure:
Bij elk menu, drukt u op [o, p] op de afstandsbediening om de opties in het hoofdmenu te selecteren.
Druk op [b, a, o, p] op de afstandsbediening om de instellingen te veranderen of bevestigen.
(Volg de tips aan de onderkant van de gerelateerde OSD-schermen.)
Nadat het instellen van een optie klaar is, drukt u op [MENU] om stap voor stap te verlaten, terwijl u met [EXIT] direct
het OSD-scherm verlaat.
Structuur van het OSD-menu:
v
TV v …
PICTURE
SOUND
TV
Picture Mode
Brightness
Contrast
Colour
Sharpness
Tint
Colour Temperature
Sound Mode
Bass
Treble
Balance
AVC
Country
Auto Tuning
Manual Tuning
FUNCTION
Child Lock
Key Lock
Change Code
Language
Video Size
TT Language
Sleep Timer
OSD Timer
Blue Screen
Reset
Child Lock
Installation
Hotel Mode
Country
Language
Delete Program
Search Program
Channel Edit
Channel
Sound System
Colour System
AFT
Manual Tuning
Hotel Lock
Source Lock
Default Source
Default Prog
Max Volume
Clear Lock
D9
Page 39

Hoofd OSD:
TINT 50
COL
OUR TEMPERATURE
TINT 50
COL
OUR TEMPERATURE
50
BEELDMENU
PICTURE MODE
BRIGHTNESS 50
CONTRAST 50
COLOUR
SHARPNESS 5
TV MENU
COUNTRY
AUTO TUNING
MANUAL
CHANNEL EDIT
PICTURE
PERSONAL
OUR TEMPERATURE
MOVE ADJUST
TV
TUNING
NORMAL
OTHER
GELUIDSMENU
SOUND
SOUND MODE
BASS 50
TREBLE 50
50
EXIT MENU
BALANCE 0
AVC
MOVE ADJUST
TV
MANUAL TUNING
CHANNEL
SOUND SYSTEM
COLOR SYSTEM
AFT
MANUAL TUNING
PERSONAL
OFF
MENU
001
BG
AUTO
OFF
860.25MHz
EXIT
MENU
MOVE ADJUST
EXIT
(TV Menu is niet beschikbaar wanneer "AV/S-VIDEO" is geselecteerd als invoerbron.)
FUNCTIEMENU
FUNCTION
LANGUAGE
VIDEO SIZE
TT LANGUAGE
SLEEP TIMER
OSD TIMER
BLUE SCREEN
RESET
MOVE ADJUST
ENGLISH
16:9
FULL
WEST EURO
OFF
60 SECONDS
ON
MENU
CHILD LOCK
INSTALLATION
HOTEL MODE
EXIT
MOVE ADJUST
FUNCTION
MOVE ADJUST
MENU
MENU
BACK
EXIT
D10
Page 40
Over de Hotelslot functie
Doorloop de submenu's stap voor stap:
FUNCTION v Hotel Mode v Hotel Lock v …
FUNCTION
LANGUAGE
VIDEO SIZE
TT LANGUAGE
SLEEP TIMER
OSD TIMER
BLUE SCREEN
RESET
MOVE ADJUST
FUNCTION
ENGLISH
16:9
FULL
WEST EURO
OFF
60 SECONDS
ON
MENU
EXIT
Hotel Lock (Hotelmodus): Heeft prioriteit over de opties
hieronder. Om de opties hieronder in te kunnen stellen
moet dit item eerst worden ingesteld op "ON" (AAN).
Wanneer het is ingesteld op “On”, dan zullen alle onder-
staande opties beschikbaar zijn.
Source Lock (Bronvergrendeling): Stel de vergrendeling
op de invoerbron (bv. TV, HDMI…) naar wens in.
Default source (Standaardbron): Stel een invoerbron in als
standaard wanneer de TV wordt aangezet.
Default Prog (Standaardzender): Stel een TV kanaalnum-
mer in als standaard als de TV naar “ATV” gaat.
Max Volume (Maximumvolume): Om de maximale volume-
waarde in te stellen.
Clear Lock (Ontgrendelen): Wis de vergrendelingen.
Over de PIN-Code:
(De standaardinstelling is “0000”.)
Als u het wachtwoord vergeet...
Voer “2008” in om het te betreden.
Voorkom dat jonge kinderen dit
wachtwoord kennen.
CHILD LOCK
INSTALLATION
HOTEL MODE
MOVE ADJUST
FUNCTION
HOTEL LOCK
HOTEL LOCK
SOURCE LOCK
DEFAULT SOURCE
DEFAULT PROG
MAX VOLUME
CLEAR LOCK
MOVE ADJUST
MENU
OFF
16:9
OFF
1
100
MENU
EXIT
EXIT
D11
Page 41

ONDERHOUD
WAARCHUWING:
VOOR UW PERSOONLIJKE VEILIGHEID, ZORG ERVOOR DAT U HET NETSNOER UIT HET STOPCONTACT
HAALT VOORDAT U ENIG ONDERHOUD OF REINIGEN UITVOERT.
Het LCD-scherm reinigen
Het LCD-scherm mag niet worden aangeraakt met scherpe voorwerpen. Als er stof en vingerafdrukken op het LCD-schermoppervlak zitten, veeg deze er dan af met een schoon, zacht doekje.
Veeg in een rechte beweging vanuit het midden naar de buitenkant van het LCD-scherm.
Gebruik nooit chemicaliën, zoals schoonmaak sprays, antistatische sprays, benzeen of thinner om het LCD-scherm schoon te maken.
Het hoofdapparaat schoonmaken
Maak de buitenkant van het apparaat schoon met een schoon, zacht doekje dat met lauw warm water bevochtigd is . Gebruik
geen benzeen, thinner of alcohol, omdat deze de afwerking van het oppervlak kunnen aantasten.
PROBLEMEN OPLOSSEN
Symptoom
Mogelijke Oorzaak
Corrigerende Actie
Geen beeld en geluid.
Netsnoer is niet correct verbonden met het hoofdapparaat.
Verbind het netsnoer met het hoofdapparaat.
Netsnoer is niet in het stopcontact gestoken.
Steek het netsnoer in een stopcontact.
De verkeerde invoerbron is geselecteerd.
Selecteer een correcte invoerbron.
Het verbinden van de invoerbron met de TV is mislukt.
Maak juiste verbindingen.
Alleen geen geluid.
Volumebediening is op het minimum ingesteld.
Druk op de VOL+ knop om het volume te verhogen.
knop op de afstandsbediening is ingedrukt.
De
Druk op de
stellen.
Er is een foute geluidsmodus ingesteld.
Stel een correct geluidssysteem, dat overeenkomt met
uw TV, in vanuit het hoofdmenu.
(of VOL+/-) knop om het volume te her-
Symptoom
Mogelijke Oorzaak
Corrigerende Actie
Alleen geen beeld of monochroom beeld.
De kleursysteem instelling komt niet overeen met de
zender.
Stel de juiste kleursysteem instelling in.
De geluidssysteem instelling komt niet overeen met de
zender.
Stel de juiste geluidssysteem instelling in.
Storend geluid of beeld.
Er is apparatuur in de buurt van uw TV die zorgt voor
storing.
Houd deze apparaten uit de buurt van uw TV.
Meerdere apparaten zijn met dezelfde stekkerdoos
verbonden.
Steek het netsnoer in een ander stopcontact.
Er is een foute geluidsmodus ingesteld.
Stel een correct geluidssysteem, dat overeenkomt met
uw TV, in vanuit het hoofdmenu.
Opmerking:
Er kunnen een aantal heldere en donkere stippen op het TV-scherm verschijnen, dat is een normale verschijning.
D12
Page 42

SPECIFICATIES
TFT-2402
Display Kenmerken
Displaytype LCD
Schermgrootte 23.6 inch
Aspect ratio 16:9
Actief Gebied 521 (H) X 293 (V)
Paneelresolutie 1366 (H) X 768 (V)
Helderheid 500 cd/m
Contrast Ratio 1000:1
Dot Pitch 0.272 (H) X 0.272 (V) mm
Maximale Kleur 16.7 M
Responstijd 8 ms
Kenmerken
HDMI compatibel 480I, 480P, 576I, 576P, 720P,
1080I, 1080P
Wandmontage VESA 100
TV Ontvangst
TV Systeem: PAL / SECAM
Geluidssysteem B/G , I, D/K, L/L'
Antenne Impedantie: 75 Ohm
Tuner ontvangstbereik:
ATV 49MHz – 863MHz
2
Aansluitingen
Invoer:
TV Tuner (RF 75Ω) 1
Video Ingang (AV) 1
S-Video Ingang (S-VIDEO) 1
SCART 1
VGA Ingang (VGA) 1
PC audio Ingang (PC AUDIO) 1
HDMI ingang (HDMI) 1
Uitvoer:
Oortelefoon ( ) 1
Ondersteunde VGA Resoluties
Tot 1360 x 768
Afmeting (BxHxD)
Apparaat met standaard/luidsprekers 587 x 438 x 196 mm
Apparaat zonder standaard 587 x 395 x 78 mm
Gewicht (N.W.)
Apparaat met standaard/luidsprekers 5.7 Kg
Omgeving
Bedrijfstemperatuur 0°C-40°C
Bedrijfsvochtigheid 20%-80%
Voeding
Stroominvoer 100-240V ~ 50/60 Hz
Stroomverbruik
Maximaal < 80W
Opmerking:
Specifi caties zijn onderheven aan veranderingen zonder berichtgeving.
D13
Page 43

For more information and support, please visit www.lenco.eu
 Loading...