

Page 1

MID-7509CM ROCKCHIP方 案 EN G LI SH M A NU AL
标准 说 明书 ,封 面 封底70g书纸, 135x102mm,钉装
USER'S MANUAL
TAB-711
For i nfo rm at ion and s up po rt,W WW. le nc o. eu
Page 2

Table of Contents
Table of Conte nts...... .. ......... ......... ......... .. .P1
Features ......... .. ......... ......... ........... ......... .P2
Unit at a Glan ce ........ .. ......... ......... ........... P3
Getting St arted.... .. ......... ......... ......... .. .P4-P5
About Appli cations.. ........... ......... ......... P5-P6
Preinsta lled Applica tions.... .. ......... ......... ...P6
Connect to a W i-Fi networ k.......... ......... .P7-P8
Optional C onnection s.......... ......... ......... ....P9
Specific ations... ........... ......... ......... .. .......P1 0
1
Page 3

Features
Browse the Web.
Vis it your favor ite website s
Check your e -mail
Keep in touc h with friend s and family
Watch You Tube™ vide os
Browse the w orld’s most popul ar videosharing co mmunity
Read your fa vorite book s
Download t housands of b ooks with the
included E -book reade r *
Discover t housands of a pps for Androi d™
Games, app lications , and more with
marketpl ace(need fo r customer in st alled)
Connect to t he Internet w irelessly
High-spe ed Wi-Fi 802. 11 b/g/ n networkin g
Enjoy your m edia librar y anywhere
2
Portable p owerhouse p lays popula r music,
video,an d photo forma ts
microSD me mory card rea der
Increase y our storage c apacity (up t o 16 G B
supporte d)
Built-in c amera
Convenie nt front-fa cing camera
Automati c orientati on detectio n
Read any way y ou want; the di splay adjus ts
automati cally!
Reading bo oks in the ePub f ormat requi re s
the includ ed E-book rea der applica tion.
Page 4

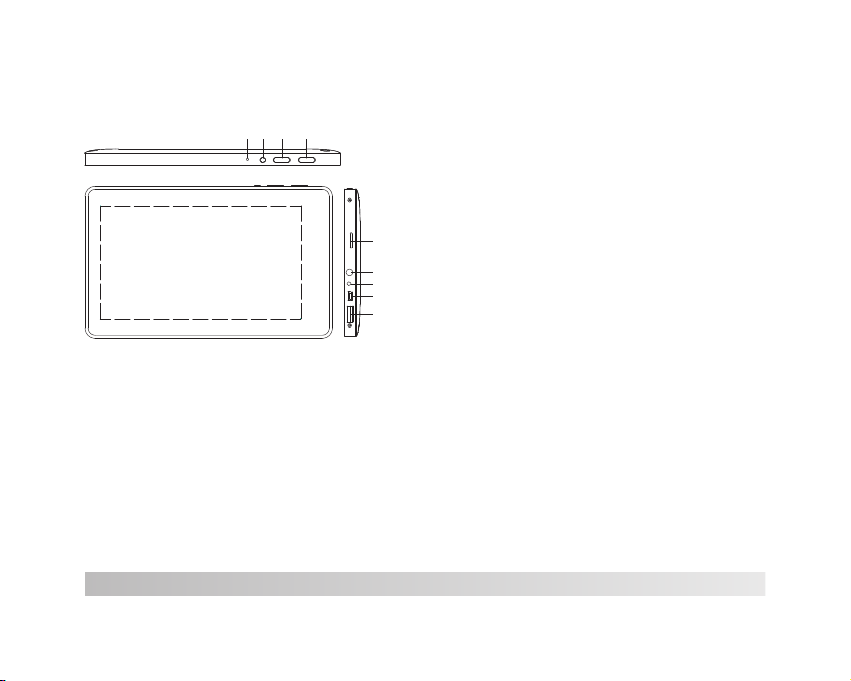
Unit at a Glance
1 2 3 4
1. RESET
Press this button to reset the system when the
device is halted.
2. POWER
Press to turn the unit on, or to turn the screen on
or off.
Press and hold to access the Power Off menu.
3. MENU
Press to view the option menu.
4.ESC
Press this button to return to a previous screen.
5. microSD
Load external microSD memory cards here.
5
6
7
8
9
6. Headphone
Audio output connection for headphones.
7.DC IN 5V
Change and power the tablet with the included
power adapter.
8.USB OTG
Connect to a USB device or a computer to transfer
data (e.g. music, videos,photos, files).
9.USB HOST
Connect to a USB device
3
Page 5

Getting Started
Turning the Tablet on or off
To turn the tabl et on:
Press and ho ld the Power ke y until the LCD
screen tur ns on. Wait un til the Home sc reen
appears; t he tablet is no w ready for use .
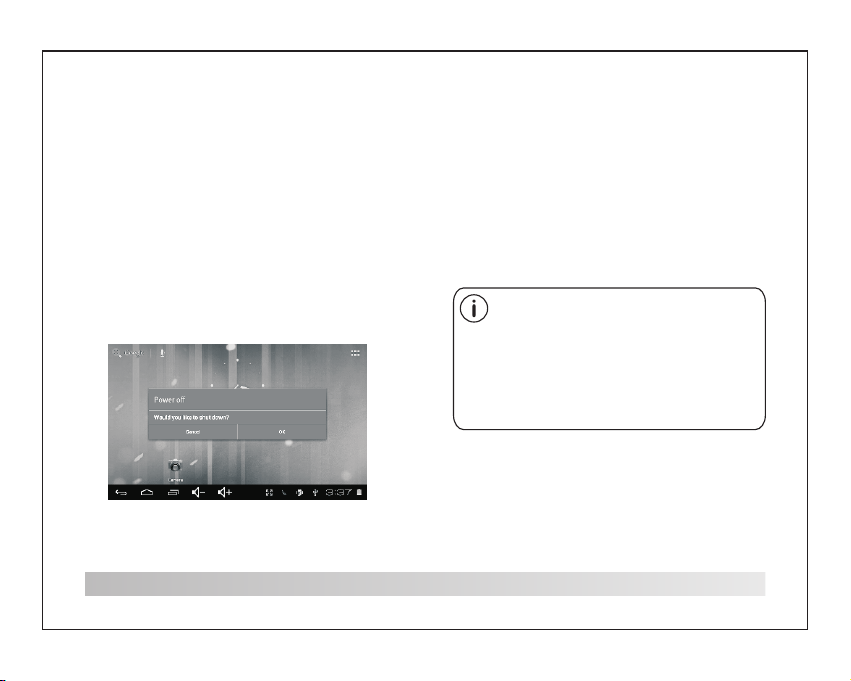
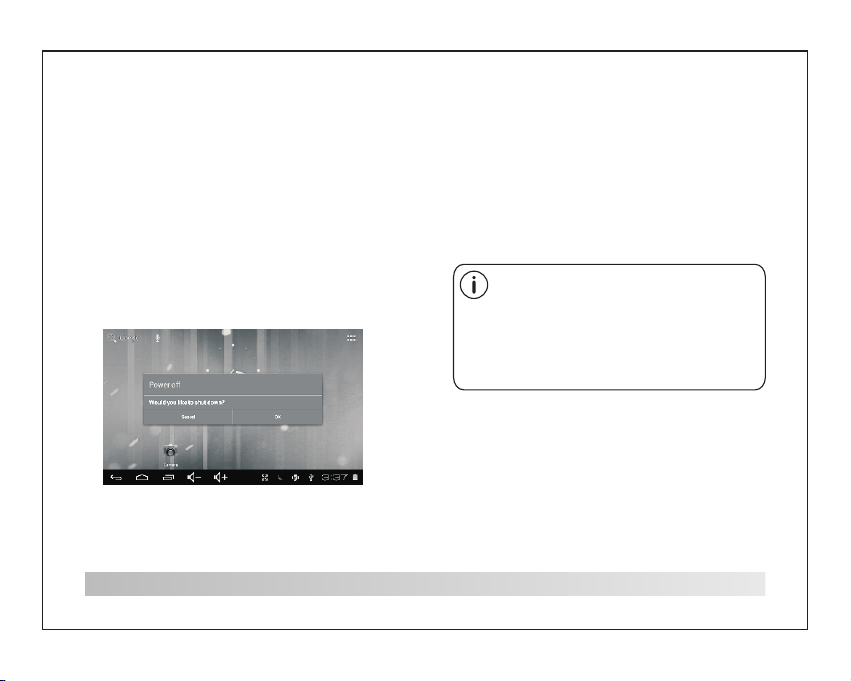
To turn the tabl et off :
1.Press an d hold the Powe r key until the
Device Opt ions menu app ears.
2. Touc h ok the screen t o turn off the tablet .
4
Turning the Screen On or off
(Standby)
When the tab let is on, you ca n turn off the
screen to co nserve batt ery power. Sim pl y press
the Power ke y once to turn th e screen
off . Press the Pow er key again to t urn the
screen bac k on.
To conserve ba ttery power, t he screen
can be set to tu rn off a utomatica lly when
the tablet i s not in use (bet ween
1 minute and 3 0 minutes).
This Scree n timeout opt ion can be foun d
in the Displ ay menu.
Page 6

Getting Started
Unlocking the Screen
When the scr een turns off, you wi ll have to
unlock the s creen
when you tur n it back on.
To unlock the sc reen, drag th e lock icon acr os s
the screen t owards the lo ck icon.
.
About Applications
To open an appli cation, tou ch the applic ation
icon on the ho me screen or in t he Launcher
where you ca n tap the icon ri ght up on the
home scree n to get in..
Launcher s creen:
The screen shown above is for illustrative
purposes only. Reserves the right to modify
and improve the final list of applications
available on the tablet.
5
Page 7

About Applications
Preinstalled Applications
Some applications have been installed on your
tablet for your convenience.
These applications include:
Browse the w eb.
Perform si mple mathem atical oper at ions.
Take picture s or videos wit h the
frontfac ing camera.
Check your e -mail.
Play music .
Music
Access the S ettings men u to adjust the
tablet’s optio ns.
Setti ngs
6
Preinstalled Applications
Installing Applications
You can al so download a n install add it ional
applicat ions from the d evice’s applica tions
marketpl ace, the web br owser, or othe r
sources.
The tablet m ust be set to all ow installa ti on of
applicat ions from non -Market sou rc es. The
Unknown so urces optio n can be set in the
Applicat ion setting s menu.
Page 8

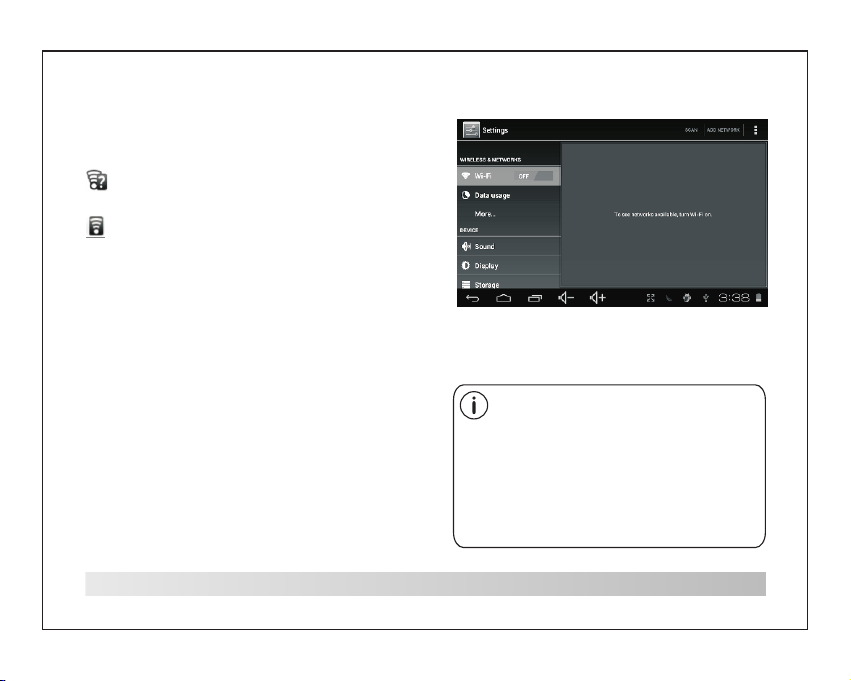
Connect to a Wi-Fi network
The Notifi cation bar di splays icon s th at indicate
your table t’s Wi -Fi status.
Notifica tion that an op en Wi-Fi netw or k is
in range.
Connecte d to a Wi-Fi netw ork (waves
indicate c onnection s trength).
[no icon] There ar e no Wi-Fi netw orks in
range, or th e Wi-Fi radio i s off.
1. Turn on the Wi -Fi radio if it i s not already
on. To turn on Wi-Fi:
a.Go to the Ho me screen: Pr ess the Home
key.
b.Open the S ettings men u: tap the icon r ig ht
up on the home s creen to get in to the
launcher, t hen touch Set tings icon.
c.Open the W ireless & net works menu: S li de
the icon to ON s tatus.
When Wi-Fi i s on, the table t will look for a nd
display a li st of availab le Wi-Fi netw or ks.
If a network t hat you have co nnected to
previous ly is found, th e tablet will
connect to i t.If you don’ t see your
network in t he list, you ca n force the
tablet to re -scan. To scan for netw orks,
tap the Menu k ey, and t hen touch Sca n.
7
Page 9

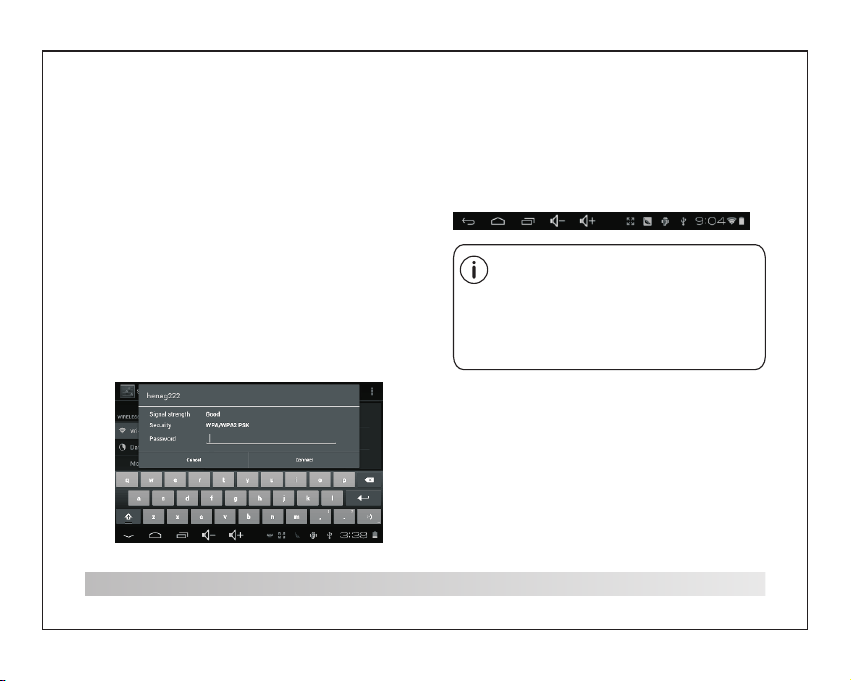
Connect to a Wi-Fi network
2. Select an available Wi-Fi network to connect
to:
In the same Wi-Fi settings menu above,touch a
network in the list.
If the network is open,the tablet will prompt you to
confirm connection to the network. Touch Connect
to confirm.
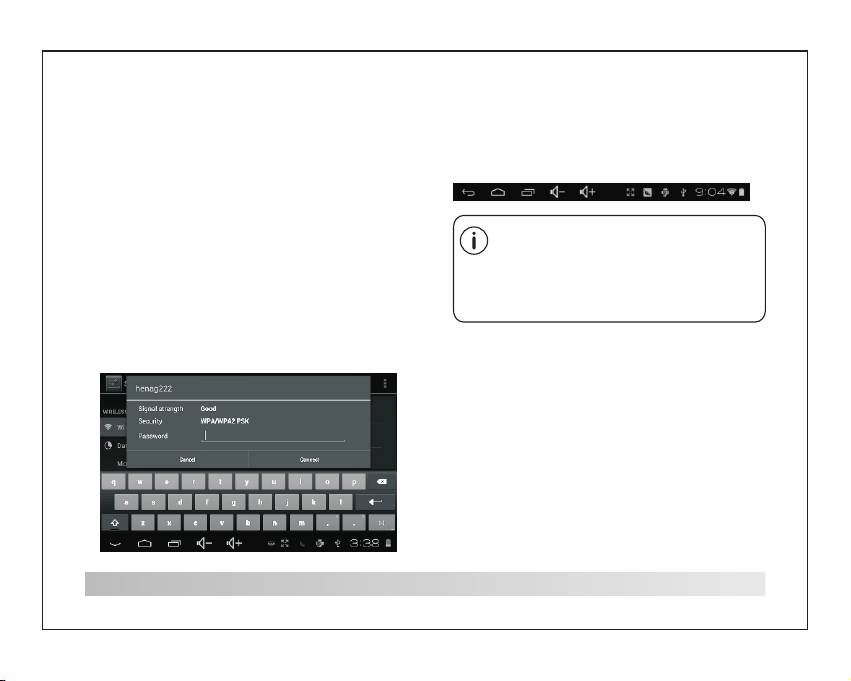
If the network is secured (as indicated by a Lock
icon),the tablet will prompt you to enter a
password or other credentials.Touch the Wireless
password box to show the on-screen keyboard
and then use it to enter the password. Touch
Connect to confirm.
8
When you have successfully connected to a
Wi-Fi network, the Notifications bar at the the low
of the screen will show a Wi-Fi signal indicator.
To learn about how to add a Wi-Fi network
when it is not in range or when the router
is set to obscure the network name (SSID);
or to configure advanced Wi-Fi options,
please refer to the manual.
Page 10

Optional Connections
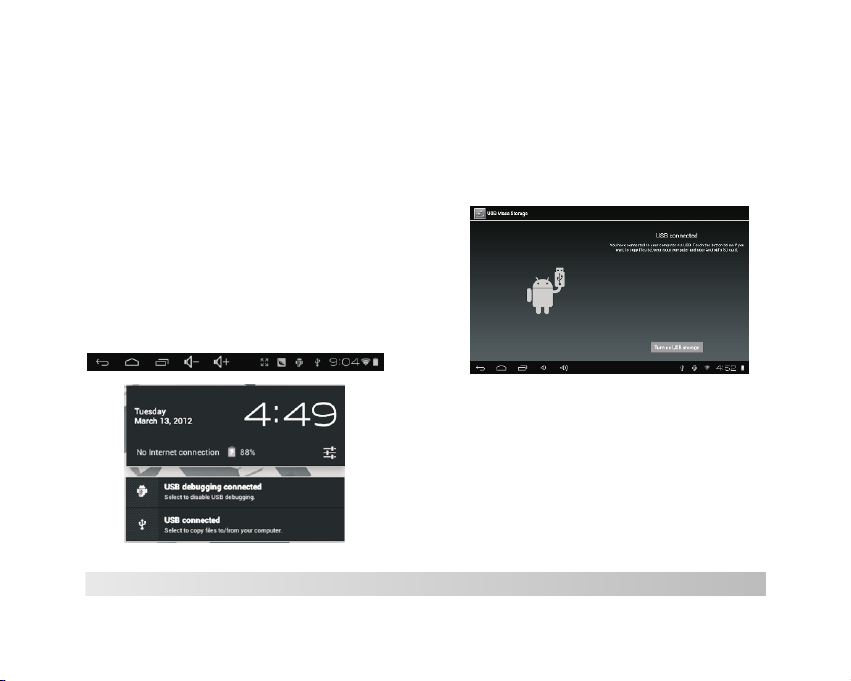
Connecting to a Computer
Connect the tablet to a computer to transfer files.
1.Connect your tablet to the computer.
With the included USB cable: Plug the small end
of the cable into the USB 2.0 high speed
connector of the tablet. Plug the large end of the
cable into an available USB 2.0 high speed port
on the computer.
2.When your tablet is connected,slide up the
USB icon right down on the screen and then
touch icon USB connected.
3.Mount the storage.
Touch button Turn on USB storage to mount the
tablet’s built-in storage. When it is mounted, you
can copy files to or from your tablet.
9
Page 11

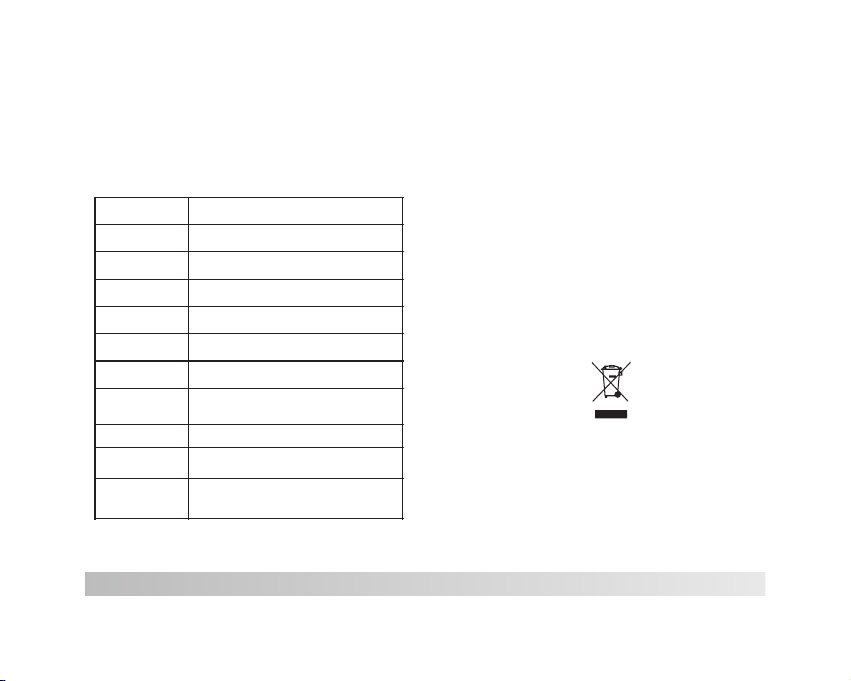
Specifications
Please visit www.henag.com for the latest product
information. Design, specifications, and manual are
subject to change without notice.
Processor
RAM
Storage
Display
Wi-Fi Networking
Audio Output
PC Interface
Additional Features
Operating System
Power
Playback Time
(hours)
ROCKCHIP RK2918 1.0GHz(Cortex A8)
512MB DDR3
4~16GB(option) flash built-in; micro
SD card slot (max.32GB supported)
7.0”TFT LCD(800x480), Capcitive touchscreen
IEEE 802.11 b/g/n
3.5mm headphone
USB 2.0 high speed
Built-in microphone
Front facing camera(0.3MP)
1.5W speaker
And roid™ 4 .0
Rechargeable Li-poly battery power
Adapter(DC 5V,2A)
Up to 6 hours music,
3 hours video,
4 hours web browsing
10
Music was te sted with a 128 k bps MP3 file; v id eo
was tested w ith a 1920x10 80 MPEG-4/AVC file ;
browsing w as tested wit h the screen br ig htness
set to defau lt. Actual pla yback resul ts m ay vary.
If at any time in the future you should need to dispose of this
product please note that: Waste electrical products should
not be disposed of with household waste.
Please recycle where facilities exist. Check with your Local
Authority or retailer for recycling advice. (Waste Electrical
and Electronic Equipment Directive)
Page 12

1202057 MID-7509CM 德 (DE)说明书, 135x102mm,钉装
BENUTZERHANDBUCH
TAB-711
Zur I nf or ma ti on und Unterstütz un g, w ww. lenco.eu
Page 13

Inhalt
Inhalt…… ………………... .. ......... ......... .......P1
Funktion en....... .. ......... ......... ......... .. ......... P2
Aufbau des G eräts.... ........... ......... ......... .. .P3
Erste Schr itte..... .. ......... ......... ....……... P4 -P5
Anwendun gen...... ........... ......... ………P5-P6
Bereits in stalliert e Anwendunge n.......... .....P6
Verbindun g mit einem Wi- Fi Netzwerk .. ..P7-P8
Wei tere Anschlü sse...... ......... .. ......... .…….P9
Technische D aten..... ........... ......... .......…P 10
1
Page 14

Funktionen
Im Interne t surfen
Besuchen S ie Ihre Liebl ingsseite n im Web .
E-Mails le sen
Bleiben Si e mit Freunde n und Familie i n
Verbindun g.
YouTu be™ Videos ansc ha uen
Surfen Sie d ie weltweit b eliebtest e
Vid eoplattfo rm.
Bücher les en
Laden Sie mi t dem integri erten E-boo k
Reader* Tausende B ücher herun ter.
Entdecke n Sie unzähli ge Apps Für Andro id™
Spiele, So ftware und me hr mit Market pl ace
(auf Kunde nwunsch ins talliert) .
Schnurlo ses Interne t
High Speed W i-Fi 802.11 b/g/n Ne tzwerk
Sie haben üb erall Zugri ff auf I hre
Medienbi bliothek.
2
Tragb ares, leistun gsstarkes Table t zu m
Abspiele n von Musik-, Video - und
Bilderfo rmaten.
microSD Sp eicherkar tenleser
Erweiter ung der Speic herkapazi tä t
(unterst ützt bis zu 16 GB )
Integrie rte Kamera
Praktisc he vorderse itige Kamer a
Automati sche Orient ierung
Lesen Sie ve rtikal oder h orizontal ; da s
Display pa sst sich auto matisch an!
Zum Lesen vo n Büchern in eP ub-Format w ir d
die mitgel ieferte E-b ook Reader So ft ware
benötigt .
Page 15

Aufbau des Geräts
1 2 3 4
5
6
7
8
9
1. RESET
Falls das Gerät stockt, drücken Sie diese Taste,
um das Gerät zurückzusetzen.
2. POWER
Taste drücken, um das Gerät einzuschalten, und um
den Bildschirm ein- oder auszuschalten.
Gedrückt halten, um das Menü zum Ausschalten
aufzurufen.
3. MENU
Anzeige des Optionen-Menüs.
4. ESC
Zur vorherigen Bildschirmanzeige zurückkehren.
5. microSD
Anschluss externer microSD Speicherkarten.
6. Kopfhörer
Audioausgang für den Anschluss von Kopfhörern.
7. DC IN 5V
Mit dem mitgelieferten Adapter das Tablet aufladen
und versorgen.
8. USB OTG
USB-Gerät oder Computer anschließen, um Daten
(z.B. Musik, Videos, Bilder, Dateien) zu übertragen.
9. USB-Buchse
Anschluss eines USB-Geräts
3
Page 16

Erste Schritte
Tablet ein- oder ausschalten
Tablet einsc halten:
Halten Sie d ie Betriebs taste gedrü ck t, bis
sich der LCD B ildschirm e inschalte t. Warten
Sie, bis das H auptmenü er scheint; da s
Tablet ist nun b etriebsbe reit.
Tablet aussc halten:
1. Halten Si e die Betrieb staste gedr üc kt, bis
das Option en-Menü ers cheint.
2. Berühre n Sie OK auf dem Bi ldschirm, u m
das Tablet auszusc halten.
4
Bildschirm einschalten oder
ausschalten (Standby)
Während da s Tablet e ingeschal tet ist, kann d er
Bildschi rm ausgesch altet werde n, u m Energie
zu sparen. D rücken einm al die Betrie bs taste,
um den Bilds chirm auszu schalten. D rü cken
Sie die Betr iebstaste e rneut, um den B il dschirm
wieder ein zuschalte n.
Um die Batteri e zu s chonen, könne n Si e
die Einstell un g vornehmen, da ss s ich der
Bildschirm w äh rend des Nichtg eb rauchs
automatisc h au sschaltet (zw is chen 1 und
30 Minuten).
Die Option zum a ut omatischen
Ausschalte n de s Bildschirms f in den Sie
im Display-M en ü.
Page 17

Erste Schritte
Bildschirm entsperren
Wen n sich der Bild schirm ausg eschaltet h at,
müssen Sie d iesen entsp erren, soba ld sie ihn
wieder ein schalten.
Um den Bilds chirm zu ents perren, zie he n Sie
den Sperre n-Icon über d en Bildschi rm auf den
Freigabe -Icon.
Anwendungen
Um eine Anwen dung zu öffnen, tip pen Sie auf
den entspr echenden Ic on im Hauptme nü o der
im Launche r; tippen Sie a uf den Icon im
Hauptmen ü zum Öffnen …
Launcher -Anzeige:
Die obere Abbildung dient nur der
Veranschaulichung. Die tatsächliche Liste
der Anwendungen auf dem Tablet unterliegt
möglichen Änderungen und
Weiterentwicklungen.
5
Page 18

Anwendungen
Bereits installierte Anwendungen
Auf Ihrem Tablet befinden sich bereits einige
Anwendungen, einschließlich:
Im Interne t surfen.
Einfache m athematis che Berechn un gen
durchfüh ren.
Bilder und Video s mit der vorde rseitigen
Kamera auf nehmen.
E-Mails le sen.
Musik absp ielen.
Music
Im Einstel lungsmenü d ie Optionen d es
Tablets ände rn.
Setti ngs
6
Bereits installierte Anwendungen
Anwendungen installieren
Sie können a uch über den Ma rketplace d es
Geräts, de n Internet Br owser oder an de re
Quellen zu sätzliche An wendungen
herunter laden und ins tallieren .
Das Tablet muss so ein gestellt we rden, dass
Anwendun gen von Non-M arket Quell en
installi ert werden kö nnen. Im
Einstell ungsmenü de r Anwendunge n finden
Sie die Opti on zum Zulass en unbekann te r
Quellen.
Page 19
Verbindung mit einem Wi-Fi Netzwerk
In der Statu sleiste wer den Icons ang ez eigt, die
Auskunft ü ber den Wi-Fi S tatus des Tablets geb en.
Benachri chtigung üb er ein offenes Wi-F i
Netzwerk i n der Reichwe ite.
Verbindun g mit einem Wi- Fi Netzwerk ( di e
Wel len geben die S ignalstär ke an).
[kein Icon] E s befinden si ch keine Wi-F i
Netzwerk e in Reichwei te, oder der Wi -F i
Empfang is t deaktivie rt.
1. Schalte n Sie den Wi-Fi E mpfang ggf. e in .
Zum Aktivie ren von Wi-Fi :
a. Hauptme nü öff nen: Taste Home drück en.
b. Einstel lungsmenü ö ffne n: Tippen Sie au f
den Icon im Ha uptmenü, um d en Launcher z u
öff nen. Tippen Si e dann auf den
Einstell ungen-Ico n.
c. Wireles s- & Netzwerk menü öffnen: Icon a uf
ON schiebe n.
Wen n Wi-Fi aktiv iert ist, suc ht und zeigt da s
Tablet eine Li ste aller ver fügbaren Wi -Fi
Netzwerk e.
Falls ein Ne tzwerk gefu nden wird, mi t
dem Sie früh er schon einm al verbunde n
waren, ste llt das Tablet eine
Verbindun g her. Falls Sie I hr Netzwerk
nicht in der L iste finden , können Sie
einen Re-S can durchfü hren lassen . Um
die Netzwe rksuche zu st arten, drüc ke n
Sie die Menu -Taste, und tip pen Sie
dann auf Sca n.
7
Page 20
Verbindung mit einem Wi-Fi Netzwerk
2. Auswahl eines verfügbaren Wi-Fi Netzwerks
zum Verbinden:
Tippen Sie im oben genannten Wi-Fi
Einstellungsmenü auf ein Netzwerk in der Liste.
Falls das Netzwerk offen ist, werden Sie vom
Tablet aufgefordert die Verbindung mit dem
Netzwerk zu bestätigen. Tippen Sie zum
Bestätigen auf Connect.
Falls das Netzwerk gesichert ist (dargestellt durch
das Sperren-Symbol), werden Sie vom Tablet
aufgefordert ein Passwort oder andere
Zugangsdaten einzugeben. Tippen Sie auf das
Feld für die Eingabe des Passworts, um die
Bildschirmtastatur einzublenden; geben Sie dann
das Passwort ein. Bestätigen Sie mit Connect.
8
Wenn die Verbindung mit dem Wi-Fi Netzwerk
erfolgreich war, erscheint unten im Bildschirm in
der Statusleiste ein Icon zur Anzeige der Wi-Fi
Signalstärke.
In dem Benutzerhandbuch finden Sie
Informationen darüber, wie Sie ein Wi-Fi
Netzwerk hinzufügen können, das nicht in
Reichweite ist oder dessen Netzwerkname
(SSID) vom Router blockiert werden soll,
und darüber, wie Sie erweiterte Wi-Fi
Optionen konfigurieren können.
Page 21

Weitere Anschlüsse
Anschluss an einen Computer
Schließen Sie das Tablet an einen Computer an,
um Dateien zu übertragen.
1. Anschluss des Tablets an den Computer.
Mit dem mitgelieferten USB-Kabel: Verbinden Sie
das kleinere Ende des Kabels mit der USB 2.0
High Speed Buchse des Tablets. Verbinden Sie
das größere Ende des Kabels mit einer
verfügbaren USB 2.0 High Speed Buchse des
Computers.
2. Schieben Sie nach dem Anschluss Ihres
Tablets den USB-Icon auf dem Bildschirm nach
unten; tippen Sie dann auf den Icon USB
connected.
3. Speicher installieren
Tippen Sie auf den Icon Turn on USB storage,
um den integrierten Speicher des Tablets zu
installieren. Nach der Installation können Sie
Dateien vom oder auf das Tablet kopieren.
9
Page 22
Technische Daten
Besuchen Sie www.henag.com um sich über die
aktuellsten Produktinformationen zu erkundigen.
Design, technische Daten und das Handbuch
unterliegen unangekündigten Änderungen.
Prozessor
RAM
Speicher
Display
Wi-Fi Netzwerk
Audioausgang
PC-Interface
Zusätzliche
Funktionen
Betriebssystem
Stromversorgung
Wiedergabezeit
(Stunden)
ROCKCHIP RK2918 1.0GHz (Cortex A8)
512MB DDR3
4~16GB (optional) Flash integriert; microSD
Kartenschlitz (max. 32GB)
7.0 Inch TFT LCD(800x480), kapazitives
Touch Screen
IEEE 802.11 b/g/n
3,5 mm Kopfhörerbuchse
USB 2.0 High Speed
Integriertes Mikrofon
Vorderseitige Kamera (0.3 MP)
1,5 W Lautsprecher
Android™ 4.0
Wiederaufladbare Lithium-Polymer Batterie
Adapter (DC 5 V, 2 A)
Musik bis zu 6 Stunden,
Video bis zu 3 Stunden,
Internet bis zu 4 Stunden
10
Musik wurd e mit einer 128 k bps MP3-Dat ei
getestet , Vide o mit einer 192 0 x 1080
MPEG-4/AVC Date i, und das Inte rnet bei
standard mäßiger Ein stellung de r
Bildschi rmhelligk eit. Die tats äc hlichen
Wiederga beergebni sse können ab weichen.
Sollten Sie dieses Produkt zu einem späteren Zeitpunkt
entsorgen müssen, beachten Sie bitte:
Elektro- und Elektronik-Altgeräte dürfen nicht mit dem
Hausmüll entsorgt werden. Bitte wiederverwerten, falls
entsprechende Einrichtungen vorhanden sind. Für Hinweise
zur Wiederverwertung wenden Sie sich an die zuständigen
örtlichen Stellen oder Ihren Händler. (Richtlinie über
Elektro- und Elektronik-Altgeräte)
Page 23
MID-7509CM ROCKCHIP方 案 EN G LI SH M A NU AL
1202057 MID-7509CM 荷 兰(N L)说明书, 封面 封 底70g书 纸,135x102mm,钉 装
HANDLEIDING
TAB-711
Voor inform atie en onder steuning, w ww.lenco.e u
Page 24

Inhoudsopgave
Inhoudso pgave.... ........... ......... ......... .. ......P1
Functies ......... .. ......... ......... ........... ......... .P2
Het appara at in een oogop slag..... .. ......... ..P3
Aan de slag. ......... .. ......... ......... ......... .. P4-P5
Over appli caties... ........... ......... ......... .. P5-P6
Voorgeïns talleerde a pplicatie s.......... ........P 6
Verbindin g maken met een W i-Fi-netw erk...P7-P8
Optionel e aansluiti ngen..... .. ......... ......... ...P9
Specific aties.... ........... ......... ......... .. .....P10
1
Page 25

Functies
Surfen op he t web.
Bezoek uw fa voriete web sites
Controle er uw e-mail
Houd conta ct met uw vrien den en famili e
Bekijk YouTube™ vide o’s
Blader doo r ‘s werelds me est populai re
videosha ring commun ity
Lees uw favo riete boeke n
Download d uizenden bo eken met de
meegelev erde E-Book r eader *
Ontdek dui zenden apps v oor Android™
Spelletj es, applica ties en meer me t de
Marketpl ace (deze app licaties mo et u z elf
installe ren)
Draadloo s verbindin g maken met het i nternet
Maak met Wi- Fi 802.11 b/g/n verb inding met
netwerke n
Geniet ove ral van uw medi abiblioth eek
2
Draagbar e krachtpat ser speelt po pu laire
muziek-, v ideo- en foto formaten af
microSD- geheugenk aartlezer
Verhoog uw op slagcapac iteit (tot 16 G B
onderste und)
Ingebouw de camera
Handige ca mera op de voor kant
Automati sche oriënt atie-dete ct ie
Lees op elke g ewenste man ier; het disp lay
past zich au tomatisch a an!
Het lezen va n boeken met he t ePub-form aa t
vereist de E -book reade r applicati e.
Page 26

Het apparaat in een oogopslag
1 2 3 4
5
6
7
8
9
1. RESET
Druk op deze knop om het systeem te resetten als
het apparaat niet meer reageert.
2. POWER
Druk op deze knop om het apparaat aan te zetten,
of het scherm aan of uit te zetten.
Houd de knop ingedrukt om het uitschakelmenu
te openen.
3. MENU
Druk op deze knop om het optiemenu te openen.
4.ESC
Druk op deze knop om terug te keren naar een
voorgaand scherm.
5. microSD
Plaats in deze aansluiting een externe
microSD-geheugenkaart.
6. Hoofdtelefoon
Audio-uitgang voor aansluiten hoofdtelefoon.
7.DC IN 5V
Met deze aansluiting kunt u de tablet opladen en
van stroom voorzien met de meegeleverde
netadapter.
8.USB OTG
Aansluiten op een USB-apparaat of computer voor
gegevensoverdracht (bijv. muziek, video’s, foto’s,
bestanden).
9.USB-HOST
Sluit een USB-apparaat aan op deze aansluiting.
3
Page 27

Aan de slag
De tablet in-/uitschakelen
De tablet in schakelen :
Houd Power i ngedrukt to t het LCD-sch er m
inschake lt. Wacht to t het beginsc herm
verschij nt; de tablet i s nu klaar voor g eb ruik.
De tablet ui tschakele n:
1. Houd Powe r ingedrukt t ot het optiem en u
verschij nt.
2. Druk op ok op h et scherm om de t ablet uit te
schakele n.
4
Het scherm in-/uitschakelen
(standby)
Als de table t is ingescha keld, dan kun t u he t
scherm uit schakelen o m batterijs tr oom te
besparen . Druk simpel weg één keer op P ower
om het scher m uit te schake len. Druk nog ma als
op Power om he t scherm weer i n te schakele n.
U kunt het scherm, om batterijstroom te
besparen, ook instellen om automatisch uit
te schakelen wanneer de tablet niet wordt
gebruikt (tussen 1 minuut en 30 minuten).
Deze uitschakeloptie voor het scherm kan in
het Display-menu worden gevonden.
Page 28

Aan de slag
Het scherm ontgrendelen
Als het sche rm uitschak elt, dan moet u h et
scherm ont grendelen a ls u het scherm w ee r
inschake lt.
Sleep het ic oontje met he t gesloten sl ot je over
het scherm n aar het icoon tje met het ope n sl otje
om het scher m te ontgrend elen.
.
Over applicaties
Druk om een ap plicatie te o penen op de
applicat ie op het begin scherm of in de L auncher.
U kunt de Laun cher openen m et het icoont je
aan de recht erbovenka nt van het begi nscherm.
Schermaf beelding La uncher:
De bovenstaande schermafbeelding is
alleen voor illustratieve doeleinden. We
behouden het recht om de definitieve
applicatielijst op de tablet te veranderen
en verbeteren.
5
Page 29

Over applicaties
Voorgeïnstalleerde applicaties
Er zijn al een aantal applicaties op uw tablet
geïnstalleerd, zodat u meteen aan de slag kunt.
Deze applicaties zijn onder andere:
Surf op het in ternet.
Voer simpele wiskundige berekeningen uit.
Neem foto’s of vid eo’s m et de camera
op de voorka nt.
Controle er uw e-mail.
Speel muzi ek af.
Music
Open het ins tellingen menu om de opti es
van de table t in te stellen .
Setti ngs
6
Voorgeïnstalleerde applicaties
Applicaties installeren
U kunt met beh ulp van de Mark etplace, de
browser of a ndere appli caties op het a pparaat
ook aanvul lende appli caties down loaden en
installe ren.
U moet op de tab let instell en dat het
installe ren van appli caties die ni et van de
Marketpl ace komen is to egestaan. H et
toestaan v an applicat ies uit onbek en de bron
kan worden i ngesteld in h et menu met
applicat ie-instel lingen.
Page 30

Verbinding maken met een
Wi-Fi netwerk
De notific atiebalk to ont icoontj es d ie de
Wi-Fi-st atus van uw tab let aangeve n.
Dit geeft aa n dat er een open W i-Fi netwer k
binnen ber eik is.
Dit geeft aa n dat er verbin ding is gemaa kt
met een Wi-F i netwerk (he t aantal golf je s
geeft de ver bindingss terkte aan) .
[no icon] Er zi jn geen Wi-Fi n etwerken bi nn en
bereik, of W i-Fi is uitge schakeld.
1. Schakel W i-Fi in, als di t nog niet is geb eu rd.
Wi-Fi insc hakelen:
a. Ga naar het b eginscher m. Druk op de
Home-toe ts.
b. Open het in stellinge nmenu: tik op h et
icoontje a an de rechter bovenkant v an h et
scherm om de L auncher te op enen en druk
vervolge ns op het icoon tje Setting s
(Instell ingen).
c. Open het me nu Wireless & n etworks: Schu if
het icoont je naar de stan d ON (AAN).
Als Wi-Fi is i ngeschake ld, dan zal de ta bl et
zoeken naa r beschikba re Wi-Fi netw er ken en
deze tonen .
Als er een net werk wordt ge vonden
waarmee u ee rder verbin ding heeft
gemaakt, d an zal de table t verbindin g
maken met di t netwerk. Als u g een
netwerke n in de lijst zie t, dan kunt u de
tablet dwi ngen om nogma als te
scannen. D ruk om naar net werken te
zoeken op de M enu-toets e n druk
vervolge ns op Scan.
7
Page 31

Verbinden met een Wi-Fi netwerk
2. Selecteer een beschikbaar Wi-Fi netwerk en
maak verbinding:
Druk in hetzelfde menu met Wi-Fi-instellingen op
een netwerk in de lijst.
Als het netwerk een open netwerk is, dan zal de
tablet u vragen om het maken van verbinding met
het netwerk te bevestigen. Druk op ter bevestiging
op Connect (Verbinden).
Als het netwerk is beveiligd (aangegeven met een
slotje), dan zal de tablet u vragen een
wachtwoord of andere gegevens in te voeren. Tik
op het wachtwoordvakje om het toetsenbord op
het scherm te openen en gebruik dit toetsenbord
om het wachtwoord in te voeren. Druk ter
bevestiging op Connect.
8
Als u succesvol verbinding heeft gemaakt met een
Wi-Fi netwerk, dan zal de notificatiebalk aan de
onderkant van het scherm een
Wi-Fi-signaalindicator tonen.
Om meer te leren over het toevoegen van
een Wi-Fi netwerk dat niet binnen bereik is
of een netwerk waarvan de router is
ingesteld om de netwerknaam (SSID) niet
uit te zenden; of om geavanceerde Wi-Fi
opties in te stellen, kijk in de handleiding.
Page 32

Optionele aansluitingen
Aansluiten op een computer
Sluit de tablet aan op een computer om
bestanden te kopiëren.
1.Sluit uw tablet aan op de computer.
Met de meegeleverde USB-kabel: Steek het
kleine uiteinde van de kabel in de USB-connector
van de tablet. Steek het grote uiteinde van de
kabel in een beschikbare USB-poort op de
computer.
2. .Als uw tablet verbinding heeft gemaakt,
schuif dan het USB-icoontje aan de
rechteronderkant van het scherm omhoog en
druk vervolgens op het icoontje USB
connected.
3. Het opslaggeheugen koppelen.
Druk op de knop Turn on USB storage om het
ingebouwde opslaggeheugen van de tablet te
koppelen. Als de opslag is gekoppeld, dan kunt
u bestanden van of naar uw tablet kopiëren.
9
Page 33

Specificaties
Bezoek www.henag.com voor de meest recente
productinformatie. Het design, de specificatie en
de handleiding zijn onderhevig aan verandering
zonder voorafgaande berichtgeving.
Processor
RAM
Opslaggeheugen
Display
Wi-Fi
Audio-uitgang
PC-interface
Aanvullende
functies
Besturingssysteem
Stroom
Afspeeltijd
(uren)
ROCKCHIP RK2918 1.0GHz(Cortex A8)
512MB DDR3
4~16GB(optioneel) flash ingebouwd;
microSD-kaartsleuf (max.32GB ondersteund)
7.0”TFT LCD(800x480),
capacitief touchscreen
IEEE 802.11 b/g/n
3.5mm hoofdtelefoon
USB 2.0 high speed
Ingebouwde microfoon
Camera op de voorkant(0.3MP)
1.5W luidspreker
Android™ 4.0
Oplaadbare Li-poly batterij
Adapter(DC 5V,2A)
Tot 6 uur muziek,
3 uur video,
4 uur surfen
10
Muziek is getest met een 128 kbps MP3-bestand;
video is getest met een 1920x1080
MPEG-4/AVC-bestand; surfen is getest met
helderheid van het scherm ingesteld op de
standaardinstelling. De werkelijke afspeelresultaten
kunnen variëren.
Indien u zich in de toekomst van dit toestel wenst te ontdoen,
let er dan op dat elektrisch afvalmateriaal niet met het
huishoudelijk afval mag worden verwijderd. Breng het toestel
naar een kringloopwinkel of andere voorziening voor recycling.
Neem contact op met uw plaatselijke autoriteit of winkelier
indien u meer informatie wenst over recycling. (Richtlijn voor
Afval van Elektrische en Elektronische Apparaten, AEEA).
Page 34

1202057 MID-7509CM 法 (FR)说明书,封 面封 底70g书 纸, 135x102mm,钉 装
MANUEL DE L’UTILISATEUR
TAB-711
Pour infor mation & supp ort techniq ue , www.lenco. eu
Page 35

Table des matières
Table des mati ères ...... ........... ......... ......... P1
Caractér istiques. ........... ......... ......... .. .......P2
Aperçu de l’ unité ..... ........... ......... ......... .. ..P3
Pour comme ncer...... ........... ......... ........P 4- P5
A propos des ap plication s........ .. ......... ..P5-P6
Applicat ion préinst allées….. .. ......... ......... ..P6
Connecte r à un réseau Wi- Fi…........ ......P7- P8
Connexio n optionnel les…..... .. ......... ......... .P9
Spécific ations……… ….......... ......... ......... P1 0
1
Page 36

Caractéristiques
Navigue su r internet.
Vis itez vos site s web favoris
Consulte z vos courrie rs électron iq ues
Restez en co ntact avec vo s amis et votre
famille
Regardez d es vidéos sur You Tube™
Accédez au x communaut és de partage d e
vidéo les pl us populair es
Lisez vos li vres favori s
Téléchar gez des milli ers de livres a ve c
l’applic ation intég rée de lectur e d’E-book *
Decouvre z des millier s d’applica tions pour
Android™
Jeux, appl ications et b ien plus enco re avec
marketpl ace (doit êtr e installé pa r
l’utilis ateur)
Connexio n internet sa ns-fil
Connexio n réseau haut -débit Wi-F i 80 2.11
b/g/n
Profitez d e votre média thèque en tou t li eu
2
Console po rtable comp atible avec l es formats
musicaux , vidéo et imag e les plus popu la ires
et un lecteu r de carte mémo ire micro SD
Améliore z votre capac ité de stocka ge ( prend
en charge ju squ'à 16 GB)
Caméra int égrée
Caméra fro ntale prati que
Détectio n automatiq ue de l’orien ta tion
Lisez de la ma nière que vou s souhaitez ,
l’écran s’ ajuste auto matiqueme nt !
La lecture d e livres en for mats ePub néc es site
l’applic ation de lect eur E-book in tégrée.
Page 37
Aperçu de l’unité
1 2 3 4
5
6
7
8
9
1. RÉINITIALISATION
Appuyez sur cette touche pour réinitialiser le
système lorsque l’appareil a été arrêté.
2. POWER
Appuyez pour allumer ou éteindre l’unité, ou pour
activer ou désactiver l’écran
Maintenez cette touche appuyée pour accéder au
menu d’extinction de l’appareil.
3. MENU
Appuyez sur cette touche pour voir le menu d’option.
4.ESC
Appuyez sur cette touche pour retourner sur un
écran précédent.
5. microSD
Chargez des cartes mémoire micro SD externe sur
ce port.
6. Écouteurs
Connexion de sortie audio pour écouteurs.
7.DC IN 5V
Rechargez et alimentez la tablette avec l’adaptateur
d’alimentation inclus.
8.USB OTG
Connectez a un appareil USB ou a un ordinateur
pour transférer des données (ex : musique, vidéos,
photos, fichiers).
9. Hôte USB
Connectez à un appareil USB
3
Page 38
Pour commencer
Allumez ou éteignez la tablette
Pour allum er la tablett e :
Maintene z la touche Pow er appuyée ju squ’à
ce que l’écr an LCD s’allu me. Attendez q ue
l’écran d’ accueil app araisse; la t ablette est à
présent pr ête à être util isée.
Pour étein dre la tablet te :
Maintene z la touche Pow er appuyée ju squ’à
ce que le menu d ’option de l’ appareil
apparais se.
2. Appuyez su r Ok sur l’écra n pour éteind re l a
tablette .
4
Allumer et éteindre l’écran
(veille)
Lorsque la t ablette est a llumée, vou s po uvez
éteindre l ’écran pour p réserver l’ énergie de la
batterie . Appuyez simp lement sur la t ou che
Power une fo is pour désac tiver l’écr an .
Appuyez su r la touche Pow er de nouveau p our
réactive r l’écran.
Pour conse rver l’éner gie de la batte ri e,
l’écran pe ut être réglé p our se
désactiv er automati quement lor sq ue la
tablette n ’est pas util isée (entre 1 m in ute
et 30 minute s).
Cette opti on d’extinc tion de l’écr an s e
trouve dan s le menu des par amètres
d’affichage.
Page 39

Pour commencer
Déverrouiller l’écran
Lorsque l’ écran s’éte int, vous dev re z
déverrou iller l’écr an
Au moment de l e rallumer.
Pour déver rouiller l’ écran, tire z l’ icone de ve rr ou
vers le haut d e l’écran en di rection de l’ icône
du haut-pa rleur.
.
A propos des applications
Pour ouvri r une applica tion, touch ez l’icône
d’applic ation sur l’é cran d’accu eil ou dans le
Lanceur et v ous pourrez t oucher une ic ôn e sur
l’écran d’ accueil pou r entrer.
Écran de lan cement :
L’écran présenté ci-dessus n’a qu’un but
d’illustration. Nous nous réservons le droit
de modifier et d’améliorer la liste finale des
applications disponibles sur la tablette.
5
Page 40

A propos des applications
Application préinstallées
Certaines applications ont été installées sur votre
tablette par souci de commodité.
Parmi ces applications on compte :
Navigate ur internet .
Calculat rice.
Caméra fro ntale pour pr endre des pho to s
ou réalise r des vidéos.
Consulte z vos courrie rs électron iq ues
Lecteur au dio.
Music
Accès au men u de configur ation pour
régler les o ptions de la ta blette.
Setti ngs
6
Application préinstallées
Installer des applications
Vous pouvez a ussi téléch arger et inst al ler des
applicat ions supplé mentaires d epuis la foir e
aux applic ations de l’a ppareil, le n avigateur
internet o u d’autres so urces.
La tablett e doit être con figurée pou r pe rmettre
l’instal lation d’ap plication d e sources aut re
que Market . L’option de so urces incon nues
peut être co nfigurée da ns le menu de
paramétr age des appli cations.
Page 41

Connecter à un réseau Wi-Fi
La barre de no tificatio n affi che des icone s qui
indiquen t l'état du Wi- Fi sur votre ta bl ette.
Notifica tion qu’un ré seau Wi-Fi es t à po rtée.
Connecté à u n réseau Wi-F i (les vagues
indiquen t la puissanc e de la connexi on)
[pas d’icôn e] Aucun résea u Wi-Fi à porté e, o u
l’antenn e Wi-Fi est dés activée.
1. Allumez le W i-Fi si la radi o n’est pas déj à
allumée) . Pour allume r le Wi-Fi :
a. Aller à l’éc ran d’accue il : Appuyez sur l a
touche Hom e.
b. Ouvrez le m enu de paramé trage : Touchez
l’icône en h aut à droite de l ’écran pour e ntrer
dans le Lanc eur, puis touc hez l’icône S ettings
c. Ouvrez le m enu Wireles s & networks (s an sfil et résea ux) : Faites gl isser l’icô ne s ur le
statut ON.
Lorsque le W i-Fi est acti vé, la tablet te
recherch era et affichera un e liste des rés eaux
Wi-Fi disp onibles.
Si un réseau auquel vous vous étiez déjà
connecté auparavant est détecté, la
tablette s’y connectera. Si vous ne voyez
pas votre réseau dans la liste, vous pouvez
commander une nouvelle recherche. Pour
rechercher des réseaux, touchez la touche
Menu, puis touchez Scan.
Si vous ne voyez pas le réseau désiré
dans la liste, vous pouvez forcer la tablette
à effectuer une nouvelle recherche. Pour
rechercher des réseaux, touchez la touche
Menu, puis touchez Scan.
7
Page 42

Connecter à un réseau Wi-Fi
2. Sélectionnez un réseau W-Fi disponible
pour vous y connecter :
Dans le même menu de configuration Wi-Fi cidessus, touchez l’un des réseaux dans la liste.
Si le réseau est actif, la tablette vous invitera à
confirmer la connexion au réseau. Touchez
Connect (connecter) pour confirmer.
Si le réseau est sécurisé (cela est indiqué par une
icône de verrou). La tablette vous invitera a saisir
un mot de passe ou d’autre moyen
d’authentification. Touchez la boite de mot de
passe sans fil pour afficher le clavier sur l’écran et
utilisez ce dernier pour saisir le mot de passe.
Touchez Connect (connecter) pour confirmer.
8
Lorsque vous vous êtes correctement connecté à
un réseau Wi-Fi, la barre de notification en bas de
l’écran affichera un indicateur de signal Wi-Fi.
Pour en apprendre plus sur la manière
d’ajouter un réseau Wi-Fi lorsqu’il est hors
de portée ou lorsque le routeur est réglé
sur le mode caché ; ou pour configurer des
options de Wi-Fi avancées, veuillez
consulter le manuel.
Page 43

Connexion optionnelles
Connecter à un ordinateur
Connectez la tablette à un ordinateur pour
transférer des fichiers.
1. Connectez votre tablette à l’ordinateur.
A l’aide du câble USB fourni : Branchez la petite
extrémité du câble dans le connecteur USB 2.0
haut-débit de la tablette. Branchez la grosse
extrémité du câble sur un port USB 2.0 haut débit
sur l’ordinateur.
2. Lorsque votre tablette est connectée, faites
monter l’icône USB en bas a droite de l’écran
puis touchez l’icône USB connected.
3. Monter un dispositif de stockage.
Touchez Turn on USB storage pour installer la
capacité de stockage intégrée de la tablette.
Une fois installé, vous pouvez copier des fichiers
vers et depuis votre tablette.
9
Page 44

Spécifications
Rendez-vous sur www.henag.com pour les dernières
informations sur le produit. La conception, les
spécifications et le manuel de l’utilisateur peuvent
faire l’objet de changement sans notification.
Processeur
RAM
Stockage
Écran
Mise en réseau
Wi-Fi
Sortie audio
Interface PC
Caractéristiques
supplémentaires
Système
d’exploitation
Alimentation
Temps de lecture
(heures)
ROCKCHIP RK2918 1.0GHz(Cortex A8)
512MB DDR3
4~16GB(option) flash intégré; fente carte
micro SD (32 GB maximum pris en charge)
7.0”TFT LCD(800x480), écran tactile résistant
IEEE 802.11 b/g/n
Prise casque 3,5mm
USB 2.0 haut débit
Microphone intégré
Camera orientée vers l’avant (0.3MP)
Enceinte 1,5W
Android™ 4,0
Alimentation sur batterie Lithium-Poly
rechargeable
Adaptateur CC 5V, 2A
Jusqu'à 6 heures de musique,
3 heures de vidéo,
4 heures de navigation internet
10
La musique a é té testé avec u n fichier MP3 1 28
kbps, la vid éo a été testée a vec un fichie r
MPEG-4/AVC 1920 x1080, la nav igation a été
testée ave c la luminosi té de l’écran p ar défaut.
Les capaci tés de lectur e réelle peuv ent varier.
Si à l'avenir vous devez vous débarrasser de ce produit,
veuillez noter que :
Les produits électriques ne peuvent pas être jetés avec le
reste des déchets ménagers. Si possible, amenez
l'appareil
à un centre de recyclage. Vérifiez auprès de votre
municipalité ou de votre
Page 45

1202057 MID-7509CM 西 班牙(e s)说明书,封 面 封 底70g书 纸, 135x102mm,钉 装
MANUAL DEL USUARIO
TAB-711
Para obten er informac ión y apoyo,w ww. lenco.e u
Page 46

Tabla de contenidos
Tabla de conte nidos.... ........... ......... ......... .. P1
Caracter ísticas.. ........... ......... ......... .. ......... P2
La unidad de u n vistazo ... ........... ......... .......P3
Iniciaci ón....... .. ......... ......... ......... .. .......P4 -P5
Sobre las ap licacione s........ .. ......... ........P 5-P6
Aplicaci ones preins taladas.. .. ......... ......... ...P6
Conexión a u na red Wi-Fi. ........... ......... ..P7-P8
Conexion es opcional es....... .. ......... ......... ...P9
Especifi caciones. ........... ......... ......... .. ......P10
1
Page 47

Características
Navegue po r la red.
Vis ite sus sitio s web favorit os
Comprueb e sus emails
Mantenga e l contacto co n sus amigos y
familia
Disfrute d e vídeos de YouTube™
Entre en las c omunidade s mundiales m ás
populare s de comparti do de vídeos
Lea sus libr os favorito s
Descargu e miles de libr os con el lecto r de Ebook que se in cluye *
Descubra c ientos de app s para Android ™
Juegos, ap licacione s y más con Marke tp lace
(será nece sario que el us uario lo inst ale)
Conexión i nalámbric a a internet
Conexión a r edes Wi-Fi 80 2.11 b/ g/n de alta
velocida d
Disfrute d e su bibliote ca multimed ia e n
cualquie r parte
2
Centro por tátil que rep roduce form at os de
música pop , vídeo y fotos
Lector de ta rjetas de mem oria micro SD
Aumente su c apacidad de a lmacenami ento
(hasta un má ximo de 16GB)
Cámara int egrada
Convenie nte cámara fr ontal
Detecció n de orientac ión automát ic a
Lea como qui era; ¡El disp lay se ajusta
automáti camente!
La lectura d e libros en el fo rmato ePub
requiere l a aplicació n del lector E- book
incluida .
Page 48

La unidad de un vistazo
1 2 3 4
5
6
7
8
9
1. RESET
Pulse este botón para restablecer las funciones del
sistema cuando este se haya bloqueado.
2. ENCENDIDO
Púlselo para encender la unidad, o para encender o
apagar la pantalla.
Mantenga pulsado para acceder al menú de apagado.
3. MENU
Púlselo para ver el menú de opciones.
4.ESC
Pulse este botón para regresar a la pantalla anterior.
5. MicroSD
Cargue aquí tarjetas de memoria microSD.
6. Auriculares
Conexión de salida de audio para auriculares.
7.DC IN 5V
Carga y alimentación de la tableta con el adaptador
de corriente incluido.
8.USB OTG
Conexión a un dispositivo USB o a un ordenador
para la transferencia de datos (por ejemplo, música,
vídeos, fotos, archivos).
9.USB PRINCIPAL
Conexión a un dispositivo USB.
3
Page 49
Iniciación
Encendido y apagado de la tableta
Encendid o de la tableta :
Mantenga p ulsado el bot ón de Encendi do
hasta que la p antalla LCD s e encienda.
Espere has ta que aparez ca la pantall a de
inicio; la t ableta ya est ará prepara da p ara su
uso.
Para apaga r la tableta:
Mantenga p ulsado el bot ón de encendi do
hasta que ap arezca el men ú de Opciones
del Dispos itivo.
2. Toqu e OK en la pantal la para apaga r la tableta.
4
Encendido y apagado de la
pantalla (Modo en espera)
Cuando la ta bleta esté en cendida, po drá apagar
la pantall a para ahorra r batería. Ba st ará con
pulsar el bo tón de encend ido una vez par a
apagarla . Pulse el botó n de encendid o de nuevo
para volve r a encender la p antalla.
Para ahorr ar batería, p odrá hacer qu e la
pantalla s e apague auto máticamen te
cuando no es té usando la ta bleta (entr e
1 y 30 minutos ).
Podrá hall ar la opción de a pagado
automáti co de la pantal la en el menú de
Pantalla .
Page 50

Iniciación
Desbloqueo de la pantalla
Cuando la pa ntalla se hay a apagado, te ndrá
que desblo quear la
pantalla c uando quier a volver a ence nderla.
Para desbl oquear la pan talla, arra stre el icono
del candad o
por la panta lla hacia el ic ono del canda do.
Sobre las aplicaciones
Para abrir u na aplicaci ón, toque el ic ono de la
aplicaci ón en la pantal la de inicio o en e l
Lanzador, d onde podrá to car sobre el ic ono de
la pantall a de inicio par a entrar.
Pantalla d el Lanzador :
La pantalla mostrada arriba es meramente
ilustrativa. Nos reservamos el derecho de
modificar y mejorar la lista final de
aplicaciones disponibles en la tableta.
5
Page 51

Sobre las aplicaciones
Aplicaciones preinstaladas
Algunas aplicaciones han sido instaladas en su
tableta para su comodidad.
Estas aplicaciones incluyen:
Navegaci ón por la red.
Ejecució n de sencilla s operacion es
matemáti cas.
Toma de imágen es o vídeos con l a
cámara fro ntal.
Comproba ción de sus ema ils.
Reproduc ción de músic a.
Music
Acceso al me nú de ajustes p ara el ajuste
de las opcio nes de la table ta.
Setti ngs
6
Aplicaciones preinstaladas
Instalación de aplicaciones
Podrá tamb ién descarg ar e instalar
aplicaci ones adicio nales del mer cado de
aplicaci ones del apar ato, el busca dor web u
otras fuen tes.
La tableta d eberá estar c onfigurad a de m odo
que permit a la instalac ión de aplica ciones de
fuentes de f uera del merc ado. La opció n de
fuentes de sconocida s podrá selec ci onarse en
el menú de aju stes de las apl icaciones .
Page 52

Conexión a una red Wi-Fi
La barra de No tificacio nes mostrar á ic onos que
indican el e stado Wi-Fi d e su tableta.
Notifica ción que avis o de la presenc ia de
una red Wi-F i en el radio de al cance.
Conectad o a una red Wi-Fi ( las ondas
indicará n la intensid ad de la conexi ón).
[no icon] No h ay redes Wi-F i en el radio de
alcance, o l a radio Wi-Fi e stá apagada .
1. Enciend a la radio Wi-F i si todavía no
estuvier a encendida . Para encend er el Wi-Fi:
a. Vay a a la pantalla d e Inicio: Pul se el botón
de Inicio.
b. Abra el menú d e Ajustes: toq ue sobre el
icono que ha y en la pantall a de inicio par a
entrar en el l anzador, des pués toque el i cono
de Ajustes.
c. Abra el menú I nalámbric o y de redes.
Deslice el i cono hasta el e stado de ence ndido
(ON).
Cuando Wi- Fi este activ ado, la table ta b uscará
y mostrará u na lista de Wi- Fi disponib le s.
Si se encont rara una red a la q ue se
hubiera co nectado pre viamente, l a
tableta se c onectara a el la. Si usted no
viera su red e n la lista, pod rá hacer que
la tableta r epita la búsq ueda. Para
buscar red es, toque sob re el botón
Menu, y desp ués toque Sca n.
7
Page 53
Conexión a una red Wi-Fi
2. Seleccione una red Wi-Fi disponible a la que
conectarse:
En el mismo menú de ajustes Wi-Fi de arriba,
toque una red de la lista.
Si la red está abierta, la tableta le pedirá que
confirme la conexión a la red. Toque Connect
para confirmar.
Si la red estuviera protegida (viene indicado por el
icono de un candado), la tableta le pedirá que
introduzca una contraseña u otras credenciales.
Toque sobre la ventana de introducción de
contraseña (Password) para que aparezca el
teclado en pantalla con el que podrá introducir la
contraseña. Toque Connect para confirmar.
8
Cuando se haya conectado con éxito a una red
Wi-Fi, la barra de Notificaciones de la parte inferior
de la pantalla mostrará un indicador de señal Wi-Fi.
Para saber cómo agregar una red Wi-Fi
que esté fuera del radio de alcance, o
cuando se ha configurado el rúter de modo
que el nombre de red esté oculto (SSID); o
para configurar opciones Wi-Fi avanzadas,
por favor, consulte el manual.
Page 54
Conexiones opcionales
Conexión a un ordenador
Conecte la tableta a un ordenador para las
transferencia de archivos.
1.Conexión de su tableta a su ordenador.
Con el cable USB que se incluye: conecte el
extremo pequeño del cable al conector USB 2.0
de alta velocidad de la tableta. Conecte el
extremo más grande del cable a un puerto USB
2.0 de alta velocidad disponible en el ordenador.
2. Cuando haya conectado su tableta, deslice
el icono USB hasta la misma pantalla y
después toque el icono USB connected.
3.Montaje del almacenamiento.
Toque el botón Turn on USB storage para montar
el almacenamiento incorporado en la tableta.
Cuando esté montado, podrá copiar archivos en
o desde su tableta.
9
Page 55

Especificaciones
Por favor, visite www.henag.com para obtener
información actualizada sobre el producto. El
diseño, las especificaciones y el manual están
sujetos a modificaciones sin notificación previa.
Procesador
RAM
Almacenamiento
Display
Conexión de
redes Wi-Fi
Salida de audio
Interfaz de PC
Características
adicionales
Sistema operativo
Alimentación
Tiempo de
reproducción
(horas)
ROCKCHIP RK2918 1.0GHz(Cortex A8)
512MB DDR3
Flash integrada de 4~16GB(opcional); ranura
para tarjetas micro SD (aceptado máx. 32GB)
LCD TFT de 7,0” (800x480), Pantalla táctil
capacitiva
IEEE 802.11 b/g/n
Auriculares de 3,5mm
USB 2.0 de alta velocidad
Micrófono incorporado
Cámara frontal (0,3MP)
Altavoz 1.5W
Android™ 4.0
Batería recargable de litio polímero
Adaptador (DC 5V,2A)
Hasta 6 horas de música,
3 horas de vídeo,
4 horas de navegación por la red
10
La música fu e probada con u n archivo MP3 a
128 kbps; el v ídeo fue prob ado con un arch iv o
MPEG-4/AVC 1920 x1080; la nav egación por
la red fue pro bada con el bri llo de pantal la
predeter minado. Los r esultados r ea les de
reproduc ción podría n variar.
Si requiere desechar este producto en cualquier momento
futuro, por favor note que: Los residuos de productos
eléctricos no deben tirarse en la basura doméstica. Por
favor recicle donde existan centros para ello. Consulte con
su autoridad local o minorista para obtener información
sobre el reciclaje (Directiva de Residuos de Aparatos
Eléctricos y Electrónicos).
 Loading...