

Page 1
USER'S MANUAL
PORTABLE DVD
MES-4031
For infor ma tion and support, WWW.lenco.com
Before co nnecting, opera ting or adjusting t his product,
please re ad t his user's manu al carefully and co mpletely.
Page 2
Important Safety Instructions
1.Warning: To reduce the risk of elec tric shock, do not re move
the cover o r ba ck. There are n o user-servicea bl e parts inside.
Refer ser vi cing to qualified p ersonnel.
2.Warning: To prevent fire or elect ri c shock hazard, do no t
expose th e un it to rain or moistur e.
3.Do not ex po se the Adaptor and por table DVD to water
(dripping o r splashing) and no o bj ects filled wit h li quids, such as
vases, sh ou ld be placed on the uni t.
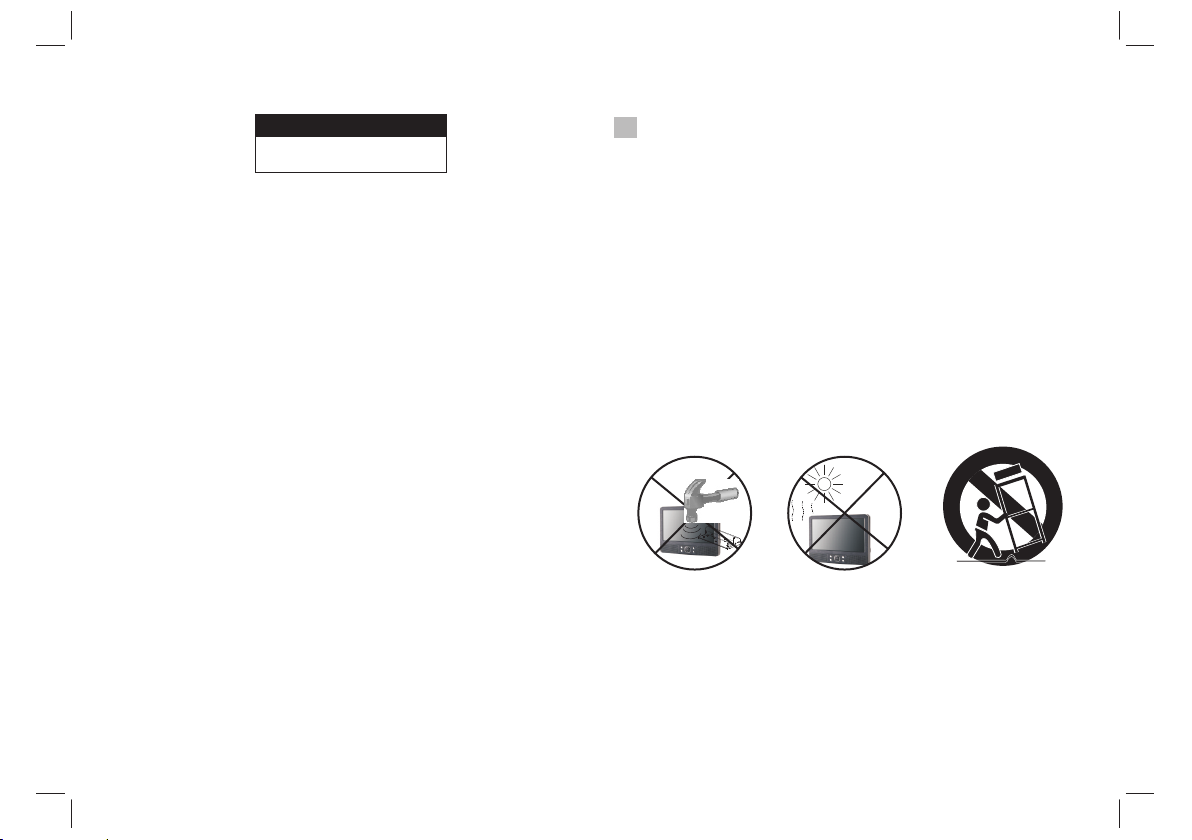
4.Keep th e po rtable DVD away fro m direct sunlight a nd h eat
source su ch a s radiators or stov es.
5.Do not bl oc k the ventilation o penings. Slots an d openings on
the unit ar e pr ovided for ventil ation. The op enings should nev er
be blocked by p lacing your porta ble DVD on a cushion, s of a or
other sim il ar surface.
6.Do not pl ac e the portable DVD on u nstable cart, sta nd, tripod,
bracket or ta ble. The unit m ay fall, resultin g in possible damage
or injury.
7.Never p la ce heavy or sharp obj ects on the LCD panel o r fr ame.
8.Only us e th e AC adapter include d with portable DVD . Us ing
any other a da pter will void your w arranty.
9.The plu g of AC a daptor is used as the d isconnect devic e, t he
disconnec t device shall rema in readily operab le .
10.Unpl ug t he power from the out let when the unit is no t in use.
11.WARNNI NG : Excessive sound p ressure from earp ho nes or
headphone s can cause hearing l os s.
12.WARNNING: O nl y use attachments /accessories sp ecified
provided by t he manufacturer, t he portable DVD is su pp lied by
AC adapte r, th e AC adapter is used as di sconnect device , th e
disconnec t device shall rema in readily operable .
This mark in g indicates that th is product
should not be d isposed with othe r
household w astes throughou t the EU. To
prevent pos sible harm to the env ironment
or human he al th from uncontrol led waste
disposal, r ecycle it respons ib ly to promote
the susta in able reuse of mater ial
resources . To return your us ed device,
please use th e return and collec tion
systems o r co ntact the retai le r where the
product was p urchased. They can take this
product for e nvironmental sa fe recycling.
1
Page 3
Safety Precautions
WARNING
RISK OF ELECTRIC SHOCK
DO NOT OPEN
1.Warning: This digital video d isc player employ s a la ser system.
Use of cont ro ls,adjustment s, or the performan ce of procedures
other tha n th ose specified her ein may result in haz ar dous
radiati on E xposure.
2.Warning: To prevent direct expo su re to laser beam, do n ot open
the enclo su re.Visibl e laser radiation w he n open.
3.Warning: Nev er s tare directly int o the laser beam.
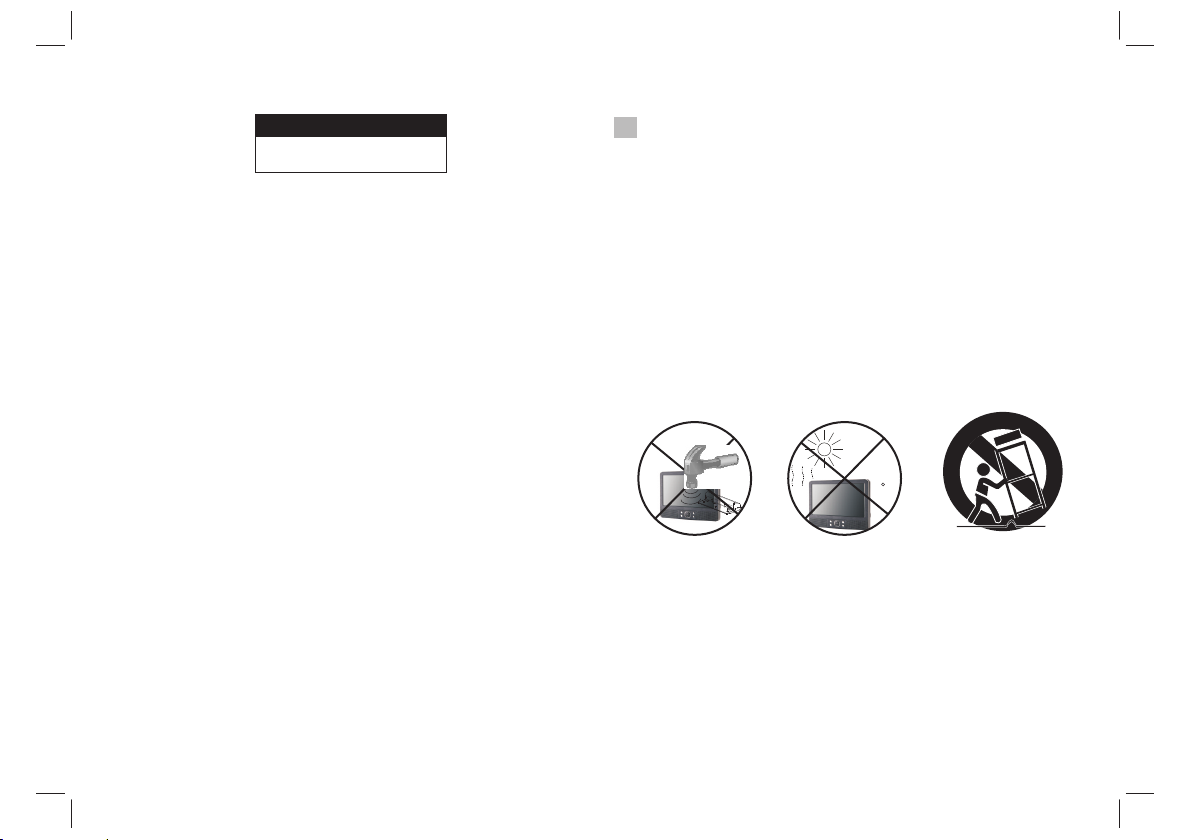
4.Cauti on : Do not install th is p roduct in a confine d space such
as a book cas e or s imilar unit.
5.Warning: whe n th e unit using by child , parents must make s ure
to let the ch il d understand all co ntents in Instruc tion book.
6.Warning: mor e th an 250mm USB extens ion cord is prohibi te d
to use for US B po rt
Notes on Copyrights:
N
N
7. It is forb id den by law to copy, broadcast, show, broadcast via
cable, pl ay i n public, or rent cop yrighted materi al w ithout
permissio n.
8. Th is p roduct features t he copy protectio n function develo pe d by
Macrovi si on.Copy protect ion signals are rec or ded on some discs.
When reco rd ing and playing the p ictures of these di sc s picture
noise will ap pear.This produc t in corporates co py right protectio n
technol og y that is protected b y method claims of ce rtain U.S.
Patents a nd o ther intellec tu al property right s owned by Macrovis io n
Corporati on and other rights o wners.Use of this c op yright protec ti on
technol og y must be authorize d by Macrovision Co rp oration, and is
intende d fo r home and other limi ted viewing uses on ly unless
otherwi se a uthorized by macr ovision Corporati on. Reverse
engineeri ng or disassembly i s pr ohibited.
stron g
impac t
over
heat
40 C
2
Page 4

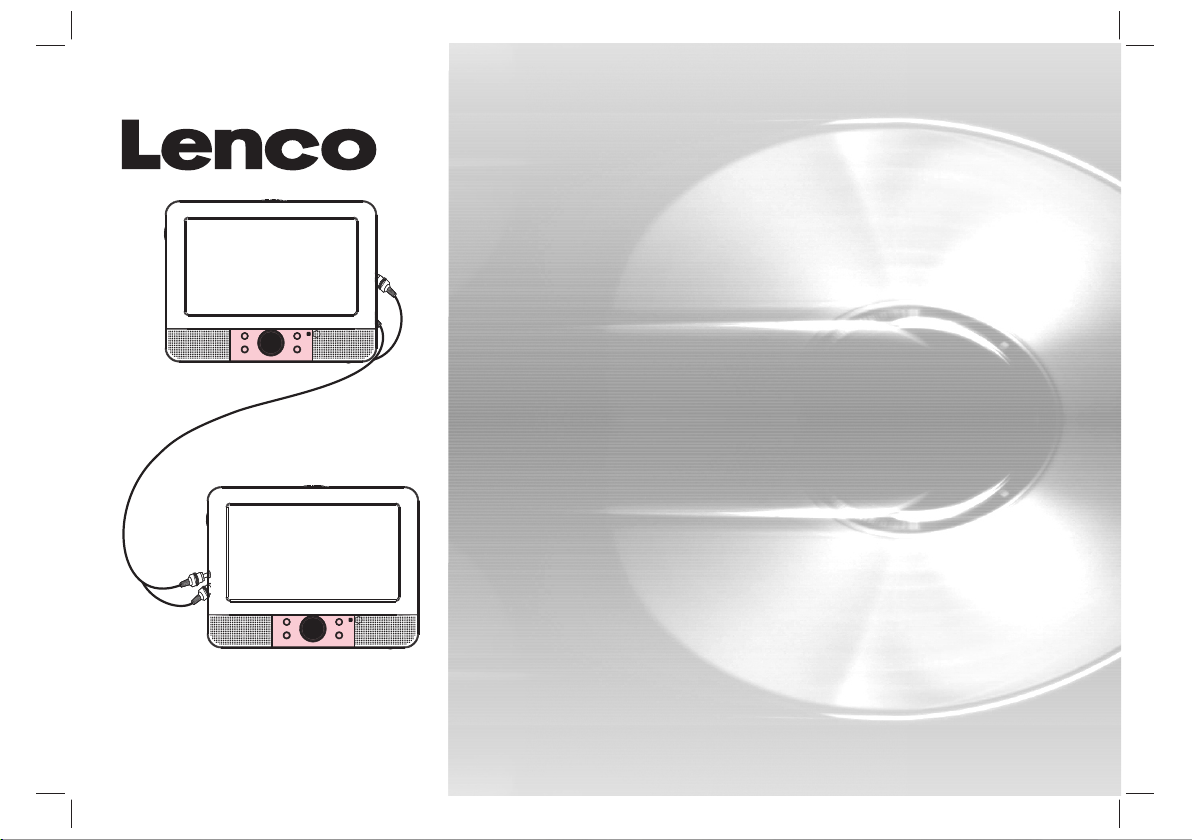
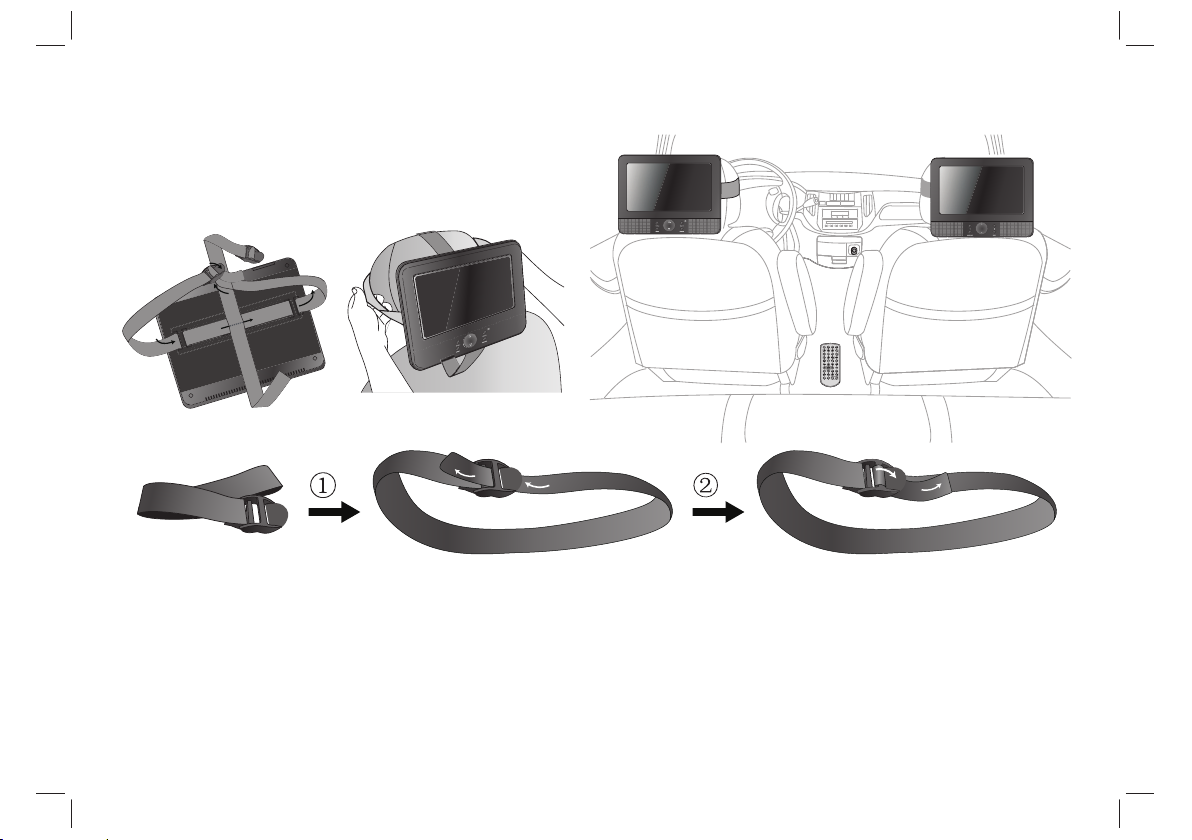
Mounting in the Vehicle
Use the sup pl ied car mounting st raps to install the m ain unit
and monitor o n the back of the vehic le's headrests. Tight ly
wrap the mo un ting strap around t he headrest.
Dear Custom er:
Thank you f or p urchasing this Po rtable DVD player .
When open in g the box for the first t ime, please check w he ther all
the acces so ries are present. B efore connectin g pa rts and power,
please care fully read the user m an ual and always keep
thesein st ructions close by y our Portable DVD pl ay er.
Box conte nt :
1 x main unit
1 x slave uni t
1 x Remote co nt rol including bat tery
1x Car Adapto r
Straps
Note: if so me p arts are missing pl ease contact your d ea ler as soon
as possible .
3
Page 5
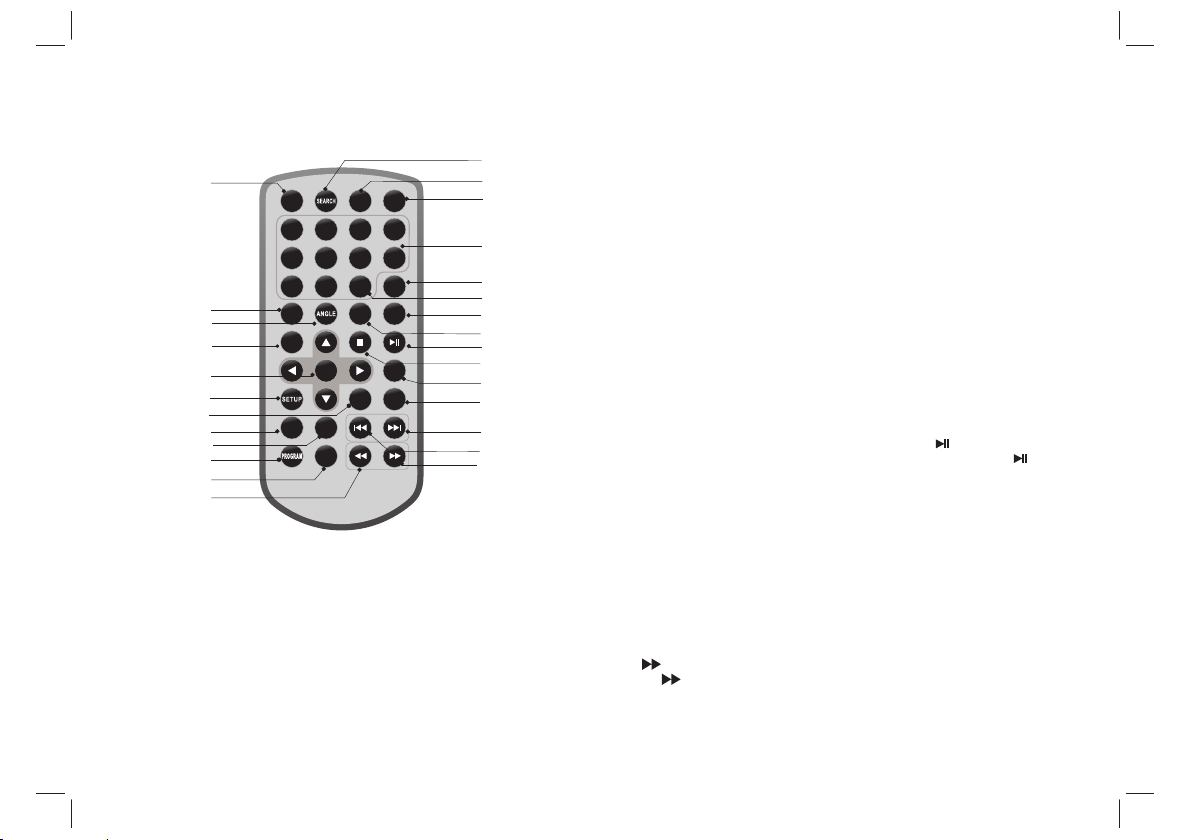
Identification of Controls
Main Unit
MASTE R TFT SCREEN
1
2
3
4
5
6
7
8
SLAVER TFT SCREEN
15
9
14
12 13
10
11
1.SD/ MS/MMC
2. POWE R ON/OFF
3. HEAD PHONE OUT JACKS
4. VIDE O/AUDIO O UT
5. DIGI TAL AUDIO OUT (COAXIA L)
6.USB
7. DC OUT
8. DC IN 9- 12V
9. ENTE R
10. UP/ DOWN/LE FT/RIGH T
11. SO URCE
12. UP/ DOWN
13. MOD E
Slave r TFT menu setti ng.
14. LEF T/RIGHT
15.BA CK LIGHT
S
16
17
18
19
20
laver TFT ba cklight s witch.
16. POW ER ON/OFF
17. AV IN
18. HEA DPHONE OU T JACKS
19. DC IN
20. Volu me Rotary
4
Page 6
Identification of Controls
Remote control unit
16
18
19
20
21
22
23
24
25
26
27
15
1. SOURCE
DVD/CAR D/ USB.
2. MUTE
Disable Audi o output.
3.0-9 NUM BE R BUTTON
Selects n um bered items in a me nu .
4.DISPL AY
To display the pl aytime and status i nformation.
STEP
1 2
5
9 0
SUBT ITLE
TITL E
REPE AT
MUTE
3
6 7 8
10+
AUDI O
ENTE R
SLOW
ZOOM
SOUR CE
DISP LAY
MENU
/PBC
MODE
VOL +VOL -
4
5.10+ BUT TON
17
2
1
3
4
5
MP3/CD/ VCD:Press AUDIO re peatedly during p la yback to
6
7
8
9
10
11
12
13
14
In order to s el ect a track 10 or great er, first press 10+, F or example;
select tr ac k 12, first press 10+ , and then press numb er 2 button.
6. MENU/P BC
Return to D VD r oot menu(DVD).
PBC on/off switch (VCD ) .
7.AUDIO
DVD:Pre ss AU DIO repeatedly du ring playback to he ar a d ifferen t
audio langu age or audio track, i f avilable.
hear a different audio cha nnel ( Left,Right ,Mix,Stereo).
8.PLAY/PAU SE
Press PLAY/PAUSE o nc e to pause playback , pressing PLAY/
PAUS E se cond time will re su me the playback.
9.STOP
When this b ut tom is pressed once , the unit records th e stopped
point,f ro m where playback wi ll resume if PLAY( )is pressed afte r
wards. Bu t if S TOP but ton is pressd again i nstead of PLAY( )
button, t he re will be no resume fu nction.
10.MODE
Set LCD par am eter(adjust big htness, contras t,and saturatio n) .
11.VOL+
12.Forw ard Skip
Go to next ch ap ter/ track.
13.Reve rs e Skip
Go to previ ou s chapter/ track to t he beginning.
14. BUTTON
Press BUT TON allow ski pp ing ahead at 5-leve l speed(X2->X4- >
X8->X16 -> X32->PLAY) , press PLAY button return to n or mal playback.
5
Page 7
Identification of Controls
Remote control unit
15. BUTTON
Press BUT TON allow ski pp ing back at 5-level s peed(X2->X4->
X8->X16 -> X32 PLAY), p ress PLAY button return to no rmal playback.->
16.STEP
Step the mo ti on in DVD mode.
17.SEAR CH
Goto time p oi nt , title or chapt er y ou want in DVD Mode.
18.SUBT ITLE
Press SUB TI TLE repeatedl y du ring playback to he ar a differen t
subtitl e la nguages.
19.ANGL E
DVD:Pre ss AN GLE will change the v iew angle, on DVDs th at
support thi s feature.
20.TITL E
Return to D VD t itle menu
21.ENTE R
Confirm s me nu selection..
22.SETU P
Accesses or r emoves setup menu .
23.VOL-
Adjust vo lu me
24.REPE AT
Press REPEAT during p layback to select a d es ired repeat mode.
DVD: you ca n pl ay select repea t ch apter/title/o ff.
VCD: you ca n se lect repeat singl e/all/off .
CD/MP3: y ou c an select repeat si ngle/folder/o ff.
DVD/VCD : Use ZOOM to enlarge o r shrink the video im ag e.
25.SLOW
Press Slo w bu tton repeatedly t o enter slow playba ck, and cycle
between d ifferent spee ds. The speed s are 1/2,1/4,1/8 ,1/16,and
normal.
26.PROG RA M
DVD/VCD :The program func tion enables you to s to re your
favouri te t racks from the disc . Press PROGRAM but ton ,then
PROGRAM M EN U will appear on scre en, now you can use the
number ke y to d irect input the tit les,chapters or t racks number and
select PL AY option. TO resum e normal playback , pr ess PROGRAM
and select cl ear program optio n on the program menu ,p ress
PROGRAM a ga in to exit program me nu.
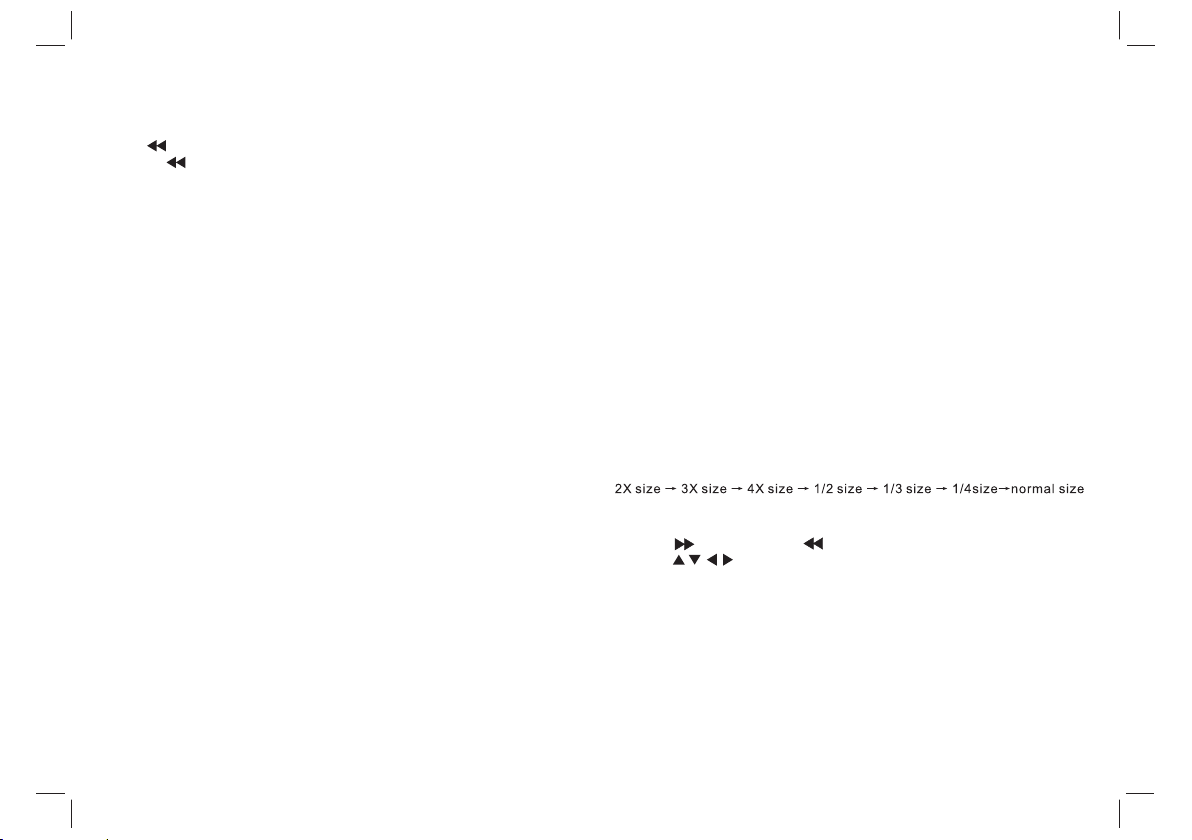
27.ZOOM
1.Press Z OO M during playback o r still playback to a ctivate the
Zoom func ti on. The squ ar e frame appears bri efly in the right bot to m
of the pict ur e.
2. Each pre ss o f the ZOOM button c ha nges the TV s cr een in the
followi ng s equence:
JPEG: Use Z OOM to enlarge or shr in k the picture.
1.Press ' ZO OM' .
2,Used " " to e nl arge,or " " to shor te n the picture.
Use the button to m ove through the zoo me d picture.
6
Page 8
Setup Menu Setting
General Setup Page
Press SETUP button to get the setup menu. Use di recti on buttons
to select the pref erred item. After finishing settings, p ress
SETUP again to norm al display.
The following menu i tems can be changed:
GENERAL: selects the GENERAL PAGE menu.
AUDIO: selects the AUDIO PAG E menu.
VIDEO: selects the VIDEO PAGE menu.
PREFERENCE : selects the PREF ERENCE PAGE menu.
General Setu p Page
Angle Mark
Displays curren t angle setting information on the ri ght hand corner
of the TFT screen if available on th e disc.
OSD Language
You can select your own preferred l anguage seetings.
Closed Captions
Closed captions ar e data that are hidden in the video sign al of some
discs.B efore you select this function,p lease ensure that the disc
contains closed cap tions information and you r TV set also has thi s
function.
Screen Saver
This functio n is used to turn the screen saver O n or Off.
- - GENERALSETUP PAGE - -
TV DISPLAY WIDE
TFT DISPLAY 16:9
ANGLE MARK ON
OSD LANGUAGE ENG
CLOSED CAPTIONS ON
SCREEN SAVER ON
AUTO STANDBY 3H
GOTO GENERAL SETUP PAGE
TV DISPLAY: selects the aspect r atio of the playback pic ture.
4:3 PANSCAN: if you have a normal TV and want b oth sides of the
picture to be t rimmed or formatted to fit y our TV screen.
4:3 LETTERBOX: if you have a normal TV. In this c ase, a wide
picture with bl ack bands on the upper and lower porti ons of the TV
screen willbe displayed.
16:9: wide screen displ ay.
TFT DISPLAY :Select s the TFT display to 16: 9 or 4:3.
OFF
3 HOUR
4HOUR
ON
OFF
ON
OFF
ENGLISH
FRENCH
GERMAN
SPANISH
DUTCH
POLISH
HUNGARIAN
ON
OFF
TFT 16:9
TFT 4:3
4:3 PANSCAN
4:3 LETTERBOX
16:9
AUTO STANDBY
This function i s used to standby.
Audio Setup Page
Audio Setup Page
-- --
- - - -AUDIO SETUP PAGE
DOWNMINX
DIGITAL OUTPUT
DOLBY DIGITAL
GO TO AUDIO SETUP PAGE
7
STR
RAW
DUAL MONO
DYNAMIC
LT/RT
STR
STR
L-MONO
R-MONO
FULL
-
-
-
-
-
-
-
-
-
-
MIX-MONO
-
-
-
-
-
-
-
-
OFF
-
SPDIF/OFF
SPDIF/RAW
SPDIF/PCM
STEREO
Page 9
Setup Menu Setting
Audio Setup Page
Downmix
This options allo ws you to set the stereo anal og output of your
DVD Player.
LT/RT :Selec t this option if your DVD Player is c onnected to a
Dolby Pro Logic decoder.
Stereo :Selec t this option when outp ut d elivers sound from onl y
the two front s peakers.
Digital Output
The function i s used to select the SPDIF Output:SPDIF Off,SPDIF
/RAW,SPDIF/PCM.
SPDIF Off : Turns off the SPDI F output.
SPDIF/RAW : If you have connected your D IGITAL AUDIO OUT
to a multi-channel decoder/receiver.
SPDIF/PCM: Only if your receiver is not capabl e of decoding
multi-channel audio .
Dolby digital
The options included i n Dolby Digital Set up are: and
'Dynamic '.
Dual Mono
Stereo :Lef t mono sound will send output signals to Left speak er
and Right mono sound will send output signals t o Right speaker.
L-Mono :Left mono sound will s end output signals to Left
and Right speaker.
R-Mono :Right mono sound will send output signals
and Right speaker.
Mix-Mono:Left and Right mixed mono sound will send o ut put
signals to Left an d Right speakers.
Dynamic
Dynamic range compr ession.
'Dual Mono '
speak er
to Le ft speaker
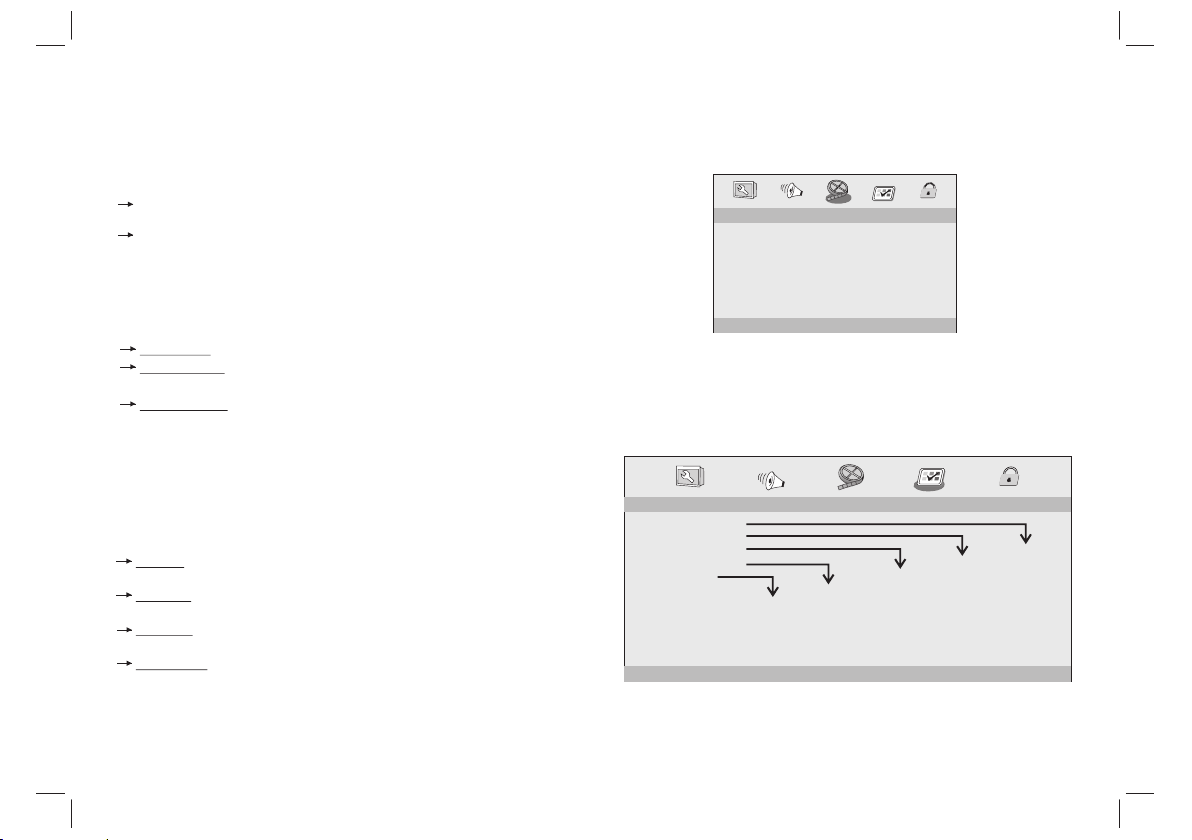
Video Setup Page
Video Setup Page
- - VIDEO SETUP PAGE - -
BRIGHTNESS 00
CONTRAST 00
HUE 00
SATURATION 00
GOTO VIDEO SETUP PAGE
Brightness, Contrast,Hue,Sat uration:setting the vid eo quality.
Preference Page
Preference Page
- - PREFERENCE SETUP PAGE - -
TV TYPE PAL
AUDIO ENG
SUBTITLE ENG
DISC MENU ENG
DEFAULT
GOTO PREFERENCE PAGE
RESET
ENGLISH
FRENCH
GERMAN
SPANISH
DUTCH
POLISH
HUNGARIAN
OTHERS
ENGLISH
FRENCH
GERMAN
SPANISH
DUTCH
POLISH
HUNGARIAN
OFF
OTHERS
ENGLISH
FRENCH
GERMAN
SPANISH
DUTCH
POLISH
HUNGARIAN
OTHERS
TV Typ e
Selecting the colour s ys tem that corresponds to your TV when AV
outputs.This DVD Player is compatibl e with both NTSC and PAL.
PAL
AUTO
NTSC
8
Page 10
Setup Menu Setting
Parameters and specifications
Preference Page
PAL - S elect this if the
video sig nal of a NTSC disc an d ou tput in PAL format.
NTSC -Sele ct this if the connecte d TV is NTSC sy st em.It will
the video s ignal of a PAL disc and o utput in NTSC for ma t.
Auto :Chang t he video signal o ut put automatic a ccording to the
playing d isk format.
Audio :Sel ects a language for audio ( if available).
Subtitl e: Selects a language for su btitle (if avai la ble).
Disc Menu : Selects a language for disc m en u (if available ).
connected TV is PAL system.I t
wil l change the
Slaver TFT Menu Setting
Picture Page
Brightnes s
Adjust sc reen Bright Setti ng .
Contras t
Adjust sc reen Contrast Setti ng.
Color
Adjust sc reen Color Setting.
LANG
Adjust Me nu OSD Language
ZOOM
Adjust sc reen ZOOM 16:9 or 4:3
PICTUR E
BRIGHT
CONTRAST
COLOR
LA NG ENGLISH
Z00M 16:9
chang e
50
50
50
Electronical parameters
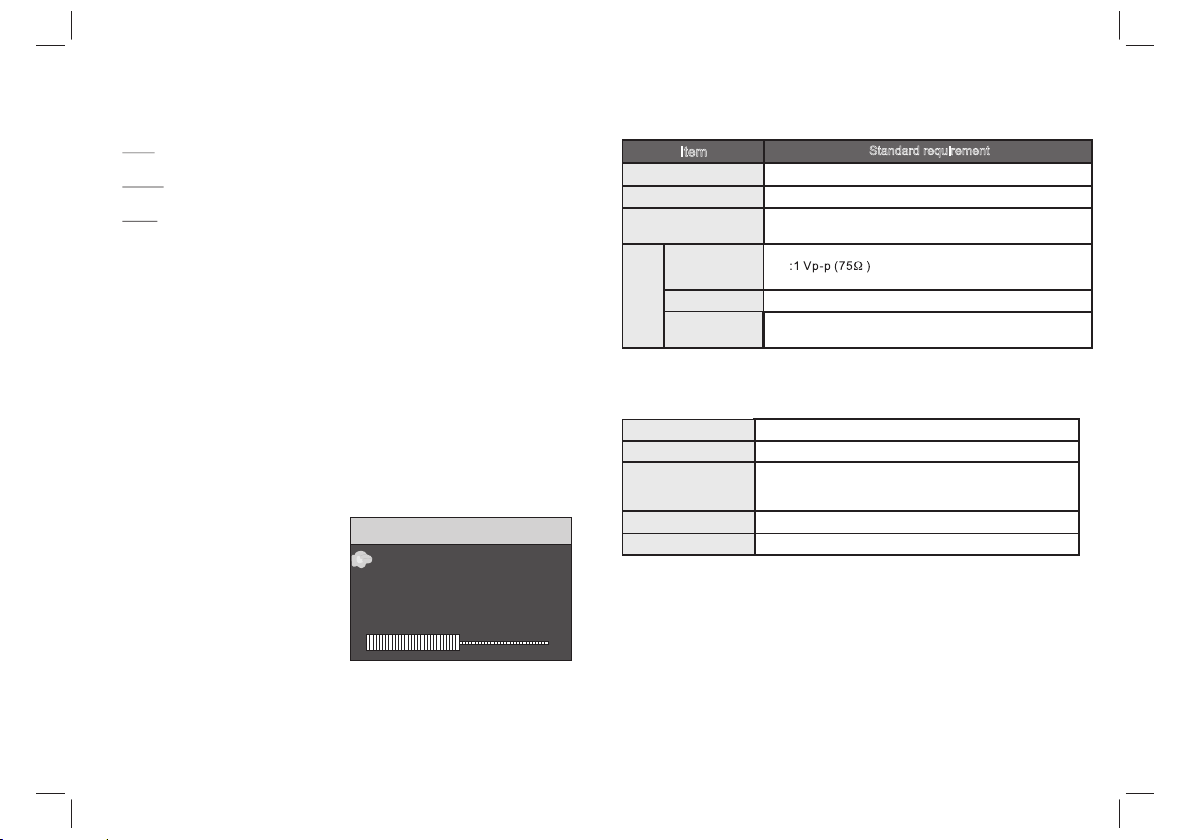
Item
Pow er req uiremen ts
Pow er con sump tion
Ope rating h umid ity
VID EO OUT
AUD IO OUT
Output
Audio
: AC 100-2 40 V , 50/6 0 Hz
: <15 W
: 5 % to 90 %
:1. 0 Vrm s (1 KHz, 0 d B)
:Speaker:1WX2, output, Coaxial outputHeadphones
Standard requirement
System
Las er
Sig nal sy stem
Fre quen cy
resp onse
Sig nal- to-noi se rat io
Dyn amic r ange
Note: Desig n and specificati ons are subject to change pri or notice.
:Se miconduct or laser, wa velengt h 650 nm
: NTS C / PAL
: 20H z to 20 kHz (1dB)
:Mo re than 8 0 dB (ANA LOG OUT conn ector s only)
:Mo re than 8 0 dB (DVD /CD)
9
Page 11
Service a nd support
For informa tion: www.lenco.com
For support: http://lencosupport.zendesk. com
Lenco helpdesk:
Germany 0900-1520530 (Local charges)
The Netherlands 0900-23553626 (Local charges + 1ct p/min)
Belgium 02-6200115 (Local charges)
France 03-81484280 (Local charges)
The helpdesk is accessibl e from Monday till Friday from 9 AM till 6
PM.
When contacting Lenco, yo u will always be asked for the model and
serial number of your product . The serial number ca n be found on
the back of the device. P lease write down the serial num ber below:
Model:MES-4031
Serial number:_________________________________
Lenco offers service and warranty in accordance to European law,
which means that in c ase of repairs (both during and after t he
warranty period) you shoul d contact your local dealer.
Important note: It
repairs to Lenco directl y.
Important note: If this unit is opened or accessed by a non-official
service center in any wa y, the warranty expires.
This device is not s uitable for professional use. In case o f
professional use, all warrant y obligations of the manufacturer will
be voided.
is not possible to send product s that need
This symbol i ndicates that the relevant elec trical product or
battery should not be di sposed of as general household
waste in Europe. To ensure the correct waste t reatment of
the product and battery, please dispose them in acco rdance
to any applicab le local laws of requirement for di sposal of
electri cal equipment or batteries. I
conserve natural resources and improv e stan dards of
environmenta l protection in treatme nt and disposal of
electrical waste ( Waste Electr ical and Electronic Equipmen t
Directive).
Products with the C E marking compl y wi th the EMC Directive
(2004/108/ EC) and the Low Voltage Directive (20 06 /95/EC)
issued by the Commissio n of the European Community.
The declaration of conformity may be consulted at
http://www.lenco.eu/supportfiles/CE/vnj3e59859tjhgjharasrppppp.pdf
®All rights reserved
n so doing, you will help to
10
Page 12

BENUTZERHANDBUCH
TRAGBARER DVD-PLAYER
MES-4031
Weitere Informationen und Hilfe bei www.lenco.com
Lesen Si e bitte diese Be dienungsanlei tung vor dem Anschlus s,
Betrieb oder Einstellu ng dieses Produ kts sorgfältig und vollstän di g durch.
Page 13
Wichtige Sicherheitshinweise
1. Warnung: Zur Verri ngerung eventue ll er Stromschlagg efahr
öff ne n Sie niemals das G eh äuse (bzw. die Gerät erückseite). Es
befinde n si ch im Inneren des Ger äts keine Teile d ie v om
Benutze r ge wartet werden kön nen. Wenden S ie s ich bei Bedarf
an entspr ec hend ausgebilde te s War tu ngspersonal.
2. Warnung: Um Feu er u nd Stromschläge n vorzubeugen,
vermeid en S ie es das Gerät Regen o der Feuchtigkei t
auszusetz en.
3. Setzen S ie d en Adapter und den tra gbaren DVD-Play er
niemals Wassertr opfen oder -sprit zern aus. Gegenst än de die
mit Flüss ig keiten gefüllt si nd, wie z. B. Vase n sollten niemals a uf
das Gerät g es tellt werden.
4. Stelle n Si e den tragbaren DVD -Player in ausrei ch ender
Entfern un g zu Hitzequellen w ie z. B. Heizkörper n bz w. Öfen auf
und halte n Si e ihn von direkter So nnenstrahlung f er n.
5. Blocki er en Sie keine der Venti lationsöffn ungen. Die
Öff nu ngen des Geräts d ie nen der Belüftung . Die
Lüftung sö ffnungen dü rfen niemals, ind em Sie den DVD-Play er
auf ein Kis se n, Sofa oder ähnlic he Oberflächen st el len, blockiert
werden.
6. Benutz en S ie zur Aufstellung d es tragbaren DVD- Pl ayers
keine insta bilen Wagen, Gestelle, S tative, Haltevo rr ichtungen
oder Tische. D as Gerät kann herun terfallen und dam it z u
Verletzu ng en oder Beschädig un gen am Gerät führ en .
7. Legen Si e ni emals schwere ode r scharfe Gegenst ände auf
den LCD-Bil dschirm oder den Bi ld schirmrahmen.
8. Verwenden S ie nur das Netzteil m it tragbaren DVD en th alten.
Die Verwendu ng eines anderen Ne tz teils erlischt di e Garantie.
9. Der Netz st ecker des Adapters d ient dazu das Gerät v om
Strom zu tr en nen und muss deshal b immer leicht zugä ng lich
bleiben.
10. Ziehe n Si e den Netzstecker a us der Steckdose he ra us,
wenn das Ge rä t nicht in Betrieb is t.
11. WARNUNG: Üb ermäßiger Schal ldruck von Kopfhö re rn kann
zu Hörschäd en führen.
12. Verwende n Sie nur Zusatzger äte bzw. Zubehörte il e, die vom
Herstel le r des Geräts gelief ert oder empfohle n werden. Der tragb ar e
DVD-Playe r wird über einen Net za dapter mit Stro m ve rsorgt. Der
Netzada pt er wird zudem als Tren nvorrichtung ve rw endet und muss
deshalb imm er frei zugänglic h bleiben.
Dieses Ze ic hen bedeutet, das s das
vorliegen de Produkt innerh al b der EU nicht
zusamme n mi t dem Hausmüll ents orgt
werden darf . Gehen Sie verantw ortlich mit
Altgerä te n um und geben Sie die
verwendet en Materialien in d en
Wer ts toffkre is lauf zurück. Dies h ilft der
Umwelt, s ow ie der Gesundheit a ller. Geben
Sie Altgerät e bei Sammelstell en ab oder
wenden Si e si ch an den Händler bei d em d as
Gerät gek au ft wurde. Dort wi rd d as Gerät
dann auf um we ltverträglich e Weise entso rg t.
Hören S ie n icht über län gere Zeit bei h oher Lautst ärke Musik,
um mögl ic he Hörschäd en zu vermeid en.
1
Page 14
Vorsichtsmaßnahmen
WARNHINWEISE
STROMSCHLAGGEFAHR!
NICHT ÖFFNEN!
1. Warnung: Dieser d igitale Disc-Pl ay er verwendet ein
Lasersyst em.
Die Verwendu ng von Bedienungs we isen, die nicht in di eser
Anleitu ng b eschrieben werd en , kann zudem zur Ausse tzung von
gefährl ic her Strahlung füh ren.
2. Achtung : Um d irekte Laserstr ahlen zu vermeide n, öffnen Sie
das Gehäu se n iemals. Es tritt be im Öffnen des G ehäuses
sichtba re L aserstrahlung a us .
3. Warnung: Niemal s direkt in den Laser st rahl blicken.
4. Achtung : St ellen Sie dieses Pr odukt nicht an been gten Orten,
wie z. B. ein em B ücherregal, auf .
5. Achtung : Wenn das Gerät vo n Kindern benutzt w ir d, sind
dessen El te rn dazu verpflich tet dafür zu sorgen , dass vom Kind
der gesam te I nhalt der Bedie nu ngsanleitung ve rs tanden wird.
6. Warnung: Die Benu tzung eines USB-Ve rl ängerungskabe ls von
einer Län ge v on mehr als 250 mm ist un tersagt.
Hinweise zum Uhrheberrechtsschutz
N
N
7. Es ist ges et zlich verbote n ur heberrechtlic h ge schütztes Mat er ial
ohne Erlaub nis zu kopieren, au sz ustrahlen, öffentlich wied erzugeben
oder zu ver mi eten.
8. Dieses P ro dukt verwendet ei ne der Firma Macrov is ion entwickelte
Kopiersch utzfunktion. Auf b estimmten Discs w er den
Kopiersch utzsignale aufg ez eichnet. Bei de r Wi edergabe von Kopi en
dieser Disc s erscheint ein Bil dr auschen. Dieses P rodukt verwende t
Kopiersch utzmechnismen d er Firma Macrovis io n und anderen Firme n,
die durch bes timmte U.S. Pat en te und andere Recht e für geistiges
Eigentu m ge schützt sind. Die B enutzung dieser
Kopiersch utztechnologi e mu ss durch die Firma Ma crovision
autoris ie rt werden und ist nur f ür die Benutzung zu H ause und anderen
eingeschr änkten Benutzun gsweisen gedacht, s olange es nicht
ausdrückl ich von der Firma Mac ro vision anders ang egeben wird.
Reverse-E ngineering und Aus ei nanderbauen sin d nicht gestattet .
Sta rke
Sto ßeinwir kun g
Hitze
über
40°C
:
2
Page 15
Montage im Fahrzeug
Verwenden Si e die mitgeliefer ten KFZ-Befesti gungsriemen, um
das Hauptge rät und den Monitor a uf der Rückseite de r Vor dersitzKopfstü tz en zu montieren . Zi ehen Sie die Montag eriemen um die
Kopfstü tz e fest.
Sehr geehrt er Kunde,
Vie le n Dank für den Kauf die ses tragbaren DVD -P layers.
Wen n Si e das erste Mal die Verp ackung aufmache n, v ergewissern
Sie sich bi tt e, dass alle Zubehö rteile vorhande n si nd. Vor dem
Anschließ en von Einzelteil en u nd der Stromver so rgung, lesen Sie
sich bitt e di e Bedienungsanl eitung durch und be wa hren Sie die
Anleitu ng i mmer in der Nähe Ihre s tragbaren DVD-P la yers auf.
Verpackung sinhalt:
1 x Hauptge rä t
1 x Zweitge rä t
1 x Fernbed ie nung mit Batterie
1 x KFZ-Ada pt er
Befesti gu ngsriemen
Hinweis: Wenn der Verpack ungsinhalt unvo ll ständig ist, wend en Sie
sich bitt e so s chnell wie möglic h an Ihren Händler.
3
Page 16

Bezeichnung der Bedienelemente
Hauptgerät
HAUPT BILDSCH IRM
1
2
3
4
5
6
7
8
ZWEIT BILDSCH IRM
15
9
14
12 13
10
11
16
17
18
19
20
4
1. SD/M S/MMC-K artensl ot
2. EIN/ AUS
3. Kopf hörerau sgang
4. VIDE O/AUDIO -Ausgan g
5. Digi talaudi oausgan g (koaxia l)
6. USB
7. Stro mausgan g
8. Stro mversor gungsei ngang 9 - 12 V
9. Eing abe
10. Nav igation stasten
11. Ei ngangss ignal
12. Nav igation stasten O ben/Unt en
13. Mod us
Einst ellungs menü - Zwei tbildsc hirm
14. Nav igation stasten L inks/Re chts
15. Hin tergrun dbeleuc htung
Einsc halten de r Hinterg rundbel euchtun g de s Zweitbi ldschir ms
16. EIN /AUS
17. AV-Eingang
18. Kop fhörera usgang
19. Str omverso rgungse ingang
20. Lau tstärke -Drehkn opf
Page 17

Bezeichnung der Bedienelemente
Fernbedienung
17
10
11
12
13
14
2
1
3
4
5
6
7
8
9
16
18
19
20
21
22
23
24
25
26
STEP
1 2
5
9 0
SUBT ITLE
TITL E
REPE AT
MUTE
3
6 7 8
10+
AUDI O
ENTE R
SLOW
ZOOM
SOUR CE
DISP LAY
MENU
/PBC
MODE
VOL +VOL -
4
27
15
1. SOURCE
DVD/CAR D/ USB
2. TO N AUS
Deaktiv ie ren der Tonausg ab e.
3. 0-9 ZIFF ERNTASTEN
Auswahl num merierter Eleme nte in Menüs.
4. DISPLAY
Anzeige der S pielzeit und Stat usinformation en .
5. 10+
Auswahl von Ti telnummer 10 oder h öher. Betätigen Si e zu nächst 10+
und dann eine r weitere Ziffer. Beispiel Titel 1 2: Betätigen Sie zu er st
10+ und dan n di e Ziffernta ste 2.
6. MENU/P BC
Zurück zu m DV D-Hauptmenü (DV D).
PBC Ein/A us ( VCD).
7. AUDIO
DVD: Betä ti gen Sie die AUDIO-Tast e während der Wiede rg abe, um
die Audiospr ache zu wechseln, w en n weitere Audiospr achen
vorhanden s ind.
MP3/CD/ VC D: Betätigen Si e di e AUDIO-Taste währen d de r
Wiederg ab e, um den Audiokanal z u we chseln (Links, Re chts, Mix,
Stereo) .
8. WIEDER GA BE/PAUSE
Betätig en S ie die WIEDERGA BE /PAUSE-Taste w ährend der
Wiederg ab e, um die Wiedergab e vorübergehend a nz uhalten.
Betätig en S ie die WIEDERGA BE /PAUSE-Taste e in zweites Mal, um
die Wiede rg abe fortzusetze n.
9. STOPP
Wen n di ese Taste nur ein mal betätigt wird , wi rd der letzte Pun kt d er
Wiederg ab e gespeichert. Da nach können Sie mit d er Wiedergabe
durch Bet ät igung der Wiederg abetaste ( ) fortfa hren. Wenn di e
STO PP -Taste allerdings e in zweites Mal anst el le der
Wiederg ab etaste ( ) gedrückt w ird, kann die Wiede rg abe nicht
fortges et zt werden.
10. MODE
Einstel le n der LCD-Paramet er (Helligkeit, K on trast und Sätti gu ng).
11. VOL+
12. VOR
Springen zu m nächsten Kapite l/Musiktitel.
13. ZURÜC K
Springen zu m vorigen Kapitel /Musiktitel.
14.
Betätig en S ie die Taste , um den Sch ne llvorlauf zu akti vieren. Es
stehen 5 Su ch laufgeschwind ig keiten zur Verfü gu ng (2fach → 4fach
→ 8fach → 16f ac h → 32fach → NORMAL). S ie können jederze it
die Wiede rg abetaste betäti gen, um zur normale n Wiedergabe
zurückzuk ehren.
5
Page 18

Bezeichnung der Bedienelemente
Fernbedienung
15.
Betätigen Sie d ie Taste , um den Schnellrücklauf zu aktivieren.
Es stehen 5 Suchlaufgeschwindigkeite n zur Verfügung (2fach →
4fach → 8fach → 16fach → 32fach → NOR MA L). Sie können
jederzeit die Wiedergabet aste betätigen, um zur normal en
Wiedergabe zurückzukehren.
16. STEP
Einzelbildwiedergabe im DVD-M odus.
17. SEARCH
Direktsuche nach Wiedergabepunkt, Tite l oder Kapitel im
DVD-Modus.
18. SUBTITLE
Benutzen Sie die S UBTITLE-Taste, um während der Wiedergabe
eine andere Untert itelsprache zu wählen.
19. ANGLE
DVD: Betätigen Sie die ANGL E-Taste, um die Kameraperspekti ve
zu wechseln (nur bei DVDs, d ie diese Funktion unterstüt zen).
20. TITLE
Zurück zum DVD-Titelmenü
21. ENTER
Best
ätigung der Menüauswahl.
22. SETUP
Aufrufen oder Verlassen des E instellungsmenüs.
23. VOL
Einstellen der Lautst ärke.
24. REPEAT
Betätigen Sie d ie REPEAT-Taste während der Wiedergabe, um
einen gewünschten Wi ederholungsmodus z u wählen.
DVD: Kapitelwiederholung / Titelwiederhol ung Aus.
VCD: Einzelwiederholung / Alle wiederholen Aus.
CD/MP3: Einzelwiederholung / Verzei chnis wiederholung / Aus
25. LANGSAM
Benutzen Sie die SLO W-Taste, um die W iedergabe in Zeitlupe in
verschiedene n Geschwindigkeiten zu schalten . Zur Verfügung
stehend e Geschwindigkeiten sind ½, 1/4, 1/8, 1/16 u nd Normal.
26. PROGRAM
DVD/VCD: Die Programmfunk tion ermöglicht Ihnen die Wied ergabe
von beliebigen Titeln i n de r von Ihnen gewünschten R eihenfolge.
Betätigen Sie d ie PROGRAM-Taste und das Programmmenü
erscheint auf dem B ildschirm. Sie können dann die Zi fferntaste n zur
direkte n Eingabe der Titel, Kapitel od er Musiktitel ben utzen und mit
der PLAY-Option die Programmwied ergabe starten. Um zur normalen
Wiedergab
erneut und wählen S ie d ie CLEAR-Option im Programmmenü.
Betätigen Sie d ie PROGRAM-Taste ein weiteres Mal, um d as
Programmmenü zu ve rlassen.
27. ZOOM
DVD/VCD: Mit der ZOOM-Taste können S ie das Videobild vergröße rn
bzw. verkleinern.
1. Betätigen Si e die ZOOM-Taste während der Wiedergabe oder
Pause, um die Bildve rgrößerungsfunktion zu akti vieren. E in Quadrat
erscheint kurzzeit ig auf der untere Bildseite rechts.
2. Mit jeder Betä tigung der ZOOM-Taste wird der Fernsehbildschirm
in folgender Rei henfolge verändert:
2fache Vergrößerung - -- 3fache Vergrößerung --- 4fache
Vergrößerung --- 1/ 2 Bildgröße -
--- normale Bildgröße
JPEG: Benutze n Sie die ZOOM-Taste, um das Vid eobild vergrößern
bzw. verkleinern.
1. Betätigen Si e die ZOOM-Taste.
2. Benutzen Sie " " zum Ve rgrößern oder " ", um das Bild zu
verkleinern.
Verwenden Sie die Navi gati onstasten 5634, um das de n verg rößerten
Bildausschnitt zu ver schieben.
e zurückzukehren, bet ätigen Sie die PROGRAM-Taste
-- 1/3 Bildgröße -- - 1/4 Bildgröße
6
Page 19

EINSTELLUNGEN - Einstellungsmenü
Allgemeine Einstellungen
Betätigen S ie die SETUP-Taste, um da s Einstellungsmenü
aufzurufen. Benutzen Sie die N avigationstasten 5634 zur Auswahl
des gewünschten Menüpunkts. Nachdem Si e die gewünschten
Einstellungen vorgenommen haben, be tätigen Sie die
SETUP-Taste, um zur normal en Anzeige zurückzukehren.
Folgende Einste llungen können gemacht werden:
GENERAL: wählt die Einstellungsseite für allgemeine Einstellungen.
AUDIO: Auswahl der Audiomenüseite.
VIDEO: Auswahl der Videomenüseite.
PREFERENCE: Auswahl der Menüseite für Benutzereinstellungen.
Allgemeine Einstellungen
- - GENERALSETUP PAGE - -
TV DISPLAY WIDE
TFT DISPLAY 16:9
ANGLE MARK ON
OSD LANGUAGE ENG
CLOSED CAPTIONS ON
SCREEN SAVER ON
AUTO STANDBY 3H
GOTO GENERAL SETUP PAGE
TV DISPLAY: Auswahl des Bildseitenverhäl tnisses.
4:3 PANSCAN: Wenn Sie einen normale n Fernseher benutzen und
wünschen, dass die beiden Sei ten des Bilds abgeschnitten bzw.
so for
matiert werden, dass si e dem Fernsehbildschirm angepasst
werden, dann wählen Si e diese Option.
4:3 LETTERBOX: Wenn Sie einen normale n Fernseher, werden mit
dieser Optio n schwarze Balken am oberen und unteren Teil des
Bildschirms angezeigt.
16:9: Breitbildanzeige
TFT DISPLAY :Einstellen des TFT-Bildschirms auf 16:9 ode r 4:3.
ON
OFF
ON
OFF
ENGLISH
FRENCH
GERMAN
SPANISH
DUTCH
POLISH
HUNGARIAN
ON
OFF
TFT 16:9
TFT 4:3
4:3 PANSCAN
4:3 LETTERBOX
16:9
Kameraperspek tive
Zeigt di e aktuelle Perspektive in der rechten Ecke o ben des
TFT-Bildschirms an, wenn die Funktio n von der Disc unterstütz t wird.
Anzeigesp rache
Wählen Sie hier die von Ihnen bevorzugte Sprache.
Geschlossene U nterti tel
Geschlossene Untertitel sind Dat en für Hörgeschädigte, d ie im
Videosi gnal ein iger Discs enthalten s ind. Bevor Sie diese Fu nktion
wählen, stellen Si e bitte sicher, dass di e eingelegte Disc und ihr
Fernsehgerät die se Funktion unterst
Bildschirmschoner
Diese Funktion wird ve rwendet, um den Bildschirm schoner ei n- bzw.
auszuschalten .
AUTO STANDBY
Schalten das Ger ät i n den St andby.
ützt.
Audioeinstellungen
Audioeinstellungen
-- --
- - - -AUDIO SETUP PAGE
DOWNMINX
DIGITAL OUTPUT
DOLBY DIGITAL
GO TO AUDIO SETUP PAGE
7
STR
RAW
DUAL MONO
DYNAMIC
LT/RT
STR
STR
L-MONO
R-MONO
FULL
-
-
-
-
-
-
-
-
-
-
MIX-MONO
-
-
-
-
-
-
-
-
OFF
-
SPDIF/OFF
SPDIF/RAW
SPDIF/PCM
STEREO
Page 20

Einstellungsmenü
Audio-Einstellungen
Downmix
Mit dieser Op tion können Sie den analogen Stereo-Ausgang Ihres
DVD-Player eingestellen.
LT/RT :Wählen Sie dies e Option, wenn Ihr DVD-Player an einen
Dolby-Pro-Logic-Dekoder anges chlossen ist.
Stereo :Wählen Sie diese Option, wenn das Audi osignal nur an
die beiden Front lautsprecher geliefert wird.
Digitalausga ng
Die Funktion wird verwendet, um den S PDIF-Ausgang zu
konfigurieren: SPDIF OFF, SPDIF/R AW, SPDIF/PCM.
SPDIF Off : Schaltet die SPDIF-Ausgabe aus.
SPDIF/RAW : Wenn Si e den Digi talausgang an einen
Multikanal- Dekoder angeschlossen haben.
SPDIF/PCM: Nur w enn Ihr Empfänger nicht zur Dekodierung
des Multikanals ignal geei gnet ist.
Dolby digital
Verfügbare Optionen für Dol by Digital sind: " Dual Mono" und
"Dynamic".
Dual Mono
Stereo :D as l inke Monosignal wird an den linken Lautsprecher
gesendet und das rechte Monosignal wird a n den rechten
Lautsprecher gesendet.
L-Mono :Das li nke Monosignal wird an den linken und den
rechten Lautsprecher gesendet.
R-Mono :Das rechte Monosignal wird an den linken und den
rechten Lautsprecher gesendet.
Mix-Mono:Das linke und das rechte Monosignal w erden zu
einem Signal gemis cht und an den linken und den rechten
Lautsprecher gesendet.
Dynamikbereich (Dynamic)
Dynamikbereichkompressi on.
Videoeinstellungen
Videoeinstellungen
- - VIDEO SETUP PAGE - -
BRIGHTNESS 00
CONTRAST 00
HUE 00
SATURATION 00
GOTO VIDEO SETUP PAGE
Helligkeit, Kontr ast, Farbton, Sättigung: Einstellu ng der Videoqualität.
Benutzereinstellungen
Benutzereinstellungen
- - PREFERENCE SETUP PAGE - -
TV TYPE PAL
AUDIO ENG
SUBTITLE ENG
DISC MENU ENG
DEFAULT
GOTO PREFERENCE PAGE
RESET
ENGLISH
FRENCH
GERMAN
SPANISH
DUTCH
POLISH
HUNGARIAN
OTHERS
ENGLISH
FRENCH
GERMAN
SPANISH
DUTCH
POLISH
HUNGARIAN
OFF
OTHERS
Bildseitenverh lt nis
Die Auswahl des Farbsyste ms, das dem Ihres Fernsehers
entspricht, wenn Sie die AV-Ausgänge benutzen. Dieser
DVD-Player ist kompatibel mi t den Systemen NTSC und PAL.
8
ENGLISH
FRENCH
GERMAN
SPANISH
DUTCH
POLISH
HUNGARIAN
OTHERS
PAL
AUTO
NTSC
Page 21

EINSTELLUNGEN - Einstellungsmenü
Technische Daten
Benutzereinstellungen
PAL
NTSC
Auto
Audio
Subtitl e
Disc Menu :
Einstellungsmenü - Zweitbildschirm
Bild-Einstellungen
Helligkei t
Einstel len der
Bildschirmhelligke it .
Kontras t
Einstel len des
Bildschirmkon trasts.
Farbe
Einstel len der
Bildschirm-Farbe instellung.
Sprache
Auswahl d er Anze igesprache.
Bildsei tenv erh
Einstel len des Bildschirms a uf 16:9 oder 4:3.
ltnis
PICTUR E
BRIGHT
CONTRAST
COLOR
LA NG ENGLISH
Z00M 16:9
50
50
50
Elektronische Daten
Nr.
Str omne tzan ford erunge n
Str omve rbra uch
Bet rieb sluftf euch tigk eit
Vid eoau sgan g
Aud ioausg ang
Ausgang
Audio
Nr.Standardanforderungen
: AC 100-2 40 V , 50/6 0 Hz
: <15 W
: 5 % to 90 %
:1. 0 Vrm s (1 KHz, 0 d B)
:Lautsprecher: 1 W x 2, Kopfhörerausgang,
Koaxialausgang
System
Las er
Far bsys tem
Fre quen zber eich
Rau scha bsta nd
Dyn amik bere ich
Hinweis : Veränderungen der t echnischen Daten und des Design
ohne vorher ig e Ankündigung vorbehalten.
:Ha lblei terla ser, Wellenlä nge 650 n m
: NTS C / PAL
: 20 Hz b is 20 kHz ( 1 dB)
:Me hr als 80 d B (nur ANA LOG-O UT-Aus gang)
:Me hr als 80 d B (DVD/ CD)
9
Page 22

Service u nd Hil fe
Für Informat ionen: www.lenco.com
Für Hilfe : http://lencosupport.zendesk.co m
Lenco Hot lines:
Deutsch land 0900-152053 0 (O rtsgebundener Tarif)
Die Niederlande 0900-23553626 (Ortsgebundener Tari f + 1ct
p/min)
Belgien 02-6200115 (Ortsgebundener Tarif )
Frankreich 03-81484280 (Ortsgebundener Tarif)
Die Hotli ne erre ichen Sie montags b is freitags von 9 b is 1 8 Uhr.
Wen n Si e Lenco kontaktieren, werde n Si e immer nach der Mode llund Seriennum me r des Geräts gefragt. D ie Seriennummer finden
Sie auf der R ückseite des Gerä ts . Bitte notieren Si e hier die
Seriennummer:
Modell: MES-4031
Seriennummer:_________________________________
co bietet L eistungen und Garantie n im Einklang mit
Len
Europäischem Recht. I m Falle von Reparaturen (so wohl während
als auch nach Ab lauf der Garantieze
Einzelhändler ko ntaktieren.
Beachten Si e: Es ist nicht mög li ch, Geräte für Reparatur en direkt
an Lenco zu schi cken .
Wicht iger H inweis :
Falls die ses Gerät von einem n icht autorisier ten Kundendienst
geöff net oder darauf zugegriff en wird, erlisc ht die Garantie.
Dieses Gerät is t ni cht für professione lle Zwecke geeignet. Fa lls
das Gerät für pro fessionelle Z
alle Garanti everpflichtungen sei tens des Herstell ers.
it) sollt en Sie deshalb Ihren
wecke eingese tz t wird, erlöschen
Dieses Symbol zeigt an, dass das entsprechende Produkt oder
dessen Batterie in Europa nicht mit dem normalen Hausmüll
entsorgt werden darf. Um die ordnungsgemäße Abfallbehandlung
des Produkts und dessen Batterie zu gewährleisten, müssen
diese im Einklang mit allen anwendbaren örtlichen Vorschriften
zur Entsorgung von Elektrogeräten und Batterien entsorgt
werden. Dabei helfen Sie natürliche Ressourcen zu schonen und
Umweltschutzstandards zur Verwertung und Entsorgung von
Altgeräten aufrecht zu halten (Waste Electrical and Electronic
Equipment Directive).
Produkte mit der CE Kennzeichnung entsprechen der EMCRichtlinie (2004/108/EC) und der Niederspannungsrichtlinie
(2006/95/EC), herausgegeben von der Kommission der
Europäischen Gemeinschaft.
The declaration of conformity may be consulted at
http://www.lenco.eu/supportfiles/CE/vnj3e59859tjhgjharasrppppp.pdf
Alle Rechte vorbehalten
10
Page 23

HANDLEIDING
DRAAGBARE DVD
MES-4031
Voor informatie en ondersteuning, www.lenco.com
Lees deze h andleiding zorg vuldig en volle dig
vóór het aa nsluiting of inst ellen van dit pro duct.
Page 24

Belangrijke veiligheidsinstructies
1. Waarschuwing: Ve rwijder de behuiz in g of de achterkant ni et om
het risic o va n elektrische sch okken te verminde re n. Er zitten geen
door de gebru iker te onderhoud en o nderdelen in dit ap paraat. Laat
onderhoud o ver aan gekwalifi ce erd personeel.
2. Waarschuwing: S tel het apparaat ni et bloot aan regen of v oc ht
om brandg ev aar of elektrisch s chokgevaar te voo rk omen.
3. Stel de ad ap ter en de draagbare D VD-speler niet bl oo t aan
water (dr up pend en spattend) e n plaats geen voorw er pen gevuld
met water, z oa ls vazen, op het ap pa raat.
4. Houd de dr aa gbare DVD-spele r ui t de buurt van dire ct z onlicht
en warmte br onnen, zoals radi atoren of kachels .
5. Blokke er d e ventilatieope ningen niet. Er zit ten sleuven en
openingen i n het apparaat voor v entilatie. Deze o pe ningen dienen
nooit geb lo kkeerd te worden do or uw DVD-speler op e en k ussen,
sofa of and er e soortgelijke on dergrond te zette n.
6. Plaats d e dr aagbare DVD-spe le r niet op een onsta bi el
wagentj e, s tandaard, driep oot, beugel of tafe l. Het apparaat kan
vallen en bes chadigd raken of me ns en verwonden.
7. Plaats n oo it zware of scherpe v oorwerpen op het LC D- paneel of
frame.
8. Gebrui k al leen de meegeleve rde AC-adapter met d e dr aagbare
DVD-spele r. Het gebruik van and er e adapters zal uw g ar antie
ongeldig ma ken.
9. De stekk er v an de AC-adapter wor dt gebruikt om het ap paraat
van het lic ht net te ontkoppele n, zorg ervoor dat de s tekker goed
bereikbaa r blijft.
10. Haal de s te kker uit het stopco ntact als het appar aat niet wordt
gebruikt.
11.WAARSC HU WING: Overmatig e geluidsdruk van d e oo rtelefoon
of hoofdt el efoon kan leiden to t gehoorverlies .
12.WAARSCHUWIN G: Gebruik alleen k oppelstukken/ ac cessoires die
worden aang eraden door de fabr ik ant. De draagba re D VD-speler
wordt gel ev erd met een netadap ter, deze netadapt er is het
ontkopp el apparaat. Zorg er voor dat de netadap te r altijd bereik ba ar
blijft.
Deze mark er ing geeft aan dat dit p roduct niet
mag worde n we ggegooid met het ov erige
huisvuil in d e gehele EU. Om schad e aa n het
milieu en d e me nselijke gezond he id door
ongecontr oleerde afvalve rw ijdering te
voorkomen , moet u op een verantw oorde
manier re cy clen en zo duurzaam h ergebruik
van grondst offen te bevo rderen. Breng uw
gebruikte p roduct terug naar e en i nzamelpunt
of neem con ta ct op met de dealer w aa r u het
product hee ft gekocht. Zij kun nen dit product
aannemen vo or milieuvriend el ijke recycling.
Luister o m mogelijke g ehoorscha de te voorkom en
niet ge du rende lange p erioden op ee n hoog volume ni veau.
1
Page 25

Veiligheidsmaatregelen
WAARSCHUWING
GEVAAR VAN ELEKTRISCHE SCHOK,
NIET OPENEN
1. Waarschuwing: D eze DVD-speler ma ak t gebruik van een
lasersyst eem.
Gebruik v an b ediening, aanpa ssingen, of het uit vo eren van
procedure s anders dan die verm el d in deze handleidi ng kunnen
resulte re n in blootstellin g aan gevaarlijke str aling.
2 Waarschuwing: Op en de behuizing nie t om d irecte blootste lling
aan de lasers traal te voorkome n. Zichtbare lase rs traling wanneer
geopend.
3. Waarschuwing: K ijk nooit rechtst reeks in de laserst ra al.
4. Let op: In st alleer dit produc t niet in een afgeslo ten ruimte, zoals
een boekenk ast of soortgelij ke plek.
5. Waarschuwing: a ls het apparaat wor dt gebruikt door ee n ki nd,
dan moete n ou ders ervoor zorge n da t het kind alle inh ou d van de
handleidi ng kent.
6. Waarschuwing: h et is verboden om mee r dan 250mm USBverlengsn oer te gebruiken vo or d e USB-poort.
Opmerkingen over copyright:
N
N
7. Het zond er t oestemming kopi ëren, tonen, uitz en den, in publiek
afspele n of v erhuren van auteu rsrechtelijk besc hermd materiaal i s bi j
wet verbo de n.
8. Dit prod uc t beschikt over een k opieerbeveiligi ngstechnologi e
ontwikk el d door Macrovisio n. Op sommige disks zij n
kopieerbe schermingssig na len opgenomen. Bi j het opnemen en
afspele n va n beelden op deze dis ks z al er beeldruis ver schijnen. Dit
product bev at copyrighttec hnologie die wordt be schermd door clai ms
van bepaald e Amerikaanse pate nt en en andere intell ectueleeigendoms rechten van Macro vi sion Corporatio n en andere
eigenaren v an rechten. Gebru ik van deze kopieerbe veiliging
technol og ie moet worden geau toriseerd door Macr ovision
Corporati on, en is bedoeld voo r thuisgebruik en and er beperkt
gebruik, te nzij anders geaut or iseerd door Macro vision Corporat io n.
Reverse eng ineering of demon ta ge is niet toegesta an.
Harde
schok ken
Tempe ratur en
bov en
40° C
2
Page 26

Montage in voertuig
Gebruik d e me egeleverde beve stigingsbande n om h et
hoofdap pa raat en de monitor op d e achterkant van de
hoofdst eu nen van het voertui g te installeren. W ikkel de
bevesti gi ngsbanden strak r ond de hoofdsteun .
Beste kla nt :
Bedankt voo r de aanschaf van dez e draagbare DVD-spe ler.
Control ee r wanneer u de doos voo r he t eerst opent of al le
accessoir es aanwezig zijn. L ee s de handleiding zo rgvuldig door
voordat u de on derdelen en stroo m aansluit en bewaa r de ze
instruc ti es altijd in de buurt v an uw draagbare DVD -s peler.
Inhoud do os :
1 x Hoofdap pa raat
1 x slave-a pp araat
1 x Afstands be diening inclusi ef b atterij
1x Autoadapt er
Bevesti gi ngsbanden
Opmerki ng : Als er onderdelen on tbreken, neem dan z o sn el mogelijk
contact o p me t uw dealer.
3
Page 27

Identificatie van bedieningselementen
Hoofdapparaat
MASTE R TFT-SC HERM
1
2
3
4
5
6
7
8
SLAVE TFT-SC HERM
15
9
14
12 13
10
11
16
17
18
19
20
4
1.SD/ MS/MMC
2. AAN/U IT-KNOP
3. HOOF DTELEFO ONUITGA NGEN
4. VIDE O/AUDIO U ITGANG
5. DIGI TALE AUDI O UITGANG ( COAX)
6.USB
7. DC UIT GANG
8. DC ING ANG 9-12V
9. ENTE R
10. OMH OOG/OML AAG/LIN KS/RECH TS
11. SO URCE
12. OMH OOG/OML AAG
13. MOD E
Slave TFT-men uinstel ling.
14. LIN KS/RECH TS
15.AC HTERGRO NDVERLI CHTING
Schak elaar ach tergron dverlic hting Slave TFT-s ch erm.
16. AAN/ UIT-KNOP
17. AV INGANG
18. HOO FDTELEF OONUITG ANGEN
19. DC IN GANG
20. Volu meknop
Page 28

Identificatie van bedieningselementen
Afstandsbediening
6. MENU/P BC
17
10
11
12
13
14
2
1
3
4
5
6
7
8
9
16
18
19
20
21
22
23
24
25
26
27
STEP
1 2
5
9 0
SUBT ITLE
TITL E
REPE AT
MUTE
3
6 7 8
10+
AUDI O
ENTE R
SLOW
ZOOM
SOUR CE
DISP LAY
MENU
/PBC
MODE
VOL +VOL -
4
15
1. SOURCE
DVD/CAR D/ USB.
2. MUTE
Schakel met d eze knop het geluid u it.
3.0-9 NUM ER IEKE TOETSE N
Selecte er m et deze toetsen gen ummerde items in ee n menu.
4.DISPL AY
Druk op dez e kn op om de afspeeltij d en statusinform atie te tonen.
5.10+ KNO P
Druk op dez e kn op om een track hoger d an 10 te selecteren e er st
op 10+, bij vo orbeeld; om track 1 2 te selecteren, dr uk eerst op 10+,
en vervol ge ns op 2.
Druk op deze kn op om terug te keren na ar het hoofdmenu va n de
DVD.
Met deze to et s kunt u ook PBC aan- /u itzetten (VCD).
7.AUDIO
DVD: ruk ti jd ens het afspelen he rhaaldelijk op AUDIO o m een andere
audiota al o f audiotrack te bel uisteren, indie n be schikbaar.
MP3/CD/ VC D: Druk tijdens het a fspelen herhaal de lijk op AUDIO om
een ander aud iokanaal te belui steren ( Links,Re ch ts,Mix,Stereo ).
8.PLAY/PAU SE
Druk één keer o p PLAY/PAUSE om het afspelen t e pauzeren, druk
nogmaal s op P LAY/ PAUS E om het afspelen te he rvatten.
9.STOP
Druk één keer o p deze knop om het afsp elen tijdelijk te s toppen. Het
afspele n ka n later hervat word en door op PLAY( ) te drukken. Als er
echter no gm aals op de STOP knop wordt ged rukt, in plaats van o p de
knop PLAY( )dan kan het afs pe len niet meer worde n hervat.
10.MODE
Stel met de ze k nop de LCD-parame ters in(helderh ei d, contrast en
verzadigi ng).
11.VOL+
12.Vooruit
Druk op deze kn op om naar het volgen de h oofdstuk/de v ol gende track
te gaan.
13.Acht er uit
Druk op deze kn op om naar het vorige h oo fdstuk of begin v an e en
track te ga an .
14.
Druk op de kn op o m vooruit te spoele n, dit kan met 5 snelhe den
(X2->X4 -> X8->X16->X32- >P LAY), druk o p de k nop PLAY om het
afspele n me t normale snelhei d te hervatten.
5
Page 29

Identificatie van bedieningselementen
Afstandsbediening
15.
Druk de knop om a chteruit te spoel en, dit kan met 5 snelh ed en
(X2->X4 -> X8->X16->X32- >P LAY), druk o p de k nop PLAY om het
afspele n me t normale snelhei d te hervatten.
16.STEP
Druk op deze kn op om in DVD-modus me t stappen vooruit t e
spelen.
17.SEAR CH
Druk op deze kn op om naar een specif ieke tijd, titel of h oo fdstuk te
gaan in DVD-m odus.
18.SUBT ITLE
Druk tijd en s het afspelen herh aaldelijk op SUBTIT LE om de
onderti te ltaal te verander en.
19.ANGL E
DVD: Druk o p ANG LE om de kijkhoek te ve randeren, dit wer kt
alleen bij DV D’s die deze fu nctie ondersteu ne n
20.TITL E
Druk op deze to ets om terug te ker en n aar het titelmenu v an de
DVD.
21.ENTE R
Druk op deze to ets om de menuselec tie te bevestigen .
22.SETU P
Druk op deze to ets om het hoofdm en u te openen of sluite n.
23.VOL
Druk op deze to ets om het volume in te s tellen.
24.REPE AT
Druk tijd en s het afspelen op REP EAT om de ge we nste
herhaalmo dus te selecteren .
DVD: u kunt h oo fdstuk herhalen /titel herhalen /herhalen
uitscha ke len.
VCD: u kunt e nk ele track herhale n/alle herhalen /h erhalen
uitscha ke len.
CD/MP3: u k un t enkele track he rh alen/map herhal en/herhalen
uitscha ke len.
25.SLOW
Druk herhaa ldelijk op de Slow- kn op om langzaam af te sp elen en
door de ver sc hillende snelhe den te bladeren. De b es chikbare
snelheden z ijn 1/2,1/4,1/8 ,1/16 en normaal af spelen.
26.PROG RA M
DVD/VCD : De p rogrammafunct ie maakt het mogeli jk om uw favoriete
tracks op e en d isk op te slaan. Druk o p de knop PROGRAM,
vervolgen s zal het PROGRAMMA MENU verschijne n op h et scherm, u
kunt nu met b eh ulp van de numeriek e toetsen rechtst re eks de titels,
hoofdst uk ken of tracknumme rs invoeren en de PLAY-opt ie
selecte re n. Druk om normaal af spelen te hervatt en o p PROGRAM en
selecte er d e “clear program” o ptie in het program ma menu. Druk
nogmaal s op P ROGRAM om het pro gr ammamenu te verla ten.
27.ZOOM
DVD/VCD : Ge bruik ZOOM om het b ee ld te vergroten of ve rkleinen.
1.Druk ti jd ens het afspelen of a ls het afspelen is ge pauzeerd op
ZOOM om de zo omfunctie te acti ve ren. Er verschijn t kort een
vierkant fr ame aan de rechtero nderkant van het be el d.
2. Met elke d ru k op de knop ZOOM ver an dert het TV-be eld in de
volgende vo lgorde:
2X groott e- -- 3X grootte --- 4X gr ootte ---1/2 groo tte --- 1/3 grootte - -1/4 groot te - --normale groot te
JPEG: Geb ru ik ZOOM om het beel d te v ergroten of verkl einen.
1.Druk op ' ZO OM' .
2,Gebru ik d e knop " " om te vergro te n, of " " om het beeld te
verkleine n.
Gebruik d e kn oppen om door het verg ro otte beeld te rond te
kijken.
6
Page 30

Instellen instellingenmenu
Pagina algemene instellingen
Druk op de SETU P knop om het instellingenmenu te openen.
Gebruik de navigatie toetsent om het gewenste it em te
selecteren. Druk na het instellen van d e instellingen nogmaals op
SETUP om terug te keren naar de normale weergave.
De volgende menu-ite ms kunnen worden ingesteld:
ALGEMEEN : selectee r de GENERAL PAGE voor het instellen van
de algemene instel lingen.
AUDIO : selecteer d
audio-instellingen .
VIDEO : selecteer de VIDEO PAGE voor het instellen van de
video-instellingen.
VOORKEUR : sel ecteer d e PREFERENCE PAGE v oor het instellen
van uw voorkeuren.
Pagina algemen e instellingen
- - GENERALSETUP PAGE - -
TV DISPLAY WIDE
TFT DISPLAY 16:9
ANGLE MARK ON
OSD LANGUAGE ENG
CLOSED CAPTIONS ON
SCREEN SAVER ON
AUTO STANDBY 3H
GOTO GENERAL SETUP PAGE
TV DISPLAY : s electeer de beeldverhouding van het afspeelbeeld.
4:3 PANSCAN : selecteer deze opti e al s u een normale TV heeft en
het beeld op volledig scherm wilt b ekijken, de zijkanten worden van
het beeld afgesneden om he t op het scherm van uw TV t e laten
passen.
e AUDIO PAGE voor he t inst ellen van de
4:3 PANSCAN
4:3 LETTERBOX
16:9
TFT 16:9
ON
TFT 4:3
OFF
ENGLISH
FRENCH
GERMAN
ON
SPANISH
ON
OFF
DUTCH
OFF
POLISH
HUNGARIAN
4:3 LETTERBOX : selec teer deze optie als u een normale TV heeft
en het volledige beel d wilt zien. In dit geval wordt het ge hele beeld
op het scherm g etoond, maar verschijnen e r twee zwarte balken
aan de boven- en onderkant v an het TV-scherm.
16:9: breedbeeldwee rgave.
TFT DISPLAY : Stel hi er de beeldverhouding van het TFT-display in
op 16:9 of 4:3.
Angle Mark
Toon de informa tie over de huidige beeldho ek, indien beschikbaar,
op de disk, a an de rechterkant va n het TFT-scherm.
OSD Language
Hier kunt u de taal i nstellen voor de menu’s o p het scherm.
Closed Captions
Closed captions zijn gegev ens die z
van sommige disks. Z org er voordat u deze functie selecte ert voor dat
de disk closed cap tions bevat en uw TV deze f unctie ook ondersteunt.
Screen Saver
Deze functie word t gebruikt om de schermbe veiliging aan of uit te
zetten.
AUTO STANDBY
Schakel het apparaat in stand-by
ijn verborgen in he t vi deosignaal
Pagina audio-instellingen
Pagina audio-inste llingen
-- --
- - - -AUDIO SETUP PAGE
DOWNMINX
DIGITAL OUTPUT
DOLBY DIGITAL
GO TO AUDIO SETUP PAGE
7
STR
RAW
DUAL MONO
DYNAMIC
LT/RT
STR
STR
L-MONO
R-MONO
FULL
-
-
-
-
-
-
-
-
-
-
MIX-MONO
-
-
-
-
-
-
-
-
OFF
-
SPDIF/OFF
SPDIF/RAW
SPDIF/PCM
STEREO
Page 31

Pagina audio-instellingen
van het instellingenmenu
Downmix
Met deze optie kunt u het si gnaal uit de analoge stereo-uitgang v an
uw DVD-speler instellen.
LT/RT :Select eer de ze optie als uw DVD-speler is aan gesloten
op een Dolby Pro L ogic d ecoder
Stereo :Selecteer deze o ptie als de uitgang is aangesloten o p
twee voorluidspreke rs.
Digital Output
Deze functie wordt gebrui kt om de SPDIF-uitvoer te selecteren:
SPDIF Off, SPDIF /RAW,SPDIF/PCM..
SPDIF Off : Schakelt de SPDIF-uitvoer uit .
SPDIF/RAW : Gebruik deze optie al s u uw DIGITALE AUDIO
UITGANG heeft aangeslot en op een multi-channel
decoder/ontvanger.
SPDIF/PCM: Gebruik deze optie alleen als uw ontvanger ni et
in staat is om mult i-channel audio te decoderen.
Dolby digital
The options included i n Dolby Digital Set up are: and
'Dynamic '.
Dual Mono
Stereo :H et l inker monogeluid wordt naar d e linker luidspreker
gestuurd en het rechter monogel uid wordt naar de rec hter
luidspreker gestuurd.
L-Mono :Het li nker monogeluid wordt naar de linker en rechte r
luidspreker gestuurd.
R-Mono :Het rechter monogeluid w ordt naar de linker en rechter
luidspreker gestuurd.
Mix-Mono:Een mix van het linker e n rechter monogeluid wordt
naar de linker en rechter luid spreker gestuurd.
Dynamic
Compressie dynamisch bereik.
'Dual Mono '
Pagina video-instellingen
Pagina video-ins tellingen
- - VIDEO SETUP PAGE - -
BRIGHTNESS 00
CONTRAST 00
HUE 00
SATURATION 00
GOTO VIDEO SETUP PAGE
Scherpte, hel derheid, contrast, tint, v erzadiging: instellen van de
videokwalitei t.
Pagina voorkeuren
Pagina voorkeu ren
- - PREFERENCE SETUP PAGE - -
TV TYPE PAL
AUDIO ENG
SUBTITLE ENG
DISC MENU ENG
DEFAULT
GOTO PREFERENCE PAGE
RESET
ENGLISH
FRENCH
GERMAN
SPANISH
DUTCH
POLISH
HUNGARIAN
OTHERS
ENGLISH
FRENCH
GERMAN
SPANISH
DUTCH
POLISH
HUNGARIAN
OFF
OTHERS
TV Typ e
Selecteer het kl eurens ysteem van uw TV. Deze DVD-speler is
compatibel me t zowe l NTSC als PAL.
ENGLISH
FRENCH
GERMAN
SPANISH
DUTCH
POLISH
HUNGARIAN
OTHERS
PAL
AUTO
NTSC
8
Page 32

Instellingen instellingenmenu
Parameters en specificaties
Pagina voorkeuren
AL - Selecte er deze optie als d e aange sloten TV een
P
PAL- kl eurensysteem hee ft. Dit zal het vid eosignaal van een
NTSC-di sk omzetten en al s PAL-formaat na ar d e TV stur en .
NTSC - Se lecteer deze op tie als de aangesloten TV een
NTSC-kl euren systeem heeft . Dit zal het video si gnaal van een
PAL- di sk omzetten e n al s NTSC-formaat na ar de TV stur en .
Auto :Verander het vi deosignaal au to matisch aan de ha nd van het
diskforma at v an de disk die word t afgespeeld.
Audio :Sel ecteer een audi otaal (indien bes chikbaar).
Subtitl e: Selecteer een ond er titeltaal (in dien beschikbaar).
Disc Menu : Selecteer een m enutaal voor de d isk
(indien b eschikbaar).
Slaver TFT Menu Setting
Pagina beeld (picture)
Brightn ess
Instell en helderheid.
Contras t
Instell en contrast.
Color
Instell en kleur.
LANG
Instell en menutaal.
ZOOM
Beeldverhouding in stellen
ZOOM 16:9 of 4: 3
PICTUR E
BRIGHT
CONTRAST
COLOR
LA NG ENGLISH
Z00M 16:9
Elektronische parameters
Item
Voed ing
Str oomver brui k
Bedri jfsv ocht igheid
VID EO
UITGA NG
AUD IO
UITGA NG
Uitgang
Audio
: AC 100-2 40 V , 50/6 0 Hz
: <15 W
: 5 % to 90 %
:1. 0 Vrm s (1 KHz, 0 d B)
:Luidspreker:1WX2,Hoofdtelefoonuitgang, Coax uitgang
Standaardeis
System
Las er
Sig naal syst eem
Fre quen tier espons
Sig naal
50
50
50
-ru isverh oudi ng
Dyn amis ch ber eik
Opmerki ng: Ontwerp en specifi caties zijn onderhev ig aan verandering
zonder voorafgaande beri chtgeving.
:Ha lfgel eider l aser, go lflen gte 650 n m
: NTS C / PAL
: 20H z to 20 kHz (1dB)
:Me er dan 80 d B (alle en conn ector en ANALO OG UIT)
:Me er dan 80 d B (DVD/ CD)
9
Page 33

Service e n ondersteuning
Voor informatie: w ww.lenco.com
Voor ondersteuning: http://lencosupport.zendesk.com
Lenco helpdesk:
Duitsland 0900-1520530 (Lokale kosten)
Nederland 0900-23553626 (Lokale kosten + 1ct p/min )
België 02-6200115 (Lokale kosten)
Frankrijk 03-81484280 (Lokale kosten)
De helpdesk is bereikbaar van maandag t ot en met vrijdag van
09:00 tot 18: 00 uur. Wanneer u Lenco cont acteert, zal u altijd
gevraagd worden naar het modelnummer en het s erienummer van
uw product. Het serienummer bevindt zi ch aan de achterkant van
het apparaat. Gelieve dit n ummer hier op te schrijven:
Model: MES-4031
Serienummer: _________________________________
Lenco biedt service en garant ie aan overeenkomstig met de
Europese wetgeving. Di t houdt in dat in het geval van reparati es
(zowel tijdens en na de garant ieperiode), u uw lokale handel
moet contacteren.
Belangrijke opm erking: Het is niet mogelijk om producten di e
gerepareerd moeten worden direct n aar Lenco te sturen.
Belangrijke opm erking:
De garantie verloopt al s een onofficieel servicecente r het apparaat
op wat voor manie r dan ook heeft geopend, of er toegang toe heeft
gekregen.
Het apparaat is nie t geschikt voor professioneel gebruik. In het
geval van professioneel gebruik worden alle
garantieverplichtingen van de fabri kant nietig verklaard.
aar
Dit symbool geeft aan dat het betreffende elektrische product of
de batterij niet moet worden verwijderd als algemeen
huishoudelijk afval in Europa. Zorg voor een juiste afvalverwerking
door het product en de batterij in overeenstemming met alle van
toepassing zijnde lokale wetten voor het verwijderen van
elektrische apparatuur of batterijen te verwijderen. Als u dit doet,
helpt u de natuurlijke hulpbronnen te behouden en de standaard
van milieubescherming te verbeteren bij de behandeling en
verwijdering van elektrisch afval (Afgedankte Elektrische en
Elektronische Apparatuur).
Producten met een CE keurmerk houden zich aan de EMC richtlijn
(2004/108/EC) en de Richtlijn voor Lage Voltage (2006/95/EC)
uitgegeven door de Europese Commissie.
De verklaring van conformiteit kan worden geraadpleegd op
http://www.lenco.eu/supportfiles/CE/vnj3e59859tjhgjharasrppppp.pdf
Alle rechten voorbehouden
10
Page 34

MANUEL DE L'UTILISATEUR
DVD PORTABLE
MES-4031
Pour plus d 'i nformations ou si v ous avez
besoin d'ai de : www.lenco.com
Avant de connect er, d 'utiliser ou de r égler cet apparei l,
veuille z lire attentivem ent et entièremen t ce m anuel de l'util isateur.
Page 35

Consignes de sécurité importantes
1. Ave rt issement : Afin de réd uire les risques de c ho cs électriques,
ne pas reti re r le capot ou l'arriè re de l'appareil. L'i ntérieur contie nt
des pièces qu i ne doivent pas être m anipulées par l'u ti lisateur.
Prendre l'a vis de personnel qu al ifié pour les manip uler.
2. Ave rt issement : Afin de pré venir des risques d 'i ncendies ou de
chocs élect riques, ne pas expo ser l'appareil à la plu ie ou
l'humidit é.
3. Ne pas exp os er l'adaptateur s ecteur et le DVD port able à l'eau
(goutte s ou é claboussures) e t ne pas placer des objet s remplis de
liquides, t els que des vases, su r l'appareil.
4. Garder l e DV D portable à l'écar t du rayonnement so la ire direct
ou de sourc es d e chaleur telle que r ad iateurs ou foye rs .
5. Ne pas obs tr uer les ouverture s de ventilation. L es encoches et
les ouver tu res sur l'apparei l servent à la ventil at ion. Les
ouvertu re s ne doivent jamais ê tre obstruées en pl aç ant votre DVD
portabl e su r un coussin, sofa ou t oute autre surfac e semblable.
6. Ne pas pla ce r le DVD portable sur u n chariot, un suppo rt, un
trépied o u un e table instable. L 'appareil pourr ai t tomber et ainsi
causer de pos sibles dégâts ou bl es sures.
7. Ne jamai s pl acer d'objets lou rds ou tranchants s ur l'écran LCD
ou son cadr e.
8. Utilis er u niquement l'Ada ptateur secteur f ourni avec le DVD
portabl e. L 'utilisation de t out autre adaptat eur rendrait la gar an tie
caduque.
9. La prise s ec teur peut être re ti rée en cours d'util isation,
l'apparei l devrait rester ut ilisable facile me nt.
10. Débra nc her l'appareil du s ec teur en cas de non- ut ilisation.
11. AVERTISSE ME NT : Un son tro p vi olent venant du cas que ou
des écouteu rs peut provoquer d es pertes auditiv es .
12. AVERTISSEMENT : Utiliser uniq ue ment les pièces e t ac cessoires
spécifi qu es fournis par le fab ricant, le DVD port ab le est alimenté p ar
l'adaptat eur secteur, l'ada ptateur secteur e st utilisé comme di sp ositif
déconnect é, le dispositif dé connecté devrai t re ster facilement
utilisa bl e.
Ce logo indiq ue que ce produit ne do it p as être
jeté avec l es a utres ordures mén agères au
sein de l'UE.
Afin de pré ve nir les possibles d égâts sur
l'environ nement ou sur la sant é hu maine dus à
une mise au reb us incontrôlée, r ecycler votre
appareil de f açon responsabl e po ur
promouv oi r le développemen t du rable.
Pour reto ur ner votre apparei l usagé, merci
d'utili se r les systèmes de c ol lecte existants o u
de contac te r le revendeur où le pr oduit a été
acheté. C el ui-ci le récupére ra afin qu'il soit
recyclé de fa çon sûre pour la natu re.
Pour evit er les dommag es possible s de l'auditi on , n'ecoutez
pas a vol um e eleve penda nt de longues p eriodes.
1
Page 36

Précautions de sécurité
AVERTISSEMENT
RISQUE DE CHOCS
ELECTRIQUES NE PAS OUVRIR
1. Ave rt issement : Ce lecte ur de DVD utilise un sy stème LASER.
L'utili sa tion des commande s, réglages ou des pr océdures de
perform an ce autres que ceux sp écifiées dans le pr és ent manuel
peut prov oq uer une expositio n à de s rayonnements da ngereux.
2. Ave rt issement : Afin de pré venir toute expos it ion directe au
faiscea u LA SER, ne pas ouvrir l' enceinte. Rayon ne ment LASER
visible qua nd l'appareil est o uv ert.
3. Ave rt issement : Ne pas fix er directement le f aisceau LASER.
4. Attenti on : N e pas installer c e pr oduit dans un espac e confiné
tel qu'un c as ier à livre ou autre en droit similaire .
5. Ave rt issement : Lorsqu e l'appareil est ut il isé par des enfants ,
les paren ts d oivent s'assure r que ceux-ci compr en nent le contenu
du livre d'in struction.
6. Ave rt issement : L'empl oi d'un fil d'exten si on USB de plus de
250 mm est in te rdit.
No tes co ncernant les Droits d'Auteurs :
N
N
7. Il est int er dit par la loi de copie r, diffuser, do nn er en représentat ion,
diffu ser via câble, joue r en public ou louer de s pr oductions dispo sa nt
d'un Droit d' Auteur sans permi ssion.
8. Ce produ it d ispose des foncti onnalités de prot ec tion de copies
développé es par Macrovisio n. D es signaux de prote ction de copies
sont enre gi strés sur certain s disques. Lors de l' en registrement ou d e
la lectur e de c es disques un grain a pp araitra. Cet appa reil intègre la
technol og ie de protection de s Droits d’auteur s pr otégée par certai ns
brevets a mé ricains et autres d roits de propriété in tellectuelle dé tenus
par Macro vi sion Corporatio n et autres ayants dr oi ts. . L'utilisati on de
cette tec hn ologie de protect ion des Droits d'Au te urs doit être
autoris ée p ar Macrovision Co rp oration, elle est d estinée à un usage
domesti qu e ou à un visionnage li mi té sans autre autor isation de la
part de Mac ro vision Corporat io n. Le démontage de l' appareil est
interdi t.
Chocs
viole nts
Surchau ffe
40 °C
2
Page 37

Montage dans le véhicule
Utilise r le s sangles de fixati on pour voiture fou rn ies pour instal le r
l'unité p ri ncipal et l'écran a u do s des appuie- têt es d u véhicule.
Serrer les sa ngles autour de l'a ppuie-tête.
Chers cli en ts :
Merci d'avo ir acheté ce lecteu r de DVD portable.
La boîte co nt ient :
1 x unité pri nc ipale
1 x unité aux il iaire
1 x Tél éc ommande avec les ba tteries compris es
1x Adaptateu r voiture
Sangles
Note : Si cer ta ines pièces sont ma nquantes, veuil lez contacter le
revendeur l e plutôt possible .
3
Page 38

Identification des commandes
Unité principale
ECRAN P RINCIPAL TFT
1
2
3
4
5
6
7
8
ECRAN S ECONDAI RE TFT
15
9
14
12 13
10
11
1.SD/ MS/MMC
2. MISE S OUS TEN TION ON/O FF
3. PRIS E CASQUE
4. SORTIE VIDÉ O/AUDIO
5. SORTIE AUDIO N UMERIQU E (COAXIA L)
6. USB
7. SORTIE DC
8. ENTR ÉE DC 9-12V
9. ENTR ER
10. HAU T/BAS/G AUCHE/D ROITE
11. SO URCE
12. HAU T/BAS
13. MOD E
Régla ge menu de l’ écran sec ondaire T FT.
14. GAU CHE/DRO ITE
15. RET RO-ECLA IRAGE
16
17
18
19
20
Inter rupteur d e l’écran s econdai re TFT.
16. MIS E SOUS TE NSION ON/ OFF
17. ENT RÉE AV
18. PRI SE CASQUE
19. ENT REE DC
20. Mol lette de vo lume
4
Page 39

Identification des commandes
Télécommande de l'unité principale
17
10
11
12
13
14
2
1
3
4
5
6
7
8
9
16
18
19
20
21
22
23
24
25
26
STEP
1 2
5
9 0
SUBT ITLE
TITL E
REPE AT
MUTE
3
6 7 8
10+
AUDI O
ENTE R
SLOW
ZOOM
SOUR CE
DISP LAY
MENU
/PBC
MODE
VOL +VOL -
4
27
15
1. SOURCE
DVD/CARTE/USB.
2. MUET
Désacti ve l a sortie audio.
3. Bouton s nombre de 0-9
Sélecti on ne les articles num érotés dans le menu .
4. AFFICHAGE
Aff ic he le temps de lectur e et les informatio ns sur l'état.
5. Bouton 1 0+
Afin de cho is ir la piste 10 ou une pis te supérieure, ap pu yer d'abord
sur 10+.
Par exemp le : p our sélectionne r la piste 12, appuye r d' abord sur
10+ et ensu it e sur le bouton 2.
6. MENU/P BC
Retourn e au m enu principal du DV D (D VD).
Interru pt eur PBC (VCD).
7. AUDIO
DVD : Appuyer su r AUDIO de façon répét ée durant la lectur e po ur
écouter u ne a utre piste audio ou u ne autre langue, si c el le-ci est
disponibl e.
MP3/CD/ VC D : Appuyer sur AUDIO de fa çon répétée duran t la
lecture p ou r écouter une autre v oix audio (Gauche , Dr oite, Mélange,
Stéréo) .
8. LECTUR E/ PAUSE
Appuyer sur P LAY/PAU SE une fois pour mett re en pause, une
seconde foi s pour reprendre la l ecture.
9. STOP
Quand ce bo ut on est appuyé une foi s, l'appareil enr eg istre le point
d'arrêt à par tir duquel la lectu re va reprendre si LE CT URE ( ) est
appuyé par la s uite. Mais si c'est l e bouton STOP qui est à nouvea u
appuyé et non L ECTURE ( ) il ne sera pas p ossible de repren dr e la
lecture .
10. MODE
Définit l es p aramètres de l'éc ran LCD (luminosi té , contraste,
saturat io n).
11. VO L+
12. Avance rapide Passe r
Va à la pi st e ou au chapitre suiv ant.
13. Retou r ra pide Passer
Va à la pi st e ou au chapitre préc édent
14. Bouto n
Appuyer sur l e bouton permet un sa ut en avant à 5 vitesse s
diffé rentes (X2->X 4- > X8->X16->X32- >P LAY), appu ye r sur le bouton
PLAY pour revenir à la le cture normale.
5
Page 40

Identification des commandes
Télécommande
15. Bouto n
Appuyer sur l e bouton permet un sa ut en arrière à 5 vites ses
diffé rentes (X2->X 4- >X8->X16->X32 - >P LAY), appu ye r alors sur le
bouton PL AY pour re ve nir à une lecture nor male.
16. PAS
Mettre le f il m en mode DVD.
17. RECHE RC HE
Pour vous r en dre au moment, à la séq uence, au chapitr e désiré en
mode DVD.
18. SOUS TI TRE
Appuyer sur S OUS TITRE d e fa çon répétée penda nt la lecture pour
aff ic her les diffé rents sous-titr es.
19. ANGLE
DVD : Appuyer su r ANGLE pour changer l 'angle de vue, sur le s
DVD qui propo sent cette foncti onnalité.
20. TITRE
Retourn e au m enu titre du DVD
21. ENTRE R
Confirm e la s élection du menu.
22. REGLA GE
Accéder ou so rtir du menu de confi guration.
23. VOL
Ajuste le v ol ume
24. REPET ER
Appuyer sur R EPETER durant la le cture pour sélect io nner le mode
de répéti ti on désiré.
DVD : Vous pou ve z lire de façon répét ée chapitre/tit re/Arrêt.
VCD : Vous pou ve z choisir de répéte r actuel/tout/A rrêt.
CD/MP3 : You pouv ez choisir de répét er a ctuel/dossier /Arrêt.
25. RALEN TI
Appuyer sur l e bouton Slow de faço n répétée pour entr er en lecture
ralenti e et p arcourir les différentes vit esses de ralenti. C elles-ci sont
½, 1/4, 1/8 , 1/16 et normal.
26. PROGR AMME
DVD/VCD : L a fo nction Programm e vous permet de stoc ker vos pistes
favorit es d u disque. Appuyer su r le bouton PROGRAM ME , le menu
PROGRAM ME v a apparaître à l' éc ran, maintenant v ous pouvez
utilise r le s boutons numérot és pour saisir dire ct ement les numéros d e
titres, c ha pitres ou pistes et s électionner les o ptions de lecture . Po ur
revenir au mo de de lecture norma l, appuyer sur PROG RAMME.
27. ZOOM
DVD/VCD : U ti liser ZOOM pour a gr andir ou rétrécir l ’image vidéo.
1. Appuyer sur Z OOM pendant la le ct ure ou pause pour act iver la
fonctio n Zo om. Le cadre carr é ap paraît brièveme nt dans la partie
inférie ur e droite de l'image .
2. Chaque a pp uie sur le bouton ZOO M change l’écran TV dans l’ordre
suivant :
Taille 2X --- tai lle3X --- taille 4X - --taille 1/2 --- ta il le 1/3 --- taille 1 /4 - -taille no rm ale
JPEG : Util is er ZOOM pour agra nd ir ou rétrécir l’im age.
1. Appuyer ‘ZO OM’.
2. Utilis er " " p our agrandir ou " " p ou r rétrécir l’imag e.
Utilise r le s boutons po ur se déplacer dans l ’i mage agrandie.
6
Page 41

Configuration du menu réglage
Page de réglages généraux
Appuyer sur le bou to n Réglage pour entr er dans le menu. Utiliser
les boutons d e direction pou r sélectionner votre rubrique
préférée. Après en avoi r terminé avec les ré glages, appuyer sur le
bouton Régl age à nouveau pour retourner à l'affichage normal.
Les rubriques s uivantes peuvent être mod ifiées :
GENERA LE : sélec tionne la page Réglages généraux.
AUDIO : séle ctionne la page du menu AUDIO.
VIDÉO : sé
PRÉFÉRENCE : sélectionne la page du men u PRÉFÉRENCE.
Page régl ages g énér aux
- - GENERALSETUP PAGE - -
TV DISPLAY WIDE
TFT DISPLAY 16:9
ANGLE MARK ON
OSD LANGUAGE ENG
CLOSED CAPTIONS ON
SCREEN SAVER ON
AUTO STANDBY 3H
GOTO GENERAL SETUP PAGE
AFFICHAGE TV : sélecti onne les proportions de l'imag e affichée.
4 :3 PANSCAN : Si vou s avez un TV normal e t que vous voulez que
les 2 bandes de l' imag e soient c
votre écran.
4 :3 LETTER BOX Si vous avez un t éléviseur normal. Dans ce cas ,
une image large avec bande n oir en haut et en bas ser a affichée.
16 :9 : Affi chage écran large.
Afficha ge écr an TFT : Sélec ti onne l’affi chage é cran TFT 16 :9 ou
4 :3.
lectionne l a page d u menu VIDÉO.
ON
OFF
ENGLISH
FRENCH
GERMAN
ON
SPANISH
ON
OFF
DUTCH
OFF
POLISH
HUNGARIAN
oupées afin que c elle-ci s'ajuste à
TFT 16:9
TFT 4:3
4:3 PANSCAN
4:3 LETTERBOX
16:9
Marqueu r Ang le
Aff iche les informat ions dans l'ang le hau t-droite de vot re écran TFT
si cette fo nctionnalité est dis ponible sur le disque .
Langue d’ affi chag e à l’écran (OSD)
Vous pouve z sélectionne r votre langue de réglag e préférée.
Sous titr e
Les Sous ti tre sont des donn ées qui sont cach ée s dans le signal
vidéo de ce rtains disques. Avant de sélect ionner cette fo nctionnalité,
assurez-v ous que le disque con tienne des info rmations de types s ous
titrage s et que votre TV dispos
Economi seur d ’écr an
Cette fonct ion permet d'acti ver l'économise ur d'écran.
AUTO STANDBY
Mettre l'appareil en veille.
e également d e cette fonctionnalit é.
Page Réglage Audio
Page Régl age Audio
-- --
- - - -AUDIO SETUP PAGE
DOWNMINX
DIGITAL OUTPUT
DOLBY DIGITAL
GO TO AUDIO SETUP PAGE
7
STR
RAW
DUAL MONO
DYNAMIC
LT/RT
STR
STR
L-MONO
R-MONO
FULL
-
-
-
-
-
-
-
-
-
-
MIX-MONO
-
-
-
-
-
-
-
-
OFF
-
SPDIF/OFF
SPDIF/RAW
SPDIF/PCM
STEREO
Page 42

Configuration du menu réglage
Page réglage audio
Downmix
Ces options v ous permettent de régler les sorti es stéréo
analogiques de votre lect eur DVD.
LT/RT : Sélectionner cette option si votr e lecteur DVD est
connecté à un décodeur Dolb y Pr o Logic.
Stéréo : Sélection ner cette option pour que le lecte ur n'émette
du son que par les 2 haut parleurs frontaux.
Sortie numé rique
Cette fonction est utilisée pour sé lectionner la sortie
SPDIF : SPDIF Off, SPDIF/RAW, SPDIF/PCM.
SPDIF Off : Désactive la sortie SPDIF.
SPDIF/RAW : Si vous avez connecté votre sortie AUDIO
DIGITAL E à un décodeur/récepteur multicanal.
SPDIF/PCM: Seul ement si votre récepteur n 'est pas capable de
décoder l'audio multicanal.
Dolby digital
Les options incluses dans les régl ages Dolb y Digital sont : 'Dual
Mono ' et 'Dynamic ' .
Dual Mono
Stéréo : Le mono gauche émettra uniquement un s ignal audi o
par le haut-parleur gauche et le mono droi te émettra uniquement
un signal audio par le haut-parl eur droi t.
L-Mono :Le mono d e gauche émettra un signal audio par les
haut-parleurs gauche et droite .
R-Mono :Le mono de droite émettra des signaux de sort ie aux
haut-parleurs de gauche et de droit e.
Mix-Mono:Le mono de droite émettra un signal audi o par les
haut-parleurs gauche et dro it.
Dynamique
Gamme de compres sion dynamique.
Page réglage vidéo
Vpage régla ge vidéo
- - VIDEO SETUP PAGE - -
BRIGHTNESS 00
CONTRAST 00
HUE 00
SATURATION 00
GOTO VIDEO SETUP PAGE
Luminosité, Contraste, Teinte, Saturation : r égla ges de la qualité de
l'image.
Page préférence
Page préfére nce
- - PREFERENCE SETUP PAGE - -
TV TYPE PAL
AUDIO ENG
SUBTITLE ENG
DISC MENU ENG
DEFAULT
GOTO PREFERENCE PAGE
RESET
ENGLISH
FRENCH
GERMAN
SPANISH
DUTCH
POLISH
HUNGARIAN
OTHERS
ENGLISH
FRENCH
GERMAN
SPANISH
DUTCH
POLISH
HUNGARIAN
OFF
OTHERS
TV Typ e
Sélectionner le syst ème de couleur qui convient à votre téléviseur,
en cas d'utilisation sur sort ie vid éo. Ce lecteur DVD est compatible
aussi bien avec le NTSC que le PAL.
8
ENGLISH
FRENCH
GERMAN
SPANISH
DUTCH
POLISH
HUNGARIAN
OTHERS
PAL
AUTO
NTSC
Page 43

Configuration du menu réglage
Page préférence
PAL - S électionner c ette option si vo tre téléviseu r es t au système
PAL. C eci transformera le s ignal NTSC d'un dis que au format PAL.
NTSC - Sé lectionner ce tte option si vot re téléviseur e st au système
NTSC. Cec i transformer a le s ignal PAL d'un disq ue au format NTSC .
Auto :Chang e automatique ment le signal vidé o de sortie en
fonctio n du format du disq ue qui est lu.
Audio :Sél ectionne une langue pour l'audio ( si disponible).
Sous titr e : Sélectio nn e une langue pour l es sous-titre s
(si dispo nible).
Disc Menu : Sélectionne u ne langue pour les me nus du disque
(si dispo nible).
Paramètres et spécifications
Paramètres électroniques
Item
Pui ssance r equi se
Pui ssan ce con sommée
Hum idité en c ours
d’utilisa tion
SOR TIEV ID O
SOR TIEA UDIO
Sortie
Audio
Système
: AC 100-2 40 V , 50/6 0 Hz
: <15 W
: 5 % to 90 %
:1. 0 Vrm s (1 KHz, 0 d B)
:Haut parleurs :1WX2, sortie casque, sortie Coaxial
Exigences Standards
Menu réglage écran secondaire
Page image
Luminos ité
Ajuste la l uminosité de l’écran.
Contraste
Ajuste le c ontraste de l’écran .
Couleur
Ajuste la c ouleur de l’écran.
LANG
Ajuste le M enu Langue
d’affichage à l’écran (OSD)
ZOOM
Ajuste le ZOO M de l’écran 16 :9 or 4 :3
PICTUR E
BRIGHT
CONTRAST
COLOR
LA NG ENGLISH
Z00M 16:9
Las er
Sys tème d e sign al
Fré quen ce de
répon se
50
50
50
Rat io signal/b ruit
Gam me dynam ique
Note: Desig n and specificati ons are subject to change pri or notice.
:La ser sem i-condu cteur, l ongue ur d'on de 650 nm
: NTS C / PAL
: 20H z to 20 kHz (1dB)
:Pl us de 80 dB ( uniqu ement s ur sort ie anal ogiqu e)
:Pl us de 80 dB ( DVD/C D)
9
Page 44

Service e t support
Pour plus d'i nformations : www.lenco.com
Pour de l'aide : http://l encosupport.zendesk.com
Service d’assi stance Le nco :
Allemagne 0900-1520530 (Prix d’u n appel local )
Pays-Bas 0900-23553626 (Prix d’un appel l ocal + 1ct
P/min)
Belgique 02-6200115 (Prix d’un appel local )
France 03-81484280 (Prix d’u n appel local )
Le centre d’assis tance est joignable du lundi au vendredi entre 9
heures et 18 heures.
Lorsque vous contactez L enco, on vous demandera
systématiquement l e modèle et le numéro de série de votre
produit. Le numéro de séri e se trouve à l'arrière de l'appareil.
Écrivez le numéro de séri e ci-dessous:
Modèle: MES-4031
Numéro de série : _______________________________
Lenco propose un service et un e garantie conformément aux lois
européenne, ce qui signifie qu’ en besoi n de réparatio
pendant et après la période de garanti e), vous pouvez contacter
votre revendeur le plu s proche.
Remarque im portante : Il n’est pas possible de renvoyer
l’appareil pour réparation di rectement à Lenco.
Remarque im portante :
Si l’unité est ouverte ou m odifiée de quelque manière par un centre
de service non agréé, cela m ettra fin à la garantie.
Cet appareil ne convient p as pour une utilisation professionnelle.
En cas d’utilisati on professionnelle, les obligati ons de garantie du
fabricant seront annulées.
n (aussi bien
Ce symbole indique que le produit électrique concerné ou la
batterie ne doit pas être jeté parmi les autres déchets ménagers
en Europe. Pour garantir un traitement correct du déchet de la
batterie ou de l'appareil, veuillez vous en débarrasser en vous
conformant aux règlements en vigueur dans votre secteur en ce
qui concerne le des appareils électriques et autres batteries. En
agissant de la sorte, vous contribuerez à la préservation des
ressources naturelles et à l'amélioration des niveaux de protection
environnementale concernant le traitement et la destruction des
déchets électriques. (Directive sur les Déchets des Equipements
Electriques et Electroniques).
Les produits avec la marque CE sont conformes à la directive
CEM (2004/108/CE) et à la directive basse tension (2006/95/
EC) émises par la commission de la communauté européenne.
La déclaration de conformité peut être consultée sur
http://www.lenco.eu/supportfiles/CE/vnj3e59859tjhgjharasrppppp.pdf
Tous droits réservés
10
Page 45

MANUAL DEL USUARIO
REPRODUCTOR DE DVD PORTÁTIL
MES-4031
Para info rm ación y ayuda, www.l en co.com
Antes de co nectar, operar o aju star este product o,
por favor, l ea a tentamente y de p ri ncipio a fin este m anual del usuario .
Page 46

Importantes instrucciones de seguridad
1. Adverte nc ia: Para reducir el r iesgo de descarga e lé ctrica, no
retire la c ub ierta o la tapa. El int erior no contiene p artes a reparar
por el usuari o. Para su reparaci ón , acuda a personal cu alificado.
2. Adverte nc ia: Para evitar un in cendio o descarga e lé ctrica, no
exponga la un idad a la lluvia o la hum ed ad.
3. No expon ga e l adaptador ni el rep roductor de DVD por tá til al
agua (goteo s o salpicaduras) y n o coloque objetos q ue c ontengan
líquido s, c omo jarrones, sob re el aparato.
4. Manten ga e l reproductor de DV D portátil alejad o de l a luz solar y
de fuente s de c alor como radiado res o fogones.
5. No bloqu ee l as aberturas de ven tilación. Las ran ur as y
abertur as d e la unidad tienen la v entilación como c ometido
principal . No deberá bloquea r la s aberturas col oc ando su
reproduct or de DVD portátil en u n cojín, sofá u otra su perficie
similar.
6. No coloq ue e l reproductor de DV D portátil sobre un c ar rito,
soporte , tr ípode, pie o mesa que n o ofrezca la sufici en te
estabil id ad. La unidad podrí a caer al suelo, pudi en do ocasionar
con ello daño s o lesiones.
7. No coloq ue o bjetos pesados o af ilados en el panel LC D o so bre
el marco.
8. Use sola me nte el adaptador de c orriente inclui do c on el
reproduct or de DVD portátil. S i utilizara un adap ta dor no
especific ado, la garantía de l aparato quedarí a an ulada.
9. El enchu fe d el adaptador de cor riente se emplea co mo elemento
de desconex ión, por lo que deber á pe rmanecer siempr e accesible.
10. Cuand o no e sté usando la unida d, desenchufe el ap ar ato de la
toma de cor ri ente.
11. ADV ERTENCIA: Una p resión sonora exc es iva de los
auricular es puede causar pér di da de la capacidad au ditiva.
12. ADVERTENCIA: Utilic e sólo accesorios e sp ecificados por el
fabrica nt e. El reproductor d e DVD portátil adem ás incluye un
adaptad or d e corriente AC que act úa como elemento de d es conexión,
y deberá perm anecer accesibl e en t odo momento.
Esta marc a in dica que este produ cto no
deberá se r el iminado junto con l os desechos
del hogar en el á mbito de la unión eur op ea.
Para evitar l os posibles daños a l medio
ambient e o a la s alud humana, caus ado por
una elimi na ción incontrola da d e desechos,
realice un re ciclaje respons ab le que
promueva la r eutilización so stenible de
recursos ma teriales. Para de positar su
aparato u sa do, por favor, hágal o en los
puntos de r ec ogida especific ados o contacte
con el punto de v enta de su aparato. E s en
estos lug ar es donde podrán ocu pa rse de un
reciclaje d el producto respe tuoso con el
medio amb ie nte.
Para evitar p osibles daños aud itivos, no escuch e a un
volumen d em asiado alto por per iodos prolongad os .
1
Page 47

Precauciones de seguridad
ADVERTENCIA
RIESGO DE DESCARGA
ELÉCTRICA NO ABRIR
1. Adverte nc ia: Este reproduc tor de DVD emplea un si st ema láser.
El uso de con tr oles, ajustes o la re alización de oper ac iones que no
sean las es pe cificadas en este m anual del usuario p od rían tener
como cons ec uencia la exposic ió n a radiación pelig rosa.
2. Adverte nc ia: Para evitar la ex posición directa al r ayo láser, no
abra la car ca sa de contención. R adiación láser vi si ble al abrir el
aparato .
3. Adverte nc ia: No mire directa mente al rayo láser.
4. Precau ci ón: No instale este p roducto en un lugar e n el q ue el
aparato q ue de empotrado, com o una estantería o mu eble de
similar es c aracterística s.
5. Adverte nc ia: Si los niños usan e sta unidad, sus pad re s deberán
asegurars e de que estos entien den el contenido de l as
instruc ci ones y sobre el uso.
6. Adverte nc ia: No se puede usar un c able extensor USB d e má s
de 250mm en e l pu erto USB.
Notas sobre los Derechos de Autor:
N
N
7. La copia , di fusión, exhibic ión, retransmis ió n por cable,
reproducc ión pública o alqui le r de material sujet o a las leyes de
derechos de a utor sin permiso es tá prohibido por ley.
8. Este pro du cto presenta la fun ción de protecció n co ntra la copia
ilegal, des arrollada por Mac ro vision. En alguno s hay grabadas
señales de pr otección contra l a co pia.
Cuando grab e y reproduzca las im ág enes de este tipo de di scos,
aparecerá u n ruido de imagen. Es te p roducto incorpo ra tecnología
de protec ci ón de los derechos de a ut or, garantizada po r
reivindic aciones de método s de c iertas patentes d e los EE.UU.
Las paten te s y otros derechos de p ropiedad intele ct ual pertenecen
a Macrovisi on Corporation y ot ro s propietarios de d erechos. El uso
de dicha te cn ología de protecc ión de los derechos de au tor deberá
estar aut or izado por Macrovi sion Corporation, y e stá destinado al
uso en hogare s y otros ámbitos res tringidos, salv o au torización en
contrar io d e Macrovision Cor po ration. La ingeni ería inversa y el
desmontaj e están prohibido s.
Impacto
fuerte
Recalent
-amiento
40°C
2
Page 48

Montaje en el vehículo
Utilice l as c orreas de montaje e n coche que se le propo rc ionan
para la insta lación de la unidad p ri ncipal y el monitor e n la parte
posteri or d e los apoyacabeza s del vehículo. Suj et e firmemente la
correa de mon taje pasándola po r el a poyacabezas.
Estimad o cl iente:
Le agradece mos la compra de este r eproductor de DVD p or tátil.
Cuando abra l a caja por primera ve z, por favor, compru eb e que no
falta nin gu no de los accesorio s Ant es de la conexión de la s partes
y de la aliment ación del aparato , por favor, lea atent am ente el
manual del us uario y consérvel o ce rca de este.
Conteni do d e la caja:
1 x unidad pr in cipal
1 x unidad se cu ndaria
1 x mando a dis ta ncia con pilas
1x adapta do r para coche
Correas
Nota: si fa lt ara alguna de las par tes, por favor, cont acte con su
distrib ui dor tan pronto como l e sea posible.
3
Page 49

Identificación de los controles
Unidad principal
PANTALLA TFT PRINC IPAL
1
2
3
4
5
6
7
8
PANTALLA TFT SECUN DARIA
15
9
14
12 13
10
11
1.SD/MS /M MC
2. ENCEND ID O/APAGAD O (O N/OFF)
3. TOMAS PARA AURIC ULARES
4. SALIDA DE V ÍD EO/AUDIO
5. SALIDA DE AUDI O DIGITAL (COAXIA L)
6.USB
7. SALIDA DC
8. DC IN 9-12 V
9. ENTER
10. ARRIBA /A BAJO/IZQUIE RD A/DERECHA
11. SO UR CE
12. ARRIBA /A BAJO
13. MODE
Ajustes d e me nú del TFT secundario.
14. IZQUI ER DA/DERECHA
16
17
18
19
20
15. BACKL IG HT
Interru pt or de iluminación d el TFT se cundario.
16. ENCEN DI DO/APAGA DO ( ON/OFF)
17. AV IN
18. TOMAS PAR A AURI CULARES
19. DC IN
20. Contr ol d e volumen
4
Page 50

Identificación de los controles
Unidad del mando a distancia
17
10
11
12
13
14
2
1
3
4
5
6
7
8
9
16
18
19
20
21
22
23
24
25
26
STEP
1 2
5
9 0
SUBT ITLE
TITL E
REPE AT
MUTE
3
6 7 8
10+
AUDI O
ENTE R
SLOW
ZOOM
SOUR CE
DISP LAY
MENU
/PBC
MODE
VOL +VOL -
4
27
15
1. SOURCE
DVD/CAR D/ USB.
2. MUTE
Supresión d el audio.
3. BOTONES NUMÉRICOS 0 -9
Selección d e los elementos num ér icos de un menú.
4. DISPLAY
Muestra e l ti empo de reproducc ión e información s ob re el estado.
5. BOTÓN 10 +
Para selecc ionar la pista 10 o sup er ior, pulse primero 1 0+, por
ejemplo, se leccione la pista 1 2 pu lsando 10+ en prime r lugar, y
después el bo tón 2.
6. MENU/P BC
Para volv er a l menú raíz del DVD (DV D).
Interru pt or PBC on/off ( VCD) .
7. AUDIO
DVD: Puls e AUD IO repetidament e durante la reprod uc ción para
escuchar lo s diferentes idio mas de audio o pistas d e au dio registrados
en el disco, si l os hubiera.
MP3/CD/ VC D: Pulse AUDIO repet idamente durant e la reproducción
para escuch ar un canal de audio di stinto ( izquierd a, d erecha, mix,
estéreo ).
8. REPROD UC CIÓN/PAU SA
Pulse REPRO DUCCIÓN/PAUSA una vez para dejar l a reproducción en
pausa. Si p ul sa este botón una seg unda vez podrá rean ud ar la
reproducc ión.
9. STOP
Cuando puls e este botón una vez, l a unidad "recordará " el punto en el
que se detu vo . La reproducción s e reanudará desde e st e punto al
pulsar de sp ués REPRODUCCIÓ N ( ). Pero si en lugar de pu lsar
REPRODU CC IÓN ( ), pulsa el botón S TOP una s egunda vez, la
función d e re anudación de repr od ucción quedará ca ncelada.
10.MODE
Seleccion e los parámetros de L CD ( ajuste del brillo , contraste y
saturac ió n).
11.VOL+
12. Salto a delante
Para pasar al c apítulo/pista s iguiente.
13. Salto a tr ás
Para pasar al c omienzo del capít ulo/pista anter io r.
14. BOTÓN
Pulse el botó n para poder avanza r la reproducción a 5 niv eles de
velocidad ( X2->X4-> X8->X1 6- >X32->REPRODU CCIÓN), pulse el
botón REP RO DUCCIÓN para reto mar la reproducci ón a velocidad
normal.
5
Page 51

Identificación de los controles
Unidad del mando a distancia
15. BOTÓN
Pulse el botó n para poder retroc eder la reproducc ió n a 5 niveles
de veloci da d (X2->X4-> X8->X 16->X32->REPR OD UCCIÓN),
pulse el botó n REPRODUCCIÓN pa ra retomar la repro du cción a
velocidad n ormal.
16.STEP
Reproducc ión fotograma a fot ograma en el modo DVD .
17.SEAR CH
Vaya d ir ectamente a un punt o, título o capítul o que usted desee
en el modo DVD.
18.SUBT ITLE
Pulse el botó n SUBTITLE repe ti damente durante l a reproducción
para poder ve r los diferentes id iomas de subtítul os.
19.ANGL E
DVD: Si pul sa AN GLE podrá cambiar e l ángulo de visiona do d e la
escena, en aq uellos DVDs que adm itan esta función .
20.TITL E
Para volv er a l menú de títulos d el D VD.
21.ENTE R
Confirm ac ión de la selección d el m enú.
22.SETU P
Acceso o sa li da del menú de config uración.
23.VOL
Ajuste de l vo lumen.
24.REPE AT
Pulse REPEAT durant e la reproducción p ar a seleccionar el mo do
de reprod uc ción deseado.
DVD: podr á se leccionar la repr oducción repeti da d e un
capítul o/ título/desa ct ivada.
VCD: podr á se leccionar la repr oducción repeti da
única/t od o/desactivada .
CD/MP3: p od rá seleccionar la r eproducción repet ida
única/c ar peta/desactiv ada.
25.SLOW
Pulse el botó n SLOW repetidame nte para entrar en la r eproducción
lenta, y pa se p or las diferentes v elocidades disp on ibles:
1/2,1/4 ,1 /8,1/16 y norma l.
26.PROG RA M
DVD/VCD : La f unción de program ación le permitir á al macenar sus
pistas fa vo ritas del disco. Pu lse el botón PROGRA M, después
PROGRAM M EN U aparecerá en la pan talla. Ahora podrá u sa r los
botones n um éricos para intro du cir los números d e título, capítul o o
pista dir ec tamente. A continua ción, seleccion e la o pción
REPRODU CC IÓN. Para retomar l a reproducción no rm al, pulse
PROGRAM y s el eccione la opción d e eliminación de prog ramas en el
menú de pro gr amación. Pulse PR OGRAM de nuevo para s al ir del
menú de pro gr amación.
27.ZOOM
DVD/VCD : Ut ilice ZOOM para a um entar o reducir la im agen de vídeo.
1.Pulse Z OO M durante la repr od ucción o la pausa par a ac tivar la
función d e Zo om. Un cuadro apare cerá brevemente e n el m argen
inferio r de recho de la imagen.
2. Cada vez q ue p ulse el botón ZOO M la p antalla de TV c ambiará
según la sigu iente secuencia :
Tamaño 2X --- Tamaño 3X --- Tama ño 4X --- Tamaño 1/ 2 -- - Tamaño
1/3 --- Tamaño 1/4 ---Tamaño nor mal
JPEG: Use Z OOM para aumentar o r ed ucir la imagen.
1. Pulse 'Z OO M' .
2. Use " " para a um entar o " " para redu ci r la imagen.
Use los boton es para d esplazarse por la i magen aumentada .
6
Page 52

Ajustes del menú de configuración (SETUP)
Página de Configuración General
Pulse el botó n SETUP para acceder al menú de confi guración.
Use los botones di reccionales para seleccionar element o
preferido. Cuando haya terminado con los a justes, pulse de nuevo
SETUP para la vi sualización normal.
Los siguientes el ementos del menú podrán ser modificados:
GENERAL : selección de la pági na general del menú.
AUDIO : se le cción de la página de audio del menú.
VIDEO : selección de la página d e vídeo del menú.
PREFERENCE : s elección de la página de preferenci as del menú.
Página de Configuración G ener al
- - GENERALSETUP PAGE - -
TV DISPLAY WIDE
TFT DISPLAY 16:9
ANGLE MARK ON
OSD LANGUAGE ENG
CLOSED CAPTIONS ON
SCREEN SAVER ON
AUTO STANDBY 3H
GOTO GENERAL SETUP PAGE
TV DISPLAY : s elección del formato de pantalla de l a imagen a
reproducir.
4:3 PANSCAN : si usted tiene u n televisor estándar, los laterales
de la imagen quedarán recortados a readaptados para que
ajusten al form ato de la pantalla de su TV.
4:3 LETTERBOX : si usted ti ene un televisor estándar, una imagen
ancha con bandas negras arriba y abajo se most rará en la pantalla
de TV.
16:9:visualización de pantalla panorámi ca.
TFT DISPLAY : selecció n del formato de pantalla del panel.
ON
OFF
ON
OFF
ENGLISH
FRENCH
GERMAN
SPANISH
DUTCH
POLISH
HUNGARIAN
ON
OFF
TFT 16:9
TFT 4:3
4:3 PANSCAN
4:3 LETTERBOX
16:9
se
Angle Mark
Muestra i nformación de la selección actual de ángulo de i magen en la
esquina derecha de la p an talla TFT, para aqu ellos discos que
cuenten con est a opción.
OSD Language
Selección de l id ioma de su preferencia.
Closed Captions
Los subtítulos c onsisten en información cont enid a en la señal de
vídeo de algu nos discos. Antes de seleccionar es ta función, por
favor, asegúrese de que el disc o contiene este tipo de informació n y
de que su apa rato de TV tamb ié n permite esta opción.
Screen Saver
Esta función se u sa para activar o desactivar e l salvapantallas.
AUTO STANDBY
Encender el disposi ti vo en modo de espera.
Página de Configuración de Audio
Página de Config uración de Audio
7
-- --
- - - -AUDIO SETUP PAGE
DOWNMINX
DIGITAL OUTPUT
DOLBY DIGITAL
GO TO AUDIO SETUP PAGE
STR
RAW
DUAL MONO
DYNAMIC
LT/RT
STR
STR
L-MONO
R-MONO
FULL
-
-
-
-
-
-
-
-
-
-
MIX-MONO
-
-
-
-
-
-
-
-
OFF
-
SPDIF/OFF
SPDIF/RAW
SPDIF/PCM
STEREO
Page 53

Ajustes del menú de configuración (SETUP)
Página de Configuración de Audio
Downmix
Esta opción le permi te ajustar la salida análoga estéreo de s u
reproductor de DVD.
LT/RT :Sele ccione esta opción si su reproductor d e DVD está
conectado a u n descodificador Dolby Pro Logic.
Stereo :Seleccione e sta opción cuando el sonido reproducido
proceda únicame nte de los dos altavoces delantero s.
Digital Output
Esta función s e usa para seleccionar la salida SPDIF: S PDIF Off,
SPDIF/RAW, SPDIF/PCM.
SPDIF Off : Desactiva la salida SPDIF.
SPDIF/RAW : Si ha conectado su salida de audi o digital a un
descodificador/receptor m ulticanal.
SPDIF/PCM: Sól o si su receptor no pudiera descodifica r audio
multicanal.
Dolby digital
Las opciones incluidas e n la configuración de Dolby Dig ital son:
'Dual Mono 'y 'Dynami c '.
Dual Mono
Stereo :E l soni do mono izquierdo enviará señales de salida al
altavoz izquierdo y el soni do mono derecho enviará señales de
salida al altavoz derecho.
L-Mono :El soni do mono izquierdo enviará señales de salida a
los altavoces izquierdo y derecho.
R-Mono :El sonido mono derecho enviará señales de salida a lo s
altavoces izquierdo y derecho.
Mix-Mono:El sonido mono mix izquierdo y derecho enviará
señales de salida a l os altavoces izquierdo y derecho.
Dynamic
Compresión del rango dinámico.
Página de Configuración de Vídeo
Página de Configur ación de Vídeo
- - VIDEO SETUP PAGE - -
BRIGHTNESS 00
CONTRAST 00
HUE 00
SATURATION 00
GOTO VIDEO SETUP PAGE
Brillo, Contrast e, Color, Saturación: ajuste de la calida d de v ídeo .
Página de Preferencias
Página de Preferen cias
- - PREFERENCE SETUP PAGE - -
TV TYPE PAL
AUDIO ENG
SUBTITLE ENG
DISC MENU ENG
DEFAULT
GOTO PREFERENCE PAGE
RESET
ENGLISH
FRENCH
GERMAN
SPANISH
DUTCH
POLISH
HUNGARIAN
OTHERS
ENGLISH
FRENCH
GERMAN
SPANISH
DUTCH
POLISH
HUNGARIAN
OFF
OTHERS
TV Typ e
Selección del sistema d e colo r que corresponde con su TV duran te
la reproducción de AV. Este reproductor de DVD e s compatible con
los sistemas NTSC y PAL.
8
ENGLISH
FRENCH
GERMAN
SPANISH
DUTCH
POLISH
HUNGARIAN
OTHERS
PAL
AUTO
NTSC
Page 54

Ajustes del menú de configuración (SETUP)
Página de Preferencias
PAL - S eleccione est a opción si el TV a l que está cone ct ado
funcion a con el sistema PAL. Cambiará la s eñal de vídeo de un
disco NTS C y la emitirá en el fo rmato PAL.
NTSC - Se leccione esta o pción si el TV al que está conec ta do
funcion a con el sistema NT SC. Cambiará la señal de vídeo de un
disco PAL y la em itirá en el forma to NTSC.
Auto :Cambi a la señal de salida de víd eo automáticamente según
el format o de reproducc ión del disco.
Audio :Sel ección del idioma d e audio (si estuv iera disponib le ).
Subtitl e: Selección del i di oma de subtít ulos (si estuvi er a disponible) .
Disc Menu : Selección del i dioma del menú de l di sco (si estuvie ra
disponi ble).
Ajustes del Menú del TFT secundario
Picture Page
Bright
Ajuste de l brillo de la pantalla.
Contras t
Ajuste de l contraste de la
pantalla.
Color
Ajuste de l color de la pantall a.
LANG
Ajuste de l idioma OSD del menú .
ZOOM
Ajuste de l Zoom de la pantalla: 16 :9 o 4:3
PICTUR E
BRIGHT
CONTRAST
COLOR
LA NG ENGLISH
Z00M 16:9
Parámetros y Especificaciones
Parámetros electrónicos
Elemento
Requi sito s de
ali ment ació n
Con sumo e léctri co
Hum edad
ope raci onal
SAL IDA DE
DEO
V
SAL IDA DE
Salida
AUD IO
Audio
: AC 100-2 40 V , 50/6 0 Hz
: <15 W
: 5 % to 90 %
:1. 0 Vrm s (1 KHz, 0 d B)
Altavoz:1WX2, salida para auriculares, salida coaxial
Sistema
50
50
50
Lás er
Sis tema d e se
Resp uesta d e
fre cuenci a
Propo rció n se al a
rui do
Ran go din ámic o
Nota: El di seño y las especifi caciones está suj et os a cambios sin
notific ación previa.
Lás er semi condu ctor, lo ngitu d de onda : 650 n m
al
: NTS C / PAL
: De 20 Hz a 20 kHz(1 dB)
: Más d e 80 dB (só lo conectore s ANALOG O UT )
: Más d e 80 dB (DVD/ CD)
Requisito estándar
9
Page 55

Servici o y asisten cia
Para información: ww w.lenco.com
Para asistencia: http ://lencosupport.zendesk.com
Teléfono d e asistenci a Lenc o:
Alemania 0900-1520530 (Tarifa local)
Países Bajos 0900-23553626 (Tarifa local + 1ct P/min)
Bélgica 02-6200115 (Tarifa local)
Francia 03-81484280 (Tarifa local)
El teléfono d e asistencia está disponible de lunes a j ueves, de 9 de
la mañana a 6 de la tarde.
Cuando se ponga en contacto c on Lenco, se le pedirá el modelo y
el número de serie de su producto . El número de serie se
encuentra en la parte posteri or del aparato. Por favor, escriba
debajo el número de serie:
Modelo: MES-4031
Número de serie :_________________________________
Lenco ofrece servicio y garantía e n cumplimiento de la le y de la
Unión Europea, lo cua l implic a que, en c
precise ser reparado (tanto durante co mo después del periodo de
garantía), deberá contactar direct amente con su distribui dor.
Nota importan te: No es posib le envi ar sus reparaciones
directamente a Lenco
Nota importan te: Si la unidad es abi erta por un centro de servi ci o
no oficia l, la garantía quedará anulada. Este aparato no es
adecuado para el uso profesional. En caso de darl e un uso
profesional, todas las obligaci ones de garantía del fabricante
quedarán anuladas.
aso de que su producto
Este símbolo indica que no deberá deshacerse del producto
eléctrico o batería en cuestión tratándolo como desecho del hogar
en el ámbito de la UE. Para garantizar un tratamiento residual
correcto del producto y su batería, por favor, elimínelos
cumpliendo con las leyes locales aplicables sobre requisitos para
el desechado de equipos eléctricos y baterías. De hacerlo,
ayudará a conservar recursos naturales y mejorar los estándares
de protección medioambiental en el tratamiento y eliminación de
residuos eléctricos (Directiva sobre la Eliminación de Equipos
Eléctricos y Electrónicos).
Los productos con la marca CE cumplen con la Directiva EMC
(2004/108/EC) y con la Directiva de Bajas Tensiones
(2006/95/EC) emitida por la Comisión de la Unión Europea.
Podrá consultar la Declaración de Conformidad en
http://www.lenco.eu/supportfiles/CE/vnj3e59859tjhgjharasrppppp.pdf
Reservados todos los derechos
10
 Loading...