

Page 1
MES-229
PORTABLE DVD PLAYER WITH 2 X 7” (17,5 CM) SCREEN
TRAGBARE DVD SPIELER MIT 2 X 7” (17,5 CM) MONITORE
DRAAGBARE DVD SPELER MET 2 X 7” (17,5 CM) SCHERM
LECTEUR DVD PORTABLE AVEC 2 ECRANS 7” (17,5 CM)
Manual
Bedienungsanleitung
Handleiding
Manuel d’utilisation
For information and support, www.lenco.eu
Zur Information und Unterstützung, www.lenco.eu
Voor informatie en ondersteuning, www.lenco.eu
Pour information & support technique, www.lenco.eu
Page 2
'9'SOD\HU
6HFRQGVFUHHQ
1
)
'
(1
1/
2YHUYLHZ
Page 3
Left side DVD-player
Lower side of both screens
Upper side of the DVD-player
Back side of both screens
Remote control
2
Left side second screen
Page 4
Overview
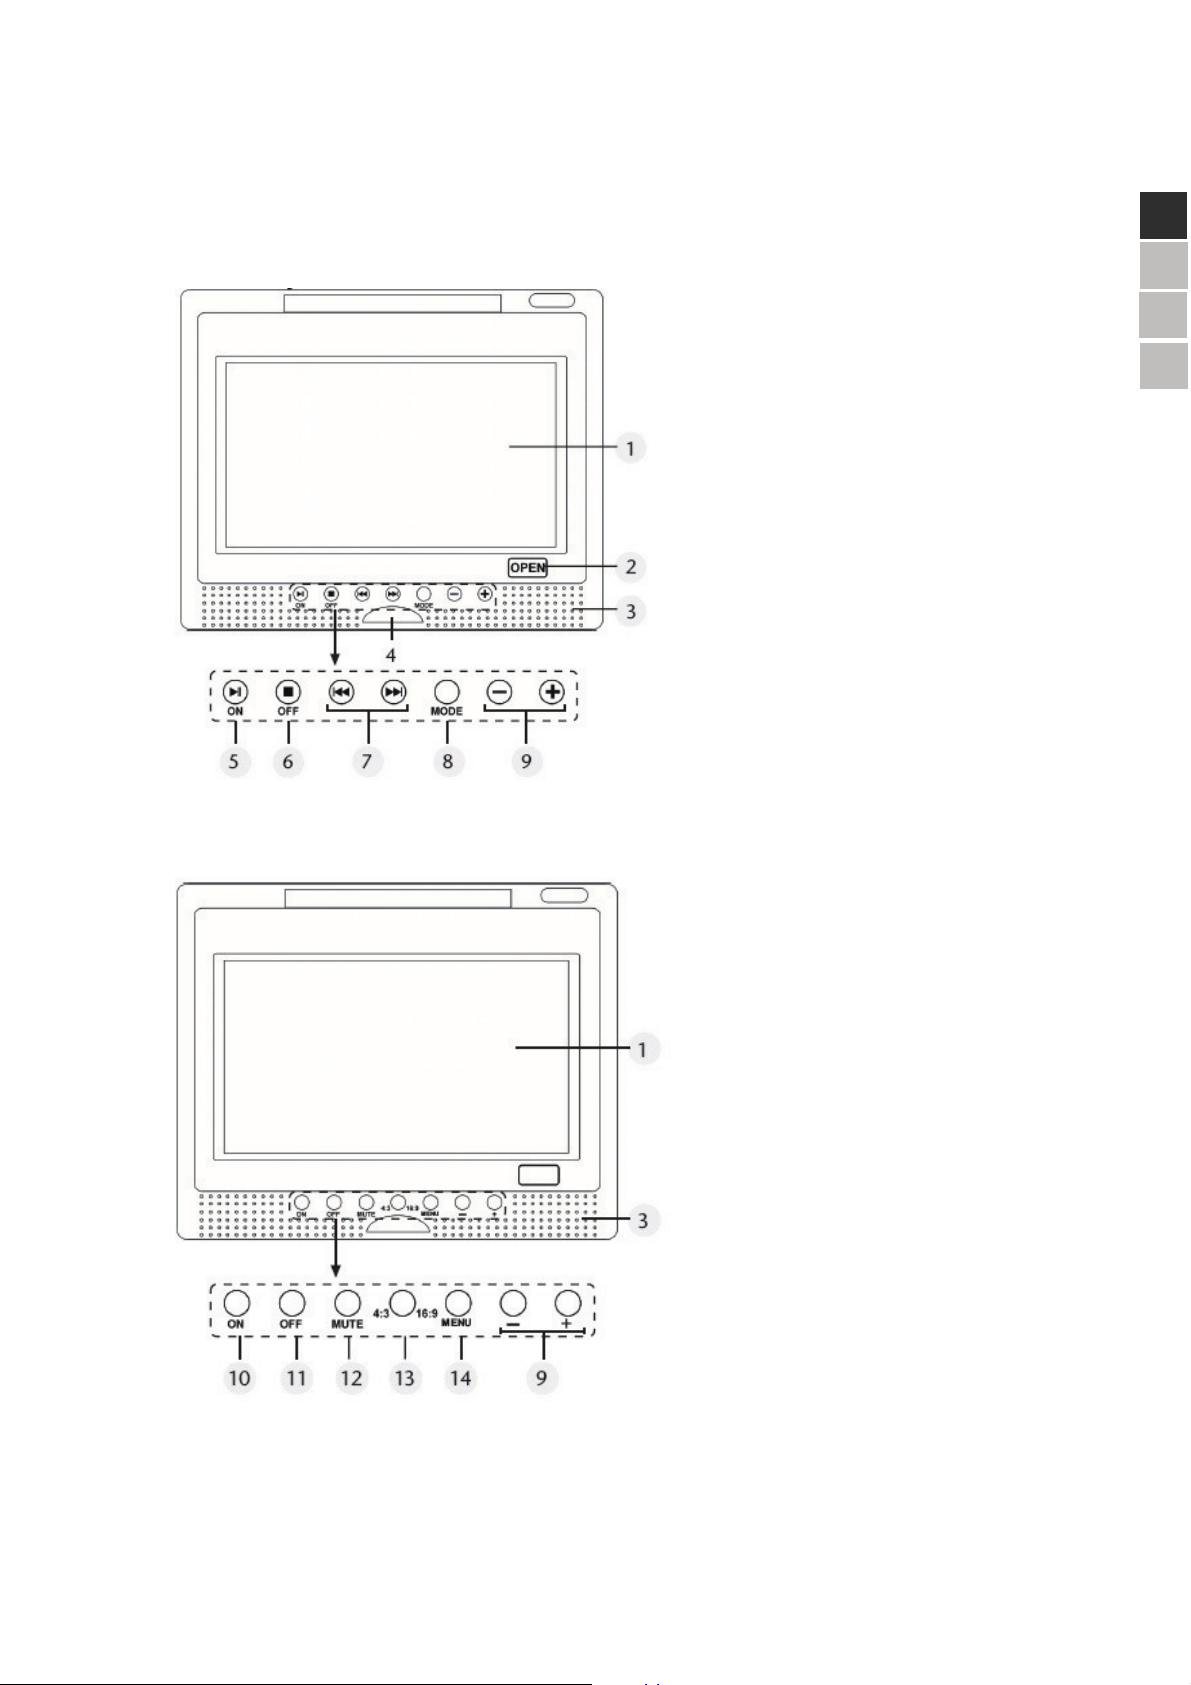
DVD player
1 TFT display
2 OPEN: open CD/LV tray
3 Speakers
4 Remote sensor
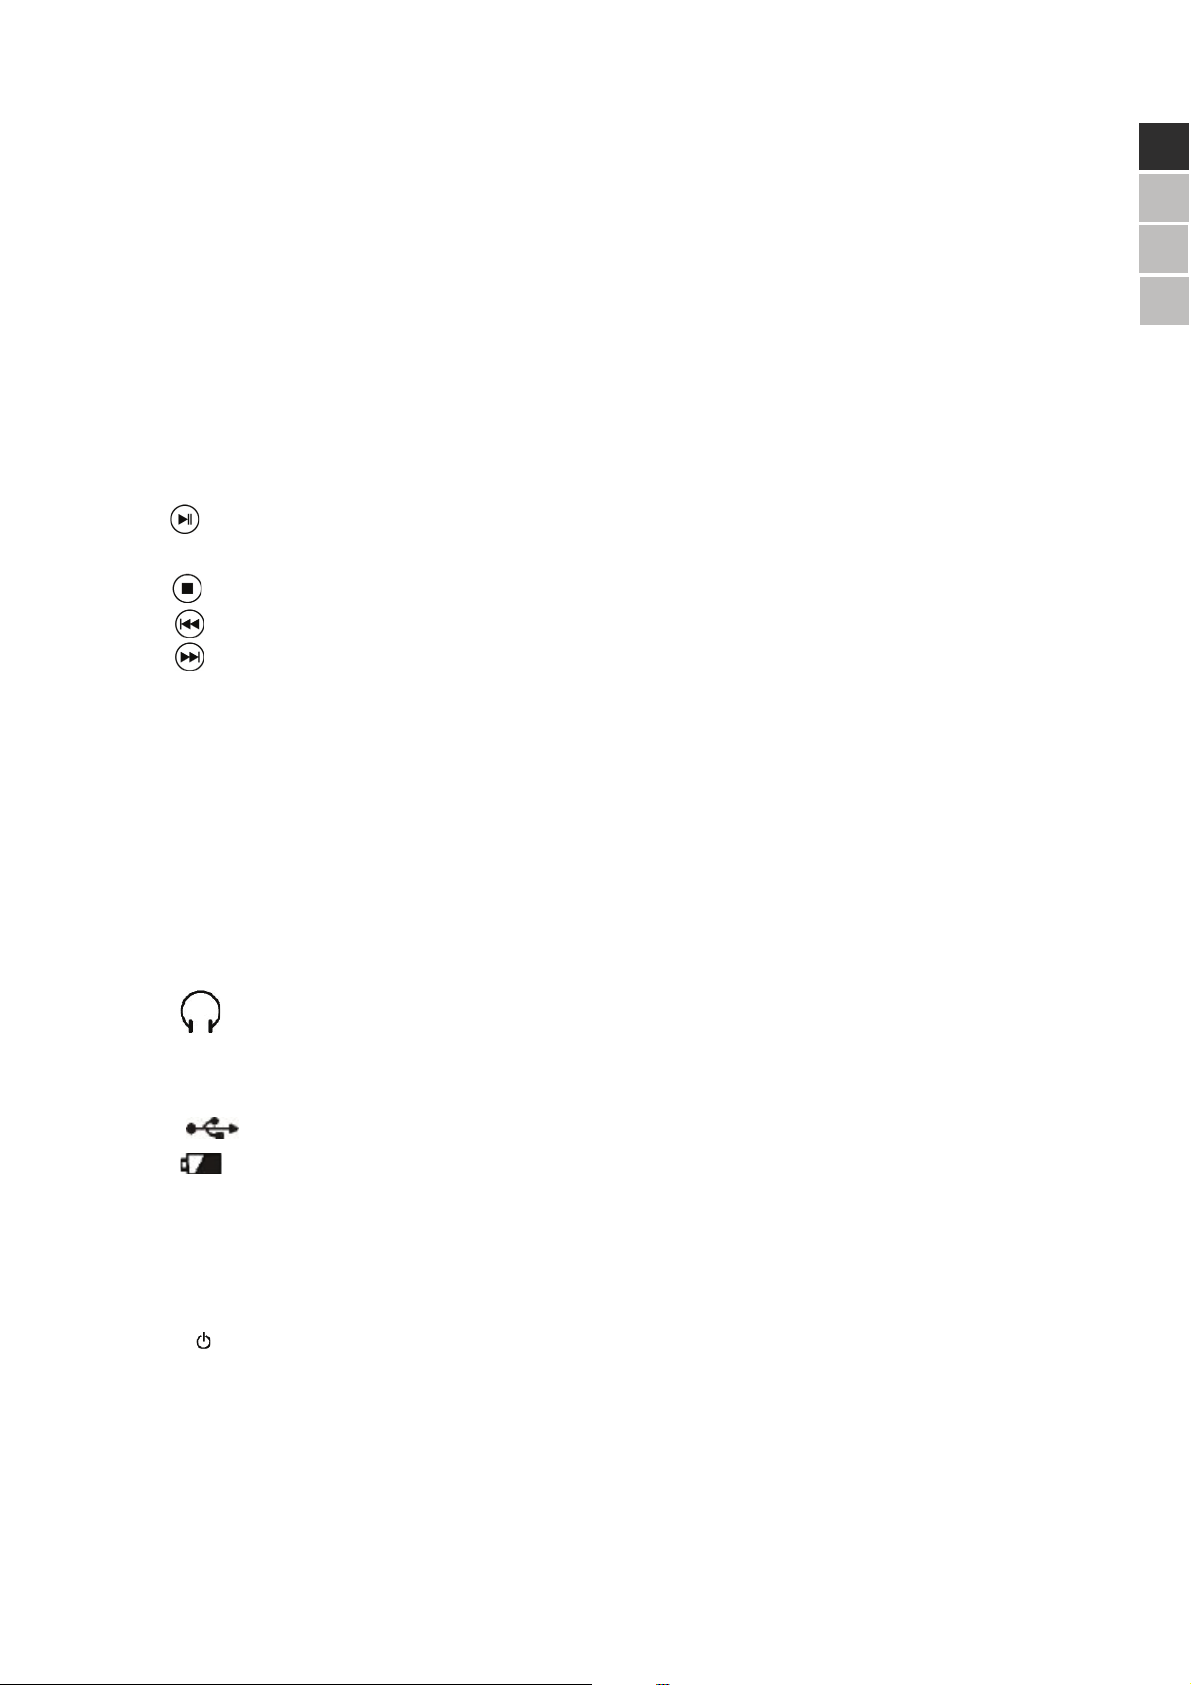
5 ON : turn on the DVD player
start or pause playback
6 OFF: turn off the DVD player,
stop playback
7 : Title/chapter rewind
: Title/chapter forward
8 MODE: displays different modes, which can be selected with + and – keys.
The following modes are available: BRIGHTNESS, CONTRAST, COLOR, SCALE, REVERSE, AV mode.
9 VOLUME +/-: adjust volume
10 ON: turn on display
11 OFF: turn off display
12 MUTE: turn off volume of this monitor
13 4:3 / 16:9: switch second monitor from 4:3 to 16:9
14 MENU: displays different settings, which can be selected with + and – keys.
The following settings are available: BRIGHTNESS, CONTRAST and COLOR.
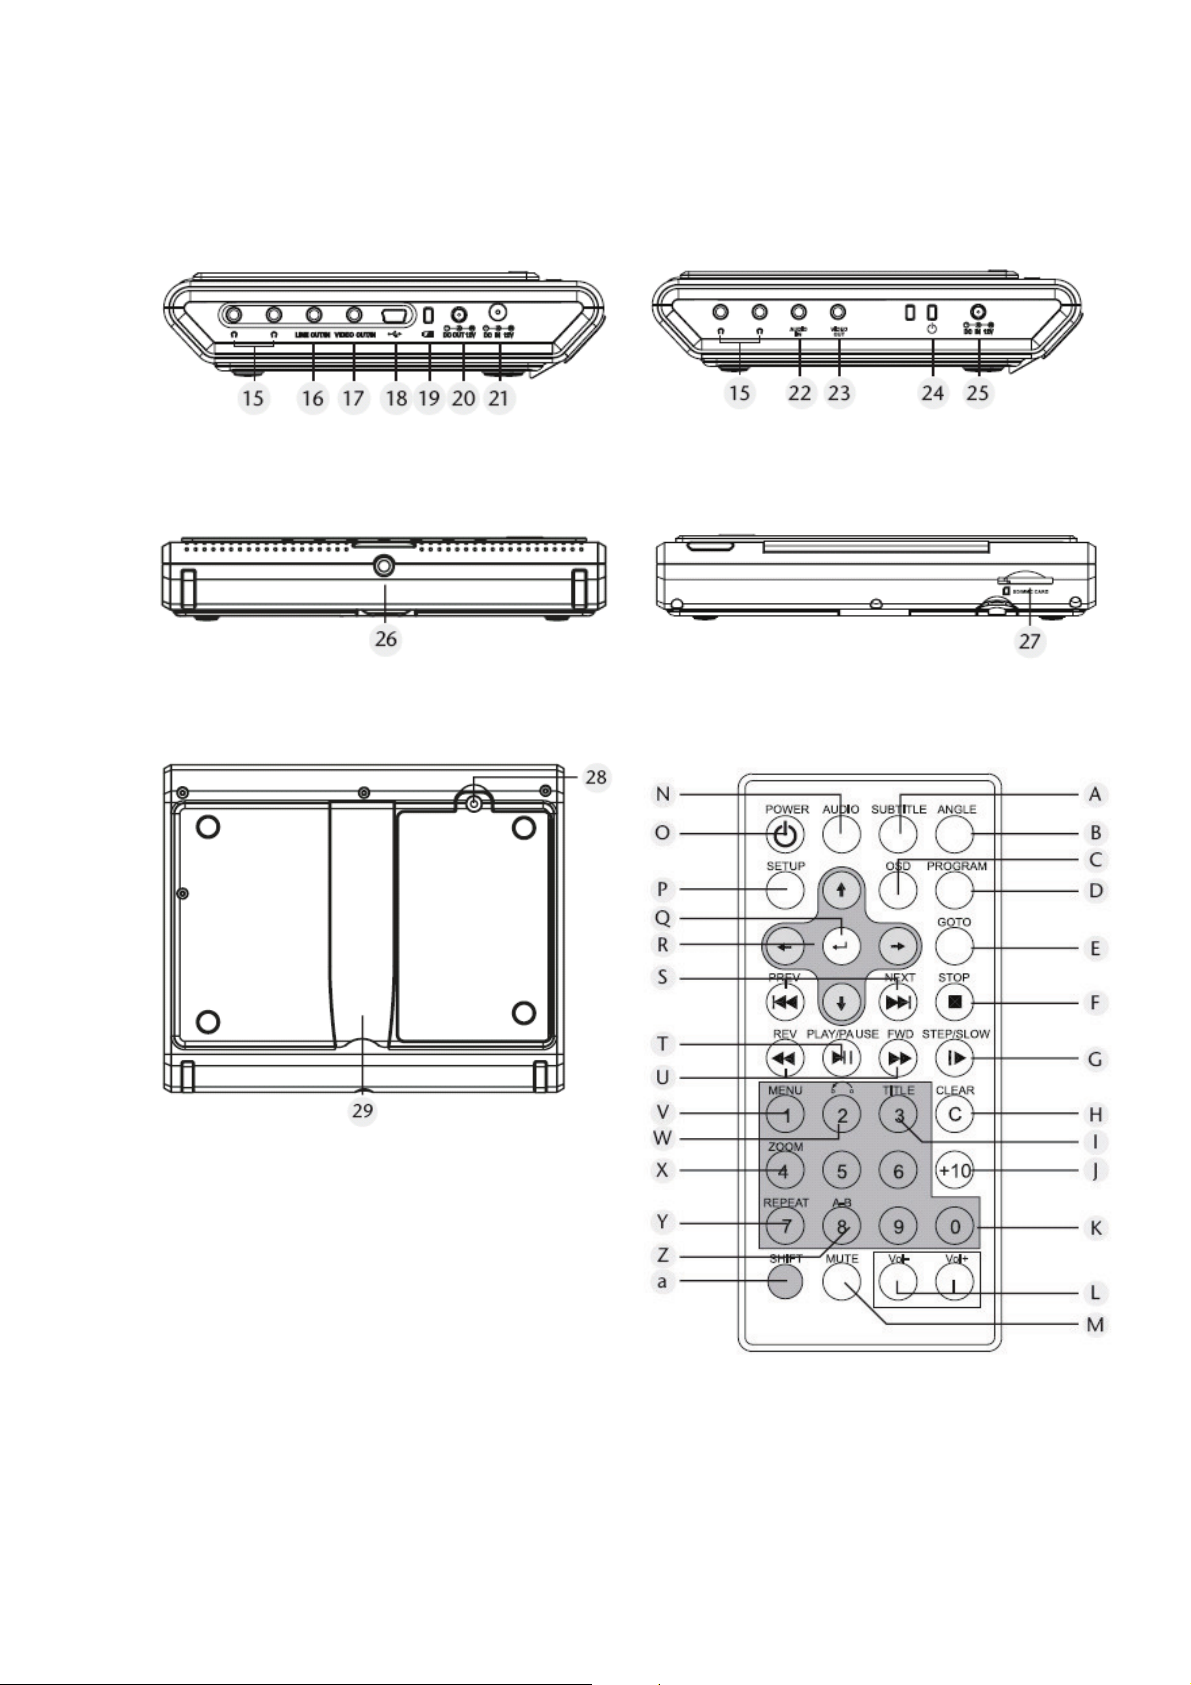
15
Headphone jack
16 LINE OUT: audio connection for second monitor
LINE IN: audio connection for auxiliary device (such as camcorder, etc.)
18
Mini USB jack
19
Battery power indicator: when charging the LED is red. When fully charged, the LED goes out.
20 DC OUT 12 V: power adapter for second monitor
21 DC IN 12 V: power adapter
22 AUDIO IN: audio input
23 VIDEO IN: video input
24 : manual second monitor
25 DC IN 12 V: power adapter for second monitor
26 Screw for mounting monitor on tripod
27 SD/MMC CARD: SD/MMC card slot
28 Screw for mounting cover battery compartment
29 Support for mounting DVD player and monitor
3
)
'
(1
1/
Page 5

Remote control
$ SUBTITLE: Press SUBTITLE repeatedly to select another
Subtitle language available on the DVD. The switch takes place immediately and does not
need to be confirmed.
B ANGLE: Select camera angle (if available on the DVD)
C OSD: During playback, repeatedly press OSD to show current position on the disc’s (current
title, current chapter, and current time). Press to switch between time displays.
D PROGRAM: Program the display frequency
E GOTO: Jump to a selected position on the disc
F STOP: Press Stop once to stop playback. Press PLAY to resume. Press STOP again to stop
playback completely.
G STEP/SLOW: During playback, press to activate time loop. Press repeatedly to select 1/2 1/3 1/4 1/5
1/6 or 1/7.
Press PLAY to resume normal playback. The SLOW mode is not available for CD and
MP3 discs. The reverse SLOW mode is not available for SVCD and VCD.
H CLEAR: Clear settings.
I TITLE: Go to disc title menu
J +10: Indicate 10 for 2 digit number display
K Keys 0-9
L VOL +/-: Adjust volume
M MUTE: Mute volume
N AUDIO: Press AUDIO repeatedly to select another language available on the DVD. The switch
takes place immediately and does not need to be confirmed. Please not that many DVD
discs do not support audio language selection.
O POWER: Turn device on/standby
P SETUP: Display setup menu
Q ENTER: Confirm selection
R Navigation keys: Select menu items
S PREV/NEXT: Press to jump to start of title (CD) or chapter (DVD).
Press to skip title (CD) or chapter (DVD). Please note that many DVD discs don’t allow
for skipping of the title/chapter before the start of the actual film out of consideration for
licenses involved.
T PLAY/PAUSE: Start or pause playback
U FWD/REV: Fast forward or fast reverse
V MENU: Display disc menu
W BACK: Return to opening of DVD.
4
Page 6

X ZOOM: Press to enlarge image in centre of display. Press repeatedly to change zoom factor: 2 3
When a function is not possible or not available in the current mode, “INVALID CDE” appears.
5
)
'
(1
1/
4 1/2 1/3 1/4 or OUT.
Y REPEAT: During playback press REPEAT repeatedly. Press to repeat the selected segment.
(Selection is reset after a few seconds)
DVD CHAPTER – Repeat chapter.
TITLE – Repeat title .
OFF – Repeat function off.
CD/VCD REPEAT - Repeat title.
REPEAT ALL – Repeat disc.
OFF – Repeat function off.
MP3-CD REPEAT - Repeat title
REPEAT DIR – Repeat folder.
REPEAT ALL – Normal playback.
OFF - Repeat function off.
Z A-B: Press A-B to mark the beginning of the sequence you wish to repeat. Press A-B again
to mark the end of the sequence. The sequence will be repeated constantly. Press A-B
again to resume normal playback.
a SHIFT: Activate function of 0-9 key.
Page 7

Contents
Overview....................................................................................................................................... 5
DVD player
Remote control……………………………………………………………………………………………6
Safety instructions ........................................................................................................................ 7
About this manual
Keep children away from electrical appliances...............................................................................7
Safely mount player and monitor .................................................................................................... 7
Power supply……………………………………………………………………………………………...7
Never service device by yourself ....................................................................................................8
Storms .................................................................................................................................... 8
The CD player
Cleaning and maintenance .............................................................................................................8
Battery safety instructions ...................................................................................................... 8
General information ...................................................................................................................... 5
DVD
.................................................................................................................................................5
DVD Content ...................................................................................................................................5
Region codes................................................................................................................................... 5
MP3 .................................................................................................................................................6
MPEG4 and DiVX............................................................................................................................ 6
Getting started .............................................................................................................................. 6
Unpacking
Content of the packing ....................................................................................................................6
Placing the batteries in the remote control .....................................................................................7
Operating the remote control ..........................................................................................................7
Connections and provisions for connections ................................................................................ 5
AC Power supply
Connecting with a plug
Connecting with a 12 V adapter ............................................................................................. 5
Connecting the battery
Charging the battery using the power adapter ....................................................................... 5
Charging the battery using the 12 V car adapter .................................................................... 5
Removing the battery ............................................................................................................. 5
Connecting the second display
Output the DVD player image to a TV set .....................................................................................6
Output images from an external source to a display
Connecting headsett .......................................................................................................................7
Using the DVD player in the car ............................................................................................. 5
Mounting a display on a head support
Operation...................................................................................................................................... 6
Turn on
Turn off ............................................................................................................................................6
Insert disc ........................................................................................................................................6
Buttons on the device and the remote control ................................................................................6
Display settings ...................................................................................................................... 6
Reverse message - REVERSE .............................................................................................. 7
Volume control........................................................................................................... 7
………………………………………………………………………………………...5
..………………………………………………………………………………..7
…………………………………………………………………………………….8
........................................................................................................................................6
.............................................................................................................................5
....................................................................................................................5
.......................................................................................................5
......................................................................6
............................................................................................5
............................................................................................................................................6
Brightness, Contrast, Color
4:3 and 16:9 switch
6
Page 8

Mute .......................................................................................................................... 8
.PREV/NEXT ............................................................................................... 8
Quick Find FWD/REV................................................................................................ 8
Repeat functions...........................................................................................................................8
Repeat ...................................................................................................................... 8
Repeating a selectedA-B sequence .......................................................................... 9
Direct selection.............................................................................................................................. 9
Direct choice - titles – Number keys (Audio CD)........................................................ 9
Direct choice Title / time - GO TO.............................................................................. 9
Image Features...........................................................................................................................10
Enlarge image – ZOOM........................................................................................... 10
Camera angle – ANGLE(DVD) ................................................................................ 10
DVD keys .....................................................................................................................................10
Disc menu – MENU ................................................................................................. 11
Title menu – TITLE .................................................................................................. 11
Language selection - AUDIO
Subtitle selection - SUBTITLE
Display info - OSD
Program list – PROGRAM.........................................................................................................12
MP3 CD playback .......................................................................................................................12
JPEG CD playback.....................................................................................................................12
Rotating JPEG images...............................................................................................................12
Settings in SETUP menu ................................................................................................. 5
System Settings ............................................................................................................................5
TV Type
Screensaver.................................................................................................................... 5
TV Format ......................................................................................................................................5
Password .......................................................................................................................................5
Ratings............................................................................................................................ 5
Default settings.......................................................................................................... 5
Language settings ........................................................................................................................ 5
Audio language.......................................................................................................... 5
Subtitle language....................................................................................................... 5
Menu language.......................................................................................................... 5
Troubleshooting .............................................................................................................. 6
Problem
Possible cause / solution............................................................................................................. 6
General...................................................................................................................... 6
DVD specific.............................................................................................................. 7
Waste disposal................................................................................................................ 8
Packaging
Device.............................................................................................................................................8
Batteries and accumulators.........................................................................................................8
Technical data ................................................................................................................ 8
7
)
'
(1
1/
Display functions...........................................................................................................................8
Playback ................................................................................................................... 8
Pause…………………………………………………………………………………………8
Stop ........................................................................................................................... 8
Slow motion - STEP/SLOW....................................................................................... 8
Page 9

Safety instructions
About this manual
Read carefully read all safety instructions before operating the player. Follow all the warnings on the
player and in the user manual.
Store the user manual for future reference. Pass on this user manual when someone else is using the
player.
Keep children away from electrical appliances
Do not allow children to play with electrical devices without supervision. Swallowing batteries can be live
threatening. Therefore, keep the device and its batteries away from small children. When a battery is
swallowed, immediately call for medical assistance. Plastic packaging material also poses suffocation
threat.
Safely mount player and monitor
Place the device on a stable flat surface. Do not use the device in a room with a high degree of humidity
such as bathrooms. Be careful to avoid:
! direct heat sources (e.g. radiator)
! direct sunlight
! moist, water and spilled water (do not place vases on top of the player)
! magnetic fields of (e.g. TV-set or other speakers)
! open fire (e.g. candles)
A certain number of aggressive furniture paintings can damage the rubber support of the player. In this
case use an underlay.
Power supply
Connect the device to an easily accessible power outlet of 230 V 50 Hz near the location of installation. In
case the power needs to be cut swiftly, this power outlet must be easily accessible.
Use the power cord and plug that are included. Do not attempt to connect this plug to another outlet, this
can cause serious damage.
When moving the player from a cold room to a warmer room, wait a while before connecting the power.
Condensation can damage the player. When on room temperature the player can be connected.
Power supply cords should be routed so that they are not likely to be walked upon or pinched by items
placed upon or against them.
8
Page 10

Never service the device by yourself
Immediately disconnect the player when the plug or power cord is damaged. Do not attempt to open or to
(1
'
1/
service this product yourself. You may be exposed to dangerous voltage. Refer all servicing to our
Service Center or other qualified service personnel.
Storms
Unplug the device from the mains supply whenever the player is left unattended and unused for long
periods of time or during a lightning storm.
The CD player
This CD player is a class 1 laser product. The player disposes of a safety system to prevent hazardous
radiation exposure when operated normally. To avoid eye injury, do not change or damage the safety
system.
Cleaning and maintenance
Use a dry soft cloth for cleaning. Do not use chemical cleaners or solvents; they can damage the surface
and/or the text on the device.
)
Battery safety instructions
Batteries can contain flammable substances. When used improperly, batteries may leak, heat up, catch
fire or even explode. This may damage your health as well as your device.
Follow these instructions carefully:
! Do not charge batteries unless clearly indicated.
! Do not discharge the batteries trough high power output.
! Do not short-circuit the batteries.
! Avoid heat and do not throw the batteries in fire.
! Do not open or reshape the batteries. Hands and fingers may be hurt and battery liquid may damage
skin and eyes. In this case, rinse the affected areas with large amounts of water and seek medical
assistance.
! Avoid bumping and shaking.
! Do not change polarity. To avoid short-circuit do not swap (+) and (-) poles.
! To avoid malfunction do not use new together with old batteries or batteries from different types.
! Remove used batteries from the player immediately.
! Remove the batteries if the player is left unattended and unused for long periods of time.
! Change used batteries at the same time and use new batteries from the same type.
! Before inserting the batteries, check and if necessary clean the contact points.
9
Page 11
General information
DVD
The DVD or Digital Versatile Disc is a digital storage medium for data. They can be
recognized by the following symbols. There are different types of DVD with different
storage capacity, these depend on the way information is stored on the disc.
DVD content
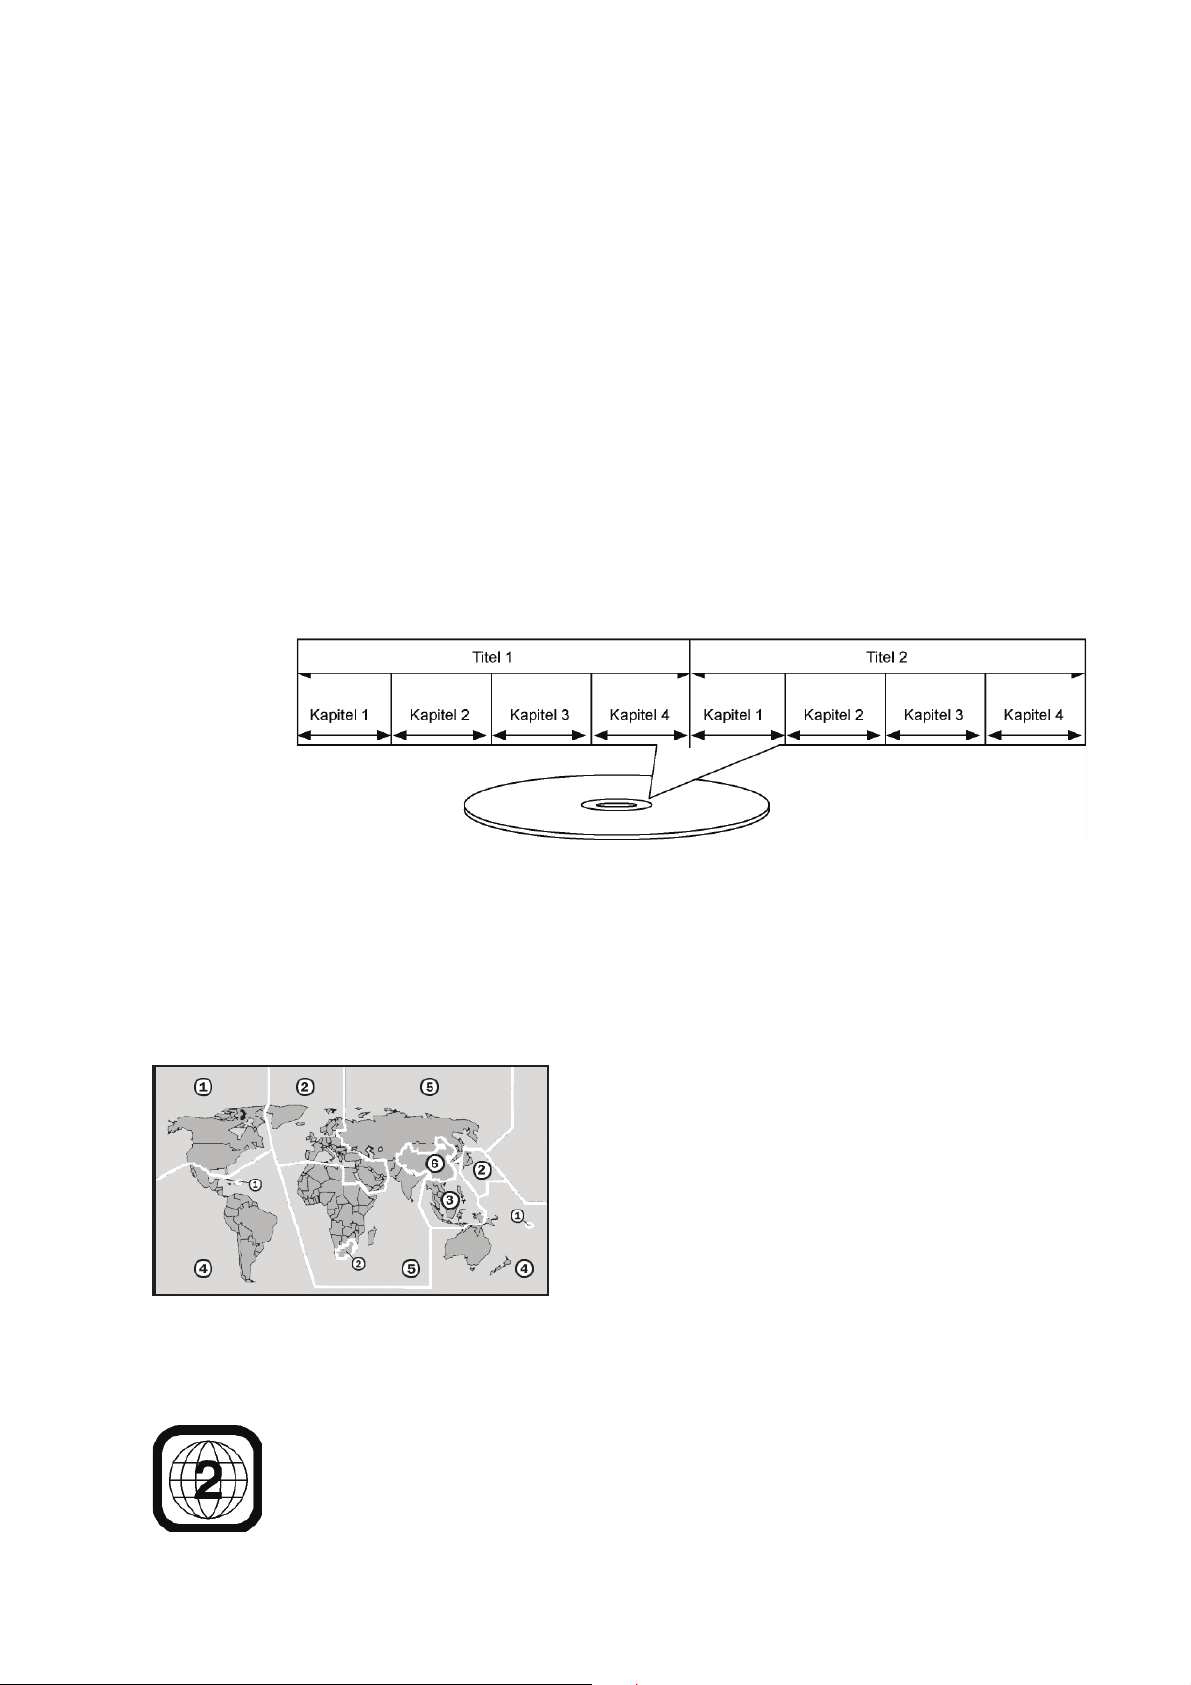
Video DVD’s are subdivided into titles and chapters. A DVD may contain several titles
which each can contain several chapters. Titles and chapters are numbered
progressively:
Usually the first title contains license information and information about the
manufacturer. The following title usually contains the film itself. Other titles may include
for example “making-of”, previews of other movies and information about the actors.
A DVD can contain a maximum of 8 languages and subtitles in maximum 32 languages.
Language and subtitles can be combined as preferred.
Region codes
Based on worldwide selling strategies, region
codes were developed to prevent DVD’s to be
played on players that were sold in another
region.
Certain movie DVD’s which were shot with
different camera angles even allow the user to
switch between these angles.
This code is based on a system in which the
entire world is subdivided into 6 regions. Europe is part of region 2. This region code is
printed on the DVD packaging (see logo).
Only DVD’s with region code 2 and 0 (suitable for DVD players) can be played on this
player.
10
Page 12

When experiencing problems during playback, please check the region code of
the DVD which should be 2 or 0.
MP3
The MP3 format is a Windows standard for compression of audio data. MP3 files will
only be recognized when saved with file extension *.mp3.
In contrast to a normal audio-CD, CD’s with MP3- and WMA-files can have directories
(maps, albums) and files (tracks, titles) the same way computer data CD’s do.
MPEG4 and DiVX
MPEG4 is a compression technology for multimedia and video (“MPEG” = Moving
Picture Experts Group).
DiVX is a trade mark for video compression technology based on the MPEG4 format.
This player supports DiVX 4 and DiVX 5, with a maximum Peak-Bit-Rate of 10.000 kbps.
Getting started
Unpacking
Remove all packing materials.
Caution!
Do not allow small children to play with the foil, this may cause suffocation!
Content of the packing
When unpacking, please check if the following items are present:
! 1 DVD player with integrated 7” TFT-display and Li-Ion battery
! 1 7” TFT-display
! 1 Power cord for the second display.
! 1 AV-connection cable (pal-plug to pal-plug)
! 1 Adapter 100-240 V input / 12 V output
! 1 Adapter for a cigarette lighter (12 V)
! 1 USB adapter cable (mini-USB to USB)
! Remote control incl. 1 button battery (3V, type CR2025)
! 2 Earphones
! 2 Cases to mount the displays to a head support in the car
! User manual and warranty documents
11
)
'
(1
1/
Page 13

Placing the batteries in the remote control
Do not expose the remote control to moisture, which could damage it.
A button battery (CR2025) is included. This battery is already mounted but is still
protected by a piece of protective foil to avoid damaging during transportation.
* Remove the foil by pulling it gently
To replace the battery:
1 In order to open the battery compartment, push the clip of
the small haft towards the inside (a) and remove the battery
compartment (b).
2 Put the battery into the compartment with its engraved plus
pole facing up.
3 Slide the battery compartment back into the remote control.
Make sure a clicking sound is heard.
Caution!
The supplied batteries may not be charged, disassembled, thrown in the fire or shortcircuited.
Operating the remote control
1. Aim the remote control directly at the infrared sensor (4) on the
front side of the player or display.
The remote control can be used up to 3 meters off the player.
! The remote control is designed to operate only the DVD
player.
12
Page 14

Ensure that all devices are switched off before connecting them. Not until all
connections have been made, may you switch them back on.
AC Power supply
When connecting other devices, first make sure these connections are made
before connecting the DVD player to the power supply.
Connecting with a plug
1 Insert the supplied player plug into the DC IN 12 V socket on the side of the player.
2 Connect the other end of the plug to a power outlet.
Connecting with a 12 V adapter
1 Insert the 12 V adapter plug into the DC IN 12 V socket on the side of the player.
2 Insert the 12 V adapter into a suitable 12 V power outlet, e.g. a car’s cigarette lighter.
Connecting the battery
When there is no other power supply available, please use the supplied battery.
This battery is already mounted but is still protected by a piece of protective foil to avoid
damaging during transportation.
1 Remove the foil by pulling it gently.
When charging the batteries for the first time and when charging them fully later
on, they need to be charged for 3, 5 hours. A fully charged battery allows for a playback
capacity of approximately 3 hours playback time (depending on the playback mode,
including volume).
Whenever the player is ON, the battery will not be charged.
13
)
'
(1
1/
Connections and provisions for connections
Connect the power supply to start using the DVD player.
You may connect the DVD player to a 230 V outlet using the plug or to a 12 V outlet
using the 12V-adapter.
The device can also be connected in several ways to other input and output devices
such as:
! a TV set
! a video recorder
! a receiver, e.g. a stereo system
Page 15
Charging the battery using the power adapter
1 Turn off the DVD player by pressing the OFF button.
2 Insert the plug of the supplied electric part into the DC IN 12 V socket on the side of
the player.
3 Connect the electric part to a power outlet. A red LED indicates that the battery is
being charged. The LED goes out only when the battery is fully charged.
Charging the battery using the 12 V car adapter
1 Turn off the DVD player by pressing the OFF button.
2 Insert the 12 V adapter plug into the DC IN 12 V socket on the side of the player.
3 Insert the 12 V adapter into a suitable 12 V power outlet, e.g. a car’s cigarette lighter.
A red LED indicates that the battery is being charged. The LED goes out only when the
battery is fully charged.
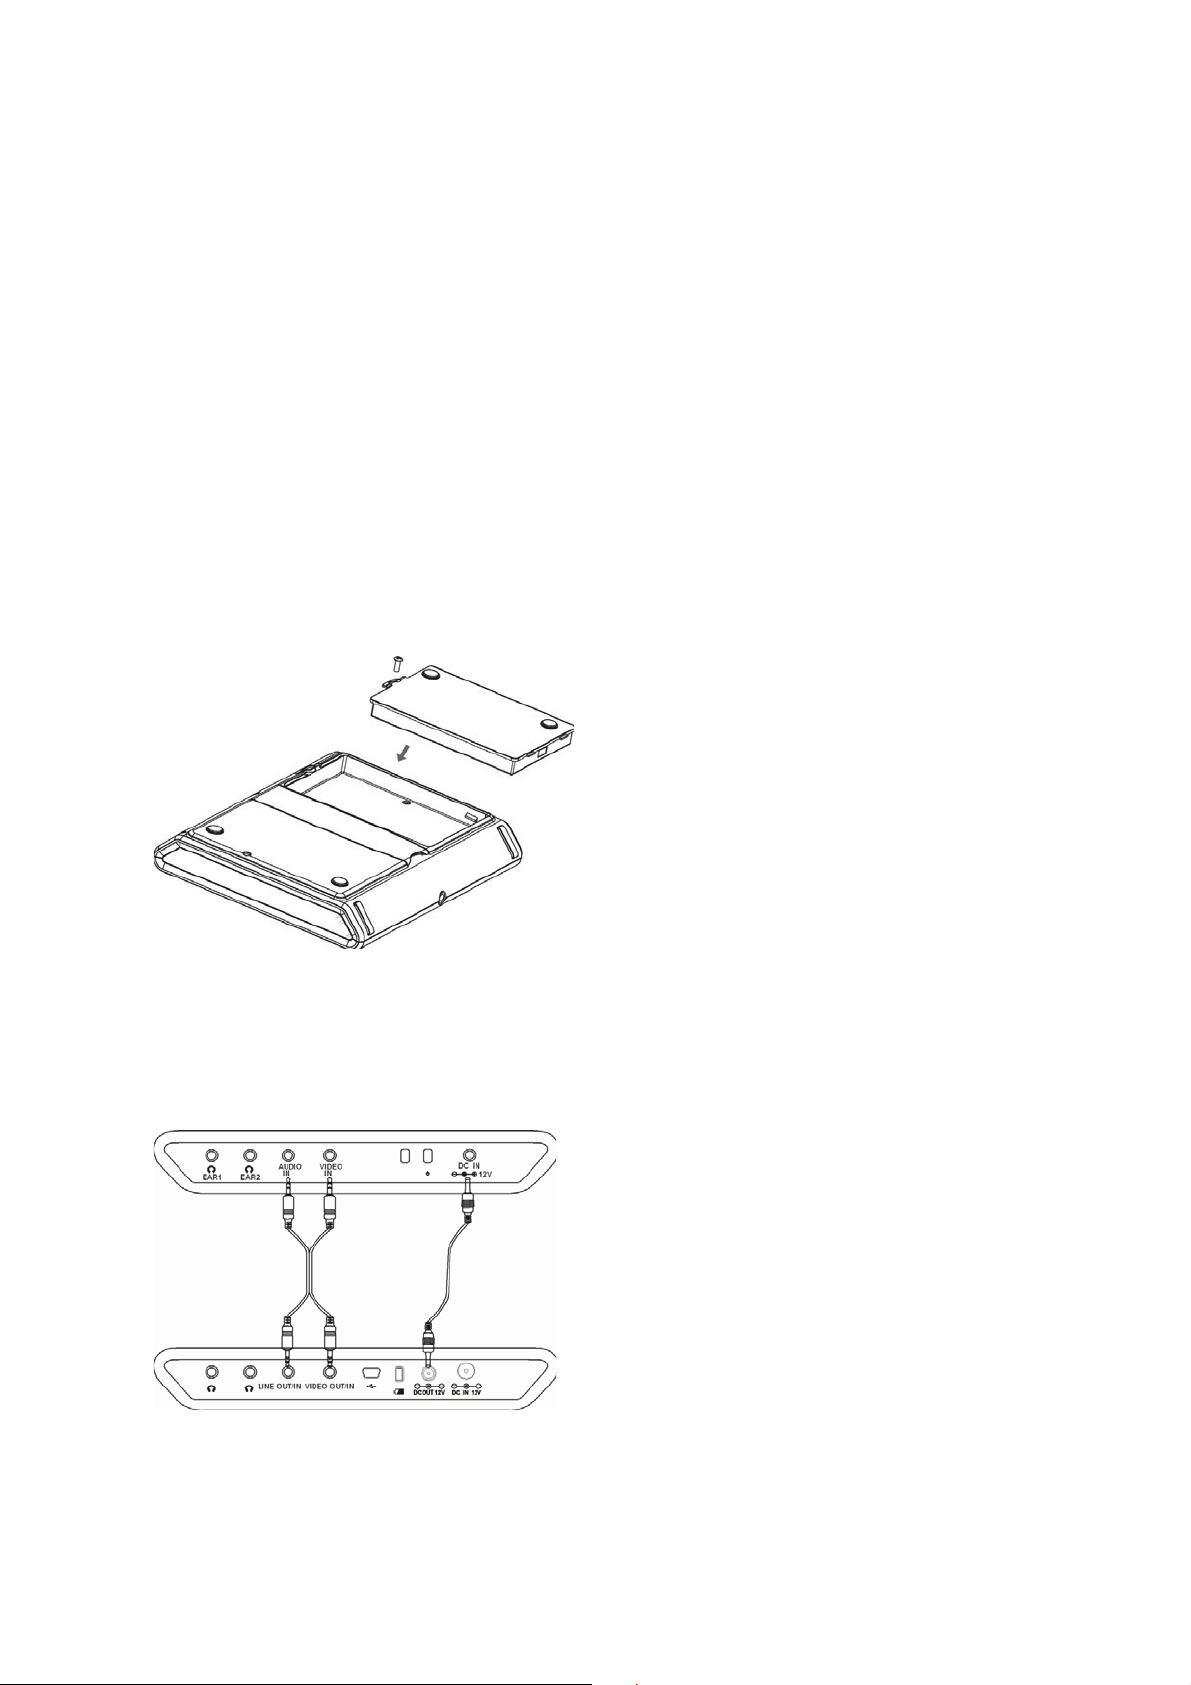
Removing the battery
1. Turn off the DVD player by pressing the
OFF button.
2. Disconnect the DVD player from the
power supply by removing the plug
from the power outlet.
3. Remove all other connections (if any).
4. Remove the screw on the cover of the
battery compartment with a crossslotted screwdriver.
5. Remove the cover of the battery
compartment.
6. Remove the battery from the battery compartment.
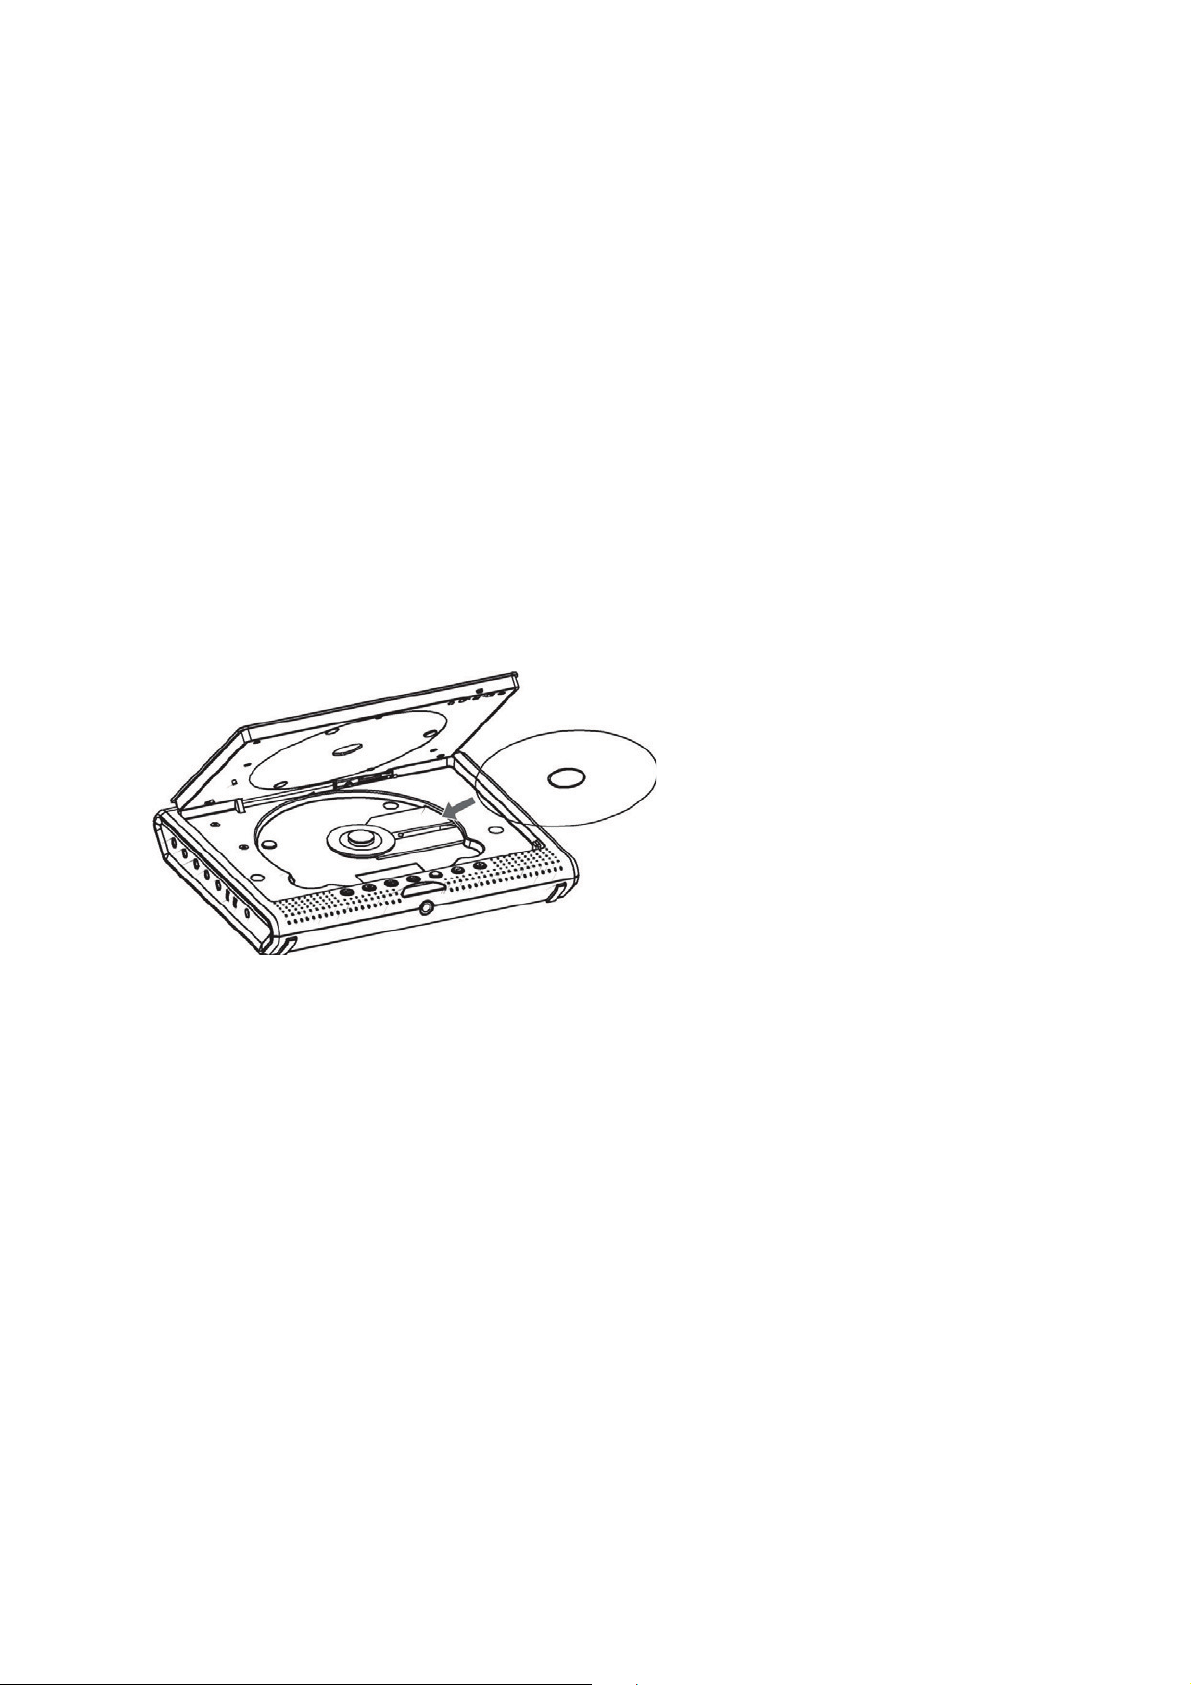
Connecting the second display
To connect both displays, the supplied power
cable (black/red cable) and the AV connection
cable (black and yellow cinch plug) are needed
1. Position the DVD player and the monitor
in a manner allowing you to easily access
the sockets of the devices.
2. Insert one end of the power cable into the
DC OUT 12 V socket on the DVD player.
3. Insert the other end into the DC IN socket
on the second display.
4. Insert one end of the AV connection cable into the AV socket on the DVD player.
Insert the black plug into the socket indicated as LINE OUT/IN and insert the
yellow plug into the socket indicated as VIDEO OUT/IN.
14
Page 16

5. Insert the other end of the AV connection cable into the AV sockets on the
second monitor. Insert the black plug into the socket indicated as LINE IN and
insert the yellow plug into the socket indicated as VIDEO IN.
Output the DVD player image to a TV set
You can connect your DVD player to a TV set.
This way you can transfer the image on a
television screen.
1. Switch off both DVD player and TV set.
2. Insert the black cinch plug of the AV
cable into the LINE OUT/IN socket of
the DVD player.
3. Insert the yellow cinch plug of the AV
cable into the VIDEO OUT/IN socket of
the DVD player.
! Pay attention to the different colors.
4. Insert the other end of the AV cable
into the appropriate sockets (VIDEO
IN+ AUDIO IN) of your TV set.
If you want to transfer the DVD image to the TV
set, you may setup the color system of your TV
(PAL/NTSC) in the setup menu.
Output images from an external source to a display
You may connect both displays to
other playback devices (e.g. video
recorder, camcorder or another
DVD player):
1. Turn off the devices you wish
to connect with each other.
2. Connect the inputs on the
DVD player (LINE OUT/IN
and VIDEO OUT/IN) to the
corresponding outputs on the
playback device.
Use a red/white/yellow cinch cable (not included). Use the AUDIO IN and VIDEO
IN inputs on the second display.
Pay attention to the different colors.
3. Set the DVD player to video mode by pressing MODE repeatedly until AV MODE
appears on the display.
15
)
'
(1
1/
Page 17

4. Confirm the new mode by the pressing VOLUME + button on the DVD player.
When transferring the image of an external device to the display of the DVD
player, it is recommended to set up the NTSC color system.
Connecting headsets
On the side of the DVD player and on
the side of each display you will see
two sockets each for a headset or
headphones with 3.5-mm connector
(two earphones included).
When connecting a headset or headphones, the external sound of that
respective device will be switched off.
1. Connect the supplied headset or another headset/headphone with a 3.5 mmconnector.
CAUTION!
Using headphones or earphones on high volume can damage your hearing.
Before putting on the headset or the headphones it is best to turn the volume
to its minimum level. Exposure to high volumes or sudden noise may
damage your hearing.
Use the + and - buttons on the DVD player and on the second display to adjust
their volume levels separately. With the remote control you can only adjust the sound
level of the DVD player.
16
Page 18

4. Wind the belts vertically around the head support and close the bayonet clasps.
Adjust the belt length making sure the case and the DVD player are firmly positioned.
5. You may now connect the DVD player to the display as described on page 14 and
operate the DVD player.
17
)
'
(1
1/
Using the DVD player in the car
The DVD player can be used in the car with the supplied accessories. You can connect
the device to the cigarette lighter in the car using a 12 V adapter cable. (See
Connecting with a 12 V adapter on page 13)
Mounting a display on a head support
With the included accessories you can mount the DVD player and the display to the
head support of the front seats of the car. Mounting the DVD player as well as the
display on the head support can be done as follows:
1. Open the Velcro fixings on the case.
2. Insert the DVD player into the case and close the bag using the Velcro fixings.
3. Open both bayonet clasps on the back of the bag.
Page 19
Operation
Turning the player on
1. Connect the DVD player to the power supply, as described on page 13).
2. Press ON for a few seconds.
3. Turn on the second display as well using the ON button.
The DVD player may also be turned on using the POWER button on the remote control.
4. The device will now try to read the disc.
Turning the player off
1. To turn off the unit, press the OFF button on the device. Turn off the second display
as well.
2. The DVD player may also be turned using the POWER button on the remote control.
Inserting a disc
1. Open the disc compartment by
pressing OPEN on the front of
the unit. The lid opens easily.
2. Open the cover.
3. Insert a disk in the tray with
the text side facing up. Make
sure that the disc is placed in
the middle of the slot.
4. Gently push the disc into the
disc holder. A clicking sound
should be heard.
5. Close the disc compartment. If the device is turned on, the DVD/CD will be
read and playback should start automatically.
A DVD usually starts on a DVD-menu, allowing you to select an item with the
navigation buttons and confirming with ENTER.
Buttons on the device and the remote control
The following operations can be executed directly on the device and/or through the
remote control.
Display settings
Brightness, contrast, color
The values for brightness, contrast and color, can be adjusted individually for the DVD
player and the second display.
Settings on the DVD Player
1. Press the MODE button on the DVD player once; the volume bar appears.
18
Page 20

2. Increase the volume with the VOLUME + button and lower it with the VOLUME -
button.
3. Press the MODE button on the DVD player twice. The contrast bar appears.
4. Increase the contrast with the VOLUME + button, lower it with the VOLUME -
button.
5. Press the MODE button on the DVD player three times; the color bar appears.
6. Increase the value with the VOLUME + button; lower the value with the
VOLUME- button.
Settings on the second display
1. Press the MENU button on the second display once. The brightness bar
appears.
2. Increase the brightness with the VOLUME + button and lower it with the
VOLUME - button.
3. Press the MENU button on the second display twice. The contrast bar
appears.
4. Increase the contrast with the VOLUME + button, lower it with the VOLUME button.
5. Press the MODE button on the second display three times. The color bar
appears.
6. Increase the value with the VOLUME + button; lower the value with the
VOLUME- button.
4:3 and 16:9 conversion
Settings on the DVD Player
1. Press the MODE button on the DVD player four times. SCALE MODE appears
on the display.
2. You may change between 4:3 and 16:9 with the VOLUME + button.
Settings on the second display
1. Press the 4:3 16:9 button on the second display. You may change between 4:3
and 16:9 with this button.
Rotating the image
1. Press the MODE button on the DVD player five times; FLIP appears on the
display
2. You may rotate the screen image by 180° with the VOLUME + button.
(1
'
1/
)
Volume control
Adjust the volume with the VOLUME buttons +/- on the DVD player and on the second
display. Adjust the DVD player volume with the VOL +/- buttons on the remote control.
Mute
1. Press the MUTE button on the second display to the turn off the sound.
2. Press the MUTE button on the remote control to turn off the sound of the DVD
player and the second display.
3. Press the above button once more to restore the sound.
19
Page 21

Display functions
PREV/NEXT
1. Press the
button on the DVD player or the NEXT button on the remote
control in order to move to the next scene or track.
2. Press the
button on the DVD player or on the PREV button on the remote
control in order to move to the previous scene or track.
Quick Find FWD/REV
1. Press the FWD button repeatedly in order to speed up playback. Pressing this button
repeatedly will increase the speed by 4, 8 to 20 times.
2. Press the REV button in order to fast rewind playback. Pressing this button
repeatedly will increase the speed by 4, 8 to 20 times.
Repeat functions
Repeat
To enable this feature, the dual function of the number keys must be activated
beforehand with the SHIFT button.
1. Press the SHIFT button, FUNCTION will appear on the display. When
NUMBER appears, press the SHIFT button again.
20
Playback
1. During playback press ON on the DVD player or PLAY/PAUSE on the remote
control.
Pause
1. To pause playback press ON on the DVD player or PLAY/PAUSE on the remote
control.
Stop
1. To stop playback either press the OFF button on the DVD player or the STOP
button on the remote control. The display will show STOP.
You may resume playback from the last position by pressing either the ON
button on the DVD player or the PLAY/PAUSE button on the remote control.
2. Press the OFF button on the DVD player or the STOP button on the remote
control once more to completely stop the playback.
Slow motion - STEP/SLOW
During playback, press the SLOW button on the remote control to start using time scale.
Each time this button is pressed, a different time scale mode will be activated:
Page 22

2. Now press the REPEAT button. REPEAT CHAPTER appears on the display.
Each time this button is pressed, the scene to be repeated is shown on the
display (input disappears after a few seconds).
DVD’s CHAPTER – Repeat chapter.
TITLE – Repeat title.
OUT – Repeat function off.
CD/VCD’s REPEAT – Repeat title.
REPEAT ALL – Repeat disc.
OUT - Repeat function off
MP3-CD REPEAT – Repeat current title.
REPEAT DIR – Repeat folder.
REPEAT ALL – Normal playback
OUT - Repeat function off.
Repeating a selected A-B sequence
To enable this feature, the dual function of the number keys must be activated
beforehand with the SHIFT button.
1. Press the SHIFT button, FUNCTION will appear on the display. When
NUMBER appears, press the SHIFT button again.
2. Press the A-B button to mark the start of the sequence. The display shows A-.
3. Press the A-B button to mark the end of the sequence. The display shows A-B.
The sequence will be repeated continuously.
4. Press the A-B button once more to resume normal playback. The display now
shows DELETE A-B.
(1
'
1/
)
Direct selection
Direct choice - titles – Number keys (Audio CD)
You may select a title directly on the disc using the number keys. The disc will go
directly to the selected title.
The number keys are the 0-9 keys on your remote control.
1. Press the corresponding number keys to choose a number between 1 and 9.
2. If you want to enter a number with two digits, first press the 10 + button, and
then the number for the second number.
When the number keys won’t respond and the display shows INPUT ERROR, this
means the double function is still activated.
1. Press the SHIFT button until NUMBER appears.
Direct choice Title / time - GO TO
You may choose to display a chapter, title or time directly with the GO TO button.
Each time this button is pressed, your choice will be selected. The disc will go directly to
the selected position.
21
Page 23

DVD
00:28:47. The first position is highlighted.
2. Press the navigation buttons to move to another position.
3. Enter the desired value using the number keys.
4. Confirm with ENTER.
SVCD, VCD, CD
1. Press the GO TO button. The display shows for example TRK 01/01 00:07:53.
The first position is highlighted.
2. Press the navigation buttons to move to another position.
3. Enter the desired value using the number keys.
4. Confirm with ENTER
! Please note that this feature is not available for MP3 discs.
Image Features
Enlarge image – ZOOM
To enable this feature, the dual function of the number keys must be activated
beforehand with the SHIFT button.
1. Press the SHIFT button, FUNCTION will appear on the display. When NUMBER
appears, press the SHIFT button again.
2. Press the ZOOM button. The image will be enlarged from the center. Each time
you press this button, the magnification will change to 2 3 4 1/2 1/3 1/4 or OFF.
Within the enlarged image, you may use the navigation buttons to select an
image fragment.
Camera Angle – ANGLE (DVD only)
A few DVDs contain separate scenes with different camera positions.
1. Press the ANGLE button to activate this feature.
2. If a scene is available with different angles, the symbol and the current
angle/total number of angles will be displayed.
3. Press the ANGLE button again to switch to the next camera position.
4. After a few seconds have passed, the image will change.
DVD keys
22
1. Press the GO TO button. The display shows for example. TT 01/04 KA 007/019
Page 24

Disc menu – MENU
Please note that on many DVD’s this language feature is not available.
Subtitle selection – SUBTITLE
Press the SUBTITLE button repeatedly to choose another subtitle language available
on the disc
The switch follows immediately and does not need to be confirmed.
Display info – OSD
1. During playback, press the OSD button to obtain information on the current
playback. At the top of the display a list of information about the disc is appears,
depending on the disc that is being used.
TT: current title/total number of titles
KA: current chapter/total number of chapters
current playing time
2. Press the OSD button again to select following information.
current subtitle language/total number of subtitle languages
current sound system
current subtitle setting
ANGLE function ON or OFF
23
)
'
(1
1/
DVD's usually contain one or more menus, through which you can navigate the DVD.
You may enter the DVD menu by pressing the MENU button.
To enable this feature, the dual function of the number keys must be activated
beforehand with the SHIFT button.
1. Press the SHIFT button, FUNCTION will appear on the display. When NUMBER
appears, press the SHIFT button again.
Title menu – TITLE
In addition to the main menu of the disc, a DVD can contain a title menu, through which
you can navigate to the titles.
You may enter the title menu by pressing the TITLE button.
To enable this feature, the dual function of the number keys must be activated
beforehand with the SHIFT button.
1. Press the SHIFT button, FUNCTION will appear on the display. When NUMBER
appears, press the SHIFT button again.
Language selection - AUDIO
Press the AUDIO button repeatedly to choose another language that is available on the
disc.
The switch follows immediately and does not need to be confirmed.
Page 25

to go to the next field.
4. Repeat steps 2 and 3 until your selection is complete.
5. Press the PLAY button to start playback of your selection.
6. Press the DELETE button to clear the list.
7. Press the EXIT button to terminate the programming.
MP3 CD playback
1. Insert an MP3 CD into the device.
On screen a menu with the highest folder structure on the CD will be displayed. If the
CD contains folders, those are shown on the left side of the menu. The active directory
and the active file are displayed in color.
2. Use the navigation buttons
or to choose a folder, and confirm with ENTER or
PLAY to show the titles in the folder.
3. Use the navigation buttons
or once more to choose a title and confirm with
ENTER or PLAY to play this title.
4. Return to the folder structure with
JPEG CD playback
1. Insert a JPEG CD into the device. If the images are stored in folders these will
appear on the left.
2. Use the navigation buttons
or to choose one of the folders and confirm with
ENTER or PLAY to show the images in this folder.
3. While using the navigation buttons
or once more to choose a picture, you will see
a preview of the left menu page.
4. Confirm with ENTER or PLAY. The images in this folder will now be shown.
4. Return to the folder structure with the BACK button.
Rotating JPEG images
During playback you may change the parameters of the current image using the
navigation keys,
! Repeatedly press navigation key
to rotate the image 90° clockwise.
! Repeatedly press navigation key
to rotate the image 90° counter clockwise.
! Press the navigation key
to flip the image on a horizontal axis.
! Press the navigation key
to flip the image on a vertical axis.
24
Program list - PROGRAM
The PROGRAM button allows you to choose the sequence of title playback. Up to 16
titles can be programmed.
1. Press the PROGRAM button. The first field is highlighted. When you are using a DVD,
title (T) and chapter (C) can be chosen.
2. Use the number keys to input the desired titles and chapters.
3. Use the navigation buttons
Page 26

(1
Settings in SETUP menu
All settings can be input in the SETUP menu which can be entered by pressing the
SETUP button. Examples are the TV format, TV type or language settings.
1. Press the SETUP button.
The display shows the main page of the SETUP menu and its two submenus:
SYSTEM SETTINGS
LANGUAGE SETTINGS
2. Select the menu of your choice with the navigation buttons.
3. Use the ENTER button to confirm your selection.
The active menu has a colored background.
4. Press the SETUP button again to exit the setup menu or select EXIT SETTINGS
in the menu.
System Settings
TV Type
Select the color standard of the connected TV set.
NTSC: The standard format in North America.
PAL: The standard format in many European countries.
Screensaver
ON: When a device is not active for several minutes, the screensaver will be activated.
OUT: No screensaver will be activated.
'
1/
)
TV Format
Set the screen ratio:
! 4:3 PS: For TV sets with 4:3-format. The Pan-Scan format will display 16:9-film
formats in full height, the image will be cropped at the sides.
! 4:3 LB: For TV sets with 4:3-format. The Letterbox format reduces the 16:9 film
format to screen width.
! 16:9: For 16:9 format TV sets.
Password
You may enter a password to set access by other people.
1. Use the navigation buttons or press ENTER to go to the right side of the
menu.
2. If the lock symbol is closed, enter the existing 4-digit password. Use 0000
when no password has been chosen yet.
3. If the lock symbol is open, you may create a new password consisting of
exactly four digits. Write down the password in order not to forget it.
25
Page 27

Ratings
Input the 4 digit password in order to set parental control.
Some DVD’s and CD’s are coded with safety locks according to the ratings of the
Motion Picture Association. The 8 ratings are:
1 SAFE for children
2 G (General) All ages admitted.
3 PG (Parental guidance) Parental guidance suggested
4 PG 13 Parents strongly cautioned. Some material may be inappropriate for children
under 13.
5 PGR (Parental guidance restricted) Parental guidance suggested for children under
17.
6 R (Rated) Under 17 requires accompanying parent.
6 NC 17 No One 17 and Under Admitted
8 ADULTS only
When you are watching a DVD with rating 7 (NC 17) or 8 (Adults) and you have only
allowed ratings 1 to 6, you will be prompted to enter a password. It is possible that only
parts of the DVD, namely certain scenes in the movie, have been rated with one or
different ratings.
Default settings
Select STANDARD and confirm with ENTER. All settings will be reset to the original
factory settings.
Your newly set password will remain unchanged.
Language settings
Allows you to set the OSD (On-Screen-Display) language, used in all DVD player
menus.
Audio language
Allows you to set the audio language.
Subtitle language
Allows you to set the subtitle language.
OFF: No subtitle language.
Menu language
Allows you to set the language of the disc menu.
26
Allows you to set the rating of parental control for DVD’s.
Page 28

Never try to service the device by yourself. When servicing is required, always
contact our Service Center or another competent company.
Problem Possible cause / solution
General
No function,No service notification
-The device is not properly connected to the mains. Remove
the power plug from the mains and place it back again.
-When the device is malfunctioning as a result of a storm,
static charge or some other external factor, you can try the
following:
Turn off the device. Remove the power plug from the mains
supply and place it back again.
When you press PLAY, the disc is not played, or it stops again immediately.
-The disc was not placed correctly within the device.
Place the disc in the device with its printed side facing up.
-The disc is dirty or damaged.
Clean the disc or test the device by attempting to play
another disc.
-Condensation has appeared. Leave the device for about
one to two hours, allowing it to dry.
-DVD: Does the DVD have the correct region code (2)?
Set the correct region code.
The device is not reacting to the remote control.
-The batteries are empty.
Replace the batteries with new ones.
-The remote control is not in tune with the device.
Remove possible obstacles between the remote control and
the device. Aim the remote control at the sensor located on
the front of the device. You should remain within a 3m
distance from the device.
27
)
'
(1
1/
Troubleshooting
Whenever an error occurs, you should always attempt to solve the problem by yourself
first. The following overview might be useful.
Page 29
No image when the device is connected to a TV set
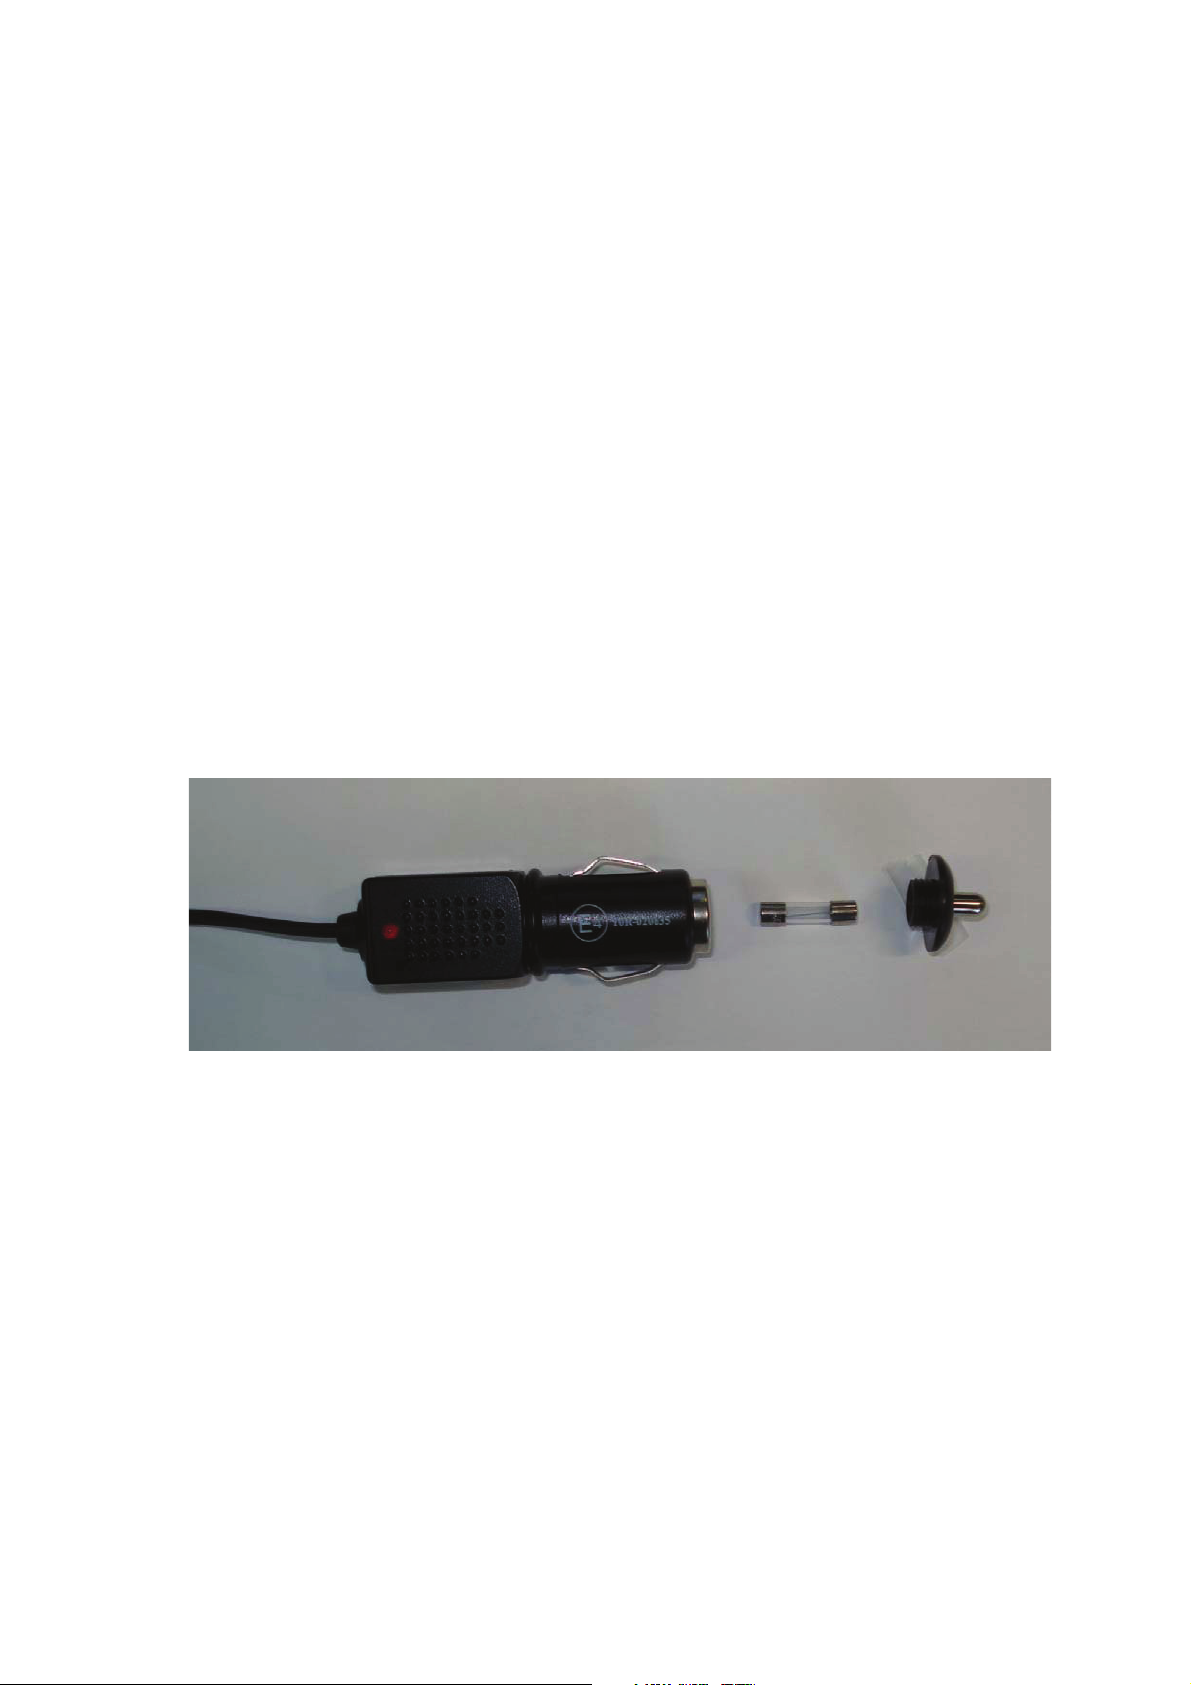
Replace the fuse only with the same type! If the fuse blows again please contact your
dealer.
FAQ: Problem: No playback. Cause: A disc with the wrong region code might be used.
Use only discs with region code 2 or 0.
DVD specific
Incorrect language
Incorrect subtitle language
-An incorrect language was set. Check on the DVD cover or
in the DVD menu if the selected language is available on this
DVD. Set the correct language.
28
-The cables between the DVD player and the TV set are not
properly connected.
Set the correct cable settings.
The TV set is not on or is not configured correctly.
Turn the TV set on. Set the video channel on your TV set
(AV-KANAL).
Bad image quality, image on the connected TV set is blurred
-The wrong video format was selected.
In the set up menu, switch to the correct video format (PALNTSC).
Distorted image -The disc is dirty. Clean the disc.
Minimal image distortions are not regarded as function errors.
FAQ: Problem: Black bars at upper and lower edge of screen or left and right edge of
screen. Cause: Setup TV mode to 16:9. See page 19 and 25
FAQ: Problem: No function: Cause: Check the fuse in the caradapter. Remove the
cover of the caradapter to check the fuse (see image).
Page 30

Waste packaging and all resources thereof can be recycled and should be
disposed off as reusable materials.
Device
When the device has reached the end of its lifespan, never treat it as normal
domestic waste. Enquire about possibilities of disposing of the device in an
environment friendly manner.
Batteries and accumulators
Empty batteries should not be disposed of as domestic waste! They should be
delivered to a collection point for empty batteries.
Technical data
Power supply: Model number: ADS-18C-12 1218GPG
Input: 100-240 V ~50/60 Hz 0.6A
Output: DC 12 V 1.5 A
Power device 6 W
Power display 4,5 W
29
)
'
(1
1/
SKIP function not allowed
-A number of DVD’s contain titles/chapters were the SKIP
function is blocked.
No switching between camera angles possible.
-Only a limited number of discs use different camera angles,
and usually only for some specific scenes.
You have forgotten the password.
-Use the master password 0000.
Waste disposal
ackaging
P
Page 31
Battery DVD player: 7,4V 2600mAh
Compatible discs: DVD (Digital Versatile Disc), DVD+R, DVD+RW,
DVD-R, DVD-RW; VCD, SVCD, CD-Audio; CD-R,
CD-RW, JPEG-CD, MP3-CD
Video formats: 4:3 / 16:9
Video decoder: MPEG 2
Audio decoder: MPEG
MP3 encoding: ISO 9660 format
Sampling frequency:
MPEG 1: 32, 44.1, 48 kHz
Bit-rate: 32 - 320 kbps
When playing audio CD’s, pay attention to the
print.
Attention: At present there are many CD recording methods and copyright
protections as well as different kinds of empty CD-R and CD-RW, part of them are not
standardized. Therefore it is possible that reading errors or delays may occur. This is
not regarded as an error within the device.
E.g. DivX format data can be downloaded from the DivX website. When reading a
DivX disc that was burnt by an end user, reading errors may occur.
Technical changes under reservation!
30
If at any time in the future you should need to dispose of this product please
note that: Waste electrical products should not be disposed of with household waste.
Please recycle where facilities exist. Check with your Local Authority or retailer for
recycling advice. (Waste Electrical and Electronic Equipment Directive)
Batteries remote control: CR2025
System color TV : PAL/NTSC
Laser power: Class 1 laser product
 Loading...