

Page 1
17,5 cm (7”) portable dvd player
Before connecting, operating or adjusting this product,
please read this user's manual carefully and completely.
USER'S MANUAL
MES-212
For information and supportWWW.lenco.com
Page 2
Important Safety Instructions
Warning: To reduce the risk of electric shock, do not remove the
Warning: To prevent fire or electric shock hazard, do not expose
WARNNING: Only use attachments/accessories specified
cover or back. There are no user-serviceable parts inside. Refer
servicing to qualified personnel.
the unit to rain or moisture.
Do not expose the Adaptor and portable DVD to water (dripping or
splashing) and no objects filled with liquids, such as vases, should
be placed on the unit.
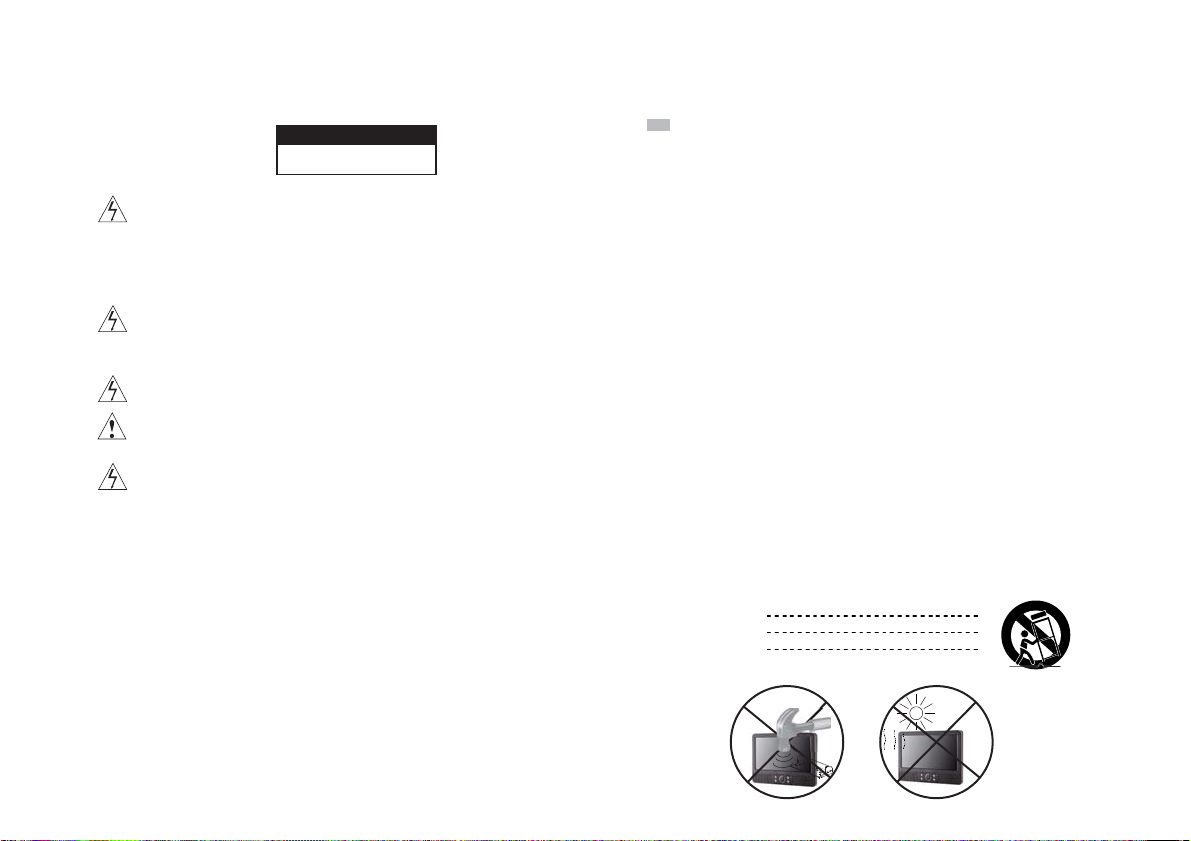
Keep the portable DVD away from direct sunlight and heat source
such as radiators or stoves.
Do not block the ventilation openings. Slots and openings on the
unit are provided for ventilation. The openings should never be
blocked by placing your portable DVD on a
similar surface.
Do not place the portable DVD on unstable cart, stand, tripod,
bracket or table. The unit may fall, resulting In possible damage or
Injury.
Never place heavy or sharp objects on the LCD panel or frame.
Unplug the power from the outlet when the unit Is not in use.
cushion, sofa or other
WARNNING: Excessive sound pressure from earphones or
headphones can cause hearing loss.
provided by the manufacturer.
This marking indicates that this product
should not be disposed with other household
wastes throughout the EU. To prevent
possible harm to the environment or human
health from uncontrolled waste disposal,
recycle it responsibly to promote the
sustainable reuse of material resources. To
return your used device, please use the
return and collection systems or contact the
retailer where the product was purchased.
They can take this product for
safe recycling
environmental
To prevent possible heating damage, do not listen at high
volume levels for long periods.
1
Page 3
Safety Precautions
Warning: This digital video disc player employs a laser system.
Warning: To prevent direct exposure to laser beam, do not open
Warning: Never stare directly into the laser beam.
Caution: Do not install this product in a confined space such as a
Warning: more than 250mm USB extension cord is prohibited to
It is forbidden by law to copy, broadcast, show, broadcast via
Model No.
Serial No.
Date of Purchase
SHOCK DO NOT OPEN
WARNING
RISK OF ELECTRIC
Use of controls, adjustments, or the performance of procedures
other than those specified herein may result in hazardous
radiation Exposure.
the enclosure. Visible laser radiation when open.
book case or similar unit.
use for USB port
Notes on Copyrights:
cable, play In public, or rent copyrighted material without
permission.
This product features the copy protection function developed
by Macrovision. Copy protection signals are recorded on some
discs. When recording and playing the pictures of these discs
picture noise will appear. This product incorporates copyright
protection technology that is protected by method claims of
certain U.S. Patents and other intellectual property rights
owned by Macrovision Corporation and other rights owners.
Use of this copyright protection technology must be authorized
by Macrovision Corporation, and is intended for home
other limited viewing uses only unless otherwise authorized by
macrovision Corporation. Reverse engineering or disassembly
is prohibited.
SERIAL NUMBER:
You can find the serial number on the back of the unit. This
number is unique to this unit and not available to others. You
should record requested information here and retain this guide
as a permanent record of your purchase.
and
2
strong
impact
over
heat
40°C
Page 4
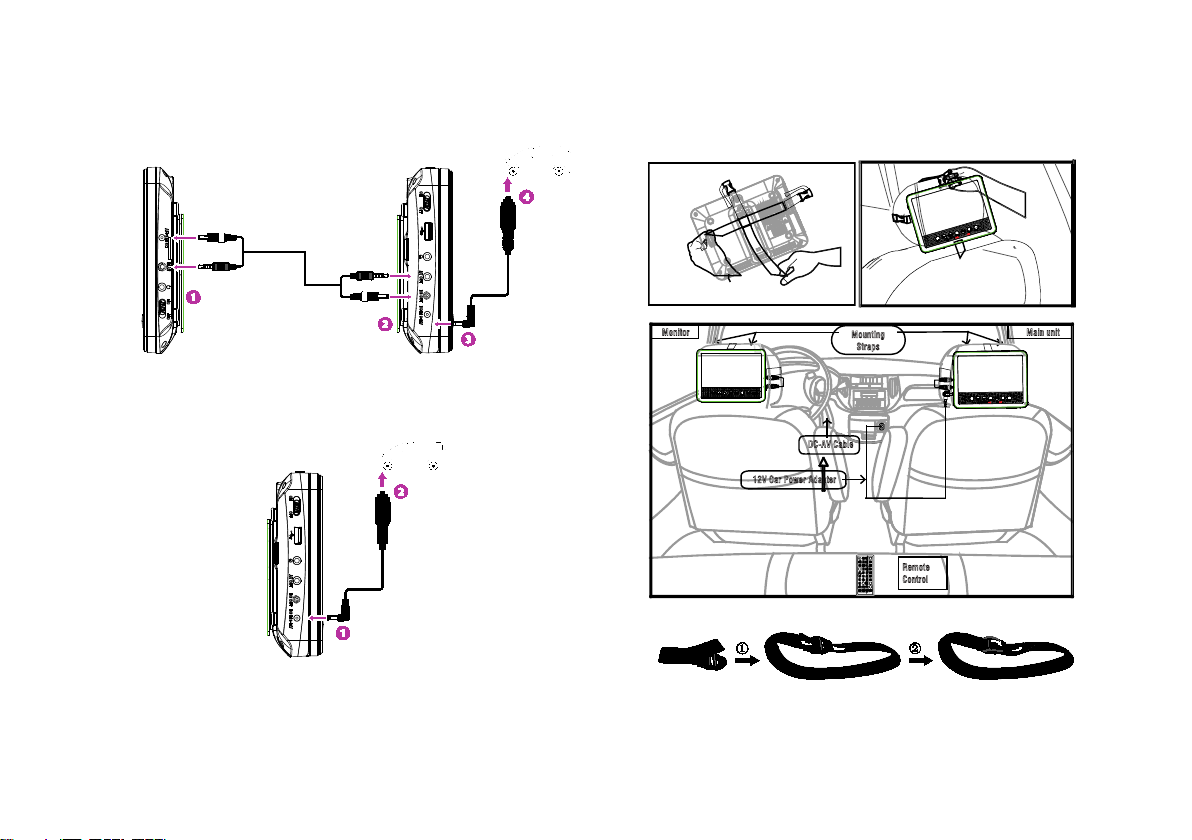
right side
left side
To the cigarette
lighter socket
DC+AV cable
(included)
To AV IN &
IN sockets
To AV OUT & DC
OUT sockets
To DC IN 9V
socket
Car Power Adapter
(included)
left side
To the cigarette
lighter socket
To DC IN 9V
socket
Car Power Adapter
(included)
Using the Car Power Adapter (for in-car use)
The included 12V car power adapter is designed for use with vehicles that have a 12v
negative ground electrical system.
Monitor
DC
Using the DVD Player Only
DVD player
DVD player
-12V
-12V
3
Mounting in the Vehicle
Use the supplied car mounting straps to install the main unit and monitor on the
back of the vehicle's headrests. Tightly wrap the mounting strap around the
headrest.
Page 5
Identification of Controls
NOTES:
DVD player for a long time.
Hole
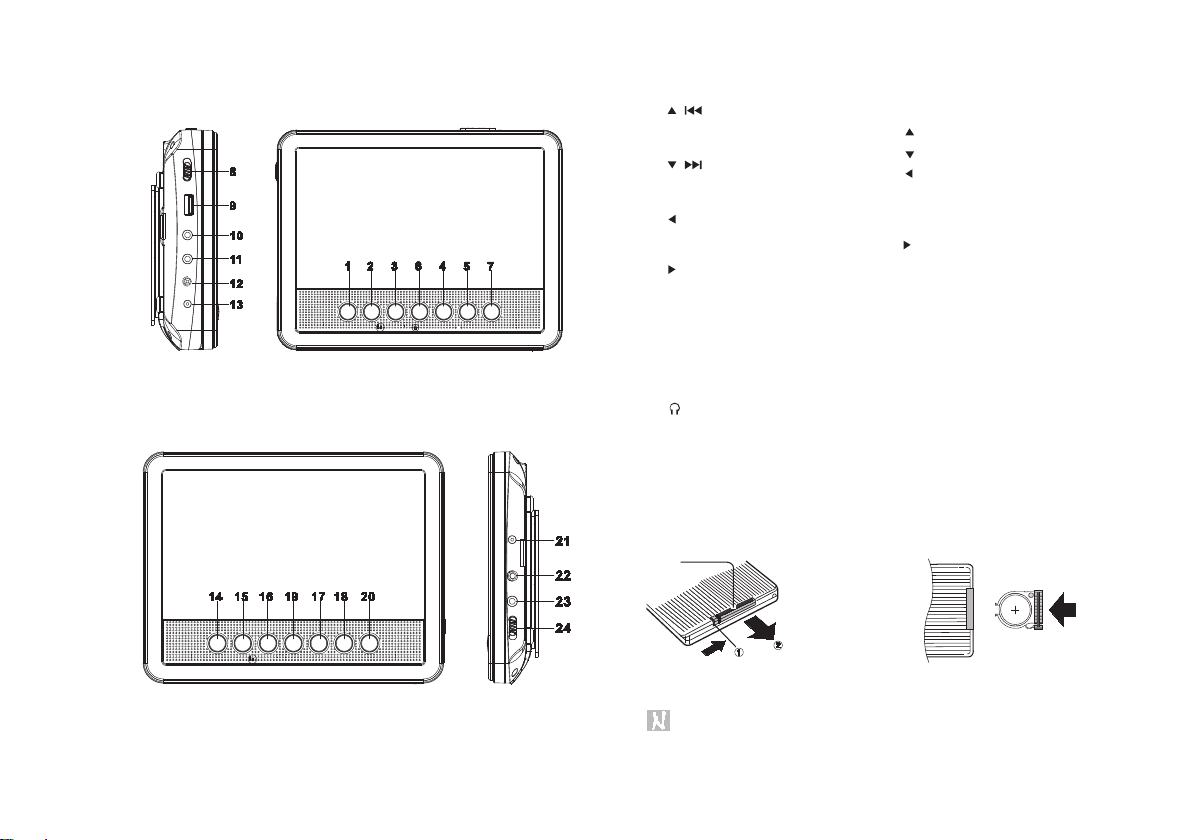
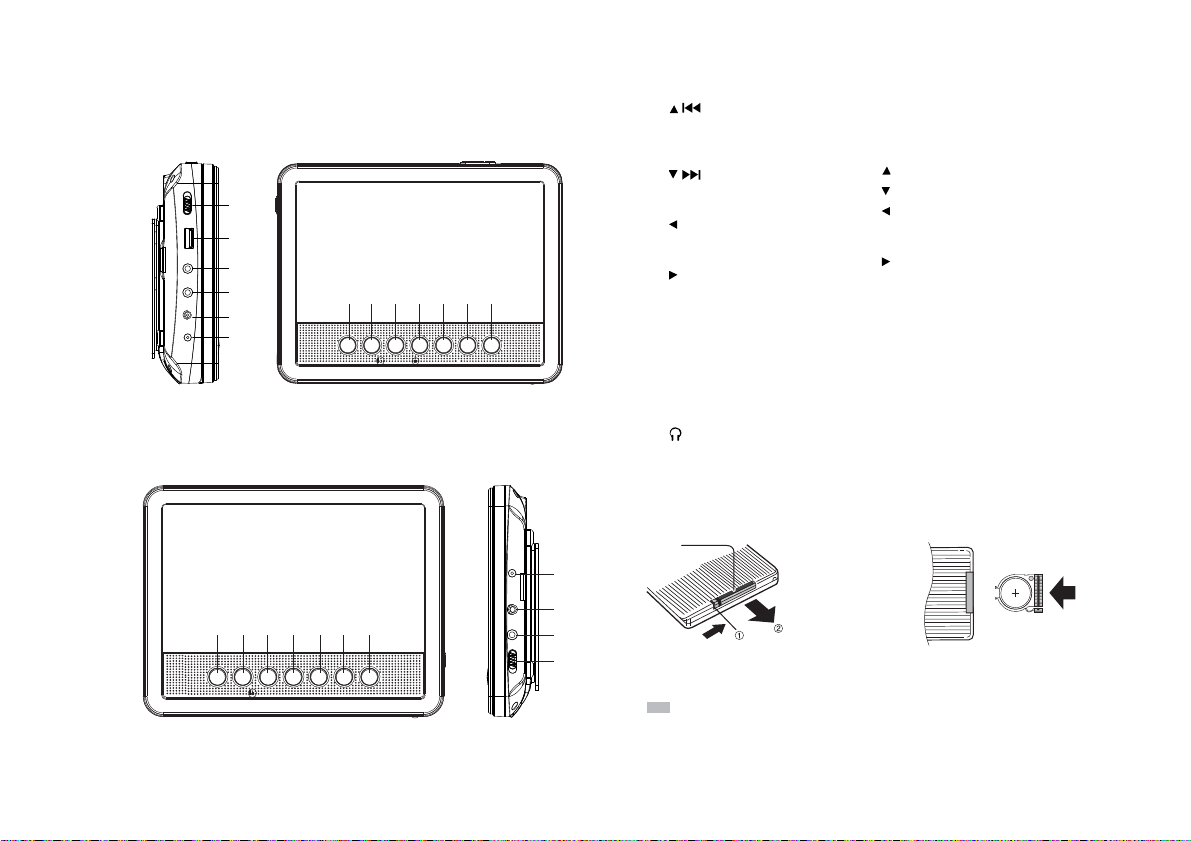
Main Unit
MONITOR TFT SCREEN
1. SETUP
2. / Up/Prev Short
press is Up Long press is
Prev
3. / Down/Next Short
press is Down Long
press is Next
4. /VOL- Left/VOL- Short
press is Left Long press
is VOL-
5. /VOL+ Right/VOL+
Short press is Right Long
press is VOL+
6. ENTER
7. SOURCE
8. ON/OFF
9. USB
10. Earphone Socket
11. AV OUT
12. DC OUT
13. DC IN 9-12V
14. MUTE
15. UP
16. Down
17. /VOL- Left/VOL-
Short press is Left
Long press is
VOL-
18. /VOL+
Right/VOL+ Short
Right
press is
Long press is
VOL+
19. MODE
20. BACK LIGHT
21. DC IN 9-12V
22. AV IN
23. O Earphone
Socket
24.
ON/OFF
Insert the battery
1. Open the battery door. 2. Insert battery CR-2025.
When using the remote control for the first time do not forget to remove
the plastic card.
Remove battery during storage or when you are not using the
4
Page 6
Identification of Controls
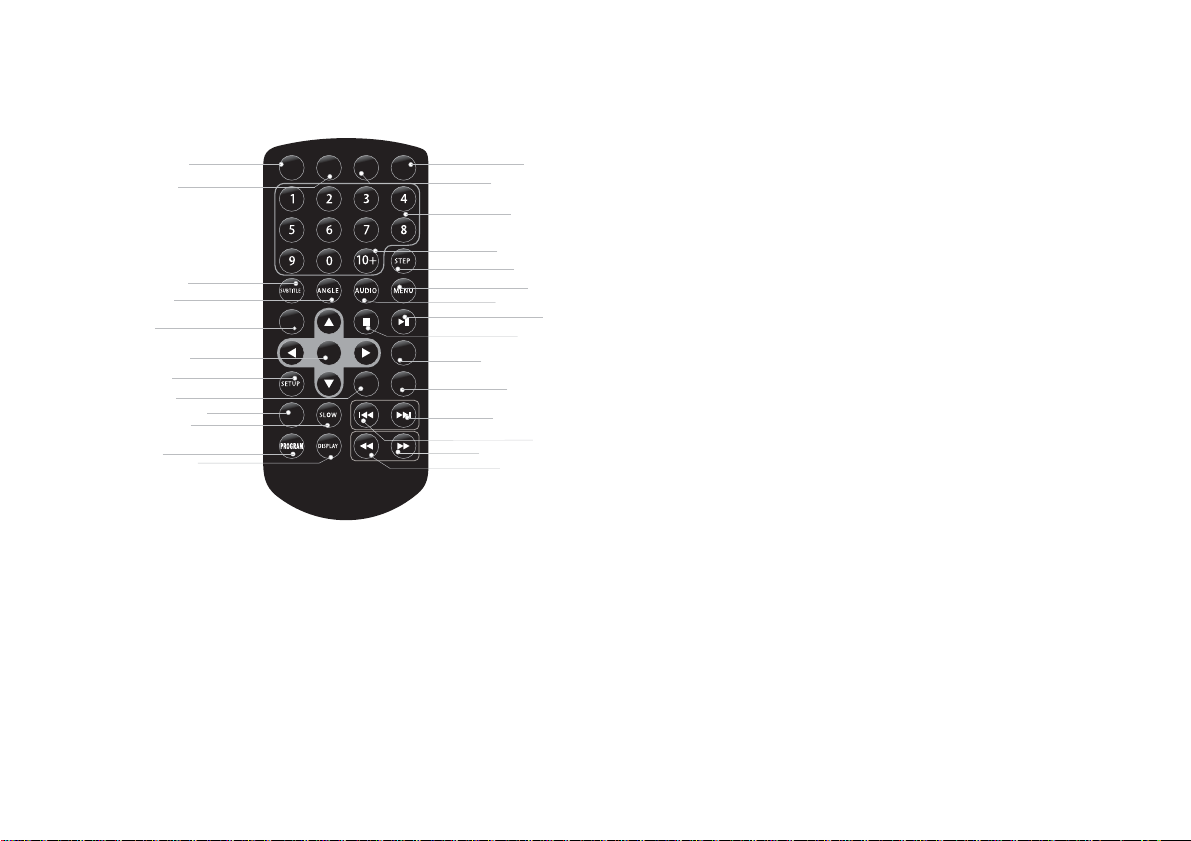
Remote control unit
MUTE
VOL -
SOURCE
RETURN
VOL+
13
14
15
6
1
17
18
19
20
21
2
2
23
24
25
6
2
27
SEARCH
1
ZOOM
2
3
4
5
6
TITLE
ENTER
7
8
9
10
11
12
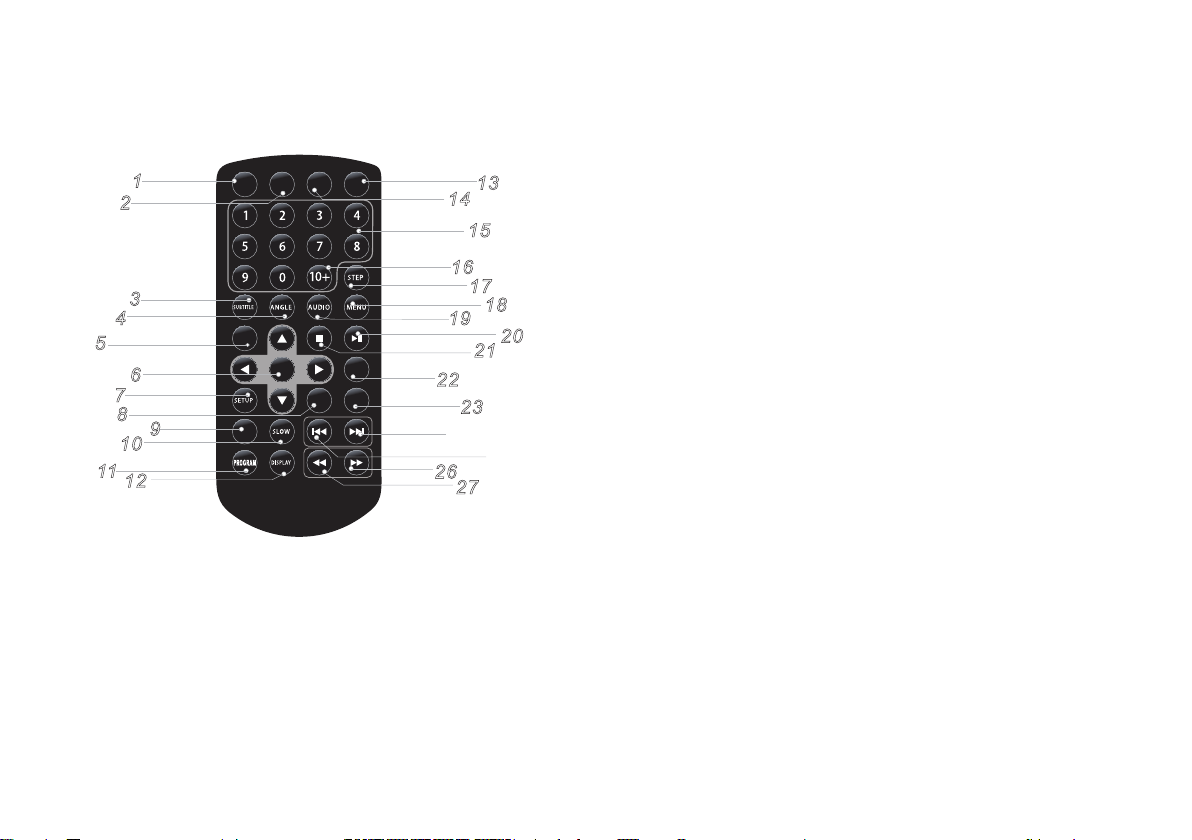
1. ZOOM
Each press of the ZOOM button changes the TV screen in the following sequence: 2X
size 3X size 4X size 1/2 1/3 1/4.
2. SEARCH
Go to time point, title or chapter you want in DVD Mode.
3. SUBTITLE
Press SUBTITLE repeatedly during playback to hear a different subtitle languages.
4. ANGLE
Press ANGLE will change the view angle, on DVDs that support this feature.
REPEAT
5. TITLE
Return to DVD title menu.
6. ENTER
onfirms menu selection.
C
7. SETUP
Accesses or removes setup menu.
8. VOL-
Adjust VOLUME
9. REPEAT
Press REPEAT during playback to select a desired repeat mode.
DVD: you can play a chapter/title/all on a disc.
VCD CD: you can play a track/all on a disc.
Mp3 WMA: you can select Repeat one/Repeat folder/ALL play mode
on a disc.
10. SLOW
Press Slow button repeatedly to enter slow playback, and cycle
between different speeds. The speeds are 1/2, 1/3, 1/4,1/5,1/6,
1/7 and norm
11. PROGRAM
DVD VCD CD MP3: The program function enables you to store your
favourlte tracks from the disc. Press PROGRAM button, then
PROGRAM MENU will appear on screen, now you can use the
number or direction keys input the titles, chapters or tracks number
and select PLAY option to resume normal playback, press PROGRAM
and select CLEAR option on the program menu.
JPEG: You can press PROGRAM repeatedly to select the slide show
mode, there are 6 types slide show mode.
12. DISPLAY
To display the playtime and status information.
13. SOURCE
DVD/USB.
al.
5
Page 7

Identification of Controls
Remote control unit
14. MUTE
Disable Audio output.
15. 0-9 NUMBER BUTTON
Selects numbered items in a menu.
16. 10+ BUTTON
In order to select a track 10 or greater, first press 10 + , For example; select track 12,
first press 10+, and then press number 2 button.
17. STEP
Press STEP once to pause playback, Form this station, press STEP to advance one
video frame.
18. MENU
Accesses menu on a DVD disc, PBC on/off switch for VCD.
19. AUDIO
DVD:
Press AUDIO repeatedly during playback to hear a different audio language or
audio track, If available.
VCD: Press AUDIO repeatedly during playback to hear a different audio channel
(Stereo, Left, or Right).
20. PLAY/PAUSE
Press PLAY/PAUSE once to pause playback, pressing PLAY/PAUSE second time
will resume the playback.
21. STOP
When this button is pressed once, the unit records the stopped point, from where
playback will resume if ENTER is pressed after wards. But if STOP button is p
again instead of ENTER button, there will be no resume function.
22. RETURN
Return to upper page.
23. VOL +
Adjust VOLUME.
ressed
24. Forward Skip
Go to next chapter/track.
25. Reverse Skip
Go to previous chapter/track to the beginning.
26. BUTTON
Press BUTTON allow skipping ahead at 5-level speed(X2->
X4->X8->X20), press ENTER button return to normal playback
27. BUTTON
Press BUTTON allow skipping back at 5-level speed(X2->
X4->X8->X20), press ENTER button r
eturn to normal playback.
6
Page 8
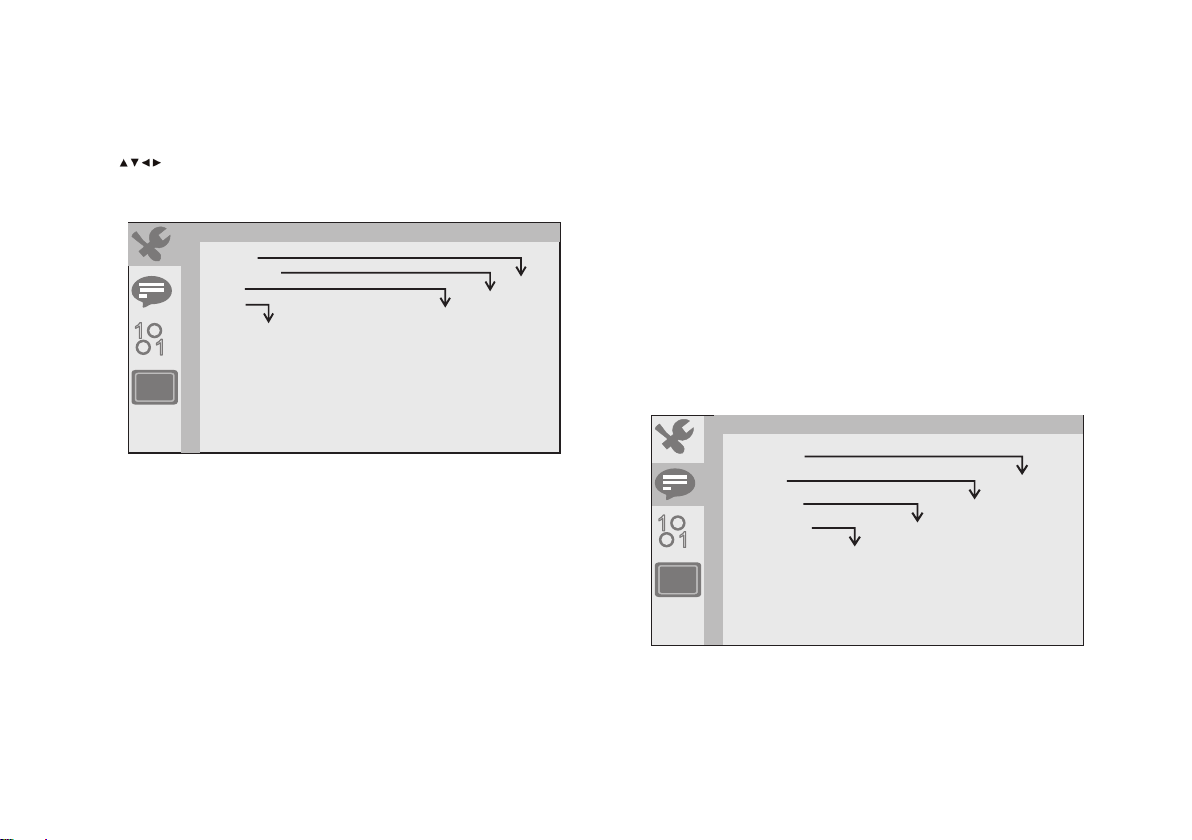
SETUP Menu Setting
System Setup Page
Press SETUP button to get the setup menu. Use direction buttons
to select the preferred item. After finishing settings, press
SETUP again to normal display.
System Setup
SYSTEM SETUP
TV SYSTEM
POWER RESUME
TV TYPE
DEFAULT
RESTORE
1
1
TV System
Selecting the color system that corresponds to your TV when AV
output. This DVD Player is compatible with both NTSC and PAL. PAL Select this If the connected TV is PAL system. It will change the video
signal of a NTSC disc and output in PAL format.
- Select this if the connected TV Is NTSC system. It will change
NTSC
the video signal of a PAL disc and output in NTSC format.
Power Resume
This function is used to turn the last memory on or off.
4:3 PS
4:3 LB
16:9
ON
OFF
NTSC
PAL
TV Type
Selects the aspect ratio of the playback picture.
4:3 PS: If you have a normal TV and want both sides of the picture to be
trimmed or formatted to fit your TV screen.
4:3 LB: If you have a normal TV. In this case, a wide picture with black
bands on
the upper and lower portions of the TV screen wilI be displayed.
16:9: wide screen display.
Default
Restore the factory setting of setup menu.
Language Setup Page
Language setup
LANGUAGE SETUP
OSD LANGUAGE
AUDIO LANG
SUBTITLE LANG
1
MENU LANGUAGE
ENGL ISH
FREN CH
GERM AN
SPANI SH
DUTC H
POLI SH
HUNG ARIAN
1
ENGL ISH
FREN CH
GERM AN
SPANI SH
DUTC H
POLI SH
HUNG ARIAN
OFF
ENGL ISH
FREN CH
GERM AN
SPANI SH
DUTC H
POLI SH
HUNG ARIAN
ENGL ISH
FREN CH
GERM AN
SPANI SH
DUTC H
POLI SH
HUNG ARIAN
You can select OSD language, and select audio/subtitle/menu
language of DVD discs if available. Also you can select font type for
mpeg4 subtitle.
7
Page 9
SETUP Menu Setting
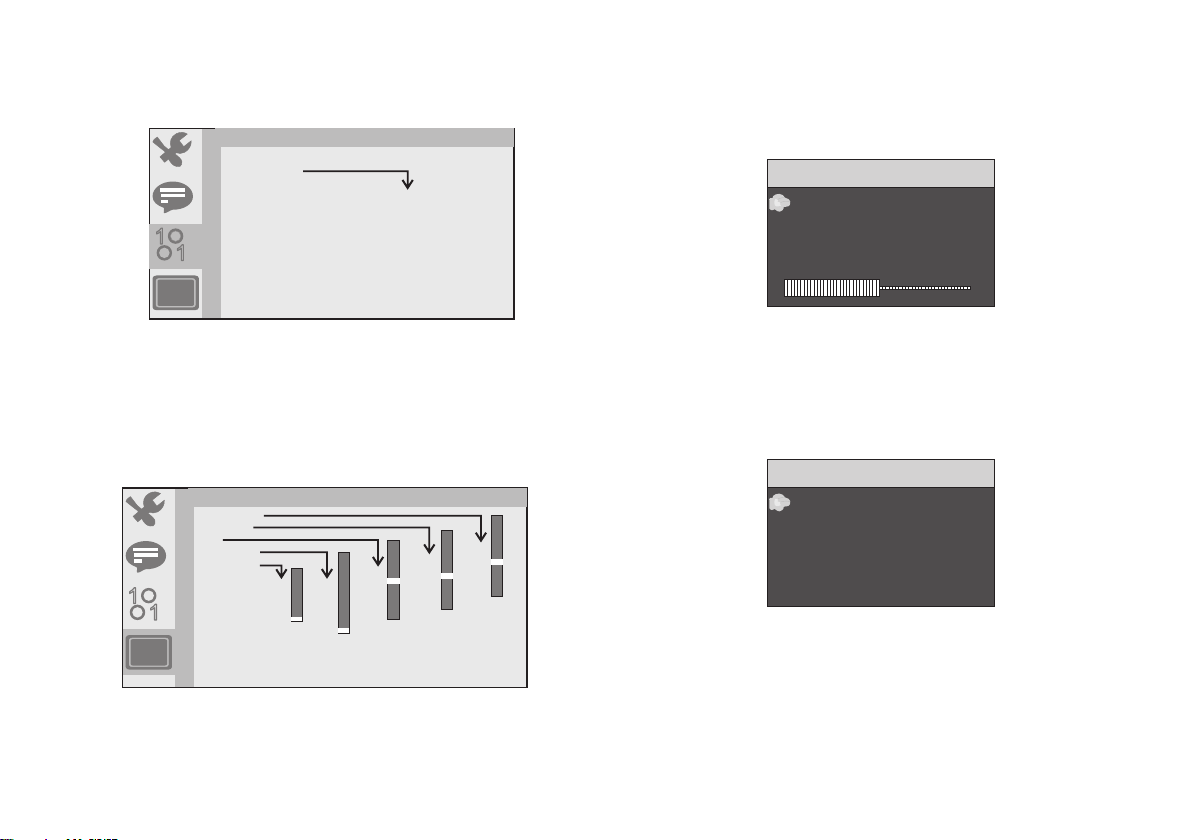
MONITOR TFT MENU SETTING
Audio Setup Page
STANDBY SETTING
AUTO STANDBY
OFF
3 HOURS
4 HOURS
1
1
The function is use to select standby setting: OFF, 3 HOURS,
4 HOURS
OFF: No standby
3 HOURS: No remote control and panel key operation within three hours into
standby
4 HOURS: No remote control and panel key operation within four hours into
standby
In standby mode, switch ON/OFF selector to OFF and ON to resume use.
Video Setup Page
BRIGHTNESS
CONTRAST
HUE
SATURATION
SHARPNESS
1
1
VIDEO SETUP
8
6
4
2
0
12
10
12
+6
12
+4
10
+2
8
0
6
-2
4
-4
2
-6
0
8
10
6
8
4
6
2
4
0
2
0
PICTURE Page
PIC TURE
BRIG HT
C ON TRAST
C OLO R
ENG LISH
RESET
Brightness
Ad just scr een Bright Se tting.
Contrast
Ad just scr een Co n tra st Setti ng.
Color
Ad just scr een Co l or Setting.
ENGLISH
Adjust Menu OSD Language
OPTION
SC REEN
SCREEN
Ad just scr een SCREE N 16: 9 or 4:3
50
50
50
16 :9
You can change the video setting: brightness, contrast, hue,
saturation.
8
Page 10
Parameters and specifications
output
Signal-to-noise ratio
Products with the CE marking comply with the EMC Directive
This symbol indicates that the relevant electrical product or
Service and support
Electronical parameters
Item Standard requirement
Power consumption : <15W
Operating humidity : 5 % to 90 %
VIDEO OUT : 1 Vp-p (75Q )
AUDIO OUT : 1.2 Vrms (1 KHz, 0 dB)
System
Laser : Semiconductor laser, wavelength 650 nm
Signal system : NTSC/PAL
Frequency response : 20 Hz to 20 kHz(1 dB)
: More than 80 dB (ANALOG OUT connectors only)
Dynamic range : More than 85 dB (DVD/CD)
Note: Design and specifications are subject to change prior notice.
For information: www.lenco.com
Lenco offers service and warranty in accordance to European law, which means
that in case of repairs (both during and after the warranty period) you should
contact your local dealer.
Important note: It is not possible to send products that need repairs to Lenco
directly.
Important note: If this unit is opened or accessed by a non-official service center
in any way, the warranty expires.
This device is not suitable for professional use. In case of professional use, all
warranty obligations of the manufacturer will be voided.
(2004/108/EC) and the Low Voltage Directive (2006/95/EC)
Issued by the Commission of the European Community.
The declaration of conformity may be consulted at
https://lencosupport.zendesk.com/forums/22413161-CE-Docum
The declaration of conformity may be consulted at
https://lencosupport.zendesk.com/forums/22413161 -CE-Documents
®AII rights reserved
ents
battery should not be disposed of as general household waste
in Europe. To ensure the correct waste treatment of the product
and battery, please dispose them in accordance to any
applicable local laws of requirement for disposal of electrical
equipment or batteries. In so doing, you will help to conserve
natural resources and improve standards of environmental
protection in treatment and disposal of electrical waste (Waste
Electrical and Electronic Equipment Directive).
9
Page 11
17,5 cm (7”) tragbarer DVD-Spieler
BEDIENUNGSANLEITUNG
MES-212
Für Informationen und Hilfe www.lenco.com
Lesen Sie vor dem Anschluss, der Verwendung oder der Anpassung dieses
Produkts bitte diese Bedienungsanleitung sorgfältig und vollständig durch.
Page 12

Wichtige Sicherheitsanweisungen
Achtung: Um das Risiko eines Stromschlages zu minimieren,
sollten Sie die Abdeckungen oder die Rückseite nicht entfernen.
Im Inneren befinden sich keine vom Benutzer zu wartenden Teile.
Überlassen Sie alle Wartungsarbeiten dem qualifizierten
Kundendienstpersonal.
Achtung: Zur Vermeidung von Brand- oder Stromschlaggefahr
darf dieses Gerät weder Regen noch Feuchtigkeit ausgesetzt
werden.
Setzen Sie den Adapter oder den tragbaren DVD-Spieler keinem
Wasser (Tropf- oder Spritzwasser) aus. Stellen Sie niemals mit
Flüssigkeit gefüllte Gegenstände, wie Vasen, auf das Gerät.
Halten Sie den tragbaren DVD-Spieler von direktem Sonnenlicht
und Wärmequelle, z. B. Heizkörpern oder Öfen fern.
Blockieren Sie nicht die Lüftungsöffnungen. Schlitze und
Öffnungen am Gerät dienen zur Belüftung. Die Öffnungen sollten
nie blockiert werden, indem Sie Ihren tragbaren DVD-Spieler auf
ein Kissen, Sofa oder anderen ähnlichen Oberflächen abstellen.
Stellen Sie den tragbaren DVD-Spieler nicht auf einen instabilen
Wagen, Ständer
herunterfallen und hierdurch beschädigt werden oder zu
Verletzungen von Personen führen.
Platzieren Sie niemals schwere oder scharfe Gegenstände auf
dem LCD-Panel oder dem Rahmen.
Trennen Sie das Gerät von der Stromversorgung, wenn es nicht
verwendet wird.
, Stativ, Tisch oder Halterung. Das Gerät kann
WARNUNG: Übermäßiger Schalldruck von Ohrhörern oder
Kopfhörern kann zu Hörschäden führen.
WARNUNG: Verwenden Sie nur vom Hersteller
bereitgestellte Zusatzgeräte/Zubehör.
Dieses Kennzeichen bedeutet, dass dieses
Gerät innerhalb der EU nicht zusammen mit
anderen Haushaltsabfällen entsorgt werden
darf. Wir möchten Sie daher bitten, uns mit
Ihrem Beitrag bei der Ressourcenschonung
und beim Umweltschutz zu unterstützen.
Bitte geben Sie das Altgerät bei den
eingerichteten
vorhanden) ab oder fragen Sie Ihren
Händler, bei dem Sie das Gerät gekauft
haben. Diese Stellen können das Produkt
zum umweltgerechten Entsorgen annehmen
Rücknahmestellen (falls
Um mögliche Schäden durch Wärme zu vermeiden, sollten
Sie nicht für längere Zeiträume hohe Lautstärken hören.
1
Page 13
Sicherheitsanweisungen
ACHTUNG
RISIKO VON ELEKTROSCHOCK
- NICHT ÖFFNEN
Achtung: Dieser digitale DVD-Spieler verfügt über ein
Lasersystem. Die Verwendung von Funktionen oder
Einstellungen bzw. die Durchführung von nicht in dieser
Gebrauchsanleitung beschriebenen Methoden, kann zu
gefährlichen Strahlungen führen.
Achtung: Um einen direkten Kontakt mit dem Laserstrahl zu
vermeiden, darf das Gehäuse nicht geöffnet werden. Sichtbare
Laserstrahlung bei Öffnung.
Achtung: Schauen Sie niemals direkt in den Laserstrahl.
Vorsicht: Stellen Sie das Gerät nicht in umschlossenen
Bereichen, wie einem Bücherregal oder ähnlichem, auf.
Achtung: Am USB-Anschluss dürfen keine
USB-Kabelverlängerungen von mehr als 250 mm verwendet
werden
N
N
Hinweise zu Urheberrechten:
Es ist gesetzlich verboten, urheberrechtlich geschütztes
Material ohne Erlaubnis zu kopieren, auszustrahlen, zu
senden, über Kabel auszustrahlen, öffentlich wiederzugeben
oder zu verleihen.
Dieses Produkt ist mit der von Macrovision entwickelten
Kopierschutzfunktion ausgestattet. Auf einigen Datenträgern
werden Kopierschutzsignale aufgezeichnet. Bei der Aufnahme
und Wiedergabe von Bildern von diesen Datenträgern können
Bildstörungen auftreten. Dieses Produkt enthält
urheberrechtlich geschützte Technologie, die durch
Verfahrensansprüche bestimmter US- Patente und anderen
geistigen Eigentumsrechte der Macrovision Corporation und
anderer Rechtsinhaber geschützt ist. Die Verwendung dieser
urheberrechtlich geschützten Technologie muss von der
Macrovision Corporation genehmigt werden und ist nur für den
privaten oder anderen eingeschränkten Gebrauch genehmigt,
sofern nicht anders von der Macrovision Corporation
genehmigt. Reverse engineering (Rückwärtsentwicklung) oder
Zerlegung sind verboten.
SERIENNUMMER:
Die Seriennummer befindet sich auf der Rückseite des Gerätes.
Diese Nummer ist für jedes Gerät individuell und steht anderen
nicht zur Verfügung. Sie sollten die angeforderten Informationen
hier eintragen und dieses Handbuch als dauerhaften Nachweis
über den Erwerb dieses Gerätes aufbewahren.
Modell-Nr.
Serien-Nr.
Kaufdatum
Starke
Einwirkung
Überhitzung
über 40 °C
2
Page 14

Verwendung des KFZ-Stromadapters (für
Verwendung im Fahrzeug)
Der mitgelieferte 12 V KFZ-Stromadapter ist für die Verwendung in Fahrzeugen mit
einem 12 V-System mit negativer Erdung vorgesehen.
Monitor
rechte
Seite
DC- und AV-Kabel
(im Lieferumfang
enthalten)
Zu AV-IN &
DC-In-Buchsen
Alleinige Verwendung des DVD-Spielers
DVD-Spieler
linke Seite
Zu AV OUT & DC
OUT-Buchsen
DVD-Spieler
linke Seite
Zum
Zigarettenanzünder
KFZ-Stromadapter
(mitgeliefert)
Zum
Zigarettenanzünder
KFZ-Stromadapter
(mitgeliefert)
Zu DC In 9 V - 12 V-Buchse
Einbau in das Fahrzeug
Verwenden Sie die mitgelieferten Montageriemen, um das Hauptgerät und die
Monitore an den Rückseiten der Kopfstützen zu befestigen. Den Montageriemen
fest um die Kopfstütze wickeln.
SOURCE
\
+
VOL
ENTER
\
\
P
SETU
VOL+\
SOURCE
\
VOL+
ENTER
P
\
SETU
\
Zu DC In 9 V - 12
V-Buchse
3
Page 15
Bezeichnung der Bedienelemente
Hauptgerät
8
9
10
11
12
13
MONITOR TFT-BILDSCHIRM
14 15 16 19 17 18 20
1 2 3 6 4 5 7
1. EINRICHTUNG
2. / Hoch/Vorh.
Kurzer Druck ist „hoch“
Langer Druck ist
„Vorheriger“
3. / Abwärts/Nächste
Kurzer Druck ist „Abwärts“
Langer Druck ist „Nächster“
4. /LAUTST.- Links/LAUTST-
Kurzer Druck ist „nach links“
Langer Druck ist „Lautstärke -“
5. /LAUTST.+
Rechts/LAUTST.+
Kurzer Druck ist „nach
rechts“ Langer Druck ist
„Lautstärke +“
6. EINGABE
7. QUELLE
8. EIN/AUS
9. USB
10. Kopfhörer-Buchse
11. AV OUT
12. DC OUT
13. DC IN 9-12 V
14. STUMM
15. NACH OBEN
16. Nach unten
17. /LAUTST.- Links/LAUTST-
Kurzer Druck ist „nach links“
Langer Druck ist „Lautstärke -“
18. /LAUTST.+ Rechts/LAUTST.+
Kurzer Druck ist „nach rechts“
Langer Druck ist „Lautstärke +“
19. MODUS
20. HINTERGRUNDBELEUCHTUN
G
21. DC IN 9-12 V
22. AV IN
23. O Kopfhörer-Buchse
24. EIN/AUS
Batterie einlegen
1. Batteriefach öffnen. 2. Batterie CR-2025 einlegen.
Öffnung
21
22
23
24
Vergessen Sie nicht, den Plastikstreifen zu entfernen, bevor Sie die
Fernbedienung zum ersten Mal verwenden.
HINWEIS:
N
N
Während der Aufbewahrung oder wenn Sie den DVD-Spieler
für länger Zeit nicht verwenden, sollten die Batterien entfernt
werden.
4
Page 16
Bezeichnung der Bedienelemente
Fernbedienung
MUTE
VOL -
SOURCE
RETURN
VOL+
22
26
14
16
19
24
23
27
15
17
21
13
18
20
25
SEARCH
1
ZOOM
2
3
4
5
6
TITLE
ENTER
7
8
9
10
11
12
1. ZOOM
Jede Betätigung der ZOOM-Taste ändert die Darstellung auf dem TV-Bildschirm in
folgender Reihenfolge: 2-fache Größe, 3-fache Größe, 4-fache Größe 1/2 1/3 1/4.
2. SUCHE
Auswahl von Zeitpunkt, Titel oder Kapitel im DVD-Modus.
3. UNTERTITEL
Wiederholtes betätigen von UNTERTITEL während der Wiedergabe zeigt
verschiedene Untertitelsprachen an.
4. WINKEL
Das Drücken der Taste ANGLE ändert den Blickwinkel auf DVDs, die diese Funktion
unterstützen.
REPEAT
5. TITEL
Führt Sie zurück zum DVD-Titelmenü.
6. EINGABE
Bestätigt die Menü-Auswahl.
7. EINRICHTUNG
Zugriff auf oder schließen des Setup-Menüs.
8. LAUTSTÄRKE -
Anpassen der LAUTSTÄRKE
9. WIEDERHOLEN
Drücken Sie während der Wiedergabe REPEAT, um einen
gewünschten Wiederholungsmodus auszuwählen.
DVD: Sie können ein Kapitel/einen Titel/alles auf einem Datenträger
wiedergeben.
VCD CD: Sie können einen Titel/alles auf einem Datenträger
wiedergeben.
MP3 WMA: Sie können aus den Wiedergabemodi „Wiederhole
eine“/„Wiederhole Ordner“/„ALLE“ eines Datenträgers auswählen.
10. LANGSAM
Drücken Sie wiederholt die Taste Langsam, um die Wiedergabe zu
verlangsamen und zwischen verschiedenen Geschwindigkeiten zu
wechseln. Die Geschwindigkeiten sind 1/2, 1/3, 1/4,1/5, 1/6, 1/7 und
normale Geschwindigkeit.
11. PROGRAMM
DVD VCD CD MP3: Die Programm-Funktion erlaubt Ihnen, Ihre
Lieblingstitel von dem Datenträger zu speichern. Drücken sie Die
PROGRAM-Taste und das PROGRAM MENU (PROGRAMM-MENÜ)
wird auf dem Bildschirm angezeigt. Nun können Sie die Ziffern- oder
Richtungstasten zur Eingabe der Titel, Kapitel oder Titelnummern
verwenden und die PLAY (WIEDERGABE)-Option auswählen, Um zur
normalen Wiedergabe zurückzukehren drücken Sie PROGRAM und
wählen die Option CLEAR (LÖSCHEN) im den Programm-Menü aus.
JPEG: Sie können über wiederholtes Drücken von PROGRAMM den
Diashow-Modus auswählen. Es gibt 6 unterschiedliche Dia show-Modi.
12. ANZEIGE
Zur Anzeige der Wiedergabezeit und von Statusinformationen.
5
Page 17

Bezeichnung der Bedienelemente
Fernbedienung
13.
QUELLE
DVD/USB.
14.
STUMM
Deaktiviert die Audio-Ausgabe.
15.
0-9 ZIFFERNTASTE
Wählt die bezifferten Elemente in einem Menü aus.
16.
10+ Taste
Um eine Titelnummer größer als 10 zu wählen, drücken Sie zuer st 10+. Bei spiel: Um
den Titel 12 auszuwählen, drücken Sie zuerst 10+ und dann die Zifferntaste 2.
17.
SCHRITT
Drücken Sie STEP einmal, um die Wiedergabe zu pausieren. Danach wird mit jedem
Drücken von STEP ein Videoframe nach dem anderen wiedergegeben.
18.
MENU
Für den Zugriff auf das Menü einer DVD, für VCD Schalter für PBC an/aus.
19.
AUDIO
DVD: Wiederholtes betätigen von AUDIO während der Wiedergabe gibt
verschiedene Audiosprachen oder Audiotitel wieder (sofern vorhanden).
VCD: Wiederholtes betätigen von AUDIO während der Wiedergabe gibt
verschiedene Audiokanäle (Stereo, Links oder Rechts) wieder.
20.
WIEDERGABE/PAUSE
Drücken Sie WIEDERGABE/PAUSE einmal zum Pausieren der Wiedergabe. Ein
erneutes betätigen der Taste setzt die Wiedergabe fort.
21.
STOPP
Wird diese Taste einmal betätigt, merkt sich das Gerät den Stopp-P unkt, von dem die
Wiedergabe fortgesetzt wird, wenn die Taste ENTER gedr ückt wird. Wenn ansta tt der
ENTER-Taste die STOPP-Taste erneut gedrückt wird, wird die
Wiederaufnahmefunktion deaktiviert.
22.
ZURÜCKKEHREN
Zurück zur oberen Seite.
6
23.
LAUTSTÄRKE +
Anpassen der LAUTSTÄRKE.
24.
Vorwärts Überspringen
Gehe zum nächsten Kapitel/Titel.
25.
Rückwärts Überspringen
Gehe zum Anfang des vorherigen Kapitels/Titels.
26.
TASTE
Drücken Sie die Taste um in einer von 5 Geschwindigkeiten (X2->
X4->X8->X20) vorwärts zu überspringen, drücken Sie die Taste
EINGABE, um zur normalen Wiedergabe zurückzukehren
27.
TASTE
Drücken Sie die Taste um in einer von 5 Geschwindigkeiten (X2->
X4->X8->X20) rückwärts zu überspringen, drücken Sie die Taste
EINGABE, um zur normalen Wiedergabe zurückzukehren.
Page 18

SETUP Menüeinstellung
Seite für die Systemeinstellung
Drücken Sie die Taste SETUP, um in das Menü für die Einstellungen
zu gelangen. Verwenden Sie die Richtungstasten zur Auswahl
des gewünschten Elements. Wenn Sie die Einstellungen beendet
haben, drücken Sie erneut SETUP, um zu der normalen Anzeige
zurückzukehren.
System Setup (Systemeinstellungen)
SYSTEM SETUP
TV SYSTEM
POWER RESUME
TV TYPE
DEFAULT
RESTORE
1
1
TV-System
Zur Auswahl des Farbsystems, das der AV-Ausgabe Ihres Fernseher s
entspricht. Dieser DVD-Spieler ist sowohl mit NTSC als auch PAL
kompatibel. PAL - wählen Sie PAL aus, wenn der angeschlossene
Fernseher über ein PAL-System verfügt. Dies ändert das Videosignal
eines NTSC-Datenträgers zur Ausgabe im PAL-Format.
NTSC - wählen Sie NTSC aus, wenn der angeschlossene Fernseher
über ein NTSC-System verfügt. Dies ändert das Videosignal eines
PAL-Datenträgers zur Ausgabe im NTSC-Format.
Power Resume (Strom-Wiederaufnahme)
Diese Funktion wird zum ein- oder ausschalten der „Last
Memory“-Funktion (Speicherung der letzten Wiedergabe) verwendet.
4:3 PS
4:3 LB
16:9
ON
OFF
NTSC
PAL
TV Type (TV-Typ)
Legt das Seitenverhältnis der Bildwiedergabe fest.
4:3 PS: Wenn Sie einen normalen Fernseher haben und beide Seiten des
Bildes beschnitten oder formatiert haben möchten, um an den
TV-Bildschirm angepasst zu werden.
4:3 LB: Wenn Sie einen normalen Fernseher haben. In diesem Fall wird
ein Breitbild mit schwarzen Balken am oberen und unteren Rand des
TV-Bildschirms angezeigt.
16:9: Breitbildanzeige.
Default (Standard)
Die Werkseinstellungen des Setup-Menüs wieder herstellen.
Seite für Spracheinstellungen
Language Setup (Spracheinstellungen)
OSD LANGUAGE
1
AUDIO LANG
SUBTITLE LANG
MENU LANGUAGE
1
Sie können die Sprache der OSD-Anzeige auswählen als auch die auf
der DVD verfügbaren Sprachen für audio (Audio)/subtitle
(Untertitel)/menu (Menu) (sofern vorhanden). Sie können ebenfalls di e
Schriftart für Mpeg-4-Untertitel auswählen.
LANGUAGE SETUP
ENGLISH
FRENCH
GERMAN
SPANISH
DUTCH
POLISH
HUNGARIAN
ENGLISH
FRENCH
GERMAN
SPANISH
DUTCH
POLISH
HUNGARIAN
OFF
ENGLISH
FRENCH
GERMAN
SPANISH
DUTCH
POLISH
HUNGARIAN
ENGLISH
FRENCH
GERMAN
SPANISH
DUTCH
POLISH
HUNGARIAN
7
Page 19

SETUP Menüeinstellung
Seite für die Audio-Einstellung
STANDBY SETTING
AUTO STANDBY
1
1
Diese Funktion wird für die Auswahl der Standby-Einstell ung v erwendet: OFF
(AUS), 3 HOURS (3 Stunden), 4 HOURS (4 Stunden)
OFF (AUS): Kein Standby
3 HOURS (3 STUNDEN): Keine Bedienung der Fernbedienung oder der
Tastatur am Gerät innerhalb von drei Stunden in Standby
4 HOURS (4 STUNDEN): Keine Bedienung der Fernbedienung oder der
Tastatur am Gerät innerhalb von vier Stunden in Standby
Bewegen Sie im Standby-Modus den Wahlschalter EIN/AUS auf OFF und
ON, um den Betrieb wieder aufzunehmen.
Seite für die Video-Einstellung
BRIGHTNESS
CONTRAST
HUE
SATURATION
SHARPNESS
1
1
Sie können die folgenden Video-Einstellungen ändern: brightness
(Helligkeit), contrast (Kontrast), hue (Farbton), saturation (Sättigung).
VIDEO SETUP
8
6
4
2
0
OFF
3 HOURS
4 HOURS
12
10
12
+6
12
+4
10
+2
8
0
6
-2
4
-4
2
-6
0
8
10
6
8
4
6
2
4
0
2
0
MENÜEINSTELLUNG FÜR
TFT-MONITOR
Seite PICTURE (Bild)
PICTURE
Brightness (Helligkeit)
Anpassen der Einstellungen für die Bildschirmhelligkeit.
Contrast (Kontrast)
Anpassen der Einstellungen für den Bildschirmkontrast.
Color (Farbe)
Anpassen der Farbeinstellung des Bildschirms.
ENGLISH (Deutsch)
Anpassen der Sprache des OSD-Menüs
OPTION
SCREEN (BILDSCHIRM)
Anpassen des Bildschirms 16:9 oder 4:3
8
BRIGHT
CONTRAST
COLOR
ENGLISH
RESET
SCREEN
16:9
50
50
50
Page 20

Parameter und technische Daten
Service und Unterstützung
Elektronische Parameter
Element Standardanforderung
Leistungsaufnahme: <15 W
Luftfeuchtigkeit bei Betrieb: 5 % bis 90 %
VIDEO-AUSGANG: 1 Vp-p (75Q)
AUDIO-AUSGANG: 1,2 Veff (1 KHz, 0 dB)
Ausgang
System
Laser: Halbleiter-Laser, Wellenlänge 650 nm
Signalsystem: NTSC/PAL
Frequenzgang: 20 Hz bis 20 kHz(1 dB)
Signal-Rauschverhältnis:
Dynamikbereich: Über 85 dB (DVD/CD)
Hinweis: Design und technische Daten können si ch ohne v orherige Ankün digung
ändern.
Über 80 dB (nur ANALOGE
AUSGANGS-Anschlüsse)
Weitere Informationen: www.lenco.com
Lenco bietet Leistungen und Garantien im Einklang mit Europäischem Recht. Im
Falle von Reparaturen (sowohl während als auch nach Ablauf der Garantiezeit)
sollten Sie deshalb Ihren Einzelhändler kontaktieren.
Wichtiger Hinweis: Es ist nicht möglich, Geräte für Reparaturen direkt an Lenco
zu schicken.
Wichtiger Hinweis: Falls dieses Gerät von einem nicht autorisier te n
Kundendienst geöffnet oder darauf zugegriffen wird, erlischt die Garantie.
Dieses Gerät ist nicht für professionelle Zwecke geeignet. Falls das Gerät für
professionelle Zwecke eingesetzt wird, erlöschen alle Garantieverpflichtungen
seitens des Herstellers.
Die Konformitätserklärung kann unter folgendem Link abgerufen werden:
https://lencosupport.zendesk.com/forums/22413161-CE-Documents
®Alle Rechte vorbehalten
Produkte mit der CE Kennzeichnung entsprechen der
EMC-Richtlinie (2004/108/EC) und der
Niederspannungsrichtlinie (2006/95/EC), herausgegeben von
der Kommission der Europäischen Gemeinschaft.
Die Konformitätserklärung kann unter folgendem Link abgerufen
werden:
https://lencosupport.zendesk.com/forums/22413161-CE-Docum
ents
Dieses Symbol zeigt an, dass das entsprechende Produkt oder
dessen Batterie in Europa nicht mit dem normalen Hausmüll
entsorgt werden darf. Um die ordnungsgemäße
Abfallbehandlung des Produkts und dessen Batterie zu
gewährleisten, müssen diese im Einklang mit allen
anwendbaren örtlichen Vorschriften zur Entsorgung von
Elektrogeräten und Batterien entsorgt werden. Dabei helfen
Sie, natürliche Ressourcen zu schonen und
Umweltschutzstandards zur Verwertung und Entsorgung von
Altgeräten aufrecht zu halten (Waste Electrical and Electronic
Equipment Directive).
9
Page 21

17,5 cm draagbare DVD-speler
GEBRUIKSAANWIJZING
MES-212
Zie voor informatie en ondersteuning www.lenco.com.
Lees voordat u dit product aansluit, bediend of aanpast, deze
gebruiksaanwijzing volledig en zorgvuldig door.
Page 22

Belangrijke Veiligheidsinformatie
Waarschuwing: Verwijder de afdekking niet om het risico op
elektrische schokken te verminderen Er bevinden zich geen door
de gebruiker te repareren onderdelen in het apparaat. Laat alle
reparaties door bevoegd personeel uitvoeren.
Waarschuwing: Stel dit apparaat niet bloot aan regen of vocht, om
het risico op brand of elektrische schokken te voorkomen.
Stel de adapter en draagbare DVD-speler niet bloot aan water
(druppelen of spatten) en er mogen geen met water gevulde
voorwerpen, zoals vazen, op het apparaat worden geplaatst.
Houd de draagbare DVD-speler uit de buurt van direct zon licht en
warmtebronnen, zoals radiators of fornuizen.
Blokkeer de ventilatieopeningen niet. Het apparaat is voorzien
van sleuven en openingen voor ventilatie. De openingen mogen
nooit worden geblokkeerd door de draagbare DVD-speler op een
kussen, bank of vergelijkbaar oppervlak te plaatsen.
Plaats de draagbare DVD-speler niet op een onstabiel karretje of
statief of een onstabiele standaard, beugel of tafel. Het apparaat
kan vallen, wat mogelijk kan leiden tot schade of letsel.
Plaats nooit zware of scherpe voorwerpen op het LCD-scherm of
het frame.
Ontkoppel de stroomaansluiting als het apparaat niet wordt
gebruikt.
WAARSCHUWING: Overmatige geluidsdruk van
oortelefoons en hoofdtelefoons kan gehoorverlies
veroorzaken.
WAARSCHUWING: Gebruik alleen hulpstukken/accessoires
die door de fabrikant zijn gespecificeerd.
Deze markering geeft aan dat dit apparaat in
de EU niet met ander huishoudelijk afval mag
worden afgevoerd. Recycle het op
verantwoorde wijze, om mogelijke schade
aan het milieu of persoonlijke gezondheid
van ongecontroleerde afvoer van afval te
voorkomen en het duurzame hergebruik van
materiële bronnen te bevorderen. Maak voor
het retourneren van het gebruikte apparaat
gebruik van de bestaande systemen voor
inzameling, of neem contact op met de
detailhandelaar waar het apparaat is
aangeschaft. Zij kunnen het apparaat
innemen om het op milieuvriendelijke wijze te
recyclen.
Luister niet gedurende langere periodes op hoge volumes,
ter voorkoming van mogelijke gehoorbeschadiging.
1
Page 23

Voorzorgsmaatregelen voor de
veiligheid
WAARSCHUWING
RISICO OP ELEKTRISCHE
SCHOKKEN; NIET OPENEN
Waarschuwing: Deze digitale speler voor videodiscs maakt
gebruik van een lasersysteem. Het apparaat op een andere
manier bedienen of het aanpassen of uitvoeren van procedures
anders dan hierin is gespecificeerd, kan leiden tot een gevaarlijke
blootstelling aan straling.
Waarschuwing: Open de behuizing niet, om directe blootstelling
aan de laserbundel te voorkomen. Zichtbare laserstraling bij
geopend apparaat.
Waarschuwing: Staar nooit direct in de laserbundel.
Let op: Plaats dit apparaat niet in een besloten ruimte, zoals een
boekenkast of vergelijkbare ruimte.
Waarschuwing: het is verboden om een USB-verlengkabel van
meer dan 250 mm lang op de USB-poort aan te sluiten.
N
N
Opmerkingen met betrekking
tot auteursrechten:
Het is wettelijk verboden om auteursrechtelijk beschermd
materiaal zonder toestemming te kopiëren, uit te zenden, te
tonen, via kabel uit te zenden, in het o penbaar af te spelen of te
verhuren.
Dit apparaat is voorzien van de functie voor kopieerbeveiliging,
die is ontwikkeld door Macrovision. Op sommige discs zij
signalen voor kopieerbeveiliging opgenomen. Bij het opnemen
en afspelen van de beelden van deze discs verschijnt er
beeldruis. Dit apparaat is voorzien van technologie ter
bescherming van auteursrechten die wordt beschermd door
bepaalde Amerikaanse octrooien en andere rechten op
intellectueel eigendom, die eigendom zijn van Macrovision
Corporation en andere eigenaren van rechten. Gebruik van
deze technologie ter bescherming van auteursrechten moet
door Macrovision Corporation worden goedgekeurd en is
uitsluitend bestemd voor gebruik thuis en voor ander beperkt
kijken, tenzij Macrovision Corporation hiervoor toestemming
heeft gegeven. Reverse engineering of demontage is verboden.
SERIENUMMER:
Het serienummer bevindt zich aan de achterkant van het
apparaat. Dit nummer is uniek voor dit apparaat en is niet
beschikbaar voor anderen. U dient gevraagde informatie hier
vast te leggen en deze handleiding als permanent bewijs van uw
aankoop te bewaren.
Modelnr.
Serienr.
Aankoopdatum
krachtige
inwerking
Oververhitting
40 °C
2
Page 24

Het gebruik van de adapter voor de auto
(voor gebruik in de auto)
De meegeleverde 12 V adapter voor de auto is ontworpen voor gebruik met
voertuigen die voorzien zijn van een 12 V elektrisch systeem met aarde aan de
negatieve pool.
Monitor
rechts
Voedings- en
AV-kabel
(inbegrepen)
Naar AV-ingang
en voedingsingang
Het gebruik van alleen de DVD-speler
DVD-speler
links
Naar AV-uitgang en
voedingsuitgang
Naar 9-12 V ingang
DVD-speler
links
Naar de
sigarettenaansteker
Adapter voor in de
auto (inbegrepen)
Naar de
sigarettenaansteker
Adapter voor in de
auto (inbegrepen)
Naar 9-12 V ingang
Bevestiging in het voertuig
Gebruik de meegeleverde riempjes voor bevestiging in de auto om het
hoofdapparaat en de monitor aan de achterkant van de hoofdsteun en van het
voertuig te bevestigen. Wikkel de bevestigingsriempjes stevig om de hoofdsteun.
SOURCE
\
+
VOL
ENTER
\
\
P
SETU
VOL+\
SOURCE
\
VOL+
ENTER
P
\
SETU
\
3
Page 25

Verklaring van de bedieningsorganen
Hoofdapparaat
8
9
10
11
12
13
TFT-SCHERM MONITOR
14 15 16 19 17 18 20
1 2 3 6 4 5 7
21
22
23
24
1. INSTALLATIE
2. / Op/Vorige
Druk kort voor Op
Druk lang voor Vorige
3. /
Neer/Volgende
Druk kort voor Neer
Druk lang voor
Volgende
4. /VOL- Rinks/VOL-
Druk kort voor Links
Druk lang voor VOL-
5. /VOL+
Rechts/VOL+
Druk kort voor Rechts
Druk lang voor VOL+
6. ENTER
7. BRON
8. AAN/UIT
9. USB
10. Aansluiting oortelefoon
11. AV-uitgang
12. Gelijkspanningsuitgang
13. Ingang 9-12 V gelijkspanning
14. DEMPEN
15. Op
16. Neer
17. /VOL- Links/VOL-
Druk kort voor Links
Druk lang voor VOL-
18. /VOL+ Rechts/VOL+
Druk kort voor Rechts
Druk lang voor VOL+
19. MODUS
20. ACHTERVERLICHTING
21. Ingang 9-12 V gelijkspanning
22. AV-ingang
23. O Oortelefoonaansluiting
24. AAN/UIT
Plaats de batterij
1. Open het batterijvak. 2. Plaats batterij CR-2025.
Openi
Vergeet niet om bij het eerste gebruik van de afstandsbediening de
kunststof kaart te verwijderen.
OPMERKING:
N
N
Verwijder de accu wanneer de DVD-speler wordt opgeslagen,
of wanneer hij gedurende langer tijd niet wordt gebruikt.
4
Page 26

Verklaring van de bedieningsorganen
Afstandsbediening
MUTE
VOL -
SOURCE
RETURN
VOL+
22
26
14
16
19
24
23
27
15
17
21
13
18
20
25
SEARCH
1
ZOOM
2
3
4
5
6
TITLE
ENTER
7
8
9
10
11
12
1. ZOOM
Ieder keer drukken op de toets ZOOM wijzigt het TV-scherm volgens de volgende
volgorde: 2 keer zo groot; 3 keer zo groot; 4 keer zo groot; 1/2; 1/3; 1/4.
2. ZOEKEN
Ga in de DVD-modus naar een tijdstip, gewenste titel of hoofdstuk dat/die u wenst.
3. ONDERTITELING
Druk tijdens het afspelen herhaaldelijk op SUBTITLE om verschillende talen voor de
ondertiteling weer te geven.
4. HOEK
Door op ANGLE te drukken wijzigt de kijkhoek voor DVD's die deze functie
ondersteunen.
REPEAT
5. TITEL
Om terug te keren naar het titelmenu van de DVD.
6. ENTER
Bevestigt de menukeuze.
7. INSTALLATIE
Voor toegang tot of verlaten van het instellingenmenu.
8. VOL-
Aanpassen VOLUME
9. HERHALEN
Druk tijdens het afspelen op REPEAT om de gewenste herhaalmodus
te selecteren.
DVD: u kunt een hoofdstuk/titel/alles op een disc afspelen.
VCD, CD: u kunt een nummer/alles op een disc afspelen.
MP3, WMA: u kunt Herhaal één/Herhaal map/Alles op een disc
selecteren.
10. TRAAG
Druk herhaaldelijk op de toets Traag om vertraagd af te spelen en de
verschillende snelheden te doorlopen. De snelheden zijn 1/2, 1/3 , 1/4 ,
1/5, 1/6, 1/7 en normaal.
11. PROGRAMMEREN
DVD, VCD, CD, MP3: Met de programmeerfunctie kunt u uw favoriete
nummer van de disc opslaan. Druk de toets PROGRAM; het
PROGRAM MENU (PROGRAMMEERMENU) verschijnt op het
scherm. U kunt nu de numerieke of pijtjestoetsen gebruiken om de
nummers van titels, hoofdstukken of nummer in te voeren en de optie
PLAY (AFSPELEN) selecteren. Druk om de normale weergave te
hervatten op de toets PROGRAM en selecteer de optie CLEAR
(LEEGMAKEN) in het programmeermenu.
JPEG: U kunt herhaaldelijk op PROGRAMMEREN drukken om de
modus diashow te selecteren; er zijn 6 soorten diashow s beschikb aar.
12. SCHERM
Voor het weergeven van de speelduur en de statusinformatie.
13. BRON
DVD/USB.
5
Page 27

Verklaring van de bedieningsorganen
Afstandsbediening
14. DEMPEN
Uitschakelen audio-uitgang.
15. NUMERIE KE TOETSEN 0-9
Voor het selecteren van genummerde onderdelen in een menu.
16. 10+ TOETS
Druk om een nummer met een volgnummer van 10 of meer in te voeren, eerst de
toets 10 +. Druk bijvoorbeeld voor het selecteren van nummer 12 eerst de toets 10+
en dan de numerieke toets 2.
17. STAP
Druk eenmaal op STEP om het afspelen te pauzeren. Druk vanuit deze stand weer
op STEP om de video te hervatten.
18. MENU
Om naar een menu op een DVD te gaan; Werkt als aan-/uitschakelaar voor PCD op
een VCD.
19. AUDIO
DVD: Druk tijdens het afspelen herhaaldelijk op AUDIO om, indien beschikbaar, de
verschillende talen voor de audio te laten horen.
VCD: Druk tijdens het afspelen herhaaldelijk op AUDIO om een verschillend
audiokanaal (stereo, links of rechts) te laten horen.
20. AFSPELEN/PAUZE
Druk eenmaal op AFSPELEN/PAUZE om het afspelen te pauzeren; als u voor de
tweede keer op AFSPELEN/PAUZE drukt, wordt het afspelen hervat.
21. STOP
Als u eenmaal op deze toets drukt, slaat het apparaat het punt waarop werd gestopt
op. Als later op ENTER wordt gedrukt, wordt het afspelen vanaf daar hervat. Maar als
u in plaats van de toets ENTER op de toets STOP indrukt, is de functie voor het
hervatten niet meer beschikbaar.
22. TERUGKEREN
Om terug te keren naar de bovenste pagina.
23. VOL +
Aanpassen VOLUME.
24. Vooruit overslaan
Ga naar het volgende hoofdstuk/nummer.
25. Achteruit overslaan
Ga naar het begin van het vorige hoofdstuk/nummer.
26. TOETS
Druk op de toets om snel vooruit af te spelen met 5 verschillende
snelheden (2x -> 4x -> 8x -> 20x). Druk de toets ENTER om terug te
keren naar normale weergave.
27. TOETS
Druk op de toets om snel achteruit af te spelen met 5
verschillende snelheden (2x -> 4x -> 8x -> 20x). Druk de toets ENTER
om terug te keren naar normale weergave.
6
Page 28

Instellen instellingenmenu
Pagina systeeminstellingen
Druk de toets SETUP om naar het instellingenmenu te gaan. Gebruik
de pijtjestoetsen om het gewenste onderdeel te selecteren.
Druk na het voltooien van de instellingen nogmaals op SETUP om
terug te keren naar normale weergave.
System Setup (Systeeminstellingen)
SYSTEM SETUP
TV SYSTEM
POWER RESUME
TV TYPE
DEFAULT
RESTORE
1
1
TV System (TV-systeem)
Voor het selecteren van het kleursysteem dat overeenkomt met uw TV
bij gebruik van de AV-uitgang. Deze DVD-speler is compatibel met
zowel NTSC als PAL. PAL - selecteer deze optie als de aangesloten
TV is voorzien van het PAL-systeem. Het wijzigt het videosignaal van
een NTSC-disc en voert dit uit in PAL-formaat.
NTSC - selecteer deze optie als de aangesloten TV is voorzien v an het
NTSC-systeem. Het wijzigt het videosignaal van een PAL-disc en
voert dit uit in NTSC-formaat.
Power Resume (Hervatten bij inschakelen)
Deze functie wordt gebruikt om het laatste geheugen in of uit te
schakelen.
4:3 PS
4:3 LB
16:9
ON
OFF
NTSC
PAL
TV Type (Soort TV)
Selecteert de beeldverhouding van het weergegeven beeld.
4:3 PS: Als u een normale TV hebt en u wilt beide kanten v an het beeld af
laten snijden of te laten formatteren zodat het op het scherm van uw TV
past.
4:3 LB: Als u een normale TV hebt. In dit geval wordt er een breed beeld
met zwarte banden aan de boven- en onderkant van het scherm van de
TV weergegeven.
16:9: breedbeeld scherm.
Default (Standaard)
Herstel de fabrieksinstellingen van het installatiemenu.
Pagina Taalinstelling
Language setup (Taalinstelling)
OSD LANGUAGE
AUDIO LANG
SUBTITLE LANG
1
MENU LANGUAGE
1
U kunt de OSD-taal en, indien beschikbaar, de taal voor audio
(audio)/subtitle (ondertiteling)/menu (menu) van DVD's selecteren. U
kunt ook het soort lettertype voor ondertiteling v an MPEG4-bestanden
selecteren.
LANGUAGE SETUP
ENGLISH
FRENCH
GERMAN
SPANISH
DUTCH
POLISH
HUNGARIAN
ENGLISH
FRENCH
GERMAN
SPANISH
DUTCH
POLISH
HUNGARIAN
OFF
ENGLISH
FRENCH
GERMAN
SPANISH
DUTCH
POLISH
HUNGARIAN
ENGLISH
FRENCH
GERMAN
SPANISH
DUTCH
POLISH
HUNGARIAN
7
Page 29

Instellen instellingenmenu
Pagina audio-instellingen
STANDBY SETTING
AUTO STANDBY
1
1
OFF
3 HOURS
4 HOURS
INSTELLINGENMENU
TFT-MONITOR
Pagina BEELD
PICTURE
BRIGHT
CONTRAST
COLOR
ENGLISH
RESET
50
50
50
Deze functie wordt gebruikt om stand-by-instellingen te selecteren: OFF
(UIT), 3 HOURS (3 UUR), 4 HOURS (4 UUR)
OFF (UIT): Geen stand-by
3 HOURS (3 UUR): Nadat de afstandsbediening en het toetsenbord drie uur
lang niet zijn gebruikt, gaat het apparaat naar de stand-bymodus.
4 HOURS (4 UUR): Nadat de afstandsbediening en het toetsenbord vier uur
lang niet zijn gebruikt, gaat het apparaat naar de stand-bymodus.
Schakel in de stand-bymodus de Aan-/uitschakelaar in de stand OFF en weer
ON om het gebruik te hervatten.
Pagina video-instellingen
BRIGHTNESS
CONTRAST
HUE
SATURATION
SHARPNESS
1
1
U kunt de volgende video-instellingen wijzigen: brightness
(helderheid), contrast (contrast), hue (tint), saturation (verzadiging).
VIDEO SETUP
8
6
4
2
0
12
10
12
+6
12
+4
10
+2
8
0
6
-2
4
-4
2
-6
0
8
10
6
8
4
6
2
4
0
2
0
8
Brightness (Helderheid)
Voor het aanpassen van de instelling voor de helderheid van het
scherm.
Contrast (Contrast)
Voor het aanpassen van de instelling voor het contrast van het
scherm.
Color (Kleur)
Voor het aanpassen van de kleurinstellingen van het scherm.
ENGLISH (Engels)
Voor het aanpassen van de OSD-taal van het menu.
OPTION
SCREEN
SCREEN (SCHERM)
Pas de schermverhouding aan: 16:9 of 4:3
16:9
Page 30

Parameters en specificaties
Service en ondersteuning
Elektronische parameters
Item Standaard eisen
Opgenomen vermogen: <15 W
Vochtigheid bij bedrijf: 5% tot 90%
VIDEO-UITGANG: 1 Vp-p (75 Q)
AUDIO-UITGANG: 1,2 VRms (1 KHz, 0 dB)
Uitgang
Systeem
Laser: Halfgeleider laser, golflengte 650 nm.
Signaalsysteem: NTSC/PAL
Frequentiebereik: 20 Hz tot 20 KHz (1 dB)
Signaal-/ruisverhouding: Beter dan 80 dB (uitsluitend analoge uitgangen)
Dynamisch bereik: Beter dan 85 dB (DVD/CD)
Opmerking: Ontwerp en specificaties kunnen zonder voorafgaande aankondiging
worden gewijzigd.
Voor informatie: www.lenco.com
Lenco biedt service en garanti e aan over eenk omstig met d e Eur opes e w etgev ing.
Dit houdt in dat u, in het geval van reparaties (zowel tijdens als na de
garantieperiode), uw lokale handelaar moet contacteren.
Belangrijke opmerking: Het is niet mogelijk om producten die gerepareerd
moeten worden direct naar Lenco te sturen.
Belangrijke opmerking: De garantie verloopt als een onofficieel servicecenter
het apparaat op wat voor manier dan ook heeft geopend, of er toegang toe heeft
gekregen.
Het apparaat is niet geschikt voor professioneel gebruik. In het geval van
professioneel gebruik worden alle garantieverplichtingen van de fabrikant nietig
verklaard.
De verklaring van overeenstemming kan worden geraadpleegd op
https://lencosupport.zendesk.com/forums/22413161-CE-Documents
®Alle rechten voorbehouden
Producten met een CE keurmerk houden zich aan de EMC
richtlijn (2004/108/EC) en de Richtlijn voor Lage Voltage
(2006/95/EC) uitgegeven door de Europese Commissie.
De verklaring van overeenstemming kan worden geraadpleegd
op
https://lencosupport.zendesk.com/forums/22413161-CE-Docum
ents
Dit symbool geeft aan dat het betr effen de ele ktri sche pro duct o f
de batterij niet moet worden verwijderd als algemeen
huishoudelijk afval in Europa. Zorg voor een juiste
afvalverwerking door het product en de batterij in
overeenstemming met alle van toepassing zijnde lokale wetten
voor het verwijderen van elektrische apparatuur of batterijen te
verwijderen. Als u dit doet, helpt u de natuurlijke hulpbronnen te
behouden en de standaard van milieubescherming te
verbeteren bij de behandeling en verwijdering van elektrisch
afval (Afgedankte Elektrische en Elektronische Apparatuur).
9
Page 31

Lecteur DVD portable 17,5 cm
MANUEL DE L’UTILISATEUR
MES-212
Pour des informations et de l’assistance : WWW.lenco.com
Avant de connecter, utiliser ou régler ce produit, veuillez lire
ce manuel de l’utilisateur soigneusement et jusqu'au bout.
Page 32

Consignes de sécurité importantes
Avertissement : Pour réduire le risque de choc électrique,
n’enlevez pas le couvercle ou l’arrière. Il n’y a aucune pièce
utilisable pour l’utilisateur à l’intérieur de l’appareil. Consultez du
personnel de maintenance qualifié.
Avertissement : Pour prévenir le risque d’incendie ou de choc
électrique, n’exposez pas cet appareil à la pluie ou l’humidité.
L’appareil ne doit pas être exposé à l’eau (gouttes ou
éclaboussements) et les objets remplis de liquides, tels que des
vases, ne doivent pas être placés sur l'appareil.
Gardez le produit à l’abri de la lumière directe du soleil et de
sources de chaleur telle que des radiateurs ou des fours.
N’obstruez aucune voie de ventilation. Les fentes et ouvertures
sur l’appareil sont destinées à sa ventilation. Les ouvertures ne
doivent jamais être bloquées en plaçant votre produit sur un
coussin, un sofa ou une surface similaire.
Ne placez pas le produit sur un chariot, un support, un trépied,
une étagère ou une table instable. L’appareil peut tomber,
causant éventuellement des dégâts ou des blessures.
Ne placez jamais d'objets lourds ou coupants sur l’écran ou le
cadre du LCD.
Débranchez la prise du secteur lorsque vous n’utilisez pas
l’appareil.
AVERTISSEMENT : Un volume sonore excessif durant
l’écoute avec des écouteurs ou un casque peut entraîner une
perte auditive.
AVERTISSEMENT : N’utilisez que les
extensions/accessoires spécifiés et fournis par le producteur.
Cette marque indique que, au sein de l’UE,
ce produit ne doit pas être éliminé avec les
autres produits ménagers. Pour prévenir les
dommages éventuels sur l’environnement ou
la santé humaine causés par une élimination
non-contrôlée des déchets, recyclez-le de
manière responsable pour promouvoir la
réutilisation durable des ressources
matérielles. Pour rendre votre appareil
usagé, veuillez utiliser le système de collecte
et de récupération ou contactez le détaillant
où le produit a été acheté. Ils peuvent
emmener ce produit dans un lieu ou il sera
recyclé de manière à protéger
l’environnement
Pour prévenir des possibles dégâts de l'audition, n'écoutez
pas à des volumes trop élevés pendant de longues périodes.
1
Page 33

Mesures de sécurité
AVERTISSEMENT
RISQUE DE CHOC
ÉLECTRIQUE, NE PAS OUVRIR
Avertissement : Ce lecteur de disque vidéo numérique utilise un
système de laser. L'utilisation des commandes, d'ajustements, ou
de procédures autres que ceux qui sont spécifiés dans ce manuel
peut entraîner une exposition dangereuse aux radiations.
Avertissement : Pour éviter l'exposition directe au rayon laser,
n'ouvrez pas le boitier. La radiation du laser est visible lorsqu'il est
ouvert.
Avertissement : Ne fixez jamais du regard le rayon laser.
Attention : N’installez pas ce produit dans un espace confiné
comme une bibliothèque ou similaire.
Avertissement : L’utilisation d’un câble de raccord USB de plus de
250 mm est interdite avec le port USB
N
N
Remarques sur les droits d’auteurs :
Il est interdit par la loi de copier, diffuser, montrer, diffuser par
câble, lire en public ou louer des documents soumis à droits
d’auteurs sans permission.
Ce produit comporte une fonction de protection contre la copie
développée par Macrovision. Les signaux de protection contre
la copie sont enregistrés sur certains disques. Lors de
l'enregistrement et de la lecture d'images de ces disques, des
perturbations de l'image se présenteront. Ce produit est équipé
d'une technologie de protection des droits d'auteurs protégée
par brevets sous le droit de propriété intellectuelle des U.S.A.
et d'autres droits de propriété intellectuelles détenus par
Macrovision Corporation et d'autres titulaires de droits.
L’utilisation de cette technologie dont la propriété intellectuelle
est protégée doit être autorisée par Macrovision Corporation, et
est destinée à des utilisations domestiques ou privées autres, à
moins d’avoir l’autorisation de Macrovision Corporation. La
retro-ingénierie et le désassemblage sont interdits.
NUMÉRO DE SÉRIE :
Vous pouvez trouver le numéro de série à l’arrière de l’appareil.
Ce numéro est unique et n'est pas disponible pour les autres.
Nous vous conseillons de noter les informations requises ici et
de garder ce guide comme une preuve permanente de votre
achat.
Modèle n°
Série no.
Date d’achat
Fort
impact
Surchauffe à
40 °C
2
Page 34

Utilisation de l'adaptateur d'alimentation de
A
(
voiture (pour une utilisation en voiture)
L’adaptateur d’alimentation de voiture 12 V est conçu pour être utilisé sur les
véhicules dotés d’un système électrique à masse négative 12 V.
Moniteur
Côté droit
Câble CC +
AV (fourni)
Fentes vers entrée AV
et entrée CC
Utiliser le lecteur DVD uniquement
Lecteur DVD
Côté droit
Fentes vers sortie
V et sortie CC
Lecteur DVD
Côté droit
Vers la fente
allume-cigare
Adaptateur
d'alimentation voiture
fourni)
Vers la fente
allume-cigare
Adaptateur
d'alimentation
voiture (fourni)
Vers la fente Entrée
CC 9 V - 12 V
Monter dans le véhicule
Utilisez le support de montage pour voiture fourni pour installer l’unité principale et
le moniteur à l’arrière des appuie-têtes du véhicule. Enroulez fermement la bande
de fixation autour du repose-tête.
SOURCE
\
+
VOL
ENTER
\
\
P
SETU
VOL+\
SOURCE
\
VOL+
ENTER
P
\
SETU
\
Vers la fente Entrée
CC 9 V - 12 V
3
Page 35

Identification des commandes
Unité principale
8
9
10
11
12
13
ECRAN DU MONITEUR À MATRICE ACTIVE
14 15 16 19 17 18 20
1 2 3 6 4 5 7
1. RÉGLAGE
2. / Haut/Précédent
Pression courte pour aller vers le haut
Pression longue pour passer à
l'élément précédent
3. / Bas/Suivant
Pression courte pour aller vers le bas
Pression longue pour passer à
l'élément suivant
4. /VOL- Gauche/VOL-
Pression courte pour aller vers la
gauche
Pression longue pour diminuer le
volume
5. /VOL+ Droite/VOL+
Pression courte pour aller vers la
droite
Pression longue pour augmenter le
volume
6. ENTRÉE
7. SOURCE
8. Marche/Arrêt
9. USB
10. Prise écouteurs
11. Sortie AV
12. Sortie CC
13. Entrée d'alim. 9-12 V
14. MUET
15. HAUT
16. BAS
17. /VOL- Gauche/VOL-
Pression courte pour aller
vers la gauche
Pression longue pour
diminuer le volume
18. /VOL+ Droite/VOL+
Pression courte pour aller
vers la droite
Pression longue pour
augmenter le volume
19. MODE
20. RÉTRO-ÉCLAIRAGE
21. Entrée d'alim. 9-12 V
22. Entrée audio-vidéo
23. O Prise écouteurs
24. Marche/Arrêt
Installer la pile
1. Ouvrez le clapet de pile. 2. Installez une pile CR-2025.
21
22
23
24
4
Trou
Lorsque vous utilisez la télécommande pour la première fois, n'oubliez
pas d'enlever la carte plastique.
REMARQUES :
N
N
Enlevez la pile lors du rangement ou lorsque vous n’utilisez pas
le lecteur DVD pendant une longue période.
Page 36

Identification des commandes
Télécommande
MUTE
VOL -
SOURCE
RETURN
VOL+
22
26
14
16
19
24
23
27
15
17
21
13
18
20
25
SEARCH
1
ZOOM
2
3
4
5
6
TITLE
ENTER
7
8
9
10
11
12
1. AGRANDISSEMENT
Chaque pression sur la touche ZOOM changera l'affichage de l'écran du téléviseur
dans l'ordre suivant : Taille x2, taille x3, taille x4, 1/2 1/3 1/4.
2. SEARCH
Pour aller à un moment précis, à un titre ou à un chapitre que vous désirez en mode
DVD.
3. SOUS-TITRE
Appuyez sur SUBTITLE à plusieurs reprises durant la lecture pour changer la langue
des sous-titres.
REPEAT
4. VUE
Appuyez sur ANGLE pour changer l’angle de vue, sur les DVD qui
prennent en charge cette fonction.
5. TITRE
Pour revenir au menu titre du DVD.
6. ENTRÉE
Pour confirmer la sélection dans un menu.
7. RÉGLAGE
Pour accéder ou sortir du menu de réglages.
8. VOL-
Pour diminuer le VOLUME
9. RÉPÉTER
Appuyez sur REPEAT durant la lecture pour choisir le mode de
répétition de votre choix.
DVD : vous pouvez jouer un chapitre/un titre/l’ensemble du disque.
VCD CD : vous pouvez jouer une piste/l’ensemble du disque.
MP3 WMA : vous pouvez choisir de répéter une piste/répéter un
dossier/répéter TOUT pour le mode de lecture d’un disque.
10. RALENTI
Appuyez sur la touche SLOW à plusieurs reprises pour passer en
lecture ralentie et faire défiler les différentes vitesses. Les vitesses
sont 1/2, 1/3, 1/4, 1/5, 1/6, 1/7 et normal.
11. PROGRAM
DVD VCD CD MP3 : La fonction programmation vous permet de
mettre en mémoire vos pistes favorites du disque. Appuyez sur la
touche PROGRAM, puis le PROGRAM MENU (MENU
PROGRAMMATION) apparaîtra sur l’écran, vous pouvez à présent
utiliser les touches numériques ou de direction pour sélectionner les
titres, chapitres ou numéro de piste et choisissez l’option PLAY
(LECTURE) pour reprendre la lecture normale. Appuyez sur
PROGRAM et choisissez l'option CLEAR (EFFACER) dans le menu
de programme pour effacer la programmation.
JPEG : Vous pouvez appuyer sur PROGRAM à plusieurs reprises
pour choisir le mode diaporama ; il y a 6 types de diaporamas.
5
Page 37

Identification des commandes
Télécommande
12.
DISPLAY
Pour afficher le temps de lecture et les informations d'état.
13.
SOURCE
DVD/USB.
14.
MUET
Pour désactiver la sortie audio.
15.
TOUCHES NUMÉRIQUES 0-9
Pour sélectionner les éléments numérotés dans un menu.
16.
TOUCHES 10+
Afin de sélectionner une piste numérotée 10 ou plus, appuyez d’abord sur 10+. Par
exemple pour la piste 12, appuyez d’abord sur 10+ puis appuyez sur la touche 2.
17.
ÉTAPE
Appuyez une fois sur la touche STEP pour mettre la lecture en pause. Depuis cet
état, appuyez sur STEP pour avancer d’une image.
18.
MENU
Pour accéder au menu sur un disque DVD, pour activer/désactiver la commande de
lecture (PBC) sur un VCD.
19.
AUDIO
DVD : Appuyez sur AUDIO à plusieurs reprises durant la lecture pour écouter une
langue audio ou piste audio différente si elles sont disponibles.
VCD : Appuyez sur AUDIO à plusieurs reprise pour écouter différents canaux audio
(stéréo, gauche ou droite).
20.
LECTURE/PAUSE
Appuyez une fois sur LECTURE/PAUSE pour mettre la lecture en pause, appuyez
une seconde fois sur LECTURE/PAUSE pour reprendre la lecture.
21.
ARRÊT
Lorsque vous appuyez une fois sur cette touche, l’appareil mémorise
le point d’arrêt, à partir duquel la lecture reprendra si vous appuyez sur
ENTER par la suite. Mais si vous appuyez de nouveau sur ARRÊT à la
place de la touche ENTER, la fonction de reprise de lecture ne sera
pas disponible.
22.
REVENIR
Pour revenir au menu supérieur.
23.
VOL +
Pour augmenter le volume.
24.
Avancer d’une piste
Pour aller au chapitre ou à la piste suivante.
25.
Revenir d’une piste
Pour aller au début du chapitre ou de la piste précédente.
26.
TOUCHE
Appuyez sur la touche pour faire une avance rapide avec 5
niveaux de vitesse (X2->X4->X8->X20), appuyez sur la touche
ENTRER pour revenir à la lecture normale
27.
TOUCHE
Appuyez sur la TOUCHE vous permet de faire un retour rapide
avec 5 niveaux de vitesse (X2->X4->X8->X20), appuyez sur la touche
ENTRÉE pour revenir a la lecture normale.
6
Page 38

Réglage du Menu RÉGLAGE
Page des réglages du système
Appuyez sur la touche SETUP pour accéder au menu des réglages.
Utilisez les touches directionnelles pour sélectionner les
éléments de votre choix. Après avoir fini les réglages, appuyez de
nouveau sur SETUP pour revenir à l’affichage normal.
System Setup (réglages système)
SYSTEM SETUP
TV SYSTEM
POWER RESUME
TV TYPE
DEFAULT
RESTORE
1
1
System TV (Système TV)
Sélectionnez la norme de couleur du système qui correspond à votre
TV lorsque vous utilisez la sortie audio-vidéo. Ce lecteur DVD est
compatible NTSC et PAL. PAL – faites ce choix si vous vous
connectez à un téléviseur de système PAL. Cela changera le signal
vidéo d’un disque NTSC et la sortie sera au format PAL.
NTSC – faites ce choix si vous vous connectez à un téléviseur de
système NTSC. Cela changera le signal vidéo d’un disque PAL et la
sortie sera au format NTSC.
Power Resume (Reprise d’alimentation)
Cette fonction sert à activer ou désactiver la dernière mémoire.
4:3 PS
4:3 LB
16:9
ON
OFF
NTSC
PAL
TV Type (Type TV)
Pour sélectionner le format de l'image en mode lecture.
4:3 PS : Si vous avez un téléviseur normal et vous voulez réduire chaque
côté de l’image ou l'adapter à votre écran TV.
4:3 LB : Si vous avez un téléviseur normal. Dans ce cas, une image large
avec des bandes noires dans les portions supérieures et inférieures de
l’écran TV s’affichera.
16:9 : Affichage d’écran large.
Default (Réglage par défaut)
Pour restaurer les paramètres d’usine par défaut du menu des réglages.
Page de réglage de la langue
Language setup (réglage de la langue)
OSD LANGUAGE
1
AUDIO LANG
SUBTITLE LANG
MENU LANGUAGE
1
Vous pouvez choisir la langue de l’OSD (Affichage à l'écran) et
sélectionner la langue pour audio/subtitle (sous-titre)/menu des
disques DVD si disponible. Vous pouvez également sélectionner la
police de caractères pour les sous-titres des mpeg4.
LANGUAGE SETUP
ENGLISH
FRENCH
GERMAN
SPANISH
DUTCH
POLISH
HUNGARIAN
ENGLISH
FRENCH
GERMAN
SPANISH
DUTCH
POLISH
HUNGARIAN
OFF
ENGLISH
FRENCH
GERMAN
SPANISH
DUTCH
POLISH
HUNGARIAN
ENGLISH
FRENCH
GERMAN
SPANISH
DUTCH
POLISH
HUNGARIAN
7
Page 39

Réglage du Menu RÉGLAGE
Page des réglages audio
STANDBY SETTING
AUTO STANDBY
1
1
La fonction sert à sélectionner le paramètre de veille : OFF (ARRÊT), 3
HOURS (3 HEURES) 4 HOURS (4 HEURES)
OFF (ARRÊT) : Pas de veille
3 HOURS (3 HEURES) : Passe en veille si aucune activité de la
télécommande et du pavé de touches pendant 3 heures
4 HOURS (4 HEURES) : Passe en veille si aucune activité de la
télécommande et du pavé de touches pendant 4 heures
En mode veille, positionnez le sélecteur MARCHE/ARRÊT sur OFF, puis sur
ON pour reprendre l'utilisation.
Page des réglages vidéo
BRIGHTNESS
CONTRAST
HUE
SATURATION
SHARPNESS
1
1
Vous pouvez changer les paramètres vidéo : Brightness (Luminosité),
contrast (contraste), hue (nuance), saturation.
VIDEO SETUP
8
6
4
2
0
OFF
3 HOURS
4 HOURS
12
10
12
+6
12
+4
10
+2
8
0
6
-2
4
-4
2
-6
0
8
10
6
8
4
6
2
4
0
2
0
RÉGLAGE DU MENU MONITEUR
TFT
Page PICTURE (IMAGE)
PICTURE
BRIGHT
CONTRAST
COLOR
ENGLISH
RESET
Brightness (Luminosité)
Règle la luminosité de l'écran.
Contrast (Contraste)
Règle le contraste de l'écran.
Color (Couleur)
Règle la couleur de l'écran.
ENGLISH (ANGLAIS)
Règle la langue d'affichage des menus
OPTION
SCREEN
SCREEN (ÉCRAN)
Règle l'écran au format 16:9 ou 4:3
50
50
50
16:9
8
Page 40

Paramètres et spécifications
Service et assistance
Paramètres électroniques
Élément Besoin standard
Puissance consommée : <15 W
Taux d’humidité de
fonctionnement :
SORTIE VIDÉO : 1 V c-c (75 Ω)
Sortie
SORTIE AUDIO : 1,2 Vrms (1 KHz, 0 dB)
5 % à 90 %
Système
Laser : laser semi-conducteur, longueur d’onde 650 nm
Système signal : NTSC/PAL
Réponse de fréquence : 20 Hz à 20 kHz (1 dB)
Rapport signal sur bruit :
Plage dynamique : Supérieure à 85 dB (DVD/CD)
Remarque : Ce modèle et ses spécifications peuvent faire l’objet de changement
sans notification.
Supérieur à 80 dB (connecteurs ANALOG OUT
seulement)
Pour obtenir des informations : www.lenco.com
Lenco propose un service et une garantie conformément à la législation
européenne, ce qui signifie qu’en cas de besoin de réparation (aussi bien pendant
et après la période de garantie), vous pouvez contacter votre revendeur le plus
proche.
Remarque importante : Il n’est pas possible de renvoyer l’appareil pour
réparation directement à Lenco.
Remarque importante : Si l’unité est ouverte ou modifiée de quelque manière
par un réparateur non agréé, la garantie serait caduque.
Cet appareil ne convient pas à une utilisation professionnelle. En cas d’utilisation
professionnelle, les obligations de garantie du fabricant seront annulées.
La déclaration de conformité peut être consultée via le lien suivant :
https://lencosupport.zendesk.com/forums/22413161-CE-Documents
®Tous droits réservés
Les produits avec la marque CE sont conformes à la directive
CEM (2004/108/CE) et à la directive basse tension (2006/95/CE)
émises par la commission de la communauté européenne.
La déclaration de conformité peut être consultée via le lien
suivant :
https://lencosupport.zendesk.com/forums/22413161-CE-Docum
ents
Ce symbole indique que le produit électrique concerné ou la
batterie ne doivent pas être jetés parmi les autres déchets
ménagers en Europe. Pour garantir un traitement correct du
déchet de la batterie ou de l'appareil, veuillez les mettre au
rebut conformément aux règlements locaux en vigueur relatifs
aux appareils électriques et autres batteries. En agissant de la
sorte, vous contribuerez à la préservation des ressources
naturelles et à l'amélioration des niveaux de protection
environnementale concernant le traitement et la destruction des
déchets électriques (Directive sur les déchets des équipements
électriques et électroniques).
9
Page 41

Reproductor portátil de DVD 17,5 cm (7”)
MANUAL DEL
USUARIO MES-212
Para más información y ayuda, visite www.lenco.com
Lea detenidamente y por completo este manual del usuario
antes de conectar, operar o ajustar este producto.
Page 42

Instrucciones Importantes de
Seguridad
Advertencia: No quite la cubierta ni la parte trasera para reducir el
riesgo de descargas eléctricas. No contiene piezas reparables
por el usuario. Solicite los servicios de mantenimiento a personal
cualificado.
Advertencia: No exponga la unidad a lluvia ni a humedad para
prevenir riesgos de incendios o descargas eléctricas.
No exponga el adaptador ni el DVD portátil al agua (gotas o
salpicaduras) ni coloque objetos llenos de líquidos, como
jarrones, encima de la unidad.
Mantenga el DVD portátil alejado de la luz del sol directa y de
fuentes de calor como radiadores o estufas.
No obstruya las aperturas de ventilación. La unidad tiene ranuras
y aperturas para su ventilación. Nunca obstruya las aperturas
colocando el DVD portátil encima de almohadas, sofás u otras
superficies similares.
No coloque el DVD portátil en carros, soportes, trípodes o mesas
inestables. La unidad podría caer, provocando posibles daños o
lesiones.
Nunca coloque objetos pesados ni afilados sobre el panel LCD ni
el marco.
Desenchufe la alimentación de la toma cuando no se use la
unidad.
ADVERTENCIA: Una presión de sonido excesiva en los
cascos y auriculares puede causar pérdida de audición.
ADVERTENCIA: Use sólo los accesorios específicos
proporcionados por el fabricante.
Esta marca indica que no se debe desechar
este producto con otros residuos domésticos
en la UE. Recíclelo con responsabilidad para
promover la reutilización sostenible de los
recursos materiales y para prevenir posibles
perjuicios al medio ambiente o la salud
debido a una eliminación no controlada de
los residuos. Utilice los sistemas de
devolución y recogida o póngase en contacto
con el distribuidor donde compró el producto
para devolverlo. Ellos pueden reciclar este
producto de forma segura para el medio
ambiente
No lo use con niveles de volumen altos durante periodos
largos para evitar posibles daños al oído.
1
Page 43

Precauciones de seguridad
ADVERTENCIA
RIESGO DE DESCARGA
ELÉCTRICA NO ABRIR
Advertencia: Este reproductor de discos de video digital utiliza un
sistema láser. El uso de controles, ajustes o procedimientos
distintos a aquéllos aquí especificados puede resultar en una
exposición peligrosa a la radiación.
Advertencia: No abra la caja para evitar la exposición directa al
rayo láser. La radiación láser será visible si se abre.
Advertencia: Nunca mire directamente al rayo láser.
Precaución: No instale este producto en espacios confinados
como una estantería o una unidad similar.
Advertencia: No se debe usar un cable de extensión USB de más
de 250 mm en el puerto USB
N
N
Notas sobre los derechos
reservados:
Está prohibido legalmente copiar, transmitir, mostrar, trasmitir
por cable, reproducir en público o alquilar material con
derechos reservados sin permiso.
Este producto dispone de una función de protección contra
copias desarrollada por Macrovision. Hay señales de
protección contra copias grabadas en algunos discos. Cuando
se graben y reproduzcan las películas de estos discos
aparecerá ruido visual. Este producto incorpora tecnología de
protección de los derechos reservados amparada por métodos
de demandas de ciertas patentes en EE.UU. y otros derechos
de propiedad intelectual propiedad de Macrovision Corporation
y otros propietarios de derechos. El uso de esta tecnología de
protección de los derechos reservados debe estar autorizado
por Macrovision Corporation y ha sido diseñada para el uso
doméstico u otros visionados limitados, excepto si ha sido
autorizado por Macrovision Corporation. Está prohibida la
ingeniería inversa o el desensamblaje.
NÚMERO DE SERIE:
El número de serie se encuentra en la parte trasera de la
unidad. Este número es exclusivo de esta unidad y no está
disponible en otros. Debe registrar aquí la información solicitada
y conservar esta guía como prueba permanente de su compra.
Nº de modelo
Nº de serie
Fecha de compra
Impactos
fuertes
Calor superior a
40°C
2
Page 44

Usar el adaptador eléctrico para coche (para
A
uso en coche)
El adaptador eléctrico para coche de 12 V incluido ha sido diseñado para usarlo en
vehículos con un sistema eléctrico con toma de tierra negativa de 12 V.
Monitor
lado derecho
Cable CC+AV
A las tomas de
entrada de AV y CC
Usar sólo el reproductor de DVD
Reproductor de DVD
(incluido)
lado izquierdo
A las tomas de
salida de AV y CC
Reproductor de DVD
lado izquierdo
A la toma del
encendedor
Adaptador eléctrico
para coche (incluido)
A la toma del
encendedor
Adaptador eléctrico
para coche (incluido)
la toma de entrada
de CC de 9-12 V
Instalación en el vehículo
Use las correas de instalación en coche incluidas para instalar la unidad principal
y el monitor en la parte trasera de los reposacabezas del vehículo. Ajuste
firmemente la correa de instalación alrededor del reposacabezas.
SOURCE
\
+
VOL
ENTER
\
\
P
SETU
VOL+\
SOURCE
\
VOL+
ENTER
P
\
SETU
\
A la toma de entrada
de CC de 9-12 V
3
Page 45

Identificación de los controles
Unidad principal
8
9
10
11
12
13
PANTALLA TFT DEL MONITOR
14 15 16 19 17 18 20
1 2 3 6 4 5 7
1. CONFIGURACIÓN
2. / Arriba/Anterior
Un toque corto para Arriba
Un toque largo para
Anterior
3. / Abajo/Siguiente
Un toque corto para Abajo
Un toque largo para
Siguiente
4. /VOL- Izquierda/VOL-
Un toque corto para
Izquierda
Un toque largo para VOL-
5. /VOL+ Derecha/VOL+
Un toque corto para
Derecha
Un toque largo para VOL+
6. ENTRAR
7. FUENTE
8. ENCENDER/APAGAR
9. USB
10. toma de auriculares
11. Salida de AV
12. Salida de CC
13. Entrada de CC de 9-12 V
14. SILENCIAR
15. Arriba
16. Abajo
17. /VOL- Izquierda/VOL-
Un toque corto para Izquierda
Un toque largo para VOL-
18. /VOL+ Derecha/VOL+
Un toque corto para Derecha
Un toque largo para VOL+
19. MODE
20. Retroiluminación
21. Entrada de CC de 9-12 V
22. Entrada de AV
23. O Toma de auriculares
24. ENCENDER/APAGAR
Insertar la pila
1. Abra la tapa de la pila. 2. Inserte la pila CR-2025.
Agujer
21
22
23
24
No olvide retirar la tarjeta de plástico cuando use el mando a distancia
por primera vez.
NOTA:
N
N
Saque la pila cuando guarde el reproductor de DVD o cuando
no lo vaya a usar durante un largo periodo.
4
Page 46

Identificación de los controles
Mando a distancia
MUTE
VOL -
SOURCE
RETURN
VOL+
22
26
14
16
19
24
23
27
15
17
21
13
18
20
25
SEARCH
1
ZOOM
2
3
4
5
6
TITLE
ENTER
7
8
9
10
11
12
1. ZOOM
Cada vez que pulse el botón ZOOM la pantalla de TV cambiará en la siguiente
secuencia: Tamaño 2X, tamaño 3X, tamaño 4X, 1/2, 1/3, 1/4.
2. BÚSQUEDA
Vaya al punto de tiempo, título o capítulo que desee en modo DVD.
3. SUBTÍTULOS
Pulse SUBTITLE varias veces durante la reproducción para ver los subtítulos en
diferentes idiomas.
4. ÁNGULO
Al pulsar ANGLE cambiará el angulo de visión en DVDs compatibles con esta
función.
REPEAT
5. TÍTULO
Regresar al menú de títulos del DVD.
6. ENTRAR
Confirma la selección de menú.
7. CONFIGURACIÓN
Acceder o salir del menú de configuración.
8. VOL-
Ajustar VOLUMEN
9. REPETIR
Pulse REPEAT durante la repetición para seleccionar el modo de
repetición deseado.
DVD: puede reproducir un capítulo/título/todos de un disco.
VCD CD: puede reproducir una pista/todas de un disco.
MP3 WMA: puede seleccionar el modo de reproducción Repetir
una/Repetir carpeta/TODO de un disco.
10. LENTO
Pulse el botón Lento varias veces para entrar en la reproducción lenta
y alternar entre las diferentes velocidades. Las velocidades son 1/2,
1/3, 1/4, 1/5, 1/6, 1/7 y normal.
11. PROGRAMA
DVD VCD CD MP3: La función de programa le permite almacenar sus
pistas favoritas del disco. Pulse el botón PROGRAM y parecerá el
PROGRAM MENU (MENÚ PROGRAMA) en la pantalla. Ahora podrá
usar las teclas de números o de dirección para introducir los números
de título, capítulo o pista y seleccionar la opción PLAY
(REPRODUCIR). Para volver a la reproducción normal, pulse
PROGRAM y seleccione la opción CLEAR (BORRAR) del menú de
programa.
JPEG: Puede pulsar PROGRAM varias veces para seleccionar el
modo de diapositivas. Hay 6 tipos de modo de diapositivas.
12. PANTALLA
Muestra el tiempo de reproducción y la información de estado.
13. FUENTE
DVD/USB.
5
Page 47

Identificación de los controles
Mando a distancia
14.
SILENCIAR
Desactivar salida de audio.
15.
BOTONES DE NÚMERO 0-9
Selecciona los objetos con número de un menú.
16.
BOTÓN 10+
Para seleccionar la pista 10 o una superior, primero pulse 10+. Por ejemplo, para
seleccionar la pista 12, primero pulse 10+ y, a continuación, pulse el botón del
número 2.
17.
Pulse STEP una vez para pausar la reproducción. A continuación, pulse STEP para
avanzar un fotograma.
18.
Acceder al menu de un disco DVD, enciende/apaga PBC de VCD.
19.
DVD: Pulse AUDIO varias veces durante la reproducción para escuchar diferentes
idiomas o pistas de audio, si hay disponibles.
VCD: Pulse AUDIO varias veces durante la reproducción para escuchar diferentes
canales de audio (Estéreo, Izquierda o Derecha).
20.
Pulse REPRODUCIR/AUDIO una vez para pausar la reproducción. Si pulsa
REPRODUCIR/AUDIO por segunda vez para continuar la reproducción.
21.
Al pulsar este botón una vez, la unidad registrar el punto detenido desde la que
continuará la reproducción si se pulsa ENTER. Pero si se vuelve a pulsar el botón
DETENER en lugar del botón ENTER, no continuará la reproducción.
22.
Volver a la página anterior.
23.
Ajustar el VOLUMEN.
PASO
MENU
AUDIO
REPRODUCIR/PAUSA
DETENER
VOLVER
VOL +
24.
Saltar hacia delante
Ir al siguiente capítulo/pista.
25.
Saltar hacia atrás
Volver al capítulo/pista anterior o al comienzo.
26.
Botón ►►
Al pulsar el BOTÓN ►► podrá avanzar a una velocidad de 5 niveles
(X2 -> X4 -> X8 -> X20). Pulse el botón ENTER para volver a la
reproducción normal.
27.
BOTÓN
Al pulsar el BOTÓN podrá retroceder a una velocidad de 5 niveles
(X2-> X4->X8->X20). Pulse el botón ENTER para volver a la
reproducción normal.
6
Page 48

Ajustes del menú CONFIGURACIÓN
Página de configuración del sistema
Pulse el botón SETUP para entrar en el menú de configuración. Use
los botones de dirección para seleccionar el objeto preferido.
Cuando complete los ajustes, pulse SETUP otra vez para volver a la
pantalla normal.
System Setup (Configuración del sistema)
SYSTEM SETUP
TV SYSTEM
POWER RESUME
TV TYPE
DEFAULT
RESTORE
1
4:3 PS
4:3 LB
16:9
1
TV System (Sistema de TV)
Seleccione el sistema de color que corresponda con su TV cuando
use la salida AV. El reproductor de DVD es compatible con los
sistemas NTSC y PAL. PAL – Seleccione esta opción si la TV
conectada es un sistema PAL. Cambiará la señal de video de un disco
NTSC y la salida a formato PAL.
NTSC - Seleccione esta opción si la TV conectada es un sistema
NTSC. Cambiará la señal de video de un disco PAL y la salida a
formato NTSC.
Power Resume (Continuar encendido)
Esta función se usa para encender o apagar la última memoria.
ON
OFF
NTSC
PAL
TV Type (Tipo de TV)
Selecciona la proporción de la imagen reproducida.
4:3 PS: Si tiene una TV normal y desea que ambos lados de la imagen
esté recortados o tengan el formato para encajar en la pantalla de su TV.
4:3 LB: Si tiene una TV normal. En este caso se mostrará una imagen
ancha con bandas negras en las partes superior e inferior de la pantalla
de TV.
16:9: Pantalla ancha.
Default (Predeterminada)
Restaurar los ajustes de fábrica del menú de configuración.
Página de configuración de idioma
Language setup (Configuración de idioma)
OSD LANGUAGE
AUDIO LANG
SUBTITLE LANG
1
MENU LANGUAGE
1
Puede seleccionar el idioma de OSD (visualización en pantalla) y
seleccionar el idioma de audio/subtitle (subtítulos)/menu (menú) de
los discos DVD si hay disponibles. También puede seleccionar el tipo
de fuente para los subtítulos mpeg4.
LANGUAGE SETUP
ENGLISH
FRENCH
GERMAN
SPANISH
DUTCH
POLISH
HUNGARIAN
ENGLISH
FRENCH
GERMAN
SPANISH
DUTCH
POLISH
HUNGARIAN
OFF
ENGLISH
FRENCH
GERMAN
SPANISH
DUTCH
POLISH
HUNGARIAN
ENGLISH
FRENCH
GERMAN
SPANISH
DUTCH
POLISH
HUNGARIAN
7
Page 49

Ajustes del menú CONFIGURACIÓN
Página de configuración de audio
STANDBY SETTING
AUTO STANDBY
1
1
La función se usa para seleccionar los ajustes de espera: OFF (Apagado), 3
HOURS (3 horas), 4 HOURS (4 horas)
OFF (APAGADO): Sin espera
3 HOURS (3 HORAS): Si no se usa el mando a distancia ni las teclas del
panel durante tres horas, la unidad pasa a espera
4 HOURS (4 HORAS): Si no se usa el mando a distancia ni las teclas del
panel durante cuatro horas, la unidad pasa a espera
En el modo de espera, ponga el interruptor de encendido y apagado en OFF y
ON para continuar el uso.
Página de configuración de vídeo
BRIGHTNESS
CONTRAST
HUE
SATURATION
SHARPNESS
1
1
VIDEO SETUP
8
6
4
2
0
OFF
3 HOURS
4 HOURS
12
10
12
+6
12
+4
10
+2
8
0
6
-2
4
-4
2
-6
0
8
10
6
8
4
6
2
4
0
2
0
AJUSTES DEL MENÚ DEL
MONITOR TFT
Página IMAGEN
PICTURE
Brightness (Brillo)
Ajusta el brillo de pantalla.
Contrast (Contraste)
Ajusta el contraste de pantalla.
Color
Ajusta el control de pantalla.
ENGLISH (INGLÉS)
Configura el idioma de OSD del menú
OPTION
SCREEN (Pantalla)
Ajusta la pantalla en modo 16:9 o 4:3
BRIGHT
CONTRAST
COLOR
ENGLISH
RESET
SCREEN
50
50
50
16:9
Puede cambiar los ajustes de vídeo: Brightness (brillo), contrast
(contraste), hue (tonalidad), saturation (saturación).
8
Page 50

Parámetros y especificaciones
Servicio y asistencia
Parámetros electrónicos
Elemento Requisitos estándar
Consumo de energía: <15 W
Humedad de
funcionamiento:
SALIDA DE VÍDEO: 1 Vp-p (75Q)
Salida
SALIDA DE AUDIO: 1,2 Vrms (1 KHz, 0 dB)
5 % a 90 %
Sistema
Láser: Láser semiconductor, longitud de onda 650 nm
Sistema de señal: NTSC/PAL
Respuesta de frecuencia: 20 Hz a 20 kHz (1 dB)
Relación señal-ruido:
Rango dinámico: Más de 85 dB (DVD/CD)
Nota: El diseño y las especificaciones están sujetos a cambios sin previo aviso.
Más de 80 dB (sólo conectores de SALIDA
ANALÓGICA)
Para más información: www.lenco.com
Lenco ofrece servicio y garantía en cumplimiento con las leyes de la Unión
Europea, lo cual implica que, en caso de que su producto precise ser reparado
(tanto durante como después del periodo de garantía), deberá contactar
directamente con su distribuidor.
Nota importante: No es posible enviar sus reparaciones directamente a Lenco.
Nota importante: Si la unidad es abierta por un centro de servicio no oficial, la
garantía quedará anulada.
Este aparato no es adecuado para el uso profesional. En caso de darle un uso
profesional, todas las obligaciones de garantía del fabricante quedarán anuladas.
Puede consultar la declaración de conformidad en
https://lencosupport.zendesk.com/forums/22413161-CE-Documents
®Reservados todos los derechos
Los productos con la marca CE cumplen con la Directiva EMC
(2004/108/EC) y con la Directiva de Bajas Tensiones
(2006/95/EC) emitida por la Comisión de la Unión Europea.
Puede consultar la declaración de conformidad en
https://lencosupport.zendesk.com/forums/22413161-CE-Docum
ents
Este símbolo indica que no deberá deshacerse del producto
eléctrico o batería en cuestión junto con los residuos
domésticos, en el ámbito de la UE. Para garantizar un
tratamiento residual correcto del producto y su batería, por
favor, elimínelos cumpliendo con las leyes locales aplicables
sobre requisitos para el desechado de equipos eléctricos y
baterías. De hacerlo, ayudará a conservar recursos naturales y
mejorar los estándares de protección medioambiental en el
tratamiento y eliminación de residuos eléctricos (Directiva sobre
la Eliminación de Equipos Eléctricos y Electrónicos).
9
Page 51

Page 52

 Loading...