

Page 1

USER'S MANUAL
DVP-938X2
For information and support,WWW.lenco.com
22,5 cm (9”) portable dvd player
Before connectin g, o perating or adjusting thi s pr od uct,
please read this use r' s manual carefully and comp le tely.
Page 2

Table of Content
Contents
Table of Contents
Important Safety Instructions
Safety Precautions
Basic Operation
Identification of Controls
Main Unit
Remote control unit
Dear Customer:
Thank you for purcha si ng this Portable DVD play er w ith swivel screen &
USB/SD. When ope ni ng t he box for the first time, pl ea se check whether
all the accessorie s ar e present. Before conne ct ing parts and power,
please carefully r ea d the user manual and alway s ke ep these
instructions clo se b y your Portable DVD playe r wi th swivel screen & USB/ SD .
Box content:
2 x main unit
2 x Remote control inc lu ding battery
2 x AC adapter
2 x headphone
1x Car Adaptor
Straps
Note: if some parts ar e mi ssing please contact yo ur d ea ler as soon as possible.
1
2
3
4
5-7
5
6-7
SETUP Menu Setting
General Page
Audio Setup Page
Video Setup Page
Preference Page
Password Setup Page
Battery Parameters
Parameters and specifications
Service and support
8-10
8
8-9
9
9-10
10
11
11
12
1
Page 3
Important Safety Instructions
Warning : To reduce the ri sk o f electric shock, do not re mo ve
the cover or back. There are no us er -s erviceable parts
inside. Refer serv ic ing to qualified person ne l.
Warning : To prevent fir e or e lectric shock hazard, d o no t
expose the unit to rai n or m oisture.
Do not expose the Adapt or a nd portable DVD to water
(dripping or splas hi ng) and no objects filled w it h liquids,
such as vases, shoul d be p laced on the unit.
Keep the portable DV D aw ay from direct sunlight a nd h ea t
source such as radia to rs or stoves.
Do not block the venti la tion openings. Slots an d op en ings on
the unit are provide d fo r ventilation. The openings shoul d
never be blocked by pl ac ing your portable DVD on a cu sh ion,
sofa or other simila r su rface.
Do not place the porta bl e DVD on unstable cart, sta nd ,
tripod, bracket or t ab le. Th e un it m ay fall, resulting in
possible damage or i nj ury.
Never place heavy or s ha rp objects on the LCD panel o r
frame.
Only use the AC adapter i nc luded with portable DVD . Us in g
any other adapter wi ll v oid your warranty.
The plug of AC adaptor is u se d as the disconnect devic e, t he
disconnect devic e sh all remain readily oper ab le.
Unplug the power fro m th e outlet when the unit is not i n us e.
Attention should b e dr awn to the environmenta l as pe cts of
battery disposal .
CAUTION: Danger of e xp losion if battery is inco rr ec tly
replaced. Replac e on ly with the same or equival en t type.
WARNNIN G: The batte ry ( battery or batteries or bat te ry
pack) shall not be exp os ed to excessive heat such a s
sunshine, fire or th e li ke.
WARNNIN G: E xc essive sound pressure f ro m earphones or
headphones can cau se h earing loss.
WARNNIN G: O nl y use attachments/acc es sories specified
provided by the manu fa cturer, the portable DVD i s su pp lied
by AC adapter, the AC ada pt er i s used as disconnect devi ce ,
the disconnect dev ic e shall remain readily op er able.
Caution: Danger of e xp losion if battery is inco rr ec tly
replaced, replac ed o nly with the same or equiva le nt type
(Lithium battery )
This marking indic at es that this product shou ld n ot
be disposed with oth er h ousehold wastes
throughout the EU. To prevent po ss ible harm to the
environment or hum an h ealth from uncontroll ed
waste disposal, re cy cle it responsibly to pro mo te
the sustainable re us e of material resources . To
return your used dev ic e, please use the return an d
collection syste ms o r contact the retailer wh er e
the product was purc ha sed. The y ca n take this
product for enviro nm ental safe recycling.
At maximum volume, continued listening of device
the ear of user.
may damage
2
Page 4

Safety Precautions
WARNING
RISK OF ELECTRIC SHOCK
Warning : This digit al v ideo disc player employ s a la ser system.
Use of controls,ad ju stments, or the perform an ce o f procedures
other than those spe ci fied herein may result in h az ardous
radiation Exposu re .
Warning : To prevent dir ec t exposure to laser beam, do n ot open
the enclosure.Visible la se r radiation when open.
DO NOT OPEN
Power supply ada pt or
Manufacturer:She nz hen Mass Power Electron ic s Limited
Model number: SEF0 90 0100E1BA
Use only the power sup pl y listed in the user instru ct ions
Warning : Ne ve r stare directly into the l as er beam.
Caution: Do not inst al l this product in a confine d sp ace such
as a book case or simila r un it.
Warning : wh en the unit using by child, par en ts must make sure
to let the child under st and all contents in Instr uc ti on book how
battery using to gua ra ntee using battery corr ec tl y all the time.
Warning : wh en find battery overheat, s we ll or dour, please
stop using battery a nd c ontact service centre f or g et ting
replacement.
Warning : do n ot charging battery on the pl ac e of insufficient
ventilation such a s: m attress, sofa, cushio n , so ft m at......
Warning : we w ill not take any responsibi li ty if user incorrectly
use battery, not following ou r wa rn ing instruction label o n th e
battery case.
warning:The USB me mo ry stick should be plugge d in t he unit
directly.USB extension ca bl e should not be used to avoid fai li ng
of data transferri ng a nd interference cause d.
WARNING : Wh en u sing the headphone: Pro lo nged exposure to
loud sounds may lead t o te mporary or permanent he ar ing loss.
When participati ng i n the traffic listening to a person al p la yer
can make the listene r le ss aware of potential dan ge rs such as
approaching ca rs .
3
N
N
Notes on Copyrights:
It is forbidden by law t o co py, bro ad cast, show,broadcast via
cable, play in pub li c, o r rent copyrighted mate ri al without
permission.
This product featu re s the copy protection fun ct io n developed by
Macrovision.Co py p rotection signals are r ec orded on some discs.
When recording and p la ying the pictures of thes e di scs picture
noise will appea r.T hi s product incorporate s co pyright protection
technology that is p ro tected by method claims o f ce rt ain U.S.
Patents and other in te llectual property rig ht s owned by Macrovision
Corporation and ot he r rights owners.Use of th is c op yright protection
technology must be a ut horized by Macrovisio n Co rporation, and is
intended for home an d ot her limited viewing use s on ly unless
otherwise author iz ed by macrovision Corpo ra tion. Reverse
engineering or d is as sembly is prohibited.
charge
strong
impact
ove r
hea t
40 ˚C
Page 5

Mounting in the Vehicle
Use the supplied car mounting straps to install the main unit
and monitor on the back of the vehicle's headrests.Tightly
wrap the mounting strap around the headrest.
Please kindly note t ha t Unit A corresponds with Re mo te control A
and Unit B correspon ds w ith Remote control B.
4
Page 6

Identification of Controls
Main Unit
1
2
3
4
5
6
7
8
10
9
11
1.SD/MS/MMC
2. POWER ON/OFF
3. HEADPHONE OUT JACKS
4. VIDEO/AUDIO OUT
VIDEO/AUDIO IN
5.
6.USB
7. DC OUT
8. DC IN 9-12V
9. ENTER
10. UP/DOWN/LEFT /R IGHT
11. SO URCE
Insert the battery
1.Open the battery d oo r.
When using the remot e co ntrol for the first time do n ot f or get to
remove the plastic c ar d.
2.Insert battery.
5
NOTES:
N
Remove battery dur in g storage or when you are not u si ng t he DVD
player for a long time .
Page 7
Identification of Controls
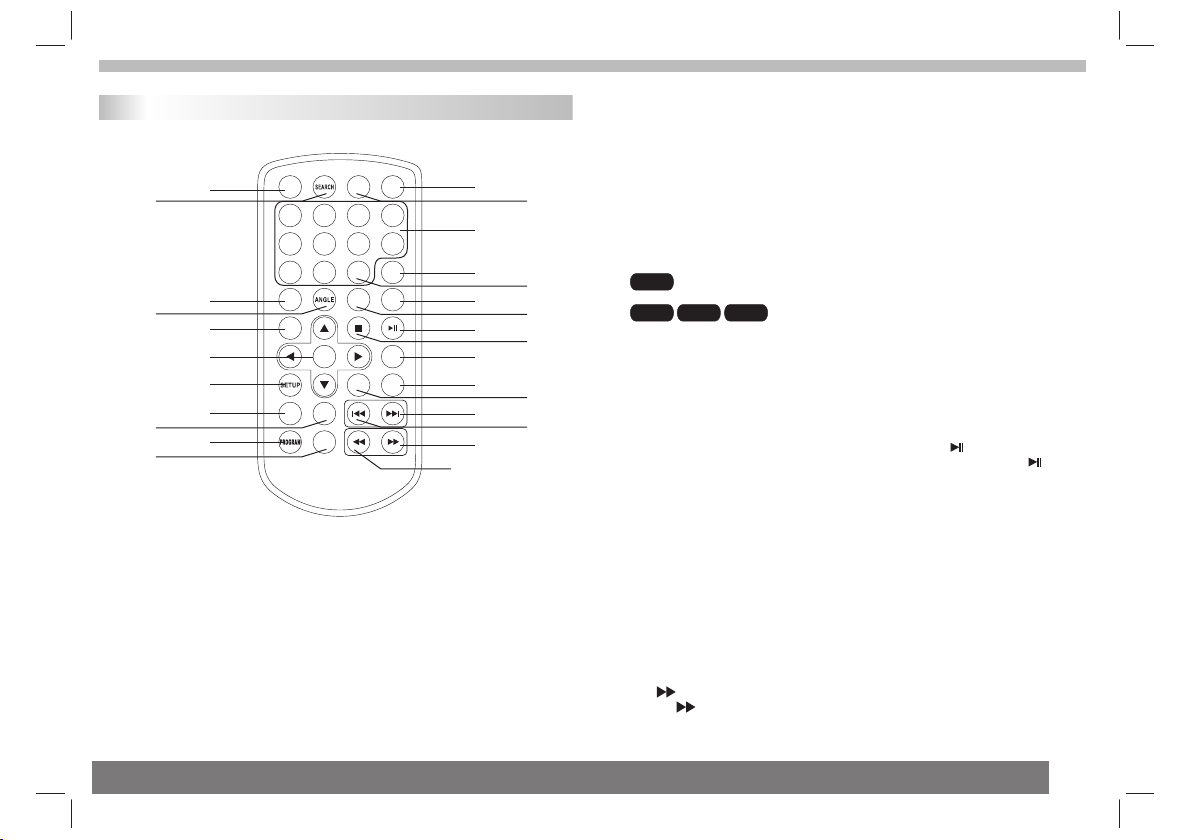
Remote control unit
16
17 2
18
19
20
21
STEP
1 2
5
9 0
SUBT ITLE
TITL E
6
ENTE R
22
SLOW
24
25
26
27
1. SOURCE
DVD/CARD/USB.
2. MUTE
Disable Audio out pu t.
3.0-9 NUMBER BUTTON
Selects numbered i te ms in a menu.
4.DISPLAY
To display the playtim e an d status information.
REPE AT
ZOOM
MUTE
10+
AUDI O
SOUR CE
3
4
7
8
DISP LAY
MENU
/PBC
MODE
VOL +VOL -
15
1
3
4
6
8
10
11
12
14
5
7
9
23
13
5.10+ BUTTON
In order to select a tra ck 1 0 or greater, first press 10 +, F or e xample;
select track 12, fir st p ress 10+, and then press nu mb er 2 b utton.
6. MENU/PBC
Return to DVD root men u( DVD).
PBC on/off switch (VCD) .
7.AUDIO
Press AUDIO repeate dl y during playback to hear a different
DVD
audio language o r au di o track, if avilable.
Press AUDIO repeatedl y du ring playback to
MP3
hear a different audio chann el ( L eft,Right,Mix,Stere o) .
8.PLAY/PAUSE
Press PLAY/PAUS E once to pause playback, p re ssing PLAY/
PAUS E second time will resume t he p la yback.
9.STOP
When this buttom is pr es sed once, the unit record s th e st opped
point,from where p la yback will resume if PLAY( )is pressed a ft er
wards. But if STOP button is pressd again in st ead of PLAY( )
button, there will b e no r esume function.
10.MODE
Set LCD parameter( ad just bightness, contr as t, and saturation).
11.VOL+
23.VOL-
Adjust volume
12.Forward Skip
Go to next chapter/ tr ac k.
13.Reverse Skip
Go to previous chapt er / track to the beginning.
14. BUTTON
Press BUTTON allow skippin g ah ea d at 5-level speed(X2-> X4 ->
X8->X16->X32-> PL AY), pr es s PL AY button retur n to n or mal playback.
VCDCD
6
Page 8
Identification of Controls
Remote control unit
15. BUTTON
Press BUTTON allow skippin g ba ck a t 5-level speed(X2->X 4- >
X8->X16->X32 PLAY), press PLAY butto n re turn to normal playback .->
16.STEP
Step the motion in DVD m od e.
17.SEARCH
Goto time point , titl e or c hapter you want in DVD Mode .
18.SUBTITLE
Press SUBTITLE rep ea tedly during playback t o he ar a d iffe re nt
subtitle languag es .
19.ANGLE
:Press ANGLE will cha ng e the view angle, on DVDs that
DVD
support this featu re .
20.TITLE
Return to DVD title me nu
21.ENTER
Confirms menu sele ct ion..
22.SETUP
Accesses or remove s se tup menu.
24.REPEAT
Press REPEAT dur ing playback to select a de si red repeat mode.
: you can play select re pe at chapter/title/off.
DVD
VCD
: you can select repea t si ngle/all/off.
: you can select repea t si ngle/folder/off.
MP3
CD
25.SLOW
Press Slow button re pe atedly to enter slow play ba ck , and cycle
between different speeds . The speeds a re 1 /2,1/4,1/8,1/16,a nd
normal.
26.PROGRAM
:The program functio n en ables you to store your
DVD VCD
favourite tracks f ro m the disc. Press PROGRAM but to n ,then
PROGRAM MENU will ap pe ar on screen, now you can use t he
number key to direct i np ut the titles,chapter s or t ra cks number and
select PLAY op tion. TO resume no rm al playback, press PROGRA M
and select clear pro gr am option on the program me nu ,p ress
PROGRAM again to exi t pr ogram menu.
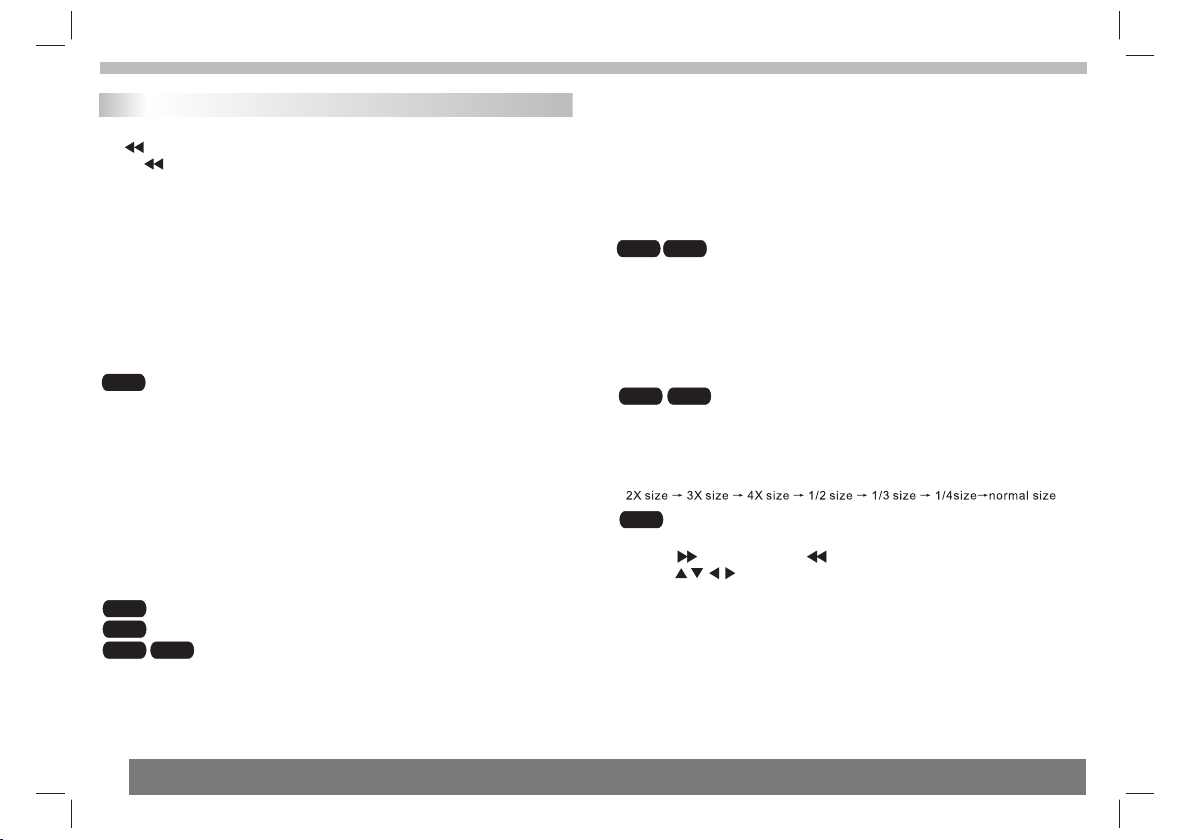
27.ZOOM
DVD VCD
: Use ZOOM to enlarge or shr in k the video image.
1.Press ZOOM durin g pl ayback or still playbac k to a ct ivate the
Zoom function. The square fr am e ap pears briefly in the righ t bo ttom
of the picture.
2. Each press of the ZOO M bu tton changes the TV screen in the
following sequen ce :
JPEG
: Use ZOOM to enlarge or s hr in k the picture.
1.Press 'ZOOM' .
2,Used " " to enlarge, or " " t o sh orten the picture.
Use the button to move t hr ou gh the zoomed picture.
7
Page 9
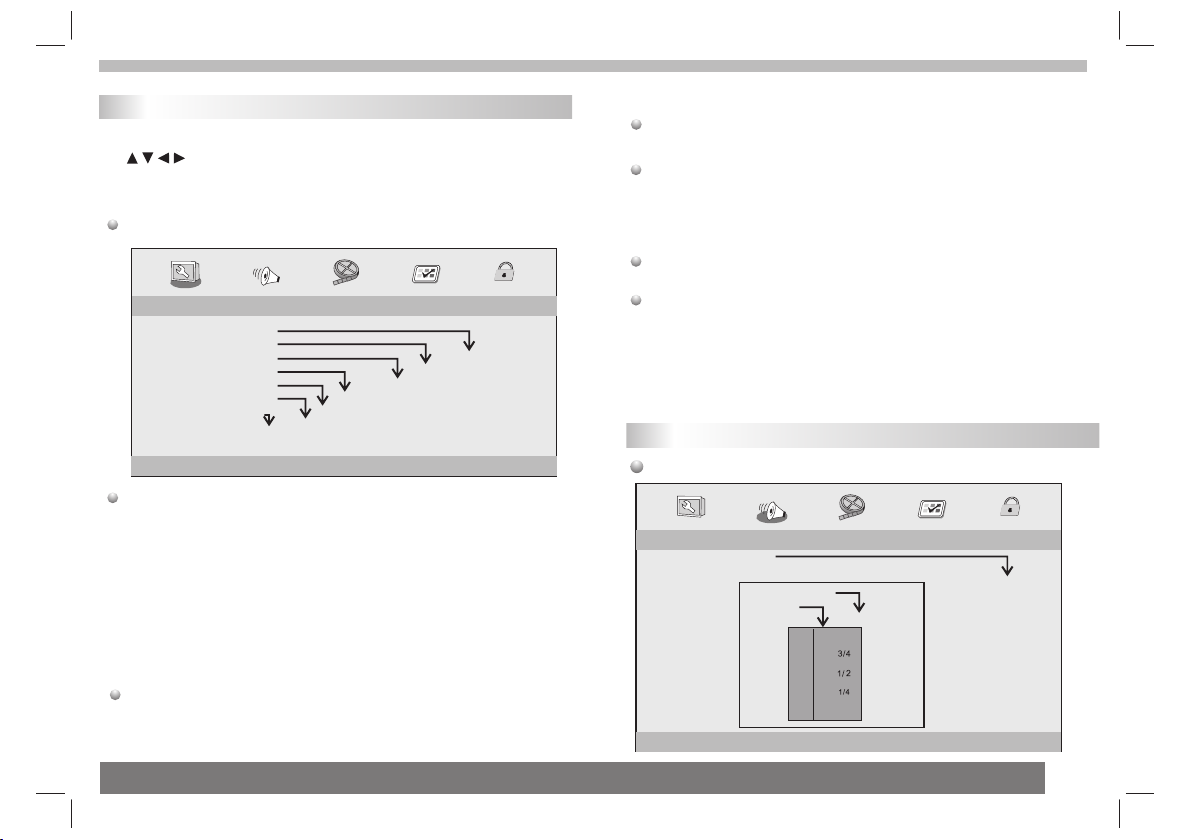
SETUP Menu Setting
General Setup Page
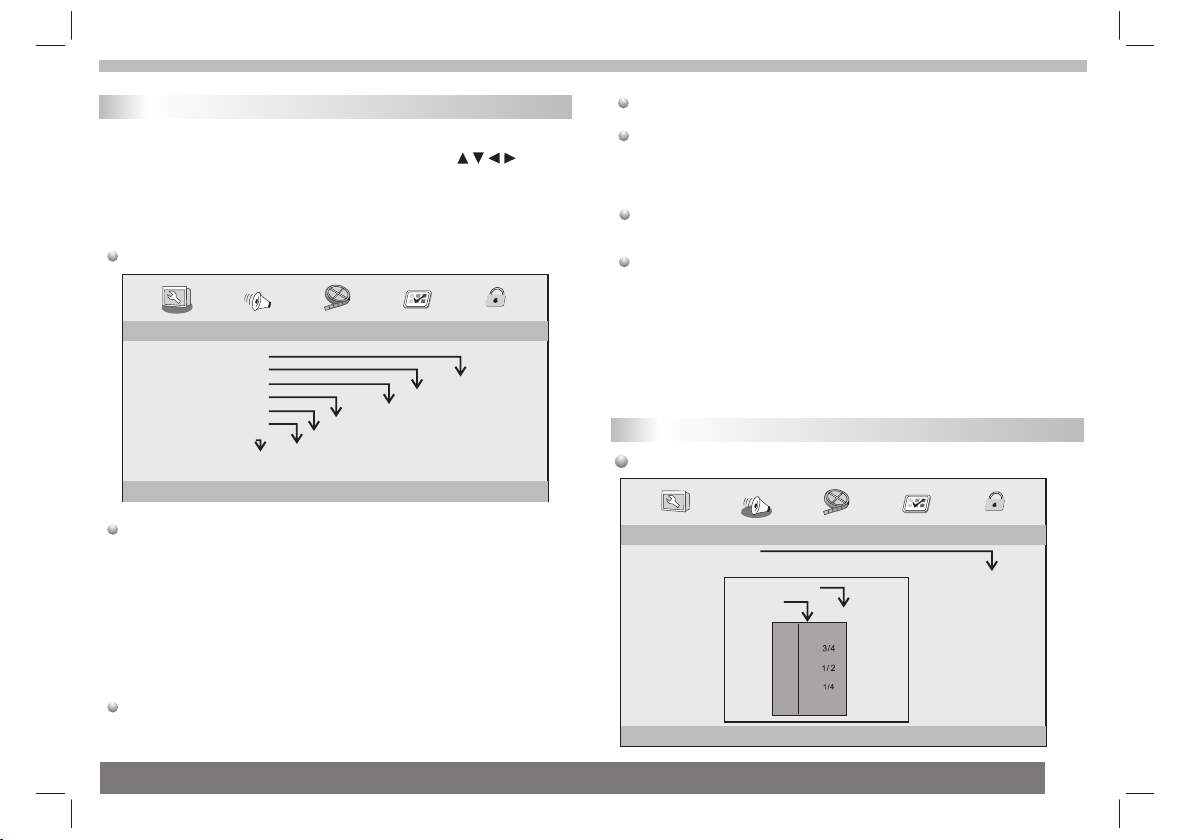
Press SETUP button to get the se tu p me nu. Use direction butto ns
to select the prefer re d it em. After finishing sett in gs, press
SETUP again to normal displa y.
The following menu i te ms can be changed:
General Setup Page
- - GENERALSETUP PAGE - -
TV DISPLAY WIDE
TFT DISPLAY 16:9
ANGLE MARK ON
OSD LANGUAGE ENG
CLOSED CAPTIONS ON
SCREEN SAVER ON
AUTO STANDBY 3H
GOTO GENERAL SETUP PAGE
TV DISPLAY: selects the a sp ect ratio of the playback p ic tu re.
4:3 PANSCAN: if you have a normal TV and want bot h si des of the
picture to be trimme d or f ormatted to fit your TV screen.
4:3 LETTERBOX: if yo u ha ve a normal TV. In this case, a wid e pi ct ure
with black bands on th e up per and lower portions of t he TV screen w il l
be displayed.
16:9:wide screen d is play.
TFT DISPLAY: Select s th e TFT display to 1 6: 9 or 4 :3.
Angle Mark
Displays current a ng le setting informatio n on t he r ight hand corner
of the TFT sc re en i f available on the disc.
3 HOURS
4 HOURS
OFF
ON
OFF
ON
OFF
ENGLISH
FRENCH
GERMAN
SPANISH
DUTCH
POLISH
HUNGARIAN
ON
OFF
TFT 16:9
TFT 4:3
4:3 PANSCAN
4:3 LETTERBOX
16:9
OSD Language
You can sele ct y our own preferred langu ag e se etings.
Closed Captions
Closed captions ar e da ta that are hidden in the vid eo s ignal of some
discs.Before you s el ect this function,ple as e en sure that the disc
contains closed ca pt ions information and yo ur TV set also h as t his
function.
Screen Saver
This function is use d to t urn the screen saver On or Off.
Auto Standby
This function is used to select auto standby settings after 3 or 4 hours.
3 HOURS: the unit will turn to standby mode after 3 hours if there is
no interaction from user within this period of time.
4 HOURS: the unit will turn to standby mode after 4 hours if there is no
interaction from user within this period of time.
OFF: the auto standby function is disabled, and unit will stay in “on”
mode even if no interaction from user.
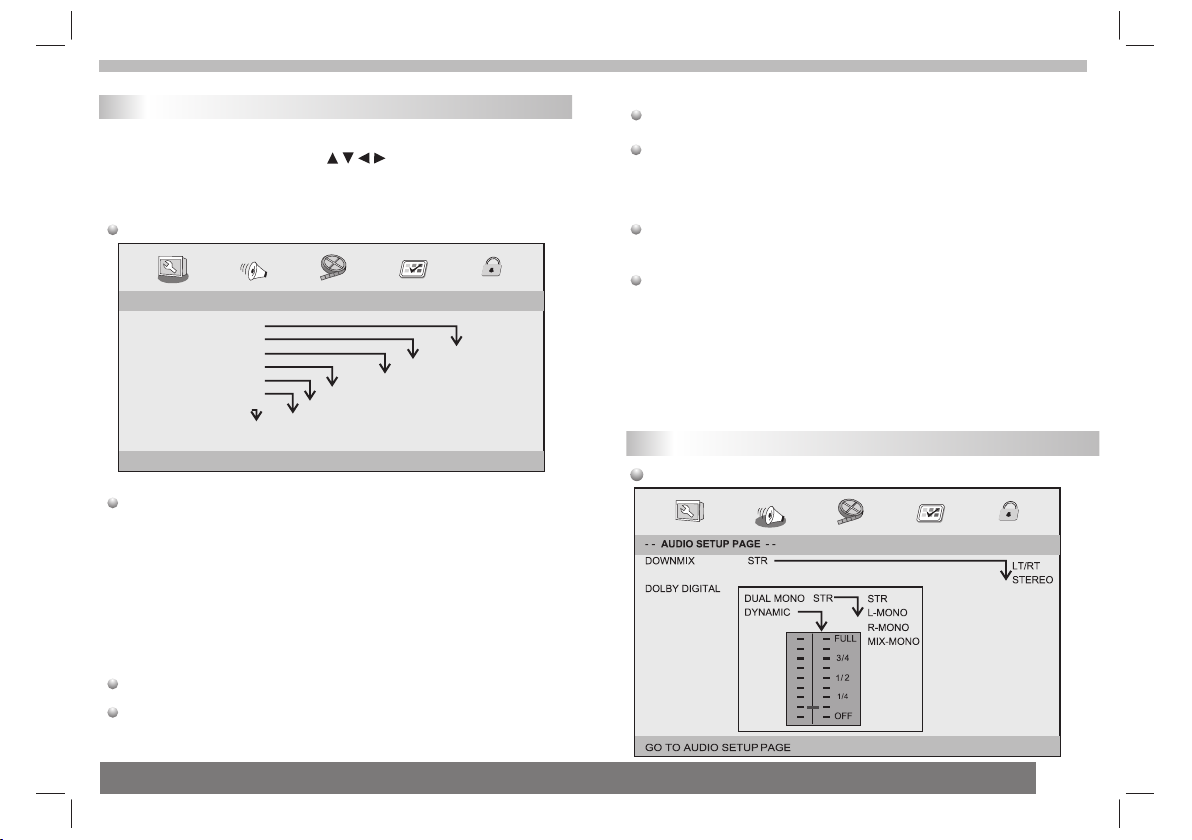
Audio Setup Page
Audio Se tu p Pa ge
-- --
- - - -AUDIO SETUP PAGE
DOWNMIX
DOLBY DIGITAL
GO TO AUDIO SETUP PAGE
STR
DUAL MONO
DYNAMIC
LT/RT
STR
STR
L-MONO
R-MONO
FULL
-
-
-
-
-
-
-
-
-
-
MIX-MONO
-
-
-
-
-
-
-
-
OFF
-
STEREO
8
Page 10

SETUP Menu Setting
Audio Setup Page
Downmix
This options allow s yo u to set the stereo analog ou tp ut o f your
DVD Player.
LT/R T :Select this option if your D VD P layer is connected to a
Dolby Pro Logic de co de r.
Stereo :Select thi s op tion when output delive rs s ou nd from only
the two front speake rs .
Dolby digital
The options includ ed i n Dolby Digital Setup are : and
'Dynamic '.
Dual Mono
Stereo:Left mono s ou nd will send output signa ls t o Le ft speaker
and Right mono sound w il l send output signals to Ri gh t speaker.
L-Mono:Left mono s ou nd will send output signa ls t o Le ft speak er
and Right speaker.
R-Mono:Right mon o so und will send output sign al s to L ef t speaker
and Right speaker.
Mix-Mono:Left an d Ri ght mixed mono sound will s en d ou tput
signals to Left and Ri gh t speakers.
Dynamic
Dynamic range comp re ssion.
'Dual Mono '
Video Setup Page
Vid eo S et up P ag e
- - VIDEO SETUP PAGE - -
BRIGHTNESS 00
CONTRAST 00
HUE 00
SATURATION 00
GOTO VIDEO SETUP PAGE
Brightness,Con tr ast,Hue,Saturatio n: se tting the video
quality.
Preference Page
Prefer en ce P ag e
- - PREFERENCE SETUP PAGE - -
TV TYPE PAL
AUDIO ENG
SUBTITLE
ENG
DISC MENU ENG
PARENTAL
DEFAULT
GOTO PREFERENCE PAGE
RESET
1 KID SAF
2 G
3 PG
4 PG13
5 PGR
6 R
7 NC17
8 ADULT
ENGLISH
FRENCH
GERMAN
SPANISH
DUTCH
POLISH
HUNGARIAN
OTHERS
ENGLISH
FRENCH
GERMAN
SPANISH
DUTCH
POLISH
HUNGARIAN
OFF
OTHERS
ENGLISH
FRENCH
GERMAN
SPANISH
DUTCH
POLISH
HUNGARIAN
OTHERS
PAL
AUTO
NTSC
9
TV Typ e
Selecting th e colour system t hat corresponds t o your TV when AV
outputs.Th is DVD Player is co mpatible with bot h NTSC and PAL.
Page 11

SETUP Menu Setting
Preference Page
PAL - Select t hi s if t he connected TV is PAL system.It will change the
video signal of a NTSC d is c and output in PAL format.
NTSC-Select this i f th e connected TV is NTSC system.It will c ha ng e
the video signal of a PAL di sc a nd output in NTSC format.
Auto:Chang the vid eo s ignal output automati c ac co rding to the
playing disk forma t.
Audio:Selects a la ng uage for audio (if availa bl e) .
Subtitle:Selec ts a l anguage for subtitle (i f av ai lable).
Disc Menu:Select s a la nguage for disc menu (if av ai la ble).
Parental
Some DVDs may have a par en tal level assigned to the c om pl ete disc
or to certain scenes o n th e disc.This feature let s yo u se t a playback
limitation level .T he rating levels are from 1 t o 8 an d ar e country
dependent. You can p ro hi bit the playing of certai n di scs that are not
suitable for your ch il dren or have certain disc s pl ay ed with alternative
scenes.
Default:Back to th e fa ctory setting.
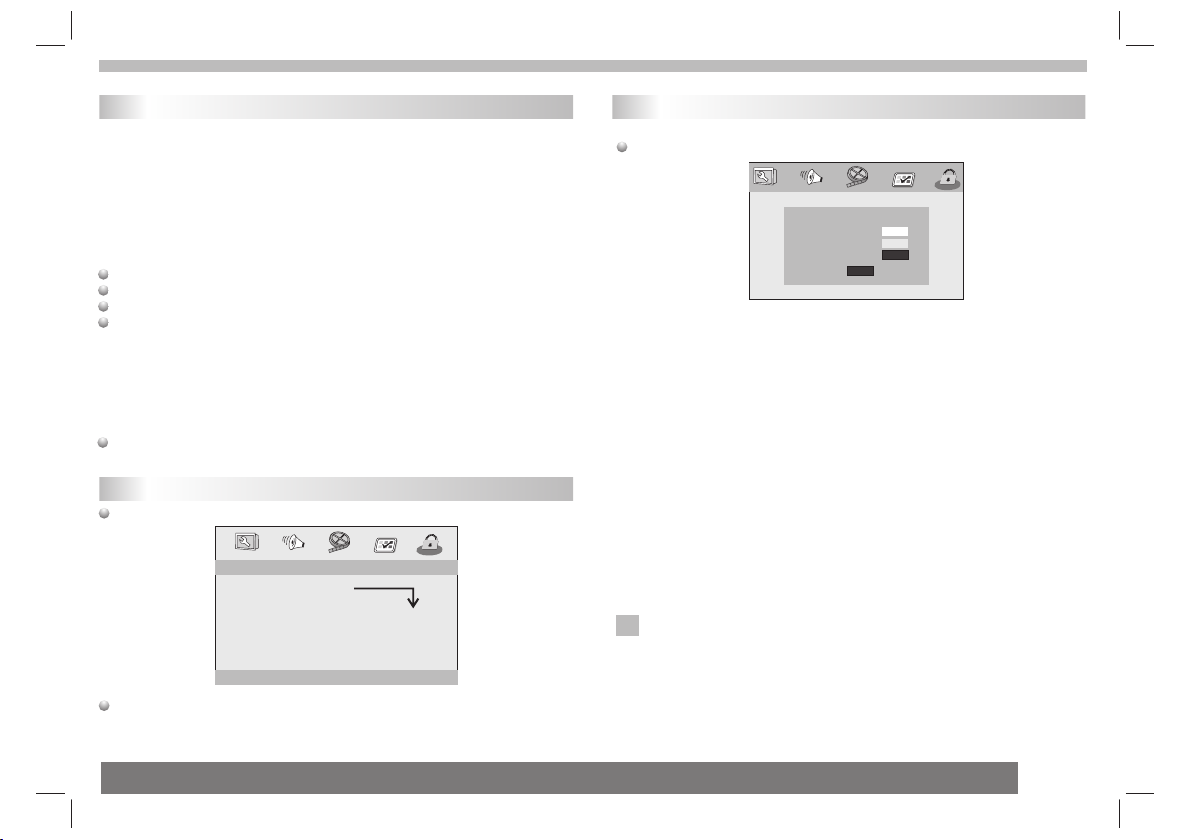
Password Setup Page
Password Setup Pag e
- - PASSWORD SETUP PAGE - -
PASSWORD MODE ON
PASSWORD
GOTO PASSWORD SETUP PAGE
Password mode: Set p as sword mode on/off. If set to off, change
parental level wil l no t check password.
ON
OFF
Password Setup Page
Password: select t he m enu password change pag e.
OLD PASSWORD
NEW PASSWORD
CONFIRM PWD
OK
OLD PASSWORD: Enter the OLD pas sw or d, (Factory setting is
1369), and the curso r wi ll jump automatically t o
NEW PASSWORD
.
NEW PASSWORD: Enter the NEW pas sw or d. Enter 4 digits from
the remote control u ni t numeric buttons, and th e
cursor will automa ti cally jump to CONFIRM PASSWORD.
CONFIRM PASSWORD: Confirm t he N EW p assword by entering
it again. If the confi rm ation is incorrect, the c ur so r
will stay in this colu mn . After entering, the corr ec t ne w password
again, the cursor wi ll j ump automatically to OK .
OK: When cursor is on th is b utton, press ENTER key to con fi rm
setting.
Note: If the passwor d ha s been changed, the paren ta la nd disc
N
lock code will also be c ha nged.
The default passwo rd (1369)is always activ e ev en t he password
has been changed.
10
Page 12
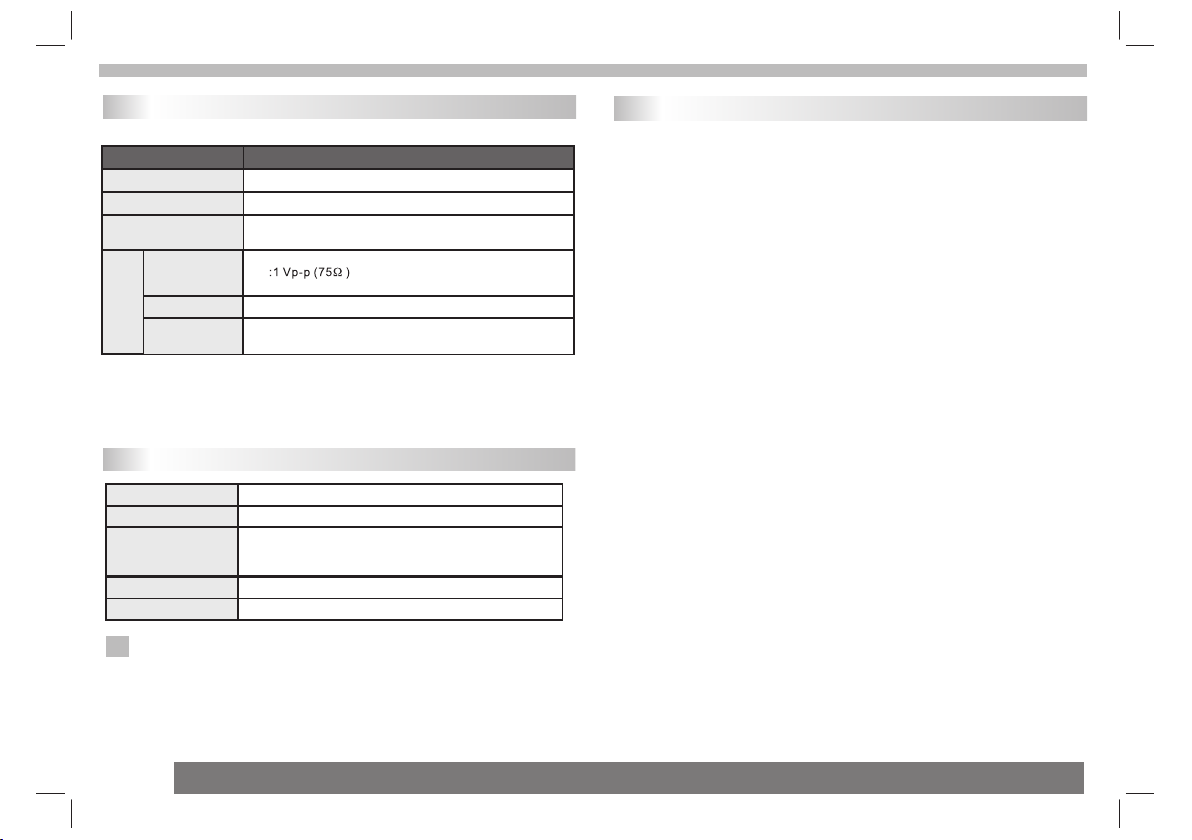
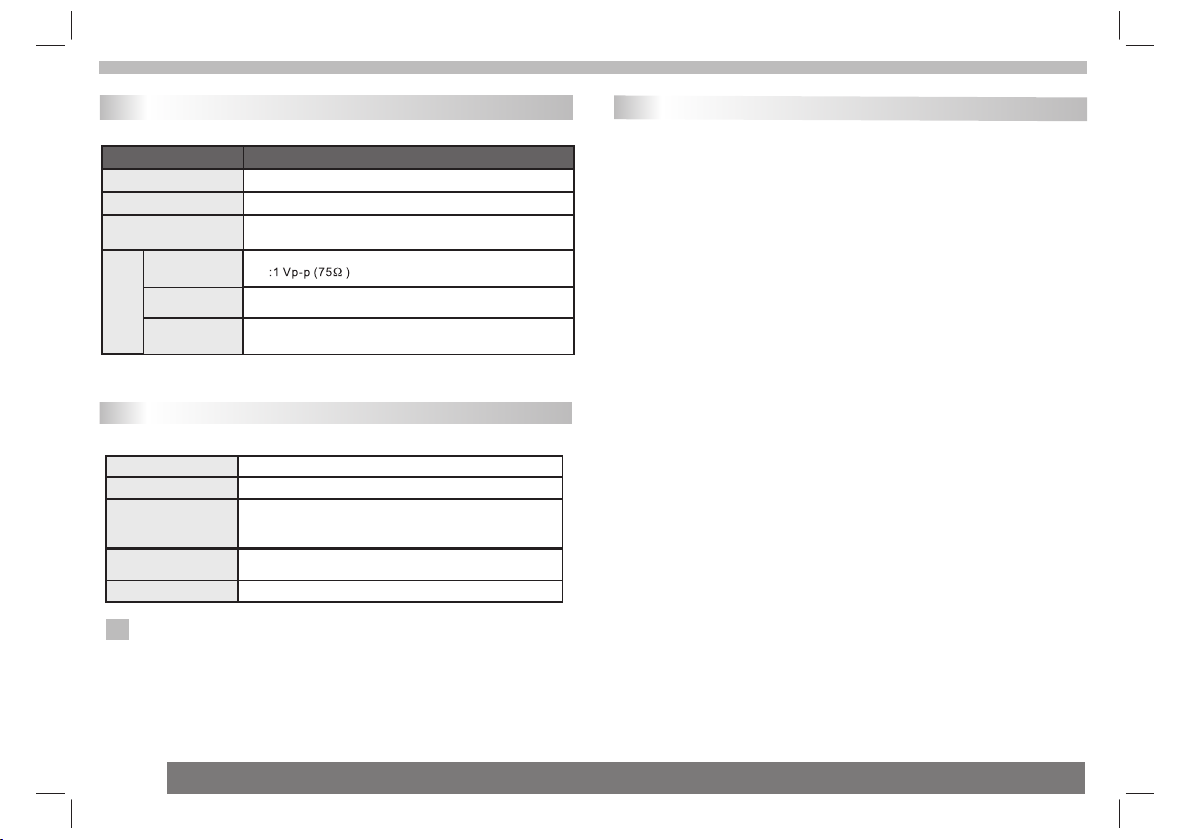
Parameters and specifications
Battery Parameters
Electronical parameters
Item
Pow er r eq uiremen ts
Pow er c on sumptio n
Ope ra ti ng humidi ty
VID EO O UT
AUDIO O UT
Output
Audio
: AC 100-2 40 V , 5 0/60 Hz
: <15 W
: 5 % to 90 %
:1.0 Vrms (1 K Hz , 0 dB)
:Speaker:1WX2, outputHeadphones
Standard requirement
System
Las er
Sig na l sy stem
Fre qu en cy
respo ns e
Sig nal-t o-noi se rati o
Dynam ic r ange
Note: Design and spe ci fications are subject t o ch an ge prior notice.
N
:Se mi co nductor l as er, wavele ng th 6 50 nm
: NTS C / PAL
: 20H z to 2 0 kH z(1dB)
:Mo re t ha n 80 dB (ANAL OG O UT conn ec tors only )
:Mo re t ha n 80 dB (DVD/ CD )
Battery Parameters
Battery Specific at ions:
Output:7.4V
Storage and work cir cu mstances:
1. Storage circums ta nces Tempe ra ture Humidity
6 months
1 week
2.Work circumstances Temperature Hum id ity
Standard charge
Standard dischar ge
-20°C +45°C~
-20°C +65°C~
0°C +45°C~
-20°C +65°C~
65±20%
65±20%
65±20%
65±20%
11
Page 13

Service and support
Service and support
For information: w ww. lenco.com
For support: http: // lencosupport.zend es k. com
Lenco helpdesk:
Germany 0900-1520530 (Local charges)
The Netherlands 0900 -2 3553626 (Local charges + 1ct p /m in)
Belgium 02-6200115 (Lo ca l charges)
France 03-81484280 (Local charges)
The helpdesk is acce ss ible from Monday till Fri da y fr om 9 AM till 6
PM.
When contacting Le nc o, you will always be asked f or t he m odel
and serial number of y ou r product. The serial number can be fou nd
on the back of the devic e. P lease write down the seri al n um ber
below:
Model: DVP-938X2
Serial number:__ __ _________________ __ __________
Lenco offers service and war ra nty in accordance to Europe an l aw,
which means that in ca se o f repairs (both during an d af te r the
warranty period) y ou s hould contact your loca l de aler.
Important note: It i s no t possible to send produc ts t ha t need repairs
to Lenco directly.
Important note: If t hi s unit is opened or accesse d by a n on -off ic ial
service center in an y wa y, the wa rr an ty expires.
This device is not sui ta ble for professional us e. I n ca se of
professional use , al l warranty obligation s of t he manufacturer will
be voided.
This symbol indicates that the relevant electrical product or
battery should not be disposed of as general household waste in
Europe. To ensure the correct waste treatment of the product
and battery, please dispose them in accordance to any
applicable local laws of requirement for disposal of electrical
equipment or batteries. In so doing, you will help to conserve
natural resources and improve standards of environmental
protection in treatment and disposal of electrical waste (Waste
Electrical and Electronic Equipment Directive).
Products with the CE marking comply with the EMC Directive
(2004/108/EC) and the Low Voltage Directive (2006/95/EC)
issued by the Commission of the European Community.
®All rights reserved
12
Page 14

德文
22,5 cm (9") Tragbarer DVD-Player
BENUTZERHANDBUCH
DVP-938X2
Weitere Informationen und Hilfe bei WWW.lenco.com
Lesen Sie bitte d ie se Bedienungsanleitu ng vor dem Anschlus s,
Betrieb oder Ein st ellung dieses Produkt s s orgfältig und vollstä nd ig durch.
Page 15

Inhalt
Inhalt
Inhalt
Wichtige Sicherheitshinweise
Vorsichtsmaßnahmen
Grundlegende Bedienung
Bezeichnung der Bedienelemente
Hauptgerät
Fernbedienung
Lieber Kunde,
Vie len Dank für den Kauf un seres tragbaren DVD-P la yer mit schwenkbare m
Bildschirm und U SB /SD-Schnittstelle . Wenn Sie da s erste Mal die
Verpackung aufma ch en, vergewissern Si e s ich bitte, dass alle Zu be hörteile
vorhanden sind. Vor dem Anschließen von E in zelteilen und der
Stromversorgun g, lesen Sie sich bitte di e B edienungsanleitun g d urch und
bewahren Sie sie Anl eitung immer in der N äh e Ihres tragbaren DVD- Pl ayers
mit schwenkbare m B ildschirm und USB/S D- Sc hnittstelle auf.
Verpackungsin ha lt :
2 x Hauptgerät
2 x Fernbedienun g m it Batterie
2 x AC-Adapter
2 x Kopfhörer
1 x 12V-Autoadapt er
Befestigungsma te rial
Hinweis: Wenn der Verpac ku ngsinhalt unvollst än di g ist, wenden Sie sic h
bitte so schnell wi e möglich an Ihren Hä nd le r.
1
2
3
4
5-7
5
6-7
EINSTELLUNGEN Einstellungsmenü
Allgemeine Einstellungen
Audioeinstellungen
Videoeinstellungen
Benutzereinstellungen
Passworteinstellungen
Akku
Technische Daten
Service und Hilfe
8-10
8
8-9
9
9-10
10
11
11
12
1
Page 16
Wichtige Sicherheitshinweise
Warnung : Z ur Verringerung eventu el ler Stromschlaggef ah r
öff nen Sie niemals das G eh äuse (bzw. die
Geräterückseit e) .Es befinden sich im In ne ren des Geräts
keine Teile die vom Benutz er gewartet werden könne n.
Wen den Sie sich bei Beda rf an entsprechend ausge bi ldetes
Wartung sp er sonal.
Warnung : U m F euer und Stromschlä ge n vorzubeugen,
vermeiden Sie es da s Gerät Regen oder Fe uc ht igkeit
auszusetzen.
Setzen Sie den Ada pt er und den tragbaren DV D- Player
niemals Wa ss ertropfen oder -spr it zern aus. Gegenstän de di e
mit Flüssigkeit en gefüllt sind, wie z. B. Vasen so ll ten niemals
auf das Gerät ges te llt werden.
Stellen Sie den t ra gbaren DVD-Player i n a usreichender
Entfernung zu Hi tz equellen wie z. B. He iz kö rpern bzw. Öfen
auf und halten Si e i hn von direkter Sonn en st rahlung fern.
Blockieren Sie n ic ht die Lüftungsöffnungen. Di e Ö ffnu ng en
des Geräts diene n d er Belüftung. Die Lü ft un gsöffn ungen
dürfen niemals, in dem Sie den DVD-Play er au f ein Kissen,
Sofa oder ähnlic he Oberflächen stelle n, bl ockiert werden.
Benutzen Sie zur Auf stellung des tragba re n D VD-Players
keine instabile n Wagen, Gestell e, Stative, Haltevorr ic ht ungen
oder Tische. Das G er ät kann herunterfal le n u nd damit zu
Verletzungen ode r B eschädigungen am Ge rä t führen.
Legen Sie niemal s s chwere oder scharfe Ge ge nstände auf
den LCD-Bildsch ir m oder den Bildschir mr ahmen.
Verwenden Sie zus am men mit dem DVD-Play er nu r den im
Lieferumfang en th altenen Netzadapte r. D ie Benutzung
anderer Netzada pt er macht Ihre Garant ie un gültig.
Der Netzstecker de s Adapters dient dazu da s G erät vom
Strom zu trennen un d sollte deshalb imm er le icht zugänglich
bleiben.
Ziehen Sie den Ne tz stecker aus der Stec kd os e, wenn das
Gerät nicht benu tz t wird.
VORSICHT: Bei fals ch eingelegten Batter ie n b esteht
Explosionsgefa hr ! Benutzen Sie nur Ba tt er ien des gleichen
Typs.
WARNUNG : D ie Batterien (Akkupac k o der Batterien) dürf en
niemals übermäß ig er Hitze, wie bei dir ek te r
Sonnenstrahlun g,
Feuer oder dergl ei chen, ausgesetzt we rd en .
WARNUNG : Ü be rmäßiger Schalldru ck von Kopfhörern kann
zu Hörschäden fü hr en.
WARNUNG : Ve rw enden Sie nur Zusatz ge räte bzw.
Zubehörteile, d ie vom Hersteller des G er ät s geliefert oder
empfohlen werde n. Der tragbare DVD-Pl ay er wird über einen
Netzadapter mit St rom versorgt. Der Ne tz ad apter wird zudem
als Trennvorrich tu ng verwendet und sol lt e deshalb immer frei
zugänglich blei be n.
Achtung: Es besteh t be i falsch eingelegtem Akk u
Explosionsgefa hr ! Benutzen Sie zum Austaus ch en nur einen
Lithium-Akku ein es g leichwertigen Typs.
Dieses Zeichen b ed eutet, dass das vorl ie ge nde
Produkt innerha lb der EU nicht zusamme n m it
dem Hausmüll ent so rgt werden darf.
Geben Sie Altgerä te bei Sammelstellen a b o de r
wenden Sie sich a n d en Händler bei dem da s
Gerät gekauft wu rd e. Dort wird das Gerä t d an n
auf umweltvertr äg liche Weise entsorgt.
Bei maximaler Lautstärke kann ständiges Musikhören auf dem
Gerät zu Gehörschäden des Benutzers führen.
2
Page 17

Vorsichtsmaßnahmen
WARNUNG
STROMSCHLAGGEFAHR!
NICHT ÖFFNEN!
Warnung : D ie ser digitale Disc-P la yer verwendet ein La se rsystem.
Die Verwendung vo n B edienungsweisen, d ie nicht in dieser
Anleitung besch ri eben werden, kann zu de m zur Aussetzung von
gefährlicher St ra hlung führen.
Achtung: Um dire kt e Laserstrahlen zu v er me iden, öffnen Sie das
Gehäuse niemals . E s tritt beim Öffnen des Gehäus es sichtbare
Laserstrahlung au s.
Warnung : N ie mals direkt in den La se rstrahl blicken.
Achtung: Stelle n S ie dieses Produkt ni ch t a n beengten Orten, wi e
z. B. einem Büche rr egal, auf.
Achtung: Wenn das Gerät vo n K indern benutzt wird , s ind dessen
Eltern dazu verp fl ichtet dafür zu sorg en , d ass vom Kind der
gesamte Inhalt d er Bedienungsanleitu ng verstanden wird, um
sicher zu stelle n, dass der Akku jederze it sa chgemäß benutzt wir d.
Warnung : Wenn der Akk u überhitzt, anschw el lt oder fehlerhaft ist ,
hören Sie bitte a uf den Akku zu benutzen u nd wenden Sie sich an
den Kundendie ns t f ür Ersatz.
Achtung: Laden S ie den Akku nicht an Orte n a uf, an denen einen
ausreichende Be lü ftung nicht gewährl ei stet ist, wie z. B.:
Matratzen, Sofa s, Kissen, weiche Matt en et c.
Achtung: Wir übe rn ehmen keine Verantwo rt ung, wenn der
Benutzer den Akku ni cht ordnungsgemäß v er wendet bzw. die
Warnhin we ise auf dem Gehäuses de s Ak kupacks nicht befol gt .
WARNUNG : U SB -Speichermedien mü ss en direkt am Gerät
angeschlosse n w er den. USB-Verlängeru ng skabel sollten nich t
dazu verwendet w er den, da dabei Datenv er luste und Störungen
hervorgerufen w er den können.
WARNUNG : Be i Ver wendung von Kopfhörer n - Lä ngere
Aussetzung durch l au te Geräusche können zum H ör verlust führen
und zu vorüberge he nd en oder dauerhaften Hör sc häden. Bei der
Verkehrsteiln ah me k ann die Verwendung von Kop fh örern dazu
führen, dass der Zuh ör er sich weniger den poten ti elle Gefahren im
Verkehr, wie z. B. sich nä he rnden Kraftfahrzeug en , bewusst ist.
Netzstromadapt er
Hersteller:She nz hen Mass Power Electron ic s Limited
Modellnummer:S EF 0900100E1BA
Gerät nur an eine Stro mv ersorgung gemäß den Anga be n
in der Bedienung sa nl eitung anschließen
N
N
Hinweise zum Urheberrecht:
Es ist gesetzlic h v erboten urheberrec ht lich geschütztes Mate ri al
ohne Erlaubni s z u k opieren, auszustra hl en, öff en tlich
wiederzugebe n o de r zu vermieten.
Dieses Produkt v er wendet eine der Firm a M acrovision entwick el te
Kopierschutzfu nk tion. Auf bestimmten Di scs werden
Kopierschutzsi gn ale aufgezeichnet. Be i der Wiedergabe von
Kopien dieser Di sc s erscheint ein Bild ra uschen. Dieses Prod uk t
verwendet Kop ie rs chutzmechnismen de r F irma Macrovision un d
anderen Firmen, di e durch bestimmte U. S. Patente und andere
Rechte für geist ig es Eigentum geschüt zt sind. Die Benutzung
dieser Kopiersc hu tztechnologie muss du rch die Firma Macrov is io n
autorisiert wer de n und ist nur für die B en utzung zu Hause und
anderen einge sc hr änkten Benutzungsw ei sen gedacht, solang e e s
nicht ausdrückl ic h von der Firma Macro vi sion anders angegeb en
wird. Reverse-E ng ineering und Auseina nd erbauen sind nicht
gestattet.
Aufladen
Stoß einwi rkung
Sta rke
Hit ze
40° C
3
Page 18

Fahrzeugmontage
Benutzen Sie die mitgelieferten Befestigungsgurte zur
Installation des Master- und Slavegeräts an den
Kopfstützen. Ziehen Sie die Befestigungsgurte fest an.
Achtung: Bitte beachten sie, dass Fernbedienung A auch
nur zu Hauptgerät A passt und die Fernbedienung B nur zu
Hauptgerät B.
4
Page 19

Bezeichnung der Bedienelemente
Hauptgerät
1
2
3
4
5
6
7
8
10
9
11
1. SD/MS/MMC KARTENLESER
2. EIN/AUS
3. OHRHÖRERBUCHSE
4. VIDEO/AUDIO AUSGANG
5. AV-Ei ngang
6. USB-PORT
7.Stromausgang
8. DC IN 9-12V NETZTEILEINGANG
9. ENTER
10. NAVIG ATION AUFWÄRTS/ABWÄRTS/LINKS/RECHTS
11. S IG NA LQ UE LLE
Legen Sie eine Batterie ein
1. Öffnen Sie das Batter ie fa ch
Wen n Sie die Fernbedien un g zum ersten Mal benutz en , vergessen
Sie bitte nicht d en Plastikstreifen zu en tf ernen.
2. Legen Sie den Ak ku ein.
5
ANMERKUNGEN:
N
Entfernen Sie de n Ak ku, wenn Sie das Gerä t z ur Aufbewahrung
wegstellen bzw. d en DVD-Player für läng er e Zeit nicht benutzen.
Page 20

Bezeichnung der Bedienelemente
Fernbedienung
16
17 2
18
19
20
21
STEP
1 2
5
9 0
SUBT ITLE
TITL E
6
ENTE R
22
SLOW
24
25
26
27
1. EINGANGSSIGN AL
DVD/CARD/USB
2. TON AUS
Deaktivieren de r Tonausg ab e.
3. 0-9 ZIFFERNTASTEN
Auswahl nummeri er ter Elemente in Menü s.
4. ANZEI GE
Anzeige der Spie lz eit und Statusinfor ma ti onen.
5. 10+
Auswahl von Titel nu mmer 10 oder höher. Be tä ti gen Sie zunächst
10+ und dann eine r w eitere Ziffer. Beispiel Titel 1 2: Betätigen Sie
zuerst 10+ und da nn die Ziffe rntaste 2.
REPE AT
ZOOM
MUTE
10+
AUDI O
SOUR CE
3
4
7
8
DISP LAY
MENU
/PBC
1
3
4
6
8
MODE
VOL +VOL -
10
11
12
14
15
5
7
9
23
13
6. MENU/PBC
Zurück zum DVD-H au ptmenü (DVD).
PBC Ein/Aus (VCD ).
7. AUDIO
DVD
Betätigen Sie di e AU DIO-Taste während der Wi ed ergabe, um
die Audiosprache zu wechseln, wenn weit er e Audiosprachen
vorhanden sind.
MP3
Betätigen Sie die AU DI O-Taste während der
Wiedergabe, um d en Audiokanal zu wechse ln (Links, Rechts, Mix,
Stereo).
8. WIEDERGABE/PAUSE
Betätigen Sie di e W IEDERGABE/PAUSE-Taste während de r
Wiedergabe, um d ie Wiedergabe vorüber ge hend anzuhalten.
Betätigen Sie di e W IEDERGABE/PAUSE-Taste ein zwei te s Mal, um
die Wiedergabe f or tzusetzen.
9. STOPP
Wen n diese Taste nur einmal betät ig t w ird, wird der letzte Pu nk t der
Wiedergabe gesp ei chert. Danach könne n S ie mit der Wiedergabe
durch Betätigun g d er Wiedergabetaste fo rt fahren. Wenn die
STO PP-Taste allerdings e in zw eites Mal anstelle d er Wiedergabetaste
gedrückt wird, k an n die Wiedergabe nic ht fo rtgesetzt werden.
10. MODUS
Einstellen der L CD -Parameter (Hellig ke it, Kontrast und Sätti gu ng).
11. VOL+
23. VOL-
Einstellen der L au tstärke
12. VOR
Springen zum näc hs ten Kapitel/Musikt it el .
13. ZURÜCK
Springen zum vor ig en Kapitel/Musikti te l.
VCDCD
6
Page 21

Bezeichnung der Bedienelemente
Fernbedienung
14. BUTTON
Betätigen Sie die Taste , um den Sch ne ll vorlauf zu aktivieren . Es
stehen 5 Suchlaufg es chwindigkeiten zur Ver fü gung (2fach → 4fach →
8fach → 16fach → 32fac h → NO RMAL). Sie können jeder ze it d ie
Wiedergabetast e be tätigen, um zur normale n Wi ed ergabe
zurückzukehren .
15. BUTTON
Betätigen Sie die Taste , um den Sch ne ll rücklauf zu aktiviere n. E s
stehen 5 Suchlaufg es chwindigkeiten zur Ver fü gung (2fach → 4fach →
8fach → 16fach → 32fac h → NO RMAL). Sie können jeder ze it d ie
Wiedergabetast e be tätigen, um zur normale n Wi ed ergabe
zurückzukehren .
16. EINZELBILD
Einzelbildwied er gabe im DVD-Modus.
17. SUCHFUNKTION
Direktsuche nach W ie dergabepunkt, Titel od er K apitel im DVD-Modus.
18. UNTERTITEL
Benutzen Sie die SUB TI TLE-Taste, um während der W ie de rgabe eine
andere Untertite ls prache zu wählen.
19. KAMERAPERSPE KT IVE
Betätigen Sie die ANG LE -Taste, um die Kameraperspe kt ive zu
DVD
wechseln (nur bei DV Ds , die diese Funktion unte rs tü tzen).
20. TITEL
Zurück zum DVD-Titelmenü
21. EINGABE
Bestätigung der Me nü auswahl.
22. EINSTELLUNGE N
Aufrufen oder Verla ss en des Einstellungsme nü s.
24. WIEDERHOLUNG
Betätigen Sie die RE PE AT-Taste w äh re nd der Wiedergabe, um ein en
gewünschten Wied er holungsmodus zu wähle n.
: Zur Verfügung stehe n di e Wiederholung von Kapi te l/ Titel/Aus.
DVD
: Zur Verfügung stehe n Ei nzelwiederholung/ Al le w iederholen/Aus.
VCD
: Zur Verfügung stehe n Ei nz elwiederholung /
MP3
CD
Verzeichniswi ed er holung / Aus.
25. ZEITLUPE
Benutzen Sie die SLO W-Taste, u m di e Wi edergabe in Zeitlupe in
verschiedenen Ge sc hwindigkeiten zu scha lt en. Zur Verfügung
stehende Geschwi nd igkeiten sind 1/2, 1/4, 1 /8 , 1/ 16 und Normal.
26. PROGRAMM
:Das Programmfun kt io n ermöglicht Ihnen die Wi ed ergabe
DVD VCD
von beliebigen Ti te ln i n der von Ihnen gewünscht en R eihenfolge.
Betätigen Sie die PR OG RAM-Taste und das Program mm en ü erscheint
auf dem Bildschirm . Si e können dann die Zifferntasten zur d ir ekten
Eingabe der Titel, Ka pi tel oder Musiktitel ben ut ze n und mit der
PLAY-Option die Progr am mwiedergabe starten . Um z ur normalen
Wiedergabe zurüc kz ukehren, betätigen Si e di e PR OGRAM-Taste
erneut und wählen Si e di e CLEAR-Option im Progr am mmenü.
Betätigen Sie die PR OG RAM-Taste ein weiteres Ma l, u m da s
Programmmenü zu ve rl assen.
27. BILDVERGRÖSS ER UNG
DVD VCD JPEG
2fache Größe → 3fach e Gr öße → 4fache Größe → 1/2 Größe →
1/3 Größe → 1/4 Größe → no rm ale Größe
7
Page 22
EINSTELLUNGEN - Einstellungsmenü
Allgemeine Einstellungen
Betätigen Sie di e S ETUP-Taste, um das Ein st el lungsmenü
aufzurufen. Ben ut zen Sie die Navigati on st asten zur
Auswahl des gewü ns chten Menüpunkts. N ac hdem Sie die
gewünschten Ein st ellungen vorgenomm en haben, betätigen Si e
die SETUP-Taste, u m z ur normalen Anzeige z ur üc kzukehren.
Folgende Einste ll ungen können gemach t w erden:
Allgemeine Einst el lungen
- - GENERALSETUP PAGE - -
TV DISPLAY WIDE
TFT DISPLAY 16:9
ANGLE MARK ON
OSD LANGUAGE ENG
CLOSED CAPTIONS ON
SCREEN SAVER ON
AUTO STANDBY 3H
GOTO GENERAL SETUP PAGE
TV DISPLAY: Auswahl des Bildsei te nverhältnisses.
4:3 PANSCAN: Wen n Sie einen normalen Fern se her benutzen und
wünschen, dass die b ei den Seiten des Bilds abge sc hnitten bzw.
so formatiert werd en , dass sie dem Fernsehbil ds ch irm angepasst
werden, dann wäh le n Si e diese Option.
4:3 LETTERBOX: Wenn Sie eine n no rm alen Fernseher, werden
mit dieser Option sc hw arze Balken am oberen und u nt eren Teil de s
Bildschirms ange ze igt.
16:9: Breitbilda nz eige
Wide Squeeze: Bild sc hirmmodus wird auf 4:3 ge st el lt.
TFT-DISPLAY: Seitenverhäl tn is 1 6:9 oder 4:3 wählen
Kameraperspekt iv e
Zeigt die aktuelle P er pektive in der rechten Ec ke o be n des
TFT-Bildschirms a n, w enn die Funktion von der Di sc u nt erstützt
wird.
3 HOURS
4 HOURS
OFF
ON
OFF
ON
OFF
ENGLISH
FRENCH
GERMAN
SPANISH
DUTCH
POLISH
HUNGARIAN
ON
OFF
TFT 16:9
TFT 4:3
4:3 PANSCAN
4:3 LETTERBOX
16:9
Anzeigesprache
Wählen Sie hier die von Ihnen bevorzugte Sprache.
Geschlossene Untertitel
Geschlossene Untertitel sind Daten für Hörgeschädigte, die im
Videosignal einiger Discs enthalten sind. Bevor Sie diese
Funktion wählen, stellen Sie bitte sicher, dass die eingelegte
Disc und ihr Fernsehgerät diese Funktion unterstützt.
Bildschirmschoner
Diese Funktion wird verwendet, um den Bildschirmschoner
ein- bzw. auszuschalten.
Auto-Bereitschaft
Benutzen Sie diese Funktion, um die Auto-Bereitschaft auf 3 oder 4
Stunden einzustellen.
3 STUNDEN: das Gerät geht nach 3 Stunden in den Bereitschaftsmodus,
wenn während dieses Zeitraum vom Benutzer keine Taste betätigt wurde.
4 STUNDEN: das Gerät geht nach 4 Stunden in den Bereitschaftsmodus,
wenn während dieses Zeitraum vom Benutzer keine Taste betätigt wurde.
AUS: Die Auto-Bereitschaft-Funktion ist deaktiviert und das Gerät bleibt
eingeschaltet, selbst wenn seitens des Benutzers keine Tastenbetätigung
erfolgt.
Audioeinstellungen
Audioe in st el lu ng en
-- --
- - - -AUDIO SETUP PAGE
DOWNMIX
DOLBY DIGITAL
GO TO AUDIO SETUP PAGE
STR
DUAL MONO
DYNAMIC
LT/RT
STR
STR
L-MONO
R-MONO
FULL
MIX-MONO
-
-
-
-
-
-
-
-
-
-
-
-
-
-
-
-
OFF
-
-
-
STEREO
8
Page 23

EINSTELLUNGEN - Einstellungsmenü
Audio Setup Page
Downmix
Mit dieser Optio n kö nnen Sie den analogen S te reo-Ausgang Ihres
DVD-Player ein ge stellen.
→ LT/RT: Wähle n Si e diese Option, wenn Ih r DV D-Player an einen
Dolby-Pro-Lo gi c-Dekoder angesch lo ssen ist.
→ Stereo: Wählen S ie d iese Option, wenn das Au di osignal nur an
die beiden Front la utsprecher gelief er t wird.
Dolby Digital
Verfügbare Option en f ür Dolby Digital sind: "D ua l Mono" und
"Dynamic".
Dual Mono
→ Stereo: Das linke Mo no signal wird an den linken L au tsprecher
gesendet und das rec ht e Monosignal wird an den re ch ten
Lautsprecher ges en det.
→ L-Mono: Das linke Mo no signal wird an den linken u nd d en rechten
Lautsprecher ges en det.
→ R-Mono: Das rechte M on osignal wird an den linke n un d den
rechten Lautspre ch er gesendet.
→ Mix-Mono: Das link e un d das rechte Monosignal w er den zu einem
Signal gemischt un d an d en linken und den rechten L au tsprecher
gesendet.
Dynamic
Dynamikbereich ko mpression.
Videoeinstellungen
Vid eo ei ns te llungen
- - VIDEO SETUP PAGE - -
BRIGHTNESS 00
CONTRAST 00
HUE 00
SATURATION 00
GOTO VIDEO SETUP PAGE
Helligkeit, Kon tr ast, Farbton, Sätti gu ng : Einstellung
der Videoqualität.
Benutzereinstellungen
Benutz er ei ns te ll ungen
- - PREFERENCE SETUP PAGE - -
TV TYPE PAL
AUDIO ENG
SUBTITLE ENG
DISC MENU ENG
PARENTAL
DEFAULT
GOTO PREFERENCE PAGE
RESET
1 KID SAF
2 G
3 PG
4 PG13
5 PGR
6 R
7 NC17
8 ADULT
ENGLISH
FRENCH
GERMAN
SPANISH
DUTCH
POLISH
HUNGARIAN
OTHERS
ENGLISH
FRENCH
GERMAN
SPANISH
DUTCH
POLISH
HUNGARIAN
OFF
OTHERS
TV Type
Die Auswahl d es Farbsyste ms, dass dem Ihr es Fersehers
entspricht , wenn Sie die AV-Ausg änge benutzen. Dieser
DVD-Player ist kompatib el mit den Syste men NTSC und PAL.
ENGLISH
FRENCH
GERMAN
SPANISH
DUTCH
POLISH
HUNGARIAN
OTHERS
PAL
AUTO
NTSC
9
Page 24
EINSTELLUNGEN - Einstellungsmenü
Benutzereinstellungen
PAL - Wä hlen Sie diese Option, we nn d as a ngeschlossene
Fernsehgerät das PAL-Syst em b en utzt. Dadurch wird das
Vid eosignal von NTSC-Dis cs i m PAL-For ma t ausgegeben.
NTSC: Wählen Sie die se , wenn das angeschlosse ne F ernsehgerät
das NTSC-System be nu tzt. Dadurch wird das Videosignal v on
PAL- Discs im NTSC-Format au sg eg eben.
Auto: Das Ausgabevi de osignal wird automati sc h dem Format auf
der Disc angepasst .
Audio: Auswahl der Aud io sprache (falls vorhan de n).
Subtitle: Auswahl d er U ntertitelsprache (f al ls v erfügbar).
Disc Menu: Wählt ein e Sp rache für Disc-Menü (we nn v er fügbar).
Parental: Einige D VD s verfügen über Altersst uf en , die der gesamten
Disc oder bestimmt en S zenen auf der DVD zugewie se n si nd. Mit
dieser Funktion kö nn en Sie die Wiedergabeei ns chränkung einstelle n.
Die Einstufungen v on 1 b is 8 und sind länderspezi fi sch. Sie können
damit die Wiederga be b estimmter Discs, die ni ch t fü r Ihre Kinder
geeignet sind verh in dern bzw. bei bestimmte Di sc s die Wiedergabe
alternativer Sze ne n auslõsen.
Default: Wiederh er stellen der Werkseinstellunge n.
Passworteinstellungen
Passworteinste ll ungen
- - PASSWORD SETUP PAGE - -
PASSWORD MODE ON
PASSWORD
GOTO PASSWORD SETUP PAGE
Password mode: E in - Ausstellen des Pass wo rt modus. Wenn die
Funktion ausges ch altet ist, wird zum Ä nd er n der
Altersstufen-F un ktion kein Passwort be nö tigt.
ON
OFF
Passworteinstellungen
Password: Funki on zum Ändern des Passw or ts .
OLD PASSWORD
NEW PASSWORD
CONFIRM PWD
OK
OLD PASSWORD: Geben Sie das alt e Pa ss wort ein (das
werksmäßig einge st ellte Passwort ist 1369 ). D ie E ingabe wechselt
danach automatis ch a uf NEW PASS WO RD.
NEW PASSWORD: Geben Sie das neu e Pa ss wort.Geben Sie eine
4stelligen Zahl mi th ilfe der Zifferntasten auf der Fern be dienung
eingeben.
CONFIRM PASSWORD: Bestäti ge n Si e das neue Passwort durch
erneute Eingabe. Wenn die Be st ätigung nicht korrekt ist , ge ht die
Eingabe nicht zum nä ch sten Punkt über. Wenn das neue Passw or t
übereinstimmt, s pr ingt die Eingabe automa ti sc h auf OK.
OK: Wenn der Eingabe-Curso r au f diesem Feld ist, betätige n Si e
die ENTER-Taste, um di e Ei nstellung zu bestätig en .
Hinweis: Wenn das Passwort g eä nd ert wird, wird der Alterss tu fenDisc-Sperr-Cod e eb enfalls geändert.
Das werksmäßig vor ei ngestellte Passwort ( 13 69 ) kann immer
benutzt werden, se lb st wenn das Passwort geän de rt wurde.
Note: If the passwor d ha s been changed, the paren ta la nd disc
N
lock code will also be c ha nged.
The default passwo rd (1369)is always activ e ev en t he password
has been changed.
10
Page 25

Technische Daten
Elektronische Daten
Bezeichnung
Str om ne tzanfor de rungen
Str om ve rbrauch
Betri eb sluftfe uc htigkei t
VID EO AU SGANG
AUDIO AU SGANG
Ausgabe
Audio
BezeichnungStandardanforderung
Str om ne tzanfor de rungenA C 1 00 - 240 V,
50/60 Hz
Str om ve rbrauch < 1 5 W
Betri eb sluftfe uc htigkei t5 % b is 90%
1 Vss ( 75 Ω )
1,0 Vrms ( 1 k Hz, 0 dB)
Lautsprecher: 1 W x 2, Kopfhörerausgang
System
Las er
Far bs ys tem
Fre qu en zbereic h
Rau schab stand
Dynam ik bereich
Hinweis: Verände ru ngen der technische n D aten und des Design
N
ohne vorherige An kü ndigung vorbehalte n.
Halbl ei terlase r, Wellen lä nge 650 nm
NTS C / PAL
20 Hz b is 20 kHz (1 dB )
Mehr a ls 80 dB (nu r AN ALOG-OU T-A us gang)
Mehr a ls 85 dB (DV D/ CD)
Akku
Batteriespezif ik ationen:
Ausgang: 7.4V
Lager- und Betri eb sbedingungen:
1. Lagerung Temperatur Luftfe uc htigkeit
6 Monate
1 Woc he
2.Betrieb Temperatur Luftfe uc htigkeit
Laden
Entladen
-20°C +45°C~
-20°C +65°C~
0°C +45°C~
-20°C +65°C~
65±20%
65±20%
65±20%
65±20%
11
Page 26

Service und Hilfe
Service und Hilfe
Fü r I nf or ma ti on en : ww w. le nc o. co m
Für Hilfe: http://lencosupp ort .zendesk.com
Lenco Hotlines :
Deutschland 09 00-1520530 (Ortsgebundener Tarif)
Die Niederlande 0900-23553626 (Ortsgebundener Tarif + 1ct p/min)
Belgien 02-6200115 (Ortsgebundener Tarif)
Frankreich 03-81484280 (Ortsgebu ndener Tarif)
Die Hotline erreichen Sie montags bis frei tags v on 9 bis 18 Uhr.
Wenn Sie L en co k ontak ti eren, werden Si e im me r nach der Modell- und
Seriennummer d es G er äts gefragt . Di e Se ri ennummer finden Sie auf
der Rückseite de s Ge räts. B it te n otieren Sie hier die Se ri ennummer:
Modell: DVP-938x2
Seriennummer:___ __ _______________ __ __ __ _______
Lenco bietet Lei st un gen und Garan ti en im Einklang mit Europä is ch em
Recht. Im Falle v on Reparatu re n (s ow ohl w äh rend als auch nach
Ablauf der Garan ti ezeit) sollte n Si e deshalb Ihren Einzelhändler
ko nt aktieren.
Beachten Sie: Es ist nicht mögli ch, Ge räte für Repa ratu re n direkt an
Lenco zu schicke n.
Wichtiger Hinw eis:
Fa ll s dieses Gerät von einem nicht autoris ierten Kun de ndienst geöffnet
oder darauf zu gegr iffen wird, erlischt die Garantie.
Dieses Gerät ist n ic ht f ür p rofessionelle Z wecke g eeignet. Falls das
Gerät für prof essionelle Zw ecke einges etzt wird, erlöschen alle
Garantie verpfli chtung en seitens des Herstellers.
Dieses Symbol zeigt an, dass das entsprechende Produkt
oder dessen Batterie in Europa nicht mit dem normalen
Hausmüll entsorgt werden darf. Um die ordnungsgemäße
Abfallbehandlung des Produkts und dessen Batterie zu
gewährleisten, müssen diese im Einklang mit allen
anwendbaren örtlichen Vorschriften zur Entsorgung von
Elektrogeräten und Batterien entsorgt werden. Dabei helfen
Sie natürliche Ressourcen zu schonen und
Umweltschutzstandards zur Verwertung und Entsorgung
von Altgeräten aufrecht zu halten (Waste Electrical and
Electronic Equipment Directive).
Produkte mit der CE Kennzeichnung entsprechen der
EMC-Richtlinie (2004/108/EC) und der
Niederspannungsrichtlinie (2006/95/EC), herausgegeben
von der Kommission der Europäischen Gemeinschaft.
®Alle Rechte vorbehalten
12
Page 27
HANDLEIDING
DVP-938X2
Voor informatie en ondersteuning, www.lenco.com
22,5 cm (9”) draagbare dvd-speler
Lees de handleidin g zo rg vuldig en volledig door vóó r he t aansluiten,
bedienen of aanpas se n van dit product.
Page 28

Inhoudsopgave
Inhoud
Inhoudsopgave
Belangrijke veiligheidsinstructies
Veiligheidsmaatregelen
Basis bediening
De bedieningselementen
Hoofdapparaat
Afstandsbediening
Beste klant:
Bedankt voor de aans ch af van deze draagbare DVD -s peler met
draaibaar scherm & U SB /SD. Controleer als u de do os v oo r het eerst
opent of alle
accessoires aanw ez ig zijn. Lees voordat u de on de rdelen en stroom
aansluit eerst zor gv uldig de handleiding en h ou d deze handleiding
altijd in de buurt van u w dr aagbare DVD-speler me t dr aaibaar
scherm & USB/SD.
Inhoud van de doos:
2 x hoofdeenheid
2 x afstandsbedien in g inclusief batterij
2 x AC-adapter
2 x hoofdtelefoon
1x auto-adapter
Riemen
Opmerking: als er on de rdelen ontbreken, nee m da n zo s nel mogelijk
contact op met uw deal er.
5-7
6-7
1
2
3
4
5
SETUP Menu-instellingen
Pagina algemene instellingen
Pagina audio-instellingen
Pagina video-instellingen
Voorkeurspagina
Pagina wachtwoordinstellingen
Parameters batterij
Parameters en specificaties
Service en ondersteuning
8-10
8
8-9
9
9-10
10
11
11
12
1
Page 29

Belangrijke veiligheidsinstructies
Waarsch uw in g: Verwijder de behuizin g of d e achterkant niet
om het risico van elek tr ische schokken te vermi nd er en. Er
zitten geen door de ge br uiker te onderhouden on de rdelen in
dit apparaat. Laat o nd erhoud over aan gekwali fi ceerd
personeel.
Waarsch uw in g: Stel het apparaat niet b lo ot aan regen of
vocht om brandgeva ar o f elektrisch schokgev aa r te
voorkomen.
Stel de adapter en de dr aa gbare DVD-speler niet b lo ot aan
water (druppend en s pa ttend) en plaats geen voo rw erpen
gevuld met water, zoa ls v azen, op het apparaat.
Houd de draagbar e DV D- speler uit de buurt van dir ec t
zonlicht en warmte br onnen, zoals radiator en o f ka chels.
Blokkeer de ventil at ieopeningen niet. Er zi tt en s leuven en
openingen in het a pp ar aat voor ventilatie. De ze o peningen
dienen nooit geb lo kk eerd te worden door uw DVD- sp eler op
een kussen, sofa of an de re soortgelijke onder gr ond te
zetten.
Plaats de draagbar e DV D-speler niet op een onst ab iel
wagentje, standa ar d, driepoot, beugel of ta fe l. H et apparaat
kan vallen en bescha di gd raken of mensen verwon de n.
Plaats nooit zware o f sc herpe voorwerpen op het L CD paneel of frame.
Gebruik alleen de me eg eleverde AC-adapter me t de
draagbare DVD-sp el er. Het gebruik van andere a da pters zal
uw garantie ongeld ig m aken.
De stekker van de AC-ad ap ter wordt gebruikt om het
apparaat van het lic ht net te ontkoppelen, zor g er vo or dat de
stekker goed berei kb aar blijft.
Haal de stekker uit he t st opcontact als het appar aa t ni et
wordt gebruikt.
Denk aan het milieu bi j he t weggooien van batteri je n.
LET OP: Explosiegevaar als d e ba tt erij onjuist wordt
geplaatst. Vervan g de b atterij alleen door een b at terij van
hetzelfde of een soo rt gelijk type.
WAARSCH UW IN G: De batterij (batteri j, b atterijen of accu)
moet niet worden blo ot gesteld aan extreme war mt e zo als
zonlicht, vuur of de rg elijke.
WAARSCH UW IN G: Overmatige geluids dr uk van
hoofdtelefoons o f oo rtelefoons kan leiden t ot g eh oorverlies.
WAARSCH UW IN G: Gebruik alleen
koppelstukken/ ac cessoires die worden ge sp ecificeerd door
de fabrikant. De dra ag bare DVD-speler wordt g el everd met
een AC-adapter, de ze AC -a dapter kan worden gebru ik t om
het apparaat te ontk op pelen van het lichtnet, z or g er voor dat
de adapter eenvoud ig b ereikbaar blijft.
Let op: Explosiege va ar als de batterij onjuis t is v er vangen,
alleen vervangen d oo r een batterij van hetzel fd e of
soortgelijk type ( Li thium batterij)
Deze markering gee ft a an dat dit product niet mag
worden weggego oi d me t het overige huisvuil in d e
gehele EU. Om schade a an h et milieu en de
menselijke gezon dh eid door ongecontrole er de
afvalverwijder in g te voorkomen, moet u op een
verantwoorde man ie r recyclen en zo duurzaam
hergebruik van gro nd stoffe n te bevorderen. Breng
uw gebruikte produ ct t erug naar een inzamelpu nt
of neem contact op met d e de aler waar u het
product heeft geko ch t. Zij kunnen dit product
aannemen voor mili eu vriendelijke recycl in g.
Langdurig naar het apparaat luisteren op maximaal volume
kan leiden tot gehoorschade.
2
Page 30

Veiligheidsmaatregelen
Waarschuwing
RISICO VAN ELEKTRISCHE SCHOK
NIET OPENEN
Waarsch uw ing: Deze dvd-speler maak t ge bruik van een
lasersysteem. Ge br uik van bediening, aanp as singen, of het
uitvoeren van proc ed ures anders dan die verme ld i n deze
handleiding ku nn en r esulteren in blootste ll ing aan gevaarlijke
straling.
Waarsch uw ing: Open de behuizing ni et o m di recte
blootstelling aa n de l aserstraal te voorkom en . Zichtbare
laserstraling wa nn eer geopend.
Waarsch uw ing: Kijk nooit rechtstre ek s in de laserstraal.
Let op: Installeer d it p roduct niet in een afgesl ot en r uimte,
zoals een boeken ka st o f soortgelijke plek.
Waarsch uw ing: als het apparaat wordt g eb ruikt door een kind,
dan moeten ouder s er vo or zorgen dat het kind alle i nh oud van
de handleiding k en t. H et kind moet begrijpen ho e me t
batterijen om te gaa n om t e garanderen dat de batte ri jen te
allen tijde correc t wo rden gebruikt.
Waarsch uw ing: als de batterijen over ve rhitten, uitzetten of
geuren, stop dan het g eb ruik van batterijen en ne em c ontact
op met het service cen te r voor vervanging.
Waarsch uw ing: Laad de batterij niet op , op p laatsen met
onvoldoende ve nt il atie, zoals op een matras , ku ssen, zachte
map, etc.
Waarsch uw ing: we zullen geen veran tw oo rdelijkheid
aanvaarden als d e ge br uiker de batterij onjui st g ebruikt en
onze waarschuw in gs label op de batterijbeh ui zing niet volgt.
Waarsch uw ing: De USB-geheugens ti ck m oet rechtstreeks in
het apparaat worde n ge stoken. Vermijd heb gebr ui k van een
USB-verlengkab el o m het mislukken van datao ve rdracht en
interferentie te ge n te gaan.
WAARSCH UW IN G: Bij gebruik van de hoofd te lefoon:
Langdurige blo ot st elling aan luide geluid en k unnen leiden tot
tijdelijke of perm an ent gehoorbeschadig in g. Bij deelname aan
het verkeer kan het lu is teren naar een persoonl ij ke speler de
luisteraar minde r be wust maken van mogelijk e ge varen, zoals
naderende auto ’s.
Netadapter
Fabrikant:Shen zh en Mass Power Electroni cs L imited
Modelnummer:SE F0 900100E1BA
Gebruik uitsluit en d de netadapter die in de han dl eiding
is vermeld.
N
N
Opmerkingen over copyright:
Het is bij wet verbode n om a uteursrechtelijk be sc hermd materiaal
zonder toestemmi ng t e kopiëren, tonen, uit te z en den, uit te zenden
via kabel, af te spele n in p ubliek of te verhuren.
Dit product beschi kt o ver een kopieerbeveil ig ingstechnologie
ontwikkeld doo r Ma cr ovision. Op sommige dis ks z ij n
kopieerbesch er mi ngssignalen opgenom en . Bij het opnemen en
afspelen van beeld en o p deze disks zal er beeldru is v erschijnen. Dit
product bevat copy ri ghttechnologie die wo rd t beschermd door
claims van bepaald e Ame rikaanse patenten en an de re
intellectuele- ei gendomsrechten van Ma cr ovision Corporation e n
andere eigenar en v an r echten. Gebruik van dez e
kopieerbevei li gi ng technologie moet wor de n geautoriseerd door
Macrovision Corp or ation, en is bedoeld voor t hu isgebruik en ander
beperkt gebruik, t en zij anders geautorise er d door Macrovision
Corporation. Rev er se engineering of demon ta ge is niet toegestaan.
Heffi ng
krachtige
invloed
temperatuur hoger
dan 40 graden
3
Page 31

Montage in voertuig
Gebruik de meegeleverde bevestigingsbanden om het
hoofdapparaat en de monitor op de achterkant van de
hoofdsteunen van het voertuig te installeren. Wikkel de
bevestigingsbanden strak rond de hoofdsteun.
Houdt u er rekening me e da t Unit A werkt met afstandsb ed iening A
en Unit B werkt met afst an dsbediening B.
4
Page 32

De bedieningselementen
Hoofdapparaat
1
2
3
4
5
6
7
8
10
1.SD/MS/MMC
2. AAN/UIT-KNOP
3. HOOFDTELEFOON UI TGANG
4. VIDEO/AUDIO UIT GA NG
5. AV ING ANG
6.USB
7. DC UITGANG
8. DC INGANG 9-12V
9. ENTER
10. OMHOOG/OMLAA G/ LINKS/RECHTS
11. SO URCE
5
9
11
De batterij plaatsen
1.Open de batterij de ur.
Gat
Vergeet niet de plastic kaart te verwijderen als u de afstandsbediening
voor het eerst gebruikt.
OPMERKINGEN:
N
Verwijder de batter ij a ls u het apparaat opbergt o f al s u de
DVD-speler niet ge br uikt voor een lange tijd.
2. Plaats de batteri j.
Page 33

De bedieningselementen
Afstandsbediening
1. SOURCE
DVD/KAART/USB.
2. MUTE
Schakel met deze kno p he t geluid uit.
3.0-9 NUMERIEKE TOETSEN
Selecteer met deze t oe tsen genummerde items i n ee n me nu.
4.DISPLAY
Druk op deze knop om de af sp eeltijd en statusinfo rm at ie te tonen.
5.10+
Druk op deze knop om een t ra ck hoger dan 10 te selecter en e er st
op 10+, bijvoorbee ld ; om track 12 te selecteren , dr uk e erst op 10+,
en vervolgens op 2.
6. MENU/PBC
Druk om deze knop om ter ug t e keren naar het hoofdmen u va n
de DVD (DVD).Met dez e to ets kunt u ook PBC aan-/uit ze tt en (VCD) .
7.AUDIO
Druk tijdens het afs pe len herhaaldelijk op AUD IO o m ee n
DVD
andere audiota al o f au diotrack te beluister en , indien beschikbaar.
Druk tijdens het afspe le n herhaaldelijk op
MP3
AUDIO om een ander aud io kanaal te beluisteren
( Links,Rechts,M ix ,Stereo).
8.PLAY/PAUSE
Druk één keer op PLAY/PAUSE om het afspelen te p au zeren,
druk nogmaals op PLAY/ PAUSE om het afspelen t e he rvatten.
9.STOP
Druk één keer op deze kn op o m het afspelen tijdelij k te s to ppen. Het
afspelen kan later h er vat worden door op PLAY te drukken. Als er
echter nogmaals op d e STOP knop wordt ge dr uk t, in plaats van op
de PLAY knop , da n ka n het afspelen niet meer wo rd en hervat.
10.MODE
Stel met deze knop de LC D- parameters in(helde rh eid, contrast
en verzadiging).
11.VOL+
Stel met deze knoppe n he t volume in
12.Vooruit
Druk op deze knop om naa r he t volgende hoofdstuk/ de v ol gende
track te gaan.
13.Terug
Druk op deze knop om naa r he t vorige hoofdstuk of beg in v an e en
track te gaan.
14.
Druk op om vooruit te sp oe len, dit kan met 5 snelhede n
(X2->X4-> X8->X1 6- >X32->AFSPELEN), dr uk o p de P LAY-knop
om het afspelen op nor ma le snelheid te hervatte n.
VCDCD
6
Page 34

De bedieningselementen
Afstandsbediening
15.
Druk op om achteruit t e sp oelen, dit kan met 5 snelhe de n
(X2->X4-> X8->X1 6- >X32-> AFSPELEN), druk o p de P LAY-k nop om
het afspelen op norm al e snelheid te hervatten .
16.STEP
Druk op deze knop om in DV D- modus met stappen vooru it t e sp elen.
17.SEARCH
Druk op deze knop om naa r ee n specifieke tijd, tite l of h oo fdstuk te
gaan in DVD-modu s.
18.SUBTITLE
Druk tijdens het afs pe len herhaaldelijk op SU BT IT LE om de
ondertiteltaal t e ve randeren.
19.ANGLE
: Druk op ANGLE om de kijkh oe k te veranderen, dit werkt
DVD
alleen bij DVD's die d ez e functie ondersteune n.
20.TITLE
Druk op deze toets om te ru g te keren naar het titelme nu v an d e DVD.
21.ENTER
Druk op deze toets om de m en uselectie te bevestig en .
22.SETUP
Druk op deze toets om he t ho ofdmenu te openen of slui te n.
23.VOL-
Ajuste el volumen.
24.REPEAT
Druk tijdens het afs pe len op REPEAT om de gew en ste
herhaalmodus te se le cteren.
: u kunt hoofdstuk her ha len/titel herhalen/he rh alen
DVD
uitschakelen.
: u kunt enkel herhale n/ alle herhalen/herha le n uitschakelen.
VCD
CD
: u kunt enkel herhale n/ map herhalen/herhal en
MP3
uitschakelen.
25.SLOW
Druk herhaaldeli jk o p de Slow-knop om langzaa m af t e spelen en
door de verschille nd e snelheden te bladeren . De b eschikbare
snelheden zijn 1 /2 ,1 /4,1/8,1/16 en normaa l af sp elen.
26.PROGRAM
:De programmafunct ie m aakt het mogelijk om uw
DVD VCD
favoriete tracks o p ee n disk op te slaan. Druk op de PROG RA M-knop,
vervolgens zal het P RO GRAMMAMENU verschijne n op h et scherm, u
kunt nu met behulp van d e nu merieke toetsen rechtst re eks de titels,
hoofdstukken of tr ac knummers invoeren en de PLAY-o pt ie selecteren.
Druk om nogmaals afs pe len te hervatten op PROGRAM e n se lecteer
de programma wisse n op tie in het programmamen u. D ru k nogmaals
op PROGRAM om het prog ra mmamenu te verlaten.
27.ZOOM
DVD VCD
: Use ZOOM to enlarge or shr in k the video image.
1.Press ZOOM durin g pl ayback or still playbac k to a ct ivate the
Zoom function. The square fr am e ap pears briefly in the righ t bo ttom
of the picture.
2. Each press of the ZOO M bu tton changes the TV screen in the
following sequen ce :
JPEG
: Use ZOOM to enlarge or s hr in k the picture.
1.Press 'ZOOM' .
2,Used " " to enlarge, or " " t o sh orten the picture.
Use the button to move throu gh t he z oomed picture.
7
Page 35
SETUP Menu-instellingen
Pagina algemene instellingen
Druk op de SETUP knop om het inste ll ingenmenu te openen.
Gebruik de navigat ie toetsen om het gewenste ite m te
selecteren. Druk n a he t instellen van de instel li ngen nogmaals op
SETUP om terug te keren naar de no rm al e weergave.
De volgende menu -i te ms kunnen worden ingest el d:
Pagina algemene in st ellingen
- - GENERALSETUP PAGE - -
TV DISPLAY WIDE
TFT DISPLAY 16:9
ANGLE MARK ON
OSD LANGUAGE ENG
CLOSED CAPTIONS ON
SCREEN SAVER ON
AUTO STANDBY 3H
GOTO GENERAL SETUP PAGE
3 HOURS
4 HOURS
OFF
ON
OFF
ON
OFF
ENGLISH
FRENCH
GERMAN
SPANISH
DUTCH
POLISH
HUNGARIAN
ON
OFF
TV DISPLAY: selecteer d e be eldverhouding van het a fs peelbeeld.
4:3 PANSCAN: selecteer deze o pt ie als u een normale TV heeft
en het beeld op volled ig s cherm wilt bekijken, de z ij kanten worden
van het beeld afgesn ed en om het op het beeld van uw TV te laten
passen.
4:3 LETTERBOX: sel ec teer deze optie als u een nor ma le TV
heeft en het volledi ge b eeld wilt zien. In dit geva l wo rdt het
gehele beeld op he t sc he rm getoond, maar versch ij nen er twee
zwarte balken aan de b ov en- en onderkant van het TV-scherm .
16:9:breedbe el dw eergave.
TV We ergave: slelects de bee ld verhouding van het pane l
Angle Mark
Toon de informatie ove r de h uidige beeldhoek, ind ie n beschikbaar
op de disk, aan de recht er kant van het TFT-scherm.
TFT 16:9
TFT 4:3
4:3 PANSCAN
4:3 LETTERBOX
16:9
OSD Language
Hier kunt u de taal inst el len voor de menu's op het sch er m.
Closed Captions
Closed captions zi jn g egevens die zijn verbor ge n in het
videosignaal van s om mige disks. Zorg er voord at u d ez e functie
selecteert voor da t de d isk closed captions bev at e n uw TV deze
functie ook onders te unt.
Screen Saver
Deze functie wordt g eb ruikt om de schermbevei li gi ng aan of uit
te zetten.
Auto Standby
Deze functie wordt gebruikt om het apparaat na 3 of 4 uur automatisch
in de standby-stand te zetten.
3 UUR: het apparaat gaat na 3 uur automatisch in de standby-stand als
er geen interactie met de gebruiker heeft plaatsgevonden in deze
periode.
4 UUR: het apparaat gaat na 4 uur automatisch in de standby-stand als
er geen interactie met de gebruiker heeft plaatsgevonden in deze
periode.
UIT: de automatische standby-functie is uitgeschakeld en het apparaat
blijft ingeschakeld, zelfs als er geen interactie met de gebruiker is.
Pagina audio-instellingen
Pagina a ud io -i ns te llingen
8
Page 36

SETUP Menu-instellingen
Pagina audio-instellingen
Downmix
Met deze optie kunt u he t si gnaal uit de analoge ster eo -u itgang
van uw DVD-speler in st ellen.
LT/R T :Selecteer deze optie a ls u w DV D-speler is aangeslot en
op een Dolby Pro Log ic d ec oder.
Stereo :Selectee r de ze optie als de uitgang is aa ng esloten
op twee luidspre ke rs .
Dolby digital
De opties waar u uit kun t ki ezen bij Dolby Digital Se tu p
zijn: 'Dual Mono ' en 'D yn amic'
Dual Mono
Stereo:Het linke r mo nogeluid wordt naar de li nk er l uidspreker
gestuurd en het rech te r monogeluid wordt naar d e re chter
luidspreker gest uu rd.
L-Mono:Het linke r mo nogeluid wordt naar de li nk er e n
rechter luidspre ke r gestuurd.
R-Mono:Het recht er m onogeluid wordt naar de l in ke r en
rechter luidspre ke r gestuurd.
Mix-Mono:Een mix v an h et linker en rechter monoge lu id
wordt naar de linker e n re chter luidspreker ges tu urd.
Dynamic
Dynamisch bereik c om pressie.
Pagina video-instellingen
Pagina v id eo -i ns te llingen
- - VIDEO SETUP PAGE - -
BRIGHTNESS 00
CONTRAST 00
HUE 00
SATURATION 00
GOTO VIDEO SETUP PAGE
Helderheid, cont ra st, tint, verzadiging : in st ellen van
de videokwalitei t.
Voorkeurspagina
Voo rk eu rs pa gina
9
TV Typ e
Selecteer he t kleurensyst eem van uw TV. Deze DVD-s peler is
compatibel m et NTSC en PAL.
Page 37
SETUP Menu-instellingen
Voorkeurspagina
PAL - Select ee r deze optie als de aangeslot en TV een
PAL- kleurensysteem heef t. D it z al het videosignaal van e en
NTSC-disk omzett en e n als PAL -f or maat naar de TV sturen.
NTSC-Selecteer d ez e optie als de aangeslote n TV een
NTSC-kleurensy st eem heeft. Dit zal het vide os ig naal van
een PAL-disk omzetten en als NT SC -f ormaat naar de TV sturen.
Auto:Verander het v id eosignaal automatis ch a an de hand van het
diskformaat van de d is k die wordt afgespeeld.
Audio:Selectee r ee n audiotaal (indien bes ch ik baar).
Subtitle:Selec te er een ondertiteltaal ( in di en beschikbaar).
Disc Menu:Select ee r een menutaal voor de disk ( in di en beschikbaar).
Parental
Aan sommige DVD's is e en n iveau voor ouderlijk to ez icht toegekend,
aan de hele disk of aan be pa alde scènes op de disk. Met d ez e functie
kunt u een limiet inst el len voor de niveaus die afg es peeld kunnen
worden. De ratingn iv eaus gaan van 1 tot 8 en zijn afh an kelijk van het
land. U kunt het afspe le n van bepaalde disks, die n ie t geschikt zijn
voor uw kinderen, ve rb ieden of bepaalde disks a fs pelen met
alternatieve scè ne s.
Default:Herste l de i nstellingen naar de fab ri eksinstellingen.
Pagina wachtwoordinstellingen
Pagina wachtwoor di nstellingen
- - PASSWORD SETUP PAGE - -
PASSWORD MODE ON
PASSWORD
GOTO PASSWORD SETUP PAGE
Password mode: Zet d e wa chtwoordmodus aan/u it . Als d e
wachtwoordmodu s is u itgeschakeld, dan zal h et v eranderen van
het niveau voor oude rl ijk toezicht ook niet om ee n wa chtwoord vragen.
ON
OFF
Pagina Wachtwoordinstellingen
Password: select ee r deze optie om de pagina voo r he t ve randeren
van het wachtwoord o pe nen.
OSD PASSWORD
NEW PASSWORD
CONFIRM PWD
OK
OSD PASSWORD: Voer het OUDE wach tw oo rd in,
(fabrieksinste ll ing is 1369), de cursor spr in gt a utomatisch naar
NEW PASSWORD.
NEW PASSWORD: Voer het NIEUWE wa ch tw oord in. Voer 4
cijfers in met de nume ri eke toetsen van de afstan ds be diening,
de cursor zal automa ti sch naar CONFIRM PASSWORD springen .
CONFIRM PASSWORD: Bevesti g he t NI EUWE wachtwoord door
het nogmaals in te voe re n. Als de bevestiging onju is t is, dan zal
de cursor in dit veld bl ij ven. Nadat u het wachtwoo rd c or rect heeft
ingevoerd, zal de cu rs or automatisch naar OK sp ri ng en.
OK: Druk als de cursor o p de ze knop staat op de ENTER toe ts
om de instelling te be ve stigen.
Opmerking: Als het wa ch twoord is veranderd, da n za l de c ode
N
voor ouderlijk toe zi cht ook zijn veranderd.
Het standaardwac ht woord (1369)is altijd a ct ie f, zelfs als het
wachtwoord is vera nd erd.
10
Page 38
Parameters en specificaties
Parameters van de batterij
Elektronische parameters
Item
Voed ing
Str oo mv erbruik
Bedri jf svochti gh eid
VID EO U IT
AUDIO U IT
Uitgan
Audio
: AC 100-2 40 V , 5 0/60 Hz
: <15 W
: 5 % to 90 %
:1.0 Vrms (1 K Hz , 0 dB)
:Luidspreker:1WX2,Hoofdtelefoonuitgang
Standaardeis
Systeem
Las er
Sig na al systeem
Fre qu en tieresp on s
Sig naal- ruisv erhou ding
Dynam is ch bereik
Opmerking: Ontwe rp e n specificaties zijn on de rh evig aan
N
verandering zond er v oorafgaande bericht ge ving.
:Ha lf ge leider la se r, golflengt e 65 0 nm
: NTS C / PAL
: 20H z to t 20 k Hz(1dB)
:Me er d an 8 0 dB (allee n ANA LOOG UIT
conne ct oren)
:Me er d an 8 0 dB (DVD/C D)
Specificaties batterij:
Specificaties ba tt erij:
Spanning:7.4V
Opberg- en werkoms ta ndigheden:
1. Opbergoms ta ndigheden Temperatuur Vochtighei d
6 maanden
1 week
2.Werkomstandigheden Temperatuur Vochtig he id
Standaard opla de n
Standaard ontlad en
I
-20°C +45°C~
-20°C +65°C~
0°C +45°C~
-20°C +65°C~
65±20%
65±20%
65±20%
65±20%
11
Page 39
Service en ondersteuning
Service en ondersteuning
Voor informatie: www.lenco.com
Voor ondersteuning: http://lencosupport.zendesk.com
Lenco helpdesk:
Duitsland 0900-1520530 (Lokale kosten)
Nederland 0900-23553626 (Lokale kosten + 1ct p/min)
België 02-6200115 (Lokale kosten)
Frankrijk 03-81484280 (Lokale kosten)
De helpdesk is bereikbaar van maandag tot en met vrijdag van 09:00 tot
18:00 uur. Wanneer u Lenco contacteert, zal u altijd gevraagd worden
naar het modelnummer en het serienummer van uw product. Het
serienummer bevindt zich aan de achterkant van het apparaat. Gelieve
dit nummer hier op te schrijven:
DVP-938X2
Model:
Serienummer: _________________________________
Lenco biedt service en garantie aan overeenkomstig met de Europese
wetgeving. Dit houdt in dat in het geval van reparaties (zowel tijdens en
na de garantieperiode), u uw lokale handelaar moet contacteren.
Belangrijke opmerking: Het is niet mogelijk om producten die
gerepareerd moeten worden direct naar Lenco te sturen.
Belangrijke opmerking:
De garantie verloopt als een onofficieel servicecenter het apparaat op
wat voor manier dan ook heeft geopend, of er toegang toe heeft
gekregen.
Het apparaat is niet geschikt voor professioneel gebruik. In het geval van
professioneel gebruik worden alle garantieverplichtingen van de
fabrikant nietig verklaard.
Dit symbool geeft aan dat het betreffende elektrische product of de
batterij niet moet worden verwijderd als algemeen huishoudelijk afval in
Europa. Zorg voor een juiste afvalverwerking door het product en de
batterij in overeenstemming met alle van toepassing zijnde lokale
wetten voor het verwijderen van elektrische apparatuur of batterijen te
verwijderen. Als u dit doet, helpt u de natuurlijke hulpbronnen te
behouden en de standaard van milieubescherming te verbeteren bij de
behandeling en verwijdering van elektrisch afval (Afgedankte
Elektrische en Elektronische Apparatuur).
Producten met een CE keurmerk houden zich aan de EMC richtlijn
(2004/108/EC) en de Richtlijn voor Lage Voltage (2006/95/EC)
uitgegeven door de Europese Commissie.
®Alle rechten voorbehouden
12
Page 40

法文
Lecteur DVD portable de 22,5 cm (9 pouces)
avec écran monté sur pivot,
MANUEL D'UTILISATION
DVP-938X2
Pour plus d'informations ou si vous avez
besoin d'aide WWW.lenco.com
Avant d'e ff ec tuer les raccordement s, u tiliser ou régler le produi t,
lisez la totalité de c es i nstructions.
Page 41

Table des matières
Sommaire
Table des mat ières
Consignes de sécurité importantes
Consignes de sécurité
Fonctionnement basique
Présentation des commandes
Unité principale
La télécommande
Cher (Chère) Clien t( e),
Nous vous remercio ns d e votre récente acquisi ti on d u Lecteur DVD
portable de 17,5 cm (7 p ou ces) avec écran monté sur p iv ot , connecteur
USB et emplacement p ou r carte mémoire SD. Lors de l 'o uv erture de
la boîte, assurez- vo us d'être en possession d e to us l es accessoires.
Ava nt tout raccordement et m is e so us tension, lisez atten ti vement le
manuel d'utilisa ti on et maintenez celui-c i pr oche du Lecteur DVD
portable de 17,5 cm (7 p ou ces) avec écran monté sur p iv ot , connecteur
USB et emplacement p ou r carte mémoire SD.
La boite inclus:
2 x unités
2 x télécommandes av ec p iles
2 x alimentation sec te ur
2 x casque d'écoute
1 x alimentation voi tu re
Sangles de fixatio n
Remarque : Si un éléme nt e st manquant, contacte z au ss itôt votre
revendeur local.
1
2
3
4
5-7
5
6-7
Menu CONFIGURATION
Page Général
Page Configuration audio
Page Configuration Vidéo
Page Préférences
Page Configuration du mot de passe
Fiche technique de la batterie
Fiche technique
Service et support
8-10
8
8-9
9
9-10
10
11
11
12
1
Page 42

Consignes de sécurité importantes
Attention : Pour réd ui re les risques d'électr oc ut ion, ne retirez
pas le couvercle (ou p an neau arrière) de l'unit é. Au cune pièce
à l'intérieur n'es t ré parable par l'utilisa te ur. Confiez toute
réparation à du pers on nel spécialisé seulem en t.
Attention : Afin de pré ve nir tout risque d'incen di e ou
d'électrocutio n, n 'exposez pas cet appare il à l a pl uie ou à
l'humidité.
L'adaptateur de co ur ant et le lecteur DVD porta bl e ne d oivent
pas être exposés aux é go uttements et éclabous su re s et aucun
objet rempli de liqu id e, tel qu'un vase, ne doit êt re p os é sur
l'unité.
N'exposez pas le lec te ur DVD portable au soleil e t au x so urces
de chaleur (telles q u' un radiateur ou une poêle ).
N'obstruez pas les o uv ertures d'aération. L es o ri fices du
lecteur DVD permet te nt la ventilation de l'un it é. L es ouvertures
ne doivent pas être bl oq uées en installant le lec te ur DVD
portable sur un cous si n, canapé ou autres surfa ce s si milaires.
N'installez pas le l ec teur DVD portable sur un ch ar io t, une
table, trépied ou su pp ort instable. L'unité p eu t su bir une chute,
s'endommager ou bl es ser quelqu'un.
Ne posez aucun objet t ra nchant ou lourd sur le boît ie r de l 'unité
ou son écran LCD.
Utilisez seuleme nt l 'adaptateur de couran t CA li vr é avec le
lecteur DVD portab le . Utiliser un autre adapt at eu r de courant
annulera votre gar an tie.
Utilisez l'adapt at eur de courant CA pour mettr e l' un ité hors
tension, celui-c i do it être rapidement acce ss ib le.
Débranchez l'app ar eil du secteur lorsque vo us n e l'utilisez pas.
Une attention tout e pa rticulière doit être po rt ée s ur les aspects
environnementa ux d e la disposition des pile s.
ATTE NTION : Un danger d'explo si on e st présent lorsque les
piles sont remplac ée s de manière incorrecte . Re mp lacez
seulement les pile s de s piles de type identique o u éq uivalent.
AVERTISS EM EN T : Les pi le s (batterie ou piles) ne do iv en t pas
être exposées à une ch al eur excessive telle que l es r ayons de
soleil, flammes ou a ut re source de chaleur simi la ir e.
AVERTISS EM EN T : Une pr es sion sonore excessive e t
continue provena nt d 'une paire d'écouteur s ou d 'un casque
d'écoute peut entr aî ner la perte de l'ouïe.
AVERTISS EM EN T : Util is ez seulement des
pièces/accesso ir es recommandés par le fab ri ca nt, le lecteur
DVD portable est liv ré a vec un adaptateur de cour an t CA ,
l'adaptateur de co ur ant CA permet de mettre l'un it é ho rs
tension et doit donc r es ter facilement access ib le e n cours
d'utilisation.
Attention : Toute batterie ins ta ll ée de manière incorrect e
présente un risque d 'e xplosion, remplacez s eu lement la
batterie par une bat te rie de modèle identique ( ba tterie
Lithium)
Ce symbole indique q ue c e produit ne doit pas être
déposé avec vos déch et s ménagers au sein de
l'UE. Afin de préveni r to ute nuisance possible à
l'environnemen t et l a santé humaine causée pa r
des dispositions d e dé chets incontrôlées, r ec yc lez
l'unité afin d'ass ur er la promotion de la
réutilisation de r es sources matérielles . Po ur
mettre au rebut votr e un ité, déposez celle-ci d an s
un point de collecte o u co ntactez votre revende ur.
Ceux-ci peuvent pr oc éder au recyclage du prod ui t
en toute sécurité
Au volume maximum, l’écoute prolongée de l’appareil peut
conduire à des troubles de l’audition chez l’utilisateur.
2
Page 43

Consignes de sécurité
WARNING
RISK OF ELECTRIC SHOCK
DO NOT OPEN
Attention : Ce lecte ur d e disques vidéo numériq ue e mploie un
émetteur laser. L'u ti lisation de commandes o u d' optimisations
autres que celles sp éc ifiées dans ce manuel peu t ca user une
dangereuse exp os it ion aux radiations.
Attention : Afin de pré ve nir toute exposition au r ay on laser,
n'ouvrez pas le boît ie r de l'unité. Une radiati on l aser invisible est
émise lorsque le b oî ti er est ouvert.
Attention : Ne regar de z pas le rayon laser.
Attention : N'inst al lez pas cet équipement da ns u n es pace
confiné tel qu'une b ib liothèque ou endroit si mi laire.
Attention : Lorsqu e ce tte unité est utilisée pa r un e nf ant, les
parents doivent s' as surer de préalablemen t ex pliquer le mode
opératoire de la b at te rie à l'enfant afin de gara nt ir une utilisation
appropriée de ce ll e- ci.
Attention : Lorsqu e la b atterie surchauffe, émet une odeu r ou
une fumée étrange, c es sez toute utilisation d e la b at terie puis
contactez notre ce nt re d'assistance clien t po ur o btenir une
batterie de rechan ge .
Attention : Lors de la c ha rge de la batterie, ne pose z pa s ce lle-ci
dans les endroits su iv ants : matelas, canapé, c ou ss in , tapis
épais.
Attention : Nous ne se ro ns en aucun cas tenus respo ns ab les de
toute utilisatio n in appropriée de la batter ie o u du non-respect
des instructions a pp osées sur la batterie.
Ave rtissement : n'utilis ez p as de rallonges USB, ceci per me t de
prévenir toute int er férence et perte de donné es .
AVERTISS EM ENT : Lors d e l' utilisation d'écout eu rs : Une
exposition prolo ng ée à un niveau de volume élev é pe ut entrainer
la perte temporair e ou p ermanente de l'ouïe. Ec ou ter de la
musique en condu is an t peut déconcentrer le co nd ucteur.
Adaptateur d'ali me ntation
Fabricant:Shen zh en Mass Power Electroni cs L imited
Numéro de modèle :S EF 0900100E1BA
N'utilisez que l'a li mentation listée dans l es i nstructions
d'utilisation
N
N
Remarques liées aux copyrights :
Toute copie, diffusion, affichage, d iffusion p ar c âble, lecture en
public ou locati on d e co ntenu protégé par copyr ig ht est interdit sans
avoir obtenu la pe rm is sion préalable du déten te ur.
Ce produit intèg re u n di spositif de protectio n co ntre la copie
développé par Ma cr ov ision. Ces signaux de pro te ction sont
enregistrés sur le s di sques. Des parasites pe uv ent être présents
lors de l'enregi st re ment et de la lecture de ces di sq ues. Ce produit
intègre une techno lo gie de protection des dro it s d'auteur qui est
protégée par des d oc um ents de méthode de certai ns b revets
américains et d'au tr es droits de propriété in te llectuelle détenus pa r
Macrovision Corp or ation ainsi que par d'aut re s détenteurs de droits.
L'utilisation de c et te technologie de prote ct ion des droits d'auteur
est soumise à l'auto ri sation de Macrovision ; e ll e est destinée
exclusivement à un e ut ilisation domestiqu e et à d es opérations
limitées de visual is ation. L'ingénierie i nv erse et le désassemblag e
sont interdits.
charge
strong
impact
over
heat
40 ˚C
3
Page 44
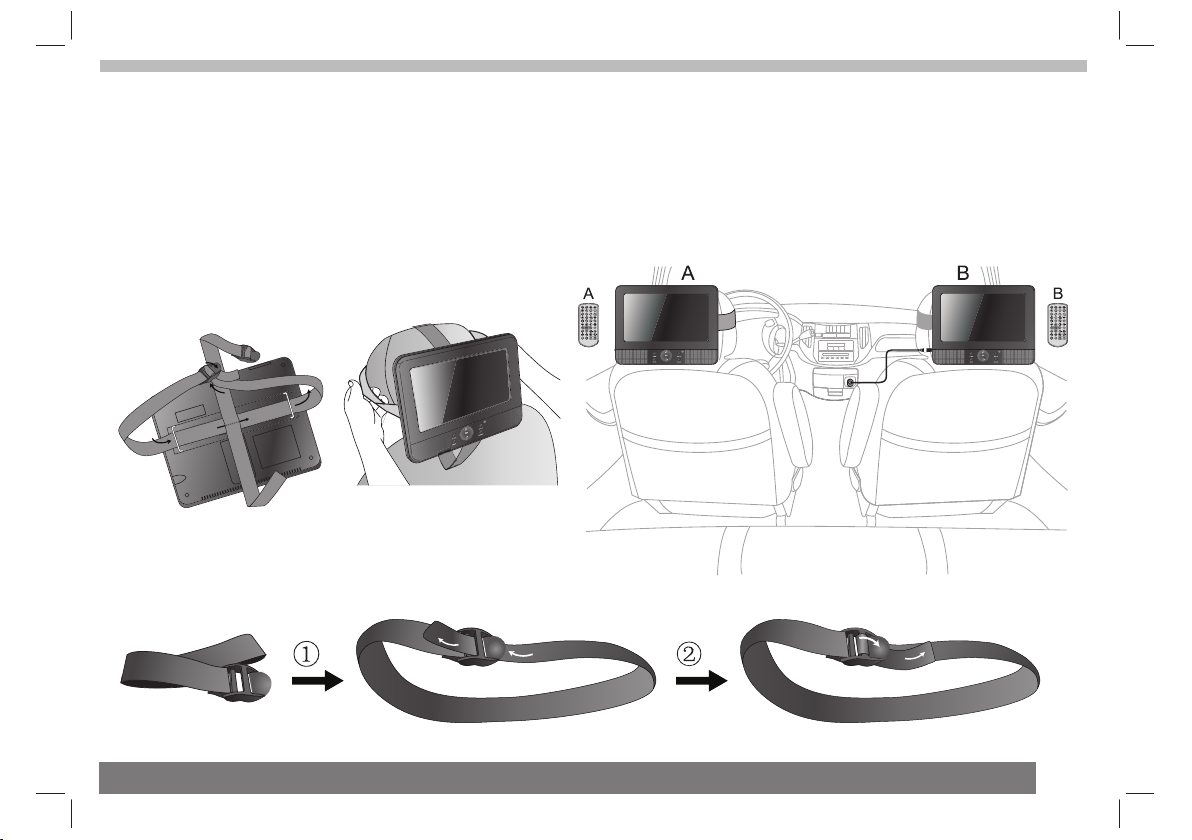
Montage dans un véhicule
Utiliser les bandes de montage pour voiture fournies pour
installer l’unité principale et le moniteur à l’arrière de
l’appui-tête du véhicule. Enrouler les bandes de montage
bien serrées autour des appuie-têtes.
N.B: L'unité A fonctio nn era uniquement via la tél éc ommande A et
idem pour l'unité B et c e po ur éviter toutes interf ér en ces entre les
2 unités.
4
Page 45
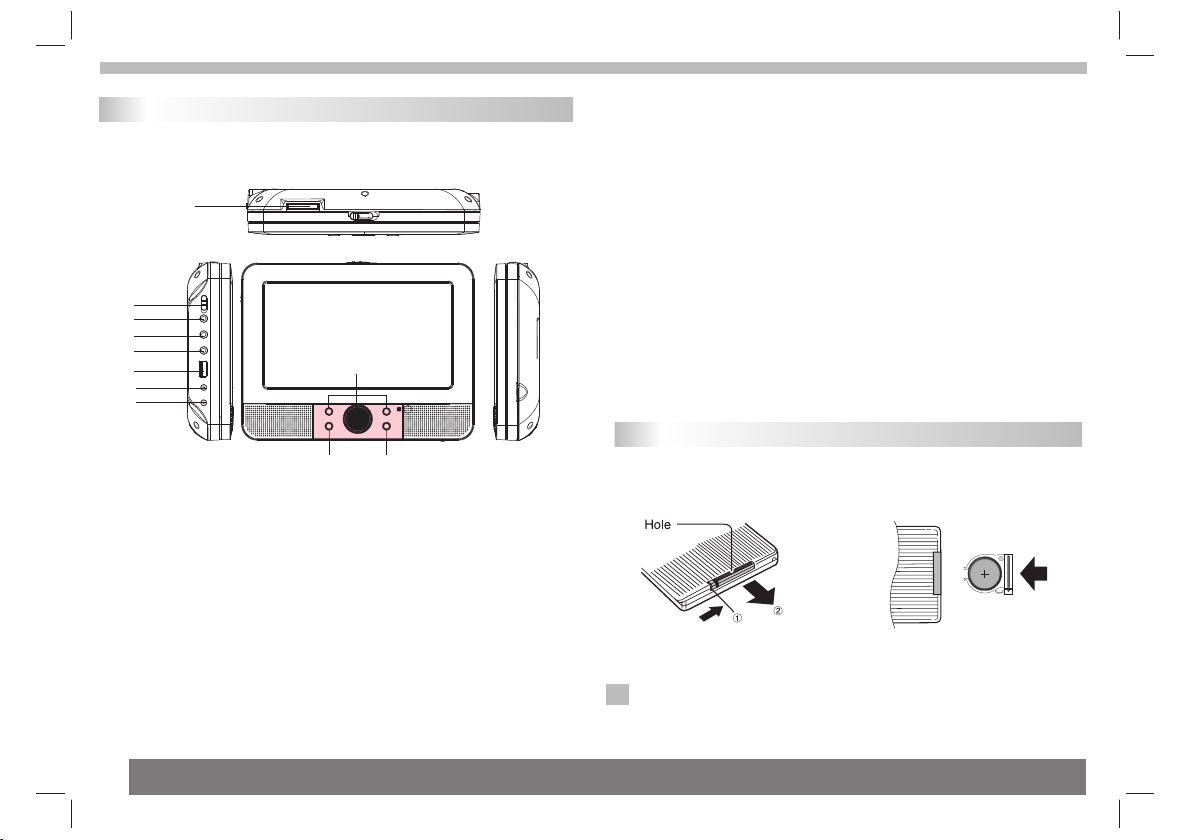
Présentation des commandes
Unité principale
1
2
3
4
5
6
7
8
10
9
11
1. SD/MS/MMC
2. MISE SOUS TENSION ON/OFF
3. PRISE CASQUE
4. SORTIE VIDEO/AUDIO
5. ENTRÉE AV
6. USB
7. SORTIE DC
8. ENTREE DC 9-12V
9. VAL IDATI ON
10. HAUT/BAS/GAU CH E/DROITE
11. SO URCE
Insertion de la pile
1. Ouvrez le couverc le d u
compartiment à pil e.
Lors de la première ut il isation de la télécomma nd e, retirez le film
de protection en pla st ique.
2.Installez la pil e.
5
REMARQUES :
N
Retirez la pile de la té lé commande lorsque vous p en sez ne plus
utiliser celle-c i pe ndant une période prolo ng ée.
Page 46

Présentation des commandes
La télécommande
17
19
23
25
16
18
20
21
22
24
26
STEP
1 2
5
9 0
SUBT ITLE
TITL E
REPE AT
6
ENTE R
SLOW
ZOOM
27
1.SOURCE
DVD/CARTE MEMOIRE/USB.
2. MUET
Permet de désactiv er l e son.
3. TO UCHES NUMERIQUES (0-9 )
Permettent de séle ct ionner une option du menu .
4.AFFICHAGE
Permet d'afficher la durée d e le cture et les autres informa ti ons de
lecture.
5.Touche 10+
Pour sélectionne r un e piste dont le numéro est ég al o u su périeur à
10, appuyez d'abor d su r la touche 10+, Par exempl e : po ur
sélectionner la pi st e 12, appuyez d'abord sur l a to uche 10+,
appuyez ensuite su r la t ouche 2.
MUTE
10+
AUDI O
SOUR CE
3
4
7
8
DISP LAY
MENU
/PBC
1
3
4
6
8
MODE
VOL +VOL -
10
11
12
14
2
5
7
9
13
15
6. MENU/PBC
Pour revenir au menu r ac ine du disque DVD
Pour les disques VCD , pe rmet d'activer/désa ct iv er le menu de lecture
PBC.
7. Langue de doublag e
DVD
En cours de lecture, a pp uyez de manière répétée sur l a to uche
LANGUE DE DOUBLAGE p ou r sélectionner une autr e la ng ue de
doublage.
MP3
En cours de lecture, app uy ez de manière répétée
sur la touche LANGUE D E DO UBLAGE pour sélection ne r un e autre
piste son (gauche, d ro ite, mixte, stéréo.
8. LECTURE/PAUSE
Appuyez une fois sur l a to uche LECTURE/PAUSE pour mettre en
pause la lecture, ap pu yez à nouveau sur cette tou ch e po ur reprendre
la lecture.
9. ARRET
Lorsque vous appuy ez u ne fois sur cette touche, l 'u ni té enregistre le
point d'arrêt, la le ct ure reprendra à partir de c e po in t si vous appuyez
sur la touche LECTUR E pa r la suite. Si vous appuyez s ur l a to uche
ARRET au lieu de la touche LECTU RE , l a le cture ne reprendra pas
à partir du point d'ar rê t.
10. MODE
Permet de configur er l 'aff ic ha ge (réglage de la luminos it é,
du contraste et de la sa tu ration).
11. Augmen te r le v olume
23. Diminuer le volu me
Régler le volume .
12. Suivant
Permet de sélectio nn er le chapitre/piste su iv an t.
13. Précédent
Permet de sélectio nn er le chapitre/piste pr éc éd ent.
VCDCD
6
Page 47

Présentation des commandes
La télécommande
14. TOUCHE
Appuyez sur la touch e , po ur sélectionner une vit es se d 'avance
rapide (X2->X4-> X 8- >X16->X32->LECTUR E NO RM ALE), appuyez
sur la touche LECTUR E po ur reprendre la lecture à v it es se normale.
15. TOUCHE
Appuyez sur la touch e , po ur sélectionner une vit es se d e
rembobinage (X2- >X 4-> X8->X16->X32->L EC TU RE NORMALE),
appuyez sur la touch e LE CTURE pour reprendre la l ec tu re à vitesse
normale.
16. LECTURE IMAGE PAR IMAGE
En mode DVD, permet d' ac tiver la lecture image pa r im ag e.
17. Recherche
En mode DVD, permet d' ac céder à une durée, titre ou c ha pi tre.
18.SOUS-TITRAG E
En cours de lecture, a pp uyez de manière répétée s ur l a to uche
SOUS-TITRAGE pou r sé lectionner une langue d e so us -titrage
disponible.
19.ANGLE
DVD
En mode DVD, appuyer s ur l a to uche ANGLE permet de
modifier l'angle d e ca méra (le disque doit comp or ter des scènes
enregistrées sou s pl usieurs angles de camér a) .
20. TITRE
Pour retourner au me nu Ti tre du disque DVD.
21.ENTREE
Permet de confirme r vo tre sélection.
22. CONFIGURATION
Permet d'afficher/quit te r le m enu Configuration
24.REPETITION
En mode Lecture, uti li sez cette touche pour sél ec ti onner un mode de
répétition.
:Les modes suivant s so nt disponibles : Répétiti on d u chapitre,
DVD
Répétition du titr e, R épétition désactivé e.
: Les modes suivants s on t disponibles : Répétitio n un ique,
VCD
Répétition total e, R épétition désactivé e.
: Les modes suivants s on t di sponibles : Répétitio n un ique,
MP3
CD
Répétition du répe rt oire, Répétition désa ct iv ée.
25.RALENTI
Appuyez de manière r ép étée sur la touche RALENT I po ur a ctiver la
Lecture au ralenti e t sé lectionner une vitess e de l ec ture au ralenti. Les
vitesses de lectur e su ivantes sont disponib le s : 1/ 2,1/4,1/8,1/16 et
Vit esse normale.
26.PROGRAMMATION
DVD VCD
: la fonction Progra mm at ion vous permet de progra mm er
la lecture des piste s du d isque.
Appuyez sur la touch e PR OGRAMMATI ON, le MENU DE
PROGRAMMATION s'affiche, vous pouve z dé sormais utiliser les
touches numériqu es p our directement saisi r le s nu méros de titres, de
chapitres et de pist es p uis sélectionner l'op ti on L ECTURE. Pour
reprendre la lectu re à v itesse normale, appuy ez s ur l a touche
PROGRAMMATION puis sélect io nn ez l'option Désactive r le p rogramme
du menu Programmat io n, appuyez à nouveau sur la t ou ch e
PROGRAMMATION pour quitte r le m en u de programmation.
27.ZOOM
DVD VCD
: Use ZOOM to enlarge or shr in k the video image.
1.Press ZOOM durin g pl ayback or still playbac k to a ct ivate the
Zoom function. The square fr am e ap pears briefly in the righ t bo ttom
of the picture.
2. Each press of the ZOO M bu tton changes the TV screen in the
following sequ en ce :
7
JPEG
: Use ZOOM to enlarge or s hr in k the picture.
1.Press 'ZOOM' .
2,Used " " to enlarge, or " " t o sh orten the picture.
Use the button to move throu gh t he z oomed picture.
Page 48

Menu Configuration
Page de configuration Général
Appuyez sur la touch e CO NFIGURATI ON pour accéder au menu
Configuration. S él ectionnez l'option de v ot re choix via les touches
directionnelle s . Un e fo is le réglage terminé, ap pu yez à
nouveau sur la touch e CO NFIGURATI ON pour quitter le menu
Configuration.
Les options suivan te s peuvent être configur ée s :
Page de configurat io n Général
- - GENERALSETUP PAGE - -
TV DISPLAY WIDE
TFT DISPLAY 16:9
ANGLE MARK ON
OSD LANGUAGE ENG
CLOSED CAPTIONS ON
SCREEN SAVER ON
AUTO STANDBY 3H
GOTO GENERAL SETUP PAGE
AFFICHAGE TV : Perme t de c onfigurer le format d'affichage d e
l'écran.
4:3 PANSCAN : Si vous disposez d' un t él éviseur standard, les
parties de gauche et d e dr oite de l'image sont coup ée s afin
d'adapter l'imag e à vo tre téléviseur.
4:3 BOITE AUX L ET TRES : Si vous disposez d'u n té léviseur
standard. L'imag e es t compressée vertical em en t, une barre noire
s'affiche sur les parties su pé rieure et inférieure de l'é cr an.
16:9: Ecran panora mi que.
Secouer panorami qu e : Permet d'activer le mode 4: 3.
Ecran TFT, veuillez sélectio nn er le format d'affichage 16:9 ou 4:3.
Indication de l'an gl e de l ecture
Permet d'afficher l'indi ca te ur de sélection de l'angl e de c améra sur
le coin supérieur dr oi t de l'écran TFT lor s de l a lecture d'une scène
enregistrée sous p lu sieurs angles de caméra .
3 HOURS
4 HOURS
OFF
ON
OFF
ON
OFF
ENGLISH
FRENCH
GERMAN
SPANISH
DUTCH
POLISH
HUNGARIAN
ON
OFF
TFT 16:9
TFT 4:3
4:3 PANSCAN
4:3 LETTERBOX
16:9
Langue d'afficha ge
Il est possible de sél ec tionner la langue d'affichage d e vo tr e choix.
Sous-titres pour m al entendants
Les sous-titres po ur m alentendants sont des d on né es intégrées au
signal vidéo de cert ai ns disques. Avant d'activer cette fo nc tion,
vérifiez que le disq ue e t votre téléviseur sont c om pa tibles avec
cette fonction.
Ecran de veille
Cette fonction per me t d'activer/désacti ve r l' écran de veille.
Mise en veille autom at ique
Cette fonction est u ti lisée pour sélectionn er l es p aramètres de mise
en veille après 3 ou 4 heu re s.
3 HEURES : L’unité pass er a en mode veille après 3 heur es s ’il n’y a
aucune interacti on d e l’utilisateur penda nt c ette durée.
4 HEURES : L’unité pass er a en mode veille après 4 heur es s ’il n’y a
aucune interacti on d e l’utilisateur penda nt c ette durée.
ÉTEINT La fonction de mise en ve il le a utomatique est désact iv ée et
l’unité restera en m od e « allumé » même sans intera ct io n de
l’utilisateur.
Menu CONFIGURATION
Page Con fi gu ra ti on a udio
-- --
- - - -AUDIO SETUP PAGE
DOWNMIX
DOLBY DIGITAL
GO TO AUDIO SETUP PAGE
STR
DUAL MONO
DYNAMIC
LT/RT
STR
STR
L-MONO
R-MONO
FULL
MIX-MONO
-
-
-
-
-
-
-
-
-
-
-
-
-
-
-
-
OFF
-
-
-
STEREO
8
Page 49

Menu Configuration
Page Configuration audio
Remixage
Cette option vous pe rm et de configurer la sorti e an al ogique stéréo
de votre lecteur DVD .
→PSG/PSD : Sélectio nn ez cette option si votre le ct eu r DVD est
raccordé à un amplif ic ateur Dolby Pro Logic.
→Stéréo : Sélection ne z cette option pour émett re l e so n depuis les
haut-parleurs av an t.
Dolby Digital
Les sous-options d e Do lby Digital sont listée s ci -dessous :
« Dual Mono » et « Dynamiq ue »
Dual Mono
→Stéréo : Les signaux m on o gauche sont transmis au h au t- parleur
gauche, les signau x mo no droite sont transmis a u ha ut-parleur droit.
→Mono G : Les signaux mon o ga uche sont transmis au hau t- pa rleur
gauche et au haut-pa rl eur droit.
→Mono D : Les signaux mon o dr oite sont transmis au hau t- pa rleur
gauche et au haut-pa rl eur droit.
→Mono mixte : Les signa ux m ono gauche et droite sont t ra ns mis au
haut-parleur gau ch e et au haut-parleur droi t.
Dynamique
Compression de la ga mm e dynamique.
Page Configuration Vidéo
Page Con fi gu ra ti on Vidéo
- - VIDEO SETUP PAGE - -
BRIGHTNESS 00
CONTRAST 00
HUE 00
SATURATION 00
GOTO VIDEO SETUP PAGE
Luminosité, Cont ra ste, Teint e, Saturation : permet de
régler la qualité vi dé o.
Page Préférences
Page Pré fé re nc es
- - PREFERENCE SETUP PAGE - -
TV TYPE PAL
AUDIO ENG
SUBTITLE ENG
DISC MENU ENG
PARENTAL
DEFAULT
GOTO PREFERENCE PAGE
RESET
1 KID SAF
2 G
3 PG
4 PG13
5 PGR
6 R
7 NC17
8 ADULT
ENGLISH
FRENCH
GERMAN
SPANISH
DUTCH
POLISH
HUNGARIAN
OTHERS
ENGLISH
FRENCH
GERMAN
SPANISH
DUTCH
POLISH
HUNGARIAN
OFF
OTHERS
Type d e téléviseur
Sélectionn ez le système de co uleurs correspo ndant à votre
téléviseur. C e lecteur DVD est c ompatible avec le s formats de
signal NTSC et PAL.
ENGLISH
FRENCH
GERMAN
SPANISH
DUTCH
POLISH
HUNGARIAN
OTHERS
PAL
AUTO
NTSC
9
Page 50

Menu Configuration
Page Préférences
PAL – Sé lectionnez cette opti on s i le t éléviseur raccordé es t au
format PAL. Le format de signal N TS C de s disques sera donc
converti au format PAL.
NTSC – Sélectionne z ce tte option si le télévise ur r ac cordé est au
format NTSC. Le form at d e signal PAL des disques sera d on c co nverti
au format NTSC.
Automatique: Le fo rm at de signal est automati qu em ent sélectionné
selon le disque in sé ré .
Audio: Permet de sél ec tionner une autre langu e de d ou blage (si
disponible).
Sous-titrage: Pe rm et de sélectionner une au tr e la ngue de doublage
(si disponible).
Menu du disque: Perm et d e sé lectionner une autre la ng ue du menu
(si disponible).
Contrôle parenta l
Quelques scènes ou l 'i ntégralité de certain s di sq ues DVD sont
assignées à un nivea u de l imitation de lecture.
Cette option vous pe rm et de limiter le contenu li si bl e.
L'utilisateur pe ut m odifier le niveau de limi ta tion de lecture de 1 à 8,
celui-ci varie sel on l e pays d'utilisation. I l es t po ssible de restreindre
la lecture de certai ne s scènes non appropriée s au x enfants et de les
remplacer par d'au tr es scènes.
Configuration pa r dé faut: Permet de rétablir la c on figuration par
défaut de l'unité.
Page Configuration du mot de passe
Page Configurati on d u mo t de passe
- - PASSWORD SETUP PAGE - -
PASSWORD MODE ON
PASSWORD
ON
OFF
Page Configuration du mot de passe
Mot de passe :
Sélectionnez le me nu M ot de passe, modifier la pa ge .
OLD PASSWORD
NEW PASSWORD
CONFIRM PWD
OK
Ancien mot de passe: S ai sissez l'ancien mot de pa ss e (mot de
passe par défaut: 13 69 ), le curseur se position ne a utomatiquement
sur Nouveau mot de p as se .
Nouveau mot de pas se S ai sissez le nouveau mot de pa ss e
Saisissez un mot de pa ss e à 4 chiffr es à l'aide des touches
numériques de la t él éc ommande, le curseur se po si tionne
automatiquem en t su r Confirmer le mot de passe .
Confirmer le mot de pa ss e: Saisissez à nouveau le n ou veau mot
de passe. Lorsqu e le c od e de confirmation est inc or rect, le curseur
reste dans cette col on ne. Une fois la saisie term in ée, saisissez à
nouveau le corre ct m ot d e passe, le curseur se posi ti onne
automatiquem en t su r OK.
OK : Lorsque le curseu r es t positionné sur ce bouto n, a ppuyez
ensuite sur la tou ch e EN TREE pour confirmer le ré gl age.
Remarque : Une fois le m ot d e passe modifié, il vous es t po ssible
N
de modifier ensuit e le n iveau de limitation de le ct ure.
Le mot de passe par défa ut ( 1369) reste actif même ap rè s avoir
modifié le mot de pa ss e.
GOTO PASSWORD SETUP PAGE
Mode Mot de passe: Per me t d'activer/désactive r le m ode Mot de
passe. Lorsque cel ui -ci est désactivé, tout e mo di fication du niveau
de limitation de lec tu re ne nécessite pas la sais ie d u mo t de passe.
10
Page 51
Fiche technique
Composants électroniques
Elément
Tens ion de fonc ti onnement
Con so mm ation d'é ne rgie
Hum id it é de foncti on nement
Con ne ct eur de sort ie
vid éo
SOR TI E AUD IO
Sortie
Audio
Norme
CA 100-2 40 V, 50 /6 0 Hz
< 15 W
5 % à 90 %
1Vp-p ( 75 Ω)
1,0 Vrms (1 KH z, 0 d B)
Haut-parleur : 2 x 1 W,
connecteur pour écouteurs
Système
Emett eu r laser
For ma ts d e signal co mp atibles
Répon se e n fréquen ce
Rappo rt s ignal/b ru it
Gam me d yn amique Supér ie ur à 80 dB (DVD /C D)
N
Remarque : La concep ti on et les caractéristiq ue s te chniques sont
soumises à des modif ic ations sans préavis.
Laser s em i-condu ct eur,
longu eu r d'onde de 6 50 n m.
NTS C / PAL
20 Hz à 20 kH z (1 d B)
Supér ie ur à 80 dB (con ne cteurs de
sorti e an alogiqu e se ulement)
Fiche technique de la batterie
Fiche technique de l a ba tterie :
Puissance :7.4V
Environnemen t de r an gement et d'utilisati on:
1. Environnement d e st ockage Tempé rature Humidité
6 mois
1 semaine
2.Environnemen t d' utilisation Température Humidit é
Charge normale
Décharge norma le
-20°C +45°C~
-20°C +65°C~
0°C +45°C~
-20°C +65°C~
65±20%
65±20%
65±20%
65±20%
11
Page 52

Service et support
Service et support
Pour plus d'informations : www.lenco.com
Pour de l'aide : http://lencosupport.zendesk.com
Service d’assistance Lenco :
Allemagne 0900-1520530 (Prix d’un appel local)
Pays-Bas 0900-23553626 (Prix d’un appel local + 1ct P/min)
Belgique 02-6200115 (Prix d’un appel local)
France 03-81484280 (Prix d’un appel local)
Le centre d’assistance est joignable du lundi au vendredi entre 9 heures
et 18 heures.
Lorsque vous contactez Lenco, on vous demandera systématiquement le
modèle et le numéro de série de votre produit. Le numéro de série se
trouve à l'arrière de l'appareil. Écrivez le numéro de série ci-dessous:
Modèle: DVP-938X2
Numéro de série : _______________________________
Lenco propose un service et une garantie conformément aux lois
européenne, ce qui signifie qu’en besoin de réparation (aussi bien
pendant et après la période de garantie), vous pouvez contacter votre
revendeur le plus proche.
Remarque importante : Il n’est pas possible de renvoyer l’appareil pour
réparation directement à Lenco.
Remarque importante :
Si l’unité est ouverte ou modifiée de quelque manière par un centre de
service non agréé, cela mettra fin à la garantie.
Cet appareil ne convient pas pour une utilisation professionnelle. En cas
d’utilisation professionnelle, les obligations de garantie du fabricant
seront annulées.
Ce symbole indique que le produit électrique concerné ou la
batterie ne doit pas être jeté parmi les autres déchets
ménagers en Europe. Pour garantir un traitement correct du
déchet de la batterie ou de l'appareil, veuillez vous en
débarrasser en vous conformant aux règlements en vigueur
dans votre secteur en ce qui concerne le des appareils
électriques et autres batteries. En agissant de la sorte, vous
contribuerez à la préservation des ressources naturelles et à
l'amélioration des niveaux de protection environnementale
concernant le traitement et la destruction des déchets
électriques. (Directive sur les Déchets des Equipements
Electriques et Electroniques).
Les produits avec la marque CE sont conformes à la directive
CEM (2004/108/CE) et à la directive basse tension (2006/95/
EC) émises par la commission de la communauté
européenne.
®Tous droits réservés
12
Page 53

MANUAL DEL USUARIO
DVP-938X2
Para información y ayuda, www.lenco.com
Reproductor DVD portátil de 22,5 cm (9”) con
Antes de conectar, ut il izar o ajustar este product o,
lea este manual del us ua rio con detenimiento y por co mp leto.
Page 54

Índice de contenido
Contenido
Índice de contenido
Importantes instrucciones de seguridad
Precauciones de seguridad
Uso básico
Identificación de controles
Unidad principal
Mando a distancia
Estimado cliente :
Gracias por compra r es te reproductor DVD port át il c on pantalla
giratoria y USB/SD . Cu ando abra el paquete por pr im er a vez, revise
que todos los acceso ri os estén presentes. Ante s de c on ectar las
partes y la alimenta ci ón, por favor lea el manual d el u su ario con
detenimiento y sie mp re consérvelas cerca de s u re pr oductor DVD
portátil con panta ll a giratoria & USB/SD.
Contenido de la caja :
2 x unidad principal
2 x Mando a distancia in cl uyendo la batería
2 x adaptador de CA
2 x auriculares
1x adaptador de coch e
Correas
Nota: Si falta algun a pi eza favor de contactar co n su d is tribuidor lo
más pronto posible .
5-7
6-7
1
2
3
4
5
Menú de ajustes
General Page
Audio Setup Page
Video Setup Page
Preference Page
Password Setup Page
Parámetros de batería
Parámetros y especificaciones
Servicio y asistencia
8-10
8
8-9
9
9-10
10
11
11
12
1
Page 55

Importantes instrucciones de seguridad
Advertencia: Par a re ducir el riesgo de descar ga e léctrica, no
quite la cubierta ni p ar te trasera. No hay partes r ep ar ables
por el usuario dentr o. R efiera los trabajos de se rv ic io a
personal calific ad o.
Advertencia: Par a pr evenir riesgos de incen di os y
descargas eléctr ic as, no exponga la unidad a ll uv ia ni
humedad.
No exponga el adap ta do r y el DVD portátil a agua (got eo s o
salpicaduras) y no c ol oque ningún objeto con lí qu ido, como
un jarrón, sobre la un id ad.
Mantenga el DVD port át il alejado de la luz solar di re cta y de
fuentes de calor com o ra diadores y hornos.
No bloquee las abe rt ur as de ventilación. Las ra nu ras y
aberturas de la unid ad s e ofrecen para la ventila ci ón. Las
aberturas nunca de be rán bloquearse coloca nd o su DVD
portátil en un colch ón , sofá u otra superficie si mi la r.
No coloque el DVD po rt át il en una mesa móvil, un sopo rt e,
un trípode, una repi sa o u na mes inestables. La uni da d
podría caerse, res ul tando en posibles daños o l es iones.
Nunca coloque ob je to s pesados ni puntiagudo s en e l panel o
el marco LCD.
Solo use el adaptado r AC in cluido con su DVD portáti l. E l
uso de cualquier otr o ad aptador anulará la gara nt ía.
La clavija del ada pt ad or AC se usa como mecanismo de
desconexión, el me ca nismo de desconexión de be
permanecer fácil me nte utilizable.
Desenchufe la corr ie nte de la toma cuando la unid ad n o esté
en uso.
Debe prestarse ate nc ión a los aspectos ambien ta les de la
eliminación de bat er ías.
PRECAUCIÓN: Ries go d e explosión si la batería s e ca mb ia
incorrectament e. C ambie únicamente por un a de l mi smo tipo
o de tipo equivale nt e.
ADVERTENCIA: La batería (p il a, p ilas o paquete de pilas) no
debe exponerse a cal or e xcesivo como el de la luz sol ar, e l
fuego o de elementos s em ejantes.
ADVERTENCIA: La presión ac ús ti ca excesiva de auricula re s
y cascos puede ocasi on ar sordera.
ADVERTENCIA: Solo use acce so ri os/acoples especifi ca dos
por el fabricantes ; el D VD portátil viene con ada pt ad or AC, el
adaptador AC se usa com o me canismo de desconexió n, e l
mecanismo de desco ne xión deberá permanece r fá cilmente
utilizable.
Precaución: Ries go d e explosión si la batería s e ca mbia
incorrectament e, c ambie únicamente por un a ba te ría igual o
de tipo equivalent e (b atería de litio).
Esta marca indica qu e es te producto no debe
desecharse con otr os r esiduos domésticos en l a
U. E. Para prevenir da ño s potenciales al ambien te
o la salud humana debi do a l a eliminación de
residuos incontr ol ada, recíclelo
responsablemen te p ara promover la reutili za ción
sustentable de rec ur sos materiales. Para de vo lv er
su dispositivo usa do , por favor use los sistema s
de devolución y reco gi da o contacte con el
minorista donde co mp ró el producto. Ellos pod rá n
aceptar este produ ct o para su reciclaje ecoló gi co.
Escuchar a máximo volumen puede provocar deterioro del
oído del usuario.
2
Page 56

Precauciones de seguridad
ADVERTENCIA
RIESGO DE DESCARGA ELÉCTRICA
NO ABRIR
Advertencia: Est e re productor DVD utiliza u n si st ema láser.
El uso de controles, a ju stes o la realización de
procedimientos d is tintos a los especifica do s aquí podría
resultar en exposi ci ón a radiación peligros a.
Advertencia: Par a pr evenir exposición dir ec ta al rayo láser,
no abra la carcasa. Ha y ra diación láser visible c ua ndo está
abierta.
Advertencia: Nun ca m ire directamente al ray o lá ser.
Precaución: No ins ta le este producto en un luga r en cerrado
como una estanterí a o un l ugar semejante.
Advertencia: Cua nd o la unidad se utilice por un n iñ o, los
padres deberán a se gu rarse de hacer comprend er a l niño
todo el contenido de l in structivo y sobre el uso de l a ba tería
para garantizar qu e se u se correctamente en tod o mo me nto.
Advertencia: Cua nd o la batería se sobrecali en te o dilate, por
favor deje de usar la ba te ría y contacte con el centr o de
servicio para camb ia rla.
Advertencia: No re ca rgue la batería en lugare s co n
ventilación in su fi ciente como: colchone s, s ofás, alfombras
suaves, etc.
Advertencia: No no s ha remos responsables si e l us uario usa
incorrectament e la b atería, sin seguir nues tr a etiqueta de
advertencia en la ba te ría.
Advertencia: El lá pi z USB debe enchufarse dir ec tamente en
la unidad. No debe u sa rs e un cable alargador USB pa ra e vitar
interferencias y l a ca ída de la transferencia d e da tos.
ADVERTENCIA: Cuando use au ri culares: La exposició n
extendida a sonido s fu ertes puede ocasionar s or dera
temporal o permane nt e. Estar en medio del tráfi co o yendo un
reproductor pers on al de música podría hacer a l oy ente
menos consciente d e pe ligros potenciales co mo c oches que
se aproximan.
Adaptador de fuent e de a limentación
Fabricante:She nz hen Mass Power Electron ic s Limited
Número de modelo:S EF 0900100E1BA
Utilice solo la fuen te d e alimentación que se ind ic a que
el manual del usua ri o
N
N
Notas sobre derechos de autor:
Esta prohibido por l a le y copiar, transmitir, mos tr ar, transmitir vía
cable, reprodu ci r en p úblico y rentar materia l pr otegido por
derechos de autor si n pe rmiso.
Este producto util iz a la función de protecció n de d erechos de autor
desarrollada p or M ac rovision. Algunos disc os t ienen señales de
protección de copy ri ght. Cuando se graben y rep ro duzcan las
imágenes de estos di sc os, aparecerá ruido vis ua l.
Este producto util iz a una tecnología de prote cc ión de derechos de
autor protegida po r re clamos de método de ciert as p atentes de EE.
UU. y otros derechos d e pr opiedad intelectual d e Ma crovision
Corporation y otro s pr opietarios de derecho s. E l uso de esta
tecnología de prot ec ción de derechos de autor d eb e estar
autorizado por Mac ro vision Corporation, y e st á concebida
únicamente para us o do méstico y otros usos limi ta dos a menos que
Macrovision Corp or ation haya autorizado l o co ntrario. Está
prohibido desm on ta r el producto y la aplicaci ón d e ingeniería
inversa.
recarga
golpe
fuerte
sobrecalentamiento
40ºC
3
Page 57

Montaje en el vehículo
Utilice las correa s pa ra el montaje en el coche que s e le
suministran para i ns talar la unidad princip al y e l monitor en la
parte posterior de l ap oyacabezas del vehícu lo . Rodee el
apoyacabezas fir me mente con la correa de mont aj e.
Por favor nota que la un id ad principal funciona c on u n mando a
distancia A y B de la unid ad p ri ncipal funciona con man do a
distancia B.
4
Page 58

Identificación de controles
Unidad principal
1
2
3
4
5
6
7
8
10
1. SD/MS/MMC
2. ENCENDIDO/APAGADO (ON/OF F)
3. TOMAS PARA AURICULA RE S
4. SALIDA DE AUDIO/VÍD EO ( VIDEO OUT)
5. AV IN
6. USB
7.SALIDA DC
8. DC IN 9-12V
9. CONFIRMACIÓN (E NT ER)
10. ARRIBA/ABAJO/ IZ QUIERDA/DERECHA
11. FU ENTE (SOURCE)
5
9
11
Insertar la batería
1.Abra la puerta de ba te rías
Orificio
Cuando use el mando por primera vez, no olvide quitar la tarjeta de
plástico.
NOTAS:
N
Saque la batería dur an te el almacenamiento o cu an do no use el
reproductor DVD en m uc ho tiempo.
2. Inserte la baterí a.
Page 59
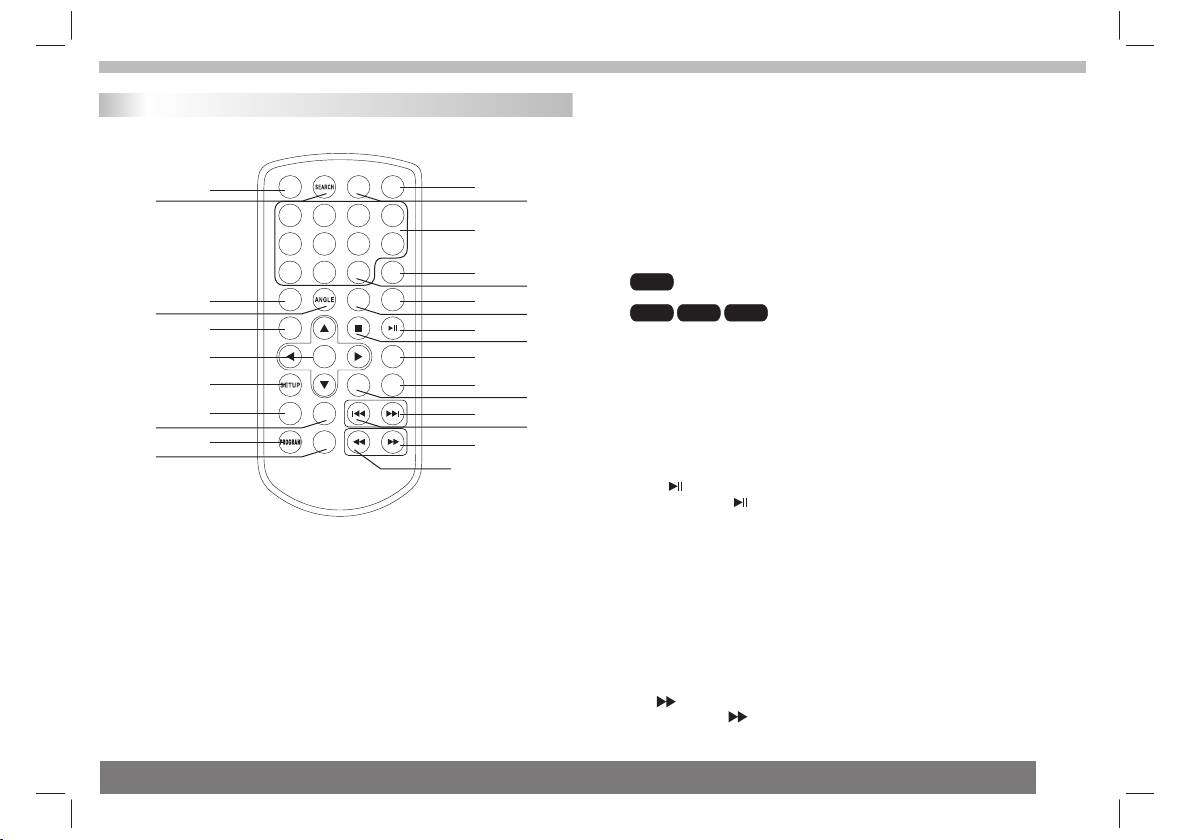
Identificación de controles
Mando a distancia
16
17 2
18
19
20
21
STEP
1 2
5
9 0
SUBT ITLE
TITL E
6 7 8
ENTE R
22
SLOW
24
25
26
27
1. SOURCE
DVD/TARJETA/U SB.
2. MUTE
Deshabilitar la sa li da de audio.
3.BOTONES NUMÉRICOS 0-9
Selecciona opcio ne s numeradas del menú.
4.DISPLAY
Para mostrar la info rm ación de tiempo y estado de r ep ro ducción.
REPE AT
ZOOM
MUTE
10+
AUDI O
SOUR CE
3
4
1
3
DISP LAY
MENU
/PBC
4
6
8
MODE
VOL +VOL -
10
11
12
14
15
5
7
9
23
13
5.BOTÓN 10+
Para seleccionar l a pi sta 10 o mayor, primero puls e 10 +, por ejemplo;
para seleccionar l a pi sta 12, primero pulse 10+ , y de sp ués pulse el
botón 2.
6. MENU/PBC
Volver al menú raíz DVD ( DV D).
Interruptor PBC on /o ff (VC D) .
7.AUDIO
Pulse AUDIO repetid am ente durante una reproduc ci ón para
DVD
oír un idioma o una pist a de a udio distintos, de esta r di sp onibles.
Pulse AUDIO repetidam en te durante la
MP3
reproducción par a oí r un canal de audio distint o (i zquierdo, derecho,
mezclado, estére o) .
8.PLAY/PAUSE
Pulse PLAY/PAUS E una vez para pausar la repr od ucción, pulse
PLAY/ PAUSE p or s eg unda ocasión para reanu da rla.
9.STOP
Cuando se pulsa este b ot ón una vez, la unidad memor iz a el punto de
detención, desde d on de se retomará la reprodu cc ión si se pulsa
PLAY despu és . Pe ro si se pulsa el botón STOP de nuevo en lugar
del botón PLAY , no habrá función de reanudam ie nto.
10.MODE
Fije los parámetro s LC D (ajuste el brillo, el con tr as te y la saturación).
11.VOL+
Ajuste el volumen
12.Forward Skip
Vaya a l siguiente capítulo/ pi st a.
13.Reverse Skip
Vaya a l capítulo/pista ante ri or.
14. BUTTON
Pulse el botón para ad el antar rápidamente a 5 vel oc id ades
(X2-> X4-> X8-> X16- > X3 2-> REPRODUCCIÓN), pu ls e el b otón PLAY
para volver a la repro du cción normal.
VCDCD
6
Page 60

Identificación de controles
Mando a distancia
15. BUTTON
Pulse el botón para re tr oceder rápidamente a 5 ve lo ci dades
(X2-> X4-> X8-> X16- > X3 2-> REPRODUCCIÓN), pu ls e el b otón PLAY
para volver a la repro du cción normal.
16.STEP
Ava nce paso a paso en el modo DVD.
17.SEARCH
Para ir a un tiempo, tít ul o o capítulo específico d es ea do en el
modo DVD.
18.SUBTITLE
Pulse SUBTITLE rep et idamente durante la rep ro du cción para ver los
distintos idioma s de s ubtitulaje.
19.ANGLE
: Pulse ANGLE para camb ia r el ángulo de visión, en los D VD
DVD
que admiten esta fun ci ón.
20.TITLE
Vuelva al m en ú de títulos del DVD.
21.ENTER
Confirma la selecc ió n en el menú.
22.SETUP
Accede o sale del menú d e aj ustes.
23.VOL-
Ajuste el volumen.
24.REPEAT
Pulse REPEAT durante la reproducción pa ra s eleccionar el modo
de repetición dese ad o.
: podrá repetir el cap ít ulo/título/ninguno.
DVD
VCD
: podrá repetir uno/ to do/ninguno.
: podrá repetir uno/ ca rpeta/ninguno.
MP3
CD
25.SLOW
Pulse Slow repetid am ente para entrar a la repro du cción lenta,
y cambiar entre las di st intas velocidades. La s ve lo cidades
son: 1/2, 1/4, 1/8, 1/ 16 y n ormal.
26.PROGRAM
:La función de program ac ión le permite guardar su s
DVD VCD
pistas favoritas d el d isco. Pulse PROGRAM y el menú d e
programación apa re cerá en pantalla. Ahora po dr á us ar las teclas
numéricas para int ro ducir títulos, capítulo s o pi stas directamente y
seleccionar la opc ió n PLAY. Para reanudar l a re producción normal,
pulse PROGRAM y sele cc ione la opción CLEAR del me nú , pu lse
PROGRAM de nuevo par a sa lir del menú de programació n.
27.ZOOM
DVD VCD
: Use ZOOM to enlarge or shr in k the video image.
1.Press ZOOM durin g pl ayback or still playbac k to a ct ivate the
Zoom function. The square fr am e ap pears briefly in the righ t bo ttom
of the picture.
2. Each press of the ZOO M bu tton changes the TV screen in the
following sequen ce :
JPEG
: Use ZOOM to enlarge or s hr in k the picture.
1.Press 'ZOOM' .
2,Used " " to enlarge, or " " t o sh orten the picture.
Use the button to move t hr ou gh the zoomed picture.
7
Page 61

Menú de ajustes
General Setup Page
Pulse SETUP para entrar al men ú de a justes. Use los botones
direccionales pa ra s eleccionar la opción pr ef er ida. Tras
ajustar los valore s, p ulse SETUP de nuevo para volver a la pant al la
normal.
Se pueden cambiar la s si guientes opciones:
General Setup Page
- - GENERALSETUP PAGE - -
TV DISPLAY WIDE
TFT DISPLAY 16:9
ANGLE MARK ON
OSD LANGUAGE ENG
CLOSED CAPTIONS ON
SCREEN SAVER ON
AUTO STANDBY 3H
GOTO GENERAL SETUP PAGE
TV DISPLAY: seleccion a la r elación de aspecto de la pe lí cula a
reproducir.
4:3 PANSCAN: si tiene una TV normal y quiere qu e am bos lados
de la imagen se recort en o s e formateen para que quep a en s u
pantalla TV.
4:3 LETTERBOX: si ti en e una TV n or ma l. En este caso, se verá
una imagen ancha c on b ar ras negras en las partes su pe rior e
inferior de su TV..
16:9:pantalla an ch a.
TFT DISPLAY: slelects l a re lación de aspecto del pan el
Angle Mark
Muestra la informa ci ón del ajuste de ángulo act ua l en la esquina
derecha de la pantal la TFT si está dispo ni bl e en el disco.
3 HOURS
4 HOURS
OFF
ON
OFF
ON
OFF
ENGLISH
FRENCH
GERMAN
SPANISH
DUTCH
POLISH
HUNGARIAN
ON
OFF
TFT 16:9
TFT 4:3
4:3 PANSCAN
4:3 LETTERBOX
16:9
OSD Language
Puede selecciona r el i dioma preferido para la i nt erfaz de pantalla.
Closed Captions
Los subtítulos esp ec iales son datos que están o cu lt os en la señal
de vídeo de algunos di sc os. Antes de seleccionar e st a fu nción,
favor de asegurars e de q ue el disco contenga subt ít ul os especiales
y que su TV también tenga esta fun ci ón .
Screen Saver
Esta función se usa pa ra a ctivar y desactivar el sa lv ap antallas.
STANDBY AUTO
Esta función se usa para seleccionar las especificaciones de standby
Auto después de tres o cuatro horas.
3 HORAS: la unidad regresará al modo de standby después de 3 horas, si
no hay interacción por parte del usuario dentro de este período de tiempo.
4 HORAS: la unidad regresará al modo de standby después de 4 horas, si
no hay interacción por parte del usuario dentro de este período de tiempo.
OFF: Deshabilita la función standby auto y la unidad permanecerá en el
modo "on", si no hay interacción por parte del usuario.
Audio Setup Page
Audio Se tu p Pa ge
-- --
- - - -AUDIO SETUP PAGE
DOWNMIX
DOLBY DIGITAL
GO TO AUDIO SETUP PAGE
STR
DUAL MONO
DYNAMIC
LT/RT
STR
STR
L-MONO
R-MONO
FULL
MIX-MONO
-
-
-
-
-
-
-
-
-
-
-
-
-
-
-
-
OFF
-
-
-
STEREO
8
Page 62

Menú de ajustes
Audio Setup Page
Downmix
Esta opción le permi te f ijar la salida analógic a es té reo de su
reproductor DVD.
→LT/RT : Seleccione est a op ción si su DVD está conecta do a u n
descodificador D ol by Pro Logic.
→Stereo : Seleccion e es ta opción cuando la salid a tr an smita
sonido únicament e de l os dos altavoces fronta le s.
Dolby digital
Las opciones inclu id as en Dolby Digital son:
'Dual Mono' y 'Dynam ic '.
Dual Mono
→Stereo: El sonido mo no i zquierdo enviará seña le s de salida al
altavoz izquierd o y el s onido mono derecho envi ar á señales de
salida al altavoz de re cho.
→L-Mono: El sonido mo no i zquierdo enviará seña le s de salida
al altavoz izquier do y d erecho.
→R-Mono: El sonido mo no d erecho enviará señale s de s alida al
altavoz izquierd o y de recho.
→Mix-Mono: Se emiti rá u n sonido mono mezclado iz qu ie rdo y
derecho a los altavo ce s izquierdo y derecho.
Dynamic
Compresión de gama d in ámica.
Video Setup Page
Vid eo S et up P ag e
- - VIDEO SETUP PAGE - -
BRIGHTNESS 00
CONTRAST 00
HUE 00
SATURATION 00
GOTO VIDEO SETUP PAGE
Brightness, Cont ra st, Hue, Saturation: pa ra f ij ar la
calidad del vídeo.
Preference Page
Prefer en ce P ag e
- - PREFERENCE SETUP PAGE - -
TV TYPE PAL
AUDIO ENG
SUBTITLE ENG
DISC MENU ENG
PARENTAL
DEFAULT
GOTO PREFERENCE PAGE
RESET
1 KID SAF
2 G
3 PG
4 PG13
5 PGR
6 R
7 NC17
8 ADULT
ENGLISH
FRENCH
GERMAN
SPANISH
DUTCH
POLISH
HUNGARIAN
OTHERS
ENGLISH
FRENCH
GERMAN
SPANISH
DUTCH
POLISH
HUNGARIAN
OFF
OTHERS
ENGLISH
FRENCH
GERMAN
SPANISH
DUTCH
POLISH
HUNGARIAN
OTHERS
PAL
AUTO
NTSC
9
TV Typ e
Para selecci onar el sistema d e color correspon diente a su TV
cuando haya sa lida AV. El reproduc tor DVD es compatib le con
NTSC y PAL.
Page 63

Menú de ajustes
Preference Page
PAL – Se leccione esta opción si l a TV conecta da e s de sistema PAL.
Cambiará la señal de v íd eo de un disco NTSC al format o PAL.
NTSC- Seleccione e st a opción si la TV conectada es de sistema
NTSC. Cambiará la se ña l de vídeo de un disco PAL al forma to N TS C.
Auto: Cambie la seña l de v ídeo de salida automáti ca me nte
conforme al format o de l disco en reproducción .
Audio: Seleccion a el i dioma del audio (de estar d is po nible).
Subtitle: Selecc io na el idioma de subtitula je ( de e star disponible).
Disc Menu: Selecci on a el idioma de menú del disco ( de e st ar
disponible).
Parental
Algunos DVD podría n ll evar asignados un nivel p ar ental al disco
entero o a ciertas esc en as del disco. Esta funció n le p er mite fijar
un nivel límite de rep ro ducción. Los niveles cl as ificatorios van de
1 a 8 y dependen de los pa ís es . Podrá prohibir la repro du cción de
ciertos discos que n o so n apropiados para sus hij os o q ue ciertos
discos reproduzc an e scenas alternativas .
Default: Restaur ar l os ajustes originales .
Password Setup Page
Password Setup Pag e
- - PASSWORD SETUP PAGE - -
PASSWORD MODE ON
PASSWORD
GOTO PASSWORD SETUP PAGE
Password mode: Act iv e/desactive el modo de co nt ra seña.
Si lo desactiva, no se p ed irá la contraseña cuand o ca mbie el
nivel parental.
ON
OFF
Password Setup Page
Password: selecc io ne la página de cambio de con tr aseña.
OSD PASSWORD
NEW PASSWORD
CONFIRM PWD
OK
OSD PASSWORD: Introduzca la c on tr aseña ANTERIOR
(la predetermina da e s 1369), y el cursor irá auto má ti camente
a NEW PASSWORD.
NEW PASSWORD: Introduzca la c on tr aseña NUEVA.
Introduzca 4 dígit os u sando los botones numér ic os d el mando a
distancia, y el curs or s altará automáticame nt e a CO NFIRM
PASS WORD.
CONFIRM PASSWORD: Confirm e la c on traseña NUEVA
introduciéndol a nu evamente. Si la confirm ac ión es incorrecta,
el cursor permanec er á en esta columna. Tras intr od ucir la
contraseña nueva c or recta de nuevo, el cursor s al ta rá
automáticament e a OK .
OK: Cuando el cursor e st é en este botón, pulse la tec la
ENTER para confirm ar e l ajuste.
Nota: Si se cambia la co nt raseña, el código de bloq ue o de disco
N
y parental también c am biará.
La contraseña pred et erminada (1369) siemp re p ermanecerá
activa, aunque se ha ya c ambiado la contraseña .
10
Page 64

Parámetros y especificaciones
Parámetros de batería
Parámetros eléctrico
Parte
Requi si tos eléct ri cos
Con su mo e léctric o
Hum ed ad d e
fun ci on amiento
SALID A DE
VÍD EO
SALID A DE
AUDIO
Salida
Audio
: AC 100-2 40 V , 5 0/60 Hz
: <15 W
: 5 % to 90 %
:1.0 Vrms (1 K Hz , 0 dB)
:Altavoz:1WX2,salida para auriculares
Especificaciones
Sistema
Lás er
Sis te ma d e señal
Respu es ta en
frecu en cia
Rel ación s eñal/ ruido
Gam a di ná mica
Nota: El diseño y las es pe cificaciones están su je ta s a cambio
N
sin previo aviso.
:Lá se r se micondu ct or, longit ud d e on da 650 nm
: NTS C / PA
: 20H z a 20 k Hz (1dB)
:Má s de 8 0 dB ( conecto re s de SALIDA ANA LÓ GI CA
solam en te)
:Má s de 8 0 dB ( DVD/CD)
Especificaciones de batería
Especificacion es d e batería:
Salida:7.4V
Condiciones de a lm ac enamiento y funcionam ie nto:
1. Almacenam ie nto Temp er at ura Humedad
6 meses
1 semana
2.Funcionamien to Temperatura Humeda d
Recarga estánd ar
Descarga estánda r
-20°C +45°C~
-20°C +65°C~
0°C +45°C~
-20°C +65°C~
65±20%
65±20%
65±20%
65±20%
11
Page 65

Servicio y asistencia
Servicio y asistencia
Para información: www.lenco.com
Para asistencia: http://lencosupport.zendesk.com
Teléfono de asistencia Lenco:
Alemania 0900-1520530 (Tarifa local)
Países Bajos 0900-23553626 (Tarifa local + 1ct P/min)
Bélgica 02-6200115 (Tarifa local)
Francia 03-81484280 (Tarifa local)
El teléfono de asistencia está disponible de lunes a jueves, de 9 de la
mañana a 6 de la tarde.
Cuando se ponga en contacto con Lenco, se le pedirá el modelo y el
número de serie de su producto. El número de serie se encuentra en la
parte posterior del aparato. Por favor, escriba debajo el número de serie:
Modelo: DVP-938x2
Número de serie:_________________________________
Lenco ofrece servicio y garantía en cumplimiento de la ley de la Unión
Europea, lo cual implica que, en caso de que su producto precise ser
reparado (tanto durante como después del periodo de garantía), deberá
contactar directamente con su distribuidor.
Nota importante: No es posible enviar sus reparaciones directamente a
Lenco
Nota importante: Si la unidad es abierta por un centro de servicio no
oficial, la garantía quedará anulada. Este aparato no es adecuado para
el uso profesional. En caso de darle un uso profesional, todas las
obligaciones de garantía del fabricante quedarán anuladas.
Este símbolo indica que no deberá deshacerse del producto
eléctrico o batería en cuestión tratándolo como desecho del
hogar en el ámbito de la UE. Para garantizar un tratamiento
residual correcto del producto y su batería, por favor,
elimínelos cumpliendo con las leyes locales aplicables sobre
requisitos para el desechado de equipos eléctricos y baterías.
De hacerlo, ayudará a conservar recursos naturales y mejorar
los estándares de protección medioambiental en el
tratamiento y eliminación de residuos eléctricos (Directiva
sobre la Eliminación de Equipos Eléctricos y Electrónicos).
Los productos con la marca CE cumplen con la Directiva
EMC (2004/108/EC) y con la Directiva de Bajas Tensiones
(2006/95/EC) emitida por la Comisión de la Unión Europea.
®Reservados todos los derechos
12
Page 66

MANUALE DI ISTRUZIONI
DVP-938X2
Per i nf ormazio ni e a ssist en za visita re il
sito w eb w ww.lenco. com.
22,5 cm Lettore DVD portatile da 9”
Prima di iniziare a ut il izzare il prodotto, legge re c on
attenzione l'int er o manuale di istruzioni.
Page 67

Sommario
Sommario
Sommario
Istruzioni di sicurezza importatnti
Precauzioni di sicurezza
Operazioni di base
Descrizione dei tasti
Unità principale
Telecomando
Gentile cliente,
La ringraziamo per a ve r scelto questo lettore D VD p or tatile dotato di scherm o
orientabile, por ta U SB e slot per scheda SD. All'a pe rt ura della confezione
verificare che tut ti g li accessori siano pres en ti . Prima di iniziare a utili zz are
l'unità, leggere c on a ttenzione il presente m an uale e tenerlo sempre a porta ta
di mano.
Contenuto della co nf ezione:
2 lettori DVD
2 telecomandi con ba tt erie incluse
2 adattatori CA
2 paia di cuffie
1 adattatore per aut o
Cinghiette
Nota: se all'inter no d ella confezione manca no a ccessori contattare
immediatamente i l ri venditore.
1
2
3
4
5-7
5
6-7
Impostazioni del menu di configurazione
Generale
Audio Setup
Video Setup
Preference
Password Setup
Specifiche della batteria
Specifiche
Assistenza
8-10
8
8-9
9
9-10
10
11
11
12
1
Page 68

Importanti istruzioni di sicurezza
Attenzione: per ri du rre il rischio di shock ele tt ri co, non
rimuovere il telai o. Al l'interno dell'unit à no n sono presenti
parti riparabili d al l'utente. Per riparaz io ni r ivolgersi a un
tecnico qualific at o.
Attenzione: per ev it are pericoli di incendi o o sh ock elettrico,
non esporre l'unit à a pi oggia o umidità.
Mantenere l'adat ta tore e l'unità al riparo da g oc ci olamenti o
spruzzi d'acqua, e n on c ollocare sull'unità o gg etti contenenti
liquidi, come ad es. v as i.
Mantenere l'unit à al r iparo dalla luce dirett a de l sole e da
fonti di calore come r ad iatori o fornelli.
Non ostruire i fori di v en tilazione. Gli slot e i for i su ll 'unità ne
garantiscono la ve nt ilazione. Non coprire i f or i co llocando
l'unità su cuscini , di vani o altre superfici si mi li .
Non collocare l'un it à su carrelli instabili , pi edistalli,
treppiedi, staffe o tavoli . L' un ità potrebbe cadere
danneggiando si o c au sando ferite.
Non collocare ogge tt i pesanti o taglienti sul lo s chermo LCD
o sul bordo dell'uni tà .
Utilizzare solo l' ad attatore CA incluso nell a co nfezione.
L'utilizzo di altr i ad attatori rende nulla la g ar anzia.
La spina dell'adat to tore CA è utilizzata come di sp ositivo di
scollegamento e de ve e ssere sempre immediat am ente
accessibile.
Se il dispositivo no n è in u so, scollegare il cavo.
Smaltire le batter ie i n accordo con le norme sull a pr otezione
dell'ambiente.
ATTE NZIONE: pericolo di esp lo si one se la batteria è
sostituita in modo i nc orretto. Sostituire s ol o co n batterie
dello stesso tipo o eq ui valenti.
AVVE RTEN ZA : no n esporre la batteria (ba tt eria, batterie o
pacco di batterie) a f on ti di calore eccessivo co me l uc e
diretta del sole, fu oc o o simili.
AVVE RTEN ZA : un a pressione sonora ecce ss iva dalle cuffie
o dagli auricola ri p uò c ausare la perdita dell' ud ito.
AVVE RTEN ZA : ut ilizzare solo accesso ri f orniti dal
produttore. L'un it à è accompagnata da un adat ta to re CA.
L'adattatore è uti li zzato come dispositiv o di s co llegamento e
deve essere sempre i mm ediatamente accessi bi le.
Attenzione: peri co lo di esplosione se la batt er ia è sostituita in
modo incorretto. S os tituire solo con batter ie d el lo stesso tipo
o equivalenti (bat te rie al litio).
Nell'Unione Euro pe a questo simbolo indica c he i l
prodotto non può ess er e smaltito insieme ai rif iu ti
domestici. Per pro te ggere l'ambiente e la sal ut e
umana dallo smal ti me nto incontrollato dei r if iuti e
promuovere il riut il izzo sostenibile dell e ri sorse
materiali, ricic la re questo prodotto in mod o
responsabile. Pe r sm altire i dispositivi ob so le ti
utilizzare gli app os iti sistemi di raccolta o
contattare il rive nd itore presso il quale si è
eff ettuato l'acquistat o.
L'ascolto prolungato al massimo volume mediante l'unità può
danneggiare l'udito.
2
Page 69

Precauzioni di sicurezza
ATTENZIONE
RISCHIO DI SHOCK
ELETTRICO, NON APRIRE.
Avvertenza: questo lettore DVD digitale impiega un sistema laser.
L'utilizzo di tasti, regolazioni e procedure in modo non conforme alle
istruzioni specificate può causare l'esposizione a radiazioni
pericolose.
Avvertenza: per evitare l'esposizione diretta al raggio laser, non
rimuovere il telaio del dispositivo. Radiazioni laser visibili all'apertura.
Avvertenza: non fissare direttamente il raggio laser.
Attenzione: non collocare il dispositivo in uno spazio delimitato, come
ad esempio sullo scaffale di una libreria o simile.
Attenzione: se il dispositivo è utilizzato da bambini, è responsabilità
dei genitori assicurarsi che i bambini comprendano i contenuti di
questo manuale per un corretto uso della batteria.
Avvertenza: se la batteria si surriscalda, si gonfia o emana cattivi
odori, arrestarne immediatamente l'uso e contattare il centro di
assistenza per richiederne la sostituzione.
Avvertenza: durante il caricamento, non collocare il dispositivo su
superfici che ostacolano la ventilazione, come materassi, divani,
cuscini, tappetini ecc.
Avvertenza: il produttore non è responsabile dell'uso incorretto della
batteria o non conforme alle avvertenze sull'etichetta posta sulla
custodia della batteria.
Avvertenza: la chiavetta USB deve essere inserita direttamente nel
dispositivo. Per evitare perdite di dati e interferenze, non utilizzare il
cavo di prolunga USB.
AVVERTENZA: l'ascolto prolungato a volumi elevati mediante cuffie
può causare perdita temporanea o permanente dell'udito. L'ascolto
mediante cuffie durante la guida può abbassare il livello di
percezione di eventuali pericoli.
Adattatore per ali me ntatore
Produttore:She nz hen Mass Power Electron ic s Li mited
Modello numero :S EF 0900100E1BA
Utilizzare solo gl i ad attatori elencati nel m an uale d'uso
N
N
Note sul copyright
È proibito per leg ge c op iare, trasmettere, mo st rare,
trasmettere via ca vo , recitare in pubblico o no le ggiare
materiale protet to d a copyright senza perme ss o.
Questo prodotto in te gra la funzionalità di pr ot ez ione anticopia
sviluppata da Macr ov ision. Su alcuni dischi s on o registrati segnali di
protezione antic op ia. Durante la registra zi one e la riproduzione di
immagini da tali dis ch i, le immagini appaiono d is torte. Questa unità
integra una tecnol og ia di protezione antico pi a
protettamedian te rivendicazioni di alc un i brevetti USA e di altri diritt i
di proprietà posse du ti da Macrovision Corpo ra tion e altri proprietari
di diritti. L'util iz zo di questa tecnologia d i pr ot ezione anticopia deve
essere autorizza to d a Macrovision Corpora ti on . Questa tecnologia è
intesa per solo uso do me stico e altri usi limitat i, s e no n
diversamente aut or izzato da Macrovision C or po ration.. Il reverse
engineering o il d is as semblaggio sono proib it i.
car icamn ento
urti violenti
sur risca ldame nto
40 ˚C
3
Page 70

Fissaggio in auto
Utilizzare le cinghiette di fissaggio per auto per posizionare
il dispositivo sul retro del poggiatesta del sedile anteriore.
Serrare bene le cinghiette attorno al poggiatesta.
Il telecomando A è assoc ia to al dipositivo A e il telecom an do
B è associato al dispo si tivo B.
4
Page 71

Descrizione dei tasti
Unità principale
1
2
3
4
5
6
7
8
10
9
11
1. SLOT PER SCHEDE SD/MS/MMC
2. TASTO DI ACCENSIONE/ SP EGNIMENTO
3. JACK CUFFIE
4. USCITA VIDEO/AUDIO
5. INGRESSO VIDEO/ AU DIO
6. PORTA USB
7. USCITA CC
8. INGRESSO CC IN 9-12 V
9. TASTO INVIO
10. TASTI SU /G IÙ /SINISTRA/DESTRA
11. TASTO ORIGINE
Inserimento della batteria
1. Aprire lo sportell in o del vano batteria.
Prima di iniziare a ut il izzare il telecomando , ri mu overe la
pellicola di pla st ic a.
2.Inserire la batt er ia.
5
NOTA:
N
rimuovere la batte ri a quando il dispositivo n on è i n uso o in caso
di inutilizzo prol un gato.
Page 72

Descrizione dei tasti
Telecomando
16
17 2
18
19
20
21
STEP
1 2
5
9 0
SUBT ITLE
TITL E
6
ENTE R
22
SLOW
24
25
26
27
1. SOURCE
Consente di selezi on are un'origine tra DVD/ SC HEDA SD/USB.
2. MUTE
Consente di disatt iv are l'audio.
3. TAS TI NUMERICI 0-9
Consente di selezi on are voci di menu numerate .
4.DISPLAY
Consente di visual iz zare informazioni sul lo s tato
dell'unità e sul tem po d i riproduzione.
REPE AT
ZOOM
MUTE
10+
AUDI O
SOUR CE
3
4
7
8
DISP LAY
MENU
/PBC
1
3
4
6
8
MODE
VOL +VOL -
10
11
12
14
15
5
7
9
23
13
5. TAS TO 10+
Per selezionare un n um ero uguale o superiore a 10 , pr emere
prima questo tasto , Ad es empio, per selezionar e la t ra ccia 12,
premere 10+, quind i pr emere il tasto 2.
6. MENU/PBC
Consente di tornar e al la pagina principale de l me nu DVD.
Consente di attiva re /disattivare la modal it à PB C (VCD).
7.AUDIO
Premere questo tas to p iù volte durante la ripro du zi one
DVD
per modificare la li ng ua o la traccia audio, se dis po nibile
MP3
riproduzione per a sc oltare un canale audio di fferen te ( s in istro,
destro, mix, stere o) .
8. RIPRODUCI/SOS PE NDI
Premere una volta qu es to tasto per sospendere l a ri pr oduzione,
Premerlo di nuovo pe r ri prendere la riproduzi on e.
9.STOP
Premendo una volta q ue sto tasto, l'unità memo ri zz a il punto di
arresto da cui ripre nd ere la riproduzione se a co nt inuazione si
preme il tasto ( ). Se inv ec e si preme di nuovo il tasto STOP
il punto memorizza to v iene perso.
10.MODE
Consente di regola re i p arametri dello scherm o LC D
(luminosità, con tr asto e saturazione).
11.VOL+
23.VOL-
Consentono di rego la re il volume.
12. Avanzamento
Consente di passar e al c apitolo o alla traccia su cc essivi.
13. Riavvolgemen to
Consente di tornar e al c apitolo o alla traccia pr ec edenti.
14. TASTO
Premere questo tas to p er avanzare a una delle 5 vel oc it à
disponibili (X2- >X 4-> X8->X16->X32). Pr em er e il tasto di
riproduzione per r ip rendere la riproduzio ne n ormale.
Premere questo tas to p iù volte durante la
VCDCD
6
Page 73

Impostazioni del menu di configurazione
Telecomando
15. TASTO
Premere questo tas to p er riavvolgere a una dell e 5 ve lo cità
disponibili (X 2- >X 4->X8->X16->X32). P re me re il tasto di riproduzio ne
per riprendere la ri pr oduzione normale.
16. STEP
In modalità DVD cons en te di avanzare di un fotogr am ma .
17. SEARCH
In modalità DVD cons en te di cercare un titolo, un c ap it olo o un
punto preciso.
18. SUBTITLE
Durante la riprodu zi one premere questo tast o pi ù volte per
selezionare una li ng ua per i sottotitoli.
19.ANGLE
premere questo tas to p er modificare l'angol o di
DVD
visualizzazion e co n DVD che supportano ques ta f unzione
20.TITLE
In modalità DVD cons en te di tornare al menu dei tit ol i.
21.ENTER
Consente di confer ma re una selezione.
22.SETUP
Consente di accede re o u scire dal menu di configu ra zione.
24.REPEAT
Durante la riprodu zi one premere questo tast o pe r se lezionare
la modalità di ripet iz ione desiderata.
: consente di ripete c ap itoli o titoli.
DVD
: consente di ripete re u n video o tutti i video.CDMP 3
VCD
MP3
CD
: consente di ripete re u n brano o una cartella.
25.SLOW
Premere più volte qu es to tasto per rallentare l a ri pr oduzione a
una delle 5 volte disp on ibili (1/2,1/4,1/8, 1/ 16 , normale).
26.PROGRAM
DVD VCD
delle tracce prefe ri te di un disco. Premere il ta st o pe r accedere al
menu di programmaz io ne, quindi utilizzare i t as ti numerici per
digitare i numeri de i ti toli, dei capitoli o dell e tr acce desiderate e
selezionare l'op zi one PLAY (Ripro du ci ). Per riprendere la
riproduzione nor ma le, premere il tasto PROG RA M e se lezionare
l'opzione di ann ul la mento della riproduzi on e programmata,quind i
premere di nuovo il ta st o PROGRAM per uscire dal me nu .
27.ZOOM
DVD VCD
1. Durante la riproduzione o da immagine sospesa premere questo
tasto per attivare la funzione. TUna cornice quadrata viene visualizzata
nell'angolo inferiore destro dell'immagine.
2. Ogni successiva pressione del tasto ZOOM modifica le dimensioni
dello schermo TV in questa sequenza:
2x - 3x - 4x 1/2 1/3 1/4 norma le
JPEG
: utilizzare questo tasto per ingrandire o ridurre le immagini.
1.Premere il tasto 'ZOOM'.
2,Usare " " per ingrandire o " " per ridurre l'immagine.
Usare i tasti per muoversi all'interno dell'immagine ingrandita.
questo tasto conse nt e di programmare la ripro du zi one
utilizzare quest o ta sto per ingrandire o ridu rr e le immagini video.
7
Page 74

Descrizione dei tasti
Pagina di configurazione generale
Premere il tasto SET UP per acc ed er e al menu di configurazio ne .
Utilizzare i tasti d ir ez ionali per selezionar e le v oci
desiderate. Al term in e della configurazion e, p remere di nuovo il
tasto SETUP per uscire dal men u. È po ssibile impostare le vo ci
indicate a continu az ione.
Pagina di configur az io ne generale
- - GENERALSETUP PAGE - -
TV DISPLAY WIDE
TFT DISPLAY 16:9
ANGLE MARK ON
OSD LANGUAGE ENG
CLOSED CAPTIONS ON
SCREEN SAVER ON
AUTO STANDBY 3H
GOTO GENERAL SETUP PAGE
SCHERMO TV: consent e di s elezionare il rapport o d' aspetto delle
immagini riprodo tt e sul TV.
4:3 LETTERBOX: con u n TV norma le , co nsente la visualizzaz io ne
con banda nera nel la p ar te superiore e inferior e de llo schermo.
16:9: consente la vi su alizzazione a schermo i nt ero.
SCHERMO TFT: conse nt e di impostare il rapport o d' aspetto per lo
schermo dell'u ni tà (16:9 o 4:3).
Contrassegno ang ol o
Consente di visual iz zare le informazioni su ll 'impostazione corre nt e
dell'angolaz io ne n ell'angolo destro.r
3 HOURS
4 HOURS
OFF
ON
OFF
ON
OFF
ENGLISH
FRENCH
GERMAN
SPANISH
DUTCH
POLISH
HUNGARIAN
ON
OFF
TFT 16:9
TFT 4:3
4:3 PANSCAN
4:3 LETTERBOX
16:9
Lingua OSD
Consente di selezi on are la lingua per il menu su sc he rmo.
Sottotitoli
I sottotitoli sono d at i nascosti nei segnali vi de o di a lcuni dischi.
Prima di seleziona re q uesta funzione, assic ur arsi che il disco
contenga le inform az ioni dei sottotitoli e ch e la f un zione sia
impostata anche su l TV
Screen saver
Consente di attiva re o d isattivare il screen sa ve r.
Sospensione automatica
Consente di impostare un'opzione per la sospensione automatica.
3 ORE: l'unità entra in modalità di standby dopo 3 ore se in
quell'intervallo di tempo non viene eseguita nessuna operazione.
4 ORE: l'unità entra in modalità di standby dopo 3 ore se in
quell'intervallo di tempo non viene eseguita nessuna operazione.
OFF: la funzionalità di sospensione automatica è disattivata, e l'unità
rimane attiva anche in assenza di operazioni da parte dell'utente.
Pagina di configurazione audio
Pagina d i im po st az io ne audio GO TO AUDIO S ET UP PAG E
-- --
- - - -AUDIO SETUP PAGE
DOWNMIX
DOLBY DIGITAL
GO TO AUDIO SETUP PAGE
STR
DUAL MONO
DYNAMIC
LT/RT
STR
STR
L-MONO
R-MONO
FULL
-
-
-
-
-
-
-
-
-
-
MIX-MONO
-
-
-
-
-
-
-
-
OFF
-
STEREO
8
Page 75
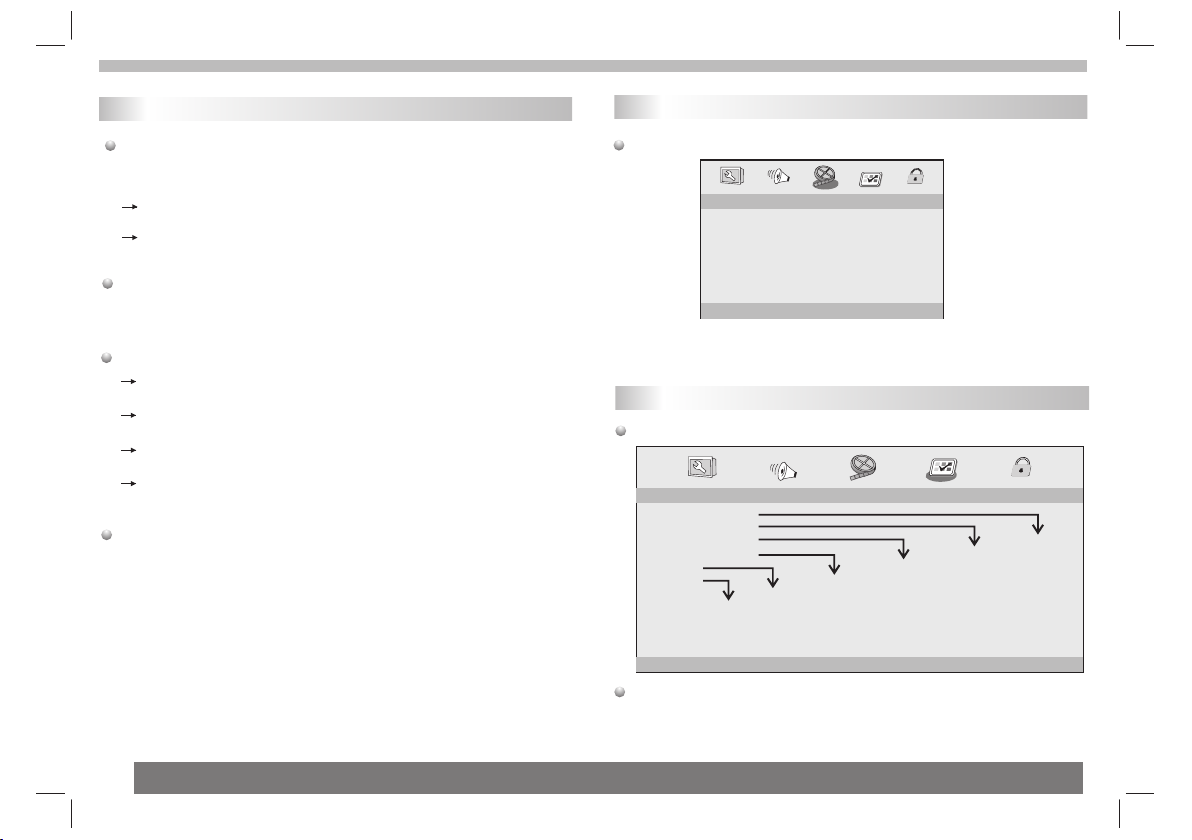
Impostazioni del menu di configurazione
Pagina di configurazione audio
Downmix
Questa opzione con se nte di impostare l'usci ta s te reo analogica
dell'unità.
Sinistra/Destr a: s elezionare questa opz io ne se l'unità è
collegata a un dec od er D olby Pro Logic.
Stereo:selezio na re questa opzione se il suo no è e messo solo
dai due altoparl an ti a nteriori.
Dolby digital
Questa opzione di me nu i nclude le voci 'Dual Mono ' e 'D inamico'.
Dual Mono
Ste r e o: il segnale audio mono sinistro è inviato all'altoparlante sinistro
e il segnale audio mono destro è inviato all'altoparlante destro.
L-Mono: il segnale audio mono sinistro è inviato all'altoparlante sinistro
e all'altoparlante destro.
R -Mono: il segnale audio mono destro è inviato all'altoparlante sinistro
e all'altoparlante destro.
Mix -Mono: i segnali audio mono sinistro e destro sono inviati
all'altoparlante sinistro e all'altoparlante destro.
Dinamico
Consente la compre ss ione dell'intervall o di namico.
Pagina di configurazione video
Pagina d i co nf ig ur az ione video
- - VIDEO SETUP PAGE - -
BRIGHTNESS 00
CONTRAST 00
HUE 00
SATURATION 00
GOTO VIDEO SETUP PAGE
Consente di impost ar e le voci Luminosità, Con tr asto,
Tonalità e Saturazio ne p er ottenere una buona qua li tà video.
Pagina preferenze
Pagina p re fe re nz e
- - PREFERENCE SETUP PAGE - -
TV TYPE PAL
AUDIO ENG
SUBTITLE ENG
DISC MENU ENG
PARENTAL
DEFAULT
GOTO PREFERENCE PAGE
RESET
1 KID SAF
2 G
3 PG
4 PG13
5 PGR
6 R
7 NC17
8 ADULT
ENGLISH
FRENCH
GERMAN
SPANISH
DUTCH
POLISH
HUNGARIAN
OTHERS
ENGLISH
FRENCH
GERMAN
SPANISH
DUTCH
POLISH
HUNGARIAN
OFF
OTHERS
Tipo TV
Consente di se lezionare il si stema colore che co rrisponde al
proprio TV in modali tà AV. Il lettore è comp atibile sia con il
sistema NTSC s ia con il sistema PAL.
ENGLISH
FRENCH
GERMAN
SPANISH
DUTCH
POLISH
HUNGARIAN
OTHERS
PAL
AUTO
NTSC
9
Page 76
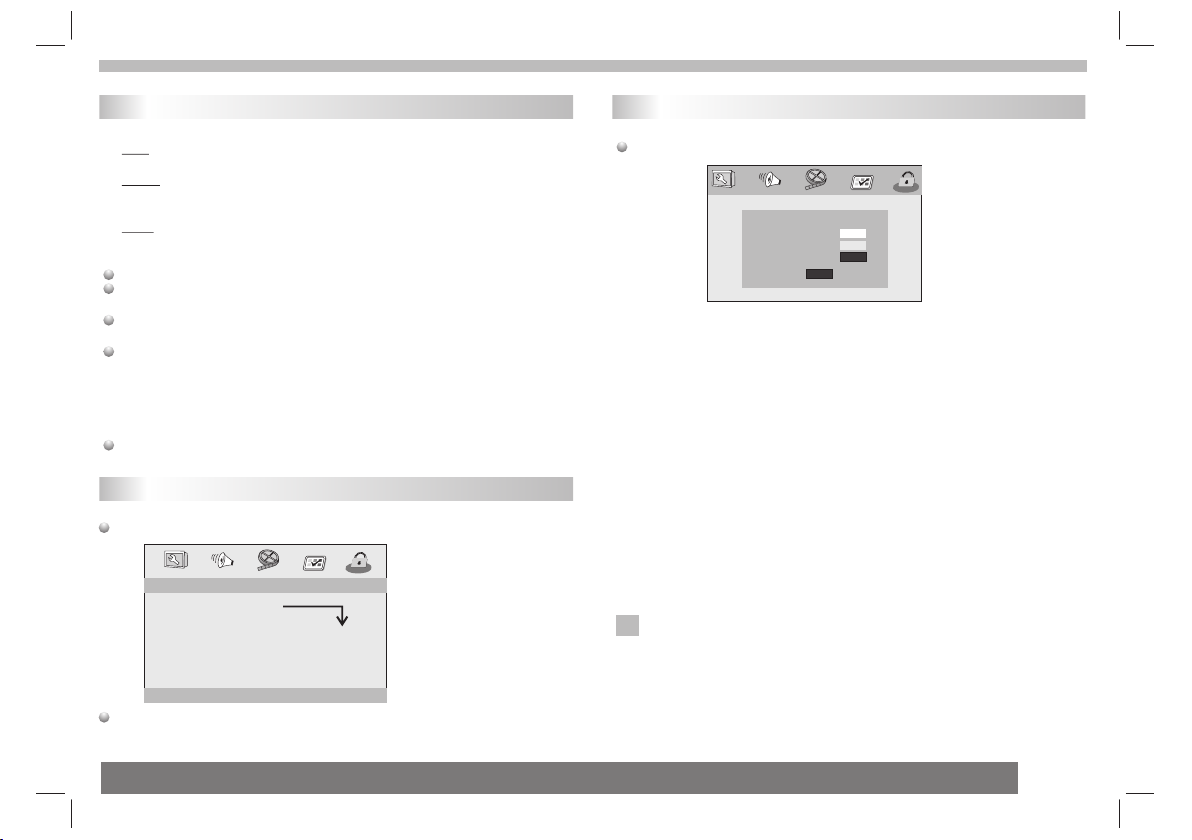
Impostazioni del menu di configurazione
Pagina preferenze
PAL - Selezionare questa opzione se il TV collegato è un TV PAL. Consente
di modificare il segnale di un disco o un'origine NTSC in formato PAL.
NTSC -Selezionare questa opzione se il TV collegato è un TV NTSC.
Consente di modificare il segnale di un disco o un'origine PAL in formato
NTSC.
Auto - Consente di modificareil segnale video in automatico a seconda del
formato del disco riprodotto.
Audio: consente di selezionare una lingua per l'audio (se disponibile).
Sottotitoli: consente di selezionare una lingua per i sottotitoli (se
disponibile).
Menu disco: consente di selezionare una lingua per il menu del disco (se
disponibile).
Filtro famiglia
Alcuni DVD potrebbero avere un filtro famiglia per l'intero disco o per alcune
scene.TQuesta funzione consente di impostare un filtro di riproduzione per
livello.I livelli di classificazione vanno da 1 a 8 e dipendono dal Paese. È
possibile bloccare la riproduzione di certi dischi non adatti ai propri bambini
o bloccare determinate scene.
Default: consente il ripristino delle impostazioni di fabbrica.
Pagina di impostazione della password
Pagina di impostaz io ne d ella password
- - PASSWORD SETUP PAGE - -
PASSWORD MODE ON
PASSWORD
GOTO PASSWORD SETUP PAGE
Modalità passwor d: c onsente di attivare/dis at tivare la modalità (on/ off).
Se disattivata, l' un ità non richiede l'inse ri me nto della password per
modificare il live ll o del filtro famiglia.
ON
OFF
Pagina di impostazione della password
Password: selezi on are la pagina di modifica p as sword.
OLD PASSWORD
NEW PASSWORD
CONFIRM PWD
OK
PASSWORD ATTUALE: immettere la password attuale (password
predefinita: 1369). Il cursore si posta in automatico sulla casella
successiva.
.
NUOVA PASSWORD: immettere la nuova password. Il cursore si
posta in automatico sulla casella successiva.
CONFERMA PASSWORD: per confermare la nuova password
digitarla di nuovo. Se la password inserita non corrisponde alla
nuova password il cursore rimane sulla stessa casella. Una volta
immessa la password corretta il cursore si sposta sul pulsante OK.
OK: con il cursore su questo pulsante, premere il tasto ENTER per
confermare.
Nota: quando si modi fi ca la password si modific an o anche i
N
codici del filtro fa mi glia e del blocco disco.
La password predef in ita 1369 è sempre attiva, a nc he s e la
password è stata mod if icata.
10
Page 77

Specifiche
Specifiche batteria
Specifiche elettroniche
Voce
Ali me nt azione
Con su mo e nergeti co
Umidi tà i n funzion am ento
VID EO O UT
AUDIO O UT
Uscite
Audio
: CA 100-2 40 V, 50 /6 0 Hz
: <15 W
: Dal 5 % al 9 0%
:1.0 Vrms (1 K Hz , 0 dB)
:Speaker:
Requisiti standard
1WX2,Headphone s ou tput
Specifiche di sistema
Las er
Segna le
Ris po st a in
frequ en za
Rap porto s egnal e/rum ore
Int erval lo dina mico
Nota: design e speci fi che sono soggetti a modif ic he s enza preavviso.
N
:Se mi co nduttor e, l unghezz a d' on da 650 nm
: NTS C / PAL
: Da 20 H z a 20 k Hz (1dB)
:Pi ù di 8 0 dB ( solo usci te a nalogic he )
:Pi ù di 8 0 dB ( DVD/CD)
Specifiche batteria
Specifiche batte ri a:
Uscita: 7,4 V
Condizioni di co ns er vazione e di utilizzo:
1. Condizioni di con se rvazione Temperatura Umidità
6 mesi
1 settimana
2.Condizioni di ut il izzo Tempe ra tura Umidità
In caricamento
Durante l'uso
-20°C +45°C~
-20°C +65°C~
0°C +45°C~
-20°C +65°C~
65±20%
65±20%
65±20%
65±20%
11
Page 78

Assistenza
Assistenza
Per informazioni v is itare il sito web www.lenc o. co m.
For assistenza vis it are la pagina web
http://lencosu pp ort.zendesk.com.
Supporto tecnico L en co:
Germany 0900-1520530 (tariffa locale)
Paesi Bassi 0900- 23 55 3626 (tariffa locale + 1 cent/min)
Belgio 02-6 200115 (tariffa locale)
Francia 0170480005 (tariffa locale)
Il servizio è dispon ib ile dal lunedì al venerdì d al le 09:00 alle 18:00.
Quando si contatta L en co per ricevere assiste nz a so no sempre
richiesti il model lo e i l numero di serie del prodo tt o. Il numero di
serie si trova sul ret ro d el prodotto. Si consigl ia d i an notare le
seguenti informa zi oni:
Modello: DVP-938 X2
Numero di serie:__ __ _________________ __ __________
Lenco offre assistenza e gar an zia in conformità con le norm at ive
europee, ciò signi fi ca che in caso di riparazio ne ( durante o dopo la
scadenza del perio do d i garanzia) è necessari o ri volgersi al
rivenditore pres so i l quale si è acquistato il pr od otto.
Nota importante: n on è p ossibile inviare prod ot ti p er la
riparazione dire tt amente a Lenco.
Nota importante: i s er vizi di riparazione effettuati da c en tri di
assistenza non ufficiali r en dono nulla la garanzia.
Questa unità non è ada tt a a un uso professionale. L 'u ti lizzo
dell'unità per sco pi p rofessionali rende nu ll i gli obblighi di garanzi a
del produttore.
Nell’Unione Euro pe a questo simbolo indica i l di vieto di
smaltire apparec ch i elettronici e batteri e in si eme ai
normali rifiuti do me stici. Per assicurare i l co rr etto
trattamento dell ’u nità e delle batterie, sm al ti rli secondo
le norme locali rela ti ve allo smaltimento di ap pa recchi
elettrici e batter ie . In tal modo si aiuterà a cons er va re le
risorse naturali e a m ig liorare le norme di prote zi one
ambientale in mate ri a di trattamento e smalti me nt o dei
rifiuti elettric i (D irettiva WEEE relativ a ai r if iuti da
apparecchiatur e el ettriche ed elettroni ch e)
I prodotti contras se gnati dal marchio CE sono c on fo rmi
alla Direttiva Com pa tibilità Elettromag ne ti ca
(2004/108/CE) e al la D irettiva Bassa Tensione
(2006/95/CE) eme ss e dalla Commissione del la
Comunità Europea .
®Tutti i di ri tt i riservati.
12
 Loading...