

Page 1
ENGLISH
PORTABLE DVD PLAYER
OWNER`S MANUAL
SE
REVER
UP
DOWN
MODE
3
16:9 / 4:
R
E
Y
A
L
P
D
DV
0
2
E
98
-
BL
A
DV
RT
L
O
E
P
OD
M
EN
EN
OP
OP
ENTER
NU/PBC
ME
P
E
T
S
/
E
S
U
A
P
Y
A
L
P
S
I
D
F
F
FR
MODEL NO :DVP-70
L/R
REMOTE CONTROL
P/N
MODEL No.:RMC-220
MENU/PBC
DISPLAY
TITLE
MUTE
SUBTITLE
LANGUAGE
ANGLE
4
3
8
SETUP
2
7
1
6
5
0
ENTER
9
W
SLO
OM
ZO
TO
GO
RK
MA
EAT
REP
Please read this manual before operating
Page 2

Table of Contents
Table of Contents.........................................................................................................................................................................1
Safety Information.......................................................................................................................................................................2
Remote Control............................................................................................................................................................................3
Description
Using the Remote Control
Connecting Earphones to the DVD Player.....................................................................................................................................6
Connecting to an External Component ........................................................................................................................................7
Connecting to a TV.......................................................................................................................................................................8
Using the AC Adaptor...................................................................................................................................................................9
Using the Battery Pack...............................................................................................................................................................10
Cautions in Using Battery Pack
Playing a Disc.......................................................................................................................................................................12-16
Playing Picture CD.....................................................................................................................................................................17
Playing MP3 and Regular Audio CD
Setting Language for OSD, Menu, Voice, Subtitle
Setting Screen and Audio
Setting Parental Control, Password, Camera Angle
Adjusting LCD Screen
Troubleshooting
Specifications...........................................................................................................................................................................25
..................................................................................................................................................................................4
............................................................................................................................................................5
..................................................................................................................................................11
............................................................................................................................................18
.......................................................................................................................19
...........................................................................................................................................................20
....................................................................................................................21
................................................................................................................................................................22
...................................................................................................................................................................23-24
5
1
Page 3

Safety Information
Please read all of the safety and operating instructions before operating this Player, follow all warnings placed on the Player
and in the user's manual. These safety and operating instructions should be retained for future reference.
Safety Information
Do not expose the system to excessive moisture, rain, sand, or heat sources.
Place the DVD Player on a firm, flat surface.
Keep the DVD Player away from domestic heating equipment and direct sunlight.
When placing the DVD Player in a cabinet, allow about one inch of space all around the DVD Player for ventilation.
SAFETY WARNING
CLASS 1 LASER PRODUCT / KLASSE 1 LASER PRODUKT / LUOKAN 1 LASER LAITE / KLASS 1 LASER APPARAT / PRODUCTO
LASER CLASE.
INVISIBLE LASER RADIATION WHEN OPEN AND INTERLOCKS DEFEATED. AVOID EXPOSURE TO BEAM.
WARNING
1.To prevent fire or electrical shock, do not expose this Player to rain or moisture.
2.To avoid electrical shock, do not open the cabinet, no user-serviceable parts inside, refer servicing to qualified personnel only.
3.Certain countries may regulate the disposal of the battery used to power this product. Please consult with your local authority.
4.Listening with earphones for many hours at maximum volume may damage your hearing.
5.The Player should be connected to a power supply only of the type described in the operating instructions or as marked on the Player.
5
2
Page 4
Remote Control
Remote Control
MENU/PBC
12
MUTE
13
14
15
16
17
18
19
20
21
22
23
DISPLAY
ANGLE
1
5
9
SLOW
LANGUAGE
REMOTE CONTROL
MODEL No.:RMC-220
P/N
SUBTITLE
3
2
6 7 8
0
ENTER
L/R
TITLE
SETUP
ZOOMREPEAT MARK GOTO
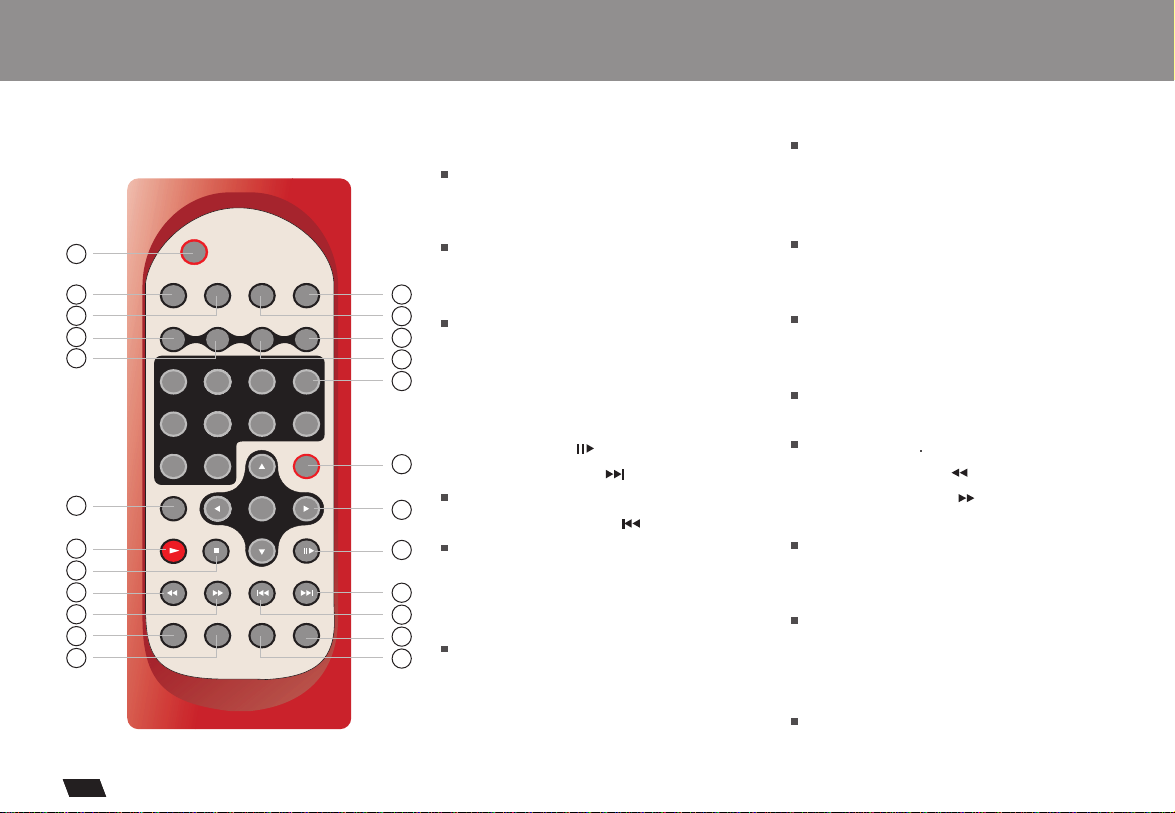
1.L/R Button
2.P/N Button
Selects PAL/NTSC TV systems.
3.TITLE Button
4.SUBTITLE Button
Selects the subtitle's language.
5.Number Buttons (0,1,...,9)
1
6.SETUP Button
2
Brings up the setup MENU
3
to set up the system's
4
language, audio, display,
4
5
password etc.
ENTER/DIRECTION Buttons
7.
8.PAUSE/STEP ( )Button
6
9.SKIP FORWARD ( )Button
Use to skip to next title, chapter or track.
7
10.SKIP BACKWARD ( ) Button
Use to skip to previous title,
8
chapter or track.
9
11.ZOOM Button
10
12.MENU/PBC Button
11
Brings up the disc menu.
24
13.DISPLAY Button
Displays the current disc playback
information.
14.MUTE Button
15.ANGLE Button
Use to access various
camera angles on a DVD.
16.LANGUAGE Button
Selects the voice language in a DVD.
17.SLOW Button
18.PLAY Button
Starts disc play.
19.STOP Button
Stops disc play
20.FAST REVERSE ( ) Button
21.FAST FORWARD ( ) Button
22.REPEAT Button
Allows you to repeat play
a title, chapter, track, or disc.
23.MARK Button
Use to mark a point where the playback
starts each time when the MARK button
is pressed later on.
24.GOTO Button
Use to enter the specific time to playback.
5
3
Page 5

Description
Front View
1
2
3
4
5
6
7
1.LCD
2. REVERSE DISPLAY
3.(16:9/4:3)/MODE/DOWN/UP
4.SPEAKER
5.DISC COVER
6.OPEN
7.PLAYBACK Buttons
PLAY( )
STOP( )
SKIP-FORWARD( )
SKIP-BACKWARD( )
Left View
Right View
8
9
REV
ERSE
16:9
/ 4:
3
MOD
E
DOWN
P
O
R
T
A
B
L
E
M
O
D
E
L
OPEN
OPEN
UP
D
V
D
P
LA
D
Y
V
E
R
9
8
2
0
MENU/PBC
ENTER
12V
D
I
S
DC IN
P
L
A
Y
P
A
U
S
E
/
ER
S
T
EP
POW
OFF
F
R
ON
F
F
PUT
INPUT OUT
O
VIDE
UT
IO O
AUD
N
IO I
AUD
SPDIF
LUME
VO
8. LCD on/off switch
9.MENU/PBC Button
10.ENTER Button
11.DIRECTION Button(UP/DOWN/
LEFT/ RIGHT)
12.DISPLAY Button
13.PAUSE/STEP( ) Button
14.FAST REVERSE( ) Button
15.FAST FORWARD( ) Button
10
12
13
14
15
11
1
2
1.OPEN
2.EARPHONE / SPEAKER VOLUME
3.EARPHONE JACK
4.DC IN 12V
5.POWER ON/OFF
O
O
P
P
E
E
N
N
UME
VOL
12V
DC IN
ER
FF
POW
O
ON
UT
UTP
INPUT O
O
VIDE
UT
IO O
AUD
IO IN
AUD
IF
SPD
6.INPUT / OUTPUT
7.VIDEO
8.AUDIO OUT
9.AUDIO IN
10.SPDIF
4
5
6
6
6
6
93
Bottom View
1
1
2
1.LED LIGHT
2.REMOTE CONTROL SENSOR
2
1.RELEASE LATCH (Battery pack
separation switch)
1.BATTERY PACK
5
4
Page 6
Using the Remote Control
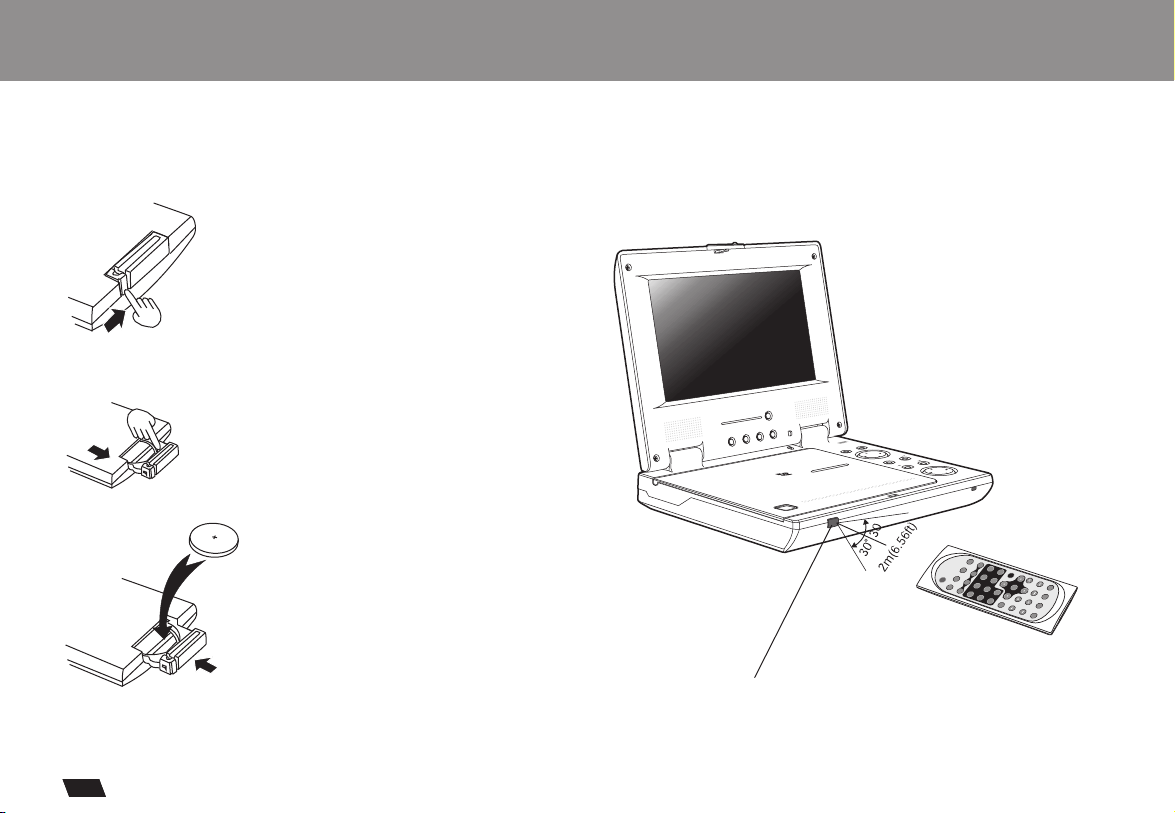
Installing the battery
1. Press the locking tab in the arrow direction.
(1)
(2)
2. Pull out the battery tray.
(3)
3. Insert a 3V lithium battery into the
tray with the polarity ( + ) facing up
as marked.
4. Replace the battery tray by pushing it
until it clicks into place.
(4)
Using the remote control
Point the remote control directly at the remote sensor
on the front of the DVD Player.
REVERSE
UP
DOWN
MODE
16:9 / 4:3
D
V
D
E
L
B
V
A
T
D
R
L
O
E
P
D
O
M
N
OPE
OPEN
Remote Control Sensor
ENTER
C
U/PB
MEN
R
E
Y
A
L
P
0
2
8
9
-
EP
ST
/
E
S
U
A
P
Y
LA
P
S
I
D
FF
R
F
L
/R
L
O
20
R
E
L
-2
IT
NT
T
O
RMC
.:
E C
o
T
/N
N
4
E
P
L
DE
EMO
TITL
O
R
B
M
U
C
S
E
/PB
T
U
E
3
U
N
E
M
AG
M
U
7
G
AN
Y
L
A
L
P
2
IS
E
L
D
G
6
N
A
0
1
5
9
W
LO
S
P
8
U
T
E
S
R
E
OOM
Z
ENT
O
T
GO
K
R
A
M
T
A
E
P
E
R
55
Page 7

Connecting Earphones to the DVD Player
You can attach an earphone with a stereo mini-jack plug to the phone jack ( ) for private listening. Its volume is adjustable
using the VOLUME control dial. You can also connect a second earphone to the AUDIO OUT jack, but its volume cannot be
adjusted.
Note: When the earphone is connected to the Phone Jack ( ), the speaker will be disconnected.
16:9 / 4:3
P
O
R
T
A
B
L
E
D
M
V
O
D
D
E
P
L
L
A
D
Y
V
OP
OP
EN
EN
E
R
9
8
2
0
REVERSE
MODE
DOWN
UP
ME
NU/PB
C
ENTE
D
I
S
P
L
AY
P
A
U
S
E
/
S
T
E
F
R
FF
AUDIO IN
SPDIF
VOLUME
R
P
AUDIO OUT
DC IN 12V
POWER
ON OFF
INPUT OUTPUT
VIDEO
Notes on DSP
The DSP decodes the digital audio signal into stereo dts or Dolby digital audio signal for speaker and earphone playback after
converting the signal to analog and amplifying it.
The 5.1 digital signal passes through without decoding and can be accessed by the SPDIF jack on the Player.
5
6
Page 8
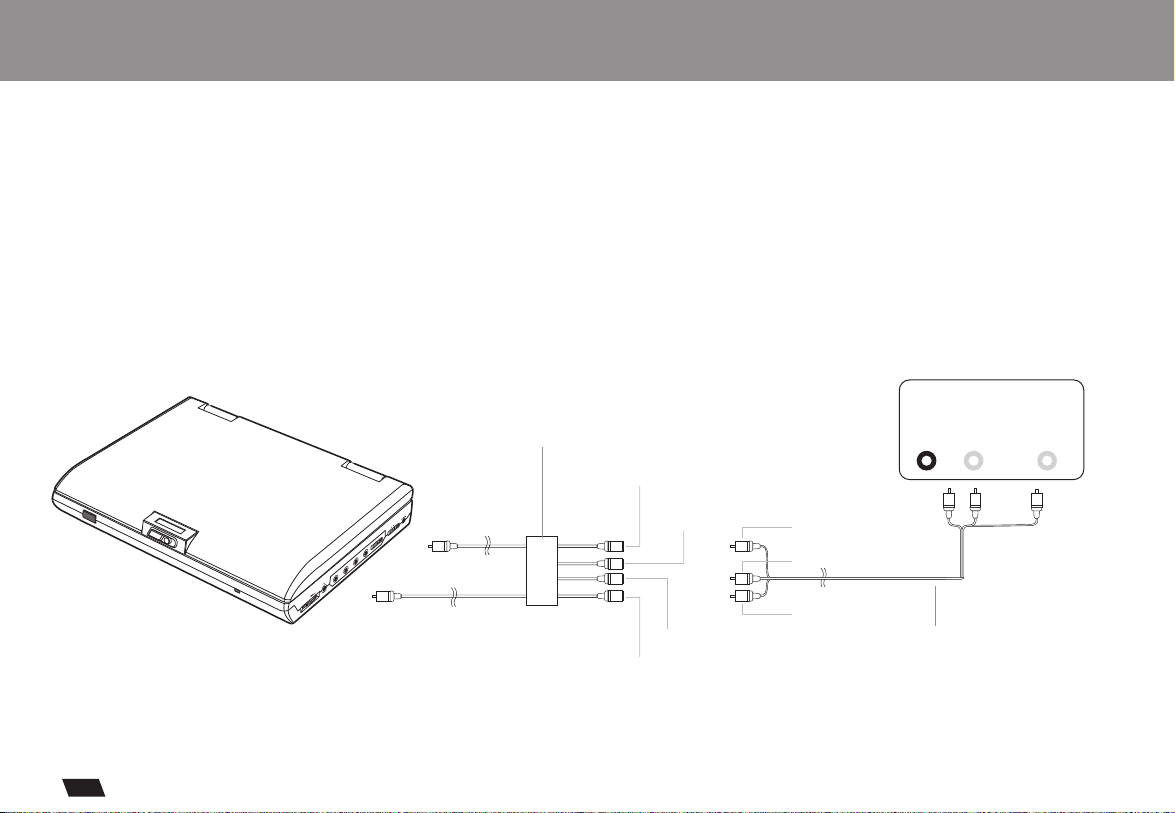
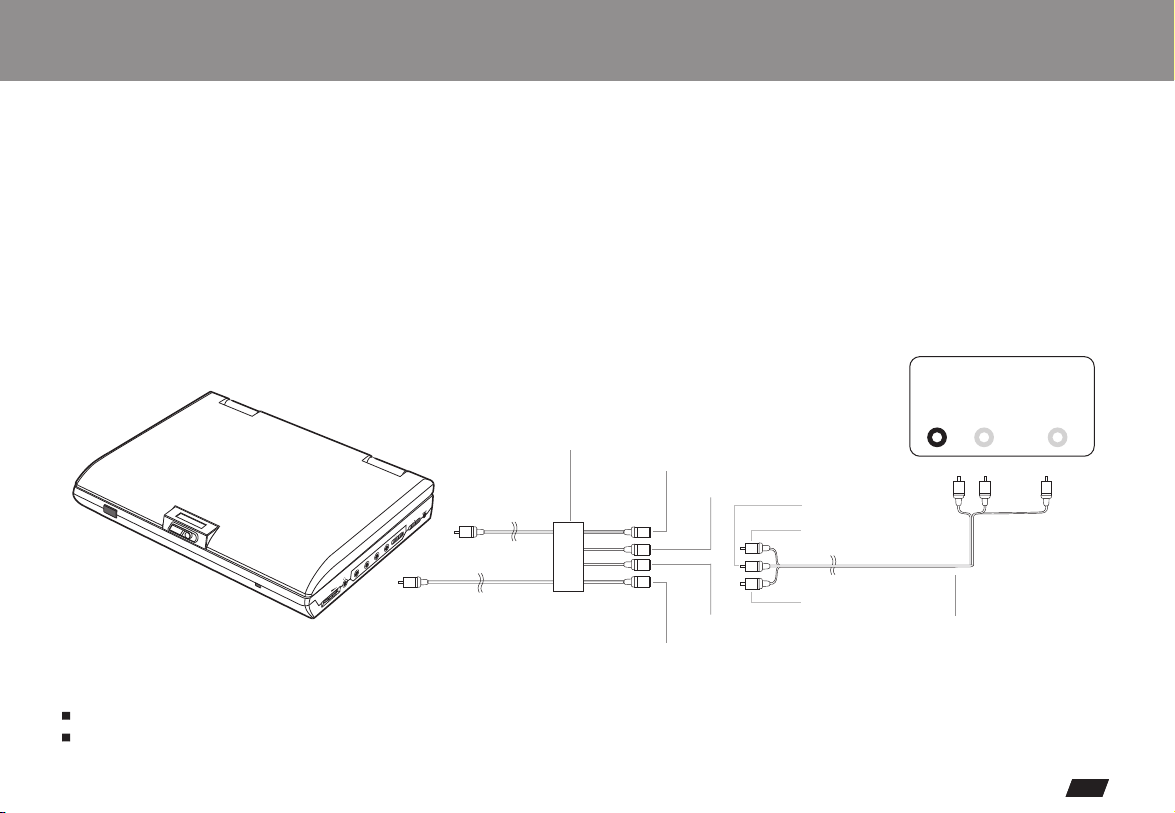
Connecting to an External Component
You can enjoy video from VCR or camcorder on your DVD player.
1. Turn off DVD player, VCR and other components.
2. Connect the audio and video cables as illustrated below.
3. Slide INPUT/OUTPUT to INPUT.
4. Turn on power.
VCR or other component equipped with external output connectors
AUDIO
AV adaptor cable (provided)
(Mini-jack to RCA)
OUT
Video in: Yellow
V
DC IN 12
OFF
Video(yellow)
POWER
O
O
P
P
E
E
N
N
ME
VOLU
ON
PUT
INPUT OUT
VIDEO
OUT
AUDIO
IN
AUDIO
SPDIF
Audio (black)
Video out: Green
Audio(left):White
Video out: Yellow
Audio(left):White
Audio(right):Red
AV CABLE (Not provided)
VIDEO
OUT
LR
Audio(right):Red
5
7
Page 9
Connecting to a TV
You can enjoy DVD quality video on TV screen.
1. Turn off DVD player and TV.
2. Connect the audio and video cables as illustrated below.
3. Slide INPUT/OUTPUT to OUTPUT.
4.Turn on DVD player and TV.
5. Select corresponding Video input which is connected to DVD player.
6. Press PLAY on DVD player.
Connect to a TV equipped with external connection jacks
AV adaptor cable (provided)
(Mini-jack to RCA)
Video in: Yellow
Video out: Green
V
Video(yellow)
DC IN 12
OFF
POWER
O
OP
P
E
E
N
N
ME
VOLU
VIDEO
AUDIO OUT
IN
AUDIO
SPDIF
Audio (black)
ON
OUTPUT
INPUT
Audio(left):White
Audio(right):Red
TIPS
If you wish to view video on your TV only, close the display panel of your DVD player.
With the display panel shut, use the remote to control DVD player.
Audio(left):White
Video in: Yellow
Audio(right):Red
AV CABLE (Not provided)
AUDIO
IN
VIDEO
IN
LR
5
8
Page 10

Using the AC Adaptor
This portable DVD player can be powered by AC through the supplied switching power AC adaptor. It can also use the
supplied battery pack to power.
When the AC adaptor is connected to the unit and powered, the unit will be automatically and electrically disconnected from the
battery pack and powered by the AC power.
AC adaptor
Power cord
DC IN 12V
FF
POWER
O
O
P
P
EN
E
N
E
VOLUM
Important !
Always turn off the DVD Player before connecting or disconnecting the AC cord.
. Using a different type of adaptor may cause malfunction or damage to the product.Only use the AC adaptor supplied with this player
When the AC adaptor is used for prolonged period of time, the adaptor may heat up,
This is normal and is not a cause for concern.
When not using the adaptor, unplug it from the outlet.
ON O
T
OUTPU
INPUT
VIDEO
UT
AUDIO O
AUDIO IN
SPDIF
To DC12V IN on the DVD player
To home power outlet
9
Page 11

Using the Battery Pack
Installing the battery pack
Align and insert the battery pack into the
corresponding slots on the back of the unit.
Removing the battery pack
Slide down the latch.
Charging the battery pack
1.Turn off the unit by sliding POWER ON/OFF to OFF.
Note: When the player is turned on, the battery will not be charged.
2.Attach the battery pack to the unit.
3.Connect one end of the AC cord to the jack on the AC adaptor.
4.Plug the other end of the AC cord into an AC outlet.
5.Connect the DC cord to the DC IN 12V jack on the DVD player.
Slide the battery pack to the left until it clicks into place.
Slide the battery pack to the right, and remove.
OPEN
1.The LED lights ( orange color ), and charging begins.
2.When battery is fully charged, the LED turns to red.
10
Page 12

Cautions in Using Battery Pack
Danger!
Strictly follow these safety information when using the battery pack. Otherwise, a short circuit, overheating, smoke, fire,
or damage to the product may result.
Never disassemble or modify the battery pack in any way. Do not touch the terminal of the battery pack with a metal object.
Do not place the battery pack in direct sunlight, dashboard of a vehicle, or high temperature place. It can cause explosion or fire.
Do not expose the battery pack to water, fire, or heat.
Always use the included AC adaptor when charging the battery pack.
This battery pack is designed exclusively for your portable DVD player. Do not use it with other devices.
Warning!
1. Do not drop or subject to strong vibration.
2. Keep out of reach of children.
3. The battery pack may leak fluid that is harmful to your eyes.
If this fluid gets in your eyes, wash eyes immediately with large amounts of running water and get medical attention immediately.
If the fluid gets on your skin or clothing, wash immediately with water.
Caution!
1. When not using the battery pack, remove it and store in a cool place.
2. Do not use the AC adaptor or battery pack for a prolonged period of time during recharging.
3. Keep the battery pack free from smoke, steam, moisture, and dust.
4. Using the battery pack under 0 C (32 F) or over 30 C(86 F) can cause reduced battery life.
11
x
Page 13

Playing a Disc
Preparation for Playback
1.Make sure the unit has the power either from the battery pack or the AC adaptor.
2.Loading a disc, following these steps:
Open the top cover by pushing the latch to the right and lift the top cover.
Press the OPEN button to open the disc lid.
Place a disc into the tray with the label side facing up.
Close the disc cover.
3.Slide INPUT/OUTPUT to OUTPUT (located on the side of the player).
4.Slide POWER to ON to turn on the power.
Play
Press to start play.
Stop
1.Press (on the remote) or STOP (on the player) to temporarily stop the playback, "PRESTOP" appears on the screen.
2.Press or STOP again to stop the playback.
Pause
1.During playback, press (on the remote) or PAUSE (on the player) to pause.
2.Press to resume playback.
Resume
When you press or STOP, the player remembers where you stopped, and when you press PLAY later, it will play from where you
stopped it. However, during which, if the disc is removed, the STOP ( ) button is pressed again or the player is turned off, the
RESUME function will be lost.
12
5
Page 14

Playing a Disc
Skip
You can skip chapters on DVD-Video, tracks on CDs, and Video CDs.
1.To skip forward, press during play or while paused; it skips to the next chapter or track. Each press increases the numbers of skips.
2.To skip to previous chapter or track, press twice. Pressing once will only move to the beginning of the current chapter or track.
Fast Forward and Reverse
1.During playback, to fast forward, repeatedly press to increase the fast forward speed 2x, 4x, 8x, 16x, 32x.
2.During playback, to fast rewind, repeatedly press to increase the fast reverse speed 2x ,4x ,8x ,16x, 32x.
3.To resume normal playback, press .
Slow Motion
1.During playback, repeatedly press SLOW to play at 1/2, 1/4, 1/8, 1/16, 1/32 speeds.
2.To resume normal playback, press .
You can only perform slow motion play in the forward direction.
Frame-by-Frame Playback
1.During playback, press or PAUSE to pause.
2.Repeatedly press or PAUSE to play one fame at a time.
3.To resume normal playback, press .
You can only perform step play in the forward direction.
Repeat Playback
You can play a chapter, a track, a title, a file or the entire disc repeatedly.
1.During playback, repeatedly press REPEAT to choose a Repeat option. Depending on the type of disc,the Repeat options may
be different.
2.To cancel repeat playback, repeatedly press REPEAT until OFF appears on the screen.
13
Page 15

Playing a Disc
Mark (Bookmark)
You can playback from a certain point using the MARK function.
1.During playback, press MARK to mark the point at which you want to start the playback.
2.At any time, when MARK is pressed again, it starts to playback from the marked point.
GOTO
GOTO lets you choose a specific elapsed playing time or a desired Chapter/Title/Track to begin playback.
1.Press GOTO, title, chapter or track information appears depending on the disc format.
2.Use key to change Chapter/Title/Track number, and to move between Chapter/Title/Track.
3.Press GOTO again, to enter the elapsed time.
4.Press PLAY to start playback.
5.If you want to play from a specific Chapter, Title or Track, you can skip Step 3.
GOTO function is not valid for MP3/JPEG file in CD-ROM format and Picture CD.
Some DVDs do not allow this function during specific Title/Chapter is playing.
Zoom
ZOOM lets you enlarge the video image during playback and pan through the enlarged image.
1.Press ZOOM repeatedly during video playback to enlarge the image to x 2 or x 4 times of the normal size.
2.Press ZOOM repeatedly while displaying JPEG file and Picture CD disc to zoom in the picture at 150% or 200%
and zoom out the picture at 25% or 50%.
Use direction keys ( and ) to move around (pan and scan) the enlarged video or picture.
14
5
Page 16

Playing a Disc
Mute
Press MUTE to silence the audio, press MUTE again to restore it.
Menu/PBC
During DVD playback, press MENU/PBC to return to the disc's Start Menu. If the disc does not have the Start Menu,
or discs that refuse MENU function, appears.
For VCD playback, press MENU/PBC to turn on/off PBC (Playback Control). If PBC is enabled, menu of scene's thumbnails appears,
you can make selection for playback.
Language
Repeatedly press LANGUAGE during DVD playback to change the language of the voice if the disc has multiple languages.
This function is only valid for DVDs.
Subtitle
Repeatedly press SUBTITLE during DVD playback to change the subtitle's language If the disc has multiple subtitle's languages.
This function is only valid for DVDs.
Angle
Repeatedly press ANGLE during DVD playback to change the camera angle if the disc has different camera angles.
This function is only valid for DVDs.
15
Page 17

Playing a Disc
Display
Press DISPLAY during DVD playback to display playback information such as current title, chapter, track, elapsed time etc.
Press DISPLAY again to show additional information such as audio channels, TV system, language etc.
Press DISPLAY again to remove information.
Audio Channel
When playing CD or VCD, repeatedly press L/R to change the sound output to Stereo, left/left, right/right.
Turn Off The Player
1.Press STOP twice to stop the playback, if the unit is playing.
2.Slide POWER ON/OFF to OFF to turn off the power.
16
5
Page 18

Playing Picture CD
Valid Picture CD
The player can play both Kodak Picture CD that you order from photo processing store, and home-made CD by burning JPEG files
onto a CD-R or CD-RW disc.
Play
In most cases, after the disc is placed into the player, the player will start to slide show automatically.
In other cases, the file manager appears. Use direction keys ( and ) to select the picture and press PLAY to play.
Slide Show Speed
During slide show, the displaying time of each picture can be changed by repeatedly pressing .
Available intervals are 2 sec, 4 sec, 8 sec and 10 .
Pause
1.During playback, press (on the remote) or PAUSE (on the player) to pause.
2.Press to resume playback.
Rotate
The picture can be rotated and flipped.
1.During playback, press or Pause to temporarily stop the playback.
2.Use direction keys ( and ) to rotate right 90 degrees, left 90 degrees, flip vertically and flip horizontally respectively.
Next/Previous
You can manually skip to the next picture by pressing , and to skip to the previous picture by pressing .
Transition Effect
There are 12 transition effects to move from one slide to another. To change transition effect, repeatedly press ANGLE.
1.Cover Up 2.Cover Down 3.Uncover Up 4.Uncover Down 5.Split Horizontal in 6.Split Horizontal out 7.Wipe Up
8.Wipe Down 9.Blinds Horizontal Up 10.Blinds Horizontal Down 11.Fade Trough Black 12.No Effect
5
17
Page 19

Playing MP3 and Regular Audio CD
Valid MP3 CD
Your MP3 files should be ISO 9660 or JOLIET format.
Play
In most cases, when a MP3 or audio disc is placed into the player, the first song file of the first folder plays.
In other cases, the file manager appears. Use direction keys ( and ) to select the song file and press PLAY to play.
18
5
Page 20

P/N
TITLE
DISPLAY
ANGLE
LANGUAGE
SUBTITLE
MUTE
L/R
1
2
3
4
5
6
7
8
SETUP
ENTER
SLOW
MENU/PBC
REMOTE CONTROL
MODEL No.:RMC-220
9
0
Setting Language for OSD,Menu, Voice, Subtitle
P/N
TITLE
DISPLAY
ANGLE
LANGUAGE
SUBTITLE
MUTE
L/R
1
2
3
4
5
6
7
8
SETUP
ENTER
SLOW
MENU/PBC
REMOTE CONTROL
MODEL No.:RMC-220
9
0
P/N
TITLE
DISPLAY
ANGLE
LANGUAGE
SUBTITLE
MUTE
L/R
1
2
3
4
5
6
7
8
SETUP
ENTER
SLOW
ZOOMREPEAT MARK GOTO
MENU/PBC
REMOTE CONTROL
MODEL No.:RMC-220
9
0
P/N
TITLE
DISPLAY
ANGLE
LANGUAGE
SUBTITLE
MUTE
L/R
1
2
3
4
5
6
7
8
SETUP
ENTER
SLOW
ZOOMREPEAT MARK GOTO
MENU/PBC
REMOTE CONTROL
MODEL No.:RMC-220
9
0
1. Press SETUP on the remote control.
2. Use the direction keys ( ) to select Language
Setup and its sub-menu.
3. Press ENTER or SETUP to confirm and exit.
REMOTE CONTROL
MODEL No.:RMC-220
:Move
MUTE
P/NDISPLAY
L/R
Changing OSD language
Press order:
( , )
Changing menu language
Press order:
( , )
5
19
1 2
3
4
:Select
B
A
C
B
A
C
SETUP: Quit
Language Setup
OSD
Menu
Audio
Subtitle
Language Setup
OSD
Menu
Audio
Subtitle
English
French
German
Italian
Spanish
Portuguese
English
Chinese
Japanese
French
German
Italian
Spanish
Portuguese
Changing voice language
B
A
C
Press order:
( , )
Changing subtitle language
B
A
C
5
7
6
8
Press order:
( , )
Language Setup
OSD
Menu
Audio
Subtitle
Language Setup
OSD
Menu
Audio
Subtitle
English
Chinese
Japanese
French
German
Italian
Spanish
Portuguese
Hindi
Thai
Russian
Korean
Other
English
Chinese
Japanese
French
German
Italian
Spanish
Portuguese
Hindi
Thai
Russian
Korean
Other
Off
Page 21

Setting Screen and Audio
P/N
TITLE
DISPLAY
ANGLE
LANGUAGE
SUBTITLE
MUTE
L/R
1
2
3
4
5
6
7
8
SETUP
ENTER
SLOW
ZOOMREPEAT MARK GOTO
MENU/PBC
REMOTE CONTROL
MODEL No.:RMC-220
9
0
P/N
TITLE
DISPLAY
ANGLE
LANGUAGE
SUBTITLE
MUTE
L/R
1
2
3
4
5
678
SETUP
ENTER
SLOW
ZOOMREPEAT MARK GOTO
MENU/PBC
REMOTE CONTROL
MODEL No.:RMC-220
9
0
P/N
TITLE
DISPLAY
ANGLE
LANGUAGE
SUBTITLE
MUTE
L/R
1
2
3
4
5
678
SETUP
ENTER
SLOW
ZOOMREPEAT MARK GOTO
MENU/PBC
REMOTE CONTROL
MODEL No.:RMC-220
9
0
P/N
TITLE
DISPLAY
ANGLE
LANGUAGE
SUBTITLE
MUTE
L/R
1
2
3
4
5
678
SETUP
ENTER
SLOW
ZOOMREPEAT MARK GOTO
MENU/PBC
REMOTE CONTROL
MODEL No.:RMC-220
9
0
P/N
TITLE
DISPLAY
ANGLE
LANGUAGE
SUBTITLE
MUTE
L/R
1
2
3
4
5
678
SETUP
ENTER
SLOW
ZOOMREPEAT MARK GOTO
MENU/PBC
REMOTE CONTROL
MODEL No.:RMC-220
9
0
P/N
TITLE
DISPLAY
ANGLE
LANGUAGE
SUBTITLE
MUTE
L/R
1
2
3
4
5
678
SETUP
ENTER
SLOW
ZOOMREPEAT MARK GOTO
MENU/PBC
REMOTE CONTROL
MODEL No.:RMC-220
9
0
1. Press SETUP on the remote control.
2. Use the direction keys ( ) to select Screen Setup
and its sub-menu.
3. Press ENTER or SETUP to confirm and exit.
Adjusting the Aspect Ratio
4:3 LB (Letter Box)
Displays the content of the DVD title in 16:9 aspect ratio.
The black bars will appear at the top and bottom of the screen.
4:3 PS( Pan Scan)
The left and right of the screen are cut off and displays the
central portion of the 16:9 screen.
Screen Setup
B
A
C
Press order:
( , )
Turning on/off screen saver
Press order:
( , )
B
A
C
TV Type
Screen Saver
TV System
Brightness
Contrast
Screen Setup
TV Type
Screen Saver
TV System
Brightness
Contrast
4:3 PS
4:3 LB
16:9
On
Off
5
7
6
3
6 7 8
3
7
6
3
6 7 8
8
4
4
8
4
Selecting TV system
Press order:
( , )
1 2
5
Adjusting screen brightness
Press order:
( , )
1 2
Adjusting screen contrast
5
Press order:
1 2
( , )
5
Adjusting Audio
Press order:
(SETUP , , , )
B
A
C
B
A
C
B
A
C
B
A
C
Screen Setup
TV Type
Screen Saver
TV System
Brightness
Contrast
Screen Setup
TV Type
Screen Saver
TV System
Brightness
Contrast
Screen Setup
TV Type
Screen Saver
TV System
Brightness
Contrast
Audio Setup
Digital Out
NTSC
PAL
Auto
Normal
Bright
Soft
-3
-2
-1
0
+1
+2
+3
SPDIF/PCM
SPDIF/RAW
Off
20
5
Page 22

Setting Parental Control, Password, Camera Angle
P/N
TITLE
DISPLAY
ANGLE
LANGUAGE
SUBTITLE
MUTE
L/R
1
2
3
4
5
6 7 8
SETUP
ENTER
SLOW
ZOOMREPEAT MARK GOTO
MENU/PBC
REMOTE CONTROL
MODEL No.:RMC-220
9
0
P/N
TITLE
DISPLAY
ANGLE
LANGUAGE
SUBTITLE
MUTE
L/R
1
2
3
4
5
6 7 8
SETUP
ENTER
SLOW
ZOOMREPEAT MARK GOTO
MENU/PBC
REMOTE CONTROL
MODEL No.:RMC-220
9
0
P/N
TITLE
DISPLAY
ANGLE
LANGUAGE
SUBTITLE
MUTE
L/R
1
2
3
4
5
6 7 8
SETUP
ENTER
SLOW
ZOOMREPEAT MARK GOTO
MENU/PBC
REMOTE CONTROL
MODEL No.:RMC-220
9
0
P/N
TITLE
DISPLAY
ANGLE
LANGUAGE
SUBTITLE
MUTE
L/R
1
2
3
4
5
6 7 8
SETUP
ENTER
SLOW
ZOOMREPEAT MARK GOTO
MENU/PBC
REMOTE CONTROL
MODEL No.:RMC-220
9
0
1. Press SETUP on the remote control.
2. Use the direction keys ( ) to select Custom Setup
and its sub-menu.
3. Press ENTER or SETUP to confirm and exit.
Setting parental control
Press order:
(SETUP , , )
1 2
5
3
4
Custom Setup
B
A
C
Parental Ctrl
Password
Angle Mark
Default
Changing password
1. Use direction keys ( ) to select Password and
press ENTER to confirm.
2. Key in your old password ( 8888 if this is the first use).
press ENTER to confirm.
3. Key in new password and again to verify.
Press order:
( , )
1 2
5
3
4
7
8
B
A
C
Custom Setup
Parental Ctrl
Password
Angle Mark
Old:
Default
New:
Verify:
4: PG 13
5: PGR
6: R
7: NC17
8: ADULT
Turning on/off camera angle
5
Custom Setup
B
A
Press order:
( , )
C
Parental Ctrl
Password
Angle Mark
Default
On
Off
When ON is selected, the player will display multi-angle mark
on the screen if the disc has multi-angle shot.
3
1 2
Returning to default setting
5
Press order:
( , )
4
7
6
8
Custom Setup
B
A
C
Parental Ctrl
Password
Angle Mark
Default
Read
All settings will revert to the original factory settings when
Read is selected.
21
5
Page 23

Adjusting LCD Screen
Following these steps to adjust the LCD quality during playback or while paused,
1.Repeatedly press MODE on the screen panel to select the parameters listed in the menu.
You can change BRIGHTNESS, CONTRAST, SHARPNESS, COLOR and TINT.
2.Repeatedly press (or hold down) UP and DOWN to change the setting of the parameter selected.
3.To reset the setting to its defaulted value, select RESET by repeatedly pressing MODE then press UP or DOWN to confirm.
Note: If no key is pressed in 9 seconds, the Menu disappears.
DOWN
MODE
16:9 / 4:3
16:9 / 4:3
DOWN
MODE UP
REVERSE
REVERSE
UP
22
5
Page 24

Troubleshooting
If your DVD player dose not seem to be functioning properly, check the items below before you contact a service center.
Symptom
Power does not turn on
or suddenly turns off
Battery pack is in place but
the power does not turn on
or suddenly turns off
Remote control does not work
Disc does not play
No picture
No picture and sound
No sound
Check
Make sure the AC Power cord is securely plugged into an AC outlet.
Turn the power off and then back on.
Check that the battery pack is charged. If not, recharge it.
Check that the battery is inserted in the "+" and "-" directions properly.
The batteries may be dead. Replace them with new batteries.
Check that the signal transmission is directed at the remote control sensor on the DVD player.
Check that the disc is a DVD, DVD-RW, VIDEO CD, or AUDIO CD.
Do not use a disc that has scratches or dirt.
Check that the label-side of the disc is facing up.
The pick-up lens of the DVD player may be dirty. Contact the service center for lens cleaning.
Check if the LCD on/off switch is stuck, and cannot move freely when the top cover is open.
Check INPUT/OUTPUT is switched to OUTPUT not INPUT.
With power turned on, slide INPUT/OUTPUT once.
Check the volume setting. If set to zero, turn up volume level.
Check that the headphones are plugged into the PHONES and Audio jack. Speakers
cannot be used with the headphones.
23
5
Page 25

Troubleshooting
Symptom
While in the input mode, no picture is
output from the external component
to the DVD player
Battery pack won't charge
Charging LED indicator does not light Check with another fully charged pack if the LED lights.
LED charging indicator
quickly turns to Green
Check that the video or audio cable is securely connected.
Check that the DVD player is in the INPUT mode and in the DVD mode.
Check that the DVD player is turned off.
You cannot charge the battery pack with the player turned on.
A hot battery pack may take longer to charge.
Wait until the battery pack is sufficiently cooled down.
Check that the AC adaptor is securely plugged in.
If DVD or battery pack is overheated, you will not be able to charge the battery pack.
Disconnect the AC adaptor and reconnect.
Use another battery pack, if the same symptom occurs, the AC adaptor may be defective.
If the second battery pack charges without any problem, your first battery pack may be
defective.
Check
24
5
Page 26

Specifications
General
Readable
Disc
Video
Output
Audio
Power Requirements
Power Consumption
Weight
Dimensions
Operating Temperature Range
DVD, DVD-R, DVD+R, DVD-RW,
VCD, SVCD, MP3 CD, CD-DA, Photo CD.
Composite Video
2 Channel
Output
Frequency Response
S/N Ratio
Dynamic Range
Battery Specifications
ITEM
Nominal Voltage
Capacity
Charge Voltage
Max Charge Current
Use Time
Charge time in Full
4A
2.5HR
4.5HR
SPECIFICATION
7.2V
Minimum 4200 mAh
+
8.400 0.05V
-
Input AC 100V~240V, 50/60 Hz, Output DC 12V
>
15 W
913.5g (without battery pack)
206mm ( W ) x 158.5mm ( D ) x 39.7mm ( H )
+10 C~ +40 C
1 channel : 1.0 Vp-p (75 load)
L(1/L), R(2/R)
(20Hz - 20 kHz) 1
>
85 dB
>
80 dB
+
-
Operating environment
Charge 0 C~ +45 C
Discharge -20 C~ +60 C
Store less than 1 month -20 C~ +60 C
Store less than 3 months -20 C~ +45 C
Store less than 1 year -20 C~ +25 C
The specifications are subject to change without notice.
Weight and dimensions are approximate.
25
5
Page 27

 Loading...