

Page 1
Model No. : DAR-070
User Manual Music center with DAB+/ FM radio, Bluetooth, CD MP3 and USB
Gebruikshandleiding Muziekcentrum met DAB+/FM-radio, Bluetooth, CD, MP3 en
USB
Benutzerhandbuch Musikanlage mit DAB+-/UKW-Radio, Bluetooth, CD-MP3 und
USB
Guide d'utilisation Chaîne stéréo avec radio DAB+/FM, Bluetooth, CD MP3 et USB
Manual de usuario Centro de música con radio FM/DAB+, Bluetooth, CD MP3 y USB
Page 2

Index:
English ............................................................................................................................................................. 1
Nederlands .................................................................................................................................................... 26
Deutsch ......................................................................................................................................................... 51
Français ....................................................................................................................................................... 778
Español ........................................................................................................................................................ 102
Version: 1.0
Page 3

English
DAR-070
Safety Warnings
CAUTION:
Usage of controls or adjustments or performance of procedures other than those specified herein
may result in hazardous radiation exposure.
This unit should not be adjusted or repaired by anyone except qualified service personnel.
PRECAUTIONS BEFORE USE
KEEP THESE INSTRUCTIONS IN MIND:
1. Do not use this device near water.
2. Clean only with a slightly damp cloth.
3. Do not cover or block any ventilation openings. When placing the device on a shelf, leave 5 cm
(2”) free space around the whole device.
4. Install in accordance with the supplied user manual.
5. * Don’t step on or pinch the power adaptor. Be very careful, particularly near the plugs and the
cable’s exit point. Do not place heavy items on the power adaptor, which may damage it. Keep
the entire device out of children’s reach! When playing with the power cable, they can seriously
injure themselves.
6. * Unplug this device during lightning storms or when unused for a long period.
7. Keep the device away from heat sources such as radiators, heaters, stoves, candles and other
heat-generating products or naked flame.
8. Avoid using the device near strong magnetic fields.
9. Electrostatic discharge can disturb normal usage of this device. If so, simply reset and restart
the device following the instruction manual. During file transmission, please handle with care
and operate in a static-free environment.
10. Warning! Never insert an object into the product through the vents or openings. High voltage
flows through the product and inserting an object can cause electric shock and/or short circuit
internal parts. For the same reason, do not spill water or liquid on the product.
11. Do not use in wet or moist areas such as bathrooms, steamy kitchens or near swimming pools.
12. Do not use this device when condensation may occur.
13. Although this device is manufactured with the utmost care and checked several times before
leaving the factory, it is still possible that problems may occur, as with all electrical appliances.
If you notice smoke, an excessive build-up of heat or any other unexpected phenomena, you
should disconnect the plug from the main power socket immediately.
14. This device must operate on a power source as specified on the specification label. If you are
not sure of the type of power supply used in your home, consult your dealer or local power
company.
15. * The socket outlet must be installed near the equipment and must be easily accessible.
16. * Do not overload ac outlets or extension cords. Overloading can cause fire or electric shock.
17. * Devices with class 1 construction should be connected to a main socket outlet with a
protective earthed connection.
18. * Devices with class 2 construction do not require a earthed connection.
19. Keep away from rodents. Rodents enjoy biting on power cords.
20. * Always hold the plug when pulling it out of the main supply socket. Do not pull the power
cord. This can cause a short circuit.
21. Avoid placing the device on any surfaces that may be subject to vibrations or shocks.
22. To clean the device, use a soft dry cloth. Do not use solvents or petrol based fluids. To remove
severe stains, you may use a damp cloth with dilute detergent.
23. The supplier is not responsible for damage or lost data caused by malfunction, misuse,
modification of the device or battery replacement.
24. Do not interrupt the connection when the device is formatting or transferring files. Otherwise,
data may be corrupted or lost.
1
Page 4

25. If the unit has USB playback function, the usb memory stick should be plugged into the unit
directly. Don’t use an usb extension cable because it can cause interference resulting in failing
of data.
26. The apparatus shall not be exposed to dripping or splashing and make sure that no objects filled
with liquids, such as vases, are placed on or near the apparatus.
27. * To completely disconnect the power input, the mains plug of the apparatus shall be
disconnected from the mains, as the disconnect device is the mains plug of apparatus.
28. If the unit works with battery, Battery shall not be exposed to excessive heat such as sunshine,
fire or the like.
29. Attention should be drawn to the environmental aspects of battery disposal.
30. The apparatus can only be used in moderate extremely cold or climates warm environments
should be avoided.
31. The rating label has been marked on the bottom or back panel of the apparatus.
32. This device is not intended for use by people (including children) with physical, sensory or
mental disabilities, or a lack of experience and knowledge, unless they’re under supervision or
have received instructions about the correct use of the device by the person who is responsible
for their safety.
33. This product is intended for non professional use only and not for commercial or industrial use.
34. Make sure the unit is adjusted to a stable position. Damage caused by using this product in an
unstable position or by failure to follow any other warning or precaution contained within this
user manual will not be covered by warranty.
35. Never remove the casing of this apparatus.
36. Never place this apparatus on other electrical equipment.
37. Do not use or store this product in a place where it is subject to direct sunlight, heat, excessive
dust or vibration.
38. Do not allow children access to plastic bags.
39. Only use attachments/accessories specified by the manufacturer.
40. Refer all servicing to qualified service personnel. Servicing is required when the apparatus has
been damaged in any way, such as the power supply cord or the plug, when liquid has been
spilled or objects have fallen into the apparatus, when the apparatus has been exposed to rain
or moisture, does not operate normally, or has been dropped.
41. *Do not use a damaged power cord or plug or a loose outlet. Doing so may result in fire or
electric shock.
42. Prolonged exposure to loud sounds from personal music players may lead to temporary or
permanent hearing loss.
INSTALLATION
• Unpack all parts and remove protective material.
• *Do not connect the unit to the mains before checking the mains voltage and before all other
connections have been made.
*Those instruction are related only to products using power cable or AC power adaptor.
2
Page 5
Thank you for purchasing the DAR-070.
We recommend that you spend some time reading this instruction manual in order that you fully
understand all the operational features it offers. You will also find trouble shooting to help you
resolve any issues.
Read all the safety instructions carefully before use and keep this instruction manual for future
reference.
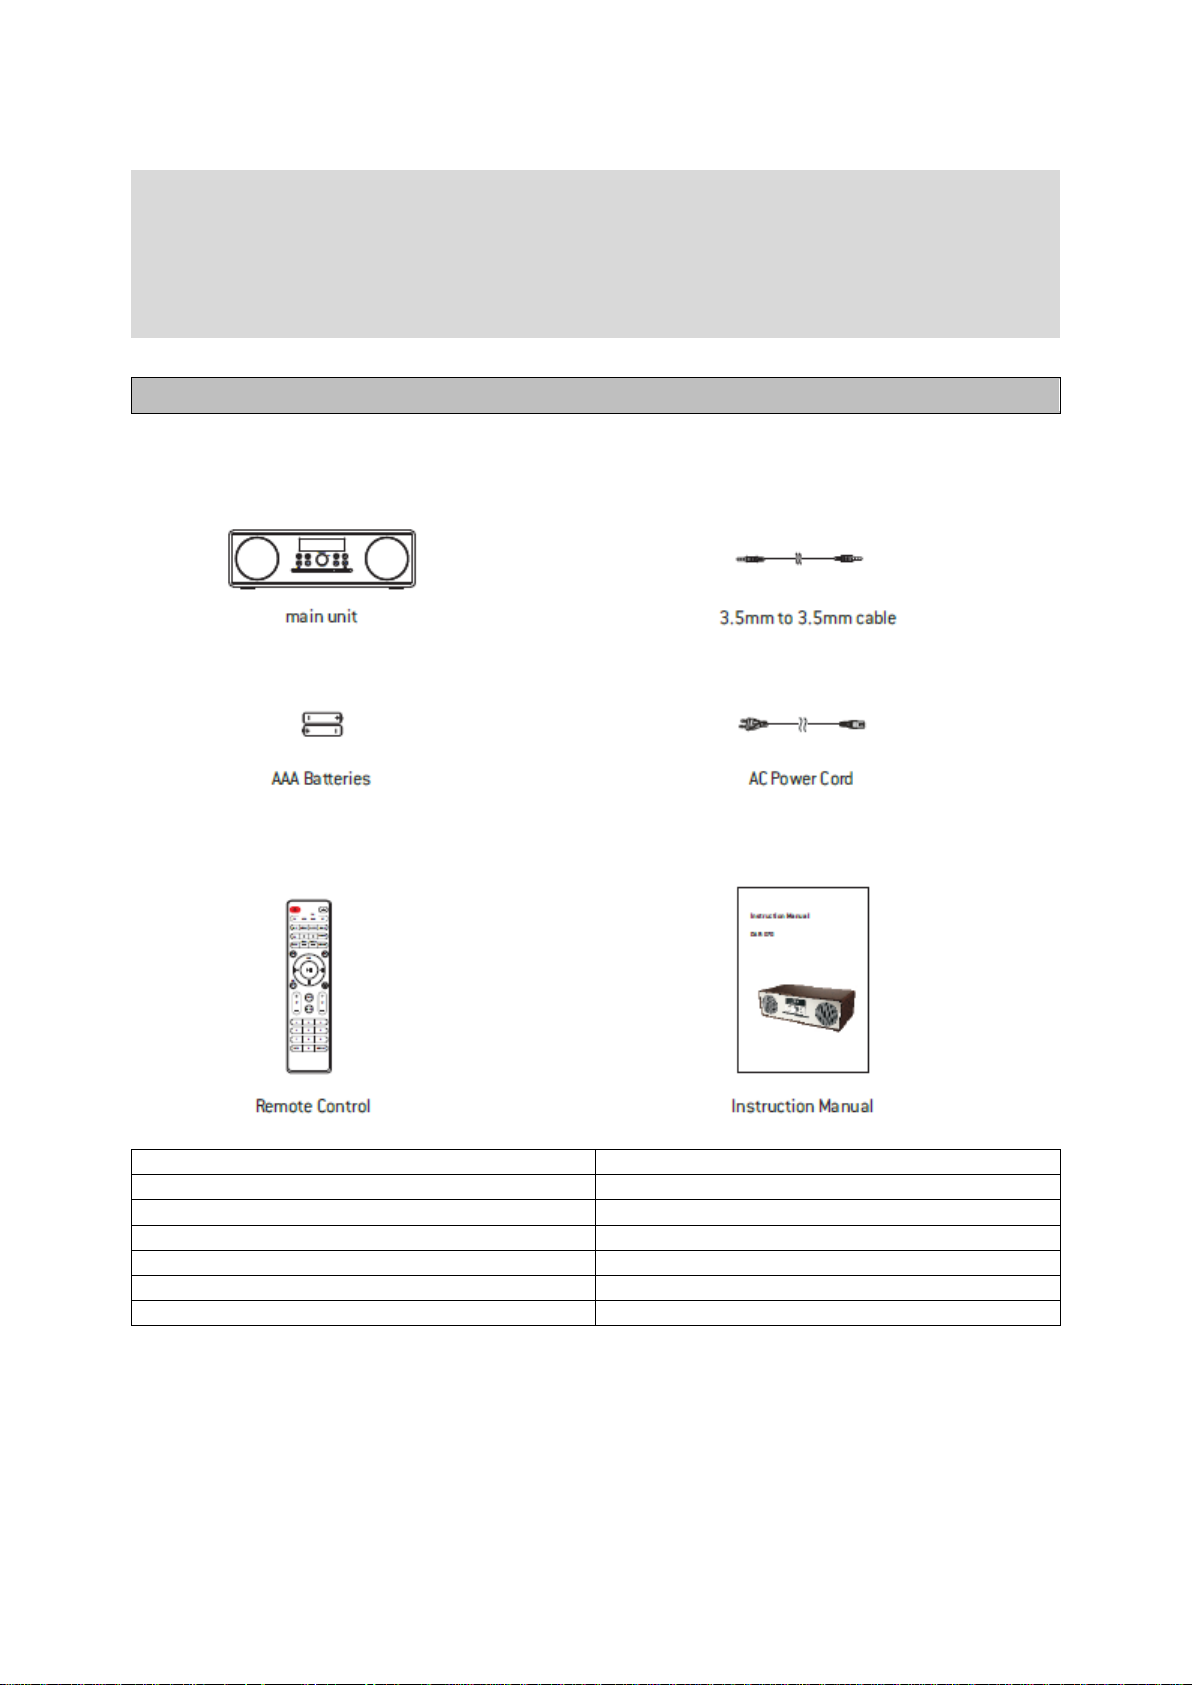
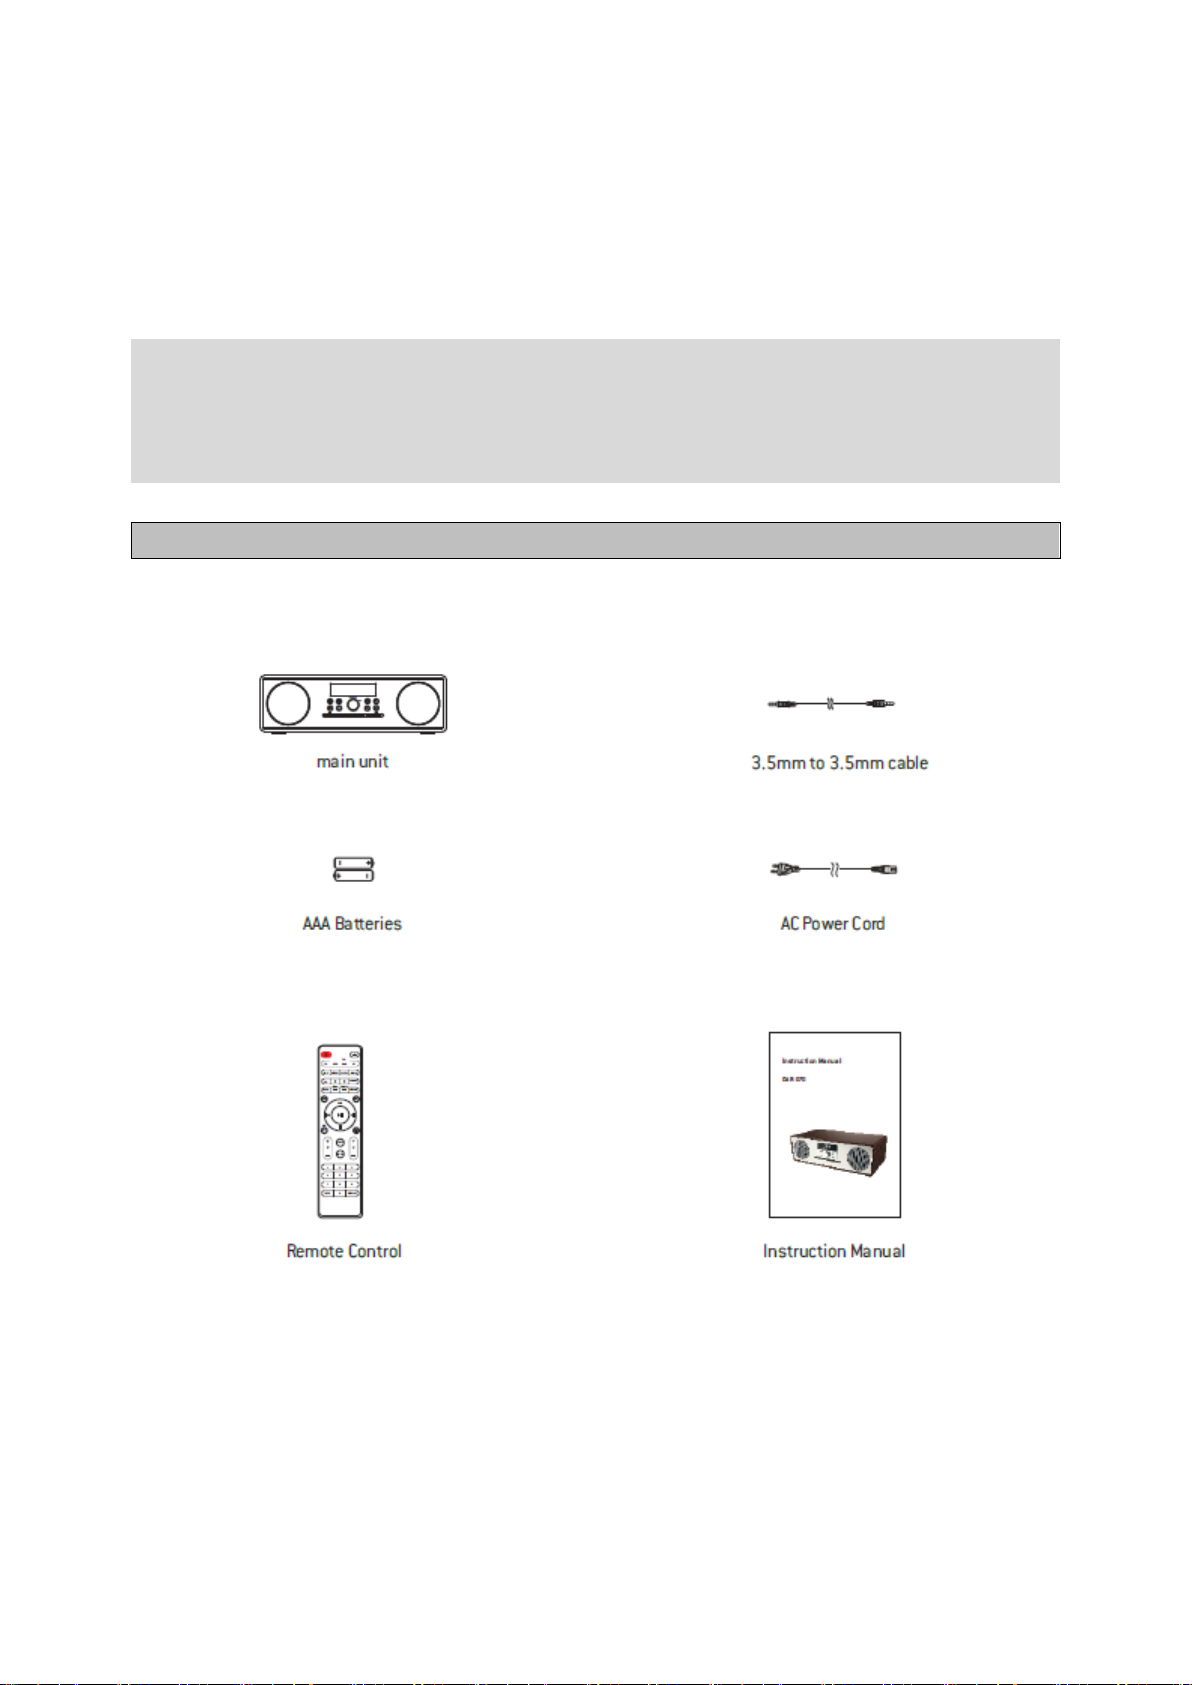
Unpacking
EN
EN
main unit
main unit
AAA Batteries
AAA Batteries
Remote Control
Remote Control
3.5mm to 3.5mm cable
3.5mm to 3.5mm cable
AC Power Cord
AC Power Cord
Instruction Manual
Instruction Manual
Remove all packaging from the unit. Retain the packaging If you dispose of it please do so
according to local regulations.
The following items are included:
3
Page 6
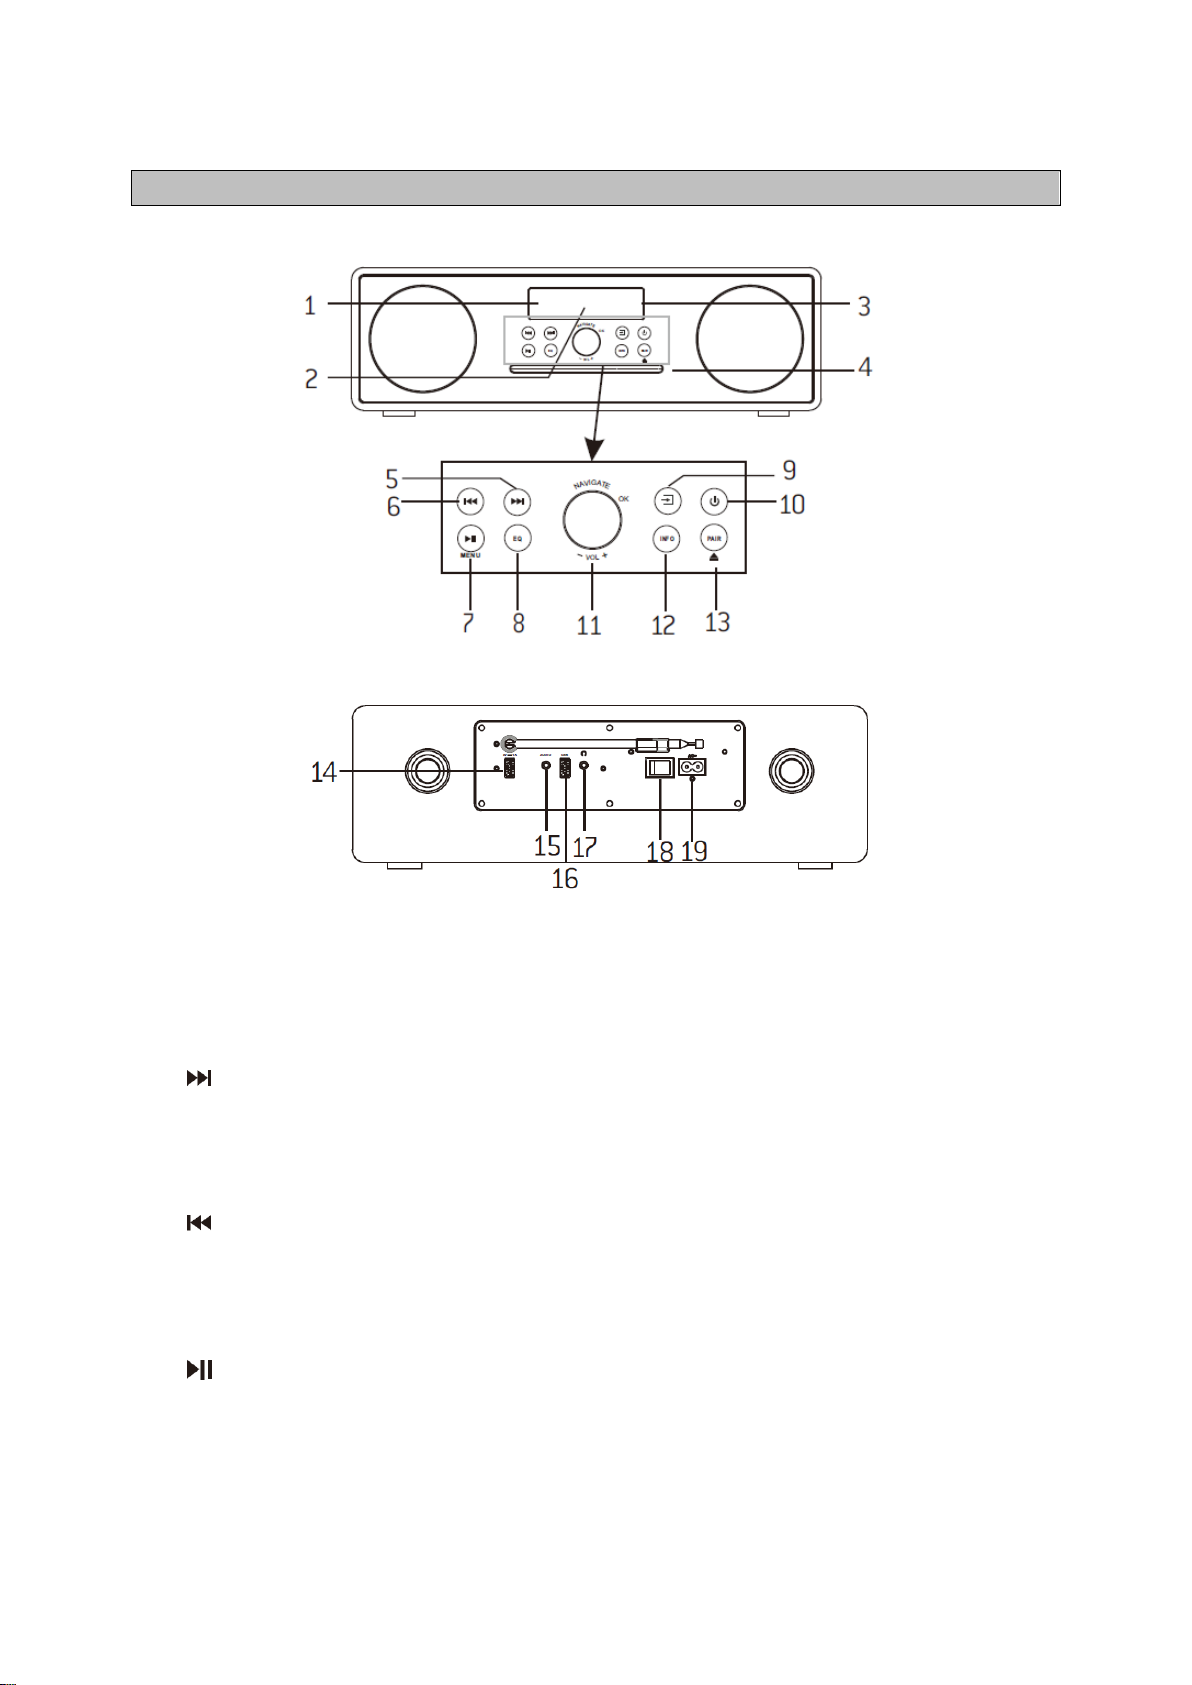
Product Overview
Front View
Rear View
1. Remote Sensor
2. Display
3. Standby indicator
4. Disc Door
5.
• Press to select next track in USB and CD.
• Press and hold to display channel list in DABand FM.
• Press to display preset channel list in DABand FM.
6.
• Press to select previous track in USB and CD.
• Press and hold to display channel list in DABand FM.
• Press to display preset channel list in DABand FM.
7.
• Press to play and pause in CD, USB and BT.
MENU
• Press to display the menu in DAB and FM.
4
Page 7

8. EQ
• Press to select sound characteristics:CLASS/POP/ROCK/JAZZ/NORMAL.
9.
• Press to change source after power on.
10.
• Press for power on and power off.
11. NAVIGATE
• Rotate to move down or move up on themenu screen in DAB and FM.
OK
• Press to select or skip to subsequent menuin DAB and FM.
VOL+/VOL-
• Rotate to increase and decrease the volumelevel.
12. INFO
• Press to on/off the ID3 information in CD andUSB.
• Press to view information in DAB and FM.
13. PAIR
• Pres and hold to activate the pairingfunction in BT and/or disconnect theexisting paired BT
device.
• Press to put disc in/out in CD.
14. 5V 1A output
• Connect to recharge for mobile device.
15. AUDIO input
16. USB
• Connect to a USB device for music playback.
17. Earphone
18. Power switch
19. AC input
5
Page 8
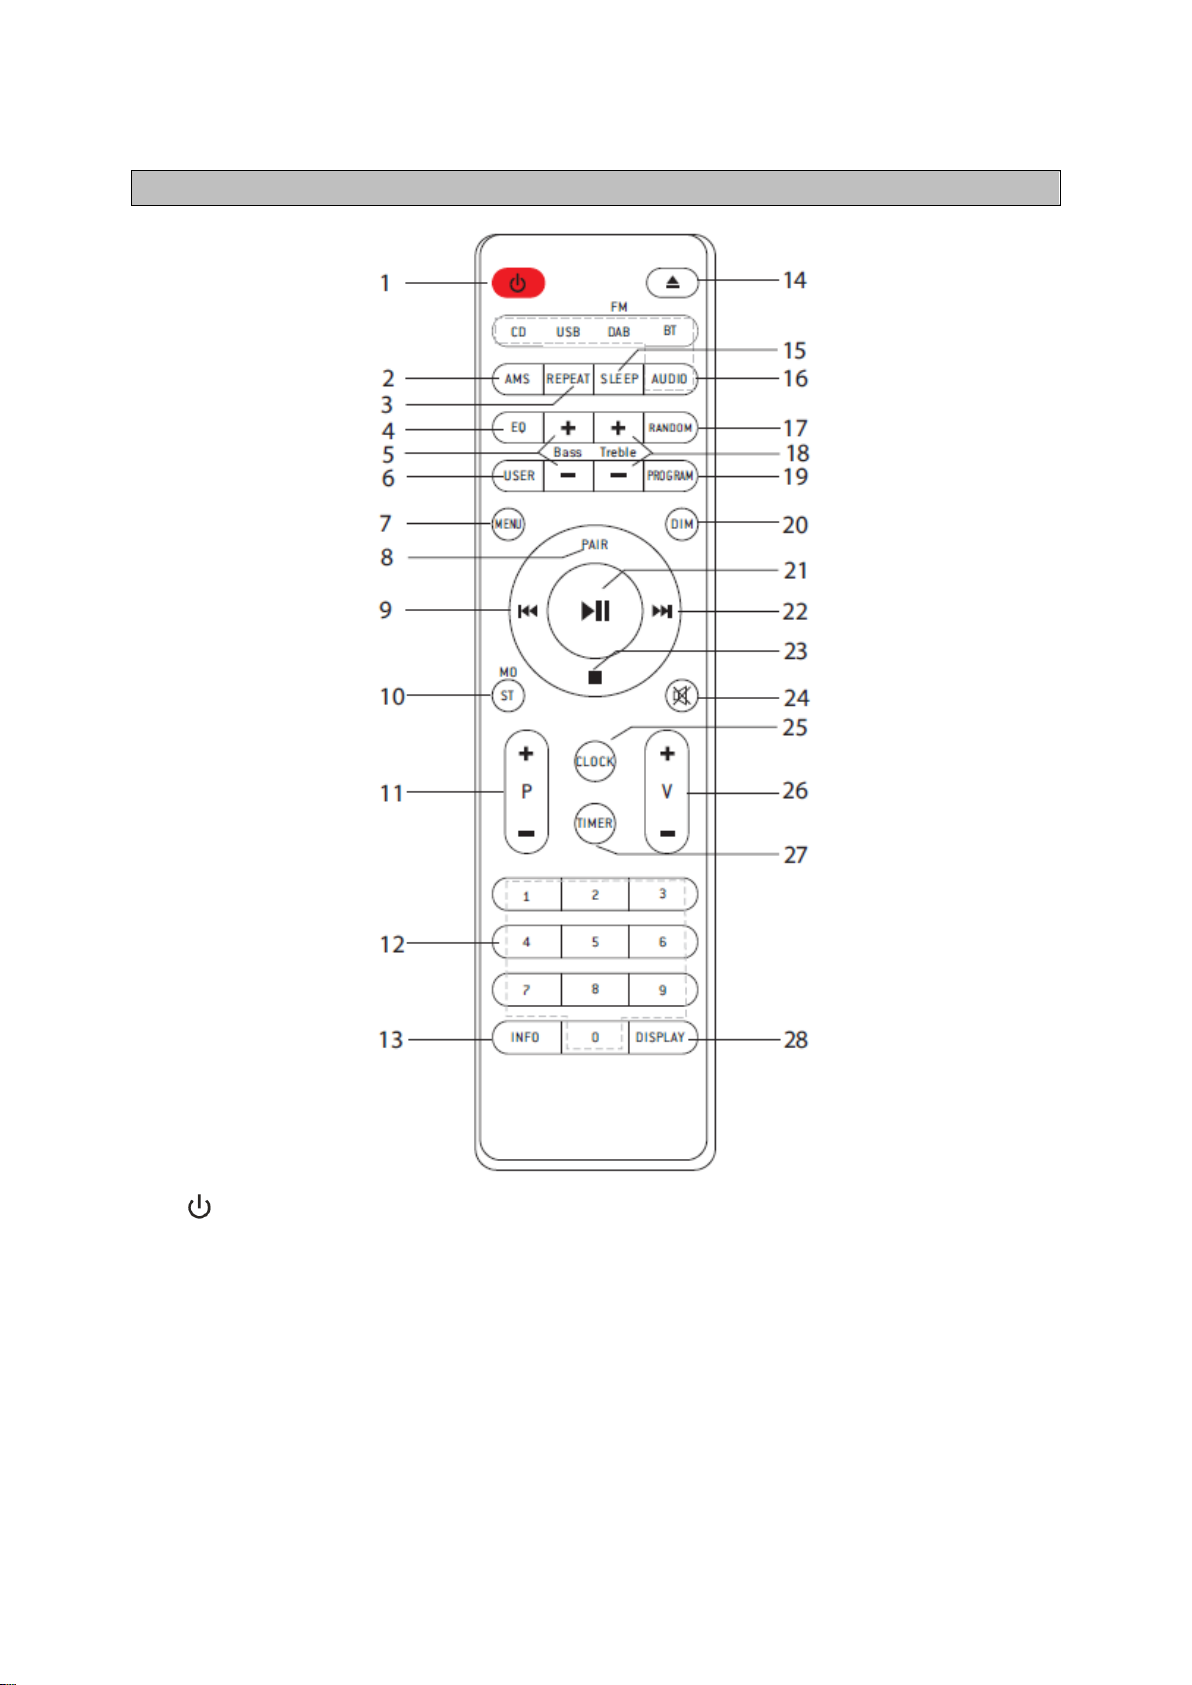
Remote Control
1.
• Switch the unit between ON and STANDBYmodes.
2. AMS
• Press to automatically search for channel inFM, when in searching, press again can stop it.
3. REPEAT
• Press to select a repeat playback mode in CDand USB.
4. EQ
• Press to select sound characteristics:CLASS/POP/ROCK/JAZZ/NORMAL.
5. BASS+/-
6
Page 9

• Press to adjust the BASS in USER mode.
6. USER
• Press to allow you to adjust the Bass and Treble.
7. MENU
• Press to display the menu in DAB and FM.
8. PAIR
• Press and hold to activate the pairing functionin BT and/or disconnect the existing paired
BTdevice.
9.
• Press and hold for fast backward in CD and USB;
• Press to select the previous track in CD and USB;
• Press to display channel list in DAB;
• Press to move up on the menu screen in DABand FM;
• Press for fine tuning in FM.
10. MO/ST
• Press to set stereo or mono sound mode.
11. P+/-
• Press to skip to the beginning of a current/previous/subsequent album;
• Press to select previous/next preset track inDAB and FM;
• Press and hold for manual tuning in FM.
12. 0-9 Numeric.
13. INFO
• Press to on/off the ID3 information in CD andUSB;
• Press to view information in DAB and FM.
14.
• Press to put disc in/out in CD.
15. SLEEP
• Press to set sleep timer.
16. CD/USB/DAB/FM/BT/AUDIO
• Press to select the corresponding AUDIOSOURCE.(CD/USB/DAB/FM/BT/AUDIO)
17. RANDOM
• Press to play tracks randomly in CD and USB.
18. TREBLE +/-
• Press to adjust the TREBLE in USER mode.
19. PROGRAM
• Press to programme in CD, USB, DAB and FM.
20. DIM
7
Page 10

• Press to select different levels of brightness forthe display screen.
21.
• Press to play/pause in BT, CD and USB;
• To select or skip to subsequent menu in DABand FM.
22.
• Press and hold for fast forward in CD andUSB;
• Press to select the next track in CD and USB;
• Press to display channel list in DAB;
• Press to move down on the menu screen inDAB and FM;
• Press for fine tuning in FM.
23.
• Press to stop playing in CD and USB.
24.
• Press to mute or resume the sound.
25. CLOCK
• Press and hold to set clock.(working instandby mode only)
26. V+/-
• Press to increase/decrease the volumelevel.
27. TIMER(working in standby mode only)
• Press to turn on/off the timer function;
• Press and hold for timer setting.
28. DISPLAY
• Press to display the date in power on mode.
8
Page 11

Operating Your Remote Control
1. Press and slide the back cover to open the battery
Remote Control Operation Range
• Make sure that there is no obstacle between the remotesensor of
the unit and remote control. If you install the unit ona TV stand,
etc., the remote control range may decreasedepending on the
thickness or colour of the glass of the TVstand.
• Do not expose the infrared remote sensor to direct sunlight orother
strong light, such as inverter fluorescent light.
EN
EN
Within about 5 m
Within about 5 m
compartment of the remote control.
2. Insert two AAA size batteries.
Make sure the (+) and (-)ends of the batteries match the
(+)and (-)ends indicated in the battery compartment.
3. Close the battery compartment cover.
Handling the Batteries
• Improper or incorrect use of batteries may cause corrosion or battery leakage, which could
cause fire, personal injury or damage to property.
• Install the batteries correctly by following the polarity (+ and -) indications in the battery
compartment.
• When the batteries are exhausted, the remote control will not function.
• Only use the battery type indicated in this manual.
• Do not dispose of the used battery as domestic waste. Dispose of them in accordance with
local regulations.
Handling the Remote Control
Be aware of your fingernails when removing the battery cover and the batteries.
• Do not drop the remote control.
• Do not allow anything to impact the remote control.
• Do not spill water or any liquid on the remote control.
• Do not place the remote control on a wet object.
• Do not place the remote control under direct sunlight or near sources of excessive heat.
• Remove the batteries from the remote control when not in use for a long period of time, as
corrosion or battery leakage may occur and result in physical injury, and/or property damage,
and/or fire.
Point the remote control at the unit no more than 5 metres from the
remote control sensor andwithin 60º horizontally and 20º vertically of the
front of the unit. The operating distance may vary depending on the
brightness of the room.
9
Page 12
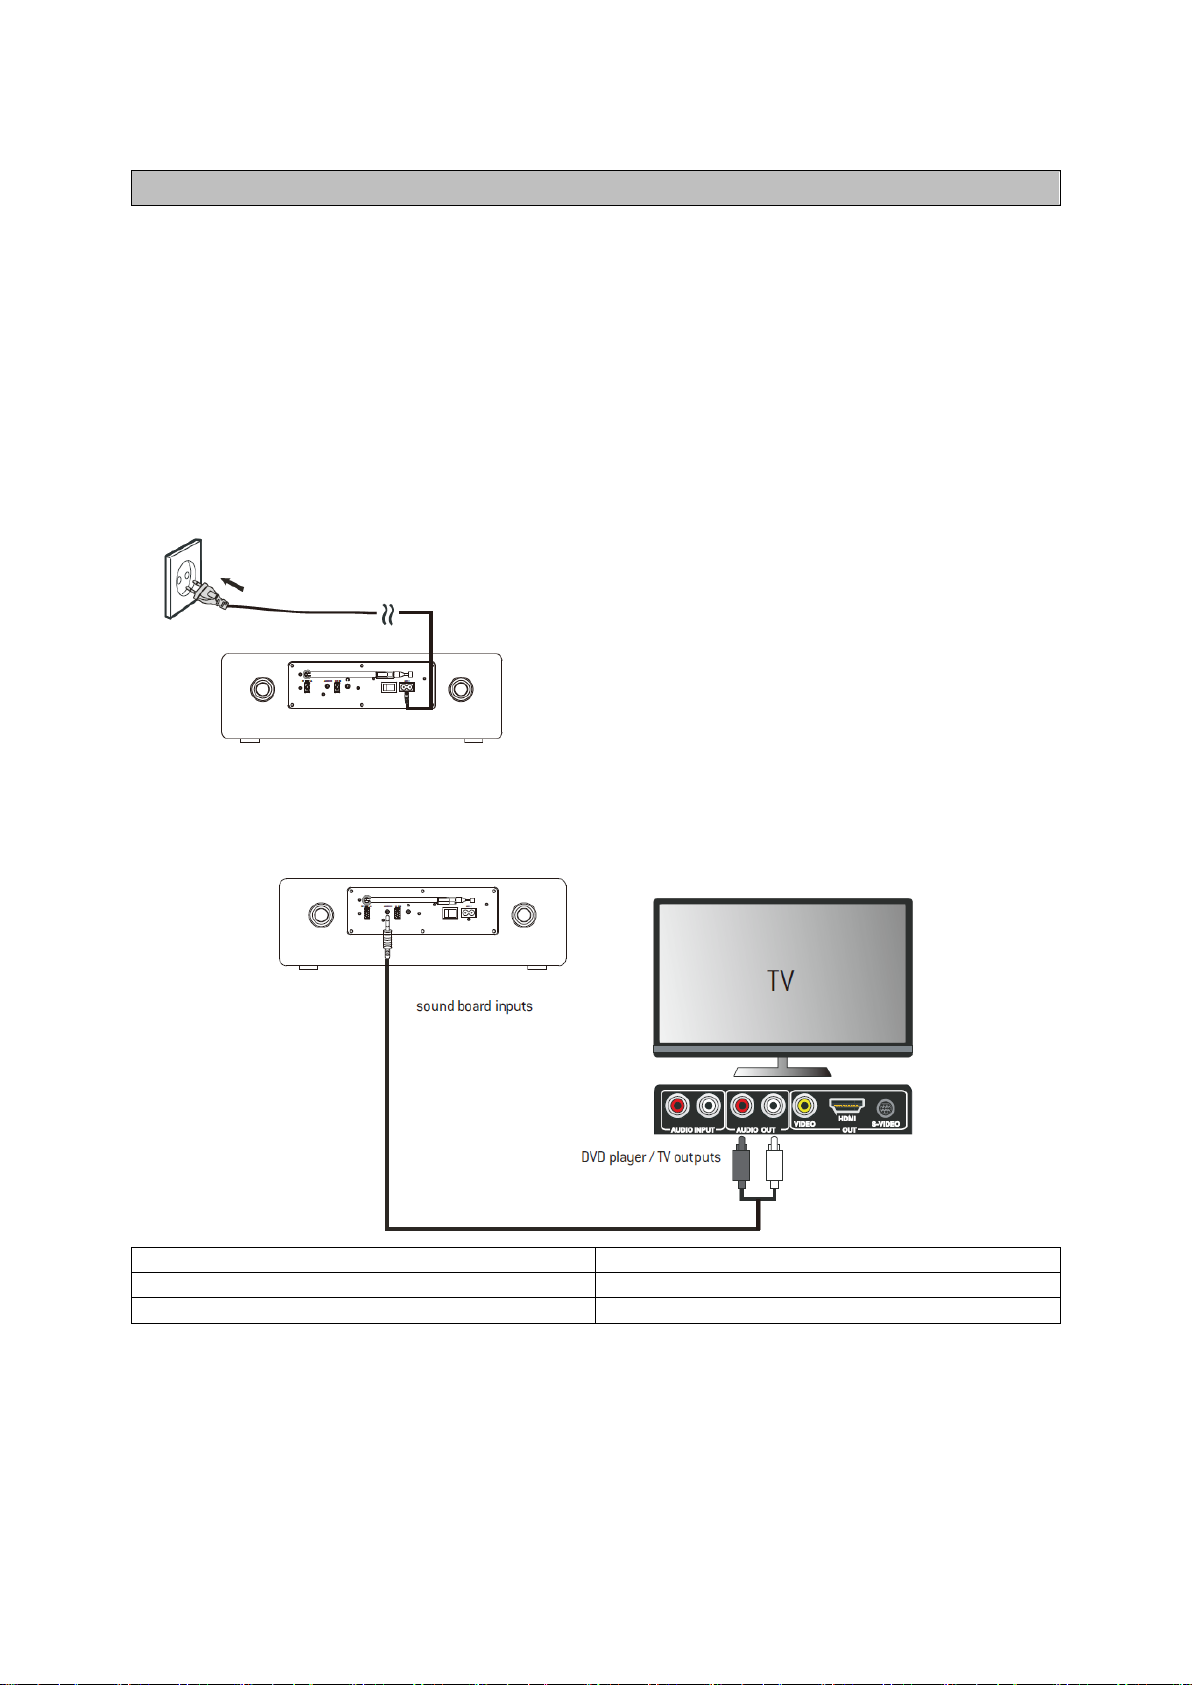
Connections
AC Power Connection
EN
EN
sound board inputs
sound board inputs
DVD player/TV outputs
DVD player/TV outputs
Caution:
- Risk of product damage! Ensure that the power supply voltage corresponds to the voltage
printed on the rating label on the back or on the underside of the unit.
- Before connecting the AC power cable, ensure that you have completed all other
connections.
- Connect the small end of AC socket at the back of unit and insert the plug of the AC power
cable into a standard AC wall outlet.
- Be sure to unplug the power cable from the outlet when the system is not in use for an
extended period of time.
- The MAINS plug or an appliance coupler is used as the disconnect device, the disconnect
device shall remain readily operable.
Analogue Inputs Connection
Connecting DVD player/TV outputs to analogue inputs from the sound board.
- Use the supplied 3.5mm to RCA audio cable to connect the DVD player/TV outputs with the
AUX(L/R) input socket from the sound board.
Connecting DVD player/TV outputs to analogue inputs from the sound board.
- Use a line-in audio cable (Φ 3.5mm) (not supplied) to connect the DVD player/TV outputs
withthe AUDIO input socket from the sound board. You can also to connect an external audio
device headphone socket to this AUDIO IN socket on the unit, such as MP3 player, Ipod®, or
Iphone®, etc…
10
Page 13

EN
EN
sound board inputs
sound board inputs
DVD player/TV outputs
DVD player/TV outputs
Headphones Connection
• Not all headphones and earphones are supported.
• Excessive sound pressure from earphones and headphones can cause hearing loss.
• Be sure to turn down the volume before connecting or putting on headphones and earphones.
Basic Operation
Connect your headphones to the headphones socket at the rear of the unit.
Switching the Unit On
Press and hold the button at the top of the unit or on the remote control to switch the unit on.
Selecting modes
Press the button on the unit repeatedly to select DAB, FM, USB, BT, AUDIO or CD.
You can also press the short-cut buttons on the remote control (DAB, FM, USB, BT, AUDIO or CD)
toselect your desired mode.
11
Page 14
EN
EN
USB
USB
BT
BT
AUDIO
AUDIO
FM
FM
DAB
DAB
CD
CD
Setting the Clock
Setting the Sleep Timer
EN
EN
OFF
OFF
Note:
- If there is no signal, the unit will switch off automatically within 19 minutes to save energy
(except in FM).
Setting the Clock Manually
1. Set the unit to Standby mode.
2. Press and hold the CLOCK button on the remote control.
3. Input the date, hour and minutes by digital keys on RC.
4. Press the CLOCK button to confirm setting.
Display the Date
In DAB or FM mode press the DISPLAY button on the remote control.
Use the sleep timer to turn the system off after a certain number off minutes in play mode. By
setting the sleep timer, you can fall asleep to music and know that your system will turn of by itself
rather than play all night.
To set the sleep timer press the SLEEP button on the remote control repeatedly, it changes
thenumber of minutes shown on the display in this sequence:
After setting the number of minutes for the sleep timer, the display will return to the previous
display.
The system is now set to turn off after the number of minutes you have set.
To Confirm the Sleep Timer
When the SLEEP button on the remote control is pressed once, the remaining sleep time is
displayed. Wait for a second until the display returns to the original display.
To Cancel the Sleep Timer
Press the SLEEP button repeatedly on the remote control until “off” is displayed. Turning off the
system also cancels the sleep timer.
12
Page 15

Setting Timer
You can use the setting timer to make the unit automatically turn on and off at a certain time every
If the selected source is BUZZER, then, the TIMER OFF setting is not available.
Sound Quality
Bluetooth Operation
In order to avoid interferences, de-activate Wi-Fi on your device(Smartphone, tablet, etc…)
when playing music using Bluetooth.
day from standby.
The clock must be correctly set for the timer to operate correctly.
1. Set the unit to Standby mode;
2. Press the TIMER button to the on/off timer function;
3. Press and hold the TIMER button for timer setting. Select source by , then input time
fortimer on by digital keys on RC, then, set volume by , after that, input the time for timer
offby digital keys on RC. Note, for all steps, you need to press the TIMER button to confirm
and goto the next step. If there is no operation in 10 seconds, it will be exit automatically.
Adjusting the Volume
To increase or decrease the volume, rotate the VOL+/- button on the unit or press the
VOL+/-buttons on the remote control.
- If you want to turn off the sound, press the button on the remote control. Press the
buttonagain or press the VOL+/- button to resume normal listening.
Note, if you adjust the volume above 26, then power off and power on again, the volume will
restore to the factory setting automatically.
Adjusting the Bass
Press the USER button on the remote control, then press the BASS +/- buttons on the remote
control to increase/decrease the bass.
Adjusting the Treble
Press the USER button on the remote control, then press the TREBLE +/- buttons on the
remotecontrol to increase/decrease the treble.
Preset Equalizer
You can select sound characteristics such as CLASS/POP/ROCK/JAZZ/NORMAL by pressing the
EQ button.
You can listen to tracks from a media device if it is connected to the unit via Bluetooth.
Pair Bluetooth-enabled Devices.
You need to pair your Bluetooth device with this unit before you connect them for the frst time.
13
Page 16
Pair Bluetooth-enabled Devices
AUDIO IN Operation
Note:
- The operational range between this unit and a Bluetooth device is approximately 10
meters(without any object between the Bluetooth device and the unit).
- Before you connect a Bluetooth device to this unit, ensure that you know the device’s
capabilities.
- Any obstacle between this unit and the Bluetooth device can reduce e the operational range.
- If the signal strength is weak, your Bluetooth device may disconnect, but it will re-enter
automatically into pairing mode.
1. During ON mode, press the BT button on the remote control to select the Bluetooth mode or
change source to BT by pressing on the unit. If the unit is not paired to any
Bluetoothdevice, the system enters automatically into pairing mode; or you need to press and
hold the PAIR button to start pairing.
2. Activate the Bluetooth function on your device and select the search mode.“Lenco DAR-070”
will appear on your Bluetooth device.
3. To disconnect the Bluetooth function, switch to another function on the unit or disable
thefunction from your Bluetooth device.
Tips:
• If there is already an existing connection, press the PAIR button to re-activate the
pairingmode. The existing connection will be interrupted.
• The unit will also be disconnected when your device is moved beyond the operational range.
• If you want to reconnect your device to this unit, place it within the operational range.
• If the device is moved beyond the operational range, when it is brought back, check if the
device is still connected to the unit.
• If the connection is lost, follow the above instructions to pair your device again to the unit.
Listen to Music from Bluetooth Device
- If the connected Bluetooth device supports Advanced Audio Distribution Profile(A2DP), you
can listen to music stored on the device through this unit.
- If the device also supports Audio Video Remote Control Profile(AVRCP), you can use this
unit's remote control to play music stored on the device.
1. Pair your device with this unit.
2. Play music via your device (if it supports A2DP).
3. Use supplied remote control to control play (if it supports AVRCP).
- To pause/resume play, press the button.
- To skip to a track, press the or buttons.
1. Press the AUDIO button on the remote control or press the button on the unit to select the
desired source.
2. Operate your audio device directly for playback features.
3. Press the VOL +/- button to adjust the volume to your desired level.
14
Page 17
DAB Operation
DAB radio mode receives DAB/DAB+ digital radio and displays
information about the station and programme/track as broadcast.
1. Scanning for stations
The first time you use the unit, or if the station list is empty, the radio automatically performs a full
scan to see what stations are available. You may also need to start a scan manually toupdate the
list of stations for one of the following reasons:
• New stations may become available from time to time.
• Stations close or can no longer be received (In the station list, invalid stations are indicated
with a question mark in front of their name).
• If reception was not good after the original scan (for example the antenna was not up), this
may result in an empty or incomplete list of available stations.
• If you have poor reception of some stations causing the audio to break up, you may wish to
list only stations with good signal strength.
To do a full scan
Select MENU> Full scan.
Once a scan is complete, the radio returns to playing the
previously -selected station or first station on thestation list.
To remove stations that are listed but unavailable
Select MENU> Prune
This removes all invalid stations, indicated in the station list with a “?” in front of the station name.
2. Selecting stations
To change station
Use the button on the RC or Rotate NAVIGATE
button onthe unit to scroll through the list of station,
press theon RC or OK button on unit to change
station.
Some stations are secondary services associated with a Primary channel and only available
at certain times. Any station that has associated secondary services is indicated with a double
chevron pointing to the right. The Secondary service station stations are always listed next to
their Primary station rather than the normal is indicated with a double chevron pointing left. In
the Station List Secondary alphabetical order.
3. Presets
The unit has 40 preset memories for DAB.
To store a station in a preset memory
Press and hold the PROGRAM button 3~5 seconds
until the display shows Preset Store. Presets (1-40)
are displayed as either Empty or with the currently
stored station name.
Use the button on the RC or Rotate NAVIGATE
button onthe unit to choose a preset memory, then
press the on RC or OK button on unit to store the
currently - playing station.After confirming the preset
station is stored the display reverts to the Now
playing screen.
15
Page 18
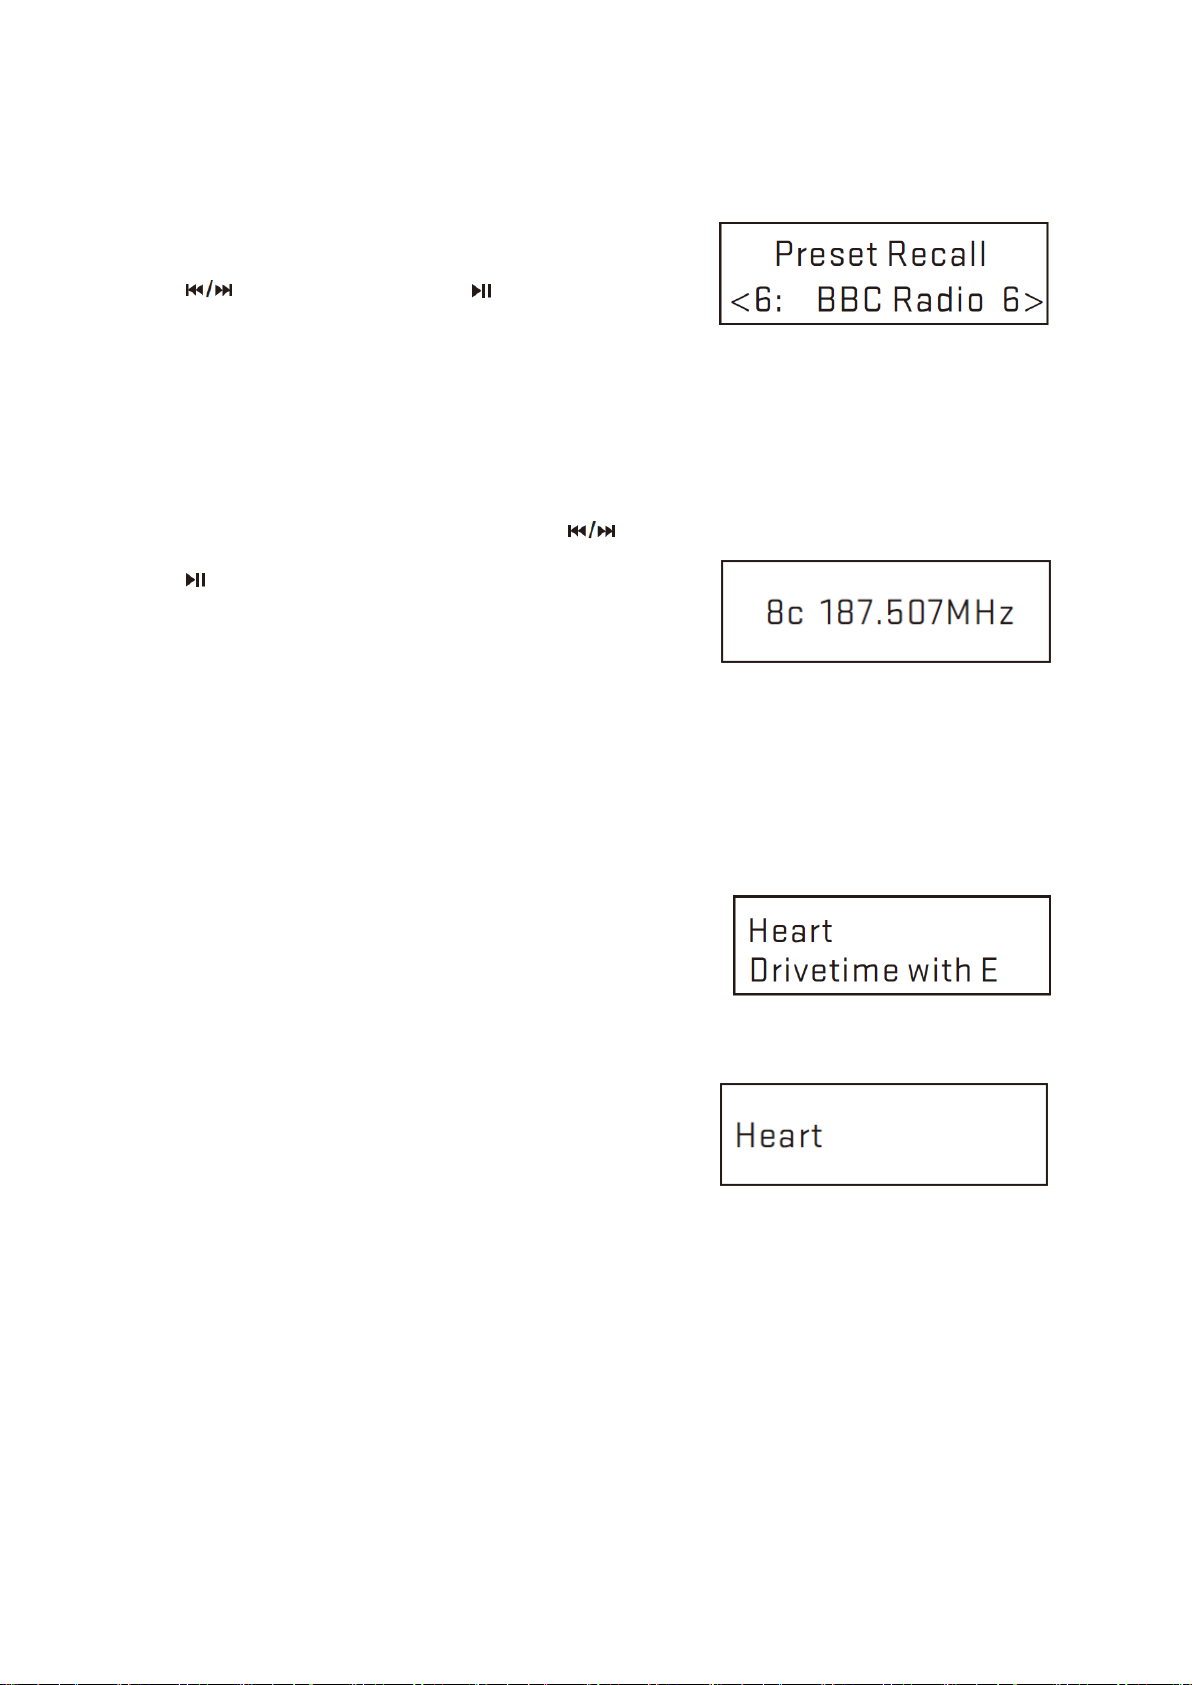
To recall a preset station
Press the PROGRAM button briefly, (the displaywill
show Preset Recall). Select one of the listed
presetstations using the P+/- buttons on the RC or
button on unit, then press button on the RC or
OKbutton on the unit to choose the displayed preset
station.
4. Manual tune
As well as the normal method of scanning, you can also manually tune to a particular
channel/frequency. This can be useful for adjusting your antenna to achieve the best possible
reception and scanning a particular channel to update the station list.
To manually tune
Press MENU > Manual tune then use the button on the RC or NAVIGATE button on the
unitto display a particular channel/frequency, press the
button on the RC or OK button on the unit to tune to
thatchannel/frequency.
The display shows a live indication of the
receivedsignal strength on the selected frequency.
Adjustments to your antenna will be manifestedin the
received signal strength displayed.
Note: The slightly larger rectangle indicates the audio quality threshold - if the signal strength,
as indicated by the solid rectangles, falls below this threshold the audio quality will deteriorate.
At the same time the unit scans for any DAB stations on the selectedfrequency and updates
the station list with any new stations found. To listen to anystations found, return to the Now
playing screen and select the required station from the station list as normal.
5. Now playing information
While a station is playing, the screen shows its name and DLS
(Dynamic Label Segment)information broadcast by the station
such asprogramme name, track title and contact details.
If DLS info over 16 characters, info will scroll.
To view further information
Press the INFO button.
Each time you press the INFO button the next set of
information is displayed, cycling through:DLS text, DL
Plus information (this is only displayed if broadcast by
the station), signalstrength, programme type, ensemble
name,channel number/frequency, signal errorrate, bit
rate, codec/DAB variant, time and date.
Note: DL Plus presents additional information that can be broadcast by stations and
storedtemporarily on your radio.
To return to the default Now playing screen at any time, press and hold the INFO button.
16
Page 19
6. Other settings
FM Operation
Dynamic range compression (DRC)
This function reduces the difference between the loudest and
quietest audio being broadcast.
Effectively, this makes quiet sounds comparativelylouder,
and loud sounds comparatively quieter.
Note: DRC only works if it is enabled by thebroadcaster for a
specific station.
To change the DRC setting
Select MENU > DRC> The options available are:
DRC off | low | high.
FM radio mode receives analogue radio from the FMband and
displays RDS (Radio Data System) informationabout the station and
show (where broadcast).
1. Selecting stations
The first time you select FM radio, the unit is set tothe lowest
frequency in the FM band.
To scan for a station in FM mode
Press the AMS button. The unit scans up through theFM band
frequencies, showing the current frequencyon the screen display.
A scan stops when a signal is found. The unit can beset to stop at
each station or only at stations with astrong signal (for details see
Scan settings in Page GB-18).
Alternatively, you can use the buttons to tune,in 50 kHz steps.
2. Presets
The unit has 40 preset memories for FM, which work in the same way as DAB mode presets,
asdescribed earlier in Presets on Page GB-16.
3. Now playing information
While FM radio is playing, the screen shows its frequency,
or if RDS information is available,station name and any
further “Radio Text” information.If no information is
available just the frequency and aNO Radio Text message
is shown.
To view further information about the broadcast
Press the INFO button.
Each time you press the INFO button the next setof
information is displayed, cycling through:RDS Radio
Text, programme type, frequency,mono/stereo, time
and date.
To return to the default Now playing screen
Press and hold the INFO button.
17
Page 20
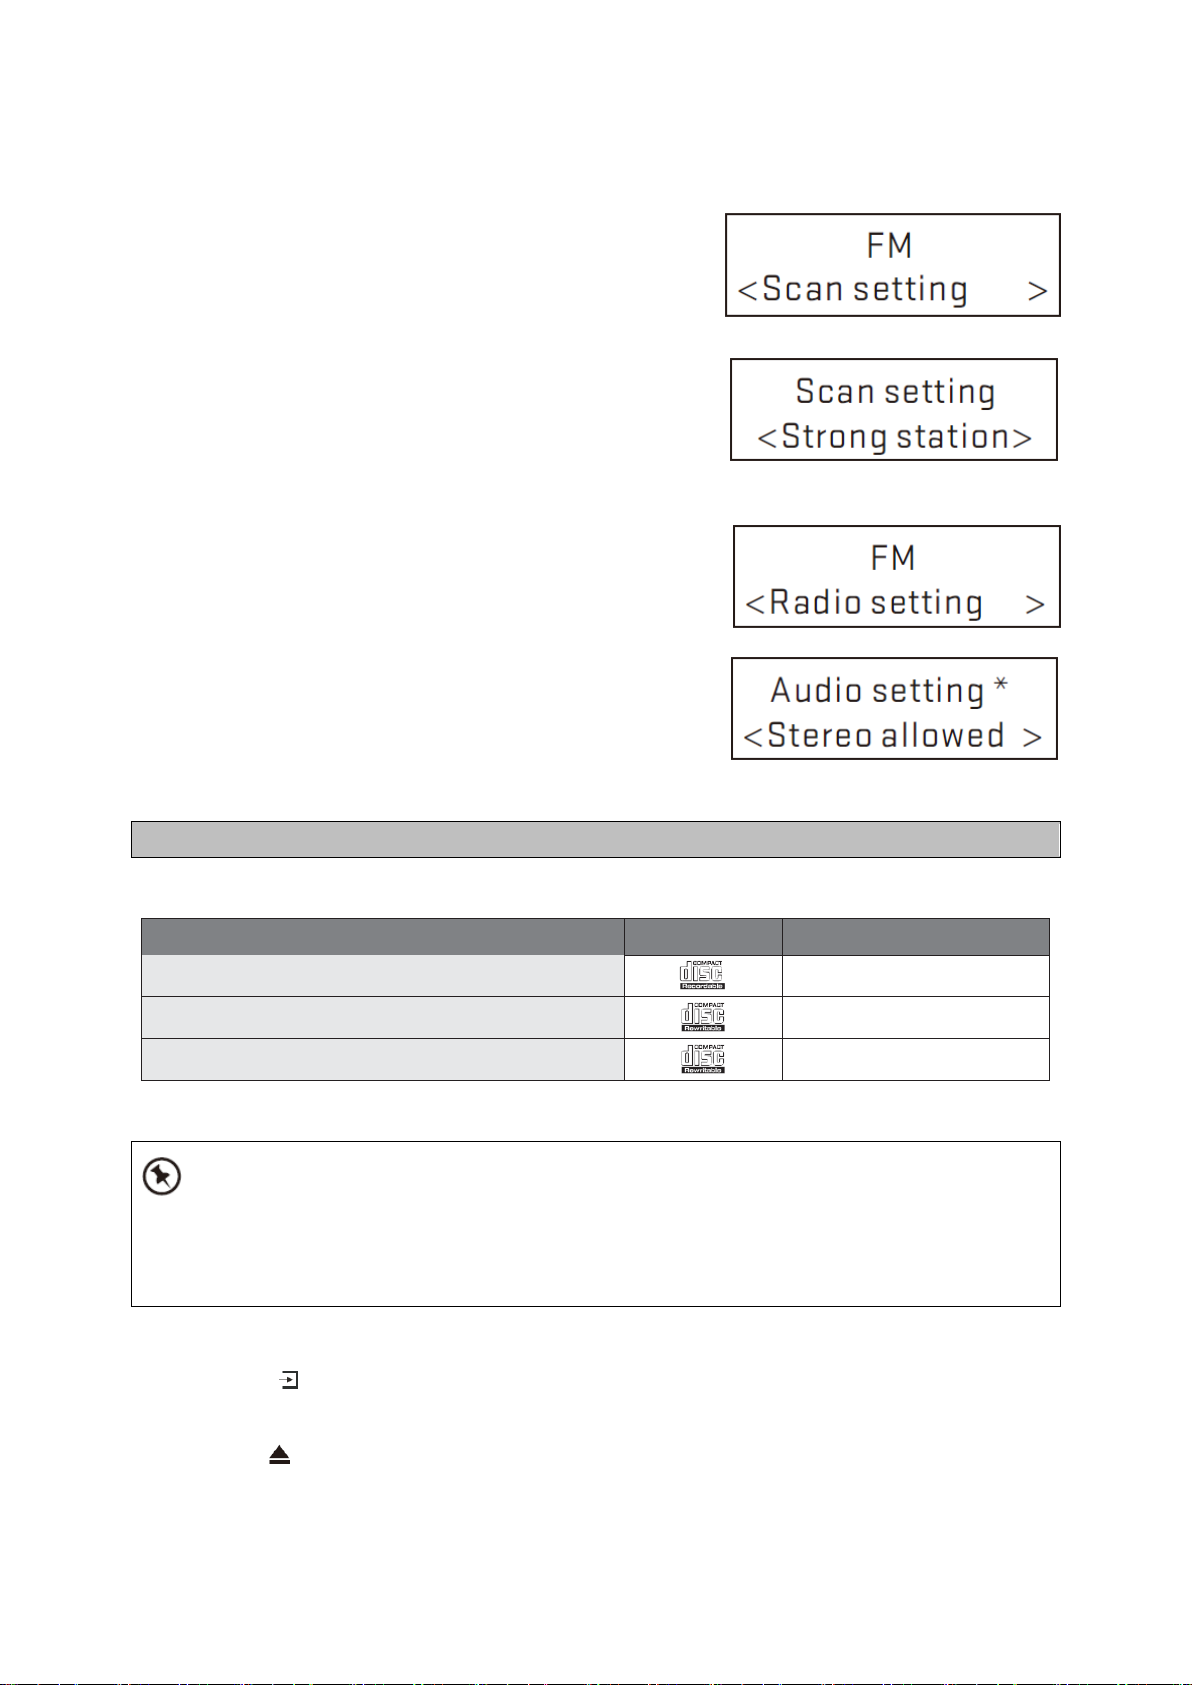
4. Other settings
CD Operation
Disc Types
Disc Logo
Recorded Content
CD-R (CD Recordable - Audio/MP3/WMA)
AUDIO/MP3/WMA
CD-RW (CD-Rewritable - Audio/MP3/WMA)
AUDIO/MP3/WMA
AUDIO-CD (Compact Disc Digital Audio)
AUDIO
Some recorded files may not be able to be played due to the type and format of disc or condition of
the recording.
Not compatible with 8 cm mini CD
Scan settings
By default, FM scans stop at any available station(ALL
Stations). This may result in poor qualityaudio from
weak stations.
Options: All stations | Strong stations only
To change the scan settings, to stop only at stations
with good signal strength
Select MENU > Scan setting then Strong stations only.
Note: In the example screen on the right, the
asteriskindicates “Strong stations only” is the
currentlyset value.
Audio settings
By default, all stereo stations are reproduced in stereo.
For weak stations, this may result inpoor quality audio.
The audio quality can be improvedusing mono.
Options: Stereo allowed | Forced mono
To play weak stations in mono
Select MENU > Audio setting> Forced mono.
Note: In the example screen on the right, theasterisk
indicates “Stereo allowed” is thecurrently set value.
Compatible Disc Types
CD Playing
1. Press the button repeatedly on the top of the unit until “CD” is displayed or press the
CDbutton on the remote control to select CD function.
2. Insert the disc into the disc door, the unit will read the disc and play it automatically.
3. Press the button to eject the disc.
18
Page 21
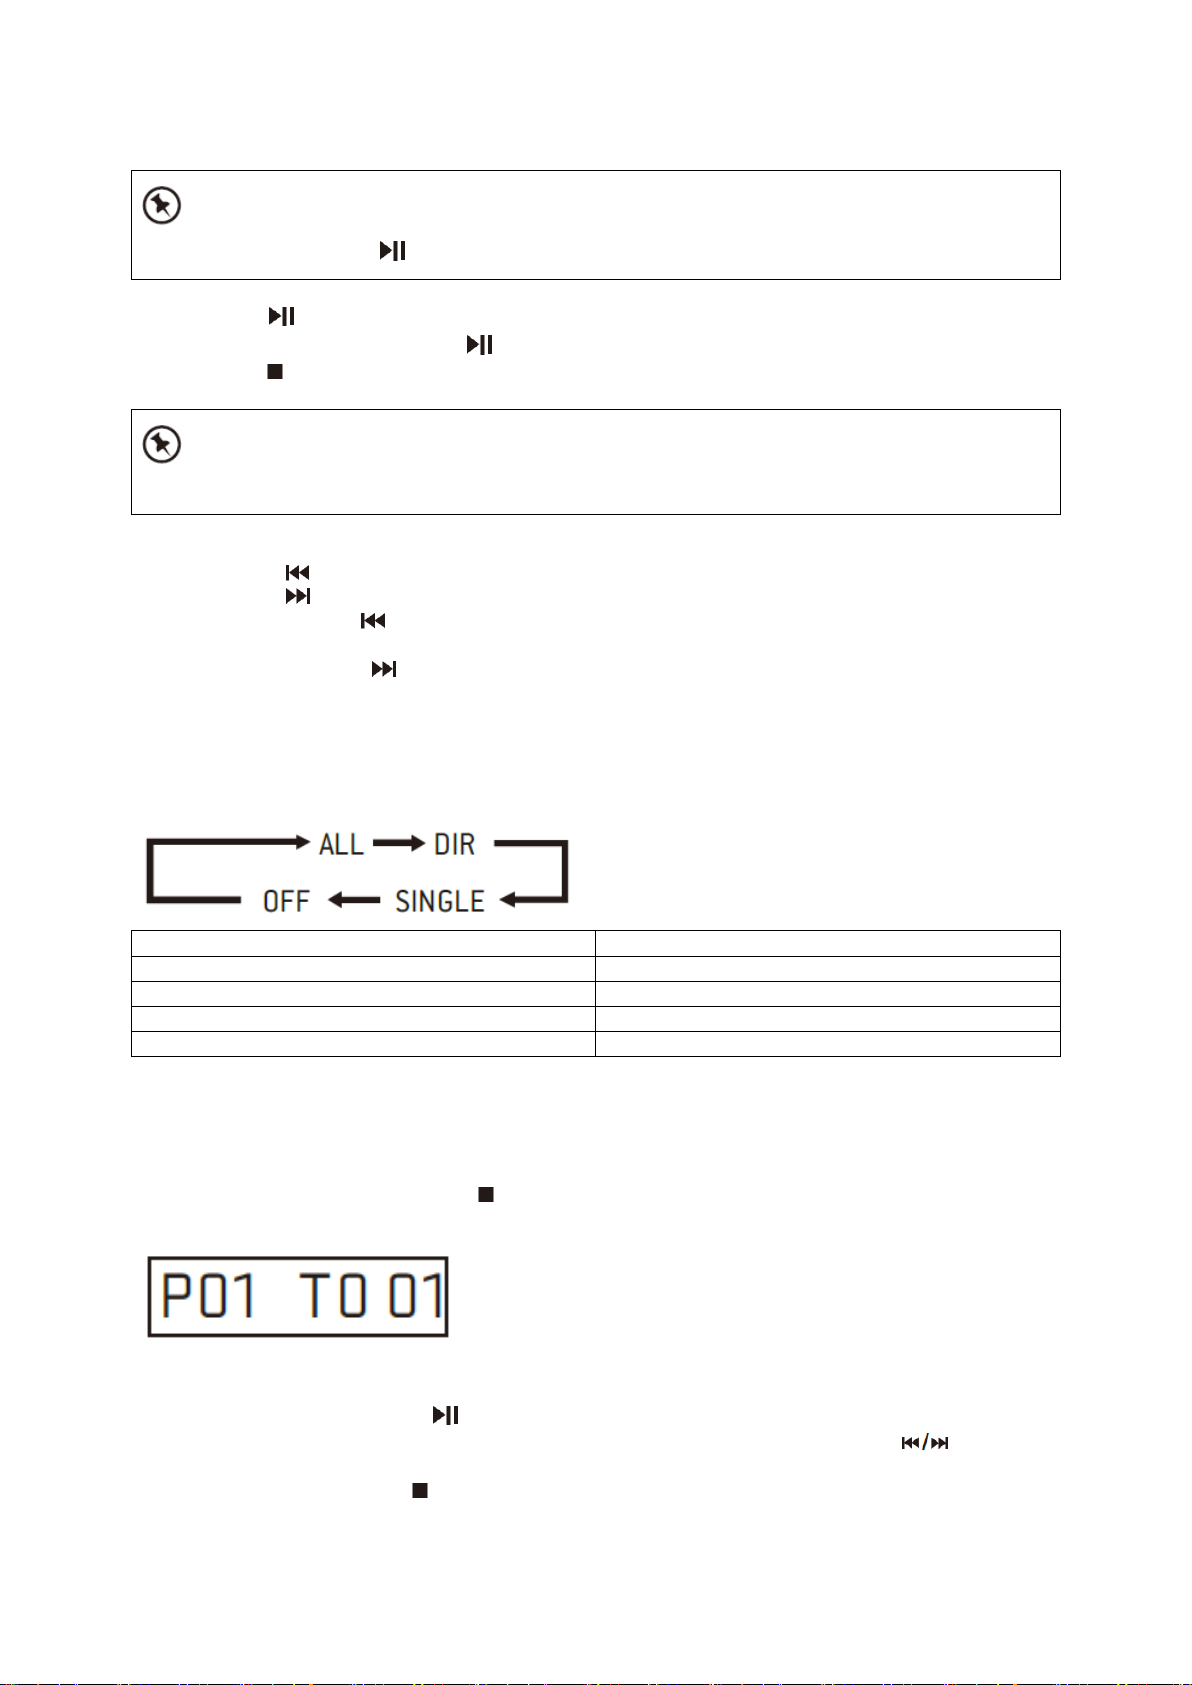
If in stop mode, press the button to start playing the disc.
While the CD is playing the current track number and the elapsed time will be displayed.
EN
EN
ALL
ALL
DIR
DIR
OFF
OFF
SINGLE
SINGLE
4. Press the button to pause the playback.
5. To resume playback, press the button again.
6. Press the button on the remote control to stop the disc playing.
To Skip Search or Search and Play
• Press the button once or more to skip backward one or more tracks on the disc.
• Press the button once or more to skip forward one or more tracks on the disc.
• Press and hold the button on the remote control to search backward for the track
positionthat you want to start playing from.
• Press and hold the button on the remote control to search forward for the track
positionthat you want to start playing from.
Playing Repeatedly
For CD disc, ONE and ALL repeat play can be set by repeatedly pressing the REPEAT button on
theremote control.
Playing Random
For CD disc, random play can be set by pressing the RANDOM button on the remote control.
Program
When playing back music, press the button on RC, then press the PROGRAM button, then
thefollowing information will be displayed on the screen.
You can choose track by RC digital key to store as P01, P02 etc. In this process, press the
PROGRAMbutton to go to the next channel setting.
After finished setting, press the button to finalize.
In program playing back, the digital keys on RC is invalid, you can only press the buttons
tochange track.
Change source or press the button twice to clear program setting.
19
Page 22
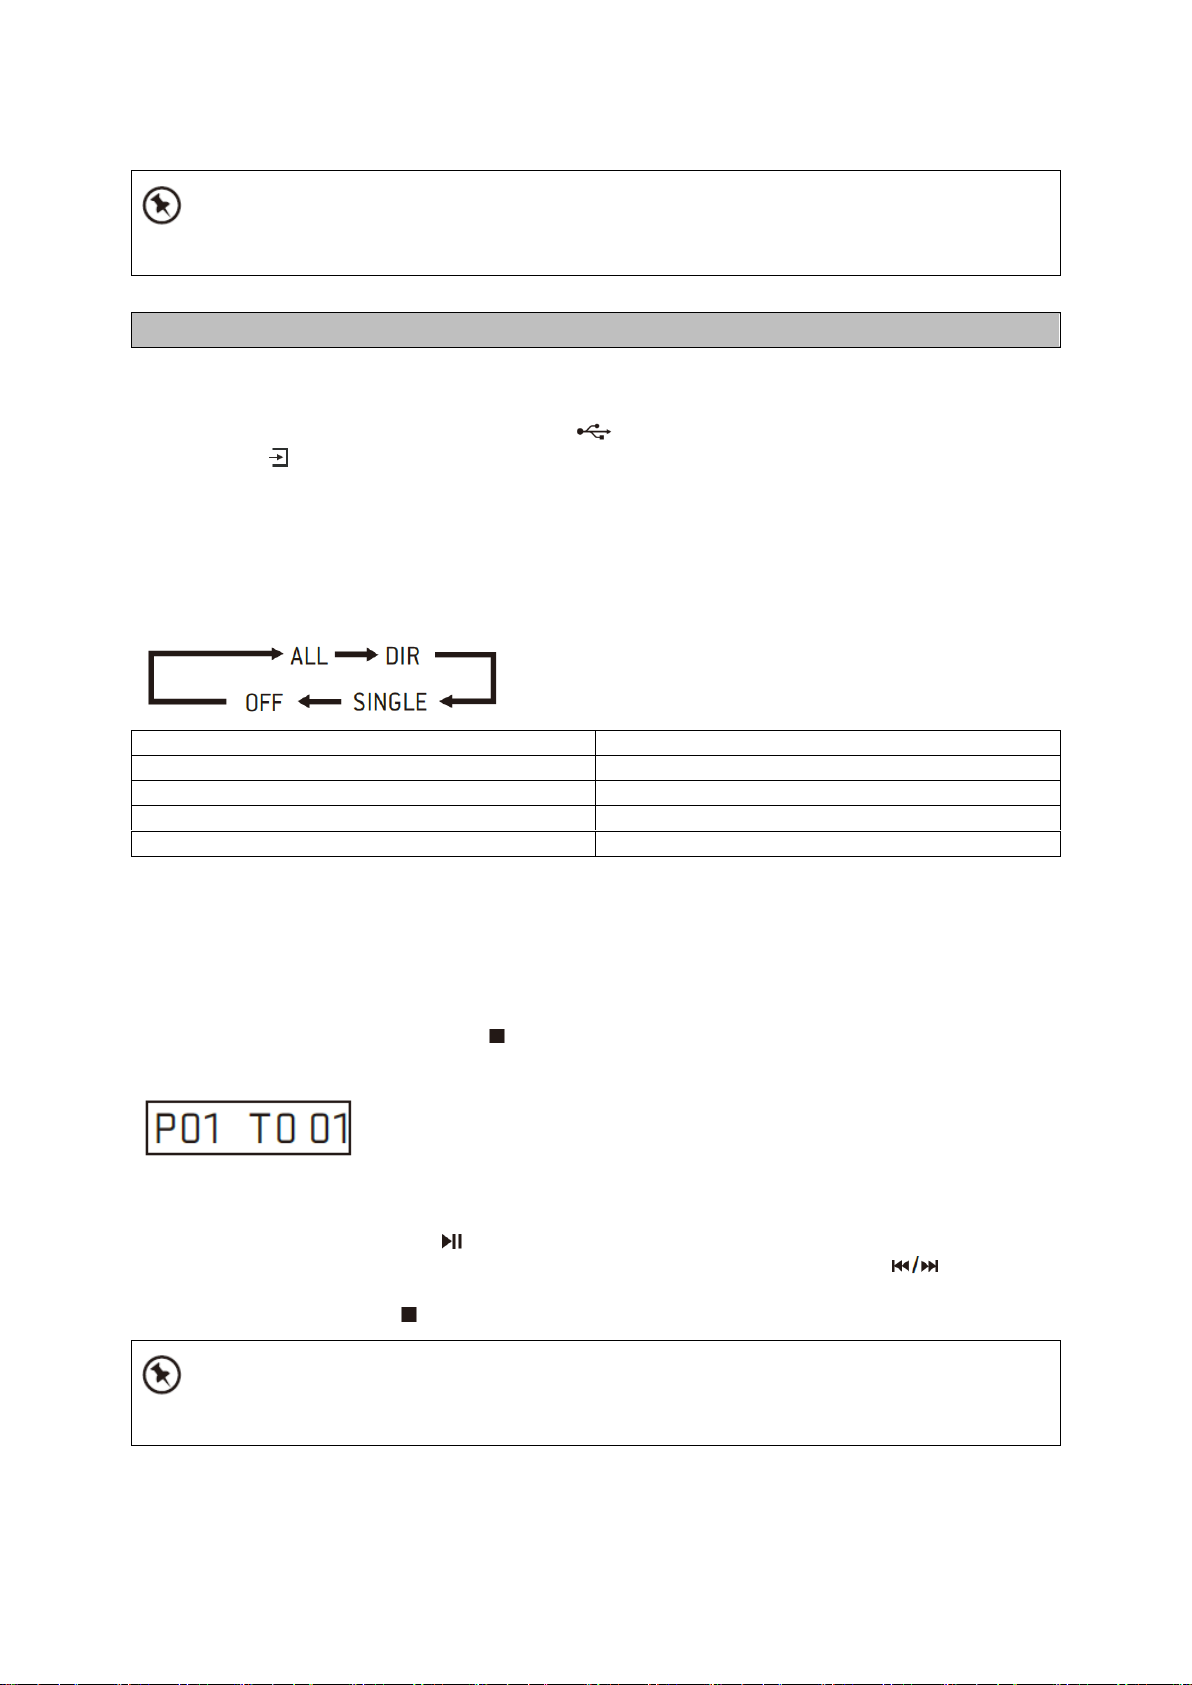
The max. Channel is 20.
Using the USB
EN
EN
ALL
ALL
DIR
DIR
OFF
OFF
SINGLE
SINGLE
The max. Channel is 20.
Connecting a USB mass storage device (including USB flash memory, USB flash players ormemory
cards) to this unit to enjoy the device’s stored music through the powerful speakers ofthis unit.
1. Insert the USB device’s USB plug into the port at the rear of the unit.
2. Press the button repeatedly on the top of the unit or press the USB button on the
remotecontrol to select the USB function.
3. The device’s stored music will be played automatically.
Playing Repeatedly
For USB device, ONE and ALL repeat play can be set by repeatedly pressing the REPEAT button
onthe remote control.
Playing Random
For music files in USB device, random play can be set by pressing the RANDOM button on
theremote control.
Program
When playing back music, press the button on RC, then press the PROGRAM button, then
thefollowing information will be displayed on the screen.
You can choose a track by RC digital key to store as P01, P02 etc. In this process, press
thePROGRAM button to go to next channel setting.
After finished setting, press the button to finalize.
In program playing back, the digital keys on RC is invalid, you can only press the buttons
tochange track.
Change source or press the button twice to clear program setting.
20
Page 23

For devices with a USB cable:
If the USB device is corrupted, this unit will not be able to detect and play the music stored.
Format the USB mass storage device and restore the music on the device with a computer.
Maintenance
Ensure the unit is fully unplugged from the mains socket before cleaning.
EN
EN
Playback side
Playback side
1. Insert one plug of the USB cable (not supplied)to the
USB socket at the rear of the unit.
2. Insert the other plug of the USB cable to the USBoutput
terminal of the USB device.
USB charging (5V 1A socket only)
You can plug an USB cable in the 5V 1A USB socket to charge the mobile device.
Cleaning the Unit
• To clean the unit, wipe the case with a slightly moist, lint-free cloth.
• Do not use any cleaning fluids containing alcohol, ammonia or abrasives.
• Do not spray an aerosol at or near the unit.
Handling Discs
• Do not touch the playback side of the disc.
• Do not attach paper or tape to the disc.
Cleaning Discs
Fingerprints and dust on the disc cause picture and sound deterioration. Wipe the discfrom the
centre outwards with a soft cloth. Always keep the disc clean.
• If you cannot wipe off the dust with a soft cloth, wipe the disc lightly with a slightly
moistenedcloth and finish with a dry cloth.
21
Page 24

• Do not use any type of solvent such as thinner, benzine, commercially available cleaners
Trouble Shooting
orantistatic spray. They may damage the disc.
Storing Discs
Do not store discs in places subjected to direct sunlight or near heat sources.
• Do not store discs in places subjected to moisture and dust such as a bathroom or near
ahumidifier.
• Store discs vertically in a case, stacking discs or placing objects on discs outside of their
casesmay cause warping.
No power
• Ensure that the mains cable is connected securely.
• Ensure that the unit is switched on.
The remote control does not function
• Use the remote control near to the unit.
• Point the remote control at the remote control sensor on the unit.
• Replace the batteries in the remote control with new ones.
• Remove any obstacles between the remote control and the unit.
Loud hum or noise is heard
• The plugs and sockets are dirty. Wipe them with a cloth slightly moistened with an
appropriatenon-abrasive cleaning solution.
The unit does not respond when pressing any buttons.
• The unit may freeze up during use. Switch off and then switch on the unit again at the
mainssocket to reset it.
No sound output
• Make sure that the unit is not muted. Press the button or V + button to resume
normallistening.
• Ensure that the audio setting of the input source (e.g. TV, game console, DVD player, etc.) is
setto PCM mode while using Optical connection.
I can’t find the Bluetooth name of this unit on my Bluetooth device for Bluetoothpairing
• Ensure that the unit is switched on.
• Ensure that the Bluetooth function is activated on your Bluetooth device.
• The unit has a Bluetooth function that can receive a signal within 10 metres.
Disc in place but the unit won’t play
• Ensure that the disc label is facing up.
• Ensure that the disc is clean.
• PAUSE mode may be activated, deactivate it.
• Disc may be damaged or dirty; check and clean the disc.
Disc skips
Ensure the unit is on a secure spot. Vibrations or jarring can cause the disc to skip.
FM reception
• Ensure the FM aerial wire is fully extended.
• Electrical interference in your home can cause poor reception. Move the unit away from
them(especially those with motors and transformers).
22
Page 25
The unit switches off automatically during playing
Specifications
Power Supply:
AC 200-240V~50/60Hz
Power Consumption:
25 Watt
Power Consumption(standby mode):
< 1 Watt
Power Output:
2 x 18 Watt
Speaker Impedance:
8 Ohm
5V 1A Output Socket:
5V 1A Out
USB:
5V 500mA
S/N(A Weight):
≥ 65dB
THD(1kHz,1W):
0.5%
Frequency Response:
40Hz~20KHz
DAB Frequency range:
174-240 MHz
FM Frequency range:
87.5-108MHz
Dimensions:
396x120x205mm
Bluetooth version:
V2.1+EDR
Work range:
approx. 10metres
Transmission frequency:
2.402~2.480GHz
Protocols:
A2DP/AVRCP
• Due to continual revision and improvement on our products design, specifications aresubject
to change without further notice.
• This product operates at 2400-2483.5 MHz and is designated only to be used inside a
normalhousehold environment. This product is suited for this purpose within all EU counties.
• Increase the volume level on your input source player like DVD player/TV etc.
Interferences in Speakers
• Check that you have not left a mobile phone near the unit.
23
Page 26

EN
This symbol indicates that the relevant electrical product or battery should not
be disposed ofas general household waste in Europe. To ensure the correct
waste treatment of the productand battery, please dispose them in accordance
to any applicable local laws of requirement fordisposal of electrical equipment or
batteries. In so doing, you will help to conserve naturalresources and improve
standards of environmental protection in treatment and disposal ofelectrical
waste (Waste Electrical and Electronic Equipment Directive).
1. Guarantee
Lenco offers service and warranty in accordance to European law, which means that in case of
repairs (bothduring and after the warranty period) you should contact your local dealer.
Important note: It is not possible to send products that need repairs to Lenco directly.
Important note: If this unit is opened or accessed by a non-official service center in any way, the
warrantyexpires.
This device is not suitable for professional use. In case of professional use, all warranty
obligations of themanufacturer will be voided.
2. Disclaimer
Updates to Firmware and/or hardware components are made regularly. Therefore some of the
instruction,specifications and pictures in this documentation may differ slightly from your particular
situation. All itemsdescribed in this guide for illustration purposes only and may not apply to
particular situation. No legal right orentitlements may be obtained from the description made in this
manual.
3. Disposal of the Old Device
4. Service
For more information and helpdesk support, please visit www.lenco.com
Lenco Benelux BV, Thermiekstraat 1a, 6361 HB Nuth, The Netherlands.
24
Page 27

Nederlands
DAR-070
Veiligheidswaarschuwingen
LET OP:
Gebruik van bedieningen of afstellingen of uitvoer van procedures anders dan gespecificeerd in deze
documentatie kan leiden tot blootstelling aan schadelijke straling.
Dit apparaat dient uitsluitend te worden aangepast of gerepareerd door gekwalificeerd
onderhoudspersoneel.
VOORZORGSMAATREGELEN VOOR GEBRUIK
ONTHOUD DE VOLGENDE INSTRUCTIES:
1. Gebruik dit apparaat niet in de buurt van water.
2. Reinig het uitsluitend met een licht vochtige doek.
3. Bedek of blokkeer de ventilatie-openingen niet. Wanneer u het apparaat op een schap plaatst,
dient u 5 cm (2”) vrije ruimte rondom het gehele apparaat te behouden.
4. Installeer het product volgens de meegeleverde gebruikershandleiding.
5. * Nooit op de stroomadapter stappen of deze indrukken. Wees voornamelijk voorzichtig in de
buurt van de stekkers en het punt waar de kabel uit het apparaat komt. Plaats geen zware
voorwerpen op de stroomadapter, om beschadiging ervan te voorkomen. Houd het gehele
apparaat buiten bereik van kinderen! Wanneer kinderen met de voedingskabel spelen, kunnen
zij ernstig letsel oplopen.
6. * Haal de stekker uit het stopcontact tijdens onweer of wanneer u deze langere tijd niet
gebruikt.
7. Houd het apparaat uit de buurt van hittebronnen, zoals radiatoren, verwarmingen, kachels,
kaarsen en andere hittegenererende producten of naakte vlam.
8. Gebruik dit apparaat niet in de buurt van krachtige magnetische velden.
9. Elektrostatische ontlading kan normaal gebruik van dit apparaat verstoren. U hoeft het
apparaat in dit geval slechts te resetten en opnieuw op te starten volgens de
gebruikershandleiding. Wees voorzichtig tijdens bestandsoverdracht en doe dat in een
omgeving zonder statische verstoringen.
10. Waarschuwing! Steek nooit een voorwerp via de ventilatie- of andere openingen in het product.
Er is hoogspanning in het product aanwezig en als u er een object insteekt, kan dat een
elektrische schok veroorzaken en/of kortsluiting in de interne onderdelen. Mors om dezelfde
reden geen water of vloeistof op het product.
11. Gebruik het toestel niet in vochtige ruimtes, zoals badkamers, stomende keukens of in de buurt
van zwembaden.
12. Gebruik dit apparaat niet wanneer condensatie kan optreden.
13. Alhoewel dit apparaat met grote zorg gefabriceerd en verschillende keren geïnspecteerd is
voordat het de fabriek verlaat, is het nog steeds mogelijk dat er problemen optreden, zoals met
alle elektrische apparaten. Als u rook, een overmatige hitteontwikkeling of enig ander
onverwacht verschijnsel opmerkt, moet u onmiddellijk de stekker van het netsnoer uit het
stopcontact halen.
14. Dit apparaat moet aangedreven worden door een voedingsbron, zoals aangegeven op het
specificatieplaatje. Als u twijfelt over het type voeding dat gebruikt wordt in uw huis, raadpleeg
dan a.u.b. uw dealer of plaatselijk energiebedrijf.
15. * Het stopcontact moet in de buurt van de apparatuur zijn geïnstalleerd en eenvoudig te
bereiken zijn.
16. * Overbelast stopcontacten of verlengsnoeren niet. Overbelasting kan brand of een elektrische
schok veroorzaken.
17. * Apparaten met een Klasse 1 structuur dienen te worden aangesloten op een stopcontact met
een beschermende aardverbinding.
25
Page 28

18. * Apparaten met een Klasse 2 structuur vereisen geen aardverbinding.
19. Houd ze uit de buurt van knaagdieren. Knaagdieren knauwen graag aan voedingskabels.
20. * Houd altijd de stekker vast wanneer u deze uit het stopcontact trekt. Trek nooit aan de
voedingskabel. Dit kan tot een kortsluiting leiden.
21. Vermijd om het toestel te plaatsen op een ondergrond die blootgesteld kan worden aan
trillingen of schokken.
22. Gebruik een zacht, droog doekje om het apparaat te reinigen. Gebruik geen oplosmiddelen of
op benzine gebaseerde vloeistoffen. U kunt een vochtig doekje met verdund
schoonmaakmiddel gebruiken om hardnekkige vlekken te verwijderen.
23. De leverancier is niet verantwoordelijk voor schade of verloren gegevens veroorzaakt door
storing, misbruik, modificatie van het apparaat of batterijvervanging.
24. Onderbreek nooit de verbinding wanneer het apparaat formatteert of bestanden overdraagt.
De gegevens kunnen anders corrupt of verloren raken.
25. Indien het apparaat een USB-afspeelfunctie heeft, moet de USB-geheugenstick rechtstreeks op
het apparaat worden aangesloten. Gebruik geen USB-verlengkabel, omdat die kan leiden tot
storingen met foutieve gegevens als gevolg.
26. Het apparaat mag niet worden blootgesteld aan druppels of spatten en zorg ervoor dat er geen
met vloeistof gevulde voorwerpen, zoals vazen, op of nabij het apparaat zijn geplaatst.
27. * Om de verbinding met de stroomaansluiting volledig te verbreken, moet de stekker van het
apparaat uit het stopcontact worden gehaald, omdat de stekker van het apparaat de
hoofdschakelaar is.
28. Indien het apparaat op batterijen kan werken, dan mogen de batterijen niet aan overmatige
hitte, zoals zonlicht, open vuur e.d. worden blootgesteld.
29. Aandacht voor het milieu is nodig bij het verwijderen van de batterijen.
30. Het apparaat kan alleen worden gebruikt in gematigde klimaten. Extreem koude of warme
omgevingen moeten worden vermeden.
31. Het nominale specificatielabel is te vinden op het paneel aan de onder- of achterkant van het
apparaat.
32. Dit apparaat is niet bestemd voor gebruik door mensen (inclusief kinderen) met fysieke,
zintuiglijke of geestelijke gebreken of gebrek aan kennis en ervaring, tenzij zij onder toezicht
staan of instructies hebben over het juiste gebruik van het apparaat hebben gekregen van de
persoon die verantwoordelijk is voor hun veiligheid.
33. Dit product is alleen voor niet-professioneel gebruik bedoeld en niet voor commercieel of
industrieel gebruik.
34. Verzeker u ervan dat het apparaat in een stabiele positie staat opgesteld. Schade, veroorzaakt
door het gebruik van dit product in een onstabiele positie, of door het niet naleven van
waarschuwingen of voorzorgsmaatregelen genoemd in deze handleiding, valt niet onder de
garantie.
35. Verwijder nooit de behuizing van dit apparaat.
36. Plaats dit apparaat nooit op andere elektrische apparatuur.
37. Dit product niet gebruiken of opslaan op plaatsen waar het wordt blootgesteld aan direct
zonlicht, hitte, buitensporig veel stof of trillingen.
38. Geef kinderen geen gelegenheid in aanraking met plastic zakken te komen.
39. Gebruik uitsluitend uitbreidingen/accessoires gespecificeerd door de fabrikant.
40. Laat alle reparaties over aan gekwalificeerd onderhoudspersoneel. Onderhoud is vereist als het
toestel hoe dan ook is beschadigd, zoals bijvoorbeeld het netsnoer of de stekker, wanneer er
vloeistof of een voorwerp in het apparaat is terechtgekomen, wanneer het apparaat is
blootgesteld aan regen of vocht, als het niet normaal werkt of is gevallen.
41. * Gebruik nooit een beschadigde voedingskabel of stekker of een los stopcontact. Dit vormt
namelijk een risico op brand of elektrische schokken.
42. Langdurige blootstelling aan luid geluid van persoonlijke muziekspelers kan leiden tot tijdelijke
of permanente gehoorbeschadiging.
INSTALLATIE
• Pak alle onderdelen uit en verwijder de beschermende materialen.
26
Page 29
* Sluit het apparaat niet aan op het stopcontact, voordat u de netspanning hebt gecontroleerd en
Hartelijk dank voor uw aankoop van de DAR-070.
Wij raden u aan om deze gebruiksaanwijzing te lezen, zodat u alle operationele functies volledig
begrijpt. U vindt ook een probleemoplossing om u te helpen bij het oplossen van problemen.
Lees de gebruiksaanwijzing vóór het gebruik zorgvuldig door en bewaar deze gebruiksaanwijzing
voor toekomstig naslagwerk.
Uitpakken
voordat alle andere aansluitingen zijn gemaakt.
*deze instructies zijn enkel van toepassing voor producten met een voedingskabel of een AC
voedingsadapter.
Haal het apparaat uit de verpakking. Bewaar de verpakking. Als u de verpakking weggooit, doe dit
volgens de plaatselijke voorschriften.
De volgende items zijn inbegrepen:
27
Page 30
EN
NL
main unit
hoofdapparaat
AAA Batteries
AAA-batterijen
Remote Control
Afstandsbediening
3.5mm to 3.5mm cable
3.5 mm naar 3.5 mm kabel
AC Power Cord
Netsnoer
Instruction Manual
Handleiding
Productoverzicht
Vooraanzicht
Achteraanzicht
1. Sensor afstandsbediening
2. Scherm
3. Standby-indicator
4. Klepje voor de schijf
5.
• Druk om de volgende track in USB en CD te selecteren.
• Houd ingedrukt om de zenderlijst in DAB en FM weer te geven.
• Druk om de lijst met voorkeuzezenders in DAB en FM weer te geven.
6.
• Druk om de vorige track in USB en CD te selecteren.
28
Page 31

• Houd ingedrukt om de zenderlijst in DAB en FM weer te geven.
• Druk om de lijst met voorkeuzezenders in DAB en FM weer te geven.
7.
• Druk om in CD, USB en BT af te spelen en te stoppen.
MENU
• Druk om het menu in DAB en FM weer te geven.
8. EQ
• Druk om de geluidskarakteristieken te selecteren: KLASSIEK/POP/ROCK/JAZZ/NORMAAL.
9.
• Druk om de bron na het aanzetten te wijzigen.
10.
• Druk voor het aanzetten en uitzetten.
11. NAVIGATE
• Draai om in het menuscherm in DAB en FM naar boven of beneden te gaan.
OK
• Druk om te selecteren, over te slaan of verder te gaan naar het volgende menu in DAB en
FM.
VOL+/VOL-
• Draai om het volume te verhogen en te verlagen.
12. INFO
• Druk om de ID3-informatie in CD en USB in/uit te schakelen.
• Druk om de informatie in DAB en FM te bekijken.
13. PAIR
• Houd ingedrukt om de koppelfunctie in BT te activeren en/of het bestaande gekoppelde
BT-apparaat los te koppelen.
• Druk om in CD de schijf te plaatsen en uit te werpen.
14. 5V 1A uitgang
• Verbind om een mobiel apparaat op te laden.
15. Audio-ingang
16. USB
• Verbind een USB-apparaat voor het afspelen van muziek.
17. Koptelefoon
18. Aan-/uitschakelaar
19. Stroomaansluiting
29
Page 32

Afstandsbediening
1.
• Schakel het apparaat tussen de modi AAN en STANDBY.
2. AMS
• Druk om in FM automatisch naar zenders te zoeken, tijdens het zoeken kunt u nogmaals
klikken om te stoppen.
3. HERHAAL
• Druk om de modus herhaald afspelen in CD en USB te selecteren.
30
Page 33

4. EQ
• Druk om de geluidskarakteristieken te selecteren: KLASSIEK/POP/ROCK/JAZZ/NORMAAL.
5. BASS+/-
• Druk om de LAGE TONEN in de modus USER in te stellen
6. USER
• Druk om de lage en hogere tonen aan te passen.
7. MENU
• Druk om het menu in DAB en FM weer te geven.
8. PAIR
• Houd ingedrukt om de koppelfunctie in BT te activeren en/of het bestaande gekoppelde
BT-apparaat los te koppelen.
9.
• Houd ingedrukt om in CD en USB snel terug te spoelen;
• Druk om de vorige track in CD en USB te selecteren;
• Druk om de zenderlijst in DAB en FM weer te geven;
• Druk om in het menuscherm omhoog te gaan in DAB en FM;
• Druk voor een goede afstemming in FM.
10. MO/ST
• Druk om het geluid in stereo or mono te zetten.
11. P+/-
• Druk om naar het begin van een huidige/vorige/volgende album te gaan;
• Druk om de vorige/volgende vooraf ingestelde track in DAB en FM te selecteren.
• Houd ingedrukt voor handmatige afstemming in FM.
12. Toetsen 0-9
13. INFO
• Druk om de ID3-informatie in of uit te schakelen in CD en USB;
• Druk om de informatie in DAB en FM te bekijken.
14.
• Druk om in CD de schijf te plaatsen en uit te werpen.
15. SLAPEN
• Druk om de slaaptimer in te stellen.
16. CD/USB/DAB/FM/BT/AUDIO
• Druk om de bijbehorende AUDIOBRON te selecteren. (CD/USB/DAB/FM/BT/AUDIO)
17. WILLEKEURIG
• Druk om willekeurig in CD en USB af te spelen.
18. TREBLE +/-
• Druk om de HOGE TONEN in de modus USER aan te passen.
31
Page 34

19. PROGRAMMA
• Druk om te programmeren in CD, USB, DAB en FM.
20. DIM
• Druk om verschillende helderheidsniveaus op het scherm te selecteren.
21.
• Druk om in BT, CD en USB af te spelen en te pauzeren;
• Om te selecteren of overslaan om naar het volgende menu in DAB en FM te gaan.
22.
• Houd ingedrukt om in CD en USB snel vooruit te spoelen;
• Druk om de volgende track in CD en USB te selecteren;
• Druk om de zenderlijst in DAB en FM weer te geven;
• Druk om in het menuscherm naar beneden te gaan in DAB en FM;
• Druk voor een goede afstemming in FM.
23.
• Druk om het afspelen in CD en USB te stoppen.
24.
• Druk om het geluid te dempen of te hervatten.
25. CLOCK
• Houd ingedrukt om de klok in te stellen (alleen in de standbymodus).
26. V+/-
• Druk om het volume te verhogen/verlagen.
27. TIMER (werk alleen in standbymodus)
• Druk om de timerfunctie in of uit te schakelen;
• Houd ingedrukt om de timer in te stellen.
28. SCHERM
• Druk om de datum in de ingeschakelde modus weer te geven.
32
Page 35

Uw afstandsbediening bedienen
1. Druk en schuif het achterklepje om het batterijvakje van
Gebruiksbereik van de afstandsbediening
• Zorg ervoor dat er geen obstakel is tussen de
afstandsbedieningsensor van het apparaat en de
afstandsbediening. Als u het apparaat in bijvoorbeeld een tv-meubel
plaatst, kan het bereik van de afstandsbediening afnemen
afhankelijk van de dikte of kleur van het glas van de tv-meubel.
• Stel de infraroodsensor van de afstandsbediening niet bloot aan
direct zonlicht of ander sterk licht, zoals fluorescerend licht van de
omvormer.
EN
NL
Within about 5 m
Binnen ongeveer 5 m.
de afstandsbediening te openen.
2. Plaats twee AAA-batterijen.
Zorg ervoor dat de (+) en (-) uiteinden van de batterijen
overeenkomen met de (+) en (-) uiteinden die in het
batterijvakje zijn aangegeven.
3. Sluit het klepje van het batterijcompartiment.
De batterijen hanteren
• Oneigenlijk of onjuist gebruik van batterijen kan corrosie of lekkage van de batterij
veroorzaken, die brand, persoonlijk letsel of schade aan eigendommen kan veroorzaken.
• Plaats de batterijen op de juiste manier volgens de polariteit (+ en -) in het batterijvakje.
• De afstandsbediening werkt niet als de batterijen leeg zijn.
• Gebruik alleen het type batterij dat in deze handleiding wordt aangegeven.
• Gooi de gebruikte batterijen niet bij het huishoudelijk afval. Verwijder hen in overeenstemming
met de plaatselijke regelgeving.
De afstandsbediening hanteren
Pas op uw vingers wanneer u het batterijklepje en de batterijen verwijdert.
• Laat de afstandsbediening niet vallen.
• Zorg dat niets de afstandsbediening kan beïnvloeden.
• Mors geen water of vloeistof op de afstandsbediening.
• Plaats de afstandsbediening niet op een nat voorwerp.
• Plaats de afstandsbediening niet onder direct zonlicht of in de buurt van bronnen met
overmatige warmte.
• Verwijder de batterijen wanneer de afstandsbediening voor een lange periode niet wordt
gebruikt, omdat er corrosie kan optreden of de batterijen lekken met als gevolg lichamelijk
letsel en/of materiële schade en/of brand.
Richt de afstandsbediening op het apparaat op minder dan 5 meter van
de afstandsbedieningsensor en binnen 60º horizontaal en 20º verticaal
van de voorkant van het apparaat. Het gebruiksbereik kan variëren
afhankelijk van de helderheid van de kamer.
33
Page 36

Aansluitingen
Aansluiting netspanning
EN
NL
sound board inputs
Ingangen geluidskaart
DVD player/TV outputs
Uitgangen dvd-speler/tv
Let op:
- Gevaar voor productschade! Zorg ervoor dat de voedingsspanning overeenkomt met de
spanning op het typeplaatje aan de achterkant of aan de onderkant van het apparaat.
- Zorg ervoor dat u alles hebt aangesloten voordat u het netsnoer aansluit.
- Sluit het kleine uiteinde van de steker aan de op achterkant van het apparaat en steek de
stekker van het netsnoer in een standaard stopcontact.
- Zorg ervoor dat u de stekker uit het stopcontact trekt wanneer het systeem voor langere tijd
niet wordt gebruikt.
- De netstekker of aansluiting op het toestel wordt als hoofdschakelaar gebruikt en moet altijd
kunnen worden bediend.
Aansluiting analoge ingangen
Sluit de uitgangen van de dvd-speler/tv aan op de analoge ingangen van de geluidskaart.
- Gebruik de bijgeleverde 3,5 mm naar RCA-audiokabel om de uitgangen van de dvd-speler/tv
aan te sluiten op de AUX-ingang (L/R) van de geluidskaart.
Sluit de uitgangen van de dvd-speler/tv aan op de analoge ingangen van de geluidskaart.
- Gebruik een line-in audiokabel (Φ 3.5mm) (niet meegeleverd) om de uitgangen van de
dvd-speler/tv te verbinden met de AUDIO-ingang van de geluidskaart. U kunt ook een
hoofdtelefoonaansluiting van een extern audioapparaat aansluiten op de AUDIO
IN-aansluiting van dit apparaat, zoals MP3-speler, iPod® of iPhone®, enz...
34
Page 37

EN
NL
sound board inputs
Ingangen geluidskaart
DVD player/TV outputs
Uitgangen dvd-speler/tv
• Niet alle koptelefoons en oortelefoons worden ondersteund.
• Overmatige geluidsdruk van oortelefoons en hoofdtelefoons kan gehoorverlies veroorzaken.
• Draai het volume omlaag voordat u de koptelefoon of oortelefoon aansluit.
Basisbediening
Aansluiting koptelefoon
Sluit uw koptelefoon aan op de koptelefoonaansluiting aan de achterzijde van het apparaat.
Het apparaat aanzetten
Houd de toets aan de bovenkant van het apparaat of op de afstandsbediening ingedrukt om
het apparaat aan te zetten.
Modi selecteren
Druk herhaaldelijk op de toets op het apparaat om DAB, FM, USB, BT, AUDIO of CD te
selecteren.
U kunt ook op de sneltoetsen van de afstandsbediening drukken (DAB, FM, USB, BT, AUDIO of
CD) om de gewenste modus te selecteren.
35
Page 38

EN
NL
USB
USB
BT
BT
AUDIO
AUDIO
FM
FM
DAB
DAB
CD
CD
Het instellen van de klok
De slaaptimer instellen
EN
NL
OFF
UIT
Opmerking:
- Als er geen signaal is, schakelt het apparaat binnen 19 minuten automatisch uit om energie te
besparen (behalve in FM).
De klok handmatig instellen
1. Zet het apparaat in de standby-modus.
2. Houd de toets CLOCK op de afstandsbediening ingedrukt.
3. Voer de datum, uur en minuten in met de digitale toetsen op de afstandsbediening.
4. Druk de toets CLOCK om de instelling te bevestigen.
De datum weergeven
Druk in de DAB- of FM-modus op de toets DISPLAY op de afstandsbediening.
Gebruik de slaaptimer om het systeem na een bepaald aantal minuten uit te schakelen in de
afspeelmodus. Door de slaaptimer in te stellen kunt u in slaap vallen tijdens het luisteren naar
muziek en wetende dat het systeem zichzelf uitzet in plaats van de hele nacht af te spelen.
Om de slaaptimer in te stellen drukt u herhaaldelijk op de toets SLEEP op de afstandsbediening,
hiermee verandert de volgorde van het aantal minuten dat op het scherm wordt weergegeven:
Nadat u het aantal minuten voor de slaapstand hebt ingesteld, gaat het scherm terug naar het
vorige scherm.
Het systeem schakelt nu uit na het aantal minuten dat u hebt ingesteld.
De slaaptimer bevestigen
Wanneer de toets SLEEP op de afstandsbediening één keer wordt ingedrukt, wordt de resterende
slaaptijd weergegeven. Wacht een paar seconden totdat het scherm naar het oorspronkelijke
scherm terugkeert.
36
Page 39

De slaaptimer annuleren
Timer instellen
Als de geselecteerde bron BUZZER is, dan is de instelling TIMER UIT niet beschikbaar.
Geluidskwaliteit
Druk herhaaldelijk op de toets SLEEP op de afstandsbediening totdat “uit” wordt weergegeven.
Als u het systeem uitzet, annuleert u ook de slaaptimer.
U kunt de timer gebruiken om het apparaat op een bepaald tijdstip vanuit standby automatisch in
of uitschakelen.
De klok moet juist zijn ingesteld om de timer goed te laten werken.
1. Zet het apparaat in de standby-modus;
2. Druk op de toets TIMER om de functie in of uit te schakelen;
3. Houd de toets TIMER ingedrukt om de timer in te stellen. Selecteer de bron met , voer
vervolgens de inschakeltijd voor de timer in met de digitale toetsen op de afstandsbediening,
stel vervolgens het volume in met , voer daarna de uitschakeltijd voor de timer in met de
digitale toetsen op de afstandsbediening. Opmerking: voor alle stappen moet u op de toets
TIMER drukken om te bevestigen en naar de volgende stap te gaan. Als er binnen
10 seconden geen bewerking plaatsvindt, wordt het automatisch afgesloten.
Volumeregeling
Om het volume te verhogen of te verlagen draait u de knop VOL+/- op het apparaat of drukt u op
de toetsen VOL+/- op de afstandsbediening.
- Druk op de toets op de afstandsbediening om het geluid uit te zetten. Druk nogmaals op
de toets of druk op de toets VOL+/- om terug te keren naar normaal geluid.
Let op, als u het volume boven 26 instelt, en volgens aan- en uitzet, wordt het volume
automatisch naar de fabrieksinstelling teruggezet.
De lage tonen aanpassen
Druk op de toets USER op de afstandsbediening, en druk vervolgens op de toetsen BASS +/- op
de afstandsbediening om de lage tonen te verhogen/verlagen.
De hoge tonen aanpassen
Druk op de toets USER op de afstandsbediening, en druk vervolgens op de toetsen TREBLE +/-
op de afstandsbediening om de hoge tonen te verhogen/verlagen.
Vooraf ingestelde equalizer
U kunt geluidskarakteristieken zoals KLASSIEK/POP/ROCK/JAZZ/NORMAAL selecteren door op
de EQ-knop te drukken.
37
Page 40

Het gebruik van Bluetooth
U kunt tracks van een media-apparaat beluisteren als deze via Bluetooth op het apparaat is
Om storingen te voorkomen moet u de wifi op uw apparaat uitschakelen (Smartphone,
tablet, enz.) wanneer u muziek afspeelt via Bluetooth.
aangesloten.
Apparaten met Bluetooth koppelen.
U moet uw Bluetooth-apparaat met dit apparaat koppelen voordat u deze voor eerste keer gaat
verbinden.
Apparaten met Bluetooth koppelen
Opmerking:
- Het gebruiksbereik tussen dit apparaat en een Bluetooth-apparaat is ongeveer 10 meter
(zonder een object tussen het Bluetooth-apparaat en dit apparaat).
- Zorg ervoor dat u de mogelijkheden van het apparaat kent voordat u een Bluetooth-apparaat
op dit apparaat aansluit.
- Elk obstakel tussen dit apparaat en het Bluetooth-apparaat kan het gebruiksbereik
verminderen.
- Als de signaalsterkte zwak is, kan de verbinding met uw Bluetooth-apparaat worden
verbroken, maar het wordt in de koppelmodus automatisch opnieuw verbonden.
1. Druk in de AAN-modus op de BT-toets op de afstandsbediening om de modus Bluetooth te
selecteren of wijzig de bron naar BT door op op het apparaat te drukken. Als het apparaat
niet met een Bluetooth-apparaat is gekoppeld, gaat het systeem automatisch in de
koppelmodus; of u moet de toets PAIR indrukken om het koppelen te starten.
2. Activeer de Bluetooth-functie op uw apparaat en selecteer de zoekmodus. “Lenco DAR-070”
verschijnt op uw Bluetooth-apparaat.
3. Om de Bluetooth-functie te verbreken, schakelt u naar een andere functie op het apparaat of
schakelt u de functie op uw Bluetooth-apparaat uit.
Tips:
• Als er al een bestaande verbinding is, druk dan op de toets PAIR om de koppelmodus
opnieuw te activeren. De bestaande verbinding wordt onderbroken.
• Het apparaat wordt ook verbroken als uw apparaat buiten het gebruiksbereik is.
• Als u uw apparaat opnieuw met dit apparaat wilt verbinden, plaatst u het binnen het
gebruiksbereik.
• Als het apparaat buiten het gebruiksbereik is, controleer dan of het apparaat nog steeds op dit
apparaat is aangesloten wanneer het weer binnen het gebruiksbereik is.
• Als de verbinding verloren is, volgt u de bovenstaande instructies om het apparaat opnieuw
met dit apparaat te koppelen.
Vanaf een Bluetooth-apparaat naar muziek luisteren
- Als het aangesloten Bluetooth-apparaat het Advanced Audio Distribution Profile (A2DP)
ondersteunt, kunt u via dit apparaat de op het andere apparaat opgeslagen muziek beluisteren.
- Als het apparaat ook Audio Video Remote Control Profile (AVRCP) ondersteunt, kunt u de
afstandsbediening van dit apparaat gebruiken om de op het andere apparaat opgeslagen
muziek af te spelen.
1. Koppel uw apparaat met dit apparaat.
2. Speel muziek af via uw apparaat (als het A2DP ondersteunt).
3. Gebruik de meegeleverde afstandsbediening om het afspelen te bedienen (als het AVRCP
ondersteunt).
38
Page 41

- Druk op de toets om te pauzeren of het afspelen te hervatten.
AUDIO IN bedienen
DAB-bediening
- Druk op de toetsen of om een track over te slaan.
1. Druk op de toets AUDIO op de afstandsbediening of druk op de knop op het apparaat om
de gewenste bron te selecteren.
2. Bedien rechtstreeks de afspeelfuncties van uw audioapparaat.
3. Druk op de toets VOL +/- om het volume op het gewenste niveau in te stellen.
De DAB-radiomodus ontvangt DAB/DAB+ digitale radio en geeft
informatie over de zender en programma/track tijdens de
uitzending.
1. Scannen van stations
De eerste keer dat u het apparaat gebruikt of wanneer de lijst met zenders leeg is, voert de radio
automatisch een volledige scan uit om te zien welke zenders beschikbaar zijn. U kunt ook
handmatig scannen om de lijst met zenders bij te werken voor een van de volgende redenen:
• Soms zijn er nieuwe zenders beschikbaar.
• Zenders zijn gestopt of kunnen niet meer ontvangen worden (in de zenderlijst hebben
ongeldige zenders een vraagteken voor de naam).
• Als de ontvangst niet goed was na de oorspronkelijke scan (bijvoorbeeld de antenne stond
niet omhoog), kan dit leiden tot een lege of onvolledige lijst met beschikbare zenders.
• Als sommige zenders slechte ontvangst hebben waardoor het geluid wegvalt, kunt u alleen
zenders met goede signaalsterkte opgeven.
Volledig scannen
Selecteert MENU> Volledige scan.
Zodra een scan is voltooid keert de radio terug naar het
eerder geselecteerde zender of eerste zender in de
zenderlijst.
Een opgeslagen zender verwijderen die niet beschikbaar is
Selecteer MENU> Verwijderen
Hiermee worden alle ongeldige zenders verwijderd die in de zenderlijst worden aangegeven met
een "?" voor de zendernaam.
2. Zenders selecteren
Zenders wijzigen
Gebruik de toets op de afstandsbediening of
draai NAVIGATE op het apparaat om door de lijst met
zenders te bladeren, druk op op de
afstandsbediening of de knop OK op het apparaat om
van zender te veranderen.
Sommige zenders zijn secundaire services geassocieerd met een primaire zender en zijn
alleen beschikbaar op bepaalde tijden. Elke zender die bij de secundaire services hoort wordt
aangegeven met een dubbele pijl naar rechts gericht. De secundaire servicezenders staan
altijd naast de hoofdzender weergegeven, in plaats van normaal weergeven met een dubbele
pijl naar links gericht. In de secondaire zenderlijst in alfabetische volgorde.
39
Page 42

3. Voorkeuzes
Het apparaat beschikt over 40 voorkeuzezenders voor DAB.
Een zender opslaan als voorkeuzezender
Houd de toets PROGRAM 3~5 seconden ingedrukt
totdat Voorkeuzezender opgeslagen op het scherm
wordt weergegeven. Voorkeuzezenders (1-40)
worden als Leeg of met de huidige opgeslagen
zendernaam weergegeven.
Gebruik de toets op de afstandsbediening of
draai de knop NAVIGATE op het apparaat om een
voorkeuzezender te kiezen, druk vervolgens op de
toets op de afstandsbediening of OK op het
apparaat om de huidige zender op te slaan. Nadat het
opslaan van de voorkeuzezender wordt bevestigd,
wordt het scherm Nu afspelen weergegeven.
Een voorkeuzezender oproepen
Druk kort op de toets PROGRAM (op het scherm
verschijnt Voorkeuzezender oproepen). Selecteer een
van de voorkeuzezenders met de toetsen P+/- op de
afstandsbediening of de knop op het apparaat,
en druk vervolgens op de toets op de
afstandsbediening of de knop OK op het apparaat om
de weergegeven voorkeuzezender te kiezen.
4. Handmatig afstemmen
Naast de normale scanmethode kunt u ook handmatig afstemmen op een bepaalde
zender/frequentie. Dit kan handig zijn wanneer u uw antenne moet afstellen voor de best
mogelijke ontvangst en om een bepaalde zender te scannen voor het bijwerken van de zenderlijst.
Om handmatig af te stemmen
Druk op MENU > Handmatig afstemmen en gebruik vervolgens de toets op de
afstandsbediening of de knop NAVIGATE op het
apparaat om een bepaalde zender/frequentie weer te
geven, druk op de toets op de afstandsbediening of
de knop OK op het apparaat om op de
zender/frequentie af te stemmen.
Het scherm toont een live indicatie van de ontvangen
signaalsterkte op de geselecteerde frequentie.
Het aanpassen van uw antenne gebeurt in de weergegeven signaalsterkte.
Opmerking: De iets grotere rechthoek toont de drempel van de geluidskwaliteit. Als de
signaalsterkte, zoals aangegeven door de vaste rechthoeken, lager ligt dan deze drempel, zal
de geluidskwaliteit slechter zijn. Tegelijkertijd scant het apparaat naar een DAB-zender op de
geselecteerde frequentie en wordt de zenderlijst bijgewerkt met alle nieuwe zenders die
gevonden zijn. Om naar de gevonden zenders te luisteren, keert u terug naar het scherm Nu
afspelen en selecteert u zoals altijd de gewenste zender in de zenderlijst.
5. Afspeelinformatie
Tijdens het afspelen van de zender toont het scherm de naam
en DLS-informatie (Dynamic Label Segment) die door de
zender wordt uitgezonden, zoals programmanaam, tracktitel
en contactgegevens.
Als de DLS-info meer dan 16 tekens bevat, scrollt de informatie.
40
Page 43

Om meer informatie weer te geven
FM-bediening
Druk op de toets INFO.
Elke keer dat u op de toets INFO drukt, wordt de
volgende informatie weergegeven: DLS-tekst, DL
Plus-informatie (dit wordt alleen weergegeven als deze
door de zender wordt uitgezonden), signaalsterkte,
programmatype, ensemble-naam,
kanaalnummer/frequentie, waarde signaalfout, bitrate,
codec/DAB-variant, tijd en datum.
Opmerking: DL Plus toont aanvullende informatie die via de zenders kunnen worden
uitgezonden en tijdelijk op uw radio worden opgeslagen.
Om terug te keren naar het standaardscherm Nu afspelen, houdt u de toets INFO ingedrukt.
6. Andere instellingen
Dynamisch bereik compressie (DRC)
Deze functie vermindert het verschil tussen het zachtste en de
hardste geluid dat wordt uitgezonden.
Hierdoor worden zachte geluiden relatief harder, en harde
geluiden relatief zachter.
Opmerking: DRC werkt alleen wanneer beschikbaar gesteld
door de uitzender voor een specifiek station.
De instelling DRC wijzigen
Selecteer MENU > DRC> De beschikbare opties zijn:
DRC uit | laag | hoog.
De FM-radiomodus ontvangt analoge radio van de FM-band en
toont RDS-informatie (Radio Data System) over de zender en het
programma (tijdens de uitzending).
1. Zenders selecteren
Als u FM-radio voor eerste keer selecteert, is het apparaat ingesteld
op de laagste frequentie in de FM-band.
Een zender scannen in de FM-modus
Druk op de toets AMS. Het apparaat scant door de frequenties van
de FM-band, waarbij de huidige frequentie op het scherm wordt
weergegeven.
Het scannen stopt als er een signaal is gevonden. Het apparaat kan
worden ingesteld om te stoppen bij elke zender of alleen bij een
zender met een sterk signaal (voor details zie Scaninstellingen op
Pagina NL-18).
U kunt ook de toetsen gebruiken om af te stemmen in
stappen van 50 kHz.
2. Voorkeuzes
Het apparaat beschikt over 40 voorkeuzezenders voor FM, die op dezelfde manier werken als
voorkeuzezenders in de DAB-modus, zoals eerder beschreven in Voorkeuzezenders op pagina
NL-16.
41
Page 44

3. Afspeelinformatie
Tijdens het afspelen van de FM-radio toont het scherm de
frequentie, of als RDS-informatie beschikbaar is,
zendernaam en “Radiotekst”-informatie. Als er geen
informatie beschikbaar is, wordt alleen de frequentie en de
melding GEEN Radiotekst weergegeven.
Meer informatie over de uitzending bekijken
Druk op de toets INFO.
Elke keer als u op de toets INFO drukt, wordt de
volgende informatie weergegeven: RDS-radiotekst,
programmatype, frequentie, mono/stereo, tijd en
datum.
Terugkeren naar het standaardscherm Nu afspelen
Houd de toets INFO ingedrukt.
4. Andere instellingen
Scaninstellingen
Standaard stopt het FM-scannen bij elke beschikbare
zender (ALLE zenders). Dit kan leiden tot slechte
geluidskwaliteit van zwakke zenders.
Opties: Alle zenders | Alleen sterke zenders
De scaninstellingen wijzigen om alleen te stoppen
bij zenders met een goede signaalsterkte
Selecteer MENU > Scaninstellingen en vervolgens
Alleen sterke zenders.
Opmerking: In het voorbeeld aan de rechterkant toont
het sterretje dat “Alleen sterke zenders” de ingestelde waarde is.
Audio-instellingen
Standaard zijn alle zenders in stereo. Zwakke zenders
kunnen voor slechte geluidskwaliteit zorgen. De
geluidskwaliteit kan in mono worden verbeterd.
Opties: Stereo toegestaan | Mono forceren
Zwakke zenders in mono afspelen
Selecteer MENU > geluidsinstellingen> Mono
forceren.
Opmerking: In het voorbeeld aan de rechterkant toont
het sterretje dat "Stereo toegestaan" de ingestelde
waarde is.
42
Page 45

Bediening CD
Geschikte schijven
Type schijven
Logo van de schijf
Opgenomen inhoud
CD-R (CD Recordable - Audio/MP3/WMA)
AUDIO/MP3/WMA
CD-RW (CD-Rewritable - Audio/MP3/WMA)
AUDIO/MP3/WMA
AUDIO-CD (Compact Disc Digital Audio)
AUDIO
Sommige opgenomen bestanden kunnen door het type en formaat van de schijf of de conditie van
de opname mogelijk niet worden afgespeeld.
Ondersteunt geen 8 cm mini CD’s.
In stopmodus drukt u op de toets om de schijf af te spelen.
Tijdens het afspelen van de cd wordt het huidige nummer en de verstreken tijd weergegeven.
CD afspelen
1. Druk herhaaldelijk op de knop bovenop het apparaat totdat “CD” wordt weergegeven of
druk op de toets CD op de afstandsbediening om de cd-functie te selecteren.
2. Plaats de schijf in het klepje. Het apparaat leest de schijf en speelt het automatisch af.
3. Druk op de knop om de schijf uit te werpen.
4. Druk op de toets om het afspelen te pauzeren.
5. Om te hervatten drukt u nogmaals op de toets .
6. Druk op de knop op de afstandsbediening om het afspelen van de schijf te stoppen.
Zoeken overslaan of Zoeken en afspelen
• Druk één of meerdere keren op de toets om terug te gaan naar één of meer tracks op de
schijf.
• Druk één of meerdere keren op de toets om verder te gaan naar één of meer tracks op
de schijf.
• Houd de toets op de afstandsbediening ingedrukt om achteruit te zoeken naar de positie
waar u de track u wilt afspelen.
• Houd de toets op de afstandsbediening ingedrukt om vooruit te zoeken naar de positie
waar u de track u wilt afspelen.
Herhaaldelijk afspelen
Voor cd-schijf kan EEN en ALLES herhaaldelijk afspelen worden ingesteld door herhaaldelijk op
de toets REPEAT op de afstandsbediening te drukken.
43
Page 46

EN
NL
ALL
ALLE
DIR
DIR
OFF
UIT
SINGLE
SINGLE (ENKEL)
Max. aantal kanalen is 20.
De USB gebruiken
Willekeurig afspelen
Voor de cd-schijf kan willekeurig afspelen worden ingesteld door op de toets RANDOM op de
afstandsbediening te drukken.
Programmering
Tijdens het afspelen van de muziek drukt u op de toets op de afstandsbediening, en drukt u op
de toets PROGRAM, en vervolgens wordt de volgende informatie op het scherm weergegeven.
U kunt de track met de digitale toets op de afstandsbediening kiezen die opgeslagen is als P01,
P02 enz. Druk op de toets PROGRAM om naar het volgende ingestelde kanaal te gaan.
Nadat u klaar bent met het instellen, drukt u op de toets om te voltooien.
Bij het afspelen van programma’s zijn de digitale toetsen op de afstandsbediening ongeldig. U
kunt alleen op de toetsen drukken om van track te veranderen.
Wijzig de bron of druk tweemaal op de toets om de instelling van het programma te wissen.
Sluit een USB-massaopslagapparaat (waaronder USB-flashgeheugen, USB-flashdrives of
geheugenkaarten) op dit apparaat aan om van de op het apparaat opgeslagen muziek te genieten
via de krachtige luidsprekers van dit apparaat.
1. Steek de stekker van het USB-apparaat in de poort aan de achterkant het apparaat.
2. Druk herhaaldelijk op de knop bovenop het apparaat of druk op de toets USB op de
afstandsbediening om de USB-functie te selecteren.
3. De op het apparaat opgeslagen muziek wordt automatisch afgespeeld.
Herhaaldelijk afspelen
Voor het usb-apparaat kan EEN en ALLES herhaaldelijk afspelen worden ingesteld door
herhaaldelijk op de toets REPEAT op de afstandsbediening te drukken.
44
Page 47

EN
NL
ALL
ALLE
DIR
DIR
OFF
UIT
SINGLE
SINGLE (ENKEL)
Max. aantal kanalen is 20.
Als het USB-apparaat beschadigd is, kan dit apparaat de opgeslagen muziek niet vinden en
afspelen.
Formatteer het USB-massaopslagapparaat en herstel de muziek op het apparaat met een
computer.
Willekeurig afspelen
Voor muziekbestanden op een usb-apparaat kan willekeurig afspelen worden ingesteld door op de
toets RANDOM op de afstandsbediening te drukken.
Programmering
Tijdens het afspelen van de muziek drukt u op de toets op de afstandsbediening, en drukt u op
de toets PROGRAM, en vervolgens wordt de volgende informatie op het scherm weergegeven.
U kunt de track met de digitale toets op de afstandsbediening kiezen die opgeslagen is als P01,
P02 enz. Druk op de toets PROGRAM om naar het volgende ingestelde kanaal te gaan.
Nadat u klaar bent met het instellen, drukt u op de toets om te voltooien.
Bij het afspelen van programma’s zijn de digitale toetsen op de afstandsbediening ongeldig. U
kunt alleen op de toetsen drukken om van track te veranderen.
Wijzig de bron of druk tweemaal op de toets om de instelling van het programma te wissen.
Voor apparaten met een USB-kabel:
1. Steek een stekker van de USB-kabel in de
USB-aansluiting op de achterkant van het apparaat.
2. Steek de andere stekker van de USB-kabel in de
USB-uitgang van het USB-apparaat.
USB opladen (alleen 5V 1A aansluiting)
U kunt een USB-kabel aansluiten op de 5V 1A USB-aansluiting om een mobiele apparaat op
te laden.
45
Page 48

Onderhoud
Het reinigen van het apparaat
Zorg ervoor dat vóór het reinigen de stekker van het apparaat uit het stopcontact is gehaald.
EN
NL
Playback side
Afspeelzijde
• Om het apparaat te reinigen, veeg de behuizing af met een licht vochtige, niet-pluizende
doek.
• Gebruik geen schoonmaakmiddelen die alcohol, ammonia of schuurmiddelen bevatten.
• Spuit niet op of nabij het apparaat.
Omgaan met cd's
• Raak de afspeelbare zijde van de cd niet aan.
• Plak geen papier of tape op de cd.
Het reinigen van CD's
Vingerafdrukken en stof op de cd veroorzaken verstoringen in de beeld- en geluidskwaliteit. Veeg
de schijf met een zachte doek af vanaf het midden naar buiten. Houd de cd altijd schoon.
• Als u het stof niet met een zachte doek kunt afvegen, maak dan de cd met een licht vochtige
doek schoon en tenslotte met een droge doek.
• Gebruik geen oplosmiddelen, zoals thinner, benzine, in de handel verkrijgbare
reinigingsmiddelen of antistatische spray. Zij kunnen de cd beschadigen.
Het opslaan van cd's
Sla cd's niet op plaatsen op, die zijn blootgesteld aan direct zonlicht of die in de buurt zijn van
warmtebronnen.
• Sla cd's niet op plaatsen op, die zijn blootgesteld aan vocht en stof, zoals een badkamer, of in
de buurt van een luchtbevochtiger.
• Bewaar schijven verticaal in een doosje. De schijven kunnen kromtrekken wanneer ze
gestapeld of op objecten buiten het doosje gelegd worden.
46
Page 49

Probleemoplossing
Geen spanning
• Zorg ervoor dat het netsnoer stevig is aangesloten.
• Zorg ervoor dat het apparaat is ingeschakeld.
De afstandsbediening werkt niet
• Gebruik de afstandsbediening in de buurt van het apparaat.
• Richt de afstandsbediening op de afstandsbedieningssensor op het apparaat.
• Vervang de batterijen in de afstandsbediening met nieuwe batterijen.
• Verwijder eventuele obstakels tussen de afstandsbediening en het apparaat.
Er is luid gezoem en ruis te horen
• De stekkers en aansluitingen zijn vies. Veeg ze af met een doek die licht bevochtigd is met
een geschikte, niet-schurende reinigingsmiddel.
Het apparaat reageert niet wanneer er op een toets wordt gedrukt.
• Het apparaat kan tijdens het gebruik vastlopen. Trek de stekker uit het stopcontact en steek
daarna opnieuw in om deze te resetten.
Geen geluid
• Zorg ervoor dat het apparaat niet is gedempt. Druk op de toets of V + om het geluid te
hervatten.
• Zorg ervoor dat de geluidsinstelling van de ingangsbron (bijvoorbeeld tv, spelcomputer,
dvd-speler, enz.) op de PCM-modus is ingesteld terwijl u Optische aansluiting gebruikt.
Ik kan de Bluetooth-naam van dit apparaat niet op mijn Bluetooth-apparaat vinden om te
koppelen via Bluetooth
• Zorg ervoor dat het apparaat is ingeschakeld.
• Zorg ervoor dat de Bluetooth-functie op uw Bluetooth-apparaat is ingeschakeld.
• Het apparaat heeft een Bluetooth-functie die binnen 10 meter een signaal kan ontvangen.
De schijf is geplaatst maar het apparaat begint niet af te spelen
• Zorg ervoor dat het label van de schijf naar boven is gericht.
• Zorg ervoor dat de schijf schoon is.
• De PAUZE-modus is misschien geactiveerd en moet worden gedeactiveerd.
• De schijf kan beschadigd of vies zijn; controleer en reinig de schijf.
De schijf hapert
Zorg ervoor dat het apparaat op een veilige plek staat. Vibraties of schokken kunnen ervoor
zorgen dat de schijf hapert.
FM-Ontvangst
• Zorg ervoor dat de FM-antennekabel volledig is uitgetrokken.
• Elektrische interferentie in uw huis kan een slechte ontvangst tot gevolg hebben. Verplaats
het toestel uit hun buurt (vooral apparaten met motoren en transformatoren).
Tijdens het afspelen schakelt het apparaat automatisch uit
• Verhoog het geluidsniveau van de speler op uw ingangsbron, zoals dvd-speler/tv enz.
Storingen in de luidsprekers
• Controleer of er in de buurt van het apparaat geen mobiele telefoon ligt.
47
Page 50

Specificaties
Stroomvoorziening:
AC 200-240V~50/60Hz
Opgenomen vermogen:
25 Watt
Opgenomen vermogen (standbymodus):
< 1 Watt
Uitgangsvermogen:
2 x 18 Watt
Luidsprekerimpedantie:
8 Ohm
5V 1A uitgang:
5V 1A uit
USB:
5V 500mA
S/N (A gewicht):
» 65 dB
THD (1kHz,1W):
0.5%
Frequentiebereik:
40Hz~20KHz
Frequentiebereik DAB:
174-240 MHz
FM-frequentiebereik:
87,5-108MHz
Afmetingen:
396 x120 x 205 mm
Bluetooth-versie:
V2.1 + EDR
Werkbereik:
ong. 10 meter
Zendfrequentie:
2.402 ~ 2.480GHz
Protocollen:
A2DP/AVRCP
• Door de voortdurende herziening en verbetering van onze producten kunnen de specificaties
zonder voorafgaande kennisgeving worden gewijzigd.
• Dit product werkt op 2400-2483,5 MHz en is aangewezen om alleen te worden gebruikt in een
normal huishoudelijke omgeving. Dit product is geschikt voor dit doel binnen alle EU-landen.
48
Page 51

NL
Dit symbool geeft aan dat het betreffende elektrische product of de accu/batterij
niet mag worden verwijderd als algemeen huishoudelijk afval in Europa. Zorg
voor een juiste afvalverwerking door het product en de accu/batterij in
overeenstemming met alle van toepassing zijnde lokale wetten voor het
verwijderen van elektrische apparatuur of accu's/batterijen te verwijderen. Als u
dit doet, helpt u de natuurlijke hulpbronnen te behouden en de standaard van
milieubescherming te verbeteren bij de behandeling en verwijdering van
elektrisch afval (Afgedankte Elektrische en Elektronische Apparatuur).
1. Garantie
Lenco biedt service en garantie aan overeenkomstig met de Europese wetgeving. Dit houdt in dat
u, in het geval van reparaties (zowel tijdens als na de garantieperiode), uw lokale handelaar moet
contacteren.
Belangrijke opmerking: Het is niet mogelijk om producten die moeten worden gerepareerd
rechtstreeks naar Lenco te sturen.
Belangrijke opmerking: De garantie verloopt als een onofficieel servicecenter het apparaat op wat
voor manier dan ook heeft geopend, of er toegang toe heeft gekregen.
Het apparaat is niet geschikt voor professioneel gebruik. In het geval van professioneel gebruik
worden alle garantieverplichtingen van de fabrikant nietig verklaard.
2. Disclaimer
Er worden regelmatig updates in de firmware en/of hardwarecomponenten gemaakt. Daardoor
kunnen gedeelten van de instructie, de specificaties en afbeeldingen in deze documentatie
enigszins verschillen van uw eigen situatie. Alle onderwerpen die staan beschreven in deze
handleiding zijn bedoeld als illustratie en zijn niet van toepassing op specifieke situaties. Aan de
beschrijving in dit document kunnen geen rechten worden ontleend.
3. Afvoer van het oude apparaat
4. Service
Bezoek voor meer informatie en helpdeskondersteuning www.lenco.com
Lenco Benelux BV, Thermiekstraat 1a, 6361 HB, Nuth, Nederland.
49
Page 52

Deutsch
DAR-070
Sicherheitshinweise
ACHTUNG:
Die zweckentfremdete Bedienung, Benutzung oder Einstellung der Prozeduren kann zu gefährlichen
Unfällen durch Strahlen führen.
Dieses Gerät darf außer von qualifizierten Fachleuten von niemand anderem repariert oder
eingestellt werden.
VORSICHTSMASSNAHMEN VOR DER BENUTZUNG
BEFOLGEN SIE IMMER FOLGENDE ANWEISUNGEN:
1. Benutzen Sie das Gerät nicht in der Nähe von Wasser.
2. Benutzen Sie zur Reinigung ein nur leicht befeuchtetes Tuch.
3. Blockieren Sie keine Lüftungsöffnungen. Wenn Sie das Gerät auf ein Regal stellen, lassen Sie um
das gesamte Gerät 5 cm (2”) freien Platz.
4. Stellen Sie das Gerät entsprechend den Anweisungen der mitgelieferten Bedienungsanleitung
auf.
5. *Treten Sie nicht auf das Netzteil und klemmen Sie es auch nicht ein. Seien Sie im näheren
Bereich des Steckers und der Herausführungen des Kabels besonders vorsichtig. Stellen Sie
keine schweren Gegenstände auf das Netzteil, weil es dadurch beschädigt werden könnte.
Halten Sie das gesamte Gerät außerhalb der Reichweite von Kindern! Durch Spielen mit dem
Netzkabel können sie sich ernsthafte Verletzungen zuziehen.
6. *Trennen Sie das Gerät während eines Gewitters oder bei längerer Nichtbenutzung vom Netz.
7. Halten Sie das Gerät von Hitzequellen wie Radiatoren, Heizern, Öfen, Kerzen oder anderen
hitzeerzeugenden Produkten oder offenen Flammen fern.
8. Meiden Sie bei der Nutzung des Produkts die Nähe starker Magnetfelder.
9. Elektrostatische Entladungen können die normale Verwendung von diesem Gerät stören. Sollte
dies geschehen, führen Sie einfach einen Reset aus und starten Sie dann das Gerät
entsprechend den Anweisungen dieser Bedienungsanleitung neu. Gehen Sie besonders bei
Datenübertragungen mit dem Gerät vorsichtig um und führen Sie diese nur in einer
antielektrostatischen Umgebung aus.
10. Warnung! Niemals Gegenstände durch die Lüftungsschlitze oder Öffnungen in das Gerät
stecken. Im Gerät sind hohe Spannungen vorhanden und das Einführen von Gegenständen kann
zu Stromschlag bzw. zu Kurzschlüssen der internen Teile führen. Aus dem gleichen Grund kein
Wasser oder Flüssigkeiten in das Gerät geben.
11. Benutzen Sie das Gerät nicht in nasser oder feuchter Umgebung wie Bad, Dampfküche oder in
der Nähe von Schwimmbecken.
12. Benutzen Sie das Gerät nicht bei Kondensationsgefahr.
13. Obwohl dieses Gerät unter größter Sorgfalt und vor Auslieferung mehrmals überprüft wurde,
können trotzdem wie bei jedem anderen elektrischen Gerät auch Probleme auftauchen.
Trennen Sie das Gerät im Falle einer Rauchentwicklung, starker Hitzeentwicklung oder jeden
anderen unnatürlichen Erscheinung sofort vom Netz.
14. Dieses Gerät ist durch eine Stromquelle wie auf dem Typenschild angegeben zu betreiben.
Halten Sie bei Unsicherheiten über die Art Ihrer Stromversorgung in Ihrer Wohnung
Rücksprache mit Ihrem Händler oder Ihrer Stromzuliefererfirma.
15. *Die Wandsteckdose muss sich in der Nähe des Geräts befinden und einfach zu erreichen sein.
16. *Steckdosen und Verlängerungsleitungen nicht überlasten. Eine Überlastung kann zu
Brandgefahr bzw. Stromschlägen führen.
17. *Geräte der Schutzklasse 1 sind an eine Netzsteckdose mit Schutzleiter anzuschließen.
18. *Geräte der Schutzklasse 2 benötigen keinen Schutzleiteranschluss.
19. Halten Sie Nagetiere vom Gerät fern. Nagetiere lieben es, am Netzkabel zu nagen.
50
Page 53

20. *Halten Sie den Netzstecker in der Hand, wenn Sie ihn aus der Netzsteckdose ziehen. Ziehen Sie
ihn nicht durch Zerren am Kabel heraus. Das kann zu einem Kurzschluss führen.
21. Vermeiden Sie es, das Gerät auf Oberflächen aufzustellen, die zu Schwingungen oder Stoß
neigen.
22. Verwenden Sie einen trockenen, sauberen Lappen für die Reinigung. Benutzen Sie niemals
Lösungsmittel oder Flüssigkeiten auf Ölbasis. Benutzen Sie zum Entfernen hartnäckiger Flecken
ein feuchtes Tuch mit mildem Reinigungsmittel.
23. Der Hersteller haftet nicht für Schäden oder Verluste durch Fehlfunktion, Zweckentfremdung
oder Modifikation des Geräts oder durch Wechseln der Batterien.
24. Unterbrechen Sie die Verbindung nicht während einer Formatierung oder einer
Datenübertragung. Bei Unterbrechung drohen Datenverlust und Datenbeschädigung.
25. Wenn das Gerät eine USB-Wiedergabefunktion besitzt, dann stecken Sie den USB-Stick direkt in
das Gerät. Verwenden Sie kein USB-Verlängerungskabel, weil die erhöhte Störanfälligkeit zu
Datenverlust führen könnte.
26. Das Gerät darf weder Tropf- noch Spritzwasser ausgesetzt werden und es dürfen keine mit
Flüssigkeit gefüllten Behälter wie z.B. Vasen auf das Gerät oder in der Nähe des Gerätes gestellt
werden.
27. *Um das Gerät vollständig vom Netz zu trennen, muss der Netzstecker des Gerätes vom
Stromnetz getrennt werden, wobei die zu trennende Einheit den Netzstecker des Gerätes
bezeichnet.
28. Wenn das Gerät über Batterien betrieben wird, dann sind diese vor übermäßiger Wärme wie
Sonneneinstrahlung, Feuer oder ähnlichem zu schützen.
29. Bei der Batterieentsorgung sind die Entsorgungsvorschriften einzuhalten.
30. Das Gerät kann nur bei moderaten Temperaturen verwendet werden. Eine Nutzung in extrem
kalten oder heißen Umgebungen sollte vermieden werden.
31. Das Typenschild befindet sich an der Unter- oder Rückseite des Gerätes.
32. Dieses Gerät ist nicht zur Benutzung durch Personen (auch Kinder) mit physischen, sensorischen
oder mentalen Beeinträchtigungen oder ohne ausreichender Erfahrung vorgesehen, es sei
denn, sie werden durch eine verantwortliche Person beaufsichtigt oder wurden in die
ordnungsgemäße Bedienung des Gerätes durch eine für ihre Sicherheit verantwortlichen
Person eingewiesen.
33. Dieses Produkt ist nur für den nicht-professionellen Gebrauch und nicht für gewerbliche oder
industrielle Zwecke bestimmt.
34. Stellen Sie sicher, dass das Gerät in einer stabilen Position aufgestellt ist. Schäden, die durch
Verwendung dieses Produkts in einer instabilen Position oder durch Nichtbeachtung der
anderen in diesem Handbuch enthaltener Warnungen und Vorwarnung entstehen, werden
nicht durch die Garantie abgedeckt.
35. Entfernen Sie niemals das Gehäuse dieses Geräts.
36. Stellen Sie dieses Gerät niemals auf andere elektrische Geräte.
37. Verwenden oder bewahren Sie dieses Produkt nicht an Orten auf, in denen es direkter
Sonneneinstrahlung, Hitze, übermäßigem Staub oder Vibration ausgesetzt ist.
38. Ermöglichen Sie Kindern nicht den Zugriff auf Plastiktüten.
39. Benutzen Sie nur vom Hersteller empfohlene Erweiterungen/Zubehörteile.
40. Sprechen Sie alle Eingriffe mit qualifiziertem Fachpersonal ab. Eingriffe werden notwendig,
wenn das Gerät in irgendeiner Weise beschädigt wurde, beispielsweise am Netzkabel oder am
Netzstecker oder wenn Flüssigkeit in das Gerät gelangt ist bzw. Gegenstände in das Gerät
gefallen sind, das Gerät Regen oder Feuchtigkeit ausgesetzt war, es heruntergefallen ist oder
nicht ordnungsgemäß funktioniert.
41. *Verwenden Sie weder ein beschädigtes Netzkabel noch einen beschädigten Stecker oder eine
lockere Steckdose. Es besteht Brand- und Stromschlaggefahr.
42. Längeres Hören lauter Töne aus einem Musikgerät kann zum zeitweiligen oder permanenten
Hörverlust führen.
AUFBAU
• Packen Sie alle Teile aus und entfernen Sie danach die Schutzmaterialien.
51
Page 54

*Schließen Sie das Gerät nicht eher an das Netz an, bevor Sie die Netzspannung überprüft haben
Vielen Dank, dass Sie sich zum Kauf eines DAR-070 entschieden haben.
Wir empfehlen Ihnen, einige Zeit darauf zu verwenden, dieses Bedienungshandbuch zu lesen, um
alle Bedienmöglichkeiten, die das Gerät bietet, vollständig zu verstehen. Sie finden auch eine
Anleitung zur Fehlerbehebung, die Ihnen dabei hilft, Probleme zu beheben.
Lesen Sie alle Sicherheitsanweisungen sorgfältig vor dem Gebrauch durch und bewahren Sie die
Bedienungsanleitung für spätere Nachschlagezwecke auf.
und alle anderen notwendigen Verbindungen hergestellt sind.
*Diese Anleitung gilt nur für Produkte, die über ein Netzkabel oder einen Netzadapter verfügen.
52
Page 55

Auspacken
Entfernen Sie die gesamte Verpackung von dem Gerät. Bewahren Sie die Verpackung auf.
EN
DE
main unit
Hauptgerät
AAA Batteries
AAA Batterien
Remote Control
Fernbedienung
3.5mm to 3.5mm cable
3,5mm bis 3,5mm Kabel
AC Power Cord
Netzkabel
Instruction Manual
Bedienungsanleitung
Sollten Sie diese entsorgen, beachten Sie bitte die örtlichen Regelungen.
Die folgenden Komponenten sind enthalten:
53
Page 56

Produktübersicht
Vorderansicht
Rückansicht
1. Fernbedienungssensor
2. Anzeige
3. Standby-LED
4. Laufwerktüre
5.
• Drücken Sie die Taste, um die nächste Spur im USB oder auf der CD auszuwählen.
• Drücken und halten Sie die Taste, um die Senderliste im DAB und FM anzuzeigen.
• Drücken Sie die Taste, um die vorgewählte Senderliste im DAB und FM anzuzeigen.
6.
• Drücken Sie die Taste, um die vorhergehende Spur im USB und auf der CD auszuwählen.
• Drücken und halten Sie die Taste, um die Senderliste im DAB und FM anzuzeigen.
• Drücken Sie die Taste, um die vorgewählte Senderliste im DAB und FM anzuzeigen.
7.
• Drücken Sie die Taste, um die CD, den USB und BT zu stoppen.
MENÜ
• Drücken Sie die Taste, um das Menü im DAB und FM anzuzeigen.
54
Page 57

8. EQ
• Drücken Sie die Taste, um die Klangeigenschaften auszuwählen: KLASSIK/POP/ROCK/
JAZZ/NORMAL.
9.
• Drücken Sie die Taste, um die Quelle nach dem Einschalten zu ändern.
10.
• Drücken Sie die Taste zum Ein- und Ausschalten.
11. NAVIGIEREN
• Drehen Sie den Knopf, um auf dem Menübildschirm im DAB und FM nach oben oder unten zu
gehen.
OK
• Drücken Sie die Taste, um das nächste Menü im DAB und FM auszuwählen oder zu
überspringen.
VOL+/VOL-
• Drehen Sie den Knopf, um die Lautstärke zu erhöhen und zu verringern.
12. INFO
• Drücken Sie die Taste, um die ID3 Information auf der CD und dem USB ein- und
auszuschalten.
• Drücken Sie die Taste, um die Informationen im DAB und FM anzusehen.
13. KOPPELN
• Drücken und halten Sie die Taste, um die Kopplungsfunktion im BT zu aktivieren und/oder
das bestehende gekoppelte BT Gerät zu trennen.
• Drücken Sie die Taste, um die CD einzulegen/auszuwerfen.
14. 5V 1A Ausgang
• Anschließen, um auf Mobilgerät umzuschalten.
15. AUDIO Eingang
16. USB
• Anschließen, um ein USB Gerät für die Musikwiedergabe anzuschließen.
17. Kopfhörer
18. Ein/Aus-Schalter
19. AC Eingang
55
Page 58

Fernbedienung
1.
• Schalten Sie auf dem Gerät zwischen EIN und STANDBY Modus um.
2. AMS
• Drücken Sie die Taste, um automatisch nach einem Sender im FM zu suchen. Drücken Sie
bei der Suche noch einmal die Taste, um den Suchlauf zu stoppen.
3. WIEDERHOLE
• Drücken Sie die Taste, um einen wiederholten Wiedergabemodus auf der CD und im USB
auszuwählen.
56
Page 59

4. EQ
• Drücken Sie die Taste, um die Klangeigenschaften auszuwählen: KLASSIK/POP/ROCK/
JAZZ/NORMAL.
5. BASS+/-
• Drücken Sie die Taste, um den BASS im USER (BENUTZER) Modus einzustellen.
6. BENUTZER
• Drücken Sie die Taste, um zu ermöglichen den Bass und die Höhen einzustellen.
7. MENÜ
• Drücken Sie die Taste, um das Menü im DAB und FM anzuzeigen.
8. KOPPELN
• Drücken und halten Sie die Taste, um die Kopplungsfunktion im BT zu aktivieren und/oder
das bestehende gekoppelte BT Gerät zu trennen.
9.
• Drücken und halten Sie die Taste für Schnell Rückwärts auf der CD und im USB;
• Drücken Sie die Taste, um die vorhergehende Spur auf der CD und im USB auszuwählen;
• Drücken Sie die Taste, um die Senderliste im DAB anzuzeigen;
• Drücken Sie die Taste, um im Menübildschirm im DAB und FM nach oben zu gehen;
• Drücken Sie die Taste zur Feineinstellung im FM.
10. MO/ST
• Drücken Sie die Taste, um den Stereo- oder Monoklangmodus einzustellen.
11. P+/-
• Drücken Sie die Taste, um an den Anfang des aktuellen, vorhergehenden, nachfolgenden
Albums zu springen;
• Drücken Sie die Taste, um die vorhergehende, nächste voreingestellte Spur im DAB und FM
auszuwählen;
• Drücken und halten Sie die Taste zur manuellen Einstellung im FM.
12. 0-9 Numerisch.
13. INFO
• Drücken Sie die Taste, um die ID3 Information auf der CD und im USB ein- und auszuschalten;
• Drücken Sie die Taste, um die Informationen im DAB und FM anzusehen.
14.
• Drücken Sie die Taste, um die CD einzulegen/auszuwerfen.
15. AUTOMATISCHE ABSCHALTUNG
• Drücken Sie die Taste, um die Schlummerfunktion einzustellen.
16. CD/USB/DAB/FM/BT/AUDIO
• Drücken Sie die Taste, um die entsprechende AUDIOQUELLE auszuwählen.
(CD/USB/DAB/FM/BT/AUDIO)
17. RANDOM (ZUFALL)
• Drücken Sie die Taste, um Spuren auf der CD und im USB zufällig abzuspielen.
57
Page 60

18. TREBLE +/- (HÖHEN)
• Drücken Sie die Taste, um die HÖHEN im USER (BENUTZER) Modus einzustellen.
19. PROGRAM
• Drücken Sie die Taste, um auf der CD, im USB, DAB und FM zu programmieren.
20. DIM (DIMMEN)
• Drücken Sie die Taste, um verschiedene Helligkeitsstufen für die Bildschirmanzeige
auszuwählen.
21.
• Drücken Sie die Taste zum Abspielen/Stoppen im BT, CD und USB;
• Um das folgende Menü in DAB und FM auszuwählen oder zu überspringen.
22.
• Drücken und halten Sie die Taste für Schnellvorwärts auf der CD und im USB;
• Drücken Sie die Taste, um die nächste Spur auf der CD und im USB auszuwählen;
• Drücken Sie die Taste, um die Senderliste im DAB anzuzeigen;
• Drücken Sie die Taste, um im Menübildschirm im DAB und FM nach unten zu gehen;
• Drücken Sie die Taste zur Feineinstellung im FM.
23.
• Drücken Sie die Taste, um die Wiedergabe der CD und des USB zu stoppen.
24.
• Drücken Sie die Taste, um den Ton stumm zu schalten oder wieder einzuschalten.
25. UHR
• Drücken und halten Sie die Taste, um die Uhr einzustellen.(funktioniert nur im Standby Modus)
26. V+/-
• Drücken Sie die Taste, um die Lautstärke zu erhöhen/verringern.
27. TIMER (funktioniert nur im Standby Modus)
• Drücken Sie die Taste, um die Zeitschaltuhrfunktion ein-/auszuschalten;
• Drücken und halten Sie die Taste zur Einstellung der Zeitschaltuhr.
28. ANZEIGE
• Drücken Sie die Taste, um das Datum im Einschaltmodus anzuzeigen.
58
Page 61

Fernbedienung bedienen
1. Drücken und schieben Sie die Abdeckung nach hinten,
Betriebsbereich der Fernbedienung
• Stellen Sie sicher, dass sich keine Hindernisse zwischen dem
Fernbedienungssensor des Gerätes und der Fernbedienung
befinden. Wenn Sie das Gerät auf einem TV Standfuß, usw.
installieren, kann der Fernbedienungsbereich je nach Dicke und
Farbe des Glases des TV Standfußes abnehmen.
• Setzen Sie den Infrarot Fernbedienungssensor nicht direktem
Sonnenlicht oder anderem starkem Licht, wie z.B.
wechselgerichteten Leuchtstofflampen aus.
EN
DE
Within about 5 m
Innerhalb von ca. 5 m
um das Batteriefach der Fernbedienung zu öffnen.
2. Legen Sie zwei AAA Batterien ein.
Stellen Sie sicher, dass die (+) und (-) Pole der Batterien
den Angaben (+) und (-) auf dem Batteriefach
entsprechen.
3. Schließen Sie das Batteriefach.
Batterien benutzen
• Unsachgemäße oder falsche Verwendung von Batterien kann zu Korrosion oder Auslaufen
der Batterien führen, das zu Brand bzw. Personen- oder Sachschäden führen kann.
• Legen Sie die Batterien entsprechend der Polaritätsangaben (+ und -) im Batteriefach ein.
• Wenn die Batterien aufgebraucht sind, funktioniert die Fernbedienung nicht.
• Verwenden Sie nur den in diesem Handbuch angegebenen Batterietyp.
• Entsorgen Sie verwendete Batterien nicht im Haushaltsmüll. Entsorgen Sie diese
entsprechend der örtlichen Regelungen.
Fernbedienung benutzen
Achten Sie auf Ihre Fingernägel, wenn Sie die Batterieabdeckung und die Batterien entfernen.
• Lassen Sie die Fernbedienung nicht fallen.
• Lassen Sie die Fernbedienung durch nichts beeinträchtigen.
• Vermeiden Sie Wasserspritzer oder andere Flüssigkeiten auf der Fernbedienung.
• Legen Sie die Fernbedienung nicht auf nasse Gegenstände.
• Legen Sie die Fernbedienung nicht in direktes Sonnenlicht oder in die Nähe von extremen
Wärmequellen.
• Entfernen Sie die Batterien aus der Fernbedienung, wenn Sie diese über längere Zeit nicht
verwenden, da Korrosion oder Batterieleckagen auftreten können und zu Körperverletzungen
und/oder Eigentumsschäden und/oder Bränden führen können.
Richten Sie die Fernbedienung auf das Gerät in einer Entfernung von
nicht mehr als 5 Metern vom Fernbedienungssensor und innerhalb von
60º horizontal und 20º vertikal der Vorderseite des Gerätes. Der
Betriebsabstand kann je nach Helligkeit im Zimmer variieren.
59
Page 62

Anschlüsse
Wechselstromanschluss
EN
DE
sound board inputs
Soundplatineneingänge
DVD player/TV outputs
DVD Player/TV Ausgänge
Achtung:
- Risiko eines Produktschadens! Stellen Sie sicher, dass die Stromversorgungsspannung der
Spannung entspricht, die auf dem Typenschild an der Rückseite oder Unterseite des Gerätes
aufgedruckt ist.
- Bevor Sie das Wechselstromkabel anschließen stellen Sie sicher, dass Sie alle anderen
Anschlüsse fertiggestellt haben.
- Schließen Sie das kleine Ende der Wechselstromsteckbuchse an die Rückseite des Gerätes
an und stecken Sie den Stecker des Wechselstromkabels in eine
Standardwechselstromsteckdose.
- Achten Sie darauf, dass das Stromkabel von der Steckdose ausgesteckt wird, wenn das
System über einen längeren Zeitraum nicht verwendet wird.
- Der NETZSTECKER oder eine Gerätesteckvorrichtung ist die Trennvorrichtung des Produkts;
die Trennvorrichtung muss immer leicht zugänglich sein.
Analoger Eingangsanschluss
Schließen Sie die DVD Player/TV Ausgänge an analoge Eingänge der Soundplatine an.
- Verwenden Sie das mitgelieferte 3,5mm RCA Audiokabel, um die DVD Player/TV Ausgänge
an die AUX (L/R) Eingangssteckdose der Soundplatine anzuschließen.
60
Page 63

Schließen Sie die DVD Player/TV Ausgänge an analoge Eingänge der Soundplatine an.
EN
DE
sound board inputs
Soundplatineneingänge
DVD player/TV outputs
DVD Player/TV Ausgänge
• Nicht alle Kopfhörer und Ohrhörer werden unterstützt.
• Übermäßiger Schalldruck der Ohrhörer und Kopfhörer kann zu Gehörverlust führen.
• Stellen Sie sicher, dass Sie die Lautstärke herunterdrehen, bevor Sie die Kopfhörer und
Ohrhörer anschließen oder aufsetzen.
- Verwenden Sie ein Line-In Audiokabel (Φ 3,5mm) (nicht im Lieferumfang enthalten), um die
DVD Player/TV Ausgänge an die AUDIO Eingangssteckdose der Soundplatine
anzuschließen. Sie können auch eine Kopfhörersteckdose eines externen Audio Gerätes an
diese AUDIO IN Steckdose am Gerät anschließen, wie z.B. einen MP3 Player, Ipod®, oder
Iphone®, usw...
Kopfhöreranschluss
Schließen Sie Ihre Kopfhörer an die Kopfhörersteckdose an der Rückseite des Gerätes an.
61
Page 64

Grundbedienung
Das Gerät einschalten
EN
DE
USB
USB
BT
BLUETOOTH
AUDIO
AUDIO
FM
UKW
DAB
DAB
CD
CD
Einstellen der Uhr
Schlummerfunktion einstellen
Drücken und halten Sie die Taste an der Oberseite des Gerätes oder an der Fernbedienung,
um das Gerät einzuschalten.
Modi auswählen
Drücken Sie mehrfach die Taste am Gerät, um die DAB, FM, USB, BT, AUDIO oder CD
auszuwählen.
Sie können auch die Shortcut Tasten an der Fernbedienung drücken (DAB, FM, USB, BT, AUDIO
oder CD), um Ihren gewünschten Modus auszuwählen.
Hinweis:
- Wenn kein Signal anliegt, schaltet sich das Gerät automatisch innerhalb von 19 Minuten aus,
um Energie zu sparen (außer bei FM).
Uhr manuell einstellen
1. Stellen Sie das Gerät auf den Standby Modus.
2. Drücken und halten Sie die CLOCK (UHR) Taste an der Fernbedienung gedrückt.
3. Geben Sie das Datum, die Stunde und die Minuten über die Digitaltasten an der
Fernbedienung ein.
4. Drücken Sie die CLOCK (UHR) Taste, um die Einstellung zu bestätigen.
Datum anzeigen
Im DAB oder FM Modus drücken Sie die DISPLAY (ANZEIGE) Taste auf der Fernbedienung.
Verwenden Sie die Schlummerfunktion, um das System nach einer bestimmten Anzahl Minuten
im Wiedergabemodus auszuschalten. Wenn Sie die Schlummerfunktion einstellen, können Sie mit
Musik einschlafen und wissen, dass Ihr System sich selbst ausschaltet und nicht die ganze Nacht
läuft.
Um die Schlummerfunktion einzustellen, drücken Sie mehrfach die SLEEP (SCHLUMMER) Taste
an der Fernbedienung. Die Anzahl Minuten, die auf der Anzeige angezeigt wird, ändert sich in
dieser Reihenfolge:
62
Page 65

EN
DE
OFF
OFF (aus)
Timer (Zeitschaltuhr) einstellen
Wenn die ausgewählte Quelle BUZZER (SUMMER) ist, ist die Einstellung TIMER OFF
(ZEITSCHALTUHR AUS) nicht verfügbar.
Klangqualität
Nachdem Sie die Anzahl Minuten für die Schlummerfunktion eingestellt haben, kehrt die Anzeige
auf die vorhergehende Anzeige zurück.
Das System ist jetzt eingestellt, dass es nach der Anzahl Minuten, die Sie eingestellt haben,
ausschaltet.
Schlummerfunktion bestätigen
Wenn die SLEEP (SCHLUMMER) Taste an der Fernbedienung einmal gedrückt wird, wird die
verbleibende Schlummerfunktionszeit angezeigt. Warten Sie eine Sekunde bis die Anzeige auf die
Originalanzeige zurückschaltet.
Schlummerfunktion abbrechen
Drücken Sie mehrfach die SLEEP (SCHLUMMER) Taste auf der Fernbedienung bis „Off
(Aus)“ angezeigt wird. Wenn Sie das System ausschalten, wird auch die Schlummerfunktion
abgebrochen.
Sie können die Einstellung der Zeitschaltuhr verwenden, damit das Gerät sich automatisch zu
bestimmten Zeiten jeden Tag vom Standby Modus ein- und ausschaltet.
Die Uhr muss richtig eingestellt sein, damit die Zeitschaltuhr richtig funktioniert.
1. Stellen Sie das Gerät auf den Standby Modus ein;
2. Drücken Sie die Taste TIMER, um die Timerfunktion ein-/auszuschalten;
3. Drücken und halten Sie die Taste TIMER zur Einstellung der Zeitschaltuhr. Wählen Sie die
Quelle mit , geben Sie dann die Zeit für die Zeitschaltuhr über die digitalen Tasten an
der Fernbedienung ein, stellen Sie dann die Lautstärke mit ein, anschließend geben
Sie die Zeit zum Ausschalten der Zeitschaltuhr über die digitalen Tasten der Fernbedienung
ein. Beachten Sie bei allen Schritten, dass Sie die Taste TIMER drücken müssen, um Ihre
Eingabe zu bestätigen und zum nächsten Schritt weiterzugehen. Wenn innerhalb von 10
Sekunden keine Eingabe erfolgt, wird die Programmierung automatisch verlassen.
Einstellen der Lautstärke
Um die Lautstärke zu erhöhen oder zu verringern, drehen Sie die VOL+/- Taste am Gerät oder
drücken Sie die VOL+/- Tasten an der Fernbedienung.
- Wenn Sie den Ton ausschalten möchten, drücken Sie die Taste an der Fernbedienung.
Drücken Sie die Taste noch einmal oder drücken Sie die VOL+/- Tasten, um die normale
Tonwiedergabe wieder einzustellen.
63
Page 66

Beachten Sie, wenn Sie die Lautstärke über 26 einstellen und dann das Gerät aus- und
Bluetooth Betrieb
Um Störungen zu vermeiden, deaktivieren Sie die WLAN Funktion an Ihrem Gerät
(Smartphone, Tablet, usw…), wenn Sie Musik über Bluetooth wiedergeben.
wieder einschalten, geht die Lautstärke automatisch auf Werkseinstellungen zurück.
Bass einstellen
Drücken Sie die USER (BENUTZER) Taste an der Fernbedienung und drücken Sie die BASS +/-
Tasten an der Fernbedienung, um den Bass zu erhöhen/verringern.
Höhe einstellen
Drücken Sie die USER (BENUTZER) Taste an der Fernbedienung und drücken Sie dann die
TREBLE +/- (HÖHEN) +/- Tasten an der Fernbedienung, um die Höhe zu erhöhen/verringern.
Equalizer voreinstellen
Sie können die Klangmerkmale, wie z.B. KLASSIK/POP/ROCK/JAZZ/NORMAL auswählen,
indem Sie die EQ Taste drücken.
Sie können Spuren eines Mediagerätes anhören, wenn dieses über Bluetooth an das Gerät
angeschlossen ist.
Bluetooth fähige Geräte koppeln.
Sie müssen Ihr Bluetooth Gerät mit dem Gerät koppeln bevor Sie diese zum ersten Mal anschließen.
Bluetooth fähige Geräte koppeln
Hinweis:
- Der Betriebsbereich zwischen dieser Anlage und einem Bluetooth Gerät beträgt ca. 10 Meter
(ohne Gegenstände zwischen dem Bluetooth Gerät und der Anlage).
- Bevor Sie ein Bluetooth Gerät an diese Anlage anschließen, stellen Sie sicher, dass Sie die
Fähigkeiten des Gerätes kennen.
- Jedes Hindernis zwischen dieser Anlage und dem Bluetooth Gerät kann den Betriebsbereich
verringern.
- Wenn die Signalstärke zu schwach ist, kann es sein, dass Ihr Bluetooth Gerät getrennt wird,
aber es geht automatisch wieder auf den Kopplungsmodus.
1. Im ON (EIN) Modus drücken Sie die BT Taste an der Fernbedienung, um den Bluetooth
Modus auszuwählen oder die Quelle auf BT zu ändern, indem Sie am Gerät drücken.
Wenn die Anlage nicht mit einem Bluetooth Gerät gekoppelt ist, geht das System automatisch
in den Kopplungsmodus oder Sie müssen die PAIR (KOPPLUNG) Taste drücken und halten,
um die Kopplung zu starten.
2. Aktivieren Sie die Bluetooth Funktion an Ihrem Gerät und wählen Sie den Suchmodus aus.
„Lenco DAR-070“ wird auf Ihrem Bluetooth Gerät angezeigt.
3. Um die Bluetooth Funktion zu trennen, schalten Sie in eine andere Funktion an der Anlage
oder deaktivieren Sie die Funktion von Ihrem Bluetooth Gerät.
Tipp:
• Wenn bereits eine bestehende Verbindung vorhanden ist, drücken Sie die PAIR (KOPPLUNG)
Taste, um den Kopplungsmodus zu reaktivieren. Die bestehende Verbindung wird
unterbrochen.
• Das Gerät wird auch getrennt, wenn Ihr sich Gerät außerhalb des Bedienbereiches bewegt.
64
Page 67

• Wenn Sie Ihr Gerät wieder an das Gerät anschließen möchten, stellen Sie es in den
AUDIO IN Betrieb
DAB-Bedienung
Betriebsbereich.
• Wenn sich das Gerät außerhalb des Betriebsbereiches bewegt, prüfen Sie wenn es
zurückgebracht wird, ob das Gerät noch immer mit der Anlage verbunden ist.
• Wenn die Verbindung verloren geht, befolgen Sie die obigen Anweisungen, um Ihr Gerät
noch einmal mit der Anlage zu koppeln.
Musik vom Bluetooth Gerät anhören
- Wenn das angeschlossene Bluetooth Gerät das Advanced Audio Distribution Profile (A2DP)
unterstützt, können Sie die auf dem Gerät gespeicherte Musik über diese Anlage anhören.
- Wenn das Gerät auch das Audio Video Remote Control Profile (AVRCP) unterstützt, können
Sie die Fernbedienung der Anlage verwenden, um die auf dem Gerät gespeicherte Musik
wiederzugeben.
1. Koppeln Sie Ihr Gerät mit dieser Anlage.
2. Spielen Sie Musik über Ihr Gerät ab (wenn es A2DP unterstützt).
3. Verwenden Sie die mitgelieferte Fernbedienung, um die Wiedergabe zu steuern (wenn es
AVRCP unterstützt).
- Zum Stoppen/Wiederaufnehmen der Wiedergabe, drücken Sie die Taste.
- Um eine Spur zu überspringen, drücken Sie die oder Tasten.
1. Drücken Sie die AUDIO Taste an der Fernbedienung oder drücken Sie die Taste an der
Anlage, um die gewünschte Quelle auszuwählen.
2. Bedienen Sie Ihr Audio Gerät direkt für Wiedergabefunktionen.
3. Drücken Sie die VOL +/- Taste, um die Lautstärke auf das gewünschte Niveau einzustellen.
DAB Radiomodus empfängt DAB/DAB+ digitales Radio und zeigt
Informationen über den Sender und das Programm/die Spur, die
gesendet wird, an.
1. Scannen nach Radiosendern
Wenn Sie die Anlage das erste Mal verwenden oder wenn die Senderliste leer ist, führt das Radio
automatisch eine vollständige Suche durch, um zu sehen, welche Sender verfügbar sind. Es kann
sein, dass Sie den Suchlauf manuell starten müssen, um die Liste der Sender aus einem der
folgenden Gründe zu aktualisieren:
• Es kann sein, dass neue Sender von Zeit zu Zeit verfügbar werden.
• Sender wurden geschlossen oder können nicht mehr empfangen werden (ungültige Sender in
der Senderliste werden mit einem Fragezeichen vor dem Namen gekennzeichnet).
• Wenn der Empfang nach dem ursprünglichen Suchlauf nicht gut war (z.B. war die Antenne
nicht aufgestellt) kann dies zu einer leeren oder unvollständigen Liste der verfügbaren Sender
führen.
• Wenn Sie bei einigen Sendern einen schlechten Empfang haben, so dass der Audioempfang
abbricht, kann es sein, dass Sie nur Sender mit guter Signalstärke auflisten möchten.
Einen vollständigen Suchlauf durchführen
Wählen Sie MENÜ> Vollständiger Suchlauf.
Sobald ein Suchlauf fertiggestellt ist, geht das Radio auf
Wiedergabe des zuvor ausgewählten Senders oder des
ersten Senders in der Senderliste zurück.
65
Page 68

Um Sender zu entfernen, die aufgelistet aber nicht verfügbar sind
Wählen Sie MENÜ> Ausschneiden
Damit werden ungültige Sender, die in der Senderliste mit einem „?“ vor dem Sendernamen
gekennzeichnet sind, gelöscht.
2. Sender auswählen
Sender ändern
Drücken Sie die Taste an der Fernbedienung
oder drehen Sie die Taste NAVIGATE (NAVIGIEREN)
an der Anlage, um die Senderliste zu durchsuchen,
drücken Sie auf an der Fernbedienung oder die
OK Taste an der Anlage, um den Sender zu wechseln.
Einige Sender sind Sekundärdienste verbunden mit einem Primärsender und sind nur zu
bestimmten Zeiten verfügbar. Die Sender, die mit einem Sekundärdienst verbunden sind,
werden mit einem Doppelpfeil gekennzeichnet, der nach rechts zeigt. Die
Sekundärdienstsender werden immer neben den Primärsendern aufgelistet, anders als die
normalen werden sie mit einem Doppelpfeil gekennzeichnet, der nach links zeigt. In der
Senderliste erscheinen die Sekundärsender in alphabetischer Reihenfolge.
3. Senderspeicher
Die Anlage hat 40 voreingestellt Speicherplätze für DAB.
Einen Sender in einem voreingestellten Speicher
abspeichern
Drücken und halten Sie die PROGRAMM Taste für
3 bis 5 Sekunden bis die Anzeige voreingestellter
Speicher anzeigt. Die Voreinstellungen (1-40) werden
entweder als leer oder mit dem aktuell gespeicherten
Sendernamen angezeigt.
Verwenden Sie die Taste an der
Fernbedienung oder drehen Sie die NAVIGATE
(NAVIGIEREN) Taste an der Anlage, um einen
voreingestellten Speicher auszuwählen, drücken Sie dann die auf der Fernbedienung
oder die OK Taste an der Anlage, um den aktuell
wiedergegebenen Sender abzuspeichern. Nach
Bestätigung wird der voreingestellte Sender
gespeichert und die Anzeige kehrt zum Bildschirm
Jetzt Wiedergabe zurück.
Einen voreingestellten Sender wieder aufrufen
Drücken Sie kurz die PROGRAMM Taste (die Anzeige zeigt Voreinstellung abrufen). Wählen
Sie einen der aufgelisteten voreingestellten Sender mit den P+/- Tasten an der
Fernbedienung oder der Taste an der Anlage aus, drücken Sie dann die Taste an
der Fernbedienung oder die OK Taste an der Anlage, um den angezeigten voreingestellten
Sender auszuwählen.
4. Manuelle Einstellung
Wie bei der normalen Suchlaufmethode können Sie auch einen bestimmten Kanal / eine
bestimmte Frequenz manuell einstellen. Dies kann sinnvoll sein, um Ihre Antenne auszurichten,
um den bestmöglichen Empfang zu ermöglichen und einen bestimmten Kanal zu suchen, um die
Senderliste zu aktualisieren.
66
Page 69

Manuelle Einstellung
Drücken Sie MENÜ > Manuelle Einstellung und dann die Taste an der Fernbedienung
oder die NAVIGATE (NAVIGIEREN) Taste an der
Anlage, um einen bestimmten Kanal / eine bestimmte
Frequenz anzuzeigen. Drücken Sie die Taste an
der Fernbedienung oder die OK Taste an der Anlage,
um diesen Kanal / diese Frequenz einzustellen.
Die Anzeige zeigt eine Liveangabe der empfangenen
Signalstärke auf der ausgewählten Frequenz an.
Einstellungen an Ihrer Antenne werden mit der empfangenen angezeigten Signalstärke
angezeigt.
Hinweis: Das etwas größere Rechteck zeigt die Audioqualitätsschwelle an, wenn die mit den
festen Rechtecken angezeigte Signalstärke unter diese Schwelle fällt, dann verschlechtert
sich die Signalqualität. Gleichzeitig sucht die Anlage nach DAB Sendern in der ausgewählten
Frequenz und aktualisiert die Senderliste mit allen neu gefundenen Sendern. Um alle
gefundenen Sender aufzulisten, kehren Sie zu dem Bildschirm „Jetzt Wiedergabe“ zurück
und wählen Sie den gewünschten Sender normal aus der Senderliste aus.
5. Informationen zur aktuellen Wiedergabe
Während ein Sender wiedergegeben wird, zeigt der
Bildschirm dessen Namen und DLS (Dynamic Label Segment
= Dynamisches Labelsegment) an, das vom Sender
übertragen wird, sowie den Programmnamen, den Liedtitel
und die Kontaktdaten.
Sollte die DSL Info mehr als 16 Zeichen haben, läuft die Information über den Bildschirm.
Ansehen weiterer Informationen
Drücken Sie die INFO Taste.
Jedes Mal wenn Sie die INFO Taste drücken wird der
folgende Informationssatz in der folgenden Abfolge
angezeigt: DLS Text, DL Plus Information (diese wird
nur angezeigt, wenn sie vom Sender übertragen
werden), Signalstärke, Programmtyp, Name des
Ensembles, Kanalnummer/Frequenz, Signalfehlerrate,
Bitrate, Codec/DAB Variante, Zeit und Datum.
Hinweis: DL Plus gibt weitere Informationen an, die von den Sendern übertragen und
temporär auf Ihrem Radio gespeichert werden.
Um zum Standard Bildschirm Jetzt Wiedergabe jederzeit zurückzukehren, drücken und
halten Sie die INFO Taste.
6. Weitere Einstellungen
Komprimierung des Dynamikbereichs (DRC)
Diese Funktion verringert den Unterschied zwischen den
lautesten und leisesten übertragenen Audio.
Tatsächlich macht sie leise Töne vergleichsweise lauter und
laute Töne vergleichsweise leiser.
Hinweis: DRC funktioniert nur, wenn es von der Station für
einen bestimmten Sender aktiviert wird.
Ändern der DRC Einstellung
Wählen Sie MENU > DRC> Die verfügbaren Optionen
sind: DRC aus | leise | laut.
67
Page 70

UKW-Bedienung
Der FM Radiomodus empfängt analoges Radio vom FM Band und
zeigt RDS (Radio Data System) Daten über den Sender und zeigt
an (wo gesendet wird).
1. Sender auswählen
Wenn Sie zum ersten Mal das FM Radio auswählen, wird die
Anlage auf die niedrigste Frequenz auf dem FM Band eingestellt.
Suchlauf nach dem Sender im FM Modus
Drücken die AMS Taste. Die Anlage durchsucht die Frequenzen
des FM Bandes und zeigt dabei die aktuelle Frequenz auf der
Bildschirmanzeige an.
Ein Suchlauf stoppt, wenn ein Signal gefunden wurde. Die Anlage
kann bei jedem Sender oder nur an den Sendern mit einem starken
Signal auf Stopp eingestellte werden (weitere Einzelheiten finden
Sie in den Suchlaufeinstellungen auff Seite GB-18).
Alternativ können Sie die Tasten zum Einstellen in 50 kHz
Schritten drücken.
2. Senderspeicher
Die Anlage hat 40 voreingestellte Speicherplätze für FM, die genauso funktionieren wie die DAB
Modus-Voreinstellungen, wie zuvor in den Voreinstellungen auf Seite GB-16 beschrieben.
3. Informationen zur aktuellen Wiedergabe
Während FM Radio wiedergegeben wird, zeigt der
Bildschirm auch dessen Frequenz an oder, wenn RDS
Daten verfügbar sind, wird der Sendername und alle
weiteren „Radio Text“ Daten angezeigt. Wenn keine Daten
zur Verfügung stehen, wird nur die Frequenz und eine
Nachricht KEIN Radio Text angezeigt.
Für weitere Informationen über die Übertragung
Drücken Sie die INFO Taste.
Jedes Mal, wenn Sie die INFO Taste drücken, wird der
nächste Informationssatz in der folgenden Abfolge
angezeigt: RDS Radio Text, Programmtyp, Frequenz,
Mono/Stereo, Zeit und Datum.
Um zum Standard Jetzt Wiedergabe Bildschirm zurückzukehren
Drücken und halten Sie die INFO Taste.
4. Weitere Einstellungen
Einstellungen Sendersuchlauf
Standardmäßig durchsucht FM und stoppt an allen
verfügbaren Sendern (ALLE Sender). Dies kann zu
schlechter Audioqualität bei schwächeren Sendern
führen.
Optionen: Alle Sender | Nur starke Sender
Um die Suchlaufeinstellungen zu ändern, so dass
dieser nur bei Sendern mit hoher Signalstärke stoppt
Wählen Sie MENU > Suchlaufeinstellung dann Nur
starke Sender.
68
Page 71

Hinweis: Im Beispielbildschrim rechts zeigt der Stern an, dass „Nur starke Sender“ der aktuell
CD Betrieb
Disk-Typen
Disk Logo
Aufgezeichneter Inhalt
CD-R (CD beschreibbar - Audio/MP3/WMA)
AUDIO/MP3/WMA
CD-RW (CD wiederbeschreibbar Audio/MP3/WMA)
AUDIO/MP3/WMA
AUDIO-CD (Compact Disc Digital Audio)
AUDIO
Einige aufgezeichnete Dateien können möglicherweise auf Grund des Typs und Formats der Disk
oder der Aufzeichnungsbedingungen nicht wiedergegeben werden.
Nicht kompatibel mit 8 cm mini CD.
Drücken Sie im Stoppmodus die Taste, um die Wiedergabe der Disk zu starten.
eingestellte Wert ist.
Audio-Einstellungen
Standardmäßig werden alle Sender in Stereo
wiedergegeben.. Bei schwachen Sendern kann dies zu
einer schlechten Audioqualität führen. Die Audioqualität
kann durch die Einstellung auf Mono verbessert
werden.
Optionen: Stereo zulässig | Mono erzwungen
Zur Wiedergabe schwacher Sender in Mono
Wählen Sie MENU > Audioeinstellung> Mono
erzwungen.
Hinweis: Im Beispielbildschrim rechts zeigt der Stern an,
dass „Stereo zulässig“ der aktuell eingestellte Wert ist.
Kompatible Disk-Typen
CD Wiedergabe
1. Drücken Sie die Taste an der Oberseite der Anlage wiederholt, bis „CD“ angezeigt wird
oder drücken Sie die CD Taste am der Fernbedienung, um die CD-Funktion auszuwählen.
2. Legen Sie die Disk in den Diskeinzug ein, die Anlage liest die Disk ab und gibt diese
automatisch wieder.
3. Drücken Sie die Taste, um die Disk auszuwerfen.
4. Drücken Sie die Taste, um die Wiedergabe zu pausieren.
5. Drücken Sie die Taste noch einmal, um die Wiedergabe wieder aufzunehmen.
6. Drücken Sie die Taste auf der Fernbedienung, um die Disk-Wiedergabe zu stoppen.
69
Page 72

Während die CD abgespielt wird, wird die aktuelle Spurnummer und die abgelaufene Zeit angezeigt.
Suche überspringen oder Suche und Wiedergabe
EN
DE
ALL
ALLE
DIR
DIR
OFF
OFF (aus)
SINGLE
EINZELN
• Drücken Sie die Taste einmal oder mehrfach, um eine oder mehrere Spuren auf der Disk
zurück zu springen.
• Drücken Sie die Taste einmal oder mehrfach, um eine oder mehrere Spuren auf der Disk
vor zu springen.
• Drücken und halten Sie die Taste auf der Fernbedienung, um rückwärts nach der
Spurposition zu suchen, ab welcher Sie die Wiedergabe starten möchten.
• Drücken und halten Sie die Taste auf der Fernbedienung, um vorwärts nach der
Spurposition zu suchen, ab welcher Sie die Wiedergabe starten möchten.
Wiederholte Wiedergabe
Bei der CD Disk, EINE und ALLE wiederholt abspielen kann eingestellt werden, indem man
mehrfach die Taste REPEAT (WIEDERHOLEN) auf der Fernbedienung drückt.
Zufällig abspielen
Bei der CD Disk kann Wiederholt abspielen eingestellt werden, indem man die Taste RANDOM
(ZUFÄLLIG) auf der Fernbedienung drückt.
Programm
Drücken Sie bei der Musikwiedergabe die Taste auf der Fernbedienung, drücken Sie dann die
Taste PROGRAM und folgen Sie dann den auf dem Bildschirm angezeigten Informationen.
Sie können die Spur auf der Fernbedienung mit den digitalen Tasten auswählen, um diese als P01,
P02 usw. abzuspeichern. Drücken Sie bei diesem Vorgang die Taste PROGRAM, um auf die
nächste Kanaleinstellung zu gehen.
Nach Beenden der Einstellung, drücken Sie die Taste, um die Einstellung zu beenden.
Bei der Programmwiedergabe ist die Eingabe über die digitalen Tasten auf der Fernbedienung
ungültig, Sie können nur die Tasten drücken, um die Spur zu wechseln.
Ändern Sie die Quelle oder drücken Sie die Taste zweimal, um die Programmeinstellung zu
löschen.
70
Page 73

Es gibt max. 20 Kanäle.
USB verwenden
EN
DE
ALL
ALLE
DIR
DIR
OFF
OFF (aus)
SINGLE
EINZELN
Schließen Sie ein USB Massenspeichergerät (u.a. USB Flash Speicher, USB Flash Player oder
Speicherkarten) an diese Anlage an, um die auf dem Gerät gespeicherte Musik über die
leistungsstarken Laufsprecher dieser Anlage wiederzugeben.
1. Stecken Sie den USB Stecker des USB Gerätes in den Anschluss an der Rückseite der
Anlage ein.
2. Drücken Sie die Taste oben an der Anlage wiederholt oder drücken Sie die USB Taste an
der Fernbedienung, um die USB Funktion auszuwählen.
3. Die im Gerät gespeicherte Musik wird automatisch wiedergegeben.
Wiederholte Wiedergabe
Bei dem USB Gerät, kann EINE und ALLE wiederholt abspielen eingestellt werden, indem man
wiederholt die Taste REPEAT (WIEDERHOLEN) auf der Fernbedienung drückt.
Zufällig abspielen
Bei Musikdateien auf dem USB Gerät kann die zufällige Wiedergabe durch Drücken der Taste
RANDOM (ZUFÄLLIG) auf der Fernbedienung eingestellt werden.
Programm
Drücken Sie bei der Musikwiedergabe die Taste auf der Fernbedienung, drücken Sie dann die
Taste PROGRAM und folgen Sie dann den auf dem Bildschirm angezeigten Informationen.
Sie können eine Spur auf der Fernbedienung mit den digitalen Tasten auswählen, um diese als
P01, P02 usw. abzuspeichern. Drücken Sie bei diesem Vorgang die Taste PROGRAM, um zur
nächsten Kanaleinstellung zu gehen.
Nach Beenden der Einstellung, drücken Sie die Taste, um die Einstellung zu beenden.
Bei der Programmwiedergabe ist die Eingabe über die digitalen Tasten auf der Fernbedienung
ungültig, Sie können nur die Tasten drücken, um die Spur zu wechseln.
Ändern Sie die Quelle oder drücken Sie die Taste zweimal, um die Programmeinstellung zu
löschen.
71
Page 74

Es gibt max. 20 Kanäle.
Wenn das USB Gerät fehlerhaft ist, kann diese Anlage nicht die gespeicherte Musik erkennen und
wiedergeben.
Formatieren Sie das USB Massenspeichergerät und stellen Sie die Musik auf dem Gerät mit dem
Computer wieder her.
Instandhaltung
Stellen Sie sicher, dass die Anlage vollständig von der Netzsteckdose getrennt ist, bevor Sie diese
reinigen.
EN
DE
Playback side
Wiedergabeseite
Bei Geräten mit einem USB Kabel:
1. Stecken Sie einen Stecker des USB Kabels (nicht im
Lieferumfang enthalten) in die USB Buchse an der
Rückseite der Anlage.
2. Stecken Sie den anderen Stecker des USB Kabels in
das Ausgangsterminal des USB Gerätes.
Über USB laden (nur 5V 1A Buchse)
Sie können ein USB Kabel in die 5V 1A USB Buchse einstecken, um das Mobilgerät zu
laden.
Reinigung des Gerätes
• Um die Anlage zu reinigen, wischen Sie das Gehäuse mit einem leicht feuchten, fusselfreien
Tuch ab.
• Verwenden Sie keine Reinigungsflüssigkeiten, die Alkohol, Ammoniak oder Scheuermittel
enthalten.
• Sprühen Sie nicht mit einer Sprühdose auf oder in der Nähe der Anlage.
Disks handhaben
72
Page 75

• Berühren Sie die Abspielseite der Diskette nicht.
Fehlersuche
• Bringen Sie kein Papier oder Klebeband an der Diskette.
Disks reinigen
Fingerabdrücke und Staub auf der Disk verursachen Bild- und Tonstörungen. Wischen Sie die
Disk mit einem weichen Tuch von der Mitte nach außen. Halten Sie die Disk immer sauber.
• Wenn Sie den Staub nicht mit einem Tuch abwischen können, wischen Sie die Disk sanft mit
einem leicht befeuchteten Tuch und anschließend mit einem trockenen Tuch ab.
• Verwenden Sie keine Lösemittel, wie Verdünner, Benzin, handelsübliche Reinigungsmittel
oder Antistatikspray. Diese könnten die Disk zerstören.
Disks lagern
Lagern Sie Disks nicht an Orten, die direkten Sonnenlicht ausgesetzt sind und nicht in der Nähe
von Hitzequellen.
• Lagern Sie die Disks nicht an Orten, die Feuchtigkeit und Staub ausgesetzt sind, wie ein
Badezimmer oder in der Nähe von einem Luftbefeuchter.
• Lagern Sie Disks vertikal in einem Gehäuse. Wenn Sie Disks stapeln oder Gegenstände auf
den Gehäusen ablegen, können sich die Disks verformen.
Kein Strom
• Stellen sie sicher, dass das Netzkabel sicher eingesteckt ist.
• Stellen Sie sicher, dass die Anlage eingeschaltet ist.
Die Fernbedienung funktioniert nicht
• Verwenden Sie die Fernbedienung in der Nähe der Anlage.
• Richten Sie die Fernbedienung auf den Fernbedienungssensor der Anlage.
• Tauschen Sie die Batterien der Fernbedienung gegen neue Batterien aus.
• Entfernen Sie alle Hindernisse zwischen der Fernbedienung und der Anlage.
Lautes Summen oder Geräusche sind zu hören
• Die Stecker und Buchsen sind schmutzig. Wischen Sie diese mit einem leicht mit einer
geeigneten nicht scheuernden Reinigungslösung befeuchten Tuch ab.
Die Anlage reagiert nicht auf das Drücken der Tasten
• Die Anlage ist während des Gebrauchs möglicherweise eingefroren. Schalten Sie die Anlage
am Hauptschalter aus und wieder ein, um diese zurückzusetzen.
Keine Tonausgabe
• Stellen Sie sicher, dass die Anlage nicht stummgeschaltet ist. Drücken Sie die Taste oder
die V + Taste, um normales Zuhören wieder aufzunehmen.
• Stellen Sie sicher, dass die Audioeinstellung der Eingangsquelle (z.B. TV, Spielkonsole, DVD
Player, usw.) auf den PCM Modus eingestellt ist, währen der optische Anschluss verwendet
wird.
73
Page 76

Ich kann den Bluetooth Namen dieser Anlage auf meinem Bluetooth Gerät für die Bluetooth
Kopplung nicht finden
• Stellen Sie sicher, dass die Anlage eingeschaltet ist.
• Stellen Sie sicher, dass die Bluetooth Funktion an Ihrem Bluetooth Gerät aktiviert ist.
• Die Anlage hat eine Bluetooth Funktion, die ein Signal innerhalb von 10 Metern empfangen
kann.
Disk eingelegt, aber an der Anlage erfolgt keine Wiedergabe
• Stellen Sie sicher, dass das Disk-Label nach oben zeigt.
• Stellen Sie sicher, dass die Disk sauber ist.
• Der PAUSE Modus ist möglicherweise aktiviert. Deaktivieren Sie den PAUSE Modus.
• Die Disk könnte beschädigt oder schmutzig sein; prüfen und reinigen Sie die Disk.
Disk springt
Stellen Sie sicher, dass die Anlage an einem sicheren Ort aufgestellt ist. Vibrationen oder
Scheppern kann verursachen, dass die Disk springt.
FM Empfang
• Stellen Sie sicher, dass das FM Antennenkabel vollständig ausgefahren ist.
• Elektrische Interferenz in Ihrem Haus kann schlechten Empfang verursachen. Stellen Sie die
Anlage entfernt davon auf (insbesondere wenn diese von Motoren oder Transformatoren
verursacht werden).
Die Anlage schaltet automatisch während der Wiedergabe aus
• Erhöhen Sie die Lautstärke an Ihrem Eingangsquellen-Player, wie z.B. dem DVD Player / TV
usw.
Interferenzen an den Lautsprechern
• Prüfen Sie, dass kein Mobiltelefon in der Nähe der Anlage liegt.
74
Page 77

Technische Daten
Versorgungsspannung:
AC 200-240V~50/60Hz
Leistungsaufnahme
25 Watt
Stromverbrauch (Standbymodus):
< 1 Watt
Leistung:
2 x 18 Watt
Lautsprecherwiderstand:
8 Ohm
5V 1A Ausgangsbuchse:
5V 1A Out
USB:
5V 500mA
S/N (A Gewicht):
» 65 dB
THD (1kHz,1W):
0,5
Frequenzbereich:
40Hz~20KHz
DAB-Frequenzbereich:
174-240 MHz
UKW-Frequenzbereich:
87,5 – 108 MHz
Abmessungen:
396x120x205mm
Bluetooth-Version:
V2.1 + EDR
Funktionsbereich:
ca. 10 Meter
Übertragungsfrequenz:
2,402 ~ 2,480 GHz
Protokolle:
A2DP, AVRCP
• Auf Grund ständiger Überarbeitung und Verbesserungen an unserem Produktdesign,
unterliegen die Spezifikationen Änderungen ohne vorherige Mitteilung.
• Dieses Produkt arbeitet im Frequenzbereich von 2400 bis -2483,5 MHz und darf nur in einer
normalen häuslichen Umgebung verwendet werden. Es ist für die Verwendung in allen
EU-Ländern geeignet.
75
Page 78

DE
Dieses Symbol zeigt an, dass das entsprechende Produkt oder dessen Batterie
in Europa nicht mit dem normalen Hausmüll entsorgt werden darf. Um die
ordnungsgemäße Abfallbehandlung des Produkts und dessen Batterie zu
gewährleisten, müssen diese im Einklang mit allen anwendbaren örtlichen
Vorschriften zur Entsorgung von Elektrogeräten und Batterien entsorgt werden.
Dabei helfen Sie, natürliche Ressourcen zu schonen und
Umweltschutzstandards zur Verwertung und Entsorgung von Altgeräten
aufrecht zu halten (Waste Electrical and Electronic Equipment Directive).
1. Garantie
Lenco bietet Leistungen und Garantien im Einklang mit Europäischem Recht. Im Falle von
Reparaturen (sowohl während als auch nach Ablauf der Garantiezeit) sollten Sie deshalb Ihren
Einzelhändler kontaktieren.
Wichtiger Hinweis: Es ist nicht möglich, Geräte für Reparaturen direkt an Lenco zu schicken.
Wichtiger Hinweis: Falls dieses Gerät von einem nicht autorisierten Kundendienst geöffnet oder
darauf zugegriffen wird, erlischt die Garantie.
Dieses Gerät ist nicht für professionelle Zwecke geeignet. Falls das Gerät für professionelle
Zwecke eingesetzt wird, erlöschen alle Garantieverpflichtungen seitens des Herstellers.
2. Haftungsausschluss
Aktualisierungen der Firmware und/oder Hardware-Komponenten werden regelmäßig
durchgeführt. Daher können einige der Anweisungen, Spezifikationen und Abbildungen in dieser
Dokumentation von Ihrer individuellen Situation abweichen. Alle in diesem Handbuch
beschriebenen Elemente dienen nur zur Illustration und treffen auf Ihre individuelle Situation
möglicherweise nicht zu. Aus der in diesem Handbuch getätigten Beschreibung können keine
Rechtsansprüche oder Leistungsanforderungen geltend gemacht werden.
3. Entsorgung des Altgeräts
4. Service
Besuchen Sie bitte für weitere Informationen und unseren Kundendienst unsere Homepage
www.lenco.com
Lenco Benelux BV, Thermiekstraat 1a, 6361 HB Nuth, The Netherlands.
76
Page 79

Français
DAR-070
Avertissements de sécurité
ATTENTION :
L’utilisation de commandes ou de réglages ou l’exécution de procédures autres que ceux spécifiés
dans ce manuel peut entraîner une exposition à des rayonnements dangereux.
Cet appareil ne doit pas être réglé ou réparé par quiconque d’autre que du personnel qualifié.
PRÉCAUTIONS AVANT UTILISATION
GARDEZ CES INSTRUCTIONS À L’ESPRIT :
1. N’utilisez pas cet appareil près de l’eau.
2. Nettoyez-le uniquement avec un chiffon doux légèrement humide.
3. Ne couvrez pas et n’obturez pas les ouvertures de ventilation. Lorsque vous placez l’appareil sur
une étagère, laissez 5 cm (2”) d’espace libre tout autour de l’appareil.
4. Installez-le conformément au mode d’emploi fourni.
5. *Ne marchez pas sur l’adaptateur secteur ou ne le coincez pas. Faites très attention, en
particulier près des fiches et du point de sortie du câble. Ne placez pas d’objets lourds sur
l’adaptateur secteur, car ils pourraient l’endommager. Gardez l’appareil hors de portée des
enfants ! Ils pourraient se blesser gravement s’ils jouent avec le câble d’alimentation.
6. *Débranchez cet appareil pendant les orages ou lorsqu’il n’est pas utilisé pendant une longue
durée.
7. Gardez l’appareil à l’écart des sources de chaleur telles que des radiateurs, chauffages, fours,
bougies et autres produits générant de la chaleur ou une flamme nue.
8. Évitez d’utiliser l’appareil à proximité de champs magnétiques puissants.
9. Des décharges électrostatiques peuvent perturber le fonctionnement normal de cet appareil.
Quand cela se passe, il suffit de réinitialiser et de redémarrer l’appareil en suivant le manuel
d’instructions. Pendant le transfert du fichier, manipulez l'appareil avec précaution et faites-le
fonctionner dans un environnement sans électricité statique.
10. Mise en garde ! N’introduisez jamais un objet dans l’appareil par les ouvertures et les fentes de
ventilation. Étant donné que des tensions élevées sont présentes à l’intérieur du produit,
l'insertion un objet peut entraîner une électrocution et/ou court-circuiter les composants
internes. Pour les mêmes raisons, ne versez pas de l’eau ou un liquide sur le produit.
11. Ne l’utilisez pas dans des endroits humides tels qu’une salle de bain, une cuisine pleine de
vapeur ou à proximité d’une piscine.
12. N’utilisez pas cet appareil lorsque de la condensation est possible.
13. Bien que ce dispositif soit fabriqué avec le plus grand soin et contrôlé à plusieurs reprises avant
de quitter l’usine, il est toujours possible que des problèmes se produisent, comme avec tous
les appareils électriques. Si l’appareil émet de la fumée, une accumulation de chaleur excessive
ou un phénomène inattendu, débranchez immédiatement la fiche d’alimentation du secteur.
14. Cet appareil doit fonctionner avec la source d’alimentation indiquée sur la plaque signalétique.
Si vous n’êtes pas sûr du type d’alimentation utilisé chez vous, consultez votre revendeur ou le
fournisseur d’électricité local.
15. *La prise secteur doit être installée près de l’appareil et doit être facilement accessible.
16. *Ne surchargez pas les prises de courant ou les rallonges. Une surcharge peut entraîner un
incendie ou une électrocution.
17. *Les appareils à la norme de construction de classe 1 doivent être branchés à une prise de
courant disposant d’une connexion protectrice à la terre.
18. *Les appareils à la norme de construction de classe 2 ne nécessitent pas de connexion à la
terre.
19. Tenez-le à l'abri des rongeurs. Les rongeurs adorent mordre les cordons d’alimentation.
20. *Tirez toujours sur la fiche pour débrancher le cordon de la prise secteur. Ne tirez pas sur le
cordon d’alimentation. Cela pourrait provoquer un court-circuit.
21. Évitez de placer l’appareil sur des surfaces sujettes aux vibrations ou aux chocs.
77
Page 80

22. Pour nettoyer l’appareil, servez-vous d’un chiffon doux et sec. N’utilisez pas de solvant ni
d’autre liquide à base de pétrole. Pour enlever les taches importantes, vous pouvez vous servir
d’un chiffon humide imbibé d’une solution de détergent diluée.
23. Le fournisseur n’est pas responsable des dommages ou pertes de données causés par un
dysfonctionnement, une utilisation abusive, une modification de l’appareil ou un remplacement
des piles.
24. N’interrompez pas la connexion lorsque l’appareil formate ou transfère des fichiers. Sinon, les
données pourraient être endommagées ou perdues.
25. Si l'appareil a une fonction de lecture USB, il faut brancher la clé USB directement sur l’appareil.
N’utilisez pas de rallonge USB, car cela peut causer des interférences provoquant une perte de
données.
26. L’appareil ne doit pas être exposé à des écoulements ou des éclaboussures et aucun objet
contenant un liquide, tel qu’un vase, ne doit être posé sur ou près de l’appareil.
27. *Pour que l’alimentation soit parfaitement déconnectée, la fiche d’alimentation de l’appareil
doit être débranchée de la prise secteur.
28. Si l'appareil a lapossibilité de fonctionne r sur batterie, n’exposez pas la batterie à une chaleur
extrême telle que les rayons du soleil, le feu ou toute autre chaleur.
29. Veuillez considérer les questions environnementales lors de la mise au rebut des piles.
30. L’appareil doit être utilisé uniquement sous des conditions climatiques modérées, évitez un
environnement extrêmement froid ou chaud.
31. La plaque signalétique se situe en dessous ou à l’arriére de l'appareil.
32. Cet appareil n’est pas destiné à être utilisé par des personnes (enfants compris) souffrant de
handicaps physiques, sensoriels ou mentaux, ou manquant d’expérience et de connaissances,
sauf si elles sont sous surveillance ou ont reçu des instructions sur l’utilisation correcte de
l’appareil par la personne qui est responsable de leur sécurité.
33. Ce produit est réservé à un usage non professionnel, et non pas à un usage commercial ni
industriel.
34. Vérifiez que l’appareil est en position stable. La garantie ne couvre pas les dégâts occasionnés
par l’utilisation de cet appareil en position instable ou par la non-observation de tout autre
avertissement ou précaution contenus dans ce mode d’emploi.
35. Ne retirez jamais le boîtier de l’appareil.
36. Ne placez jamais cet appareil sur un autre appareil électrique.
37. N’utilisez et ne rangez pas ce produit au soleil, à la chaleur, à la poussière ou à des vibrations
excessives.
38. Ne laissez pas les sacs en plastique à la portée des enfants.
39. Utilisez uniquement les accessoires recommandés par le fabricant.
40. Confiez l’entretien et les réparations à un personnel qualifié. Une réparation est nécessaire
lorsque l’appareil a été endommagé d’une quelconque façon telle qu’un cordon d’alimentation
ou une prise endommagés, lorsqu’un liquide a été renversé ou des objets ont été introduits
dans l’appareil, lorsque l’appareil a été exposé à la pluie ou à l’humidité, lorsqu’il ne fonctionne
pas correctement ou lorsque l’appareil est tombé.
41. *N’utilisez pas un cordon ou une fiche d’alimentation endommagé ni une prise desserrée. Vous
risqueriez de causer un incendie ou une décharge électrique.
42. Une exposition prolongée aux sons puissants des lecteurs personnels de musique peut
entraîner une perte temporaire ou permanente de l’ouïe.
INSTALLATION
• Déballez toutes les pièces et enlevez le matériau de protection.
• *Ne connectez pas l’unité au secteur avant d’avoir vérifié la tension du secteur et avant que
toutes les autres connexions n’aient été effectuées.
*ces instructions s’appliquent uniquement aux produits utilisant un câble d’alimentation ou un
adaptateur secteur.
78
Page 81

Nous tenons à vous féliciter pour votre achat de la micro chaîne DAR-070.
Nous vous conseillons de consacrer le temps nécessaire pour lire ce manuel et comprendre
parfaitement toutes les fonctions de cet équipement. Vous y trouverez également un guide de
dépannage pour vous aider à résoudre certains problèmes.
Lisez attentivement toutes les consignes de sécurité avant l'utilisation et conservez ce manuel
pour toute référence future.
Déballage
Retirez tous les matériaux d'emballage de l’unité. Conservez l'emballage, si vous pensez vous en
débarrasser, faites-le conformément aux réglementations locales.
Les éléments suivants sont fournis :
79
Page 82

EN
FR
main unit
unité principale
AAA Batteries
Piles AAA
Remote Control
Télécommande
3.5mm to 3.5mm cable
Câble 3,5mm - 3,5mm
AC Power Cord
Cordon d’alimentation secteur
Instruction Manual
Mode d’emploi
Présentation du produit
Vue avant
Vue arrière
1. Capteur de la télécommande
2. Affichage
3. Témoin de veille
4. Fente pour disque
5.
• Appuyez pour sélectionner le morceau suivant en mode USB et CD.
• Maintenez appuyée pour afficher la liste des chaînes DAB et FM.
• Appuyez pour afficher la liste des chaînes DAB et FM préréglées.
6.
• Appuyez sur pour sélectionner le morceau précédent en mode USB et CD.
80
Page 83

• Maintenez appuyée pour afficher la liste des chaînes DAB et FM.
• Appuyez pour afficher la liste des chaînes DAB et FM préréglées.
7.
• Appuyez pour lancer/suspendre la lecture en mode CD, USB et BT.
MENU
• Appuyez pour afficher le menu en mode DAB/FM.
8. EGALISATION
• Appuyez pour sélectionner les effets sonores : CLASSIQUE/POP/ROCK/JAZZ/NORMAL.
9.
• Appuyez pour changer de source.
10.
• Appuyez pour allumer et éteindre.
11. NAVIGATION
• Tournez pour se déplacer vers le haut/bas dans le menu en mode DAB/FM.
OK
• Appuyez pour sélectionner ou passer au menu suivant en mode DAB/FM.
VOL+/VOL-
• Tournez pour augmenter/diminuer le volume.
12. INFO
• Appuyez pour activer/désactiver les informations ID3 en mode CD/USB.
• Appuyez pour afficher les informations en mode DAB/FM.
13. COUPLAGE
• Maintenez appuyée pour activer la fonction couplage en mode Bluetooth et/ou déconnecter
l'appareil Bluetooth déjà couplé.
• Appuyez pour insérer/éjecter en mode CD.
14. Sortie 5V 1A
• Utilisée pour charger un appareil portable.
15. Entrée AUDIO
16. USB
• Utilisée par un appareil USB pour la lecture de musique.
17. Écouteurs
18. Interrupteur marche/arrêt
19. Entrée CA
81
Page 84

Télécommande
1.
• Permet de basculer l'appareil entre les modes marche et veille.
2. AMS
• Appuyez pour lancer la recherche automatique des chaînes en mode FM, appuyez de
nouveau pour arrêter.
3. RÉPÉTITION
• Appuyez pour sélectionner le mode de répétition de lecture en mode CD/USB.
82
Page 85

4. EGALISATION
• Appuyez pour sélectionner les effets sonores : CLASSIQUE/POP/ROCK/JAZZ/NORMAL.
5. BASS+/-
• Appuyez pour régler les GRAVES en mode Personnalisé.
6. Personnalisé
• Appuyez pour régler les graves et les aigus.
7. MENU
• Appuyez pour afficher le menu en mode DAB/FM.
8. COUPLAGE
• Maintenez appuyée pour activer la fonction couplage en mode Bluetooth et/ou déconnecter
l'appareil Bluetooth déjà couplé.
9.
• Maintenez appuyée pour retourner rapidement en mode CD/USB ;
• Appuyez pour sélectionner le morceau précédent en mode CD/USB ;
• Appuyez pour afficher la liste des chaînes DAB ;
• Appuyez pour afficher le menu en mode DAB/FM ;
• Appuyez pour effectuer un réglage fin en mode FM.
10. MO/ST
• Appuyez pour choisir le mode sonore stéréo ou mono.
11. P+/-
• Appuyez pour aller au début de l'album actuel/précédent/suivant ;
• Appuyez pour sélectionner le morceau précédent/suivant en mode DAB/FM ;
• Maintenez appuyée pour effectuer une recherche manuelle en mode FM.
12. Touches numériques 0-9
13. INFO
• Appuyez pour activer/désactiver les informations ID3 en mode CD/USB ;
• Appuyez pour afficher les informations en mode DAB/FM.
14.
• Appuyez pour insérer/éjecter en mode CD.
15. SOMMEIL
• Appuyez pour régler le Minuteur de veille automatique.
16. CD/USB/DAB/FM/BT/AUDIO
• Appuyez pour sélectionner la SOURCE AUDIO correspondante.
(CD/USB/DAB/FM/BT/AUDIO)
17. ALÉATOIRE
• Appuyez pour lire les morceaux de façon aléatoire en mode CD/USB.
83
Page 86

18. TREBLE +/-
• Appuyez pour régler les AIGUS en mode Personnalisé.
19. PROGRA.
• Appuyez pour préparer un programme en mode CD/USB/DAB/FM.
20. DIM
• Appuyez pour choisir différents niveaux de luminosité de l'écran.
21.
• Appuyez pour lancer/suspendre la lecture en mode CD/USB/BT ;
• Pour sélectionner ou passer au menu suivant en mode DAB/FM.
22.
• Maintenez appuyée pour avancer rapidement en mode CD/USB ;
• Appuyez pour sélectionner le morceau suivant en mode CD/USB ;
• Appuyez pour afficher la liste des chaînes DAB ;
• Appuyez pour se déplacer vers le bas dans le menu en mode DAB/FM ;
• Appuyez pour effectuer un réglage fin en mode FM.
23.
• Appuyez pour arrêter la lecture en mode CD/USB.
24.
• Appuyez pour couper/rétablir le son.
25. CLOCK
• Maintenez appuyée pour régler l’heure. (uniquement en mode veille)
26. V+/-
• Appuyez pour augmenter/diminuer le volume.
27. MINUTEUR (uniquement en mode veille)
• Appuyez pour activer/désactiver le minuteur ;
• Maintenez appuyée pour régler le minuteur.
28. AFFICHAGE
• Appuyez pour afficher la date en mode fonctionnement.
84
Page 87

Utilisation de la télécommande
1. Appuyez et faites glisser le couvercle arrière pour ouvrir
Portée de la télécommande
• Assurez-vous qu'il n'y a pas d'obstacles entre le capteur de la
télécommande situé sur le panneau avant et la télécommande. Si
vous installez l’unité sur un support TV, etc., la portée de la
télécommande peut diminuer en fonction de l’épaisseur ou de la
couleur du verre du support.
• N’exposez pas le capteur infrarouge de la télécommande à la
lumière directe du soleil ou à d’autres lumières fortes, telle que
lumière fluorescente d’un onduleur.
EN
FR
Within about 5 m
À environ 5 m
le compartiment à piles de la télécommande.
2. Insérez deux piles AAA.
Veillez à ce que les bornes (+) et (-) des piles
correspondent aux marques (+) et (-) du compartiment à
piles.
3. Fermez le compartiment de la pile.
Manipulation des piles
• une utilisation inappropriée ou incorrecte des piles peut causer une corrosion o une fuite des
piles, pouvant entraîner un incendie, des blessures ou des dommages matériels.
• Installez les piles correctement en suivant les indications de polarité (+ et -) dans le
compartiment à piles.
• Lorsque les piles sont épuisées, la télécommande ne marche pas.
• N'utilisez que des piles du type indiqué dans ce guide.
• Ne jetez pas les piles usées avec les ordures ménagères. Mettez-les au rebut conformément
à la réglementation locale en vigueur.
Manipulation de la télécommande
Prenez soin à vos ongles lorsque vous retirez le couvercle du compartiment à piles.
• Ne faites pas tomber la télécommande.
• Ne soumettez pas la télécommande à des chocs.
• Ne renversez pas d'eau ou tout autre liquide sur la télécommande.
• Ne placez pas la télécommande sur un objet mouillé.
• Ne placez pas la télécommande sous les rayons directs du soleil ou à proximité de sources de
chaleur excessive.
• Retirez les piles de la télécommande lorsque vous n'allez pas l'utiliser pendant une longue
période, autrement cela pourrait provoquer une fuite ou une corrosion qui entraînerait des
blessures et/ou des dommages, voir un incendie.
Dirigez la télécommande vers l’unité à une distance ne dépassant pas
5 mètres du capteur de la télécommande et dans un rayon de 60° à
l’horizontale et 20º à la verticale par rapport à la face avant de l’unité. La
distance peut varier en fonction de la luminosité de la pièce.
85
Page 88

Connexions
Branchement de l’alimentation secteur
EN
FR
sound board inputs
Entrées de la carte son
DVD player/TV outputs
Sorties Lecteur DVD/TV
Attention :
- Risque de dommages au produit ! Assurez-vous que la tension d'alimentation correspond à la
tension indiquée sur la plaque signalétique située à l'arrière ou en dessous de l’unité.
- Avant de brancher le cordon d'alimentation, assurez-vous que vous avez terminé toutes les
autres connexions.
- Connectez la petite extrémité du cordon d'alimentation à l’arrière de l’unité et insérez la fiche
dans une prise secteur standard.
- Veillez à débrancher le cordon d’alimentation du secteur lorsque le système ne va pas être
utilisé pendant une longue période.
- La fiche d'alimentation ou le coupleur d'appareil sert de dispositif de débranchement et doit
donc rester accessible.
Connexion des entrées analogiques
Connexion des sorties d'un lecteur DVD/TV aux entrées analogiques de la carte son.
- Utilisez le câble audio RCA 3,5mm fourni pour connecter les sorties d'un lecteur DVD/TV à
l'entrée AUX (L/R) de la carte son.
Connexion des sorties d'un lecteur DVD/TV aux entrées analogiques de la carte son.
- Utilisez un câble audio haut niveau (3,5mm) (non fourni) pour connecter les sorties d'un
lecteur DVD/TV à l'entrée AUDIO de la carte son. Vous pouvez également connecter la sortie
casque d'un appareil audio externe à cette entrée AUDIO de l’unité, tel que lecteur MP3,
iPod® ou iPhone®, etc.
86
Page 89

EN
FR
sound board inputs
Entrées de la carte son
DVD player/TV outputs
Sorties Lecteur DVD/TV
Connexion de casque
• Tous les casques et écouteurs ne sont pas forcement compatibles.
• Une pression acoustique excessive des écouteurs peut endommager votre audition.
• Veillez à diminuer le volume avant de connecter un casque/écouteurs.
Fonctionnement de base
Connectez votre casque à la sortie casque située à l’arrière de l’unité.
Allumer l'unité
Maintenez appuyée la touche située en haut de l’unité ou de la télécommande pour l'allumer.
Sélection des modes
Appuyez plusieurs fois sur la touche de l’unité pour sélectionner DAB, FM, USB, BT, AUDIO
ou CD.
Vous pouvez également utilisez les touches de la télécommande (DAB, FM, USB, BT, AUDIO ou
CD) pour sélectionner un mode.
87
Page 90

EN
FR
USB
USB
BT
BT
AUDIO
AUDIO :
FM
FM
DAB
DAB
CD
CD
Réglage de l'horloge
Réglage du minuteur de veille automatique
EN
FR
OFF
ÉTEINT
Remarque :
- S’il n’y a pas de signal, l’unité s’éteint automatiquement au bout de 19 minutes pour
économiser de l’énergie (sauf en mode FM).
Réglage manuel de l’heure
1. Mettez l’unité en mode veille.
2. Maintenez appuyée la touche CLOCK de la télécommande.
3. Entrez la date, les heures et les minutes en utilisant les touches numériques de la
télécommande.
4. Appuyez sur la touche CLOCK pour confirmer le réglage.
Afficher la date
En mode DAB ou FM, appuyez sur la touche DISPLAY de la télécommande.
Utilisez le minuteur de veille automatique pour éteindre l’unité au bout de quelques minutes en
mode lecture. En réglant le minuteur de veille automatique, vous pouvez vous endormir à la
musique en sachant que votre système va s’éteindre automatiquement au bout d'un certain
temps.
Pour régler le minuteur de veille automatique, appuyez plusieurs fois sur la touche SLEEP de la
télécommande pour modifier la durée en minutes affiché selon cet ordre :
Après avoir réglé la durée en minutes du minuteur, l’écran revient à l’affichage précédent.
Le système sera éteint au bout de la durée en minutes fixée.
Confirmation du minuteur de veille automatique
Lorsque vous appuyez sur la touche SLEEP de la télécommande, la durée de veille automatique
restante s’affiche. Attendez quelques secondes jusqu'à ce que l'écran retourne à l'affichage initial.
88
Page 91

Pour annuler le minuteur de veille automatique
Réglage du minuteur
Si la source sélectionnée est SONNERIE, l'option désactivé du minuteur ne sera pas disponible.
Qualité sonore
Appuyez plusieurs fois sur la touche SLEEP de la télécommande jusqu’à ce que « off » (désactivé)
s’affiche. Le minuteur de veille automatique est annulé dès que vous éteignez l’unité.
Vous pouvez utiliser le minuteur pour allumer/éteindre automatiquement l’unité tous les jours à
des heures déterminées.
L'horloge doit être réglée correctement pour que le minuteur fonctionne correctement.
1. Mettez l’unité en mode veille ;
2. Appuyez sur la touche TIMER pour l’activer/désactiver ;
3. Maintenez appuyée la touche TIMER pour régler le minuteur. Sélectionnez une source à
l’aide de , puis entrez l’heure d'allumage en utilisant les touches numériques de la
télécommande, réglez le volume en utilisant ; entrez l’heure d'extinction en utilisant les
touches numériques de la télécommande. Remarque : pour toutes les étapes, appuyez sur la
touche TIMER pour confirmer et passer à l’étape suivante. Si aucune opération n’est
effectuée pendant 10 secondes, le réglage sera abandonné.
Réglage du volume
Pour augmenter ou diminuer le volume, tournez le bouton VOL+/- de l’unité ou utilisez les touches
VOL+/- de la télécommande.
- Pour couper le son, appuyez sur la touche de la télécommande. Appuyez de nouveau sur
la touche ou sur VOL+/- pour rétablir le son.
Remarque : si le volume est supérieure à 26, éteignez et rallumez l’unité pour rétablir le
niveau de volume par défaut.
Réglage des graves
Appuyez sur la touche USER de la télécommande, puis utilisez les touches BASS +/- de la
télécommande pour augmenter/diminuer les graves.
Réglage des aigus
Appuyez sur la touche USER de la télécommande, puis utilisez les touches TREBLE +/- de la
télécommande pour augmenter/diminuer les aigus.
Égaliseur préréglé
Vous pouvez sélectionner les effets sonores tels que CLASSIQUE/POP/ROCK/JAZZ/NORMAL
en utilisant la touche EQ.
89
Page 92

Fonctionnement par Bluetooth
Vous pouvez écouter les morceaux d'un support multimédia s'il est connecté à l’unité via
Pour éviter les interférences, désactivez le Wi-Fi de votre appareil (smartphone, tablette, etc.)
lors de la lecture de musique Bluetooth.
Bluetooth.
Couplage d'appareils compatibles Bluetooth.
Vous devez coupler votre appareil Bluetooth avec cette unité avant de le connecter pour la
première fois.
Couplage d'appareils compatibles Bluetooth
Remarque :
- Cette unité peut fonctionner avec un appareil Bluetooth dans un rayon d'environ 10 mètres
(en l'absence d'obstacles entre l'appareil Bluetooth et l'unité).
- Avant de connecter un appareil Bluetooth à cette unité, vous devez vous assurer des
possibilités de l'appareil.
- Tout obstacle entre cette unité et l'appareil Bluetooth peut réduire la portée effective.
- Si la force du signal est faible, votre appareil Bluetooth peut se déconnecter, mais passe
automatiquement en mode couplage.
1. En mode fonctionnement, appuyez sur la touche BT de la télécommande pour passer en
mode Bluetooth ou changez la source en BT en appuyant sur de l’unité. Si l'unité n'est
pas couplée à un appareil Bluetooth, le système passe automatiquement en mode couplage ;
ou vous devez appuyer sur la touche PAIR pour lancer le couplage.
2. Activez la fonction Bluetooth sur votre appareil et sélectionnez le mode recherche. « Lenco
DAR-070 » apparaît sur votre appareil Bluetooth.
3. Pour désactiver la fonction Bluetooth, passez à une autre fonction sur l'unité ou désactivez la
fonction sur votre appareil Bluetooth.
Conseils :
• S’il y a une connexion existe déjà, appuyez sur la touche PAIR pour réactiver le mode
couplage. La connexion existante sera annulée.
• L'unité sera également déconnectée lorsque votre appareil est déplacé au-delà de la portée
Bluetooth.
• Ramenez votre appareil à portée de l'unité pour le reconnecter.
• Si l'appareil est déplacé en dehors de la portée de transmission puis ramené, vérifiez s'il est
toujours connecté à l'unité.
• Si la connexion est perdue, suivez les instructions ci-dessus pour coupler de nouveau votre
appareil à cette unité.
Écouter de la musique à partir d'un appareil Bluetooth
- Si l'appareil Bluetooth connecté prend en charge le profil A2DP (Profil de distribution audio
avancée), vous pouvez écouter la musique stockée sur l'appareil via les haut-parleurs de
l'unité.
- Si l’unité prend en charge le profil de contrôle à distance audio vidéo (AVRCP), vous pouvez
utiliser la télécommande de cet appareil pour lire la musique stockée dans l’unité.
1. Couplage de votre appareil à cette unité.
2. Lancez la lecture de musique via votre appareil (s'il prend en charge le profil A2DP).
3. Utilisez la télécommande pour contrôler la lecture (si elle prend en charge AVRCP).
- Pour suspendre/reprendre la lecture, appuyez sur la touche .
- Utilisez les touches / pour choisir un morceau.
90
Page 93

Utilisation de l'entrée audio
Fonctionnement DAB
1. Appuyez sur la touche AUDIO de la télécommande ou sur la touche de l’unité pour
sélectionner une source.
2. Vous pouvez utiliser les fonctions de votre appareil audio directement pour contrôler la lecture.
3. Utilisez les touches VOL +/- pour régler le niveau de volume.
Le mode radio DAB permet de recevoir des stations radio
numériques DAB/DAB+ et affiche des informations sur la station
et le programme/morceau si disponibles.
1. Recherche des stations
Lors de la première utilisation de l'unité, ou si la liste de stations est vide, la radio effectue
automatiquement une recherche complète des stations disponibles. Vous aurez aussi besoin de
lancer une recherche manuelle pour mettre à jour la liste des stations pour l'une des raisons
suivantes :
• Des nouvelles stations pourraient devenir disponibles de temps à autre.
• Des stations ferment ou ne peuvent plus être reçues (dans la liste de stations, toute station
non valide est signalée par un point d'interrogation devant son nom).
• Si la réception n'est pas bonne pour la recherche initiale (par exemple l'antenne n'était pas
complètement déployée), il peut en résulter une liste de stations vide ou incomplète.
• Si la réception de certaines stations est mauvaise provoquant l'arrêt audio, vous pouvez lister
uniquement les stations dont la force de signal est bonne.
Pour effectuer une recherche complète
Sélectionnez MENU> Full scan (Recherche complète).
Une fois la recherche terminée, la radio retourne à la
diffusion de la station précédemment sélectionnée ou la
première station sur la liste des stations.
Pour supprimer des stations listées mais non disponibles
Sélectionnez MENU> Prune (Purger)
Cette option supprime toutes les stations non valides indiquées par un point d'interrogation « ?»
devant leurs noms dans la liste des stations.
2. Sélection de stations
Pour changer de station
Utilisez les touches de la télécommande ou
tournez le bouton de NAVIGATION de l’unité pour
parcourir la liste de stations, appuyez sur la touche
de la télécommande ou OK de l’unité pour changer de
station.
Certaines stations sont des services secondaires associés à une chaîne primaire et sont
uniquement disponibles à certaines heures. Toute station ayant des services secondaires
associés est indiquée par un double chevron pointant vers la droite. Les services secondaires
sont toujours listés à côté de leur station primaire avec un double chevron pointant vers la
gauche. Dans la liste des stations, les services secondaires sont triés par ordre alphabétique.
91
Page 94

3. Stations préréglées
L'unité permet de mémoriser 40 stations DAB.
Pour mémoriser une station comme préréglage
Maintenez appuyée la touche PROGRAM pendant
3 ~ 5 secondes jusqu'à ce que l’écran indique Preset
Store (station mémorisée). Chaque préréglage (1-40)
est affiché comme étant vide ou contenant le nom de
la station mémorisée.
Utilisez les touches de la télécommande ou
tournez le bouton de NAVIGATION de l’unité pour
sélectionner une position mémoire, appuyez sur la
touche de la télécommande ou OK de l’unité pour
mémoriser la station en cours. Une fois la
mémorisation de la station confirmée, l’écran retourne
à l'affichage Now playing (Station en cours).
Pour rappeler une station mémorisée
Appuyez sur la touche PROGRAM (l’écran affiche
Preset Recall (rappel de station mémorisée).
Sélectionnez l'une des stations mémorisées listées à
l'aide des touches P+/- de la télécommande ou
de l'unité, puis appuyez sur la touche de la
télécommande ou OK de l’unité pour l'écouter.
4. Recherche manuelle
Comme pour la méthode normale de recherche, vous pouvez également rechercher
manuellement une chaîne/fréquence particulière. Il se peut que vous deviez réorienter votre
antenne afin d'obtenir la meilleure réception possible pour rechercher une chaîne particulière et
mettre à jour la liste des stations.
Pour effectuer une recherche manuelle
Appuyez sur MENU> Manual tune (Recherche manuelle), puis utilisez les touches de
la télécommande ou tournez le bouton de
NAVIGATION de l’unité pour afficher une
chaîne/fréquence particulière, appuyez sur la touche
de la télécommande ou OK de l’unité pour
rechercher cette chaîne/fréquence.
L'écran affiche une indication sur la force du signal reçu
de la fréquence sélectionnée.
La force du signal reçu affichée reflète les réglages de l'antenne.
Remarque : Le rectangle légèrement plus grand indique le seuil de qualité audio, si la force
du signal, indiquée par des rectangles pleins, tombe en dessous de ce seuil, la qualité audio
se détériore. L'unité recherche toutes les stations DAB sur la fréquence sélectionnée et met à
jour la liste des stations avec les nouvelles stations trouvées. Pour écouter l’une des stations
trouvées, retournez à l'écran Now playing (Station en cours) et sélectionnez la station
souhaitée dans la liste des stations.
5. Informations sur la station écoutée
Lorsqu'une station est en cours, l'écran affiche son nom et les
informations DLS (Segment d'étiquette dynamique) diffusées
par la station, telles que nom du programme, titre du morceau
et coordonnées de contact.
Les informations DLS se mettent à défiler si elles contiennent plus de 16 caractères.
92
Page 95

Pour afficher plus d'informations Appuyez sur la touche INFO.
Fonctionnement FM
Chaque fois la touche INFO est appuyée, la série
d'informations suivante sera affichée dans l'ordre
suivant : Texte DLS, informations DL Plus (ne sont
affichées que si elles sont diffusées par la station), force
du signal, type de programme, nom de l'ensemble,
numéro de chaîne/fréquence, taux d'erreur de signal,
débit binaire, codec/variante DAB, heure et date.
Remarque : DL Plus présente des informations supplémentaires qui peuvent être diffusées
par les stations et mémorisées temporairement dans la radio.
Maintenez appuyée la touche INFO à tout moment pour retourner à l'écran Now playing
(Station en cours).
6. Autres réglages
Compression de plage dynamique (DRC)
Cette fonction réduit la différence entre le son diffusé le plus
fort et le plus bas.
Cela signifie que les sons forts deviennent relativement
faibles et les sons faibles relativement forts.
Remarque : DRC fonctionne uniquement si le diffuseur l’a
activée pour une station spécifique.
Pour modifier le réglage de la Compression de la
gamme dynamique (DRC)
Sélectionnez MENU> DRC>> options disponibles :
DRC désactivé | faible | élevé.
Le mode FM permet de recevoir des stations radio analogiques sur
la bande FM et d'afficher des informations RDS (Radio Data System)
sur la station et les émissions (si disponibles).
1. Sélection de stations
Lors de la première utilisation du mode FM, la radio se syntonise
sur la plus faible fréquence de la bande FM.
Pour rechercher une station en mode FM
Appuyez sur la touche AMS. L'unité recherche dans les fréquences
de la bande FM, tout en affichant la fréquence actuelle l'écran.
La recherche s'arrête dès qu'un signal est détecté. L'unité peut être
réglée pour s'arrêter à chaque station ou uniquement aux stations
avec un signal fort (pour plus d'informations, reportez-vous à
Paramètres de recherche à la page FR-18).
Vous pouvez également utiliser les touches pour la
recherche, à des pas de 50 kHz.
2. Stations préréglées
L'unité comprend 40 positions mémoire pour les stations FM, utilisables de la même manière que
les préréglages du mode DAB, comme décrit dans Préréglages à la page FR-16.
93
Page 96

3. Informations sur la station écoutée
Lorsqu'une station radio FM est syntonisée, l'écran affiche
sa fréquence, ou si des informations RDS sont disponibles,
le nom de la station et toute autre information de type
« Radio Text » (Texte radio). Si aucune information n'est
disponible, il n'y aura que la fréquence et le message No
Radio Text (pas de texte radio) qui sont affichés.
Pour voir plus d'informations sur l'émission
Appuyez sur la touche INFO.
Chaque fois la touche INFO est appuyée, la série
d'informations suivante sera affichée dans l'ordre
suivant : Texte radio RDS, type de programme,
fréquence, mono/stéréo, heure et date.
Pour retourner à l'écran par défaut Station en cours
Maintenez appuyée la touche INFO.
4. Autres réglages
Paramètres de recherche
Par défaut, la recherche FM s’arrête sur chaque
station détectée (ALL Stations) (Toutes les stations).
Ceci peut donner une mauvaise qualité audio pour les
stations faibles.
Options : Toutes les stations | Stations fortes uniquement
Pour changer les paramètres de recherche afin de
s'arrêter uniquement sur les stations de bon signal
Sélectionnez MENU > Scan setting (MENU>
Paramètres de recherche), puis Strong stations only
(Stations fortes uniquement).
Remarque : Dans l'écran de droite, l'astérisque indique
que « Strong stations only » (Stations fortes uniquement) est l’option actuellement utilisée.
Réglages audio
Par défaut, toutes les stations reproduisent en stéréo.
Pour les stations faibles, cela peut entraîner une
mauvaise qualité audio. La qualité audio peut être
améliorée en utilisant le mode mono.
Options : Stéréo autorisé | Mono forcé
Pour écouter des stations faibles en mono
Sélectionnez MENU > Audio setting> Forced mono
(MENU> Paramètres audio> Mono forcé).
Remarque : Dans l'écran de droite, l'astérisque indique
que « Stereo allowed » (Stéréo autorisé) est l’option
actuellement utilisée.
94
Page 97

Utilisation d’un CD
Types de disques compatibles
Type de disque
Logo du disque
Contenu enregistré
CD-R (CD enregistrable - Audio/MP3/WMA)
AUDIO/MP3/WMA
CD-RW (CD-réinscriptible - Audio/MP3/WMA)
AUDIO/MP3/WMA
CD AUDIO (Disque Compact Audio numérique)
AUDIO :
Certains fichiers enregistrés peuvent ne pas être lus à cause du type et du format du disque ou de
l'état de l'enregistrement.
Ne lit pas les mini CD de 8 cm.
En mode arrêt, appuyez sur la touche pour lancer la lecture du disque.
Lors de la lecture, le numéro du morceau et temps écoulé s'affichent.
Lecture de CD
1. Appuyez plusieurs fois sur la touche située en haut de l’unité jusqu'à ce que « CD »
apparaisse ou appuyez sur la touche CD de la télécommande pour accéder au mode CD.
2. Insérez un disque dans le tiroir pour disque pour que l’unité commence à le lire.
3. Appuyez sur la touche pour éjecter le disque.
4. Appuyez sur la touche pour suspendre la lecture.
5. Pour reprendre la lecture, appuyez de nouveau sur la touche .
6. Appuyez sur la touche de la télécommande pour arrêter le CD.
Pour ignorer la recherche ou pour rechercher et lire
• Appuyez une ou plusieurs fois sur la touche pour sauter vers l'arrière un ou plusieurs
morceaux sur le disque.
• Appuyez une ou plusieurs fois sur la touche pour sauter vers l'avant un ou plusieurs
morceaux sur le disque.
• Maintenez appuyée la touche de la télécommande pour effectuer une recherche vers
l'arrière du morceau avec lequel vous voulez commencer.
• Maintenez appuyée la touche de la télécommande pour effectuer une recherche vers
l'avant du morceau avec lequel vous voulez commencer.
Répétition de lecture
En mode CD, vous pouvez répéter la lecture d'un morceau (ONE) ou de plusieurs morceaux (ALL)
en appuyant plusieurs fois sur la touche REPEAT de la télécommande.
95
Page 98

EN
FR
ALL
TOU
DIR
Dossier
OFF
ÉTEINT
SINGLE
Un seul
Le nombre maximum de chaînes est 20.
Utilisation de l'USB
Lecture aléatoire
En mode CD, pour effectuer une lecture aléatoire, appuyez sur la touche RANDOM de la
télécommande.
Programme
Lors de la lecture, appuyez sur la touche de la télécommande, puis sur la touche PROGRAM
pour afficher les informations suivantes.
Vous pouvez choisir un morceau en utilisant les touches numériques de la télécommande pour le
mémoriser sous P01, P02, etc. ; appuyez sur la touche PROGRAM pour aller au réglage de la
chaîne suivante.
Après avoir terminé, appuyez sur la touche pour confirmer.
Lors de la lecture d'un programme, les touches numériques sur de la télécommande ne sont pas
utilisables, utilisez les touches pour changer de morceau.
Changez la source ou appuyez deux fois sur la touche pour effacer le programme.
La connexion d'un appareil de stockage de masse USB (tel que clé USB, lecteur flash USB ou
carte mémoire) à cette unité permet d'écouter de la musique stockée sur l’appareil via les
haut-parleurs puissants de l'unité.
1. Insérez le connecteur USB de l’appareil dans le port USB situé à l'arrière de l'unité.
2. Appuyez plusieurs fois sur la touche située en haut de l’unité ou sur la touche USB de la
télécommande pour accéder au mode USB.
3. La musique stockée dans l’appareil sera lue automatiquement.
Répétition de lecture
En mode USB, vous pouvez répéter la lecture d'un morceau (ONE) ou de plusieurs morceaux
(ALL) en appuyant plusieurs fois sur la touche REPEAT de la télécommande.
96
Page 99

EN
FR
ALL
TOU
DIR
Dossier
OFF
ÉTEINT
SINGLE
Un seul
Le nombre maximum de chaînes est 20.
Si l’appareil USB est corrompu, cette unité ne peut pas le détecter ni lire la musique qu’y est
stockée.
Formatez l’appareil de stockage de masse USB et copiez la musique en vous servant d’un
ordinateur.
Lecture aléatoire
En mode USB, pour effectuer une lecture aléatoire, appuyez sur la touche RANDOM de la
télécommande.
Programme
Lors de la lecture, appuyez sur la touche de la télécommande, puis sur la touche PROGRAM
pour afficher les informations suivantes.
Vous pouvez choisir un morceau en utilisant les touches numériques de la télécommande pour le
mémoriser sous P01, P02, etc. ; appuyez sur la touche PROGRAM pour aller au réglage de la
chaîne suivante.
Après avoir terminé, appuyez sur la touche pour confirmer.
Lors de la lecture d'un programme, les touches numériques sur de la télécommande ne sont pas
utilisables, utilisez les touches pour changer de morceau.
Changez la source ou appuyez deux fois sur la touche pour effacer le programme.
Pour les appareils équipés d’un câble USB :
1. Insérez une extrémité du câble USB (non fourni) au port
USB situé à l’arrière de l’unité.
2. Insérez l’autre extrémité du câble USB au port de sortie
USB de l’appareil USB.
Charge USB (5V 1A uniquement)
Vous pouvez brancher un câble USB dans le port USB 5V 1A pour charger un appareil
portable.
97
Page 100

Entretien
Nettoyage de l'appareil
Débranchez le cordon d'alimentation de l'appareil avant de le nettoyer.
EN
FR
Playback side
Côté lecture
• Pour nettoyer l'appareil, essuyez sa surface extérieure avec un chiffon non pelucheux
légèrement humide.
• N'utilisez pas de nettoyant contenant de l'alcool, de l'ammoniac ou des abrasifs.
• Ne pulvérisez pas d'aérosols sur ou près de l'unité.
Manipulation des disques
• Évitez de toucher au côté gravé du disque.
• Ne collez pas de papier ni de ruban au disque.
Nettoyage des disques
Les traces de doigts et la poussière sur un disque détériore l'image et le son. Nettoyez le disque
du centre vers le bord extérieur à l'aide d'un chiffon doux. Gardez toujours vos disques propres.
• Si un chiffon ne suffit pas à enlever la poussière d'un disque, essuyez-le légèrement avec un
chiffon humidifié et passez derrière avec un chiffon sec.
• N'utilisez aucun type de solvant tel que du diluant, du benzène, des nettoyants du commerce
ni un vaporisateur antistatique. Ils risqueraient d'endommager le disque.
Rangement des disques
Ne rangez pas vos disques au soleil ou à proximité de sources de chaleur.
• Ne rangez pas vos disques dans un lieu sujet à l'humidité et à la poussière, tel qu'une salle de
bain ou à proximité d'un humidificateur.
• Rangez les disques verticalement dans une boîte, les disques peuvent se déformer si vous
les empilez ou placez des objets dessus.
98
 Loading...