

Page 1
Model
Model
Model
Model Lenco
Lenco
Lenco
Lenco CR-2003
CR-2003
CR-2003
CR-2003
User
manual
User
manual
User
User manual
manual (Internet
Gebruiksaanwijzing
Gebruiksaanwijzing
Gebruiksaanwijzing
Gebruiksaanwijzing (Internetradio
Benutzerhandbuch
Benutzerhandbuch
Benutzerhandbuch
Benutzerhandbuch (Internetradio
Mode
Mode
Mode
Mode d
Manual
Manual
Manual
Manual del
d
’
emploi
d
’
emploi
d ’
’ emploi
emploi (Radio
del
usuario
del
usuario
del usuario
usuario (Radio
(Internet
(Internet
(Internet Radio
(Internetradio
(Internetradio
(Internetradio met
(Internetradio
(Internetradio
(Internetradio mit
(Radio
(Radio
(Radio Internet
(Radio
(Radio
(Radio por
Radio
Radio
Radio with
Internet
Internet
Internet avec
por
por
por Internet
with
FM)
with
FM)
with FM)
FM)
met
met
met FM)
mit
mit
mit UKW)
avec
avec
avec FM)
Internet
Internet
Internet con
FM)
FM)
FM)
UKW)
UKW)
UKW)
FM)
FM)
FM)
con
FM)
con
FM)
con FM)
FM)
Page 2

INDEX
INDEX
INDEX
INDEX
ENGLISH...................................................................................................... 3
NEDERLANDS.............................................................................................. 47
DEUTSCH..................................................................................................... 93
FRAN Ç AIS.................................................................................................. 139
ESPA Ñ OL.................................................................................................... 185
VERSION: 2.0
Page 3

ENGLISH
ENGLISH
ENGLISH
ENGLISH
1. Before Started
1.1
1.1
1.1
1.1 Network
• A broadband connection in combination with a wired/wireless access
• The network device needs to support WiFi (802.11b/g/n) wireless
• A PC or smart phone with a network ready. This network has to be the
1.2
1.2
1.2
1.2 Safety
• Do not use this device near
Network
Network
Network Requirement
Before using the CR-2003, the following requirements are needed:
point, router or similar network device.
connection.
same one as the CR-2003 equipped with.
Safety
Safety
Safety Precautions
Requirement
Requirement
Requirement
Precautions
Precautions
Precautions
water.
• Clean only with a slightly damp cloth.
• Do not cover or block any ventilation openings. When placing the device
on a shelf, leave 5 cm (2 ” ) free space around the whole device.
• Install in accordance with the supplied user manual.
• Don ’ t step on or pinch the power adaptor . Be very careful, particularly
near the plugs and the cable’s exit point. Do not place heavy items on
the power adaptor, which may damage it. Keep the entire device out of
children’s reach! When playing with the power cable, they can seriously
injure themselves.
• Unplug this device during lightning storms or when unused for a long
period.
• Keep the device away from heat sources such as radiators, heaters,
stoves, candles and other heat-generating products.
• Avoid using the device near strong magnetic fields.
• Electrostatic discharge can disturb normal usage of this device. If so,
simply reset and restart the device following the instruction manual.
During file transmission, please handle with care and operate in a
static-free environment.
• Warning! Never insert an object into the product through the vents or
openings. High voltage flows through the product and inserting an
object can cause electric shock and/or short circuit internal parts. For
the same reason, do not spill water or liquid on the product.
• Do not use in wet or moist areas such as bathrooms, steamy kitchens or
near swimming pools.
3
Page 4

• Do not use this device when condensation may occur.
• Although this device is manufactured with the utmost care and checked
several times before leaving the factory, it is still possible that problems
may occur, as with all electrical appliances. If you notice smoke, an
excessive build-up of heat or any other unexpected phenomena, you
should disconnect the plug from the main power socket immediately.
• This device must be well ventilated at all time!
• This device must operate on a power source as specified on the
specification label. If you are not sure of the type of power supply used
in your home, consult your dealer or local power company.
• The socket outlet must be installed near the equipment and must be
easily accessible.
• Do not overload ac outlets or extension cords. Overloading can cause
fire or electric shock.
• Keep away from rodents. Rodents enjoy biting on power cords.
• Always hold the plug when pulling it out of the main supply socket. Do
not pull the power cord. This can cause a short circuit.
• Avoid placing the device on any surfaces that may be subject to
vibrations or shocks.
•
To
protect the device during a thunderstorm, unplug the ac power
adaptor.
• When the device is not in use for long periods, unplug the ac power
adaptor for safety reasons.
•
To
clean the device, use a soft dry cloth. Do not use solvents or petrol
based fluids.
dilute detergent.
To
remove severe stains, you may use a damp cloth with
• The supplier is not responsible for damage or lost data caused by
malfunction, misuse, modification of the device or battery replacement.
• The apparatus shall not be exposed to dripping or splashing and make
sure that no objects filled with liquids, such as vases, are placed on or
near the apparatus.
•
To
completely disconnect the power input, the mains plug of the
apparatus shall be disconnected from the mains, as the disconnect
device is the mains plug of apparatus.
• The mains plug of the apparatus should not be obstructed or should be
easily accessed during intended use.
• Battery shall not be exposed to excessive heat such as sunshine, fire or
the like.
• The ventilation should not be impeded by covering the ventilation
openings with items such as newspapers, table-cloths, curtains etc.
• No naked flame sources such as lighted candles should be placed on the
4
Page 5

apparatus.
• Attention should be drawn to the environmental aspects of battery
disposal.
• The apparatus can only be used in moderate extremely cold or climates
warm environments should be avoided.
• The rating label has been marked on the bottom panel of the apparatus.
• This device is not intended for use by people (including children) with
physical, sensory or mental disabilities, or a lack of experience and
knowledge, unless they ’ re under supervision or have received
instructions about the correct use of the device by the person who is
responsible for their safety.
• This product is intended for household use only and not for commercial
or industrial use.
• Make sure the unit is adjusted to a stable position. Damage caused by
using this product in an unstable position or by failure to follow any
other warning or precaution contained within this user manual will not
be covered by warranty.
• Never remove the casing of this apparatus.
• Never place this apparatus on other electrical equipment.
• Do not use or store this product in a place where it is subject to direct
sunlight, heat, excessive dust or vibration.
• Do not clean this product with water or other liquids.
• Do not block or cover the slots and holes in the product.
• Do not push foreign objects into the slots or holes in the product.
• Do not allow children access to plastic bags.
• Please check that the voltage on the type plate of your appliance
corresponds with your house electricity supply (type plate is located on
the back of the unit).
• Protect the power cord from being walked on or pinched, particularly at
plugs, convenience receptacles, and the point where they exit from the
apparatus.
• Only use attachments/accessories specified by the manufacturer.
• Refer all servicing to qualified service personnel. Servicing is required
when the apparatus has been damaged in any
supply cord or the plug, when liquid has been spilled or objects have
fallen into the apparatus, when the apparatus has been exposed to rain
or moisture, does not operate normally, or has been dropped.
way,
such as the power
• Do not use a damaged power cord or plug or a loose outlet. Doing so
may result in fire or electric shock.
• Warning: prolonged exposure to loud sounds from personal music
players may lead to temporary or permanent hearing loss.
5
Page 6

•
•
•
• To reduce the risk of electric shock, do not remove screws. The device
does not contain any user-serviceable parts. Please leave all
maintenance work to qualified personnel.
•
•
•
• It is not recommended to use headphone with the device via 3.5mm
Audio Out socket. In case of using the headphones, be reminded that
excessive sound pressure or volumes from
headphones or earphones can lead to damage to
the hearing. Always adjust the volume to a
pleasant, not too loud level. If you have adjusted
the volume of the headphones to be too high
and use that for an extended period, it can
damage the listener’s hearing.
• Where the mains plug is used as the disconnect device, the disconnect
device shall remain readily operable.
• The cell batteries shall not be exposed to excessive heat such as
sunshine, fire or the like.
6
Page 7
2.
Appearance
2.
Appearance
2.
2. Appearance
Appearance and
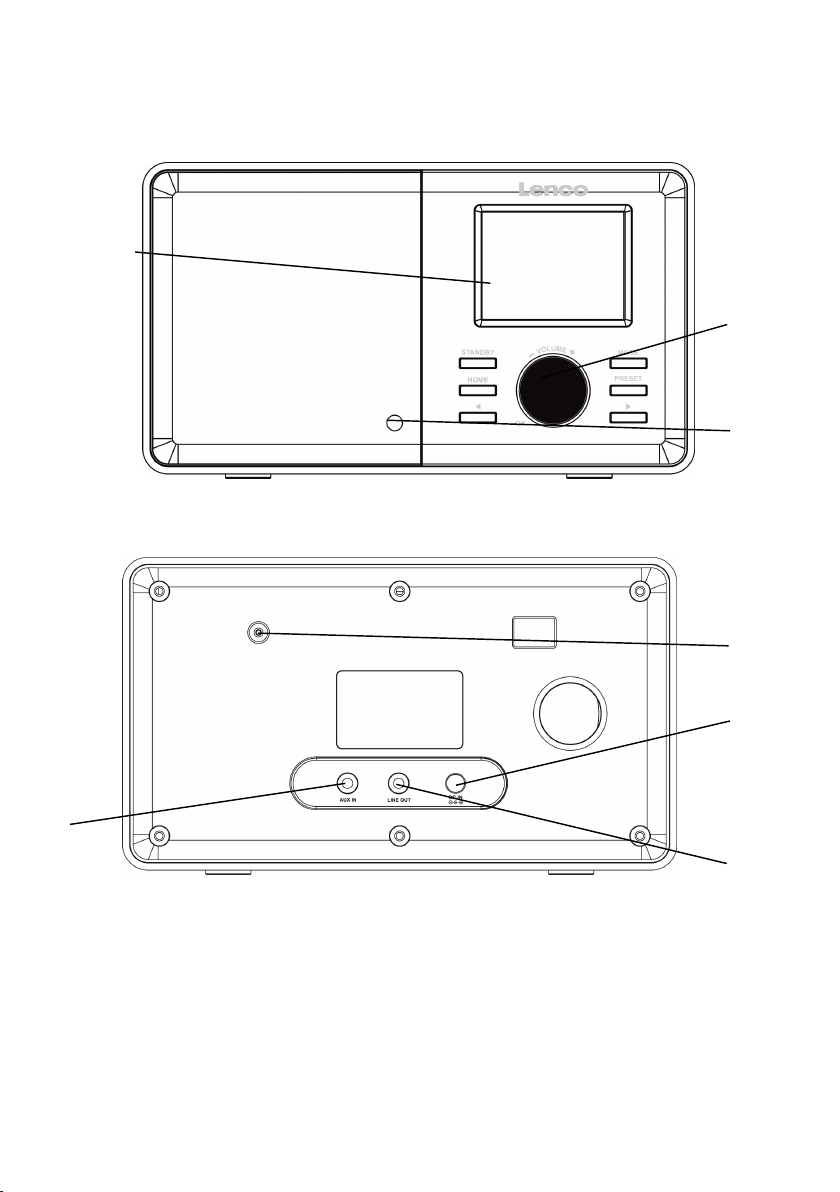
Front View
1
Back View
and
Key
and
and Key
Descriptions
Key
Descriptions
Key Descriptions
Descriptions
2
3
7
4
5
6
7
Page 8
No.
No.
No.
No. Description
1 2.4 ” TFT Screen Display
Description
Description
Description Functions
Functions
Functions
Functions
2 Buttons and Reel
- S tandby
-Mode
-Home
-Preset
-
-
- Volume+ OK dial
3 Infrared receiver Reception of remote control
4 DC IN 9V 1A Connection socket for mains adapter
5 Aux in 3.5 mm audio in socket
6 Line out 3.5mm audio out socket
7 Antenna FM Reception
C ontrol panel
-Switch on/off
-Switch between audio sources
-Go to main menu
-Save station
-Left cursor button
-Right cursor button
-Adjust volume; Cursor up/down;
Confirm selection
8
Page 9

Remote Control
9
Page 10
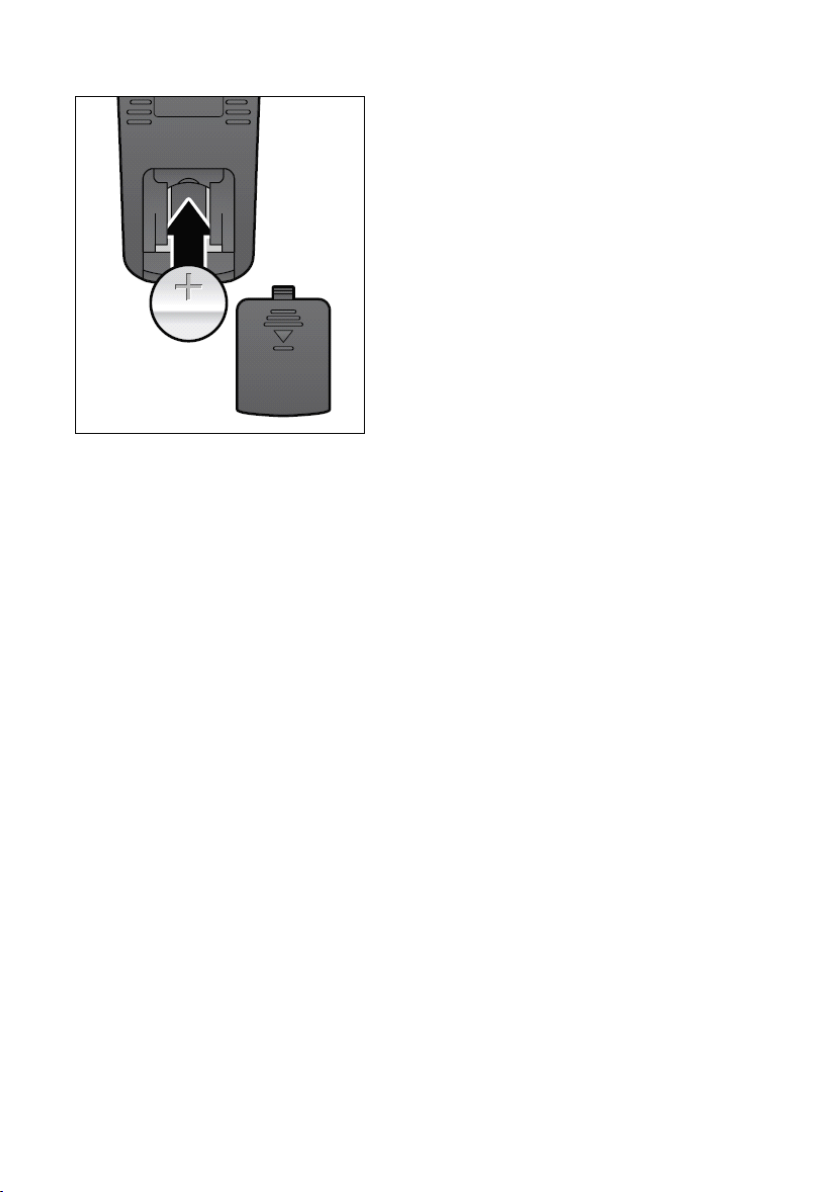
Remember to pull out the clear plastic
tab from the battery compartment
before using the remote.
To
remove the battery from the remote,
use your thumb to p ull out the battery
tray.
Replace it with a CR2025 type 3V
battery, taking care to insert it with the
positive (+) side up.
Caution
Caution
Caution
Caution : Risk of explosion of battery if it
is replaced by an incorrect type.
Dispose of used batteries according to
the instructions
WARNING
WARNING
WARNING
WARNING
Do not ingest the battery, Chemical Burn Hazard
(The remote control supplied with) This product contains a coin/button
cell battery. If the coin/button cell battery is swallowed, it can cause
severe internal burns in just 2 hours and can lead to death.
Keep new and used batteries away from children.
If the battery compartment does not close securely, stop using the
product and keep it away from children.
If you think batteries might have been swallowed or placed inside any
part of the body, seek immediate medical attention.
10
Page 11
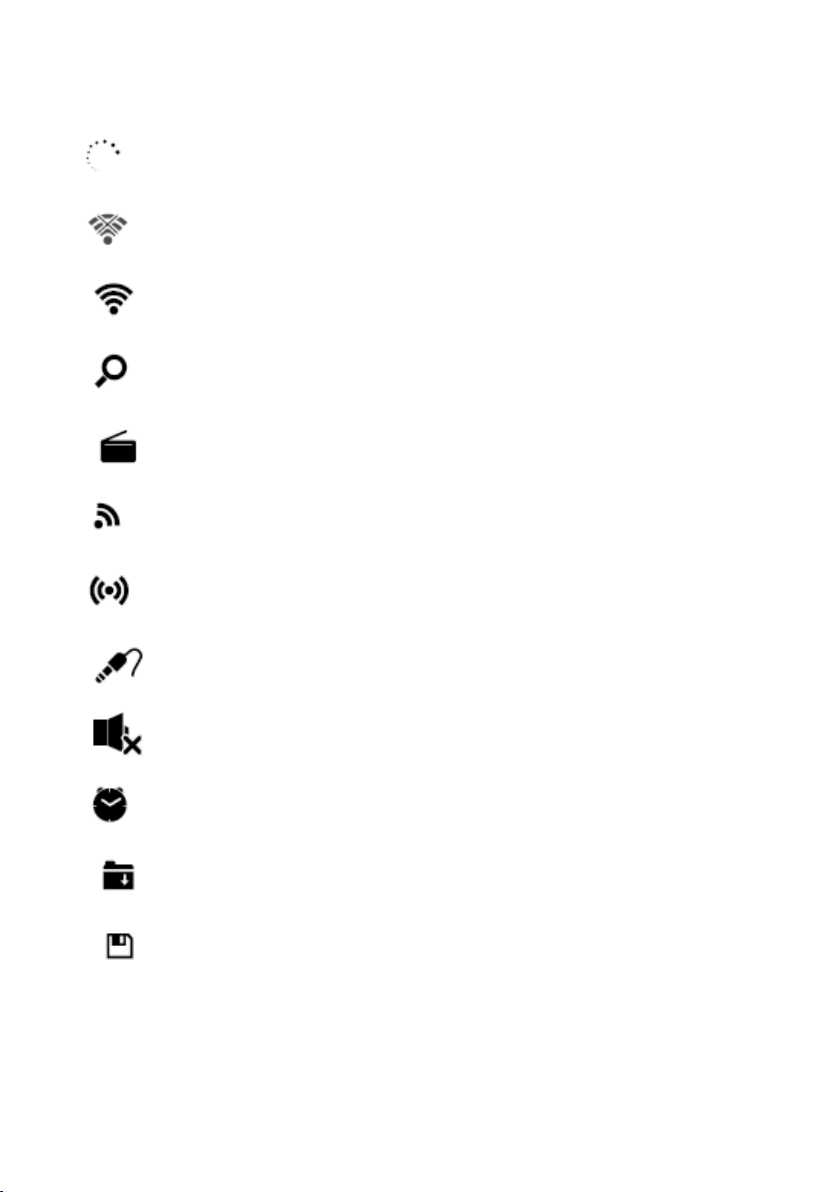
Symbols on the display
Connection is being established, device functioning
No wireless connection
Wireless connection established
Search
VHF radio function selected
VHF radio reception: Mono
VHF radio reception: Stereo
AUX function selected
Speaker off
Alarm on
Internet radio station saved as favorite
FM radio station saved
11
Page 12
3.
Getting
3.
Getting
3.
3. Getting
Getting Started
The packaging box contains the following items:
CR-2003 Internet Radio
Remote Control
Power adaptor
User Manual
Get
the
Get
the
Get
Get the
the network
• For wireless LAN (WLAN) network connection:
Check if WLAN LINK/ACT light of the wired/wireless access point or router
is illuminated. Consult the user guide of that for any questions.
Note:
Note:
Note:
Note: WiFi
without
without
without
without the
may
may
may
may reduce
Therefore
Therefore
Therefore
Therefore try
distance
distance
distance
distance mentioned
devices.
devices.
devices.
devices.
• Connect the power adaptor to the back of the CR-2003 and plug into
power socket.
Started
Started
Started
network
network
network ready
WiFi
WiFi
WiFi allows
reduce
reduce
reduce the
ready
ready
ready
allows
allows
allows data
the
need
the
need
the need
need of
the
the
the strength
try
to
try
to
try to
to locate
mentioned
mentioned
mentioned above,
data
transfer
data
transfer
data transfer
transfer over
of
cabling
of
cabling
of cabling
cabling between
strength
strength
strength of
locate
locate
locate the
the
the
the CR-2003
above,
above,
above, and
over
over
over short
between
between
between the
of
the
WiFi
of
the
WiFi
of the
the WiFi
WiFi connectivity.
CR-2003
CR-2003
CR-2003 and/or
and
avoid
and
avoid
and avoid
avoid any
short
distances
short
distances
short distances
distances within
the
devices.
the
devices.
the devices.
devices. Any
connectivity.
connectivity.
connectivity.
and/or
and/or
and/or the
the
the
the access
any
obstacles
any
obstacles
any obstacles
obstacles between
within
within
within 20
Any
walls
Any
walls
Any walls
walls or
access
access
access point
point
point
point within
between
between
between two
20
meters
20
meters
20 meters
meters
or
ceilings
or
ceilings
or ceilings
ceilings
within
within
within the
two
two
two
the
the
the
• When it is the first time running the device, the system will ask you to set
Language
Language
Language
Language and Network
Network
Network
Network Configurations
Configurations
Configurations
Configurations .
12
Page 13

• Select
• Select Yes(WPS) (only for WPS routers). Then press the WPS butto on
• Select No if you would prefer to listen to a terrestrial station or to use the
Yes
to establish connection to the network
your router.
speaker with an external playback device.
If you answer “
shortly afterwards a list of available wireless networks will appear .
Yes”, the display goes to scanning for Wireless Network and
13
Page 14
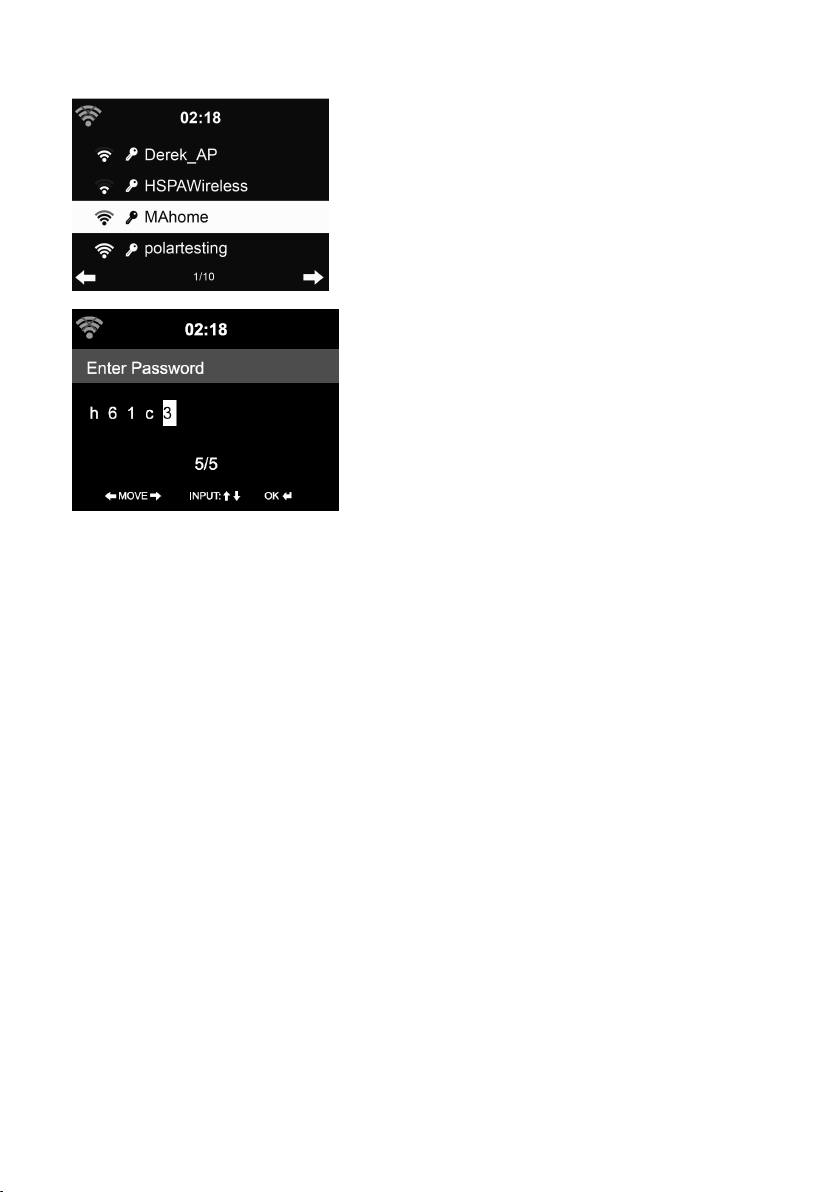
The number of bars in the wireless symbol in front of the network name (SSID)
shows the relative signal strength of the network.
The key symbol indicates that the network is password-protected.
If the device does not find any wireless networks, No wireless Networks
Found appears on the display. Change your location, if necessary, and check
your WLAN router.
You can find the SSID of your Access Point in the configuration of the Access
Point (router).
Select your network and confirm with OK. If your WLAN is
password-protected, you will be prompted to enter your password.
Enter the password using the number and letter buttons of the remote
control or enter it directly on the device.
Note the use of upper and lower case when entering the password.
You can rotate reel to choose the code. If it is accidentally pressed
move a redundant entry, press
With
Remote
With
Remote
With
With Remote
Remote control:
The cursor indicates the current entry space.
Press the corresponding number button repeatedly:
0 0 (delete entry)
1 1 (space) @ ! “ # $ % & ‘ ( ) * + , - . / : ; < = > ? [ \ ] ^ _ ` { | } ~
2 2 A B C a b c
control:
control:
control:
to correct .
to
14
Page 15
3 3 D E F d e f
4 4 G H I g h i
5 5 J K L j k l
6 6 M N O m n o
7 7 P Q R S p q r s
8 8 T U V t u v
9 9 W X Y Z w x y z
Alternatively, you can enter the numbers and letter using only the cursor
buttons:
Go to previous entry space, entry can beoverwritten
Go to next entry space, the last entry is saved
/ Select number/letter
OK Confirm entire entry
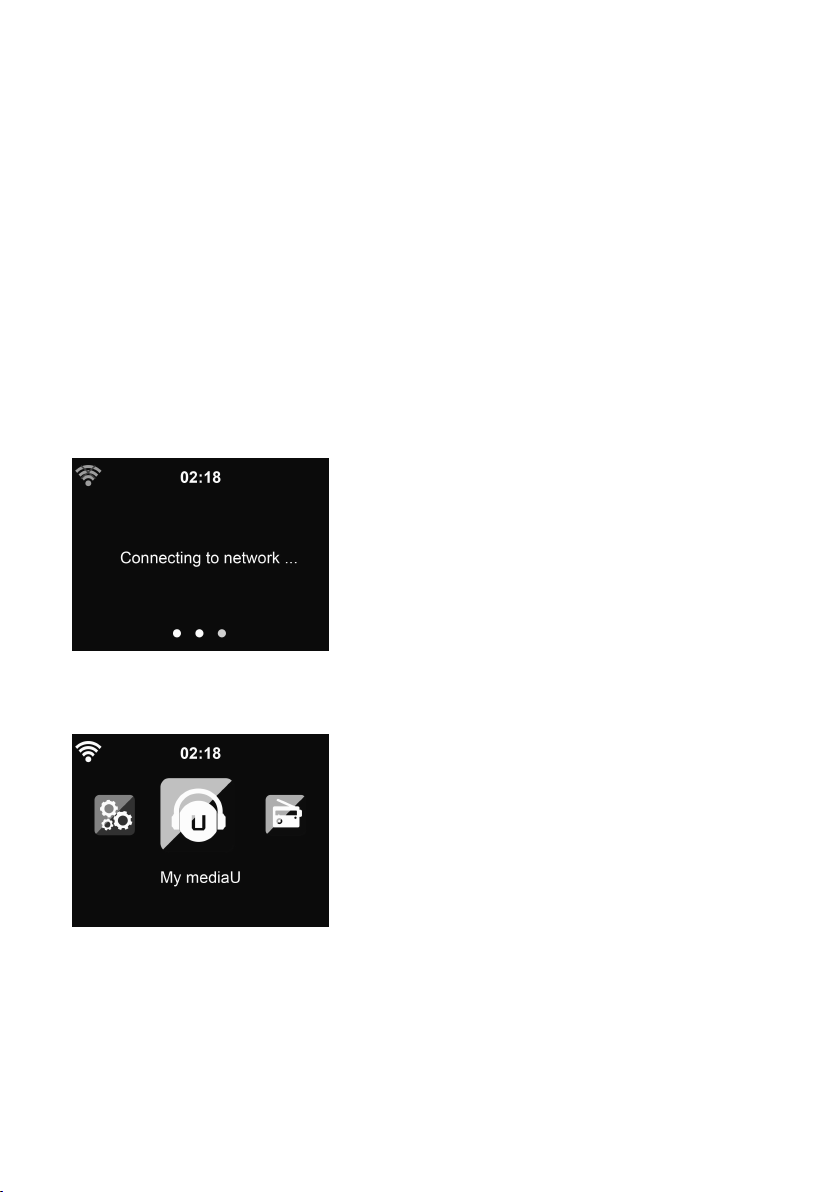
It may take a few seconds to establish the connection to the network.
Once the connection is established, the main menu appears with the main
menu items:
- Internet Radio : Access to worldwide radio stations
- Media Centre : Access to your UPnP devices via software with
streaming capability
- FM : Terrestrial VHF radio stations, WLAN not necessary
15
Page 16
- Information Center: Access to weather, financial and system
information
- AUX : Access to all devices connected via the AUX IN socket
- Configuration : various system settings, alarm
- Local Radio : Access to radio stations in a particular region (e.g. only
German stations)
- My mediaU : Access to an online media library. This menu item only
appears if the function has already been enabled under Configuration
> Manage my mediaU.
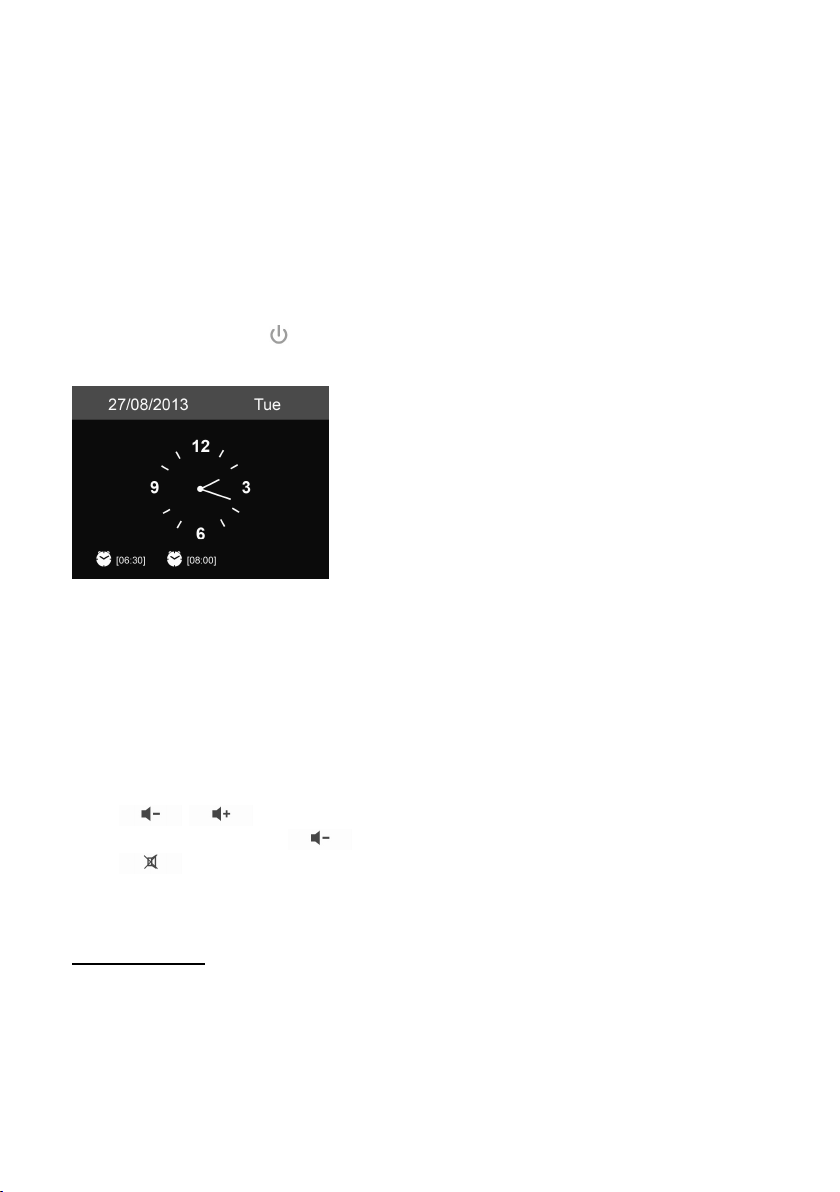
STANDBY
• Press STANDBY
• If you have setup a network connection, and use CR-2003 again within
• Use the letter keys to input numbers/letters.
Press / or rotate the volume reel to adjust the volume. Rotate
the volume reel or press until volume level becomes 0, or direct
press to mute the sound.
STANDBY
STANDBY /
active alarm times display on the screen.
the network, CR-2003 will automatically make the connection. In case you
desire to change the network, enter
corresponding connection.
Once you are on the letter you want, press
When you are at the end the input, press OK
to move to previous entry.
/
/
/ to enter standby mode. The time, date and any
configuration
configuration
configuration
configuration
OK
OK
OK to confirm. You may press
to setup the
to move to the next entry.
4.
About
4.
About
4.
4. About
About Music
Lenco
Lenco
Lenco
Lenco CR-2003
as you like. (See section 5.3)
The information below is the introduction of how to setup up media
streaming from PC or other media server. Study the own instruction of the
software or apps you use to enjoy music streaming if necessary.
Music
streaming
Music
streaming
Music streaming
streaming
CR-2003
CR-2003
CR-2003 is the default device name for DLNA, and you may rename it
16
Page 17
Make sure the music files are in the format of MP3, WMA, WAV or AAC for
music streaming to CR-2003 .
Refer to section 5.6 for the details of the control on CR-2003 for music
streaming playback .
4.1
4.1
4.1
4.1 UPnP
•
UPnP
UPnP
UPnP
To
enjoy the streaming music from PC, the following steps are to be
done on the PC:
- Connect the PC to the network.
- Ensure the CR-2003 is powered on and connected to the same
network.
Windows
- Open the UPnP platform
Alternatively, other platforms or server such as
Connection
Connection
Connection
Connection
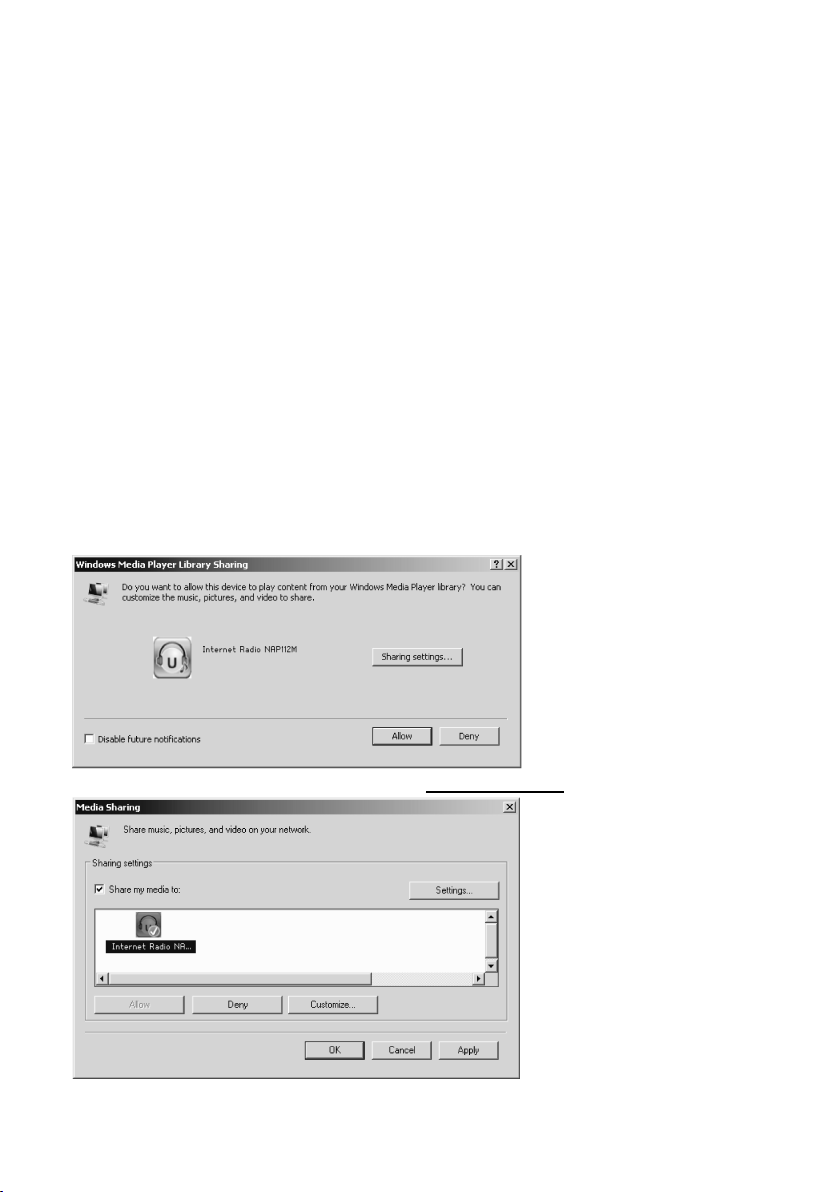
Below set up example is under Windows XP and Windows Medio Player
11 version.
- Allow to share your media to Lenco
may be used.
Windows
Windows
Windows Media
Media
Media
Media Player
Lenco
CR-2003
Lenco
CR-2003
Lenco CR-2003
CR-2003 .
Player
Player
Player
(1 1 or later).
Windows
Windows
Windows
Windows Media
Media
Media
Media
17
Page 18
- Add the audio files and folders you want to share with CR-2003 to
the media library.
• You may also enjoy the streaming music from other music server , such
Android
as smart phone (
- Connect the mobile to the network
- Search and install media sharing apps from
- Add the audio files from your mobile you want to share.
• After setup the shared server, choose the music and control playback on
the CR-2003 . (See section 5. 6 )
Android
Android
Android
platform):
Google
Google
Google
Google Play
Play
Play
Play
.
4.2
4.2
4.2
4.2 DLNA
• Besides
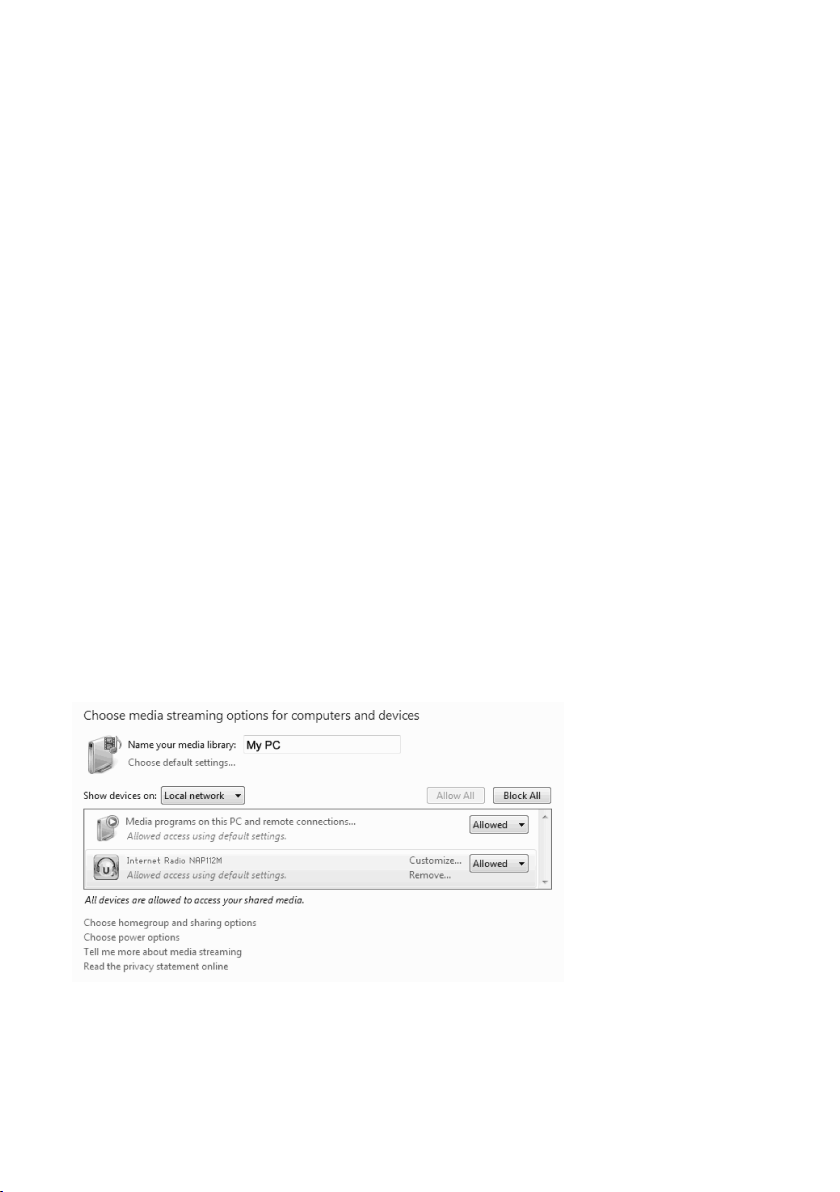
• The PC system requirement for DLNA is Windows 7 and Windows Media
DLNA
Function
DLNA
Function
DLNA Function
Function
UPnP,
CR-2003 supports DLNA function, you share the music
files from PC or Android mobile, and you use your PC, Android mobile or
iPhone / iPad to control music playback on the CR-2003 . (It is not
required to control each playback on the CR-2003 .)
Player 12. Setup as below:
Firstly, share the media on your PC to CR-2003 .
Control
Control
Control
Control Panel
Media
Media
Media
Media streaming
Panel
>
Panel
Panel >
streaming
streaming
streaming options
Network
>
Network
> Network
Network and
options
options
options
and
Internet
and
Internet
and Internet
Internet >
>
Network
>
Network
> Network
Network and
and
Sharing
and
Sharing
and Sharing
Sharing Center
Center
Center
Center >
>
>
>
18
Page 19

Windows
Windows
Open
Windows
Windows Media
Right click any music in the library and choose Play to Lenco
Media
Media
Media Player
Player
Player
Player
to enable
Allow
remote
Allow
remote
Allow
Allow remote
remote control
control
control
control of
Lenco
Lenco
Lenco CR-2003
of
my
of
my
of my
my Player
CR-2003
CR-2003
CR-2003 .
Player
Player
Player
.
There will be a window for controlling music playback on CR-2003 .
19
Page 20

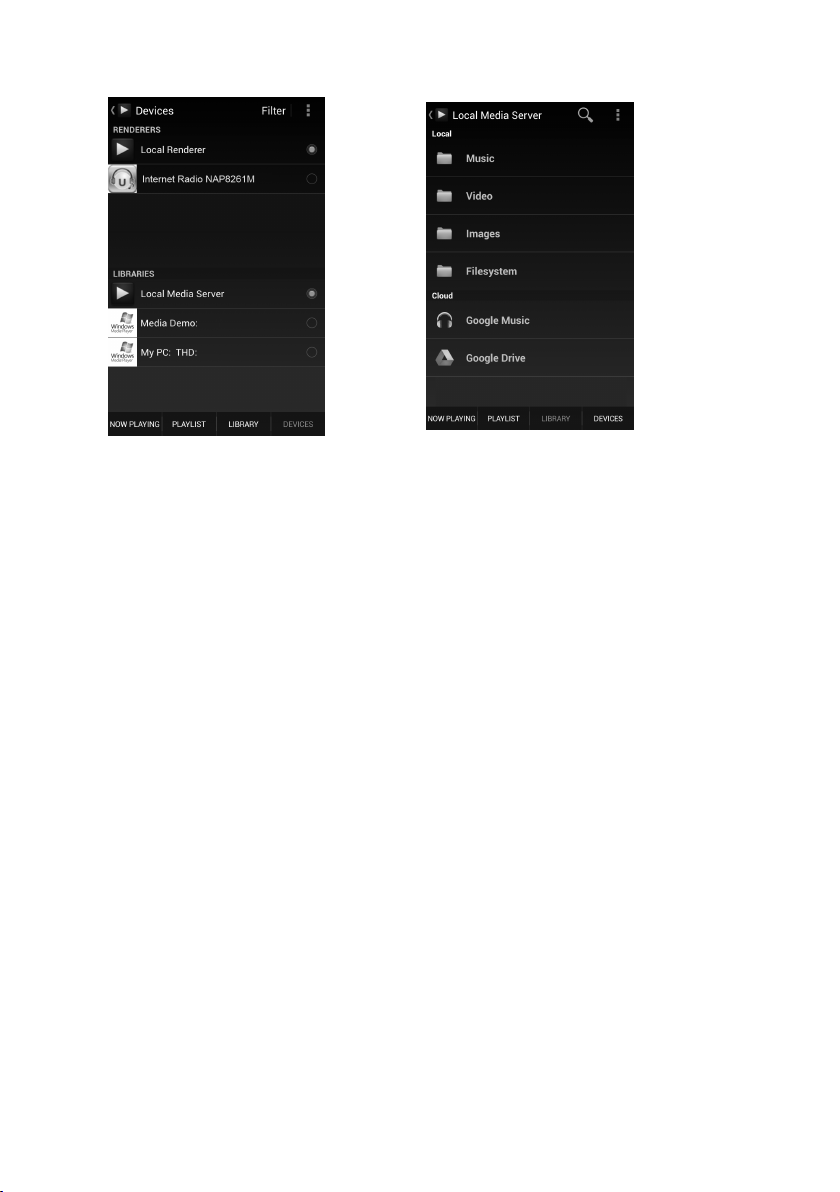
You may s earch and install any free or commercial DLNA apps from
Google Play or Apple Store if you are using Android mobile , tablet or
bubbleUPnP,
iPhone / iPad. It is suggested to use
Android mobile, tablet or iPhone/iPad.
Some apps may not support streaming music from iPhone/iPod but
iPhone/iPod could still be used to control streaming music from other
servers.
Procedures for playing shared music on the app are as follows:
Lenco
CR-2003
Lenco
Select Lenco
music to multi players at the same time.
Select music server and choose the music. Some app can create a
playlist if you choose several music.
You
may choose Lenco
internet radio list and select your internet radio on the app .
CR-2003
Lenco CR-2003
CR-2003 as the
Lenco
Lenco
Lenco CR-2003
player.
CR-2003
CR-2003
CR-2003 itself as a server, then you can view the
bubbleUPnP,
bubbleUPnP,
bubbleUPnP,
Some apps may allow to play the
MediaShare on
20
Page 21
Select server and player Select music
• W hen using DLNA music streaming function on Music Link, you can
only control the volume and standby via the unit . It is restricted to
control the other functions.
• Stop DLNA on PC, mobile or tablet before you resume Music Link’s
own control.
21
Page 22
5.
CR-2003
5.
CR-2003
5.
5. CR-2003
CR-2003 Functions
Functions
Functions
Functions
5.1
5.1
5.1
5.1 Overview
Overview
Overview
Overview
22
Page 23
5.2
5.2
5.2
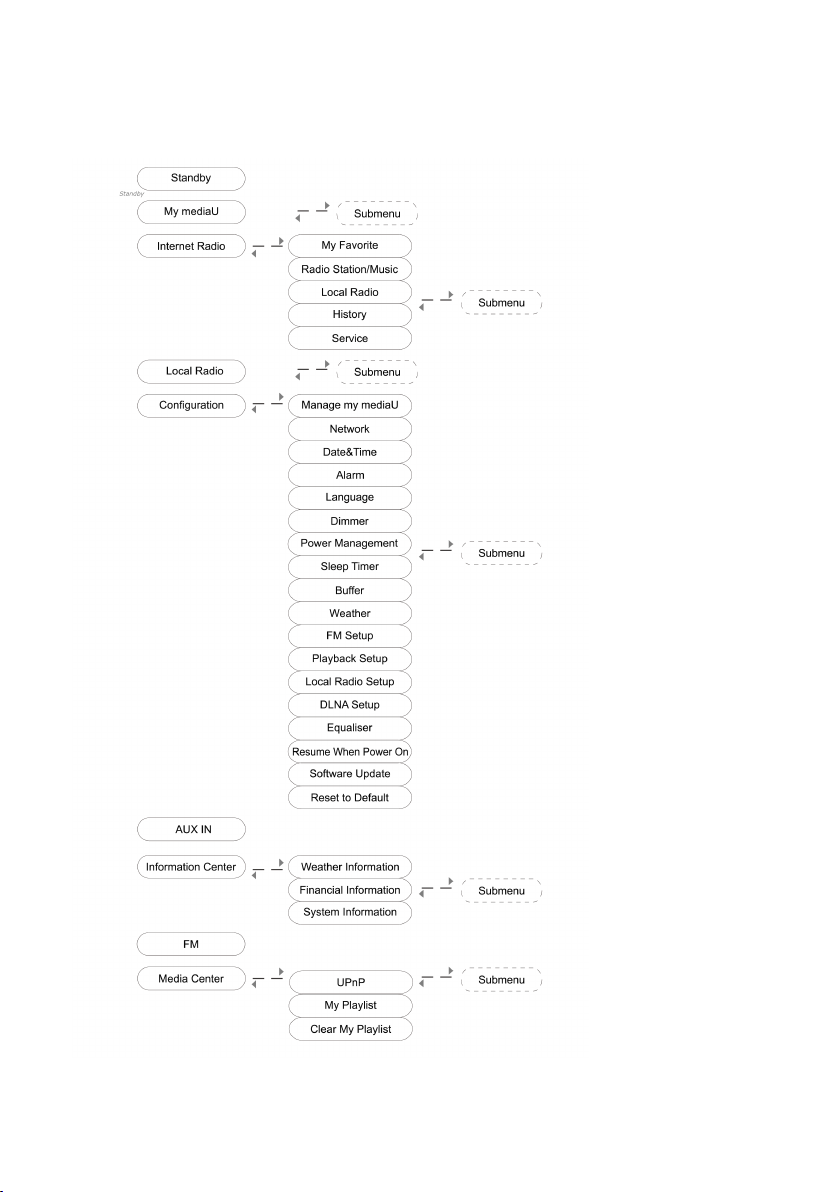
5.2 Main
Under the main menu, you can select the following modes: My mediaU,
Internet Radio, Local Radio, Configuration, AUX, Information Center, FM,
Media Center.
Main
Menu
Main
Menu
Main Menu
Menu
5.3
5.3
5.3
5.3 Configuration
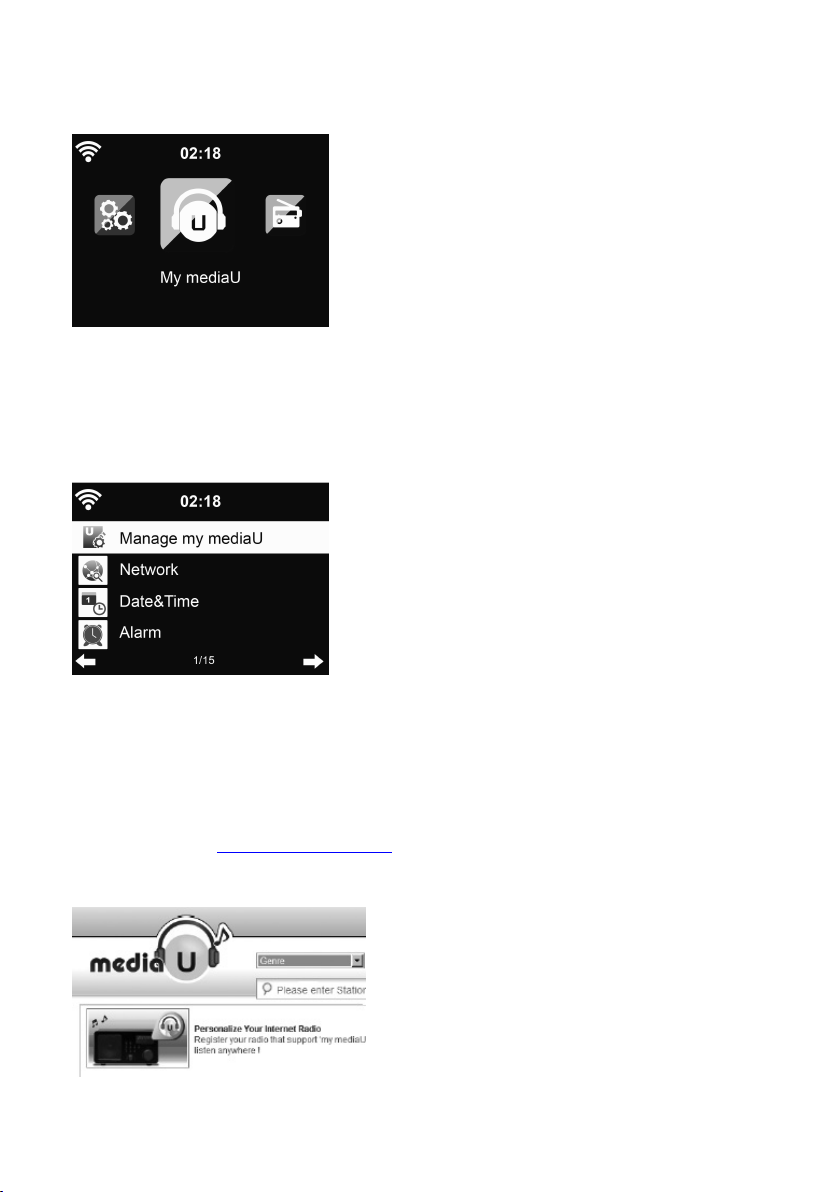
5.3.1 Manage my mediaU
My mediaU media library – managing radio stations via lnternet
In order to access your favourite radio stations worldwide, at any time and
using any device with streaming capability, you can create a free account for a
media library at www.mediayou.net and add as many devices as you like.
You can access the service with a username and password of your choice.
Configuration
Configuration
Configuration
23
Page 24
You must also know the MAC address of your device (called a serial number
on MediaYou) in order to register this device under “ Personalize Your Internet
Radio”.
Information
You can find the AC address of the Internet radio under Information
System
System
System
System information
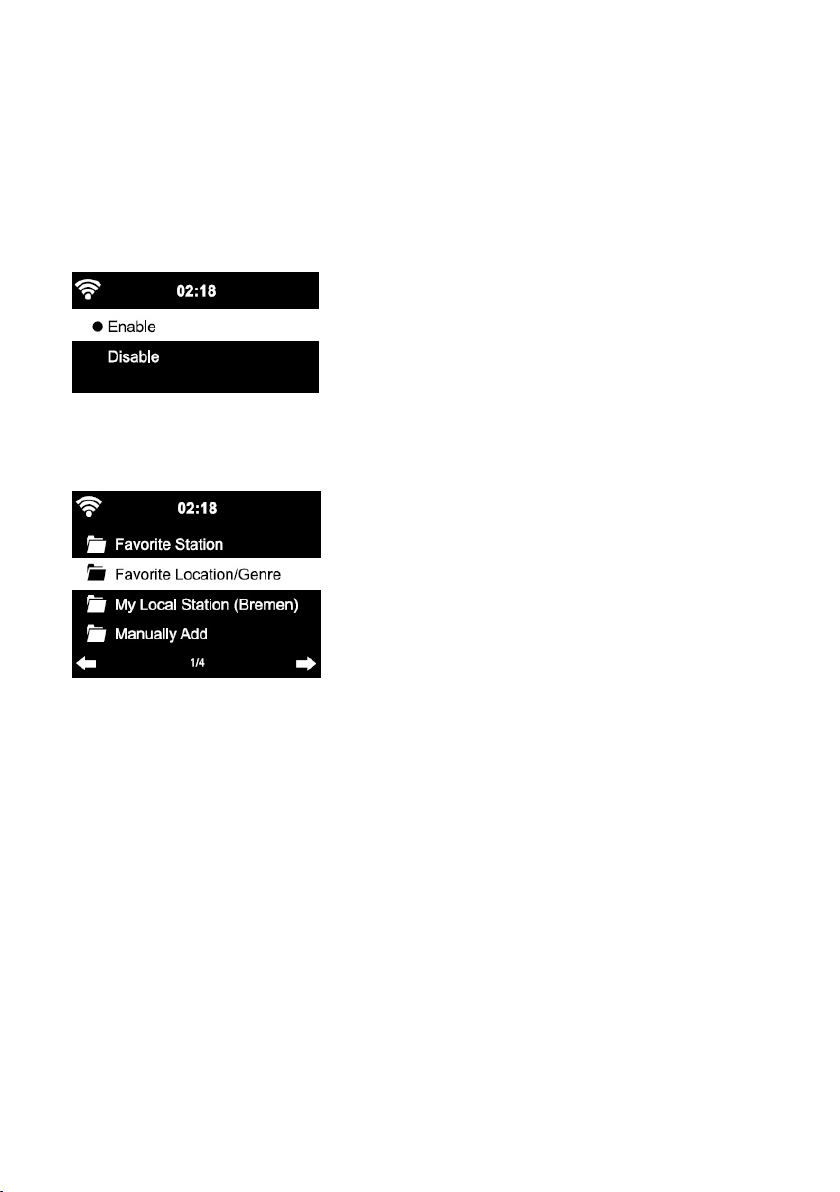
After registering the device, you must enable this function under
Configuration
Configuration
Configuration
Configuration >
the media library.
The device automatically connects to your account and displays what has
been saved there:
- Favorite Station
- Favorite Location/Genre
- My Local Station
- Manually Add
information
information
information >
>
Manage
>
Manage
> Manage
Manage my
>
Wireless
>
Wireless
> Wireless
Wireless Info
my
my
my mediaU
Info
>
MAC
Info
>
Info >
> MAC
mediaU
mediaU
mediaU , so that the Internet radio can access
Address
MAC
Address
MAC Address
Address .
Information
Information Center
Center
Center
Center >
>
>
>
• Depending on your personal My mediaU settings, the display on the
Internet radio may look different.
• If the device has not yet been registered with MediaYou, a
corresponding message appears when you wish to enable My
mediaU.
• If you have registered a device with multiple accounts, these will be
displayed after the activation and you can select the account you
wish to use. It is not necessary to enter a password.
24
Page 25
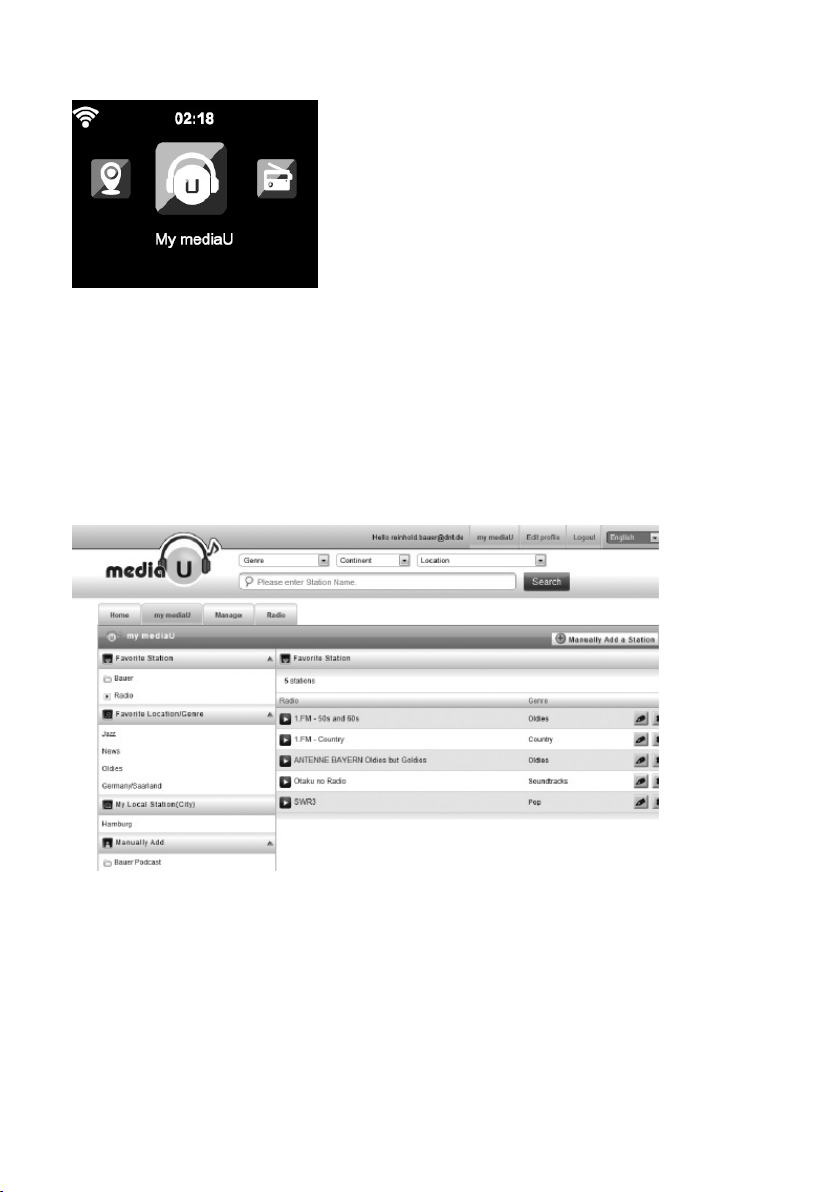
The menu Item My mediaU also appears in the main menu.
You can find the selection again here:
- Favorite Station
- Favorite Location/Genre
- My Local Station
- Manually Add
You can also find this selection in the media library, where you can assign and
manage the radio stations accordingly.
Under Add Manually, you can link the device to podcasts, for example.
You must know the URL of the podcast for this purpose.
1. Fill in the highlighted fields in your MediaYou account under“Add
Manually”.
2. On the Internet radio, go to Configuration> Manage my mediaU and
enable once again.
3. Under My mediaU > Manually Add, you can find all manually added
folders and addresses and can select the podcast.
25
Page 26
The following podcast formats are supported:
- asx
- m3u
- pls
- pure streaming with HTTP ,
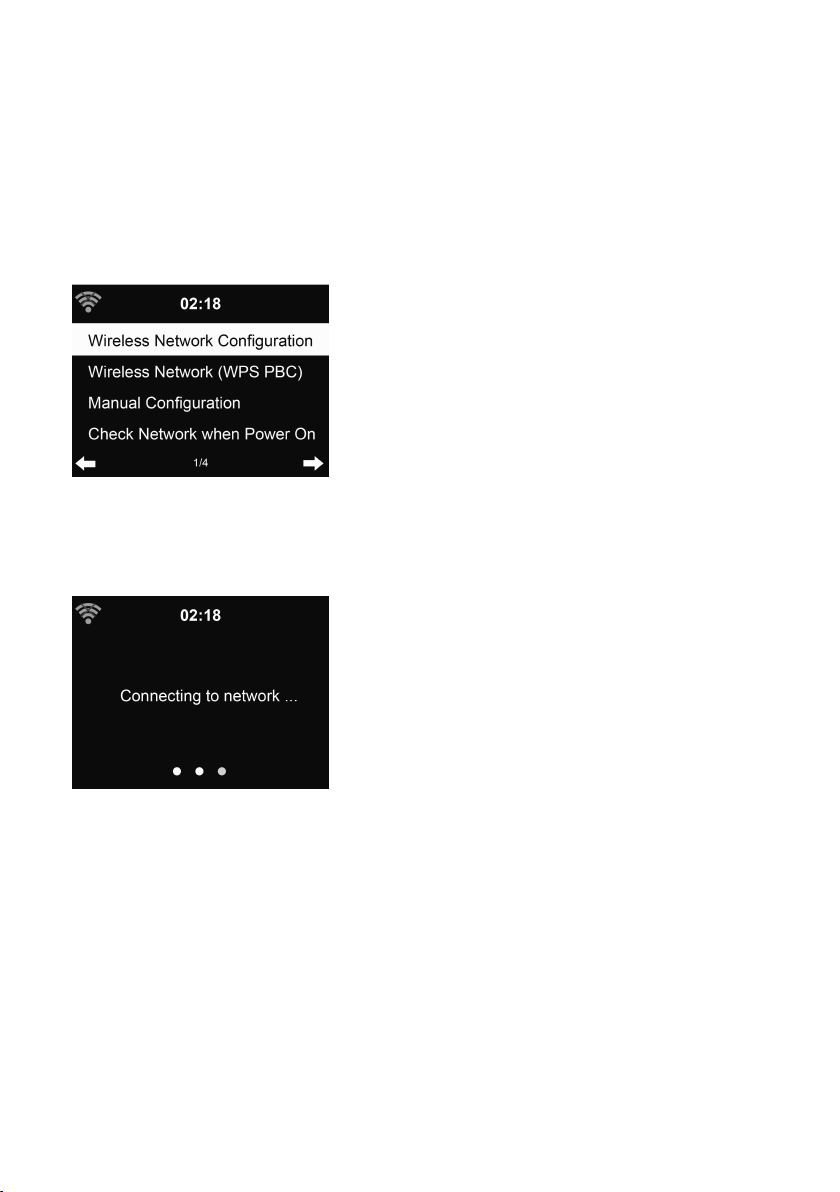
5.3.2 Network
• Wireless Network Configuration
Enable / disable WiFi network. When you enable the WiFi network, the
system will automatically
RTSP,
MMS protocol
Select
Select
Select
Select you required router.
Getting
You may refer to the section 3, Getting
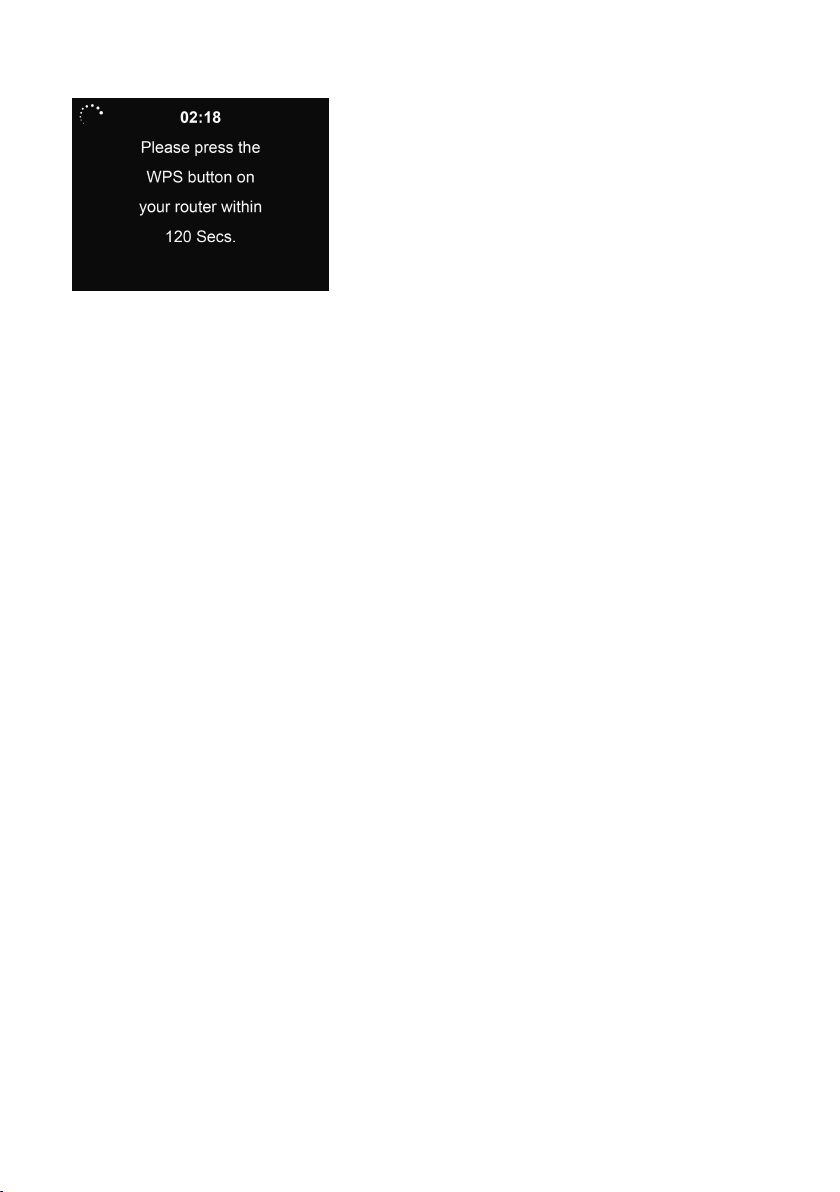
• Wireless Network (WPS PBC)
If you are using a router with WPS/QSS button, you may set up the
network connection simple via WPS function. Press WPS key on the
remote control or select the WPS network connection mode. Enter it
go to press the WPS/QSS button on your router within 120 seconds. The
connection between the router and Lenco CR-2003 will then be
configured automatically.
Getting
Getting Started
Started
Started
Started for the network setting.
26
Page 27
• Manual Configuration
You can choose DHPC (which IP assigned automatically) or manually
input IP address for wireless network connection.
When you select manual setting for wired connection, the followings
have to be entered:
1. SSID (the name of Access Point);
2. IP Address;
3. Subnet Mask;
4. Default Gateway;
5. Preferred DNS Server;
6. Alternate DNS Server .
Manage
You may choose ( Manage
one network connection within an area.
• Check Network when Power On
Enable / disable WiFi network.
When you enable the WiFi network, the system will automatically
search the available
Enter WEP or WPA code to connect the WiFi.
If the wireless network connection is not existed or failed, the icon at
the top left corner will have a cross on it.
Manage
Manage ) specific network if you have setup more than
AP.
Sel ec t you required
AP.
27
Page 28

5.3. 3 Date&Time
The date and time settings can only be made if the lnternet radio is
connected to a wireless network.
Setup the date and time: The internet radio takes the date and time
automatically from a central server once a network connection has been
established. However, you will need to change the time manually to
account for the change from winter time to summer time.
12
Hour
12
Set time format display as 12
Set date format in the positions of YY
YY/MM/DD, DD/MM/YY or MM/DD/YY .
Daylight
Turn on/off the Daylight
Confirm with OK or by pressing the reel.
With a wireless network connected, GMT
time setting. Add or deduce the hour according to your time zone when you
set the time.
Daylight
Daylight Saving
Hour
12 Hour
Hour or 24
Saving
Saving
Saving Time
24
Hour
24
Hour
24 Hour
Hour ;
YY
YY
YY (year), MM
Time
(DST)
Time
(DST)
Time (DST)
(DST) .
GMT
GMT
GMT (+01:00) time is a time reference of
MM
MM
MM (month) and DD
DD
DD
DD (day) –
5.3. 4 Alarm
There are three independent alarms - 2 alarms of absolute time setting
Alarm
Alarm
( Alarm
Alarm 1
1
Alarm
1
Alarm
1 and Alarm
Alarm 2
2
2
2 ) and 1 alarm for relative time setting ( NAP
NAP
NAP
NAP Alarm
Alarm
Alarm
Alarm ).
28
Page 29
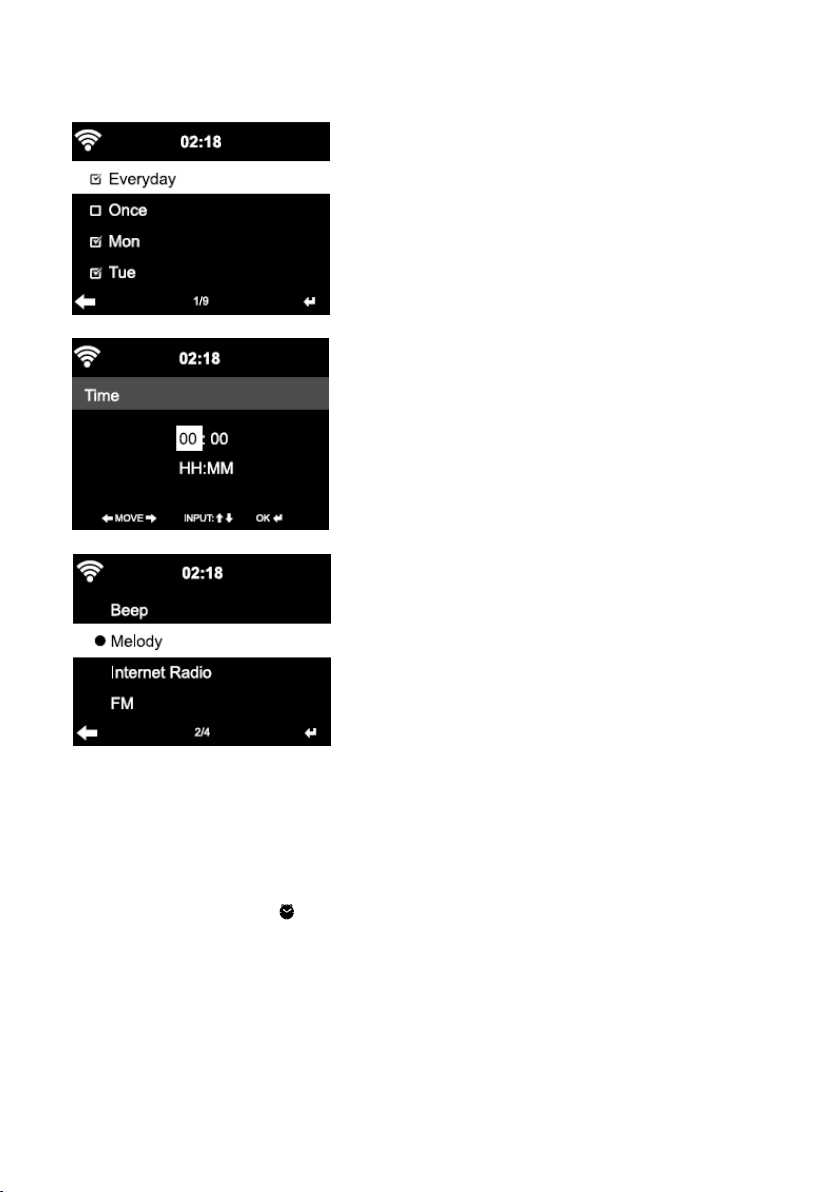
Alarm
Alarm
Press Alarm
Alarm on the remote control to enter this menu directly.
The first two alarms are similar to the normal alarm, turn on then set the
time and set it alarms Everyday , Once or every specific day of week.
Select Alarm time. Set the respective values using / on the remote
control or the reel on the device and switch to the next entry field using
Confirm with OK or by pressing the reel.
Choose Sound to set the sound to Beep, Melody or Radio (Internet Radio or
FM). An alarm symbol will appear on the top of the display next to the
time.
Note that the alarm source is from the preset Internet radio if Alarm Sound is
set to be Radio. It can only set one same IR/FM station for Alarm 1 and Alarm
2. When it reaches the alarm time, the unit connects to the Internet if the set
network is available. Therefore there may be some delay from the alarm to
.
29
Page 30
the radio play. If no network is connection in one minute, the alarm will
Melody
change to Melody
After NAP
depending on which one you have set.
Melody
Melody automatically.
NAP
Alarm
NAP
Alarm
NAP Alarm
Alarm is set, it alarms once in 5/10/20/30/60/90/120 minutes
Alarm
You may choose Alarm
When the alarm(s) is/are set, there will be a clock icon at the bottom of the
display. The clock icon with alarm time will also clearly display on the standby
mode screen.
During alarm, press any keys (except press on the remote or press
Standby on the device to stop the alarm) to enter to snooze mode. It will
alarm again in 5 minutes. Press on the remote or press Standby on the
device to stop the alarm .
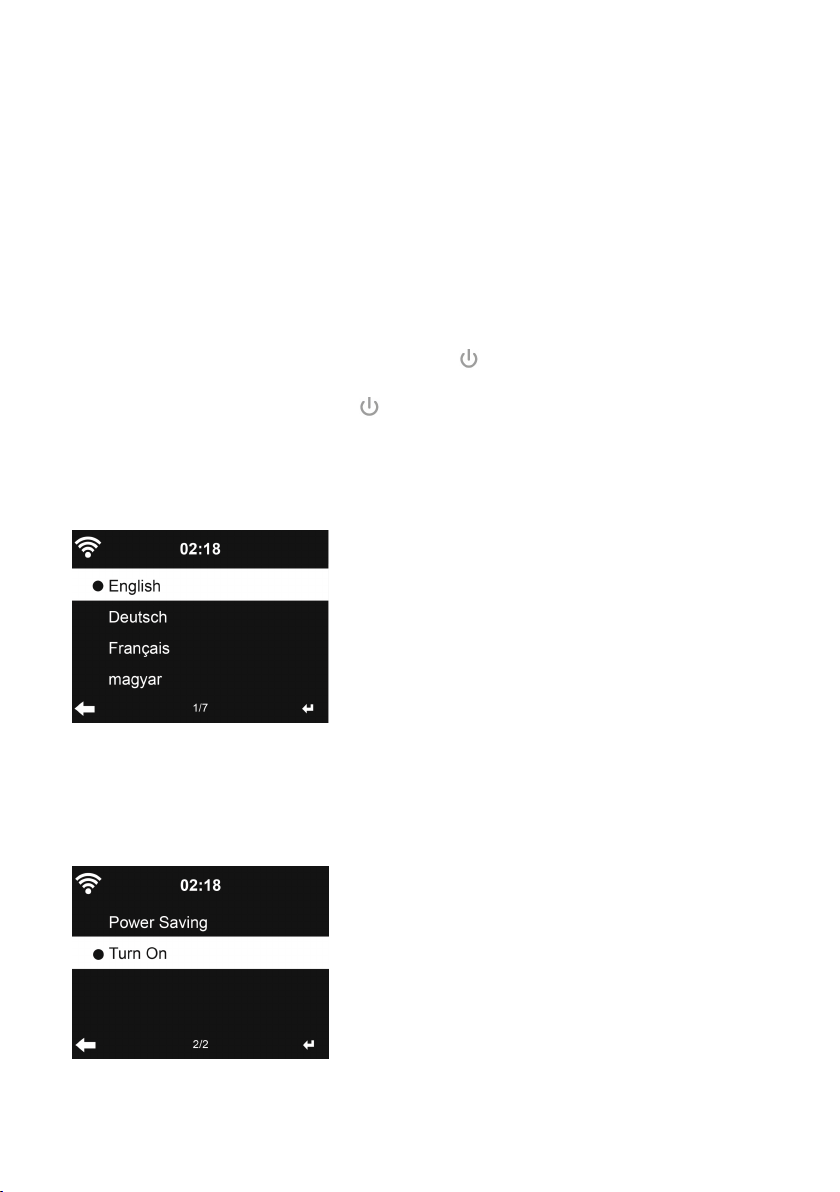
5.3. 5 Language
Select
Select
Select
Select the OSD language: English/ German/ French/ Hungarian/ Czech/
Slovakian/ Polish
Alarm
Alarm Volume
Volume
Volume
Volume to configure the volume of the alarms.
5.3. 6 Dimmer
30
Page 31

Configure the brightness of backlight on the display.
“
Power
“
Select “
and select ”
Choose Dimmer Timer to set the duration of the radio changing backlight
when you are not controlling it.
5.3. 7 Power Management
Configure to go to standby mode automatically during in the menu or/and
without Wifi signal.
Choose the power management timer (5/15/30mins) to set the duration of
the radio to switch standby mode automatically when you are not controlling
it.
Choose “ Turn off ” to ignore the power management function.
5.3. 8 Sleep Timer
Power
“ Power
Power Saving
”
Turn
”
Turn
” Turn
Turn On
Saving
”
Saving
”
Saving ”
” to set the brightness of backlight in standby mode,
On
”
On
”
On ”
” to set that in operation mode.
Turn off or set the sleep time of 15/30/60/90/120/150/180 minutes. Once
the time is set, there will be a bed icon with remaining minutes at the top
Sleep
right corner and CR-2003 will turn to standby then. Press Sleep
control for the shortcut of this function.
5.3. 9 Buffer
Sleep
Sleep on the remote
31
Page 32

Configure the buffer time of the music playback, 2/4/8 seconds.
5.3. 10 Weather
CR-2003 is able to display the current weather information (refer to 5.8.1)
under standby mode. Turn on Standby Display and set Temperature Unit ( ℃
or ℉ ) to get the weather displayed at the standby mode.
When it is turned on, the current time and the current weather will display in
alternative 10 seconds.
5.3.1 1 FM Setup
Choose Mono/Stereo mode when listening to FM station.
5.3.1 2 Local Radio Setup
Local
Radio
Local
There is a shortcut Local
to the station list of your location.
You may Manual Setup your location, or let the system Auto Detect your
current location. The system detects the location according to the IP address
of your connected network.
Radio
Local Radio
Radio under Internet Radio so that you can easily go
32
Page 33

5.3.1 3 Playback Setup
Select the playback mode of media center – Off (no repeat or shuffle), Repeat
all, Repeat one, or Shuffle.
5.3.1 4 DLNA Setup
Lenco
CR-2003
Lenco
Default device name for DLNA is Lenco
setup on the PC or mobile. (see section 4.2)
5.3.1 5 Equalizer
Default equalizer is Normal, you may change to Normal, Flat, Jazz, Rock,
Soundtrack, Classical, Pop, or News.
EQ
EQ
Press EQ
EQ on the remote control to swap among the EQ mode for shortcut.
CR-2003
Lenco CR-2003
CR-2003 . You may rename it for DLNA
33
Page 34

5.3.1 6 Resume When Power On
The system is default to resume the main menu when switching on the unit.
If turn this setting on, the system will remain in the internet radio playback.
If you were listening to internet radio or media center before switch off the
unit.
5.3.1 7 Software Update
Update software. If there is an updated software version on the server, the
system will notify you when you return to the main menu.
5.3.1 8 Reset
Restore the default settings.
Language
After CR-2003 is reset, the system will move to Language
Network
will automatically turn to Network
elect ed.
Network
Network setting menu once the OSD language is
Language
Language setting menu. And it
5.4
5.4
5.4
5.4 My
Display and playback your own mediaU station list on the mediaU server.
Set your account first (see the section 5.3.1).
My
mediaU
My
mediaU
My mediaU
mediaU
34
Page 35

5.5
5.5
5.5
5.5 Internet
After the connection of any station is succeeded, the bit rate and the format
of the station will display on the playing screen.
5.5.1 My Favorite
List of my favorite preset stations. It supports 250 favorite entries including
station and folder .
During the station playing screen, press and hold Preset
my favorite. You may replace the previous saved station to the new one.
The symbol appears in the top line of the display while the device is
saving.
If the Selected station have been saved, you cannot save it again.
The saved stations are showed under this menu. You may also press Preset
enter the saved station list.
Internet
Internet
Internet Radio
Radio
Radio
Radio
Preset
Preset
Preset to save the station as
Preset
Preset
Preset to
Under the preset station list, move to your station, press OK
may also press
the favourites list), Shift
radio station a name of your choice), Play
chose internet as alarm sound in alarm configuration).
to enter its submenu to Delete
Shift
Up
Shift
Shift Up
Down
Up
Down
Up / Down
Down along the list, Rename
Delete
Delete
Delete (deletes a radio station from
Rename
Rename
Rename (you can give the
Play
Play
Play , or Use
Use
Use
Use as
as
Alarm
as
Alarm
as Alarm
Alarm Sound
35
OK
OK
OK to listen.
Sound
Sound
Sound (if you
You
Page 36

250 storage spaces are available for your favorites.
5.5.2 Radio Station/Music
Global
Stations are categorized into Global
Highlight
Highlight
Highlight
Highlight .
Enter to continue the subcategories and choose the station to listen.
For each station, press OK
Add
submenu – you can Add
(if you chose internet as alarm sound in alarm configuration).
When you choose Auto
station in the subcategory. Each station plays 30 seconds until all have played
OK
or you press OK
Info
Info
Press Info
Info to view the display information of the station.
5.5.3 History
A list of last listened stations. It can save up to 10 history stations.
For each station, press OK
submenu – you can Add
(if you chose internet as alarm sound in alarm configuration).
When you choose Auto
station in the History. Each station plays 30 seconds until all have played or
you press OK
OK
OK to stop the marquee listening.
OK
OK
OK to stop the marquee listening.
Add
Add to
Auto
Auto
Auto Scan
Add
Add
Add to
Auto
Auto
Auto Scan
Global
Global
OK
OK
OK to play directly. You may press
to
Favorite
to
Favorite
to Favorite
Favorite , Auto
Scan
Scan
Scan , it becomes the playback of marquee for each
OK
OK
OK to play directly. You may press
to
Favorite
to
Favorite
to Favorite
Favorite , Auto
Scan
Scan
Scan , it becomes the playback of marquee for each
Top
20
Top
20
Top
Top
20
20 , Genre,
Auto
Auto
Auto Scan
Auto
Auto
Auto Scan
Genre,
Genre,
Genre, Country/Location
Scan
Scan
Scan , Play
Scan
Scan
Scan , Play
Country/Location
Country/Location
Country/Location and
to enter its
Play
Play
Play or Use
Play
Play
Play or Use
Use
as
Use
as
Use as
as Alarm
to enter its
Use
as
Use
as
Use as
as Alarm
Alarm
Sound
Alarm
Sound
Alarm Sound
Sound
Alarm
Sound
Alarm
Sound
Alarm Sound
Sound
36
Page 37

5.5.4 Service
Search
Search
Search
Search radio
list.
Add
Add
Add
Add new
Note that the maximum character of the station name is 250.
5.
5.
5.
5. 6
There is a shortcut Local
to the station list of your location.
The device can use the IP address to detect its current location and can then
automatically generate a list of local radio stations. However, you can also
enter a different country. (Refer to Local Radio setup section 5.3.12)
5.7
5.7
5.7
5.7 Media
radio
radio
radio station
new
radio
new
radio
new radio
radio station
6
6
6 Local
Local
Local
Local Radio
Media
Media
Media Center
station
station
station - Enter your keyword to search radio station from the
station
station
station - The added stations will be stored in My Favorite.
Radio
Radio
Radio
Local
Radio
Local
Radio
Local Radio
Radio under Internet Radio so that you can easily go
Center
Center
Center
5. 7 . 1 UPnP
UPnP
If you have set up shared media, you should see the shared media from UPnP
UPnP
UPnP .
37
Page 38

If you have more than one computer sharing media, the alternatives are
listed. SELECT the shared media you want to play.
(see section 4.1)
P ress
press
Press Info
Tips
Tips
Tips
Tips
characters. And the characters should be in European language. If you
encounter failure of reading the track under UPnP mode, you may try to
rename the file.
However, if the track is still unable to play, you can try converting the file to
different formats.
5. 7 .2 My Playlist
You can create a playlist of favourious music from
the music, press and hold OK
5. 7 .3 Clear My Playlist
You can remove all the saved music under My Playlist.
/
on the remote control to play previous/next music track,
to stop or play .
Info
Info
Info to view the display information of the playing track.
: The radio can only read the track with the file name less than 40
OK
OK
OK to save it into My
UPnP.
My
Playlist
My
Playlist
My Playlist
Playlist .
When you playing
5.8
5.8
5.8
5.8 FM
FM radio mode receives analogue radio from the FM band. (Refer to 5.3.10
for the setting of FM band)
Press
CR-2003 scans the FM band. It stops when it has received a station.
FM
FM
FM
/
to search FM station. The frequency display starts to run up as
38
Page 39

You may press / on the remote control to tune station manually. Each
step moves 0. 05 MHz.
PRESET
Press and hold the PRESET
You can save up to 20 stations. Press PRESET
control to choose the saved station.
Alternatively, you can let the system scan ALL stations for you by pressing OK
The searched stations will automatically be stored in preset station list.
5.
9
5.
9
5.
5. 9
9 Information
5. 9 .1 Weather Information
There are weather information and forecasts for 2000 cities. Select the
country and then the city for the weather details.
Information
Information
Information Center
PRESET
PRESET on the remote control to save the station.
PRESET
PRESET
PRESET , then press / on the remote
Center
Center
Center
OK
OK
OK ,
Rotate the reel to see the weather forecasts.
It is able to display the weather information on the standby mode. On the
weather information page, press
want the weather of the city you selected displaying on the Standby, press OK
to set the city to displaying on the standby mode. Then turn on the weather
display as mentioned in 5.3.10.
, then show
“
Add to Standby”. If you
39
OK
OK
OK
Page 40

5. 9 .2 Financial Service
View the stock index from around the world.
5. 9 .3 System Information
Check out the version of t he system, and the details of connected network.
The information includes MAC address which you are required to fill in when
registration of my mediaU membership.
5.10
5.10
5.10
5.10 AUX
Aux in mode plays audio from an external source such as an MP3 player .
To
• Turn the volume low on both CR-2003 and, if adjustable, the audio
• Connect the external audio source to the Aux in 3.5mm stereo socket.
• Either press MODE until the display shows AUX IN or select AUX in
• Adjust the volume of CR-2003 (and, if necessary, the audio source
5.11
5.11
5.11
5.11 LINE
Internet
Internet
Internet
Internet radio
AUX
IN
AUX
IN
AUX IN
IN
play audio with Aux in mode:
source device.
under Main menu.
device) as required.
LINE
OUT
LINE
OUT
LINE OUT
OUT
radio
playback
radio
playback
radio playback
playback via
via
an
via
an
via an
an external
external
external
external device
device
device
device
40
Page 41

You can connect an external device such as a stereo system to the LINE OUT
output socket.
You will require an audio cable with 3.5mm jack.
- Select the corresponding input on your stereo system. The music from
the Internet radio will be played via the stereo system.
- The LINE OUT output socket is not suitable for connecting
standard/in-ear headphones.
6.
Remote
6.
Remote
6.
6. Remote
Remote Control
Some apps for Android, e.g. AirMusic Control, let you control the internet
radio from your smartphone or tablet.
As soon as the devices are connected, the same menu structure shown on
the Internet radio will appear on the smartphone/tablet.
functions just like on the radio. The selected functions / menu items shown
on the radio will change according to the actions taken on your mobile
device.
If you are controlling the Internet Radio via app, a UPnP connection to
Windows Media Player may not be possible.
Control
Control
Control via
via
Apps
via
Apps
via Apps
Apps
You
can select all
41
Page 42

7.
Troubleshooting
7.
Troubleshooting
7.
7. Troubleshooting
Troubleshooting
Error
Error
Error
Error Remedy
Remedy
Remedy
Remedy
The device does not
switch on.
No sound. 1. Turn on the sound as it may be muted
No network connection
can be established.
WLAN connection
1. Check if the power adaptor is connected
properly.
2. The device may malfunction when used in
areas with strong radio interference. The device
will work properly again once there is no more
interference.
2. Increase the volume.
1. Check the WLAN function.
2. Try to set an IP address at the device.
3. Activate the DHCP function on the router and
make the connection again at the device.
4. A firewall is activated on the network – set
the respective program in such a way that
access is possible.
5. Reboot the unit to try.
1. Check the availability of WLAN network on
cannot be established.
No station is found. 1. Check the network as well as the access point
the access point.
2. Place the device closer to the router.
3. Make sure the WEP/WPA password is correct.
and firewall.
2. The station may not be available currently,
try it again later or Select another station.
3. The link of the station is changed or the
42
Page 43

station no longer transmits – ask the provider
for information.
4. The link of manual added station is not
correct, make sure it is correct and re-enter .
Hiss in FM mode. 1. Check/move the FM antenna.
2. Move the radio.
Alarm does not work. 1. Switch on the alarm.
2. Due to the volume setting, refer to the
solutions of “ No sound”.
3. The source of alarm was set to be station but
there is no network connection. Change the
source of alarm or reconfigure the connection.
Unable to do DLNA
streaming.
Electro-Magnetic
1. Check the connection of the network,
CR-2003 and your device need to be in the
same network; and test if the network in
good condition.
2. Make sure the settings on your device are
correct.
1.The normal function of the product may be
Interference.
System freezes
suddenly.
disturbed by strong Electro-Magnetic
Interference. If so, simply reset the product to
resume normal operation by following the
instruction manual. In case the function could
not resume, please use the product in other
location.
1. The radio is overloaded, reboot the unit.
43
Page 44

8.
Specifications
8.
Specifications
8.
8. Specifications
Specifications
Model number CR-2003
Description Internet Radio
Display 320 x 240 TFT colour display
Network supported 802.11b/g /n (WLAN)
WLAN key
Streaming
Supported playback formats WM A, MP 3,
FM 87.5 – 108.0 MHz
Speaker power output 5W
Power adaptor Input: 100-240V ~ 50/60Hz
Standby mode power consumption <1 W
Operating temperature 0oC - 35oC
Connections DC IN power supply socket
Dimensions 201mm(L) x 116mm(H) x 118mm(D)
Weight 800g
WEP,
WPA, WPA2 (PSK) and WPS
UPnP,
DLNA
WAV,
Output: 9 V 1000m A
3.5mm aux in
3.5mm line out
AAC
Power
Power
Power
Power supply
Manufacturer:
Manufacturer:
Manufacturer:
Manufacturer: DongGuan Yingna Electronic Technology Co. Ltd.
Model
Model
Model
Model number:
Adapter
Adapter
Adapter
Adapter type
Use
Use
Use
Use only
Use
Use
Use
Use only
supply
supply
supply adaptor:
number:
number:
number: YN12W-0900100VZ
only
only
only original
only
only
only the
adaptor:
adaptor:
adaptor: (
type
type
type
original
original
original AC
the
power
the
power
the power
power supply
(
For
(
For
( For
For EU
AC
adaptor
AC
adaptor
AC adaptor
adaptor
supply
supply
supply listed
EU
only)
EU
only)
EU only)
only)
listed
listed
listed in
in
in
in the
the
the
the user
user
instructions
user
instructions
user instructions
instructions
44
Page 45

9.
Guarantee
9.
Guarantee
9.
9. Guarantee
Guarantee
Lenco offers service and warranty in accordance with the European
which means that in case of repairs (both during and after the warranty
period) you should contact your local dealer.
Important note: It is not possible to send products that need repairs to Lenco
directly.
Important note: If this unit is opened or accessed by a non-official service
center in any
This device is not suitable for professional use. In case of professional use, all
warranty obligations of the manufacturer will be voided.
10.
10.
10.
10. Disclaimer
Updates to Firmware and/or hardware components are made regularly.
Therefore some of the instruction, specifications and pictures in this
documentation may differ slightly from your particular situation. All items
described in this guide for illustration purposes only and may not apply to
particular situation. No legal right or entitlements may be obtained from the
description made in this manual.
11. Disposal
way,
Disclaimer
Disclaimer
Disclaimer
Disposal
Disposal
Disposal of
the warranty expires.
of
the
Old
of
of the
the
the Old
Device
Old
Device
Old Device
Device
law,
This symbol indicates that the relevant electrical product or
battery should not be disposed of as general household
waste in Europe.Toensure the correct waste treatment of
the product and battery, please dispose them in accordance
to any applicable local laws of requirement for disposal of
electrical equipment or batteries. In so doing, you will help
to conserve natural resources and improve standards of environmental
protection in treatment and disposal of electrical waste (Waste Electrical and
Electronic Equipment Directive).
45
Page 46

CE
Marking
CE
12. CE
product is in compliance with the essential requirements and other relevant
provisions of Directive 1999/5/EC.
The declaration of conformity may be consulted at techdoc@lenco.com
13.
13.
13.
13. Service
For more information and helpdesk support, please visit www.lenco.com
Lenco Benelux
Marking
CE Marking
Marking
Service
Service
Service
BV,
Products with the CE marking comply with the EMC
Directive (2004/108/EC) and the Low Voltage
Directive (2006/95/EC) issued by the Commission of
the European Community.
Hereby, Lenco Benelux
6361HB Nuth, The Netherlands, declares that this
Thermiekstraat 1a, 6361HB, The Netherlands.
BV,
Thermiekstraat 1a,
46
Page 47

Nederlands
1. Voordat u begint
1.1 Netwerkeisen
Voordat u de CR‐2003 kunt gebruiken dient u te beschikken over de
volgende zaken:
• Een breedbandverbinding in combinatie met een bedraad/draadloos
toegangspunt, router of soortgelijk netwerkapparaat.
• Het netwerkapparaat moet WiFi (802.11b/g/n) draadloze verbindingen
ondersteunen.
• Een PC of smartphone die verbonden is met een netwerk. Dit netwerk
moet hetzelfde zijn als het netwerk waarmee de CR‐2003 is verbonden.
1.2 Veiligheidsmaatregelen
• Gebruik dit apparaat niet in de buurt van water.
• Reinig het uitsluitend met een licht vochtige doek.
• Bedek of blokkeer de ventilatieopeningen niet. Zorg bij het plaatsen van
het apparaat op een plank voor een vrije ruimte van 5 cm (2 inch)
rondom het hele apparaat.
• Installeer het in overeenstemming met de meegeleverde handleiding.
• Ga niet op de voedingsadapter staan en beknel deze niet. Wees heel
voorzichtig, vooral bij de stekkers en de kabeluitgangen. Plaats geen
zware voorwerpen op de voedingsadapter, wat hem kan beschadigen.
Houd het apparaat volledig buiten het bereik van kinderen! Als zij met
de netspanningskabel spelen, kunnen zij ernstig letsel oplopen.
• Haal de stekker van dit apparaat tijdens onweer uit het stopcontact of
wanneer het apparaat voor een lange periode niet wordt gebruikt.
• Houd het apparaat uit de buurt van warmtebronnen zoals radiatoren,
kachels, fornuizen, kaarsen en andere producten die warmte
voortbrengen.
• Vermijd het gebruik van het apparaat in de buurt van sterke
magnetische velden.
• Elektrostatische ontlading kan normaal gebruik van dit apparaat
verstoren. Als dat gebeurt, reset en herstart het apparaat dan gewoon
volgens de handleiding. Ga er voorzichtig mee om en zorg voor een
statisch vrije omgeving tijdens bestandsoverdracht.
• Waarschuwing! Steek nooit een voorwerp via de ventilatie‐ of andere
openingen in het product. Er is hoogspanning in het product aanwezig
47
Page 48

en als u er een object insteekt, kan dat een elektrische schok
veroorzaken en/of kortsluiting in de interne onderdelen. Mors om
dezelfde reden geen water of vloeistof op het product.
• Gebruik het toestel NIET in vochtige ruimtes, zoals badkamers,
stomerige keukens of in de buurt van zwembaden.
• Gebruik dit apparaat niet wanneer condensatie kan optreden.
• Hoewel dit apparaat met de grootste zorg is vervaardigd en meerdere
malen is gecontroleerd, voordat het de fabriek verliet, is het toch
mogelijk dat er zich problemen kunnen voordoen, zoals met alle
elektrische apparaten. Als u rook, een overmatige hitteontwikkeling of
enig ander onverwacht verschijnsel, moet u onmiddellijk de stekker van
het netsnoer uit het stopcontact halen.
• Dit apparaat moet te allen tijde goed worden geventileerd!
• Dit apparaat moet werken met een spanningsbron zoals op het
specificatielabel wordt weergegeven. Als u niet zeker bent van het soort
stroomvoorziening in uw huis, raadpleeg dan uw dealer of het
plaatselijke elektriciteitsbedrijf.
• Het stopcontact moet zich in de buurt van de apparatuur bevinden en
moet makkelijk toegankelijk zijn.
• Overbelast stopcontacten of verlengsnoeren niet. Overbelasting kan
brand of een elektrische schok veroorzaken.
• Houd ze uit de buurt van knaagdieren. Knaagdieren genieten van het
bijten op netsnoeren.
• Houd altijd de stekker vast wanneer u deze uit het stopcontact trekt.
Trek niet aan het snoer. Dit kan kortsluiting veroorzaken.
• Vermijd om het toestel te plaatsen op een ondergrond die blootgesteld
kan worden aan trillingen of schokken.
• Om het apparaat tijdens onweer te beschermen, haalt u de
netvoedingsadapter uit het stopcontact.
• Wanneer het apparaat voor een lange periode niet in gebruik is, haalt u
de netvoedingsadapter om veiligheidsredenen uit het stopcontact.
• Gebruik een zachte, droge doek om het apparaat schoon te maken.
Gebruik geen oplosmiddelen of op benzine gebaseerde vloeistoffen. Om
ernstige vlekken te verwijderen, kunt u een vochtige doek met een
verdund reinigingsmiddel gebruiken.
• De leverancier is niet verantwoordelijk voor schade of verlies van
gegevens als gevolg van een storing, verkeerd gebruik, veranderingen
aan het apparaat of batterijvervanging.
• Het apparaat mag niet worden blootgesteld aan druppels of spatten en
zorg ervoor dat er geen met vloeistof gevulde voorwerpen, zoals vazen,
op of nabij het apparaat zijn geplaatst.
48
Page 49

• Om de verbinding met de stroomaansluiting volledig te verbreken, moet
de stekker van het apparaat uit het stopcontact worden gehaald, omdat
de stekker van het apparaat de hoofdschakelaar is.
• De netstekker van het apparaat mag niet worden belemmerd en moet
tijdens gebruik eenvoudig toegankelijk worden gehouden.
• Batterijen mogen niet aan overmatige hitte, zoals zonlicht, open vuur
e.d., worden blootgesteld.
• De ventilatie mag niet worden gehinderd door het bedekken van de
ventilatieopeningen met voorwerpen zoals kranten, tafelkleden,
gordijnen etc.
• Plaats geen bronnen met een open vlam, zoals brandende kaarsen, op
het apparaat.
• Aandacht voor het milieu is nodig bij het verwijderen van de batterijen.
• Het apparaat kan alleen worden gebruikt in gematigde klimaten.
Extreem koude of warme omgevingen moeten worden vermeden.
• Het nominale specificatielabel is te vinden op het onderpaneel van het
apparaat.
• Dit apparaat is niet bedoeld voor gebruik door personen (inclusief
kinderen) met een lichamelijke, zintuiglijke of verstandelijke beperking
of met een gebrek aan kennis en ervaring, tenzij zij onder toezicht
staan of instructies over het juiste gebruik van het apparaat hebben
gekregen van de persoon die verantwoordelijk is voor hun veiligheid.
• Dit product is alleen voor huishoudelijk gebruik bedoeld en niet voor
commercieel of industrieel gebruik.
• Verzeker u ervan dat het apparaat in een stabiele positie staat opgesteld.
Schade, veroorzaakt door het gebruik van dit product in een onstabiele
positie, of door het niet naleven van waarschuwingen of
voorzorgsmaatregelen genoemd in deze handleiding, valt niet onder de
garantie.
• Verwijder nooit de behuizing van dit apparaat.
• Plaats dit apparaat nooit op andere elektrische apparatuur.
• Dit product niet gebruiken of opslaan op plaatsen waar het wordt
blootgesteld aan direct zonlicht, hitte, buitensporig veel stof of
trillingen.
• Reinig dit product niet met water of andere vloeistoffen.
• Bedek of blokkeer de gleuven en de gaten in het product niet.
• Stop geen vreemde voorwerpen in de gleuven of gaten van het product.
• Geef kinderen geen gelegenheid in aanraking met plastic zakken te
komen.
• Controleer of de spanning op het specificatieplaatje van uw apparaat
overeenkomt met het lichtnet in uw huis (specificatieplaatje is te vinden
49
Page 50

op de achterzijde van het apparaat).
u
• Zorg ervoor dat niemand op de voedingskabel kan gaan staan of dat de
kabel kan worden ingedrukt, voornamelijk bij stekkers, stopcontacten en
het punt waar kabels uit het apparaat komen.
• Gebruik uitsluitend uitbreidingen/accessoirs gespecificeerd door de
fabrikant.
• Laat alle reparaties over aan gekwalificeerd onderhoudspersoneel.
Onderhoud is vereist als het toestel hoe dan ook is beschadigd, zoals
bijvoorbeeld het netsnoer of de stekker, wanneer er vloeistof of een
voorwerp in het apparaat is terechtgekomen, wanneer het apparaat is
blootgesteld aan regen of vocht, als het niet normaal werkt of is
gevallen.
• Gebruik nooit een beschadigde voedingskabel of stekker of een los
stopcontact. Dit vormt namelijk een risico op brand of elektrische
schokken.
• Waarschuwing: Langdurige blootstelling aan luid geluid van persoonlijke
muziekspelers kan leiden tot tijdelijke of permanente
gehoorbeschadiging.
• Verwijder de schroeven niet om het risico van een elektrische schok te
verminderen. Het apparaat bevat geen onderdelen die door de
gebruiker kunnen worden onderhouden. Laat al het onderhoud over
aan gekwalificeerd personeel.
• Wij raden u niet aan een koptelefoon via de 3,5 mm audio‐uitgang op
het apparaat aan te sluiten. In het geval van het gebruik van een
koptelefoon, herinneren wij u eraan dat overmatige
geluidsdruk of volume van de hoofdtelefoon of
oortelefoon kan leiden tot gehoorschade. Zet het
volume altijd op een aangenaam, niet te luid nivea
Als u het volume van de koptelefoon te hoog hebt
ingesteld en u gebruikt dat voor een langere
periode, dan kan dat uw gehoor beschadigen.
• De stekker wordt gebruikt als schakelaar en moet gemakkelijk
bereikbaar blijven.
• Batterijen mogen niet aan overmatige hitte, zoals zonlicht, open vuur
e.d., worden blootgesteld.
50
Page 51

2. Uiterlijk en beschrijving toetsen
Vooraanzicht
1
Achteraanzicht
2
3
7
4
5
6
51
Page 52

No. Omschrijving Functies
12.4”TFT‐scherm Display
2 Knoppen en draaiknop
‐Standby
‐Mode
‐Home
‐Preset
‐
‐
‐ Volume+ OK‐knop
3 Infraroodontvanger Ontvangst van afstandsbediening
4 DC IN 9V 1A Aansluiting voor netadapter
5 Aux in 3,5mm audio‐ingang
6 Line out 3,5mm audio‐uitgang
7 Antenne FM‐ontvangst
Bedieningspaneel
‐In‐/uitschakelen
‐Schakelen tussen audiobronnen
‐Ga naar hoofdmenu
‐Zender opslaan
‐Cursor links
‐Cursor rechts
‐ Volume instellen; Cursor
omhoog/omlaag; Keuze bevestigen
52
Page 53

Afstandsbediening
53
Page 54

Standby button Standby
Up cursor button Cursor omhoog
Left cursor button Cursor links
Down cursor button Cursor omlaag
Mode
Go to main menu items
Alarm Alarm button Alarm Alarm
Sleep Snooze button Sleep Snooze
Media center:
Go back one track
Media center:
Play/Pause
EQ Set Tone EQ Stel tonen in
Switch speaker on/off Schakel luidspreker in/uit
OK Confirm selection OK bevestig keuze
+ Increase volume + Volume verhogen
Right Cursor button Cursor rechts
‐Decrease volume ‐ Volume verlagen
Preset Saved stations, favorites, etc. Preset Opgeslagen zenders,
Main menu button Roep hoofdmenu op
Info Call up info Info Roep info op
Media Center:
Go forward one track
0‐9 Call up favorites/memory; input
letters and numbers
WPS Network connection WPS‐netwerkverbinding
Battery compartment on the rear Batterijvak op de achterkant
Mode
Ga naar items hoofdmenu
Media Center:
Ga een track terug
Media Center:
Afspelen/Pauzeren
favorieten, etc.
Media Center:
Ga een track vooruit
0‐9 Roep favorieten/geheugen op;
Invoeren letters en nummers
54
Page 55

Vergeet niet om het heldere plastic lipje uit
het batterijvak te trekken voordat u de
afstandsbediening gebruikt.
Om de batterij uit de afstandsbediening te
verwijderen, gebruik uw duim om de
batterijlade naar buiten te trekken.
Vervang de batterij door een CR2025 type
3V batterij en plaats de nieuwe batterij
met de positieve (+) kant naar boven
gericht.
Let op: explosiegevaar indien de batterij
wordt vervangen door een onjuist type.
Gooi batterijen weg in overeenstemming
met de instructies.
WAARSCHUWING
Batterij niet inslikken, risico op chemische brandwonden
(De afstandsbediening meegeleverd met) Dit product bevat een
munt/knoopcelbatterij. Als deze knoopcelbatterij wordt ingeslikt, kan dit binnen
slechts 2 uur tot ernstige interne brandwonden en fataal letsel leiden.
Houd nieuwe en gebruikte batterijen buiten bereik van kinderen.
Als de batterijhouder niet goed kan worden gesloten, dient u het product niet meer
te gebruiken en buiten bereik van kinderen te houden.
Als u denkt dat batterijen zijn ingeslikt of binnenin een willekeurig lichaamsdeel
terecht zijn gekomen, dient u onmiddellijk medische hulp te zoeken.
55
Page 56

Symbolen op het display
Verbinding wordt tot stand gebracht, apparaat functioneert
Geen draadloze verbinding
Draadloze verbinding is tot stand gebracht
Zoeken
VHF‐radiofunctie geselecteerd
VHF‐radio‐ontvangst: Mono
VHF‐radio‐ontvangst: Stereo
AUX‐functie geselecteerd
Luidspreker uitgeschakeld
Alarm ingeschakeld
Internetradiozender opgeslagen als favoriet
FM‐radiozender opgeslagen
3. Aan de slag
De doos bevat de volgende items:
CR‐2003 Internetradio
Afstandsbediening
Netadapter
Handleiding
Het netwerk voorbereiden
• Voor verbinding met draadloos LAN (WLAN):
Controleer of het lampje WLAN LINK/ACT van het bedraad/draadloos
56
Page 57

toegangspunt of de router is opgelicht. Raadpleeg de handleiding van het
toegangspunt of de router voor meer informatie.
Opmerking: WiFi maakt het mogelijk om gegevens te versturen over korte
afstanden tot 20 meter zonder de noodzaak van kabels tussen apparaten.
Eventuele muren of plafonds kunnen de sterkte van het WiFi‐signaal
reduceren.
Probeer daarom de CR‐2003 en/of het toegangspunt binnen de afstand
die hierboven is genoemd te plaatsen en probeer eventuele obstakels
tussendetweeapparatentevermijden.
• Sluit de netadapter aan op de achterkant van de CR‐2003 en steek de
stekker in het stopcontact.
• Als het apparaat voor het eerst wordt gebruikt, zal het system u vragen
om de Taal en Netwerkinstellingen in te stellen.
57
Page 58

• Selecteer Yes (Ja) om verbinding te maken met het netwerk
• Selecteer Yes(WPS) (alleen voor WPS‐routers). Druk daarna op de
WPS‐knop op uw router.
• Selecteer No (Nee) als u liever naar een radiozender luistert of als u de
luidspreker met een extern afspeelapparaat wilt gebruiken.
Als u “Yes” antwoordt, zal het display aangeven dat er naar draadloze
netwerken wordt gezocht en kort daarna een lijst met beschikbare draadloze
netwerken tonen.
58
Page 59

Het aantal balkjes in het draadloze symbool dat voor de netwerknaam (SSID)
&
_
`
Q
wordt getoond geeft de relatieve signaalsterkte van het netwerk weer.
Het sleutelsymbool geeft aan dat een netwerk is beveiligd met een
wachtwoord.
Als het apparaat geen draadloze netwerken kan vinden, dan verschijnt de
melding ‘No wireless Networks Found’ (geen draadloze netwerken gevonden)
op het display. Wijzig uw locatie, indien nodig, en controleer uw
WLAN‐router.
U kunt het SSID van uw toegangspunt vinden in de instellingen van het
toegangspunt (router).
Selecteer uw netwerk en bevestig met OK. Als uw WLAN is beveiligd met een
wachtwoord, dan wordt u gevraagd een wachtwoord in te voeren.
Voer het wachtwoord in met behulp van de nummer‐ en lettertoetsen op de
afstandsbediening of voer het wachtwoord rechtstreeks op het apparaat in.
Let op het gebruik van hoofd‐ en kleine letters bij het invoeren van het
wachtwoord.
U kunt aan de draaiknop draaien om de code te selecteren. Als u per
ongeluk opdrukt, dan kunt u dit corrigeren gaan door opte
drukken.
Met afstandsbediening:
De cursor geeft de huidige invoerplek aan.
Druk herhaaldelijk op de corresponderende cijfertoets:
0 0 (invoer verwijderen)
1 1(spatie)@!“#$%
22ABCabc
33DEFdef
44GHIghi
55JKLjkl
66MNOmno
77P
RSpqrs
‘()*+,‐ ./:;<=>?[\]^
{|}~
59
Page 60

88TUVtuv
99WXYZwxyz
Als alternatief kunt u ook de nummers en letters invoeren door alleen
de cursortoetsen te gebruiken:
Ga terug naar de vorige invoerplek, invoer kan overschreven worden
Ga naar de volgende invoerplek, de vorige invoer wordt opgeslagen
/
Selecteer nummer/letter
OK Bevestig volledige invoer
Het kan een paar seconden duren om de verbinding met het netwerk tot
stand te brengen.
Zodra de verbinding tot stand is gebracht, zal het hoofdmenu met de
volgende items verschijnen:
‐ Internet Radio: Internetradio, toegang tot radiozenders wereldwijd
‐ Media Center: Mediacenter, toegang tot uw UPnP‐apparaten via
software met streamingmogelijkheden
‐ FM: VHF‐radiozenders, geen WLAN benodigd
‐ Information Center: Informatiecenter, toegang tot weersinformatie,
financiële informatie en systeeminformatie
‐ AUX : Toegang tot alle apparaten die zijn aangesloten op de
AUX‐INGANG
‐ Configuration: Configuratie, verschillende systeeminstellingen, alarm
‐ Local radio: Lokale radio, toegang tot radiozenders in een bepaalde
60
Page 61

regio (bijv. alleen Duitse zenders)
‐ My mediaU : Mijn mediaU, toegang tot een online mediabibliotheek.
Dit menu verschijnt alleen als de functie al is ingeschakeld onder
Configuration > Manage my mediaU.
• Druk op STANDBY /
datum en eventuele actieve alarmtijden worden op het scherm
weergegeven.
• Als u een netwerkverbinding heeft ingesteld en de CR‐2003 weer binnen
hetzelfde netwerk gebruikt, dan zal de CR‐2003 automatisch verbinding
maken met het netwerk. Als u het netwerk wilt veranderen, open dan
configuration om de gewenste verbinding in te stellen.
• Gebruik de lettertoetsen om nummers/cijfers in te voeren.
Zodra u op de gewenste letter staat, druk dan opom naar de volgende
invoerplek te gaan. Druk na het invoeren van alle letters ter bevestiging
op OK.Ukuntopdrukken om terug te gaan naar de vorige invoerplek.
Druk op
stellen. Draai aan het volumeknop of druk op
druk rechtstreeks op
/ of draai aan de volumeknop om het volume in te
om naar de standbymodus te schakelen. De tijd,
tot het volume 0 is of
om het geluid uit te schakelen.
4. Over het streamen van muziek
De standaardnaam van het apparaat voor DLNA is Lenco CR‐2003
apparaat indien gewenst een andere naam geven. (Zie paragraaf 5.3)
De informatie hieronder is de introductie voor het instellen van
mediastreaming vanaf een PC of andere mediaserver. Bestudeer, indien nodig,
de eigen instructies van de software of apps die u wilt gebruiken voor het
streamen van muziek.
Zorg ervoor dat de muziekbestanden zijn opgeslagen in het formaat MP3,
WMA, WAV of AAC om muziek te streamen naar de CR‐2003.
.
Ukunthet
61
Page 62

Raadpleeg paragraaf 5.6 voor details over het bedienen van het afspelen en
streamenvanmuziekopdeCR‐2003.
4.1 UPnP
• U moet de volgende stappen uitvoeren op uw PC om muziek te
streamen vanaf uw PC:
‐ Maak met de PC verbinding met het netwerk.
‐ Zorg ervoor dat de CR‐2003 is ingeschakeld en verbonden met
hetzelfde netwerk.
‐ Open het UPnP‐platform Windows Media Player (11 of hoger). Als
alternatief kunnen ook andere platformen of servers zoals
Windows Media Connection worden gebruikt.
Het onderstaande voorbeeld toont het installeren van Windows Media
Player versie 11 onder Windows XP.
‐ Sta toe om media te delen met Lenco CR‐2003.
‐ Voeg de audiobestanden en –mappen die u wilt delen met de
CR‐2003 toe aan de mediabibliotheek.
62
Page 63

• U kunt ook muziek streamen vanaf een andere muziekserver, zoals een
d
y
l
d
S
y
smartphone (Androi
‐ Maak met de smartphone verbinding met het netwerk
‐ Zoek apps voor het delen van media op Google Pla
de apps.
‐ Voeg de audiobestanden die u wilt delen vanaf uw smartphone
toe.
• Na het instellen van de gedeelde server kunt u de muziek selecteren en
het afspelen bedienen op de CR‐2003. (Zie paragraaf 5.6)
4.2 DLNA‐functie
• Naast UPnP ondersteunt de CR‐2003 ook DLNA. U deelt
muziekbestanden vanaf een PC of Android‐smartphone en u gebruikt
uw PC, Android‐smartphone of iPhone / iPad om het afspelen van
muziek op de CR‐2003 te bedienen. (U hoeft het afspelen niet te
bedienen op de CR‐2003.)
• De systeemeisen voor DLNA op de PC zijn Windows 7 en Windows
Media Player 12. Installeer zoals hieronder:
Deel eerst de media op uw PC met de CR‐2003.
Contro
Media streaming options
Panel>NetworkandInternet>Networkan
‐platform):
en installeer
haring Center >
Open Windows Media Player en schakel Allowremote controlof m
Player in.
63
Page 64

Klik met de rechterknop op een willekeurig muziekbestand en de
y
bibliotheek en selecteer Pla
Er zal een venster verschijnen voor de bediening van de muziek die
wordt afgespeeld op de CR‐2003.
to Lenco CR‐2003.
64
Page 65

U kunt gratis of commerciële DLNA‐apps zoeken in Google Play of de
Apple Store en installeren als u gebruik maakt van een
Android‐smartphone of ‐tablet of een iPhone / iPad. Het wordt
aanbevolen gebruik te maken van bubbleUPnP, MediaShare op
Android‐smartphones, ‐tablets of iPhone/iPad.
Sommige apps ondersteunen het streamen van muziek vanaf
iPhone/iPod mogelijk niet, maar de iPhone/iPod kan nog steeds worden
gebruikt om het streamen van muziek vanaf andere servers te bedienen.
U kunt als volgt gedeelde muziek afspelen met de apps:
Selecteer Lenco CR‐2003 als de speler. Sommige apps staan het toe om
muziek tegelijkertijd af te spelen op meerdere spelers.
Selecteer de muziekserver en selecteer de muziek. Sommige apps
kunnen een afspeellijst creëren als u meerdere nummers selecteert.
UkuntdeLenco CR‐2003 zelf selecteren als een server. U kunt in dit geval
de lijst met internetradiozenders bekijken en uw internetradio in de app
selecteren.
65
Page 66

Selecteer server en speler Selecteer muziek
• BijgebruikvandefunctievoorDLNA‐streaming in Music Link kunt
u alleen het volume en de standbyfunctie bedienen via het
apparaat. De andere functies kunnen niet worden bediend op het
apparaat.
• Stop DLNA op de PC, smartphone of tablet voordat u doorgaat met
de eigen bediening van Music Link.
66
Page 67

5. CR‐2003 Functies
5.1 Overzicht
67
Page 68

5.2 Hoofdmenu
U kunt in het hoofdmenu de volgende modi selecteren: My mediaU, Internet
Radio, Local Radio, Configuration, AUX, Information Center, FM, Media
Center.
5.3 Configuration (Configuratie)
5.3.1 Manage my mediaU (Beheer my mediaU)
My mediaU media library – beheer van radiozenders via internet
Voor wereldwijde toegang tot al uw favoriete radiozenders, te allen tijde en
op elk apparaat met streamingmogelijkheden, kunt u een gratis account
creëren voor een mediabibliotheek op www.mediayou.net
apparaten toevoegen als u wilt. U krijgt toegang tot de dienst met een
zelfgekozen gebruikersnaam en wachtwoord.
en zoveel
68
Page 69

U moet ook het MAC‐adres van uw apparaat (dit wordt serienummer
genoemd op MediaYou) hebben om het apparaat te registreren onder
“Personalize Your Internet Radio”.
UkunthetMAC‐adres van de internetradio vinden onder Information Center
> System information > Wireless Info > MAC Address.
Na het registreren van het apparaat, moet u deze functie inschakelen onder
Configuration > Manage my mediaU, zodat de internetradio toegang heeft
tot de mediabibliotheek.
Het apparaat maakt automatisch verbinding met uw account en toont wat
daar is opgeslagen:
‐ Favorite Station (Favoriete zender)
‐ Favorite Location/Genre (Favoriete locatie/genre)
‐ My Local Station (Mijn lokale zenders)
‐ Manually Add (Handmatig toevoegen)
69
Page 70

• Afhankelijk van uw persoonlijke mediaU‐instellingen, zal het display
van de internetradio er anders uitzien.
• Als het apparaat nog niet is geregistreerd op MediaYou, dan zal er een
corresponderende melding verschijnen wanneer u My mediaU wilt
inschakelen.
• Als u een apparaat heeft geregistreerd onder meerdere accounts, dan
zullen deze accounts worden getoond na de activatie en u kunt het
account dat u wilt gebruiken selecteren. Het is niet nodig om een
wachtwoord in te voeren.
Het menu‐item My mediaU verschijnt ook in het hoofdmenu.
U kunt ook hier de verschillende keuzemogelijkheden vinden:
‐ Favorite Station (Favoriete zender)
‐ Favorite Location/Genre (Favoriete locatie/genre)
‐ My Local Station (Mijn lokale zenders)
‐ Manually Add (Handmatig toevoegen)
U kunt deze keuzemogelijkheden ook in de mediabibliotheek vinden, waar u
de radiozenders indien gewenst kunt toewijzen en beheren.
70
Page 71

Onder“Add Manually” (handmatig toevoegen), kunt u het apparaat
“
bijvoorbeeld naar podcasts linken.
Hiervoor moet u wel de URL van de podcast kennen.
1. Vul de gemarkeerde velden van uw MediaYou‐account onder
Manually” in.
2. Ga op de internetradio naar Configuration> Manage my mediaU en
schakel opnieuw in.
3. Onder My mediaU > Manually Add kunt u alle handmatig
toegevoegde mappen en adressen vinden en de podcast selecteren.
De volgende podcast‐formaten worden ondersteund:
‐ asx
‐ m3u
‐ pls
‐ pure streaming met HTTP‐,RTSP‐,MMS‐protocol
5.3.2 Network (Netwerk)
Add
71
Page 72

• Wireless Network Configuration (Configuratie draadloos netwerk)
WiFi‐netwerk inschakelen / uitschakelen. Als u het WiFi‐netwerk
inschakelt, dan zal het systeem automatisch de gewenste router
selecteren.
U kunt hoofdstuk 3, Aan de slag, raadplegen voor het instellen van het
netwerk.
• Wireless Network (Draadloos netwerk, WPS PBC)
Als u gebruik maakt van een router met WPS/QSS‐knop, dan kunt u de
netwerkverbinding eenvoudig opzetten via de WPS‐functie. Druk op de
WPS‐toets op de afstandsbediening of selecteer de
WPS‐netwerkverbindingsmodus. Open de modus en druk binnen 120
seconden op de WPS/QSS‐knop op uw router. De netwerkverbinding
tussen de router en de Lenco CR‐2003 zal daarna automatisch worden
geconfigureerd.
• Manual configuration (Handmatig instellen)
U kunt DHPC (wat automatisch een IP toewijst) selecteren of handmatig
een IP‐adres invoeren voor de draadloze netwerkverbinding.
Als u het handmatig instellen voor een bedraad netwerk selecteert, dan
moeten de volgende zaken worden ingevoerd:
1. SSID (de naam van het toegangspunt);
2. IP‐adres;
72
Page 73

3. Subnetmasker;
4. Standaardgateway;
5. Gewenste DNS‐server;
6. Alternatieve DNS‐server.
U kunt (Manage) selecteren voor het beheren van een specifiek netwerk,
indien u meer dan één netwerkverbinding heeft opgezet binnen een
gebied.
• Check Network when Power On (Controleer netwerk wanneer
ingeschakeld)
WiFi‐netwerk inschakelen / uitschakelen.
Wanneer u het WiFi‐netwerk inschakelt, zal het systeem automatisch
naar het beschikbare toegangspunt zoeken. Selecteer het gewenste
toegangspunt.
Voer de WEP‐ of WPA‐code in om verbinding te maken met het
draadloze netwerk.
Als het draadloze netwerk niet bestaat of er geen verbinding kan
worden gemaakt, dan zal het icoontje aan de linkerbovenkant zijn
doorgekruist.
5.3.3 Date&Time (Datum&Tijd)
De instellingen voor datum en tijd kunnen alleen worden ingesteld als de
internetradio is verbonden met een draadloos netwerk.
De datum en tijd instellen: De internetradio ontvangt de datum en tijd
automatisch van een centrale server zodra een netwerkverbinding tot stand is
gebracht. U moet de tijd echter handmatig aanpassen om rekening te houden
met de verandering van winter‐ naar zomertijd.
U kunt het tijdformaat instellen op 12 uur of 24 uur;
U kunt het datumformaat instellen, waarbij de posities van YY (jaar), MM
73
Page 74

(maand) en DD (dag) veranderen – YY/MM/DD, DD/MM/YY or MM/DD/YY.
Schakel Daylight Saving Time (zomertijd, DST) in/uit.
Bevestig met OK of door op de draaiknop te drukken.
Als er verbinding is gemaakt met een draadloos netwerk, dan wordt GMT
(+01:00) gebruikt voor het instellen van de tijd. Tel uren op of trek uren af aan
de hand van tijdzone waar u de tijd instelt.
5.3.4 Alarm
Er zijn drie onafhankelijke alarmen ‐ 2 alarmen die kunnen worden ingesteld
met een absolute tijd (Alarm 1 en Alarm 2) en 1 alarm dat kan worden
ingesteld met een relatieve tijd (NAP Alarm). Druk op Alarm op de
afstandsbediening om het alarmmenu rechtstreeks te openen.
74
Page 75

De eerste twee alarmen zijn gelijk aan een normaal alarm. Schakel de
t
t
t
t
t
t
t
alarmen in, stel de tijd in en stel daarna de frequentie van het alarm in ‐ elke
dag, eenmalig of een specifieke dag van de week.
Selecteer de alarmtijd. Stel de waardes in met behulp van/op de
afstandsbediening of de draaiknop op het apparaat en ga naar het volgende
invoerveld met behulp van. Bevestig met OK of door op de draaiknop te
drukken.
Selecteer “Sound” om het geluid in te stellen op Beep (pieptoon), Melody
(melodie) of Radio (internetradio of FM‐radio). Er verschijnt een
alarmsymbool
aan de bovenkant van het display naast de tijd.
Merk op da
geluid afkomstig is van de voorafingestelde Internetradio. Hetkan voor
alarm 1 en alarm 2 alleen worden ingesteld op hetzelfde IR/FM‐station. Er
kan maar één zender worden ingesteld voor beide alarmen. Wanneer de
alarmtijd word
ingestelde netwerk beschikbaar is. Hetis daarom mogelijk dater een
he
kleine vertraging is tussen he
radio. Als er binnen één minuu
gemaakt, dan zal he
Nadat het NAP Alarm is ingesteld, zal het één keer klinken na
5/10/20/30/60/90/120 minuten, afhankelijk van de ingestelde tijd.
UkuntAlarm Volume selecteren om het volume van de alarmen in te stellen.
Als de alarm(en) zijn ingesteld, zal er een klokicoontje verschijnen aan de
onderkant van het display. Het klokicoontje met de alarmtijd zal ook in de
standbymodus duidelijk op het display worden getoond.
Druk tijdens een alarm op een willekeurige toets (behalve
afstandsbediening of Standby op het apparaat) om de snooze‐modus in te
schakelen. Het alarm zal na 5 minuten worden hervat. Druk op
wanneer hetgeluid voor hetalarm is ingesteld op radio, datdi
bereikt, maakthetapparaatverbinding methetinternetals
inschakelen van hetalarm en hetafspelen van
geen verbinding methetnetwerk kan worden
alarm automatisch overschakelen naar Melody.
op de
op de
75
Page 76

afstandsbediening of Standby op het apparaat om het alarm te stoppen.
5.3.5 Language (Taal)
Selecteer de menutaal: Engels/ Duits/ Frans/ Hongaars/ Tsjechisch/ Slowaaks/
Pools
5.3.6 Dimmer
Configureer de helderheid van de achtergrondverlichting van het display.
Selecteer “Power Saving” om de helderheid van de achtergrondverlichting in
de standbymodus in te stellen, en selecteer ”Turn On” om de helderheid
tijdens gebruik in te stellen.
Selecteer “Dimmer Timer” om de tijdsduur in te stellen waarna de radio de
helderheid van de achtergrondlicht aanpast wanneer de radio niet wordt
bediend.
5.3.7 Power Management (Energiebeheer)
Configureer wanneer het apparaat automatisch naar de standbymodus moet
schakelen als er menu’s geopend zijn en/of er geen WiFi‐signaal wordt
ontvangen.
Selecteer de power management timer (5/15/30mins) om de tijdsduur in te
stellen waarna de radio automatisch naar de standbymodus schakelt wanneer
76
Page 77

de radio niet wordt bediend.
Selecteer “Turn off” om de energiebeheerfunctie uit te schakelen.
5.3.8 Sleep Timer (Slaaptimer)
Schakel de slaaptimer uit of stel de slaaptimer in op
15/30/60/90/120/150/180 minuten. Zodra de tijd is ingesteld, zal een
bed‐icoontje en het resterende aantal minuten aan de rechterbovenkant van
het display verschijnen en de CR‐2003 zal als de tijd verstreken is automatisch
naar de standbymodus schakelen. De toets Sleep op de afstandsbediening is
een snelkoppeling naar deze functie.
5.3.9 Buffer
Stel de buffertijd voor het afspelen van muziek in, 2/4/8 seconden.
77
Page 78

5.3.10 Weather (Weer)
De CR‐2003 kan in de standbymodus actuele weersinformatie weergeven (zie
paragraaf 5.8.1). Schakel Standby Display in en stel de temperatuureenheid
(Ԩ of Ԭ) in om het weer te tonen in de standbymodus.
Als de functie is ingeschakeld, worden de huidige tijd en het huidige weer om
de beurt getoond voor 10 seconden.
5.3.11 FM Setup (FM‐instellingen)
Selecteer Mono/Stereo modus tijdens het luisteren naar FM‐zenders.
5.3.12 Local Radio Setup (Lokale radio‐instellingen)
Er is een snelkoppeling naar Local Radio onder Internet Radio zodat u
eenvoudig naar de plaatselijke zenderlijst kunt gaan.
U kunt uw locatie handmatig instellen of het systeem uw huidige locatie
automatisch laten detecteren. Het systeem detecteert uw locatie aan de hand
van het IP‐adres van het netwerk waarmee u verbonden bent.
78
Page 79

5.3.13 Playback Setup (Afspeelinstellingen)
’
Selecteer de afspeelmodus van het media center – Off (geen herhaling of
afspelen in willekeurige volgorde), Repeat all (herhaal alle), Repeat one
(herhaal één
5.3.14 DLNA Setup (DLNA‐instellingen)
, or Shuffle (afspelen in willekeurige volgorde).
De standaardnaam voor DLNA is Lenco CR‐2003. U kunt de naam voor het
configureren van DLNA veranderen op PC of smartphone/tablet. (zie
paragraaf 4.2)
5.3.15 Equalizer
De standaardequalizer is Normal, u kunt de equalizer instellen op Normal,
79
Page 80

Vlak, Jazz, Rock, Soundtrack, Classical, Pop, of News.
Q
Druk op E
verschillende equalizerinstellingen.
5.3.16 Resume When Power On (Hervatten bij inschakelen)
Het systeem is schakelt standaard automatisch naar het hoofdmenu wanneer
de radio wordt ingeschakeld. Als u deze optie inschakelt, dan zal het systeem
het afspelen van internetradio hervatten als u naar internetradio of
mediacenter luisterde voordat de radio werd uitgeschakeld.
5.3.17 Software Update
De software updaten. Als er een nieuwe softwareversie beschikbaar is op de
server, dan zal het systeem u een melding geven wanneer u terugkeert naar
het hoofdmenu.
5.3.18 Reset
De standaardinstellingen herstellen.
op de afstandsbediening om snel te schakelen tussen de
Nadat de CR‐2003 is gereset, zal het systeem naar het instellen van de Taal
gaan. En het systeem zal na het instellen van de menutaal automatisch naar
het instellen van de Netwerkinstellingen gaan.
5.4 My mediaU
Voor de weergave en het afspelen van uw eigen mediaU‐zenderlijst op de
mediaU‐server. Stel eerst uw account in (zie paragraaf 5.3.1).
80
Page 81

5.5 Internet Radio
Nadat er succesvol verbinding is gemaakt met een zender, zal de bitrate en
het formaat van de zender worden getoond op het afspeelscherm.
5.5.1 My Favorite (Mijn favorieten)
Lijst met uw favoriete zenders. De lijst ondersteunt tot 250 favorieten,
waaronder zenders en mappen.
Houd op het afspeelscherm voor zenders de toets Preset ingedrukt om een
zender op te slaan als favoriete zender. U kunt eerder opgeslagen zenders
vervangen door nieuwe zenders. Het
opslaan op de bovenste regel van het display.
Als de geselecteerde zender is opgeslagen, dan kunt u de zender niet
nogmaals opslaan.
De opgeslagen zenders worden getoond in dit menu. U kunt ook op Preset
drukken om de lijst met opgeslagen zenders te bekijken.
symbool verschijnt tijdens het
81
Page 82

Verplaats de cursor in de lijst met favoriete zenders naar de gewenste zender
en druk op OK om te luisteren. U kunt ook opdrukken om het submenu te
openen en een zender te verwijderen uit de favorietenlijst (Delete), een
zender omhoog of omlaag te verplaatsen in de lijst (Shift Up/Down), een
zender een nieuwe naam te geven (Rename), een zender af te spelen (Play)
of een zender te gebruiken voor het alarm (Use as Alarm S ound).
Er zijn 250 opslagplaatsen beschikbaar voor uw favorieten.
5.5.2 Radio Station/Music
Zenders zijn gecategoriseerd in de categorieën Global Top 20 (Globale Top
20), Genre, Country/Location (Land/Locatie) en Highlight (Hoogtepunten).
U kunt deze categorieën openen om subcategorieën en zenders die u wilt
beluisteren te selecteren.
Als u een zender wilt beluisteren, druk dan op OK om de zender rechtstreeks
af te spelen. U kunt ook opom het submenu voor de zender te openen–
hier kunt u de zender toevoegen aan uw favorieten (Add to Favorite),
automatisch scannen (Auto Scan), afspelen (Play) of gebruiken als
alarmgeluid (Use as Alarm Sound, indien u internet als alarmgeluid heeft
ingesteld in de alarmconfiguratie).
82
Page 83

Als u de optie Auto Scan selecteert, dan worden alle zenders in de
subcategorie kort afgespeeld. Elke zender wordt voor 30 seconden afgespeeld
tot alle zenders zijn afgespeeld of u op OK drukt om de functie te stoppen.
Druk op Info om informatie over de zender te bekijken.
5.5.3 History (Geschiedenis)
Een lijst met de laatst beluisterde zenders. De lijst bevat tot 10 zenders die u
eerder heeft beluisterd.
Als u een zender wilt beluisteren, druk dan op OK om de zender rechtstreeks
af te spelen. U kunt ook opom het submenu voor de zender te openen–
hier kunt u de zender toevoegen aan uw favorieten (Add to Favorite),
automatisch scannen (Auto Scan), afspelen (Play) of gebruiken als
alarmgeluid (Use as Alarm Sound, indien u internet als alarmgeluid heeft
ingesteld in de alarmconfiguratie).
Als u de optie Auto Scan selecteert, dan worden alle zenders in de
geschiedenislijst kort afgespeeld. Elke zender wordt voor 30 seconden
afgespeeld tot alle zenders zijn afgespeeld of u op OK drukt om de functie te
stoppen.
5.5.4 Service (Dienst)
Search radio station – Voer uw trefwoord in om naar radiozenders in de lijst
te zoeken.
Add new radio station – De toegevoegde zenders worden opgeslagen in uw
favorieten. Houd er rekening mee dat een zendernaam uit maximaal 250
karakters kan bestaan.
83
Page 84

5.6 Local Radio (Lokale radio)
Er is een snelkoppeling Local Radio onder Internet Radio zodat u eenvoudig
naar de plaatselijke zenderlijst kunt gaan.
Het apparaat kan het IP‐adres gebruiken om de huidige locatie te bepalen en
dan automatisch een lijst met lokale radiozenders te genereren. U kunt echter
ook zenders van een ander land beluisteren. (Raadpleeg paragraaf 5.3.12
Lokale radio‐instellingen)
5.7 Media Center
5.7.1 UPnP
Als u gedeelde media heeft ingesteld, dan moet u de gedeelde media vanaf
UPnP zien. Als u meer dan een computer heeft die media deelt, dan worden
de alternatieven weergegeven. SELECTEER de gedeelde media die u wilt
afspelen.
(zie paragraaf 4.1)
Druk op/op de afstandsbediening om naar de vorige/volgende track te
gaan, druk op
Druk op Info om informatie over de huidige track weer te geven.
Tips: De radio kan de track alleen lezen wanneer de bestandsnaam uit minder
dan 40 karakters bestaat. Daarnaast moeten het Europese karakters zijn. Als
het lezen van de track in de UPnP‐modus mislukt, dan kunt u proberen het
bestand een nieuwe naam te geven.
Als de track daarna echter nog steeds niet kan worden afgespeeld, kunt u
proberen het bestand te converteren naar een van de andere ondersteunde
formaat.
om het afspelen te starten of stoppen.
84
Page 85

5.7.2 Persoonlijke afspeellijst
U kunt een afspeellijst met uw favoriete muziek vanaf UPnP maken. Houd OK
tijdens het afspelen van een nummer ingedrukt om het nummer op te slaan
in My Playlist (uw persoonlijke afspeellijst).
5.7.3 Persoonlijke afspeellijst wissen
U kunt alle opgeslagen muziek verwijderen onder My Playlist.
5.8 FM
De FM‐modus ontvangt analoge radio van de FM‐band. (Raadpleeg paragraaf
5.3.11 voor het instellen van de FM‐band)
Druk op/om naar FM‐zenders te zoeken. De frequentie die op het
display wordt weergegeven zal veranderen terwijl de CR‐2003 een scan
uitvoert op de FM‐band. De frequentie stopt wanneer er een zender
ontvangen wordt.
Ukuntop/op de afstandsbediening drukken om met stappen van
0.05MHz handmatig af te stemmen op een zender.
Houd PRESET op de afstandsbediening ingedrukt om de zender op te slaan.
U kunt tot 20 voorkeurszenders opslaan. Druk op PRESET en daarna op/
op de afstandsbediening om de opgeslagen zender te selecteren.
Als alternatief kunt u het systeem ook naar ALLE zenders laten scannen door
op OK te drukken. De gevonden zenders worden automatisch opgeslagen in
de lijst met voorkeurszenders.
85
Page 86

5.9 Information Center (Informatiecenter)
“
5.9.1 Weather Information (Weersinformatie)
Er zijn weersinformatie en weersvoorspellingen beschikbaar voor 2000 steden.
Selecteer het land en de stad voor details over het weer.
Draai aan de draaiknop om weersvoorspellingen te bekijken.
De radio kan weersinformatie tonen in de standbymodus. Druk op de
weersinformatiepagina open daarna op
van de stad die u heeft geselecteerd wil weergeven in de standbymodus, druk
dan op OK om in te stellen dat de informatie van de stad moet worden
weergegeven in de standbymodus. Schakel daarna de weergave van
weersinformatie in zoals beschreven in paragraaf 5.3.10.
Add to Standby”. Als u het weer
5.9.2 Financial Service (Financiële dienst)
86
Page 87

Bekijk aandelenindexen uit de hele wereld.
5.9.3 System Information (Systeeminformatie)
Controleer de versie van het systeem en details over het netwerk waarmee
verbinding is gemaakt. De informatie omvat het MAC‐adres dat u moet
invullen bij de registratie van het my mediaU‐lidmaatschap.
5.10 AUX IN
In de Aux‐modus kunt u audio van een externe bron, zoals een MP3‐speler,
afspelen.
Om audio af te spelen in de Aux‐modus:
• Zet het volume laag op zowel de CR‐2003 en, indien instelbaar, het
bronapparaat.
• Sluit de externe audiobron aan op de 3,5mm stereo‐aux‐ingang.
• Druk op MODE tot het display AUX IN toont of selecteer “AUX in” in het
hoofdmenu.
• Stel het volume naar wens in op de CR‐2003 (en, indien nodig, op het
bronapparaat).
5.11 LINE OUT
Het afspelen van internetradio op een extern apparaat
U kunt een extern apparaat, zoals een stereotoren, aansluiten op de LINE
OUT‐aansluiting.
U heeft een audiokabel met 3,5mm stekker nodig.
‐ Selecteer de bijbehorende ingang op uw stereotoren. De muziek van de
internetradio wordt afgespeeld via de stereotoren.
‐ De LINE OUT‐aansluiting is niet geschikt voor het aansluiten van
standaard/in‐ear hoofdtelefoons.
87
Page 88

6. Afstandsbediening via Apps
Sommige apps voor Android, bijv. AirMusic Control, laten u de internetradio
bedienen vanaf uw smartphone of tablet.
Zodra de apparaten verbonden zijn, zal de menustructuur die wordt getoond
op de internetradio ook verschijnen op de smartphone/tablet. U kunt alle
functies net zoals op de radio selecteren. De geselecteerde functies /
menu‐items die worden getoond op de radio zullen veranderen als gevolg van
de handelingen op uw mobiele apparaat.
Als u de internetradio bedient via een app, dan is het mogelijk dat er geen
UPnP‐verbinding met Windows Media Player kan worden gemaakt.
7. Problemen oplossen
Fout
Het apparaat schakelt
niet in.
Geen geluid.
Kan geen verbinding
maken met netwerk.
Oplossing
1. Controleer of de netadapter juist is
aangesloten.
2. Het apparaat kan onjuist werken in gebieden
met sterke radio‐interferentie. Het apparaat zal
weer naar behoren werken wanneer er geen
interferentie meer is.
1. Schakel het geluid in, aangezien het wellicht
gedempt is (mute).
2. Verhoog het volume.
1. Controleer de WLAN‐functie.
2. Probeer een IP‐adresintestellenophet
apparaat.
3. Activateer de DHCP‐functie op de router en
maak nogmaals verbinding op het apparaat.
4. Er is een firewall actief op het netwerk – stel
het desbetreffende programma zo in dat
toegang mogelijk is.
5. Start het apparaat opnieuw op en probeer
het nogmaals.
88
Page 89

Kan geen verbinding
maken met draadloos
netwerk.
Geen zenders gevonden.
Ruis in FM‐modus.
1. Controleer de bereikbaarheid van het
WLAN‐netwerk op het toegangspunt.
2. Plaats het apparaat dichter bij de router.
3. Zorg ervoor dat het WEP/WPA‐wachtwoord
juist is.
1. Controleer het netwerk alsmede het
toegangspunt en de firewall.
2. De zender is wellicht op dit moment niet
beschikbaar, probeer het later nog eens of
selecteer een andere zender.
3. De link van de zender is veranderd of de
zender zendt niet meer uit– vraag de provider
naar informatie.
4. The link van de handmatig toegevoegde
zender is onjuist, zorg ervoor dat de link juist is
en voer de link opnieuw in.
1. Controleer/verplaats de FM‐antenne.
2. Verplaats de radio.
Alarm werkt niet.
DLNA‐streaming werkt
niet.
1. Schakel het alarm in.
2. Mogelijk een probleem met de
volume‐instelling, raadpleeg de oplossingen
voor “Geen geluid”.
3. De alarmbron was ingesteld op een zender
maar er is geen netwerkverbinding. Verander
de alarmbron of configureer de verbinding
opnieuw.
1. Controleer de netwerkverbinding, CR‐2003
en uw apparaat moeten verbonden zijn met
hetzelfde netwerk; en test of het netwerk
naar behoren werkt.
2. Zorg ervoor dat de instellingen op uw
apparaat juist zijn.
89
Page 90

Elektromagnetische
interferentie.
1. De normale functie van het product kan
worden verstoord door sterke
elektromagnetische interferentie. Als dit het
geval is, reset het product dan om het normale
gebruik te hervatten door de instructies in deze
handleiding te volgen. Als het gebruik niet kan
worden hervat, probeer het product dan op
een andere locatie te gebruiken.
Systeem hangt
plotseling
1. De radio is overbelast, start de radio opnieuw
op.
8. Specificaties
Modelnummer CR‐2003
Omschrijving Internetradio
Display 320 x 240 TFT‐kleurendisplay
Ondersteunde netwerken 802.11b/g/n (WLAN)
WLAN‐beveiliging WEP, WPA, WPA2 (PSK) en WPS
Streaming UPnP, DLNA
Ondersteunde afspeelformaten WMA, MP3, WAV, AAC
FM 87.5 – 108.0 MHz
Vermogen luidspreker 5W
Adapter Invoer: 100‐240V ~ 50/60Hz
Uitvoer: 9V 1000mA
Stroomverbruik in standbymodus <1W
Bedrijfstemperatuur 0
o
C ‐ 35oC
Aansluitingen DC IN‐stroomaansluiting
3,5mm aux in
3,5mm line out
Afmetingen 201mm(L) x 116mm(H) x 118mm(D)
Gewicht 800g
90
Page 91

Netadapter: (Alleen voor de EU)
Fabrikant: DongGuan Yingna Electronic Technology Co. Ltd.
Modelnummer: YN12W‐0900100VZ
Adaptertype
Gebruik alleen de originele netadapter
Gebruik alleen de netadapter die is vermeld in de han dleiding
9. Garantie
Lenco biedt service en garantie aan overeenkomstig met de Europese
wetgeving. Dit houdt in dat u, in het geval van reparaties (zowel tijdens als na
de garantieperiode), uw lokale handelaar moet contacteren.
Belangrijke opmerking: Het is niet mogelijk om producten die gerepareerd
moeten worden direct naar Lenco te sturen.
Belangrijke opmerking: De garantie verloopt als een onofficieel servicecenter
het apparaat op wat voor manier dan ook heeft geopend, of er toegang toe
heeft gekregen.
Het apparaat is niet geschikt voor professioneel gebruik. In het geval van
professioneel gebruik worden alle garantieverplichtingen van de fabrikant
nietig verklaard.
10. Disclaimer
Er worden regelmatig updates in de firmware en/of hardwarecomponenten
gemaakt. Daardoor kunnen gedeelten van de instructies, de specificaties en
afbeeldingen in deze documentatie enigszins verschillen van uw eigen situatie.
Alle onderwerpen die staan beschreven in deze handleiding zijn bedoeld als
illustratie en zijn niet van toepassing op specifieke situaties. Aan de
beschrijving in dit document kunnen geen rechten worden ontleend.
91
Page 92

11. Afvoer van het oude apparaat
Dit symbool geeft aan dat het betreffende elektrische
product of de batterij niet moet worden verwijderd als
algemeen huishoudelijk afval in Europa. Zorg voor een juiste
afvalverwerking door het product en de batterij in
overeenstemming met alle van toepassing zijnde lokale
wetten voor het verwijderen van elektrische apparatuur of
batterijen te verwijderen. Als u dit doet, helpt u de natuurlijke hulpbronnen
te behouden en de standaard van milieubescherming te verbeteren bij de
behandeling en verwijdering van elektrisch afval (Afgedankte Elektrische en
Elektronische Apparatuur).
12. CE‐markering
Producten met een CE keurmerk houden zich aan de EMC
richtlijn (2004/108/EC) en de Richtlijn voor Lage Voltage
(2006/95/EC) uitgegeven door de Europese Commissie.
Hierbij verklaart Lenco Benelux BV, Thermiekstraat 1a,
6361HB Nuth, Nederland, dat dit product voldoet aan de essentiële eisen en
andere relevante bepalingen van Richtlijn 1999/5/EU.
De conformiteitsverklaring kan worden geraadpleegd op techdoc@lenco.com
13. Service
Bezoek voor meer informatie en helpdeskondersteuning www.lenco.com
Lenco Benelux BV, Thermiekstraat 1a, 6361HB, Nederland.
92
Page 93

Deutsch
Deutsch
Deutsch
Deutsch
1.
Vorbereitung
1.
Vorbereitung
1.
1. Vorbereitung
Vorbereitung
1.1
1.1
1.1
1.1 Netzwerkanforderungen
ben ö tigt:
Netzwerkanforderungen
Netzwerkanforderungen
Netzwerkanforderungen
Vor der Verwendung des CR-2003 werden die folgenden Anforderungen
• Eine Breitbandverbindung in Kombination mit einem Ethernet- oder
WLAN-Zugangspunkt, Router oder ä hnlichem Netzwerkger ä t.
• Das Netzwerkger ä t muss WiFi-Verbindungen (802.11b/g/n)
unterst ü tzen.
• Ein PC oder Smartphone mit einem Netzwerkanschluss. Dieses Netzwerk
muss das gleiche sein, mit dem das CR-2003 verbunden ist.
1.2
1.2
1.2
1.2 Sicherheitshinweise
• Verwenden Sie dieses Ger ä t nicht in der N ä he von Wasser.
• Benutzen Sie zur Reinigung ein nur leicht befeuchtetes Tuch.
• Blockieren Sie keine L ü ftungs ö ffnungen. Wenn das Ger ä t in einem Regal
• Installieren Sie das Ger ä t gem äß der mitgelieferten
• Nicht auf den Netzadapter treten oder diesen einklemmen. Seien Sie
• Ziehen Sie bei Gewittern oder bei l ä ngerer Nichtbenutzung den Stecker
• Das Ger ä t sollte von anderen W ä rmequellen wie Heizk ö rpern,
• Die Verwendung des Ger ä tes in der N ä he von starken Magnetfeldern
• Elektrostatischer Entladungen k ö nnen die normale Verwendung von
Sicherheitshinweise
Sicherheitshinweise
Sicherheitshinweise
aufgestellt wird, rund um das Ger ä t 5 cm (2 “ ) Freiraum lassen.
Bedienungsanleitung.
vorsichtig, insbesondere in der N ä he der Stecker und dem
Kabelaustrittspunkt. Stellen Sie keine schweren Gegenst ä nde auf das
Netzteil, da es hierdurch besch ä digt werden k ö nnte. Bewahren Sie das
gesamte Ger ä t au ß erhalb der Reichweite von Kindern auf! Wenn Kinder
mit dem Stromkabel spielen, k ö nnen sie sich selber schwer verletzen.
des Ger ä tes aus der Steckdose.
W ä rmespeichern, Ö fen oder anderen Hitze erzeugenden Ger ä ten
ferngehalten werden.
sollte vermieden werden.
diesem Ger ä t st ö ren. Sollte dies der Fall sein, setzen Sie das Ger ä t, wie
in der Bedienungsanleitung beschrieben, zur ü ck und starten es neu.
93
Page 94

Lassen Sie w ä hrend der Daten ü bertragung Sorgfalt walten und
betreiben Sie das Ger ä t in einer antistatischen Umgebung.
• Warnung! Niemals Gegenst ä nde durch die L ü ftungsschlitze oder
Ö ffnungen in das Ger ä t stecken. Im Ger ä t sind hohe Spannungen
vorhanden und das Einf ü hren von Gegenst ä nden kann zu Stromschlag
bzw. zu Kurzschl ü ssen der internen Teile f ü hren. Aus dem gleichen
Grund kein Wasser oder Fl ü ssigkeiten in das Ger ä t geben.
• Benutzen Sie das Ger ä t nicht in nasser oder feuchter Umgebung wie
dem Bad, einer Dampfk ü che oder in der N ä he eines Schwimmbeckens.
• Wenn eine Kondensation auftreten kann, das Ger ä t nicht verwenden.
• Obwohl dieses Ger ä t mit gr öß ter Sorgfalt hergestellt und vor dem
Verlassen des Werks mehrfach gepr ü ft wurde, k ö nnen dennoch, wie bei
allen elektrischen Ger ä ten, Probleme auftreten. Trennen Sie das Ger ä t
im Falle einer Rauchentwicklung, starker Hitzeentwicklung oder jeden
anderen unnat ü rlichen Erscheinung sofort vom Netz.
• Das Ger ä t muss immer gut bel ü ftet sein!
• Dieses Ger ä t muss mit einer Stromquelle betrieben werden, die auf dem
Aufkleber mit den technischen Daten spezifiziert ist. Wenn Sie sich
unsicher ü ber die in Ihrem Zuhause verwendete Stromversorgung sind,
kontaktieren Sie bitte Ihren H ä ndler oder Ihren lokalen Stromversorger .
• Die Steckdose sollte sich in der N ä he des Ger ä tes befinden und leicht
zug ä nglich sein.
• Steckdosen und Verl ä ngerungsleitungen nicht ü berlasten. Eine
Ü berlastung kann zu Brandgefahr bzw. Stromschl ä gen f ü hren.
• Halten Sie Nagetiere vom Ger ä t fern. Nagetiere knabbern gern an
Netzkabeln.
• Halten Sie das Kabel immer an dem Stecker, wenn Sie es von der
Stromversorgung trennen. Ziehen Sie nicht an dem Netzkabel. Dies kann
einen Kurzschluss verursachen.
• Vermeiden Sie es, das Ger ä t auf Oberfl ä chen aufzustellen, die zu
Schwingungen oder Sto ß neigen.
• Um das Ger ä t bei Gewitter zu sch ü tzen, den Netzadapter vom
Stromnetz trennen.
• Sollte das Ger ä t f ü r l ä ngere Zeit nicht verwendet werden, sollte die
Stromversorgung aus Sicherheitsgr ü nden unterbrochen werden.
• Zum Reinigen des Ger ä tes ein weiches, trockenes Tuch verwenden.
Benutzen Sie niemals L ö sungsmittel oder Fl ü ssigkeiten auf Ö lbasis. Um
hartn ä ckige Flecken zu entfernen, kann ein feuchtes Tuch und
verd ü nntes Sp ü lmittel verwendet werden.
• Der Lieferant haftet nicht f ü r Sch ä den, die durch Fehlfunktionen,
Missbrauch, Ä nderungen am Ger ä t oder das Ersetzen von Batterien
verursacht werden.
94
Page 95

• Das Ger ä t darf weder Tropf- noch Spritzwasser ausgesetzt werden und
es d ü rfen keine mit Fl ü ssigkeit gef ü llten Beh ä
Ger ä t oder in der N ä he des Ger ä tes gestellt werden.
• Um das Ger ä t vollst ä ndig vom Netz zu trennen, muss der Netzstecker
des Ger ä tes vom Stromnetz getrennt werden, wobei die zu trennende
Einheit den Netzstecker des Ger ä tes bezeichnet.
• Der Netzstecker darf nicht blockiert werden und muss w ä hrend des
bestimmungsgem äß en Gebrauchs immer leicht erreichbar sein.
• Die Batterie darf keiner extremen Hitze wie z.B. Sonnenschein, Feuer o. ä .
ausgesetzt werden.
• Die Ventilation darf nicht durch Abdecken der Ventilations ö ffnungen
durch Gegenst ä nde wie Zeitungen, Tischdecken, Gardinen o. ä .
behindert werden.
• Stellen Sie kein offenes Feuer, wie z.B. angez ü ndete Kerzen, auf das
Ger ä t.
• Bei der Batterieentsorgung sind die Entsorgungsvorschriften
einzuhalten.
• Das Ger ä t kann nur bei moderaten Temperaturen verwendet werden.
Eine Nutzung in extrem kalten oder hei ß en Umgebungen sollte
vermieden werden.
• Das Typenschild befindet sich an der Unterseite des Ger ä ts.
• Dieses Ger ä t ist nicht zur Benutzung durch Personen (auch Kinder) mit
physischen, sensorischen oder mentalen Beeintr ä chtigungen oder ohne
ausreichender Erfahrung vorgesehen, es sei denn, sie werden durch eine
verantwortliche Person beaufsichtigt oder wurden in die
ordnungsgem äß e Bedienung des Ger ä tes durch eine f ü r ihre Sicherheit
verantwortlichen Person eingewiesen.
• Dieses Produkt ist nur f ü r den Hausgebrauch und nicht f ü r gewerbliche
oder industrielle Zwecke bestimmt.
• Stellen Sie sicher, dass das Ger ä t in einer stabilen Position aufgestellt ist.
Sch ä den, die durch Verwendung dieses Produkts in einer instabilen
Position oder durch Nichtbeachtung der anderen in diesem Handbuch
enthaltener Warnungen und Vorwarnung entstehen, werden nicht
durch die Garantie abgedeckt.
• Entfernen Sie niemals das Geh ä use dieses Ger ä ts.
• Stellen Sie dieses Ger ä t niemals auf andere elektrische Ger ä te.
• Verwenden oder bewahren Sie dieses Produkt nicht an Orten auf, in
denen es direkter Sonneneinstrahlung, Hitze, ü berm äß igem Staub oder
Vibration ausgesetzt ist.
• Reinigen Sie dieses Produkt nicht mit Wasser oder anderen
Fl ü ssigkeiten.
• Blockieren Sie nicht die Schlitze und Ö ffnungen in diesem Produkt.
lter,
wie z.B. Vasen, auf das
95
Page 96

• Schieben Sie keine Fremdk ö rper in die Schlitze und Ö ffnungen in diesem
Produkt.
• Erm ö glichen Sie Kinder nicht den Zugriff auf Plastikt ü ten.
• Vergewissern Sie sich, dass die Spannungsangaben auf dem Typenschild
des Ger ä ts mit der Spannungsversorgung in Ihrem Haushalt
ü bereinstimmen (Das Typenschild befindet sich an der R ü ckseite des
Ger ä ts).
• Verhindern Sie, dass das Netzkabel eingequetscht oder darauf getreten
wird, insbesondere an den Steckern, Steckdosen und der Stelle, an der
das Kabel aus dem Ger ä t austritt.
• Benutzen Sie nur vom Hersteller empfohlene
Erweiterungen/Zubeh ö rteile.
• Sprechen Sie alle Eingriffe mit qualifiziertem Fachpersonal ab. Eingriffe
werden notwendig, wenn das Ger ä t in irgendeiner Weise besch ä digt
wurde, beispielsweise am Netzkabel oder am Netzstecker oder wenn
Fl ü ssigkeit in das Ger ä t gelangt ist bzw. Gegenst ä nde in das Ger ä t
gefallen sind, das Ger ä t Regen oder Feuchtigkeit ausgesetzt
heruntergefallen ist oder nicht ordnungsgem äß funktioniert.
• Verwenden Sie weder ein besch ä digtes Netzkabel noch einen
besch ä digten Stecker oder eine lockere Steckdose. Es besteht Brandund Stromschlaggefahr.
• Achtung: L ä ngeres H ö ren lauterTö ne aus einem Musikger ä t kann zum
zeitweiligen oder permanenten H ö rverlust f ü hren.
•
•
•
• Um das Risiko eines Stromschlages zu minimieren, sollten Sie die
Schrauben nicht entfernen. Das Ger ä t enth ä lt keine vom Benutzer zu
wartenden T eile. Bitte ü berlassen Sie alle Wartungsarbeiten
qualifiziertem Personal.
•
•
•
• Von der Verwendung eines Kopfh ö rers, der an das Ger ä t mittels der 3,5
mm Audio-Ausgangsbuchse angeschlossen ist, wird abgeraten. Denken
Sie bei der Verwendung von Kopfh ö rern daran, dass ein ü berm äß iger
Schalldruck oder hohe Lautst ä rken zu einer Sch ä digung des
H ö rverm ö gens f ü hren k ö nnen. Passen Sie die
Lautst ä rke auf ein angenehmes, nicht zu lautes
Niveau an. Wenn Sie die Lautst ä rke der Kopfh ö rer
zu laut einstellen und Kopfh ö rer ü ber einen
l ä ngeren Zeitraum verwenden, kann dies Ihr
H ö rverm ö gen sch ä digen.
• Der Netzstecker dient der Trennung des Ger ä tes vom Stromnetz und
sollte jederzeit m ü helos erreichbar sein.
• Die Batterie darf keiner extremen Hitze wie z.B. Sonnenschein, Feuer o. ä .
ausgesetzt werden.
war,
es
96
Page 97

2.
Ger
ä
2.
2.
2. Ger
Vorderansicht
1
R ü ckseitenansicht
teabbildung
Ger
ä
teabbildung
Ger ä
ä teabbildung
teabbildung und
und
Tastenbeschreibungen
und
Tastenbeschreibungen
und Tastenbeschreibungen
Tastenbeschreibungen
2
3
7
4
5
6
97
Page 98

Nr.
1 2,4"-TFT-Bildschirm Anzeige
Beschreibung Funktionen
2 Tasten und Kn ö pfe
- Bereitschaft
- Modus
- Start
- Speicher
-
-
- Lautst ä rke+ / OK
3 Infrarotsensor Empfang der
4 DC IN 9V 1A Anschluss f ü r den Netzadapter
5 Aux-Eingang 3,5-mm-Audioanschluss
6 Line-Ausgang 3,5-mm-Audioausgang
Bedientafel
- Ein/Aus
- Umschalten zwischen
Audiosignalen
- zum Hauptmen ü gehen
- Sender speichern
- Navigation links
- Navigation rechts
- Einstellen der Lautst ä rke;
Navigation oben/unten;
Auswahl best ä tigen
Fernbedienungssignale
7 Antenne UKW-Empfang
98
Page 99

Fernbedienung
99
Page 100

Standby button Bereitschaftstaste
Up cursor button Navigation oben
Left cursor button Navigation links
Down cursor button Navigation unten
MODE MODUS
Go to main menu items Zum Hauptmen ü
Alarm Alarm
Alarm button Alarmtaste
Sleep Einschlaffunktion
Sleep button Einschlaftaste
Media Center: Media-Center:
Go back one track voriger Titel
Media Center: Media-Center:
Play / pause Wiedergabe / Pause
EQ Equalizer
Set tone
Switch speaker on/off Lautsprecher ein-/ausschalten
OK OK
Confirm selection Auswahl best ä tigen
Increase volume Lautst ä rke erh ö hen
Right cursor button Navigation rechts
Decrease volume Lautst ä rke verringern
Preset Speicher
Saved stations, favorites, etc. Gespeicherte Sender , Favoriten usw.
Main menu button Hauptmen ü taste
Info Info
Call up info Infos abrufen
Media Center: Media-Center:
Go forward one track n ä chster Titel
0.....9 0 ..... 9
Call up favorites / memory; input
letters and numbers
Ton
einstellen
Abrufen Ihrer Favoriten /
gespeicherten Sender; Eingabe von
Buchstaben und Zahlen
100
 Loading...