

Page 1
Model TT-33
User manual Retro Suit Case Turntable
Gebruiksaanwijzing Platenspeler in Retro Behuizing
Benutzerhandbuch Koffer-Plattenspieler im Retro-Stil
Mode d’emploi Tourne-Disque Valise Rétro
Manual del usuario Maleta Retro Para Tocadisco
Page 2

Index
English ..................................................................................................................................................... 3
Nederlands ............................................................................................................................................ 12
Deutsch ................................................................................................................................................. 21
Français ................................................................................................................................................. 31
Español .................................................................................................................................................. 41
Version: 1.0
Page 3

English
1. Safety instructions
• When using electrical equipment basic safety precautions should always be followed.
• This equipment is not intended to be used by persons (including children) with reduced
physical, sensory or mental capabilities or lack of experience or knowledge. They should be
given appropriate supervision and instructions to use the equipment by a person responsible
for their safety.
• Ensure the equipment is not too close to heat emitting appliances or placed in direct sunlight.
• Check that the voltage indicated on the data plate corresponds with that of the local network
before connecting the equipment to the mains power supply.
• Do not leave the equipment unattended while connected to the power supply.
• Do not immerse the equipment in water or any other liquids. It is imperative to unplug the
power cord after the equipment has been used, before it is cleaned and while being repaired.
• Close supervision is required when using this equipment near children.
• Never leave the equipment within the reach of children.
• Repairs to electrical appliances should only be performed by qualified personnel. Improper
repairs may place the user and/or equipment at serious risk.
• This equipment’s intended for household use only and should not be used for industrial or
commercial purposes.
• Do not operate this appliance with a damaged plug or cord, after a mal- function or after being
dropped or damaged in any way.
• Do not use this equipment for anything other than its intended use. This equipment must be
placed on a stable, heat resistant surface.
• Do not push objects into any openings as damage to the equipment and/or electric shock may
occur.
• Do not use this product in wet or bad weather conditions. This product is not a toy.
• Do not play music at excessive levels especially near children.
• The normal function of the product may be disturbed by Strong Electro Magnetic Interference.
If so, simply reset the product to resume normal operation by following the instruction manual.
• Refer all service to qualified service personnel. Servicing is required when the apparatus has
been damaged in any way, such as power supply cord or plug is damaged, liquid has been
spilled or objects have fallen into the apparatus, or when the apparatus has been exposed to
rain or moisture.
• Please keep the unit in a well-ventilated environment.
• These servicing instructions are for use by qualified service personnel only. To reduce the risk of
electric shock, do not perform any servicing other than that contained in the operating
instructions unless you are qualified to do so.
• The main plug is used as disconnect device, the disconnect device shall remain readily operable.
• This equipment is a class II or double insulated electrical appliance. It is designed in such a way
that it does not require a safety connection to electrical earth.
• The lighting with the triangle symbols shows that the unit contains non- insulated dangerous
voltage.
• The batteries in remote shall not be exposed to excessive heat such as sunshine and fire.
3
Page 4
• The apparatus shall not be exposed to liquid, and objects filled with liquids, such as vases, shall
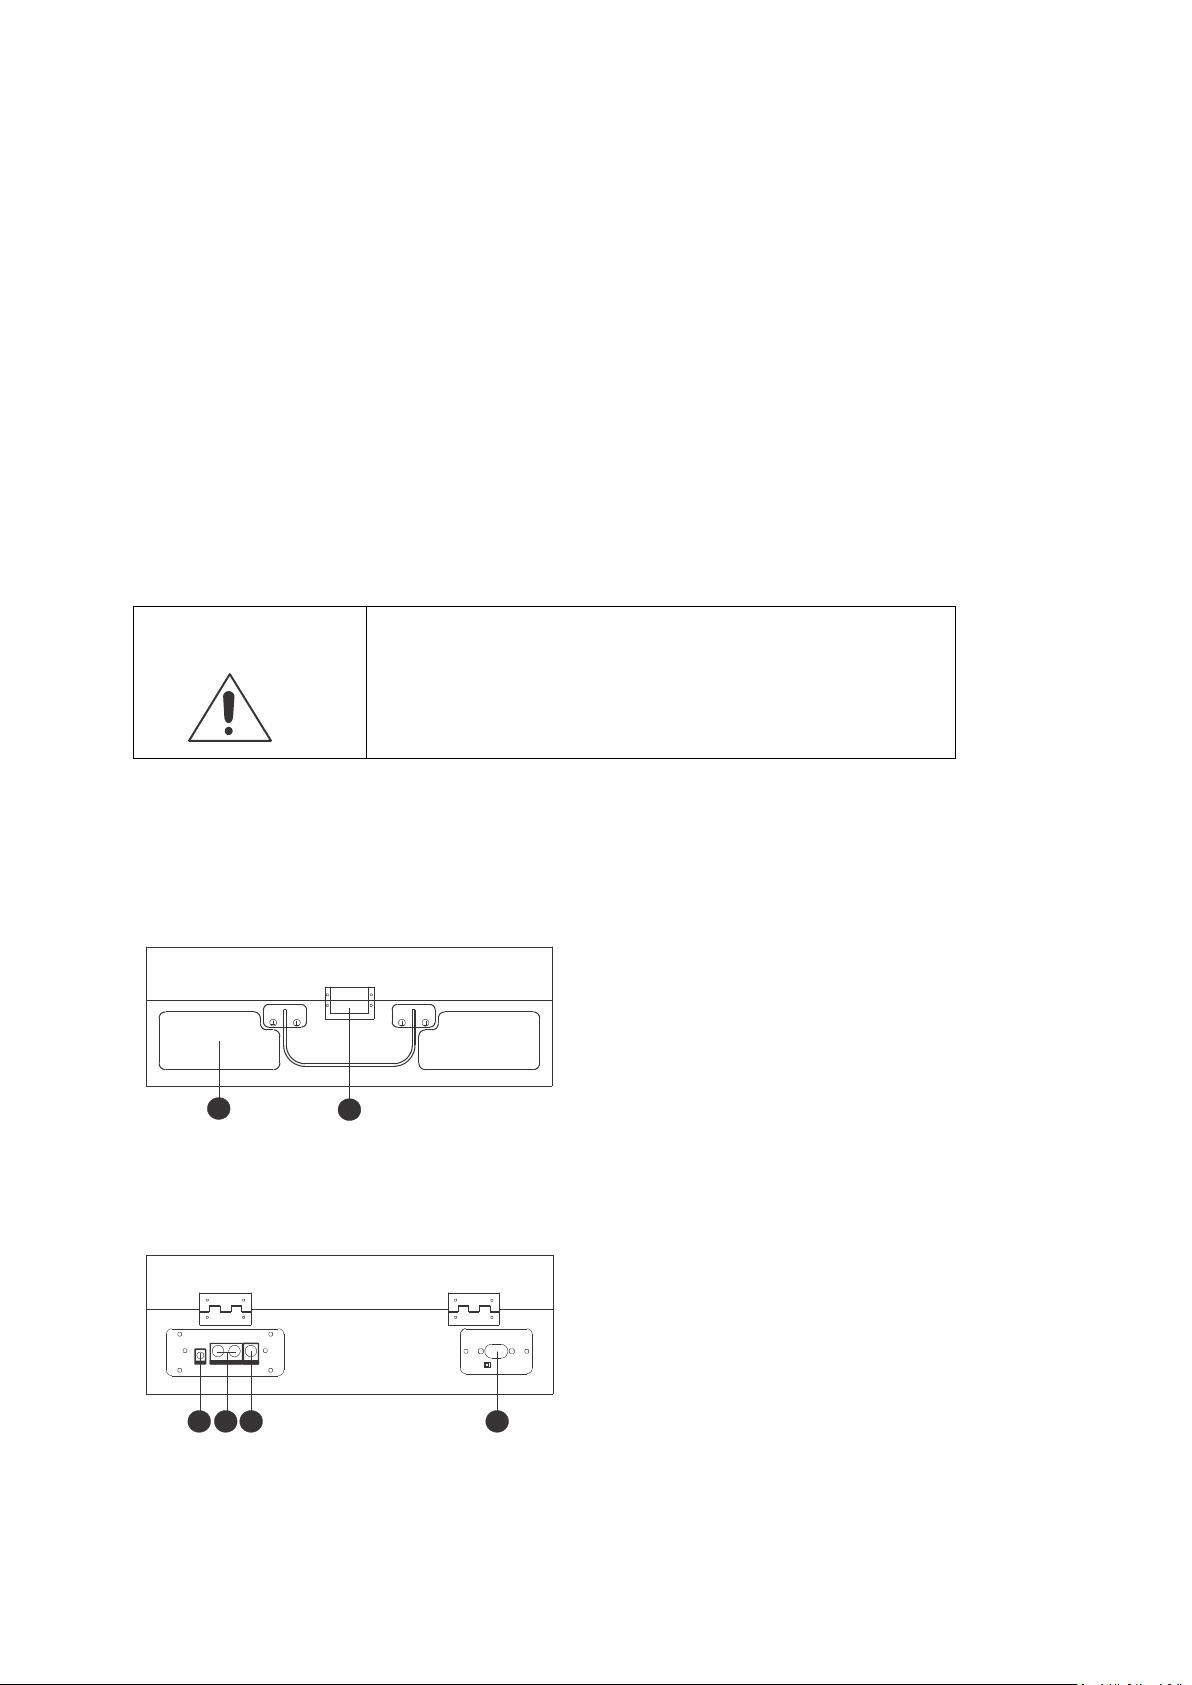
WARNING:
• Never remove the casing of this apparatus.
• Never place this apparatus on other electrical equipment.
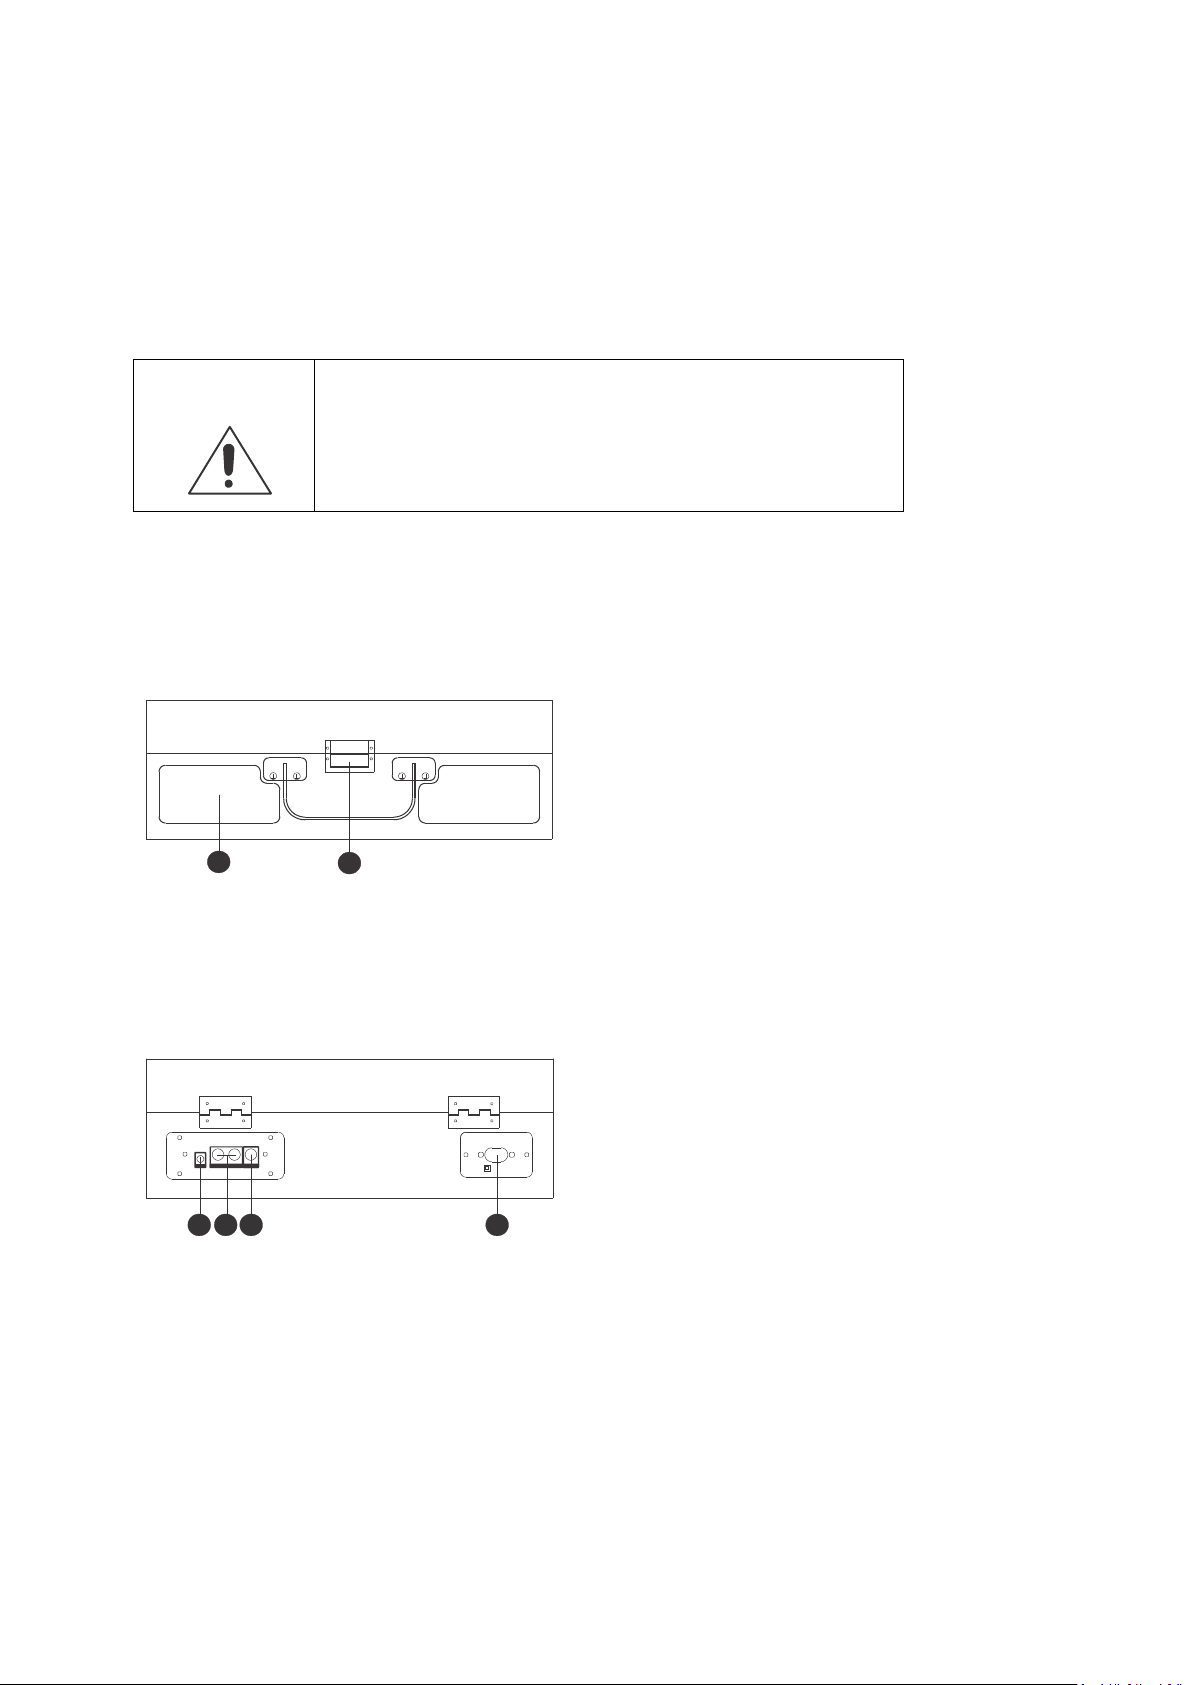
1. SPEAKER
2. LOCK
3. AUX INPUT 3.5MM
JACK
4. LEFT/RIGHT LINE
OUT JACK
5. SUBWOOFER LINE
OUTPUT JACK
6. POWER SUPPLY
1
2
3 4 5
6
230V ~50Hz
not be placed on the apparatus.
We strongly recommend retaining the packaging for future transport of the product.
2. Outlook and controls
Front
Back
4
Page 5
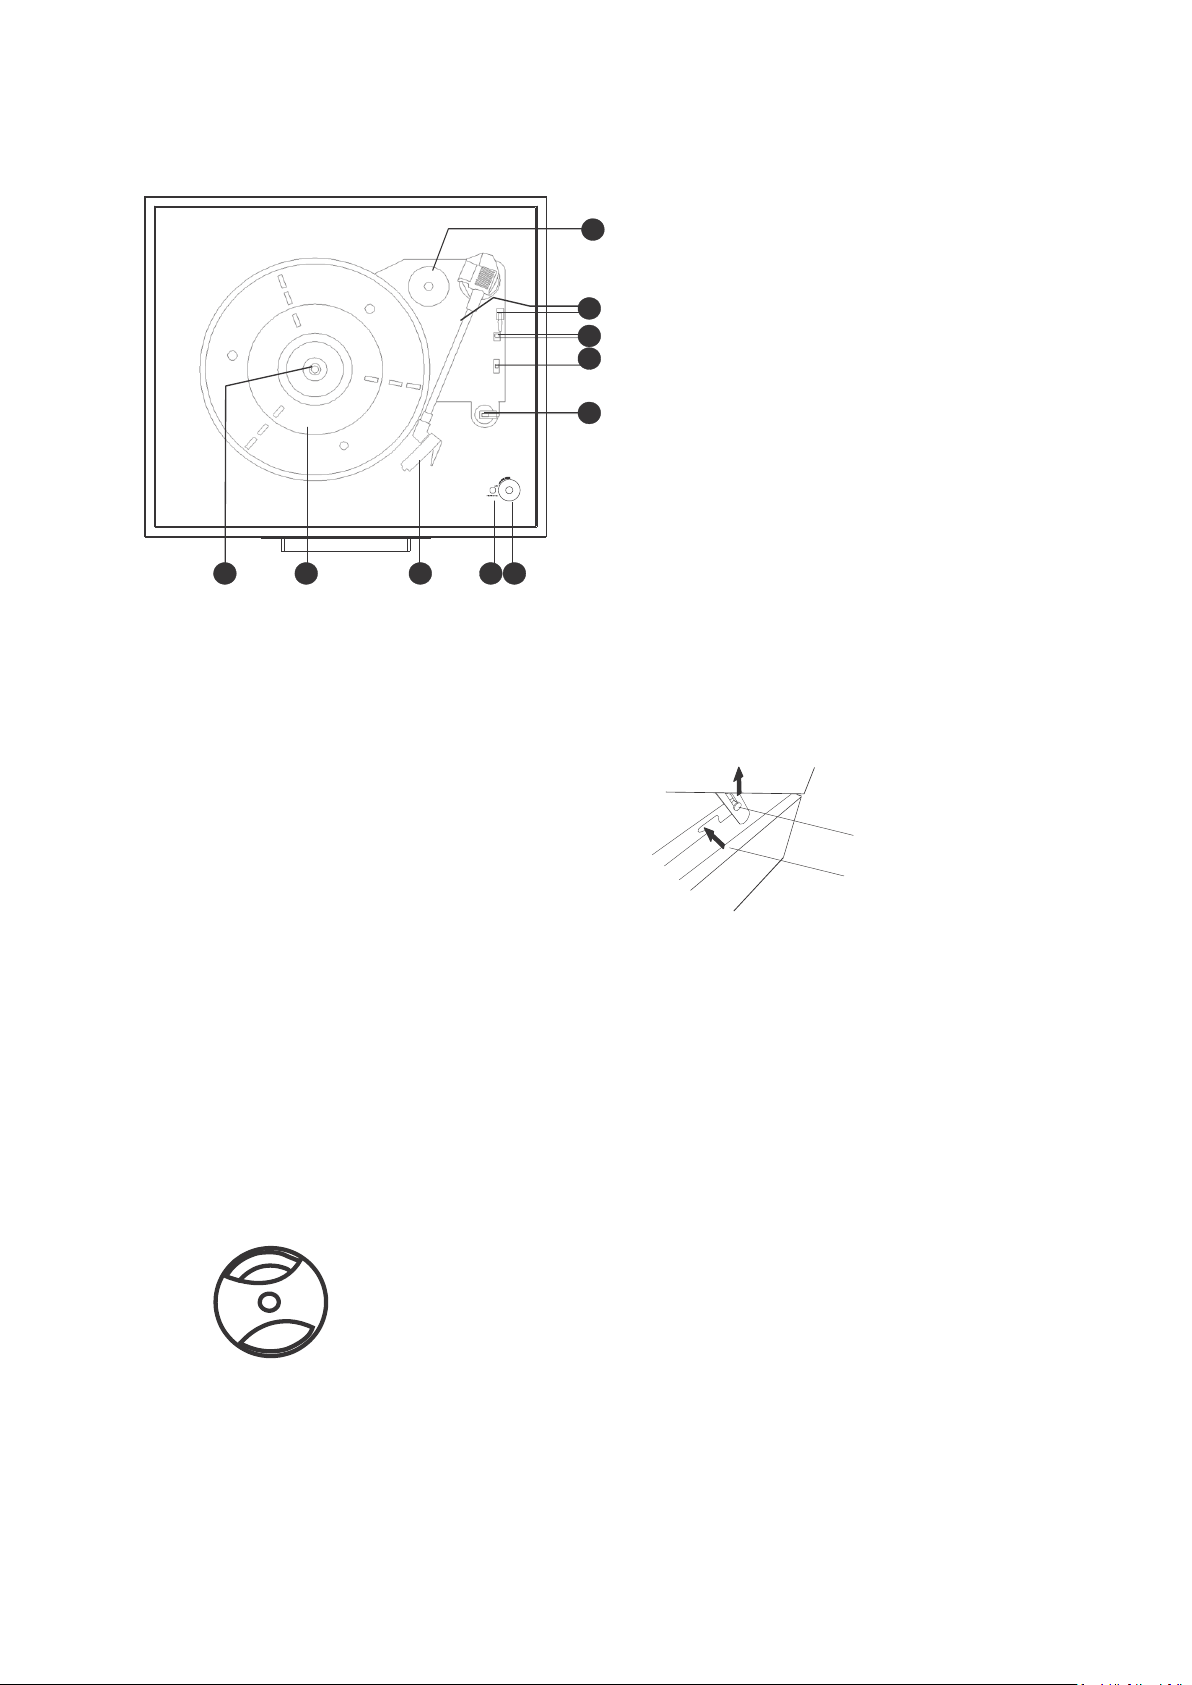
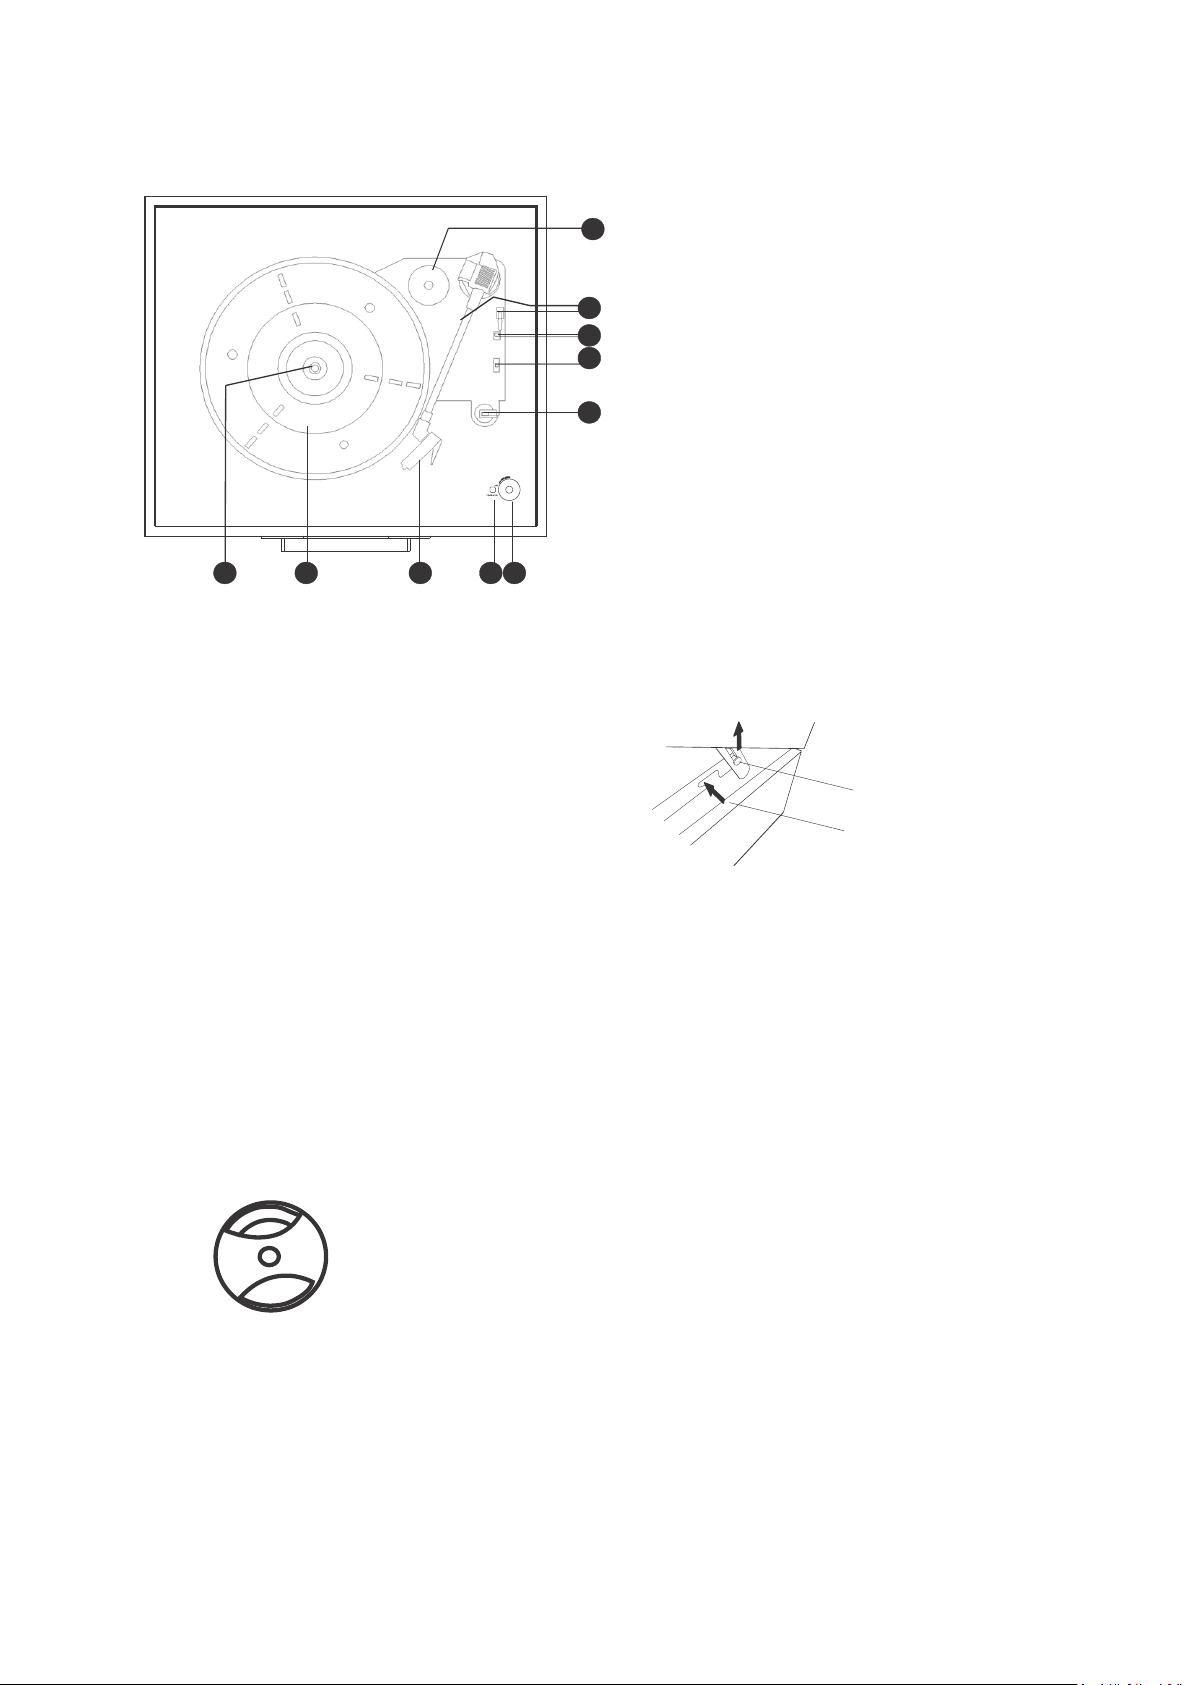
Inside
7. ADAPTOR FOR 45 RPM RECORDS
8. TONE ARM, ARM LIFT
9. AUTO STOP
ON/OFF SWITCH
10. R.P.M 33⅓, 45, 78 SELECTION
11. ARM LOCK/REST
12. SPINDLE
13. TURNTABLE
14. CARTRIDGE
15. POWER INDICATOR
16. POWER/VOLUME
Metal support
1. Tap up the cover until the Metal spike touches
the end of the metal arm.
2. Move the metal spike to the gap of the other
metal arm.
1
2
7
8
9
10
11
16
15
14
13
12
ACCESSORY
Adaptor for 45 rpm record
To play the 45 rpm record, place the ADAPTOR on the SPINDLE.
1. Place the 45 rpm adaptor over the spindle.
2. Gently place your 45 rpm record onto the turntable.
3. Follow the step of OPERATION to play your record.
5
Page 6
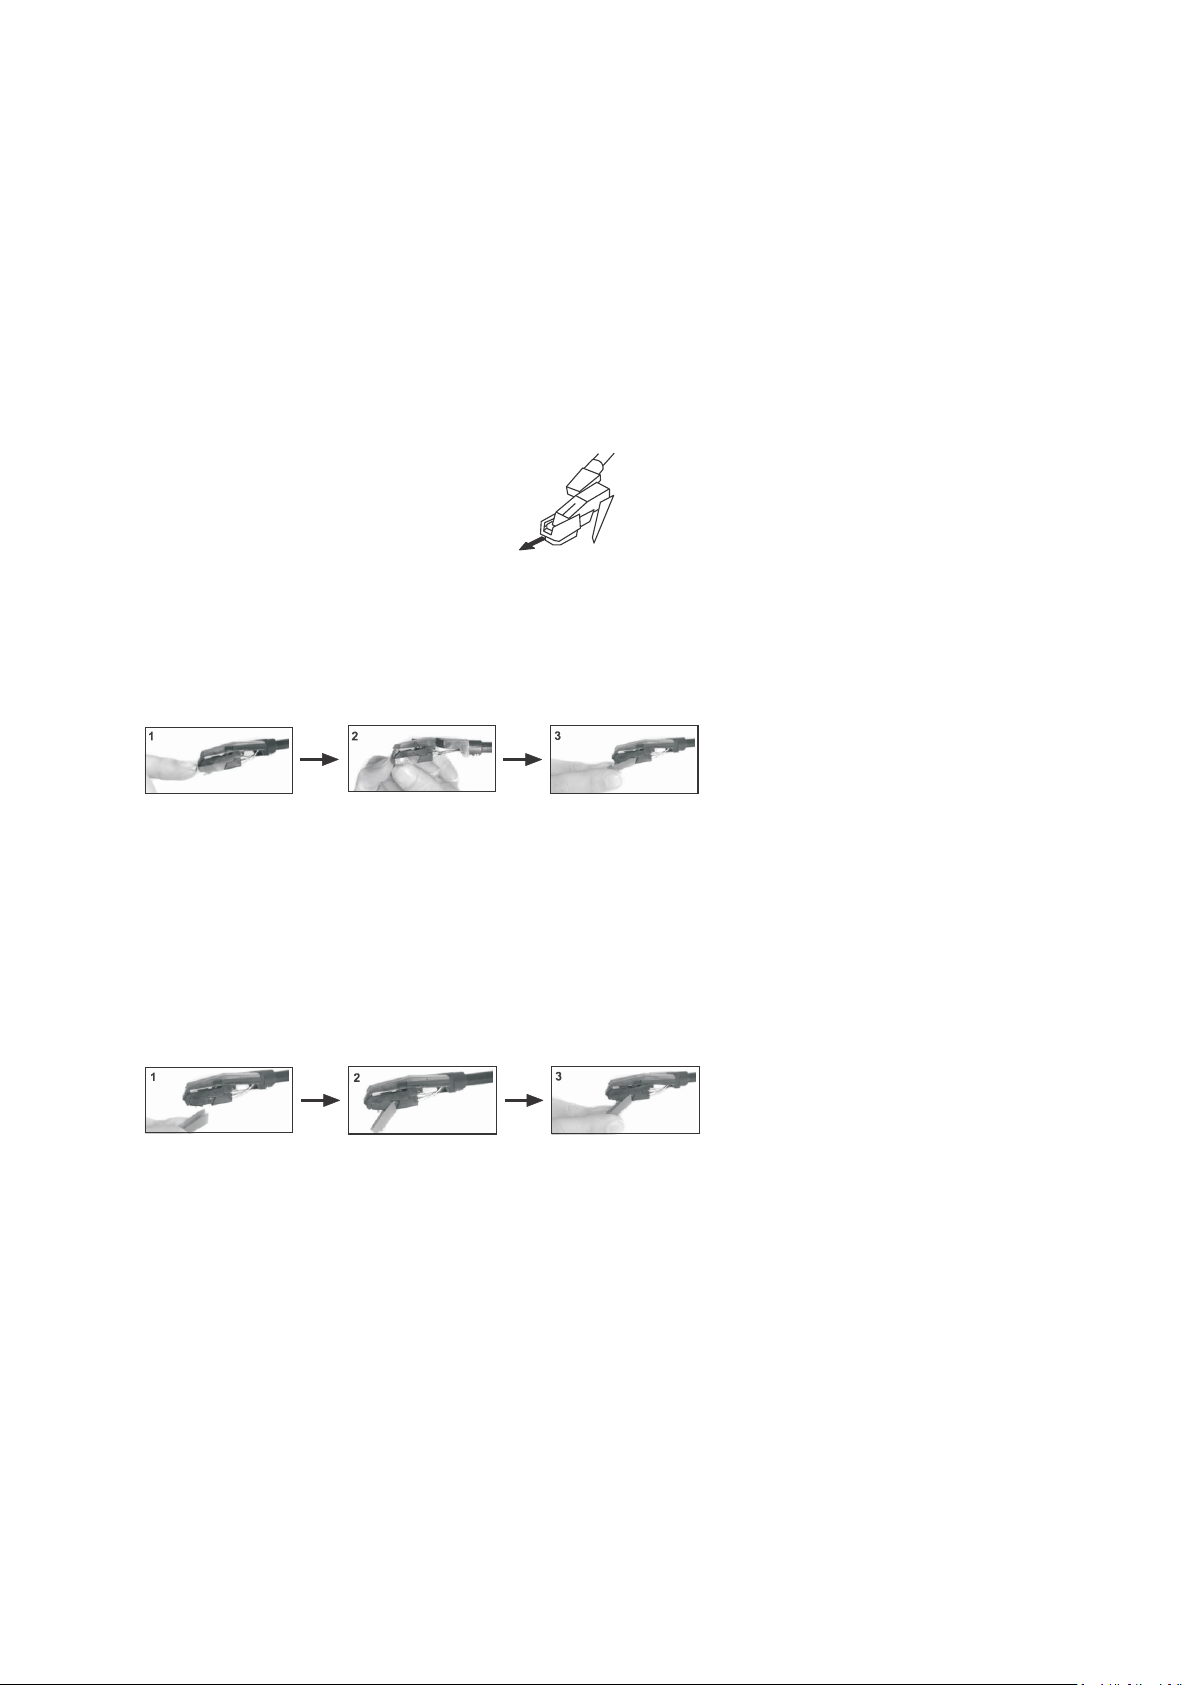
3. Cartridge installation
UNPACKING
1. Remove all packing materials from the unit. (Save all packing materials.)
2. Carefully remove the unit from its Styrofoam and take it out of the plastic bag.
3. Although records can be played with the lid closed as well as opened, it is recommended that
the lid is opened.
4. Remove the white protective needle cover by gently pulling towards the front of the unit.
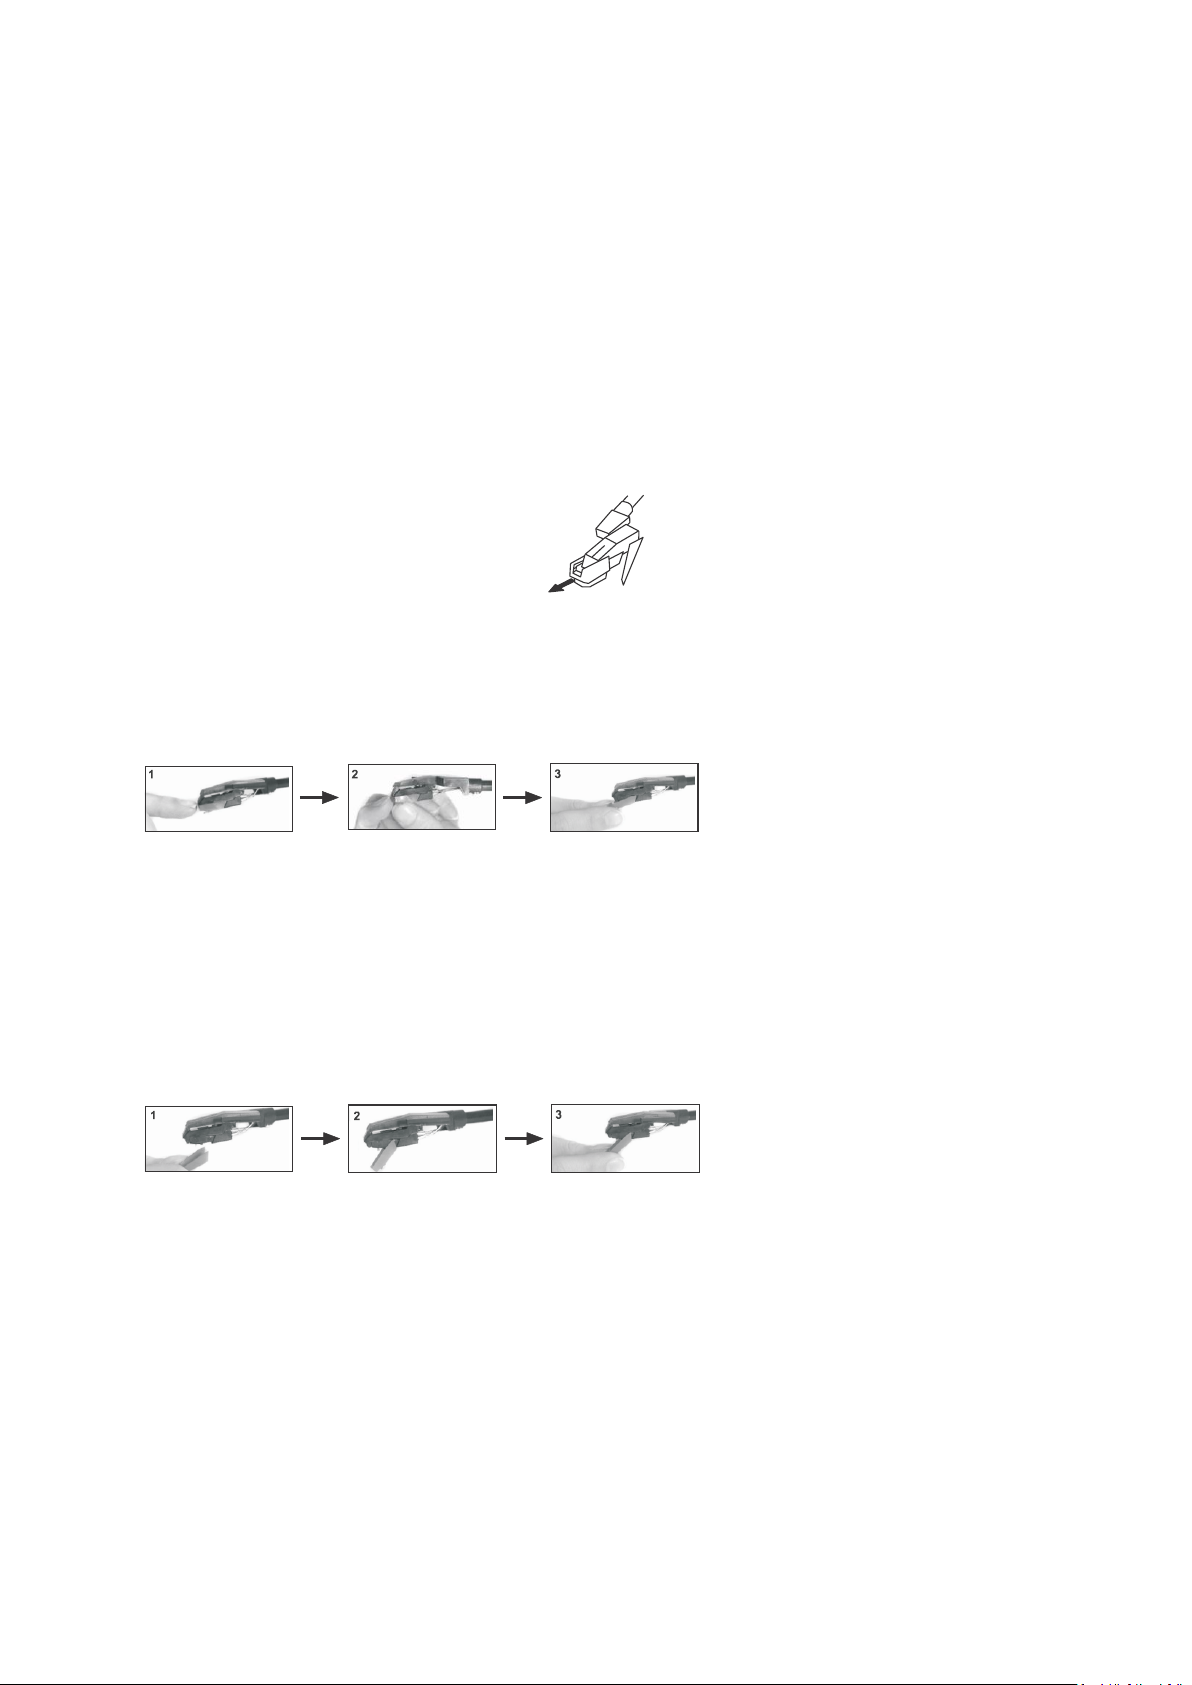
REMOVING THE NEEDLE
1. Gently pull down the tip of the cartridge.
2. Pull the cartridge forward.
3. Pull out and remove.
INSTALLING THE CARTRIDGE
Position the red cartridge with the sapphire stylus facing down.
1. Line up the tab on the back of the needle with the tone arm.
2. Insert the cartridge with its front end at a downward angle.
3. Lift the front end of the needle upward until it snaps into place.
ADDITIONAL INFORMATION
1. The red cartridge has a very small sapphire stylus that is barely visible.
Notice that the replacement needle you are receiving should be the same as the one already on
the tone arm.
2. This Needle is safe for 33 ⅓, 45 & 78 speed records.
3. Replacing the needle depends on how often you use the turn table.
6
Page 7
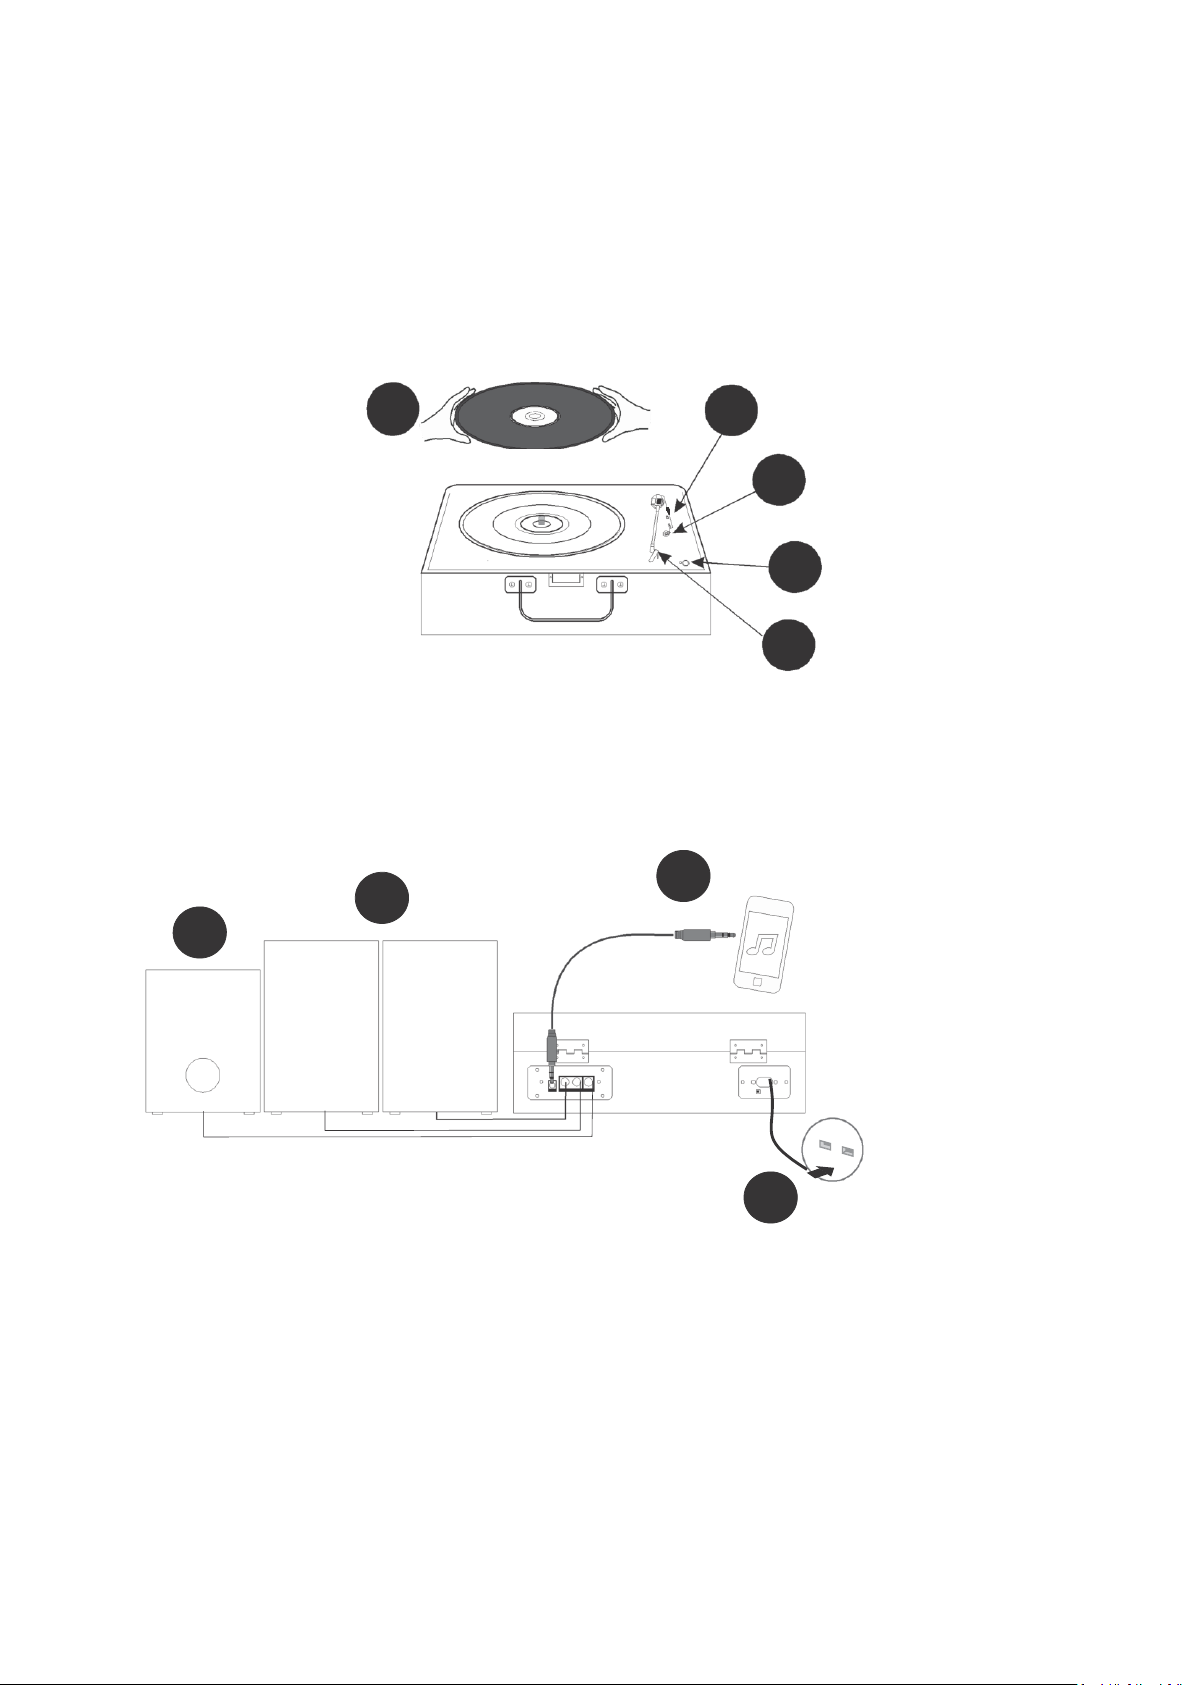
System connection
5
4
2
6
Music device
Active
Active
Active
230V ~50Hz
Follow the operation steps on the next page to start using the unit.
3
7
Page 8

4. Operation
Use the POWER CABLE to connect the unit with the power outlet.
POWER ON
Turn the unit on by rotating the POWER/VOL located on the front panel to power on the unit.
VOLUME CONTROL
Rotate the POWER/VOL on the front panel of the unit to adjust the volume to a comfortable level.
STEPS OF PLAYING RECORDS
Release the TONE ARM from the ARM LOCK/REST.
SELECT SPEED: Set the R.P.M 33⅓, 45, 78 SELECTION to the desired speed of the records.
AUTO STOP
Choose whether the records stop automatically when finished playing by the AUTO STOP ON/OFF
SWITCH. If the AUTO STOP ON/OFF SWITCH turns on, the record will stop turning when it comes to
its end.
Gently place the record on the TURNTABLE.
Gently lift the TONE ARM and move it to the desired starting point on the records.
LINE OUT CONNECTION
- Connect the Auxiliary cable (not supplied) to the LINE OUT JACK on the rear of the record
player and the other end of the cable to the auxiliary inputs of the external component, e.g.
another Hi-Fi unit, Amplifier, etc.
- Check the volume level of your external component and adjust it if necessary.
- Refer to the instruction manual of the external component for its correct operation.
SUBWOOFER OUTPUT JACK
The subwoofer output jack enables you to attach an active subwoofer (not supplied) which will
enhance bass response. Please contact your retailer for suitable subwoofer models.
AUX IN CONNECTION & OPERATION
Any component with an Audio Output, such as for instance a DAB Radio module, CD/Cassette Player,
MP3 Player can be connected by using a cable with a 3.5mm dia. jack plug (a 3.5mm AUX IN cord is
supplied).
- Turn the unit on and adjust the volume.
8
Page 9

- Plug the supplied AUX IN cord into the AUX IN JACK on the rear of the unit.
- Insert the plug at the other end of the Auxiliary cable into the output jack or 3.5mm dia.
headphone jack of the external audio player.
- Switch the other Audio Player on, play the music and adjust its volume if required.
Note: Inserting the Aux plug will disable the record play function.
5. Trouble shooting
THERE IS NO POWER
* The POWER CORD is not connected to either a power outlet or the unit.
- Check the plugs and whether they are not damaged.
* The unit is not turned on.
- Rotate the POWER/VOL switch from the OFF position.
THE UNIT KEEPS SHUTTING ITSELF DOWN
* This unit has a POWER SAVING FUNCTION, to comply with ERP Stage II regulations. If the unit is
not operated or there is no signal output for 15 minutes, it will automatically turn itself off.
* Turn the POWER/VOL switch off for approximately 5 seconds and then switch it ON again to re-
activate the unit.
THE TURNTABLE IS NOT ROTATING
* The turn table drive belt may have come off the turn table mechanism and needs to be refitted.
Please contact professionals for advice on how to re-fit it.
* The AUX IN cable is plugged in. Disconnect it.
MY 45RPM RECORDS DO NOT FIT ON THE TURNTABLE SPINDLE
* Ensure you have placed the 45rpm spindle adaptor on the turn table before installing the
record.
MY RECORD DOES NOT PLAY AT THE CORRECT SPEED
* Switch the speed control switch to the correct one for 33⅓, 45 or 78 rpm records.
MY 33⅓ RECORD WOBBLES WHEN PLACED ON THE TURN TABLE PLATTER
* Make sure you have folded down the ARM LOCK before placing the record on it, or that the
45rpm SPINDLE ADAPTOR has not been left on the turntable platter.
9
Page 10

THE TONE ARM SLIDES ACROSS THE RECORD AND DOES NOT PLAY IT
Power source
AC 230V/50Hz
Speakers
4Ohm X 2
3-Speed Turn table
33⅓, 45, 78 rpm
Line-Out
RCA connection
Aux In
3.5mm dia.
Subwoofer Output Jack
RCA jack for Active Subwoofer
Stylus
Universal type fitted (for 33⅓, 45 & 78 rpm records*)
Accessories supplied
45rpm Spindle Adaptor
3.5mm Aux in connection
* The white protective cover is still covering the needle cartridge. Remove it.
* The stylus tip may be damaged. Replace the stylus. (See specifications for details)
NO SOUND IS HEARD WHEN THE RECORD IS PLAYING
* Adjust the VOLUME CONTROL knob to turn the sound up.
* Check if the Aux connection is removed.
6. Specifications
* DESIGN AND SPECIFICATIONS ARE SUBJECT TO CHANGE WITHOUT NOTICE.
7. Guarantee
Lenco offers service and warranty in accordance with the European law, which means that in case of
repairs (both during and after the warranty period) you should contact your local dealer.
Important note: It is not possible to send products that need repairs to Lenco directly.
Important note: If this unit is opened or accessed by a non-official service center in any way, the
warranty expires.
This device is not suitable for professional use. In case of professional use, all warranty obligations of
the manufacturer will be voided.
10
Page 11
8. Disclaimer
Updates to Firmware and/or hardware components are made regularly. Therefore some of the
instruction, specifications and pictures in this documentation may differ slightly from your particular
situation. All items described in this guide for illustration purposes only and may not apply to
particular situation. No legal right or entitlements may be obtained from the description made in
this manual.
9. Disposal of the Old Device
This symbol indicates that the relevant electrical product or battery should not be
disposed of as general household waste in Europe. To ensure the correct waste
treatment of the product and battery, please dispose them in accordance to any
applicable local laws of requirement for disposal of electrical equipment or
batteries. In so doing, you will help to conserve natural resources and improve
standards of environmental protection in treatment and disposal of electrical
waste (Waste Electrical and Electronic Equipment Directive).
10. CE Marking
Products with the CE marking comply with the EMC Directive (2004/108/EC) and
the Low Voltage Directive (2006/95/EC) issued by the Commission of the European
Community.
Hereby, Lenco Benelux BV, Thermiekstraat 1a, 6361 HB Nuth, The Netherlands, declares that this
product is in compliance with the essential requirements and other relevant provisions of Directive
1999/5/EC.
The declaration of conformity may be consulted at techdoc@lenco.com
11. Service
For more information and helpdesk support, please visit www.lenco.com
Lenco Benelux BV, Thermiekstraat 1a, 6361 HB, The Netherlands.
11
Page 12

Nederlands
1. Veiligheidsinstructies
• Bij het gebruik van elektrische apparatuur moeten de algemene voorzorgsmaatregelen voor de
veiligheid altijd worden opgevolgd.
• Deze apparatuur is niet bestemd voor gebruik door personen (waaronder kinderen) met
gereduceerde fysieke, zintuiglijke of mentale capaciteiten of met een tekort aan kennis of
ervaring. Zij moeten onder toezicht staan en aanwijzingen krijgen van een persoon die
verantwoordelijk is voor hun veiligheid.
• Zorg ervoor dat u de apparatuur uit de buurt houdt van apparaten die hitte uitstralen en plaats
hem niet in direct zonlicht.
• Controleer, voordat u de stekker in het stopcontact steekt, of de op het typeplaatje aangegeven
spanning overeenkomt met die van het lokale lichtnet.
• Laat het apparaat niet onbeheerd achter, terwijl het is aangesloten op de stroomvoorziening.
• Dompel het apparaat niet onder in water of enige andere vloeistof. Het is noodzakelijk om de
stekker uit het stopcontact te halen, nadat de apparatuur is gebruikt, voordat het wordt
schoongemaakt en terwijl het wordt gerepareerd.
• Wanneer de apparatuur in de buurt van kinderen wordt gebruikt, moet er direct toezicht zijn.
• Laat de apparatuur nooit binnen het bereik van kinderen.
• Reparaties aan elektrische apparatuur mogen uitsluitend door gekwalificeerd personeel worden
uitgevoerd. Onjuist uitgevoerde reparaties kunnen de gebruiker en/of de apparatuur
blootstellen aan ernstige risico's.
• Deze apparatuur is uitsluitend bestemd voor huishoudelijk gebruik en mag niet voor industriële
of commerciële doeleinden worden gebruikt.
• Gebruik dit apparaat niet met een beschadigde stekker of kapot snoer, niet na een storing of
nadat het is gevallen of op andere wijze is beschadigd.
• Gebruik deze apparatuur niet anders dan waarvoor hij is bestemd. Dit apparaat moet op een
stabiele, hittebestendige ondergrond worden geplaatst.
• Duw geen voorwerpen in de openingen, omdat dit schade aan de apparatuur en/of elektrische
schokken kan veroorzaken.
• Gebruik dit product niet in natte of slechte weersomstandigheden. Dit product is geen
speelgoed.
• Speel geen muziek op overmatige geluidsniveaus af, in het bijzonder in de buurt van kinderen.
• De normale functie van het product kan worden verstoord door sterke elektromagnetische
interferentie. Als dat gebeurt, volg dan de instructies van de handleiding om het product te
resetten, zodat de normale werking wordt hervat.
• Laat alle reparaties over aan gekwalificeerd onderhoudspersoneel. Onderhoud is vereist
wanneer het apparaat is beschadigd, bijvoorbeeld als het netsnoer of de stekker is beschadigd,
er vloeistof of een voorwerp in het apparaat is terechtgekomen of wanneer het apparaat werd
blootgesteld aan regen of vocht.
• Plaats het apparaat a.u.b. in een goed geventileerde ruimte.
• Deze service-instructies zijn uitsluitend bestemd voor gekwalificeerd onderhoudspersoneel. Om
het risico van elektrische schokken te voorkomen, mag u geen ander onderhoud plegen dan in
12
Page 13
de handleiding staat vermeld, tenzij u hiervoor gekwalificeerd bent.
WAARSCHUWING:
• Verwijder nooit de behuizing van dit apparaat.
• Plaats dit apparaat nooit op andere elektrische
apparatuur.
1. LUIDSPREKER
2. VERGRENDELING
3. AUX-INGANG 3,5MM
4. LLINKS/RECHTS
LIJNUITGANG
5. SUBWOOFER LIJN
UITGANG
6. STROOMVOORZIENING
1
2
3 4 5
6
230V ~ 50Hz
• De stekker wordt gebruikt als schakelaar en moet gemakkelijk bereikbaar blijven.
• Dit apparaat is een klasse II of dubbel geïsoleerd elektrisch apparaat. Het apparaat is zodanig
ontworpen dat deze geen veiligheidaansluiting vereist op elektrische aarding.
• Het bliksemschichtsymbool betekent dat het apparaat gevaarlijke, ongeïsoleerde spanning
bevat.
• Stel de batterijen van de afstandsbediening niet bloot aan overmatige warmte, zoals zonlicht en
vuur.
• Het apparaat mag niet worden blootgesteld aan vloeistoffen en met vloeistof gevulde
voorwerpen, zoals vazen, mogen niet op het apparaat worden geplaatst.
Wij raden u sterk aan de verpakking te bewaren voor toekomstig transport van het product.
2. Uiterlijk en bediening
Voorkant
Achterkant
13
Page 14
Binnenzijde
7. ADAPTER VOOR 45 TPM
PLATEN
8. TOONARM, TOONARMLIFT
9. AUTO-STOP
AAN/UITSCHAKELAAR
10. T.P.M 33⅓, 45, 78 SELECTIE
11. ARMVERGRENDELING/
STEUN
12. AS
13. DRAAITAFEL
14. PATROON
15. INDICATIELAMPJE AAN/UIT
16. AAN/UIT/VOLUME
Metalen steun
1. Til de cover op totdat de metalen pin het
uiteinde van de metalen arm aanraakt.
2. Beweeg de metalen pin naar de opening van de
andere metalen arm.
1
2
7
8
9
10
11
16
15
14
13
12
ACCESSOIRE
Adapter voor 45 tpm platen
Om een 45 tpm langspeelplaat af te spelen, dient u de ADAPTER op de AS te plaatsen.
1. Plaats de 45 tpm adapter over de as.
2. Plaats uw 45 tpm langspeelplaat voorzichtig op het draaiplateau.
3. Volg de stappen beschreven over BEDIENING om uw plaat af te spelen.
14
Page 15
3. Patroon installeren
UITPAKKEN
1. Verwijder alle verpakkingsmaterialen van het apparaat. (Bewaar alle
verpakkingsmaterialen.)
2. Haal het apparaat voorzichtig uit de Styrofoam en vervolgens uit de plastic zak.
3. Al kunnen platen worden afgespeeld met het deksel beide gesloten en geopend, wij
raden u aan het deksel geopend te houden.
4. Verwijder de witte beschermkap van de naald door deze voorzichtig richting de
voorzijde van het apparaat te trekken.
DE NAALD VERWIJDEREN
1. Trek de tip van het patroon voorzichtig omlaag.
2. Trek het patroon naar voren.
3. Trek het patroon er uit en verwijder.
HET PATROON INSTALLEREN
Plaats het rode patroon met de saffieren naald omlaag gericht.
1. Stem het palletje op de achterzijde van de naald af op de toonarm.
2. Steek het patroon in met zijn voorzijde omlaag gericht.
3. Til de voorzijde van de naald omhoog totdat deze op zijn plek klikt.
AANVULLENDE INFORMATIE
1. Het rode patroon heeft een uiterst kleine saffieren naald die vrijwel niet te zien is.
Vergeet niet dat de vervangingsnaald die u ontvangt hetzelfde dient te zijn als die al
geïnstalleerd op de toonarm.
2. Deze naald is veilig voor 33 ⅓, 45 & 78 tpm platen.
3. De naald dient te worden vervangen op basis van hoe vaak u de platenspeler gebruikt.
15
Page 16

3
2
Muziekapparaat
Actief
Actief
Actief
230V ~ 50Hz
Systeemaansluiting
Volg de stappen op de volgende pagina voordat u het apparaat in gebruik neemt.
16
Page 17

4. Operatie
Gebruik de VOEDINGSKABEL om het apparaat aan te sluiten op het stopcontact.
INSCHAKELEN
Schakel het apparaat in door POWER/VOL op het voorpaneel te draaien.
VOLUMEREGELING
Draai POWER/VOL op het voorpaneel van het apparaat om het volume in te stellen op een
comfortabel luisterniveau.
STAPPEN VOOR HET AFSPELEN VAN PLATEN
Ontgrendel de TOONARM van de ARMVERGRENDELING/STEUN.
SNELHEID SELECTEREN: Stel de T.P.M 33⅓, 45, 78 SELECTIE in op de juiste snelheid voor uw plaat.
AUTO-STOP
Kies of de plaat automatisch moet stoppen wanneer het einde ervan is bereikt via de AUTO-STOP
AAN/UITSCHAKELAAR. Als u de AUTO-STOP AAN/UITSCHAKELAAR inschakelt, zal de plaat stoppen
met draaien wanneer het einde ervan is bereikt.
Plaats de plaat voorzichtig op het DRAAIPLATEAU.
Til de TOONARM voorzichtig op en beweeg deze naar het gewenste startpunt op de plaat.
LIJNUITGANG
- Sluit de AUX-kabel (niet inbegrepen) aan op de LIJNUITGANG op de achterzijde van de
platenspeler en het andere uiteinde van de kabel op de AUX-ingangen van het externe
apparaat, bijvoorbeeld een andere Hi-Fi eenheid, versterker, enz.
- Controleer het volumeniveau van uw externe apparaat en pas aan indien noodzakelijk.
- Lees de gebruikshandleiding van het externe apparaat voor de juiste bediening ervan.
SUBWOOFERUITGANG
U kunt op de subwooferuitgang een actieve subwoofer aansluiten (niet inbegrepen) om de lage
tonen te versterken. Neem a.u.b. contact op met uw dealer voor geschikte subwoofermodellen.
AUX-IN AANSLUITING & BEDIENING
Elk willekeurig apparaat met een audio-uitgang, zoals een DAB-radiomodule, CD-/cassettespeler of
MP3-speler kan via een kabel worden aangesloten op een ingang met een 3,5mm diameter (een
3,5mm AUX-kabel is meegeleverd).
17
Page 18

- Schakel het apparaat in en pas het volume aan.
- Steek de meegeleverde AUX-kabel in de AUX-INGANG op de achterzijde van het apparaat.
- Steek de stekker aan het andere uiteinde van de AUX-kabel in de uitgang of 3,5mm
hoofdtelefoonuitgang van de externe audiobron.
- Schakel de andere audiospeler in, speel de muziek af en pas het volume naar wens aan.
Opmerking: Zodra de AUX-kabel wordt aangesloten, wordt de afspeelfunctie voor langspeelplaten
gedeactiveerd.
5. Probleemoplossing
GEEN VOEDING
* De VOEDINGSKABEL is niet aangesloten op het stopcontact of op het apparaat.
- Controleer de stekkers op beschadigingen.
* Het apparaat is niet ingeschakeld.
- Draai de schakelaar POWER/VOL uit de stand OFF.
HET APPARAAT BLIJFT ZICHZELF UITSCHAKELEN
* Dit apparaat is voorzien van een ENERGIEBESPARINGFUNCTIE in overeenstemming met ERP
Fase II richtlijnen. Als het apparaat voor 15 minuten niet wordt gebruikt of er is voor 15
minuten geen signaaluitvoer, schakelt het apparaat zichzelf automatisch uit.
* Draai de schakelaar POWER/VOL voor ongeveer 5 seconden uit en weer aan om het apparaat
opnieuw te activeren.
HET DRAAIPLATEAU DRAAIT NIET
* De aandrijfriem van het draaiplateau is mogelijk los geraakt van het draaimechanisme en moet
opnieuw worden bevestigd. Neem a.u.b. contact op met professionelen voor advies over hoe u
de riem opnieuw kunt bevestigen.
* De AUX-kabel is aangesloten, koppel deze los.
MIJN 45TPM PLATEN PASSEN NIET OP DE AS VAN HET DRAAIPLATEAU
* Zorg ervoor de 45tpm adapter op de as van het draaiplateau te installeren voordat u de
langspeelplaat plaatst.
MIJN PLAAT SPEELT NIET AF OP DE JUISTE SNELHEID
* Schakel de snelheidsregeling op de juiste snelheid voor 33⅓, 45 of 78 tpm platen.
18
Page 19

MIJN 33⅓ PLATEN WIEBELEN WANNEER GEPLAATST OP HET DRAAIPLATEAU
Voedingsbron
AC 230V/50Hz
Luidsprekers
4Ohm X 2
Platenspeler met 3 snelheden
33⅓, 45, 78 tpm
Lijn-uit
RCA-aansluiting
Aux In
3,5mm dia.
Subwooferuitgang
RCA-aansluiting voor actieve subwoofer
Naald
Universeel type bevestigd
(voor 33⅓, 45 & 78 tpm platen*)
Accessoires inbegrepen
45tpm adapter
3,5mm AUX-ingang
* Zorg ervoor de ARMVERGRENDELING omlaag te klappen voordat u de plaat plaatst of dat de
45tpm ADAPTER niet op het draaiplateau achter is gelaten.
DE TOONARM SCHUIFT OVER DE PLAAT EN SPEELT NIETS AF
* De witte beschermkap dekt nog steeds het naaldpatroon af. Verwijder deze bescherming.
* De naaldtip is mogelijk beschadigd. Vervang de naald. (Zie specificaties voor details)
ER KLINKT GEEN GELUID WANNEER DE PLAAT WORDT AFGESPEELD
* Draai de VOLUMEREGELING om het geluid te verhogen.
* Controleer of de AUX-aansluiting is losgekoppeld.
6. Specificaties
* ONTWERP EN SPECIFICATIES KUNNEN ZONDER VOORAFGAANDE KENNISGEVING WORDEN
GEWIJZIGD.
7. Garantie
Lenco biedt service en garantie aan overeenkomstig met de Europese wetgeving. Dit houdt in dat u,
in het geval van reparaties (zowel tijdens als na de garantieperiode), uw lokale handelaar moet
contacteren.
19
Page 20

Belangrijke opmerking: Het is niet mogelijk om producten die gerepareerd moeten worden direct
naar Lenco te sturen.
Belangrijke opmerking: De garantie verloopt als een onofficieel servicecenter het apparaat op wat
voor manier dan ook heeft geopend, of er toegang toe heeft gekregen.
Het apparaat is niet geschikt voor professioneel gebruik. In het geval van professioneel gebruik
worden alle garantieverplichtingen van de fabrikant nietig verklaard.
8. Disclaimer
Er worden regelmatig updates in de firmware en/of hardwarecomponenten gemaakt. Daardoor
kunnen gedeelten van de instructies, de specificaties en afbeeldingen in deze documentatie
enigszins verschillen van uw eigen situatie. Alle onderwerpen die staan beschreven in deze
handleiding zijn bedoeld als illustratie en zijn niet van toepassing op specifieke situaties. Aan de
beschrijving in dit document kunnen geen rechten worden ontleend.
9. Afvoer van het oude apparaat
Dit symbool geeft aan dat het betreffende elektrische product of de batterij niet
moet worden verwijderd als algemeen huishoudelijk afval in Europa. Zorg voor een
juiste afvalverwerking door het product en de batterij in overeenstemming met
alle van toepassing zijnde lokale wetten voor het verwijderen van elektrische
apparatuur of batterijen te verwijderen. Als u dit doet, helpt u de natuurlijke
hulpbronnen te behouden en de standaard van milieubescherming te verbeteren
bij de behandeling en verwijdering van elektrisch afval (Afgedankte Elektrische en
Elektronische Apparatuur).
10. CE-markering
Producten met een CE keurmerk houden zich aan de EMC richtlijn (2004/108/EC)
en de Richtlijn voor Lage Voltage (2006/95/EC) uitgegeven door de Europese
Commissie.
Hierbij verklaart Lenco Benelux BV, Thermiekstraat 1a, 6361 HB Nuth, Nederland, dat dit product
voldoet aan de essentiële eisen en andere relevante bepalingen van Richtlijn 1999/5/EU.
De conformiteitsverklaring kan worden geraadpleegd op techdoc@lenco.com
11. Service
Bezoek voor meer informatie en helpdeskondersteuning www.lenco.com
Lenco Benelux BV, Thermiekstraat 1a, 6361 HB, Nederland.
20
Page 21

Deutsch
1. Sicherheitsanweisungen
• Befolgen Sie immer die grundlegenden Sicherheitsanweisungen für die Benutzung elektrischer
Geräte.
• Dieses Gerät ist nicht für die Benutzung durch Personen (Kinder inbegriffen) mit verminderter
körperlicher, sensorischer oder geistiger Leistungsfähigkeit oder unzureichender Erfahrung und
Kenntnis bestimmt. Diese sind ordnungsgemäß zu beaufsichtigen und über die sichere
Benutzung des Gerätes durch eine für ihre Sicherheit verantwortliche Person zu unterweisen.
• Stellen Sie sicher, dass das Gerät nicht zu nah an wärmeabgebenden Vorrichtungen bzw. im
direkten Sonnenlicht platziert wird.
• Überprüfen Sie, dass die auf dem Typenschild angegebene Spannung mit der
Heimnetzspannung übereinstimmt, bevor Sie das Gerät an das Stromnetz anschließen.
• Lassen Sie niemals die Anlage unbeaufsichtigt, solange diese am Stromnetz angeschlossen ist.
• Tauchen Sie das Gerät nicht in Wasser oder andere Flüssigkeiten. Trennen Sie das Gerät vom
Netz, nachdem Sie es benutzt haben, bevor Sie es reinigen oder während der Reparatur.
• Die Nutzung des Gerätes in der Nähe von Kindern erfordert eine strenge Beaufsichtigung derer.
• Lassen Sie das Gerät außerhalb der Reichweite von Kindern.
• Reparaturen an elektrischen Geräten dürfen nur durch qualifiziertes Fachpersonal durchgeführt
werden. Unsachgemäße Reparaturen können den Benutzer und/oder das Gerät Gefahren
aussetzen.
• Dieses Gerät ist nur für den häuslichen Gebrauch bestimmt und nicht für den industriellen oder
geschäftlichen Gebrauch jeglicher Art.
• Betreiben Sie niemals die Anlage, wenn der Stecker oder das Kabel beschädigt ist, nach einer
Fehlfunktion, nachdem es umgestürzt ist oder in irgendeiner anderen Art beschädigt wurde.
• Benutzen Sie das Gerät in keiner anderen als für das Gerät vorgesehenen Weise. Diese Anlage
ist auf einer stabilen, hitzebeständigen Oberfläche aufzustellen.
• Das Stecken von Gegenständen in die Öffnungen kann eine Beschädigung des Gerätes und/oder
einen elektrischen Schock zur Folge haben.
• Benutzen Sie dieses Produkt nicht im Regen oder bei schlechtem Wetter. Dieses Produkt ist kein
Spielzeug.
• Geben Sie die Musik nicht in übermäßiger Lautstärke wieder, vor allem nicht in der Nähe von
Kindern.
• Das ordnungsgemäße Funktionieren dieses Produktes kann durch starke elektromagnetische
Interferenzen gestört werden. Sollte dies geschehen sein, stellen Sie die normale Arbeitsweise
des Gerätes durch Befolgen der Schritte in der Bedienungsanleitung wieder her.
• Sprechen Sie alle Eingriffe mit qualifiziertem Fachpersonal ab. Eine Wartung wird notwendig,
wenn das Gerät in irgendeiner Weise beschädigt wurde, wie z.B. das Stromkabel oder der
Netzstecker, Flüssigkeiten oder Objekte in das Gerät gelangt sind oder das Gerät Regen oder
Feuchtigkeit ausgesetzt wurde.
• Betreiben Sie das Gerät in einer gut belüfteten Umgebung.
• Diese Wartungsanweisungen dürfen nur durch qualifiziertes Fachpersonal ausgeführt werden.
Um das Risiko eines elektrischen Schockes zu verringern, führen Sie keine anderen als die in der
Bedienungsanleitung enthaltenen Wartungsarbeiten aus, es sei denn, sie wissen was Sie tun.
• Der Netzstecker dient der Trennung des Gerätes vom Stromnetz und sollte jederzeit mühelos
21
Page 22

erreichbar sein.
ACHTUNG:
• Entfernen Sie niemals das Gehäuse dieses Geräts.
• Stellen Sie dieses Gerät niemals auf andere elektrische
Geräte.
1. LAUTSPRECHER
2. VERRIEGELUNG
3. AUX-
EINGANGSBUCHSE
3,5 MM
4. LINKE/RECHTE
AUSGANGSBUCHSE
5. SUBWOOFER LINE
AUSGANGSBUCHSE
6. STROMVERSORGUNG
1
2
3 4 5
6
230 V ~ 50 Hz
• Diese Anlage ist ein Klasse II/doppelt isoliertes Gerät. Es ist so konzipiert, dass keine
sicherheitstechnische Erdung des Gerätes nötig ist.
• Der Blitz in dem dreieckigen Symbol weist darauf hin, dass diese Einheit unter unisolierter
lebensgefährlicher Spannung steht.
• Halten Sie die Batterien der Fernbedienung von starker Hitze wie Sonnenschein oder Feuer fern.
• Setzen Sie das Gerät keinen Flüssigkeiten aus und stellen Sie keine mit Flüssigkeit gefüllten
Gefäße wie Vasen auf das Gerät.
Wir empfehlen dringend, die Verpackung für den Fall eines zukünftigen Transportes des
Produktes aufzubewahren.
2. Übersicht und Bedienelemente
Vorderseite
Rückseite
22
Page 23

Innen
7. ADAPTER FÜR 45 U/MIN
SCHALLPLATTEN
8. TONARM; ARMHEBER
9. AUTOM. ABSCHALTUNG
EIN-/AUSSCHALTER
10. U/MIN AUSWAHL 33⅓, 45, 78
11. TONARMVERRIEGELUNG/ABLAGE
12. SPINDEL
13. PLATTENSPIELER
14. TONABNEHMER
15. POWER-LED
16. POWER/LAUTSTÄRKE
Metallhalterung
1. Tippen Sie auf die Abdeckung, bis die
Metallspitze das Ende des Metallarms berührt.
2. Bewegen Sie die Metallspitze zu der Spalte auf
dem anderen Metallarm.
1
2
7
8
9
10
11
16
15
14
13
12
ZUBEHÖR
Adapter für 45 U/Min.-Schallplatten
Zur Wiedergabe von 45 U/Min. Schallplatten den ADAPTER auf die SPINDEL setzen.
1. Setzen Sie den 45 U/Min. Adapter auf die Spindel.
2. Legen Sie vorsichtig eine 45 U/Min. Schallplatte auf den Plattenteller.
3. Folgen Sie den Schritten unter BETRIEB zur Wiedergabe einer Schallplatte.
23
Page 24

3. Einbau des Tonabnehmers
AUSPACKEN
1. Entfernen Sie sämtliches Verpackungsmaterial aus dem Gerät.
(Bewahren Sie alle Verpackungsmaterialien auf.)
2. Entnehmen Sie das Gerät vorsichtig aus der Styroporverpackung und aus dem Kunststoffbeutel.
3. Obwohl Schallplatten bei geschlossenem als auch offenem Deckel wiedergegeben werden
können, wird empfohlen, dass der Deckel geöffnet ist.
4. Die weiße Schutzabdeckung vorsichtig von der Nadel entfernen, indem diese zur Vorderseite des
Gerätes abgezogen wird.
ENTFERNEN DER NADEL
1. Ziehen Sie die Spitze des Tonabnehmers vorsichtig nach unten.
2. Ziehen Sie den Tonabnehmer nach vorn.
3. Herausziehen und entfernen.
EINBAU DES TONABNEHMERS
Positionieren Sie den roten Tonabnehmer mit der Saphir-Abtastnadel nach unten.
1. Richten Sie die Lasche auf der Rückseite der Nadel mit dem Tonarm aus.
2. Halten Sie den Tonabnehmer in einem leichten Winkel nach unten (die Vorderseite zeigt nach
unten) und setzen Sie ihn ein.
3. Heben Sie die Vorderseite der Nadel an, bis sie einrastet.
ZUSÄTZLICHE INFORMATIONEN
1. Der rote Tonabnehmer verfügt über eine sehr kleine Saphir-Abtastnadel, die kaum sichtbar ist.
Achten Sie bei einer Ersatznadel darauf, dass sie identisch mit der Nadel ist, die sich bereits im
Tonarm befindet.
2. Die Nadel ist für die Wiedergabe von 33 ⅓, 45, & 78 Schallplatten geeignet.
3. Wie häufig die Nadel ersetzt werden muss ist abhängig davon, wie häufig Sie den Plattenspieler
verwenden.
24
Page 25

Systemanschluss
3
2
7
Musikgerät
Aktiv
Aktiv
Aktiv
230 V ~ 50 Hz
Befolgen Sie die Bedienungsschritte auf der nächsten Seite, um mit dem Betrieb des Gerätes zu
beginnen.
3
25
Page 26

4. Betrieb
Verwenden Sie das STROMKABEL zum Anschließen des Geräts an einer Steckdose.
EINSCHALTEN: Schalten Sie das Gerät ein, indem Sie den Regler POWER/VOL drehen, der sich an der
Vorderseite befindet, um das Gerät einzuschalten.
LAUTSTÄRKEREGLER
Drehen Sie den Regler POWER/VOL ab der Vorderseite des Gerätes, um die Lautstärke anzupassen.
SCHRITTE FÜR DIE WIEDERGABE EINER SCHALLPLATTE
Nehmen Sie den TONARM von der TONARMVERRIEGLUNG/ABLAGE.
GESCHWINDIGKEIT AUSWÄHLEN: Stellen Sie die U/Min 33⅓, 45, 78 AUSWAHL auf die notwendige
entsprechende Geschwindigkeit für die Schallplatte.
AUTOM. ABSCHALTUNG
Wählen Sie aus, ob die Schallplatte automatisch durch den AUTOM. STOPP AN/AUS SCHALTER
stoppen soll, wenn die Wiedergabe der Schallplatte beendet ist. Wenn der AUTOM. STOPP AN/AUS
SCHALTER eingeschaltet wird, hört die Schallplatte auf sich zu drehen, wenn sie das Ende erreicht.
Legen Sie die Schallplatte vorsichtig auf den PLATTENTELLER.
Heben Sie vorsichtig den TONARM an und bewegen ihn zu der gewünschten Stelle auf der
Schallplatte, an der Sie die Wiedergabe beginnen möchten.
ANSCHLUSS DER AUSGANGSBUCHSE
- Verbinden Sie das Aux-Kabel (nicht mitgeliefert) mit der LINE-AUSGANGSBUCHSE auf der
Rückseite des Plattenspielers und das andere Ende des Kabels mit dem Aux-Eingang der
externen Komponente, z. B. einem anderen HiFi-Gerät, Verstärker, usw.
- Überprüfen Sie die Lautstärke des externen Gerätes und passen Sie diese ggf. an.
- Für den korrekten Betrieb schauen Sie bitte in die Bedienungsanleitung des externen Gerätes.
SUBWOOFER AUSGANGSBUCHSE
Die Subwoofer-Ausgangsbuchse ermöglicht Ihnen das Anschließen an einen aktiven Subwoofer
(nicht mitgeliefert), der die Basswiedergabe verstärken wird. Bitte kontaktieren Sie Ihren Händler
bezüglich geeigneter Subwoofer-Modelle.
AUX IN-ANSCHLUSS & BETRIEB
Jedes beliebige Gerät mit einem Audio-Ausgang, wie zum Beispiel ein DAB-Radiomodul,
CD/Kassettenspieler, MP3-Spieler, kann über ein 3,5 mm-Kabel mit einem Klinkenstecker
angeschlossen werden (ein 3,5 mm AUX IN-Kabel ist mitgeliefert).
26
Page 27

Schalten Sie das Gerät ein und passen Sie die Lautstärke an.
- Stecken Sie das mitgelieferte AUX IN-Kabel in die AUX-EINGANGSBUCHSE auf der Rückseite des
Gerätes.
- Stecken Sie das andere Ende des Aux-Kabels in die Ausgangsbuchse oder 3,5 mm
Kopfhörerbuchse eines externen Audio-Spielers.
- Schalten Sie das andere Audiogerät ein, geben Sie die Musik wieder und passen Sie die
Lautstärke ggf. an.
Hinweis: Das Einstecken des Aux-Steckers deaktiviert die Wiedergabefunktion für Schallplatten.
5. Fehlersuche
KEIN STROM
* Das STROMKABEL ist entweder nicht an einer Steckdose oder an dem Gerät angeschlossen.
- Überprüfen Sie die Stecker auf Beschädigungen.
* Das Gerät ist nicht eingeschaltet.
- Drehen Sie den POWER/VOL-Knopf aus der Stellung OFF.
DAS GERÄT SCHALTET SICH SELBER AUS
* Dieses Gerät verfügt über eine STROMSPARFUNKTION, um die ERP-Phase-II-Vorschriften
einzuhalten. Wenn das Gerät nicht benutzt wird oder wenn für länger als 15 Minuten keine
Signalausgabe stattfindet, schaltet sich das Gerät automatisch selber aus.
* Drehen Sie den POWER/VOL-Knopf für ca. 5 Sekunden auf OFF und dann wieder auf AN, um das
Gerät neu zu aktivieren.
DER PLATTENTELLER DREHT SICH NICHT
* Es kann möglich sein, dass der Antriebsriemen sich von dem Plattentellermechanismus gelöst
hat und neu angepasst werden muss. Bitte kontaktieren Sie einen Fachmann für Ratschläge,
wie er wieder angepasst werden kann.
* Das AUX-Eingangskabel ist eingesteckt. Trennen Sie es.
MEINE 45 U/MIN SCHALLPLATTEN PASSEN NICHT AUF DIE PLATTENSPIELERSPINDEL
* Stellen Sie sicher, dass sich der 45 U/Min-Spindeladapter auf dem Plattenspieler befindet, bevor
Sie eine 45 U/Min Schallplatte auflegen.
MEINE SCHALLPLATTE WIRD NICHT MIT DER RICHTIGEN GESCHWINDIGKEIT WIEDERGEGEBEN
* Stellen Sie den Geschwindigkeitsregler auf die richtige Umdrehungsgeschwindigkeit für 33⅓, 45
oder 78 U/Min-Schallplatten ein.
27
Page 28

Stromquelle
AC 230 V/50 Hz
Lautsprecher
4 Ohm X 2
Plattenspieler mit 3
Geschwindigkeiten
33⅓, 45, 78 U/Min.
Line-Ausgang
RCA-Verbindung
Aux In
3,5 mm Durchm.
Subwoofer Ausgangsbuchse
RCA-Buchse für AKtiv-Subwoofer
Abtastnadel
Mit Universaltyp ausgestattet (für 33⅓, 45 & 78 U/Min.Schallplatten*)
Mitgeliefertes Zubehör
45 U/Min-Spindeladapter
3,5 mm Aux-In-Anschluss
MEINE 33⅓ SCHALLPLATTE WACKELT, WENN SIE AUF DEM PLATTENTELLER LIEGT
* Stellen Sie sicher, dass Sie die ARMVERRIEGELUNG heruntergeklappt haben, bevor Sie die
Schallplatte darauf auflegen, oder dass der 45 U/Min.-SPINDELADAPTER vom Plattenteller
entfernt wurde.
DER TONARM RUTSCHT ÜBER DIE SCHALLPLATTE UND GIBT SIE NICHT WIEDER
* Die Nadel des Tonabnehmers ist immer noch mit der Abdeckung versehen. Entfernen Sie diese.
* Die Spitze des Abtasters kann beschädigt sein. Ersetzen Sie den Abtaster. (Für Details siehe
Technische Angaben)
KEIN TON BEI DER WIEDERGABE EINER SCHALLPLATTE
* Passen Sie den Regler für die LAUTSTÄRKESTEUERUNG an, um die Lautstärke zu erhöhen.
* Prüfen, ob die Aux-Verbindung entfernt ist.
6. Technische Daten
* DESIGN UND TECHNISCHE ANGABEN KÖNNEN SICH OHNE VORHERIGE ANKÜNDIGUNG
ÄNDERN.
28
Page 29

7. Garantie
Lenco bietet Leistungen und Garantien im Einklang mit Europäischem Recht. Im Falle von
Reparaturen (sowohl während als auch nach Ablauf der Garantiezeit) sollten Sie deshalb Ihren
Einzelhändler kontaktieren.
Wichtiger Hinweis: Es ist nicht möglich, Geräte für Reparaturen direkt an Lenco zu schicken.
Wichtiger Hinweis: Falls dieses Gerät von einem nicht autorisierten Kundendienst geöffnet oder
darauf zugegriffen wird, erlischt die Garantie.
Dieses Gerät ist nicht für professionelle Zwecke geeignet. Falls das Gerät für professionelle Zwecke
eingesetzt wird, erlöschen alle Garantieverpflichtungen seitens des Herstellers.
8. Haftungsausschluss
Aktualisierungen der Firmware und/oder Hardware-Komponenten werden regelmäßig durchgeführt.
Daher können einige der Anweisungen, Spezifikationen und Abbildungen in dieser Dokumentation
von Ihrer individuellen Situation abweichen. Alle in diesem Handbuch beschriebenen Elemente
dienen nur zur Illustration und treffen auf Ihre individuelle Situation möglicherweise nicht zu. Aus
der in diesem Handbuch getätigten Beschreibung können keine Rechtsansprüche oder Ansprüche
geltend gemacht werden.
9. Entsorgung des Altgeräts
Dieses Symbol zeigt an, dass das entsprechende Produkt oder dessen Batterie in
Europa nicht mit dem normalen Hausmüll entsorgt werden darf. Um die
ordnungsgemäße Abfallbehandlung des Produkts und dessen Batterie zu
gewährleisten, müssen diese im Einklang mit allen anwendbaren örtlichen
Vorschriften zur Entsorgung von Elektrogeräten und Batterien entsorgt werden.
Dabei helfen Sie, natürliche Ressourcen zu schonen und Umweltschutzstandards
zur Verwertung und Entsorgung von Altgeräten aufrecht zu halten (Waste
Electrical and Electronic Equipment Directive).
10. CE-Kennzeichen
Produkte mit der CE Kennzeichnung entsprechen der EMC-Richtlinie
(2004/108/EC) und der Niederspannungsrichtlinie (2006/95/EC), herausgegeben
von der Kommission der Europäischen Gemeinschaft.
Lenco Benelux BV, Thermiekstraat 1a, 6361 HB Nuth, Die Niederlande, erklärt hiermit, dass dieses
Produkt den grundlegenden Anforderungen und anderen Vorschriften der Richtlinie 1999/5/EC
entspricht.
Die Konformitätserklärung ist erhältlich unter techdoc@lenco.com
29
Page 30

11. Service
Weitere Informationen und Unterstützung erhalten Sie unter www.lenco.com
Lenco Benelux BV, Thermiekstraat 1a, 6361 HB, Die Niederlande.
30
Page 31

Français
1. Précautions d'emploi
• Lors de l’utilisation de cet appareil électrique, observez toujours les mesures de sécurité ci-
dessous.
• Les personnes (y compris les enfants) aux capacités physiques, sensorielles ou mentales
réduites, ou manquant d'expérience ou de connaissances, ne doivent pas utiliser cet appareil.
Ils doivent être surveillés et conseillés par une personne responsable de leur sécurité.
• Vérifiez que l'appareil est suffisamment éloigné des sources de chaleur et n'est pas exposé
directement à la lumière du soleil.
• Vérifiez que la tension figurant sur la plaque signalétique correspond à celle du secteur avant de
brancher l'appareil sur une prise électrique.
• Ne laissez pas l'appareil sans surveillance lorsqu’il est branché au secteur.
• Ne plongez pas l'appareil dans l’eau ni un autre liquide. Débranchez toujours le cordon
d'alimentation quand vous avez fini d'utiliser l'appareil et avant de le nettoyer ou de le réparer.
• Surveillez attentivement les enfants qui sont à proximité de l'appareil lorsqu’il est en
fonctionnement.
• Ne laissez jamais l'appareil à portée des enfants.
• Les réparations de cet appareil électrique doivent être effectuées uniquement par un technicien
compétent. Des réparations incorrectes peuvent exposer l'utilisateur et/ou l'appareil à de
graves dangers.
• Cet appareil est réservé à un usage familial et ne doit pas être utilisé à des fins industrielles ou
commerciales.
• Ne faites pas fonctionner cet appareil avec un cordon ou une fiche endommagés, après un
dysfonctionnement, après une chute ou s'il est endommagé de quelque façon que ce soit.
• Utilisez cet appareil uniquement pour son utilisation prévue. L’appareil doit être posé sur une
surface stable et résistante à la chaleur.
• N'introduisez pas d'objets dans les ouvertures, sous risque d'endommager l'appareil et/ou de
prendre une décharge électrique.
• N'utilisez pas cet appareil sous la pluie ou dans un environnement humide. Ce produit n'est pas
un jouet.
• Ne réglez pas la musique à un niveau excessif, en particulier à proximité d'enfants.
• Le fonctionnement normal de l'appareil peut être perturbé par de fortes interférences
électromagnétiques. Si cela est le cas, réinitialisez simplement l'appareil en suivant le mode
d'emploi afin qu'il reprenne son fonctionnement normal.
• Confiez l'entretien et les réparations à un personnel qualifié. L’appareil doit être réparé quand il
a été endommagé, notamment si le cordon ou la fiche d’alimentation sont endommagés, si un
liquide a été renversé ou si des objets sont tombés sur l’appareil ou si l’appareil a été exposé à
la pluie ou l’humidité.
• Conservez l’appareil dans un environnement bien ventilé.
• Ces consignes d’entretien sont uniquement destinées à un technicien qualifié. Afin de réduire le
risque d’électrocution, ne réalisez vous-même aucun travail d’entretien autre que ceux indiqués
dans les consignes d’utilisation, à moins que vous ne soyez qualifié pour cela.
• La fiche d'alimentation sert à éteindre l’appareil, elle doit être facilement accessible.
• Cet appareil appartient à la catégorie II ou appareil électrique à double isolement. Sa
31
Page 32

conception n'exige pas de prise terre/masse.
AVERTISSEMENT :
• Ne retirez jamais le boîtier de l'appareil.
• Ne placez jamais cet appareil sur un autre appareil
électrique.
1. HAUT-PARLEUR
2. VERROUILLAGE
3. PRISE DE 3,5 MM
D'ENTRÉE AUX
4. PRISE DE SORTIE DE
LIGNE GAUCHE/DROITE
5. PRISE DE SORTIE DE
LIGNE DU CAISSON DE
BASSES
6. ALIMENTATION
ÉLECTRIQUE
1
2
3 4 5
6
230 V ~ 50 Hz
• Le symbole d'éclair dans un triangle indique que l'appareil contient une tension dangereuse non
isolée.
• Les piles de la télécommande ne doivent pas être exposées à une chaleur excessive telle que la
lumière du soleil ou un feu.
• Cet appareil ne doit pas être exposé à l'égouttement ou aux éclaboussures. N'y posez jamais
d'objet rempli de liquide tel qu'un vase.
Nous recommandons fortement de conserver les emballages pour un éventuel transport futur
du produit.
2. Aperçu et commandes
Avant
Arrière
32
Page 33

Intérieur
7. ADAPTATEUR POUR 45 TOURS
8. BRAS DE LECTURE, LEVAGE DU BRAS
9. ARRÊT AUTOMATIQUE
INTERRUPTEUR MARCHE/ARRÊT
10. SÉLECTION DE 33⅓, 45, 78 TOURS
11. BLOCAGE/SUPPORT DU BRAS
12. BROCHE
13. TOURNE-DISQUE
14. CARTOUCHE
15. TÉMOIN D’ALIMENTATION
16. POWER/VOLUME
Support métallique
1. Tirez le couvercle vers le haut jusqu'à ce que la
pointe métallique touche l'extrémité du bras
métallique.
2. Déplacez la pointe métallique jusqu'à l'espace
de l'autre bras métallique.
1
2
7
8
9
10
11
16
15
14
13
12
ACCESSOIRES
Adaptateur pour 45 tours
Pour lire un 45 tours, placez l' ADAPTATEUR sur la BROCHE.
1. Placez l'adaptateur de 45 tours sur la broche.
2. Placez délicatement votre 45 tours sur le tourne-disque.
3. Suivez la procédure d' UTILISATION pour lire votre disque.
33
Page 34

3. Installation de la cartouche
DÉBALLAGE
1. Enlevez tous les emballages de l'appareil. (Conservez tous les emballages.)
2. Enlevez délicatement l'appareil de sa mousse de polystyrène et sortez-le du sachet en plastique.
3. Bien que des disques puissent être lus avec le couvercle fermé aussi bien qu'ouvert, il est
recommandé que le couvercle soit ouvert.
4. Enlevez le couvercle de protection de la pointe de lecture en le tirant doucement vers l'avant de
l'appareil.
DÉMONTAGE DE LA TÊTE DE LECTURE
1. Tirez doucement la pointe de la cartouche vers le bas.
2. Tirez la cartouche vers l'avant.
3. Sortez-la et enlevez-la.
INSTALLATION DE LA CARTOUCHE
Placez la cartouche rouge avec la pointe de lecture en saphir vers le bas.
1. Alignez la patte à l'arrière de la tête de lecture avec le bras de lecture.
2. Insérez la cartouche avec sa face avant à un angle descendant.
3. Levez l'avant de la tête de lecture jusqu'à ce qu'elle s'enclenche.
INFORMATIONS SUPPLÉMENTAIRES
1. La cartouche rouge a une très petite pointe de lecture en saphir qui est à peine visible.
Remarque : la tête de lecture de rechange que vous recevez doit être la même que celle qui est
déjà sur le bras de lecture.
2. Cette tête de lecture est conçue pour des disques de 33 ⅓, 45 et 78 tours.
3. Le remplacement de la tête de lecture dépend de la fréquence d'utilisation du tourne-disque.
34
Page 35

Branchement du système
3
9
8
1
Lecteur audio
Actif
Actif
Actif
230 V ~ 50 Hz
Suivez la procédure à la page suivante pour commencer à utiliser l'appareil.
3
35
Page 36

4. Utilisation
Utilisez le CÂBLE D'ALIMENTATION pour brancher l'appareil à une prise secteur.
MISE SOUS TENSION
Mettez l'appareil en marche en tournant la molette POWER/VOL située en façade pour allumer
l'appareil.
RÉGLAGE DU VOLUME
Tournez la molette POWER/VOL en façade de l'appareil pour régler le volume à votre convenance.
PROCÉDURE DE LECTURE D'UN DISQUE
Libérez le BRAS DE LECTURE de son VERROUILLAGE/SUPPORT.
SÉLECTION DE LA VITESSE: Réglez le SÉLECTEUR de 33⅓, 45, 78 TOURS à la vitesse voulue pour le
disque.
ARRÊT AUTOMATIQUE
Choisissez si le disque s'arrête automatiquement à la fin de la lecture grâce à l'INTERRUPTEUR
D'ACTIVATION/DÉSACTIVATION D'ARRÊT AUTOMATIQUE. Si l'INTERRUPTEUR
D'ACTIVATION/DÉSACTIVATION D'ARRÊT AUTOMATIQUE est activé, le disque cessera de tourner
lorsqu'il arrive à la fin.
Mettez le disque délicatement sur le TOURNE-DISQUE.
Levez délicatement le BRAS DE LECTURE et déplacez-le jusqu'au point de début voulu sur le disque.
CONNEXION DE SORTIE DE LIGNE
- Branchez une extrémité du câble auxiliaire (non fourni) sur la PRISE DE SORTIE DE LIGNE à
l'arrière du lecteur de disque et l'autre extrémité du câble sur les entrées auxiliaires de
l'appareil externe, par ex. une autre chaîne Hi-Fi, un amplificateur, etc.
- Vérifiez le niveau du volume de votre appareil externe et réglez-le si nécessaire.
- Consultez le mode d'emploi de l'appareil externe pour une utilisation correcte.
PRISE DE SORTIE DU CAISSON DE BASSES
La prise de sortie du caisson de basses sert à brancher un caisson de basses actif (non fourni) qui
améliore la réponse en basses. Contactez votre détaillant pour des modèles de caissons de basses
adéquats.
36
Page 37

CONNEXION ET UTILISATION DE L'ENTRÉE AUXILIAIRE
Vous pouvez brancher n'importe quel appareil ayant une sortie audio, tel qu'un module radio DAB
ou un lecteur CD/cassette/MP3 grâce à un câble muni d'une fiche de 3,5 mm de dia. (un cordon de
3,5 mm est fourni).
- Allumez l'appareil et réglez le volume.
- Branchez le cordon ENTRÉE AUXILIAIRE fourni sur la PRISE D'ENTRÉE AUXILIAIRE à l'arrière de
l'appareil.
- Branchez l'autre extrémité du câble auxiliaire dans la prise de sortie ou la prose casque de
3,5 mm de dia. du lecteur audio externe.
- Allumez l'autre lecteur audio, lisez de la musique et réglez son volume si nécessaire.
Remarque : Le branchement de la fiche aux. désactivera la fonction de lecture du disque.
5. Dépannage
LE TOURNE-DISQUE NE S'ALLUME PAS
* Le CORDON D'ALIMENTATION n'est pas branché à une prise secteur ou à l'appareil.
- Vérifiez l'intégrité des fiches.
* L'appareil n'est pas allumé.
- Tournez l’interrupteur POWER/VOL qui est en position OFF.
L'APPAREIL N'ARRÊTE PAS DE S'ÉTEINDRE
* Cet appareil a une FONCTION D'ECONOMIE D'ÉNERGIE, conformément à la législation ErP
catégorie II. Si l'appareil n'est pas utilisé ou s'il n'y a pas de sortie de signal pendant 15 minutes,
il s'éteindra automatiquement.
* Réglez l'interrupteur POWER/VOL sur OFF pendant environ 5 secondes puis remettez-le sur
MARCHE pour remettre en marche l'appareil.
LE TOURNE-DISQUE NE TOURNE PAS
* La courroie d'entraînement du tourne-disque peut sortir du mécanisme du tourne-disque,
auquel cas il faut la remettre en place. Demandez conseil à des professionnels sur la méthode
pour la remettre en place.
* Le câble ENTRÉE AUXILIAIRE est branché. Débranchez-le.
MES DISQUES DE 45 TOURS NE CORRESPONDENT PAS À LA BROCHE DU TOURNE-DISQUE.
* Placez l'adaptateur de broche pour 45 tours sur le tourne-disque avant d'installer un disque.
37
Page 38

MON DISQUE NE LIT PAS À LA BONNE VITESSE
Source d'alimentation
230 Vca/50 Hz
Haut-parleurs
2x 4 Ohm
Tourne-disque à 3 vitesses
33⅓, 45 et 78 tours/minutes
Sortie de ligne
Connexion RCA
Entrée auxiliaire
3,5 mm dia.
Prise de sortie du caisson de basses
Prise RCA pour caisson de basses actif
Tête de lecture
Type universel équipé
(pour des disques de 33⅓, 45 et 78 tours*)
Accessoires fournis
Adaptateur de broche de 45 tours
Connexion d'entrée auxiliaire de 3,5 mm
* Réglez correctement le sélecteur de vitesse pour un disque de 33⅓, 45 ou 78 tours.
MON DISQUE DE 33⅓ TOURS TREMBLE QUAND IL EST PLACÉ SUR LE PLATEAU DU TOURNE-DISQUE
* Vérifiez que vous avez abaissé le VERROUILLAGE DU BRAS avant d'y mettre le disque, ou que
l'ADAPTATEUR DE BROCHE de 45 tours n'est pas encore sur le plateau du tourne-disque.
LE BRAS DE LECTURE GLISSE SUR LE DISQUE ET NE LE LIT PAS
* Le couvercle de protection blanc couvre encore la cartouche de la tête de lecture. Enlevez-le.
* La pointe de la tête de lecture est peut-être endommagée. Changez la tête de lecture. (Voir les
détails dans les caractéristiques techniques)
LA LECTURE DU DISQUE EST SILENCIEUSE
* Réglez la molette de RÉGLAGE DU VOLUME pour monter le son.
* Vérifiez si la connexion auxiliaire est enlevée.
6. Caractéristiques
* LA CONCEPTION ET LES CARACTÉRISTIQUES SONT SUJETTES À MODIFICATION SANS PRÉAVIS.
38
Page 39

7. Garantie
Lenco propose un entretien et une garantie conformément à la législation européenne, ce qui
signifie qu’en cas de besoin de réparation (aussi bien pendant et après la période de garantie), vous
pouvez contacter votre revendeur le plus proche.
Remarque importante : Il n’est pas possible de renvoyer l’appareil pour réparation directement à
Lenco.
Remarque importante : Si l’unité est ouverte ou modifiée de quelque manière que ce soit par un
réparateur non agréé, la garantie serait caduque.
Cet appareil ne convient pas à une utilisation professionnelle. En cas d’utilisation professionnelle, les
obligations de garantie du fabricant seront annulées.
8. Clause de non responsabilité
Des mises à jour du logiciel et/ou des composants informatiques sont régulièrement effectuées. Il se
peut donc que certaines instructions, caractéristiques et images présentes dans ce document
diffèrent légèrement de votre configuration spécifique. Tous les articles décrits dans ce guide le sont
fournis uniquement à des fins d'illustration et peuvent ne pas s'appliquer à une configuration
spécifique. Aucun droit légal ne peut être obtenu depuis les informations contenues dans ce manuel.
9. Mise au rebut de l'appareil usagé
Ce symbole indique que l'équipement électrique concerné ou la batterie ne
doivent pas être jetés parmi les autres déchets ménagers en Europe. Afin de
garantir un traitement approprié de la batterie ou de l’appareil usagés, veuillez les
mettre au rebut conformément à la règlementation locale en vigueur relative aux
équipements électriques et autres batteries. En agissant de la sorte, vous
contribuerez à la préservation des ressources naturelles et à l’amélioration des
niveaux de protection environnementale concernant le traitement et la
destruction des déchets électriques (Directive sur les déchets des équipements électriques et
électroniques).
10. Marquage CE
Les produits avec la marque CE sont conformes à la directive CEM (2004/108/CE)
et à la directive basse tension (2006/95/CE) émises par la commission de la
Communauté européenne.
Par la présente, Lenco Benelux BV, Thermiekstraat 1a, 6361 HB Nuth, The Netherlands, déclare que
ce produit est conforme aux exigences principales et autres clauses applicables de la Directive
1999/5/CE.
La déclaration de conformité peut être consultée au lien : techdoc@lenco.com
39
Page 40

11. Service
Pour en savoir plus et obtenir de l'assistance, visitez www.lenco.com
Lenco Benelux BV, Thermiekstraat 1a, 6361 HB, The Netherlands.
40
Page 41

Español
1. Instrucciones de seguridad
• Cuando use aparatos eléctricos debe seguir siempre unas precauciones de seguridad básicas.
• Este equipo no está diseñado para que los usen personas (incluyendo niños) con capacidades
físicas, sensoriales o mentales reducidas o con falta de conocimientos o experiencia. Para poder
usar el equipo deberán ser supervisados e instruidos por una persona responsable de su
seguridad.
• Asegúrese de que el equipo no esté demasiado cerca de otros electrodomésticos que generen
calor, ni expuesto a la luz solar directa.
• Antes de enchufar el equipo a una toma de corriente, compruebe que la tensión eléctrica
indicada en la placa de datos técnicos se corresponde con la de la red eléctrica local.
• No deje el equipo sin supervisión mientras conecta la fuente de alimentación.
• No sumerja el equipo en agua ni en otros líquidos. Es crucial que desconecte el cable de
alimentación después de utilizar el equipo, antes de limpiarlo o durante su reparación.
• Es necesaria una atenta supervisión cuando use el equipo cerca de los niños.
• Nunca deje el equipo al alcance de los niños.
• Las reparaciones de los equipos eléctricos solo deben ser realizadas por personal cualificado.
Reparaciones realizadas de un modo inadecuado pueden poner en riesgo al equipo y/o propio
usuario.
• Este equipo está destinado únicamente al uso doméstico y no debe utilizarse para fines
industriales ni comerciales.
• No utilice este aparato con el enchufe o el cable dañados, tras un mal funcionamiento o
después de haberse caído o dañado de cualquier modo.
• Utilice este equipo solamente para su uso previsto. Este equipo debe situarse sobre una
superficie estable y resistente al calor.
• No introduzca ningún objeto a través de las ranuras u orificios ya que puede dañar el equipo y/o
provocar una descarga eléctrica.
• No use este producto en entornos húmedos o con malas condiciones meteorológicas. Este
producto no es un juguete.
• No escuche música demasiado alta, especialmente cerca de los niños.
• El funcionamiento normal del producto podría verse afectado por interferencias
electromagnéticas fuertes. Si esto ocurre, sólo debe reiniciar el producto siguiendo el manual
de instrucciones para que recupere su normal funcionamiento.
• Remita todas las reparaciones al personal cualificado. Se requerirá reparación cuando el
aparato haya sido dañado de cualquier modo, como por ejemplo cuando el cable de
alimentación o el enchufe estén dañados, se haya derramado líquido, se haya introducido algún
objeto dentro del aparato o el aparato se haya expuesto a la lluvia o a la humedad.
• Por favor, guarde la unidad en un entorno con buena ventilación.
• Estas instrucciones de reparación sólo deben emplearse por personal de reparación cualificado.
Para reducir el riesgo de descarga eléctrica, no realice ninguna reparación distinta de las
contenidas en las instrucciones de operación, a menos que esté cualificado para ello.
• El enchufe de alimentación se utiliza como dispositivo de desconexión, y debería permanecer
fácilmente utilizable.
• Este equipo es un aparato de Clase II o con doble aislamiento eléctrico. Está diseñado de forma
41
Page 42

que no requiere una conexión de seguridad a la toma eléctrica a tierra.
ADVERTENCIA:
• No retire nunca la carcasa de este aparato.
• Nunca coloque el aparato sobre otro equipo eléctrico.
1. ALTAVOZ
2. BLOQUEO
3. TOMA DE ENTRADA
AUXILIAR DE 3,5MM
4. TOMA DE SALIDA DE
LÍNEA
IZQUIERDA/DERECHA
5. TOMA DE SALIDA DE
LÍNEA DEL SUBWOOFER
6. ALIMENTACIÓN
1
2
3 4 5
6
230V ~ 50Hz
• El rayo con los símbolos de un triángulo muestra que la unidad contiene tensión peligrosa sin
aislamiento.
• Las pilas del mando no deben exponerse a un calor excesivo, como la luz solar o el fuego.
• El aparato no debe exponerse a líquidos, y no deben colocarse objetos que contengan líquido,
como jarrones, sobre el aparato.
Recomendamos encarecidamente que guarde el envase para el transporte futuro del producto.
2. Apariencia y controles
Delanteras
Traseras
42
Page 43

Interior
7. ADAPTADOR PARA DISCOS
DE 45 RPM
8. BRAZO, PALANCA
LEVANTADORA DEL BRAZO
9. PARADA AUTOMÁTICA
INTERRUPTOR ON/OFF
10. SELECCIÓN DE R.P.M 33⅓,
45, 78
11. REPOSABRAZOS/BLOQUEO
DEL BRAZO
12. EJE
13. TOCADISCOS
14. CARTUCHO
15. INDICADOR DE ENCENDIDO
16. ALIMENTACIÓN/VOLUMEN
Carcasa metálica
1. Dé un golpecito a la cubierta hasta que la punta
metálica toque el extremo del brazo metálico.
2. Mueva la punta metálica hasta el espacio del
otro brazo metálico.
1
2
7
8
9
10
11
16
15
14
13
12
ACCESORIO
Adaptador para discos de 45 rpm
Para reproducir un disco de 45, coloque el ADAPTADOR en el EJE.
1. Coloque el adaptador de 45 rpm sobre el eje.
2. Coloque suavemente el disco de 45 rpm en el tocadiscos.
3. Siga el paso de FUNCIONAMIENTO para reproducir el disco.
43
Page 44

3. Instalación del cartucho
DESEMBALAJE
1. Retire todos los materiales del envase de la unidad. (Guarde todos los materiales del envase.)
2. Retire con cuidado la unidad de la espuma styro y extráigala de la bolsa de plástico.
3. Aunque se puede reproducir los discos con la tapa cerrada así como abierta, se recomienda
que la tapa esté abierta.
4. Retire la cubierta protectora blanca de la aguja tirando suavemente de la misma hacia la parte
delantera de la unidad.
RETIRAR LA AGUJA
1. Tire suavemente hacia debajo de la punta del cartucho.
2. Tire hacia delante del cartucho.
3. Extráigalo y retírelo.
INSTALACIÓN DEL CARTUCHO
Coloque el cartucho rojo con la punta de zafiro hacia abajo.
1. Alinee la pestaña de la parte posterior de la aguja con el brazo.
2. Inserte el cartucho con el extremo delantero en un ángulo descendente.
3. Levante el extremo delantero de la aguja hacia arriba para ajustarlo en su lugar.
INFORMACIÓN ADICIONAL
1. El cartucho rojo dispone de una punta de zafiro muy pequeña que apenas es visible.
Tenga en cuenta que la aguja de sustitución que recibe debe ser la misma que la que ya está
instalada en el brazo.
2. Esta aguja es segura para discos con velocidades de 33 ⅓, 45, y 78.
3. La sustitución de la aguja depende de la frecuencia con la que use el tocadiscos.
44
Page 45

8
1
Dispositivo
de música
Activo
Activo
Activo
230V ~ 50Hz
Conexiones del sistema
Siga los pasos de funcionamiento en la página siguiente para empezar a usar la unidad.
3
45
Page 46

4. Funcionamiento
Use el CABLE DE ALIMENTACIÓN para conectar la unidad con la toma de alimentación.
ENCENDIDO
Encienda la unidad girando el botón POWER/VOL situado en el panel frontal para encender la
unidad.
CONTROL DE VOLUMEN
Gire el botón POWER/VOL situado en el panel frontal de la unidad para ajustar el volumen a un nivel
cómodo.
PASOS PARA REPRODUCIR DISCOS
Libere El BRAZO del REPOSABRAZOS/BLOQUEO DEL BRAZO.
SELECCIÓN DE VELOCIDAD: Fije la SELECCIÓN R.P.M 33⅓, 45, 78 a la velocidad de los discos que
desee.
PARADA AUTOMÁTICA
Elija si el disco se detiene automáticamente cuando haya finalizado la reproducción mediante el
INTERRUPTOR PARADA AUTOMÁTICA CONECTADO/DESCONECTADO. Si se enciende el
INTERRUPTOR PARADA AUTOMÁTICA CONECTADO/DESCONECTADO, el disco se detendrá cuando
llegue al final.
Coloque suavemente el disco en el TOCADISCOS.
Levante suavemente el BRAZO y muévalo al punto de inicio del disco que desee.
CONEXIÓN DE SALIDA DE LÍNEA
- Conecte el cable auxiliar (no suministrado) a la TOMA DE SALIDA DE LÍNEA situada en la parte
posterior del tocadiscos y el otro extremo del cable a las entradas auxiliares del componente
externo, es decir, otra unidad Hi-Fi, amplificador, etc.
- Compruebe el nivel de volumen del componente externo y ajústelo si es necesario.
- Remítase al manual de instrucciones del componente externo para su funcionamiento correcto.
TOMA DE SALIDA DEL SUBWOOFER
La toma de salida del subwoofer le permite fijar un subwoofer activo (no suministrado) que
mejorará la respuesta de bajos. Por favor, póngase en contacto con su distribuidor para ver modelos
adecuados de subwoofer.
46
Page 47

AUX IN CONNECTION & OPERATION
Cualquier componente de la salida de audio, como, por ejemplo, el módulo de Radio DAB,
reproductor de CD/Casete, reproductor MP3 puede conectarse mediante el uso de una toma de
3,5mm de diámetro (se suministra un cable de ENTRADA AUXILIAR de 3,5mm).
- Encienda la unidad y ajuste el volumen.
- Conecte el cable de ENTRADA AUXILIAR que se suministra en la TOMA DE ENTRADA AUXILIAR
situada en la parte posterior de la unidad.
- Inserte la toma en el otro extremo del cable auxiliar en la toma de salida o en la toma de
auriculares de 3,5mm de diámetro del reproductor de audio externo.
- Encienda el otro reproductor de audio, reproduzca la música y ajuste el volumen si es necesario.
Nota: Insertar la toma auxiliar desactivará la función de reproducir el disco.
5. Solución de problemas
NO HAY ALIMENTACIÓN
* El CABLE DE ALIMENTACIÓN no está conectado a ninguna toma de alimentación o a la unidad.
- Compruebe las tomas y compruebe si están dañadas o no.
* La unidad no se enciende.
- Gire el interruptor POWER/VOL desde la posición OFF.
LA UNIDAD SE APAGA ELLA SOLA
* Esta unidad dispone de una FUNCIÓN DE AHORRO ENERGÉTICO para cumplir con la normativa
ERP Fase II. Si no se opera la unidad o no hay una señal de salida durante 15 minutos, se
apagará automáticamente.
* Apague el interruptor POWER/VOL durante aproximadamente 5 segundos y después vuelva a
encenderlo para volver a activar la unidad.
EL TOCADISCOS NO GIRA
* La correa de transmisión del tocadiscos puede que se haya desprendido del mecanismo del
tocadiscos y debe volver a ajustarse. Por favor, póngase en contacto con profesionales para
obtener asesoramiento sobre cómo volverla a ajustar.
* El cable de ENTRADA AUXILIAR está conectado. Desconéctelo.
LOS DISCOS DE 45RPM NO SE AJUSTAN EN EL EJE DEL TOCADISCOS
* Asegúrese de que ha colocado el adaptador 45 rpm en el eje del tocadiscos antes de colocar el
disco.
47
Page 48

EL DISCO NO SE REPRODUCE A LA VELOCIDAD CORRECTA
Fuente de alimentación
CA 230V/50Hz
Altavoces
4 Ohmios X 2
Tocadiscos de 3 velocidades
33⅓, 45, 78 rpm
Salida de línea
Conexión RCA
Entrada auxiliar
3,5mm de diámetro
Toma de salida del subwoofer
Toma RCA para el subwoofer activo
Aguja
Tipo universal instalado
(para discos de 33⅓, 45 & 78 rpm*)
Accesorios suministrados
Adaptador de eje de 45rpm
Conexión de entrada auxiliar de 3,5mm
* Gire el interruptor de control de velocidad a la velocidad correcta para discos de 33⅓, 45 o 78
rpm.
EL DISCO DE 33⅓ SE BAMBOLEA CUANDO SE COLOCA EN EL PLATO DEL TOCADISCOS
* Asegúrese de que ha plegado el BLOQUEO DEL BRAZO antes de colocar el disco en el plato, o
que no se ha dejado del adaptador del eje de 45 rpm en el plato del tocadiscos.
EL BRAZO SE DESLIZA POR EL DISCO PERO NO LO REPRODUCE
* La cubierta protectora blanca todavía cubre el cartucho de la aguja. Retírela.
* La punta de la aguja puede estar dañada. Sustituya la aguja. (Véase las especificaciones para
obtener más detalles)
NO SE OYE NINGÚN SONIDO CUANDO SE ESTÁ REPRODUCIENDO EL DISCO
* Ajuste el dial CONTROL DE VOLUMEN para subir el sonido.
* Compruebe si se ha retirado la conexión auxiliar.
6. Especificaciones
* EL DISEÑO Y LAS ESPECIFICACIONES ESTÁN SUJETAS A CAMBIO SIN PREVIO AVISO.
48
Page 49

7. Garantía
Lenco ofrece servicio y garantía en cumplimiento con las leyes de la Unión Europea, lo cual implica
que, en caso de que su producto precise ser reparado (tanto durante como después del periodo de
garantía), deberá contactar directamente con su distribuidor.
Nota importante: No es posible enviar sus reparaciones directamente a Lenco.
Nota importante: Si la unidad es abierta por un centro de servicio no oficial, la garantía quedará
anulada.
Este aparato no es adecuado para el uso profesional. En caso de darle un uso profesional, todas las
obligaciones de garantía del fabricante quedarán anuladas.
8. Exención de responsabilidad
Regularmente se llevan a cabo actualizaciones en el Firmware y en los componentes del hardware.
Por esta razón, algunas de las instrucciones, especificaciones e imágenes incluidas en este
documento pueden diferir ligeramente respecto a su situación particular. Todos los elementos
descritos en esta guía tienen un objetivo de mera ilustración, y pueden no ser de aplicación en su
situación particular. No se puede obtener ningún derecho ni derecho legal a partir de la descripción
hecha en este manual.
9. Eliminación del antiguo dispositivo
Este símbolo indica que no deberá deshacerse del producto eléctrico o batería en
cuestión junto con los residuos domésticos, en el ámbito de la UE. Para garantizar
un tratamiento residual correcto del producto y su batería, por favor, elimínelos
cumpliendo con las leyes locales aplicables sobre requisitos para el desechado de
equipos eléctricos y baterías. De hacerlo, ayudará a conservar recursos naturales y
mejorar los estándares de protección medioambiental en el tratamiento y
eliminación de residuos eléctricos (Directiva sobre la Eliminación de Equipos
Eléctricos y Electrónicos).
10. Marca CE
Los productos con la marca CE cumplen con la Directiva EMC (2004/108/EC) y con
la Directiva de Bajas Tensiones (2006/95/EC) emitida por la Comisión de la Unión
Europea.
Por la presente, Lenco Benelux BV, Thermiekstraat 1a, 6361 HB Nuth, Países Bajos, declara que este
producto cumple con las exigencias esenciales y otras provisiones relevantes de la Directiva
1999/5/EC.
La declaración de conformidad puede consultarse en techdoc@lenco.com
49
Page 50

11. Servicio
Para obtener más información y soporte del departamento técnico, por favor, visite la página web
www.lenco.com
Lenco Benelux BV, Thermiekstraat 1a, 6361 HB, Países Bajos.
50
 Loading...