

Page 1
Model: BTT-9
User manual
Speaker Tower with CD, Bluetooth, PLL
FM Radio, USB And NFC
Gebruiksaanwijzing
Luidsprekertoren met CD, Bluetooth, PLL
FM-radio, USB en NFC
Benutzerhandbuch
Lautsprecherturm mit CD, Bluetooth,
PLL-UKW-Radio, USB und NFC
Mode d'emploi
Colonne acoustique avec CD, Bluetooth,
radio FM PLL, USB et FNC
Manual del Usuario
Torre de sonido con CD, Bluetooth, radio
FM PLL, USB y NFC
Page 2

Index
English ...........................................................................................................................3
Nederlands ................................................................................................................. 15
Deutsch ....................................................................................................................... 27
Français....................................................................................................................... 41
Español ....................................................................................................................... 54
Page 3

English
Speaker Tower with CD, Bluetooth, PLL FM Radio, USB And NFC
Thank you for purchasing this Tower Speaker
Getting started
Remove the equipment from the box.
Remove all packaging and place inside the box to store for future
reference and/or
use.
In the box
Speaker tower unit
Tower base plate and screws (with washers) to attach the unit
3.5mm-RCA Audio cable
Instruction manual
Remote control
Power cable
Screws & Reinforcing bars
Features
Stereo Speakers
Bluetooth connectivity
Audio Cable Included
USB Port for playing MP3
PLL FM radio
Page 4

Safety instructions
When using electrical equipment, basic safety precautions should always be followed:
This equipment is not intended for use by persons (including children) with reduced
physical, sensory or mental capabilities or lack of experience or knowledge. They should
be given appropriate supervision and instructions to use the equipment by a person
responsible for their safety.
Ensure the equipment is not too close to heat emitting appliances or placed in direct
sunlight.
Check that the voltage indicated on the data plate corresponds with that of the local
network before connecting the equipment to the mains power supply.
Do not leave the equipment unattended while it’s connected to the power supply.
Do not immerse the equipment in water or any other liquids.
It is imperative to unplug the power cord after the equipment has been used, before it is
cleaned and while being repaired.
Close supervision is required when using this equipment near children. Never leave the
equipment within reach of children.
Repairs to electrical appliances should only be performed by qualified personnel.
Improper repairs may place the user and/or equipment at serious risk.
This equipment is intended for household use only and should not be used for industrial
or commercial purposes.
Do not operate this appliance with a damaged plug or cord, after a malfunction or after
being dropped or damaged in any way.
Do not use this equipment for anything other than its intended use.
This equipment must be placed on a stable, heat resistant surface.
Do not push objects into any openings as damage to the equipment and/or electric
shock may occur.
Do not use this product in wet or bad weather conditions. This product is not a toy.
Do not play music at excessive levels, especially near children.
The normal function of the product may be disturbed by Strong Electro Magnetic
Interference. If so, simply reset the product to resume normal operation by following
the instruction manual. In case the function could not resume, please use the product in
another location.
WARNING
Do not ingest the battery, Chemical Burn Hazard
(The remote control supplied with) This product contains a coin/button cell
battery. If the coin/button cell battery is swallowed, it can cause severe internal
burns in just 2 hours and can lead to death.
Keep new and used batteries away from children.
If the battery compartment does not close securely, stop using the product and
Page 5

keep it away from children.
If you think batteries might have been swallowed or placed inside any part of the
body, seek immediate medical attention.
Page 6
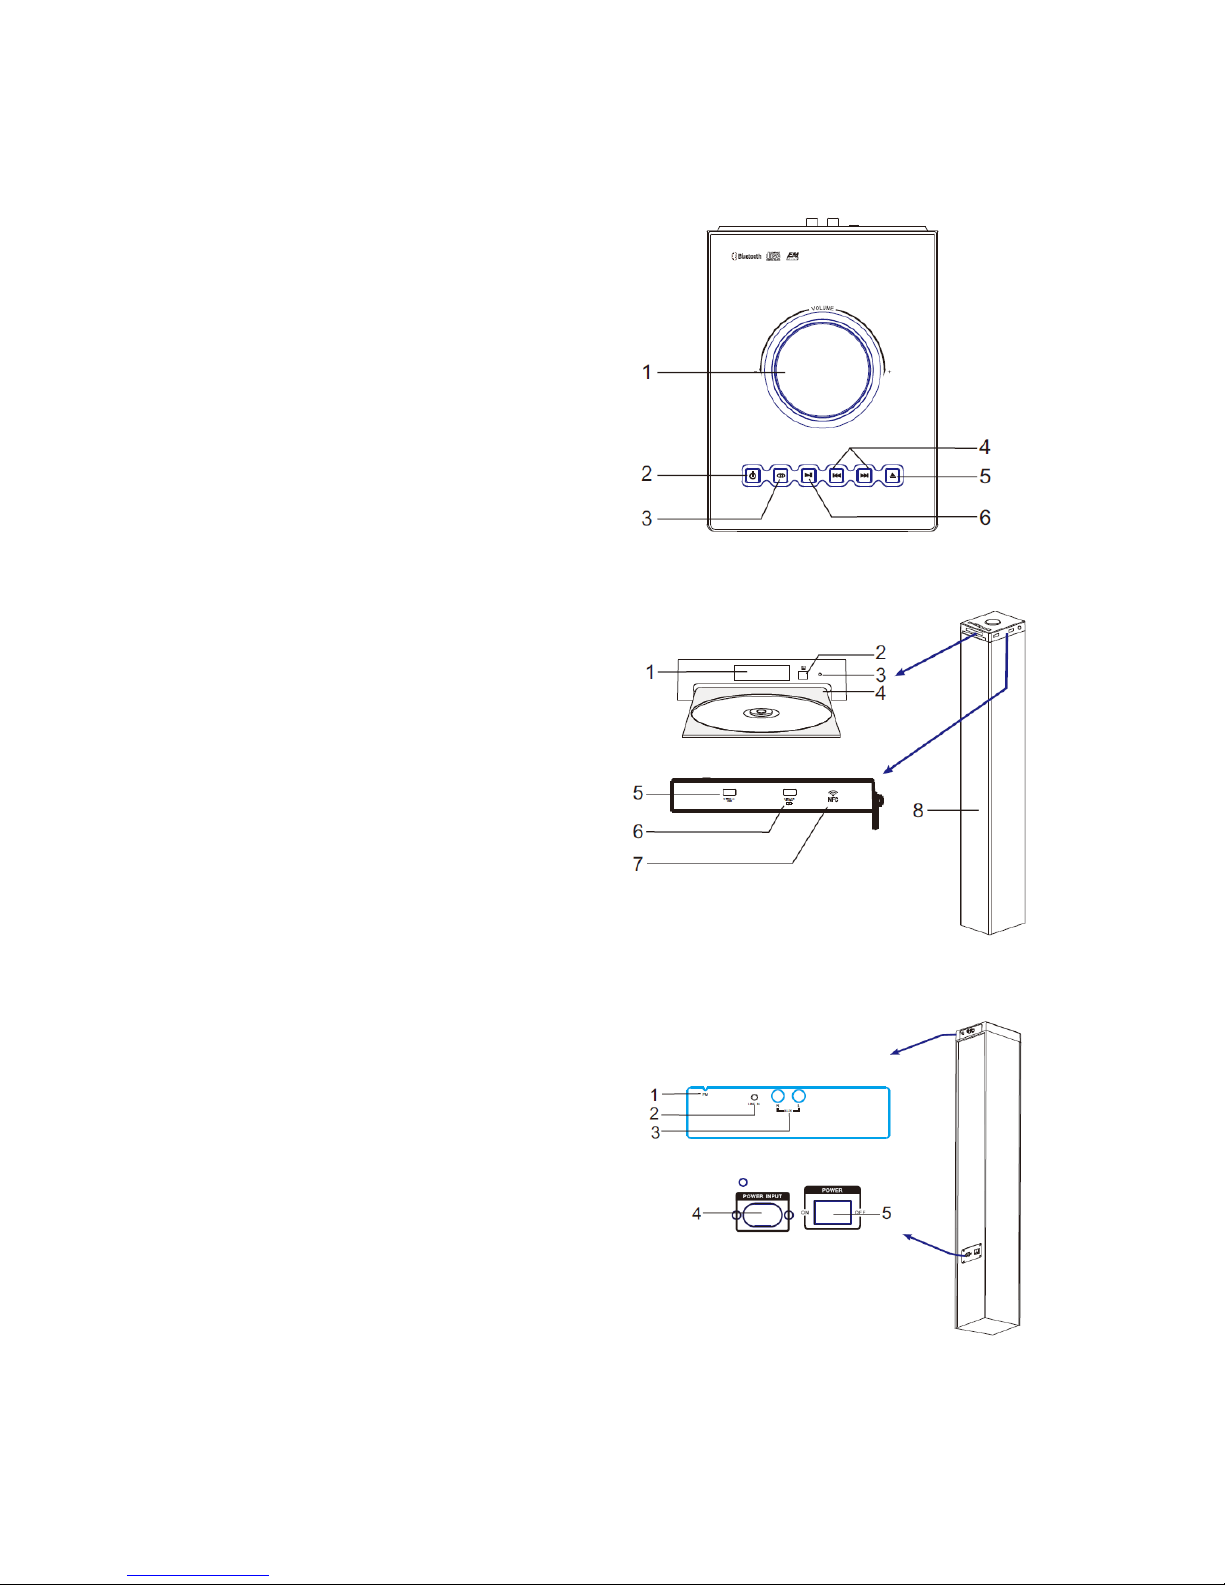
DESCRIPTION OF PARTS
TOP PANEL
1. Volume+/-
2. Standby
3. Mode
4. Previous/Next
5. Eject (Open or close the disc tray)
6.
Play/Pause
FRONT/SIDE
1. Display screen
2. Remote sensor
3. Indicator
4. Disc tray
5. USB port for playing MP3
6. USB port for charging
7. NFC sensor
8.
Speakers
BACK PANEL
1. FM antenna
2. 3.5mm Aud-2 in Jack
3. R/L RCA Aud-1 in Jack
4. Power input
5.
Power switch
Page 7
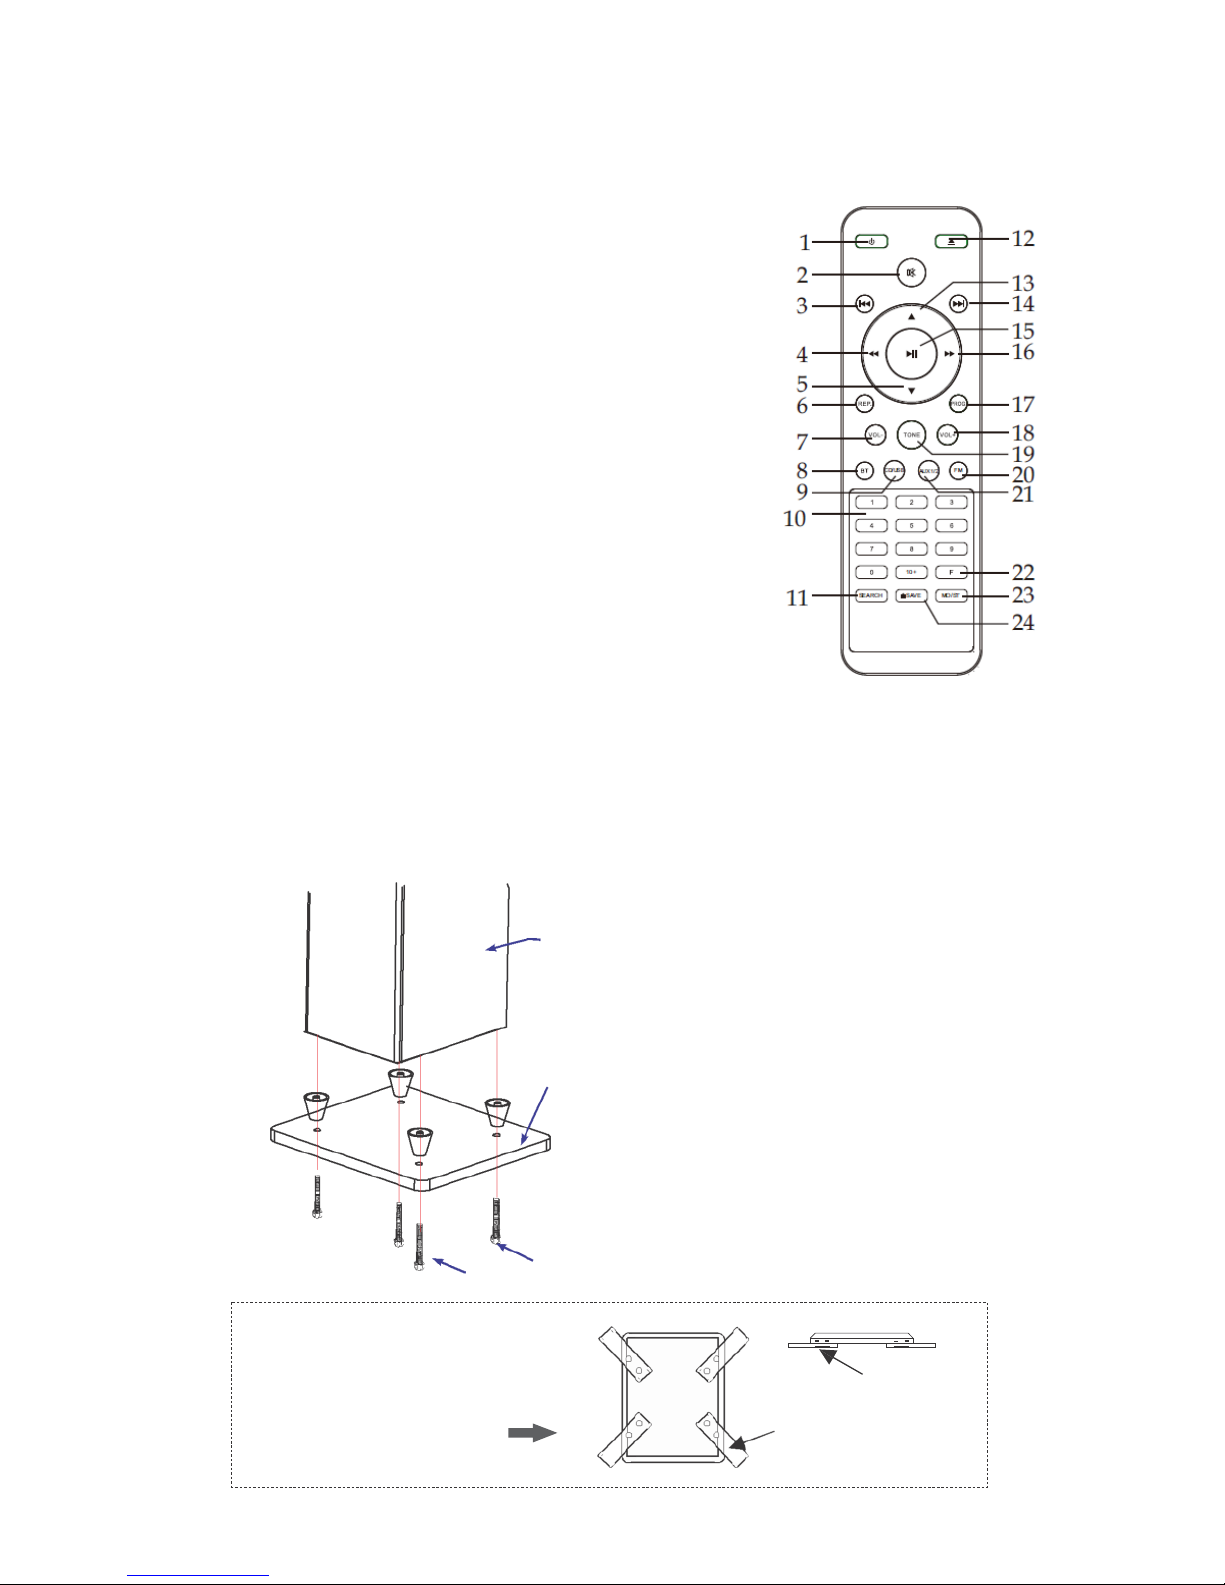
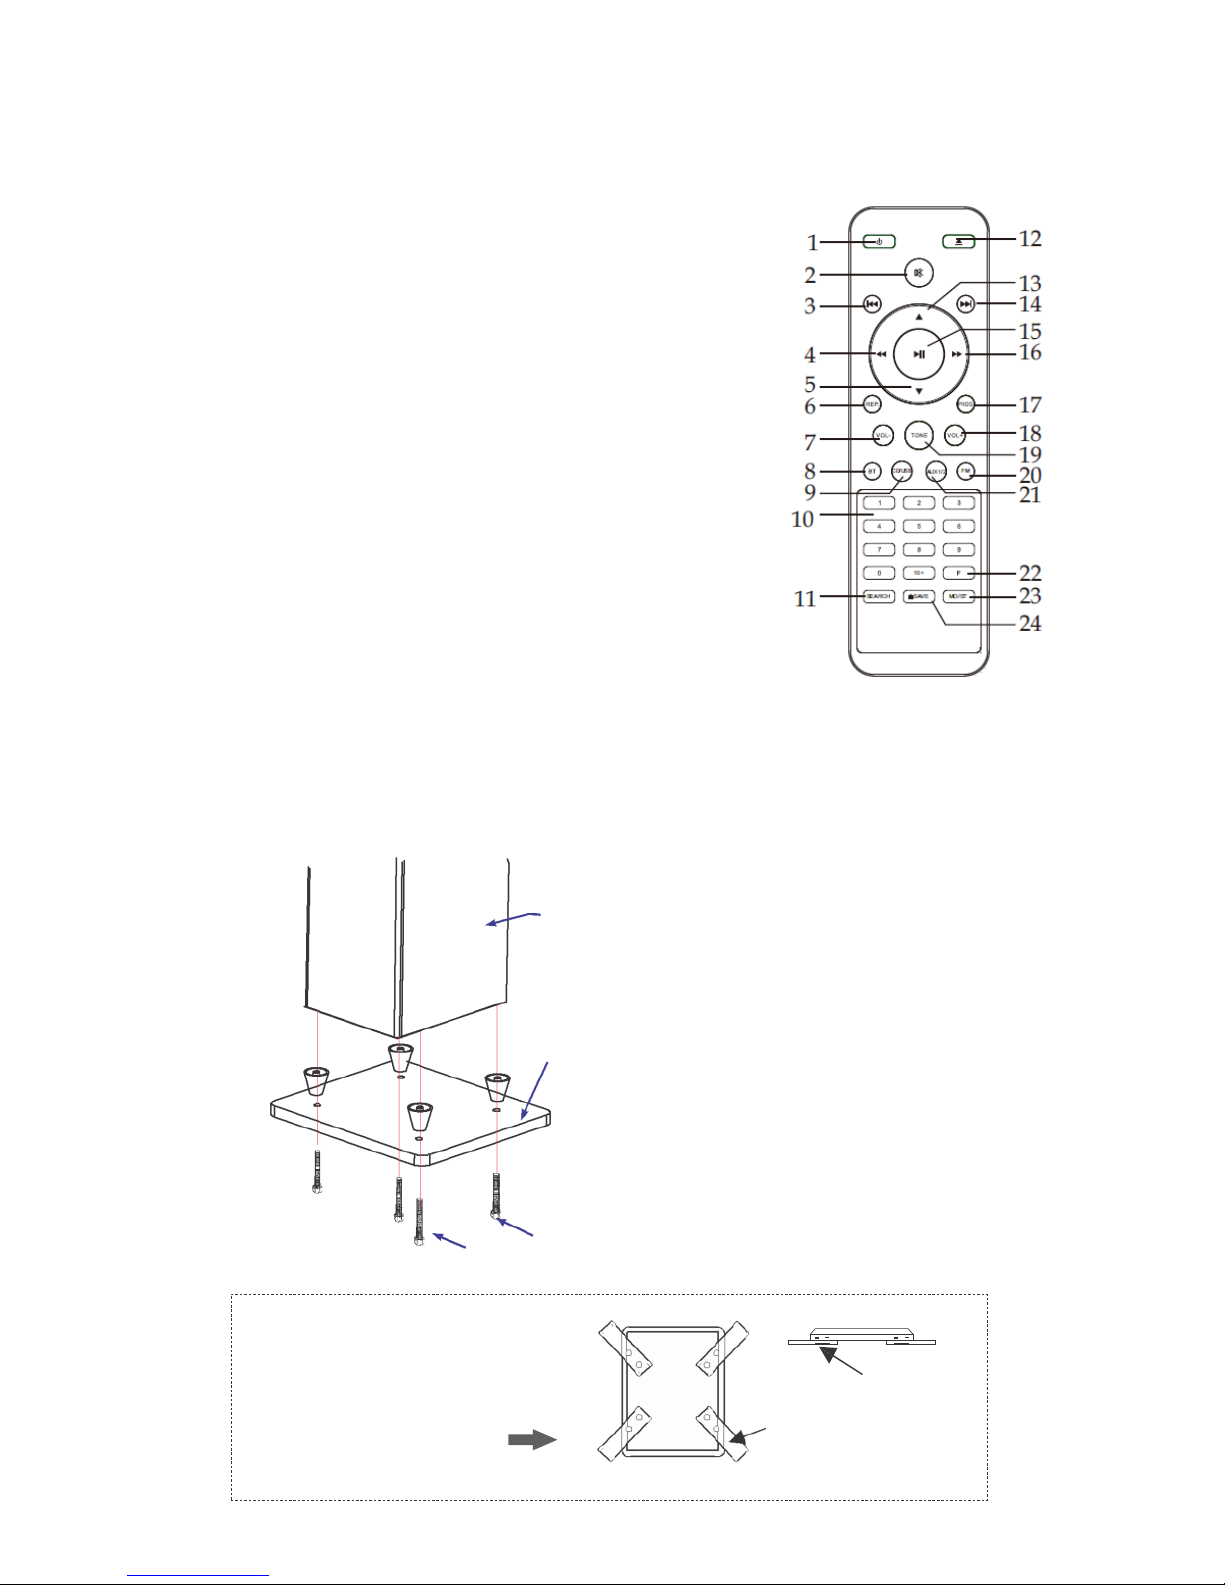
REMOTE CONTROL
1. Standby
2. Mute
3. Previous
4. Fast rewind
5. Down
6. Repeat/Random
7. Volume-
8. Bluetooth
9. CD/USB
10. Numbers
11. Search
12. Eject
13. Up
14. Next
15. Play/Pause
16. Fast forward
17. Program
18. Volume+
19. Tone
20. FM
21. AUX 1/2
22. Frequency
23. Mono/Stereo
24. Save
INSTALLATION
Please install the machine as below (do not connect to power):
The tower
Base plate
Screws
To stand the unit more
stable, use the provided
Screws to mount the
Reinforcing bars on the
bottom of the Tower Base
Plate. Check the diagram for
installation method!
Reinforcing bars
Page 8

GENERAL OPERATION
STANDBY MODE
Press the STANDBY button to wake up the unit or turn to standby mode.
SELECT MODE
Press the MODE button to switch to one of the modes: CD, USB, FM, Bluetooth, or
Aux1/2. Press the CD/USB button on remote to select CD or USB mode, press the
AUX1/2 button on remote to select Aud-1 or Aud-2 mode.
VOLUME SETTING
Press the VOLUME+/- buttons or rotate the volume knob to adjust the volume.
MUTE THE SOUND
Press the MUTE button on remote control to mute the sound. Press again or press the
VOLUME+/- buttons to resume the volume level.
SKIP TRACKS
Press the PREVIOUS /NEXT button on remote control or on TOP panel to skip to
the previous or next track.
PLAY/PAUSE
Press the PLAY/PAUSE button to pause the playback, press again to resume.
ACCELERATE THE MUSIC
In USB or CD mode, press the / button on remote control to forward or reward the
music. Press repeatedly to resume the normal speed.
REPEAT MODE
Press the REP. button on remote control to repeat the song by once, press again to
repeat
all songs, press the third time to resume normal.
PROGRAM
In CD mode, press the PROG. button on remote control to enter the program setting
interface, “P :0100", use the digit NUMBER buttons to select the song you want to
program, (for store track 4 it has to press “0” + “4”). Then press the button to confirm
and start playing the music in the programmed order.
MO/ST BUTTON
In FM mode, press MO/ST button switch from stereo mode to mono mode.
Press again to switch back to stereo mode.
Page 9

GENERAL OPERATION
TONE ADJUSTMENT
Press TONE button on the remote control to select bass and treble. When the display
screen shows “TRB”, use VOL+/- buttons to adjust the effect of treble.
When the display screen shows “BS”, use VOL+/- buttons to adjust the effect of bass.
SAVE BUTTON
In FM mode, press SAVE button to save the current frequency to a preset position.
RANDOM
In CD or USB mode, press and hold the REPEAT button to select the music into random
playback mode.
DISCONNECT THE BLUETOOTH
In Bluetooth mode, press and hold the PLAY/PAUSE button to disconnect the Bluetooth
connection.
Page 10
BLUETOOTH OPERATION
1.
Press the MODE button to switch to the Bluetooth mode.
2. The previous paired device will connect to speaker tower automatically when each
time changing to Bluetooth mode.
3. Turn on the Bluetooth device (e.g. phone) and enter the Bluetooth search interface.
4. Search "BTT-9" and pair it, input the password "0000" if necessary. If paired, the
display will blink steadily.
5.
If it still doesn't work, reset the Bluetooth and follow above steps again.
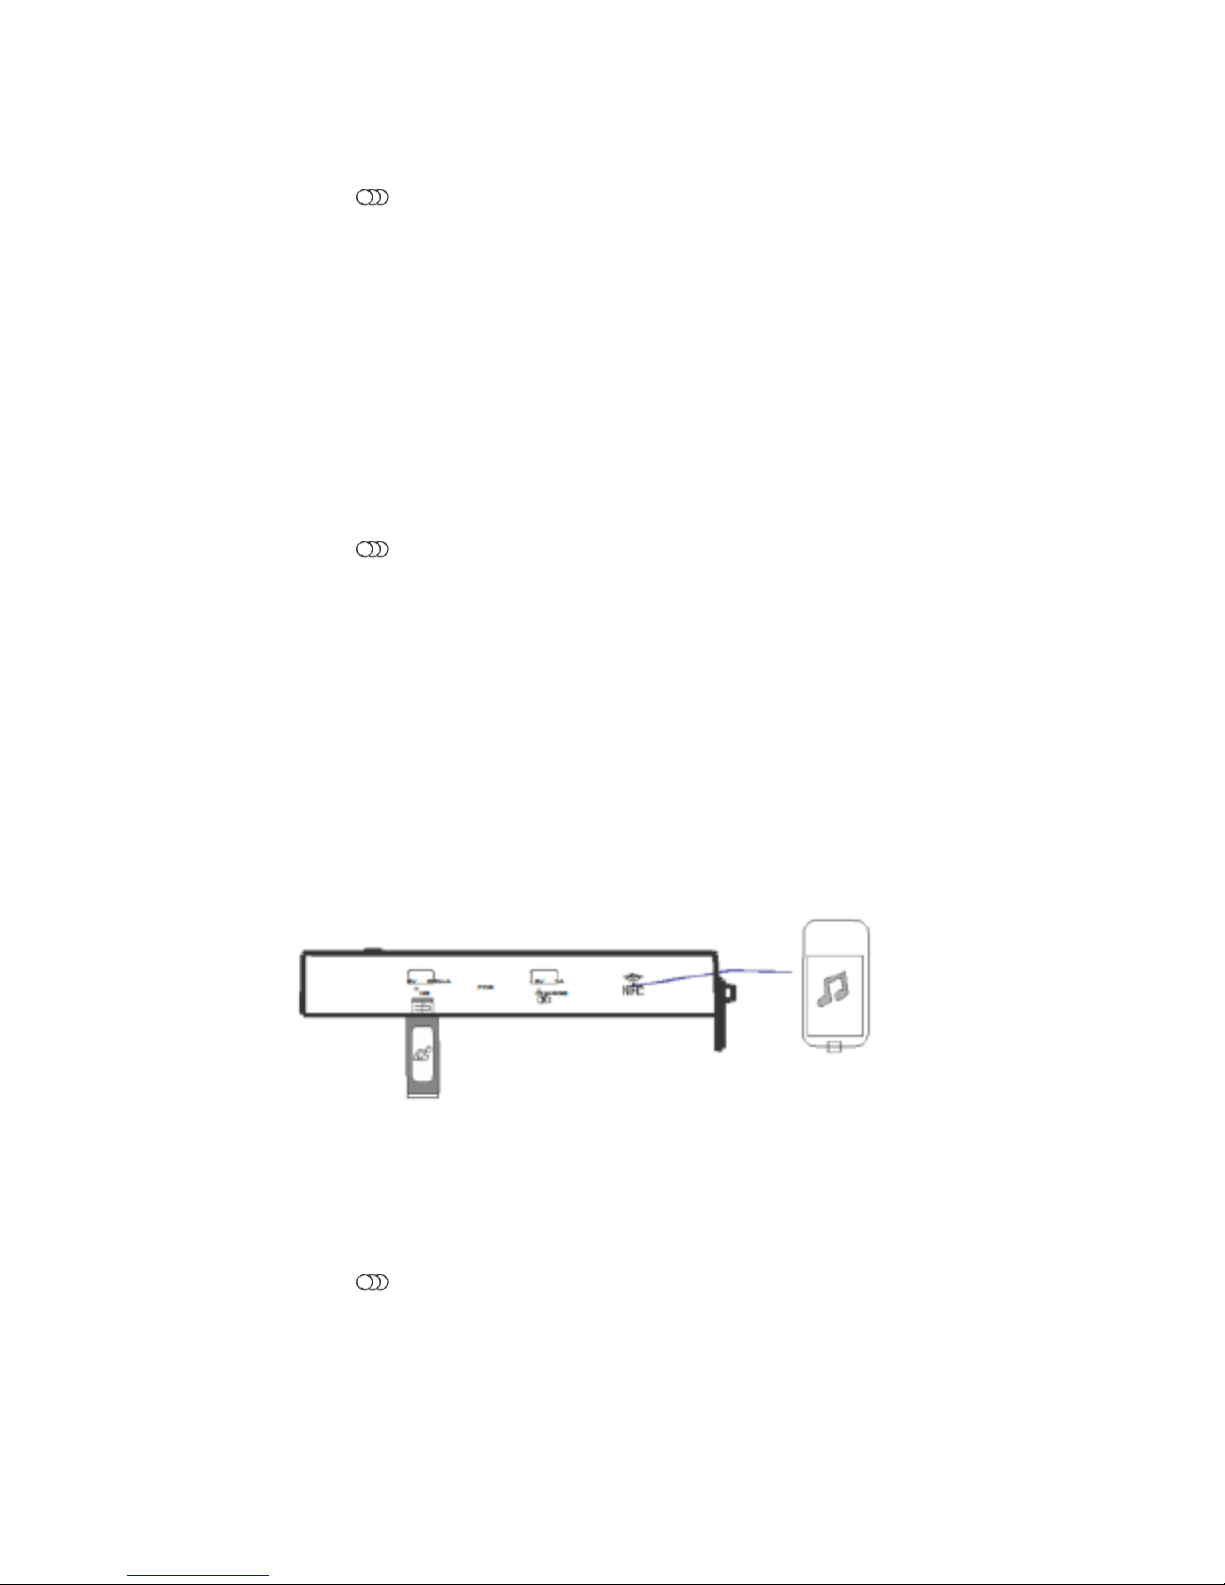
NFC OPERATION
1. Press the MODE button to enter the Bluetooth mode.
2. Place the back of phone (with NFC function) on the position of word “NFC” on the
front panel of the unit for 3 seconds, the Bluetooth function of the phone is activated
automatically.
3. When the indicator lights steadily and you can hear an audible signal, they are paired.
4. To disconnect NFC Bluetooth connection, place the back of the phone on the position
of the word “NFC” on the front panel of the unit. When there comes an audible
signal, they are disconnected.
5. Some devices of Android system 4.0 or below need to install the NFC.apk to enable
the NFC function. Some devices may be in a weak compatibility for NFC
function, that
may relate to the NFC software.
USB
USB OPERATION
1.
Power on the unit and insert a USB Flash Drive (not supplied) into the USB Port,
ensuring the plug is fully inserted at the correct way.
2. Press the MODE button to switch to the USB mode.
3. The tower will play music from the USB automatically.
4. The maximum size of Flash Drive that can be connected is 32GB max.
5. The supported format for USB play is MP3.
NFC sensor
Phone with NFC
Page 11
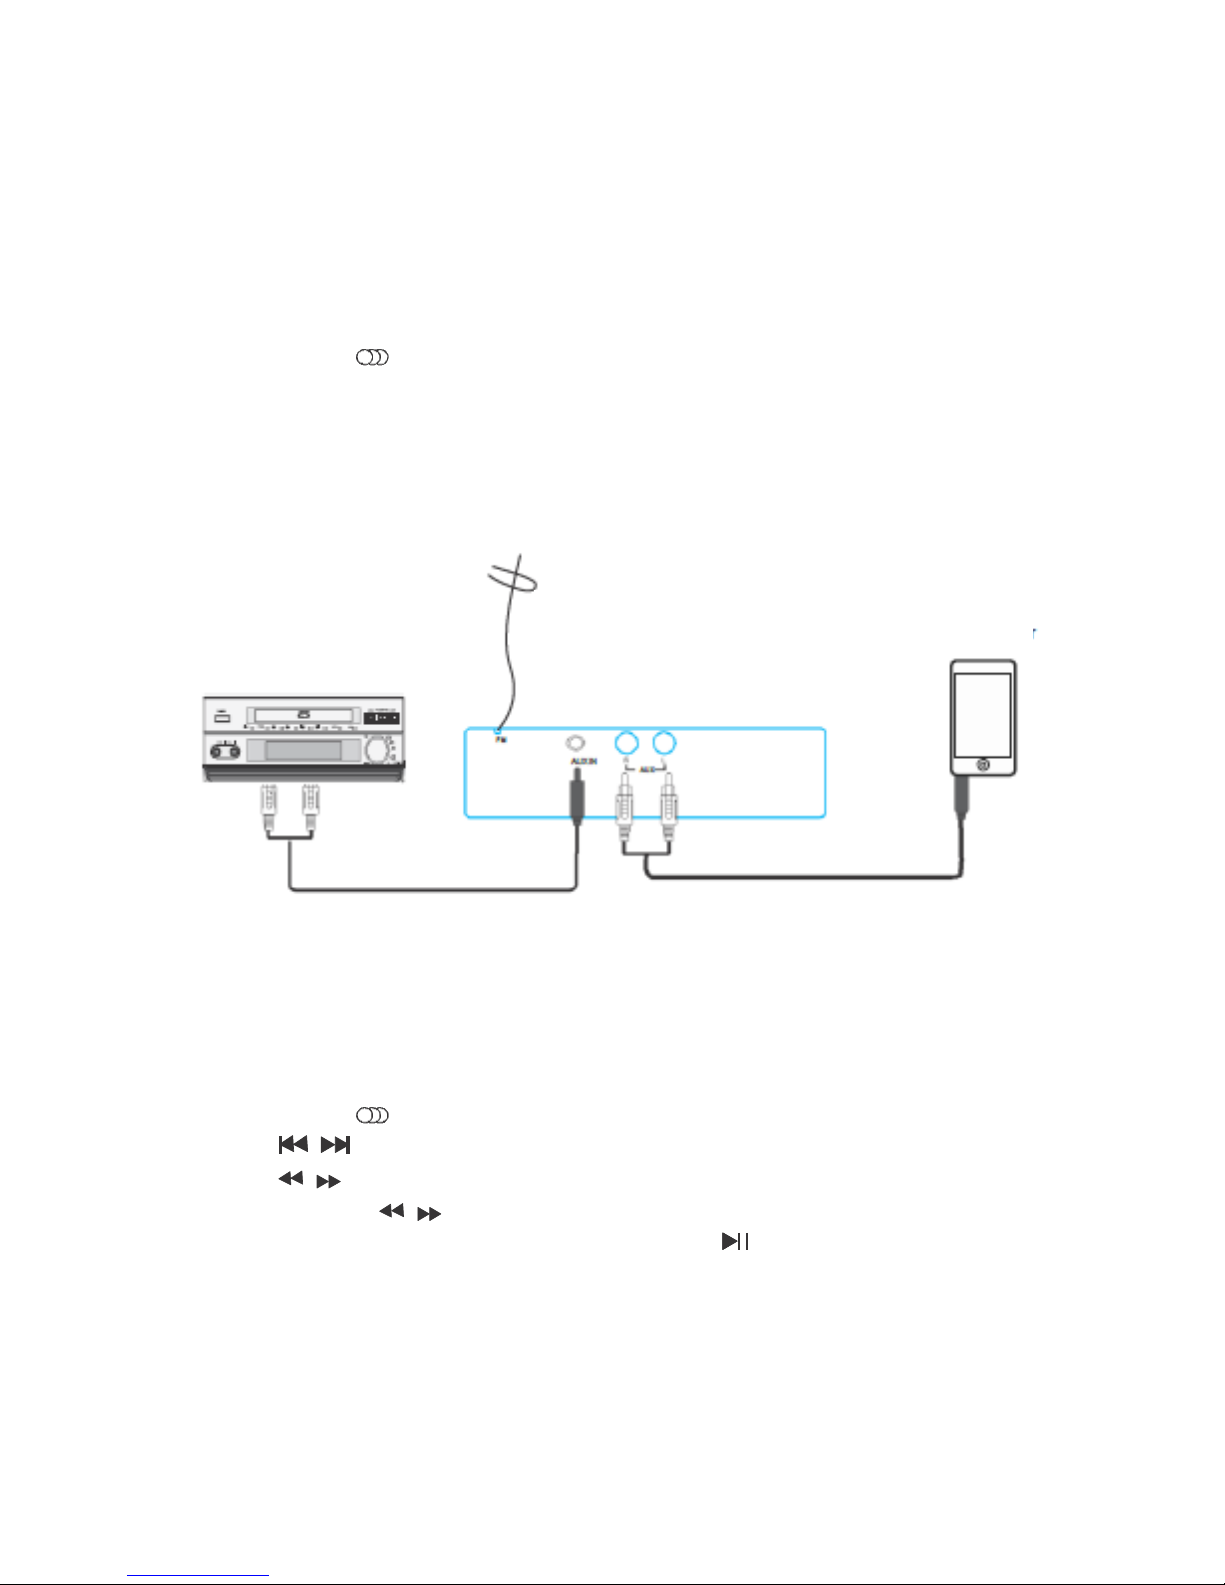
AUDIO OPERATION
Use the 3.5mm-RCA Audio cable (included) to connect the unit with Disc player/MP3
player/phone/computer or other music device.
1. Connect one end of the Audio cable to the R/L Audio-in Jack on the back panel of
the unit, then connect the other end to the MP3 player.
2. Press the MODE button on the top panel or press the AUX1/2 button on
remote to switch to Aux in mode (Aud-1/Aud-2).
3. Press the AUX1/2 button to enter the Aud-1 mode and start playback by the
device connected to the R/L RCA Jack.
4. Press the AUX1/2 button to enter the Aud-2 mode and start playback by the
device connected to the 3.5mm Aux in Jack.
FM OPERATION
1. Adjust the FM antenna to get the best reception.
2. Press the MO/ST button to turn stereo on.
3. Press the MODE button to switch to the FM mode.
4. Press the / button to skip to the previous or next station.
5. Press the / button on remote to tune the frequency by 0.05MHz.
6. Press and hold the / button on remote to skip to strongest station.
7. Press the SEARCH button on the remote control or on unit to search the stations,
press again to stop searching.
8. Save (60) stations:
Press the NUMBER buttons to select the preset number, then press the F button and
input the frequency, at last press the SAVE button to save the station.
E.g. to save the 107.5MHz into preset 36. Press the NUMBER button 10+, 6, then
press F and input 1, 7, 5, 0, at last press the SAVE button.
Disc player
FM antenna
MP3 player
Page 12
TROUBLE SHOOTING
Before taking the unit to be repaired, please check the following table when a problem
occurs. Consult your dealer or service center if the problem cannot be solved with the
following information.
Problem
Remedy
(Power) System does not
turn on or does not respond
to the Remote control.
- Make sure AC power plug is connected to the wall
socket outlet properly and it has power.
- If this does not help, leave the unit unplugged before
seeking advice.
(Remote control) No
functions or short range.
- Insert new batteries.
- Aim remote directly towards the remote sensor
located in center of speaker.
(Pairing the product) Cannot
pair successfully.
- Check whether the speaker is in off or searching
mode.
- Check whether there are other Bluetooth receivers
around your Bluetooth device. Turn them off to avoid
any disturbance. Attempt to pair again.
Cannot play properly, the
music plays intermittently.
- Check whether the distance between the speaker
and your Bluetooth device is out of its working
distance (10m).
- Check whether there are some obstacles blocking the
communication between the speaker and the
Bluetooth device.
- Move the speaker or the Bluetooth device to get the
best reception.
The sound is distorted.
- Check the volume setting on both the speaker and
your Bluetooth device and adjust the volume to a
suitable level.
Page 13

SPECIFICATIONS
Power
220-240V~ 50/60Hz
Operation temperature
0°C to +35°C
Max power output
60W
Remote control range
7 meters
Bluetooth range
10 meters
Input jack
3.5mm Aux in jack; R/L RCA jack; USB
NOTE:
1. As a result of continual improvements, the design and specifications of the product
within differ slightly from the unit illustrated on the packaging.
2. This product operates at 2400 - 2483.5 MHz and is designated only to be used
inside a normal household environment. This product is suited for this purpose
within all EU
counties.
Service and support
Guarantee
Lenco offers service and warranty in accordance with the European law, which means
that in case of repairs (both during and after the warranty period) you should contact
your local dealer.
Important note: It is not possible to send products that need repairs to Lenco
directly.
Important note: If this unit is opened or accessed by a non-official service center in
any way, the warranty expires.
This device is not suitable for professional use. In case of professional use, all
warranty obligations of the manufacturer will be voided.
Disclaimer
Updates to Firmware and/or hardware components are made regularly. Therefore
some of the instruction, specifications and pictures in this documentation may differ
slightly from your particular situation. All items described in this guide for illustration
purposes only and may not apply to particular situation. No legal right or entitlements
may be obtained from the description made in this manual.
Page 14
Disposal of the Old Device
This symbol indicates that the relevant electrical product or battery
should
not be disposed of as general household waste in Europe.
To ensure the correct waste treatment of the product and battery, please
dispose them in accordance to any applicable local laws of requirement for
disposal of electrical equipment or batteries.
In so doing, you will help to conserve natural resources and improve standards of
environmental protection in treatment and disposal of electrical waste (Waste
Electrical and Electronic Equipment Directive).
CE Marking
Products with the CE marking comply with the EMC Directive
(2004/108
/EC) and the Low Voltage Directive (2006/95/EC) issued by the
Commission of the European Community.
Hereby, Lenco Benelux BV, Thermiekstraat 1a, 6361 HB Nuth, The Netherlands, declares
that this product is in compliance with the essential requirements and other relevant
provisions of Directive1999/5/EC.
The declaration of conformity may be consulted via techdoc@lenco.com
Service
For more information and helpdesk support, please visit www.lenco.com
Lenco Benelux BV, Thermiekstraat 1a, 6361 HB, The Netherlands.
Page 15

Nederlands
Luidsprekertoren met CD, Bluetooth, PLL FM-radio, USB en NFC
Hartelijk dank voor de aanschaf van deze
Luidsprekertoren
Hoe te beginnen
Haal de apparatuur uit de verpakking.
Verwijder al het verpakkingsmateriaal en bewaar dat in de doos voor later gebruik en/of
referentie.
In de doos
Luidsprekerzuil
Bodemplaat en schroeven (met ringen) om aan de zuilen te bevestigen
3,5 mm RCA-audiokabel
Gebruiksaanwijzing
Afstandsbediening
Netsnoer
Schroeven en verstevigingsmateriaal
Kenmerken
Stereo luidsprekers
Bluetooth-verbinding
Audiokabel meegeleverd
USB-poort voor het afspelen van MP3
PLL FM-radio
Page 16

Veiligheidsinstructies
Bij het gebruik van elektrische apparatuur moeten de algemene
voorzorgsmaatregelen voor de veiligheid altijd worden opgevolgd.
Deze apparatuur is niet bestemd voor gebruik door personen (inclusief kinderen) met
beperkte fysieke, zintuiglijke of mentale vermogens of gebrek aan kennis of ervaring. Zij
moeten onder toezicht staan en aanwijzingen krijgen van een persoon die
verantwoordelijk is voor hun veiligheid.
Zorg ervoor dat u de apparatuur uit te buurt houdt van apparaten die hitte uitstralen en
plaats hem niet in direct zonlicht.
Controleer, voordat u de stekker in het stopcontact steekt, of de op het typeplaatje
aangegeven spanning overeenkomt met die van het lokale lichtnet.
Laat het apparaat niet onbeheerd achter, terwijl het is aangesloten op de
stroomvoorziening.
Dompel het apparaat niet onder in water of enige andere vloeistof.
Het is noodzakelijk om de stekker uit het stopcontact te halen, nadat de apparatuur is
gebruikt, voordat het wordt schoongemaakt en terwijl het wordt gerepareerd.
Wanneer de apparatuur in de buurt van kinderen wordt gebruikt, moet er direct
toezicht zijn. Laat de apparatuur nooit binnen het bereik van kinderen.
Reparaties aan elektrische apparatuur mogen uitsluitend door gekwalificeerd personeel
worden uitgevoerd.
Onjuist uitgevoerde reparaties kunnen de gebruiker en/of de apparatuur blootstellen
aan ernstige risico's.
Deze apparatuur is uitsluiten bestemd voor huishoudelijk gebruik en mag niet voor
industriële of commerciële doeleinden worden gebruikt.
Gebruik dit apparaat niet met een beschadigde stekker of kapot snoer, niet na een
storing of nadat het is gevallen of op andere wijze is beschadigd.
Gebruik deze apparatuur niet anders dan waarvoor hij is bestemd.
Dit apparaat moet op een stabiele, hittebestendige ondergrond worden geplaatst.
Duw geen voorwerpen in de openingen, omdat dit schade aan de apparatuur en/of
elektrische schokken kan veroorzaken.
Gebruik dit product niet in natte of slechte weersomstandigheden. Dit product is geen
speelgoed.
Speel geen muziek op overmatige geluidsniveaus af, in het bijzonder in de buurt van
kinderen.
De normale functie van het product kan worden verstoord door sterke
elektromagnetische interferentie. Als dat gebeurt, volg dan de instructies van de
handleiding om het product te resetten, zodat de normale werking wordt hervat. In het
geval dat de functie niet kon hervatten, gebruik het product dan op een andere locatie.
Page 17

WAARSCHUWING
Batterij niet inslikken, risico op chemische brandwonden
(De afstandsbediening meegeleverd met) Dit product bevat een
munt/knoopcelbatterij. Als deze knoopcelbatterij wordt ingeslikt, kan dit
binnen slechts 2 uur tot ernstige interne brandwonden en fataal letsel leiden.
Houd nieuwe en gebruikte batterijen buiten bereik van kinderen.
Als de batterijhouder niet goed kan worden gesloten, dient u het product niet
meer te gebruiken en buiten bereik van kinderen te houden.
Als u denkt dat batterijen zijn ingeslikt of binnenin een willekeurig
lichaamsdeel terecht zijn gekomen, dient u onmiddellijk medische hulp te
zoeken.
Page 18

ONDERDELENBESCHRIJVING
BOVENPANEEL
1. Volume +/-
2. Stand-by
3. Modus
4. Vorige/Volgende
5. Uitwerpen (open of sluit de cd-lade)
6.
Afspelen/Pauze
VOORKANT
1. Display
2. Sensor afstandsbediening
3. Indicator
4. Disc-lade
5. USB-poort voor het afspelen van
MP3
6. USB-poort voor opladen
7. NFC-sensor
8.
Luidsprekers
ACHTERPANEEL
1. FM-antenne
2. 3,5 mm Aud-2 in jack
3. R/L RCA Aud-1 in jack
4. POWER INPUT (Stroomaansluiting)
5.
Aan-/uitschakelaar
Page 19
AFSTANDSBEDIENING
1. Stand-by
2. Demp
3. Vorige
4. Snel achteruit
5. Omlaag
6. Herhaal/Willekeurig
7. Volume –
8. Bluetooth
9. CD/USB
10. Nummers
11. Zoeken
12. Uitwerpen
13. Omhoog
14. Volg
15. Afspelen/Pauze
16. Snel vooruit
17. Programma
18. Volume +
19. Toon
20. FM
21. AUX 1/2
22. Frequentie
23. Mono/Stereo
24. Opslaan
INSTALLATIE
Installeer de machine, zoals hieronder beschreven (niet aansluiten op de netspanning):
De toren
Bodemplaat
Bevestig de schroeven
Schroef
Om het toestel stabieler te
maken, gebruikt u de
meegeleverde schroeven om
het verstevigingsmateriaal
aan de bodemplaat van de
toren te bevestigen.
Controleer het schema voor
de juiste manier van
installeren!
Verstevigingsmateriaal
Page 20

ALGEMENE BEDIENING
STAND-BYMODUS
Druk de toets STAND-BY om het apparaat te activeren of het weer in de standbystand te zetten.
SELECTEER MODUS
Druk de toets MODUS om naar een van de volgende modi te schakelen: CD, USB,
FM, Bluetooth of AUX 1/2. Druk op de CD/USB-knop op de afstandsbediening om de
CD- of USB-modus te selecteren. Druk op de AUX 1/2-knop op de afstandsbediening om
de AUD-1- of AUD-2-modus te selecteren.
VOLUME-INSTELLING
Druk op de VOLUME +/- knoppen of draai aan de volumeknop om het volume aan te
passen.
DEMPEN VAN HET GELUID
Druk de toets DEMPEN op de afstandsbediening om het geluid te dempen. Druk
nogmaals of druk op de VOLUME +/- knoppen om het volume te herstellen.
NUMMERS OVERSLAAN
Druk op de VORIGE /VOLGENDE -knop op de afstandsbediening of op het
bovenpaneel om naar de vorige of volgende track te gaan.
AFSPELEN/PAUZE
Druk de toets AFSPELEN/PAUZE om het afspelen te pauzeren; druk er nogmaals op
om het afspelen te hervatten.
VERSNEL DE MUZIEK
Druk in de USB- of CD-modus op de / knop op de afstandsbediening om in de
muziek vooruit of achteruit te gaan. Druk herhaaldelijk om de normale snelheid te
hervatten.
HERHAALMODUS
Druk op de REP.-knop op de afstandsbediening om het nummer één keer te herhalen.
Druk nog een keer om alle nummers te herhalen. Druk een derde keer om normaal
afspelen te hervatten.
PROGRAMMA
Druk in de CD-modus op de PROG.-knop op de afstandsbediening om naar de
programma-instellingen te gaan. "P: 0100": gebruik dan cijferknoppen om de track die u
wilt programmeren (om track 4 op te slaan, drukt u op "0" + "4") te selecteren. Druk
vervolgens op de knop om te bevestigen en begin het afspelen van de muziek in de
geprogrammeerde volgorde.
Page 21

MO/ST-KNOP
Druk in de FM-modus op de MO/ST-knop om over te schakelen van stereo naar mono.
Druk nogmaals op om terug te schakelen naar de stereo-modus.
ALGEMENE BEDIENING
TOONREGELING
Druk op de TONE-knop op de afstandsbediening om de lage en hoge tonen te
selecteren. Wanneer "TRB" op het display verschijnt, gebruik de VOL+/- knoppen om
het effect van de hoge tonen aan te passen.
Wanneer "BS" op het display verschijnt, gebruik de VOL+/- knoppen om het effect van
de bastonen aan te passen.
SAVE-KNOP
Druk in de FM-modus op de SAVE-knop om de huidige frequentie op te slaan in een
voorkeuze-instelling.
WILLEKEURIG
Houd in de CD- of USB-modus de knop REPEAT ingedrukt om de muziek in willekeurige
weergave te selecteren.
BLUETOOTH UITSCHAKELEN
Druk in de Bluetooth-modus op de AFSPELEN/PAUZE-knop om de Bluetooth-verbinding
te verbreken.
Page 22

BLUETOOTH BEDIENING
1. Druk op de MODUS -knop om over te schakelen naar de Bluetooth-modus.
2. Bij de overgang naar de Bluetooth-modus zal het vorige gekoppelde apparaat
automatisch met de luidsprekertoren verbinding maken.
3. Schakel het Bluetooth toestel (bijv. telefoon) in en ga naar het Bluetooth zoekmenu.
4. Zoek "BTT-9" en koppel het; voer indien nodig het wachtwoord "0000" in. Eenmaal
gekoppeld, zal het display gestaag knipperen.
5. Als het dan nog niet werkt, reset de Bluetooth en volg de bovenstaande stappen
opnieuw.
NFC-BEDIENING
1. Druk op de MODUS -knop om over te schakelen naar de Bluetooth-modus.
2. Plaats de achterkant van de telefoon (met NFC-functie) gedurende 3 seconden op
het woord "NFC" aan de voorkant van het apparaat. Nu is de Bluetooth-functie van
de telefoon automatisch geactiveerd.
3. Als de indicator blijft branden en u een geluidssignaal hoort, zijn zij gekoppeld.
4. Om de NFC/Bluetooth-verbinding te verbreken, houdt u de achterkant van de
telefoon op het woord "NFC" aan de voorkant van het apparaat. Als er een
geluidssignaal komt, zijn ze verbroken.
5. Sommige apparaten met het Android-systeem 4.0 of lager hebben de installatie van
NFC.apk nodig om de NFC-functie in te schakelen. Sommige apparaten zijn
onvoldoende compatibel met de NFC-functie; dat kan betrekking hebben op de NFCsoftware.
USB
BEDIENING USB
1.
Schakel het apparaat in en steek een USB-flashdrive (niet inbegrepen) in de USB-poort,
zorg er hierbij voor de stekker volledig en correct in te steken.
2. Druk de toets MODUS om naar de USB-modus te schakelen.
3. De toren zal de muziek van de USB automatisch afspelen.
4. De maximale grootte van Flash Drive die kan worden aangesloten is 32 GB.
5. Het ondersteunde formaat voor het afspelen vanaf de USB is MP3.
NFC-sensor
Telefoon met NFC
Page 23

AUDIO-BEDIENING
Gebruik de 3,5 mm RCA-kabel (meegeleverd) om het toestel aan te sluiten op de cdspeler, MP3-speler, telefoon, computer of op een ander muziekapparaat.
1. Sluit een kant van de audiokabel aan op de audio-ingang R/L op het achterpaneel
van het apparaat en sluit dan de andere kant aan op de MP3-speler.
2. Druk op de MODUS -knop op het bovenpaneel of druk op de AUX 1/2-knop op
de afstandsbediening om naar de AUX-IN-modus te schakelen (AUD-1/AUD-2).
3. Druk op de AUX 1/2-knop om naar AUD-1-modus te gaan en start het afspelen
van het apparaat dat op de R/L RCA-jack is aangesloten.
4. Druk op de AUX 1/2-knop om naar de AUD-2-modus te gaan en start het
afspelen van het apparaat is aangesloten op de 3,5 mm AUX IN jack.
BEDIENING FM
1. Pas de positie van de FM-antenne aan om de beste ontvangst te krijgen.
2. Druk op de MO/ST-knop om stereo in te schakelen.
3. Druk op de MODUS -knop om over te schakelen naar de FM-modus.
4. Druk op de / -knop om naar het vorige of volgende station te gaan.
5. Druk op de / knop op de afstandsbediening om in frequentiestapjes van 0,05
MHz af te stemmen.
6. Houd de / -knop op de afstandsbediening om naar het krachtigste station te
gaan.
7. Druk op de SEARCH-knop op de afstandsbediening of op op het apparaat om de
stations te zoeken. Druk nogmaals om het zoeken te stoppen.
8. Opslaan van (60) stations:
Druk op de cijfertoetsen om het voorkeuzenummer te selecteren en druk daarna op
de F-toets om de frequentie in te voeren. Druk tot slot op de knop SAVE om het
station op te slaan.
Voorbeeld om de 107,5 MHz op te slaan in voorkeuze 36. Druk op de cijfertoetsen
10+, 6 en vervolgens op F. Voer in 1, 0, 7, 5 en druk op de SAVE-knop.
cd-speler
FM-antenne
MP3-speler
Page 24

PROBLEEMOPLOSSING
Wanneer er zich een probleem voordoet, raadpleeg dan, voordat u het apparaat ter
reparatie aanbiedt, de onderstaande tabel. Als het probleem met de onderstaande
informatie niet kan worden opgelost, raadpleeg dan uw dealer of servicecentrum.
Probleem
Oplossing
(Netspanning) Het systeem
gaat niet aan of reageert niet
op de afstandsbediening.
- Zorg ervoor dat de AC-stekker correct is aangesloten
op een werkend stopcontact.
- Als dit niet helpt, haal dan de stekker uit het
stopcontact voordat u advies inwint.
(Afstandsbediening) werkt
niet of alleen van korte
afstand.
- Plaats nieuwe batterijen.
- Richt de afstandsbediening rechtstreeks op de sensor
voor de afstandsbediening, gelegen in het midden van
de luidspreker.
(Koppelen van het product)
Kan niet met succes
koppelen.
- Controleer of de luidspreker is uitgeschakeld of in
zoekmodus.
- Controleer of er zich andere Bluetooth-ontvangers in
de buurt van uw Bluetooth toestel bevinden. Schakel
ze uit om storingen te vermijden. Probeer opnieuw te
koppelen.
Kan niet goed afspelen, de
muziek speelt met
tussenpozen af.
- Controleer of de afstand tussen de luidspreker en het
Bluetooth-apparaat niet meer is dan de werkafstand
van 10 m.
- Controleer of er obstakels zijn die de communicatie
tussen de luidspreker en het Bluetooth-toestel
blokkeren.
- Beweeg de luidspreker of het Bluetooth-toestel om de
beste ontvangst te krijgen.
Het geluid is vervormd.
- Controleer de volume-instelling op zowel de
luidspreker als uw Bluetooth-toestel en stel het
volume op een geschikt niveau in.
Page 25

SPECIFICATIES
Stroomvoorziening
220-240 V AC, 50/60 Hz
Bedrijfstemperatuur
0 °C tot +35 °C
Maximaal vermogen
60 W
Bereik afstandsbediening
7 meter
Bereik Bluetooth
10 meter
Ingang jack
3,5 mm AUX-ingang; R/L RCA-aansluiting; USB
OPMERKING:
1. Wegens onafgebroken verbeteringen, kunnen het ontwerp en de specificaties van
het product ietwat verschillen van het product afgebeeld op de verpakking.
2. Dit product werkt op 2400 - 2483,5 MHz en is ontworpen om alleen te worden
gebruikt in een normale huishoudelijke omgeving. Dit product is geschikt voor dit
doel binnen alle EU-landen.
Service en ondersteuning
Garantie
Lenco biedt service en garantie aan overeenkomstig met de Europese wetgeving. Dit
houdt in dat u, in het geval van reparaties (zowel tijdens als na de garantieperiode), uw
lokale handelaar moet contacteren.
Belangrijke opmerking: Het is niet mogelijk om producten die gerepareerd moeten
worden direct naar Lenco te sturen.
Belangrijke opmerking: De garantie verloopt als een onofficieel servicecenter het
apparaat op wat voor manier dan ook heeft geopend, of er toegang toe heeft
gekregen.
Het apparaat is niet geschikt voor professioneel gebruik. In het geval van
professioneel gebruik worden alle garantieverplichtingen van de fabrikant nietig
verklaard.
Disclaimer
Er worden regelmatig updates in de firmware en/of hardwarecomponenten gemaakt.
Daardoor kunnen gedeelten van de instructie, de specificaties en afbeeldingen in deze
documentatie enigszins verschillen van uw eigen situatie. Alle onderwerpen die staan
beschreven in deze handleiding zijn bedoeld als illustratie en zijn niet van toepassing
op specifieke situaties. Aan de beschrijving in dit document kunnen geen rechten
worden ontleend.
Page 26

Afvoer van het oude apparaat
Dit symbool geeft aan dat het betreffende elektrische product of de batterij
niet moet worden verwijderd als algemeen huishoudelijk afval in Europa.
Zorg voor een juiste afvalverwerking door het product en de batterij in
overeenstemming met alle van toepassing zijnde lokale wetten voor het
verwijderen van elektrische apparatuur of batterijen te verwijderen.
Als u dit doet, helpt u de natuurlijke hulpbronnen te behouden en de standaard van
milieubescherming te verbeteren bij de behandeling en verwijdering van elektrisch
afval (Afgedankte Elektrische en Elektronische Apparatuur).
CE-markering
Producten met een CE keurmerk houden zich aan de EMC richtlijn
(2004/108/EC) en de Richtlijn voor Lage Voltage (2006/95/EC) uitgegeven
door de Europese Commissie.
Hierbij verklaart Lenco Benelux BV, Thermiekstraat 1a, 6361 HB Nuth, Nederland, dat
dit product voldoet aan de essentiële eisen en andere relevante bepalingen van
Richtlijn 1999/5/EU.
De conformiteitsverklaring kan worden geraadpleegd op techdoc@lenco.com
Service
Bezoek voor meer informatie en helpdeskondersteuning www.lenco.com
Lenco Benelux BV, Thermiekstraat 1a, 6361 HB, Nederland.
Page 27

Deutsch
Lautsprecherturm mit CD, Bluetooth, PLL-UKW-Radio, USB und NFC
Vielen Dank für den Kauf dieses Lautsprecherturms
Inbetriebnahme
Nehmen Sie das Gerät aus dem Verpackungskarton.
Entfernen Sie alle Verpackungsmaterialien und bewahren Sie diese für zukünftige
Referenz und/oder Verwendung im Verpackungskarton auf.
Inhalt des Kartons
Lautsprecherturmeinheit
Turmgrundplatte und Schrauben (mit Unterlegscheiben) für die Befestigung der Einheit
Audiokabel 3,5 mm-Klinke auf Cinch
Bedienungsanleitung
Fernbedienung
Netzkabel
Schrauben und Stabilisierungsplatten
Eigenschaften
Stereolautsprecher
Bluetooth-fähig
Audiokabel beiliegend
USB-Port für die MP3-Wiedergabe
PLL-UKW-Radio
Page 28

Sicherheitsanweisungen
Befolgen Sie immer die grundlegenden Sicherheitsanweisungen für die Benutzung
elektrischer Geräte:
Dieses Gerät ist nicht für die Benutzung durch Personen (Kinder inbegriffen) mit
verminderter körperlicher, sensorischer oder geistiger Leistungsfähigkeit oder
unzureichender Erfahrung und Kenntnis bestimmt. Diese sind ordnungsgemäß zu
beaufsichtigen und über die sichere Benutzung des Gerätes durch eine für ihre
Sicherheit verantwortliche Person zu unterweisen.
Stellen Sie sicher, dass das Gerät nicht zu nah an wärmeabgebenden Vorrichtungen bzw.
im direkten Sonnenlicht platziert wird.
Überprüfen Sie, dass die auf dem Typenschild angegebene Spannung mit der
Heimnetzspannung übereinstimmt, bevor Sie das Gerät an das Stromnetz anschließen.
Lassen Sie niemals die Anlage unbeaufsichtigt, solange diese am Stromnetz
angeschlossen ist.
Tauchen Sie das Gerät nicht in Wasser oder andere Flüssigkeiten.
Trennen Sie das Gerät vom Netz, nachdem Sie es benutzt haben, bevor Sie es reinigen
oder während der Reparatur.
Die Nutzung des Gerätes in der Nähe von Kindern erfordert eine strenge Beaufsichtigung
derer. Lassen Sie das Gerät außerhalb der Reichweite von Kindern.
Reparaturen an elektrischen Geräten dürfen nur durch qualifiziertes Fachpersonal
durchgeführt werden.
Unsachgemäße Reparaturen können den Benutzer und/oder das Gerät Gefahren
aussetzen.
Dieses Gerät ist nur für den häuslichen Gebrauch bestimmt und nicht für den
industriellen oder geschäftlichen Gebrauch jeglicher Art.
Betreiben Sie niemals die Anlage, wenn der Stecker oder das Kabel beschädigt ist, nach
einer Fehlfunktion, nachdem es umgestürzt ist oder in irgendeiner anderen Art
beschädigt wurde.
Benutzen Sie das Gerät in keiner anderen als für das Gerät vorgesehener Weise.
Diese Anlage ist auf einer stabilen, hitzebeständigen Oberfläche aufzustellen.
Das Stecken von Gegenständen in die Ö ffnungen kann eine Beschädigung des Gerätes
und/oder einen elektrischen Schock zur Folge haben.
Benutzen Sie dieses Produkt nicht im Regen oder bei schlechtem Wetter. Dieses Produkt
ist kein Spielzeug.
Geben Sie die Musik nicht in übermäßiger Lautstärke wieder, vor allem nicht in der Nähe
von Kindern.
Das ordnungsgemäße Funktionieren dieses Produktes kann durch starke
elektromagnetische Interferenzen gestört werden. Sollte dies geschehen sein, stellen Sie
die normale Arbeitsweise des Gerätes durch Befolgen der Schritte in der
Bedienungsanleitung wieder her. Kann die Funktionalität nicht wiederhergestellt
werden, benutzen Sie bitte das Gerät in einem anderen Umfeld.
Page 29

ACHTUNG
Nehmen Sie niemals die Batterie ein, Verätzungen wären die Folge
(mitgelieferte Fernbedienung) Dieses Produkt enthält eine Knopfzelle. Wenn die
Knopfzellenbatterie verschluckt wird, kann dies innerhalb von 2 Stunden zu
schweren inneren Verätzungen und Tod führen.
Neue und gebrauchte Batterien von Kindern fernhalten.
Wenn das Batteriefach nicht sicher schließt, dieses Produkt nicht weiter
verwenden und von Kindern fernhalten.
Wenn Sie vermuten, dass Batterien verschluckt oder eine Körperöffnung
eingeführt wurden, suchen Sie umgehend ärztliche Hilfe.
Page 30

BESCHREIBUNG DER GERÄTEBESTANDTEILE
BEDIENEINHEIT OBEN
1. Lautstärke +/-
2. Standby
3. Modi
4. Zurück/Vor
5. Auswurf (Ö ffnet oder Schließt das CDFach)
6.
Wiedergabe/Pause
VORDERSEITE/SEITLICH
1. Anzeige
2. Fernbedienungssensor
3. Anzeige-LED
4. CD-Fach
5. USB-Port für die MP3-Wiedergabe
6. USB-Port zum Aufladen
7. NFC-Sensor
8.
Lautsprecher
RÜCKSEITE
1. UKW-Antenne
2. Aud-In 2: 3,5 mm-Klinkenstecker
3. Aud-In 1: Cinchstecker L/R
4. Netzbuchse
5.
Netzschalter
Page 31

FERNBEDIENUNG
1. Standby
2. Stumm
3. Zurück
4. Schnelles
Zurückspulen
5. Runter
6. Wiederholen/Zufall
7. Lautstärke-
8. Bluetooth
9. CD/USB
10. Zifferntasten
11. Suche
12. Auswurf
13. Hoch
14. Vor
15. Wiedergabe/Pause
16. Schnelles Vorspulen
17. Sendung
18. Lautstärke +
19. Klang
20. UKW
21. AUX 1/2
22. Frequenz
23. Mono/Stereo
24. Speichern
AUFBAU
Bitte bauen Sie den Lautsprecherturm wie nachstehend gezeigt auf (verbinden Sie ihn
nicht mit dem Netz):
Der Turm
Grundplatte
Diese Schrauben festziehen
Schrauben
Benutzen Sie für einen
sicheren Stand Ihres Turms
die mitgelieferten Schrauben,
um die Stabilisierungsplatten
an der Unterseite der
Turmgrundplatte zu
befestigen. Siehe Abbildung
zur Art der Anbringung!
Stabilisierungsplatten
Page 32

ALLGEMEINE BEDIENUNG
STANDBY-MODUS
Drücken Sie die STANDBY- Taste, um in den Standby-Modus zu wechseln oder das
Gerät wieder einzuschalten.
AUSWAHLMODUS
Drücken Sie die MODUS- Taste, um in einen der folgenden Modi zu wechseln: CD,
USB, FM (UKW), Bluetooth oder Aux1/2. Drücken Sie zur Auswahl des CD- oder USBModus die Taste CD/USB und zur Auswahl des Audioeinganges 1 oder 2 die Taste
AUX1/2 Ihrer Fernbedienung.
LAUTSTÄRKEEINSTELLUNG
Drehen Sie für die Einstellung der Lautstärke den Lautstärkeregler oder Drücken Sie die
Tasten VOLUME+/-.
STUMMSCHALTEN DES SOUNDS
Drücken Sie die STUMM- Taste der Fernbedienung, um den Sound stummzuschalten.
Drücken Sie zum Wiederherstellen der Lautstärke diese Taste erneut oder eine der
Tasten VOLUME+/-.
TITEL Ü BERSPRINGEN
Drücken Sie die ZURÜ CK /WEITER -Tasten Ihrer Fernbedienung oder der
Bedieneinheit auf der Oberseite des Turms, um zum vorherigen bzw. nächsten Titel zu
springen.
WIEDERGABE/PAUSE
Drücken Sie die WIEDERGABE/PAUSE- Taste, um die Wiedergabe zu unterbrechen;
erneutes Drücken setzt die Wiedergabe fort.
BESCHLEUNIGTE MUSIKWIEDERGABE
Drücken Sie im USB- oder CD-Modus die / -Taste Ihrer Fernbedienung, um die
Musik zurück- oder vorzuspulen. Durch erneutes Drücken wird die Musik wieder in
normaler Geschwindigkeit wiedergegeben.
WIEDERHOLUNGSMODUS
Drücken Sie die REP.-Taste Ihrer Fernbedienung, um den aktuellen Titel und ein
weiteres Mal, um alle Titel wiederholt wiederzugegeben. Drücken Sie ein drittes Mal,
werden alle Titel wieder normal wiedergegeben.
Page 33

SENDUNG
Drücken Sie im CD-Modus die PROG.-Taste Ihrer Fernbedienung, um in den
Programmiermodus zu wechseln. In der Anzeige erscheint „P: 0100“. Wählen Sie mit
den Zifferntasten den Titel aus, den Sie programmieren möchten (Drücken Sie z.B. für
die Programmierung von Titel 4 die Tasten „0“ + „4“). Drücken Sie danach zur
Bestätigung die Taste , wodurch die Musikwiedergabe in der programmierten
Reihenfolge beginnt.
MO/ST-TASTE
Drücken Sie im FM-Modus (UKW-Modus) die MO/ST-Taste, um vom Stereo-Modus in
den Mono-Modus zu wechseln.
Erneutes Drücken wechselt wieder in den Stereo-Modus.
Page 34

ALLGEMEINE BEDIENUNG
KLANGEINSTELLUNG
Drücken Sie die TONE-Taste Ihrer Fernbedienung, um die Bässe und Höhen
auszuwählen. Wird in der Anzeige „TRB“ (Höhen) angezeigt, werden durch die Tasten
VOL+/- die Höhen verändert und eingestellt.
Wird in der Anzeige „BS“ (Bässe) angezeigt, werden durch die Tasten VOL+/- die Bässe
verändert und eingestellt.
SAVE-TASTE
Drücken Sie im FM-Modus (UKW-Modus) die SAVE-Taste, um die gegenwärtige
Frequenz auf einem Speicherplatz zu speichern.
ZUFALLSWIEDERGABE
Halten Sie im CD- oder USB-Modus die REP.-Taste gedrückt, um die Titel für den
Zufallswiedergabe-Modus auszuwählen.
BLUETOOTH-VERBINDUNG TRENNEN
Halten Sie im Bluetooth-Modus die WIEDERGABE/PAUSE-Taste gedrückt, um die
Bluetooth-Verbindung zu trennen.
Page 35

BLUETOOTH-BEDIENUNG
1.
Drücken Sie die MODUS -Taste, um in den Bluetooth-Modus zu wechseln.
2. Jedes Mal, wenn Sie in den Bluetooth-Modus wechseln, wird das zuletzt mit dem
Lautsprecherturm verbundene Gerät automatisch wiederverbunden.
3. Schalten Sie Ihr Bluetooth-Gerät (z. B. Handy) ein und wechseln Sie in das Bluetooth-Suchmenü.
4. Suchen Sie nach „BTT-9“ und koppeln Sie ihn. Geben Sie bei Bedarf das Passwort
„0000“ ein. Nach erfolgreicher Kopplung blinkt die Anzeige kontinuierlich.
5.
Setzen Sie Bluetooth zurück, sollte die Kopplung fehlschlagen und führen Sie danach
obenstehende Schritte noch einmal aus.
NFC-BEDIENUNG
1. Drücken Sie die MODUS -Taste, um in den Bluetooth-Modus zu wechseln.
2. Halten Sie die Rückseite Ihres Mobilgeräts (mit NFC-Funktionalität) für 3 Sekunden an
die Stelle mit der Aufschrift „NFC“ an der Vorderseite des Lautsprecherturms. Die
Bluetooth-Funktion Ihres Mobilgeräts wird dabei automatisch aktiviert.
3. Wenn die Anzeige-LED permanent leuchtet und ein hörbares Signal ertönt, war das
Koppeln erfolgreich.
4. Halten Sie erneut die Rückseite Ihres Mobilgeräts an die Stelle mit der Aufschrift
„NFC“ an der Vorderseite des Lautsprecherturms, um die NFC-Bluetooth-Verbindung
wieder zu trennen. Ertönt ein hörbares Signal, wurde die Verbindung getrennt.
5. Bei einigen Mobilgeräten mit dem Android-System 4.0 oder niedriger ist es
notwendig, für die Aktivierung der NFC-Funktion NFC.apk zu installieren. Einige
Geräte können für die NFC-Funktion inkompatibel sein, was unter Umständen an der
verwendeten NFC-Software liegen kann.
USB
USB-BENUTZUNG
1.
Schalten Sie den Lautsprecher ein und schließen Sie eine USB-Stick (nicht enthalten) an
den USB-Port an; achten Sie darauf, dass das Gerät vollständig und richtig am Port
angesteckt ist.
2. Drücken Sie die MODUS- Taste, um in den USB-Modus zu wechseln.
3. Der Turmlautsprecher startet die USB-Wiedergabe automatisch.
4. Die maximale Größe des USB-Sticks, der verbunden werden kann, beträgt. 32 GB.
5. Das unterstützte Format für die USB-Wiedergabe ist MP3.
NFC-Sensor
Mobilgerät mit NFC
Page 36

AUDIO-BEDIENUNG
Verwenden Sie das Audiokabel 3,5 mm Klinke auf Cinch (mitgeliefert), um Ihren CDPlayer/MP3-Player/Handy/Computer, Ihr Mobilgerät oder auch andere Audioquellen
anzuschließen.
1. Verbinden Sie das eine Ende des Audiokabels mit den AUX-IN L/R-Eingängen oder
dem Line-In-Eingang auf der Rückseite der Lautsprechereinheit und das andere
Ende mit dem MP3-Player.
2. Drücken Sie die MODUS -Taste der oberen Bedieneinheit oder Drücken Sie die
Taste AUX1/2 Ihrer Fernbedienung, um entweder Audioeingang 1 oder 2 (Aud-In
1/Aud-In 2) auszuwählen.
3. Durch Drücken der Taste AUX1/2 wechseln Sie in den Modus Aud-In 1. Es wird
das Gerät wiedergegeben, das an die Cinch-Buchsen L/R angeschlossen ist.
4. Durch erneutes Drücken der Taste AUX1/2 wechseln Sie in den Modus Aud-In 2.
Es wird das Gerät wiedergegeben, das an die 3,5 mm-Line-In-Klinkenbuchse
angeschlossen ist.
UKW-BEDIENUNG
1. Richten Sie die UKW-Antenne entsprechend dem besten Empfang aus.
2. Drücken Sie die MO/ST-Taste, um Stereo zu aktivieren.
3. Drücken Sie die MODUS -Taste, um in den FM-Modus (UKW-Modus) zu wechseln.
4. Drücken Sie die Taste / , um zum vorherigen oder nächsten Sender zu springen.
5. Drücken Sie die Taste / Ihrer Fernbedienung, um die Frequenz in 0,05 MHzSchritten einzustellen.
6. Halten Sie die Taste / gedrückt, um den Sender mit dem stärksten Signal
auszuwählen.
CD-Player
UKW-Antenne
MP3-Player
Page 37

7. Drücken Sie die SEARCH-Taste Ihrer Fernbedienung oder die Taste am
Lautsprecherturm, um die Suche nach Sendern zu starten. Drücken Sie erneut, um
die Suche zu beenden.
8. Sender speichern (60):
Drücken Sie zur Auswahl des Speicherplatzes die Zifferntasten und danach die F-Taste.
Geben Sie nun die gewünschte Frequenz ein. Drücken Sie für die Speicherung des
Senders die SAVE-Taste.
Um beispielsweise die Frequenz 107,5 MHz auf Speicherplatz 36 zu speichern:
Drücken Sie 3-mal die Zifferntaste 10+ und danach die Zifferntaste 6. Drücken Sie
danach die Taste F und geben Sie 1, 0, 7 und 5 ein und speichern Sie Ihre Auswahl
durch Drücken der Taste SAVE.
Page 38

FEHLERBEHEBUNG
Bitte überprüfen Sie Ihr Gerät beim Auftreten von Problemen anhand nachstehender
Liste, bevor Sie es zur Reparatur geben. Kontaktieren Sie Ihren Händler oder Ihr
Servicecenter, wenn das Problem nicht mit den folgenden Informationen gelöst
werden kann.
Problem
Abhilfe
(Strom) Das Gerät schaltet
sich nicht ein oder reagiert
nicht auf die Fernbedienung.
- Vergewissern Sie sich, dass der AC-Netzstecker richtig
mit der Steckdose verbunden ist und dass letztere
Strom führt.
- Sollte dies nicht helfen, trennen Sie die
Lautsprechereinheit vom Netz, bevor Sie Ratschlag
suchen.
(Fernbedienung) Keine
Funktion oder kurze
Reichweite.
- Wechseln Sie die Batterien.
- Halten Sie die Fernbedienung direkt in Richtung des
Fernbedienungssensors, der sich rechts neben der
Anzeige befindet.
(Koppeln des Turms)
Kopplung nicht erfolgreich.
- Ü berprüfen Sie, ob sich der Lautsprecherturm im
Standby- oder Suchmodus befindet.
- Überprüfen Sie, ob noch andere Bluetooth-Empfänger
in der Umgebung Ihres Bluetooth-Gerätes vorhanden
sind. Schalten Sie diese aus, um Störungen
vorzubeugen. Versuchen Sie ein erneutet Koppeln.
Keine exakte
Musikwiedergabe, die
Musikwiedergabe ist
lückenhaft.
- Ü berprüfen Sie, ob die Entfernung zwischen Turm und
Bluetooth-Gerät größer als die Reichweite des Turms
(10 m) ist.
- Ü berprüfen Sie, ob Hindernisse die Kommunikation
zwischen Lautsprecher und Bluetooth-Gerät
beeinträchtigen.
- Bewegen Sie den Lautsprecher oder das Bluetooth-
Gerät für bestmöglichsten Empfang.
Der Sound ist verzerrt.
- Überprüfen Sie die Lautstärkeeinstellungen an beiden
Lautsprechern sowie Ihres Bluetooth-Gerätes, und
stellen Sie einen angemessenen Lautstärkepegel ein.
Page 39

TECHNISCHE DATEN
Stromversorgung
220–240 V, 50/60 Hz
Betriebstemperatur
0 °C bis +35 °C
Maximale Leistung
60 W
Reichweite der Fernbedienung
7 Meter
Bluetooth-Verbindungsreichweite
10 Meter
Eingangsbuchse
Line-In: 3,5 mm-Klinke, AUX-IN: Cinch R/L, USB
HINWEIS:
1. Aufgrund kontinuierlicher Verbesserungen können das Design und die technischen
Daten des tatsächlichen Produkts von den Verpackungsangaben abweichen.
2. Dieses Produkt arbeitet im Frequenzbereich von 2400 bis 2483,5 MHz und sollte
nur in einer normalen häuslichen Umgebung verwendet werden. Es eignet sich zur
Verwendung in allen EU Ländern.
Service und Unterstützung
Garantie
Lenco bietet Leistungen und Garantien im Einklang mit Europäischem Recht. Im Falle
von Reparaturen (sowohl während als auch nach Ablauf der Garantiezeit) sollten Sie
deshalb Ihren Einzelhändler kontaktieren.
Wichtiger Hinweis: Es ist nicht möglich, Geräte für Reparaturen direkt an Lenco zu
schicken.
Wichtiger Hinweis: Falls dieses Gerät von einem nicht autorisierten Kundendienst
geöffnet oder darauf zugegriffen wird, erlischt die Garantie.
Dieses Gerät ist nicht für professionelle Zwecke geeignet. Falls das Gerät für
professionelle Zwecke eingesetzt wird, erlöschen alle Garantieverpflichtungen
seitens des Herstellers.
Haftungsausschluss
Aktualisierungen der Firmware und/oder Hardware-Komponenten werden regelmäßig
durchgeführt. Daher können einige der Anweisungen, Spezifikationen und
Abbildungen in dieser Dokumentation von Ihrer individuellen Situation abweichen. Alle
in diesem Handbuch beschriebenen Elemente dienen nur zur Illustration und treffen
auf Ihre individuelle Situation möglicherweise nicht zu. Aus der in diesem Handbuch
getätigten Beschreibung können keine Rechtsansprüche oder Leistungsanforderungen
geltend gemacht werden.
Page 40

Entsorgung des Altgeräts
Dieses Symbol zeigt an, dass das entsprechende Produkt oder dessen
Batterie in Europa nicht mit dem normalen Hausmüll entsorgt werden darf.
Um die ordnungsgemäße Abfallbehandlung des Produkts und dessen
Batterie zu gewährleisten, müssen diese im Einklang mit allen
anwendbaren örtlichen Vorschriften zur Entsorgung von Elektrogeräten
und Batterien entsorgt werden.
Dabei helfen Sie, natürliche Ressourcen zu schonen und Umweltschutzstandards zur
Verwertung und Entsorgung von Altgeräten aufrecht zu halten (Waste Electrical and
Electronic Equipment Directive).
CE-Kennzeichen
Produkte mit der CE Kennzeichnung entsprechen der EMV-Richtlinie
(2004/108/EC) und der Niederspannungsrichtlinie (2006/95/EC),
herausgegeben von der Kommission der Europäischen Gemeinschaft.
Lenco Benelux BV, Thermiekstraat 1a, 6361 HB Nuth, Die Niederlande, erklärt hiermit,
dass dieses Produkt den grundlegenden Anforderungen und anderen Vorschriften der
Richtlinie 1999/5/EC entspricht.
Die Konformitätserklärung ist erhältlich unter techdoc@lenco.com
Service
Weitere Informationen und Unterstützung erhalten Sie unter www.lenco.com
Lenco Benelux BV, Thermiekstraat 1a, 6361 HB, Die Niederlande.
Page 41

Français
Colonne acoustique avec CD, Bluetooth, radio FM PLL, USB et FNC
Merci d’avoir acheté cette colonne acoustique.
Pour commencer
Sortez le matériel de la boîte.
Enlevez tous les emballages et rangez-les dans la boîte pour pouvoir les consulter ou les
utiliser par la suite.
Contenu du produit
Colonne acoustique
Socle de la colonne et vis (avec rondelles) pour monter l'appareil
Câble audio RCA de 3,5 mm
Mode d’emploi
Télécommande
Câble d'alimentation
Vis et tiges de renfort
Caractéristiques
Enceintes stéréo
Connectivité Bluetooth
Câble audio inclus
Port USB pour lire des MP3
Radio FM PLL
Page 42

Consignes de sécurité
Lors de l’utilisation de cet appareil électrique, observez toujours les mesures de
sécurité ci-dessous :
Les personnes (y compris les enfants) aux capacités physiques, sensorielles ou mentales
réduites, ou manquant d'expérience ou de connaissances, ne doivent pas utiliser cet
appareil. Ils doivent être surveillés et conseillés par une personne responsable de leur
sécurité.
Vérifiez que l'appareil est suffisamment éloigné des sources de chaleur et n'est pas
exposé directement à la lumière du soleil.
Vérifiez que la tension indiquée sur la plaque signalétique correspond à celle du secteur
avant de brancher l'appareil sur une prise électrique.
Ne laissez pas l'appareil sans surveillance alors qu’il est branché au secteur.
Ne plongez pas l'appareil dans l’eau ni un autre liquide.
Débranchez toujours le cordon d'alimentation quand vous avez fini d'utiliser l'appareil et
avant de le nettoyer ou de le réparer.
Surveillez attentivement les enfants qui sont à proximité de l'appareil lorsqu’il est en
fonctionnement. Ne laissez jamais l'appareil à portée des enfants.
Les réparations de cet appareil électrique doivent être effectuées uniquement par un
technicien compétent.
Des réparations incorrectes peuvent exposer l'utilisateur et/ou l'appareil à de graves
dangers.
Cet appareil est réservé à un usage familial et ne doit pas être utilisé à des fins
industrielles ou commerciales.
Ne faites pas fonctionner cet appareil avec un cordon ou une fiche endommagés, après
un dysfonctionnement, après une chute ou s'il est endommagé de quelque façon que ce
soit.
Utilisez cet appareil uniquement pour l’usage prévu.
L’appareil doit être posé sur une surface stable et résistante à la chaleur.
N'introduisez pas d'objets dans les ouvertures, sous risque d'endommager l'appareil
et/ou de prendre une décharge électrique.
N'utilisez pas cet appareil sous la pluie ou dans un environnement humide. Ce produit
n'est pas un jouet.
Ne régler pas la musique à un niveau excessif, en particulier à proximité d'enfants.
Le fonctionnement normal de l'appareil peut être perturbé par de fortes interférences
électromagnétiques. Si cela est le cas, réinitialisez simplement l'appareil en suivant le
mode d'emploi afin qu'il reprenne son fonctionnement normal. S'il ne retrouve pas un
fonctionnement normal, essayez d'utiliser l'appareil à un autre endroit.
Page 43

AVERTISSEMENT
N’ingérez pas la pile, risque de brûlure chimique
(La télécommande fournie avec) Ce produit contient une pile bouton.
L’ingestion d’une pile bouton peut causer de graves brûlures internes en
seulement 2 heures et causer la mort.
Tenez les piles neuves et usagées hors de portée des enfants.
Si le compartiment à pile ne se ferme pas correctement, cessez d’utiliser
l’appareil et tenez-le hors de portée des enfants.
Si vous pensez que les piles ont été avalées ou placées à l’intérieur d’une partie
du corps, consultez un médecin immédiatement.
Page 44

DESCRIPTION DES PIÈCES
PANNEAU DU HAUT
1. Volume +/-
2. Mise en veille
3. Mode
4. Précédent/suivant
5. Éjecter (ouvrir ou fermer le tiroir de
disque)
6.
Lecture/pause
AVANT/ARRIÈRE
1. Écran
2. Capteur de la télécommande
3. Indicateur
4. Tiroir de disque
5. Port USB pour lire des MP3
6. Port USB pour la charge
7. Capteur NFC
8.
Haut-parleurs
PANNEAU ARRIÈRE
1. Antenne FM
2. Prise d'entrée Aud-2 de 3,5 mm
3. Prise d'entrée Aud-1 RCA G/D
4. POWER INPUT (Entrée
d’alimentation)
5.
Interrupteur marche/arrêt
Page 45

TÉLÉCOMMANDE
1. Mise en veille
2. Muet
3. Précéde.
4. Retour rapide
5. Bas
6. Répétition/aléatoire
7. Volume –
8. Bluetooth
9. CD/USB
10. Numéros
11. Recherche
12. Éjecter
13. Haut
14. Suiv
15. Lecture/pause
16. Avance rapide
17. Progra.
18. Volume +
19. Ton
20. FM
21. AUX 1/2
22. Fréquence
23. Mono/stéréo
24. Enregistrer
INSTALLATION
Installez la machine comme ci-dessous (ne pas brancher au secteur) :
La colonne
Socle
Fixez les vis.
Vis
Pour stabiliser l'appareil,
utilisez les vis fournies pour
monter les tiges de renfort en
bas de la plaque du socle de
la colonne. Consultez le
schéma pour la méthode
d'installation !
Tiges de renfort
Page 46

FONCTIONNEMENT GÉNÉRAL
MODE VEILLE
Appuyez sur le bouton VEILLE pour rallumer l'appareil ou le mettre en mode veille.
MODE SÉLECTION
Appuyez sur le bouton MODE pour basculer vers l'un des modes suivants : CD, USB,
FM, Bluetooth ou Aux1/2. Appuyez sur le bouton CD/USB de la télécommande pour
sélectionner le mode CD ou USB, appuyez sur le bouton AUX1/2 de la télécommande
pour sélectionner le mode Aud-1 ou Aud-2.
RÉGLAGE DU VOLUME
Appuyez sur les boutons VOLUME+/- ou tournez la molette du volume pour régler le
volume.
DÉSACTIVATION DU SON
Appuyez sur le bouton SOURDINE de la télécommande pour couper le son. Rappuyez
sur les boutons VOLUME+/- pour rétablir le son.
CHANGEMENT DE PISTE
Appuyez sur le bouton PRÉCÉDENT /SUIVANT de la télécommande ou du panneau
du HAUT pour aller à la piste précédente ou suivante.
LECTURE/PAUSE
Appuyez sur le bouton LECTURE/PAUSE pour mettre la lecture en pause et appuyez
de nouveau dessus pour reprendre la lecture.
LECTURE DE MUSIQUE EN ACCÉLÉRÉ
En mode USB ou CD, appuyez sur le bouton / de la télécommande pour avancer ou
reculer sur la piste. Appuyez plusieurs fois pour reprendre la vitesse normale.
MODE DE RÉPÉTITION
Appuyez sur le bouton REP. de la télécommande pour répéter une piste, rappuyez pour
répéter toutes les pistes, rappuyez une troisième fois pour reprendre la lecture normale.
PROGRA.
En mode CD, appuyez sur le bouton PROG. de la télécommande pour accéder à
l'interface de réglage de programmation, « P: 0100 », utilisez le pavé NUMÉRIQUE pour
sélectionner une piste à programmer, (pour mémoriser la piste 4, appuyez sur « 0 » +
« 4 »). Ensuite, appuyez sur le bouton pour confirmer et commencer la lecture de
musique dans l'ordre programmée.
BOUTON MO/ST
En mode FM, appuyez sur le bouton MO/ST pour passer du mode stéréo au mode mono.
Rappuyez dessus pour revenir en mode stéréo.
Page 47

FONCTIONNEMENT GÉNÉRAL
BOUTON TONE
Appuyez sur le bouton TONE de la télécommande pour sélectionner les basses et les
aiguës. Quand « TRB » s'affiche, utilisez les boutons VOL+/- pour régler l'effet des
aiguës.
Quand « BS » s'affiche, utilisez les boutons VOL+/- pour régler l'effet des basses.
BOUTON SAVE
En mode FM, appuyez sur le bouton SAVE pour sauvegarder la fréquence actuelle à un
emplacement de présélection.
ALÉATOIRE
En mode CD ou USB, maintenez enfoncé le bouton REPEAT pour sélectionner la
musique en mode de lecture aléatoire.
DÉCONNEXION DU BLUETOOTH
En mode Bluetooth, maintenez enfoncé le bouton LECTURE/PAUSE pour désactiver la
connexion Bluetooth.
Page 48

UTILISATION PAR BLUETOOTH
1.
Appuyez sur le bouton MODE pour passer en mode Bluetooth.
2. L'appareil préalablement apparié se connectera automatiquement à la colonne
acoustique à chaque activation du mode Bluetooth.
3. Mettez en marche l'appareil Bluetooth (par ex. : un téléphone) et accédez au menu de recherche
Bluetooth.
4. Recherchez « BTT-9 » et appariez-vous-y en saisissant le mot de passe « 0000 » si
nécessaire. Si l'appariement est effectué, l'affichage clignotera régulièrement.
5.
Si cela ne fonctionne toujours pas, réinitialisez le Bluetooth et recommencez la
procédure ci-dessus.
FONCTION NFC
1. Appuyez sur le bouton MODE pour passer en mode Bluetooth.
2. Placez l'arrière du téléphone (avec fonction NFC) sur la position du mot « NFC » sur le
panneau avant de l'appareil pendant 3 secondes, la fonction Bluetooth du téléphone
s'active automatiquement.
3. Quand le témoin s'allume constamment et vous entendez un signal sonore, ils sont
appariés.
4. Pour désactiver la connexion Bluetooth NFC, placez l'arrière du téléphone (avec
fonction NFC) sur la position du mot « NFC » sur le panneau avant de l'appareil.
Quand vous entendez un signal sonore, ils sont déconnectés.
5. Sur certains appareils Android de version 4.0 ou antérieure, il faut installer NFC.apk
pour activer la fonction NFC. Certains appareils peuvent avoir une faible
compatibilité pour la fonction NFC, pouvant être liée au logiciel NFC.
USB
FONCTIONNEMENT PAR USB
1.
Mettez en marche l'appareil et branchez une clé USB (non fournie) dans le port USB, en
vérifiant que la fiche est insérée entièrement dans le bon sens.
2. Appuyez sur le bouton MODE pour passer en mode USB.
3. La tour lira automatiquement la musique à partir de la clé USB.
4. La taille maximale de clé USB pouvant être connectée est de 32 Go.
5. Le format pris en charge pour la lecture par USB est MP3.
Capteur NFC
Téléphone avec NFC
Page 49

FONCTIONNEMENT AUDIO
Utiliser le câble audio 3,5mm-RCA (inclus) pour brancher l'appareil à un lecteur de
disque, un lecteur MP3, un téléphone, un ordinateur ou un autre lecteur de musique.
1. Branchez une extrémité du câble audio à l'entrée audio D/G sur le panneau
arrière de l'appareil, puis branchez l'autre extrémité au lecteur MP3.
2. Appuyez sur le bouton MODE du panneau du haut ou appuyez sur le bouton
AUX1/2 de la télécommande pour passer en mode d'entrée auxiliaire (Aud-1/Aud-
2).
3. Appuyez sur le bouton AUX1/2 pour passer en mode Aud-1 et lancer la lecture
avec l'appareil connecté à la prise RCA G/D.
4. Appuyez sur le bouton AUX1/2 pour passer en mode Aud-2 et lancer la lecture
avec l'appareil connecté à la prise d'entrée auxiliaire de 3,5 mm.
UTILISATION EN FM
1. Orientez l'antenne FM afin d'obtenir une bonne réception.
2. Appuyez sur le bouton MO/ST pour activer le stéréo.
3. Appuyez sur le bouton MODE pour passer en mode FM.
4. Appuyez sur le bouton / pour aller à la station précédente ou suivante.
5. Appuyez sur le bouton / de la télécommande pour régler la fréquence par
paliers de 0,05 MHz.
6. Maintenez enfoncé le bouton / de la télécommande pour aller à une station
ayant un signal puissant.
7. Appuyez sur le bouton SEARCH de la télécommande ou sur l'appareil pour
rechercher des stations, rappuyez dessus pour arrêter la recherche.
8. Sauvegarder des stations (60) :
Lecteur de disque
Antenne FM
Lecteur MP3
Page 50

Utilisez le pavé NUMÉRIQUE pour sélectionner le numéro de présélection, puis
appuyez sur le bouton F et saisissez la fréquence, et enfin appuyez sur le bouton
SAVE pour sauvegarder la station.
Par ex. sauvegardez la fréquence 107,5 MHz à l'emplacement 36. Appuyez sur le
bouton NUMÉRIQUE 10+, puis 6, appuyez ensuite sur F et saisissez 1, 0, 7, 5, et enfin
appuyez sur le bouton SAVE.
Page 51

DÉPANNAGE
Avant de faire réparer l'appareil, vérifiez le tableau suivant en cas de problème.
Adressez-vous à votre distributeur ou service après-vente si les informations suivantes
ne résolvent pas le problème.
Problème
La solution
(Alimentation) Le système ne
se met pas en marche ou ne
répond pas à la
télécommande.
- Vérifiez que la fiche d'alimentation CA est
correctement branchée à une prise secteur sous
tension.
- Si le problème n’est pas résolu, laissez débranchez
l'appareil avant de faire appel à l’assistance.
(Télécommande) Pas de
fonctions ou portée courte.
- Installez des piles neuves.
- Dirigez la télécommande directement vers le capteur
de la télécommande situé au centre de la colonne
acoustique.
(Appariement de l'appareil)
Appariement impossible.
- Vérifiez si la colonne acoustique est éteinte ou en
mode recherche.
- Vérifiez s'il y a d'autres récepteurs Bluetooth à
proximité de votre appareil Bluetooth. Éteignez-les
afin d'éviter toute interférence. Réessayez d'apparier
l'appareil.
La musique ne se lit pas
correctement, elle se lit par
intermittence.
- Vérifiez si la colonne acoustique est hors de portée de
l'appareil Bluetooth (10 m).
- Vérifiez si des obstacles bloquent la communication
entre l'enceinte et l'appareil Bluetooth.
- Déplacez l'enceinte ou l'appareil Bluetooth afin
d'améliorer la réception.
Le son est déformé.
- Vérifiez le réglage du volume sur l'enceinte et
l'appareil Bluetooth et réglez le volume à votre
convenance.
Page 52

CARACTÉRISTIQUES TECHNIQUES
Alimentation
220-240 V~50/60 Hz
Température de
fonctionnement
de 0 à +35 °C
Sortie de puissance maximale
60 W
Portée de la télécommande
7 mètres
Portée Bluetooth
10 mètres
Prise d'entrée
Prise d'entrée aux. de 3,5 mm ; prise RCA D/G ; port
USB
REMARQUE :
1. En raison des améliorations continues, la conception et les caractéristiques de ce
produit peuvent différer légèrement du produit illustré sur l'emballage.
2. Ce produit fonctionne à 2400 à 2483,5 MHz et est destiné uniquement pour être
utilisé dans un environnement domestique normal. Ce produit convient à cet usage
pour tous les pays de I’UE.
Service et assistance
Garantie
Lenco propose un service et une garantie conformément à la législation européenne,
ce qui signifie qu’en cas de besoin de réparation (aussi bien pendant et après la
période de garantie), vous pouvez contacter votre revendeur le plus proche.
Remarque importante : Il n’est pas possible de renvoyer l’appareil pour réparation
directement à Lenco.
Remarque importante : Si l’unité est ouverte ou modifiée de quelque manière par
un réparateur non agréé, la garantie serait caduque.
Cet appareil ne convient pas à une utilisation professionnelle. En cas d’utilisation
professionnelle, les obligations de garantie du fabricant seront annulées.
Clause de non-responsabilité
Des mises à jour du logiciel et/ou des composants informatiques sont régulièrement
effectuées. Il se peut donc que certaines instructions, caractéristiques et images
présentes dans ce document diffèrent légèrement de votre configuration spécifique.
Tous les articles décrits dans ce guide ne sont fournis uniquement qu’à des fins
d’illustration et peuvent ne pas s’appliquer à une configuration spécifique. Aucun droit
légal ne peut être obtenu depuis les informations contenues dans ce manuel.
Page 53

Mise au rebut de l’appareil usagé
Ce symbole indique que le produit électrique concerné ou la batterie ne
doivent pas être jetés parmi les autres déchets ménagers en Europe.
Pour garantir un traitement correct du déchet de la batterie ou de
l’appareil, veuillez les mettre au rebut conformément aux règlements
locaux en vigueur relatifs aux appareils électriques et autres batteries.
En agissant de la sorte, vous contribuerez à la préservation des ressources naturelles
et à l’amélioration des niveaux de protection environnementale concernant le
traitement et la destruction des déchets électriques (Directive sur les déchets des
équipements électriques et électroniques).
Marquage CE
Les produits avec la marque CE sont conformes à la directive CEM
(2004/108/CE) et à la directive basse tension (2006/95/CE) émises par la
commission de la communauté européenne.
Par la présente, Lenco Benelux BV, Thermiekstraat 1a, 6361 HB Nuth, The Netherlands,
déclare que ce produit est conforme aux exigences principales et autres clauses
applicables de la Directive 1999/5/CE.
La déclaration de conformité peut être consultée au lien : techdoc@lenco.com
Service après-vente
Pour en savoir plus et obtenir de l'assistance, visitez www.lenco.com
Lenco Benelux BV, Thermiekstraat 1a, 6361 HB, Pays-Bas.
Page 54

Español
Torre de sonido con CD, Bluetooth, radio FM PLL, USB y NFC
Gracias por adquirir el esta torre de sonido
Primeros pasos
Saque el equipo de la caja.
Retire todo el material de embalaje y guárdelo en la caja para guardarlo para futuras
consultas y/o usos.
Contenido de la caja
Torre de altavoces
Base de soporte de la torre y tornillos (con arandelas) para fijarla a la unidad
Cable de audio RCA de 3,5 mm
Manual de instrucciones
Mando a distancia
Cable de alimentación
Tornillos y barras de refuerzo
Características
Altavoces estéreo
Conectividad Bluetooth
Cable audio incluido
Puerto USB para reproducción de MP3
Radio FM PLL
Page 55

Instrucciones de seguridad
Cuando use aparatos eléctricos debe seguir siempre unas precauciones de seguridad
básicas:
Este equipo no está diseñado para que lo utilicen personas (niños incluidos) con
discapacidad física, sensorial o mental, o que carezcan de experiencia o conocimiento.
Para poder usar el equipo deberán ser supervisados e instruidos por una persona
responsable de su seguridad.
Asegúrese de que el equipo no esté demasiado cerca de otros electrodomésticos que
generen calor, ni expuesto a la luz solar directa.
Antes de enchufar el equipo a una toma de corriente, compruebe que la tensión
eléctrica indicada en la placa de datos técnicos se corresponde con la de la red eléctrica
local.
No deje el equipo sin supervisión mientras conecta la fuente de alimentación.
No sumerja el equipo en agua ni en otros líquidos.
Es crucial que desconecte el cable de alimentación después de utilizar el equipo, antes
de limpiarlo o durante su reparación.
Es necesaria una atenta supervisión cuando use el equipo cerca de los niños. Nunca deje
el equipo al alcance de los niños.
Las reparaciones de los equipos eléctricos solo deben ser realizadas por personal
cualificado.
Reparaciones realizadas de un modo inadecuado pueden poner en riesgo al equipo y/o
propio usuario.
Este equipo está destinado únicamente al uso doméstico y no debe utilizarse para
propósitos industriales ni comerciales.
No utilice este aparato con el enchufe o el cable dañados, tras un mal funcionamiento o
después de haberse caído o dañado de cualquier modo.
Utilice este equipo solamente para su uso previsto.
Este equipo debe situarse sobre una superficie estable y resistente al calor.
No introduzca ningún objeto a través de las ranuras u orificios ya que puede dañar el
equipo y/o provocar una descarga eléctrica.
No use este producto en entornos húmedos o con malas condiciones meteorológicas.
Este producto no es un juguete.
No escuche música demasiado alta, especialmente cerca de los niños.
El funcionamiento normal del producto podría verse afectado por interferencias
electromagnéticas fuertes. Si esto ocurre, sólo debe reiniciar el producto siguiendo el
manual de instrucciones para que recupere su normal funcionamiento. En caso de no
corregirse su funcionamiento, por favor, utilice el producto en otro lugar.
Page 56

ADVERTENCIA
No ingiera la batería; riesgo de quemaduras químicas
(El mando a distancia que se suministra con) este producto contiene una pila de
tipo botón/moneda. Si se traga la pila botón, en solo 2 horas podría sufrir
quemaduras internas de importancia que pueden causarle la muerte.
Mantenga las pilas nuevas o usadas fuera del alcance de los niños.
Si el compartimiento de la pila no se cierra correctamente, deje de usar el
producto y no lo deje al alcance los niños.
Si tiene la sospecha de que una pila ha sido ingerida o se encuentra en algún
lugar del cuerpo, busque inmediatamente atención médica.
Page 57

DESCRIPCIÓ N DE LAS PIEZAS
PANEL SUPERIOR
1. Volumen+/-
2. En espera
3. Modo
4. Anterior/Siguiente
5. Expulsar (abre o cierra la bandeja del
disco)
6.
Reproducir/Pausa
FRONTAL/LATERAL
1. Pantalla de visualización
2. Sensor remoto
3. Indicador
4. Bandeja del disco
5. Puerto USB para reproducción de
MP3
6. Puerto USB para cargar
7. Sensor NFC
8.
Altavoces
PANEL POSTERIOR
1. Antena FM
2. Conector de entrada Aud-2 de 3,5
mm
3. Conector de entrada Aud-1 RCA R/L
4. Conector de alimentación
5.
Selector de alimentación
Page 58

MANDO A DISTANCIA
1. En espera
2. Sil.
3. Anterior
4. Rebobinado
5. Bajar
6. Repetir/Aleatorio
7. Volumen-
8. Bluetooth
9. CD/USB
10. Números
11. Búsqueda
12. Expulsar
13. Subir
14. Sig.
15. Reproducir/Pausa
16. Avance rápido
17. Programa
18. Volumen+
19. Tono
20. FM
21. AUX 1/2
22. Frecuenc.
23. Mono/Estéreo
24. Guardar
INSTALACIÓ N
Por favor, instale el aparato como se indica abajo (no lo conecte a la alimentación):
La torre
Base de soporte
Apriete los tornillos
Tornillo
Para que la unidad resulte
más estable de pie, utilice los
tornillos incluidos para
montar las barras de refuerzo
en la parte inferior de la base
de soporte de la torre.
¡Consulte el diagrama del
Barras de refuerzo
Page 59

FUNCIONAMIENTO GENERAL
MODO EN ESPERA
Pulse el botón de ESPERA para activar la unidad desde el modo en espera.
SELECCIONAR MODO DE FUNCIONAMIENTO
Pulse el botón de MODO para seleccionar uno de los modos: CD, USB, FM,
Bluetooth, o Aux1/2. Pulse el botón CD/USB en el mando a distancia para seleccionar el
modo CD o USB; pulse el botón AUX1/2 en el mando para seleccionar el modo Aud-1 o
Aud-2.
AJUSTAR EL VOLUMEN
Pulse los botones VOLUME+/- o gire el mando de volumen para ajustar el volumen.
SILENCIAR EL SONIDO
Pulse el botón SILENCIAR en el mando a distancia para silenciar el sonido. Vuelva a
pulsarlo o pulse los botones VOLUME+/- para retomar el nivel de volumen.
SALTAR PISTAS
Pulse el botón ANTERIOR /SIGUIENTE en el mando a distancia o en el panel
superior para saltar a la pista anterior o siguiente.
REPRODUCIR/PAUSA
Pulse el botón REPRODUCIR/PAUSA para hacer una pausa en la reproducción;
púlselo otra vez para reanudar la reproducción.
ACELERAR LA MÚSICA
En el modo USB o CD, pulse el botón / en el mando a distancia para avanzar o
retroceder la música. Púlselo repetidamente para retomar la velocidad normal.
MODO DE REPETICIÓ N
Pulse el botón REP. en el mando a distancia para repetir la canción una vez; vuélvalo a
pulsar para repetir todas las canciones; púlselo una tercera vez para retomar el modo
normal.
PROGRAMA
En modo CD, pulse el botón PROG. en el mando a distancia para acceder a la interfaz de
ajustes de programación, "P: 0100". Utilice los botones numéricos para seleccionar la
canción que desee programar. (Para almacenar la pista 4, debe pulsar "0" + "4".)
Después pulse el botón para confirmar y comenzar la reproducción de música en el
orden programado.
BOTÓ N MO/ST
En el modo FM, pulse el botón MO/ST para cambiar entre los modos mono y estéreo.
Púlselo de nuevo para volver al modo estéreo.
Page 60

FUNCIONAMIENTO GENERAL
AJUSTE DEL TONO
Pulse el botón TONE en el mando a distancia para seleccionar graves y agudos. Cuando
la pantalla indique "TRB", pulse los botones VOL+/- para ajustar el efecto de los agudos.
Cuando la pantalla indique "BS", pulse los botones VOL+/- para ajustar el efecto de los
graves.
BOTÓN GUARDAR
En El modo FM, pulse el botón SAVE para guardar la frecuencia actual en una posición
de presintonía.
ALEATORIO
En el modo CD o USB, pulse el botón REPEAT para seleccionar que la música se
reproduzca en modo aleatorio.
DESCONECTAR EL BLUETOOTH
En el modo de Bluetooth, mantenga pulsado el botón REPRODUCIR/PAUSA para
desconectar la conexión Bluetooth.
Page 61

FUNCIONAMIENTO DEL BLUETOOTH
1.
Pulse el botón MODO para cambiar al modo de Bluetooth.
2. El dispositivo previamente emparejado se conectará automáticamente a la torre de
sonido cada vez que se cambie al modo Bluetooth.
3. Encienda el dispositivo Bluetooth (p.ej. el teléfono) y entre en el menú de búsqueda de dispositivos
Bluetooth.
4. Busque "BTT-9" y emparéjelo. Introduzca la contraseña "0000" si es necesario. Si está
emparejado, la pantalla parpadeará de manera continua.
5.
Si aún no funciona, reinicie el Bluetooth y repita los pasos anteriores.
FUNCIONAMIENTO DEL NFC
1. Pulse el botón MODO para cambiar al modo de Bluetooth.
2. Coloque la parte posterior del teléfono (con función NFC) en la posición en la que
está escrito "NFC" sobre el panel frontal de la unidad durante 3 segundos. La función
Bluetooth del teléfono se activará automáticamente.
3. Cuando el indicador se ilumine fijo y escuche una señal de audio, estarán
emparejados.
4. Para desconectar la conexión Bluetooth NFC, coloque la parte posterior del teléfono
en la posición en la que está escrito NFC sobre el panel frontal de la unidad. Cuando
escuche una señal de audio, estarán desconectados.
5. Algunos dispositivos con el sistema Android 4.0 o anteriores necesitan tener
instalada la aplicación NFC.apk para habilitar la función NFC. Algunos dispositivos
pueden tener poca compatibilidad con la función NFC, lo que puede deberse al
software NFC.
USB
FUNCIONAMIENTO USB
1.
Encienda la unidad e inserte una unidad flash USB (no incluida) en el puerto USB,
asegurando que la clavija está totalmente insertada de la forma correcta.
2. Pulse el botón de MODO hasta seleccionar el modo USB.
3. La torre reproducirá música del USB automáticamente.
4. El tamaño máximo del la unidad flash que se puede conectar es de 32 GB.
5. El formato de archivos para la reproducción USB es MP3.
Sensor NFC
Teléfono con NFC
Page 62

FUNCIONAMIENTO DE AUDIO
Utilice el cable de audio RCA de 3,5 mm (incluido) para conectar la unidad al
reproductor de discos/MP3/teléfono/ordenador u otro dispositivo de audio.
1. Conecte el extremo RCA del cable de audio a la entrada R/L en el panel trasero de
la unidad y, a continuación, conecte el extremo de la clavija de 3,5 mm al
reproductor.
2. Pulse el botón MODO del panel superior o pulse el botón AUX1/2 en el mando
a distancia para cambiar al modo de entrada Aux (Aud-1/Aud-2).
3. Pulse el botón AUX1/2 pata acceder al modo Aud-1 y comenzar la reproducción
del dispositivo conectado al conector RCA R/L.
4. Pulse el botón AUX1/2 pata acceder al modo Aud-2 y comenzar la reproducción
del dispositivo conectado al conector de entrada Aux de 3,5 mm.
FUNCIONAMIENTO DE FM
1. Ajuste la antena FM para lograr la mejor recepción.
2. Pulse el botón MO/ST para activar el estéreo.
3. Pulse el botón MODO para cambiar al modo de FM.
4. Pulse el botón / para saltar a la emisora anterior o siguiente.
5. Pulse el botón / en el mando a distancia para sintonizar la frecuencia en
intervalos de 0,05 MHz.
6. Mantenga pulsado el botón / en el mando a distancia para cambiar a la emisora
con mejor recepción.
7. Pulse el botón SEARCH en el mando a distancia o en la unidad para buscar las
emisoras. Vuélvalo a pulsar para detener la búsqueda.
8. Guardar (60) emisoras:
Reproductor de
discos
Antena FM
Reproductor
MP3
Page 63

Pulse los botones numéricos para seleccionar el número de presintonía, después
pulse el botón F e introduzca la frecuencia y a continuación pulse el botón SAVE para
guardar la emisora.
Ej.: para guardar la frecuencia 107,5 MHz en la presintonía 36. Pulse los botones
numéricos 10 + 6, pulse F e introduzca 1, 0, 7, 5, y por último pulse el botón SAVE.
Page 64

SOLUCIÓ N DE PROBLEMAS
Antes de llevar la unidad a reparar, por favor consulte esta tabla si encuentra un
problema. Si no puede resolver el problema con la siguiente información, consulte con
su vendedor o con el centro de reparaciones.
Problema
Remedio
(Alimentación) El sistema no
se enciente o no responde al
mando a distancia.
- Compruebe que el enchufe de alimentación de CA
esté conectado correctamente a la toma de corriente
de pared y tiene energía.
- Si esto no resuelve el problema, deje la unidad
desenchufada antes de buscar ayuda.
(Mando a distancia) No
funciona o tiene poco
alcance.
- Cambie las pilas por unas nuevas.
- Apunte con el mando directamente al sensor situado
en el centro del altavoz.
(Emparejamiento del
producto) No se puede
emparejar con éxito.
- Compruebe si el altavoz está apagado o en modo de
búsqueda.
- Compruebe si hay otras unidades receptoras
Bluetooth cerca del dispositivo Bluetooth. Apáguelas
para eliminar las interferencias. Intente emparejarlo
de nuevo.
No funciona correctamente,
la música suena
intermitentemente.
- Compruebe si la distancia entre el altavoz y su
dispositivo Bluetooth es mayor al rango de alcance (10
m).
- Compruebe si hay obstáculos que bloqueen la
comunicación entre el altavoz y el dispositivo
Bluetooth.
- Mueva el altavoz o el dispositivo Bluetooth para lograr
mejor recepción.
El sonido está distorsionado.
- Compruebe el ajuste del volumen tanto en el altavoz
como en el dispositivo Bluetooth, y ajústelo a un nivel
confortable.
Page 65

ESPECIFICACIONES
Alimentación
220-240V~50/60Hz
Temperatura de funcionamiento
0 °C a +35 °C
Máxima potencia de salida
60 W
Alcance del mando a distancia
7 m
Alcance del Bluetooth
10 m
Clavija de entrada
Clavija de entrada Aux de 3,5 mm; clavija RCA R/L; USB
NOTA:
1. Como resultado de la mejora continua, el diseño y las especificaciones del
producto difieren ligeramente de la unidad que aparece en el embalaje.
2. Este producto funciona a 2400 a 2483,5 MHz y está diseñado únicamente para ser
utilizado dentro de un entorno doméstico normal. Este producto es adecuado para
este propósito en todos los países de la UE.
Servicio y asistencia
Garantía
Lenco ofrece servicio y garantía en cumplimiento con las leyes de la Unión Europea, lo
cual implica que, en caso de que su producto precise ser reparado (tanto durante
como después del periodo de garantía), deberá contactar directamente con su
distribuidor.
Nota importante: No es posible enviar sus reparaciones directamente a Lenco.
Nota importante: Si la unidad es abierta por un centro de servicio no oficial, la
garantía quedará anulada.
Este aparato no es adecuado para el uso profesional. En caso de darle un uso
profesional, todas las obligaciones de garantía del fabricante quedarán anuladas.
Exención de responsabilidad
Regularmente se llevan a cabo actualizaciones en el Firmware y en los componentes
del hardware. Por esta razón, algunas de las instrucciones, especificaciones e imágenes
incluidas en este documento pueden diferir ligeramente respecto a su situación
particular. Todos los elementos descritos en esta guía tienen un objetivo de mera
ilustración, y pueden no ser de aplicación en su situación particular. No se puede
obtener ningún derecho ni derecho legal a partir de la descripción hecha en este
manual.
Page 66

Eliminación del antiguo dispositivo
Este símbolo indica que no deberá deshacerse del producto eléctrico o
batería en cuestión junto con los residuos domésticos, en el ámbito de la
UE.
Para garantizar un tratamiento residual correcto del producto y su batería,
por favor, elimínelos cumpliendo con las leyes locales aplicables sobre
requisitos para el desechado de equipos eléctricos y baterías.
De hacerlo, ayudará a conservar recursos naturales y mejorar los estándares de
protección medioambiental en el tratamiento y eliminación de residuos eléctricos
(Directiva sobre la Eliminación de Equipos Eléctricos y Electrónicos).
Marca CE
Los productos con la marca CE cumplen con la Directiva EMC
(2004/108/EC) y con la Directiva de Bajas Tensiones (2006/95/EC) emitida
por la Comisión de la Unión Europea.
Por la presente, Lenco Benelux BV, Thermiekstraat 1a, 6361 HB Nuth, Países
Bajos, declara que este producto cumple con las exigencias esenciales y otras
provisiones relevantes de la Directiva 1999/5/EC.
La declaración de conformidad puede consultarse en techdoc@lenco.com
Servicio
Para obtener más información y soporte del departamento técnico, por favor, visite la
página web www.lenco.com
Lenco Benelux BV, Thermiekstraat 1a, 6361 HB, Países Bajos.
 Loading...