

Page 1

2.1 Audio system with
Bluetooth, DAB+/NFC/CD
BT-9000
Instruction Manual
For information and support www.lenco.eu
Page 2

Important Safety Instructions
When used in the directed manner, this unit has been designed and manufactured to ensure your personal safety.
However, improper use can result in potential electrical shock or re hazards. Please read all safety and operating
instructions carefully before installation and use, and keep these instructions handy for future reference. Take special
note of all warnings listed in these instructions and on the unit.
1. Water and Moisture
The unit should not be used near water. For example: near a bathtub, washbowl, kitchen sink, laundry tub,
swimming pool or in a set basement.
2. Ventilation
The unit should be situated so that its location or position does not interfere with its proper ventilation. For
example, it should not be situated on a bed, sofa, rug or similar surface that may block the ventilation openings.
The ventilation should not be impeded by covering the ventilation openings with items, such as newspapers,
table-cloths, curtains, etc. Also, it should not be placed in a built-in installation, such as a bookcase or cabinet,
which may impede the ow of air through the ventilation openings.
3. Heat & Flame
The unit should be situated away from heat sources such as radiators, heat registers, stoves or other appliances
(including ampliers) that produce heat.
No naked ame sources, such as lighted candles, should be placed on the apparatus.
4. Power Source
The unit should be connected to a power supply only of the type described in the operating instructions or as
marked on the appliance.
Where the power adaptor is used as the disconnect device, the disconnect device shall remain readily operable.
5. Power Adaptor Wire Protection
The power adaptor wire should be routed so that they are not likely to be walked on or pinched by items placed
upon or against them. It is always best to have a clear area from where the wire exits the unit to where the
adaptor plugged into an AC outlet.
6. Cleaning
The unit should be cleaned only as recommended. See the section “Care and Maintenance” of this manual for
cleaning instructions.
7. Object and Liquid Entry
Care should be taken so that objects do not fall and liquids are not spilled into any openings or vents located on
the product. It shall not be exposed to dripping or splashing and that no objects lled with liquids, such as vases,
shall be placed on the apparatus.
8. Attachments
Do not use attachments not recommended by the product manufacturer.
9. Lightning and Power Surge Protection
Unplug the unit from the wall outlet and disconnect the periods of time. This will prevent damage to the product
due to lightning and power-line surges.
10. Overloading
Do not overload wall outlets, extension cords as this can result in a risk of re of electric shock.
11. Damage Requiring Service
This unit should be serviced by qualied service personnel when:
A. The power supply cord or plug has been damaged.
B. Objects have fallen into or liquid has been spilled into the enclosure.
C. The unit has been exposed to rain.
D. The unit has been dropped or the enclosure damaged.
E. The unit exhibits a marked change in performance or does not operate
normally.
12. Periods of Nonuse
If the unit is to be left unused for an extended period of time, such as a month or longer, the power cord should
be unplugged from the unit to prevent damage or corrosion.
13. Servicing
The user should not attempt to service the unit beyond those methods described in the user’s operating
instructions. Service methods not covered in the operating instructions should be referred to qualied service
personnel.
GB 2
Page 3
Warnings
Follow the advice below for safe and appropriate operations.
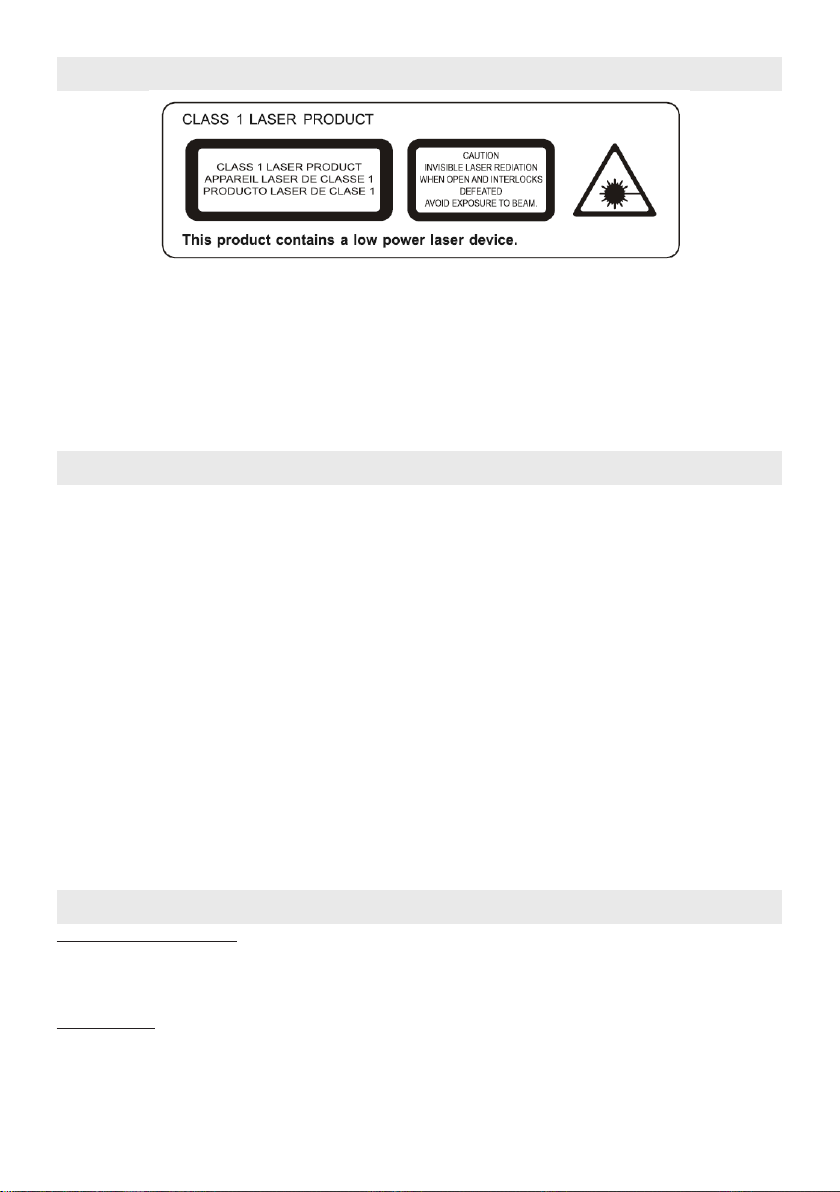
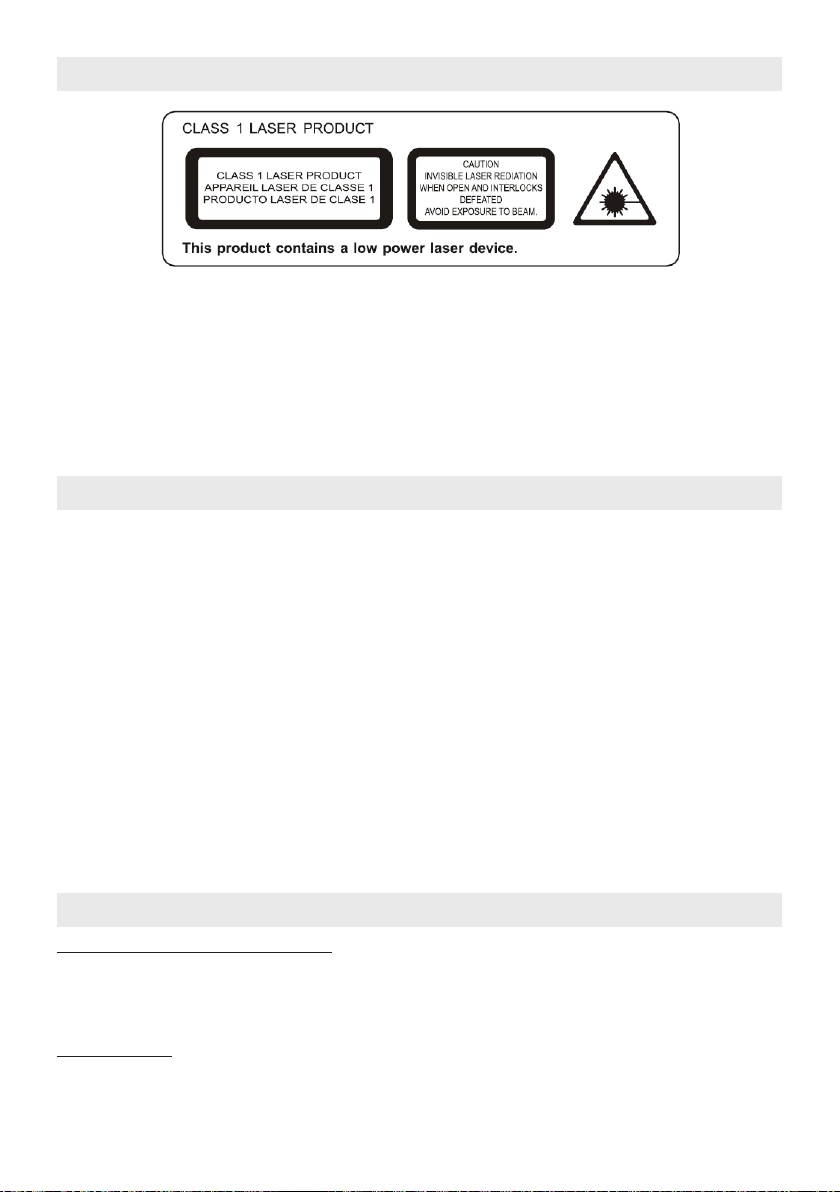
ON PROTECTION AGAINST LASER ENERGY EXPOSURE
● As the laser beam used in this compact disc player is harmful to the eyes, do not attempt to disassemble the
casing.
● Stop operation immediately if any liquid or solid object should fall into the cabinet.
● Do not touch the lens or poke at it. If you do, you may damage the lens and the player may not operate properly.
● Do not put anything in the safety slot. If you do, the laser diode will be ON when the CD door is still open.
● This unit employs a laser. The use of controls or adjustment or performance of procedures other than those
specied here may result in exposure to hazardous radiation.
Features
Thank you for purchasing the CD DAB+ Radio with Bluetooth music system.
This model incorporates following features:
- Stream and playback Apple device (iPad /iPhone/iPod Touch) and Android OS smart phone songs through
Bluetooth technology.
- NFC (Near Field Communication) function for easy Bluetooth connection
- CD player with playback of Audio CDs and MP3 songs
- ID3 technology displaying song title
- DAB / DAB+ receiver
- FM receiver with digital read out on LCD
- RDS function
- LCD Clock
- Sleep timer function
- LCD display with back-light
- Three different Audio inputs (LINE-IN / AUX-IN) for connecting external audio source/player.
- Built-in 2 High Fidelity Speakers
- Build-in Subwoofer for heavy bass effect
- With Bass and Treble settings
iPhone, iPad and iPod touch are trademarks of Apple Inc., registered in the U.S. and other countries.
iPhone, iPad and iPod touch are not included.
Installation
Clock setting battery back-up
A backup battery compartment located at rear of the unit.
(1) Open the clock battery compartment lid.
(2) Follow the polarity diagram shown inside the compartment and install 2 x AAA (UM-4) batteries (not included).
(3) Close the clock battery compartment lid.
Remote Control
A battery compartment located at bottom of the remote control.
- For the rst time usage, remove the insulation tag.
- To replace battery, slide out the battery holder then follow the polarity diagram shown on the holder and install a
fresh CR2025 / DC 3V Lithium battery. Insert the battery holder back into the remote control bottom.
GB 3
Page 4
Installation
2322
18
21
24
17
19
20
AC-DC Adaptor Connection
The unit can be powered by an external AC-DC Adaptor, required the output DC 18V 3000mA (included).
(1) Firmly and securely plug the adaptor’s AC plug into AC main outlet.
(2) Connect the adaptor’s DC output plug to the DC-in jack of the unit.
Warnings:
- Batteries shall not be exposed to excessive heat such as sunshine, re or the like.
- Be sure that the batteries are installed correctly. Wrong polarity may damage the unit.
- Do not mix old and new batteries.
- Do not mix alkaline, standard (carbon-zinc) or rechargeable (nickel- cadmium) batteries.
- Only batteries of the same or equivalent type as recommend are to be used.
- If the unit is not to be used for an extended period of time, remove the battery.
- Do not dispose of batteries in re, battery may explode or leak.
- Danger of explosion if battery is incorrectly replaced.
Your product contains batteries, which cannot be disposed with normal household waste. Please inform yourself
about the local rules on separate collection of batteries because correct disposal helps to prevent negative consequences for the environmental and human health.
Use only the power supply listed in the user instructions.
Power supply adaptor: Manufacturer: KINGWALL Model no.: AS600-180-AE300
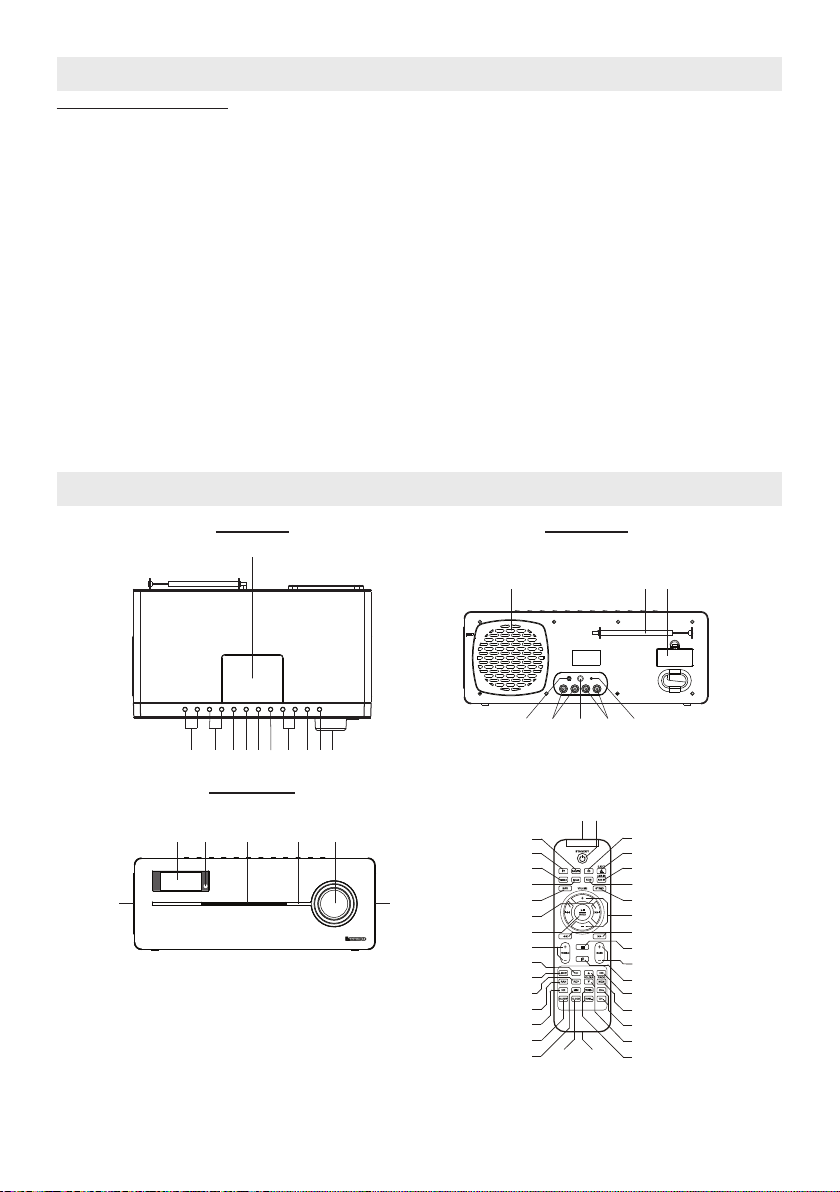
Description of Parts
Main Unit
Top View Rear View
1
6789
1011
Front View
15
16
13
14
2345
Remote Control
1
33
2
3
4
5
6
7
8
9
10
11
34
12
13
14
15
16
17
INTRO/
212
16
18
19
20
21
22
23
24
25
26
27
28
29
30
31
32
GB 4
Page 5

Description of Parts
Main Unit
1. NFC sensor --- The NFC (Near Field Communication) sensor located at top front of the unit.
2. VOLUME knob --- Adjust volume level up or down.
3. Button STANDBY --- To turn the unit on and off.
4. Button OPEN/CLOSE --- Open / Close CD slot.
5. Buttons TUN / + and / - --- In DAB / FM tuner mode: Tune the FM radio frequency up/down;
Select DAB channel.
In DAB / FM menu mode: Acts as navigation button.
In BT (Bluetooth) and CD mode: Press to skip tracks Forward / Backward.
In CD mode: Press and hold to perform high-speed search.
6. Button ENTER / --- Conrm DAB / FM radio settings selection; Bluetooth / CD Play/Pause function.
7. Button MENU / --- Select DAB and FM radio menu setting mode; Stop CD playback.
8. Button LIGHT --- Turn LCD backlight and Power indicator ON / OFF.
9. Button FUNCTION --- Select DAB/FM radio/BT(Bluetooth)/ AUX-IN/ LINE-IN1/ LINE-IN 2/ CD mode.
10. Buttons TREBLE + / - --- Adjust Treble level.
11. Buttons BASS + / - --- Adjust Bass level.
12. Power Status indicator
13. CD slot
14. Remote Control Infrared receiver
15. LCD display
16. Speakers
17. Subwoofer
18. Rod antenna
19. Memory backup battery compartment
20. AUX-IN jack --- Auxiliary audio signal input
21. LINE-IN 2 jack --- Audio line2 input
22. DC-in jack --- For the connection of external DC power supply
23. LINE-IN 1 jack --- Audio line1 input
24. RESET button --- For resetting the unit
Remote Control
1. Infrared Transmitter
2. STANDBY button
3. Button CD --- Select CD mode.
4. Button EJECT --- Open / Close CD slot.
5. Button AUX IN / LINE-IN --- Select AUX-IN / LINE-IN 1 / LINE-IN 2 mode.
6. Button RDS --- In DAB mode: Display DAB station information.
In FM radio mode: Display FM station RDS information.
7. Button ST/MO --- Select FM radio Stereo / Mono reception.
8. Buttons VOLUME + / - --- Adjust volume level up or down.
9. Buttons / --- In CD mode: Perform high-speed search.
10. Button --- Stop CD playback.
11. Buttons BASS + / - --- Adjust Bass level.
12. Button --- Volume mute on/off.
13. Button ID3 --- In CD mode: Enable / Disable ID3 function.
14. Button MEM / PROG --- Save DAB / FM radio preset station; Set CD program.
15. Buttons CH + / - --- In DAB / FM radio mode: Select preset channel.
16. Buttons FOLDER / --- In CD mode: Select MP3 song directory/folder.
17. Buttons TUNE + / - --- In FM tuner mode: Tune the radio frequency up/down.
In FM menu mode: Act as navigation button.
18. Button DAB / FM --- Select DAB / FM mode.
19. Button BT --- Select Bluetooth mode.
20. Button MENU --- Select DAB and FM radio menu setting mode.
21. Button SCAN --- In FM radio mode: Scan FM radio station.
22. Button INFO --- In CD mode: Press to display clock.
23. Buttons / --- In BT (Bluetooth) / CD mode: Skip tracks Backward / Forward.
In DAB menu mode: Act as navigation button.
24. Button ENTER / --- Conrm DAB / FM settings selection; BT (Bluetooth) / CD Play/Pause function.
25. Button TREBLE +/- --- Adjust Treble level.
26. Button 10+ --- In CD mode: Skip 10 MP3 songs.
GB 5
Page 6
Description of Parts
27. Button LIGHT --- Turn the LCD backlight and Power indicator On / Off.
28. Button REP --- In CD mode: Select repeat playback one/all song(s).
29. Button RAN --- In CD mode: Select random playback songs.
30. Button INTRO / HR --- In Standby mode: Set clock hour.
In CD mode: Select INTRO playback.
31. Button SLEEP --- Select the time duration of the sleep timer.
32. Button MIN --- Set clock minute.
33. Button CLOCK --- In Standby mode: Set clock and 12/24 hour format.
34. Battery Compartment --- Located at the rear bottom of the remote control.
Bluetooth Operation
The unit playback mobile device (like, iPad/iPhone/iPod Touch, smart phone and Tablet ) music through Bluetooth
operation. It also incorporated NFC (Near Field Communication) function for easy connection with a mobile device
which also has the NFC function.
Pairing / Connection
(A) NFC Bluetooth pairing / connection
1. Press the STANDBY button to turn on the unit
2. Press the FUNCTION button from the main unit or the BT button from the remote control to select Bluetooth
mode. The LCD will display “ BT Pairing “ .
3. Unlock the mobile device (incorporated NFC function) then place it on top of the NFC sensor area.
4. The mobile device will pair and connect with this model automatically.
Note: The Bluetooth device name of this model: Lenco BT-9000
5. After successful connection, the LCD shows “ BT LINK “.
6. Now you can playback Bluetooth music, see section “Playback Bluetooth music” below.
(B) Manual Bluetooth pairing / connection
1. Press the STANDBY button to turn on the unit.
2. Press the FUNCTION button from the main unit or the BT button from the remote control to select Bluetooth
mode. The LCD will display “ BT Pairing “ and the unit will search nearby Bluetooth device.
3. From the mobile device, turn on its Bluetooth function and it will also search for the nearby Bluetooth device
as well.
4. From the Bluetooth device list of your mobile device, tap on Bluetooth device name “Lenco BT-9000” of this
model for the connection.
5. Once the mobile device is connected with the unit, the LCD shows “ BT LINK “.
6. Now you can playback Bluetooth music, see section “Playback Bluetooth music” below.
Note:
(a) When the unit is turned on from standby mode, in the Bluetooth mode it will automatically search and connect the
device last connected, no need to re-scan and pair.
(b) For connecting other Bluetooth device, in the Bluetooth mode press and hold the BT button from the remote
control. The unit will start to search nearby Bluetooth device and the LCD will show “BT Pairing” again. Implement
steps (B)-3 to (B)-6 above.
Playback Bluetooth music
1. After Bluetooth communication link is set up, run the music player App from the mobile device then playback the
mobile device music.
2. You may adjust both the volume control of your mobile device and the volume control of this unit to nd the most
desirable volume setting.
3. You may press:
(a) the button to Play / Pause Bluetooth music.
(b) the / button to skip tracks backward / forward.
Energy Saving Note
In Bluetooth mode, if the Bluetooth communication link disconnected for around 10 minutes, the unit will go into
standby mode automatically.
GB 6
Page 7

FM Radio Tuner Operation
Antenna
For the best radio reception, fully extend the rod antenna located at rear of the unit.
MENU Option
In the FM radio mode, the unit allows you to select following options.
1. Press the MENU button entering menu mode.
2. Two options, [Scan setting] and [Audio setting] can be set by pressing the / buttons from the main unit or the
TUNE +/- button from the remote control.
(a) Whilst [Scan setting] is displayed, press the ENTER button to conrm the selection.
- Then press main unit / buttons or remote control TUNE +/- buttons to display [All stations] or
[Strong stations].
Note:
[All stations] ----- By default FM scan stops at any available station (All stations). This may result in
[Strong stations] ----- FM scan stops only at stations with good signal strength.
- Press the ENTER button to conrm the desired selection when [All stations] or [Strong stations] displayed.
(b) Whilst [Audio setting] displays, press the ENTER button to conrm selection.
- Then press main unit / buttons or remote control TUNE +/- buttons to display [Stereo] or
[Forced mono].
Note:
[Stereo] ----- By default, all stereo stations are reproduced in stereo. For weak stations, this may
[Forced mono] ----- Reproduce mono audio only.
- Press the ENTER button to conrm the desired selection when [Stereo] or [Forced mono] displayed.
3. You can press the MENU button to exit menu setting mode at any time.
Auto-scan and store Preset Stations
The unit allows you to store up to 20 FM stations for easy recall at any time.
1. Press the STANDBY button to turn on the unit, where the power status indicator light on.
2. Press the FUNCTION button from the main unit or the DAB/FM button from the remote control to select FM radio
mode.
3. Press the SCAN button from the remote control until the frequency digits begin to change. The tuner will
automatically scan for stations from low to high frequency and then store them in the preset location.
Note: After each auto-scan & store operation, it will overwrite the existing preset stations by overwriting and
storing the new stations in their place.
4. To recall the preset station, press the CH +/- buttons from the remote control then press the ENTER button to
conrm selection.
FM Radio Tuning and manual store Preset Stations
1. Press the STANDBY button to turn on the unit, where the power status indicator light on.
2. Press the FUNCTION button from the main unit or the DAB/FM button from the remote control to select FM radio
mode.
FM Radio Tuning
3. You can have following ways to tune to a desired station:
(a) Press the / buttons from the main unit or the TUNE +/- buttons from the remote control with 0.05MHz
tuning step and tune to a desired radio station frequency gure.
(b) Press and hold the main unit / buttons or remote control TUNE +/- buttons and tune to a desired radio
station frequency gure then release the button.
(c) For up-scan, press the main unit button or remote control TUNE + button once then press the SCAN
button from the remote control and it will tune to the next higher radio station.
For down-scan, press the main unit button or remote control TUNE - button once then press the SCAN
button from the remote control and it will tune to the next lower radio station.
Save preset station
4. Press the MEM button from the remote control. The preset channel number appears on display and blinks.
5. To select a desired preset station number, press the CH + / - buttons from the remote control.
Note: Each time the station number changed, it will display the current frequency or “Empty” of that preset
station location.
6. To conrm preset location, press the ENTER button and “Preset store” displays a while then returns to normal
tuner mode. The newly tuned frequency will replace the frequency in the selected preset station location.
7. Repeat steps 3 to 6 to store other stations, if apply.
Notes:
● There is a few seconds delay when programming, after this delay time, the unit will automatically switch back
to normal tuner mode.
● You can overwrite a preset station by overwriting and storing the new frequency in its place.
poor quality audio from distant stations.
result in poor quality audio. The audio quality can be improved using mono.
GB 7
Page 8

FM Radio Tuner Operation
Recalling Preset Station
8. Press the CH +/- buttons from the remote control. The preset channel number and frequency appear on display
then press the ENTER button to conrm selection.
RDS function
The unit incorporated the RDS functions.
When the received radio station with RDS information, you may press the RDS button repeatedly from the remote
control to display the RDS information.
DAB / DAB+ Tuner Operation
The unit is able to receive available DAB and DAB+ radio stations in your area.
Antenna
For the best radio reception, fully extend the rod antenna located at rear of the unit.
MENU Option
In the DAB mode, before listening to a DAB / DAB+ radio station, following section describes options which are available for your selection, if apply.
Navigation button
In the menu setting mode, you can make use of following navigation buttons to implement the option selection.
Button MENU --- Press to enter or exit menu mode.
Buttons / --- Press to select / display option item.
Button ENTER --- Press to conrm selection.
MENU Options
[Full scan] --- A full scan of DAB/DAB+ radio stations in your area. Once the scan is completed, the radio
[Manual tune] --- Manual tune to a particular channel/frequency.
[DRC] --- Dynamic range compression (DRC), this function reduces the difference between the
[Prune] --- This removes all invalid stations indicated in the station list with a “?” in front of the station
[System] --- Factory Reset Y/N option, select “Y” to initiate a factory reset.
Full scan operation
1. Press the STANDBY button to turn on the unit, where the power status indicator light on.
2. Press the FUNCTION button from the main unit or DAB/FM button from the remote control to select DAB radio
mode.
3. Press the MENU button and the [Full scan] indicator displays.
4. Press ENTER button to conrm selection. The unit starts scanning DAB / DAB+ stations around your area and the
display will show “Scanning 0 “. Please wait for the completion of the scanning process.
5. Once the scan is completed, the radio returns to play the previously-selected station or rst station on the station
list.
Manual tune operation
Before beginning a manual tune, you may rst want to obtain the available DAB/DAB+ stations channel/frequency
information for your area.
1. In the DAB radio mode, press the MENU button entering menu setting mode.
2. Press the / buttons until [Manual tune] indicator displays.
3. Press the ENTER button to conrm the selection.
4. Press the / buttons to display a particular channel/frequency.
5. Press the ENTER button to tune to that channel/frequency.
6. If stations are captured and display will show signal strength from “SG Str : 0” to “SG Str : xx”, where xx is greater
than zero.
7. Press MENU button repeatedly to exit menu setting mode.
Save preset station
1. Whilst a desired station is displayed, press the MEM button from the remote control.
The preset channel number appears on display and blinks.
2. To select a desired preset station number, press the CH + / - buttons from the remote control.
Note: Each time the station number changed, it will display the current station name or “Empty” of that preset
stations location.
3. To conrm preset location, press the ENTER button and “Preset store” displays a while then returns to normal
DAB tuner mode. The new station will replace the last station in the selected preset station location.
returns to play the previously-selected station or rst station on the station list.
loudest and quietest audio being broadcast. Effectively, this makes quiet sounds comparatively louder and loud sounds comparatively quieter.
Note: DRC only works if it is enabled by the broadcaster for a specic station.
name.
GB 8
Page 9
DAB / DAB+ Tuner Operation
Notes: - There is a few seconds delay when programming, after this delay time, the unit will automatically
switch back to normal tuner mode.
Recalling Preset Station
Press the CH +/- button from the remote control. The preset channel number and station names appear on display
then press the ENTER button to conrm selection.
Change listening channel
1. Whilst listening to current channel, press the / button repeatedly until the desired channel name is
2. Press the ENTER button to conrm the selection.
Display DAB radio station information
If necessary, you may press the RDS button from the remote control to display current receiving DAB station’s
information.
- You can overwrite a preset station by overwriting and storing the new station.
displayed.
Listening to CD Music
The CD player can playback CD/CD-R/CD-RW disc with Audio CD and MP3 format.
CD Playback
1. Press the STANDBY button to turn on the unit.
2. Press the FUNCTION button from the main unit or the CD button from the remote control to select CD mode.
3. Insert a CD with printed side facing up into the CD slot.
4. Music playback will automatically start.
5. For Audio CD format disc ---- The display will show the “CD” indicator and the track number (e.g. T001).
For MP3 le format disc ---- The display will show the “MP3” indicator, Folder number (e.g. A01) and the track
6. Adjust the volume level by rotating the VOLUME knob from the main unit or press the VOLUME +/- button from
the remote control.
7. To skip to a desired CD track, press the / buttons. If it is playing the MP3 song, you may press the FOLDER
/ buttons from the remote control to select the desired folder.
8. To fast-rewind or forward within the currently playing track, press and hold either the / button from the main
unit or the / button from the remote control.
9. To pause CD playback, press the play/pause button.
To resume playback, press the play/pause button again.
10. To stop CD playback, press the STOP button.
11. To eject the CD, press the OPEN/CLOSE button.
CD Play Modes
Repeat Playback
● For Audio CD discs :
To repeat playback of one track, press the REP button once from the remote control. A repeat one indicator
“ ”appears on the LCD.
To repeat playback of an entire CD, press the REP button until the repeat all “ ” indicator appears on LCD.
● For MP3 discs:
To repeat playback of one track, press the REP button once from the remote control. A repeat one indicator
“ ” appears on the LCD.
To repeat playback a directory, press the REP button twice. A repeat directory indicator “ DIR” appears on
LCD.
To repeat playback of an entire CD, press the REP button until the repeat all “ ” indicator appears on LCD.
Random Playback
To playback CD tracks in random order, press the RAN button from the remote control.
The “RND” indicator appears on the LCD.
INTRO Playback
To playback the rst ten seconds of each song, press the INTRO button from the remote control until “INTRO”
indicator appears on LCD.
Cancel CD play mode
To cancel a CD play mode, press the STOP button at any time.
number (e.g. T001).
GB 9
Page 10

Listening to CD Music
CD Program Playback
This feature allows you to program up to 20 tracks for Audio CD or 30 songs for MP3 CD in a desired order.
1. With CD playback stopped, press the PROG button once from the remote control.
The LCD shows following indication:
“PGM” indicator
The program number (e.g. P01) blinks.
The Track number (e.g. T001)
The Directory (Folder) number (e.g. A01) ---- apply for MP3 disc only.
2. To select a directory number, press the FOLDER / button from the remote control (for MP3 disc only).
To select a track number, press the / button.
3. When desired track number displayed, press the PROG button to conrm entry.
4. To program up to 20 Audio CD tracks or 30 MP3 CD songs, repeat steps 2 and 3 until all desired tracks are
entered.
Or, to begin programmed playback, press the Play/Pause button, the “PGM” indicator stays on the display.
5. To cancel programmed playback, press the STOP button twice.
Note:
● If you press the / button during programmed playback, the unit will skip backward / forward to previous / next
track in the program, which is not necessarily the previous / next track on the disc.
● The CD play modes function, “ ”repeat one track and “ ” repeat all programmed track, work in the same
manner as during normal CD playback (see CD Play Modes above).
ID3 Function
This function allows users to view the song information (if any) on the track (le) that they are playing.
To enable this function:
1. During CD-MP3 playback, press the ID3 button. The information (e.g. artist name, song title) saved on the track
(le) will be shown on the LCD display.
2. To turn off the ID3 function, press the ID3 button again.
Note:
● Only applicable for recorded MP3 tracks (les) with ID3 tags.
● The unit supports ID3 tags in English characters only. It does not support any other languages.
Treble and Bass Settings
When the unit is powered on (in Bluetooth, Aux-IN, Line1, Line2, CD, DAB Radio or FM Radio mode), you can press
the BASS + / - and TREBLE + / - buttons to adjust to the desired bass and Treble level.
Listening to External Audio Source
The unit provides three sets audio input connector (AUX-IN / LINE-IN 1 / LINE-IN 2).
You can connect to three different external audio sources.
1. Connect an audio cable with 3.5mm stereo plug from an auxiliary audio device to the AUX IN jack of the unit. Also
RCA type audio connector can be connected to the LINE-IN 1 and LINE-IN 2 audio input jacks.
2. Press the STANDBY button to turn on the unit.
3. To select auxiliary audio input, press the FUNCTION button from the main unit or the button LINE-IN / AUX IN
from the remote control. The “AUX-IN” / “LINE-IN 1” / “LINE-IN 2” indicator shows on display.
4. Turn on the external auxiliary audio device.
5. The volume can now be controlled through the unit.
Operate all other functions on the external device as usual.
Notes: Press the STANDBY button to turn off the unit when you nish listening.
Don’t forget to switch off the power of the external audio device as well.
GB 10
Page 11
Clock Setting
Auto-setting
The unit can auto-synchronize with the DAB radio station time information.
Each time a DAB station is received and its time information will be copied to this unit automatically which will overwrite current time setting on the unit.
Manual setting
When the unit is OFF (Standby mode):
Set 12/24 Hour format
1. Press the CLOCK button from the remote control entering 12/24 hour format setting mode.
2. Press the HR or MIN button from the remote control to select 12 or 24 hour display format.
Set Clock
3. Press the CLOCK button again entering time setting mode.
4. Press the HR button from the remote control to set hour.
5. Press the MIN button from the remote control to set minute.
Exit setting mode
6. To save all settings, press the CLOCK button or wait for a few seconds to exit the setting mode.
Sleep Timer Function
Sleep to timer
This feature allows you to fall asleep to the CD, radio or Bluetooth for up to 90 Minutes.
The unit shuts off automatically when the time expires.
1. Press the STANDBY button to turn the unit on.
2. Either tune to the desired FM or DAB radio station in radio mode, playback CD song or playback Bluetooth music.
3. To select the sleep timer to turn the unit off after 15, 30, 45, 60 or 90 minutes, press the SLEEP button (from the
remote control) repeatedly. The display shows the “SLEEP” indicator. The unit plays for the selected length of
time then automatically turns off.
4. To check the remaining sleep time, press the SLEEP button (from the remote control) once.
To turn the unit off before the sleep timer counts down to zero, press the STANDBY button at any time.
Notes:
● If you are falling asleep to music from an external device connected to the AUX-IN or LINE-IN input, the sleep
timer will shut off the power to this system but it will not turn off the external device.
● If you activate the sleep timer while a CD is playing, the unit will only continue playing until the end of the disc
then shut off automatically no matter the sleep timer setting. For example, if your CD is only 30 minutes long and
45 minutes sleep timer is selected, the unit will shut off approximately 3 minutes after the disc ends.
GB 11
Page 12

Care and Maintenance
- Do not subject the unit to excessive force, shock, dust or extreme temperature.
- Do not tamper the internal components of the unit.
- Clean your unit with a damp (never wet) cloth. Solvent or detergent should never be used.
- Avoid leaving your unit in direct sunlight or in hot, humid or dusty places.
- Keep your unit away from heating appliances and sources of electrical noise such as uorescent lamps or motors.
If drop-outs or interruptions occur in the music during play, or if the disc fails to play at all, its bottom surface may
require cleaning. Before playing, wipe the disc from the center outwards with a good soft clean cloth.
Resetting the Unit
If the unit experiences a power surge or electric shock, it is possible that the internal micro-controller may lock up and
the unit will not respond to any commands from the panel controls.
1. In this event, unplug and then reconnect the AC power plug into the wall outlet.
2. Use a straightened paper clip, toothpick or similar objects to press the RESET button located at the rear of the
main unit (see the below gure). The reset operation clears the system memory and all of your previous settings
will be erased.
RESET Button
CAUTION: DO NOT USE SHARP, POINTED OBJECT TO PRESS THE RESET BUTTON.
Note:
- In case of malfunction due to electrostatic discharge (ESD), just reset the product to
- The normal function of the product may be disturbed by Strong Electro Magnetic Interference. If so, simply reset
IT MAY DAMAGE THE RESET SWITCH INSIDE THE UNIT.
resume normal operation.
the product to resume normal operation. In case the function could not resume, please use the product in other
location.
GB 12
Page 13
Specications
Power Adaptor Input AC 100-240V ~ 50/60Hz
Output DC 18V 3000mA
Main unit supply power DC 18V 3000mA
Battery Back-up for clock / memory DC3V--- AAA (UM-4) type x 2 (not included)
Remote Control battery DC3V --- CR2025 x 1 Lithium battery
Speaker Output 10W+10W (Max.)
Subwoofer Output 25W (Max.)
Power consumption 1 W (Standby)
54 W (Max.)
Dimensions 351 x 136 x 214 mm
Weight 3300g
Operating Temperature 0 C ~ + 45 C
and Humidity 70%
This product operates at 2400 - 2483.5 MHz and is designated only to be used inside a normal household environment. This product is suited for this purpose within all EU counties.
Products with the CE marking comply with the EMC Directive (2004/108/EC) and the Low
Voltage Directive (2006/95/EC) issued by the Commission of the European Community.
This symbol indicates that the relevant electrical product or battery should not be disposed of as
general household waste in Europe. To ensure the correct waste treatment of the product and
battery, please dispose them in accordance to any applicable local laws of requirement for disposal of electrical equipment or batteries. In so doing, you will help to conserve natural resources
and improve standards of environmental protection in treatment and disposal of electrical waste
(Waste Electrical and Electronic Equipment Directive).
®All rights reserved
THE SPECIFICATION AND EXTERNAL APPEARANCE OF THE SET ARE SUBJECT TO CHANGE WITHOUT
PRIOR NOTICE.
GB 13
Page 14

Service and Support
For information: www.lenco.com
For support: http://lencosupport.zendesk.com
Lenco helpdesk:
Germany 0900-1520530 (Local charges)
The Netherlands 0900-23553626 (Local charges + 1ct p/min)
Belgium 02-6200115 (Local charges)
France 03-81484280 (Local charges)
The helpdesk is accessible from Monday till Friday from 9 AM till 6 PM.
When contacting Lenco, you will always be asked for the model and serial number of your product. The serial num-
ber can be found on the back of the device. Please write down the serial number below:
Model:
Serial number:_________________________________
Lenco offers service and warranty in accordance to European law, which means that in case of repairs (both during
and after the warranty period) you should contact your local dealer.
Important note: It is not possible to send products that need repairs to Lenco directly.
Important note: If this unit is opened or accessed by a non-ofcial service center in any way, the warranty expires.
This device is not suitable for professional use. In case of professional use, all warranty obligations of the manufacturer will be voided.
GB 14
Page 15
2.1 Audiosysteem met
Bluetooth, DAB+, NFC en CD
BT-9000
Handleiding
Voor informatie en ondersteuning www.lenco.eu
Page 16

Belangrijke veiligheidsinstructies
Dit apparaat is, bij gebruik volgens de instructies, ontworpen en vervaardigd om uw persoonlijke veiligheid te waarborgen. Echter, oneigenlijk gebruik kan resulteren in potentiële elektrische schokken of brandgevaar. Lees voor de
installatie en het gebruik de veiligheids- en bedieningsinstructies zorgvuldig door en bewaar deze instructies op een
geschikte plaats voor toekomstige referentie. Let ook goed op alle waarschuwingen die in deze handleiding en op het
apparaat staan.
1. Water en vocht
Het apparaat moet niet worden gebruikt in de buurt van water. Bijvoorbeeld: in de buurt van een badkuip, was-
bak, aanrecht, zwembad of een natte kelder.
2. Ventilatie
Het apparaat moet zo worden geplaatst, dat de plaats of positie de eigen ventilatie niet in de weg staat. Zo
moet het niet geplaatst worden op een bed, sofa, tapijt of soortgelijk oppervlak, dat de ventilatieopeningen kan
blokkeren. De ventilatie mag niet worden belemmerd door de ventilatieopeningen te bedekken met voorwerpen,
zoals kranten, tafelkleden, gordijnen, etc. Ook moet het apparaat niet worden geplaatst in een ingebouwde installatie, zoals een boekenkast of kast, die de doorstroming van lucht door de ventilatieopeningen belemmeren.
3. Warmte & vlammen
Het apparaat moet uit de buurt van warmtebronnen, zoals radiotoren, warmte-uitlaten, kachels of andere apparaten (inclusief versterkers) die warmte produceren, geplaatst worden
Plaats geen voorwerpen met open vlam, zoals kaarsen, op het apparaat.
4. Stroomvoorziening
Het apparaat mag uitsluitend worden aangesloten op een stroomvoorziening die overeenkomt met het type
stroomvoorziening dat is beschreven in de handleiding of is gemarkeerd op de achterkant van het apparaat.
Als de netadapter wordt gebruikt om het apparaat los te koppelen van het lichtnet, zorg er dan voor dat de
adapter eenvoudig bereikbaar blijft.
5. Bescherming netsnoer
Het netsnoer (het snoer van de netadapter) moet zo worden gelegd dat het onwaarschijnlijk is dat er op gestapt
wordt of dat voorwerpen het snoer beknellen. Het is het beste om de ruimte vrij te houden vanaf het punt waar
het snoer het apparaat verlaat tot het punt waar de adapter in het stopcontact is gestoken.
6. Reinigen
Het apparaat dient alleen zoals aangeraden te worden gereinigd. Kijk in de “Zorg en Onderhoud” sectie van
deze handleiding voor reiniginstructies.
7. Voorwerpen en vloeistoffen
Zorg ervoor dat er geen voorwerpen en vloeistoffen in de ventilatieopeningen van het product vallen. Het moet
niet worden blootgesteld aan druppend of spattend water en er mogen geen voorwerpen gevuld met vloeistof,
zoals vazen, op het apparaat gezet worden.
8. Hulpstukken
Gebruik alleen hulpstukken die worden aangeraden door de fabrikant.
9. Bliksem en bescherming stroompieken
Haal de stekker uit het stopcontact en verbreek de verbinding in deze perioden. Dit voorkomt schade aan het
product als gevolg van blikseminslag en stroompieken.
10. Overbelasting
Overbelast stopcontacten niet, het gebruik van verlengsnoeren kan leiden tot risico op brand en elektrische
schokken.
11. Schade die onderhoud vereist
Dit apparaat dient door gekwaliceerd onderhoudspersoneel onderhouden te worden als:
A. Het netsnoer of stekker beschadigd is.
B. Voorwerpen of vloeistof in de behuizing zijn gevallen.
C. Het apparaat is blootgesteld aan regen.
D. Het apparaat is gevallen of de behuizing is beschadigd.
E. Het apparaat vertoont een duidelijke verandering in prestaties of functioneert niet
normaal.
12. Perioden van niet gebruik
Als het apparaat voor een langere periode niet gebruikt wordt, zoals een maand of langer, haal het netsnoer uit
het apparaat om schade of corrosie te voorkomen.
13. Onderhoud
De gebruiker moet niet proberen het apparaat te onderhouden op methoden die verder gaan dan de methoden
die beschreven worden in de gebruiksaanwijzing. Onderhoudsmethoden die niet worden besproken in de
gebruiksaanwijzing moeten worden overgedragen aan gekwaliceerd onderhoudspersoneel.
NL 2
Page 17
Waarschuwingen
Volg het onderstaande advies voor veilig en juist gebruik.
OVER DE BESCHERMING TEGEN BLOOTSTELLING AAN LASERENERGIE
● Probeer de behuizing niet te demonteren, omdat de laserstraal in deze cd-speler schadelijk is voor uw ogen,.
● Stop gebruik onmiddellijk als er vloeistof of voorwerpen in de behuizing vallen.
● Raak de lens niet aan en tik er niet op. Als u dit doet, kan dit de lens beschadigen en is het mogelijk dat de speler
niet meer naar behoren werkt.
● Plaats niets in de veiligheidssleuf. Als u dit doet, dan zal de laserdiode ingeschakeld zijn als de CD-deur open is.
● Dit apparaat gebruikt een laser. Het gebruik van bediening of aanpassingen of het uitvoeren van procedures
anders dan de procedures die gespeciceerd zijn in deze handleiding kan leiden tot blootstelling aan schadelijke
straling.
Kenmerken
Bedankt voor de aanschaf van de CD DAB+ Radio met Bluetooth-muzieksysteem.
Dit model beschikt over de volgende kenmerken:
- Geschikt voor streamen en afspelen van nummers vanaf Apple-apparaten (iPad/iPhone/iPod Touch) en Android-
smartphones door Bluetooth-technologie.
- NFC (Near Field Communication) functie om eenvoudig verbinding te maken met Bluetooth
- CD-speler die zowel Audio CD’s als MP3-CD’s kan afspelen
- ID3-technologie voor het tonen van de titel van nummers
- DAB / DAB+ ontvanger
- FM-ontvanger met digitale weergave op LCD-display
- RDS-functie
- Klok op LCD-display
- Slaaptimerfunctie
- LCD-display met achtergrondverlichting
- Drie verschillende audio-ingangen (LINE-IN / AUX-IN) voor het aansluiten van een externe audiobron/-speler
- Twee ingebouwde High Fidelity luidsprekers
- Ingebouwde subwoofer voor zware bass-effecten
- Bass- en treble-instellingen
iPhone, iPad en iPod touch zijn handelsmerken van Apple Inc., geregistreerd in de V.S. en andere landen.
iPhone, iPad en iPod touch worden niet meegeleverd.
Installatie
De backup batterijen voor de klok installeren
Er zit een batterijcompartiment voor de backupbatterij op de achterkant van het apparaat.
(1) Open het deksel van het batterijcompartiment.
(2) Installeer 2 x AAA (UM-4) batterijen (niet meegeleverd) volgens het polariteitsdiagram aan de binnenzijde van het
compartiment.
(3) Sluit het deksel van het batterijcompartiment.
Afstandsbediening
Er zit een batterijcompartiment op de onderkant van de afstandsbediening.
- Verwijder vóór het eerste gebruik het isolatiefolie.
- Volg bij het plaatsen of vervangen van de batterij het polariteitsdiagram op de houder en installeer een nieuwe
CR2025 / DC 3V Lithium batterij. Plaats de batterijhouder terug in de onderkant van de afstandsbediening.
NL 3
Page 18

Installatie
2322
18
21
24
17
19
20
Aansluiten netadapter
Het apparaat kan worden gevoed door een externe netadapter, de vereiste uitvoer is 18V 3000mA (inbegrepen).
(1) Steek de stekker van de netadapter stevig in een stopcontact.
(2) Sluit de DC-stekker van de adapter aan op de DC IN-aansluiting op het apparaat.
Waarschuwingen:
- Batterijen mogen niet worden blootgesteld aan extreme warmte, zoals zonlicht, vuur en dergelijke.
- Controleer of de batterijen juist zijn geïnstalleerd. Onjuist plaatsen (polariteit) kan het apparaat beschadigen.
- Mix geen oude en nieuwe batterijen.
- Mix geen alkaline, standaard (koolstofzink) en oplaadbare (nikkelcadmium) batterijen.
- Gebruik alleen batterijen die aangeraden worden of van eenzelfde of equivalent type zijn.
- Haal de batterijen uit het apparaat als het langere tijd niet gebruikt wordt.
- Gooi geen batterijen weg in vuur, batterijen kunnen dan ontploffen of lekken.
- Explosiegevaar als de batterij onjuist wordt vervangen.
De batterijen in het product mogen niet worden weggegooid met het normale huisvuil. Raadpleeg de lokale regels
over de aparte inzameling van batterijen, omdat een goede afvalverwerking een bijdrage levert aan het voorkomen
van negatieve gevolgen voor het milieu en de volksgezondheid.
Gebruik uitsluitend de voeding die in de handleiding is vermeld.
Netadapter: Fabrikant: KINGWALL modelnummer.: AS600-180-AE300
Beschrijving van onderdelen
Hoofdapparaat
Bovenaanzicht Achteraanzicht
1
6789
1011
Vooraanzicht
15
16
13
14
2345
Afstandsbediening
1
33
2
3
4
5
6
7
8
9
10
11
34
12
13
14
15
16
17
INTRO/
212
16
18
19
20
21
22
23
24
25
26
27
28
29
30
31
32
NL 4
Page 19
Beschrijving van onderdelen
Hoofdapparaat
1. NFC-sensor --- De NFC (Near Field Communication) sensor op de bovenkant van het apparaat.
2. VOLUME --- Voor het verhogen of verlagen van het volume.
3. STANDBY --- Om het apparaat aan of uit te zetten.
4. OPEN/CLOSE --- Openen / sluiten CD-sleuf.
5. TUN / + en / - --- In DAB / FM-modus: Afstemmen op hogere/lagere FM-frequentie;
Een DAB-kanaal selecteren.
6. ENTER / --- Bevestig instelling voor DAB / FM-radio; Afspelen van Bluetooth / CD starten/pauzeren.
7. MENU / --- Open DAB- of FM-menu; Stop het afspelen van een CD.
8. LIGHT --- Schakel achtergrondverlichting LCD en de power-indicator IN/UIT.
9. FUNCTION --- Selecteer de modus: DAB /FM radio /BT (Bluetooth) /AUX-IN /LINE-IN1 /LINE-IN 2 /CD.
10. TREBLE + / - --- Instellen treble-niveau.
11. BASS + / - --- Instellen bass-niveau.
12. Power-indicator
13. CD-sleuf
14. Infraroodontvanger afstandsbediening
15. LCD-display
16. Luidsprekers
17. Subwoofer
18. Staafantenne
19. Compartiment voor backupbatterij
20. AUX-INGANG --- Ingang voor audiosignaal van hulpbron
21. LINE-INGANG 2 --- Lijningang 2 voor audio
22. STROOMINGANG --- Voor het aansluiten van externe voeding
23. LINE-INGANG 1 --- Lijningang 1 voor audio
24. RESET --- Om het apparaat te resetten
In DAB / FM-menu: Navigatietoetsen in het menu.
In BT (Bluetooth) en CD-modus: Druk om naar volgende / vorige track te gaan.
In CD-modus: Houd ingedrukt om vooruit/terug te spoelen.
Afstandsbediening
1. Infraroodzender
2. STANDBY
3. CD --- Selecteer CD-modus.
4. EJECT --- Openen / sluiten CD-sleuf.
5. AUX IN / LINE-IN --- Selecteer de modus AUX-IN / LINE-IN 1 / LINE-IN 2.
6. RDS --- In DAB-modus: Toon informatie over DAB-zender.
7. ST/MO --- Selecteer stereo- of mono-ontvangst voor FM-radio.
8. VOLUME + / - --- Verhoog of verlaag het volumeniveau.
9. / --- In CD-modus: terugspoelen/vooruitspoelen.
10. --- Stoppen met afspelen CD.
11. BASS + / - --- Instellen bass-niveau.
12. --- Volume dempen aan/uit (mute).
13. ID3 --- In CD-modus: In-/uitschakelen ID3-functie.
14. MEM / PROG --- DAB- / FM-voorkeurszender opslaan; Instellen CD-programma.
15. CH + / - --- In DAB- / FM-modus: Selecteer voorkeurszender.
16. FOLDER / --- In CD-modus: Selecteer map met MP3-nummers.
17. TUNE + / - --- In FM-modus: Afstemmen op hogere/lagere frequentie.
18. DAB / FM --- Selecteer DAB- / FM-modus.
19. BT --- Selecteer Bluetooth-modus.
20. MENU --- Open DAB- of FM-menu.
21. SCAN --- In FM-modus: Scan naar FM-zender.
22. INFO --- In CD-modus: Druk om de klok weer te geven.
23. / --- In BT- (Bluetooth) / CD-modus: Ga naar vorige / volgende track.
24. ENTER / --- Bevestig DAB- / FM- instelling; Afspelen / pauzeren voor BT (Bluetooth) / CD.
25. TREBLE +/- --- Instellen treble-niveau.
26. 10+ --- In CD-modus: Sla 10 MP3-nummers over.
In FM-modus: Toon RDS-informatie FM-zender.
In FM-menu: Navigatietoetsen.
In DAB-menu: Navigatietoetsen.
NL 5
Page 20
Beschrijving van onderdelen
27. LIGHT --- Schakel achtergrondverlichting LCD en power-indicator in / uit.
28. REP --- In CD-modus: Herhaal één nummer of alle nummers.
29. RAN --- In CD/modus: Selecteer afspelen van nummers in willekeurige volgorde.
30. INTRO / HR --- In standbymodus: Stel de uren van de klok in.
31. SLEEP --- Selecteer de tijdsduur van de slaaptimer.
32. MIN --- Stel de minuten van de klok in.
33. CLOCK --- In standbymodus: Instellen klok en 12/24-uursformaat.
34. Batterijcompartiment --- Bevindt zich op de onderkant van de achterkant van de afstandsbediening.
In CD/modus: Selecteer afspelen van intro´s.
Bediening Bluetooth
Dit apparaat kan met Bluetooth muziek weergeven die wordt afgespeeld vanaf een mobiel apparaat ( zoals iPad /
iPhone / iPod Touch, smartphone en tablet). Het apparaat is ook uitgerust met NFC (Near Field Communication)
zodat het eenvoudig is verbinding te maken met een mobiel apparaat dat ook is uitgerust met NFC.
Koppelen/ Verbinding maken
(A) Bluetooth: koppelen / verbinding maken met NFC
1. Druk op STANDBY om het apparaat in te schakelen.
2. Druk op FUNCTION op het hoofdapparaat of BT op de afstandsbediening om naar de Bluetooth-modus te
schakelen. Het LCD zal “ BT Pairing “ tonen.
3. Ontgrendel het mobiele apparaat (met NFC-functie) en plaats het op het NFC-detectiegebied.
4. Het mobiele apparaat zal automatisch koppelen en verbinding maken met het muzieksysteem.
Opmerking: De Bluetooth-naam van deze radio is: Lenco BT-9000
5. Nadat er succesvol verbinding is gemaakt, toont het LCD-display “ BT LINK “.
6. U kunt nu Bluetooth-muziek afspelen, zie het hoofdstuk “Bluetooth-muziek afspelen” hieronder.
(B) Bluetooth: handmatig koppelen / verbinding maken
1. Druk op STANDBY om het apparaat in te schakelen.
2. Druk op FUNCTION op het hoofdapparaat of BT op de afstandsbediening om naar de Bluetooth-modus te
schakelen. Het LCD zal “ BT Pairing “ tonen en het muzieksysteem zoekt naar Bluetooth-apparaten in de
buurt.
3. Schakel de Bluetooth-functie in op het mobiele apparaat en laat het mobiele apparaat ook zoeken naar
Bluetooth-apparaten in de buurt.
4. Selecteer het Bluetooth-apparaat met de naam “Lenco BT-9000” in de Bluetooth-lijst op het mobiele
apparaat om verbinding te maken met het muzieksysteem.
5. Zodra het mobiele apparaat verbinding heeft gemaakt, dan verschijnt de melding “ BT LINK“ op het display
van het muzieksysteem.
6. U kunt nu Bluetooth-muziek afspelen, zie het hoofdstuk “Bluetooth-muziek afspelen” hieronder
Opmerking:
(a) Als het apparaat vanuit de standbymodus wordt ingeschakeld naar de Bluetooth-modus, dan zal het automatisch
zoeken naar Bluetooth-apparaten en verbinding maken met het laatste apparaat waarmee verbinding is gemaakt,
het is in dit geval niet nodig om opnieuw te scannen en koppelen.
(b) Als u verbinding wilt maken met een ander Bluetooth-apparaat terwijl het apparaat in de Bluetooth-modus staat,
houd dan BT op de afstandsbediening ingedrukt. Het apparaat zoekt naar Bluetooth-apparaten in de buurt en het
LCD toont opnieuw de melding “BT Pairing”. Herhaal daarna de stappen (B)-3 tot (B)-6 hierboven.
Bluetooth-muziek afspelen
1. Nadat er een Bluetooth-verbinding is gemaakt, kunt u de muziekspeler-app op het mobiele apparaat openen en
muziek afspelen op het mobiele apparaat.
2. U kunt het volume zowel op het mobiele apparaat als op het muzieksysteem aanpassen om tot de ideale
instelling te komen.
3. U kunt drukken op:
(a) om het afspelen van Bluetooth-muziek te starten / pauzeren.
(b) / om naar de vorige / volgende track te gaan.
Opmerking over energiebesparing
Als het muzieksysteem in de Bluetooth-modus staat en er voor ongeveer 10 minuten geen verbinding is met een
ander apparaat, dan zal het muzieksysteem automatisch naar de standbymodus schakelen.
NL 6
Page 21
Bediening FM-radio
Antenne
Voor de beste ontvangst moet u de staafantenne op de achterkant van het apparaat volledig uitstrekken.
De menu-opties
U kunt de volgende opties selecteren in de FM-modus.
1. Druk op MENU om het menu te openen.
2. Hier heeft u twee opties: [Scan setting] en [Audio setting]. De opties kunnen worden ingesteld door op / op
het hoofdapparaat of TUNE +/- op de afstandsbediening te drukken.
(a) Druk terwijl [Scan setting] wordt getoond op ENTER om uw keuze te bevestigen.
- Druk daarna op / op het hoofdapparaat of TUNE +/- op de afstandsbedi ening om [All stations] of
[Strong stations] te selecteren.
Opmerking:
[All stations] ---- De FM-scan stopt standaard bij elke beschikbare zender (Alle zenders). Dit kan tot
[Strong stations] ---- De FM-scan stopt alleen bij zenders met een goed signaal.
- Druk, wanneer [All stations] of [Strong stations] wordt getoond, op ENTER om uw keuze te bevestigen.
(b) Druk terwijl [Audio setting] wordt getoond op ENTER om uw keuze te bevestigen.
- Druk daarna op / op het hoofdapparaat of TUNE +/- op de afstandsbedi ening om [Stereo] of
[Forced Mono] te selecteren.
Opmerking:
[Stereo] ---- Standaard zulle alle stereozenders in stereo worden weergegeven.
[Forced mono] ---- Geef alleen monogeluid weer.
- Druk, wanneer [Stereo] of [Forced mono] wordt getoond, ter bevestiging van uw keuze op ENTER.
3. U kunt te allen tijde op MENU drukken om het menu te verlaten.
Automatisch scannen en voorkeurszenders opslaan
U kunt met deze radio tot 20 FM-zenders opslaan als voorkeurszender, zodat u de zenders op elk gewenst moment
eenvoudig kunt oproepen.
1. Druk op STANDBY om het muzieksysteem in te schakelen, de power-indicator licht op.
2. Druk op FUNCTION op het hoofdapparaat of DAB/FM op de afstandsbediening om de FM-modus te selecteren.
3. Druk op SCAN op de afstandsbediening tot de frequentiegetallen beginnen te verand eren. De tuner scant
automatisch naar nieuwe zenders (van lage naar hoge frequentie) en slaat de zenders op als voorkeurszenders.
Opmerking: Bij elk gebruik van de functie voor het automatisch scannen & opslaan van zenders, zal het muziek
systeem de bestaande voorkeurszenders overschrijven en nieuwe zenders opslaan op hun plaats.
4. Druk om een voorkeurszender op te roepen op CH +/- op de afstandsbediening en daarna ter bevestiging op
ENTER.
Handmatig afstemmen op FM-zenders en voorkeurszenders opslaan
1. Druk op STANDBY om het muzieksysteem in te schakelen, de power-indicator licht op.
2. Druk op FUNCTION op het hoofdapparaat of DAB/FM op de afstandsbediening om de FM-modus te selecteren.
Handmatig afstemmen op FM-zender
3. U heeft de volgende opties om op een zender af te stemmen:
(a) Druk op / op het hoofdapparaat of TUNE +/- op de afstandsbediening om met stappen van 0.05MHz op
de gewenste radiofrequentie af te stemmen.
(b) Houd / op het hoofdapparaat of TUNE +/- op de afstandsbediening ingedrukt om op een gewenste
frequentie af te stemmen en laat de knop daarna los.
(c) Als u naar een hogere frequentie wilt scannen, druk dan één keer op op het hoofdapparaat of TUNE + op
de afstandsbediening en druk daarna op SCAN op de afstandsbediening. Het muzieksysteem stemt af op de
eerstgevonden zender met een hogere frequentie.
Als u naar een lagere frequentie wilt scannen, druk dan één keer op op het hoofdapparaat of TUNE + op
de afstandsbediening en druk daarna op SCAN op de afstandsbediening. Het muzieksysteem stemt af op de
eerstgevonden zender met een lagere frequentie.
Voorkeurszender opslaan
4. Druk op MEM op de afstandsbediening. Het nummer van de voorkeurszender knippert op het display.
5. Selecteer het gewenste nummer van de voorkeurszender door op CH + / - op de afstandsbediening te drukken.
Opmerking: Elke keer wanneer het voorkeurszendernummer wordt veranderd, zal het muzieksysteem de
huidige frequentie die is opgeslagen onder de desbetreffende voorkeurszender of “Empty” (leeg)
tonen.
6. Druk om het nummer van de voorkeurszender te bevestigen op ENTER, de melding “Preset store” wordt voor
een paar seconden op het display getoond en daarna keert het muzieksysteem terug naar de normale afstemmodus. De nieuw frequentie is opgeslagen onder de gekozen voorkeurszender en heeft de oude frequentie van
die voorkeurszender vervangen.
slechte ontvangst leiden bij zenders die ver weg zijn.
Bij zenders met een zwak signaal kan dit leiden tot slechte geluidskwaliteit. De geluid-
skwaliteit kan worden verbeterd door gebruik te maken van mono.
NL 7
Page 22

Bediening FM-radio
7. Herhaal indien nodig stappen 3 tot 6 voor andere zenders.
Opmerkingen:
● Er is een paar seconden vertragen tijdens het programmeren, na deze vertraging zal het apparaat automatisch
terugkeren naar de normale afstemmodus.
● U kunt een voorkeurszender overschrijven door af te stemmen op een nieuwe frequentie en deze op de plaats
van de voorkeurszender op te slaan.
Een voorkeurszender oproepen
8. Druk op CH +/- op de afstandsbediening. Het nummer van de voorkeurszender en de frequentie verschijnen op
het display. Druk daarna op ter bevestiging op ENTER.
RDS-functie
Dit apparaat is uitgerust met RDS-functies.
Als er een radiozender met RDS-informatie wordt ontvangen, dan kunt u herhaaldelijk op RDS op de afstandsbediening drukken om de RDS-gegevens weer te geven.
Gebruik met DAB / DAB+
Het apparaat is in staat de DAB en DAB+ radiozenders die beschikbaar zijn in uw regio te ontvangen.
Antenne
Voor de beste ontvangst moet u de staafantenne op de achterkant van het muzieksysteem volledig uitstrekken.
De menu-opties
Dit hoofdstuk beschrijft de opties die u, indien gewenst, voor het luisteren naar een DAB /DAB+ zender kunt
selecteren in het menu in de DAB-modus.
Navigatietoetsen
In het menu kunt u gebruik maken van de volgende navigatietoetsen om opties te selecteren.
MENU --- Druk om het menu te openen of verlaten.
/ --- Druk om een item te selecteren / tonen.
ENTER --- Druk om uw keuze te bevestigen.
Opties in menu
[Full scan] --- Een volledige scan naar DAB/DAB+ zenders in uw regio. Zodra de scan is voltooid zal het
[Manual tune] --- Handmatig afstemmen op een speciek kanaal/frequentie.
[DRC] --- Dynamic range compression (DRC). deze functie reduceert het verschil tussen de hardste
[Prune] --- Deze functie verwijdert alle niet-beschikbare zenders uit de zenderlijst. Niet-beschikbare
[System] --- Fabrieksreset Y/N, selecteer “Y” om een fabrieksreset uit te voeren.
Volledige scan uitvoeren
1. Druk op STANDBY om het muzieksysteem in te schakelen, de power-indicator licht op.
2. Druk op FUNCTION op het hoofdapparaat of DAB/FM op de afstandsbediening om de DAB-modus te selecteren.
3. Druk op MENU, de [Full scan] indicator wordt getoond.
4. Druk ter bevestiging op ENTER. Het apparaat begint met een scan naar DAB / DAB+ zenders in uw regio en het
display toont “Scanning 0 “. Wacht tot het scanproces is voltooid.
5. Zodra de scan is voltooid, zal het muzieksysteem de eerder geselecteerde zender of de eerste zender uit de
zenderlijst afspelen.
Handmatig afstemmen
Voordat u begint met handmatig afstemmen, is het verstandig eerst informatie over beschikbare DAB/DAB+ zenders
in uw regio bemachtigen.
1. Druk in de DAB-modus op MENU om het menu te openen.
2. Druk op / tot [Manual tune] op het display verschijnt.
3. Druk op ENTER om uw keuze te bevestigen.
4. Druk op / om een speciek kanaal/frequentie te selecteren.
5. Druk op ENTER om af te stemmen op het kanaal/ frequentie.
6. Als zenders worden gevonden, dan zal het display de signaalsterkte weergeven van “SG Str : 0” tot “SG Str : xx”,
waar xx groter dan 0 is.
7. Druk herhaaldelijk op MENU om het menu te verlaten.
muzieksysteem de eerder geselecteerde zender of de eerste zender in de zenderlijst
afspelen.
en zachtste geluiden die worden uitgezonden. Effectief maakt het zachte geluiden relatief
harder en harde geluiden relatief zachter.
Opmerking: DRC werkt alleen wanneer het is ingeschakeld door de zender die wordt
beluisterd.
zenders worden in de zenderlijst aangegeven met een “?” voor de naam van de zender.
NL 8
Page 23

Gebruik met DAB / DAB+
Voorkeurszenders opslaan
1. Druk terwijl een gewenste zender wordt weergegeven op MEM op de afstandsbediening. Het nummer van de
voorkeurszenders knippert op het display.
2. Druk om een gewenste voorkeurszendernummer te selecteren op CH + / - op de afstandsbediening.
Opmerking: Elke keer wanneer het voorkeurszendernummer wordt veranderd, zal het muzieksysteem de
3. Druk om het voorkeurszendernummer te bevestigen op ENTER, de melding “Preset store” wordt voor een paar
seconden op het display getoond en daarna keert het muzieksysteem terug naar den normale DAB-afstemmodus. De nieuwe zender vervangt de oude zender die was opgeslagen onder het geselecteerde voorkeurszender-
nummer.
Opmerkingen:
- Er is een paar seconden vertragen tijdens het programmeren, na deze vertraging zal het apparaat automatisch
terugkeren naar de normale afstemmodus.
- U kunt een voorkeurszender overschrijven door af te stemmen op een nieuwe frequentie en deze op de plaats
van de voorkeurszender op te slaan.
Een voorkeurszender oproepen
Druk op CH +/- op de afstandsbediening. Het voorkeurszendernummer en zendernaam verschijnen het display, druk
daarna op ENTER om uw keuze te bevestigen en af te stemmen op de zender.
Het kanaal veranderen
1. Druk terwijl u luistert naar een zender herhaaldelijk op / tot de gewenste zendernaam wordt getoond.
2. Druk ter bevestiging op ENTER.
Weergeven DAB-zenderinformatie
U kunt, indien gewenst, op RDS op de afstandsbediening drukken om informatie die wordt uitgezonden door de
DAB-zender weer te geven.
huidige zendernaam of “Empty” (wanneer er geen voorkeurszender is opgeslagen) tonen.
Luisteren naar CD-muziek
De CD-speler kan CD/CD-R/CD-RW discs van het Audio CD- en MP3-formaat afspelen.
CD afspelen
1. Druk op STANDBY om het muzieksysteem in te schakelen.
2. Druk op FUNCTION op het hoofdapparaat of CD op de afstandsbediening om naar de CD-modus te schakelen.
3. Plaats een CD met de bedrukte zijde omhoog gericht in de CD-sleuf.
4. Het afspelen van muziek start automatisch.
5. Voor Audio CD’s ---- Het display toont de “CD” indicator en het tracknummer (bijv. T001).
Voor MP3-discs ---- Het display toont de “MP3” indicator, het mapnummer (bijv. A01) en het tracknummer
6. Stel het volume naar wens in met behulp door aan VOLUME op het hoofdapparaat te draaien of door op
VOLUME +/- op de afstandsbediening te drukken.
7. Druk om naar de gewenste track op een CD te gaan op / . Als er een MP3-disc wordt afgespeeld, dan kunt
u op FOLDER / drukken om naar de gewenste map te gaan.
8. Houd / op het hoofdapparaat of / op de afstandsbediening ingedrukt om terug of vooruit te spoelen.
9. Druk op om het afspelen van een CD te pauzeren.
Druk om het afspelen te hervatten nogmaals op .
10. Druk op STOP om het afspelen van de CD te stoppen.
11. Druk op OPEN/CLOSE om de CD uit te werpen.
Afspeelmodi CD
Herhalen
● Voor Audio CD’s:
Druk één keer op REP op de afstandsbediening om een enkele track te herhalen.
Er verschijnt een herhaal één-indicator “ ”op het LCD-display.
Druk, om een gehele CD te herhalen, op REP tot de herhaal alle “ ” indicator op het LCD-display verschijnt.
● Voor MP3-discs:
Druk één keer op REP op de afstandsbediening om een enkele track te herhalen. Er verschijnt een herhaal éénindicator “ ”op het LCD-display.
Druk twee keer op REP om een map te herhalen. Er verschijnt een herhaal map-indicator “ DIR” op het LCD-
display.
Druk, om een gehele CD te herhalen, op REP tot de herhaal alle “ ” indicator op het LCD-display verschijnt.
In willekeurige volgorde afspelen
Druk op RAN op de afstandsbediening om de tracks op een CD in willekeurige volgorde af te spelen. De “RND”
indicator verschijnt op het LCD-display.
(bijv. T001).
NL 9
Page 24

Luisteren naar CD-muziek
Intro’s afspelen
Druk op INTRO op de afstandsbediening tot de “INTRO” indicator op het LCD-display verschijnt om de eerste 10
seconden van elke track af te spelen.
Het afspelen van een CD stoppen
U kunt te allen tijde op STOP drukken om het afspelen van een CD te stoppen.
Afspelen CD-programma
U kunt met deze functie tot 20 tracks voor audio CD’s of 30 tracks voor MP3-discs in de gewenste volgorde afspelen
1. Druk als het afspelen van de CD is gestopt één keer op PROG op de afstandsbediening.
Het LCD toont de “PGM” indicator
Het programmanummer (bijv. P01) knippert.
Het tracknummer (bijv. T001)
Het mapnummer (bijv. A01) ---- alleen bij MP3-discs.
2. Druk om een mapnummer te selecteren op FOLDER / op de afstandsbediening (alleen voor MP3-discs).
Druk om een tracknummer te selecteren op / .
3. Druk als het gewenste tracknummer wordt getoond ter bevestiging op PROG.
4. Herhaal de stappen 2 en 3 om alle gewenste nummers te programmeren. Er kunnen tot 20 Audio CD tracks of 30
MP3 CD tracks worden geprogrammeerd.
Of, druk om het afspelen van het programma te starten op Play/Pause , de “PGM” indicator blijft op het display
staan.
5. Druk om het afspelen van het programma te annuleren twee keer op STOP .
Opmerking:
● Als u op / drukt tijdens het afspelen van een programma, dan gaat het muzieksysteem naar de vorige /
volgende track van het programma, wat niet altijd de vorige / volgende track op de disc is.
● De herhaalmodi, “ ”herhaal één track en “ ” herhaal alle geprogrammeerde tracks, werken hetzelfde als
tijdens het normale afspelen van een CD (zie afspeelmodi CD hierboven).
ID3-functie
Deze functie stelt gebruikers in staat om de informatie van een track (bestand) dat wordt afgespeeld (indien beschikbaar) te bekijken.
De functie inschakelen:
1. Druk tijdens het afspelen van een MP3-disc op ID3. De informatie (bijv. naam artiest, naam track) die is
opgeslagen in de track (het bestand) worden getoond op het LCD-display.
2. Druk nogmaals op ID3 om de ID3-functie uit te schakelen.
Opmerking:
● Deze functie werkt alleen bij MP3-tracks (bestanden) met ID3-tags.
● Het apparaat ondersteunt alleen ID3-tags in Engelse karakters. Er worden geen andere talen ondersteund.
Instellen treble en bass
Als het apparaat is ingeschakeld (in de Bluetooth-, Aux-, Line1-, Line2-, CD-, DAB- of FM-modus), dan kunt u op
BASS + / - en TREBLE + / - drukken om het bass- en treble-niveau naar wens in te stellen.
Luisteren naar een externe audiobron
Het muzieksysteem is uitgerust met drie audio-ingangen (AUX-IN / LINE-IN 1 / LINE-IN 2). Hierop kunt u drie verschillende externe audiobronnen aansluiten.
1. Sluit een extern audioapparaat met een 3,5mm audiokabel aan op de AUX-INGANG van het muzieksysteem.
Het is ook mogelijk om gebruik te maken van RCA-kabels en deze aan te sluiten op LINE-INGANG 1 of
LINE-INGANG 2.
2. Druk op STANDBY om het apparaat in te schakelen.
3. Druk op FUNCTION op het hoofdapparaat of op LINE-IN / AUX IN op de afstandsbediening om de juiste modus
voor de externe audiobron te selecteren. De indicator van de geselecteerde modus, “AUX-IN” / “LINE-IN 1” /
“LINE-IN 2”, verschijnt op het display.
4. Zet het externe audioapparaat aan.
5. Het volume kan nu worden geregeld op het muzieksysteem.
Bedien alle andere functies op het extern apparaat, net als gebruikelijk.
Opmerking: Druk op STANDBY om het apparaat uit te schakelen wanneer u klaar bent met luisteren.
Vergeet niet ook de externe audiobron uit te schakelen.
NL 10
Page 25

De klok instellen
Automatisch instellen
Het muzieksysteem kan de klok automatisch synchroniseren met tijdinformatie van DAB-zenders.
Telkens wanneer er een DAB-zender wordt ontvangen, zal de tijdinformatie automatisch worden gekopieerd naar het
muzieksysteem en zal de huidige tijdinstelling worden overschreven.
Handmatig instellen
Wanneer het apparaat is UITGESCHAKELD (standbymodus):
Instellen 12/24-uursformaat
1. Druk op CLOCK op de afstandsbediening om de modus voor het instellen van het 12/24-uursformaat te openen.
2. Druk op HR of MIN op de afstandsbediening om het 12- of 24-uursformaat te selecteren.
De klok instellen
3. Druk nogmaals op CLOCK om het instellen van de tijd te openen.
4. Druk op HR op de afstandsbediening om de uren in te stellen.
5. Druk op MIN op de afstandsbediening om de minuten in te stellen.
De instelmodus verlaten
6. Druk om alle instellingen op te slaan op CLOCK of wacht een paar seconden om de instelmodus te verlaten.
Slaaptimerfunctie
Slapen met timer
U kunt de slaaptimer gebruiken om in slaap te vallen terwijl u voor tot 90 minuten naar een CD, de radio of Bluetooth
luistert.
Het muzieksysteem schakelt automatisch uit wanneer de ingestelde tijd is verstreken.
1. Druk op STANDBY om het muzieksysteem in te schakelen.
2. Stem af op de gewenste FM- of DAB-zender in de radiomodus, speel een CD af of speel Bluetooth-muziek af.
3. Druk herhaaldelijk op SLEEP op de afstandsbediening om de slaaptimer in te stellen op 15, 30, 45, 60 of 90
minuten. Het display toont de “SLEEP” indicator. Het apparaat speelt voor de geselecteerde tijdsduur af en
schakelt daarna automatisch uit.
4. Druk één keer op SLEEP op de afstandsbediening om de resterende tijd van de slaaptimer te controleren.
Druk te allen tijde op STANDBY om het muzieksysteem uit te schakelen voordat de timer tot 0 is afgeteld.
Opmerkingen:
● Als u in slaap valt met muziek die is opgeslagen op een extern apparaat dat is aangesloten AUX-INGANG of
LINE-INGANG, dan schakelt de slaaptimer alleen het muzieksysteem uit en niet het extern apparaat.
● Als u de slaaptimer activeert tijdens het afspelen van een CD, dan zal het muzieksysteem afspelen tot het einde
van de disc en daarna automatisch uitschakelen, ongeacht de instelling van de slaaptimer. Bijvoorbeeld, als uw
CD slechts 30 minuten lang is en de slaaptimer is ingesteld op 45 minuten, dan zal het apparaat ongeveer 3
minuten nadat het afspelen van de disc is beëindigd uitschakelen.
NL 11
Page 26

Zorg en onderhoud
- Stel het apparaat niet bloot aan overmatige druk, schokken, stof of extreme temperaturen.
- Knoei niet met de interne onderdelen van het apparaat.
- Maak uw apparaat schoon met een vochtige (nooit natte) doek. Oplosmiddel of afwasmiddel mag nooit worden
gebruikt.
- Laat uw apparaat niet achter in direct zonlicht of op hete, vochtige of stofge plaatsen.
- Houd uw apparaat uit de buurt van verwarmingstoestellen en bronnen van elektrische ruis, zoals
uorescentielampen of motoren.
Als er zich drop-outs of onderbrekingen voordoen tijdens het afspelen van muziek of als de disc helemaal niet kan
worden afgespeeld, dan is het mogelijk dat het oppervlak aan de onderkant moet worden schoongemaakt.
Veeg de disc, vóór het afspelen, schoon vanuit het midden naar buiten met een goede, zachte, schone doek.
Het apparaat resetten
Als het apparaat is blootgesteld aan een stroomstoot of elektrische schok, dan is het mogelijk dat de interne
microcontroller vastloopt en het apparaat niet meer reageert op commando’s van de bedieningselementen op het
voorpaneel.
1. In dit geval, haal de stekker uit het stopcontact en steek de stekker vervolgens weer terug in het stopcontact.
2. Gebruik een rechtgebogen paperclip, tandenstoker of soortgelijk voorwerp om op de Resetknop op de achterkant
van het hoofdapparaat te drukken (zie in de afbeelding hieronder). De Reset operatie wist het systeemgeheugen
en al uw eerder ingestelde instellingen zullen gewist worden.
RESET-knop
LET OP: GEBRUIK GEEN SCHERP, SPITS VOORWERP OM DE RESETKNOP IN TE DRUKKEN. DIT KAN DE
Opmerking:
- In het geval van storing door elektrostatisch ontlading (ESD), reset het product om de normale werking te hervatten.
- De normale werking van het product kan worden verstoord door sterke elektromagne tische interferentie. Als dit het
RESETSCHAKELAAR IN HET APPARAAT BESCHADIGEN.
geval is, reset het product dan om de normale werking te hervatten. Als de normale werking niet kan worden hervat, gebruik het product dan op een andere locatie.
NL 12
Page 27

Specicaties
Netadapter Invoer AC 100-240V ~ 50/60Hz
Uitvoer DC 18V 3000mA
Voeding hoofdapparaat DC 18V 3000mA
Backupbatterij voor klok / geheugen DC3V--- AAA (UM-4) type x 2 (niet meegeleverd)
Batterij afstandsbediening DC3V --- CR2025 x 1 Lithium batterij
Vermogen speaker 10W+10W (Max.)
Vermogen subwoofer 25W (Max.)
Stroomverbruik 1 W (Standby)
54 W (Max.)
Afmetingen 351 x 136 x 214 mm
Gewicht 3300g
Bedrijfstemperatuur 0 C ~ + 45 C
en -vochtigheid 70%
Dit product werkt op 2400 - 2483,5 MHz en is aangewezen om alleen te worden gebruikt in een normaal huishoudelijke omgeving. Dit product is geschikt voor dit doel binnen alle EU-landen.
Producten met een CE keurmerk houden zich aan de EMC richtlijn (2004/108/EC) en de Richtlijn
voor Lage Voltage (2006/95/EC) uitgegeven door de Europese Commissie.
Dit symbool geeft aan dat het betreffende elektrische product of de batterij niet moet worden
verwijderd als algemeen huishoudelijk afval in Europa. Zorg voor een juiste afvalverwerking door
het product en de batterij in overeenstemming met alle van toepassing zijnde lokale wetten voor
het verwijderen van elektrische apparatuur of batterijen te verwijderen. Als u dit doet, helpt u de
natuurlijke hulpbronnen te behouden en de standaard van milieubescherming te verbeteren bij
de behandeling en verwijdering van elektrisch afval (Afgedankte Elektrische en Elektronische
Apparatuur).
®Alle rechten voorbehouden
DE SPECIFICATIE EN HET UITERLIJK VOORKOMEN VAN HET TOESTEL ZIJN ONDERHEVIG AAN VERANDERING ZONDER VOORAFGAANDE KENNISGEVING.
NL 13
Page 28

Service en ondersteuning
Voor informatie: www.lenco.com
Voor ondersteuning: http://lencosupport.zendesk.com
Lenco helpdesk:
Duitsland 0900-1520530 (Lokale kosten)
Nederland 0900-23553626 (Lokale kosten + 1ct p/min)
België 02-6200115 (Lokale kosten)
Frankrijk 03-81484280 (Lokale kosten)
De helpdesk is bereikbaar van maandag tot en met vrijdag van 09:00 tot 18:00 uur. Wanneer u Lenco contacteert, zal
u altijd gevraagd worden naar het modelnummer en het serienummer van uw product. Het serienummer bevindt zich
aan de achterkant van het apparaat. Gelieve dit nummer hier op te schrijven:
Model:
Serienummer: _________________________________
Lenco biedt service en garantie aan overeenkomstig met de Europese wetgeving. Dit houdt in dat in het geval van
reparaties (zowel tijdens en na de garantieperiode), u uw lokale handelaar moet contacteren.
Belangrijke opmerking: Het is niet mogelijk om producten die gerepareerd moeten worden direct naar Lenco te
sturen.
Belangrijke opmerking:
De garantie verloopt als een onofcieel servicecenter het apparaat op wat voor manier dan ook heeft geopend, of er
toegang toe heeft gekregen.
Het apparaat is niet geschikt voor professioneel gebruik. In het geval van professioneel gebruik worden alle garantieverplichtingen van de fabrikant nietig verklaard.
NL 14
Page 29

2.1 Système audio avec
Bluetooth, DAB+, NFC et CD
BT-9000
Manuel d’instruction
Pour des informations et de l’assistance www.lenco.eu
Page 30

Instructions importantes sur la sécurité
Lorsqu’utilisée de la manière indiquée, cette unité a été conçue et fabriquée pour garantir votre sécurité personnelle.
Cependant une utilisation inappropriée peut entrainer un risque potentiel de choc électrique ou d’incendie. Veuillez
lire soigneusement toutes les instructions sur la sécurité et l’utilisation avant d’utiliser, et garder ces instructions à
portée de main pour référence ultérieure. Prenez spécialement en considération tous les avertissements listés dans
ces instructions et sur l’unité.
1. Eau et humidité
L’unité ne doit pas être utilisée à proximité de l’eau. Par exemple : près d’une baignoire, d’un lavabo, d’un évier,
d’un bac à linge, d’une piscine ou dans un sous-sol.
2. Ventilation
L’unité doit être placée dans un endroit ou une position qui n’entravera pas sa ventilation correcte. Par exemple, elle ne doit pas être placée dans un lit, un sofa, une couverture ou autre surface qui pourrait bloquer les
ouvertures de ventilation. La ventilation ne doit pas être empêchée par la couverture des ouvertures de ventilation avec des objets tels que journaux, linges de table, rideaux, etc. En outre, elle ne doit pas être placée dans
une installation intégrée telle qu’une bibliothèque ou un placard qui pourrait empêcher la circulation de l’air par
les ouvertures de ventilation.
3. Chaleur et Flamme
L’unité doit être placée loin des sources de chaleur telles que radiateurs, registre de chaleur, poêle ou autres
appareils (y compris les amplicateurs) qui produisent de la chaleur.
Aucune source de amme telle que des bougies allumées ne devraient être placée près de l’appareil.
4. Source d’alimentation
L’unité doit uniquement être connectée à une source d’alimentation du type décrit dans les instructions
d’utilisation ou indiquées sur l’appareil.
Si le cordon d’alimentation sert de sectionneur, le sectionneur doit toujours rester en état de marche.
5. Protection du l de l’adaptateur d’alimentation
Le cordon d’alimentation doit être dirigé de manière à ce qu’il ne risque pas d’être piétiné ou pincé par des objets placés contre ou sur lui. Il est toujours préférable d’avoir une zone dégagée entre la sortie du cordon depuis
l’unité et l’endroit ou l’adaptateur est branché sur le secteur.
6. Nettoyage
L’unité doit seulement être nettoyée comme indiquée. Voir la section de ce manuel “Soin et entretien” pour les
instructions de nettoyage.
7. Entrée d’objets et de liquide
Prenez garde à ce qu’aucun objet ne tombe ou qu’aucun liquide ne se répande sur les ouvertures de ventilation situées sur le produit. L’appareil ne doit pas être exposé aux gouttes ou aux éclaboussements et les objets
remplis de liquides, tels que des vases, ne doivent pas être placés près de l’appareil.
8. Attachements
N’utilisez pas d’accessoires non recommandés par le fabriquant du produit.
9. Protection contre les orages et les sautes de puissance
Débranchez l’unité du secteur et déconnectez-la durant ces moments. Cela empêchera la survenue des dégâts
sur le produit dus aux éclairs et aux sautes de courant.
10. Surcharge
Ne surchargez pas les prises secteur et les cordons de rallonge car ceci pourrait entrainer un risque d’incendie
ou de choc électrique.
11. Dégât nécessitant un entretien
Cette unité doit être entretenue par un technicien qualié lorsque :
A. Le cordon d’alimentation ou la che a été endommagée.
B. Des objets sont tombés ou du liquide s’est répandu dans le boitier.
C. L’unité a été exposée à la pluie.
D. L’unité a subi une chute ou si le boitier est endommagé.
E. La performance de l’unité a nettement changé ou si elle ne fonctionne pas normalement.
12. Périodes de non-utilisation
Si l’unité doit être laissée inutilisée pendant une période prolongée, tel qu’un mois ou plus, le cordon
d’alimentation doit être débranchée de l’unité pour prévenir tout dégât ou corrosion.
13. Entretien
L’utilisateur ne doit pas tenter d’effectuer l’entretien de l’appareil outre les mesures décrites dans ces instructions d’utilisation. Les mesures d’entretien non précisées dans les instructions d’utilisation doivent être conées
à du personnel d’entretien qualié.
FR 2
Page 31

Avertissements
Suivez les conseils suivants pour une utilisation sans danger et appropriée.
PROTECTION CONTRE L’EXPOSITION AUX RAYONS LASER
● Vu que le rayon laser utilisé dans ce lecteur de disque compact est dangereux pour les yeux, n’essayez pas de
démonter le boitier.
● Arrêtez l’utilisation immédiatement si du liquide ou un objet tombe dans le boitier.
● Ne touchez pas ou n’appuyez pas sur la lentille. Si vous le faites, vous pourriez endommager la lentille et le lecteur
pourrait ne plus fonctionner correctement.
● Ne mettez rien dans la fente de sécurité. Si vous le faites, la diode laser s’allumera alors que le clapet du CD est
ouvert.
● Cette unité est munie d’un laser. L’utilisation de commande ou l’exécution de procédures autres que celles
spéciées ici peuvent aboutir à une exposition à des radiations dangereuses.
Caractéristiques
Merci d’avoir acheté ce système musical Bluetooth avec Radio DAB+ et CD.
Ce modèle présente les caractéristiques suivantes :
- Lecture et streaming de chansons depuis des appareils Apple (iPad/iPhone/iPod Touch) et smartphone
fonctionnant sous Android grâce à la technologie Bluetooth.
- Fonction NFC (Near Field Communication) pour une connexion Bluetooth facile
- Lecteur CD avec lecture de chansons de CD audio et MP3
- Technologie ID3 afchant le titre de la chanson
- Récepteur DAB / DAB+
- Récepteur FM avec afchage digital sur écran LCD
- Fonction RDS
- Horloge LCD
- Fonction minuteur de mise en veille
- Écran LCD avec retro éclairage
- Trois entrées audio différentes (Entrée de ligne / entrée auxiliaire) pour la connexion à des sources / lecteurs audio
externes.
- 2 haut-parleurs haute-délité intégrés.
- Caisson de graves intégré pour un effet de basse profond
- Réglage des graves et des aigus
iPad, iPhone, et iPod touch sont des marques déposées d’Apple Inc., enregistrées aux États-Unis et dans d’autres
pays.
Les iPhone, iPad et iPod touch ne sont pas fournis.
Installation
Pile de secours du réglage de l’horloge
Un compartiment pour pile de secours est situé à l’arrière de l’unité.
(1) Ouvrez le couvercle du compartiment de pile de l’horloge.
(2) Conformément aux indications sur la polarité à l’intérieur du compartiment de piles, installez 2 piles AAA (UM-4)
(non fournies).
(3) Fermez le couvercle du compartiment de pile de l’horloge.
Télécommande
Un compartiment pour pile est situé à l’arrière de la télécommande.
- Pour la première utilisation, enlevez l’onglet d’isolation.
- Pour changer les piles, sortez le support de pile et observez l’illustration de polarité indiqué sur le support et
installez une nouvelle pile lithium CR2025 / 3V CC. Insérez le support de piles dans la télécommande de nouveau.
FR 3
Page 32

Installation
2322
18
21
24
17
19
20
Connexion de l’adaptateur AC-DC
L’unité peut être alimentée par un adaptateur AC-DC externe, à l’aide de la sortie DC 18V 3000mA (inclus).
(1) Branchez la prise CA de l’adaptateur fermement et solidement dans le secteur.
(2) Connectez la sortie CC de l’adaptateur à la prise d’entrée CC sur l’unité.
Avertissements :
- Les batteries ne doivent pas être exposées à des chaleurs excessives telles que la lumière du soleil, le feu ou
autres.
- Assurez-vous que les piles soient correctement installées. Une polarité incorrecte pourrait endommager l’unité.
- Ne mélangez pas les piles nouvelles et anciennes.
- Ne mélangez pas les piles alcalines, standards (carbone-zinc) ou rechargeables.
- Seule l’utilisation de piles identiques ou d’un type équivalent est recommandée.
- Si l’unité n’est pas utilisée pendant une période prolongée, enlevez les piles.
- Ne jetez pas les piles dans le feu, elles pourraient exploser ou couler.
- Danger d’explosion si les piles ne sont pas correctement remplacées.
Votre produit contient des piles qui ne doivent pas être éliminées avec les déchets domestiques normaux. Veuillez
vous renseigner sur les lois locales concernant la collecte séparée des piles car l’élimination correcte aide à éviter
les conséquences négatives sur l’environnement et la santé humaine.
N’utilisez que l’alimentation listée dans les instructions d’utilisation
Adaptateur d’alimentation : Fabricant : KINGWALL modèle no.: AS600-180-AE300
Description des éléments
Unité principale
Vue de Vue arrière
1
6789
1011
Vue frontale
15
16
13
14
2345
Télécommande
1
33
2
3
4
5
6
7
8
9
10
11
34
12
13
14
15
16
17
INTRO/
212
16
18
19
20
21
22
23
24
25
26
27
28
29
30
31
32
FR 4
Page 33

Description des éléments
Unité principale
1. Capteur NFC --- Le capteur NFC (Near Field Communication) situé au milieu en haut de l’unité.
2. Molette de VOLUME --- augmente ou diminue le volume.
3. Touche STANDBY --- Allumer ou éteindre l’unité.
4. Touche OPEN/CLOSE --- Ouvre / ferme la fente CD.
5. Touches TUN / + et / - ---- En mode radio DAB / FM : Règle la fréquence de la radio FM vers le haut ou
En mode de menu radio DAB / FM : Sert de touche de navigation.
En mode BT (Bluetooth) ou CD : Appuyez pour passer à la piste suivante /
En mode CD : Maintenez appuyé pour faire une recherche rapide.
6. Touche ENTER / --- Conrme la sélection du réglage de radio DAB / FM;
Fonction lecture/pause en Bluetooth/CD
7. Touche MENU / --- Sélectionne le mode de paramètre de menu radio DAB et FM.
Arrête la lecture de CD
8. Touche LIGHT ---- Allume/éteint le rétro éclairage du LCD et l’indicateur d’alimentation.
9. Touche FUNCTION --- Sélectionne le mode DAB / FM radio / BT (Bluetooth) / AUX-IN / LINE-IN1 /
LINE-IN 2 / CD.
10. Touches TREBLE + / - --- Règle le niveau des aiguës.
11. Touches BASS + / - --- Règle le niveau des graves.
12. Indicateur d’alimentation
13. Fente CD
14. Récepteur infrarouge de la télécommande
15. Écran LCD
16. Haut-parleurs
17. Caisson de grave
18. Antenne tige
19. Compartiment pour piles de sauvegarde de mémoire
20. Prise AUX-IN --- Entrée pour les signaux audio auxiliaires.
21. Prise LINE-IN 2 --- Entrée ligne audio 2
22. Prise entrée DC --- Pour la connexion à une source d’alimentation DC externe.
23. Prise LINE-IN 1 --- Entrée ligne audio 2
24. Touche Réinitialisation --- Pour réinitialiser l’unité.
Télécommande
1. Transmetteur infrarouge
2. Bouton M/A
3. Touche CD --- Sélectionne le mode CD.
4. Touche EJECT --- Ouvre / ferme la fente CD.
5. Touche AUX IN / LINE-IN --- Sélectionne le mode AUX-IN / LINE-IN 1 / LINE-IN 2.
6. Touche RDS --- En mode DAB : Afche les informations de la station DAB.
En mode radio FM : Afche les informations RDS sur les stations FM
7. Touche ST/MO --- Sélectionne la réception Stéréo / Mono pour la radio FM.
8. Touches VOL +/- --- Augmente ou diminue le volume.
9. Touche / --- En mode CD : Effectue une recherche rapide.
10. Touche --- Arrête la lecture du CD.
11. Touches BASS + / - --- Règle le niveau des graves.
12. Touche --- Coupe/remet le volume.
13. Touche ID3 --- En mode CD : Active /désactive la fonction ID3.
14. Touche MEM / PROG --- Sauvegarde la station radio DAB / FM en présélection;
Régler le programme du CD.
15. Touches CH + / - --- En mode radio DAB / FM : Sélectionne un canal présélectionné.
16. Touche FOLDER / --- En mode CD : Sélectionne le répertoire/dossier d’une chanson MP3.
17. Touches TUNE + / - --- En mode radio FM : Règle la fréquence vers le haut ou vers le bas.
En mode menu FM : Sert de touche de navigation.
18. Touche DAB / FM --- Sélectionne le mode DAB / FM.
19. Touche BT --- Sélectionne le mode Bluetooth.
20. Touche MENU --- Sélectionne le mode de paramètre de menu radio DAB et FM.
21. Touche SCAN --- En mode radio FM : Recherche les stations de radio FM.
22. Touche INFO --- En mode CD : Appuyez pour afcher l’horloge.
vers le bas; Sélectionne un canal DAB.
précédente.
FR 5
Page 34

Description des éléments
23. Touches / --- En mode BT (Bluetooth) / CD : Passer aux pistes précédentes / suivantes.
--- En mode menu DAB : Sert de touche de navigation.
24. Touche ENTER / --- Conrme la sélection du réglage de radio DAB / FM;
Fonction lecture/pause en mode Bluetooth/CD
25. Touches TREBLE + / - --- Règle le niveau des aiguës.
26. Touche 10+ --- En mode CD : Saute de 10 chansons MP3.
27. Touche LIGHT --- Allume/éteint le rétro éclairage du LCD et l’indicateur d’alimentation.
28. Touche REP --- En mode CD : Sélectionne la répétition de lecture d’une chanson / de toutes
29. Touche RAN --- En mode CD : Sélectionne la lecture aléatoire des chansons.
30. Touche INTRO / HR --- En mode veille: Réglage de l’heure de l’horloge
En mode CD : Sélectionne la lecture des introductions.
31. Touche SLEEP --- Sélectionne le temps du minuteur de mise en veille.
32. Touche MIN --- Règle les minutes de l’horloge.
33. Touche CLOCK --- En mode veille : Règle le format 12/24 heures de l’horloge.
34. Compartiment de piles --- situé à l’arrière de la télécommande.
Allumé/ Éteint
les chansons.
Fonctionnement Bluetooth
L’unité peut lire de la musique depuis un appareil mobile (comme un iPad/iPhone/iPod Touch, un Smartphone ou une
tablette) grâce au fonctionnement Bluetooth®. Elle est également dotée d’une fonction NFC (Near Field Communication) pour une connexion facilitée avec un appareil mobile disposant également de la fonction NFC.
Couplage / connexion
(A) Couplage / connexion NFC Bluetooth®
1. Appuyez sur le bouton M/A pour mettre l’unité en marche.
2. Appuyez sur la touche FONCTION sur l’unité ou appuyez sur la touche BT sur la télécommande pour passer en
mode Bluetooth. L’écran afchera « BT Pairing ».
3. Débloquez l’appareil mobile, et placez-le (fonction NFC intégrée) sur la zone de capteur NFC.
4. L’appareil mobile se connectera automatiquement avec ce modèle.
Remarque: Le nom du modèle de cet appareil Bluetooth® : Lenco BT-9000
5. Une fois la connexion effectuée, l’écran afche « BT LINK ».
6. À présent, vous pouvez lire de la musique Bluetooth®, voir la section « Lire de la musique Bluetooth® » ci
dessous.
(B) Couplage / connexion manuel
1. Appuyez sur le bouton M/A pour mettre l’unité en marche.
2. Appuyez sur la touche FONCTION sur l’unité ou appuyez sur la touche BT sur la télécommande pour passer en
mode Bluetooth. L’écran afchera « BT Pairing » et l’unité recherchera les appareils Bluetooth dans les environs.
3. Sur l’appareil mobile, activez la fonction Bluetooth® et il recherchera également les appareils Bluetooth® dans les
environs.
4. Dans la liste des appareils Bluetooth de votre appareil mobile, choisissez le nom de l’appareil Bluetooth
« Lenco BT-9000 » de ce modèle pour la connexion.
5. Une fois l’appareil mobile connecté avec l’unité, l’écran afchera « BT LINK ».
6. À présent, vous pouvez lire de la musique Bluetooth®, voir la section « Lire de la musique Bluetooth® » ci
dessous.
Remarque:
(a) Lorsque l’unité est allumée depuis le mode veille, en mode Bluetooth, l’appareil recherchera et connectera
automatiquement le dernier appareil connecté, inutile de rechercher et coupler de nouveau.
(b) Pour connecter d’autres appareils Bluetooth, en mode Bluetooth, tenez la touche BT appuyée sur la
télécommande. L’unité commencera à rechercher les appareils Bluetooth dans les environs et l’écran afchera «
BT Pairing » de nouveau. Suivez les étapes (B)-3 à (B)-6 décrites plus haut.
Lire de la musique Bluetooth®
1. Une fois qu’un lien de communication Bluetooth® est établi, exécutez l’application de lecteur audio sur l’appareil
mobile et jouez la musique sur l’appareil mobile.
2. Vous pouvez régler le volume aussi bien sur votre appareil mobile et le contrôle de volume de cette unité pour
obtenir le réglage de volume idéal.
3. Vous pouvez appuyez sur :
(a) La touche pour Lire / mettre en pause la musique Bluetooth.
(b) les touches / pour passer à la piste précédente/ suivante.
FR 6
Page 35

Fonctionnement Bluetooth
Mode d’économie d’énergie
En mode Bluetooth® si le lien de communication Bluetooth® est déconnecté pendant environ 10 minutes, l’unité
passera automatiquement en mode veille.
Réglage de stations FM
Antenne
Pour une meilleure réception radio, étendez entièrement l’antenne tige située à l’arrière de l’unité.
Option MENU
En mode de radio FM, l’unité vous permet de sélectionner les options suivantes.
1. Appuyez sur la touche MENU pour entrer dans le mode menu.
2. Deux options, [Scan setting] et [Audio setting] peuvent être réglées en appuyant sur les touches / de l’unité
principale ou sur les touches TUNE +/- de la télécommande.
(a) Lorsque [Scan setting] s’afche, appuyez sur la touche Entrée pour conrmer la sélection.
- Alors, appuyez sur les touches / de l’unité ou les touches TUNE +/- de la télécommande pour afcher
[All stations] ou [Strong stations].
Remarque:
[All stations] ---- par défaut, la recherche FM s’arrête sur toutes les stations disponibles. Cela peut
[Strong stations] ---- La recherche FM ne s’arrête que sur les stations avec une bonne force de signal.
- Appuyez sur la touche Entrée pour conrmer l’option de votre choix lorsque [All stations] or [Strong stations]
s’afchent.
(b) Lorsque [Scan setting] s’afche, appuyez sur la touche Entrée pour conrmer la sélection.
- Alors, appuyez sur les touches / de l’unité ou les touches TUNE +/- de la télécommande pour afcher
[Stereo] ou [Forced mono].
Remarque:
[Stereo] ---- Par défaut, toutes les stations stéréo seront reproduites en stéréo. cela peut causer un
[Forced mono] ---- Ne reproduit que le son en mono.
- Appuyez sur la touche Entrée pour conrmer l’option de votre choix lorsque [Stereo] ou [Forced mono]
s’afchent.
3. Vous pouvez appuyer sur la touche MENU pour sortir du mode de paramétrage de menu à tout instant.
Recherche et mise en mémoire automatique de stations en présélection
L’unité vous permet d’enregistrer jusqu’à 20 stations FM facilement accessibles à tout moment.
1. Appuyez sur le bouton M/A pour allumer l’unité et l’indicateur d’alimentation s’allume.
2. Appuyez sur la touche FONCTION sur l’unité ou appuyez sur la touche DAB/FM sur la télécommande pour
passer en mode radio FM.
3. Appuyez sur la touche SCAN jusqu’à ce que les chiffres de la fréquence commencent à changer. La radio
recherchera automatiquement les stations en partant des fréquences basses et en allant vers les fréquences
hautes, puis les stockera dans les emplacements de présélection.
Remarque: Après chaque opération de recherche et mise en mémoire automatique, toutes les stations
présélectionnées seront écrasées par les nouvelles stations.
4. Pour rappeler des stations préselectionnées, appuyez sur les touches CH +/- sur la télécommande, puis appuyez
sur la touche ENTER pour conrmer la sélection.
Réglage de la radio FM et sauvegarde manuelle des stations présélectionnées
1. Appuyez sur le bouton M/A pour allumer l’unité et l’indicateur d’alimentation s’allume.
2. Appuyez sur la touche FONCTION sur l’unité ou appuyez sur la touche DAB/FM sur la télécommande pour passer
en mode radio FM.
Réglage de la radio FM
3. Vous pouvez utiliser les moyens suivants pour régler la station de votre choix :
(a) Appuyez sur les touches / sur l’unité principale ou sur les touches TUNE +/- sur la télécommande pour
régler par incrément de 0,05MHz et régler le chiffre de la station de radio de votre choix.
(b) Tenez appuyées les touches / de l’unité ou les touches TUNE +/- de la télécommande et réglez sur une
fréquence de la station de votre choix, puis relâchez la touche.
(c) Pour une recherche vers le haut, appuyez sur la touche une fois, puis appuyez sur la touche SCAN de la
télécommande et elle sera réglée sur la prochaine station vers le haut de la bande.
Pour une recherche vers le bas, appuyez sur la touche une fois, puis appuyez sur la touche SCAN de la
télécommande et elle sera réglée sur la prochaine station vers le haut de la bande.
causer un son de mauvaise qualité de la part de certaines stations.
niveau de qualité sonore moindre pour les stations faibles. La qualité sonore peut être
améliorée en utilisant le mode mono.
FR 7
Page 36

Réglage de stations FM
Sauvegarder une station présélectionnée
4. Appuyez sur la touche MEM de la télécommande. Le numéro du canal présélectionné apparait en clignotant sur
l’écran.
5. Pour choisir une station présélectionnée, appuyez sur les touche CH +/ - de la télécommande.
Remarque: Chaque fois que vous changez le numéro de station, la fréquence actuelle ou « Empty » apparait sur
6. Pour conrmer l’emplacement de présélection, appuyez sur la touche Entrée et « Preset store » s’afche un
moment puis l’écran retourne au mode de réglage normal. Les fréquences nouvellement réglées remplaceront les
fréquences dans les emplacements de stations présélectionnées.
7. Répétez les étapes 3 à 6 pour enregistrer d’autres stations si vous le souhaitez.
Remarque :
• Il y’a un décalage de quelques secondes lors de la programmation, après ce décalage l’unité se remettra
automatiquement en mode de réglage radio normal.
• Vous pouvez enregistrer une station en présélection par dessus une autre et enregistrer une nouvelle fréquence
à la place de l’ancienne.
Rappel d’une station présélectionnée.
8. Appuyez sur la touche CH +/- de la télécommande. Le numéro et la fréquence du canal préslectionné
apparaissent sur l’écran, alors appuyez sur la touche ENTER pour conrmer la sélection.
Fonction RDS
L’unité dispose de fonction RDS intégrées.
Lorsqu’une station de radio reçoit des informations RDS, vous pouvez appuyez sur la touche RDS à plusieurs
reprises sur la télécommande pour afcher les informations RDS.
cet emplacement de station présélectionnée.
Réglage de stations DAB / DAB +
Cette unité est capable de recevoir des stations de radio DAB ou DAB+ dans votre zone.
Antenne
Pour une meilleure réception radio, étendez entièrement l’antenne tige située à l’arrière de l’unité.
Option MENU
En mode DAB, avant d’écouter une station de radio DAB / DAB+, la section suivante décrit les options que vous
pouvez choisir si nécessaire.
Touche de navigation
Dans le mode de paramètre de menu, vous pouvez utiliser les touches de navigation suivante pour appliquer la
sélection de l’option.
Touche MENU --- Appuyez pour entrer ou sortir du mode menu.
Touches / --- Appuyez pour sélectionner/afcher l’élément d’option.
Touche ENTER --- Appuyez pour conrmer la sélection.
Option MENU
[Full scan] --- Balayage complet des stations de radio DAB/DAB+ dans votre zone. Une fois que la
[Manual tune] --- Réglage manuel d’un canal / d’une fréquence particulière.
[DRC] --- Dynamic range compression (DRC) (compression de la portée dynamique), cette fonction
[Prune] --- Cela permet d’enlever les stations invalides indiquées dans la liste des stations avec
[System] --- réinitialisation des paramètres d’usine, sélectionnez « Y » pour déclencher la
Opération de balayage complet
1. Appuyez sur le bouton M/A pour allumer l’unité et l’indicateur d’alimentation s’allume.
2. Appuyez sur la touche FONCTION sur l’unité ou appuyez sur la touche DAB/FM sur la télécommande pour passer
en mode radio DAB.
3. Appuyez sur la touche MENU et l’indicateur [Full scan] s’afche.
4. Appuyez sur la touche ENTER pour conrmer la sélection. L’unité commence à balayer les stations DAB/DAB+
autour de votre zone et l’afchage indiquera « Scanning 0 ». Attendez que le processus de recherche soit terminé.
5. Une fois que la recherche est terminée, la radio retourne à la lecture de la station précédemment sélectionnée ou
de la première station de la liste.
recherche est terminée, la radio retourne à la lecture de la station précédemment sélectionnée ou de la première station de la liste.
réduit la différence entre les diffusions audio les plus bruyantes et les plus calmes. En ef-
fet, cela rend les sons les plus doux plus forts et les sons les plus forts plus doux.
Remarque: La fonction DRC ne fonctionne que si elle est activée par le diffuseur pour une
station spécique.
un « ? » en face du nom de la station.
réinitialisation.
FR 8
Page 37

Réglage de stations DAB / DAB +
Opération de réglage manuel
Avant de commencer un réglage manuel, vous souhaitez peut-être d’abord obtenir des informations sur les canaux/
fréquences de stations DAB/DAB+ disponibles dans votre zone
1. En mode de radio DAB, appuyez sur la touche MENU pour entrer dans le menu de paramètres.
2. Appuyez sur les touches / jusqu’à ce que l’indicateur [Manual tune] s’afche.
3. Appuyez sur la touche ENTER pour conrmer la sélection.
4. Appuyez sur les touches / pour afcher un canal / une fréquence particulière.
5. Appuyez sur la touche Entrée pour régler ce canal / cette fréquence.
6. Si les stations sont capturées, l’écran afchera la force de signal entre « SG Str : 0 » vers « SG Str : xx »,
ou xx est plus grand que zéro.
7. Appuyez sur la touche MENU à plusieurs reprise pour sortir du mode de paramétrage de menu.
Sauvegarder une station présélectionnée
1. Lorsque la station de votre choix s’afche, appuyez sur la touche MEM sur la télécommande. Le numéro du canal
présélectionné apparait en clignotant sur l’écran.
2. Pour choisir une station présélectionnée, appuyez sur les touche CH +/ - de la télécommande.
Remarque: Chaque fois que vous changez le numéro de station, la fréquence actuelle ou « Empty » apparait sur
3. Pour conrmer l’emplacement de présélection, appuyez sur la touche Entrée et « Preset store » s’afche un
moment puis l’écran retourne au mode de réglage DAB normal. La nouvelle station remplacera la dernière station
dans l’emplacement de station présélectionnée choisi.
Remarque : - Il y’a un décalage de quelques secondes lors de la programmation, après ce décalage l’unité se
Rappel d’une station présélectionnée.
Appuyez sur la touche CH +/- de la télécommande. Le numéro et la fréquence du canal présélectionné apparaissent
sur l’écran, alors appuyez sur la touche ENTER pour conrmer la sélection.
Changer de canal d’écoute
1. Pendant l’écoute d’un canal, appuyez sur la touche / à plusieurs reprises jusqu’à ce que le nom du canal
s’afche.
2. Appuyez sur la touche ENTER pour conrmer la sélection.
Afcher les informations de la station radio DAB.
Si nécessaire, vous pouvez appuyer sur la touche RDS sur la télécommande pour afcher les informations sur la
station DAB que vous recevez actuellement.
cet emplacement de station présélectionnée.
remettra automatiquement en mode de réglage radio normal.
- Vous pouvez enregistrer une station en présélection par dessus une autre et enregistrer une
nouvelle fréquence à la place de l’ancienne.
Écouter un CD musical
Le lecteur CD peut lire les disques CD/CD-R/CD-RW aux formats CD audio et MP3.
Lecture de CD
1. Appuyez sur le bouton M/A pour mettre l’unité en marche.
2. Appuyez sur la touche FONCTION sur l’unité ou appuyez sur la touche CD sur la télécommande pour passer en
mode CD.
3. Insérez un CD dans la fente, le coté imprimé vers le haut.
4. La lecture de musique commencera automatiquement.
5. Pour les disques au format Audio Cd ----- L’écran afchera l’indicateur « CD » et le numéro de la piste (ex : T001).
Pour les disques au format MP3 ----- L’écran afchera l’indicateur « MP3 », le numéro du dossier (ex : A01) et le
6. Vous pouvez tourner la molette de VOLUME (sur l’unité principale) ou appuyer sur les touches VOLUME +/(sur la télécommande) pour régler le volume sonore au niveau désiré.
7. Pour passer a une piste CD de votre choix, appuyez sur les touches / . Si une piste MP3 est en cours de
lecture, vous pouvez appuyer sur la touche FOLDER / de la télécommande pour sélectionner un dossier de
votre choix.
8. Pour avancer ou reculer rapidement dans la piste en cours de lecture, tenez appuyée l’une des touches /
sur l’unité principale ou sur la touche / de la télécommande.
9. Pour mettre en pause la lecture du CD, appuyez sur la touche lecture/pause .
Pour reprendre la lecture, appuyez sur la touche lecture/pause de nouveau.
10. Pour arrêter la lecture du CD, appuyez sur la touche STOP .
11. Pour éjecter le CD, appuyez sur le bouton OUVRIR/FERMER .
numéro de la piste (ex : T001).
FR 9
Page 38

Écouter un CD musical
Mode de lecture CD
Lecture répétée
• Pour les disques CD audio :
Pour répéter la lecture d’une chanson, appuyez sur le bouton REP une fois (sur la télécommande). Un indicateur
répéter une fois “ ” s’afchera sur l’écran.
Pour répéter la lecture d’un CD entier, appuyez sur le bouton REP jusqu’à ce que l’indicateur répéter tout « »
s’afche sur l’écran.
• Pour les disques MP3 :
Pour répéter la lecture d’une chanson, appuyez sur le bouton REP une fois (sur la télécommande). Un indicateur
répéter une fois “ ” s’afchera sur l’écran.
Pour répéter la lecture d’un répertoire, appuyez deux fois sur la touche REP. Un indicateur répéter le répertoire
« DIR » s’afchera sur l’écran.
Pour répéter la lecture d’un CD entier, appuyez sur le bouton REP jusqu’à ce que l’indicateur répéter tout « »
s’afche sur l’écran.
Lecture aléatoire
Pour lire les pistes d’un CD dans le désordre, appuyez sur la touche RAN sur la télécommande. L’indicateur « RND »
s’afche sur l’écran.
Lecture des INTRO
Pour lire les dix premières secondes de chaque chanson, appuyez sur le bouton INTRO (de la télécommande)
jusqu’à ce que l’indicateur “INTRO” s’afche sur l’écran.
Annuler le mode lecture CD.
Pour annuler un mode de lecture de CD, appuyez sur le bouton STOP à tout moment.
Lecture programmée de CD
Cette caractéristique vous permet de programmer jusqu’à 20 pistes pour les CD audio et 30 pistes pour les CD MP3
dans l’ordre de votre choix.
1. La lecture du CD arrêtée, appuyez sur le bouton PROG une fois sur la télécommande.
L’écran afche l’indication suivante :
Indicateur “PGM”
Le numéro de programme (ex : P01) clignote
Le numéro de la piste (ex : T001)
Le numéro du répertoire (dossier) (ex : A01) ---- s’applique seulement pour les CD MP3.
2. Pour sélectionner un numéro de répertoire, appuyez sur le bouton FOLDER / sur la télécommande
(seulement pour les CD MP3).
Pour sélectionner un numéro de piste, appuyez sur les touches / .
3. Lorsque le numéro de la piste de votre choix s’afche, appuyez sur le bouton PROG pour conrmer l’entrée.
4. Pour programmer jusqu’à 20 pistes de CD audio ou 30 pistes de CD MP3, répétez les étapes 2 et 3 jusqu’à ce
que toutes les pistes soient entrées.
Ou, pour commencer la lecture programmée, appuyez sur le bouton lecture/pause , l’indicateur “PGM” reste
afché sur l’écran.
5. Pour arrêter la lecture programmée, appuyez sur le bouton STOP deux fois.
Remarque:
• Si vous appuyez sur le bouton / durant la lecture programmée, l’unité passera à la piste suivante/précédente
du programme, ce qui n’est donc pas nécessairement la piste suivante/précédente du disque.
• La fonction de modes de lecture du CD, répéter une piste et répéter toutes les pistes , fonctionnent de la
même manière que lors de la lecture normale du CD (voir les modes de lecture de CD ci-dessus).
Fonction ID3
Cette fonction permet à l’utilisateur de visionner les informations de la chanson (le cas échéant) sur la piste (chier)
en cours de lecture.
Pour activer cette fonction :
1. Durant la lecture d’un CD-MP3, appuyez sur le bouton ID3. Les informations (ex : nom de l’artiste, titre de la
chanson) enregistrées sur la piste (chier) s’afcheront sur l’écran LCD.
2. Pour désactiver la fonction ID3, appuyez de nouveau sur le bouton ID3.
Remarque:
• S’applique seulement pour les pistes (chiers) MP3 enregistrés avec ID3.
• L’unité prend en charge les ID3 en caractères anglais seulement. Elle ne prend pas en charge les autres langages.
FR 10
Page 39

Réglage des aigus et des basses
L’unité allumée, (en mode Bluetooth, Aux-IN, Line1, Line2, CD, DAB Radio ou radio FM), vous pouvez appuyez sur
les touches BASS + / - et TREBLE + / - pour régler les niveaux de graves et d’aiguës de votre choix.
Écouter une source audio externe
L’unité comporte trois connecteurs d’entrée audio (AUX-IN / LINE-IN 1 / LINE-IN 2). Vous pouvez connecter trois
sources audio externes différentes.
1. Connectez un câble audio avec une prise stéréo 3,5 mm depuis un appareil audio auxiliaire à la prise AUX IN de
l’unité. Les connecteurs audio de type RCA peuvent également être connectés sur les prises d’entrée audio
LINE-IN 1 et LINE-IN 2.
2. Appuyez sur le bouton M/A pour mettre l’unité en marche.
3. Pour choisir une entrée audio auxiliaire, appuyez sur la touche FUNCTION de l’unité principale ou sur la touche
LINE-IN / AUX IN de la télécommande. Les indicateurs « AUX-IN » / « LINE-IN 1 » / « LINE-IN 2 » s’afchent sur
l’écran.
4. Allumez l’appareil audio auxiliaire externe.
5. Le volume peut à présent être contrôlé par l’unité.
Utilisez toutes les autres fonctions sur l’appareil externe comme d’habitude.
Remarque : Appuyez sur le bouton M/A lorsque vous avez ni d’écouter.
N’oubliez pas d’éteindre l’alimentation de l’appareil audio externe également.
Réglage de l’horloge
Réglage automatique
L’unité peut se synchroniser automatiquement avec les informations d’heure des stations radio DAB.
Chaque fois qu’une station de radio DAB est reçue, et que ses informations concernant l’heure sont copié automatiquement sur cette unité, ce qui écrasera le réglage de l’heure existant sur l’unité.
Réglage manuel
Lorsque l’unité est éteinte (mode veille) :
Régler le format 12/24 heures
1. Appuyez sur le bouton CLOCK de la télécommande pour entrer dans le mode de réglage de format 12/24 heures.
2. Appuyez sur la touche HR ou MIN de la télécommande pour sélectionner le format d’afchage 12 heures ou 24
heures.
Régler l’horloge
3. Appuyez de nouveau sur la touche CLOCK pour entrer dans le mode de réglage de l’heure.
4. Appuyez sur la touche HR de la télécommande pour régler les heures.
5. Appuyez sur la touche MIN de la télécommande pour régler les minutes.
Sortir du mode de réglage
6. Pour enregistrer tous les réglages, appuyez sur le bouton CLOCK ou attendez quelques seconde pour sortir du
mode de réglage.
Fonction minuteur de mise en veille
Mise en veille programmée
Cette fonction vous permet de vous endormir en écoutant le CD, la radio ou le Bluetooth jusqu’à 90 minutes.
L’unité s’éteint automatiquement lorsque le délai est terminé.
1. Appuyez sur la touche M/A pour mettre l’unité en marche.
2. Réglez la station de radio de votre choix en mode radio, lisez une piste du CD ou de la musique Bluetooth.
3. Pour sélectionner le délai du minuteur de mise en veille sur 15, 30, 45, 60 ou 90 minutes, appuyez sur le bouton
SLEEP (sur la télécommande) de manière répétée. L’écran afche l’indicateur “SLEEP”. L’unité fonctionne pen-
dant la durée de temps sélectionnée et s’éteint automatiquement.
4. Pour vérier le temps restant avant la mise en veille, appuyez sur le bouton SLEEP (sur la télécommande)
une fois.
Pour éteindre l’unité avant que le compteur de mise en veille atteigne zéro, appuyez sur le bouton M/A à tout
moment.
Remarques:
• Si vous vous endormez sur de la musique d’un appareil audio externe connecté à l’entrée AUX, le minuteur
coupera l’alimentation de ce système mais n’éteindra pas l’appareil externe.
• Si vous activez le minuteur de mise en veille lors de la lecture d’un CD, l’unité continuera de jouer jusqu’à la n du
CD et s’éteindra automatiquement sans tenir compte du réglage de minuteur de mise en veille. Par exemple,
si votre CD ne dure que 30 minutes et que le délai sélectionné avant la mise en veille est de 45 minutes, l’unité
s’éteindra automatiquement environ 3 minutes après que le disque s’arrête.
FR 11
Page 40

Soins et entretien
- Ne soumettez pas l’unité à une force excessive, un choc, de la poussière ou une température extrême.
- Ne modiez pas les composants internes de cette unité.
- Nettoyez votre unité avec un linge (jamais humide) doux. N’utilisez jamais de solvants ou détergents.
- Evitez de laisser votre unité à la lumière directe du soleil, ou dans des endroits chauds, humides ou poussiéreux.
- Maintenez votre unité hors de portée des appareils de chauffage et des sources de bruit électrique telles que
lampes uorescentes ou moteurs.
Si des arrêts ou des interruptions surviennent lors de la lecture de musique, ou si le disque ne se joue pas du tout,
sa surface demande peut-être à être nettoyée.
Avant la lecture, nettoyez le disque à partir du centre et vers les bords, avec un linge doux et propre.
Réinitialiser l’unité
Si l’unité a subi une surcharge ou un choc électrique, il est possible que les micro contrôleurs internes se verrouillent
et que l’unité ne réponde plus à aucune commande depuis le panneau de commande.
1. Dans ce cas, débranchez l’unité du secteur, puis rebranchez-la.
2. Utilisez un trombone, un cure-dent ou un objet similaire pour appuyer sur le bouton RESET situé à l’arrière de
l’unité principale (voir le schéma ci-dessous). L’opération de réinitialisation efface toute la mémoire du système et
tous vos réglages précédents seront effacés.
Touche RESET
ATTENTION : N’UTILISEZ PAS D’OBJETS COUPANTS OU POINTUS POUR APPUYER SUR LE BOUTON DE
Remarque:
- En cas de dysfonctionnement du fait de décharge électrostatique (DES), réinitialisez simplement le produit pour
reprendre le fonctionnement normal.
- Le fonctionnement normal du produit peut être perturbé par des interférences électromagnétiques fortes. Si cela
venait à se produire, réinitialisez simplement le produit pour reprendre le fonctionnement normal. Au cas où le
fonctionnement ne reprenait pas, veuillez utiliser le produit dans un autre endroit
RÉINITIALISATION.
CELA POURRAIT ENDOMMAGER L’INTERRUPTEUR DE RÉINITIALISATION DANS L’UNITÉ.
FR 12
Page 41

Spécications
Adaptateur d’alimentation Entrée CA 100-240V ~ 50/60Hz
Sortie CC 18V 3000mA
Alimentation de l’unité principale DC 18V 3000mA
Pile de secours pour l’horloge / la mémoire CC3V--- AAA (UM-4) type x 2 (non fournies)
Pile de la télécommande CC3V --- type lithium CR2025 (inclue)
Puissance du haut-parleur : +10W+10W (Max.)
Puissance caisson de graves 25W (Max.)
Consommation énergétique 1 W (en veille)
54 W (Max.)
Dimensions 351 x 136 x 214 mm
Poids 3300g
Température de fonctionnement 0 C ~ + 45 C
Et humidité 70%
Ce produit fonctionne à 2400 à 2483,5 MHz et est destiné uniquement pour être utilisé dans un environnement
domestique normal. Ce produit convient à cet usage pour tous les pays de l’UE.
Les produits avec la marque CE sont conformes à la directive CEM (2004/108/CE) et à la directive basse tension (2006/95/EC) émises par la commission de la communauté européenne.
Ce symbole indique que le produit électrique concerné ou la batterie ne doit pas être jeté parmi
les autres déchets ménagers en Europe. Pour garantir un traitement correct du déchet de la
batterie ou de l’appareil, veuillez vous en débarrasser en vous conformant aux règlements en
vigueur dans votre secteur en ce qui concerne le des appareils électriques et autres batteries. En agissant de la sorte, vous contribuerez à la préservation des ressources naturelles et
à l’amélioration des niveaux de protection environnementale concernant le traitement et la
destruction des déchets électriques. (Directive sur les Déchets des Equipements Electriques et
Electroniques).
®Tous droits réservés
LES SPÉCIFICATIONS ET L’APPARENCE EXTERNE DE CET APPAREIL PEUVENT FAIRE L’OBJET DE MODIFICATIONS SANS NOTIFICATIONS PRÉALABLE.
FR 13
Page 42

Service et support
Pour plus d’informations : www.lenco.com
Pour de l’aide : http://lencosupport.zendesk.com
Service d’assistance Lenco :
Allemagne 0900-1520530 (Prix d’un appel local)
Pays-Bas 0900-23553626 (Prix d’un appel local + 1ct P/min)
Belgique 02-6200115 (Prix d’un appel local)
France 03-81484280 (Prix d’un appel local)
Le centre d’assistance est joignable du lundi au vendredi entre 9 heures et 18 heures.
Lorsque vous contactez Lenco, on vous demandera systématiquement le modèle et le numéro de série de votre
produit. Le numéro de série se trouve à l’arrière de l’appareil. Écrivez le numéro de série ci-dessous:
Modèle:
Numéro de série : _______________________________
Lenco propose un service et une garantie conformément aux lois européenne, ce qui signie qu’en besoin de réparation (aussi bien pendant et après la période de garantie), vous pouvez contacter votre revendeur le plus proche.
Remarque importante : Il n’est pas possible de renvoyer l’appareil pour réparation directement à Lenco.
Remarque importante :
Si l’unité est ouverte ou modiée de quelque manière par un centre de service non agréé, cela mettra n à la garantie.
Cet appareil ne convient pas pour une utilisation professionnelle. En cas d’utilisation professionnelle, les obligations
de garantie du fabricant seront annulées.
FR 14
Page 43

2.1 Audiosystem mit
Bluetooth, DAB+, NFC und CD
BT-9000
Bedienungsanleitung
Informationen und Support erhalten Sie unter www.lenco.eu
Page 44

Wichtige Sicherheitshinweise
Wenn das Gerät entsprechend der Anweisungen benutzt wird, kann aufgrund des Gerätedesign Ihre persönliche
Sicherheit gewährleistet werden. Bei unsachgemäßer Benutzung besteht allerdings Stromschlag- und Brandgefahr.
Bitte lesen Sie alle Sicherheits- und Bedienungshinweise sorgfältig vor der Inbetriebnahme durch und bewahren Sie
diese Anleitung zum späteren Nachschlagen auf. Beachten Sie besonders alle Warnhinweise in dieser Anleitung und
auf dem Gerät.
1. Wasser und Feuchtigkeit
Das Gerät darf nicht in der Nähe von Wasser benutzt werden. Beispiel: in der Nähe von Badewannen, Spülen,
Waschbecken, Schwimmbecken oder feuchten Kellerräumen.
2. Belüftung
Das Gerät sollte so aufgestellt werden, dass die Luftzirkulation nicht beeinträchtigt wird. Das Gerät sollte z. B.
nicht auf ein Bett, Sofa, Bettvorleger oder eine andere weiche Unterlage gestellt werden, bei der die Ventilationsöffnungen blockiert werden könnten. Vergewissern Sie sich, dass keine der Ventilationsöffnungen durch
Gegenstände wie z. B. Zeitungen, Tischtücher, Vorhänge o. Ä. abgedeckt ist. Das Gerät sollte nicht an Orten,
wie z. B. Schränke oder Bücherregale, aufgestellt werden, an denen die Luftzufuhr zu den Ventilationsöffnungen
beeinträchtigt werden könnte.
3. Hitze und Flammen
Stellen Sie das Gerät nicht in der Nähe von Hitzequellen, wie z. B. Heizungen, Herden oder anderen Geräten die
Hitze produzieren (z. B. Verstärker) auf.
Gegenstände mit offenen Flammen, wie z. B. Kerzen, dürfen nicht auf das Gerät gestellt werden.
4. Stromversorgung
Schließen Sie das Gerät nur an eine Stromversorgung an, die mit den technischen Angaben in der Bedienungsanleitung oder auf dem Gerät übereinstimmt.
Wird der Netzadapter als Trennvorrichtung verwendet, muss dieser immer betriebsbereit sein.
5. Netzadapterkabel
Das Netzadapterkabel muss so verlegt werden, dass niemand darauf treten und dass es nicht von Gegenständen eingeklemmt werden kann. Der Bereich, in dem das Kabel mit dem Gerät und der AC Steckdose verbunden
ist, sollte immer frei von Hindernissen sein.
6. Reinigung
Das Gerät darf nur den Anweisungen nach gereinigt werden. Siehe Abschnitt “Pege und Wartung” dieses
Handbuchs für Anweisungen zur Reinigung des Geräts.
7. Fremdgegenstände und Flüssigkeiten im Gerät
Bitte achten Sie darauf, dass keine Gegenstände und Flüssigkeiten in die Ventilationsöffnungen des Geräts
gelangen. Dieses Gerät darf keinen Wassertropfen und -spritzern ausgesetzt werden. Gegenstände die mit Flüssigkeiten gefüllt sind dürfen nicht auf das Gerät gestellt werden.
8. Zubehör
Verwenden Sie keine Aufsätze, die nicht vom Hersteller angegeben wurden.
9. Blitz- und Überspannungsschutz
Ziehen Sie den Stecker aus der Steckdose, wenn Sie das Gerät über einen längeren Zeitraum nicht benutzen.
Dadurch werden Schäden am
Produkt verhindert, die durch Blitzeinschläge und Überspannung entstehen können.
10. Überlast
Steckdosen und Verlängerungskabel dürfen nicht überlastet werden, um die Gefahr von Feuer oder Stromschlägen zu vermeiden.
11. Schäden, die Reparaturen erfordern
Dieses Gerät muss durch entsprechend ausgebildetes Personal repariert werden, wenn:
A. Das Netzkabel oder der Netzstecker beschädigt sind.
B. Fremdgegenstände oder Flüssigkeiten in das Gehäuse gelangt sind.
C. Wenn das Gerät Regenwasser ausgesetzt wurde.
D. Das Gerät heruntergefallen ist oder das Gehäuse beschädigt wurde.
E. Das Gerät nicht wie gewohnt funktioniert oder einen starken Leistungsabfall zeigt.
12. Bei Nicht-Benutzung
Wenn das Gerät über einen gewissen Zeitraum nicht benutzt wird, z. B. einen Monat oder länger, sollten Sie das
Netzkabel aus der Steckdose ziehen, um Schäden oder Korrosion zu vermeiden.
13. Wartung
Der Benutzer sollte jegliche Versuche das Gerät eigenhändig zu warten vermeiden, es sei denn diese wurden
entsprechend in der Bedienungsanleitung beschrieben. Wartungsmethoden, die nicht in der Bedienungsanleitung
beschrieben werden, dürfen nur von entsprechend ausgebildetem Fachpersonal ausgeführt werden.
DE 2
Page 45

Warnung
Befolgen Sie bitte die folgenden Vorsichtsmaßnahmen und Bedienungshinweise.
SCHUTZ GEGEN LASERSTRAHLEN
● Der von diesem CD-Player benutzte Laserstrahl ist schädlich für die Augen. Öffnen Sie aus diesem Grund bitte
niemals das Gehäuse.
● Stoppen Sie die Benutzung umgehend, wenn Flüssigkeiten oder Gegenstände in das Gerät gelangt sind.
● Berühren Sie niemals die Laserlinse. Dadurch kann die Linse beschädigt werden und der Player kann danach
nicht mehr richtig benutzt werden.
● Stecken Sie keine Gegenstände in Sicherheitsverriegelung. Dadurch wird der Laser in Betrieb gesetzt, obwohl das
CD-Ladefach noch offen ist.
● Dieses Gerät verwendet einen Laser. Die Verwendung von Bedienungsschritten, die nicht in dieser Anleitung
beschrieben werden, können zur Aussetzung von gefährlicher Strahlung führen.
Vielen Dank für den Kauf des DAB+ Radios mit CD-Spieler und Bluetooth-Funktion.
Dieses Modell verfügt über folgende Produktmerkmale:
- Übertragung und Wiedergabe von Musik auf Apple-Geräten (iPad /iPhone/iPod Touch) und Smartphones mit
Android OS via Bluetooth-Technologie.
- NFC-Funktion (Nahbereichskommunikation) für eine vereinfachte Bluetooth-Verbindung
- CD-Spieler für die Wiedergabe von Audio-CDs und MP3-Musik
- ID3-Technologie für die Anzeige von Musiktiteln
- DAB / DAB+ Empfänger
- FM Empfänger mit digitaler LCD-Anzeige
- RDS-Funktion
- LCD-Uhr
- Automatische Abschaltung
- Beleuchtetes LCD-Display
- Drei unterschiedliche Audioeingänge (LINE-IN / AUX-IN) für den Anschluss externer Audiogeräte.
- 2 integrierte Lautsprecher mit hoher Wiedergabetreue
- Integrierter Subwoofer für tiefen Basseffekt
- Tief- und Hochtoneinstellung
iPhone, iPad und iPod touch sind in den USA und in anderen Ländern eingetragene Markenzeichen von Apple Inc.
iPhone, iPad und iPod touch sind nicht im Lieferumfang enthalten.
Installation
Uhrzeiteinstellung mit Gangreserve
An der Rückseite des Geräts bendet sich ein Batteriefach für die Backup-Batterien.
(1) Öffnen Sie die Abdeckung des Batteriefachs.
(2) Legen Sie 2 x AAA (UM-4) Batterien (nicht enthalten) gemäß den Polaritätsmarkierungen im Inneren des
Batteriefachs ein.
(3) Schließen Sie die Abdeckung des Batteriefachs.
Fernbedienung
An der Unterseite der Fernbedienung bendet sich das Batteriefach.
- Entfernen Sie die Schutzfolie für den erstmaligen Gebrauch.
- Um die Batterie zu ersetzen, ziehen Sie die Batteriehalterung heraus und legen Sie eine neue, CR2025 / DC 3V
Lithiumbatterie gemäß den Polaritätsmarkierungen ein. Schieben Sie die Batteriehalterung zurück in die Fernbedi-
enung.
DE 3
Produktmerkmale
Page 46

Installation
2322
18
21
24
17
19
20
Anschluss des Netzadapters
Dieses Gerät kann über ein externes Netzteil mit DC 18V, 3000 mA Ausgangsleistung (im Lieferumfang), mit Strom
versorgt werden.
1. Stecken Sie den Stecker des Netzadapters fest in eine Steckdose.
2. Schließen Sie den Ausgangsstecker des Netzadapters an den DC-IN-Eingang des Geräts an.
Warnung:
- Die Batterien dürfen niemals starker Hitze, wie z. B. Sonnenlicht, Feuer o. Ä. ausgesetzt werden.
- Vergewissern Sie sich, dass die Batterien auf die richtige Weise eingelegt werden. Die falsche Polarität kann das
Gerät beschädigen.
- Benutzen Sie niemals alte und neue Batterien zusammen.
- Verwenden Sie niemals verschiedenenartige Batterien zusammen, wie z. B. alkalische, Zink-Kohle-Batterien oder
wiederauadbare (Nickel-Cadmium).
- Nur Batterien des empfohlenen oder eines gleichwertigen Typs dürfen verwendet werden.
- Wenn das Gerät für längere Zeit nicht benutzt wird, entfernen Sie bitte die Batterien aus dem Gerät.
- Werfen Sie die Batterien nicht ins Feuer, da sie dadurch explodieren oder auslaufen können.
- Bei falsch eingelegten Batterien besteht Explosionsgefahr!
Ihr Produkt enthält Batterien, die nicht über den normalen Haushaltsmüll entsorgt werden dürfen. Informieren Sie
sich selbständig über Ihre lokalen Vorschriften und Sammelstellen, denn durch die ordnungsgemäße Entsorgung
tragen Sie dazu bei, negative Auswirkungen auf Umwelt und Gesundheit zu vermeiden.
Verwenden Sie nur eine Stromversorgung gemäß den Angaben in der Bedienungsanleitung.
Netzadapter: Hersteller: KINGWALL Modell-Nr.: AS600-180-AE300
Geräteübersicht
Hauptgerät
Draufsicht Rückseite
1
6789
1011
Vorderseite
15
16
13
14
2345
Fernbedienung
1
33
2
3
4
5
6
7
8
9
10
11
34
12
13
14
15
16
17
INTRO/
212
16
18
19
20
21
22
23
24
25
26
27
28
29
30
31
32
DE 4
Page 47

Geräteübersicht
Hauptgerät
1. NFC-Sensor --- Der NFC-Sensor (Nahbereichskommunikation) bendet sich an der Oberseite
2. LAUTSTÄRKE-Regler --- Lautstärke erhöhen oder reduzieren.
3. STANDBY --- Gerät ein- oder ausschalten.
4. ÖFFNEN/SCHLIESSEN --- CD-Laufwerk öffnen oder schließen.
5. TUNING / + und / - --- Im DAB / FM Tuner-Modus: FM Radiofrequenz vorwärts/rückwärts suchen;
DAB-Kanal auswählen.
Im DAB- / FM-Menümodus: Navigationstasten.
Im BT- (Bluetooth) und CD-Modus: Titel vorwärts/rückwärts überspringen.
Im CD-Modus: Für schnellen Suchlauf gedrückt halten.
6. ENTER / --- Auswahl von DAB- / FM-Radioeinstellungen bestätigen; Wiedergabe/Pause für
7. MENU / --- Menüeinstellungen für DAB- und FM-Radio aufrufen;
8. LIGHT-Taste --- LCD-Beleuchtung und Betriebsanzeige EIN / AUS.
9. FUNCTION-Taste --- DAB- / FM-Radio / BT (Bluetooth) / AUX-IN / LINE-IN 1 / LINE-IN 2 / CD-Modus
10. TREBLE + / - --- Hochton einstellen.
11. BASS + / - --- Tiefton einstellen.
12. Betriebsstatusanzeige
13. CD-Laufwerk
14. Infrarotempfänger der Fernbedienung
15. LCD-Display
16. Lautsprecher
17. Subwoofer
18. Antenne
19. Batteriefach für Gangreserve
20. AUX-IN Buchse --- Eingang für zusätzliches Audiosignal
21. LINE-IN 2 Buchse --- Audioeingang 2
22. DC-Eingang --- Anschluss der externen DC Stromversorgung
23. LINE-IN 1 Buchse --- Audioeingang 1
24. RESET --- Gerät zurückstellen
Fernbedienung
1. Infrarottransmitter
2. STANDBY
3. CD --- CD-Modus auswählen.
4. EJECT --- CD-Laufwerk öffnen/schließen.
5. AUX IN / LINE-IN --- Modus AUX-IN / LINE-IN 1 / LINE-IN 2 auswählen.
6. RDS --- Im DAB-Modus: Anzeige der DAB-Senderinformationen.
Im FM-Modus: RDS-Daten des FM-Senders anzeigen.
7. ST/MO --- Stereo-/Monoempfang für FM-Radiosender auswählen.
8. VOLUME + / - --- Lautstärke erhöhen oder reduzieren.
9. / --- Im CD-Modus: schneller Suchlauf.
10. --- CD-Wiedergabe beenden.
11. BASS + / - --- Tiefton einstellen.
12. --- Ton stumm bzw. ein-/ausschalten.
13. ID3 --- Im CD-Modus: ID3-Funktion aktivieren / deaktivieren.
14. MEM / PROG --- DAB- / FM-Radiosender als Favoriten speichern;
15. CH + / - --- Im DAB- / FM-Radiomodus: voreingestellten Sender einschalten.
16. FOLDER / --- Im CD-Modus: Verzeichnis/ Ordner mit MP3-Titeln auswählen.
17. TUNE + / - --- Im FM Tuner-Modus: Radiofrequenz erhöhen/reduzieren.
Im FM Menümodus: Navigationstasten.
18. DAB / FM --- DAB- / FM-Modus auswählen.
19. BT --- Bluetooth-Modus auswählen.
20. MENU --- Menüeinstellungen für DAB- und FM-Radio aufrufen.
21. SCAN --- Im FM-Radiomodus: nach FM-Radiosendern suchen.
22. INFO --- Im CD-Modus: Uhrzeit anzeigen.
23. / --- Im BT- (Bluetooth) / CD-Modus: Titel rückwärts/vorwärts überspringen.
Im DAB-Menümodus: Navigationstasten.
des Geräts.
Bluetooth / CD.
CD-Wiedergabe beenden.
auswählen.
CD-Wiedergabe programmieren.
DE 5
Page 48

Geräteübersicht
24. ENTER / --- Auswahl einer DAB- / FM-Einstellung bestätigen; Wiedergabe/Pause für BT
25. TREBLE +/- --- Hochton einstellen.
26. 10+ --- Im CD-Modus: 10 MP3-Titel überspringen.
27. LIGHT --- LCD-Beleuchtung und Betriebsanzeige Ein/Aus
28. REP --- Im CD-Modus: Einen/Alle Titel wiederholen.
29. RAN --- Im CD-Modus: Willkürliche Wiedergabe aktivieren.
30. INTRO / HR --- Im Standby-Modus: Stunden der Uhrzeit einstellen.
31. SLEEP --- Dauer bis zur automatischen Abschaltung einstellen.
32. MIN --- Minuten für Uhrzeit einstellen.
33. CLOCK --- Im Standby-Modus: Uhrzeit und 12/24-Stundenformat auswählen.
34. Batteriefach --- An der Unterseite der Fernbedienung.
(Bluetooth) / CD.
Im CD-Modus: Titel ANSPIELEN.
Bluetooth-Funktion
Das Gerät kann per Bluetooth-Funktion die Musik von Mobilgeräten (z.B. iPad / iPhone / iPod Touch, Smartphones
und Tablets) abspielen. Es verfügt außerdem über eine NFC-Funktion (Nahbereichskommunikation) für den einfachen Verbindungsaufbau mit einem Gerät, das ebenfalls mit der NFC-Funktion ausgerüstet ist.
Kopplung / Verbindung
(A) Bluetooth-Kopplung / -Verbindung via NFC
1. Drücken Sie STANDBY zum Einschalten des Geräts.
2. Drücken Sie FUNCTION am Hauptgerät oder BT auf der Fernbedienung, um den Bluetooth-Modus
auszuwählen. Im LCD-Display erscheint die Anzeige „ BT Pairing“.
3. Entsperren Sie Ihr Mobilgerät (mit integrierter NFC-Funktion) und halten Sie das Gerät über den
NFC-Erfassungsbereich dieses Modells.
4. Das Mobilgerät wird automatisch gekoppelt und verbunden.
Hinweis: Der Bluetooth-Gerätename dieses Modells ist: Lenco BT-9000
5. Nach der erfolgreichen Verbindung erscheint im LCD „BT LINK“.
6. Sie können nun via Bluetooth Musik abspielen; siehe Abschnitt „Musikwiedergabe via Bluetooth“ weiter unten.
(B) Manuelle Bluetooth-Kopplung / -Verbindung
1. Drücken Sie STANDBY zum Einschalten des Geräts.
2. Drücken Sie FUNCTION am Hauptgerät oder BT auf der Fernbedienung, um den Bluetooth-Modus
auszuwählen. Im LCD-Display erscheint die Anzeige „BT Pairing“ und das Gerät sucht nach Bluetooth-
Geräten in der Nähe.
3. Aktivieren Sie an Ihrem Mobilgerät die Bluetooth-Funktion, damit dieses ebenfalls nach Bluetooth-Geräten in
der Nähe sucht.
4. Tippen Sie in der Bluetooth-Geräteliste Ihres Mobilgeräts auf den Namen „Lenco BT-9000“ für den
Verbindungsaufbau.
5. Nach der Verbindung des Mobilgeräts mit diesem Modell erscheint im LCD die Anzeige „BT LINK“.
6. Sie können nun via Bluetooth Musik abspielen; siehe Abschnitt „Musikwiedergabe via Bluetooth“ weiter unten.
Hinweis:
(a) Wenn Sie das Gerät vom Standby-Modus aus einschalten und der Bluetooth-Modus aktiviert ist, sucht das Gerät
automatisch nach dem zuletzt verbundenen Gerät. Eine erneute Suche und Kopplung ist nicht erforderlich.
(b) Um andere Bluetooth-Geräte zu verbinden, drücken Sie im Bluetooth-Modus die Taste BT auf der
Fernbedienung. Das Gerät sucht automatisch nach Bluetooth-Geräten in der Nähe und im Display erscheint
erneut die Anzeige „BT Pairing“. Wiederholen Sie die oben genannten Schritte (B)-3 bis (B)-6.
Musikwiedergabe via Bluetooth
1. Öffnen Sie nach der Herstellung der Bluetooth-Verbindung an Ihrem Mobilgerät die entsprechende App für den
Musik-Player und starten Sie die Musikwiedergabe.
2. Sie können die Lautstärke sowohl an Ihrem externen Mobilgerät sowie an diesem Modell einstellen.
3. Drücken Sie:
(a) für die Wiedergabe/Pause der Bluetooth-Musikübertragung.
(b) / , um Titel rückwärts/vorwärts zu überspringen.
Hinweise zum Einsparen von Energie
Wird die Bluetooth-Verbindung im Bluetooth-Modus ungefähr 10 Minuten lang unterbrochen, aktiviert das Gerät
automatisch den Standby-Modus.
DE 6
Page 49

FM-Radiobetrieb
Antenne
Ziehen Sie die Antenne an der Rückseite des Geräts für einen optimalen Radioempfang vollständig aus.
MENÜ-Option
Im FM-Radiomodus können Sie folgende Optionen kongurieren.
1. Drücken Sie MENU, um das Einstellungsmenü zu öffnen.
2. Sie können mit den Tasten / am Hauptgerät oder mit TUNE +/- auf der Fernbedienung die Optionen
[Scan setting] und [Audio setting] entsprechend einstellen.
(a) Drücken Sie während der Anzeige von [Scan setting] die Taste ENTER zum Bestätigen.
- Drücken Sie dann / am Hauptgerät oder TUNE +/- auf der Fernbedienung, bis [All stations] oder
[Strong stations] angezeigt wird.
Hinweis:
[All stations] --- Sobald das Gerät einen Sender (Alle Sender) ndet, wird die FM-Suche unterbrochen.
[Strong stations] --- Die FM-Suche wird beendet, wenn das Gerät Sender mit gutem Signalempfang ndet.
- Drücken Sie während der Anzeige von [All stations] oder [Strong stations] die Taste ENTER zum Bestätigen
der jeweiligen Auswahl.
(b) Drücken Sie während der Anzeige von [Audio setting] die Taste ENTER zum Bestätigen.
- Drücken Sie dann / am Hauptgerät oder TUNE +/- auf der Fernbedienung, bis im Display [Stereo]
oder [Forced mono] angezeigt wird.
Hinweis:
[Stereo] --- Per Standardeinstellung werden alle Stereosender in Stereo wiedergegeben, was bei
[Forced mono] --- Nur Wiedergabe in Mono.
- Drücken Sie während der Anzeige von [Stereo] oder [Forced mono] die Taste ENTER zum Bestätigen der
jeweiligen Auswahl.
3. Drücken Sie jederzeit die Taste MENU, um das Einstellungsmenü zu verlassen.
Automatische Suche und Speicherung von Sendern
Sie haben die Möglichkeit, bis zu 20 FM-Sender für die Wiedergabe zu jeder beliebigen Zeit zu speichern.
1. Drücken Sie STANDBY zum Einschalten des Geräts. Die Betriebsstatusanzeige leuchtet auf.
2. Drücken Sie FUNCTION am Hauptgerät oder DAB/FM auf der Fernbedienung, um den FM-Radiomodus
auszuwählen.
3. Drücken Sie SCAN auf der Fernbedienung, bis sich im Display die Frequenzziffern ändern. Das Gerät scannt
automatisch von der niedrigsten bis zur höchsten Frequenz nach Sendern und speichert gefundene Sender auf
den Speicherplätzen.
4. Um gespeicherte Sender aufzurufen, drücken Sie CH +/- auf der Fernbedienung und bestätigen Sie Ihre Auswahl
mit ENTER.
FM-Radiosender einstellen und manuell speichern
1. Drücken Sie STANDBY zum Einschalten des Geräts. Die Betriebsstatusanzeige leuchtet auf.
2. Drücken Sie FUNCTION am Hauptgerät oder DAB/FM auf der Fernbedienung, um den FM-Radiomodus
auszuwählen.
FM-Radiosender einstellen
3. Sie können Sender wie folgt einstellen:
(a) Drücken Sie / am Hauptgerät oder TUNE +/- auf der Fernbedienung, um die gewünschte
Radiofrequenz in Schritten von 0,05MHz einzustellen.
(b) Halten Sie / am Hauptgerät oder TUNE +/- auf der Fernbedienung gedrückt. Lassen Sie die Tasten los,
wenn Sie den gewünschten Radiosender gefunden haben.
(c) Um das Band vorwärts abzusuchen, drücken Sie einmal am Hauptgerät oder TUNE + auf der
Fernbedienung. Drücken Sie dann SCAN auf der Fernbedienung, um den nächsten Sender mit der höheren
Frequenz zu suchen.
Um das Band rückwärts abzusuchen, drücken Sie einmal am Hauptgerät oder TUNE - auf der
Fernbedienung. Drücken Sie dann SCAN auf der Fernbedienung, um den nächsten Sender mit der niedrigeren Frequenz zu suchen.
Sender speichern
4. Drücken Sie MEM auf der Fernbedienung. Die Speicherplatznummer beginnt im Display zu blinken.
5. Drücken Sie CH + / - auf der Fernbedienung zur Auswahl des gewünschten Speicherplatzes.
Hinweis: Jedes Mal, wenn Sie einen neuen Speicherplatz auswählen, erscheint im Display die aktuell auf diesem
Platz gespeicherte Radiofrequenz oder die Anzeige „Empty“.
6. Drücken Sie ENTER, um die Auswahl des Speicherplatzes zu bestätigen. Im Display erscheint kurz die Anzeige
„Preset store“ und das Gerät kehrt dann zum normalen Tuner-Modus zurück. Die auf dem ausgewählten Speicherplatz gespeicherte Frequenz wird durch die neue Radiofrequenz ersetzt.
Bei entfernten Radiosendern kann dies einen schlechten Empfang zur Folge haben.
schwachen Sendern eine schlechte Audioqualität zur Folge haben kann. Die Audio-
qualität lässt sich durch Einstellung von Mono verbessern.
DE 7
Page 50

FM-Radiobetrieb
7. Wiederholen Sie ggf. die Schritte 3 bis 6, um weitere Sender zu speichern.
Hinweise:
● Während der Programmierung gibt es eine Verzögerung von einigen Sekunden. Nach dieser Verzögerung kehrt
das Gerät automatisch zum normalen Tuner-Modus zurück.
● Sie können den Inhalt eines Speicherplatzes überschreiben, indem Sie eine neue Radiofrequenz auf diesem
Platz speichern.
Gespeicherte Sender aufrufen
8. Drücken Sie CH +/- auf der Fernbedienung. Im Display werden die Speicherplatznummer und die Frequenz
angezeigt. Drücken Sie ENTER zum Bestätigen Ihrer Auswahl.
RDS-Funktion
Das Gerät ist mit einer RDS-Funktion ausgestattet.
Wenn der empfangene Radiosender über RDS-Informationen verfügt, können Sie durch wiederholtes Drücken der
Taste RDS auf der Fernbedienung die RDS-Daten anzeigen.
DAB / DAB+ Radiobetrieb
Das Gerät ist in der Lage, verfügbare DAB und DAB+ Radiosender in Ihrem Gebiet zu empfangen.
Antenne
Ziehen Sie die Antenne an der Rückseite des Geräts für einen optimalen Empfang vollständig aus.
MENÜ-Optionen
Bevor Sie DAB / DAB+ Radiosender anhören, können Sie im DAB-Modus nachfolgend erläuterte Optionen kongurieren, sofern verfügbar und erforderlich.
Navigationstasten
Im Einstellungsmenü können Sie mit folgenden Navigationstasten Optionen auswählen.
MENU ---- Menü öffnen oder schließen.
/ ---- Option auswählen / anzeigen.
ENTER ---- Auswahl bestätigen.
MENU-Optionen
[Full scan] ---- Vollständige Suche nach DAB/DAB+ Radiosendern in Ihrem Gebiet. Nach Abschluss der
[Manual tune] ---- Einen bestimmten Kanal/ eine bestimmte Frequenz einstellen.
[DRC] ---- Kompression des Dynamikbereichs (DRC). Mit dieser Funktion wird der Abstand zwischen
[Prune] ---- Alle ungültigen Sender der Senderliste, die vor dem Sendernamen mit einem „?“
[System] ---- Wiederherstellung der Fabrikeinstellungen (Y/N). Wählen Sie „Y“, um die Funktion
Durchführung der vollständigen Suche
1. Drücken Sie STANDBY zum Einschalten des Geräts. Die Betriebsstatusanzeige leuchtet auf.
2. Drücken Sie FUNCTION am Hauptgerät oder DAB/FM auf der Fernbedienung, um den DAB-Radiomodus
auszuwählen.
3. Drücken Sie MENU. Im Display erscheint die Anzeige [Full scan].
4. Drücken Sie ENTER zum Bestätigen. Das Gerät beginnt nach DAB / DAB+ Sendern in Ihrem Gebiet zu suchen.
Im Display erscheint die Anzeige „Scanning 0“. Warten Sie, bis die Suche abgeschlossen ist.
5. Nach Abschluss der Suche spielt das Gerät den zuletzt eingestellten Sender oder den ersten Sender in der
Senderliste ab.
Manuelle Suche
Bevor Sie Sender manuell einstellen, informieren Sie sich bitte über die Kanäle/ Frequenzen von verfügbaren DAB/
DAB+ Sendern in Ihrem Gebiet.
1. Drücken Sie im DAB-Modus die Taste MENU, um das Einstellungsmenü zu öffnen.
2. Drücken Sie / , bis im Display [Manual tune] erscheint.
3. Drücken Sie ENTER zum Bestätigen.
4. Geben Sie mit den Tasten / den entsprechenden Kanal/ die Frequenz ein.
5. Drücken Sie ENTER, um diesen Kanal/ diese Frequenz zu suchen.
Suche spielt das Radio wieder den zuletzt eingestellten Sender oder den ersten Sender
in der Senderliste ab.
dem lautesten und leisesten Ton der Übertragung verringert. Leisere Töne werden dadurch lauter und lautere Töne werden vergleichsweise leiser.
Hinweis: DRC ist nur verfügbar, wenn es von der Rundfunkanstalt für den jeweiligen
Sender aktiviert wurde.
gekennzeichnet sind, werden gelöscht.
durchzuführen.
DE 8
Page 51

DAB / DAB+ Radiobetrieb
6. Falls ein Sender gefunden wird, zeigt das Display die Signalstärke zwischen „SG Str : 0“ und „SG Str : xx“ an,
wobei xx größer als Null ist.
7. Drücken Sie wiederholt die Taste MENU, um das Einstellungsmenü zu beenden.
Sender speichern
1. Drücken Sie während der Anzeige einer bestimmten Radiofrequenz die Taste MEM auf der Fernbedienung. Im
Display beginnt die Speicherplatznummer zu blinken.
2. Drücken Sie CH + / - auf der Fernbedienung zur Auswahl einer Speicherplatznummer.
Hinweis: Jedes Mal, wenn Sie einen neuen Speicherplatz auswählen, erscheint im Display die aktuell auf dem
3. Drücken Sie ENTER zum Bestätigen der Speicherplatznummer. Im Display erscheint kurz die Anzeige
„Preset store“. Danach kehrt das Gerät zum normalen DAB Tuner-Modus zurück. Die auf dem Speicherplatz
gespeicherte Radiofrequenz wird durch die neue Frequenz ersetzt.
Hinweise:
- Während der Programmierung gibt es eine Verzögerung von einigen Sekunden. Nach dieser Verzögerung kehrt
- Sie können den Inhalt eines Speicherplatzes überschreiben, indem Sie eine neue Radiofrequenz auf diesem
Gespeicherte Sender aufrufen
Drücken Sie CH +/- auf der Fernbedienung. Im Display werden die Speicherplatznummer und der Sendername
angezeigt. Drücken Sie ENTER zum Bestätigen Ihrer Auswahl.
Andere Sender einschalten
1. Drücken Sie während der Wiedergabe eines Senders wiederholt die Tasten / , bis der gewünschte Sender
name angezeigt wird.
2. Drücken Sie ENTER zum Bestätigen Ihrer Auswahl.
Informationen von DAB-Radiosendern anzeigen
Drücken Sie ggf. die Taste RDS auf der Fernbedienung, um Informationen des aktuell empfangenen DAB-Senders
anzuzeigen.
Speicherplatz gespeicherte Frequenz oder die Anzeige „Empty“.
das Gerät automatisch zum normalen Tuner-Modus zurück.
Platz speichern.
CD-Musikwiedergabe
Der CD-Spieler kann CD/CD-R/CD-RW im Audio-CD-Format und MP3-Format abspielen.
CD-Wiedergabe
1. Drücken Sie STANDBY zum Einschalten des Geräts.
2. Drücken Sie FUNCTION am Hauptgerät oder CD auf der Fernbedienung, um den CD-Modus auszuwählen.
3. Legen Sie eine CD mit der bedruckten Seite nach oben in das CD-Laufwerk ein.
4. Die Musikwiedergabe startet automatisch.
5. Für Discs im Audio-CD-Format ----- Im Display erscheinen die Anzeige „CD“ und die Titelnummer (z.B. T001).
Für Discs mit MP3-Dateien ---- Im Display erscheinen die Anzeige „MP3“, die Ordnernummer (z.B. A01) und die
6. Stellen Sie die Lautstärke durch Drehen des LAUTSTÄRKE-Reglers am Hauptgerät oder durch Drücken der
Tasten VOLUME +/- auf der Fernbedienung entsprechend ein.
7. Drücken Sie die Tasten / , um zu einem bestimmten Titel zu springen. Falls Sie eine Disc mit MP3-Titeln
abspielen, können Sie durch Drücken der Tasten FOLDER / auf der Fernbedienung einen gewünschten
Ordner auswählen.
8. Halten Sie jeweils die Tasten / am Hauptgerät oder die Tasten / auf der Fernbedienung gedrückt, um
den aktuellen Titel zurück- oder vorzuspulen.
9. Drücken Sie die Taste Wiedergabe/Pause , um die CD-Wiedergabe zu unterbrechen.
Drücken Sie die Taste Wiedergabe/Pause erneut, um die Wiedergabe fortzusetzen.
10.Drücken Sie STOPP , um die Wiedergabe zu beenden.
11.Drücken Sie ÖFFNEN/SCHLIESSEN , um die Disc auszuwerfen.
CD-Wiedergabemodi
Wiederholte Wiedergabe
● Audio-CDs:
Um einen Titel wiederholt abzuspielen, drücken Sie einmal die Taste REP auf der Fernbedienung. Im LCD erscheint die Anzeige „ “.
Um die gesamte CD wiederholt abzuspielen, drücken Sie die Taste REP, bis im Display die Anzeige „ “
erscheint.
Titelnummer (z.B. T001).
DE 9
Page 52

CD-Musikwiedergabe
● MP3-Discs:
Um einen Titel wiederholt abzuspielen, drücken Sie einmal die Taste REP auf der Fernbedienung. Im LCD erscheint die Anzeige „ “.
Um einen Ordner wiederholt abzuspielen, drücken Sie zweimal die Taste REP. Im LCD erscheint die Anzeige
„ DIR“.
Um die gesamte CD wiederholt abzuspielen, drücken Sie die Taste REP, bis im Display die Anzeige „ “
erscheint.
Willkürliche Wiedergabe
Um CD-Titel in willkürlicher Reihenfolge abzuspielen, drücken Sie die Taste RAN auf der Fernbedienung. Im LCD
erscheint die Anzeige „RND“.
Titel ANSPIELEN
Um jeden Titel 10 Sekunden lang anzuspielen, drücken Sie die Taste INTRO auf der Fernbedienung, bis im LCD die
Anzeige „INTRO“ erscheint.
CD-Wiedergabemodi beenden
Drücken Sie jederzeit die Taste STOPP , um einen Wiedergabemodus zu beenden.
Programmierte CD-Wiedergabe
Diese Funktion ermöglicht Ihnen, bis zu 20 Titel einer Audio-CD oder bis zu 30 Titel einer MP3-CD in beliebiger
Reihenfolge für die Wiedergabe zu programmieren.
1. Drücken Sie im Stopp-Modus der CD-Wiedergabe einmal die Taste PROG auf der Fernbedienung.
Folgende Anzeigen erscheinen im LCD:
„PGM“
Speicherplatznummer (z.B. P01) blinkt.
Titelnummer (z.B. T001)
(Ordner-) Verzeichnisnummer (z.B. A01) ---- nur für MP3-Discs.
2. Drücken Sie die Taste FOLDER / auf der Fernbedienung, um ein Verzeichnis auszuwählen (nur für
MP3-Discs).
Drücken Sie zur Auswahl einer Titelnummer die Tasten / .
3. Wenn die gewünschte Titelnummer angezeigt wird, drücken Sie PROG zum Bestätigen.
4. Wiederholen Sie die Schritte 2 und 3, bis Sie bis zu 20 gewünschte Titel einer Audio-CD oder 30 Titel einer
MP3-Disc programmiert haben.
Oder starten Sie die programmierte Wiedergabe durch Drücken der Taste Wiedergabe/Pause . Im Display
leuchtet die Anzeige „PGM“.
5. Drücken Sie die Taste STOPP zweimal, um die programmierte Wiedergabe zu beenden.
Hinweis:
● Wenn Sie die Tasten / während der programmierten Wiedergabe drücken, springt das Gerät zum vorherigen
/ nächsten Titel der programmierten Sequenz; dieser ist nicht unbedingt mit dem vorherigen / nächsten Titel der
Disc identisch.
● Die CD-Wiedergabemodi „ “ (Titel wiederholen) und „ “ (Alle Titel wiederholen) funktionieren für die
programmierte Sequenz genauso wie während der normalen CD-Wiedergabe (siehe CD-Wiedergabemodi oben).
ID3-Funktion
Diese Funktion ermöglicht Ihnen, Titelinformationen (sofern vorhanden) des aktuellen Tracks (der Datei) anzuzeigen.
Funktion aktivieren:
1. Drücken Sie während der Wiedergabe einer MP3-CD die Taste ID3. Die im Titel (in der Datei) gespeicherten
Informationen (z.B. Interpret, Titelname) werden im LCD-Display angezeigt.
2. Drücken Sie ID3 erneut, um die ID3-Funktion abzubrechen.
Hinweis:
● Nur verfügbar für MP3-Titel (Dateien) mit aufgezeichneten ID3-Tags.
● Das Gerät unterstützt nur ID3-Tags mit englischen Zeichen. Es unterstützt keine anderen Sprachen.
Hochton- und Tieftoneinstellungen
Ist das Gerät eingeschaltet (in den Modi Bluetooth, Aux-IN, Line 1, Line 2, CD, DAB-Radio oder FM-Radio), können
Sie durch Drücken der Tasten BASS + / - und TREBLE + / - den Tiefton oder Hochton entsprechend einstellen.
DE 10
Page 53

Anschluss externer Audiogeräte
Das Gerät verfügt über drei unterschiedliche Audioeingänge (AUX-IN / LINE-IN 1 / LINE-IN 2) für den Anschluss von
drei externen Audiogeräten.
1. Schließen Sie ein Audiokabel mit 3,5 mm Stereostecker eines externen Audiogeräts an den AUX-IN Eingang
dieses Geräts an. An die Eingänge LINE-IN 1 und LINE-IN 2 können Sie RCA-Stecker anschließen.
2. Drücken Sie STANDBY zum Einschalten des Geräts.
3. Drücken Sie FUNCTION am Hauptgerät oder die Tasten LINE-IN / AUX IN auf der Fernbedienung, um die
Aux-Funktion auszuwählen. Im Display erscheint „AUX-IN“ / „LINE-IN 1“ / „LINE-IN 2“.
4. Schalten Sie das externe Audiogerät ein.
5. Stellen Sie die Lautstärke an diesem Gerät ein.
Alle anderen Funktionen des externen Geräts sind wie gewohnt verfügbar.
Hinweise: Drücken Sie STANDBY zum Ausschalten des Geräts, wenn Sie keine Musik mehr anhören möchten.
Vergessen Sie nicht, das externe Gerät auszuschalten.
Uhrzeit einstellen
Automatische Einstellung
Das Gerät kann die Uhrzeit automatisch mit den Zeitinformationen von DAB-Radiosendern synchronisieren.
Während des Empfangs eines DAB-Senders werden dessen Zeitdaten automatisch kopiert und die aktuellen Uhrzeiteinstellungen des Geräts überschrieben.
Manuelle Einstellung
Gerät ist AUS (Standby-Modus):
12/24-Stundenformat auswählen
1. Drücken Sie CLOCK auf der Fernbedienung, um den Einstellungsmodus für das 12/24-Stundenformat aufzurufen.
2. Drücken Sie HR oder MIN auf der Fernbedienung zur Auswahl des 12- oder 24-Stundenformats.
Uhrzeit einstellen
3. Drücken Sie CLOCK erneut, um den Einstellungsmodus für die Uhrzeit aufzurufen.
4. Drücken Sie HR auf der Fernbedienung, um die Stunden einzustellen.
5. Drücken Sie MIN auf der Fernbedienung, um die Minuten einzustellen.
Einstellungsmodus verlassen
6. Um alle Einstellungen zu speichern, drücken Sie CLOCK oder warten Sie einige Sekunden, um den
Einstellungsmodus zu beenden.
Automatische Abschaltung
Automatische Abschaltung
Diese Funktion ermöglicht Ihnen, vor dem Einschlafen bis zu 90 Minuten lang Musik via CD-, Radio- oder BluetoothFunktion abzuspielen.
Nach Ablauf der eingestellten Zeit schaltet sich das Gerät automatisch aus.
1. Drücken Sie STANDBY zum Einschalten des Geräts.
2. Stellen Sie entweder einen FM- oder DAB-Radiosender im Radiomodus ein, spielen Sie eine CD ab oder starten
Sie die Musikwiedergabe via Bluetooth.
3. Drücken Sie SLEEP (auf der Fernbedienung) wiederholt, um die Dauer bis zum Ausschalten des Geräts mit 15,
30, 45, 60 oder 90 Minuten einzustellen. Im Display erscheint die Anzeige „SLEEP“. Nach Ablauf der eingestellten
Zeit schaltet sich das Gerät automatisch aus.
4. Um die verbleibende Zeit bis zum Ausschalten anzuzeigen, drücken Sie einmal die Taste SLEEP (auf der
Fernbedienung).
Wenn Sie das Gerät vor Ablauf der Zeit ausschalten möchten, drücken Sie jederzeit die Taste STANDBY .
Hinweise:
● Falls Sie mit dieser Funktion ein externes Gerät abspielen und an den Eingängen AUX-IN oder LINE-IN
angeschlossen haben, wird nach Ablauf der Zeit dieses Gerät ausgeschaltet. Das externe Gerät läuft jedoch weiter.
● Falls Sie die automatische Abschaltung während der Wiedergabe einer CD aktivieren, spielt das Gerät die CD
bis zum Ende ab und schaltet sich dann aus, unabhängig davon, ob die eingestellte Zeit abgelaufen ist oder nicht.
Falls Ihre CD zum Beispiel nur 30 Minuten lang ist und Sie die Funktion mit 45 Minuten eingestellt haben, schaltet
sich das Gerät nach 30 Minuten am Ende der Disc aus.
DE 11
Page 54

Reinigung und Pege
- Schützen Sie das Gerät vor übermäßiger Beanspruchung, vor Aufprall, Staub oder extremen Temperaturen.
- Modizieren Sie nicht die internen Komponenten des Geräts.
- Reinigen Sie Ihr Gerät mit einem feuchten (niemals nassen) Lappen. Verwenden Sie keine Lösungs- oder
Reinigungsmittel.
- Schützen Sie das Gerät vor direkter Sonneneinstrahlung. Stellen Sie es nicht an heiße, feuchte oder schmutze
Orte.
- Halten Sie das Gerät von Heizgeräten und elektrischen Störquellen wie uoreszierenden Lampen oder Motoren
fern.
Falls während der Wiedergabe das Signal ausfällt oder die Wiedergabe unterbrochen wird oder die Disc überhaupt
nicht abgespielt wird, muss deren Unterseite möglicherweise gereinigt werden.
Wischen Sie die Disc vor der Wiedergabe mit einem hochwertigen, weichen, trockenen Lappen von der Mitte nach
außen ab.
Gerät zurückstellen
Im Fall eines Stromstoßes oder Kurzschlusses kann es passieren, dass die interne Mikrosteuerung verriegelt wird
und das Gerät nicht mehr auf Befehle des Bedienfelds reagiert.
1. Trennen Sie in solch einem Fall das Gerät vom Netzstrom und schließen Sie es dann erneut an die AC Steckdose
an.
2. Verwenden Sie eine ausgeklappte Büroklammer, einen Zahnstocher oder einen ähnlichen Gegenstand und
drücken Sie auf die Taste RESET an der Rückseite des Hauptgeräts (siehe nachfolgende Abbildung). Während
der Rückstellung des Geräts werden der Systemspeicher und alle Ihre vorgenommenen Einstellungen gelöscht.
RESET-Taste
ACHTUNG: VERWENDEN SIE KEINE SCHARFEN, SPITZEN GEGENSTÄNDE ZUM DRÜCKEN DER RESET-
Hinweis:
- Stellen Sie das Gerät im Fall von Fehlfunktionen aufgrund elektrostatischer Entladung (ESD) zurück, um den
normalen Betrieb fortzusetzen.
- Der normale Betrieb des Geräts kann durch starke elektromagnetische Störungen beeinträchtigt werden. Stellen
Sie das Gerät in solch einem Fall zurück, um den normalen Betrieb wieder fortzusetzen. Falls dies nicht funktioniert, verwenden Sie das Gerät bitte an einem anderen Ort.
TASTE. DER RÜCKSTELLUNGSSCHALTER IM INNEREN DES GERÄTS KÖNNTE DADURCH
BESCHÄDIGT WERDEN.
DE 12
Page 55

Technische Daten
Netzadapter Eingang AC 100-240V ~ 50/60Hz
Ausgang DC 18V 3000mA
Stromversorgung Hauptgerät DC 18V 3000mA
Gangreserve für Uhrzeit/Speicher DC 3V--- 2x AAA (UM-4) Batterien (nicht enthalten)
Batterie Fernbedienung DC 3V --- 1x CR2025 Lithiumbatterie
Lautsprecherleistung 10W+10W (Max.)
Subwoofer-Leistung 25W (Max.)
Stromverbrauch 1 W (Standby)
54 W (Max.)
Abmessungen 351 x 136 x 214 mm
Gewicht 3300g
Betriebstemperatur 0°C ~ + 45°C
und -feuchtigkeit 70%
Dieses Produkt arbeitet im Frequenzbereich von 2400 bis 2483,5 MHz und sollte nur in einer normalen häuslichen
Umgebung verwendet werden. Es eignet sich zur Verwendung in allen EU Ländern.
Produkte mit der CE Kennzeichnung entsprechen der EMC-Richtlinie (2004/108/EC) und der
Niederspannungsrichtlinie (2006/95/EC), herausgegeben von der Kommission der Europäischen
Gemeinschaft.
Dieses Symbol zeigt an, dass das entsprechende Produkt oder dessen Batterie in Europa nicht
mit dem normalen Hausmüll entsorgt werden darf. Um die ordnungsgemäße Abfallbehandlung des Produkts und dessen Batterie zu gewährleisten, müssen diese im Einklang mit allen
anwendbaren örtlichen Vorschriften zur Entsorgung von Elektrogeräten und Batterien entsorgt
werden. Dabei helfen Sie natürliche Ressourcen zu schonen und Umweltschutzstandards zur
Verwertung und Entsorgung von Altgeräten aufrecht zu halten (Waste Electrical and Electronic
Equipment Directive).
®Alle Rechte vorbehalten
ÄNDERUNGEN AM ÄUSSEREN AUSSEHEN UND DEN TECHNISCHEN DATEN VORBEHALTEN.
DE 13
Page 56

Service und Hilfe
Für Informationen: www.lenco.com
Für Hilfe: http://lencosupport.zendesk.com
Lenco Hotlines:
Deutschland 0900-1520530 (Ortsgebundener Tarif)
Die Niederlande 0900-23553626 (Ortsgebundener Tarif + 1ct p/min)
Belgien 02-6200115 (Ortsgebundener Tarif)
Frankreich 03-81484280 (Ortsgebundener Tarif)
Die Hotline erreichen Sie montags bis freitags von 9 bis 18 Uhr.
Wenn Sie Lenco kontaktieren, werden Sie immer nach der Modell- und Seriennummer des Geräts gefragt. Die Seriennummer nden Sie auf der Rückseite des Geräts. Bitte notieren Sie hier die Seriennummer:
Modell:
Seriennummer:_________________________________
Lenco bietet Leistungen und Garantien im Einklang mit Europäischem Recht. Im Falle von Reparaturen (sowohl
während als auch nach Ablauf der Garantiezeit) sollten Sie deshalb Ihren Einzelhändler kontaktieren.
Beachten Sie: Es ist nicht möglich, Geräte für Reparaturen direkt an Lenco zu schicken.
Wichtiger Hinweis:
Falls dieses Gerät von einem nicht autorisierten Kundendienst geöffnet oder darauf zugegriffen wird, erlischt die
Garantie.
Dieses Gerät ist nicht für professionelle Zwecke geeignet. Falls das Gerät für professionelle Zwecke eingesetzt wird,
erlöschen alle Garantieverpichtungen seitens des Herstellers.
DE 14
Page 57

2.1 Sistema Audio con
Bluetooth, DAB+, NFC y CD
BT-9000
Manual de instrucciones
Para información y asistencia www.lenco.eu
Page 58

Importantes Instrucciones de Seguridad
Este dispositivo ha sido diseñado y fabricado para garantizar su seguridad personal, siempre que se utilice de la
forma indicada. Sin embargo, un uso inapropiado puede dar lugar a potenciales descargas eléctricas o incendios.
Por favor, lea atentamente todas las instrucciones de seguridad y de funcionamiento antes de su instalación y uso, y
mantenga a mano estas instrucciones para futura referencia. Preste especial atención a todos precauciones que se
enumeran en estas instrucciones y en el dispositivo.
1. Agua y Humedad
El dispositivo no debe ser utilizado cerca del agua, por ejemplo, cerca de una bañera, lavabo, pila, lavadora,
piscina o sótano.
2. Ventilación
El dispositivo debe ser colocado de forma que su emplazamiento o posición no interera con su propio sistema
de ventilación. Por ejemplo, no debe ser colocado sobre una cama, sofá, moqueta o supercie similar que pueda
bloquear los oricios de ventilación. No se deberá obstruir la ventilación cubriendo los oricios de ventilación con
objetos como periódicos, manteles, cortinas, etc. Asimismo, no deberá ser colocado en instalaciones empotradas
como librerías, estanterías o armarios, que puedan obstruir la circulación de aire por los oricios de ventilación.
3. Calor & Llamas
El dispositivo deberá ser colocado lejos de fuentes de calor, como radiadores, corrientes de calor, estufas, y
otros dispositivos (incluídos amplicadores) que generen calor.
No se deberán colocar llamas sin protección, como velas encendidas, cerca del aparato.
4. Fuente de alimentación
Conecte la unidad únicamente a la fuente de alimentación del tipo descrito en las instrucciones de uso o indicado
en el aparato.
Allá donde el adaptador de corriente se use como elemento de desconexión, este último deberá permanecer
operativo en todo momento.
5. Protección del cable del apaptador de corriente
El cable del adaptador de corriente deberá ser guiado de modo que no pueda ser pisado o pellizcado por
elementos colocados sobre o contra él. Será recomendable dejar cierto espacio libre desde el lugar por el que el
cable sale de la unidad hasta donde el adaptador se conecta a una toma de alimentación.
6. Limpieza
El aparato debe ser limpiado únicamente siguiendo las recomendaciones. Diríjase a la sección “Cuidados y
Mantenimiento” de este manual para las instrucciones de limpieza.
7. Objetos y Entrada de Líquidos
Se deberá prestar atención para que no caigan objetos ni se derramen líquidos en ninguno de los oricios o aperturas situados en el producto. Se debe evitar salpicar o derramar líquidos así como colocar objetos con líquido,
como vasos, sobre el aparato.
8. Accesorios
No utilice accesorios no recomendados por el fabricante del producto.
9. Relámpagos y Sobrecargas de Energía
Desconecte el aparato de la toma de corriente de la pared y desconecte los períodos de tiempo. Esto evitará
daños ocasionados al producto debido a relámpagos y sobrecargas de energía.
10. Sobrecarga
No sobrecargue las tomas de corriente ni cables extensores, ya que ello supondría un riesgo de incendio o
descarga eléctrica.
11. Daños que Requieran un Servicio
Este aparato deberá ser atendido por personal cualicado cuando:
A. El cable de alimentación o enchufe haya sido dañado.
B. Se hayan caído objetos encima o se haya derramado liquído en la caja.
C. El aparato haya sido expuesto a la lluvia.
D. El aparato se haya caído o la caja haya sido dañada.
E. El aparato presente un notable cambio de rendimiento o no funcione normalmente.
12. Períodos de Inactividad
Si el aparato permanece en desuso durante un largo período de tiempo, como un mes o más, el cable de alimentación deberá ser desconectado del aparato para prevenir daños o corrosion.
13. Servicio
El usuario no deberá tratar de manipular el aparato más allá de los métodos descritos en las instrucciones de
funcionamiento. Los servicios que no estén cubiertos por las instrucciones de mantenimiento deberán ser derivados a personal de servicio cualicado.
ES 2
Page 59

Advertencias
Siga las instrucciones abajo indicadas para garntizar un funcionamiento seguro y apropiado.
ACERCA DE LA PROTECCIÓN CONTRA LA EXPOSICIÓN A ENERGÍA LÁSER
● Dado que el rayo láser de este reproductor de CD es nocivo para los ojos, no trate de desarmar la caja.
● Detenga inmediatamente su funcionamiento en caso de que cualquier objeto liquído o sólido cayera en el soporte.
● No toque ni pinche la lente. Si lo hace, ésta podría dañarse y el reproductor podría dejar de funcionar
correctamente.
● No introduzca nada en la ranura de seguridad. Si lo hace, el diodo láser permanecerá encendido mientras que el
compartimiento del CD sigue abierto.
● Este aparato utiliza un láser. El uso de controles, ajustes, rendimiento o procedimientos que no hayan sido
especicados aquí podrían dar lugar a peligro de radiación.
Características
Gracias por la compra de la Radio CD DAB+ con sistema de música Bluetooth.
Este modelo incorpora las funciones siguientes:
- Transmisión y reproducción canciones de dispositivos Apple (iPad /iPhone/iPod Touch) y smartphones con SO
Android mediante la tecnología Bluetooth.
- Función NFC (Near Field Communication) para la conexión sencilla a Bluetooth
- Reproductor de CD con reproducción de CDs de audio y canciones MP3.
- Tecnología ID3 de visualización del título de la canción
- Receptor DAB / DAB+
- Receptor FM con lectura digital en la pantalla LCD
- Función RDS
- Reloj LCD
- Función de temporizador de apagado automático
- Display LCD con retroiluminación
- Tres entradas de audio distintas (LINE-IN / AUX-IN) para la conexión de fuentes / reproductores de audio externos.
- 2 altavoces incorporados de alta delidad
- Subwoofer incorporado para un potente efecto de graves
- Con ajuste de graves y agudos
iPhone, iPad y iPod touch son marcas de Apple Inc., registradas en los EE.UU. y otros países.
iPhone, iPad y iPod no están incluidos.
Instalación
Alimentación de reserva para el reloj
En la parte posterior de la unidad se halla un compartimento para pilas.
(1) Abra la tapa del compartimento para las pilas de alimentación del reloj.
(2) Siga el diagrama de polaridad mostrado en el interior del compartimento e instale 2 pilas del tipo AAA (UM-4)
(no incluidas).
(3) Cierre la tapa del compartimento para pilas.
Mando a distancia
En la parte inferior del mando a distancia encontrará un compartimento para pila.
- Para el primer uso, retire la lámina aislante.
- Para sustituir la pila, saque el alojamiento de la pila y siga el diagrama de polaridad mostrado en el alojamiento,
después instale una pula de litio CR2025 / DC 3V nueva. Finalmente, vuelva a colocar el alojamiento de la pila en
el mando a distancia.
ES 3
Page 60

Instalación
2322
18
21
24
17
19
20
Conexión del Adaptador de corriente alterna-corriente directa
El aparato puede ser encendido a través de un adaptador externo de corriente alterna-corriente directa, y requiere la
salida de corriente directa 18V 3000mA (incluído).
(1) Enchufe de manera rme y segura el enchufe de corriente alterna del adaptador a la salida principal de corriente
alterna..
(2) Conecte el enchufe de salida del adaptador de corriente directa a la clavija de entrada de corriente directa del
aparato.
Advertencias:
- Las pilas no deben ser expuestas a calor excesivo, como por ejemplo sol, fuego o similar.
- Asegúrese de que las pilas están instaladas correctamente. La polaridad errónea podría dañar el aparato.
- No mezcle pilas nuevas y antiguas.
- No mezcle pilas alcalinas, normales (carbono-cinc) o recargables (niquel-cadmio).
- Solo se deben usar pilas iguales o equivalentes a las recomendadas.
- Si el aparato no va a ser utilizado durante un período prolongado, saque ls pilas.
- No exponga las pilas al fuego, ya que podrían explotar o producirse fugas.
- Existe riesgo de explosión si las pilas son reemplazadas de manera incorrecta.
Su producto contiene pilas que no pueden ser eliminadas con los desechos del hogar. Por favor, infórmese sobre
las reglamentación local referente a la recolección separada de las pilas, ya que su correcta eliminación ayuda a
prevenir las consecuencias negativas para el medio ambiente y la salud humana.
Use solo la fuente de alimentación que aparezca en el manual del usuario.
Adaptador de fuente de alimentación: Fabricante: KINGWALL No. de modelo: AS600-180-AE300
Descripción de las partes
Unidad principal
Vista superior Vita posterior
1
6789
1011
Vista frontal
15
16
13
14
2345
Mando a distancia
1
33
2
3
4
5
6
7
8
9
10
11
34
12
13
14
15
16
17
INTRO/
212
16
18
19
20
21
22
23
24
25
26
27
28
29
30
31
32
ES 4
Page 61

Descripción de las partes
Unidad principal
1. Sensor NFC --- El sensor NFC (Near Field Communication) está situado en la parte frontal
2. Control VOLUME --- Ajuste del volumen.
3. Botón STANDBY --- Para encender y apagar la unidad.
4. Botón ABRIR/CERRAR --- Abrir / Cerrar la ranura de acceso de CD.
5. Botones TUN / + y / - --- En el modo de sintonizador DAB / FM: Sintonice la frecuencia de radio FM +/-;
Selección del canal DAB.
6. Botón ENTER / --- Conrmación de los ajustes de radio DAB / FM; Función de Reprod./Pausa de
7. Botón MENU / --- Selección del modo de ajuste del menú de radio DAB y FM radio;
8. Botón LIGHT --- Enc./Apag. de la retroiluminación de la LCD y el indicador de encendido.
9. Botón FUNCTION --- Selección del modo de radio DAB / FM / BT (Bluetooth) / AUX-IN / LINE-IN1 /
10. Botones TREBLE + / - --- Ajuste del nivel de agudos.
11. Botones BASS + / - --- Ajuste del nivel de graves.
12. Indicador de estado de encendido
13. Ranura para CD
14. Receptor infrarrojo del mando a distancia
15. Display LCD
16. Altavoces
17. Subwoofer
18. Antena de varilla
19. Compartimento para las pilas de alimentación de reserva
20. Toma AUX-IN --- Entrada de señal de audio auxiliar
21. Toma LINE-IN 2 --- Entrada de Audio line2
22. Toma DC-in --- Para la conexión de alimentación DC externa
23. Toma LINE-IN 1 --- Entrada de Audio line 1
24. Botón RESET --- Para el reseteo de la unidad
Mando a distancia
1. Transmisor de infrarrojos
2. Botón STANDBY
3. Botón CD --- Selección del modo CD.
4. Botón EJECT --- Apertura/cierre de la ranura para CD.
5. Botón AUX IN / LINE-IN --- Selección del modo AUX-IN / LINE-IN 1 / LINE-IN 2.
6. Botón RDS --- En el modo DAB: Visualización de información de la emisora DAB.
En el modo FM: Visualización de información RDS de la emisora FM.
7. Botón ST/MO --- Selección de la recepción de radio FM Estéreo / Mono.
8. Botones VOLUME + / - --- Ajuste del volumen.
9. Botones / --- En el modo CD: Realización de búsqueda de alta velocidad.
10. Botón --- Detención de la reproducción del CD.
11. Botones BASS + / - --- Ajuste del nivel de graves.
12. Botón --- Supresión/restablecimiento del audio.
13. Botón ID3 --- En el modo CD: Activación/desactivación de la función ID3.
14. Botón MEM / PROG --- Guardar una emisora de radio DAB / FM presintonizada;
Selección de programa de CD.
15. Botones CH + / - --- En el modo de radio DAB / FM: Selección del canal presintonizado.
16. Botones FOLDER / --- En el modo CD: Selección del directorio/carpeta de canciones MP3.
17. Botones TUNE + / - --- En el modo de sintonizador FM: Sintonización de la frecuencia de radio +/-.
En el modo de menú FM: Hace de botón de navegación.
18. Botón DAB / FM --- Selección del modo DAB / FM.
19. Botón BT --- Selección del modo Bluetooth.
20. Botón MENU --- Selección del modo de ajustes del menú DAB y FM.
21. Botón SCAN --- En el modo de radio FM: Búsqueda de una emisora FM.
22. Botón INFO --- En el modo CD: Púlselo para mostrar el reloj.
superior de la unidad.
En el modo de menú DAB / FM: Hace de botón de navegación.
En los modos BT (Bluetooth) y CD: Púlselo para pasar pistas hacia Delante/
Atrás.
En el modo CD: Manténgalo pulsado para realizar una búsqueda a alta velo-
cidad.
Bluetooth / CD.
Detención de la reproducción del CD.
LINE-IN 2 / CD.
ES 5
Page 62

Descripción de las partes
23. Botones / --- En el modo BT (Bluetooth) / CD: Salto de pistas hacia delante / atrás.
En el modo de menú DAB: Hace de botón de navegación.
24. Botón ENTER / --- Conrmación de las selección del ajuste DAB / FM;
Función de reproducción/pausa de BT (Bluetooth) / CD.
25. Botón TREBLE +/- --- Ajuste del nivel de agudos.
26. Botón 10+ --- En el modo CD: Salto de 10 canciones MP3.
27. Botón LIGHT --- Encendido/apagado de la retroiluminacióm de la y el indicador de encendido.
28. Botón REP --- En el modo CD: Selección de la repetición de una/todas las canción(es).
29. Botón RAN --- En el modo CD: Selección de la reproducción aleatoria de las canciones.
30. Botón INTRO / HR --- En el modo de espera: Ajuste de las horas del reloj.
En el modo CD: Selección de la reproducción introductoria.
31. Botón SLEEP --- Selección de la duración del temporizador de apagado automático.
32. Botón MIN --- Ajuste de los minutos del reloj.
33. Botón CLOCK --- En el modo de espera: Selección del formato de 12/24 horas del reloj.
34. Compartimento para la pila --- Situado en la parte posterior inferior del mando a distancia.
Uso de Bluetooth
La unidad reproducirá música de dispositivos móviles ( como un iPad / iPhone / iPod Touch, smartphone o tableta )
mediante la función de Bluetooth. También incorpora la función NFC (Near Field Communication) para una sencilla
conexión con un dispositivo móvil que también cuente con la función NFC.
Emparejamiento/conexión
(A) Emparejamiento / conexión Bluetooth NFC
1. Pulse el botón STANDBY para encender la unidad
2. Pulse el botón FUNCTION de la unidad principal o el botón BT del mando a distancia para seleccionar el
modo Bluetooth. El display LCD mostrará “ BT Pairing “ .
3. Desbloquee el dispositivo móvil (función NFC incorporada) y después sitúelo sobre la zona de detección NFC.
4. El dispositivo móvil se emparejará y conectará con este modelo automáticamente.
Nota: El nombre del modelo de este dispositivo Bluetooth: Lenco BT-9000
5. tras la conexión, el display LCD mostrará: “ BT LINK “.
6. Ahora ya podrá reproducir música Bluetooth. Vea la sección “Reproducción de música Bluetooth” más
adelante.
(B) Emparejamiento/conexión manual de Bluetooth
1. Pulse el botón STANDBY para encender la unidad.
2. Pulse el botón FUNCTION de la unidad principal o el botón BT del mando a distancia para seleccionar el
modo Bluetooth. El display LCD mostrará “ BT Pairing “ y la unidad buscará los dispositivos Bluetooth que se
encuentren cerca.
3. En el dispositivo móvil, encienda su función de Bluetooth y este buscará también los dispositivos Bluetooth
que se encuentren cerca.
4. En la lista de dispositivos Bluetooth de su dispositivo móvil, toque sobre el nombre del dispositivo Bluetooth
“Lenco BT-9000” de este modelo para la conexión.
5. Una vez el dispositivo móvil esté conectado a la unidad, el display LCD mostrará “BT LINK“.
6. Ahora ya podrá reproducir música Bluetooth. Vea la sección “Reproducción de música Bluetooth” más
adelante.
Nota:
(a) Cuando se encienda la unidad desde el modo de espera, en el modo Bluetooth se realizará la búsqueda y
conexión del último dispositivo que se hubiera conectado, sin que sea necesaria una nueva búsqueda y emparejamiento.
(b) Para la conexión de otros dispositivos Bluetooth, en el modo Bluetooth mantenga pulsado el botón BT del mando
a distancia. La unidad comenzará a buscar dispositivos Bluetooth cercanos y el display LCD mostrará de
nuevo “BT Pairing”. Aplique los pasos (B)-3 a (B)-6.
Reproducción de música Bluetooth
1. Una vez se haya establecido la comunicación por Bluetooth, abra la App del reproductor de música del dis
positivo móvil y después reproduzca la música del dispositivo móvil.
2. Podrá ajustar tanto el volumen de su dispositivo móvil como el de esta unidad a su gusto.
3. Pulse:
(a) el botón para reproducir/dejar en pausa la música de Bluetooth.
(b) el botón / para pasar pistas hacia atrás / delante.
Nota sobre el ahorro de energía
En el modo Bluetooth, si la comunicación Bluetooth se interrumpiera durante unos 10 minutos, la unidad pasará al
modo de espera automáticamente.
ES 6
Page 63

Uso del sintonizador de radio FM
Antena
Para la mejor recepción de radio, extienda por completo la antena de varilla que hay en la parte posterior de la
unidad.
Opciones del MENÚ
En el modo de radio FM, la unidad le permitirá seleccionar las siguientes opciones.
1. Pulse el botón MENU para entrar en el modo de menú.
2. Podrán seleccionarse dos opciones, [Scan setting] y [Audio setting] pulsando los botones / en la unidad
principal o el botón TUNE +/- del mando a distancia.
(a) Cuando se muestre [Scan setting], pulse el botón ENTER para conrmar la selección.
- Después pulse los botones / de la unidad principal o TUNE +/- del mando a distancia para mostrar
[All stations] o [Strong stations].
Nota:
[All stations] --- La búsqueda FM se detendrá en cualquier emisora disponible por defecto (Todas las
emisoras). Como resultado, las emisoras más distantes podrían no ofrecer una buena
calidad de sonido.
[Strong stations] --- La búsqueda FM se detendrá solo en aquellas emisoras cuya señal sea lo bastante
buena.
- Pulse el botón ENTER para conrmar la selección que desee cuando se muestre [All stations] o
[Strong stations].
(b) Cuando se muestre [Audio setting], pulse el botón ENTER para conrmar la selección.
- Después pulse los botones / de la unidad principal o TUNE +/- del mando a distancia para mostrar
[Stereo] o [Forced mono].
Nota:
[Stereo] --- De forma predeterminada, todas las emisoras estéreo se reproducirán en estéreo. Para
[Forced mono] --- Reproduce audio solo en modo mono.
- Pulse el botón ENTER para conrmar la selección que desee cuando se muestre [Stereo] o
[Forced mono].
3. Podrá pulsar el botón MENU para salir del modo de ajuste del menú en cualquier momento.
Búsqueda automática y almacenamiento de emisoras presintonizadas
La unidad le permitirá almacenar hasta 20 emisoras FM para su selección rápida cuando los desee.
1. Pulse el botón STANDBY para encender la unidad, entonces el indicador de estado de encendido se iluminará.
2. Pulse el botón FUNCTION de la unidad principal o el botón DAB/FM del mando a distancia para seleccionar el
modo de radio FM.
3. Pulse el botón SCAN del mando a distancia hasta que los dígitos de la frecuencia empiecen a cambiar. El
sintonizador buscará automáticamente emisoras desde una frecuencia baja hasta la más alta, guardando las que
encuentre en la ubicación de la presintonía.
Nota: Después de cada proceso de búsqueda automática y operación de almacenamiento, podrá sobrescribir las
emisoras presintonizadas existentes con nuevas emisoras en su lugar.
4. Para seleccionar una emisora presintonizada, puse los botones CH +/- del mando a distancia y después el botón
ENTER para conrmar su selección.
Sintonización de radio FM y almacenamiento manual de presintonías
1. Pulse el botón STANDBY para encender la unidad, entonces el indicador de estado de encendido se iluminará.
2. Pulse el botón FUNCTION de la unidad principal o el botón DAB/FM del mando a distancia para seleccionar el
modo de radio FM.
Sintonización de radio FM
3. Podrá optar por varios modos para la sintonización de las emisoras que desee:
(a) Pulse los botones / de la unidad principal o los botones TUNE +/- del mando a distancia con intervalos de
sintonización de 0.05MHz y sintonice la frecuencia de la emisora de radio que desee.
(b) Mantenga pulsados los botones / de la unidad o TUNE +/- del mando a distancia y sintonice la frecuencia
de la emisora de radio que desee, después suelte el botón.
(c) Para una búsqueda en sentido ascendente, pulse el botón de la unidad principal o TUNE + del mando a
distancia, después pulse el botón SCAN del mando a distancia para sintonizar la emisora de radio inmediata-
mente posterior.
Para una búsqueda en sentido descendente, pulse el botón de la unidad principal o TUNE - del mando a
distancia, después pulse el botón SCAN del mando a distancia para sintonizar la emisora de radio inmediata-
mente anterior.
Para guardar una emisora como presintonía
4. Pulse el botón MEM del mando a distancia. El número de canal de presintonía aparecerá parpadeando en el
display.
las emisoras de señal más débil, la calidad de audio podría ser pobre, aunque podrá
mejorarla usando la opción mono.
ES 7
Page 64

Uso del sintonizador de radio FM
5. Para elegir el número de emisora presintonizable deseado, pulse los botones CH + / - del mando a distancia.
Nota: Cada vez que cambie el número de la emisora, se mostrará la frecuencia que corresponda o “Empty” en la
ubicación de dicha emisora presintonizada.
6. Para conrmar la ubicación de la presintonía, pulse el botón ENTER y “Preset store” se mostrará unos
segundos para retomar el modo normal de sintonizador. La frecuencia recién sintonizada sustituirá a la frecuencia
de la ubicación de emisora presintonizada seleccionada.
7. Repita los pasos 3 a 6 para guardar otras emisoras, si lo desea.
Notas:
● Habrá unos segundos de demora cuando programe, tras los cuales, la unidad pasará al modo normal de
sintonización.
● Podrá sobrescribir una emisora presintonizada con otra emisora distinta en su lugar.
Selección de una emisora presintonizada
8. Pulse los botones CH +/- del mando a distancia. El número de canal de presintonía y la frecuencia aparecerán en
el display, después pulse el botón ENTER para conrmar la selección.
Función RDS
La unidad incorpora la función RDS,
Cuando la emisora de radio recibida contenga información RDS, podrá pulsar el botón RDS del mando a distancia
repetidamente para mostrar información RDS.
Uso del sintonizador DAB / DAB+
La unidad podrá recibir emisoras de radio DAB y DAB+ de su área.
Antena
Para la mejor recepción de radio, extienda por completo la antena de varilla que hay en la parte posterior de la
unidad nit.
Opciones del MENÚ
En el modo DAB, antes de escuchar una emisora de radio DAB / DAB+, la siguiente sección describe las opciones
disponibles para su selección, en caso de que se desee.
Botón de navegación
En el modo de ajustes del menú, podrá usar los siguientes botones de navegación para aplicar la selección de la
opción.
Botón MENU --- Púlselo para entrar o salir del modo de menú.
Botones / --- Púlselo para seleccionar / mostrar el elemento de la opción.
Botón ENTER --- Púlselo para conrmar la selección.
Opciones del MENÚ
[Full scan] --- Se llevará a cabo una búsqueda completa de emisoras de radio DAB/DAB+ en su área.
[Manual tune] --- Sintonización manual de un canal / frecuencia determinado.
[DRC] --- Compresión de Gama Dinámica (DRC), esta función reduce la diferencia entre el audio
Nota: DRC solo funcionará i ha sido habilitada por la estación de retransmisión para una
emisora especíca.
[Prune] --- Esta opción eliminará todas las emisoras inválidas indicadas en la lista de emisoras con
[System] --- Opción de conguración predeterminada de fábrica. Seleccione “Y” para restablecer la
Operación de búsqueda completa
1. Pulse el botón STANDBY para encender la unidad, entonces el indicador de estado de encendido se iluminará.
2. Pulse el botón FUNCTION de la unidad principal o el botón DAB/FM del mando a distancia para seleccionar el
modo de radio DAB.
3. Pulse el botón MENU, entonces se mostrará el indicador [Full scan].
4. Pulse el botón ENTER para conrmar la selección. La unidad comenzará la búsqueda de emisoras DAB / DAB+
de su área y el display mostrará “Scanning 0 “. Por favor, espere a que se complete el proceso de búsqueda.
5. Una vez se haya completado la búsqueda, la radio volverá a reproducirla la emisora seleccionada previamente o
la primera emisoras de la lista de emisoras.
Operación de sintonización manual
Antes de comenzar la sintonización manual, puede que antes desee obtener la información de los canales / frecuencias de las emisoras DAB/DAB+ disponibles en su área.
Una vez se haya completado la búsqueda, la radio volverá a reproducir la radio selec-
cionada anteriormente o la primera emisora de la lista de emisoras.
más alto y el más bajo que se están retransmitiendo. Efectivamente, con esta opción los
sonidos más suaves serán comparativamente más altos y los más altos comparativamente más suaves.
un signo de interrogación delante del nombre de la emisora.
conguración predeterminada de fábrica.
ES 8
Page 65

Uso del sintonizador DAB / DAB+
1. En el modo de radio DAB, pulse el botón MENU para entrar en el modo de ajuste del menú.
2. Pulse los botones / hasta que se muestre el indicador [Manual tune].
3. Pulse el botón ENTER para conrmar la selección.
4. Pulse los botones / para mostrar un canal / frecuencia determinado.
5. Pulse el botón ENTER para sintonizar dicho canal/frecuencia.
6. Si se captara la emisora, el display mostrará la intensidad de su señal entre “SG Str : 0” y “SG Str : xx”,
donde xx es mayor que cero.
7. Pulse el botón MENU repetidamente para salir del modo de ajustes del menú.
Para guardar una emisora presintonizada
1. Cuando se esté mostrando la emisora que desee, pulse el botón MEM del mando a distancia. El número del canal
de presintonía aparecerá parpadeando en el display.
2. Para seleccionar el número de emisora presintonizable deseado, pulse los botones CH + / - del mando a
distancia.
Nota: Cada vez que cambie el número de la emisora, se mostrará la frecuencia que corresponda o “Empty” en la
ubicación de dicha emisora presintonizada.
3. Para conrmar la ubicación de la presintonía, pulse el botón ENTER y “Preset store” se mostrará unos segundos
para retomar el modo normal de sintonizador DAB. La frecuencia recién sintonizada sustituirá a la frecuencia de
la ubicación de emisora presintonizada seleccionada.
Notas:
- Habrá unos segundos de demora cuando programe, tras los cuales, la unidad pasará al modo normal de
sintonización.
- Podrá sobrescribir una emisora presintonizada con otra emisora distinta en su lugar.
Selección de una emisora presintonizada
Pulse los botones CH +/- del mando a distancia. El número de canal de presintonía y la frecuencia aparecerán en el
display, después pulse el botón ENTER para conrmar la selección.
Cambio de canal de escucha
1. Cuando esté escuchando un canal, pulse el botón / repetidamente hasta que se muestre el nombre del
canal que desee.
2. Pulse el botón ENTER para conrmar la selección.
Visualización de información de emisoras de radio DAB
Si fuera necesario, podrá pulsar el botón RDS del mando a distancia para mostrar la información de la emisora DAB
que se esté recibiendo.
Para escuchar música de un CD
El reproductor de CD podrá reproducir música de discos CD/CD-R/CD-RW en el formato de CD de audio y MP3.
Reproducción de un CD
1. Pulse el botón STANDBY para encender la unidad.
2. Pulse el botón FUNCTION de la unidad principal o el botón CD del mando a distancia para seleccionar el
modo CD .
3. Introduzca un CD en la ranura para CDs con la cara impresa mirando hacia arriba.
4. La reproducción automática de música dará comienzo.
5. Para discos en formato de CD de audio ----- El display mostrará el indicador “CD” y el número de pista
Para el disco en formato MP3 ---- El display mostrará el indicador “MP3”, el número de carpeta (por ejemplo, A01)
y el número de pista (por ejemplo, T001).
6. Ajuste el volumen girando el control VOLUME de la unidad principal o pulse el botón VOLUME +/- del mando a
distancia.
7. Para pasar a una pista del CD que usted desee, pulse los botones / . Si estuviera reproduciendo una
canción MP3, pulse los botones FOLDER / del mando a distancia para seleccionar la carpeta que desee.
8. Para el avance o retroceso rápido por la pista en reproducción, mantenga pulsado el botón / de la unidad
principal o / del mando a distancia.
9. Para dejar en pausa la reproducción de un CD, pulse el botón de reproducción/pausa .
Para reanudar la reproducción, pulse de nuevo el botón de reproducción/pausa .
10. Para detener la reproducción del CD, pulse el botón STOP .
11. Para expulsar el CD del interior de la unidad, pulse el botón de APERTURA/CIERRE .
(por ejemplo, T001).
ES 9
Page 66

Para escuchar música de un CD
Modos de reproducción de un CD
Reproducción repetida
● Para discos de CD de audio :
Para repetir la reproducción de una pista, pulse el botón REP del mando a distancia una vez, entonces aparecerá
el indicador “ ”en la pantalla LCD.
Para repetir la reproducción de todo un CD, pulse el botón REP hasta que el indicador “ ” aparezca en la
pantalla LCD.
● Para discos MP3:
Para repetir la reproducción de una pista, pulse el botón REP del mando a distancia una vez, entonces aparecerá
el indicador “ ”en la pantalla LCD.
Para repetir la reproducción de un directorio, pulse el botón REP dos veces, entonces aparecerá el indicador de
repetición de directorio“ DIR” en la pantalla LCD.
Para repetir la reproducción de todo un CD, pulse el botón REP hasta que el indicador “ ” aparezca en la
pantalla LCD.
Reproducción aleatoria
Para reproducir las pistas de un CD en orden aleatorio, pulse el botón RAN del mando a distancia. El indicador
“RND” aparecerá entonces en la pantalla LCD.
Reproducción introductoria
Para repetir los primeros diez segundos de cada canción, pulse el botón INTRO del mando a distancia hasta que
el indicador “INTRO” aparezca en la pantalla LCD.
Cancelación del modo de reproducción del CD
Para cancelar el modo de reproducción del CD, pulse el botón STOP cuando lo necesite.
Reproducción programada del CD
Esta función le permitirá programa hasta un total de 20 pistas de un CD de audio o 30 canciones de un CD MP3 en
el orden que usted desee.
1. Con la reproducción del CD detenida, pulse el botón PROG del mando a distancia una vez. La pantalla LCD
mostrará la siguiente indicación:
“PGM”
El número de programa (por ej., P01) parpadeará.
El número de pista (por ej., T001)
El número de directorio (carpeta) (por ej., A01) ---- es aplicable solo a los discos MP3.
2. Para seleccionar un número de directorio, pulse el botón FOLDER / del mando a distancia (solo para
discos MP3).
Para seleccionar un número de pista, pulse el botón / .
3. Cuando se muestre el número de pista que desee, pulse el botón PROG para conrmar su introducción
4. Para programar hasta un total de 20 pistas de un Cd de audio o 30 canciones de un Cd MP3, repita los pasos 2 y
3 hasta haber introducido todas las pistas que desee.
O para comenzar la reproducción programada, pulse el botón Reproducción/Pausa y el indicador “PGM”
permanecerá en el display.
5. Para cancelar la reproducción programada, pulse el botón STOP dos veces.
Nota:
● Si pulsa el botón / durante la reproducción programada, la unidad saltará hacia atrás / delante hasta la pista
anterior / siguiente del programa, que no será necesariamente la pista anterior / siguiente del disco.
● La función de modos de reproducción del CD, “ ”repetición de una pista y “ ” repetición de todas las
pistas programadas, funcionará de la misma forma que la reproducción normal de un CD (vea los Modos de
reproducción de CD arriba).
Función ID3
Esta función permitirá a los usuarios consultar información sobre la canción (si la hubiera) en la pista (archivo) que
estén reproduciendo.
Para habilitar esta función:
1. Durante la reproducción de un CD-MP3, pulse el botón ID3. La información (por ejemplo, nombre del artista, título
de la canción) guardada en la pista (archivo) se mostrará en el display LCD.
2. Apague la función ID3, pulse de nuevo el botón ID3.
Nota:
● Solo aplicable para pistas MP3 grabadas (archivos) con etiquetas ID3.
● La unidad será compatible con etiquetas ID3 solo en caracteres del idioma inglés. No será compatible con
otros idiomas
ES 10
Page 67

Ajustes de agudos y graves
Cuando la unidad esté encendida (en el modo Bluetooth, Aux-IN, Line1, Line2, CD, Radio DAB o Radio FM), podrá
pulsar los botones BASS + / - y TREBLE + / - para ajustar el nivel de graves y agudos a su gusto.
Para escuchar de una fuente de audio externa
La unidad proporciona tres tipos de conector de entrada de audio (AUX-IN / LINE-IN 1 / LINE-IN 2). Podrá conectarse a tres fuentes de audio distintas.
1. Conecte un cable de audio con clavija estéreo de 3,5mm de un dispositivo de audio auxiliar a la toma AUX IN de
la unidad. También podrá conectarse un conector de audio del tipo RCA a las tomas de entrada de audio LINE-
IN 1 y LINE-IN 2.
2. Pulse el botón STANDBY para encender la unidad.
3. Para seleccionar una entrada de audio auxiliar, pulse el botón FUNCTION de la unidad principal o el botón
LINE-IN / AUX IN del mando a distancia. El indicador “AUX-IN” / “LINE-IN 1” / “LINE-IN 2” se mostrará en el
display.
4. Encienda el dispositivo de audio externo.
5. El volumen podrá controlarse ahora en la unidad.
El resto de funciones podrán controlarse desde el dispositivo, como de costumbre.
Notas: Pulse el botón STANDBY para apagar la unidad cuando termine de escuchar.
No olvide apagar también el dispositivo de audio externo.
Ajuste del reloj
Ajuste automático
La unidad podrá sintonizar la hora automáticamente con la información de la hora de la emisora de radio DAB.
Cada vez que se reciba una emisora DAB y se copie la información de la hora que esta incluye en la unidad, la
nueva hora se sobrescribirá automáticamente en la unidad.
Ajuste manual
Cuando la unidad esté apagada (Modo de espera):
Selección del formato de 12/24 horas
1. Pulse el botón CLOCK del mando a distancia para entrar en el modo de selección del formato de 12/24 horas.
2. Pulse el botón HR o MIN del mando a distancia para seleccionar el formato de 12 o de 24 horas.
Ajuste de la hora
3. Pulse de nuevo el botón CLOCK para entrar en el modo de ajuste de la hora.
4. Pulse el botón HR del mando a distancia para ajustar las horas.
5. Pulse el botón MIN del mando a distancia para ajustar los minutos.
Salida del menú de ajuste
6. Para guardar todos los ajustes, pulse el botón CLOCK o espere unos segundos para salir del modo de ajuste.
Temporizador de apagado automático
Dormirse con el temporizador
Esta función le permitirá quedarse dormido con un CD la radio o el Bluetooth seleccionando un tiempo de hasta 90
minutos.
La unidad se apagará automáticamente cuando se haya agotado el tiempo seleccionado.
1. Pulse el botón STANDBY para encender la unidad.
2. Sintonice la emisora FM o DAB que desee en el modo radio, reproduzca una canción de un CD o reproduzca
música Bluetooth.
3. Para seleccionar el temporizador de apagado para que la unidad se apague al cabo de 15, 30, 45, 60 o 90
minutos, pulse el botón SLEEP (del mando a distancia) repetidamente. El display mostrará el indicador “SLEEP”.
La unidad reproducirá durante el tiempo que haya seleccionado y se apagará una vez este haya transcurrido.
4. Para comprobar el tiempo para el apagado restante, pulse el botón SLEEP (del mando a distancia).
Para apagar la unidad antes de que el temporizador de apagado llegue a cero, pulse el botón STANDBY
cuando usted desee.
Notas:
● Si programa el temporizador de apagado automático con música de un dispositivo externo conectado a la entrada
AUX-IN o LINE-IN, el temporizador de apagado automático apagará este sistema, pero no el dispositivo externo.
● Si activa el temporizador de apagado automático cuando haya un Cd en reproducción, la unidad seguirá
reproduciendo hasta el nal del disco y después se apagará automáticamente, sin importar cuál sea el ajuste
seleccionado en el temporizador. Por ejemplo, si su CD durará 30 minutos y el tiempo elegido para el temporizador
de apagado automático fuera de 45 minutos, la unidad se apagará aproximadamente tres minutos después de que
haya nalizado la reproducción del disco.
ES 11
Page 68

Cuidados y Mantenimiento
- No someta el aparato a fuerzas excesivas, choques, polvo o temperaturas extremas.
- No manipule los componentes internos del aparato.
- Limpie su aparato con un trapo húmedo (nunca mojado). Nunca use detergente o disolvente.
- Evite dejar su aparato bajo la luz solar directa, o en lugares calientes, húmedos o con polvo.
- Mantenga su aparato alejado de aparatos de calor y fuentes de ruido eléctrico como lámparas uorescentes o
motores.
Si suceden cortes o interrupciones en la música durante su reproducción, o si el disco no consigue reproducir, podría
ser que su parte inferior requiera limpieza.
Antes de su reproducción, limpie el disco desde el centro hacia fuera con un trapo limpio y suave.
Restablecer el Aparato
Si el aparato sufre una sobrecarga de energía o una descarga eléctrica, es posible que el microcontrolador interno
se bloquee y que el aparato no responda a ninguna orden de los paneles de control.
1. Si esto sucediera, desconecte y vuelva a conectar el enchufe de alimentacón por corriente alterna a la toma de
corriente de pared.
2. Utilice un clip desdoblado, un mondadientes u objetos similares para pulsar el botón RESET situado en la parte
trasera de la unidad principal (ver la gura abajo). La operación de restablecer borra la memoria del sistema y
todas sus conguraciones previas serán borradas.
Botón RESET
PRECAUCIÓN: NO UTILICE OBJETOS CORTANTES O CON PUNTA PARA PULSAR EL BOTÓN RESET.
Nota:
- En caso de fallos en el funcionamiento debido a descarga electrostática (ESD), deberá aplicara la operación de
reset en el producto para reanudar su funcionamiento normal.
- El funcionamiento normal podría ser alterado por fuertes interferencias electromagnéticas. Si así fuera, no tendrá
más que resetear el producto para restablecer su normal funcionamiento. En caso de no poder restablecer el
funcionamiento, por favor, utilice el producto en otra ubicación.
PODRÍA DAÑAR EL BOTÓN DE RESET DENTRO DEL APARATO.
ES 12
Page 69

Especicaciones
Adaptador de corriente Entrada AC 100-240V ~ 50/60Hz
Salida DC 18V 3000mA
Alimentación de la unidad principal DC 18V 3000mA
Alimentación de reserva para el reloj / memoria DC3V--- AAA (UM-4) x 2 (no incluido)
Pila del mando a distancia Pila de litio DC3V --- CR2025 x 1
Salida del altavoz 10W+10W (Máx.)
Salida de subwoofer 25W (Máx.)
Consumo 1 W (En espera)
54 W (Máx.)
Dimensiones 351 x 136 x 214 mm
Peso 3300g
Temperatura operativa 0 C ~ + 45 C
y humedad 70%
Este producto funciona a 2400 a 2483,5 MHz y está diseñada únicamente para ser utilizado dentro de un entorno
doméstico normal. Este producto es adecuado para este propósito dentro de todo.
Los productos con la marca CE cumplen con la Directiva EMC (2004/108/EC) y con la Directiva
de Bajas Tensiones (2006/95/EC) emitida por la Comisión de la Unión Europea.
Este símbolo indica que no deberá deshacerse del producto eléctrico o batería en cuestión
tratándolo como desecho del hogar en el ámbito de la UE. Para garantizar un tratamiento re-
sidual correcto del producto y su batería, por favor, elimínelos cumpliendo con las leyes locales
aplicables sobre requisitos para el desechado de equipos eléctricos y baterías. De hacerlo,
ayudará a conservar recursos naturales y mejorar los estándares de protección medioambiental
en el tratamiento y eliminación de residuos eléctricos (Directiva sobre la Eliminación de Equipos
Eléctricos y Electrónicos).
®Reservados todos los derechos
LAS ESPECIFICACIONES Y APARIENCIA EXTERNA DE ESTE JUEGO ESTÁN SUJETAS A CAMBIOS SIN
PREVIO AVISO.
ES 13
Page 70

Servicio y asistencia
Para información: www.lenco.com
Para asistencia: http://lencosupport.zendesk.com
Teléfono de asistencia Lenco:
Alemania 0900-1520530 (Tarifa local)
Países Bajos 0900-23553626 (Tarifa local + 1ct P/min)
Bélgica 02-6200115 (Tarifa local)
Francia 03-81484280 (Tarifa local)
El teléfono de asistencia está disponible de lunes a jueves, de 9 de la mañana a 6 de la tarde.
Cuando se ponga en contacto con Lenco, se le pedirá el modelo y el número de serie de su producto. El número de
serie se encuentra en la parte posterior del aparato. Por favor, escriba debajo el número de serie:
Modelo:
Número de serie:_________________________________
Lenco ofrece servicio y garantía en cumplimiento de la ley de la Unión Europea, lo cual implica que, en caso de que
su producto precise ser reparado (tanto durante como después del periodo de garantía), deberá contactar directamente con su distribuidor.
Nota importante: No es posible enviar sus reparaciones directamente a Lenco
Nota importante: Si la unidad es abierta por un centro de servicio no ocial, la garantía quedará anulada. Este
aparato no es adecuado para el uso profesional. En caso de darle un uso profesional, todas las obligaciones de
garantía del fabricante quedarán anuladas.
ES 14
Page 71

 Loading...