

Page 1
Technical
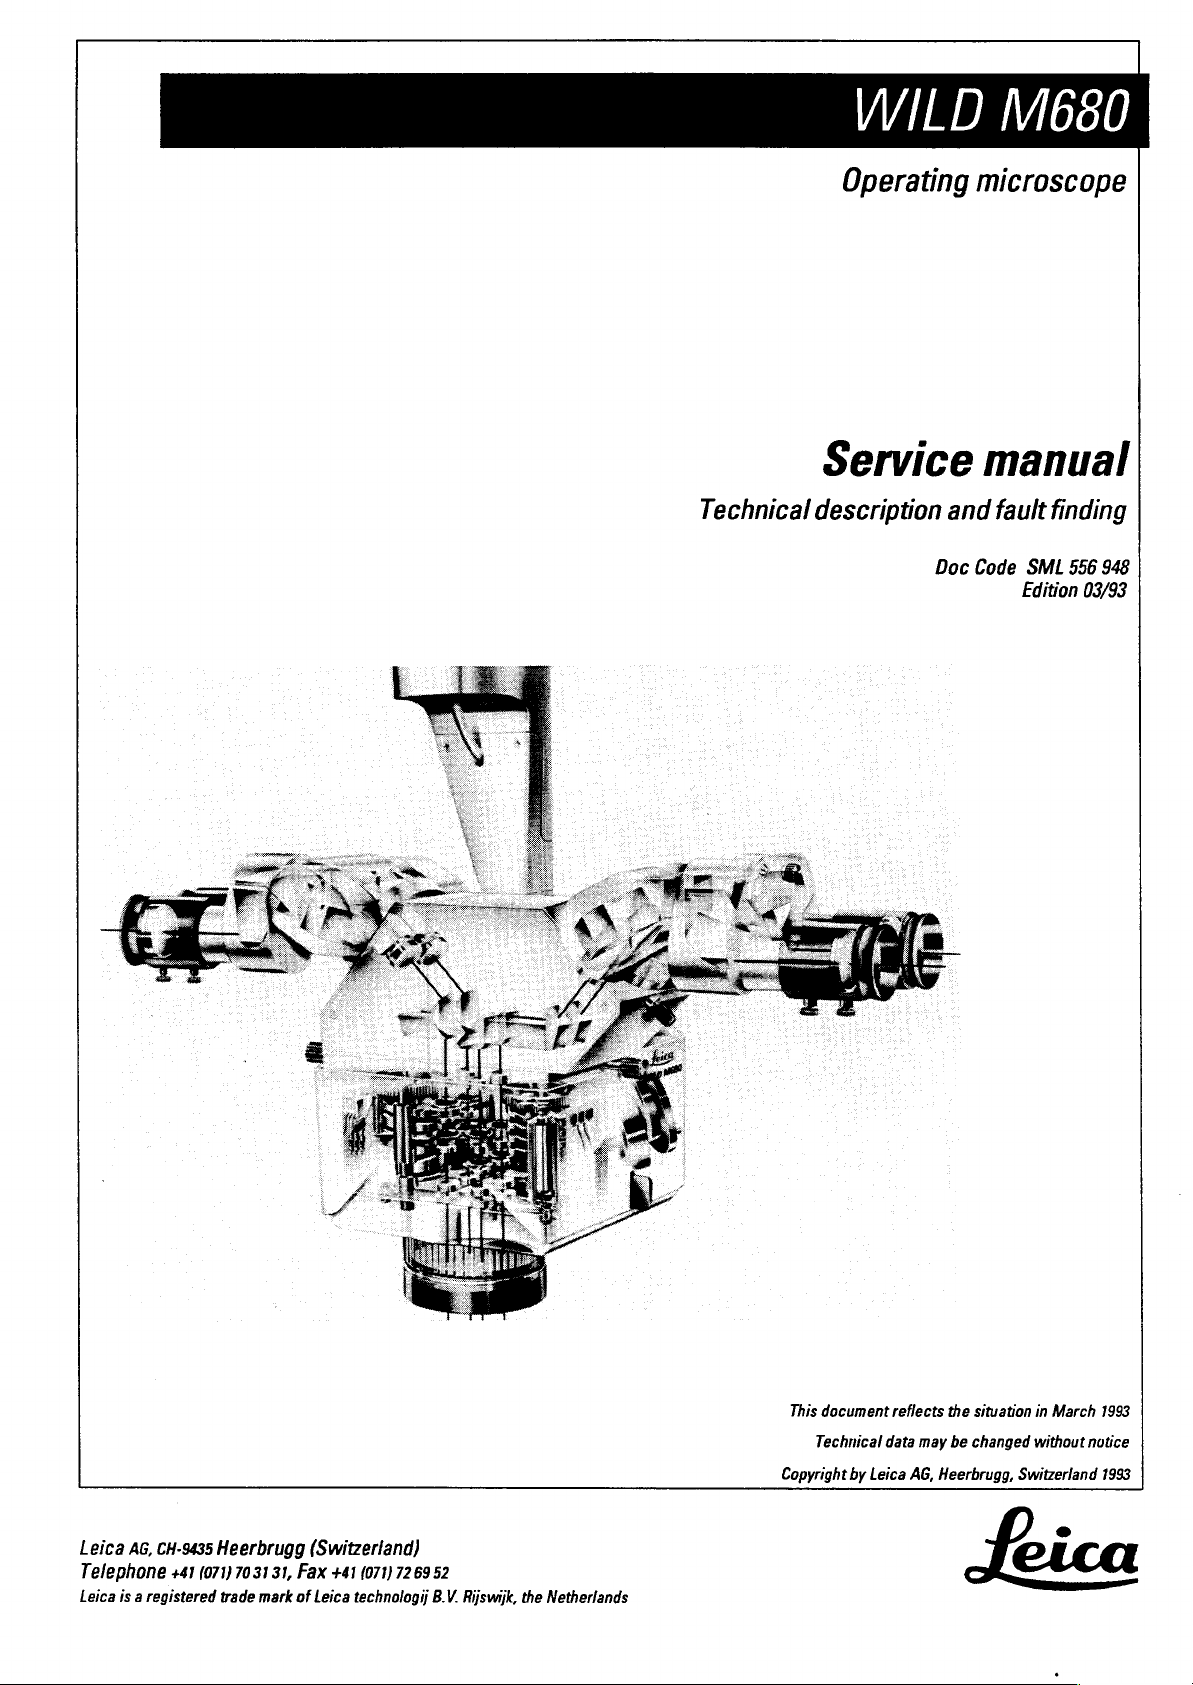
WILD
Operating
Service
description
and
Doc
M660
microscope
manual
fault
finding
Code
SML
556
948
Edition
03/93
Leica
AG,
CH-9435
Telephone
Leica
is a registered
+41
(071)
Heerbrugg
7031
trade
(Switzerland)
31,
Fax
mark
of
Leica
+41
(071)
technologij
7269
52
B.V.
Rijswijk,
the
Netherlands
This
document
Technical
Copyright
by
reflects
data
Leica
the
may
be
AG,
Heerbrugg,
situation
changed
Switzerland
eLca
in
March
without
1993
notice
1993
Page 2
Legal
matters
Service
WILD
Operating
Manual
M680
microscope
Modifications / Service
Introduction / User
Fault
Control
Swingarm
Microscope
XY-
finding
unit
MSV
Gear
MSV138
with
MEL61/62
M680
manual
testset
136/137
News
Wiring
Replacing
Replacing
diagram
modules
boards
Inspection
procedure
Training
Testset
Spare
Special
parts
catalogue
tools
Page 3

HAFTUNG
/
LIABILITY / RESPONSABILITE
/
RESPONSABILIDAD
DIESES
SERVICETECHNIKERINNEN,
QUALIFIZIERTE
ENTSPRECHENDEN
LEICA
SERVICEWERKSTATTEN
WIRD
VERWENDET,
SCHADEN,
DOKUMENTES
THIS
TECHNICAL
ONLY
HEERBRUGG
DISTRIBUTOR,
QUALIFIED
LEICA
OCCUR
PERSON
DOKUMENT
GRUPPE
DIESES
DIE
DOCUMENT
SKILLS.
PERSONS
SERVICE
AG,
HEERBRUGG
DUE
TO
WHO
RICHTET
SERVICETECHNIKER
SERVICEKURS
ODER
BEI
DOKUMENT
SO
LEHNT
DURCH
ENTSTEHEN.
IS
STRICTLY
WHO
HAVE
AND
ARE
OR
SERVICE
ENGINEER.
THE
UNAUTHORIZED
IS
NOT A QUALIFIED
VON
TATIG
VON
LEICA
NICHT
COMPLETED
IN
THE
WORKSHOP
ACCEPTS
SICH
AUSSCHLIESSLICH
WELCHE
LEICA
FACHGEMASSE
FOR
EMPLOY
BEI
SIND.
NICHT
AG,
HEERBRUGG
THE
NO
SERVICE
UBER
UND
AG,
LIABILITY
OR
AN
DIE
NOTWENDIGEN
SERVICETECHNIKERINNEN
LEICA
QUALIFIZIERTEN
AG,
HEERBRUGG
HEERBRUGG
JEGLICHE
ANWENDUNG
USE
OF
QUALIFIED
THE
APPROPRIATE
OF A COMPANY
DULY
AUTHORIZED
WHATEVER
IMPROPER
ENGINEER
AUTORISIERTEN
USE
IN
QUALIFIZIERTE
FACHKENNTNISSE
SIND
BESUCHT
VERTRETUNGEN
SERVICETECHNIKER
HAFTUNG
UND/ODER
SERVICE
SERVICE
IN
THE
LEICA
BY
FOR
OR
INTERPRETATION
ACCORDANCE
LEICA
DIRECT
AB
INTERPRETATION
ENGINEERS
TRAINING
GROUP
AG,
SERVICETECHNIKER
VERFUGEN.
SOLCHE,
HABEN
UND
FUR
DIREKTE
OR
HEERBRUGG
OR
INDIRECT
OF
WITH
DIE
UND
BEI
SERVICETECHNIKERINNEN
WITH
THE
PROVIDED
OF
AN
THIS
DOCUMENT
THE
ABOVE
UND
DEN
UNTERNEHMEN
ODER
UND
INDIREKTE
DIESES
REQUISITE
BY
LEICA
AGENCY,
HAVE
DAMAGE
THE
DEFINITION.
STATUS
THAT
BY
DER
AG,
OF
MAY
ANY
CE
DOCUMENT
CONNAISSANCES
CE
PERSONNEL
DANS
DES
AGREES
SI
CE
DOCUMENT
PAR
RESPONSABILITE
CONFORME
ESTE
DOCUMENTO
LOS
CONOCIMIENTOS
ESTOS
TECNICOS
NECESARIO.
S'ADRESSE
REQUISES.
DOIT
SOCIETES
LEICA
FACE A DES
OU A UNE
DEBEN
ASIMISMO
REPRESENTACIONES
SI
ESTE
DOCUMENTO
RESPONSABILIDAD
EMPLEO
INDEBIO
EXCLUSIVEMENT
AVOIR
DU
AG,
EST
SUIVI
GROUP
HEERBRUGG.
UTILISE
MAUVAISE
SE
DIRIJE
EXCLUSIVAMENTE
REQUERIDOS.
HABER
HAN
DE
DE O TALLERES
SE
UTILIZA
EN
CASO
DE
Y/O
INTERPRETACIÓN
UNE
FORMATION
LEICA
PAR
OU
UN
PERSONNEL
DOMMAGES
INTERPRETATION
ATENDIDO
TRABAJAR
AUTORIZADOS
POR
PERSONAL
PRODUCIRSE,
ERRÓNEA
AU
PERSONNEL
DANS
DES
DIRECTS
EN
LEICA
BIEN
EN
APPROPRIEE
REPRESENTATIONS
NON
OU
DE
AL
PERSONAL
AG,
UNA
POR
NO
CUALIFICADO,
TECHNIQUE
CHEZ
QUALIFIE,
INDIRECTS
CE
DOCUMENT.
TECNICO
HEERBRUGG
DE
LAS
SOCIEDADES
LEICA
AG,
DIRECTA O INDIRECTAMENTE,
DE
ESTE
DOCUMENTO.
QUALIFIE,
LEICA
OU
ATELIERS
LEICA
AG,
DUS A UNE
CUALIFICADO
EL
CURSO
HEERBRUGG.
LEICA
AG,
DISPOSANT
AG,
HEERBRUGG,
DE
HEERBRUGG
APPLICATION
QUE
DE
ADIESTRAMIENTO
DEL
GRUPO
HEERBRUGG
DAŇOS
RESULTANTES
DES
TRAVAILLER
MAINTENANCE
DECLINE
TOUTE
NON
DISPONGA
LEICA,
BIEN
DECLINA
TODA
DE
DE
EN
UN
Leica
Page 4

COPYRIGHT
OHNE
DOKUMENT
ELEKTRONISCHEN
ODER
ABGELEGT,
LEICA
WERDEN.
WITHOUT
SHALL
OTHER
RETRIEVAL
MADE
BY
SANS
DOCUMENT,
ELECTRONIQUE
EXPLOITABLE
VORHERIGE
WEDER
UEBERTRAGUNG
AUSSERHALB
AG,
HEERBRUGG
PRIOR
NOT
BE
REPRODUCED
MEANS
ACCESSIBLE
LEICA
SYSTEM;
AG,
HEERBRUGG
(INCLUDING
AUTORISATION
ENTIEREMENT
MACHINELLEMENT),
SCHRIFTLICHE
INSGESAMT
ODER
PERMISSION
USED
OR
ECRITE
OU
AUTRES, Y COMPRIS
L'UTILISER A D'AUTRES
SOUS
QUELQUE
FORME
HEERBRUGG.
ERLAUBNIS
NOCH
IRGENDWELCHEN
IN
MASCHINENLESBARER
DES
DAFUR
NICHT
COMMUNICATED
AUSDRUCKLICH
IN
WRITING
AS A WHOLE
INTO
OR
FOR
ANY
TO
HAVE
TRANSMISSION
PURPOSE OTHER
ACCESS
PREALABLE
OU
PARTIELLEMENT,
DE
FINS
QUE
CELLES
QUE
CE
SOIT A DES
DER
AUSZUGSWEISE
ANDEREN
FORM)
VORGESEHENEN
BEFUGTE
BY
LEICA
OR
IN
PART,
IN
ANY
FORM
THERETO.
DE
LEICA
PAR
LA
TRANSFORMATION
LE Y METTRE
PREVUES,
TIERS
NON
FIRMA
LEICA
MIT
MECHANISCHEN,
MITTELN
KOPIERT,
ZWECKS
DRITTE
AG,
HEERBRUGG
BY
MECHANICAL,
IN
MACHINE-READABLE
THAN
AG,
THAT/THOSE
TO
ANY
HEERBRUGG
QUELQUE
EN
MEMOIRE
DE
LA
RENDRE
AUTHORISES
AG,
HEERBRUGG
PHOTOGRAPHISCHEN,
(EINSCHLIESSLICH
IN
EINEM
ODER
ZUGANGLICH
(SWITZERLAND),
THIRD
IL
PROCEDE
OU
LA
SUR
INFORMATIONSSPEICHER
IN
IRGEND
PHOTOGRAPHIC,
FORM),
FOR
WHICH
PARTY
NOT
EST
INTERDIT
QUE
TRANSMISSION
UN
SUPPORT
ACCESSIBLE
EXPRESSEMENT
(SCHWEIZ),
IHRER
EINER
GEMACHT
EXPRESSLY
UMWANDLUNG
FORM
THIS
STORED
IT
IS
DE
CE
SOIT
(MECANIQUE,
SOUS
INFORMATIQUE,
UO
DE
LE
PAR
LEICA
DARF
DIESES
AN
VON
ODER
ABGEGEBEN
DOCUMENT
ELECTRONIC,
IN
ANY
INTENDED;
AUTHORIZED
NOR
REPRODUIRE
UNE
FORME
DE
TRANSMETTRE
AG,
OR
CE
SIN
EL
PERMISO
REPRODUZIDO
CALQUIER
OTRO
INTRODUCIDO
NINGUN
AG,
CONCEPTO
HEERBRUGG.
PREVIO
TOTAL
TIPO
EN
UN
POR
ESCRITO
NI
PARCIALMENTE
(INCLUYENDO
SISTEMA
PUEDE
HACERSE
DE
LEICA
POR
LA
CONVERSION
AG,
HEERBRUGG
MEDIOS
MECANICOS,
EN
FORMA
INFORMATICO O UTILIZADO PARA
ACCESIBLE A TERCEROS
SIN
Leica
(SUIZA),
ESTE
FOTOGRAFICOS,
LEGIBLE
FINES
LA
POR
DISTINTOS
AUTORIZACION
DOCUMENTO
NO
ELECTRONICOS O DE
MAQUINAS),
DE
NI
LOS
PREVISTOS.
EXPLICITA
PUEDE
SER
DE
SER
BAJO
LEICA
Page 5

Service
Doe
code
Manual
556
948
M680
Preconditions
for
using
this
service
manual
Introduction
03/93
3077-HWE
Intended
What
the
users
is
expected
person
Testset?
using
of
the
Technical
with
Stage
1:
-
-
-
-
-
e
Directions
Stage
2:
+
personnel
testset
Allocation
article
of a fault
Footswitch
Control
unit
Swingarm
Microscope
X-
or
Y-gear
You
have
read
are
given
Locating
You
engineering
and
have been
provided
nbr.
566
(optics
the
user
in
eliminating
trained
by
152.
to
one
carrier)
manual
Sections 3 and
errors
in
the
customer
of
the
main
and
can
4.
at
module
basics
or
by
LEICA
groups:
operate
of
electronics
agencies,
the
surgical
level
microscope
and
mechanical
equipped
+
You
have
been
instructed
LEICA
Sections
Stage
3:
Locating
.
You
engineering
‧
You
Sections 3 to
AG,
HEERBRUGG.
3, 4 and
and
have been
have
taken
9,
and
10
eliminating
trained
part
Section
by a technician
errors
in
the
in
an
M690/M695-
11
at
board
basics
from
level
of
electronics
or
M680
your
agency
and
course.
or
from
mechanical
Page 6

Introduction
03/93
3077-HWE
Legal
aspects
To
the
This
book
detailed
in
contents
may
Section
only
1.
of
be
service
given
to,
and
manual
used
by,
certain
persons.
Service
Doc
Manual
code
These
M680
556
948
are
Changes/
Service
Introduction/
User
Locating
the
News
manual
test
set
faults
(Test
with
box)
Place
Service
CONGRATULATIONS
read
the
If a fault
and
the
The
test
・
・
*
‧
News
important
develops,
test
box.
set
helps
Footswitch
Control
Swingarm
Microscope
unit
on
top
of
-
You
Section 3 of
we
will
guide
you
to
assign
the
M680
are
this
the
in
one
of
manual.
you
to
fault
to
Section
those
methodical
it
with
the
the:
2.
people
assistance
who
of
Section
also
4
Control
Description
3-2
unit
of
MEL61/62
function
ㆍ
X-orY-gear
The
search
diagrams
The
will
interface.
and
function
lead
you
is
then
continued
the
wiring
description
to
the
diagram.
in
defective
at
board
Section
board
5,
or
level
with
in
conjunction
cable
connection.
the
assistance
with
the
The
of
wiring
swingarm
diagram,
block
is
the
Leica
Page 7
Service
Doc
code
Manual
556 948
M680
Introduction
03/93
3077-HWE
Swingarm
Description
M680
Description
of
function
microscope
of
function
XY-gear
Description
Wiring
of
function
diagram
The
function
will
lead
interface.
The
function
will
lead
interface.
The
function
will
lead
interface.
Section 9 contains
the
boards
description
you
to
the
description
you
to
the
description
you
to
the
and
the
defective
defective
defective
the
plug
in
Section
in
Section
in
Section
wiring
6,
board
or
7,
in
board
or
8,
board
or
diagram,
connections.
in
conjunction
cable
connection.
conjunction
cable
connection.
in
conjunction
cable
connection.
with
with
with
and a description
the
wiring
The
swingarm
the
wiring
The
swingarm
the
wiring
The
swingarm
of
diagram,
diagram,
diagram,
the
positions
is
is
is
the
the
the
of
Exchanging
Exchanging
Testing
Test
procedure
set
modules
boards
Section
available
Section
available
After
specifications.
in
The
10
as
11
as
modules
Section
test
box
includes
spare
includes
spare
or
Values
12.
and
service
instructions
parts.
instructions
parts.
boards
have
and
tolerances
cable,
been
and
for
for
their
exchanging
exchanging
replaced,
are
laid
circuits,
the
down
are
those
modules
those
boards
instrument
in
the
testing
described
which
which
must
procedure
in
Section
are
are
meet
18.
3-3
Page 8

Introduction
03/93
3077-HWE
Spare
parts
The
spare
listed
in
parts,
the
Section
exchange
19.
of
which
is
described
in
Sections
Service
Doc
10
Manual
code
and
11,
M680
556
948
are
Special
tools
Section
carry
out
No
special
a
service
20
includes a list
the
operations
tools
are
required.
handswitch
of
the
service
described
The
components
and a service
above.
cable
which
equipment
making
serves
which
up
to
bridge
will
the
test
enable
box
the
swingarm.
you
to
include
3-4
Page 9
User
manual e Mode
d'emploi
os
o
a
Bedienungsanleitung e Manual
de
empleo
Page 10
まさ
Page 11
To
you,
the
Thank
you
tion.
and
future
surgical
We
our
microscope.
technology
completely
was
surgeon
constructive,
heart
and
gynaecology.
dependent
two
focusing
ideal
coperation
surgeon
You
out
you
study
detail.
movements
have
When
cal
prepared,
the
strument
for
If
you
sometime,
your
write
Heerbrugg,
“ve
"sposal.
ærvice
us.
sale,
well.
for
We
wish
satisfaction
work
microscope.
are
proud
WILD
M680
instrument,
new
developed
operations
and
spinal
also
in
urology
zooms
independent
systems
conditions
between
and
will
only
of
the
WILD
take
the
this
user
Practice
become
you
and
microscope
you
advantages
into
your
patients.
still
have a question
just
local
Leica
to
Leica
are
gladly
Customer
is a big
Not
only
but
afterwards
user
your
atten-
you
success
in
your
with
this
to
introduce
surgical
This
high-
a
concept,
for
two-
in
orthopaedic,
The
assistant.
get
trouble
until
routine.
Switzerland.
before
re-
surgery,
and
two
in-
and
the
internal
create
for
the
best
M680
if
to
manual
in
the
various
they
your
surgi-
are
fully
will
convert
of
the
in-
advantages
contact
agency
AG*
in
at
your
thing
with
the
as
or
Cher
utilisateur
Nous
souhaitons
microscope
vous
apporte
faction
et
de
votre
attention.
Les
composants
nique
fine,
électroniques
WILD
M680
ment
compact
technologie.
que
fascinante
largement
de
la
médecine.
2
zooms
de
dants
les
els,
ment
ons
chirurgien
tant
travail
entendu,
s'utilise
microscope
normal.
un
les
dants,
aucunement
point
individuel.
M680,
novateur
nouvelles
la
cardiaque,
dos,
gynécologie.
Le
être
minutieusement
Vopération,
tant
ment
d'emploi.
permettra
connaitre
WILD
ter
avantages.
Pour
complémentaire,
vous
représentation
directement à Leica
Heerbrugg
Nous
entièrement à votre
disposition.
et
mise
au
ainsi
d'observation
le
M680
qui
de
travail
et
facilite ainsi
d'équipe.
aussi
Il
bouton
deux
zooms
ce
dont
un
chirurgie
pour
microscope
réglé
d'étudier
le
présent
M680
pleinement
toute
adresser à votre
nous
que
d’opération
entière
vous
remercions
de
optiques
font
un
instru-
de
haute
Une
techni-
qui
aux
besoins
Doté
de 2 systèmes
point
indépen-
que
de
modu-
individu-
est
un
offre
des
idéales
et à son
Bien
le
WILD
comme
d'opération
suffit
de
pour
coupler
indépen-
qui
n’influe
sur
la
le
réglage
Le
WILD
instrument
offrant
de
possibilités
restauratrice,
de
la
main,
Purologie
devant
et
contrôlé
avant
il
est
impor-
attentive-
mode
Celui-ci
les
vous
de
parfaitement
fonctions
et
d’exploi-
ses
question
veuillez
Leica
en
Suisse.
tenons
ce
satis-
méca-
et
du
répond
de
instru-
conditi-
au
assis-
le
M680
un
presser
mise
au
reste
pour
du
et
la
du
ou
AG*
Liebe
Benutzerin
Lieber
Wir
Aufmerksamkeit
wiinschen
folg
Operationsmikroksop.
Mit
artigen
Aufwand
WILD
nische,
tronische
zu
“High-Tech-Instrument”
verdichtet.
hangige
abhangige
systeme
wählbare
module
Bedingungen
sammenarbeit
urg
bessere
Teamarbeit
Mit
ergeben
Móglichkeiten
Plastisch-Rekonstruktive
Chirurgie,
Wirbelsáulenchirurgie,
Urologie,
und
Damit
WILD
optimal
lesen
gende
tung.
Zeit
WILD
nen.
Funktionen,
Routine
Wenn
tionsmikroskop
vorbereitet
sich
Operationsmikroskops
Vorteile
Patienten
Und
Fragen
sich
Vertreter
AG*,
Schweiz.
Wir
Denn
wird
schrieben.
dem
Benutzer
danken
Ihnen
Ihnen
mit
Ihrem
wertvollen
einem
bisher
konstruktiven
wurden
M680
feinmecha-
optische
Komponenten
einem
kompakten
Zwei
Zooms,
interne
und
individuell
Beobachtungs-
schaffen
fiir
und
dem
Herzchirurgie.
Sie
Bedienungsanlei-
Nehmen
und
Trainieren
Sie
die
falls
bitte an
Heerbrugg,
helfen
KUNDENDIENST
bei
Kauf.
von
Assistent.
und
zeitsparende
ist
die
WILD
sich
neue
fůr
Handchirurgie,
Gynákologie
Sie die
Vorteile
M680
kennen
nutzen
bitte
die
Sie
lernen
M680
genau
bis
geworden
und
das
sind,
Vorteile
fiir
Ihre
umwandeln.
Sie
einmal
haben,
wenden
Ihren
oder
an
Ihnen
uns
gross
Vor
fiir
und
viel
Er-
einzig-
beim
und
elek-
unab-
zwei
Fokus-
ideale
die
Zu-
Chir-
Eine
Folge.
M680
die
kónnen,
vorlie-
sich
Sie
das
ken-
Sie
seine
sie
zur
sind.
Opera-
optimal
werden
des
Leica-
Leica
gern.
ge-
und
nach
Ihre
un-
des
und
die
in
Sie
Estimado
Le
agradecemos
atención y le
mucho
microscopio
El
WILD
componentes
electrónicos y mecánicos
de
precisión
vierten
de
tecnologia
zooms y dos
enfoque
independientes,
módulos
individualmente
seleccionables
una
serie
Optimas
común
asistente,
ce
en
trabajo
WILD
nuevas
campo
ca,
la
y
de
la
urología y la
gía.
Ahora
máximo
posible
recomendamos
manual
mese
para
WILD
diversas
aparato
conviertan
que
sus
traigan
dos
en
paciente.
Si
una
ran
dificultades,
en
ponerse
con
su
local
Leica
Estamos a su
disposición,
una
gran
asistencia
antes
compra.*
usuario
por
deseamos
éxito
con
su
de
operación.
M680
atina
6pticos,
gue
en
incorporados
para
de
un
en
M680
perspectivas
de
espinal,
la
mano,
bien,
rendimiento
al
con
el
tiempo
conocer a fondo
M680.
funciones
hasta
multiples
los
el
vez
representación
de
Leica o bien con
AG,
como
le
un
instrumento
punta.
sistemas
asi
de
observación
ofrecen
de
condiciones
el
trabajo
cirujano
lo
que
se
eficaz y rápido
equipo.
Con
se
abren
la
cirugía
del
corazón
así
como
ginecolo-
para
sacar
instrumento,
leer
atención.
necesario
Ensaye
del
que
se
en
rutina,
ventajas
frutos
se
le
en
contacto
Suiza.
plena
pues
al
cliente,
después
apeteci-
presenta-
no
damos
tratamiento
importancia a la
su
nuevo
con-
Dos
de
como
y
tradu-
en
plásti-
este
Tó-
su
las
para
del
dude
tanto
de
en
el
el
en
el
le
la
*
Leica
AG,
Switzerland,
certified
equipped
system
International
of
and
(ISO
as
with a quality
which
Quality
Quality
standard
Heerbrugg,
has
been
being
meets
the
Standard
Management
Systems
9001).
*
Leica
Heerbrugg
la
certification
détient
ISO
9001.
*
Leica
Heerbrugg
das
Internationale
Qualitátszertifikat
der
Norm
ISO
erteilt.
9001
wurde
nach
*
Leica
AG,
Suiza,
certificado
internacional
norma
Heerbrugg,
cuenta
de
ISO
9001.
con
el
calidad
segun
la
Page 12

Contents
Table
des
matiéres
Inhaltsverzeichnis
Sumario
Page
Overviews
6
Functions:
Surgical
8
Functions:
Stand
10
Functions:
Control
footswitch,
handswitch
12
Short
Checklist
Use
Surgical
14
15
16
17
18
19
20
22
24
25
26
microscope
Switching
The
master
Coupled
led
mode
Zoom
—
Footswitch
handswitch
—
Footswitch:
the
Handgrips
XY-movements
Displacement
Microscope
Selector
Stereo
binocular
—
Tube
rotatable
—
Interpupillary
distance
Wide-field
for
spectacle
Working
without
Illumination
—
Switching
off
—
Ouick-change
mount
—
Filter
Adjusting
setting
microscope
unit,
instructions
on
and
function
and
uncoup-
and
focus
and
tilt
Setting
speeds
positions
positions
modules,
tube
adapter,
+30°
eyepieces
wearers
with
and
spectacles
on
slide
the
dioptric
and
lamp
off
Page
Vues
d'ensemble
6
Microscope
d'opération
8
Statif
10
Bloc
de
commande,
commandes à pédale
et
manuelle
12
Liste
de
contrôle
Utilisation
Microscope
14
Mise
tension
15
Fonction
Zooms
indépendants
16
Zoom
—
—
17
Poignées
positionnement
18
Mouvements
19
Vitesses
20
Positions
microscope
Sélecteur
22
Modules
binoculaire
—
—
24
Oculaires
angulaires
porteurs
Travail
lunettes
25
Eclairage
—
—
—
26
Réglage
d'opération
sous
et
Master
couplés
et
mise
Commandes
pédale
et
Réglage
naison
mande a pédale
Bague
diaire
Ecartement
pupillaire
Mise
tension
Changeur
d’ampoule
Glissiêre
porte-filtres
de
de
de
de
réglage
du
stéréo,
intermé-
tournante
grand-
pour
de
lunettes
avec
sous
des
hors
ou
au
point
à
manuelle
l'incli-
la
com-
XY
tube
30°
ou
sans
et
hors
rapide
dioptries
Seite
Übersichten
6
Funktionen:
Operationsmikroskop
8
Funktionen:
Stativ
10
Funktionen:
Steuergerät,
Fuss-
und
Handschalter
12
Kurzanleitung
Checkliste
Bedienung
Operationsmikroskop
14
Ein-
und
Ausschalten
15
Die
Master-Funktion
Gekoppelter
nicht-gekoppelter
Betrieb
16
Zoom
~
Fuss-
Handschalter
ー
Fussschalter:
Neigung
17
Handgriffe
18
XY-Bewegungen
19
Verstell-
geschwindigkeiten
20
Mikroskop-Positionen
Selektorstellungen
22
Stereo-Module,
Binokulartubus
—
Tubuszwischenstiick
+30°
ー
Augenabstand
24
Weitwinkel-
Brillenträgerokulare
Arbeiten
mit
Brille
25
Beleuchtung
—
Ein-
Ausschalten
-
Lampenschnell-
wechsler
—
Filterschieber
26
Dioptrien
und
Fokus
und
einstellen
ohne
und
einstellen
und
und
Página
Vision
general
6
Funciones:
Microscopio
8
Funciones:
Estativo
10
Funciones:
Aparato
dispositivo
por
12
Instrucciones
Lista
Manejo
Microscopio
operación
14
Conexión
desconexión
15
La
Funcionamiento
plado y desacoplado
16
Zoom y enfoque
ー
—
17
Empuňaduras
18
Movimientos
19
Velocidades
20
Posiciones
microscopio
Posiciones
22
Módulos
cos,
ー
—
24
Oculares
observar
Trabajar
25
Huminación
—
-
-
26
Ajustado
de
de
pedal/manual
de
control
de
y
función
Master
Dispositivo
control
por
manual
Dispositivo
control
por
ajuste
de
la
inclinación
del
de
estereoscópi-
tubo
binocular
Pieza
intermedia
giratoria
Distancia
interpupilar
Conexión
desconexión
Cambiador
de
Corredera
filtros
+30°
para
con
con/sin
bombillas
de
mando,
control
breves
aco-
de
pedal
de
pedal:
XY
de
ajuste
selector
gafas
gafas
y
rápido
para
dioptrías
y
Stand
28
Swingarm
—
locking and
releasing
—
balancing
30
Adjusting
movement
-
Articulation
braking
ー
Perforated-plate
linkage
31
Transport,
rest
position
the
ease
of
positioning,
Statif
28
Bras
mobile
—
Blocage
déblocage
—
Equilibrage
30
Réglage
des
—
Boutons
—
Liaison
perforé
31
Transport,
ment,
et
de
la
mouvements
de
par
positionne-
rangement
dureté
freinage
disque
Stativ
28
Schwenkarm
ー
blockieren
lósen
ー
ausbalancieren
30
Gangleichtigkeit
regulieren
—
Gelenkbremsen
~
Lochscheiben-
verbindung
31
Transport,
Ruhestellung
und
Plazierung,
Estativo
28
Brazo
móvil
—
bloquear
desbloquear
—
equilibrar
30
Regulado
suavidad
ー
frenos
articulacién
—
acoplamiento
ante
31
Transporte,
miento,
reposo
y
de
la
de
marcha
de
disco
perforado
emplaza-
posición
medi-
de
Page 13
Sterile
controls
32
Eléments
stérilisables
32
Sterile
Bedienungselemente
32
Elementos
esterilizables
32
de
mando
Accessories
33
Weights
34
Beam
splitter
ー
Fitting
—
Fitting
—
Double-iris
diaphragm:
Adjusting
of
field
36
Dual-station
~
Second-observer
tube
—
Stereo
for
second
38
Photo/TV
ment
—
Rotatable
turret
-~
TV
and
formats
40
Cine/TV
41
Phototube
Format
limits
Fitting
and
assembly
42
Floor
stand
Assembly
to
control
44
Swingarm,
microscope
Microscope
45
Footswitch
-
Holder
—
Cleaning
46
Control
—
—
—
48
Stereo
Binocular
fitting
49
50
Ceiling
unit
Connections
Changing
Fault-location
system
modules
Objective,
the
(reticle)
Bulbs
mount
accessories
the
depth
viewing
attachment
observer
dual
attach-
filter
photo
attachment
from
base
unit
surgical
carrier
the
fuses
tube
eyepieces
graticule
Accessoires
33
Poids
34
Répartiteur
—
Montage
—
Mise
en
accessoires
—
Double
iris:
profondeur
champ
36
Observation
simultanée
—
Tube
pour
observateur
—
Rallonge
pour
observateur
38
Double
photo
—
Revolver à filtres
-
Formats
photo
40
Rallonge
41
Rallonge
Cadrages
Montage
42
Statif de
Montage
bloc
44
Bras
cope
Porte-microscope
45
Commande à pédale
—
Support
ー
Nettoyage
46
Bloc
—
Connexions
—
Changement
fusible
—
Localisation
pannes
48
Modules
Tube
Objectif
Oculaires
Mise
réticule
49
Ampoules
50
Statif
place
diaphragme
réglage
monoculaire
deuxiğme
deuxième
rallonge
et
TV
TV
TV/ciné
photo
sol
du
de
commande
mobile,
d’opération
de
commande
stéréo
binoculaire
en
place
de
plafond
optique
des
de
la
de
stéréo
et
pied
au
micros-
de
des
du
Zubehór
33
Gewichtstabelle
34
Strahlenteiler
—
montieren
—
Zubehör
-
Doppelirisblende:
Scharfentiefe
lieren
36
Mitbeobachtung
-
Monokularer
Mitbeobachtertubus
ー
Stereo-Mitbeobach-
teransatz
38
Dualansatz
Photo/TV
—
Filterrevolver
—
TV-
Photo-Formate
40
TV-/Kino-Ansatz
41
Photoansatz
Bildausschnitte
Montage/Aufbau
42
Bodenstativ
Montage
Steuergerät
44
Schwenkarm,
Operationsmikroskop
Mikroskoptráger
45
Fussschalter
—
Trager
ー
Reinigung
46
Steuergerät
-
Anschliisse
ー
Sicherungswechsel
~
Fehlerlokalisie-
rungssystem
48
Stereo-Module
Binokulartubus,
Objektiv,
Strichplatte
49
Glihlampen
50
Deckenstativ
montieren
und
Fuss
Okulare
einsetzen
regu-
bis
Accesorios
33
Tabla
de
34
Divisor
de
—
Montaje
—
Montaje
accesorios
~
Diafragma
doble:
ajuste
de
didad
de
36
Observación
simultánea
—
Tubo
monocular
para
segundo
observador
—
Dispositivo
estereoscópico
observación
tánea
38
Suplemento
fotografia y TV
—
Revölver
—
Formatos
fotografia
40
Suplemento
camara
41
Montaje
42
Montaje
44
Portamicroscopio
45
Dispositivo
por
46
48
49
50
de
Suplemento
camara
fotografica
Encuadres
Estativo
aparato
Brazo
copio
—
—
Aparato
—
—
—
Módulos
cópicos,
binocular,
oculares
Acoplado
Bombillas
Estativo
de
de
móvil,
de
pedal
Soporte
Limpieza
Conexiones
eléctricas
Sustitución
fusibles
Sistema
localización
errores
Tubo
pesos
rayos
de
iris
la
profun-
campo
de
simul-
dual
para
para
filtros
de
TV
y
de
cine/TV
de
suelo
del
pie
hasta
mando
micros-
operación
de
control
de
mando
de
de
de
estereos-
Objetivo
del
retículo
de
techo
Notes
51
Care
52
Notes
54
Tips
57
We
guality
58
Technical
59
Optical
for
your
and
hints
guarantee
data
data
safety
the
Remarques
51
Entretien
52
Consignes
S4
Remarques
57
Nous
garants
58
Données
59
Données
de
nous
portons
de
la
techniques
optiques
sécurité
et
conseils
qualité
Hinweise
51
Pflege
52
Hinweise
Sicherheit
54
Hinweise
Ratschláge
57
Wir
garantieren
Qualität
58
Technische
59
Optische
zu
Ihrer
und
Daten
Daten
Observaciones
51
Mantenimiento
52
fiir
Observaciones
seguridad
54
Observaciones
consejes
57
Respondemos
calidad
58
Datos
técnicos
59
Datos
ópticos
para
y
de
la
su
Page 14
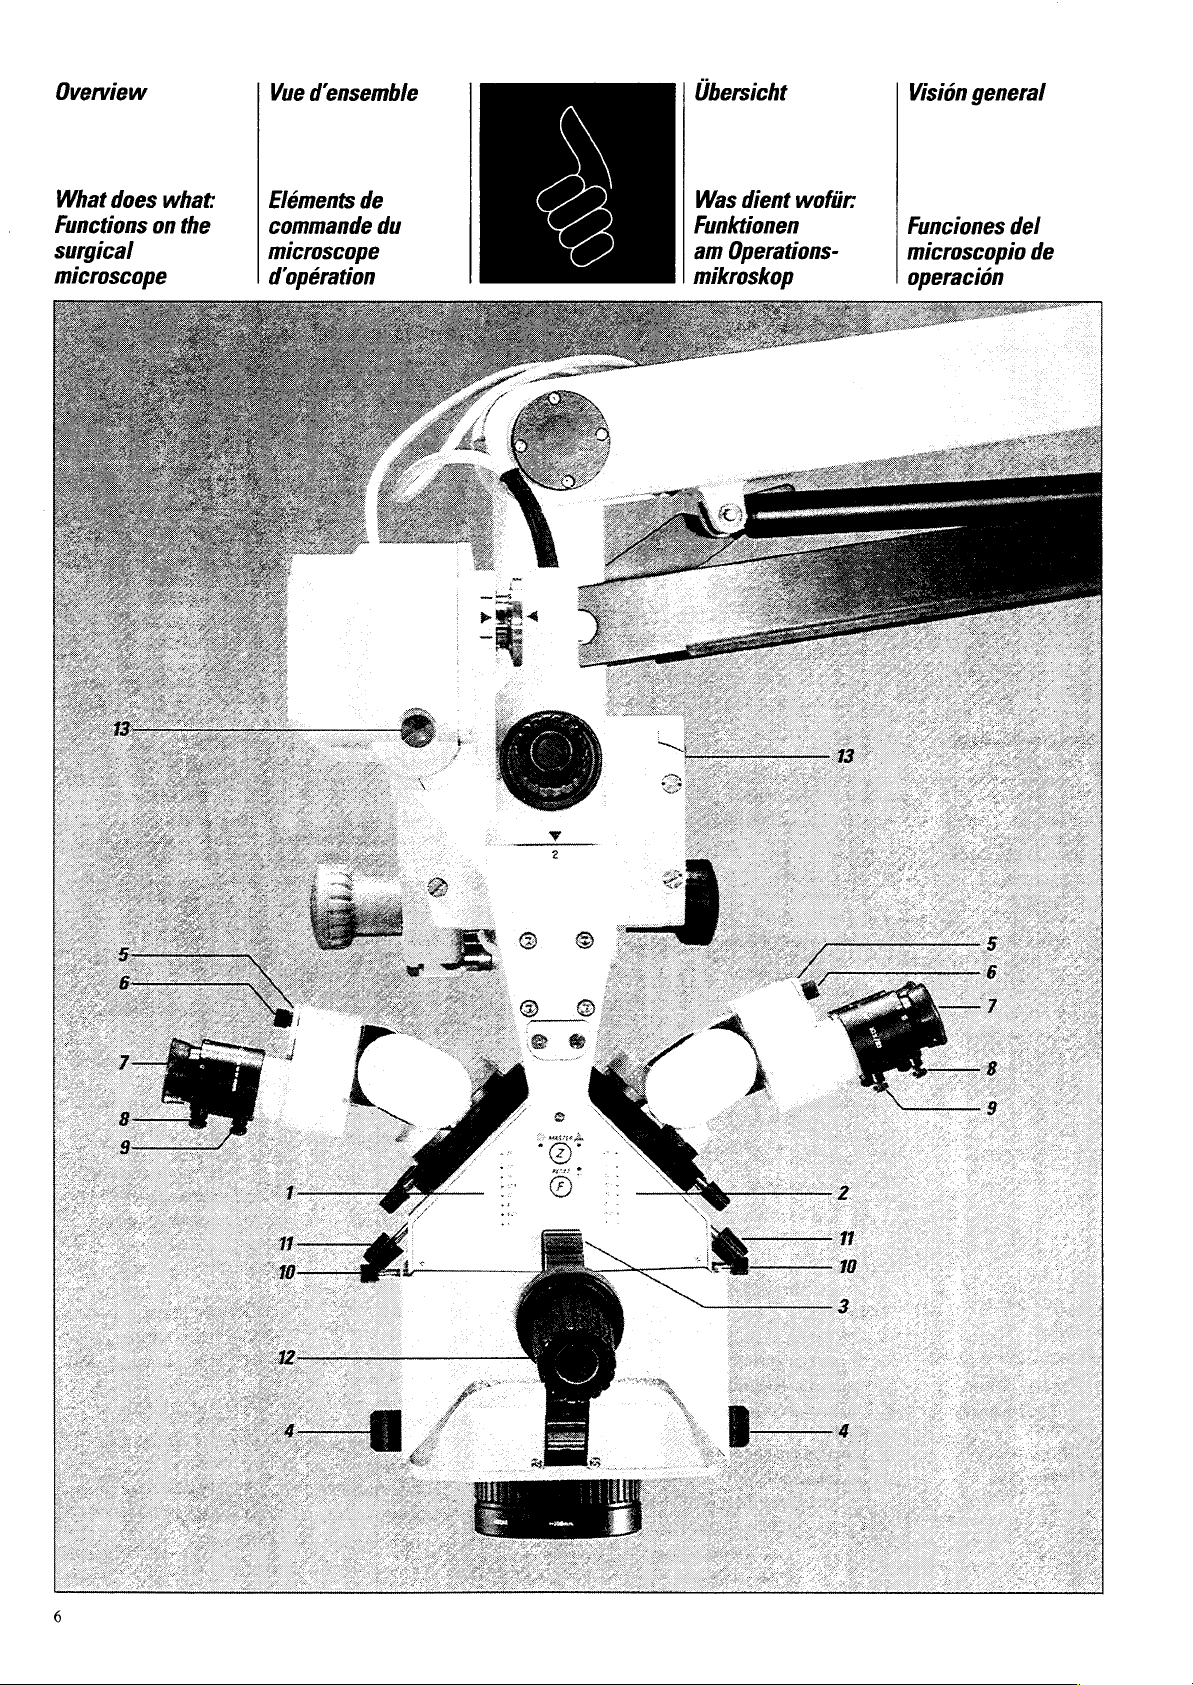
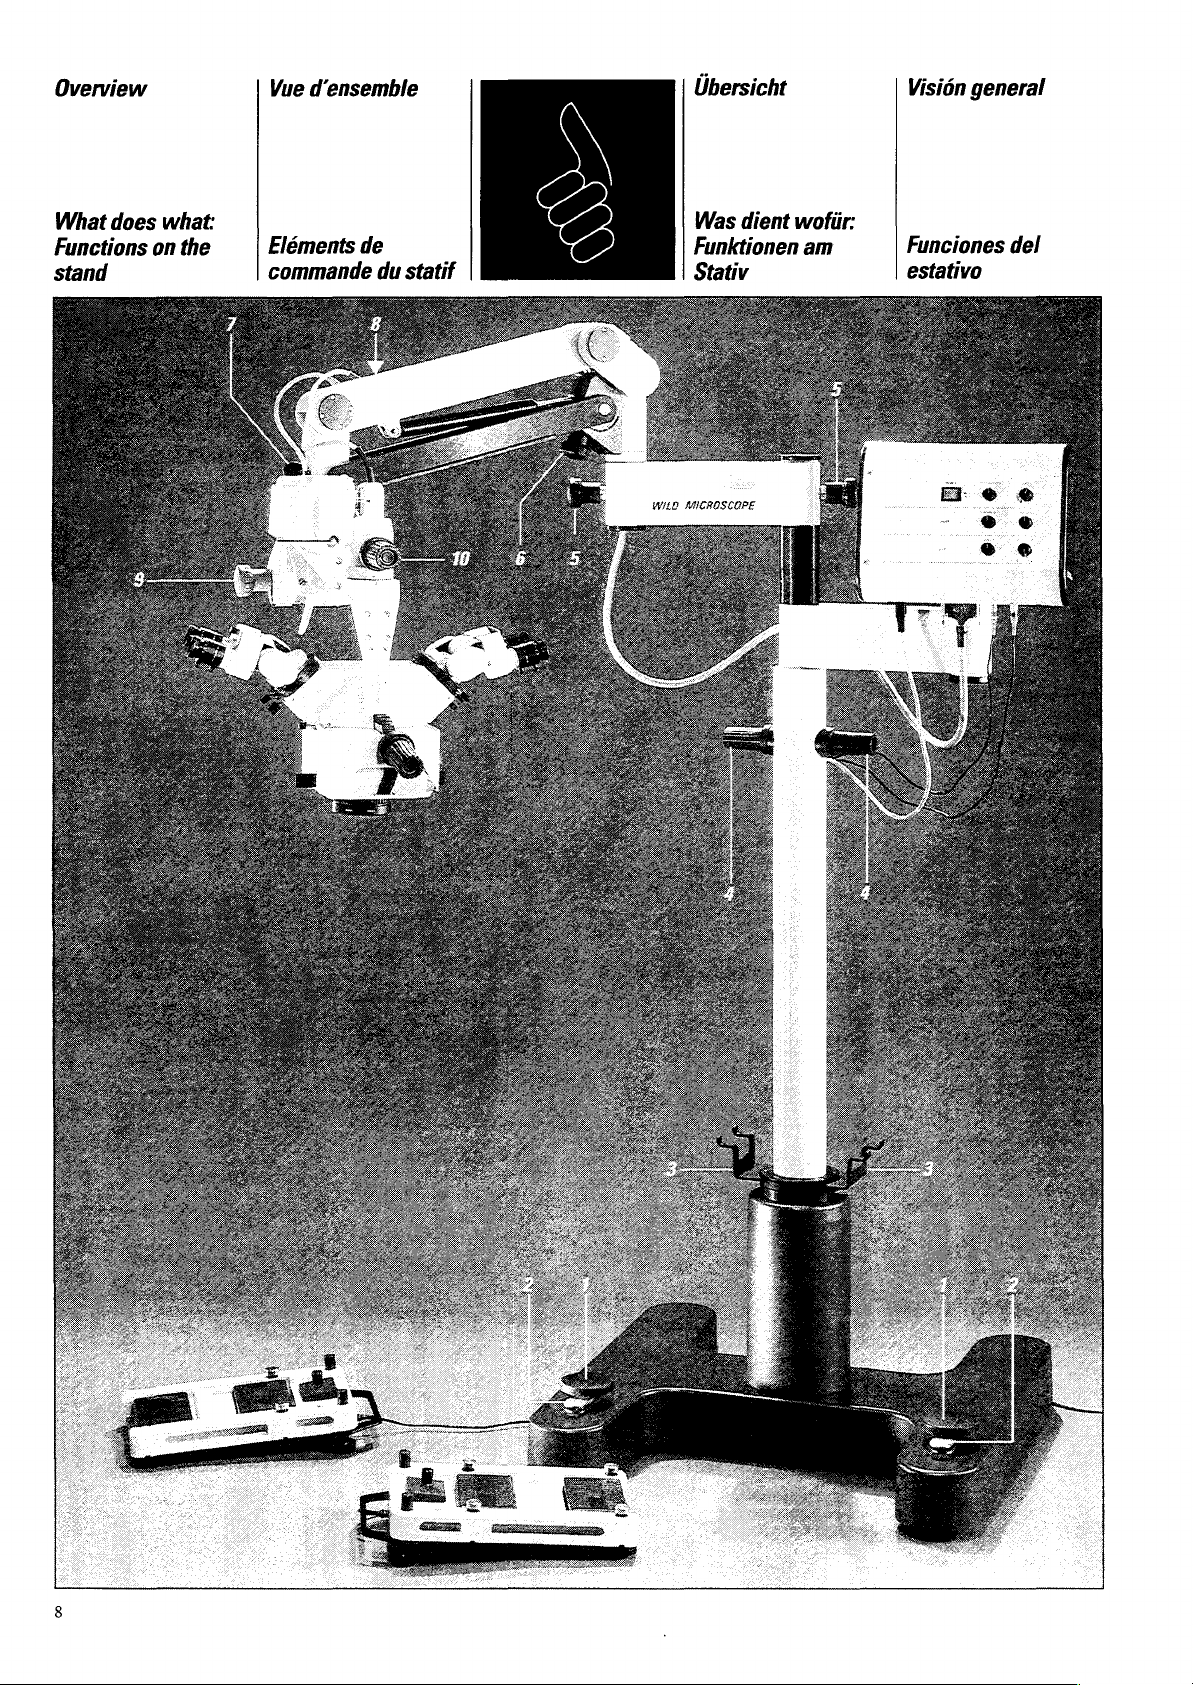
Overview
What
does
Functions
surgical
microscope
on
what:
the
Vue
d'ensemble
Eléments
commande
microscope
de
du
Übersicht
Was
dient
Funktionen
am
Operations-
mikroskop
wofür:
Visiôn
Funciones
microscopio
operacion
general
del
de
Page 15
Keys
Z
Switching
functions
F
Automatic
basic
focus
Signal
lamps
@
(red)
pilot
Surgeon @ (red)
controls
A
(blue)
pilot
Surgeon
controls
©
warning
—
The
wheel
bulbs
correctly
—
Replace
Display
bei
(red)
Magnifications
5x
to
2
25x
Display
(blue)
Magnifications
5x
to
25x
of
setting
position
lamp:
both
lamp:
A
(blue)
both
lamp:
is
not
engaged
the
of
zoom
of
zoom
master
zooms
zooms
with
the
bulb.
@
A
of
Touches
Z
Commuter
fonctions
F
Position
matique
à
Affichage
(rouge)
témoin:
Le
(rouge)
deux
(bleue)
Le
(bleue)
deux
Lampe
d’avertissement:
—
ー
Fenêtre
(rouge):
Grossissements
5x a 25x
Fenétre
(bleue):
Grossissements
5x a 25x
de
de
mise
au
lumineux
Lampe
chirurgien
commande
zooms.
Lampe
chirurgien
commande
zooms.
le
disque
se
trouvent
poules
gagé
correctement
l'ampoule
remplacée
du
du
sur
les
Master
base
l’objectif
point
@
témoin:
À
sur
lequel
les
n’est
pas
doit
zoom
zoom
auto-
les
les
am-
en-
être
@
A
MASTER
RESET
Drucktasten
Z
Master-Funktionen
umschalten.
F
Automatische
Grundstellung.
Leuchtanzeigen
(rot)
Kontrollampe:
Chirurg @ (rot)
steuert
A
Я
beide
(blau)
Kontrollampe:
Chirurg A (blau)
steuert
beide
Warnlampe:
—
Das
Rad
Glúhlampen
nicht
gerastet.
—
Gliihlampe
ersetzt
Anzeige
(rot):
Vergrósserungen
5x
bis
Anzeige
(blau):
Vergrósserungen
5x
bis
mit
korrekt
werden.
Zoom
25x
Zoom
25x
Fokus-
Zooms.
Zooms.
den
ist
ein-
muss
©
A
Botones
Z
Conmutar
Master.
F
Posición
enfogue
Indicaciones
(rojo)
control:
cirujano © (rojo)
controla
zooms.
(azul)
control:
cirujano A (azul)
controla
zooms,
Lampara
-
—
Indicación
(rojo):
aumentos
Indicación
(azul):
aumentos
básica
automática.
lámpara
ambos
lámpara
ambos
de aviso:
el
disco
bombillas
correctamente
encajado.
debe
sustituirse
bombilla.
funciones
de
luminosas
de
de
con
las
no
está
la
zoom
©
de
5x a 25x
zoom
A
de
5x a 25x
Illumination
3.
Quick-change
mount:
There
are
in
the
4
Binocular
5
6
7
8
9
10
11
12
13
wheel
Filterholders
with
VG9
or
KB12
ters,
Display
pupillary
Clamping
Secure
distance
Wide-field
for
with
adjustable
to 5 and
Clamping
Secure
positions
Securing
Secure
binocular
Securing
Secure
to
Securing
Secure
intermediate
beam
stereo
Handle
Manual
If
hexagonal
perform X and
movements
daylight
interchangeable
tube
of
distance
interpupillary
setting
spectacle
diopter
with
eyelens
screws:
eyepieces
screws:
stereo
microscope
screws:
binocular
splitter,
modules
XY
necessary,
lamp
two
bulbs,
green
filters
inter-
screw:
eyepieces
wearers
setting
from
+5
eyecups
screws:
tube
module
tube,
tube
to
control
use
the
key
to
Y
fil-
in
or
Eclairage
3
Changeur
d’ampoule:
Le
disque
deux
ampoules.
Porte-filtres
avec
filtres
ou
lumière
KB12,
interchangea-
bles
Tube
binoculaire
Indicateur
5
ment
6
10
11
13
pupillaire
Pince à vis:
pour
fixer
Vécartement
pupillaire
Oculaires
laires
de
dioptries réglables
+5 a -5
Pinces
pour
d’oeil.
Vis
pour
oculaires
binoculaire.
Vis
pour
stéréo
scope.
Vis
pour
binoculaire,
intermédiaire
tournante
répartiteur
sur
Poignée
positionnement
Comande
manuelle
En
effectuer
ments
la
pour
Junettes
et
vis:
fixer
de
fixation:
fixer
de
fixation:
fixer
sur
de
fixation:
fixer
les
modules
de
cas
d'urgence,
XY à l'aide
clé à six
requis.
grand-angu-
oeilleres.
dans
les
rapide
contient
verts
VG9
du
jour
d’écarte-
les
tubes
porteurs
avec
la
lentille
les
le
tube
les
modules
le
micro-
le
tube
la
bague
ou
le
optique
stéréo.
XY
mouve-
pans.
de
de
Beleuchtung
3
Lampenschnell-
wechsler:
Im
Rad
zwei
Filterhalter
mit
oder
KB12,
Binokulartubus
5
Augenabstands-
Anzeige
Klemmschraube:
6
à
Augenabstand
feststellen.
Weitwinkel-
Brillenträgerokulare
mit
Dioptrien
+5
Augenmuscheln.
Klemmschrauben:
Augenlinsen
feststellen.
Befestigungs-
schrauben:
Okulare
tubus befestigen.
10
Befestigungs-
schrauben:
Stereo-Module
dem
befestigen.
Befestigungs-
il
schrauben:
Binokulartubus,
Tubuszwischenstück
oder
den
befestigen.
Handgriff
Manuelle
XY-Bedienung
Im
Bewegungen
Imbussschliissel
ausführen.
befinden
Glühlampen.
Griinfiltern
Tageslichtfiltern
auswechselbar.
verstellbaren
bis
—5
Mikroskop
Strahlenteiler
Stereo-Modulen
Notfali
von
und
im
Binokular-
XY-
mit
VG9
auf
sich
auf
Iluminación
3
Cambiador
bombillas:
en
el
disco
tran
dos
Corredera
con
filtros
o
filtros
natural
Tubo
5
Indicador
distancia
6
Tornillo
para
distancia
Oculares
res
gafas
con
bles
anteojeras.
Torniilos
para
oculares.
Tornillos
para
en
10
Tornillos
para
estereoscópicos
microscopio.
11
Tornillos
para
binocular,
intermedia
el
los
estereoscópicos.
Empuňadura
Manejo
XY
en
lleve a cabo
mientos
la
para
KB12,
intercambiables.
binocular
ajustar
para
observar
dioptrias
de
+5 a -S
fijar
fijar
el
tubo
fijar
fijar
divisor
módulos
manual
caso
necesario
XY
Have
Allen.
rápido
de
se
encuen-
bombillas.
para
filtros
verdes
VG9
luz
de
la
interpupilar
de
ajuste:
la
interpupilar.
granangula-
de
de
de
de
con
ajusta-
y
apriete:
las
lentes
apriete:
los
oculares
binocular.
apriete:
los
médulos
en
apriete:
el
tubo
la
pieza
giratoria
de
rayos
de
los
movi-
mediante
el
o
en
Page 16
Overview
What
does
Functions
stand
what:
on
the
Vue
d'ensemble
Eléments
commande
de
du
statif
Ubersicht
Was
Funktionen
Stativ
WILD
MIEBOSCOPE
dient
wofiir:
am
Vision
Funciones
estativo
general
del
о
о
de
×
I
00
о
Page 17

Footbrakes
block
the
Footbrake
release
Carrier
for
two
Handles
displace
Articulation
adjust
the
rotary
movements
the
swingarm
Weight
balances
when
accessories
changed
Safety
hook
blocks
the
Picture:
freely
movable
(released
captured
mechanism)
Retaining
Picture:
hook
when
been
released
Perforated-disc
linkage
This
connects
stand
to
cope
carrier
The
orange
holds
the
carrier
on
perforated
10
Brake
knobs
articulation
These
hold
microscope
basic
position
required
stand
levers
the
footbrakes
footswitches
the
stand
brakes
ease
of
the
on
compensation
the
swingarm
are
swingarm
Swingarm
safety
hook
by
retaining
mechanism
Holds
safety
latter
has
the
the
micros-
system.
knob
microscope
to
the
disc
for
the
in
the
Pédales
pour
Levier
pour
freins
Support
pour 2 commandes
pédale
Poignées
pour
Boutons
pour
de
ments
Contrepoids
pour
mobile
changement
d'accessoires.
Crochet
pour
mobile.
Illustration:
(crochet
goujon
engagé).
Goujon
d’encliquetage
pour
en
Joint
entre
porte-microscope,
dernier
tenu
perforé a l’aide
bouton
10
Bouton
pour
microscope
position
requise.
de
bloquer
desserrer
du
pied
déplacer
de
régler
dureté
du
équilibrer
après
de
bloquer
libéré
d’encliquetage
caler
position
de
sécurité
le
statif
étant
dans
orange.
de
maintenir
de
frein
le
statif
les
du
le
freinage
le
degré
des
mouve-
bras
mobile
le
un
retenue
le
bras
bras
et
le
crochet
de
repos.
et
le
main-
le
disque
du
freinage
le
dans
base
statif
à
statif
bras
libre
ce
la
Fussbremsen
Stativ
arretieren.
Fusshebel
Fussbremsen
Trager
fiir 2 Fussschalter.
Griffe
Stativ
verschieben.
Gelenkbremsen
Gangleichtigkeit
Drehbewegungen
Schwenkarm
ren.
Gewichtsausgleich
Bei
Zubehôrwechsel
Schwenkarm
Gleichgewicht
bringen.
Sperrhaken
Schwenkarm
blockieren.
Im
Bild:
frei
beweglich
haken
Haltebolzen
geklinkt).
Haltebolzen
halt
den
wie
im
geléstem
Sicherheitsverbindung
verbindet
mit
dem
trägersystem.
orange
hält
den
Lochscheibe.
10
Gelenkbremse
halt
das
der
gewiinschten
Grundposition.
regulie-
ins
Schwenkarm
gelôst
und
fest-
Sperrhaken
Bild
in
Zustand.
das
Mikroskop-
Klemmknopf
Träger
Mikroskop
lôsen.
der
am
(Sperr-
im
Stativ
Der
in
der
in
Frenos
de
para
retener
estativo.
Palanca
para
de
Soportes
para
de
Mangos
para
estativo.
Frenos
para
dad
tos
Compensacion
peso
mantiene
el
después
sustitución
accesorio.
Gancho
para
brazo
En
móvil
blogueo
encajado
de
Perno
en
que
bloqueo
por
el
Conexion
seguridad
conecta
el
portamicroscopio.
El
anaranjado
brazo
disco
10
Freno
retiene
en
elegida.
de
soltar
pie.
dos
dispositivos
control
desplazar
de
regular
de
los
del
brazo
brazo
móvil
de
de
inmovilizar
móvil.
la
imagen:
libre
suelto
en
sujeción).
de
sujeción
este
caso
el
gancho
se
ende
brazo
mévil.
el
sistema
botón
de
horizontal
perforado.
de
articulación
el
la
posición
pie
el
pie
los
frenos
por
pedal.
el
articulación
la
suavi-
movimien-
móvil.
del
equilibrado
cada
de
blogueo
el
brazo
(gancho
agarre
se
de
estativo
del
asegura
microscopio
de
y
el
perno
impide
de
y
bloquee
con
retención
el
en
el
básica
—
Refer
to
electrical
page
connections
46
for
Connexions
voir
p.
46
électriques,
Elektrische
und
siehe
Anschliisse
Verbindungen
S.
46.
Conexiones
véase
pág.
eléctricas,
46
Page 18

What
does
what:
*
Vue
d'ensemble
Übersicht
Vision
general
Functions
control
footswitch
handswitch
on
unit,
the
and
Eléments
commande
commandes
pédale/manuelle
du
et
bloc
des
à
de
Funciones
Was
dient
wofür:
Funktionen
Steuergerät,
Fuss-/
am
Handschalter
aparato
dispositivo
control
pedal/manual
del
de
por
mando,
de
10
Page 19
Control
1
2
3
10
unit
Power
Regulating
governs
Regulating
Zoom
speed @ (red)
and
zoom
(blue)
Regulating
governs
speed
Regulating
governs
Selector
rearranges
functions
microscope
Socket
for
power
Voltage
fuse
holder
sets
wheel
to
115V
Fuses
2x1,6AT,
250VA,
Socket
for
microscope
Socket
for
foot
handswitch,
@
(red)
switch
knob
the
brightness
knobs
speed
knob
the
focus
knob
the
XY
knob
footswitch
when
is
cable
selector
behind
or
230V.
5x20mm
or
surgeon
A
speed
turned
and
flap
cable
Bloc
de
commande
1
Interrupteur
2
Bouton
de
de
la
Boutons
de
la
©
(rouge)
À
(bleue)
Bouton
de
la
point
Bouton
de
la
mouvements
Sélecteur
de
commutation
pédales
pivotement
microscope
Connexion
pour
Sélecteur
et
porte-fusibles
Derrière
positionner
sur
Fusibles
250
Connexion
pour
microscope
10
Connexion
commande
pédale/manuelle
chirurgien @ (rouge)
réglage
luminosité
de
vitesse
et
de
réglage
vitesse
de
réglage
vitesse
lors
le
câble
de
la
plaque,
115 V ou
2x1,6
VA,
5x20
le
câble
à
réglage
du
le
principal
du
zoom
du
zoom
de
mise
des
XY
des
d’un
réseau
tension
disque
230
V.
AT,
mm
du
pour
POWER
LAMP
ZOOM
SPEED
FOCUS
XY
SPEED
1—2
CONTROL
CONTROL
SPEED
A
B
Steuergerát
Netzschalter
Regulierknopf
Helligkeit
Regulierknôpfe
Verstellgeschwindig-
keiten
und
regulieren.
Regulierknopf
Verstellgeschwindig-
keit
Regulierknopf
Verstellgeschwindig-
keit
regulieren.
Selektorknopf
Zuordnung
schalter
des
umschalten.
Anschluss
Netzkabel
anschliessen.
Spannungswahler
Sicherungshalter
Rad
auf 115 V oder
stellen.
Sicherungen
250
Anschluss
Mikroskopkabel
anschliessen.
10
Anschluss
Fuss-/Handschalter
für
anschliessen.
regulieren.
Zoom @ (rot)
Zoom A (blau)
Fokus
regulieren.
XY-Bewegungen
der
bei
Drehen
Mikroskops
hinter
der
VA,
Chirurg © (rot)
2x1,6AT,
5x20
Fuss-
Klappe
230
mm.
und
V
Aparato
Interruptor
Boton
para
adaptar
intensidad
Botones
para
regular
velocidades
del
zoom © (rojo)
el
zoom 4 (azul).
Boton
de
para
regular
velocidad
del
enfoque.
Botón
de
para
regular
velocidad
los
movimientos
Botón
de
para
conmutar
disposición
comandos
cuando
microscopio.
Conexión
para
cable
Selector
portafusibles
fijar
el
la
tapa a 115 6 230
Fusibles
250
VA,
Conexién
para
cable
microscopio.
10
Conexiôn
para
dispositivo
control
pedal,
para
©
(rojo).
de
mando
de
red
de
regulacion
la
luminosa.
de
regulacion
las
de
ajuste
regulación
la
de
ajuste
regulación
la
de
ajuste
selección
la
de
los
del
pedal
se
gira
el
de
red.
de
tensión
disco
detrás
2x1,6AT,
5x20
mm.
de
manual/por
cirujano
y
de
XY.
y
de
V.
de
11
Socket
for
foot
or
handswitch,
A
(blue)
Socket
12
for
attaching
additional
Locating
13
If a fault
inspect
faults
develops,
the
Footswitch
handswitch
Z
Zoom
F
Focus
Z
MASTER
switches
functions
F
RESET
automatically
basic
XY
movements
are
A
Additional
is
ML
No
14
Adjustable
Rotate
of
over
focus
controlled
switched
function
to
footswitch.
surgeon
instrument
diodes.
and
master
sets
position
function
on
and
off
footrest
change
tilt
11
Connexion
commande
pédale/manuelle
chirurgien À (bleue)
Connexion
pour
supplémentaire
Localisation
13
pannes
En
cas
contrôler
Commandes
à
appareil
de
pannes,
les
à
pour
des
diodes
ADD.
FUNCT.
pédale/manuelle
Zoom
F
Mise
au
MASTER
Z
Commuter
fonctions
F
RESET
Position
automatique
mise
XY
Mouvements
Guidage
A
Fonction
supplémentaire
Activer
ML
Sans
14
Repose-pieds
à
point
sur
Master
de
base
au
point
et
désactiver
fonction
inclinaison
les
de
la
réglable
11
Anschluss
Fuss-/Handschalter
fiir
Chirurg A (blau)
anschliessen.
12
Anschiuss
Zusatzgerat
anschliessen.
13
Fehlerlokalisierung
Im
Stérungsfall
Dioden
Fuss-/Handschalter
Z
F
Z
F
XY
A
ML
14
kontrollieren.
Zoom
Fokus
MASTER
Master-Funktionen
umschalten.
RESET
Automatische
Grundstellung.
Bewegungen
steuern
Zusatzfunktion
ein-
und
ohne
Funktion
Verstellbare
Fussstiitzen
Durch
Neigung
schalters
Fokus-
ausschalten
Drehen
des
Fuss-
einstellen.
11
Conexión
para
dispositivo
control
manual/por
pedal,
para
A
(azul).
Conexión
para
adicional.
13
Localización
errores
En
caso
controle
Dispositivo
control
cirujano
instrumento
de
de
averia,
los
diodos.
de
por
pedal/manual
之
Zoom
F
Enfoque
Z
MASTER
conmutación
funciones
RESET
F
posición
máticade
XY
Movimientos
contro]
movimientos
A
Función
conectar/desconectar
ML
sin
función
14
Reposapiés
ajustables
gire
para
grado
de
master.
básica
enfogue.
de
los
XY
adicional
ajustar
de
inclinación
de
auto-
el
11
Page 20

Overview
Vue
d'ensemble
Ubersicht
Vision
general
Checklist:
Settings
before
the | réglages
operation
Eyepieces
~
Screw
on
if
rings,
with user
~
Elele
(page
—
Fold
appropriate
user
Clean o tical
components
~
Inspect
eyepieces,
photo
ters
-
Remove
(page
Eguipping
~
ase
_
(page
=
ben
ー
~
Ensure
is
~
Equip
ready
necessary
(short
m
odules?).
Oculaires
~
Visser,
les
ment
teurs)
(p.
~
Pour
insérer
cadrage
Voculaire
—
Retourner,
saire,
(liste
p.
Propreté
~
Vérifier
des
tifs
tateurs
ー
Les
échéant
Accessoires
—
Desserrer
de
~
Déplier
~
Resserrer
—
Contrôler
bile
~
Equiper
de
(modules
courts
12
eyecups
appropriate,
in
ticule
49)
back
list)
p
and
51).
ーー
30)
blocked
for
or
anneaux
(liste
et
24).
photographier,
les
des
23)
oculaires
ainsi
nettoyer
freinage
est
tous
spacing
accordance
list
(page
leri
e)
(reticle
eyecupsif | -
(refer
(page
23).
cleanliness
objectives, | Connect
TV
adap-
dust
and
brakes
swingarm
that
swingarm
(page
microscope
use
with
accessories
long
stereo
le
cas
échéant, | —
d’écarte-
des
utilisa- | -
les-oeillères
le
réticule
dans
(p.
49).
si
néces-
oeilléres
utilisateurs,
la
propreté
et
que
des
photo/TV.
le
cas
(p.
51).
les
boutons
(p.
30)
le
bras
mobile
les
boutons
si
le
bras
bloqué
(p.
le
microscope
les
accessoires
stéréo
longs?)
28)
.
objec-
adap-
28)
Liste
de
contrôle:
préopératoires
Balancing
and, | —
24)
to
of
dirt | Respect
ali
de
mo-
Release
(page
—
Balance
(page
Fase
Adjust
brakes
with
ries
requirements
-
Engage
swingarm
handswitch
—
(red) / surgeon @ (red)
—
Foot-/handswitch A (on
(blue) / surgeon
(blue).
Inspect
and
properly
Equilibrage
Libérer
retenue
Mettre
en
Dureté
~
Régler
freinage
poids
des
Vopérateur
—
Encliqueter
de
bloquer
Raccorder
commandes
pédale/manuelle
en
disposition
—
commande
pédale/manuelle
@
—
commande
pédale/manuelle
(bleue)
A
Tous
sont à contrôler.
safety
28)
swingarm
29).
of
movement
articulation
in
accordance
weight
and
with
safety
is
foot
the
correct
hand
Foot-/handswitci
all
cables
ensure
that
connected.
le
crochet
(p.28)
le
bras
équilibre
des
mouvements
les
en
des
accessoires
besoins
retenue
le
les
respectant
(rouge)
correcte:
pour
(rouge)
pour
(bleue)
les
câbles
hook
of
accesso-
personal
(page
hook:
blocked.
or
itch
@
A
they
de
mobile
(p.
29)
boutons
fonction
de
(p.
30).
le
crochet
pour
bras
mobile.
à
la
à
@
chirurgien
à
A
chirurgien
Checkliste:
Einstellungen
der
Operation
Basic
position
The
lamp
30).
are
|
de
du
et
point
the
‘page
—
-articulation
-
—
-
Inte,
—
~
screw.
Double
e
Dioptric
一
Correct
With
~
Tighten
_
TE
antimisting
Position
Le
se
du
1)
contraire:
—
—
—
—
Ecartement
—
—
Double
L’ouvrir
optique)
housing
in
the
stand
(front
20),
otherwise:
Release
Turn
the
appropriately
Retighten
articulation
Set
selector
tion
1.
illary
pupillary
Set
in
accordance
user
list
Tighten
vie
iris
beam
age
open
(page
setting
user
necess
ary,
eyepieces
de
boîtier
trouver
statif
(index à "avant | zoom
(p.20).
desserrer
freinage
tourner
bloquer
freinage
positionner
sélecteur
Régler
l’écartement
d’après
utilisateurs
Serrer
la
diaphragme
(répartiteur
(p.
must
direction
index
the
brake
microscope
the
brake
to
posi-
dista
distance
(page
23)
clamping
di
diaphragm
3).
Is
i
in
accordance
lis
(page
clamping , |
treat
with
an
agent.
base
de
lampe
en
direction
Dans
le
cas
le
bouton
le
microscope
le
bouton
le
sur
1
pupillaire
la
liste
des
(p.
23)
pince à vis
35).
Dioptries
—
Les
régler
ment á la
utilisateurs
—
Serrer
—
Appliquer
ment
buée
conformé-
liste
(p.
les
pinces à vis.
éventuelle-
un
agent
sur
les
oculaires.
des
26).
anti-
Inspect
Control
of. | Power
1, | and
‘. | Inspect
with | Use
,
to
26)
doit | Bloc
de
de
iris
focus
travel
(page
Master
Switch
(page
Illumination
change
| Functions
footswitches
activate
XY
movement
16-18).
Adiust
just
If
your
not
function
inspect
side
of
bef
Leica
agency
age
47)
page”).
Contréle
de
Interrupteur
et
au
point
matiquement
de
base
Fonction
La
commuter
ment
(p.
Eclairage
Contrôler
ampoules
(p.
25)
Fonctions
A
l’aide
à
pédale.
l’objectif à mise
et
le
mouvement
(p.
16-18).
Régler
déplacement
Si
votre
tionne
contrôler
diodes
côté
du
de
avant
tre
représentation
(voir
aussi
vor
functions
unit
switch
on:
zoom
automatically
to
basic
positions — Switch
16).
function
over
if
necessary,
15).
and,
if
necessary, | -
bulb
(page
25).
zoom,
speeds
instrument
the
the
commande
l'objectif à mise
se
(p.
15).
des
les
appareil
pas
se
bloc
de
to
focus
and
(pages
d
lights
control
des
mettent
16).
Master
et
si
nécessaire
activer
vitesses
correctement,
tout
trouvant
contacter
page
19).
(page
does
satisfactorily,
on
the
unit
tact
(see
ak
our
fonctions
activé:
le
auto- | —
en
position
éventuelle-
remplacer
commandes
le
zoom,
au
point
XY
de
(p.
19).
ne
fonc-
d’abord
sur
de
comman-
Leica
47).
vo-
Lista
de
control:
ajustes antes
de
la
operación
The
final
touches
Positioning
—
XY
basic
(indices):
wer
Pout
- — Place
holder:
ー
Ensure
‘is
blocked
—
Fold
up
Tighten
brakes
-
Bring
‘ting
table
in.
accordance
forthcoming
page
E
engage
19)
les
les
le
T
_
Picasa
(pase
Footswitches
Respect
arrangement
positioning © 45)
Sterility
Fit
sterile
and
sterile
(page
22):
Opérations
Positionner
—
Position.de
(index,
Eteindre
désactiver
teur
principal
—
Déconnectér
réseau
—
Suspendre
commande à pédale.
au
support.
—
Contrôler
bile
est
—
Plier
le
—
Serrer
freinage
—
'Amener
table
placer
(p.
31).
~
Appuyer
du
statif
—
Libérer
retenue
Commandes à pédale
Respecter
correcte
Asepsie
Mettre
les
et
housses
place
(p.
SER
off
238
switch
(pate
power
footswitch
that
(page
swingarm
articulation
(page
stand
and
31)
footbrakesto.
them:
sa
safety
28).
the
correct’
components
tos.
finales
l'instrument
p.
18).
la
l’interrup-
ㆍ
si
bloqué
bras
les
boutons
(p.
le
d'opération
correctement
sur
(p.
le-crochet
{p.
la
©.
43).
composants
stériles
32).
25)
cable
in
its
swingarm
28)
-.
30)
to
opera-
position
with
operation
(page
when
.
base
lumière
lâ
le
mobile
30)
statif à la
les
31).
28).
disposition‘
hook
XY
(p:
le
cáble
bras
(p.
freins
en
:
|
M
…
et
25).
mo-
28). . .
de.
et
le
de
©
.
i
:
Page 21
Okulare
~
Augenmuscheln
gemäss
Benutzerliste
evtl.
Distanzringe
festschrauben
~
Bei
Photographie
ey
oo
~
Evtl.
Augenmuschein
umstülpen
liste,
S.
23).
5
Optisches
sáubern
~
Okulare,
Photo-
und
Adapter
und
(Š.
24).
cinsetzen
(Benutzer- | -
=
Zubehěr
Objektiv,
TV-
auf
Sauber-
Ausbalancieren
—
Sperrhaken
(S.
28).
ー
Schwenkarm
Gleichgewicht
(5.29).
Gangleichtigkeit
Gelenkbremsen
persGnlichem
und
терилегеп
-
Sperrhaken
Schwenkarm
Fuss-/Handschalter
anschliessen
lösen
ins
bringen
nach
ος
Bedarf
σον
(5.
2).
festklinken: | Augenabstand
blockiert. | _
-
Grundposition
Das
Lampenhaus
Richtung
(Index
dies
ー
-
~
festziehen.
~
-
Stativ
vorn
1, $.
nicht
der
Gelenkbremse
Mikroskop
sprechend
Gelenkbremse
Selektor
Gemáss
einstellen
Klemmschraube
festziehen.
Fall:
ent-
drehen.
auf
Benutzerliste
(S.
muss
in | Steuergerät
zeigen
20).
Ist | Zoom
lôsen
Stellung
23).
|
Funktionskontrolle
Netzschalter
automatisch
Grundstellungen
Master-Funktion
evtl.
umschalten
|
Beleuchtung
1.
kontrollieren,
Glůhl
IN
Funktionen
Mit
den
Zoom,
ein:
und
Fokus
in
evtl.
nes
Fussschaltern
Fokus
und
fahren
ihre
(S.
(S.
XY-
16).
15)
ーー
hsel
Letzte
Handgriffe
Instrument
—
XY-Grundposition
(Indizes,
一
Del
aus
-
Fussschalter
Halterung
~
Kontrollieren:
Schwenkarm
$
—
Schwenkarm
zusammenfalten.
-
Gelenkbremsen
festziehen
—
Stativ
tisch
positionieren
S.
18).
225)
Netzschalter
(5.25).
anhángen
28).
(S.
zum
Operations-
fahren
|
an
der
blockiert
30).
und
|
sen
im
Staubund
一
entfernen
Ausrůsten
-
-
Bremsen
auseinanderziehen.
ー
Bremsen
~
Kontrollieren:
ela)
.
—
Mikroskop
Zubehôr
Module
lang?)
ausriisten.
Oculares
—
Apriete
y,
en
usuarios,
eventualmente,
anillos
(pág.
—
Ši
monte
(pág.
—
Sise
las
flexibles.
Limpiar
—
Controle
res,
adaptador
fotografia y TV
sucios.
—
En
límpielos
Accesorios
~
Suelte
(pag.
—
Despliegue
móvil.
—
Vuelva a tirar
frenos.
—
Controlar:
movil
(pág.
—
Montaje
accesorios.
Schmutz | Richtige
(S.
51).
č
låsen
(5.30). | Euss-/Handschalter A Dioptrien
festziehen.
arm
30).
base a la
se
va a fotografiar,
requiere,
anteojeras
el
caso
blockiert | Alle
mit
allem
(Stereo-
kurz
oder
gebrauchsfertig
las
anteojeras | -
lista
espaciadores
24).
el
49).
ópticos
objetivo y el
los
30).
esta
28).
los
reticulo
vuelva
si
los
ocula-
de
están
afirmativo,
(pág.
51).
frenos
el
brazo
de
El
brazo
bloqueado
de
los
los
beachten:
—
-
kontrollieren
Equilibrado
de
—
Suavidad
—
~
Conexión
de
pedal/manual
Observe
es
—
-
Cables
Controle
bién
Zuordnung
> >
Fuss-/Handschalter © zj
(rot)
für
Chirurg
rot)
(Play)
for
blau
f
festen
Suelte
queo
Equilibre
movil
Regule
articulación y el
los
como
(pag.
Vuelva a encajar
gancho
brazo móvil
blogueado.
control
correcta:
dispositivo
manual/por
(rojo),
(rojo).
dispositivo
manual/por
(azul),
(azul).
Chirurg
Kabel
Sit —
el
gancho
(pag.
el
(pag.
.
de
los
accesorios
se
reguiera
30).
de
del
por
si
la
para
para
si
están
conectados.
@
&
de
28).
29).
la
frenos
blogueo.
disposición
de
de
blo- | La
brazo
marcha | -
de
peso
de
tal
y
el
El
está
dispositivo
control
pedal
O
cirujano
pedal
cirujano
O
control
A
4
todos
oe
Doppelirisblende
$.
35).
—
Gemäss
einstellen
—
Klemmschrauben
festrichen
Okulare
Antibeschlagmittel
behandeln.
Posición
caja
de
debe
sefialar
estativo
ro:
1,
pág.
contrario:
Afloje
articulación.
—
Gire
el
—
Eche
articulacién.
—
Ajuste
posición
Distancia
~
Fijela
usuarios
—
Apriete
Diafragma
—
Abra
hers
pag.35).
Dioptrias
—
Ajüstelas
lista
de
(pàg.26).
~
Fije
los
apriete.
—
Trate
un
producto
pañante.
_
eller)
čffnen
Benutzerliste
(S.
26).
evtl.
mit
básica
la
lámpara
hacia
(indice
20),
el
microscopio
el
freno
el
interocular
segůn
el
el
diafragma
de
usuarios
tornillos
los
el
delante-
de
lo
freno
de
de
selector
1.
la
lista
(pág.23).
tornillo.
iris
doble
rayos)
en
base
—
de
oculares
antiem-
Siege
ha
Verstellgeschwindigkeiten | —
regulieren
Falls Ihr
Vouchtdicden
des
Sie
Ihre
informi
(siehe | Ὃ
Control
Aparato
Conecte
red:
se
ajustan
mente a sus
básicas
Función
Si
se
(pag.
a
Iluminación
Contrólela, y si
necesario,
bombilla
de
Funciones
Mediante
de
control
active
y
el
(pags.
Velocidades
Para
sulte
ala
Si
su
ciona
trole
en
el
mando
con
a
su
(véase
een
+
(S.
19).
~
Gerát
nicht
η
dfrei
fun
Ktionie
Steuergeräts,
el
requiere,
15).
el
ajuste
16-18).
su
pag.
instumente
perfectamente,
los
lado
representación
an
Leica-Vetretung
S.
47).
de
las
funciones | Ultimos
de
control
el
interruptor
zoom y el
(pag.
Master
zoom,
regulación,
diodos
antes
también
enfoque
automática-
posiciones
16).
conmute
fuera
sustituya
(pag.
25).
los
dispositivos
por pedal,
el
de
XY
de
ajuste
19.
no
luminosos
del
aparato
de
informar
pág.
der Seite
bevor
enfoque
tende
plazieren
Fussbremsen
SD
|
la
con-
fun-
Leica
47).
7
S.
e
Fussschalter
Beim
are
.
45).
Sterilität
Sterile
und
anbringen
Posicionado
de | instrumento
—
Posición
(marcas,
—
Desconecte
nación y el
de
ー
Desenchufe
de
—
Cuelgue
soporte.
-
Bloguee
movil
—
Pliegue
ー
Apriete
articulación
—
Lleve
la
y
como
operación
—
Pise
(pag.
一
Suelte
bloqueo
Dispositivos
Al
con-
de
emplazar
observe
es
correcta
Asepsia
Coloque
tes
esterilizados
Operation
(S.
31).
festtreten]
ken
låsen
28).
Plazieren
,
Komponenten
Sterilhiillen
red
red.
mesa
emplácelo
los
richtige
beachten
(S.
32).
preparativos
del
básica
pág.18).
la
interruptor
(pág.
25).
ei
el
pedal
el
brazo
(pag.
28).
el
brazo
los
frenos
(pag.
el
estativo
de
operación
tal
lo
requiera
(pág.
frenos
31).
el
gancho
Gig
de
el
equipo,
si
la
disposición
(pág.
los
componen-
|
de
XY
ilumi-
Gabie
en
el
móvil.
de
30).
hasta
y
la
31).
del pie
de
28).
control
45).
(pág.
32).
13
Page 22
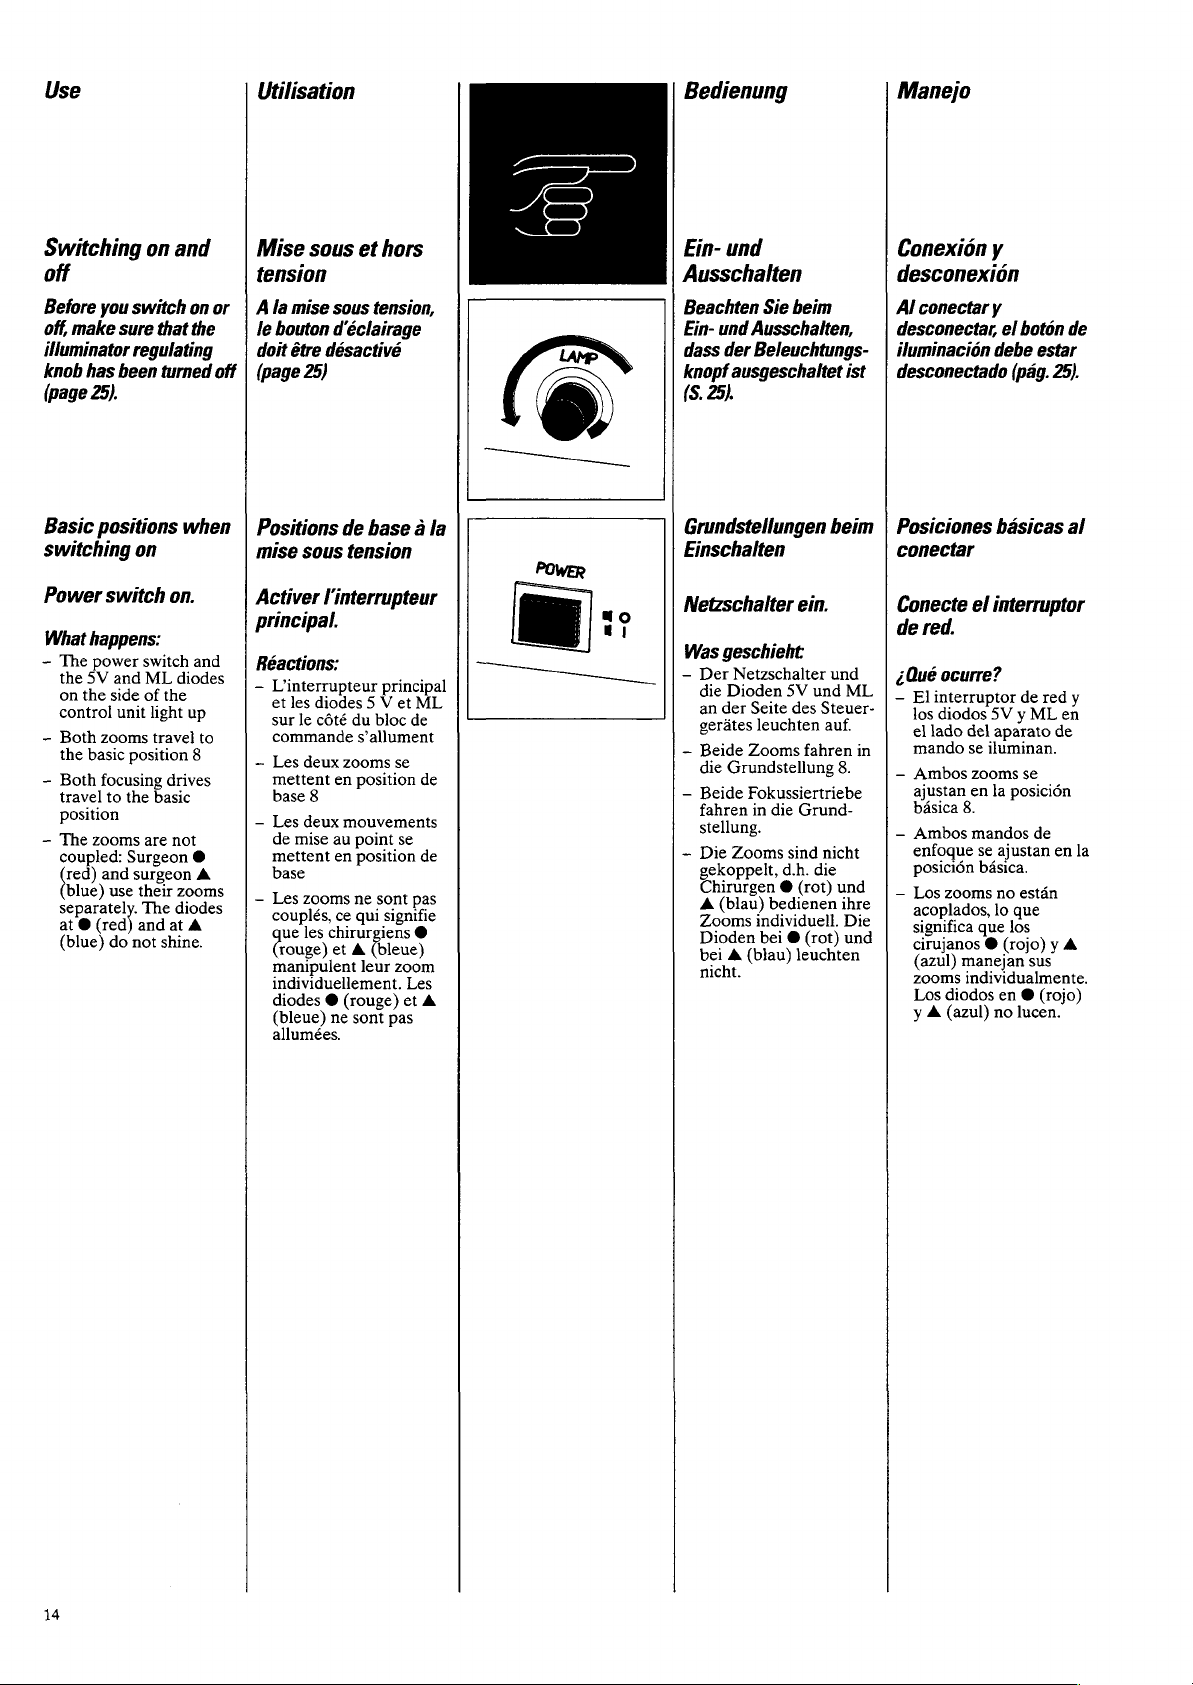
Use
Utilisation
Bedienung
Manejo
Switching
off
Before
you
switch
off,
make
sure
illuminator
knob
(page
Basic
switching
Power
What
~
The
the
on
control
-
Both
the
-
Both
travel
position
—
The
coupled:
(e?
blue)
separately.
at @ (red)
(blue)
regulating
has
been
25).
positions
on
switch
happens:
power
switch
5V
and
the
side
unit
zooms
basic
position
focusing
to
the
zooms
Surgeon
and
surgeon
use
their
The
andat
do
not
on
and
that
turned
on.
ML
diodes
of
the
light
travel
drives
basic
are
not
zooms
diodes
shine.
on
or
the
off
when
and
up
to
8
@
A
A
Mise
sous
et
tension
Ala
mise
sous
le
bouton
d'éclairage
doit
être
désactivé
{page
25)
Positions
mise
Activer
principal.
Réactions:
—
Vinterrupteur
et
sur
commande
~
Les
mettent
base
—
Les
de
mettent
base
—
Les
couplés,
ue
(rouge)
manipulent
individuellement.
diodes © (rouge)
(bleue)
allumées.
de
sous
tension
l'interrupteur
les
diodes 5 V
le
côté
du
s’allument
deux
zooms
en
position
8
deux
mouvements
mise
au
point
en
position
zooms
ne
ce
qui
les
chirurgiens
et A (bleue)
leur
ne
sont
hors
tension,
base
à la
principal
et
ML
bloc
de
se
de
se
de
sont
pas
signifie
@
zoom
Les
et
A
pas
Ein-
und
Ausschalten
Beachten
Ein-
dass
knopf
(S.
Grundstellungen
Einschalten
Netzschalter
Was
—
Der
die
an
gerates
—
Beide
die
—
Beide
fahren
stellung.
~
Die
gekoppelt,
Chirurgen @ (rot)
A
Zooms
Dioden
bei A (blau)
nicht.
Sie
und
Ausschalten,
der
Beleuchtungs-
ausgeschaltet
25).
geschieht
Netzschalter
Dioden
der
Seite
leuchten
Zooms
Grundsteliung
Fokussiertriebe
in
die
Zooms
d.h.
(blau)
bedienen
individuell.
bei @ (rot)
beim
beim
ein.
und
5V
und
des
Steuer-
auf.
fahren
Grund-
sind
nicht
die
leuchten
ist
ML
in
8.
und
ihre
Die
und
Conexión
desconexión
Al
conectar
desconectar,
iluminación
desconectado
Posiciones
conectar
Conecte
de
red.
éQué
—
Elinterruptor
los
el
mando
—
Ambos
ajustan
basica
—
Ambos
enfoque
posición
—
Los
acoplados,
significa
cirujanos @ (rojo) y À
(azul)
zooms
Los
y A (azul)
y
y
el
debe
(pág.
básicas
el
interruptor
ocurre?
diodos
5V y ML
lado
del
aparato
se
iluminan.
zooms
en
la
posición
8.
mandos
se
ajustan
básica.
zooms
no
lo
que
que
los
manejan
individualmente.
diodos
en € (rojo)
no
lucen.
botón
de
se
están
estar
25).
red
de
de
en
sus
de
al
y
en
la
14
Page 23
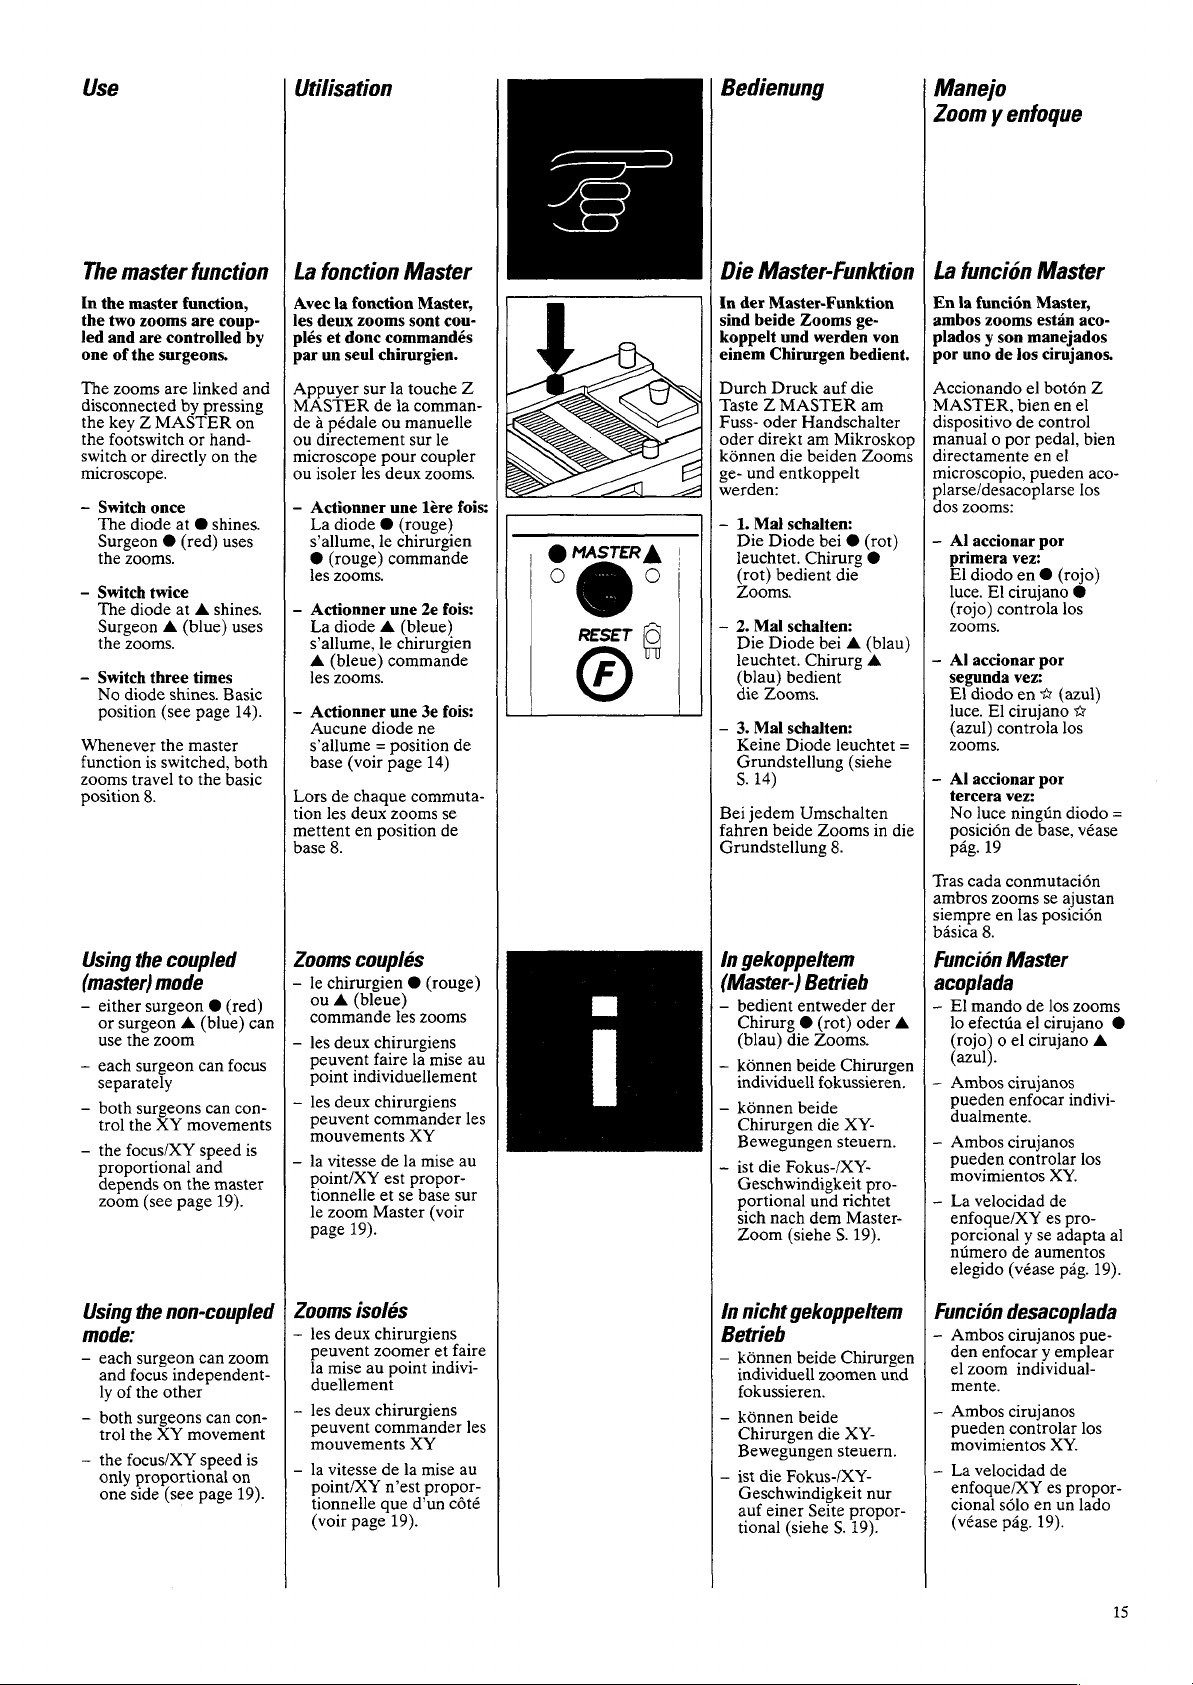
Use
The
master
In
the
master
the
two
led
and
one
of
The
zooms
disconnected
the
key Z MASTER
the
footswitch
switch
microscope.
~
Switch
The
Surgeon © (red)
the
—
Switch
The
Surgeon A (blue)
the
—
Switch
No
position
Whenever
function
zooms
position
Using
(master)
—
either
or
surgeon A (blue)
use
—
each
separately
—
both
trol
—
the
proportional
depends
zoom
function,
zooms
are
controlled
the
surgeons.
are
by
or
directly
once
diode
at @ shines.
zooms.
twice
diode
at A shines.
zooms.
three
diode
shines.
(see
the
is
switched,
travel
to
8.
the
coupled
mode
surgeon © (red)
the
zoom
surgeon
surgeons
the
XY
focus/XY
on
(see
page
function
are
coup-
by
linked
and
pressing
on
or
hand-
on
the
uses
uses
times
Basic
page
14).
master
both
the
basic
can
can
focus
can
con-
movements
speed
is
and
the
master
19).
Utilisation
La
fonction
Avec
la
les
deux
plés
et
par
un
Appuyer
MASTER
de à pédale
ou
directement
microscope
ou
isoler
—
Actionner
La
diode @ (rouge)
s'allume,
@
(rouge)
les
zooms.
—
Actionner
La
diode A (bleue)
s’allume,
A
(bleue)
les
zooms.
—
Actionner
Aucune
s'allume = position
base
Lors
de
tion
les
mettent
base
8.
Zooms
—
le
chirurgien @ (rouge)
ou À (bleue)
commande
—
les
deux
peuvent
point
—
les
deux
peuvent
mouvements
—
la
vitesse
point/XY
tionneile
le
zoom
page
Master
fonction
zooms
donc
seul
(voir
sont
commandés
chirurgien.
sur
la
touche
de
la
ou
manuelle
sur
pour
les
deux
une
le
chirurgien
commande
une
le
chirurgien
commande
une
diode
page
chague
commuta-
deux
zooms
en
position
couplés
les
chirurgiens
faire
individuellement
chirurgiens
commander
XV
de
la
est
propor-
et
se
Master
19).
Master,
cou-
comman-
le
coupler
zooms.
1ère
fois:
2e
fois:
Je
fois:
ne
de
14)
se
de
zooms
là
mise
mise
base
sur
(voir
Z
les
au
au
Bedienung
Manejo
Zoom y enfoque
La
Die
Master-Funktion
In
der
Master-Funktion
sind
beide
koppelt
einem
Durch
Taste Z MASTER
Fuss-
oder
kônnen
ge-
werden:
—
—
und
Chirurgen
Druck
oder
direkt
die
und
entkoppelt
1.
Mal
Die
Diode
leuchtet.
(rot)
bedient
Zooms.
2.
Mal
Die
Diode
leuchtet.
(blau)
die
Zooms.
—
3.
Mal
Keine
Diode
Grundstellung
S.
14
Bei
jedem
fahren
beide
Grundstellung
In
gekoppeltem
(Master-)
ー
bedient
Chirurg @ (rot)
(blau)
—
kônnen
individuell
—
können
Chirurgen
Bewegungen
~
ist
die
Fokus-/XY-
Geschwindigkeit
portional
sich
nach
Zoom
Zooms
ge-
werden
bedient.
auf
die
am
Handschalter
am
Mikroskop
beiden
schalten:
bei @ (rot)
Chirurg
die
schalten:
bei A (blau)
Chirurg
bedient
schalten:
leuchtet
(siehe
Umschalten
Zooms
8.
Betrieb
entweder
die
beide
(siehe
oder
Zooms.
Chirurgen
fokussieren.
beide
die
XY-
steuern.
und
richtet
dem
Master-
S.
19).
von
Zooms
@
A
in
die
der
pro-
A
función
En
la
función
ambos
plados y son
por
uno
Accionando
MASTER,
dispositivo
manual o por
directamente
microscopio,
plarse/desacoplarse
dos
zooms:
—
Alaccionar
primera
El
diodo
luce.
(rojo)
zooms.
ー
Al
accionar
segunda
El
diodo
luce.
(azul)
=
zooms.
—
Al
accionar
tercera
No
luce
posición
pág.
Tras
cada
ambros
siempre
básica
Función
acoplada
—
El
mando
lo
efectúa
rojo) o el
azul).
-
Ambos
pueden
dualmente.
-
Ambos
pueden
movimientos X Y.
~
La
velocidad
enfoque/XY
porcional y se
numero
elegido
Master
Master,
zooms
estan
manejados
de
los
el
bien
de
control
pedal,
en
pueden
por
vez:
en @ (rojo)
El
cirujano
controla
por
vez:
en % (azul)
El
cirujano
controla
por
vez:
ningtin
de
base,
19
conmutación
zooms
en
las
8.
Master
de
el
cirujano
cirujanos
enfocar
cirujanos
controlar
de
aumentos
(véase
aco-
cirujanos.
botón
Z
en
el
bien
el
aco-
los
@
los
vr
los
diodo
véase
se
ajustan
posición
los
zooms
cirujano
de
es
A
indivi-
los
pro-
adapta
pag.
19).
O
al
=
Using
mode:
—
each
and
ly
of
—
both
trol
—
the
focus/XY
only
one
the
non-coupled
surgeon
focus
the
surgeons
the
proportional
side
can
independent-
other
can
XY
movement
speed
(see
page
Zooms
—
zoom
~
con-
is
on
—
19).
isolés
les
deux
peuvent
la
duellement
les
peuvent
mouvements
la
point/XY
tionnelle
(voir
chirurgiens
zoomer
mise
au
deux
chirurgiens
commander
vitesse
page
que
point
XY
de
la
n’est
d’un
19).
et
faire
indivi-
mise
au
propor-
côté
les
In
nicht
gekoppeltem
Betrieb
ー
konnen
beide
individuell
fokussieren.
—
können
Chirurgen
Bewegungen
—
ist
die
Geschwindigkeit
auf
einer
tional
Chirurgen
zoomen
beide
die
XY-
steuern.
Fokus-/XY-
Seite
(siehe
propor-
S.
19).
nur
Funciôn
-
und
—
—
desacoplada
Ambos
cirujanos
den
enfocar y emplear
el
zoom
mente.
Ambos
pueden
movimientos X Y.
La
enfoque/XY
cional
(véase
individual-
cirujanos
controlar
velocidad
sélo
en
pag.
19).
de
es
propor-
un
pue-
los
lado
15
Page 24

Use
Zoom
and
focus,
footswitch
Controlling
focus
The
functions
footswitch
in
accordance
requirements.
Leica
Activate
focus
Adjustment
for
focus
(see
zoom
arrangement
on
the
can
consultant.
zoom
(F).
speeds
and
page
zoom
19).
be
with
Ask
(Z)
and
of
the
changed
your
your
and
Utilisation
Zoom
et
mise
point,
commande
pédale
Commande
de
la
La
disposition
tions
pédale
sur
demande.
vous
seiller
Commande
et
de
point
Vitesses
de
la
zoom
du
mise
au
de
la
commande
peut
être
auprès
de
Leica.
du
l’objectif
(F).
de
réglage
mise
au
point
(voir
p.
au
a
zoom
et
point
des
fonc-
à
modifiée
Renseignez-
votre
con-
zoom
(Z)
de
mise
au
et
du
19).
Bedienung
Zoom
und
Fokus,
Fussschalter
Zoom
und
Fokus
steuern
Die
Anordnung
tionen
am
kann
nach
Wünschen
werden.
Leica-Berater
Zoom
(Z)
steuern.
Verstellgeschwindigkeiten
von
Fokus
siehe
5.
19.
der
Fussschalter
Ihren
geändert
Fragen
Sie
danach.
und
Fokus
und
Zoom
Funk-
Ihren
Manejo
Zoom y enfogue,
dispositivo
control
Control
enfogue
Silo
desea,
carse
la
funciones
de
control
sulte a su
(F)
Control
enfogue
Velocidades
de
enfogue y zoom,
consulte
de
por
pedal
del
zoom y el
puede
disposición
asesor
del
(F).
pag.
modifi-
del
dispositivo
por pedal.
Leica.
zoom
(Z) y el
de
ajuste
19.
de
las
Con-
Zoom
Using
the
mode
surgeon
independently
other.
The
each
within
The
10x
f=100
used
page
Basic
When
MASTER
switch
directly
is
automatically
the
Both
automatically
position:
—
-
non-coupled
(see
page
can
zoom
magnification
user
can
the
range
figure
assumes
eyepieces
mm
objective
(see
optical
59).
zoom
position
the
key
on
or
handswitch
on
basic
zooms
the
the
both
position
always
instrument
on
the
is
pressed,
when
switched
whenever
function
14),
each
of
the
set
be
read
off
5x
to
that
and
an
are
data
Z
the
foot-
or
microscope
zooms
return
to
8.
travel
to
the
basic
master
switched.
Zoom
Lorsque
pas
chirurgien
zoom
(voir
by
Les
par
25x.
peuvent
25X,
oculaires
f=100
on
optiques à la
Position
zoom
En
MASTER
de à pédale
ou
microscope,
automatiquement
zooms 4 la
base
Les
mettent
is
en
— à la
—
les
couplés,
les
actionnant
directement
position
de
lors
tation
Master
zooms
chaque
commande
individuellement
page
14).
grossissements
deux
opérateurs
être
c’est-à-dire
8.
deux
lus
10x
et
mm
(voir
page
de
base
la
sur
la
où
on
position
zooms
automatiquement
de
base
mise
sous
"instrument
de
chaque
de
la
fonction
ne
sont
le
réglés
de
5x
à
avec
les
Vobjectif
Données
59).
du
touche
comman-
manuelle
sur
le
améne
les
deux
de
se
tension
commu-
Zoom
In
nicht-gekoppeltem
Betrieb
bedienen
ihre
voneinander.
Die von
eingestellten
rungen
25x
mit
Objektiv f =
(siehe
S.
Zoom-Grundstellung
Bei
MASTER
Handschalter
direkt
fahren
automatisch
Grundstellung
Beide
immer
die
~
-
(siehe
S.
beide
Zooms
unabhängig
beiden
Vergrósse-
kónnen
ablesen
Okularen
59).
Grundstellung:
beim
Instruments
bei
der
werden,
10x
100
optischeDaten
Druck
auf
die
am
Fuss-
oder
am
Mikroskop
beide
Zooms
auf
8.
Zooms
fahren
automatisch
Einschalten
jedem
Umschalten
Master-Funktion.
von
14)
Chirurgen
Benutzern
3x
bis
d.h.
und
mm
Taste
oder
die
auf
des
Zoom
Cuando
desacoplada
cada
propios
individual.
Los
dos
los
objetivo f =
(véase
ópticos”,
Posición
zoom
Al
MASTER,
dispositivo
manual o por
directamente
microscopio,
zooms
automáticamente
posición
Ambos
siempre
en
~
—
la
función
(pag.
cirujano
zooms
aumentos
van
de
5x a 25x
oculares
accionar
la
al
instrumento
tras
de
10x y el
100
tabla
“datos
pág.
básica
la
bien
de
se
ajustan
básica
zooms
automaticamente
posición
conectar
cada
conmutación
la
función
controla
59).
tecla
control
pedal.
en
los
básica:
el
está
14),
sus
de
forma
selecciona-
con
mm
del
en
el
bien
el
dos
en
la
8.
se
ajustan
Master.
16
Page 25

Focusing
The
focusing
nondirectional
upper
The
two
their
focusing
independently
another.
or
lower
surgeons
drive
is
and
has
limits.
use
drives
of
one
no
Mise
au
point
Indépendant
tion,
le
mouvement
mise
au
point
limite.
Les
ens
commandent
toujours
de
damment
mise
leur
au
l’un
de
la
n’a
deux
chirurgi-
mouvement
point
indépen-
de
direc-
de
pas
de
donc
l’autre.
Fokussieren
Der
Fokussiertrieb
nicht
richtungsorientiert
und
hat
keine
untere
Chirurgen
Fokussiertriebe
unabhangig
obere/
Begrenzung.
bedienen
immer
voneinander.
ist
Beide
ihre
Enfoque
E]
mando
de
límites
accionan
enfoque
inferior
dos
siempre
tiene
superior y los
nos
lo
de
forma independiente.
no
o
ciruja-
Basic
focus
When
the
the
footswitch
switch
or
microscope
the
matically
basic
The
travels
the
~
—
The
can
two
directly
focusing
returns
focus
focusing
automatically
basic
position:
when
the
switched
whenever
key
is
pressed.
tilt
of
be
set
spindles
position
key
RESET
or
hand-
on
is
pressed,
drive
to
position.
drive
instrument
on
the
RESET
the
footswitch
by
turning
on
the
auto-
the
always
to
the
Position
mouvement
point
Lorsque
RESET
la
manuelle
sur
deux
automatiquement
position
is
Le
point
ment
— à la
—
L'inclinaison
commande à pédale
peut
tournant
de
la
est
commande a pédale
ou
le
microscope,
zooms
de
mouvement
se
met
en
position
mise
de
l’instrument
lors
de
chaque
sur
la
touche
être
modifiée
les
base
du
de
mise
touche
actionnée,
directement
les
se
mettent
en
base
8.
de
mise
automatique-
de
RESET
de
deux
base
tension
pression
la
en
broches.
sous
au
sur
ou
au
Fokus-Grundstellung
Bei
Druck
auf
die
RESET
Handschalter
am
Fokussiertrieb
automatisch
Fokus-Grundstellung.
Der
automatisch
stellung:
-
—
Die
Fusschalters
kann
den
gestellt
am
Mikroskop
Fokussiertrieb
beim
Einschalten
Geráts
bei
Druck
RESET.
Neigung
durch
beiden
werden.
Taste
Fuss-
oder
oder
fahrt
in
die
in
die
Grund-
auf
die
des
Drehen
Spindeln
direkt
der
fahrt
des
Taste
an
ein-
Posición
enfoque
Al
RESET,
sitivo
por pedal, bien
mente
el
ajusta
en
El
ajusta
en
—-
—
Inclinación
dispositivo
por
Puede
sto.
los
básica
accionar
mando
la
mando
la
al
instrumento
al
RESET.
dos
la
bien
de
control
en
el
microscopio,
de
enfoque
automáticamente
posición
de
automáticamente
posición
conectar
accionar
del
de
pedal
regularla a su
Para
ello,
husillos.
en
enfoque
el
la
de
tecla
el
dispo-
manual
directa-
básica.
de
base:
tecla
control
debe
girar
o
se
se
gu-
Handgrips
You
can
ble
the
precisely.
Sterile
use
handgrips
surgical
microscope
controls
the
steriliza-
to
position
(see
p.
Poignées
positionnement
Les
poignées
permettent
le
microscope
avec
32)
précision.
Eléments
stérilisables
de
stérilisables
de
positionner
d'opération
de
commande
(voir
p.
32).
Handgriffe
Mit
den
Handgriffen
das
feinfúhlig
Sterile
(siehe
sterilisierbaren
Operationsmikroskop
kônnen
positionieren.
Komponenten
S.
32).
Sie
Empuñaduras
Las
empuñaduras
esterilizables
emplazar
de
Elementos
esterilizables
(véase
forma
pág.
el
exacta.
de
le
permiten
microscopio
mando
32).
17
Page 26
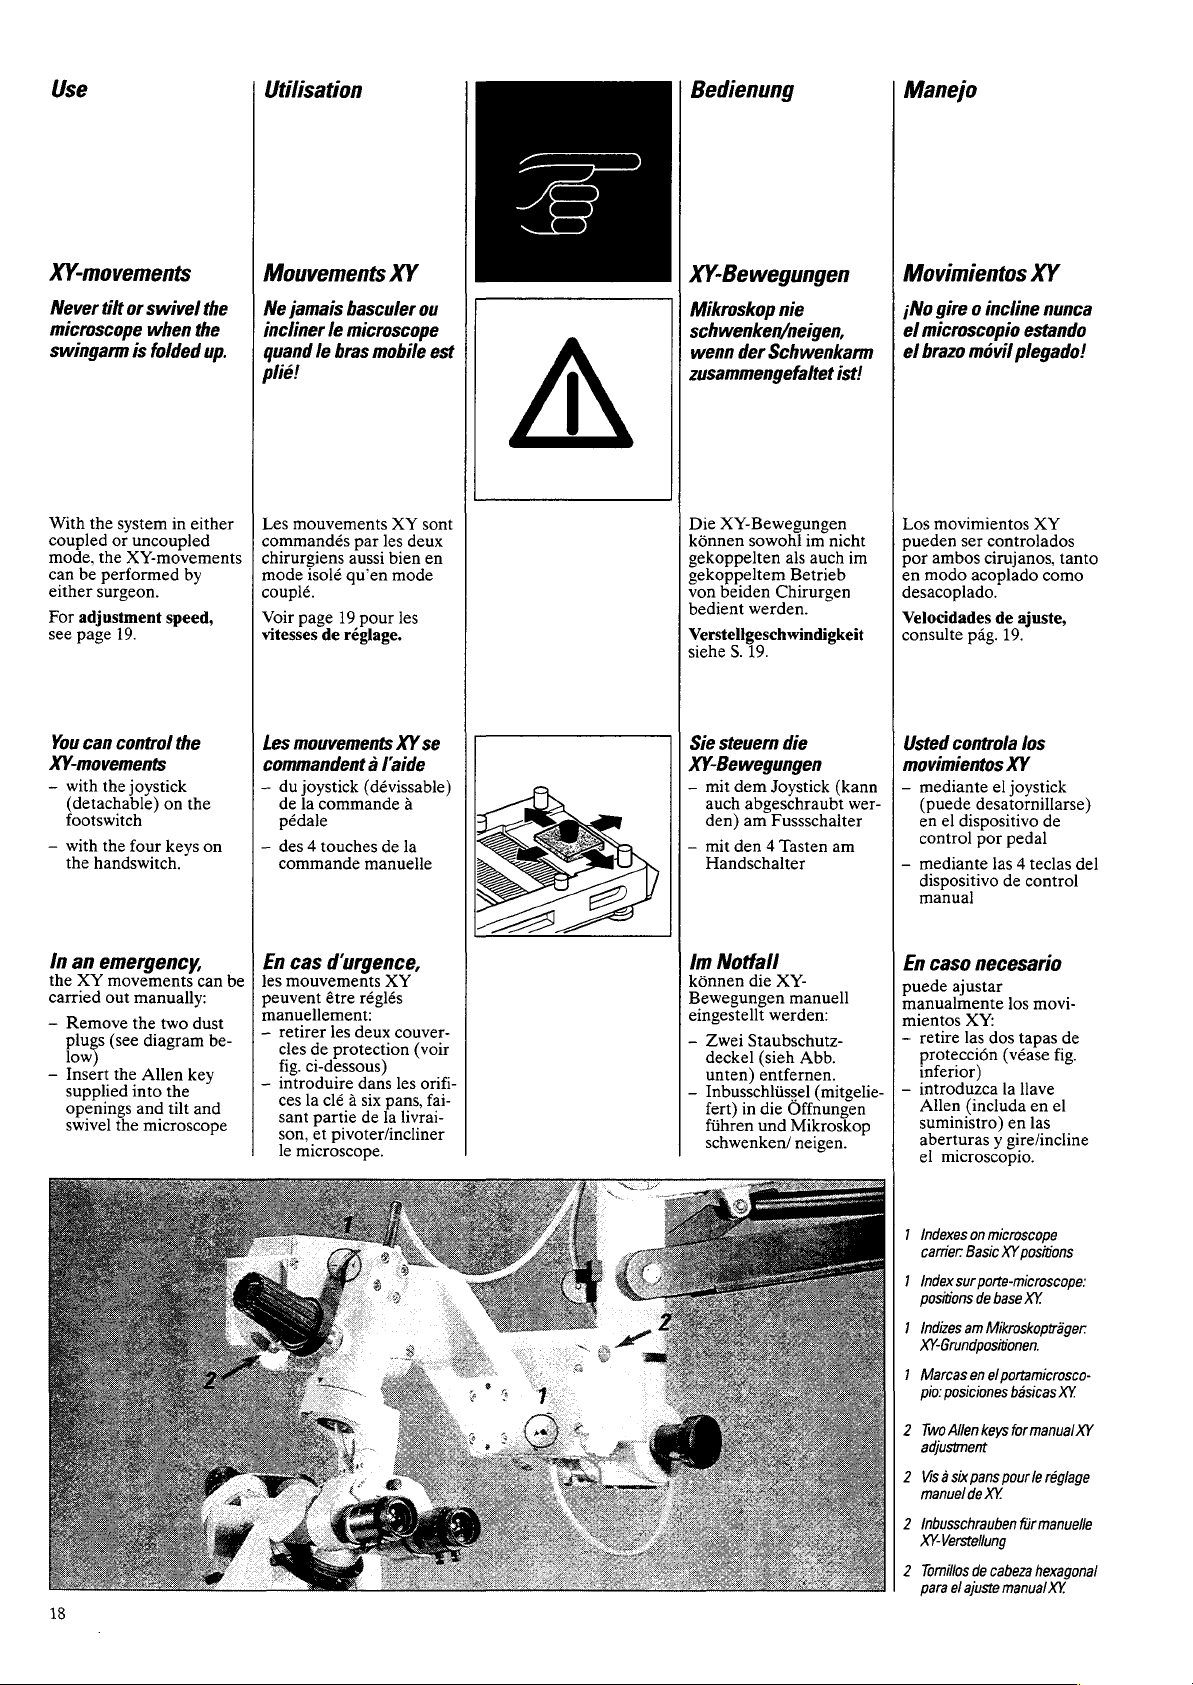
Use
Utilisation
Bedienung
Manejo
XY-movements
Never
tilt
or
swivel
microscope
swingarm
With
coupled
mode,
can
be
either
For
adjustment
see
page
You
can
XY-movements
~
with
(detachable)
footswitch
—
with
the
In
an
the
XY
carried
~
Remove
plugs
low
ー
Insert
supplied
openings
swivel
when
is
folded
the
system
or
uncoupled
the
XY-movements
performed
surgeon.
19.
control
the
joystick
the
four
handswitch.
emergency,
movements
out
manually:
the
two
(see
diagram
the
Allen
into
and
the
microscope
the
in
either
by
speed,
the
on
the
keys
can
dust
key
the
tilt
and
Mouvements
the
Ne
jamais
incliner
up.
quand
le
plié!
Les
mouvements
commandés
chirurgiens
mode
isolé
couplé.
Voir
page
vitesses
de
Les
mouvements
commandent à l'aide
—
du
joystick
de
la
commande
pédale
on
—
des 4 touches
commande
En
cas
be
les
peuvent
manuellement:
—
be-
—
d'urgence,
mouvements
être
retirer
cles
de
fig.
ci-dessous)
introduire
ces
la
clé à six
sant
partie
son,
et
le
microscope.
XY
basculer
le
microscope
bras
mobile
XY
par
les
deux
aussi
bien
qu'en
mode
19
pour
les
réglage.
XY
(dévissable)
a
de
la
manuelle
XY
réglés
les
deux
dans
de
couver-
les
pans,
la
livrai-
protection
pivoter/incliner
ou
est
sont
en
se
(voir
orifi-
fai-
XY-Bewegungen
Mikroskop
schwenken/neigen,
wenn
zusammengefaltet
nie
der
Schwenkarm
ist!
Movimientos
iNo
el
el
Die
XY-Bewegungen
k6nnen
sowohl
im
gekoppelten
gekoppeltem
von
beiden
bedient
werden.
Verstellgeschwindigkeit
siehe
S.
19.
Sie
steuern
XY-Bewegungen
—
mit
dem
auch
abgeschraubt
den)
am
—
mit
den 4 Tasten
Handschalter
nicht
als
auch
Betrieb
Chirurgen
die
Joystick
Fussschalter
(kann
am
im
wer-
Los
pueden
por
en
desacoplado.
Velocidades
consulte
Usted
movimientos
—
—
Im
Notfall
können
Bewegungen
eingestellt
—
ー
die
XY-
manuell
werden:
Zwei
Staubschutz-
deckel
(sieh
entfernen.
in
die
Offnungen
und
Mikroskop
Abb.
(mitgelie-
neigen.
unten)
Inbusschliissel
fert)
führen
schwenken/
En
puede
manualmente
mientos
—
ー
XY
gire o incline
microscopio
brazo
movil
movimientos
ser
ambos
cirujanos,
modo
acoplado
pag.
controla
mediante
(puede
desatornillarse)
en
el
dispositivo
control
por
mediante
dispositivo
manual
caso
necesario
ajustar
XY:
retire
las
protección
inferior)
introduzca
Allen
(includa
suministro)
aberturas y gire/incline
el
microscopio.
nunca
estando
plegado!
XY
controlados
de
el
las 4 teclas
dos
como
ajuste,
19.
los
XY
joystick
de
pedal
de
control
los
movi-
tapas
(véase
la
llave
en
el
en
las
tanto
de
fig.
del
18
—
Indexes
on
carrier.
~
Index
positions
~
Indizes
XY-Grundpositionen.
~
Marcas
pio:
2
Two
adjustment
2
Viså
manuel
2
Inbusschrauben
XY-Verstellung
2
Tomillos
para
microscope
Basic
XY
positions
sur
porte-microscope:
de
base
am
Mikroskopträger:
en
el
portamicrosco-
posiciones
Allen
six
el
keys
pans
pour
de
XY.
de
cabeza
ajuste
basicas
for
für
manual
XY.
XY.
manual
XY
le
réglage
manuelle
hexagonal
XY.
Page 27
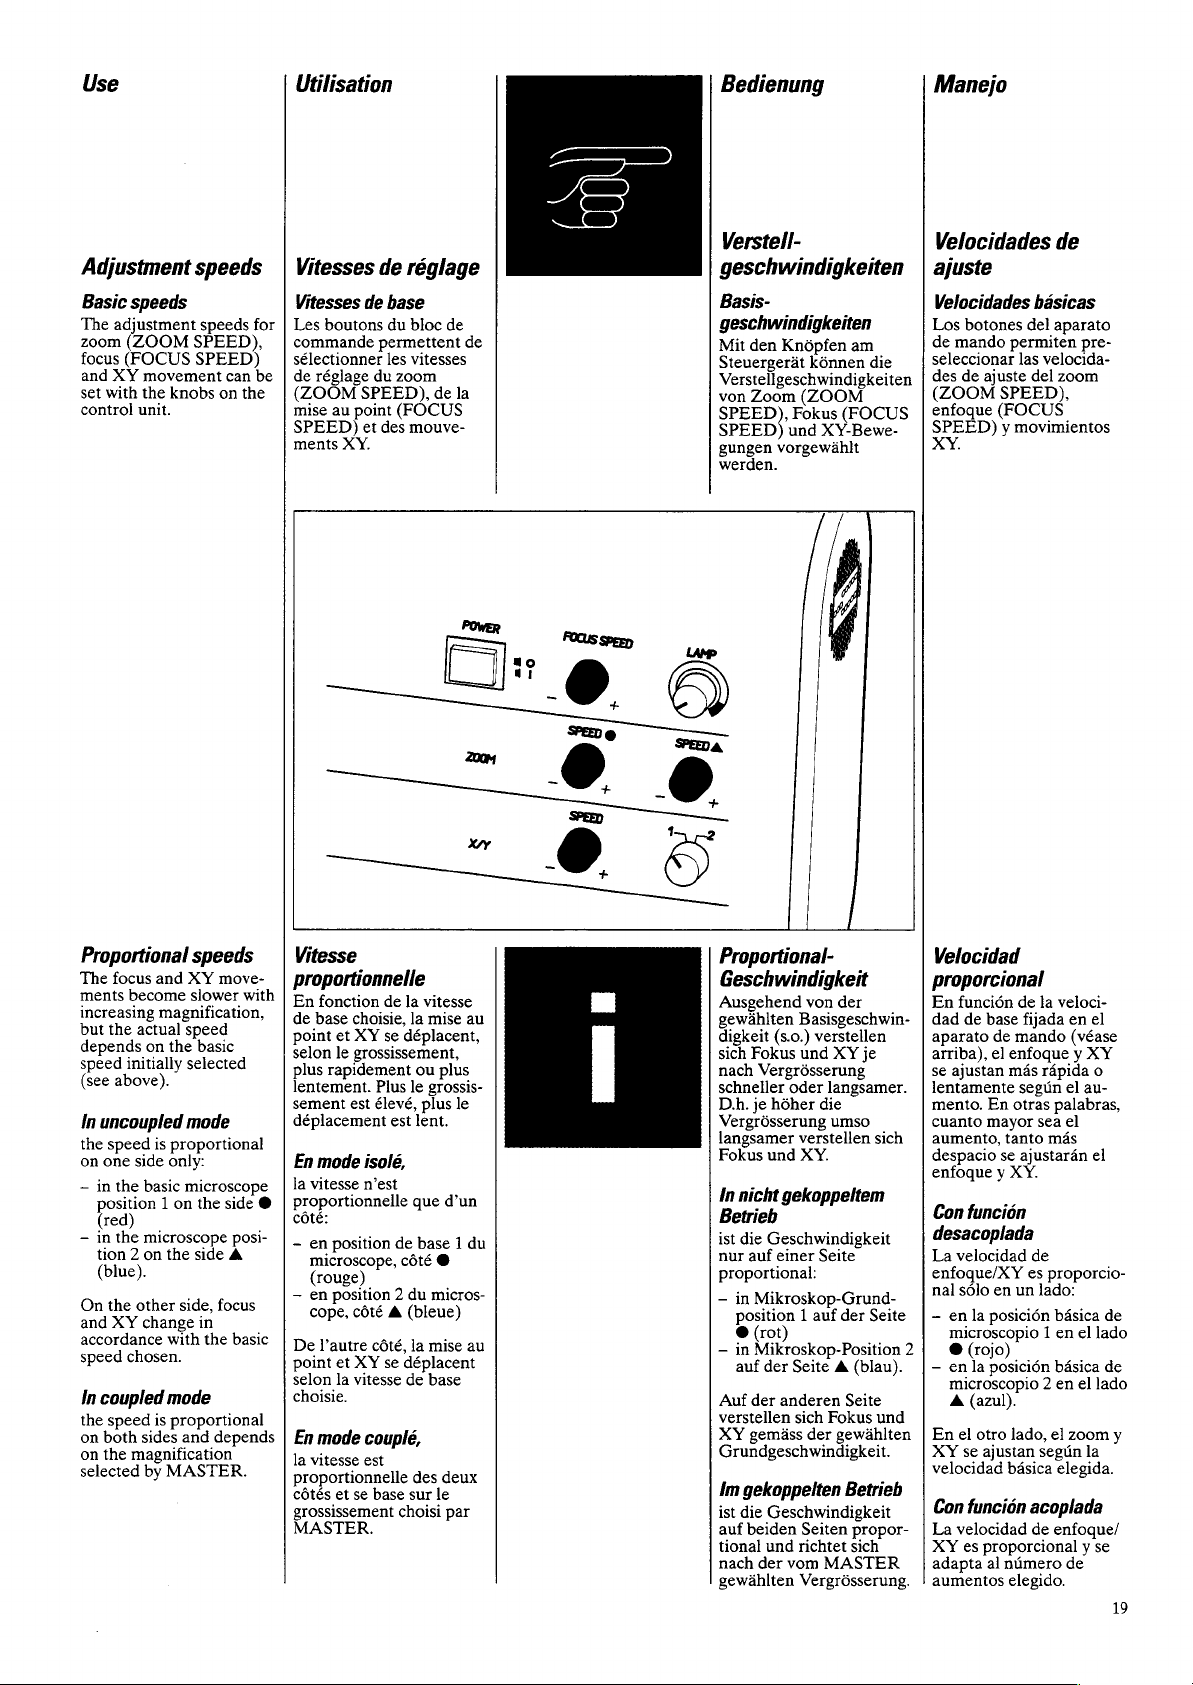
Use
Utilisation
Bedienung
Manejo
Adjustment
Basic
speeds
The
adjustment
zoom
focus
and
XY
set
with
control
(ZOOM
(FOCUS
movement
the
knobs
unit.
SPEED),
speeds
speeds
for
SPEED)
can
be
on
the
Vitesses
Vitesses
Les
commande
sélectionner
de
réglage
(ZOOM
mise
SPEED)
ments
de
boutons
SPEED),
au
point
et
XY.
de
permettent
du
des
réglage
base
du
bloc
les
vitesses
zoom
de
(FOCUS
mouve-
de
de
la
POWER
FOCUS
-ο
SPEED
©
|
Verstell-
geschwindigkeiten
Basis-
geschwindigkeiten
Mit
den
Steuergerát
Verstellgeschwindigkeiten
von
SPEED),
SPEED)
gungen
werden.
Knôpfen
Zoom
und
vorgewáhlt
kónnen
(ZOOM
Fokus
XY-Bewe-
am
die
(FOCUS
Di
Velocidades
ajuste
Velocidades
Los
botones
de
mando
seleccionar
des
de
ajuste
(ZOOM
enfoque
SPEED) y movimientos
XY.
básicas
del
permiten
las
velocida-
del
SPEED),
(FOCUS
de
aparato
pre-
zoom
Proportional
The
focus
ments
become
increasing
but
the
depends
speed
initially
(see
above).
In
uncoupled
the
speed
on
one
—
in
the
position 1 on
(red)
ー
in
the
tion 2 on
(blue).
On
the
and X Y
accordance
speed
chosen.
In
coupled
the
speed
on
both
on
the
magnification
selected
speeds
and
XY
slower
magnification,
actual
speed
on
the
basic
selected
mode
is
proportional
side
only:
basic
microscope
the
microscope
the
side
other
side,
change
in
with
the
mode
is
proportional
sides
and
by
MASTER.
move-
with
side
@
posi-
4
focus
basic
depends
Vitesse
proportionnelle
En
fonction
de
base
point
selon
plus
lentement.
sement
déplacement
En
mode
la
vitesse
proportionnelle
côté:
-
en
microscope,
(rouge)
—
en
cope,
De
l’autre
point
selon
choisie.
En
mode
la
vitesse
proportionnelle
côtés
grossissement
MASTER.
de
choisie,
et
XY
se
le
rapidement
position
position 2 du
et
la
et
déplacent,
grossissement,
Plus
est
élevé,
est
isolé,
n’est
de
côté
côté À (bleue)
côté,
XY
se
déplacent
vitesse
couplé,
est
se
base
choisi
la
vitesse
la
mise
ou
plus
le
grossis-
plus
lent.
que
d’un
base 1 du
@
micros-
la
mise
de
base
des
deux
sur
le
par
au
le
au
Proportional-
Geschwindigkeit
Ausgehend
gewáhlten
digkeit
sich
nach
schneller
D.h.
Vergrósserung
langsamer
Fokus
In
nicht
Betrieb
ist
die
nur
proportional:
— in
position 1 auf der
@
—
in
auf der
Auf
verstellen
XY
Grundgeschwindigkeit.
Im
gekoppelten
ist
die
auf
tional
nach
gewáhlten
von
der
Basisgeschwin-
(s.o.)
Fokus
je
auf
Mikroskop-Grund-
(rot)
Mikroskop-Position
der
gemãss
beiden
verstellen
und
Vergrósserung
hóher
und
Geschwindigkeit
Geschwindigkeit
und
der
XY
oder
langsamer.
die
umso
verstellen
XY.
gekoppeltem
einer
Seite
Seite A (blau).
anderen
Seite
sich
Fokus
der
gewáhiten
Betrieb
Seiten
propor-
richtet
vom
sich
MASTER
Vergrósserung.
Velocidad
proporcional
En
dad
je
Seite
aparato
arriba),
se
lentamente
mento.
cuanto
sich
aumento,
despacio
enfogue y XY.
Con
desacoplada
La
enfogue/XY
nal
—
2
-
und
En
XY
velocidad
Con
La
XY
adapta
aumentos
función
de
la
de
base
de
el
ajustan
En
mayor
función
velocidad
sólo
en
en
la
posición
microscopio 1 en
©
(rojo)
en
la
posición
microscopio 2 en
A
(azul).
el
otro
se
ajustan
función
velocidad
es
proporcional y se
al
veloci-
fijada
mando
enfogue y XY
más
rápida
según
otras
palabras,
sea
tanto
mas
se
ajustarán
de
es
proporcio-
un
lado:
básica
básica
lado,
el
según
básica
elegida.
acoplada
de
enfoque/
número
elegido.
en
el
(véase
o
el
au-
el
el
el
lado
el
lado
zoom
la
de
de
de
y
19
Page 28
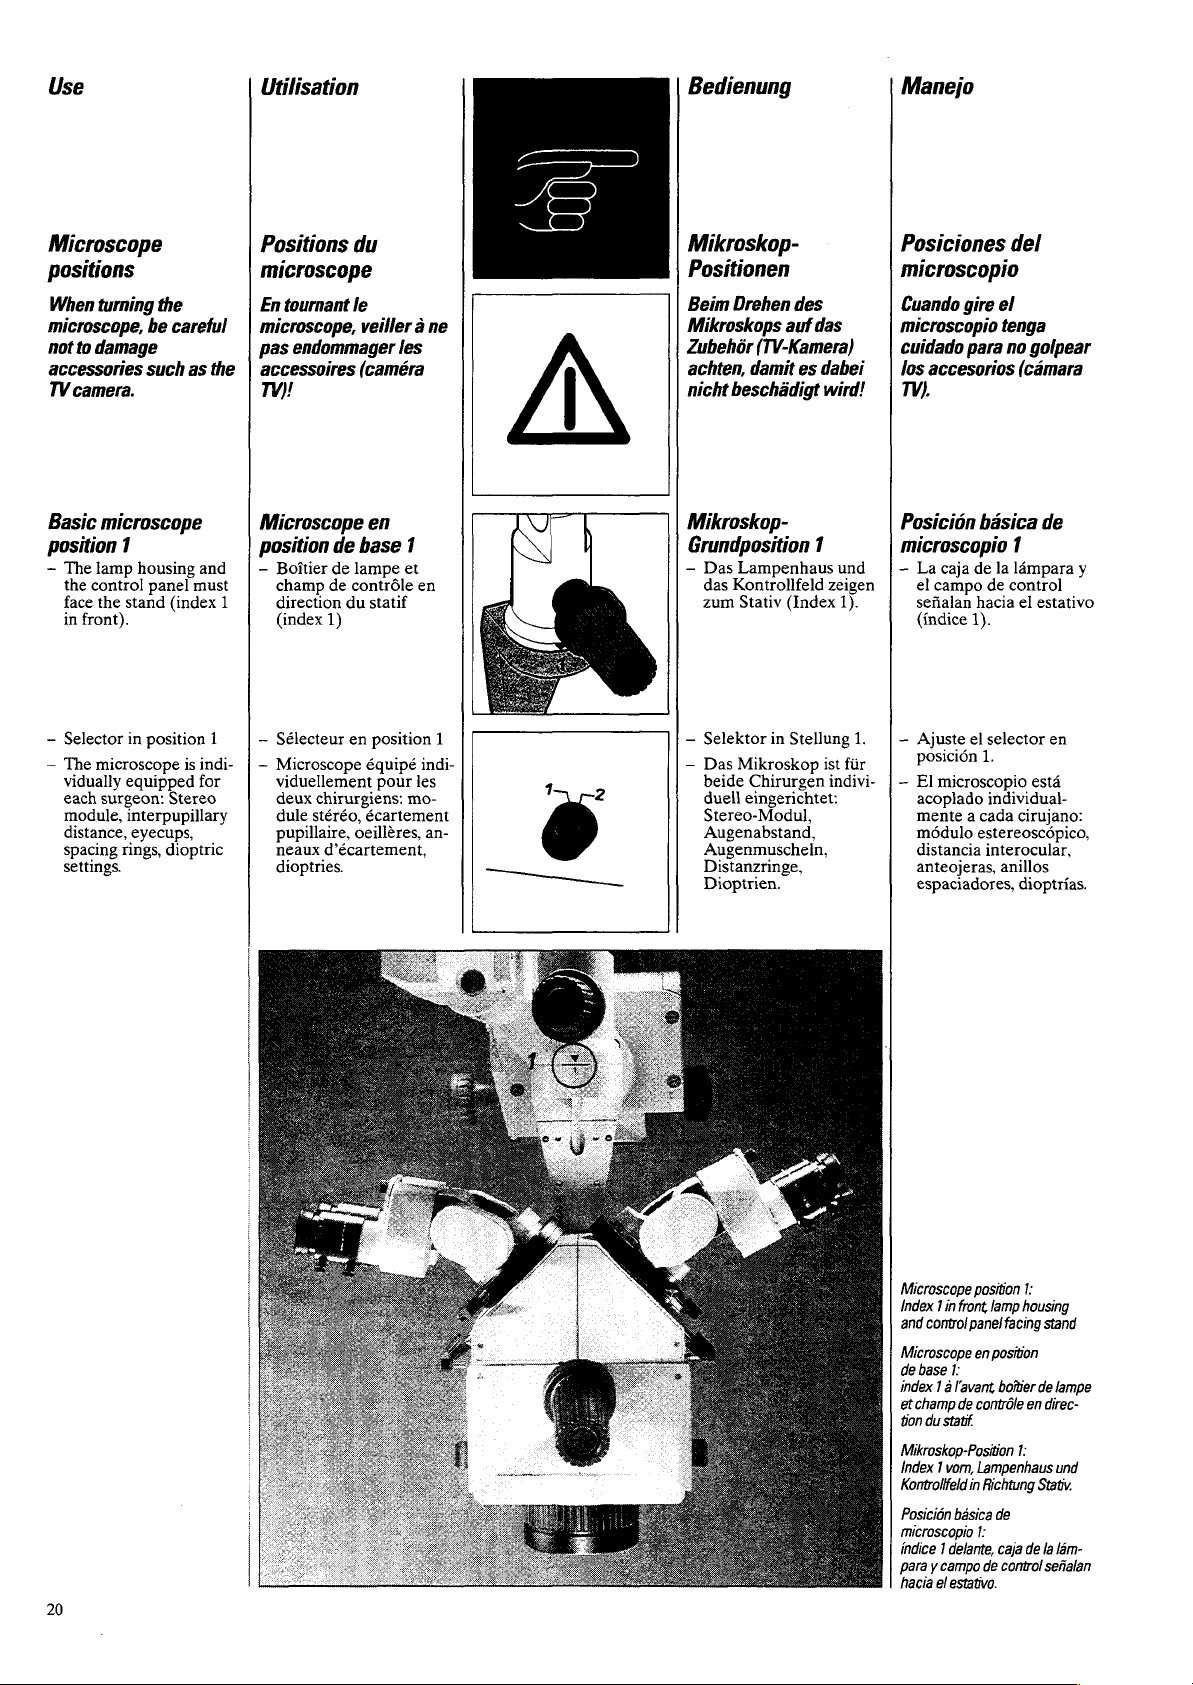
Use
Utilisation
Bedienung
Manejo
Microscope
positions
When
turning
the
microscope,
not
to
accessories
TV
camera.
Basic
position
~
The
the
face
in
front).
—
Selector
—
The
vidually
each
module,
distance,
spacing
settings.
be
damage
such
microscope
1
lamp
housing
control
panel
the
stand
in
position
microscope
equipped
surgeon:
interpupillary
eyecups,
rings,
careful
as
the
and
must
(index
1
1
is
indi-
for
Stereo
dioptric
Positions
microscope
En
tournant
microscope,
pas
endommager
accessoires
TV)!
Microscope
position
—
Boîtier
champ
direction
(index
—
Sélecteur
—
Microscope
viduellement
deux
dule
pupillaire,
neaux
dioptries.
du
le
veiller
(caméra
de
base
de
lampe
de
contrôle
du
1)
en
chirurgiens:
stéréo,
oeillères,
d’écartement,
a ne
les
en
1
et
en
statif
position
équipé
indi-
pour
les
mo-
écartement
an-
Mikroskop-
1
Positionen
Beim
Drehen
Mikroskops
Zubehôr
achten,
nicht
beschädigt
Mikroskop-
Grundposition
—
Das
das
Kontrollfeld
zum
—
Selektor
—
Das
beide
duell
Stereo-Modul,
Augenabstand,
Augenmuscheln,
Distanzringe,
Dioptrien.
des
auf das
(TV-Kamera)
damit
es
1
Lampenhaus
Stativ
(Index
in
Stellung
Mikroskop
Chirurgen
eingerichtet:
dabei
wird!
und
zeigen
1).
ist
indivi-
Posiciones
microscopio
Cuando
microscopio
cuidado
los
TV).
Posicion
microscopio
—
1.
—
fůr
—
del
gire
el
tenga
para
no
accesorios
basica
La
caja
de
el
campo
señalan
(índice
Ajuste
posición
El
acoplado
mente a cada
médulo
distancia
anteojeras,
espaciadores,
la
de
control
hacia
1).
el
selector
1.
microscopio
individual-
estereoscépico,
interocular,
anillos
golpear
(cámara
de
1
lámpara
el
cirujano:
dioptrias.
y
estativo
en
està
20
Microscope
Index 1 in
and
Microscope
de
index 1 à
et
tion
Mikroskop-Position
Index 1 vom,
Kontrolifeld
Posición
microscopio
índice 1 delante,
para y campo
hacia
contro!
base
champ
du
statif.
el
estativo.
position
front
lamp
panel
en
position
1:
l'avant
boîtier
de
contrôle
Lampenhaus
in
Richtung
básica
de
1:
caja
de
1:
housing
facing
stand
de
en direc-
1:
Stativ.
de
la
control
sefialan
lampe
und
lam-
Page 29
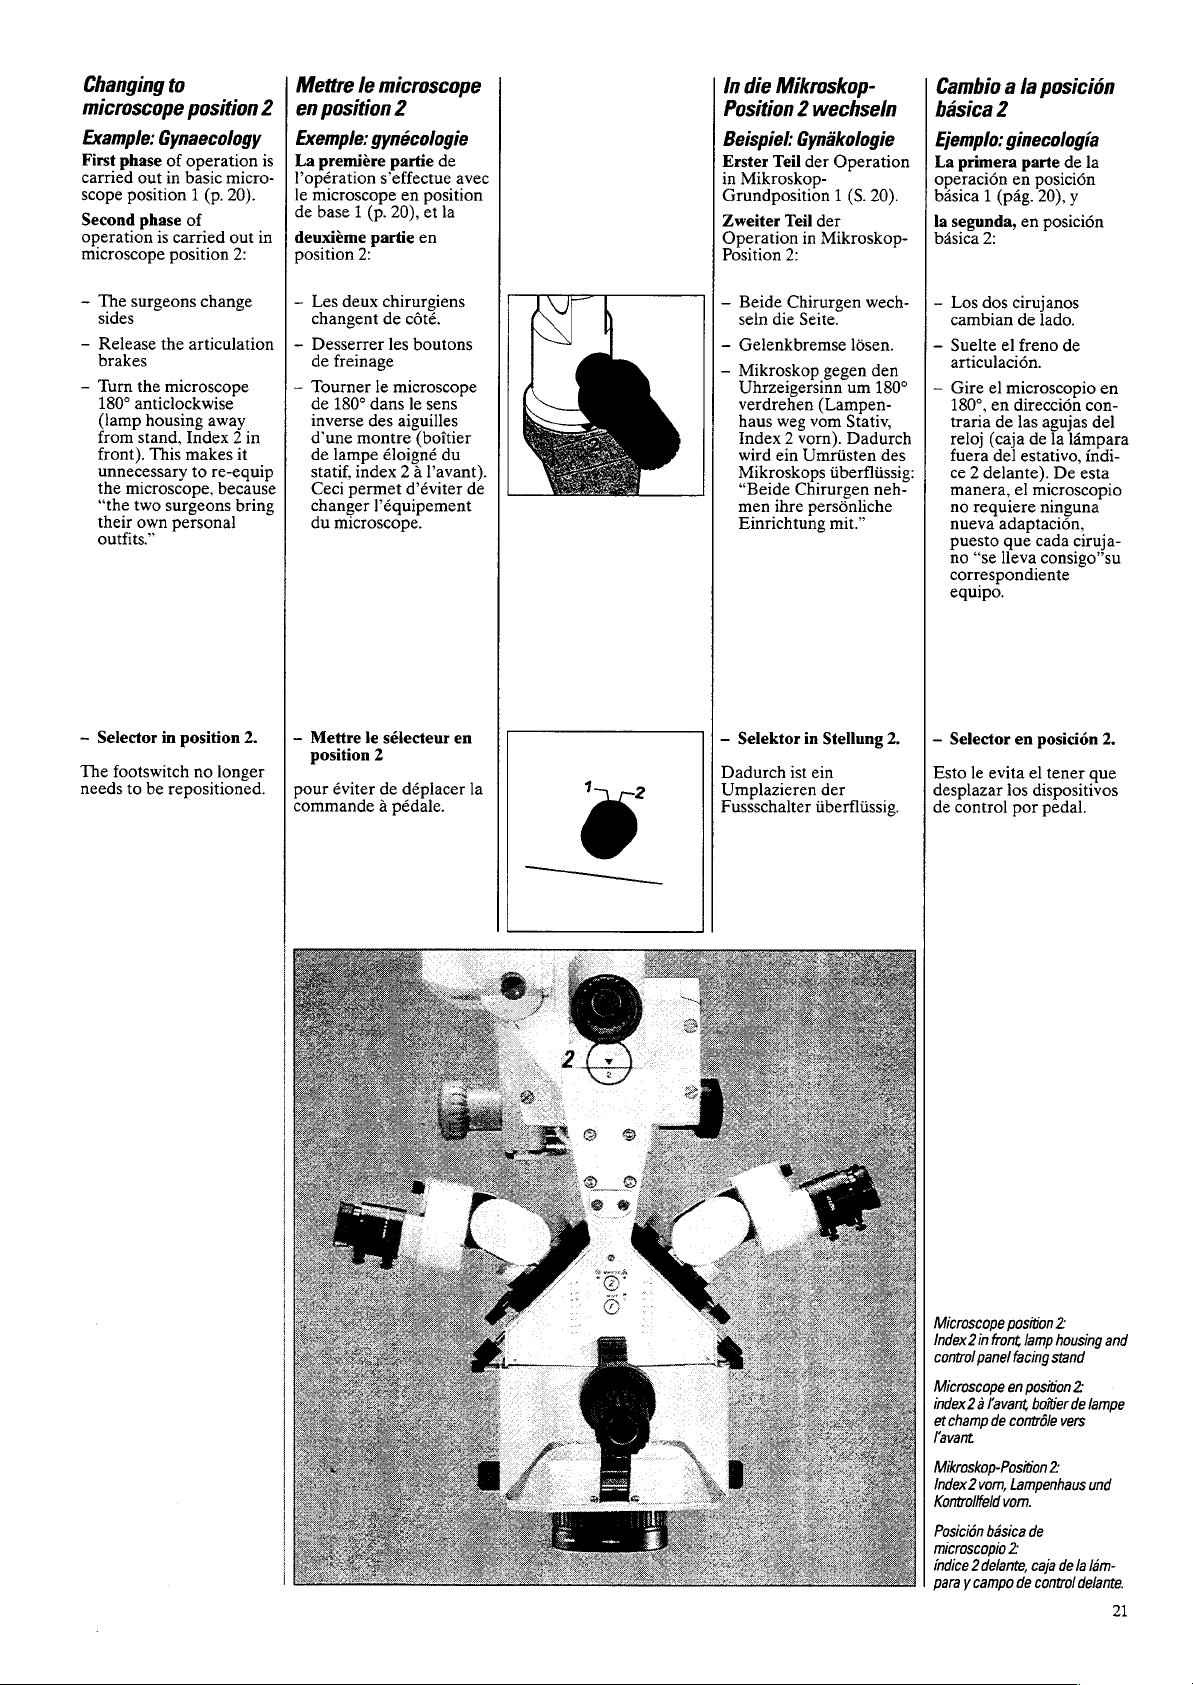
Changing
microscope
Example:
First
carried
scope
Second
operation
microscope
to
Gynaecology
phase
of
out
in
position 1 (p.
phase
is
carried
position
position
operation
basic
of
2
is
micro-
20).
out
in
2:
Mettre
en
Exemple:
La
l’opération
le
de
deuxième
position
le
position
gynécologie
première
microscope
base 1 (p.
partie
2:
microscope
2
partie
de
s'effectue
20),
en
position
et
en
avec
la
In
die
Mikroskop-
Position 2 wechseln
Beispiel:
Erster
in
Grundposition 1 (S.
Zweiter
Operation
Position
Gynákologie
Teil
Mikroskop-
der
Teil
in
2:
Operation
20).
der
Mikroskop-
Cambio a la
básica
Ejemplo:
La
operación
básica 1 (pag.
la
básica
2
ginecologia
primera
segunda,
2:
parte
en
posición
en
posición
de
la
20),
y
posición
-~
The
surgeons
sides
—
Release
brakes
—
Turn
the
180°
anticlockwise
(lamp
from
stand,
front).
unnecessary
the
microscope,
“the
two
their
own
outfits.”
~
Selector
The
footswitch
needs
to
change
the
articulation
microscope
housing
be
away
Index 2 in
This
makes
to
re-equip
because
surgeons
personal
in
position
no
longer
repositioned.
—
Les
changent
—
Desserrer
de
—
Tourner
de
inverse
it
bring
2.
d’une
de
statif,
Ceci
changer
du
-
Mettre
position
pour
commande à pédale.
deux
chirurgiens
de
côté.
les
freinage
le
microscope
180°
dans
le
des
aiguilles
montre
lampe
éloigné
index
2 à
permet
d'éviter
l'équipement
microscope.
le
sélecteur
2
éviter
de
déplacer
boutons
sens
(boîtier
du
avant).
en
de
la
ー
Beide
seln
-
Gelenkbremse
ー
Mikroskop
Uhrzeigersinn
verdrehen
haus
Index 2 vorn).
wird
Mikroskops
“Beide
men
Einrichtung
—
Selektor
Dadurch
Umplazieren
Fussschalter
Chirurgen
die
Seite.
gegen
(Lampen-
weg
vom
ein
Umrüsten
Chirurgen
ihre
persônliche
in
Stellung
ist
ein
der
überflüssig.
wech-
lôsen.
den
um
180?
Stativ,
Dadurch
des
überflüssig:
neh-
mit.”
2.
—
Los
dos
el
el
de
(caja
del
requiere
adaptaciôn,
“se
lleva
le
evita
control
cirujanos
de
freno
microscopio
dirección
las
estativo,
el
que
en
los
por
cambian
—
Suelte
articulación.
—
Gire
1809, en
traria
reloj
fuera
ce 2 delante).
manera,
no
nueva
puesto
no
correspondiente
equipo.
—
Selector
Esto
desplazar
de
lado.
de
en
con-
agujas
de
microscopio
el
del
la
lámpara
indi-
De
esta
ninguna
cada
ciruja-
consigo”su
posiciòn
dispositivos
pedal.
tener
2.
que
Microscope
Index
control
Microscope
index
et
l'avant
Mikroskop-Position
Index 2 vom,
Kontrolifeld
Posición
microscopio
indice 2 delante,
para y campo
2 in
2 a
champ
position
front
panel
facing
en
l'avant,
de
contréle
Lampenhaus
vom.
básica
2:
lamp
stand
position
boîtier
2:
de
caja de
de
control
2:
housing
2:
de
lampe
vers
und
la
lám-
delante.
and
21
Page 30
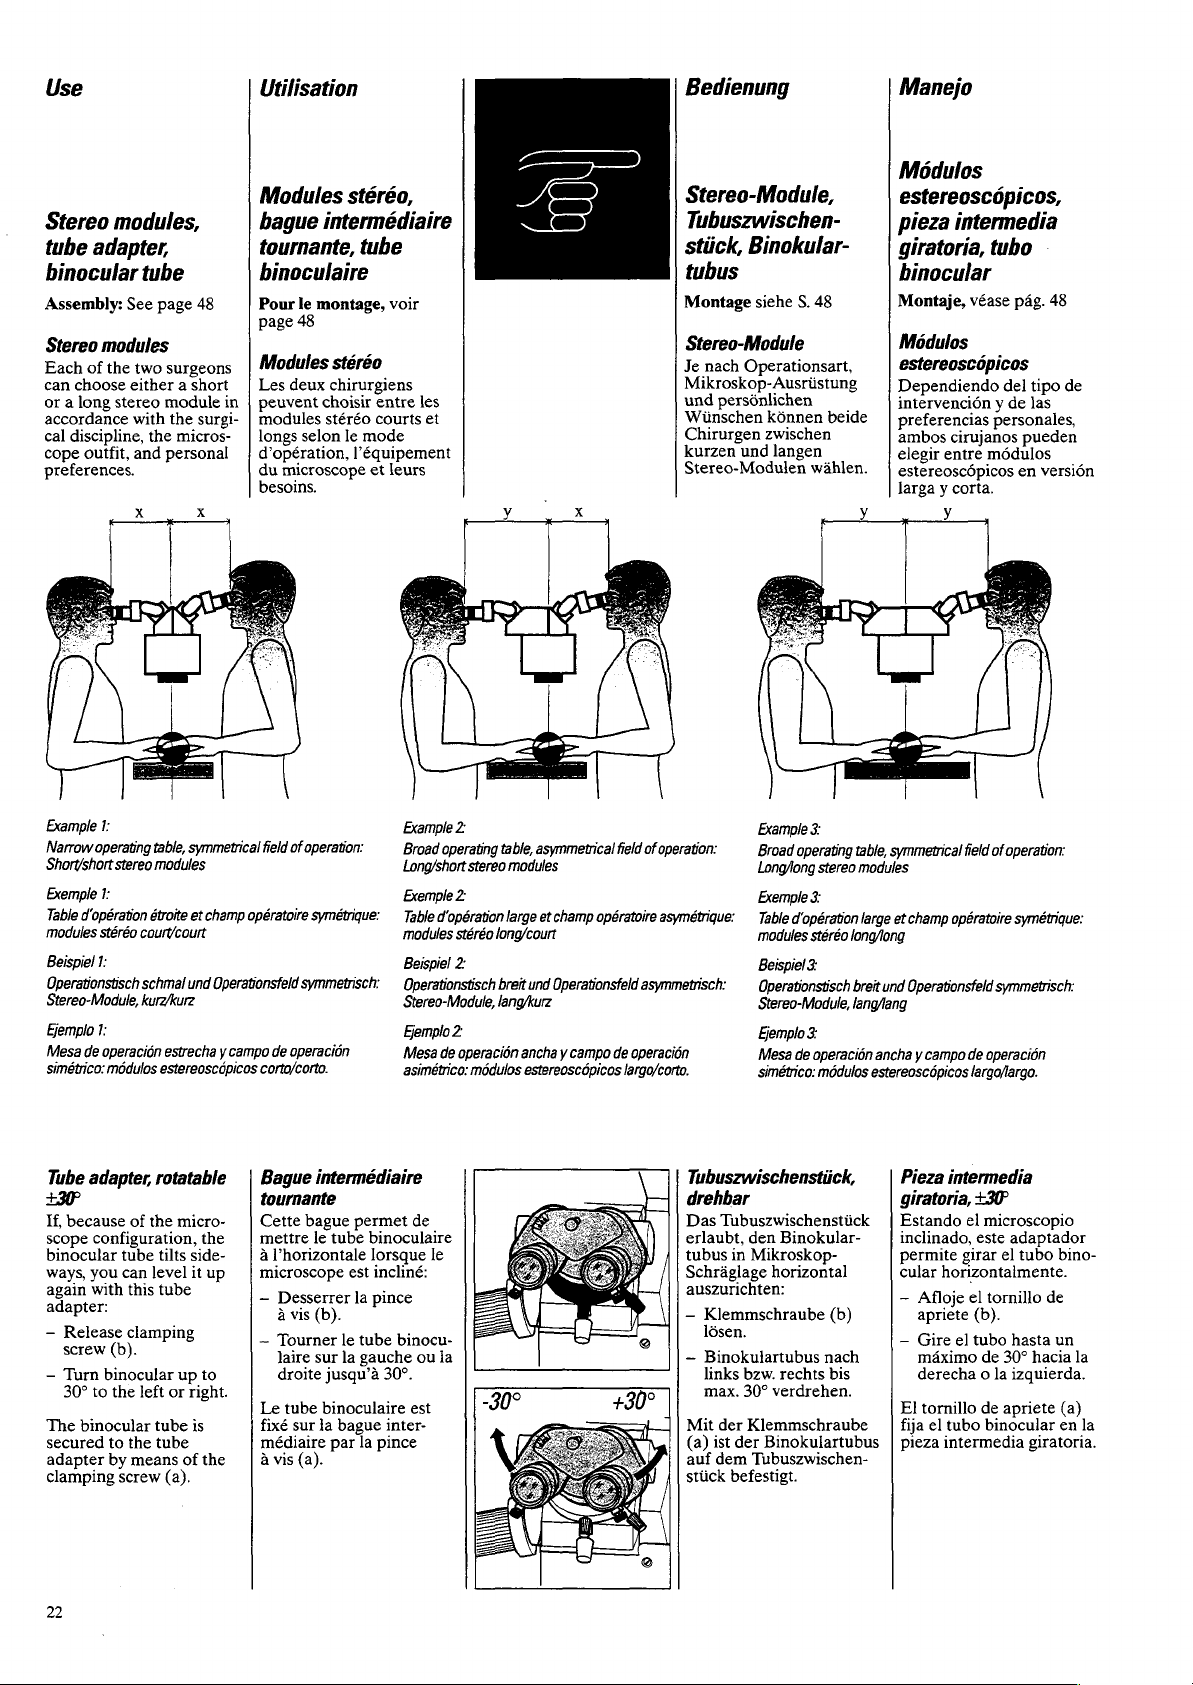
Use
Stereo
tube
binocular
Assembly:
Stereo
Each
can
or a long
accordance
cal
cope
preferences.
modules,
adapter,
See
modules
of
the
choose
either a short
stereo
discipline,
outfit,
tube
page
two
with
the
and
48
surgeons
module
the
surgi-
micros-
personal
Utilisation
Modules
bague
tournante,
binoculaire
Pour
page
Modules
Les
in
deux
peuvent
modules
longs
d'opération,
du
microscope
besoins.
stéréo,
intermédiaire
tube
le
montage,
48
choisir
stéréo
selon
voir
stéréo
chirurgiens
entre
courts
le
mode
l'équipement
et
leurs
les
et
Bedienung
Stereo-Module,
Tubuszwischen-
stück,
tubus
Montage
Stereo-Module
Je
Mikroskop-Ausriistung
und
Wünschen
Chirurgen
kurzen
Stereo-Modulen
Binokular-
siehe
nach
Operationsart,
persônlichen
kônnen
zwischen
und
langen
S.
48
beide
wahlen.
Manejo
Modulos
estereoscopicos,
pieza
intermedia
giratoria,
tubo
binocular
Montaje,
Módulos
estereoscópicos
Dependiendo
intervención y de
preferencias
ambos
elegir
estereoscópicos
larga y corta.
véase
personales,
cirujanos
entre
módulos
y
pág.
del
pueden
en
48
tipo
las
versión
de
Example
1:
Narrow
operating
Short/short
Exemple
Table
d'opération
modules
Beispiel
Operationstisch
Stereo-Module,
Ejemplo
Mesa
de
simétrico:
Tube
adapter,
+30
If,
because
scope
configuration,
binocular
ways,
you
again
with
adapter:
—
Release
screw
—
Turn
30°
to
The
binocular
secured
adapter
clamping
table,
stereo
modules
1:
étroite
stéréo
court/court
1:
schmal
kurz/kurz
I:
operación
módulos
rotatable
of
the
tube
can
level
this
clamping
(b).
binocular
the
left
tube
to
the
tube
by
means
screw
symmetrical
et
und
estrecha y campo
estereoscópicos
micro-
the
tilts
side-
it
tube
up
to
or
right.
is
of
the
(a).
field
champ
opératoire
Operationsfeld
corto/corto.
Bague
tournante
Cette
mettre
à
up
microscope
—
—
Le
fixé
médiaire
à
of
operation:
symétrique:
symmetrisch:
de
operación
intermédiaire
bague
permet
le
tube
l'horizontale
Desserrer
à
vis
Tourner
Jaire
droite
tube
sur
vis
(a).
binoculaire
lorsque
est
incliné:
la
pince
(b).
le
tube
sur
la
gauche
jusqu’à
binoculaire
la
bague
par
la
pince
Example
2:
Broad
operating
Long/short
Exemple
2
Table
d'opération
modules
stéréo
Beispiel
2:
Operationstisch
Stereo-Module,
Ejemplo
2:
Mesa
de
operación
asimétrico:
de
le
binocu-
ou
ia
30°.
est
inter-
table,
stereo
modules
large
long/court
breit
lang/kurz
módulos
ancha y campo
asymmetrical
et
champ
und
Operationsfeld
estereoscópicos
field
opératoire
de
operación
largo/corto.
of
operation:
asymétrique:
asymmetrisch:
Tubuszwischenstiick,
drehbar
Das
erlaubt,
tubus
Schraglage
auszurichten:
—
—
Mit
(a)
auf
stiick
Example
Broad
Long/long
Exemple
Table
modules
Beispiel
Operationstisch
Stereo-Module,
Ejemplo
Mesa
simétrico:
Tubuszwischenstiick
den
in
Mikroskop-
Klemmschraube
lösen.
Binokulartubus
links
bzw.
max,
30°
der
Klemmschraube
ist
der
Binokulartubus
dem
Tubuszwischen-
befestigt.
3:
operating
stereo
3:
d'opération
stéréo
3:
3:
de
operaciôn
módulos
Binokular-
horizontal
(b)
nach
rechts
bis
verdrehen.
table,
symmetrical
modules
large
et
champ
long/long
breit
und
Operationsfeld
lang/lang
ancha y campo
estereoscópicos
Pieza
giratoria,
Estando
inclinado,
permite
cular
horizontalmente.
—
Afloje
apriete
—
Gire
máximo
derecha o la
El
tornillo
fija
el
pleza
field of
operation:
opératoire
intermedia
tubo
intermedia
symétrique:
symmetrisch:
de
operaciôn
largo/largo.
+30
el
microscopio
este
adaptador
girar
el
tubo
el
tornillo
(b).
el
tubo
hasta
de
30º
izquierda.
de
apriete
binocular
hacia
giratoria.
bino-
de
un
(a)
en
la
la
22
Page 31

P-18P
Binocular
variable
observation © -180º
Possibilities
adjustment
—
Choice
heights
-
Viewing
nuously
the
Interpupillary
Set
your
distance
—
Release
screw
-
Look
and
of
both
see a single
field
—
Tighten
screw.
Scale
Read
pupillary
the
tube
angle
of
two
angle
variable
range
0º-180º.
interpupillary
as
follows:
the
into
the
displace
the
binocular
hands
the
off
the
distance
scale.
with
of
for
viewing
conti-
within
distance
clamping
eyepieces
the
tubes
with
until
you
circular
clamping
inter-
from
Tube
binoculaire
angle
d'observation
variable
Possibilités
—
Le
tube
étre
hauteurs
tube
l’angle
0° à 180°.
et
mains
l'obtention
champ
la
lisible
sur
binoculaire
adapté
permet
d'observation
pupillaire
la
dans
déplacer
les
pince à vis.
pupillaire
l’échelle.
peut
deux
différentes.
—
Le
régler
hauteur
de
Ecartement
Procédure:
—
Desserrer
-
Regarder
laires
deux
jusqu’à
unique
circulaire.
—
Serrer
Echelle
L'écartement
est
à
pour
de
et
la
pince à vis.
les
ocu-
des
tubes
d'un
」
Binokulartubus
variablem
Einblickwinkel
Varianten
—
Der
Binokulartubus
kann
für 2 unterschied-
liche
Ausgangshöhen
montiert
—
Einblickwinkel/-höhe
können
0°-180°
werden.
Augenabstand
So
stellt
nen
-
Klemmschraube
~
In
und
beiden
verschieben,
ein
Bildfeld
—
Klemmschraube
festziehen.
Skala
An
Augenabstand
werden.
zusâtzlich
eingestellt
der
Benutzer
Augenabstand
die
Okulare
Tubusrohre
Handen
sehen.
Skala
bis
kreisrundes
ist
ablesbar.
einziges
der
schauen
der
mit
von
sei-
fest:
lósen.
mit
Sie
Tubo
binocular
angulo
observaciôn
—
—
Distancia
Para
distancia
proceda
-
—
—
Escala
En
distancia
de
El
tubo
binocular
puede
acoplarse
dos
alturas
diferentes.
Adicionalmente
ajustar
el
altura
de
Afloje
apriete.
Mire a través
oculares y mueva
tubos
hasta
campo
Apriete
la
ángulo y la
de
observación
0º a 180º.
interpupilar
determinar
interpupilar
como
el
tornillo
con
que
vea
circular.
el
escala
puede
fijada.
con
variable
para
de
salida
puede
su
sigue:
de
de
los
los
ambas
manos
un
único
tornillo.
leer
la
Recommendation:
User
list
Draw
up a list
include
ments
lary
distance,
settings,
spacing
etc.,
and
cope
adjusted
for
each
personal
such
as
whether
rings
have
user
of
users,
require-
interpupil-
dioptric
or
are
required
the
accordingly
in
turn.
to
not
micros-
Remarque:
liste
des
utilisateurs
Tenir
une
liste
avec
données
l’utilisateur
écartement
dioptries,
anneau
et
microscope.
personnelles
avec/sans
d’écartement,
préparer
les
telles
pupillaire,
ensuite
de
que
etc.
le
Tip:
Benutzerliste
Fiihren
Sie
eine
den
persônlichen
der
Benutzer
Augenabstand,
mit/
ohne
usw.
und
Mikroskop
Liste
Daten
wie
Dioptrien,
Distanzring
bereiten
danach
Sie
vor.
Recomendaciôn:
lista
de
mit
das
usuarios
Establezca
los
usuarios
interpupilar,
anillos
y
prepare
el
microscopio
ésta.
datos
personales
como
espaciadores,
posteriormente
una
dioptrias,
lista
distancia
en
con
de
etc.
base
los
a
23
Page 32

Use
Wide-field
eyepieces
spectacle
Fitting:
Recommendation:
page
23
If
you
spectacles
and
want
contact:
—
Screw
—
Screw a 6mm
9mm
each
—
Screw
firmly
position.
See
page
work
without
closer
off
the
spacing
eyepiece
the
eyecups
back
for
wearers
into
49
See
eye
eyecups
and/or
ring
on
Utilisation
Oculaires
angulaires
porteurs
Pour
page
Remarque,
Travail
Pour
distance
Voculaire:
—
dévisser
—
fixer
d’écartement 6 mm
to
et/ou 9 mm
Voculaire
—
revisser
de
le
montage,
49.
sans
une
très
entre
les
les
anneaux
les
grand-
pour
lunettes
voir
voir
page
lunettes
petite
Voeil
oeillěres
sur
oeillères
et
23.
Bedienung
Weitwinkel-
Brillenträgerokulare
Montage
Tip
Wenn
arbeiten
und
kontakt
-
—
-
siehe
S.
49.
siehe
S.
23.
Sie
ohne
Brille
einen
engen
wiinschen:
Augenmuscheln
abschrauben.
Distanzringe 6 mm
und/oder 9 mm
Okular
Augenmuscheln
festschrauben.
Augen-
am
festschrauben.
wieder
Manejo
Oculares
granangulares
observadores
gafas
Montaje,
Recomendación,
pag.
Si
y
contacto
—
ー
~
véase
23
trabaja
desea
un
con
desatornille
anteojeras
Atornille
los
anillos
de 6 y/o
Vuelva a apretar
fuertemente
anteojeras.
con
pag.
véase
sin
gafas
estrecho
los
oculares:
las
en
el
ocular
espaciadores
9mm.
las
para
49
If
you
work
spectacles:
—
Do
not
fit
~
Fold
back
eyecups
full
Eyepoint
To
the
eyepieces
proceed
your
the
see
Adjusting
settings:
-
Release
screw
-
Set
ment
from
dance
given
Refer
explanation
these
mined.
Each
this
once.
values
to
advantages
WILD
ー
Retighten
screws.
24
if
working
position
right
distance
(22mm),
as
follows:
eyes
slowly
eyepieces
the
full
the
the
the
dioptric
within
+5
to
with
in
the
to
page
values
user
procedure
Set the
exactly
maximize
M680
your
field
with
spacing
the
flexible
you
need
distance.
eyes
from
Bring
towards
until
you
of
view.
dioptric
clamping
adjust-
the
range
—5
in
accor-
the
values
user
list.
26
for
of
how
are
deter-
need
follow
only
dioptric
in
order
the
optical
of
the
the
clamping
Travail
avec
lunettes
—
Ne
pas
utiliser
rings
the
at
the
an
d’anneaux
—
Retourner
ment
Pupille
Pour
trouver
correcte
l'oeil
cher
lentement
des
oculaires
observer
champ
sombres.
Dioptries
-
Desserrer
vis
—
Tourner
d'oeil
formément à la
utilisateurs.
La
les
utilisateur
mentionnée a la
N’effectuer
dure
pour
pleinement
ges
du
—
Serrer
d’écartement
éventuelle-
les
oeilléres
d'émergence
la
(22
mm)
et
l’oculaire,
jusqu’à
la
totalité
sans
parties
les
les
lentilles
de
+5 A -5
façon
de
pour
est
qu’une
pouvoir
système
M680.
les
pinces à vis.
déterminer
cette
seule
les
valeurs
du
WILD
distance
entre
appro-
les
yeux
du
pinces
con-
liste
chaque
page
procé-
exploiter
avanta-
optique
à
des
==
=
EA
EA
=
EA
ESA
fois
Wenn
Sie
mit
Brille
arbeiten:
~
Keine
Distanzringe
einsetzen.
~
Evtl.
auch
Augenmuscheln
hinten
Pupillenlage
So
finden
gen
Abstand
Augen
Augen
Okulare
das
volle
Abschattungen
noch
umsttilpen.
Sie
den
(22
zu
den
Okularen:
langsam
führen,
Bildfeld
die
nach
richti-
mm)
an
die
bis
Sie
ohne
sehen.
der
Si
trabaja
—
no
acople
espaciadores
— y si
fuera
vuelva
las
hacia
atrás.
Pupila
de
Para
hallar
correcta
oculares
los
los
la
visual.
de
(22
ojos
lentamente
oculares
totalidad
con
gafas:
anillos
necesario,
anteojeras
salida
la
distancia
los
ojos a los
mm),
hasta
del
campo
Dioptrien
—
Klemmschrauben
—
Dioptrien
Benutzerliste
Drehen
linsen
einstellen.
Wie
Werte
ist
E
beschrieben.
Jeder
diesen
mal
halten
daran,
optischen
WILD
nutzen
-
Klemmschrauben
festziehen.
einstellen:
gemäss
der
Augen-
von
+5
jeder
Benutzer
feststellen
auf
der
S.
26
Benutzer
Vorgang
durchführen.
Sie
sich
damit
Vorteile
M680
kônnen.
durch
bis
muss
nur
genau
Sie
voll
Ajuste
de
las
dioptrias:
lösen.
~
Afloje
los
las
usuarios,
ellos
método
los
valores
en
usuario
sélo
favor,
sacar
el
M680.
los
tornillos
dioptrias
base a la
moviendo
las
lentes
para
la
pág.
debe
este
una
aténgase a las
con
mayor
óptico
tornillos.
—5
die
kann,
ein-
Bitte
die
des
apriete.
—
Ajuste
+5 a —5 en
de
para
oculares.
El
minar
describe
Cada
llevar a cabo
proceso
Por
instrucciones,
de
rendimiento
WILD
ー
Apriete
lleve
hacia
que
vea
de
de
lista
deter-
se
26.
vez.
el
al
fin
Page 33

Use
Utilisation
Bedienung
Manejo
Illumination
The
field
of
fully
the
zooming
and
brightness
stant.
repeated
changes
Switching
illumination
Before
off,
make
rotary
nator
This
the
bulbs.
Then:
—
Turn
switch.
diodes
control
-
Use
switch
to
view
illuminated
the
procedure
image-side
remains
This
avoids
adaptations
in
light
on
you
switch
sure
knob
of
has
been
lengthens
on
the
The
at
the
unit
the
rotary
on
the
adjust
the
5V
the
that
power
shine.
stays
during
con-
tiring
to
intensity.
on
or
the
the
illumi-
turned
off.
the
life
of
and
ML
side
of
the
knob
to
light
and
brightness.
Eclairage
Chaque
automatiquement
pendant
l'intensité
constante
vateur/accessoires.
évite
modation
variables
scurité/clarté).
Le
plètement
gauche.
ainsi
-~
—
champ
le
zoomage
lumineuse
du
la
fatigante
aux
d'éclairage
Mise
sous
tension
l'éclairage
bouton
doit être
tourné
Vous
les
ampoules.
Activer
doit
les
bloc
Régler
lumineuse
du
l'interrupteur,
s’allumer
diodes 5 V
de
commande.
l'intensité
bouton
visuel
éclairé
côté
obser-
Ceci
accom-
conditions
sur
ménagez
ainsi
et
ML
au
moyen
rotatif.
est
et
reste
(ob-
de
com-
la
que
il
du
Beleuchtung
Gesichtsfelder
Die
beim
zoomen
automatisch
leuchtet.
bleibt
Zubehórseite
Die
sonst
Hell-/
der
Augen
Beleuchtung
einschalten
Vergewissern
dass
der
ausgeschaltet
schonen
Glühlampen.
Dann
—
Netzschalter
Der
die
an
der
gerátes
—
Mit
Licht
Helligkeit
immer
voll
Die
Helligkeit
auf
der
Beobachter-/
konstant.
so
ermiidende
Dunkeladaption
entfallt.
Sie
Regulierknopf
ist.
damit
die
erst:
Netzschalter
Dioden
dem Regulierknopf
ein.
5V
Seite
des
leuchten
einschalten und
regulieren.
sind
ausge-
sich,
Sie
und
und
ML
Steuer-
auf.
Iluminación
Cuando
el
completamente.
intensidad
permanece
el
accesorio,
ello
de
a
Conexión
iluminación
Asegúrese
botón
desconectado.
manera
la
Después:
—
—
acciona
campo
visual
luminosidad
lado
del
observador/
evitándose
la
molesta
los
ojos
la
bombilla.
Conecte
de
diodos
lado
control
Conecte
botón
la
de
oscuridad.
de
de
giratorio
alarga
el
red.
Este y los
SV y ML
del
aparato
se
giratorio y regule
intensidad
constante
adaptación
la
la
que
De
la
interruptor
iluminan.
la
luz
el
zoom,
se
ilumina
La
en
por
claridad
el
está
esta
vida
de
en
el
de
con
el
luminosa.
Switching
illumination
The
lengthens
bulb:
—
Use
switch
—
Then
power.
Quick-change
mount
If a bulb
operation,
to
bring
into
The
as a reminder
new
Filters
Both
the
holder
daylight
green
off
following
the
life
the
rotary
off
the
switch
fails
during
turn
the
second
position.
warning
bulb
beam
lamp
to
later
users
can
path a filter
carrying a KB12
filter
or a VG9
filter.
the
procedure
off the
(page
slide
of
knob
light
lamp
the
wheel
bulb
shines
insert
the
to
the
a
49).
into
Mise
hors
tension
l'éclairage
En
procédant
augmente
des
—
Tourner
rotatif
—
Désactiver
l'interrupteur.
Changeur
d'ampoule
Si
grille
amener
poule
en
La
s'allume
ampoule
(page
Filtres
Les
peuvent
trajet
filtre
du
vert
ampoules.
jusqu’à
"une
des
pendant
la
dans
tournant
lampe
d’avertissement
et
est à remplacer
49).
deux
utilisateurs
introduire
optique
avec
jour
KB12
VG9.
la
durée
le
rapide
ampoules
deuxième
l’axe
le
signale
filtre
de
ainsi,
on
de
vie
bouton
la
butée.
l’opération,
am-
optique
disque.
qu’une
dans
un
porte-
lumière
ou
filtre
le
Beleuchtung
ausschalten
Mit
diesem
erhóhen
dauer
ー
Zuerst
Regulierknopf
ten.
—
Dann
schalter
Lampenschnellwechsler
Fallt
tion
am
zweite
einrastet.
Die
und
eine
einzusetzen
Filter
Beide
einen
KB12
Griinfilter
Strahlengang
Vorgehen
Sie
die
der
wahrend
eine
Rad
Glühlampe
Warnlampe
erinnert
neue
Benutzer
Filterhalter
Tageslichtfilter
Lebens-
Gluhlampe.:
Licht
mit
erst
den
Netz-
ausschalten.
der
Gliihlampe
drehen,
bis
leuchtet
daran,
Giühlampe
(S.
49).
kônnen
VG9
in
schieben.
dem
abschal-
Opera-
aus,
die
später
mit
oder
den
Desconexión
iluminación
Si
procede
manera
la
bombilla:
-
Apague
la
giratorio.
ー
Desconecte
interruptor
Cambiador
bombillas
Si
durante
funde
el
disco
la
seguenda
repuesto.
La
y
le
de
nueva
Filtros
Ambos
introducir
rayos
un
KB12 o un
VG9.
alarga
luz
con
una
hasta
lámpara
recuerda
deberá
bombilla
usuarios
un
portafiltros
filtro
para
de
primeramente
la
bombilla,
colocar una
en
filtro
de
la
la
siguiente
la
vida
el
botón
luego
de
red.
rapido
de
operación
que
encaje
bombilla
de
aviso
que
más
(pág.
pueden
el
divisor
luz
natural
verde
de
el
se
gire
de
luce,
tar-
49).
de
con
25
Page 34

Use
Utilisation
Bedienung
Manejo
Adjusting
dioptric
The
to
for
Only
stay
the
(=
Each
procedure
Draw
users.
A
Preparatory
~
Power
(page
-
Light
—
Set
distance
—
Eyepiece
settings
~
Double
OPEN
-
RESET:
basic
(page
setting
dioptric
be
carried
both
eyes.
then
will
in
focus
zoom
range
parfocal).
user
need
only
up a list
switch
25)
on
(page
interpupillary
(page
diopter
zero
iris
(page
focus
17)
the
correction
out
precisely
the
image
throughout
follow
once.
for
all
work
on
25)
23)
(page
24)
diaphragm
35)
position
Réglage
dioptries
is
Les
réglées
pour
Ceci
constante
gement
(parfocalité).
this
Un
saire
conseillé
liste
teurs
A
—
—
—
—
-
—
des
dioptries
de
façon
chaque
oeil.
garantira
lors
de
grossissement
seul
réglage
par
opérateur.
d'établir
des
différents
du
microscope.
Travaux
Activer
(page
Allumer
(page
Régler
pupillaire
Oculaires:
(page
Double
iris:
RESET
position
mise
préliminaires
l'interrupteur
25)
la
25)
l’écartement
(page
dioptries
24)
diaphragme
OPEN
de
au
point
doivent
précise
une
netteté
d’un
chan-
est
néces-
une
utilisa-
lumière
23)
(page
35)
base
dela
(page
étre
Il
est
O
17)
Dioptrien
Die
Dioptrien
beide
einzustellen.
Nur
dann
Scharfe
konstant = parfokal.
Jeder
sen
Vorgang
durchfiihren.
aller
A
Vorhereitungen
-
Netzschalter
—
Licht
—
Augenabstand
einstellen
—
Okulare:
(S.
—
Doppelirisblende:
OPEN
—
RESET:
Fokus-Grundein-
stellung
einstellen
Augen
bleibt
beim
Benutzer
Benutzer
ein
(S.
(S.
Dioptrien
24)
(S.
35)
(S.
sind
fiir
exakt
die
Zoomen
muss
nur
einmal
Datenliste
erstellen!
ein
(S.
25)
23)
17)
Ajuste
dioptrias
Ajuste
dioptrias
Asi,
la
constante
aumentos = parfocal.
Cada
usuario
a
die-
25)
0
cabo
una
vez.
con
las
todos
los
A
Preparativos
—
Conecte
de
red
~
Dé
la
—
Ajuste
interocular
—
Oculares:
(pag.
—
Diafragma
OPEN
—
RESET
posiciön
enfoque
de
las
correctamente
de
los
permanece
al
cambiar
debe
proceso
Haga
usuarios.
el
interruptor
(pág.
luz
(pag.
la
distancia
(pag.
dioptrfas
24)
iris
(pág.
bâsica
(pag.
dos
una
25)
25)
doble:
35)
17)
llevar
lista
de
nitidez
este
correcciones
las
ojos.
de
sólo
de
23)
O
Is
there a graticule
eyepiece?
Go
straight
B
Focus
object
1
Zoom:
2
Place a flat
beneath
the
(see
page
3
Look
pieces.
the
you
4
Zoom:
5
Focus
switch
to
section
on
the
5
test
the
optical
56)
into
the
Raise
see
the
25
with
the
or
handswitch
objective
distance
data,
object
working
microscope
or
test
object
eye-
lower
until
foot-
in
E.
the
at
F.
En
cas
d'utilisation
réticule,
passer à la
B
Mise
au
objet-test
1
Zoom:
2
Placer
un
sous
l’objectif
Données
page
56).
3
Regarder
laires.
Lever/abaisser
microscope
l’objet.
4
Zoom:
5
Faire
la
l’aide
de
pédale/manuelle
section
|
|
ЛАДНО
區
point
5
objet
optiques
dans
jusqu’a
25
mise
la
commande
E.
sur
plat
(voir
les
au
point
d'un
un
ocu-
voir
F.
le
a
a
Befindet
Strichplatte
Zum
springen.
sich
im
Abschnitt
ez
eine
920
o
o
25
o
B
Testobjekt
1
Zoom:
2
Flaches
Arbeitsabstand
Optische
unter
legen.
3
In
die
Mikroskop
senken,
Objekt
4
Zoom:
5
Mit
Handschalter
fokussieren.
fokussieren | B
5
Testobjekt
Daten
das
Objektiv
Okulare
heben/
bis
Sie
sehen.
25
dem
Fuss-/
éSe
encuentra
Okular? | retículo
E
Pase
en
al
apartado
o
©
(siehe
S.
schauen.
das
F
im
56)
Enfocado
de
ensayo
1
Zoom:
2
Coloque
ensayo
objetivo.
ópticos,
3
Mire a través
oculares.
el
microscopio
que
vea
4
Zoom:
5
Enfoque
dispositivo
por
pedal/manual
un
el
ocular?
E.
de
un
objeto
5
un
objeto
debajo
56).
de
hasta
el
de
control
de
Datos
los
F.
plano
(véase
pág.
Incline/levante
el
objeto.
25
con
del
26
Page 35

C
Adjust
the
dioptric
setting
6
Zoom
position
7
Do
not
‘eyepieces
Turn
the
unts
fully
(+
direction).
position
to
+5
diopters.
8
Look
into
Release
screws.
each
eyepiece
clockwise ( direction)
until
both eyes
object
in
Record
setting
9
Reset
the
Zero.
Repeat
(i.e.
focus
diopters
Now
set
the
mean
Tighten
screws.
D
Inspect
-
Zoom:
—
Look
into
and,
if
necessary,
cus
minimally
footswitch
handswitch.
—
Zoom
from
The
image
must
remain
(parfocal)
fications.
then
repeat
dure
described.
5.
look
into
eyepiece
anticlockwise
This
corresponds
the
eyepieces
the
clamping
Slowly
rotate
in
see the
sharp
focus.
the
dioptric
for
each
eye.
eyepieces
points
4-8
at
36
and
for
both
eyepieces
value.
the
clamping
the
parfocality
Position
25
the
eyepieces
with
or
25
to
sharpness
constant
at
all
magni-
If
it
does
the
proce-
the
mo-
turn
to
twice
set
eyes).
to
refo-
the
5.
not,
C
Réglage
6
Zoom:5
7
Ne
les
Tourner
re
des
tre
butée
8
Regarder
oculaires.
Desserrer
vis.
oculaire
le
d'une
jusqu’à
de
Noter
ques
9
Régler
oculaires
Répéter
opérations 4 à 8 (mise
au
des
chaque
ensuite
les
puis
vis.
D
Contréle
parfocalité
-
Zoom:
—
Regarder
oculaires
nécessaire,
l’image
commande
pédale/manuelle.
—
Passer
La
constante
réglage
Dans
répéter
précédentes.
des
pas
regarder
oculaires!
chague
dans
le
sens
aiguilles
(vers
Tourner
sens
l’objet
point à 25X,
dioptries
valeurs
netteté
d’une
+)
jusqu’à
+5.
dans
les
chaque
lentement
des
aiguilles
montre
ce
que
soit
les
valeus
pour
chaque
de
nouveau
sur
deux
oeil).
les
oculaires
moyennes,
serrer
les
de
la
25
dans
et
régler,
la
au
moyen
à
de
25x a 5x.
doit
lors
(parfocalité).
le
cas
contraire,
les
opérations
dioptries
contraire
les
pinces
(vers
l’image
nette.
0.
fois
réglage
pour
Régler
pinces
les
netteté
rester
de
dans
oculai-
mon-
la
à
dans
—)
dioptri-
oeil.
les
les
sur
à
si
de
de
la
ce
€
Dioptrien
6
Zoom:5
7
Nicht
in
schauen!
Okulare
Uhrzeigersinn
tung
'+'
drehen = +5
8
In
die
Klemmschrauben
Okulare
sam
im
in
Richtung
bis
beide
Objekt
Werte
notieren.
9
Okulare
stellen.
Die
Punkte
sieren
en
fiir
stellen)
Dann
Mittelwerte
den
Okularen
len.
Klemmschrauben
ziehen.
D
Parfokalitat
—
Zoom:
—
In
die
und
falls
mit
dem
Handschalter
nachfokussieren.
—
Von
25x-5x
Die
Schärfe
bei
jeder
konstant
bleiben.
wiederholen
den
beschriebenen
Vorgang.
regulieren
die
Okulare
gegen
den
in
bis
Okulare
einzeln
Uhrzeigersinn
scharf
fiir
wieder
bei
beide
2x
25
Okulare
notwendig
Fuss-/
Andernfalls
Rich-
Anschlag
Dioptrien.
schauen.
lôsen.
lang-
—'
drehen,
Augen
das
sehen.
beide
Augen
auf
4-8
(Fokus-
25x,
Dioptri-
Augen
wiederholen.
einstel-
fest-
priifen
schauen
minim
zoomen.
muss
Sie
nun
bitte
Vergrósserung
(parfokal)
0
ein-
an
C
Regulado
dioptrias
6
Zoom:
7
¡No
oculares!
Mueva
sentido
manecillas
dirección
tope = +5
8
Mire a través
oculares
Afloje
apriete.
te
por
uno
sentido
las
ción
objeto
Apunte
ambos
9
Ajuste
nuevamente a 0.
Repita
puntos 4 a 8 (enfocado
con
dioptrias
ojos).
mente
valores
apriete
D
Control
parfocalidad
—
Zoom:
—
Mire a través
oculares y si
reenfoque
te
por
dispositivo
por
—
Lieve
5x.
La
constante
(parfocal)
aumento.
contrario,
procedimiento
de
las
5
mire a través
los
oculares
contrario a las
del
reloj
“+”
hasta
dioptrías.
de
los
tornillos
Gire
lentamen-
separado
de
los
del
reloj
“—"
se
ojos.
los
dos
25x,
Ajuste
los
medios
los
medio
pedal o manual.
el
nitidez
cada
oculares
de
las
manecil-
en
direc-
hasta
gue
vea
nitido.
los
valores
oculares
veces
ajuste
de
para
ambos
seguida-
oculares a los
y
tornillos.
de
la
25
de
se
requiere
minimamen-
del
de
control
zoom
de
debe
quedar
en
cada
De
lo
repita
descrito.
de
los
el
los
las
los
25
el
los
en
en
el
de
en
para
a
E
Eyepiece
graticule
Prepare
Then:
—
—
—
Do
of
contains
as
Turn
the
of
the
eyepiece
ning
the
in
the
“+”
Look
into
and
slowly
eyelens
“—
direction
see
the
imaged.
clamping
Go
straight
on
page
setting
without
not
adjust
the
eyepiece
with
in
section
eyelens
graticule
direction.
the
eyepiece
turn
mount
in
until
graticule
Secure
screw.
to
section
26.
Adjust
of
the
eyepiece
graticule.
the
which
the
graticule.
A.
mount
contai-
fully
the
the
you
sharply
the
B
the
setting
E
Oculaire
réticule
‘Travaux
comme
Ensuite:
—
Tourner
réticule
jusqu’à
—
Regarder
re
et
la
lentille
jusqu’à
du
Serrer
—
Passer à la
page
sans
encore
d’un
Ne
plus
réglage
muni
avec
préliminaires
section
l’oculaire
vers
“+”
la
butée.
dans
tourner
d'oeil
ce
que
réticule
la
pince à vis.
section
26.
Seul
réticule
faire
réglage.
modifier
de
l'oculaire
du
réticule!
soit
peut
l’objet
À.
avec
l’oculai-
lentement
vers
“—”
l’image
nette.
B,
l’oculaire
le
E
Okular
Strichplatte
Vorbereitungen
Abschnitt
—
Okular
in
Anschlag
—
In
und
sam
drehen,
Strichplatte
sehen.
—
Klemmschraube
festziehen.
—
Zum
springen
beschrieben
ohne
regulieren.
Das
Strichplatte
verstellen!
mit
A.
Dann
mit
Richtung
drehen.
das
Okular
Augenlinse
in
Richtung
bis
Abschnitt
und
Strichplatte
Okular
mit
nicht
wie
Strichplatte
'+'
bis
schauen
lang-
'—
Sie
die
scharf
B,
S.
26,
wie
dort
das
Okular
mehr
E
Ocular
retículo
Preparativos
apartado
—
Gire
retículo
“+”
—
Mire a través
y
lente
hasta
nítidamente.
—
Ajuste
apriete.
—
Vaya
pág.
sólo
retículo,
describe
No
con
con
A.
Luego
el
ocular
en
hasta
el
gire
lentamente
en
dirección
que
vea
el
tornillo
al
apartado
26.
Regule
el
ocular
tal y como
alli.
mueva
ya
reticulo.
como
con
dirección
tope.
del
el
sin
el
en
el
ocular
la
“—”,
retículo
de
B,
ahora
se
ocular
27
Page 36

Use
Swingarm
Never
put
your
the
fork
of
the
when
the
safety
not
engaged.
fingers
swingarm
hook
is
Utilisation
Bras
in
Ne
jamais
mains
du
bras
le
crochet
mobile
mettre
entre
les
mobile
est
les
barres
lorsque
libéré.
Bedienung
Schwenkarm
Nie
zwischen
Schwenkarmgabel
greifen,
Sperrhaken
wenn
gelóst
die
der
ist
Manejo
Brazo
movil
No
meta
los
apertura
cuando
gancho
del
está
de
dedos
en
brazo
móvil
suelto
el
bloqueo.
la
Locking
Always
swingarm:
—
—
—
—
Unlocking
Always
microscope
disengaging
hook,
whether
arm
the
lock
during
transport
when
changing
accessories.
Pull
out
pin
Engage
If
lower
slightly
it
the
the
necessary,
the
in
with
the
hold
you
are
or
is
balanced
swingarm
the
retaining
safety
raise
swingarm
order
to
safety
hook.
the
swingarm
the
surgical
firmly
if,
the
safety
not
sure
not
the
swing-
(page
hook.
or
align
when
23).
Blocage
Ne
bloquer
—
—
—
—
Déblocage
mobile
Tenir
d’opération à la
de
libérant
n'est
bras
équilibré
du
bras
jamais
oublier
le
bras
pour
le
transport
pour
changer
d'accessoires
Tirer
le
goujon
quetage.
Encliqueter
de
retenue
partie
bras
échéant,
mobile
le
positionnement
pas
mobile
le
dans
supérieure
mobile.
Le
pousser
vers
le
du
bras
microscope
le
crochet
certain
ait
été
(page
mobile
de
mobile:
d’encli-
crochet
la
du
cas
le
bras
crochet.
poignée
en
s’il
que
le
23).
Schwenkarm
Schwenkarm
blockieren:
—
beim
Transport
—
beim
Umriisten
ー
Haltebolzen
ー
Sperrhaken
Dabei
evtl.
arm
durch
Heben/Senken
Sperrhaken
Blockierung
Halten
Sie
tionsmikroskop
Offnen
des
am
Positioniergriff
wenn
Sie
der
Schwenkarm
23).
nicht
ob
balanciert
(S.
blockieren
immer
ziehen.
festklinken.
Schwenk-
leichtes
zum
ftihren.
lósen
das
Opera-
beim
Sperrhakens
fest,
sicher
ist
sind,
aus-
Bloqueado
móvil
Bloquee
brazo
—
cuando
transportar
-
cuando
sustituir
-
Tire
sujeción.
—
Encaje
bloqueo.
necesario,
móvil
bloqueo,
levantando
el
mente.
Desbloqueado
Cuando
bloqueo
copio
no
estar
equilibrado
(pág.
siempre
móvil
del
el
al
brazo
abra
sujete
de
operación,
seguro
23).
del
vayaa
vaya a |
accesorios
perno
gancho
S1
lleve
gancho
inclinando/
móvil
el
brazo
el
.
el
equipo
de
de
resulta
el
brazo
de
para
ello
ligera-
el
gancho
el
micros-
de
de
si
está
brazo móvil
de
To
release
Push
the
wards
until
mechanism
sition.
If
not
easily
or
lower
slightly.
28
the
swingarm:
counterlever
the
retaining
clicks
the
the
into
safety
released,
swingarm
hook
raise
le
reste
up-
po-
is
Libérer
pousser
haut
crochet
s’enclenche
goujon.
fixé,
légérement
le
bras
le
levier
jusqu’a
de
retenue
Si
le
lever
ou
mobile:
vers
ce
que
dans
crochet
abaisser
le
bras
le
le
mobile.
Schwenkarm
Gegenhebel
drücken,
ken
im
klinkt.
Sperrhaken
Schwenkarm
heben/senken.
lôsen:
nach
bis
der
sich
nicht
leicht
Sperrha-
der
Haltebolzen
Falls
oben
fest-
lôst,
Aflojado
Empuje
hacia
encaje
bloqueo
sujeción.
gancho,
ligeramente
móvil.
del
la
arriba hasta
el
gancho
en
Si
levante/incline
brazo
contrapalanca
el
perno
no
se
el
brazo
móvil:
que
de
de
suelta
el
Page 37

Balance
each
accessories
changed
the
time
the
swingarm
are
Equilibrage
mobile
changement
d'accessoires
du
aprés
bras
chaque
Nach
jedem
Zubehôrwechsel:
Schwenkarm
ausbalancieren
Después
cambio
equilibre
de
de
el
cada
accesorio
brazo
móvil
Always
the
Never
accessories
to
microscope
field
The
(no.
swingarm
of
(see
When
the
can
on
60cm
balance
operation
change
or
rebalance
is
of
operation
1100N
gas
433826)
up
surgical
be
the
to
23.5kg
page
33)
properly
moved
swingarm
without
in
carries
microscope
before
attempt
when
the
over
the
spring
the
loads
balanced,
vertically
through
drifting.
Toujours
l'équilibrage
l'opération!
Ne
d'accessoires
équilibrer
au-dessus
opératoire!
Le
1100 N (n°
bras
des
poids
kg
Une
est
d’abaisser
de
craindre
brage
effectuer
jamais
changer
le
bras
du
ressort
pneumatique
433826)
mobile
supporte
équipements
maximal
(cf.
p.
33).
fois
contrebalancé,
possible
60
de
le
bras
cm
sans
un
déséquili-
du
microscope.
avant
ni
champ
lever
devoir
mobile
du
d'un
de
23,5
ou
mobile
BALANCE
il
Ausbalancieren
vor
der
Operation!
Umriisten
und
Schwenkarms
dem
Die
(Nr.
Schwenkarm
Ausriistungen
23.5
In
Zustand
tionsmikroskop
Schwenkarm
von
werden,
ständig
zu
des
Zubehórs
Ausbalancieren
nie
Operationsfeld!
Gasfeder
433826)
kg
ausbalanciertem
60
verstellen.
1100
im
tragt
bis
(vgl.
S.
33).
kann
das
im
cm
positioniert
ohne
sich
nach
oben/unten
am
immer
des
über
N
max.
Opera-
Bereich
selb-
¡Equilibre
de
¡No
accesorios o efectúe
compensación
del
campo
El
resorte
(artículo
del
accesorios
kg.
(compare
Una
microscopio
puede
el
brazo
margen
se
suba/incline
siempre
la
operación!
sustituya
brazo
móvil
de
operación!
1100
número
brazo
móvil
de
como
máximo
pág.
vez
equilibrado,
de
posicionarse
móvil
de
60
antes
nunca
del
peso
sobre
N
433
soporta
hasta
33).
operación
sobre
en
un
cm
sin
que
por
sí
solo.
la
el
826)
23,5
el
Rebalancing
accessories
—
Lock
the
swingarm
—
Tighten
knobs
—
Fit
-
Hold
with
other,
hook.
swingarm
—
Turn
ment
swingarm
Tension
loading = low
all
the
accessories
the
microscope
one
hand.
release
See
the
tension
knob
scale:
after
braking
With
the
whether
drifts
until
the
is
balanced.
Low
figure.
fitting
safety
adjust-
Equilibrage après
changement
d'accessoires
—
Bloquer
—
Serrer
de
—
Monter
the
—
Tenir
the
d’une
crochet
Vérifier,
juste
microscope,
mobile
seul.
—
Tourner
d’équilibrage
que
bré.
Echelle:
petite
le
tous
freinage
les
le
microscope
main
de
en
un
moment
se
déplace
le
le
bras
faible
valeur.
bras
mobile
les
boutons
accessoires
et
libérer
retenue.
lâchant
le
si
le
bras
tout
bouton
jusqu’à
soit
équili-
poids
=
le
се
Ausbalancieren
Zubehôrwechsel
—
Schwenkarm
ー
Alle
Bremsknopfe
festziehen.
—
Zubehör
—
Mikroskop
Hand
am
griff
festhalten
Sperrhaken
Testen
(Mikroskop
loslassen),
Schwenkarm
standig
hebt/senkt.
—
Drehknopf
der
Schwenkarm
Gleichgewicht
Skala:
Wenig
niedriger
Wert.
nach
blockieren.
montieren.
mit
einer
Positionier-
und
lôsen.
sich
selb-
drehen,
ist.
kurz
der
bis
im
=
ob
Gewicht
Equilibrado
sustitución
accesorios
—
Bloquee
ー
Apriete
botones
—
Monte
—
Sujete
empuñadura
microscopio y suelte
gancho
Soltando
microscopio,
el
por
—
Mueva
rio,
esté
equilibrado.
Escala:
pequeno.
tras
de
el
brazo
todos
de
freno.
los
accesorios.
con
una
del
de
bloqueo.
brevemente
se
solo.
el
botón
que
poco
peso = valor
controle
sube/inclina
brazo
si
hasta
completamente
móvil.
los
mano
girato-
el
brazo
la
el
el
si
29
Page 38

Use
Utilisation
Bedienung
Manejo
Adjusting
movements
required
Always
braking
completely:
—
—
The
stand
which
for
freedom
zation.
tighten
knobs
when
re-equipping
for
transport.
three
joints
have
braking
can
be
all
stages
to
total
the
as
the
on
the
knobs
adjusted
from
total
immobili-
Réglage
de
mouvements
Toujours
boutons
—
pour
d'accessoires
—
pour
la
dureté
de
changer
le
serrer
transport
individuel
des
freinage:
les
Les
trois
joints
sur
İe
statif
boutons
permettant à l'utilisateur
de
régler
l'arrêt
complet.
sont
de
freinage
le
jeu
articulés
dotés
jusqu’à
de
Gangleichtigkeit
der
Bewegungen
regulieren
Bremsknópfe
festziehen:
—
beim
—
beim
immer
Umriisten
Transport
Die
drei
tiv
mit
die
nach
von
Arretierung
kann.
Gelenke
besitzen
Stativbewegungen
Bremsknôpfe,
denen
der
Benutzer
persónlichem
leichtgángig
regulieren
bis
am
Sta-
Bedarf
zur
Regulado
suavidad
de
los
Apriete a fondo
botones
— al
—
para
Las
tres
estativo
botones
pueden
mente
suave
de
de
movimientos
de
los
sustituir
accesorios
el
transporte
articulaciones
estan
dotadas
de
freno
regular
desde
marcha
hasta
blogueo.
marcha
frenos:
individual-
la
los
que
del
de
se
The
braking
positioning
serves
microscope
or 2 (page
The
keeps
in
the
and
when
first
30
handle
to
retain
in
20).
orange
knob
the
horizontal
perforated
may
only
the
equipment
installed.
knob
with
the
position
plate
be
opened
Le
bouton
de
freinage
avec
positionnement
1
sert à maintenir
cope
(page
Le
arm
assure
te-microscope
que
is
desserré
l'installation
poignée
en
20)
bouton
perforé
position 1 ou
orange
la
fixation
et
que
lors
initiale.
de
le
micros-
du
dans
ne
doit étre
de
le
2
por-
dis-
Der
Bremsknopf
Positioniergriff
dient
dazu,
in
der
festzuhalten
(S.
20).
Der
halt
in
der
und
stallation
das
Stellung 1 oder
orange
Knopf
den
Mikroskoptrager
Lochscheibe
ist
nur
bei
Neuin-
zu
6ffnen.
mit
Mikroskop
2
fest
El
botón
de
freno
con
empufiadura
emplazamiento
sirve
para
microscopio
162
(pág.
El
botón
asegura
portamicroscopio
disco
perforado y podrá
aflojarse
instale
primera
de
retener
en
la
20).
anaranjado
el
encaje
sólo
cuando
el
equipo
vez.
por
el
posición
del
en
el
se
Page 39

Use
Utilisation
Bedienung
Manejo
Transport,
positioning
operating
position
Transport
Important:
Adhere
the
following
This
will
swingarm
sideways
and
perhaps
floor
Stand
—
Release
bolt
and
safety
—
Slacken
brakes
swingarm
the
picture
-
Tighten
brakes
—
Put
the
its
holder
—
Pull
out
cable
and
fold
—
Release
by
pressing
levers
—
Use
the
move
working
—
Now
brakes
at
table,
scrupulously
directions.
prevent
from
out
of
causing
to
tip
the
securing
engage
hook
the
articulation
and
fold
as
shown
the
articulation
footswitch
the
power
from
the
it
up
the
footbrakes
on
handles
the
stand
location
press
the
to
engage
the
rest
to
the
moving
control
the
over.
the
up
the
in
into
socket
the
foot
to
to
its
foot-
them.
Transport,
positionnement
rapport a la
d'opération
par
table
et
rangement
Transport
Il
est
important
de
suivre a la
instructions
nées
ci-dessous.
éviterez
cement
bras
mobile
culement
—
Tirer
quetage
crochet
bloque
—
Desserrer
de
freinage
bras
diqué
—
Resserrer
de
freinage.
—
Mettre
pédale
—
Tirer
la
prise
—
Appuyer
des
pédales
pour
roulettes
—
Rouler
tenant
~
Appuyer
de
frein.
lettre
mention-
Vous
ainsi
le
balan-
involontaire
et
le
bas-
du
statif
le
goujon
d’encli-
pour
que
de
retenue
le
bras
mobile.
les
boutons
et
mobile
le
débloquer
replier
comme
sur
Pillustration
les
boutons
la
commande
dans
le
support.
câble
réseau
de
courant.
sur
les
de
frein
du
statif.
le
statif
aux
en
poignées.
sur
les
leviers
les
pédales
les
du
de
le
le
sol.
le
in-
à
de
Transporte,
Transport,
Plazierung
OP-Tisch
PCM
3;
bl
KBD
Ruhestellung
Transportieren
Wichtig:
exakt
Anweisungen.
vermeiden
trolliertes
ken
des
und damit
Kippen
—
Haltebolzen
Sperrhaken
—
Gelenkbremsen
und
gemäss
falten.
—
Gelenkbremsen
festziehen.
ー
Fussschalter
Trager
-
Netzkabel
Steckdose
zusammenlegen.
-
Auf
treten,
bremsen
~
Stativ
zum
schieben.
—
Fussbremsen
am
und
Halten
Sie
an
die
folgenden
Dadurch
Sie
ein
Ausschwen-
Schwenkarms
ein
mégliches
des
Bodenstativs.
ziehen
festklinken.
Schwenkarm
Bild
zusammen-
an
hangen.
aus
der
ziehen
die
Fusshebel
um
die
Fuss-
zu
lòsen.
an
den Griffen
gewiinschten
festtreten.
unkon-
öffnen
den
und
Ort
emplazamiento
la
mesa
operación
posición
Transporte
sich
Observación:
aténgase a las
instrucciones
siguientes.
evita
del
brazo
consiguiente
vuelco
und
—
Tire
sujeción y encaje
gancho
ー
Suelte
articulación y pliegue
brazo
se
muestra
~
Apriete
frenos
—
Coloque
de
el
soporte.
—
Desenchufe
red y enröllelo
mente.
—
Pise
soltar
pedal.
—
Tome
desplazar
destino
—
Pise
de
en
Con
giros
incontrolados
movil y por
del
estativo.
del
perno
de
blogueo.
los
frenos
móvil
en
fuertemente
de
articulación.
el
control
por
las
palancas
los
frenos
los
mangos
el
reguerido.
los
frenos.
en
y
reposo
ello
un
posible
de
el
de
el
dibujo.
pedal
cable
debida-
para
de
para
el
los
en
de
al
tal y como
dispositivo
el
estativo
Positioning
the
operating
For
maximum
—
the
pivotal
extension
over
the
tion,
—
the
swingarm
slight
Rest
—
Lock
described
and
tion
—
Place
into
—
Fit
the
field
and
articulation
lateral
position
the
swingarm
tighten
brakes
the
its
holder
the
dust
dust
covers.
the
stand
table
mobility:
point
on
arm
must
of
opera-
of
be
angle.
the
articula-
caps
the
at
fold
and
must
above,
footswitch
at
Positionnement
rapport
a la
d'opération
La
the
be
a
as
parfaite
garantie
—
—
Rangement
—
it,
—
-
lorsque
le
point
du
microscope
trouve
champ
le
bras
légèrement
Bloquer
comme
dessus,
les
boutons
Placer
pédale
Mettre
antipoussière
vrir
l’instrument.
par
table
mobilité
de
pivotement
se
au-dessus
opératoire
mobile
est
plié.
le
bras
indiqué
le
la
dans
les
mobile
ci-
plier
et
de
freinage.
commande
le
support.
couvercles
et
du
serrer
recou-
est
et
à
AT
GL
NUE
Plazieren
Die
keit
wenn
—
—
Ruhestellung
—
ー
-
D
am
OP-Tisch
maximale
ist
sich
Drehpunkt
Operationsfeld
und
der
Schwenkarm
abgewinkelt
Schwenkarm
blockieren,
falten
bremsen
Fussschalter
Trager
Staubdeckel
schutzhülle
Beweglich-
gewáhrleistet,
der
Mikroskop-
tiber
ist.
wie
zusammen-
und
Gelenk-
festziehen.
an
hangen.
und
anbringen.
dem
befindet
leicht
oben
den
Staub-
Emplazamiento
la
mesa
La
movilidad
garantizada
—
el
punto
microscopio
situado
de
operacién
—
yel
brazo
ligeramente
Posicién
—
Bloquee
se
ha
descrito
pliéguelo y apriete
frenos
—
Coloque
de
control
el
soporte.
—
Coloque
funda
junto
de
operaciôn
maxima
cuando
de
giro
del
esta
sobre
el
campo
mövil
esta
angulado.
de
reposo
el
brazo
como
arriba,
de
articulación.
el
dispositivo
por
pedal
la
tapa y la
protectoras.
a
esta
los
en
31
Page 40

Use
Utilisation
Bedienung
Manejo
Sterile
The
with
handles
the
also
disposable
controls
grasp.
Sterilization
All
components
positioning
lever
steam-
Never
sterilization.
Clip-on
Fitting:
The
ge
metal
microscope
microscope
Removing:
Press
Lever
for
diaphragm
splitter.
controls
controls
steam-sterilizable
sterilizable
when
attachable
clip-on
when
the
can
and
covers.
handles
you
use
drapes.
will
be
easier
polymer
such
handles
extensions
or
gas-sterilizable.
use
formic
handles
handles
pushed
axles
or
on
carrier.
axial
button.
on
the
over
handle
the
extension
double-iris
be
fitted
Use
sterile
The
as
and
are
acid
enga-
on
the
beam
Eléments
commande
stérilisables
Vous
éléments
avec
poignées
Pautoclave.
sont
to
que
ses
usage.
Stérilisation
Tous
matière
que
tionnement
diaphragme
bles à l'autoclave
for
gaz.
Ne
jamais
formique!
Poignées
ment
the
the
Mise
Faire
sur
microscope
microscope
qu’elles
tomatiquement
Retrait:
Libérer
déclic
Rallonge
à
mettre
double
sur
de
pouvez
recouvrir
de
commande
des
gaines
et
stérilisables
Ces
aussi
vous
stériles à jeter
les
les
poignées
en
glisser
les
porte-poignées
par
diaphragme
le
répartiteur
dernières
conseillées
utilisez
composants
synthétique
et
le
sont
utiliser
de
positionne-
place:
les
poignées
et
du
jusqu'à
s’enclenchent
par
le
verrouillage
pression.
de
levier
sur
le
levier
les
des
a
lors-
des
hous-
après
en
tels
de
posi-
levier
de
stérilisa-
ou
au
d'acide
du
porte-
ce
au-
déclic.
à
du
iris
optique.
Elementos
Sterile
elemente
Die
kônnen
sierbaren
Abdeckungen
werden.
Griffe
wenn
hüllen
Bedienungselemente
dann
Sterilisation
Alle
stoffkomponenten
z.B.
und
dampf-
sierbar.
Sterilisieren
Ameisensäure!
Positioniergriffe
Aufsetzen:
Positioniergriffe
Griffhalterungen
Mikroskop
Mikroskoptrager
schieben.
mittels
automatisch
Abnehmen:
Schnappverschluss
Druck
Hebelverlångerung
fiir
am
Hebel
Bedienungs-
Bedienungselemente
mit
dampfsterili-
Griffen
und
versehen
Bringen
auch
Sie
benutzen.
griffiger.
aufsteckbaren
Positioniergriffe
Blendenhebel
oder
Schnappverschluss
låsen.
die
Doppelirisblende
Strahlenteiler
feststecken.
dann
sterile
Einweg-
gassterili-
Sie nie
tiber
und
am
Sie
rasten
ein.
Sie
an,
Die
Kunst-
wie
sind
mit
am
durch
auf
die
und
mando
esterilizables
Puede
ras y fundas
con
elementos
microscopio.
estas
que
tas
sind
pues
elementos
instrumento
les
de
Esterilización
Todos
plástico
las
palancas
y
las
ten
vapor.
¡No
ácido
Empuñaduras
Montaje:
die
Deslice
por
microscopio y el
microscopio.
encajan
mediante
Desmontaje:
Haga
empuñadura
salga.
Prolongación
palanca
dem
Introduzca
en
la
diafragma
divisor
vapor
empuñaduras
vaya a utilizar
estériles
de
empuñaduras
esterlizarse
esterilice
fórmico!
los
presión
palanca
de
adaptar
agarrar.
los
empuñadu-
esterilizables
en
todos
de
control
Coloque
cubier-
desechables,
esta
manera
de
control
son
más
componentes
insertables
de
diafragma
permi-
con
nunca
las
empuñaduras
soportes
automáticamente
de
del
porta-
Estas
cierre a presión.
sobre
para
que
de
la
este
elemento
para
el
iris
doble
rayos.
los
del
aun-
los
del
fáci-
como
gas
con
la
en
de
o
el
Cover
for
the
binocular
with
variable
observation
Do
not use
beneath
Lever
transparent
respectively
double-iris
with
knob
inclined
when
attachment
observer.
32
this
the
extension
diaphragm
interpupillary
of
straight
binocular
used
with
for
tube
angle
of
0°-180°.
cover
sterile
drape.
and
cover
for
use
drive
and
tubes
stereo
second
Gaine
à
mettre
sur
le
tube
bino-
d’observa-
180°.
sous
levier
et
diaphrag-
réglage
de
pupillaire
incliné
(pour
pour
with
and
culaire à angle
tion
variable
A
ne
pas
housse
Rallonge
gaine
pour
me
Vécartement
le
et
rallonge
xiéme
utiliser
stérile.
du
le
double
iris
et
le
tube
binoculaire
le
tube
droit
stéréo
observateur).
la
sur
la
deu-
グ
ヽ
Abdeckung
fiir
den
Binokulartubus
mit
variablem
winkel
Tubusrohre
Abdeckungen
der
Sterilhülle
Hebelverlängerung
und
Drehknopf
für
Doppelirisblende
Augenabstandsversteller
am
binokularen
tubus
und
(beim
achteransatz)
Einblick-
180°
iiber
die
schieben.
nicht
unter
benutzen.
Schrág-
Geradtubus
Stereo-Mitbeob-
feststecken.
Funda
Encájese
binocular
observación
No
jo
Prolongación
palanca y funda
und
botón
Para
doble
distancia
los
el
estereoscópico
servación
recto e inclinado.
en
el
con
variable
utilice
las
de
la
fundas
giratorio
el
diafragma
y el
regulador
interpupilar
tubos
binoculares
dispositivo
simultánea)
tubo
ángulo
fundas
estéril.
de
es
para
de
180°.
deba-
la
para
iris
de
en
(en
ob-
el
la
Page 41

Accessories
Table
of
weights
WILD
M680
complete
standard
outfit:
with
microscope,
pe
carrier,
(1
short
and 1 long), 2 tube
adapters, 2 variable
cular
tubes, 4 eyepieces
10xB,
and
objective
Example
combination
accessories:
Beam
splitter,
with
f=107mm
Sony
TV
f=350mm
and
Leica
motor
winder
Accessories
Stereo
module,
Stereo
module,
Beam
splitter
Dual
attachment
TV
objectives
and
f=85mm
attachment
TV
objective
dual
attachment
Photo
objective
for
dual
attachment
Photo
objective
for
dual
attachment
Sony
TV
Edixa
Leica
with
Phototube
Adapter
phototube
Adapter
phototube
Cine/TV
Stereo
attachment
second
observer
Straight
binocular
with
drive
Inclined
with
drive
Inclined
binocular
Wide-field
spectacle
Second
observer
microsco-
stereo
modules
f=250mm
of
additional
of
dual
TV
camera
DXC107,
photo
adapter,
camera
short
long
f=60mm
for
dual
f=107mm
f=250mm
f=350mm
camera
DXC
motor
winder
f=250mm
f=350mm
tube
f=107mm
binocular
eyepiece
wearers
tube,
with
bino-
adapter
adapter,
for
107
for
for
for
tube
tube
tube,
45°
for
10xB
long
Accessoires
Poids
WILD
M680
Equipement
standard
complet:
avec
microscope,
microscope,
stéréo
(1
bagues
intermédiaires
tournantes, 2 tubes
laires à angle
oculaires
{=250
mm
Exemple
supplémentaires:
Répartiteur
double
rallonge
TV
avec
1=107
Sony
photo
appareil
transport
adaptateur
mm,
DXC
f=350
photo
Accessoires
Module
stéréo
Module
stéréo
Répartiteur
Double
rallonge
Adaptateur
et
f=85
mm
rallonge
Adaptateur
pour
photo
Adaptateur
pour
et
Adaptateur
pour
photo
Caméra
TV
photo
double
et
TV
double
double
et
TV
TV
Edixa
Appareil
transport
Railonge
Adaptateur
pour
rallonge
Adaptateur
pour
rallonge
Rallonge
adaptateur
Rallonge
deuxiéme
Tube
droit
Tube
incliné
commande
Tube
binoculaire
Oculaire
porteurs
Tube
observateur
grand-angulaire
de
long
porte-
modules
court
et 1 long),
variable,
10xB
et
d’accessoires
optique,
photo
caméra
107,
adaptateur
mm
et
Leica
de
film 4 moteur
court
long
optigue
photo
TV
f-60
pour
double
et
TV
f=107
rallonge
photo
f=250
rallonge
photo
f=350
rallonge
Sony
DXC
photo
Leica
de
film 4 moteur
photo
f=250
photo
f=350
photo
ciné/TV
f=107
stéréo
pour
observateur
avec
commande
avec
incliné
lunettes
pour
deuxième
binocu-
4
objectif
et
TV
TV
avec
et
TV
mm
TV
mm
mm
photo
mm
107
avec
mm
mm
avec
mm
45°
pour
10xB
2
206409
3027
520
880
each/chacun/je/cada
1480
600
630g
5509
7000
110g
64g
167g
360
690g
960
6000
709
170g
790
660
5679
1109
1250
g
g
g
y
g
g
g
g
g
g
Zubehôr
Gewichtstabelle
WILD
M680
komplette
Standardausrůstung:
mit
Mikroskop,
Mikroskoptráger,
Modulen
lang), 2 Tubuszwischen-
stůcken, 2 variablen
okulartuben, 4 Okularen
10xB
f = 250
Beispiel
Zubehôr:
Strahlenteiler,
mit
f=107
Kamera
Adapter
Leica-Kamera
Motorwinder
Zubehör
Stereo-Module,
Stereo-Module,
Strahlenteiler
Dualansatz
TV-Adapter f =
uno
und
Dualansatz
TV-Adapter f =107
zu
Photo-Adapter f =
zu
Photo-Adapter
zu
TV-Kamera
Edixa
Leica
Photoansatz
Adapter f =
zu
Adapter f =
zu
Kino-/TV-Ansatz
Adapter
Stereo-Mitbeobachter-
ansatz
Geradtubus
Schrágtubus
Binokulartubus,
Weitwinkel-Brillentráger-
okular
Mitbeobachtertubus,
(1x
kurz
und
Objektiv
mm
fiir
zusatzliches
TV-Adapter
mm,
f=
Dualansatz
Dualansatz
Dualansatz
mit
Photoansatz
Photoansatz
Dualansatz
Sony
DXC
107,
f=350
mm
mit
85
mm
Sony
Motorwinder
250
350
f=107
mm
mit
mit
10xB
zu
Accesorios
Tabla
de
Equipo
WILD
M680:
con
Stereo-
und
1X
Bin- © giratorias, 2 tubos
TV-
Photo-
und
kurz
lang
60
mm
mm
250
mm
f=350
mm
DXC
107
mm
mm
mit
Trieb
Trieb
schràg,
45°
lang
microscopio,
microscopio,
reoscópicos
go), 2 piezas
lares
variables, 4 oculares
10xB y objetivo = 250
Ejemplo
adicionales:
divisor
de
to
dual
con
TV f =
107
TV
Sony
adaptador
f = 350
mm y camara
con
bobina a motor
Accesorios
Médulo
estereoscépico,
Módulo
estereoscópico,
Divisor
de
Suplemento
Adaptador
mm y f = 85
suplemento
Adaptador
f=
107
mm,
suplemento
Adaptador
f = 250
mm,
suplemento
Adaptador
f = 350
mm,
suplemento
Cámara
TV
Edixa
Leica
con
Suplemento
Adaptador f =
suplemento
Adaptador f =
suplemento
Suplemento
adaptador f =
Dispositivo
para
observación
Tubo
recto
ajuste
Tubo
inclinado
de
ajuste
Tubo
binocular
Ocular
granangular
observar
Tubo
para
observador,
pesos
completo
(1
con
rayos,
adaptador
mun,
DXC
fotográfico
rayos
de
mm,
dual
de
para
dual
fotográfico
para
dual
fotográfico
para
dual
Sony
bobina a motor
para
para
estereoscópico
con
con
segundo
del
porta-
módulos
corto, 1 lar-
intermedias
binocu-
accesorios
suplemen-
cámara
107,
Leica
dual
TV f =
para
TV
DXC
para
fotografia
250
mm,
fotografía
350
mm,
fotografia
cine/TV
largo
con
107
mm
simultánea
botón
de
con
botón
inclinado,
para
gatas
10xB
este-
mm
de
de
corto
largo
60
107
para
para
45°
33
Page 42

Accessories
Accessoires
Zubehôr
Accesorios
Beam
splitter
No
more
than
accessories,
the
beam
splitter,
fitted
(see
page
Never
change
accessories
microscope
field
Rebalance
swingarm
you
change
accessories
Fitting
The
beam
fitted
observers.
Preparatory
—
Lock
(page
—
Tighten
brakes
—
Release
screw
pe.
lar
sent,
tube
when
is
of
operation.
the
each
the
(page
splitter
for
either
work
the
swingarm
28)
the
(page
the
on
the
Remove
tube
and,
the
+30°
adapter
3.1kg
of
including
may
be
33).
the
over
the
time
that
29).
can
be
of
the
two
articulation
30)
clamping
microsco-
the
binocu-
if
it
is
pre-
rotatable
(page
48).
Répartiteur
Le
poids
accessoires
supplémentaires
pas
dépasser
le
répartiteur
{voir
page
Ne
jamais
d'accessoires
du
champ
Equilibrer
et
le
bras
chaque
d'accessoires
Montage
Le
répartiteur
peut
être
côtés
observateur.
Préliminaires
—
Bloquer
(page
—
Serrer
freinage
—
Desserrer
du
module
rer
le
avec
re
tournante
optique
des
ne
3,1
kg
optique
33).
changer
au-dessus
opératoire!
le
microscope
mobile
après
changement
(page
optique
utilisé
des
le
bras
mobile
28)
les
boutons
(page
30)
la
pince à vis
stéréo.
tube
binoculaire
bague
intermédiai-
30°(p.
doit
avec
29).
deux
de
Reti-
48).
Strahlenteiler
Die
Zuladung
behòr
(mit
Strahlenteiler)
begrenzt
Umriisten
Operationsfeld!
Nach
jedem
wechsel
ausbalancieren
Montage
Der
Strahlenteiler
auf
beiden
seiten
benutzt
Vorbereitungen
—
Schwenkarm
(5.28).
—
Gelenkbremsen
festziehen
—
Klemmschraube
Stereo-Modul
Binokulartubus
Tubuszwischenstůck
abnehmen
von
ist
auf
max.
(siehe
nie
über
Zubehór-
Schwenkarm
Beobachter-
werden.
(S.
(S.
S.
(S.
blockieren
30).
lósen.
48).
Zu-
3,1
33).
dem
29).
kann
am
mit
Divisor
La
kg
esta
como
divisor
pag.
iNo
accesorios
campo
Después
cambio
equilibre
y
el
operacion
Montaje
El
utilizarse
del
Preparativos
—
Bloquee
(pag.
—
Apriete
articulación
—
Afloje
30“
apriete
estereoscópico.
-
Retire
con
giratoria
de
rayos
carga
de
accesorios
limitada a 3,1
maximo
33).
sustituya
microscopio
divisor
observador.
la
(con
de
rayos)
nunca
sobre
de
operacion!
de
cada
de
accesorio
el
brazo
(pag.
de
rayos
en
ambos
el
brazo
28).
los
frenos
(pág.
el
tornillo
del
módulo
el
tubo
pieza
intermedia
+30"
kg
(veáse
el
movil
de
29).
puede
lados
móvil
de
30).
de
binocular
(pág.
48).
Fitting
the
Always
fit
splitter
on
stereo
modules.
—
Introduce
splitter
ring
of
le
and
that
the
engages
groove
—
Secure
screw
—
Secure
adapter
lar
tube
splitter
manner.
clamping
34
beam
the
beam
top
of
the
into
the
the
stereo
turn
it
locating
the
guide
the
clamping
the
+30° tube
and
the
to
the
in
the
Secure
screw.
splitter
the
beam
dovetail
modu-
slightly
so
screw
binocu-
beam
same
the
Montage
optique
Toujours
teur
modules
ー
—
—
du
fixer
optique
stéréo.
Introduire
optique
d’aronde
stéréo
légèrement
que
s'enclenche
glissiére.
Serrer
Procéder
façon
bague
avec
le
Serrer
dans
sur
et
le
la
vis
d'orientation
les
pinces à vis.
de
pour
intermédiaire
tube
binculaire
répartiteur
la
pince à vis.
répartiteur
le
réparti-
sur
les
le
répartiteur
la
queue
le
module
tourner
jusqu’à
dans
la
la
même
fixer
la
optique.
ce
30°
sur
Strahlenteiler
Strahlenteiler
den
Stereo-Modulen
befestigen.
—
Strahlenteiler
Ringschwalbe
Stereo-Modul
und
verdrehen,
Orientierungsschraube
in
die
—
Klemmschraube
festziehen.
—
Tubuszwischenstück
mit
Binokulartubus
dieselbe
Strahlenteiler
gen.
festziehen.
montieren
immer
in
die
auf
dem
leicht
bis
Weise
schieben
die
greift.
auf
befesti-
seitlich
Führung
Klemmschrauben
Montaje
auf
rayos
Monte
en
estereoscópicos.
—
—
30°
auf
—
dem
del
divisor
el
divisor
los
módulos
Introduzca
rayos
milano
estereoscópico y gírelo
ligeramente
bos
correctamente
encajado.
Apriete
Ргоседа
manera
divisor
binocular
intermedia
+30".
los.
en
del
lados
el
para
de
Apriete
el
divisor
la
cola
módulo
hacia
hasta
tornillo.
de
la
misma
fijar
rayos
con
la
giratoria
los
de
siempre
de
am-
que
esté
en
el
el
tubo
pieza
tornil-
de
Page 43

Fitting
accessories
The
two
the
beam
used
simultaneously
different
Respect
(see
—
-
—
the
page
Release
screw
at
lateral
ve
the
Carefully
observer
phototube,
tube
or
ment,
and
clamping
Balance
(page
28).
lateral
splitter
tasks.
weight
34)!
the
clamping
the
left
outlet
black
cover
fit
the
tube,
the
the
dual
tighten
screw
the
swingarm
outlets
can
be
for
limit
or
right
and
remo-
plate
second
the
cine/TV
attach-
the
Mise
en
of
accessoires
Les
deux
du
répartiteur
peuvent
ment a différentes
applications.
Attention
(voir
p.
—
Desserrer
de
la
droite,
plaque
-
Mettre
pour
vateur,
photo/TV
rallonge
Serrer
—
Equilibrer
mobile
place
sorties
optique
servir
simultané-
au
poids
34)!
la
pince à vis
sortie
gauche
puis
retirer
noire.
en
place
deuxième
la
rallonge
ou
photo
la
pince à vis.
le
(page
des
latérales
total
ou
la
le
tube
obser-
la
double
et
TV.
bras
28).
Zubehór
Die
gánge
kónnen
verschiedene
genutzt
Gesamtgewicht
(siehe
—
—
—
montieren
beiden
des
gleichzeitig
werden.
S.
34)!
Klemmschraube
linken
oder
Ausgang
schwarze
platte
abnehmen.
Mitbeobachtertubus,
Photo-,
Dualansatz
einsetzen
Klemmschraube
festziehen.
Schwenkarm
ausbalancieren
seitlichen
Strahlenteilers
Aufgaben
lösen
Staubschutz-
TV-
und
Aus-
fur
beachten
am
rechten
und
oder
sorgfâltig
(S.
28)
Montaje
accesorios
Las
del
den
mente
accesorios.
jObserve
en
—
-
-
de
dos
salidas
divisor
utilizarse
para
la
pag.
34!
Afloje
el
apriete
de
dos
salidas
retire
la
Monte
con
tubo
de
de
TV o el
para
(pag.
observaciön
el
simultânea,
mento
el
apriete
Equilibre
movil
los
laterales
de
rayos
simultanea-
diferentes
tabla
de
tornillo
una
de
laterales
placa
negra.
cuidado
el
suple-
fotografia,
dual
tornillo.
el
brazo
28).
pue-
pesos
de
las
y
el
y
Depth
of
field
You
can
lateral
The
of
the
depth
increase
field
influences
lever
in
the
depth
double-iris
which
observation
both
Move
OPEN
1.
increases.
the
with
the
diaphragm,
the
tube
and
outlets.
from
direction
of
field
Profondeur
Le
augmente
de
tube
deux
La
se
of
l'augmentation
s'obtient
de
double
diaphragme
la
champ
profondeur
règle à l’aide
profondeur
et
agit
d'observation
sorties
latérales.
en
position
champ
sur
le
et
de
champ
du
levier;
maximum
1.
iris
les
Schárfentiefe
Mit
der
Doppelirisblende
kónnen
Sie
die
tiefe
steigern.
auf
den
und
die
Ausgänge.
Hebel
von
Richtung 1 schieben.
Dabei
nimmt
Scharfentiefe
Schárfen-
Sie
Beobachtertubus
beiden
seitlichen
OPEN
die
zu.
wirkt
in
Profundidad
El
diafragma
permite
profundidad
actúa
binocular y las
laterales.
Para
incrementar
profundidad
lleve
la
en
dirección
aumentar
sobre
palanca
de
iris
de
el
de
1.
campo
doble
campo
tubo
dos
campo,
de
la
y
salidas
la
OPEN
Beam
splitter
with
optique
appareil
photo
mit
Photoansatz
rayos
con
phototube
Leica
camera
Répartiteur
photo
et
Strahenteiler
und
Leica-Kamera
Divisor
de
fotografico y camara
avec
rallonge
Leica
suplemento
Leica
and
35
Page 44

Accessories
Accessoires
Zubehôr
Accesorios
Dual-station
viewing
The
stereo
a
second
the
tubes,
required,
image
accordance
direction
Second-observer
—
Fit
tube
splitter
ー
Insert
The
—
turns
the
~
corrects
settings
~
uses
erect
attachment
observer,
second-observer
can
be
turned
and
so
can
the
to
assistant
the
direction
the
the
the
be
orientated
with
the
of
observation.
second-observer
the
beam
(page
35)
the
eyepiece.
attachment
required
the
dioptric
knurled
image.
for
and
as
tubes
to
ring
to
Observation
simultanée
La
rallonge
deuxiéme
les
tubes
peuvent
gré
de
in
ainsi
la
redresser
fonction
d'observation.
Tube
observateur
—
Monter
deuxième
sur
optique
—
Mettre
l'assistant
-
tourne
direction
—
corrige
Yoculaire
—
redresse
de
l'anneau
stéréo
observateur
d’observation
étre
orientés
l’utilisateur
possibilité
l’image
de
son
axe
pour
deuxième
le
tube
observateur
le
répartiteur
(page
35).
les
oculaires.
ce
tube
dans
voulue
ses
dioptries
l’image à l’aide
moleté
pour
qui
de
en
pour
et
au
a
la
sur
Observacion
Mitbeobachtung
Der
Stereo-Mitbeobachter-
ansatz
und
Mitbeobachtertuben
kônnen
werden.
dann
Einblickrichtung
gerichtet
Mitbeobachtertuben
—
Mitbeobachtertubus
Strahlenteiler
montieren
—
Okular
Der
—
dreht den
gewiinschte
—
stellt
Okular
—
richtet
Rândelring
die
beliebig
Das
Bild
entsprechend
werden.
(S.
einsetzen.
Assistent
Tubus
Richtung.
seine
Dioptrie
ein
das
Bild
auf.
verdreht
kann
der
auf-
35).
in
mit
simultanea
Los tubos
observador y el
vo
observación
pueden
Asi,
de
de
Tubos
am
observador
~
—
El
die
—
am
—
dem
—
para
estereoscópico
acuerdo a la
observación.
Monte
segundo
el
(påg.
Acople
asistente
gira
dirección
ajusta
el
Orienta
anillo
simultánea
girarse a voluntad.
la
imagen
se
para
segundo
el
tubo
observador
divisor
de
rayos
35).
el
ocular.
el
tubo
en
deseada
sus
dioptrías
ocular
la
imagen
moleteado.
segundo
dispositi-
para
la
orienta
dirección
|
para
en
la
en
con
el
36
Page 45

Stereo
second
ー
Fit
the
ment
splitter
right
~
Fit
the
—
Insert
The
assistant
—
turns
the
direction
—
turns
to
the
-
sets
distance
—
corrects
settings
—
uses
erect
attachment
observer
stereo
attach-
to
the
beam
on
the
side
(page
binocular
the
eyepieces.
the
attachment
the
the
the
required
binocular
horizontal
interpupillary
the
dioptric
on
the
knurled
the
image.
for
a
left
or
35)
tube
to
tube
position
eyepieces
ring
to
Rallonge
deuxiéme
—
—
—
L'assistant
—
—
—
—
-~
stéréo
observateur
Monter
gauche
répartiteur
(page
Fixer
re.
Mettre
tourne
direction
met
à
règle
pupillaire
corrige
les
redresse
de
la
rallonge
ou à droite
35).
le
tube
les
oculaires.
ce
tube
voulue
le
tube
l’horizontale
son
écartement
ses
oculaires
l’image à l’aide
l’anneau
pour
à
du
optique
binoculai-
dans
la
binoculaire
dioptries
moleté
sur
Stereo-
Mitbeobachteransatz
—
Ansatz
links
am
Strahlenteiler
montieren
ー
Binokulartubus
befestigen.
ー
Okulare
Der
Assistent
dreht
gewünschte
ー
richtet
tubus
stellt
Augenabstand
~
stellt
den
Okularen
ー
richtet das
Rändelring
oder
(S.
einsetzen.
den
Ansatz
Richtung.
den
Binokular-
horizontal
seinen
seine
Dioptrien
Bild
auf.
35).
ein.
rechts
in
aus.
ein.
mit
Dispositivo
estereoscópico
observacion
-
~
~
El
die
—
—
-
an
—
dem
—
para
simultanea
Monte
el
la
derecha
rayos
Asegure
binocular.
Acople
asistente
gira
dirección
coloca
horizontalmente
fija
interocular
ajusta
los
orienta
anillo
dispositivo
izguierda o la
en
el
divisor
(pag.
35).
el
tubo
los
oculares.
el
dispositivo
reguerida
el
tubo
binocular
su
distancia
sus
dioptrías
oculares
la
imagen
moleteado.
en
en
con
la
a
de
la
el
Beam
splitter
with
dual
ment
and
with
cameras
Répartiteur
rallonge,
vidéo
Strahlenteiler
Leica-
Divisor
dual,
camara
optique
appareil
und
Video-Kamera
de
rayos
camara
attach-
Leica-
and
video
avec
double
photo
Leica
mit
Dualansatz,
con
suplemento
Leica y video-
et
37
Page 46

Accessories
Dual
attachment
photography and
cine/TV
The
dual
cepts a commercially-avai-
lable
C-mount
camera
(Photo
attachment
TV
camera
and
at
the
on
page
an
with
SLR
same
37).
for
for
ac-
time.
Accessoires
Double
pour
TV/ciné
Cette
pour
temps
filetage C et
reflex
rallonge
photo
rallonge
recevoir
une
caméra
un
(photo
p.
et
est
prévue
en
même
TV
appareil
37.
Zubehór
Dualansatz
Photographie
TV/Kino
Der
Dualansatz
à
gleichzeitig
übliche
C-Gewinde
Spiegelreflexkamera
(Abbildung
fiir
eine
TV-Kamera
und
S.
37.)
und
nimmt
handels-
mit
eine
auf
Accesorios
Suplemento
para
fotografia
TV/cine
En
el
suplemento
pueden
montarse
simultáneamente
cámara
de
TV
(véase
corriente
una
fotografía
con
rosca C y
réflex
pag.
37).
dual
y
dual
una
cámara
Fitting
1
Dual
Fit
the
to
the
(page
2
TV
camera
~
Screw
tive
~
Fit
dual
—
Tighten
screw.
3
35mm
—
Screw
adapter
—
Screw
objective
camera
—
Connect
camera
attachment
—
Tighten
screw.
4
Align
—
Release
screw
—
Engage
Ta
steps
with
available
—
Tighten
screw.
38
attachment
dual
attachment
beam
splitter
35)
the
TV
into
position
the
camera
attachment
the
clamping
SLR
camera
the
camera
into
position
the
camera
to
the
adapter
the
to
the
the
clamping
the
TV
camera
the
clamping
(a)
the
at
TV
one
of
in
accordance
the
space
the
the
clamping
objec-
to
the
dual
came-
45°
Montage
1
Fixer
la
double
rallonge
sur
le
répartiteur
optique
2
Caméra
—
—
—
3
Appareil
—
—
-
—
4
Positionner
—
—
—
(page
Visser
Placer
la
rallonge
Serrer
Visser
chambre
Visser
sur
l’adaptateur
chambre
Mettre
la
rallonge
Serrer
TV
Desserrer
vis
(a)
Selon
la
nible,
positionner
caméra
des
crans à 45°
Serrer
35).
TV
Pobjectif
la
la
photo
l’adaptateur
l’objectif
l’appareil
la
la
TV
caméra
dans
pince à vis
photo
de
pince à vis
la
caméra
la
pince
place
dispo-
TV
dans
l’un
pince à vis
dans
la
de
à
ών
SØ
паст:
LB
CZ,
Montage
1
Dualansatz
am
Strahlenteiler
befestigen
2
TV-Kamera
-
TV-Objektiv
festschrauben.
—
Kamera
ansatz
-
Klemmschraube
festziehen.
3
Photo-Kamera
~
Kameraadapter
der
festschrauben.
—
Photo-Objektiv
Kameraadapter
festschrauben.
—
Kamera
ansatz
—
Klemmschraube
festziehen.
4
TV-Kamera
~
Klemmschraube
lósen.
-
TV-Kamera
Platzverháltnissen
einem
Schritte
—
Klemmschraube
festziehen.
(S.
im
einsetzen.
Kamera
im
einsetzen.
ausrichten
der
einrasten.
35).
Dual-
Dual-
je
45°-
Montaje
1
Fije
el
suplemento
dual
en
el
divisor
de
(pag.
35).
2
Camara
-
Atornille
de
TV
—
monte
suplemento
—
fije
el
apriete.
an
3
Camara
ー
Atornille
dor
am
4
(a)
nach
in
en
-
atornille
fotográfico
tador
—
monte
suplemento
—
fije
el
apriete.
Orientacion
camara
—
Afloje
—
Dependiendo
espacio
enclave
TV
en
pasos
—
fije
el
apriete.
rayos
de
TV
el
objetivo
la
camara
en
dual
tornillo
de
.
fotografica
el
adapta-
la
camara
el
objetivo
en
el
la
cámara
câmara
dual
de
de
la
TV
tornillo
del
la
câmara
de
los
45º
de
adap-
en
“a”.
de
de
la
tornillo
de
el
disponible,
uno
de
tornillo
el
el
Page 47

Adjusting
for
TV
The
filter
and
one
provided
Remove
Change
TV
outlet.
changer
filters
100%
of
with
contains
50%
sion,
replaced
filter
outfit:
—
—
the
brightness
with
transmis-
which
the
8%
with
the
TV
the
filter
(b)
30%,
can
be
the
camera
in
the
Réglage
pour
Le
contient
transmission:
100%,
étre
8%
livraison:
-
~
la
caméra
changeur
trois
l’un
remplacé
faisant
Retirer
Changer
sortie
TV
de
la
deux
partie
la
caméra
le
luminosité
TV
de
filtres
filtres
de
30%,
50%,
pouvant
par
le
filtre
de
la
filtre
de
(b)
la
Helligkeitsregulierung
für
TV
Im
Filterwechsler
finden
sich
filter
30%,
Einer
dieser
durch
den
(mitgeliefert)
getauscht
—
Kamera
ー
Filter
im
auswechseln.
werden:
(b)
Transmissions-
50%,
100%.
Filter
8%-Filter
kann
aus-
abnehmen.
TV-Ausgang
be-
—
Regulado
luminosidad
En
“b”
transmisión
100%.
puede
de
suministro):
-
retire
sustituya
salida
el
cambiador
se
hallan
Uno
sustituirse
8%
(se
la
para
de
para
filtros
de
de
incluye
câmara
el
TV.
la
de
30,
50
estos
por
en
filtro
TV
filtros
de
y
filtros
el
el
de
la
TV
with
12":
and
dual
LN
SA
60
mm
photo
formats
attachment
x
/
Formats
avec
TV
14°:
double
et
photo
85
mm
TV
et
photo
rallonge
12°:
107
mm
Formatos
TV-
und
Photo-Formate
mit
Dualansatz
24x
36
mm:
250
mm
fotografia
suplemento
24x
350
36
mm
mm:
de
con
dual
TV
y
el
24":
60
mm
24"
85
mm
26" 107
mm
39
Page 48

Accessories
Accessoires
Zubehôr
Accesorios
Cine/TV
The
film
having a C-mount.
Fitting
1
Cine/TV
Secure
tube
splitter
2
C-mount
Fit
adapter
3
Camera
~
—
4
Align
—
~
~
tube
cine/TV
and
video
tube
the
to
the
(page
the
C-mount
to
with
Fit
the
plete
with
the
cine/TV
Tighten
screw.
the
Release
screw
(a)
Engage
one
of
in
accordance
the
space
Tighten
screw.
tube
cameras
cine/TV
beam
35).
adapter
the
adapter
camera,
adapter,
the
camera
the
the
camera
the
90°
available
the
accepts
camera.
com-
to
tube
clamping
clamping
steps
with
clamping
Rallonge
Cette
tous
caméras
munies
Montage
1
Fixer
ciné/TV
teur
2
Visser
à
filetage C sur
caméra.
3
Caméra
adaptateur
—
—
4
Positionnement
caméra
—
at
—
ー
ciné/TV
rallonge
les
modèles
ciné
ou
d’un
filetage
la
rallonge
sur
optique
l'adaptateur
avec
Mettre
la
dans
la
rallonge
ciné/TV
Serrer
la
pince à vis
Desserrer
vis
(a)
Selon
la
nible,
caméra
crans à 90°
Serrer
place
positionner
dans
la
pince à vis
convient
de
vidéo
le
réparti-
(page
la
caméra
de
la
pince
dispo-
l’un
à
C.
35).
la
à
la
des
Kino-/TV-Ansatz
Der
Kino-/TV-Ansatz
nimmt
Film-
und
Kameras
auf.
Montage
1
Kino-/TV-Ansatz
am
Strahlenteiler
befestigen
2
Adapter
C-Gewinde
an
der
Kamera
festschrauben.
3
Kamera
—
im
Kino-/TV-Ansatz
einsetzen.
—
Klemmschraube
festziehen.
4
Kamera
-
Klemmschraube
lôsen.
—
Kamera
Platzverhåltnissen
in
einem
Schritte
—
Klemmschraube
festziehen.
Video-
mit
C-Gewinde
(S.
35).
mit
mit
Adapter
ausrichten
je
nach
der
90°-
einrasten.
(a)
Suplemento
cine/TV
En
este
montar
vídeo
2
3
4
suplemento
cámaras
con
rosca
Montaje
1
Suplemento
cine/TV
-
fíjelo
en
rayos
(pág.
Adaptador
rosca
E
—
atornillelo
camara.
Camara
adaptador
—
móntela
mento
—
fije
el
tornilio
apriete.
Orientación
cámara
—
afloje
~
dependiendo
espacio
enclave
en
uno
de
90°
-
116
el
apriete.
para
el
con
con
en
para
de
el
tornillo
disponible,
la
camara
de
los
tornillo
para
puede
de
TV
C.
divisor
35).
en
la
el
suple-
cine/TV
de
la
“a”
del
pasos
de
o
de
Page 49

Accessories
Accessoires
Zubehôr
Accesorios
Phototube
Photo
on
page
—
f=
250
mm
for
large
fields
exposure
corners
—
f=
for
tions.
Assembly
1
Secure
to
(page
2
Secure
adapter
to
3
Connect
adapter
[=
f=
4
Secure
with
to
Tighten
screw.
Fit
raticule
page
photographic
and
are
350
mm
higher
the
the
beam
35)
the
the
SLR
to
250
тт
350
mm
the
adapter,
the
phototube
the
the
format-indicating
into
49).
35.
adapter
shorter
times.
The
vignetted.
adapter
magnifica-
phototube
splitter
camera
camera
the
camera
the
or
adapter
camera,
clamping
the
eyepiece
Rallonge
Photo
—
Adaptateur
pour
de
temps
Les
sombres.
—
Adaptateur
pour
grossissements.
Montage
1
Rallonge
La
teur
2
Adaptateur
chambre
L'installer
reflex
3
Adaptateur f =
ou
Le
teur
4
Caméra
adaptateur
La
rallonge
Serrer
Introduire
cadrage
(page
photo
page
35.
de
grands
prise
de
de
pose
coins
restent
de
plus
photo
fixer sur
optique
350
mm
visser
sur
de
chambre
avec
mettre
photo.
la
pince a vis.
le
dans
49).
dans
f=
250
mm
champs
vue
et
des
courts.
f=
350
mm
forts
le
réparti-
(page
35)
de
sur
Vappareil
250
mm
l’adapta-
la
réticule
de
l’oculaire
Photoansatz
Abbildung
—
Adapter
fiir
grosse
felder
und
Belichtungszeiten.
Ecken
tet.
—
Adapter f =
für
höhere
rungen.
Montage
1
Photoansatz
am
Strahlenteiler
befestigen
2
Kameraadapter
an
der
kamera
3
Adapter
oder
350
am
Kameraadapter
festschrauben.
4
Kamera
im
Photoansatz
einsetzen.
Klemmschraube
festziehen.
Formatstrichplatte
Okular
einsetzen
auf
S.
35.
f=
250
mm
Aufnahme-
kürzere
sind
Spiegelreflex-
befestigen.
f=
mm
mit
Die
abgeschat-
350
mm
Vergrösse-
(S.
35).
250
mm
Adapter
in
ein
(S.
49).
Suplemento
fotografia
Fotografia,
—
Adaptador f =
para
amplios y tiempos
exposición
Las
iluminadas.
—
Adaptador f =
para
grandes.
Montaje
1
Fije
para
en
(pag.
2
Fije
en
3
Acople
de
adaptador f =
350
4
Monte
adaptador
en
fotografia y fije
nillo
Montaje
formatos
(pág.
pag.
campos
más
esguinas
aumentos
el
suplemento
fotografia
el
divisor
de
35).
el
adaptador
la
camara
en
el
camara
el
mm
la
camara
el
suplemento
de
apriete.
del
retículo
en
un
49).
para
35.
250
mm;
visuales
de
breves.
no
están
350
mm;
mas
rayos
réflex.
adaptador
250 o f
con
para
el
tor-
de
ocular
Format
limits
Cadrages
я
|
350
24x
36
mm:
250
mm
\
250
350
24x
36
mm:
350
mm
X
Bildausschnitte
250
\
716x
107
350
mm
9,6:
Encuadres
ap"
107
mm
de
la
imagen
41
Page 50

Assembly
Floor
stand
Montage
Statif
de
sol
Aufbau
Bodenstativ
Montaje
Estativo
Components
WNP
AB
DOM
10
11
12
Composants
一
iD
上
^
I
00
NO
10
11
12
Einzelteile
ha
人
a 人
~
oo
\
10
11
12
Componentes
Nr
RO BW
00
\D
10
11
12
de
suelo
Base
Column
Additional
Column
Handles
axes
Carrier
Control
Swingarm
Microscope
Microscope
Holder
switches
Footpedal
or
Pied
Rallonge
Poids
Colonne
Porte-poignées
poignées
Porteur
commande
Bloc
Bras
Porte-microscope
Microscope
Support
commandes à pédale
Commande à pédale
(type A ou
Fuss
Säulenverlängerung
Zusatzgewicht
Säule
Griffhalterungen
Griffe
Träger
Steuergerät
Steuergerät
Schwenkarm
Mikroskopträger
Mikroskop
Träger
2
Fussschalter
oder
Pie
Prolongación
columna
Peso
Columna
Portamangos y mangos
Soporte
to
Aparato
Brazo
Portamicroscopio
Microscopio
Soporte
dispositivos
por
Dispositivo
(tipo A 6
extension
weight
and
handle
for
control
unit
carrier
for 2 foot-
(type
B)
de
colonne
supplémentaire
du
bloc
de
commande
mobile
pour
B)
für
das
für
Fussschalter
de
pedal
(Typ.A
B)
adicional
para
el
mando
de
mando
móvil
para
dos
de
por
B)
2
de
unit
A
et
de
und
apara-
control
pedal
42
Page 51

Never
use
stand
without
additional
is a risk
1
2
3
4
5
6
7
of
Depress
-
Remove
(a)
—
Partly
screws
them.
Fit
the
20cm
extension.
—
Tighten
—
Fit
the
Additional
Slide
the
weight
over
extension
that
you
extract
the
through
Column
Insert
the
Handles
—
~
~
Slide
the
—
~
Mount
so
on
the
head
movement
control
ー
the
the
column
Fit
handles
handle
Turn
the
the
column
so
that
are
aligned
cross-member
base
as
diagram
Tighten
(b)
(through
holes)
engage
weight.
the
column.
Slide
the
over
the
Place
the
(c)
on
and
match
screw
head.
the
that
the
the
carrier
notch.
limits
unit.
Screw
plate
(d)
beneath.
the
floor
the
weight.
it
tipping
the
footbrakes.
dust
covers
extract
the
located
behind
column
the
screws
dust
plugs.
weight
additional
the
column
and
turn
can
partly
screws
holes.
column
extension.
to
the
axes
column
extension
the
handles
with
of
shown
in
the
screws
the
so
that
they
the
additional
carrier
over
black
sleeve
column
Teflon
to
the
carrier
it
to
control
screw
head
engages
The
screw
the
lateral
of
the
on
the
cover
from
Ne
jamais
utiliser
le
statif
de
sol
sans
poids
There
(b)
into
the
supplémentaire:
over.
de
basculement!
1
Appuyer
de
—
—
2
Mettre
20
—
—
3
Poids
so
6
7
Le
rallonge
façon à pouvoir
desserrer
les vis
Colonne
La
rallonge.
Poignées
—
—
—
-
Mettre
colonne.
—
—
Placer
commande
la
porteur
dans
rôle
pivotement
bloc
ー
it
two
in
the
the
the
plate
unit
sur
frein.
Enlever
capuchons
Desserrer
les
cm
Serrer
Remettre
capuchons
faire
mettre
Fixer
poignées
Fixer
sur ces
poignées.
Tourner
pour
se
trouvent
gnement
transversale
Visser
emplacements
dans
mentaire.
Faire
manchon
colonne.
Placer
téflon
que
s’enclenche
porteur.
téte
est
de
Visser
(d)
les
les
(a)
légèrement
vis.
la
rallonge
les vis
les
supplémentaire
glisser
et
le
tourner
légèrement
(b).
dans
les
porte-
deux
poignées
porte-
la
colonne
que
les
de
les
vis
le
poids
le
porteur
glisser
noir
la
plaque
(c)
de
la
tête
de
le
bloc
de
de
la
vis
s’enclenche
l’évidement.
de
limiter
latéral
commande.
le
couvercle
par
en
bas.
risque
pédales
sur
la
poignées
dans
la
barre
du
pied.
(b)
prévus
supplé-
sur
le
sur
sorte
la
dans
de
sorte
sur
Son
le
©
la
de
l’ali-
aux
la
la
en
vis
le
que
le
du
20
Bodenstativ
Zusatzgewicht
=
Kippgetahr!
1
Fussbremsen
—
Staubdeckel
entfernen.
-
cm
Die
sich
befinden,
herausdrehen.
2
20
einsetzen.
—
Schrauben
—
Staubdeckel
einsetzen.
3
Zusatzgewicht
liber
schieben
verdrehen,
Schrauben
Locher
teilweise
kónnen.
4
Sáule
in
der
lángerung
5
Griffe
ー
Oriffhalterungen
befestigen.
—
Zwei
Griffhalterungen
befestigen.
-
Sáule
Sáulenverlángerung
verdrehen,
Griffe
zum
Fusses
sind.
~
Schrauben
die
satzgewicht
festziehen.
6
Trager
über
—
Schwarze
die
-
Teflonplatte
auflegen,
Schraubenkopf
Trager
7
Steuergerat
so
Schraubenkopf
Trager
Aussparung
Der
begrenzt
Drehbewegung
Steuergerátes.
—
Deckel
festschrauben.
nie
ohne
benutzen
festtreten.
(a)
Schrauben,
dahinter
teilweise
cm-Verlängerung
festziehen.
die
Verlangerung
und
so
bis
Sie
'b'
durch
hindurch
herausdrehen
Sáulenver-
einsetzen.
Griffe
an
den
in
der
bis
die
wie
im
Ouerbalken
Locher
die
Sâule
einsetzen,
in
Schraubenkopf
Bild
ausgerichtet
(b)
durch
im
Zu-
hindurch
Säule
schieben.
Hülse
schieben.
(c)
dass
der
einrastet.
dass
der
am
der
einrastet.
die
seitliche
des
(d)
von
unten
No
estativo
contrapeso = peligro
vuelco
1
Pise
freno.
-
die
die
des
über
so
am
die
—
2
Coloque
gación
20
—
—
3
Desplace
nal
ción y gírelo
forma
parcialmente
tornillos
los
Inserte
prolongacién.
Mangos
-
-
-~
ー
Guíe
largo
—
—
Coloque
mando
que
tornillo
engrane
entalladura.
del
movimiento
aparato
—
emplee
nunca
de
suelo
los
pedales
Retire
las
protectoras
Saque
los
encuentran
cm.
Apriete
Coloque
protectoras.
sobre
orificios.
Fije
Fije
en
tes
Gire
prolongación
que
alineados
travesaño
estativo
dibujo).
Introduzca
tornillos
orificios
adicional
Deslice
negra
Coloque
teflon
manera
del
en
la
tornillo
Atornille
desde
tapas
“a”.
parcialmente
tornillos
los
portamangos.
el
de
tornillo
el
detrás.
la
prolon-
de
columna
los
tornillos.
las
el
peso
la
prolonga-
de
que
pueda
los
“b” a través
la
columna
los
portamangos.
los
dos
mangos
correspondien-
la
columna
los
mangos
con
del
(véase
los
“b”
del
y
apriételos.
soporte a lo
la
columna.
la
cubierta
en
la
columna.
la
placa
“c”
de
que
engrane
soporte.
el
aparato
de
tal
manera
cabeza
del
del
soporte
en
la
La
limita
lateral
de
mando.
la
abajo.
el
sin
de
que
tapas
adicio-
tal
sacar
hasta
estén
el
pie
en
los
peso
tal
la
cabeza
cabeza
el
tapa
de
se
de
en
en
del
de
de
del
“d”
de
la
la
43
Page 52

Assembly
Montage
Aufbau
Montaje
Swingarm,
Surgical
microscope
Fitting
the
swingarm
the
column
Make
sure
that
swingarm
folded
articulation
tight.
ー
Fit
—
Turn
and
that
be
the
Fitting
carrier
—
Make
swingarm
—
Tighten
articulation
—
Open
ping
—
Suspend
carrier,
hook,
zontally,
in
—
Tighten
clamping
Fitting
microscope
During
the
towards
stand,
front.
Use
screws
microscope
microscope
is
up
and
brakes
the
swingarm
the
control
sleeve
the
four
tightened
holes.
microscope
to
swingarm
sure
the
the
orange
knob
completely
the
using
position
and
the
perforated
the
knob.
microscope
carrier
fitting,
lamp
housing
the
column
with
index 1 in
the
four
to
secure
to
carrier.
locked
that
together
that
is
microscope
orange
ensure
hollow
the
on
the
and
the
are
unit
so
screws
can
through
the
locked
brakes.
clam-
the
crane
it
hori-
engage
plate
to
that
faces
of
the
Bras
mobile,
Microscope
ďopération
Montage
sur
Le
bloqué
boutons
serrés.
—
—
Montage
microscope
mobile
—
—
—
~
it
—
Montage
sur
Veiller à ce
de
the
la
L'index 1 doit
à
avant.
Fixer
porte-microscope à l’aide
des 4 vis à six
du
bras
la
colonne
bras
mobile
et
plié
de
freinage
Placer
le
sur
Tourner
mande
de
serrer
Vérifier
mobile
Serrer
freinage
Dévisser
orange
Fixer
microscope à l’aide
crochet
Vencligueter
disgue
tenant a l’horizontale.
Visser
orange.
lampe
colonne
bras
la
colonne
le
bloc
et
le
façon à pouvoir
les 4 vis.
du
porte-
sur
si
le
est
les
boutons
le
jusqu'à
le
porte-
de
sécurité
perforé
le
bouton
du
microscope
le
porte-microscope:
que
soit
du
le
microscope
mobile
du
statif
doit
étre
et
les
mobile
de
com-
manchon
le
bras
bras
bloqué
bouton
la
butée
dans
le
en
le
le
boîtier
dirigé
vers
statif.
se
trouver
au
pans.
de
du
puis
Schwenkarm,
Operations-
mikroskop
Montage
Stativsáule
Kontrollieren,
Schwenkarm
und
ist
bremsen
sind.
—
—
Montage
Mikroskoptrâger
Schwenkarm
—
—
—
—
—
Montage
Mikroskoptrâger
Beachten
tieren,
haus
Index 1 vorn.
Befestigen
skop
ben
Schwenkarm
ob
der
blockiert
zusammengefaltet
und
die
Gelenk-
festgezogen
Schwenkarm
Steuergerat
so
verdrehen,
die 4 Schrauben
die
Lócher
festziehen
Kontrollieren,
Schwenkarm
blockiert
Gelenkbremsen
festziehen.
Orangen
bis
Anschlag
Mikroskopträger
mittels
anhängen
tal
gerichtet
Lochscheibe
Orangen
festziehen.
dass
zur
mit 4 Inbusschrau-
am
einsetzen.
und
dass
hindurch
kónnen.
—
ob
ist.
Klemmknopf
aufdrehen.
Kranhaken
und
horizon-
in
der
einrasten.
Klemmknopf
Mikroskop
Sie
beim
das
Lampen-
Stativsáule
Sie
das
Mikroskoptrager.
Hiilse
durch
der
Mon-
weist.
Mikro-
Brazo
Microscopio
operacion
—
Montaje
columna
Controle
móvil
plegado y si
de
echados.
—
Coloque
—
Sie
—
Gire
mando y la
tal
apretar
“e” a través
orificios.
Montaje
portamicroscopio-
brazo
—
Controle
móvil
—
Apriete
articulación.
-
Afloje
apriete
girándolo
—
Enganche
microscopio
gancho
posición
encájelo
perforado.
—
Apriete
anaranjado.
Montaje
portamicroscopio
Durante
cerciórese
de
lámpara
la
columna
Indice 1 delante.
Acople
el
portamicroscopio
mediante 4 tornillos
cabeza
movil,
brazo
móvil
del
estativo
si
el
brazo
está
bloqueado
los
articulación
el
forma
móvil
el
hexagonal.
están
el
brazo
aparato
cubierta
que
pueda
los 4 tornillos
de
si el
brazo
está
bloqueado.
los
frenos
el
botón
anaranjado,
hasta
el
porta-
con
de
grúa
horizontal,
en
el
disco
el
botón
microscopio
el
montaje,
de
gue
señala
del
estativo.
microscopio
de
—
y
frenos
móvil.
de
de
los
de
de
el
tope.
el
y,
en
—
la
caja
hacia
en
de
44
Page 53

Assembly
Montage
Aufbau
Montaje
Footswitch
handswitch
Apply
blue
symbols
or
handswitch.
the
plugs
red
adhesive
supplied).
Connect
or
handswitch
Respect
gement:
~
Footswitch
switch @ (red)
surgeon @ (red)
~
Footswitch
switch A (blue)
surgeon A (blue).
Holder
Make
sure
between
the
clamping
same
width
between
of
the
rotatable
—
Connect
of
the
(4
adjustment
facing
two
screws
—
Place
the
rotatable
the
clamping
—
Push
spaces
two
screws.
Cleaning
Zoom/focus
Release
the
base
so
that
removed
XY
control
Unscrew
The
securing
loosened
(a)
in
the
and
and
to
the
footswitch
Mark
with
blue
strips
the
footswitch
the
correct
or
or
for
footswitches
that
the
two
ring
as
those
the
two
the
two
clamping
upwards)
the
two
the
disks
and
tighten
the
footswitch
pedals
the 4 screws
of
the
footswitch
the
pedals
and
cleaned.
plate
the
joystick.
screw
through
control
red
and
(all
(page
arran-
hand-
for
hand-
for
the
gaps
halves
are the
halves
ring.
halves
ring
screws
with
halves
ring
on
ring
into
can
can
the
plate.
Commande
pédale/manuelle
Coiler
les
et
rouge
à
Marquer
des
bleue
de
Raccorder
à
46).
(page
en
on
—
—
Support
à
of
Lors
fentes
deux
de
identiques à celles
bague
—
of
—
the
the
—
Nettoyage
commande à pédale
on
Pédales
mise
be
Dévisser
plaque
retirer
Plaque
be
hole
Dévisser
Libérer
par
plaque
sur
pédale
bandes
et
rouge
la
livraison).
pédale
46):
respectant
correcte:
Commande à pédale
manuelle @ (rouge)
le
chirurgien @ (rouge)
Commande à pédale
manuelle À (bleue)
le
chirurgien À (bleue)
pédale
du
montage,
formées
moitiés
serrage
tournante.
Relier
de
l’anneau
les 4 vis à tenon
vers
le
deux
vis.
Mettre
de
la
bague tournante
sur
l’anneau
Insérer
dans
les
les
deux
du
au
point
de
les
de
la
l'ouverture
de
a
symboles
ou
les
adhésives
la
ou
de
doivent
les
haut, à l’aide
les
les
fentes
vis.
de
zoom/de
les 4 vis
fond
pédales.
commande
le
joystick.
vis
commande.
bleu
la
commande
manuelle.
prises
avec
(font
commande
manuelle
la
dispositi-
la
commande
les
par
les
de
l’anneau
être
de
deux
moitiés
de
serrage,
carré
deux
moitiés
de
serrage.
rondelles
et
serrer
la
de
puis
de
fixation
(a)
de
partie
ou
pour
ou
pour
la
de
la
la
la
Fuss-/Handschalter
Blaue
und
rote
auf
die
Fuss-
schalter
Stecker
roten
Klebstreifen
kieren
(alles
Fuss-
oder
anschliessen
Richtige
beachten:
—
Fuss-
ter @ (rot)
@
(rot)
—
Fuss-
ter A (blau)
A
(blau)
Trager
fiir
Achten
ren
darauf,
ten
zwischen
ring-
und
gleich
sind.
-
Klemmringhálften,
Justierschrauben
oben,
Schrauben
—
Drehringhâlften
Klemmring
—
Unterlagsscheiben
die
Spalten
und
zwei
festziehen.
Fussschalter
Zoom-/Fokus-Pedale
4
Schrauben
lósen.
Dann
Pedale
gereinigt
XY-Steuerplatte
Joystick
Durch
das
Steuerplatte
Befestigungsschraube
gelóst
werden.
Symbole
oder
kleben.
mit
Zuordnung
oder
oder
Sie
Drehringhälften
mit
abgenommen
werden.
abschrauben.
Hand-
blauen
und
mar-
mitgeliefert).
Handschalter
(S.
46).
Handschal-
fiir
Chirurg
Handschal-
fiir
Chirurg
Fussschalter
beim
Montie-
dass
die
Spal-
den
Klemm-
nach
zwei
verbinden.
am
anlegen.
schieben
Schrauben
reinigen
am
Boden
kónnen
Loch
(a)
in
kann
die
4
in
die
und
der
Dispositivo
control
de
por
pedal/manual
Pegue
los
azules
de
manual.
chufes
azul y roja
tos
nistro).
Conecte
de
manual
Observe
correcta:
—
ー
Soporte
dispositivo
por
Preste
las
dos
apriete
del
—
—
—
Limpiado
de
Pedales
enfoque
Afloje 4 tornillos
base
pedales.
Placa
Desatornille
A
la
de
fijacién.
simbolos
en
los
control
forman
control
Dispositivo
por
Go
rojo
Dispositivo
por
(zu
azul
pedal
hendiduras
mitades
giratorio.
Conecte
del
(los 4 tornillos
mirando
con 2 tornillos.
Coloque
mitades
giratorio
de
Lieve
hendiduras y apriete
dos
control
través
placa
aflojar
dispositivos
por
pedal
Senalice
con
cinta
adhesiva
(estos
parte
el
dispositivo
por
pedal
(pag.
46).
si
la
disposicién
de
pedal o manual
para
pedal o manual
para
atención
sean
anillo
apriete.
tornillos.
para
para
de
de
control
cirujano
de
control
cirujano
para
el
de
mando
para
entre
del
anillo
idénticas a las
las
dos
de
apriete
hacia
las
dos
del
anillo
sobre
las
arandelas a las
del
dispositivo
por
pedal
zoom/
retirar
control
el
joystick.
del
orificio
control
el
tornillo
rojos
o
los
en-
elemen-
del
sumi-
o
@
©
A
À
que
las
de
mitades
de
ajuste
arriba)
el
anillo
de
la
los
XY
(a)
se
pue-
de
y
es
de
45
Page 54

Assembly
Montage
Aufbau
Montaje
Control
Always
power
opening
for
For
tion,
Connections
1
2
3
4
5
6
unit
pull
cable
the
servicing.
additional
see
p.
58
Power
cable
Fuse
holder
(2x1.6AT,
stock
no.
and voltage
Cable
secured
screws
Footswitch
switch,
Footswitch
handswitch,
Additional
393
from
with
red
out
the
before
control
unit
informa-
5x20mm,
606)
selector
swingarm,
two
grub-
or
hand-
@
or
blue
&
instrument.
Bloc
de
commande
Ne jamais
retirer
de
avant
commande!
Pour
et
données,
Connexions
1
Cable
2
Porte-fusibles
AT,
393
et
3
Fixer
mobile à l’aide
vis
4
Commande à pédale
manuelle,
5
Commande à pédale
manuelle,
6
Appareil
supplémentaire
le
cable
la
prise
d'ouvrir
d'autres
réseau
5x20
606)
sélecteur
le
cable
sans
tête
oublier
réseau
de
courant
le
remarques
voir
p.
électriques
mm,
de
du
rouge
bleue
de
bloc
de
58.
(2x1,6
n°
d’art.
tension
bras
de
deux
@
A
ou
ou
| 5 Fuss-
Steuergerät
Wenn
das
Steuergerät
zu
Servicezwecken
geôffnet
erst
der
Weitere
Daten
werden
das
Netzkabel
Steckdose
Hinweise
siehe
S.
Anschlüsse
1
Netzkabel
2
Sicherungshalter
(2x1,6AT,
Best.
und
3
Kabel
arm,
stiften
4
Fuss-
Handschalter
Handschalter
6
Zusatzgerát
5x20
Nr.
393
Spannungswáhler
vom
mit
zwei
fixiert.
oder
oder
muss,
aus
ziehen!
und
58.
mm,
606)
Schwenk-
Gewinde-
rot
©
blau
A
Aparato
Cuando
aparato
recuerde
primero
Para
más
datos,
Conexiones
1
Cable
2
Portafusibles
(2x1,6
num.
y
selector
3
Cable
fijado
rosca
4
Dispositivo
por
rojo
5
Dispositivo
por
azul
6
Instrumento
de
mando
deba
abrir
el
de
control,
de
desenchufar
el
cable
de
observaciones
consulte
pedal o manual,
O
pedal o manual,
A
pág.
de
red
AT,
5x20
de
pedido
393
de
tensión
del
brazo
con 2 pernos
de
control
de
control
adicional
58.
mm,
móvil,
red.
606)
de
Connect
the
surgical
to
the
green
swingarm
Hang
the
cable
clips
Connect
the
microscope
to
the
grey
swingarm
46
the
cable
microscope
socket
and
secure
cable
on
in
slack
the
cable
socket
and
secure
from
on
the
it.
to
the
loops.
from
carrier
on
the
it.
Raccorder
microscope
à
la
mobile,
placer
dans
Raccorder
porte-microscope
à
la
mobile,
le
douille
verte
le
visser
en
large
le
porte-câble.
le
douille
grise
le
visser.
câble
d'opération
du
bras
et
le
boucles
câble
du
bras
du
du
Kabel
vom
Operationsmikroskop
an
der
griinen
Schlaufen
einlegen.
vom
grauen
Buchse
anschliessen,
und
in
in
Buchse
anschliessen
Schwenkarm
festschrauben
lockeren
Kabelhalter
Kabel
Mikroskopträger
an
der
Schwenkarm
und
festschrauben.
Inserte
el
cable
del
microscopio
operación
am
en
el
enchufe
brazo
die
enróllelo
bles,
dejándolo
mente
Enchufe
portamicroscopio
am
en
el
enchufe
brazo
de
verde
móvil,
en
holgado.
el
móvil y atorníllelo.
del
atorníllelo
el
portaca-
suficiente-
cable
del
gris
del
y
Page 55

Connect
the
swingarm
to
the
control
Set
the
power
voltage
—
Open
—
Connect
cable
Check
properly
the
Turn
the
the
appropriate
115V
(for
230V
visible
when
the
replaced.
that
the
cable
unit.
supply
cover
drum
so
100-120V)
(for
200-240V
in
the
window
cover
is
the
power
all
cables
attached.
from
that
figure
or
is
are
Raccorder
bras
mobile
au
bloc
de
Réglage
réseau:
—
—
Raccorder
réseau.
Contréler
cables.
de
Ouvrir
la
Tourner
jusqu'à
ce
sion
voulue
tensions
230 V (pour
200-240
dans
la
fenêtre
plaque
refermée.
le
cable
commande.
la
tension
plaque
le
tambour
que
la
115 V (pour
100-120
tensions
V)
apparaisse
le
cable
tous
les
de
du
ten-
V)
la
du
ou
Kabel
vom
Schwenkarm
am
Steuergerat
anschliessen.
Netzspannung
einstellen:
—
Klappe
—
Trommel
Netzkabel
anschliessen.
Alle
Sitz
öffnen.
dass
Zahl
Spannungen
oder
nungen
Fenster
nen
so
die
entsprechende
115 V (für
230 V
(für
200-240
der
geschlosse-
Klappe
erscheint.
Kabel
auf
kontrollieren.
drehen,
100-120
Span-
V)
festen
V)
im
Enchufe
brazo
en
Ajuste
la
—
—
Conecte
Controle
cables
enchufados.
el
cable
móvil
el
aparato
de
la
red:
abra
la
tapa
gire
el
tambor
manera
que,
cerrada
la
ca
115 V (para
nes
de
100 a 120
230 V (para
de
200 a 240
ventanita.
el
cable
si
todos
están
del
_
del
mando.
tensión
de
tal
una
vez
tapa,
aparez-
tensio-
V)
tensiones
V)
en
de
los
bien
de
ó
la
red.
Changing
If,
has
ted
her
any
first
—
Pull
cable
—
Open
—
Pull
marked
You
fuse by
tube
-
Replace
complete
fuses.
Locating
You
fault-finding
you
the
let
answers
questions:
—
Does
shine?
—
If
tor
diodes
inspect
(see
—
Which
when
footswitch
handswitch?
after
the
been
and
switched
the
illuminator
of
the
inspect
out
the
out
can
can
inspect
control
the
Leica
to
the
neither
nor any
above).
you
fuses
control
properly
diodes
the
the
cover
the
with
tell a blown
its
the
with
faults
speed
the
unit
the
SV
the
shines,
the
diodes
activate
connec-
on,
nor
shines,
fuses.
power
holders
an
arrow.
melted
holders
new
up
the
process
diodes
and
agency
following
diode
illumina-
of
the
first
fuses
shine
or
unit
neit-
glass
if
on
then
have
the
Changement
Le
bloc
raccordé
sous
tension:
ge,
ni
s'allument.
contrôler
fusibles.
-
Retirer
de
la
—
Ouvrir
—
Retirer
marquées
Un
eux
tube
—
Remettre
pourvues
fusibles
Localisation
En
cas
contrôler
odes
du
de
avant
représentation
—
La
allumée?
- Si
ni
diode
contrôler
(voir
—
Quelles
qui
vous
commande a pédale
manuelle?
de
de
commande
correctement
ni
les
diodes
Dans
d’abord
le
câble
prise
de
la
plaque
les
fixations
d’une
fusible
est
lorsque
le
de
verre a fondu
les
des
de
de
pannes,
d’abord
bloc
de
d'informer
diode 5 V
l'éclairage
ne
s’allument,
les
ci-dessus)
sont
s’allument
actionnez
Leica:
fusibles
est
et
l'éclaira-
ne
ce
cas,
les
réseau
courant
flèche.
défectu-
fil
dans
le
fixations
nouveaux
pannes
les di-
comman-
la
est-elle
ni
la
fusibles
les
diodes
lorsque
la
ou
τον
Sicherungswechsel
Falls
beim
angeschlossenen
eingeschalteten
gerat
tung
leuchtet,
die
—
Netzkabel
—
Klappe
—
Die
ten
ausziehen.
eine
daran,
Y
|
aw
in
IN
geschmolzen
-
Halterungen
Sicherungen
Fehlerlokalisierung
Bei
beschleunigen
Fehlerbehebung,
die
gerat
Sie
informieren:
—
Leuchtet
5
~
Falls
Beleuchtung
Diode
Sie
gen
—
Welche
ten,
bzw.
betátigen?
korrekt
weder
die
noch
eine
priifen
Sicherungen.
čffnen.
mit
Pfeil
Halterungen
defekte
dass
der
Glasróhre
Funktionsstórung
Dioden
am
kontrollieren,
die
Leica
die
V?
weder
leuchtet,
zuerst
die
(siehe
Dioden
wenn
Sie
Handschalter
und
Steuer-
Beleuch-
Diode
Sie
zuerst
abziehen.
markier-
her-
Sie
erkennen
Sicherung
der
Faden
ist.
mit
neuen
einsetzen.
Sie
die
wenn
Steuer-
bevor
Vertretung
Diode
die
noch
eine
priifen
Sicherun-
oben).
leuch-
den
Fuss-
Cambio
Si el
está
tado y ha
rruptor
se
enciende
ni
ningún
primero
—
Desenchufe
red.
—
Abra
~
Saque
marcados
flecha.
averiado
que
tubito
fundido.
—
Coloque
fusibles
nuevos
Localizaciôn
Puede
de
Sie
si
inspecciona
situados
control
en
sentanción
ー
Luce
— Si
naciôn
iluminan
controle
los
arriba).
ー
{Qué
acciona
de
manual?
de
fusibles
aparato
correctamente
localización
contacto
no
de
dado
de
conexión, y no
la
diodo,
los
fusibles.
la
tapa.
los
portafusibles
con
Un
fusible
se
el
filamento
de
vidrio
los
provistos
fusibles.
acelerar
en
el
antes
de
con
de
el
diodo 5 V?
funciona
ni
tampoco
los
primeramente
fusibles
diodos
el
dispositivo
mando
por
iluminación
el
reconce
porta-
de
los
aparato
Leica.
(véase
mando
conec-
al
inte-
controle
cable
una
del
esta
de
errores
el
proceso
de
errores
diodos
ponerse
la
repre-
la
ilumi-
diodos,
lucen,
pedal
de
en
de
se
si
o
47
Page 56

Assembly
Stereo
binocular
objective,
eyepieces
Stereo
~
—
modules,
modules
Introduce
long
stereo
obliquely
mount
and
Tighten
screws.
the
tube,
the
into
short
module
the
lower
it
clamping
or
Montage
Modules
Tube
Objectif
Oculaires
Modules
-
Au
Vintroduire
ment
et
—
Visser
stéréo
binoculaire
stéréo
choix court
dans
Vabaisser.
les
ou
long.
oblique-
les
tourilions
pinces à vis.
Aufbau
Stereo-Module,
Binokulartubus,
Objektiv,
Okulare
Stereo-Module
—
nach
Wahl
lang,
Zapfen
absenken.
—
Klemmschrauben
festziehen.
kurz
leicht
schrag
einführen
oder
in
und
Montaje
Modulos
estereoscopicos
Tubo
binocular
Objetivos
Oculares
Modulos
estereoscopicos
die
-
Encaje
el
estereoscópico
largo/corto
oblicua
bájelo.
~
Apriete
módulo
en
los
de
forma
las
espigas
tornillos.
y
If
you use a beam
splitter
Fit
the
beam
top
of
the
afterwards
(page
adapters
Fit
the
tube
into
the
the
stereo
the
beam
Move
the
slightly
from
side
until
screws
on
module
engage
the
the
tube
Tighten
screws.
stereo
dovetail
or
adapters
the
and
adapter
Tube
—
—
—
splitter
module
fit
the
34).
adapter
ring
module
splitter
tube
adapter
side
to
the
locating
the
stereo
beam
splitter
guides
clamping
on
tube
or
on
on
on
Avec
répartiteur
Fixer
le
optique
stéréo,
intermédiaire
—
—
ー
répartiteur
sur
les
modules
puis
la
bague
(page
Bague
tournante
Placer
queue
dules
ment
optique
La
tourner
de
gauche à droite
qu’à
entation
stéréo/répartiteur
optique
dans
bague.
Serrer
tournante
34).
intermédiaire
la
bague
d’aronde
stéréo,
respective-
du
répartiteur
légèrement
ce
que
les vis
du
module
s’enclenchent
la
glissiére
les
pinces à vis.
optique:
dans
la
des
mo-
jus-
d’ori-
de
la
Bei
Verwendung
Strahlenteilers:
Strahlenteiler
Stereo-Modulen
befestigen
das
Tubuszwischenstiick
befestigen
Tubuszwischenstiicke
—
in
die
auf
den
Modulen
Strahlenteiler
und
ー
nach
leicht
Orientierungsschrauben
an
den
Modulen/Strahlenteiler
in
die
den
stücken
-
Klemmschrauben
festziehen.
auf
und
dann
(S.
34).
Ringschwalben
Stereo-
bzw.
auf
einführen
beiden
Seiten
verdrehen,
Stereo-
Fiihrungen
Tubuszwischen-
greifen.
eines
den
erst
dem
bis
an
Si
rayos:
ー
Pieza
giratoria
—
die
— y gírela
—
emplea
Fije
divisor
mödulos
cópicos y luego
intermedia
(pág.
Introduzca
intermedia
de
módulos
cos/del
hacia
hasta
guía
estereoscópicos/del
divisor
en
intermedias.
Apriete
un
divisor
primeramente
de
rayos
estereos-
giratoria
34).
intermedia
la
pieza
en
milano
ambos
que
de
la
guía
la
de
los
estereoscópi-
divisor
ligeramente
lados,
los
tornillos
los
módulos
de
rayos
de
las
los
tornillos,
en
la
pieza
|
cola
de
rayos
encajen
piezas
de
el
los
Binocular
Secure
the
in
the
same
top
of
the
48
tube
binocular
manner
tube
adapter.
Tubes
binoculaires
tube
on
Procéder
façon
intermédiaire.
de
qu’avec
la
même
la
bague
Binokulartuben
auf
dieselbe
den
Tubuszwischen-
stücken
Weise
befestigen.
auf
Tubos
binoculares
Acóplelos
manera
intermedias
de
en
las
giratorias.
la
misma
piezas
Page 57

Objective
Attach
the
screwing
the
wise.
Eyepieces
—
~
Graticule
The
eyepieces
ning
the
tube
Adjust
with
position
Fitting
1
2
3
Bulbs
it
microscope
If
necessary,
rings
(page
the
graticule
sing
and
Push
each
ly
into
the
then
tighten
ping
screws
the
seating
eyepieces.
graticule
is
the
format
film
when
is
used
the
the
graticule
(page
the
Unscrew
from
the
the
eyepiece
Press
the
graticule
to
the
sleeve
insert
Replace
the
eyepiece.
objective,
carefully
framing
for
(see
diopter
graticule
the insert
underside
mount
fully
the
anticlock-
fit
spacing
18)
and/or
for
focu-
eyepiece
tube
and
the
clam-
(a).
Inspect
of
the
in
one
determi-
limits
the
photo-
page
setting
in
26).
of
home
of
the
insert
on
of
to
ful-
the
on
41).
of
the
on
in
Objectif
Le
visser
sur
sens
d'une
Oculaires
—
—
Réticule
Le
l’un
d'observation,
cadrage
d'utilisation
photo
Réglage
réticule,
Mise
réticule
1
2
3
avec
le
microscope,
inverse
des
montre.
Le
cas
échéant,
des
anneaux
ment
(page
réticule
de
Introduire
dans
les
Serrer
contrôler
en
place.
réticule,
des
oculaires
de
(voir
des
voir
en
place
de
sous
la
monture
la
tubes
placé
l’image
de
page
dioptries avec
page
la
l’anneau
l’oculaire
une
le
monture.
butée.
puis
bien
Dévisser
l’aide
leté
Introduire
dans
exerçant
Contrôler
tionnement.
Visser
cadrage.
les
le
Ampoules
précaution
dans
aiguilles
insérer
d’écarte-
18)
et/ou un
oculaires
jusqu’à
les
vis
(a),
s’ils
sont
dans
du
tube
sert
au
en
cas
la
rallonge
41).
26.
du
monture
mo-
réticule
en
pression.
bon
posi-
le
la
à
Objektiv
gegen
den
am
festschrauben.
Okulare
—
Evtl.
(S.
Formatstrichplatte
einsetzen.
—
Okulare
Anschlag
rohre
Klemmschrauben
festziehen.
kontrollieren.
Strichplatte
Die
einem
Bestimmung
ausschnitte
mit
(siehe
Dioptrien
einstellen
Strichplatte
1
Einsatz
unten
abschrauben.
2
Strichplatte
Druck
schieben.
priifen!
3
Einsatz
Uhrzeigersinn
Mikroskop
18)
Formatstrichplatte
Okular
dem
S.
vorsichtig
Distanzringe
und/oder
bis
zum
in
die
schieben.
Photoansatz
41).
am
auf
Tubus-
Die
Festen
dient
der
Bild-
auf
dem
mit
Strichplatte
(S.
26).
einsetzen
mit
Randelring
Okular
mit
etwas
den
Einsatz
Festen
Sitz
festschrauben.
'a'
Sitz
zur
Film
in
Glühlampen
Objetivo
Enrósguelo
copio
ria a las
Oculares
— Si
anillos
(pág.
de
—
Introduzca
en
Apriete
y
oculares
encajados.
Retículo
El
retículo
colocado
oculares
minar
imagen cuando
el
suplemento
grafía
Ajuste
retículo
Colocación
1
Desenrosque
manguito
ocular.
2
Coloque
presionando
mente.
ha
3
Vuelva a enroscar
manguito.
Bombillas
en
dirección
agujas
se
requiere,
espaciadores
18)
formatos.
el
tubo
los
controle
están
de
en
permite
los
encuadres
(véase
de
dioptrías
(pág.
el
Compruebe
asentado
en
y/o
los
hasta
tornillos
si
uno
pág.
26)
del
inferior
retículo,
el
micros-
contra-
del
reloj.
coloque
un
retículo
oculares
el
tope.
los
bien
formatos
de
los
deter-
de
se
emplea
para
foto-
41).
con
retículo
el
del
ligera-
bien.
el
“a”
la
si
Changing
When
use
M680
bulbs
Do
the
Fingermarks
cause
can
a
cloth
alcohol.
~
Turn
you
defective
-
Holding
insert
—
Turn
bulb
position.
The
now
the
changing
only
precision-centred
12V/50W
in
special
not
touch
new
bulb.
it
to
burst
be
removed
dampened
the
can
extract
the
the
clicks
warning
go
out.
bulb
the
which
wheel
bulb
the
new
wheel
into
the
bulb,
halogen
mount.
glass
may
when
with
with
until
the
wheel,
bulb
until
lamp
Changement
N'utiliser
poules
M680
une
monture
of
Ne
pas
des
nouvelles
qui
hot,
the
must
risquerait
sous
l’effet
En
cas
toyer
l'alcool.
—
Tourner
jusqu’à
Vampoule
tout
-
Placer
ampoule.
—
Tourner
jusqu’à
Vampoule
La
maintenant
d'ampoule
gue
les
halogenes
de
12
V/
spéciale.
toucher
d’éclater
de
de
contact,
le
verre
avec
le
disque
pouvoir
défectueuse
en
le
maintenant.
la
nouvelle
le
disque
ce
que
s'enclenche.
lampe
témoin
am-
centrées
50 W dans
le
verre
ampoules
la
s’éteindre.
-
chaleur.
net-
de
retirer
doit
Lampenwechsel
Setzen
Sie
nur
präzisions-zentrierten
M680-Halogen-
Glühlampen
in
Spezialfassung
Glas
beim
neuen
beriihren.
Sie
kénnte
Erhitzen
Bei
Berührung
Alkohol
-
Wechselrad
bis
Sie
Glühlampe
gerändelten
herausziehen
Dabei
halten.
—
Neue
einsetzen.
—
Wechselrad
bis
die
rastet.
DieWarnlampe
nun
die
12
V/50
ein.
Einsetzen
Glúhlampe
sonst
beim
zerspringen.
Glas
putzen.
drehen,
die
defekte
an
der
Fassung
können.
Wechselrad
Glühlampe
drehen,
Gliihlampe
verlóschen.
nicht
mit
muss
W
der
fest-
ein-
Cambio
Monte
billas
das
con
No
cuando
bombilla,
al
En
pie
con
—
—
—
de
bombillas
únicamente
de
halógeno
de
12V/15W
casquillo
toque
calentarse.
caso
las
alcohol.
Gire
llegue a la
fectuosa.
tras
Introduzca
bombilla.
Gire
encaje
La
deberá
el
cristal
monte
podría
de
contacto,
huellas
el
disco
bombilla
Sáquela
sujeta
el
el
disco
la
bombilla.
lámpara
dejar
especial.
la
del
la
dactilares
hasta
disco.
nueva
hasta
de
de
bom-
centra-
M680
nueva
saltar
lim-
que
de-
mien-
que
aviso
lucir.
49
Page 58

Assembly
Montage
Aufbau
Montaje
Ceiling
Fitting
The
mount,
connections , will
organized
agency.
the
microscope
described
The
fitted
or
Functions
1
2
3
mount
fitting
of
and
the
by
fitting
of
on
control
unit
either
the
jib
to
wall.
switch
and
to
Main
lamp.
Handswitch:
lifting
the
Connection
handswitch.
the
electrical
the
the
carrier
page
can
the
with
Motorized
lowering
for
ceiling
be
Leica
is
44.
be
stand
pilot
of
Statif
de
plafond
C’est
la
Leica
montage
plafond
électriques.
microscope,
44,
Le
fixe
mur.
2
3
représentation
qui
s’occupe
du
statif de
et
des
connexions
Pour
la
fixation
bloc
de
sur
le
Fonctions
1
Interrupteur
avec
lampe
Commande
pour
relèvement/
abaissement à moteur
du
bras
Connexion
commande
du
voir
commande
statif
ou
principal
témoin.
manuelle
du
statif.
de
la
manuelle.
du
porte-
page
se
sur
le
Deckenstativ
Montage
Die
Montage
Deckenstativs
elektrischen
gen
zum
wird
von
Vertretung
Befestigung
Mikroskoptrágers
siehe
Das
Steuergerät
Stativ
befestigt
Funktionen
1
Hauptschalter
Kontrollampe
2
Handschalter:
Stativarm
heben/senken.
3
Anschluss
des
und
Verbindun-
Deckenstativ
der
Leica
geregelt.
des
S.
44
oder
an
der
werden.
motorisch
Handschalter
der
kann
Wand
mit
Estativo
Montaje
El
montaje
techo y las
eléctricas
de
techo
representación
Ajuste
del
portamicroscopio,
véase
pág.
El
am
aparato
puede
asegurarse
pared o en
Funciones
1
Interruptor
con
lámpara
2
Interruptor
elevar/bajar
estativo.
3
Conexión
interruptor
de
techo
del
estativo
conexiones
para
el
lo
regula
Leica.
44.
de
mando
el
estativo.
principal
de
manual:
el
del
manual.
de
estativo
la
en
la
control.
brazo
del
Fuses
Fusibles:
Sicherungen:
Fusibles:
ZV
T63A,
5x20mm_
TO05A,
5x20mm
TO5A,
5x20mm
115V
T63A
63
x32
70054
63x32mm
TIOA,
63x32mm
(167656)
(167660)
(167650)
mm
(167673)
(167676)
(167669)
50
Page 59

Notes
Remarques
Hinweise
Observaciones
Care
Dust
and
dirt
quality
of
your
Therefore:
—
Put a dust
the
instrument
breaks
in
~
Protect
tube
tubes
without
pieces,
and
by
means
—
Remove
pneumatic
or
with a soft
—
Clean
objectives
eyepieces
optics
cleaning
and
with
—
Keep
accessories
dust-free
not
in
use.
Protect
—
—
—
-
—
—
your
from
damp,
acids,
alkalis
corrosive
Do
not
keep
near
the
from
improper
handling.
Never
fit
or
dismantle
systems
components
directions
are
instructions.
from
Never
mechanical
sliding
or
given
oil
oil
surfaces.
affect
the
results.
cover
over
during
work
openings,
eye-
eyepieces,
of
dust
caps
dust
with
a
rubber
bulb
brush
and
with
special
cloths
pure
alcohol
in
place
when
instruments
vapours,
and
substances.
chemicals
instrument.
different
for
in
and
or
plugs
optical
mechanical
unless
doing
the
grease.
grease
parts
or
a
so
Entretien
Poussière
affectent
votre
Donc
—
protégez
pendant
recouvrant
de
—
protégez
tubes,
oculaire
avec
—
enlevez
l’aide
d’un
—
nettoyez
les
chiffon
Valcool
—
rangez
non
la
Protégez
instruments
-
contre
buée,
substances
corrosives.
—
Ne
produit
proximité.
-
contre
tion
Ne
tres
de
et
cela
mentionné
ment
mode
-
contre
graisse.
Ne jamais
surfaces
les
et
la
travail!
l’instrument
les
protection.
les
les
tubes
et
des
capuchons.
la
d’un
pinceau
les
oculaires avec
spécial
pur.
les
utilisés à Pabri
poussière.
vos
Phumidité,
les
acides,
conserver
chimique
toute
non
appropriée.
jamais
prises,
composants
pièces
mécaniques
n’est
dans
d'emploi.
Phuile
de
pièces
crasse
qualité
de
pauses
en
de
la
housse
orifices
des
sans
les
oculaires
poussière
soufflet
accessoires
alcalines
monter
ni
pas
expressé-
le
lubrifier
guidage
mécaniques.
à
et
doux.
objectifs
un
et
de
de
la
les
et
aucun
à
manipula-
d’au-
dévisser
optiques
présent
et
la
les
ni
le
Ш]
et
si
Pflege
Staub
und
Schmutz
beeintráchtigen
Arbeitsresultate!
Deshalb
—
schiitzen
ment
in
unter
der
hiille.
—
schützen
offnungen,
ohne
Okulare
lare
mit
-
entfernen
einem
Blasebalg
einem
weichen
ー
reinigen
und
Okulare
Optikreinigungstiichern
und
reinem
—
bewahren
benutztes
staubfrei
Schiitzen
Instrumente
—
vor
Nâsse,
Sâuren,
âtzenden
Bewahren
Chemikalien
Nâhe
der
auf.
—
vor
unsachgemâsser
Behandlung.
Niemals
Gerâtestecker
optische
mechanische
auseinandergeschraubt
werden,
der
Anleitung
ausdriicklich
ben
ist.
-
vor
Ol
Fiihrungsflachen
mechanische
diirfen
werden.
Ihre
Sie
das
Arbeitspausen
Staubdeckeln.
Sie
alkalischen
wenn
und
niemals
Instru-
Staubschutz-
Sie
Tubus-
Tubusrohre
und
Sie
Staub
und
Pinsel.
Sie
Objektive
mit
Alkohol.
Sie
nicht
Zubehör
auf.
thre
Dünsten,
Stoffen.
Sie
keine
in
der
Instrumente
dürfen
andere
montiert,
Systeme
und
Teile
dies
nicht
beschrie-
Fett.
und
Teile
gefettet
Oku-
in
Mantenimiento
El
polvo y la
influyen
en
los
trabajo
Por
—
Cubra
con
durante
trabajo.
—
Cubra
toras
aberturas
los
mit
—
Quite
partes
una
pincel
—
Limpie
oculares
puro y paños
—
Mantenga
polvo
utilizados.
Preserve
instrumentos
—
und
de
vapores,
y
COrrosivas.
—
No
químicos
instrumento.
—
de
inadecuadas.
No
fes,
sistemas
partes
ser
explícitamente
manual
nes.
—
del
No
superficies
partes
suciedad
negativamente
resultados
ello:
los
instrumentos
la
funda
protectora
las
pausas
con tapas
los
oculares,
de
tubos
pera
la
las
guarde
manipulaciones
acople
ni
que
aceite y las
engrase
los
sin
oculares.
el
polvo
ópticas
mediante
de
goma y un
suave.
los
objetivos
con
alcohol
especiales.
libres de
los
accesorios
los
humedad,
ácidos,
sustancias
productos
cerca
otros
desmonte
ópticos y las
mecánicas, a no
se
mencione
de
instruccio-
nunca
de
guía
mecánicas.
de su
de
protec-
las
tubos
de
las
y
no
los
álcalis
del
enchu-
los
en
el
grasas.
las
ni
y
las
51
Page 60

Notes
safety
for
your
Consignes
sécurité
de
Zu
Ihrer
Sicherheit
Observaciones
su
seguridad
para
Never
use
the
surgical
microscope
which
described
manual.
Stability
Here
procedures
affect the stability
MS-C
Do
not
stronger
the
swingarm.
Stronger
allow
accessories
time,
could
The
outfit
stand
used
additional
otherwise
topple.
for
have
not
in
is
how
to
which
floor
stand:
use a gas
than
gas
springs
the
use
at
and
the
topple
the
with
must
never
without
weight,
the
purposes
been
this
user
avoid
could
of
spring
1100N
of
too
the
same
loading
stand.
floor
be
an
stand
the
in
will
many
could
Ne
jamais
utiliser
microscope
à
d'autres
décrites
d'emploi.
Stabilité
Les
erreurs
tion
mentionnées
sous
risquent
stabilité
MS-C.
La
force
pneumatigue
dans
doit
pas
1100
Dans
risque
raison
des
accessoires!
Toujours
poids
avec
pour
basculement.
d'opération
fins
dans
de
d’affecter
du
statif
du
ressort
le
bras
mobile
dépasser
N.
le
cas
contraire,
de
basculement
du
poids
utiliser
supplémentaire
le
statif
éviter
tout
le
que
celles
ce
mode
manipula-
ci-des-
de
sol
se
trouvant
ne
plus
élevé
un
risgue
la
en
de
max.
1100
Benutzen
Operationsmikroskop
nie
fiir
andere,
dieser
Anleitung
beschriebene
Verwendungszwecke.
Standfestigkeit
In
diesem
Manipulationsfehler
aufgefiihrt,
Standfestigkeit
Bodenstativs
beeinträchtigen kônnten.
Im
N
Schwenkarm
keine
Gasfeder
1100 N eingesetzt
werden.
Die
Verwendung
stárkerer
kónnte
Ausrůstungsgewicht
Zubehôr
Kippgefahr!
Die
Bodenstativ
ohne
verwendet
Ansonsten
Kippgefahr.
Gasfedern
zu
fůhren
Ausriistung
Zusatzgewicht
Sie
das
als
in
Abschnitt
die
die
des
MS-C
darf
über
hóherem
=
mit
darf
nie
werden.
besteht
No
emplee
microscopio
menesteres
descritos
Estabilidad
sind
En
este
presentamos
observaciones
ran
afectar
del
estativo
MS-C.
No
acople
superiores a 1100 N en
el
brazo
Resortes
permitirían
simultáneo
accesorios,
excesivo
durch
ocasionar
instrumento.
No
use
con
estativo
peso
adicional.
El
instrumento
peligro
este
para
de
aqui.
apartado
una
que
la
estabilidad
de
resortes
movil.
más
potentes
el
empleo
de
demasiados
por
peso
podria
el
vuelco
nunca
de
de
vuelco.
otros
los
le
serie de
pudie-
suelo
lo
que
el
equipo
suelo
corre
el
del
sin
During
transport,
swingarm
folded
up
and
the
brakes
tight.
Otherwise
may
drift
the
out
stand
and
topple.
52
must
and
the
swingarm
of
could
the
be
locked,
must
be
control
Avant
le
transport
l'équipement,
bras
mobile,
et
serrer
Ceci
permet
balancement
du
bras
conséquent,
basculement.
le
les
freins.
d'éviter
involontaire
mobile
le
plier
bloquer
et,
risque
de
le
par
un
de
Beim
Schwenkarm
zusammengefaltet,
blockiert
Bremsen
festgezogen
Andernfalls
Schwenkarm
liert
Kippgefahr.
Transport
und
die
müssen
sein.
kónnte
wegschwenken
unkontrol-
muss
der
=
der
Cuando
equipo,
brazo
bloqueado y plegado,
si
articulaciôn
echados.
De
móvil
forma
instrumento
peligro
desplace
controle
movil
esta
los
frenos
de
estän
lo
contrario
se
descontrolada y el
de
el
movería
correría
vuelco.
el
si
el
brazo
de
y
Page 61

Movable
Here
nipulations
cause
parts
is
how
injury:
to
avoid
which
ma-
could
Piéces
mobiles
L'utilisateur
blesser
les
consignes
s’il
risque
ne
de
respecte
ci-dessous.
se
pas
Bewegliche
In
diesem
weisen
tionen
Falle
von
Verletzungsgefahr
besteht.
Teile
Abschnitt
wir
auf
hin,
Manipula-
bei
denen
Unachtsamkeit
im
Componentes
Aquí
le
indicamos
evitar
manipulaciones
pueden
causar
personas.
móviles
cómo
que
daños
a
Add
accessories
balance
the
over
operation.
Never
between
and
it
when
moved.
Be
put
pull
towards
Feet
could
beneath
base.
the
operation,
the field
put
your
the
the
swingarm;
could
become
the
swingarm
careful
where
your
feet
the
floor
you.
in
lightweight
become
the
stand
and
of
hand
gas
trapped
when
stand
trapped
casing
and
before
never
spring
is
you
you
shoes
of
the
Toujours
accessoires
équilibrer
avant
jamais
champ
Ne
main
pneumatique
mobile.
Risque
de
bras
Attention
du
statif!
Chaussés
gers,
sous
monter
le
microscope
l'opération
au-dessus
opératoire!
jamais
mettre
entre
le
de
pincement
la
manipulation
mobile.
aux
déplacement
de
souliers
ils
risquent
le
pied
du
les
et
et
du
la
ressort
et
le
bras
du
pieds
du
de
passer
statif.
lors
lors
lé-
Zubehôr
Ausbalancieren
vor
nie
Operationsfeld!
Hand
Gasfeder
Schwenkarm
Sie
des
geklemmt
Achten
Fiisse,
Bodenstativ
heranziehen.
Fiisse
kônnten
schalung
zuladen
der
Operation
über
dem
nicht
zwischen
und
halten.
kónnte
beim
Schwenkarms
werden.
Sie
auf
wenn
Sie
zu
in
leichten
unter
die
geraten.
und
immer
und
Bewegen
ein-
Ihre
das
sich
Schuhen
Ver-
Sustituya
efectúe
compensación
del
operación y nunca
el
No
entre
brazo
Podría
el
brazo
Tenga
pies,
estativo
Si
lleva
puede
facilidad
revestimiento
la
brazo
campo
ponga
el
resorte y el
móvil.
pillársela
móvil.
cuidado
cuando
hacia
zapatos
atrapárselos
debajo
accesorios
del
antes
de
de
operación.
nunca
la
al
con
tira
del
usted.
ligeros
del
de
la
y
peso
la
sobre
mano
mover
los
con
base.
The
footbrakes
remain
throughout
Always
power
If
satisfactorily,
inspect
diodes
control
contact
engaged
operation.
cable
opening
your
instrument
longer
functions
the
on
unit
your
(see
page
must
the
disconnect
before
the
control
light-emitting
the
side
before
Leica
39).
the
unit.
no
of
the
you
agency
Les
freins
du
pied
doivent
pendant
Avant
manipulation
effectuée
commande
toujours
réseau
courant!
Au
instrument
fonctionnerait
correctement,
contrôlez
trouvant
bloc
d’informer
sentation
(voir
être
l'opération.
toute
sur
ouvert
retirer
de
la
cas
où
votre
ne
les
sur
le
de
commande
votre
Leica
page
39).
bloqués
devant
le
bloc
le
câble
prise
de
pas
diodes
se
côté
du
avant
repré-
être
de
Fussbremsen
während
blockiert
Vor
Manipulationen
geôffneten
immer
Netzkabel
abziehen!
Falls
Ihr
einwandfrei
priifen
Leuchtdioden
des
Steuergeráts,
Sie
Ihre
informieren
(siche
der
Operation
sein.
Steuergerät
erst
das
vom
Gerát
funktioniert,
Sie
bitte
Leica-
auch
S.
39).
miissen
im
Netz
nicht
zuerst
die
an
der
Seite
bevor
Vetretung
Los
frenos
de pie
estar
bloqueados
durante
Cuando
aparato
desenchufe,
nada,
Si
funciona
por
primeramente
luminosos
aparato
de
representacion
(véase
la
operación.
deba
abrir
de
mando,
antes
el
cable
su
instrumento
perfectamente,
favor,
controle
los
en
el
de
informar a la
mando,
también
de
lado
Leica
pag.
deben
el
de
red.
no
diodos
del
antes
39).
53
Page 62

Tips
and
if
an
electrical
develops,
following:
—
Is
set
—
Is
(p.14)?
—
Is
ched
—
Are
bles
(p.46)?
—
Are
(p.
first
the
voltage
correctly
the
power
the
power
correctly
all
connecting
attached
the
fuses
47)?
hints
fault
check
selector
(p.47)?
switch
cable
(p.46)?
correctly
in
the
on
atta-
ca-
order
Remarques
et
conseils
En
cas
de
panne
des
fonctions à commande
électrique,
d’abord
suivants:
—
Le
est-il
ment
~
Lappareil
tension
—
Le
branché
(p.
—
Les
ment
correctement
—
Les
intacts
vérifier
les
points
sélecteur
réglé
correcte-
(p.
47)?
est-il
(p.
14)?
cable
réseau
correctement
46)?
cables
de
sont-ils
fusibles
(p.
47)?
de
tension
sous
est-il
raccorde-
branchés
(p.
46)?
sont-ils
Hinweise
Ratschlage
Bei
Stérungen
elektrisch
Funktionen
Sie
immer
—
Ist
wahler
gestellt
~
Ist
eingeschaltet
—
Ist
richtig
(S.46)?
—
Sind
kabel
angeschlossen
—
Sind
intakt
und
betriebenen
iiberpriifen
erst
der
Spannungs-
korrekt
(S.47)?
der
Netzschalter
das
Netzkabel
angeschlossen
alle
Verbindungs-
richtig
die
Sicherungen
(S.47)?
von
ein-
(S.
14)?
(S.46)?
Observaciones
consejos
Si
se
producen
las
funciones
verifique:
ー
¿Está
mente
tensión
—
¿Está
interr.uptor
14)?
—
¿Está
rectamente
red
(pág.
—
¿Están
rectamente
cables
(pág.
46)?
—
¿Están
correcto
47)?
fallas
eléctricas,
ajustado
el
selector
(pág.
47)?
activado
de
enchufado
el
cable
46)?
enchufados
todos
de
conexión
los
fusibles
estado
correcta-
el
red
y
de
de
(pág.
cor-
de
cor-
los
en
(pág.
Microscope
The
functions
activated
hand-/footswitch
Assistance
—
Inspect
connections
—
Connect
handswitch
correct
—
Inspect
the
control
Activate
handswitch.
diodes
unit
~
Operate
ment
interim
Note:
~
The
no
function
with
the
electrical
the
to
socket
the
diodes
unit
the
on
the
shine?
the X Y-move-
manually
measure
left
key
cannot
the
(see
foot-/
the
(p.62)
foot-/
Do
control
as
(ML)
(p.10).
be
above)
on
(p.62):
the
an
(p.33).
has
Microscope
Les
fonctions
pas
étre
avec
la
pédale/manuelle
Solution
—
Contrôler
xions
plus
—
Raccorder
de à pédale/manuelle
aux
(p.
62)
—
Contrôler
bloc
(p.
62):
commande à pédale/
manuelle.
sont-elles
—
Actionner
ment
XY
Attention:
—
La
touche
est
sans
ne
actionnées
commande
les
conne-
électriques
haut)
la
comman-
douilles
(p.
les
de
commande
actionner
Les
allumées?
provisoire-
les
mouvements
33).
gauche
effet
correctes
diodes
(p.
peuvent
diodes
10
a
(voir
du
la
(ML)
Mikroskop
Die
Funktionen
mit
Fuss-/Handschalter
nicht
betatigt
Abhilfe
~
Elektrische
gen
kontrollieren
(s.
oben).
ー
Fuss-/Handschalter
den
richtigen
anschliessen
ー
Dioden
uberprufen
/Handschalter
gen.
Leuchten
am
Steuergerät
ー
XY-Bewegungen
vorlaufig
bedienen
Zur
Beachtung
—
Linke
ohne
Funktion
Verbindun-
am
Steuergerat
(S.62):
manuell
(S.33).
Taste
kénnen
werden.
Buchsen
(S.62).
(ML)
an
Fuss-
betáti-
Dioden
auf?
ist
(S.
10).
Microscopio
Las
funciones
accionarse
dispositivo
por
pedal/manual
Remedio
—
Controle
eléctricas
arriba).
~
Conecte
de
control
pedal/manual
enchufe
(pag.
—
Controle
aparato
62):
accione
vo
de
pedal/manual. ; Se
mina
aparato
—
Maneje
mente
XY
de
(pág.
¡Atención!
—
La
tecla
no
tiene
guna
no
con
de
control
las
conexiones
(véase
el
dispositivo
por
en
correcto
62).
los
diodos
de
mando
el
control
por
algún
diodo
de
mando?
provisional-
los
movimientos
forma
33).
función
manual
izquierda
atribuida
(pág.
el
pueden
el
del
(pag.
dispositi-
ilu-
del
(ML)
nin-
10).
The
surgeons
zoom
individually
Reason
—
The
master
activated
34
cannot
function
(p.15).
Les
chirurgiens
peuvent
individuellement
is
Raison:
—
La
fonction
activée
pas
(p.
ne
zoomer
Master
15)
est
Die
Chirurgen
nicht
individuell
Grund
—
Die
Master-Funktion
eingeschaltet
können
zoomen.
(S.
15).
Los
cirujanos
trabajar
individualmente
ist
Razón
—
La
función
activada
con
(pág.
no
pueden
el
zoom
Master
15)
está
Page 63

The
foot-/handswitch
controls
the
instead
user
Assistance
—
~
—
No
microscope
Assistance
—
—
-
ー
the
functions
other
surgeon
of
those
Connect
to
(p.45)
Inspect
microscope
(p.20)
Set
correctly
Switch
tion
knob
(p.25)
Inspect
connections
malfunctioning
trically-powered
tions)
Engage
ge
tely
Inspect
cing
(p.
the
correct
the
light
with
BRIGHTNESS
lamp
(p.
them
49).
the
the
selector
(p.21).
in
the
on
the
the
the
the
mount
25)
the
if
of
of
the
footswitch
socket
basic
position
knob
illumina-
regulating
electrical
(see
above,
of
elec-
func-
quick-chan-
comple-
bulbs,
repla-
defective
Actionnée,
a
pédale/manuelle
sur
l'autre
Solution
~
Raccorder
de a pédale a Ja
correcte
—
Contrôler
base
(p.
—
Régler
sélecteur
Pas
microscope
Solution
—
Régler
le
—
Contrôler
ons
plus
fonctions à commande
électrique)
-
Enclencher
rapide
(p.
—
Contrôler
et
sont
(p.
la
les
fonctions
chirurgien
(p.
la
du
microscope
20)
correctement
(p.21)
de
lumière
l'éclairage
bouton
(p.
les
électriques
haut,
pannes
d’ampoule
25)
les
changer
défectueuses
49).
commande
la
comman-
45)
position
dans
25
connexi-
le
changeur
ampoules
celles
agit
de
douille
le
le
avec
(voir
des
qui
de
Mit
dem
Fuss-/
Handschalter
nicht
die
sondern
des
anderen
betätigt.
Abhilfe
ー
Fussschalter
richtigen
anschliessen
-
Mikroskop-Grund-
stellung
(5.20).
-
Selektorknopf
einstellen
Kein
Licht
Abhilfe
-
Beleuchtung
lierknopf
(S.
25).
—
Elektrische
gen
kontrollieren
(s.
oben,
elektrisch
Funktionen).
—
Lampenschnellwechsler
ganz
—
Glühlampen
ren
evtl.
wechseln
werden
eigenen
die
Funktionen
Chirurgen
an
Buchsen
(S.45).
kontrollieren
(S.21).
im
Mikroskop.
mit
einschalten
Verbindun-
Stórungen
betriebenen
einrasten
kontrollie-
defekte
(S.49).
den
richtig
(S.25).
aus-
Regu-
von
Con
el
dispositive
control
por
manual
las
sino
Remedio
—
-
—
No
microscopio
Remedio
—
—
~
-
no
se
funciones
las
del
Conecte
de
los
(pag.
Controle
básica
(pág.
Ajuste
botón
21).
Conecte
con
ción
Controle
eléctricas
“fallas
eléctricas”).
Engrane
te
de
Controle
y
necesario
los
control
enchufes
45).
la
del
20).
correctamente
de
selección
funciona
la
el
botón
(pág.
las
de
completamen-
el
cambiador
bombillas
las
sustitúyalas
de
pedal/
accionan
propias,
otro
cirujano
dispositivos
por
pedal
correctos
posición
microscopio
(pág.
la
luz
del
iluminación
de
regula-
25).
conexiones
(véase
arriba,
las
funciones
rápido
(pag.
25).
bombillas
si
fuera
(pág.
49).
a
el
The
image
is
too
Assistance
—
Turn
the
NESS
enough
—
Open
diaphragms
The
focus
Assistance
—
Fit
correctly
~
Carry
adjustment
accordance
directions
Zoom/focus/XY
or
too
Assistance
Adjust
speed
The
produces
reflections
Assistance
Tilt
the
wards
objective
BRIGHT-
knob
(p.34)
the
image
goes
the
eyepieces
(p.49)
out
slow
the
displacement
(p.19).
sterile
stray
the
objective
drape
slightly
in
relation
mount.
up
double-iris
(p.35).
the
precisely
with
(p.26).
drape
dark
high
out
of
dioptric
in
the
too
fast
cover
of
for-
to
the
L'image
Solution
—
—
L'image
Solution
—
—
Zoom/mise
rapides/trop
Solution
Régler
zoom
point
La
provoque
Solution
Sur
l'objectif
légèrement
Vavant.
est
trop
Tourner
réglage
sur
Ouvrir
phragme
Introduire
correctement
Corriger
en
tions
de
la
droite
le
n'est
suivant
(p.
les
et
de
(p.
19)
housse
la
housse,
le
le
bouton
la
double
iris
les
les
les
26)
au
lents
vitesses
la
stérile
des
capuchon
incliné
sombre
de
luminosité
(p.
34)
dia-
(p.
35)
pas
nette
oculaires
(p.
49)
dioptries
instruc-
point
trop
du
mise
au
reflets
fixer
à
vers
Das
Bild
ist
zu
dunkel.
Abhilfe
—
Regulierknopf
genug
einstellen
—
Doppelirisblenden
ôffnen
Das
Bild
scharf.
Abhilfe
ー
Okulare
einsetzen
ー
Dioptrien-Korrektur
genau
nach
durchführen
Zoom/Fokus/XY
schnell/zu
Abhilfe
Verstellgeschwindigkeiten
regulieren
Mit
Sterilhülle
Reflexe
Abhilfe
Objektiv-Abdeckung
der
schrag
Objektiv
auf.
Sterilhiille
nach
festklemmen.
(S.35).
bleibt
nicht
richtig
(S.49).
Anweisung
(S.26).
zu
langsam
(S.
19).
treten
leicht
vorn
hoch
(8.34).
an
am
La
imagen
demasiado
Remedio
—
Gire
hacia
(pág.
—
Abra
doble
La
imagen
permanece
Remedio
—
Monte
rrectamente
—
Corrija
siguiendo
las
(pág.
Zoom/enfoque/XY
demasiado
Remedio
—
Regule
de
La
cubierta
provoca
Remedio
—
En
tapa
ramente
adelante.
resulta
oscura
el
botón
la
34).
los
instrucciones
26).
ajuste
la
cubierta,
en
regulador
derecha
diafragmas
(pág.
35).
no
nítida
los
oculares
(pág.
las
dioptrías
atentamente
rápido/lento
las
velocidades
(pág.
19).
estéril
reflejos
fije
el
objetivo
inclinada
iris
co-
49).
la
lige-
hacia
55
Page 64

Stand
The
swingarm
upwards
Assistance
Balance
(p.29)
TV,
The
monitor
Assistance
—
—
—
Photos
Assistance
—
—
or
the
swingarm
photography
image
on
is
too
Change
dual
Adjust
ra / monitor
dance
facturer’s
For
refer
tion:
dark".
Focus
Carry
adjustment
accordance
directions
the
attachment
the
with
instructions
further
to
the
“The
are
unsharp
precisely
out the
drifts
downwards
the
dark
filter
in
the
(p.39)
video
came-
in
accor-
the
manu-
assistance,
earlier
image
(p.26).
sec-
is
too
(p.17)
dioptric
precisely
with
the
in
Statif
Le
bras
horizontal
releve/s
lui-même
Solution
-
TV,
L'image
trop
Solution
—
—
—
Les
sont
Solution
~
-
'abaisse
Equilibrer
mobile
(p.
le
29).
photographie
de
l'écran
sombre
Changer
rallonge
Régler
caméra
teur
tions
Voir
trop
Faire
précise
Corriger
en
tions
le
filtre
double
correctement
vidéo/le
(suivre
du
fabricant)
aussi
“L'image
sombre”.
photographies
pas
nettes
une
mise
(p.
17)
les
suivant
les
(p.
26)
se
de
bras
est
dans
(p.
39)
moni-
les
instruc-
est
ne
au
point
dioptries
instruc-
la
la
Stativ
Der
Schwenkarm
hebt/senkt
selbstandig.
Abhilfe
—
Schwenkarm
balancieren
TV,
Das
Bildschirm
Abhilfe
—
Filter
wechseln
ー
Video-Kamera/Monitor
korrekt
leitung
—
Weitere
siehe
dunkel’.
Photographien
unscharf.
Abhilfe
—
Prázise
(S.
—
Dioptrien-Korrektur
genau
durchführen
sich
aus-
(5.29).
Photographie
Bild
auf
dem
ist
zu
dunkel.
im
Dualansatz
(S.39).
einstellen
des
Herstellers).
Massnahmen
"Bild
ist
zu
sind
Fokussieren
17).
nach
Anweisung
(8.26).
(An-
Estativo
El
brazo
móvil
se
inclina/levanta
mismo
Remedio
—
Equilibre
movil
TV,
fotografia
La
imagen
resulta
demasiado
oscura
Remedio
~
Sustituya
suplemento
(pag.
39).
—
Ajuste
videocámara/el
(siga
las
del
fabricante).
—
Véase
resulta
gen
oscura”.
Las
fotografías
nítidas
Remedio
—
Enfoque
sión
(pág.
—
Efectúe
de
dioptrias
atentamente
ciones
por
el
brazo
(pag.
29).
del
monitor
el
filtro
dual
correctamente
también
(pag.
monitor
instrucciones
"la
demasiado
no
con
más
17).
la
corrección
siguiendo
las
instruc-
26).
si
en
el
ima-
son
preci-
la
Photos
have a yellow
cast
Assistance
—
Use
artificial-light
—
Turn
the
clockwise
voltage
—
If
using
insert a KB12
the
microscope
rotary
to
maximum
(p.25)
daylight
filter
film
knob
film,
into
(p.25).
Les
photographies
une
nuance
Solution
—
Utiliser
un
artificielle
—
Tourner
réglage,
aiguilles
sur
la
tension
(p.
25)
—
Avec
un
jour,
utiliser
KB12
dans
scope
(p.
jaune
film
le
bouton
dans
d’une
film
le
25).
ont
lumière
de
le
sens
montre,
maximale
lumière
un
filtre
micro-
des
du
Photographien
Gelbstich
Abhilfe
—
Kunstlichtfilm
verwenden.
-
Regulierknopf
zeigersinn
spannung
~
Bei
Tageslichtfilm
KB12
einsetzen
auf
drehen
im
Mikroskop
(S.25).
haben
im
Uhr-
Maximal-
(S.25).
Filter
Las
fotografias
presentan
amarillo
Remedio
—
Emplee
para
—
Gire
ción
agujas
tensión
(pag.
—
Si
luz
filtro
microscopio
una
luz
artificial.
el
botón
en
dirección
del
máxima
25).
emplea
natural
KB12
un
matiz
pelicula
reloj
un
monte
en
(pág.
de
regula-
de
hasta
filtro
para
un
el
25).
las
la
56
Page 65

Notes
We
guarantee
quality
You
are
high-performance
sion
meets
ments,
Consequently,
tee
struments.
covers
als
does
damage
careless
handling.
Please
ble
with
fulfil
same
decades.
are
If
ger
ly,
or
Heerbrugg,
working
instrument
the
highest
the
quality
all
faults
and
manufacture.
not,
however,
resulting
or
handle
optical
respect.
its
function
precision
Our
renowned
your
instrument
functions
call
in
your
contact
Leica
which
we
of
The
guarantee
in
improper
your
instrument
It
will
for
instruments
for
satisfactori-
Leica agent
Switzerland.
the
with
a
preci-
require-
guaran-
our
in-
materi-
It
cover
from
valua-
then
with
the
that.
no
lon-
AG,
Remarques
Nous
nous
portons
garants
Vous
instrument
performant
aux
Ainsi,
qualité
ments.
couvre
cation
mais
dû à la
manipulation
priée.
Utilisez
d'opération
grand
service
nes
servant
qualité
instruments
Si
fonctionne
ment,
tre
ou
AG,
de
la
travaillez
de
précision
qui
plus
hautes
nous
garantissons
de
nos
instru-
Cette
garantie
les
vices
et
de
matériaux,
exclut
tout
négligence
inappro-
votre
microscope
avec
soin.
I]
vous
pendant
d’années
votre
représentation
directement à Leica
Heerbrugg,
tout
sa
précision.
pour
laquelle
sont
instrument
plus
adressez-vous à vo-
qualité
avec
un
répond
exigences.
de
fabri-
dommage
et à une
le
plus
rendra
des
dizai-
en
con-
Une
nos
réputés.
ne
correcte-
Leica
Suisse.
la
Hinweise
Wir
garantieren
Qualitat
Sie
arbeiten
Präzisionsinstrument
grosser
keit,
Ansprüchen
Dementsprechend
wir
für
unserer
Garantie
auf
Fabrikations-
Materialfehler,
auf
Schäden,
Fahrlássigkeit
gemásse
entstanden
Bitte
wertvolles
strument
Sorgfalt.
uber
Dienst
der
Genauigkeit.
sind
berühmt.
Sollte
nicht
funktionieren,
sich
Vertretung
e
AG,
mit
einem
Leistungsfahig-
das
hóchsten
gerecht
die
Qualität
Instrumente.
erstreckt
nicht
die
und
Handhabung
sind.
behandeln
optisches
mit
gebůhrender
Dann
Jahrzehnte
unsere
Ihr
mehr
bitte
Heerbrugg,
erfiillt
mit
gleichbleiben-
Instrumente
Instrument
einwandfrei
wenden
an
Ihre
oder
bürgen
sich
und
durch
unsach-
Sie
Ihr
In-
seinen
Dafiir
Leica
an
Leica
Schweiz.
Observaciones
fiir
Respondemos
calidad
Tiene
instrumento
de
grandes
gue
wird.
Die
aber
es
Sie
responde a las
exigencias
más
estrictas.
Garantizamos
de
nuestros
Sin
embargo,
garantia
defectos
de
material,
daños
descuidos o manipula-
ciones
Trate
sumo
prestarà
durante
la
misma
hecho
instrumentos.
Si el
instrumento
funciona
diríjase a la
ción
local o directamente
a
Leica
(Suiza).
de
la
en
sus
manos
un
de
precisión
prestaciones
de
calidad
la
calidad
instrumentos.
nuestra
solo
cubre
de
causados
incorrectas.
su
instrumento
cuidado.
sus
muchos
precisión
famosos a nuestros
correctamente,
AG,
los
fabricación
pero
no
los
por
con
Sélo
asi
servicios
años
con
que
no
representa-
Heerbrugg,
o
ha
57
Page 66

Notes
Remarque
Hinweise
Observaciones
Technical
Only
the
following
accessories
connected
unit:
1.
Tested
Leica
nes
2.
Accessories
safe
to
use
approved
Power
supply
Prima
115
V/230
V-
+10%
15%
Fuses:
2x1.6AT
Safety
Type B f
Output
Secondary
24V = SA
Microscope:
for
Fuse
(5x20mm)
lamp
6.3AT
(5x20mm)
class
Class
type:
12V/50W
data
may
to
the
accesso-
passed
by
an
testing
50/60
1
WILD
be
control
as
station
Hz
M680
Dates
técnique
Ne
brancher
éléments
bloc
1.
Accessoires
homologués
2.
Accessoires
compatibilité
attestée
de
Connexion
Primaire
115
Fusible
2x1.6
Classe
Typ B 4
Sortie
Secondaire
24V=5A
Microscope:
pour
fusible
(5x20
suivants
de
commande:
contrôle
V/230
+10%
15%
AT
(5x20
de
protection
classe
type
6.3
mm)
par
au
V-
WILD
de
AT
12
que
les
Leica
dont
est
un
centre
agrée
réseau
50/60
mm)
1
lampe:
V/50
au
la
M680
W
Hz
Technische
Am
Steuergerát
ausschliesslich
folgendes
angeschlossen
1.
Geprüftes
Firma
2.
Zubehôr,
heitstechnisch
denkliche
dungsfähigkeit
eine
zugelassene
stelle
Netzanschluss
Primär
115
V/230
Sicherung
2x1.6
AT
Schutzklasse
TypB & Klasse
Ausgang
Sekundar
24V=5A
Mikroskop:
für
Lampentyp:
Sicherung
(5x20
mm)
Daten
darf
Zubehór
werden:
Zubehôr
Leica.
dessen
unbe-
Verwen-
nachgewiesen
V-
+10%
İso,
50/60
(5x20
mm)
1
WILD
6.3
AT
12
V/50
sicher-
durch
Prüf-
M680
W
Datos tecnicos
En
el
pueden
únicamente
siguientes
1.
der
ist.
Accesorios
por
2.
Accesorios
bados
ensayos
garantizan
dad
la
hora
lados.
Conexión
Primario
115
V/230
Hz
Fusibles
2x1.6
Clase
TipoB
Salida
Secundario
24V=5A
Microscopio:
para
tipo
fusible
(5x20
aparato
conectarse
los
accesorios:
controlados
la
compañía
que,
por
un
autorizado,
una
técnica
completa,
de
ser
de
red
V-
+10%
oo
AT
(3x20
de
protección
4
clase
WILD
de
bombilla:
6.3
AT
mm)
12
de
mando
Leica.
apro-
centro
seguri-
manipu-
50/60
mm)
1
V/SO
W
de
a
Hz
M680
Care!
The
control
unit
230V
grid
factory.
To
voltage
setting,
page
47.
Pull
out
you
open
Use
the
in
medically-designated
rooms
in
VDE0107.
instrument
the
danger
38
was
voltage
change
refer
the
cable
the
control
instrument
accordance
Do
not
where
of
explosion.
set
in
the
the
grid
to
before
unit.
only
with
use
the
there
Attention!
to
Le bloc
été
une
230
tension,
Avant
commande,
câble
L'instrument
utilisé
à
dant à la
is
0107
zones
ajusté
tension
V.
Pour
d'ouvrir
réseau.
que
usage
et
non
explosives.
de
commande
en
usine
de
changer
voir
page
débrancher
ne
dans
médical
norme
pas
pour
réseau
la
47.
le
bloc
doit
des
locaux
répon-
VDE
dans
a
de
le
être
des
Achtung!
Das
Steuergerát
Werk
auf
230 V
eingestellt.
Umschaltung
spannung
Vor
dem
Steuergerätes
ziehen.
Verwendung
nur
in
medizinisch
ten
Ráumen
0107.
Betrieb
nicht
in
explosionsgefáhr-
detem
Bereich.
wurde
Netzspannung
der
Netz-
siehe
Seite
Offnen
des
Netzkabel
des
Geràtes
genutz-
nach
VDE
des
Gerátes
¡Atención!
im
El
47.
aparato
viene
para
de
230
tensión,
Antes
de
mando,
cable
No
sino
médico
Absténgase
instrumento
peligro
de
ajustado
una
de
emplee
en
control
tensión
V.
Para
consulte
de
abrir
desenchufe
red.
el
instrumento
recintos
exclusivamente.
de
en
de
explosión.
de
fábrica
de
cambiar
pág.
el
aparato
de
utilizar
zonas
red
la
47.
el
uso
el
con
Page 67

Optical
Eyepieces
Oculaires
Okulare
Oculares
data
Données
Zoom
optiques
f=
Working
Distance
Arbeitsabstand
Distancia
200
180
mm
distance
de
travail
de
trabajo
mm
Optische
Objective / Objectif / Objektiv / Objectivo
f = 250
Working
Distance
Arbeitsabstand Arbeitsabstand
Distancia
233
mm
distance
de
travail
de
trabajo
mm
Daten
f = 300
Working
Distance
Distancia
287
mm
distance
de
travail
de
trabajo
mm
Datos
f=
Working
Distance
Distancia
ópticos
350
mm
distance
de travail
Arbeitsabstand
de
trabajo
341
mm
fils | det | Biz | slet | Hig | ss
3é3E | ЗЕЕ
SOL
5
6.25
8
10
10x / 21B
16x / 14B
25х / 9.5В
12.5
16
20
25
5
6.25
8
10
12.5
16
20
25
5
6.25
8
10
12.5
16
20
25
E252 | Segs
000
mm
2.5
3.1
4
5
6.3
8
10 21
12.5
4
5
6.4
8
10
12.8 17.5
16 14
20
6.3
7.8
10
12.5
15.6
20
25
31.3
84
67.2
52.5
42
33.6
26.3
16.8
56
44.8
35
28
22.4
11.2
38
30.4
23.8
19 10
15.2
11.9
9.5
7.6
ESSE
|
ЗЕЕ
ESS
2
2.5
3.2
4
5
6.4
8
10 21
3.2
4
5.1
6.4
8
10.2
12.8
16 14
5
6.3
8
12.5
16
20
25
Зее
|
ЗЕ
BODŮ
mm
105
84
65.6
52.5
42
32.8
26.3
70
56
43.8
35
28
21.9
17.5
47.5
38
29.7
23.8
19
14.8
11.9
9.5
855
|
3288 | 3536 | a6sî | ЗЕ
GE
マ
1.7
2.1
2.7
33
4.2
5.3
6.7
8.3
2.7
3.3
4.3
53
6.7
8.5
10.7
13.3
4.2
5.2
6.7
8.3
10.4
13.3
16.7
20.8
| His |
|
Sede
OOO
mm
126
100.8
78.8
63
50.4
39.4
31.5
25.2
84
67.2
52.5
42
33.6
26.3
21
16.8
57
45.6
35.6
28.5
22.8
17.8
14.3
11.4
Eis:
#522 ESSO
1.4
1.8
2.3
2.9
3.6
4.6
5.7
7.1
2.3
2.9
3.7
4.6
5.7
7.3
9.1
11.4 19.6
3.6
4.5
5.7
7.1
8.9
11.4
14.3
17.9 13.3
se
Saio
mm
147
117.6
91.9
73.5
58.8
45.9
36.8
29.4
98
78.4
61.3
49
39.2
30.6
24.5
66.5
53.2
41.6
33.3
26.6
20.8
16.6
59
Page 68

The
comprehensive
program
Leicas
Scientific
Division
range
products
Microscopy
Instruments
offers a full
of
quality
including:
Microscopes
Compound & stereo
Surgical
Acoustic
Electron-scanning
Laser-scanning
Advanced
Image
Spectral
Automated
Measurement
Electron
Laboratory
Specimen
Routine-
Refractometers
Diagnostic
Microtomes
Sliding & rotary
Cryostats
Ultramicrotomes
Systems
analysis
photometry
inspection
systems
beam
lithography
Equipment
preparation
and
immunostaining
&
stations
Surgical
for
Multidisciplinary
WILD
WILD
microscopes
all
microsurgical
M650
M690
application
Ophthalmology
WILD
M650
WILD
M690,
illuminator,
XY-unit,
slit
illuminator,
Neurosurgery
WILD
M655
WILD
M695
WILD
M690/Mitaka
ENT
WILD
M655
WILD
M695
WILD
M715
Plastic
WILD
WILD
WILD
Gynaecology,
spinal
WILD
surgery
M680
M651,
180°
M691,
180°
surgery
M680
dual
dual
urology,
from
Leica
disciplines
0°
illumination
0°
stereo
stereo
attachment
stereo
attachment
cardiosurgery,
AG,
Heerbrugg,
optics,
assistant’s
oblique
microscope
Leica
AG,
Heerbrugg,
Switzerland,
certified
with a quality
meets
Standard
Management
Systems
EN
standard
Illustrations,
and
may
be
Printed
in
Switzerland — Copyright
M2
680 - VII.93
has
as
being
system
the
International
of
Quality
and
(ISO
standard
29001).
descriptions,
changed
without
been
equipped
which
Quality
and
technical
notice.
Leica
9001,
data
are
AG,
Heerbrugg,
not
binding
Switzerland,
1993
eua
Leica
CH-3435
Heerbrugg
(Switzerland)
Telephone
Fax
+41
Telex
881
+41
71
222
AG
72
71
13
70
1638
wich
31
31
Page 69

Service
Doc
code
manual
M680 M680
556
948
fault
03/93
finding
3077-HWE
Chapter
Preparation
Power
Functions
Supply
Lamp
supply
of
control
of
control
of
hand-
or
microscope
M680
unit
footswitch
and
XY-gear
Table
of
fault
content
finding
Page
4-1
4-3
4-4
4-5
4-7
Zoom
Focus
control
control
X(Y)-gear
4-8
4-9
4-10
Page 70

Service
Doc
code
manual
556 948
M680
M680
03/93
Fault
finding
3077-HWE
1.
Connecting
the
testbox
M680
Preparation
Disconnect
Hook
e
Plug
with
Fault
plugs
in
the
testbox
in
P36
and
P37
microscope
finding
P36 und
and
P37
to
the
swingarm
at
the
testbox.
XY-gear
from
swingarm
With
through
that
the
the
testbox.
control
unit
is
connected
Var | Arce
Ve
da
Xn | Yen
NE
ur”
|
TESTROX
M695/M680
ARTELE
KL
Mé
HG
5
UE
Y
|
DA
XY-GEAR
M680
4-1
Page 71

M680
Fault
03/93
3077-HWE
2.
Settings
finding
on
the
control
unit
・
e
Adjust
Set
Position
Lamp
to
minimal
switch
brightness
to
"1"
Service
Doc
manual
code
556 948
M680
51
POWER
2008
чо
di
FOCUS
SPEED
-
SPEED
-
+
+
um
-
+
|
7
2
1
Page 72

Service
Doc
code
manual
556
$48
M680
M680
03/93
Fault
finding
3077-HWE
Action
SWITCHING
ON
Power
Reaction
supply
of
control
Possible
Lamp
of
main
does
SV-LED
Display
not
light
on
Function-
does
not
switch
light
Line
24V-main
unit
reason
voltage
supply
Check
Fuses
F1
line
plug
Main
switch
Line
cable
Transformer
Rectifier
Wiring
and
F2
P1
S1
circuit
in
Zoom
does
to
position 5 and
subsequently
Focus
does
to
center
not
move
to
9
not
move
position
10V-supply
SV-supply
Control
Swingarm
microscope
Control
Swingarm
microscope
unit,
or
unit,
or
Panel
board
Receiver
Zoom
control
page
4-8
Focus
control
page
4-9
board
Page 73

M680
03/93
Fault
finding
3077-HWE
Service
Doc
manual
code
556
M680
948
Functions
Condition:
Malfunction
Fault
Fault
Replace
a)
Service-handswitch
b)
Hand-/footswitch
of
of
hand-
or
appeares
appeares
hand-
hand-
footswitch
at
at
or
or
side
A:
side
B:
footswitch
or
of
the
footswitch
of
only
one
side, A or
positionswitch
set
positionswitch
of
the
opposit
side
at
defective
B,
is.
"1"
to
"2"
side A or B
by
either:
Action
Release
Connect
and
release
functions:
SL
(Z)
SL
(P
Xe
及
一
YT
yl
VA)
zi
FT
FJ
again
original
functions
7
switch
Reaction
Corresponding
Display
Corresponding
Display
does
does
LED
not
LED
not
at
light
at
light
Function
Function
Possible
Receiver
Hand-
reason
Board
or
footswitch
Imprtant:
Set
positionswitch
4-4
back
to
"1"!
Page 74

Service
Doc
code
manual
556
948
M680
M680
03/93
Fault
finding
3077-HWE
J
Voltage
24V
MICRO
Action
1.Lamp
2.Lamp
3.Lamp
to
to
back
brightness
Supply
of
min.brighiness
max.brightness
to
min.
microscope
Reading
Reaction
26V
+-5%
20V
+-5%
and
XY-gear
Microscope
but
incorrect
Microscope
any
function
reacts
-
without
Possible
Check
lines
check
page
Wiring
microscope
fault
supply-
of
24V
PGND
4-6
of
and
-
Switch
arm
switch
Switch
Separate
testbox
24VxY-GEAR
Lamptomin.brightness
Bridge
servicecable
off,
with
on
off,
and
swing-arm
bridge
servicecable
again
microscope
switch
swing-
and
from
on
with
26V
26V
26V
26V
+-5%
+-5%
+-5%
+-5%
microscope
Voltage
Voltage
Voltage
XY-Gear
Voltage
XY-gear
Voltage
ok
not
ok
and
does’nt
ok
and
reacts
not
reacts
ok
react
ok
Swingarm
evtl.
short
in
the
microscope
Control
Check
12VXY-GEAR
page
Swingarm
Control
unit
4-6
unit
cable
circuit
cable
Leica
4-5
Page 75

M680
03/93
3077-HWE
Fault
finding
Service
Doc
manual
code
556 948
M680
Voltage
12V
xy-GEAR
Action
1.
Zoom
min.
2.
Zoom
max.
position
XY-speed
position
XY-speed
Check
(Voltage
25
5
Reading
5.2V
14.5V+-0.6V
lines
of
drop
Reaction
+-0.3V
Powerground
on
PGND
relating
Voltage
reacts
incorrect
Voltage
PGND
to
logic
ok
not
but
XY-gear
ok
ground)
Possible
verify
signals
XY-gear
page
Control
servo);
short
fault
control
of
4-10
unit
XYmotor
circuit
the
(XY-
FOCUS
UP
Adjust
brightness
Bridge
service
lamp
Important:
lamp
swingarm
cable
to
max.
to
maximal
with
and
adjust
brightness
Adjust
lamp
max.
with
swingarm
cable
max.
again
-0.8V
standard-
-0.8V
to
minimal
If
voltage
function,
Voltage
Voltage
typ.
brightness!
>-1V
is
ok - depending
check
ok
not
ok
signals
Lamp
control - page
Zoom
control - page
Focus
control - page
on
of:
Swingarm
(One
PGND-lines
broken)
One
PGND-lines
the
or
broken.
the
incorrect
4-7
4-8
4-9
cable
of the
two
of
the
two
microscope
control
unit
is
in
is
Page 76

Service
Doc
code
manual
556 948
M680
M680
03/93
Fault
finding
3077-HWE
Signal
LAMP
REF
Lamp
Action
control
Reading
Adjust
brightness
Separate
from
adjust
brightness
lamp
microscope
the
testbox,
lamp
to
to
min./max
min./max
0.3V...5V
+-5%
0.3V...5V
+-5%
Reaction
Voltage
Voltage
ok
ok
Possible
Microscope
(Lamp
Wiring)
Microscope
fault
Control,
Bridge
service
adjust
brightness
Important:
swingarm
cable,
lamp
to
min./max
Adjust
with
lamp
0.3V...5V
+-5%
again
to
minimal
brightness!
Voltage
Voltage
ok
not
ok
Swingarm
Control
unit
cable
Page 77

M680
03/93
Fault
finding
3077-HWE
Service
Doc
manual
code
556
M680
948
Signal
A/B
ZOOM
AB
ZOOM
J
SPEED
UP
Action
Set
min.
zoom
Set
max.
zoom
Release
/footswitch
non-actuated
ZT
Zoom
Select
‚
*
speed
speed
on
hand-
A/B
control
microscope
Select A or
Select A if
Reading
1.84...
SV
>4.75V
<0.2V
side A or
B,
depending
the
fault
2.34V
+-5%
B:
on
appeares
Reaction
|
>
Voltages
reacts
which
on
both
incorrect
side
the
zoom
sides, A and
ok,
but
works
incorrect
B.
Possible
Microscope
(Logic
Zoom
wiring)
fault
board,
servo,
AB
ZOOM
DN
Release Z on
/footswitch
non-actuated
Separate
from
check
Bridge
servicecable
Signals
A/B
microscope
the
testbox
signals
swingarm
and
hand-
and
with
verify
>4.75V
<0.2V
see
above
see
above
-
Voltages
Voltages
Voltages
ok
ok
not
ok
Microscope
(short
circuit
Logic
board,
Zoom
Servo
wiring)
Swingarm
Control
cable
unit
on
or
Page 78

Service
Doc
code
manual
556 948
M680
M680
03/93
Fault
finding
3077-HWE
Signal
AB
FOCUS
A/B
FOCUS
SPEED
UP
Action
Set
min.
focus
Set
max.
focus
Release
/footswitch
non-actuated
FŤ
on
A/B
Focus
Select
‚
*
microscope
Select A or B,
Select A if
speed
speed
hand-
control
side A or
depending
the
fault
Reading
1.25...
SV
>4.75V
<0.2V
1.27V
+-5%
B:
on
appeares
Reaction
Voltage
reacts
which
on
both
ok,
incorrect
side
the
zoom
sides, A and
but
works
incorrect
B.
Possible
Microscope
(Logic
Focus
wiring)
fault
board,
servo,
AB
FOCUS
DN
Release
/footswitch
non-actuated
Separate
from
check
Bridge
servicecable
signals
FJ
on
A/B
microscope
the
testbox
signals
swingarm
and
hand-
and
with
verify
>4.75V
<0.2V
see
above
see
above
一
Voltages
Voltages
Voltages
ok
ok
not
ok
Microscope
(short
circuit
Logic
board,
Focus
servo
wiring)
Swingarm-
cable
Control
unit
on
or
Page 79

M680
03/93
Fault
finding
3077-HWE
X(Y)-gear
Service
Doc
manual
code
556
M680
948
Signal
MAGNIFICATION
Action
Set
zoom
Set
zoom
position
position
e
Move
necessary
25
5
Reading
4V
ОУ
the
microscope
(see
+-0.5V
+-0.5У
user
manual)
Reaction
Voltages
but
display
board
shows
zoom
position
Voltages
display
shows
position
to
the
any
centre
not
not
on
Select
wrong
ok
on
Select
correct
ok
and
of
X-
Possible
Microscope
(Zoom
board
zoom
and
Microscope
(Logic
Zoom
Y-range - manually
fault
servo)
board
servo)
od.
if
AMPERE
XY-GEAR
4-10
Release
X,
Xe,
YT,
YJ
at
Hand-/Fussschalter A =current-
0.7A
limit
>0.35A
no
reaction
direction
eventually
noise
released
is
audible
of
the
unusual
XY-Gear
mechanically
blocked
mechanical
problem
gearbox
in
the
Page 80

Service
Doc
code
manual
556
948
M680
M680
03/93
Fault
finding
3077-HWE
Signal
DIRECTION
DIRECTION
DIRECTION
DIRECTION
LIMIT
X+
LIMIT
Y+
LIMIT
X-
LIMIT
Y-
Action
X+
Release
Y+
hand-/fcootswitch
X-
Release
Y- | hand-/footswitch
Release
hand-/footswitch
Release X (YJ)
hand-/footswitch
X—
Xe
X—
(YT)at
A
(YJ)
at
A
(Y7)
at
A
A
Reading
same
12Vxy-0.2V
see
page
0.0V+0.2V
at
value
4-6
Reaction
as”
Voltages
”
does
|
not
ok,
but
react
Possible
X(Y)-gearbox
(XY_GND,
Limit
X(Y)-motor)
fault
board,
bridge
swingarm
service
verify
Leica
cable
the
with
and
signals
as
above
voltages
voltages
ok
not
ok
Swingarm
Control
(XY-servo)
unit
cable
4-11
Page 81

M680
03/93
Fault
finding
3077-HWE
Service
Doc
manual
code
556
M680
948
Page 82

Service
Doc
code
manual
556 948
M680
Description
control
unit
03/93
MEL61/62
3077-HWE
Chapter
Introduction
Power
Lamp
Zoom
supply
control
control
Table
Description
MEL61/62
of
content
of
control
functions
unit
Page
5-1
5-3
5-9
5-11
Focus
control
XY-gear
control
5-17
5-23
Page 83

Service
Doc
code
manual
556
948
M680
Description
of
control
unit
03/93
MEL61/62
3077-HWE
The
description
The
control
is
subdivided
circuits
for
zoom,
Description
MEL61/62
for
the
main
groups:
¢
Control
e
Swingarm
*
M680
+
XY-gear
focusing
are
located
functions
unit
MEL61/62 - Section
MSV136/137 - Section
microscope - Section
MSV138 - Section
and
XY-gear
partly
in
are
described
of
functions
control
7
8
the
control
in
unit
the
following
unit
5
6
and
partly
pairs
in
the
microscope
of
sections:
itself.
Their
The
swingarm
cable
e
Sand 7 for
e
$5
and 8 for
is
the
electrical
and
is
therefore
main
groups.
The
test
be
used
which
of
these
box
is
to
study
are
transmitted
signals.
microscope
XY-gear
link
between
the
ideal
introduced
the
supply
through
functions
the
control
place
to
between
voltages,
the
unit,
start
looking
the
swingarm
control
swingarm
the
microscope
for
faults
and
signals
and
cable.
Section 6 includes a list
and
at
the
the
microscope.
control
the
XY-gear,
level
levels,
of
It
all
the
can
of
Page 84

Description
03/93
3077-HWE
Notes
of
control
unit
MEL61/62
Service
Doc
manual
code
556
M680
948
5-2
Leica
Page 85

Service
Doc
code
manual
556
M680
948
Description
of
control
unit
03/93
MEL61/62
3077-HWE
Tasks
24V
supply
for
microscope
12V
supply
for
final
stage
10V
supply
for
potentiometer
and
XY-gear
XY-servo
and
receiver
Power
board
supply
Control
Red
tive
Variable
Green
OK
MEL61/62
elements / displays
LED
on
panel
board
fuse
with
XY-speed
LED
on
panel
indicates
potentiometer
board
shows
defec-
10V
Pages
5-6,
7-4
5-6
5-7
5V
supply
for
logics
witch
or
5V
supply
for
logics
Ground
PGND:
SENS
of
receiver
handswitch
board
in
microscope
Microscope
ground
board
and
foots-
LED
"SV"
Yellow
switch-off
Logics
LED
(ground)
OK
on
on
panel
caused
microscope
function
board
by
excess
display
indicates
current
5-7
5-7,
5-7,
7-4
7-4
7-4
GND_XY:
Leica
XY
ground
5-7
5-3
Page 86

Description
03/93
of
3077-HWE
control
unit
MEL61/62
Service
Doc
manual
code
M680
556
948
+24V
GND
MAGN
PANEL
pisa
pigra
1928
P14/11
|
베베
FUSE
AA
6.3AT
BOARD
+24V
P12/15,1
C-LIMIT
>SA
2
+24V
POTENTIOMETER-
SUPPLY
AA
COMPAR.
CURRENT-
LIMIT
>
REGUL.
OV
1
K
к
da
\
VR
10V
SV
P12/19,20
OK
у
>
ーー
J13/9
Page 87

Service
Doc
code
manual
556
848
M680
Description
of
control
unit
03/93
MEL61/62
3077-HWE
RECEIVER
P6/12
P6/10
J10 ノ 10
「
|
|
|
|
|
|
Lo.
J10/23,24
一
一 十 一 一 一 一 一
SERVO!
XY-GEAR
1
6-16V
REGUL.
| |
BUARD
q
|
«11/7
Z
|
|
Ш
J11/5,6
P14/25,26
|
27/45.
P7/7
P7/5,6
SWING
P19/22,26
J36/13,18
pere
P19/19
P19/29
J37/10
P32 ノ 9
J37/11
»
。
> 1 ev
”
>
ARM
24
Vuicro
ど
4V ツ xy-cEas
XY-GEAR
GND
XY
——
P6/7,8
P6/4
sv
REGUL.
J10/14,13
FUNCTION-
DISPLAY
R
‘a
SVok
>
LOGIC
sv
P14/21,22
SUPPLY
|
P2/6
P2/5
P19/20,25
53571814
HAND-/FOOTSWITCH
ーー
PGND
JI6/1 p SV
416/5
p
A
GND
SV
P3/6
|
P3/5
517/71
J17/5
p.
p
SV
GND
B
Page 88

Description
03/93
3077-HWE
of
control
unit
MEL61/62
Service
Doc
manual
code
556
M680
948
Control-LEDs
24V
supply
On
the
panel
and
on
the
The
24V
microscope
board:
10V
OK:
>5A
on
24V
Fuse
interrupted:
function
SV
OK:
supply
via
powers
the
green
LED
(PGND):
display:
green
LED
the
swingarm.
shines
yellow
red
LED
shines
servo
LED
shines
board
shines
via
the
receiver
board,
and
the
Limitation
current
12V
of
supply
excess
The
fuse
(6.3AT).
The
on
at
PGND.
A
switching
Y-motors.
(MAGN)
Zoom
loading
the
panel
position
Zoom
position
The
for the
unstabilized
red
LED
at
maximum
board
regulator
The
voltage
set.
25
<8
main
supply
indicates a burt
lamp
brightness
indicates
on
switching
the
servo
varies,
depending
at
min.
5.2V
9V
fuse.
off
board
produces a 12V
XY-speed
voltage
is
about
as a result
on
the
XY-speed
at
8.5V
is
3.25A.
of
supply
max.
14.5V
on
the
panel
The
yellow
excess
current
for the
and
zoom
XY-speed
board
LED
(5A)
X-
and
position
5-6
Leica
Page 89

Service
manual
Doc
code
10V
5V
556
supply
supply
Receiver
M680
948
board
A
switching
for
the
potentiometer
RECEIVER
An
LED
with
power:
regulator
BOARD
on
the
function
Handswitch
on
the
panel
(SV)
is
is
supplied
display
or
footswitch,
board
derived
with
10V.
shows
reduces
from
5V
OK.
and
logics
Description
the
it.
The
24V
The
SV
following
on
receiver
of
control
unit
03/93
to
10V.
regulator
are
board.
MEL61/62
3077-HWE
The
power
on
supplied
the
PGND,
ground
SENS
SENS
and
logics
Microscope
high
lamp
current
voltage
For
the
signals.
All
to
resistance.
is
passed
the
reason
microscope.
control
SENS.
signals
SENS
ground
produces a voltage
to
indicated
The
to
is
(PGND)
the
voltage
the
and
control
above,
drop
microscope
connected
SENS
unit
through
Logic
at
PGND
to
GND
are
drop
ground
are
measured
of
connected
of
SENS.
is
influences
panel
about
about
with
board
in
0.6V
0.6V
the
the
microscope.
at
PGND.
below
PGND
level
of
the
control
the
testbox
in
relation
through a 20-Ohm
The
This
in
Page 90

Description
03/93
of
3077-HWE
Notes
control
unit
MEL61/62
Service
Doc
manual
code
556
M680
948
5-8
Leica
Page 91

Service
Doc
code
manual
556
948
M680
Description
of
control
unit
03/93
MEL61/62
3077-HWE
Tasks
Setting
Limiting
Inspect
the
excess
spare
lamp
brightness
current
bulb
Lamp
control
MEL61/62
Control
Potentiometer
Measurement
TROL
LED
is
defective
mount
element / display
on
control
resistor
in
microscope
on
microscope
or
is
disengaged.
flashes
if
quick-change
on
unit
LAMP
if
CON-
spare
lamp
bulb
Pages
5-10,
7-6
7-6
7-6
Leica
5-9
Page 92

Description
03/93
of
3077-HWE
control
unit
MEL61/62
Service
Doc
manual
code
556
M680
948
PANEL
VR
BRIGHTNESS
Reference
regulator
LAMP
for
lamp
BOARD
REF,
P12/3
The
voltage
potentiometer.
cable
to
the
lamp
value
(reguired
RECEIVER
BUARD
P6/18
level
LAMP
LAMP
REF
control
value)
of
board
the
P14/17
REF
is
passed
in
lamp
depends
the
on
via
the
microscope,
regulator.
SWING
P19
ノ 5
し
the
position
receiver
board
where
ARM
>
A
M P R E F
of
the
brightness
and
the
swingarm
it
forms
the
reference
236/78
Min.
Max.
brightness
brighiness
LAMP
0.3V
5.0V
REFerence
+-5%
+5%
5-10
Leica
Page 93

Service
Doc
code
manual
556 948
M680
Description
of
control
unit
03/93
MEL61/62
3077-HWE
Tasks
Using
motor
tion:
Presetting
Setting
after
zoom
zoom
switching
to
set
and
adjustment
position
on
or
resetting
display
speed
9
Zoom
zoom
control
post
MEL61/62
Control
Footswitch
Function
Up/down-LED
Zoom
Footswitch
Reset
Display
elements / display
or
display
speed
potentiometer
or
switch
of
zoom
handswitch
on
zoom
handswitch
Z
position
servo
on
microscope
Page
5-14,7-10
5-14,7-10
5-15,7-11
Microscope
Arranges
A,
and
displays
B:
Microscope A and
Exchanging
functions
Producing
The
focusing-
the
zoom
the
footswitch/handswitch
signal
and
position
Master-Slave
master
B,
changing
level
MAGN
XY-speeds
set.
function
sides:
depend
on
Footswitch
Reset
switch
LED
on
microscope
Selector
switch
or
handswitch
Z
on
control
A
unit
5-15,
5-15,
7-11
5-15
7-12
Leica
5-11
Page 94

Description
03/93
of
3077-HWE
control
unit
MEL61/62
Service
Doc
manual
code
M680
556
948
PANEL
VR
ZOOM
1,8
oo
A
B
SPEED
ZDOM
DIRi
DIRE
BOARD
SPEED»,
p
P12/6
/5
Р12/12
P12/11
SELECTOR
η
7
SWITCH
RD_2
RD_3
和
16/39
J17/3
5-12
Page 95

Service
Doe
code
manual
556 948
M680
Description
of
control
unit
03/93
MEL61/62
3077-HWE
RECEIVER
P6720
/22
P6724
P6/23
y
y
BOARD
Pi4
|
I
o
“LF 30ms
15
12
SWING
J19
24
27
A
ZUUM
>
ARM
336
16
11
SPEED/CENT,
B
A
ZOOM
B
UR
7
1
—_
s
3
A
B
ZOOM
UP
P2/1__s
P3 ノ 1
RECV,
LOGIC
A
B
ZOOM
ZOOM
SL
ZOOM
UP
DN
DN
10
4
6
κκ
长
K
+—
K
FUNCTION
一
DISPLAY
г
«A
'
B
ZOOM
DN
5-13
Page 96

Description
03/93
of
3077-HWE
control
unit
MEL61/62
Service
Doc
manual
code
M680
556
948
Control
Using
the
zoom
position
LEDs
motor
to
set
the
The
function
handswitch
ZT
Zİ
SL
The
handswitch
correspond
Data
The
logics
appropriate
to
format:
ASCII
repeating
+5V/-8V
on
display
are
the
tells
being
correctly
for
ZOOM
for
ZOOM
for
CENTER
or
the
footswitch
functions:
8-bit
at
the
receiver
functions:
you
whether
received
UP
DOWN
POSITION
transmits
with
start
bit
2.3-millisecond
board
intervals
(processor)
the
signals
and
interpreted:
on
RD_2
assign
from
or
the
the
RD_3
codes
footswitch
the
codes
received
which
to
their
or
Presetting
displacement
the
speed
zoom
The
control
logics
The
voltage
meter
are
set
min.
max.
ZOOM
ZOOM
CENTER
signals
board
in
the
level
on
the
panel
separately,
ZOOM
SPEED
ZOOM
SPEED
UP
DOWN
POSITION © zoom
(0V/SV)
microscope
of
ZOOM
board.
with
for
via
SPEED
The
displacement
one
potentiometer
ZOOM
the
swingarm
depends
Level
2.10V
5V
position
UP
and
on
9
ZOOM
cable.
the
speeds
for
each
microscope.
of
ZOOM
+-
0.25V
+-
5%
DOWN
position
of
microscopes A and
of
the
reach
potentio-
SPEED
the
B
5-14
Page 97

Service
Doc
code
manual
556
M680
948
Description
of
control
unit
03/93
MEL61/62
3077-HWE
Setting
Microscope
Master-Slave
zoom
position
A,
B:
arrangement
Microscope A and
Changing
sides
B;
9
This
function
(selector
SPEED
The
impulse
the
system
Activation
of
the
master
The
zoom
This
function
switch
to
GND
is
is
steered
of
SL<
function:
Press
Press
of the
assigns
can
recognized
footswitch A to
only
be
triggered
on
position
potential
for
on
to
zoom
on
the
handswitch
once:
Master = A
twice:
Master = B
slave
microscope
the
ZOOM
microscope
1),
using
about
the
logics
position
follows
UP/DOWN
B,
and
from
the
handswitch
the
key
(SLe-). A timer
30
milliseconds,
board
in
the
9.
or
footswitch A changes
that
of
the
movement
vice
versa.
or
footswitch
sets A ZOOM
using a transistor.
M680
master
of
the
microscope
the
assignment
handswitch
and
A
or
Producing
the
MAGN
signal
level
The
position
logics
to
In
setting
ZOOM
The
commands
similar
The
microscope
depends
The
following
of
the
recognize
"2",
an
DOWN,
manner.
on
the
zoom
parameters
Focusing
XY-speed
selector
the
assignment
UP
command
and a DOWN
from
the
produces
position
speed
switch
(1/2)
required
is
transmitted
command
handswitch
the
signal
selected.
are
influenced:
on
the
panel
for
the
from
is
transmitted
or
footswitch B are
level
MAGN,
see
page
see
page
board
enables
handswitch
the
handswitch A to
to B ZOOM
transmitted
the
magnitude
7-16
5-27
the
receiver
or
footswitch.
UP.
of
which
in
B
a
5-15
Page 98

Description
03/93
of
3077-HWE
Notes
control
unit
MEL61/62
Service
Doc
manual
code
556
M680
948
5-16
Leica
Page 99

Service
Doc
code
manual
556
M680
948
Description
of
control
unit
03/93
MEL61/62
3077-HWE
Tasks
Motorized
Presetting
Travelling
after
focusing
speed
to
switching
of
focusing
centre
position
on
or
resetting
Focus
control
MEL61/62
Control
Footswitch
Function
Focus
Zoom
Footswitch
Reset
(light
barrier)
elements/display
or
handswitch
display
speed
potentiometer
magnification
or
handswitch
switch F on
microscope
Pages
5-20,
7-16
5-20,
7-16
5-21,
7-16
Microscope A and
Exchanging
or
handswitch
the
functions
B,
changing
sides:
of
footswitch
Selector
switch
on
control
unit
5-21
Leica
5-17
Page 100

Description
03/93
3077-HWE
of
control
unit
MEL61/62
VR
FOCUS
SPEED
Service
Doc
manual
code
556 948
M680
1.2
oo
SELECTOR
FOC.SPEED
DIRI
DIRE
SWITCH
=
De
p
P12/7
P12/12
P12/11
5-18
©
dle
V
RD.
3
J17/3
 Loading...