

Page 1

LEICA V-LUX 4
Instructions
About
downloading
Adobe® Photoshop®
Lightroom®
see page .
Page 2

Table of Contents
Before Use
Care of the camera...................................................................................................... 6
Scope of Delivery / Accessories ................................................................................ 7
Names and Functions of the Components ............................................................... 8
Preparation
Attaching the Lens Cap/the Shoulder Strap ........................................................... 13
Attaching the Lens Hood.......................................................................................... 14
Charging the Battery................................................................................................. 15
• Charging ............................................................................................................. 15
• Operating time and number of recordable pictures ............................................ 17
Inserting and Removing Card and Battery ............................................................. 19
About the Internal Memory/the Card ....................................................................... 20
• Number of recordable pictures and available recording time ............................. 22
Setting Date/Time...................................................................................................... 24
• Changing the clock setting.................................................................................. 25
Tips for taking good pictures ................................................................................... 26
• Preventing camera shake ................................................................................... 26
Basic
Selecting the Recording Mode................................................................................. 27
Program Mode ........................................................................................................... 28
• Program Shift...................................................................................................... 29
Focusing .................................................................................................................... 30
Snapshot Mode.......................................................................................................... 32
• Using the Defocus Control Function................................................................... 34
• Changing the menu settings............................................................................... 35
• Recording using Snapshot Plus Mode................................................................ 36
Recording Motion Pictures....................................................................................... 38
• Recording still pictures while recording motion pictures..................................... 41
Playing Back Pictures............................................................................................... 42
• Selecting a picture.............................................................................................. 42
• Displaying Multiple Images ................................................................................. 43
• Using the Playback Zoom................................................................................... 43
Playing Back Motion Pictures .................................................................................. 44
• Creating Still Pictures from a Motion Picture ...................................................... 45
Deleting Pictures....................................................................................................... 46
• Deleting a single picture ..................................................................................... 46
• Deleting multiple pictures (up to 100) or all the pictures..................................... 47
Setting the Menu ....................................................................................................... 48
• Setting menu items ............................................................................................. 49
• Using the Quick Menu ........................................................................................ 51
About the Setup Menu .............................................................................................. 52
- 2 -
Page 3

Recording
About the Monitor/the Viewfinder............................................................................ 66
Using the Zoom ......................................................................................................... 68
• Using the Optical Zoom/the Extended Optical Zoom (EZ)/the Intelligent Zoom/
the Digital Zoom ................................................................................................. 68
Using the Built-In Flash ............................................................................................ 72
• Switching flash modes........................................................................................ 73
Exposure Compensation .......................................................................................... 76
Continuous Mode...................................................................................................... 77
Using the Self-Timer ................................................................................................. 80
Setting the Sensitivity............................................................................................... 82
Setting the White Balance ........................................................................................ 84
Using Auto Focus...................................................................................................... 88
Close-up Pictures...................................................................................................... 92
Manual Focusing....................................................................................................... 93
Focus and Exposure Memory Lock (AF/AE Lock) ................................................. 96
Using the function button......................................................................................... 98
Aperture-Priority Mode ............................................................................................. 99
Shutter-Priority Mode.............................................................................................. 100
Manual Exposure Mode .......................................................................................... 101
Using the Scene Modes .......................................................................................... 102
• [Portrait]............................................................................................................ 102
• [Soft Skin] ......................................................................................................... 103
• [Scenery]........................................................................................................... 103
• [Panorama Shot]............................................................................................... 104
• [Sports].............................................................................................................. 106
• [Panning]........................................................................................................... 106
• [Night Portrait]................................................................................................... 107
• [Night Scenery]................................................................................................. 107
• [Handheld Night Shot]....................................................................................... 108
• [HDR]................................................................................................................ 108
• [Food]................................................................................................................ 108
• [Baby1]/[Baby2] ................................................................................................ 109
• [Pet] ...................................................................................................................110
• [Sunset]..............................................................................................................110
• [High Sens.].......................................................................................................110
• [Glass Through].................................................................................................110
• [3D Photo Mode]................................................................................................111
Using the different image effects............................................................................112
• [Expressive].......................................................................................................113
• [Retro]................................................................................................................113
• [High Key] ..........................................................................................................113
• [Low Key]...........................................................................................................113
• [Sepia]................................................................................................................114
• [Dynamic Monochrome].....................................................................................114
• [Impressive Art]..................................................................................................114
• [High Dynamic] ..................................................................................................114
- 3 -
Page 4

• [Cross Process] .................................................................................................115
• [Toy Effect].........................................................................................................115
• [Miniature Effect]................................................................................................115
• [Soft Focus]........................................................................................................117
• [Star Filter] .........................................................................................................117
• [One Point Color]...............................................................................................117
Recording Motion Pictures with Manual Settings.................................................118
• Recording High Speed Motion Pictures .............................................................119
Using Custom Mode................................................................................................ 120
• Registering Personal Menu Settings ................................................................ 121
• Recording using registered custom settings..................................................... 121
Using the Face Recognition Function................................................................... 122
• Face Settings.................................................................................................... 123
Entering Text............................................................................................................ 126
Using the [Rec] menu ............................................................................................. 127
• [Photo Style]...................................................................................................... 127
• [Aspect Ratio] ................................................................................................... 128
• Resolution [Picture Size]................................................................................... 129
• [Quality]............................................................................................................. 130
• [ISO Limit Set]................................................................................................... 131
• [ISO Increments]............................................................................................... 131
• [Extended ISO] ................................................................................................. 131
• [Face Recog.] ................................................................................................... 131
• [AF Mode] ......................................................................................................... 131
• [AF Style] .......................................................................................................... 132
• [Quick AF]......................................................................................................... 133
• [AF/AE Lock]..................................................................................................... 133
• [Metering Mode]................................................................................................ 133
• [i.Dynamic] (Intelligent dynamic range control) ................................................. 134
• [Min. Shtr Speed].............................................................................................. 134
• [i.Resolution]..................................................................................................... 135
• [Digital Zoom].................................................................................................... 135
• [Stabilizer] ......................................................................................................... 136
• [AF Assist Lamp]............................................................................................... 137
• [Flash]............................................................................................................... 137
• [Flash Synchro]................................................................................................. 137
• [Flash Adjust.]................................................................................................... 138
• [Red-Eye Removal]........................................................................................... 138
• [Auto Bracket]................................................................................................... 139
• [Date Stamp] ..................................................................................................... 140
• [Clock Set] ........................................................................................................ 140
Using the [Motion Picture] menu ........................................................................... 141
• [Rec Mode] ....................................................................................................... 141
• [Rec Quality] ..................................................................................................... 142
• [High Speed Video]........................................................................................... 143
• [Continuous AF] ................................................................................................ 143
• [Wind Cut]......................................................................................................... 144
- 4 -
Page 5

• [Zoom Mic]........................................................................................................ 144
Playback/Editing
Having Fun with Recorded Pictures...................................................................... 145
• [Auto Retouch].................................................................................................. 145
• [Creative Retouch]............................................................................................ 146
Playing Back Picture Series ................................................................................... 147
Editing Picture Series ............................................................................................. 148
Various playback methods..................................................................................... 149
• [Slide Show]...................................................................................................... 149
• [Filtering Play]................................................................................................... 152
• [Calendar] ......................................................................................................... 153
Using the [Playback] menu .................................................................................... 154
• [Title Edit].......................................................................................................... 154
• [Text Stamp] ...................................................................................................... 155
• [Video Divide].................................................................................................... 157
• [Resize]............................................................................................................. 158
• [Cropping] ......................................................................................................... 159
• [Leveling] .......................................................................................................... 160
• [Favorite]........................................................................................................... 161
• [Print Set].......................................................................................................... 162
• [Protect] ............................................................................................................ 164
• [Face Rec Edit] ................................................................................................. 165
• [Copy] ............................................................................................................... 166
Connecting to other equipment
Playing Back Pictures on a TV............................................................................... 167
• Using HDTV Link .............................................................................................. 169
Playing back 3D pictures........................................................................................ 171
Saving still and motion pictures on your computer ............................................ 173
Saving still and motion pictures on a Recorder................................................... 177
Printing the Pictures ............................................................................................... 178
• Selecting a single picture and printing it ........................................................... 179
• Selecting multiple pictures and printing them ................................................... 179
• Print Settings .................................................................................................... 180
Others
Screen Displays....................................................................................................... 183
Cautions for Use...................................................................................................... 186
Message Displays ................................................................................................... 190
Troubleshooting ...................................................................................................... 193
Leica Service Addresses ........................................................................................ 203
- 5 -
Page 6
Before Use
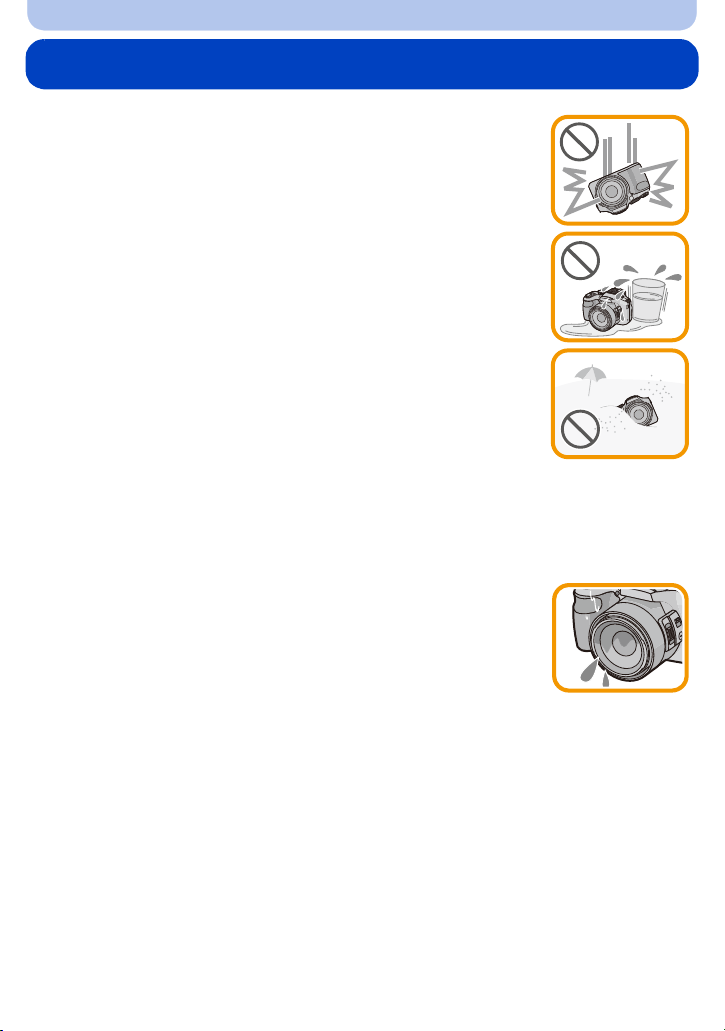
Care of the camera
Do not subject the camera to strong vibration, shock, or pressure.
•
The lens, monitor, or external body parts may be damaged by such
treatment.
It may also malfunction or the image may not be recorded.
– Do not drop or hit the camera.
– Do not exert excessive pressure on the lens barrel or the monitor.
• When the camera is not in use or when using the playback feature,
ensure that the lens is in the retracted position, with the lens cap
attached.
• During certain operations, the camera may emit rattling sounds or
vibrations. These are due to the motorized diaphragm and lens zoom
setting and do not indicate a defect.
This camera is not dust/splash/waterproof.
Avoid using the camera at locations with a lot of dust, water, sand,
etc.
Liquids, sand and other foreign material may enter the camera through the
•
gaps around the lens barrel, the buttons, etc. Be particularly careful since it
may not just cause malfunctions, but it may become unrepairable.
– Take special care in places with a lot of sand or dust.
– Take special care in places where water can come into contact with the camera such as when
using it on a rainy day or on the beach.
∫ About Condensation (When the lens or viewfinder is fogged up)
•
Condensation occurs when the equipment is subjected to significant
changes of the ambient temperature or humidity. Try to avoid condensation
since it causes lens stains, fungus and camera malfunction.
• If condensation occurs, turn the camera off and leave it for about 2 hours.
The fog will disappear naturally when the temperature of the camera
approaches the ambient temperature.
- 6 -
Page 7
Before Use
Scope of Delivery / Accessories
∫ Scope of Delivery ∫ Accessories
Order No. Order No.
Rechargeable battery
BP-DC12-E
BP-DC12-U
Battery charger
BC-DC12-E
BC-DC12-U
Mains cable
EU
UK
AUS
TW
CN
KR
Shoulder strap 423-094.001-014
Lens hood 423-111.001-015
Lens cap w. string 423-111.001-018
CD with instr. PDFs 423-111.001-016
USB cable 423-106.001-010
AV cable 423-105.001-010
Button template for
Canada / Taiwan
Short instructions 93 483 -486
Warranty Card 439-399.100-026
18 728
18 729
423-111.001-012
423-111.002-010
423-111.001-006
423-111.001-007
423-068.801-023
423-111.001-009
423-111.001-010
423-111.001-008
(delivery differs
depending on markets)
423-111.001-025/-026
(only with camera model
18 191 / 18 192)
(delivery differs
depending on markets)
Small system case 18 746
Leica CF 22
flash unit
HDMI mini cable 14 491
Tabletop tripod 14 100
Ball and socket head 14 110
18 694
Notes:
•
Cards are optional. You can record or play back pictures on the internal memory when you are not
using a card.
• Check that all items belonging to the scope of delivery are included before using the camera.
• The items and their shape may differ depending on the country or area where the camera was
purchased.
• Keep small parts in a safe place out of the reach of children.
• Please dispose of all packaging appropriately.
- 7 -
Page 8
Before Use
1
3 45 6
7
8
9
10
2
1112
13
14
15 16
17
22
19
20
21
23
18
24
25
26
27
282930
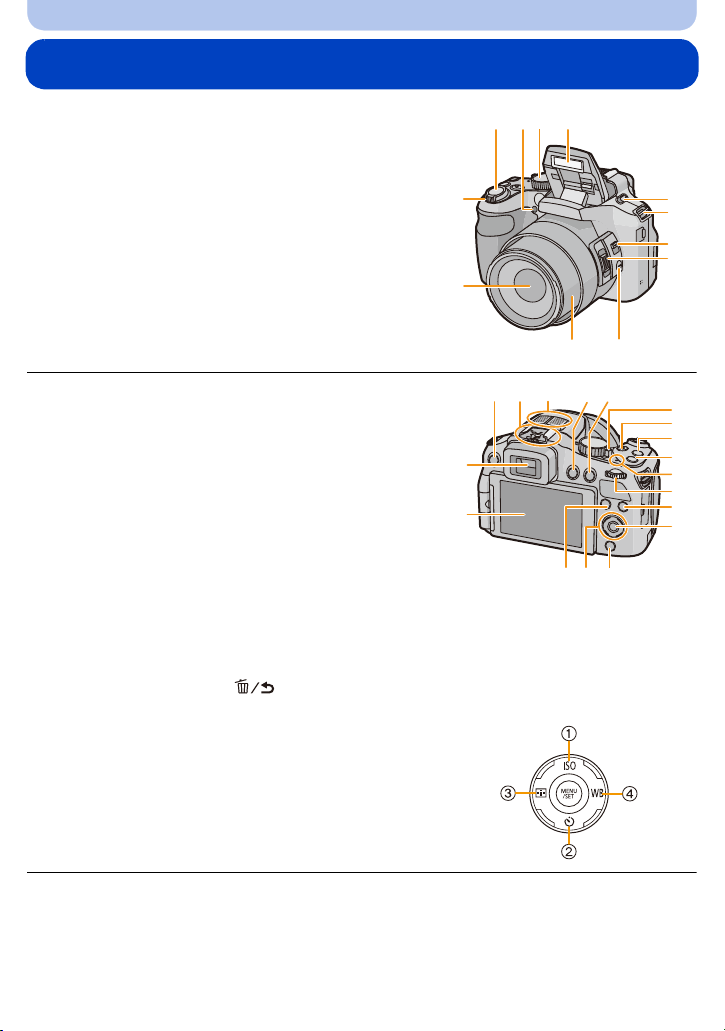
Names and Functions of the Components
1 Lens (P6, 187)
2 Zoom lever (P68)
3 Shutter release button (P28, 32)
4 Self-timer indicator (P80)/
AF Assist Lamp (P137)
5 Mode dial (P27)
6Flash (P72)
7 Flash release slider (P72)
8 Shoulder strap eyelet (P13)
9 Focus selector switch (P92, 93)
10 Zoom/focus rocker (P69, 94)
11 [FOCUS] button (P32, 91, 95)
12 Lens barrel
13 Monitor (P66, 183)
14 Viewfinder (P11, 183)
15 [EVF/LCD] button (P11)
16 Hot shoe
17 Stereo microphone
18 [(] (Playback) button (P42)
19 [AF/AE LOCK] button (P96)/[Fn2] button (P98)
20 Camera ON/OFF switch (P24)
21 Motion picture button (P38)
22 [˜] (Continuous Mode) button (P77)
23 [Fn1] button (P98)
24 Power lamp (P24)
25 Setting wheel (P12)
26 [DISP.] button (P66)
27 [MENU/SET] button (P12, 49)
28 [Q.MENU] button (P51)/[ ] (Delete/Cancel) button (P46)
29 Cursor buttons (P12)
1 3/ISO (P82)
2 4/ Self-timer (P80)
3 2/AFMODE (P88)
4 1/ (WB) White Balance (P84)
30 [Fn3] button (P98)
- 8 -
Page 9
Before Use
MIC
REMOTE
31
32
33
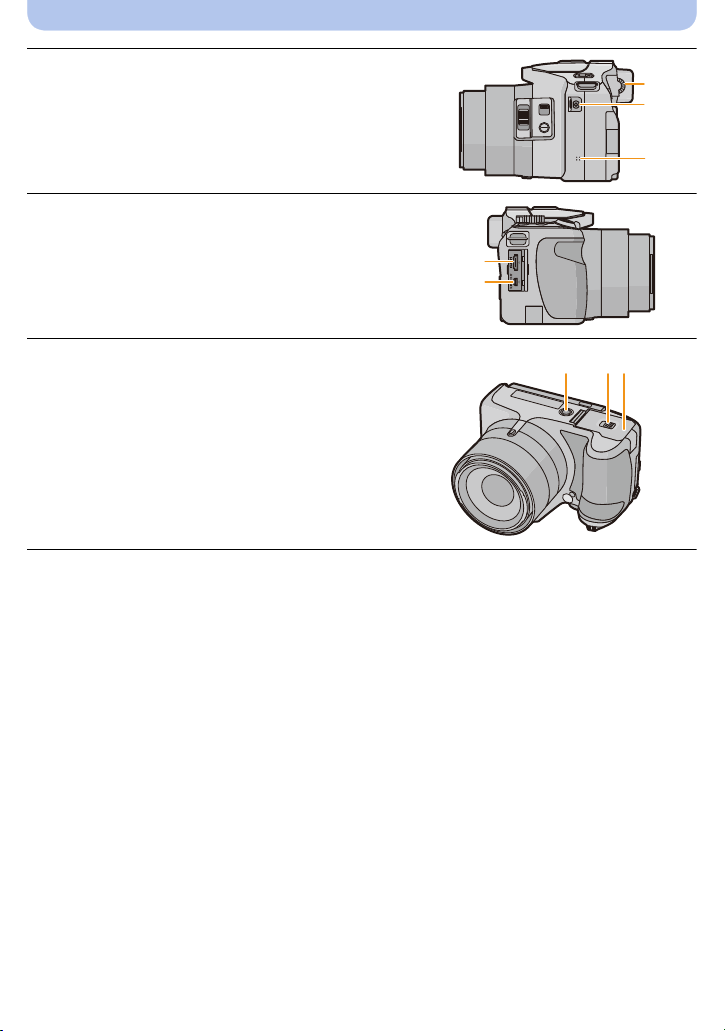
31 Diopter adjustment dial (P11)
32 [MIC/REMOTE] socket
33 Speaker (P54)
Be careful not to cover the speaker with your finger.
•
Doing so may make sound difficult to hear.
34 [HDMI] socket (P167)
35 [AV OUT/DIGITAL] socket (P167, 174, 177, 178)
34
35
36 Tripod thread (P189)
•
Using tripods with screw lengths of 5.5mm (7/32q) or
more may damage the camera if attached.
37 Release slider (P19)
38 Card/Battery door (P19)
36
37
38
- 9 -
Page 10
Before Use
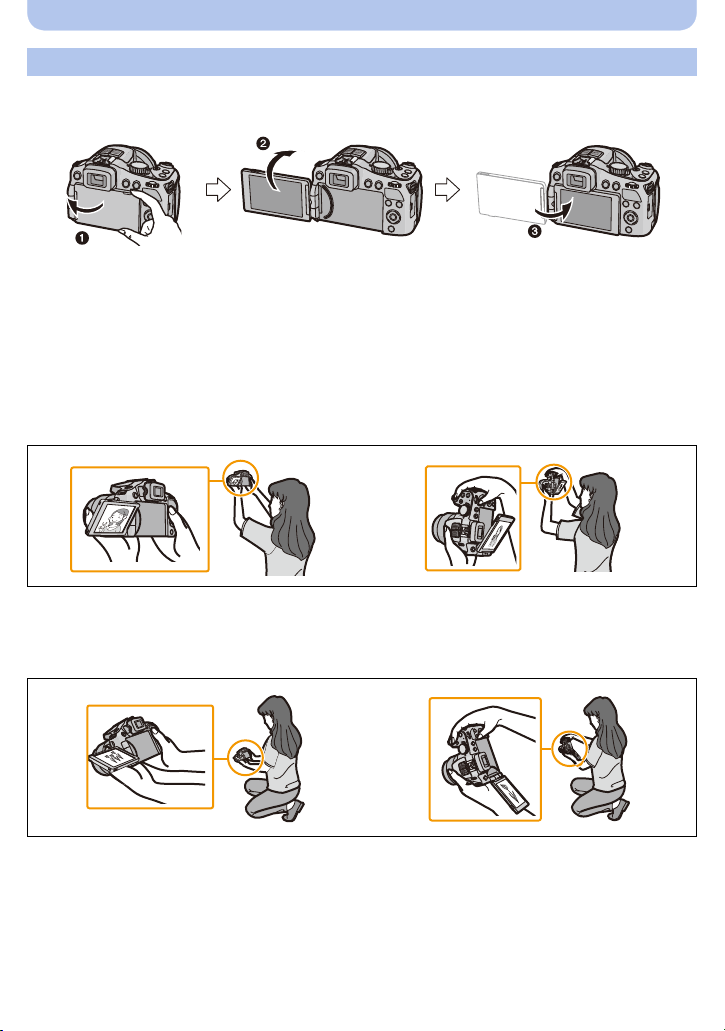
Monitor
At the time when this camera is purchased, the monitor faces the camera body. Fold out the
monitor as shown below.
1 Fold out the monitor. (Maximum 180o)
2 It can be rotated 180o forwards.
3 Return the monitor to its original position.
Only rotate the monitor after opening it wide enough, and be careful not to use excessive
•
force as this may damage it.
• Do not cover the AF Assist Lamp with your fingers or other objects.
∫ Taking pictures at a high angle
•
This is convenient when there is someone/something between you and your subject.
• It can only be rotated 90o towards you.
∫ Taking pictures at a low angle
•
This is convenient when taking pictures of flowers etc. that are in a low position.
• It can be rotated 180o forwards.
- 10 -
Page 11
Before Use
A
Notes
•
Be careful as the camera may get scratched if you rotate the monitor without folding it out
completely.
• When not using the monitor it is recommended that you close it with the screen facing inwards to
prevent dirt and scratches.
• Note that operating noise may be recorded when rotating the monitor while recording a motion
picture.
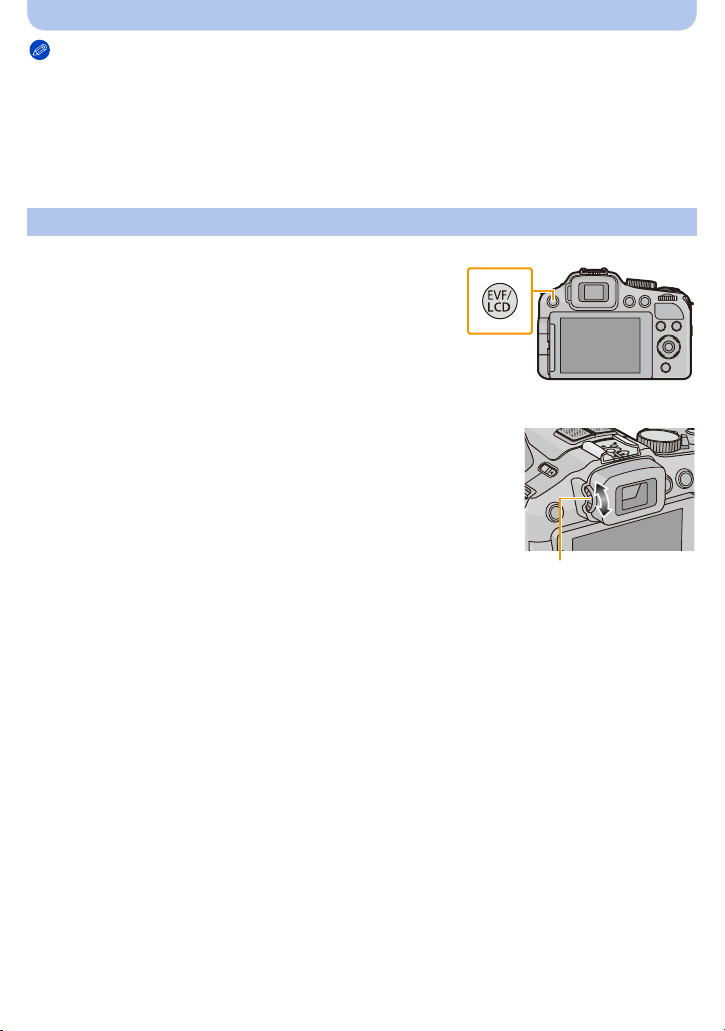
Viewfinder
∫ Switching between the monitor/the viewfinder
Press [EVF/LCD].
Switching via the [EVF/LCD] button will be maintained even
•
when the camera is turned off.
∫ Diopter adjustment
Look at the viewfinder image and rotate the diopter adjustment
dial so that you can see the image and the displays clearly.
A Diopter adjustment dial
- 11 -
Page 12
Before Use
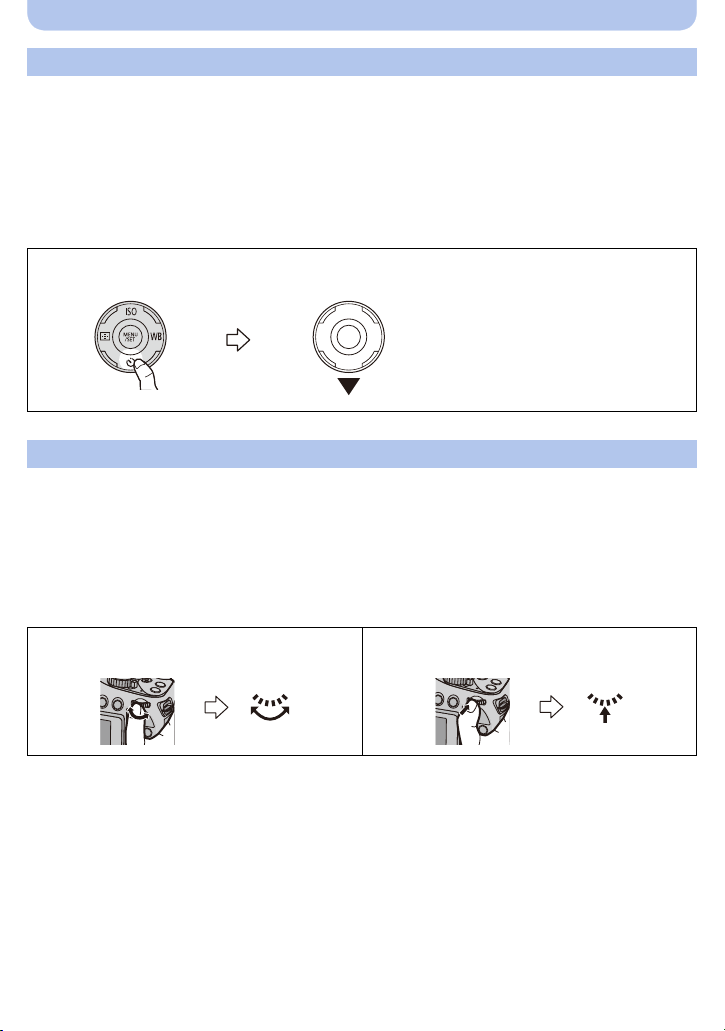
Cursor buttons/[MENU/SET] button
Cursor button:
For selection of items or setting of values etc.
[MENU/SET] button:
For confirmation of settings, etc.
This document mentions the top, bottom, left, and right sections of the cursor button as follows, or as
•
3/4/2/1.
e.g.: When you press the 4 (down) section
or Press 4
Setting wheel
There are 2 ways to operate the setting wheel, rotating it to the left or the right, or by pressing it.
Rotating:
For selection of items or setting of values.
Pressing:
For confirmation of settings, i.e. operations that are the same as [MENU/SET] button.
Setting wheel operation is indicated as follows in these instructions:
•
e.g.: Rotate to the left or to the right e.g.: Press
- 12 -
Page 13
Preparation
A
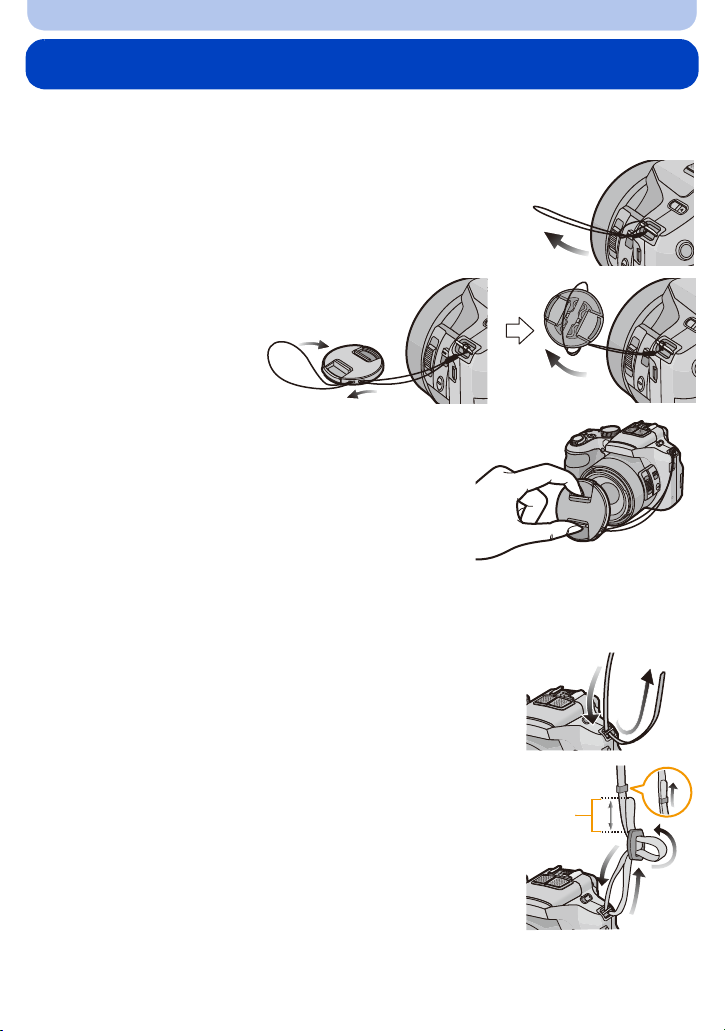
Attaching the Lens Cap/the Shoulder Strap
∫ Attaching the Lens Cap
•
When the camera is not being used, always attach the lens cap to protect the lens.
Pass the string through the strap eyelet on the
1
camera.
Pass the same
2
string through the
eyelet on the lens
cap.
Attach the lens cap.
3
• Do not hang or swing around the camera holding it only
by the lens cap string.
• Make sure to remove the lens cap before turning the
camera on.
• Take care not to entangle the lens cap string with the
shoulder strap.
∫ Attaching the Shoulder Strap
•
We recommend attaching the shoulder strap when using the camera to prevent it from
dropping.
Pass one end of the shoulder strap through the
1
shoulder strap eyelet.
Pass the shoulder strap through the stopper and
2
pull the shoulder strap tight.
A Let the end of the strap extend 2cm (25/32q) or more.
• Attach the shoulder strap to the other side of the camera without
twisting it.
- 13 -
Page 14
Preparation
A
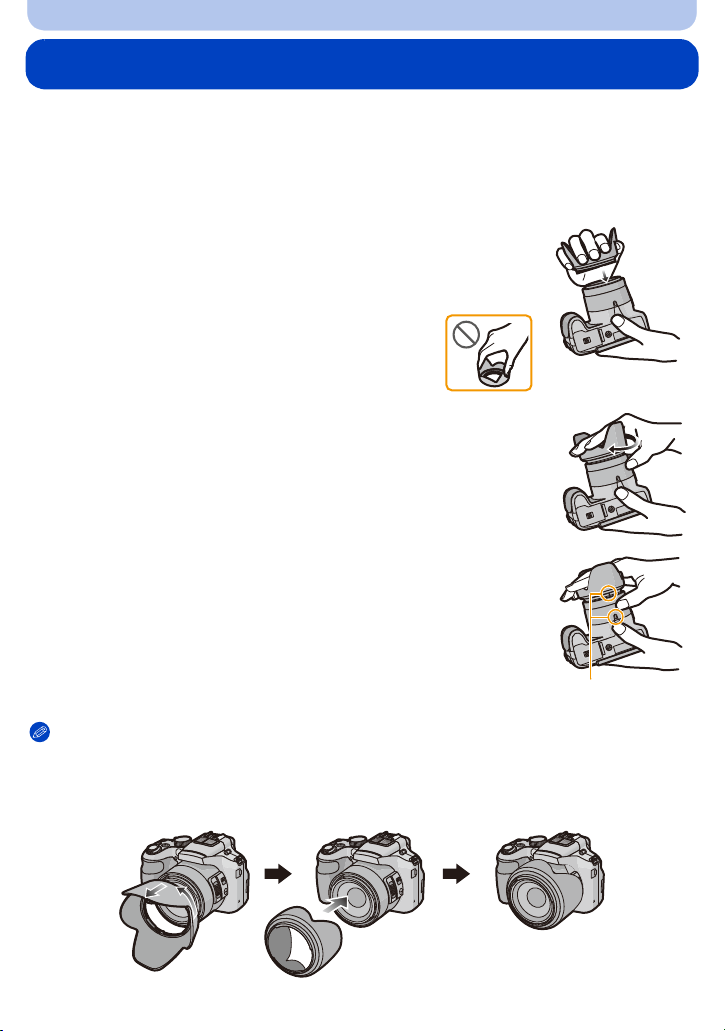
Attaching the Lens Hood
In bright sunlight or backlight, the lens hood will minimize lens flare and ghosting. The lens
hood cuts off excess lighting and improves the picture quality and should therefore remain
mounted for most photographing situations (exemptions: see below).
Check that the camera is turned off.
•
• Close the flash.
Attach the lens hood on the lens with one of the short
1
petals aligned with the bottom of the camera.
• Do not exert excess pressure to any part of the lens hood.
Rotate the lens hood in the
2
direction of the arrow.
Rotate the lens hood as far as it will go, i.e. overcoming
3
the increased resistance just before the final position and
until the two marks on the hood and the camera body
are aligned. (The lens hood will “click” into place.)
• Check that the lens hood is firmly attached and that it does not
appear in the picture.
Notes
•
When taking pictures with flash and the lens hood attached, the lower portion of the pictures may be
dark (vignetting effect) and the control of the flash may be disabled because it may be obscured by
the lens hood. We recommend to remove it for flash photography.
• When the lens hood is to be removed temporarily, attach it to the lens in the reverse direction.
A
- 14 -
Page 15
Preparation
90°
Charging the Battery
∫ About batteries that you can use with this camera
It has been found that counterfeit batteries which look very similar to the genuine
product are made available to purchase in some markets. Some of these batteries are
not adequately protected with internal protection to meet the requirements of
appropriate safety standards. There is a possibility that these batteries may lead to
fire or explosion. Please be advised that Leica Camera AG is not liable for any
accident or failure occurring as a result of use of a counterfeit battery. To ensure that
safe products are used we urgently recommend to use only the Leica battery
BP-DC12 (P7).
Use only the dedicated charger and battery.
•
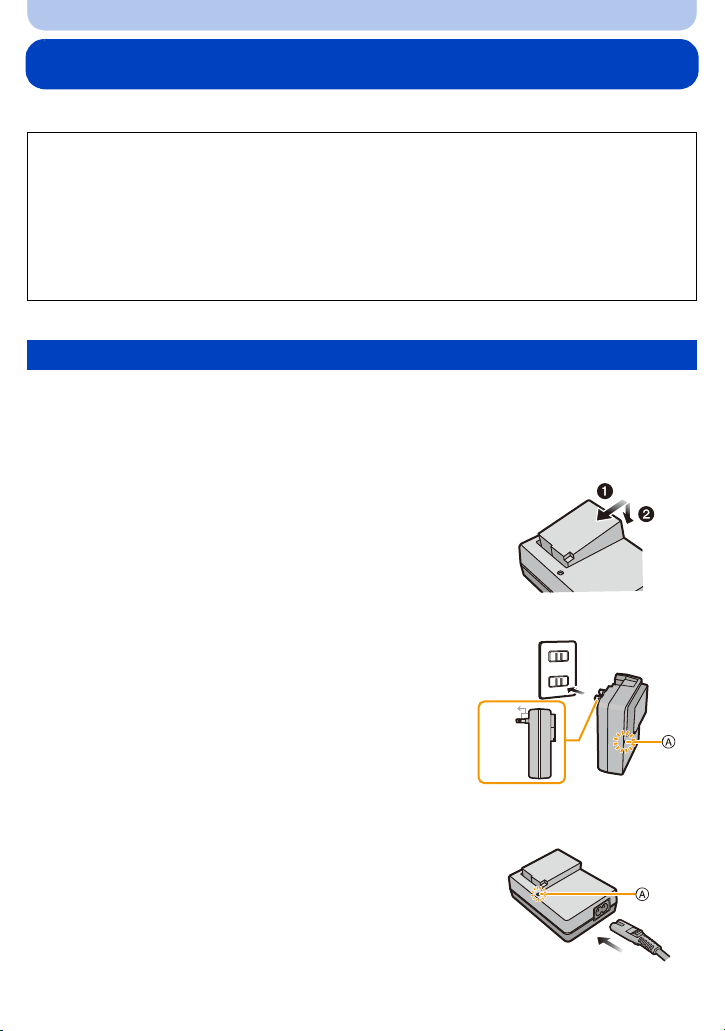
Charging
• The battery is not charged when the camera is shipped. Charge the battery before use.
• Charge the battery indoors.
• Charge the battery in areas with an ambient temperature between 10oC and 30oC
(50oF and 86oF) (same as the battery temperature).
Insert the battery into the charger.
1
• The terminals should face the charger’s contacts and
the Leica logo upwards.
Connect the charger to the electrical outlet.
2
• The [CHARGE] indicator A lights up and charging
begins.
Plug-in type
Cable type
- 15 -
Page 16

Preparation
∫ About the [CHARGE] indicator
The [CHARGE] indicator turns on:
Charging has started.
The [CHARGE] indicator turns off:
Charging has been completed without any problem. (Disconnect the charger from the electrical
outlet and detach the battery after charging is completed.)
When the [CHARGE] indicator flashes
•
– The battery temperature is too high or too low. It is recommended to charge the battery again in an
ambient temperature of between 10oC and 30oC (50oF and 86oF).
– The terminals of the charger or the battery are dirty. In this case, wipe them clean with a dry cloth.
∫ Charging time: approx. 140 min
The indicated charging time is for when the battery has been discharged completely. The
•
charging time may vary depending on how the battery has been used. The charging time for
the battery in hot/cold environments or a battery that has not been used for long time may be
longer than normal.
∫ Battery indication
The battery indication is displayed on the monitor/viewfinder.
The indication turns red and flashes if the remaining battery power is exhausted. (The power lamp
•
also flashes) Recharge the battery or replace it with a fully charged battery.
Notes
•
Do not leave any metal items (such as clips) near the power plug terminals. Otherwise, a fire
and/or electric shocks may be caused by short-circuiting or the resulting generated heat.
• The battery becomes warm during use and during and after charging. The camera also becomes
warm during use. This is not a malfunction.
• The battery can be recharged even when it still has some charge left, but it is not recommended that
the battery charge be frequently topped up while the battery is fully charged. (Since characteristic
swelling may occur.)
- 16 -
Page 17

Preparation
Operating time and number of recordable pictures
∫ Recording still pictures (When using the monitor)
Number of recordable
pictures
Recording time approx. 270 min
approx. 540 pictures
(By CIPA standard in
Program Mode)
Recording conditions by CIPA standard
CIPA is an abbreviation of [Camera & Imaging Products Association].
•
• Temperature: 23oC (73.4oF)/Humidity: 50% RH when the monitor is on.
• Using a 32MB SD Memory Card.
• Using the supplied battery.
• Starting recording 30 seconds after the camera is turned on. (When the Optical Image Stabilizer
function is set to [ON].)
• Recording once every 30 seconds with full flash every second recording.
• Rotating the zoom lever from Tele to Wide or vice versa in every recording.
• Turning the camera off every 10 recordings and leaving it until the battery has cooled down again.
The number of recordable pictures varies depending on the recording interval time. If
the recording interval time becomes longer, the number of recordable pictures
decreases. (For example, if you were to take one picture every two minutes, then the
number of pictures would be reduced to approximately one-quarter of the number of
pictures given above.)
- 17 -
Page 18

Preparation
∫ Recording motion pictures (When using the monitor)
(Recording with resolution set to
Recordable time approx. 160 min approx. 200 min
Actual recordable time approx. 80 min approx. 100 min
These times are for an ambient temperature of 23oC (73.4oF) and a humidity of 50% RH. Please be
•
aware that these are approximate times.
[AVCHD]
(Recording with resolution set to
[PSH])
[MP4]
[FHD])
• Actual recordable time is the time available for recording when repeating actions such as turning the
camera on and off, starting/stopping recording, zoom operation etc.
• With camera model 18 190:
Maximum time to record motion pictures continuously with [AVCHD] is 29 minutes.
Maximum time to record motion pictures continuously with [MP4] is 29 minutes or up to 4GB.
You can check the recordable time on the screen. (For [FHD] in [MP4] format, the file size is large
and so the recordable time will drop below 29 minutes.)
• With camera models 18 191 / 18 192:
Maximum time to record motion pictures continuously with [MP4] is 29 minutes or up to 4GB.
You can check the recordable time on the screen. (For [FHD] in [MP4] format, the file size is large
and so the recordable time will drop below 29 minutes.)
∫ Playback (When using the monitor)
Playback time approx. 440 min
Notes
•
The operating times and number of recordable pictures will differ according to the
environment and the operating conditions.
For example, in the following cases, the operating times will be shorter and the number of recordable
pictures is reduced.
– In low-temperature environments, such as on ski slopes.
– When using [LCD Mode].
– When [Live View Mode] is set to [NORMAL].
– When operations such as flash and zoom are used repeatedly.
• When the operating time of the camera becomes extremely short even after properly charging the
battery, the life of the battery may have expired. Buy a new battery.
- 18 -
Page 19
Preparation
B
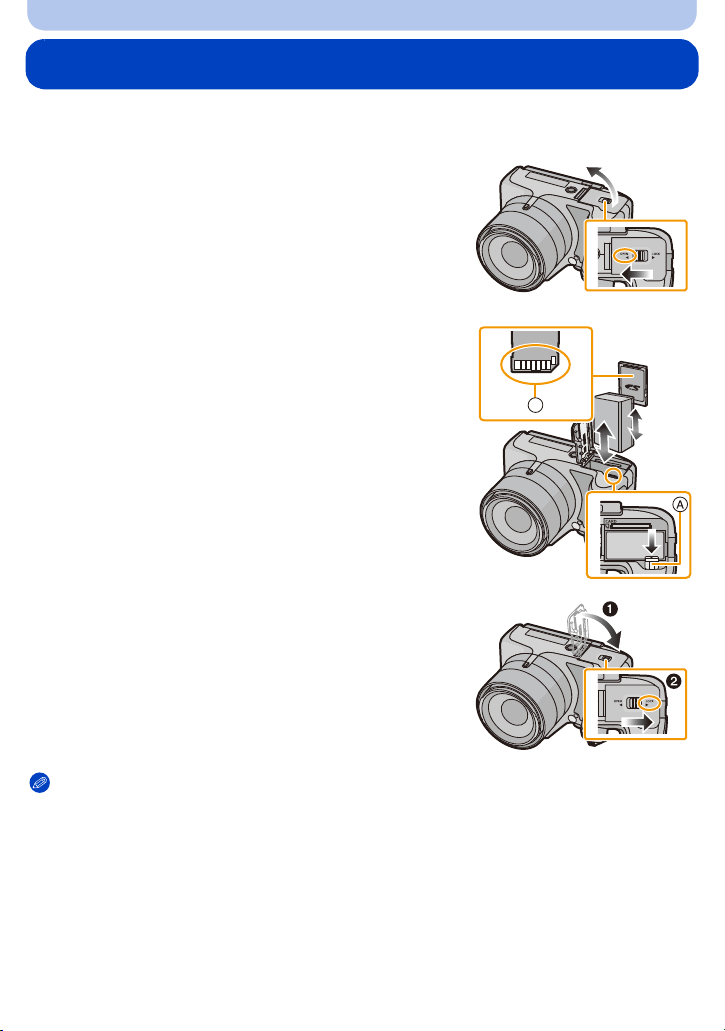
Inserting and Removing Card and Battery
• Turn the camera off and confirm that the lens barrel is retracted.
• Close the flash.
Set the camera ON/OFF switch to OFF, push
1
the release slider in the direction of the
arrow, and open the card/battery door.
• Use only the Leica battery BP-DC12 (P7).
• We cannot guarantee the quality of any other
batteries.
Insert battery and card.
2
Be sure to insert in the correct orientation.
Battery: Push it in until it is locked by the
lever A. To remove, pull this lever in the
direction of the arrow.
Card: Push it down until it clicks into place.
To remove, push it further down until it
clicks, then pull it out upright.
B: Do not touch the connection terminals of the card.
1:Close the card/battery door.
3
2:Push the release slider in the direction of
the arrow.
Notes
•
Remove the battery when you are not going to use the camera for a long time. (The battery will be
exhausted if left for a long period of time after being charged.)
• Remove the card or battery only after turning off the power, i.e. with the power lamp completely
turned off and the lens barrel retracted completely. (Otherwise, the camera may not function
properly, or the card or the recorded contents may be damaged.)
- 19 -
Page 20
Preparation
About the Internal Memory/the Card
The camera stores the image data as follows.
When no card is inserted
When a card is inserted Pictures are recorded and played back on/ from the card.
Pictures are recorded and played back in/ from the internal
memory.
• When using the internal memory
>ð (access indication
k
• When using the card
(access indication
¢ The access indication is displayed in red when pictures are being recorded on the
internal memory (or the card).
¢
)
¢
)
Internal Memory
• You can copy the recorded pictures to a card. (P166)
• The access time for the internal memory may be longer than the access time for a card.
Memory size approx. 70MB
- 20 -
Page 21

Preparation
2
Card
The following cards which conform to the SD video standard can be used with the camera.
Remarks
SD memory cards
(8MB to 2GB)
SDHC memory cards
(4GB to 32GB)
• Use a card with SD Speed Class
when recording motion pictures.
• SDHC type memory cards can be used with SDHC or SDXC
memory card compatible equipment.
• SDXC type memory cards can only be used with SDXC memory
card compatible equipment.
¢
with “Class 4” or higher
• Check that the computer and other equipment are compatible
SDXC memory cards
(48GB to 64GB)
when using SDXC type memory cards.
• The camera is compatible with UHS-I standard SDHC/SDXC
memory cards.
• Only cards with the capacities listed on the left can be used.
¢ SD Speed Class is the speed standard regarding continuous writing. Check via the label on the
card, etc.
e.g.:
Notes
•
Do not turn the camera off, remove its battery or card when the access indication is lit (when
pictures are being written, read or deleted, or the internal memory or the card is being
formatted). Furthermore, do not subject the camera to vibration, impact or static electricity.
The card or the data on the card may be damaged, and the camera may no longer operate
normally.
If operation fails due to vibration, impact or static electricity, perform the operation again.
• Write-Protect switch A: When this switch is set to the [LOCK] position, no further data
writing, deletion or formatting is possible. The ability to write, delete and format data is
restored when the switch is returned to its original position.
• The data in the internal memory or on the card may be damaged or lost due to
electromagnetic fields, static electricity or breakdown of the camera or the card. We
recommend storing important data on a computer etc.
• Do not format the card on your computer or other equipment. Format it on the camera only to ensure
proper operation. (P65)
• Keep memory cards out of reach of children to prevent swallowing.
- 21 -
Page 22
Preparation
313
0+3
A
R
1m41
s
R
1m41
s
0+3
B
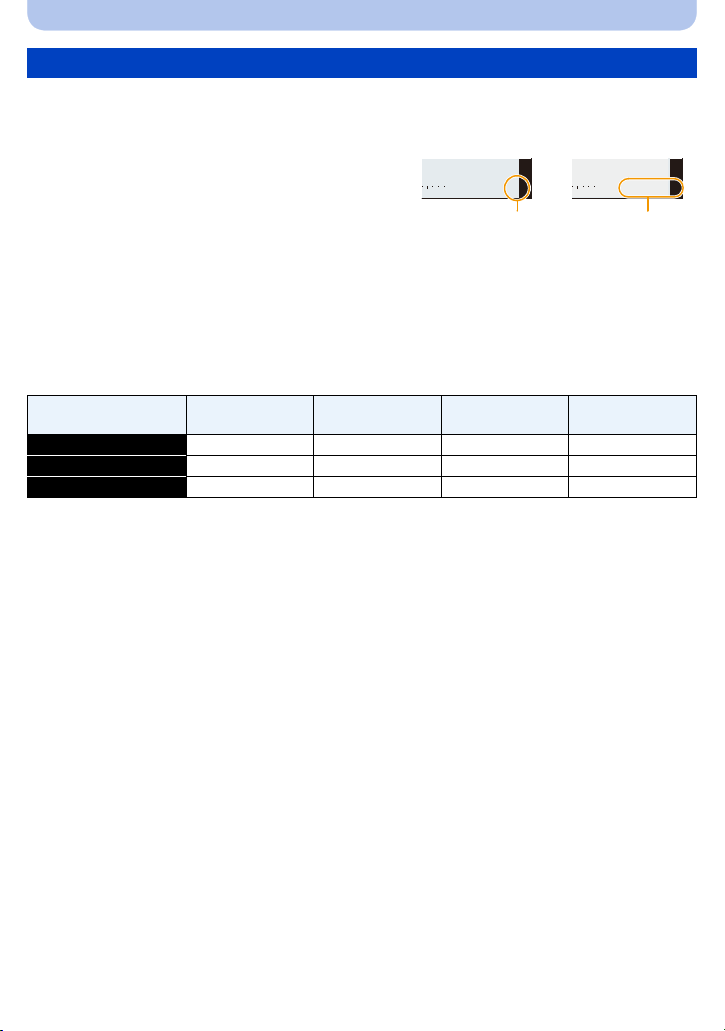
Number of recordable pictures and available recording time
∫ About the display of the number of recordable pictures and available recording time
•
Switching between the display of number of recordable pictures and available recording time can be
performed in the [Remaining Disp.] (P58) in the [Setup] menu.
A Number of recordable pictures
B Available recording time
• The number of recordable pictures and the available recording time are an approximation. (These
vary depending on the recording conditions and the type of card.)
• The number of recordable pictures and the available recording time varies depending on the
subjects.
∫ Number of recordable pictures
•
[i99999] is displayed if there are more than 100,000 pictures remaining.
• Aspect ratio [X], Quality [A]
[Picture Size]
12M 13 380 6260 12670
5M (EZ) 24 650 10620 21490
0.3M (EZ) 380 10050 162960 247150
Internal Memory
(approx. 70MB)
2GB 32GB 64GB
- 22 -
Page 23

Preparation
∫ Available recording time (when recording motion pictures)
•
“h” is an abbreviation for hour, “m” for minute and “s” for second.
• [AVCHD]
[Rec Quality]
PSH j 8m00s 2h31m00s 5h07m00s
FSH j 14m00s 4h10m00s 8h26m00s
SH j 14m00s 4h10m00s 8h26m00s
Internal Memory
(approx. 70MB)
2GB 32GB 64GB
• [MP4]
[Rec Quality]
FHD j 12m02s 3h22m58s 6h50m54s
HD j 22m59s 6h27m29s 13h04m28s
VGA 1m42s 50m36s 14h12m48s 28h46m30s
Internal Memory
(approx. 70MB)
2GB 32GB 64GB
Notes
•
The recordable time is the total time of all the motion pictures which have been recorded.
• With camera model 18 190:
Maximum time to record motion pictures continuously with [AVCHD] is 29 minutes.
Maximum time to record motion pictures continuously with [MP4] is 29 minutes or up to 4GB.
You can check the recordable time on the screen. (For [FHD] in [MP4] format, the file size is large
and so the recordable time will drop below 29 minutes.)
• With camera models 18 191 / 18 192:
Maximum time to record motion pictures continuously with [MP4] is 29 minutes or up to 4GB.
You can check the recordable time on the screen. (For [FHD] in [MP4] format, the file size is large
and so the recordable time will drop below 29 minutes.)
• The maximum available continuous recording time is displayed on the screen.
- 23 -
Page 24
Preparation
1
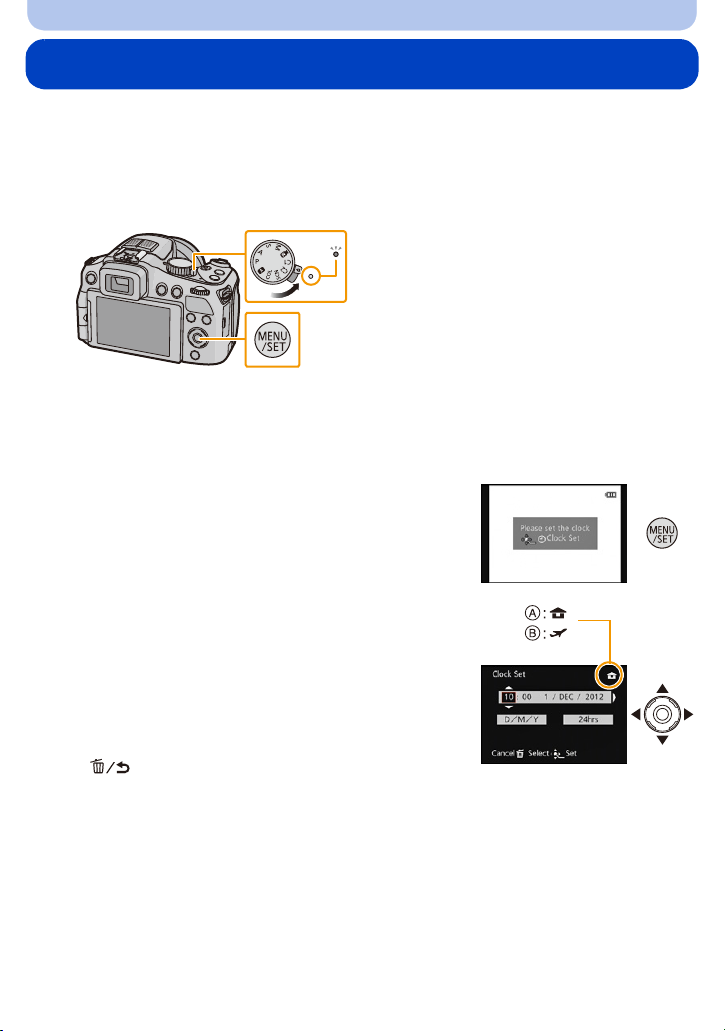
Setting Date/Time (Clock Set)
• The clock is not set when the camera is shipped.
Turn the camera on.
1
• The power lamp 1 lights when you turn the camera on.
• If the language select screen is not displayed, proceed to step 4.
Press [MENU/SET].
2
Press 3/4 to select the language, and then [MENU/SET].
3
Press [MENU/SET].
4
Press 2/1 to select the items (year, month,
5
day, hour, minute, display sequence or time
display format), and then 3/4 to set.
A: Time at the home area
B: Time at the travel destination
You can cancel without setting the clock by pressing
•
[].
Press [MENU/SET] to set.
6
Press [MENU/SET].
7
- 24 -
Page 25

Preparation
Changing the clock setting
Select [Clock Set] in the [Rec] or [Setup] menu, and press 1. (P49)
•
The clock can be reset as shown in steps 5 and 6.
• The clock setting is maintained for 3 months using the built-in back-up battery even without
the main battery inserted. (Leave the charged battery in the camera for 24 hours to charge the
back-up battery.)
Notes
•
If the clock is not set, the correct date cannot be printed when you order a store/lab to print the
picture, or when you stamp the date on the pictures with [Date Stamp] (P140) or [Text Stamp]
(P155).
• If the clock is set, the correct date can be printed even if the date is not displayed on the monitor/
viewfinder.
- 25 -
Page 26

Preparation
AB
Tips for taking good pictures
Hold the camera firmly with both hands, keep
your arms still at your side and stand with
your feet slightly apart.
• Be careful not to place your fingers on the flash, AF
Assist Lamp A, microphone B, speaker or lens etc.
• Be careful not to cover the speaker with your finger. Doing
so may make sound difficult to hear. (P9)
• Hold the camera as still as possible when you release the
shutter, i.e. when you press the shutter release button.
• When taking pictures, make sure your footing is stable and
there is no danger of colliding with another person, an
object etc.
• Do not hold the lens barrel as you take pictures. There is a
risk that your fingers may be pinched as the lens retracts.
∫ Direction Detection Function ([Rotate Disp.])
Pictures recorded with the camera held vertically are played back vertically (rotated). (Only
when [Rotate Disp.] (P64) is set)
When the camera is held vertically and tilted up and down to record pictures, the Direction Detection
•
function may not work correctly.
• Motion pictures taken with the camera held vertically are not displayed vertically.
• You cannot record 3D pictures in vertical orientation.
MIC
REMOTE
MIC
REMOTE
Preventing camera shake
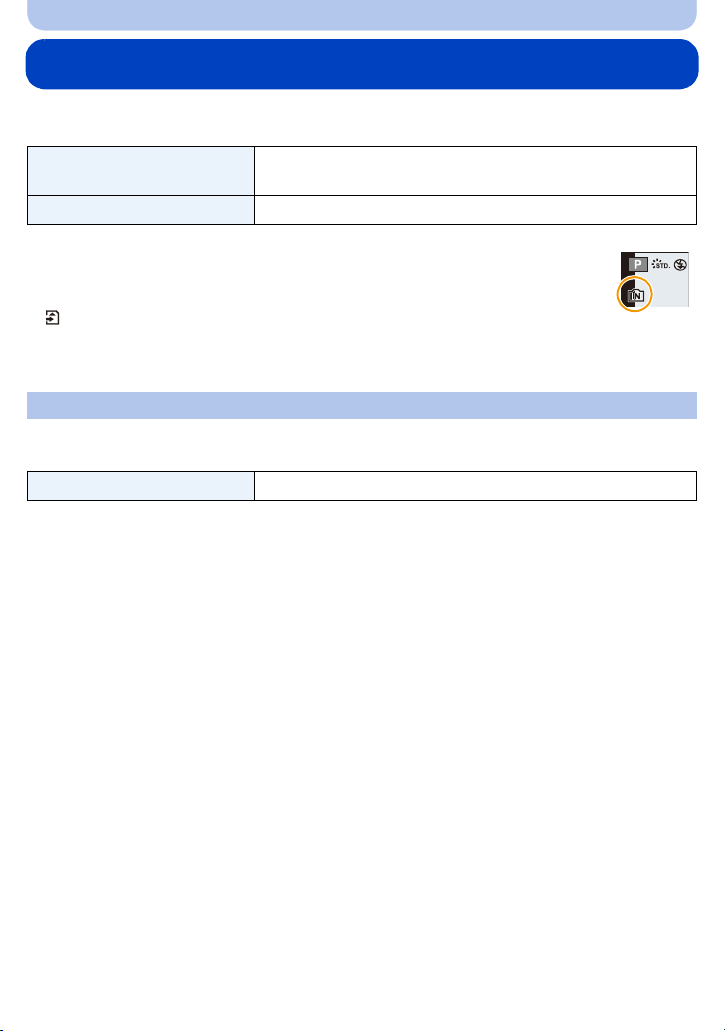
When the camera shake alert [ ] appears, use [Stabilizer] (P136), a tripod or the Self-timer
(P80).
The shutter speed will be slower particularly in the following cases. Keep the camera still from the
•
moment the shutter release button is pressed until the picture appears on the monitor/viewfinder. We
recommend using a tripod.
– Slow sync./Red-Eye Reduction
– [Night Portrait]/[Night Scenery] (Scene Mode)
– When a slow shutter speed limit has been set in [Min. Shtr Speed]
- 26 -
Page 27
Basic
A
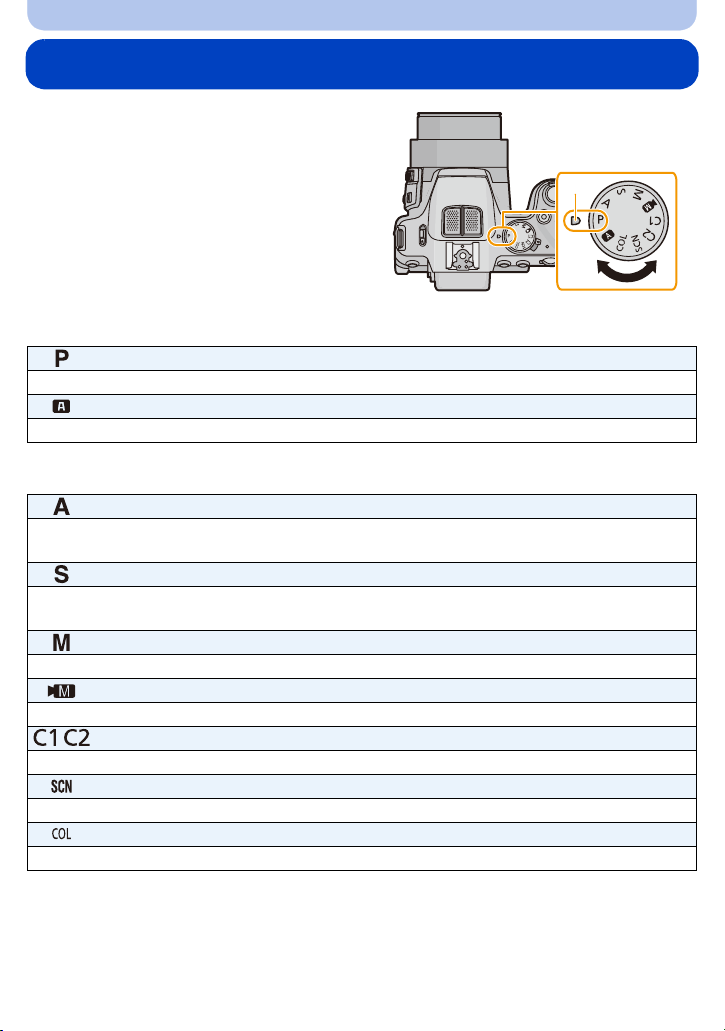
Selecting the Recording Mode
Change modes by rotating the mode
dial.
Align the desired mode with index A.
•
Make sure the dial is set exactly to the
click-stop position of the desired mode. (The
mode dial rotates 360o)
∫ Basic
Program Mode (P28)
For taking pictures with automatic exposure control.
Snapshot Mode (P32)
For taking pictures with extended automatic settings.
∫ Advanced
Aperture-Priority Mode (P99)
The exposure is determined by the automatically controlled shutter speed, based on the
manually set aperture value.
Shutter-Priority Mode (P100)
The exposure is determined by the automatically controlled aperture value, based on the
manually set shutter speed.
Manual Exposure Mode (P101)
The exposure is determined by the manually set aperture value and shutter speed.
Creative Video Mode (P118)
For recording motion pictures with manual settings.
Custom Mode (P120)
Use this mode to take pictures with previously registered settings.
Scene Mode (P102)
For taking pictures with preset menu settings that match the scene being recorded.
Creative Control Mode (P112)
For recording while checking the image effect.
- 27 -
Page 28
Basic
1
0000100100100
2.82.82.8 303030
D
AB C
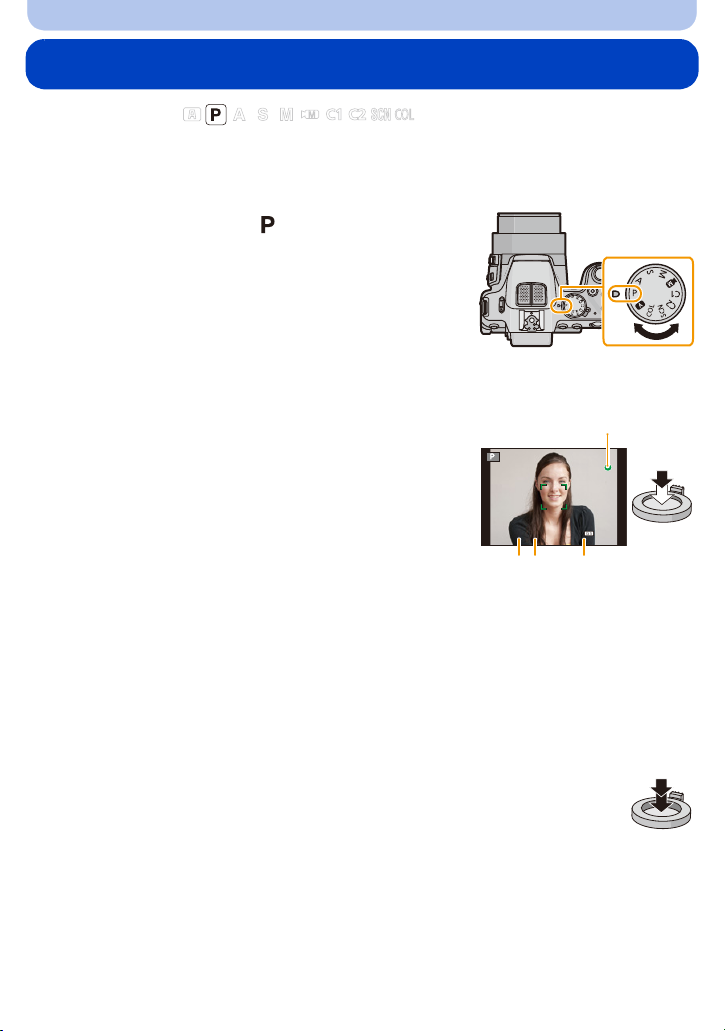
Program Mode
Recording mode:
The camera automatically sets the shutter speed and the aperture value according to the
brightness of the subject.
You can also change various settings in the [Rec] menu.
Set the mode dial to [ ].
1
Aim the AF frame at the subject you want to focus on.
2
Press the shutter release button halfway to
3
focus.
A Aperture value
B Shutter speed
C ISO sensitivity
• The focus indication D (green) lights up when the subject
is focused.
• The maximum close-up distance (the shortest distance at
which the subject can be taken) differs depending on the
set focal length. Please check with the focus range display.
(P31)
• Aperture value and shutter speed are displayed in red
when a correct exposure cannot be achieved. (Except
when using a flash)
Press the shutter release button fully (push it
4
in further), and take the picture.
- 28 -
Page 29
Basic
PP
4.0 15
A
1 2 3 4 5 6 7 8 9 10 11 12 13
1 1
/
2
1
/
4
1
/
8
1
/
15
1
/
30
1
/
60
1
/
125
1
/
250
1
/
500
1
/
1000
1
/
2000
2
2.8
4
5.6
8
11
14
(B)
(A)
Program Shift
In Program Mode, you can change the preset aperture value and shutter speed combinations
without changing the exposure. This is called program shift.
You can e.g. reduce the extent of the sharply rendered subject parts by decreasing the aperture
value or record a moving subject more dynamically by slowing the shutter speed.
Press the shutter release button halfway to display the aperture and
1
shutter speed values on the screen.
While the values are displayed (about
2
10 seconds), set the desired program shift by
rotating the setting wheel.
• The operation mode will switch between program shift and
exposure compensation (P76) every time the setting
wheel is pressed while the values are displayed.
• When program shift is activated, an indication A appears on the screen.
• Program shift is canceled
– when the camera is turned off.
– when the setting wheel is rotated until the respective indication disappears.
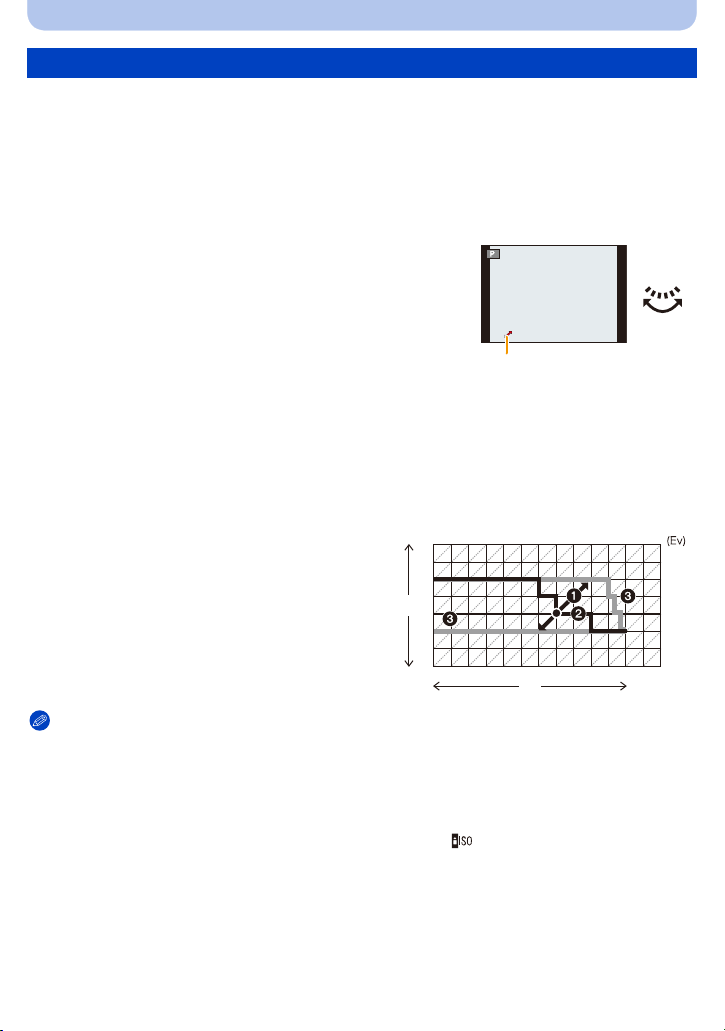
∫ Example of Program Shift
(A): Aperture value
(B): Shutter speed
1 Program shift range
2 Program shift line chart
3 Program shift limit
Notes
EV is an abbreviation of [Exposure Value], a unit indicating an exposure level increment. The EV
•
changes with the aperture value or the shutter speed.
• If more than 10 seconds pass after a program shift was set, it will be canceled, i.e. it will return to the
original program mode setting. Even so, the program shift setting is memorized.
• Depending on the brightness of the subject, program shift may not be possible.
• Program shift is available in all ISO sensitivity settings except [ ].
- 29 -
Page 30

Basic
1
0000100100100
2.82.82.8 303030
B
A
Focusing
Aim the AF frame at the subject, and then press the
shutter release button halfway.
Focus
Focus indication A On Flashes
AF frame B White>Green White>Red
Sound Beeps 2 times Beeps 4 times
When the subject is focused When the subject is not
focused
• The AF frame is automatically enlarged for certain zoom magnifications and in dark places.
- 30 -
Page 31

Basic
1X
W
T
0.3m
--
∞
T
W
∫ About focus range
The focus range is displayed when operating the zoom.
The focus range is displayed in red when focusing was not
•
successful after pressing the shutter release button halfway.
The focus range may change gradually depending on the zoom position.
e.g.: Focusing range during Program Mode
∫ When the subject is not focused as desired (such as when it is not in the center of the
composition of the picture you want to take)
1 Aim the AF frame at the subject, and then
press the shutter release button halfway to
set and lock focus and exposure.
2 Press and hold the shutter release button
halfway as long as you move the camera to
compose the picture.
You can repeat the actions in step 1 before pressing the shutter release button fully.
•
∫ Subjects and recording conditions which are difficult to focus
•
Fast-moving subjects, extremely bright subjects or subjects without contrast
• When recording subjects through windows or near shiny objects
• When it is dark or when the camera is not held still
• When the camera is too close to the subject or when there are both distant and near subject parts in
the picture
- 31 -
Page 32

Basic
A
B
Snapshot Mode
Recording mode:
The camera will set the most appropriate settings to match the subject and the recording
conditions so we recommend this mode for beginners or those who want to leave the settings
to the camera and take pictures easily.
The following functions are activated automatically.
•
– Scene Detection/Backlight Compensation/Intelligent ISO sensitivity control/Auto White Balance/
Face Detection/[AFS]/[Quick AF]/[i.Dynamic]/[i.Resolution]/[i.ZOOM]/[Stabilizer]/[AF Assist Lamp]/
[Red-Eye Removal]/[Continuous AF]/[Zoom Mic]
• Image quality is fixed to [A].
Set the mode dial to [ ].
1
Press the shutter release button halfway to
2
focus and then press it fully to take the
picture.
A Focus indication
• The AF frame B is placed over the subject’s face by the
Face Detection function. In other cases, it is placed on
the part of the subject which is in focus.
• You can set AF tracking
details, refer to P90. (AF tracking is canceled by
pressing [FOCUS] again.)
¢You cannot use the AF tracking function when
[Color Mode] is set to [B&W] or [SEPIA].
¢
by pressing [FOCUS]. For
- 32 -
Page 33

Basic
Scene Detection
When the camera identifies the optimum scene, the icon of the scene concerned is displayed in
blue for 2 seconds, after which its color changes to the usual red.
When taking pictures
>
[i-Portrait] [i-Scenery]
1
[i-Macro] [i-Night Portrait]
[i-Night Scenery] [iHandheld Nite Shot]
[i-Sunset] [i-Baby]
¢1 Only when [ ] is selected.
¢2 Only displayed when [iHandheld Nite Shot] is set to [ON].
¢3 When [Face Recog.] is set to [ON], [ ] will be displayed for birthdays of registered
faces already set only when the face of a person 3 years old or younger is detected.
¢
2
¢
3
¢
When recording motion pictures
>
[i-Portrait] [i-Scenery]
[i-Low Light] [i-Macro]
•
[ ] is set if none of the scenes are applicable, and the standard settings are set.
• When [ ], [ ] or [ ] is selected, the camera automatically detects a person’s face, and it will
adjust the focus and exposure accordingly. (Face Detection)
• If a tripod is used, for instance, and the camera has judged that camera shake is minimal when the
Scene Mode has been identified as [ ], the shutter speed will be set to a maximum of
8 seconds.Take care not to move the camera while taking pictures.
• When [Face Recog.] is set to [ON], and a face similar to the registered face is detected, [R] is
displayed in the top right of [ ], [ ] and [ ].
• Due to conditions such as the ones below, different scene modes may be identified for the same
subject.
– Subject conditions: When the face is bright or dark, the size and/or color of the subject, the
distance to the subject, the contrast of the subject, when the subject is moving
– Recording conditions: Sunset, sunrise, under low brightness conditions, when the camera is not
held still, when the zoom is used
• To take pictures of an intended scene, it is recommended that you take pictures in the appropriate
recording mode.
- 33 -
Page 34

Basic
AUTO
Backlight Compensation
When there is a backlight, the subject appears darker and the camera will automatically
attempt to correct it by increasing the brightness of the picture.
In Snapshot Mode, backlight compensation works automatically. [ ] is displayed on the
screen when backlighting is detected. (Depending on the backlighting conditions, backlighting
may not be detected correctly.)
Using the Defocus Control Function
You can easily set the blurriness of the background while checking the screen.
Press the setting wheel to display [ ].
1
Press 2/1 or rotate the setting wheel to
2
adjust.
• Press [ ] to reset the setting to the default state
(AUTO).
• To adjust automatically, reset the setting to the default
state (AUTO).
Press [MENU/SET] or the setting wheel to set.
3
- 34 -
Page 35

Basic
Changing the menu settings
Following menu items can be set.
Menu Item
[Rec] [Picture Size]¢/[Color Mode]/[Motion Deblur]/[iHandheld Nite Shot]/
[Motion Picture] [Rec Mode]/[Rec Quality]
[Setup] [Clock Set]/[World Time]/[Beep]
•
For the setting method of the menu, refer to P49.
¢ Available settings may be different from other recording modes.
Menu items specific to Snapshot Mode
[iHDR]/[Face Recog.]
¢
•
Menu items other than those listed above are not displayed, but you can
set them in other recording modes.
/[Language]/[O.I.S. Demo.]
∫ [Color Mode]
[Color Mode] can set the
color effects of [STANDARD], [Happy], [B&W] or [SEPIA]. When
[Happy] is selected, it is possible to automatically take a picture with a higher level of brilliance
for the color brightness and vividness.
∫ [Motion Deblur]
When [Motion Deblur] is set to [ON], [ ] is displayed on the recording screen as you press
the shutter release button halfway. To reduce
optimal shutter speed according to the subject’s motion. (In such a case, the
subject blurring, the camera automatically sets an
resolution may
decrease.)
∫ [iHandheld Nite Shot]
When [iHandheld Nite Shot] is set to [ON] and [ ] is detected while taking handheld night
a high frequency picture series will be taken and composed into a single picture. This mode
shots,
is useful if you want to take stunning night shots with minimal
camera shake effects and noise,
without using a tripod. If the camera is mounted on a tripod or other type of stand, [ ] will not
be detected.
∫ [iHDR]
When [iHDR] is set to [ON] and there is, for example, strong contrast between the background
and the subject, multiple still pictures are recorded with differing exposures and combined to
create a single still picture rich in gradation.
When [ ] is displayed on the screen but not otherwise, the iHDR function will work automatically as
•
required.
•
In the case that a single picture is going to be composed from multiple pictures, a message indicating
that multiple pictures are to be recorded appears on the screen and the respective recording is carried
out. Note that multiple picture recording will not take place if the camera determines that it can
compensate for the difference in contrast without composing the picture from multiple pictures.
• In the case of composition from multiple pictures, ghost images may appear if the subject was
moving.
• In the following cases, a compensated picture is not created.
– When the zoom factor exceeds 24k.
– When recording in [Burst].
- 35 -
Page 36

Basic
About the flash
• Open the flash when it is to be used. (P72)
• When [ ] is selected, [ ], [ ], [ ] or [ ] is set depending on the type of subject and
brightness.
• When [ ], [ ] is set, Red-Eye Removal is enabled.
• The shutter speeds will be slower during [ ] or [ ].
Recording using Snapshot Plus Mode
You can adjust the brightness and the color balance in addition to the Snapshot Mode function.
Press [MENU/SET] when in Snapshot Mode.
1
Press 1 to select [ ] and then press
2
[MENU/SET].
- 36 -
Page 37

Basic
AUTO
AUTO
AUTO
Adjusting brightness, color balance, and background blur
1 Press the setting wheel to display the options.
2 Press 3/4 to select the item.
[]:Adjust the brightness.
[]:Adjust the background blur.
[]:Adjust the color balance.
3 Press 2/1 or rotate the setting wheel to adjust.
•
Press [ ] to reset the setting to the default state (AUTO).
4 Press [MENU/SET] or the setting wheel to set.
Note
•
If you turn the camera off or switch another recording mode, the adjusted slider position returns to
the default state (AUTO).
- 37 -
Page 38

Basic
3
8
s
AB
C
Recording Motion Pictures
Applicable modes:
This camera can record full high definition motion pictures compatible with the AVCHD format
or motion pictures recorded in MP4.
Audio will be recorded in stereo.
Start recording by pressing the motion picture
1
button.
A Available recording time
B Elapsed recording time
• It is recommended that you close the flash when recording
motion pictures.
• You can record motion pictures fitting each recording
mode.
• Release the motion picture button right after you press it.
• The recording state indicator (red) C will flash while
recording motion pictures.
• Focus can be achieved during recording by pressing
[FOCUS].
• For the setting of [Rec Mode] and [Rec Quality], refer to
P141,142.
Stop the recording by pressing the motion picture button again.
2
s3s
R
1m38
R
1m38
s
- 38 -
Page 39

Basic
∫ About the recording format for recording motion pictures
This camera can record motion pictures in either the AVCHD or MP4 formats.
AVCHD:
You can record high definition quality images with this format. It is suitable for viewing on a
large format TV or for saving to disc.
AVCHD Progressive:
The [PSH] in [AVCHD] is a mode that allows motion pictures to be recorded at 1920k1080/
1
¢
(1920k1080/60p
50p
2
¢
), the highest quality
3
¢
that complies with the AVCHD standard.
Recorded motion pictures can be saved and played back using this camera or the available
software (P173).
¢1 With camera model 18 190
¢2 With camera models 18 191 / 18 192
¢3 This means the highest quality for this camera.
MP4:
This is a simpler video format best used when extensive editing is needed, or when uploading
videos to the Internet.
∫ About the compatibility of the recorded motion pictures
Motion pictures recorded in [AVCHD] or [MP4] may be played back with poor picture or sound
quality or playback may not be possible even when played back with equipment compatible
with these formats. Also, the recording information may not be displayed properly. In this case,
camera.
use this
- 39 -
Page 40

Basic
Notes
•
The internal memory can only store [VGA] data as [MP4].
• The available recording time displayed on the screen may not decrease regularly.
• Depending on the type of the card, the card access indication may appear for a while after recording
motion pictures. This is not a malfunction.
• ISO sensitivity will operate as [AUTO] in Motion Picture Recording except for with Creative Video.
Also, [ISO Limit Set] will not function.
• There is a risk that the sound of zooming and button operations and the rubbing of the lens cap
string will be recorded, so care is necessary.
• The screen may be blacked out momentarily, or the camera may record noise due to static electricity
or electromagnetic fields etc. depending on the environment of the motion picture recording.
• About zooming while recording motion pictures
– Operating the zoom while recording motion pictures, it can take time for the image to come into
focus.
– If Extended Optical Zoom is used before pressing the motion picture button, those settings will be
cleared, so the shooting range will change dramatically.
• Even if the aspect ratio setting is the same in still and motion pictures, the angle of view may change
at the start of the motion picture recording.
When [Video Rec Area] (P57) is set to [ON], the angle of view during motion picture recording is
displayed.
• If you end motion picture recording after a short time when using [Miniature Effect] of the Creative
Control Mode, the camera may go on recording for a certain period. Please continue to hold the
camera still until the recording finishes.
• It is recommended to use a fully charged battery when recording motion pictures.
• Motion pictures cannot be recorded in the following cases.
– [Panorama Shot]/[3D Photo Mode] (Scene Mode)
– [Soft Focus]/[Star Filter] (Creative Control Mode)
• A motion picture will be recorded in the following categories for certain recording modes. A motion
picture recording matching each recording mode will be performed for the ones not listed below.
Selected Recording Mode
Recording Mode while recording motion
picture
• Program Mode
• Aperture-Priority Mode
• Shutter-Priority Mode
Normal motion picture
• Manual Exposure Mode
• [Sports]/[HDR]/[Pet] (Scene Mode)
• [Baby1]/[Baby2] (Scene Mode) Portrait Mode
• [Night Portrait]/[Night Scenery]/[Handheld Night Shot]
(Scene Mode)
Low Light Mode
- 40 -
Page 41

Basic
Recording still pictures while recording motion pictures
Still pictures can be recorded even while recording a motion picture. (simultaneous recording)
During motion picture recording, press the shutter release button fully to
record a still picture.
Notes
•
You can record up to 20 pictures per motion picture recording.
• During motion picture recording, if you press the shutter release button halfway, the camera will
refocus and the noise caused by this operation will be recorded. To prioritize the motion picture
image, recording still pictures by fully pressing the shutter release button, or creating still pictures
after motion picture recording is recommended. (P45)
• The resolution and the number of recordable pictures are displayed by pressing the shutter release
button halfway.
• The recording of a motion picture will continue after taking a still picture.
• Recording motion pictures is done with the electronic shutter, so the recorded still picture may
appear distorted.
• Pictures will be recorded with a resolution of [3.5M] (16:9). The picture quality may be different than
[3.5M] (16:9) of standard pictures.
• The flash setting is fixed to [Œ].
• Zooming will stop when a picture is recorded while zooming.
• Only one picture is recorded when Auto Bracketing or White Balance Bracketing is set.
• Simultaneous recording is not possible in the following cases:
– When [Rec Mode] is set to [VGA] in [MP4]
– Creative Video Mode
• In [Miniature Effect] of Creative Control Mode, there may be a slight delay between fully pressing the
shutter release button and recording.
• The frame rate of a picture series while recording motion pictures is limited to the following. (P77)
– [ ] and [ ]/[ ] cannot be set. These settings will automatically switch to [ ] and [ ].
– [ ], [ ], [ ] or [ ] cannot be set. These settings will automatically switch to [ ].
• Only JPEG images are recorded when [Quality] is set to [ ], [ ] or [ ]. (When set to
[ ] or [ ], still pictures will be recorded in [Quality] of [A].)
- 41 -
Page 42

Basic
1/13
100-0001
A
B
Playing Back Pictures ([Normal Play])
Press [(].
∫ To finish playback
(] again, press the motion picture button or press the shutter release button
Press [
halfway.
Notes
• This camera complies with the DCF standard “Design rule for Camera File system” established by
JEITA “Japan Electronics and Information Technology Industries Association” and with Exif
“Exchangeable Image File Format”. Files which do not comply with the DCF standard cannot be
played back.
• The lens barrel retracts about 15 seconds after switching from recording to playback mode.
• Pictures recorded with another camera may not be played back on this camera.
Selecting a picture
Press 2 or 1.
2: To play back the previous picture
1: To play back the next picture
A File number
B Picture number
• If you press and hold 2/1, you can play back the pictures in succession.
• The speed of picture forwarding/rewinding changes depending on the playback status.
- 42 -
Page 43

Basic
A
W
T
A
Displaying Multiple Images (Multi Playback)
Rotate the zoom lever towards [W].
1/26
1 image>12 images>30 images>Calendar screen
display
A Number of the selected picture and the total number of
recorded pictures
Rotate the zoom lever towards [T] to return to the former display.
•
• Pictures displayed using [ ] cannot be played back.
∫ To return to normal playback
Press 3/4/2/1 to select a picture and then press [MENU/SET].
Using the Playback Zoom
Rotate the zoom lever towards [T].
1k>2k>4k>8k>16k
•
When you rotate the zoom lever towards [W] after enlarging the
picture, the magnification becomes lower.
• When you change the magnification, the zoom position indication
A appears for about 1 second, and the position of the enlarged
section can be moved by pressing 3/4/2/1.
• The more a picture is enlarged, the more its quality deteriorates.
∫ Switching the displayed image while maintaining a magnification setting
You can switch the displayed image while maintaining the same magnification and position.
Rotate the setting wheel to select an other picture while a magnification is set.
•
The position of the magnified section returns to the center in the following cases.
– Images with different aspect ratios
– Images with different resolutions
– Images with a different rotation direction (when [Rotate Disp.] is set to [ON])
2X
W
T
∫ Enlarging the focused part of the subject (display focus point)
The camera memorizes the focused part of the subject during the recording, and can enlarge
the image with that part as the center.
Press [FOCUS] during image playback.
The focused part of the subject may not be at the center of the enlargement when it is at the edge of
•
the image.
• The setting returns to the original enlargement if [FOCUS] is pressed again.
• The following pictures cannot be enlarged because there is no part of the subject in focus:
– Pictures that were taken without focusing
– Pictures that were taken with manually focused
– Pictures that were taken with a different camera
- 43 -
Page 44

Basic
3s
B
A
W
T
Playing Back Motion Pictures
This camera was designed to play back motion pictures using the AVCHD, MP4 and QuickTime
Motion JPEG formats.
Press 2/1 to select a recording with a motion picture icon
(such as [ ]/[ ]), and then press 3 to play back.
A Motion picture icon
B The motion picture recording time
• After playback starts, the elapsed time is displayed on the screen.
For example, 8 minutes and 30 seconds is displayed as [8m30s].
• Some information (recording information, etc.) is not displayed for motion
pictures recorded in [AVCHD].
• High speed motion pictures are identified by the [ ] icon.
∫ Operations performed during Motion Picture Playback
The cursor displayed during playback is the same as 3/4/2/1.
3 Play/Pause
Stop
4
Fast rewind
2
Frame-by-frame rewind (while pausing)
Fast forward
1
Frame-by-frame forward (while pausing)
Reduce volume level
[W]
¢
¢
Increase volume level
[T]
¢ The fast forward/rewind speed increases if you press 1/2 again.
Notes
•
When using a high capacity card, it is possible that fast rewinding may be slower than usual.
• To playback the motion pictures recorded by this camera on a computer, use the available software
(P173).
• Motion pictures recorded with other cameras may not be played back on this camera.
• When playing back high speed motion pictures, the motion picture recording time differs to the
actual playback time.
• With camera model 18 190:
Motion pictures recorded with [Miniature Effect] in Creative Control Mode play back at approximately
8 times speed.
• With camera models 18 191 / 18 192:
Motion pictures recorded with [Miniature Effect] in Creative Control Mode play back at approximately
10 times speed.
- 44 -
Page 45

Basic
Creating Still Pictures from a Motion Picture
You can create a single still picture from a recorded motion picture.
Press 3 to pause motion picture playback.
1
Press [MENU/SET].
2
• A confirmation screen is displayed. It is executed when [Yes] is selected.
Exit the menu after it is executed.
Notes
•
The picture is saved with the following resolutions.
Recording format Resolution
[AVCHD] 2 M (16:9)
[MP4]
• You may not be able to save still pictures from a motion picture taken on other equipment.
• Still pictures created from a motion picture may have a lower resolution than with normal picture
quality.
([FHD]/[HD]) 2 M (16:9)
([VGA]) 0.3 M (4:3)
- 45 -
Page 46

Basic
ュリヴヱハ
Deleting Pictures
Once deleted, pictures cannot be recovered.
•
The picture being played back is deleted, regardless of whether it is recorded on the internal
memory or the card.
• Pictures that do not comply with the DCF standard or those that are protected cannot be deleted.
Press [(].
Deleting a single picture
Select the picture to be deleted, and then
press [ ].
• A confirmation screen is displayed.
The picture is deleted by selecting [Yes].
- 46 -
Page 47

Basic
1 2 3
4
5
6
Deleting multiple pictures (up to 100) or all the pictures
Press [ ].
1
Press 3/4 to select [Delete Multi] or [Delete
2
All] and then [MENU/SET].
• [Delete All] > A confirmation screen is displayed.
The pictures are deleted by selecting [Yes].
• It is possible to delete all pictures except the ones set as
favorite when [All Delete Except Favorite] is selected with
the [Delete All] set.
(When [Delete Multi] is selected) Press 3/4/
3
2/1 to select the picture, and then [DISP.] to
set. (Repeat this step.)
• [ ] appears on the selected pictures. If [DISP.] is pressed
again, the setting is canceled.
(When [Delete Multi] is selected) Press [MENU/SET].
4
• A confirmation screen is displayed.
The pictures are deleted by selecting [Yes].
ュリヴヱハ
Notes
•
Picture series groups (pictures with the picture series icon [˜]) will be treated as a single picture.
Deleting a picture series group will delete all pictures in the group. (P147)
• Do not turn the camera off while deleting. Use a sufficiently charged battery.
• Depending on the number of pictures to be deleted, it may take some time to delete them.
- 47 -
Page 48

Basic
Setting the Menu
The camera features menus that allow you to choose the settings for taking pictures and
playing them back as you like. There are also menus that enable you to have more fun with the
camera and use it more easily.
In particular, the [Setup] menu contains some important settings relating to the camera’s clock
and power. Check the settings of this menu before proceeding to use the camera.
∫ Types of menus
Menu Description of settings
[Rec]
(P127 to 140)
[Motion Picture]
(P141 to 144)
[Playback Mode]
(P149 to 153)
[Playback]
(P154 to 166)
[Setup]
(P52 to 65)
This menu includes settings for the coloring, sensitivity,
aspect ratio, resolution and other aspects of the pictures you
are recording.
This menu includes settings for the [Rec Mode], [Rec Quality],
and other aspects for motion picture recording.
This menu includes settings for the playback methods such
as playback or slide show of only the pictures set as
[Favorite].
This menu includes settings for protection, cropping or print
settings, etc. of recorded pictures.
This menu is for the clock settings, selecting the operating
beep tone settings and other settings which make it easier for
you to operate the camera.
- 48 -
Page 49

Basic
Setting menu items
• If you set [Menu Resume] (P64) in the [Setup] menu to [ON], the screen shows the last selected
menu item when the camera was turned off.
Example: In the [Rec] menu, change [AF Mode] from [Ø] (1-area-focusing) to [š] (Face
Detection)
Press [MENU/SET].
1
Press 3/4 or rotate the setting wheel to select
2
the menu item.
• It will switch to the next page when you reach the bottom.
(It will also switch by rotating the zoom lever.)
Press 1 or the setting wheel.
3
• Depending on the menu item, its setting may not appear or
it may be displayed in a different way.
Press 3/4 or rotate the setting wheel to select
4
the settings.
Press [MENU/SET] or the setting wheel to set.
5
∫ Close the menu
Press [MENU/SET] or press the shutter release button halfway.
- 49 -
Page 50

Basic
∫ Switching to other menus
e.g.: Switching to the [Setup] menu from [Rec] menu
1 Press 2.
2 Press 4 or rotate the setting wheel to select the
[Setup] menu icon [ ].
3 Press 1 or the setting wheel.
•
Select a menu item next and set it.
Note
•
There are functions that cannot be set or used depending on the
modes or menu settings being used on the camera due to the
specifications.
- 50 -
Page 51

Basic
AFSAFS
2.8 30
0-3+3
AFSAFS
2.8 30
0-3+3
Using the Quick Menu
By using the Quick Menu, some of the menu settings can be easily found.
•
The features that can be set using Quick Menu are determined by the mode or a display style the
camera is in.
Press [Q.MENU] when recording.
1
Press 2/1 to select the item and then [MENU/
2
SET].
Press 2/1 to select the setting and then
3
[MENU/SET] to set.
Press [Q.MENU] or the shutter release button halfway to close the menu.
4
∫ Using the Quick Menu with the setting wheel
You can also set the Quick Menu with the setting wheel, without changing your position or the
camera angle when using the viewfinder.
1 Press [Q.MENU] in the Recording Mode.
2 Rotate the setting wheel to select the item, and then press it.
3 Rotate the setting wheel to select the setting, and then press it to set.
Exit the menu after it is set.
•
- 51 -
Page 52

Basic
A
B
C
D
About the Setup Menu
[Clock Set], [Economy] and [Auto Review] are important items. Check their settings before
using them.
[Clock Set] —
Refer to P24 for details.
•
Set the time in your home area and travel destination.
You can display the local times at the travel destinations and record
them on the pictures you take.
After selecting [Destination] or [Home], press 2/1 to select an
area, and then [MENU/SET] to set.
Set [Home] first thing after purchasing. [Destination] can be set after
•
setting up [Home].
“ [Destination]:
[World Time]
Travel destination area
A Current time of the destination area
B Time difference from home area
– [Home]:
Your home area
C Current time
D Time difference from GMT (Greenwich
Mean Time)
• Press 3 if you are using Summer Time [ ]. (The time will move forward by 1 hour.) Press 3
once more to return to the normal time.
• If you cannot find the travel destination in the areas displayed on the screen, set by the time
difference from the home area.
- 52 -
Page 53

Basic
123
123
Departure date and return date of the trip as well as the name of the
travel destination can be set.
You can display the number of days that have passed when playing
back the pictures and stamp it on the recorded pictures with [Text
Stamp] (P155).
[Travel Setup]:
[SET]: Departure date and return date are set. Elapsed days (how
many days after) of the trip are recorded.
[Travel Date]
[OFF]
The travel date is automatically canceled if the current date is after the
•
return date. If the [Travel Setup] is set to [OFF], [Location] will be also
set to [OFF].
[Location]:
[SET]: Travel destination is recorded at the time of recording.
[OFF]
For details on how to enter characters, refer to “Entering Text” on P126.
•
• The travel date is calculated using the date in the clock setting and the departure date you set. If you
set [World Time] to the travel destination, the travel date is calculated using the date in the clock
setting and the travel destination setting.
• The travel date setting is memorized even when the camera is turned off.
• The number of days that have passed since the departure date is not recorded before the departure
date.
• [Travel Date] cannot be set for motion pictures recorded with [AVCHD].
• [Location] cannot be recorded when taking motion pictures.
• [Travel Date] cannot be set in the Snapshot Mode. Setting of other recording modes will be reflected.
[Beep]
This allows you to set the beep and shutter sound.
[Beep Level]: [Shutter Vol.]:
[u]
[t]
[s]
([High])
([Low])
([OFF])
[]
([High])
[]
([Low])
[]
([OFF])
[Beep Tone]: [Shutter Tone]:
[ ]/[ ]/[ ] [ ]/[ ]/[ ]
- 53 -
Page 54

Basic
[Volume] Adjust the volume of the speaker to any of 7 levels.
• When you connect the camera to a TV, the volume of the TV speakers does not change. Also, when
connected, no sound is output from the camera speakers.
[Cust.Set Mem.]
Up to 4 current camera settings can be registered as custom settings.
[ ]/[ ]/[ ]/[ ]
• Refer to P121 for details.
The function of the [AF/AE LOCK] button can be switched between
[AF/AE LOCK /Fn2]
AF/AE Lock and Fn(function).
[AF/AE LOCK]/[Fn2]
• At the time of purchase, AF/AE Lock is selected.
Certain menu items can be assigned to the function button. You may
[Fn Button Set]
find it convenient to register a menu item that you often use.
[Fn1 Button Set]/[Fn2 Button Set]/[Fn3 Button Set]
• Refer to P98 for details.
Switches the function of the zoom/focus rocker to zoom or to focus
when the camera is set to manual focusing.
[ZOOM]:
[Side Lever]
Control the zoom by sliding the zoom/focus rocker.
[FOCUS]:
Sets the focus when the camera is set to manual focusing
(P69)
. (P93)
Sliding the zoom/focus rocker when AF is locked (when the shutter
release button is pressed halfway, or AF is locked with [AF/AE Lock])
will slightly adjust the focus when the camera is set to auto focusing.
• The focus cannot be slightly adjusted with AF locked when recording motion pictures in Snapshot
Mode.
- 54 -
Page 55

Basic
Brightness, color, or red or blue tint of the monitor/viewfinder is
adjusted.
[Brightness]:
Adjusts the brightness.
[Contrast · Saturation]:
[LCD Display]/
[Viewfinder]
Adjusts the contrast or clarity of colors.
[Red Tint]:
Adjusts the red tint.
[Blue Tint]:
Adjusts the blue tint.
1 Select the settings by pressing 3/4, and adjust with 2/1.
2 Press [MENU/SET] to set.
• This operation will adjust the monitor when it is in use, or the viewfinder when it is in use.
• Some subjects may appear differently than in reality on the monitor/viewfinder. However, this does
not affect the recorded pictures.
These menu settings make it easier to see the monitor image when
you are in bright places.
¢
„ [Auto Power LCD]
The monitor brightness is adjusted automatically depending on the
[LCD Mode]
ambient brightness.
… [Power LCD]:
The monitor becomes brighter and easier to see even when taking
pictures outdoors.
[OFF]
¢ Can be set only during recording mode.
• The brightness of the pictures displayed on the monitor is increased so some subjects may appear
differently than in reality on the monitor. However, this does not affect the recorded pictures.
• The monitor automatically returns to normal brightness after 30 seconds when recording in Power
LCD Mode. Press any button to turn the monitor bright again.
• When [LCD Mode] is set, the battery usage time is reduced.
:
[EVF Disp.Style]
• Refer to P66 for details.
This will set the display style of the Viewfinder.
[]: Viewfinder style
[]:
Monitor style
- 55 -
Page 56

Basic
This will set the display style of the monitor.
[LCD Disp.Style]
[]: Viewfinder style
[]:
Monitor style
• Refer to P66 for details.
This will set the pattern of guide lines displayed when taking a picture.
[]
[]
[]:
[Guide Line]
Press 3/4/2/1 to determine the
position, then press [MENU/SET] to
set.
Press [DISP.] to return to the default
position.
[OFF]
• When you align the subject on the horizontal and vertical guidelines or the cross point of these lines,
you can take pictures with well-designed composition by determining the size, the slope and the
balance of the subject.
• In [Panorama Shot] in Scene Mode, the guideline is not displayed.
- 56 -
Page 57

Basic
This allows you to set to display the histogram or not.
[ON]/[OFF]
A histogram is a graph that displays brightness along
[Histogram]
the horizontal axis (black to white) and the number of
pixels at each brightness level on the vertical axis.
It allows you to easily check a picture’s exposure.
A dark
B optimal
C bright
• When the recorded picture and the histogram do not match each other under the following
conditions, the histogram is displayed in orange.
– When the Manual Exposure Assistance is other than [0] during exposure compensation or in the
Manual Exposure Mode
– When the flash is activated
– When the flash is closed
• When the brightness of the screen is not correctly displayed in dark places
• When the exposure is not adequately set
• The histogram is an approximation in Recording Mode.
• The histogram of a picture may not match in Recording Mode and Playback Mode.
• The histogram displayed in this camera does not match histograms displayed by picture editing
software used in computers etc.
• Histograms are not displayed in the following cases.
– Snapshot Mode
– Multi Playback
– When recording motion pictures
– Playback Zoom
– When an HDMI mini cable is connected
– Calendar Search
[Video Rec Area]
The angle of view for motion picture recording can be checked.
[ON]/[OFF]
• The motion picture recording area display is only an approximation.
• The recording area display may disappear when zooming to longer focal lengths depending on the
resolution setting.
• The setting will be fixed to [OFF] during the Snapshot Mode.
- 57 -
Page 58

Basic
SS
SS
This will switch between displaying the number of recordable pictures
and available recording time.
[Remaining Disp.]
([Remaining Shots]):
This will display the number of recordable pictures for still pictures.
([Remaining Time]):
This will display the available recording time for motion pictures.
When the Auto Review function is activated or when playing back,
[Highlight]
If there are any white saturated areas, we recommend
•
compensating the exposure towards negative (P76)
referring to the histogram and then taking the picture
again. It may result in a better quality picture.
• There may be white saturated areas if the distance
between the camera and the subject is too close when
taking pictures with the flash.
• Highlighting does not work during Multi Playback,
Calendar Search, Playback Zoom, or Motion Picture
Playback.
white saturated areas appear flashing in black and white.
This does not affect the recorded image.
[ON]/[OFF]
[ON] [OFF]
[Expo.Meter]
• Set to [ON] to display the [Expo.Meter] when correcting exposure,
performing Program Shift, setting aperture, and setting shutter speed.
Set whether or not to display the shutter speed/aperture combination.
[ON]/[OFF]
S
SS
SS
F
• Unsuitable areas of the ranges are displayed in red.
• When [Expo.Meter] is not displayed, switch the display information for the
screen by pressing [DISP.]. (P66)
• The [Expo.Meter] disappears after approximately 4 seconds if no operation is performed.
- 58 -
3030304.0
60 125
30158
4.02.8 5.6 8.0
0-3+3
Page 59

Basic
The camera
memorizes a zoom position and an MF (Manual Focus)
position when it is turned off.
[Zoom Resume]:
the camera on, the zoom position when you last turned
[Lens Resume]
When you turn
the camera off are automatically restored.
[ON]/[OFF]
[MF Resume]:
This function will memorize the manually focused position. It will
resume this memorized focus position when you return to manual
focus recording.
[ON]/[OFF]
• The MF position will be memorized in the following cases:
– When the camera is turned off
– When switching to a type of focus other than manual
– When switched to Playback Mode
• The zoom position will be set to the shortest focal length when the [Zoom Resume] is set to [OFF].
• When [MF Resume] is set to [OFF], the MF position will be the distance manually focused at the time
of recording.
• Depending on the recording conditions, the memorized MF positions and resumed MF positions
might be different.
In Manual Focus, the screen to facilitate focusing on the subject is
displayed.
[MF Assist]
[ON]:
The center of the image is enlarged over the whole screen.
[OFF]
• Refer to P94 for details.
- 59 -
Page 60

Basic
You can conserve the battery life by setting these menus.
Also, it will turn off the monitor automatically when not in use to
prevent discharge of the battery.
[Sleep Mode]:
The camera is automatically turned off if the camera has not been
used for the time selected.
[10MIN.]/[5MIN.]/[2MIN.]/[1MIN.]/[OFF]
[Economy]
[Auto LCD Off]:
The camera is automatically turned off if it has not been used for the
time selected.
[30SEC.]/[15SEC.]/[OFF]
[Live View Mode]:
Sets the monitor to display in such a way that power consumption is
reduced.
[NORMAL]/[ECO]
• Press the shutter release button halfway or turn the camera off and on to cancel [Sleep Mode].
• [Sleep Mode] is set to [5 MIN. ] in Snapshot Mode.
• Press any button to turn on the monitor again.
• [Sleep Mode] does not work in the following cases.
– When connecting to a computer or a printer
– When recording or playing back motion pictures
– During a slide show
• [Auto LCD Off] does not work in the following cases.
– When connecting to a computer or a printer
– With Snapshot Mode
– While the Self-timer is set
– When recording or playing back motion pictures
– During a slide show
– While the menu screen is displayed
• [Sleep Mode] is fixed to [2MIN.] when [Auto LCD Off] is set to [15SEC.] or [30SEC.].
• When [Live View Mode] is set to [ECO] the image quality on the recording screen may be worse than
when it is set to [NORMAL], but this does not affect the recorded image.
• When [Live View Mode] is set to [NORMAL], the battery usage time is reduced.
[Play on LCD]
If you selected the viewfinder in a Recording Mode, the display will
automatically switch to the monitor when playing back the pictures.
[ON]
[OFF]
- 60 -
Page 61

Basic
Sets the length of time that the picture is displayed after taking the still
picture.
[HOLD]: The pictures are displayed until one of the buttons is
[Auto Review]
pressed.
[2 SEC.]
[1 SEC.]
[OFF]
• [Auto Review] is activated regardless of its setting in the following cases.
– When using Auto Bracketing
– During Continuous Mode
• The Auto Review function is fixed to [2 SEC.] in the following cases.
– Snapshot Mode
• [Auto Review] does not work when recording motion pictures.
[No.Reset]
Resets the file number of the next recording to 0001.
• The folder number is updated and the file number starts from 0001.
• A folder number between 100 and 999 can be assigned.
When the folder number reaches 999, the number cannot be reset. We recommend formatting the
card (P65) after saving the data on a computer or elsewhere.
• To reset the folder number to 100, format the internal memory or the card first and then use this
function to reset the file number.
A reset screen for the folder number will then appear. Select [Yes] to reset the folder number.
- 61 -
Page 62

Basic
[Reset] The [Rec] or [Setup] menu settings are reset to the initial settings.
• When the [Reset] setting is selected during recording, the operation that resets the lens is also
performed at the same time. You will hear the sound of the lens operating but this is normal and not
indicative of malfunctioning.
• When the Recording Mode settings are reset, data registered with [Face Recog.] will be also reset,
too.
• The folder number and the clock setting are not changed.
• When [Setup] menu settings are reset, the following settings are also reset.
– The birthday and name settings for [Baby1]/[Baby2] and [Pet] in Scene Mode.
– The [Travel Date] setting. (Departure date, return date, destination)
– The [World Time] setting.
– The [Cust.Set Mem.] setting.
– Position memorized in [Lens Resume]/[Menu Resume].
Select the USB communication system after or before connecting the
camera to your computer or your printer with the USB cable (supplied).
y [Select on connection]:
[USB Mode]
Select either [PC] or [PictBridge(PTP)] if you connected the camera to
a computer or a printer supporting PictBridge.
{ [PictBridge(PTP)]:
Set after or before connecting to a printer supporting PictBridge.
z [PC]:
Set after or before connecting to a computer.
- 62 -
Page 63

Basic
This sets how the camera connects to a television etc.
[Video Out]: (Menu item only available with model no. 18 190.)
Set to match the television color system in each country.
[NTSC]:
Video output is set to NTSC system.
[PAL]:
Video output is set to PAL system.
•
[Output]
This will work when the AV cable or HDMI mini cable (available as
accessory, see P7) is connected.
[TV Aspect]:
Set to match the type of TV.
W [16:9]:
When connecting to a 16:9 screen TV.
X [4:3]:
When connecting to a 4:3 screen TV.
•
This will work when the AV cable is connected.
This sets the camera so it can be controlled by the remote control of
the HDTV compatible equipment which is automatically coupled with
the camera using HDMI mini cable (available as accessory, see P7).
[HDTV Link]
[ON]: Remote control operation of the HDTV Link compatible
equipment is enabled. (Not all operations are possible)
Button operation of the camera will be limited.
[OFF]: Operation is performed with the buttons on the camera.
• This will work when the HDMI mini cable (available as accessory, see P7) is connected.
• Refer to P169 for details.
This sets the output method for 3D pictures.
[]: Set when connecting to a 3D compatible television.
[3D Playback]
[]: Set when connecting to a television not compatible with 3D.
Set this when you would like to view pictures in 2D
(conventional image) on a 3D compatible television.
• This will work when the HDMI mini cable (available as accessory, see P7) is connected.
• Refer to P171 for the method to playback 3D pictures in 3D.
- 63 -
Page 64

Basic
This mode allows you to display pictures vertically if they were
recorded holding the camera vertically.
[] ([On]):
[Rotate Disp.]
Rotates pictures on a TV and the LCD display so that they are
displayed vertically.
[] ([External Only]):
Pictures are displayed vertically by rotating when played back on TV.
[OFF]
• Refer to P42 for information about how to play back pictures.
• When you play back pictures on a computer, they cannot be displayed in the rotated direction unless
the OS or software is compatible with Exif. Exif is a file format for still pictures which allows recording
information, etc. to be added. It was established by “JEITA (Japan Electronics and Information
Technology Industries Association)”.
• It may not be possible to rotate pictures that have been recorded with other equipment.
• The display is not rotated during Multi Playback.
This sets the screen that appears as you switch the mode dial to [ ].
[Scene Menu]
[AUTO]: Display the Scene Mode menu.
[OFF]: Display the recording screen of the currently selected
Scene Mode.
The last operated menu position is saved even if the camera is turned
[Menu Resume]
off.
[ON]/[OFF]
[Version Disp.] —
• Allows checking which version of firmware is on the camera.
Press [MENU/SET] on the version display screen to display information about the software on the
•
camera.
- 64 -
Page 65

Basic
A
B
[Format]
The internal memory or the card is formatted. Formatting irretrievably
deletes all the data, so check the data carefully before formatting.
• Use a battery with sufficient capacity. Do not turn the camera off during formatting.
• If a card is inserted, only the card is formatted. To format the internal memory, remove the card.
• If the card has been formatted on a computer or other equipment, format it on the camera again.
• It may take longer to format the internal memory than the card.
• If you cannot format, contact your Leica dealer or a Leica agency.
[Language] Set the language displayed on the screen.
• If you set a different language by mistake, select [~] from the menu icons to set the desired
language.
Displays the amount of camera shake the camera has detected.
A Amount of camera shake
B Amount of camera shake after correction
[O.I.S. Demo.]
• The Stabilizer function is switched between ON and OFF every time [MENU/SET] is pressed during
the [O.I.S. Demo.].
• [O.I.S. Demo.] is an approximation.
- 65 -
Page 66

Recording
ュリヴヱハ
AFSAFSAFS
313
0-3+3
¢
AFSAFSAFS
131313
000-3-3-3-3 +3+3+3+3+3
¢
131313
000-3-3-3-3 +3+3+3+3+3
About the Monitor/the Viewfinder
Press [DISP.] to change.
• When the menu screen appears, the [DISP.] button is not
activated. During Playback Zoom, while playing back motion
pictures and during a Slide Show, you can only select E or G.
• You can select between [ ] (monitor style) and [ ]
(viewfinder style) for each of the monitor and the Viewfinder
display screen using [LCD Disp.Style] and [EVF Disp.Style] in the [Setup] menu.
In Recording Mode
[ ] (monitor style)
A Normal display B No display
[ ] (viewfinder style)
C Normal display D Normal display
¢ You can switch between available recording time and number of recordable pictures by setting
[Remaining Disp.] in [Setup] menu.
- 66 -
Page 67

Recording
1/13
100-0001
'(&
5HWRXFK
1/13
100-0001
'(&
5HWRXFK
1
00
F
2.8 30
AWB
In Playback Mode
E Normal display F Display with recording
information
¢1
G No display
¢2
¢1 If the [Histogram] in [Setup] menu is set to [ON], the histogram will be displayed.
¢2 The name of the registered person in [Face Recog.] is displayed when [DISP.] is pressed.
- 67 -
Page 68

Recording
W
T
AB
Using the Zoom
Applicable modes:
Using the Optical Zoom/the Extended Optical Zoom (EZ)/the Intelligent
Zoom/the Digital Zoom
You can determine how much of a subject is to be captured / how large a subject is to be
rendered by selecting the appropriate focal length, i.e. by zooming.
Extended Optical Zoom works except when the maximum resolution is set. This function allows
you to utilize even longer focal lengths without the image quality deteriorating.
To make subjects appear further away use shorter focal lengths
Rotate the zoom lever towards [W].
To make subjects appear closer use longer focal lengths
Rotate the zoom lever towards [T].
∫ Changing the zoom speed
The zoom speed becomes slower when the rotation
angle is small and faster when it is large.
A Fast
B Slow
W
T
∫ Storing the zoom position (Zoom resume)
•
Refer to P59 for details.
- 68 -
Page 69

Recording
∫ Controlling the zoom with the zoom/focus rocker
Using the zoom/focus rocker to control the zoom when taking
pictures with the viewfinder may facilitate holding the camera still
and so reduce blurring due to camera shake.
When controlling the zoom with the zoom/focus rocker, set [Side
•
Lever] in the [Setup] menu to [ZOOM]. (P54)
• You can operate the zoom at 2 speeds. The zoom speed becomes
slower when the sliding distance is small and faster when it is large.
• You cannot use the zoom lever and zoom/focus rocker
simultaneously.
To make subjects appear closer use longer focal lengths
Slide the zoom/focus rocker towards [T].
To make subjects appear further away use shorter focal lengths
Slide the zoom/focus rocker towards [W].
MIC
REMOTE
- 69 -
Page 70

Recording
ABCDE
∫ Types of zooms
Feature Optical Zoom Extended Optical Zoom (EZ)
Maximum
magnification
Picture quality No deterioration No deterioration
Conditions None
¢1 This includes the optical zoom magnification. The magnification level differs depending on
[Picture Size] setting.
24k 46.9k
[Picture Size] with (P129) is
selected.
¢1
The zoom functions below can also be used to further increase the zoom magnification.
Feature Intelligent Zoom Digital Zoom
Maximum
magnification
Picture quality Limited deterioration
Conditions
¢22k when [i.Resolution] in the [Rec] menu is set to [i. ZOOM].
[i.Resolution] (P135) on the [Rec] menu
is set to [i.ZOOM].
2k 4k
The higher the magnification level, the
greater the deterioration.
[Digital Zoom] (P135) on the [Rec]
menu is set to [ON].
¢2
∫ Screen display
A Extended Optical Zoom indication
B Optical Zoom range
C Intelligent Zoom range
D Digital Zoom range
E Zoom magnification
When using the zoom function, an approximation of the focus range will appear in
•
conjunction with the zoom display bar. [Example: 0.3m (1p) –¶]
- 70 -
Page 71

Recording
Notes
•
The indicated zoom magnification is an approximation.
• The lens barrel extends or retracts according to the zoom position. Take care not to interfere with the
motion of the lens barrel while the zoom lever is rotated.
• When you rotate the zoom lever, you may hear some sound from the camera or the camera may
vibrate. This is not a malfunction.
• When using the Digital Zoom, we recommend using a tripod and the Self-timer (P80).
• The Extended Optical Zoom cannot be used in the following cases.
– [Motion Deblur] (Snapshot Mode)
– When Continuous Mode is set to [ ], [ ] or [ ].
– [Toy Effect] (Creative Control Mode)
– [Panorama Shot]/[HDR]/[High Sens.]/[3D Photo Mode] (Scene Mode)
– When recording motion pictures
– When [Quality] is set to [ ], [ ] or [ ]
• The Intelligent Zoom cannot be used in the following cases.
– [Motion Deblur] (Snapshot Mode)
– When Continuous Mode is set to [ ], [ ] or [ ].
– [Toy Effect] (Creative Control Mode)
– [Panorama Shot]/[Handheld Night Shot]/[HDR]/[High Sens.]/[3D Photo Mode] (Scene Mode)
• [Digital Zoom] cannot be used in the following cases.
– Snapshot Mode
– When Continuous Mode is set to [ ], [ ] or [ ].
– [Toy Effect]/[Miniature Effect] (Creative Control Mode)
– [Panorama Shot]/[Handheld Night Shot]/[HDR]/[High Sens.]/[3D Photo Mode] (Scene Mode)
– [High Speed Video] (Creative Video Mode)
– When [Quality] is set to [ ], [ ] or [ ]
- 71 -
Page 72

Recording
Using the Built-In Flash
Applicable modes:
∫ To open/close the flash unit
A To open the flash unit
Push the flash release slider in the direction
indicated by the arrow.
B To close the flash unit
Push the flash unit down until it clicks into
place.
Notes
• Be sure to close the flash when it is not in use.
• The flash setting is fixed to [Œ] while the flash is
closed.
• Be careful not to pinch your fingers when you close the flash.
• Be sure to keep the flash unit clean, clear of dust and avoid exposure to anything sticky. This may
cause it to stick and not open.
• You should not close the flash unit by pushing the microphone section or its periphery. Forcibly
closing the flash can damage the camera.
- 72 -
Page 73

Recording
Switching flash modes
Set the flash mode to match the recording situation.
•
Open the flash.
Select [Flash] in the [Rec] menu. (P49)
1
Press 3/4 to select a mode and then [MENU/SET].
2
• Exit the menu after it is set.
Settings
‡ ([Auto]) The flash is automatically fired when the recording conditions make it
([iAuto])
([Auto/
Red-Eye])
¢1
necessary.
The flash is automatically fired when the recording conditions make it
necessary.
It is fired once immediately before the actual exposure to reduce the
¢2
red-eye phenomenon (the pupils of the subjects’ eyes appear red in
the picture) and then again for the actual exposure.
Description of the modes
• Use this mode for pictures of people in low lighting conditions.
‰
([Forced Flash
On])
([Slow Sync./
Red-Eye])
The flash is fired every time regardless of the recording conditions.
• Use this mode when your subject is back-lit or under
fluorescent light.
The flash is automatically fired when the recording conditions make it
necessary. Also, the appropriate longer shutter speeds for the
ambient light situations are used. Dark backgrounds will be rendered
brighter. Simultaneously this mode reduces the red-eye
¢2
phenomenon.
• Use this mode for pictures of subjects in front of a dark
background.
The flash is never fired.
([Forced Flash
Œ
Off])
¢1 This can be set only when Snapshot Mode is set. The icon changes depending on the
type of subject and brightness. (P36)
¢2 The flash is fired twice. The subject should not move until the second flash has
been fired.
The interval between the two flashes depends on the brightness of the subject.
When [Red-Eye Removal] (P138) on the [Rec] menu is set to [ON], [ ] appears
with the flash icon.
• This item is not displayed on the menu. To set the camera to
[Œ], close the flash.
• Use this mode when you take pictures in places where the use
of the flash is not permitted.
- 73 -
Page 74

Recording
∫ Available flash modes in Recording Mode
The available flash modes depend on the recording mode.
(±: Available, —: Not available, ¥: Scene Mode initial setting)
‡ ‰ Œ
¢
/ ±±±±±
/ ±±±— ±
:/; ±¥±— ±
//
¢
±
———±
,/ / ///ï// ————¥
1/í/9 ¥ — ± — ±
//
———¥±
¢ [ ] is displayed.
• The flash mode may change if the recording mode is changed. Reset the flash mode again if
necessary.
• The flash mode is memorized even if the camera is turned off. However, the Scene Mode flash
mode is reset to the initial setting when the Scene Mode is changed.
• The flash is not available when recording motion pictures.
- 74 -
Page 75

Recording
∫ The available flash range
•
The available flash range is an approximation.
Wide Tel e
[AUTO] in
[Sensitivity]
30cm (1p) to 13.5m (44p)
¢1
1.0m (3p3q) to 13.5m (44p)
¢1
¢1 When the [ISO Limit Set] (P131) is set to [AUTO].
∫ Shutter speed for each flash setting
Flash mode Shutter speed (Sec.) Flash mode Shutter speed (Sec.)
‡
1
¢2
/
to 1/
60
4000
1¢2 to 1/
4000
‰Œ
¢2 When [Sensitivity] is set to [AUTO]. The shutter speed may vary depending on the [ISO Limit Set]
setting.
• In Snapshot mode, the shutter speed changes depending on the identified scene.
• In Scene Mode, the shutter speeds will differ from those described above.
Notes
•
When using the flash, white saturation can occur if the subject is too close. If [Highlight] in the
[Setup] menu is set to [ON], regions with white saturation will flash black and white when you play
back or use Auto Review. In this case, we recommend that you adjust [Flash Adjust.] (P138) in the
minus direction and take the pictures again.
• Do not use the flash too close to objects or close it while it is firing. The objects may be discolored by
its heat or illumination.
• Do not close the flash immediately after it is fired the first time prior to taking pictures with AUTO/
Red-Eye Reduction etc. It causes a malfunction.
• Recording a subject from too close, or without sufficient flash illumination will not provide the
appropriate level of exposure, and may result in a picture that is too bright or dark.
• When the flash is being charged, the flash icon flashes red, and you cannot take a picture even
when you press the shutter release button fully.
• If recording a subject without sufficient flash illumination, the White Balance may not be properly
adjusted.
• The flash effect may not be sufficient when shutter speed is fast.
• Flash recharging may take some time after a succession of flash shots. Take a picture after the
access indication disappears.
• The Red-Eye Reduction effect differs between people. Also, if the subject was far away from the
camera or was not looking at the first flash, the effect may not be evident.
- 75 -
Page 76

Recording
000-3-3-3-3 +3+3+3+3+3
A
S
000-
3
-
3
B
Exposure Compensation
Applicable modes:
Use this function to adjust the exposure to the important part of the subject in case of large
differences in brightness within the frame.
Press the setting wheel to set Exposure
1
Compensation to a selected state.
A Exposure Compensation value
8125
Rotate the setting wheel to select the
2
SSS
F
compensation value.
B Shutter speed/aperture combination
Underexposed Properly exposed Overexposed
2.8 4.0 5.6
-
3
-
3 +3+3+3+3+3
153060
Compensate the exposure towards
Compensate the exposure towards
positive.
Notes
Set the value to [0] when you do not wish to compensate the exposure.
•
• The set compensation value is memorized even if the camera is turned off.
• The compensation range may be limited depending on the brightness of the subject.
- 76 -
negative.
Page 77

Recording
OFF
12 40 60
5
5
Continuous Mode
Applicable modes:
With this mode, pictures are taken as long as the shutter release button is pressed.
The frame rate/frequency can be selected to match the recording conditions or subjects.
Press [˜].
1
Press 2/1 to select the frame rate and then [MENU/
2
SET].
• A description of the recording conditions suitable for each frame rate
is displayed by pressing [DISP.].
- 77 -
Page 78

Recording
Frame rate
(pictures/second)
/2
/5.5
12
¢3
40
Features
• When [ ] or [ ] is set, the focus is fixed to that for the
first picture.
• When [ ] or [ ] is set, the focus is adjusted for each
picture.
• Exposure and White Balance are adjusted for each picture.
• Focus, exposure and White Balance are fixed to those for
the first picture.
• Focus, exposure and White Balance are fixed to those for
the first picture.
Maximum
recordable
pictures
¢1
100
¢2
12
40
• Pictures taken with Continuous Mode will be recorded as a
¢3
single picture group.
60 60
• The range that can be recorded will become smaller when
it is set to [ ].
• A series of pictures are taken with flash.
¢4
• Settings for focus, exposure, shutter speed, ISO sensitivity,
j
and flash output are fixed to those for the first picture.
5
¢1 The number of serially taken pictures is limited by the picture-taking conditions and the type and/
or status of the card used.
¢2 If [Quality] is set to [ ], [ ] or [ ], the maximum number of recordable pictures is 11.
¢3 This item cannot be set in the Snapshot Mode.
¢4 This option is available only in Program Mode, Aperture-Priority Mode or Shutter Priority mode.
- 78 -
Page 79

Recording
Notes
•
When [ ], [ ] or [ ] is selected, the resolution setting will become as shown below.
Aspect ratio [] [] []
[4:3] [5M], [3M], [2M], [0.3M] [2.5M], [0.3M] [3M]
[3:2] [4.5M], [2.5M], [0.3M] [3M], [0.3M] [2.5M]
[16:9] [3.5M], [2M], [0.2M] [3.5M], [0.2M] [2M]
[1:1] [3.5M], [2.5M], [0.2M] [2M], [0.2M] [2.5M]
• When [ ], [ ] or [ ] is selected, [Quality] can only be set to [A] or [›].
• The electronic shutter is used when [ ] or [ ] is selected, so the recorded picture may appear
distorted.
• When the self-timer is used, the number of recordable pictures in Continuous mode is fixed to 3.
(5 pictures in [ ])
• The frame rate (pictures/second) may become slower depending on the recording environment such
as in dark places, if the ISO sensitivity is high etc.
• Continuous Mode is not canceled when the camera is switched off.
• The flash setting is fixed to [Œ] (except for [ ]).
• When using AF Lock, the camera does not adjust the focus for each picture even if you use the
setting [ ] or [ ].
• Continuous mode cannot be used in the following cases.
– When the self-timer is set to [10s / 3pictures]
– [Toy Effect]/[Miniature Effect]/[Soft Focus]/[Star Filter] (Creative Control Mode)
– [Panorama Shot]/[Handheld Night Shot]/[HDR]/[3D Photo Mode] (Scene Mode)
• The zoom cannot be used when recording a series of continuous pictures.
• Depending on the operating conditions, it may take time to take the next picture if you repeat taking
a picture.
• It may take time to save pictures taken in Continuous mode on the card. If you take pictures
continuously while saving, the maximum number of recordable pictures decreases. For
continuous shooting, use of a high speed memory card is recommended.
• When [ ] or [ ] is set, focus prediction will be performed in a possible range to prioritize the
frame rate. Therefore, if you try to take a picture of a subject that is moving fast, it may have trouble
with focusing or it may take time to focus.
• When [ ], [ ] or [ ] is set, the recording may be brighter or darker from the second picture
depending on changes in the brightness of the subject.
- 79 -
Page 80

Recording
A
Using the Self-Timer
Applicable modes:
Press 4 [ë].
1
Press 3/4 to select the item and then [MENU/SET].
2
Item Description of settings
[10sec.]
[10s / 3pictures]
[2sec.]
[Off] —
The picture is taken 10 seconds after the shutter release button
is pressed.
10 seconds after the shutter release button is pressed, the
camera takes 3 pictures at about 2 second intervals.
The picture is taken 2 seconds after the shutter release button
is pressed.
This setting is a convenient way to avoid the effects of camera
•
shake caused by pressing the shutter release button, e.g. when
using a tripod.
Press the shutter release button halfway to
3
focus and then fully to take the picture.
• The Self-timer indicator A flashes and the shutter is
tripped after 10 seconds (or 2 seconds).
• When [10s / 3pictures] is selected, the self-timer indicator
flashes again after the first and the second pictures are
taken and the shutter is tripped 2 seconds after it flashes.
- 80 -
Page 81

Recording
Notes
•
When you press the shutter release button once fully, the subject is automatically focused just
before recording. In dark places, the self-timer indicator will flash and then may switch to glowing
continuously and brightly as an AF Assist Lamp to allow the camera to focus on the subject.
• We recommend using a tripod when recording with the self-timer.
• Depending on the recording conditions, the interval between the exposures may become longer
than 2 seconds when [10s / 3pictures] is selected.
• It is not possible to set [10s / 3pictures] in the following cases.
– Snapshot Mode
– When using Auto Bracketing
– When using White Balance Bracketing
– During Continuous Mode
– [Panorama Shot] (Scene Mode)
• Setting of the self-timer cannot be performed in following conditions.
– [3D Photo Mode] (Scene Mode)
– When recording motion pictures
- 81 -
Page 82

Recording
Auto
Setting the Sensitivity
Applicable modes:
This allows the sensitivity to light (ISO sensitivity) to be set. Higher values allow using faster
shutter speeds and/or higher aperture values or unblurred hand-held shots.
Press 3 [].
1
Press 3/4 to select the ISO sensitivity and then
2
[MENU/SET] to set.
Settings
AUTO
100/200/400/800/1600/3200/
¢2
H6400
Recording location
(recommended)
Shutter speed Slow Fast
Noise Less Increased
Blurred pictures due to camera
shake and/or moving subjects
¢1 When the [ISO Limit Set] of [Rec] menu (P131) is set to anything except [AUTO], it is set
automatically within the value set in [ISO Limit Set].
¢2 Only available when [Extended ISO] (P131) is set.
The ISO sensitivity is automatically adjusted according to the
brightness.
• Maximum [1600]
The ISO sensitivity is adjusted according to the movement of the
subject and the brightness.
• Maximum [1600]
The ISO sensitivity is fixed to various settings.
• When the [ISO Increments] in [Rec] menu (P131) is set to
[1/3 EV], items of ISO sensitivity that can be set will increase.
When it is light (outdoors) When it is dark
Increased Less
Description of settings
¢1
¢1
[100] [6400]
¢2
- 82 -
Page 83

Recording
∫ About [ ] (Intelligent ISO sensitivity control)
The camera
detects movement of the subject and then automatically sets the optimum ISO
sensitivity and shutter speed to suit the movement of the subject and brightness of the scene to
minimize the blurred rendition of the subject.
The shutter speed is not fixed when the shutter release button is pressed halfway. It will continuously
•
change to match the movement of the subject until the shutter release button is pressed fully.
Notes
•
For the flash range when [AUTO] is set, refer to P75.
• The setting is fixed to [AUTO] in the following cases.
– Creative Control Mode
• The setting is fixed to [ ] in the following cases.
– [Sports]/[Baby1]/[Baby2]/[Pet] (Scene Mode)
• You cannot select [ ] in Shutter-Priority mode.
• You cannot select [AUTO] or [ ] in manual exposure mode.
• Setting items below will be selectable in Creative Video Mode.
[AUTO]/[100]/[200]/[400]/[800]/[1600]/[3200]/[6400]
• The shutter speed is determined by the [Sensitivity] setting as shown in the table below.
(When the [ISO Increments] (P131) is set to
AUTO/
100/125/160/200/250/320/400/500/640/800/
1000/1250/1600
[Sensitivity]
[1/3 EV])
The shutter speed changes automatically
according to ISO sensitivity setting.
60 to 1/
2000/2500/3200 15 to
H4000¢/H5000¢/H6400
¢ Only available when [Extended ISO] is set.
¢
8 to 1/
Shutter speed (Sec.)
4000
1
/
4000
4000
- 83 -
Page 84

Recording
1
2
Setting the White Balance
Applicable modes:
In sunlight, under incandescent lights or in other such conditions where the color of white takes
on a reddish or bluish tinge, this item allows adjusting the rendition to the color of white which is
closest to what is seen by the eye in accordance with the light source.
Press 1 ().
1
Press 3/4 to select the White Balance and then [MENU/SET].
2
Settings Description of settings
[AWB] Automatic adjustment
[V] For taking pictures outdoors under a clear sky
[Ð] For taking pictures outdoors under a cloudy sky
[î] For taking pictures outdoors in the shade
[] For taking pictures in which the flash supplies the illumination exclusively
[Ñ] For taking pictures under incandescent lights
2
[]/[] For pre-setting a metered White Balance value
[] For pre-setting a color temperature value
Notes
•
Under fluorescent lighting, LED lighting etc., the appropriate White Balance will vary depending on
the lighting type, so use [AWB] or [ ]/[ ].
• When using the flash, the White Balance may not be correct for subjects beyond the flash range.
• The White Balance setting is memorized even if the camera is turned off. (However, the White
Balance setting for a Scene Mode returns to [AWB] when the Scene Mode is changed.)
• White Balance is fixed to [AWB] in following conditions.
– [Scenery]/[Panning]/[Night Portrait]/[Night Scenery]/[Handheld Night Shot]/[Food]/[Sunset] (Scene
Mode)
1
- 84 -
Page 85

Recording
2
∫ Auto White Balance
Depending on the conditions prevailing when pictures are taken, they may take on a reddish or
bluish tint. Furthermore, when several different types of light sources are being used or there is
nothing within the subject with a color close to white, Auto White Balance may not function
properly. In a case like this, set the White Balance to a mode other than [AWB].
1 Auto White Balance will work within this range.
2 Blue sky
3 Cloudy sky (Rain)
4 Shade
5 Sunlight
6 White fluorescent light
7 Incandescent light (bulbs)
8 Sunrise and sunset
9 Candlelight
KlKelvin color temperature
Setting the White Balance manually
For setting the White Balance by metering.
1 Select [ ] or [ ] and then press 1.
1
2 Aim the camera at a sheet of white paper etc. so that the frame
in the center is filled by the white object only and then press
[MENU/SET].
The White Balance may not be set when the subject is too bright or too
•
dark. Set it again after adjusting to an appropriate brightness.
Setting the color temperature
You can set the color temperature manually, e.g. if the color temperature of the light source is
known. The light color is defined as a number in degrees Kelvin. As the color temperature
increases, the picture becomes more bluish, as it decreases, the picture becomes more
reddish.
1 Select [ ] and then press 1.
2 Press 3/4 to select the color temperature and then [MENU/
SET].
You can set a color temperature from [2500K] to [10000K].
•
- 85 -
Page 86

Recording
A B
G
M
1
2
2
Finely adjusting the White Balance
You can finely adjust the White Balance when you cannot acquire the desired hue with the
setting options described above.
1 Select White Balance and then press 1.
•
Press 1 again if [ ], [ ] or [ ] is selected.
2 Press 3/4/2/1 to adjust the White Balance and then [MENU/
SET].
2 : A (AMBER: ORANGE)
1 : B (BLUE: BLUISH)
3 :G_ (GREEN: GREENISH)
4 :M` (MAGENTA: REDDISH)
Notes
•
If you finely adjust the White Balance to A (amber), the White Balance icon on the screen will change
to orange. If you finely adjust the White Balance to B (blue), the White Balance icon on the screen
will change to blue.
• If you finely adjust the White Balance to G_ (green) or M` (magenta), [_] (green) or [`] (magenta)
appears beside the White Balance icon on the screen.
• Select the central point if you do not want a fine adjustment.
• The White Balance fine adjustment setting is reflected in the picture when using the flash.
• You can finely adjust the White Balance independently for each White Balance item.
• The White Balance fine adjustment setting is memorized even if the camera is turned off.
• The White Balance fine adjustment level returns to the standard setting (central point) in the
following cases.
– When you reset the White Balance in [ ] or [ ]
– When you reset the color temperature manually in [ ]
1
- 86 -
Page 87

Recording
A B
G
M
White Balance Bracketing
Bracket setting is performed based on the adjustment values for the White Balance fine
adjustment, and 3 pictures with different color rendition are automatically recorded when the
shutter release button is pressed once.
1 Press [DISP.] in step 2 of the “Finely adjusting the White
Balance” procedure, and 3/4/2/1 to set the bracket.
2/1: Horizontal (A to B)
3/4: Vertical (Gi to Mj)
2 Press [MENU/SET].
Notes
•
[ ] is displayed on the screen when it is set.
• The White Balance Bracketing setting is erased when the camera is turned off (including Sleep
Mode).
• You will only hear the shutter sound once.
• White Balance Bracketing does not work when recording motion pictures.
• White Balance Bracketing cannot be set when the [Quality] is set to [ ], [ ], or [ ].
- 87 -
Page 88

Recording
Using Auto Focus
Applicable modes:
This mode allows selecting the focusing method that suits the positions and number of the
subjects to be selected.
Set the focus selector switch to [AF].
1
Press 2 ().
2
Press 3/4 to select the Auto Focus
3
Mode and then [MENU/SET].
Settings
[š] ([Face Detection]) The camera automatically detects the person’s face. Focus
and exposure are then set based on that face no matter what
section of the picture it is in. (max. 15 areas)
¢
[ ] ([AF Tracking])
[ ] ([23-Area])
[Ø] ([1-Area]) The camera focuses on the subject within the AF frame in the
¢ [Ø] will be used during motion picture recording.
Notes
•
The AF mode will be fixed to [š] when [Face Recog.] is set to [ON].
• It is not possible to set [š] in the following cases.
– [Panorama Shot]/[Panning]/[Night Scenery]/[Handheld Night Shot]/[Food] (Scene Mode)
– [Soft Focus] (Creative Control Mode)
• It is not possible to set [ ] in the following cases.
– [Panorama Shot] (Scene Mode)
– [Sepia]/[Dynamic Monochrome]/[High Dynamic]/[Toy Effect]/[Soft Focus] (Creative Control Mode)
– When [Photo Style] is set to [Monochrome]
• Only [š] or [Ø] can be set during Creative Video Mode.
• [AF Mode] is fixed to [Ø] in the following cases.
– [Miniature Effect] (Creative Control Mode)
– [High Speed Video] (Creative Video Mode)
¢
Focus and exposure are locked onto a specified subject. The
focus setting will keep on following the subject even if it
moves.
(Dynamic tracking)
Focusing is based on the closest registered object by
metering in 23 areas. This mode can be useful when the
subject is not in the center of the screen.
(AF frame will be same as image aspect ratio setting.)
center of the screen.
Description of settings
- 88 -
Page 89

Recording
∫ About [š] ([Face Detection])
The following AF frames are displayed when the camera detects the
faces.
Yellow:
When the shutter release button is pressed halfway, the frame turns
green when the camera is focused.
White:
Displayed when more than one face is detected. Other faces that are the same distance away
as faces within the yellow AF frames are also focused.
Notes
When [Metering Mode] is set to [C], the camera will adjust the exposure to suit the person’s face.
•
• Under certain picture-taking conditions including the following cases, the face detection function may
fail to work, making it impossible to detect faces. [AF Mode] is switched to [ ]
([Ø] while motion pictures are taken).
– When the face is not facing the camera
– When the face is at an angle
– When the face is extremely bright or dark
– When there is little contrast on the faces
– When the facial features are hidden behind sunglasses, etc.
– When the face appears small on the screen
– When there is rapid movement
– When the subject is other than a human being
– When the camera is shaking
– When Digital Zoom is used
• If the camera is registering something other than someone’s face, change the settings to a different
mode than [
š].
- 89 -
Page 90

Recording
A
∫ Setting up [ ] ([AF Tracking])
Aim the AF tracking frame at the subject, and press [AF/AE LOCK]
to lock it.
A AF tracking frame
• The AF tracking frame will be displayed in yellow when a subject is
recognized, and exposure and focus will automatically be adjusted
continuously following the subject’s movement (Dynamic tracking).
• AF tracking is canceled when [AF/AE LOCK] is pressed again.
Notes
•
When the AF lock fails, the AF tracking frame will turn red and then disappear. Perform AF lock
again.
• In the following cases, [ ] operates as [Ø]:
– When the subject is not specified
– When the subject is lost
– When the AF tracking fails
• The dynamic tracking function may not work in the following cases:
– When the subject is too small
– When the recording location is too dark or bright
– When the subject is moving too fast
– When the background has the same or similar color as the subject
– When camera shake is occurring
– When using the zoom
- 90 -
Page 91

Recording
∫ Changing position and size of the AF frame (Only when [Ø] is selected)
If you perform any of the following operations, the screen will switch to the settings menu.
When [Ø] is selected, press [FOCUS].
•
• From the menu screen, select [Ø], and press 1.
1 Press 3/4/2/1 to move the AF frame.
•
You can move the frame to any position on the screen except the
edges.
• After moving the AF frame, press [DISP.] to return it to the center.
2 Rotate the setting wheel to change the size of the AF frame.
Setting wheel rotated to the right: Enlarges the frame
Setting wheel rotated to the left: Reduces the frame
It can be changed to 4 different sizes.
•
3 Press [MENU/SET] to set.
Notes
•
The AF frame cannot be moved during motion picture recording.
• The spot metering target can also be moved to match the AF frame when using [Ù].
• The position of the AF frame will return to the initial state when the camera is set to Snapshot Mode,
when the Sleep Mode is activated, or when the camera is turned off.
• The AF frame may not be displayed as intended at certain zoom magnifications or under low light.
- 91 -
Page 92

Recording
Close-up Pictures
Applicable modes:
This mode allows you to take close-up pictures, e.g. of flowers. You can take pictures of a
subject as close as 1cm /
(1k magnification; utmost W position).
Set the focus selector switch to [AF#].
• In AF Macro Mode, [#] is displayed.
Notes
•
We recommend using a tripod and the Self-timer.
• We recommend setting the flash mode to [Œ] (close the flash) when you take pictures at close
range.
• If the distance between the camera and the subject is beyond the focus range of the camera, the
picture may not be properly focused even if the focus indication lights up.
• When a subject is close to the camera, the depth of field, i.e. the area rendered sharply is
significantly reduced. Therefore, if the distance between the camera and the subject is changed after
focusing on the subject, it may become difficult to focus on it again.
• Macro Mode gives priority to a subject close to the camera. Therefore, if the distance between the
camera and the subject for a following shot is much greater, it takes longer to focus on it.
• When you take pictures at close range, the resolution of the periphery of the picture may decrease
slightly. This is not a malfunction.
• If the lens becomes dirty with fingerprints or dust, it may not be able to focus on the subject correctly.
• It is not possible to set AF Macro Mode in the following cases.
– In all Scene Modes except [3D Photo Mode]
3
/
q
from the lens with the shortest focal length setting
8
- 92 -
Page 93

Recording
∞
1
2
mm
0.30.01
Manual Focusing
Applicable modes:
Use this function when you want to fix the focus or when the distance between the lens and the
subject is known and you do not want to activate Auto Focus.
Set the focus selector switch to [MF].
1
• When using Manual Focus, [MF] is displayed on
the screen.
Press the setting wheel to set [MF] to a
2
selected state.
• Enabled operation will switch every time the setting wheel
is pressed.
Rotate the setting wheel to display the focus range on the screen.
3
Press 2/1 or rotate the setting wheel to focus
4
on the subject.
• Using the cursor buttons is recommended when making
slight adjustments.
• When you stop setting the focus, the focus range display
will disappear after a few seconds.
- 93 -
Page 94

Recording
∫ Focus setting with the zoom/focus rocker
•
Set the focus selector switch to [MF].
1 Set [Side Lever] in the [Setup] menu to [FOCUS]. (P54)
2 Slide the zoom/focus rocker to display the focus range
on the screen.
3 Slide the zoom/focus rocker to focus on the subject.
Zoom/focus rocker moved towards (T): Sets longer focal lengths
Zoom/focus rocker moved towards (W): Sets shorter focal lengths
• Using the cursor buttons is recommended when making slight
adjustments.
∫ MF Assist
If [MF Assist] (P59) in the [Setup] menu is set to [ON], the
displayed image is enlarged as soon as focusing is performed.
If you press [MENU/SET] while the enlarged section is displayed, the area can be moved using
•
3/4/2/1. Pressing [MENU/SET] again returns the camera to MF Assist.
• Performing the following operations returns the MF area to the center.
– Changing the resolution or aspect ratio.
– Turning the camera off (including Sleep Mode).
• The magnification of the enlarged area can be changed by pressing the setting wheel when MF
Assist is activated or the MF area is moving.
MIC
REMOTE
- 94 -
Page 95

Recording
Performing manual focusing
1 Focus by rotating the setting wheel.
2 Press the cursor button in the same direction
(nearer or farther) a few times.
3 Finely focus on the subject by pressing the
cursor button for the opposite direction.
∫ Prefocusing
This is a technique for focusing in advance on the distance the subject will be, when using Auto
Focus is difficult due to the subject’s quick motion. (e.g. [Panning] in Scene Mode)
This function is suitable when the distance between the camera and the subject is known and
remains the same.
∫ One shot AF
You can focus on the subject with Auto Focus by pressing the [FOCUS] button
.
Focus
during Manual
This is convenient for prefocusing.
Notes
•
If you use the zoom function after focusing on the subject, focus on the subject again.
• MF Assist is disabled in the Digital Zoom range or when recording motion pictures.
• The distance to the subject displayed on the screen in Manual Focus is an approximation of the
focus position. Use the MF Assist screen for a final check of the focus.
• After canceling Sleep Mode, focus on the subject again.
• Using MF Assist in combination with AE Lock makes it easy to check the focus.
- 95 -
Page 96

Recording
Fn2
AF/AE
LOCK
2.8 30
0-3+3
AEL
AFL
Focus and Exposure Memory Lock (AF/AE Lock)
Applicable modes:
This function is useful when you want to take a picture of an off-center subject or when you
want to base the exposure on a specific part of the subject in situations with significant
brightness differences.
¢ To use for the [AF/AE LOCK] function, set [AF/AE LOCK /Fn2] in the [Setup] menu to [AF/AE
LOCK]. (P54)
Aim the AF frame at the main subject.
1
Press [AF/AE LOCK] to fix the focus and exposure settings.
2
• This does not work when AF tracking is active.
• The setting is canceled by pressing the [AF/AE LOCK] button again.
Move the camera to compose the picture and then press the shutter
3
release button fully.
• When [AE] is set, after pressing the shutter release button halfway to
focus, press the shutter release button fully.
- 96 -
Page 97

Recording
∫ AF/AE Lock
Which of the focus and exposure settings you wish to lock can be set in [AF/AE Lock] in the
[Rec] menu.
Item Description of settings
[AF]
[AE]
Only the focus setting is locked.
•
[AFL] and focus indication are displayed when the subject comes into focus.
Only the exposure setting is locked.
•
[AEL], aperture value and shutter speed are displayed when the exposure is set.
Both focus and exposure settings are locked.
•
[AF/AE]
[AFL], [AEL], the focus indication, aperture value and shutter speed are displayed
when the focus and the exposure are set.
Notes
When AE lock is performed, the image brightness on the screen is fixed.
•
• AF Lock only is only available in Manual Exposure Mode or Scene Mode.
• AE Lock only is only available with Manual Focus.
• AE Lock and AF Lock must be activated before motion picture recording begins.
•
When recording motion pictures after locking, you can continue to record in a locked state in Creative
Video Mode. The locked settings will be canceled in other modes than Creative Video Mode.
•
The locked settings are canceled when zooming is performed after locking. Perform the locking again.
• The exposure setting remains locked, even if the brightness of the subject changes after locking.
• The subject can be focused again by pressing the shutter release button halfway even when the
exposure setting is locked.
• Program Shift can be set even when the exposure setting is locked.
- 97 -
Page 98

Recording
Fn3
Fn1
Fn2
AF/AE
LOCK
Using the function button
You can assign one of a number of functions. to the function buttons. Press the buttons to
instantly access the assigned functions.
¢ To use as the function button, set [AF/AE LOCK /Fn2] in the [Setup] menu to [Fn2]. (P54)
Select [Fn Button Set] in the [Setup] menu. (P49)
1
Press 3/4 to select the button to assign and then press [MENU/SET].
2
Press 3/4 to select the function to assign and then press [MENU/SET].
3
Assignable functions
[Photo Style] (P127) [Video Rec Area] (P57)
? [Aspect Ratio] (P128) [Remaining Disp.] (P58)
A [Quality] (P130) [Flash] (P72)
C [Metering Mode] (P133) [Flash Adjust.] (P138)
[AF Style] (P132) [Auto Bracket] (P139)
[i.Dynamic] (P134) [Side Lever] (P54)
[Guide Line] (P56)
• Exit the menu after it is set.
- 98 -
Page 99

Recording
FFF
SSSS
8460
5.64.0
1530
8.08.08.0
8.0
A B
Aperture-Priority Mode
Recording mode:
Set the aperture value to a higher number when you want a larger in-focus area (in front of and
behind the main subject), to a lower number for a smaller in-focus area.
Set the mode dial to [ ].
1
Rotate the setting wheel to set the aperture value.
2
A Aperture Value
B Shutter speed/aperture combination
• The operation mode will switch between aperture and exposure
compensation setting every time the setting wheel is pressed.
Available Aperture Value
(Per 1/3EV)
¢
Shutter Speed¢ (Sec)
F2.8 to F8.0 8 to
¢ Depending on the zoom position, some of the values cannot be selected.
1
/
4000
- 99 -
Page 100

Recording
F
SSSSSS
5.6 4.0 2.8
125125125
1256030
250 500
A B
Shutter-Priority Mode
Recording mode:
When you want to take a sharp picture of a fast moving subject, set to a faster shutter speed.
When you want to create a trailing effect, set to a slower shutter speed.
Set the mode dial to [ ].
1
Rotate the setting wheel to set the shutter speed.
2
A Shutter Speed
B Shutter speed/aperture combination
• The operation mode will switch between shutter speed and
exposure compensation setting operation every time the setting
wheel is pressed.
Available Shutter Speed (Sec)
¢ Depending on the zoom position, some of the values cannot be selected.
(Per
8 to 1/
1
/3EV)
4000
- 100 -
Aperture Value
¢
F2.8 to F8.0
 Loading...