

Page 1

LEICA V-LUX 30
Anleitung / Instructions /
Notice d‘utilisation / Istruzioni /
Instrucciones
Page 2

Sehr geehrte Kundin,
Sehr geehrter Kunde,
Wir möchten diese Gelegenheit nutzen, Ihnen für den Kauf dieser Leica
V-Lux 30 zu danken und Sie zu Ihrer Entscheidung beglückwünschen.
Wir wünschen Ihnen viel Freude und Erfolg beim Fotografieren mit Ihrer
neuen Kamera.
Damit Sie alle Möglichkeiten dieser Kamera richtig nutzen können,
empfehlen wir Ihnen, zunächst diese Kurzanleitung sorgfältig
durchzulesen und für ein späteres Nachschlagen aufzubewahren.
Weiterführende Bedienungsverfahren sowie Maßnahmen zur
Störungsbeseitigung finden Sie in der ausführlichen Anleitung (im PDFFormat) auf der mitgelieferten CD-ROM.
Beachten Sie sorgfältig die Urheberrechte.
• Das Aufnehmen - außer für den privaten Gebrauch - von kommerziell
vorbespielten Bändern oder Platten bzw. anderem veröffentlichtem
oder gesendetem Material kann Urheberrechte verletzen.
Auch für den privaten Gebrauch kann das Aufnehmen bestimmten
Materials Beschränkungen unterliegen.
Informationen für Ihre Sicherheit
WARNUNG:
ZUR REDUZIERUNG DER GEFAHR VON BRAND, ELEKTRISCHEM
SCHLAG UND BESCHÄDIGUNG:
• VERWENDEN SIE AUSSCHLIESSLICH DIE MITGELIEFERTEN
AUSRÜSTUNGSTEILE BZW. DAS EMPFOHLENE ZUBEHÖR.
• SCHÜTZEN SIE DIESES GERÄT SORGFÄLTIG VOR NÄSSE,
FEUCHTIGKEIT, SPRITZ- UND TROPFWASSER UND STELLEN
SIE KEINE BLUMENVASEN UND ANDERE MIT FLÜSSIGKEITEN
GEFÜLLTE BEHÄLTER AUF DIE KAMERA.
• SCHRAUBEN SIE AUF KEINEN FALL DIE ABDECKUNG (ODER
RÜCKWAND) AB; IM GERÄTEINNEREN BEFINDEN SICH KEINE
TEILE, DIE VOM BENUTZER GEWARTET WERDEN KÖNNEN.
REPARATURARBEITEN SIND GRUNDSÄTZLICH VON
EINEM AUTHORISIERTEN LEICA REPARATURBETRIEB /
DER LEICA VERTRETUNG IHRES LANDES (ADRESSEN, S.
GARANTIEKARTE), ODER DEM LEICA CUSTOMER SERVICE
(ADRESSE, →30) DURCHZUFÜHREN.
•
DIE STECKDOSE SOLLTE IN DER NÄHE DES ANGESCHLOSSENEN
LADEGERÄTS UND FREI ZUGÄNGLICH SEIN.
2
Page 3

DEUTSCH
■
Typenschild
Produkt Lage
Kamera Unterseite
Akku-Ladegerät Unterseite
■
Hinweise zum Akku
ACHTUNG
Explosionsgefahr bei falschem Einsetzen des Akkus. Ersetzen Sie ihn
nur mit dem von der Leica Camera AG empfohlenen Typ.
Behandeln Sie gebrauchte Akkus nach den Anweisungen des
Herstellers.
• Der Akku darf weder erhitzt noch offenen Flammen ausgesetzt werden.
• Lassen Sie den Akku nicht längere Zeit über in einem mit
geschlossenen Fenstern und Türen in praller Sonne geparkten
Fahrzeug zurück.
Warnung
Brand-, Explosions- und Verbrennungsgefahr! Auf keinen Fall zerlegen,
auf mehr als 60°C erhitzen oder in ein Feuer werfen!
3
Page 4

Akku-Entsorgung
Akkus gehören nicht in den Hausmüll!
Bitte bedienen Sie sich bei der
Rückgabe verbrauchter Akkus eines
in Ihrem Land evtl. vorhandenen
Rücknahmesystems.
Bitte geben Sie nur entladene Akkus
ab. Akkus sind in der Regel dann
entladen, wenn das damit betriebene
Gerät
- abschaltet und signalisiert “Akku
leer”
- nach längerem Gebrauch des
Akkus nicht mehr einwandfrei
funktioniert.
Zur Kurzschlußsicherheit sollten die
Akku-Kontakte mit einem Klebestreifen
überdeckt werden.
Deutschland: Als Verbraucher
sind Sie gesetzlich verpflichtet,
gebrauchte Akkus zurückzugeben. Sie
können Ihre alten Akkus überall dort
unentgeltlich abgeben, wo sie gekauft
wurden. Ebenso bei den öffentlichen
Sammelstellen in Ihrer
Stadt oder Gemeinde.
Diese Zeichen finden Sie
auf schadstoffhaltigen
Akkus:
Pb = Akku enthält Blei
Cd = Akku enthält
Cadmium
Hg = Akku enthält
Quecksilber
Li = Akku enthält Lithium
4
Page 5

■
Hinweis zum Akku-Ladegerät
WARNUNG!
• UM AUSREICHENDE BELÜFTUNG ZU GEWÄHRLEISTEN,
DARF DIESES GERÄT NICHT IN EINEM BÜCHERREGAL,
EINBAUSCHRANK ODER EINEM SONSTIGEN ENGEN RAUM
INSTALLIERT ODER AUFGESTELLT WERDEN. SORGEN SIE
DAFÜR, DASS DIE BELÜFTUNG NICHT DURCH VORHÄNGE
ODER ANDERE MATERIALIEN BEHINDERT WIRD, UM
STROMSCHLAG- ODER FEUERGEFAHR DURCH ÜBERHITZUNG
ZU VERMEIDEN.
• ACHTEN SIE DARAUF, DIE ENTLÜFTUNGSSCHLITZE DES
GERÄTES NICHT DURCH GEGENSTÄNDE AUS PAPIER ODER
STOFF ZU BLOCKIEREN, Z.B. ZEITUNGEN, TISCHDECKEN UND
VORHÄNGE.
• STELLEN SIE KEINE QUELLEN OFFENER FLAMMEN, Z.B.
BRENNENDE KERZEN, AUF DAS GERÄT.
• BEACHTEN SIE BEI DER ENTSORGUNG
VERBRAUCHTER AKKUS DIE EINSCHLÄGIGEN
UMWELTSCHUTZBESTIMMUNGEN.
• Bei Anschluss an die Stromversorgung befindet sich das Ladegerät
im elektrischen Bereitschaftszustand. Solange das Ladegerät an eine
Netzsteckdose angeschlossen ist, führt der Primärkreis ständig Strom.
5
Page 6

■
Beim Betrieb
• Verwenden Sie ausschließlich das mitgelieferte AV-Kabel für den Anschluss (→9).
• Verwenden Sie kein anderes als das mitgelieferte USB-Kabel zum Anschließen
(→9).
• Verwenden Sie kein anderes Mini-HDMI-Kabel als das für dieses Gerät
vorgeschriebene Original Leica Kabel (als Zubehör erhältlich, →9).
Sorgen Sie für einen möglichst großen Abstand zwischen der Kamera und
Geräten, die elektromagnetische Wellen erzeugen (z.B. Mikrowellenherde,
Fernsehgeräte, Videospiele usw.).
• Wenn die Kamera auf oder in der Nähe eines Fernsehgerätes verwendet wird,
können Bilder und Ton der Kamera durch die vom Fernsehgerät abgegebenen
elektromagnetischen Wellen beeinträchtigt werden.
• Vermeiden Sie einen Gebrauch der Kamera in der Nähe von Handys, da Bilder
und Ton anderenfalls durch Rauschen beeinträchtigt werden können.
• Starke Magnetfelder, die von Lautsprechern oder großen Elektromotoren erzeugt
werden, können dazu führen, dass die aufgezeichneten Daten beschädigt werden
oder Bildverzerrungen auftreten.
• Der Betrieb der Kamera kann durch die von Mikroprozessoren erzeugten
elektromagnetischen Wellen beeinträchtigt werden, so dass Bild- und
Tonstörungen auftreten.
• Falls die Kamera durch die von einem anderen Gerät abgegebenen
elektromagnetischen Wellen negativ beeinflusst wird, schalten Sie die Kamera
aus, entnehmen Sie den Akku, setzen ihn wieder ein, und schalten Sie die
Kamera ein.
Verwenden Sie die Kamera nicht in der Nähe von Rundfunksendern oder
Hochspannungsleitungen.
• Wenn Aufnahmen in der Nähe von Rundfunksendern oder
Hochspannungsleitungen gemacht werden, können Bilder und Ton dadurch
negativ beeinflusst werden.
6
Page 7

Benutzerinformation zur Sammlung und Entsorgung von
veralteten Geräten und Verbrauchten Akkus
Cd
Diese Symbole auf den Produkten, Verpackungen und/
oder Begleitdokumenten bedeuten, dass benutzte
elektrische und elektronische Produkte und Akkus nicht in
den allgemeinen Hausmüll gegeben werden sollen.
Bitte bringen Sie diese alten Produkte und Akkus zur
Behandlung, Aufarbeitung bzw. zum Recycling gemäß Ihrer
Landesgesetzgebung und den Richtlinien 2002/96/EG und
2006/66/EG zu Ihren zuständigen Sammelpunkten.
Indem Sie diese Produkte und Akkus ordnungsgemäß
entsorgen, helfen Sie dabei, wertvolle Ressourcen
zu schützen und eventuelle negative Auswirkungen
auf die menschliche Gesundheit und die Umwelt zu
vermeiden, die anderenfalls durch eine unsachgemäße
Abfallbehandlung auftreten können.
Wenn Sie ausführlichere Informationen zur Sammlung und
zum Recycling alter Produkte und Akkus wünschen, wenden
Sie sich bitte an Ihre örtlichen Verwaltungsbehörden, Ihren
Abfallentsorgungsdienstleister oder an den Händler, bei
dem Sie die Gegenstände gekauft haben.
Gemäß Landesvorschriften können wegen nicht ordnungsgemäßer
Entsorgung dieses Abfalls Strafgelder verhängt werden.
Für geschäftliche Nutzer in der Europäischen Union
Wenn Sie elektrische oder elektronische Geräte entsorgen
möchten, wenden Sie sich wegen genauerer Informationen
bitte an Ihren Händler oder Lieferanten.
[Informationen zur Entsorgung in Ländern außerhalb
der Europäischen Union]
Diese Symbole gelten nur innerhalb der Europäischen
Union. Wenn Sie solche Gegenstände entsorgen
möchten, erfragen Sie bitte bei den örtlichen Behörden
oder Ihrem Händler, welches die ordnungsgemäße
Entsorgungsmethode ist.
Hinweis zum Batteriesymbol (unten zwei Symbolbeispiele):
Dieses Symbol kann in Kombination mit einem chemischen
Symbol verwendet werden. In diesem Fall erfüllt es die
Anforderungen derjenigen Richtlinie, die für die betreffende
Chemikalie erlassen wurde.
7
Page 8

Inhaltsverzeichnis
Informationen für Ihre Sicherheit
Vor der Inbetriebnahme
Lieferumfang ...............................9
Zubehör .......................................9
Bezeichnung der Teile ..............10
Cursortasten ...................................11
Touch-Bedienung .....................12
Vorbereitungen
Laden des Akkus ......................14
Speicherkarte und Akku
einsetzen und herausnehmen
Verwendbare Speichermedien
(Speicherkarte/interner Speicher)
Einstellen der Uhr .....................18
Hinweise zu GPS ...........................19
Menüsteuerung .........................20
Dieses Produkt ist unter der AVC Patent Portfolio-Lizenz für die private,
nichtgewerbliche Nutzung durch einen Verbraucher lizensiert, um (i) Videomaterial
gemäß AVC-Norm („AVC-Video“) zu codieren und/oder (ii) AVC-Video zu
decodieren, das vom Verbraucher im Zuge einer privaten, nichtgewerblichen
Tätigkeit codiert und/oder von einem zur Lieferung von AVC-Video lizensierten
Videoanbieter erhalten wurde. Für eine Nutzung zu irgendwelchen anderen
Zwecken wird keine Lizenz erteilt oder implizit gewährt. Weitere Informationen
hierzu sind von MPEG LA, LLC erhältlich.
Siehe http://www.mpegla.com.
...2
Grundfunktionen
Wahl der
Aufnahme-Betriebsart ..............21
Fotografieren mit
automatischen Einstellungen
[Schnappschuss-Betr.] ............22
AF-Verfolgung ................................23
Video-Aufnahmen .....................24
Wiedergabe-Betrieb
[Normal-Wdgb.] .........................25
Aufnahmen löschen .................25
...16
...17
Sonstiges
Verwendung der Anleitung auf
der mitgelieferten CD-ROM ......26
Technische Daten .....................27
Leica Service Adressen ...........30
8
Page 9

Lieferumfang Zubehör
®
®
®
Best.-Nr.
(je nach Land
unterschiedlich)
423-068.801-015
423-083.001-023
423-083.001-024
423-083.001-025
423-083.001-026 /
-027
(je nach Land
unterschiedlich)
Ledertasche 18 751
Weichledertasche 18 714
HDMI Minikabel 14 491
Ministativ 14 320
Tischstativ 14 110
Kugelkopf 14 100
Anmerkungen:
• Speicherkarten sind nicht Teil
des Lieferumfangs. Sie sind im
Fachhandel erhältlich. Wenn Sie
keine Speicherkarte einsetzen,
werden die Aufnahmen im
internen Speicher abgelegt.
• Bitte überprüfen Sie nach dem
Auspacken, dass alle Artikel des
Lieferumfangs vorhanden sind,
bevor Sie die Kamera erstmals
in Betrieb nehmen.
• Bitte entsorgen Sie das
Verpackungsmaterial
vorschriftsmäßig (→7).
• Bewahren Sie Kleinteile
grundsätzlich außerhalb der
Reichweite von Kindern an
einem sicheren Ort auf.
Akku
BP-DC7-E 18 701
BP-DC7-U 18 702
Ladegerät
BC-DC7-E 423-082.001-012
BC-DC7-U 423-082.001-010
BC-DC7-TK 423-083.001-028
Netzkabel
EU 423-068.801-019
UK 423-068.801-020
AUS 423-068.801-023
TW 424-025.002-000
CN 423-082.805-004
KR 423-082.805-005
Handgelenksriemen
CD-ROM mit Anl.PDFs
DVD mit Adobe
Photoshop
®
Elements
DVD mit Adobe
®
Premiere
Elements
USB-Kabel 423-083.001-020
AV-Kabel 423-083.001-022
Stift 423-083.001-029
Tastenfolie für
Kanada / Taiwan
Kurzanleitung 93 374 -377
Garantiekarte 439-399.100-026
®
Best.-Nr.
9
Page 10
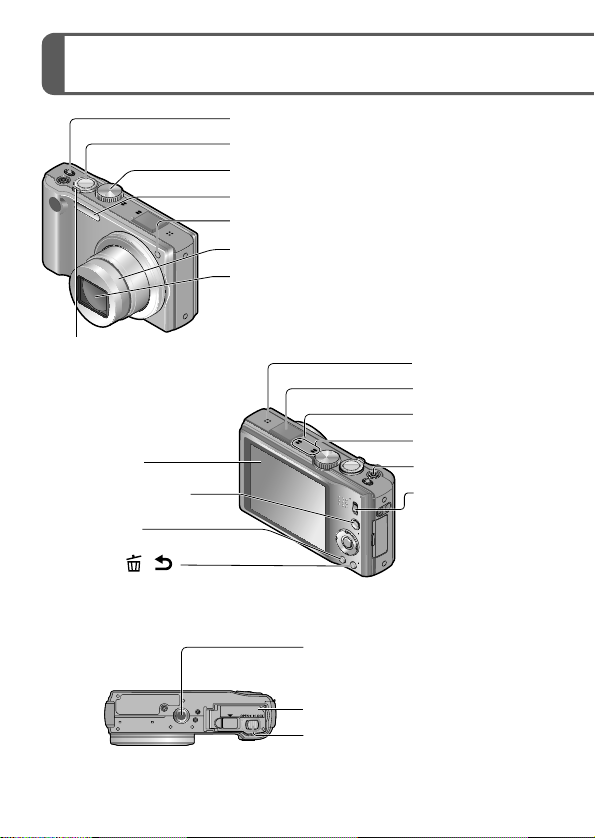
Bezeichnung der Teile
Hauptschalter
Auslöser
Betriebsartenwähler
Blitz
Selbstauslöser-Anzeige/AF-Hilfslampe
Objektivtubus
Objektiv
Zoomhebel
LCD-Monitor
[EXPOSURE]-Taste
[DISP.]-Taste
[Q.MENU]/[
(Löschen/Rückkehr)
-Taste
/ ]
10
Lautsprecher
GPS-Antenne
GPS-Statusanzeige
Mikrofon
Video-Auslöser
[REC/PLAY]-
Schalter
Stativgewinde
• Vergewissern Sie sich, dass das
Stativ stabil steht.
Karten-/Akkufachklappe
Entriegelungsschieber
Page 11

Cursortasten
Trageriemenöse
Die Abbildungen der Monitor-Anzeigen in dieser Anleitung können vom
tatsächlichen Erscheinungsbild Ihrer Kamera abweichen.
[MENU/SET]
(Menüanzeige/Einstellen/
Beenden)
Links-Pfeiltaste (◄)
• Selbstauslöser
Abwärts-Pfeiltaste (▼)
• Makro-Betrieb usw.
In dieser Anleitung werden die jeweils zu betätigenden Pfeiltasten
●
mit den Symbolen ▲▼◄► dargestellt.
Aufwärts-Pfeiltaste (▲)
• Belichtungskorrekturen,
Belichtungsreihen usw.
Rechts-Pfeiltaste (►)
• Blitz
Der Gebrauch der
Griffschlaufe wird angeraten,
um ein Fallenlassen der
Kamera zu verhindern.
HDMI-Buchse
[AV OUT/DIGITAL]Buchse
Es wird empfohlen, vor dem Aufnehmen von Videos grundsätzlich
●
einen ausreichend aufgeladenen Akku zu verwenden.
11
Page 12
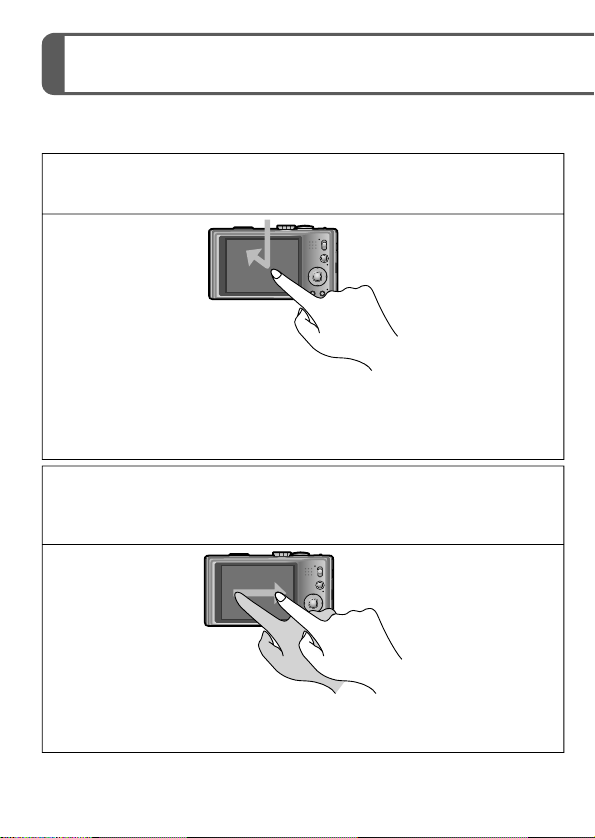
Touch-Bedienung
Die druckempfindliche Monitor-Oberfläche reagiert auf Berührungen
durch kleinere Gegenstände, wie zum Beispiel die einer Fingerspitze.
Berührung
Unter einem „Touch-Vorgang“ versteht man eine kurzzeitige
Berührung der Monitor-Oberfläche mit der Fingerspitze.
Der Berührungsvorgang wird beispielsweise zur Auswahl von Symbolen und
Bildern angewandt.
• Berühren Sie ein Symbol stets möglichst in der Mitte. Wenn versehentlich
mehrere Symbole gleichzeitig berührt werden, funktioniert die Kamera
möglicherweise nicht wie erwartet.
Ziehen
Unter „Ziehen“ versteht man eine Berührung der Monitor-Oberfläche
mit anschließender, weiter berührender Bewegung über die
Oberfläche.
Der Ziehvorgang (d. h. das Schieben der Fingerspitze über die MonitorOberfläche) wird zum Blättern innerhalb der Bilder sowie zum Ändern des
Ausschnitts (Vergrößern) des gezeigten Bildes angewandt.
12
Page 13

Wenn eine handelsübliche Schutzfolie für LC-Anzeigen verwendet
●
werden soll, sind die der Folie beiliegenden Vorsichtshinweise sorgfältig
zu beachten. (Bestimmte Ausführungen von Schutzfolien können die
Ablesbarkeit des Monitors beeinträchtigen und die Touch-Bedienung
erschweren.)
Wenn eine handelsübliche Schutzfolie auf dem Monitor der Kamera
●
aufgebracht worden ist oder die Monitor-Oberfläche nicht ohne weiteres
auf eine Berührung anspricht, können Sie mit geringfügig stärkerem
Druck arbeiten.
Wenn Sie beim Halten der Kamera versehentlich mit der Hand Druck
●
auf die Monitor-Oberfläche ausüben, kann die zu Fehlfunktionen
führen.
Drücken Sie nicht mit der Spitze eines harten Gegenstands, z. B.
●
eines eines Kugelschreibers oder eines Fingernagels, auf die MonitorOberfläche.
Entfernen Sie Fingerabdrücke oder Schmutzflecken auf der Monitor-
●
Oberfläche mit einem weichen, trockenen Tuch.
■
Stift
Der mitgelieferte Stift ist besonders praktisch bei
Bedienungsvorgängen, die die Nutzung eines Fingers nicht erlaubt,
z. B. wenn die Monitor-Oberfläche ganz genau an einer bestimmten
Stelle, bzw. in einem sehr kleinen Bereich berührt werden muss.
• Verwenden Sie ausschließlich den mitgelieferten Stift.
• Bewahren Sie den Stift außerhalb der Reichweite von Kleinkindern
auf.
• Legen Sie den Stift nicht zur Aufbewahrung auf dem LCD-Monitor ab.
Der LCD-Monitor kann beschädigt werden, wenn mit dem Stift hoher
Druck darauf ausgeübt wird.
13
Page 14
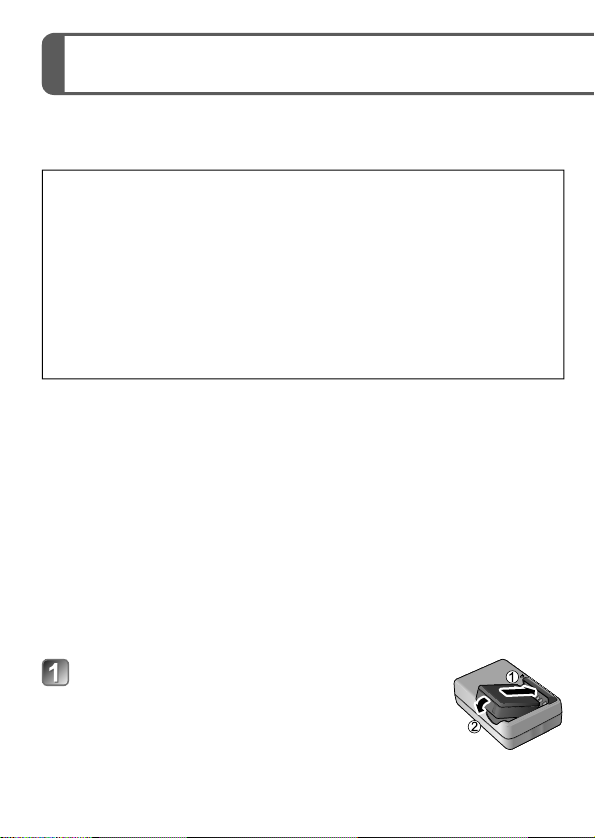
Laden des Akkus
■
Hinweise zu dem für dieses Gerät vorgesehen Akku
Der für den Gebrauch mit dieser Kamera vorgesehene Akku ist der
Leica Akku BP-DC7 (→9)
In letzter Zeit werden in bestimmten Ländern nachgemachte Akkus
verkauft, die den original Leica Akkus sehr ähnlich sind. Manche
dieser nachgemachte Akkus verfügen nicht über die internen
Schutzvorrichtungen, die von den einschlägigen Sicherheitsnormen
gefordert werden. Beim Gebrauch derartiger nachgemachter Akkus besteht
daher akute Gefahr von Brandausbruch und Explosion! Bitte beachten Sie,
dass die Leica Camera AG keinerlei Haftung für Unfälle, Sachschäden oder
Störungen übernimmt, die auf den Gebrauch eines nachgemachten Akkus
zurückzuführen sind. Damit die Sicherheit beim Gebrauch unserer Produkte
gewährleistet ist, möchten wir die dringende Empfehlung aussprechen,
ausschließlich den vorgesehenen original Leica Akku zu verwenden.
• Verwenden Sie ausschließlich das Spezial-Ladegerät und den für
diese Kamera vorgesehenen Akku.
•
Diese Kamera verfügt über eine Funktion zur Erkennung von Akkus,
die für einen sicheren Gebrauch mit dieser Kamera geeignet sind. Der
für diese Kamera vorgesehene Akku (→9) unterstützt diese Funktion.
Ausschließlich Akkus dieses Typs sind von Leica für den Gebrauch mit
dieser Kamera zugelassen. (Akkus, die diese Funktion nicht unterstützen,
können nicht verwendet werden). Leica Camera AG bietet keinerlei Gewähr
für die Qualität, Leistung oder Sicherheit von Akkus anderer Fabrikate.
• Bei der Auslieferung der Kamera ist der Akku nicht geladen.
Bitte laden Sie den Akku vor der Inbetriebnahme der Kamera
vollständig auf, und stellen Sie die Uhr ein.
• Das Laden des Akkus sollte stets in geschlossenen Räumen
erfolgen (bei 10° - 30°C).
Schieben Sie den Akku mit seinen
Kontakten nach vorne und unten
zeigend in das Ladegerät ein und
drücken Sie ihn vollständig nach unten.
Stellen Sie sicher, dass die Seite mit der Aufschrift
[LEICA] nach außen weist.
14
Page 15
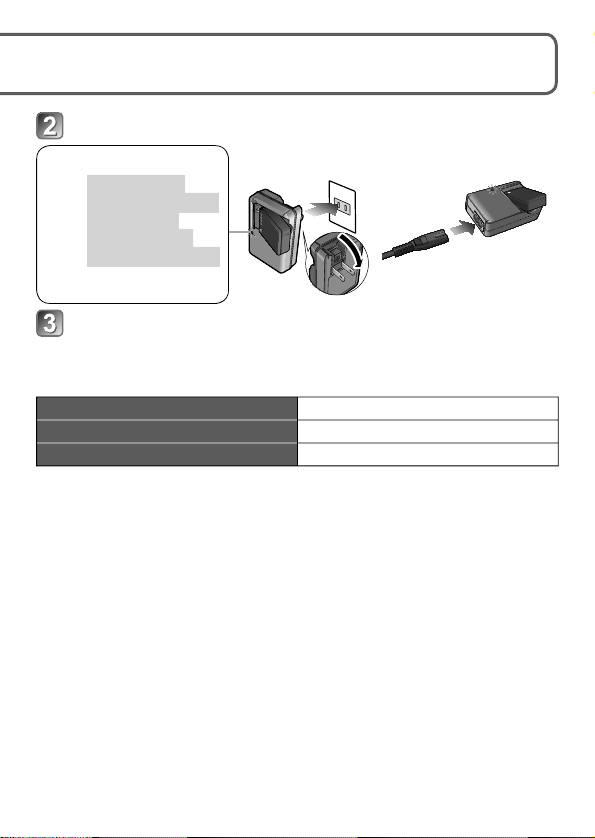
Schließen Sie das Ladegerät an eine Netzsteckdose an.
Ladelampe ([CHARGE])
Ein: Ladevorgang
findet statt (Dauer
ca. 130 Min.
bei vollständig
entladenem Akku)
Aus: Ladevorgang
abgeschlossen
Kabellose
●
Steckausführung
Ausführung mit
●
Netzeingang
Entnehmen Sie den Akku nach beendetem
Ladevorgang aus dem Ladegerät.
■
Aufnahmekapazität
(Anzahl der aufnehmbaren Bilder/Aufnahmezeit)
Anzahl der aufnehmbaren Bilder Ca. 260 Bilder
Aufnahmezeit Ca. 130 Minuten
Wiedergabezeit Ca. 210 Minuten
Aufnahmebedingungen gemäß CIPA-Norm
• Bei „CIPA“ handelt es sich um die Abkürzung von [Camera & Imaging Products
Association].
• [Programm-AE]-Betrieb
• Bei Einstellung des Menüpunkts [GPS-Einstel.] auf [AUS]
• Temperatur: 23 °C/Luftfeuchtigkeit: 50 %RH rel. Feuchte, bei eingeschaltetem
LCD-Monitor.
• Verwendung einer 32MB-Speicherkarte.
• Verwendung des mitgelieferten Akkus.
• Aufnahme des ersten Bildes 30 Sekunden nach Einschalten der Kamera (bei
Einstellung der optischen Bildstabilisator-Funktion auf [AN].)
• Nachfolgende Aufnahmen in 30-Sekunden-Intervallen mit vollem Blitz bei jeder
zweiten Aufnahme.
• Durchfahren des gesamten Zoombereichs bei jeder Aufnahme.
•
Ausschalten der Kamera nach jeweils 10 Aufnahmen, gefolgt von Abkühlen des Akkus.
Die Anzahl der möglichen Aufnahmen oder die verfügbare Aufnahmezeit richtet
sich nach den jeweiligen Umgebungs- und Betriebsbedingungen. Bei häufigem
Gebrauch von Blitz, Zoom und anderen Funktionen sowie bei Einsatz der Kamera
bei kälteren Temperaturen kann die Zahl der Aufnahmen, bzw. die Aufnahmezeit
abnehmen.
15
Page 16

Speicherkarte und Akku einsetzen und
herausnehmen
Stellen Sie den Hauptschalter
auf OFF, und drücken Sie den
Entriegelungsschieber ( ) in
die Stellung [OPEN], bevor Sie
die Klappe öffnen.
Setzen Sie Akku und
Speicherkarte ein.
Akku: Bis zum Einrasten des
Verriegelungsschiebers hinein
schieben.
Karte: Bis zum hörbaren Einrasten hinein
schieben.
Schließen Sie die Klappe.
Schieben Sie den Entriegelungsschieber in die Position [LOCK].
■
Entnehmen
• Zum Entfernen des Akkus:
Drücken Sie den
Verriegelungsschieber in
Pfeilrichtung.
Verriegelungsschieber
• Zum Entfernen der Karte:
Drücken Sie die Karte geringfügig
weiter hinein um sie zu entriegeln.
Sie kommt dann ein Stück heraus.
[OPEN] [LOCK]
Bitte verwenden Sie ausschließlich Original-Akkus von Leica (→9).
●
Bei Verwendung von Akkus anderer Fabrikate ist nicht gewährleistet,
●
dass die volle Leistung der Kamera erzielt wird.
Die Speicherkarte kann beschädigt werden, wenn sie nicht bis zum
●
Einrasten eingeschoben wird.
16
Page 17
Verwendbare Speichermedien
(Speicherkarte/interner Speicher)
■
Interner Speicher (ca. 18 MB)
Wenn die eingesetzte Karte voll ist, kann der interne Speicher als
●
zeitweiliges Speichergerät verwendet werden.
Der Zugriff auf Daten im internen Speicher kann längere Zeit
●
beanspruchen als die, die auf einer Karte aufgezeichnet sind.
■
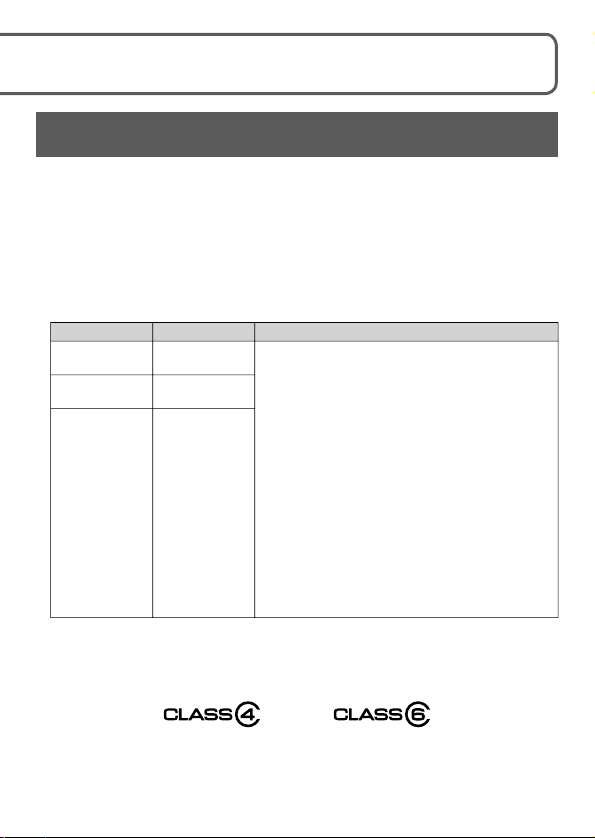
Geeignete Speicherkarten (separat erhältlich)
Mit dieser Kamera können die folgenden Speicherkarten verwendet
werden, die der SD-Norm entsprechen:
Kartentyp
SDSpeicherkarten
SDHCSpeicherkarten
SDXCSpeicherkarten
∗
Bei der SD-Geschwindigkeitsklasse handelt es sich um eine
Norm für Dauerschreibgeschwindigkeiten. Überprüfen Sie die SDSchreibgeschwindigkeit auf dem Etikett der jeweils verwendeten Karte bzw. in
deren Begleitliteratur.
(Beispiel)
Speicherkapazität
8 MB – 2 GB • Beim Aufnehmen von Videos im Format
4 GB – 32 GB
48 GB, 64 GB
[AVCHD] empfiehlt sich der Gebrauch einer
Karte der SD-Geschwindigkeitsklasse 4
oder höher.
Beim Aufnehmen von Videos im Format
„Motion JPEG“ empfiehlt sich der Gebrauch
einer Karte der SD-Geschwindigkeitsklasse
∗
6
oder höher.
• Diese Speicherkarten können mit Geräten
verwendet werden, die mit dem jeweiligen
Format kompatibel sind.
• Vergewissern Sie sich vor dem Gebrauch
von SDXC-Speicherkarten, dass Ihr PC
bzw. andere Geräte diesen Kartentyp
unterstützen.
• Karten mit Speicherkapazitäten, die
links nicht aufgeführt sind, werden nicht
unterstützt.
Anmerkungen
∗
Halten Sie Speicherkarten außerhalb der Reichweite von Kindern,
●
damit sie nicht versehentlich verschluckt werden können.
17
Page 18
Einstellen der Uhr
Bei der Auslieferung ist die eingebaute Uhr dieser Kamera nicht
eingestellt.
Schalten Sie die Kamera ein ( ).
Drücken Sie [MENU/SET] ( )
während die Meldung angezeigt
wird.
Drücken Sie ▲▼ zur Wahl der
gewünschten Sprache, und
dann [MENU/SET].
• Daraufhin erscheint die Meldung [Bitte
Uhr einstellen].
Drücken Sie [MENU/SET].
Drücken Sie ◄► zur Wahl des Menüpunkts (Jahr,
Monat, Tag, Stunde, Minute, Anzeigereihenfolge
oder Zeitanzeigeformat), und dann ▲▼ zur Wahl
der gewünschten Einstellung.
• Abbrechen → Drücken Sie [ / ].
Drücken Sie [MENU/SET].
Überprüfen Sie die Einstellung, und drücken Sie
dann [MENU/SET].
• Um zur vorigen Anzeige zurückzukehren, drücken Sie [ / ].
Um die Uhrzeit unter Verwendung der GPSFunktion automatisch korrigieren zu lassen,
drücken Sie ◄ zur Wahl von [Ja], und dann
[MENU/SET].
•
Für manuelle Einstellung von Datum und Uhrzeit → wählen Sie [Nein].
18
Page 19
Hinweise zu GPS
Drücken Sie [MENU/SET] bei Anzeige von [Bitte
wohnort einstellen].
Drücken Sie ◄► zur Einstellung Ihres
Heimatgebiets, und dann [MENU/SET].
Die gegenwärtige Uhrzeit und Ihr
Heimatgebiet werden eingestellt.
• Die Einstellung des Menüpunkts [GPSEinstel.] wechselt auf [AN].
• Schalten Sie die Kamera erneut ein, und
überprüfen Sie die Anzeige der Uhrzeit.
■
Ändern der Uhrzeiteinstellung
Wählen Sie [Zeit] im Menü [Aufn.] oder [Einstellung], und führen Sie
dann und aus
Bei Verwendung von GPS führt die Kamera die folgenden Funktionen aus:
•
Die Ortsnamen-Informationen sowie der Breitengrad und der Längengrad des über
Positionierung ermittelten Ortes werden in den aufgenommenen Bildern aufgezeichnet.
•
Die Uhr wird automatisch genau auf die gegenwärtige Uhrzeit nachgestellt.
■
Bei Einstellung des Menüpunkts [GPS-Einstel.] auf [AN]
arbeitet die GPS-Funktion selbst bei ausgeschalteter Kamera.
•
Die von dieser Kamera erzeugte elektromagnetische Strahlung kann Instrumente
und Messgeräte beeinflussen. Bitte achten Sie daher an Bord eines Flugzeugs vor
dem Starten oder Landen bzw. an einem anderen Ort, an dem der Funkverkehr
Einschränkungen unterliegt, unbedingt darauf, den Menüpunkt [GPS-Einstel.] auf
[AUS] oder einzustellen, bevor Sie die Kamera ausschalten.
• Bei Einstellung des Menüpunkts [GPS-Einstel.] auf [AN] entlädt
sich der Akku auch bei ausgeschalteter Kamera.
Wichtig:
Die Verwendung von GPS innerhalb der Volksrepublik China und in der Nähe ihrer
Grenzen (Ausnahmen: Hong Kong und Macao) ist durch Gesetze des Landes
verboten. Zuwiderhandlungen werden durch die Landesbehörden verfolgt! Die
GPSFunktionen der Kamera werden daher in diesen Gebieten selbsttätig deaktiviert.
19
Page 20
Menüsteuerung
Sämtliche Menü-Einstellungen werden wie im Folgenden beschrieben
durchgeführt:
Beispiel: Ändern der Einstellung des Menüpunkts [AF-Modus] von
auf in der Betriebsart [Programm-AE]
Drücken Sie [MENU/SET], um das Menü aufzurufen .
Umschalten auf das Menü [Aufn.]
Wählen Sie [Aufn.], aund drücken Sie
dann [MENU/SET].
• Der Menütyp kann auch über TouchOperationen gewählt werden.
Drücken Sie ▲▼ zur Wahl von
[AF-Modus], und dann [MENU/
SET].
Drücken Sie ▲▼ zur Wahl von
, und dann [MENU/SET] zur
Einstellung.
• Bei bestimmten Menüpunkten wird die
Einstellung möglicherweise überhaupt
nicht oder auf andere Weise als hier
dargestellt angezeigt.
Drücken Sie [ / ] so oft, bis
sich das Menü schließt.
20
Page 21

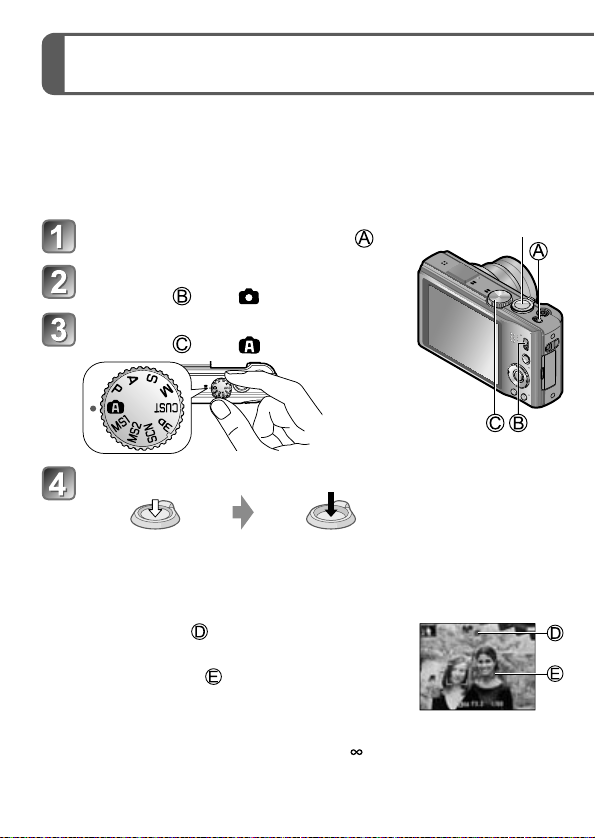
Wahl der Aufnahme-Betriebsart
Schalten Sie die Kamera ein ( ).
Bringen Sie den [REC/PLAY]-
Schalter ( ) in die Stellung .
Die Betriebsarten werden
durch Drehen des Wählrades
eingestellt ( ).
[Schnappschuss-Betr.]
Für das Fotografieren mit erweiterten automatischen Einstellungen.
[Programm-AE]-Betrieb
Für das Fotografieren mit automatischer Belichtungssteuerung.
[Zeitautomatik]-Betrieb
Für das Bestimmen der Schärfentiefe durch manuelle Vorwahl der Blende.
[Blendenautomatik]-Betrieb
Für das Bestimmen der (Un-)Schärfe bei bewegten Motiven durch manuelle
Vorwahl der Verschlusszeit.
[Manuelle Belicht.]-Betrieb
Für die vollständige Kontrolle über die Belichtungssteuerung durch
manuelle Wahl von Verschlusszeit und Blende.
[Benutzerspez.]-Betrieb
Für das Fotografieren mit Einstellungen, die Sie im Voraus gespeichert
haben.
[3D-Foto-Betrieb]
Für das Fotografieren von 3D-Standbildern.
[Szenen-Modus]
Für das Fotografieren mit optimalen Einstellungen für die jeweilige
Aufnahmesituation.
[Meinszenen-Mod.]
Für das Fotografieren mit im Voraus gespeicherten Szene-Betriebsarten.
21
Page 22
Fotografieren mit automatischen Einstellungen
Nach einfachem Anvisieren des Motivs mit der Kamera werden die
jeweils optimalen Einstellungen automatisch auf der Grundlage von
Informationen wie „Gesicht“, „Bewegung“, „Helligkeit“ und „Entfernung“
vorgenommen, so dass scharfe Bilder erhalten werden, ohne dass Sie
die Einstellungen manuell vornehmen müssen.
Schalten Sie die Kamera ein ( ).
Auslöser
Stellen Sie den [REC/PLAY]Schalter ( ) auf .
Stellen Sie das BetriebsartenWählrad ( ) auf .
Lösen Sie aus.
halb herunterdrücken
(zur Fokussierung)
• Wenn Verwackeln droht, halten Sie die Kamera mit beiden Händen, legen
Sie die Arme an den Oberkörper an, und stehen Sie mit den Füßen um etwa
Schulterbreite auseinander.
• Fokusanzeige (
(Schärfe eingestellt: leuchtet /
Schärfe-Einstellung nicht möglich: blinkt)
• Das AF-Messfeld (
Erkennungsfunktion auf das Gesicht der Person
gelegt. In anderen Fällen erscheint es an der
Stelle des Motivs, auf das scharfgestellt ist.
• Einstellbereich: Max. Weitwinkelposition: 3 cm/Max. Teleposition: 1 m und
)
mehr (7× bis 11×: 2 m bis
ganz durchdrücken
(für die Aufnahme)
) wird von der Gesichts-
)
22
Page 23
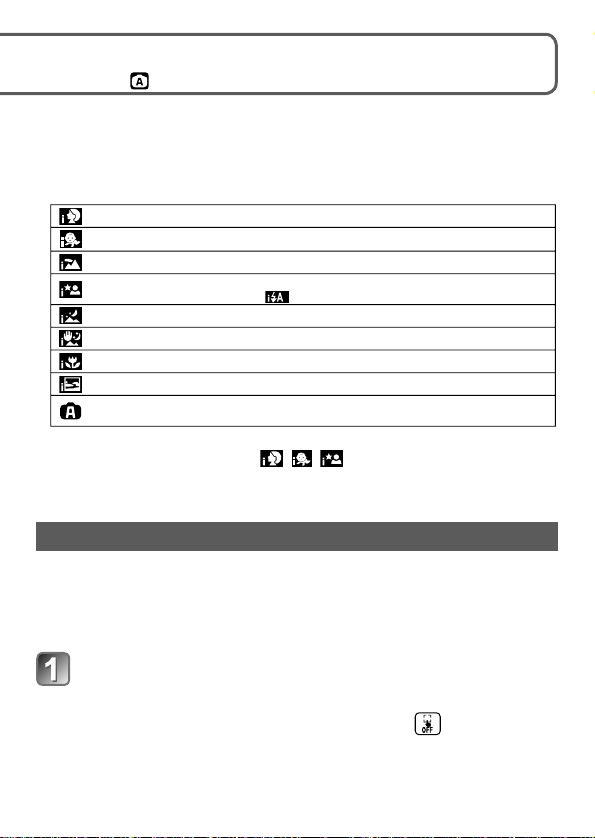
[Schnappschuss-Betr.]
Betriebsart:
■
Automatische Erkennung von Aufnahmesituationen
Wenn die Kamera auf ein Motiv gerichtet wird, erfasst sie die jeweilige
Aufnahmesituation und nimmt die optimalen Einstellungen automatisch
vor. Das Symbol der jeweils erfassten Aufnahmesituation wird für
2 Sekunden in Blau angezeigt.
Personen sind erfasst worden.
Ein Kleinkind ist erfasst worden.
Eine Landschaft ist erfasst worden.
Personen sind vor einem dunklen, weiter entfernten Hintergrund erfasst
worden. (Nur bei Wahl von
Ein dunkles und weiter entferntes Motiv ist erfasst worden.
Ein dunkles Motiv und die Gefahr des Verwackelns ist erkannt worden.
Ein nahe bei der Kamera liegendes Motiv ist erfasst worden.
Ein Sonnenuntergang ist erkannt worden.
Wird automatisch aktiviert, um unscharfe Aufnahmen zu verhindern,
wenn das erfasste Motiv keines der obigen entspricht.
)
Wenn die Kamera bei der automatischen Erkennung des Motivs
Personen im Bild erfasst hat ( , , ), wird die GesichtsErkennungsfunktion aktiviert, und Fokussierung und Belichtung werden
für die erkannten Gesichter eingestellt.
AF-Verfolgung
Mit dieser Funktion stellt die Kamera Schärfe und Belichtung bei einem
bewegten Motiv kontinuierlich nach.
Deaktivieren Sie ggf. die Touch-Auslöse-Funktion, bevor Sie diesen
Bedienungsschritt ausführen.
Berühren Sie das Motiv.
• Umschalten der AF-Speicherung auf ein anderes Motiv
→ Berühren Sie das andere Motiv.
• Aufheben der AF-Verfolgung → Berühren Sie .
23
Page 24
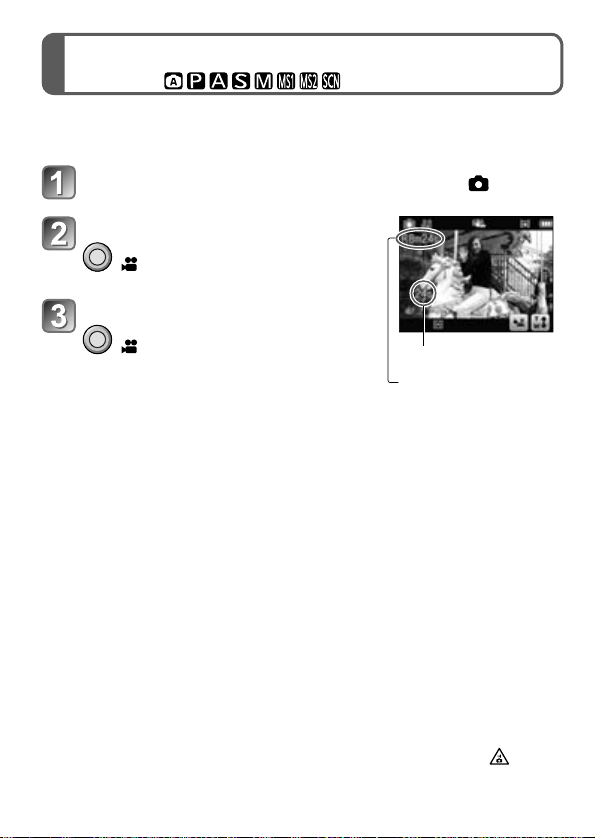
Video-Aufnahmen
Betriebsart:
Mit dieser Betriebsart können Sie Videos mit Ton aufnehmen. Die ZoomFunktion steht dabei ebenfalls verwendet werden.
Stellen Sie den [REC/PLAY]-Schalter auf .
Starten Sie die Aufnahme.
drücken
Beenden Sie die Aufnahme.
drücken
■
Aufnahmedauer
Im Fall von zusammenhängenden Video-Aufnahmen im Format [Motion
JPEG] beträgt die maximale Dateigröße 2GB.
• Mit den Modell-Varianten 18 163/ 18 164:
Eine AVCHD-Video-Aufnahme ist bis zu einer Dauer von 29 Minuten
möglich, wenn [GFS] oder [FSH] eingestellt ist.
• Mit der Modell-Variante 18 162:
Video-Aufnahmen sind bis zu einer Dauer von 29 Minuten möglich.
Lassen Sie den Video-Auslöser unmittelbar nach dem Drücken wieder los.
●
Sobald die Speicherkapazität erschöpft ist, wird die Video-Aufnahme
●
automatisch beendet.
Wenn der Menüpunkt [Aufn.-Qual.] auf [GFS] oder [FSH]
●
eingestellt ist und die Umgebungstemperatur sehr hoch ist oder
eine längere Video-Aufnahme ausgeführt wird, erscheint , und
die Aufnahme wird möglicherweise abgebrochen.
verstrichene Aufnahmezeit
verbleibende
Aufnahmezeit (ungefähr)
24
Page 25
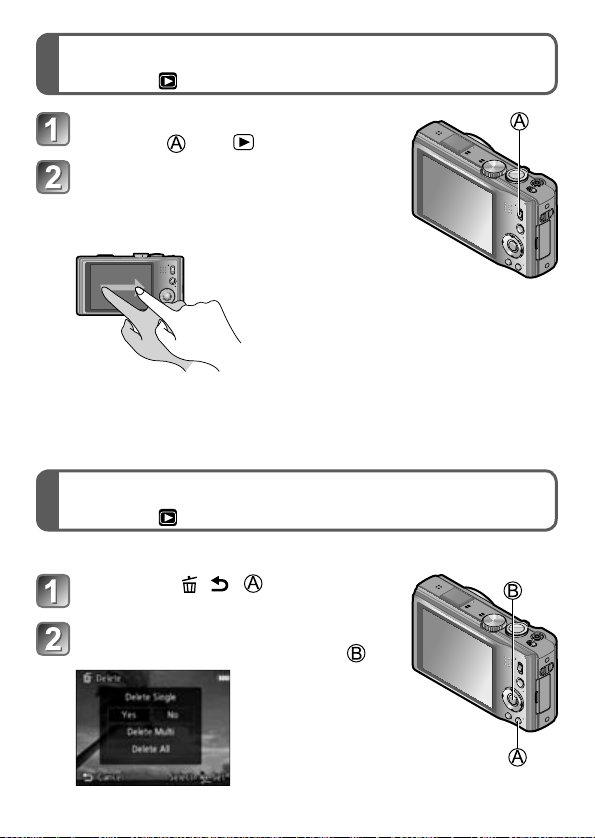
Wiedergabe-Betrieb [Normal-Wdgb.]
Betriebsart:
Stellen Sie den [REC/PLAY]Schalter ( ) auf .
Ziehen Sie den Finger
über den Monitor, um das
Bild auszuwählen, das
wiedergegeben werden soll.
Um eine Video-Aufnahme wiederzugeben, drücken Sie ◄ oder ► zur
●
Wahl eines Bilds, und dann ▲, um die Wiedergabe zu starten.
Sie können Ihre Bilder ausdrucken, indem Sie die Kamera an einen PC oder
●
Drucker anschließen oder eine SD-Karte bei einem Fotolabor abgeben.
Aufnahmen löschen
Betriebsart:
Gelöschte Bilder können nicht wiederhergestellt werden.
Drücken Sie [ / ] ( ), um das
momentan angezeigte Bild zu löschen.
Drücken Sie ◄ zur Wahl von
[Ja], und dann [MENU/SET] ( ).
25
Page 26

V erwendung der Anleitung auf der
mitgelieferten CD-ROM
• Sie haben sich mit den in dieser Anleitung beschriebenen
grundlegenden Bedienungsverfahren vertraut gemacht und möchten
weiterführende Funktionen Ihrer Kamera nutzen.
• Sie benötigen Informationen zur Störungsbeseitigung.
In einer solchen Situation schlagen Sie in der Bedienungsanleitung (PDFFormat) nach, die auf der mitgelieferten CD-ROM enthalten ist.
Schalten Sie den PC ein, und legen Sie die
mitgelieferte CD-ROM in das Laufwerk ein.
Öffnen Sie die CD-ROM.
Doppelklicken Sie auf das PDF mit der
gewünschten Sprache.
■
Wenn die PDF-Bedienungsanleitung nicht geöffnet werden
kann
Zum Lesen oder Ausdrucken der PDF-Bedienungsanleitung wird Adobe
Acrobat Reader 5.0 oder eine neuere Version bzw. Adobe Reader 7.0
oder eine neuere Version benötigt.
• Von der nachstehend aufgeführten Website können Sie eine für Ihr
Betriebssystem geeignete Version von Adobe Reader herunterladen:
http://get.adobe.com/reader/otherversions
26
Page 27

Technische Daten
1
Sensor
Effektive Pixelzahl 14.100.000
Mindest-Beleuchtung
Objektiv LEICA DC VARIO-ELMAR
EntfernungsEinstellbereich
P/A/S/M 50cm (Weitwinkel) / 2m (Tele) bis
Makro/
SchnappschussBetriebsart/
Videos
SzeneBetriebsarten
Digitalzoom max. 4x
Extra optisches
Zoom
Verschlusssystem Elektronisch und mechanisch gesteuert
Verschlusszeiten-
Bereich
Serienaufnahmen Bildfrequenz
Mit
mechanischem
Verschluss
Mit
elektronischem
Verschluss
Bei VideoAufnahmen
2.33
/
”MOS-Sensor, Gesamtmenge Pixel: 15.100.000,
Primärfarbenfilter
ca. 14lx
Mit den Modell-Varianten 18 163/ 18 164
(wenn i-low light eingesetzt wird, Verschlusszeit dabei: 1/60s)
Mit der Modell-Variante 18 162
(wenn i-low light eingesetzt wird, Verschlusszeit dabei: 1/50s)
F/3.3 (Weitwinkel) – 5,9 (Tele) 4.3 – 68,8mm ASPH.,
entspricht bei Kleinbild-Kameras: 24 - 384mm
3cm (Weitwinkel) / 1m (Tele) bis
Unterscheidet sich ggf. von den obigen Angaben
max. 33,8x (wenn Auflösung auf 3 Millionen Pixel [3M]
oder geringer eingestellt ist)
1
4000
60s -
/
s, [Sternenhimmel]-Betriebsart: 15s/30s/60s
(Frequenz (Bilder pro Sekunde) /
(maximale Aufnahmezahl /maximale Auflösung)
ca. 2B/s (100/14M) / 5B/s (100/14M) / 10B/s (15/14M)
40B/s (50/5M) / 60B/s (60/3.5M)
ca. 2B/s (40/3.5M) / 5B/s (40/3.5M) / 10B/s (40/3.5M)
27
Page 28

Technische Daten (Fortsetzung)
BelichtungsBetriebsarten
BelichtungsMessmethoden
Blitzgerät Eingebaut
Blitz-Betriebsarten AUTO, AUTO/Verr. “Roter Augen”, AN (AN/ Verr. “Roter
Blitz-Arbeitsbereich
(mit ISO AUTO)
LCD-Monitor 3,0” TFT LCD (ca. 460.000 Pkt), Seitenverhältnis 4:3,
Mikrofon Stereo
Lautsprecher Mono
Aufnahmedaten-
Speicherung
Aufnahmeformat
Stehbilder JPEG (basiert auf Design rule for Camera File system, auf
Videos (mit Ton) AVCHD / QuickTime Motion JPEG
GPS
Empfangsfrequenz
Geografisches
Koordinatensystem
Schnittstellen Digital: USB 2.0 (High Speed)
Anschlüsse HDMI: für HDMI-Minikabel (Typ C)
Programmautomatik (P), Zeitautomatik (A),
Blendenautomatik (S), manuelle Einstellung (M),
Belichtungskorrektur
(Abstufung: 1/3 EV-Schritte, Einstellbereich: ±2EV)
Mehrfeld / Mittenbetont / Spot
Augen”), AUTO Langzeit-Synchronisierung/
Verr . “Roter Augen”, AUS
ca. 60cm – 5m (bei maximaler Weitwinkel-Einstellung)
zeigt ca. 100% des Bildfeldes
Interner Speicher (ca. 18MB),
SD/SDHC/SDXC Speicherkarten
Grundlage der Norm Exif 2.3 standard) /
DPOF-kompatibel / MPO
1575.42MHz (C/A code)
WGS84
Daten vom PC können nicht mit dem
USB-Kabel auf die Kamera übertragen werden.
(Mit der Modell-Variante 18 162)
Analoge Video-/Audiosignale:
Mit den Modell-Varianten 18 163/ 18 164:
NTSC FBAS/Komposit,
Mit der Modell-Variante 18 162:
NTSC/PAL FBAS/Komposit (Umschaltung über Menü),
Audio-Line-Ausgang (mono)
AV OUT/DIGITAL: Spezialbuchse (8-polig)
28
Page 29

Betriebstemperatur /
-feuchtigkeit
Leistungsaufnahme 5,1V Gleichstrom
Bei Aufnahme 1,4W
Bei Wiedergabe 0,9W
Abmessungen
(BxHxT,
Objektiv eingefahren)
Gewicht
(mit/ohne
Speicherkarte und
Akku)
0°C - 40°C / 10%RH - 80%RH
ca. 105 x 58 x 34mm tbd
ca. 218g / 196g
Akku (Lithium-Ionen)
Spannung/
Kapazität
3,6V / 895mAh
Akku-Ladegerät
Eingang 110 - 240V 50/60Hz, 0,2A Wechselstrom
Ausgang 4,2V
0,65A Gleichstrom
29
Page 30

Leica Service Adressen
Leica Akademie
Neben anspruchsvollen Produkten der Höchstleistungsklasse von der
Beobachtung bis zur Wiedergabe bieten wir als besonderen Service
seit vielen Jahren in der Leica Akademie praxisgerechte Seminare
und Schulungen an, in denen das Wissen um die Welt der Fotografie,
der Projektion und der Vergrößerung sowohl Anfängern als auch
fortgeschrittenen Foto-Enthusiasten nahe gebracht wird.
Die Inhalte der Kurse - die in modern ausgestatteten Kursräumen
im Werk Solms sowie im nahe gelegenen Gut Altenberg von einem
ausgebildeten Team von Fachreferenten durchgeführt werden - variieren
von allgemeiner Fotografie bis zu interessanten Spezialgebieten und
bieten eine Fülle von Anregungen, Informationen und Ratschlägen für die
Praxis.
Nahere Auskünfte und das aktuelle Seminarprogramm, einschließlich der
Fotoreisen sind erhältlich bei:
Leica Camera AG
Leica Akademie
Oskar-Barnack-Str. 11
D-35606 Solms
Tel.: +49 (0) 6442-208-421
Fax: +49 (0) 6442-208-425
la@leica-camera.com
Leica im Internet
Aktuelle Informationen zu Produkten, Neuheiten, Veranstaltungen und
dem Unternehmen Leica erhalten Sie auf unserer Homepage im Internet
unter:
http://www.leica-camera.de
30
Page 31

Leica Infodienst
Anwendungstechnische Fragen zu den Leica Produkten, einschließlich
der ggf. mitgelieferten Software beantwortet Ihnen schriftlich, telefonisch,
oder per E-Mail der Leica Anwender-Service.
Auch für Kaufberatungen und die Bestellung von Anleitungen ist er Ihr
Ansprechpartner.
Alternativ können Sie Ihre Fragen ebenso über das Kontaktformular auf
der Leica Camera AG Homepage (s. o.) an uns richten.
Leica Camera AG
Anwender-Service / Software-Support
Postfach 1180
D-35599 Solms
Tel.: +49 (0) 6442-208-111 / -108
Fax: +49 (0) 6442-208-490
info@leica-camera.com / software-support@leica-camera.com
Leica Kundendienst
Für die Wartung Ihrer Leica Ausrüstung sowie in Schadensfällen steht
Ihnen der Customer Service der Leica Camera AG oder der ReparaturService einer Leica Landesvertretung zur Verfügung (Adressenliste siehe
Garantiekarte).
Leica Camera AG
Customer Service
Solmser Gewerbepark 8
D-35606 Solms
Tel.: +49 (0) 6442-208-189
Fax: +49 (0) 6442-208-339
customer.service@leica-camera.com
31
Page 32

• HDMI, das HDMI-Logo und “High-Definition
Multimedia Interface” sind Marken bzw.
eingetragene Marken von HDMI Licensing
LLC in den USA und anderen Ländern.
• Bei „AVCHD“ und dem AVCHD-Logo
handelt es sich um Marken von Panasonic
Corporation und Sony Corporation.
• Hergestellt unter Lizenz von Dolby
Laboratories.
Dolby und das Doppel-D-Symbol sind
Warenzeichen von Dolby Laboratories.
• SDXC Logo ist ein Markenzeichen von SD3C, LLC.
• QuickTime und das QuickTime-Logo
sind Warenzeichen bzw. eingetragene
Warenzeichen der Apple Inc., die mit Lizenz
genutzt werden.
• Dieses Produkt verwendet “DynaFont” der
DynaComware Corporation. DynaFont
ist ein eingetragenes Warenzeichen der
DynaComware Taiwan Inc.
• Leica ist ein eingetragenes Warenzeichen der
Leica Microsystems IR GmbH.
• Elmar ist ein eingetragenes Warenzeichen
der Leica Camera AG.
• Bei allen sonstigen in dieser Anleitung
erwähnten Firmennamen und
Produktbezeichnungen handelt es sich
um Marken bzw. eingetragene Marken der
betreffenden Unternehmen.
32
EU
Page 33

FÜR NOTIZEN
33
Page 34

Dear Customer,
Thank you for having purchased the Leica V-Lux 30!
You have purchased one of the most sophisticated and reliable products
on the market today. Used properly, we’re sure it will bring you and your
family years of enjoyment.
The serial number is on the tag located on the underside of your camera.
Be sure to retain these instructions as your convenient camera
information source. Please note that the actual controls and components,
menu items, etc. of your Leica V-Lux 30 may look somewhat different
from those shown in the illustrations in these instructions.
Carefully observe copyright laws.
• Recording of pre-recorded tapes or discs or other published or
broadcast material for purposes other than your own private use may
infringe copyright laws. Even for the purpose of private use, recording
of certain material may be restricted.
• Before connecting, operating or adjusting your camera, please read
these instructions completely.
• More details on the operation of this camera are contained in the
instructions for advanced features (PDF format) on the supplied CDROM. Install them on your PC to read them.
(U.S. only)
A lithium ion battery that is recyclable powers
the product you have purchased. Please call
1-800-8-BATTERY for information on how to recycle
this battery.
Information for Your Safety
(U.S. only)
The mains outlet must be located near the connected equipment and it
must be easily accessible.
This Class B digital apparatus complies with Canadian ICES-003.
34
Page 35

ENGLISH
FCC Note: (U.S. only)
This equipment has been tested and found to comply with the limits
for a Class B digital device, pursuant to Part 15 of the FCC Rules.
These limits are designed to provide reasonable protection against
harmful interference in a residential installation. This equipment
generates, uses, and can radiate radio frequency energy and, if not
installed and used in accordance with the instructions, may cause
harmful interference to radio communications. However, there is no
guarantee that interference will not occur in a particular installation. If
this equipment does cause harmful interference to radio or television
reception, which can be determined by turning the equipment off and
on, the user is encouraged to try to correct the interference by one or
more of the following measures:
• Reorient or relocate the receiving antenna.
• Increase the separation between the equipment and receiver.
• Connect the equipment into an outlet on a circuit different from that to which
the receiver is connected.
• Consult the dealer or an experienced radio/TV technician for help.
FCC Caution: To assure continued compliance, follow the attached
installation instructions and use only shielded interface
cables with ferrite core when connecting to computer or
peripheral devices.
Any changes or modifications not expressly approved by the party
responsible for compliance could void the user’s authority to operate
this equipment.
Declaration of Conformity
Trade Name: Leica
Model No.: LEICA V-LUX 30
Support Contact: Leica Camera Inc.
This device complies with Part 15 of the FCC
Rules. Operation is subject to the following
two conditions: (1) This device may not cause
harmful interference, and (2) this device must
accept any interference received, including
interference that may cause undesired
operation.
1 Pearl Court, Unit A
Allendale, New Jersey 07401
Phone: i1 201 995 0051 232
Fax: i1 201 995 1684
e-mail: olesin@aol.com
LEICA
V-LUX 30
FOR HOME OR OFFICE USE
35
Page 36

(U.K. only)
Caution for AC mains lead
For your safety, please read the
following text carefully.
This appliance is supplied with a
moulded three pin mains plug for your
safety and convenience.
A 5-ampere fuse is fitted in this plug.
Should the fuse need to be replaced
please ensure that the replacement
fuse has a rating of 5-ampere and that it
is approved by ASTA or BSI to BS1362.
Check for the ASTA mark
mark
on the body of the fuse.
If the plug contains a removable fuse
cover you must ensure that it is refitted
when the fuse is replaced.
If you lose the fuse cover the plug must
not be used until a replacement cover
is obtained.
A replacement fuse cover can be
purchased from your local dealer.
CAUTION!
IF THE FITTED MOULDED PLUG IS
UNSUITABLE FOR THE SOCKET
OUTLET IN YOUR HOME THEN
THE FUSE SHOULD BE REMOVED
AND THE PLUG CUT OFF AND
DISPOSED OF SAFELY.
THERE IS A DANGER OF SEVERE
ELECTRICAL SHOCK IF THE CUT
OFF PLUG IS INSERTED INTO ANY
13- AMPERE SOCKET.
If a new plug is to be fitted please
observe the wiring code as stated
below.
If in any doubt please consult a qualified
electrician.
■
IMPORTANT
The wires in this mains lead are
coloured in accordance with the
following code:
Blue: Neutral, Brown: Live.
or the BSI
As these colours may not correspond
with the coloured markings identifying the
terminals in your plug, proceed as follows:
The wire which is coloured Blue must
be connected to the terminal which is
marked with the letter N or coloured
Black or Blue.
The wire which is coloured Brown must
be connected to the terminal which is
marked with the letter L or coloured
Brown or Red.
WARNING: DO NOT CONNECT
EITHER WIRE TO THE EARTH
TERMINAL WHICH IS MARKED WITH
THE LETTER E, BY THE EARTH
SYMBOL
OR GREEN/YELLOW.
THIS PLUG IS NOT WATERPROOF
KEEP DRY.
■
Before use
Remove the connector cover.
■
How to replace the fuse
The location of the fuse differ according
to the type of AC mains plug (figures A
and B). Confirm the AC mains plug fitted
and follow the instructions below.
Illustrations may differ from actual AC
mains plug.
1.
Open the fuse cover with a screwdriver.
Figure A Figure B
2. Replace the fuse and close or attach
the fuse cover.
Figure A
OR COLOURED GREEN
Fuse cover
Figure B
Fuse
(5 ampere)
Fuse
(5 ampere)
36
Page 37

WARNING:
TO REDUCE THE RISK OF FIRE, ELECTRIC SHOCK OR PRODUCT
DAMAGE,
•
DO NOT EXPOSE THIS CAMERA TO RAIN, MOISTURE, DRIPPING OR
SPLASHING AND THAT NO OBJECTS FILLED WITH LIQUIDS, SUCH
AS VASES, SHALL BE PLACED ON THE CAMERA.
• USE ONLY THE RECOMMENDED ACCESSORIES.
• DO NOT REMOVE THE COVER (OR BACK); THERE ARE NO
USER SERVICEABLE PARTS INSIDE.
Refer servicing to your Leica dealer, Leica Customer Service station,
an authorized Leica service station / the Leica distributer in your
country (for addresses, see Warranty Card), or the Leica Customer
Service department (for address →62).
■
About the battery
CAUTION
Battery (Lithium ion battery)
• Use the specified camera to recharge the battery.
• Do not use the battery with equipment other than the specified camera.
• Do not get dirt, sand, liquids, or other foreign matter on the terminals.
• Do not touch the plug terminals (+ and −) with metal objects.
• Do not disassemble, remodel, heat or throw into fire.
If any electrolyte should come into contact with your hands or clothes,
wash it off thoroughly with water.
If any electrolyte should come into contact with your eyes, never rub
the eyes. Rinse eyes thoroughly with water, and then consult a doctor.
CAUTION
Danger of explosion if battery is incorrectly replaced. Replace only with
the same or equivalent type recommended by Leica. Dispose of used
batteries according to the Leica’s instructions.
• Do not heat or expose to flame.
• Do not leave the batteries in an automobile exposed to direct sunlight
for a long period of time with doors and windows closed.
Warning
Risk of fire, explosion and burns. Do not disassemble, heat above 60 °C
(140 °F) or incinerate.
37
Page 38

■
About the charger
CAUTION!
DO NOT INSTALL OR PLACE THIS CAMERA IN A BOOKCASE,
BUILT-IN CABINET OR IN ANOTHER CONFINED SPACE. ENSURE
THE CAMERA IS WELL VENTILATED. TO PREVENT RISK OF
ELECTRIC SHOCK OR FIRE HAZARD DUE TO OVERHEATING,
ENSURE THAT CURTAINS AND ANY OTHER MATERIALS DO NOT
OBSTRUCT THE VENTILATION VENTS.
Charger
This charger operates on AC between 110 V and 240 V.
But
• In the U.S.A. and Canada, the charger must be connected to a 120 V
AC power supply only.
• When connecting to an AC supply outside of the U.S.A. or Canada,
use a plug adapter to suit the AC outlet configuration.
• The battery charger is in the standby condition when the AC power supply cord
is connected. The primary circuit is always “live” as long as the power cord is
connected to an electrical outlet.
■
Cautions for Use
• Do not use any other AV cables except the supplied one (→41).
• Do not use any other USB connection cables except the supplied one (→41).
• Do not use any other HDMI mini cable except the Leica model (available as
accessory, →41).
Keep this camera as far away as possible from electromagnetic equipment
(such as microwave ovens, TVs, video games etc.).
• If you use this camera on top of or near a TV, the pictures and/or sound on this
camera may be disrupted by electromagnetic wave radiation.
• Do not use this camera near cell phones because doing so may result in noise
adversely affecting the pictures and/or sound.
• Recorded data may be damaged, or pictures may be distorted by strong magnetic
fields created by speakers or large motors.
• Electromagnetic wave radiation generated by microprocessors may adversely
affect this camera, disturbing the pictures and/or sound.
• If this camera is adversely affected by electromagnetic equipment and stops
functioning properly, turn it off and remove the battery. Then reinsert the battery
and turn the camera back on.
Do not use this camera near radio transmitters or high-voltage lines.
• If you record near radio transmitters or high-voltage lines, the recorded pictures
and/or sound may be adversely affected.
38
Page 39

Information for Users on Collection and Disposal of Old
Equipment and used Batteries
Cd
These symbols on the products, packaging, and/or
accompanying documents mean that used electrical and
electronic products and batteries should not be mixed with
general household waste.
For proper treatment, recovery and recycling of old
products and used batteries, please take them to
applicable collection points, in accordance with your
national legislation and the Directives 2002/96/EC and
2006/66/EC.
By disposing of these products and batteries correctly,
you will help to save valuable resources and prevent
any potential negative effects on human health and
the environment which could otherwise arise from
inappropriate waste handling.
For more information about collection and recycling of
old products and batteries, please contact your local
municipality, your waste disposal service or the point of
sale where you purchased the items.
Penalties may be applicable for incorrect disposal of this
waste, in accordance with national legislation.
For business users in the European Union
If you wish to discard electrical and electronic equipment,
please contact your dealer or supplier for further
information.
[Information on Disposal in other Countries outside
the European Union]
These symbols are only valid in the European Union. If
you wish to discard these items, please contact your local
authorities or dealer and ask for the correct method of
disposal.
Note for the battery symbol (bottom two symbol
examples):
This symbol might be used in combination with a chemical
symbol. In this case it complies with the requirement set by
the Directive for the chemical involved.
39
Page 40

Table of Contents
Information for Your Safety .....34
Before use
Scope of Delivery .....................41
Accessories ..............................41
Names of Components ............42
Cursor buttons ................................43
Touch operations ......................44
Preparations
Charging the battery ................46
Inserting and removing the card/
the battery .................................48
Picture save destination
(cards and built-in memory) ...........49
Setting the clock .......................50
About GPS .....................................51
Setting the menu ......................52
This product is licensed under the AVC patent portfolio license for the personal
and noncommercial use of a consumer to (i) encode video in compliance with
the AVC Standard (“AVC Video”) and/or (ii) decode AVC Video that was encoded
by a consumer engaged in a personal and non-commercial activity and/or was
obtained from a video provider licensed to provide AVC Video. No license is
granted or shall be implied for any other use. Additional information may be
obtained from MPEG LA, LLC.
See http://www.mpegla.com.
Basics
Selecting the Recording
Mode ..........................................53
Taking pictures with
[Snapshot Mode] ......................54
AF Tracking ....................................55
Taking motion pictures ............56
Viewing your pictures
[Normal Play] ............................57
Deleting pictures ......................57
Others
Using the instructions on the
supplied CD-ROM .....................58
Technical Data ..........................59
Leica Service Addresses .........62
40
Page 41

Scope of Delivery Accessories
®
®
®
Order No.
(delivery differs
depending on
markets)
423-083.001-023
423-083.001-024
423-083.001-025
423-083.001-026 /
-027
(delivery differs
depending on
markets)
Rechargeable
battery
BP-DC7-E 18 701
BP-DC7-U 18 702
Charger
BC-DC7-E 423-082.001-012
BC-DC7-U 423-082.001-010
BC-DC7-TK 423-083.001-028
Mains cable
EU 423-068.801-019
UK 423-068.801-020
AUS 423-068.801-023
TW 424-025.002-000
CN 423-082.805-004
KR 423-082.805-005
Wrist strap 423-068.801-015
CD with instr.
PDFs
DVD with Adobe
Photoshop
®
Elements
DVD with Adobe
®
Premiere
Elements
USB cable 423-083.001-020
AV cable 423-083.001-022
Touch pen 423-083.001-029
Button template for
Canada / Taiwan
Short instructions 93 374 -377
Warranty Card 439-399.100-026
®
Leather case 18 751
Soft leather case 18 714
HDMI mini cable 14 491
Mini tripod 14 320
Tabletop tripod 14 110
Ball and Socket
head
Order No.
14 100
Notes:
• Cards are optional. You can
record or play back pictures on
the built-in memory when you
are not using a card.
• Check that all items belonging
to the scope of delivery are
included before using the
camera.
• The items and their shape may
differ depending on the country
or area where the camera was
purchased.
• Please dispose of all packaging
appropriately (→39).
• Keep small parts in a safe place
out of the reach of children.
41
Page 42

Names of Components
Camera ON/OFF switch
Shutter button
Mode dial
Flash
Self-timer indicator/AF Assist Lamp
Lens barrel
Lens
Zoom lever
LCD monitor
[EXPOSURE] button
[DISP.] button
[Q.MENU]/[
(Delete/Return) button
/ ]
42
Speaker
GPS antenna
GPS status
indicator
Microphone
Motion picture
button
REC/PLAY switch
Tripod thread
• When you use a tripod, make
sure it is stable when the camera
is attached to it.
Card/Battery door
Release lever
Page 43

Cursor buttons
Wrist strap eyelet
The illustrations and screens in these instructions may differ from your
camera.
[MENU/SET]
(menu display/set/finish)
Left cursor button (◄)
• Self-timer
Down cursor button (▼)
• Macro Mode etc.
In this manual, the button that is used is indicated by▲▼◄►.
●
Up cursor button (▲)
•
Exposure Compensation,
Auto Bracket etc.
Right cursor button (►)
• Flash
We recommend using the
supplied wrist strap to avoid
dropping the camera.
HDMI socket
[AV OUT/DIGITAL] socket
We recommend you use a battery with sufficient battery power when
recording motion pictures.
43
Page 44

Touch operations
This camera’s monitor surface senses pressure that is applied to it.
Touch
To “touch” is to press the monitor’s surface and then pull the finger
back again.
Touching is used to select icons or pictures, among other actions.
• Touch an icon near its center. If multiple icons are touched simultaneously, the
camera may not operate normally.
Drag
To “drag” is to touch and slide your finger across the monitor’s surface.
Dragging (sliding your finger across the monitor’s surface) is used to scroll the
pictures or change the range of the pictures displayed.
44
Page 45

If you want to use one of the protective foils available on the market on
●
the monitor, observe the precautions that are contained with the foil.
(Some types may impair the monitor’s visual recognition and ease of
operation.)
If the camera is used with such a foil resulting in the monitor not being
●
very responsive, apply a little more pressure.
If you apply pressure to the monitor’s surface with your hand when
●
holding the camera, it will not work properly.
Do not use objects with hard pointed tips (such as ball point pens or
●
your fingernails) instead of the supplied touch pen.
Clean the monitor with a soft dry cloth if there are fingerprints or other
●
kinds of dirt on it.
■
Touch pen
The touch pen (supplied) comes in handy when doing the kinds of jobs
that require close or careful operation and your fingertips are too large
to perform the operations easily.
• Do not use any other pen than the supplied one.
• Keep the touch pen out of the reach of infants and small children.
• Do not place the touch pen on the monitor when storing. The monitor
may break when the touch pen is pressed strongly against it.
45
Page 46

Charging the battery
■
About batteries that you can use with this camera
The only battery that can be used with this camera is the Leica battery
BP-DC7 (→41).
It has been found that counterfeit batteries which look very
similar to the genuine products are available in some markets.
Some of these batteries are not adequately protected with
internal protection to meet the requirements of appropriate safety
standards. There is a possibility that these batteries may lead to
fire or explosion. Please be advised that Leica Camera AG is not
liable for any accident or failure occurring as a result of use of a
counterfeit battery. To ensure that the batteries used are safe, we
urgently recommend to use only the dedicated Leica battery.
• Use only the dedicated charger and battery.
• The camera has a function for distinguishing batteries which can
be used safely. The dedicated Leica battery BP-DC7 (→41) supports
this function. Batteries which do not support this function cannot
be used. Leica Camera AG cannot in any way guarantee the
quality, performance, or safety of any other batteries.
• The battery is not charged when the camera is shipped. Charge
the battery and set the clock before use.
• Charge the battery with the charger indoors (10°C - 30°C (50°F -
86°F)).
Insert the battery into the charger
The terminals should face the charger’s contacts
and the Leica logo upwards.
46
Page 47

Connect the charger to the electrical outlet
Charging light
Plug-in type
●
Cable type
●
([CHARGE])
On: Charging in
progress (approx.
130 min. if fully
depleted)
Off: Charging complete
Detach the battery after charging is completed
■
Recording capacity guidelines (pictures/recording time)
Number of recordable
pictures
Recording time Approx. 130 min
Playback time Approx. 210 min
Recording conditions by CIPA standard
• CIPA is an abbreviation of [Camera & Imaging Products Association].
• [Program AE] Mode.
• [GPS Setting] is set to [OFF]
• Temperature: 23°C (73.4°F)/Humidity: 50%RH when monitor is on.
• Using a 32MB memory card.
• Using the supplied battery.
• Starting recording 30 seconds after the camera is turned on. (When the
Optical Image Stabilizer function is set to [ON].)
Recording once every 30 seconds with full flash every second recording.
•
•
Rotating the zoom lever from Tele to Wide or vice versa in every recording.
• Turning the camera off every 10 recordings and leaving it until the
temperature of the battery decreases.
The number of recordable pictures or available operating time may vary
according to surrounding environment and usage conditions. Figures may
be reduced if flash, zoom, or other functions are used frequently, or in
colder climates.
Approx. 260 pictures
47
Page 48

Inserting and removing the card/
the battery
Set the camera ON/OFF switch
to OFF and slide the release
lever ( ) to [OPEN], then open
the card/battery door
Insert the battery and card,
making sure that their
orientation is correct
Battery: Push it in until it is locked by the
Card: Push it down until it clicks into place.
Close the card/battery door
Slide the release lever to the [LOCK]
position.
■
To remove
• To remove the battery:
Move the gray lever in the direction
of the arrow.
gray lever.
• To remove the card:
Push it further down until it
clicks, then pull it out upright.
[OPEN] [LOCK]
Lever
Use only the Leica battery BP-DC7 (→41).
●
Leica Camera AG cannot guarantee the quality of any other batteries.
●
Insert the card fully, otherwise it may be damaged.
●
48
Page 49

Picture save destination (cards and built-in memory)
■
Built-in memory (approx. 18 MB)
The built-in memory can be used as a temporary storage device when
●
the card being used becomes full.
The access time for the built-in memory may be longer than the access
●
time for a card.
■
Compatible memory cards (available as accessory)
The following cards which conform to the SD standard can be used
with the camera:
Type of Card Capacity Notes
SD
Memory Cards
SDHC
Memory Cards
SDXC
Memory Cards
∗
SD speed class refers to a specification for sustained write speeds.
Confirm the SD speed by checking the card label or other card related
materials.
(Example)
Keep the Memory Card out of reach of children to prevent swallowing.
●
8 MB – 2 GB
4 GB – 32 GB
48 GB, 64 GB
• Using a card of SD speed “Class 4”∗ or above
is recommended for recording motion pictures
in [AVCHD].
Using a card of SD speed “Class 6”
is recommended for recording motion pictures
in “Motion JPEG”.
• Can be used with devices compatible with the
respective formats.
• Before using SDXC memory cards, check that
your computer and other devices support this
type of card.
• Only the cards listed on the left with the given
capacities are supported.
∗
or above
49
Page 50

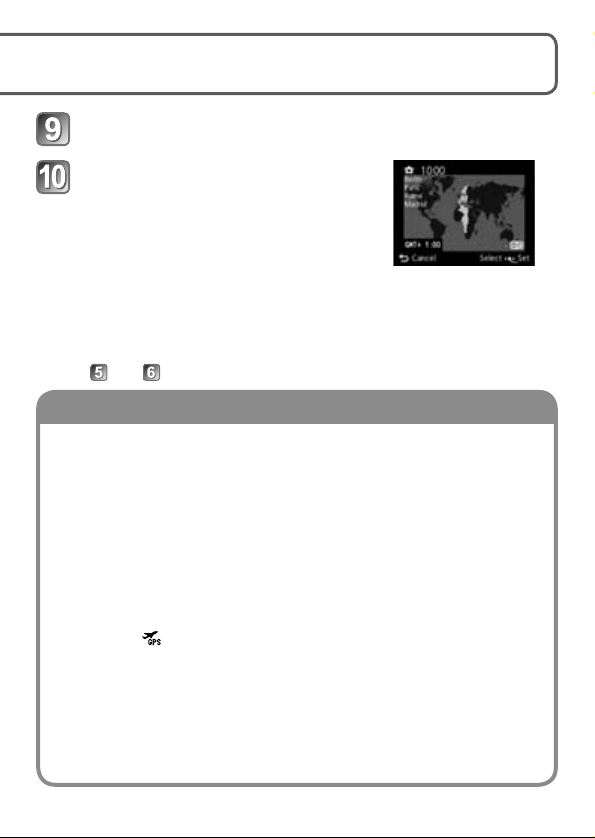
Setting the clock
The clock is not set when the camera is shipped.
Turn on the power ( )
Press [MENU/SET] ( ) while the
message is displayed
Press ▲▼ to select the
language, and then [MENU/SET]
• The [Please set the clock] message
appears.
Press [MENU/SET]
Press ◄► to select the items (year, month,
day, hour, minute, display order or time display
format), and then ▲▼ to set
• To cancel → Press [ / ].
Press [MENU/SET]
Confirm the setting and press [MENU/SET]
• To return to the previous screen, press [ / ].
Press ◄ to select [Yes] and then [MENU/SET] if
automatically correcting time of day using the
GPS function
• To manually set date and time → select [No].
50
Page 51

About GPS
When [Please set the home area] is displayed,
press [MENU/SET]
Press ◄► to set your home
area and then [MENU/SET]
The current time and home area are set.
• [GPS Setting] turns [ON].
• Turn on power again and check the time
display.
■
To change the time setting
Select [Clock Set] from [Rec] or [Setup] menu, perform and .
When GPS is used, the camera performs the following functions.
• Records location name information and the latitude and longitude
for the positioned location on the recorded pictures
• Corrects automatically to the current time
■
When [GPS Setting] is [ON], the GPS function works
even if the camera’s power is off.
• Electromagnetic waves from the camera can affect instruments
and meters. During airplane takeoff and landing or in other
restricted areas, set [GPS Setting] to [OFF] or , then turn the
camera’s power off.
• When [GPS Setting] is [ON], power will drain from the battery
even if the camera’s power is OFF.
Important:
The use of GPS within the People’s Republic of China and near its
borders is prohibited by the country’s legislature (with the exception
of Hong Kong and Macao). Violations will be persecuted by PRC
authorities! The camera’s GPS functions are therefore automatically
disabled in these areas.
51
Page 52

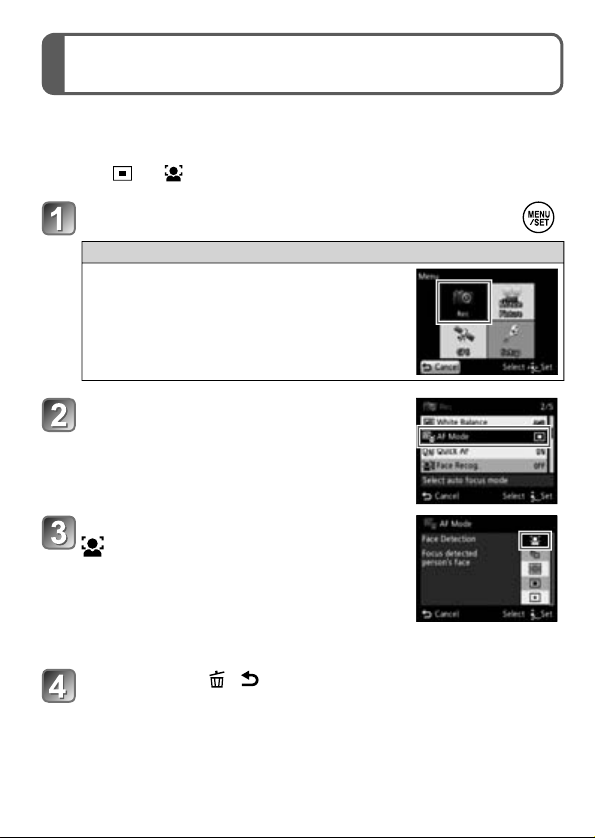
Setting the menu
Refer to the following procedures to operate the menus.
Example: Setting [AF Mode] from to in the [Program AE] Mode
Press [MENU/SET] to display the menu
Switching to the [Rec] menu
Select [Rec], and press [MENU/SET].
• The menu type can also be selected by
touch operations.
Press ▲▼ to select [AF Mode]
and then press [MENU/SET]
Press ▲▼ to select and then
press [MENU/SET] to set
• Depending on the item, its setting may not
appear or it may be displayed in a different
way.
Press [ / ] several times to
close the menu
52
Page 53

Selecting the Recording Mode
Turn on the power ( )
Slide the [REC/PLAY] switch
( ) to
Switch the mode by rotating the
mode dial ( )
[Snapshot Mode]
For taking pictures with snapshot mode (with extended automatic settings).
[Program AE] Mode
For taking pictures with automatic exposure control.
[Aperture-Priority] Mode
The exposure is determined by the automatically controlled shutter speed,
based on the manually set aperture value.
[Shutter-Priority] Mode
The exposure is determined by the automatically controlled aperture value,
based on the manually set shutter speed.
[Manual Exposure] Mode
The exposure is determined by the manually set aperture value and shutter
speed.
[Custom] Mode
For taking pictures with previously registered settings.
[3D Photo Mode]
For taking 3D still pictures.
[Scene Mode]
For taking pictures with factory-registered settings matching the scene
being recorded.
[My SCN Mode]
For taking pictures with frequently-used Scene Modes.
53
Page 54

Taking pictures with [Snapshot Mode]
Recording Mode:
Optimum settings are made automatically by the camera based on
information such as “face,” “movement,” “brightness,” and “distance” just
by pointing the camera at the subject. This results in sharp and wellexposed pictures without the need to make settings manually.
Turn on the power ( )
Shutter button
Slide the [REC/PLAY] switch
( ) to
Set the mode dial ( ) to
Take pictures
Press halfway
(press lightly and focus)
• To prevent camera shake, hold the camera with both hands, press
your arms to your body, and stand with your feet at shoulder width.
• Focus display (
(In focus: lit / Not in focus: flashing)
• With the Face Detection function, the AF
frame ( ) appears over a subject’s face.
In other cases, the frame is displayed at
the point on the subject which is in focus.
• Focus: Max. W: 3 cm (13/16”)/Max. T: 1 m (3’ 33/8”) and above
(7 × to 11 × is 2 m (6’ 63/4”) to )
)
Press fully
(press the button
all the way to record)
54
Page 55

■
Automatic Scene Detection
The camera identifies the scene when pointed at the subject, and
makes optimum settings automatically. The type of scene detected is
indicated by a blue icon for two seconds.
Appears when persons are detected.
Appears when a baby is detected.
Appears when a distant subject is detected.
Appears when persons and night scenery are detected.
(Only when
Appears when a poorly illuminated scenery is detected.
Appears when a poorly illuminated subject and camera shake scenes
without a tripod.
Appears when a subject close to the camera is detected.
Appears when a sunset is detected.
Automatically selected in case of subject movement to reduce blurring
when the scene does not correspond to any of the above.
is selected)
If the camera automatically identifies a scene in which persons appear
in the picture ( , , ), Face Detection is activated, and focus and
exposure are adjusted based on the recognized faces.
AF Tracking
This function enables the camera to continue to focus on the subject and
adjust the exposure even when it moves.
Perform these operations with the touch shutter release function.
Touch the subject
• When switching to lock on to another subject
→ Touch the other subject.
• To release AF tracking → Touch .
55
Page 56

Taking motion pictures
Recording Mode:
This records motion pictures with audio. Zoom can also be used during
recording.
Slide the [REC/PLAY] switch to
To start recording
Press
To end recording
Press
■
Recording time
A single [Motion JPEG]-format motion picture take can be recorded
up to a maximum file size of 2GB (Even with more memory capacity
available than 2GB, the recording will be terminated when its file size
reaches the maximum 2GB.)
• With camera models 18 163 / 18 164:
An AVCHD motion picture can be recorded continuously for up to
29 minutes when [GFS] or [FSH] is set.
• With camera model 18 162:
Motion pictures can be recorded continuously for up to 29 minutes.
Release the motion picture button immediately after pressing it all the
●
way.
When there is no memory capacity left to store the motion picture,
●
recording automatically ends.
If [Rec Quality] is set to [GFS] or [FSH], and if the surrounding
●
temperature is high, or a motion picture is being recorded
continuously, is displayed, and the recording may be stopped
halfway through.
Elapsed recording time
Remaining recording time
(approx.)
56
Page 57

Viewing your pictures [Normal Play]
Playback Mode:
Slide the [REC/PLAY] switch
( ) to
Drag your finger across the
screen, and select the picture to
be played back
To play back a motion picture, select an image with ◄ or ►, and then
●
press ▲ to start playback.
You can print pictures by connecting a camera to your computer or
●
printer, or by having the pictures printed from the card by your photo
shop.
Deleting pictures
Playback Mode:
Deleted pictures cannot be recovered.
Press [ / ] ( ) to delete the
displayed picture
Press ◄ to select [Yes] and
then press [MENU/SET] ( )
57
Page 58

Using the instructions on the supplied
CD-ROM
• You have practised the basic operations introduced in these instructions
and want to progress to advanced operations.
• You want to check the Troubleshooting.
In these kinds of situations, refer to the instructions (PDF format) on the
supplied CD-ROM.
Turn the PC on and insert the supplied CD-ROM
Open the CD-ROM
Double click on the PDF with the desired language
to open it
■
When the instructions (PDF format) will not open
You will need Adobe Acrobat Reader 5.0 or later or Adobe Reader 7.0
or later to browse or print the instructions (PDF format).
• You can download and install a version of Adobe Reader that you can
use with your OS from the following Web Site.
http://get.adobe.com/reader/otherversions
58
Page 59

Technical Data
1
Image sensor
Effective pixels 14,100,000
Minimum
illuminance
Lens LEICA DC VARIO-ELMAR
Focus range
P/A/S/M 50 cm/1’ 7
Macro/
Snapshot/
Motion pictures
Scene modes There may be difference to the ranges above.
Digital zoom max. 4x
Extended optical
zoom
Shutter system Electronically and mechanically controlled
Shutter speed 60 s -
Series exposures Frame rate
With mechanical
shutter
With electronic
shutter
During motion
picture recording
2.33
/
” MOS sensor, total pixel number: 15,100,000,
primary color filter
approx. 14 lx
(With camera models 18 163 / 18 164:
when i-low light is used, the shutter speed is
(With camera model 18 162:
when i-low light is used, the shutter speed is 1/
F/3.3 (wide) – 5.9 (tele) 4.3 - 68.8 mm ASPH.
35 mm camera equivalent: 24 - 384 mm
11
/16’’ (wide) / 2 m/6’ 63/4’’ (tele) to
3 cm/13/16” (wide) / 1 m/3’ 33/8’’ (tele) to
max. 33.8x
(when resolution is set to 3 million pixels [3M] or less)
1
4000
/
s, [Starry Sky] mode: 15 s/30 s/60 s
(Frequency (frames per second) /
(maximum no. of frames/maximum resolution)
Approx. 2 fps (100/14M) / 5 fps (100/14M) /
10 fps (15/14M)
40 fps (50/5M) / 60 fps (60/3.5M)
Approx. 2 fps (40/3.5M) / 5 fps (40/3.5M) /
10 fps (40/3.5M)
1
60
/
s)
50
s)
59
Page 60

Technical Data (Continued)
Exposure modes Program AE (P), Aperture priority AE (A),
Metering modes Multiple-field / Center-weighted / Spot
Flash Built-in flash unit
Flash modes AUTO, AUTO/Red-eye reduction, ON (ON/Red-eye
Flash range
(with ISO AUTO)
LCD monitor 3.0” TFT LCD (approx. 460,000 dots), aspect ratio 4:3,
Microphone Stereo
Speaker Monaural
Recording media Built-in Memory (approx. 18 MB),
Recording file
format
Still pictures JPEG (based on Design rule for Camera File system,
Motion Pictures
(with audio)
GPS
Reception
frequency
Geographical
coordinate
system
Interface Digital: USB 2.0 (High Speed)
Terminals HDMI: for HDMI mini cable (type C)
Shutter priority AE (S), Manual setting (M),
Exposure compensation
(increments: 1/3 EV Steps, range: ±2EV)
reduction), AUTO Slow sync./Red-eye reduction, OFF
approx. 60 cm/1’ 11
(with maximum wide angle setting)
shows approx. 100% of the captured frame
SD/SDHC/SDXC Memory Card
based on Exif 2.3 standard) / corresponds to DPOF / MPO
AVCHD / QuickTime Motion JPEG
1575.42 MHz (C/A code)
WGS84
Data from the PC cannot be written to the camera using
the USB connection cable. (With camera model 18 162)
Analog video/audio:
With camera models 18 163 / 18 164: NTSC Composite
With camera model 18 162: NTSC/PAL Composite
(Switched by menu),
Audio line output (monaural)
AV OUT/DIGITAL: Dedicated jack (8 pin)
5
/8’’ – 5 m/16’ 4”
60
Page 61

Operating
temperature /
humidity
Power consumption DC 5.1 V
When recording 1.4 W
When playing
back
Dimensions
(WxHxD;
lens retracted)
Weight
(with/without card and
battery)
32°F - 104°F / 0°C - 40°C / 10%RH - 80%RH
0.9 W
approx. 105 x 58 x 34 mm /
5
/16 x 29/16 x 111/16” tbd
4
approx. 218 g/0.481 lbs / 196 g/0.432 lbs
Battery (lithium-ion)
Voltage/capacity 3.6 V / 895 mAh
Battery charger
Input AC 110 - 240 V 50/60Hz, 0.2 A
Output DC 4.2 V
0.65 A
61
Page 62

Leica Service Addresses
Leica Academy
As well as outstanding high-performance products for taking and viewing
photographs, for many years we have also been offering the special
services of the Leica Akademie, with practical seminars and training
courses, which are intended to share our knowledge about the world
of photography, projection and magnification with both beginners and
advanced photo graphic enthusiasts.
The contents of the courses, which are run by a trained team of experts
in the modern, well-equipped training suite at our Solms factory and in
the nearby Gut Altenberg, vary from general photography to areas of
special interest and offer a range of suggestions, information and advice
for your own work.
More detailed information and the current Leica Academy brochure are
available from:
Leica Camera AG
Leica Akademie
Oskar-Barnack-Str. 11
D-35606 Solms
Phone: +49 (0) 6442-208-421
Fax: +49 (0) 6442-208-425
la@leica-camera.com
Leica on the Internet
Current information about products, news, events and the Leica company
is available on our homepage on the Internet at:
http://www.leica-camera.us
http://www.leica-camera.co.uk
62
Page 63

Leica Information Service
Should you have any technical questions regarding the use of Leica
products or the software included in some cases, Leica information
service will be happy to answer in writing or by phone, fax, or e-mail.
They are also your contact if you need advice concerning an acquisition
or if you would like us to send you instructions.
Alternatively, you can also send us your questions through the contact
form on the Leica Camera AG homepage (see above).
Leica Camera AG
Information-Service / Software-Support
Postfach 1180
D 35599 Solms
Phone: +49 (0) 6442-208-111 / -108
Fax: +49 (0) 6442-208-490
info@leica-camera.com / software-support@leica-camera.com
Leica Customer Service
Leica AG’s Customer Service center, or the repair service of the Leica
national offices (see the Warranty Card for an address list), is available to
assist you in maintaining your Leica equipment or in case of damage.
Please contact your nearest authorised Leica dealer.
Leica Camera AG
Customer Service
Solmser Gewerbepark 8
D-35606 Solms
Phone: +49 (0) 6442-208-189
Fax: +49 (0) 6442-208-339
customer.service@leica-camera.com
63
Page 64

• HDMI, the HDMI Logo, and High-Definition
Multimedia Interface are trademarks or
registered trademarks of HDMI Licensing LLC
in the United States and other countries.
• The “AVCHD” and the “AVCHD” logo are
trademarks of Panasonic Corporation and
Sony Corporation.
• Manufactured under license from Dolby
Laboratories. Dolby and the double-D symbol
are trademarks of Dolby Laboratories.
• SDXC Logo is a trademark of SD-3C, LLC.
• QuickTime and the QuickTime logo are
trademarks or registered trademarks of Apple
Inc., used under license therefrom.
• This product uses “DynaFont” from
DynaComware Corporation. DynaFont is
a registered trademark of DynaComware
Taiwan Inc.
• Leica is a registered trademark of Leica
Microsystems IR GmbH.
• Elmar is a registered trademark of Leica
Camera AG.
• Other names, company names, and product
names printed in these instructions are
trademarks or registered trademarks of the
companies concerned.
64
EU
Page 65

MEMO
65
Page 66

À notre clientèle,
Nous tenons à vous remercier d’avoir choisi cet appareil photo
numérique Leica V-Lux 30. Veuillez lire attentivement le présent manuel
et le conserver pour référence ultérieure. Veuillez noter que les véritables
commandes, composantes, options de menu, etc., de votre appareil
photo numérique peuvent avoir une apparence différente de celle des
illustrations du présent Mode d’emploi.
Il importe de respecter les droits d’auteur.
• L’enregistrement de bandes ou de disques préenregistrés ou de tout
autre matériel publié ou diffusé pour des buts autres qu’un usage privé
et personnel peut violer les lois de droits d’auteur. Même sous des buts
d’usage privé, l’enregistrement de certain matériel peut-être réservé.
Pour votre sécurité
AVERTISSEMENT :
POUR RÉDUIRE LES RISQUES D’INCENDIE, DE CHOC
ÉLECTRIQUE OU DE DOMMAGES À L’APPAREIL,
• NE PAS EXPOSER CET APPAREIL À LA PLUIE, À L’HUMIDITÉ, À
L’ÉGOUTTEMENT OU AUX ÉCLABOUSSURES, ET NE PLACER
DESSUS AUCUN OBJET REMPLI DE LIQUIDE, TEL QU’UN VASE
PAR EXEMPLE.
• UTILISER UNIQUEMENT LES ACCESSOIRES RECOMMANDÉS.
• NE PAS RETIRER LE COUVERCLE (OU LE PANNEAU
ARRIÈRE) ; IL N’Y A AUCUNE PIÈCE RÉPARABLE PAR
L’UTILISATEUR À L’INTÉRIEUR. CONFIER TOUTE RÉPARATION
AU PERSONNEL DE SERVICE APRÈS-VENTE QUALIFIÉ.
LA PRISE DE COURANT DOIT SE TROUVER À PROXIMITÉ DE
L’APPAREIL ET ÊTRE FACILEMENT ACCESSIBLE.
■
Inscriptions d’identification du produit
Produit Emplacement
Appareil photo numérique Dessous
Chargeur de batterie Dessous
66
Page 67

FRANÇAIS
■
À propos de la batterie
MISE EN GARDE
Une batterie de remplacement inappropriée peut exploser. Ne
remplacez qu’avec une batterie identique ou d’un type recommandé
par le fabricant. L’élimination des batteries usées doit être faite
conformément aux instructions du manufacturier.
• Évitez de chauffer ou d’exposer à une flamme.
• Ne laissez pas la batterie pour une période prolongée dans un véhicule
exposé directement aux rayons du soleil toutes portes et fenêtres
fermées.
Avertissement
Risque d’incendie, d’explosion et de brûlures. Ne pas démonter,
chauffer à plus de 60 °C ou incinérer.
■
À propos du chargeur de batterie
AVERTISSEMENT!
• NE PAS INSTALLER NI PLACER L’APPAREIL DANS UNE BIBLIOTHÈQUE,
UN PLACARD RENFERMÉ NI AUCUN AUTRE ESPACE RÉDUIT DE FAÇON
À ASSURER UNE BONNE VENTILATION. VÉRIFIER QU’AUCUN RIDEAU
NI AUCUN AUTRE MATÉRIAU NE BLOQUE LA VENTILATION DE FAÇON
À ÉVITER TOUT RISQUE DE CHOC ÉLECTRIQUE OU DE FEU DÛ À UNE
SURCHAUFFE.
• NE BOUCHEZ PAS LES OUVERTURES D’AÉRATION DE L’APPAREIL AVEC
DES JOURNAUX, NAPPES, RIDEAUX OU OBJETS SIMILAIRES.
• NE PLACEZ PAS DE SOURCES DE FLAMMES VIVES TELLES QUE
BOUGIES ALLUMÉES SUR L’APPAREIL.
• JETEZ LES PILES D’UNE MANIÈRE COMPATIBLE AVEC
L’ENVIRONNEMENT.
• Le chargeur de batterie est en mode d’attente quand il est branché. Le circuit
primaire demeure “sous tension” tant que le chargeur de batterie reste branché
sur une prise de courant.
67
Page 68

■
Lors de l’utilisation
• Utilisez exclusivement les câbles AV fournis.
• Utilisez exclusivement le câble de connexion USB fourni.
• Utilisez exclusivement un mini-câble HDMI Leica authentique (en option, →71).
Gardez l’appareil photo le plus loin possible des appareils électromagnétiques
(tels que fours à micro-ondes, téléviseurs, consoles de jeu, etc.).
• Si vous utilisez l’appareil photo sur ou près d’un téléviseur, les photos et le
son de l’appareil photo peuvent être affectés par le rayonnement des ondes
électromagnétiques.
• N’utilisez pas l’appareil photo près d’un téléphone cellulaire car le bruit émis par
ce dernier risquerait d’affecter les photos et le son.
• Les données enregistrées risquent d’être endommagées, ou les photos
déformées par les puissants champs magnétiques générés par les haut-parleurs
ou les gros moteurs.
• Le rayonnement d’ondes électromagnétiques généré par les microprocesseurs
peut affecter l’appareil photo, ainsi que déformer les photos ou le son.
• Si l’appareil photo est affecté par un appareil électromagnétique et ne fonctionne
plus correctement, mettez l’appareil photo hors tension et retirez la batterie.
Ensuite, réinsérez la batterie et mettez l’appareil photo sous tension.
N’utilisez pas l’appareil photo près des émetteurs radio ou des lignes haute
tension.
• Si vous enregistrez près d’un émetteur radio ou d’une ligne haute tension, les
photos et le son enregistrés risquent d’être affectés.
Remarque concernant les batteries et piles
Les batteries rechargeables ou piles usagées ne peuvent
être ajoutées aux déchets ménagers.
Informez-vous auprès de l’autorité locale compétente
afin de connaître les endroits où vous pouvez déposer
celles-ci.
68
Page 69

Avis aux utilisateurs concernant la collecte et l’élimination des
piles et des appareils électriques et électroniques usagés
Cd
Apposé sur le produit lui-même, sur son emballage, ou figurant
dans la documentation qui l’accompagne, ce pictogramme
indique que les piles et appareils électriques et électroniques
usagés doivent être séparés des ordures ménagères.
Afin de permettre le traitement, la valorisation et le
recyclage adéquats des piles et des appareils usagés,
veuillez les porter à l’un des points de collecte prévus,
conformément à la législation nationale en vigueur ainsi
qu’aux directives 2002/96/CE et 2006/66/CE.
En éliminant piles et appareils usagés conformément à la
réglementation en vigueur, vous contribuez à prévenir le
gaspillage de ressources précieuses ainsi qu’à protéger la santé
humaine et l’environnement contre les effets potentiellement
nocifs d’une manipulation inappropriée des déchets.
Pour de plus amples renseignements sur la collecte et le
recyclage des piles et appareils usagés, veuillez vous renseigner
auprès de votre mairie, du service municipal d’enlèvement des
déchets ou du point de vente où vous avez acheté les articles
concernés. Le non-respect de la réglementation relative à
l’élimination des déchets est passible d’une peine d’amende.
Pour les utilisateurs professionnels au sein de l’Union
européenne
Si vous souhaitez vous défaire de pièces d’équipement
électrique ou électronique, veuillez vous renseigner
directement auprès de votre détaillant ou de votre fournisseur.
[Information relative à l’élimination des déchets dans
les pays extérieurs à l’Union européenne]
Ce pictogramme n’est valide qu’à l’intérieur de l’Union
européenne. Pour connaître la procédure applicable dans les
pays hors Union Européenne, veuillez vous renseigner auprès
des autorités locales compétentes ou de votre distributeur.
Note relative au pictogramme à apposer sur les piles
(voir les 2 exemples ci-contre)
Le pictogramme représentant une poubelle sur roues
barrée d’une croix est conforme à la réglementation. Si ce
pictogramme est combiné avec un symbole chimique, il
remplit également les exigences posées par la Directive
relative au produit chimique concerné.
69
Page 70

Contenu
Pour votre sécurité ...................66
Avant l’utilisation
Éléments livrés .........................71
Accessoires en option .............71
Noms des composants ............72
Touche de curseur ..........................73
Opérations par toucher ............74
Préparatifs
Charger la batterie ....................76
Insertion et retrait de la carte/
la batterie...................................78
Destination de sauvegarde des
photos
(cartes et mémoire intégrée) ..........79
Régler l’horloge ........................80
À propos de GPS ...........................81
Régler le menu ..........................82
Ce produit est accordé sous licence du portefeuille de brevets AVC pour
l’utilisation privée et non commerciale par un consommateur, pour (i) coder du
contenu vidéo conformément à la norme AVC (“AVC Vidéo”) et/ou (ii) décoder du
contenu AVC Vidéo codé par un consommateur engagé dans une activité privée
et non commerciale et/ou obtenu d’un fournisseur de contenu vidéo détenteur
d’une licence l’autorisant à fournir du contenu AVC Vidéo. Aucune licence n’est, ni
ne sera accordée implicitement pour tout autre usage. Vous pouvez obtenir des
informations supplémentaires de MPEG LA, LLC.
Voir http://www.mpegla.com.
Notions de base
Sélectionner le mode
d’enregistrement ......................83
Prendre une photo avec les
réglages automatiques
[Mode instantané] .....................84
Recherche MPA .............................85
Filmer .........................................86
Afficher les photos
[Lect. normale] ..........................87
Supprimer des photos .............87
Autres
Lire le mode d’emploi
(format PDF) ..............................88
Données techniques ................89
Adresses de service
après-vente Leica .....................92
70
Page 71

Éléments livrés
®
®
®
№ de commande
(la livraison varie
suivant le marché)
423-083.001-023
423-083.001-024
423-083.001-025
423-083.001-026 /
-027
93 374 -377
(la livraison varie
suivant le marché)
Batterie
rechargeable
BP-DC7-E 18 701
BP-DC7-U 18 702
Chargeur
BC-DC7-E 423-082.001-012
BC-DC7-U 423-082.001-010
BC-DC7-TK 423-083.001-028
Cordon
d’alimentation
EU 423-068.801-019
UK 423-068.801-020
AUS 423-068.801-023
TW 424-025.002-000
CN 423-082.805-004
KR 423-082.805-005
Dragonne 423-068.801-015
CD avec mode
d’emploi PDF
DVD avec Adobe
Photoshop
®
Elements
DVD avec Adobe
®
Premiere
Elements
Câble USB 423-083.001-020
Câble AV 423-083.001-022
Stylet électronique 423-083.001-029
Étiquette de
bouton pour le
Canada et Taïwan
Instructions
abrégées
Carte de garantie 439-399.100-026
®
Accessoires en
option
Étui de cuir 18 751
Étui en cuir souple 18 714
Mini-câble HDMI 14 491
Mini-trépied 14 320
Trépied de table 14 110
Tête à rotule 14 100
Remarques :
• Les cartes sont en option. Vous
pouvez enregistrer des photos
dans la mémoire intégrée ou
en faire la lecture lorsque vous
n’utilisez pas de carte.
• Avant d’utiliser l’appareil photo,
assurez-vous que tous les
éléments livrés sont présents.
• Les composants et leur forme
peuvent varier suivant le pays
ou la région d’achat de l’appareil
photo.
• Veuillez respecter la
réglementation locale pour la
mise au rebut de toutes les
pièces d’emballage (→69).
• Gardez les petites pièces dans
un emplacement sûr, hors de
portée des enfants.
№ de commande
71
Page 72

Noms des composants
Bouton de marche/arrêt de l’appareil photo
Touche d’obturateur
Molette de sélection de mode
Flash
Indicateur de retardateur/
Lampe d’assistance AF
Monture de l’objectif
Objectif
Commande de
zoom
Écran LCD
Touche [EXPOSURE]
Touche [DISP.]
Touche [Q.MENU]/[
(Supprimer/Retour)
72
Haut-parleur
Antenne GPS
Indicateur d’état
GPS
Microphone
Touche d’images
animées
Commutateur
[REC/PLAY]
/ ]
Orifice pour trépied
• Lors de l’utilisation d’un trépied,
assurez-vous qu’il est stable
lorsque l’appareil photo y est fixé.
Couvercle du logement à carte/
batterie
Bouton de libération
Page 73

Touche de curseur
Œillère pour dragonne
Les illustrations et captures d’écran dans ce mode d’emploi peuvent être
différentes du véritable produit.
[MENU/SET]
(afficher le menu/valider/
terminer)
Touche de curseur
gauche (◄)
• Retardateur
Touche de curseur bas (▼)
• Mode macro, etc.
Dans ce manuel, la touche utilisée est indiquée par ▲▼◄►.
●
Touche de curseur haut
(▲)
• Compensation
d’exposition, prises de
vue en rafale, etc.
Touche de curseur droit
(►)
• Flash
Nous vous recommandons
d’utiliser la dragonne fournie
pour ne pas échapper
l’appareil photo.
Prise HDMI
Prise [AV OUT/DIGITAL]
Il est recommandé d’utiliser une batterie suffisamment chargée lors de
l’enregistrement d’images animées.
73
Page 74

Opérations par toucher
Le panneau tactile de cet appareil photo détecte les pressions appliquées
sur l’écran.
Toucher
« Toucher » signifie appuyer sur le panneau tactile puis retirer le doigt.
Le toucher sert, entre autres choses, à sélectionner les icônes et les images.
• Touchez une icône près de son centre. Si vous touchez plusieurs icônes
simultanément, l’appareil risque de ne pas bien fonctionner.
Glisser
« Glisser » signifie toucher la surface du panneau tactile et y faisant
glisser le doigt.
Le glissement (faire glisser le doigt à la surface de l’écran) sert à faire défiler les
images ou à modifier la plage des images affichées.
74
Page 75

En cas d’utilisation d’une pellicule de protection d’écran LCD disponible
●
dans le commerce, suivez les instructions qui accompagnent la
pellicule. (Certaines pellicules de protection peuvent réduire la visibilité
de l’écran et sa facilité d’utilisation.)
Si l’appareil photo est utilisé avec l’écran recouvert d’une pellicule de
●
protection disponible dans le commerce, ou si l’écran ne répond pas
bien aux commandes, appliquez une pression légèrement plus forte
lorsque vous touchez l’écran.
Le panneau tactile ne fonctionnera pas bien si vous tenez l’appareil
●
photo en appuyant la main contre le panneau tactile.
N’utilisez pas d’objets à pointe dure (comme les stylos à bille ou l’ongle
●
de vos doigts) au lieu du stylet électronique fourni.
Nettoyez l’écran LCD avec un chiffon doux et sec s’il est recouvert
●
d’empreintes digitales ou autres saletés.
■
Stylet électronique
Le stylet électronique (fourni) est pratique pour les opérations qui
requièrent beaucoup de précision ou d’attention, et lorsque le bout du
doigt est trop gros pour effectuer facilement une opération.
• Utilisez exclusivement le stylet fourni.
• Gardez le stylet électronique hors de la portée des jeunes enfants et
des bébés.
• Lorsque vous rangez le stylet électronique, ne le placez pas sur
l’écran LCD. Vous risquez d’abîmer l’écran LCD si vous appuyez
dessus trop fort avec le stylet électronique.
75
Page 76

Charger la batterie
■
À propos des batteries utilisables sur cet appareil
La seule batterie utilisable sur cet appareil photo est la batterie BP-DC7
de Leica (→71).
Nous avons constaté que certaines imitations de batterie très
similaires aux batteries authentiques sont disponibles sur
certains marchés. Certaines de ces batteries ne possèdent
pas une protection interne adéquate répondant aux exigences
des normes de sécurité qui s’y appliquent. L’utilisation de ces
batteries comporte un risque d’incendie ou d’explosion. Notez
que Leica Camera AG décline toute responsabilité en cas
d’accident ou de panne résultant de l’utilisation d’une imitation
des batteries authentiques. Par mesure de sécurité, nous vous
recommandons vivement l’utilisation exclusive de la batterie
spécifique de Leica.
• Utilisez le chargeur et la batterie spécialement conçus pour cet
appareil.
• Cet appareil photo est doté d’une fonction permettant de
distinguer les batteries qui peuvent être utilisées de manière sûre.
La batterie spécifique BP-DC7 de Leica (→71) prend en charge
cette fonction. Il n’est pas possible d’utiliser des batteries qui ne
prennent pas en charge cette fonction. Leica Camera AG n’offre
aucune garantie concernant la qualité, le fonctionnement et la
sécurité des autres batteries.
• La batterie n’est pas chargée à la sortie d’usine de l’appareil
photo. Chargez la batterie et réglez l’horloge avant l’utilisation.
• Chargez la batterie avec le chargeur à l’intérieur (10°C à 30°C).
Insérez les bornes de batterie et fixez
la batterie au chargeur
Les bornes doivent être orientées du côté des
contacts du chargeur, avec le logo Leica sur le
dessus.
76
Page 77

Branchez le chargeur sur la prise de courant
Témoin de charge
([CHARGE])
Allumé :
Charge en cours
(environ 130 min.
si la batterie est
complètement épuisée)
Éteint : Charge terminée
À branchement
●
direct
À prise d’entrée
●
Enlevez la batterie une fois la charge terminée
■
Capacités d’enregistrement approximatives (nombre de
photos et temps d’enregistrement)
Nombre de photos enregistrables Environ 260 photos
Temps d’enregistrement Environ 130 min
Temps de lecture Environ 210 min
Conditions d’enregistrement selon la norme CIPA
• CIPA est une abréviation de [Camera & Imaging Products Association].
• Mode [Programme AE].
• [Réglage GPS] est réglé sur [NON]
Température : 23 °C / Humidité : 50 %RH lorsque l’écran LCD est allumé.
•
• Utiliser une carte mémoire 32 Mo.
• Utiliser la batterie fournie.
•
Commencer la photographie ou le filmage 30 secondes après avoir allumé l’appareil
photo. (Lorsque la fonction de stabilisateur d’image optique est réglée sur [OUI].)
•
Photographier toutes les 30 secondes en mode plein flash une fois sur deux.
• Tourner la commande de zoom de Tele à Wide ou vice-versa à chaque
enregistrement.
• Mettre l’appareil photo hors tension tous les 10 enregistrements et le
laisser hors tension jusqu’à ce que la température de la batterie baisse.
Le nombre de photos enregistrables et le temps de fonctionnement
disponible peuvent varier suivant l’environnement immédiat et les conditions
d’utilisation. Ces chiffres peuvent être inférieurs si le flash, le zoom ou autres
fonctions sont utilisés fréquemment, ainsi que sous les climats froids.
77
Page 78

Insertion et retrait de la carte/
la batterie
Mettez le commutateur ON/
OFF de l’appareil photo sur
OFF et faites glisser le levier de
libération ( ) jusqu’à [OPEN]
avant d’ouvrir le couvercle
Insérez la batterie et la carte,
en vous assurant qu’elles sont
dans le bon sens
Batterie : Enfoncez-la jusqu’à ce qu’elle
Carte : Insérez fermement et à fond
Fermez le couvercle
Glissez le bouton de libération en position
[LOCK].
■
Pour retirer
• Pour retirer la batterie :
Déplacez le bouton dans le sens
de la flèche.
soit verrouillée par le levier gris.
jusqu’à ce qu’un léger bruit sec soit
émis.
• Pour retirer la carte :
Abaissez-la encore jusqu’à
ce qu’elle émette un bruit de
déclic, puis tirez-la vers le haut.
[OPEN] [LOCK]
Bouton
Utilisez exclusivement la batterie BP-DC7 de Leica (→71).
●
Leica Camera AG ne garantit pas la qualité des autres batteries.
●
La carte risque d’être endommagée si elle n’est pas insérée à fond.
●
78
Page 79

Destination de sauvegarde des photos
(cartes et mémoire intégrée)
■
Mémoire interne (environ 18 Mo)
La mémoire intégrée peut être utilisée comme dispositif de stockage
●
temporaire lorsque la carte utilisée est pleine.
Le temps d’accès à la mémoire intégrée peut être plus long que celui
●
de l’accès à une carte.
■
Cartes mémoire compatibles (en option)
Les cartes suivantes conformes à la norme SD peuvent être utilisées
sur l’appareil photo :
Type de carte Capacité Remarques
Cartes
mémoire SD
Cartes
mémoire SDHC
Cartes
mémoire SDXC
∗
La classe de vitesse SD fait référence à une spécification pour les vitesses
d’écriture maintenues. Vérifiez la vitesse SD sur l’étiquette de la carte ou sur la
documentation qui accompagne la carte.
(Exemple)
Gardez la carte mémoire hors de portée des enfants pour éviter qu’elle
●
ne soit avalée.
8 Mo à 2 Go
4 Go à 32
Go
48 Go, 64
Go
• L’utilisation d’une carte SD de vitesse « Classe
∗
4 »
ou supérieure est recommandée pour
filmer en mode [AVCHD].
L’utilisation d’une carte SD de vitesse « Classe
∗
6 »
ou supérieure est recommandée pour
filmer en mode « Motion JPEG ».
• Utilisables sur les appareils compatibles avec
les formats respectifs.
• Avant d’utiliser des cartes mémoire SDXC,
assurez-vous que les cartes de ce type sont
prises en charge par l’ordinateur et les autres
périphériques.
• Seules sont prises en charge les cartes qui
figurent ci-contre à gauche et ont la capacité
indiquée.
79
Page 80

Régler l’horloge
L’horloge n’est pas réglée à la sortie d’usine de l’appareil photo.
Allumez l’appareil ( )
Appuyez sur [MENU/SET]
( ) pendant que le message
s’affiche
Appuyez sur ▲▼ pour
sélectionner la langue, puis
appuyez sur [MENU/SET]
• Le message [Veuillez régler l’heure]
apparaît.
Appuyez sur [MENU/SET]
Appuyez sur ◄► pour sélectionner les options
(année, mois, jour, heure, minute, ordre
d’affichage ou format d’affichage du temps), et
appuyez sur ▲▼ pour valider
• Pour annuler → Appuyez sur [ / ].
Appuyez sur [MENU/SET]
Vérifiez le réglage et appuyez sur [MENU/SET]
• Pour revenir à l’écran précédent, appuyez sur [ / ].
Appuyez sur ◄ pour sélectionner [Oui], puis
appuyez sur [MENU/SET] pour que le temps soit
automatiquement corrigé au moyen de la fonction
GPS
• Pour régler manuellement la date et l’heure → sélectionnez [Non].
80
Page 81

À propos de GPS
Lorsque [Régler la zone de départ] s’affiche,
appuyez sur [MENU/SET]
Appuyez sur ◄► pour régler
votre zone de résidence, puis
appuyez sur [MENU/SET]
L’heure actuelle et la zone de résidence sont réglées.
• [Réglage GPS] devient [OUI].
• Remettez l’appareil sous tension et
vérifiez l’affichage du temps.
■
Pour changer le réglage du temps
Sélectionnez [Régl.horl.] dans le menu [Enr.] ou [Config.], puis effectuez et .
Lorsque la fonction GPS est utilisée, l’appareil photo effectue les
opérations suivantes.
•
Enregistre, sur les photos prises ou les images animées filmées, les
informations de nom de lieu, la latitude et la longitude pour le lieu positionné
• Se règle automatiquement sur l’heure actuelle
■
Lorsque [Réglage GPS] est réglé sur [OUI], la fonction
GPS demeure opérante même si l’appareil photo est éteint.
•
Les ondes électromagnétiques émises par l’appareil photo peuvent
affecter les instruments et les appareils de mesure. Pendant le décollage
et l’atterrissage de l’avion, ou dans les zones à utilisation restreinte,
réglez [Réglage GPS] sur [NON] ou , puis éteignez l’appareil photo.
• Lorsque [Réglage GPS] est réglé sur [OUI], la charge de la
batterie diminue même si l’appareil est éteint.
Important :
L’utilisation de la fonction GPS en République populaire de Chine et près
de ses frontières est interdite par la législature de ce pays (à l’exception de
Hong Kong et de Macao). Les violations sont sujettes à persécutions par les
autorités de la République populaire de Chine ! Par conséquent, les fonctions
GPS de l’appareil photo sont automatiquement désactivées dans ces régions.
81
Page 82

Régler le menu
Reportez-vous aux procédures suivantes pour utiliser les menus.
Exemple : Réglez [Mode AF] de à en mode [Programme AE]
Appuyez sur [MENU/SET] pour afficher le menu
Permuter sur le menu [Enr.]
Sélectionnez [Enr.], et appuyez sur
[MENU/SET].
• Le type de menu peut aussi être
sélectionné par des opérations tactiles.
Appuyez sur ▲▼ pour
sélectionner [Mode AF] puis
appuyez sur [MENU/SET]
Appuyez sur ▲▼ pour
sélectionner , puis appuyez
sur [MENU/SET] pour valider
• Suivant l’option, il se peut que son réglage
ne s’affiche pas, ou qu’il s’affiche d’une
manière différente.
Appuyez plusieurs fois sur [ / ]
pour fermer le menu
82
Page 83

Sélectionner le mode d’enregistrement
Allumez l’appareil ( )
Faites glisser le commutateur
[REC/PLAY] ( ) jusqu’à
Changer de mode en tournant
la molette de sélection du mode
( )
[Mode instantané]
Pour prendre des photos en mode Instantané (avec réglages automatiques
étendus).
Mode [Programme AE]
Photographiez avec vos propres réglages.
Mode [Priorité ouvert.]
Établissez l’ouverture, puis photographiez.
Mode [Priorité vitesse.]
Établissez la vitesse d’obturation, puis photographiez.
Mode [Expo. manuelle]
Établissez l’ouverture et la vitesse d’obturation, puis photographiez.
Mode [Personnaliser]
Photographiez avec des réglages prédéfinis.
[Mode Photo 3D]
Photographiez en 3D.
[Mode scène]
Photographiez en fonction de la scène.
[Mode ma scène]
Photographiez dans les modes de scène souvent utilisés.
83
Page 84

Prendre une photo avec les réglages automatiques
Il suffit de pointer l’appareil photo vers le sujet pour qu’il effectue automatiquement
les réglages optimaux sur la base d’informations telles que « visage »,
« mouvement », « luminosité » et « distance ». Vous obtiendrez ainsi des images
nettes et bien exposées sans avoir à effectuer les réglages manuellement.
Allumez l’appareil ( )
Faites glisser le commutateur
[REC/PLAY] ( ) jusqu’à
Mettez la molette de sélection
du mode ( ) sur
Photographiez
Touche d’obturateur
Enfoncez à mi-course
(appuyez légèrement pour
faire la mise au point)
• En cas de vacillement visible, utilisez vos deux mains, gardez les
bras près du corps et écartez les pieds à la largeur des épaules.
• Témoin de mise au point (
(Mise au point effectuée : allumé / Mise
au point non effectuée : clignote)
• La zone AF ( ) est affichée autour
du visage du sujet par la fonction de
détection de visage. Dans les autres cas,
elle est affichée par un point sur le sujet
sur lequel s’effectue la mise au point.
• Mise au point : W max. = 3 cm/
Enfoncez complètement
(appuyez à fond sur la
touche pour enregistrer)
)
T max. = 1 m et plus
(7 × à 11 × est 2 m à )
84
Page 85

[Mode instantané]
Mode d’enregistrement :
■
Détection de scène automatique
L’appareil photo identifie la scène lorsqu’il est pointé vers un sujet, et
il effectue automatiquement les réglages optimaux. Le type de scène
détectée est indiqué par une icône bleue pendant deux secondes.
Les gens sont détectés.
Bébé est détecté.
La scène est détectée.
Les gens et la scène nocturne sont détectés.
(Uniquement lorsque
La scène nocturne est détectée.
Reconnaît les scènes nocturnes sans trépied.
Un gros plan est détecté.
Un coucher de soleil est détecté.
Lit les mouvements du sujet pour éviter le flou lorsque la scène ne
correspond à aucune de celles ci-dessus.
est sélectionné)
Si l’appareil photo identifie automatiquement la scène et établit que
les gens qui se trouvent sur l’image en sont les sujets ( , , ), la
détection de visage s’active, puis l’appareil effectue la mise au point et
ajuste l’exposition en fonction des visages reconnus.
Recherche MPA
Cette fonction permet à l’appareil photo de garder automatiquement la
mise au point sur le sujet et d’ajuster l’exposition du sujet même s’il se
déplace.
Effectuez ces opérations une fois annulée la fonction de déclencheur
tactile.
Touchez le sujet
• Pour verrouiller sur une autre sujet → Touchez l’autre sujet.
• Pour annuler la recherche MPA → Touchez .
85
Page 86

Filmer
Mode d’enregistrement :
Filme avec le son. Il est aussi possible d’utiliser le zoom tout en filmant.
Faites glisser le commutateur [REC/PLAY] jusqu’à
Lancez l’enregistrement
Appuyez
Terminez l’enregistrement
Appuyez
■
À propos du temps d’enregistrement
La taille maximale d’enregistrement des images animées de format
[Motion JPEG] est de 2 Go par fichier. (Même si la mémoire disponible
est supérieure à 2 Go, l’enregistrement s’arrêtera lorsque la taille du
fichier atteindra la taille maximale de 2 Go.)
• Avec les modèles d’appareil photo 18 163 / 18 164 :
Le filmage continu en format AVCHD est possible jusqu’à 29 minutes
lorsque l’appareil est réglé sur [GFS] ou [FSH].
• Avec le modèle d’appareil photo 18 162 :
Le filmage continu est possible jusqu’à 29 minutes.
Libérez immédiatement la touche d’images animées après avoir
●
appuyé dessus.
L’enregistrement s’arrête automatiquement lorsqu’il n’y a plus d’espace
●
pour stoker les images animées.
Si [Qualité enr.] est réglé sur [GFS] ou [FSH], et si la température
●
ambiante est élevée, ou en cas de filmage continu, s’affiche et
il se peut que le filmage soit interrompu.
Temps d’enregistrement
écoulé
Temps d’enregistrement
restant (approximatif)
86
Page 87

Afficher les photos [Lect. normale]
Mode de lecture :
Faites glisser le commutateur
[REC/PLAY] ( ) jusqu’à
Faites glisser votre doigt sur l’écran,
et sélectionnez la photo à afficher
Pour lire des images animées, sélectionnez-les à l’aide de ◄ ou ►,
●
puis appuyez sur ▲ pour lancer la lecture.
Vous pouvez imprimer les photos en raccordant l’appareil photo à votre
●
ordinateur ou à votre imprimante, ou en présentant votre carte SD au
personnel d’une boutique photo.
Supprimer des photos
Mode de lecture :
Il n’est pas possible de récupérer les photos après leur suppression.
Appuyez sur [ / ] ( ) pour
supprimer l’image affichée
Appuyez sur ◄ pour
sélectionner [Oui], puis
appuyez sur [MENU/SET] ( )
87
Page 88

Lire le mode d’emploi (format PDF)
• Vous vous êtes familiarisé avec les commandes de base présentées
dans le présent mode d’emploi et désirez passer aux commandes
avancées.
• Vous voulez consulter la section Dépannage.
Dans ce type de situations, reportez-vous au mode d’emploi (format
PDF) enregistré sur le CD-ROM (fourni).
Mettez l’ordinateur sous tension et insérez le CDROM qui contient le mode d’emploi (fourni)
Ouvrez le tiroir de CD-ROM
Double-cliquez sur le fichier PDF de la langue
désirée
■
Si le mode d’emploi (format PDF) ne s’ouvre pas
Vous devez installer soit Adobe Acrobat Reader 5.0 ou plus récent, soit
Adobe Reader 7.0 ou plus récent pour afficher ou imprimer le mode
d’emploi (format PDF).
• Vous pouvez télécharger et installer une version d’Adobe Reader
compatible avec votre système d’exploitation, depuis le site Web
suivant.
http://get.adobe.com/reader/otherversions
88
Page 89

Données techniques
Capteur d’image
Pixels effectifs de
l’appareil photo
Illumination
minimale
Objectif LEICA DC VARIO-ELMAR
Capteur MOS 1/
Filtre de couleurs primaires
14 100 000 pixels
Environ 14 lx
(Avec les modèles d’appareil photo 18 163 / 18 164 :
lors de l’utilisation de i-FAIBLE ÉCLAIRAGE, la vitesse
d’obturation est de
(Avec le modèle d’appareil photo 18 162 :
lors de l’utilisation de i-FAIBLE ÉCLAIRAGE, la vitesse
d’obturation est de 1/50 de seconde)
F/3,3 (grand angle) – 5,9 (téléobjectif) 4,3 - 68,8 mm ASPH.
Équivalent sur appareil photo 35 mm : 24 - 384 mm
2.33
”, nombre total de pixels = 15 100 000 pixels
1
/60 de seconde)
Plage de mise au point
P/A/S/M 50 cm (grand angle)/2 m (téléobjectif) à
Macro/Instantané/
Image animée
3 cm (grand angle)/ 1 m (téléobjectif) à
Mode Scène Les réglages ci-dessus peuvent être différents.
Zoom numérique 4 x max.
Zoom optique
supplémentaire
Système d’obturation
Vitesse d’obturation 60 à 1/
Enregistrement en
rafale
Pour obturateur
mécanique
Pour obturateur
électronique
Pendant
l’enregistrement
d’images
animées
33,8 x max. (Lorsque la taille de photo est réglée sur 3
millions de pixels [3M] ou moins.)
Obturateur électronique + obturateur mécanique
4000
Mode [Ciel étoilé] : 15 secondes, 30 secondes,
60 secondes
Vitesse de rafale
(Nombre d’images enregistrables/Nombre maximum de
pixels enregistrables)
Environ 2 cadres/sec. (Max. 100 images/14 M),
Environ 5 cadres/sec. (Max. 100 images/14 M),
Environ 10 cadres/sec. (Max. 15 images/14 M)
40 cadres/sec. (Max. 50 images/5 M),
60 cadres/sec. (Max. 60 images/3,5 M)
Environ 2 cadres/sec. (Max. 40 images/3,5 M),
Environ 5 cadres/sec. (Max. 40 images/3,5 M),
Environ 10 cadres/sec. (Max. 40 images/3,5 M)
s
89
Page 90

Données techniques (Suite)
Exposition (AE) Programme AE (P)/Priorité ouverture AE (A)/
Mode de mesure Multiple/Pondéré au centre/Centré
Flash Flash intégré
Modes de flash AUTO, AUTO/Réduction des yeux rouges,
Portée du flash
(ISO AUTO)
Écran LCD Écran LCD TFT 3,0 pouces (4:3) (environ 460 000 pixels)
Microphone Stéréo
Haut-parleur Monaural
Support
d’enregistrement
Format de fichier à
l’enregistrement
Photo JPEG (basé sur ‘Design rule for Camera File system’,
Images animées
avec son
GPS
Fréquence de
réception
Système de
coordonnées
géographiques
Priorité obturateur AE (S)/Exposition manuelle (M)
Compensation d’exposition
(par pas de 1/3 EV, -2 EV à +2 EV)
OUI (OUI/Réduction des yeux rouges),
Synchro lente AUTO/Réduction des yeux rouges, NON
Environ 60 cm à 5,0 m (Large)
(champ de rapport d’affichage d’environ 100 %)/
Panneau tactile
Mémoire interne (environ 18 Mo)/
Carte mémoire SD/Carte mémoire SDHC/
Carte mémoire SDXC
basé sur la norme Exif 2.3/conforme DPOF)/MPO
AVCHD/QuickTime Motion JPEG
1575,42 MHz (code C/A)
WGS84
90
Page 91

Interface Numérique : USB 2.0 (haute vitesse)
Borne HDMI : MiniHDMI type C
Température
et humidité de
fonctionnement
Consommation CC 5,1 V
lors de
l’enregistrement
lors de la lecture 0,9 W
Dimensions
(L × H × P ;
objectif rentré)
Poids
(avec/sans carte et
batterie)
Il n’est pas possible d’écrire les données d’un ordinateur
sur l’appareil photo au moyen d’un câble de connexion
USB. (Avec le modèle d’appareil photo 18 162)
Vidéo analogique/Audio
Avec les modèles d’appareil photo 18 163 / 18 164 :
Composite NTSC
Avec le modèle d’appareil photo 18 162 :
Composite NTSC/PAL (commutation par menu),
Sortie de ligne audio (Monaural)
AV OUT/DIGITAL : prise spéciale (8 broches)
0 °C à 40 °C / 10 %RH à 80 %RH
1,4 W
Environ 105 x 58 x 34 mm
Environ 218 g/ 196 g
Batterie (lithium-ion)
Tension/capacité 3,6 V/895 mAh
Chargeur de batterie
Entrée 110 V à 240 V ~ 50/60Hz, 0,2 A
Sortie 4,2 V
0,65 A
91
Page 92

Adresses de service après-vente Leica
Academie Leica
Parallèlement aux produits de pointe que nous créons dans les domaines
de la prise de vue, de la reproduction et de l’observation, nous proposons
depuis de nombreuses années avec la Leica Akademie des séminaires
et des stages de formation axés sur la pratique dont l’objectif est de
faire découvrir l’univers de la photographie, de la projection et de
l’agrandissement aux débutants comme aux enthousiastes de la photo.
Les cours, qui se déroulent dans les locaux modernes des
établissements de Solms et au domaine de Altenberg et sont qui
assurés par une équipe d’instructeurs qualifiés, traitent aussi bien de la
photographie générale que de spécialités intéressantes et donnent lieu à
de nombreuses suggestions, informations et conseils pratiques.
Pour recevoir le prospectus actuel de la Leica Akademie:
Leica Camera AG
Leica Akademie
Oskar-Barnack-Str. 11
D-35606 Solms
Tél: +49 (0) 6442-208-421
Fax: +49 (0) 6442-208-425
la@leica-camera.com
Leica sur Internet
De plus amples informations sur nos produits, nos nouveautés, nos
manifestations et au sujet de la société Leica vous sont fournies sur notre
site Web :
http://www.leica-camera.fr
92
Page 93

Service-Info Leica
Le service d’information Leica se fera un plaisir de répondre par écrit, par
téléphone, par fax ou par mail à toutes les questions d’ordre technique se
rapportant à la gamme de produits Leica :
Leica Camera AG
Information-Service / Software-Support
Postfach 1180
D-35599 Solms
Tél: +49 (0) 6442-208-111 / -108
Fax: +49 (0) 6442-208-490
info@leica-camera.com / software-support@leica-camera.com
Service après-vente Leica
Le Customer Service de la société Leica Camera AG et les services
après-vente des divers représentants Leica (liste des adresses sur le bon
de garantie) se tiennent à votre disposition pour entretenir et réparer vos
équipements Leica. Veuillez vous adresser à votre Centre Conseil Leica.
Leica Camera AG
Customer Service
Solmser Gewerbepark 8
D-35606 Solms
Tél: +49 (0) 6442-208-189
Fax: +49 (0) 6442-208-339
customer.service@leica-camera.com
93
Page 94

• HDMI, le logo HDMI et High-Definition
Multimedia Interface sont des marques
déposées ou enregistrées de HDMI Licensing
LLC aux Etats-Unis et dans d’autres pays.
• “AVCHD” et le logo “AVCHD” sont des
marques de commerce de Panasonic
Corporation et de Sony Corporation.
• Fabriqué sous licence de Dolby Laboratories.
Le terme Dolby et le sigle double D sont
des marques commerciales de Dolby
Laboratories.
• Le logo SDXC est une marque déposée de
SD-3C, LLC.
• QuickTime et le logo QuickTime sont des
marques de commerce ou des marques
déposées de Apple Inc. et sont utilisées sous
licence.
• Ce produit utilise “DynaFont” de
DynaComware Corporation. DynaFont est
une marque déposée de DynaComware
Taiwan Inc.
• Leica est une marque déposée de Leica
Microsystems IR GmbH.
• Elmar est une marque déposée de Leica
Camera AG.
• Les autres noms, noms de compagnie
et noms de produit qui figurent dans les
présentes instructions sont les marques
de commerce, déposées ou non, des
compagnies concernées.
94
EU
Page 95

NOTE
95
Page 96

Egregio cliente,
Grazie per aver acquistato una fotocamera digitale Leica V-Lux 30. Legga
attentamente queste istruzioni per l’uso e le conservi per consultare
quando ne avesse bisogno. Tenere presente che i reali controlli e
componenti, opzioni dei menu, ecc., della fotocamera digitale potrebbero
avere un aspetto diverso da quello mostrato nelle illustrazioni di queste
istruzioni per l’uso.
Osservare attentamente le leggi sul copyright.
• La registrazione di nastri o dischi preregistrati, o di altro materiale
pubblicato o trasmesso, per scopi che non siano il puro utilizzo
personale può costituire una violazione delle leggi sul copyright. Anche
in caso di utilizzo personale, la registrazione di alcuni materiali può
essere soggetta a limitazioni.
Informazioni per la sua sicurezza
ATTENZIONE:
PER RIDURRE IL RISCHIO DI INCENDIO, DI SCOSSE ELETTRICHE
O DI DANNI:
• NON ESPORRE QUESTO PRODOTTO ALLA PIOGGIA, UMIDITÀ,
GOCCIOLAMENTI O SPRUZZI, E NON METTERVI SOPRA
OGGETTI PIENI DI LIQUIDI, COME I VASI.
• USARE SOLTANTO GLI ACCESSORI CONSIGLIATI.
• L’INVOLUCRO O LA PARTE POSTERIORE NON DEVONO
ESSERE RIMOSSI. ALL’INTERNO NON CI SONO PARTI
RIPARABILI DALL’UTENTE. PER LE RIPARAZIONI, RIVOLGERSI
A PERSONALE TECNICO QUALIFICATO.
LA PRESA DEVE ESSERE INSTALLATA VICINO ALL’APPARECCHIO
ED ESSERE FACILMENTE RAGGIUNGIBILE.
■
Etichetta di identificazione del prodotto
Prodotto Posizione
Fotocamera digitale Parte inferiore
Caricabatteria Parte inferiore
96
Page 97

ITALIANO
■
Riguardo al battery pack
PRECAUZIONE
Se la batteria non è sostituita correttamente, potrebbe verificarsi
un’esplosione. Per la sostituzione utilizzare solo batterie dello stesso
tipo o di tipo equivalente consigliate dal produttore. Per lo smaltimento
delle batterie usate attenersi alle istruzioni del produttore.
• Non riscaldare o esporre a una fiamma.
• La batteria non deve essere lasciata all’interno di una automobile
esposta per un lungo periodo di tempo alla luce diretta del sole con le
portiere e i finestrini chiusi.
Attenzione
Pericolo d’incendio, esplosione e bruciature. Non smontare, riscaldare
oltre i 60 °C o incenerire.
97
Page 98

■
Riguardo al caricabatteria
ATTENZIONE!
• PER MANTENERE UNA BUONA VENTILAZIONE, NON INSTALLARE O
SISTEMARE QUESTA UNITÀ IN UNO SCAFFALE DEI LIBRI, ARMADIETTO
INCORPORATO OD ALTRO SPAZIO RISTRETTO. PER PREVENIRE I
RISCHI DI SCOSSE O INCENDIO DOVUTI A SURRISCALDAMENTO,
ACCERTARSI CHE TENDE OD ALTRO MATERIALE NON OSTRUISCANO
LE CONDIZIONI DI VENTILAZIONE.
• NON OSTRUIRE LE APERTURE DI VENTILAZIONE DELL’UNITÀ CON
GIORNALI, TOVAGLIE, TENDE ED ALTRI OGGETTI SIMILI.
• NON METTERE SULL’UNITÀ SORGENTI DI FIAMME NUDE, COME
CANDELE ACCESE.
• DISFARSI DELLE PILE RISPETTANDO L’AMBIENTE.
• Il caricabatteria è nella modalità di standby quando è collegato alla presa di
corrente. Il circuito primario è sempre “sotto tensione” per tutto il tempo che il
caricabatteria rimane collegato alla presa di corrente.
■
Usando la fotocamera
• Non si deve usare alcun cavo AV diverso da quello in dotazione.
• Non si devono usare cavi di collegamento USB diversi da quello in dotazione.
• Non usare altri cavi all’infuori di un cavo mini HDMI Leica autentico
(opzionale, →101).
Allontanare quanto più possibile la fotocamera dagli apparecchi
elettromagnetici (come i forni a microonde, il televisore, i videogiochi, ecc.).
• Se si usa la fotocamera sopra o vicino al televisore, le immagini e il suono
della fotocamera potrebbero essere disturbati dalla radiazione delle onde
elettromagnetiche.
• Non usare la fotocamera vicino ai cellulari, perché altrimenti il rumore potrebbe
disturbare le immagini e il suono.
• I dati registrati, o le foto, possono essere distorti dai forti campi magnetici creati
dai grandi diffusori o motori.
• La radiazione delle onde elettromagnetiche generata dai microprocessori
potrebbe avere effetti negativi sulla fotocamera, disturbando le immagini e il
suono.
• Se gli apparecchi elettromagnetici hanno un effetto negativo sulla fotocamera
ed essa smette di funzionare correttamente, spegnerla e rimuovere la batteria.
Reinserire poi la batteria e accendere la fotocamera.
Non usare la fotocamera vicino ai trasmettitori radio o i fili dell’alta tensione.
• Se si registra vicino ai trasmettitori radio o i fili dell’alta tensione, le immagini
registrate e il suono potrebbero essere disturbati.
98
Page 99

Informazioni per gli utenti sulla raccolta e l’eliminazione di
vecchie apparecchiature e batterie usate
Cd
Questi simboli sui prodotti, sull’imballaggio, e/o sulle
documentazioni o manuali accompagnanti i prodotti
indicano che i prodotti elettrici, elettronici e le batterie usate
non devono essere buttati nei rifiuti domestici generici. Per
un trattamento adeguato, recupero e riciclaggio di vecchi
prodotti e batterie usate, vi preghiamo di portarli negli
appositi punti di raccolta, secondo la legislazione vigente
nel vostro Paese e le Direttive 2002/96/EC e 2006/66/EC.
Smaltendo correttamente questi prodotti e le batterie,
contribuirete a salvare importanti risorse e ad evitare i
potenziali effetti negativi sulla salute umana e sull’ambiente
che altrimenti potrebbero verificarsi in seguito ad un
trattamento inappropriato dei rifiuti.
Per ulteriori informazioni sulla raccolta e sul riciclaggio
di vecchi prodotti e batterie, vi preghiamo di contattare il
vostro comune, i vostri operatori per lo smaltimento dei
rifiuti o il punto vendita dove avete acquistato gli articoli.
Sono previste e potrebbero essere applicate sanzioni
qualora questi rifiuti non siano stati smaltiti in modo
corretto ed in accordo con la legislazione nazionale.
Per utenti commerciali nell’Unione Europea
Se desiderate eliminare apparecchiature elettriche
ed elettroniche, vi preghiamo di contattare il vostro
commerciante od il fornitore per maggiori informazioni.
[Informazioni sullo smaltimento rifiuti in altri Paesi
fuori dall’Unione Europea]
Questi simboli sono validi solo all’interno dell’Unione
Europea. Se desiderate smaltire questi articoli, vi
preghiamo di contattare le autorità locali od il rivenditore ed
informarvi sulle modalità per un corretto smaltimento.
Nota per il simbolo delle batterie (esempio con
simbolo chimico riportato sotto il simbolo principale):
Questo simbolo può essere usato in combinazione con
un simbolo chimico; in questo caso è conforme ai requisiti
indicati dalla Direttiva per il prodotto chimico in questione.
99
Page 100

Indice
Informazioni per la sua sicurezza
Prima dell’uso
Accessori in dotazione ..........101
Accessori ................................101
Nome delle parti......................102
Pulsante dei cursori ......................103
Operazioni a tocco .................104
Preparativi
Carica della batteria ...............106
Inserimento e rimozione della
scheda/della batteria ..............108
Destinazione di salvataggio foto
(schede e memoria incorporata) ..109
Impostazione dell’orologio ....110
Riguardo al GPS ..........................111
Impostazione dei menu ..........112
Questo prodotto viene concesso con licenza del portafoglio del brevetto AVC per
l’uso personale e non commerciale di un utente per (i) la codifica video conforme
allo Standard AVC (“AVC Video”) e/o (ii) la decodifica AVC Video che è stata
codificata da un utente che svolge una attività personale e non commerciale e/o
ottenuta da un fornitore video dotato di licenza per la distribuzione AVC Video.
Non viene concessa, neppure implicitamente, alcuna licenza per un qualsiasi altro
uso. Si possono ottenere informazioni addizionali da MPEG LA, LLC.
Vedere http://www.mpegla.com.
...96
Operazioni di base
Selezione della modalità di
registrazione ...........................113
Scatto delle foto con le
impostazioni automatiche
[Mod. snapshot] ......................114
Tracking AF ..................................115
Ripresa dei filmati...................116
Visione delle foto
[Ripr. normale] ........................117
Eliminazione delle foto ...........117
Varie
Lettura delle istruzioni per l’uso
(formato PDF) ..........................118
Dati tecnici ..............................119
Indirizzi dei Centri di
Assistenza Leica.....................122
100
 Loading...