

Page 1

LEICA V-LUX 30
取扱説明書 / Instructions /
Notice d‘utilisation /
Instrucciones
Page 2

WARNING:
TO REDUCE THE RISK OF FIRE, ELECTRIC SHOCK OR PRODUCT
DAMAGE,
•
DO NOT EXPOSE THIS CAMERA TO RAIN, MOISTURE, DRIPPING OR
SPLASHING AND THAT NO OBJECTS FILLED WITH LIQUIDS, SUCH
AS VASES, SHALL BE PLACED ON THE CAMERA.
• USE ONLY THE RECOMMENDED ACCESSORIES.
• DO NOT REMOVE THE COVER (OR BACK); THERE ARE NO
USER SERVICEABLE PARTS INSIDE.
Refer servicing to your Leica dealer, Leica Customer Service station,
an authorized Leica service station / the Leica distributer in your
country (for addresses, see Warranty Card), or the Leica Customer
Service department (for address →66).
■
About the battery
CAUTION
Battery (Lithium ion battery)
• Use the specified camera to recharge the battery.
• Do not use the battery with equipment other than the specified camera.
• Do not get dirt, sand, liquids, or other foreign matter on the terminals.
• Do not touch the plug terminals (+ and −) with metal objects.
• Do not disassemble, remodel, heat or throw into fire.
If any electrolyte should come into contact with your hands or clothes,
wash it off thoroughly with water.
If any electrolyte should come into contact with your eyes, never rub
the eyes. Rinse eyes thoroughly with water, and then consult a doctor.
CAUTION
Danger of explosion if battery is incorrectly replaced. Replace only with
the same or equivalent type recommended by Leica. Dispose of used
batteries according to the Leica’s instructions.
• Do not heat or expose to flame.
• Do not leave the batteries in an automobile exposed to direct sunlight
for a long period of time with doors and windows closed.
Warning
Risk of fire, explosion and burns. Do not disassemble, heat above 60 °C
(140 °F) or incinerate.
41
Page 3

■
About the charger
CAUTION!
DO NOT INSTALL OR PLACE THIS CAMERA IN A BOOKCASE,
BUILT-IN CABINET OR IN ANOTHER CONFINED SPACE. ENSURE
THE CAMERA IS WELL VENTILATED. TO PREVENT RISK OF
ELECTRIC SHOCK OR FIRE HAZARD DUE TO OVERHEATING,
ENSURE THAT CURTAINS AND ANY OTHER MATERIALS DO NOT
OBSTRUCT THE VENTILATION VENTS.
Charger
This charger operates on AC between 110 V and 240 V.
But
• In the U.S.A. and Canada, the charger must be connected to a 120 V
AC power supply only.
• When connecting to an AC supply outside of the U.S.A. or Canada,
use a plug adapter to suit the AC outlet configuration.
• The battery charger is in the standby condition when the AC power supply cord
is connected. The primary circuit is always “live” as long as the power cord is
connected to an electrical outlet.
■
Cautions for Use
• Do not use any other AV cables except the supplied one (→45).
• Do not use any other USB connection cables except the supplied one (→45).
• Do not use any other HDMI mini cable except the Leica model (available as
accessory, →45).
Keep this camera as far away as possible from electromagnetic equipment
(such as microwave ovens, TVs, video games etc.).
• If you use this camera on top of or near a TV, the pictures and/or sound on this
camera may be disrupted by electromagnetic wave radiation.
• Do not use this camera near cell phones because doing so may result in noise
adversely affecting the pictures and/or sound.
• Recorded data may be damaged, or pictures may be distorted by strong magnetic
fields created by speakers or large motors.
• Electromagnetic wave radiation generated by microprocessors may adversely
affect this camera, disturbing the pictures and/or sound.
• If this camera is adversely affected by electromagnetic equipment and stops
functioning properly, turn it off and remove the battery. Then reinsert the battery
and turn the camera back on.
Do not use this camera near radio transmitters or high-voltage lines.
• If you record near radio transmitters or high-voltage lines, the recorded pictures
and/or sound may be adversely affected.
42
Page 4
Information for Users on Collection and Disposal of Old
Equipment and used Batteries
Cd
These symbols on the products, packaging, and/or
accompanying documents mean that used electrical and
electronic products and batteries should not be mixed with
general household waste.
For proper treatment, recovery and recycling of old
products and used batteries, please take them to
applicable collection points, in accordance with your
national legislation and the Directives 2002/96/EC and
2006/66/EC.
By disposing of these products and batteries correctly,
you will help to save valuable resources and prevent
any potential negative effects on human health and
the environment which could otherwise arise from
inappropriate waste handling.
For more information about collection and recycling of
old products and batteries, please contact your local
municipality, your waste disposal service or the point of
sale where you purchased the items.
Penalties may be applicable for incorrect disposal of this
waste, in accordance with national legislation.
For business users in the European Union
If you wish to discard electrical and electronic equipment,
please contact your dealer or supplier for further
information.
[Information on Disposal in other Countries outside
the European Union]
These symbols are only valid in the European Union. If
you wish to discard these items, please contact your local
authorities or dealer and ask for the correct method of
disposal.
Note for the battery symbol (bottom two symbol
examples):
This symbol might be used in combination with a chemical
symbol. In this case it complies with the requirement set by
the Directive for the chemical involved.
43
Page 5

Table of Contents
Information for Your Safety .....38
Before use
Scope of Delivery .....................45
Accessories ..............................45
Names of Components ............46
Cursor buttons ................................47
Touch operations ......................48
Preparations
Charging the battery ................50
Inserting and removing the card/
the battery .................................52
Picture save destination
(cards and built-in memory) ...........53
Setting the clock .......................54
About GPS .....................................55
Setting the menu ......................56
This product is licensed under the AVC patent portfolio license for the personal
and noncommercial use of a consumer to (i) encode video in compliance with
the AVC Standard (“AVC Video”) and/or (ii) decode AVC Video that was encoded
by a consumer engaged in a personal and non-commercial activity and/or was
obtained from a video provider licensed to provide AVC Video. No license is
granted or shall be implied for any other use. Additional information may be
obtained from MPEG LA, LLC.
See http://www.mpegla.com.
Basics
Selecting the Recording
Mode ..........................................57
Taking pictures with
[Snapshot Mode] ......................58
AF Tracking ....................................59
Taking motion pictures ............60
Viewing your pictures
[Normal Play] ............................61
Deleting pictures ......................61
Others
Using the instructions on the
supplied CD-ROM .....................62
Technical Data ..........................63
Leica Service Addresses .........66
44
Page 6

Scope of Delivery Accessories
®
®
®
Order No.
(delivery differs
depending on
markets)
423-083.001-023
423-083.001-024
423-083.001-025
423-083.001-026 /
-027
(delivery differs
depending on
markets)
Rechargeable
battery
BP-DC7-E 18 701
BP-DC7-U 18 702
Charger
BC-DC7-E 423-082.001-012
BC-DC7-U 423-082.001-010
BC-DC7-TK 423-083.001-028
Mains cable
EU 423-068.801-019
UK 423-068.801-020
AUS 423-068.801-023
TW 424-025.002-000
CN 423-082.805-004
KR 423-082.805-005
Wrist strap 423-068.801-015
CD with instr.
PDFs
DVD with Adobe
Photoshop
®
Elements
DVD with Adobe
®
Premiere
Elements
USB cable 423-083.001-020
AV cable 423-083.001-022
Touch pen 423-083.001-029
Button template for
Canada / Taiwan
Short instructions 93 374 -377
Warranty Card 439-399.100-026
®
Leather case 18 751
Soft leather case 18 714
HDMI mini cable 14 491
Mini tripod 14 320
Tabletop tripod 14 110
Ball and Socket
head
Order No.
14 100
Notes:
• Cards are optional. You can
record or play back pictures on
the built-in memory when you
are not using a card.
• Check that all items belonging
to the scope of delivery are
included before using the
camera.
• The items and their shape may
differ depending on the country
or area where the camera was
purchased.
• Please dispose of all packaging
appropriately (→43).
• Keep small parts in a safe place
out of the reach of children.
45
Page 7
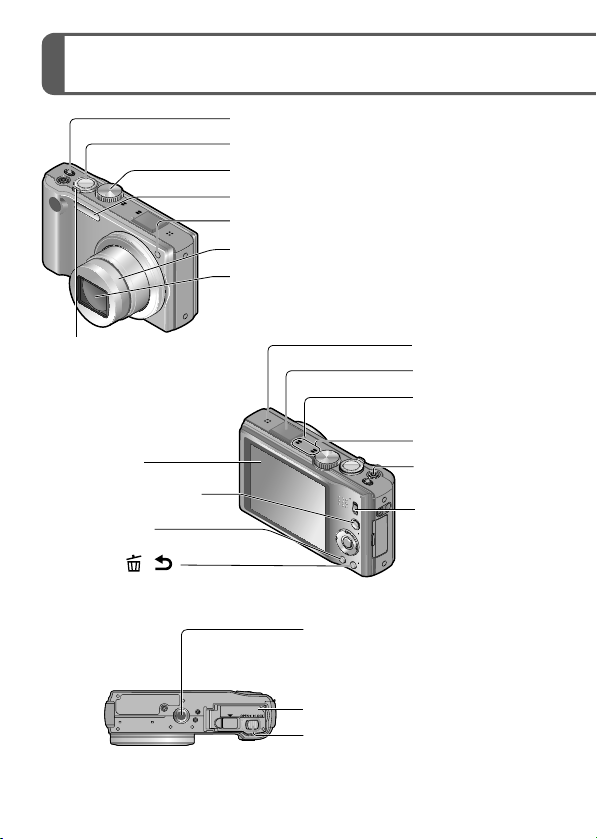
Names of Components
Camera ON/OFF switch
Shutter button
Mode dial
Flash
Self-timer indicator/AF Assist Lamp
Lens barrel
Lens
Zoom lever
LCD monitor
[EXPOSURE] button
[DISP.] button
[Q.MENU]/[
(Delete/Return) button
/ ]
46
Speaker
GPS antenna
GPS status
indicator
Microphone
Motion picture
button
REC/PLAY switch
Tripod thread
• When you use a tripod, make
sure it is stable when the camera
is attached to it.
Card/Battery door
Release lever
Page 8
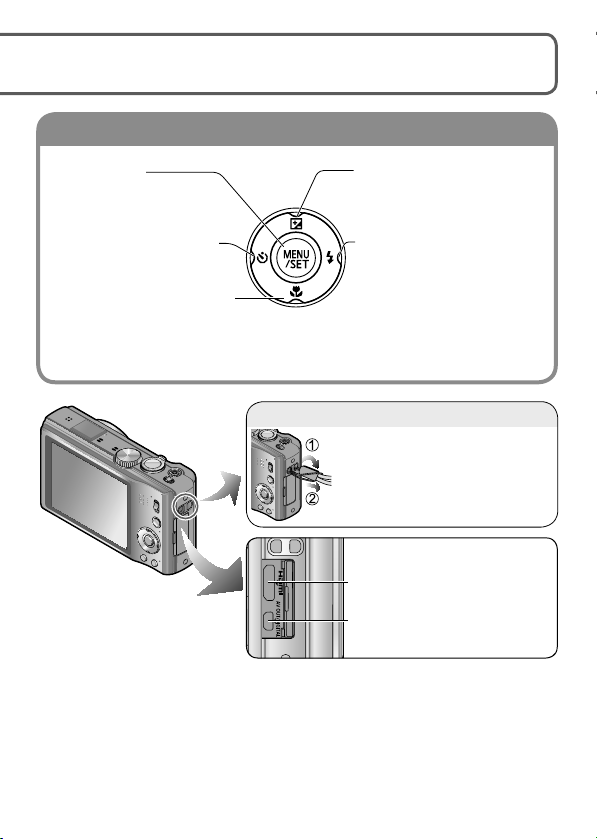
Cursor buttons
Wrist strap eyelet
The illustrations and screens in these instructions may differ from your
camera.
[MENU/SET]
(menu display/set/finish)
Left cursor button (◄)
• Self-timer
Down cursor button (▼)
• Macro Mode etc.
In this manual, the button that is used is indicated by▲▼◄►.
●
Up cursor button (▲)
•
Exposure Compensation,
Auto Bracket etc.
Right cursor button (►)
• Flash
We recommend using the
supplied wrist strap to avoid
dropping the camera.
HDMI socket
[AV OUT/DIGITAL] socket
We recommend you use a battery with sufficient battery power when
recording motion pictures.
47
Page 9

Touch operations
This camera’s monitor surface senses pressure that is applied to it.
Touch
To “touch” is to press the monitor’s surface and then pull the finger
back again.
Touching is used to select icons or pictures, among other actions.
• Touch an icon near its center. If multiple icons are touched simultaneously, the
camera may not operate normally.
Drag
To “drag” is to touch and slide your finger across the monitor’s surface.
Dragging (sliding your finger across the monitor’s surface) is used to scroll the
pictures or change the range of the pictures displayed.
48
Page 10

If you want to use one of the protective foils available on the market on
●
the monitor, observe the precautions that are contained with the foil.
(Some types may impair the monitor’s visual recognition and ease of
operation.)
If the camera is used with such a foil resulting in the monitor not being
●
very responsive, apply a little more pressure.
If you apply pressure to the monitor’s surface with your hand when
●
holding the camera, it will not work properly.
Do not use objects with hard pointed tips (such as ball point pens or
●
your fingernails) instead of the supplied touch pen.
Clean the monitor with a soft dry cloth if there are fingerprints or other
●
kinds of dirt on it.
■
Touch pen
The touch pen (supplied) comes in handy when doing the kinds of jobs
that require close or careful operation and your fingertips are too large
to perform the operations easily.
• Do not use any other pen than the supplied one.
• Keep the touch pen out of the reach of infants and small children.
• Do not place the touch pen on the monitor when storing. The monitor
may break when the touch pen is pressed strongly against it.
49
Page 11

Charging the battery
■
About batteries that you can use with this camera
The only battery that can be used with this camera is the Leica battery
BP-DC7 (→45).
It has been found that counterfeit batteries which look very
similar to the genuine products are available in some markets.
Some of these batteries are not adequately protected with
internal protection to meet the requirements of appropriate safety
standards. There is a possibility that these batteries may lead to
fire or explosion. Please be advised that Leica Camera AG is not
liable for any accident or failure occurring as a result of use of a
counterfeit battery. To ensure that the batteries used are safe, we
urgently recommend to use only the dedicated Leica battery.
• Use only the dedicated charger and battery.
• The camera has a function for distinguishing batteries which can
be used safely. The dedicated Leica battery BP-DC7 (→45) supports
this function. Batteries which do not support this function cannot
be used. Leica Camera AG cannot in any way guarantee the
quality, performance, or safety of any other batteries.
• The battery is not charged when the camera is shipped. Charge
the battery and set the clock before use.
• Charge the battery with the charger indoors (10°C - 30°C (50°F -
86°F)).
Insert the battery into the charger
The terminals should face the charger’s contacts
and the Leica logo upwards.
50
Page 12

Connect the charger to the electrical outlet
Charging light
Plug-in type
●
Cable type
●
([CHARGE])
On: Charging in
progress (approx.
130 min. if fully
depleted)
Off: Charging complete
Detach the battery after charging is completed
■
Recording capacity guidelines (pictures/recording time)
Number of recordable
pictures
Recording time Approx. 130 min
Playback time Approx. 210 min
Recording conditions by CIPA standard
• CIPA is an abbreviation of [Camera & Imaging Products Association].
• [Program AE] Mode.
• [GPS Setting] is set to [OFF]
• Temperature: 23°C (73.4°F)/Humidity: 50%RH when monitor is on.
• Using a 32MB memory card.
• Using the supplied battery.
• Starting recording 30 seconds after the camera is turned on. (When the
Optical Image Stabilizer function is set to [ON].)
Recording once every 30 seconds with full flash every second recording.
•
•
Rotating the zoom lever from Tele to Wide or vice versa in every recording.
• Turning the camera off every 10 recordings and leaving it until the
temperature of the battery decreases.
The number of recordable pictures or available operating time may vary
according to surrounding environment and usage conditions. Figures may
be reduced if flash, zoom, or other functions are used frequently, or in
colder climates.
Approx. 260 pictures
51
Page 13

Inserting and removing the card/
the battery
Set the camera ON/OFF switch
to OFF and slide the release
lever ( ) to [OPEN], then open
the card/battery door
Insert the battery and card,
making sure that their
orientation is correct
Battery: Push it in until it is locked by the
Card: Push it down until it clicks into place.
Close the card/battery door
Slide the release lever to the [LOCK]
position.
■
To remove
• To remove the battery:
Move the gray lever in the direction
of the arrow.
gray lever.
• To remove the card:
Push it further down until it
clicks, then pull it out upright.
[OPEN] [LOCK]
Lever
Use only the Leica battery BP-DC7 (→45).
●
Leica Camera AG cannot guarantee the quality of any other batteries.
●
Insert the card fully, otherwise it may be damaged.
●
52
Page 14

Picture save destination (cards and built-in memory)
■
Built-in memory (approx. 18 MB)
The built-in memory can be used as a temporary storage device when
●
the card being used becomes full.
The access time for the built-in memory may be longer than the access
●
time for a card.
■
Compatible memory cards (available as accessory)
The following cards which conform to the SD standard can be used
with the camera:
Type of Card Capacity Notes
SD
Memory Cards
SDHC
Memory Cards
SDXC
Memory Cards
∗
SD speed class refers to a specification for sustained write speeds.
Confirm the SD speed by checking the card label or other card related
materials.
(Example)
Keep the Memory Card out of reach of children to prevent swallowing.
●
8 MB – 2 GB
4 GB – 32 GB
48 GB, 64 GB
• Using a card of SD speed “Class 4”∗ or above
is recommended for recording motion pictures
in [AVCHD].
Using a card of SD speed “Class 6”
is recommended for recording motion pictures
in “Motion JPEG”.
• Can be used with devices compatible with the
respective formats.
• Before using SDXC memory cards, check that
your computer and other devices support this
type of card.
• Only the cards listed on the left with the given
capacities are supported.
∗
or above
53
Page 15

Setting the clock
The clock is not set when the camera is shipped.
Turn on the power ( )
Press [MENU/SET] ( ) while the
message is displayed
Press ▲▼ to select the
language, and then [MENU/SET]
• The [Please set the clock] message
appears.
Press [MENU/SET]
Press ◄► to select the items (year, month,
day, hour, minute, display order or time display
format), and then ▲▼ to set
• To cancel → Press [ / ].
Press [MENU/SET]
Confirm the setting and press [MENU/SET]
• To return to the previous screen, press [ / ].
Press ◄ to select [Yes] and then [MENU/SET] if
automatically correcting time of day using the
GPS function
• To manually set date and time → select [No].
54
Page 16

About GPS
When [Please set the home area] is displayed,
press [MENU/SET]
Press ◄► to set your home
area and then [MENU/SET]
The current time and home area are set.
• [GPS Setting] turns [ON].
• Turn on power again and check the time
display.
■
To change the time setting
Select [Clock Set] from [Rec] or [Setup] menu, perform and .
When GPS is used, the camera performs the following functions.
• Records location name information and the latitude and longitude
for the positioned location on the recorded pictures
• Corrects automatically to the current time
■
When [GPS Setting] is [ON], the GPS function works
even if the camera’s power is off.
• Electromagnetic waves from the camera can affect instruments
and meters. During airplane takeoff and landing or in other
restricted areas, set [GPS Setting] to [OFF] or , then turn the
camera’s power off.
• When [GPS Setting] is [ON], power will drain from the battery
even if the camera’s power is OFF.
Important:
The use of GPS within the People’s Republic of China and near its
borders is prohibited by the country’s legislature (with the exception
of Hong Kong and Macao). Violations will be persecuted by PRC
authorities! The camera’s GPS functions are therefore automatically
disabled in these areas.
55
Page 17

Setting the menu
Refer to the following procedures to operate the menus.
Example: Setting [AF Mode] from to in the [Program AE] Mode
Press [MENU/SET] to display the menu
Switching to the [Rec] menu
Select [Rec], and press [MENU/SET].
• The menu type can also be selected by
touch operations.
Press ▲▼ to select [AF Mode]
and then press [MENU/SET]
Press ▲▼ to select and then
press [MENU/SET] to set
• Depending on the item, its setting may not
appear or it may be displayed in a different
way.
Press [ / ] several times to
close the menu
56
Page 18

Selecting the Recording Mode
Turn on the power ( )
Slide the [REC/PLAY] switch
( ) to
Switch the mode by rotating the
mode dial ( )
[Snapshot Mode]
For taking pictures with snapshot mode (with extended automatic settings).
[Program AE] Mode
For taking pictures with automatic exposure control.
[Aperture-Priority] Mode
The exposure is determined by the automatically controlled shutter speed,
based on the manually set aperture value.
[Shutter-Priority] Mode
The exposure is determined by the automatically controlled aperture value,
based on the manually set shutter speed.
[Manual Exposure] Mode
The exposure is determined by the manually set aperture value and shutter
speed.
[Custom] Mode
For taking pictures with previously registered settings.
[3D Photo Mode]
For taking 3D still pictures.
[Scene Mode]
For taking pictures with factory-registered settings matching the scene
being recorded.
[My SCN Mode]
For taking pictures with frequently-used Scene Modes.
57
Page 19

Taking pictures with [Snapshot Mode]
Recording Mode:
Optimum settings are made automatically by the camera based on
information such as “face,” “movement,” “brightness,” and “distance” just
by pointing the camera at the subject. This results in sharp and wellexposed pictures without the need to make settings manually.
Turn on the power ( )
Shutter button
Slide the [REC/PLAY] switch
( ) to
Set the mode dial ( ) to
Take pictures
Press halfway
(press lightly and focus)
• To prevent camera shake, hold the camera with both hands, press
your arms to your body, and stand with your feet at shoulder width.
• Focus display (
(In focus: lit / Not in focus: flashing)
• With the Face Detection function, the AF
frame ( ) appears over a subject’s face.
In other cases, the frame is displayed at
the point on the subject which is in focus.
• Focus: Max. W: 3 cm (13/16”)/Max. T: 1 m (3’ 33/8”) and above
(7 × to 11 × is 2 m (6’ 63/4”) to )
)
Press fully
(press the button
all the way to record)
58
Page 20

■
Automatic Scene Detection
The camera identifies the scene when pointed at the subject, and
makes optimum settings automatically. The type of scene detected is
indicated by a blue icon for two seconds.
Appears when persons are detected.
Appears when a baby is detected.
Appears when a distant subject is detected.
Appears when persons and night scenery are detected.
(Only when
Appears when a poorly illuminated scenery is detected.
Appears when a poorly illuminated subject and camera shake scenes
without a tripod.
Appears when a subject close to the camera is detected.
Appears when a sunset is detected.
Automatically selected in case of subject movement to reduce blurring
when the scene does not correspond to any of the above.
is selected)
If the camera automatically identifies a scene in which persons appear
in the picture ( , , ), Face Detection is activated, and focus and
exposure are adjusted based on the recognized faces.
AF Tracking
This function enables the camera to continue to focus on the subject and
adjust the exposure even when it moves.
Perform these operations with the touch shutter release function.
Touch the subject
• When switching to lock on to another subject
→ Touch the other subject.
• To release AF tracking → Touch .
59
Page 21

Taking motion pictures
Recording Mode:
This records motion pictures with audio. Zoom can also be used during
recording.
Slide the [REC/PLAY] switch to
To start recording
Press
To end recording
Press
■
Recording time
A single [Motion JPEG]-format motion picture take can be recorded
up to a maximum file size of 2GB (Even with more memory capacity
available than 2GB, the recording will be terminated when its file size
reaches the maximum 2GB.)
• With camera models 18 163 / 18 164:
An AVCHD motion picture can be recorded continuously for up to
29 minutes when [GFS] or [FSH] is set.
• With camera model 18 162:
Motion pictures can be recorded continuously for up to 29 minutes.
Release the motion picture button immediately after pressing it all the
●
way.
When there is no memory capacity left to store the motion picture,
●
recording automatically ends.
If [Rec Quality] is set to [GFS] or [FSH], and if the surrounding
●
temperature is high, or a motion picture is being recorded
continuously, is displayed, and the recording may be stopped
halfway through.
Elapsed recording time
Remaining recording time
(approx.)
60
Page 22

Viewing your pictures [Normal Play]
Playback Mode:
Slide the [REC/PLAY] switch
( ) to
Drag your finger across the
screen, and select the picture to
be played back
To play back a motion picture, select an image with ◄ or ►, and then
●
press ▲ to start playback.
You can print pictures by connecting a camera to your computer or
●
printer, or by having the pictures printed from the card by your photo
shop.
Deleting pictures
Playback Mode:
Deleted pictures cannot be recovered.
Press [ / ] ( ) to delete the
displayed picture
Press ◄ to select [Yes] and
then press [MENU/SET] ( )
61
Page 23

Using the instructions on the supplied
CD-ROM
• You have practised the basic operations introduced in these instructions
and want to progress to advanced operations.
• You want to check the Troubleshooting.
In these kinds of situations, refer to the instructions (PDF format) on the
supplied CD-ROM.
Turn the PC on and insert the supplied CD-ROM
Open the CD-ROM
Double click on the PDF with the desired language
to open it
■
When the instructions (PDF format) will not open
You will need Adobe Acrobat Reader 5.0 or later or Adobe Reader 7.0
or later to browse or print the instructions (PDF format).
• You can download and install a version of Adobe Reader that you can
use with your OS from the following Web Site.
http://get.adobe.com/reader/otherversions
62
Page 24

Technical Data
1
Image sensor
Effective pixels 14,100,000
Minimum
illuminance
Lens LEICA DC VARIO-ELMAR
Focus range
P/A/S/M 50 cm/1’ 7
Macro/
Snapshot/
Motion pictures
Scene modes There may be difference to the ranges above.
Digital zoom max. 4x
Extended optical
zoom
Shutter system Electronically and mechanically controlled
Shutter speed 60 s -
Series exposures Frame rate
With mechanical
shutter
With electronic
shutter
During motion
picture recording
2.33
/
” MOS sensor, total pixel number: 15,100,000,
primary color filter
approx. 14 lx
(With camera models 18 163 / 18 164:
when i-low light is used, the shutter speed is
(With camera model 18 162:
when i-low light is used, the shutter speed is 1/
F/3.3 (wide) – 5.9 (tele) 4.3 - 68.8 mm ASPH.
35 mm camera equivalent: 24 - 384 mm
11
/16’’ (wide) / 2 m/6’ 63/4’’ (tele) to
3 cm/13/16” (wide) / 1 m/3’ 33/8’’ (tele) to
max. 33.8x
(when resolution is set to 3 million pixels [3M] or less)
1
4000
/
s, [Starry Sky] mode: 15 s/30 s/60 s
(Frequency (frames per second) /
(maximum no. of frames/maximum resolution)
Approx. 2 fps (100/14M) / 5 fps (100/14M) /
10 fps (15/14M)
40 fps (50/5M) / 60 fps (60/3.5M)
Approx. 2 fps (40/3.5M) / 5 fps (40/3.5M) /
10 fps (40/3.5M)
1
60
/
s)
50
s)
63
Page 25

Technical Data (Continued)
Exposure modes Program AE (P), Aperture priority AE (A),
Metering modes Multiple-field / Center-weighted / Spot
Flash Built-in flash unit
Flash modes AUTO, AUTO/Red-eye reduction, ON (ON/Red-eye
Flash range
(with ISO AUTO)
LCD monitor 3.0” TFT LCD (approx. 460,000 dots), aspect ratio 4:3,
Microphone Stereo
Speaker Monaural
Recording media Built-in Memory (approx. 18 MB),
Recording file
format
Still pictures JPEG (based on Design rule for Camera File system,
Motion Pictures
(with audio)
GPS
Reception
frequency
Geographical
coordinate
system
Interface Digital: USB 2.0 (High Speed)
Terminals HDMI: for HDMI mini cable (type C)
Shutter priority AE (S), Manual setting (M),
Exposure compensation
(increments: 1/3 EV Steps, range: ±2EV)
reduction), AUTO Slow sync./Red-eye reduction, OFF
approx. 60 cm/1’ 11
(with maximum wide angle setting)
shows approx. 100% of the captured frame
SD/SDHC/SDXC Memory Card
based on Exif 2.3 standard) / corresponds to DPOF / MPO
AVCHD / QuickTime Motion JPEG
1575.42 MHz (C/A code)
WGS84
Data from the PC cannot be written to the camera using
the USB connection cable. (With camera model 18 162)
Analog video/audio:
With camera models 18 163 / 18 164: NTSC Composite
With camera model 18 162: NTSC/PAL Composite
(Switched by menu),
Audio line output (monaural)
AV OUT/DIGITAL: Dedicated jack (8 pin)
5
/8’’ – 5 m/16’ 4”
64
Page 26

Operating
temperature /
humidity
Power consumption DC 5.1 V
When recording 1.4 W
When playing
back
Dimensions
(WxHxD;
lens retracted)
Weight
(with/without card and
battery)
32°F - 104°F / 0°C - 40°C / 10%RH - 80%RH
0.9 W
approx. 105 x 58 x 34 mm /
5
/16 x 29/16 x 111/16” tbd
4
approx. 218 g/0.481 lbs / 196 g/0.432 lbs
Battery (lithium-ion)
Voltage/capacity 3.6 V / 895 mAh
Battery charger
Input AC 110 - 240 V 50/60Hz, 0.2 A
Output DC 4.2 V
0.65 A
65
Page 27

Leica Service Addresses
Leica Academy
As well as outstanding high-performance products for taking and viewing
photographs, for many years we have also been offering the special
services of the Leica Akademie, with practical seminars and training
courses, which are intended to share our knowledge about the world
of photography, projection and magnification with both beginners and
advanced photo graphic enthusiasts.
The contents of the courses, which are run by a trained team of experts
in the modern, well-equipped training suite at our Solms factory and in
the nearby Gut Altenberg, vary from general photography to areas of
special interest and offer a range of suggestions, information and advice
for your own work.
More detailed information and the current Leica Academy brochure are
available from:
Leica Camera AG
Leica Akademie
Oskar-Barnack-Str. 11
D-35606 Solms
Phone: +49 (0) 6442-208-421
Fax: +49 (0) 6442-208-425
la@leica-camera.com
Leica on the Internet
Current information about products, news, events and the Leica company
is available on our homepage on the Internet at:
http://www.leica-camera.us
http://www.leica-camera.co.uk
66
Page 28

Leica Information Service
Should you have any technical questions regarding the use of Leica
products or the software included in some cases, Leica information
service will be happy to answer in writing or by phone, fax, or e-mail.
They are also your contact if you need advice concerning an acquisition
or if you would like us to send you instructions.
Alternatively, you can also send us your questions through the contact
form on the Leica Camera AG homepage (see above).
Leica Camera AG
Information-Service / Software-Support
Postfach 1180
D 35599 Solms
Phone: +49 (0) 6442-208-111 / -108
Fax: +49 (0) 6442-208-490
info@leica-camera.com / software-support@leica-camera.com
Leica Customer Service
Leica AG’s Customer Service center, or the repair service of the Leica
national offices (see the Warranty Card for an address list), is available to
assist you in maintaining your Leica equipment or in case of damage.
Please contact your nearest authorised Leica dealer.
Leica Camera AG
Customer Service
Solmser Gewerbepark 8
D-35606 Solms
Phone: +49 (0) 6442-208-189
Fax: +49 (0) 6442-208-339
customer.service@leica-camera.com
67
Page 29

• HDMI, the HDMI Logo, and High-Definition
Multimedia Interface are trademarks or
registered trademarks of HDMI Licensing LLC
in the United States and other countries.
• The “AVCHD” and the “AVCHD” logo are
trademarks of Panasonic Corporation and
Sony Corporation.
• Manufactured under license from Dolby
Laboratories. Dolby and the double-D symbol
are trademarks of Dolby Laboratories.
• SDXC Logo is a trademark of SD-3C, LLC.
• QuickTime and the QuickTime logo are
trademarks or registered trademarks of Apple
Inc., used under license therefrom.
• This product uses “DynaFont” from
DynaComware Corporation. DynaFont is
a registered trademark of DynaComware
Taiwan Inc.
• Leica is a registered trademark of Leica
Microsystems IR GmbH.
• Elmar is a registered trademark of Leica
Camera AG.
• Other names, company names, and product
names printed in these instructions are
trademarks or registered trademarks of the
companies concerned.
68
EU
Page 30

MEMO
69
Page 31

MEMO
70
Page 32

MEMO
71
 Loading...