

Page 1

LEICA T
Instructions
EN
Page 2

EN
FOR US ONLY:
FCC Note:
This equipment has been tested and found to comply with the
limits for a Class B digital device, pursuant to Part 15 of the FCC
Rules. These limits are designed to provide reasonable protection
against harmful interference in a residential installation. This
equipment generates, uses, and can radiate radio frequency energy
and, if not installed and used in accordance with the instructions,
may cause harmful interference to radio communications. However, there is no guarantee that interference will not occur in a
particular installation. If this equipment does cause harmful interference to radio or television reception, which can be determined by
turning the equipment off and on, the user is encouraged to try to
correct the interference by one or more of the following measures:
• Reorient or relocate the receiving antenna.
• Increase the separation between the equipment and receiver.
• Connect the equipment into an outlet on a circuit different from
that to which the receiver is connected.
• Consult the dealer or an experienced radio/TV technician for
help.
FCC Caution:
To assure continued compliance, follow the attached installation
instructions and use only shielded interface cables with ferrite core
when connecting to computer or peripheral devices. Any changes
or modifications not expressly approved by the party responsible
for compliance could void the user’s authority to operate this
equipment.
Declaration of Conformity
Trade Name: Leica
Model No.: LEICA T (Typ 701)
Responsible party/
Support contact:
Leica Camera Inc.
1 Pearl Court, Unit A
Allendale, New Jersey 07401
Tel.: +1 201 995 0051
Fax: +1 201 995 1684
technicalinfo@leicacamerausa.com
This device complies with Part 15 of the FCC Rules. Operation is
subject to the following two conditions: (1) This device may not
cause harmful interference, and (2) this device must accept any
interference received, including interference that may cause
undesired operation.
Contains FCC ID: EW4W092
This transmitter must not be co-located or operated in conjunction
with any other antenna or transmitter. This equipment complies
with FCC radiation exposure limits set forth for an uncontrolled
environment and meets the FCC radio frequency (RF) Exposure
Guidelines. This equipment has very low levels of RF energy that
are deemed to comply without testing of specific absorption ratio
(SAR).
114
Page 3

FOR CANADA ONLY:
CAN ICES-3 (B)/NMB-3(B)
This device complies with RSS-210 of the IC Rules.
Operation is subject to the following two conditions:
(1) This device may not cause harmful interference,
(2) This device must accept any interference received,
including interference that may cause undesired operation of the
device.
This equipment complies with IC radiation exposure limits set forth
for an uncontrolled environment and meets RSS-102 of the IC radio
frequency (RF) Exposure rules.
This equipment has very low levels of RF energy that are deemed
to comply without testing of specific absorption ratio (SAR).
FOR SINGAPORE ONLY:
FOR UNITED ARAB EMIRATES ONLY:
EN
TRA
REGISTERED No:
ER0119716/13
DEALER No:
DA0112968/13
115
Page 4

EN
FOREWORD
Dear Customer,
We wish you a great deal of pleasure and success using your new
Leica T.
Please read these instructions so that you can make the most of
your Leica T’s capabilities.
Use the Quick Start Guide for a fast introduction to your new Leica.
Foreword / Items supplied
PACKAGE CONTENTS
Before using your Leica T for the first time, please check that the
accessories supplied are complete.
a. Leica BP-DC13 battery
b. Battery charger BC-DC13 (including interchangeable mains
connector)
c. Micro USB cable
d. Dummy plug (inserted when delivered)
e. Carrying strap
f. Carrying strap release pin
g. Housing bayonet cover
h. Accessory shoe cover
i. Registration card with TAN for downloading Adobe
Lightroom
AG website)
Caution:
Always store small parts (e.g. carrying strap release pin) as follows:
– out of reach of children
– in a location where they will not get lost, e.g. in the designated
positions in the camera case
®
(after registering the camera on the Leica Camera
®
Photoshop®
116
Page 5
The production date of your camera can be found on the stickers in
the warranty card or on the packaging. The notation is: Year /
Month / Day
You can fi nd specifi c approvals for this product in the camera
menu.
► Select
► Select Regulatory information in the submenu
EN
Regulatory information
117
Page 6

EN
Caution:
• Modern electronic components react sensitively to electrostatic
discharge. As people can easily pick up charges of tens of
thousands of volts, by walking on synthetic carpets for example,
a discharge can occur when you touch your camera, particularly
if it is placed on a conductive surface. If only the camera housing
is affected, this discharge is harmless to the electronics.
However, despite built-in safety circuits, the outer contacts, such
Legal information
as those in the flash shoe, should not be touched if at all
possible for safety reasons.
• For any cleaning of the contacts, do not use an optical microfiber cloth (synthetic); use a cotton or linen cloth instead. Before
touching the contacts, you can make sure you discharge any
electrostatic charge by deliberately touching a heating or water
pipe (conductive, earthed material). You can also avoid soiling
and oxidization of the contacts by storing your camera in a dry
location with the lens cover and the flash shoe/viewfinder
socket cover fitted.
• You should use exclusively the recommended accessories to
prevent faults, short circuits or electric shock.
• Do not attempt to remove parts of the housing (covers);
specialist repairs can be carried out only at authorized service
centers.
Legal notice:
• Please ensure that you observe copyright laws. The recording
and publication of pre-recorded media such as tapes, CDs, or
other published or broadcast material may contravene copyright
laws.
• This also applies to all of the software supplied.
• With regard to videos created using this camera: This product is
subject to the AVC Patent Portfolio license for personal use by
an end user and other types of use for which the end user
receives no remuneration (i) for coding to the AVC standard
("AVC Video") and/or (ii) decoding of an AVC video coded by an
end user for personal use and/or received by the private end
user by the supplier, who has acquired a license to supply AVC
videos. Explicit nor implicit licenses are not granted for any other
use. Further information is available from MPEG LA, L.L.C. under
HTTP://WWW.MPEGLA.COM. Any other use, in particular
offering AVC videos for remuneration, require the conclusion of
a separate license agreement with MPEG LA, L.I.C. Further
information is available from MPEG LA, L.L.C. under
HTTP://WWW.MPEGLA.COM.
• The SD and USB logos are registered trademarks.
• Other names, company or product names referred to in this
manual are trademarks or registered trademarks of the relevant
companies.
118
Page 7

DISPOSAL OF ELECTRICAL AND
ELECTRONIC EQUIPMENT
(Applies within the EU, and for other European
countries with segregated waste collection systems)
This device contains electrical and/or electronic components and
should therefore not be disposed of in general household waste.
Instead it should be disposed of at a recycling collection point
provided by the local authority. This costs you nothing.
If the device itself contains replaceable (rechargeable) batteries,
these must be removed first and, if necessary, also be disposed of
in line with the relevant regulations.
Further information on this issue is available from your local
administration, your local waste collection company, or in the store
where you purchased this device.
Meaning of the different categories of information in
this manual
Note:
Additional information
Important:
Non-compliance can lead to damage to the camera,
accessories, or pictures
Caution:
Non-compliance can lead to personal injury
EN
Disposal of electrical and electronic equipment
119
Page 8

EN
120
CONTENTS
Designation of parts ................................................................................. U2/U4
Foreword ......................................................................................................116
Package contents .........................................................................................116
Warning messages ........................................................................................118
Legal information ..........................................................................................118
Contents
Disposal of electrical and electronic equipment .............................................119
Preparations
Attaching the carrying strap .......................................................................122
Changing the battery..................................................................................123
Charging the battery ..................................................................................124
Changing the memory card ........................................................................128
Attaching / removing lenses ......................................................................130
Lenses for the Leica T ................................................................................130
Camera operation
Main switch ...............................................................................................132
Adjusting dials ...........................................................................................132
Shutter release ..........................................................................................133
Gesture control ..........................................................................................134
Locking / unlocking the right toolbar ......................................................135
INFO display ...........................................................................................136
Opening the main menu ..........................................................................137
Opening the exposure mode / scene menu.............................................137
Opening the main menu ..........................................................................137
Navigation in the main and My Camera menus ........................................138
Menu tiles ..............................................................................................139
Setting the function options in submenus ................................................140
General comments on menu control .......................................................141
Customizing the My Camera menu ..........................................................142
Setting dial menu ....................................................................................144
Allocating the required function to the setting dial ...................................145
Basic camera settings
Menu language ..........................................................................................146
Date / time ...............................................................................................146
Automatic camera shutdown ......................................................................147
Acoustic signals .........................................................................................148
Monitor / viewfinder settings .....................................................................148
Automatic monitor shutdown .....................................................................149
Basic picture settings
File format / Compression rate ..................................................................150
JPEG resolution ..........................................................................................150
White balance ............................................................................................150
ISO sensitivity ............................................................................................152
Color reproduction / picture properties .....................................................152
Picture mode
Picture sequence .......................................................................................154
Distance setting .........................................................................................154
Automatic distance setting / autofocus ..................................................154
AF auxiliary light ..................................................................................155
Autofocus metering methods ...............................................................156
Spot / single point measurement ........................................................156
Focusing by touching ...........................................................................158
Multiple field measurement ..................................................................158
Face detection ....................................................................................158
Manual focus ..........................................................................................159
Auxiliary function for manual distance setting .......................................159
Focusing .............................................................................................159
Exposure metering and control
Exposure metering methods ....................................................................160
Histogram / clipping ...............................................................................161
Exposure control .....................................................................................162
Programmed automatic exposure mode ...............................................162
Changing the specified shutter speed / aperture combinations .........163
Aperture priority ..................................................................................164
Shutter speed priority ..........................................................................165
Manual setting .....................................................................................166
Subject programs ................................................................................167
Metering memory lock .........................................................................168
Exposure compensation .......................................................................168
Automatic bracketing ..........................................................................169
Page 9

Video recordings ...........................................................................................170
Stabilization ............................................................................................170
Sound recording .....................................................................................171
Flash photography
Using the built-in flash unit .........................................................................172
Flash modes ..............................................................................................173
Flash range ................................................................................................174
Sync time ..................................................................................................175
Flash exposure compensation ....................................................................175
Using external flash units ...........................................................................176
Additional functions
Picture stabilization ....................................................................................178
Self-timer ...................................................................................................178
Recording the location with GPS ................................................................179
Review mode
Switching between picture and review modes.............................................180
Automatic review .......................................................................................180
Reviewing pictures in portrait format ..........................................................181
Selecting pictures ......................................................................................181
Enlarging / reducing pictures .....................................................................182
Simultaneously viewing 9 pictures ...........................................................182
Selecting the trimming ...............................................................................183
Review menu .............................................................................................184
Slide show ..............................................................................................184
Marking pictures as favorites / canceling markings .................................185
Protecting pictures / canceling delete protection ....................................185
Selecting the review source ....................................................................188
Copying picture data between the internal memory
and the inserted memory card ................................................................188
Deleting pictures........................................................................................186
Video review ..............................................................................................190
Cutting and combining video recordings .....................................................192
Miscellaneous
User profiles ..............................................................................................194
Resetting all menu settings to the factory defaults ..................................194
Resetting all custom settings .....................................................................194
Resetting the picture file numbering ...........................................................195
Setting up and using the WIFI function .......................................................196
Transferring data to a computer .................................................................200
Formatting .................................................................................................201
Using raw data (DNG) ................................................................................202
Installing Adobe
Installing firmware updates ........................................................................203
Accessories ..................................................................................................204
Spare parts ...................................................................................................206
Precautions and care instructions .................................................................208
Appendix
Menu options .............................................................................................212
Picture mode menu ....................................................................................214
Subject program settings ...........................................................................216
Technical data ..............................................................................................218
Index ............................................................................................................220
Leica Product Support...................................................................................222
Leica Customer Care ....................................................................................222
®
Photoshop® Lightroom® ..................................................202
EN
ContentsContents
121
Page 10
EN
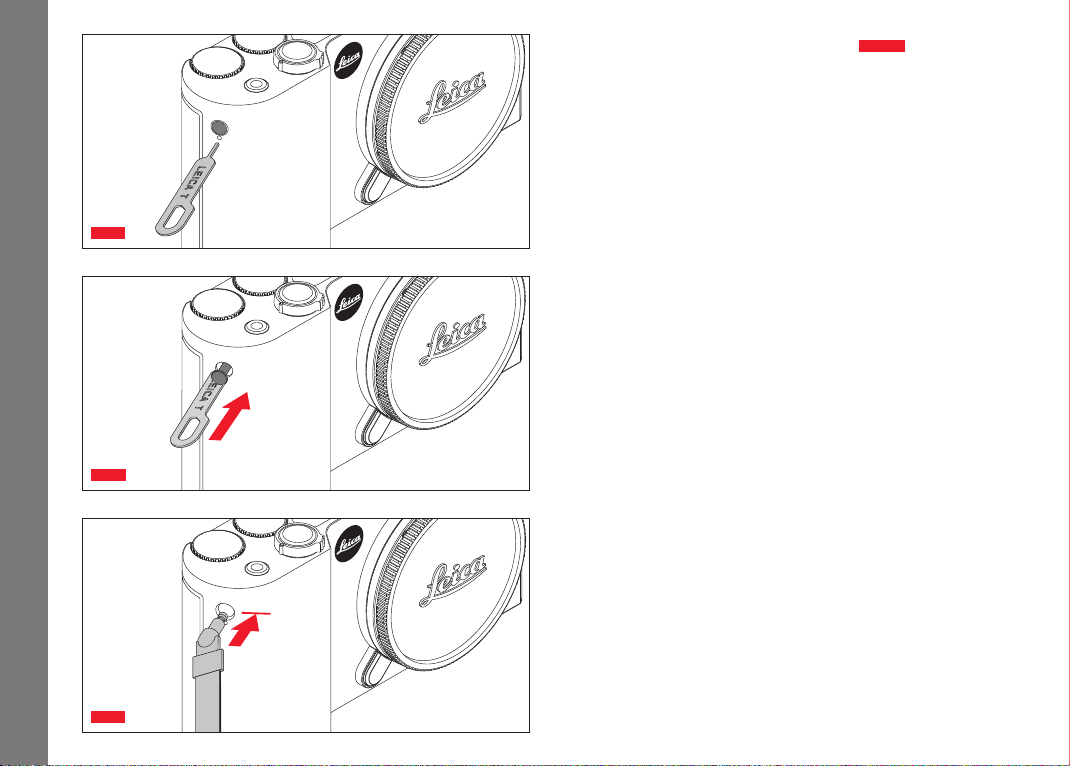
ATTACHING THE CARRYING STRAP
Fig. 1a- c
Preparations
Fig. 1a
Fig. 1b
122
Fig. 1c
Page 11
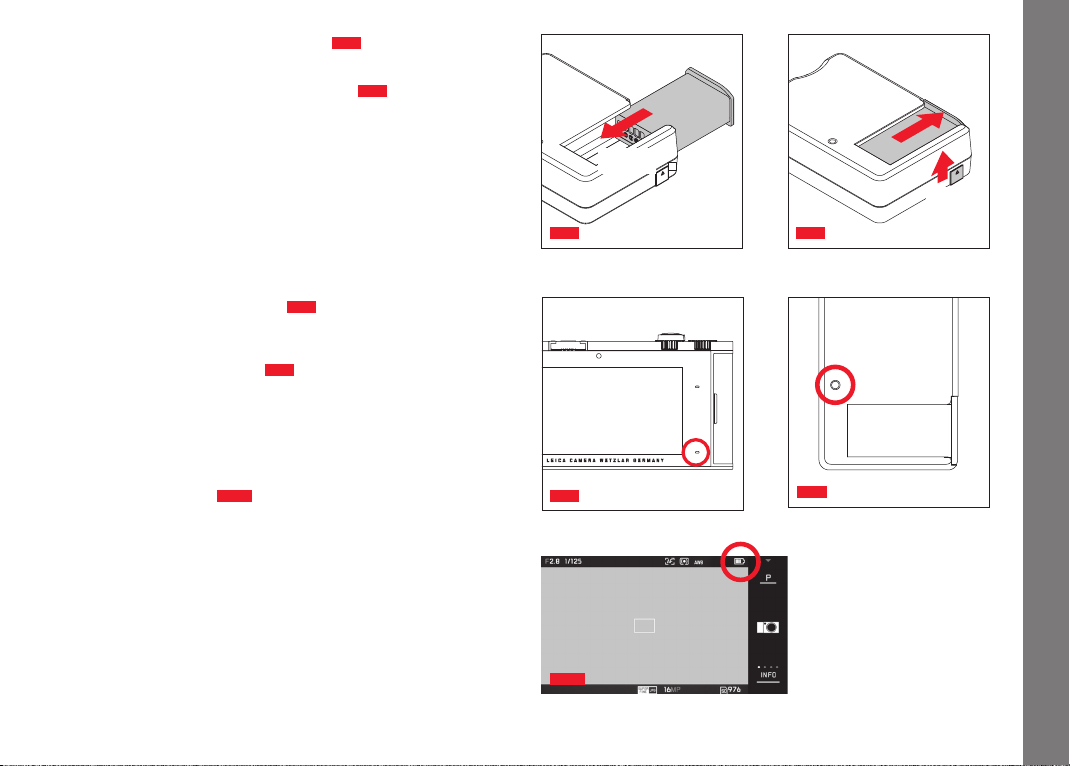
CHANGING THE BATTERY
Turning off the camera
Fig. 2a
EN
Preparations
Preparations
Inserting the battery
Removing the battery
Fig. 2b
Fig. 2c
Notes:
• The battery is supplied pre-charged, which means that you can
start using the camera immediately.
• The lock has a retaining mechanism to prevent the battery from
falling out when the camera is held upright.
Important:
Removing the battery with the camera turned on can result in your
settings being deleted, a loss of picture data, and damage to the
memory card.
Fig. 2a
Fig. 2b
Fig. 2c
123
Page 12

EN
CHARGING THE BATTERY
The Leica T is powered by a Lithium ion battery. It can be charged
while inserted in the camera using the USB cable supplied or
outside the camera using the charger supplied.
Caution:
Preparations
• Only the battery type specified and described in this manual,
and/or battery types specified and described by Leica Camera
AG, may be used in this camera.
• This battery may only be used in the units for which it is
designed and may only be charged exactly as described.
• Using this battery contrary to the instructions and using non-
specified battery types can result in an explosion under certain
circumstances.
• Batteries may not be exposed to sunlight, heat, humidity or
condensation for long periods. To prevent a risk of fire or
explosion, batteries may not be placed in a microwave oven or a
pressurized container.
• Never throw batteries into a fire as this can cause them to
explode.
• Humid or wet batteries may not be charged or used in the
camera under any circumstances.
• Always ensure that the battery contacts are clean and freely
accessible.
• Whilst lithium ion batteries are proof against short circuits, they
should still be protected against contact with metal objects such
as paper clips or jewelry. A short-circuited battery can get very
hot and cause severe burns.
• If a battery is dropped, check the casing and the contacts
immediately for any damage. Using a damaged battery can
damage the camera.
• If the battery makes a noise, becomes discolored or deformed,
overheats or leaks any fluid, it must be removed from the
camera and replaced immediately. Continuing to use the battery
can result in overheating, leading to a risk of fire and/or
explosion.
• If any fluid is escaping or a burning smell occurs, keep batteries
away from sources of heat. Leaked fluid can catch fire.
• Only the charger specified and described in this manual, or other
chargers specified and described by Leica Camera AG, may be
used. The use of any other chargers not approved by Leica
Camera AG can cause damage to the battery and, in extreme
cases, serious or life-threatening injuries.
• The charger supplied should be used exclusively for charging this
battery type. Do not attempt to use it for other purposes.
• Ensure that the mains outlet used is freely accessible.
• Heat is generated during charging. Therefore, charging should
not be carried out in small, enclosed - i.e. unventilated - spaces.
• The battery and charger may not be opened. Repairs may only
be carried out by authorized workshops.
• Make sure that batteries are kept out of reach of children.
Swallowing batteries brings a risk of suffocation.
Dispose of used batteries in line with the information provided
in this manual.
124
Page 13

First aid:
• If battery fluid comes into contact with the eyes, there is a risk
of blinding.
Wash the eyes thoroughly with clean water immediately. Do not
rub the eyes. Seek medical attention immediately.
• If leaked fluid gets onto the skin or clothing, there is a risk of
injury. Wash the affected areas with clean water.
Notes:
• The battery is supplied partially charged, but it should be
charged before long periods of use.
• In order to charge the battery, it must have a temperature of
between 0°C and 35°C / 32°F and 95°F (otherwise the
charger may not turn on or off again).
• Lithium ion batteries can be charged at any time, regardless of
their current charge level. If a battery is only partly discharged
when charging starts, it is charged to full capacity faster.
• Lithium ion batteries should only be stored in a partially charged
condition, i.e. not fully charged or fully discharged. For very long
storage periods, batteries should be charged for around 15
minutes around twice a year to prevent total discharge.
• The batteries warm up during the charging process. This is
normal and not a malfunction.
• A new battery only reaches its full capacity after it has been fully
charged and – by use in the camera – discharged 2 or 3 times.
This discharge procedure should be repeated every 25 cycles.
• Rechargeable lithium ion batteries generate power through
internal chemical reactions. These reactions are also influenced
by the external temperature and humidity. To ensure a maximum
service life of the battery, it should not be exposed to (high or
low) extremes of temperature (e.g. in a parked car in the
summer or winter).
• Even with optimum conditions of use, every battery has a limited
service life. After several hundred charging cycles, this becomes
noticeable as the operating times get significantly shorter.
• Take damaged batteries to an appropriate collection point for
proper recycling, in line with the applicable regulations (see p.
119).
• The replaceable battery supplies another back-up battery that is
integrated into the camera. This back-up battery ensures that
the date and time data entered is retained for up to 2 days. If
this back-up battery becomes discharged it must be recharged
by inserting a charged main battery. Once the replaceable
battery has been inserted, the full capacity of the back-up
battery is recovered after about 60 hours. This process does not
require the camera to be turned on. However, the date and time
will need to be entered again.
• Remove the battery if you will not be using the camera for a long
period of time. When doing so, turn the camera off using the
main switch first. Otherwise, after several weeks the battery
could become totally discharged, i.e. the voltage is sharply
reduced as the camera still consumes a small amount of current
(for saving your settings) even when it is turned off.
EN
Preparations
125
Page 14
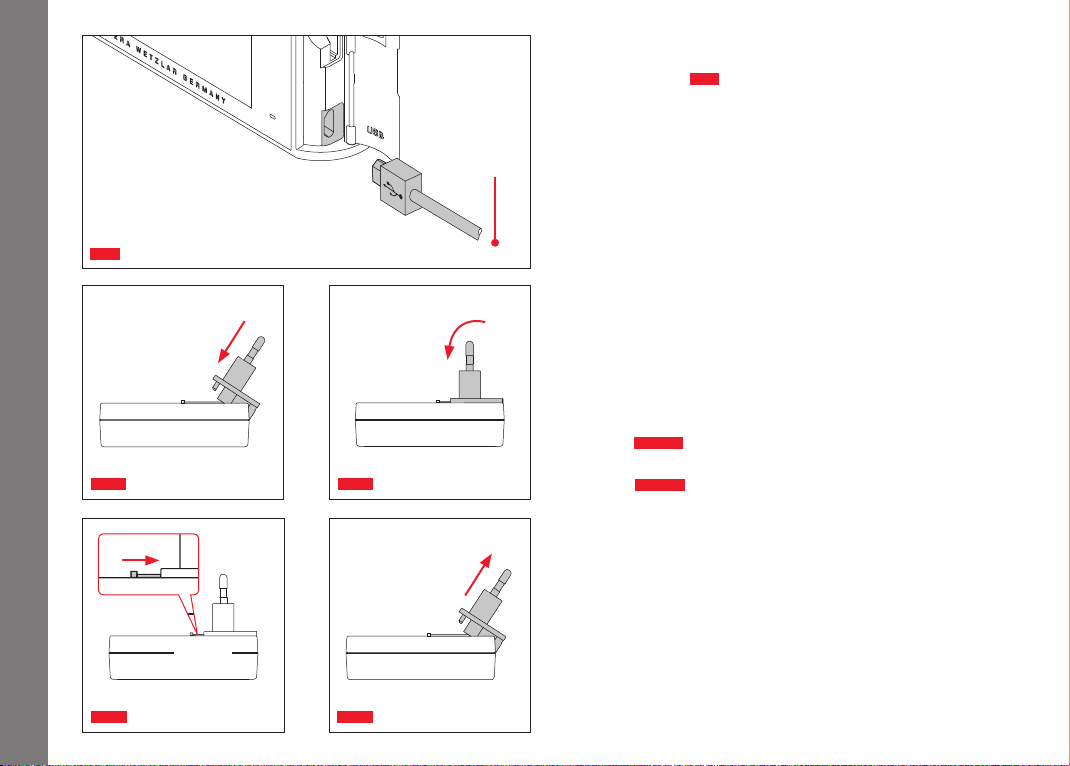
EN
CHARGING THE BATTERY
WITH USB CABLE
Fig. 3
Computer /
USB charger
Preparations
Notes:
• The camera should only be connected to a computer or a
standard USB charger (with maximum charging current of
500mA or 1A) and not to a monitor, keyboard, printer, or USB
hub.
• The USB charging process is only started when the camera is
Fig. 3
turned off .
• If the computer goes into standby mode during charging, this
may cancel the charging process.
"Click"
2.
WITH THE CHARGER
Changing the mains connector on the charger
Attaching
Removing
Fig. 4a/b
Fig. 5a/b
2.
Fig. 4a
1.
Fig. 4b
1.
"Click"
126
Fig. 5a
Fig. 5b
Page 15
Inserting the battery in the charger
Fig. 6
EN
Removing the battery from the charger
Fig. 7
Notes:
• The charger must be fi tted with the appropriate connector for
local power sockets.
• The charger automatically adjusts to the relevant mains voltage.
Charge status displays
The charging process is indicated by LEDs.
With USB cable (LED on camera)
Fig. 8
– Continuous red: Charging in progress
– Continuous green: Battery fully charged
With charger (LED on charger
Fig. 9
)
– Flashing red: Fault, no charging
– Continuous red: Charging in progress
– Continuous green: Battery fully charged
Charge level display
Fig. 10
The charge level of the battery inserted is indicated in the monitor.
The display fl ashes if the battery only has capacity for a few more
pictures. At this point, the battery should be replaced or recharged.
Fig. 6
Fig. 8
Preparations
2.
"Click"
1.
Fig. 7
Fig. 9
Fig. 10
127
Page 16

EN
CHANGING THE MEMORY CARD
SD, SDHC or SDXC memory cards can be used in the Leica T.
However, thanks to an integrated 16 GB memory you can also take
photos without a memory card.
Preparations
Turning off the camera
Fig. 11a
Inserting the memory card
Fig. 11a
Fig. 11b
128
Fig. 11b
Fig. 11c
Removing the memory card
Fig. 11c
2.
1.
Page 17

Notes:
• Do not open the compartment and do not remove the memory
card or the battery while the LED is lit to indicate that the
camera is accessing the memory. Otherwise, the data on the
card can be destroyed and the camera may malfunction.
• SD, SDHC and SDXC cards have a write protection switch, that
can be used to prevent unintentional storage and deletion of
pictures. This switch takes the form of a slider on the nonbeveled side of the card; in the lower position, marked LOCK,
the data is protected.
• If the memory card cannot be inserted, check that it is aligned
correctly.
• If a memory card is inserted, pictures are only saved on the
card. If no card is inserted, the camera stores image data in the
internal memory.
• The range of SD/SDHC/SDXC cards is too large for Leica
Camera AG to be able to completely test all available types for
compatibility and quality. Although no damage to the camera or
the card is generally expected, because some "no name" cards
may not fully comply with the SD/SDHC/SDXC standards Leica
Camera AG cannot provide any guarantee of function.
• As electromagnetic fields, electrostatic charge, and defects on
the camera or the card can lead to damage or loss of the data
on the memory card, we recommend that you also transfer the
data to a computer and save it there.
EN
Preparations
129
Page 18
EN
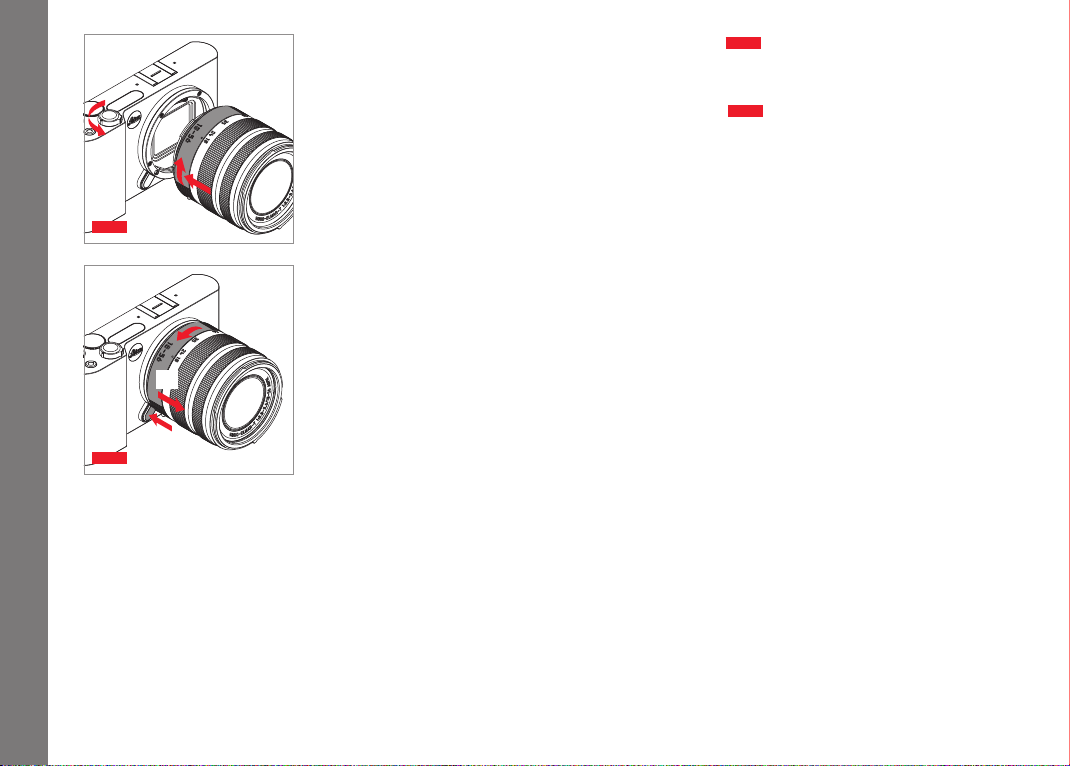
ATTACHING THE LENS
Fi g. 12
DETACHING THE LENS
1.
Preparations
3.
Fi g. 12
2.
Notes:
• To protect against dust getting into the interior of the camera, it
is important always to have a lens or a cover fi tted to the camera
body.
• For the same reason, when changing lenses work quickly and in
Fig. 13
an environment that is as dust-free as possible.
• Camera or lens rear covers should not be stored in your trouser
2.
3.
pocket as they attract dust that can get into the camera when
they are fi tted.
LENSES FOR THE LEICA T
All Leica T lenses essentially have the same external construction:
1.
Fig. 13
they have an external bayonet fi tting on the front mount for the
lens hood and an internal thread for fi lters, an adjusting dial for the
distance, a fi xed ring with a red index button for changing lens, and
a contact strip for transferring information and control signals.
Leica T Vario lenses also have an additional focal length setting dial
with its own index.
Note:
Illustration on the inside of the rear envelope.
130
Page 19
Depth of fi eld
As Leica T lenses do not have an aperture ring, there is no depth of
fi eld scale. For the corresponding values, refer to the tables on the
Leica Camera AG website.
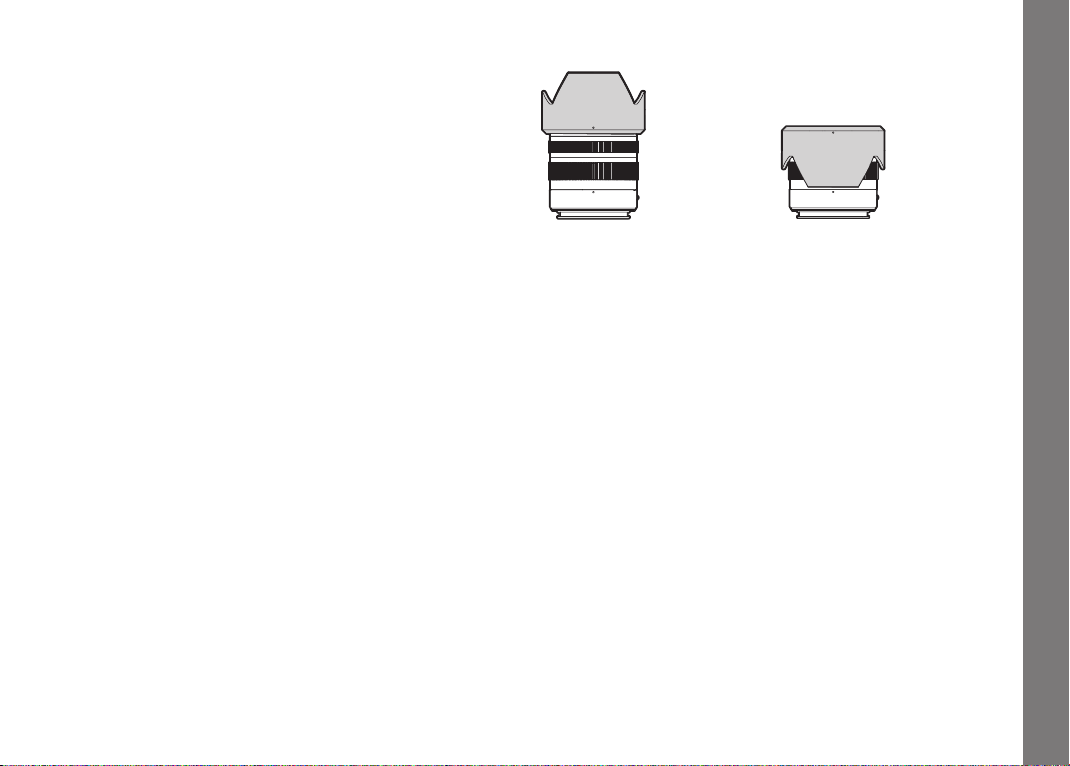
Lens hood
EN
Preparations
Exposure measurement and control with Leica T Vario lenses
Leica T Vario lenses have a variable speed, i.e. the eff ective
aperture opening varies depending on the set focal length. To
prevent incorrect exposures, the desired focal length must be
determined before storing the measured value or changing the
speed/aperture combination. For further details, refer to the
sections under "Exposure metering and control" starting on p.
160.
When using additional, non-system compatible fl ash units, the
aperture setting on the fl ash unit must correspond to the actual
aperture.
Picture
position
Transport
position
Leica T lenses are supplied with optimized lens hoods. Thanks to
their symmetrical bayonet, they can be fi tted quickly and easily and
removed again for space-saving storage.
Lens hoods reduce stray light and refl ections, as well as preventing
damage and dirt on the front lens.
Filters
Screw-on fi lters can be used on lenses for Leica T. For the
appropriate diameter, refer to the technical data in the relevant
lens manuals.
131
Page 20
EN
OFF
ON
OFF
ON
CAMERA OPERATION
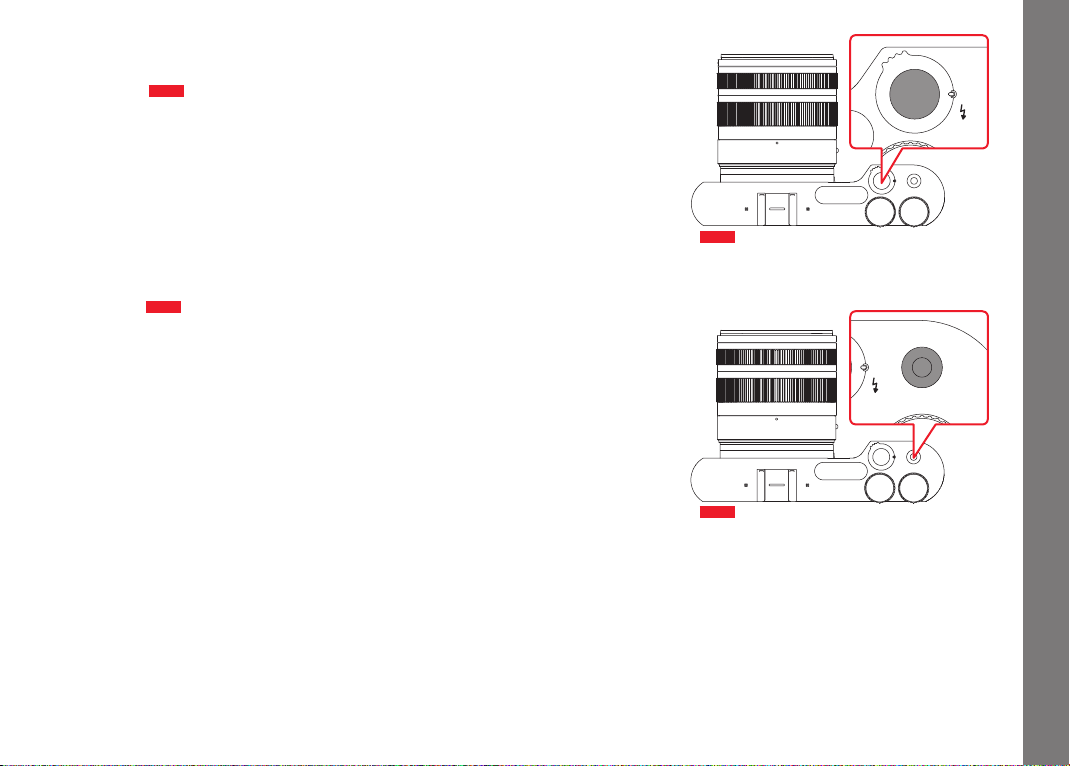
MAIN SWITCH
Fi g. 14
The Leica T is turned on and off using the main switch
–
OFF = Turned off
–
ON = Turned on
It is also used to release the built-in fl ash unit:
= Flash unit pops up
–
• When the camera is turned on, the monitor screen appears.
132
Camera operation
Note:
The fi rst time you turn on, or when you turn on after resetting all
Fi g. 14
settings,
this display starts a welcome video. Playback can be stopped at
any time by pressing
The
the settings the
PL AY ▸ appears in the top right of the monitor. Pressing
SKIP ▸.
LANGUAGE submenu then appears, and when you have made
DATE/TIM E submenu, and fi nally, once you have
made the settings here, the monitor screen.
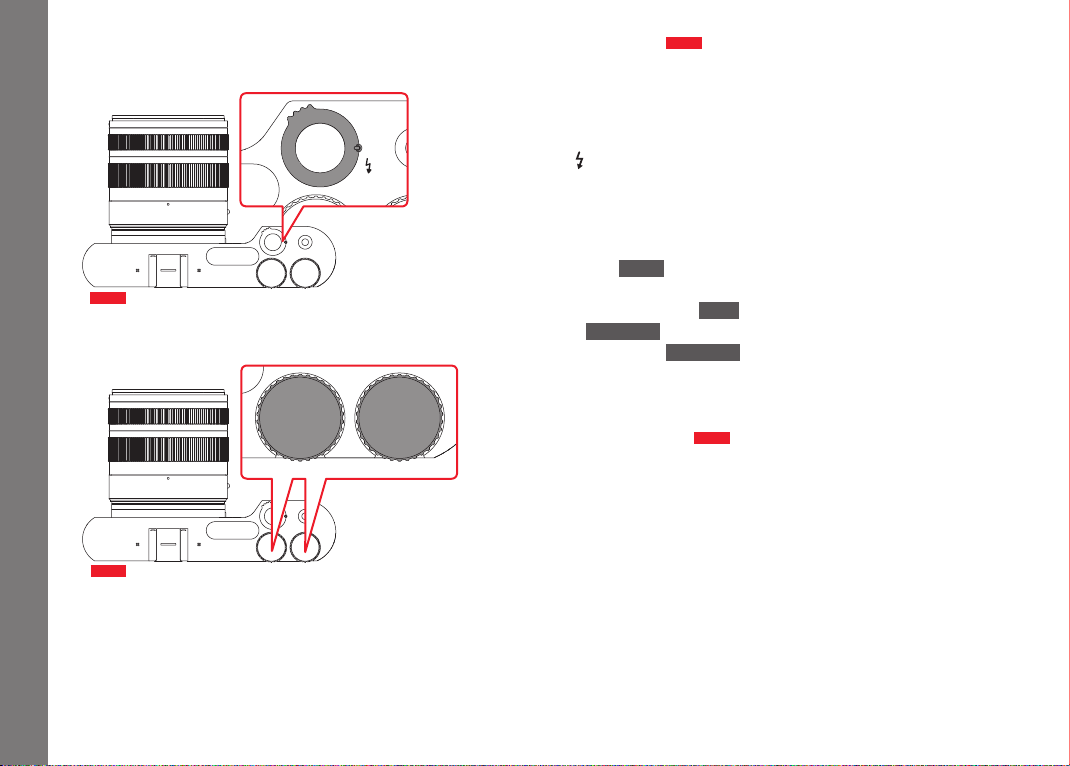
ADJUSTING DIALS
Fi g. 15
The two adjusting dials on the Leica T are allocated diff erent
functions in picture, review and menu modes.
Fi g. 15
Page 21
SHUTTER RELEASE
OFF
ON
OFF
ON
EN
For photos
Fi g. 16
The shutter release works in two stages. Lightly pressing activates
both automatic distance setting and exposure metering and
control, and stores the relevant settings/values. If the camera was
previously in standby mode, this reactivates it and the monitor
screen appears again.
Pressing the shutter release button all the way down takes a
picture.
For videos
Fi g. 17
The shutter release starts and stops video recordings.
Camera operation
Fi g. 16
Fi g. 17
133
Page 22
EN
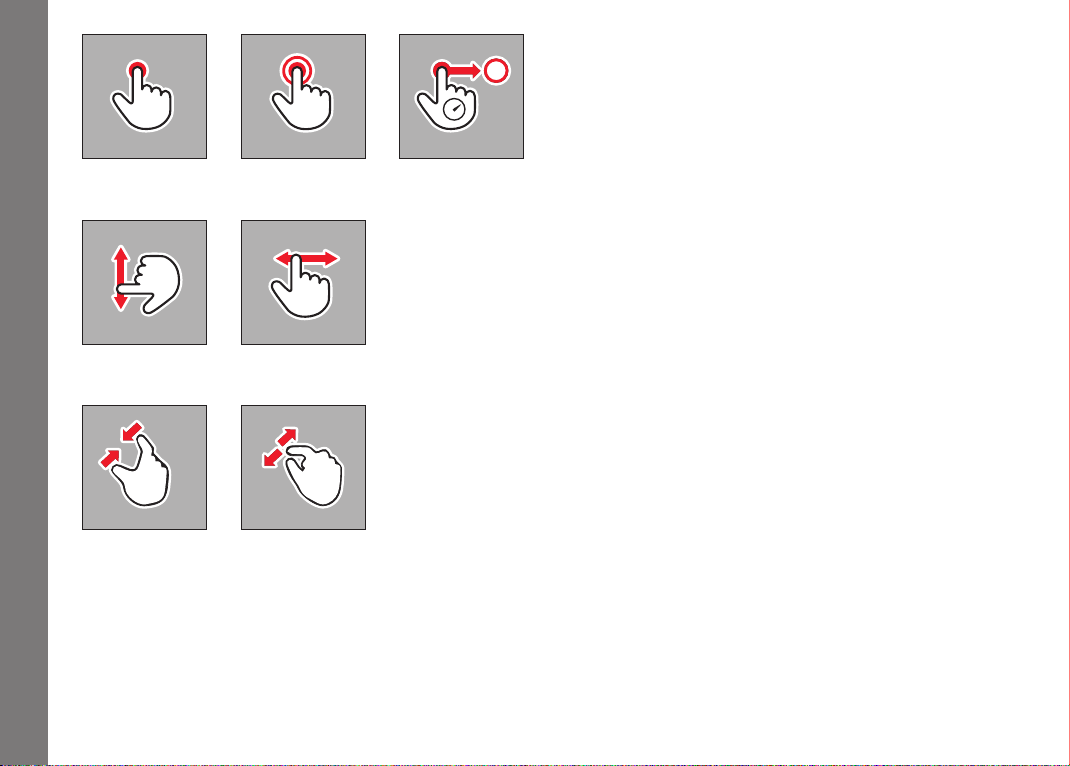
Briefly touch Double tap
Camera operation
Swipe
GESTURE CONTROL
The Leica T is predominantly operated using the gestures on the
touch-sensitive monitor listed on the left.
Note:
A light touch is sufficient, there is no need to press firmly.
Long touch, drag and
release
134
Drag together
Drag apart
Page 23
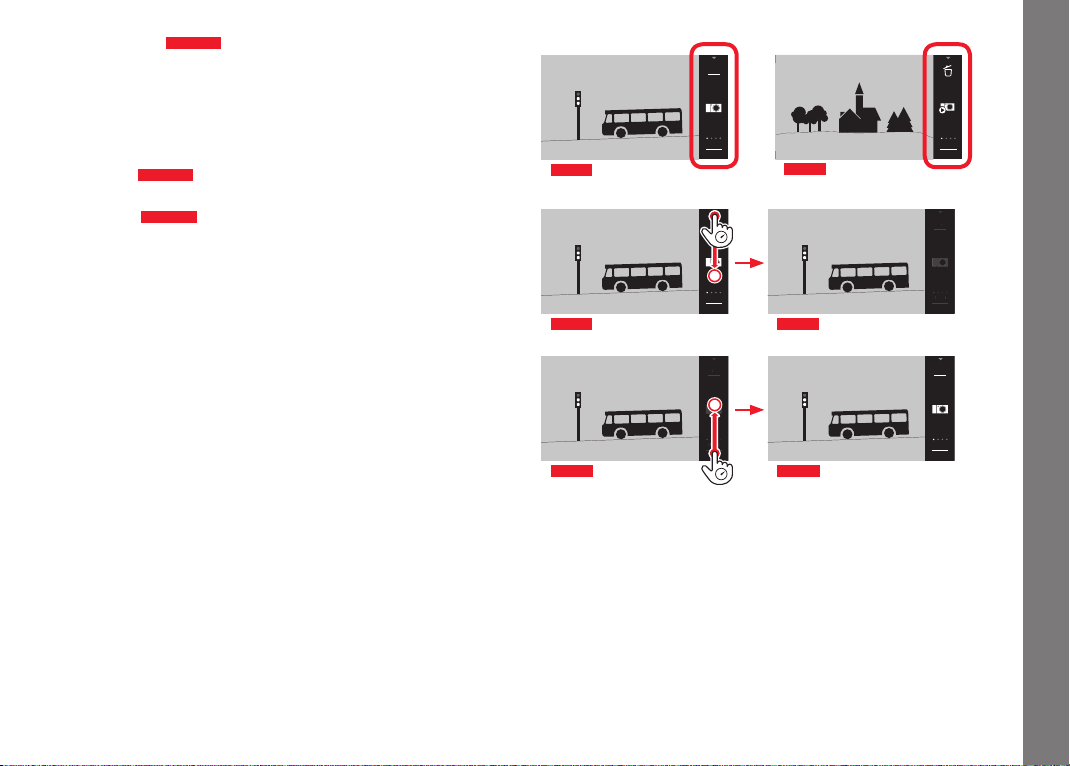
Right toolbar
INFO
1/80002.8F 12500ISO EV
A
823412MP
22:45 PM 22.02.2012
999-9000
8234/999912MP
2.8F 1/8000 12500ISO EV
INFO
INFO
1/80002.8F 12500ISO EV
A
823412MP
INFO
1/80002.8F 12500ISO EV
A
823412MP
INFO
1/80002.8F 12500ISO EV
A
823412MP
INFO
1/80002.8F 12500ISO EV
A
823412MP
I
NFO
I
NFO
Fig. 18a/b
The symbols at the right edge of the monitor are the entry point for
operating the Leica T. To prevent unintentional operation, you can
disable these symbols.
Picture mode Review mode
EN
Camera operation
Disabling
Releasing
Fi g. 19a/b
Fig. 20a/b
Fig. 18a
Fi g. 19a
Fig. 20a
Fig. 18b
Fi g. 19b
Fig. 20b
135
Page 24
EN
1/602.8F
A
823416MP
AWB
SD
INFO
999-9000
2.8F 1/60 100ISO
AWB
823416MP
SD
INFO
1/80002.8F 12500ISO EV
A
-3 2 1 0 21 3+
823412MP
INFO
22:45 PM 22.02.2012
999-9000
8234/999912MP
2.8F 1/8000 12500ISO EV
INFO
1/602.8F
A
823416MP
AWB
SD
INFO
999-9000
2.8F 1/60 100ISO
AWB
823416MP
SD
INFO
1/602.8F
A
823416MP
AWB
SD
INFO
999-9000
2.8F 1/60 100ISO
AWB
823416MP
SD
INFO
INFO display
Repeatedly pressing
monitor displays.
INFO allows you to gradually extend the
Camera operation
Fig. 21a
Fig. 21d
Fig. 22a
Fig. 22d
Fig. 21b
Fig. 21c
In picture mode
1x = Status displays
= Grid
2x
= Histogram
3x
= No additional information
4x
In review mode
Fig. 21a-d
Fig. 22a -d
1x = Status displays
= Histogram
2x
= Clipping
3x
Note:
The histogram and clipping displays are not available when playing
Fig. 22b
Fig. 22c
back a video.
136
Page 25
Opening the exposure mode / scene menu
A
1/80002.8F 12500ISO EV
A
-3 2 1 0 21 3+
823412MP
INFO
1/80002.8F 12500ISO EV
A
-3 2 1 0 21 3+
823412MP
INFO
1/80002.8F 12500ISO EV
A
-3 2 1 0 21 3+
823412MP
INFO
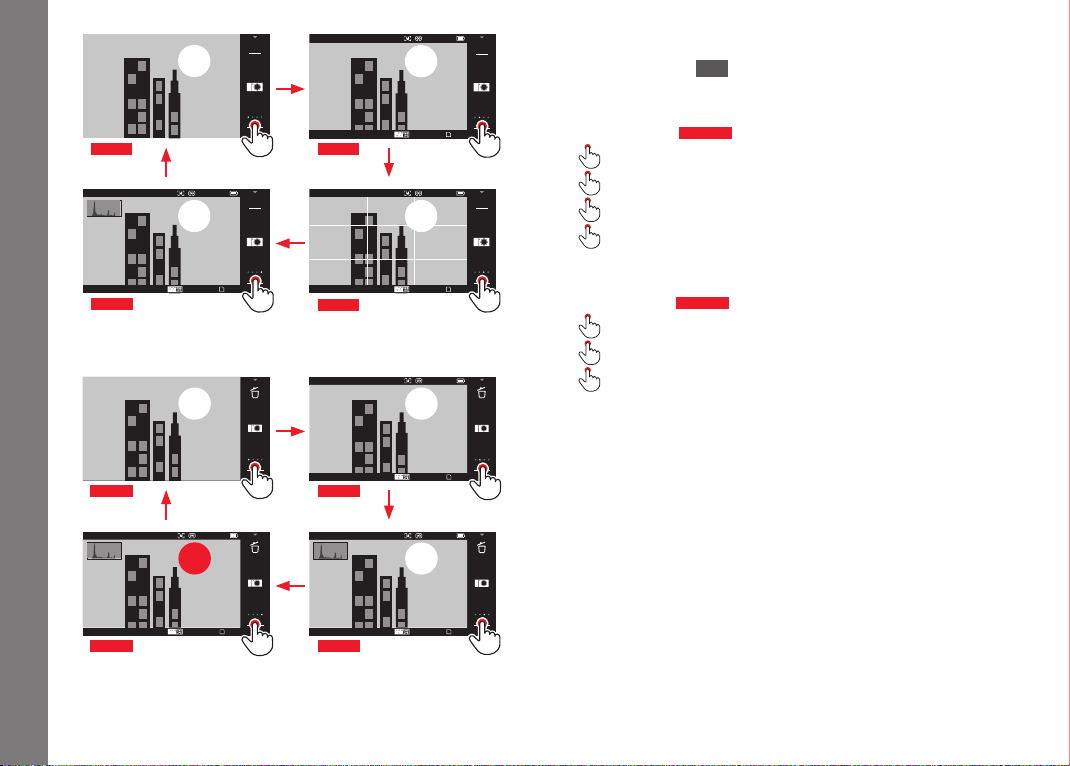
Fig. 23a/b
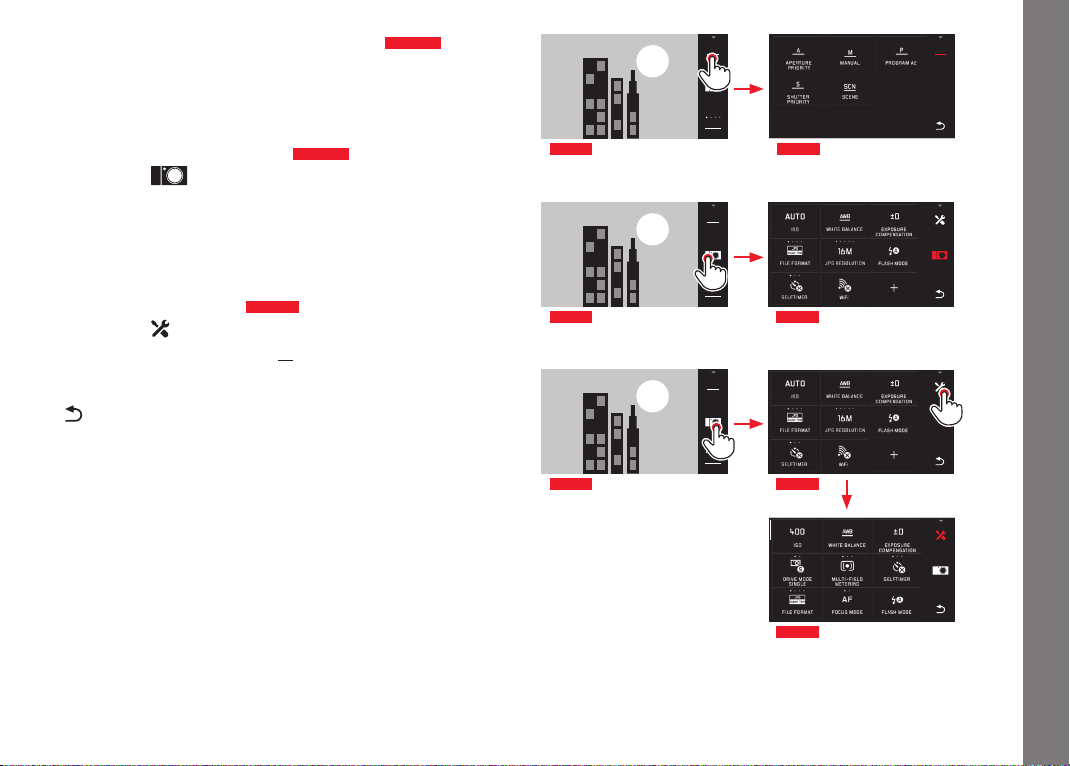
Pressing the symbol in the top right of the toolbar opens the
exposure mode / scene menu (see p. 214).
EN
Camera operation
Opening the My Camera menu
Fig. 24a/b
Pressing the symbol opens the My Camera menu. This menu
can be individually confi gured with functions from the main menu.
This gives you faster access to the functions you use most
frequently.
Opening the main menu
Fig. 25a -c
Pressing the symbol in the My Camera menu opens the main
menu. The main menu contains all menu functions on the camera.
= Back to previous menu level / setting
Fig. 23a
Fig. 23b
Fig. 24a Fig. 24b
Fig. 25a
Fig. 25b
Fig. 25c
137
Page 26

EN
Fig. 26a Fig. 26b
Camera operation
Scroll bar
Fig. 27a Fig. 27b
Fig. 26c
Navigation in the main and My Camera menus
The camera provides two diff erent options for navigating in the
menus.
– Using gesture control
Fig. 26a-c
– Using the adjusting dials (both have the same function in this
case) and gesture control
• The scrollbar to the left indicates the current position in the
Fig. 27a- d
menu.
Note:
Menu functions that are not available, e.g. because of other
settings, are indicated by a gray display
Fig. 28a
and are skipped.
138
Fig. 27d Fi g. 27c
Page 27
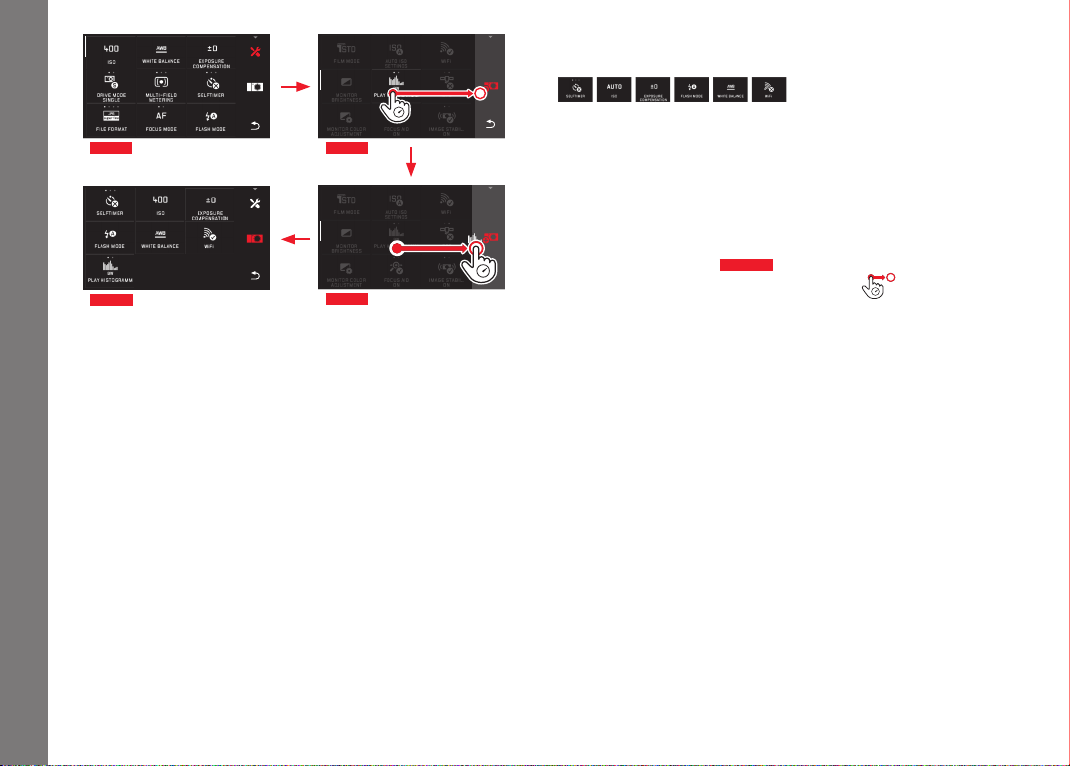
Menu tiles
The menu options are displayed in the form of tiles.
Information in the tiles
Fig. 28a
Display for a tile that allows direct setting of the function
options (max. 5).
Fig. 28a-d
Symbol or numerical value
Fig. 28a-d
Name of the menu option or the set menu function.
a.
b.
c.
Fig. 28a Fig. 28b
EN
b.
c.
Camera operation
Depending on the scope of the menu option, the tile provides:
– Direct setting of the function options, or
– Access to a submenu
Direct setting of function options
For menu tiles that can be set directly, the next function option is
accessed simply by pressing
Fig. 29a-c
.
b.
c.
Fig. 28c Fig. 28d
Fig. 29a Fig. 28b
Fig. 29c
b.
c.
139
Page 28
EN
Setting the function options in submenus
Menu options that only have the displays b. and c. are set using
submenus. Their structure diff ers depending on the function.
140
Fig. 30a
Camera operation
Fig. 30b Fig. 30c
Fig. 30d
Fig. 30e
Fig. 30f
Settings in submenus with gesture control
Fig. 30a-f
Swiping scrolls through the submenu list a line at a time.
Page 29
Settings in submenus with adjusting dials and gesture
SET
SET
control
Fig. 31a-h
The setting dials - in this case both have the same
function - can be used to select individual options in submenus.
If you continue turning beyond the fi rst or last submenu option on
a page, the submenu list 'jumps' by a page, i.e. the next or
previous lines appear. This also applies to the start and end of the
submenu list (=> "endless loop").
Note:
The menu and submenu options can also be set at any time by
pressing the selected menu option itself or the
SET button that
appears in the toolbar on the right.
General comments on menu control
• Settings for options that diff er from the above explanations or
include additional steps, are described in the sections dealing
with the relevant options.
• Some options may not be available, e.g. because the relevant
functions have fi xed settings in the scene modes (see p. 167),
or because they relate to the external viewfi nder available as an
accessory and it is not fi tted. These options are then indicated
by a gray function icon (instead of white) and cannot be
selected.
• The menu is normally opened at the position of the last option
set.
Fig. 31a
Fig. 31d
Fig. 31e
EN
Camera operation
Fig. 31b
Fig. 31c
Fig. 31f
Fig. 31h
Fi g. 31g
141
Page 30
EN
Customizing the My Camera menu
The following functions are preset as supplied.
In the My Camera menu, every function from the main menu can
Fig. 32a
Fig. 32b
be added, deleted, or its position changed. This free menu design
allows you to individually confi gure the camera to match your own
needs and provides faster access to the functions you use most
frequently.
Camera operation
142
Fig. 32d
Fig. 32c
Adding menu options
Fig. 32a -d
Menu option can be added using the gesture .
Page 31

Changing the order of options
Fig. 33a-d
The options are initially displayed in the order of selection.
However, this order can be changed at any time.
EN
Camera operation
Deleting options
Fig. 34a-c
All functions can be removed at any time by dragging from the
My Camera menu.
Fig. 33a
Fig. 33d
Fig. 34a
Fig. 33b
Fig. 33c
Fig. 34b
Fig. 34c
143
Page 32

EN
INFO
1/80002.8F 12500ISO EV
A
823412MP
INFO
1/80002.8F 12500ISO EV
A
823412MP
INFO
1/80002.8F 12500ISO EV
A
823412MP
INFO
1/80002.8F 12500ISO EV
A
823412MP
Fig. 35a Fig. 35b
Camera operation
Fig. 35c
ISO
ISOFF
Adjusting dial menu
In aperture priority, shutter speed priority and automatic program
modes, the right adjusting dial is assigned the aperture, shutter
speed and program shift functions respectively.
In these modes, the left adjusting dial can be allocated the six
functions shown in
Fig. 35c
. The factory default is
Opening the adjusting dial menu
Fig. 35a -c
ISO
.
The function displays appear when one of the dials is turned by one
detent position. Pressing
in the left function display brings up
the 6 available functions.
144
Page 33

Allocating the required function to the setting dial
INFO
1/80002.8F 12500ISO EV
A
823412MP
INFO
1/80002.8F 12500ISO EV
A
823412MP
INFO
1/80002.8F 12500ISO EV
A
823412MP
INFO
1/80002.8F 12500ISO EV
A
823412MP
INFO
1/80002.8F 12500ISO EV
A
823412MP
INFO
1/80002.8F 12500ISO EV
A
823412MP
INFO
1/80002.8F 12500ISO EV
SET
-3 2 1 0 21 3+
823412MP
INFO
1/80002.8F 12500ISO EV
A
823412MP
INFO
1/80002.8F 12500ISO EV
A
823412MP
INFO
1/80002.8F 12500ISO EV
SET
823412MP
INFO
1/80002.8F 12500ISO EV
A
823412MP
INFO
1/80002.8F 12500ISO EV
SET
-3 2 1 0 21 3+
823412MP
INFO
1/80002.8F 12500ISO EV
A
823412MP
INFO
1/80002.8F 12500ISO EV
A
823412MP
With gesture control
Fig. 36a/b
ISO F
WB F
EN
Camera operation
With left adjusting dial and gesture control
Fig. 37a-f
Note:
Regardless of which of the functions is active in the menu list
(outlined in red) any of them can be selected at any time by
pressing it.
Fig. 36a Fig. 36b
ISO ISOF F
Fig. 37a Fig. 37 b
ISO F
Fig. 37d
WB F
Fig. 37f
Fig. 37c
Fig. 37e
ISO F
ISO F
145
Page 34

EN
BASIC CAMERA SETTINGS
MENU LANGUAGE
► Select
► Select the required language in the submenu
DATE / TIME
Basic camera settings
► Select
Selecting the time zone
Fig. 39a-c
Each press or drag advances the setting by one time zone.
Fig. 42a
Fig. 39bFig. 39a
146
Setting the date / time
Fig. 38
These settings are made in the same way in all fi ve 'columns'.
Fig. 38
► Press SET to confi rm
► Press SET to confi rm
Selecting the time format
Fig. 40
► Press SET to confi rm
Fig. 39c
Fig. 40
Page 35

Selecting summer/winter time
Fi g. 41a - b
Automatic camera shutdown
If this function is activated, the camera switches to energy-saving
standby mode after the selected time (1/2/5/10/20min).
► Select the required setting in
EN
Basic camera settings
Fi g. 41a Fi g. 41b
► Press SET to confi rm
Note:
Even if no battery is inserted or if the battery is fl at, the date and
time settings are retained for around 2 days thanks to the built-in
back-up battery. However, they then have to be reset.
Notes:
• Even if the camera is in standby mode, it can be turned on again
at any time by pressing the shutter release or by turning it off
and back on with the main switch.
147
Page 36

EN
Acoustic signals
On the Leica T you can set whether you want particular operations
or a full memory card to be indicated by tones, or whether you
prefer operation of the camera and photography itself to be largely
quiet.
► Select
► Select the required settings in the Volume, Click , SD card full,
AF Confirmation submenus (OFF, LOW, HIGH)
Basic camera settings
Monitor / viewfi nder settings
For optimum visibility and to adapt to diff erent lighting conditions,
the brightness and color reproduction can be adjusted.
Notes:
• The operations described below using the example of the
monitor settings also apply to the viewfi nder settings, i.e. for the
EVF BRIGHTNESS and EVF COLOR AD JUSTMENT options.
• If the Leica Visofl ex external electronic viewfi nder available as an
accessory is not attached, these menu options cannot be
selected and the relevant function icons are grayed out.
• The viewfi nder is turned on automatically - and the camera
monitor is turned off - as soon as the sensor in the eyepiece
detects that you are looking through the viewfi nder. However, if
menu control is active, this does not happen until you tap the
shutter release.
• Further details of viewfi nder can be found on p. 205.
Brightness settings
► Select
► Select AUTO in the submenu (for automatic setting controlled
by the external brightness)
or
► Make the required setting on the scale in the submenu using
Color settings
Fig. 42
► Select
1. Cursor for current setting
2. Color directions (Y = yellow, G = green,
2.
B = blue, M = magenta)
3. Symbol for resetting to neutral-
3.
position (center)
2.
Fig. 42
2.
1.
2.
► Using or the adjusting dials - vertical with the left,
horizontal with the right - to move the cursor from its initial
position in the center to the position that results in the desired
color reproduction in the monitor screen, i.e. towards the
corresponding colors displayed at the edges
• The color reproduction in the monitor screen changes
according to your setting.
+
148
Page 37

Automatic monitor shutdown
This function enables you to select the time after which the
monitor is shut down or whether you want it to remain turned on.
Shutting down saves power and also ensures that the camera is
ready to use more quickly when reactivated.
► Select the required setting in
EN
Basic camera settings
149
Page 38

EN
BASIC PICTURE SETTINGS
File format / Compression rate
Two diff erent JPEG compression rates are available:
JPG Super Fine. The two can be combined with simultaneous
recording in
DNG format. DNG (digital negative) is a standardized
and future proof raw data format.
► Select the required setting in
Basic picture settings
Note:
The specifi ed remaining number of pictures or recording time are
approximate values, as the fi le size for compressed images can
fl uctuate considerably depending on the subject.
JPEG resolution
When one of the JPG formats is selected, pictures can be taken
with 5 diff erent resolutions (numbers of pixels). The settings
available are 1.8M, 3M, 7M, 12M and 16M (M = megapixels). This
allows you to adjust the setting precisely to the intended use or to
the available memory card capacity.
► Select the required setting in
Note:
Raw data (DNG format) is always stored with the maximum
resolution, regardless of the settings for JPEG images.
JPG Fine and
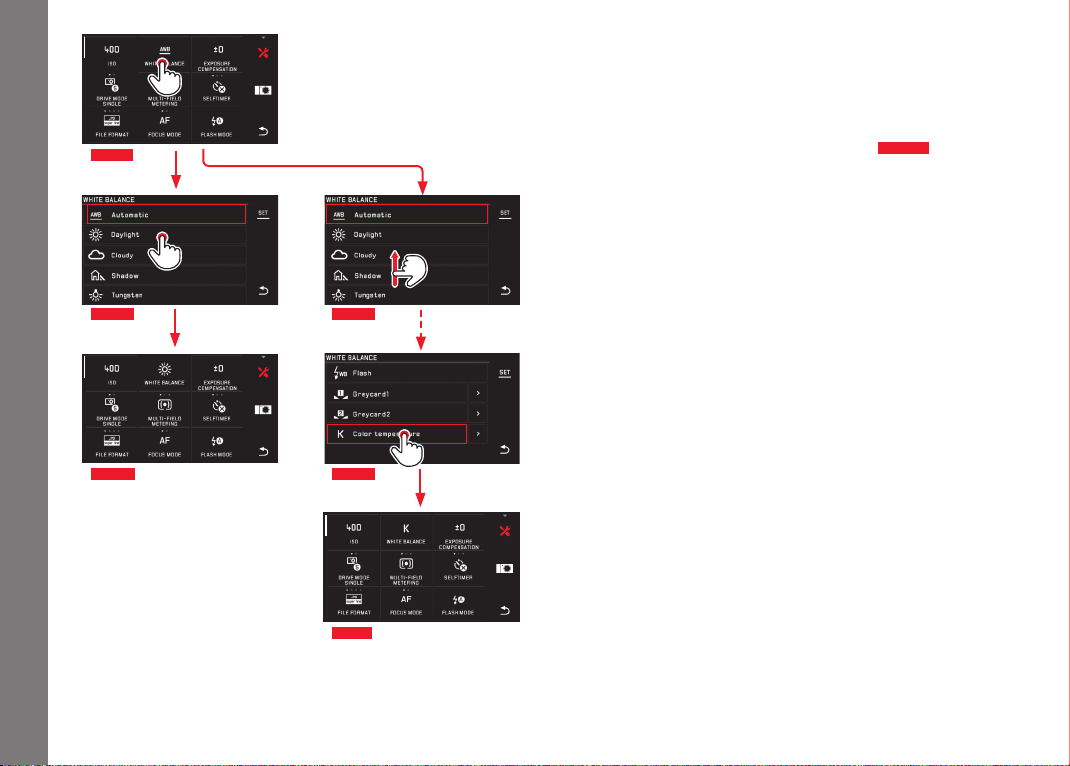
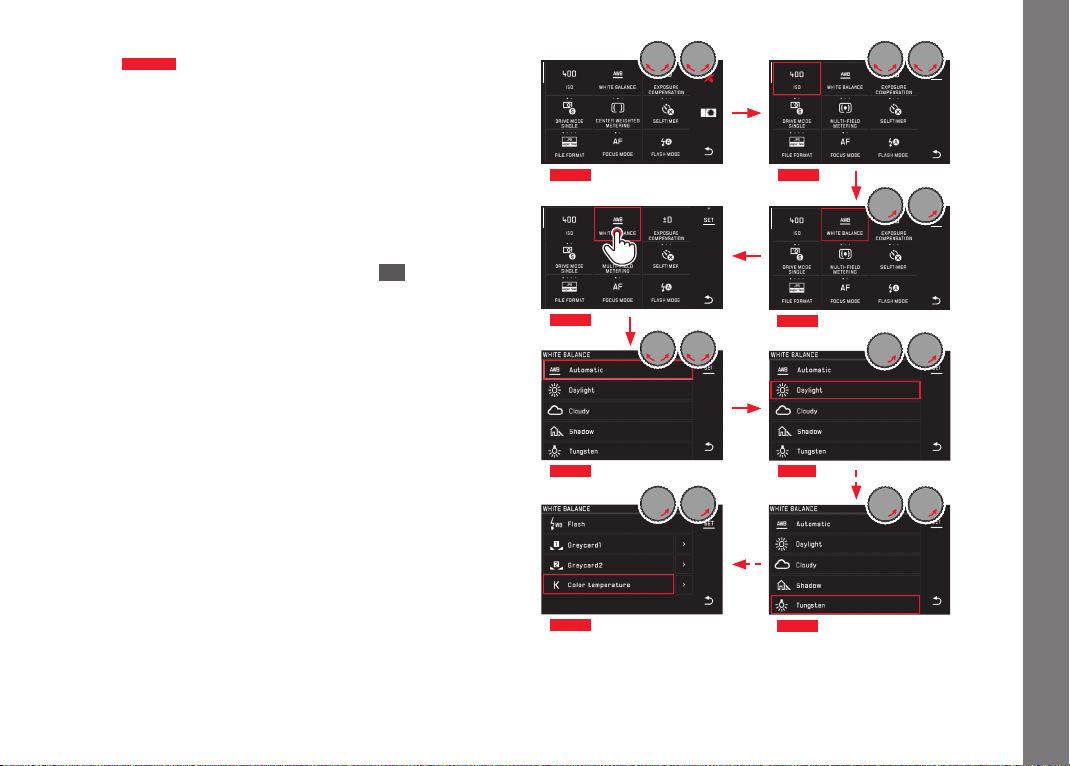
White balance
In digital photography, white balance ensures neutral, i.e. natural,
reproduction of color in any light. It is based on the camera being
preset to reproduce a particular color as white.
You can choose between automatic white balance, various presets,
two fi xed settings based on selective measurements, and direct
setting of the color temperature.
1.
Automatic (automatic settings)
2.
Daylight (for outdoor pictures in sunshine)
3.
Cloudy (for outdoor pictures in cloudy conditions)
4.
Shadow (for outdoor pictures with the main subject in shadow)
5.
Tun gste n (for incandescent bulb lighting)
6.
Flash (for illumination with electronic fl ash)
7.
Gray card 1 (memory slot for your own measured results)
8.
Gray card 2 (memory slot for your own measured results)
9.
Color temperature (memory slot for fi xed setting)
150
Page 39

Fixed presets
Direct color temperature setting
EN
► Select
► Select the required setting in the 1st submenu
Manual setting by metering
► Select
► In the 1st submenu, select next to Gra y card1 or Gray card 2
• A yellow frame appears in the center of the monitor screen,
with an instruction below it.
► Aim the frame at a uniform white or gray object that completely
fi lls the frame
► Press SET to confi rm
The camera releases the shutter and carries out metering and
storage.
The settings can subsequently be retrieved using
Gray card2.
Gray card1 or
► Select
► In the 1st submenu, select next to Color temperature
► Select the required value in the 2nd submenu
Selecting white balance functions with the left adjusting
dial.
WB
If the
function is assigned to the left adjusting dial, it can be
used to directly select the required option.
Basic picture settings
151
Page 40

EN
ISO sensitivity
The ISO setting specifi es the possible shutter speed and aperture
combinations at a particular brightness. Higher sensitivities allow
faster shutter speeds and/or smaller apertures (for "freezing" rapid
movements or to increase the depth of fi eld), but this can result in
greater picture noise.
► Select
► Select the required setting in the submenu (i.e. AUTO ISO for the
Basic picture settings
automatic setting, or one of the eight fi xed settings)
ISO
If the
function is assigned to the left adjusting dial, it can be
used to directly select the required option.
Within the
AUTO ISO option, it is possible to limit the sensitivity
range to be used (e.g. to control picture noise), and the slowest
shutter speed to be used can also be specifi ed (e.g. to prevent
blurred pictures of moving subjects).
Color reproduction (FILM MODE) / image properties
One of the many advantages of digital photography is that it is very
easy to change critical properties of a picture.
On the Leica T, you can infl uence color reproduction, contrast,
sharpness and color saturation before taking the picture.
Note:
The functions and settings described in the next section relate
exclusively to pictures in one of the two JPEG formats. If the fi le
format DNG is specifi ed, these settings have no eff ect as in this
case the image data is always saved in its original form.
Color reproduction
For the color reproduction, you can select between
Vivid – for highly saturated colors – and Natural – for slightly less
Standard,
saturated colors and a somewhat softer contrast. There are also
two black and white settings
Contrast (high contrast).
B&W Natural (natural) and B&W High
152
► Select
► Select the Max. exposure time and/or Maximum ISO submenu
► Select the required settings in the Max. exposure time and/or
Maximum ISO submenus
► Select
► Select the required setting in the submenu
Page 41

Contrast, sharpness, saturation
For each color reproduction setting, these 3 image properties can
also be changed.
– The contrast, i.e. the diff erence between light and dark sections
of the image, determines whether an image has a more “fl at” or
“brilliant” eff ect. As a consequence, the contrast can be
infl uenced by increasing or reducing this diff erence, i.e. by
lighter reproduction of light sections of the image and darker
reproduction of dark sections.
– Sharp reproduction – at least of the main subject – using the
correct distance setting is a prerequisite for a successful
picture. In addition, the impression of sharpness of a picture is
determined by the edge sharpness, i.e. how small the transition
area between light and dark is at edges in the picture. The
impression of sharpness can thus be changed by expanding or
reducing these areas.
– In color pictures, the saturation determines whether the colors
in the picture tend to appear as "pale" and pastel-like or "bright"
and colorful.
► Select
► In the 1st submenu, press for the required color reproduction
► In the 2nd submenu
Fig. 43
press for the relevant image
property, or make the required setting using the right adjusting dial
Fig. 43
► Press SET to confi rm
• If a corresponding setting is available, the relevant color reproduction option is indicated in the 1st submenu by an additional
asterisk, e.g.
Standard*.
EN
Basic picture settings
153
Page 42

EN
PICTURE MODE
Picture sequence
The Leica T can be used to take single pictures and series of
pictures.
Picture mode
► Select the required setting in
Distance setting
On the Leica T, the distance can be set either automatically or
manually.
Note:
When using Leica M lenses with the Leica M Adapter T available as
an accessory, only manual distance setting is possible.
154
Notes:
• Picture series are taken at a frequency of 5fps, provided shutter
speeds of
1
/60s and faster are used.
• Picture series are not possible when using the fl ash. If a fl ash
function is activated, only one picture is taken.
• If picture series mode is set and the self-timer is used at the
same time, only a single picture is taken.
• After a series of a maximum of 12 pictures, the shooting
frequency slows down slightly. This is due to the time required to
transfer the data from the buff er memory to the card / internal
memory.
• Regardless of how many pictures are taken in a series, the last
picture is always shown fi rst in review mode.
Automatic distance setting / autofocus
► Select AF in
If the AF function is assigned to the left adjusting dial, it can be
used to directly select the required option -
AF
or MF.
• The set function is displayed in the monitor.
The sharpness and thus the distance is automatically determined,
set and saved (metering memory lock) when you press the shutter
release to the pressure point.
• A successful and saved AF setting is indicated as follows:
– The color of the rectangle changes to green
– With multiple fi eld metering up to 9 green rectangles appear
– An acoustic signal is generated (if selected)
Page 43

Notes:
• With the shutter release pressed halfway and focusing by
pressing, it is also possible to manually change the automatically
set distance in autofocus mode with the distance adjusting dial.
• The setting is saved in conjunction with the exposure setting.
• In certain situations, the AF system cannot correctly set the
distance, e.g.
– The distance to the subject you are aiming at is outside the
setting range of the attached lens, and/or
– The subject is not suffi ciently illuminated (see next section).
These situations and subjects are indicated by:
– Color of rectangle changes to red,
– With multiple fi eld metering the display changes to a single red
rectangle
Important:
The shutter release is not blocked regardless of whether or not the
distance setting for the relevant subject is correct.
AF auxiliary light
The built-in AF auxiliary light extends the operating range of the AF
system to cope with poor lighting conditions. If the function is
activated, this light is lit under appropriate conditions, as soon as
you press the shutter release.
► Select the required setting in
Note:
The AF auxiliary light illuminates a range of around 4m. Therefore,
AF mode in poor lighting conditions is not possible at distances
beyond this limit.
EN
Picture mode
155
Page 44

EN
1/80002.8F 12500ISO EV
-3 2 1 0 21 3+
823412MP
SET
1/80002.8F 12500ISO EV
-3 2 1 0 21 3+
823412MP
SET
1/80002.8F 12500ISO EV
-3 2 1 0 21 3+
823412MP
SET
Autofocus metering methods
For optimum adjustment of the AF system to diff erent subjects,
situations and your compositional ideas, you can choose between
fi ve AF metering methods on the Leica T.
► Select the required setting in
► Select the required setting in the submenu
Picture mode
Spot / single point measurement
Both metering methods detect only those parts of the subject
within the relevant AF frame.
• The metering fi elds are indicated by a small AF frame.
Thanks to the exceptionally small metering area for spot metering,
you can concentrate on very small details of the subject.
The slightly larger metering area for 1-fi eld metering requires less
precise aiming and is therefore easier to use, but still allows
selective metering.
The AF function can also be used for picture series in which the
part of the subject you want to be in focus is always at the same
point in the image, away from the center.
With both metering methods, you can do this by moving the AF
frame, which is otherwise positioned in the center of the monitor
screen, to another point.
This can be done using menu control or directly*.
Direct operation*
Fig. 44a
Fi g. 4 4a/c
Fig. 44b
Fig. 44c
156
* From fi rmware version 1.2
Page 45

Operation after selecting function from menu*
1/80002.8F 12500ISO EV
-3 2 1 0 21 3+
823412MP
SET
1/80002.8F 12500ISO EV
SET
-3 2 1 0 21 3+
823412MP
1/80002.8F 12500ISO EV
SET
-3 2 1 0 21 3+
823412MP
1/80002.8F 12500ISO EV
-3 2 1 0 21 3+
823412MP
SET
1/80002.8F 12500ISO EV
SET
-3 2 1 0 21 3+
823412MP
1/80002.8F 12500ISO EV
-3 2 1 0 21 3+
823412MP
SET
1/80002.8F 12500ISO EV
SET
-3 2 1 0 21 3+
823412MP
Fig. 45a -c / 46
a/b
► In the submenu, press for the required metering
method
The metering fi eld can then be shifted or moved in two ways*.
The frame can be reset directly to the center position before
confi rming
Fig. 47a-b
.
EN
Picture mode
Fig. 45a
Fig. 45b
Fig. 45b
Fig. 46a Fig. 46b
* From fi rmware version 1.2
Fig. 47a
Fig. 47 b
Note:
In both cases, the metering fi elds remain at the last positions set
even if the metering method is changed or the camera is turned
o ff .
157
Page 46

EN
1/80002.8F 12500ISO EV
A
-3 2 1 0 21 3+
823412MP
INFO
1/80002.8F 12500ISO EV
A
-3 2 1 0 21 3+
823412MP
INFO
Focusing by touching
In this mode, the AF frame can be moved for every picture, without
additional settings in the menu. The metering characteristics and
metering fi eld size correspond to single fi eld metering.
► Select
► Select Tou ch A F in the submenu
Picture mode
Multiple fi eld measurement
This metering method detects the subject using a total of 11 fi elds.
Focusing is carried out automatically based on the parts of the
subject detected at the shortest distance, thus providing maximum
reliability for snapshots. The fi elds used are indicated by AF frames.
Under normal circumstances, 9 of the 11 fi elds are used, and are
positioned in such a way as to cover most of the center of the
image.
158
Moving the metering fi eld
Fig. 48a/b
► Press the monitor at the required position in the image fi eld
Fig. 48a Fig. 48b
• The AF frame 'jumps' to the selected position.
Pictures
In this case, the focusing process does not take place when the
shutter release is pressed to the pressure point but immediately
when you press the monitor.
Note:
The metering fi eld remains at the last point determined, even after
turning off the camera.
► Select
► Select Multi Point in the submenu
Face detection
In this mode, the Leica T automatically detects faces in the image
and focuses on the one that is detected at the shortest distance. If
no faces are detected, multiple fi eld metering is used.
► Select
► Select Face Detection in the submenu
Page 47

Manual focus
1/80002.8F 12500ISO EV
-3 2 1 0 21 3+
823412MP
x3
x6
A
INFO
0,3 1 2 ∞
∞631
ft
m
For certain subjects and situations, it can be benefi cial to set the
focus yourself, rather than using autofocus. For example, if the
same setting is needed for several pictures and using the metered
value lock would involve more eff ort, or if the infi nity setting is to
be retained for landscape pictures, or if poor, i.e. very dark, lighting
conditions do not allow or signifi cantly slow down AF mode.
► Select
► Select MF in the submenu
Manual focusing is carried out using the corresponding dial on the
lens.
The optimum setting is reached when the monitor screen shows
the key part(s) of your subject as you want them to appear.
Auxiliary function for manual distance setting
To make it easier to make the setting and to increase accuracy, the
Leica T provides you with a useful tool - an enlarged display.
Background: The larger details of the subject appear in the monitor
the more accurately you can assess their sharpness and the more
precisely you can set the distance.
► Select ON in
Adjusting the sharpness
Fig. 49
► Select the trimming,
► Turn the distance setting dial on the lens until the required parts
of the subject appear with optimum sharpness
1
2
Fig. 48
1 x3-/x6 fi eld for changing the enlargement
2 Distance scale, the bar shows the current setting (only appears in conjunction with the
status displays, see „INFO“ display). Both displays disappear around 5s after the last
distance setting
EN
Picture mode
159
Page 48

EN
EXPOSURE METERING AND CONTROL
Exposure metering methods
To adjust to the prevailing lighting conditions, the situation, or your
working methods and compositional ideas, the Leica T provides
you with three exposure metering modes.
Picture mode
► Select the required setting in
Multiple fi eld metering -
With this metering method, the camera automatically analyses the
brightness diff erences in the subject and, by comparing them with
programmed brightness distribution patterns, arrives at the likely
position of the main subject and the corresponding best exposure.
As a result, this method is particularly suitable for spontaneous,
uncomplicated and yet reliable photography under diffi cult
conditions, and therefore for use in conjunction with an automatic
program.
Center-weighted metering -
This metering method allocates the highest weighting to the center
of the image fi eld, but also records all other areas.
Particularly when used in conjunction with metering memory lock,
it allows targeted adjustment of the exposure to particular parts of
the subject while simultaneously taking account of the entire
image fi eld.
Spot metering -
This metering method concentrates exclusively on a tiny area in the
center of the picture.
It allows exact measurement of small or tiny details for precise
exposure – preferably in conjunction with manual setting.
For example, in backlit shots you normally have to prevent the
lighter surroundings leading to underexposure of the main subject.
With the much smaller metering fi eld used for spot metering, you
can concentrate selectively on these subject details.
160
Page 49

Histogram
1/602.8F
A
823416MP
AWB
SD
INFO
1/602.8F
A
823416MP
AWB
SD
INFO
The histogram depicts the brightness distribution in the picture.
The horizontal axis shows the brightness values from black (left)
through gray to white (right). The vertical axis corresponds to the
number of pixels of each brightness level.
This form of representation enables the exposure setting to be
assessed quickly and easily along with the overall impression of the
image itself.
The histogram is available in both picture and review modes.
The histogram can also be moved to the bottom right corner of the
monitor screen*
Fig. 50a Fig. 50b
Fig.50 a/b
.
EN
Picture mode
For picture mode
see p. 136 Fig. 21d
► INFO 3x
For review mode
see p. 136 Fig. 22c
► INFO 2x
Select an option with clipping function if you want excessively
bright sections of the pictures to be indicated
see p. 136 Fig. 22d
► INFO 3x
In addition to the black/white histogram, in review mode you also
have the option of an RGB histogram, in which the brightness
values for the three colors red, green, and blue are represented
separately:
► Select the required setting in
Notes:
• For a picture with fl ash, the picture histogram cannot represent
the fi nal exposure as the fl ash is fi red after the display.
• In picture mode, the histogram should be seen as a "trend", not
as a refl ection of the exact numbers of pixels.
• The review histogram is not available for simultaneous review of
several smaller pictures or for enlarged pictures.
• The histograms when reviewing and taking a picture may diff er
slightly from one another.
* From fi rmware version 1.2
161
Page 50

EN
Exposure control
For optimum adjustment to the relevant subject or your preferred
working method, the Leica T provides you with four exposure
modes.
Automatic program - P
For fast, fully automatic photography. The exposure is controlled by
an automatic shutter speed and aperture setting.
162
Notes:
• Depending on the prevailing light conditions, the brightness of
Picture mode
the monitor screen can diff er from that of the actual pictures
taken. Particularly for long exposures on dark subjects, the
monitor screen appears considerably darker than the – correctly
exposed – picture.
• When using Leica M lenses with the Leica M Adapter T available
as an accessory, only aperture priority and manual setting are
available, i.e. the automatic program (P), shutter speed priority
(T) and the subject programs are not available. If one of these
modes is selected, the camera automatically switches to
aperture priority mode when the adapter is attached. The mode
displayed in the monitor also changes to
displayed is
F0.0.
A. The aperture value
Setting the mode
► Select
Taking a picture
► Press the shutter release to the pressure point
• The shutter speed and aperture are displayed in white. If even
a completely open or closed aperture combined with the
fastest or slowest shutter speed will result in under or
overexposure, both values are displayed in red.
If the automatically set values appear appropriate for the intended
composition:
► Press the shutter release all the way down to take the picture
Page 51

Changing the specified shutter speed / aperture
combinations (Shift)
Changing the preset values using the Shift function combines the
reliability and speed of fully automatic exposure control with the
opportunity to vary the speed/aperture combination selected by
the camera at any time to fit in with your own ideas and intentions.
► This is done using the right adjusting dial. If you prefer to use
faster speeds, e.g. for sports shots, turn it to the left. On the
other hand, if you prefer a larger depth of field, for landscape
shots for example, and are prepared to accept the resulting
shower shutter speeds, turn it to the right.
The overall exposure, i.e. the brightness of the image, remains
unchanged. To guarantee correct exposure, the adjustment range
is limited.
• Shifted pairs of values are indicated by a + next to the shutter
speed.
To prevent accidental use, the values revert to the default settings
after each picture, and also if exposure metering is automatically
deactivated after 12s.
EN
Picture mode
163
Page 52

EN
Aperture priority - A
Aperture priority mode automatically controls the exposure based
on a preset manual aperture setting. It is therefore particularly
useful for pictures in which depth of fi eld is the critical
compositional element.
By selecting an appropriately low aperture value, you can reduce
the depth of fi eld range, for example in a portrait to "release" the
Picture mode
face, which is in focus, from an unimportant or distracting
background, or conversely you can use a higher aperture value to
increase the depth of fi eld range, so that everything from the
foreground to the background will be sharp in a landscape shot.
Setting the mode
If the automatically set shutter speed appears appropriate for the
intended composition:
► Press the shutter release all the way down to take the picture
164
► Select
Taking a picture
► Select the required aperture value with the right adjusting dial,
► Press the shutter release to the pressure point
• Both the set aperture value and the automatically calculated
shutter speed are displayed in white. If even the fastest or
slowest shutter speed combined with the set aperture will
result in under or overexposure, both values are displayed in
red.
Page 53

Shutter speed priority - T
Shutter speed priority mode automatically controls the exposure
based on a preset manual shutter speed. It is therefore particularly
well suited for taking pictures of moving subjects, where the
sharpness of the movement portrayed is the crucial compositional
element.
With a corresponding fast shutter speed, you can prevent
unwanted lack of sharpness due to movement, i.e. "freeze" your
subject or conversely a slower shutter speed can express the
dynamic nature of movement by incorporating deliberate "trail
eff ects".
Setting the mode
If the automatically set aperture value appears appropriate for the
intended composition:
► Press the shutter release all the way down to take the picture
EN
Picture mode
► Select
Taking a picture
► Select the required shutter speed with the right adjusting dial,
► Press the shutter release to the pressure point
• Both the set shutter speed and the automatically calculated
aperture value are displayed in white.
If even the lowest or highest aperture value combined with the
set shutter speed will result in under or overexposure, both
values are displayed in red.
165
Page 54

EN
Manual setting - M
If, for example, you want to achieve a particular eff ect, which is
only possible with a quite specifi c exposure, of if you want to
ensure that several pictures with diff erent trimming have an
absolutely identical exposure, then you can use manual setting of
the shutter speed and aperture.
Picture mode
Setting the mode
If the set values and/or exposure appears appropriate for the
intended composition:
► Press the shutter release all the way down to take the picture
166
► Select
Taking a picture
► Select the required aperture value with the left adjusting dial,
► Select the required shutter speed with the right adjusting dial
► Press the shutter release to the pressure point
• The shutter speed and aperture are displayed in white.
The light balance scale also appears. It covers a range of ±3EV
(exposure value) in
1
/3EV increments.
Settings within ±3EV are indicated by white lines on the scale,
settings outside this range by red lines.
► Adjust the settings for correct exposure so that the central mark
is displayed in white.
Page 55

Subject programs
The Leica T provides nine "advanced" automatic program options
for exceptionally easy and reliable photography. The
an automatic snapshot setting for general use.
The other eight (see right) are designed for the specifi c
requirements of frequently occurring subject types.
In all cases, a range of additional functions are automatically
controlled in addition to the shutter speed and aperture. For
details, refer to the table on p. 216.
Setting the mode
option is
EN
Picture mode
► Select
► Select the required subject program
Taking a picture
As in automatic program mode
Notes:
• The Program Shift function (see p. 163) is not available.
• The two adjusting dials have no function.
167
Page 56

EN
Metering memory lock
For composition reasons, it can be benefi cial not to have the main
subject in the center of the picture.
In these cases, metering memory lock - in exposure modes
and
A, and single fi eld and spot metering AF modes and focusing
by touch - allows you to fi rst take a reading for the main subject
and then retain the relevant settings until you have selected your
Picture mode
fi nal trimming and are ready to take the picture.
Taking a picture with this function:
► Aim the relevant AF frame at the part of your subject you want to
adjust the sharpness and exposure to.
► Press the shutter release to the fi rst pressure point to set and
store the sharpness and exposure.
► Hold the shutter release half way down and move the camera to
set your fi nal trimming.
► Press the shutter release all the way down to take the picture
P , T
Exposure compensation
Some subjects consist predominantly of areas of above or below
average brightness, for example extensive areas of snow or,
conversely, a full-format black steam locomotive. With
P , T and A
exposure modes, it may be more benefi cial in these situations to
set a corresponding exposure compensation instead of using
metering memory lock each time. The same applies to situations
where you want to ensure that several pictures have identical
exposure. Values from +3 to -3EV in
1
/3EV increments are
available.
► Select
► In the submenu, make the required setting on the scale using
or the right adjusting dial
► Press SET to confi rm
EV
If the
function is assigned to the left adjusting dial, it can be
used to directly select the compensation value.
• If a compensation value is set, it is displayed in the monitor, e.g.
EV+3. During setting, you can observe the eff ect as the monitor
screen becomes darker or lighter accordingly.
168
Page 57

Notes:
• When setting the exposure manually, exposure compensation is
only possible using the menu.
• A set exposure compensation remains active even after any
number of pictures and even after turning off the camera, until it
is reset to ±0 (= center of scale).
Automatic bracketing
High contrast subjects that have both very bright and very dark
sections can result in very diff erent eff ects depending on the
exposure.
Automatic bracketing enables you to take a series of three pictures
with graduated exposure You can then select the most successful
picture for further use.
Notes:
• If bracketing is set, this is indicated by
in the monitor. While
the three pictures are being taken, you can observe the eff ect as
the monitor screen becomes darker or lighter accordingly.
• Depending on the exposure mode, the graduations are produced
by changing the shutter speed (
P /A/M) or the aperture (T).
• The sequence of pictures is: correct exposure / underexposure
/ overexposure.
• Depending on the available shutter speed/aperture
combination, the working range for automatic bracketing may be
limited.
• Once set, bracketing remains active even after any number of
pictures and even after turning off the camera, until it is reset to
±
0 (= center of scale).
EN
Picture mode
► Select
► In the submenu, make the required setting on the scale using
or the right adjusting dial
► Press SET to confi rm
• If bracketing is set, this is indicated by a symbol in the monitor.
While the three pictures are being taken, you can observe the
eff ect as the monitor screen becomes darker or lighter
accordingly.
169
Page 58

EN
VIDEO RECORDINGS
You can also use the Leica T to produce video recordings.
Note:
As only part of the sensor area is used, the eff ective focal length is
increased, i.e. the trimming is reduced in size accordingly.
Picture mode
The following functions are available.
Exposure control
This is totally independent of the exposure mode and the shutter
speed and aperture settings made for photos.
– Shutter speed: Depending on the selected
1
/50s or 1/60s
VIDEO RESOLUTION
– Aperture: Automatic
– If correct exposure is not possible even with the maximum
aperture, the ISO sensitivity is automatically increased regardless of any manual setting.
170
Resolution:
► Select the required setting in
ISO sensitivity:
All settings available in the menu
Distance setting:
All options described on pages 154-159.
Exposure metering methods:
All options described on page 160
Note:
Automatic exposure control takes into account all fl uctuations in
brightness. If you do not want this, e.g. for landscape pictures and
pan shots, you should set the shutter speed manually.
Film presets, contrast, sharpness, color saturation:
All options described on pages 152-153 but in this case only the
white balance, contrast, saturation, and sharpness settings are
changed (see table on p. 216).
Stabilization:
► Select the required setting in
Note:
When using video stabilization, the trimming is slightly reduced
compared to operation without stabilization.
Page 59

Starting / ending the recording
Starting:
► Press the video shutter release
• A fl ashing red dot indicates that a video recording is in pro-
gress. The remaining recording time is also displayed.
Ending:
► Press the video shutter release again
Sound recording
Sound is recorded in stereo with the built-in microphones.
A damping function is available to reduce any noise caused by wind
during sound recording:
► Select the required setting in
Note:
Both autofocus and changing the focal length on zoom lenses
produce noises that may be picked up in the recording.
To prevent this, you should not use either of these functions while a
recording is in progress - only adjust the focus manually and do not
change the focal length.
EN
Picture mode
171
Page 60

EN
FLASH PHOTOGRAPHY
USING THE BUILT-IN FLASH UNIT
The Leica T has a built-in fl ash unit. When not in use, it is recessed
into the camera body and is turned off . For fl ash pictures, it must
be extended:
Fig. 51
Picture mode
► Turn the main switch to the right as far as it will go, i.e. beyond
the spring resistance
Fig. 51
The fl ash unit then pops up automatically into its operating position
which also turns it on.
• The display for the set fl ash mode appears in white. If the fl ash
unit is not yet fully charged and therefore not ready for use, it
briefl y fl ashes in red.
Notes:
• To determine the fl ash exposure, a metering fl ash is fi red
immediately before taking the picture and before the main fl ash.
• Picture series and automatic bracketing are not possible with
the fl ash. In these cases, even if the fl ash unit is extended there
is not fl ash display and the fl ash is not fi red.
172
Whenever you want to take photographs without the fl ash, leave it
in its idle position or carefully push it down until it locks into place.
Page 61

FLASH MODES
Select the mode:
► Extend the fl ash unit
► Select
► Select the required setting in the submenu
• The fl ash mode display changes accordingly.
If the
used to directly select the required option.
• The set mode is displayed in the monitor.
Automatic fl ash activation
This is the default mode. The fl ash is automatically activated if
longer exposure times could lead to blurred pictures in poor
lighting conditions.
Automatic fl ash and pre-fl ash activation
To reduce the "red eye" eff ect in photographs of people with fl ash.
If possible, people should not look directly at the camera. As this
eff ect is worsened when the pupils are wide open in conditions of
low lighting, when taking photographs indoors for example, you
should switch on as much room lighting as possible. The pre-fl ash,
which is activated when the shutter release is pressed just before
the main fl ash, narrows the pupils of people looking at the camera
thereby reducing the eff ect.
function is assigned to the left adjusting dial, it can be
Manual fl ash activation
For backlit pictures, in which your main subject does not fi ll the
entire frame and is in shadow, or in situations where you want to
moderate high contrasts (e.g. in direct sunlight) (fi ll in fl ash). As
long as this mode is activated, the fl ash will fi re each time you take
a shot, whatever the prevailing lighting conditions. The fl ash power
depends on the metered ambient brightness: in poor light it is the
same as in automatic mode, with a reduced power as the
brightness increases. The fl ash then operates as a fi ll in fl ash, e.g.
to lighten dark shadows in the foreground or backlit subjects,
creating a more balanced lighting eff ect overall.
Manual fl ash and pre-fl ash activation
For a combination of the situations and functions described above.
EN
Picture mode
173
Page 62

EN
Automatic flash activation with slower shutter speeds
To simultaneously create more appropriate, i.e. brighter,
reproduction of dark backgrounds and as a fill in flash for the
foreground. To minimize the risk of blurring, the shutter speed is
not extended beyond
1
/30s in the other modes with flash activation.
For pictures where the flash is used, this means that objects in the
background, which the flash cannot reach, are often badly under
Picture mode
exposed.
To take account of the available ambient light, the required longer
exposure times (up to 30s) are allowed in these picture situations.
Notes:
• Depending on the
AUTO ISO SETTINGS, it is possible that the
camera will not support slower shutter speeds as in such cases
increasing the ISO sensitivity takes priority.
• The
Slowest Speed setting can be used if required.
Automatic flash and pre-flash activation with slower shutter
speeds
For a combination of the situations and functions described above.
Note:
To prevent blurred pictures with the slower shutter speeds in
and
modes, you should hold the camera steady, i.e. support
it or use a tripod. Alternatively, you can select a higher sensitivity.
Flash range
The usable flash range depends on the aperture and sensitivity
values set manually or calculated by the camera. To ensure that the
flash light provides sufficient illumination, it is essential that the
main subject is within the relevant flash range.
174
Page 63

Sync time
Flash photographs are always illuminated by two light sources, the
available light and the light from the fl ash. The time at which the
fl ash is fi red normally determines where the parts of the subject
that are exclusively or predominantly illuminated by the fl ash
appear in the image fi eld.
With a conventional fl ash fi ring time at the beginning of the
exposure, this can lead to visible contradictions, e.g. a vehicle
being "overtaken" by the light trails from its own rear lights.
The Leica T allows you to choose between this conventional fl ash
fi ring point and the end of the exposure.
► Select the required setting in
Flash exposure compensation
This function can be used to selectively reduce or strengthen the
fl ash exposure regardless of the exposure of the available light, e.g.
in a picture taken outside in the evening, to lighten the face of a
person in the foreground while retaining the lighting atmosphere.
► Select in
► In the submenu, make the required setting on the scale using
or the right adjusting dial
► Press
SET to confi rm
• If a compensation is set, this is indicated by
in the monitor.
EN
Picture mode
In the latter case, in our example the light trails from the rear lights
would be behind the vehicle as expected. This fl ash technique gives
a more natural impression of movement and dynamics.
Note:
When using the fl ash with faster shutter speeds, in terms of the
image there is no diff erence, or only for rapid movements, between
the two fl ash moments.
Notes:
• Flash exposure compensation changes the range of the fl ash.
• Once set, compensation remains active even after any number
of pictures and even after turning off the camera, until it is reset
to ±
0 (= center of scale).
175
Page 64

EN
Using external fl ash units
Fig. 52
The ISO fl ash shoe on the Leica T allows you to use more powerful
external fl ash units. We particularly recommend using Leica fl ash
units.
Picture mode
Fig. 52
Attaching the fl ash unit
► Turn off the camera and the fl ash unit.
► Slide back the cover that protects the fl ash shoe on the camera
when not in use.
► When attaching, make sure that the foot is fully inserted into the
fl ash shoe and, if available, secured against falling out with the
clamping nut. This is important because changes of position in
the fl ash shoe can break the required contacts, causing
malfunctions.
As soon as an external fl ash unit is attached, the specifi ed fl ash
modes with pre-fl ash function (
otherwise identical modes without pre-fl ash (
/ / ) are switched to the
/ / ) and
displayed accordingly. However, when the fl ash unit is removed the
camera reverts to the set mode.
176
Page 65

Notes:
• The built-in flash unit must be retracted to use external flash
units.
• If an external flash unit is attached, it must also be turned on,
i.e. ready to use, otherwise incorrect exposures and incorrect
messages on the camera can occur.
• Simultaneous use of the Leica Visoflex electronic viewfinder is
not possible.
EN
Picture mode
177
Page 66

EN
ADDITIONAL FUNCTIONS
Setting:
PICTURE STABILIZATION
Particularly in poor lighting conditions, the required shutter speed
may be too slow to achieve sharp pictures, even if the
function is active. The Leica T provides a function that ensures that
Picture mode
sharp pictures can still be obtained even with very slow shutter
speeds:
► Select the required setting in
Notes:
• With this function the camera automatically takes two pictures,
one after the other (you can hear the shutter release twice). It
then combines the pictures into one using digital techniques.
• Hold the camera steady until after the second picture.
• As the function uses two pictures, it can only be used for
stationary subjects.
• Picture stabilization is only possible with shutter speeds in the
1
range
/4s to 1/30s, and sensitivities up to ISO 800. It is not
available when using series of pictures, automatic bracketing,
the self-timer, in fl ash mode, or with the DNG data format.
Self-timer
You can use the self-timer to take a picture with a delay of either 2
or 12s. For example, this is particularly useful for group
photographs, where you want to appear in the picture yourself or if
you want to avoid the picture being out of focus due to camera
shake when releasing the shutter. In such cases we recommend
that the camera is placed on a tripod.
AUTO ISO
► Select the required setting in
If the function is assigned to the left adjusting dial, it can be
used to directly select the required option.
• If the self timer is turned on,
or
is displayed.
Operation:
► Press the shutter release all the way down to take the picture
• The progress is indicated by the fl ashing self timer LED:
– 12s delay: Initially slow, then faster in the fi nal 2s
– 2s delay: As described above for the last 2s
• The remaining time is counted down in the monitor.
Notes:
• A delay time in progress can be restarted at any time by
pressing the shutter release again.
• A delay time in progress can only be stopped by turning off the
camera.
• It is only ever possible to take single pictures with the self timer
activated, i.e. picture series and automatic bracketing cannot be
combined with the self timer mode.
• In self-timer mode, the focus and exposure are not set when the
shutter release reaches its pressure point, but immediately
before the picture is taken.
178
Page 67

RECORDING THE LOCATION WITH GPS
The external LEICA Visofl ex (Typ 020) available as an accessory
contains a GPS (Global Positioning System) receiver. If the
viewfi nder is attached, this enables the camera to add the location
coordinates to the picture data.
Setting the function
► Select the required setting in
• The "satellite" symbol in the monitor indicates the relevant
status:
– GPS off : No display
– GPS on, no reception:
– GPS on, reception:
Notes on the function:
• The prerequisite for GPS positioning is to have as clear a view as
possible of at least three GPS satellites (out of the total of 24
satellites, up to 9 are available from every location on earth).
• Make sure that the viewfi nder is not covered with your hand or
any other item, particularly metal objects.
• It may not be possible to receive good signals from GPS
satellites at the following locations or in the following situations.
In such cases, positioning may not be possible at all, or may be
incorrect.
– In closed rooms
– Underground
– Under trees
– In a moving vehicle
– Close to high buildings or in steep valleys
– Close to high voltage cables
– In tunnels
– Close to 1.5 GHz mobile telephones
Information for safe use
Make sure the GPS function is deactivated on board an aircraft
before takeoff or landing, in hospitals or in other locations where
there are restrictions on wireless transmissions.
Important (legal restrictions on use):
In certain countries or regions, the use of GPS and associated
technologies may be restricted. Therefore, before traveling in other
countries you should consult the relevant country's embassy or
your travel agent.
EN
Picture mode
179
Page 68

EN
-3 2 1 0 21 3+
823412MP
REVIEW MODE
Switching between picture and review modes
Fig. 53a/b
Automatic review
You can automatically review every picture immediately after taking
it.
Picture mode
1/80002.8F 12500ISO EV
Review mode
A
Review mode
INFO
Fig. 53a Fig. 53b
Notes:
• You can switch back from review mode to picture mode at any
time by tapping the shutter release.
• From the menu, you must select picture mode fi rst before you
can switch to review mode.
• In review mode you can select whether you want to view the
pictures on the card or pictures saved in the internal memory.
• If the memory card or internal memory does not contain any
image fi les,
• If you have used the picture series function or automatic
bracketing, the last or last saved picture in the series is
displayed fi rst - if not all pictures in the series have been
overwritten by the camera's internal back-up memory yet.
• It may not be possible to view fi les that were not created on this
camera.
• In some cases, the monitor screen does not have the normal
quality, or the monitor remains dark and only shows the fi le
name.
No valid image to play appears
► Select
► Select the required function or duration in the DURATION
submenu
► Select the required setting in the HISTOGRAM submenu
Note:
Portrait format pictures displayed using
shown with no rotation even if the
You can use
to rotate the picture.
AUTO REVIEW are initially
AU TO RO TATE function is active.
180
Page 69

REVIEWING PICTURES IN PORTRAIT FORMAT
If the camera is held horizontally when taking the picture, the
picture is normally displayed this way. For portrait pictures, i.e.
taken with the camera held vertically, this may not be practical
when viewing with the camera held horizontally, if the monitor
screen is not displayed as an upright picture.
Solution:
► Select
► Select the required setting in the submenu
SELECTING PICTURES
With gesture control
Fig. 54a
Fig. 54a/b
EN
Review mode
Fig. 54b
On is selected, pictures in portrait format are automatically
If
displayed upright.
Notes:
• Pictures in portrait format that are displayed upright are, by
necessity, signifi cantly smaller.
• This function is not available for automatic review.
With left adjusting dial
Fig. 55a Fig. 55b
Fig. 55a/b
Swiping to the right or turning the adjusting dial to the right selects
the pictures with higher numbers, swiping to the left or turning the
adjusting dial to the left selects those with lower numbers. In each
case, the pictures are displayed in an endless loop. When the last
picture is reached, the fi rst is displayed again.
181
Page 70

EN
182
ENLARGING / REDUCING PICTURES
The enlarged display allows you to assess the sharpness more
accurately. Pictures can be enlarged and reduced using the
gestures
Fig. 56a/b
or the right adjusting dial
gesture gives you the maximum enlargement in two stages
58a-c
.
Review mode
INFO
Fig. 56a
INFO
Fig. 57a
INFO
Fig. 58a
Fig. 56b
Fig. 57b
Fig. 58b
Fig. 58c
Fig. 57a/b
. The
Fig.
Note:
Pressing the corresponding point on the monitor determines which
part of the picture is enlarged.
/
Simultaneously viewing 9 pictures
Viewing 9 reduced pictures enables you to get an overview or to
fi nd the picture you are looking for more quickly
60a/b
.
INFO
Fig. 59a
INFO
Fig. 60a
Fig. 59b
Fig. 60b
Notes:
• Videos cannot be enlarged.
• In the enlarged/9 picture display, additional information cannot
be called up.
• The more the picture is enlarged, the more the reproduction
quality deteriorates – due to the proportionately lower
resolution.
• It may not be possible to enlarge pictures taken using other
camera types.
Fig. 59a/b / Fig.
Page 71

Selecting a picture in the 9 picture view
-3 2 1 0 21 3+
Fi g. 61a Fi g. 61b
Fi g. 61a/ b
SELECTING THE TRIMMING
Fig. 64a/b
In an enlarged picture, you can move the enlarged trimming away
from the center, e.g. to check reproduction of subject details
outside the center.
EN
Review mode
Exiting the 9 picture view
Fig. 62a
Fig. 63a
Fig. 62a/b / 63a/b
Fig. 62b
1/80002.8F 12500ISO EV
Fig. 63b
Fig. 64a
Fig. 64b
• The approximate position of the trimming in the picture is
specifi ed.
INFO
A
INFO
INFO
823412MP
183
Page 72

EN
DURATION REPEAT
PLAY ALL
FAVORITE ONLY
VIDEOS ONLYPICTURES ONLY
INFO
DURATION REPEAT
PLAY ALL
FAVORITE ONLY
VIDEOS ONLYPICTURES ONLY
DURATION REPEAT
PLAY ALL
FAVORITE ONLY
VIDEOS ONLYPICTURES ONLY
DURATION REPEAT
PLAY ALL
FAVORITE ONLY
VIDEOS ONLYPICTURES ONLY
DURATION REPEAT
PLAY ALL
FAVORITE ONLY
VIDEOS ONLYPICTURES ONLY
REPEAT
PLAY ALL
FAVORITE ONLY
VIDEOS ONLYPICTURES ONLY
VIDEOS ONLYPICTURES ONLY
VIDEOS ONLYPICTURES ONLY, VIDEOS ONLY
VIDEOS ONLYPICTURES ONLY
INFO
REVIEW MENU
The review menu contains a range of functions, which can be set
using submenus.
Opening the review menu
Fig. 65a/b
Review mode
Slide show
On the Leica T you can make a setting so that pictures will
automatically be shown in a sequence. Within this function, you
can specify whether all pictures will be shown, or only pictures
marked as favorites (see next page), or only photos, or only videos.
In addition, you can select the time for which pictures will be
displayed, and whether the slide show will be repeated until you
cancel it.
The slide show submenu appears when you open the review menu.
Fig. 65a
As an alternative to the pure gesture control shown here and on
the following pages, individual operations can also be carried out
using one of the adjusting dials
Fig. 66a Fig. 66b
184
Fig. 67a
Fig. 65b
Fig. 66a/b / Fig. 67a/b
.
submenus:
– Settings in
– Start with
DURATION
PLAY ALL
REPEAT
and
PICTURES ONLY, VIDEOS ONLY
or
FAVORITE ONLY
Note:
► The subsequent operations are carried out in the relevant
Your settings in
DURATION and REPE AT are retained even when
you turn the camera off and back on.
Exiting the slide show
Fig. 68a
Fig. 67 b
Fig. 68a/b
Fig. 68b
Page 73

Marking pictures as favorites / canceling markings
MULTISINGLE
FAVORITE
SET
DURATION REPEAT
PLAY ALL
FAVORITE ONLY
VIDEOS ONLYPICTURES ONLY
You can mark any picture as a favorite, e.g. so you can fi nd it more
quickly.
Marking individually
Fig. 69a-c
EN
Review mode
Protecting pictures / canceling delete protection
Pictures that you want to protect from accidentally being deleted
can be marked.
The operations used to mark and protect are the same, and the
only diff erence is the way you enter the relevant submenus,
for favorites,
here for favorites as an example.
Fig. 69a
Fig. 69b
for protection. The operations are described
Fig. 69c
At the 3rd step, as an alternative to pressing , marking can
also be carried out by pressing
SET.
185
Page 74

EN
MULTISINGLE
DURATION REPEAT
PLAY ALL
FAVORITE ONLY
VIDEOS ONLYPICTURES ONLY
FAVORITE
INFO
Delete
Single
Multi
All
1/80002.8F 12500ISO EV
-3 2 1 0 21 3+
823412MP
INFO
Delete
Single
Multi
All
Marking multiple
Fig. 70a-c
Deleting pictures
Pictures on the memory card and in the internal memory can be
deleted at any time, either individually, several at a time, or all at
once.
Fig. 70a
Review mode
Deleting marking(s)
At the 3rd step, markings can be cleared by pressing
again.
Notes:
• If you attempt to delete protected pictures, warning messages
• Even protected pictures are deleted when you format the
186
Fig. 70b
Fig. 70c
or
are displayed. If you still want to delete these pictures, clear the
protection as described above.
memory card.
Opening the delete menu
Fig. 71a
Deleting single pictures
Fig. 72a
Fig. 71a/b
Fig. 71b
Fig. 72a/b
Fig. 72b
Page 75

Deleting multiple pictures
SET
Delete
Single
Multi
All
Do you really want
to delete all
marked images?
NO
YES
SET
Do you really want to
delete all images?
NO
YES
Delete
Single
Multi
All
Fig. 73a
Fig. 73d
Fig. 73e
Deleting all pictures
Fig. 74a/b
Fig. 73a -e
Fig. 73b
Fig. 73c
Notes:
• For
SINGLE only:
After deleting, the next picture appears. If the picture is
protected, it continues to be displayed, and the message
image is protected appears briefl y.
• For
MULTI only:
This
Pictures already marked as protected cannot be marked for
deleting. If you attempt to do this, a corresponding message
appears briefl y.
• For
ALL only:
When deleting is complete, the message
No valid image to play
appears. If deleting cannot be carried out, the original picture is
displayed again.
• When deleting multiple or all pictures, a corresponding
information screen may appear due to the time required to
process the data.
• If the pictures included some with delete protection,
images were not deleted appears briefl y. The fi rst of these
Protected
protected pictures is then displayed.
For protected pictures, the delete protection must fi rst be
cleared before they can be deleted.
• The delete and protection functions always relate exclusively to
pictures from the source (memory card / internal memory) you
have selected in the review menu.
Important:
Pictures cannot be retrieved once they have been deleted.
EN
Review mode
Fig. 74a
Fig. 74b
187
Page 76

EN
SD CARD
INTERNAL MEMORY
DURATION REPEAT
PLAY ALL
FAVORITE ONLY
VIDEOS ONLYPICTURES ONLY
MULTI ALL FAVORITES ONLY
DURATION REPEAT
PLAY ALL
FAVORITE ONLY
VIDEOS ONLYPICTURES ONLY
Selecting the review source*
Fig. 75a -c
Note:
This function is only available if a memory card is inserted.
Review mode
Copying picture data between the internal memory and the
inserted memory card*
If a card is inserted, the Leica T saves the picture data to
the card, and if no card is inserted, the internal memory is used.
You can copy the picture data at any time from its original location
to the other - provided the destination has suffi cient capacity
available.
The copy direction is determined by the selected review source: If
the internal memory is selected, data is copied from there onto the
memory card, and vice versa.
Fig. 75a
The selected source determines not only which pictures are
displayed, but also which pictures the
functions apply to.
188
* From fi rmware version 1.2
Fig. 75b
Copying all pictures / pictures marked as favorites
Fig. 76a/b
The procedure is the same for both functions. The only diff erence
is whether you select
Fig. 75c
FAVO RI T ES ONLY, as in the example, or ALL.
#
, , and
Fig. 76a
Processing of the data begins after around 3s.
Fig. 76b
• Because of the time required, a corresponding information
screen appears. When the copy operation is complete, a
confi rmation message appears.
Page 77

Copying multiple pictures
MULTI ALL FAVORITES ONLY
DURATION REPEAT
PLAY ALL
FAVORITE ONLY
VIDEOS ONLYPICTURES ONLY
COPY MULTI INTERNAL SD CARD
SET
COPY MULTI INTERNAL SD CARD
SET
COPY MULTI INTERNAL SD CARD
SET
Fig. 77a-e
From
Fig. 77c
onwards, you can select the required pictures using
the adjusting dials, as an alternative to gesture control.
• The
SET display is replaced with .
Approx. 2s after your last marking, the display returns and you can
Fig. 77e
continue with
.
EN
Review mode
Fig. 77a
Fig. 77d
Fig. 77e
Processing of the data begins after around 3s.
• Because of the time required, a corresponding information
screen appears. When the copy operation is complete, a
confi rmation message appears.
Fig. 77b
Fig. 77c
189
Page 78

EN
INFO
16:12
16:12
Video review
If a video recording is selected,
PL AY > appears on the monitor.
Calling up the video and audio control symbols
5 6 7
3
Fig. 79a/b
Starting playback
Review mode
Fig. 78
Fig. 78
1
Fig. 79a Fig. 79b
1 Elapsed time
2 Scroll bar with contact area
3 Pause
4 Volume
5 Shorten video
6 Combine two videos
7 Back to beginning of video
Note:
The control symbols disappear after 3s.
2 4
190
Page 79

Continuing playback from a particular point
16:12
18:26
16:12
16:12
16:12
INFO
16:12
16:12
Fig. 80a/b
Adjusting the volume
Fig. 83a/b
EN
Review mode
Fig. 80a
Pausing playback
Fig. 81a/b
Fig. 80b
Fig. 83a
Note:
Fig. 83b
With the scroll bar at the bottom, sound playback is deactivated
Fig. 81a
Stopping playback
Fig. 82a
and the volume symbol changes to
Fig. 81b
Fig. 82a/b
Fig. 82b
.
191
Page 80

EN
16:12
16:12
SAVE
16:12
16:12
SAVE
16:12
11:30
SAVE
SAVE AS NEW
OVERWRITE
REVIEW CLIP
12:36
16:12
SAVE
SAVE AS NEW
OVERWRITE
REVIEW CLIP
12:36
SAVE
SAVE
SAVE
Cutting and combining video recordings
The Leica T provides two diff erent options for cutting a video
recording.
Cutting out a particular scene
Fig. 85a -f
Cutting starting and/or end sections
Review mode
Fig. 84a
Fig. 84a-e
Fig. 84b
Fig. 85a
Fig. 85d
Fig. 82b
Fig. 85c
2 3
1
Fig. 84d
Fig. 84c
Fig. 85f Fig. 85e
• During the operation, both the time (1) and a still shot of the
Fig. 84e
selected start and end points (
► Operation continued on next page, right-hand column.
2/3) are displayed
► Operation continued on next page, right-hand column.
Note:
192
You can cut in 1s increments, therefore the initial video must have
a length of at least 3s.
Page 81

Combining two video recordings
SET
2 1
SET
16:12
1
SAVE AS NEW
OVERWRITE
REVIEW CLIP
Fig. 86
When cutting and when combining videos, the operation continues
by selecting one of the three options in the submenu
Fig. 84e, 85f, 86d
and the process is the same.
► Select
SAVE AS NEW
The new video is also saved and the original is retained.
EN
Review mode
Fig. 86a
Fig. 86b
Fig. 86cFig. 86d
► Operation continued in right-hand column.
Note:
Two videos can be selected for each combination operation. The
order is indicated by
1 and 2.
► Select
OVERWRITE
The new video is saved and the original is deleted.
► Select
REVIEW CLIP
The new video is shown. It is not saved and the original is not
deleted.
• In all three cases, a corresponding information screen initially
appears due to the time required to process the data, followed
by the initial scene of the new video.
193
Page 82

EN
MISCELLANEOUS
USER PROFILES
On the Leica T, any combination of menu settings can be
permanently stored, e.g. so that they can be retrieved quickly and
easily at any time for recurring situations / subjects. A total of
three memory slots are available for these combinations. Of
Miscellaneous
course, you can reset all menu options to the factory default
settings.
Creating profi les
► Set the required functions in the menu.
► Select
► In the 1st submenu select SAVE AS PROFILE
► In the 2nd submenu select the relevant profi le slot
Notes:
• Until you have saved your settings using
SAVE AS PROFILE,
opening a profi le that has not yet been assigned has the same
eff ect as the
• Unlike the
PROFILE does not reset your time, date, and language settings.
function (see next section).
function (see next section), using DEFAULT
Resetting all custom settings
This function allows you to reset all custom settings previously
made in the menu at once and restore the factory default settings:
► Select
• A confi rmation prompt appears
► Confi rm - YES or reject - NO
194
Applying profi les
► Select
► Select the required USER PROFILE (1-4) in the submenu
Resetting all menu settings to the factory defaults
► Select
► Select DEFAULT PROFILE in the submenu
Note:
This reset applies to all of your settings, i.e. not just the profi les
defi ned and saved using
but also those in
SAVE AS PROFILE (see previous section),
Date/Time and Language. The next time the
camera is turned on, the welcome video is played again.
For details of what to do next, refer to the "Main switch", "Menu
language", and "Date/Time" sections.
Page 83

Resetting the picture fi le numbering
The Leica T saves picture fi les with ascending numbers and stores
them in automatically created folders. The names of the picture
fi les are therefore made up of eight characters, "
L" for the (Leica)
camera, three fi gures for the folder, and four fi gures for the picture,
e.g. "
L1001234". You can reset this numbering at any time:
► Select
• A confi rmation prompt appears
► Confi rm - YES or reject - NO
When you reset the numbering, or if the current folder contains the
picture fi le number 9999, a new folder is automatically created and
the numbering starts over. Example: Last picture before reset
"
L1009999", fi rst picture afterwards "L1010001". For example, you
can use this to sort your picture fi les more clearly.
The next available number is always used as the folder number, and
a maximum of 999 folders are possible.
If the number capacity is reached at "
L9999999", a corresponding
warning message appears in the monitor and the numbering has to
be reset.
Notes:
• If a memory card is inserted, the numbering is only reset on the
card; if no card is inserted the internal memory numbering.
• If the memory card used already contains a picture fi le with a
higher number than the last number assigned by the camera, the
numbers are incremented according to the numbering on the
card.
• To reset the folder number to 100, format the memory card or
the internal memory and then immediately reset the image
number. This resets the image number (to 0001).
EN
Miscellaneous
195
Page 84

EN
SETTING UP AND USING THE WIFI FUNCTION
There are 2 diff erent ways to access the Leica T by WiFi. For a
platform-independent connection without using a smart phone or
tablet, you can access your camera easily using a Web browser*.
Extended functionality is provided by the Leica App T (available in
the Apple™ App Store™) for Apple™ iOS™ devices such as the
Apple™ iPhone™ or iPad™.
Miscellaneous
Selecting a network
Fig. 88a/b
Select the network you want from the list displayed on the monitor
by tapping it. If the relevant network does not appear in the list
immediately, you can start another search for available networks by
pressing the
SCAN button.
196
Activating the WiFi function on the camera
Fig. 87a/b
► Select
► In the WLAN Connection submenu, select ON
The camera automatically searches for available networks.
Fig. 87a
* From fi rmware version 1.2
Fig. 87b
Fig. 88a
Fig. 88b
Pressing the DEVICE NAME button allows you to add "hidden"
networks by entering the network name
Fig. 89a/b
. Use the keyboard
displayed on the monitor to do this.
Fig. 89a Fig. 89b
Page 85

Entering the required data
Fig. 90a -c
Pressing the IP Settings button takes you to the corresponding
submenu. If required, you can enter a fi xed IP address and subnet
mask for the camera by pressing the
MANUAL button here.
However, these two settings are normally supplied automatically by
the WLAN. Enter the corresponding password in the
Password
fi eld to access the relevant network. If no password is set for the
network, you can leave this fi eld blank.
Fig. 90a
EN
Miscellaneous
Fig. 90b
Managing networks
Fig. 91a-c
The settings for diff erent networks can be deleted using the
MANAGE NETWORKS option in the WiFi menu. This is
recommended for WLAN networks that you use infrequently or only
once.
Connected networks are indicated by a symbol (
).
► Select
► Select in the submenu
► Select MANAGE NETWORKS
Fig. 90c
Fig. 91a Fig. 91b
Fig. 91c
197
Page 86

EN
Miscellaneous
Fig. 92a
Fig. 92d
Fig. 92b
Fig. 92c
WiFi access with the Leica T app
Download the app from the App Store™ to your iPad™ or iPhone™.
Check whether the app connection is activated in the camera
menu for the app.
A list of available cameras is displayed in the app. Select the
camera you want to connect to by tapping it.
A pin code is then displayed on the monitor on the selected
camera. To complete the connection wizard, enter this pin code in
your app.
These settings are saved both on the camera and in the app.
Subsequent connections are established automatically. If you want
to connect the app to another Leica T, select
DISCONNECT and
continue as described above to establish the new connection.
198
Changing network names on the Leica T
Fig. 92a-d
You can create a custom network name for your Leica T (factory
default setting:
the
Device Name symbol in the WiFi menu on the camera.
Leica
T Camera Serial Number
). To do this, press
► Select
► Select in the submenu
► Select Device
Note:
You can use the characters "
A…Z", "a…z", "0…9", "-". Spaces
cannot be used.
Page 87

WiFi access using an Internet browser*
Fig. 93a -c
Enter the network name (e.g. max_muster.local) or the IP address
of the camera in the address bar of your Internet browser.
You can then view and download the pictures on the camera.
Press the
Important
Browser Connection option in the WiFi menu.
Fig. 94
:
With this connection method, there is no access control. Therefore,
make sure that you are working in a secure WLAN network.
Notes:
• With WiFi access, pictures are only transferred in 2MP
resolution. To access the original data, you should connect the
camera with a USB cable or insert the SD card into an SD card
reader.
• Always connect using secure networks to prevent unauthorized
access to your camera and your data.
• The WiFi function requires slightly more power. We therefore
recommend deactivating the function when it is no longer
required.
• If there is an active USB connection between the camera and a
computer, the WiFi function is disabled on technical grounds.
* From fi rmware version 1.2
EN
Miscellaneous
Fig. 93a Fig. 93b
Fig. 93c
Fig. 94
199
Page 88

EN
TRANSFERRING DATA TO A COMPUTER USING THE USB
CONNECTION
The Leica T is compatible with the following operating systems:
Microsoft
®
: Windows® XP / Vista® / 7® / 8
®
Apple® Macintosh®: Mac® OS X (10.6) and later
The camera is equipped with a high-speed USB 2.0 interface for
transferring data.
Miscellaneous
Using the camera as an external drive
With Windows operating systems:
The operating system detects the camera as an external drive and
assigns it a drive letter. Transfer the picture data to your computer
using Windows Explorer and save it.
Important:
• Only use the USB cable supplied.
• While data is being transferred, the USB cable must not be
disconnected as otherwise the computer and/or the camera
may crash. This could cause irreparable damage to the memory
card.
• The camera must not be turned off or automatically shut itself
down due to a lack of battery power while data is being
transferred, as this can cause the computer to crash.
• For the same reason the battery must never be removed from
the camera whilst the connection is active. If the battery
capacity deteriorates while data is being transferred, the INFO
screen appears with the battery capacity flashing. In this case,
stop the data transfer, turn off the camera and charge the
battery.
200
With Mac operating systems:
The camera appears as a storage medium on the desktop. Transfer
the picture data to your computer using Finder and save it.
Transferring data to a computer using a card reader
Picture data can also be transferred using card readers for SD/
SDHC/SDXC memory cards. Compatible external card readers are
available for computers with a USB interface.
Note:
The Leica T is equipped with an integral sensor which detects the
position of the camera – horizontal or vertical (both directions) –
for each picture. This information allows the pictures to always be
automatically displayed upright when subsequently displayed on a
computer running the appropriate programs.
Page 89

Formatting
On the Leica T, the picture data in the internal memory and on an
inserted memory card can be deleted separately.
For memory cards, it is not normally necessary to format cards
that have already been inserted. However, if a card that has yet to
be formatted is inserted for the fi rst time, it must be formatted. In
such cases, the corresponding confi rmation prompt appears
automatically.
Nevertheless, it is recommended that the internal memory and
memory cards be reformatted occasionally, as a certain amount of
residual data (info accompanying pictures) can take up memory
capacity.
► Select
► Call up the relevant submenu
• A confi rmation prompt appears
► Confi rm - YES or reject - NO
Notes:
• When formating the memory card, the data on it is irretrievably
lost.
• You should therefore get into the habit of transferring all your
pictures onto a secure bulk storage medium, e.g. the hard drive
on your computer, as soon as possible.
• Do not turn off the camera while the operation is in progress.
• If the memory card has been formatted in another device, such
as a computer, you should reformat it in the camera.
• If the memory card cannot be formatted, you should ask your
dealer or the Leica Product Support department (for address,
see p. 222) for advice.
• Pictures marked with delete protection do not prevent formating.
EN
Miscellaneous
201
Page 90

EN
Using raw data (DNG)
If you want to edit DNG format, you require appropriate software,
such as the Adobe
®
Photoshop® Lightroom® professional raw data
converter. You can use this to convert saved raw data in optimum
quality, and it also provides quality-optimized algorithms for digital
color processing, which combines exceptionally low noise with
incredible resolution.
Miscellaneous
During editing, you have the option of adjusting parameters such
as gradation, sharpness etc. to achieve an optimum image quality.
Installing Adobe
®
Photoshop® Lightroom
®
Adobe® Photoshop® Lightroom® is available as a free download
when you register your Leica T on the Leica Camera AG website.
In addition to the active Internet connection on your computer
required for registration (i.e. it must be online), you also require a
valid e-mail address to install the software. Registration and the
download can both be found in the "CUSTOMER AREA" on the
website.
To download, enter your camera's serial number and the TAN
number, which you can find on the rear of the card supplied, under
"IMAGE EDITING SOFTWARE". You will then receive an e-mail from
Leica containing the license number required to install the
software.
If you require support for Adobe
®
Photoshop® Lightroom®: You will
find a support form in the "CUSTOMER AREA" of the Leica Camera
AG website, where you registered your camera and downloaded the
software.
System requirements
Like any software, depending on the version Lightroom
®
requires
different operating system versions (Windows/Mac). You should
therefore check the compatibility of your operating system before
setting up Lightroom
®
.
In some Windows versions, it is possible that the operating system
will issue a warning message about a missing Windows signature.
Ignore this message and continue with the installation.
202
Page 91

Installing fi rmware updates
Leica is constantly working on developing and optimizing its
products. As digital cameras have many functions that are
controlled electronically, some of these improvements and
enhancements to the functions can be installed on the camera at a
later date.
To do this, Leica provides fi rmware updates at irregular intervals,
which you can easily download from our homepage to your camera
yourself:
Once you have registered your camera, Leica will notify you about
all new updates.
To identify which fi rmware version is installed:
► Select
• The current version number on the camera is displayed in the
fi rst line of the submenu.
The second line of the submenu provides access to a display of
various country-specifi c approval symbols and numbers.
► Select
► Select Regulatory information in the submenu.
• The two-page display appears.
EN
Miscellaneous
203
Page 92

EN
ACCESSORIES
LEATHER PROTECTOR / LEICA SNAP T
When the camera is in the protector, you can still freely access the
entire monitor and the controls. The camera can remain in the
Accessories
protector while in use. Silicon (18 800 leather)
(Order no. 18 800 [stone gray] / 18 801 [black] / 18 802 [white] /
18 803 [melon yellow] / 18 804 [orange red])
SAILCLOTH SYSTEM CASE (black)
Size M
(Order no. 18 748)
LEATHER SYSTEM CASE (stone gray)
Size S
(Order no. 18 761)
204
LEICA FLAP T
The Leica Flap T is an add-on to the protector - when used in
combination, the two make up a case that completely covers the
camera body. Silicon
(Order no. 18 805 [stone gray])
LEICA T HOLSTER
Half shell for attaching to a belt. Combines convenient carrying,
protection, and fast access to the camera.
Order no. 18 809 [leather, stone gray] / 18 810 [aluminum, silver]
CARRYING STRAP T
Ergonomically cut, silicon.
(Order no. 18 811 [black] / 18 812 [white] / 18 813 [melon
yellow] / 18 814 [orange red])
HAND LOOP T
Ergonomically cut, silicon.
(Order no. 18 816 [black] / 18 817 [white] / 18 818 [melon
yellow] / 18 819 [orange red])
Page 93

ELECTRONIC VIEWFINDER LEICA VISOFLEX (Typ 020)
The Visoflex provides 100% reproduction of the image field at a
resolution of 2.4 megapixels. This allows easy and accurate picture
composition along with comprehensive control of all relevant data.
It is particularly useful when the lighting conditions impair the
visibility of the monitor screen and - thanks to the pivoting eyepiece
- for worm's eye view pictures.
It also contains a GPS receiver that enables the camera to add the
location coordinates to the picture data.
The Visoflex is attached to the flash shoe on the camera in the
same way as an external flash unit, and therefore is an alternative
to a flash unit.
(Order no. 18 767)
FLASH UNITS
With its compact dimensions and design that matches the camera,
the Leica SF 26 system flash unit is the perfect solution. It is also
extremely easy to operate.
(Order no. 14 622)
Important:
Only the accessories specified and described in this manual,
and/or by Leica Camera AG, may be used with the Leica T.
EN
Accessories
205
Page 94

EN
Spare parts Order no.
Housing cover .................................................... 470-701.001-022
Accessory shoe cover ....................................... 470-701.001-024
Dummy plug....................................................... 470-701.001-020
Carrying strap release pin................................... 470-701.001-029
Silicone carrying strap ........................................ 439-612.100-000
Spare parts
Lithium ion battery BP-DC 13, silver ....................................18 772
Lithium ion battery BP-DC 13, black ....................................18 773
Battery Charger LEICA BC-DC13 ........................ 470-701.022-000
(including interchangeable plugs)
Mains plug set .................................................. 470-701.801-005
(contains all versions listed on the right
Micro USB cable ................................................ 470-701.001-035
Charger adapter plug
Plug Country
1 US/Japan USA
Canada
Japan
Singapore
Thailand
Taiwan
2 EU EU
Turkey
Russia
3 UK UK
Qatar
UAE
Hong Kong
Malaysia
South Africa
Malta
4 China China
5 Australia Australia
New Zealand
6 Korea Korea
206
1
To ensure that a power supply is available when used for long periods, we recommend
carrying a second battery.
Page 95

1
2
EN
Spare parts
3
5
4
6
207
Page 96

EN
208
PRECAUTIONS AND CARE INSTRUCTIONS
GENERAL PRECAUTIONS
Do not use your camera in the immediate vicinity of devices with
powerful magnetic, electrostatic or electromagnetic fields (e.g.
induction ovens, microwave ovens, television sets or computer
monitors, video game consoles, cell phones, radio equipment).
• If you place the camera on or immediately adjacent to a
television set, the magnetic field could impair the pictures
recorded.
• The same applies for use in the vicinity of cell phones.
• Strong magnetic fields, e.g. from speakers or large electric
motors, can damage the stored data or the pictures.
• If the camera malfunctions due to the effects of electromagnetic
Precautions and care instructions
fields, remove the battery and then turn the camera on again.
Do not use the camera in the immediate vicinity of radio
transmitters or high-voltage power lines.
Their magnetic fields can also interfere with picture recordings.
• Protect the camera from contact with insect sprays and other
aggressive chemicals. Petroleum spirit, thinner and alcohol may
not be used for cleaning.
Certain chemicals and liquids can damage the camera’s housing
or the surface finish.
• As rubber and plastics sometimes emit aggressive chemicals,
they should not remain in contact with the camera for a long
time.
• Ensure that sand and dust cannot get into the camera, e.g. on
the beach.
Sand and dust can damage the camera and the memory card.
Take particular care when inserting and removing the card.
• Ensure that water cannot get into the camera, e.g. when it is
snowing or raining and on the beach.
Moisture can cause malfunctions and even irreparable damage
to the camera and the memory card.
• If salt water spray gets onto the camera, wet a soft cloth with
tap water, wring it out thoroughly and wipe the camera with it.
Then wipe down thoroughly with a dry cloth.
Important:
Only the accessories specified and described in this manual, and/
or by Leica Camera AG, may be used in the camera.
Monitor
• If the camera is exposed to significant temperature fluctuations,
condensation can form on the monitor. Wipe it carefully with a
soft dry cloth.
• If the camera is very cold when turned on, the monitor screen
will initially be slightly darker than normal. As soon as the
monitor warms up, it will reach its normal level of brightness.
The monitor is manufactured using a high-precision process. This
ensures that, of the total of around 920,000 pixels, more than
99.995% work correctly and only 0.005% remain dark or are always
light. However, this is not a malfunction and it does not impair the
reproduction of the picture.
Page 97

Picture sensor
• Cosmic radiation (e.g. on flights) can cause pixel defects.
Condensation
If condensation has formed on or in the camera, you should turn it
off and leave it to stand at room temperature for around an hour.
Once the camera temperature has adjusted to room temperature,
the condensation will disappear by itself.
Care instructions
• As any soiling also represents a growth medium for
microorganisms, you should take care to keep the equipment
clean.
For the camera
• Only clean the camera with a soft, dry cloth. Stubborn dirt
should first of all be covered with a well-thinned cleaning agent
and then wiped off with a dry cloth.
• To remove stains and fingerprints, wipe the camera with a clean
lint-free cloth. Tougher dirt in hard to reach corners of the
camera body can be removed with a small brush.
• All mechanically operated bearings and sliding surfaces on your
camera are lubricated. Please remember this if you will not be
using the camera for a long period of time. To prevent the
lubrication points becoming gummed up, the camera shutter
should be released a number of times every three months. We
also recommend repeated adjustment and use of the setting
dials.
EN
Precautions and care instructions
209
Page 98

EN
210
For lenses
• Normally, a soft hair brush is sufficient to remove dust from the
outer lens elements. However, in case of more stubborn dirt,
they can be carefully cleaned with a very clean, soft cloth that is
completely free of foreign matter, using circular motions from the
inside to the outside. We recommend micro-fiber cloths
(available from photographic and optical specialists) that are
stored in a protective container and can be washed at
temperatures of up to 40°C/104°F (without fabric softener,
never iron!). Cloths for cleaning glasses, which are impregnated
with chemicals, must not be used as they can damage the lens
glass.
• The lens hood supplied also protects the lens from unintentional
fingerprints and the rain.
Precautions and care instructions
For the battery
Rechargeable lithium ion batteries generate power through internal
chemical reactions. These reactions are also influenced by the
external temperature and humidity. Very high or low temperatures
reduce the life of the battery.
• Always remove the battery, if you will not be using the camera for
a long period of time. Otherwise, it could become totally
discharged after several weeks, i.e. its voltage will fall sharply.
• Lithium ion batteries should only be stored in a partially charged
condition, i.e. not fully charged or fully discharged. For very long
storage periods, the battery should be charged for around 15
minutes twice a year to prevent total discharge.
• Always ensure that the battery contacts are clean and freely
accessible. Whilst lithium ion batteries are proof against short
circuits, they should still be protected against contact with metal
objects such as paper clips or jewelry. A short-circuited battery
can get very hot and cause severe burns.
• In order to charge the battery, it must have a temperature of
between 0°C and 35°C / 32°F and 95°F (otherwise the charger
may not turn on or off again).
• If a battery is dropped, check the casing and the contacts
immediately for any damage. Using a damaged battery can
damage the camera.
• Batteries have only a limited service life.
• Take damaged batteries to a collection point for proper recycling.
• Never throw batteries into a fire as this can cause them to
explode.
For the charger
• If the charger is used in the vicinity of radio receivers, it can
interfere with the reception; make sure there is a distance of at
least 1m between the devices.
• When the charger is in use, it can make a noise (buzzing) – this is
quite normal and is not a malfunction.
• When it is not in use, disconnect the charger from the mains as
otherwise it uses a certain (very small) amount of power even
when no battery is inserted in it.
• Always keep the charger contacts clean, and never short circuit
them.
Page 99

For memory cards
• Whilst a picture is being stored or the memory card is being
read, it may not be removed, the camera turned off or exposed
to vibrations.
• For safety, memory cards should only ever be stored in the anti
static cover supplied.
• Do not store memory cards where they will be exposed to high
temperatures, direct sunlight, magnetic fields or static discharge.
• Do not drop or bend memory cards as this can damage it and
result in loss of the stored data.
• Always remove the memory card, if you will not be using the
camera for a long period of time.
• Do not touch the connections on the rear of the memory card
and keep them free of dirt, dust and moisture.
• It is recommended that the memory card be reformatted from
time to time, as fragmentation occurs when deleting, which can
block some of the memory capacity.
Storage
• If you are not using the camera for a longer period of time, we
recommend that you:
a. Turn it off
b. Remove the memory card, and
c. Remove the battery.
• A lens acts like a burning glass, particularly when exposed to
frontal sunlight. Therefore, the camera must never be stored
without the lens being protected. Attaching the lens cover and
keeping the camera in the shade (or immediately put it away in
the case) help to prevent damage to the interior of the camera.
• You should preferably store the camera in a closed and padded
container so that nothing can damage it and it is protected from
dust.
• Store the camera in a dry, adequately ventilated place, where
neither high temperatures nor high humidity will occur. When
used in humid conditions, the camera should be completely free
of all moisture before being put away.
• Photo cases that became wet during use should be emptied to
prevent damage to your equipment caused by moisture and any
leather-tanning residue released.
• To prevent fungal growth during use in hot, humid tropical
climates, the camera equipment should be exposed to the sun
and air as much as possible. Storage in airtight containers or
cases is recommended only if a desiccant such as silica gel is
placed in the container.
• To prevent the formation of fungus, do not store the camera in a
leather case for long periods of time.
• Note down the serial number of your Leica T, as this is extremely
important in case of loss.
EN
Precautions and care instructions
211
Page 100

EN
•
MENU OPTIONS
Menu options
13
1
ISO sensitivity p. 152
2
White balance p. 150
3
1
4
2 3
5 6
87 9
1210 11
14 15
Exposure compensation p. 168
4
Picture frequency p. 154
5
Exposure metering method p. 160
6
Self-timer p. 178
7
Compression rate / fi le format (for photos) p. 150
8
Fine focus mode p. 154
9
Flash mode p. 173
10
JPEG resolution p. 150
11
Autofocus metering method p. 156
12
Flash exposure compensation p. 175
13
Video fi le format / resolution p. 170
14
Automatic bracketing p. 169
15
Flash sync time p. 175
16
Color reproduction p. 152
17
Automatic ISO settings p. 152
18
WiFi connection p. 196
212
16
17 18
 Loading...