

Leica APO-VARIO-ELMARIT-SL 1:2.8-4/90-280 Instructions Manual

LEICA APO-VARIO-ELMARIT-SL
1:2.8-4/90-280
Anleitung | Instructions | Notice d’utilisation
Gebruiksaanwijzing | Istruzioni | Instrucciones
說明書
取扱説明書
|
使用说明 | 사용 설명서 | Инстpyкция
| Panduan
1
9f
9
1a
2c
2b
2a
3
4
8b
8a
8
7
5
6
9d
9a
9b
9
9c
9e
9f

VORWORT
Vielen Dank für Ihr Vertrauen, das Sie uns mit dem Kauf dieses Objektivs entgegengebracht haben.
Damit Sie viele Jahre Freude an diesem hochwertigen Produkt haben, lesen Sie bitte diese Anleitung
sorgfältig durch.
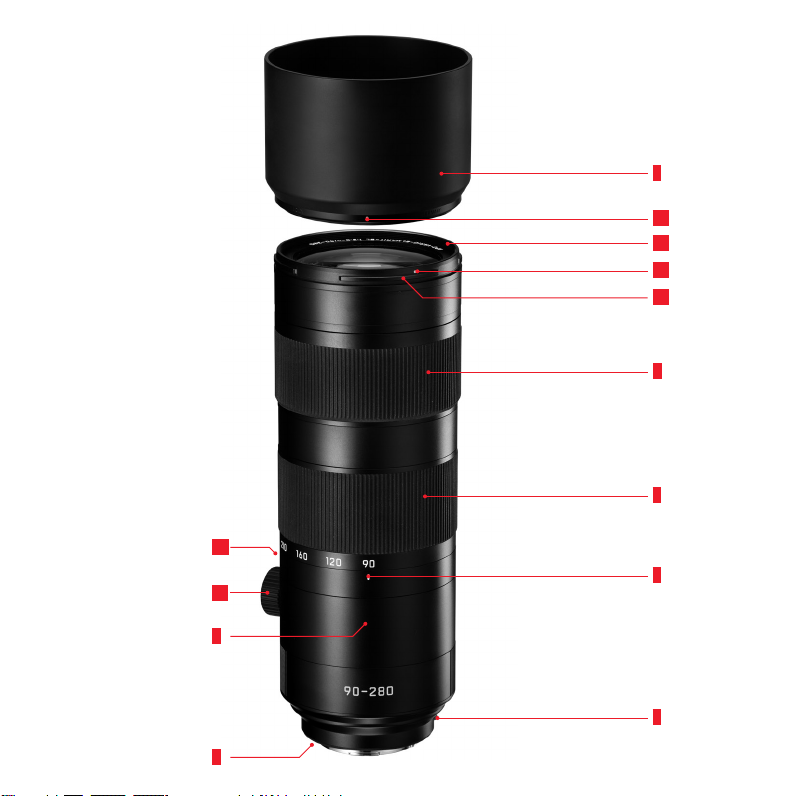
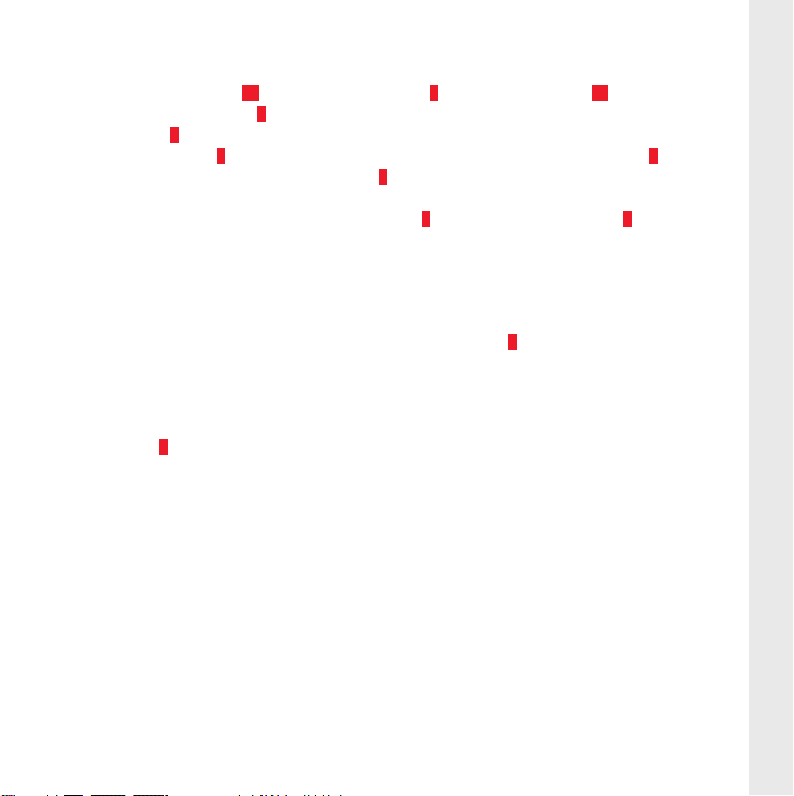
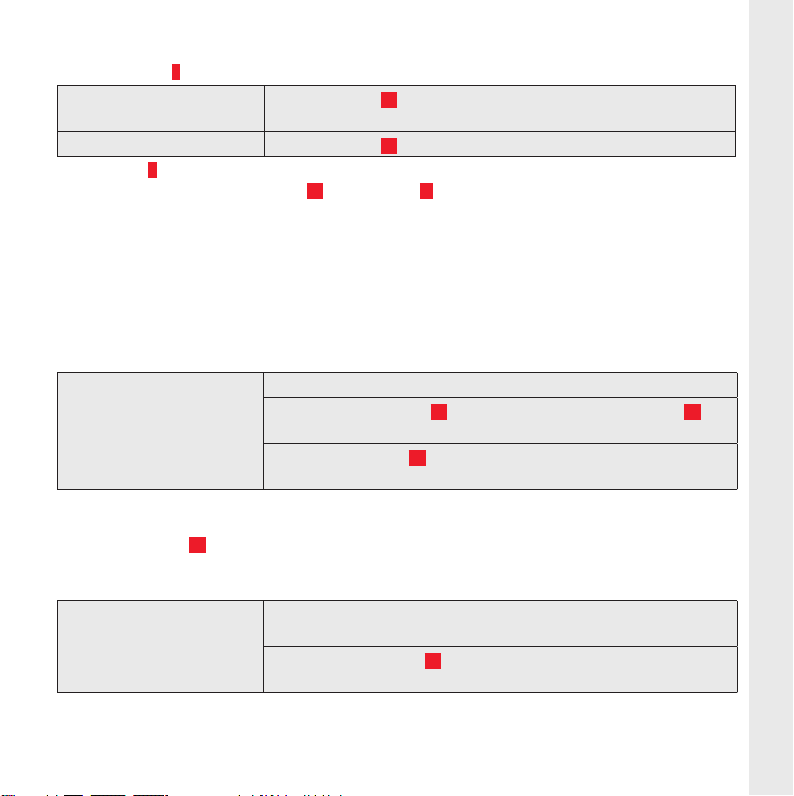
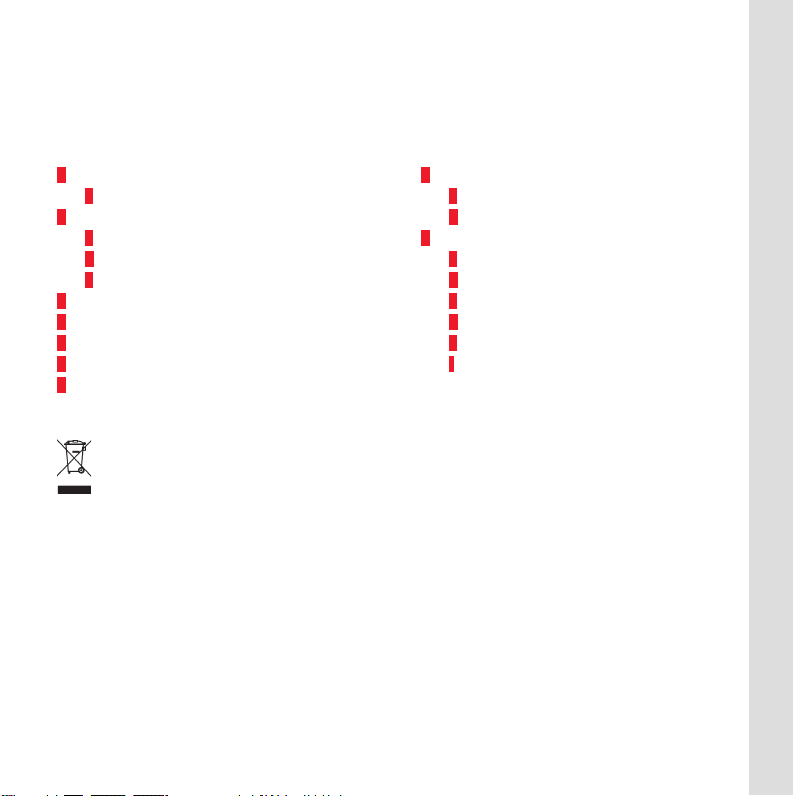
BEZEICHNUNG DER TEILE
1 Gegenlichtblende mit
a Indexpunkten
2 Frontfassung mit
a Außenbajonett für Gegenlichtblende
b Indexpunkt für Gegenlichtblende
c Innengewinde für Filter
3 Entfernungs-Einstellring
4 Brennweiten-Einstellring
5 Index für Brennweite
6 Roter Indexknopf für Objektivwechsel
7 Kontaktleiste
8 Stativschelle mit
a Klemmschraube
b Schwalbenschwanz für Stativfuß
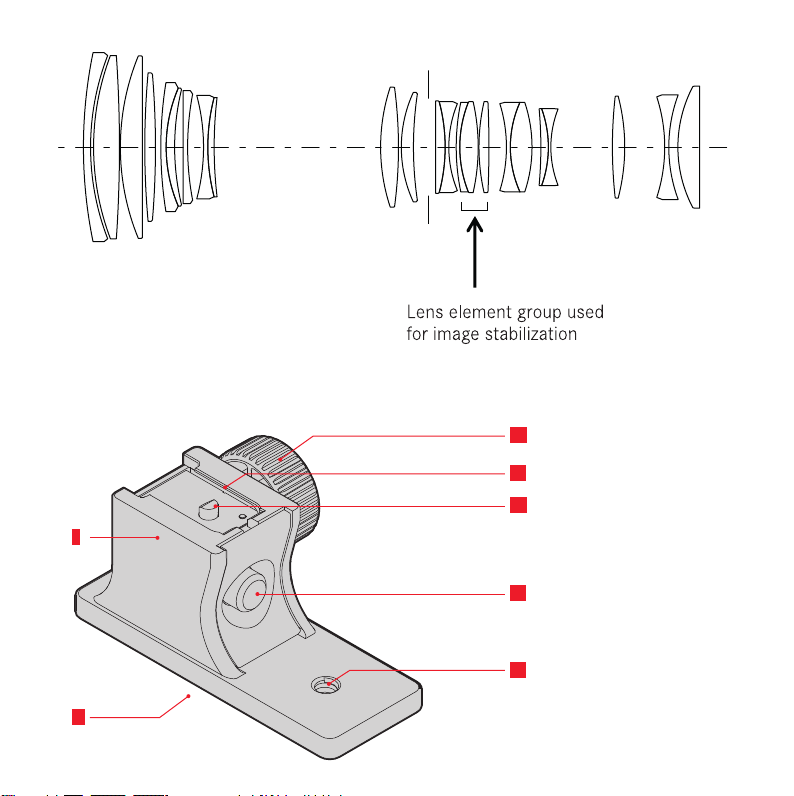
9 Stativfuß mit
a Schalbenschwanz für Stativschelle
b Sicherungsstift
c Entriegelungstaste
d Klemmschraube
1
e
⁄4‘‘-Stativgewinde
f Loch für Verdrehsicherung
ENTSORGUNG ELEKTRISCHER UND ELEKTRONISCHER GERÄTE
(Gilt für die EU, sowie andere europäische Länder mit getrennten Sammelsystemen)
Dieses Gerät enthält elektrische und/oder elektronische Bauteile und darf daher nicht im normalen
Hausmüll entsorgt werden! Stattdessen muss es zwecks Recycling an entsprechenden, von den
Gemeinden bereit gestellten Sammelstellen abgegeben werden. Dies ist für Sie kostenlos. Falls das
Gerät selbst wechselbare Batterien oder Akkus enthält, müssen diese vorher entnommen werden und
ggf. ihrerseits vorschriftsmäßig entsorgt werden. Weitere Informationen zum Thema bekommen Sie
bei Ihrer Gemeindeverwaltung, Ihrem Entsorgungsunternehmen, oder dem Geschäft, in dem Sie
dieses Gerät erworben haben.
DE
1

DE
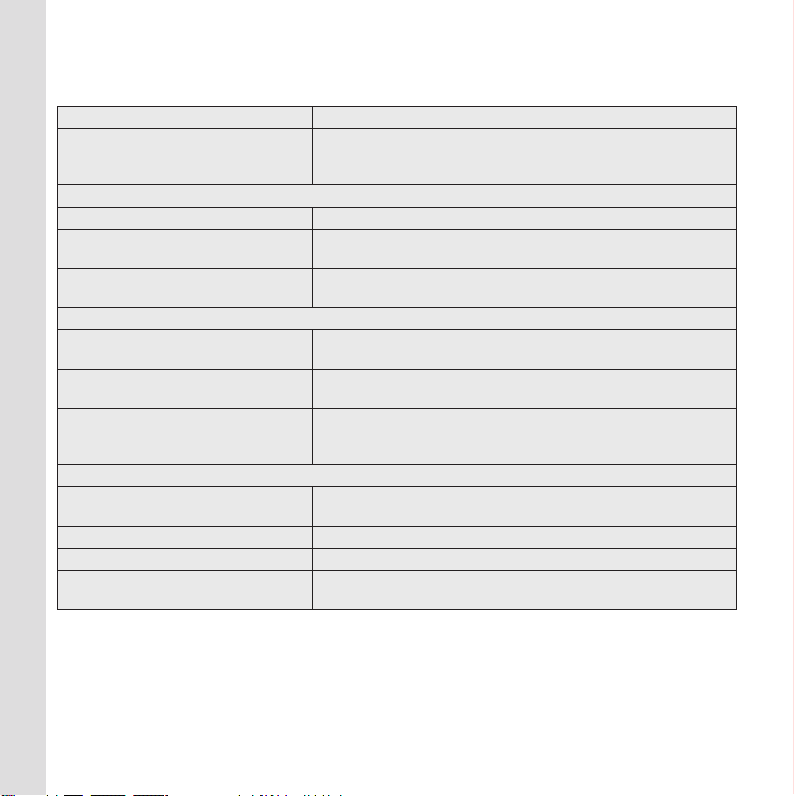
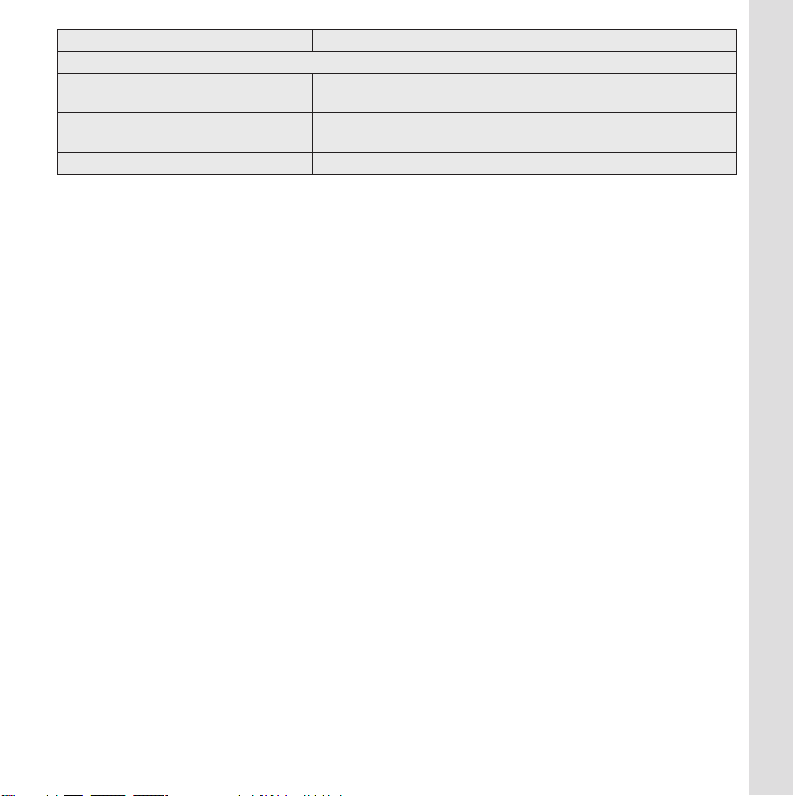
TECHNISCHE DATEN
Lichtstarkes Tele-Zoomobjektiv mit herausragenden Abbildungsleistung
Verwendbare Kameras
Bildwinkel
(diagonal, horizontal, vertikal,
bei 90/280mm)
Leica SL, Leica T (Typ 701)
Für Leica SL (Typ 601): ca. 26°, 22°, 15° / 9°, 7,5°, 5°,
für Leica T (Typ 701): ca. 17°, 15°, 10°* / 6°, 5°, 3°**
(entspricht ca. 135*/420** Brennweite bei Kleinbild)
1
2
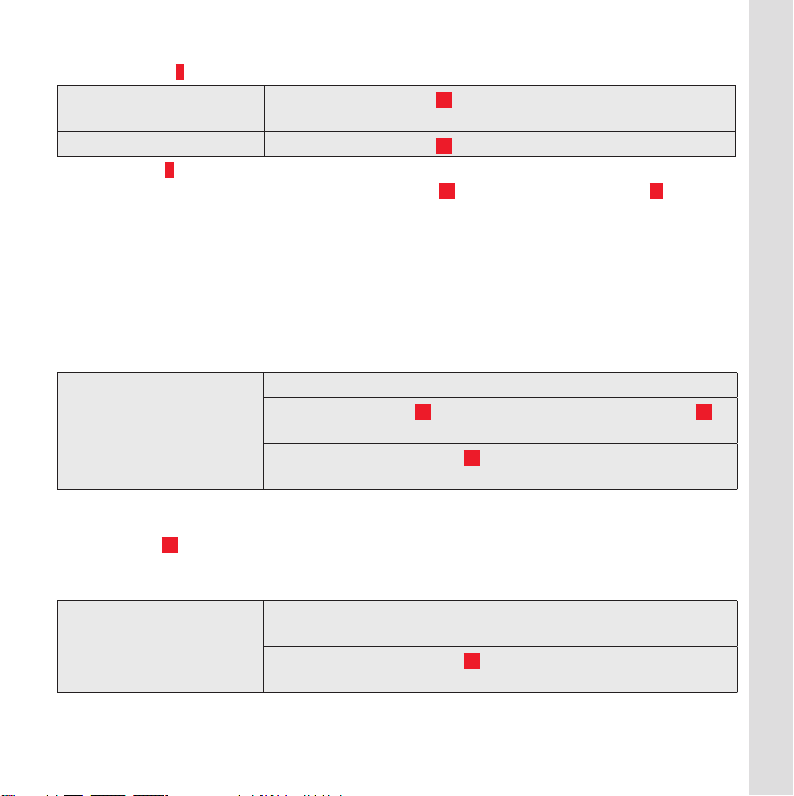
Optischer Aufbau
Zahl der Linsen / Glieder 23/17
Lage d. Eintrittspupille
(bei unendlich)
Bildstabilisierung
3
90/280mm: 130,2/-21,1mm (in Lichteinfallsrichtung vor/hinter
Bayonett-Auflagefläche)
Mehrachs-System, Stabilisierungsleistung entspricht gem. CIPA- Prüfbedingungen 3,5 Verschlusszeit-Stufen
Entfernungseinstellung
Einstellung Wahlweise automatisch (Autofokus)
4
oder manuell, Betriebsarten
werden an der Kamera eingestellt
Arbeitsbereich
0,6/1,4m ∞
(bei 90/280mm)
Kleinstes Objektfeld /
Größter Maßstab
Für Leica SL (Typ 601): ca. 114 x 171mm/1:4,8 / 120 x 180mm/1:5,
für Leica T (Typ 701): ca. 76 x 114mm/1:4,8 / 80 x 120mm/1:5
(bei 90/280mm)
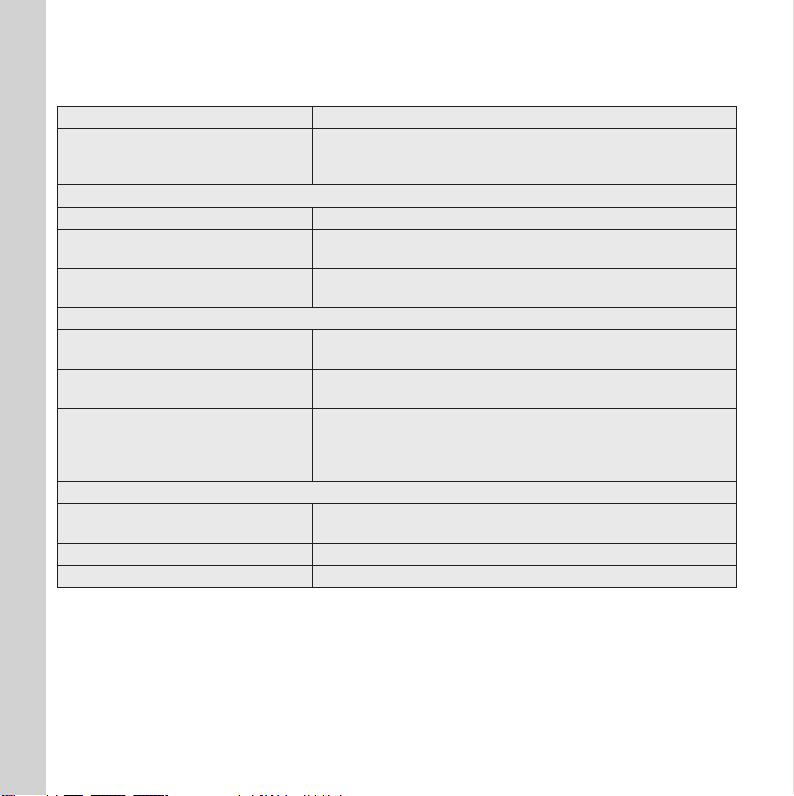
Blende
Einstellung / Funktionsweise Elektronisch gesteuerte Blende, Einstellung über Dreh-/Drückrad der
Kamera, auch halbe Werte einstellbar
Kleinster Wert 22
Bajonett
Filterfassung / Gegenlichtblende
Leica L-Bajonett mit Kontaktleiste
Außenbajonett für Gegenlichtblende (im Lieferumfang), Innengewinde
für E82-Filter, Filterfassung rotiert nicht
2
Oberflächenausführung
Schwarz eloxiert
Abmessungen und Gewicht
Länge bis Bajonettauflage ca. 238/310mm (ohne/mit Gegenlichtblende)
Größter Durchmesser/
ca. 88/123mm (Gegenlichtblende (B x H) 116 x 96mm)
Höhe mit Stativfuß
Gewicht ca. 1850/1950g (ohne/mit Stativfuß)
1
Halten Sie die Kombination einer T-Kamera und diesem Objektiv nie nur am Kamera-Gehause, sondern unterstutzen Sie
immer auch das Objektiv. So entlasten Sie das Kamerabajonett.
2
Die Nenn-Brennweiten der Leica SL-Objektive sind auf das Kleinbild-Filmformat bezogen, d.h. auf ein Ausgangsformat von
24 x 36mm. Der Sensor der Leica T (Typ 701) ist jedoch mit 23,6 x 15,7mm im Vergleich dazu etwas kleiner ca. um den
Faktor 0,66. Deshalb entspricht der Bildwinkel dieser Objektive an der Leica T (Typ 701) jeweils denen von Objektiven mit
Brennweiten, die ca. um den Faktor 1,52 langer sind (1,52 ≈ Kehrwert von 0,66).
3
Funktion ist bei der Verwendung an der Leica T (Typ701) nicht verfugbar.
4
Funktion ist bei der Verwendung an der Leica T (Typ701) langsamer.
Die MTF (siehe Anhang) ist jeweils für die volle Öffnung und für die Öffnungen 5,6 und 8 für große Aufnahmeentfernungen
(unendlich) angegeben. Aufgetragen ist der Kontrast in Prozent für 5, 10, 20, 40 Lp/mm über die Höhe des Formats für
tangentiale (gestrichelte Linie) und sagittale Strukturen (durchgezogene Linie) bei weißem Licht. Die 5 und 10 Lp/ mm
geben einen Eindruck über das Kontrastverhalten für gröbere Objektstrukturen, die 20 und 40 Lp/mm dokumentieren das
Auflösungsvermögen feiner und feinster Objektstrukturen.
DE
3

DE
BESONDERE EIGENSCHAFTEN
Das Leica Apo-Vario-Elmarit-SL 1:2,8-4/90-280mm ist ein lichtstarkes Tele-Zoomobjektiv mit Leica
L-Bajonett. Es kann nicht nur an Leica SL-, sondern auch an Leica TL-Kameras
1
verwendet werden.
Das Leica Apo-Vario-Elmarit-SL 1:2,8-4/90-280mm zeichnet sich bereits bei offener Blende, bei allen
Brennweiten und von Unendlich bis in den Nahbereich aus durch sehr hohe Kontrastwiedergabe und
höchste Auflösung. Alle Bildfehler sind sehr gut auskorrigiert, bzw. werden Kamera-intern digital
kompensiert. Abblenden ergibt zwar eine weitere, geringfügige Leistungssteigerung, die jedoch in aller
Regel nur aus Gründen der Bildgestaltung - mit der Schärfentiefe - erforderlich ist. Herauszuheben
sind ebenfalls die sehr kurzen Naheinstellgrenzen, die bei kürzester wie längster Brennweite
beachtliche Abbildungsmaßstäbe von bis zu 1:5 ermöglichen.
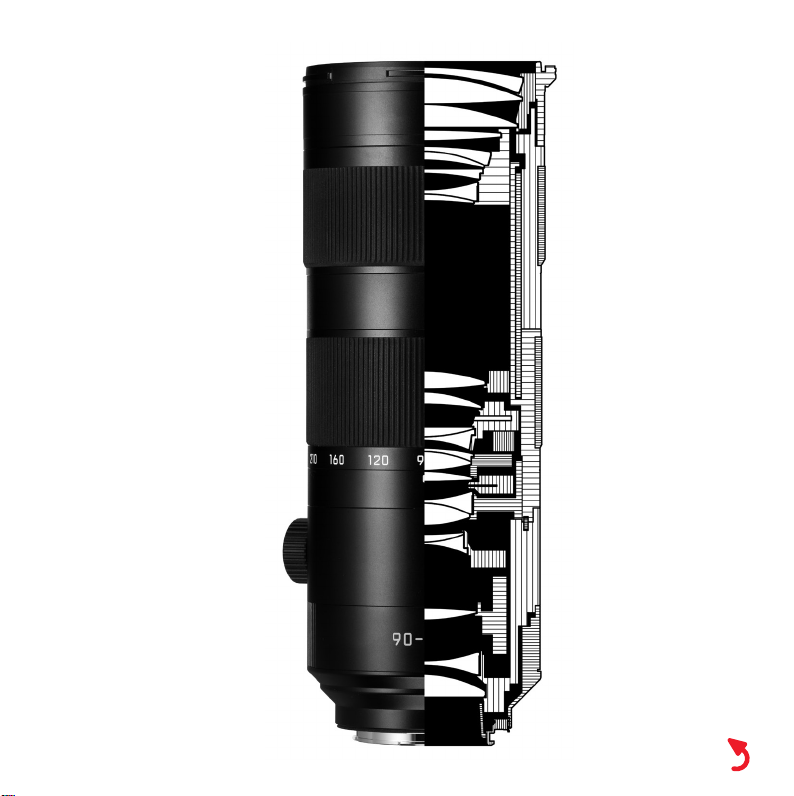
Insgesamt 23 Linsen, aufgeteilt in 7 Baugruppen werden zur Erzielung dieser Leistung eingesetzt.
Darunter sind sieben Linsen aus Gläsern mit anomaler Teildispersion. Die Konstruktion beinhaltet eine
rein interne Brennweiten-Verstellung, mit den Vorteilen, dass sich die Länge des Objektivs nicht
verändert und der Schwerpunkt der Ausrüstung auch beim Zoomen fast gleich bleibt. Die hochwertigen Vergütungen sämtlicher Linsen-Oberflächen tragen zur Reflex- und Streulicht-Armut bei.
Das Objektiv weist eine sehr schnelle Autofokus-Funktion, sowie eine sehr wirkungsvolle Stabilisierungsfunktion auf, beide arbeiten zudem sehr leise.
Fazit: Das Leica Apo-Vario-Elmarit-SL 1:2,8-4/90-280mm vereint eine ausgedehnte Tele-Brennweitenspanne und eine außerordentlich hohe Abbildungsleistung, von der Unendlich-Einstellung bis in den
Nahbereich, bei Offenblende ebenso wie im abgeblendeten Zustand. Damit, und mit seiner gegenüber
Festbrennweiten nur etwas geringeren Lichtstärke kann es die Flexibilität der/des Fotografin/-en
erheblich vergrößern, z.B. in Einsatzbereichen wie der Reise- und Reportagefotografie ebenso wie
Porträts und Nahaufnahmen.
1
Siehe ‚Technische Daten‘
4
AUFBAU DER LEICA SL-OBJEKTIVE
Alle Leica SL-Objektive weisen im Prinzip den gleichen äußeren Aufbau auf: es gibt an der vorderen
Fassung ein Außenbajonett
Einstellring für die Entfernung
Objektivwechsel
8. Darüber hinaus verfügt das Leica Apo-Vario-Elmarit-SL 1:2,8-4/90-280mm über
einen zusätzlichen Ring
Bajonettflansch befindet sich eine Kontaktleiste
2a für die Gegenlichtblende 1 und ein Innengewinde 2c für Filter, einen
3 und einen feststehenden Ring mit einem roten Indexknopf für den
4 zur Einstellung der Brennweite, und den entsprechenden Index 5. Im
7, über die der gesamte Datenaustausch zwischen
Kamera und Objektiv stattfindet, einschließlich der Steuerbefehle für den Autofokus und die Blende.
Außerdem verfügt das Objektiv über eine Stativschelle
8 mit abnehmbarem Stativfuß 9.
EINSTELLEN DER SCHÄRFE UND DER BRENNWEITE
Das Einstellen der Schärfe erfolgt bei Autofokus-Betrieb automatisch durch die Kamera, bei ManuellBetrieb durch drehen des vorne liegenden Entfernungs-Einstellrings
3. Die Geschwindigkeit, mit der
Sie den Ring drehen, bestimmt dabei wie schnell sich die Einstellung verändert. So können Sie ebenso
gezielt Fein-Einstellungen vornehmen, wie schnell vom Nah- in den Fernbereich gelangen. Weitere
Einzelheiten entnehmen Sie bitte den entsprechenden Abschnitten in der Kamera-Anleitung. Das
Einstellen der Brennweite - und damit des gewünschten Bildausschnitts – erfolgt mit dem dahinter
liegenden Ring
4.
SCHÄRFENTIEFE
Da Leica SL-Objektive keinen Blendenring besitzen, ist auch keine Schärfentiefe-Skala vorhanden.
Stattdessen können die jeweiligen vorderen und hinteren Grenzen der Schärfentiefe zusammen mit
der eingestellten Entfernung im Deckkappen-Display der Kamera abgelesen werden.
DE
5

DE
FOTOGRAFIEREN MIT DEN BELICHTUNGSAUTOMATIKEN UND MIT
MANUELLER EINSTELLUNG VON VERSCHLUSSZEIT UND BLENDE
Das Leica Apo-Vario-Elmarit-SL 1:2,8-4/90-280mm besitzt eine veränderliche Lichtstärke, d. h. die
wirksame Blendenöffnung variiert in Abhängigkeit von der eingestellten Brennweite. Ist zum Beispiel
bei 90mm der Blendenwert 2,8 eingestellt, entspricht die Öffnung dem angezeigten Wert. Bei längeren
Brennweiten verringert sich die tatsächliche Öffnung, und bei 280mm gilt schließlich der auch in der
Bezeichnung des Objektivs festgehaltene zweite Wert 4. Dank der Lichtmessung durch das Objektiv
wird dennoch bei allen Belichtungs-Betriebsarten immer die richtige Lichtmenge gemessen.
Allerdings muss, um Fehlbelichtungen zu vermeiden, der gewünschte Bildausschnitt (BrennweitenWahl) für die spätere Aufnahme vor dem Messwert-Speichern oder dem Verändern der Zeit-/
Blendenkombination bestimmt werden. Dies gilt auch für den Blitzbetrieb mit manueller Einstellung
der Leistungsabgabe oder Computersteuerung am Blitzgerät. In beiden Fällen muss die Einstellung der
Blende am Blitzgerät jeweils der tatsächlichen Blendenöffnung entsprechen. Dagegen wird bei der
Verwendung eines System-Blitzgeräts und der TTL-Blitzbelichtungs- Steuerung die tatsächliche
Blendenöffnung automatisch übertragen, so dass die korrekte Belichtung stets gewährleistet ist.
GEGENLICHTBLENDE
Das Leica Apo-Vario-Elmarit-SL 1:2,8-4/90-280mm wird mit einer optimal auf die Strahlengänge
abgestimmten Gegenlichtblende
und einfach-, und zur platzsparenden Aufbewahrung auch umgekehrt aufsetzen. In beiden Fällen wird
sie, bei abgenommenem Objektivdeckel, zunächst so angesetzt, dass sich einer der Indexpunkte auf
der Gegenlichtblende
steht. In dieser Ausrichtung wird die Gegenlichtblende aufgesetzt, und ca. 30° im Uhrzeigersinn
gedreht bis sie deutlich hör- und spürbar einrastet. Solange die Kamera fotografierbereit getragen und
benutzt wird, sollte die Gegenlichtblende immer aufgesetzt bleiben. Sie schützt wirksam gegen
Kontrast minderndes Nebenlicht, aber auch gegen Beschädigungen und Verschmutzungen der
Frontlinse, wie z.B. durch versehentliche Fingerabdrücke.
2b genau dem Indexpunkt an der Frontfassung des Objektivs 1a gegenüber
1 geliefert. Sie lässt sich dank ihres symmetrischen Bajonetts schnell
6
VERWENDEN DER STATIVSCHELLE / DES STATIVFUSSES
Die Stativschelle 6 ist frei drehbar und rastet alle 90° ein.
Stativschelle arretieren: Klemmschraube 6a im Uhrzeigersinn drehen
Auf festen Sitz prüfen!
Stativschelle lösen:
Der Stativfuß
7 ist abnehmbar, z.B. um Fotografieren aus der Hand zu erleichtern. Seine Auflagefläche
besitzt neben dem ¼‘‘-Stativgewinde
Stift. Die Auflagefläche kann – auch mit Kamera mit angesetztem Handgriff – als Tragegriff verwendet
werden.
Hinweis:
Die beiden Gewinde am Stativfuß, als auch das in der Aufnahme an der Stativschelle können zur
Befestigung von Zubehör, beispielsweise von Tragegurten verwendet werden. Bitte beachten Sie dabei
die Angaben der jeweiligen Zubehör-Hersteller.
Stativfuß ansetzen: Langer Schenkel der Auflagefläche zeigt zur Objektiv-Vorderseite.
Hinweis:
Der Sicherungsstift
7b gewährleistet – bei korrekt angesetztem, d.h. vollständig eingeschobenem
Stativfuß - auch schon ohne Klemmung mit der Schraube, dass sich die Verbindung nicht löst.
Stativfuß abnehmen: 1. Klemmschraube gegen den Uhrzeigersinn drehen bis Fuß in der
Klemmschraube 6a gegen den Uhrzeigersinn drehen
7e eine Bohrung 7f für Stativköpfe mit einem entsprechenden
1. Schwalbenschwanz 7a des Stativfußes in das Gegenstück 6b der
Stativschelle schieben, bis es hör- und fühlbar einrastet.
2. Klemmschraube 7d im Uhrzeigersinn drehen
Auf festen Sitz prüfen!
Schelle lose sitzt
2. Entriegelungstaste 7c drücken und Stativfuß in Richtung
Objektiv-Vorderseite abziehen
DE
Wichtig:
Klemmschrauben nicht mit Gewalt festziehen oder gegen ihre Anschläge herausdrehen!
7

DE
BILDSTABILISATOR
Das Stabilisierungssystem im Objektiv verringert die Unschärfen, die durch unruhiges Halten der
Ausrüstung verursacht werden. Die Wirksamkeit des Systems beträgt gemäß CIPA-Prüfbedingungen*
bis zu 3,5 Verschlusszeit-Stufen, d.h. es können mit entsprechend längeren Verschlusszeiten als nach
der Faustregel für die Freihandgrenze noch scharfe Aufnahmen aus der Hand erfolgen.
Die Funktion unterscheidet dabei automatisch zwischen unbeabsichtigter Verwacklung und gezielten
Kamerabewegungen, wie z. B. beim ‚Mitziehen‘ eines bewegten Motivs.
FILTER
Am Leica Apo-Vario-Elmarit-SL 1:2,8-4/90-280mm können E82-Schraubfilter verwendet werden. Von
Leica sind entsprechende UV-(Best.-Nr. 13 042), ND16x-(Best.-Nr. 13 059) und Polfilter (Best.-Nr. 13
052) erhältlich.
ERSATZTEILE Best.-Nr.
Rückdeckel .............................................................................................................................. 16 064
Frontdeckel ............................................................................................................................. 16 019
Gegenlichtblende ..................................................................................................................... 12 300
Stativfuß ..................................................................................................................475-090.005-000
Weichköcher ............................................................................................................439-606.133-000
*CIPA = Camera and Imaging Products Association; gemessen bei 90mm
8

TIPPS ZUR PFLEGE IHRES OBJEKTIVS
Staub auf den Außenlinsen sollten Sie ausschließlich mit einem weichen Haarpinsel oder mit einem
sauberen, trockenen, weichen Mikrofasertuch entfernen. Zur Beseitigung von Flecken und Fingerabdrücken wird die Linse mit einem solchen Tuch vorsichtig von der Mitte aus in kreisförmigen
Bewegungen zum Rand hin gereinigt. Die Leica Aquadura
Reinigung. Üben Sie auch beim Abwischen stark verschmutzter Linsenoberflächen keinen großen
Druck aus, um diese Eigenschaft möglichst lange zu erhalten. Die Vergütung ist zwar hoch abriebfest,
durch Sand oder Salzkristalle kann sie dennoch beschädigt werden.
Brillen-Spezialreinigungstücher sollten nicht verwendet werden, da sie mit chemischen Stoffen
imprägniert sind, die für die verwendeten Glassorten und Vergütungen schädlich sein können.
Lösungsmittel- oder Ölhaltige Reinigungsmittel dürfen keinesfalls verwendet werden.
Jedes Objektiv trägt außer der Typbezeichnung seine „persönliche“ Seriennummer. Notieren Sie sich
diese Nummer zur Sicherheit in Ihren Unterlagen.
®
-Beschichtung ermöglicht Ihnen eine leichte
DE
9

DE
LEICA PRODUCT SUPPORT
Anwendungstechnische Fragen zum Leica Programm beantwortet Ihnen, schriftlich, telefonisch, per
Fax oder per e-mail die Leica Product Support-Abteilung:
Leica Camera AG
Product Support / Software Support
Am Leitz-Park 5
D-35578 Wetzlar
Tel.: +49(0)6441-2080-111 /-108
Fax: +49(0)6441-2080-490
info@leica-camera.com /
software-support@leica-camera.com
LEICA CUSTOMER CARE
Für die Wartung Ihrer Leica Ausrüstung sowie in Schadensfällen steht Ihnen die Customer Care-Abteilung der Leica Camera AG oder der Reparatur-Service einer Leica Landesvertretung zur Verfügung
(Adressenliste siehe Garantiekarte).
Leica Camera AG
Customer Care
Am Leitz-Park 5
D-35578 Wetzlar
Tel.: +49(0)6441-2080-189
Fax: +49(0)6441-2080-339
customer.care@leica-camera.com
10
FOREWORD
Thank you for your show of confidence in purchasing this lens. To ensure that you get many years of
enjoyment from this high-quality product, please read this manual carefully.
DESIGNATION OF PARTS
1 Lens hood with
a Index points
2 Front mount with
a External bayonet fitting for lens hood
b Index point for lens hood
c Internal thread for filter
3 Focusing dial
4 Focal length setting/zoom ring
5 Index for focusing
6 Red index button for changing lenses
7 Contact strip
8 Tripod mount with
a Clamping screw
b Dovetail for tripod shoe
9 Tripod shoe with
a Dovetail for tripod mount
b Locking pin
c Release button
d Clamping screw
1
e
⁄4‘‘-Tripod thread
f Hole for anti-twist protection
DISPOSAL OF ELECTRICAL AND ELECTRONIC EQUIPMENT
(Applies within the EU, and for other European countries with segregated waste collection
systems)
This device contains electrical and/or electronic components and must therefore not be disposed of
in general household waste! Instead, it should be disposed of at a recycling collection point provided
by the local authority. This costs you nothing. If the device contains standard or rechargeable
batteries, these must be removed first and also be disposed of in line with relevant regulations.
Further information on this issue is available from your local administration, your local waste collection
company, or in the store where you purchased this device.
EN
11
EN
TECHNICAL DATA
High-speed telephoto zoom lens with outstanding performance
Compatible cameras
Angles of view
(diagonal, horizontal, vertical)
at 90 / 280mm:
Leica SL, Leica T (Type 701)
For Leica SL (Typ 601): approx. 26°, 22°, 15° / 9°, 7,5°, 5°,
for Leica T (type 701): approx. 17°, 15°, 10°* / 6°, 5°, 3°**
(corresponding to approx. 135*/420** focal length in 35mm format)
Optical design
Number of lenses / groups 23/17
Position of the entrance pupil
(when infinite)
Image stabilization
3
90/280mm: 130,2/-21,1mm (in the direction of light incidence in
front of/behind bayonet fitting contact area)
Multiple axis system, stabilization performance 3.5 shutter speed
stages in accordance with CIPA testing conditions
Distance setting
Setting Either automatic (Autofocus)
camera
Focusing range
0.6/1.4m ∞
(at 90 / 280mm)
Smallest object field/
Biggest scale
(at 90 / 280mm)
For Leica SL (type 601): approx. 114 x 171mm/1:4.8 / 120 x
180mm/1:5,
for Leica T (type 701): approx. 76 x 114mm/1:4.8 / 80 x 120mm/1:5
Aperture
Setting / Function Electronically controlled aperture, setting via turn/push wheel on
camera, half values can also be set
Lowest value 22
Bayonet fitting
Filter mount/lens hood
Leica L bayonet fitting with contact strip
External bayonet fitting for lens hood (included), internal thread for
E82 filters, filter mount does not rotate
1
4
or manual, modes are set on the
2
12
Finish
Black anodized
Dimensions and weight
Length of the bayonet fitting contact
Approx. 238/310mm (without/with lens hood)
surface
Biggest diameter/
approx. 88/123mm (lens hood (W x H) 116 x 96mm)
height with tripod shoe
Weight approx. 1850/1950g (without/with tripod shoe)
1
Never hold the combination of a T camera and this lens just by the camera housing; always support the lens as well. This
relieves pressure on the camera bayonet fitting.
2
The nominal focal lengths of the Leica SL lenses are based on the 35mm-format, i.e. on a film format of 24x36mm. In
comparison, with its 23.6x15.7mm, the sensor in the LEICA T (type 701) is somewhat smaller though, approximately by a
factor of 0.66. Therefore, when used on the LEICA T (type 701), these lenses have angles of view corresponding to lenses
with focal lengths that are longer approximately by a factor of 1.52 (1.52 = reciprocal of 0.66).
3
Function is not available when used on the Leica T (Type701).
4
Function is slower when used on the Leica T (Type701).
The MTF (see Annex) is stated for full aperture and for the apertures 5,6 and 8 for large shooting distances (infinite). The
contrast is applied in percent for 5, 10, 20, 40 Lp/mm over the height of the format for tangential (dotted line) and sagittal
structures (solid line) in white light. 5 and 10 Lp/ mm give an impression of the contrast behavior for coarser object
structures, 20 and 40 Lp/mm document the resolving power of fine and the finest object structures.
EN
13

EN
SPECIAL FEATURES
The Leica Vario-Elmarit-SL 1:2.8-4/90-280mm is a high-speed telephoto zoom lens with Leica L
bayonet fitting. It can be used on Leica TL cameras
1
as well as Leica SL cameras.
The Leica Vario-Elmarit-SL 1:2.8-4/90-280mm .is characterized by its excellent contrast rendition and
the highest resolution, even with an open aperture, at all focal lengths and from infinite right up to
close range. All image errors are corrected well or are compensated for digitally inside the camera.
Although stopping down results in a further, slight increase in performance, in most cases it is not
necessary for reasons of image composition with depth of field. The very short closest focusing
distance, which allows impressive reproduction scales of up to 1:5 at the shortest and the longest
focal lengths, must also be emphasized.
A total of 23 lenses, divided into 7 modules, are used to achieve this performance. These include
seven lenses made of ultra-low dispersion glass. The construction contains a purely internal focal
length adjustment, with the advantages that the length of the lens does not chage and the equipment's center of gravity remains almost the same, even when zooming. The high-quality coatings on
all lens surfaces help to ensure low reflection and light scatter.
The lens has a very fast autofocus function as well as a very effective stabilization function; furthermore, they both work very quietly.
Summary: The Leica Vario-Elmarit-SL 1:2.8-4/90-280mm combines an extended range of telephoto
focal lengths and extremely good performance, from the infinite setting right up to close-up, with open
aperture just as much as when stopped down. In this way, with its shutter speed that is only slightly
slower than that of fixed focal lengths, it can increase the photographer's flexibility, e.g. in areas such
as travel and reportage photography just as much as portraits and close-ups.
1
See 'Technical Data'
14

DESIGN OF THE LEICA SL LENSES
In principle, all Leica SL lenses have the same external design: on the front mount there is 2 an
external bayonet fitting 2a for the lens hood
the distance
3 and a fixed ring with a red index button for changing lenses 8. Furthermore, the Leica
Vario-Elmarit-SL 1:2.8-4/90-280mm has an additional ring
appropriate index
5. In the bayonet flange there is a contact strip 7 by means of which the entire data
1 and an internal thread 2c for filters, a setting ring for
4 for setting the focal length and the
exchange between the camera and lens is effected, including the control commands for autofocus
and the aperture. Furthermore, the lens has a tripod mount
8 with a removable tripod shoe 9.
FOCUSING AND SETTING THE FOCAL LENGTH
The camera focuses automatically in autofocus mode; in manual mode turn the distance setting ring
on the front to focus
3. The speed at which you turn the ring determines how quickly the setting
changes. In this way, you can make fine adjustments just precisely as you can quickly move from the
close-up to long-distance range. Please refer to the relevant sections in the camera instruction for
more details. The focal length - and thus the desired shot composition – is set with the rear ring
4.
DEPTH OF FIELD
Since Leica SL lenses do not have an aperture ring, there is no depth of field scale. Instead, the
relevant front and rear limits of the depth of field can be read in the camera's cover display together
with the distance set.
EN
15

EN
TAKING PHOTOGRAPHS WITH AUTOMATIC EXPOSURE AND BY MANUALLY
SETTING SHUTTER SPEED AND APERTURE
The Leica Apo-Vario-Elmarit-SL 1:2,8-4/90-280mm has a variable shutter speed, i.e. the effective
aperture opening depends on the focal length set. For example, if the aperture value of 2.8 is set at
90mm, the aperture corresponds to the value displayed. At longer focal lengths, the actual opening
reduces and, finally, at 280mm the second value 4 specified in the name of the lens applies. Thanks
to light measuring by the lens, however, the right amount of light is always measured in all exposure
modes.
However, to prevent incorrect exposure, the desired shot composition (focal length choice) for the
subsequent shot must be identified before the measured value is saved or the time/aperture
combination is changed. This also applies to flash mode with manual setting of the output or
computer control on the flash unit. In both cases, the aperture setting on the flash unit must always
correspond to the actual aperture opening. However, when a system flash unit is used and the TTL
flash exposure control, the actual aperture opening is automatically transmitted so that the correct
exposure is always guaranteed.
LENS HOOD
The Leica Vario-Elmarit-SL 1:2.8-4/90-280mm is supplied with a lens hood 1 ideally matched to
optical paths. Thanks to its symmetrical bayonet it can be fitted quickly and simply, or vice versa for
space-saving storage. In both cases, when the lens cover is removed, it is initially fitted so that one of
the index points on the lens hood
lens
1a. In this alignment, the lens hood is fitted and turned by approx. 30° until it clearly engages,
audibly and noticeably. For as long as the camera is being carried and used ready for photography,
the lens hood should alway remain fitted. It provides effective protection against contrast-reducing
stray light and also against damage and soiling of the front lens, e.g. from accidental fingerprints.
2b is precisely opposite the index point on the front mount of the
16
USING THE TRIPOD MOUNT/TRIPOD SHOE
The tripod mount 6 can be rotated freely and engages for a full 90°.
Fix the tripod mount: Turn the clamping screw 6a in a clockwise direction
Check it is fastened securely!
Loosen the tripod shoe:
The tripod shoe
7 can be removed, e.g. to make it easier to take photographs while holiding the
camera in your hands. In addition to the ¼‘ tripod thread
heads with a corresponding pin. The contact area can be used as a carrying handle - also in a camera
with a fitted handle.
Note:
The two threads on the tripod shoe, as well the one in the mounting on the tripod mount, can be used
to attach accessories, for example carrying straps. Please note the information from the relevant
accessory manufacturer.
Attach tripod shoe: The long arm on the contact area points to the front of the lens.
Note:
The locking pin
7b ensures that the connection does not break, even without clamping with the screw
– when the tripod shoe is inserted correctly, i.e. completely.
Remove tripod shoe: 1. Turn the clamping screw in an anti-clockwise direction until the
Turn the clamping screw 6a in am anti-clockwise direction
7e, the contact area has a hole 7f for tripod
1. Push the dovetail 7a of the tripod shoe into the counterpart 6b of
the tripod mount until it audibly and noticeably engages.
2. Turn the clamping screw 7d in a clockwise direction
Check it is fastened securely!
shoe is loose in the mount
2. Press the release button 7c and pull out the tripod show towards
the front of the lens
EN
Important:
Do not tighten the clamping screws with force or pull out against their limit stops!
17

EN
IMAGE STABILIZER
The stabilization system in the lens reduces the blurs caused by shaking the equipment. According to
CIPA Test Conditions, the effectiveness of the system contributes up to 3.5 shutter speed stages, i.e
clear pictures can be produced using shutter speeds that are slower than what would normally be
feasible for a good picture manually.
The function automatically distinguishes between unintentional wobbling and deliberate camera
movements, such as when 'tracking' a moving subject.
FILTERS
E82 screw-on filters can be used on the Leica Vario-Elmarit-SL 1:2.8-4/90-280mm. The relevant UV
(Order No. 13 042), ND16x (Order No. 13 059) and polarizing filters (Order No. 13 052) are available
from Leica.
SPARE PARTS Oder No.
Back cover ............................................................................................................................... 16 064
Front cover .............................................................................................................................. 16 019
Lens hood ................................................................................................................................ 12 300
Tripod shoe ..............................................................................................................475-090.005-000
Soft bag ...................................................................................................................439-606.133-000
*CIPA = Camera and Imaging Products Association; measured at 90mm
18

TIPS ON LENS CARE
Dust on the outside of the lens should be removed only with a soft-haired brush or a soft, clean, dry
microfiber cloth. If stains and fingerprints have to be removed, use such a cloth and clean carefully
with a circular movement starting at the center of the lens and working towards the edge. The Leica
Aquadura
for as long as possible, even when wiping extremly dirty lens surfaces. Although the coating is highly
abrasion-resistant, it can nevertheless be damaged by sand or salt crystals.
Special cleaning cloths for spectacles should not be used because they are impregnated with
chemical substances that could be harmful to the glass and coatings used.
Cleaning agents containing solvents or oil must never be used.
In addition to the designation by type, each lens has an individual serial number. Please note this
number in your documents as a safety measure.
®
coating allows simple cleaning. Do not apply any high pressure to maintain this property
EN
19

EN
LEICA PRODUCT SUPPORT
The Leica Product Support department can provide you with an answer to any technical application
questions relating to the Leica range either in writing, on the telephone or by e-mail.
Leica Camera AG
Product Support / Software Support
Am Leitz-Park 5
D-35578 Wetzlar, Germany
Tel.: +49 (0)6441-2080-111 /-108
Fax: +49 (0)6441-2080-490
info@leica-camera.com/
software-support@leica-camera.com
LEICA CUSTOMER CARE
Authorized Leica agents and Leica Camera AG Customer Care are available in your country for the
service and repair of your Leica equipment (a list of addresses is provided on your warranty card).
Leica Camera AG
Customer Care
Am Leitz-Park 5
D-35578 Wetzlar, Germany
Tel.: +49 (0)6441-2080-189
Fax: +49 (0)6441-2080-339
customer.care@leica-camera.com
20
AVANT-PROPOS
Nous vous remercions pour la confiance que vous nous témoignez par l'acquisition de cet objectif.
Afin que vous puissiez en profiter pendant de nombreuses années, nous vous recommandons de lire
attentivement cette notice d'utilisation.
DÉSIGNATION DES PIÈCES
1 Parasoleil avec
a Points de repère
2 Monture frontale avec
a Baïonnette extérieure pour parasoleil
b Point de repère pour parasoleil
c Filetage femelle pour filtre
3 Bague de mise au point
4 Bague de réglage de la distance focale
5 Repère pour la distance focale
6 Bouton de repère rouge pour le changement
8 Bride de trépied avec
a Vis de serrage
b Queue d'aronde pour trépied
9 Trépied avec
a Queue d'aronde pour bride de trépied
b Tige de sécurité
c Touche de verrouillage
d Vis de serrage
e Filetage de trépied
f Orifice pour sécurité anti-torsion
1
⁄4"
d'objectif
7 Barrette de contacts
ÉLIMINATION DES APPAREILS ÉLECTRIQUES OU ÉLECTRONIQUES
(Applicable au sein de l'UE ainsi que dans les autres pays européens avec des systèmes
de collecte distincts.)
Cet appareil contient des composants électriques et/ou électroniques et ne doit donc pas être jeté
dans les ordures ménagères ordinaires. Il doit être déposé à un point de collecte municipal adapté
afin d'être recyclé. Ce dépôt est gratuit. Si l'appareil contient des piles ou des batteries remplaçables,
celles-ci doivent être préalablement retirées et, le cas échéant, éliminées séparément conformément
à la réglementation en vigueur. D'autres informations à ce sujet sont disponibles auprès de l'administration municipale, de la société de traitement des déchets ou du magasin dans lequel vous avez
acheté le présent appareil.
FR
21
FR
CARACTÉRISTIQUES TECHNIQUES
Téléobjectif zoom à forte intensité lumineuse avec qualité d'image exceptionnelle
Appareils photo utilisables
Angle de champ
(en diagonale, horizontal, vertical,
pour 90 / 280 mm)
Leica SL, Leica T (type 701)
Pour Leica SL (type 601) : env. 26°, 22°, 15° / 9°, 7,5°, 5°,
pour Leica T (type 701) : env. 17°, 15°, 10°* / 6°, 5°, 3°**
(correspond à une focale d'env. 135-84 mm pour un petit format)
Structure optique
Nombre de lentilles/ groupes 23/17
Position de la pupille d'entrée
(pour l'infini)
Stabilisation de l'image
3
90 / 280 mm : 130,2/-21,1mm (devant/derrière la surface de
contact de la baïonnette dans la direction de la lumière incidente)
Système multiple, la qualité de stabilisation correspond à 3,5 niveaux
de vitesse d'obturation d'après les conditions de contrôle CIPA
Mise au point
Réglage Automatique (autofocus)
fonctionnement se règlent sur l'appareil
Plage de travail
0,6/1,4 m ∞
(pour 90 / 280 mm)
Champ objet le plus petit /
Échelle la plus grande
(pour 90 / 280 mm)
Pour Leica SL (type 601) : env. 114 x 171 mm / f/4,8 / 120 x 180
mm / f/5,
pour Leica T (type 701) : env. 76 x 114 mm / f/4,8 / 80 x 120 mm /
f/5
Diaphragme
Réglage / Fonctionnement Diaphragme à commande électronique, réglage à partir de la molette
de l'appareil, réglable par 1/2 incrément
Valeur minimale 22
Baïonnette
Baïonnette du Leica L avec barrette de contacts
1
4
ou manuel au choix, les modes de
2
22
Monture du filtre / parasoleil
Baïonnette extérieure pour parasoleil (fournie), filetage femelle pour
filtre E82, la monture du filtre reste fixe
Surface
Anodisé noir
Dimensions et poids
Longueur jusqu'à la zone de contact de
env. 238/310 mm (sans/avec parasoleil)
la baïonnette
Diamètre le plus grand /
env. 88/123 mm (parasoleil (l x h) 116 x 96 mm)
hauteur avec trépied
Poids env. 1850/1950 g (sans/avec trépied)
1
L'ensemble de l'appareil T avec l'objectif doit être tenu non seulement par le boîtier de l'appareil, mais toujours aussi au
niveau de l'objectif. La baïonnette de l'appareil s'en trouvera ainsi soulagée.
2
Les distances focales nominales des objectifs Leica SL sont adaptées aux films petit format, c’est-à-dire à un format de
sortie de 24x36 mm. Toutefois, avec 23,6 x 15,7 mm, le capteur du LEICA T (type 701) est en comparaison légèrement
plus petit (x 0,75). L’angle de champ de ces objectifs sur le Leica T (type 701) correspond donc à celui des objectifs
présentant des distances focales plus longues d'un facteur d’environ 1,52 (1,52 ≈ nombre inverse de 0,66).
3
Cette fonction n'est pas disponible en cas d'utilisation sur le Leica T (type 701).
4
Cette fonction est plus lente en cas d'utilisation sur le Leica T (type 701).
La MTF (cf. Annexe) est indiquée pour la pleine ouverture et pour les ouvertures 5,6 et 8 pour les prises de vues de très loin
(infini). Les indications concernent le contraste en pourcentage pour 5, 10, 20, 40 lp/mm au-delà de la hauteur du format
pour les structures tangentielles (ligne pointillée) et sagittales (ligne continue) pour la lumière blanche. Les 5 et 10 lp/mm
donnent une impression de la tenue au contraste pour des structures d'objets assez grossières, les 20 et 40 lp/mm
documentent la capacité de résolution pour des structures d'objets fines ou très fines.
FR
23

FR
PARTICULARITÉS
Le Leica Apo-Vario-Elmarit-SL f/2,8-4/ 90-280 mm est un téléobjectif zoom à forte intensité
lumineuse avec baïonnette Leica L. Il peut s'utiliser non seulement sur des appareils photo Leica SL,
mais aussi sur des appareils Leica TL
1
.
Le Leica Apo-Vario-Elmarit-SL f/2,8-4 / 90-280 mm se distingue déjà à diaphragme grand ouvert
quelle que soit la distance focale et de l'infini jusqu'à la zone de près par une restitution des
contrastes très fidèle et une résolution maximale. Toutes les imperfections de l'image sont corrigées
ou compensées au niveau numérique à l'intérieur de l'appareil. Le diaphragmage apporte certes une
légère amélioration supplémentaire des performances dont la nécessité se limite toutefois généralement à la profondeur de champ pour des raisons de composition d’image. Il faut également souligner
des limites du réglage de près très réduites permettant d'obtenir des rapports de grossissement
jusqu'à 5x pour une distance focale soit très faible soit très grande.
Au total 23 lentilles, réparties en 7 sous-ensembles, sont utilisées pour obtenir ces performances.
Sept de ces lentilles sont en verres présentant une dispersion partielle anormale. La conception
intègre un réglage purement interne de la distance focale avec pour avantages la conservation de la
longueur de l'objectif et la quasi stabilité du centre de gravité du dispositif même en zoomant. Les
traitements de très haute qualité de l'ensemble des surfaces des lentilles contribuent à une réflexion
et une dispersion très faibles de la lumière.
L'objectif possède une fonction autofocus très rapide ainsi qu'une fonction stabilisation très
performante, toutes les deux très silencieuses.
Conclusion : le Leica Vario-Elmarit-SL f/2,8-4 / 90-280 mm allie une large plage de distances
focales utilisable de manière polyvalente et une qualité d'image exceptionnelle, du réglage sur l'infini
jusqu'au réglage de près, à diaphragme grand ouvert comme en position de diaphragmage. Grâce à
cela et à son intensité lumineuse à peine réduite avec une focale fixe, il permet au (ou à la) photographe de bénéficier d'une souplesse nettement plus grande, par ex. pour les photos de voyage ou de
reportage tout comme pour les portraits et les gros plans.
1
Voir « Caractéristiques techniques »
24

STRUCTURE DES OBJECTIFS LEICA SL
Tous les objectifs Leica SL présentent généralement la même structure extérieure : il existe sur la
monture avant une baïonnette extérieure
une bague pour la mise au point
d'objectif
supplémentaire
8. Par ailleurs, le Leica Apo-Vario-Elmarit-SL f/2,8-4 / 90-280 mm possède une bague
4 pour le réglage de la distance focale et le repère 5 correspondant. Dans la bride de
baïonnette se trouve une barrette de contacts
2a pour le parasoleil 1 et un filetage femelle 2c pour filtre,
3 et une bague fixe avec bouton repère rouge pour le changement
7 à travers laquelle s'effectue l'ensemble des échanges
de données entre l'appareil et l'objectif, y compris les ordres de commande pour l'autofocus et le
diaphragme. Par ailleurs, l'objectif dispose d'une bride de trépied
8 avec trépied 9 amovible.
RÉGLAGE DE LA NETTETÉ ET DE LA DISTANCE FOCALE
Le réglage de la netteté est effectué automatiquement par l'appareil en mode autofocus ou, en mode
manuel, en tournant la bague de réglage
3 située sur le devant. La vitesse avec laquelle vous tournez
la bague détermine la rapidité de la modification du réglage. Vous pouvez ainsi procéder de manière
ciblée à des réglages fins ou encore passer d'un gros plan à un plan large. Pour plus de détails,
veuillez vous reporter aux chapitres correspondants du mode d'emploi de l'appareil. Le réglage de la
distance focale - et donc du cadrage souhaité – s'effectue avec la bague située derrière
4.
PROFONDEUR DE CHAMP
Comme les objectifs Leica SL ne possèdent pas de bague de diaphragme, il n'existe pas non plus
d'échelle de profondeur de champ. Par contre, il est possible de voir les limites avant et arrière de la
profondeur de champ en même temps que la distance paramétrée sur l'écran situé dans le cache de
protection de l'appareil.
FR
25

FR
PRISE DE VUE AVEC L'EXPOSITION AUTOMATIQUE ET AVEC LE RÉGLAGE
MANUEL DE LA VITESSE D'OBTURATION ET DU DIAPHRAGME
Le Leica Apo-Vario-Elmarit-SL f/2,8-4 / 90-280 mm présente une intensité lumineuse variable,
c'est-à-dire que l'ouverture effective du diaphragme varie en fonction du réglage de la distance focale.
Si, par exemple pour le 90 mm, le réglage du diaphragme est de 2,8, l'ouverture correspond à la
valeur affichée. Pour des distances focales plus grandes, l'ouverture effective diminue et, pour le 280
mm, la valeur qui prévaut en fin de compte est la seconde valeur 4 indiquée dans la dénomination de
l'objectif. Grâce à la mesure de la lumière par l'objectif, la quantité de lumière mesurée est toujours
correcte quel que soit le mode d'exposition.
Toutefois, pour éviter les erreurs d'exposition, il convient de déterminer le cadrage (choix de la
distance focale) souhaité pour la prise de vue à venir avant d'enregistrer la valeur mesurée ou de
modifier le rapport vitesse/diaphragme. Ceci est aussi valable pour le mode flash avec réglage
manuel de la puissance ou commande de l'ordinateur au niveau du flash. Dans les deux cas, le
réglage du diaphragme sur le flash doit correspondre à l'ouverture effective du diaphragme. Par
contre, en cas d'utilisation d'un flash intégré et de la commande du système de flash TTL, l'ouverture
effective du diaphragme est transmise automatiquement, ce qui garantit une exposition toujours
correcte.
PARASOLEIL
Le Leica Apo-Vario-Elmarit-SL f/2,8-4 / 90-280 mm est fourni avec un parasoleil 1 parfaitement
adapté aux trajectoires des faisceaux optiques. Celui-ci s'installe rapidement et facilement grâce à sa
baïonnette symétrique et se range aussi à l'envers pour gagner de la place. Dans les deux cas, lorsque
le couvercle est enlevé, il est d'abord placé de manière que l'un des points de repère du parasoleil
se trouve exactement en face de l'un des points de repère de la monture frontale de l'objectif
Dans cette position, le parasoleil sera mis en place et tourné d'env. 30° dans le sens des aiguilles
d'une montre jusqu'à ce qu'il s'emboîte et qu'un déclic se fasse entendre. Tant que l'appareil photo
est prêt à photographier, le parasoleil doit toujours être en place. Il protège efficacement de la
lumière parasite, facteur de réduction des contrastes, mais aussi de tout dommage et des salissures
affectant la lentille frontale, comme par exemple des traces de doigts involontaires.
2b
1a.
26
 Loading...