

Page 1
Sprinter_01
Version 1.0
EN, JA, ZH, KO, RU, PL, HU,
EL, CZ, TR, SR
Sprinter
150/150M/250M
User Manual
Page 2

Page 3

User Manual
取扱説明書
用户手册
사용자 매뉴얼
Руководство пользователя
Instrukcja obsługi
Használati utasítás
Εγχειρίδιο χρήσης
Uživatelská příručka
Kullanma Kılavuzu
Корисничко упутство
EN
JA
ZH
KO
RU
PL
HU
EL
CZ
TR
SR
Page 4

EN
User Manual (English)
DE
1. Introduction
FR
Purchase
ES
Congratulations on the purchase of a new Leica Geosystems electronic level. It is designed to make levelling works easier and
IT
quicker on any construction site.
PT
NL
NO
SV
Read carefully through the User Manual before you use the
product.
FI
Product identification
DA
The model and the serial number of your product are indicated on
the type plate.
Enter the model and serial number in your manual and always refer
to this information when you need to contact your agency or Leica
Geosystems authorized service workshop.
Type: ____________ Serial no.: ____________
Validity of this manual
This manual is valid for Sprinter 150/150M/250M.
Sections only valid for Sprinter 150M/250M are marked
)
accordingly with an asterisk (*).
Introduction
Product
This manual contains important safety directions as well as instructions for setting up the
product and operating it. Refer to "12. Safety
Directions" for further information.
Trademarks
All trademarks are the property of their respective owners.
Available documentation
Name Description
Sprinter
150/150M/
250M User
Manual
Symbols
The symbols used in this Manual have the following meanings:
avoided, will result in death or serious injury.
use which, if not avoided, could result in death or serious injury.
use which, if not avoided, may result in minor or moderate injury
and / or appreciable material, financial and environmental damage.
)
1
All instructions required in order to operate the
product to a basic level are contained in this User
Manual. Provides an overview of the system together
with technical data and safety directions.
DANGER
Indicates an imminently hazardous situation which, if not
WARNING
Indicates a potentially hazardous situation or an unintended
CAUTION
Indicates a potentially hazardous situation or an unintended
Important paragraphs which must be adhered to in practice
as they enable the product to be used in a technically
correct and efficient manner.
Sprinter 150/150M/250M - 1.0.0en
Page 5

Table of Contents
1. Introduction ..................................................................... 1
2. Instrument Components.................................................. 2
3. Measurement Preparations ............................................. 3
4. User Interface.................................................................. 4
5. Set of Characters ............................................................ 9
6. Operation ........................................................................ 9
7. Data Transfer DataLoader*........................................... 15
8. Check & Adjust.............................................................. 16
9. Error Messages............................................................. 18
10. Operation Messages ..................................................... 19
11. Care and Transport....................................................... 21
12. Safety Directions ........................................................... 22
13. Technical Data .............................................................. 29
14. International Warranty, Software
Licence Agreement ....................................................... 32
15. Index ............................................................................. 33
2. Instrument Components
a
b
c
a) Horizontal fine motion screw
b) Battery compartment incl. phone
jab interface for USB cable
c) Circular level
d) Gunsight
e) Focusing knob
Container Contents
Sprinter, batteries (4x), allen key, user manual, strap, CD-ROM*
(incl. DataLoader), USB cable*.
f) Handle
g) Eyepiece
h) LCD display
i) Base plate
j) Levelling foot-
screw
EN
DE
d
FR
e
ES
f
IT
PT
NL
g
NO
h
SV
i
FI
DA
j
Instrument Components
2
Sprinter 150/150M/250M - 1.0.0en
Page 6

Accessories
EN
Tripod, aluminum staff (region dependant), fibre glass staff (to
DE
achieve 0.7 mm accuracy with Sprinter 250M). (Optional:
sunshade, 4 rechargeable batteries and charger)
FR
3. Measurement Preparations
ES
3.1 Change Battery
IT
Insert 4 AA dry cells according to the positive and negative signs as
PT
indicated on the holder.
NL
NO
SV
DA
Always replace with a complete battery set!
)
Do not use old and new batteries together.
)
Do not use batteries from different manufacturers or
)
batteries of different types.
FI
3.2 Set-up Instrument
Levelling
• Set up the tripod. Extend the legs to a suitable length and ensure
that the tripod head is approximately level. Tread the tripod
shoes firmly into the ground to ensure stability.
• Mount the instrument on the tripod by screwing the tripod screw
onto the base of the instrument.
• Use the three levelling foot screws to center the circular bubble
in order to level the instrument.
Eyepiece Adjustment
Point the telescope to a uniform light surface such as a wall or a
piece of paper. Turn the eyepiece until the cross hairs are sharp or
distinct.
Target Image Focusing
Use the gunsight to aim the objective lens at the staff. Turn the horizontal fine motion screw until the staff is nearly centered in the field
of view and then turn the focusing knob to focus on the staff. Ensure
that staff image and reticle are sharp or distinct.
Power ON
The instrument is ready to measure.
Technical hints:
)
• First check and adjust the electronic and optical line-of-sight
errors, then the circular level on the instrument and then t he staff:
before starting work in the field, after long storage periods, after
long transportation.
• Keep the optics clean. Dirt or condensation on the optics can
limit measurements.
• Before starting work, let the instrument adjust to the ambient
temperature (approx. 2 minutes per °C of temperature difference).
• Avoid measuring through window panes.
• Staff sections have to be fully extended and properly secured.
• Touching the upper third of the tripod, can damp vibrations at the
instrument due to wind.
• Use the lens hood to cover the objective when backlight disturbs.
• Evenly illuminate the measuring area of the staff with a flashlight
or spotlight in darkness.
Measurement Preparations
3
Sprinter 150/150M/250M - 1.0.0en
Page 7
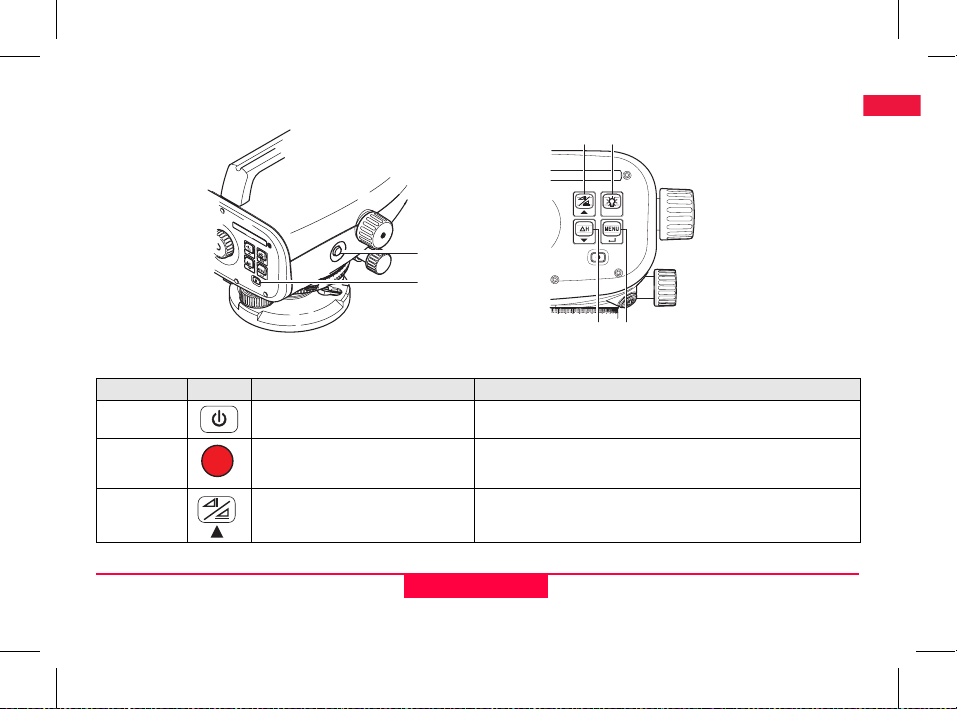
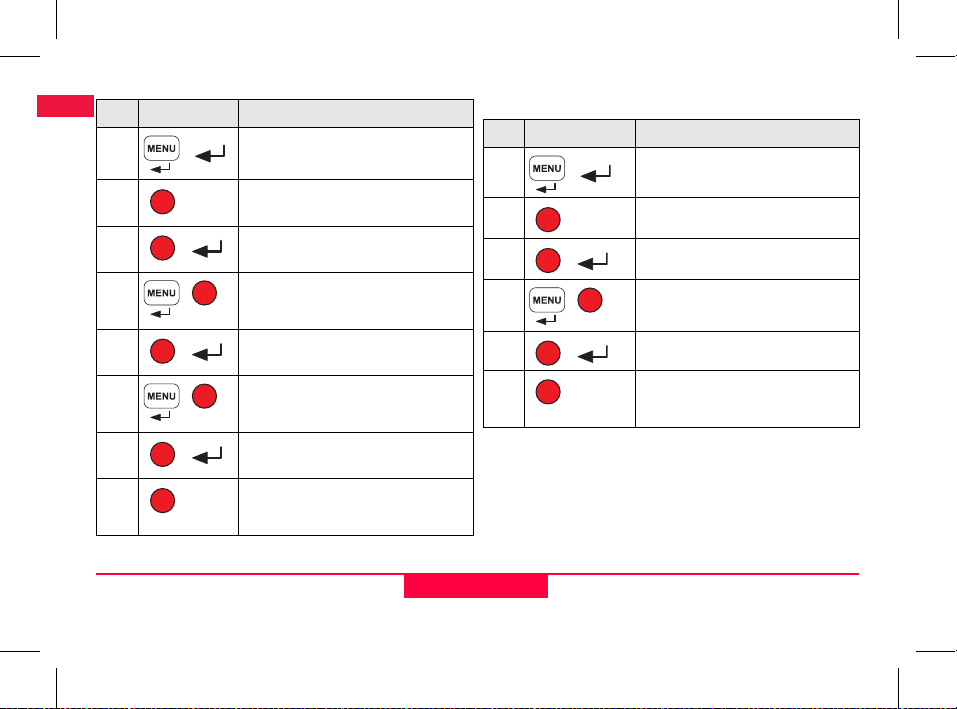
4. User Interface
b
a
Sprinter_08
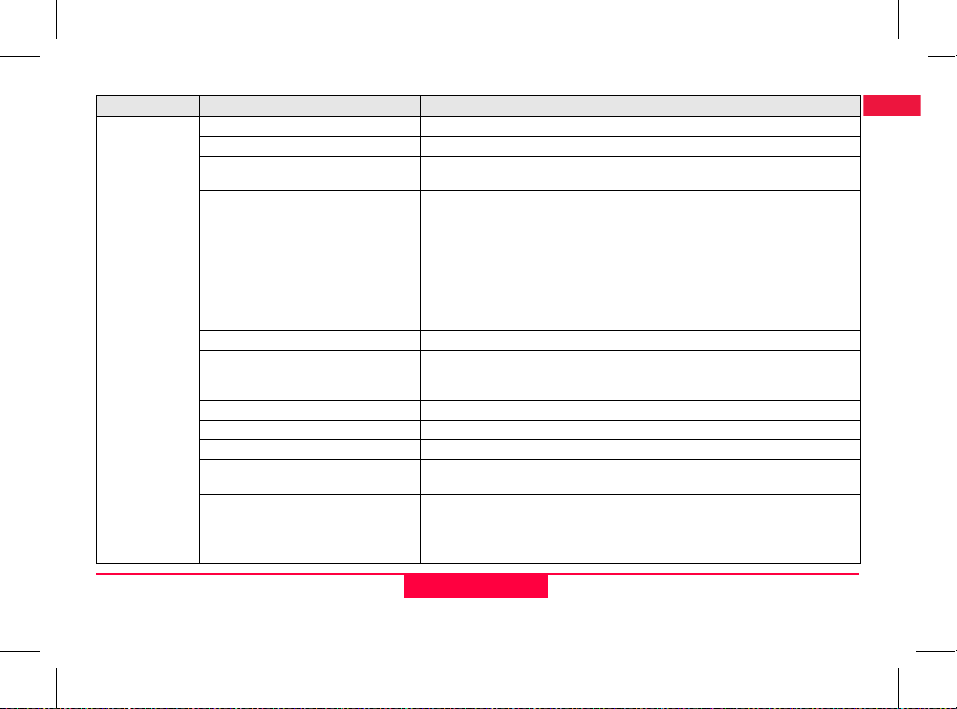
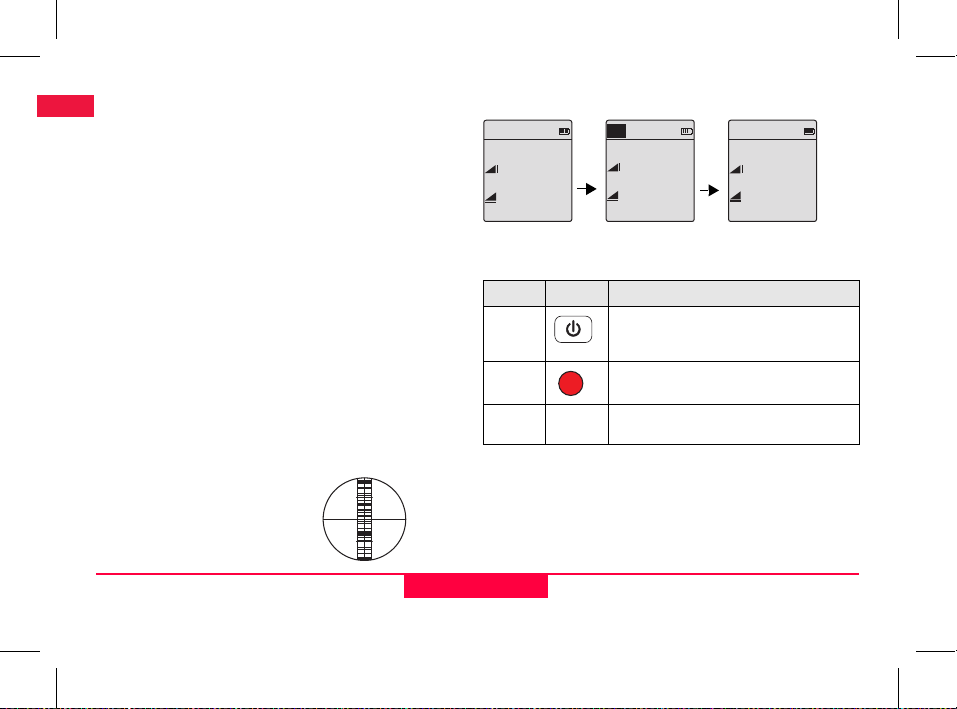
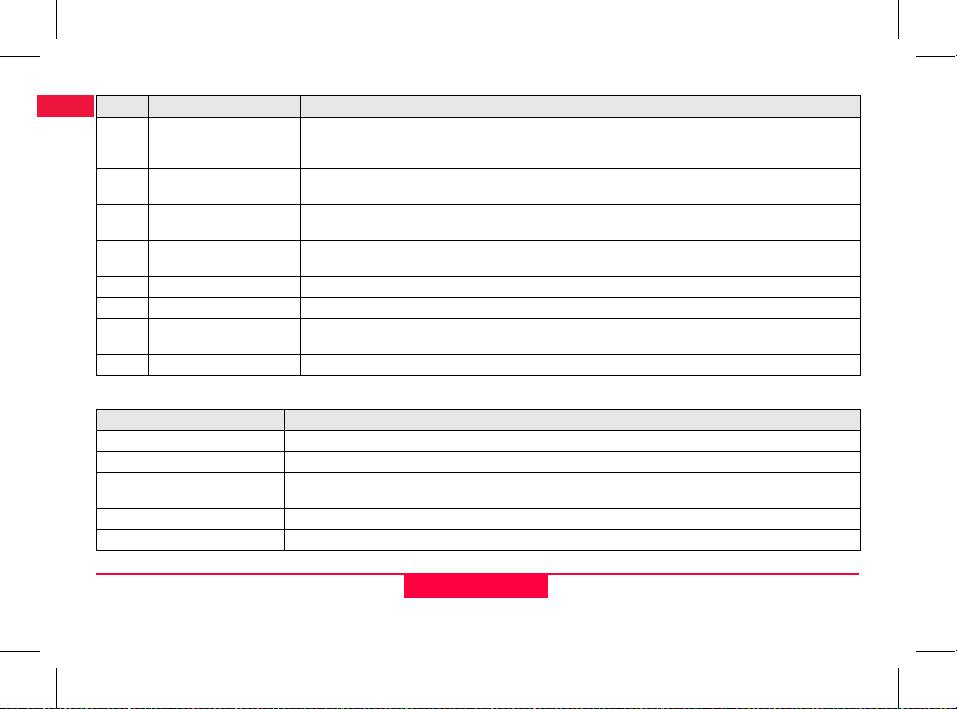
Key Symbol 1st level functions 2nd level functions
a) On/Off
Power On or Off switch NONE
Sprinter_09
EN
f
c
ESC
e
d
DE
FR
ES
IT
PT
NL
NO
SV
FI
DA
b) MEAS
c) Height /
Distance
User Interface
Measuring trigger key Press and hold for 3 seconds to start and stop tracking measurement /
Alternating between Height and
Distance display
timer measurement*
Cursor up (in Menu / Settings mode), Switch between intermediate sight
I and foresight F in line leveling program BIF*
4
Sprinter 150/150M/250M - 1.0.0en
Page 8
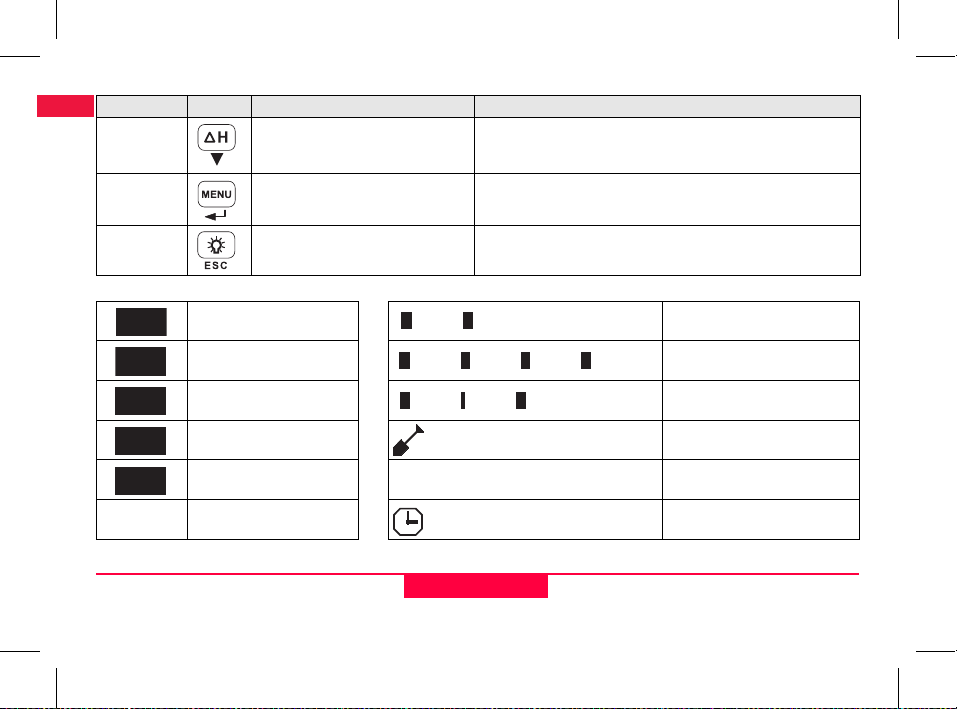
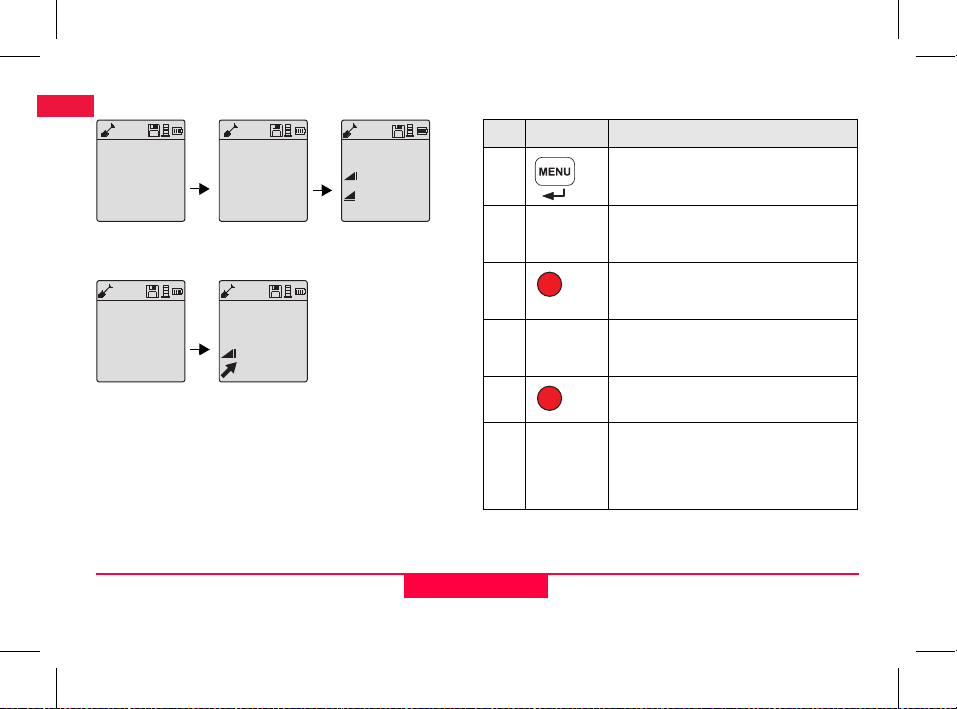
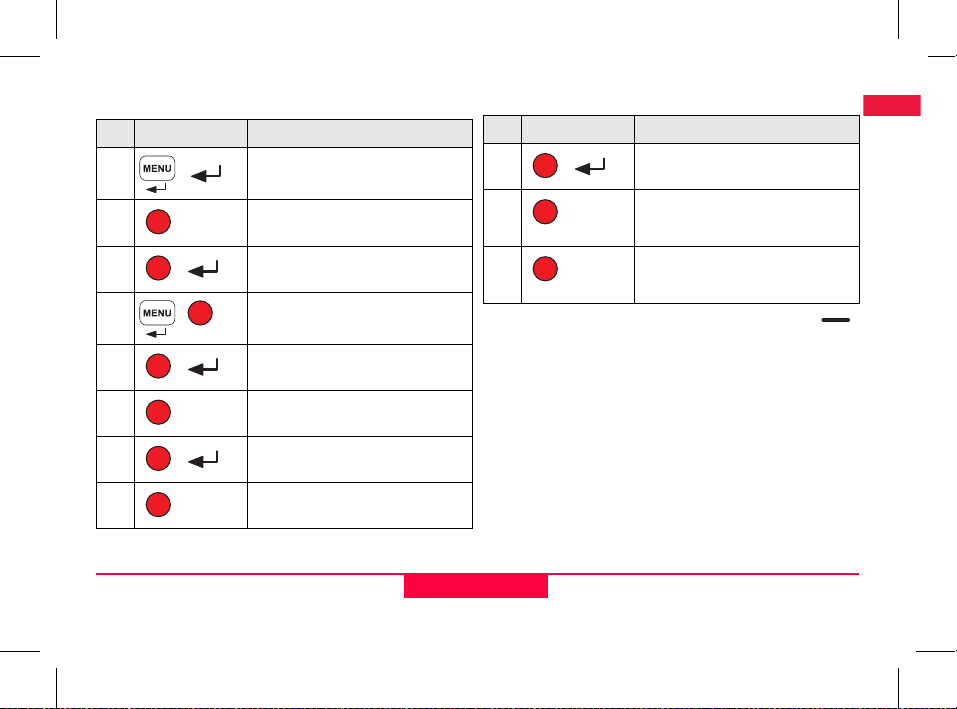
Key Symbol 1st level functions 2nd level functions
EN
d) dH
DE
FR
ES
e) MENU
IT
PT
f) Backlight
NL
NO
Modes
SV
FI
DA
MEAS
MENU
ADJ
TRK
SET
Height Difference and Elevation measurement
Activation and Selection of settings ENTER key for confirmation purpose
LCD backlight illumination ESC key to decline termination of program / application or to exit setting
Measurement Mode BF line levelling *
MENU BFFB line levelling *
Adjustment Mode BIF line levelling *
Tracking Cut & Fill *
Settings Height Difference
BF BF
BFFB BFFB BFFB
BIF BIF BIF
dH
Cursor down (in Menu / Settings mode)
(in Menu / Settings mode)
BFFB BFFB
Measurement interval / timer activated *
User Interface
5
Sprinter 150/150M/250M - 1.0.0en
Page 9

Icons
LCD backlight ON Battery icon at various capacities
Upright staff measuring mode Data stored to internal memory *
Inverted staff measuring mode Tilt warning OFF
External power connected * Measurement averaging activated
Measurement and Data Display Symbols
PtID: / RfID: Point ID * / Reference Benchmark ID * Measured staff height
BM: Benchmark elevation Measured distance
dH: Height Difference Mean height difference in BFFB *
Elv: Elevation Fill / raise height to reach design elevation *
D.Elv: Design Elevation * Cut / lower height to reach design elevation *
dH:
EN
DE
FR
ES
IT
PT
NL
NO
SV
FI
DA
User Interface
6
Sprinter 150/150M/250M - 1.0.0en
Page 10
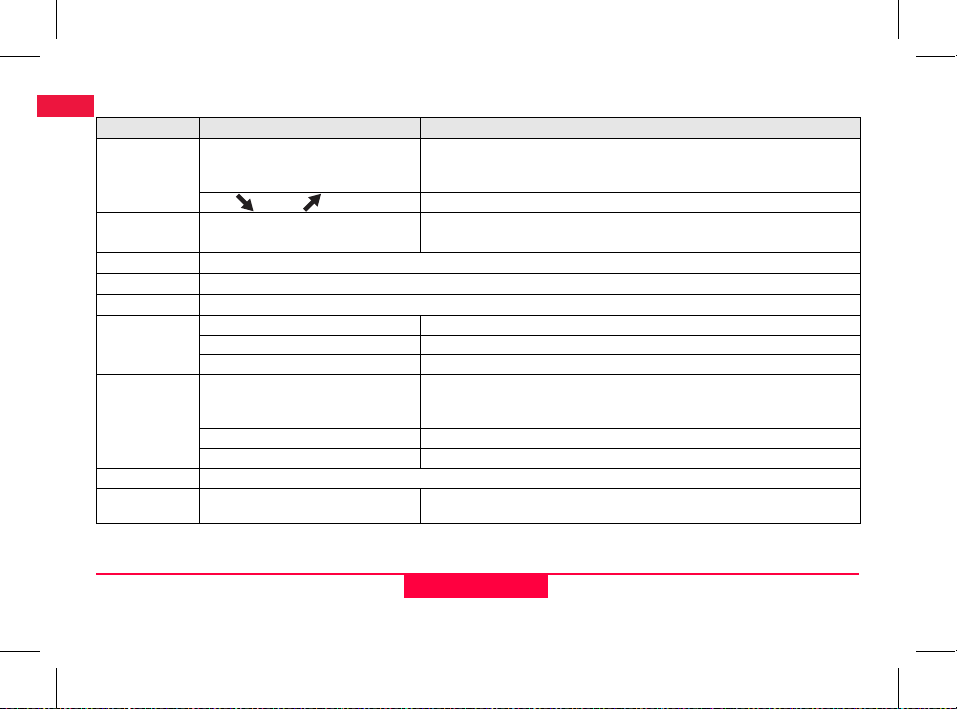
Menu Setting
EN
Menus Selections (sub-selections) Descriptions
DE
1. Program*
FR
ES
IT
2. Intermediate
PT
Sight*
NL
3. Input PtID*
4. Input BM
NO
5. Input D.ELV*
SV
6. Data
FI
Manager*
DA
7. Recording*
Line Levelling (BIF, BF, BFFB) Select line levelling method.
)
Cut & Fill Cut & Fill application.
ON / OFF Enable / disable Intermediate Sight in BIF line levelling.
Input user point ID.
Input Reference Benchmark elevation.
Input design elevation in Cut & Fill application.
View Data Viewing recorded data / deleting of a recorded data by pressing ENTER key.
Download Data (GSI / ASCII) Transferring of recorded data to PC via RS232, in GSI-8 or ASCII format.
Delete All Data Deleting of all recorded data in the on-board / internal memory.
Memory Measurement recorded to on-board / internal memory.
)
Off Measurement not stored.
Ext Measurement recorded to external device in GSI-8 format via RS232 cable.
8. Adjustment
9. Inverse Staff
Adjustment program.
ON [Inverted], OFF [Upright], AUTO
[Auto recognition of staff orientation]
Recognition mode setting of staff orientation.
Sighting and measurement sequence in line levelling is indicated with
highlighted 'alphabet' of the respective line levelling icons.
In line levelling application, recording mode has to be set prior to first
backsight measurement.
User Interface
7
Sprinter 150/150M/250M - 1.0.0en
Page 11
Menus Selections (sub-selections) Descriptions
10.Settings
User Interface
Contrast (10 levels) LCD display contrast setting.
Unit (M, Int. ft, US ft, Ft in 1/16 inch) Unit setting.
AutoOff (ON 15 min. / OFF) ON 15 min., instrument will be switched off about 15 minutes after the last key
Rounding (Standard / Precise) Minimum reading display setting.
Beep (ON / OFF) Trigger key acoustic signal setting.
RS232* (Baudrate: 1200, 2400, 4800,
9600, 19200, 38400; Parity: None, Odd,
Even; Stop Bit: 1, 2; Data Bit: 7, 8)
Tilt Warning (ON / OFF) Electronic tilt warning setting.
Backlight (ON / OFF) Backlight setting.
Averaging Input number of measurement for averaging of measurements.
Language (List of interface language
selections)
Timer* Input measurement time interval 00 hr: 00 min (applicable to Ht / Dist application
press. OFF, the instrument will not auto switch off.
In metric:
• Standard = 0.001m for height and 0.01m for distance
• Precise = 0.0001 m for height and 0.001m for distance
In Ft (Int. and US ft):
• Standard = 0.01 ft for height and 0.1 ft for distance
• Precise = 0.001 ft for height and 0.01 ft for distance
In Ft in 1/16 inch:
• Precise & Standard = ft-inch-1/16 inch for height and distance
Communication settings for RS232 interface.
Interface language setting.
only).
Press height / distance or dH or backlight or menu key. A message "stop
)
Tracking" will be displayed.
8
EN
DE
FR
ES
IT
PT
NL
NO
SV
FI
DA
Sprinter 150/150M/250M - 1.0.0en
Page 12
5. Set of Characters
EN
Benchmark Elevation (BM), Design Elevation* (D.Elv)
DE
BM and Design elevation numeric input consists of 0 ~ 9, space,
FR
decimal, Ft in 1/16 inch separator, the "+" and "-" signs.
Point ID* (PtID)
ES
Point ID alphanumeric input consists of a ~ z, 0 ~ 9 and space.
IT
Accepting character in the existing value
If there is no change for any particular character in the existing entry
PT
field, press ENTER key to accept the old entry.
NL
Clearing all the existing entry field
Highlight the first entry field with "SPACE" character and press
NO
ENTER key to clear the entire last input value.
SV
To discard entry
Press ESC key to discard entry and restore old value.
FI
Point ID increment
Point ID will be automatically incremented by 1from the last point ID,
DA
if point ID input field is not updated manually.
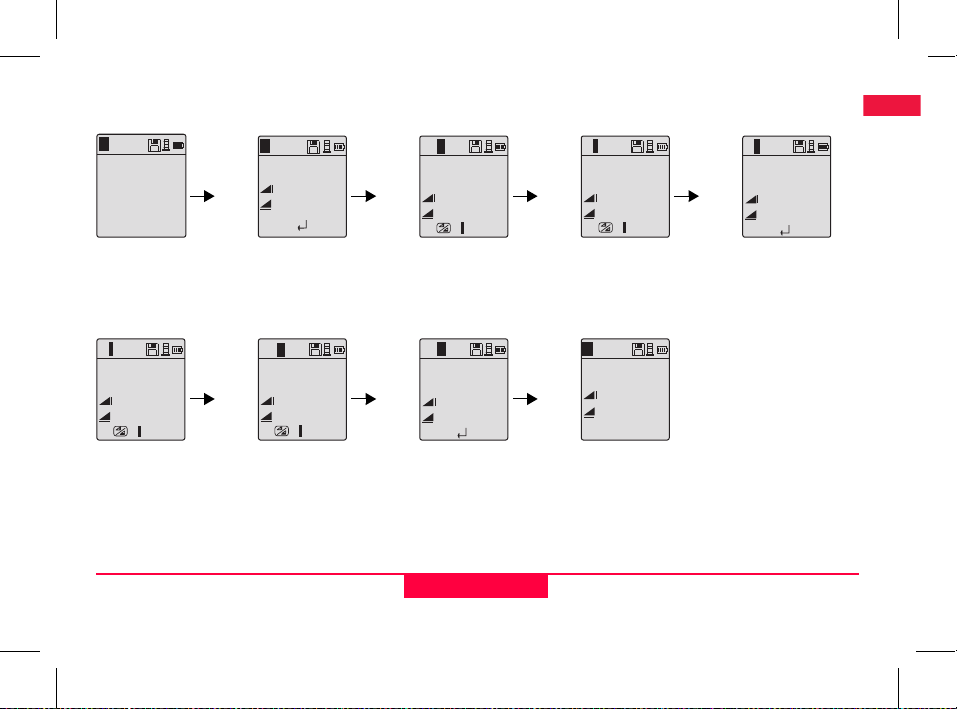
6. Operation
Height and Distance measurement (electronic)
Example of an electronic measurement:
Always aim at the center of
)
bar code staff and focus the
staff image for accurate measurement.
6.1 Height and Distance Measurement
MEAS
: _ _ _ _ _
: _ _ _ _ _
Measurement
Standby Mode
Step Key Description
1.
2.
3.
: >>>>
: >>>>
Measuring in
progress
Press to switch on the instrument, Leica logo
is displayed follow by the default measurement standby mode.
Aim at staff and focus. Lightly trigger the
measurement key to activate measurement.
Height and distance measurement is
displayed.
: 1.235 m
: 5.68 m
Measurement with
height and distance
Set of Characters
9
Sprinter 150/150M/250M - 1.0.0en
Page 13

6.2 Height Difference and Reduced Level Measurement (internal Memory not active)
dH
100.038m
BM
:
Meas Reference
To change BM & RflD
goto nenue
Measure to Benchmark with prompt
message
dH
Meas.Target !
Prompt message
measure to target
MEAS
:
>>>>
:
>>>>
Measuring in
progress
MEAS
Elv:
dH:
:
>>>>
:
>>>>
Measuring in
progress
dH
: 1.235 m
: 5.68 m
Measurement to
Benchmark
displayed
dH
Elv:
99.138
dH:
:
:
m
- 0.900 m
2.135 m
31.11 m
Measurement to
target displayed
Step Key/Screen Description
1.
2.
3.
4.
5.
6.
Press key to start height difference and
reduced level function.
A message "Meas. Reference" with input
reduced level is displayed.
Press measuring key to initiate measurement
with respect to the Reference staff / Benchmark.
Reference height and distance measurement
is displayed; follow by a message "Meas.
Target!" prompted.
Again, press measure key to start measurement with reference to target point.
The following results are displayed accordingly;- target reduced level (RL), target height
difference (dH) with respect to the reference
staff, height and distance of target point.
EN
DE
FR
ES
IT
PT
NL
NO
SV
FI
DA
Operation
10
Sprinter 150/150M/250M - 1.0.0en
Page 14
6.3 Cut & Fill Measurement* (internal Memory active)
EN
DE
BM1
RfID:
FR
100.038m
BM:
0.000m
D.Elv:
ES
Meas Reference
Change RfID, BM &
IT
D.Elv goto menu
PT
Measure to Benchmark with prompt
NL
message
NO
SV
FI
Meas.Target !
DA
Prompt message
measure to target
BM1
RfID:
100.038m
BM:
100.500m
D.Elv:
Meas Reference
Change RfID, BM &
D.Elv goto menu
Go to menu update
Design Elevation
PtID:
SLAB 1
Elv.:
99.563 m
1.710 m
:
0.937 m
Measurement to
target displayed
RfID :
1.235m
:
:
5.68m
BM1
Measurement to
Benchmark
displayed
Step Key/Screen Description
1.
2.
3.
4.
5.
6.
Press Menu key and select Cut & Fill application in the Program sub-menu.
A message "Meas. Reference" with input
Benchmark reduced level value and Design
Elevation is displayed.
Press measuring key to initiate measurement
with respect to the Reference staff / Benchmark.
Reference height and distance measurement
is displayed; follow by a message "Meas.
Target!" prompted.
Again, press measure key to start measurement to target point.
The following results are displayed accordingly- target reduced level (RL) / Elevation,
height of target point and cut / fill value at
target point with respect to the Design
reduced level / Design Elevation.
Operation
11
Sprinter 150/150M/250M - 1.0.0en
Page 15
6.4 BIF Line Levelling Measurement* (internal Memory active)
B I F
1 PtlD :
120.000m Elv:
Meas to backsight
To change Elv & PtID
goto menu
Measure to backsight with
prompt message
B I F
PtID:
RD2
_ _ _ _ _m
Elv:
_ _ _ _ _m
:
_ _ _ _ _m
:
/ Menu
B I F
Measure to next intermediate sight with prompt
message
B I F
PtlD :
Backsight measurement
displayed with prompt
message
1
:
1.417 m
:
28.35 m
Accept
B I F
PtID:
Elv:
Go to menu set "Intermediate Sight" to OFF OR
press Height & Distance
key, measure to foresight
_ _ _ _ _m
_ _ _ _ _m
:
_ _ _ _ _m
:
B I F
2
/ Menu
B I F
PtID:
2
_ _ _ _ _m
Elv:
_ _ _ _ _m
:
_ _ _ _ _m
:
/ Menu
B I F
Measure to foresight with
prompt message
B I F
2
PtID:
119.894m
Elv:
1.523m
:
30.76m
:
Accept
Foresight measurement
displayed with prompt
message
B I F
PtID:
RD1
_ _ _ _ _m
Elv:
_ _ _ _ _m
:
_ _ _ _ _m
:
/ Menu
B I F
Go to menu set "Intermediate Sight" to ON OR
press Height & Distance
key, measure to intermediate sight
B I F
PtlD : 2
_ _ _ _ _m
:
_ _ _ _ _m
:
Meas / Menu
Measure to backsight of
next change point with
prompt message
B I F
RD1
PtID:
119.317m
Elv:
2.100m
:
30.617m
:
Accept
Intermediate sight
measurement
displayed with
prompt message
EN
DE
FR
ES
IT
PT
NL
NO
SV
FI
DA
Operation
12
Sprinter 150/150M/250M - 1.0.0en
Page 16
EN
Step Key/Screen Description
DE
FR
ES
PT
NL
NO
SV
DA
1.
2.
IT
3.
4.
FI
5.
6.
7.
Initialize the BIF method.
Initiate measurement to Benchmark.
Backsight measurement displayed.
To start 'Intermediate sight' measurement,
go to menu set 'Intermediate Sight' to ON
or press Height & Distance key.
Intermediate sight measurement
displayed.
Go to menu set 'Intermediate Sight ' to OFF
or press Height & Distance key, then
measure to the foresight staff.
Foresight measurement displayed.
6.5 BF Line Levelling Measurement*
Step Key/Screen Description
1.
2.
3.
4.
5.
6.
Initialize the BF method
Initiate measurement to Benchmark
Backsight measurement displayed.
Measure to the foresight staff.
Foresight measurement displayed.
System refreshes a standby display for
measurement to the backsight of next
change point.
8.
Operation
System refreshes a standby display for
measurement to the backsight of next
change point.
13
Sprinter 150/150M/250M - 1.0.0en
Page 17
6.6 BFFB Line Levelling Measurement*
Step Key/Screen Description
1.
2.
3.
4.
5.
6.
7.
8.
Initialize the BFFB method.
Initiate measurement to Benchmark.
Backsight measurement displayed.
Measurement to foresight.
Foresight measurement displayed.
Measure to the foresight staff (second
sighting).
Foresight (second sighting) measurement displayed.
Measure to the backsight staff (second
sighting).
Step Key/Screen Description
9.
10.
11.
Mean (average) of height difference in double-
)
sighting of backsight and foresight for BFFB line
levelling method.
Backsight (second sighting) measurement displayed.
System displays current 'Change Point'
measurement report. Press ENTER key
to accept the result.
System refreshes a standby display for
measurement to the backsight of next
change point.
dH
6.7 Timer Measurement*
Set measurement time interval 00 hr:00 min in
Menu\Settings\Timer. Press and hold measuring key for 3 seconds
to start timer measurement, Timer icon will be shown at the top left
of LCD display to indicate current measurement mode. To stop
timer measurement, press and hold measuring key for 3 seconds.
EN
DE
FR
ES
IT
PT
NL
NO
SV
FI
DA
Operation
14
Sprinter 150/150M/250M - 1.0.0en
Page 18

7. Data Transfer DataLoader*
EN
1. Double left click on the Sprinter_Dataloader .exe setup
DE
launcher (by default, the DataLoader will be installed in C: \
FR
Program files \ Leica-Geosystems).
ES
2. Connect the USB cable with phone jab to the connector port
(which is located in the battery compartment of the instrument)
IT
and USB jab to the USB port at the PC.
PT
3. Power On the instrument, wait for the double beeps and USB
NL
icon will be shown on the LCD of the instrument.
NO
4. Start the DataLoader from default C: \ Program files \ LeicaGeosystems.
SV
5. Left click on 'USB Connect' button in the DataLoader and all
FI
info relevant to instrument will be displayed.
DA
6. Left click on 'Data Listing' / 'Field Book' button in the Data
Export window to download the data from the instrument to PC
in Window Ms-Excel
For further DataLoader details and RS232 data transfer
)
instructions please refer to the Sprinter CD-ROM*.
®
.
Data Transfer DataLoader*
15
Sprinter 150/150M/250M - 1.0.0en
Page 19

8. Check & Adjust
A
8.1 Electronic Collimation Adjustment
A
~15m
To activate "Adjustment" program, go to Menu\Adjustment.
Step 1: Aim at Staff A and press MEAS key. Measurement display,
press ENTER key to accept.
Step 2: Aim at Staff B and press MEAS key. Measurement display,
press ENTER key to accept.
Now shift the Sprinter towards staff A and set it up at about 3 m to
staff A.
~15m
B
~3m ~27m
Step 3: Aim at Staff B and press MEAS key. Measurement display,
press ENTER key to accept.
Step 4: Aim at Staff A and press MEAS key. Measurement display,
press ENTER key to accept.
The new electronic collimation error is displayed. To accept new
correction, press ENTER key, otherwise press ESC key to decline
adjustment result.
Optical collimation error can be corrected by adjusting the
)
reticle.
B
EN
DE
FR
ES
IT
PT
NL
NO
SV
FI
DA
Check & Adjust
16
Sprinter 150/150M/250M - 1.0.0en
Page 20
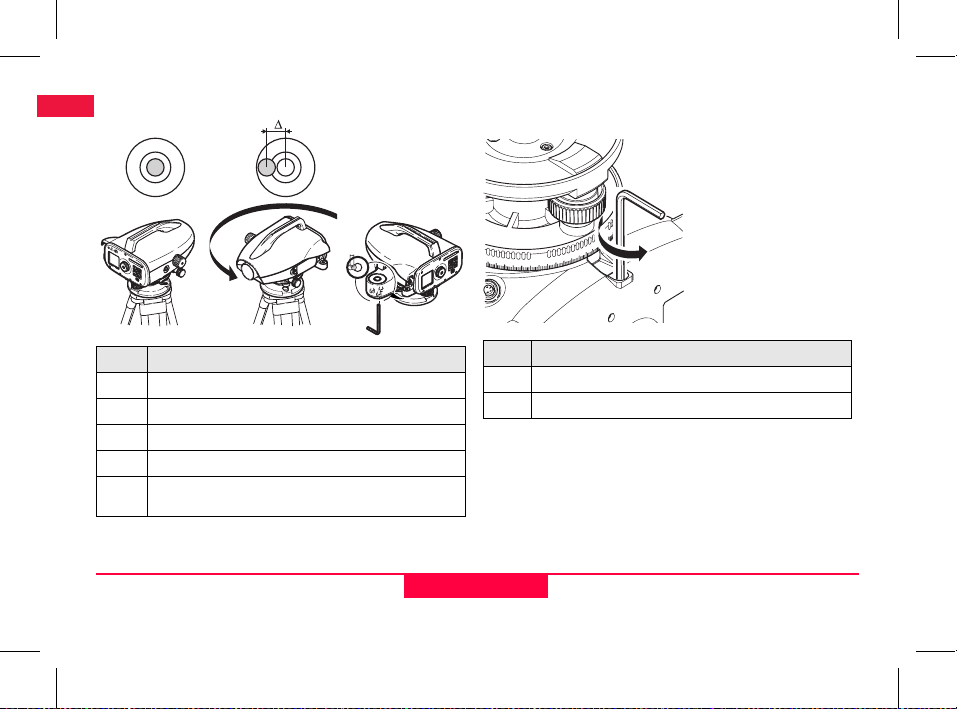
8.2 Circular Level 8.3 Optical Collimation / Reticle Ad-
EN
DE
FR
ES
IT
PT
NL
NO
SV
r_18
FI
Step Description
DA
Level instrument.
1.
Turn instrument by 180°.
2.
Center bubble if it extends beyond the centering circle.
3.
Correct half of the error with the Allen key.
4.
Repeat steps 1 to 4 until the circular level bubble is
)
centered at any random telescope pointing.
3.
1.
2.
4.
justment
Step Description
Turn Allen key until design value is reached.
1.
Check collimation.
2.
If the collimation error exceeds 3 mm over 60 m distance, the collimation needs to be adjusted.
Check & Adjust
17
Sprinter 150/150M/250M - 1.0.0en
Page 21
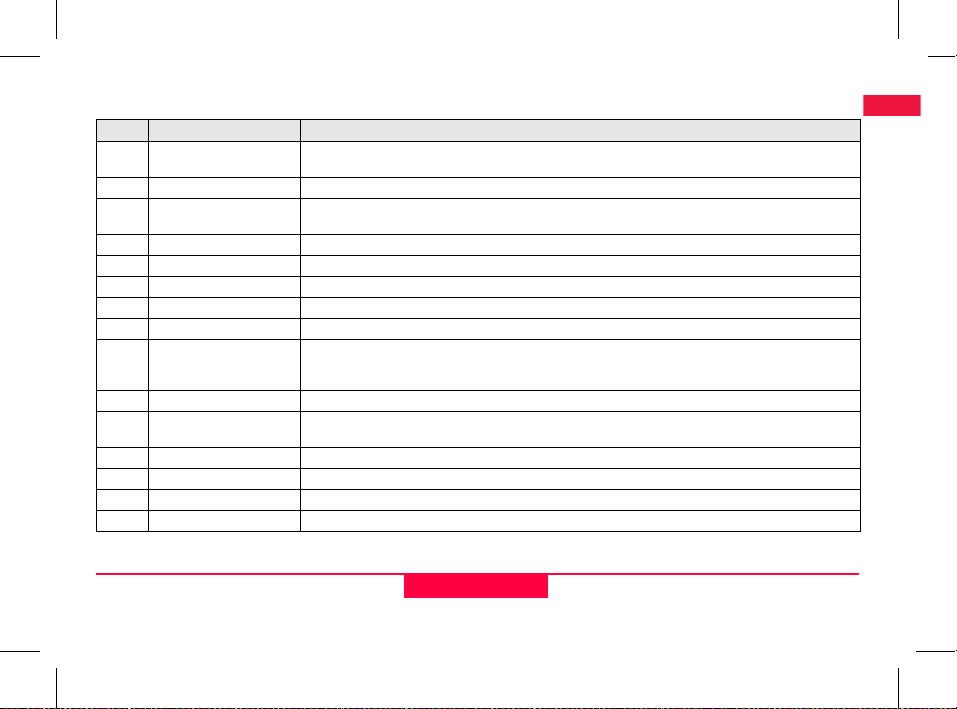
9. Error Messages
No. Error message Counter measure / causes
E99 System Error, Contact
Services !
E100 Low Battery ! Change to new or freshly charged batteries.
E101 Point No. Not Incre-
mented!
E102 Too Bright ! Darken staff or reduce lighting on staff or shade the objective telescope.
E103 Too Dark ! Light up staff uniformly.
E104 No Staff ! Check targeting.
E105 Invalid Entry! Check the entry / input.
E106 Out Of Level ! Level the instrument.
E107 Memory Full! Set internal memory to OFF and continue measurement without recording OR download stored data to
E108 Data File Error ! Data file error.
E109 Low Memory! Prepare to download data to external device, in order to continue further measurement with recording ON
E110 Target Too Close ! Move staff or instrument further apart.
E111 Target Too far ! Move staff or instrument closer together.
E112 Too Cold ! Stop working, external temperature is outside the instrument operating temperature.
E113 Too Hot ! Stop working, external temperature is outside the instrument operating temperature.
Hardware faults or file errors or adjustment errors or setting errors rendering instrument not working properly.
Change the PtID. Max. PtID is 99999999 and do not end any 8 characters string with an alphabet character.
an external device and continue measurement with internal memory ON after deleting all recorded data
in the internal memory.
after deleting all recorded data in the internal memory.
EN
DE
FR
ES
IT
PT
NL
NO
SV
FI
DA
Error Messages
18
Sprinter 150/150M/250M - 1.0.0en
Page 22
No. Error message Counter measure / causes
EN
E114 Invalid Measurement ! Make another measurement. If further measurement proved to be futile, check staff position and Inverse
DE
FR
E115 Temperature Sensor
ES
IT
PT
NL
NO
SV
FI
DA
Error !
E116 Adjustment Error ! Carry out the adjustment with guided steps, make sure instrument is level and staff is truly vertical in
E117 BM Change Not Allowed! Exit to default measurement mode by pressing HEIGHT/DISTANCE key, and change the Benchmark
E119 Staff Blocked Not enough barcode length for measurement.
E120 Image sensor Error! Contact services.
E121 Adjustment Inverse Staff
Not Allowed!
E123 PtID Change Not Allowed Exit the message by pressing ESC key.
Staff setting, check the lighting condition at the staff and stray light, check focusing and targeting, check
if sufficient length of barcode in the field of view.
Cover the objective telescope with a hand and switch ON the instrument. Hardware communication failed.
normal position. Collimation is out of correction range.
elevation in the INPUT BM menu mode.
Check the staff orientation and staff setting.
10. Operation Messages
Operation message Counter measure / remark
Start Tracking! Tracking mode starts.
Stop Tracking! Tracking mode stops.
Tracking Hold! Press measure key for 3 seconds to restart tracking mode. Tracking will hold after 10 unsuccessful meas-
Abort Measurement! Current measuring process is terminated.
Downloading Data! Downloading of data from the internal memory to an external device is in progress.
urements.
Operation Messages
19
Sprinter 150/150M/250M - 1.0.0en
Page 23

Operation message Counter measure / remark
Download Completed! System is successfully downloaded the internal memory data to an external device.
No Data In Memory! No data is stored in the internal memory.
Delete. Are You Sure? Questionnaire prompted user to confirm the deletion of a data (in View Data mode) / all the data (in Delete
Data Deleted! System confirmation a data or all the data in the internal memory is deleted.
Can't Delete! Reference Benchmark and line levelling measurement not allowed to be deleted by single data deletion method.
Change BM. Are You Sure? Question to prompt user if changing of Reference Benchmark elevation to confirm.
Change Design Elevation. Are
You Sure?
Wait! File System Clean Up! Cleaning up of temporary files/system files.
Shut Down! System is switching OFF.
Sand Clock Icon Please wait! System task is in progress.
Meas Target Aim to target staff and press measuring button.
Setting... System parameter setting in progress.
Change Point not completed! Quit
Application?
Quit This Application? Prompt message to quit current application, pressing ENTER key to quit application; otherwise, press ESC
All Data mode) in the internal memory.
Question to prompt user if changing of Design elevation to confirm.
Prompt message to quit application during line levelling process. Complete current line levelling change point
measurements, then leave the application program. Pressing ENTER key to quit application; otherwise,
press ESC key to return to current application.
key to return to current application.
EN
DE
FR
ES
IT
PT
NL
NO
SV
FI
DA
Operation Messages
20
Sprinter 150/150M/250M - 1.0.0en
Page 24

11. Care and Transport
EN
DE
11.1 Transport
Transport in the field
FR
When transporting the equipment in the field, always make sure
ES
that you
• either carry the product in its original transport container,
IT
• or carry the tripod with its legs splayed across your shoulder,
keeping the attached product upright.
PT
Transport in a road vehicle
NL
Never carry the product loose in a road vehicle, as it can be affected
by shock and vibration. Always carry the product in its transport
NO
container and secure it.
SV
Shipping
When transporting the product by rail, air or sea, always use the
FI
complete original Leica Geosystems pack aging, transport container
DA
and cardboard box, or its equivalent, to protect against shock and
vibration.
Shipping, transport of batteries
When transporting or shipping batteries, the person in charge of the
product must ensure that the applicable national and international
rules and regulations are observed. Before transportation or shipping, contact your local passenger or freight transport company.
Field adjustment
After transport inspect the field adjustment parameters given in this
user manual before using the product.
11.2 Storage
Product
Respect the temperature limits when storing the equipment, particularly in summer if the equipment is inside a vehicle. Refer to "13.
Technical Data" for information about temperature limits.
Field adjustment
After long periods of storage inspect the field adjustment parameters given in this user manual before using the product.
If the equipment is to be stored for a long time, remove the alkaline
batteries from the product in order to avoid the danger of leakage.
11.3 Cleaning and Drying
Product and Accessories
• Blow dust off lenses.
• Never touch the glass with your fingers.
• Use only a clean, soft, lint-free cloth for cleaning. If necessary,
moisten the cloth with water or pure alcohol.
Do not use other liquids; these may attack the polymer components.
Damp products
Dry the product, the transport container, the foam inserts and the
accessories at a temperature not greater than +40°C / +104°F and
clean them. Do not repack until everything is completely dry.
Care and Transport
21
Sprinter 150/150M/250M - 1.0.0en
Page 25

12. Safety Directions
12.1 General Introduction
Description
The following directions should enable the person responsible for
the product, and the person who actually uses the equipment, to
anticipate and avoid operational hazards.
The person responsible for the product must ensure that all users
understand these directions and adhere to them.
12.2 Intended Use
Permitted use
• Measuring distances.
• Recording measurements.
• Electronic and optical height measurements to a staff.
• Optical height readings.
• Optical distance measuring with stadia readings.
• Data communication with external appliances.
Adverse use
• Use of the product without instruction.
• Use outside of the intended limits.
• Disabling safety systems.
• Removal of hazard notices.
• Opening the product using tools, for example screwdriver,
unless this is specifically permitted for certain functions.
• Modification or conversion of the product.
• Use after misappropriation.
• Use of products with obviously recognizable damages or
defects.
• Use with accessories from other manufacturers without the prior
explicit approval of Leica Geosystems.
• Inadequate safeguards at the working site, for example when
measuring on roads.
• Aiming directly into the sun.
WARNING
Adverse use can lead to injury, malfunction and damage. It is
the task of the person responsible for the equipment to inform the user
about hazards and how to counteract them. The product is not to be
operated until the user has been instructed on how to work with it.
12.3 Limits of Use
Environment
Suitable for use in an atmosphere appropriate for permanent
human habitation: not suitable for use in aggressive or explosive
environments.
DANGER
Local safety authorities and safety experts must be
contacted before working in hazardous areas, or in close proximity
to electrical installations or similar situations by the person in charge
of the product.
12.4 Responsibilities
Manufacturer of the product
Leica Geosystems AG, CH-9435 Heerbrugg, here inafter referred to
as Leica Geosystems, is responsible for supplying the product,
including the user manual and original accessories, in a completely
safe condition.
EN
DE
FR
ES
IT
PT
NL
NO
SV
FI
DA
Safety Directions
22
Sprinter 150/150M/250M - 1.0.0en
Page 26
Manufacturers of non Leica Geosystems accessories
EN
The manufacturers of non Leica Geosystems accessories for the
DE
product are responsible for developing, implementing and communicating safety concepts for their products , and are also responsible
FR
for the effectiveness of those safety concepts in combination with
the Leica Geosystems product.
ES
Person in charge of the product
IT
The person in charge of the product has the following duties:
• To understand the safety instructions on the product and the
PT
instructions in the user manual.
NL
• To be familiar with local regulations relating to safety and accident prevention.
NO
• To inform Leica Geosystems immediately if the product and the
SV
application becomes unsafe.
WARNING
FI
DA
The person responsible for the product must ensure that it is
used in accordance with the instructions. This person is also
accountable for the training and the deployment of personnel who
use the product and for the safety of the equipment in use.
12.5 Hazards of Use
WARNING
The absence of instruction, or the inadequate imparting of
instruction, can lead to incorrect or adverse use, and can give rise
to accidents with far-reaching human, material, financial and environmental consequences.
Precautions:
All users must follow the safety directions given by the manufacturer
and the directions of the person responsible for the product.
CAUTION
Watch out for erroneous measurement results if the product
has been dropped or has been misused, modified, stored for long
periods or transported.
Precautions:
Periodically carry out test measurements and perform the field
adjustments indicated in the user manual, particularly after the
product has been subjected to abnormal use and before and after
important measurements.
DANGER
Because of the risk of electrocution, it is very dangerous to
use staffs in the vicinity of electrical installations such as power
cables or electrical railways.
Precautions:
Keep at a safe distance from electrical installations. If it is essential to
work in this environment, first contact the safety authorities responsible for the electrical installations and follow their instructions.
CAUTION
Strong magnetic fields in the immediate vicinity (e.g. transformers, melting furnaces...) may influence the compensator and
lead to measuring errors.
Safety Directions
23
Sprinter 150/150M/250M - 1.0.0en
Page 27

Precautions:
When measuring near strong magnetic fields, check results for
plausibility.
CAUTION
Be careful when pointing the product towards the sun,
because the telescope functions as a magnifying glass and can
injure your eyes and/or cause damage inside the product.
Precautions:
Do not point the product directly at the sun.
WARNING
During dynamic applications, for example stakeout procedures there is a danger of accidents occurring if the user does not
pay attention to the environmental conditions around, for example
obstacles, excavations or traffic.
Precautions:
The person responsible for the product must make all users fully
aware of the existing dangers.
WARNING
Inadequate securing of the working site can lead to
dangerous situations, for example in traffic, on building sites, and at
industrial installations.
Precautions:
Always ensure that the working site is adequately secured. Adhere
to the regulations governing safety and accident prevention and
road traffic.
WARNING
If computers intended for use indoors are used in the field
there is a danger of electric shock.
Precautions:
Adhere to the instructions given by the computer manufacturer with
regard to field use in conjunction with Leica Geosystems products.
CAUTION
If the accessories used with the product are not properly
secured and the product is subjected to mechanical shock, for
example blows or falling, the product may be damaged or people
may sustain injury.
Precautions:
When setting-up the product, make sure that the accessories are
correctly adapted, fitted, secured, and locked in position.
Avoid subjecting the product to mechanical stress.
CAUTION
When using a vertical staff supported by one brace there is
always the danger of falling, for example by wind gusts and therefore
danger of damage to equipment and danger of personal injuries.
Precautions:
Never leave a vertical staff supported by a brace unsupervised
(person at the staff).
WARNING
If the product is used with accessories, for example masts,
staffs, poles, you may increase the risk of being struck by lightning.
Precautions:
Do not use the product in a thunderstorm.
EN
DE
FR
ES
IT
PT
NL
NO
SV
FI
DA
Safety Directions
24
Sprinter 150/150M/250M - 1.0.0en
Page 28

EN
DE
FR
ES
PT
NL
NO
SV
DA
CAUTION
During the operation of the product there is a hazard of
squeezing extremities or entanglement of hairs and/or clothes by
rotating parts.
Precautions:
Keep a safe distance of the rotating parts.
WARNING
IT
If you open the product, either of the following actions may
cause you to receive an electric shock.
• Touching live components
• Using the product after incorrect attempts were made to carry
out repairs.
Precautions:
Do not open the product. Only Leica Geosystems authorized
service workshops are entitled to repair these products.
FI
WARNING
Batteries not recommended by Leica Geosystems may be
damaged if charged or discharged. They may burn and explode.
Precautions:
Only charge and discharge batteries recommended by Leica
Geosystems.
WARNING
Using a battery charger not recommended by Leica Geosystems can destroy the batteries. This can cause fire or explosions.
Precautions:
Only use chargers recommended by Leica Geosystems to charge
the batteries.
CAUTION
During the transport, shipping or disposal of batteries it is
possible for inappropriate mechanical influences to constitute a fire
hazard.
Precautions:
Before shipping the product or disposing of it, discharge the
batteries by running the product until they are flat.
When transporting or shipping batteries, the p erson in charge of the
product must ensure that the applicable national and international
rules and regulations are observed. Before transportation or shipping contact your local passenger or freight transport company.
WARNING
High mechanical stress, high ambient temperatures or
immersion into fluids can cause leackage, fire or explosions of the
batteries.
Precautions:
Protect the batteries from mechanical influences and high ambient
temperatures. Do not drop or immerse batteries into fluids.
WARNING
Short circuited battery terminals can overheat and cause
injury or fire, for example by storing or transporting in pockets if
battery terminals come in contact with jewellery, keys, metallized
paper or other metals.
Precautions:
Make sure that the battery terminals do not come into contact with
metallic objects.
Safety Directions
25
Sprinter 150/150M/250M - 1.0.0en
Page 29

CAUTION
Long term storage may reduce lifetime or damage the
battery.
Precautions:
During long term storage, maintain battery life by periodic recharge.
WARNING
If the product is improperly disposed of, the following can
happen:
• If polymer parts are burnt, poisonous gases are produced which
may impair health.
• If batteries are damaged or are heated strongly, they can
explode and cause poisoning, burning, corrosion or environmental contamination.
• By disposing of the product irresponsibly you may enable unauthorized persons to use it in contravention of the regulations,
exposing themselves and third parties to the risk of severe injury
and rendering the environment liable to contamination.
Precautions:
The product must not be disposed with household
waste.
Dispose of the product appropriately in accordance w ith
the national regulations in force in your country.
personnel.
Product specific treatment and waste management information can
be downloaded from the Leica Geosystems home page at http://
Always prevent access to the product by unauthorized
www.leica-geosystems.com/treatment or received from your Leica
Geosystems dealer.
WARNING
Only Leica Geosystems authorized service workshops are
entitled to repair these products.
12.6 Electromagnetic Compatibility EMC
Description
The term Electromagnetic Compatibility is taken to mean the capability
of the product to function smoothly in an environment where electromagnetic radiation and electrostatic discharges are present, and
without causing electromagnetic disturbances to other equipment.
WARNING
Electromagnetic radiation can cause disturbances in other
equipment.
Although the product meets the strict regulations and standards
which are in force in this respect, Leica Geosystems cannot
completely exclude the possibility that other equipment may be
disturbed.
CAUTION
There is a risk that disturbances may be caused in other
equipment if the product is used in conjunction with accessories
from other manufacturers, for example field computers, personal
computers, two-way radios, non-standard cables or external
batteries.
EN
DE
FR
ES
IT
PT
NL
NO
SV
FI
DA
Safety Directions
26
Sprinter 150/150M/250M - 1.0.0en
Page 30

Precautions:
EN
Use only the equipment and accessories recommended by Leica
DE
Geosystems. When combined with the product, they meet the strict
requirements stipulated by the guidelines and standards. When
FR
using computers and two-way radios, pay attention to the information about electromagnetic compatibility provided by the manufac-
ES
turer.
IT
CAUTION
PT
NL
NO
SV
DA
Disturbances caused by electromagnetic radiation can
result in erroneous measurements.
Although the product meets the strict regulations and standards
which are in force in this respect, Leica Geosystems cannot
completely exclude the possibility that the product may be disturbed
by very intense electromagnetic radiation, for example, near radio
transmitters, two-way radios or diesel generators.
FI
Precautions:
Check the plausibility of results obtained under these conditions.
WARNING
If the product is operated with connecting cables attached at
only one of their two ends, for example exte rnal supply cables, interface cables, the permitted level of electromagnetic radiation may be
exceeded and the correct functioning of other products may be
impaired.
Precautions:
While the product is in use, connecting cables, for example product
to external battery, product to computer, must be connected at both
ends.
12.7 FCC Statement, Applicable in U.S.
WARNING
This equipment has been tested and found to comply with
the limits for a Class B digital device, pursuant to par t 15 of the FCC
rules.
These limits are designed to provide reasonable protection against
harmful interference in a residential installation.
This equipment generates, uses and can radiate frequency energy
and, if not installed and used in accordance with the instructions,
may cause harmful interference to radio communication.
However, there is no guarantee that interference will not occur in a
particular installation.
If this equipment does cause harmful interference to radio or television reception, which can be determined by turning the equipment
off and on, the user is encouraged to try to correct the interference
by one or more of the following measures:
• Reorient or relocate the receiving antenna.
• Increase the separation between the equipment and the
receiver.
• Connect the equipment into an outlet on a circuit different from
that to which the receiver is connected.
• Consult the dealer or an experienced radio/TV technician for
help.
WARNING
Changes or modifications not expressly approved by Leica
Geosystems for compliance could void the user's authority to
operate the equipment.
Safety Directions
27
Sprinter 150/150M/250M - 1.0.0en
Page 31

Labelling
EN
DE
FR
ES
IT
PT
NL
NO
SV
FI
DA
Safety Directions
28
Sprinter 150/150M/250M - 1.0.0en
Page 32

13. Technical Data
EN
Height measurements Standard deviation per km double run (ISO 17123-2):
DE
FR
ES
IT
Distance Accuracy
PT
(Standard Deviation)
NL
Range Distance measuring range for electronic measurements with standard aluminum barcode staff: 2 m to
NO
SV
Optical - Shortest focusing
distance
FI
Measuring time single
DA
measure (Electronic)
• Electronic measurement with Sprinter aluminum barcode staff:
• 1.0 mm (Sprinter 250M)
• 1.5 mm (Sprinter 150/150M)
• Optical measurement with standard aluminum E-scale/Numeral staff: 2.5 mm
• Standard Deviation for single staff reading: 0.6 mm (electronic) and 1.2 mm (optical) at 30m
10 mm for D<= 10 m
Distance in m x 0.001 for D>10 m
100 m.
50 cm
Typically 3 seconds and less in normal daylight condition; needs longer measuring time in uniform dim
light condition (20 lux).
Circular Bubble Circular Bubble Sensitivity: 10'/2 mm
Compensator Magnet damped pendulum compensator with electronic range monitoring
• Tilt Warning Range (Electronically): ± 10'
• Compensator range (Mechanically): ± 10'
• Setting accuracy: 0.8" max. (Standard Deviation)
• Magnetic field sensitivity: < 10"
(Line-of-sight difference in horizontal constant magnetic field at a field strength of up 5 Gauss)
RS232 Port* For RS232 cable connection to external battery and communication to PC / data collector.
Phone Jab Port* For USB cable connection to communication to PC.
Technical Data
29
Sprinter 150/150M/250M - 1.0.0en
Page 33

Internal Memory Storage* Capacity: up to 1000 points.
Data Transfer* Program: To DataLoader via USB, to Leica Geo Office and HyperTerminal via RS232 on PC, using a
Power Supply • Sprinter 150: internal battery
Windows® application
• Sprinter 150M/250M: internal battery and external via RS232 port.
Battery Power Battery internal: AA dry cells 4 x 1.5 V; powered via RS232 port:
Nominal voltage 12 V ,
voltage range 4 - xx V ,
GEV71 power cable to a 12 V car battery; current rating max. 300 mA.
LCD • Type: Monochrome display with backlight capability
• Dimensions: 128 x 104 pixels
Telescope • Magnification (Optical): 24 x
• Free objective diameter: 36 mm
• Clear Objective Aperture: 2 °
• Multiplication constant: 100
• Addition constant: 0
Hz Circle Circle Engraving:
Plastic horizontal circle of 360° (400 gon). Graduation and numerals scale resolution at 1°(upper scale)
and at 50 gon intervals (lower scale)
Side Drive Movement & Play in side drive: Continuous horizontal dual drive
System • MMI capability
Temperature Range • Operating Temperature: -10°C to +50°C
• Measuring / applications
• Keyboard: 5 rubber keys
• Storage Temperature: -40°C to +70°C
EN
DE
FR
ES
IT
PT
NL
NO
SV
FI
DA
Technical Data
30
Sprinter 150/150M/250M - 1.0.0en
Page 34

Environmental Specifica-
EN
tions
DE
FR
Dimensions Instrument:
ES
IT
PT
NL
NO
Weight 2.55 kg (including 4 AA batteries)
SV
FI
DA
• Protection against water, dust and sand: IP55 (IEC 60529)
• Protection against Humidity: Up to 95% humidity no condensation. The effects of condensation are
to be effectively counteracted by periodically drying out the product.
• Length (incl. front of lens tube to fully extended eyepiece) 219 mm
• Width (from the external face of focusing drive to the external side of circular bubble holder) 196 mm
• Height (incl. hand grip, base fully extended) 178 mm
Container:
• Length 400 mm
• Width 220 mm
• Height 325 mm
Technical Data
31
Sprinter 150/150M/250M - 1.0.0en
Page 35

14. International Warranty, Software Licence Agreement
International Warranty
The International Warranty can be downloaded from the Leica
Geosystems AG home page at http://www.leica-geosystems.com/
internationalwarranty or received from your Leica Geosystems
dealer.
Software Licence Agreement
This product contains software that is preinstalled on the product, or
that is supplied to you on a data carrier medium, or that can be
downloaded by you online pursuant to prior authorization from
Leica Geosystems. Such software is protected by copyright and
other laws and its use is defined and regulated by the Leica
Geosystems Software Licence Agreement, which covers aspects
such as, but not limited to, Scope of the Licence, Warranty, Intellectual Property Rights, Limitation of Liability, Exclusion of other Assurances, Governing Law and Place of Jurisdiction . Please make sure,
that at any time you fully comply with the terms and cond itions of the
Leica Geosystems Software Licence Agreement.
Such agreement is provided together with all products and can also
be found at the Leica Geosystems home page at http://www.leicageosystems.com/swlicense or your Leica Geosystems dealer.
You must not install or use the software unless you have read and
accepted the terms and conditions of the Leica Geosystems Software
Licence Agreement. Installation or use of the software or any part
thereof, is deemed to be an acceptance of all the terms and conditions of such licence agreement. If you do not agree to all or some of
the terms of such licence agreement, you may not download, install
or use the software and you must return the unused software together
with its accompanying documentation and the purchase receipt to the
dealer from whom you purchased the product within ten (10) days of
purchase to obtain a full refund of the purchase price.
15. Index
A
Accessories .............................................................................. 3
Adjustment Mode ..................................................................... 5
AutoOff ..................................................................................... 8
Averaging ................................................................................. 8
B
Backlight .................................................................................. 8
Base plate ................................................................................ 2
Battery
Battery compartment ........................................................ 2
Change Battery ................................................................3
Baudrate ..................................................................................8
Beep .........................................................................................8
Benchmark Elevation (BM) ...................................................... 9
BF .................................................................................. 5, 7, 13
EN
DE
FR
ES
IT
PT
NL
NO
SV
FI
DA
International Warranty, Software Licence Agreement
32
Sprinter 150/150M/250M - 1.0.0en
Page 36

BFFB .......................................................................... 5, 6, 7, 14
EN
BIF ............................................................................. 4, 5, 7, 12
DE
C
FR
Check & Adjust ...................................................................... 16
ES
Circular Level ..................................................................... 2, 17
IT
Cleaning and Drying .............................................................. 21
PT
Components .............................................................................2
Container Contents .................................................................. 2
NL
Contrast ...................................................................................8
NO
Cut & Fill ............................................................................ 5, 11
SV
D
FI
Data Display Symbols .............................................................. 6
DA
Data Manager .......................................................................... 7
Data Transfer ......................................................................... 15
DataLoader ............................................................................15
Design Elevation (D.Elv) .......................................................... 9
dH ............................................................................................5
E
Electronic Collimation Adjustment .......................................... 16
Error Messages ...................................................................... 18
Eyepiece ..................................................................................2
F
Focusing knob .......................................................................... 2
G
Gunsight ................................................................................... 2
H
Height and Distance Measurement .......................................... 9
Height Difference and Reduced Level Measurement ............ 10
I
Icons ........................................................................................ 6
Input BM ................................................................................... 7
Input D.ELV .............................................................................. 7
Input PtID ................................................................................. 7
Intermediate Sight .................................................................... 7
Inverse Staff ............................................................................. 7
L
Language .................................................................................8
LCD display .............................................................................. 2
Levelling footscrew .................................................................. 2
M
MEAS ....................................................................................... 4
Index
33
Sprinter 150/150M/250M - 1.0.0en
Page 37

Measurement Display Symbols ................................................ 6
Measurement Mode .................................................................5
MENU ...................................................................................... 5
Menu Setting ............................................................................ 7
Modes ......................................................................................5
O
Operation .................................................................................9
Operation Messages ..............................................................19
Optical Collimation ................................................................. 17
P
Point ID (PtID) .......................................................................... 9
Point ID increment ................................................................... 9
Power ON ................................................................................ 3
Program ................................................................................... 7
R
Recording ................................................................................. 7
Reticle Adjustment ................................................................. 17
Rounding ..................................................................................8
RS232 ...................................................................................... 8
S
Set of Characters ..................................................................... 9
Settings .................................................................................... 8
Set-up Instrument
Eyepiece Adjustment ....................................................... 3
Levelling ........................................................................... 3
Target Image Focusing .................................................... 3
Storage .................................................................................. 21
Symbols ................................................................................... 1
T
Tilt Warning .............................................................................. 8
Timer ........................................................................................ 8
Timer Measurement ............................................................... 14
Transport ................................................................................ 21
U
Unit ........................................................................................... 8
User Interface .......................................................................... 4
EN
DE
FR
ES
IT
PT
NL
NO
SV
FI
DA
Index
34
Sprinter 150/150M/250M - 1.0.0en
Page 38

EN
取扱説明書 ( 日本語)
JA
1. はじめに
ZH
ご購入について
ライカジオシステムズの新しいデジタルレベルをお
KO
買い上げいただきまして、誠にありがとうございま
RU
す。本製品は、建設現場で容易にすばやくレベル測
定を行えるように作られています。
PL
HU
EL
CZ
てください。
TR
本製品をご使用になる前に、この取扱説明書をよく
お読みください。
SR
器械の識別
器械の機種名とシリアル番号は、型式プレートに記
載されています。
下記の欄に、機種名とシリアル番号を記入してくだ
さい。販売代理店、またはライカジオシステムズ
サービスセンターにお問い合わせの際は、必ずこの
機種名とシリアル番号をお知らせください。
機種名 :____________ シリアル番号 : ____________
本取扱説明書の有効性
この取扱説明書は、Sprinter 150/150M/250M に有効
です。
Sprinter 150M/250M にのみ有効なセクションに
)
製品
この取扱説明書は、本製品の設置方
法、操作方法、および安全管理につ
いての重要な注意事項を説明します。
詳しくは "12. 安全管理 " を参照し
はじめに
は、星印 (*) が付いています。
商標
すべての商標は、各所有者の商標です。
利用可能な資料
名称 説明
Sprinter
150/
150M/
250M 取
扱説明書
記号
本取扱説明書で使用されている記号について
故(死亡または重傷)につながる事項を示します。
または重傷)につながる可能性が高い事項を示します。
害またはかなりの物質的、経済的損失、あるいは環
境上の損害を生じる可能性が高い事項を示します。
)
1
この取扱説明書には製品を操作するため
に初級者に必要なすべての取扱説明が書
かれています。システムの全体概要、テ
クニカルデータ、安全管理に関すること
が説明されます。
危険
この記載が遵守されない場合、すぐにも人身事
警告
この記載が遵守されない場合、人身事故(死亡
注意
この記載が遵守されない場合、中程度の人身障
器械を、技術的に正しく、かつ有効に使用する
ために、操作に際して遵守されるべき重要事項
を示します。
Sprinter 150/150M/250M - 1.0.0ja
Page 39

目次
1. はじめに....................................................................... 1
2. 本システムについて................................................. 2
3. 測定の準備 .................................................................. 3
4. ユーザインターフェース ........................................ 4
5. 文字入力....................................................................... 9
6. 操作................................................................................ 9
7. データ転送 DataLoader*....................................... 15
8. 点検と調整 ................................................................ 16
9. エラーメッセージ ................................................... 18
10. 操作メッセージ........................................................ 19
11. お手入れと輸送........................................................ 21
12. 安全管理..................................................................... 22
13. テクニカルデータ ................................................... 29
14. 国際保証、ソフトウェアライセンス契約 ....... 32
15. 索引.............................................................................. 32
本システムについて
2. 本システムについて
a
b
c
a)水平微動ネジ
b)バッテリー部品 (USB ケー
ブル用の電話 ジャブ イン
ターフェースを含む )
c)円形気泡管
d)照準器
e)合焦ネジ
ケースの内容
Sprinter, 電池 (4 個 ), アレンキー, 取扱説明書 ,
ストラップ , CD-ROM*(データローダーを含む),
USB ケーブル
2
Sprinter 150/150M/250M - 1.0.0ja
f)ハンドグリッ
プ
g)接眼レンズ
h)液晶表示部
i)基盤
j)整準ネジ
EN
JA
d
ZH
e
KO
f
RU
PL
HU
g
EL
h
CZ
i
TR
SR
j
Page 40

アクセサリー
EN
三脚 , アルミ製の標尺 ( 国および地域によって異な
JA
ります ), ガラス繊維の標尺 (Sprinter 250M で
0.7mm 精度を実現します )。( オプション : 日除け、
ZH
充電式電池 (4 個)と充電器 )
KO
3. 測定の準備
RU
3.1 電池交換
PL
カバーの説明に従って、極性を間違えないように 4
個の単三乾電池を入れます。
HU
EL
CZ
TR
SR
必ず、すべての電池を一緒に交換してください。
)
古い電池と新しい電池を混ぜて使用しないでく
)
ださい。
メーカーやタイプの異なる電池を混ぜて使用し
)
ないでください。
3.2 器械のセットアップ
整準
• 三脚をセットします。適当な長さに脚を伸ばし、
三脚の頭部がほぼ水平になるようにしてください。
安定して固定されるように三脚の脚の先端を地面
にしっかり押し込んでください。
• 三脚の固定ネジを器械の底部に捻じ込んで、器械
を三脚に固定します。
• 3 本の整準ネジを使用して、気泡が円形気泡管の中
心にくるようにして器械の水平を調整します。
接眼レンズの調整
望遠鏡を壁面や紙などの均一な明るさの平面に向け
測定の準備
ます。十字線が鮮明に見えるようになるまで接眼レ
ンズを回します。
標尺に焦点を合わせる
照準器(照星)を使用して、標尺の方向に対物レン
ズの照準を合わせます。標尺が視野のほぼ中心にく
るように水平微動ネジを回し、合焦ネジを回して標
尺に焦点を合わせます。標尺と十字線をシャープに、
またははっきり区別できるようにします。
電源を入れる
器械は測定可能な状態になっています。
技術的なヒント :
)
• 遠距離輸送、長期間保管の後に野外で使用する前
には、電子的、光学的視準線の誤差、装置の円形
気泡管、標尺の順に、点検・調整します。
• 光学部品はきれいな状態に保ってください。汚れや
結露があると測定精度が低下する恐れがあります。
• 作業を開始する前に、周囲温度に器械を馴染ませ
てください(温度差 1 ℃あたり約 2 分間必要で
す)。
• ガラス窓を通した測定は避けてください。
• 標尺各部は完全に伸ばし正しく固定してください。
• 風などによる器械の振動は、三脚の上から 1/3 ほど
の部分を手で触れると振動を抑えることができます。
• 逆光で作業が行いにくい場合は、レンズフードで
対物レンズをカバーしてください。
• 標尺の測定部分を懐中電灯やスポットライトで均
一に照らしてください。
3
Sprinter 150/150M/250M - 1.0.0ja
Page 41

4. ユーザインターフェース
b
a
Sprinter_08
操作キー 記号 1 段階機能 2 段階機能
a)オン / オ
フ
b)測定
電源のオン / オフスイッチ なし
測定キー キーを3秒間押し続けた場合に連続測定 / タイマー測定
Sprinter_09
* の開始と停止 *
EN
f
c
ESC
e
d
JA
ZH
KO
RU
PL
HU
EL
CZ
TR
SR
c)高さ /
距離
高さ表示と距離表示の切り換え カーソルを上に移動 (メニュー / 設定モードの場合),
ユーザインターフェース
路線測量プログラム BIF* で中間点 I とフォアサイト F
を切り替え
4
Sprinter 150/150M/250M - 1.0.0ja
Page 42

EN
操作キー 記号 1 段階機能 2 段階機能
d)高低差
JA
ZH
KO
e)メニュー
RU
PL
f)バックラ
HU
EL
モード
CZ
TR
SR
イト
MEAS
MENU
ADJ
TRK
SET
測定モード 路線測量(BF)*
メニュー 路線測量(BFFB)*
調整モード 路線測量(BIF)*
連続測定モード カット & フィル *
設定 高低差
高低差と高度の測定 カーソルを下に移動 (メニュー / 設定モードの場合)
設定値の有効化と選択 確定のための実行 ENTER キー
液晶表示部のバックライトのオ
ン/オフ
プログラム / アプリケーションの終了または前画面に戻
るための ESC キー(メニュー / 設定モードの場合)
BF BF
BFFB BFFB BFFB
BIF BIF BIF
dH
BFFB BFFB
測定間隔 / タイマー有効化
*
ユーザインターフェース
5
Sprinter 150/150M/250M - 1.0.0ja
Page 43

アイコン
液晶バックライト点灯 各モードでのバッテリアイコン
正像標尺測定モード 内部メモリーにデータを保存 *
正像標尺測定モード 整準警報オフ
外部電源使用中 * 平均測定有効化
測定およびデータ表示記号
PtID:/
RfID:
BM: ベンチマーク高度 距離の測定値
dH: 高低差 平均高低差 (BFFB) *
Elv: 高度 デザイン高度まで高さを上げる *
D.Elv: デザイン高度 * デザイン高度まで高さを下げる *
測点番号 */ 基準ベンチマーク番号 * 標尺の高さの測定値
dH:
EN
JA
ZH
KO
RU
PL
HU
EL
CZ
TR
SR
ユーザインターフェース
6
Sprinter 150/150M/250M - 1.0.0ja
Page 44

メニューの使い方
EN
メニュー 選択 ( 副選択 ) 説明
JA
1.プログラム *
ZH
KO
RU
2.中間点 *
PL
3.基準点入力 *
HU
4.BM 入力
EL
5.D.ELV* 入力
6.データ管理 *
CZ
TR
SR
7.記録 *
8.調整
9.倒像標尺
路線測量 (BIF, BF, BFFB) 路線測量法の選択
カット & フィル カット & フィル アプリケーション
オン / オフ 路線測量(BIF)の中間点を有効 / 無効にする。
ユーザ測点入力
基準ベンチマーク高度入力
カット & フィル アプリケーションのデザイン高度入力
データの一覧 実行 ENTER キーを押して記録データの表示 / 記録データの
ダウンロードデータ (GSI/ASCII) GSI-8 または ASCII フォーマットで RS232 経由で記録データ
すべてのデータ削除 装置搭載 / 内部メモリーのすべての記録データを削除
メモリー 装置搭載 / 内部メモリーに測定を記録
オフ 測定は保存されません。
外部 RS232 ケーブルを使って GSI-8 フォーマットで外部機器に測
調整プログラム
オン [ 倒像 ], オフ [ 正像 ],
オート [ 標尺の向きを自動認識 ]
路線測量の視準・測定順序は、各路線測量アイコンの
)
アルファベットをハイライトして表示されます。
消去
を転送
路線測量では、記録モードが最初のバックサイト測定
)
の前に設定してください。
定を記録
標尺の向きの認識モード設定
ユーザインターフェース
7
Sprinter 150/150M/250M - 1.0.0ja
Page 45

メニュー 選択 ( 副選択 ) 説明
10.設定
コントラスト(10 段階) 液晶ディスプレイコントラスト設定
単位 ( メートル、国際フィー
ト、測量フィート、1/16 インチ
刻みのフィート )
自動電源オフ (15 分後 / オフ ) 15分後、最後のキー操作の約 15 分後に本機のスイッチが
精度 ( 標準 / 精密) 最小表示測定値の設定
ブザー音(オン / オフ) 操作キーの音響信号設定
RS232* ( ボーレート :1200,
2400, 4800, 9600, 19200,
38400; パリティ: なし , 奇数 ,
偶数 ; ストップビット :1, 2;
データビット : 7, 8)
整準警報機能(オン / オフ) 電子式整準警報機能設定
バックライト(オン / オフ) バックライト設定
平均化 測定の平均化のための測定回数入力
言語(インターフェイス言語の
リスト)
単位設定
切れます。オフ、本機は常にオン状態に保たれます。
In metric:
・ 標準 = 高さ 0.01 フィート , 距離 0.1 フィート
・ 精密 = 高さ 0.001 フィート , 距離 0.01 フィート
フィート ( 国際フィートおよび測量フィート ):
・ 標準 = 高さ 0.01 フィート , 距離 0.1 フィート
・ 精密 = 高さ 0.001 フィート , 距離 0.01 フィート
1/16 インチ刻みのフィート :
・ 精密 & 標準 = 高さおよび距離 フィート - インチ -1/16
RS232 インターフェースの通信設定
インターフェイス言語設定
ユーザインターフェース
インチ
8
EN
JA
ZH
KO
RU
PL
HU
EL
CZ
TR
SR
Sprinter 150/150M/250M - 1.0.0ja
Page 46

EN
5. 文字入力
ベンチマーク高度 (BM), デザイン高度 * (D.Elv)
JA
ベンチマーク高度(BM) とデザイン高度入力数値は、
ZH
0 ~ 9、スペース、小数点、1/16 インチ刻みの
フィート、+" 符号、"-" 符号で構成されます。
KO
測点番号 * (PtID)
RU
測点番号の英数字入力は、a ~ z、0 ~ 9、スペース
で構成されます。
PL
既存の値を確定する
HU
現在の入力行内に変更すべき文字がない場合は、実
行 ENTER キーを押して現在の値のまま確定します。
EL
現在の入力桁すべての内容を削除する
CZ
スペースを使用して最初の入力桁を反転表示にして
実行 ENTER キーを押すと、 最後に入力された基準
TR
高の値全体が削除されます。
入力内容の取り消す
SR
ESC キーを押すと入力内容が取り消され、前の値が
保存されます。
測点番号インクリメント
測点番号入力画面を手動で更新しない場合は、測点
番号は自動的に最後の測点番号から 1 ずつインクリ
メントします。
6. 操作
高さと距離の測定(電子測定)
電子測定の例 :
正確な測定のためには、
)
必ず、バーコード標尺
の中心をねらい、標尺
に焦点を合わせます。
6.1 高さと距離の測定
MEAS
: _ _ _ _ _
: _ _ _ _ _
測定待機モード 測定中 高さと距離の測
ステップ操作キー説明
1.
2.
3.
: >>>>
: >>>>
装置のスイッチを入れると、ライカ
のロゴが表示され、デフォルトの測
定待機モードとなります。
標尺をねらい焦点を合わせてくださ
い。軽く測定キーに触れ、測定を開
始してください。
高さと距離の測定が表示されます。
: 1.235 m
: 5.68 m
定
文字入力
9
Sprinter 150/150M/250M - 1.0.0ja
Page 47

6.2 高低差と減少レベル測定 ( 内部メモリー非アクティブ )
dH
100.038m
BM
:
⪉䄥浧ት䂻⸩
*/,'⮘㦃㣑ቒኾከ
ዂዙቛ
確認メッセージ
のあるベンチ
マークまでの測
定
dH
ኜዙአእት
䂻⸩ሺሲቃሸሧ
ターゲットまで
の測定を確認す
るメッセージ
MEAS
:
>>>>
:
>>>>
測定中 ベンチマークま
MEAS
GL:
dH:
:
>>>>
:
>>>>
測定中 ターゲットまで
dH
: 1.235 m
: 5.68 m
での測定の表示
dH
GL:
99.138
dH:
:
:
m
- 0.900 m
2.135 m
31.11 m
の測定の表示
ステップキー / ス
クリーン
1.
2.
3.
4.
5.
6.
説明
キーを押して高低差と減少レベル
機能を開始します。
入力したベンチマークの減少レベ
ルとデザイン高度と共に「基準を
測定してください」というメッ
セージが表示されます。
測定キーを押して参照標尺 / ベン
チマークに対する測定を開始しま
す。
基準の高さと距離の測定が表示さ
れ、続いて「ターゲットを測定し
てください」という確認メッセー
ジが表示されます。
再び測定キーを押して標尺点を基
準とした測定を開始します。
目標減少レベル (RL), 基準標尺に
関する目標高低差 (dH), 標尺点の
高さと距離の結果が表示されま
す。
EN
JA
ZH
KO
RU
PL
HU
EL
CZ
TR
SR
操作
10
Sprinter 150/150M/250M - 1.0.0ja
Page 48

EN
6.3 カット & フィル測定 * ( 内部メモリー有効 )
JA
BM1
RfID:
ZH
100.038m
BM:
0.000m
䂻岼䍈
H:
KO
⪉䄥浧ት䂻⸩
䂻䍈⚜ᇬ%0ᇬ䂻岼䍈ቑ
RU
⮘㦃ቒኾከዂዙ䟊槱ቛ
PL
確認メッセージ
のあるベンチ
HU
マークまでの測
EL
定
CZ
TR
ኜዙአእት䂻⸩
ሲቃሸሧ
SR
ターゲットまで
の測定を確認す
るメッセージ
BM1
RfID:
100.038m
BM:
100.500m
⸳ὐH:
⪉䄥浧ት䂻⸩
䂻䍈⚜ᇬ%0ᇬ䂻岼䍈ቑ
⮘㦃ቒኾከዂዙ䟊槱ቛ
メニューへ移動
してデザイン高
度を更新しま
す。
PtID:
SLAB 1
GL:
99.563 m
1.710 m
:
0.937 m
ターゲットまで
の測定の表示
RfID :
ベンチマークま
での測定の表示
1.235m
:
:
5.68m
BM1
ステップ キー / ス
1.
2.
3.
4.
5.
6.
クリーン
説明
メニュー キーを押して、プロ
グラム サブメニューからカッ
ト & フィル アプリケーション
を選択します。
入力したベンチマークの減少レ
ベルとデザイン高度と共に「基
準を測定してください」という
メッセージが表示されます。
測定キーを押して参照標尺 /
ベンチマークに対する測定を開
始します。
基準の高さと距離の測定が表示
され、続いて「ターゲットを測
定してください」という確認
メッセージが表示されます。
再び測定キーを押して標尺点ま
での測定を開始します。
目標減少レベル (RL) / 高度 ,
標尺点の高さ、デザイン減少レ
ベル / デザイン高度に対する
標尺点のカット / フィル値の
結果が表示されます。
操作
11
Sprinter 150/150M/250M - 1.0.0ja
Page 49

6.4 BIF 路線測量測定 * ( 内部メモリー有効 )
B I F
1 PtlD :
120.000m GL:
ᓟⷞ
*/,'⮘㦃㣑ቒ
ኾከዂዙቛ
確認メッセージのあ
るバックサイトまで
の測定
B I F
PtID:
RD2
_ _ _ _ _m
GL:
_ _ _ _ _m
:
_ _ _ _ _m
:
/
ኾከዂዙ
B I F
確認メッセージのあ
る次の中間点までの
測定
B I F
PtlD :
確認メッセージと共
に表示されるバック
サイト測定
1
:
1.417 m
:
28.35 m
⸃
B I F
PtID:
GL:
メニューに移動し、
「中間点」を OFF に設
定するか、または高
さ & 距離キーを押し
てフォアサイトを測
定します。
_ _ _ _ _m
_ _ _ _ _m
:
_ _ _ _ _m
:
B I F
2
/
ኾከዂዙ
B I F
PtID:
2
_ _ _ _ _m
GL:
_ _ _ _ _m
:
_ _ _ _ _m
:
/
ኾከዂዙ
B I F
確認メッセージのあ
るフォアサイトまで
の測定
B I F
2
PtID:
119.894m
GL:
1.523m
:
30.76m
:
ℕ屲
確認メッセージと共
に表示されるフォア
サイト測定
B I F
PtID:
RD1
_ _ _ _ _m
GL:
_ _ _ _ _m
:
_ _ _ _ _m
:
/
ኾከዂዙ
B I F
メニューに移動し、
「中間点」を ON に設
定するか、または高
さ & 距離キーを押し
て中間点を測定しま
す。
B I F
PtlD : 2
_ _ _ _ _m
:
_ _ _ _ _m
:
䂻⸩᧫ኾከዂዙ
確認メッセージのあ
る次の変更点のバッ
クサイトまでの測定
B I F
RD1
PtID:
119.317m
GL:
2.100m
:
30.617m
:
ℕ屲
確認メッセー
ジと共に表示
される中間点
測定
EN
JA
ZH
KO
RU
PL
HU
EL
CZ
TR
SR
操作
12
Sprinter 150/150M/250M - 1.0.0ja
Page 50

EN
ステップキー / ス
JA
ZH
KO
RU
PL
HU
EL
CZ
TR
SR
クリーン
1.
2.
3.
4.
5.
6.
7.
説明
BIF 法を初期化します。
ベンチマークまでの測定を開始し
ます。
バックサイト測定が表示されま
す。
「中間点」測定を開始するには、
メニューに移動し、「中間点」を
ON に設定するか、高さ & 距離
キーを押します。
中間点測定が表示されています。
メニューに移動し、「中間点」を
OFF に設定するか、または高さ &
距離キーを押してフォアサイト標
尺までを測定します。
フォアサイト測定が表示されま
す。
ステップキー / ス
クリーン
8.
説明
システムは次の変更点のバックサ
イトまでの測定を表す待機表示を
更新します。
6.5 路線測量測定(BF)*
ステップキー / ス
クリーン
1.
2.
3.
4.
5.
6.
説明
BF 法を初期化します。
ベンチマークまでの測定を開始し
ます。
バックサイト測定が表示されま
す。
フォアサイト標尺までを測定しま
す。
フォアサイト測定が表示されます。
システムは次の変更点のバックサ
イトまでの測定を表す待機表示を
更新します。
操作
13
Sprinter 150/150M/250M - 1.0.0ja
Page 51

6.6 路線測量測定(BFFB)*
ステップキー / スク
リーン
1.
2.
3.
4.
5.
6.
7.
8.
説明
BFFB 法を初期化します。
ベンチマークまでの測定を開
始します。
バックサイト測定が表示され
ます。
フォアサイトまでの測定
フォアサイト測定が表示され
ます。
フォアサイト標尺までを測定
します (2 番目の視準 )。
フォアサイト (2 番目の視準 )
測定が表示されます。
バックサイト標尺までを測定
します (2 番目の視準 )。
ステップキー / スク
リーン
9.
10.
11.
BFFB 路線測量測定法のバックサイト
)
およびフォアサイトの往復照準におけ
る平均高低差
説明
バックサイト (2 番目の視準 )
測定が表示されます。
システムは現在の「測点変更」
測定レポートを表示します。
ENTER キーを押して結果を許
諾します。
システムは次の変更点のバッ
クサイトまでの測定を表す待
機表示を更新します。
dH
6.7 タイマー測定 *
メニュー\ 設定 \ タイマーで測定間隔を 00 時間 :00
分に設定します。キーを 3 秒間押し続けるとタイ
マー測定が開始され、現在の測定モードを示すタイ
マー アイコンが液晶表示の左上に表示されます。タ
イマー測定を開始するには、測定キーを 3 秒間押し
てください。
EN
JA
ZH
KO
RU
PL
HU
EL
CZ
TR
SR
操作
14
Sprinter 150/150M/250M - 1.0.0ja
Page 52

EN
7. データ転送 DataLoader*
1.Sprinter_Dataloader .exe セットアップ ラン
JA
チャーをダブルクリックします ( デフォルトで
ZH
は、DataLoader は C:\ Program files \ Leica-
KO
Geosystems にインストールされます )。
RU
2.電話ジャブ付きの USB ケーブルをコネクタ ポート
( 装置のバッテリー部分にあります ) に接続し、
PL
UAB ジャブを PC の USB ポートに接続します。
HU
3.装置の電源をオンにしてブザー音が 2 回鳴り、
EL
USB アイコンが装置の液晶表示部に表示されるの
を待ちます。
CZ
4.デフォルトの C:\ Program files \ Leica-
TR
Geosystems から DataLoader を起動します。
SR
5.DataLoader の「USB 接続」ボタンをクリックする
と装置に関するすべての情報が表示されます。
6.データ エクスポート ウィンドウ「データ一覧」/
「フィールド ブック」ボタンをクリックし、装置
から PC にデータ (Window Ms-Excel 形式 ) をダ
ウンロードします
DataLoader に関する詳細と RS232 データ転送
)
方法については、Sprinter CD-ROM* をご覧く
ださい。
ィ
。
データ転送 DataLoader*
15
Sprinter 150/150M/250M - 1.0.0ja
Page 53

8. 点検と調整
A
8.1 電子式視準調整
A
~15m
「調整」プログラムを有効化するには、メニュー \
調整に移動します。
ステップ 1: 標尺 A に照準を合わせ、測定キーを押
します。結果が表示されたら実行 ENTER キーを押し
て承認します。
ステップ 2: 標尺 B に照準を合わせ、測定キーを押
します。結果が表示されたら実行 ENTER キーを押し
て承認します。
次に、 Sprinter を標尺 A の方向に移動し、標尺 A か
ら約 3m の距離に設置します。
~15m
B
~3m ~27m
ステップ 3: 標尺 B に照準を合わせ、測定キーを押
します。結果が表示されたら実行 ENTER キーを押し
て承認します。
ステップ 4: 標尺 A に照準を合わせ、測定キーを押
します。結果が表示されたら実行 ENTER キーを押し
て承認します。
新しい電子測定による視準誤差が表示されます。こ
の補正量で良い場合は実行 ENTER キーを押します。
そうではない場合は ESC キーを押して調整結果を拒
否します。
光学測定による視準誤差が、十字線を調整する
)
ことにより補正されます。
B
EN
JA
ZH
KO
RU
PL
HU
EL
CZ
TR
SR
点検と調整
16
Sprinter 150/150M/250M - 1.0.0ja
Page 54

EN
8.2 円形気泡管 8.3 光学測定による視準 / レティクル
JA
ZH
KO
RU
PL
HU
EL
CZ
r_18
TR
ステップ説明
SR
3.
1.
2.
4.
調整
ステップ説明
1.
2.
3.
4.
)
液面計
器械を180℃回してください。
中心円から気泡が外れている場合は、中心に
合わせてください。
アレンキーで誤差の半分を補正してください。
ステップ1から4までを繰り返し、望遠鏡を
いかなる方向に向けても円形気泡管の気泡が
中心に来るようにしてください。
点検と調整
1.
2.
視準誤差が60メートルの距離で3ミリメートルを
超えるならば、諮詢器の調整が必要です。
17
アレンキーを設定値が得られるまで回して
ください。
視準器をチェックしてください。
Sprinter 150/150M/250M - 1.0.0ja
Page 55

9. エラーメッセージ
No. エラーメッセージ 対策 / 原因
E99 システムエラー、サービ
スセンターに連絡 !
E100 電池残量低下 新しい電池または完全に充電した電池に交換してください。
E101 測点番号を更新できません 測点番号(PtID)を変更してください。測点番号 (PtID) の最大値は 99999999
E102 明るすぎる 標尺を暗くするか、標尺の照明を弱くするか、望遠鏡の対物レンズが陰になる
E103 暗すぎる 標尺の照明が均一になるようにしてください。
E104 標尺が見つかりません 望遠鏡の照準をチェックしてください。
E105 入力エラー 入力項目をチェックしてください。
E106 精度範囲を超えています 器械の水平を調整してください。
E107 メモリーがいっぱいです 内部メモリーをオフに設定し記録を行わずに測定を続けるか、保存されている
E108 データファイルのエラー データファイルのエラーです。
E109 メモリー領域不足 保存されていた内部データをすべて削除してから記録を伴う測定を続けられる
E110 標尺が近すぎます 標尺と器械を離してください。
E111 標尺が遠すぎます 標尺と器械を近付けてください。
E112 温度が低すぎます 作業を中止してください。外部温度が器械の使用温度範囲外です。
E113 温度が高すぎます 作業を中止してください。外部温度が器械の使用温度範囲外です。
ハードウェアの異常、ファイルエラー、調整や設定のエラーなどのため、器械
が正常に動作していない。
であり、英文字を含む 8 文字の文字列で終わっていません。
ようにしてください。
データを外部機器にダウンロードし保存されていた内部データをすべて削除し
てから測定を続けてください。
ように、外部機器にデータをダウンロードする準備をしてください。
EN
JA
ZH
KO
RU
PL
HU
EL
CZ
TR
SR
エラーメッセージ
18
Sprinter 150/150M/250M - 1.0.0ja
Page 56

EN
No. エラーメッセージ 対策 / 原因
E114 無効な測定 測定をやり直してください。測定をやり直してもうまく行かない場合は、標尺
JA
ZH
E115 温度センサーエラー ! 望遠鏡の対物レンズを手で覆って器械の電源を入れてください。ハードウェア
KO
RU
E116 調整エラー 説明の手順に従って調整を行ってください。器械が水平で標尺が垂直になって
PL
E117 ベンチマーク高度変更で
HU
EL
CZ
TR
SR
きません
E119 標尺がよく見えません バーコードの長さが測定には不十分です。
E120 画像センサーエラー サービスセンターへ連絡。
E121 倒像標尺では調整できません標尺の位置をチェックしてください。
E123 測点名変更できません ESC キーを押してメッセージを終了してください。
の位置、倒像標尺の設定、標尺の照明状態、焦点、照準などをチェッ クしてく
ださい。また、視野内のバーコードの長 さが十分かチェックしてください。
通信機能の故障も考えられます。
いるか確認してください。調整誤差が補正範囲を超えています。
高さ / 距離 キーを押して初期の測定モードに戻し、ベンチマーク高度入力 メ
ニューモードでベンチマーク高度を変更してください。
10. 操作メッセージ
操作メッセージ 対策 / 原因
連続測定開始 連続測定モードを開始します。
連続測定を停止 連続測定モードを停止します。
連続測定継続 連続測定モードを再開するには、測定キーを 3 秒間押し続けます。測定に 10 回失敗
測定失敗 現在の測定は終了します。
データのダウンロード 内部メモリーから外部機器にデータをダウンロード中。
ダウンロード完了 内部メモリーから外部機器にデータが正常にダウンロードされました。
すると、 連続測定がホールド状態になります。
操作メッセージ
19
Sprinter 150/150M/250M - 1.0.0ja
Page 57

操作メッセージ 対策 / 原因
記録されたデーターがあ
りません
削除してよろしいですか ? 内部メモリーの 1 つのデータ(データ一覧モード時) またはすべてのデータ(データ
データーを削除しました 内部メモリーの 1 つのデータまたはすべてのデータを削除したことをシステムから
削除できません 1 つのデータを削除する方法では、基準ベンチマークと路線測量測定を削除することは
BM を変更します。よろし
いですか ?
デザイン高度を変更しま
す。よろしいですか ?
お待ちください ! ファイ
ルを掃除します !
電源オフ システムの電源を遮断中です。
砂時計アイコン お待ちください ! システムが処理を実行中です。
ターゲットを測定してく
ださい
設定中 ... システムパラメータを設定中です。
測点変更が完了していま
せん。アプリケーション
を終了しますか?
このアプリケーションを
終了しますか
内部メモリーにデータが保存されていません。
削除モード時)を削除してよいかユーザに確認するためのメッセージです。
ユーザに通知するメッセージです。
できません。
基準ベンチマーク高度を変更してよいかユーザに確認するためのメッセージです。
デザイン高度を変更してよいかユーザに確認するためのメッセージです。
一時ファイル / システムファイルの掃除中です。
次の測点を視準して測定ボタンを押してください。
路線測量の途中でアプリケーションを終了するかどうかを確認するメッセージです。
現在の路線測量測点変更測定を完了し、アプリケーションプログラムから出てくださ
い。実行 ENTER キーを押してアプリケーションを終了するか、ESC キーを押して現
在のアプリケーションに戻ってください。
実行 ENTER キーを押してアプリケーションを終了するか、ESC キーを押して現在の
アプリケーションに戻ることを確認するメッセージです。
EN
JA
ZH
KO
RU
PL
HU
EL
CZ
TR
SR
操作メッセージ
20
Sprinter 150/150M/250M - 1.0.0ja
Page 58

EN
11. お手入れと輸送
JA
11.1 輸送
現場での移送
ZH
作業現場で器械を持ち運ぶ際は、次の事項を必ず
守ってください。
KO
• 器械をオリジナルの輸送ケースに入れて持ちんで
RU
ください。
• 器械を三脚に取り付けた状態で運ぶ場合は、脚を
PL
開いた状態で肩に担ぎ、器械が真っ直ぐに立った
状態を保つようにしてください。
HU
自動車での輸送
EL
自動車で輸送する場合は、器械をそのまま車両に乗
せないでください。衝撃や振動で器械が破損する恐
CZ
れがあります。必ず専用のケースに入れて輸送して
TR
ください。
運送便による輸送
SR
器械を列車、航空機、船舶などで輸送する場合は、
ライカジオシステムズが出荷の際に使用したオリジ
ナルの梱包材(輸送ケースと出荷用段ボール箱)を
使用するか、衝撃や振動から器械を保護できるよう
な適切な梱包材を使用してください。
電池の運送、輸送
電池を運送、輸送する際、本製品の取扱責任者は、
国内および外国の該当法規や条例に従ってください。
運送や輸送の前に、各地域の旅客、貨物輸送会社に
お問い合わせください。
現場での調整
輸送後は、器械を使用する前に、この取扱説明書に
示されている現場調整パラメータをチェックしてく
お手入れと輸送
ださい。
11.2 保管
製品
器械を保管する場合は温度に注意してください。特
に夏期や車中にて保管する場合はご注意ください。
温度条件については "13. テクニカルデータ " を参
照してください。
現場での調整
長期間器械を保管した後は、器械を使用する前に、
この取扱説明書に示されている現場調整パラメータ
をチェックしてください。
器械を長期保管する場合は、漏洩の危険を避ける為
に製品からアルカリ電池を取り外してください。
11.3 清掃と乾燥
製品とアクセサリー
• レンズの埃は吹き飛ばしてください。
• ガラス部分には、決して指で触れないでください。
• 清掃するときは、清潔で柔らかい毛羽立っていな
い布だけを使用してください。必要に応じて、純
粋アルコールで湿らせた布を使用することも可能
です。 その際、アルコール以外の液体は絶対に使
用しないでください。ポリマー材の部分が破損す
る恐れがあります。
器械が濡れた場合
器械、輸送ケース、発泡インサート、アクセサリー
を40ーC (104ーF) 以下の温度で乾燥させ、清掃して
ください。すべての部分が完全に乾燥するまでは
ケースに入れないでください。
21
Sprinter 150/150M/250M - 1.0.0ja
Page 59

12. 安全管理
12.1 概要
説明
以下の説明は、取扱責任者、および実際に器械を使
用するすべての方が、操作上の危険を予想し、回避
できるようにするためのものです。
操作を行うすべての人員に、危険性とその危険への
対応を指導し、安全管理に努めてください。
12.2 想定用途
許されている用途
• 距離の測定
• 測定データの記録
• 電子的、光学的な方法による、標尺の高さの測定
• 光学的な方法による高度測定
• スタジア法による光波測量
• 外部装置とのデータ通信
禁止事項
• 事前に取扱説明書を読まずにレベルを使用するこ
と
• 想定用途以外での使用
• 安全システムを解除した状態での使用
• 注意書きを取り外した状態での使用
• 特殊な目的のために特別に許可されている場合を
除いて、工具(ドライバーなど)を使用して器械
を分解すること
• 器械の改造または変造
• 盗難された器械であることを承知しての使用
安全管理
• 明らかに認識できる損傷または欠陥がある状態の
器械の使用
• ライカジオシステムズからの明確な承認を得ずに
他社製のアクセサリーとともに器械を使用するこ
と
• (路上での測定など) 器械の設置場所に十分な安全
対策を取らない状況での使用
• 太陽の直接視準
警告
禁止事項を遵守せずに使用した場合、人身事
故、故障あるいは破損の原因につながります。操作
を行うすべての方に、危険性とその危険への対応を
指導することは、取扱責任者の責務です。器械の使
用方法の説明を事前に受けてから使用してください。
12.3 使用の制限
使用環境
本器械は、人間が継続的に居住可能な環境での使用
には適しますが、過酷な環境、あるいは爆発の危険
がある環境での使用には適していません。
危険
爆発の危険がある環境内や電気設備の近くなど
で作業を行う場合、本器械の取扱責任者は、 安全に
関する各地域の管轄機関や専門家に事前に問い合わ
せてください。
22
Sprinter 150/150M/250M - 1.0.0ja
EN
JA
ZH
KO
RU
PL
HU
EL
CZ
TR
SR
Page 60

EN
12.4 責任
ライカジオシステムズ社 オリジナル製品の製造者責
JA
任
ZH
製造者であるライカジオシステムズ(Leica
Geosystems AG, CH-9435 Heerburgg、以降はライカジ
KO
オシステムズと表記)が、製造者責任を負います。
ライカジオシステムズは、本器械、 付属取扱説明書、
RU
およびオリジナルのアクセサリーに責任を負います。
PL
ライカジオシステムズ製以外のアクセサリーの製造
者責任
HU
本器械に、ライカ製品以外のアクセサリーを使用す
EL
る場合、アクセサリーの製造者は、その製品の開発、
使用、あるいは製品に関する安全対策に責任を負い
CZ
ます。また、アクセサリーの製造者は、ライカジオ
システムズの器械と組み合わせて使用する上での安
TR
全対策について も責任を負います。
SR
本器械の取扱責任者の責任
本器械の取扱責任者には、次のような責任がありま
す。
• 本器械の安全対策と、取扱説明書の内容を理解す
ること。
• 本器械を使用する地域の安全と事故予防規定に精
通していること。
• 器械の安全が損なわれたと判断した場合は、ただ
ちにライカジオシステムズに連絡すること。
警告
本器械の取扱責任者は、取扱説明書に基づいて
器械が安全に使用されるようにしなければなりませ
ん。また、取扱責任者は、本器械を使用するすべて
の人々のトレーニング、および使用時の安全管理に
ついて、責任を負います。
12.5 使用中の危険
警告
説明に従わなかったり、説明の理解が不十分だ
と、誤った方法で使用したり、禁止事項を実行する
ことになります。その結果、人身事故や物損事故ま
たは経済上および環境上の問題を引き起こす恐れが
あります。
予防措置 :
器械を使用するすべての方は、製造者が示した安全
対策と、器械の取扱責任者の指示に従わなければな
りません。
注意
器械を落とした場合や使用法を誤ったり改造さ
れている場合、あるいは長期間保管したり輸送した
後には、測定値に誤差がないか注意してください。
予防措置 :
取扱説明書に従って、定期的にテスト観測と現場で
の調整を行ってください。特に器械を通常と異なる
方法で使用した後や、重要な測定の前後には必ずテ
スト観測を行ってください。
安全管理
23
Sprinter 150/150M/250M - 1.0.0ja
Page 61

危険
送電線や電車の軌道など、電気施設の近くでプ
リズムポールや延長ポールなどを使用するのは大変
危険です。感電の恐れがあります。
予防措置 :
電気施設から十分な距離を確保してください。この
ような環境で作業を行う必要がある場合は、まず電
気施設の安全管理の責任者に相談し、指示に従って
ください。
注意
近くに強い磁気発生源(変圧器、溶解炉など)
がある場合は、コンペンセータ(自動補正装置)が
影響を受け測定誤差の原因となる恐れがあります。
予防措置 :
強い磁気の近くで測定を行う場合は、正しい結果が
得られているか確認してください。
注意
レベルを太陽の方向に視準する場合は注意して
ください。望遠鏡が拡大レンズの役割を果たし、目
を傷めたり、レベルの内部にダメージを与えること
があります。
予防措置 :
太陽光線を直接視準しないでください。
警告
ダイナミックな使用、例えば、用地測量では、
操作を行う人員が障害物、掘削工事または交通量な
どの周囲の状況に注意を向けないなら事故が起こる
危険性があります。
予防措置 :
器械の取扱責任者は、操作を行うすべての人員に現
存する危険を十分に承知させてください。
警告
路上、建設現場、または工場など、危険な場所
で測量を行う際は、安全対策が不十分だと危険な状
況が生じる場合があります。
予防措置 :
常に測量現場の安全を確保してください。事故予防
規定や交通規則を遵守してください。
警告
屋内用コンピュータを屋外で使用すると感電の
危険があります。
予防措置 :
ライカジオシステムズの製品とともに屋外で使用す
ることに関するコンピュータメーカーの説明に従っ
てください。
注意
本製品とともに使用するアクセサリーが正しく
固定されていない場合に本製品に打撃や落下などの
器械的衝撃が加わると、製品を損傷したり人身事故
を招く恐れがあります。
EN
JA
ZH
KO
RU
PL
HU
EL
CZ
TR
SR
安全管理
24
Sprinter 150/150M/250M - 1.0.0ja
Page 62

予防措置 :
EN
本製品を設置する際には、三脚、基盤(整準盤)、接
JA
続ケーブルなどのアクセサリーが正しく取り付けら
れ、固定され、所定の位置にロックされているか、
ZH
確認してください。
KO
また、本製品に器械的な力を加えないように注意し
てください。
RU
PL
HU
EL
CZ
TR
SR
注意
1 本の支柱で標尺を垂直に支える場合は、(突風
などにより)倒れる危険が常に伴い、機材の破損や人
員の負傷につながる恐れがあります。
予防措置 :
1 本の支柱のみで標尺を垂直に支えている場合は、
絶対に目を離さないでください(標尺に人員がつい
ていること)。
警告
マスト、標尺、ポールなどアクセサリーととも
に使用する場合は、落雷被害の危険性が増します。
予防措置 :
雷雨の時には使用しないでください。
注意
製品の操作の間、回転部品に髪や衣服が絡まる
恐れがあります。
予防措置 :
回転部品から離れてください。
警告
製品を分解すると、以下のいずれかにより感電
する恐れがあります。
• 通電している部品への接触。
• 不適切な修理が試みられた製品の使用。
予防措置 :
製品を分解しないでください。ライカジオシステム
ズサービスセンターだけに製品を修理する資格を与
えられています。
警告
ライカジオシステムズが推奨していない電池を
充放電すると電池を破損し、火災や爆発の恐れがあ
ります。
予防措置 :
必ず、ライカジオシステムズが推奨する電池を充放
電してください。
警告
ライカジオシステムズが推奨していない充電器
を使用すると電池を破損し、火災や爆発を引き起こ
す恐れがあります。
予防措置 :
必ず、ライカジオシステムズが推奨する充電器で電
池を充電してください。
注意
電池の輸送、運送、廃棄の際に、不慮の器械的
衝撃により火災が発生する恐れがあります。
安全管理
25
Sprinter 150/150M/250M - 1.0.0ja
Page 63

予防措置 :
器械を運送または廃棄する前に、電池残量がなくな
るまで器械を動作させて電池を完全に放電してくだ
さい。
電池を運送、輸送する際、本製品の取扱責任者は、
国内および外国の該当法規や条例に従ってください。
運送や輸送の前に、各地域の旅客、貨物輸送会社に
お問い合わせください。
警告
電池を大きな器械的応力、高温にさらしたり、
液体に浸けたりすると、電池の漏れ、火災、爆発な
どの恐れがあります。
予防措置 :
電池を大きな器械的な力や周囲の高温にさらさない
ようにしてください。また、電池を落としたり液体
に浸けないでください。
警告
電池をポケットに入れて持ち運び、宝飾品、
鍵、金属蒸着紙などに触れた場合など、電池の端子
が短絡すると過熱する恐れがあり、火傷や火災の危
険があります。
予防措置 :
電池の端子が金属製の物体に接触しないように注意
してください。
注意
長期間保管により電池の寿命が短くなったり、
ダメージを受けることがあります。
予防措置 :
長期間保管中、定期的に充電して電池の寿命を維持
してください。
警告
電池の廃棄処理が不適切であると、次のような
危険があります。
• ポリマー製の部分を燃やすと有毒ガスが発生して
健康を害する恐れがあります。
• 電池が破損したり、熱せられると、爆発、毒物の
発生、火災、腐食、あるいは環境汚染の原因にな
ります。
• 器械を無責任に廃棄処分すると、使用する資格の
ない人が規定を守らずに使用し、彼ら自身または
第三者が重傷を負ったり環境を汚染する危険があ
ります。
予防措置 :
器械は家庭廃棄物とともに廃棄しないでく
ださい。
器械の廃棄処分は、各国の基準に従って適
切に行ってください。
してください。
製品固有の処理法と廃棄物管理に関する情報は、
Leica Geosystems AG のホームページ http://
www.leica-geosystems.com/treatment からダウン
ロードしていただくこともできますし、最寄りのラ
イカジオシステムズの販売店から入手していただく
こともできます。
資格のない人が器械に触れないように予防
EN
JA
ZH
KO
RU
PL
HU
EL
CZ
TR
SR
安全管理
26
Sprinter 150/150M/250M - 1.0.0ja
Page 64

EN
JA
ZH
KO
RU
PL
HU
EL
CZ
TR
SR
警告
ライカジオシステムズサービスセンターだけに
製品を修理する資格を与えられています。
12.6 電磁障害の許容量(EMC)
説明
電磁障害の許容量(EMC)とは、電磁気放射や静電気
放電がある環境でも他の機器を妨害せずに製品が支障
なく機能する能力のことをいいます。
警告
電磁気放射は、他の機器を妨害する可能性があ
ります。
本製品は、この点に関する厳しい規定や規格に適合
していますが、ライカジオシステムズは、 他の機器
を妨害する可能性を完全には否定できません。
注意
本製品を他社製のアクセサリーや機器(フィー
ルドコンピュータ、パソコン、無線モデム、標準外
のケーブル、外部電池など)とともに使用した場合、
他の機器を妨害する恐れがあります。
予防措置 :
ライカジオシステムズが推奨するアクセサリーや機
器のみを使用してください。これらは、本製品と組
合わせた場合でもガイドラインや規格で定められた
厳密な条件に適合します。コンピュータや無線モデ
ムを使用する場合は、その機器の製造元が示す電磁
障害の許容量に関する情報に注意してください。
注意
電磁気放射による障害で、測定値が許容誤差の
制限を超えてしまうことがあります。
本製品 は、この点に関する厳しい規定と規格に適合
していますが、本製品の近くにある無線モデム、小
型ラジオ、ディーゼル発電機などからの非常に強い
電磁波によって本製品が影響を受ける可能性がある
ことを完全には否定できません。
予防措置 :
このような条件下での測定結果については、信頼性
をよく確認してください。
警告
接続ケーブル(外部電源ケーブル、インター
フェイスケーブルなど)の片側しか接続されていな
い状態で本製品を動作させると、電磁放射が許容レ
ベルを超え、他の機器に悪影響を与える恐れがあり
ます。
予防措置 :
本製品は、必ず(本製品と外部電池やコンピュータ
などの間の)接続ケーブルの両端を接続した状態で
使用してください。
安全管理
27
Sprinter 150/150M/250M - 1.0.0ja
Page 65

12.7 FCC 規格(アメリカ合衆国で適用)
警告
FCC 規定の第 15 条に従ってテストを行った結
果、本装置は、クラス B のデジタル装置であること
が確認されています。
これは、住居内に設置して通常の状態で使用した場
合に他の機器との間で悪影響を及ぼし合わないこと
を意味します。
本装置は、電磁波を発生、使用、放射するため、指
示に従わずに使用した場合、無線通信を妨害する恐
れがあります。
また、設置状況によっても妨害を起こす可能性があ
ります。
本装置がラジオやテレビの受信傷害の原因となって
いる場合は、本装置の電源をオン / オフすると判断
できますので、そのような場合は、次のような対策
を行ってみてください。
• 受信アンテナの方向や場所を変える。
• 本製品と受信機を離す。
• 本製品を、受信機とは別のコンセントに接続する。
• 販売店や技術者に相談する。
警告
ライカジオシステムズの許可なく本製品を分
解、改造、または修理した場合、ライカシステムズ
は、一切の責任を負いません。
ラベル
EN
JA
ZH
KO
RU
PL
HU
EL
CZ
TR
SR
安全管理
28
Sprinter 150/150M/250M - 1.0.0ja
Page 66

EN
13. テクニカルデータ
高さの測定値 1km の往復測定での標準誤差(ISO 17123-2):
JA
ZH
KO
RU
PL
距離の精度(標準偏差)D<= 10 m の場合は、10 mm
HU
EL
範囲 標準のアルミバーコード標尺の場合の電子測定の距離範囲 2 m ~ 100 m.
CZ
光学式の最短合焦距離 50 cm
単一測定の測定時間
TR
(電子測定)
SR
円形気泡管 円形気泡管の感度 :10'/2 mm
• Sprinter アルミニウム製バーコード標尺を使用した電子測定の場合 :
• 1.0 mm (Sprinter 250M)
• 1.5 mm (Sprinter 150/150M)
• 標準のアルミニウム製の 5mm 目盛り / 数値目盛標尺を使用した光学測定の場合
:2.5 mm
• 30m の標尺単一測定での標準誤差:0.6 mm ( 電子測定 ) および1.2 mm ( 光学測定 )
D>10 m の場合は、距離(単位 m) x 0.001
標準的な昼光の下で通常は 3 秒以内:均一な薄明かり状態 (20 lux) ではより長い
測定時間が必要
コンペンセータ 磁気制動式ペンジュラムコンペンセータ(範囲の電子警報機能付き)
• 整準警報範囲(電子的): ア 10'
• コンペンセータ作動範囲(器械的): ア 10'
• 設定精度 :0.8" 以下 (標準誤差 )
• 磁場感度 : < 10"
(5 ガウス未満の磁場強度における水平の一定磁場での視準線の差)
RS232 ポート * データ出力、外部電源接続、外部通信データコレクタなど用。
電話ジャブ ポート * PC と通信を行う USB ケーブル接続用。
内部メモリーの容量 * 容量 :1000 点までの測定値
テクニカルデータ
29
Sprinter 150/150M/250M - 1.0.0ja
Page 67

データ転送 * プログラム :USB 経由で DataLoader、PC の RS232 経由で Geo Office および
Hyper Terminal へ接続するには、Windows アプリケーションを使用します。
電源 • Sprinter 150: 内部電池
• Sprinter 150M/250M: 内部電池+ RS232 ポート経由の外部電源
バッテリ電源 内部電源 : 単三形乾電池 1.5 V x 4 個 ; RS232 ポート経由の外部電源
公称電圧 12 V ,
電圧範囲 4 - xx V ,
GEV71 車載バッテリー DC12V (車載バッテリー用 ケーブルで接続); 定格電流
300 mA 以下
液晶表示器 • 機種名 : バックライト付きモノクロディスプレイ
• 寸法 :128 x 104 ピクセル
望遠鏡 • 倍率(光学):24 x
• 対物レンズの有効径 :36 mm
• 視野角 :2
• スタジア乗数 :: 100
• 加算定数 : 0
水平角 円形刻印目盛盤 :
プラスチック製の 360 ・ 400 gon) の水平円。数値目盛りの分解能は 1 ・ ( 上側目
盛 ) および 50 gon 間隔(下側目盛)。
側面駆動 側面駆動の動作 : 水平連続デュアル駆動
システム • MMI システム
温度範囲 • 使用温度範囲 :-10 淸 から +500 淸
• 測定方法 / 用途
• キーボード :5 つのラバーキー
• 保管温度範囲 :-40 淸 から +70 淸
EN
JA
ZH
KO
RU
PL
HU
EL
CZ
TR
SR
テクニカルデータ
30
Sprinter 150/150M/250M - 1.0.0ja
Page 68

EN
環境条件 • 水、埃、砂に対する保護 :IP55 (IEC 60529)
JA
ZH
寸法 : 器械本体 :
KO
RU
PL
HU
EL
重量 2.55 kg ( 単三形電池 4 個を含む )
CZ
TR
SR
• 湿気に対する保護 :95% 以下で結露がないこと。結露の影響が出ないように、定
期的に本製品を乾燥させて対処すること。
• 長さ(接眼レンズを完全に伸ばした状態でのレンズ管の前部を含む) 219 mm
• 幅(合焦ドライブ部の外面から円形気泡管ホルダの側部外面まで) 196 mm
• 高さ(基盤部を完全に伸ばした状態でハンドグリップ部も含む) 178 mm
ケース :
• 長さ 400 mm
• 幅 220 mm
• 高さ 325 mm
テクニカルデータ
31
Sprinter 150/150M/250M - 1.0.0ja
Page 69

14. 国際保証、ソフトウェアライセン ス契約
国際保証
国際保証書は、Leica Geosystems AG のホームページ
http://www.leica-geosystems.com/
internationalwarranty からダウンロードしていた
だくこともできますし、最寄りのライカジオシステ
ムズの販売店から入手していただくこともできます。
ソフトウェアライセンス契約
本製品用のソフトウェアは、あらかじめインストール
された状態またはデータ記録媒体に保存された状態で
本製品に添付されているか、ライカジオシステムズか
ら事前の許可を得た上でオンラインでダウンロードし
ていただくことができます。本製品のソフトウェアは
著作権その他の法律により保護されており、ソフト
ウェアの使用に関してはライカジオシステムズのソフ
トウェアライセンス契約で定義、規定されています。
ソフトウェアライセンス契約には、ライセンスの範
囲、保証、知的財産の所有権、責任の範囲、他の保証
の排除、準拠法と 管轄裁判所などの事項が示されてい
ます。ライカジオシステムズのソフトウェアライセン
ス 契約の条項は常に必ず遵守してください。
この契約書は、すべての製品に添付されている他、
Leica Geosystems AG のホームページ http://
www.leica-geosystems.com/swlicense や最寄りのラ
イカジオシステムズの販売店でもご覧いただけます。
ソフトウェアをインストールし、使用するためには、
ライカジオシステムズのソフトウェア ライセンス契
国際保証、ソフトウェアライセンス
契約
約の条項をお読みいただき、同意していただく必要
があります。ソフトウェア またはその一部をインス
トールまたは使用されますと、ライセンス契約のす
べての条項に同意したものと見なされます。ライセ
ンス契約のすべてまたは一部の条項に同意されない
場合は、ソフトウェアをダウンロード、インストー
ル、使用することはできませんので、未使用のソフ
トウェアと添付資料に領収書を添えて、ご購入から
10 日以内に、本製品を購入された販売店に返品して
ください。購入価格全額をご返金致します。
15. 索引
B
BF .................................5, 7, 13
BFFB ............................5, 6, 7, 14
BIF .............................4, 5, 7, 12
BM 入力 ....................................7
D
D.ELV 入力 .................................7
DataLoader ...............................15
R
RS232 .....................................8
32
Sprinter 150/150M/250M - 1.0.0ja
EN
JA
ZH
KO
RU
PL
HU
EL
CZ
TR
SR
Page 70

ア
EN
アイコン ................................. 6
JA
アクセサリー ............................. 3
ZH
エ
KO
エラーメッセージ ........................ 18
RU
カ
PL
カット & フィル ...................... 5, 11
HU
ケ
EL
ケースの内容 ............................. 2
CZ
コ
TR
コントラスト ............................. 8
SR
タ
タイマー ................................. 8
タイマー測定 ............................ 14
デ
データ管理 ............................... 7
データ転送 .............................. 15
データ表示記号 ........................... 6
デザイン高度 (D.Elv) ..................... 9
バ
バックライト ..............................8
バッテリー
バッテリー収納部 ......................2
電池交換 ...............................3
ブ
ブザー音 ..................................8
プログラム ................................7
ベ
ベンチマーク高度 (BM) .....................9
ボ
ボーレート ................................8
メ
メニュー ..................................5
メニューの使い方 ..........................7
モ
モード ....................................5
ユ
ユーザインターフェース ....................4
索引
33
Sprinter 150/150M/250M - 1.0.0ja
Page 71

レ
レティクル調整 .......................... 17
液
液晶表示部 ............................... 2
円
円形気泡管 ........................... 2, 17
器
器械のセットアップ
整準 .................................. 3
接眼レンズの調整 ...................... 3
標尺に焦点を合わせる .................. 3
基
基準点入力 ............................... 7
基盤 ..................................... 2
記
記号 ..................................... 1
記録 ..................................... 7
言
言語 ..................................... 8
光
光学測定による視準 .......................17
高
高さと距離の測定 ..........................9
高低差 ....................................5
高低差と減少レベル測定 ...................10
合
合焦ネジ ..................................2
自
自動電源オフ ..............................8
照
照準器 ....................................2
整
整準ネジ ..................................2
整準警報 ..................................8
清
清掃と乾燥 ...............................21
精
精度 ......................................8
EN
JA
ZH
KO
RU
PL
HU
EL
CZ
TR
SR
索引
34
Sprinter 150/150M/250M - 1.0.0ja
Page 72

接
EN
接眼レンズ ............................... 2
JA
設
ZH
設定 ..................................... 8
KO
操
RU
操作 ..................................... 9
PL
操作メッセージ .......................... 19
HU
測
EL
測定 ..................................... 4
CZ
測定モード ............................... 5
TR
測定表示記号 ............................. 6
測点番号 (PtID) .......................... 9
SR
測点番号インクリメント ................... 9
単
単位 ..................................... 8
中
中間点 ................................... 7
調
調整モード ............................... 5
点
点検と調整 ...............................16
電
電源を入れる ..............................3
電子式視準調整 ...........................16
倒
倒像標尺 ..................................7
部
部品 ......................................2
文
文字入力 ..................................9
平
平均化 ....................................8
保
保管 .....................................21
輸
輸送 .....................................21
索引
35
Sprinter 150/150M/250M - 1.0.0ja
Page 73

用户手册 (中文)
1. 说明
前言
祝贺您购买新型徕卡数字水准仪。 该仪器的设计和技
术使得水准测量在任何建筑工地上都更简便、更快
捷。
使用本仪器前请仔细阅读本手册。
仪器标识
在仪器型号牌上,标有该仪器的型号和仪器机身编
号。
请将你的仪器型号和仪器机身编号填在下面,以便你
在需要的时候,与徕卡服务中心或徕卡维修中心联
系。
型号:____________ 机身编号:____________
手册适用范围
本手册适用于 Sprinter 150/150M/250M 。
有星号 (*) 的地方只适用于 150M/250M。
)
商标
所有的商标属于它们各自的所有者。
说明
产品
本手册包含了很重要的安全及操作指
南,请在使用本仪器前详细阅读。 1 2 .
安全指南更多的信息请参见 “12. 安
全说明”。
适用的文件
相关手册 说明
Sprinter
150/150M/
250M 用户
手册
符号
手册中所用符号有如下含义:
成人身伤害甚至死亡。
不避免,将造成人身伤害甚至死亡。
或明显的设备、经济损失和环境损害。
)
1
仪器所有的功能操作都包含在该手册
中, 手册同时提供了系统的技术数据和
安全指导。
危险
它表示非常严重的危险情况,如不避免,将会造
警告
它表示潜在的或操作不当所导致的危险情况,如
小心
它表示潜在的或操作不当会导致轻微的人身伤害
表示在实际使用中必须注意的重要段落,以便正
确、有效的使用仪器。
Sprinter 150/150M/250M - 1.0.0zh
EN
JA
ZH
KO
RU
PL
HU
EL
CZ
TR
SR
Page 74

EN
目录
JA
1. Introduction.............................................................. 1
ZH
2. 仪器部件....................................................................... 2
KO
3. 测量准备....................................................................... 3
RU
4. 用户界面....................................................................... 4
PL
5. 设置字符....................................................................... 9
HU
6. 操作................................................................................ 9
7. 数据传输 数据加载 *.............................................. 15
EL
8. 检查和校正 ................................................................ 16
CZ
9. 错误信息表 ................................................................ 18
TR
10. 操作信息表 ................................................................ 19
SR
11. 保管和运输 ................................................................ 21
12. 安全指南..................................................................... 22
13. 技术参数..................................................................... 28
14. 国际质量保证,软件许可 ...................................... 31
15. 目录.............................................................................. 31
2. 仪器部件
a
b
c
a)水平微动螺旋
b)电池仓及包括 USB 线的接
口
c)圆水准器
d)瞄准器
e)调焦旋钮
包装
主机,4 节电池,内六角扳手,用户手册,盖板,CDROM* ( 包括文件认读程序 ),USB 数据线 *。
f)提把
g)目镜
h)LCD 显示屏
i)底座
j)底座调平螺旋
d
e
f
g
h
i
j
仪器部件
2
Sprinter 150/150M/250M - 1.0.0zh
Page 75

附件
三脚架,铝质标尺 ( 因地区而异 ), 玻璃纤维标尺 (
用于 Sprinter250M,以完成 0.7 mm 精度的测量 )。(
可选件:遮阳板,4 节可充电电池和充电器 )
3. 测量准备
3.1 安装电池
按正负极指示将 4 节 AA 电池装入电池仓。
总是同时更新所有的电池!
)
请勿混用新旧电池。
)
不要同时使用不同厂家和不同型号的电池。
)
3.2 安置仪器
整平
• 安置三脚架。 将三脚架的腿伸展到合适的长度拧紧
螺丝,使三脚架顶部保持近似水平。 将三角架的腿
踩牢,以保持它的稳定。
• 把水准仪放到三脚架上面并用三脚架的中心螺旋将
仪器和三脚架连接在一起。
• 通过调整三个基座螺旋使仪器上圆水准器的气泡居
中,从而达到整平的目的。
物镜调焦
旋转仪器使望远镜对准稳定并且比较亮的目标如墙面
或白纸。 调整目镜使望远镜中的十字丝最清晰为止。
瞄准目标
通过瞄准器瞄准标尺。 用水平微动螺旋使标尺位于视
场的中间,调整物镜调焦螺旋使标尺最清晰。 确保标
尺和刻度的清晰。
开机
仪器已经做好测量的准备。
技术说明
)
• 在使用之前,长时间存放后或长途运输后,请首先
检验和校正电子和光学的视线误差,然后圆水准器
和标尺。
• 保持光学部件的清洁。 光学部件上污物或冷凝水会
影响测量范围。
• 让仪器适应环境温度后再工作 (每摄氏度的温差需
要大约 2 分钟的适应时间)。
• 避免通过玻璃窗测量。
• 标尺应完全拉开并适当的固定。
• 扶住三脚架上面三分之一部分可以减少因风对仪器
产生的振动。
• 当受到背景光干扰时,可用镜头盖盖住物镜。
• 用手电或其他照明装置把标尺上的测量区域照明即
可。
EN
JA
ZH
KO
RU
PL
HU
EL
CZ
TR
SR
测量准备
3
Sprinter 150/150M/250M - 1.0.0zh
Page 76

EN
4. 用户界面
JA
ZH
KO
RU
PL
HU
EL
CZ
TR
SR
Sprinter_08
b
a
键盘 图标 第一功能 第二功能
a)开关
电源开关 无
Sprinter_09
f
c
ESC
e
d
b)测量
c)高程 / 距
离
用户界面
测量键 按住此键 3 秒钟用来启动或停止跟踪测量 / 延迟测量 *
在显示距离和高程之间的切换 光标向上移 ( 在菜单 / 设置模式下有效 ), 在线水平
BIF* 程序下,在中间瞄准 I 和前视 F 之间切换
4
Sprinter 150/150M/250M - 1.0.0zh
Page 77

键盘 图标 第一功能 第二功能
d)高差
e)菜单
f)背景照明
模式
MEAS
MENU
ADJ
TRK
SET
测量模式 BF 水准线路测量 *
菜单 BFFB 水准线路测量 *
校正模式 BIF 水准线路测量 *
跟踪 挖方和填方 *
设置 高差
高差和水平测量 光标向下移 (在菜单 / 设置模式下有效)
激活并选择设置 回车键用于确认设置
LCD 背景照明 ESC 中断退出程序或退出设置 (在菜单 / 设置模式下有
效)
BF BF
BFFB BFFB BFFB
BIF BIF BIF
dH
BFFB BFFB
EN
JA
ZH
KO
RU
PL
HU
EL
CZ
TR
SR
仪器待机 / 延迟器启动 *
用户界面
5
Sprinter 150/150M/250M - 1.0.0zh
Page 78

图标
EN
JA
ZH
KO
RU
PL
HU
EL
测量及数据显示图标
PtID: /
CZ
RfID:
TR
BM: 高度基准 测量距离
SR
dH: 高差 BFFB * 的平均高差
Elv: 高程 填方 / 提高到设计高程 *
D.Elv: 设计高程 * 挖方 / 降低到设计高程 *
LCD 背景灯开启 电池容量图标
垂直标尺测量模式 将数据保存到内存 *
标尺倒立测量模式 倾斜警告关
连接外接电源 * 平均值测量开启
标准点 * / 参考基准点 * 标尺高度测量
dH:
用户界面
6
Sprinter 150/150M/250M - 1.0.0zh
Page 79

菜单设置
菜单 选项
1.程序 *
2.粗瞄 *
3.输入
PtID*
4.输入 BM
5.输入
D.ELV*
6.数据管理 *
7.储存 *
8.校正
9.倒立标尺
水准线 (BIF, BF, BFFB) 选择水准线的方法。
挖方 & 填方 挖方 & 填方程序。
开 / 关 在 BIF 水准线整平功能下开启 / 关闭过渡瞄准。
输入用户自定义点。
输入参考基准高程。
在挖方 & 填方程序中输入设计标高。
浏览数据 浏览储存的数据 / 按回车键删除储存的数据。
下载数据 (GSI / ASCII) 以 GSI-8 或 ASCII 格式,通过 RS232 将记录的数据传输到 PC 上。
删除所有的数据 删除所有储存的数据 / 内存记忆。
储存 将测量结果储存到仪器里。
关闭 不储存测量值。
外部设备 测量结果通过 RS232 数据线以 GSI-8 的格式储存于外部设备。
校正程序。
ON [ 倒立 ], OFF [ 垂直 ], AUTO
[ 自动识别标尺的方向 ]
在整平水准线的过程中瞄准并测量的顺序是以字母的形式
)
标注在水准线的图标里。
在水准线测量过程中,储存方式设置为按照测量顺序的先
)
后。
识别方式用来设定标尺的定位。
EN
JA
ZH
KO
RU
PL
HU
EL
CZ
TR
SR
用户界面
7
Sprinter 150/150M/250M - 1.0.0zh
Page 80

EN
菜单 选项
10.设置
JA
ZH
KO
RU
PL
HU
EL
CZ
TR
SR
用户界面
对比度 (10 个级别 ) LCD 显示屏对比度设定。
单位 (M, Int. ft, US ft, Ft in
1/16 inch)
自动关机 (ON 15 min. / OFF) ON 15 min., 在 15 分钟无按键的情况下仪器自动关机。 OFF, 仪器
显示精度 ( 标准 / 精确 ) 设置最小显示。
蜂鸣 (ON / OFF) 设置按键音。
RS232* ( 波特率:1200, 2400,
4800, 9600, 19200, 38400; 奇
偶性:无,奇数,偶数; 停止
位:1, 2; 数据位:7, 8)
倾斜提示 (ON / OFF) 电子倾斜提示设置。
背景光 (ON / OFF) 背景光设置。
平均值 输入的测量数据的平均值。
语言 ( 选择界面语言清单 ) 设置界面语言。
延迟器 * 输入测量停止的时间 00 hr: 00min (只适用于高度和距离的测量)。
单位设定。
不自动关机。
公制:
t 标准 = 0.001m 为高度,0.01m 为距离
t 精确 = 0.0001 m 为高度,0.001m 为距离
Ft ( 国际和美国英尺 ):
t 标准 = 0.01 ft 为高度,0.1 ft 为距离
t 精确 = 0.001 ft 为高度,0.01 ft 为距离
Ft 在 1/16 英寸时:
t 精确 & 标准 = ft- 英寸 -1/16 英寸,适用于高和距离
通讯接口设置为 RS232 。
按高度 / 距离 或 dH 或背景灯或菜单键。 “停止跟踪”的
)
提示将出现在显示屏内。
8
Sprinter 150/150M/250M - 1.0.0zh
Page 81

5. 设置字符
基准高程 (BM), 设计高程 * (D.Elv)
BM 和设计标高由数字 0~9 组成,空格,小数,Ft 分
隔成 1/16 英寸,并由 "+" 和 "-" 标记出。
定位点 * (PtID)
定位点由字母 a ~ z, 0 ~ 9 及空格组成。
确认当前的字符
如果在目前输入栏内没有更改任何字符,按确认键确
认以前的输入。
删除当前的输入
用空白字符给第一个输入栏做标记,然后按确认键清
除最后输入的全部值。
放弃输入
按 ESC 键放弃输入并恢复原来的数值。
增加定位点
如果定位点输入栏不人工更新的话,定位点将在上次
定位的基础上自动增加一个。
6. 操作
高度和距离测量 ( 电子 )
电子测量实例:
为了测量结果的精确,
)
请将仪器总瞄准条形码
标尺的中间,然后将标
尺的图像调焦。
6.1 高度和距离测量
MEAS
: _ _ _ _ _
: _ _ _ _ _
准备测量 测量进行中 测量距离和高度
设置 键盘 说明
1.
2.
3.
: >>>>
: >>>>
按键启动仪器,在默认的准备测量的
模式下 Leica 的标志将显示在显示屏
内。
瞄准标尺并调焦。轻轻的触发测量键
激活测量。
距离和高度将显示在显示屏内。
: 1.235 m
: 5.68 m
EN
JA
ZH
KO
RU
PL
HU
EL
CZ
TR
SR
设置字符
9
Sprinter 150/150M/250M - 1.0.0zh
Page 82

EN
6.2 高差和约化水平测量 ( 在内存没有启动的情况下 )
JA
dH
ZH
KO
RU
PL
HU
EL
CZ
TR
SR
100.038m
⪉䄥煭
:
㿚摞⪉䍈
扪⏴噫◤㦃㟈RL✛ID
利用提示信息测
量水准
dH
㿚摞䥽㪖
MEAS
:
>>>>
:
>>>>
测量进行中 水准的距离结果
MEAS
浧䲚:
浧ぽ:
:
>>>>
:
>>>>
提示信息测量目标测量进行中 至目标的测量结
dH
: 1.235 m
: 5.68 m
显示在显示屏上
dH
浧䲚:
99.138
浧ぽ:
- 0.900 m
:
2.135 m
:
31.11 m
果显示在显示屏
上
m
设置 按键 / 显示说明
1.
2.
3.
4.
5.
6.
按键启动高差和约化水平测量功能。
随着输入约化水平测量,“测量参照
" 信息显示在显示屏内。
按测量键开始对参照标尺 / 基准进
行测量。
参照高度和距离测量被显示出来;在
测量和测量目标提示之后。
再次按测量键以参照靶点进行测量。
因此接下来的结果将被显示; - 利用
参照标尺的约化水平 (RL) 定位,高
差 (dH) 定位,及靶点的高度和距离
操作
10
Sprinter 150/150M/250M - 1.0.0zh
Page 83

6.3 挖方 & 填方测量 * ( 内置储存开启的情况下 )
设置 按键 / 显示说明
BM1
⪉䍈:
100.038m
ၮḰ㤭
:
0.000m
⸳⸘㜞⒟
:
㿚摞⪉䍈
㟈♧䍈⚆᧨⪉浧
+幍帰浧+扪⏴噫◤
利用提示信息测
量水准
㿚摞䥽㪖
提示信息测量目标至目标的测量结
BM1
⪉䍈:
100.038m
ၮḰ㤭
:
100.500m
⸳⸘㜞⒟
:
㿚摞⪉䍈
㟈♧䍈⚆᧨⪉浧
+幍帰浧+扪⏴噫◤
进入菜单更新高
程设计
⪉䍈
:
SLAB 1
浧䲚:
99.563 m
1.710 m
:
0.937 m
果显示在显示屏
上
RfID :
水准的距离结果
显示在显示屏上
1.235m
:
:
5.68m
BM1
1.
2.
3.
4.
5.
6.
在子菜单里按菜单键并选择挖方 &
填方功能。
此时 “测量参照”与输入的基准约
化水平和设计高度将被显示出。
按测量键开始对参照标尺 / 基准进
行测量。
参照高度和距离测量被显示出来;
在测量和测量目标提示之后。
再次按测量键对靶点进行测量。
以下的结果会显示在显示屏内- 目
标约化水平 (RL) / 标高,靶点高度
及设计约化水平 / 高度下靶点的挖方
/ 填方值。
EN
JA
ZH
KO
RU
PL
HU
EL
CZ
TR
SR
操作
11
Sprinter 150/150M/250M - 1.0.0zh
Page 84

EN
6.4 BIF 线水平测量 * ( 内置储存开启的情况下 )
JA
B I F
ZH
KO
RU
PL
HU
1䍈⚆ :
120.000m浧䲚:
ⓜ展恬䱊
扪⏴噫◤㦃㟈
(OY✛,'
利用提示信息测量后视提示信息里显示出后
B I F
䍈⚆:
:
:
视测量
1
1.417 m
28.35 m
㘴♦
B I F
䍈⚆
:
2
_ _ _ _ _m
浧䲚
:
_ _ _ _ _m
:
_ _ _ _ _m
:
/ 噫◤
B I F
利用提示信息测量前视进入菜单设置将 “中
EL
CZ
B I F
TR
䍈⚆
:
RD2
_ _ _ _ _m
浧䲚
:
SR
_ _ _ _ _m
:
_ _ _ _ _m
:
/ 噫◤
B I F
利用提示信息测量下
一个中视
B I F
䍈⚆
:
2
_ _ _ _ _m
浧䲚
:
_ _ _ _ _m
:
_ _ _ _ _m
:
/ 噫◤
B I F
进入菜单设置将 “中
视”关闭,或按高度
距离键,测量前视
B I F
2
䍈⚆
:
119.894m
浧䲚
:
1.523m
:
30.76m
:
㘴♦
提示信息里显示出前
视测量
B I F
䍈⚆
:
RD1
_ _ _ _ _m
浧䲚
:
_ _ _ _ _m
:
_ _ _ _ _m
:
/ 噫◤
B I F
视”开启,或按高度
距离键,测量中视
B I F
䍈⚆
: 2
_ _ _ _ _m
:
_ _ _ _ _m
:
㿚摞噫◤
在下一个点利用提示
信息测量后视
B I F
RD1
䍈⚆
:
119.317m
浧䲚
:
2.100m
:
30.617m
:
ធฃ
提示信息中显
示出中视测量
操作
12
Sprinter 150/150M/250M - 1.0.0zh
Page 85

设置 按键 / 显示 说明
1.
2.
3.
4.
5.
6.
7.
开启 BIF 功能 .
开始测量基准。
显示出后视测量。
开启 “中视”测量,进入菜单设
置将 “中视”开启,或按高度距
离键。
中视测量将显示在显示屏内。
进入菜单设置将 “中视”关闭,
或按高度距离键,测量前视标尺。
前视测量将显示在显示屏内。
6.5 BF 线水平测量 *
设置按键 / 显示 说明
1.
2.
3.
4.
5.
6.
开启 BF 功能
开始测量基准。
显示出后视测量。
测量前视标尺。
前视测量将显示在显示屏内。
系统为更换下一个后视测量点更
新出备用显示。
EN
JA
ZH
KO
RU
PL
HU
EL
CZ
TR
SR
8.
操作
系统为更换下一个后视测量点更新
出备用显示。
13
Sprinter 150/150M/250M - 1.0.0zh
Page 86

EN
6.6 BFFB 线水平测量 *
JA
设置按键 / 显示 说明
ZH
KO
RU
PL
HU
EL
CZ
TR
SR
1.
2.
3.
4.
5.
6.
7.
8.
开启 BFFB 功能。
开始测量基准。
显示出后视测量。
测量前视。
前视测量将显示在显示屏内。
测量前视标尺 (第二次观测)。
前视 (第二次观测)测量显示在
显示屏内。
测量后视标尺 (第二次观测)。
设置按键 / 显示 说明
9.
10.
11.
在 BFFB 线水平功能里,后视和前视在
)
双视中的高差平均值。
后视 (第二次观测)测量显示在
显示屏内。
系统显示当前的 “变更点”的测
量结果。按确认键确认测量结
果。
系统为更换下一个后视测量点更
新出备用显示。
dH
6.7 延迟测量 *
在菜单 \ 设置 \ 延迟器中设置测量的时间范围 00 小时
:00 分钟。按键 3 秒开启延迟测量,延迟图标及当前
的测量模式在 LCD 显示屏左上角显示出来。按键 3 秒
停止延迟测量。
操作
14
Sprinter 150/150M/250M - 1.0.0zh
Page 87

7. 数据传输 数据加载 *
1.双击 Springter_Dataloader .exe (数据加载)左
键 (在默认情况下数据加载程序 DataLoader 安装
在 C: \ Program files \ Leica-Geosystems 内)。
2.将 USB 数据线连接于插口 ( 在仪器的电池仓内 ),
将 USB 数据线另一头与 PC 机连接。
3.仪器开机,等待直到蜂鸣声连响两次且 USB 图标显
示在显示屏内。
4.在 C: \ Program files \ Leica-Geosystems 下启
动数据加载程序。
5.在 DataLoader 里左键点击 “USB 连接”,所有有关
仪器的信息将被显示出来。
6.左键点击 'Data Listing' / 'Field Book' 键,在
数据输出窗口内,仪器的数据将下载到 PC Window
Ms-Excel ? 里。
更进一步关于DataLoadxinxier和RS232数据传输
)
的介绍请参照 Sprinter CD-ROM*。
EN
JA
ZH
KO
RU
PL
HU
EL
CZ
TR
SR
数据传输 数据加载 *
15
Sprinter 150/150M/250M - 1.0.0zh
Page 88

EN
A
8. 检查和校正
JA
8.1 电子瞄准校正
ZH
A
~15m
KO
RU
PL
HU
EL
进入菜单 / 校正,启动校正程序。
CZ
第一步: 瞄准标尺 A 按测量键。 显示测量结果,按确
TR
认键确认测量结果。
第二步: 瞄准标尺 B 按测量键。 显示测量结果,按确
SR
认键确认测量结果。
将 Sprinter 移至距离标尺 A 3 米的地方。
~15m
B
~3m ~27m
第三步: 瞄准标尺 B 按测量键。 显示测量结果,按确
认键确认测量结果。
第四步: 瞄准标尺 A 按测量键。 显示测量结果,按确
认键确认测量结果。
此时显示出新的电子准直误差。 按确认键接受新的校
正,否则按 ESC 键放弃校正结果。
光学准直误差可以通过调整分划板来校正。
)
B
检查和校正
16
Sprinter 150/150M/250M - 1.0.0zh
Page 89

8.2 圆水准器 8.3 光学校准 / 分划板校正
3.
1.
r_18
设置 说明
仪器找平。
1.
将仪器旋转 180°。
2.
如果气泡超过黑圈的范围需将气泡对中。
3.
用六内角扳手校正一半的误差。
4.
重复 1 至 4 步骤直到圆水准器气泡在望远镜处
)
于任意位置时都居中。
2.
4.
设置 说明
旋转内六角扳手直到达到设计值范围。
1.
效验瞄准。
2.
如果准直误差在 60 米时超过 3 毫米,此时瞄准需要校
正。
EN
JA
ZH
KO
RU
PL
HU
EL
CZ
TR
SR
检查和校正
17
Sprinter 150/150M/250M - 1.0.0zh
Page 90

EN
9. 错误信息表
序号 错误提示 错误原因或解决方法
JA
E99 系统错误,与维修中
ZH
KO
RU
PL
HU
EL
CZ
TR
SR
心联系!
E100 电量不足! 更换电池或及时充电。
E101 点号未增量! 改变点号。点号的最大值是 99999999,当点号的长度是 8 位时末位不能是字母。
E102 太亮! 减少标尺上的光照或使用遮光罩。
E103 太暗! 增加标尺上的光照
E104 无标尺! 检查目标
E105 无效输入! 检查输入值。
E106 未整平! 重新整平仪器。
E107 内存满! 关闭内存继续测量但不再储存测量结果,或将内存数据下载到外接设备,删除内存
E108 数据文件错误! 数据文件错误。
E109 内存不足! 把内存数据传输到外接设备,然后把内存数据删除,再使用内存进行测量。
E110 目标太近! 移动标尺或仪器使其距离远一点。
E111 目标太远! 移动标尺或仪器使其距离近一点。
E112 移动标尺或仪器使其
距离近一点。
E113 温度太低! 停止工作。环境温度高于仪器允许温度。
E114 无效测量! 再测一次。 若多次测量都不行就检查标尺的位置和亮度、调焦情况以及视场内标尺
E115 温度传感器错误! 用手遮住物镜再开机。 硬件通讯错误。
硬件错误、文件错误、调整错误、设置错误等引起的不能正常工作。
数据后再使用内存继续测量。
停止工作。环境温度高于仪器允许温度。
的条码是否足够。
错误信息表
18
Sprinter 150/150M/250M - 1.0.0zh
Page 91

序号 错误提示 错误原因或解决方法
E116 校正错误! 按要求逐步进行校正。检查仪器是否整平、标尺是否竖直。 校正错误是由于超出自
E117 不容许改变 BM! 按 HEIGHT/DISTANCE 键返回到缺省测量模式,重新输入基准地面高 BL。
E119 标尺遮挡! 视场内标尺的可见条码不够。
E120 影像传感器错误! 与维修中心联系。
E121 不容许倒置标尺! 检查标尺的方向和标尺的设置。
E123 不容许改变 PtID! 按 ESC 键退出。
动改正范围引起的。
10. 操作信息表
提示信息 原因或解决方法
开始跟踪! 跟踪模式开始
停止跟踪! 跟踪模式停止
锁定跟踪! 按住测量键 3 秒钟开始跟踪测量模式。 在 10 次测量失败后退出跟踪测量模式。
异常测量! 中断当前的测量。
下载数据 把内存中的数据下载到外部存储设备。
下载完成! 成功地把内存中的数据下载到外部存储设备。
内存中无数据! 内存中无数据
删除 肯定要删除吗? 让用户进一步确认是否删除一组数据 ( 在浏览数据的模式下 ) / 所有内存数据 ( 在删
删除数据 系统确认一个或所有数据都被删除。
不能删除! 在单个数据删除时,基准地面高不容许被删除。
除所有数据的模式下 )。
EN
JA
ZH
KO
RU
PL
HU
EL
CZ
TR
SR
操作信息表
19
Sprinter 150/150M/250M - 1.0.0zh
Page 92

EN
提示信息 原因或解决方法
肯定要更改 BM 吗。 肯定要
JA
删除吗?
ZH
肯定要更改设计地面高
吗? 肯定要删除吗?
KO
稍等! 清理文件系统 清理临时文件和系统文件。
RU
关闭电源! 正在关机。
PL
沙漏图标 请销等! 系统正在执行任务。
HU
测量目标 瞄准标尺上的目标按测量键。
设置 ... 系统正在设置信息。
EL
未完成更换点! 退出操作?在边的水准测量中提示退出程序的信息。 完成当前行的水准测量更换到点测量,离开
CZ
TR
退出此程序? 提示信息退出当前程序,按确认键退出程序;否则按 ESC 键返回到当前的程序。
SR
让用户再次确认是否需要更改基准地面高度。
让用户再次确认是否需要更改设计地面高。
应用程序。 按确认键退出程序;否则按 ESC 键返回到当前的程序。
操作信息表
20
Sprinter 150/150M/250M - 1.0.0zh
Page 93

11. 保管和运输
11.1 运输
野外搬运
野外测量中用下述方法搬站:
• 仪器装在原包装箱内,
• 将固定仪器的脚架直立放在肩上,保持仪器向上。
公路运输
公路运输时仪器箱之间不能太松散,否则汽车的颠簸
会引起仪器的碰撞。 一般在公路运输中要把仪器装在
专用的运输箱中。
长途运输
当在飞机、火车或轮船上运输时,必须把仪器装在徕
卡原包装箱或运输箱中,以防止颠簸和碰撞对仪器的
损坏。
电池的运输
管员应该充分了解国内和国际的相关法规。 办理运输
前,一定要与有关运输公司协商好。
野外校正
仪器长途运输后,请参照本手册详细说明检验仪器的
野外校正参数。
11.2 保管
产品
保管仪器要注意温度限制,特别是炎热的夏季放置仪
器的车内温度。 请参照 13. 技术参数 技术参数关于
极限温度部分。
野外校正
在仪器长期不用或长途运输之后,按照本手册详细说
明检验仪器的野外校正参数。
在仪器需要长时间储藏的时候,请取出电池以避免电
池泄漏损坏仪器。
11.3 清洁与干燥
产品及附件
• 把镜头上灰尘吹掉
• 不能用手触摸镜头
• 只能用干净柔软的布清洁。 如需要可将擦布用水或
纯酒精蘸湿后再用。
不要使用其它液体,因为可能损坏仪器零件。
潮湿的仪器
在不超过 40 糃 /104 糉 的环境下将仪器、仪器箱、仪
器箱内的泡抹板以及其它附件擦干后装箱。 在彻底擦
干以前千万不要装箱。
EN
JA
ZH
KO
RU
PL
HU
EL
CZ
TR
SR
保管和运输
21
Sprinter 150/150M/250M - 1.0.0zh
Page 94

EN
12. 安全指南
JA
12.1 概述
说明
ZH
按安全指南操作可使仪器保管者和操作者避免人身伤
KO
害。
仪器保管者应要求所有的仪器使用者理解这些指南内
RU
容并遵守它。
PL
12.2 正确的使用
HU
允许使用
• 测量距离。
EL
• 储存测量数据。
• 对标尺高度用电子或光学方法测量。
CZ
• 用光学方式测定高度。
TR
• 利用视距仪用光学方式测量距离。
• 与外接设备进行数据传输。
SR
禁止使用
• 不按照使用手册的方法使用水准仪
• 使用超越规定范围
• 不可靠的安全系统
• 除去危险标志
• 用工具打开水准仪 (螺丝刀等)除非是特殊功能允
许的
• 修理或改造仪器
• 滥用后使用
• 使用有明显损坏或故障的仪器
• 使用未经徕卡公司同意的其他厂家生产的附件。
• 无适当安全措施的工作现场,如在公路上测量。
安全指南
• 直接瞄准太阳。
警告
有害的使用能够导致人身伤害,仪器故障和财产
损失。 让仪器使用者知道有害情况使用仪器的危险和
防止方法是仪器管理者的责任。 只有经过指导,才许
可使用。
12.3 限制使用
环境
仪器对使用环境条件的要求与人所能适应的环境条件
相同。禁止在有腐蚀、易燃、易爆的环境中使用。
危险
在进入危险地带、接近电器设备或类似的工作环
境之前必须联系当地政府和安全负责人员。
12.4 责任
厂家责任
Leica Geosystems AG, CH-9435 Heerbrugg 又名 Leica
Geosystems 负责:提供本公司产品,包括用户手册和
原装附件。
非徕卡附件制造商的责任
非徕卡附件的制造商要对自己的产品在发展、提供工
具和通讯安全方面负责。也要对这些附件与徕卡仪器
配套后的安全标准的有效性负责。
责任人的责任
仪器的责任人有下列义务:
• 理解产品安全说明和用户手册中的仪器安全说明。
• 熟悉当地的安全规则以防止事故。
22
Sprinter 150/150M/250M - 1.0.0zh
Page 95

• 如果仪器出现安全问题,立即通知徕卡代理商。
警告
仪器的负责人必须确保仪器是按照说明使用的。
也应负责向全体使用人员培训仪器安全指南。
12.5 使用的中危险
警告
无操作指导或对操作说明不完全熟悉的人不能掌
握正确的使用方法,可能会损坏仪器,造成人力、物
力、财力的浪费,甚至会给外界环境带来不良后果。
预防
所有的使用者必须遵循生产厂商或仪器负责人所作的
安全规定和个人对仪器的责任指南。
小心
密切注视仪器是否有故障、是否被摔过、是否已
经被错误地使用或者改造过。
预防
定期执行仪器的测试程序,特别是在仪器被别人非正
常使用之后和重要测量前后,请按照仪器的用户手册
完成野外检校。
危险
在电力设备,诸如电力线或电气化铁路附近,使
用杆及其加长杆作业,是十分危险的。
预防
与这些电气设备保持一定的安全距离。 假如一定要在
此环境下作业,请与负责这些电力设备的安全部门联
系,遵从他们的指导。
安全指南
小心
在强磁场附近 (如:变压器,熔炼炉)可能会
对补偿器造成影响从而造成测量误差。
预防
如果测量在强磁场附近进行时,请检测测量结果的合
理性。
小心
避免将望远镜对准太阳,因为望远镜的聚焦功能
会伤你的眼睛及损坏仪器内部的部件。
预防
不要将望远镜指向太阳。
警告
如果使用者在动态操作仪器时 (如监视过程)
不注意周围的环境情况可能会发生意外,如:路障、
坑穴或交通。
预防
仪器负责人必须告知所有的使用者在使用过程中可能
潜在的危险。
警告
工作现场如没有充分的安全保障也会造成危险情
况,如:交通车辆、建筑工地和工业设备安装现场。
预防
随时保证测量现场的安全。 保证测量现场的适度安
全,遵守地方安全规则和交通规则。
23
Sprinter 150/150M/250M - 1.0.0zh
EN
JA
ZH
KO
RU
PL
HU
EL
CZ
TR
SR
Page 96

EN
JA
ZH
KO
RU
PL
HU
EL
CZ
TR
SR
警告
如果室内使用的计算机在野外使用计算机,可能
会发生触电事故。
预防
按照计算机厂商给出的野外使用指南,以及如何连接
徕卡仪器的方法操作。
小心
如果仪器与所使用的附件连接不牢固,仪器受机
械震动 (如:刮风、摔落)将会损坏仪器或造成人身
伤害。
预防
在安装产品时,请确保所有的附件都是正确和安全的
与仪器连接。
不要让仪器受到机械震动。
小心
使用垂直标尺若只用一个标尺撑杆支撑,标尺就
有 (被阵风)倒下的危险,因而有损坏仪器和人身受
到伤害的可能。
预防
标尺员决不要离开一根撑杆支撑的标尺。
警告
如果使用如支杆、标尺、测杆等附件进行测量,
会增加野外操作中遇到雷击的危险。
预防
请不要在雷暴雨中使用本仪器。
小心
在仪器操作中,仪器旋转部件可能会因搅缠头发
或织物而发生故障。
预防
与旋转部件保持安全距离。
警告
如果你打开仪器外壳,下面两种情况会使你触
电。
• 触摸有电压的部件
• 在不正确使用本产品后,试图修复。
预防
请勿打开产品外壳。 只有徕卡指定的维修部有权对产
品进行维修。
警告
非徕卡推荐的电池在充电和放电时可能被损坏。
可能起火或爆炸。
预防
只使用徕卡推荐的电池充电和放电。
警告
使用非徕卡推荐的充电器可能会损坏电池。 可能
会引起起火或爆炸。
预防
只使用徕卡推荐的充电器给电池充电。
小心
在运输或处理充满电的电池时,由于不恰当的机
械性影响,可能会引起火灾。
安全指南
24
Sprinter 150/150M/250M - 1.0.0zh
Page 97

预防
在运输仪器或丢弃仪器前,请将仪器开启放电直到放
电完毕仪器关闭。
管员应该充分了解国内和国际的相关法规。 运输前请
联系当地的运输公司。
警告
严重的机械挤压、高温或浸在液体中会导致电池
泄漏、起火或爆炸。
预防
保护电池免受机械挤压或高温。 不要把电池掉入或浸
入液体中。
警告
电池电极短路会发热而导致烫伤或火灾。例如在
电池运输保存电池在口袋时,由于电极碰到钥匙、金
属纸及其它导电体形成回路。
预防
确定电池电极不要碰到金属物件。
小心
长时间储存电池会减短使用寿命或损坏电池。
预防
在长时间储存的情况下,周期性给电池充电可以维持
电池的使用寿命。
警告
如果仪器设备处置不当,会出现如下情况:
• 如果仪器的聚合物部件燃烧,会产生有损健康的毒
气。
• 如果电池受损或过热,会引起燃烧爆炸、腐蚀以及
环境污染。
• 如果把仪器交给未经授权的人使用,其误操作,可
能会导致仪器损坏,或人身伤害,甚至污染环境。
预防
本产品不与家庭废弃物一同处理。
依照所在国家的相关规定来处理本仪器。
要注意防止未经授权的人接触仪器。
本产品特定的废弃和处理方式可从徕卡网站
treatment 下载,或从徕卡代理商得到。
http://www.leica-geosystems.com/
警告
只有徕卡指定的维修部有权对产品进行维修。
12.6 电磁兼容性 EMC
说明
电磁兼容性是指仪器在出现电磁辐射和放电的环境下正
确工作而不对其它设备造成干扰的能力。
警告
电磁辐射能够对其它设备造成干扰。
虽然本产品在这方面满足严格的规则和标准,但徕卡
仪器仍然不完全排除对其他仪器造成干扰的可能。
小心
如果本仪器与其它厂家生产的附件连接,如野外
计算机,PC 计算机,收音机,非标准的电缆,外部电
池等连接就可能对其他设备造成干扰。
EN
JA
ZH
KO
RU
PL
HU
EL
CZ
TR
SR
安全指南
25
Sprinter 150/150M/250M - 1.0.0zh
Page 98

预防
EN
只使用徕卡推荐的设备和附件。 与全站仪组合时,它
JA
们满足严格的标准要求。 使用计算机、收音机时,请
注意制造商提供的电磁兼容性的信息。
ZH
KO
RU
PL
HU
EL
CZ
TR
SR
小心
电磁波引起的干扰能造成测量成果超限。
虽然本产品在这方面满足严格的规则和标准,但徕卡
仪器仍然不完全排除本产品被很强的电磁辐射波 (如
靠近无线电传输设备、柴油发电机、电缆等)干扰的
可能。
预防
在以上环境下对获取结果的正确性进行检查。
警告
如果本产品在只与连接电缆 (如外部供电电缆,
接口电缆)的一端连接的情况下操作,就可能使允许
的电磁辐射超标,就会削弱另外仪器的正确功能。
预防
在确保连接 (仪器到外部电池、仪器到计算机)电缆
两端都连接的情况下,仪器方可使用。
12.7 FCC 声明,适用于美国
警告
仪器已经测试并证明符合 B 级数字设备标准。该
标准是依据 FCC 规则 15 章的规定指定的。
该标准是用来对居住场所的有害干扰提供保护的规
定。
仪器在使用过程中会辐射一定频率的能量 , 假如没完
全按照仪器说明书的进行安装和使用,就可能对广播
通信等产生有害的影响。
无论如何无法保证本仪器对于个别设备发生干扰。
如果仪器对收音机电视机信号的接收有干扰,请用如
下的方法来进行测量:
• 重新调整天线 。
• 增大仪器与受干扰设备之间的间距。
• 把仪器的接电插口连接在与接受机不同的电路上。
• 请求代理商或经验丰富的收音机或电视技术人员帮
助。
警告
若仪器经非徕卡公司授权单位改变和修改,用户
操作仪器的权利无效。
安全指南
26
Sprinter 150/150M/250M - 1.0.0zh
Page 99

标签
EN
JA
ZH
KO
RU
PL
HU
EL
CZ
TR
SR
安全指南
27
Sprinter 150/150M/250M - 1.0.0zh
Page 100

EN
13. 技术参数
高程测量 每公里往返测量标准偏差 (ISO17123-2):
JA
ZH
KO
RU
PL
距离精度 (标准偏差) 当 D ≤ 10m 时 10mm
HU
测量范围 使用标准铝质条码标尺的电子测距范围:2 m 至 100 m。
EL
光学最小测程 50 cm
CZ
单次测量时间 (电子测量)正常条件下需要 3 秒钟,在光线昏暗的情况下需要的时间会稍长一些 (20 lux)。
TR
圆水准器 圆水准器灵敏度:10'/2 mm
SR
• 使用 Sprinter 铝质条码标尺进行电子测量:
• 1.0 mm (Sprinter 250M)
• 1.5 mm (Sprinter 150150M)
• 使用铝质 E-Scale/Numeral 标尺进行光学测量:2.5 mm
• 单尺标准读数偏差 (30 米):0.6 mm ( 电子测量 ),1.2 mm ( 光学测量 )
当 D>10 m 时 D( 以米为单位 ) × 0.001
补偿器 用电子跟踪的磁阻尼摆补偿器
• 倾斜警告范围 (电子): 隆? 10'
• 补偿器范围 (机械): 隆? 10'
• 安置精度:0.8" max. ( 标准偏差 )
• 磁场灵敏度:< 10" ( 在野外磁场强度为 5 高斯以下,对水平方向的影响 )
RS232 接口 * 用于连接外置电池和 PC / 数据储存设备之间的数据传输。
电话端口 * 用于 USB 数据线与 PC 之间的连接。
内存容量 * 容量:至 1000 点。
数据传送 * 程序:利用 Windows ? 程序,通过 USB 完成数据加载,在 PC 上通过 RS232 传输到
Leica Geo Office 和 HyperTerminal 上。
技术参数
28
Sprinter 150/150M/250M - 1.0.0zh
 Loading...