

Page 1
Qadvanced Roller Shade
ZigBee HA1.2
Programming Instructions
These instructions are for building a simple-Stand alone network, where no Qube or other control Gateway is used.
IMPORTANT
Read and understand each section before performing required steps
Refer to appropriate user manual whenever a QMotion Gateway/Router is NOT used to establish the ZigBee network.
Instructions for allowing Routers and End Devices to join the ZigBee HA1.2 network will vary by manufacturer.
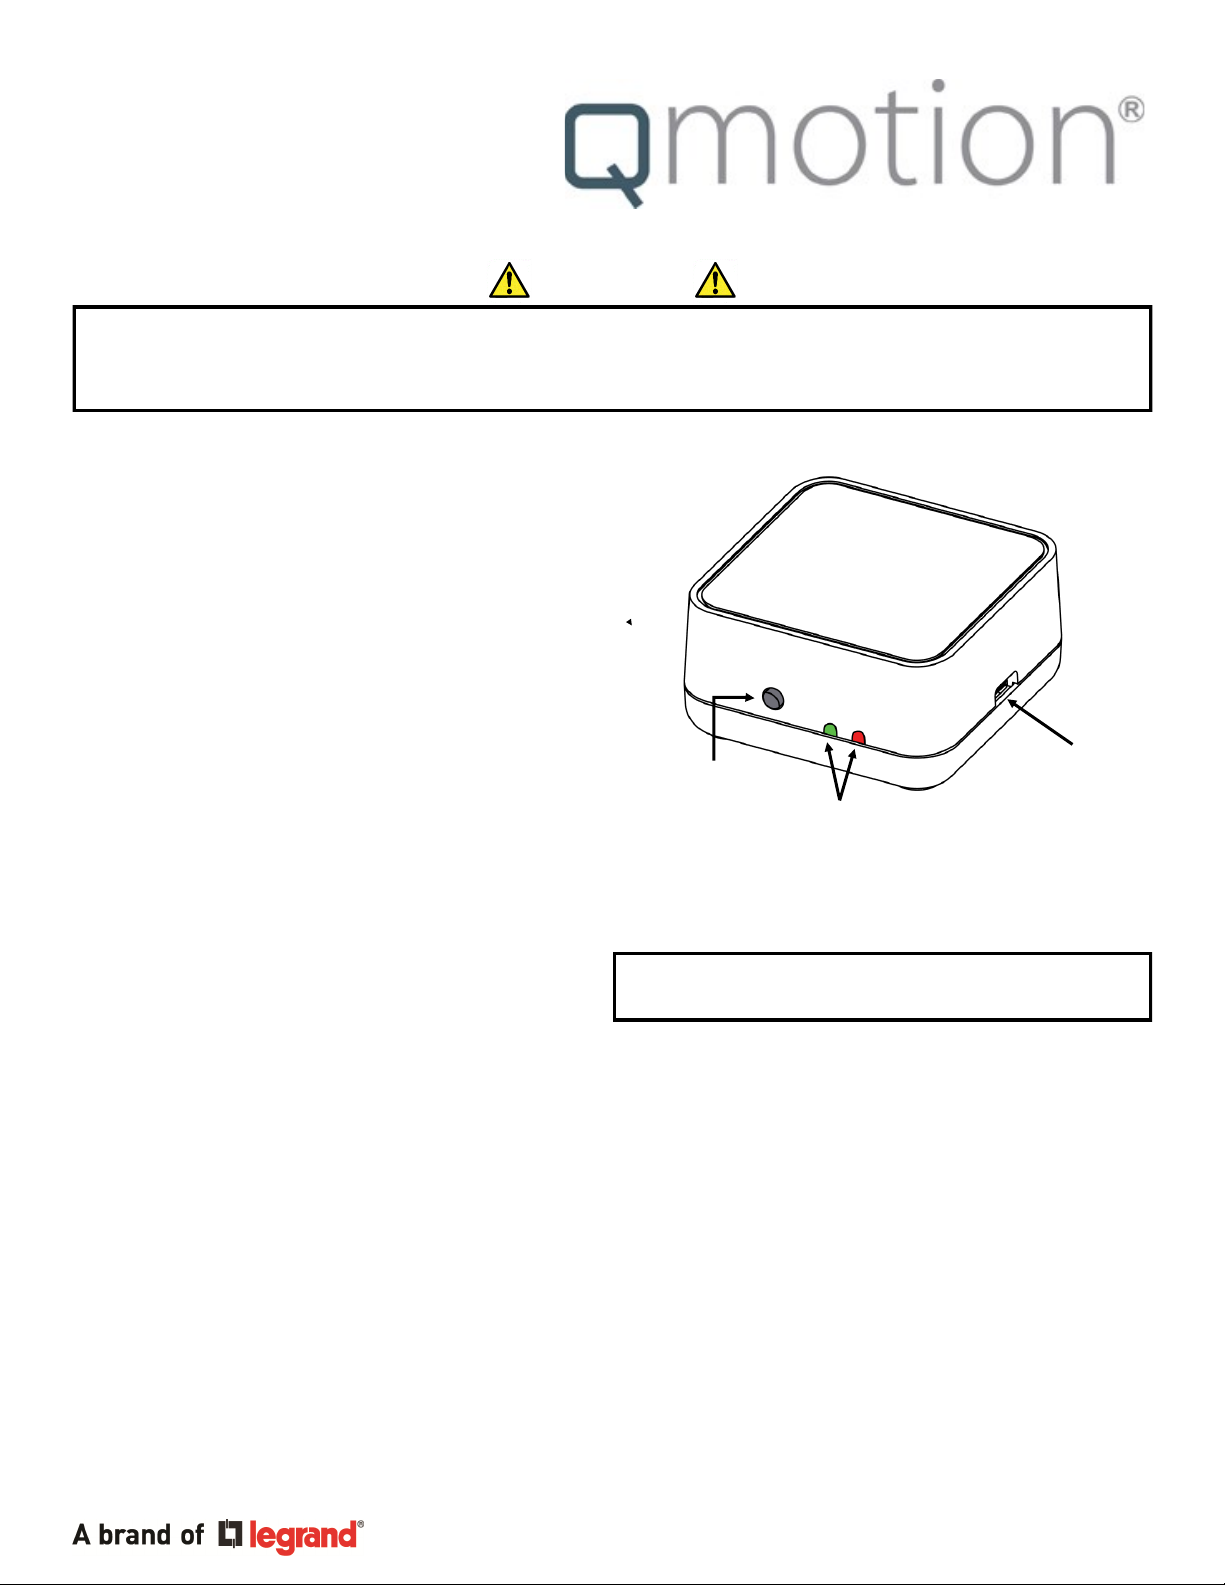
CREATE A NEW NETWORK (Range Ex tender )
1. POWER the RANGE EXTENDER using the pr o vided
__power supply (Should be centrally located to shades)
2. PRESS and HOLD the NETWORK button u ntil the
__GREEN LED illuminates (Green LED illumi nation
__indicates the network is active)
ADD REMOTE TO NETWORK
1. PRESS and RELEASE the NETWORK button on the
__RANGE EXTENDER
__(Red LED will pulsate on network coordinator/routers )
2. PULL BATTERY TAB fro m Remote
3. Use a paperclip to PRESS the PROGRAM button on
__back of the remote
(The channel LEDs will scroll back and forth when in
__program mode)
4. PRESS ANY BUTTON on the remo te to j oin network
__(Green LED will flash when remote joins the network)
ADD SHADE TO NETWORK
1. PRESS and RELEASE the NETWORK button on the
__RANGE EXTENDER
__(Red LED will pulsate on network coordinator/routers )
2. TUG the HEMBAR 6-10 inches
__(Shade will JOG in response)
PAIR REMOTE TO SHADE
1. PRESS and RELEASE the CHANNEL button to select
__the channel that will control the shade
2. PRESS th e PROGRAM b utton on the back of the remote
3. PRESS and RELEASE the UP button
__(Shade will JOG in response)
4. TUG the HEMBAR 6-10 inches
__(During Step 3, multiple shades can be tugged to learn __
the same remote)
Network
Button
LED
Range Extender
ZigBee Router
Range Extender: Green LED will flash rapid ly for 1 second when a device (Shade/Remote) joins the network
ADD RANGE EXTENDER TO ZIGBEE NETWORK
1. PRESS and RELEASE the NETWORK button on the first
__Range Extender that created the ZigBee network
__(The green LED will be a solid illumination, the red LED will
___begin to pulse when the network is open for joining)
2. PRESS and RELEASE the NETWORK button on Range
__Extender to be added to the network
__(The green LED will illuminate and blink when it has joined
___the ZigBee network )
3. The Range Extender green LED will continue to pulse,
__showing that it has extended the ZigBee network.
DELETE RANGE EXTENDER FROM ZIGBEE NETWORK
1. PRESS and RELEASE the NETWORK button 3 times
__quickly
__(The green LED will stop illuminating)
Micro USB
Port
www.qmoonshades.com Pensacola FL, 32514 1 -877-849-6070
1
PN 9000225
Page 2

IMPORTANT
Lower Limit Position must be set prior to using the PRESET positions (20%, 40%, 60%, 80%). These positions are based on
the Lower Limit Position of the shade. When learning new positions, the button currently being programmed (after Step 3.
TUG) will not send commands to the shade. After Step 5 all buttons resume full functionality.
Example 1: When learni ng a new Upper Limit Position, the UP b utton is semi-disable. Only by pressing the UP button 3
times will the shade move to the up position (or manually roll the shade up by hand).
Example 2: When learni ng a new Lower Limit Posi tion , the DOWN butto n is disabl ed. The sh ade can s till be adju sted
using the UP button (or manually roll the shade by hand).
SETTING UPPER AND LOWER LIMITS / LEARNING A NEW POSITION
1. PRESS and RELEASE the (UP, DOWN, or PRESET) butt on that will be pro grammed
__(Shade will move to selected position)
2. PRESS and HOLD the same (UP, DOWN, or PRESET) button UNTIL the shade JOGS
3. TUG shade 6-10 inches (Shade wil l JOG in response)
4. ADJUST shade to desired positi on (Manu ally roll s hade b y hand if necessar y)
5. PRESS and HOLD the same (UP, DOWN, or PRESET) button (Shade will JOG when learned )
UP
DO W N
CH ANNEL
CH
12345
Front
QdR Remote
UNLEARN A REMOTE FROM SHADE
(Shade at Upper Limit)
1. Use a paperclip to PRESS the PROGRAM button on
__back of the remote
2. PRESS and RELEASE the DOWN button
__(Shade will JOG in response)
3. TUG the shade 6-10 inches
__(Shade will JOG and move to the Upper Limit)
REMOVE REMOTE FROM NETWORK
1. Use a paperclip to PRESS the PROGRAM button on
__back of the remote three (3) times quickly
20 %
40 %
60 %
80 %
PR OGR AM
Pi n Hol e
Back
When unrolling the shade to expose battery cover, the shade
will try to roll upward. Hold the FABRIC ROLL TUBE firmly in
place to resist the initial upward movement, then continue to
unroll the FABRIC ROLL TUBE to expose battery cover.
BATTERY REPLACEMENT
1. PRESS and RELEASE the DOWN button t o unr oll s hade
2. UNROLL the FABRIC ROLL TUBE t o expo se the b attery
__cover
3. REMOVE BATTERY COVER
4. REPLACE batteries w ith NEW D-CELL Alkalin e batteries
5. INSTALL BATTERY COVER
6. PRESS and RELEASE the UP button to rol l fabric back
__onto tube
www.qmoonshades.com Pensacola FL, 32514 1 -877-849-6070
2
PN 9000225
Page 3

IMPORTANT
Tug Command Mode will allow certain features to be performed manually without a learned remote. Read the following
instructions completely before starting the procedure. Inputs from the user are time sensitive. If the shade ti mes ou t
before entering a tug command, return the shade to the Upper Limit Position and begin the procedure over.
TUG COMMAND MODE
TO ENTER TUG COMMAND MODE
1. Start with the shade at the Upper Limit Position.
2. Perform two consecutive 6 inch tugs, waiting 1 second between tugs.
(Shade will JOG, then travel up, settling a few inches below the Upper Limit Position)
SHADE IS NOW IN TUG COMMAND MODE: There i s a 10 second opportunity to enter a tug c omman d before the shade
will leave Tug Command Mode and resume normal operation.
3. Once the shade is in Tug Command Mode, perform additional 6 inch tugs to select a command option. After each tug, the
shade will return to its starting position. Once the shade returns to its starting position, wait 1 second before performing the
next tug (a brake is engaged during this 1 second wait, making the shade difficult to tug). After the tug sequence is performed
(1-4 Tugs), wait 5 seconds and the shade will accept the tug command.
1 Tug - Join ZigBee Network / Identify
2 Tugs - Set Lower Limit Position
3 Tugs - ZigBee Network Reset
4 Tugs - Factory Master Reset
Join ZigBee Network / Identify
This command will allow the shade to join an open ZigBee network. If the shade is not connected to a ZigBee network, the
shade will “micro-jog” while trying to find a network. Once a ZigBee network is found, the shade will seek the Upper Limit
Position hardstop. If a ZigBee network is not found after 1 minute, the shade will stop “micro-jogging” and wait for further
inputs. If the shade “micro-jogs” but does not find a network, make sure the ZigBee network coordinator (Qube/Range
Extender) is open for devices joining the network.
If the shade is already connected to a ZigBee network, the shade will continually “long jog” up and down for 2 minutes. Manual
operation of the shade will not be available during this operation. Wait until the 2 minute “long jog” is complete to proceed. If the
shade “Identifies” on a network, but is unable to pair to a remote, perform the ZigBee Network Reset tug command and then
connect the shade to the correct ZigBee network.
Set Lower Limit
This command will allow the Lower Limit Position to be adjusted without a remote. The shade will travel to the current Lower
Limit Position and then jog. Manually adjust the shade to the desired Lower Limit Position. To set this new position as the
Lower Limit Position, leave the shade to idle for 1 minute. After the 1 minute has passed, the shade will jog to confirm the new
Lower Limit Position.
Zigbee Network Reset
This command will remove the shade from its current ZigBee network. This command will also delete any groups/scenes that
are stored on the shade. Tugging the shade after a ZigBee Network Reset will cause the shade to “micro-jog” and search for
an open ZigBee network.
Factory Master Reset
This command will perform a ZigBee Network Reset as well as restore the Upper & Lower Limits Positions and Intermediate
Set-points to their default values. Tugging the shade after a Factory Master Reset will cause the shade to “micro-jog” and
search for an open ZigBee network.
www.qmoonshades.com Pensacola FL, 32514 1 -877-849-6070
3
PN 9000225
 Loading...