

Page 1

N0064FM6/01
Branchement
Caractéristiques
Sagane™
Intervariateur
845 21
Configuration d’usine
A la première mise sous tension l’appui sur les touches ON et OFF commande l’ensemble des points d’éclairage de
l’installation “In One by Legrand”. L’appui sur Learn
(1)
annule cette fonction de commande générale.
(1) Touche de programmation ou apprentissage.
Charges
Protection par dispositif électronique :
- En cas de surcharge et au-delà de la température maxi
d’utilisation, le produit régule automatiquement la puissance par diminution
de l’éclairement.
- En cas de court-circuit ou de très for te surcharge, l’intervariateur se met hors
service. Après élimination du défaut, le produit est à nouveau fonctionnel.
Tension 100 - 240 V±
Fréquence 50 - 60 Hz
2 x 1,5 mm
Profondeur = mini. 40 mm
Norme
Courant porteur EN 50065
IEC 60669-2-1
+ 5°C à + 45°C
2
110 V 150 W 150 W 150 W
230 V 300 W 300 W 300 W
Lampe incandescente
Lampe halogène
Lampe halogène TBT à transformateur
ferromagnétique ou électronique
N
L
Page 2
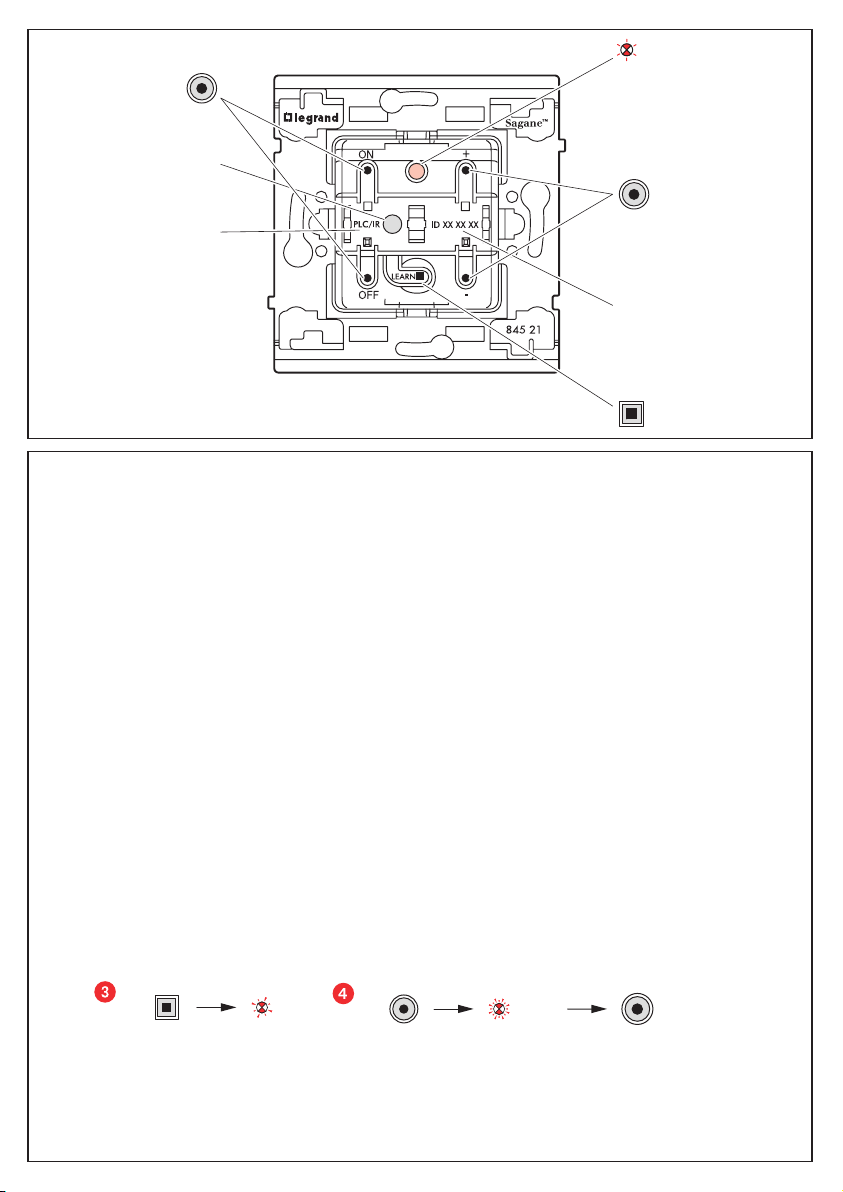
Description
2
Fonctionnement
L’intervariateur :
- peut commander simultanément à partir de ses touches ON et OFF un ensemble de produits (acteurs) qui lui sont
associés lors de son apprentissage
(1)
, il est alors Leader du scénario
(2)
.
- peut-être commandé par d’autres produits leaders, il est alors Acteur.
En Leader :
L’intevariateur permet de commander :
- les points d’éclairage à partir des touches ON, OFF.
- les points d’éclairage qui lui sont associés, lors de l’apprentissage (les acteurs).
En Acteur :
L’intervariateur peut participer à 16 scénarios différents, en éxécutant localement les commandes provenant
des autres leaders.
Il possède une interface pour les signaux infrarouges qui permet la commande de ses scénarios et/ou d’autres produits
de l’installation.
En local :
L’intervariateur permet de commander les points d’éclairage à partir des touches ON, OFF, + et -, qui sont reliés directe-
ment à la borne de phase coupée.
Réglage du niveau lumineux de la touche ON (hors procédure d’apprentissage) :
- régler le niveau lumineux à l’aide des touches + et -,
- appuyer simultanément sur les touches + et ON durant 5 secondes
- la charge s’éteint et se rallume au niveau ON.
Le niveau ON est alors enregistré.
Pour enregistrer un niveau lumineux lors de l’apprentissage, l’étape 2 de l’Apprentissage du scénario devient :
(1) Apprentissage : action d’associer des produits en vue de les commander simultanément à partir d’un point central.
Cette association se réalise en appliquant la procédure d’apprentissage du scénario en page 3.
(2) Scénario : correspond à l’ensemble des produits (acteurs) qui sont associés à une touche de commande.
Appuyer sur
LEARN
Appuyer sur la touche
de commande + ou pour régler le niveau
d'éclairage souhaité
Appuyer sur la touche
de commande ON qui doit
être associé au leader
Voyant LEARN
N d'identification
Touche LEARN
Touches de
commandes
Média de communication
PLC => Courant porteur
IR => Infrarouge
Touches de
commandes
Cellule Infrarouge
Page 3

3
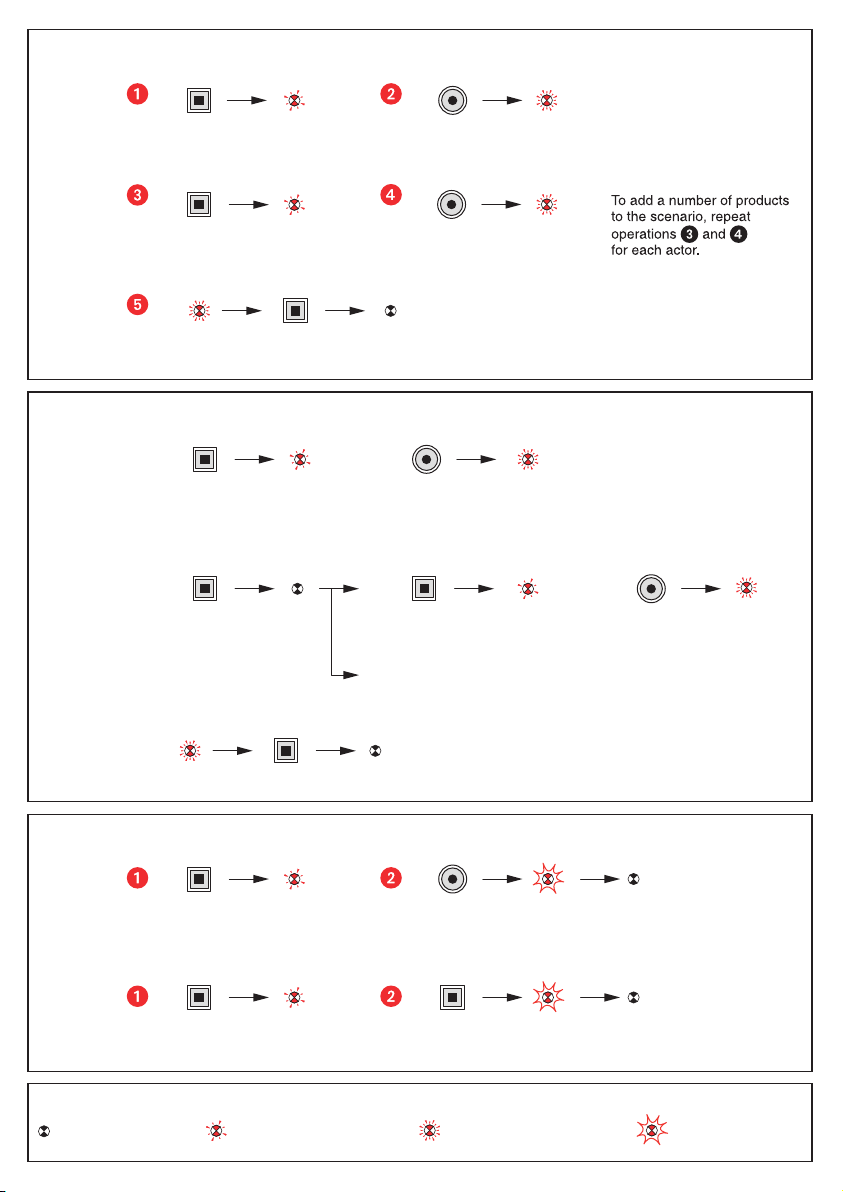
Modification d’un scénario
Apprentissage du scénario
Appuyer sur
LEARN
Appuyer sur la touche
de commande qui doit
piloter le scénario
Appuyer sur la touche
de commande qui doit
être associée au leader
Les voyants de tous les produits s'éteignent.
Le scénario est enregistré.
Etape 1 : débuter l'apprentissage (sur le LEADER)
Etape 2 : ajouter un acteur au scénario (sur l'ACTEUR)
Etape 3 : enregistrer le scénario (sur le LEADER)
Appuyer sur
LEARN
Appuyer sur
LEARN
Appuyer sur
LEARN
Appuyer sur
LEARN
Appuyer sur
LEARN
Appuyer sur la touche
de commande qui
pilote le scénario
Appuyer sur la touche
de commande que
l'on souhaite associer
Les voyants de tous les produits s'éteignent.
Le scénario est enregistré.
Les voyants de tous les produits
du scénario clignotent.
Etape 1 : ouvrir le scénario (sur le LEADER)
Etape 2 : modifier l'état d'un acteur du scénario (sur l'ACTEUR)
Etape 3 : enregistrer le scénario (sur le LEADER)
Appuyer sur
Pour supprimer le produit
du scénario passer à l'étape 3
ou
Légende
Le voyant s'éteint
Le voyant clignote lentement Le voyant clignote rapidement
Le voyant flashe
Effacement d’un scénario
Appuyer sur
LEARN
Appuyer sur
la touche
de commande
et maintenir 10s
5 s
Le scénario est effacé
Effacer tous les scénarios liés à la touche de commande (sur le LEADER)
Effacer tous les scénarios liés à ce produit (sur le LEADER)
Appuyer sur
LEARN
Appuyer sur
LEARN
et maintenir 10s
5 s
Retour du produit
en configuration usine
Page 4

5
Aansluiting
Eigenschappen
Sagane™
Dimmer
845 21
Standaardconfiguratie
Bij de eerste inschakeling worden bij een druk op de toetsen ON of OFF alle lichtpunten van de installatie “In One by
Legrand” bediend. Door op Learn (1)te drukken, wordt deze algemene bedieningsfunctie geannuleerd.
(1) Toets voor programmering of aanleren.
Spanning 100 - 240 V±
Frequentie 50 - 60 Hz
2 x 1,5 mm
2
Diepte = mini. 40 mm
Norm
Draaggolf EN 50065
IEC 60669-2-1
+ 5°C tot + 45°C
Belasting
Bescheming via elektronische veiligheid :
- In geval van overbelasting en boven de maximale bedrijfstemperatuur
reguleert het product automatisch het vermogen door de verlichtingssterkte te verminderen.
- In geval van kortsluiting of een zeer sterke overbelasting schakelt de
intervariator zelf uit. Na het oplossen van de storing is het product
opnieuw functioneel.
110 V 150 W 150 W 150 W
230 V 300 W 300 W 300 W
Gloeilamp
Halogeenlamp
Halogeenlamp ZLS met ferromagnetische
of elektronische transformator
N
L
Page 5

6
Beschrijving
Werking
De dimmer :
- kan tegelijkertijd met behulp van de toetsen ON en OFF meerdere producten (actoren) bedienen die hier aan geasso-
ciëerd werden tijdens het aanleren
(1)
, het is dan de Leider van het scenario
(2)
.
- kan door andere leiders bediend worden en is dan Actor van het scenario.
Als Leider:
Kunnen met de dimmer bediend worden:
- de lichtpunten met behulp van de toetsen ON, OFF.
- de hieraan toegevoegde lichtpunten, tijdens het aanleren (de actoren).
Als Actor:
De dimmer kan aan 16 verschillende scenario’s deelnemen, door plaatselijk de opdrachten van andere leiders uit te
voeren.
Het bezit een interface voor infrarode signalen waarmee zijn scenario’s en/of andere producten van de installatie bediend
kunnen worden.
Plaatselijk:
Met de intervariator kunnen de lichtpunten bediend worden met behulp van de toetsen ON, OFF, + en -, die rechtstreeks
zijn aangesloten op de onderbroken faseklem.
Instelling van het lichtniveau van de toets ON (buiten de inleesprocedure):
- stel het lichtniveau in met behulp van de toetsen + en -,
- druk de toetsen + en ON 5 seconden lang gelijktijdig in
- de belasting gaat uit en gaat opnieuw aan op niveau ON.
Niveau ON wordt dan geregistreerd.
Voor het registreren van een lichtniveau tijdens het inlezen wordt stap 2 van het aanleren van het scenario:
(1) Aanleren : actie van het associëren van producten met de bedoeling deze tegelijkertijd vanaf een centraal punt te
bedienen.
Dit associëren geschiedt door toepassing van de aanleerprocedure van het scenario op pagina 7.
(2) Scenario: komt overeen met alle producten (actoren) die bij een bedieningstoets horen.
Controlelampje
LEARN
Identificatienummer
Toets LEARN
Bedieningstoetsen
Communicatiemiddelen
PLC => Draaggolf
IR => Infrarood
Infraroodcel
Bedieningstoetsen
Druk op
LEARN
Druk op de bedieningstoets
ON die aan de leider moet
zijn toegevoegd
Druk op de bedieningstoets
+ of – voor het instellen van
het gewenste lichtniveau
Page 6

7
Wijziging van een scenario
Aanleren van het scenario
Druk op LEARN
Druk op LEARN
Druk op de bedieningstoets
die het scenario bestuurt
Druk op de bedieningstoets
die u toe wilt voegen
De controlelampjes van alle producten gaan uit.
Het scenario is geregistreerd
De controlelampjes
van alle producten
van het scenario
knipperen.
Stap 1: het scenario openen (op de LEIDER)
Stap 2: de staat van een actor van het scenario wijzigen (op de ACTOR)
Stap 3: het scenario registreren (op de LEIDER)
Druk op LEARN
Druk op LEARN
Ga voor het wissen
van het product uit het
scenario naar stap 3
of
Legende
Het controlelampje gaat uit
Het controlelampje knippert langzaam
Het controlelampje knippert snel
Het controlelampje flitst
Wissen van een scenario
Druk op LEARN
Druk op de
bedieningstoets en houd
deze 10 s ingedrukt
5 s
Het scenario is gewist
Wis alle scenario's die verbonden zijn met de bedieningstoets (op de LEIDER)
Wis alle scenario's die bij dit product horen (op de LEIDER)
Druk op LEARN
Druk op LEARN
en houd
deze 10 s ingedrukt
5 s
Terugkeer van het
product naar de
standaardconfiguratie
Stap 1: beginnen met aanleren (op de LEIDER)
Druk op
LEARN
Stap 2: voeg een actor toe aan het scenario (op de ACTOR)
Druk op
LEARN
Stap 3: het scenario registreren (op de LEIDER)
Druk op de bedieningstoets
die het scenario bestuurt
Druk op de bedieningstoets
die aan de leider moet zijn toegevoegd
Druk op
LEARN
Herhaal voor het toevoegen
van meerdere producten aan
het scenario voor iedere actor
de handelingen
De controlelampjes van alle producten gaan uit.
Het scenario is geregistreerd.
en .
Page 7

9
Connection
Characteristics
Sagane™
Dimmer switch
845 21
Factory configuration
The first time it is switched on, pressing the ON or OFF keys controls all the lighting points in the “In One by Legrand”
installation. Pressing Learn
(1)
cancels this general control function.
(1) Programming or learn key.
Loads
Protection by electronic device:
- If there is an overload and it is above the max. operating temperature,
the product automatically regulates the power by lowering the lighting.
- If there is a short-circuit or a very high overload, the dimmer switches
itself off. Once the fault has been eliminated, the product is once
again operational.
Voltage 100 - 240 V
Frequency 50 - 60 Hz
2 x 1,5 mm
Depth = 40 mm min.
EN 50065
Standard Power line carrier
IEC 60669-2-1
+ 5°C to +45°C
±
2
N
L
110 V 150 W 150 W 150 W
230 V 300 W 300 W 300 W
Lampe incandescente
Lampe halogène
Lampe halogène TBT à transformateur
ferromagnétique ou électronique
Page 8

1010
Description
Operation
The dimmer switch:
- Using its ON and OFF keys it can simultaneously control a set of products (actors) that have been associated with it
during the learn phase
(1)
. It is then the Leader of the scenario
(2)
.
- Can be controlled by other Leader products. It is then an Actor.
As Leader:
The dimmer switch can control:
- The lighting points that are directly connected to the open phase terminal, using the ON, OFF, + and - keys.
- The lighting points associated with it (the actors) using the ON and OFF keys.
As Actor:
The remote control dimmer can participate in 16 different scenarios, executing the commands from the other Leaders.
Locally:
The dimmer switch can control:
- The lighting points that are directly connected to the open phase terminal, using the ON, OFF, + and - keys.
When the remote control dimmer is used in local control, it is possible to record a default light level.
Setting the light level of the ON button (excluding learning procedure) :
- Set the level using the + and - buttons
- Press the + and ON buttons at the same time, for 5 seconds
- The load will extinguish and light up again at the ON level
The ON level is now saved.
To record a light level during the learn phase, step 2 of the “learn scenario” becomes:
(1) Learn phase: Operation to associate products so that they can be controlled simultaneously from a central point.
This association is carried out by applying the learn scenario procedure on page 11.
(2) Scenario: Corresponds to the set of products (actors) that are associated with a command key.
Press LEARN
Press the + or - command key
to set the required
lighting level
Press the ON command key
which must be associated
with the leader
LEARN indicator lamp
Command keys
Infrared cell
Command keys
Communication media
PLC => Mains-borne signalling
IR => Infrared
ID number
LEARN key
Page 9
11
Clearing a scenario
Modification of a scenario
Learn scenario
Key
Press LEARN Press the command key
that is to control
the scenario
Press the command key
that is to be associated
with the leader
The indicator lamps of all the products go off.
The scenario is recorded.
Step 1: Start the learn phase (on the LEADER)
Step 2: Add an actor to the scenario (on the ACTOR)
Step 3: Record the scenario (on the LEADER)
Press LEARN
Press LEARN
Press LEARN Press the command
key and hold it
down for 10 s
5 s
The scenario is cleared
Clear all the scenarios linked with the command key (on the LEADER)
Clear all the scenarios linked to this product (on the LEADER)
Press LEARN Press LEARN
and hold down
for 10 s
5 s
Return the product
to factory configuration
Step 2 : Modify the state of an actor in the scenario (on the ACTOR)
Step 3 : Record the scenario (on the LEADER)
6
or
To remove the product from
the scenario, go to step 3
Press LEARN Press LEARN Press the command key
that is to be associated
Press LEARN Press the command key
that controls the scenario
The indicator lamps of all the products
in the scenario blink.
Step 1: Open the scenario (on the LEADER)
The indicator lamps of all the products go off.
The scenario is recorded.
Press LEARN
The indicator lamp
goes off
The indicator lamp
blinks slowly
The indicator lamp
blinks quickly
The indicator lamp
flashes
 Loading...