

Page 1

STUDY & SOUND SYSTEM
™
Parent Guide & Instructions
This Guide contains important information.
Please keep it for future reference.
Page 2

TABLE OF CONTENTS
GETTING STARTED ___________________________________________________________ 1
Battery Installation ___________________________________________________________ 1
Navigating the CRAMMER™ Handheld___________________________________________ 1
General Controls__________________________________________________________ 1
Flash Cards______________________________________________________________ 1
Quizzes _________________________________________________________________ 2
Music___________________________________________________________________ 2
Games _________________________________________________________________ 2
CONNECTING THE CRAMMER HANDHELD________________________________________ 3
Installing the LEAPFROG® Connect Application____________________________________ 3
Launching the LEAPFROG Connect Application ____________________________________ 3
Creating a Player Profile ______________________________________________________ 4
Selecting a Player Profile to Begin_______________________________________________ 4
Multiple CRAMMER Handhelds _________________________________________________ 4
Switching Player Profiles ______________________________________________________ 5
Renaming a Player Profile _____________________________________________________ 5
CRAMMER Handheld Settings _________________________________________________ 5
Resetting the Handheld to Factory Settings _____________________________________ 5
The CRAMMER View in the Connect Application ___________________________________ 5
THE CRAMMER HOME PAGE ___________________________________________________ 5
Parents Window _____________________________________________________________ 6
Quick Links _________________________________________________________________ 6
Downloads _________________________________________________________________ 6
New Products and General Information ___________________________________________ 6
THE CREATE FLASH CARDS PAGE ______________________________________________ 6
Creating a Flash Card Set _____________________________________________________ 7
Using the Basic Flash Cards Tool _______________________________________________ 7
Using the Spanish Translator Flash Cards Tool ____________________________________ 8
Definite and Indefinite Articles ______________________________________________ 10
Misspellings and Word Forms ______________________________________________ 10
Gender ________________________________________________________________ 10
Abbreviations ___________________________________________________________ 10
Audio __________________________________________________________________ 10
Editing Flash Card Sets ______________________________________________________ 10
THE DOWNLOADS PAGE ______________________________________________________ 11
Page 3

Downloading Files __________________________________________________________ 12
Moving Files to the CRAMMER™ Handheld ______________________________________ 12
THE ON MY CRAMMER PAGE __________________________________________________ 12
View All Tab _______________________________________________________________ 12
Quizzes Tab _______________________________________________________________ 13
Flash Cards Tab ____________________________________________________________ 13
Music Tab _________________________________________________________________ 13
Add Songs Button ________________________________________________________ 14
Adding & Removing Files _____________________________________________________ 14
The CRAMMER Status Column ________________________________________________ 15
The Memory Gauge _________________________________________________________ 15
DISCONNECTING THE CRAMMER HANDHELD____________________________________ 16
The Eject Button ____________________________________________________________ 16
The Unsafe to Eject Icon _____________________________________________________ 16
UPDATES & REPAIRS ________________________________________________________ 16
Quiz and Flash Card Pack Updates _____________________________________________ 16
CRAMMER Handheld Updates ________________________________________________ 16
LEAPFROG® Connect Application Updates ______________________________________ 16
TROUBLESHOOTING _________________________________________________________ 17
FREQUENTLY ASKED QUESTIONS (FAQ) ________________________________________ 18
General __________________________________________________________________ 18
Connecting ________________________________________________________________ 18
Downloads ________________________________________________________________ 19
Flash Cards _______________________________________________________________ 20
Adding Music ______________________________________________________________ 21
On My CRAMMER and Syncing _______________________________________________ 21
Settings __________________________________________________________________ 23
Eject/Disconnect____________________________________________________________ 23
CARE AND SAFETY INSTRUCTIONS ____________________________________________ 23
Instructions for Care ________________________________________________________ 23
Battery Information _________________________________________________________ 24
USB & Cable Warning _______________________________________________________ 24
Protect Your Hearing ________________________________________________________ 25
FCC Notice _______________________________________________________________ 25
CONSUMER INFORMATION ___________________________________________________ 26
Service Contacts and Warranty & Legal Information________________________________ 26
Page 4
GETTING STARTED
Battery Installation
Requires 3 AAA (called LR03 in some countries) alkaline batteries, not included.
1. Open battery door with a screwdriver, coin or other household tool.
2. Install new batteries as shown in the polarity (+/-) diagram inside the battery
compartment.
3. Replace battery door securely.
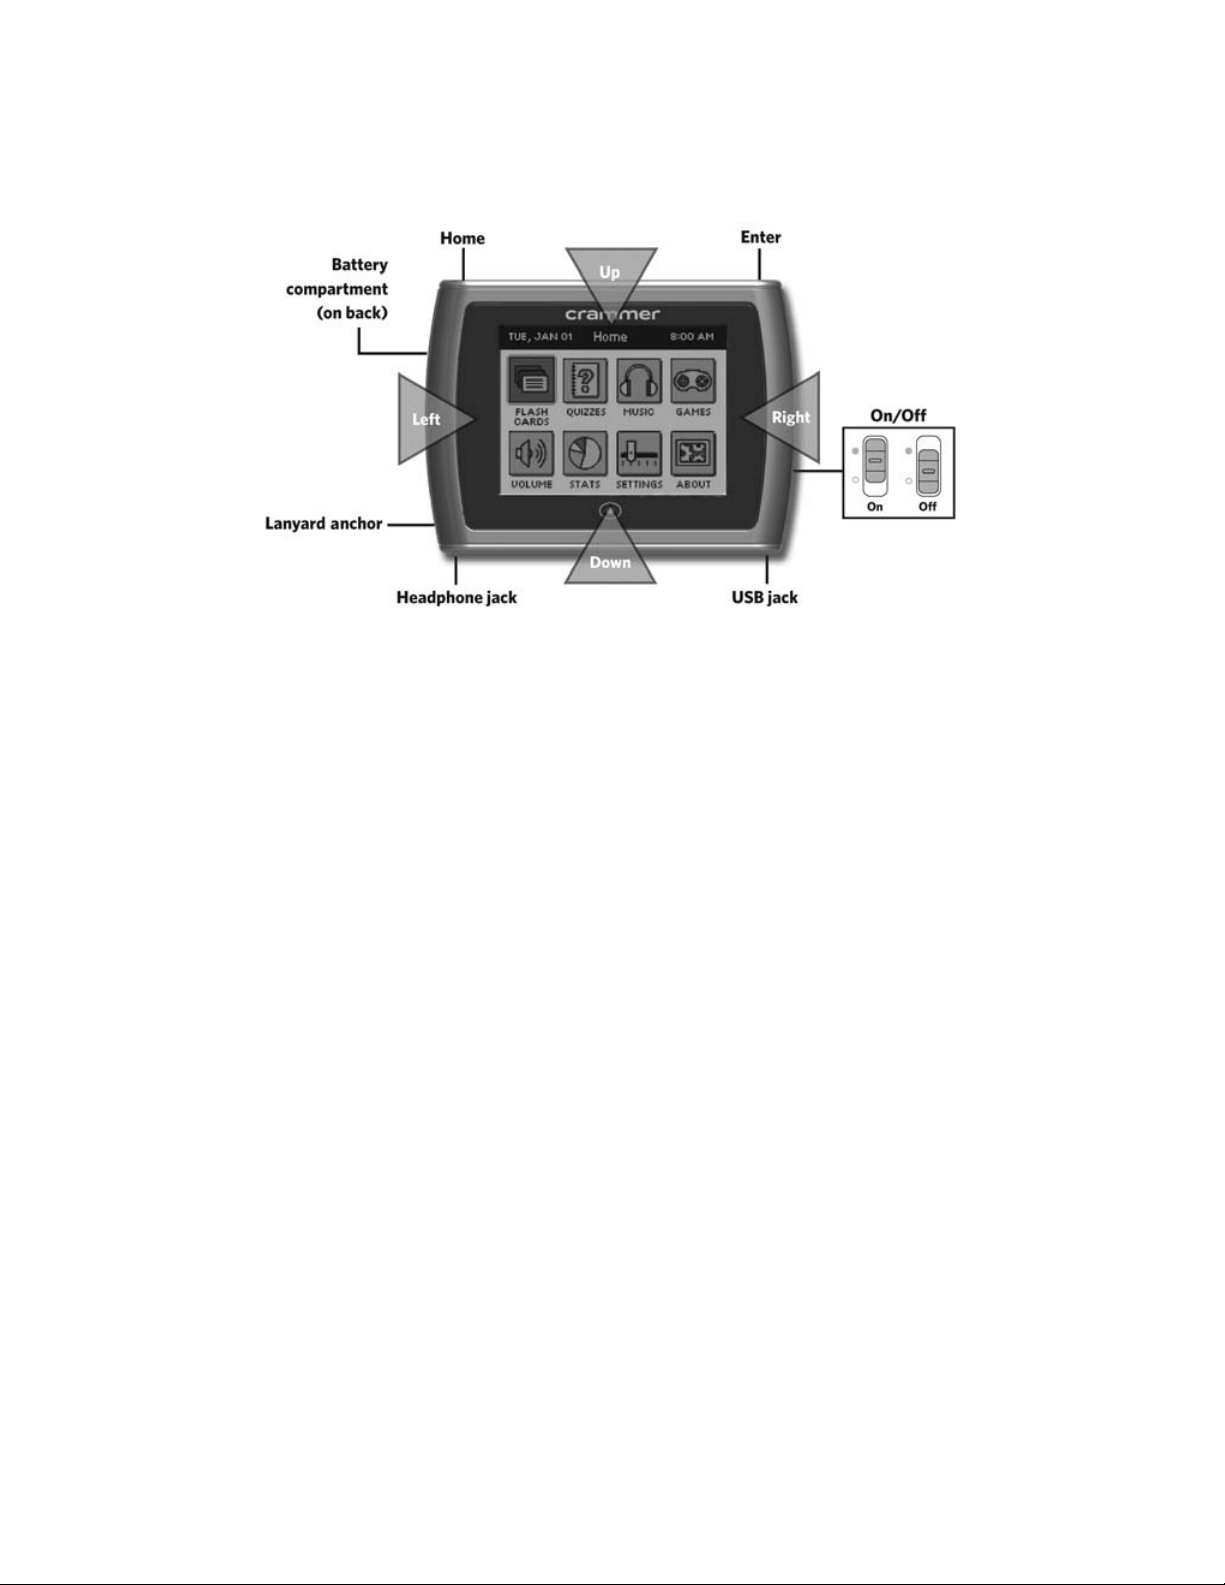
Navigating the CRAMMER™ Handheld
The CRAMMER handheld has eight Home menu options. Press UP, DOWN, LEFT or RIGHT
directly on the edge of the screen to scroll through the menu icons. To select a menu option,
press the ENTER button on the top-right corner of the handheld. To return Home, press the
HOME button on the top-left corner of the handheld (see diagram above).
General Controls
• PAUSE & RESUME: To pause a quiz, flash card set or game, press the HOME button.
To resume an activity, select it from the Home screen (Quiz, Flash Cards or Games) and
choose the Resume menu option.
• VOLUME: Use to set the volume level. (SHORTCUT: press and hold the ENTER button
from any screen to quickly jump to Volume. Press and hold the ENTER button again to
jump back.)
• STATS: Use to view flash card, quiz and game statistics.
• SETTINGS: Use to adjust contrast, set the date and time, set the sleep timer or reset
your handheld settings.
• ABOUT: Use to obtain information about your handheld and learn more about shortcuts.
Flash Cards
• VIEW—press screen RIGHT or LEFT to scroll through flash cards.
• FLIP—press the ENTER button to flip a flash card over and view the other side.
• FLAG—press screen UP to flag a flash card and add it to the Do Over set. Press screen
UP again to un-flag a flash card and remove it from the Do Over set. Cards in the Do
Over set can be used for review later.
• EXIT—press screen DOWN to exit a flash card set.
• AUDIO—turn Audio On to play sound for flash cards with audio (e.g., Spanish flash
cards). Flash card audio will not play when a song is playing.
1
Page 5

• SHUFFLE—turn shuffle On to display flash cards in a random order.
• SIDE DISPLAY—select which side of the flash cards displays first.
Quizzes
• QUESTIONS & ANSWERS—press screen UP or DOWN to scroll through questions and
answers. Press the ENTER button or screen RIGHT to select an answer.
• HINT—hints are available for all questions.
• DIFFICULTY LEVEL—on the Easy level, a hint is automatically displayed for wrong
answers and you get a second try. On the Hard level, you have only one chance to
answer the question correctly.
• TIMER—set the Quiz Timer to 3, 6 or 9 minutes or set the timer to Off and take as much
time as you want.
Music
• SELECT & PLAY—in the Titles, Artists or Albums folder, press the ENTER button or
screen RIGHT to select and play a song. Select Play All to play all the songs in the folder.
• PLAY or PAUSE—press screen RIGHT
• NEXT SONG—press screen DOWN
• SHUFFLE—if shuffle is On, songs will play in random order. If shuffle is Off, songs play
in the order in which they appear in the folder.
• REPEAT—if Repeat is On, songs in a folder will play again after the last song is finished.
• SHORTCUT—press and hold the HOME button from any screen to quickly jump to
Music. Press and hold the HOME button again to jump back.
Games
The CRAMMER™ system comes with two games: Wheeler Dealer and Domino Madness.
Wheeler Dealer: Test your entrepreneurial skills while managing a scooter rental business. Weigh
risk versus reward, and rise through the ranks from store intern to scooter tycoon! Play either a
timed 30-day game or an untimed game, and see how long you can keep your store profitable.
Game Play & Navigation: Each day, decide how much to spend on ads, how many scooters to
unlock and how much to charge per rental. The more ads you purchase, the more potential
customers you bring in. The more scooters you unlock, the more available to rent. The more you
charge, the more you can make for each rental. Don’t set prices too high—you may drive
customers away. You will have the opportunity to visit Cambuchi’s Garage to repair broken
scooters, purchase new ones or upgrade your fleet to make your rentals more attractive. A
purchase of any upgrade will apply to all future additions to your fleet as well.
Highlight an entry field by pressing screen UP or DOWN. Increase or decrease its value by
pressing screen RIGHT or LEFT. Press screen RIGHT or the ENTER button to select GO.
Domino Madness: Match up numbers on dominos as they fall to clear the board. Earn extra
points for multiple matches! Play in Timed mode and try get enough before time runs out, or play
in Untimed mode to score as many points as you can.
Game Play & Navigation: Move the dominos as they fall to make matches to clear your board.
Matches must be of the same number of dots and of the same color domino. Matching a star
game piece will clear all dominos with the same number of dots. Matching a bomb game piece
will clear all adjacent dominos, even if they have different dots. Both star and bomb game pieces
will never clear if they land without being matched.
Move a falling domino horizontally by pressing screen LEFT or RIGHT. Rotate a falling domino
with the ENTER button. Once you have aligned a match, press screen DOWN to instantly drop a
falling domino.
2
Page 6

CONNECTING THE CRAMMER™ HANDHELD
Installing the LEAPFROG® Connect Application
To install the LEAPFROG Connect Application for the CRAMMER handheld:
1. Connect the handheld to your computer using the included USB cable, and turn it on.
Note: You will need an Internet connection to install the application.
Windows users: The installer will launch automatically. Follow the onscreen instructions
to download and install the Connect Application.
Mac users: Open the CRAMMER installer that will appear on your desktop and doubleclick the installation file. Follow the onscreen instructions to download and install the
Connect Application.
NOTE: If you have previously installed the LEAPFROG Connect Application for a
different type of connected device (TAG™ Reader, LEAPSTER®2 handheld or DIDJ™
handheld), you will still need to install the CRAMMER view of the Connect Application.
2. After you’ve installed the Connect Application you will be directed through a series of
setup screens that suggest creating a LEAPFROG account. Although a LEAPFROG
account is not required to use the application, it allows LeapFrog to create a customized
Learning Path® for your child, providing you with detailed play data and insights into what
your child is learning. After creating your LEAPFROG account, follow the directions on
the screen to create a child footprint and link the player profile to the child footprint.
3. For parents: Once the LEAPFROG Connect Application is installed and you’ve created a
LEAPFROG account, you can navigate to the Parent’s view, where you can access your
child’s LEAPFROG Learning Path; an online experience that lets parents see and shape
their children’s learning progress.
4. For kids: Once the LEAPFROG Connect Application is installed, you can select your
CRAMMER profile to enter the CRAMMER view. From here you can create, download
and manage all the content for your handheld.
For system requirements of the LEAPFROG Connect Application or more information on creating
a LEAPFROG account, see the Connect Application General Help document.
Launching the LEAPFROG Connect Application
Once you have installed the LEAPFROG Connect Application, turn the CRAMMER handheld on
and connect it to your computer using the included USB cable.* Each time you connect the
CRAMMER handheld to your computer, the application will open automatically and invite you to
select a player profile. Or, you can open the application manually by clicking the Connect
Application logo on your desktop.
3
Page 7
*Note: While connected to the computer, the CRAMMER™ handheld is powered from the
computer and does not consume battery power.
Creating a Player Profile
A CRAMMER player profile is required to use the Connect Application. The first time you connect
a CRAMMER handheld to your computer, a screen will appear asking you to name the device.
The player profile must be a name that is not being used by any other CRAMMER handheld on
this computer.
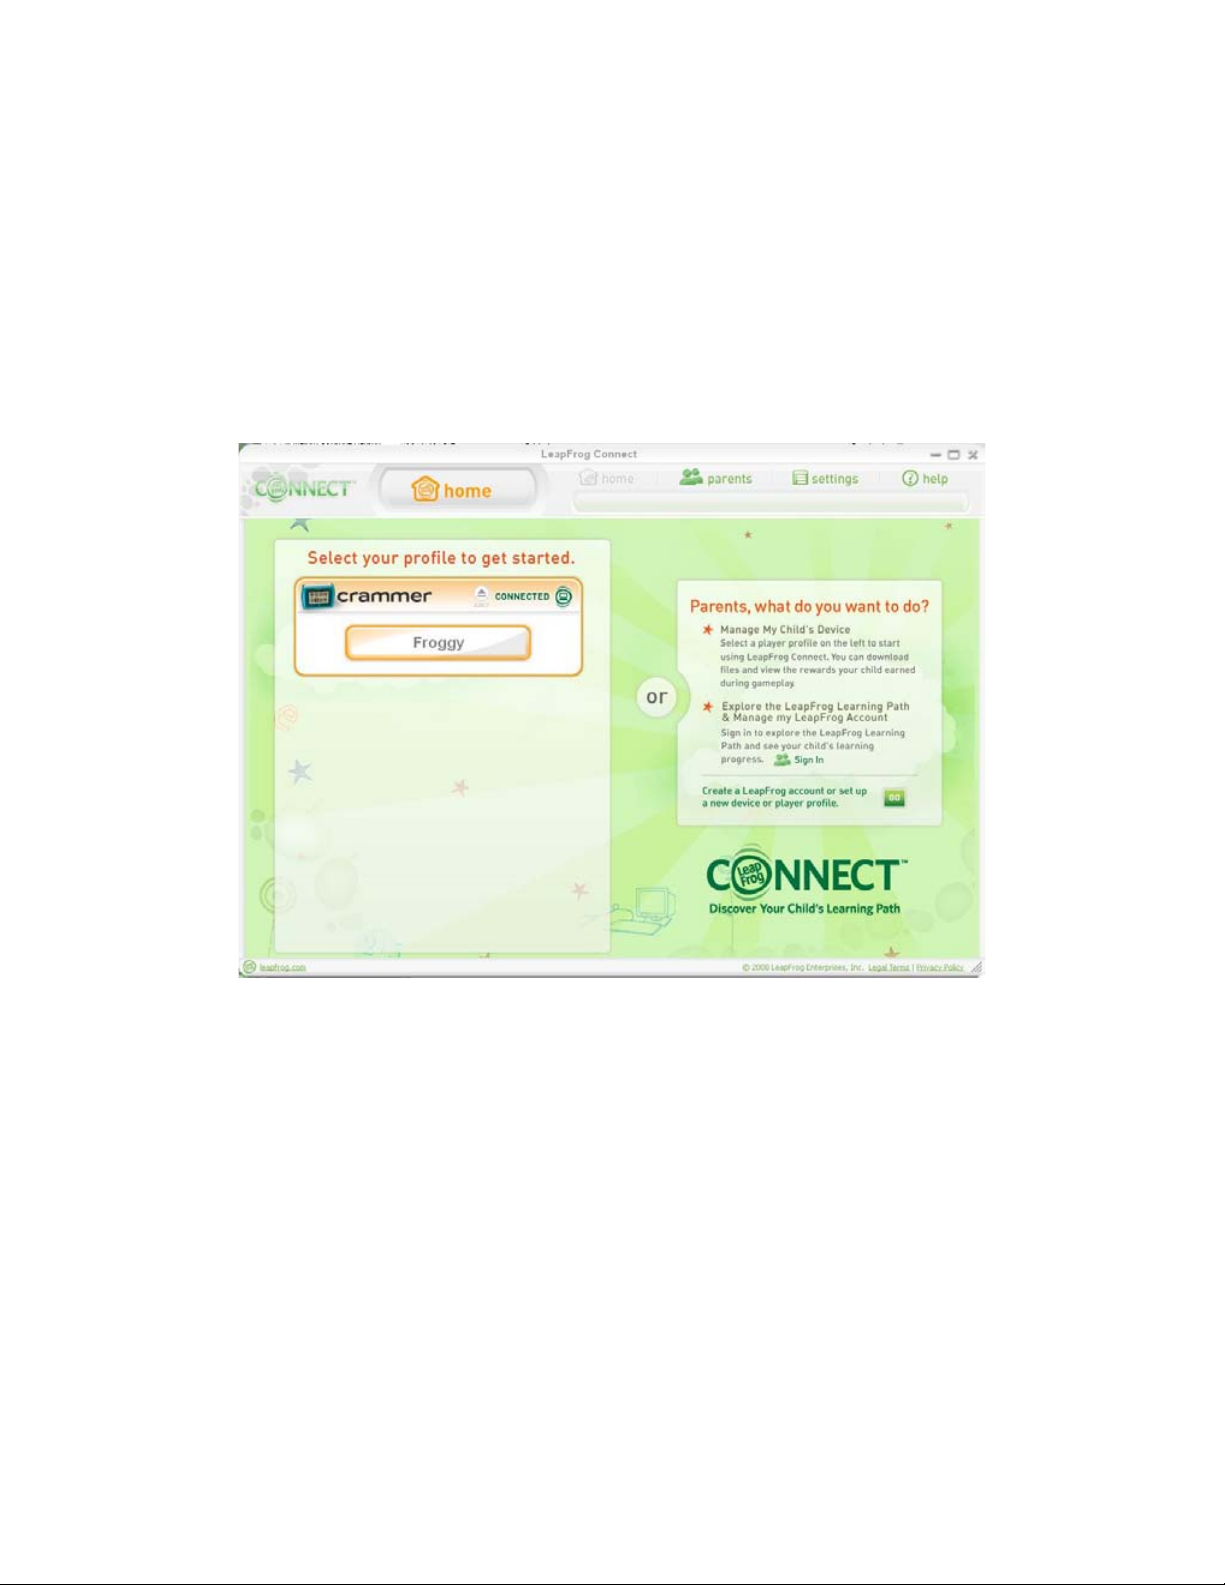
Selecting a Player Profile to Begin
When the Connect Application opens, you will need to select one of the player profiles listed on
the Home page to open the CRAMMER view.
If you have more than one CRAMMER player profile, or player profiles for other devices, you may
need to use the scroll bar to the right of the player profiles to find the one you want to explore.
See the LEAPFROG® Connect Application General Help document for more information on
player profiles and signing in when you have more than one CRAMMER handheld, or multiple
types of devices.
Multiple CRAMMER Handhelds
Each CRAMMER handheld can hold only one player profile. However, many CRAMMER
handhelds can be managed using one LEAPFROG Connect Application. If you have multiple
CRAMMER handhelds, you will be prompted to select one of the player profiles from the Home
page when the application launches.
It is recommended that you connect only one CRAMMER handheld to your computer at a time. If
you connect a second handheld while the first CRAMMER handheld is syncing, the second
handheld might not be recognized. When the sync finishes, you will need to turn the second
CRAMMER handheld off and then on again, or disconnect and reconnect the USB cable for it to
be recognized.
4
Page 8

Switching Player Profiles
To switch between player profiles, click the Home button at the top of the Connect Application
window (in the center) and select another player profile from the list. You can also switch player
profiles by connecting a CRAMMER™ handheld to the computer. A message will appear asking if
you would like to switch to that player profile.
Note: You can distinguish which profile is in use by looking at the message in the title bar of the
LEAPFROG® Connect Application window.
Renaming a Player Profile
To change the name of a CRAMMER player profile, enter the CRAMMER view of the Connect
Application and click the Settings button at the top of the window. Go to the CRAMMER tab and
enter a new player profile name and close the Settings window. Now, when the Connect
Application opens, you will see the new player profile listed on the Home page and in the
application. The name change will also be applied to all child footprints and Learning Path pages.
CRAMMER Handheld Settings
In the upper right corner of the Connect Application window you will see a Settings button. Here
you can find setting options, rename a player profile or reset a CRAMMER handheld.
Resetting the Handheld to Factory Settings
To reset a CRAMMER handheld, you must have the CRAMMER handheld connected and turned
on. Once you have selected a player profile and entered the Settings window, click the Reset
button. A warning message will appear asking you to confirm that you want to reset the
CRAMMER handheld and erase all player profile data. After reset, the Connect Application will
begin syncing the handheld with all of the quizzes, flash cards and music that need to be added
back onto the device.
Warning: It is rare that you will need to reset the CRAMMER handheld and this function should be
used with caution. All contents of the handheld will be erased and, though they will be added
back onto the device following the reset, it may take some time depending on the amount and
size of files.
The CRAMMER View in the Connect Application
After signing in and entering the CRAMMER view, you will see four buttons in the left navigation
column. If you click on one of these buttons, that page will appear in the area to the right.
• CRAMMER Home: this page is always accessible.
• Create Flash Cards: this page is always accessible, however, the CRAMMER handheld
must be connected to save any new flash card sets or edits to the device.
• Downloads: an Internet connection is required to enter the Downloads page. The
CRAMMER handheld must be connected to save any downloads to the device.
• On My CRAMMER: you can always see a list of files that are stored in your library (on
your computer) and on the CRAMMER handheld, however, the handheld must be
connected to save any file changes to the device.
THE CRAMMER HOME PAGE
Selecting a CRAMMER player profile takes you to the CRAMMER Home page, which introduces
you to the LEAPFROG Connect Application and supplies a few quick links to the most commonly
5
Page 9

used features within the CRAMMER™ view of the application. You can return to the CRAMMER
Home page at any time by clicking the CRAMMER Home button in the left-hand navigation
column.
Parents Window
At the top right of the CRAMMER Home page is a small window that includes messages for
parents, including the status of their account and LEAPFROG® Learning Path profile.
Quick Links
From the CRAMMER Home page, you can click any of the quick links under the Parents Window
to download quizzes and flash cards, create new custom flash cards or add songs.
Downloads
In the lower left corner of the CRAMMER Home page, you’ll see a sample of subjects
represented in the downloadable flash card and quiz packs. Click this window to go to the
Downloads page.
New Products and General Information
Look for news and general information about CRAMMER products in the lower right portion of the
CRAMMER Home page.
THE CREATE FLASH CARDS PAGE
This page lets you create custom flash card sets to reflect personal studying or testing needs.
You can create or edit flash card sets without connecting the CRAMMER handheld. However,
when you are done working with the set and want to use it, you will need to save the set to the
handheld.
Note that you cannot edit the information shown on downloaded flash card sets, only on flash
cards sets you have created.
6
Page 10

Creating a Flash Card Set
To create a custom flash card set:
1. Click the Create Flash Cards button in the left-hand navigation column. This takes you to
the Create Flash Cards main page.
2. Type a name for your flash card set (up to 40 characters) where indicated. The name you
choose must be different from the other flash card sets that exist for this player profile.
You can change the name of your flash card set at any time.
3. Click one of the two buttons to choose a tool for creating your set—Basic or Spanish
Translator. The Spanish Translator tool has the same functionality as the basic flash
cards, but with a built-in translator and Spanish accent buttons. Note: once chosen, this
set can not be switched to the other tool.
4. Click the Create button to start creating flash cards.
Using the Basic Flash Cards Tool
Once you’ve clicked the Create button, the editing panel in the middle of the page shows details
about the information on both sides of the selected flash card (you can enter text into both sides
or just one). When you are done creating the flash card, click the Save and Continue button. An
empty flash card will appear for you to edit. If you want to start over with a flash card, click the
Delete Card button and a blank card will appear.
7
Page 11

You can only enter plain text on a flash card—no italics, bold or underlining. You can also
copy/cut and paste text from outside sources using the right-click function on your mouse. There
is a maximum limit of 100 characters. Once you see scrollbars appear, you’ve surpassed the
allowed limit and will need to shorten your entry or it will be cut off when viewed on the
CRAMMER™ handheld.
The Preview panel on the right side of the page shows information about the number of flash
cards in the set (you can save up to 200 flash cards per set) and provides thumbnail images of
both sides of the cards in the set. To read the contents of the thumbnail images, place your
mouse over the image and a tool tip will appear showing you the text at a more readable size.
You can drag-and-drop the flash cards in the Preview panel to reorder them (Use the Shift and/or
Control keys to select multiple cards). If you click a card in the preview panel it will appear in the
editing panel. Be sure to click the Save and Continue button to save any changes! To add a new
card to the set, click on the blank card at the bottom of the preview panel.
Clicking the Switch button at the top of the Preview panel flips the information on the cards from
left to right. This will also affect how the cards are displayed on the CRAMMER handheld. Click
the switch button again to switch the sides back.
When you have completed creating your flash card set, click the Done button to save the set. If
the CRAMMER handheld is connected and turned on, the flash card set will automatically be
synced to the handheld. If not, it will automatically be synced the next time the CRAMMER
handheld is connected and turned on.
Using the Spanish Translator Flash Cards Tool
Once you’ve clicked the Create button, you’ll follow the same basic method as outlined in the
previous section for the Basic Tool. However, the Spanish Translator tool has some additional
functionality.
8
Page 12

When using the Spanish Translator tool, you will see that the special characters used in Spanish
text are included as buttons in the center of the page. When you need a special character, click
on the button that shows the character and it will be inserted into the text on the flash card.
Side A of the flash card will default to Spanish and Side B to English. If you want, you can swap
the two sides by clicking the Switch button at the top of the Preview panel. This will affect how the
cards display on the CRAMMER™ handheld as well.
To use the Translator tool, type a Spanish word into one side of the flash card and click the
Translate button. The English translation of the word will appear on the other side of the card.
Alternately, you can type an English word and click the Translate button for the Spanish side to
be populated. Note that only single words can be translated by the Translation tool, not phrases.
You can also enter a translation manually or edit the result of a translation.
The Translate button pulls information from a word list of about 33,000 words. Half of those are
Spanish with their corresponding English translations, and half are English with their
corresponding Spanish translations. If there is an exact match for what was entered, and only one
translation option exists, that match will appear on the opposite side of the card. If there is not an
exact match and/or there is more than one translation option, a pop-up window will appear,
prompting you to consider the choices and select one of them (or none). The entry will be altered
to match the direct translation.
9
Page 13

Definite and Indefinite Articles
If the words un, una, el, la, los or las are included in the Spanish entry, they will be ignored and
the search will be completed on the main word. This is also true of the words a, an or the on the
English side. Other phrases, sentences and punctuation will prompt an error message.
Misspellings and Word Forms
Misspelled words will not be found (this includes missing or incorrect accents). If you type a
conjugation of a verb rather than an infinitive, or the feminine form of the word instead of the
masculine, it will be found only if it is in the database of words. Some verb conjugations, feminine
forms of words and accent redirects exist and will prompt you to choose the related match found
in the database.
Gender
For nouns, gender will be indicated by adding (masc) for masculine or (fem) for feminine at the
end of the word. If you type “el lago” the translation will show “lago (masc): n, lake.” If you select
that entry, Side A will read “lago (masc)” and Side B will read “lake.”
NOTE that Spanish adjectives can be masculine or feminine but only the masculine forms are
included in the Create Flash Cards application.
Abbreviations
For a list of abbreviations used for gender and parts of speech, click the Abbreviations link at the
bottom left of the page.
• masc. masculine
• fem. feminine
• n. noun
• adj. adjective
• v. verb
• adv. adverb
• prep. preposition
• conj. conjunction
• interj. interjection
• art. article
Audio
When using the Translation tool, you will see an audio icon on some Spanish cards in the preview
panel. This icon appears after clicking the Save and Continue button when the word on the
Spanish side of the card is found in the database. Only exact matches have audio. If definite or
indefinite articles, phrases or punctuation exist, audio will not be attached. The audio cannot be
previewed in the CRAMMER™ view of the LEAPFROG® Connect Application, but will be
available when using the CRAMMER handheld. Audio is only available for the Spanish words, not
the English translations.
Editing Flash Card Sets
To begin editing a set of flash cards, choose a flash card set from the right box of the Create
Flash Cards main page. You can type in the set name or click the browse button. When typing in
a name, keep in mind that punctuation matters.
After choosing the desired set, click the Edit button. The flash card set will appear for you to make
edits or add to the set (to add a new card, click the last, blank card in the set). You can rename a
10
Page 14

set using the Rename button at the top of the page. You can delete a card from a set by choosing
that card in the Preview panel and clicking the Delete Card button.
THE DOWNLOADS PAGE
Click the Downloads button in the left-hand navigation column to open the Downloads page.
From here, you can find pre-made quiz and flash card packs to use with the CRAMMER™
handheld. The files are free and include thousands of questions and vocabulary words.
The quiz and flash card packs are divided into four subject areas: Math, Science, Social Studies
and Language Arts. They cover three grade level ranges: Grades 3–4, Grade 5 and Grades 6–8.
Click on any of the subject or grade links or one of the See More links on the Downloads page to
see a complete list of study tools available for that category.
When you click on the title or icon for a download, a separate window will open to show you the
table of contents for that quiz or flash card pack. You can come back to this page or print the
table of contents for future reference once the file is downloaded to the CRAMMER handheld.
11
Page 15

Downloading Files
To download a file, click the Download button associated with the file you want to download. The
file will immediately begin to download to your computer. You can click multiple Download buttons
and the files will automatically download one after the other. The Message Center will inform you
when each file has completed the download process.
Moving Files to the CRAMMER™ Handheld
If the CRAMMER handheld is connected to the computer and turned on when the quiz or flash
card packs are downloaded, the downloaded files will automatically transfer to the handheld and
be ready for use. If the handheld is not connected to the computer or not turned on when the
download completes, the download will wait to transfer until the handheld is connected and
turned on.
THE ON MY CRAMMER PAGE
The On My CRAMMER page is where you manage and organize the files that are stored on your
child’s CRAMMER handheld. Although you can add or remove files from the handheld even while
it’s not connected, no changes will be saved to the device until it is connected and turned on.
There are four tabs on this page: View All, Quizzes, Flash Cards and Music.
View All Tab
The View All tab shows a complete list of all the files that are stored on your computer and
indicates which of them have been saved to your child’s CRAMMER handheld (or will be saved to
the handheld after any changes have been synced). If there is a checkmark to the left of the file,
that file is stored on the handheld. If there is a blank box with no checkmark, the file is not
currently on the handheld.
The View All tab also shows files that are on the CRAMMER handheld that are not on the local
computer (i.e., you download files, create custom flash cards or add songs and transfer the files
to your child’s CRAMMER handheld and then connect to a new computer). The On My
CRAMMER Page will notify you if it finds a file on the handheld but not on the computer.
12
Page 16

There are three columns on the View All tab: “Saved to CRAMMER™,” “Type” and “Title.” You
can click on the column header to sort the rows using that parameter. Click the column header
again to reverse-sort.
To the right of downloaded files you will see an Information icon (“i”). Click this icon to open the
table of contents for this file. This is the same table of contents accessible in on Downloads page
that lists the structure and content for that file.
To the right of custom flash cards sets you will see an Edit button. Click this button to open the
flash card set in the Create Flash Cards page for editing. Note that only custom flash cards can
be edited.
Quizzes Tab
The Quizzes tab shows the list of downloaded quiz packs stored on your computer and saved to
the handheld (including the sample quizzes that were included with the handheld).
Flash Cards Tab
The Flash Cards tab shows the complete list of downloaded flash card packs and custom flash
card sets stored on your computer and saved to the handheld (including the sample flash card
pack that was included with the handheld). A “Date Modified” column is provided for custom flash
cards that indicates when that set was last edited.
Music Tab
The Music tab shows the complete list of music files stored on your computer or saved to your
child’s CRAMMER handheld (including the two songs that were included with the handheld). Two
other columns, “Artist” and “Album,” display additional details about the songs.
13
Page 17

Add Songs Button
If you click the Add Songs button, the Music tab will automatically open and a window will appear
prompting you to select a music file (Note that only MP3, WAV and OGG files are supported).
Select multiple files using the Shift and Control keys or select an entire music folder.
If the CRAMMER™ handheld is connected and turned on, the music files will automatically
transfer to the device. If the CRAMMER handheld is not connected, the files will transfer the next
time the handheld is connected and turned on.
Before importing a music file, be sure that any information about that song, album or artist is
updated, as you will not be able to edit that information once the song has been imported to the
LEAPFROG® Connect Application.
NOTE: Songs that are protected by DRM or that were purchased from iTunes® cannot be added
to the CRAMMER handheld. You cannot add songs from an outside music application using that
application’s export feature.
Adding & Removing Files
All files listed and checked in the On My CRAMMER Library will automatically transfer to your
child’s CRAMMER handheld. If you download, add or create a new file, it will automatically be
checked and transferred to the handheld as soon as the device is connected and turned on. You
can check or uncheck files while the CRAMMER handheld is not connected, but the changes
won’t be applied until the handheld is connected and turned on.
To remove a file from the handheld, uncheck the file(s) while the device is connected. The sync
will begin immediately and the file will be removed from the handheld. However, as long as the
file is located on your computer, it will remain available and can be added back to the handheld at
any time. If the file you are trying to remove was downloaded from or created on another
computer, you will see a warning message that the file is not located on your computer and, once
deleted from the handheld, will not be able to be added again from this computer.
14
Page 18

The CRAMMER™ Status Column
The CRAMMER Status column indicates the status and state of your child’s CRAMMER
handheld and includes the following images for reference:
The Memory Gauge
At the bottom of the CRAMMER Status column, there is a memory gauge.
This bar is a visual representation of how much of the memory in the CRAMMER handheld is
being used, and how much is available for additional files. The gauge is only active when the
CRAMMER handheld is connected and turned on. The CRAMMER handheld has 1 GB of
memory available. You can add as many components to your CRAMMER handheld as can be
stored in that amount of space. If the memory on the CRAMMER handheld is full, you will need to
remove at least one file in order to add additional files.
15
Page 19

DISCONNECTING THE CRAMMER™ HANDHELD
The Eject Button
The Eject button appears when a CRAMMER handheld is connected and turned on. When you
have finished transferring files onto and off of the CRAMMER handheld, click the Eject button to
disconnect the handheld. Once ejected, a message will appear letting you know that it is safe to
unplug the handheld from the computer.
It is important to remember to use the Eject button before unplugging the handheld to avoid
corrupting the device. Should you forget, the application will notify you if you need to reconnect
your handheld to fix it. See the Updates & Repairs section for more information.
If you need to reconnect a CRAMMER handheld to the application, turn the device’s power off
and on again or disconnect and reconnect the USB cable on that handheld.
The Unsafe to Eject Icon
If your CRAMMER handheld is syncing files, the Eject button will be covered with a red circle with
a slash through it, showing you that it is not safe to eject the handheld. Do not disconnect the
CRAMMER handheld when the Unsafe to Eject icon is showing. If you do, the handheld might be
corrupted and require reconnecting to fix it.
UPDATES & REPAIRS
There are two main types of updates for your child’s CRAMMER handheld: content updates (e.g.,
quiz and flash card downloads) and updates to the handheld itself.
Quiz and Flash Card Pack Updates
Every time the CRAMMER handheld is connected to your computer with an open Internet
connection, the LEAPFROG® Connect Application checks to see if there are updates to quiz and
flash card packs that have been previously downloaded. If any updates exist, they will
automatically download and will be labeled as “Updated” in the On My CRAMMER page until the
file syncs to your child’s CRAMMER handheld.
CRAMMER Handheld Updates
Every time the CRAMMER handheld is connected to your computer with an open Internet
connection, the LEAPFROG Connect Application checks to see if the handheld needs to be
updated or repaired. If an update or repair is required, you will see a pop-up message to that
effect. Once you click the OK button, the update will begin. You will not be able to navigate
around the application while this update is in progress. The Message Center will alert you when
the update has finished. At that time your child can continue to use the handheld as before.
LEAPFROG Connect Application Updates
In addition to the CRAMMER updates, there may also be updates to the LEAPFROG Connect
Application. For information about updates to the LEAPFROG Connect Application see the
LEAPFROG Connect Application General Help document.
16
Page 20

TROUBLESHOOTING
Symptom
Try This
Product does not turn on
Make sure the On/Off switch on the
CRAMMER™ handheld is in the On position
Make sure batteries are correctly installed
Make sure the battery cover is securely
attached
Remove batteries and put them back in
Clean battery contacts by rubbing lightly with a
soft eraser and then wiping with a clean and dry
cloth
Install new batteries
Display stops working
Adjust contrast in Settings menu
Install new batteries
System screen shows
“Update Required”
Make sure the On/Off switch on the CRAMMER
handheld is in the On position
Open the LEAPFROG® Connect Application
Connect the handheld to the computer to
update
Quizzes, flash cards or music are
missing or incomplete
Make sure the On/Off switch on the CRAMMER
handheld is in the On position
Connect the handheld to the computer to have
your content automatically restored by the
LEAPFROG Connect Application
Product does not respond
or freezes
Make sure the On/Off switch on the CRAMMER
handheld is in the On position
PARENT: Insert the end of a paper clip into the
RESET pinhole on the back of the handheld
under the battery door
Computer does not detect
handheld even though USB cable
is connected on both ends
If you have already installed the CRAMMER™
software by using the LEAPFROG® Connect
Application:
• Make sure the On/Off switch on the
CRAMMER handheld is in the On
position
• Disconnect and reconnect the USB
cable to the handheld. It might take a
moment to recognize the handheld
17
Page 21

If you have not yet installed the CRAMMER™
software by using the LEAPFROG® Connect
Application:
• Make sure the On/Off switch on the
CRAMMER handheld is in the On
position
• Disconnect and reconnect the USB
cable to the handheld
• PC users—Follow the instructions on
the computer to install the LEAPFROG
Connect Application (Internet
connection required)
• Mac users—Open the CRAMMER
Installer on the desktop and double
click the installation file. Follow the
instructions on the computer to install
the LEAPFROG Connect Application
(Internet connection required)
• Or, download the application from
www.leapfrog.com/crammer
For more troubleshooting tips click Help within the LEAPFROG Connect Application or go to
www.leapfrog.com/support.
FREQUENTLY ASKED QUESTIONS (FAQ)
General
Question: What is the LEAPFROG® Learning Path?
Answer: The LEAPFROG Learning Path a free online tool that offers unparalleled insights into
your child’s learning progress with LEAPFROG products. Every time you connect
your child’s CRAMMER handheld to your computer, rich play data is transferred to
your child's online Learning Path, empowering you to see details such as which skills,
stories and activities your child is most engaged with, know when your child has
started playing with content above his or her grade level and even see the questions
your child has answered during play.
Connecting
Question: When I connect the CRAMMER handheld for the first time, an operating system
window tells me, “This disk or device contains more than one type of content,” and
asks me what I want to do. What should I do?
Answer: You might see this window the very first time you connect the CRAMMER handheld
for some operating systems. Click Cancel and wait for the LEAPFROG Connect
Application to tell you what to do next.
Question: Why doesn’t the LEAPFROG Connect Application recognize the CRAMMER
handheld?
Answer: Try disconnecting the handheld, turning the power off and on again, and then
reconnecting to refresh the connection.
Did the Connect Application tell you that the handheld needed an update when you
connected it? Try disconnecting and reconnecting the handheld and then follow the
18
Page 22

instructions to update it. Be sure the handheld is turned on.
Check that your USB cable is plugged securely into both the computer and into the
CRAMMER™ handheld.
Question: Can I connect more than one CRAMMER handheld at a time?
Answer: Connecting more than one CRAMMER handheld at a time is not recommended.
Question: Can I connect a CRAMMER handheld and another device such as a LEAPSTER®2
handheld, TAG™ Reader or DIDJ™ handheld at the same time?
Answer: Connecting more than one LEAPFROG® device at a time is not recommended, as
you might get messages about the second device or player profiles on the second
device while still using your CRAMMER player profile.
Question: The LEAPFROG® Connect Application updated the CRAMMER handheld, so why are
there still problems?
Answer: If the Connect Application has updated the handheld and it is still not working properly,
go to the Settings tab to reset the handheld. Warning: This should only be done as a
last resort. You will erase all of the player profile data and it will take a long time for
the Connect Application to add all of your files back to the handheld.
Question: The CRAMMER handheld screen says “Update Required. Please Connect.” What’s
wrong?
Answer: If the CRAMMER handheld becomes corrupted, it is able to detect the problem and
prompt you to connect to the computer so it can be fixed. After connecting, follow the
onscreen instructions to update the handheld.
Question: The handheld screen says “Sync Failed. Please Connect.” Why did it fail and what do
I do?
Answer: If you unplug the CRAMMER handheld while its is syncing you may get this message.
You can fix it by connecting the CRAMMER handheld again and letting the sync
restart. Remember to always wait for the sync to complete and use the Eject button to
disconnect.
Question: The handheld screen says “Connected” but I turned the power off. Why is it still
connected?
Answer: The CRAMMER handheld continues to show “Connected” status if you do not click the
Eject button. Either click the Eject button or unplug the CRAMMER handheld for this
message to disappear.
Question: Do the batteries in the CRAMMER handheld lose charge while it is connected to the
computer?
Answer: No. When the CRAMMER handheld is connected to your computer using the USB
cable, it is powered through the computer and does not use batteries. The batteries
will not charge, but the batteries will also not lose any of the charge that they already
hold.
Downloads
Question: I downloaded a quiz pack; how do I found out what is in each quiz?
Answer: There are many levels and categories within each quiz pack and often dozens of
quizzes. Click the Quiz or Flash Card Pack title on the Downloads page and view the
Table of Contents for that pack. The Table of Contents is also available on the On My
CRAMMER page by clicking the Information (“i”) button.
19
Page 23

Flash Cards
Question: What’s the difference between “Basic” and “Spanish Translation” for the tools
available on the Create Flash Cards page?
Answer: “Basic” provides you with all the tools you need to create custom flash cards to add to
the CRAMMER™ handheld. “Spanish Translation” offers extra features such as
Spanish accent buttons, a translate button that converts between Spanish and English
words and the ability to add Spanish audio that can be heard once the flash cards are
transferred to the handheld.
Question: I want to open a custom flash card to edit, but can’t find it. What can I do?
Answer: On the right side of the Create Flash Card main page you can either type the name of
the set (it must be exact) or click the Browse button to look through all of the
previously-created custom flash card sets (only sets created under the current player
profile will be displayed).
Question: Can I edit a custom flash card set on a different computer than I created it on?
Answer: No. You can only edit a custom flash card set on the computer it was created on, and
by using the player profile it was created in.
Question: The words on the custom flash cards are cut off when viewed on the handheld. How
do I fix that?
Answer: When creating custom flash cards, be sure to type only within the visible space. Once
a scrollbar appears, you’ve exceeded the limit that will appear on the handheld
screen.
Question: Can I insert special characters in custom flash cards?
Answer: Only the standard keyboard characters (the ASCII 128 set) are allowed within the
custom flash cards. However, cards using the Spanish Translator tool will allow
characters with Spanish accents and special punctuation.
Question: Can I use italics, bold, underlining or other formatting tools within my custom flash
cards?
Answer: Only plain text is available when creating custom flash cards. Italics, bold and
underlining are not possible.
Question: When I use the translate button in the Spanish flash cards it adds (fem) or (masc) onto
my Spanish words. What does that mean? Can I remove it?
Answer: Spanish nouns and adjectives have a gender associated with them. Adjectives can be
masculine or feminine depending on what word they are modifying, but nouns have a
specified gender. We show that gender by displaying (fem) for feminine words and
(masc) for masculine words. You can think of (fem) as adding “la” in front of the word,
or “el” for (masc). Example: “playa (fem)” would be the same as “la playa.” You can
remove the gender label if you want. It will not affect whether audio is attached to that
card.
Question: Why can’t I hear the audio for my Spanish custom flash cards within the LEAPFROG®
Connect Application?
Answer: The LEAPFROG Connect Application does not play audio, but you will know if there is
audio attached to your flash card because you will see a speaker icon appear on that
card in the preview panel in the Create Flash Card pages. You can hear the audio
while studying the flash cards on the handheld.
Question: How do I attach audio for custom flash cards?
Answer: Be sure that you entered the Spanish word into the Spanish side of the card and that
you are using the Spanish Translator tool within the Create Flash Card pages. Once
you click the Save and Continue button for the card, LEAPFROG Connect will search
20
Page 24

its Spanish–English database for the word. If the word is found in its exact form,
Spanish audio will be attached to the card. Only audio for the Spanish words will be
added, not the English translations.
Question: The translate function in the Spanish custom flash cards says it doesn’t find any
matches to a word, but it’s a common word. Am I doing something wrong?
Answer: Be sure to enter Spanish words into the side that says “Spanish” and English words
into the side that says “English.” Enter only one word, and use the singular form if
there is a singular or plural option. For verbs, type in the infinitive rather than a
conjugated form (e.g., “go” rather than “going”). If none of these options work, that
word is probably not included in the LEAPFROG® Connect Spanish database of
words.
Question: If a player creates custom flash cards in his/her CRAMMER™ profile and a sibling
creates custom flash cards in his/hers, can they access each other’s flash cards?
Answer: No. Custom flash cards sets are private to each player profile. You can only view and
sync custom flash cards to the same CRAMMER handheld in whose player profile
they were created.
Adding Music
Question: I can’t find any music in the Downloads page. How do I add music to the CRAMMER
handheld?
Answer: The Downloads page is only for flash cards and quizzes. Go to the On My CRAMMER
page and click the Add Songs button. It will open a window to the music folder on your
computer so you can choose which songs to add to the handheld.
Question: I added music to the CRAMMER handheld from my computer but the song displays as
“Track 1” without the title. How do I add the title, album or artist information to the
song?
Answer: You must add title, album and artist information for songs prior to importing them to
the Connect Application. To delete the song and try again, click the song title in the On
My CRAMMER page then press the Delete button on your keyboard. Edit song
information using an application that handles music files, then use the Add Songs
button in the Connect Application to add the song again with its updated information.
Question: Why can’t I see all of the music files I’m trying to add to the Connect Application?
Answer: You can only import MP3, WAV and OGG formatted songs. Songs that were
purchased from iTunes® or other sites will not be visible because they cannot be
added to the CRAMMER handheld.
Question: Why did my songs fail when I tried to import them?
Answer: You can only import MP3, WAV, and OGG formatted songs. Songs that are protected
by DRM or that were purchased from iTunes cannot be added to the CRAMMER
handheld.
On My CRAMMER and Syncing
Question: What does “sync” or “syncing” mean?
Answer: It’s short for “synchronize” or “synchronizing.” It means to transfer files to or from the
computer to the CRAMMER handheld.
Question: The message center says it’s “downloading” and then “syncing.” What’s the difference
between “downloading” and “syncing”?
Answer: Downloading means to transfer a file from the Internet to your computer. Syncing
means to transfer a file from the computer to the CRAMMER handheld or to remove a
file from the handheld.
21
Page 25

Question: The message says I need to connect the handheld to sync it, but it is already
connected. What’s wrong?
Answer: Be sure the CRAMMER™ handheld is connected correctly and that it is turned on.
Question: Syncing takes a long time, can I stop the sync or disconnect the CRAMMER handheld
during the sync?
Answer: No. Disconnecting the CRAMMER handheld during a sync can corrupt the handheld
and require you to connect it again for a repair. Please wait until the sync finishes.
Question: I want to add another quiz, flash card set, or song to the handheld but I get a message
saying that the memory is full. How do I fix this?
Answer: Go to the On My CRAMMER page and remove some files so that you can add new
ones. You can remove files by un-checking them.
Question: The memory gauge shows that there is 3 MB of space left on the handheld, but when I
try to add a file that is only 2.5 MB, I get a message that there is not enough available
space to add the file. Why?
Answer: The size displayed for each file is approximate and does not always include hidden
components that need to be synced along with the file.
Question: The On My CRAMMER page says “Sync Required.” What do I need to do?
Answer: You normally see the “Sync Required” message when you’ve made changes to the
On My CRAMMER page (adding or removing files) but the CRAMMER handheld is
either not connected or it’s connected but not turned on. Turn on the handheld and
connect it to start the sync.
Question: How do I remove a file from the On My CRAMMER page that I don’t want anymore?
Answer: You cannot permanently delete downloaded or sample quizzes or flash card packs
from the LEAPFROG® Connect Application. You can delete custom flash card sets by
going to the Create Flash Cards page, opening the set to edit it and clicking Delete
Set at the bottom of the page. You can delete songs by selecting them in the On My
CRAMMER page by clicking the title and then clicking the Delete button on your
keyboard.
Question: I want to edit some flash cards that I downloaded. How can I do this?
Answer: You cannot edit downloaded flash card packs, only custom flash card sets. To edit a
custom flash card set, go to the Create Flash Cards main page and select that set for
editing.
Question: Next to one of the files in the On My CRAMMER is a message: “On handheld but not
on computer.” What does that mean?
Answer: That label will display for files that are found on the CRAMMER handheld but are not
found on the computer. Usually this happens when you download files, create custom
flash card sets or add songs on one computer and then connect the CRAMMER
handheld to a different computer. If you remove these files from the handheld by unchecking them, you will not be able to add them back unless you reconnect the
handheld to the original computer.
Question: How long does it take to sync the CRAMMER handheld?
Answer: Syncing depends on the size of the files that you are syncing and on the file type.
Songs take the longest to sync due to size and also because they have to be
transcoded before adding them to the device. Syncing can take anywhere from
seconds to nearly an hour.
22
Page 26

Settings
Question: How do I reset the CRAMMER™ handheld?
Answer: You should only reset the handheld as a last resort. Resetting will erase all of the
player profile data and it might take a long time to sync all of the files back onto the
handheld. If you do need to reset the handheld, select the appropriate CRAMMER
player profile from the Home page. Then click the Settings button at the top of the
LEAPFROG® Connect Application. Select the CRAMMER tab at the top of the
Settings window and press the Reset button. Follow the onscreen instructions.
Eject/Disconnect
Question: How do I disconnect the CRAMMER handheld?
Answer: Within the CRAMMER view you will see a small image of the handheld at the top of
the window. To the right of that image is the Eject button. Click that button to safely
disconnect the CRAMMER handheld from the Connect Application. Do Not disconnect
the handheld without clicking the Eject button—it could become damaged and need to
be connected again for repair. You can also disconnect using the Eject button next to
the name of the current CRAMMER player profile on the Home page.
Question: When is it safe to disconnect the CRAMMER handheld from the computer?
Answer: It is safe to disconnect the CRAMMER handheld at any time other than when the Eject
button is crossed out. Remember to always click the Eject button to safely disconnect
the handheld.
Question: The handheld screen is telling me to “Click Eject in LEAPFROG Connect”—is that on
the device or on the computer?
Answer: The Eject button is in the LEAPFROG Connect Application on the computer. If you are
in the CRAMMER player profile, the button will be at the top of the application next to
the image of the handheld. If you are on the LEAPFROG Connect Home page, the
Eject button will be next to the current CRAMMER player profile name.
CARE AND SAFETY INSTRUCTIONS
Instructions For Care
For indoor, dry-location use only. Keep food and beverages away from product. Do not spill liquid
of any kind on this product as it may render it inoperative. Clean gently with a soft, dry cloth. Do
not use water, soap, detergent or other chemicals. Never submerge the unit in water. Avoid
prolonged exposure to extreme temperatures and direct sunlight. Avoid dropping the unit. Never
try to dismantle it.
CAUTION: Routinely check this toy for proper and safe condition. If there is any damage or
broken parts, remove toy from use.
ATTENTION : Vérifiez régulièrement que ce jouet est en bon état et qu’il ne présente pas
de danger. Dans le cas contraire (par exemple, s'il est cassé à certains endroits), tenez ce jouet
hors de portée des enfants.
CAUTION: If for any reason the screen (display) is fractured or cracked, immediately
remove this product from use and contact LeapFrog Consumer Services for replacement if under
warranty.
23
Page 27

ATTENTION : Si pour quelque raison que ce soit, l’écran (d’affichage) est brisé ou fendu,
mettez immédiatement ce produit hors de portée des enfants. Contactez ensuite le Service
clientèle de LeapFrog pour qu’il soit remplacé (si ce produit est sous garantie).
BATTERY INFORMATION
BATTERY REMOVAL AND INSTALLATION INSTRUCTIONS
1. Open the battery door with a screwdriver, coin, or other household tool.
2. If used or dead batteries are present, remove these batteries from the unit by pulling up
on one end of each battery.
3. Install new batteries as shown in the polarity (+/-) diagram inside the battery
compartment.
4. Replace battery door securely.
Battery Safety
Batteries are small objects and may pose a choking hazard for small children. Batteries must be
replaced by an adult. Follow the polarity (+/-) diagram in the battery compartment. Promptly
remove dead batteries from the toy to avoid leaking. Dispose of used batteries properly. Remove
batteries for prolonged storage. Only batteries of the same or equivalent type as recommended
are to be used.
DO NOT incinerate used batteries.
DO NOT dispose of batteries in fire, as batteries may explode or leak.
DO NOT mix old and new batteries or types of batteries (i.e., alkaline/standard).
DO NOT use rechargeable batteries.
DO NOT recharge non-rechargeable batteries.
DO NOT short-circuit the supply terminals.
Sécurité relative aux piles
Les piles sont des objets de petite taille et peut constituer un risque d'étranglement pour les
enfants en bas âge. Le remplacement des piles doit être effectué par un adulte. Respectez le
schéma de polarité (+/-) reproduit dans le compartiment des piles. Enlevez rapidement les piles
usagées du jouet pour éviter les fuites. Suivez les procédures adéquates pour vous débarrasser
des piles usagées. Retirez les piles en cas de non-usage prolongé. Utilisez uniquement des piles
ou accumulateurs du type recommandé ou d’un type équivalent.
NE PAS incinérer les piles usagées.
NE PAS jeter les piles au feu car elles peuvent exploser ou fuir.
NE PAS mélanger piles usagées et piles neuves, ni différents types de piles
(c’est-à-dire alcalines/standard).
NE PAS utiliser des piles rechargeables.
NE PAS recharger des piles non rechargeables.
NE PAS court-circuiter les terminaux d’alimentation.
USB Cable
Use only the USB cable provided by LeapFrog Enterprises, Inc. Using any other cable may
exceed FCC and other regulatory emissions limits. The USB cable is not a toy. Disconnect the
toy from the USB connection before cleaning
Câble USB
Utilisez exclusivement le câble USB fourni par LeapFrog Enterprises, Inc. L’utilisation d'un autre
câble peut dépasser les limites de la FCC (Commission fédérale américaine des
communications) et autres limites règlementaires en matière d'émission. Le câble USB n’est pas
un jouet. Déconnectez le jouet du port USB avant d'entamer toute opération de nettoyage.
WARNING: Cords could be a strangulation hazard. Keep out of reach of children under 3
years of age. Children pulling on the cord could cause the computer monitor or other equipment
24
Page 28

to which the device is connected to fall with the possibility of property damage, serious personal
injury, or death. Adult supervision required during play.
AVERTISSEMENT : Les cordons peuvent représenter un risque d’étranglement. Tenez-
les hors de portée des enfants de moins de 3 ans. En tirant sur le cordon, un enfant peut
causer la chute de l’écran de l’ordinateur ou d’un autre appareil connecté à ce dispositif et
provoquer des risques de dommages matériels, de blessures graves, voire même la mort.
L’utilisation de ce jouet doit avoir lieu sous la supervision d’un adulte.
PROTECT YOUR HEARING
Use only the LeapFrog ear buds specified for this product. Do not use these ear buds with other
products.
CAUTION: Long-term exposure to loud sounds, at high volume, may result in permanent
hearing loss. When using ear buds, it is recommended that the product is listened to at lower
volumes for shorter periods of time. Set the volume while in a quiet environment. Turn the volume
down if you cannot hear people speaking near you. Limit the listening time to 90 minutes,
followed by a quiet period. The louder the volume, the less time required before your hearing may
be affected. If you experience ringing in your ears or hear muffled speech, stop listening and have
your hearing checked.
PROTÉGEZ VOTRE OUÏE
Utilisez exclusivement les écouteurs de la marque LeapFrog recommandés pour ce produit.
Ne pas utiliser ces oreillettes avec d'autres produits.
ATTENTION : Une exposition durable à des sonorités trop fortes peut entraîner une perte
définitive de l’ouïe. Lorsque vous utilisez le casque ou les écouteurs bouton, il est conseillé de
baisser le volume et réduire le temps d’écoute. Réglez le son lorsque vous êtes dans un endroit
calme et baissez-le si vous n'entendez pas les personnes qui parlent autour de vous. Limitez le
temps d’écoute à 90 minutes, puis accordez-vous un moment de tranquillité. Plus le volume est
élevé, plus il y a de chances que votre ouïe soit rapidement touchée. En cas de bourdonnement
dans les oreilles ou si vous entendez des voix sourdes, arrêtez immédiatement d’écouter ce
produit et faites contrôler votre ouïe dans les plus brefs délais.
FCC NOTICE
This device complies with Part 15 of the FCC rules. Operation is subject to the following two
conditions:
1) This device may not cause harmful interference, and
2) This device must accept any interference received, including interference that may cause
undesired operation.
NOTE: This equipment has been tested and found to comply with the limits for a Class B digital
device, pursuant to part 15 of the FCC Rules. These limits are designed to provide reasonable
protection against harmful interference in a residential installation. This equipment generates
uses and can radiate radio frequency energy and, if not installed and used in accordance with the
instructions, may cause harmful interference to radio communications. However, there is no
guarantee that interference will not occur in a particular installation. If this equipment does cause
harmful interference to radio or television reception, which can be determined by turning the
equipment off and on, the user is encouraged to try to correct the interference by one or more of
the following measures:
• Reorient or relocate the receiving antenna.
• Increase the separation between the equipment and receiver.
• Consult the dealer or an experienced radio/TV technician for help.
25
Page 29

NOTE: Changes or modifications to this unit not expressly approved by LeapFrog Enterprises,
Inc., could void the user’s authority to operate the equipment.
This Class B digital apparatus complies with Canadian ICES-003.
Cet appareil numérique de la classe B est conforme à la norme NMB-003 du Canada.
Environmental Phenomena
• The unit may malfunction if subjected to radio-frequency interference. It should revert to
normal operation when the interference stops. If not, it may become necessary to turn the
power off and back on, or remove and reinstall the batteries.
• In the unlikely event of an electrostatic discharge, the unit may malfunction and lose
memory, requiring the user to reset the device by removing and reinstalling the batteries.
Impact de l’environnement
• Une défaillance de fonctionnement de l’appareil peut survenir s’il est sujet à des
interférences avec des fréquences radioélectriques. Le fonctionnement normal de
l’appareil devrait reprendre avec l’arrêt des interférences. Si ce n’est pas le cas, il peut
s’avérer nécessaire d’éteindre et rallumer l’appareil ou de retirer et réinstaller les piles.
• Dans l’éventualité peu probable d’une décharge électrostatique, un mauvais
fonctionnement et une perte de mémoire de l’appareil peuvent se produire. L’utilisateur
doit alors retirer et réinstaller les piles pour réinitialiser l’appareil.
U.S. Consumer Service Contact: Visit our U.S. Consumer Support website at
http://www.leapfrog.com/support 24 hours a day.
Canada Consumer Service Contact: Visit our Canada Consumer Support website at
http://lfcanada.custhelp.com 24 hours a day.
U.K. Consumer Service Contact: Visit our U.K. Consumer Support website at
http://leapfroguk.custhelp.com 24 hours a day.
Australia Consumer Service Contact: Please submit questions to our support staff via email at
info@funtastic.com.au.
LIMITED WARRANTY: Subject to a limited three (3) month warranty. Visit our website at
www.leapfrog.com for full details of the warranty provided in your country. LeapFrog shall not
be liable for any incidental or consequential damages for the breach of any warranty on this
product. Some jurisdictions do not allow the exclusion or limitation of incidental or consequential
damages, or limitation on how long an implied warranty lasts, so the above limitations or
exclusions may not apply to you.
GARANTIE LIMITÉE: Ce produit est soumis à une garantie limitée de trois (3) mois. Veuillez
consulter notre site Web à l’adresse www.leapfrog.com pour obtenir l’intégralité des informations
de garantie fournies dans votre pays. LeapFrog ne sera pas tenu responsable des dommages
consécutifs ou indirects induits par la violation de toute garantie sur ce produit. Certaines
juridictions n’autorisant pas l’exclusion ou la limitation des dommages consécutifs ou indirects, ni
même la limitation de la durée des garanties implicites, il est donc possible que les limitations ou
exclusions ci-dessus ne s’appliquent pas à votre cas.
Screenshots used in this guide are for illustrative purposes only. Actual screenshots may vary.
LEAPFROG, the LeapFrog logo, the LeapFrog Learning Path logo, CRAMMER, DIDJ,
LEAPSTER and TAG are trademarks or registered trademarks of LeapFrog Enterprises, Inc.
© 2008 LeapFrog Enterprises, Inc. All rights reserved.
leapfrog.com
26
Page 30

For ages 8 years and up./ Convient aux enfants à partir de 8 ans.
27
 Loading...