

Page 1

operating instructions
__________
instrucciones de operación
__________
instructions
La-Z-Boy Incorporated
12 84 N. Telegraph Road
Monroe, MI 4816 2
la-z-boy.com
PowerReclineXRw
™
PowerReclineXR
®
&
©2015 La-Z-Boy Incorporate d
93000541-00 Rev. 01/15
Rocker Recliner / Wall Recliner / Motion Sofas
Page 2

Congratulations!
Table of Contents
You are now the proud owner of a
stat e-of-the-art PowerReclineXR
PowerReclineXRw
™
product by La-Z-Boy®.
You have just selected one of the
finest quality upholstered products
produced in the furniture industry,
backed by over 86 years of quality
manufacturing experience.
La-Z-Boy is proud of our designs
and craftsmanship and knows you
will feel the same as you enjoy your
new furniture’s comfort and style.
Important Safety Instructions ...................................... 4-5
®
or
PowerReclineXR
®
& PowerReclineXRw™Recliner
Assembly Instructions....................................................6-7
PowerReclineXR
®
with Massage & Heat
Assembly Instructions..................................................8-10
PowerReclineXR
®
Rocking Loveseat
Assembly Instructions..........................................................12-13
PowerReclineXRw
™
Motion Sofa
Assembly Instructions..........................................................14-17
Battery Backup Assembly Instructions..................................18
PowerReclineXR
®
& PowerReclineXRw
™
Operating Instructions.........................................................20-21
PowerReclineXR
®
with Optional Hand Wand
Operating Instructions........................................................... 22-23
PowerReclineXR
®
with Massage and Heat
Operating Instructions...................................................24-26
PowerReclineXR
®
& PowerReclineXRw
™
Troubleshooting....................................................................27-28
Furniture Placement Guide &
Cup Holder Operating and Cleaning Instructions........................29
IMPORTANT
Read the safety and other instructions before using
your PowerReclineXR
Keep this manual for future reference.
2
®
or PowerReclineXRw™Product.
Disclaimer: The information and products featured in this manual may be
somewhat different from the product you purchased. La-Z-Boy
to make substitutions that are equal in quality and performance.
®
reserves the right
3
Page 3

Important Safety Instructions:
Important: Read these instructions thoroughly before using.
Important Safety Instructions:
Important: Read these instructions thoroughly before using.
DANGER
• Disconnect the electrical plug from the wall outlet before cleaning, moving, servicing or when
not in use for an extended period of time.
• Do not use this product if it is wet, in water, around water or any liquid. Do not handle the plug
or remote control with wet hands.
• To prevent suffocation keep plastic bags away from children.
• Plug directly into a wall outlet. Do not use an extension cord, adapter or surge protector.
• Keep cord out of reach of small children, and do not use where it may be a trip hazard.
WARNING
• Always keep open flame and lit cigarettes away from upholstered furniture. Upholstered furniture
may burn rapidly with toxic gas and thick smoke.
• Closely supervise children and disabled persons using this product.
• Sit down in the unit slowly. To avoid tip over, do not throw your weight against the back of the unit.
Move the unit into or out of the reclining position slowly, making sure that no children or pets are
in close proximity.
• This product has many moving parts, serious injury can occur if not used properly. Keep hands,
fingers and body parts away from the mechanism. To reduce the risk of head entrapment and other
injuries, keep children and pets away from openings and moving parts in and around furniture.
• Only the occupant should operate the unit. Never attempt to open the legrest by pulling on it.
• Do not stand, sit, or place extra weight on the arms, back or open legrest.
• To safely exit the unit and prevent a tripping hazard, bring the back upright and close the legrest.
• Do not use this product if it is damaged. Do not use attachments or substitute parts.
• This product is intended for indoor residential use only.
• Provide a clear path for operation of the back and legrest. Place tables and area rugs at a distance
to allow the legrest to fully extend without rubbing or interference.
• Check the condition of the power transformers, electrical cords, plugs, and connectors monthly. Keep
the power transformers and electrical cords away from heat sources. Never operate the unit with a
damaged power transformer, electrical cord, plug, or connector. Contact your La-Z-Boy
• Do not use unit if power control is damaged or wet. Do not use unit if the hand wand has been
dropped in water or any liquid. Contact your La-Z-Boy
• This product is not intended for use as a health care device.
• Do not place containers with hot beverages in the cup holders. The furniture moves and
beverages may spill and cause injury. Do not place oversized or uncovered beverage containers
in the cup holders.
• Users of medical devices should contact their health care provider before using this product.
Do not use this product if you have poor circulation, are immobile, or cannot sense heat, except
as directed by your health care provider.
– To reduce the risk of electric shock, serious injury or death:
– To reduce the risk of burns, fire, electric shock,
serious injury or death:
®
dealer for service.
®
dealer for service.
• Only operate the power recline function when you are in a fully seated position.
• To avoid tipping the chair forward, bring the back completely upright and close the legrest before
you exit the chair.
• Do not use this product where aerosol (spray) products are being used or where oxygen
is being administered.
• Do not operate the unit until the back is installed and locked.
• Before moving the product, disconnect the electrical plug from the wall outlet and secure the
mechanism to prevent unexpected opening or movement. Never move the product by the mechanism,
legrest, handle or reclining back. Disconnect modular units.
• Do not attempt to disassemble or service the pump or motor; no serviceable parts are inside.
Contact your La-Z-Boy
• Do not allow electrical cord to be pinched between moving parts or between the frame and the
floor. Do not place cord under carpet or in a location where it could become worn.
• Do not attempt to disconnect the power plug by pulling the power cord. Always hold the power
plug and pull it out.
• Do not use pillow, blanket, or other cover between occupant and chair surface when heat is engaged.
• Burns may result from improper use and care of internal heating pads. To avoid risk of burns, do not
use pins, do not allow heating pad area to become wet, and do not remove upholstery cover.
• Unplug the power cord immediately if you detect strange odors or fumes coming from the unit.
• This product is not intended to be used as a bed. Do not sleep in for an extended period.
• Keep hands, arms and body parts away from the open area between a reclined back and an upright
back on a motion sofa or modular. This area must remain clear at all times to provide unobstructed
movement and prevent injury that could occur when a reclined back is returning toward the
upright position.
• The PowerReclineXR
300 pounds per seat. Do not operate an individual seat with more than one occupant in or on any part
of the individual seat.
• If you give this product to someone else, include this Operating Instructions manual.
NOTICE
• To prevent damage to the power transformer, do not plug in until instructed.
• Gently press the buttons during operation and avoid hitting the buttons with pointed or hard objects.
• Do not move the units while connected together. The purpose of the bracket system is to connect the
units and prevent them from being separated while on the floor. The bracket system does not provide
adequate structural support for the movement of connected units.
• Never operate the unit except when it is on its base in the upright position.
• Some units contain cup holders. Take care to prevent spilling of beverages, which could damage
the cover.
• After 1 minute of continuous operation, allow the back recline and legrest extension features
to rest for 9 minutes.
®
dealer for service.
®
and PowerReclineXRw™units are intended for a single occupant not exceeding
– To reduce the risk of product damage:
4
Save These Instructions
Save These Instructions
5
Page 4
PowerReclineXR®& PowerReclineXRw™ Recliner
Assembly Instructions
PowerReclineXR®& PowerReclineXRw™ Recliner
Assembly Instructions
I
llustrations show a PowerReclineXR
®
R
ecliner
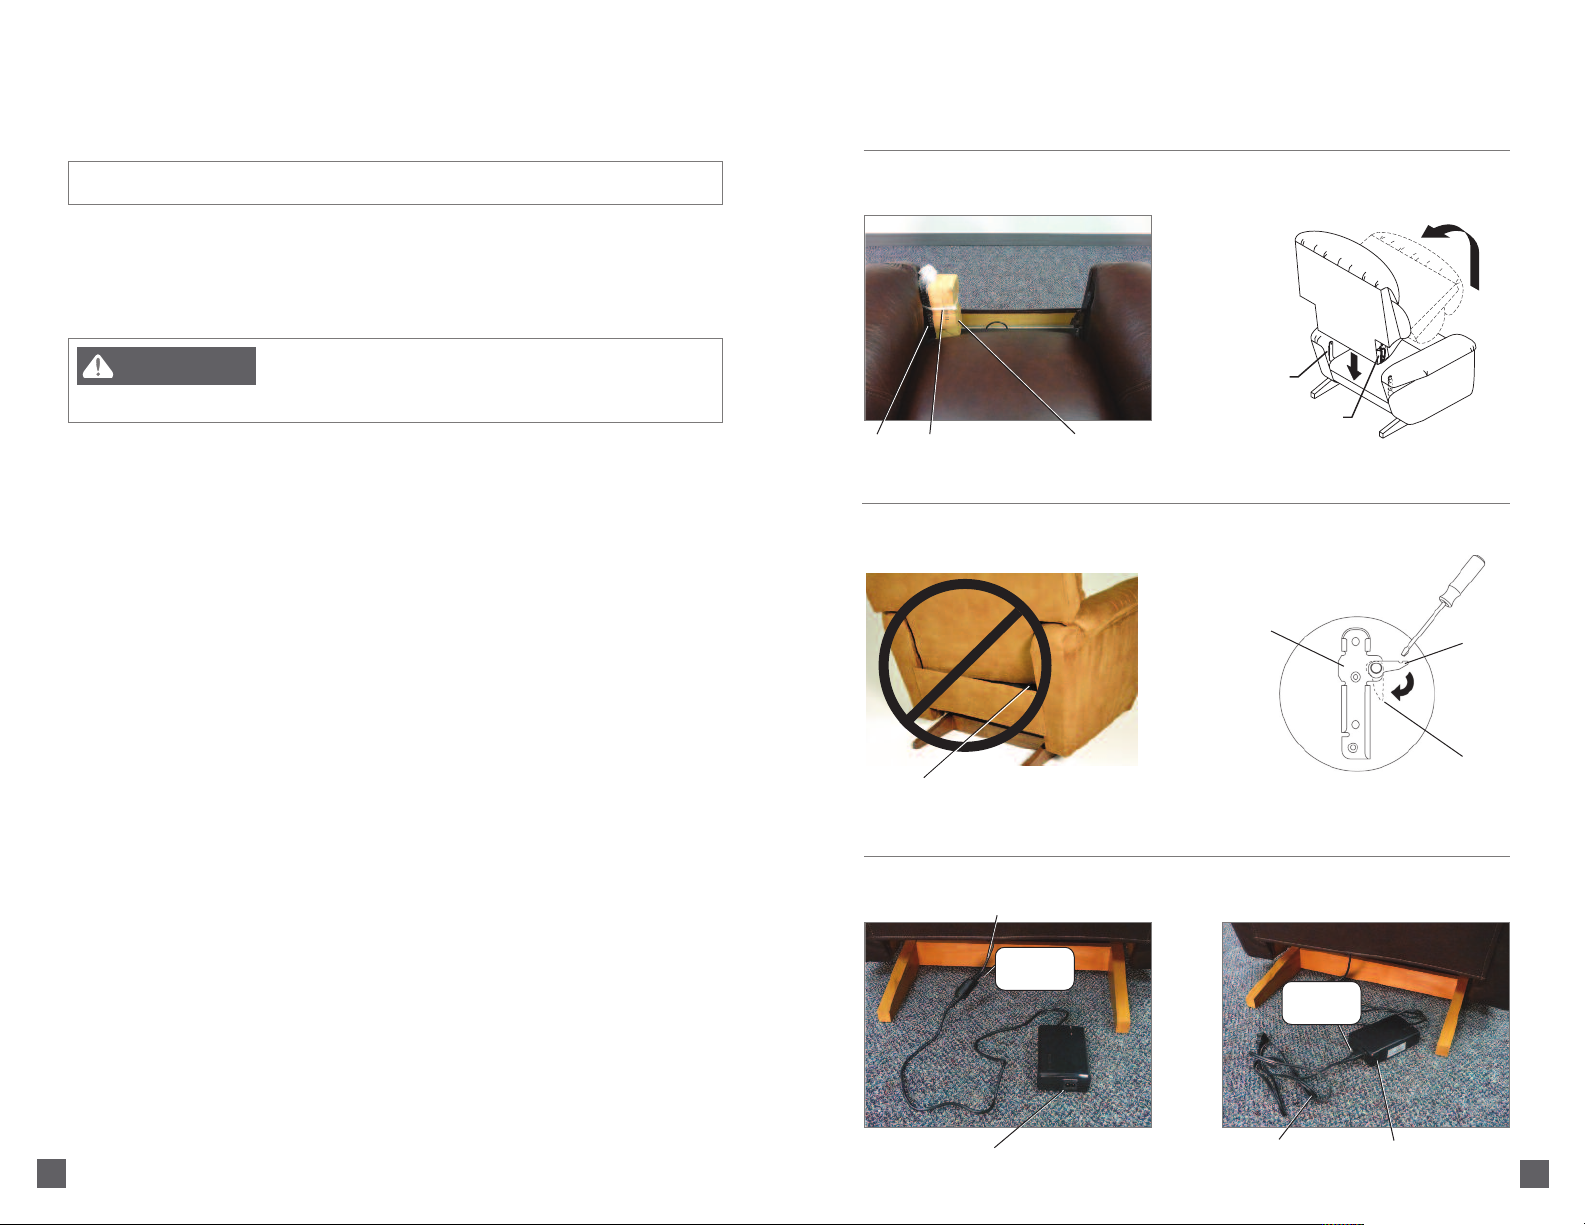
NOTICE: Do not plug in until instructed.
1. Carefully cut the plastic tie holding the power transformer box to the body bracket (F
NOTE: The hand wand will also be tied to the body bracket for units ordered with the optional
hand wand.
2. For units with a hand wand, remove the hand wand from the bubble wrap, and lay the hand
wand on the seat.
WARNING
• Do not operate the unit until the back is installed and locked.
3. Install the back.
• Lay the back across the arms of the chair. Turn the locking levers, located on the brackets attached
to the back (one on each side), to a 90 degree angle (F
align the brackets on the back with the brackets on the body (F
• Lower the back onto the body, making sure the back and body brackets are completely engaged.
- To make sure the back is properly installed with both sets of back and body brackets
engaged, stand behind the chair and twist the back from side to side. If one or both sides
move out of position the brackets are not engaged (F
the steps above.
- If you are unable to install the back properly, contact your La-Z-Boy
• Lock the brackets by using a screwdriver to push down the locking levers (FIGURE 4).
4. Locate the power supply connector behind the chair. Connect the power transformer connector into
the power supply connector. If your connector has a locking cover, close the locking cover to secure
the connection (F
connector directly into the power supply until it is fully seated.
5. Connect the 120 volt power cord to the power transformer (F
instructed in the Operating Instructions.
6. If assembling a PowerReclineXR
Rocking Loveseat Assembly Instructions.
7. If assembling a PowerReclineXR
Assembly Instructions.
8. To remove the back, unplug the 120 volt power cord from the electrical outlet, and
disconnect the power transformer connector from the power supply connector. Reverse
the Assembly Instructions steps.
IGURE 5). If your connector does not have a locking cover, plug the power supply
– To reduce the risk of injury:
IGURE 4). Lift the back at a slight angle and
IGURE 2).
IGURE 3). Remove the back and repeat
®
dealer for assistance.
IGURE 6). Do not plug in until
®
Rocking Loveseat, proceed to the PowerReclineXR
®
or PowerReclineXRw™ chair, proceed to the Battery Backup
IGU RE 1).
®
FIGURE 1FIGURE 2
Body
Bracket
Back Bracket
Hand
Plastic
Wand
Tie
IGURE 3FIGURE 4
F
Back and body brackets on this side are not
engaged. Remove the back and reinstall.
F
IGURE 5FIGURE 6
Power Supply Connector
connection
Power
Transformer Box
Back
Bracket
Make this
Make this
connection
Locking
Lever
at 90
Degree
Angle
Locked
Position
Power Transformer*
6
*Power transformers/connections will vary by style.
120 Volt
Power Cord
Power
Transformer
7
Page 5
PowerReclineXR® with Massage & Heat
Assembly Instructions
PowerReclineXR® with Massage & Heat
Assembly Instructions
NOTICE: Do not plug in until instructed.
1. Carefully cut the plastic tie holding the power transformer box and the hand wand to the
body bracket (F
2. Remove the hand wand from the bubble wrap, and lay the hand wand on the seat.
WARNING
• Do not operate the unit until the back is installed and locked.
3. Install the back.
• Lay the back across the arms of the chair. Turn the locking levers, located on the brackets attached
to the back (one on each side), to a 90 degree angle (F
cables between the rear of the seat and the metal rear rail (F
become pinched while installing the back.
• Lift the back at a slight angle and align the brackets on the back with the brackets on the
body (F
• Lower the back onto the body, making sure the back and body brackets are completely engaged.
- To make sure the back is properly installed with both sets of back and body brackets
engaged, stand behind the chair and twist the back from side to side. If one or both sides
move out of position the brackets are not engaged (F
the steps above.
- If you are unable to install the back properly, contact your La-Z-Boy
• Lock the brackets by using a screwdriver to push down the locking levers (FIGURE 5).
4. To access the connectors, gently roll the chair forward to rest on the arms and the top of the back.
The connectors are located at the back of the chair, under the rear seat.
5. Identify the electrical connectors (F
• The rectangular red connectors are for the heating pad connection.
• The rectangular brown and black connectors are for the massage connection.
• The round black connector is for the power supply connection.
IGURE 3).
IGU RE 1).
– To reduce the risk of injury:
IGURE 5). Route the massage and heating pad
IGURE 4). Remove the back and repeat
IGURE 6).
IGURE 2). Do not allow the cables to
®
dealer for assistance.
FIGURE 1FIGURE 2
Massage & Heat Cables
Hand
Plastic
Wand
Tie
IGURE 3FIGURE 4
F
Body
Bracket
Back Bracket
F
IGURE 5FIGURE 6
Power
Transformer Box
Metal Rear Rail
Back and body brackets on this side are not
engaged. Remove the back and reinstall.
Power Supply
Power Supply
Connector
Connector
Back
Bracket
8
(Assembly Instructions Continued)
Locking
Lever
at 90
Degree
Angle
Locked
Position
Massage
Connectors
Heating Pad
Connectors
9
Page 6

PowerReclineXR® with Massage & Heat
Assembly Instructions
6. Align the red heating pad connectors and push the connectors together until locked (FIGU RE 7).
7. Align the brown massage connector with the black massage connector and push the connectors
together until locked (F
8. Gently rotate the chair back to the upright position so it is resting on its base. Do not allow the power
supply connector to be pinched between the frame and the floor.
9. Connect the power transformer connector into the power supply connector. If your connector has a
locking cover, close the locking cover to secure the connection (F
have a locking cover, plug the power supply connector directly into the power supply until
it is fully seated.
10. Connect the 120 volt power cord to the power transformer (FIGURE 10). Do not plug in until instructed
in the Operating Instructions.
11. Proceed to the Battery Backup Assembly Instructions.
12. To remove the back, unplug the 120 volt power cord from the electrical outlet, and disconnect the
power transformer connector from the power supply connector. Reverse the Assembly Instructions steps.
FIGURE 7FIGURE 8
Make this
connection
GURE
I
8).
GURE
I
9). If your connector does not
(Page intentionally left blank.)
IGURE 9FIGURE 10
F
*Power transformers/connections will vary by style.
10
Power Supply Connector
Make this
connection
Power Transformer*
Make this
connection
Make this
connection
120 Volt
Power Cord
11
Page 7

PowerReclineXR
®
Rocking Loveseat Assembly Instructions
PowerReclineXR
®
Rocking Loveseat Assembly Instructions
WARNING
• Provide a clear path for operation of the back and legrest. Place tables and area rugs
at a distance to allow the legrest to fully extend without rubbing or interference.
1. Place the furniture in the desired location; refer to Furniture Placement Guide.
2. Use a T-30 torx driver to loosen the threaded studs to approximately 1"; this measurement may vary
depending on the fabric and style. The threaded studs are located on the left side (sitting) of right side
(sitting) units.
3. Place the console (F
Position the console (with the threaded studs) slightly behind the recliner. Separate the fronts of the units
to be connected, about 6" apart. Pull the console forward until the threaded stud on the console engages
in the rear bracket on the recliner.
WARNING
• The front of the unit must be raised to engage the front bracket. Please seek assistance if
you are unable to lift at least 21 pounds.
• Keep feet clear of the unit when lowering into position.
4. Lift the front of the console approximately 3" off the ground, aligning it to the attachment bracket on the
left side (sitting) rocker recliner. Gently lower the threaded stud into the front attachment bracket (F
Keep feet clear of the unit when lowering into position.
NOTE: Due to variations in upholstery and style, the threaded stud length may need to be adjusted to fit
into the attachment brackets or control gaps between units. Loosen or tighten the threaded studs to provide
adequate clearance.
5. Place the right side (sitting) rocker recliner (F
side (sitting) rocker recliner (with the threaded studs) slightly behind the console. Separate the fronts of
the units to be connected, about 6" apart. Pull the right side (sitting) recliner forward until the threaded
stud on the recliner engages in the rear bracket on the console.
WARNING
• The front of the unit must be raised to engage the front bracket. Please seek assistance if
you are unable to lift at least 21 pounds.
• Keep feet clear of the unit when lowering into position.
NOTICE:
• Lift from the side frame. Do not lift from the upholstery or bottom of the legrest.
– To reduce the risk of serious injury:
GURE
I
3) approximately 2" to the side of the left side (sitting) rocker recliner (FI
– To reduce the risk of serious injury:
IGURE 2) about 2" to the side of the console. Position the right
– To reduce the risk of serious injury:
– To reduce the risk of product damage:
GURE
IGURE 4).
1).
NOTICE:
• Do not move the units while connected together. The purpose of the bracket system is to
connect the units and prevent them from being separated while on the floor. The bracket
system does not provide adequate structural support for the movement of connected units.
8. The units must be disconnected before moving the loveseat. To disconnect the units, lift up the left front
corner of the right side (sitting) recliner approximately 3" to clear the front attachment bracket on the
console. Move the recliner to the side before returning it to the floor. Slide the right side (sitting) recliner
backward to disengage the back bracket on the console. Repeat these steps to disconnect the console
from the left side (sitting) recliner.
9. Proceed to the Battery Backup Assembly Instructions.
FIGURE 1
Left Side (Sitting) Rocker Recliner
Rear Bracket
Front Attachment
Bracket
FIGURE 3
Console
Rear
Side
Mount
Bracket
– To reduce the risk of product damage:
FIGURE 2
Right Side (Sitting) Rocker Recliner
Threaded
Studs
FIGURE 4
Front Attachment
Bracket (Left Side
Sitting Rocker
Recliner)
6. Lift the front of the right side (sitting) recliner approximately 3" off the ground, aligning it to the attachment
bracket on the console. Gently lower the threaded stud into the front attachment bracket. Keep feet clear
of the unit when lowering into position.
7. Adjust the glides on the console to level the unit, if necess ary. Turn clockwise to lower and
counterclockwise to raise.
12
(Assembly Instructions Continued)
Front Side
Mount “U”
Bracket
Front Attachment
Bracket (Console)
13
Page 8

PowerReclineXRw™Motion Sofa
Assembly Instructions
PowerReclineXRw™Motion Sofa
Assembly Instructions
NOTICE: Do not plug in until instructed.
1. Starting with all packaging removed from the unit, locate the boxed power transformer, packaged
120 volt power cord and bubble wrapped optional hand wand (if applicable) secured to the body
bracket of the unit (F
2. Carefully cut the plastic tie(s) securing the parts. Unpack the power transformers and 120 volt
power cords and set aside. For units with optional hand wands, remove the bubble wrap and
place the hand wand on the seat (FI
WARNING
• Do not operate the unit until the back is installed and locked.
3. Install the back.
• Lay the backs face down on the seats. Starting with one back, turn the locking levers, located
on the brackets attached to the back (one on each side), 45 to 30 degrees from vertical (F
• Hold the back at a slight angle to the seat and align the brackets on the back with the brackets
on the body (F
• Rotate the back upright and lower the back onto the body (FIGURE 4), making sure the back and
body brackets are completely engaged.
- To make sure the back is properly installed with both sets of back and body brackets
engaged, stand behind the unit and twist the back from side to side. If one or both sides
move out of position the brackets are not engaged (F
repeat the steps above.
- If you are unable to install the back properly, contact your La-Z-Boy
• Lock both back brackets by using a screwdriver to push the locking levers down (FIGURE 6).
• Repeat this step for each back.
IGURE 1); there is one each per reclining seat.
GURE
2).
– To reduce the risk of injury:
IGURE 4).
IGURE 5). Remove the back and
®
dealer for assistance.
IGURE 3).
FIGURE 1FIGURE 2
Hand
Wand
IGURE 3
F
Back
Bracket
Plastic
Tie
Power Transformer &
120 Volt Power Cord
45 Degrees
from
Vertical
Locking
Lever
Hand
Wand
FIGURE 4
Body Bracket
Back Bracket
F
IGURE 5FIGURE 6
Back
Bracket
Back and body brackets on this side are not
14
(Assembly Instructions Continued)
engaged. Remove the back and reinstall.
Locking
Lever
at 45
Degrees
from
Vertical
Locked
Position
15
Page 9

PowerReclineXRw™Motion Sofa
Assembly Instructions
PowerReclineXRw™Motion Sofa
Assembly Instructions
4. Locate the power supply connector, one behind each reclining seat (FIGURE 7). Align the power
transformer connector to the power supply connector, push together until fully seated and close
the locking cover to secure the connection (F
5. Connect the 120 volt power cord to the power transformer (F
instructed in the Operating Instructions.
6. Proceed to the Battery Backup Assembly Instructions.
To Remove the Back:
1. Unplug the 120 volt power cord from the electrical outlet and disconnect the power transformer
connector from the power supply connector.
2. Taking care not to damage the cover, insert a screwdriver between the arm and back and engage
the locking lever on the back bracket (F
3. Push up on the locking lever until the lever is at 45 to 30 degrees from vertical (F
4. Repeat steps 2 and 3 for the other side of the back, inserting the screwdriver between
the rear post and back.
5. The back is free to remove at this point. Lift up on the back to remove.
IGURE 8). Do this for each reclining seat.
IGURE 9). Do not plug in until
IGU REs 10).
IGU RE 10).
FIGURE 7FIGURE 8
Make this
connection
Power Supply Connector
IGURE 9FIGURE 10
F
Make this
connection
120 Volt
Power Cord
Power
Transformer
Power Transformer
Back
Bracket
Power Supply Connector
45 Degrees
from
Vertical
Locking
Lever
16
(Assembly Instructions Continued)
17
Page 10

Battery Backup Assembly Instructions
Replace the power transformer batteries every six months and
NOTICE:
The performance of the built-in battery backup cannot be guaranteed. If you require continuing
use during a power outage, you should purchase a separate battery backup system. Contact
your La-Z-Boy
To reduce battery consumption, the massage and heat features are blocked and unavailable
when the battery backup is in use. Additionally, the operating speed is reduced to decrease
energy consumption.
Always maintain constant even pressure on the button when operating on battery backup to
reduce the energy consumption.
The battery backup is located in the power transformer and uses two 9-volt alkaline
batteries (not included).
1. Unplug the 120 volt power cord from the electrical outlet, and disconnect the power
transformer connector from the power supply connector.
2. The battery compartment is located in the bottom of the power transformer. Slide the battery
cover(s) over to access the battery compartment(s). Your power transformer will look like
F
IGURE 1 or FI GURE 2.
3. Snap the connection caps on the battery terminals. Place the batteries in the power transformer.
4. Slide the battery cover(s) over the batteries.
5. Proceed to the Operating Instructions.
FIGURE 1
after each power failure use. Under normal conditions, the battery
backup will operate the chair two times, but this performance
cannot be guaranteed.
®
dealer for more information.
FIGURE 2
(2) 9-Volt
Alkaline Batteries
(Page intentionally left blank.)
Battery
Cover
Power
Transformer
(2) 9-Volt
Alkaline Batteries
Battery
Cover
PowerReclineXR®& PowerReclineXRw
Transformer Specifications:
Input: 100V-240V~, AC 50/60Hz
Output: 29V, DC 2A
18
Note: Transformers vary by style and date of manufacturer.
Power
Transformer
™
(2) 9-Volt
Alkaline Batteries
PowerReclineXR
Transformer Specifications:
Input: 100V-240V~, AC 50/60Hz
Output: 29V DC 1.5A
Battery
Cover
®
19
Page 11

PowerReclineXR
®
& PowerReclineXRw
™
Operating Instructions
To reduce the risk of electric shock, serious
DANGER
• Plug directly into a wall outlet. Do not use an extension cord, adapter or surge protector.
WARNING
• Sit down in the unit slowly. To avoid tip over, do not throw your weight against the back
of the unit. Move the unit into or out of the reclining position slowly, making sure that
no children or pets are in close proximity.
• Keep hands, arms and body parts away from the open area between a reclined back and
an upright back on a motion sofa or modular. This area must remain clear at all times to
provide unobstructed movement and prevent injury that could occur when a reclined back
is returning toward the upright position.
• The PowerReclineXR
exceeding 300 pounds per seat. Do not operate an individual seat with more than one
occupant in or on any part of the individual seat.
• To safely exit the unit and prevent a tripping hazard, bring the back upright
and close the legrest.
NOTICE:
To avoid product damage, the back recline and legrest extension features should not be operated continuously for
extended periods of time. After 1 minute of continuous operation, allow these features to rest for 9 minutes.
Plug the power cord directly into a wall outlet. Make sure there is enough slack in the cord running
from the chair to the outlet to allow for rocking and reclining. Never stretch or strain a cord.
The PowerReclineXR
• Only recline the back. When the back is reclined, the PowerReclineXR
• Only extend the legrest. When the legrest is extended, the chair body tilts backward.
• Operate both the back recline and legrest extension simultaneously.
Back Recline:
Press and hold down the top, front button. Release the button when you have reached a comfortable position.
To return the back to the upright position, press and hold down the top, back button. Release the button
when you have reached a comfortable position, or when the back is fully upright.
Legrest Extension:
Press and hold down the bottom, front button. Release the button when you have reached a comfortable position.
To return the legrest to the closed position, press and hold down the bottom, back button. Release the button
when you have reached a comfortable position, or when the legrest is fully closed.
Back Recline and Legrest Extension:
The back recline and legrest extension can move simultaneously by pressing and holding both front buttons at
the same time, releasing the buttons when you have reached a comfortable position.
The reclined back and extended legrest can also be returned simultaneously by pressing and holding both back
buttons at the same time, releasing them when you have reached a comfortable position, or the back is fully
upright and the legrest is fully closed.
The function of each button is explained in greater detail on the following page.
We recommend that you unplug the power transformer if you will be away from your residence
for an extended period of time.
20
®
–
injury or death:
– To reduce the risk of serious injury:
®
and PowerReclineXRw™units are intended for a single occupant not
After 1 minute of continuous operation, allow the back recline
and legrest extension features to rest for 9 minutes.
and PowerReclineXRw™offers three reclining options:
®
chair can be rocked.
PowerReclineXR®& PowerReclineXRw
Operating Instructions
Press and hold down
the top, back button
to return the back to
the upright position.
Release the button to
stop the back in any
reclined position or
when fully raised.
Press and hold down
the back top and
bottom buttons to raise
the back and close the
legrest and return the
chair body. Release
the buttons to stop
the chair in any position
or when the back is fully
raised and the legrest
is fully closed.
Press and hold down the bottom, back
button to close the legrest. Release the
button to stop the legrest in any extended
position or when fully closed.
Back Return
Legrest Return
WARNING
• Do not use unit if power control is damaged or wet. Contact your La-Z-Boy
dealer for service.
– To reduce the risk of serious injury:
Press and hold down the bottom, front button to extend
the legrest and tilt the chair body backward. Release the
button to stop the legrest in any extended position or
when fully raised.
Back Recline
Legrest Extension
Press and hold down the
top, front button to recline
the chair back. Release the
button to stop the back in
any reclined position or
when fully reclined.
Press and hold down the
front top and bottom buttons
to recline the back and
extend the legrest and tilt
the chair body backward.
Release the buttons to stop
the chair in any position or
when the back is fully
reclined and the legrest is
fully raised.
™
®
21
Page 12

PowerReclineXR®& PowerReclineXRw
™
with Optional Hand Wand Operating Instructions
PowerReclineXR®& PowerReclineXRw
™
with Optional Hand Wand Operating Instructions
DANGER
• Plug directly into a wall outlet. Do not use an extension cord, adapter or surge protector.
WARNING
• Sit down in the unit slowly. To avoid tip over, do not throw your weight against the back
of the unit. Move the unit into or out of the reclining position slowly, making sure that
no children or pets are in close proximity.
• Keep hands, arms and body parts away from the open area between a reclined back and an
upright back on a motion sofa or modular. This area must remain clear at all times to provide
unobstructed movement and prevent injury that could occur when a reclined back is
returning toward the upright position.
• The PowerReclineXR
not exceeding 300 pounds per seat. Do not operate an individual seat with more than
one occupant in or on any part of the individual seat.
• To safely exit the unit and prevent a tripping hazard, bring the back upright
and close the legrest.
NOTICE:
To avoid product damage, the back recline and legrest extension features should not be operated
continuously for extended periods of time. After 1 minute of continuous operation, allow these features
to rest for 9 minutes.
Plug the power cord directly into a wall outlet. Make sure there is enough slack in the cord running
from the chair to the outlet to allow for rocking and reclining. Never stretch or strain a cord.
The PowerReclineXR
• Only recline the back. When the back is reclined, the PowerReclineXR
• Only extend the legrest. When the legrest is extended, the chair body tilts backward.
• Operate both the back recline and legrest extension simultaneously.
To recline, press and hold down one of the three reclining option buttons on the right side of the
hand wand. Release the button when you have reached a comfortable position.
To return to the upright position, press and hold down one of the three return buttons on the left
side of the hand wand. Release the button when you have reached a comfortable position, or
when the back is fully upright and the legrest is fully closed.
The function of each hand wand button is explained in greater detail on the following page.
We recommend that you unplug the power transformer if you will be away from your residence
for an extended period of time.
®
– To reduce the risk of electric shock, serious
injury or death:
– To reduce the risk of serious injury:
®
and PowerReclineXRw™units are intended for a single occupant
After 1 minute of continuous operation, allow the back recline
and legrest extension features to rest for 9 minutes.
and PowerReclineXRw™offers three reclining options:
®
chair can be rocked.
Press and hold the
button down to return
the back to the upright
position. Release the
button to stop the back
in any reclined position
or when fully raised.
Press and hold the
button down to close
the legrest and return
the chair body. Release
the button to stop the
legrest in any extended
position or when
fully closed.
Press and hold the
button down to raise
the back and close the
legrest and return the
chair body. Release
the button to stop the
chair in any position or
when the back is fully
raised and the legrest
is fully closed.
WARNING
• Do not use unit if power control is damaged or wet. Do not use unit if the hand wand has
been dropped in water or any liquid. Contact your La-Z-Boy
– To reduce the risk of serious injury:
®
Press and hold the
button down to recline
the chair back. Release
the button to stop the
back in any reclined
position or when
fully reclined.
Press and hold the
button down to extend
the legrest and tilt the
chair body backward.
Release the button to
stop the legrest in any
extended position or
when fully raised.
Press and hold the
button down to recline
the back, extend
the legrest and tilt the
chair body backward.
Release the button to
stop the chair in any
position or when the
back is fully reclined
and the legrest is
fully raised.
dealer for service.
22
23
Page 13

PowerReclineXR®with Massage & Heat
Operating Instructions
PowerReclineXR®with Massage & Heat
Operating Instructions
DANGER
• Plug directly into a wall outlet. Do not use an extension cord, adapter or surge protector.
WARNING
• Sit down in the unit slowly. To avoid tip over, do not throw your weight against the back
of the unit. Move the unit into or out of the reclining position slowly, making sure that
no children or pets are in close proximity.
• The PowerReclineXR
per seat. Do not operate an individual seat with more than one occupant in or on any
part of the individual seat.
• To safely exit the unit and prevent a tripping hazard, bring the back upright
and close the legrest.
NOTICE:
To avoid product damage, the back recline and legrest extension features should not be operated
continuously for extended periods of time. After 1 minute of continuous operation, allow these features
to rest for 9 minutes.
Plug the power cord directly into a wall outlet. Make sure there is enough slack in the cord running
from the chair to the outlet to allow for rocking and reclining. Never stretch or strain a cord.
The PowerReclineXR
• Only recline the back. When the back is reclined, the chair can be rocked.
• Only extend the legrest. When the legrest is extended, the chair body tilts backward.
• Operate both the back recline and legrest extension simultaneously.
To recline, press and hold down one of the three reclining option buttons on the right side of the
hand wand. Release the button when you have reached a comfortable position.
To return to the upright position, press and hold down one of the three return buttons on the left
side of the hand wand. Release the button when you have reached a comfortable position, or
when the back is fully upright and the legrest is fully closed.
The function of each hand wand button is explained in greater detail on the following page.
We recommend that you unplug the power transformer if you will be away from your residence
for an extended period of time.
®
– To reduce the risk of electric shock, serious
injury or death:
– To reduce the risk of serious injury:
®
units are intended for a single occupant not exceeding 300 pounds
After 1 minute of continuous operation, allow the back recline
and legrest extension features to rest for 9 minutes.
offers three reclining options:
TO OPERATE HEAT OR MASSAGE:
•
Press the MSG button to start and stop the massage.
•
Press the button to select your massage mode. The button light will change to green for
Constant massage, amber for Wave massage and red for Pulse massage. The massage program
will run for 15 minutes, then shut off. When restarted, massage will operate in the last mode
selected before shut off.
•
Press the button to select the massage intensity. The button light will change to green for
Low intensity, amber for Medium intensity, and red for High intensity. The chair automatically
resets to the Low intensity setting when massage is restarted.
•
Heat may be used with or without massage. Press the HEAT button to start and stop the heat.
The button light will change to amber for Low heat, and red for High heat. The heat will operate
for 15 minutes, then shut off. The chair automatically resets to the Low heat setting when heat
is restarted.
•
When you are ready to leave the chair, turn the massage system off by pressing the MSG button.
The button light will change to blue. Turn the heat system off by pressing the HEAT button until the
indicator light changes to blue.
The massage and heat systems shut off automatically after approximately 15 minutes of operation.
If you immediately restart the systems, they will operate for an additional 15 minutes and then shut
off for a 30-minute cool down. You can restart the systems after the 30-minute cool down period.
If you attempt to restart the massage or heat function before the cool down period is over, the MSG
or HEAT button will flash for 5 seconds indicating the cool down period.
NOTE:
Activated massage and heat functions are temporarily suspended when the BACK,
LEGREST or BOTH buttons are in use.
•
Following a power outage or power interruption, the chair will return to the off setting
when power is restored.
We recommend that you unplug the power transformer if you will be away from your residence
for an extended period of time.
24
25
Page 14

PowerReclineXR®with Massage & Heat
Operating Instructions
PowerReclineXR®& PowerReclineXRw
Troubleshooting
™
Press and hold the button down
to return the back to the upright
position. Release the button
to stop the back in any reclined
position or when fully raised.
Press and hold the button
down to close the legrest
and return the chair body.
Release the button to stop the
legrest in any extended position
or when fully closed.
Press and hold the button
down to raise the back and
close the legrest and return
the chair body. Release the
button to stop the chair in
any position or when the
back is fully raised and the
Press and hold the button down
to recline the chair back. Release
the button to stop the back in
any reclined position or when
fully reclined.
Press and hold the button down
to extend the legrest and tilt the
chair body backward. Release
the button to stop the legrest
in any extended position or
when fully raised.
Press and hold the button down
to recline the back, extend the
legrest and tilt the chair body
backward. Release the button
to stop the chair in any position
or when the back is fully reclined
and the legrest is fully raised.
legrest is fully closed.
MASSAGE
Activates the massage
system. Press once for a
15-minute massage. Two
15-minute massage cycles
can be activated
consecutively, followed by
a 30-minute cool down.
- (Blue)
OFF
- Push 1x (Green)
ON
HEAT
Activates the heat feature.
Use independently or with
the massage.
OFF
- (Blue)
LOW
HIG H
Push 3x to turn off (Blue)
Heat will activate for
15-minutes. Two 15-minute
heat cycles can be activated
MASSAGE MODES
- (Blue)
OFF
CONSTANT
is constant. (Green
WAVE
- Push 1x Massage
)
- Push 2x Massage moves side
to side in a wave-like motion. (Amber)
- Push 3x Massage turns on and
PULSE
off to simulate a pulsing action. (Red)
WARNING
– To reduce the risk of serious injury:
• Do not use unit if power control is damaged or wet. Do not use unit if the hand wand has
been dropped in water or any liquid. Contact your La-Z-Boy
26
consecutively, followed by a
30-minute cool down.
MASSAGE INTENSITY
OFF
- (Blue)
LOW
- Push 1x (Green)
MEDIUM
HIGH
®
dealer for service.
- Push 1x (Amber)
- Push 2x (Red)
- Push 2x (Amber)
- Push 3x (Red)
WARNING
• Do not attempt to disassemble or service the pump or motor; no serviceable parts are
inside. Contact your La-Z-Boy
– To reduce the risk of serious injury:
®
dealer for service.
• Check the condition of the power transformers, electrical cords, plugs, and connectors
monthly. Keep the power transformers and electrical cords away from heat sources.
Never operate the unit with a damaged power transformer, electrical cord, plug, or
connector. Contact your La-Z-Boy
®
• The PowerReclineXR
units are intended for a single occupant not exceeding 300 pounds
®
dealer for service.
per seat. Do not operate an individual seat with more than one occupant in or on any part
of the individual seat.
Troubleshooting for Legrest Operation
If the legrest stops moving while closing, it may have encountered an obstruction.
1. Check to make sure there are no obstructions. Lift and hold the legrest up, look for obstructions
and remove them.
2. The legrest uses spring tension to close, and will close quickly when the obstruction is removed.
Release the legrest slowly to prevent it from slamming shut.
Troubleshooting for Reclining Function
1. Make sure the 120 volt power cord is plugged into an electrical outlet.
2. Check the power transformer to make sure the green LED power indicator light is on.
3. Make sure the electrical outlet is working. For example, make sure there are no blown
fuses or tripped circuit breakers.
4. Make sure all the connectors are secure; refer to the Assembly Instructions.
5. Make sure the electrical cords are not crimped or pinched. Make sure the electric cord
or plug is not damaged.
6. Make sure the operating capacity has not been exceeded and there is only one occupant
in the individual seat or unit; refer to the Operating Instructions.
Troubleshooting for Massage and Heat Function
If the massage or heat function does not work:
1. Make sure the automatic time-out operation has not been activated, indicated by either
the MSG button or the HEAT button flashing for 5 seconds. If either button is blinking, the
system is in a 30-minute cool down period. Following the cool down period, press the
MSG button to restart the massage, or press the HEAT button to restart the heat.
2. Refer to the Troubleshooting for Reclining Function steps 1-6 above.
3. Make sure the massage and heating pad connectors are secured; refer to the Assembly Instructions.
®
If the PowerReclineXR
or PowerReclineXRw™still does not operate properly, contact your dealer for
instructions on returning the unit for examination and repair. Except for the replacement of the power
transformer, never attempt to make any repairs or adjustments yourself.
(Troubleshooting Instructions Continued)
27
Page 15

PowerReclineXR®& PowerReclineXRw
Troubleshooting
™
Furniture Placement Guide
& Cup Holder Operating and Cleaning Instructions
Power Transformer Replacement
If the power transformer must be replaced:
1. Unplug the power transformer from the electrical outlet.
2. Disconnect the 120 volt power cord from the power transformer, and disconnect the power
transformer from the power supply connector; refer to the Assembly Instructions.
3. Connect the new power transformer to the power supply connector, and close the locking cover
when applicable. Connect the 120 volt power cord to the new power transformer; refer to the
Assembly Instructions.
4. Proceed to the Battery Backup Assembly Instructions.
WARNING
• Provide a clear path for operation of the back and legrest. Place tables and area rugs
at a distance to allow the legrest to fully extend without rubbing or interference.
To place your reclining unit the proper distance from the wall, fully recline the unit and leave
a minimum of 2" of space between the top of the back and the wall.
Place tables and area rugs at a distance to allow the legrest to fully extend without rubbing
or interference.
Operating and Cleaning Instructions for the LED Lighted Cup Holder:
– To reduce the risk of serious injury:
Lightly touch the indented circle on the inside of the cup holder with your finger to turn the cup
holder light on and off. No pressure is necessary operate the cup holder light.
The finish on the cup holder can be damaged during use or cleaning. It is recommended that a
coaster be used to reduce the chance for damage, and that the cleaning instructions be followed.
Use water and mild soap, such as dish soap, to clean the cup holders. Dry immediately and
thoroughly with a soft clean cloth to maintain the finish.
The use of harsh, abrasive cleaners is not recommended and must be avoided.
28
29
 Loading...