

Page 1

PC100 Serial to
Ethernet Adapter
Installation Guide
Page 2

Lathem Time
200 Selig Drive, SW, Atlanta, GA 30336
404-691-0405
www.lathem.com
Copyright © 2004 Lathem Time Corporation. All rights reserved.
Document number: USG0043G
10-8-2007
Page 3
1
Hardware Installation
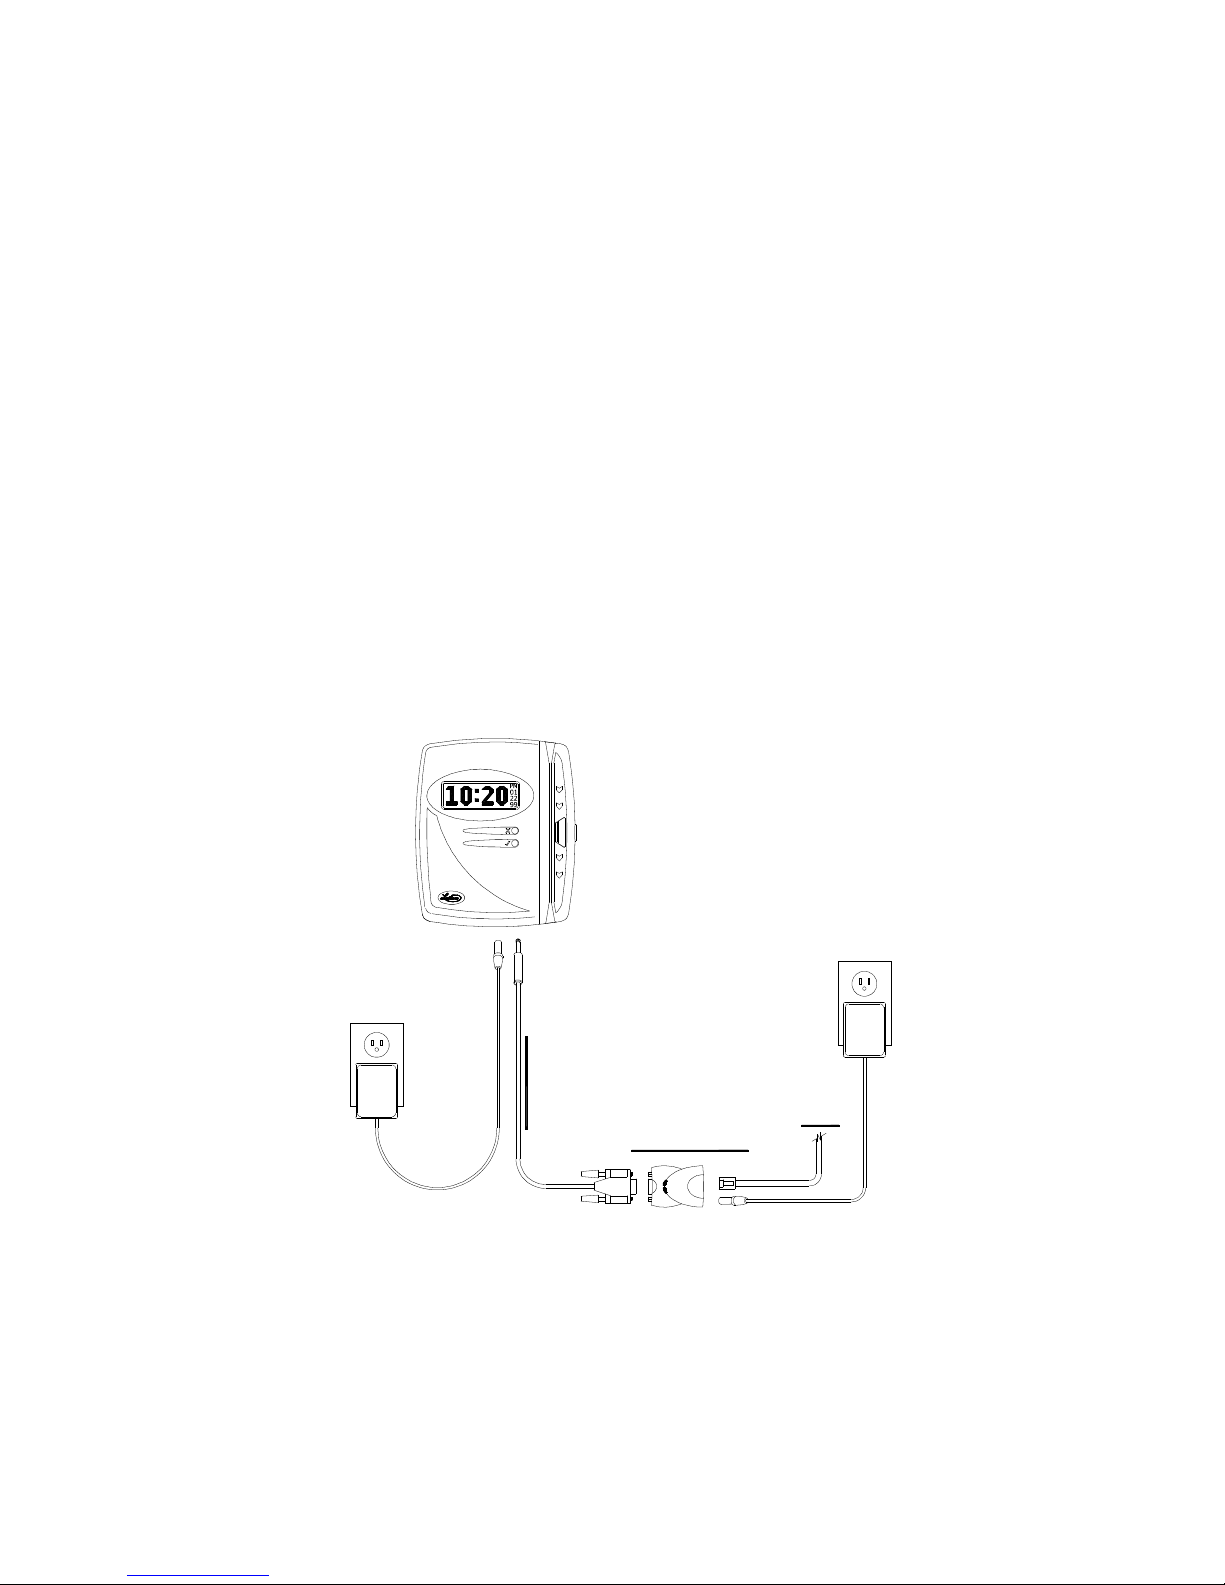
1. Locate a flat wall surface close to an available 110VAC wall outlet and mount
the PC100 terminal using the supplied mounting screws. The wall outlet should
be no farther than four feet from the terminal.
2. Plug in the PC100 power pack and communications cable.
3. Plug in the external Ethernet interface power pack.
4. Connect the PC100 communications cable to the 9-pin serial port on the
external Ethernet interface.
5. Connect the cable attached to your network to the RJ-485 port on the external
Ethernet interface.
POWER
AC
POWER
AC
External ethernet interface
Network
Provided 25 Ft. Cable
Page 4
2
Software Installation
If you are currently running Lathem PayClock
Version 4 (ProV4 or EZ 2006) or higher software
you do NOT need to install the interface software
from the enclosed CD-ROM. Support for this
external Ethernet adapter is built-in to your current
PayClock software. Your hardware installation is
complete, and you do not need to precede with these
software installation instructions.
IMPORTANT! Wide Area Networks: Lathem Time does not
support the use of this adapter on Wide Area Networks (WAN’s) due
to the complexities and varied configurations options necessary for
WAN communications. Technical support is not available when this
product is used in a WAN environment.
Page 5
3
Installing the Ethernet Interface Software
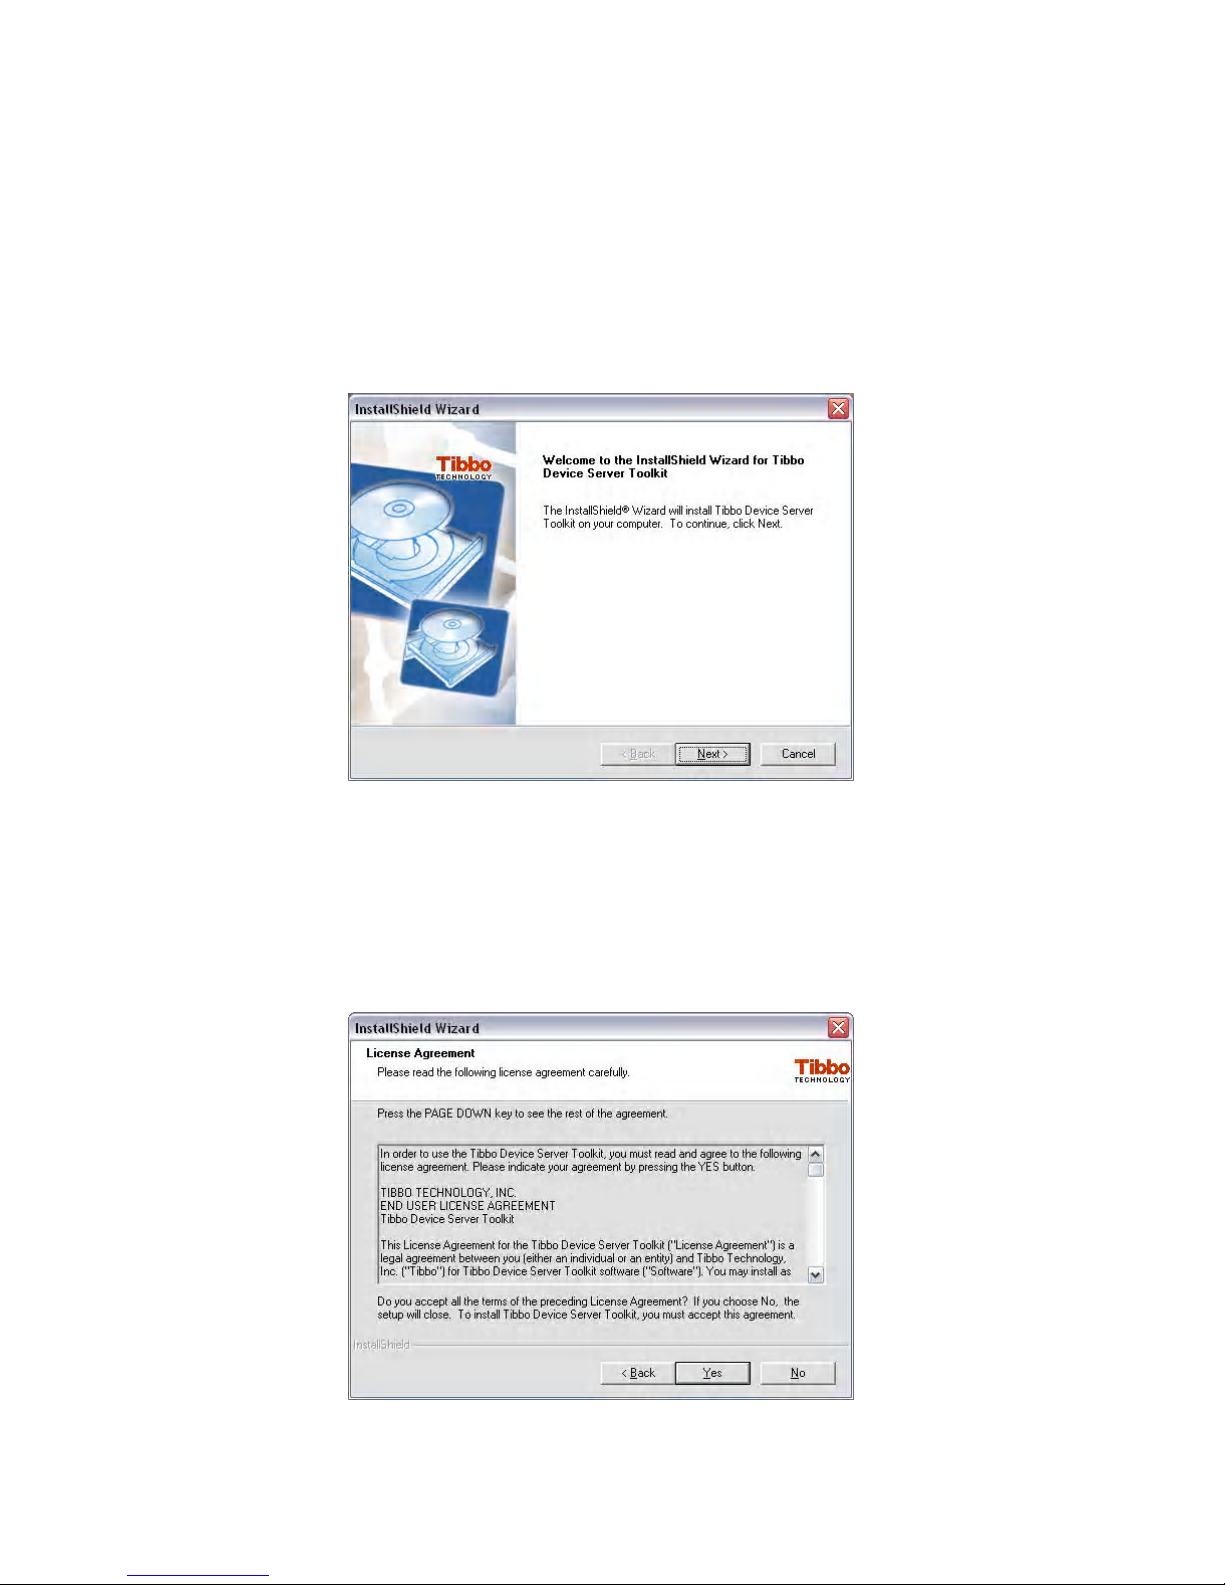
1. Insert the PC100 external Ethernet interface software installation CD into the
CD-ROM drive on your computer.
2. Select Next on the welcome screen.
3. Read the license agreement and select Yes to continue
Page 6

4
4. On the software destination location screen select Next to install to the default
folder or click Browse to choose an alternate location.
5. Make sure that all 3 components have been checked and select Next.
Page 7
5
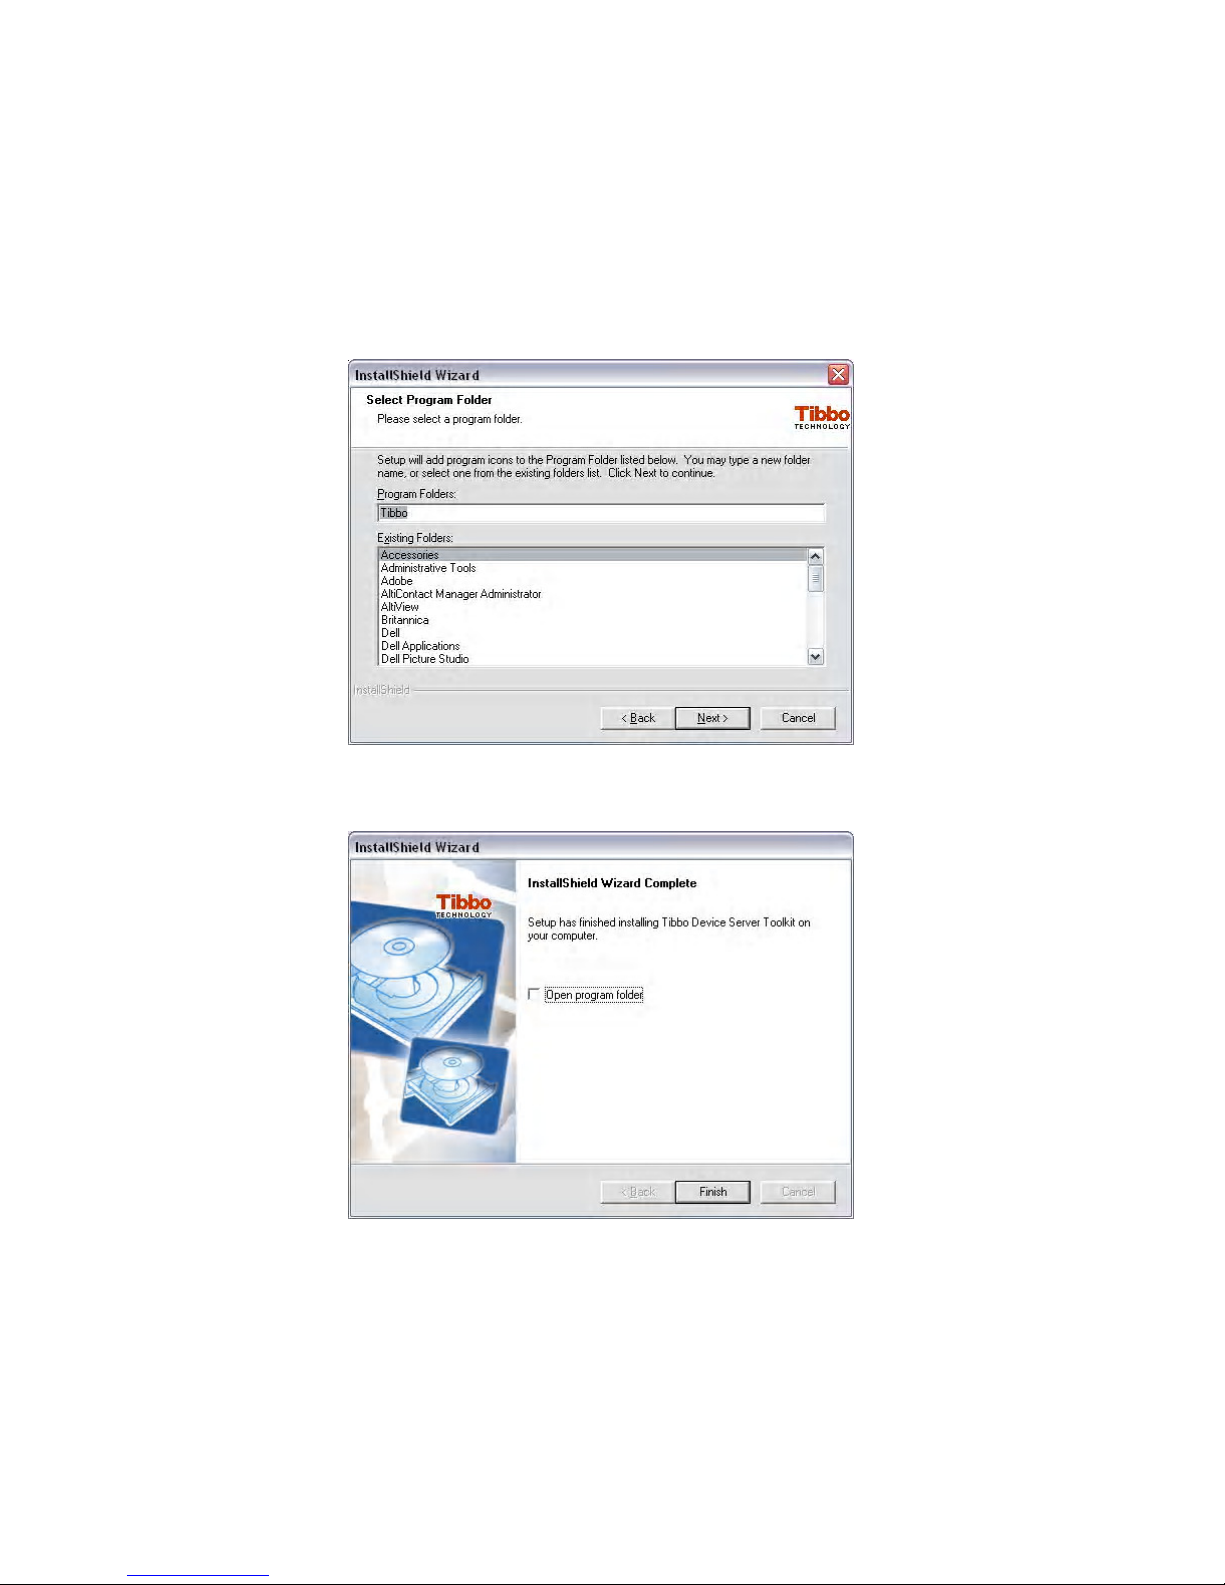
6. Select Next to install the program folder and begin the file installation.
7. Select Finish, completing the software installation.
8. Select Start/Programs/Tibbo from the Windows tool bar and choose Connection
Wizard.
Page 8

6
9. Select Next.
10. Choose “Create a link between the Virtual Serial Port and the Device Server”
and select Next.
Page 9
7
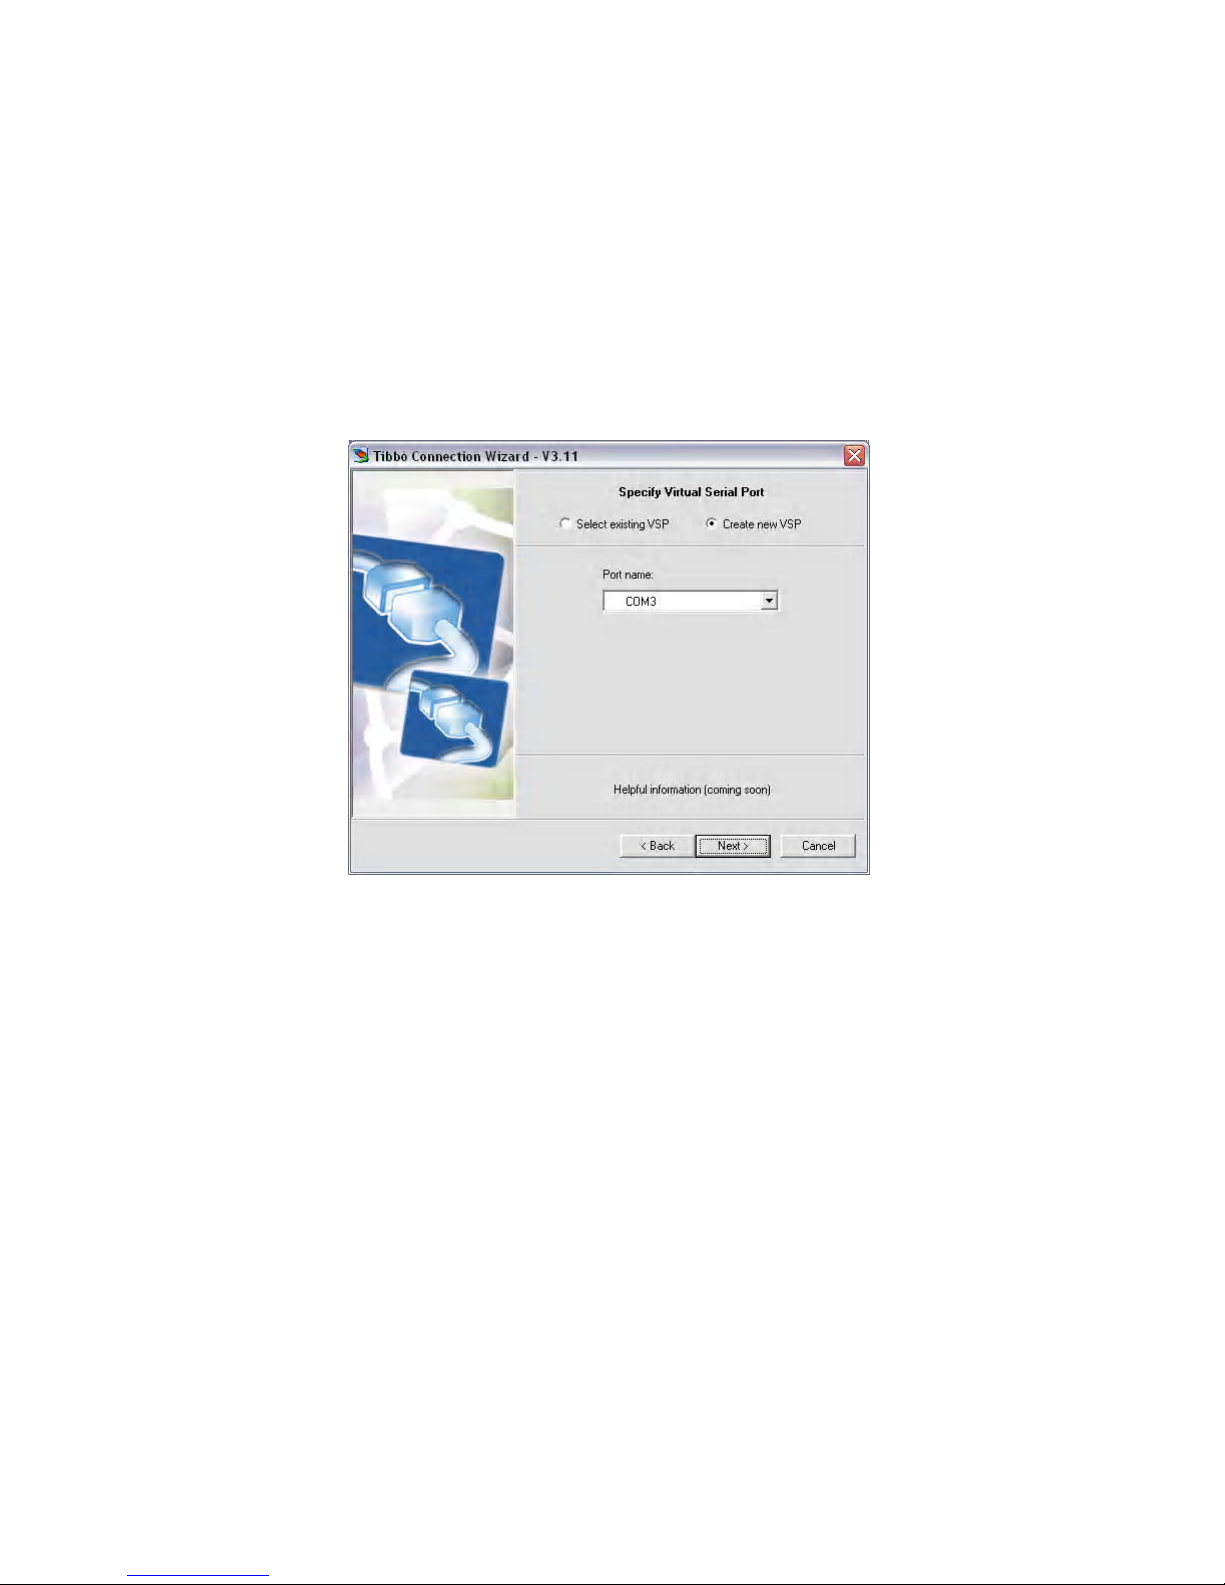
11. Select “Create new VSP”, choose the port name that you wish to use (1-8) and
select Next.
IMPORTANT: Write down the port name that you selected for this clock, you will
need it to finish the terminal setup in PayClock EZ.
NOTE: If you receive a message indicating that Windows Firewall is blocking this
program and asking if you would like to unblock it select the unblock option.
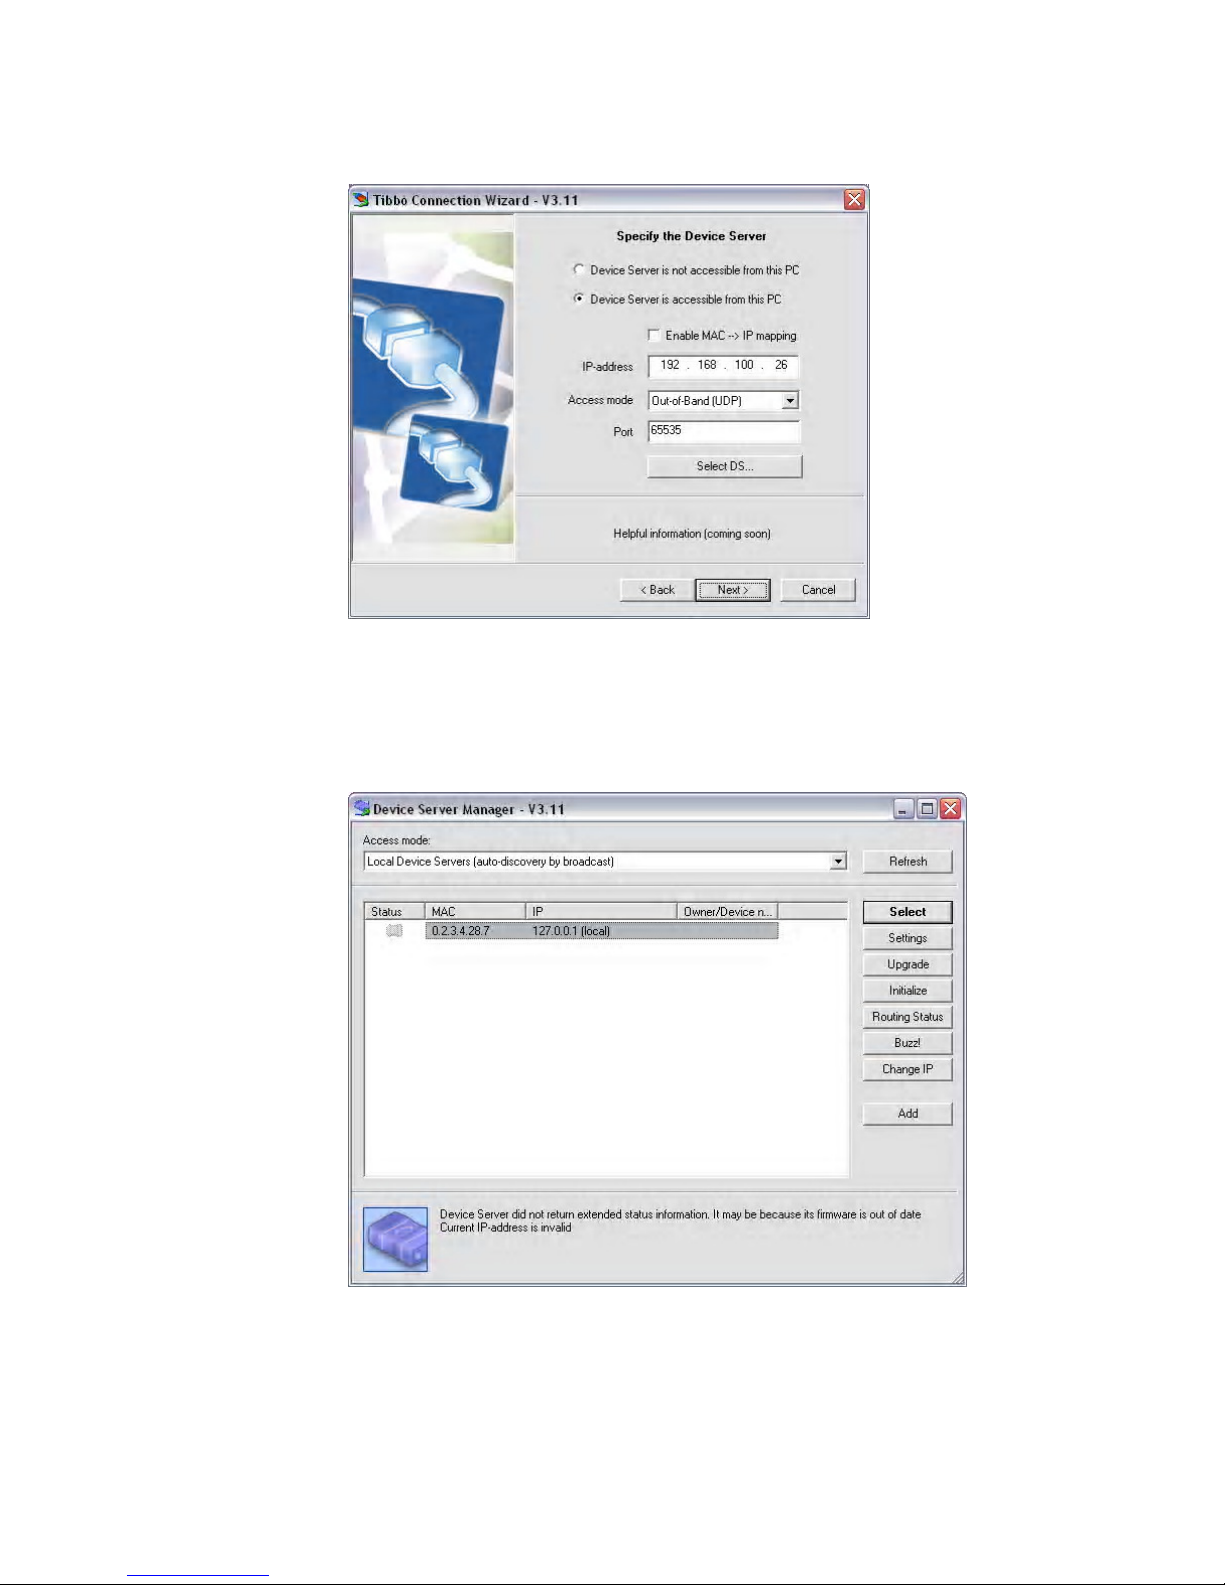
12. Choose “Device Server is accessible from this PC” and click on the Select DS
button.
Page 10
8
13. Highlight the external Ethernet interface listed in the main window and click
on the Change IP button.
14. Enter the IP address that you will be using for the clock and click OK to close
this window. Note that the IP address must be obtained from your system
administrator. On the Device Server Manager window, click Select.
Page 11
9
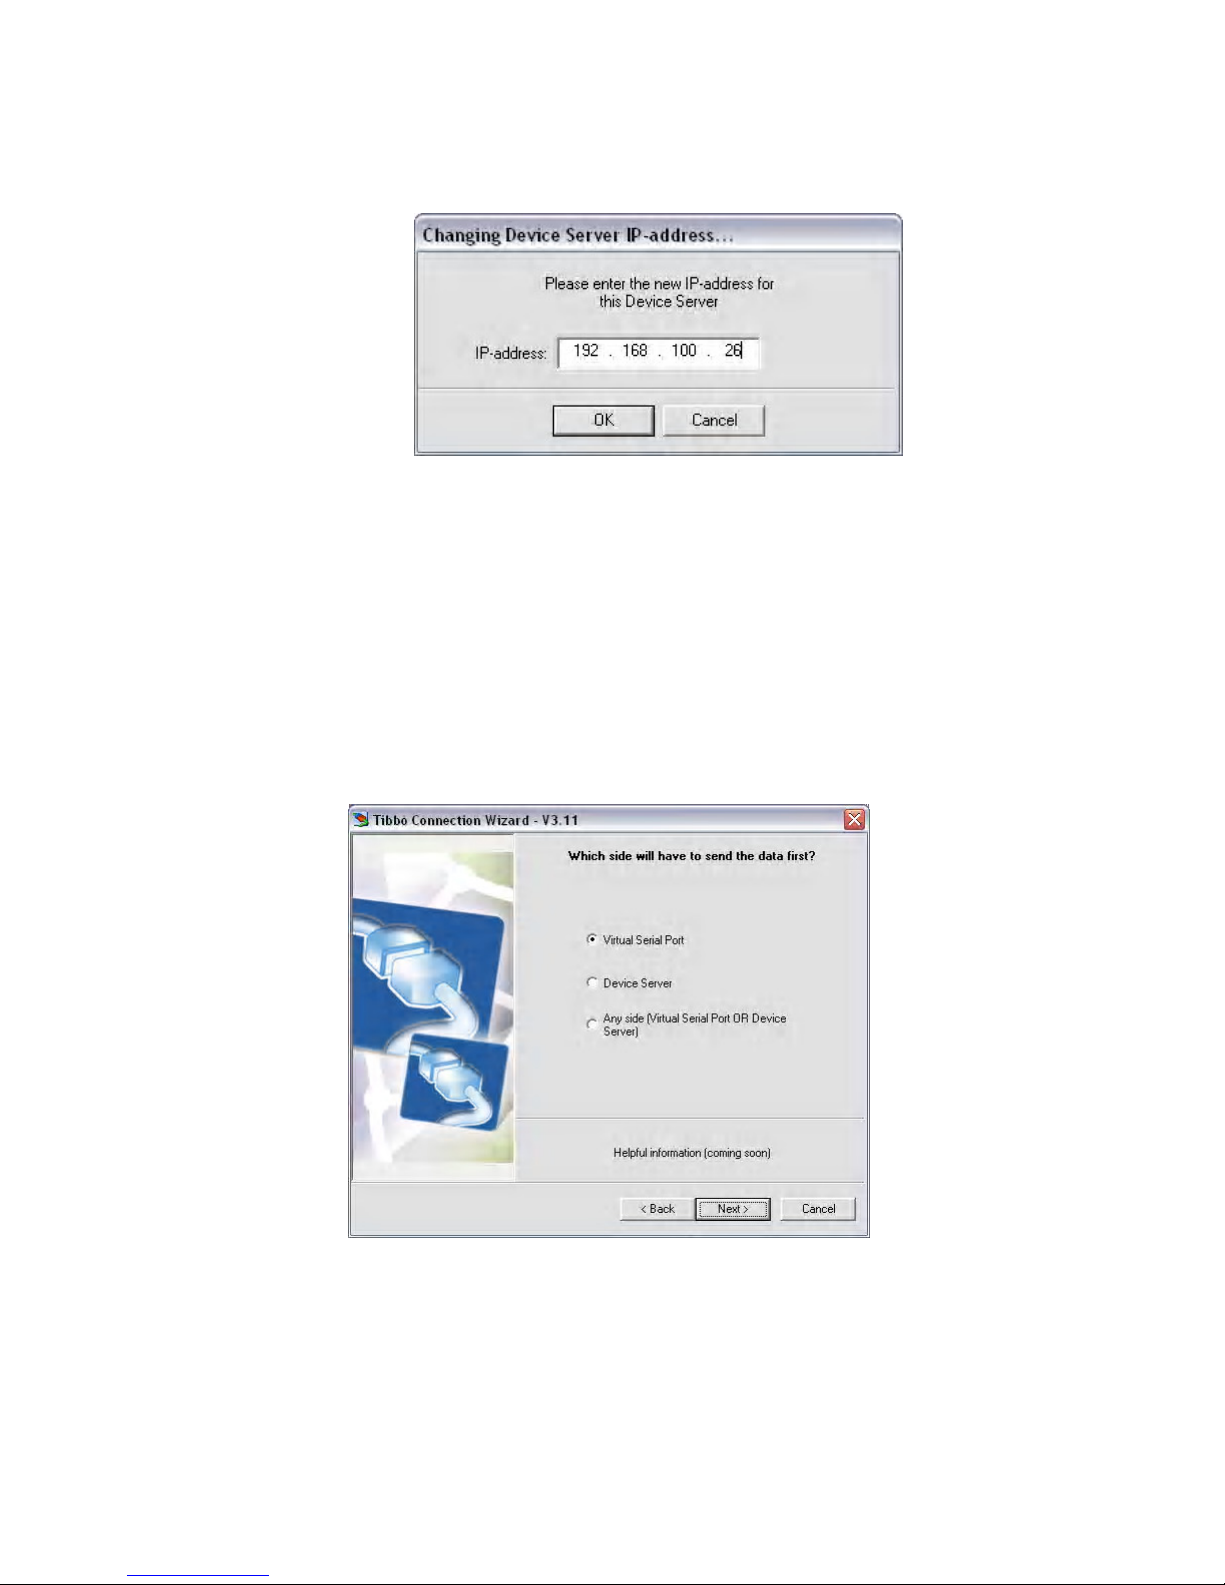
15. Choose “Virtual Serial Port” and select Next.
16. Select Next.
Page 12

10
17. Choose “TCP” and select Next.
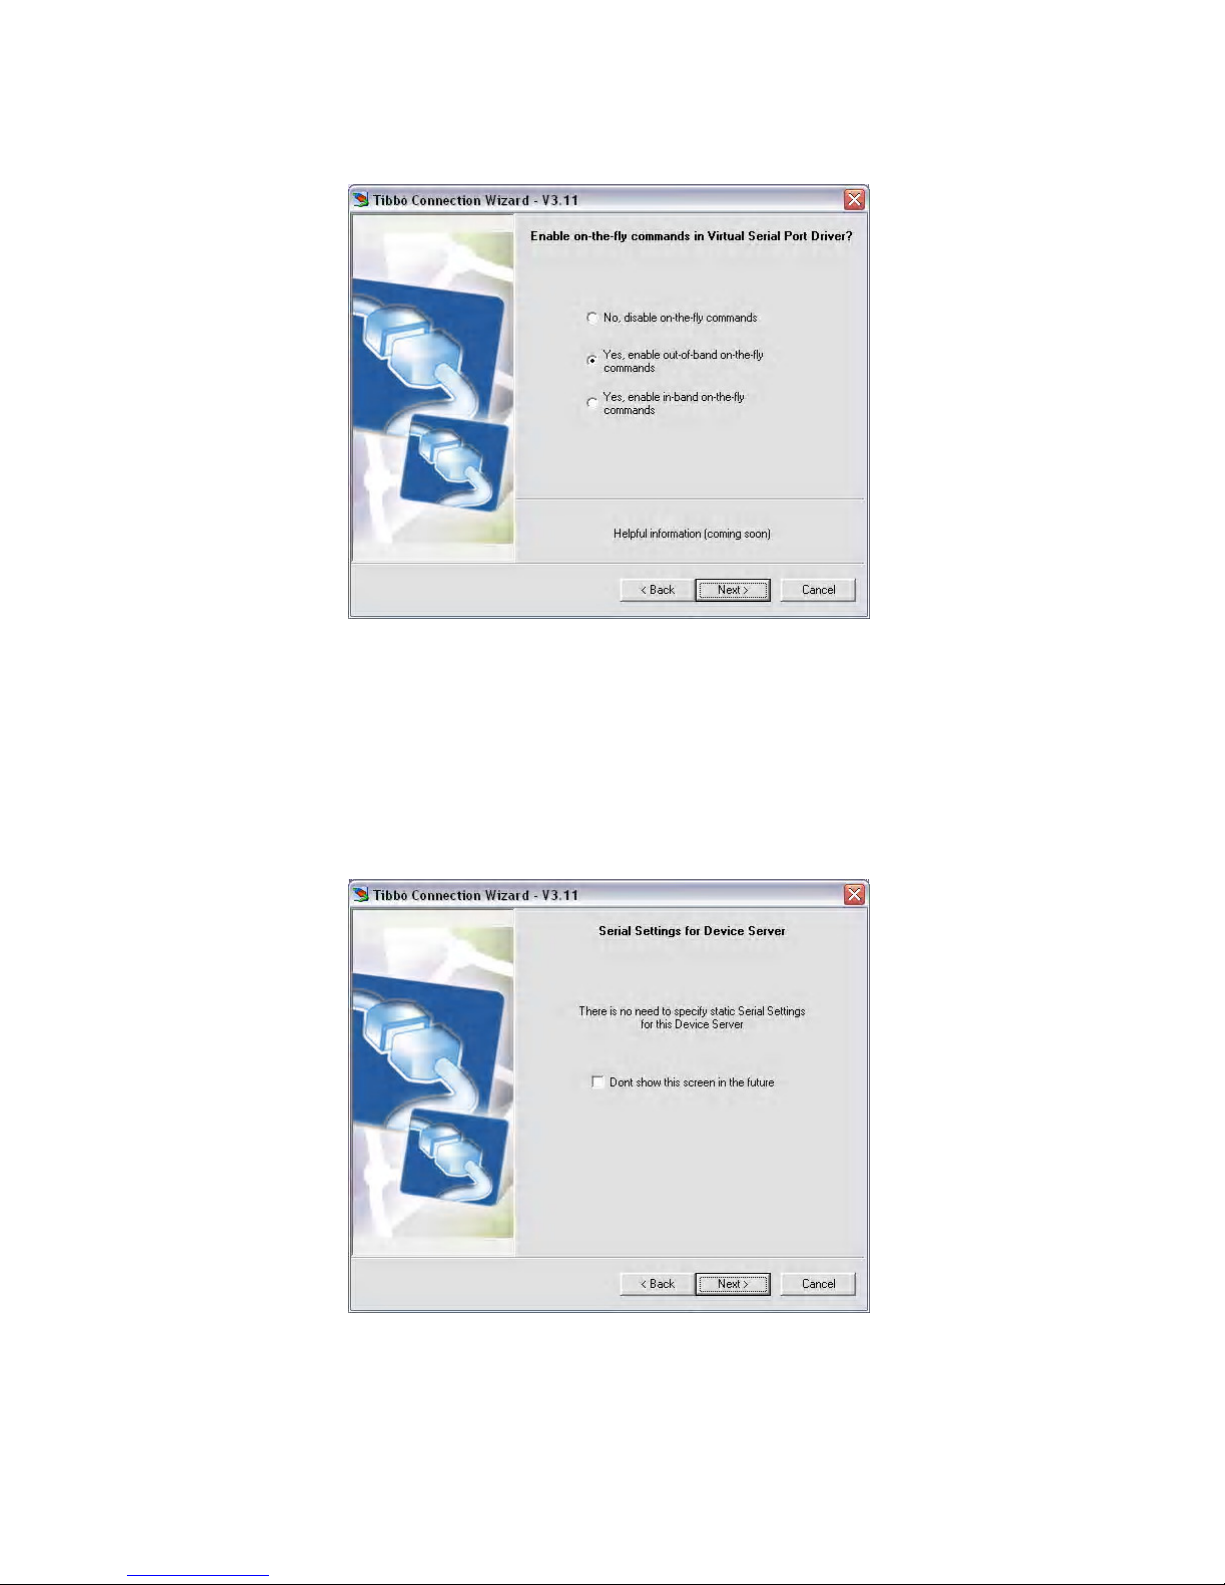
18. Choose “Yes, enable out-of-band on-the-fly commands” and select Next.
Page 13
11
19. Select Next.
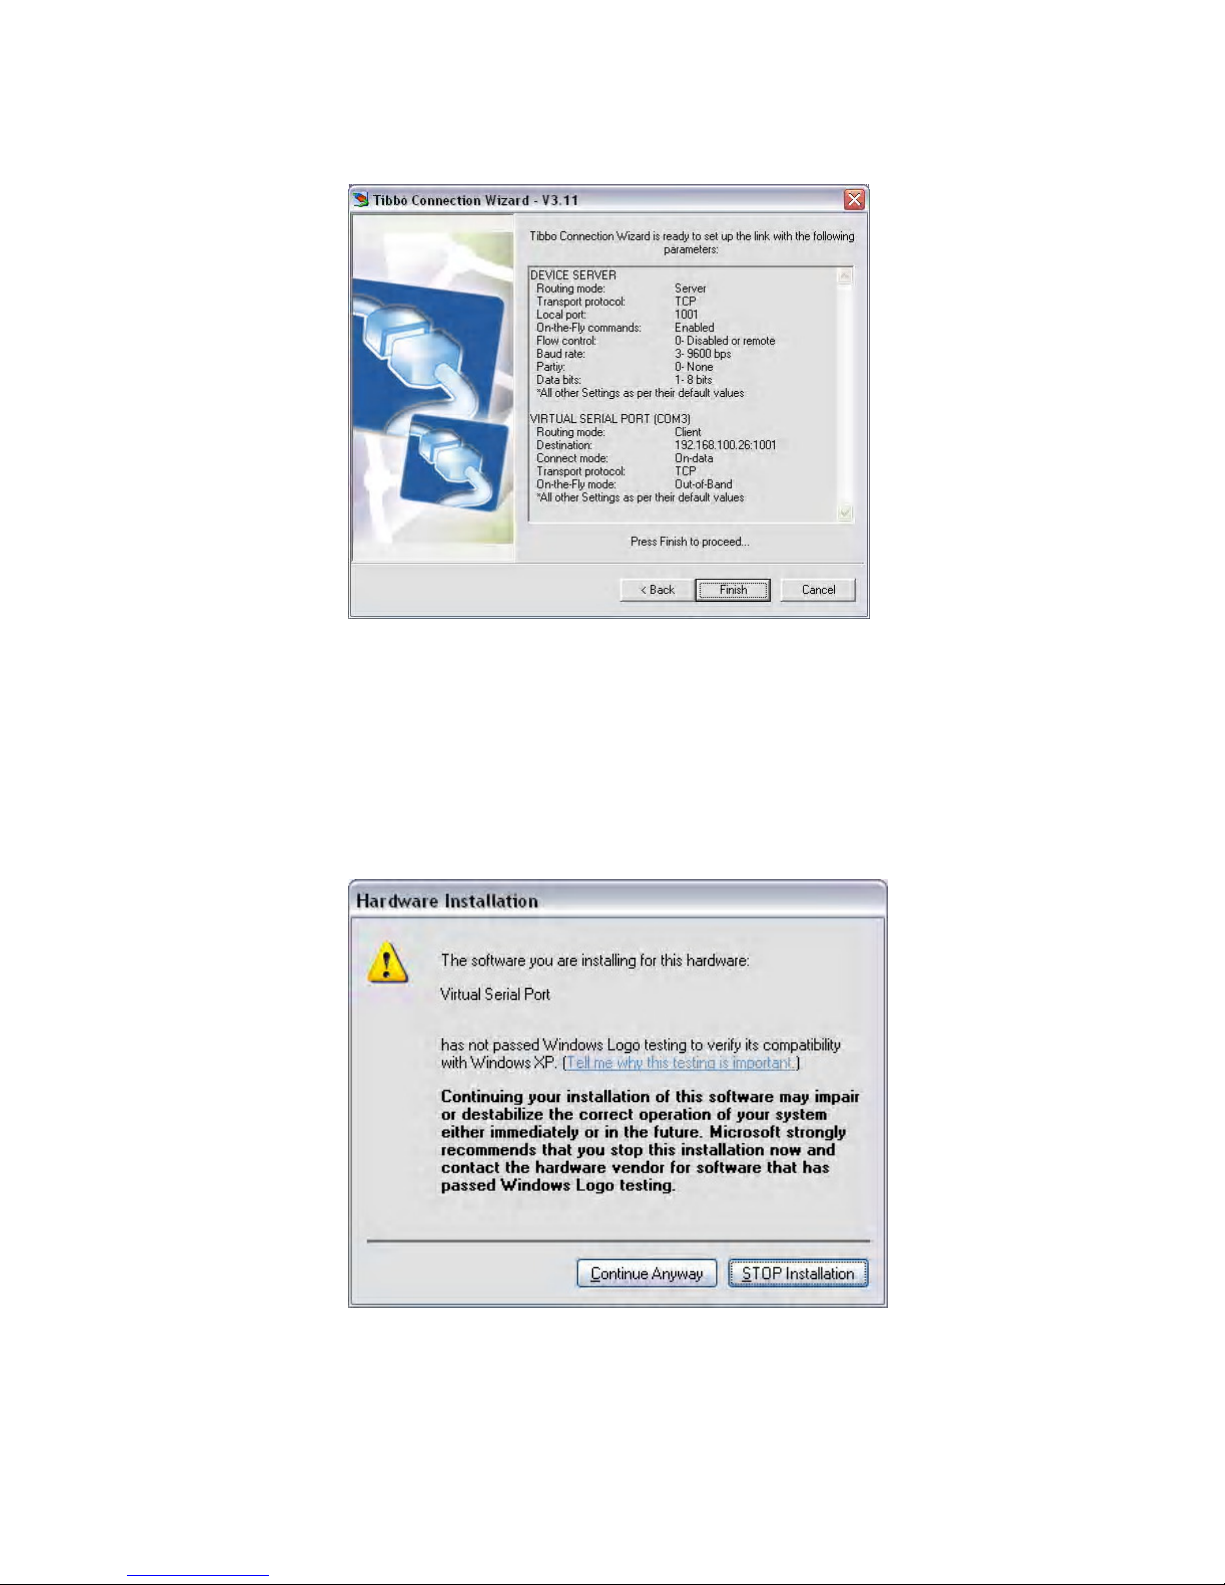
20. Select Finish.
Page 14
12
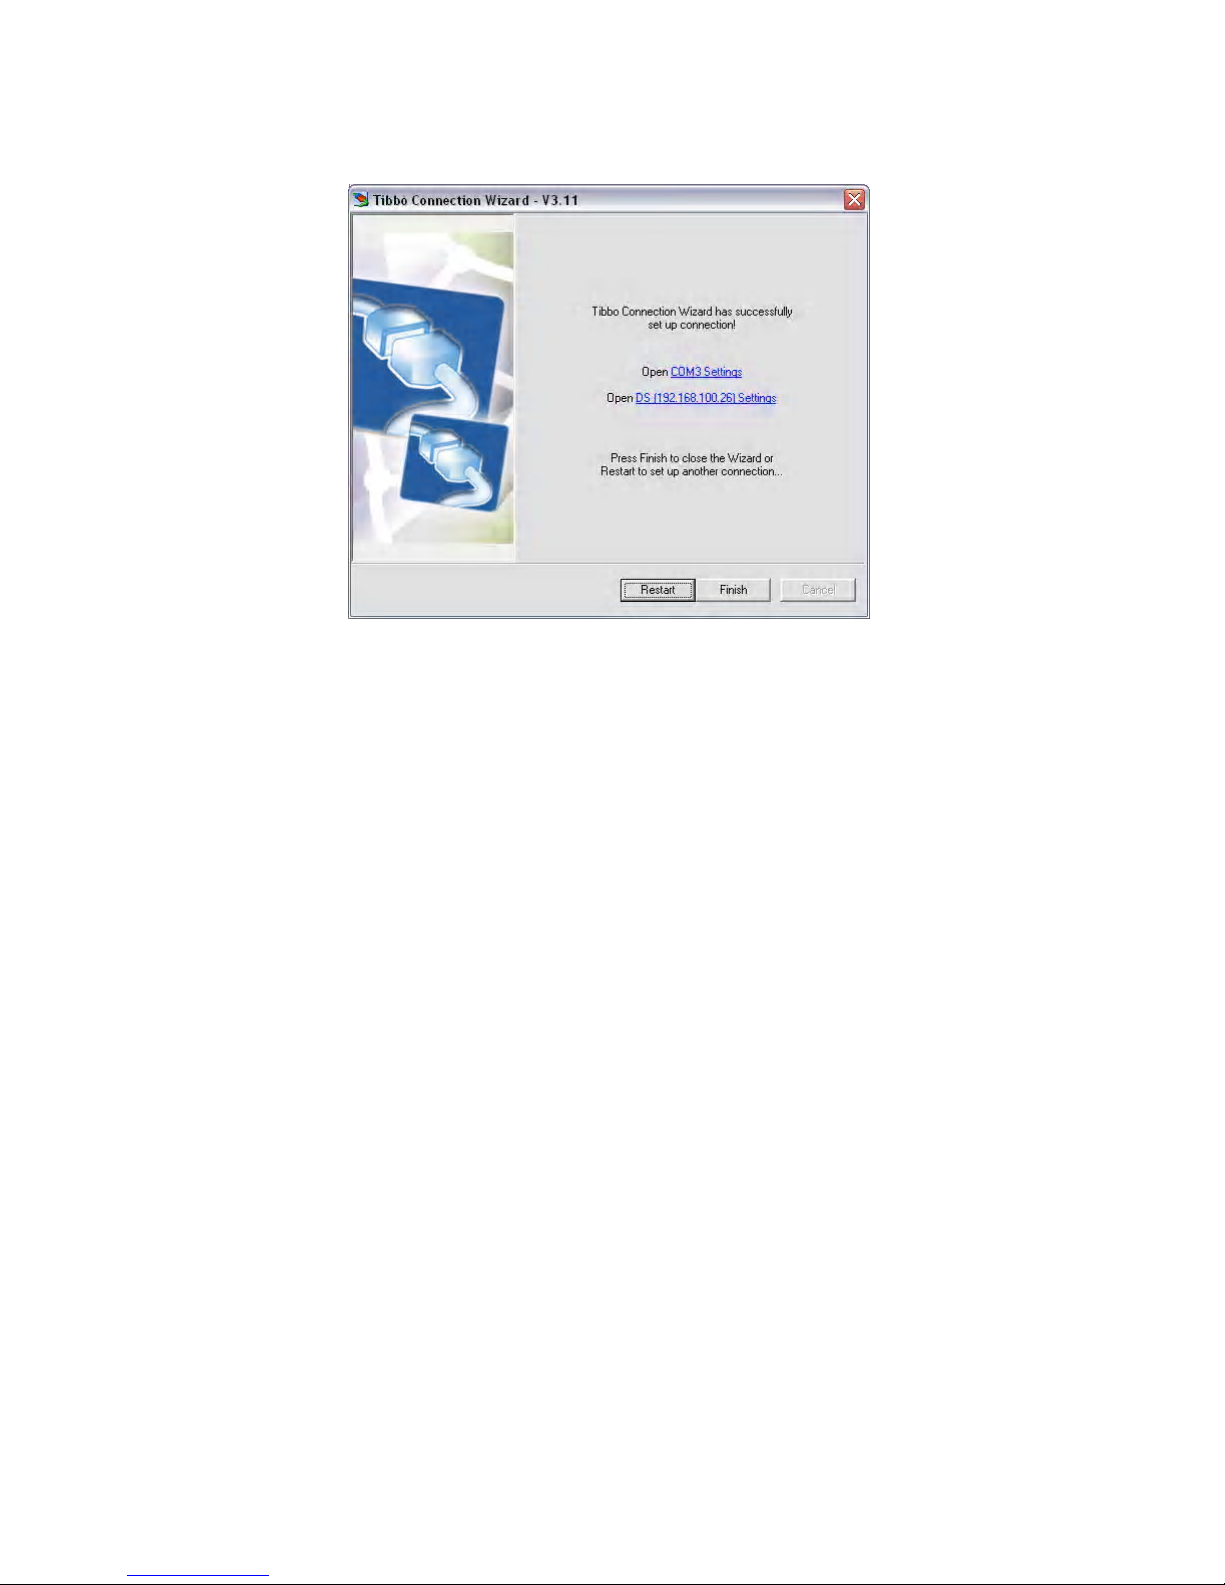
21. If you receive a Windows compatibility screen, select “Continue Anyway.”
22. Select Finish and then restart Windows.
Page 15
13
23. Once Windows has restarted, enter the PayClock EZ software.
24. Select the Setup option on the left hand side of the screen and then choose the
System option.
25. Click on the Terminal tab and set the COM Port equal to the port name that
you selected during the external Ethernet interface software installation. Be
sure to Save your changes.
Page 16

14
26. Test the connection to verify that your settings are correct and the external
Ethernet interface software is working properly.
Using the PC100 Ethernet Adaptor with
Windows Firewall (XP/SP2).
This will explain how to use the PC 100 Ethernet adaptor on PCs
running Windows XP with Service Pack2 (XP/SP2). One of the new
components included in SP2 is a Windows Firewall. Unless setup
correctly, the Firewall will prevent certain features of PC100
Ethernet adaptor software from operating properly.
Using auto-discovery access mode of DS Manager with
Windows Firewall
One difference you will immediately notice after XP2 is installed
and the Firewall is enabled is that the
DS Manager can no longer
find local Device Servers in the auto-discovery access mode
(address book mode continues to operate properly). You can find
an explanation on why this is happening later in this Note.
Page 17
15
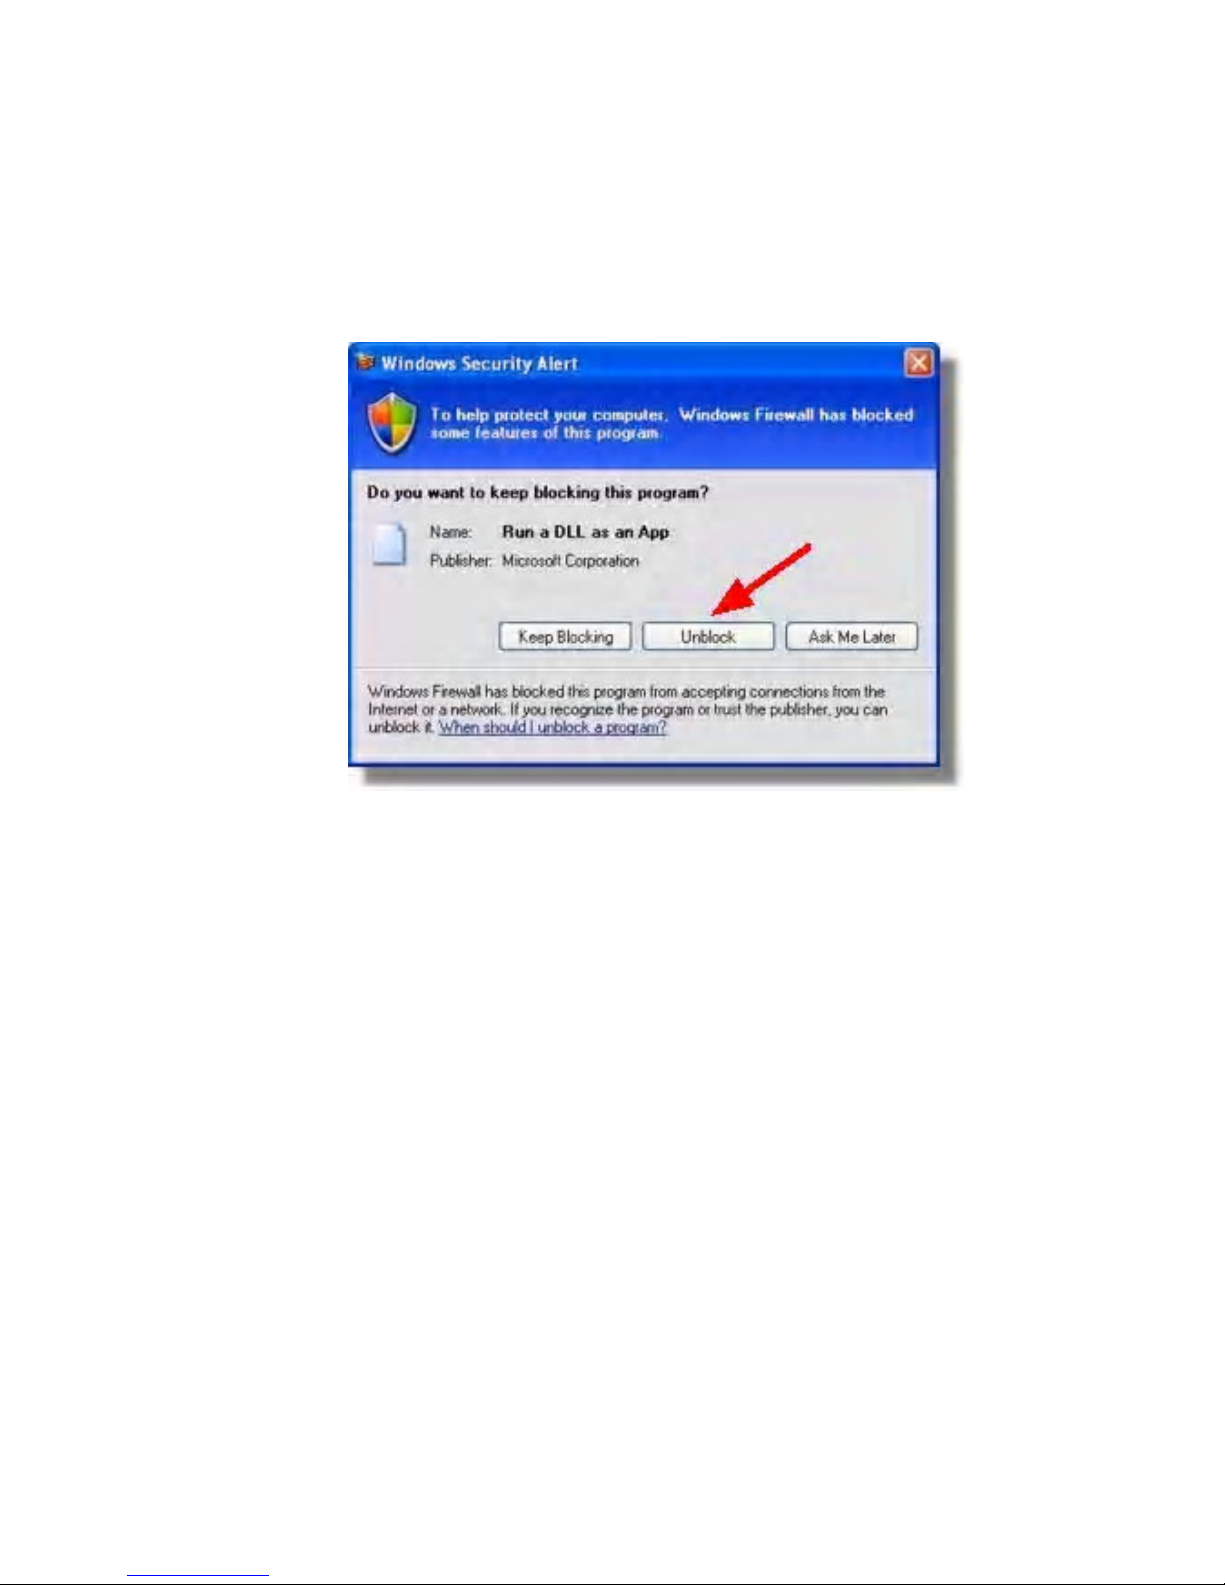
Once you run the DS Manager (or click Refresh in the autodiscovery mode), and provided that your Firewall is using default
configuration, you will get this warning message:
This message means that Windows Firewall has detected certain
network activity that is currently not allowed. Application name is
"Run DLL as an App" and, believe it or not, this is how Windows
sees the DS Manager (yes, DS Manager is a "DLL" but Windows
should be smart enough to understand its "real name".... alas, it
isn't that smart). Click Unblock and the DS Manager will be able to
auto-discover local Device Servers again.
If, when you run the DS Manager (click Refresh), the warning is
not displayed (and the DS Manager is still unable to find Device
Servers) then this may be because the Firewall is not allowing
"exceptions" and/or firewall notifications are not enabled.
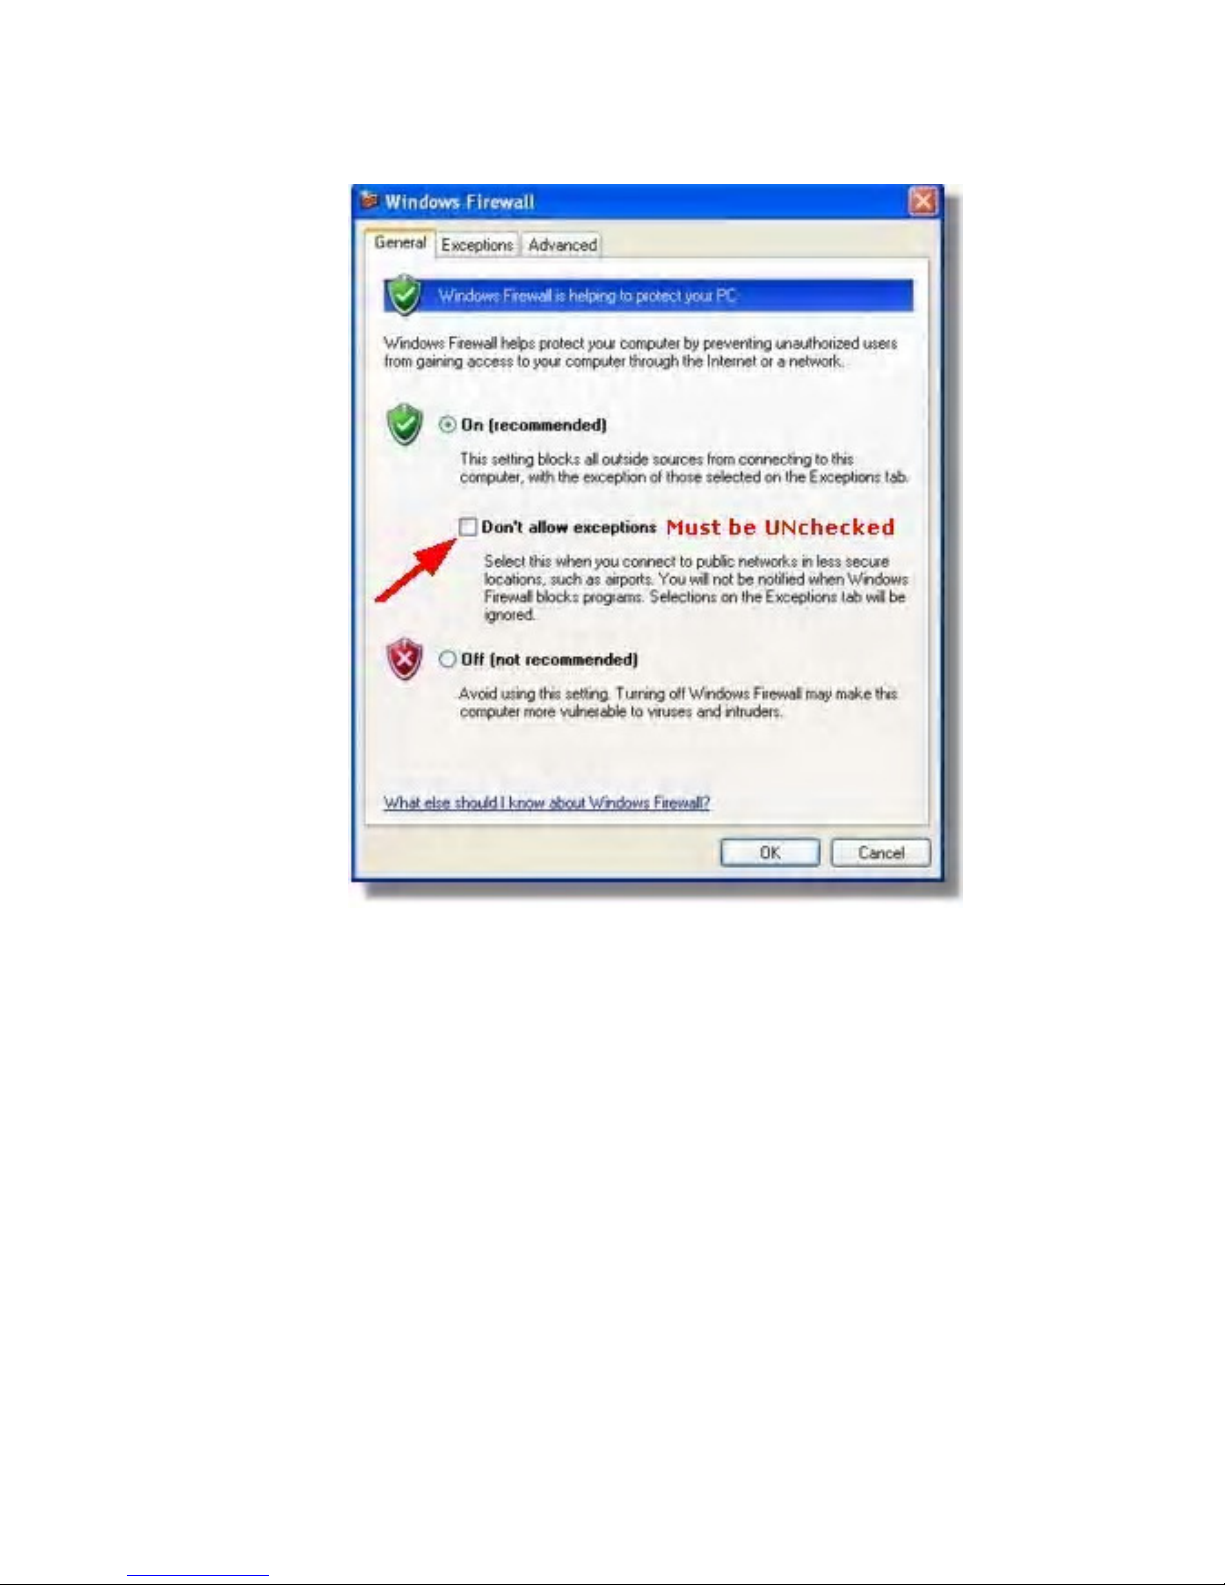
Run the Firewall (Start--> Control Panel--> Windows Firewall) and
make sure that Don't allow exceptions checkbox is unchecked
(clear):
Page 18
16
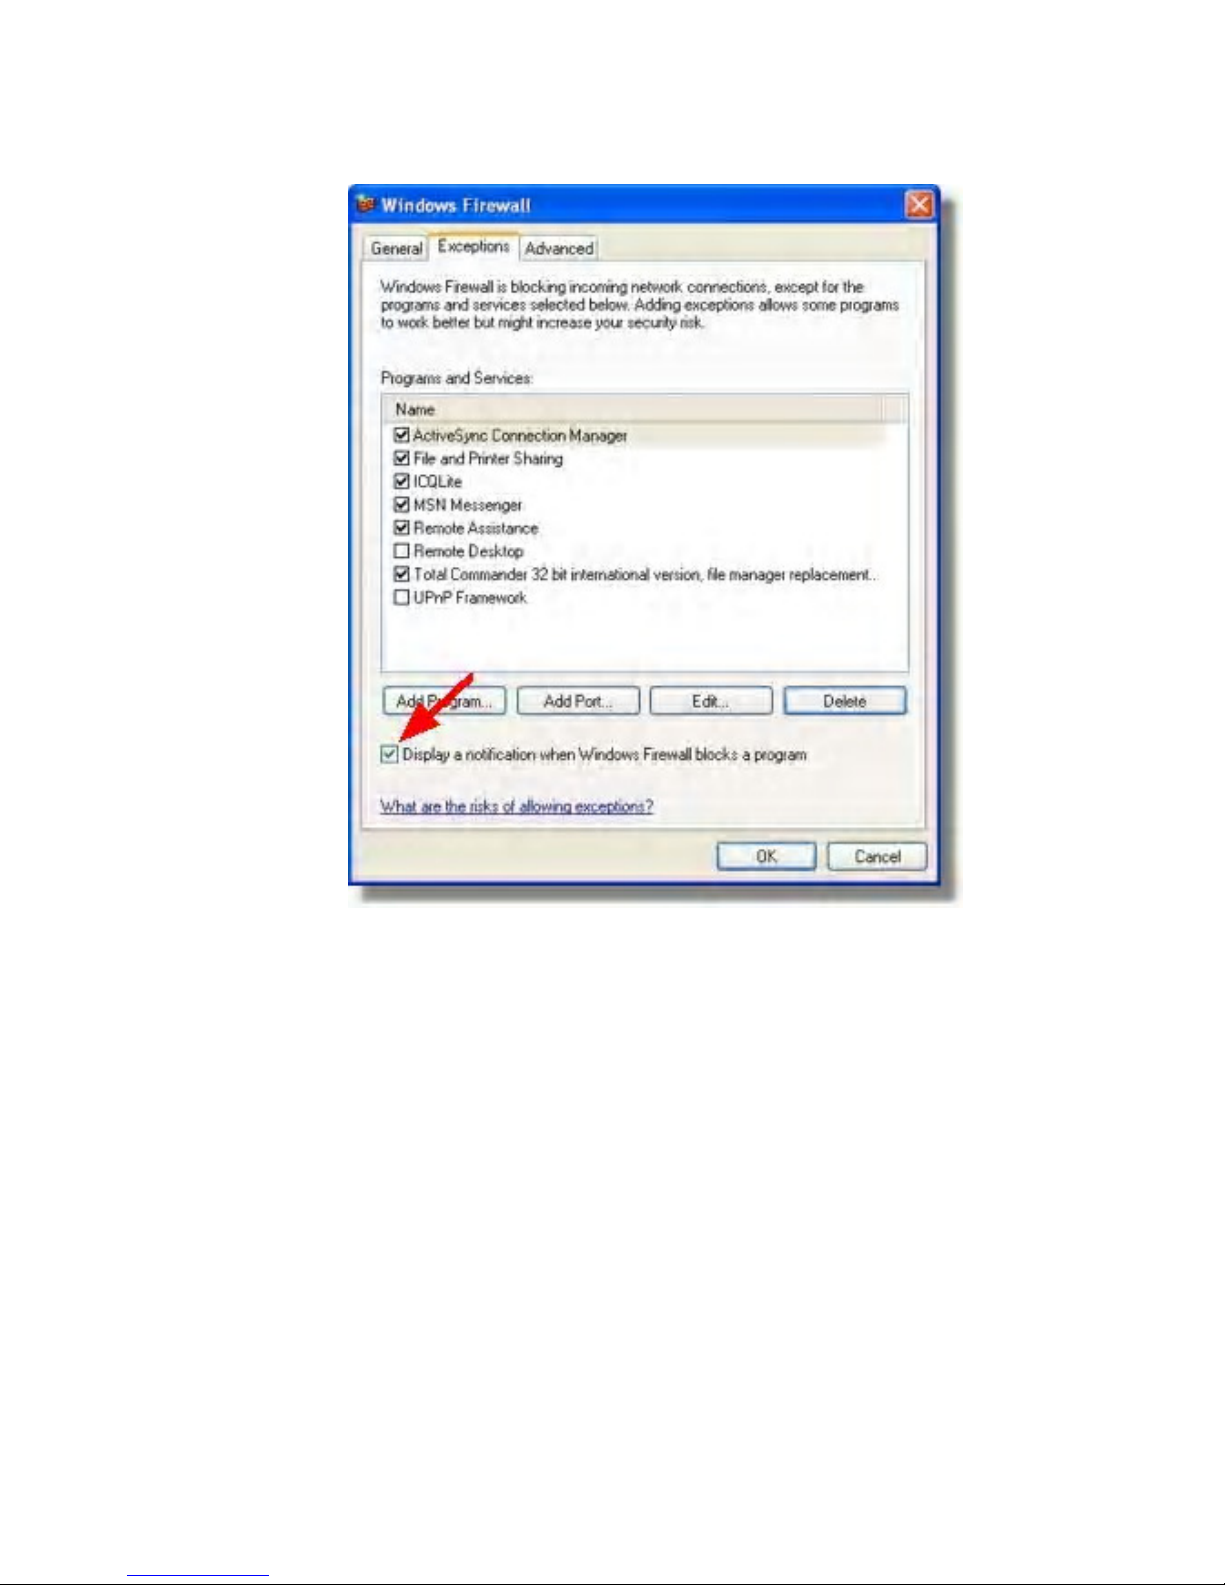
Next, click on the Exceptions tab and make sure that Display a
notification when Windows Firewall blocks a program checkbox is
checked:
Page 19
17
After you "unblock" the DS Manager the Firewall puts it into the
list of "exceptions" i.e. programs whose traffic is allowed to pass
through the Firewall:
Page 20

18
Manual way of making the auto-discovery mode work
Same result can be achieved by telling the Firewall which port on
Page 21
19
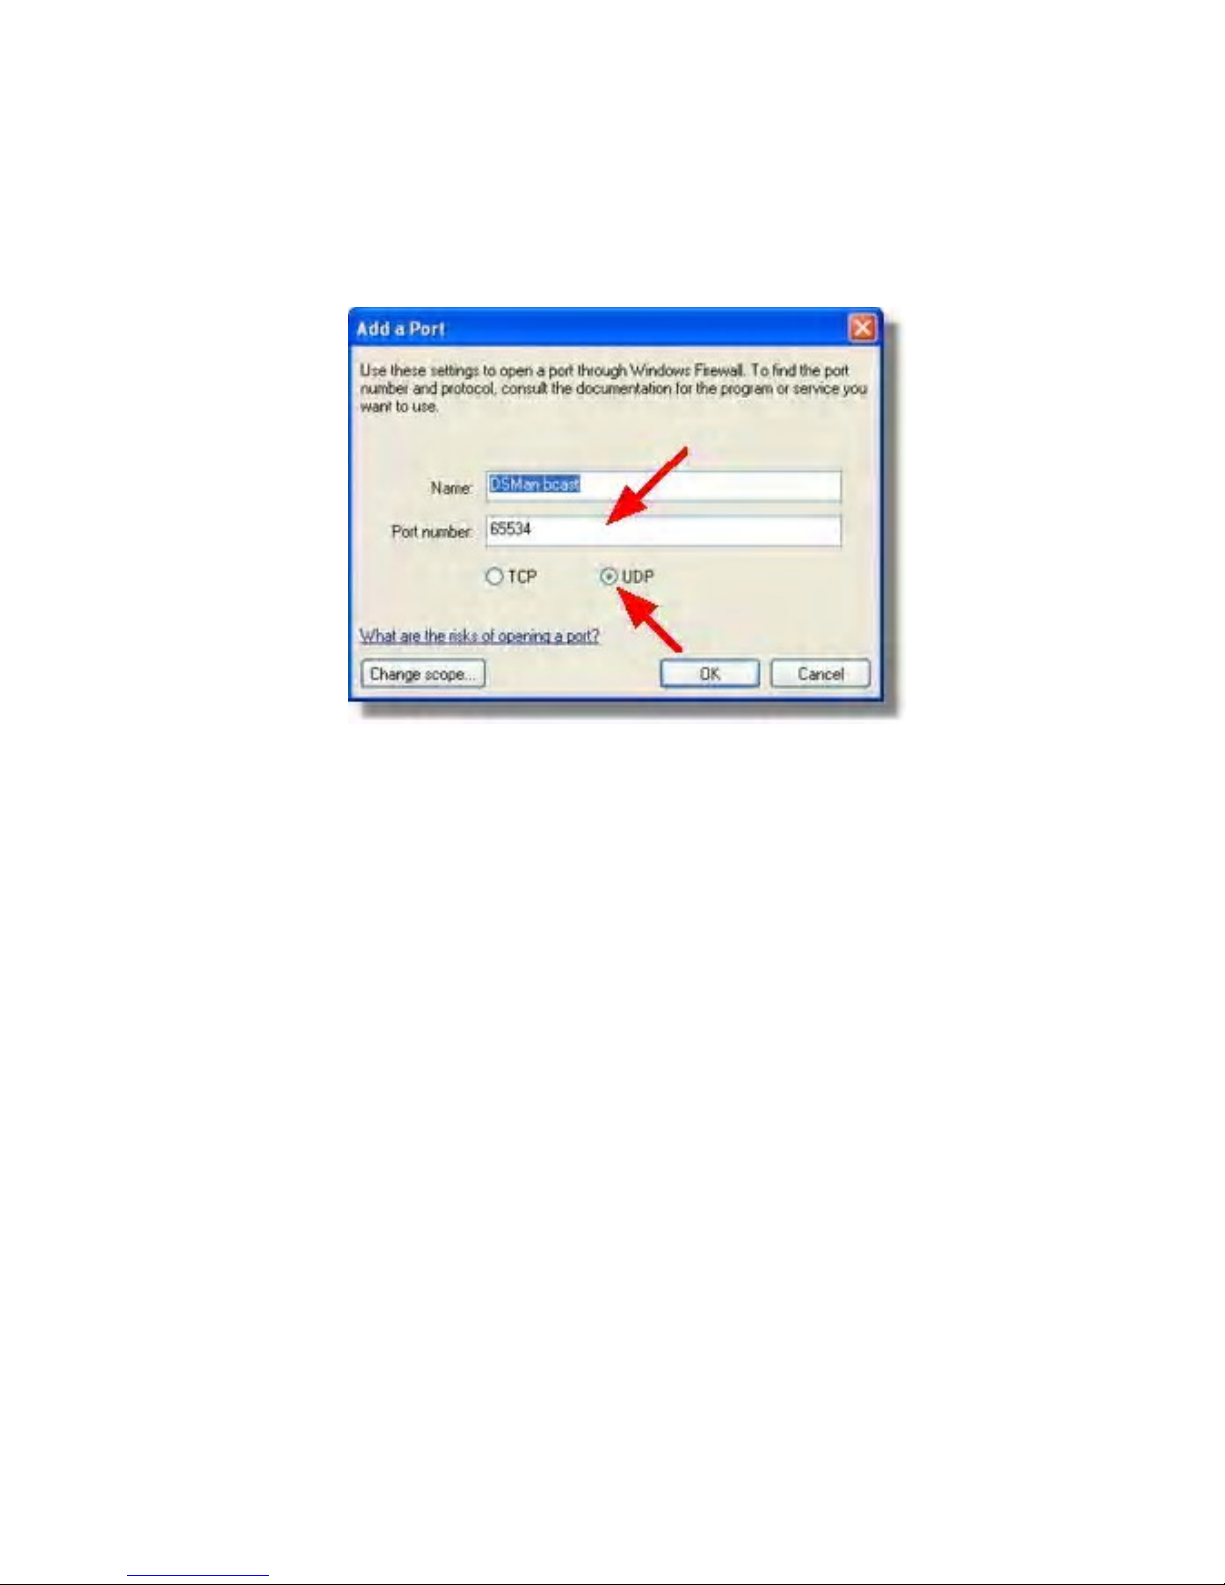
the PC should be opened. To do this click on the Exceptions tab of
the Windows Firewall dialog, then press Add Port... button- Edit a
port dialog
will open:
Input any meaningful name into the Name textbox (i.e. "DSMan
bcast"- this is because what we are opening here is a port for DS
Manager's auto-discovery broadcasts to work). In the Port number
textbox input 65534- this is the port number that must be opened
on your PC. Finally, select UDP- this is a protocol the DS Manager
is using to find Device Servers on the network. Click OK when
finished.
Page 22
20
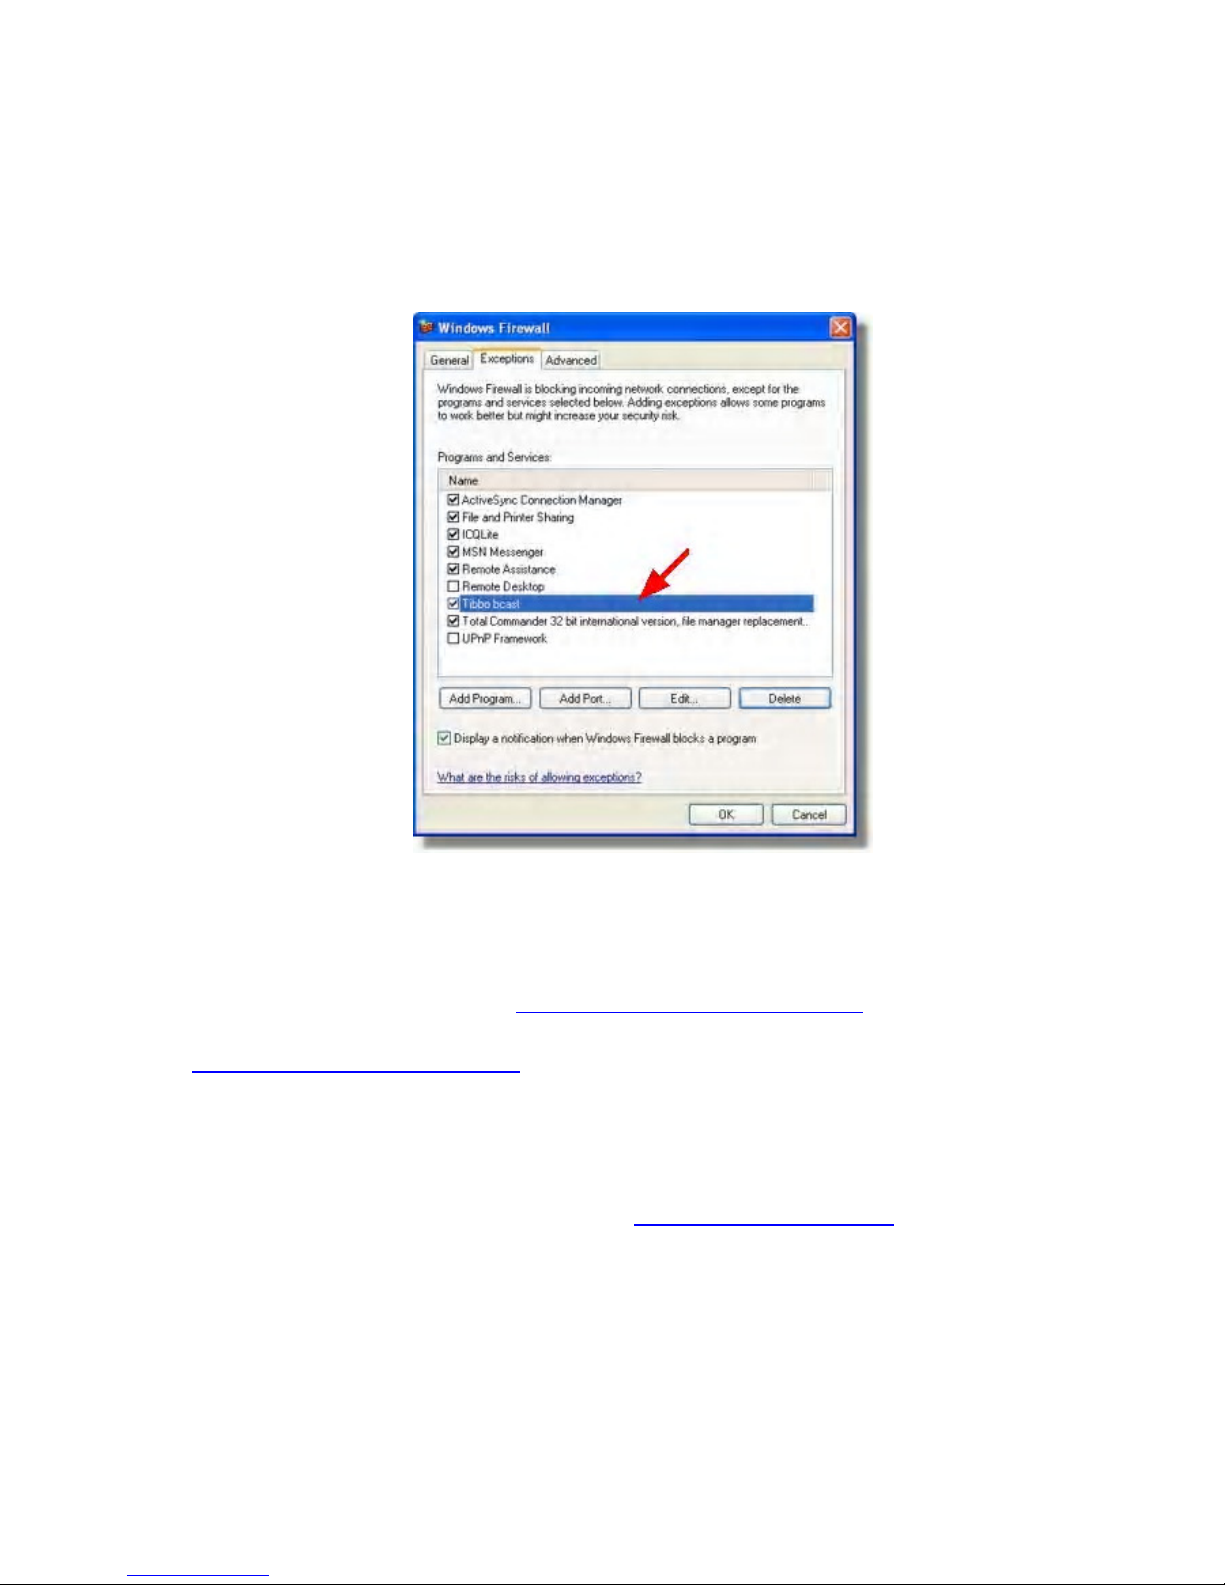
New entry will appear in the list of exceptions and the DS Manager
will start working properly:
Why Windows Firewall needs configuration for autodiscovery to work
This section explains why auto-discovery access mode will work
only after you configure the Windows Firewall properly while
address book access mode will require no adjustment to the
Firewall setup. You can happily skip this section if you are not that
interested to know.
In the auto-discovery access mode the DS Manager finds Device
Servers on the network by sending Echo (X) command as UDP
broadcast. Every Tibbo Device that receives this broadcast will
respond to it and the DS Manager will build a list of available
Device Servers basing on received responses.
Page 23

21
Trouble with Windows Firewall arises because the Firewall cannot
link received responses to the broadcast sent from the PC. So,
from the Firewall's point of view these responses are individual
incoming UDP "connections" and by defaults the firewall blocks any
incoming connection unless it is explicitly allowed. By unblocking
"Run DLL as an App" or manually opening UDP port 65534 you let
the responses from Device Servers to pass through. Port 65534 is
the port from which the DS Manager is sending its broadcasts and
to which all local Device Servers send their replies.
Contrary to what you'd probably expected, Windows Firewall does
not interfere with DS Manager's operation in the address book
access mode. This is because in this mode the DS Manager sends
Echo (X) command individually to each DS in the device list (no
broadcasts are used at all). When replies are received from Device
Servers the Firewall is able to link those replies to the requests
that were sent by the DS Manager earlier. The Firewall then
assumes that these were outgoing connections initiated by a
program on the PC and doesn't block incoming replies.
Opening the Firewall for DS data connections
Windows Firewall monitors all incoming connections and that
means that if your DS is supposed to connect to the VSP
on the PC
(or directly to your application) then a specific port (to which the
DS will be connecting) must be opened on the Firewall.
For example, if you know that the DS will be opening a TCP
connection to the VSP "COM3" with listening port number 1001
then you need to "open" this port in the Firewall. Use Add port...
feature to do this:
Page 24

22
Notice, that you only need to open ports if your DS is going to
connect to your PC. If it is the VSP (or application) on your PC that
is going to connect to the DS then you don't need to setup the
Firewall. This is because the Firewall doesn't block any connections
that originate from within the PC.
 Loading...