


Model FR700
User’s Guide
10:08

THIS EQUIPMENT COMPLIES WITH FCC CLASS-B REQUIREMENTS
PURSUANT SUBPART J OF PART-15
This device complies with Part 15 of the FCC Rules. Operation is subject to the following two conditions: (1) this device may not cause harmful interference, and (2) this device must accept any interference received, including interference that may cause undesired operation.
WARNING: Changes or modifications to this product not expressly approved by the party responsible for compliance could void the user’s authority to operate this equipment.
NOTE:: This equipment has been tested and found to comply with the limits for a Class B digital device, pursuant to Part 15 of the FCC Rules. These limits are designed to provide reasonable protection against harmful interference in a residential installation. This equipment generates, uses, and can radiate radio frequency energy and, if not installed and used in accordance with the instructions, may cause harmful interference to radio communications. However, there is no guarantee that interference will not occur in a particular installation. If this equipment does cause harmful interference to radio or television reception, which can be determined by turning the equipment off and on, the user is encouraged to try to correct the interference by one or more of the following measures:
-Reorient or relocate the receiving antenna.
-Increase the separation between the equipment and receiver.
-Connect the equipment into an outlet on a circuit different from that to which the receiver is connected.
-Consult the dealer or an experienced radio TV technician for help.
This Class B digital apparatus complies with Canadian ICES-003.
Cet appariel numerique de la classe B est conforme a la norme NMB-003 du Canada.
Lathem Time Corporation
200 Selig Drive, SW
Atlanta, Georgia USA 30336
(800) 241-4990
(404) 691-0400 www.lathem.com
Copyright © 2010 Lathem Time Corporation. All rights reserved. Revised 11-09-2010
Document Number: USG0094
CONTENTS |
|
QUICK START STEPS ................................................................................... |
V |
WELCOME........................................................................................................ |
1 |
PACKAGE CONTENTS ........................................................................... |
6 |
SYSTEM REQUIREMENTS .................................................................... |
7 |
INSTALL THE FACEIN TERMINAL ........................................................... |
8 |
FACEIN TERMINAL STARTUP........................................................... |
10 |
FACE ENROLLMENT GUIDE.............................................................. |
13 |
ENROLLING EMPLOYEES AT THE TERMINAL ........................... |
15 |
USING THE FACEIN TERMINAL ....................................................... |
20 |
INSTALL THE PAYCLOCK SOFTWARE....................................................... |
24 |
SETTING UP A MULTI-USER SYSTEM............................................. |
28 |
USING THE PAYCLOCK SOFTWARE...................................................... |
29 |
LOGGING INTO PAYCLOCK.............................................................. |
31 |
SETTING UP PAYCLOCK............................................................................ |
34 |
ADDITIONAL SOFTWARE SETUP..................................................... |
37 |
ADD THE FACEIN TERMINAL ........................................................... |
39 |
ADD EMPLOYEES AND ASSIGN BADGES....................................... |
40 |
EDITING TIMECARDS................................................................................. |
45 |
GLOBAL SCHEDULING............................................................................... |
63 |
REPORTS ........................................................................................................ |
64 |
SETTING UP YOUR TERMINAL................................................................ |
66 |
UPDATE THE TERMINAL.................................................................... |
71 |
POLLING THE TERMINAL.................................................................. |
72 |
AUTOMATIC POLLING........................................................................ |
73 |
HARDWARE TROUBLESHOOTING ......................................................... |
74 |
SOFTWARE TROUBLESHOOTING........................................................... |
76 |
APPENDIX A - EXPORTING PUNCHES TO A USB DRIVE .................. |
77 |
APPENDIX B - ADDING EMPLOYEES AT THE TERMINAL ............... |
79 |
APPENDIX C - CONNECTING THE FACEIN DIRECTLY TO THE |
|
COMPUTER’S NIC ........................................................................................ |
84 |
APPENDIX D - FACEIN WAN INSTALLATION ...................................... |
87 |
APPENDIX E - PAYCLOCK CLIENT SOFTWARE WAN |
|
INSTALLATION............................................................................................. |
89 |
Copyright © 2010 Lathem Time Corporation. All rights reserved. Reproduction of this document in whole or in part is strictly prohibited. This document may contain typographical or copy errors. PayClock, Lathem, the Lathem logo, and all other Lathem product names mentioned in this document are registered trademarks of Lathem Time Corporation. All other products, brand names, or company names mentioned in this document are properties and trademarks or registered trademarks of their respective companies.
Quick Start Steps
Verify the contents of your system. (For more detailed information turn to page 6.)
Terminal Installation
1
Separate the mounting-plate from the FaceIN terminal by removing the Philips head screws. Retain the screws for later. (See page 8 for more details.)
3
Plug the RJ45 network cable into the Ethernet port and the Power Adapter plug into the Power Adapter port which is located in the compartment on back of the terminal.
2
Install the mounting-plate to the wall using the supplied wallmount screws. Note: For best visibility mount the terminal for the shortest employee, taller employees can bend down.
4
Align the FaceIN terminal with the pins on the mounting-plate and secure the two together with the 2 Philip head screws. Be careful not to pinch the AC cord.
When finished, plug the Power Adapter into an AC wall outlet.

Terminal Startup
5
6
-Set up the network communications-
·Press the MENU key, the Functions Menu will open.
·Press 4, the System Setting menu will open.
·From the System Setting menu, press 2 - Set Network.
·Enter the IP Address for the terminal and press OK.
·Enter the Mask Code and press OK. ·Enter the Gateway Address and press
OK.
·The terminal will automatically restart. (For more detailed information turn to page 10.)
Note: You may have to contact your network administrator if you are unsure how to set up the network communications.
-Set up the first Administrator-
·Press the MENU key, the Functions Menu will open.
·Press 1, the Set Admin menu will open. ·From the Set Admin menu, press 1 - Admin 1.
·Position your face and follow the prompts.
(For more detailed information turn to page 11.)

Software Installation
7 |
-Verify System Requirements- |
Verify your computer meets the |
Minimum System Requirements listed in this User Guide, turn to page 7.
8
9
10
Install the PayClock Software. (For more detailed instructions turn to page 24.)
Important Notes
Make sure your screen saver is not showing before inserting the installation CD’s.
Open and close the CD-ROM drawer if the CD is not recognized when inserted.
-Open PayClock-
Open the PayClock software by clicking on the PayClock Icon. The default password is lathem. (For more detailed instructions turn to page 31.)
-Configure the PayClock software-
Click Setup Now from the Get Started window to configure PayClock. (For more detailed instructions turn to page 34.)

11
12 
-Add the FaceIN terminal-
Click on the Terminal Manager tab and add the FaceIN terminal.
(For more detailed instructions turn to page 39).
-Add the Employees-
Add employees using the
Employees button under the Setup tab.
To add a new employee, click New and then enter the employee data.
(For more detailed instructions turn to page 40).
13
14
-Update the FaceIN terminal-
After adding the employees, update the FaceIN terminal.
(For more detailed instructions turn to page 71).
-Enroll Employee Faces-
After adding the employees in PayClock, register their faces at the terminal.
·Press the MENU key, and verify the administrator’s face.
·After verification the Functions Menu will open. ·Press 2, the User Management menu will open. ·Press 2, the Modify User screen will open. ·Using the numeric keypad enter the desired employee’s badge number and press OK.
·The employee’s name will display, press OK. ·Select the verification method, have the employee position their face and follow the prompts. (See page 61 for details.)
·Press ESC at the “Permit Open Door?” Prompt. ·Press OK at the “Permit Attendance?” Prompt. ·Press ESC, ESC and ESC when finished.
(For more detailed instructions turn to page 15.)
P A Y C L O C K & F A C E I N U S E R ’ S G U I D E
Welcome
Purpose of this User’s Guide
The purpose of this user’s guide is not meant to be a complete manual for the product. It is a quick reference to get you started. Please refer to the PayClock Help for detailed product information, setup guidance, and operation information.
Product Overview
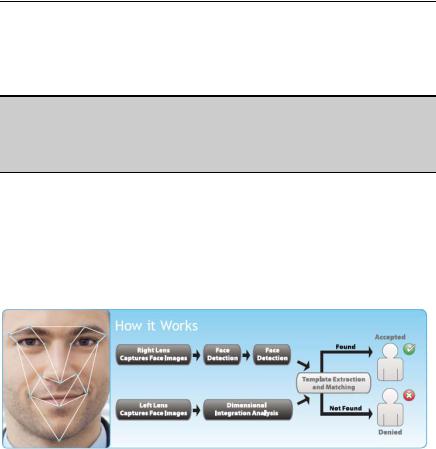
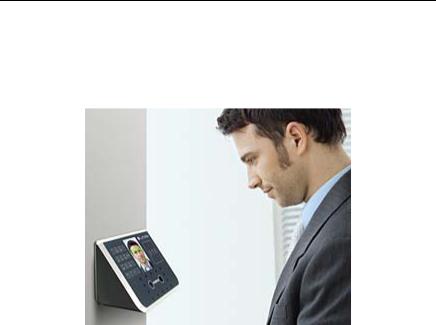
Reliability, functionality and ease of use are trademarks of the PayClock software and terminals. The terminal utilizes an “embedded facial recognition” system, meaning that employees will punch in and out by presenting their face in front of the terminal’s “Dual Camera System” .
The FaceIN terminal connects to your network (LAN - PayClock software and FaceIN terminal have to be on the same subnet) for communications with the PayClock software. The PayClock software and FaceIN terminals are the ideal solution for businesses that want to track employee time and automate payroll.
The FaceIN terminal offers a large color LCD display that displays employee information along with an audio prompt. Upon a successful validation, the display will show the employee’s name, time of punch and an audio prompt identifying a successful punch. When you’re ready, you simply poll the terminal to add the punches to the database.
1
P A Y C L O C K & F A C E I N U S E R ’ S G U I D E
IMPORTANT
The FaceIN terminal operates independently from the computer where the PayClock software resides. The employee punches are retained in the terminal’s memory and when you are ready simply poll the terminal.
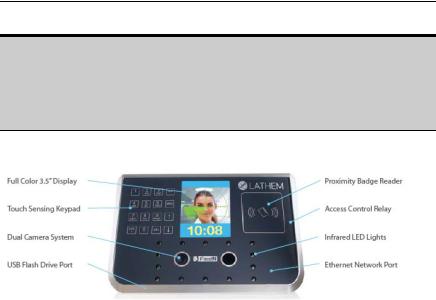
Features and Specifications
•Embedded facial recognition system - Advanced DSP technology keeps the image processing and matching on the terminal.
•Accurate and fast identification - The industries leading “Dual Sensor” facial recognition technology.
•Reliable performance under different light environments - The terminal can work in different light conditions even in the dark. Over one year of market testing.
•Flexible I/O interfaces - Internet Protocol (TCP/IP) enables communications over the LAN. USB allows for employee data upload or punch download using a USB flash drive.
•User friendly design - 3.5 inch color LCD screen for face positioning with voice prompt. No-touch authentication for the ultimate in hygiene.
•Easy-to-use PayClock software automatically calculates worked hours including overtime, tracks sick and vacation time and provides dozens of standard time and labor reports.
•Export hours directly from the PayClock software to most major payroll providers including ADP and Paychex.
2
P A Y C L O C K & F A C E I N U S E R ’ S G U I D E
•PayClock software offers seamless integration with the QuickBooks accounting products for a complete “punch-to- paycheck” solution.
•Comprehensive support agreements minimize technical difficulties.
•Numerous Accessory options further enhance the functionality of your PayClock and FaceIN system.
Note: The USB Flash Drive Port is located on the bottom of the terminal and the Ethernet Network Port is located on the back of the terminal.
Upgrades
If you find that you need to accommodate more employees in your system or if you would like enhanced software capabilities, consider purchasing a software upgrade for your system. A number of accessories are offered to further enhance your PayClock system.
• Increased employee capacity |
• |
Customized export options |
• Customized reporting options |
• |
Multi-user capabilities |
Upgrading is as easy as visiting http://shop.lathem.com or open PayClock and click on the PayClock orb in the upper left corner and select Upgrade PayClock. Then select the options you would like to purchase and download your software upgrade. Options are instantly activated upon receipt of online payment.
Accessories
A number of accessories are offered to further enhance your PayClock system. Visit http://shop.lathem.com to purchase additional accessories like the ones listed below.
Getting Help
The purpose of this user’s guide is not meant to be a complete manual for the product. It is a quick reference to get you started. Please refer to the PayClock Help for detailed product information, setup guidance, and operation information.
3

P A Y C L O C K & F A C E I N U S E R ’ S G U I D E
You can access the help desk and answers to your issues in a number of different ways. In addition to resources within the PayClock software, assistance may be accessed online, via email, via telephone, or through your dealer. Don’t forget annual support contracts are also offered.
PayClock Help
The PayClock Help allows you to search through an index of help topics to locate the answer you need. To launch the Help, click the Help button on the ribbon bar.
Troubleshooting
For answers to Frequently Asked Questions, refer to the Troubleshooting sections of this User Guide on page 74 and 76.
Online and Email Support
Lathem.com provides access to numerous support resources that will allow you maximize your use of PayClock. Help may be accessed by visiting the following link:
http://support.lathem.com
On the Support page, you may also submit a question through our online knowledgebase and one of our technicians will respond to your inquiry within 24 hours. Email support is free to all registered users.
Telephone Support
The help desk is available between the hours of 8am and 7pm Monday through Friday. Please call (800) 241-4990 to speak with our help desk. You will receive free technical support for the first 30 days after your initial call. After that period, you may purchase an Annual Support Agreement which will cover all calls for one year or you may pay a per-call fee.
4

P A Y C L O C K & F A C E I N U S E R ’ S G U I D E
Annual Support Agreements
Annual support contracts are designed to keep your terminal and PayClock software working seamlessly. For a single annual fee, your Support Agreement offers the following advantages:
•Unlimited toll-free telephone support (versus a per-call fee) and priority status for calls
•Unlimited access to the extensive library of web-based tips and FAQs
•Free software updates and version upgrades during the Support Period, giving you free access to the most current software features
•Quick exchanges for damaged or broken terminal, thereby reducing downtime
•Extended parts and labor warranty helps you to save money on repairs needed after the regular product warranty has expired
To learn more about annual support contracts and to make a purchase, contact us at (800) 241-4990 or visit http://www.lathem.com/support/support-plans.aspx
5
P A Y C L O C K & F A C E I N U S E R ’ S G U I D E
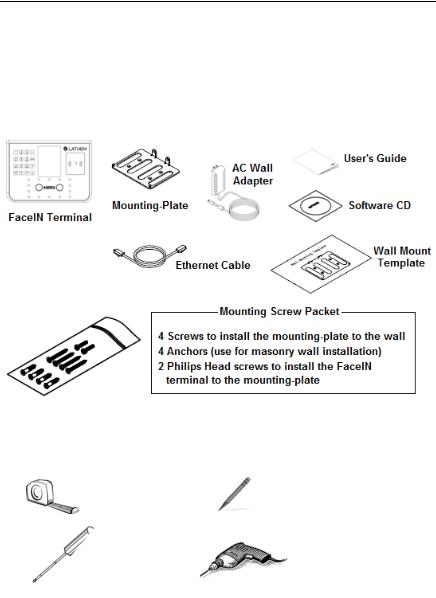
Package Contents
Please verify that your package includes ALL of the following items. If your package is missing an item, please call the help desk at 1-800- 241-4990.
Recommended Installation Tools
Tape Measure |
Pencil |
|
|
Philips Head |
Optional-Power |
Screw Driver |
Drill & Drill Bits |
6

P A Y C L O C K & F A C E I N U S E R ’ S G U I D E
System Requirements
You must verify that your system meets ALL of the minimum requirements listed below in order to run PayClock on your computer. Do not install the software if your system does not meet these minimum requirements!
Requirements:
yProcessor: 1 GHz or higher
yOperating System: Microsoft Windows 32-Bit or 64-Bit
XP - SP2 or later
Vista
Windows 7
Server 2003 or 2008 (Standard or Enterprise Edition)
yMemory: 1 GB of RAM or higher
yHard Disk Drive: Up to 450 MB free disk space; up to 1 GB if the .NET framework is not installed
yDisplay: 1024x768 or higher resolution
yCD-ROM Drive: Required
yInternet: 56 Kbps (broadband recommended for online features/services)
yPrinter: Any printer compatible with Windows XP SP2 or later
yNetwork Interface: Network adaptor configured for TCP/IP connected to a switch on LAN network.
yAdditional Software:
Microsoft .Net 3.5 SP1 (included in the installer)
Internet Explorer 7.0 or later
7
P A Y C L O C K & F A C E I N U S E R ’ S G U I D E
Install the FaceIN Terminal
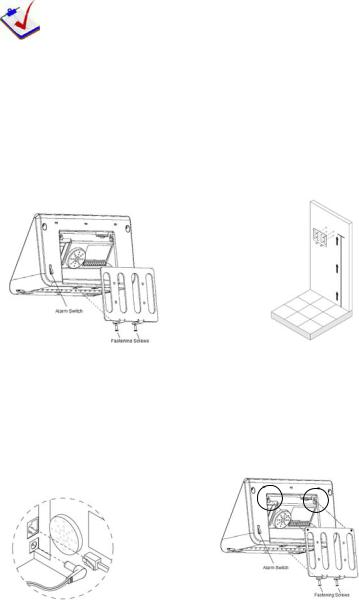
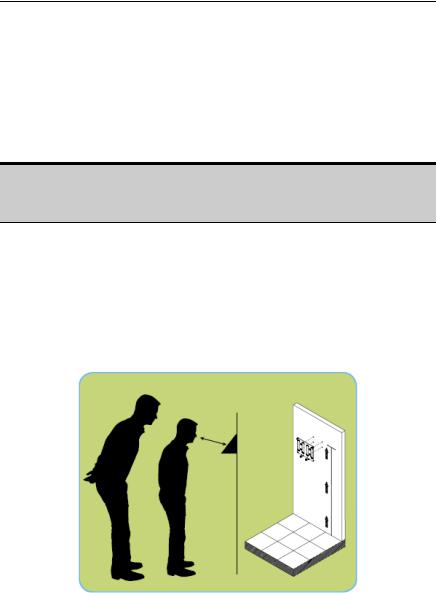
Step 1: Select a site to install your FaceIN terminal that will be convenient to employees clocking in and out. When deciding where the terminal will be installed, keep in mind that an 115vAC power outlet should be within 6 feet of the mounting location as well as a connection to the network (LAN).
Note about Direct Sunlight - It is not recommended to have the terminal mounted in a location where it is exposed to direct sunlight. This could be troublesome during the registration process.
Step 2: After selecting the appropriate installation site, use the terminal to determine the appropriate height. Have the shortest employee stand in from of the terminal. Hold the terminal on the wall so that this employee can comfortably center their face in the LCD display window. Mark the height of the terminal on the wall. Note: Taller employees can easily adjust their stance to center their face in the LCD display window.
Install the mounting-plate to the wall using the supplied screws. For sheetrock walls, drill a 3/16” diameter hole through each of the four screw locations; each approx 1-1/2” deep. Install the plastic “anchors” included in the mounting screw packet.
8
P A Y C L O C K & F A C E I N U S E R ’ S G U I D E
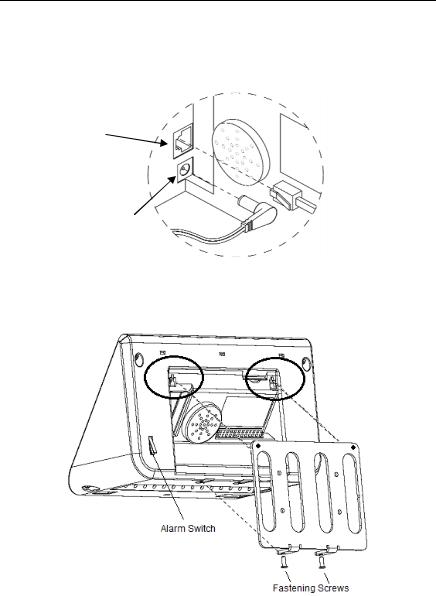
Step 3: Plug the RJ45 network cable into the Ethernet port and the Power Adapter plug into the Power Adapter port which is located in the compartment on the back of the terminal.
Ethernet Port
Power Adapter Port
Step 4: Align the FaceIN terminal with the pins on the mountingplate and secure the two together with the 2 Philips head screws. Be careful not to pinch the AC cord or network cable.
When finished, plug the power adapter into an AC wall outlet and proceed to the software installation.
9

P A Y C L O C K & F A C E I N U S E R ’ S G U I D E
FaceIN Terminal Startup
After completing the installation and power-up, the terminal will display the normal screen with the date, day of week and time.
You are now ready to set up the network communications and define the initial administrator. Note: You must set up at least one administrator.
Set up the Network Communications
The FaceIN terminal must be configured to communicate with the PayClock software over the network. You may have to contact your network administrator if you are unsure how to set up the network communications.
•Press the MENU key, the Functions Menu will open.
•Press 4, the System Setting menu will open.
•From the System Setting menu, press 2 - Set Network.
•Enter the IP Address for the terminal and press OK.
•Enter the Mask Code and press OK.
•Enter the Gateway Address and press OK.
•The FaceIN terminal will restart automatically.
Note: You may have to enter leading zeros when entering the addresses. For example, the address 10.0.0.1 would be entered as
010.000.000.001 at the terminal.
10

P A Y C L O C K & F A C E I N U S E R ’ S G U I D E
Set up an Administrator
After setting up the network communications you will need to set up at least one administrator. Note: You can have up to 5 administrators.
•Press the MENU key, the Functions Menu will open.
•Press 1, the Set Admin menu will open.
•From the Set Admin menu, press 1 - Admin 1.
•The image collecting screen will display.
•Position the face in the middle of the two cameras with 9 to 25 inches between the face and the terminal.
•The image collecting screen will start the face recognition enrollment.
•Perform 2 small head circles to the right.
•Perform 2 small head circles to the left.
•Move the face closer to the terminal until the white dashed square appears.
•Move the face back until there is 9 to 25 inches between the face and the terminal.
•Turn the head fully to the right.
•Turn the head fully to the left.
•Raise the head up slightly.
•Lower the head down slightly.
•Move the face back from the terminal until there is 9 to 25 inches between the face and the terminal (if adjust position message is still displaying).
•Resume small head circles to the right (if adjust position message is still displaying).
•The progress bar at the bottom of the screen will display the process of the imaging.
11

P A Y C L O C K & F A C E I N U S E R ’ S G U I D E
When the face is successfully enrolled the terminal will display, “Add as User?”.
Ask yourself this question.
Will the administrator be using the door access function or punching In and Out on the terminal?
Yes - The administrator will be using the door access function or punching In and Out at the terminal.
•If the administrator will be punching In and Out or using the door access function at the terminal, press the OK key. The Input User No screen will display.
•Use the numeric keys to enter the user number and press OK. This should be the same as the PIN number you will enter into the PayClock software. The user number can be from 1 to 9999.
•Using the index/numeric keys enter a name. This should be the same as the first name you will enter into the PayClock software. After pressing the desired index/numeric key, use the ↑/↓ to move through the available letters. To change to caps, press the index/numeric key with the desired letter and press the ESC key. The letter group will change to caps.
After entering the name, press the OK key.
•Select the verification method to use for this user. A user can punch In and Out using one of four methods, Face, Pin and Face, Card or Card and Face.
No - The administrator will not be using the door access function or punching In and Out at the terminal.
•If the administrator will not be punching In and Out or using the door access function at the terminal, press the ESC key.
•The screen will display “Register Finished” and will return to the “Set Admin” menu. Press ESC and ESC again to return to the normal time/date screen.
12
P A Y C L O C K & F A C E I N U S E R ’ S G U I D E
Face Enrollment Guide
Follow these guidelines for trouble-free enrollments.
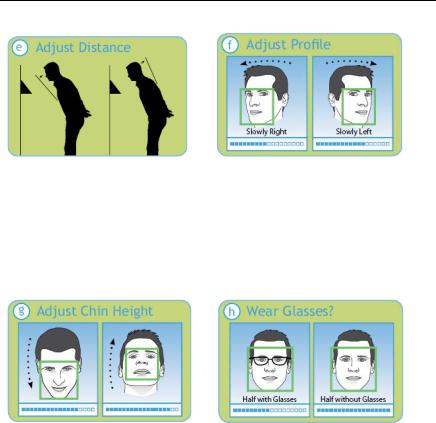
During the enrollment process the employee should keep their eyes centered on the screen at all times. Try to keep a solid green box around your face by following the steps below.
Position yourself and bend at the waist to bring your face 1 - 2.5 ft. from the screen on the terminal.
The white dashed box is preparing to locate points. Identification images will only be taken when the green box appears around your face.
The line of squares at the bottom of the screen indicate how much data is needed to complete the enrollment.
Slowly make an imaginary circle with your nose. Two small circles to the right and two to the left while keeping your eyes centered on the screen.
13
P A Y C L O C K & F A C E I N U S E R ’ S G U I D E
Slowly move your face closer until the whitedashed frame appears and then move away until the white-dashed frame appears.
Tilt the head down slightly (chin lowered) while keeping your eyes on the screen, then tilt the head back slightly (chin upward).
Slowly turn your head fully to the right, and then fully to the left, all the while keeping you eyes centered on the screen.
If you wear glasses all of the time, or on occasion, you must initially enroll with your glasses on (sunglasses or dark tinted glasses are not allowed). Once the progress bar indicates enroll is 50% complete, REMOVE YOUR GLASSES and complete the enrollment without your glasses on.
14

P A Y C L O C K & F A C E I N U S E R ’ S G U I D E
Enrolling Employees at the Terminal
The FaceIN terminal utilizes an “embedded facial recognition” system, meaning that employees will punch in and out by presenting their face in front of the terminal’s “Dual Camera System”. The FaceIN terminal verifies the face image and records the punch. When you’re ready, you simply poll the terminal to add the punches to the database.
Before enrolling the employees update the FaceIN terminal first. From the Terminal Manager tab, click the Update button.
Enrollment Guidelines
•The FaceIN terminal is for use indoors; do not position the terminal in direct sunlight.
•Use normal facial expressions and avoid wearing sunglasses.
•If glasses or a hat is worn, please take the glasses and/or hat off halfway through the enrollment process for better face recognition.
•Bend into the camera, keeping the distance between the face and screen at 9 to 25 inches for best results.
•Keep the face centered between the 2 cameras.
•If the green lined frame displays when the employees face is successfully being detected.
•If the white dashed frame appears, the employees face can not be recognized, so please have the employee adjust their positioning.
The FaceIN terminal requires administrator verification in order to register employee faces.
•At the FaceIN terminal, press the MENU key, administrator verification is required.
15

P A Y C L O C K & F A C E I N U S E R ’ S G U I D E
•The administrator should present and position themselves for a facial scan. The Functions Menu will display upon a successful verification.
•Press 2 or select User Management and press OK, the User Management menu will display.
•Press 2 or select the Modify User menu and press OK.
•Use the numeric keys to enter the user number and press OK. The user number is the same as the badge number that was set up in the PayClock software.
•The employee’s first name will display, press OK to continue.
•With the employee standing at the ready, select the verification method to use for the employee.
Verify Method Recommendation: Typically for a normal employee you would select Face recognition, for a temporary employee select
Card recognition, for higher security select either Pin and Face or
Card and Face recognition.
When registering an employee’s face take the following into consideration:
16

P A Y C L O C K & F A C E I N U S E R ’ S G U I D E
Eye Glasses - It is recommended for the employee to register with the eye glasses on for half the process, then remove the eye glasses and complete the registration.
Hair Style - If the employee has a hair style that has their hair covering or blocking their eyes, move the hair away from the eyes during the registration process.
Direct Sunlight - It is not recommended to have the terminal mounted in a location where it is exposed to direct sunlight. This could be troublesome during the registration process.
Face / Pin and Face Verification Method Selected
•Position the employee so the face is in the middle of the two cameras with 9 to 25 inches between the face and the terminal.
•The image collecting screen will display, start the face recognition enrollment.
•Perform 2 small head circles to the right.
•Perform 2 small head circles to the left.
•Move the face closer to the terminal until the white dashed square appears.
•Move the face back until there is 9 to 25 inches between their face and the terminal.
•Turn the head fully to the right.
•Turn the head fully to the left.
•Raise the head up slightly.
•Lower the head down slightly.
•Move the face back from the terminal until there is 9 to 25 inches between the face and the terminal (if adjust positioning message is still displaying).
•Resume small head circles to the right (if adjust positioning message is still displaying).
17

P A Y C L O C K & F A C E I N U S E R ’ S G U I D E
•The progress bar at the bottom of screen will display the process of the imaging.
•When the face is registered the terminal will display, “Permit Open Door?” press ESC. Note: Door access is not currently supported.
•When “Permit Attendance?” displays, press OK. Note: You must press OK; otherwise punches will not be recorded for polling.
•The screen will display “Finished” and will return to the “Input User No” screen. Continue with the next employee or press ESC, ESC and ESC again to return to the normal time/date screen.
Card Verification Method Selected
•When “Please Swipe Card” displays, present the card at the terminal.
•When the card is registered the terminal will display, “Permit Open Door?” press ESC. Note: Door access is not currently supported.
•When “Permit Attendance?” displays, press OK. Note: You must press OK; otherwise punches will not be recorded for polling.
•The screen will display “Finished” and will return to the “Input User No” screen. Continue with the next employee or press ESC, ESC and ESC again to return to the normal time/date screen.
Card and Face Verification Method Selected
•When “Please Swipe Card” displays, present the card at the terminal.
•Position the employee so the face is in the middle of the two cameras with 9 to 25 inches between the face and the terminal.
18

P A Y C L O C K & F A C E I N U S E R ’ S G U I D E
•The image collecting screen will display, start the face recognition enrollment.
•Perform 2 small head circles to the right.
•Perform 2 small head circles to the left.
•Move the face closer to the terminal until the white dashed square appears.
•Move the face back until there is 9 to 25 inches between their face and the terminal.
•Turn the head fully to the right.
•Turn the head fully to the left.
•Raise the head up slightly.
•Lower the head down slightly.
•Move the face back from the terminal until there is 9 to 25 inches between the face and the terminal (if adjust positioning message is still displaying).
•Resume small head circles to the right (if adjust positioning message is still displaying).
•The progress bar at the bottom of screen will display the process of the imaging.
•When the face is registered the terminal will display, “Permit Open Door?” press ESC. Note: Door access is not currently supported.
•When “Permit Attendance?” displays, press OK. Note: You must press OK; otherwise punches will not be recorded for polling.
•The screen will display “Finished” and will return to the “Input User No” screen. Continue with the next employee or press ESC, ESC and ESC again to return to the normal time/date screen.
19
P A Y C L O C K & F A C E I N U S E R ’ S G U I D E
Using the FaceIN Terminal
The FaceIN will be ready for use when the facial enrollment process is complete.
To punch, the employee will simply approach and look at the terminal, within seconds they are identified and punched In or Out.
Upon successful verification the terminal will play a confirmation sound and the screen will display the employee’s first name and time of punch.
Clocking IN / Out
Employees can punch by presenting their face or a badge.
Clocking IN/Out - Face Verification
•The employee should step towards the terminal and stop when within 9 - 25 inches; the terminal will detect the employee and start the face recognition automatically.
•With the face detected, the screen will display a green radar screen rotating clockwise over the employee’s image. A message will display at the bottom of the screen guiding the employee.
20

P A Y C L O C K & F A C E I N U S E R ’ S G U I D E
•When the employee’s face is in the correct position, a green lined frame will display on the screen, and a green bar will scan the employee’s image from top to bottom.
•During the face recognition process, the terminal will provide guidance for the employee, such as: “Please Get Closer”, “Please Get Farther” or “Adjust Your Action”.
•Upon successful verification the terminal will play a confirmation sound and the screen will display the employee’s first name and time of the punch.
Clocking IN/Out - PIN & Face Verification
•Press the backspace key “←”, at the Input User No. screen enter the employee’s PIN and press OK.
•The employee should step towards the terminal and stop when within 9 - 25 inches; the terminal will detect the employee and start the face recognition automatically.
•With the face detected, the screen will display a green radar screen rotating clockwise over the employee’s image. A message will display at the bottom of the screen guiding the employee.
•When the employee’s face is in the correct position, a green lined frame will display on the screen, and a green bar will scan the employee’s image from top to bottom.
•During the face recognition process, the terminal will provide guidance for the employee, such as: “Please Get Closer”, “Please Get Farther” or “Adjust Your Action”.
•Upon successful verification the terminal will play a confirmation sound and the screen will display the employee’s first name and time of the punch.
21

P A Y C L O C K & F A C E I N U S E R ’ S G U I D E
Clocking IN/Out - Card & Face Verification
•Move the badge over the badge reader symbol on the front of the FaceIN.
•When the badge is in close proximity to the FaceIN, a confirmation beep will sound.
•The employee should step towards the terminal and stop when within 9 - 25 inches; the terminal will detect the employee and start the face recognition automatically.
•With the face detected, the screen will display a green radar screen rotating clockwise over the employee’s image. A message will display at the bottom of the screen guiding the employee.
•When the employee’s face is in the correct position, a green lined frame will display on the screen, and a green bar will scan the employee’s image from top to bottom.
•During the face recognition process, the terminal will provide guidance for the employee, such as: “Please Get Closer”, “Please Get Farther” or “Adjust Your Action”.
•Upon successful verification the terminal will play a confirmation sound and the screen will display the employee’s first name and time of the punch.
Clocking IN/Out - Card Verification
The Card Verification method only requires that the employee present their badge and then the terminal will take a snapshot of the person presenting the badge, no facial verification occurs.
22
 Loading...