

Page 1
USG0111 Rev A
QUICK START GUIDE
READ THIS FIRST
10:08
1
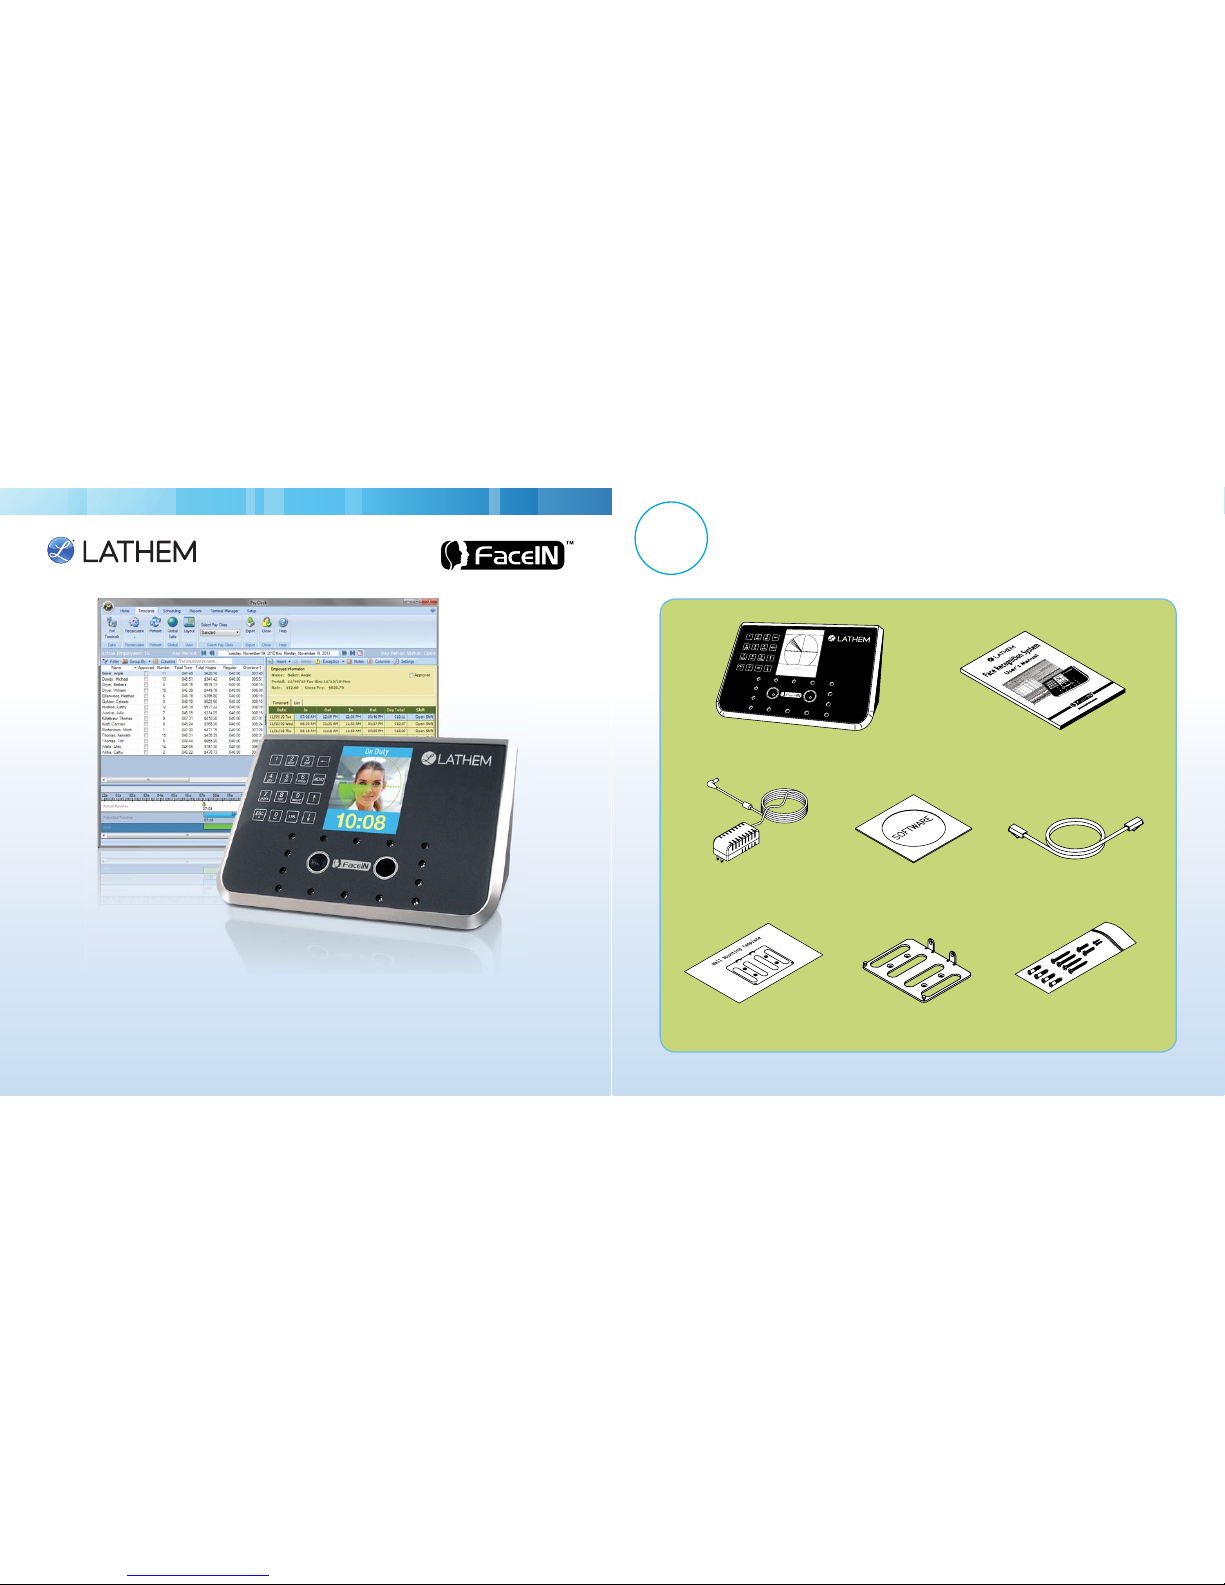
Verify Contents
Verify the contents of your system and make sure your computer meets the
minimum system requirements.
Power Adapter PayClock Software CD Ethernet cable
Mounting Diagram Mounting Bracket Mounting Hardware
FaceIN Terminal FaceIN User Guide
Page 2
2
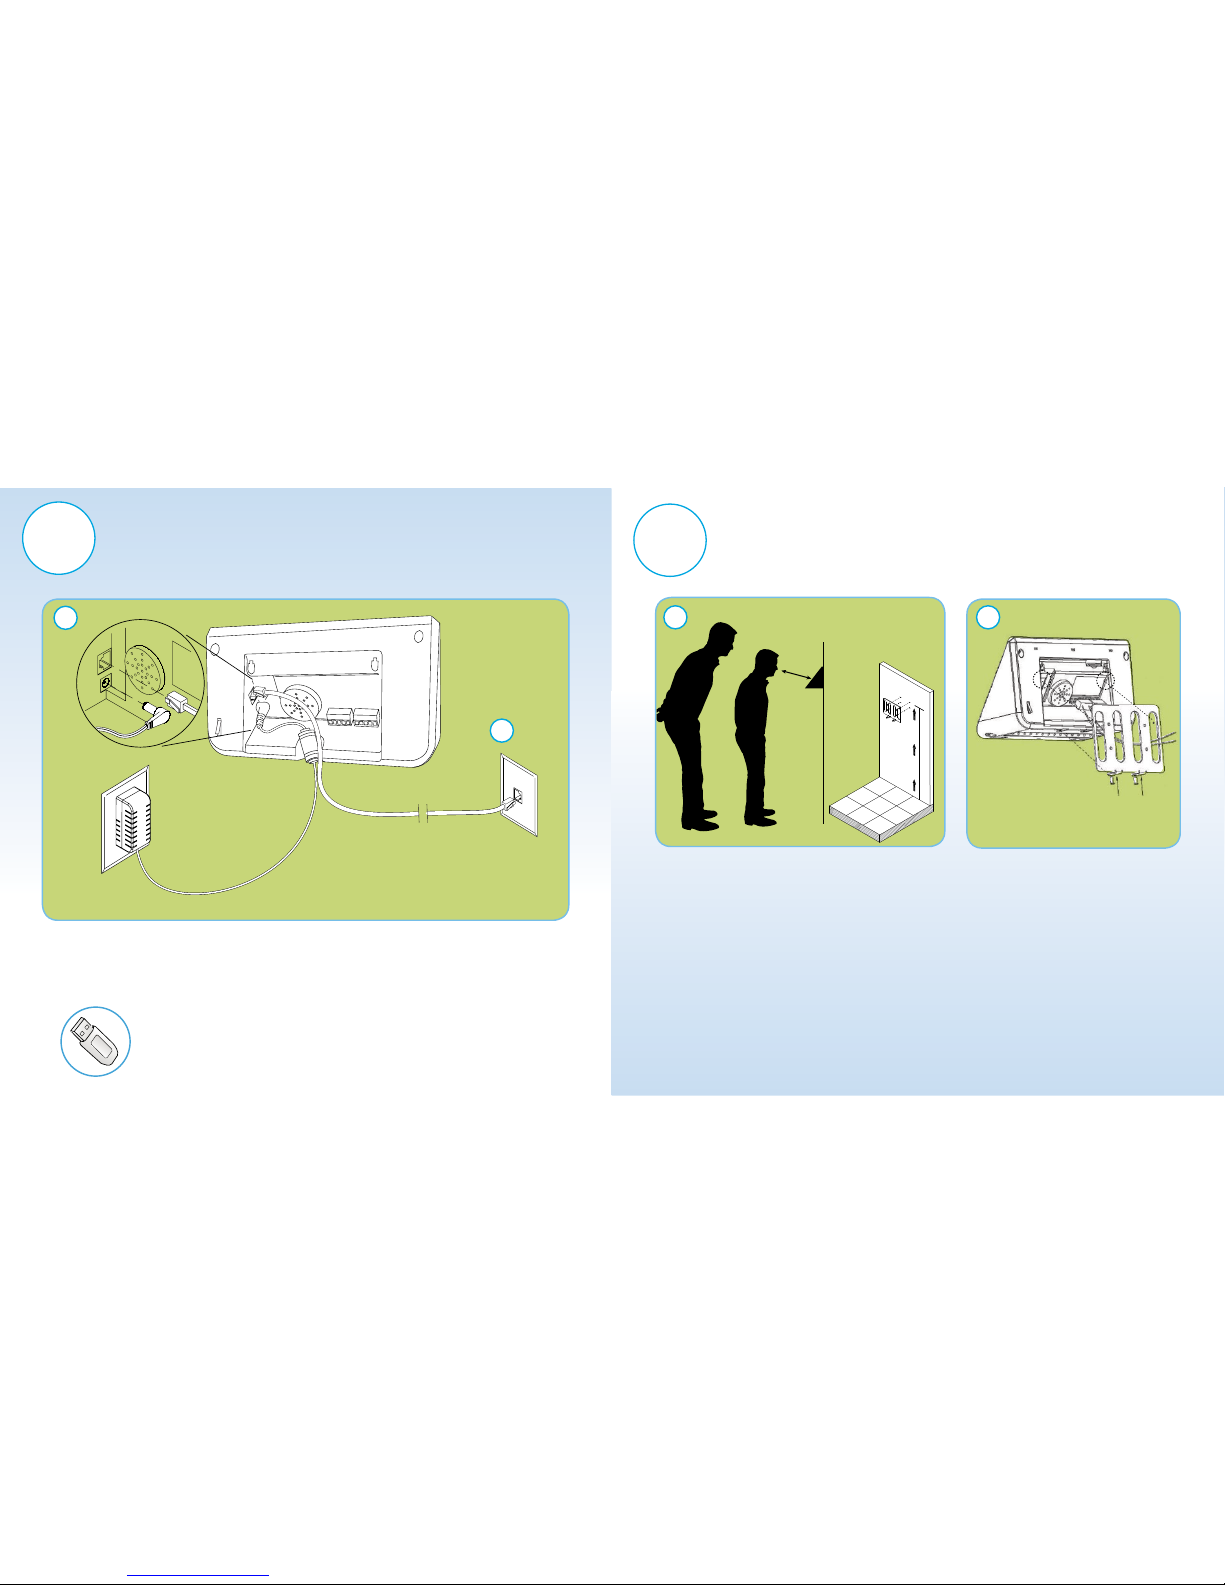
Connect Power And Ethernet
a.
Plug the RJ45 network cable into the Ethernet port and the Power Adapter plug into the
Power Adapter port which is located in the compar tment on back of the terminal.
b.
Plug the other end of the network cable into an available network jack or switch.
No Ethernet? Transfer data back and for th between this unit and the software
using a standard USB thumb drive, eliminating the need for an Ethernet
connection. See Appe ndix A in the User’s Guide for instructions.
b
a
Plug this end of the ethe rnet
cable into an available network jack
or switch.
The power cord is 5 ft .
long so take that into
consideration bef ore
mounting.
3
Mount On Wall
Align the FaceIN terminal with the pins
on the mounting-plate and secure the two
together with the 2 Phillips head screws.
Be careful not to pinch the AC cord.
When fi nished, plug the Power
Adapter into an AC wall outlet.
Mount the FaceIN terminal by choosing your
“shortest” employee and have them stand in
front of the device. Hold the device on the
wall so that this employee can comfort ably
center their face in the LCD display window.
Mark the height of the terminal on the wall.
NOTE: taller employees can easily adjust their
stance to center their face in the LCD display
window. For detailed wall mounting
instructions please refer to the User’s Guide.
b
a
Use the 2 Terminal Bracket Screws
on the bottom of the t erminal bracket.
Use the 4 Wall Mount
Screws to mount the
bracket to the wall.
Page 3
a.
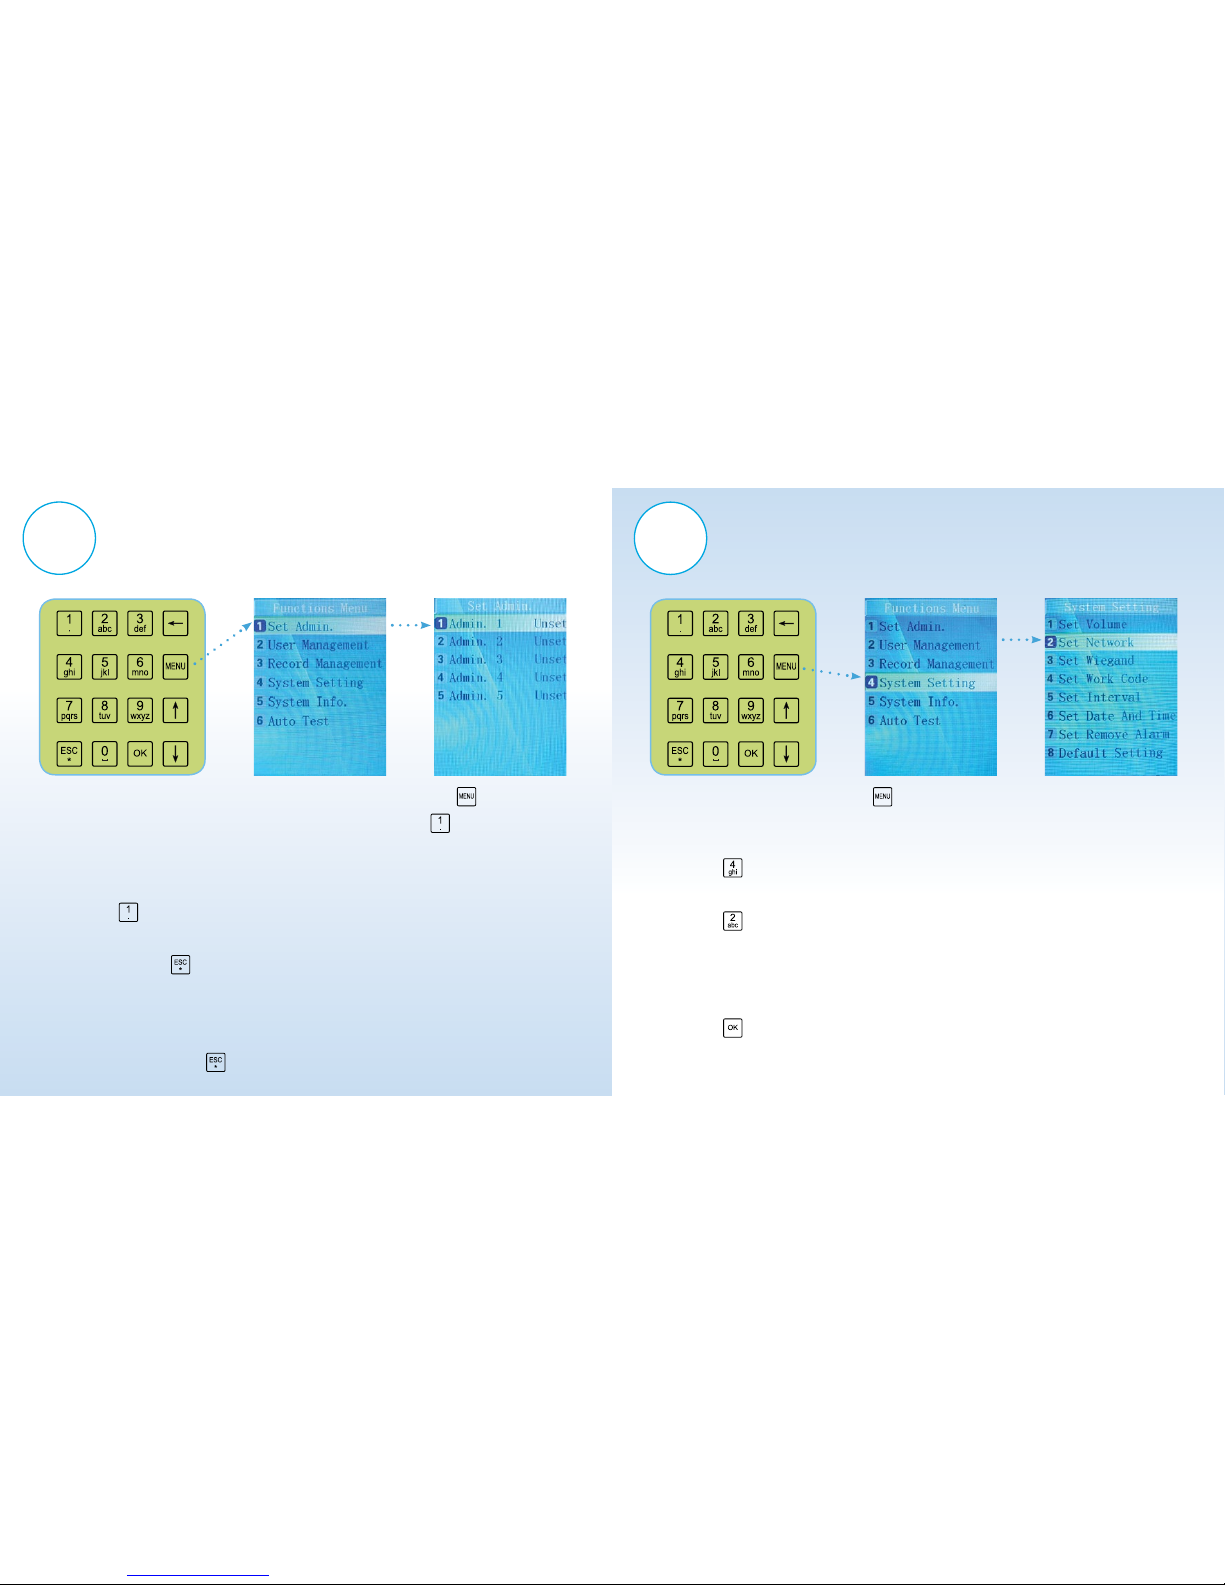
When the FaceIN terminal is powered up and at the home screen, press the
key.
b.
After pressing the MENU key, the Functions Menu will open. Press the
key on the keypad
to start the Admin Enrollment process.
c.
You will be prompted to enroll your face as the Administrator of the device. Plea se review
Face Enrollment Tips section (on the back) of this g uide.
d.
Press the
key on the keypad to select Admin 1 and b egin the Face Enrollment process.
e.
When Face Enrollment is complete, the display will ask you if you want to set the Administrator
as a User. Press the
key on the keypad to bypass this setting.
f.
A successful registration confi rmation screen will appear, and after 2 seconds, it will default to
the Set Admin scre en.
g.
Enter additional Administrators as necessar y at this time by repeating the steps above.
h.
When complete, press th e
key multiple times to return to the main default screen.
4
Enroll An Administrator
NOTE: An Administrator is required to enroll employees or change device settings.
You can enroll up to fi ve (5) Administrators. Use keypad to navigate through screens.
a.
From the main home screen, press t he
key. The Administrator must present their face
for verifi cation.
b.
The main Functions Menu screen will appear.
c.
Press the
key on the keypad.
d.
The System Setting Menu screen will appear.
e.
Press the
key on the keypad to access the Set Network Menu.
f.
Using the keypad, enter the network confi guration settings provided by your Network Administrator.
Record the set tings for future reference. Note: If your computer is not connected to a Local Area
Network , and is operating as a stand alone terminal, you should enter an IP address of 192.168.0.1
or 192.168.0.2, and leave the Subnet Mask and Gateway set tings blank.
g.
Press the
key to save your settings.
h.
After successfully saving your net work confi guration settings the terminal will automatically restart.
5
Confi gure Network Settings
After you have successfully enrolled the Administrator, you will have access to the
device confi guration settings.
Page 4
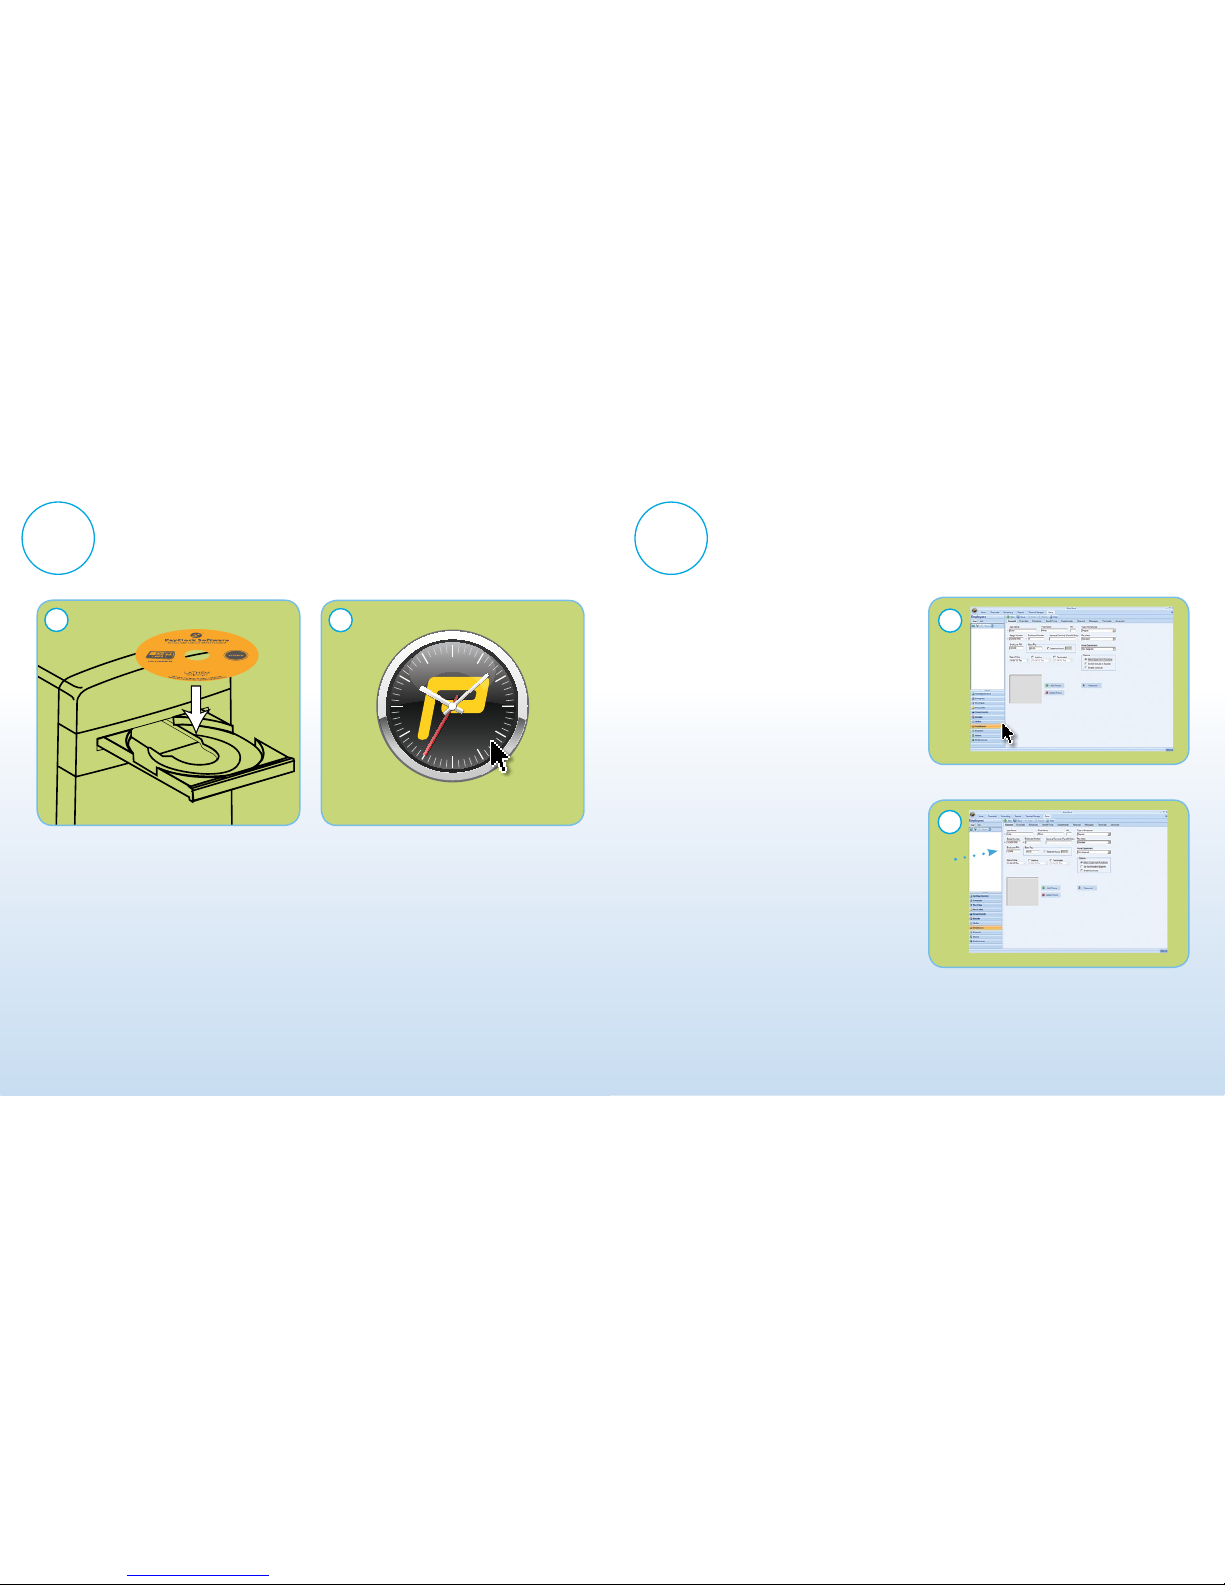
The default password is lathem
a.
Important - Make sure your screen saver is not
showing before inserting the installation CD’s.
Install the PayClock Sof tware. (For more
detailed instructions see the User’s Guide).
b.
Open PayClock - Ope n the Pay Clock software
by clicking on the PayClock Icon. The default
password is lathem. (For more detailed
instructions see the User ’s Guide.)
Install Software
Go to the computer where you want to install the PayClock Sof tware.
See User’s Guide for detailed instructions.
6
a
b
a.
Add Employees - The Employe e button
under the Setup Tab is used to maintain
the employees in the PayClock sof tware.
This will include adding, editing and
terminating employees. (For more
detailed instructions see User’s Guide).
b.
Employee PIN The PIN you enter in the PayClock
software mus t match the User No. at the
FaceIN terminal. The software uses these
numbers to identify which punches go with
which employee.
Record the PIN you enter for each employee
for use when enrolling employee faces in the
terminal, as shown in Step 9.
Add Employees In Software
The screens below indicate a few key steps in adding an employee.
(For more detailed instructions see the User’s Guide).
7
a
b
Page 5
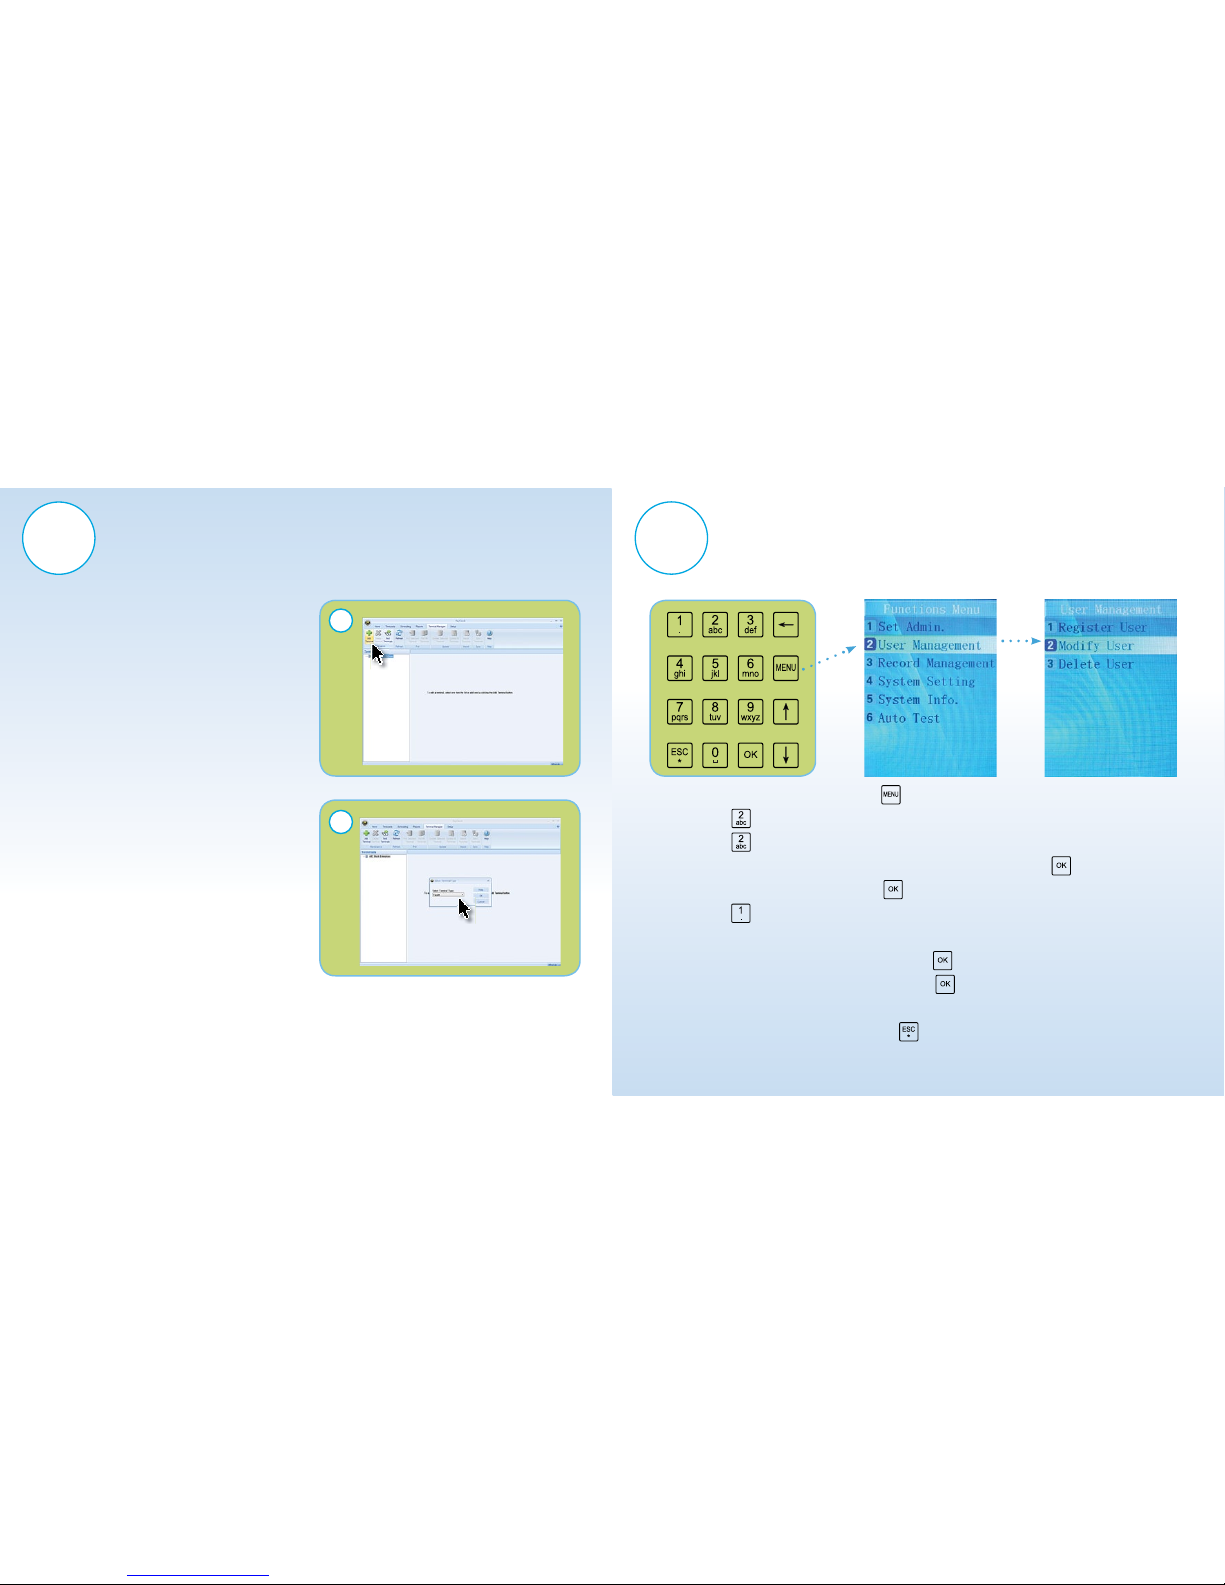
Setup Software Connection
The screens below indicate the fi rst few key steps in setting up your software
connection. (For more detailed instructions see the User’s Guide).
8
a
b
a.
Open your PayClock Soft ware on your computer.
Click on the “Terminal Manag er” tab.
Then click on the “Add Terminal” button located
in the top left corner of the screen.
b.
Select “FaceIN “ and click OK to continue.
c.
Type in the name or location identifi er that you
want to use to identify the FaceIN terminal
in the text box next to Device Nickname.
d.
In the IP Address box enter the IP Address you
entered into the terminal and then click Save.
e.
Click the “Test Connection” button to verify the
communications between the PayClock software
and the terminal. A confi rmation screen
will pop up, click OK to continue.
f.
Select the “Se ttings Tab” and click the “Set”
button to send the time / date to the terminal.
g.
Click on the “Update S elected Terminal”
button on the Ribbon Bar. This will send your
employee data to the device.
9
Enroll Employee Faces
Once you have successfully updated the FaceIN Terminal with your employees,
you can begin enrolling employee faces.
a.
From the main home screen, press t he
key. The Administrator must present their face.
b.
Press the
key on the keypad to access the User Management Menu.
c.
Press the
key on the keypad to Modify User.
d.
Enter the PIN Number of the employee you want to enroll and pr ess the
key.
e.
Their name will be displayed, pre ss the
key.
f.
Press the
key to select Face as the verify method.
g.
Enroll the em ployees face using the Face Enrollme nt Tips provided.
h.
When “Permit Open Door” is displayed press the
key. (This Step is for FR70 0 Ter minals only)
i.
When “Permit Attendance” is displayed pr ess the
key.
j.
Complete these steps until all employees are enrolled.
k.
Once all employees are enrolled pr ess the
key multiple times to return to the
home screen and begin clocking employees In.
Page 6
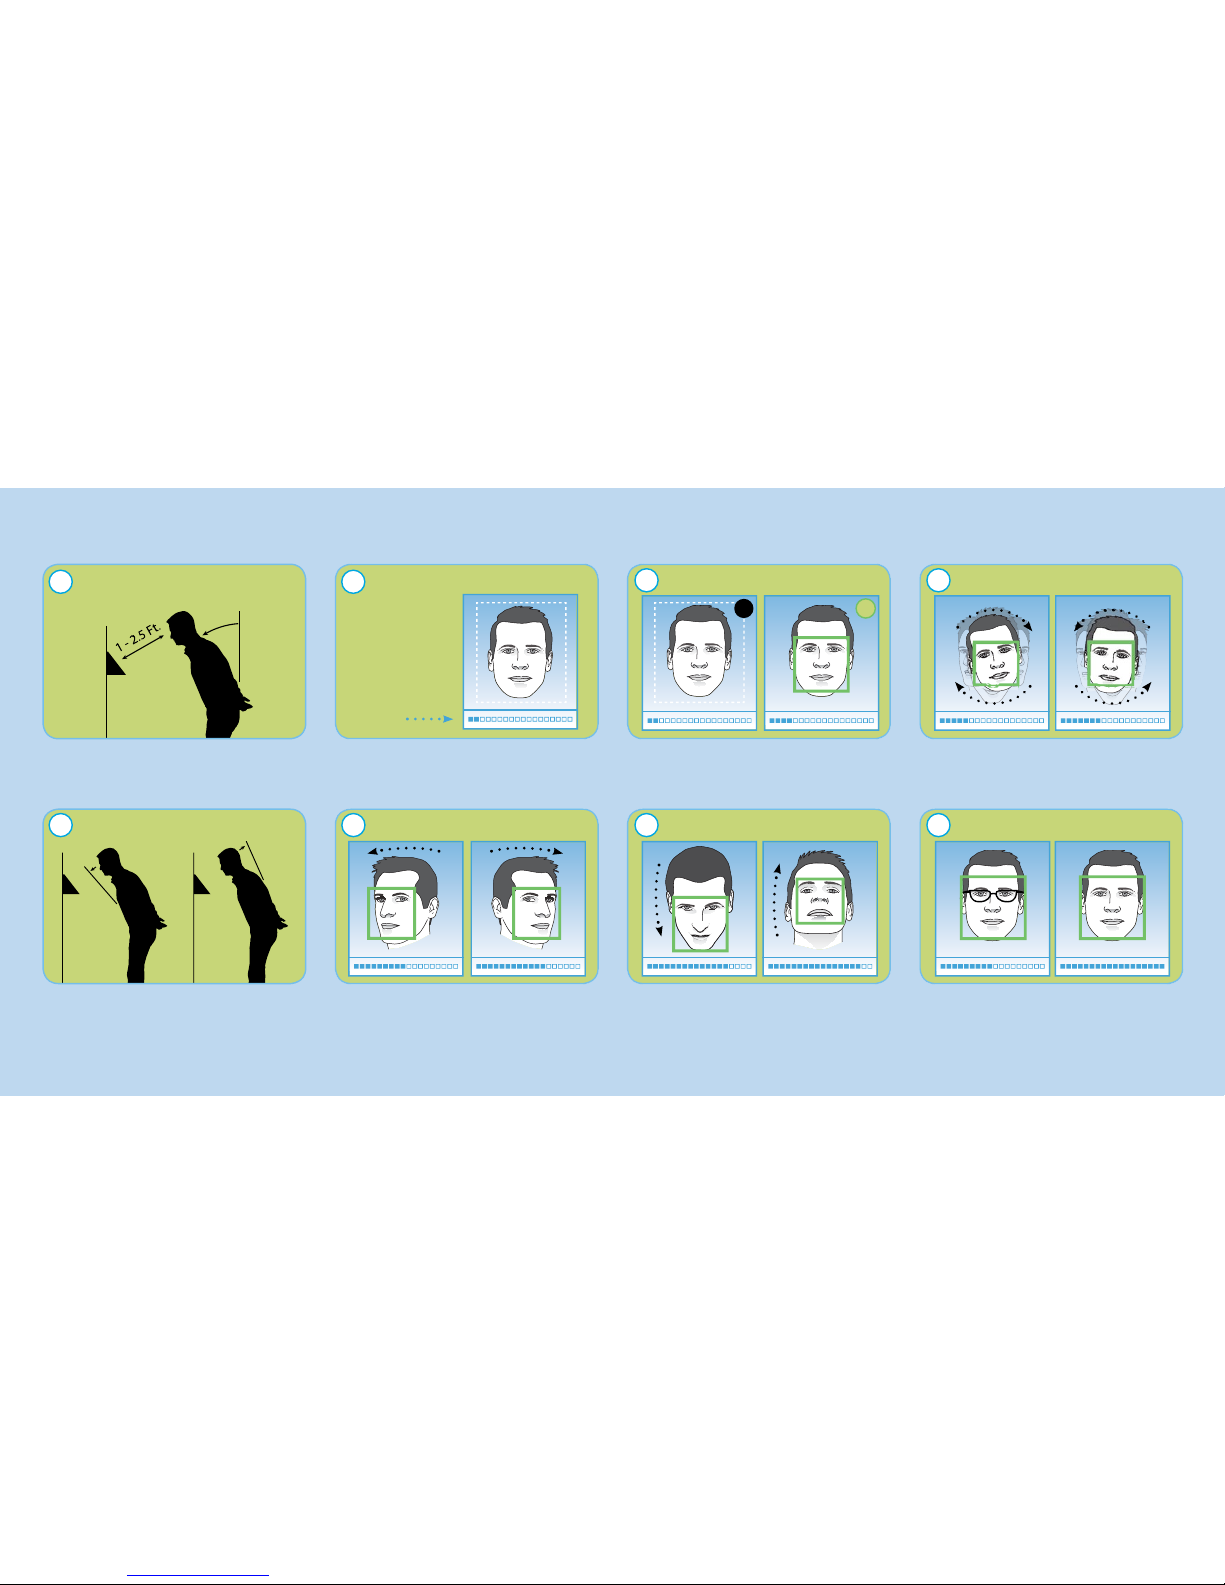
Position yourself and bend at the waist to
bring your face 1- 2.5 ft. fro m the screen on
the terminal.
Slowly move your face closer until white- dashed
frame appears and then move away until
white-dashed frame appears.
The line of squares at the bottom of the screen
indicate how much data is needed to complete
enrollment.
The progress bar
shows status of
enrollment.
Adjust Your Action
Slowly Right
Half with Glasses Half without Glass es
Good!
Slowly Left
Slowly turn your head fully to the right, and then
fully to the left, all while keeping your eyes
centered on the screen.
The white dashed box is preparing to lo cate
points. Identifi cation images will only be taken
when the green box appears around your face.
Tilt head down slightly (chin lowered) while
keeping your eyes on the screen, then tilt head
back slightly (chin upward).
Slowly make an imaginary circle with your nose.
Two small circles to the right and two to the left
while keeping eyes centered on the screen.
If you wear glasses all of the time, or on occasion, you
must initially enrol l with your glasses on (sunglasses or
dark tinted glasses are not allowed). Once the progress
bar indicates enrollme nt is 50% complete, REMOVE
YOUR GLASSES and complete the enrollment without
your glasses on.
Face Enrollment Tips Keep your eyes centered on the screen at all times during enrollment. Tr y to keep a solid green box around your face by following steps below.
e
f
c
b
a
g
d
h
Position
Adjust Distance
Progress Bar
Adjust Profi le Adjust Chin Height
Small Circles
Wear Glasses?
✔
✖
USG0111 Rev A
 Loading...