

Page 1
Pico rigging manual 2007.doc Page 1 of 28
Page 2

Pico Rigging Instructions
The Pico rigging instructions are a guide to rigging your boat. Due to production supplies
certain parts may be slightly modified from those shown. This instruction manual is not a
guide to sailing your craft and it should not be considered suitable for the task of learning
to sail a boat.
Laser Centre
Options, accessories and spares are available from Laser Direct +44 (0)1327 841610
www.lasersailing.com
The Laser Centre
Station Works
Long Buckby
Northampton
NN6 7PF
UK
Contents
1. Glossary
2. Safety Afloat
3. Maintenance
4. Rigging the boat – Standard and Sport
4.1. Unpacking your Pico
4.2. Unpacking Pico Sport pack
4.3. Checking the hull
4.4. Rigging the mast and sail
4.5. Raising the mast
4.6. Rigging the boom
4.7. Rigging the kicker
4.8. Rigging the mainsheet and traveller
4.9. Attaching Sport Toe straps and mainsheet block
4.10. Fitting the Rudder assembly
4.11. Fitting the Centreboard
4.12. Reefing your Pico
4.13. Attaching the Jib
4.14. Stowing your Sail
5. Positioning Sail numbers – Standard and Sport
Pico rigging manual 2007.doc Page 2 of 28
Page 3

Pico rigging manual 2007.doc Page 3 of 28
Page 4
Pico rigging manual 2007.doc Page 4 of 28
Page 5

Rigging your Pico
4.
Your Pico comes in the following main component parts:-
40001 Pico Standard Vela Grey 07 or 40003 Pico Standard Yellow 07
40010 Pico fitted hull vela grey or 40011 Pico hull fitted Yellow
40030 Pico sail kit standard Blue/White – Blue white Dacron mainsail and Jib
40060 Pico mast assembly 2007 – Upper and lower mast and boom
40100 Pico rudder and centreboard kit – Rudder assembly, tiller extension and rope pack
with blocks.
40200 Pico Documentation pack – Owners manual , sail numbers, Rigging manual, CE
certificate.
40002 Pico Sport Vela Grey 07 or 40004 Pico Sport Yellow 07
40010 Pico fitted hull vela grey or 40011 Pico hull fitted Yellow
40040 Pico Sport sail kit 2007 – Mylar mainsail c/w battens and black/white jib.
40060 Pico mast assembly 2007 - Upper and lower mast and boom
40101 Pico Sport rudder and centreboard kit - Rudder assembly, carbon tiller extension,
padded toe straps and rope pack with blocks.
40120 Pico Sport XD pack – Harken Vang assembly, mainsheet block and “stand-up”
boot.
40200 Pico Documentation pack – Owners manual , sail numbers, Rigging manual, CE
certificate.
Pico rigging manual 2007.doc Page 5 of 28
Page 6
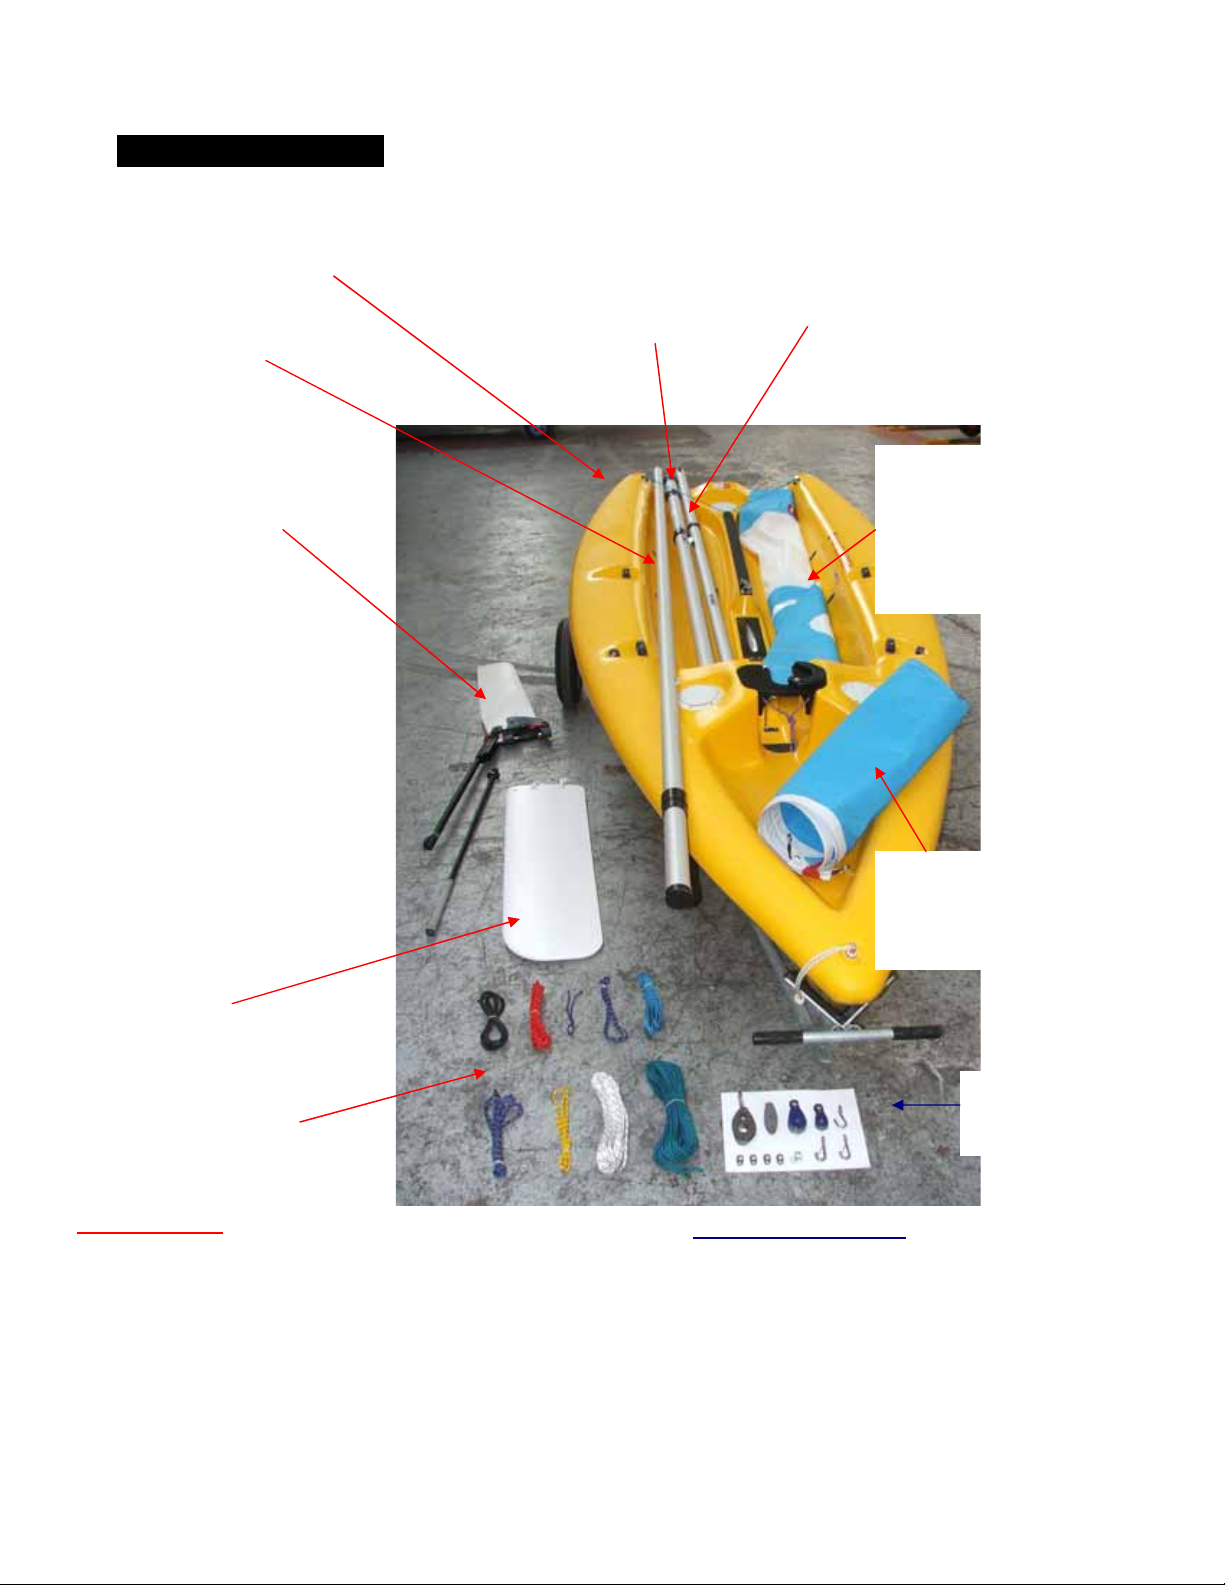
4.1 Unpack your Pico
Unpack Pico and check that you have all the components.
40010/40011 Pico hull
1301 Pico upper
mast
1821 Pico Rudder
assembly
1831 Pico Lower
mast
1836 Pico Boom
1840RB Pico mainsail
Blue/White.
1845 Pico mainsail Black
Mylar
1841RB Pico jib Blue.
1820 Pico
Centreboard
1851 Pico rope
pack- Standard
1851 Pico Sport
rope pack
Pico Rope Pack.
1. Centre board and clew outhaul
shockcord.
2. Vang/kicking strap rope
3. Clew tie down
4. Traveller
5. Jib Halyard
6. Clew outhaul
7. Cunningham
8. Jib sheet
9. Mainsheet.
1
6
23
45
789
1841BW Pico jib
black/white
162
354
Pico blocks
and fittings
7
Pico Blocks and fittings
1. 1938 Kicking strap lower block inc. hook.
X1
2. 1364 Upper kicking strap block. X1
3. 3501P Single mainsheet block inc. clip X1
4. 3502P Traveller block inc. clip
5. D92058 Twisted hook for clew outhaul. X1
6. D40028 Engle field clips X4.
7. 2136 Rigging link X1
8. 1823 Hook Pico for jib tack X1
Pico rigging manual 2007.doc Page 6 of 28
Page 7
4.2 Pico Sport Pack
40120 Pico Sport XD pack- Replaces Standard kicking strap and mainsheet block.
40126 Sport
Vang/Kicking
Strap
40125 Sport
mainsheet
boot
40124 Carbo
ratchet block
Pico Sport padded toestraps
1871 Padded side toe strap x3
1872 Padded centre toe strap
40040 Pico Sport sail kit with Mylar mainsail and Black & white Jib replaces
standard blue sails
40101 Pico Sport rudder assembly has a carbon tiller extension that replaces the
aluminium extension on the standard boat.
1851S Pico rope pack Sport with black/red lines replaces the standard rope pack.
Pico rigging manual 2007.doc Page 7 of 28
Page 8
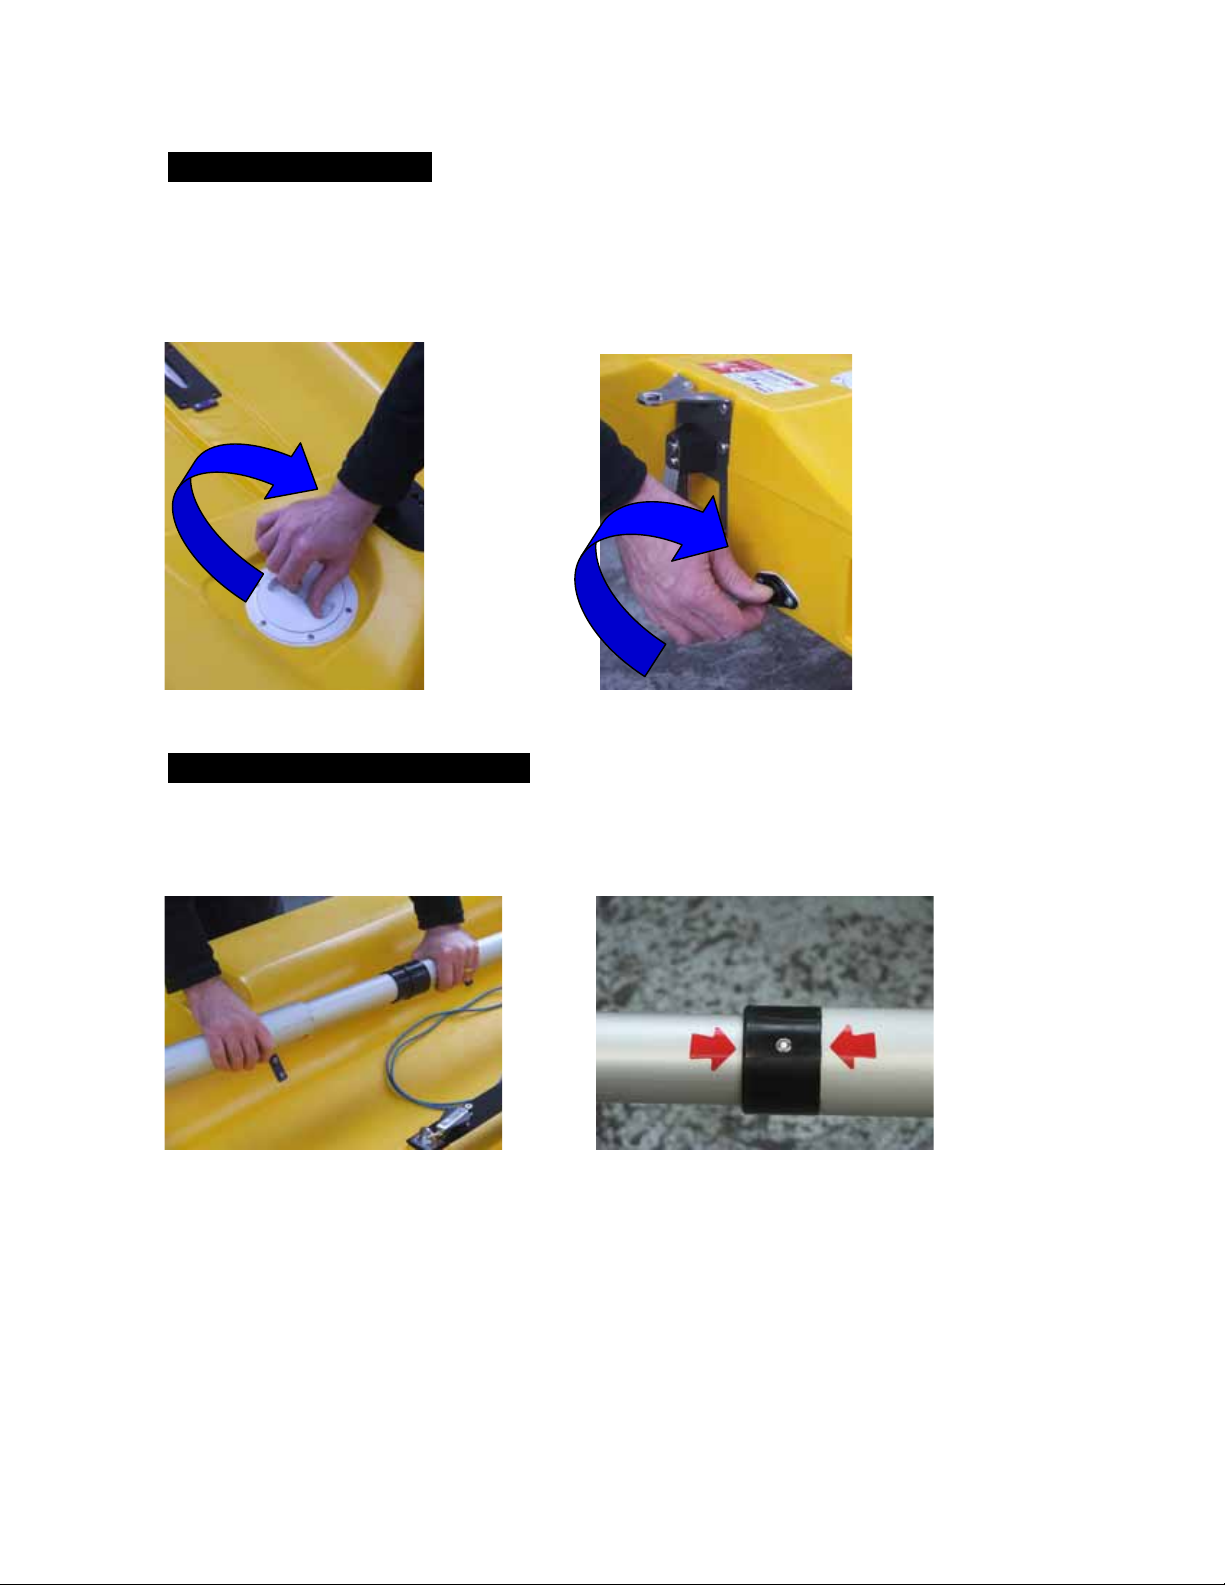
4.3 Checking the hull
Check that the 3 hatches and transom drain bung are fully screwed into the hull. It
is advisable to apply a small amount of Vaseline or other non-staining lubricant to
the threads on a regular basis.
4.4 Rigging the Mast and sail
1) Insert the upper mast into the lower mast, making sure that the red arrows align.
Pico rigging manual 2007.doc Page 8 of 28
Page 9
2) Thread the jib halyard through the Halyard plate eye on the upper mast. Take
one end of the halyard and pass it through the halyard cleat on the port side of the
lower mast and tie the 2 free ends together.
3) Unfold the mainsail (try to keep it clean and dry) and sleeve it over the top of the
mast and jib halyard, making sure that the mast stays together. Slide the sail down
over the mast, with the Cunningham D-ring on the sail facing forward in line with
the cleat at the centre and bottom of the mast.
Sport Mainsail
With the Sport mainsail insert the 3 battens into the batten pockets and ensure that
the end of the batten engages into the fold in the outer end of the pocket.
Pico rigging manual 2007.doc Page 9 of 28
Page 10

4) Untie the ends of the jib halyard and tie a figure of eight knot in the part that
goes through the cleat. Pull the non-cleated rope end out from under the sail at the
halyard exit point in the sail. Rethread the jib halyard throw the eye and back
down outside the sail. Tie the free end of the halyard to the end that has passed
through the cleat.
5) From your rope kit, find the rope marked Cunningham. Tie a bowline loop onto
the sail D-ring, thread around the cleat bridge, back up to the D-ring and down to
the cleat. Tie a bowline loop in the end of the rope and add a small amount of
tension.
Pico rigging manual 2007.doc Page 10 of 28
Page 11

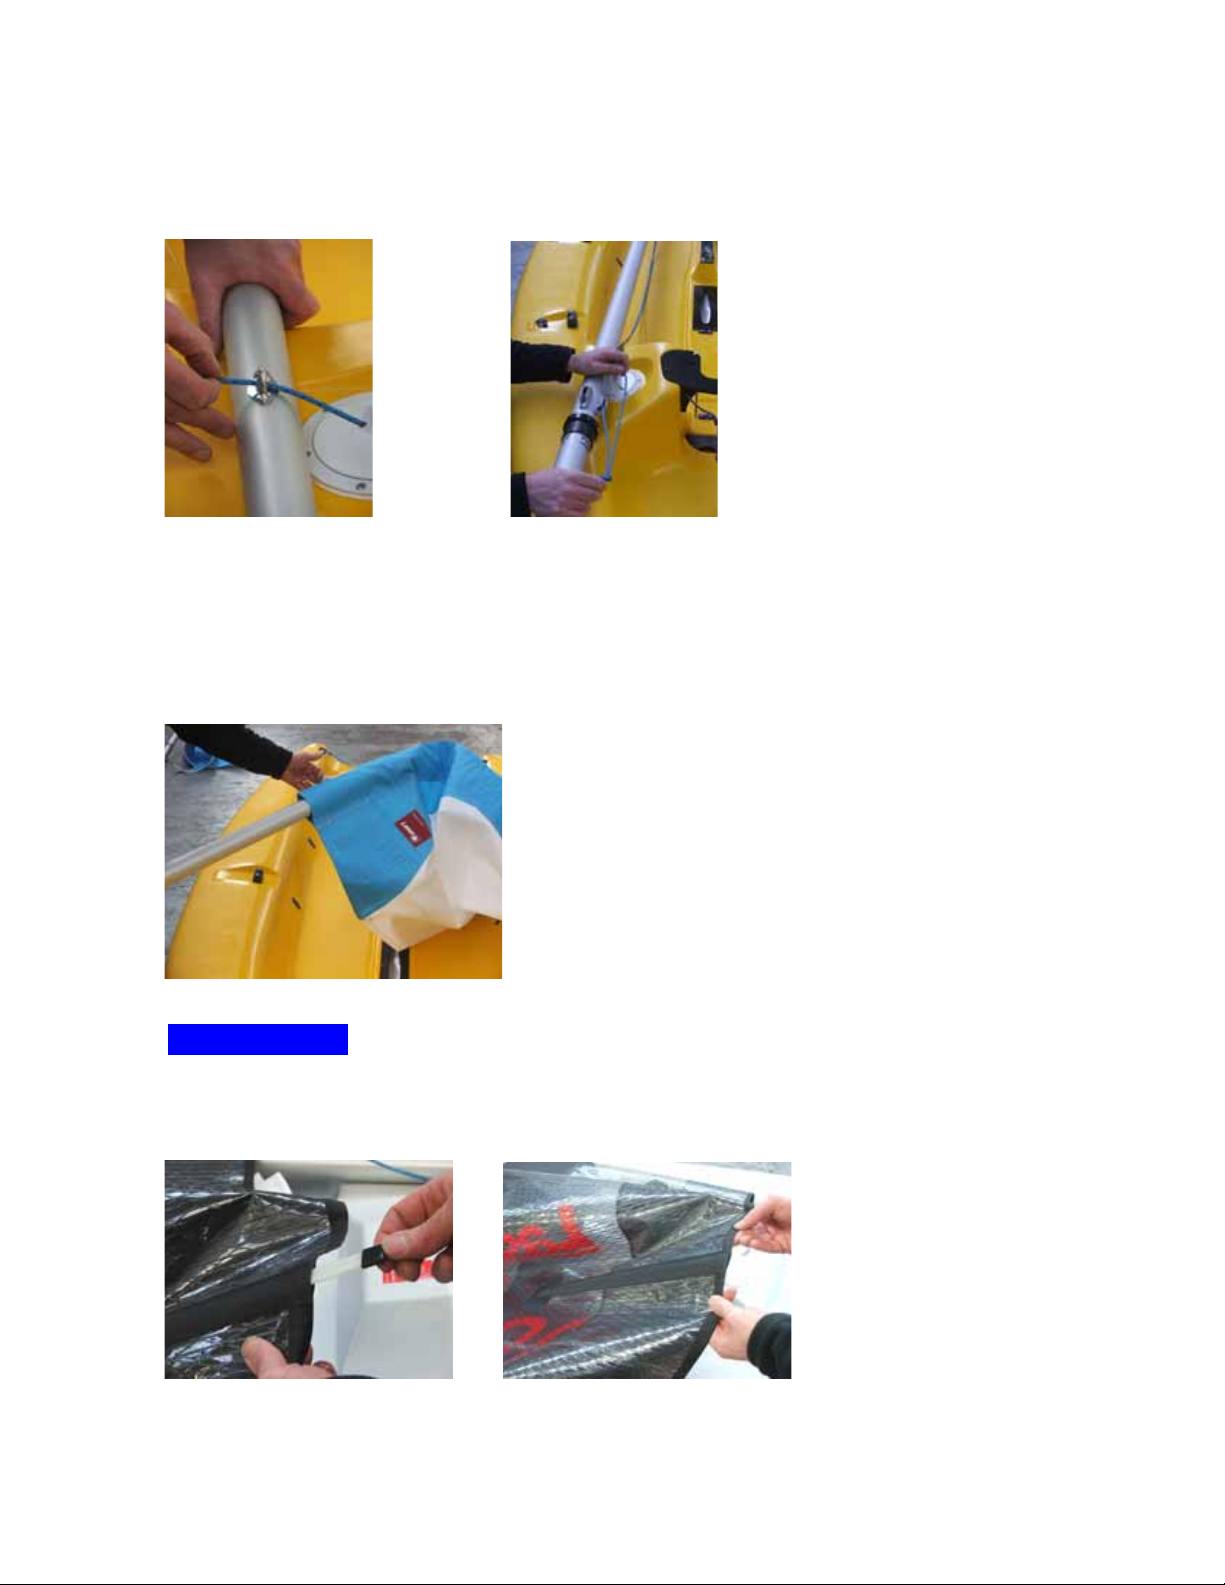
4.5 Raising the Mast
1) With the boat turned into the wind, remove the mast gate pin and open the mast
gate. Lift mast into the boat, dropping the bottom of the mast into the mast step.
Raise the mast into an upright position and the mast gate will close.
Warning: do not let go of the mast at this stage or it may fall backwards.
2) Insert the mast gate pin into the mast gate claw. Remember to move the sliding
tang to 90 degrees to lock the pin in position.
4.6 Rigging the boom
1) Clip the boom onto the mast above the black collar. This will require a firm
push.
Note:- In windy or bad weather the boom can be rigged before raising the mast and without clipping
it onto the mast.
Pico rigging manual 2007.doc Page 11 of 28
Page 12

2) At the back of the boom, use a small reef knot to tie on the clew hook with the
clew tie down rope.
3) Tie the clew outhaul line to the small fairlead on the outboard end of the boom.
With a bowline loop, then run through the eye of the clew hook, back round the
fairlead and up to the cleat on the boom.
4) Take the tail end of the clew outhaul line and pass it through the front fairlead
mounted on the boom. Thread through the small englefield clip and tie off with a
figure of eight knot.
Pico rigging manual 2007.doc Page 12 of 28
Page 13

5) At the outer end take the long piece of shockcord, pass it through the eye of the
hook and tie a large knot or bowline.
6) At the other end pass through another small englefield clip and tie a figure of
eight knot in the end. Now clip the two clips together. This is the tidy up line for
your clew outhaul.
Pico rigging manual 2007.doc Page 13 of 28
Page 14

7) Now take the sail and with the boat pointing into the wind, locate the clew hook
into the eyelet on the corner of the sail. Tension the clew out haul and secure in
the cleat on the boom.
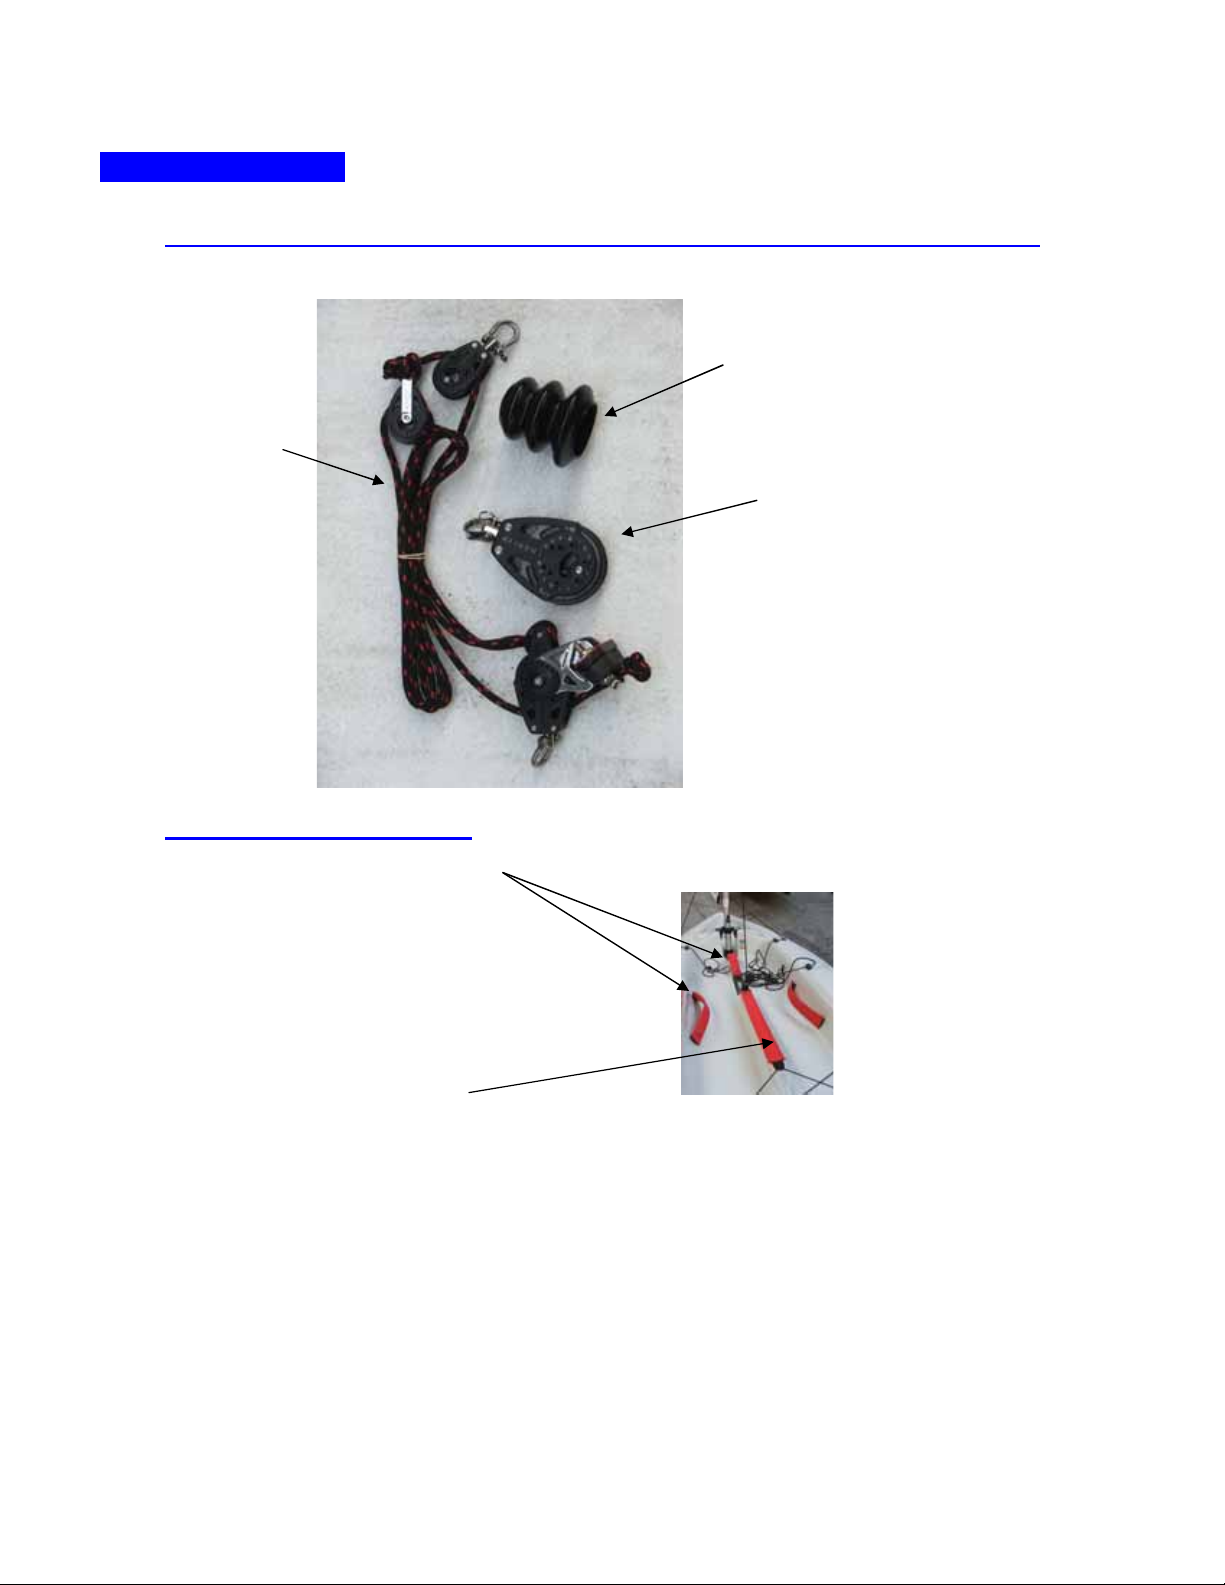
4.7 Rigging the Kicker
1) Take the large kicker block with the snap hook and clip it to the plate on the
mast, just above the mast gate.
2) Take the small kicker block and fit it to the plate on the boom (near the front
end), using the small pin and ring.
Pico rigging manual 2007.doc Page 14 of 28
Page 15

3) Tie one end of the kicking strap line to the Becket on the small block and thread
the line as shown in the photograph.
1
3
2
4
Sport
Pico rigging manual 2007.doc Page 15 of 28
Page 16

Sport Kicking strap/Vang
If you have purchased the Pico Sport then attach the complete assembly to the
plate with the shackle on the block that has the cleat and the other end to the plate
on the boom .
Sport kicker block
attached to boom
Sport kicker block with
cleat attached to lower
Sport kicking strap attached to mast
and boom.
Pico rigging manual 2007.doc Page 16 of 28
Page 17

The angle of the cleat should be adjusted to a “fully up” position. This can be
changed by unscrewing the centre screw and re-assembling to the preferred angle.
4.8 Rigging the mainsheet and traveller
1) Attach the traveller system. Take the traveller line, tie a knot in one end, pass it
through the small traveller block and the fairlead on the opposite side. Tie a knot
in the end of the rope.
Pico rigging manual 2007.doc Page 17 of 28
Page 18

2) Join the large traveller block to the small block on the traveller with the
englefield clips. Take the mainsheet. Starting at the back of the boom, you will
find a block with a Becket at the bottom. Pass the end of the mainsheet through
the back end of the block and tie a figure of eight knot (Photo 1). Then thread the
mainsheet down to the large traveller block and thread bow to stern (Photo 2).
Back up to the boom end block and along to the webbing loop. Pass the
mainsheet through the loop, along to the middle block and down to the ratchet
block in the middle of the boat (Photo 3) Ensure that the rope goes through the
block in the same direction as indicated by the arrow on the side of the block
(Photo 4). Tie a figure of eight knot in the end of the mainsheet (Photo 5).
1
2
3
5
4
Pico rigging manual 2007.doc Page 18 of 28
Page 19

4.9 Fitting Sport Toe straps and mainsheet block and “Stand up” Boot
Centre Toe strap
Remove standard ratchet block and unscrew the mainsheet block attachment
plate. Remove the standard toe strap and replace with the padded Sport strap.
Before re-screwing the mainsheet plate and toe strap apply silicone sealant to the
screw holes. This is to avoid potential leaking.
Warning:
“Finger tight”. Over-tightening can strip the thread in the plastic.
Sport “stand-up” mainsheet Block boot
1) Place the mainsheet block stand up boot over the mainsheet block attachment
point.
2) Remove the shackle from the base of the sport mainsheet block and shackle to
the mainsheet attachment point. To get access to the attachment point you will
have to compress the mainsheet boot.
Please take care not to over-tighten the screws. Screws should be
3) Thread the mainsheet through the ratchet block and tie a figure of eight knot.
You will find a small black slide on the side of the ratchet block. This turns the
ratchet on and off. Ensure that the ratchet “Click-clicks” when the mainsheet is
pulled out to the cleats.
Pico rigging manual 2007.doc Page 19 of 28
Page 20

Sport Padded side and front Toe straps.
1) Unscrew plastic toe strap plates on the insides and in front of the centreboard
case.
2) Secure toe straps. Before re-screwing the toe straps apply silicone sealant to
the screw holes. This is to avoid potential leaking.
Warning:
“Finger tight”. Over-tightening can strip the thread in the plastic.
Please take care not to over-tighten the screws. Screws should be
Pico rigging manual 2007.doc Page 20 of 28
Page 21

4.10 Fitting the rudder Assembly
Fit the ruder assembly on the transom rudder fitting.
Warning: The split ring must be used secure the rudder assembly to prevent it
from falling off during a capsize. Also, the rudder retaining clip should be adjusted
so that the stock cannot be removed without depressing the clip by hand.
Split ring
Rudder
retaining clip
Sept 2007
Sept 2007
Slide the tiller extension universal joint into the housing on the end of the tiller.
Secure the captive over plate on top to the universal joint housing.
Pico rigging manual 2007.doc Page 21 of 28
Page 22

Operating instructions for Pico rudder assembly Sept 2007
The rudder assembly has a kick – up system so that if you run aground, the rudder
will come up automatically. This can be adjusted by re-positioning the plastic
buffer under the tiller. When the rudder blade is fully down the tiller should locate
over the capstone on the stock. If the rudder blade can be moved backwards from
the tip more than 3.0mm then the plastic buffer under the tiller should be moved
forward to remove the slack. The buffer is adjusted by loosening the Allen screws
with the Allen key provided, moving the buffer and re-tightening the screws.
To put tiller down
• To put the rudder down; lift the tiller 2cm and simultaneously push the tiller
aft (Backwards) until the plastic buffer under the tiller engages over the
capstone.
• To lift the rudder; Lift the tiller 2 cm to disengage it from the capstone and
simultaneously pull the tiller forwards.
To lift tiller up
Pico rigging manual 2007.doc Page 22 of 28
Page 23

Warning; The kick up system is a safety feature in case you run aground
accidentally. Under normal circumstances the rudder should be lifted before
approaching the beach or slipway.
Operating instructions for Pico rudder system Sept 2007
The Pico rudder assembly has a simple downhaul system with a quick release
cleat that will release if you run aground. To lower the rudder, slacken the wing
nut, pull the down haul line until the rudder blade is fully down, position the down
haul line in the cleat and finally retighten the wing nut.
Wing nut
When launching and recovering, the rudder blade can be lifted above the transom
line and secured in position by lifting the blade by hand and tightening the wing
nut.
4.11 Fitting the Centreboard
Take the centreboard. Thread the centreboard shock cord through the small hole
in the top front corner of the centreboard. Put the 2 remaining small englefield
clips on either end of the shockcord and secure each end with a knot. When you
put the board into its slot, you can then loop the shockcord retaining line round
the base of the mast and clip it together.
Pico rigging manual 2007.doc Page 23 of 28
Page 24

4.12 Reefing your Pico
In strong winds, or if you are unsure whether you can cope with the conditions, it
is always best to reef the sail down to reduce its area.
1) Drop the jib if fitted (see section 4.13) and stow the jib Halyard rope tails in the
pocket by the tack of the mainsail. Your Pico cannot be sailed reefed with the jib
up.
2) Slacken the kicking strap and unclip the large kicker block from the lower mast.
3) Uncleat and slacken the clew outhaul line and ensure that the foot of the sail is
loose.
4) Rotate the mast in either direction by turning the mast below the gooseneck.
This will roll the sail around the mast, thus reducing the sail area. This is reefing.
5) Re-attach the kicking strap but leave it loose.
6) Re-attach the clew outhaul and pull it tight.
7) Re-tighten the kicking strap.
Pico rigging manual 2007.doc Page 24 of 28
Page 25

4.13 Attaching the jib
1) Attach the hook for the jib to the tack of the jib with the rigging link and clip onto
the eye bolt on the bow.
1
2) Tie the jib halyard to the top of the jib with a bow line.
3) Hoist the jib and cleat the halyard securely in the cleat. Then stow the free end
of the halyard in the pocket on the tack of the mainsail.
2
34
Pico rigging manual 2007.doc Page 25 of 28
Page 26

4) Tie the jib sheet onto the jib clew by taking the jib sheet in the centre and
passing the loop through the clew cringle. Pass the two free ends through the
loop and pull tight. Ensure that the two rope ends are the same length.
5) Thread the ends of the jib sheets through the fairleads and tie a figure of eight
knot in each end.
4.14 Stowing your mainsail
After sailing, the mainsail can be temporarily stowed by wrapping the sail around
the mast. If your Pico is not being used the sail should be stowed dry and clean in
its sail bag.
Pico rigging manual 2007.doc Page 26 of 28
Page 27

5. Sail Number positioning – Standard sails
If you intend to race your Pico you will have to attach your sail numbers. It is advised to
apply the sail numbers in a dry, clean and wind free environment.
1. Lay the sail on a flat surface port side up.
2. The numbers on the starboard side are always higher than the port side.
3. Measure 25mm above the “P” of the Pico screen print and draw the base line
perpendicular to the leach and blue sail panel
4. Measure 70mm from the leach and draw a line parallel to the leach and
perpendicular to the base line previously drawn.
5. Position the Port sail numbers starting with the last digit squared to the base and
leach lines.
6. The remaining numbers should be square to the previous number and 60mm
apart.
Turn the sail over and mark a line on the starboard side of the sail 100mm above the port
numbers. Starting with the first digit work from the leach line position the sail numbers
60mm apart as above.
100mm
70mm
25mm
60mm
Pico rigging manual 2007.doc Page 27 of 28
Page 28

5. Sail Number positioning – Sport sails
If you intend to race your Pico you will have to attach your sail numbers. It is advised to
apply the sail numbers in a dry, clean and wind free environment.
7. Lay the sail on a flat surface starboard side up.
8. The numbers on the starboard side are always higher than the port side.
9. Measure 60mm below the middle batten and draw a line parallel to the batten
pocket. This marks the top line for the starboard sail numbers.
10. Measure 70mm from the leach and draw a line parallel to the leach and
perpendicular to the line previously drawn.
11. Position the starboard sail numbers starting with the first digit squared to the top
and leach lines.
12. The remaining numbers should be square to the previous number and 60mm
apart.
Turn the sail over and mark a line on the port side of the sail 60mm below the starboard
numbers. Starting with the last digit work from the leach line position the sail numbers
60mm apart as above.
60mm
60mm
70mm
Pico rigging manual 2007.doc Page 28 of 28
 Loading...