


QUICK USER MANUAL |
MMC-B18 |
1

QUICK USER MANUAL |
MMC-B18 |
Index
The Remote control |
|
3 |
|||||||||||
The Player Outputs |
|
4 |
|||||||||||
Connecting to TV |
|
5 |
|||||||||||
Connection to Internet |
|
6 |
|||||||||||
The Home Screen |
|
9 |
|||||||||||
The Apps Centre |
|
10 |
|||||||||||
Smart Apps |
|
11 |
|||||||||||
Settings |
|
12 |
|||||||||||
Operating Live TV |
|
14 |
|||||||||||
Feature Overview |
|
19 |
|||||||||||
FAQ |
|
20 |
|||||||||||
Specifications |
|
21 |
|||||||||||
IMPORTANT SAFETY INSTRUCTIONS AND PRECAUTIONS
-Read all instructions carefully before use.
-Retain manuals for future reference.
-Use this product only in the manner described.
-Only use a water-dampened soft-cloth to clean the surface of this product.
-The following will damage this product: any liquid such as water or moisture, extreme heat; cold; humidity, dusty or sandy environments.
-Only place this device on stable surfaces and ensure that any attached cables are secure and will not cause the device to fall.
-If charging is required, it is recommended to thoroughly charge electronic devices for the first time overnight. Subsequent charges can be as needed. During charging, or extended use, the product may become warm.
-There are no user serviceable parts in this product.
-Un-authorized attempts to dismantle or repair this product will void product warranty
-Using this device near other electronic devices may cause interference.
2

QUICK USER MANUAL
THE REMOTE CONTROL
1 |
14 |
2 |
|
3 |
|
4 |
|
5 |
15 |
6 |
|
7 |
|
8 |
|
9 |
16 |
10 |
17 |
11 |
|
12 |
|
13
18
MMC-B18
Note. Some subscription based Apps may require a WIRED mouse or keyboard for setup and operation. (This mouse is not included with this product)
1 |
|
Power On / Off |
9 |
|
Setup |
||
|
|
|
(Red button) Picture size |
|
10 |
|
Play / Pause |
|
|
|
*WHILE WATCHING TV |
|
|
||
|
|
|
|
|
|
|
|
|
2 |
|
(Green button) Channel information |
|
11 |
|
Volume Up / Down |
|
|
*WHILE WATCHING TV |
|
|
|||
|
|
|
|
|
|
|
|
|
|
|
(Blue button) Multi-function |
12 |
|
Turn Air Mouse On / Off |
|
|
|
|
(Yellow button) Multi-function |
|
|
|
|
3 |
|
Goto, Recall, Fav, Info |
13 |
|
Numeric buttons |
||
|
4 |
|
Sub-title, Sound Track, Sound Channel, |
|
14 |
|
Mute/Un-mute sound |
|
|
|
Ratio |
|
|
|
|
5 |
|
EPG, TTX, T-Shift, REC |
15 |
|
Menu |
||
6 |
|
Home |
16 |
|
Return (back a screen) |
||
7 |
|
OK |
17 |
|
Next / previous file |
||
|
8 |
|
Move up and down |
|
18 |
|
Delete / Backspace numeral |
|
|
inside menu options |
|
|
|||
|
|
|
|
|
|
|
|
3
QUICK USER MANUAL |
MMC-B18 |
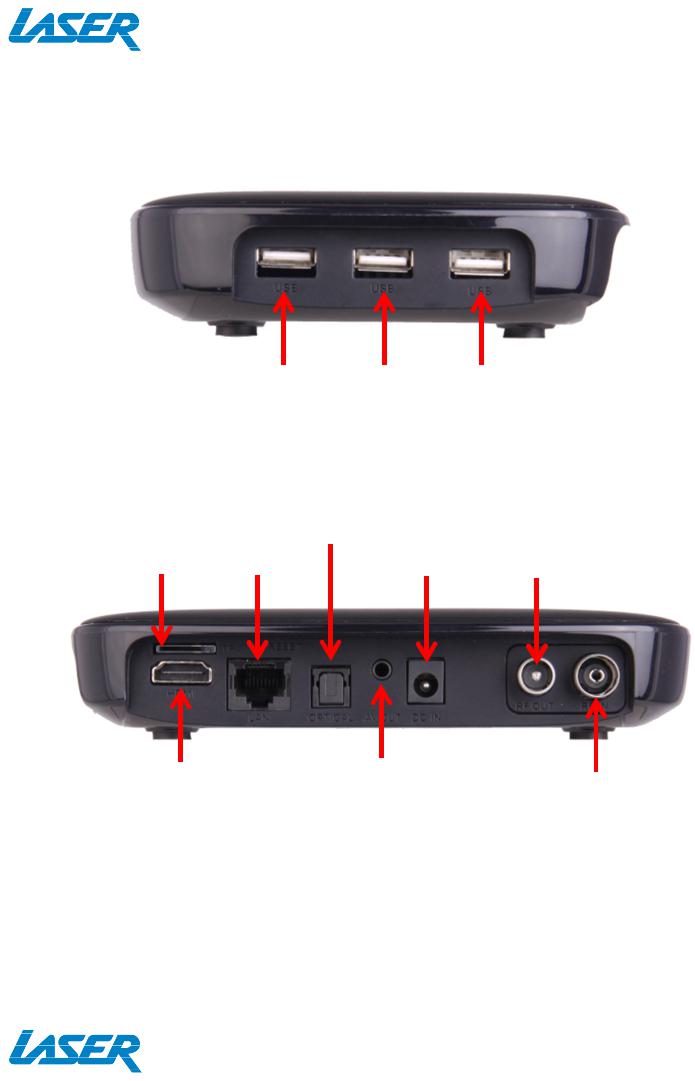
THE PLAYER OUTPUTS
SIDE PANEL
USB port (1) |
|
USB port (2) |
USB port (3) |
|
|
|
|
REAR PANEL |
Digital Audio |
|
|
RJ45 Network |
Coaxial output |
Power |
Antenna |
Ethernet port |
|
input |
Loop |
Micro SD Card slot |
|
socket |
|
|
|
|
|
HDMI Output |
AV output |
Antenna |
|
(3.5mm |
|||
|
Input |
||
|
audio jack |
||
|
|
||
|
cable to |
|
|
|
RCA) |
|
4

QUICK USER MANUAL |
MMC-B18 |
CONNECTING TO TV
GOOD – via RCA Cables
Note: RCA A/V Cable not supplied
BEST – via HDMI Cable
Note: HDMI A/V Cable not supplied
5
QUICK USER MANUAL |
MMC-B18 |
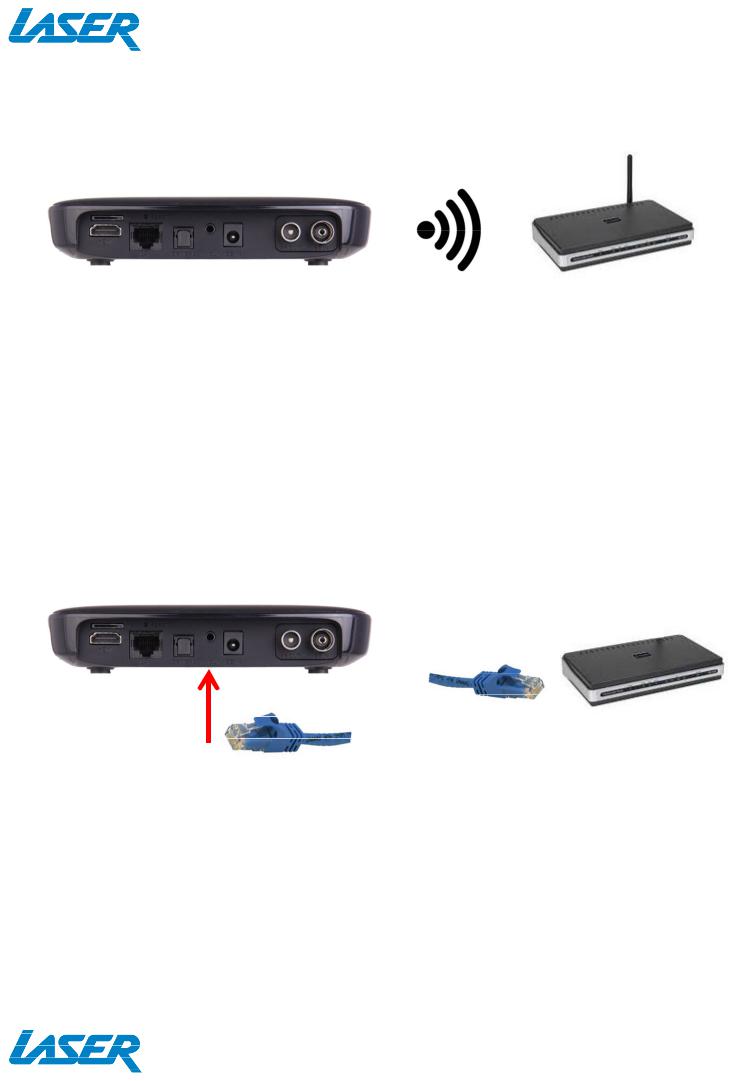
CONNECTION TO INTERNET
GOOD – Wi-Fi
WIRELESS MODEM
Note: See page 7 for Wi-Fi setup.
BEST – Direct Connection (to a Modem/Router)
Note: Network cables not supplied
Note: An Ethernet cable internet connection is recommended for streaming HD and FHD video.
6

QUICK USER MANUAL |
MMC-B18 |
Cable connection to the internet using a Modem/Router
-Connect the network cable to the Media Player and your Modem/Router.
-In most cases your Modem/Router will automatically assign network settings to your media player and display the screen below. Then click OK. If not, you may have to: -Turn on and login into your Modem/Router to ensure an IP address can be automatically assigned to your Media Player (DHCP (Dynamic Host Configuration Protocol must be enabled)
-After connection has been successful the below screen will be displayed, showing IP, Netmask, Gateway and DNS. Then click OK.
Wi-Fi connection to the internet using a Modem/Router
-Go into the "Settings" at the home screen, select "Wi-Fi" option.
-A list of available Wi-Fi connections will be displayed. See the example screen below. Note: The Ethernet cable musts be unplugged.
7
 Loading...