

Page 1

EDS8/16PS
200 8 Copy rig ht © Lantronix i s a trad emark of Lantronix. All rights reserved. 900 -54 6 Rev. A 11/ 08
EDS8/16PS Quick Start Guide
Page 2

EDS8/16PS
QUICK START GUIDE CONTENTS
EDS8/16PS
What’s In the Box . . . . . . . . . . . . . . . . . . . . . . . . . . . . . . . . . . . . . . . . . . . . . . . . . . . . . . .
Pinouts . . . . . . . . . . . . . . . . . . . . . . . . . . . . . . . . . . . . . . . . . . . . . . . . . . . . . . . . . . . .
Quick Connect . . . . . . . . . . . . . . . . . . . . . . . . . . . . . . . . . . . . . . . . . . . . . . . . . . . . . . . . .
IP Addressing . . . . . . . . . . . . . . . . . . . . . . . . . . . . . . . . . . . . . . . . . . . . . . . . . . . . . . . . .
Quick Setup Using the DeviceInstaller Utility . . . . . . . . . . . . . . . . . . . . . . . . . . . . .5-9
Configuration Using Web Manager . . . . . . . . . . . . . . . . . . . . . . . . . . . . . . . . . . . .10-11
LEDs . . . . . . . . . . . . . . . . . . . . . . . . . . . . . . . . . . . . . . . . . . . . . . . . . . . . . . . . . . . . . . . . . . . . .12
Contact . . . . . . . . . . . . . . . . . . . . . . . . . . . . . . . . . . . . . . . . . . . . . . . . . . . . . . . . . . . . . . . . . .13
. . .2
. . . . . . .2
. . .3
. . . .4
Page 3
Q u i c k S t a r t G u i d e
10/100 BASE-T
Ethernet
Serial Device
2
3
1
E D S 8 / 1 6 P S
The EDS products allow serial devices to connect and communicate over an
Ethernet network. This Quick Start will step you through hardware installation
and initial configuration of your EDS8PS or EDS16PS.
WHAT'S IN THE BOX
In addition to the EDS8PS or EDS16PS, the box contains the following items:
PART # COMPONENT DESCRIPTION
500-041 Power cord
500-103 RJ45-DB9F Null Modem Cable
CD-EDSPS-XX CD-ROM containing the User Guide, software utilities,
and Quick Start Guide.
PINOUTS
RS-232 Pin Assignment
2
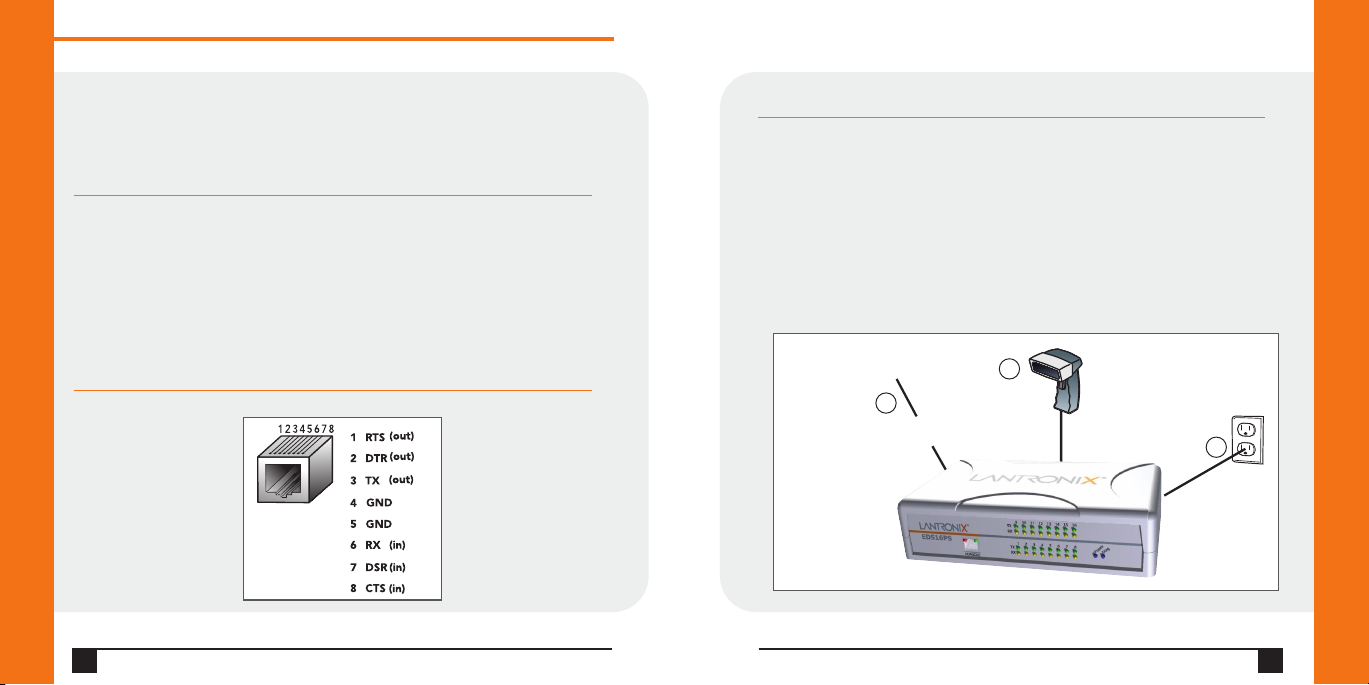
QUICK CONNECT
Complete the following steps in order. Refer to the numbers in the
figure below.
1. Connect a serial device to your unit.
2. Connect an Ethernet cable to the RJ45 port.
3. Supply power to your unit using the power cord that was included in
the packaging.
4. Supply power to the serial device.
W W W . L A N T R O N I X . C O M
3
Page 4

Q u i c k S t a r t G u i d e
E D S 8 / 1 6 P S
IP ADDRESSING
Your unit must have a unique IP address on your network. The IP address can be
assigned automatically or you can assign it manually.
DHCP
Many networks use an automatic method of assigning an IP address called
DHCP. If you are unsure whether your network uses DHCP,check with your
systems administrator.
The EDS looks for a DHCP server when it first powers up. You can use the
DeviceInstaller graphical user interface to search the network if your unit has been
assigned an IP address by the DHCP server. If the EDS does not acquire an IP, or you
do not use DHCP, you must assign a fixed IP address using the serial port of the EDS.
FIXED IP ADDRESS
In most installations, a fixed IP address is desirable. The system administrator
generally provides the IP address.
The IP address must be within a valid range, unique to your network, and in the
same subnet as your PC. You will need the following information before you set
up the unit as described in this Quick Start Guide.
IP Address:
Subnet Mask:
Gateway:
The following section describes assigning an IP address using DeviceInstaller.
Note: For detailed instructions on assigning the IP address using the serial port, please
see the User Guide or the Lantronix web site.
4
___ ___ ___ ___
___ ___ ___ ___
___ ___ ___ ___
QUICK SETUP USING THE DEVICEINSTALLER UTILITY
Step 1: Install DeviceInstaller
To use the DeviceInstaller utility, first install it from the product CD:
1. Insert the product CD into your CD-ROM drive.
2. If the CD does not launch automatically:
a) Click the Start button on the Task Bar and select Run.
b) Enter your CD drive letter,colon,backslash,Launch.exe (e.g., D:\Launch.exe).
3. Click the DeviceInstaller button.
4. Respond to the installation wizard prompts.
(When prompted to select an installation type, select Typical.)
Note: For more information about DeviceInstaller, see the DeviceInstaller Online Help.
Step 2: Configure Network Settings
To assign an IP address manually:
1. Click Start > Programs > Lantronix > DeviceInstaller > DeviceInstaller.
If your PC has more than one network adapter, a message displays. Select an
adapter and click OK.
W W W . L A N T R O N I X . C O M
5
Page 5

Q u i c k S t a r t G u i d e
E D S 8 / 1 6 P S
USING THE DEVICEINSTALLER UTILITY CONTINUED…
Note: If the unit already has an IP address (e.g., DHCP has assigned an IP address),
click the Search icon and select the unit from the list of Lantronix device
servers on the local network.
2. Click the Assign IP icon .
3. If prompted, enter the hardware address (on the product label) and click Next.
4. Select Assign a specific IP address and click Next.
5. Enter the IP address. The Subnet mask displays automatically based on the
IP address; if desired, you may change it. On a local network, you can leave the
Default gateway blank (all zeros). Click Next.
6
USING THE DEVICEINSTALLER UTILITY CONTINUED…
6. Click the Assign button and wait several seconds until a confirmation message
displays. Click Finish.
7. Click the Close button to close the dialog box and return to the main window.
W W W . L A N T R O N I X . C O M
7
Page 6

Q u i c k S t a r t G u i d e
E D S 8 / 1 6 P S
USING THE DEVICEINSTALLER UTILITY CONTINUED…
Step 3: Add the Unit to the Device List
Now add the unit to the list of similar Lantronix devices on the network so
that you can manage and configure it.To perform this step, click the
Search icon . DeviceInstaller locates the unit and adds it to the list.
To view the current configuration, double-click the unit in the list.
8
USING THE DEVICEINSTALLER UTILITY CONTINUED
Step 4: Complete the Configuration
Once the unit is in the device list, you can complete the configuration:
• To use a web interface (Web Manager), double-click the unit in the
list and click the Web Configuration tab. See Configuration Using
Web Manager on page 10.
• To use Setup Mode (a command line interface), double-click the unit in
the list and click the Telnet Configuration tab.
Note: Please see your product's User Guide and Command Reference for
detailed instructions on configuration.
W W W . L A N T R O N I X . C O M
9
Page 7

Q u i c k S t a r t G u i d e
E D S 8 / 1 6 P S
In this Quick Start Guide, we briefly describe how to configure the EDS using Web
Manager,Lantronix’s browser-based configuration tool. For detailed information
on Web Manager configuration and on other methods, please see the User Guide
for your product.
1. Perform one of the following steps:
• Using DeviceInstaller, select the unit, select the Web Configuration tab,
and click Go.
• Open a web browser and enter the IP address of the EDS to open
Web Manager.
2. Enter your User Name (default is admin) and Password (default is PASS).
The EDS Web Manager window displays.
CONFIGURATION USING WEB MANAGER CONTINUEDCONFIGURATION USING WEB MANAGER
2. Use the menu to navigate to sub pages and configure the EDS.
10
W W W . L A N T R O N I X . C O M
11
Page 8

Q u i c k S t a r t G u i d e
E D S 8 / 1 6 P S
LEDS
Transmit (green) Blinking = EDS is transmitting data on the serial port.
Receive (yellow) Blinking = EDS is receiving data on the serial port.
Power (blue) ON = EDS is receiving power.
Diagnostic (yellow) Fast blink = initial startup (loading OS).
Speed (yellow) ON = EDS is connected to a 100 Mbps Fast
Activity (green) Blink = EDS is sending data to or receiving data from the
12
MEANING
Slow blink (once per second) = operating system startup.
ON = unit has finished booting.
Ethernet network.
OFF = EDS is connected to a 10 Mbps Ethernet network.
Ethernet network.
CONTACT
For questions and technical support, please check our online knowledge base
at www.lantronix.com/support
Lantronix
15353 Barranca Parkway, Irvine, CA 92618, USA
Phone: (949) 453-3990 or Fax: (949) 453-3995
www.lantronix.com
W W W . L A N T R O N I X . C O M
13
 Loading...