

Page 1

CoBox-FL-IAP User Guide
Rev. C 7/01
Page 2

Chapter 1: Introduction
The IAP Family of Device Servers........................................................ 1-1
Key Features..........................................................................................1-2
Network Protocols.................................................................................1-3
Packing Algorithms.................................................................. 1-3
Ethernet (MAC) Address.......................................................... 1-3
Internet Protocol (IP) Address.................................................. 1-3
Port Numbers............................................................................1-3
Chapter 2: Installation
Product Description............................................................................... 2-1
Network Interface..................................................................... 2-1
Serial Interface.......................................................................... 2-2
Product Information Label .......................................................2-2
Installing the CoBox-FL-IAP................................................................2-3
LEDs.........................................................................................2-4
Contents
Chapter 3: Getting Started
Assigning the IP Address ......................................................................3-1
DHCP ....................................................................................... 3-1
Auto IP......................................... ......... ......... ........................... 3-2
APS Configuration Utility........................................................3-3
ARP ..........................................................................................3-7
Direct Serial Connection..........................................................3-8
Configuring the Device Server.............................................................. 3-8
Chapter 4: Using the Device Server
Comm Port Redirector........................................................................... 5-1
Redirector Setup....................................................................... 5-1
Device Server Configuration....................................................5-1
Appendix A: Contact Information
Problem Report Procedure.................................................................... A-1
Full Contact Information...................................................................... A-2
Corporate Offices ................................. ......... .......................... A-2
Sales Offices............................................................................ A-2
-i
Page 3

Appendix B: Troubleshooting
Monitor Mode........................................................................................B-1
Entering Monitor Mode Via the Serial Port .............................B-1
Entering Monitor Mode Via the Network Port.........................B-1
Monitor Mode Commands........................................................B-2
Appendix C: Updating Firmware
Downloading Firmware.........................................................................C-1
Downloading Via the APS Configuration Utility..................................C-1
Downloading Via TFTP ........................................................................C-3
Downloading Via the Serial Port...........................................................C-4
Appendix D: Technical Specifications
CoBox-FL-IAP..................................................................................... D-1
Appendix E: IP Addressing
Network Portion.....................................................................................E-1
Subnet Portion .......................................................................................E-2
Host Portion...........................................................................................E-2
Network Address...................................................................................E-2
Broadcast Address.................................................................................E-2
IP Subnet Mask......................................................................................E-3
Private IP Networks and the Internet.....................................................E-4
Network RFCs.......................................................................................E-4
Appendix F: Pinouts
Ethernet Connectors...............................................................................F-1
10BASE-T................................................................................F-1
10BASE-FL..............................................................................F-1
Serial Connectors...................................................................................F-2
Warranty Statement
Declaration of Conformity
-ii
Page 4

1: Introduction
The IAP Family of Device Servers
The Lantronix Industrial Automation Platform (IAP) family of Device Servers allows a
single network and protocol to connect multiple serial devices from many vendors. IAP
provides the automation industry with a network-enabling s olution using TCP/IP and
standard Ethernet networks that is vendor-ind e pen dent.
By encapsulating serial data and transporting it over Ethernet, the Device Server allows
virtual serial links t o be establishe d over Ethernet a nd IP networks. As a result, direct serial
connections can be extended within the plant, throug hout the facility, and across the global
enterprise.
Existing COM-port-based Windows
devices, using Comm Port Re director TM software. Redirector allows the creation of virtual
serial ports, which can be mapped to remote Device Servers over Ethernet. When used in
conjunction with an OPC server, most Windows based HMI, SCADA, and PC based
control applications have full access to information in the connected device.
Lantronix provides IAP Device Servers specifically designed for different industrial
environments:
u
CoBox-DR1-IAP, with a DIN rail interface for harsh environments or alongside
controls instruments in electrical panels.
u
CoBox-FL-IAP, with fiber connectivity for long cable runs or electrically hazardo us
environments.
u
UDS-10-IAP, a compact design Device Server for use in less demanding
environments.
TM
applications can access network-enabled serial
1-1
Page 5

Key Features Introduction
A few examples of attached devices are:
u
PLCs
u
AC/DC drives
u
CNC systems
u
Operator panels and message displays
u
Process Controls
u
Instrumentation
u
Power monitoring equipm ent
u
Scales and weighing systems
u
Barcode scanners
u
Label printers
u
Most factory floor serial devices
Key Features
IAP Device Servers, adapted to the three factory environments , will unit e any mixture of
equipment from indust rial automation v endors into a sing le reliable pipel ine. This new and
open infrastructure opens the way for data to flow in real time from all your plant devices
up to your IT layer.
The IAP Device Servers feature installable industrial communication protocols.
Lantronix’s Automation P rotocol s Suite (APS) includes protocol s such as DF1 (Rock well
Automation) and Modbus (Schneider Electric). Where the Standard Tu nneli ng p rotoco l is
limited to exclusive, device-to-device connections, the industrial protocols offer
connections to other devices simultaneously.
You can configure the unit using the serial po rt, or remotely over the network using Telnet
or a web browser. The APS CD (the CD that comes with your Device Server) includes
Windows-based configuration software that simplifies the process of installing protocols
and configuring them for use with attached devices. Flash memory provides for
maintenance free, non-volatile storage and allows system upgrades.
1-2
Page 6

Introduction Network Protocols
Network Protocols
Device Servers use IP protocols for network communicatio ns. The supported prot ocols are
ARP, UDP, TCP, ICMP, Telnet, TFTP, DHCP, HTTP, SNMP, and BOOTP. For
connections to the serial port, TCP, UDP, or Telnet protocols are used. Firmware updates
can be performed using TFTP.
The Internet Protocol (IP) defines addressing, routing, and data block handling over the
network. The Transmission Control Protocol (TCP) assures that no data is lost or
duplicated, and that everything sent to the connection arrives correctly at the target.
For typical datagram applications in which devices interact with other devices withou t
maintaining a point-to-point connection, User Datagram Protocol (UDP) is used.
Packing Algorithms
Two firmware selectable packing algorithms define how and when packets are sent to the
network. The standard algor ith m i s opti mized for app lications in which the Device Serv er
is used in a local environment, allowing for very small delays for single characters while
keeping the packet count low. The alternate packing algorithm minimizes the packet count
on the network, and is especially useful in applications in a routed Wide Area Network
(WAN). Adjusting parameters in this mode can economize the network data stream.
Ethernet (MAC) Address
The Ethernet address is also referred to as the hardware address or the MAC address. The
first three bytes of the Ethernet Address are fixed (e.g., 00-20-4A), identifying the unit as
a Lantronix product. The f ourth, fifth, and sixt h bytes are u nique numbers assigned to each
Device Server.
Figure 1-1: Sample Ethernet Address
00-20-4A-14-01-18 or 00:20:4A:14:01:18
Internet Protocol (IP) Address
Every device connected to an IP network must have a unique IP address. This address is
used to reference the specific Device Server.
Port Numbers
Every TCP connection and every UD P datagram i s defined by a dest ination IP ad dress and
a port number. For example, a Telnet application commonly uses port number 23. A port
number is similar to an extension on a PBX system.
1-3
Page 7

2: Installation
This chapter describes the CoBox-FL-IAP and shows how to install it on a basic network.
Product Description
Network Interface
The CoBox-FL-IAP’s network panel contains a 9-30VDC or 9-25VAC power plug, four
LEDs, an ST-Fiber (10BASE-FL) Ethernet port, and an RJ45 (10BASE-T) Ethernet port.
Both Ethernet ports support 10 Mbps and are auto detecting.
Note: Do not attempt to connect both Ethernet ports simultaneously. If one
is used, the other is disabled.
Figure 2-1: Network Interface
10 BASE-T
10BASE-T
Ethernet Port
2-1
10 BASE-FL
Tx
10BASE-FL
Ethern et Port
(Transmit)
9-30V DC
Tx GL
Rx
Rx Co
Power Plug
LEDs
10BASE-FL
Ethernet Port
(Receive)
Page 8

Product Description Installation
Serial Interface
The CoBox-FL-IAP’s serial panel contains two serial ports and three LEDs. Port (Channel)
1 is a femal e DB25 (DCE) that supports RS-232, RS-485 , and RS-422 serial s t andards
(firmware selectable) up to 115.2 Kbps. Port (Channel) 2 is a male DB9 (DTE) tha t
supports RS-232 only. LED functionality is described in Table 2-2.
Figure 2-2: Serial Interface
CH 1
DB25 Serial Port
(DCE)
CH 2
DB9 Serial Port
(DTE)
State
LEDs
Product Information Label
A product informati on label is located on the undersi de of the CoBox-FL-IAP, and contains
the following information about your specific unit:
u
Bar Code
u
Serial Number
u
Product ID (name)
u
Product Description
u
Ethernet Address (also referred to as Hardware Address or MAC Address)
2-2
Page 9

Installation Installing the CoBox-FL- IAP
Installing the CoBox-FL-IAP
The following connection diagram shows a typical CoBox-FL-IAP used to attach serial
devices to a network.
Figure 2-3: CoBox-FL-IAP Connected to Serial Device and Network
2
1
9-30V DC
10 BASE-FL
Tx
Tx GL
Rx
Rx Co
10 BASE-T
Serial
Device 2
4
Serial
Device 1
OR
10BASE-T
Ethernet
10BASE-FL
Ethernet
3
To install the CoBox-FL-IAP, complete the following steps in order. Refer to the numbers
in the previous figure.
1 Connect a serial device to the CoBox-FL-IAP. See Appendix F, Pinouts, for more
information about the kinds of device attachments the CoBox-FL-IAP supports.
2 Connect a second serial device to the CoBox-FL-IAP (optional).
3 Connect an Ethernet cable to either the 10BASE-FL OR the10BASE-T Ethernet
port. When connecting to the 10BASE-FL, connect the receiving cable to the Rx
port and the transmitting cable to the Tx port.
Note: Do not attempt to connect both Ethernet ports simultaneously. Only
one Ethernet connection can be made at any one time.
4 Supply power to the CoBox-FL-IAP using the power s upply that was included in the
packaging.
Note: The required input voltage is 9-30VDC or 9-25VAC.
5 Supply power to the serial devices.
2-3
Page 10

Installing the CoBox-FL-IAP Installation
LEDs
Network LEDs
The following table explains the function of the four network LEDs:
Table 2-1: CoBox-FL-IAP Network LEDs
LED Function
GL (Good Link) Lights solid green to indicate network port is connected to the network.
Tx (Network Transmit) Blinks yellow to indicate network packets are transmitting.
Rx (Network Receive) Blinks yellow to indicate network packets are recei ving.
Co (Collision) Blinks red to indicate network collisions.
Serial LEDs
Simultaneously lit red and green LEDs means something is wrong. If the red LED is lit or
blinking, count the number of times the green LED bl inks bet ween its paus es. Eig ht blin k
patterns indicate which fault condition exists. The following table explains the functions of
the three serial LEDs
Table 2-2: CoBox-FL-IAP Network LEDs.
LED Function
Serial Port 1
Status
Serial Port 2
Status
Diagnostics Blinks or lights solid red in combination with the green (Channel 1) LED to
Lights solid green to indic a te that Channe l 1 is idle.
Blinks green to indicate that the Channel 1 socket connection has been made.
Lights solid yellow to indicate Channel 2 is connected to the network and idle.
Blinks yellow to indicate the Channel 2 socket connection has been made.
indicate diagnostics and error detection.
Red solid, gree n (Channel 1) blinki ng:
1x: EPROM checksum error
2x: RAM error
3x: Token Ring error
4x: EEPROM checksum error
5x: Duplicated IP address on the network
6x: Firmware does not match hardware
Red blinking, green (Channel 1) blinking:
4x: Faulty network connection
5x: No DHCP response received
2-4
Page 11

3: Getting Started
This chapter covers the required steps to get the Device Server on-line and working.
Consider the following points before logging into and configuring the Device Server:
u
The Device Server’s IP address must be configured befor e a network connection is
available.
u
The IP address must be within a valid range, unique to your network, and i n the same
subnetwork as your PC.
u
Only one person at a time may be logged in to the Set up (configu ration) sc reen. This
eliminates the possibility of several people simultaneously attempting to configure
the Device Server.
u
Network port logins can be disabled. The system manager will not be able to access
the unit if the port is disabled. This port can also be password protected.
u
Only one terminal at a time can be connected to a serial port.
Assigning the IP Address
You can several methods to assign an IP address to your Device Server, including:
u
DHCP
u
AutoIP
u
APS Configuration Utility
u
ARP
u
Direct serial connection
DHCP
IP Address
The Device Server ships with a default setting of 0.0.0.0, which automatically enables
DHCP within the Device Server.
Provided a DHCP server exists on t he network, it will su pply the Device S erver with an IP
address, gateway addres s, and subnet mask whe n the Device Server boot s up. (If no DHCP
server exists, the red Di agnostic LED blinks continuously, and the green Status LED bl inks
five times.)
3-1
Page 12

Assigning the IP Address Getting Started
A DHCP-assigned IP address does not appear in the Device Server’s configuration screen
(Setup Menu). You can, however, determine your Device Server’s DHCP-assigned IP
address in Monitor Mod e. When you enter Monit or Mode from the seri al port with network
connection enabled and issue the NC (Network Connection) command., you will see the
Device Server’s IP configuration. (For more infor mat i on abou t Monitor Mode, see the
Troubleshooting appendix.)
DHCP Name
A DHCP name is a unique identifier used for managing multiple DHCP hosts on a network.
Your Device Server ships with a default DHCP name of Cxxxx xx, where the xxxxxx is the
last six digits of your Device Server’s MAC address . You can change the DHCP nam e (up
to 8 characters) from the Server Configuration option on the Setup Menu.
The name can be changed to LTXdd, where 0.0.0.d d is the IP address assigned (dd s hould
be a number between 1 and 99). For example, if the IP address is set to 0.0.0.5, the resulting
DHCP name is LTX05.
Figure 3-1: Server Configuration Option
Change DHCP device name (LTRX) ? (N) Y
Enter new DHCP device name : LTRXYES
Note: If you are rolling out a large number of Device Servers and do not
want to track them by their MAC address, change the DHCP name to
LTX##, where ## is the IP address of your Device Server. For
example, if the IP ad dr ess i s 1 92. 169 .11.17, then the D HCP n ame fo r
the Device Server will be LTX17.
The Device Server’s IP address must be configured before a network connection is
available. If the IP address was not set automatically via DHCP, set it now using one of the
following methods.
Auto IP
AutoIP is an alternative to DHCP that allows hosts to automatically obtain an IP address in
smaller networks that may not have a DHCP server. A range of IP addresses (from
169.254.0.1 to 169.254.255.1) has been explicitly reserved for AutoIP-enabled devices.
The range of Auto IP addresses is not intended to be used over the Internet.
If your Device Server canno t find a DHCP s erver, and you have no t man ually ass igned an
IP address to it, then it automatically selects an address from the AutoIP reserved range.
Then, your device sends out an (ARP) request to other nodes on the same network to see
whether the selected address is being used. If the selected address is not in use, then the
Device Server uses it for local subnet communication.
If another device is using the selected IP address, the Device Server selects another address
from the AutoIP rang e and reboots it self. After rebo ot, the Device Serv er sends out an other
ARP request to see if the selected address is in use, and so on.
3-2
Page 13

Getting Started Assigning the IP Address
AutoIP is not intended to replace DHCP. The Device Server will continue to look for a
DHCP server on the network. If it finds a DHCP server, the Device Server will switch to
the DHCP server-provided address and reboot.
Note: If a DHCP server is found, but it denies the reque st for an IP add ress,
the Device Server does not attach to the network, but waits and retries.
AutoIP can be disabled by setting the Device Server’s IP address to 0.0.1.0.
APS Configuration Utility
You can manually assign the IP address using the APS Config uration Utility, which you
can install from the APS CD and then select the protocol (firmware) to suit your needs.
1 Insert the APS CD into your CD-ROM drive.
2 Respond to the installation wizard prompts.
Note: If the CD does not launch automatically, click the Start button on the
Windows Task Ba r and sel ect Run. In the Open field, enter your drive
letter, colon, backslash, and setup.exe (e.g., E:\setup.exe). Click OK.
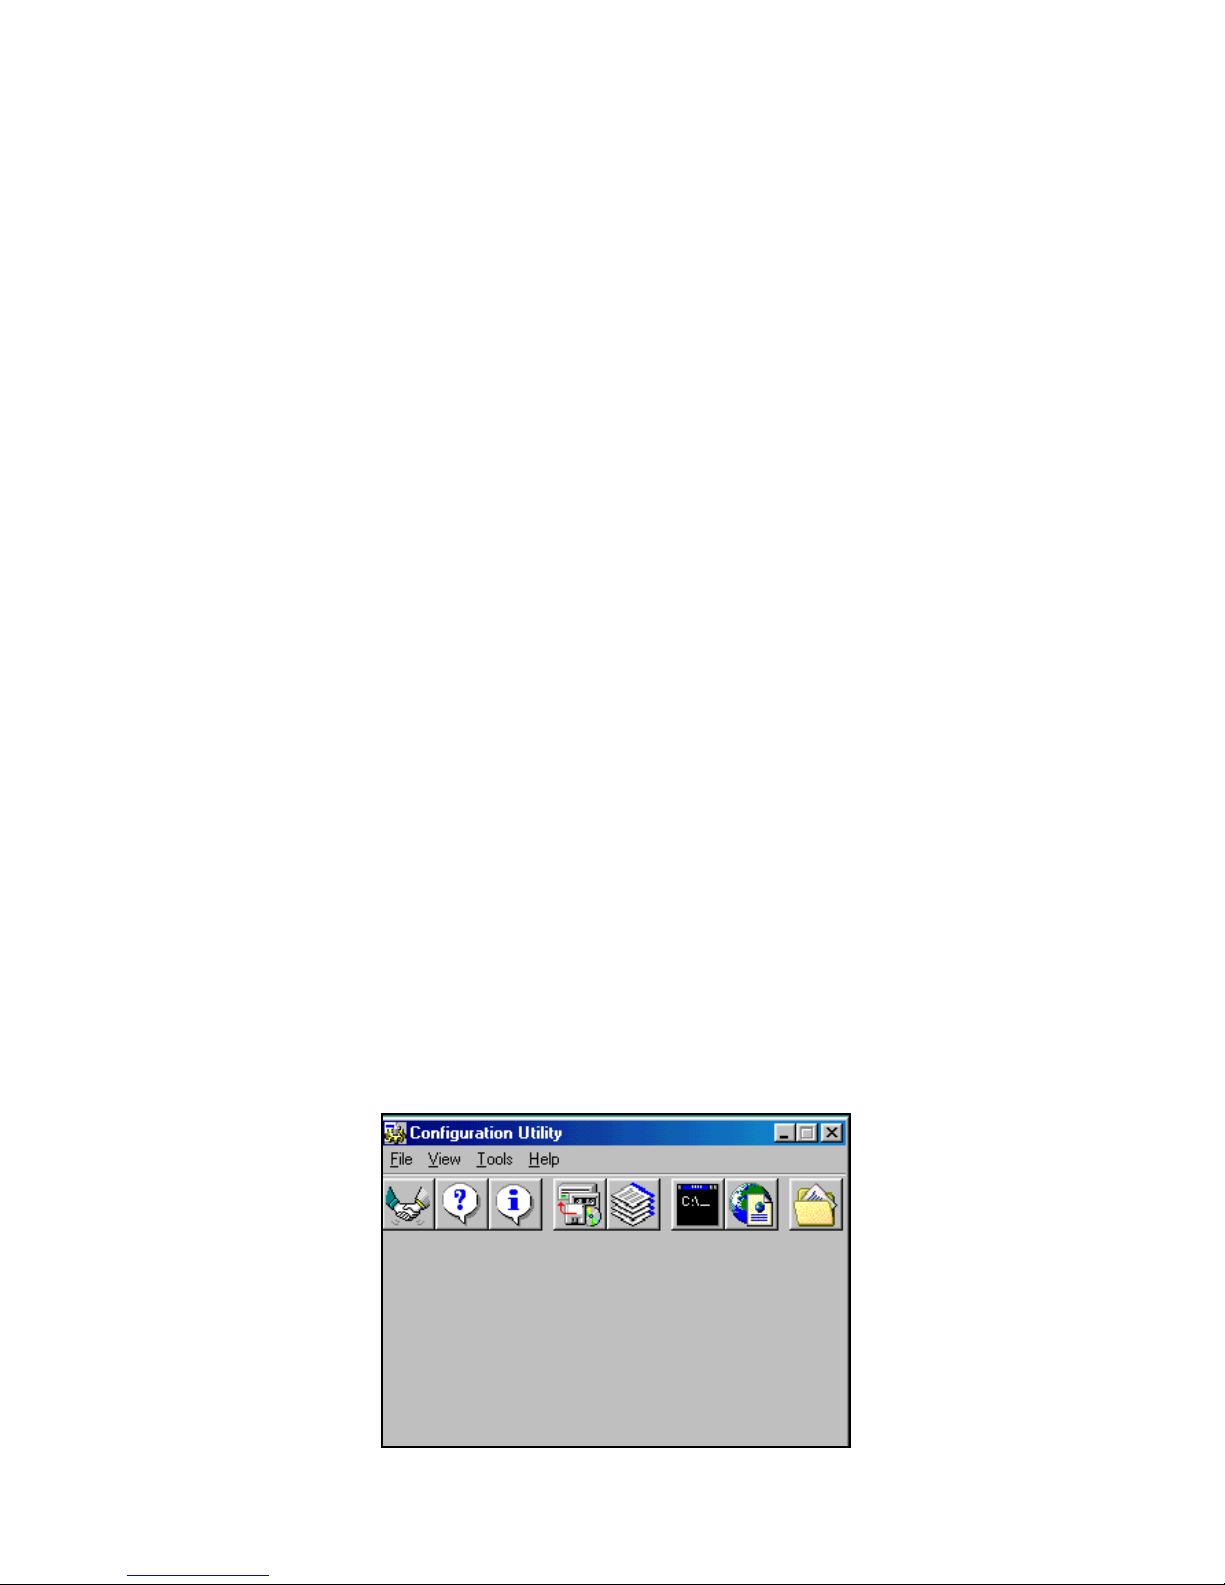
3 Click the Start button on the Windows Task Bar, and select Programs-->APS
Config-->APS Config. The Configuration Utility window displays.
Figure 3-1: Configuration Utility Window.
3-3
Page 14

Assigning the IP Address Getting Started
4 Click the Assign IP icon. The Assign IP Address window displays.
Figure 3-2: Assign IP Address Window.
5 In the Enter IP Address to assign field, type the IP address of the Device Server
(XXX.XXX.XXX.XXX format).
6 In the Enter the Hardware or Ethernet Address field, type the Ethernet address
(MAC address) listed on the Device Server label.
7 Click the Set IP Address button. The Assign IP Successful message displa ys. Click
OK.
8 Click the Ping icon . The Ping Device window displays.
9 Click the Ping butt on. The Reply received message displays in the window,
indicating that the IP address has been entered successfully.
Figure 3-2: Ping Device Window
3-4
Page 15

Getting Started Assigning the IP Address
Note: If you do not receive Reply received messages, make sure the Device
Server is properly attached to the network and that the IP address
assigned is valid for the particular network segment you are working
with. If you are not sure, check with your Network Administrator.
10 Click the Query Device icon. The Query Device win dow displays. Confirm
that the IP address is correct.
Figure 3-3: Query Device Window
11 Click the Get Device Information button. Firmware Type displays the protocol
that is currently loaded on the device.
Note: The communications protocol is an integrated part of the Device
Server firmware. When you load the firmware, you are loading the
protocol too. (For that reason, in this manual we use the terms
firmware and protocol interchangeably.)
The unit comes with the Standard Tunneling protocol installed. If your application
requires a different protocol, such as Modbus (Schneider) or DF1 (Allen-Bradley),
follow the steps in Load the Protocol below to install it. Otherwise, proceed to the
Telnet to the Device Server section.
3-5
Page 16

Assigning the IP Address Getting Started
Load the Protocol (Firmware)
1 Click the Load icon. The Load Firmware window displays.
2 Click Select FW File. A list of firmware files disp lays
Figure 3-4: Firmware Files.
3 Select the desired protocol and click Open. The selected file displays in the FW File
field.
4 Click Download FW File. The File download successful message displays. Click
OK.
Note: You can use the query tool to confirm that the protocol has been
installed.
Telnet to the Device Server
To configure the Device Server, use the Telnet tool in the APS Configuration Utility. The
tool allows you to establish a terminal session with the Device Server. Within the terminal
session, menus will guide you through the process of c onfigurin g the unit.
1 Click the Telnet icon and press Enter within 5 seconds.
The Configuration Set-Up window for the protocol displays.
2 Continue with the configuration procedure for the protocol y ou ins talled .
Instructions are in the specific protocol manual o n t he APS CD.
When you are finished, make sure to save the current configuration and exit. This
configuration is stored in non-volatile memory and is retained even if power is
removed. At this point, the Device Server will reset and restart-- using the
configuration parameters just programmed.
3-6
Page 17

Getting Started Assigning the IP Address
ARP
ARP can be used from a Windows or Unix host to assign a temporary IP address to the
Device Server. The server sets its IP address from a directed ARP packet and uses it until
it is rebooted. This met hod onl y works if your Wi ndow s or Unix ho st are o n the same side
of the router.
1 On a UNIX host, create an entry in the host’s ARP table using the intended IP
address and the hardware address of the Device Server, which is found on the
product label.
Figure 3-4: ARP on UNIX
arp -s 191.12.3.77 00:20:4a:xx:xx:xx
For the ARP command to wo rk on Windows 95, the ARP table on the PC mu st have
at least one IP address defined other than its own. Type ARP -A at the DO S prompt
to verify that there is at least one entry in the ARP table.
If the local machine is the only entry, ping another IP address on your network to
build a new entry in the ARP table; the IP address must be a host other than the
machine on which you are working. Once there is at least one additional entry in the
ARP table, use the following command to ARP an IP address to the Device Server:
Figure 3-5: ARP on Windows
arp -s 191.12.3.77 00-20-4a-xx-xx-xx
2 Now open a Telnet connection to port 1. The connection should fail quickly (3
seconds), but the Device Server will temporarily change its IP address to the one
designated in step 1.
Figure 3-6: Telnet to Port 1
telnet 191.12.3.77 1
3 Finally, open a Telnet con nection to port 9999 and s et all required paramete rs. Make
sure to enter the information quickly; otherwise you will be timed out and will need
to open a Telnet connection to port 1 again.
Figure 3-7: Telnet to Port 9999
telnet 191.12.3.77 9999
Note: This IP address is temporary and will revert to the default value when
the Device Server’s power is reset. You must log into the Device Server
and store the changes permanently.
3-7
Page 18

Configuring the Device Server Getting Started
Direct Serial Connection
1 Connect a console terminal or PC running a terminal emulation program to the
Device Server’s first serial port (CH 1). The default serial port settings are 9600
baud, 8 bits, no parity, 1 stop bit, no flow control.
2 To enter Setup (configuration) Mode, cycle the Device Server’s power (power off
and back on). After power-up, the self-tes t begins and the red Diagnostic LED starts
blinking. You have one second to enter three lowercase “x” characters.
Note: The easiest way to enter Setup Mode is to hold down the “x” key at the
terminal while powering up the Device Server.
3 Select 0 (Server Configuration) and follow the prompts until you get to IP address.
4 Enter the new IP address.
5 Select 9 to save the configuration and exit Setup Mode. The Device Server performs
a power reset.
Note: Every time you exit the configuration menu, the Device Server
performs a power reset even if you did not make any changes.
Configuring the Device Server
Although IAP Device Se rvers ship with the Standard Tu nneling protocol, t hey also support
other industrial protocols. Refer to the APS CD f or instructions on installing another
protocol (User Guide f or your Device S erver) and configuring th e Device Server with that
protocol (appropriate Protocol Manual).
Note: )Only Standard Tunneling communications are simultaneously
supported through both the Device Servers’ serial channels. When
other protocols such as Modbus or DF1 are used, communication is
supported through one serial channel only.
3-8
Page 19

4: Using the Device Server
Comm Port Redirector
The Lantronix Comm Port Redirector application allows PCs to share modems and other
serial devices connected to a Device Server using Wi ndows-based applicat ions. The Comm
Port Redirector intercepts communications to specified communication ports and sends
them over an IP network connection to th e Device Server’s serial port. This enables the PC
to use the Device Server’s serial port as if it were one of the PC’s communication ports.
Using their existing communications software, users can dial out to a remote host through
a modem connected to the Device Server.
Redirector Setup
To set up the Comm Port Redirector software:
1 Install the Redirector software from the APS CD. The software and installation
instructions are included on the APS CD.
2 In the Redirector’s configuration screen, select Port Setup and add as many
communication ports as you need (for example, one for each Device Server).
3 Under each port, select Add IP and enter the IP address (Host) of the Device Ser ver
that you want to assign to that port and the TCPPort number (3000 to 3009).
Note: Remember the TCPPort number. You will need it to configure the
Device Server.
4 Save the configurations, and if you’ve just ins talled the Red irector, r e boo t you r PC.
Device Server Configuration
The following procedure should be repeated for each Device Server defined in the
Redirector setup, above.
1 Enter the Device Server’s Setup (configuration) Mode (see the protocols manuals on
the APS CD).
2 Set the Port Number to a value that is 11000 higher than the TCPPort number
selected in the Redirector setup above (for example, if the TCPPort number was
3005, set the Device Server’s Port Number to 14005).
3 Save the configurations and exit Setup Mode.
Note: When using the Redirector, ensure that the Device Server s erial port’s
configuration matches the configuration of your serial device.
4-1
Page 20

A: Contact Information
If you are experiencing an error that you are unable to fix, there are a number of other
troubleshooting options:
u
Look on the APS CD that was included in your package for additional
documentation and support informat i on
u
Look on the Lantronix Web site for technical FAQs and documentation updates.
u
For information pertaining to your system’s configuration, refer to your system’s
documentation or technical support. For example, for specific questions about the
Microsoft Windows O perating System, refer to the Microsoft K nowledge Base Web
site at www.support.microsoft.com/directory.
u
For technical support, contact the Industrial Automation Distributor assigned to sell
and support in your region.
Problem Report Procedure
When you report a problem, please provide the following information:
u
Your name
u
Your company name, address, and phone number
u
Product model number (for example, CoBox-FL-IAP-01)
u
Serial number
u
Software version
u
Network configuration
u
Description of the problem
u
Debug report (stack dump), if applicable
u
Status of the unit when the problem occurred, including information on user and
network activity at the time of the problem, if possible.
A-1
Page 21

Full Contact Info rmation Contact Information
Full Contact Information
Corporate Offices
15353 Barranca Parkway
Irvine, CA 92618, USA
Phone: (949) 453-3990
Fax: (949) 453-3995
World Wide Web: www.lantronix.com
Sales Offices
The Americas
15353 Barranca Parkway
Irvine, CA 92618, USA
Phone: (949) 450-7227
Fax: (949) 450-7231
E-mail: sales@lantronix.com
Europe, Middle East, and Africa
Minervum 1707
4817 ZK Breda
The Netherlands
Phone: +31 (0) 76 565 8176
Fax: +31 (0) 76 565 8179
E-mail: eu_sales@lantronix.com
France
Phone: +33 (0) 139 30 41 74
Fax: +33 (0) 139 30 41 73
E-mail: eu_sales@lantronix.com
Germany
Phone: +49 (0) 7720 3016 20
Fax: +49 (0) 7720 3016 88
E-mail: eu_sales@lantronix.com
Pacific Rim
46 East Coast Road
East Gate #10-01
Singapore 428766
Phone: +65 447 4222
Fax: +65 344 0614
E-mail: asiapacsales@lantronix.com
Spain and Portugal
Phone: +34 (0) 91760 0846
Fax: +34 (0) 91760 0846
E-mail: eu_sales@lantronix.com
A-2
Page 22

Contact Information Full Contact Information
United Kingdom and Ireland
Phone: +44 (0) 118 945 1555
Fax: +44 (0) 118 945 1663
E-mail: eu_sales@lantronix.com
International Sales
Phone: (949) 450-7227
Fax: (949) 450-7231
E-mail: intsales@lantronix.com
Technical Support
Contact the Industrial Automation Distributor assig ned to sell and support in your region.
A-3
Page 23

B: Troubleshooting
Monitor Mode
Monitor Mode is a command-line interface used for diagnostic purposes. There are two
ways to enter Monitor Mode: locally via the serial port or remotely via the network.
Entering Monitor Mode Via the Serial Port
To enter Monitor Mode locally:
1 Connect a console terminal or PC running a terminal emulation program to the
Device Server’s first serial port (CH 1). The default serial port settings are 9600
baud, 8 bits, no parity, 1 stop bit, no flow control.
2 Cycle the Device Server’s power (power off and back on) . After power-up, the s elf-
test begins and the red Diagnost ic LED start s bli nking. You have on e second to do
one of the fo ll owing:
u
To enter Monitor Mode with valid network connections, type zzz.
u
To enter Monitor Mode without valid network connections, type yyy.
Note: The easiest way to enter Monitor Mode is to hold down the z or y key
at the terminal while powering up the Device Server.
A 0> prompt indicates that you have successfully entered Monitor Mode.
Entering Monitor Mode Via the Network Port
To enter Monitor Mode using a Telnet connection:
1 Establish a Telnet session to the configuration port (9999).
2 Immediately after the following message displays, type M (upper case).
Figure B-3: Entering Monitor Mode Via the Network
*** Lantronix Universal Device Server ***
Serial Number 1400280 MAC address 00:20:4A:14:01:18
Software Version 04.0b7 (000428)
Press Enter to go into Setup Mode
A 0> prompt indicates that you have successfully entered Monitor Mode.
B-1
Page 24

Monitor Mode Troubleshooting
Monitor Mode Commands
The following commands are available in Monitor Mode. Many commands have an IP
address as an optional parameter (xxx.xxx.xxx.xxx). If the IP address is given, the
command is applied to another De vice Server with that IP address. If no IP address is given,
the command is executed locally.
Note: All commands must be given in capital letters, with blank spaces
between the parameters.
Table B-1: Monitor Mode Commands
Command Command Name Function
DL Download
Download firmware to the
Device Server via
the serial port in hex format
VS x.x.x.x Version Query software header record (16 bytes) of
Device Server with IP address x.x.x.x
GC x.x.x.x Get Configuration Get configuration of Device Server with IP
address x.x.x.x as h ex records (120 bytes)
SC x.x.x.x Send Configuration Set configuration of Device Server with IP
address x.x.x.x from hex records
PI x.x.x.x Ping Ping Device Server with IP address x. x.x.x to
check device status
AT ARP Tab le
TT TCP Connection
Table
NC Network Connection
RS Reset
SI
xxx.xxx.xxx.xxx:yyy.
yyy.yyy.yyy
Send/Set IP Address Remotely assign an IP address to a Device Server,
Show the
Show all incomi ng and outgoing TC P connec-
tions
Show the
Reset the
where xxx.xxx.xxx.xxx is the I P address, and
yyyy.yyy.yyyy.yyy is the two-part iden tification
number at the bottom of the label, converted to
decimal and written twice.
Device Server’s ARP table entries
Device Server’s IP configuration
Device Server’s power
QU Quit Exit diagnostics mode
G0, G1, ....,GE, GF Get configuration
from memory page
S0, S1,...,SE Set configuration to
memory page
Gets a memory page of configura tion informatio n
from the device.
Sets a memory page o f c onfig ura ti on in form atio n
on the device.
B-2
Page 25

Troubleshooting Monitor Mode
Entering any of the commands listed above will generate one of the following command
response codes:
Table B-2: Comma nd R esp ons e C ode s
Response Meaning
0> OK; no error
1> No answer from remote device
2> Cannot reach remote device or no answer
8> Wrong pa r a me te r (s )
9> Invalid command
B-3
Page 26
C: Updating Firmware
Downloading Firmware
Current firmware files are available on the APS CD. Firmware updates and release notes
for Device Servers can be downloaded directly from Lantronix in one of the following
ways: via the Lantronix Web site (www.lantronix.com), or using anonymous FTP through
the Internet (ftp.lantronix.com).
There are three ways to update the Device Server’s internal operational code (CBX*.ROM
or CBX*.HEX). Using the APS Configuration Utility is the preferred method. Alternatives
are by means of TFTP or through a serial port.
You can also update the Devi ce Server’s internal Web interface (CBXW*.COB) via TFTP.
Downloading Via the APS Configuration
Utility
The procedure for installing updated firmware is basically the same as for installing a
protocol. (Since the protocol is an integrated part of the firmware, and you can’t get one
without the other, in this manual we use the terms interchangeably.) You just need to
download the updated firmware to your computer and then use the APS Configuration
Utility to install it.
1 Download the updated firmware files from www.lantronix.com or ftp.lantronix.com
and store them in the Firmware subfolder of the APSConfig. folder on your
computer. If you accept all the defaults when you installed the utility, the folder will
be on your hard drive under Program Files.
2 Click the Start button and sele ct Programs-->APS Config-->APS Config to
display the APS Configuration Utility window.
Figure C-1: APS Configuration Utility Window
C-1
Page 27
Downloading Via the APS Configurati on Utili ty Updating Firmware
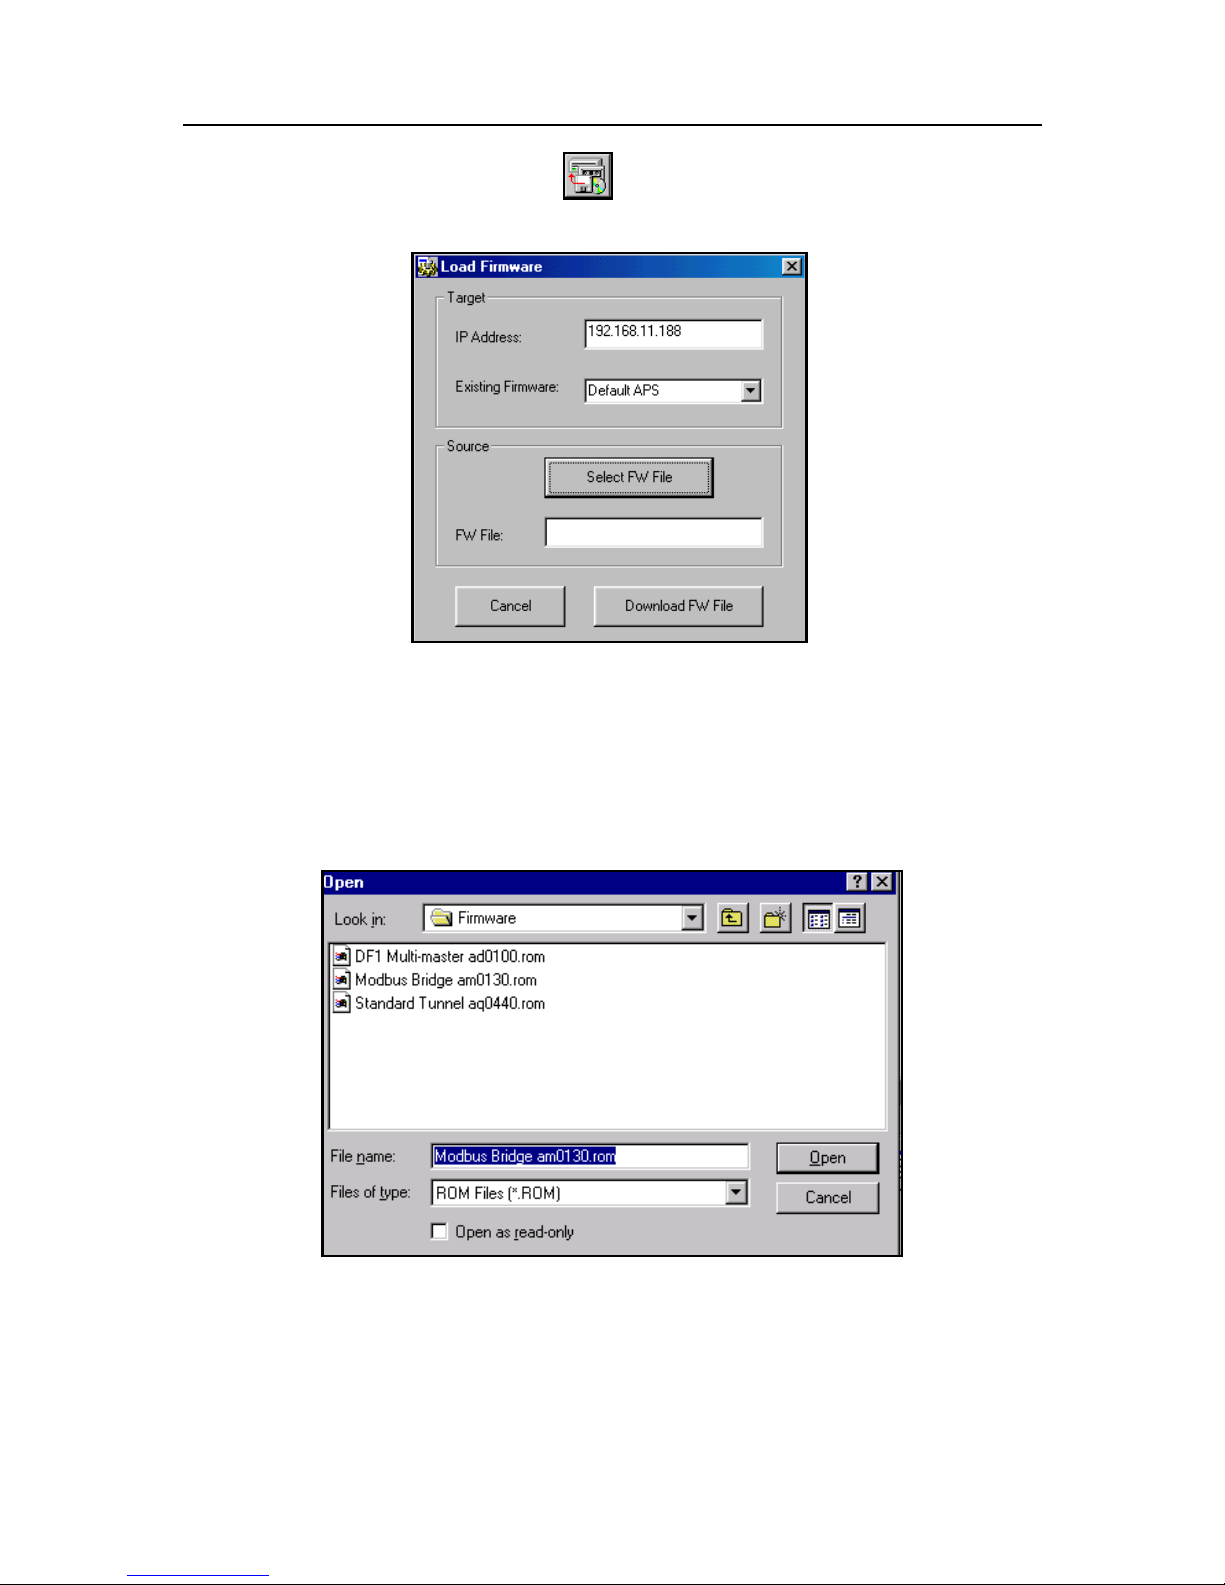
3 Click the Load Firmware icon . The Load Firmware window displays.
Figure C-2: Load Firmware Window
4 Type the Device Server’s assigned IP address in the IP Address field.
5 Click the Select FW File button. The files in your Firmware folder display. (If the
files are stored elsewhere, browse until you find them.)
Figure C-4: Firmware Files
6 Select the file to download and click the Open button. The path of the selected file
displays in the FW File field.
7 Click the Download FW File button. When the File download successful message
displays, click OK.
C-2
Page 28

Updating Firmware Downloading Via TFTP
Downloading Via TFTP
To download new firmware from a computer:
1 Use a TFTP client to send a binary file to the Device Server (CBX*.ROM to upgrade
the Device Server’s internal operational code and CBXW*.COB to upgrade its
internal Web interface).
Note: TFTP requires the .ROM (binary) version of the Device Server’s
internal operational code.
Figure C-3: 7)73'LDORJ%R[
2 Type the full path in the Source File field.
3 Type one of the following codes in the Destination File field:
Codes must be upper case.
AQ - Standard Tunneling
AM - Modbus
AD - DF1
WEB6 - Internal Web interface.
The destination file can also be ROM to match any firmware.
Remote Host is the IP address of the unit being upgraded.
4 Click the Put button to transfer the file to the Device Server.
5 The Device Server performs a power reset after the firmware reload process has
completed.
C-3
Page 29

Downloading Via the Serial Port Updating Firmware
Downloading Via the Serial Port
Note: This procedure takes about 10 minutes. Do not switch off the power
supply during the upda te . A loss of pow er w hil e repr ogr am mi ng wi ll
result in a corr upt program im age and a nonf unctional Device Server.
To download firmware from a computer via the Device Server’s serial port:
1 Enter Monitor Mode.
2 Download the firmware to the Device Server using the DL command.
3 Select Send Text File and select the CBX*.HEX file to be downloaded.
Note: The downloaded file must be the .HEX (ASCII) version.
4 After the final record is received, the Device Server checks the integrity of the
firmware image before programming the new firmware in the flash ROM.
5 The following message displays when the firmware upgrade is complete.
Figure C-5: Firmware Upgrade Screen Display
*** NodeSet 2.0 ***
0>DL
02049 lines loaded.
Max Address FFE0
Loading EEPROM ...
6 The Device Server performs a power reset after the firmware load has been
completed.
Note: You can only update the Device Server’s internal Web interface using
TFTP.
C-4
Page 30

D: Technical Specifications
CoBox-FL-IAP
The following table lists technical information about the CoBox-FL-IAP Device Server.
Table D-1: CoBox-FL-IAP Technical Specifications
Protocols Supported
Network Interface
Serial Interface
Data Rates
Serial Line Formats
Modem Controls
Flow Control
Management
ARP, UDP, TCP, Telnet, ICMP, SNMP, DHCP, TFTP, HTTP, BootP,
and ECHO
10BASE-T or 10BASE-FL
DB25 RS-232/RS-422/RS-485 serial port with DCE configuration
DB9 RS233 serial port with DTE configurat ion
Serial speed ranging from 300 bps - 115.2 Kbps
Characters: 7 or 8 data bits
Stop bits: 1 or 2
Parity: odd, even, none
RTS, CTS, DSR, DCD, DTR
XON/XOFF
CTS/RTS
HTTP (internal web server)
SNMP (read only)
Serial login
Telnet login
System Software
Diagnostic LEDs
Compatibility
Flash ROM standard: download able from a TCP/IP host (TFTP) or
over serial port
Network Transmit
Network Receive
Good Link
Collisions
Channel 1 Status
Channel 2 Status
Diagnostic
Ethernet: Version 2.0/IEEE 802.3
D-1
Page 31

CoBox-FL-IAP Technical Specifications
Power Requirements
Memory
Environmental
Physical Dimensions
Weight
9-30VDC or 9-25VAC (External adapter included)
Power Consumption: 3 Watts
Flash: 512K
RAM: 128K
NVRAM: 2K
Operating Temperature: 5to 50C (41 to 122F)
Storage Temperature: -40 to 66C (-40 t o 151F)
6.5 x 4.46 x 1.39 in (16.51 x 11.34 x 3.55 cm)
1.10 lbs (.48 kg)
D-2
Page 32

E: IP Addressing
Each TCP/IP node on a network host has a unique IP address. This address provides the
information needed to forward packets on the local network and across multiple networks
if necessary.
IP addresses are specified as x.x.x.x, where each x is a number from 1 to 254, f or example,
192.0.1.99. The Device Server must be assigned a unique IP address to use network
functionality.
IP addresses contain three pieces of information: the network, the subnet mask, and the
host.
Network Portion
The network portion of th e IP addr ess is d etermined by th e networ k type: Cl ass A, B , or C.
Table E-1: Network Portion of IP Address
Network Class Network Portion of Address
Class A First byte (2nd, 3rd, and 4th byt es are the host)
Class B First 2 bytes (3rd and 4th bytes are the host)
Class C First 3 bytes (4th byte is the host)
In most network examples, the host portion of the address is set to zero.
Table E-2: Available IP Addresses
Class Reserved Available
A 0.0.0.0
127.0.0.0
B 128.0.0.0
191.255.0.0
C 192.0.0.0
223.255.255.0
D, E 224.0.0. 0 to 255.255.25 5.254
255.255.255.255
1.0.0.0 to 126.0.0.0
128.1.0.0 to 19 1.254.0.0
192.0.1.0 to 223.255.254.0
None
E-1
Page 33

Subnet Portion IP Addressing
Consider the IP address 36.1.3.4. This addres s is a Clas s A address; therefore, the network
portion of the address is 36.0.0.0, and the host portion is 1.3.4.
Subnet Portion
The subnet portion of the IP address represents which subnetwork the address is from.
Subnetworks are formed when an IP netw or k i s br oken down int o small er netw or ks usin g
a subnet mask.
A router is required between all net wor ks and al l sub networks. Generally, nodes can send
packets directly only to nodes on their own subnetwork. All packets destined for other
subnets are sent to a router on the local network.
Host Portion
The host portion of the IP address is a unique number assigned to identify the node.
Network Address
A host address with all host bits set to 0 addresses the network as a whole (for example, in
routing entries).
Figure E-1: Sample Network Address
192.168.0.0
Broadcast Address
A host address with all host bits set to 1 is the broadcast address, meaning for “for every
station.”
Figure E-2: Sample Broad ca st Addre ss
192.168.0.255
Note: Network and broadcast addresses must not be used as a host ad dress;
for example, 192.168.0.0 identifies the entire network, and
192.168.0.255 identifies the broadcast address.
E-2
Page 34

IP Addressing IP Subnet Mask
IP Subnet Mask
A subnet mask divides IP addresses differently from the standards defined by the classes
A, B, and C. A subnet mask defines the number of bits to be taken from the IP address as
the network or host sections. The Devi ce S erver promp t s fo r th e number of ho st bi ts to be
entered and then calculates the subnet mask, which is displayed in standard decimal-dot
notation (for example, 255.255.255.0) when saved parameters are displayed.
Table E-3: Standard IP Network Netmasks
Network Class Network Bits Host Bits Netmask
A824 255.0.0.0
B1616 255.255.0.0
C248 255.255.255.0
Table E-4: Netmask Examples
Netmask Host Bits
255.255.255.252 2
255.255.255.248 3
255.255.255.240 4
255.255.255.224 5
255.255.255.192 6
255.255.255.128 7
255.255.255.0 8
255.255.254.0 9
255.255.252.0 10
255.255.248.0 11
... ...
255.128.0.0 23
255.0.0.0 24
E-3
Page 35

Private IP Networks and the Internet IP Addressing
Private IP Networks and the Internet
If your network is not and will not be con nected to the Internet, you may use any IP address.
If your network is connected or will be connected to the Internet , or if you intend to operate
the Device Server on an intranet, you should use one of the reserved subnetworks. Cons ult
your network administrator wi th questions about IP address as signment .
Network RFCs
For more information about IP addresses, refer to the following documents, which can be
located on the World Wide Web using one of the following directories or indices:
u
RFC 950 Internet Standard Subnetting Procedure
u
RFC 1700 Assigned Numbers
u
RFC 1117 Internet Numbers
u
RFC 1597 Address Allocation for Private Networks
E-4
Page 36

F: Pinouts
x
Ethernet Connectors
The CoBox-FL-IAP contains a 10BASE-T ethernet connector and a 10BASE-FL ethernet
connector.
Note: Do not attempt to connect both Ethernet ports simultaneously.If one is
used, the other is disabled.
10BASE-T
The CoBox-FL-IAP supports 10 Mbit Ethernet through an RJ45 connector.
Figure F-1: RJ45 Ethernet Conn ec tor
1
8
1 - Tx+
2 - Tx3 - Rx+
6 - Rx-
10BASE-FL
The CoBox-FL-IAP also supports 10 Mbit Ethernet through an ST-Fiber Ethernet
connector.
Figure F-2: 10BASE-FL Ethernet Connector
R
Tx
F-1
Page 37

Serial Connectors Pinouts
*
2)
l
*
*
.
D
t)
)
Serial Connectors
The CoBox-FL-IAP’s female DB25 connector provide s an RS-232C , RS-485, or RS-422
DCE serial interface. The default serial por t se ttings are 9600 baud , 8 bits , no parity, and 1
stop bit.
Figure F-3: DB25 Serial Connector (DCE)
1
TX (in)
RX (out)
RTS (in)
CTS (out)
DSR (out)
GND
DCD (out)
*Reg. +5VDC
Reg. +9-30VDC
13
(RS-232C)
*The Device Server can alternately be powered up via the seria
port using one of these pins.
*The minus sign (-) is sometimes represented as A (e.g., TXA)
The plus sign (+) is sometimes represented as B (e.g., TXB).
14
TX+ (out)*
TX- (out)**
DTR (in)
RX+ (in)**
RX- (in)**
25
(RS-485/42
Note: For RS-485 2-w ire fu ncti ona lity, pins 14 and 21 and pins 15 and 22
must be connected to each other.
The CoBox-FL-IAP’s male DB9 connector is a DTE serial interface.
Figure F-4: DB9 Serial Connector (DTE)
5
GND
TRA (out)
TxA (out)
RxA (in)
DCDA (in)
1
9
CTSA (in
RTSA (ou
6
F-2
Page 38

Warranty Statement
Lantronix warrants for a period of FIVE years from the date of shipment that each CoBox-FL-IAP
Device Server supplied shall be free from defects in material and workmanship. During this period,
if the customer experie nces di fficult ies with a produc t a nd is un able to resolve the p roblem by ph one
with Lantronix Technical Supp ort, a Return Material Authorizatio n (RMA) will be issued. Following
receipt of a RMA number, the customer is responsible for returning the product to Lantronix, freight
prepaid. Lantronix, upon verification of warranty will, at its option, repair or replace the product in
question, and return it to the customer freight prepaid. No services are handled at the customer’s site
under this warranty.
Lantronix warrants software for a perio d of sixty (60) days from the date of shipment that each software package supplied shall be free from defects and shall operate according to Lantronix specifications. Any software revisions required hereunder cover supply of distribution media only and do not
cover, or include, any installa tion. The customer is responsible for return of media to Lantronix and
Lantronix for freight associated with replacement me dia being returned to the cus to mer.
Lantronix shall have no obligation to make repairs or to cause replacement required through normal
wear and tear of necessitated in whole or in part by catastrophe, fault or negligence of the user, im proper or unauthorized use of the Product, or use of the Product in such a manner for which it was
not designed, or by cause s exte rna l to the P rod uc t, suc h as, bu t not lim ite d to, po we r or fail ure of air
conditioning.
There are no understandings, agreements, representations or warranties, express or implied, including
warranties of merchantabil ity or fi tne ss fo r a pa rticular purpose, other than those specifically set out
above or by any existing contract between the parties. Any such contract states the entire obligation
of Lantronix. The contents of this document shall not become part of or modify any prior or existing
agreement, commitment or relationship
The informa tion, recommendation, descript ion and safety notations in this or other documents supplied by Lantronix are based on general industry experience and judgment with respect to such hardware and software. THIS INFORMATION SHOULD NOT BE CONSIDERED TO BE ALL
INCLUSIVE OR COVERING ALL CONTINGENCIES. NO OTHER WARRANTIES, EXPRESS
OR IMPLIED, INCLUDING WARRANTIES OF FITNESS FOR A PARTICULAR PURPOSE OR
MERCHANTABILITY, OR WARRANTIES ARISING FROM COURSE OF DEALING OR USAGE OF TRADE, ARE MADE REGARDING THE INFORMATION, RECOMMENDATIONS,
DESCRIPTIONS AND SAFETY NOTATIONS CONTAINED HEREBY AND IN HARDWARE
AND SOFTWARE SPECIFICATION DOCUMENTATION, OR INSTRUCTIONS SUPPLIED BY
Lantronix. In no event will Lantronix be responsible to the user in contract, in tort (including negligence), strict liability or otherwise for any special, indirect, incidental or consequential damage or
loss of equipment, plant or power system, cost of capital, loss of profits or revenues, cost of replacement power, additional expenses in the us e of exis ting software, h ardware, equipment or faciliti es, or
claims against the user by its employees or customers resulting from the use of the information, recommendations, desc riptions and safe ty notations supp lied by Lantroni x. Lantronix lia bility is limited
(at its election) to (1) refund of buyer’s purchase price for such affected products (without interest);
(2) repair of such products, or (3) replacement of such products, provided however, that the buyer
follows the procedures set forth herein
Warranty claims must be received by Lantronix within the applic able warranty period. A replaced
product, or part thereof, shall become the property of Lantronix and shall be returned to Lantronix at
the Purchaser’s expense. All return material must be accompanied by a return material authori-
zation number assign e d by Lantronix.
Page 39

Declaration of Conformity
(according to ISO/IEC Guide 22 and BS 7514)
Manufacturer’s Name: Lantronix
Declares that the product:
Product Name: Device Server
Model Name/Number: CoBox-FL-IAP
Conforms to the following standards:
Safety: EN60950:1992+A1, A2, A3, A4, A11
Electromagnetic Emissions: FCC Part 15, Subpart B, Class B
EN55022: 1998 (CISPR 22, Class A: 1993, A1:
1995, A2: 1996)
IEC 1000-3-2/A14: 2000
IEC 1000-3-3: 1994
Electromagnetic Immunity: EN55024: 1998 Information Technology Equip-
ment-Immunity Characteristics
IEC 6100-4-2: 1995 Electro-Static Discharg e Test
IEC 6100-4-3: 1996 Radiated Immunity Field Test
IEC 6100-4-4: 1995 Electrical Fast Transient Test
IEC 6100-4-5: 1995 Power Supply Surge Test
IEC 6100-4-6: 1996 Conducted Immunity Test
IEC 6100-4-8: 1993 Magnetic Field Test
IEC 6100-4-11: 1994 Voltage Dips & Interrupts
Test
(L.V.D. Directive 73/23/EEC)
Supplementary Information: The product complies with the requirements of the
Low Voltage Directive 72/23/EEC and the EMC Directive 89/336/EEC.
The product has been verified as being compliant
within the Class A limits of the FCC Radio Frequency Devices Rules (FCC Part 15, Subpart B),
revised as of October 1993.
Manufacturer’s Contact: Director of Quality Assurance, Lantronix,
15353 Barranca Parkway
Irvine, CA 92618 USA
General Tel: 949/453-3990
Fax: 949/453-3995
Page 40

The information in this guide may change without notice. The manufacturer assumes no
responsibility for any errors which may appear in this guide.
Ethernet is a trademark of XEROX Corporation. UNIX is a registered trademark of Th e
Open Group. Windows 95, Windows 98, W indows 2000, and Win dows NT are trademarks
of Microsoft Corp. Netscape is a trademark of Netscape Communications Corporation.
Copyright 2001, Lantronix. A ll rights re served. No part of the conten ts of this book may be
transmitted or reproduced in any form or by any means without the written permission of
Lantronix. Printed in the United States of America.
The revision date for this manual is July 2001.
Part Number: CD-APS-01
Rev. C
WARNING
This product has been designed to comply with the limits for a Class A digital d e vice
pursuant to Part 15 of FCC Rules. These limits are designed to provide reasonable
protection against such interference when operating in a commercial environment. This
equipment generates, uses, and can radiate rad io frequency energy, an d if not installed and
used in accordance with this guide, may cause harmful interference to radio
communications.
Operation of this equipment in a residential area is likely to cause interference, in which
case the user, at his or her own expense, will be required to take whatever measures may
be required to correct the interference.
Changes or modi ficati ons to this device n ot ex plici tly app roved by Lant ronix will void the
user’s authority to operate this device.
 Loading...