

Page 1

On-board Telephone
Page 2

RANGE ROVER
In-Car Telephone
Publication Part No. LRL 0456ENG-2nd Edition
© Land Rover 2002
All rights reserved. No part of this publication ma y be reproduced, stored in a retrieval system or transmitted in any form, electronic, mechanical,
As part of Land Rover environmental policy, this publication is printed on p aper made from chlorine free pulp.
recording or other means w ithout prior written permi ssion from La nd Rover.
Page 3

On-board Telephone Handbook
For your convenience, this handbook is divided into sections, each dealing with a different aspect of the
Telephone System. These are listed on the contents page and you will find it worthwhile to take a little
time in reading each section relevant to your specification.
The specification of each vehicle will vary according to territorial requirements and also to personnal
specifications. Some of the information published in this handbook, therefore, may not apply to your
particular vehicle.
*An asterisk appearing within the text identifies features or items of equipment that are fitted as options.
Land Rover operates a policy of constant product improvement and therefore reserves the right to change specifications without
notice at any time. Whilst every effort is made to ensure complete accuracy of the information in this handbook, no liabilities for
inaccuracies or the consequences thereof can be accepted by the manufacturer or the dealer, except in respect of personal injury
caused by the negligence of the manufacturer or the dealer.
2
Page 4

Contents
Introduction . . . . . . . . . . . . . . . . . . . . . . . . . . . . . . . . . . . . . . . . . . . . . 4
Telephone Handset . . . . . . . . . . . . . . . . . . . . . . . . . . . . . . . . . . . . . . . . 6
SIM Card . . . . . . . . . . . . . . . . . . . . . . . . . . . . . . . . . . . . . . . . . . . . . . 10
Replacing Batteries . . . . . . . . . . . . . . . . . . . . . . . . . . . . . . . . . . . . . . . 12
Codes . . . . . . . . . . . . . . . . . . . . . . . . . . . . . . . . . . . . . . . . . . . . . . . . . 13
Handset Operation . . . . . . . . . . . . . . . . . . . . . . . . . . . . . . . . . . . . . . . 19
Making Calls . . . . . . . . . . . . . . . . . . . . . . . . . . . . . . . . . . . . . . . . . . . . 22
Receiving Calls . . . . . . . . . . . . . . . . . . . . . . . . . . . . . . . . . . . . . . . . . . 25
Phone Book . . . . . . . . . . . . . . . . . . . . . . . . . . . . . . . . . . . . . . . . . . . . 27
Diverting Calls . . . . . . . . . . . . . . . . . . . . . . . . . . . . . . . . . . . . . . . . . . 30
Multiple Connections . . . . . . . . . . . . . . . . . . . . . . . . . . . . . . . . . . . . . 32
Missed Calls . . . . . . . . . . . . . . . . . . . . . . . . . . . . . . . . . . . . . . . . . . . . 33
TOP 8 List . . . . . . . . . . . . . . . . . . . . . . . . . . . . . . . . . . . . . . . . . . . . . . 34
Text Messages . . . . . . . . . . . . . . . . . . . . . . . . . . . . . . . . . . . . . . . . . . 35
DTMF Codes . . . . . . . . . . . . . . . . . . . . . . . . . . . . . . . . . . . . . . . . . . . . 38
Cell Broadcast Messages . . . . . . . . . . . . . . . . . . . . . . . . . . . . . . . . . . 39
Charges . . . . . . . . . . . . . . . . . . . . . . . . . . . . . . . . . . . . . . . . . . . . . . . 40
System Settings . . . . . . . . . . . . . . . . . . . . . . . . . . . . . . . . . . . . . . . . . 43
Network Settings . . . . . . . . . . . . . . . . . . . . . . . . . . . . . . . . . . . . . . . . 50
Conformance . . . . . . . . . . . . . . . . . . . . . . . . . . . . . . . . . . . . . . . . . . . 52
Troubleshooting . . . . . . . . . . . . . . . . . . . . . . . . . . . . . . . . . . . . . . . . . 54
Telephone Menu Structure . . . . . . . . . . . . . . . . . . . . . . . . . . . . . . . . . 57
3
Page 5

Introduction
Contro ls
Introduction
USING THE PHONE IN THE VEHICLE
IMPORTANT
Use of the telephone handset while you are
driving can be dangerous as it diverts
attention from the traffic situation. In some
countries it is prohibited and in other
countries a hands-free unit must be used by
those wishing to use the phone while driving.
When you wish to use the telephone handset,
you should stop at an appropriate place where
you are not endangering or inconveniencing
other vehicles.
This telephone system has a hands free
facility. Operating instuctions can be found in
the audio handbook supplied with your
vehicle
WARNING
Using the telephone near the car:
Do not telephone inside a garage or near an
open car bonnet. The air may contain fuel
vapours and the telephone could produce
sparks and start a fire.
WARNING
Unusual ambient conditions:
Switch off the telephone in areas where high
explosives are being used. High frequency
remote controls could be interfered with and
cause an explosion.
Switch off your telephone in areas with a high
explosion risk. This includes filling stations,
fuel storage areas or chemical factories as well
as places where the air contains fuel vapour,
chemicals or metal dust. The telephone might
possibly produce sparks and cause a fire or
explosion.
WARNING
Medical equipment:
The functioning of cardiac pacemakers or
hearing aids may be impaired when the phone
is in use. Check with a doctor or manufacturer
whether any such devices you or your
passengers are using are sufficiently protected
against high-frequency energy.
Cleaning
Use a damp or anti-static cloth to clean your
phone handset.
Do not use dry or electrostatically-charged
cloths.
Do not use aggressive cleaning agents.
GSM NETWORKS
The GSM standard allows you to use your phone
in many countries and has a uniform emergency
call number (112) irrespective of the country in
which you are driving.
It is possible that telephone reception may be
poor or unavailable in remote regions. This will
usually be due to the inadequate power of the
transmitter and, therefore, to incomplete
coverage. Depending on your location, you may
also be using the transmitters of a network
operator with which your service provider has an
agreement for handling your calls.
4
Page 6

Introduction
SIM CARD AND SERVICE PROVIDER
IMPORTANT
Many telephone functions depend on the
service provider and the terms of your
individual contract. For this reason, it is
possible that certain functions of your
telephone handset that are described in this
Handbook may not be available to you.
Your telephone requires a SIM (Subscriber
Identity Module) card, which you will be given by
your service provider. All details of the services
to which you are contractually entitled are stored
on it.
Please see the information sheets published by
the GSM (Global System for Mobile
Communication) network operators, together
with the information from your service provider.
In the event of loss, have your SIM card blocked
immediately. Your service provider can be
reached at any time, day or night, so that you can
do this.
Any person who knows your PIN codes for the
SIM card, wil be able to fraudulantly use the card
without restriction and as a result, incur costs at
your expense. It is therefore important that you
keep your SIM card in a safe place and PIN code
secure to prevent misuse.
PIN and PUK
The SIM card is protected against misuse by a
PIN (Personalised Identification Number) which
comprises between four and eight digits. The
cards supplied by some service providers also
contain a PIN2, with which you can grant limited
access rights to other users . Your card is
blocked if you enter an incorrect PIN three times.
To unblock the card you require the PUK (PIN
Unblocking Key) which comprises between four
and eight digits. After you have entered the PUK,
you can select a new PIN. If you enter an
incorrect PUK ten times in succession, your card
is permanently blocked. In this case contact your
service provider.
The SIM card and the PIN are delivered in a
sealed envelope by your service provider.
The PUK code will be available from your service
provider if you accidentally lock your SIM by
entering the PIN or PIN2 incorrectly three times
in succession.
Protect the SIM card against damage, static
electricity and moisture to ensure that it remains
operational and that the memorised data is not
lost.
5
Page 7
Telephone Handset
Telephone Handset
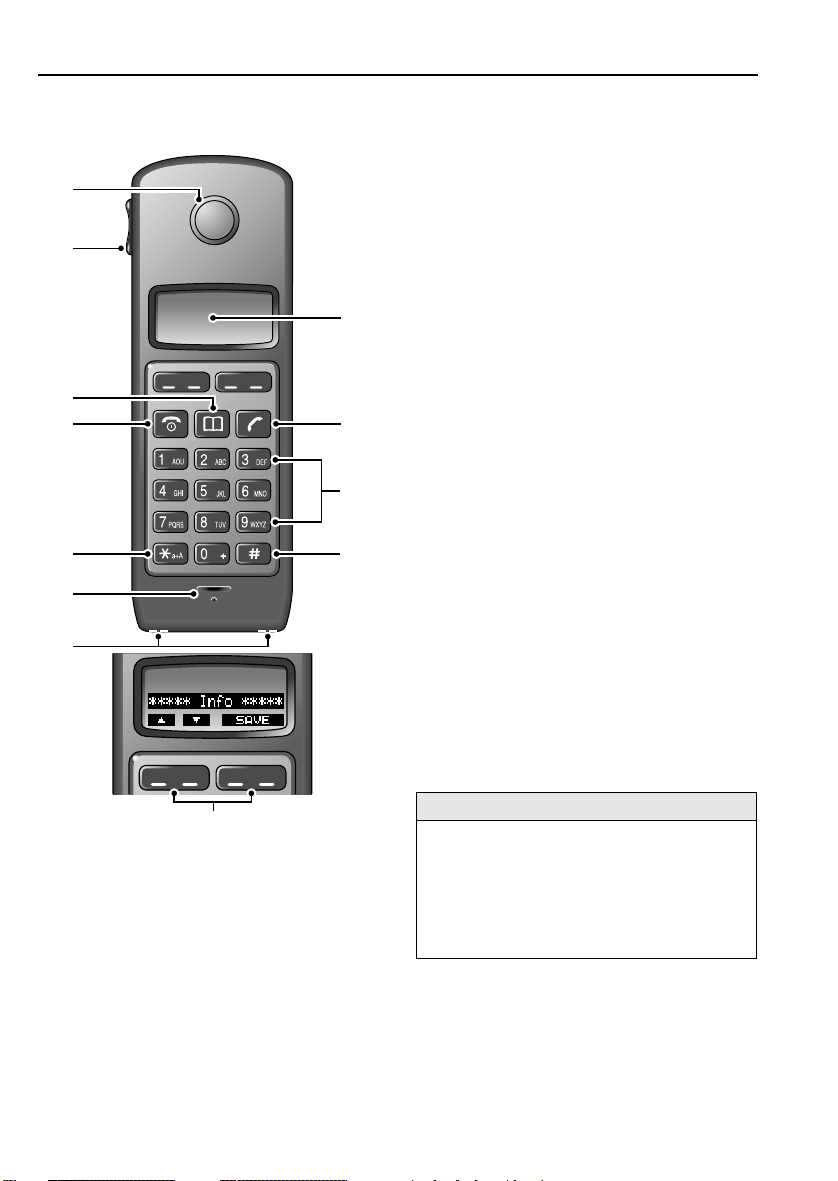
TELEPHONE HANDSET Handset controls
1. Electrical charging contacts
2. Microphone
7
6
8
5
4
9
10
3
11
2
1
3. Changeover to capitals (Used in text entry)
4. Keep pressed for a while: switching the
phone on and off:
Press briefly: ending a call or returning to
main menu
5. Opening phone book or switching between
phone book and TOP 8 list
6. Adjust volume of handset
7. Earpiece
8. Display
9. Answering calls, establishing a connection
10. Entering letters, numbers and special
symbols
11. Press and hold to de-activate the key lock
Press briefly confirming code input
12. Display/rocker controls
NOTE: Use the arrow symbols to scroll up
or down within a menu. If there are two
different symbols above a key, press the key
on the left or right as appropriate. If there is
only one wide display above a key, it is
irrelevant where the key is pressed. Most
menus contain a ***** Info**** line. This
shows what features can be adjusted or
altered in that menu.
H4151
12
IMPORTANT
The telephone handset is connected to the
base station in the vehicle via a radio link and
is usable for a distance of 30 metres from the
vehicle.
Reception may be affected when the handset
is used within a building.
6
Page 8
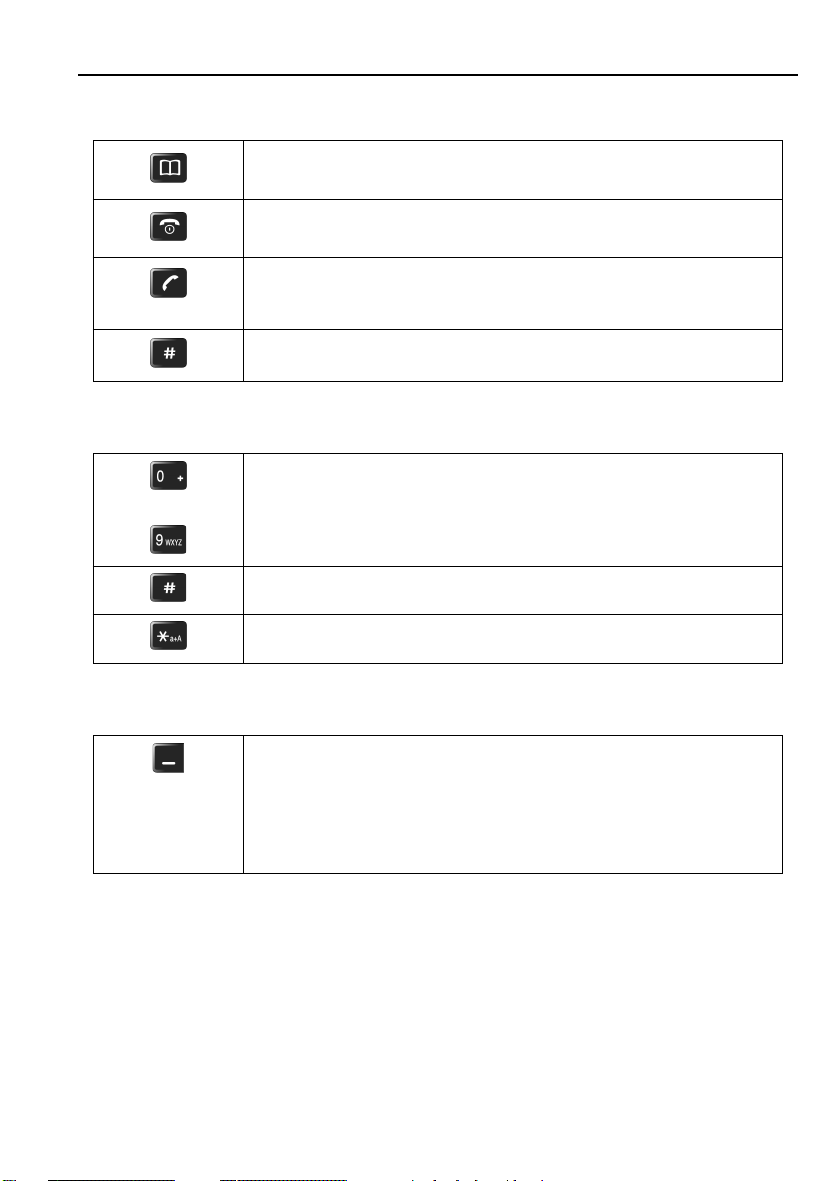
Function keys
Numerical keys
to
Telephone Handset
Calling up the phone book .
Changing between the phone book and the TOP 8 list.
Press briefly: back to idle display.
Keep pressed for a while: switching the phone on and off.
With incoming call: answering the call.
On stand-by: calling up the redial list.
After entering a phone number: establishing connection.
Press briefly: confirming a code input.
Keep pressed for a while: activating and deactivating the key lock.
Entering digits, letters and special symbols.
Entering special characters #.
Entering special characters *.
Switching from lower case to capitals (for the next character).
Display controls
The rocker keys are used to control the soft keys which are shown in the
bottom line of the handset display, exactly above the rocker keys.
NOTE: If two different symbols appear above a rocker key, the key must be
pressed to the left or right side, depending on the symbol required. If there
is only one wide display above a rocker key, it is irrelevant where the key is
pressed.
7
Page 9
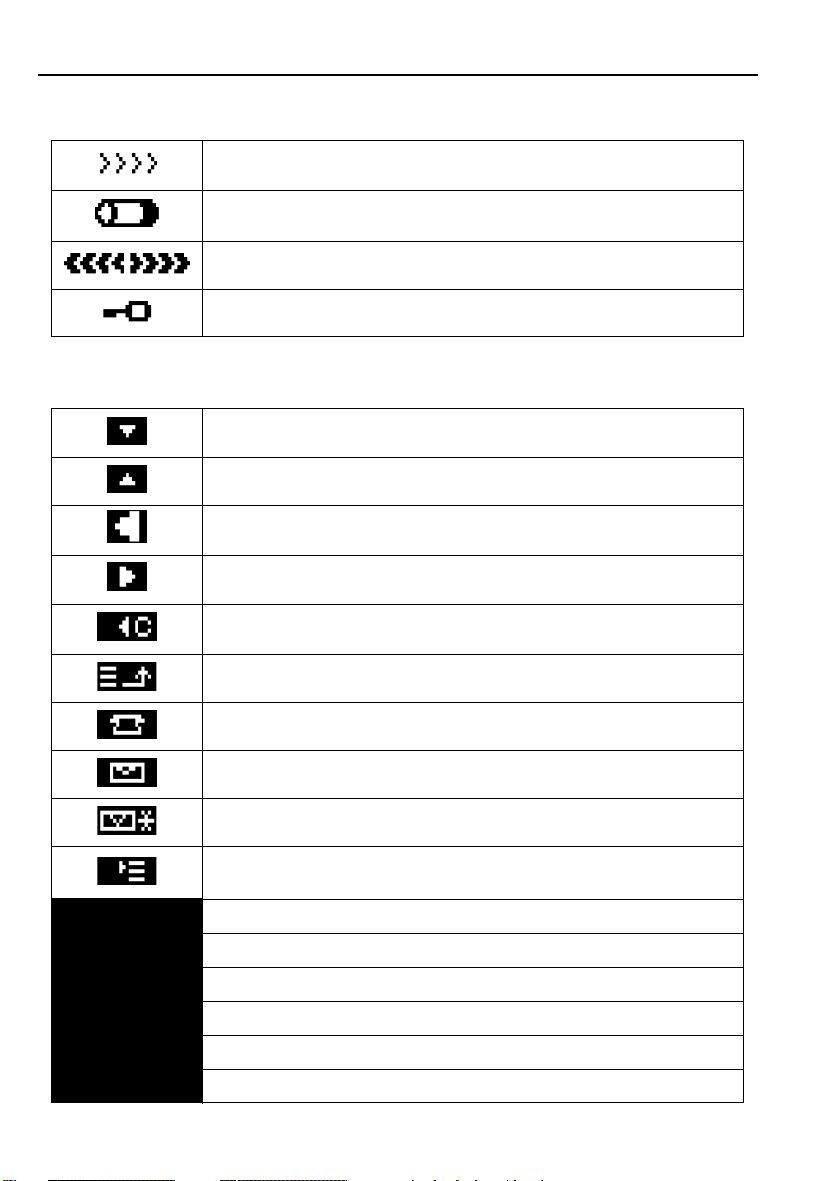
Pictograms
Softkeys
Telephone Handset
Strength of reception signal:
the fewer arrows displayed, the weaker the signal.
Battery charge status:
dark if the batteries are fully charged, light if the batteries are discharged.
Incoming call.
Key lock is switched on.
To proceed to the menu item or entry on the next line down.
To proceed to the menu item or entry on the next line up.
Press briefly: to move one character back.
Keep pressed for a while: to move one word back.
Press briefly: to move one character forward.
Keep pressed for a while: to move one word forward .
Press briefly: to delete one character at a time.
Keep pressed for a while: to delete one word at a time.
To move to a higher menu level.
REJECT
ALTER
ACCEPT
REPLACE
HANDSFR
YES
New missed call.
New message received.
New message received and message memory full.
Call up Settings Menu (e.g. to check mailbox, change call tone etc.).
Reject incoming call.
Edit entry
Accept incoming call.
Terminate current connection and accept incoming call.
Transfer call to the hands-free unit.
Confirm an action.
8
Page 10

Telephone Handset
NO
CONF
READ
DELETE
TRADE
OK
PRK
SEND
SET
SAVE
SOS
TONEOFF
NEXT
BACK
,
.
-
Cancel an action.
Initiate a conference call.
Read entry in phone book/redial list/TOP 8 list.
Delete an entry, code or list.
Switch between two calls.
Confirm input/settings for storing.
Hold current connection, e.g. in order to dial a new number.
Used when sending text messages.
Used when sending/accessing & confirming menu settings.
Save entry.
Make an emergency call.
Switch off call tone.
Used when the operator list is displayed.
Back one menu level.
Comma, (required for inputs).
Full stop, (required for inputs).
Dash, (required for inputs).
9
Page 11
SIM Card
SIM Ca rd
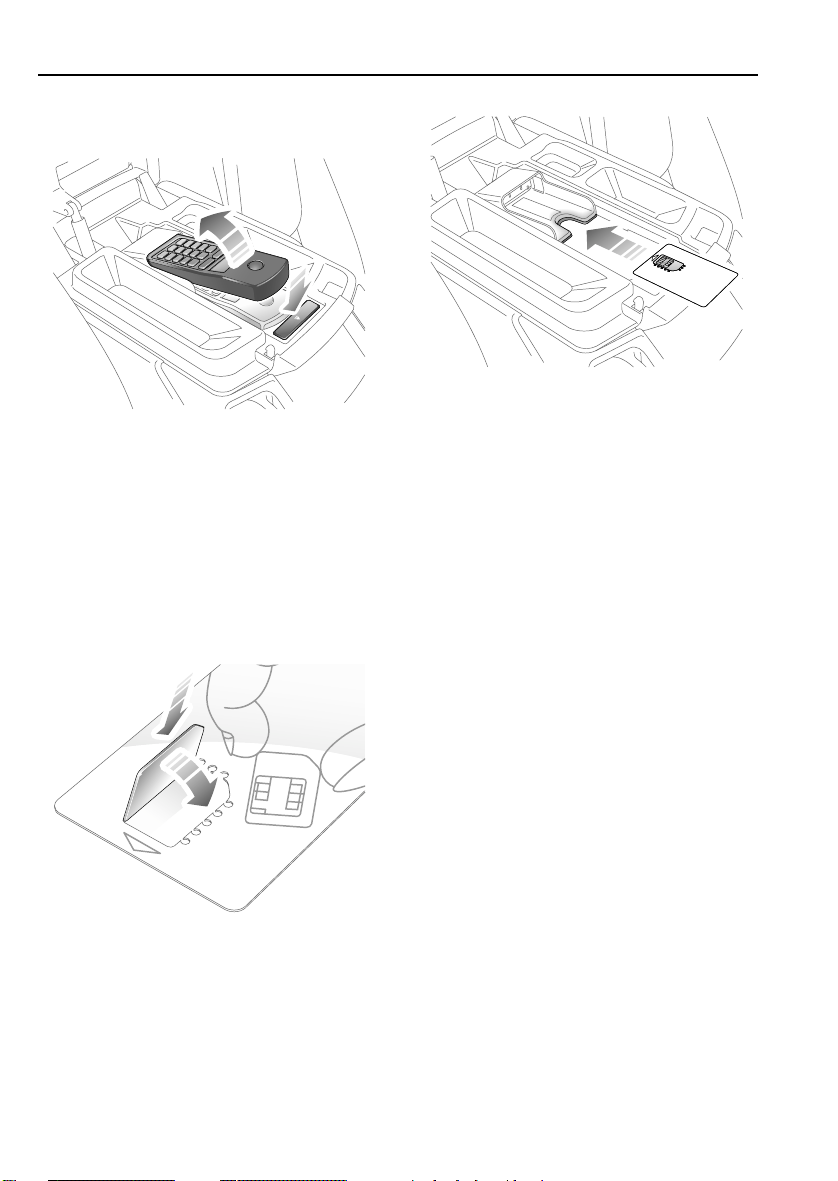
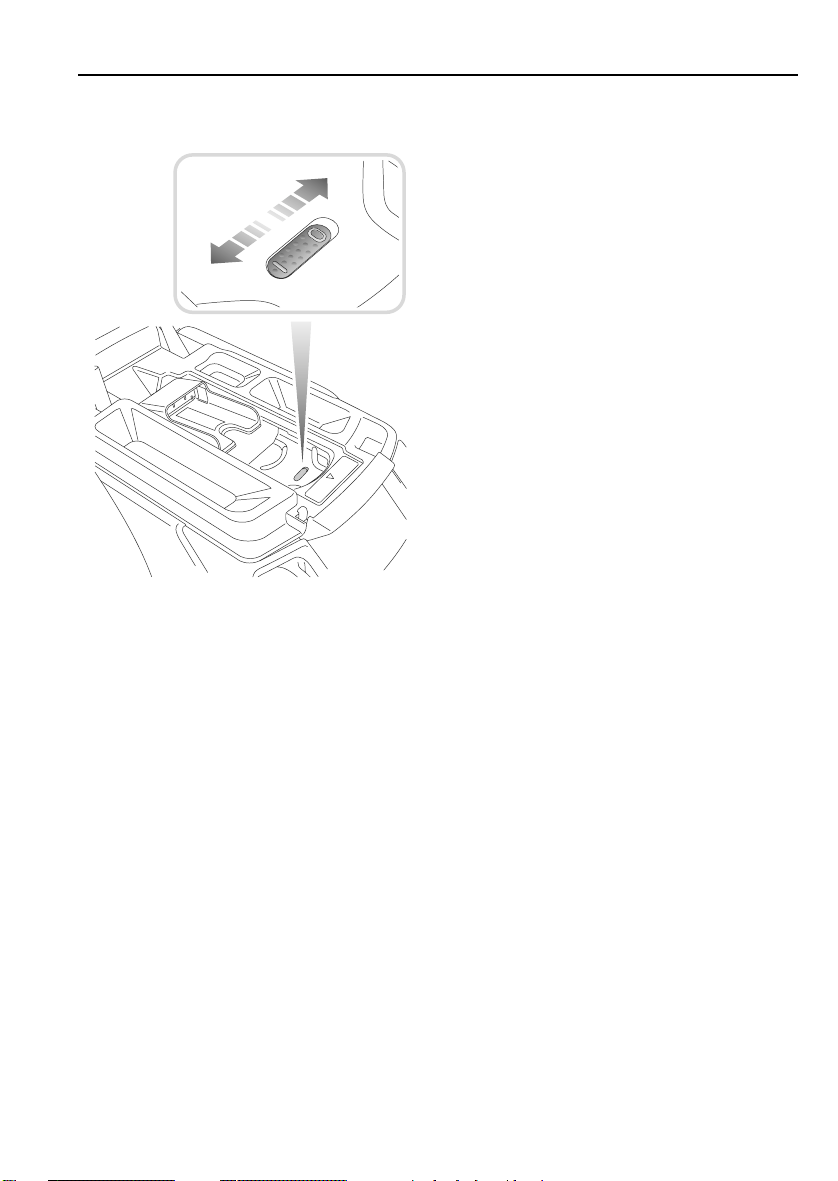
SIM CARD INSERTION/REMOVAL
H4178
Press the release button on the handset cradle.
The handset will swing upwards and can then be
removed from the vehicle.
The handset can also be inserted with the keys
facing downwards. This will prevent the keys
from being operated inadvertently.
Remove the SIM card holder from the handset.
H4171
Replace the SIM card holder in the direction of
the arrow, with the gold chip facing upwards.
If you have a large SIM card, place this into the
slot in place of the card holder.
H4175
If you have a small SIM card, it must be placed
into the card holder with the gold chip facing
upwards as shown.
10
Page 12
SIM Card
Radio switch
H4250
The handset is connected with the base station in
the vehicle by radio link. This limits the out-of-car
use to a distance of 30 metres. This link can be
switched off for workshop purposes. When
using your car phone, ensure that the switch
above the SIM card always remains in position
‘1’ (to the right).
11
Page 13
Replacing Batteries
Replacing Batteries
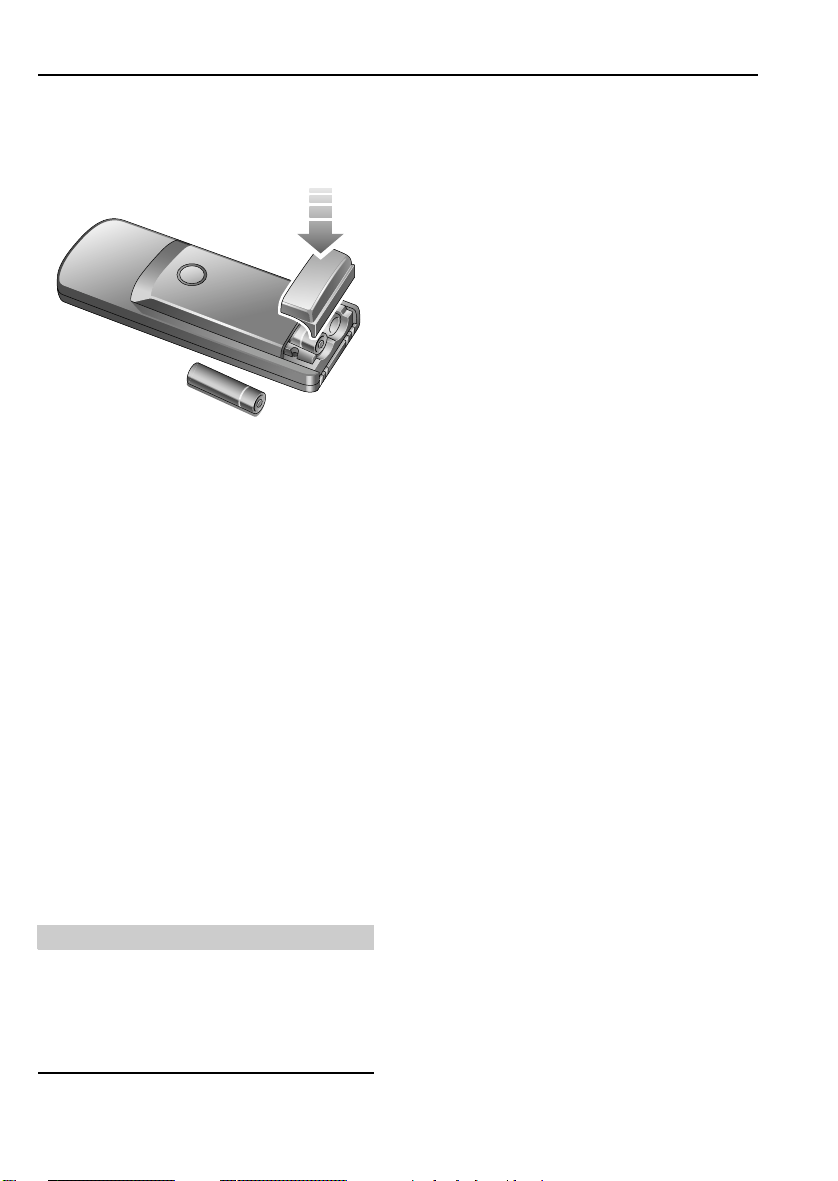
CHANGING THE BATTERIES
H4177
Inserting rechargeable batteries
1. Remove the lid of the battery compartment.
Press the base of the handset between the
two electrical contacts and simultaneously
slide the cover upwards.
2. Remove the old batteries, if fitted. Insert
two new batteries of the same type.
3. The installed arrangement of the batteries is
shown by a sticker in the battery
compartment.
4. Fit the cover and press to close it.
Approved battery types
Use only batteries of type:
SAFT VH1200/1200mAh
or
PANASONIC HHR110AAB/1020 mAh.
Talk time with the batteries fully charged is
3 hours and stand-by time is 48 hours.
WARNING
Do not use conventional non-rechargeable
batteries. The in-car charger would attempt to
charge these batteries causing them to
overheat and, possibly, explode.
Dispose of old batteries in a safe manner.
12
Page 14
Codes
Codes
PIN (Personal Identification Number)
Entering PIN
Each time you switch on the car phone, you are
requested to enter your PIN.
After the phone is switched on, the display shows
‘Please enter PIN’.
For example, enter ‘1234’ (only asterisks appear
in the display) and either confirm with the display
controls
or
press the hash key.
NOTE: Your card is blocked if you enter an
incorrect PIN three times in succession.
Resetting PIN block
To reset your blocked PIN you require the PUK
code supplied by your service provider together
with your SIM card.
If your PIN is blocked, the display shows:
‘PIN Blocked. Enter PUK’
For example, enter ‘1234’ (only asterisks appear
in the display) and either confirm with the display
controls
or
press the hash key.
Defining a new PIN
The display shows:
‘Please Enter PIN Again’
For example, enter ‘5678’ and either confirm with
the display controls
or
press the hash key.
The display shows:
‘Please Repeat Input’
enter ‘5678’ and confirm again.
Suppressing PIN input
The requirement to enter your PIN when
switching on the phone, a standard feature, can
be suppressed:
• Call up the main menu.
• Select ‘BLOCKS 3’ and confirm.
• Select ‘PIN Control’ and confirm.
Display shows: ‘PIN Control On
• Select ‘ALTER’.
Display shows: ‘Please Enter PIN’
• Enter PIN and confirm.
Once the PUK has been verified, you are
requested to define a new PIN.
13
Page 15
Codes
Changing the PIN code
• Call up the main menu.
• Select ‘SETTINGS 7’ and confirm.
• Select ‘PIN Settings’ and confirm.
• Select ‘Alter PIN’ and confirm.
Display shows ’ Please Enter PIN:’
and, for example, enter ‘1234’
• ‘ALTER’ select.
Display shows:
‘Please Enter PIN Again:’
and, for example, enter ‘5678’
and either confirm with the display controls
or
press the hash key.
Display shows:
‘Please Repeat Input’
Enter ‘5678’ and confirm again.
PIN2
Some service providers supply SIM cards with a
PIN2. This can be used to:
• reset the duration of a call and the call
charges.
• activate and de-activate or adjust the charge
limiting function.
• determine the charge rate.
Change PIN2 code
• Call up the main menu.
• Select ‘SETTINGS 7’ and confirm.
• Select ‘PIN Settings’ and confirm.
• Select ‘Alter PIN2’ and confirm.
Display shows ’ Please Enter PIN2:’
and, for example, enter ‘1234’
• Select ‘ALTER’.
Display shows:
‘Please Enter PIN2 Again:’
and, for example, enter ‘5678’
and either confirm with the display controls
or
press the hash key.
Display shows:
‘Please Repeat Input’
Enter ‘5678’ and confirm again.
14
Page 16

Codes
Equipment code
The equipment code protects your vehicle phone
against unauthorised manipulations of the
system settings.
Enter the equipment code before the following
functions can be used:
• Delete entire phone book.
• Loan phone.
• Preventing new SIM.
• Call screening.
• Permit only numbers from the phone book.
• Permit only the last ten numbers from the
redial list.
NOTE: If you enter the equipment code
incorrectly three times in succession, the above
functions will no longer be available. Please
contact your Land Rover Dealer to have them
unblocked.
The equipment code is set to “0000” on delivery.
Altering the equipment code (phone code)
To change the equipment code:
Call up the main menu.
‘LOCAL SETTINGS 8’ select and confirm.
‘Service setting’ select and confirm.
‘Equipment Code’ select and confirm.
Enter equipment code.
‘ALTER’ select.
Display shows:
‘Equipment Code Enter Again’
enter the new equipment code.
‘OK’ select.
Display shows:
‘Please Repeat Input’
enter the new code again.
‘OK’ select to activate the new equipment code
or
‘BACK’ to retain the old code.
NOTE: Keep a note of the equipment code in a
safe place. If an incorrect code is input three
times in succession it will have to be unblocked.
15
Page 17

Codes
AUTHORISATION
Deleting entire phone book
You can delete all entries in the entire phone
book with a single command.
To ensure that you cannot do this inadvertently
or that it cannot be done by an unauthorised
person, the phone code must be entered as a
safeguard.
Restricting use by third parties
Use of the phone, e.g. if lent to another person,
can be restricted with the ‘Loan Phone’ function:
1. the theft protection is activated, i.e. the
phone cannot be used with a different SIM
card.
2. the charge counter cannot be deleted.
3. the charge rate cannot be modified.
To initiate:
• Call up the main menu .
• Select ‘BLOCKS 3’ and confirm.
• Select ‘Loan Phone’ and confirm.
Display shows:
‘Loan Phone OFF’
• Select ‘ALTER’.
Display shows:
‘Phone Code: Please Enter’.
• Enter phone code (your equipment code) and
confirm.
NOTE: The setting ‘Loan Phone’ automatically
activates the theft protection feature.
• Select ‘Prevent New SIM’ and confirm.
Display shows:
‘Prevent New SIM Off’
• Select ‘ALTER’.
Display shows:
‘Phone Code: Please Enter’.
• Enter phone code (your equipment code) and
confirm.
Permit only known callers
With the ‘Call Screening’ function, you can set
the phone so that it rings only if the caller’s
number is stored in your phone book.
When other callers phone:
1. the phone does not ring, but the call is
indicated by means of the call symbol in the
display, and can be answered.
2. the number may appear in the display.
3. the call is added to the ‘Missed Calls’ list.
To initiate:
• Call up the main menu .
• Select ‘BLOCKS 3’ and confirm.
• Select ‘Call Screening’ and confirm.
Display shows:
‘Call Screening Off’
• Select ‘ALTER’.
Display shows:
‘Phone Code: Please Enter’.
• Enter phone code (your equipment code) and
confirm.
Theft protection
With the theft protection feature activated, the
phone cannot be operated with a different SIM
card. That is, the phone can only be used in
conjunction with the SIM card in the phone at the
time of activation.
To initiate:
• Call up the main menu .
• Select ‘BLOCKS 3’ and confirm.
16
Page 18

Codes
Restricting choice of numbers
The function ‘Except Tel.’ can be used to restrict
the choice of available numbers that can be
dialled to only those in the phone book.
To initiate:
• Call up the main menu .
• Select ‘BLOCKS 3’ and confirm.
• Select ‘Except Tel.’ and confirm.
Display shows:
‘Except Tel. Off’
• Select ‘ALTER’.
Display shows:
‘Phone Code: Please Enter’.
• Enter phone code (your equipment code) and
confirm.
Permit only last ten numbers
The function ‘Except Last 10’ can be used to
restrict the choice of numbers that can be dialled
to the last ten numbers in the redial list.
To initiate:
• Call up the main menu .
• Select ‘BLOCKS 3’ and confirm.
• Select ‘Except Last 10.’ and confirm.
Display shows:
‘Except Last 10 Off’
• Select ‘ALTER’.
Display shows:
‘Phone Code: Please Enter’.
• Enter phone code (your equipment code) and
confirm.
NETWORK BARRINGS
Range of features
The function ‘Network Barrings’ can be used to
restrict the type of calls that can be made to or
from your phone.
You can:
1. Permit only emergency calls.
2. Bar incoming calls.
3. Permit only national calls.
4. Permit calls from abroad to your own
network provider.
5. Bar all incoming calls when in a visited
network.
Requirements
The followi ng conditions mu st be sati sfied before
network barring can be used:
1. The service provider of your SIM card and
the GSM network must support the barring
features.
2. You must register separately for all network
barring features with your service provider.
Your service provider will give you a
dedicated four-digit password, not
necessarily the same as the SIM card PIN,
for this purpose.
17
Page 19
Codes
Permit only emergency call
All outgoing calls except to the emergency
service number (112) can be barred.
• Call up the main menu.
• Select ‘BLOCKS 3’ and confirm.
• Select ‘Network Barrings’ and confirm.
• Select ‘All Calls Out’ and confirm.
Display shows:
‘All Calls Out
• Enter the password for network barring and
confirm.
Blocked’.
Do not permit incoming calls
All incoming calls can be barred.
• Call up the main menu.
• Select ‘BLOCKS 3’ and confirm.
• Select ‘Network Barrings’ and confirm.
• Select ‘All Calls In’ and confirm.
Display shows:
‘All Calls In
• Enter the password for network barring and
confirm.
Blocked’.
Permit only national calls
Calls from and to another country can be barred.
• Call up the main menu.
• Select ‘BLOCKS 3’ and confirm.
• Select ‘Network Barrings’ and confirm.
• Select ‘Out Int.+Home’ and confirm.
Display shows:
‘Out Int.+Home
• Enter the password for network barring and
confirm.
Blocked’.
Permit calls from abroad
You can permit calls from abroad to your home
network only.
• Call up the main menu.
• Select ‘BLOCKS 3’ and confirm.
• Select ‘Network Barrings’ and confirm.
• Select ‘Out Only Int.’ and confirm.
Display shows:
‘Out Only Int.
• Enter the password for network barring and
confirm.
Blocked’.
Barring alternative network calls
If you are logged onto another network, you will
incur charges when calls are passed on to you.
To prevent this from happening, you can bar all
incoming calls.
• Call up the main menu.
• Select ‘BLOCKS 3’ and confirm.
• Select ‘Network Barrings’ and confirm.
• Select ‘In Visited Netw’ and confirm.
Display shows:
‘In Visited Netw’
• Enter the password for network barring and
confirm.
Blocked’.
18
Page 20

Handset Operation
Handset Operation
KEY LOCK
If it is not possible to make inputs via your
handset, the key lock is active. This means that
no keys can be accidentally activated while you
are driving. However, calls to emergency
services can be made even when the key lock is
active.
To activate the key lock:
• Call up the main menu.
• Select ‘LOCAL SETTINGS 8’ and confirm.
• Select ‘Keys’ and confirm.
• Select ‘Key Lock’ and confirm.
In the stand-by mode, this is shown in the
display as .
The key lock is now switched on.
You can also select key lock on by pressing the
hash key for a short time.
NOTE: Even with the key lock switched on, it is
still possible to receive calls or make emergency
calls.
To de-activate the key lock:
Press and hold the hash key.
CALL PROCESSING
Your car phone always processes a call from the
equipment used to make or accept it.
For example, if you make a call from the
on-board computer, the call will be treated as a
hands-free call dialling on the cordless handset.
You always end a call with the equipment used to
make it.
The hands-free unit is automatically switched on
if you make or accept a call with the following
items of equipment:
• Multi-function steering wheel (MFL)
• Multi-information display (MID)
• On-board computer
You can switch to the handset manually if, for
example, you do not want passengers to hear
what the caller is saying.
The hands-free unit is switched off if you make or
accept a call with the handset. The hands-free
mode must then be activated manually.
To switch to the hands-free unit during a call,
select ‘HANDSFR’.
To switch to the handset during a call, press the
key .
Display shows:
‘Do You Wish To Answer The Call?’
Select ‘Yes’.
19
Page 21

Handset Operation
MUTING
Microphone muting
If you are using the handset to conduct a
conversation, you can switch its microphone on
and off. With the microphone switched off the
caller cannot hear what you are saying, for
example, to the other vehicle occupants.
To mute the microphone during a call:
• Press .
• Move to ‘Mute’ and press ‘OK’.
The handset microphone is now switched off.
Cancelling Muting
The display controls remain set to ‘Mute’ until
you end the call or cancel muting.
To do this:
• Select ‘OK’.
• Select ‘ALTER’.
Display shows:
‘Mute Off’.
• Confirm ‘OK’.
The handset microphone is switched on again.
EMERGENCY CALLS
If you need to make an emergency call, all
requests to enter the PIN, PIN2, PUK and phone
code, together with all other displays can be
ignored.
An emergency call can be placed irrespective of
network and country of use. Some networks also
permit emergency calls to be made without a
SIM card inserted.
It is also possible to make an emergency call in
the GSM network via the on-board computer.
NOTE: The landline network uses different
emergency call numbers to the mobile phone
network. If you dial the landline networks
emergency call number, no emergency call may
be placed with the emergency centre for the
mobile phone network.
Emergency call via the keypad
If your phone is operational (SIM card inserted,
PIN entered) dial 112 and confirm.
The emergency call is placed and passed on to
the nearest emergency centre.
NOTE: Always tell the emergency centre your
phone number and your location.
20
Page 22

Handset Operation
Emergency call via SOS
If your phone is switched on but the PIN has not
been entered:
• Select ‘SOS’.
The display shows ‘Emergency Call’.
• Select ‘YES’.
The emergency call is placed and passed on to
the nearest emergency centre.
NOTE: Always tell the emergency centre your
phone number and your location..
Ending an emergency call
Press this key.
NOTE: Do not end any emergency call until
instructed to do so by the emergency services
operator.
Interrupting an emergency call
If the following appears:
‘Emergency Call’
Select ‘NO’.
21
Page 23

Making Calls
Making Calls
DIALLING
Dialling with the keypad
Enter the desired telephone number.
Press the key on the handset keypad.
The number dialled and the call duration are
shown on the handset display.
NOTE: Always enter the entire phone number,
the area code and the person’s/business’
number, even if you are in the local area of the
person/business you are calling. Refer to your
service provider documentation for guidance.
Making international calls
The principle is the same as that for making a
National call except that the International dialling
code must be entered before the area code and
person’s/business’ number.
The access code for International calls is 00 plus
the country code. the
Alternatively, press and hold the key.
NOTE: An International call is any call conducted
from the network of one country to the network
of another country. For example, if you are in
Italy and are logged on to an Italian network, a
call made to England is an International call.
However, if you are driving in France but are
logged to an Italian network, and you are
sufficiently close to the border to be still within
range of the Italian network’s transmitters, a call
to a number in Italy will be a National call. Refer
to your service provider documentation for
guidance.
Dialling from the phone book
Call up the phone book by pressing the
book key
and then select an entry by pressing
the up/down arrow keys.
Press the phone key on the keypad .
The selected phone number is dialled.
Dialling from the TOP 8 list
The TOP 8 list automatically memorises the eight
phone numbers that you call most frequently.
• Press the phone book key twice.
Each subsequent time you press this key you
switch between the phone book and the TOP
8 list.
• Select an entry.
• Press the phone book key.
The person selected is dialled.
NOTE: The TOP 8 list is stored in the phone. If
you use your SIM card in a different phone, the
TOP 8 list is not transferred with the card to the
new phone.
Ending a call
Press the key briefly to end the call.
22
Page 24

Making Calls
Redialling, including if previous call
unanswered
Numbers you called or attempted to call are
automatically stored in a redial list. The most
recently dialled is at the top of the list.
The total number of phone numbers that can be
memorised depends on the capacity of your SIM
card (usually between 5 and 10).
• Press the key .
• Select an entry using the up/down arrow
keys.
• Press the key again.
The subscriber selected is dialled.
NOTE: The redial list is stored in the phone. If you
use your SIM card in a different phone, the redial
list is not transferred along with the SIM card..
Ending a call
Press the key briefly to end the call.
Displaying subscribers not reached
• Press .
• Select an entry.
• Select ‘READ’.
Storing in the phone book persons not
reached
• Press to display.
• Select an entry.
• Select ‘SAVE’.
The number is shown in the display.
• Enter the desired name and confirm.
The entry is saved in the phone book.
NOTE: The option ‘SAVE’ is only offered if the
person dialled but not reached is not already
stored in the phone book - the person then
appears by number in the redial list.
Deleting the redial list
• Press .
• Using the up/down arrow keys,
select ‘*All Numbers*. Display shows ‘Please
wait’.
• The redial list is deleted.
NOTE: The option ‘Delete’ is only available if the
option ‘All Numbers’ has been selected.
The name and number are shown in the display.
• Select ‘BACK’ to return to the redial list.
NOTE: The option ‘READ’ is only offered if the
subscriber dialled but not reached is stored in the
phone book - the subscriber then appears by
name in the redial list.Pressing the ‘READ’ button
will display the name and number for that
memory entry.
See ‘Phone Book’ Page 26.
23
Page 25

Making Calls
WITHHOLDING OWN NUMBER
If you wish to prevent your number from being
displayed to the other party when making a call,
you can choose ‘Incognito’ function. You can
choose whether to use this function on a
call-by-call basis or for all calls.
‘Incognito’ must be supported by your own
network. You must be registered with your
service provider in order to use the ‘Incognito’
function.
UK networks support the use of 141 service.
Entering 141 before the UK telephone number
withholds your number for this one call only.
Always withhold own number
If you want to withhold your number every time:
• Call up the main menu .
• Select ‘GSM SERVICES 5’ and confirm.
• Select ‘Incognito’ and confirm.
• Select ‘Incog. All’ and confirm.
• Select ‘Status’ and confirm.
The current status is shown.
The current status setting is shown on the
display.
To change it:
• Select ‘ALTER’.
Display shows ‘Status On’
• Press ‘OK’.
Display shows ‘Incog. Next’.
Perform a similar operation to switch off this
function.
To change it:
• Select ‘ALTER’.
The display shows ‘Status On’.
• Press ‘OK’.
Display shows ‘Incog. All’.
Perform a similar operation to switch off this
function.
Withholding own number once
If you wish to withhold your number for the next
call only:
• Call up the main menu .
• Select ‘GSM Services 5’ and confirm.
• Select ‘Incognito’ and confirm.
• Select ‘Incog. Next’ and confirm.
• Select ‘Status’ and confirm.
24
Page 26

Receiving Calls
Receiving Calls
Accepting a call
When an incoming call is received, you will hear
a signal unless you have switched off the call
tone in the setup menu.
The ringing symbol appears in
the display, possibly in conjunction with the
name and number of the caller.
Press key to accept the call, or select
‘ACCEPT’.
If answered in this way, the conversation is
conducted via the handset; the hands-free unit is
switched off.
If you wish to conduct an incoming call via the
hands-free unit, answer it via the multi-functional
steering wheel, the multi-information display or
the on-board computer.
Alternatively, you can switch manually to
hands-free mode using the ‘HANDSFR’ option.
Automatic answering
You can set your car phone so that incoming
calls are automatically answered via the
hands-free unit every time:
• Call up the main menu .
• Select ‘SETTINGS 7’ and confirm.
• Select ‘Auto Answer’ and confirm.
• Select ‘On’ and confirm.
The display shows ‘On’.
Adjusting number of call cycles
With auto answering switched on, you can
determine how many rings are allowed before an
incoming call is automatically answered and
diverted to the hands-free unit.
• Call up the main menu .
• Select ‘SETTINGS 7’ and confirm.
• Select ‘Auto answer’ and confirm.
• Select ‘ No. Call Cycles’ and confirm.
For example, 3.
• Press OK to store the input.
The number of call cycles is now set at 3.
If you do not answer an incoming call manually,
it will be automatically diverted to the hands-free
unit after the third call tone.
To alter or delete a previously defined value:
• Press and enter new value.
Auto answering is now activated so that an
incoming call is automatically answered and
diverted to the hands-free unit.
Rejecting calls
To reject an incoming call, select ‘REJECT’
. or press key
The call will not be accepted and the ringing
signal is cancelled.
25
Page 27

Receiving Calls
ACCEPTED CALLS
You can retrieve a list of the most recently
answered calls in the phone display. If the caller
is stored in your phone book, the name of the
caller is displayed instead of the number.
The total number of phone numbers listed
depends on the memory capacity of your SIM
card.
Displaying accepted calls
• Call up the main menu .
• Select ‘MESSAGES 4’ and confirm.
• Select ‘Calls Received’ and confirm.
• The list of answered calls appears in the
display.
Calling a person back
To call back a person from the list,
• Select an entry from the displayed list.
• Press the key.
Adding a caller to the phone book
To add a caller from the list of answered calls to
the phone book:
• Select an entry from the list and select ‘SAVE’.
Deleting the list of callers
• Call up the main menu .
• Select ‘MESSAGES 4’ and confirm.
• Select ‘Calls Received’ and confirm.
• Select ‘*All Numbers*’.
• Select ‘Delete’.
Display shows ‘Please Wait’.
After a short delay, all entries are deleted.
NOTE: The option ‘SAVE’ only appears in the
display if the entry is not yet stored in the phone
book.
• You are now requested to enter a name for
the number to be saved.
• Enter name and press ‘OK’ to confirm.
The entry is saved in the phone book.
26
Page 28

Phone Book
Phone Book
PHONE BOOK
You can set up a personal phone book with
numbers and names. These entries are stored on
your SIM card; depending on the service
provider, there may be capacity for up to 200.
After storing, entries can be modified or
extended at any time, and individual entries or
the entire phone book deleted.
If you are phoned by someone whose number is
stored on the card, the name of the caller is
displayed on the handset and in the Check
Control display before you answer the call.
Creating a new entry
• Press to open the phone book.
• Move down from ‘Own Tel No’.
• Press key.
• Select ‘New Entry’ and confirm.
Display shows:
‘Please Enter Number’.
Enter the desired number, complete with area
dialling code (and, if appropriate, the
international dialling code).
Select ‘OK’ to store the entry in the phone book.
You can now enter the name that accompanies
the number. Press repeatedly if you wish to enter
special symbols.
Lower case characters
Key Characters
1 ä ö ü 1
2 a b c 2 á å ç
3d e f 3 é è ç
4g h i 4 ì
5j k l 5
6 m n o 6 ñ ò ø
7 p q r s 7 ß
8 t u v 8 ù
9 w x y z 9
0 0 - . , : ; ? !
* Aa * / ( ) < = > % & @ § £ $ ¥
##
ΦΓΛΩΠΨΣΘ≡
Upper case characters
KEY CHARACTERS
1 Ä Ö Ü 1
2 A B C 2 Å
3 D E F 3 É Æ
4G H I 4
5J K L 5
6 M N O 6 Ñ Ø
7 P Q R S 7
8T U V 8
9 W X Y Z 9
00 ‘ “ _ ¿ !
* Aa * / ( ) < = > % & @ § £ $ ¥
##
∆ΦΓΛΩΠΨΣΘ≡
Examples:
Press briefly once generates the letter ‘a’,
twice generates ‘b’ and three times generates ‘c’.
Press briefly once to enter a space.
Press before the next letter to change over
to capital letters.
Press to delete text. Press briefly to
delete the character before the cursor: keep
pressed to delete the entire entry.
Press to move the cursor to the right.
Press to move the cursor to the left.
27
Page 29

Phone Book
Displaying entry
• Press to open the phone book.
e.g.Select ‘Gloria’
• Press to call up the phone book
menu.
• Select ‘Show Entry’ and confirm.
Display shows:
‘Gloria 0247667899’
If the phone book is arranged according to
memory location, an entry can also be called up
directly:
Enter e.g. ‘27’ with the keypad.
Press.
The entry on memory location 27 is shown.
Sorting entries
Entries in the phone book can be sorted:
Alphabetically or
According to memory location number or
According to frequency of use.
• Press to open the phone book.
Select an entry (not ‘Own Tel No).
• Press to call up the phone book
menu.
• Select ‘Sort’ and confirm.
• Select, e.g. ‘Memory Location’ and confirm.
Display shows:
‘
Memory Location’.
The phone book entries will now always be
displayed according to the selected principle.
Editing an entry
• Press to open the phone book.
e.g. Select ‘Gloria’.
• Call up the phone book menu.
• Select ‘Edit Entry’ and confirm.
Display shows:
Phone number: 0247667899’
• Select to delete the digits.
Enter the new number, e.g.02476543219.
• Select ‘OK’ to store the entry.
You can now also alter the name that
accompanies the number:
Display shows:
‘Gloria 02476543219’
• Select to delete the digits.
Enter new name.
Select ‘OK’ to store the entry in the phone book.
Entering own phone number
On most SIM cards, the first entry in the phone
book is intended for your own phone number.
Your number is usually already stored when you
receive your card from the service provider.
• Press to open the phone book.
• Select ‘Own Tel No’ and confirm.
If ‘No Entries’ appears in the display:
• Call up the phone book menu.
• Select ‘New Entry’ and confirm.
Display shows:
‘Number Please Enter:’
Enter your own number in
full.e.g.02412345678
• Select ‘OK’.
If you also wish to enter your name, the display
shows:
‘Name:
Please Enter
02412345678’
Enter name and press ‘OK’ to confirm.
The name and telephone number are now stored
in the phone book under the entry ‘Own Tel No’
at the top of the list.
NOTE: You can enter a total of five numbers of
your own, e.g voice, fax and data numbers.
28
Page 30

Phone Book
Displaying own phone number
• Press to open the phone book.
• Select ‘Own Tel No’ and confirm.
Display shows:
‘My Name’.
• Call up the phone book menu.
• Select ‘Show Entry’ and confirm.
Display shows:
‘My Name 02412345678’.
Deleting an individual entry
• Press to open the phone book.
e.g. make a name selection.
• Call up the phone book menu.
• Select ‘Delete Entry’ and confirm.
Display shows selected entry
‘Delete Entry?’.
• Select ‘YES’ to delete the entire entry.
If the phone book entries have been deleted, ‘No
Entries’ appears in the display.
Interrupting without deleting
Select ‘NO’, for example, ‘Gloria’ is shown in the
display.
Move to a higher menu level.
Deleting entire phone book
You can also delete all entries in the entire phone
book with a single command. To ensure that you
cannot do this inadvertently, or that it cannot be
done by an unauthorised person, the phone code
must be entered as a safeguard.
• Press to open the phone book.
Select an entry (not ‘Own Tel No’)
• Select ‘YES’, you are now requested to enter
the phone code.
Entering the phone code
• Display shows:
‘Phone Code Please Enter’
e.g. enter 0000 (set by the manufacturer).
To prevent misuse the display only shows
asterisks ‘****’.
• Select ‘OK’ to confirm the input.
• All entries are now deleted and the phone
book is empty.
If you want to interrupt deleting without entering
the phone code, select ‘BACK’ and you are now
back in the phone book.
Checking memory capacity
• Press to open the phone book.
Select an entry (not ‘Own Tel No’)
• Call up the phone book menu.
• Select ‘Capacity’ and confirm.
Display shows:
‘Entries 145 Locations 5 Free’.
In other words, there are 145 entries already in
the phone book and 5 further entries can be
added to it.
Select ‘OK’.
• Call up the phone book menu.
• Select ‘Delete Phonebook’ and confirm.
Display shows:
‘Delete all items ?’.
29
Page 31

Diverting Calls
Diverting Calls
CALLS
Diverting when you are unreachable
Incoming calls can be diverted to a
predetermined number if you cannot be reached
when the caller phones. This is the case if your
telephone is switched off, you are momentarily
out of range (travelling through an underpass or
tunnel) or are outside the area covered by the
GSM network.
Setting up a call diversion number
• Call up the main menu.
• Select ‘DIVERSION 2’ and confirm.
• Select ‘If Not Reachable Off’ and confirm.
• Select ‘ALTER’.
Display shows;
‘If Not Reachable Please Enter’.
Now enter the number to which calls are to be
diverted or select one from the phone book.
Press to select an entry and confirm. The
display shows ‘Status Stored’.
Altering the call diversion number
• Call up the main menu.
• Select ‘DIVERSION 2’ and confirm.
• Select ‘
Display shows:
‘If Not Reachable 08751922229’
• Select ‘ALTER’.
• Select to delete the number.
Now enter the number to which calls are to be
diverted, or select one from the phone book.
Display shows ‘Status Stored’.
If Not Reachable’ and confirm.
Press, then select an entry and confirm.
NOTE: The status of all diversions can be
checked by selecting ‘Status’.
Cancelling call diversion
• Call up the main menu.
• Select ‘DIVERSION 2’ and confirm.
• Select ‘
Display shows:
If Not Reachable 08751922229’
• Select ‘DELETE’.
• ‘Status Stored’ is shown on the display.
If Not Reachable’ and confirm.
30
Page 32

Diverting Calls
Diverting your unanswered calls
Incoming calls can be diverted to a diversion
number if they are not answered, for example, if
your telephone was able to receive them but you
were not in the vehicle at the time.
• Call up the main menu.
• Select ‘DIVERSION 2’ and confirm.
• Select ‘If No Reply’ and confirm.
Display shows:
‘If No Reply Off’.
• Select ‘ALTER’.
Display shows:
‘If No Reply Please Enter’.
Now enter the number to which calls are to be
diverted or select one from the phone book.
Press, then select an entry and confirm.
The display shows ‘Status Stored’.
With the display
‘If No Reply Delay:0’ showing,
you can now determine the delay after which a
call that goes unanswered is to be automatically
diverted.
Inputs from 0 to 6 are possible;
0 means divert immediately
1 means divert after 5 seconds
2 means divert after 10 seconds, etc., in
increments of 5 seconds.
Select ‘OK’ to confirm the input.
Display shows Status Stored’.
• Select ‘ALTER’.
Display shows ‘All Calls Please Enter’. Now enter
the number to which calls are to be diverted or
select one from the phone book.
Press then select an entry and confirm.
Display shows ‘Status Stored’.
Perform a similar operation to switch off this
function.
NOTE: The status of all diversions can be
checked by selecting ‘Status’.
Diverting if line is busy
Incoming calls are only diverted to the number
you have defined if your phone is busy, e.g. you
are currently making a call.
• Call up the main menu.
• Select ‘DIVERSION 2’ and confirm.
• Select ‘If Busy’ and confirm.
• Display shows ‘If Busy Please Enter’ and you
can now enter the number to which calls are
to be diverted or select one from the phone
book.
Press, then select an entry and confirm.
Display shows ‘Status Stored’.
Perform a similar operation to switch off this
function.
Perform a similar operation to switch off this
function.
Diverting all calls
All incoming calls are diverted to another number
as determined by you.
• Call up the main menu.
• Select ‘DIVERSION 2’ and confirm.
• Select ‘All Calls’ and confirm.
Display shows:
‘All Calls Off’.
31
Page 33

Multiple Connections
Multiple Connections
MULTIPLE CONNECTIONS
IMPORTANT
This feature depends on the network provider
being able to support the functions described
below:
Making a call during a conversation
If you would like to call a further party during a
conversation without terminating the first call:
• Select ‘PRK’ to put the connection with the
first party on hold.
• Enter the number of, or select from a list, the
second party you wish to speak to
• Press the key.
• If the person being called (party 2) answers
the call, the connection is established
immediately.
Switching between two conversations
If you have two calls in progress simultaneously,
you can switch between them (trading).
Select ‘TRADE’ to switch between party 1 and
party 2.
Ending a call
• Press to terminate the current call.
Display shows
‘Back to held call?’
• Select ‘YES’ to terminate the current call and
to re-activate the call that is on hold.
or
Select ‘NO’ to terminate both calls.
Telephone conference
If you wish to connect several parties to form a
conference call:
Select ‘CONF’ and the display shows
‘Conference’
You can connect up to eight external parties to
form a conference in this way, subject to network
operator capabilities.
Terminating a conference call.
If you were the one who called the other parties
and formed the telephone conference:
• Press.
Display shows ‘End All Ext. Calls?’
• Select ‘YES’ to terminate the conference.
Press, if you were connected to the
conference call by another party,.
Your connection to the conference is terminated,
but the other parties remain connected.
Accepting multiple calls
If you wish to accept a second call during a
conversation select ‘ACCEPT’.
When the second call is accepted, the line to the
second caller is opened immediately and the first
call is put on hold.
Rejecting multiple calls.
If you do not wish to accept the second call select
‘REJECT’.
Replacing current call
If you wish to terminate a current call in order to
accept a further call, select ‘REPLACE’.
If you are already trading between two calls, the
call that is currently active rather than the one
that is on hold is substituted.
32
Page 34

Missed Calls
Missed Calls
MISSED CALLS
You can call up a list of all calls that have gone
unanswered. If the caller is entered in your phone
book, the caller’s name instead of the number is
shown. The total number of phone numbers
listed depends on the memory capacity of your
SIM card.
If your telephone displays this when
you switch it on, details of missed calls are
stored.
Displaying missed calls
• Call up the main menu.
• Select ‘MESSAGES 4’ and confirm.
• Select ‘Missed Calls’ and confirm.
If you have missed calls, you will then see them
listed in the display.
Dialling a number directly
Select the appropriate entry from the list
and press to return a call.
33
Page 35

TOP 8 List
TOP 8 List
USING TOP 8 FEATURES
TOP 8 displays a list of the eight most frequently
used numbers that are stored in the phone book.
Displaying TOP 8 list
• Press twice to open the TOP 8 list.
Each subsequent time you press this key you
switch between the phone book and the TOP 8
list.
Dialling a number from the TOP 8 list
Press twice to open the TOP 8 list then
select the desired entry.
Press to dial the number.
Exiting the TOP 8 list
Press to move to a higher menu level
or
press .
Displaying an entry from the TOP 8 list
• Press twice to open the TOP 8 list then
select the desired entry.
Sorting entries in the TOP 8 list
You can sort entries in the TOP 8 list
alphabetically or according to frequency of use.
• Press twice to open the TOP 8 list.
• Call up the TOP 8 menu.
• Select ‘Alphabetically’ and confirm.
Display shows:
‘
Alphabetical’.
• Press to move to a higher menu
level.
The entries are now shown in the display in
alphabetical order. The alphabetical sorting
makes no distinction between capitals and lower
case letters.
• Call up the TOP 8 menu.
• Select ‘Show Entry’ and confirm.
Display shows:
‘Gloria 02498765432’.
34
Page 36

Text Messages
Text Messag es
TEXT MESSAGES
You can send or receive short messages (text up
to 160 characters long), known as SMS (Short
Message Services) to or from another GSM
phone.
You may have to register with your service
provider in order to use this feature.
You will always have to enter the number of the
service centre which handles such messages
before you can send or receive SMS texts.
The number will be supplied by your service
provider when you subscribe to the network.
NOTE: Not all networks support SMS.
Altering the number of the service centre
• Call up the main menu.
• Select ‘MESSAGES 4’ and confirm.
• Select ‘Text Message’ and confirm.
• Select ‘Settings’ and confirm.
• Select ‘Service Centre’ and confirm.
Display shows:
‘Service Centre 02412345678’
• Select ‘ALTER’.
• Select to delete the number.
Enter the new number.
Select ‘OK’ to store the entry.
Service centre, setup for text messages
You will be notified of the number of the service
centre for handling SMS messages by your
service provider.
To set it up:
• Call up the main menu.
• Select ‘MESSAGES 4’ and confirm.
• Select ‘Text Message’ and confirm.
• Select ‘Settings’ and confirm.
• Select ‘Service Centre’ and confirm.
Display shows:
‘Service Centre Please Enter:’
• Enter the number of your service centre.
• Select ‘OK’ to store the entry.
Your phone is now ready to handle SMS
messages.
Adjusting storage time
Text messages are stored temporarily by the
service centre to ensure that they are not lost if
your phone is switched off.
You can determine how long the service centre
has to attempt to pass on a new message from
you, by entering a value between 0 and 99
(number of days). If the service centre fails to
reach the recipient by the time the validity of a
message has expired, the text message is
deleted.
• Call up the main menu.
• Select ‘MESSAGES 4’ and confirm.
• Select ‘Text Message’ and confirm.
• Select ‘Settings’ and confirm.
• Select ‘Validity’ and confirm.
Display shows:
‘Validity 2 days:’
• Enter the number of your service centre.
• Select ‘OK’ to store the entry.
• Select to delete the set value.
Enter a value between 0 and 99. An input of ‘0’
means save for one day, ‘99’ means save for 100
days.
Select ‘OK’ to store the entry.
35
Page 37

Text Messages
Creating a text message
• Call up the main menu.
• Select ‘MESSAGES 4’ and confirm.
• Select ‘Text Message’ and confirm.
• Select ‘Create New’ and confirm.
Display shows:
‘Please Enter’.
Create a new text message using the keypad.
Select ‘OK’ to conclude the text input.
You are now requested to enter a phone number
to which the text message is to be sent.
Sending a text message
Display shows:
‘Send to: Please Enter:’
Enter a number or select a name or number from
the phone book.
Select an entry and confirm.
Select ‘SEND’.
Saving own text message
Select ‘SAVE’.
Instead of being sent, the text message is stored
in the list of incoming text messages. It can be
retrieved from there at any time and sent.
Reading a text message
If your phone is on stand-by, this
symbol will appear in the handset display to
indicate that you have received a text message.
To call up the message:
• Call up the main menu.
• Select ‘MESSAGES 4’ and confirm.
• Select ‘Text Message’ and confirm.
• Select ‘3Text (1New)’ and confirm.
In this example, a total of three text messages is
stored for you ‘(3Text)’, one of which you have
not yet read ‘(1New)’.
The list of all stored text messages, together with
the time and date, appears in the display. The
most recent message is shown first.
You can now select and read a text message.
NOTE: If you have composed a text message of
your own and saved but not sent it, it also
appears in this list.
Select ‘READ’
Replying to a text message
The fastest way to reply to a text message is to
return to the preset answers ‘YES’ or ‘NO’
immediately after reading the message:
• Call up the sub-menu.
• Select
‘Answer is YES’ and confirm
or
‘Answer is NO’ and confirm.
• If the answer is ‘YES’, the display shows your
answer, the number and possibly the name of
the sender, and the start of the original
message, e.g.
‘Answer is YES Gloria 02412345678 Can you
make the party?’
• Select ‘OK’ then select ‘SEND’
Your answer is sent to the message sender.
36
Page 38

Text Messages
Saving received text messages
After calling up a message that has been
received, select ‘SAVE’.
The text message is stored in the list of incoming
text messages. You can reply to it at any time.
Deleting received text messages
This is indicated in the display, if the
message memory at your service provider is full.
You should delete older messages without delay
so that you can receive new ones.
To do this:
Call up the sub-menu, select ‘Delete
Text’ and confirm.
To delete a text message:
Select ‘YES’.
To keep a text message:
Select ‘NO’.
Editing a text message
• Call up the sub-menu.
• Select ‘Edit Old’ and confirm.
Select a stored message.
Display shows:
‘Will be coming tomorrow’ for example.
• Select to delete the text.
Edit the text e.g. ‘Please wait until day after
tomorrow’
• Select ‘OK’.
You can receive and edit a text, then send it
directly back to the original sender:
Display shows:
‘Send to: 02412345678’.
Select ‘SEND’.
37
Page 39

DTMF Codes
DTMF Codes
DTMF codes
You can use your car phone to transmit control
codes (Dual-tone multi-frequency DTMF
numbers) for accessing network services or for
controlling remote devices, e.g. remote
monitoring of an answering machine. The DTMF
key tone must be switched on for this to be
possible.
NOTE: Refer to the instructions supplied with
your remote device. Not all devices are
compatible.
This feature can only be used during an existing
connection.
NOTE: It is recommended that you read any
instructions provided by your service provider to
clarify any issues arising from answering
machines/voice mail.
Switching on DTMF touchtone
NOTE:The following digits are permitted: digits
from 0 to 9, # and *..
• Call up the main menu.
• Select ‘SETTINGS 7’ and confirm.
• Select ‘Special Tones’ and confirm.
• Select ‘DTMF Touchtone’ and confirm.
Display shows:
‘DTMF Touchtone Off’
• Select ‘ALTER’.
Display shows
‘DTMF Touchtone
• Select ‘OK’ and switch to the next higher
menu level.
Display shows
‘
DTMF Touchtone’.
On’.
Sending DTMF codes
Press this key after entering the phone
number or required provider.
• Call up the main menu.
• Select ‘Send DTMF NO.’ and confirm.
Display shows:
‘Send DTMF NO. Please Enter’.
Enter the desired code e.g. 000##123437*76.
Select ‘OK’.
Display shows:
‘Please Wait’.
The connection, e.g.with your answering
machine, has now been established. You can
monitor any messages left on your answering
machine.
Terminating the connection
Press to terminate.
Perform a similar operation to switch off the
DTMF touchtone.
38
Page 40

Cell Broadcast Messages
Cell Broad cast Messages
CB MESSAGES
Cell broadcast messages (CB messages) are
typically used for distributing regional weather
reports, traffic information or share prices. Your
service provider can notify you of the available
channels and the information that is distributed
on them.
NOTE: Not all network providers operate CB
messages.
It is usual that messages are only sent to
subscribers of the service
CB messages can only be received if your phone
is on stand-by.
A CB message is always called up directly on to
the telephone display from its start point until
you delete it or until a new message is received.
Receipt of a new CB message is also indicated by
an acoustic signal if you have activated the
corresponding special signal.
Switching on CB messaging service
• Call up the sub-menu.
• Select ‘MESSAGES 4’ and confirm.
• Select ‘CB Messages’ and confirm.
• Select ‘ALTER’.
Display shows:
‘CB Messages
• Select ‘OK’.
Display shows:
‘
CB Messages’.
The CB messaging service is now switched on.
Perform a similar operation to turn CB messages
Off.
Reading a new CB message
After being sent, CB messages are displayed
directly in the first three lines on the phone
display.
On
Adding new CB topics
New cell broadcast topics can be activated for
your car phone by entering their channel
number. Your service provider has details of
what messages are transmitted on which
channels.
• Call up the main menu.
• Select ‘MESSAGES 4’ and confirm.
• Select ‘Text Message’ and confirm.
• Select ‘CB Topics’ and confirm.
Display shows:
‘CB Topics 0-999, 1000-65534’
Enter the channel number of an additional
information service via the keypad, e.g.61-999.
Display shows:
‘CB Topics 0-999, 1000-65534
61-999’
Select ‘OK’.
Deleting a CB topic
• Call up the main menu.
• Select ‘MESSAGES 4’ and confirm.
• Select ‘Text Message’ and confirm.
• Select ‘CB Topics’ and confirm.
Display shows:
‘CB Topics 0-999, 1000-65534’
• Select to delete the channel number
of a CB information service.
You are now requested to enter a different CB
channel number.
Display shows:
‘CB Topics Please Enter’.
Enter a new channel number with the keypad.
Select ‘OK’.
They remain there until they are either
overwritten by new CB messages or until you call
up a menu with the display controls.
39
Page 41

Charges
Charges
Showing time and cost of last call
NOTE: Details shown in this section, Charges,
assumes compatability with the network
provider.
• Call up the main menu.
• Select ‘TIMER CHARGE 6’ and confirm.
• Select ‘Last Call’ and confirm.
Display shows:
‘Last Call 02:00 Min 1.36GBP
(GBP = Great Britain Pounds)
• Select ‘OK’ to switch to the next higher level
menu.
The display shows:
The duration of the last call.
The charges for the last call, assuming that the
charge rate has been set (see determining the
charge rate later in this section of the Handbook).
The number of units used, if your service
provider supports this feature.
All cost/charges are a network-dependent
service.
Showing time and cost of all calls
• Call up the main menu.
• Select ‘TIMER CHARGE 6’ and confirm.
• Select ‘All Calls’ and confirm.
Display shows:
‘All Calls 20:00 Min 13.60GBP
• Select ‘OK’ to switch to the next higher level
menu.
The display shows:
The duration of all calls.
The charges for all calls, assuming that the
charge rate has been set (see determining the
charge rate later in this section of the Handbook).
The number of units used, if the network
operator supports this feature.
Resetting call duration and call charges
A SIM card that permits input of a PIN2 can be
used to reset the duration of a call and the call
charges.
• Call up the main menu.
• Select ‘TIMER CHARGE 6’ and confirm.
• Select ‘All Calls’ and confirm.
Display shows:
‘All Calls 20:00 Min 13.60GBP
• Select ‘REJECT’ to reset the values to 0.
You are now requested to enter PIN2.
The display shows:
‘Enter PIN2’
Enter PIN2 (your code).
The display shows:
‘****’
Select ‘OK’
The values for the total call duration and the total
charges are reset to 0.
Activating automatic charge display
If you wish to have the duration and charges
incurred displayed automatically after every call:
• Call up the main menu.
• Select ‘TIMER CHARGE 6’ and confirm.
• Select ‘AutoCharge Disp’ and confirm.
Display shows:
‘Autocharge Disp Off’
• Select ‘ALTER’
Display shows:
‘Autocharge Disp
• Select ‘OK’.
The display shows:
‘
Autocharge Disp’.
Perform a similar operation to switch off the
automatic charge display.
On’.
40
Page 42

Charges
Switching on the 1 minute bleep
To hear a reminder signal every minute during a
call:
• Call up the main menu.
• Select ‘TIMER CHARGE 6’ and confirm.
• Select ‘1 Minute Bleep’ and confirm.
Display shows:
‘1Minute Bleep Off’
• Select ‘ALTER’
Display shows:
‘1 Minute Bleep
• Select ‘OK’.
The display shows:
‘
1 Minute Bleep’.
Perform a similar operation to switch off the 1
minute bleep.
On’.
CHARGE LIMIT
A SIM card that permits input of a PIN2 can be
set to permit use of only a predefined number of
charge units. This restriction can only be
determined, altered or cancelled with PIN2.
Activating and adjusting charge limit
• Call up the main menu.
• Select ‘TIMER CHARGE 6’ and confirm.
• Select ‘Charge Limit’ and confirm.
Display shows:
‘Charge Limit Off’
• Select ‘ALTER’
Display shows:
‘Enter PIN2’.
• Enter PIN2 (your code).
• Select ‘OK’
Display shows:
‘Charge Limit 0 Units.
• Select to delete the existing value.
• Enter new charge limit.
Display shows:
‘Charge Limit 100 Units’.
• Select ‘OK’. The charge limit is now set to 100
units.
To interrupt input, select ‘BACK’.
The option ‘BACK’ does not appear in the display
until the new entry has been deleted completely.
The previous value is then retained.
Deactivating charge limit
• Call up the main menu.
• Select ‘TIMER CHARGE 6’ and confirm.
• Select ‘Charge Limit’ and confirm.
Display shows:
‘Charge Limit
• Select ‘ALTER’
Display shows:
‘Enter PIN2’.
• Enter PIN2 (your code).
• Select ‘OK’
Display shows:
‘Charge Limit 123 Units’.
• Select to delete the existing value.
• Enter new charge limit., e.g. 0
Display shows:
‘Charge Limit 0 Units’.
• Select ‘OK’ to store a new value
The limit is now set to 0 charge units; the limit is
now deactivated.
On’
41
Page 43

Charges
Cancelling input
• Select ‘BACK’.
The option ‘BACK’ does not appear in the display
until the new entry has been deleted completely.
The previous value is then retained.
CHARGE RATE
If your service provider transmits information on
charges and you are registered for this service,
after every call you will receive details of the
number of charge units used.
You can enter the charge rate per unit as
specified in your contract. The phone then
calculates the cost of the call and displays it. If
the number of units is not transmitted, you will
only receive information on the call duration.
You can also enter the charge per minute. In this
instance, the calculated costs may not be very
precise.
NOTE: Charge rate is a network-specific feature.
Determining the charge rate
• Call up the main menu.
• Select ‘TIMER CHARGE 6’ and confirm.
• Select ‘Charge Rate’ and confirm.
Display shows:
‘Per Unit:0.68 Per Min:1.00 Currency GBP’
• Select ‘ALTER’
Display shows:
‘Enter PIN2’.
• Enter PIN2 (your code).
• Select ‘OK’ to confirm the input.
Altering the charge per unit
• Display shows:
‘Per Unit:0.68
• Select to delete the existing value.
Enter new value.
Select ‘OK’ to store the input.
You can now alter the charge per minute.
Altering the charge per minute
• Display shows:
‘Per Min:1.00’
• Select to delete the existing value.
Enter new value.
Select ‘OK’ to store the input.
You can now select the currency.
Selecting currency
• Display shows:
‘GBP’
• Select to delete the existing entry.
Select new currency.
Select ‘OK’ to store the input.
You can now select the currency.
Cancelling input
• Select ‘BACK’.
The option ‘BACK’ does not appear in the display
until you have deleted the complete entry. The
previous value is retained.
You can now set the charge rate.
42
Page 44

System Settings
User Configuration
System Sett ings
LANGUAGE
Adjusting display language
• Call up the main menu.
• Select ‘SETTINGS 7’ and confirm.
• Select ‘Language’ and confirm.
All available languages are listed in the
display.
• Select required language, e.g ‘English’ and
confirm.
Display shows:
‘
English’.
The display texts will now appear in English.
KEY SETTINGS
Switching on key lock
• Call up the main menu.
• Select ‘LOCAL SETTINGS 8’ and confirm.
• Select ‘Keys’ and confirm.
• Select ‘Key Lock’ and confirm.
is shown in the display, in the
stand-by mode.
Switching on key acknowledge
• Call up the main menu.
• Select ‘LOCAL SETTINGS 8’ and confirm.
• Select ‘Keys’ and confirm.
• Select ‘Key Acknowledge’ and confirm.
• Select ‘Key Sound’ and confirm.
Display shows:
‘
Key Sound’
• Set using the key.
The key lock is now switched on.
Switching off key acknowledge
• Call up the main menu.
• Select ‘LOCAL SETTINGS 8’ and confirm.
• Select ‘Keys’ and confirm.
• Select ‘Key Acknowledge’ and confirm.
• Select ‘Key Silent’ and confirm.
Display shows:
‘
Key Silent’
• Set using the key.
The key lock is now switched off.
The key lock is now switched on.
You can also switch on the key lock by
pressing and holding this key.
NOTE: Even with the key lock switched on, it is
possible to receive calls or make an emergency
call.
Cancelling key lock
Press and hold.
43
Page 45

System Settings
Answering a call with any key
If you wish to answer incoming calls with any key
on the handset:
• Call up the main menu.
• Select ‘LOCAL SETTINGS 8’ and confirm.
• Select ‘Any Key Answer’ and confirm.
Display shows:
‘Any Key Answer Off’.
• Select ‘ALTER’.
Display shows:
‘Any Key Answer
• Select ‘OK’.
Display shows:
‘
Any Key Answer’.
Any key can now be pressed to accept a call.
Perform a similar operation to switch off the
function.
On’.
EQUIPMENT SETTINGS
Switching on illuminated display
• Call up the main menu.
• Select ‘LOCAL SETTINGS 8’ and confirm.
• Select ‘Display’ and confirm.
• Select ‘Lighting’ and confirm.
Display shows:
‘Lighting Off’.
• Select ‘ALTER’.
Display shows:
‘Lighting
• Select ‘ON’.
Display shows:
‘
Lighting’.
On’
Entering greeting text
• Call up the main menu.
• Select ‘LOCAL SETTINGS 8’ and confirm.
• Select ‘Display’ and confirm.
• Select ‘Greeting Text’ and confirm.
• You are now requested to enter text
Display shows:
‘Greeting: <Text>’.
• Enter, for example, ‘Hello’ with the keypad.
Display shows:
‘Greeting: Hello’.
Select ‘OK’ to store the text and switch to the
higher level menu.
The greeting appears in the display for a few
seconds each time the mobile device is switched
on.
Altering the greeting text
• Call up the main menu.
• Select ‘LOCAL SETTINGS 8’ and confirm.
• Select ‘Display’ and confirm.
• Select ‘Greeting Text’ and confirm.
• The display now shows the previous text
‘Greeting: Hello’.
• Select to delete the text.
Enter new text with the keypad.
The display shows the new text.
Select ‘OK’ to store the text and switch to the
higher level menu.
Perform a similar operation to switch off the
display lighting.
To maximise the stand-by time before the
batteries require recharging, switch off the
lighting.
44
Page 46

System Settings
Adjusting the switch-off timer
You can determine how long the car phone
remains on stand-by after you have parked the
vehicle, to protect the vehicle battery against
being drained. The maximum value that can be
set is 120 minutes.
• Call up the main menu.
• Select ‘SETTINGS 7’ and confirm.
• Select ‘Airtime Remain’ and confirm.
The current value set is shown in the display.
• Select to delete the existing value.
• Enter a new value e.g.90.
• Select ‘OK’.
The stand-by time is now set to 90 minutes, that
is, the phone will remain on stand-by for 90
minutes after the vehicle ignition is turned off.
Activating EjectBox answering
If you would like to answer a call simply by taking
the handset out of its cradle:
• Call up the main menu.
• Select ‘LOCAL SETTINGS 8’ and confirm.
• Select ‘EjectBox Answer’ and confirm.
Display shows:
‘EjectBox Answer Off’.
• Select ‘ALTER’.
Display shows:
‘EjectBox Answer
• Select ‘OK’.
Display shows:
‘
EjectBox Answer’.
On’.
Resetting the handset
If you wish to cancel any modified settings on the
handset and restore the manufacturer’s settings:
• Call up the main menu.
• Select ‘LOCAL SETTINGS 8’ and confirm.
• Select ‘Status’ and confirm.
• Select ‘Standard Value’ and confirm.
• Select ‘Mobile unit’ and confirm.
The handset settings are now reset to the
standard values.
Press to interrupt without saving.
Any previously modified settings remain valid.
It is now no longer necessary to press this
key in order to answer a call.
Perform a similar operation to switch off
EjectBox answering.
45
Page 47

System Settings
Resetting the base station
To reset any previously modified settings on the
handset to the manufacturer’s settings:
• Call up the main menu.
• Select ‘LOCAL SETTINGS 8’ and confirm.
• Select ‘Status’ and confirm.
• Select ‘Standard Value’ and confirm.
• Select ‘Base’ and confirm.
The base station settings are now reset to the
standard values.
Press to interrupt without saving.
Any previously modified settings remain valid.
Displaying phone ID number
• Call up the main menu.
• Select ‘LOCAL SETTINGS 8’ and confirm.
• Select ‘Status’ and confirm.
• Select ‘Phone Info’ and confirm.
The phone ID number is shown in the display.
Select ‘OK’ and switch to the next higher level
menu.
NOTE: This is also known as the IMEI number
and may be requested by the service provider.
RINGING TONES
Switching on call tone
• Call up the main menu.
• Select ‘TONES 1’ and confirm.
• Select ‘Call Tone’ and confirm.
To switch off call tone, select ‘Off’ and confirm.
Selecting ‘Beep’ as the ringing tone
If you want to select just a simple signal as the
ringing tone.
• Call up the main menu.
• Select ‘TONES 1’ and confirm.
• Select ‘Call Tone’ and confirm.
• Select ‘Beep’ and confirm.
Display shows:
‘
Beep’.
Adjusting the ringing tone sound
You can choose from 16 pitches for the sound of
the ringing tone. The currently selected tone
pitch is heard as a reference. The volume may
not be set to the value ‘0’.
• Call up the main menu.
• Select ‘TONES 1’ and confirm.
• Select ‘Sound’ and confirm.
WARNING
Do NOT log off the handset.
If you log off the handset and later wish to log
back on, you will need to visit a Land Rover
dealership to register the handset again.
Select the desired pitch with the display/rocker
keys and confirm with ‘OK’ to store the setting.
Adjusting the ringing tone volume
The volume of the ringing tone can be adjusted in
6 stages. The current volume is heard as a
reference during adjusting.
• Call up the main menu.
• Select ‘TONES 1’ and confirm.
• Select ‘Volume’ and confirm.
Adjust the volume with the display/rocker keys
for display control
or
Adjust the keys on the side of the handset.
Select ‘OK’ to store the setting.
46
Page 48

System Settings
SERVICE SIGNALS
Switching on service signals
You can set your phone to emit special service
signals when it establishes a connection with the
network and after a number has been dialled.
• Call up the main menu.
• Select ‘SETTINGS 7’ and confirm.
• Select ‘Special Tones’ and confirm.
• Select ‘Service Signals’ and confirm.
Display shows;
‘Service Signals Off’.
• Select ‘ALTER’.
Display shows;
‘Service Signals
• Select ‘OK’ and switch to the next higher
menu level.
Display shows;
‘
Service Signals’.
Perform a similar operation to switch off the
service signals.
On’.
CONTROL TONES
The warning signal indicating that the handset
battery is almost discharged and the signal to
indicate out of range cannot be switched off.
47
Page 49

System Settings
STANDARD SETTINGS
Base unit
The standard settings of the car phone base
station as supplied by the manufacturer.
Function Standard settings
Ringing tone. On.
Number of call cycles before automatic answering. 3.
Automatic charge display. Off.
Automatic answering. Off.
CB signal. On.
DTMF touchtone. On.
Prevent new SIM. Off.
Duration of last call. 0.
Charge limit. Off.
Charge rate per minute. 0.
Duration of all calls. 0.
All calls incognito. Off.
Next call incognito. Off.
1 minute beep. Off.
Stand-by time. 1 minute.
Language. English.
These values above are set by activating the function ‘Base Unit standards settings’.
The following settings are not affected by the function ‘Base Unit standards settings’.
Phone book sorting. Alphabetically.
TOP 8 list sorting. Alphabetically.
Loan phone. Off.
48
Page 50

System Settings
Handset
The standard settings of the car phone base
station as supplied by the manufacturer.
Function Standard setting
Call waiting. On.
Greeting text. None.
Lighting. On.
EjectBox answering. Off.
Any key answer. Off.
Sound of call tone. Level 5.
Volume of receiver. Level 3.
Volume of tone call. Level 3.
Key lock. Off.
Service signals. Off.
Key acknowledge. On.
49
Page 51

Network Settings
Network Settings
NETWORK SETTINGS
Displaying available network operators
• Call up the main menu.
• Select ‘GSM SERVICES 5’ and confirm.
• Select ‘Operator List’ and confirm.
The list of available network operators appears in
the display.
Select ‘OK’ and switch to the next higher level
menu.
NOTE: Refer to the documentation provided by
your network provider.
Displaying GSM networks
• Call up the main menu.
• Select ‘GSM SERVICES 5’ and confirm.
• Select ‘Network Info’ and confirm.
The list of all GSM networks that can be picked
up at your present location appears in the
display. Network operators that are not permitted
by your SIM card are indicated by a crossed-out
receiver symbol.
Selecting preferred network
If you have switched on automatic network
selection, you can determine a priority list of your
preferred network operators.
If you are out of range of your home network,
instead of selecting the network with the
strongest reception signal of those networks that
can be received, your phone will then choose the
one that is highest on your priority list (the
network with the lowest number).
• Call up the main menu.
• Select ‘GSM SERVICES 5’ and confirm.
• Select ‘Preferred Netw.’ and confirm.
Display shows:
‘Home Netwrk D1’.
• Select ‘NEXT’.
The display shows a list of the preferred network
operators, which you can place in order of
priority.
Assigning empty place in list
For example, select 3:
• Select ‘OK’.
You will see a list of the available network
operators in the display.
Select a network operator e.g. ‘OMNITEL’ and
press ‘OK’ to confirm.
Display shows:
‘3:OMNITEL’.
You have now assigned the network operator
OMNITEL to place 3 in your list of preferred
network operators.
Assigning occupied place in list
For example, select 4:UK VODAPHONE
• Select ‘OK’.
Display shows:
‘UK VODAPHONE’.
• Select ‘ALTER’.
• Select ‘REPLACE’.
You will see a list of the available network
operators in the display.
Select a network operator e.g. ‘UK CELLNET’ and
press ‘OK’ to confirm.
Display shows:
‘4:UK CELLNET’.
You have now assigned the network operator UK
CELLNET to place 4 in your list of preferred
network operators.
Deleting network operator
E.g. select 4:UK CELLNET
• Select ‘OK’.
• Select ‘ALTER’.
• Select ‘DELETE’.
50
Page 52

Network Settings
You will have now deleted the network operator
UK CELLNET from your list of preferred
operators.
The vacant place 4 in the list can now be
assigned to a different network operator.
Select a network operator e.g. ‘D1-TELEKOM’
and press ‘OK’ to confirm.
Display shows:
‘4:D1-TELEKOM’.
You have now assigned the network operator
D1-TELEKOM to place 4 in your list of preferred
network operators.
Selecting a new network
The network search is activated with ‘Change
Network’. It is advisable to do this if you are out
of range of your home network or want to change
the network you are currently logged onto.
• Call up the main menu.
• Select ‘GSM Services’ and confirm.
• Select ‘Change Network’ and confirm.
Display shows:
‘Home Network D1 Change Network’.
Select ‘YES’.
You will see a list of the currently available GSM
networks in the display.
For example: select E TELEFONICA and press
‘YES’ to select or select ‘NO’ to remain logged
onto D1
AUTOMATIC NETWORK SELECTION
(RECOMMENDED)
If this function is activated, your phone
automatically logs onto a different network if you
go out of range of the network you are currently
logged onto.
If you have defined preferred networks, your
phone will log onto whichever network has been
given the highest priority.
If you have not defined any priorities, your phone
will log onto whichever network offers the
strongest reception signal at your current
location.
If you have switched off automatic network
selection and leave the range covered by your
current network operator, you are requested to
select a different network operator manually.
Switching on automatic network selection
• Call up the main menu.
• Select ‘GSM SERVICES 5’ and confirm.
• Select ‘Auto Network’ and confirm.
Display shows:
‘Auto Network Off’.
• Select ‘ALTER’.
Display shows:
‘Auto Network
• Select ‘OK’ and switch to the next higher level
menu.
Display shows:
‘
Auto Network ‘.
On’
Perform a similar operation to switch off
automatic network selection.
If ‘Auto Network’ is shown in the display, the
function is switched off.
51
Page 53

Conformance
Conformance
EEC CONFORMANCE
In conformance with current EC guidelines, any
person may operate this radio receiver.
This unit conforms to the current valid European
or harmonised national regulations. The
designation is your guarantee of conformance to
the applicable specifications concerning
electromagnetic compatibility for the unit. This
means that interference affecting other
electrical/electronic devices caused by your unit,
as well as interfering influences on your unit
from other electrical/electronic devices, can be
largely prevented.
Current valid designations are:
- CE symbol for issue according to European
guideline 89/336/EEC under application of the
following standards:
EN 55013 & EN 55020
- e symbol according to European motor vehicle
EMC guideline 95/54/EU, also permits operation
in motor vehicles (classes M, N and 0) which
received their type approval after 1st January
1996.
SAFETY STANDARDS
Your telephone complies with all of the relevant
security standards for radio telephones.
It complies, among other things, with the
standards and recommendations of the following
Government agencies and other relevant
organisations responsible for protection against
electromagnetic radiation:
• Directives of the European Community,
Directorate General V in Matters of Radio
Frequency Electromagnetic Energy.
• National Radiological Protection Board of the
United Kingdom. GS-11, 1988.
• American National Standards Institute
(ANSI)/IEEE. C95. 1-1992.
• National Council on Radiation Protection and
Measurements (NCRP). Report 86.
• Department of Health and Welfare Canada,
Safety Code 6.
H4371
Declaration of Conformity
Your telephone complies with all of the
requirements set out in the relevant EU
guidelines. The declarations are available from
LandRover.
52
Page 54

Conformance
53
Page 55

Troubleshooting
Troubleshooting
Troubleshooting
What to do if ......
Minor problems should not be allowed to
interfere with the pleasure offered to you by the
many functions of your telephone. You are
provided with a summary of the solutions to
frequently-asked questions in the following
pages. If particular settings are to be made or
checked, you will find references to further
information (in brackets). If you are unable to
remedy a problem, please contact your service
provider or your Land Rover Dealer.
• Are the battery contacts on the handset
contaminated?
Clean the contacts by removing the batteries
and clean the contacts with a dry, soft cloth.
• Are the charging contacts on the handset
contaminated?
Clean the contacts using a dry, soft cloth on
the bottom of the handset.
• Are the batteries faulty?
Replace the batteries with new ones of the
recommended type.
...you are unable to switch the phone on
• Did you press the on/off key for long enough?
Press the on/off key for at least two to three
seconds.
• Are the batteries sufficiently charged?
Charge the batteries by placing the phone in
the EjectBox (handset cradle) and check the
charge indicator in the display.
• Are the batteries completely discharged?
Leave the handset in the EjectBox (handset
cradle) for about 6 hours.
• Are the charging contacts on the handset
contaminated?
Clean the contacts using a dry, soft cloth on
the bottom of the handset.
• Are the batteries faulty?
Replace the batteries with new ones of the
recommended type.
...no charging symbol appears in the
display
• Are the batteries completely discharged?
Leave the handset in the EjectBox (handset
cradle) for about 6 hours.
• Is the ambient temperature above or below
the batteries’ operating range?
Adjust the ambient temperature accordingly.
Wait a short while, then recharge the
batteries.
...the stand-by time is too short
• Is the display lighting switched on?
Switch off the display lighting.
...there is a SIM fault
• Is the SIM card inserted correctly?
Make sure that the SIM card is properly
inserted.
• Are the contacts of the SIM card
contaminated?
Clean the contacts with a dry, clean cloth.
• Is the SIM card damaged?
Inspect it visually. If the SIM card is damaged
return it to your network operator.
...the handset loses contact with the base
station
• Is the radio switch in the EjectBox (handset
cradle) in position1?
Move the switch to position 1.
• Has the maximum range been exceeded?
Move closer to the vehicle.
54
Page 56

Troubleshooting
...you cannot connect up to the network
• Is the signal intensity sufficiently strong, or
are you in a dead spot?
Find a higher location or stop your vehicle
and try to establish the connection again.
• Are you trying to use a network that is not
permitted?
Select a different network.
• Is network barring on?
Check the settings.
• Is the network at capacity?
Try phoning again later.
• Are the batteries faulty?
Replace the batteries with new ones of the
recommended type.
...you lose connection with the network
• Is the signal too weak?
If you have switched on the function
‘automatic network selection’ you are
automatically logged onto an available
network with the strongest signal.Switching
the phone off and on again may accelerate
this.
...you cannot make any calls
• Has a specified ‘units limit’ been reached?
Reset the limit by entering PIN2.
• Have you inserted a new SIM card?
Check the SIM card for new restrictions.
• Are you trying to use a new network that is
not permitted?
Select a different network.
...you cannot make any international calls
• Are international calls barred on your
telephone?
Reset the barring.
• Is access to international phone numbers
generally possible from your telephone?
Ask your service provider.
...you are unable to make certain calls
• Does the telephone number have more than
20 digits?
Check the number.
• Are call barrings switched on?
Barrings may be defined by the network
operator; consult your network operator.
Alternatively, check your personal settings.
...you cannot make any entries at the
handset
• Is the key lock switched on?
Release the lock.
...no entries can be made in the phone
book
• Is the phone book full?
Delete less important phone numbers.
...you are unable to alter entries in the
phone book
• Is SIM card barring active?
Ask your service provider.
...you have no access to your phone book
• Have you changed your SIM card?
Insert the original SIM card.
...you cannot receive calls
• Is the signal intensity at a sufficient level or
are you in a dead spot?
Find a higher location or stop your vehicle
and try to establish the connection again.
• Is the call diversion function switched on?
Switch call diversion off.
• Has your phone been set to ‘Call barring’?
Switch the barring off.
...you hear signal tones at regular
intervals during a phone call
• The one minute beep is switched on as a
means of reminding you of the duration of
your call.
55
Page 57

Troubleshooting
...you are unable to send text messages
• Does the network operator support this
service?
Ask your service provider.
• Has the number of the service centre not been
set, or is it incorrect?
Set the correct number for the service centre.
• Might the network be overloaded?
Try sending the text message again later.
• Does the recipient have a phone that supports
text messages?
Check with the recipient.
• Are the batteries faulty?
Replace the batteries with new ones of the
recommended type.
...you are unable to switch certain
functions on or off
• Are the functions in question supported by
the network operator, or is it necessary to
register for them first?
Ask your service provider.
...the charge counter does not work
• Does the network operator transmit the meter
clock pulse?
Ask your service provider.
...you receive a code error message (for
PIN, PUK, and possible PIN2 or phone
code
• Have you entered the wrong code three
times?
Enter the codes supplied together with the
SIM card in the manner instructed.
...you are unable to transmit DTMF codes
• Have you switched on the function ‘DTMF
touchtone’?
Switch on the function ‘DTMF touchtone’.
...the phone does not switch off at the
same time as the ignition
• The stand-by timer is switched on.
...the range of functions available on
certain menus is restricted or additional
functions are available on one or more
menus
• Has the service provider or network operator
added or deleted functions?
Ask your service provider.
...you do not know the PIN code
• If you know the PUK you can enter a new PIN.
...you do not know the PUK code
• Please contact your service provider.
...handset does not function.
Display shows ‘PLEASE REGISTER’
• Handset has been de-registered.
Contact your Land Rover dealer for
assistance.
...you receive a code error message from
the service provider
• Are you entitled to use the service in
question?
Ask your service provider.
56
Page 58

Telephone Menu Structure
Menu Structure Telephone Menu Struc ture
H4619
Tones
Divert
Control Use
Messages
GSM Services
Time, Charge
Setup
Local Settings
Call Tone
Volume
Sound
If Not Reachable
If No Reply
All Calls
If Busy
PIN Control
Except Tel. TB
Except Last Ten
Call Screening
Prevent New SIM
Loan Phone
Network Barrings
Text Message
Text Message
Missed Calls
Calls Received
Network Info
Change Network
Auto Network
Operator List
Preferred Netw.
Incognito
Call Waiting
Last Call
All Calls
Autocharge Disp
1 Minute Beep
Charge Rate
Charge Limit
Language
Airtime Remain
Special Tones
Auto Answer
PIN Settings
Keys
Any Key
Display
EjectBoxAnswer
Service Setting
Status
On
Off
Beep
All Calls Out
Out Int.+Home
Out Only Home
All Incoming
In Visited Netw
x Text (x new)
Edit Old
Create New
Settings
CB Messages
CB Topics
English
Deutsch
Francais
Italiano
Nederlands
Espanol
Vlaams
Service Signals
CB Signals
DTMF Touchtone
ON
OFF
No. Call Cycles
Alter PIN
Alter PIN2
Key Lock
Key Acknowledge
Lighting
Greeting Text
Log On
Log Off
Phone Code:
Phone Info
Standard Value
Answer Is YES
Answer Is NO
Delete Text
Edit Old
Create New
Send Text
Service Centre
Validity
Key Sound
Keys Mute
Own Mobile
Other Mobile
Base
Mobile Unit
57
Page 59

Telephone Menu Structure
H4620
Show Entry
Edit Entry
Delete Entry
New Entry
Delete Phonebook
Capacity
Sort
2 x
Alphabetical
Memory Location
Frequency
Show Entry
Sort
Alphabetical
Frequency
58
Page 60

Index
A
Accepted calls 26
Adding a caller to the phone book 26
Adjusting number of call cycles 25
Authorisation 16
permit only known callers 16
permit only last ten numbers 17
restricting choice of numbers 17
restricting use by third parties 16
theft protection 16
Automatic network selection 51
switching on automatic network selection 51
B
Batteries
approved types 12
inserting 12
C
Calls during a conversation
accepting multiple calls 32
ending a call 32
rejecting multiple calls 32
replacing current call 32
switching between two conversations 32
telephone conference 32
Cell broadcast messages 39
adding new CB topics 39
deleting a CB topic 39
reading a new message 39
switching on CB messaging service. 39
Charge rate 42
altering the charge per minute 42
altering the charge per unit 42
cancelling input 42
determining the charge rate 42
selecting currency 42
Charges
activating and adjusting charge limit 41
activating automatic charge display 40
cancelling input 42
charge limit 41
deactivating charge limit 41
resetting call duration and call charges 40
show time and cost of all calls 40
show time and cost of last call 40
switching on the 1 minute bleep 41
Control tones 47
D
Deleting list of callers 26
Display controls 7
Diverting calls 30
altering call diversion 30
cancelling call diversion 30
divert if line busy 31
diverting all calls 31
diverting unanswered calls 31
if not reachable 30
DTMF codes 38
sending DTMF codes 38
switching on DTMF touchtone 38
terminating the connection 38
E
EEC conformance 52
Emergency call 20
ending an emergency call 21
interrupting an emergency call 21
via keypad 20
via SOS 21
Equipment code 15
Equipment settings 44
activating EjectBox answering 45
adjusting the switch-off timer 45
altering the greeting text 44
displaying phone ID number 46
entering greeting text 44
resetting the base station 46
resetting the handset 45
switching on illuminated display 44
59
Page 61

Index
F
Function keys 7
G
GSM networks 4
H
Handset
changing the batteries 12
K
Key lock
activate and deactivate 19
Key settings 43
answering a call with any key 44
cancelling the key lock 43
switching off key acknowledge 43
switching on key acknowledge 43
switching on the key lock 43
L
Language 43
M
Making a call
deleting the redial list 23
dialling 22
dialling from the phone book 22
dialling from the TOP 8 list 22
displaying subscribers not reached 23
international dialling 22
redialling 23
storing subscribers not reached 23
Missed calls 33
dialling a number directly 33
displaying missed calls 33
Multiple Connections 32
Muting 20
N
Network barrings 17
barring alternative network calls 18
do not permit incoming calls 18
permit international calls 18
permit only emergency calls 18
permit only national calls 18
range of features 17
Network settings 50
assigning empty place in list 50
assigning occupied place in list 50
deleting network operator 50
displaying available network operators 50
displaying GSM networks 50
selecting a new network 51
selecting preferred network 50
Numerical keys 7
P
Phone book 27
checking memory capacity 29
creating a new entry 27
deleting an individual entry. 29
Deleting entire phone book 29
deleting entire phone book 16
displaying entry 28
displaying own phone number 29
editing an entry 28
entering own phone number 28
entering the phone code 29
lower case characters 27
sorting entries 28
upper case characters 27
Phone code
altering 15
Pictograms 8
PIN
changing the PIN code 14
changing the PIN2 code 14
defining a new PIN 13
entering 13
PIN2 14
resetting a PIN block 13
suppressing 13
60
Page 62

Index
R
Radio switch 11
Receiving a call
accepting 25
automatic answering 25
calling a person back 26
Rejecting calls 25
Ringing tones 46
adjusting the ringing tone sound 46
adjusting the ringing tone volume 46
selecting ’Beep’ as the ringing tone 46
switching on call tone 46
S
Safety standards 52
Service signals 47
switching on service signals 47
SIM card
inserting into the handset 10
SIM card and service provider 5
SMS 35
adjusting storage time 35
altering the service centre number 35
creating a text message 36
editing a text message 37
reading a text message 36
replying to a text message 36
saving own text message 36
saving received text message 37
service centre setup 35
Softkeys 8
Standard settings 48
base unit 48
handset 49
T
Telephone 4
Telephone conference 32
Telephone handset 6
Terminating a conference call 32
TOP 8 34
dialling a number from the TOP 8 list 34
displaying an entry from the TOP 8 list 34
displaying TOP 8 list 34
sorting entries 34
Troubleshooting 54
61
 Loading...