

Page 1
In-Car Entertainment
Geluidsinstallatie in voertuig
Equipement de sonorisation automobile
Stereoanlage
Antenna dell'autoradio
Equipo de sonido
Sistema audio
Page 2

The audio equipment fitted to your vehiclehasbeencarefullychosen to add to
your motoring enjoyment.
Whether you drive for business, or purely for pleasure, we want you to enjoy
using your audio equipment, so please take a little time to read these
instructions and find out how to get the very best In-Car Entertainment!
Printed in Australia on 100% Recycled Paper.
Page 3

In-Car Entertainment
Contents
Sound controls 2...................................................................................
Radio controls 4....................................................................................
Cassette player 5...................................................................................
Compact disc player 7...........................................................................
Radio tuning 9.......................................................................................
Radio pre-set buttons 10.......................................................................
Auto-store 11........................................................................................
Radio reception 12................................................................................
Care of cassette player and tapes 13.....................................................
Compact disc changer unit 14...............................................................
Caring for compact discs 15..................................................................
Security code 16....................................................................................
1998 Rover Group Limited
Publication Part No. VDK100320
11.98 AUS Range Rover - 1st Edition
1
Page 4
Sound Controls
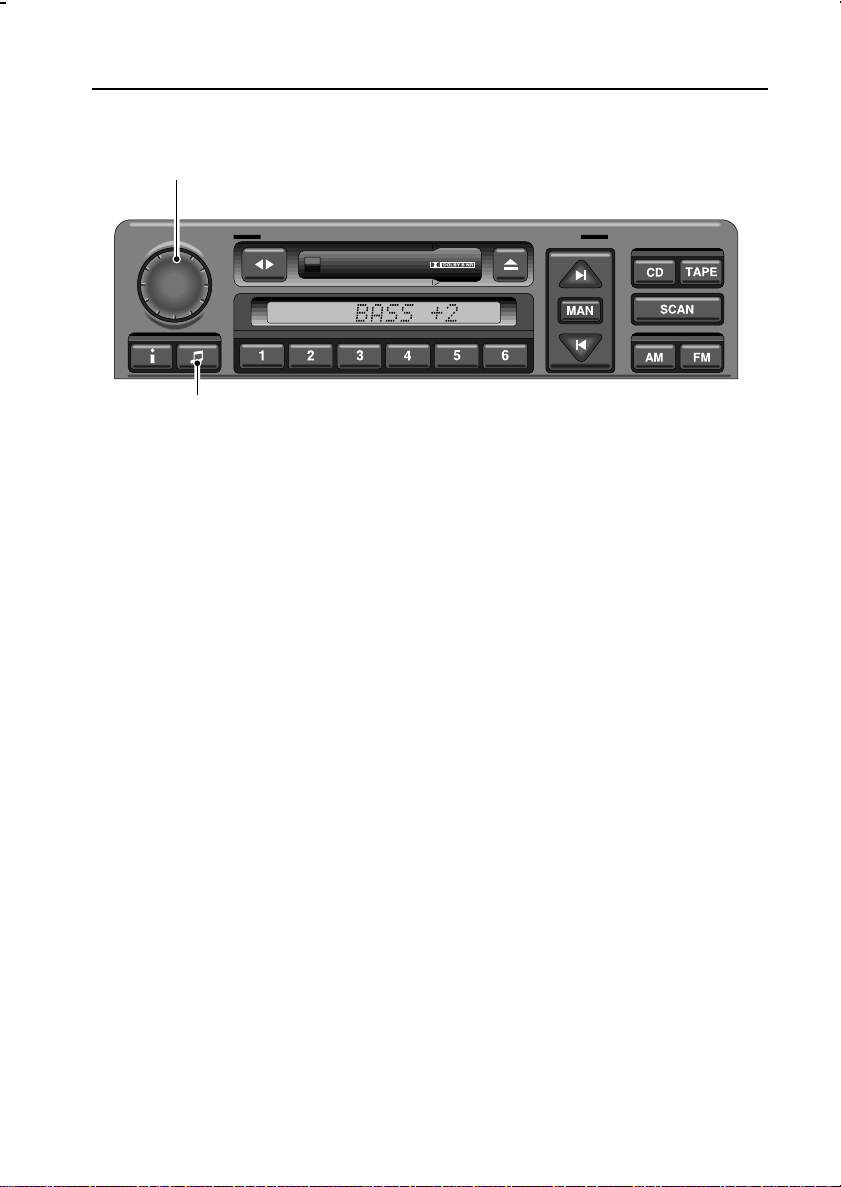
1
ICE0113
1. On/off and volume control
Press to switch on (display shows ’RANGE
ROVER’, followed briefly by ’CODE’). Press
again to switch off.
Rotate steadilyto right or left to adjust the
volume.
The volume can also be adjusted using the
remote switches on the steering wheel (see
’Owner’s handbook’).
NOTE: The volume level will automatically
increase or decrease according to the vehicle
road speed, thereby comabating any
additional road or wind noise that may be
experienced.
NOTE: If you have a car telephone with a
mute signal output connected to the stereo
system, radio, tape or CD play automatically
mutes when the telephone is in use.
2
SOUND CONTROLS
2. Audio selection button
Press one or more times to select bass,
treble, balance, fader or subwoofer (display
confirms selection).
NOTE: The subwoofer control, and associated
display, operate only with the optional
subwoofer unit.
Bass:
Press once, then rotate volume control to left
or right to reduce or increase bass response.
Display shows:
’BASS - 9’ = minimum bass
’BASS 0’ = normal bass
’BASS + 9’ = maximum bass
Treble:
Press twice, then rotate volume control to
left or right to reduce or increase treble
response. Display shows:
’TREB - 9’ = minimum treble
’TREB 0’ = normal treble
’TREB + 9’ = maximum treble
2
Page 5

Sound Controls
Balance:
Press three times, then rotate volume control
to left or right to adjust balancebetween left
and right speakers.Display shows:
’BAL R 9’ = max sound from RIGHT
’BAL 0’ = equal balance
’BAL L 9’ = max sound from LEFT
Fader:
Press four times, then rotate volume control
to left or right to adjust balancebetween
front and rear speakers. Display shows:
’FAD F 9’ = max sound from FRONT
’FAD 0’ = equal balance
’FAD R 9’ = max sound from REAR
Subwoofer:
Press five times, then rotate volume control
left or right to reduce or increase subwoofer
response. Display shows:
’SUB WFR - 9’ = minimum response
’SUB WFR 0’ = normal response
’SUB WFR + 9’ = maximum response
Press the button again to return to volume
control.
NOTE: After 5 seconds without further
adjustment, audio mode deselects and
reverts to volume control.
IMPORTANT
This audio unit is equipped with a 20 minute
time-out function. This enables the unit to be
switched on and then used for up to 20
minutes after the vehicle starter switch has
been turned to position ’0’, even if the key is
removed. This means that if a passenger is
to be left in the vehicle, music can be listened
to, without the security risk of leaving the
keys in the starterswitch. At the end of the
20 minutes, the unit will switch off
automatically.
3
Page 6
Radio Controls
MAN
9
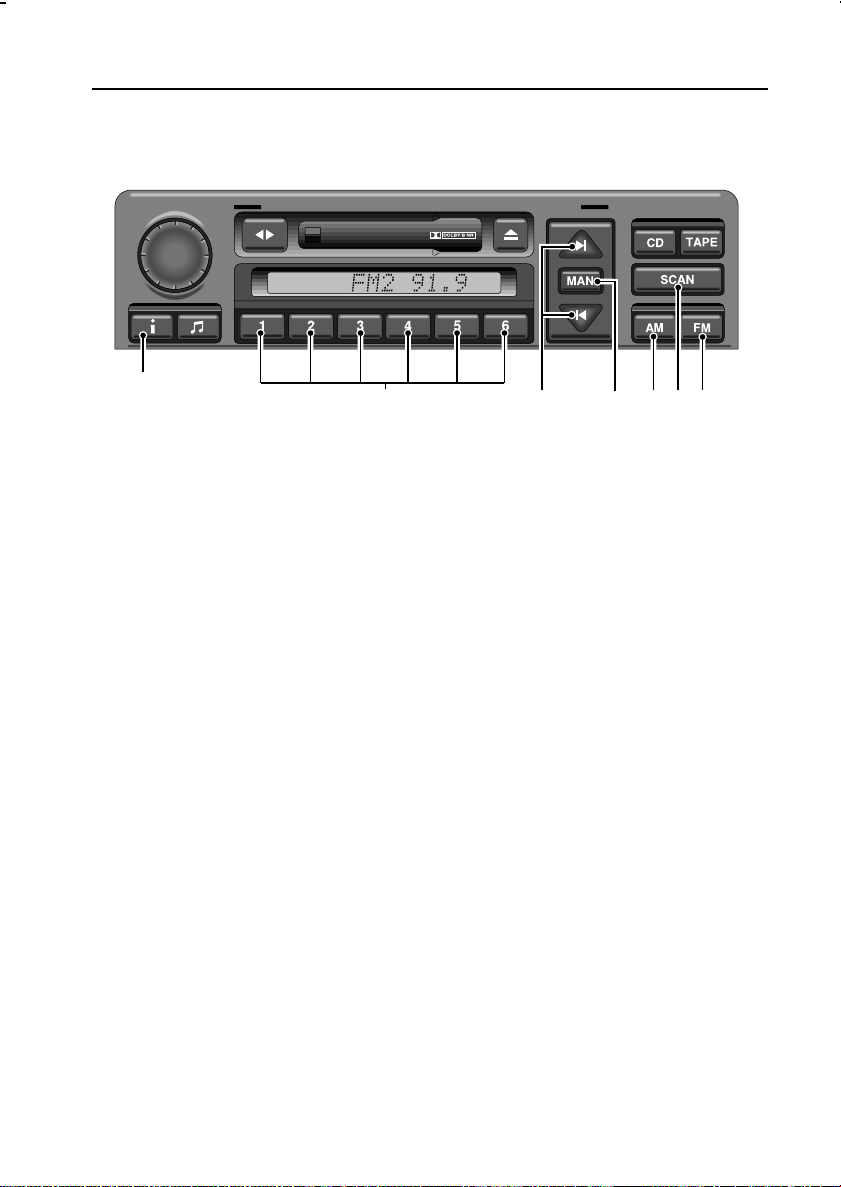
ICE0114
3. FM waveband selector
Press briefly to select FM frequencies. There
are two FM bands (FM1 and FM2). Both have
the same tuning range, and each one can be
used to store six frequencies on the pre-set
buttons.
Press and hold to activate auto-store (on
FM2 only - see ’Auto-store’).
4. AM waveband selector
Press briefly to select one of the two AM
bands (AM1 and AM2). Both AM wavebands
can be used to store six stations on the
pre-set buttons.
Press and hold to activate auto-store (on
AM2 only - see ’Auto-store’).
5. Tuning buttons
Briefly press either button to search
(manually or automatically) up or down the
frequency range (see ’Radio tuning’).
7
RADIO CONTROLS
4
65
6. Manual tuning selector
Press to select manual tuning mode (’MAN’
is displayed)- use in conjunction with the
tuning buttons (see ’Radio tuning’). Press
again to return to automatic tuning.
NOTE: The frequency can also be adjusted by
using the remote switches on the steering
wheel (see ’Owner’s handbook’).
7. Radio pre-set buttons (1-6)
Use to store up to 6 radio stations on the FM
and AM wavebands.
Press briefly to select a stored frequency.
Press and hold (until radio bleeps) to store a
frequency on a pre-set (see ’Pre-set
buttons’).
8. Scan mode button
Press the button to scan through all
frequencies on the chosen waveband
(5 seconds of each frequency will be played).
Press again to cancel the scan.
9. ’i’ button
The functionality of this button is inhibited on
this radio.
8
3
4
Page 7

Cassette Player
14
ICE0115
10. Tape mode selector
Press to select tape play (display shows
’SIDE-1’ or ’SIDE-2’).
If the set is switched off during tape play, the
cassette remains in stand-by mode. Play
resumes when the set is switched on again.
11. Cassette compartment
Insert the tape with the open side to the right
and push in gently. The radio mutes and tape
play starts immediately.
NOTE: At the end of either side of the tape,
play will automatically continue in the
opposite direction.
12. Cassette eject button
Press to eject the tape (display shows ’TAPE
EJECT’). The unit returns to radio mode,
selecting the waveband and frequency last in
use.
NOTE: If the tape is ejected when the set is in
radio or CD mode, sound briefly mutes.
15 16
CASSETTE PLAYER CONTROLS
12
1011
13
13. Tape search controls
Fast forward/rewind:
Press the manual mode button (’MAN’), then
press and hold (for at least 1 second) the
appropriate search button (’TAPE FFWD’ or
’TAPE FREW’ appear in the display). The tape
will fast forward/rewind until the search
button is pressed again.
Skip:
With the unit in automatic mode, press the
appropriate search button to skip to either
the beginning of the next track, or the
beginning of the current track (’SEEK’, and
chevrons indicating direction, appear in the
display). Press the button repeatedly to skip
forwards or backwards through more than
one track.
NOTE: The skip function may not find spaces
between tracks of less than three seconds
duration, and may also be confused by
excessivebackground noise, very soft
musical passages and intermittent pauses in
music or speech.
NOTE: Skip and mode selection can be
operated using the remote switches on the
steering wheel (see ’Owner’s handbook’).
5
Page 8

Cassette Player
14
ICE0115
14. Tape reverse
Press to play the opposite side of the tape.
15. Dolby B noise reduction *
Press pre-set 1 when playing tapes recorded
using the Dolby B NR system (display shows
Dolby double ’D’ symbol).
15 16
12
1011
13
16. Tape scan button
Press the SCAN button to listen to the first
10 seconds of each track on the tape (both
sides). The display shows ’TAPE SCAN’. The
scan continues until the button is pressed
again or until another function is selected.
* Noise reduction manufactured under license. Dolby and the double ’D’ symbol are trade marks of Dolby Laboratories Licensing Corporation.
6
Page 9

Compact Disc Player
17
ICE0116
COMPACT DISC PLAYER CONTROLS
17. CD mode selector
Press to select CD player mode. Playback
starts from the point on the disc at which
play last stopped, or from the start of the
first disc if the magazine is newly inserted.
The display shows disc number (’CD1’) and
track number (’01’). If no magazine has been
inserted into the autochanger, ’NO
MAGAZINE’ is displayed.
At the end of each disc, playback
automaticallycontinues with the next disc
(missing discs are skipped if less than six
have been loaded).
NOTE: If a disc has been inserted into the
magazine upside down, ’CD ERROR’ is
displayed.
18
19
(if fitted)
18. Disc selection buttons (1-6)
Press the appropriate button to select the
desired disc. If an empty compartment is
selected, the display shows ’NO DISC’ and
the next availabledisc is selected instead.
NOTE: Skip and mode selection can be
operated using the remote switches on the
steering wheel (see ’Owner’s handbook’).
NOTE: The compact disc player controls will
operate only with the optional CD changer
unit.
20
7
Page 10

Compact Disc Player
17
ICE0116
19. Track search buttons
Skip:
Press the appropriate button to skip to the
beginning of the next, or back to the
beginning of the current track (the display
shows disc and track numbers). Press the
backward search button twice to skip to the
beginning of the previous track. If the button
is pressed and held, the CD player continues
to skip tracks (forwards or backwards) until
the button is released.
Search:
Press the Manual mode button (’MAN’), then
press and hold the appropriate search button
to move forward or backward (display shows
’FFWD’ or ’FREW’) through the track at a
greatly increased play speed (volume
reduces).
18
19
20. Scan mode button (SCAN)
Press the SCAN button to listen to the first
10 seconds of every track on the selected
disc. ’SCAN’ appears in the display, along
with the numbers of the disc and the
scanned track. The scan continues until the
button is pressed again or until another
function is selected.
Press and hold the button for approximately
2 seconds (until the set bleeps) to activate
the random play mode (’RND’ and the disc
and track number are displayed). This allows
any track from any loaded disc to be played
at random.
20
8
Page 11

Radio Tuning
If you know the frequency of the radio
RADIO TUNING
station you are seeking, or you need to select
a radio station that is too weak to be found
by automatic tuning, use manual tuning, as
follows:
Select the desired waveband (FM or AM),
then press the ’MAN’ button (6). By briefly
pressing either tuning button (5), the
frequency changes (either up or down) in
steps of 0.1 MHz for FM, or 9 kHz for AM.
Fast manual tuning
By keeping either manual tuning button
depressed, the waveband is scanned rapidly
(up or down) until the button is released.
Automatic tuning
Select the required waveband (FM or AM),
then briefly press one of the tuning buttons
(5) - (’SEEK’ along with the chosen
waveband appear in the display).
The radio automaticallysearches the
frequency range (either up or down
depending upon which button is pressed)
looking for a station of acceptable strength.
The search then stops unless you choose to
continue by pressing the tuning button
again.
The search can be stopped at any time by
pressing any pre-set button.
Local radio stations
Reception of most local radio stations is
intentionally limited to a comparatively small
area around the transmitter.
ICE0103
Waveband scan
Select the desired waveband (FM or AM) and
press the SCAN button (8). The radio scans
through the waveband, seeking stations of
acceptable strength (the waveband,
frequency and ’SC’ are displayed). The radio
stops at each one it finds and plays that
station for 5 seconds, the radio then mutes
and scans for the next station.
To stop the scan, press the button again the radio commences playing the station at
which the scan was stopped.
NOTE: If you have a car telephone with a
mute signal output connected to the radio,
the radio automaticallymutes when the
telephone is in use.
MONO/STEREO
Whenever the FM waveband is selected, the
radio automaticallyreproduces stereo sound,
provided a suitable signal is available.
However, if a signal becomes too weak for
good stereo reception, only mono sound is
produced until the signal strengthens
sufficiently for stereo sound reproduction.
65
8
9
Page 12

Radio Pre-sets
ICE0104
The six pre-set buttons (7) can be used to
manually store up to twelve FM stations (six
each on FM1 and FM2) and twelve AM
stations (six each on AM1 and AM2). The
pre-sets are programmed as follows:
Programming the pre-sets
•
•
•
RADIO PRE-SET BUTTONS
Select the required waveband (FM1, FM2,
AM1 or AM2).
Tune to the desired frequency using
either automatic or manual tuning.
Press and hold one of the pre-set buttons
until a bleep sounds. The frequency is
now stored (the display shows the
waveband and frequency or name of the
station to which you have tuned).
7
43
NOTE: Once the pre-sets have been
programmed, they will be retained by the
unit until they are re-programmed or until the
battery is disconnected.
Operating the pre-sets
Once the pre-set buttons have been
programmed, operation is simple; select the
desired waveband, then press the pre-set
button of your choice.
10
Page 13

Auto-store
ICE0104
Auto-store enables you to rapidly tune and
store the strongest FM and AM radio signals
in a single operation. This facility is
particularlyuseful if you are in an unfamiliar
area and have little knowledge of local
transmitter frequencies.
Programming auto-store
Press and hold the appropriate waveband
selection button (3 or 4) until a bleep sounds
(the radio mutes and the display shows
either ’FM AUTOSTORE’ or ’AM
AUTOSTORE’).
Auto-store scans the waveband to find the
six strongest frequencies and then stores
them on either the FM2 or AM2 pre-set
buttons in order of signal strength.
NOTE: Auto-store overwrites any stations
already stored on the FM2 or AM2 pre-set
buttons.
Radio play resumes when the operation is
complete.
7
AUTO-STORE
43
NOTE: If auto-store is unable to find six
strong stations, the remaining pre-set
buttons remain blank.
Operating auto-store
To tune to one of the auto-store frequencies,
select FM2 or AM2, then press the pre-set
button of your choice; the frequency or radio
station name appears on the display.
11
Page 14

Radio Reception
Distortion, interference and lack of signal
clarity, are often attributed to a fault in the
radio - this is rarely the case.
Problems of this kind are usually caused by
phenomena such as atmospheric conditions,
signal strength, hilly terrain, tall buildings,
bridges and even electrical interference from
power lines.
Please remember: A car radio receives
signals while the vehicle is in motion (unlike
a domestic set) - constantly changing
direction and moving away from, or nearer
to, the transmitter whilst negotiating terrain
with widely differing reception
characteristics.Some interference is to be
expected from time to time.
FM transmitters can only broadcast over a
limited range and good, clear signals will
only be receivedin the immediate area of the
transmitter. When travelling, it may be
necessaryto re-tune the radio from time to
time, to offset the effects of moving from
one transmitter area to another.
The broadcast range for good stereo
reception (usually within a 30 to 40 mile
radius of the transmitter) is noticeably less
than it is for mono.
FM Signals (like light waves) travel in a
straight line, so large obstacles, such as tall
buildings, can shield the car from the signal
causing distortion or loss of reception
(known as dead spots).
Distortion can also occur if FM signals
received directly from the transmitter mix
with signals which have been reflected by
obstructions such as mountains, hills and tall
buildings (this is known as multi-path
distortion).
ICE 0052
12
Page 15

ICE 0054
Care of Cassette Player and Tapes
Use only good quality tapes with a maximum
capacity of ninety minutes (C90). Check that
both spools rotate freely and remove any
loose turns at the start of the tape by winding
one spool with a pen or pencil.
Cassette player
In use, the tape head accumulatesdust and
contamination, gradually impairing sound
reproduction and, in extreme cases, reducing
volume too. To combat contamination, clean
the tape head periodically(after
approximatelyevery 20 hours playing time)
by passing a wet type cleaning cassette
through the player.
NOTE: Because your cassette player is fitted
with auto reverse, the cleaning cassette must
be played in both directions.
The tape will require more frequent cleaning
in winter, as contamination is greater in
conditions of low temperature and increased
humidity. However, the use of good quality
tapes, keeps the build up to a minimum.
Cassette tapes
Always store cassettes in their boxes
•
when not in use.
Never leave cassettes in the vehicle
•
during extremes of temperature. In
particular, do not leave tapes in direct
sunlight as they may warp and become
unuseable, or jam the tape player
mechanism.
Fast forward, or rewind tapes every 8 to
•
10 plays to prevent them from becoming
too tightly wound.
Ensure that labels attached to the cassette
•
are glued firmly in place.
DO NOT leave tapes in the cassette player
•
for more than a few hours in very cold or
humid conditions - the oxides on the tape
surface may contaminate the cassette
player mechanism.
NOTE: After continuous playing, cassettes
may become hot to touch. This is normal
and will not harm good quality tape.
13
Page 16

CD Autochanger & Discs
1
ICE0096
Removing/inserting the magazine
Fully open the sliding cover (1) to insert or
remove the magazine. Keep the cover closed
at all other times to prevent dust and dirt
from entering the changer unit.
Press the button (2) to eject the magazine.
Insert the magazine (3) in the direction of the
arrow marked on the magazine casing and
push it fully into the changer. Finally, close
the sliding cover.
2 3
COMPACT DISC CHANGER UNIT (if fitted)
3
Loading & unloading the magazine
Holding the magazine as shown (arrow
uppermost), remove each CD tray in turn.
Place a disc (label side uppermost) onto
each tray - holding ONLY the outside edge
and centre hole of the disc. Load only one
disc in each tray. Correctly align the tray with
the parallel slots on each side of the
magazine and slide the tray into the
magazine.
To unload the magazine, hold the magazine
with the arrow uppermost, pull out each tray
in turn, holding the tray securely so as not to
drop the disc. Unload one disc at a time and
handle only the edge and centre of the disc.
ICE0097
ICE0043
14
Page 17

Caring for Compact Discs
IMPORTANT
Use standard 12cm CDs only.
•
DO NOT use irregularly shaped or
•
damaged CDs - these may damage
the compact disc changer.
8cm CD singles must NOT be used,
•
even if a CD adaptor is fitted.
The CD autochanger should not be
•
used in temperaturesoutside the
range -10
In th unlikely event that the CD
•
autochanger overheats, ’CD OVER
TEMP’ will be displayed- change to
radio or tape mode until the unit has
cooled.
The CD autochanger should only be
•
used as described- any other
application or method of use could
result in the user being exposed to
invisible laser radiation exceeding the
limit of laser class 1.
NOTE: Additional magazines can be
obtained from a Land Rover dealer.
°
Cto+60°C.
CARING FOR COMPACT DISCS
Dirt, dust, condensation and heat can
damage discs. Always observe the following
precautions:
NEVER touch the horizontal playing surface
(the unlabelled side) of a disc! Handle discs
by holding the outer edges, or the edge of
the central hole and the outer edge, between
finger and thumb.
ALWAYS return discs to their boxes after use
(dirt detracts from the sound quality).
NEVER leave the disc or the box exposed to
excessiveheat or direct sunlight!
NEVER use a solvent or abrasive cleaner!
Dust or dirt should be removed from the
playing surface by wiping with a clean, dry,
lint-free cloth always wipe in a straight line
from the centre to the edge of the disc!
15
Page 18

Security Code
SECURITY CODE INFORMATION
NOTE: Your vehicle was delivered with the
security code disabled, if you wish to have
the code activated, consult your Land Rover
dealer.
To reduce the risk of theft, Range Rover
radio/cassetteand CD players are
programmed with a four digit security code.
Once activated,this code prevents the unit
from functioning if it is illegally removed
from the vehicle. There are 10,000 different
codes - making your radio equipment
valuelessto a thief unless he has the correct
one. In addition, each unit is further
protected by a time delay penalty system that
effectivelydefies even the most systematic
attempt to break the code.
NOTE: If an incorrect code is entered, a one
minute time delay is imposed before a
second code can be attempted. Each time a
wrong code is entered, the time delay
doubles (2 min, 4 min, 8 min, etc.) making
theft a very unattractive proposition.
The vehicle was supplied with a Security
Information card. This card contains a record
of the four digit security code, as well as the
unit’s unique serial number. The serial
number is also stamped into the metal side
of the unit and, in the event of theft, would
confirm proof of ownership.
It is VERY IMPORTANT that you keep a safe
record of the security code and heed the
following advice:
NEVER keep a record of the security code
•
in the vehicle.
PLEASE stick the securitywarning
•
stickers where the potential thief is sure
to see them, but where they do not
impede your vision of traffic and
pedestrians.
If you lose your code number, contact the
•
nearest Land Rover dealer, who will be
able to obtain this information for you.
16
Page 19

Security Code
ICE0106
ENTERING THE SECURITY CODE
If the code has not already been entered, or
power to the set has been interrupted, the
code MUST be entered before the set will
operate. Enter the code as follows:
Switch on the radio (’CODE’appears in
•
the display). Press pre-set button 1.
Press either the up or down tuning button
•
(highlighted in illustration) until the first
digit of the security code appears in the
display. Press pre-set 1 to store the first
digit in the unit’s memory.
Use either tuning button to select the
•
second digit of the code (correct digit
appears in the display). Press pre-set 1 to
store the second digit.
Select the third digit, again using the
•
tuning buttons (until the correctdigit is
displayed). Press pre-set 1 to store the
third digit.
Select the final digit (the display now
•
shows the full four digit code). Press
pre-set 1 to store the final digit.
If the correct code has been selected, a
two-tone bleep sounds and the radio will
operate.
NOTE: If an incorrect code has been entered,
the first time delay period commences.
During the delay period, ’WAIT’ appears in
the display - DO NOT switch off. At the end
of the delay period, ’CODE’ reappears in the
display and you can then enter the correct
code. Remember; the time delay period
doubles each time an incorrect code is
entered.
17
 Loading...