

Page 1

LANCOM Wireless ePaper Server
User Manual
Page 2

User Manual
Contents
Contents
Copyright...............................................................................................................................3
1 Introduction........................................................................................................................4
2 Installation and setup.........................................................................................................6
1.1 How it works..............................................................................................................................................4
2.1 Installing the Wireless ePaper Server..........................................................................................................6
2.2 Setting up the license.................................................................................................................................8
2.3 General settings.........................................................................................................................................9
2.4 Installing and configuring the access points.............................................................................................10
2.4.1 Adding access points...............................................................................................................12
2.4.2 Removing access points...........................................................................................................13
2.5 Managing Wireless ePaper Displays.........................................................................................................14
2.5.1 Add Wireless ePaper Display....................................................................................................15
2.5.2 Tasks and functions.................................................................................................................15
2.5.3 Reset Display...........................................................................................................................19
3 Rendered graphics: Creation and display........................................................................20
3.1 Example of a template.............................................................................................................................20
3.2 Interaction between template, XML information and Wireless ePaper Displays........................................22
2
Page 3

Copyright
© 2014 LANCOM Systems GmbH, Würselen (Germany). All rights reserved.
While the information in this manual has been compiled with great care, it may not be deemed an assurance of product
characteristics. LANCOM Systems shall be liable only to the degree specified in the terms of sale and delivery.
The reproduction and distribution of the documentation and software supplied with this product and the use of its
contents is subject to written authorization from LANCOM Systems. We reserve the right to make any alterations that
arise as the result of technical development.
Windows®, Windows Vista™, Windows NT® and Microsoft® are registered trademarks of Microsoft, Corp.
The LANCOM Systems logo, LCOS and the name LANCOM are registered trademarks of LANCOM Systems GmbH. All
other names or descriptions used may be trademarks or registered trademarks of their owners.
Subject to change without notice. No liability for technical errors or omissions.
User Manual
Copyright
Products from include software developed by the "OpenSSL Project" for use in the "OpenSSL Toolkit" (
Products from include cryptographic software written by Eric Young (
Products from LANCOM Systems include software developed by the NetBSD Foundation, Inc. and its contributors.
LANCOM Systems GmbH
Adenauerstr. 20/B2
52146 Würselen, Germany
Germany
www.lancom-systems.com
Würselen, July 2017
eay@cryptsoft.com
).
www.openssl.org
).
3
Page 4
Access Point
Wireless ePaper
Server
LANconfig
Wireless ePaper
Display
Wireless ePaper
management
User Manual
1 Introduction
1 Introduction
LANCOM Wireless ePaper Displays provide a variety of options for displaying information. You can automatically and
remotely update the calendar schedule for your conference rooms, you can create dynamic notices and direction signs,
or you can control the price labels of goods on your shelves from a central location in real time. The wide range of
different settings allows you to set up your very own customized use case.
The Wireless ePaper Displays are battery powered and radio controlled, so they operate independent of any external
power supply or physical network connection. This allows a highly flexible use. The graphical display offers a high-contrast
image with a very wide viewing angle, while at the same time consuming an extremely low level of energy. Data
transmission is protected by 128-bit encryption.
The associated LANCOM E-series access points provide not only the wireless connection to the Wireless ePaper Displays:
They also support a full WLAN infrastructure and also the iBeacon technology. By integrating all of these technologies
into a single device, they all operate in parallel without interfering with one another.
This User Manual helps you with the steps required to commission the Wireless ePaper Server for centralized management
and monitoring of your Wireless ePaper infrastructure.
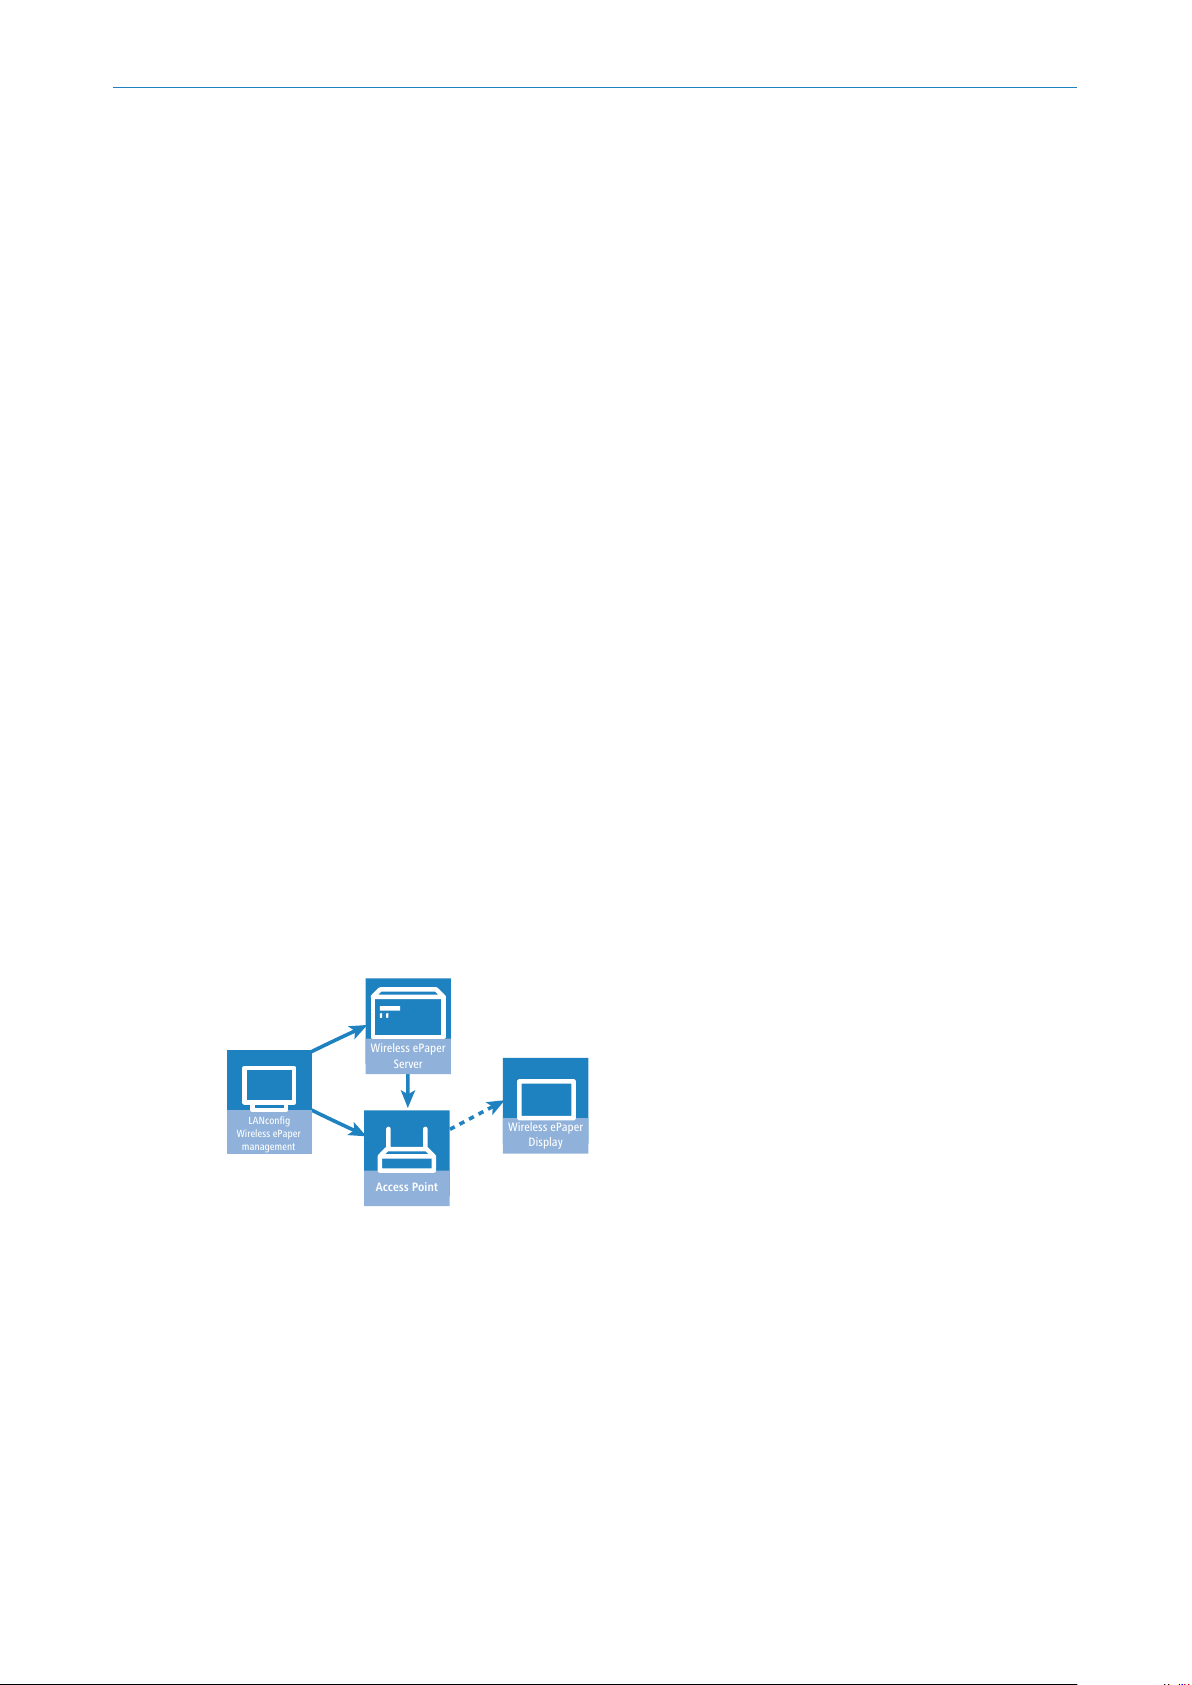
1.1 How it works
The LANCOM Wireless ePaper solution consists of four components:
LANconfig allows the management and configuration of access points, includes the Wireless ePaper management
a
feature, and facilitates the configuration of the Wireless ePaper Server
The Wireless ePaper Server creates the graphics and transmits the information to the access point
a
The access point connects to the Wireless ePaper Displays via radio
a
The Wireless ePaper Display shows the desired content
a
The software consists of LANconfig and the Wireless ePaper Server. LANconfig manages the access points, facilitates
their configuration, and invokes the Wireless ePaper management. The Wireless ePaper Server receives the instructions
from the Wireless ePaper Management, computes the content to be rendered, and transfers this to the access points.
The access points forward the content to the Wireless ePaper Displays by radio.
4
Wireless ePaper Display
A Wireless ePaper Display is based on ePaper technology for the display of any information in the form of graphics and
text. It can be used, for example, as room signage in the appropriate corporate design, or to display information about
an article. The information on display is automatically updated via radio when the content changes, unlike any printed
signs.
Page 5

User Manual
1 Introduction
LANCOM E-series access points
E-series access points communicate with Wireless ePaper Displays using radio frequencies in the 2.4-GHz ISM band and
a proprietary protocol. They offer a choice of 11 radio channels.
Depending on the size of the area where the radio-controlled Wireless ePaper Displays are installed, more than one
access point may be required to provide coverage over the entire area. If more than one access point is available, each
Display automatically selects the access point with the best signal quality.
Further technical details on the LANCOM E-series access points can be taken from the data sheet.
LANCOM Wireless ePaper Server
The LANCOM Wireless ePaper Server is a software program required for the management of the LANCOM access points
and Wireless ePaper Displays. The Wireless ePaper Server runs as a background service on an on-site Windows or Linux
PC. It does not provide a graphical user interface.
The Wireless ePaper Server generates the graphics, which are transmitted to and shown on the Displays when there is
a change of information.
LANconfig and Wireless ePaper management
The software LANconfig is required to operate the access points, with regard to both the WLAN and the Wireless ePaper
solutions. Please use the appropriate User Manual for the installation and setup of LANconfig.
Monitoring and configuration of the Wireless ePaper infrastructure is available in LANconfig in the form of the Wireless
ePaper management, which provides a graphical user interface. The Wireless ePaper management connects to the
Wireless ePaper Server. The server can be installed on the same computer or on any other computer that is accessible
on the network.
5
Page 6

User Manual
2 Installation and setup
2 Installation and setup
Before you can access a Display, you first need to install and set up the various components. Go to the LANCOM website
and download the latest version of LANconfig and the current installation packages for the Wireless ePaper Server. The
Wireless ePaper management is integrated into LANconfig, so no separate installation is required.
The necessary steps are explained below:
Install the Wireless ePaper Server software on a computer available locally in the network
a
Set up the license for the Wireless ePaper Server
a
Connect the access point to the local network and configure it
a
Register the Displays with the Wireless ePaper Server
a
The Wireless ePaper management indicates whether the Wireless ePaper Server, access point and LANconfig are
communicating correctly. It is accessible in LANconfig under Tools > Start Wireless ePaper management. The Wireless
ePaper management opens in a new window in the system's default browser.
The Wireless ePaper management is a part of LANconfig and does not require separate installation.
4
2.1 Installing the Wireless ePaper Server
Install the Wireless ePaper Server on a central computer in the network with constant access to the Wireless ePaper
Displays.
Only one Wireless ePaper Server should be installed on a network, otherwise conflicts could arise.
5
However, in the interests of system latency, the Wireless ePaper Server and the E-series access points should be
5
connected over the same local network.
System requirements
The number of displays and their size directly affect the amount of RAM required. The required disk space may increase
over time depending on the number of tasks and transmitted images.
Intel dual core processor or equivalent
a
2 GB RAM (512 MB for the server)
a
100 MB hard disk space for the server installation
a
Windows Vista or later, Windows Server 2003 or later, Linux (x86- and x64-architecture are supported)
a
Java Runtime Environment Version 7 or later (x86- and x64-JRE-versions are supported)
a
Installation
On computers with the Windows operating system, the software is installed with the supplied installation routine. This
directly installs and starts the Wireless ePaper Server as a service. In principle, the software runs outside of Windows on
any computer with Java. You will find the corresponding ".jar" files in the download area of the LANCOM website.
6
Page 7

User Manual
2 Installation and setup
To manage the Wireless ePaper Displays, the Wireless ePaper Server has to be started and running. To see whether the
server is correctly installed and configured, look under the Wireless ePaper management for "Connected with server:
[Server name] (IP: x.x.x.x)".
Files and folders of the Wireless ePaper Server installation:
Contains files used for the configuration of the Wireless ePaper Serverconfig/
Contains runtime data such as templatesdata/
Local mounted database (created when you first start)db/
External libraries required by your applicationlib/
Folder with user-specific pluginsplugins/
Database-related logging (created when you first start)derby.log
All logs of the import connections (created when you first start)import.log
Batch file for the installation of the server as a Windows serviceinstall_service.bat
Program code for operating the server on integration tier 1level1.jar
Required to run the Java application as a Windows serviceprunsrv.exe
Main executable file to launch the applicationserver.jar
All logs of the Wireless ePaper Server (created when you first start)server.log
Batch file for the installation of the server as a Windows serviceuninstall_service.bat
Updating the Wireless ePaper Server
In order to retain the database and configuration of your existing installation, simply copy the folder db and all modified
files in the folders config and data to the new installation.
Starting the Wireless ePaper Server
You start the Wireless ePaper Server by double-clicking on the server.jar file. The Wireless ePaper Server requires
a current Java Runtime Environment installed on the system. Furthermore, ".jar" files need to be associated with Java.
When stated from the server.jar, the Wireless ePaper Server does not run as a service.
By default, this server uses TCP connections on port 8000 (for Wireless ePaper management requests) and 8001
5
(for web services) and UDP connections on port 8000 (for detecting access points). Make sure that these ports
are not blocked by a firewall or used by other applications.
When starting for the first time, the Wireless ePaper Server automatically creates a local database.
It is not possible to start two instances of the Wireless ePaper Server at the same time on the same computer,
5
because the database is locked and the TCP port is busy with the other instance. Additional configuration work
is necessary in order to run multiple installations on the same computer.
7
Page 8

User Manual
2 Installation and setup
Operating the Wireless ePaper Server as a background service
The Wireless ePaper Server can be run as a normal application, as described above. However, a productive system usually
requires the application to start automatically and without a login user. To achieve this, the Wireless ePaper Server is
registered as a Windows service. The Wireless ePaper Server then starts automatically.
The batch file install_service.bat is provided in order to start the Wireless ePaper Server as a Windows
service. When this file is executed with administrator privileges, it installs the Wireless ePaper Server from the same
directory but as a Windows service named
The file uninstall_service.batremoves the Windows service when it is executed with administrator privileges.
2.2 Setting up the license
In order to operate the Wireless ePaper Server, you first need to register it. On purchasing a Wireless ePaper Server
license, you receive a license number that first has to be activated before use.
To activate your license, open your web browser and go to
http://lancom-systems.com/service-support/registrations/software. The option to activate your license is under
Wireless ePaper Servers. Enter the serial number of your Wireless ePaper Server and the license number you purchased.
If successful, you will receive an activation code for your license.
EPE_SERVICE
.
This is how to find the serial number of your Wireless ePaper Server: Go to the Wireless ePaper management,
5
open the menu in the top right-hand corner next to the LANCOM logo and click on License.
8
Page 9

User Manual
2 Installation and setup
To complete the registration of your license, you will find the option in the Wireless ePaper management in the menu
in the top right-hand corner. Open the menu next to the LANCOM logo and click License.
Once you have successfully registered your license on the LANCOM website and have received your activation code,
enter this into the field Add license and then click Send. If your entries are correct, your license will be displayed. Under
Licensed access points you can see the maximum number of access points that can be operated by the Wireless ePaper
Server. To find the number of access points currently in operation, see Managed access points. The number of Licensed
Displays and Managed Displays is shown in a similar manner. If you wish to operate more access points or displays
than your current license allows, please contact LANCOM.
If you have not set up a license, any commands sent to the display will be faulty and do not run.
5
2.3 General settings
In the upper-right corner of the Wireless ePaper management, click on the gear-wheel icon to access the general settings
for the Wireless ePaper Server.
9
Page 10

User Manual
2 Installation and setup
Under Encryption key you change the encryption passphrase used for the AES-128 encrypted communication between
the Wireless ePaper Server and the managed Displays. You should change this for your installation first.
This key is stored to the Displays when they are registered. Should you want to change the key for a running
5
installation, you need to reset all of the Displays to their factory settings beforehand (see
19).
Under Refresh view in seconds you set the frequency with which the Wireless ePaper management updates the Displays.
The preferred language for the Wireless ePaper management is set under Language. The About item contains the
version number of the Wireless ePaper Server and a link to the LANCOM website.
2.4 Installing and configuring the access points
Access points of the E-series act as an interface between the Wireless ePaper Server and the Displays. Before content
can be shown on the Display, you must have set up at least one access point on your network. For instructions on the
basic installation and configuration of LANCOM access points, please refer to the relevant Quick Reference Guide.
Installing LANconfig
LANconfig is supplied with an automatic installation routine that is tailored to your access point. To install the application,
execute the file with the extension .exe and select the folder of your choice.
Reset Display
on page
Opening LANconfig
Start LANconfig either from the Start menu, the desktop shortcut, or by double-clicking on the file lanconfig.exe.
10
Page 11

User Manual
2 Installation and setup
The settings for operating Wireless ePaper Displays are to be found in LANconfig under Tools > Options > Wireless
ePaper. Under IP/Hostname you enter the IP address and the port of the Wireless ePaper Server. The recommended port
number is 8001.
Opening WEBconfig
To access the WEBconfig user interface for the access point, open your web browser and enter the access point IP address
into the address bar. You will find the settings and status information for the Wireless ePaper Displays in the menu items
LCOS menu tree > Setup and LCOS menu tree > Status under Wireless-ePaper.
Opening the Wireless ePaper management
To start the Wireless ePaper management in LANconfig, click Tools > Start Wireless ePaper management.
Channel selection
For a functioning installation, a channel must be selected on each access point in the network. There are 11
non-overlapping channels, which are reserved for communication with the Displays. Five of these channels should be
preferred because the Displays connect to the access points more quickly. If your WLAN installation operates on the
channels 1, 6 and 11, then in all cases the channels 3, 5, 8, 9 and 10 should be selected. If there is another WLAN
installation operating at 2.4 GHz (IEEE 802.11b/g/n), or another wireless technology operating on the 2.4-GHz ISM band,
then you select the channels with the least overlap with the existing installation. The transmission continues to function
even if the channels overlap, but this can result in loss of speed in the WLAN and for the communication with the Displays.
The radio channel is set using WEBconfig for the access point under LCOS menu tree > Setup > Wireless-ePaper.
The channels 1 – 11 are available in the frequency range 2404 MHz to 2480 MHz. If possible, use the channels 3, 5, 8,
9 and 10, as these are scanned more frequently and do not cause interference with the usual WLAN channels (1, 6, and
11).
11
Page 12

User Manual
2 Installation and setup
Do not select the same channel for two access points that are in the same area. This causes interference and
5
prevents Displays from joining the network. It is possible to set the same channel on two access points if you
are sure that each display is only within range of one of these access points.
2.4.1 Adding access points
To assign an access point to a Wireless ePaper Server, two options are available to you.
Option 1: Open the Wireless ePaper management under LANconfig. To do this, open the context menu of the desired
access point in LANconfig and select Add Wireless ePaper Server.
Option 2: In the Wireless ePaper management, go to the tab Access points and click the button Add to open the dialog
for adding new access points.
Select the desired device from the list. The rest of the information is usually entered automatically. The IP address of the
access point is displayed in LANconfig next to the discovered LANCOM devices. The access point ID is a unique ID that
you will find either on the label of the access point or in LANmonitor. The port number is also to be found in the
configuration settings of the access point. The default port is 4713, the setting is located in the configuration menu for
the access point under LCOS menu tree > Setup > Wireless ePaper. A message informs you whether the action was
a success. If an access point was added successfully but does not immediately show up in the list, you can refresh the
display with F5.
12
Page 13

User Manual
2 Installation and setup
If an access point was added correctly, it is displayed in the Wireless ePaper management list. The information displayed
includes the IP address of the access point, its status, the ID, the version of the Wireless ePaper Server, the ePaper radio
channel being used, and the time of the last update.
The list of access points contains the following values:
AP address
The IP address of the E-series access point
Status
The current connection status of the access point
ID
The unique ID of the access point
Wireless ePaper Server version
The version of the Wireless ePaper Server that the access point is connected to
Wireless ePaper radio channel
The Wireless ePaper radio channel selected for this access point
Last update
The time that the server last attempted to reach the access point
2.4.2 Removing access points
You can remove an access point from the Wireless ePaper management. In the Access points tab, select the relevant
access point by placing a check mark in the appropriate selection box. Then click Edit > Remove, and confirm your
selection with Yes.
13
Page 14

User Manual
2 Installation and setup
2.5 Managing Wireless ePaper Displays
Opening the Wireless ePaper management
To invoke the Wireless ePaper management, start LANconfig and click on Tools > Start Wireless ePaper management.
The tab Wireless ePaper Displays contains the setting options for the Displays.
Display ID
Displays are identified by their unique Display ID, which is an 8-digit hexadecimal number (e.g. B3010A4F) printed on
the back of the display or shown on the Display itself (factory settings).
If a display is not registered, it does not join the network and any commands sent to it will fail with an error message.
In order to register a display, a valid license must be installed first. Just how the licensing works is explained in
up the license
two hours depending on the number of access points and channels used). A Display cannot be registered on multiple
Wireless ePaper Server installations at the same time. It connects to one of these installations only.
on page 8. After registration, it may take some time until all registered displays join the network (up to
Setting
Displays that are not yet registered remain in sleep mode. Individual channels are scanned every 30 or 120
5
minutes and, depending on the choice of channel, it can take up to 2 hours for a device to be registered by the
Wireless ePaper Server.
The list of Wireless ePaper Displays contains the following values:
Display ID
The unique identifier of the display
Display status
Current status of the Display. Communication with the Display is only possible when the status shows that
this is secure.
Slot
The page that is currently shown in the Display
Tag
A marking used to group individual or multiple Displays or to indicate the location
Type
The Display type
AP address
The IP address of the selected access point
Signal strength
The signal strength of the last communication with the Display (from the perspective of the access point)
Battery
The last reported charge of the internal batteries
Last task
The last task xml:lang="en"sent to the Display
Last status
Indicates whether the last command was completed or is still being processed
14
Page 15

Last update
Time and date of the last task xml:lang="en"sent to the Display
User Manual
2 Installation and setup
2.5.1 Add Wireless ePaper Display
The following prerequisites must be met in order to add a new Wireless ePaper Display:
The Wireless ePaper Server software is installed and running.
a
The access point is connected to the server.
a
The display is within radio range of the access point.
a
In the Wireless ePaper management, the tab Wireless ePaper Displays features the button Register, which leads to
the following dialog.
Enter the registration code shown on the Display.
The registration code is not the same as the display ID. The registration code is only shown for Displays in their
4
factory settings. The ID uniquely identifies the Display, also during normal operation. For more information about
the ID, please see
2.5.2 Tasks and functions
A number of functions are available for managing the Wireless ePaper Displays, and these are explained in detail here.
Managing Wireless ePaper Displays
on page 14
15
Page 16

User Manual
2 Installation and setup
These functions are invoked in the Wireless ePaper management under Wireless ePaper Displays > Edit.
Upload image
The easiest way to display content on the Display is to send it an image file.
To display an image file, go to the Wireless ePaper management, select the tab Wireless ePaper Displays, select the
desired Display, click Edit and select Upload image. In the following menu, select Add.
The display size is detected automatically. You select the desired image using "Image file (PNG, BMP)". LANCOM Wireless
ePaper Displays support monochrome bitmaps in BMP or PNG format. The images need to have the same resolution as
the Display. The image is displayed within approx. 10 seconds.
You can upload up to 12 images. Only the most recently added image appears on the display. You can enter different
images into the various items under Display slot.
The function Show after upload sets which images are to be displayed subsequently. If this item is not selected, the
image is transmitted to the Display but is not shown. The slot can be selected later with the option Switch display
slots.
16
The item Open image editing allows you to select a portion of the image to be displayed. Select the area simply by
moving the selection box. Click Apply to confirm your selection.
Additionally, you have the option of rotating or resizing your image. You can also choose to perform a dithering.
Page 17

2 Installation and setup
Dithering serves best for simulating greyscales within a picture. Thus, it is not recommended for images diplaying
5
alphanumerics.
User Manual
Image resolutionDisplay size
400 x 800 pixels (portrait)7.4"
400 x 300 pixels (landscape)4.2" and 4.4"
264 x 176 pixels (landscape)2.4"
Switching slots
When you upload an image, you can tag it to be displayed immediately or at a later time with the option Show after
upload. The slot to be displayed can be switched in the Wireless ePaper management with Wireless ePaper Displays >
Edit > Switch display slot. You select the required slot from the list here.
Set tag
Tags are useful markers for the individual Displays, e.g. to collect them into groups or to record their location.
17
Page 18

User Manual
2 Installation and setup
To assign a particular tag to a Display, enter the Wireless ePaper management and click Wireless ePaper Displays >
Edit > Set tag and enter the desired tag into the menu that appears. The QuickFinder offers a convenient way of finding
individual or multiple displays by conducting a tag-based search in the Wireless ePaper management.
Removing tags
To remove an existing tag, go to Wireless ePaper Displays > Edit > Remove tag and select the appropriate tag from
the drop-down menu.
Remove
To remove a Wireless ePaper Display from the management program, go to Wireless ePaper Displays > Edit > Remove,
confirm your selections by marking the check box and click Yes.
Although this method removes the display from the management, it is still assigned to the corresponding Wireless
5
ePaper Server. To assign the Display to another server, you need to reset the Display to its factory settings. Refer
to section
Reset Display
on page 19 for information on this.
18
Page 19

User Manual
2 Installation and setup
Show ID
The ID of a display is printed on the back of the device.
To display the ID on the Display itself, go to the Wireless ePaper management, click Wireless ePaper Displays > Edit >
Show ID and confirm with Yes.
Refresh display
To refresh the Display, use the Wireless ePaper management function under Wireless ePaper Displays > Edit > Refresh
display and click Yes.
2.5.3 Reset Display
To reset a Display to its factory settings, click on the gear-wheel icon in the upper-right corner and select the item Reset.
In this menu, enter the unlock code supplied with your Wireless ePaper Display. If you no longer have the unlock code,
please contact LANCOM Support at + 49 (0) 2405 64597 77.
Restoring the factory settings is necessary if you wish to assign a Wireless ePaper Display to another Wireless ePaper
Server.
If a Display is reset after it was already associated with another Wireless ePaper Server, it must first be registered with
the new server. Then it must be reset, deleted and registered again.
19
Page 20

User Manual
3 Rendered graphics: Creation and display
3 Rendered graphics: Creation and display
Compared to image files, rendered graphics provide better options for management and editing as the content and
presentation can be handled independently of one another. The Wireless ePaper Server renders graphics by processing
the content and formatting information as provided by XML and XSL files.
The content of a displayed graphic could be, for example, the calendar schedule for a conference room, or the name of
a product and its price. It is stored in XML format, which makes it editable as text.
The Server reads a template for the formatting information of the graphic, such as the font style or size. The template is
available as an XSL file. To make changes to the template, you will need knowledge of the programming language XSL
(Extensible Stylesheet Language). Sample templates for your use are available under
\\<Installation-directory>\data\templates\.
There are a number of features that are available from a template:
Various fonts and styles
a
Tables, lines, and other graphic elements
a
Barcodes (1D and 2D)
a
All special characters (covered by UTF-8)
a
Insertion of images or parts of images
a
Loops and conditions
a
Text transformation (e.g. transformation into capital letters)
a
Automatic scaling and compression of the text to best make use of the available space.
a
In order to send the graphics to the Wireless ePaper Server, you need a command-line utility such as cURL. As an example,
you send the command to the Server by entering the following into cURL: curl -X POST -d
@template_task_Wireless_ePaper_Solutions.xml
http://ePaperServer:8001/service/task xml:lang="en"--header
"Content-Type:application/xml". This recognizes the XML file and its reference to the XSL file with the
formatting.
3.1 Example of a template
This XSL template is based on a potential meeting-room signage concept xml:lang="en"for the LANCOM Systems GmbH.
This code can be used, for example, to access a calendar management system (such as IBM Notes, Microsoft Exchange,
or Google iCalendar) to send automatic updates with the latest meeting information to the Wireless ePaper Displays.
Line numbering is not a part of the code and is for purposes of clarity only.
001 <?xml version="1.0" encoding="UTF-8"?>
002 <!—The template is provided for 7.4" Displays mounted in the landscape orientation.-->
003 <xsl:stylesheet xmlns:xsl="http://www.w3.org/1999/XSL/Transform" version="1.0">
004
005 <xsl:template match="Record">
006
007 <!-- Rendering information for 7.4” Displays -->
008 <image height="480" width="800" rotation="90" font-family="Verdana">
009
010 <!-- Room -->
011 <field height="108" width="780" x="10" y="20">
012 <text align="center" font-size="40" font-weight="bold">
013 <utils method="toUpperCase">
014 <xsl:value-of select="room/@roomName"/>
20
Page 21

3 Rendered graphics: Creation and display
015 </utils>
016 </text>
017
018 <!-- Date -->
019 <text align="center" font-size="35" font-weight="bold" padding-top="10">
020 <xsl:value-of select="room/field[@key='date']/@value"/>
021 </text>
022 </field>
023
024 <line thickness="2" x-from="0" x-to="800" y-from="130" y-to="130"/>
025
026 <!-- Time1 -->
027 <field height="50" width="780" x="20" y="150">
028 <text align="left" font-weight="bold" font-size="40">
029 <xsl:value-of select="room/field[@key='time1']/@value"/>
030 </text>
031 </field>
032
033 <!-- Purpose1 -->
034 <field height="50" width="780" x="20" y="200">
035 <text align="left" font-size="40" condense="1, 0.8, 0.6, 0.5">
036 <xsl:value-of select="room/field[@key='purpose1']/@value"/>
037 </text>
038 </field>
039
040 <!-- Chair1 -->
041 <field height="40" width="770" x="20" y="250">
042 <text align="left" font-weight="bold" font-size="30">
043 <xsl:value-of select="room/field[@key='chair1']/@value"/>
044 </text>
045 </field>
046
047 <!-- Time2 -->
048 <field height="35" width="780" x="20" y="320">
049 <text align="left" font-size="28">
050 <xsl:value-of select="room/field[@key='time2']/@value"/>
051 </text>
052 </field>
053
054 <!-- Purpose2 -->
055 <field height="35" width="780" x="20" y="355">
056 <text align="left" font-size="28" condense="1, 0.8, 0.6, 0.5">
057 <xsl:value-of select="room/field[@key='purpose2']/@value"/>
058 </text>
059 </field>
060
061 <!-- Chair2 -->
062 <field height="30" width="770" x="20" y="390">
063 <text align="left" font-size="20">
064 <xsl:value-of select="room/field[@key='chair2']/@value"/>
065 </text>
066 </field>
067
068 <!-- LANCOM Logo -->
069 <field align="right" height="60" width="780" x="10" y="410">
070 <img src="../images/LANCOM_Logo_200.png"></img>
071 </field>
072 </image>
073 </xsl:template>
074 </xsl:stylesheet>
User Manual
21
Page 22

User Manual
3 Rendered graphics: Creation and display
3.2 Interaction between template, XML information and Wireless ePaper Displays
This chapter uses an example to describe the interaction between the template, XML information and the actual
representation on the Wireless ePaper Display.
Step 1:
When an update is triggered by the Notes agent, the Wireless ePaper Server receives XML information with the following
content: (Line numbering is not a part of the code and is for purposes of clarity only.)
001 <?xml version="1.0" encoding="UTF-8" standalone="yes"?>
002 <TaskOrder title="Refresh D1001BF6 for Aachen B2.100">
003 <TemplateTask xml:lang="en"labelId="D1001BF6" externalId="4711"
template="lcsconference_landscape.xsl">
004 <room roomName="Aachen B2.100">
005 <field key="date" value="16.09.2014"/>
006 <field key="time1" value="10:00 - 11:30"/>
007 <field key="purpose1" value="Marketing Project Coordination"/>
008 <field key="chair1" value="Alec Coad"/>
009 <field key="time2" value="11:30 - 13.00"/>
010 <field key="purpose2" value="Team Meeting Controlling"/>
011 <field key="chair2" value="Emily Kirby"/>
012 </room>
013 </TemplateTask>
014 </TaskOrder>
Step 2:
The Wireless ePaper Server processes the received information line by line. This sets the relevant label and the required
template. Based on the template, the Server now creates the data set used to render the image. The layout is set according
to the template and then the information from the XML is inserted.
Two content elements are described here for illustrative purposes: The chairperson of the next meeting and the company
logo.
The chairperson for the subsequent meeting is formatted according to the template as follows:
061 <!-- Chair2 -->
062 <field height="30" width="770" x="20" y="390">
063 <text align="left" font-size="20">
064 <xsl:value-of select="room/field[@key='chair2']/@value"/>
065 </text>
066 </field>
The information necessary for the representation can be seen in the XML below:
011 <field key="chair2" value="Emily Kirby"/>
Access to the image specified in the template does not require access to the XML information. The path is evaluated
instead.
068 <!-- LANCOM Logo -->
069 <field align="right" height="60" width="780" x="10" y="410">
070 <img src="../images/LANCOM_Logo_200.png"></img>
071 </field>
22
Page 23

User Manual
3 Rendered graphics: Creation and display
Step 3:
The image is rendered and sent to the Wireless ePaper Display. The Display appears as shown below. The chairperson
of the subsequent meeting (1) and the image (2) are highlighted in color.
23
 Loading...