

Lakos H20-05, Sandmaster Series, SMP-05, SMP-10, H20-10 Operating Manual
...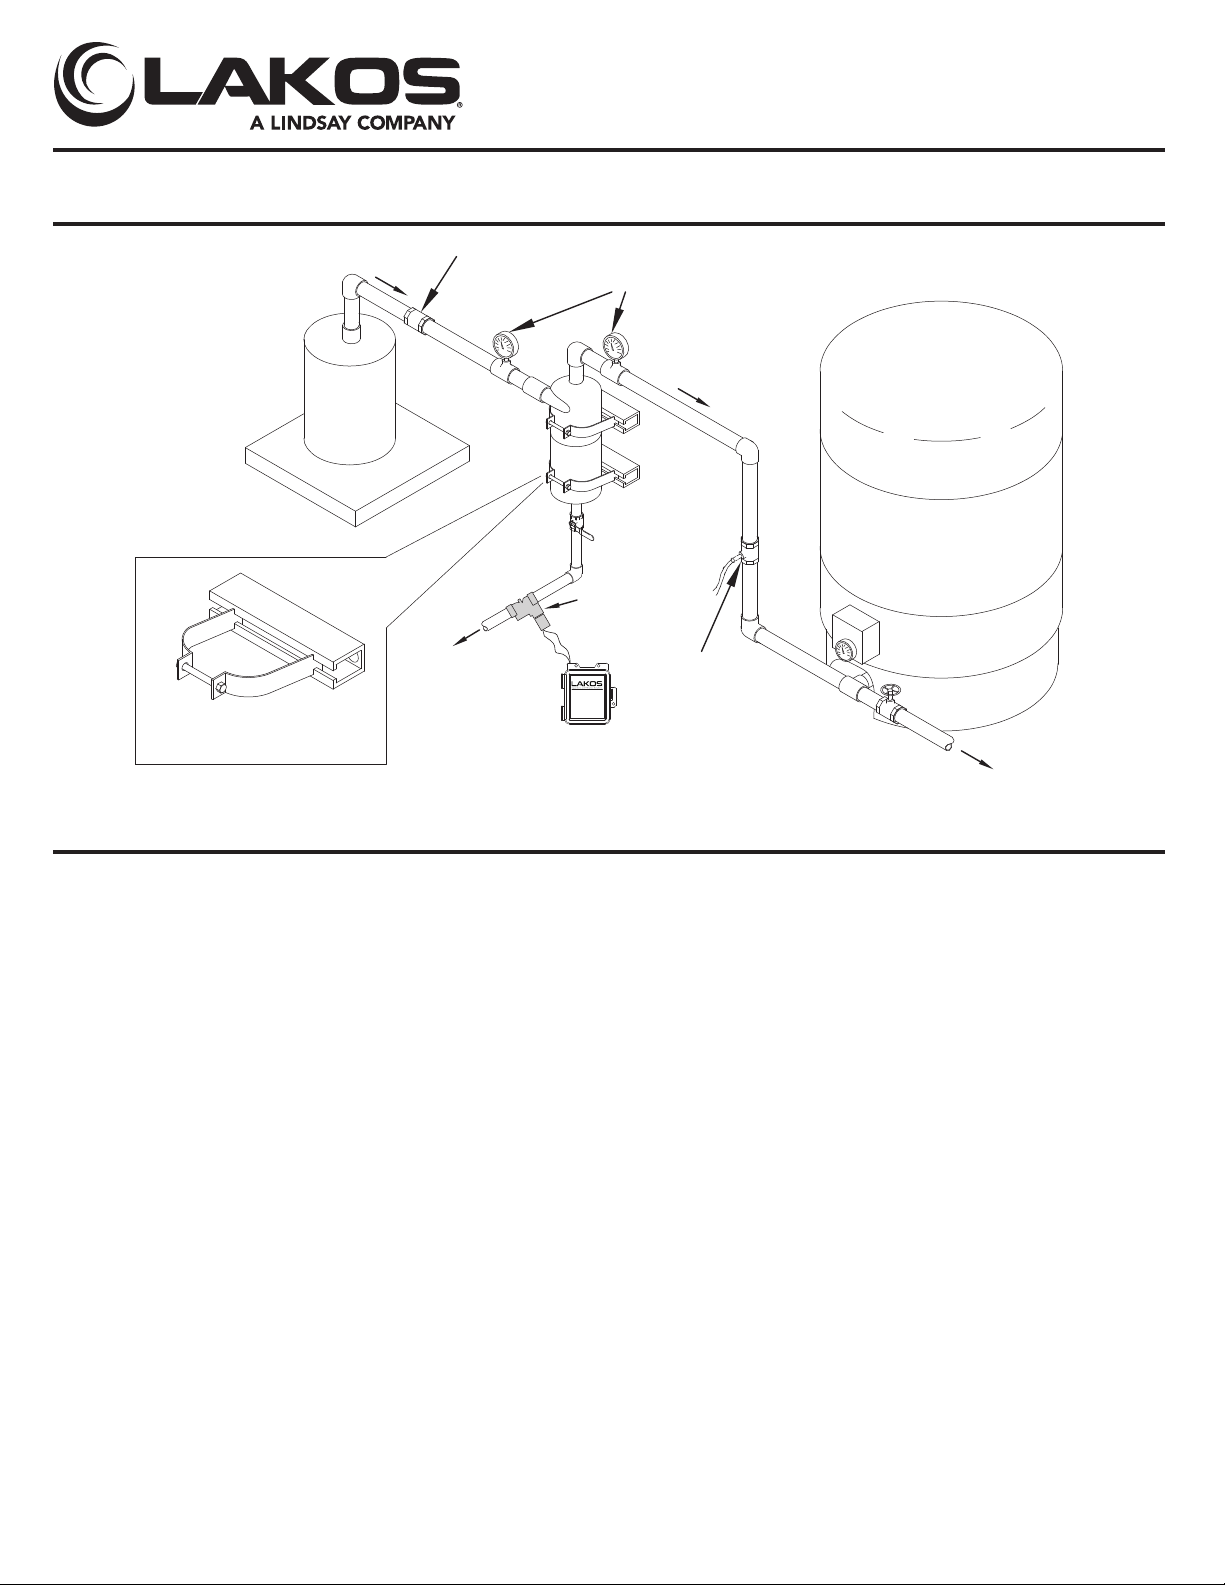
From
Pump
Pressure
Tank
LAKOS
SANDMASTER
Valve
Sand Purge
IMPORTANT: Install SandMaster between
the pump and pressure tank.
Flow to house
Close-Up of Optional
LAKOS Mounting Bracket
Check Valve
Pressure Gauges
(recommended)
Pressure Switch
For effective sand removal, SandMaster must be operated within the recommended flow range for each model (see
product label). Pipe size is notafactorin model selection. Use pipe reduction fittings as necessary to connect to
existing piping. Minimum inlet pressure should be at least 15 psi (1 bar). If operating a variable-flow pump,
separator’s performance will be affectedat flows below the recommended range for any model; LAKOS recommends
that the separator be sized for the highest expected flow rate (or consult factory for additionalconsiderations). Read
all instructions before proceeding.
Installation Placement
1. Separator must be placedbetween the pump and pressure tank of aresidential water well system.
2. Check valve must be between the pump and separator.
3. Pressure switch must be between the separator and the pressure tank.
4. Any tees or diversions of pump discharge flow (such as to sprinklers or other needs) should be installedafter
the separator’s outlet.
Installation Procedures
1. Remove plastic caps from the inlet, outlet and purge connections.
2. Install separator in the near upright position. For best results, allow at least five pipe diameters of straight
pipe to and from the separator’s inlet and outlet connections.
3. Support the separator’s weight independently from the inlet/outlet piping. A LAKOS Mounting Bracket Kit is
recommended, but may be substituted with similar hardware.
SANDMASTER SERIES
Installation & Operating Instructions
FOR RESIDENTIAL WATER WELL SYSTEMS ONLY
SANDMASTER SERIES
From
Pump
Close-Up of Optional LAKOS
Mounting Bracket (recommended)
Installation & Operating Instructions
FOR RESIDENTIAL WATER WELL SYSTEMS ONLY
Check Valve
Valve
(normally
open)
Sand Purge
Residential Purge
LAKOS RPV Controller
(recommended)
Pressure Gauges
(required for monitoring
and troubleshooting)
LAKOS
SANDMASTER
SEPARATOR
LAKOS
RPV AutoValve
(recommended)
Pressure Switch
Valve Controller
Pressure
Tank
Flow to house
IMPORTANT: Install SandMaster between
the check valve and pressure tank.
For effective sand removal, SandMaster must be operated within the recommended flow range for each model (see
product label). Pipe size is not a factor in model selection. Use pipe reduction fittings as necessary to connect to
existing piping. Minimum inlet pressure should be at least 15 psi (1 bar). If operating a variable-flow pump,
separator’s performance will be affected at flows below the recommended range for any model; LAKOS recommends
that the separator be sized for the highest expected flow rate (or consult factory for additional considerations).
Read all instructions before proceeding.
Installation Placement
1. Separator must be placed between the pump and pressure tank of a residential water well system.
2. Check valve must be between the pump and separator.
3. Pressure switch must be between the separator and the pressure tank.
4. Any tees or diversions of pump discharge flow (such as to sprinklers or other needs) should be installed after
the separator’s outlet.
Installation Procedures
1. Remove plastic caps from the inlet, outlet and purge connections.
2. Install separator in the upright position. For best results, allow at least five pipe diameters of straight
pipe to and from the separator’s inlet and outlet connections.
3. Support the separator’s weight independently from the inlet/outlet piping. A LAKOS Mounting Bracket Kit is
recommended, but may be substituted with similar hardware.
(See reverse for additional instructions)
4. Pressure gauges are required at the inlet and outlet of the separator for monitoring and troubleshooting.
A pressure differential reading of 5-15 psi (0.3-1.0 bar) confirms that the separator is operating at its proper
flow range.
5. Use proper isolators (such as plastic fittings) when dealing with copper pipe connections to the separator.
Grounding the separator is also recommended (run wire from separator/bracket to the pump’s earth ground,
for example).
6. When installing LAKOS purge equipment:
a. Manual valve should be installed directly below the separator, before any elbows or turns in the
purge piping.
b. Automatic valve should be installed downstream from the elbow. Valve should not be more than
24 inches downstream from the elbow.
c. Install a manual isolation valve between the SandMaster and the automatic valve. This allows the
manual valve to be closed and/or used as a manual purge valve if/when servicing the automatic valve.
Operation & Maintenance
1. SandMaster must be regularly purged of separated sand. Do not allow separated sand to accumulate and
compact in the separator’s collection chamber. At least weekly purging is recommended. Recommended load
capacity per model:
H20-05 or SMP-05
H20-10 or SMP-10
4 ounces of sand
H20-20 or SMP-20
H20-30 or SMP-30
7 ounces of sand
H20-45 or SMP-45
2. Avoid uphill piping and long pipe runs on the purge line.
3. If manually purging, open purge valve until purge flow runs relatively clear.
4. Automatic purging is recommended at these intervals:
a. Extreme sand content: Purge every 12 hours for 20 seconds
b. Average sand content: Purge every 24 hours for 15 seconds
c. Light sand content: Purge every 24 hours for 10 seconds
5. If SandMaster is subject to long idle periods in sub-freezing conditions, drain separator to allow for water
expans
ion to ice without damaging the unit. Alternatively, protect SandMaster from freezing with appropriate
insulation.
Cannon Water Technology Inc.
233 Technology Way Suite 9 Rocklin, CA 95765
1365 N. Clovis Avenue • Fresno, California 93727 USA
Telephone: (559) 255-1601
www.lakos.com • info@lakos.com
Voice: 1 916-315-2691 FAX: 1 916-304-0210
https://cannonwater.com/
csd@cannonwater.com
LS-548F (Rev. 2/17)
 Loading...