

Page 1

Virtual I.V.
Directions for Use
1
Self-directed I.V. learning
SIM-001-W00 rev E
Virtual I.V.
Directions for Use
www.laerdal.com
Page 2

Virtual I.V.
Directions for Use
2
www.laerdal.com
Page 3

Virtual I.V.
Directions for Use
Tabl e of Cont ents
CONTENTS
1 Introduction 5
2 Benefi ts, learning objectives and features 7
3 Setting up the system 15
4 Quick start user guide 23
5 Using the haptic device 31
6 System overview 37
7 Training Sequence 53
8 Administration 65
9 Packing up the system 83
10 Frequently asked questions (FAQ) 89
11 Single case model list 95
12 Support 101
www.laerdal.com
3
Page 4

Tabl e of Cont ents
Virtual I.V.
Directions for Use
4
www.laerdal.com
Page 5

Virtual I.V.
Directions for Use
Introduction
www.laerdal.com
5
Page 6

Virtual I.V.
Directions for Use
Introduction
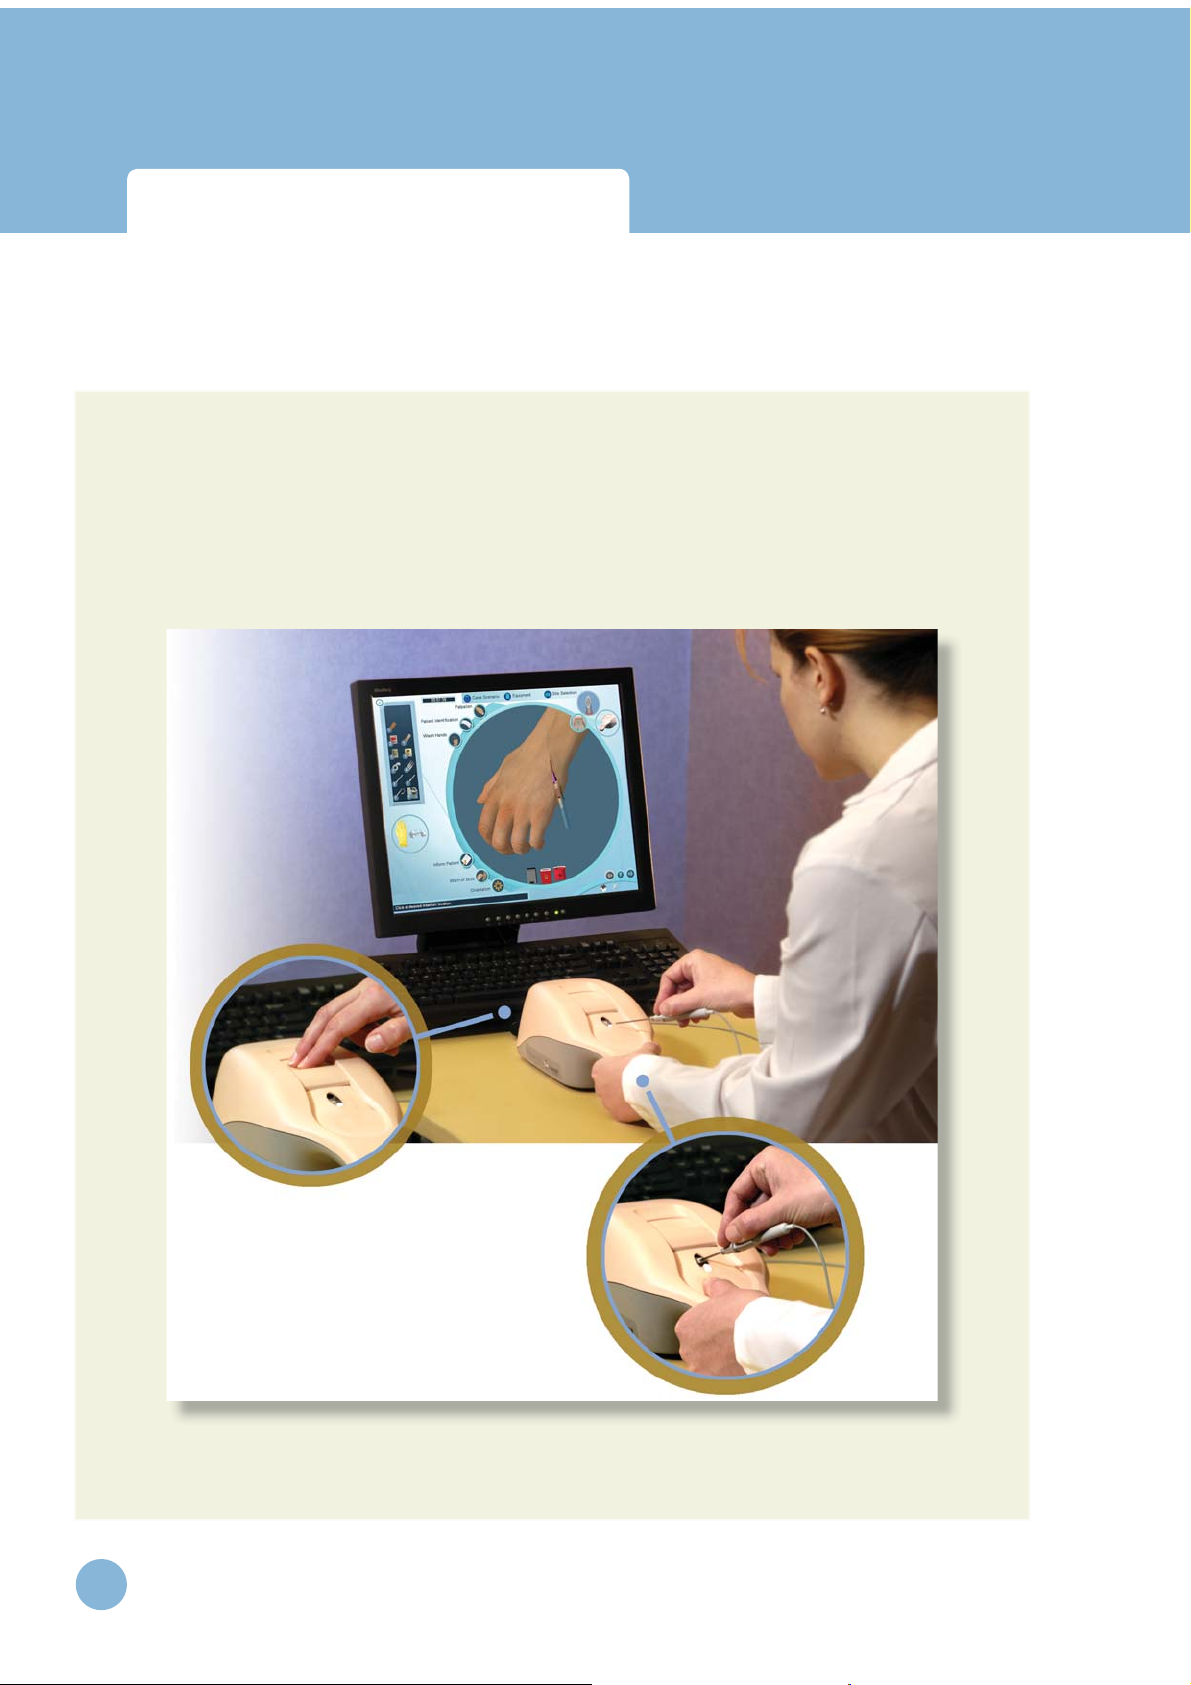
1 INTRODUCTION
The Virtual I.V. Self-Directed Learning System is designed to provide both the novice student and
advanced practitioner with the opportunity to learn and practice the psychomotor skills of performing
intravenous catheterization in the context of patient case scenarios.
The simulator offers both an introduction to I.V. insertion, serving as a part-task trainer, and as a
tiered, progressive path to build the competence required for advanced practice.
This Learner Manual is to be used only as a reference for using the system, as the simulator provides
a ‘System Tutorial’ video, a ‘Procedure Training’ video, ‘Help’ screens, and hints that can stand on their
own for tutoring the student in how best to use the simulator.
This Manual includes:
• The Learning Objectives for this product, to serve as a guide both for instructors and students to make
best use of the training benefi ts offered by the Virtual I.V. Self-Directed Learning System.
• Directions for setting up the system, including the equipment included with product and the ‘care’ of
the haptic device. This section includes the Quick Start Set-Up guide, also included as a fold-out with the
product packaging.
• The Quick Start Reference guide, which provides the learner with rapid directions for use of the Virtual
I.V. simulator.
• An instructional manual for using the Virtual I.V. simulator, providing the various options for the administrator and learner of the training system.
• Simple overview of the debriefi ng and testing functions of the Virtual I.V. product.
• A frequently asked questions help guide for addressing any problems encountered with the
product, and resources for customer support.
6
www.laerdal.com
Page 7

Virtual I.V.
Directions for Use
Benefits, learning objectives and features
www.laerdal.com
7
Page 8
Virtual I.V.
Directions for Use
Benefits, learning objectives
and features
2
BENEFITS, LEARNING OBJECTIVES AND FEATURES
The Virtual I.V. Self-Directed Learning System provides a comprehensive environment for training in
the placement of peripheral intravenous catheters. It trains a broad range of cognitive and psychomotor skills in I.V. insertion, based both on practice patient case scenarios, and a competency training
mode where the student can climb the ladder of I.V. exper tise.
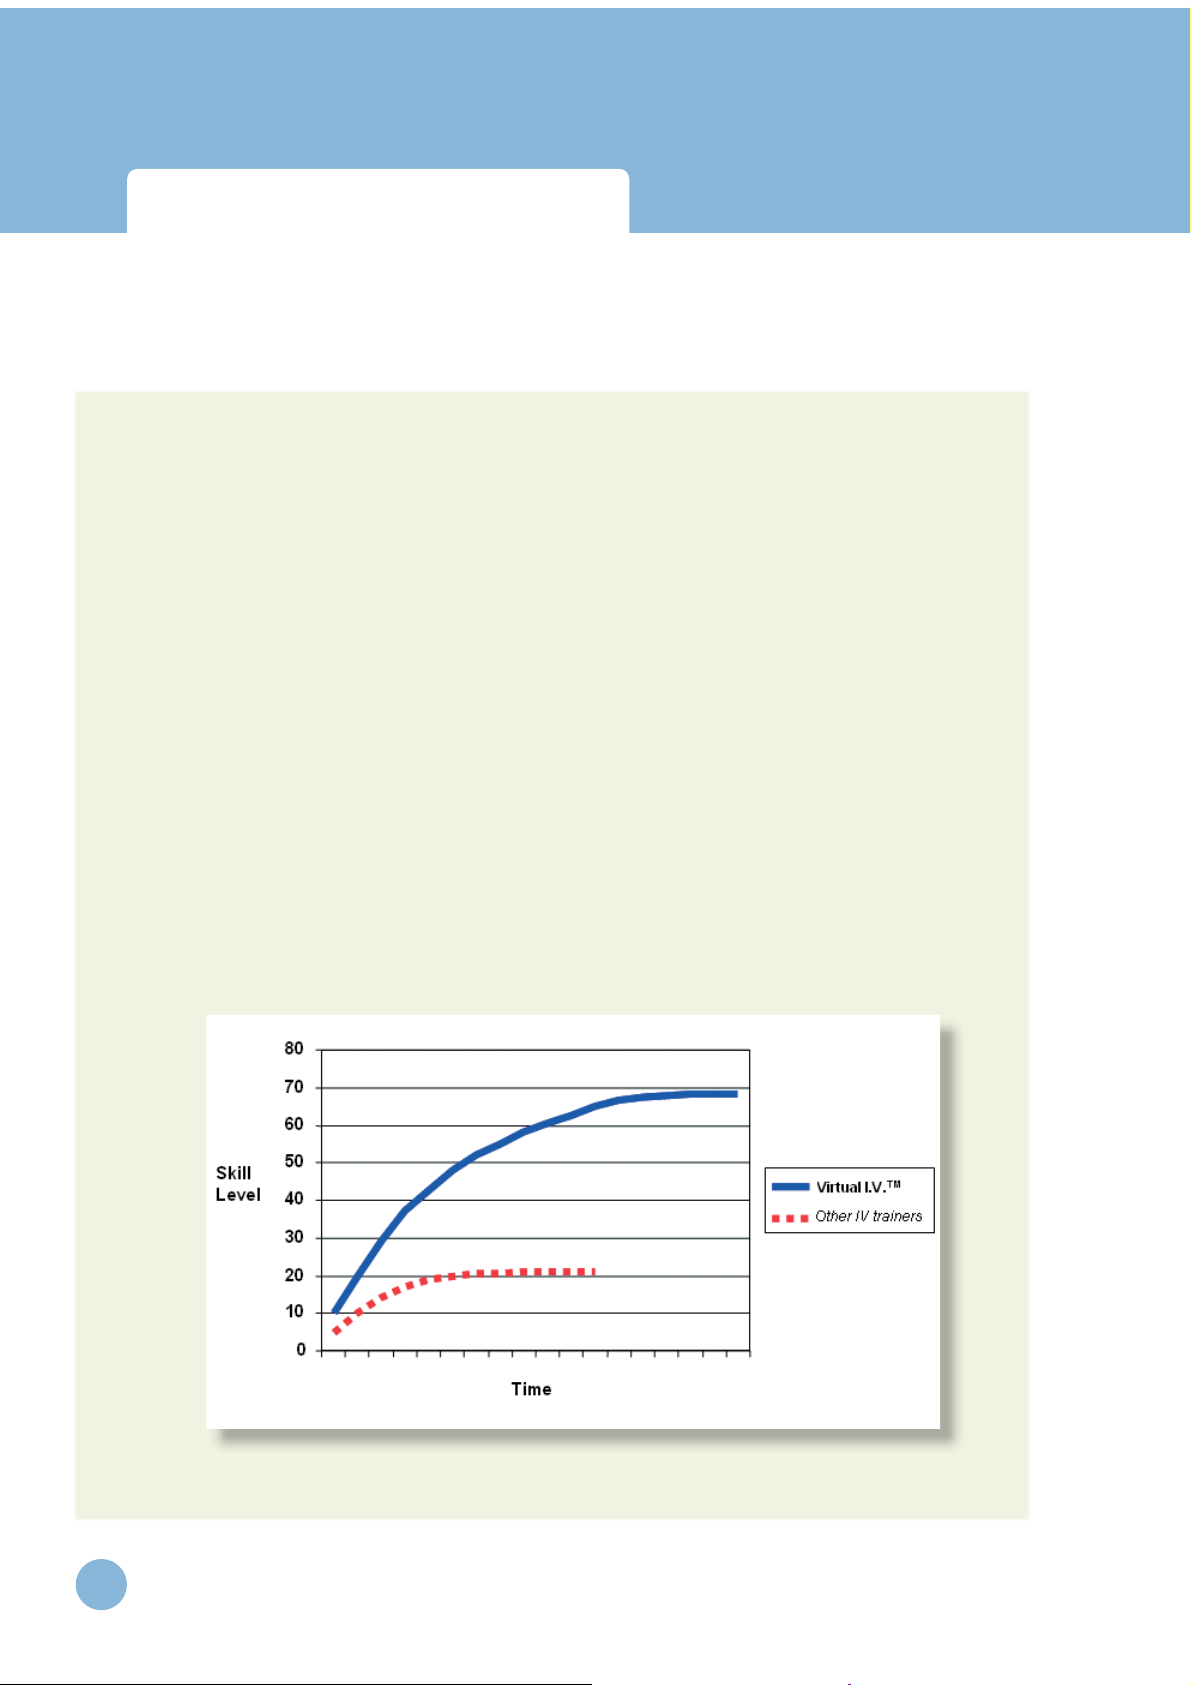
The general training objectives are conceptually illustrated in the Figure below. As part of our task
analysis of needle inser tion tasks and related critique of existing training technologies, we noted that
existing technologies are severely limited in terms of their training potential. Thus, other I.V. training
simulators are only capable of providing trainees with the most basic of needle insertion skills. This is
illustrated by the lower of the two learning curves presented in the Figure below, which achieves a relatively low level of skill. As a result, the value of this system to customers would seem to be severely
limited, as experienced and advanced medical personnel have nothing to gain by using it.
In contrast, the Virtual I.V. Self-Directed Learning System provides a system to customers that will
take learners much further through the needle inser tion “skill space”. By providing intermediate and
advanced skill level learners with the opportunity to practice procedures in the presence of realistic
complications, the product provides them the opportunity to practice techniques and, more importantly, refine the necessary decision-making skills needed to successfully complete more complex
venous access tasks.
8
www.laerdal.com
Page 9

Virtual I.V.
Directions for Use
Benefits, learning objectives
and features
2.1 Learning Objectives
The Virtual I.V. Self-Directed Learning System provides the learner with the ability to:
Overcome initial discomfort and fear associated with performing the procedure.
•
• Perform Differential diagnosis of patient cases, related to placement of a peripheral I.V. in different
regions of the arm and hand.
• Select proper equipment, including needle gauge, from an inventory.
• Perform Standard Precautions and site preparation prior to I.V. needle insertion.
• Learn the proper ‘feel’ of the procedure; from palpation, to needle insertion and feeling the ‘pop’, to
threading the catheter, to skin stretch.
• Train the ‘proper’ hand position for performing the procedure - this is critical to a successful and skillful
completion.
• Palpate for vein location.
• Perform appropriate orientation and angle of I.V. needle insertion.
• Detect I.V. insertion into a peripheral vein.
• Secure the catheter and fi nish the procedure of I.V. cannulation, including wound dressing and fl uid
administration as appropriate to the patient case scenario.
• Be presented with automated debriefi ng, including identifi cation of critical and non-critical errors, and
video and animation depicting ideal performance.
• Progress through a tiered hierarchy of ever more diffi cult patient cases, ranging from beginning student
through advanced practitioner.
www.laerdal.com
9
Page 10

Virtual I.V.
Directions for Use
Benefits, learning objectives
and features
2.2 Benefi ts for the Instructor
• Track learner competency history, including test results. Record student performance and compare
results using easy-to-understand ratings and recognized standards.
• Metrics-based assessment of student performance to facilitate effective feedback and guidance to
students.
• Administration mode, for confi guration of the simulator options and tracking the performance of stu-
dents.
• Simplify training and skills sustainment in an engaging training environment.
• Present the student with a customized training experience adjusted to their needs and performance
level.
• Identify student defi ciencies and remediate using a range of case scenarios and basic science
tutorials.
• Full integration with the Laerdal Competence Management System Version 1.8 allows remote instructor
oversight and education management.
2.3 Benefi ts for the Student
• Learn and practice needle procedures through interaction with life-like patient anatomy in real-world
scenarios.
• Test your skill against other learners and experts in the context of ever-increasing challenges. Track your
progress as you progress through the levels. Compare performance with national rankings.
• Select “Practice Cases” mode for quick play or “Competency Training” for more structured procedural
simulations and performance tracking.
• Learn and review proper I.V. insertion procedures, anatomy and physiology with dynamic simulations
and tutorials.
• Full integration with the Laerdal Competence Management System Version 1.8 allows
students to remotely review progress and understand problem areas.
10
www.laerdal.com
Page 11

Virtual I.V.
Directions for Use
Benefits, learning objectives
and features
2.4 Overall Features
1. Integrated with the Laerdal Competence Management Version 1.8 system
a. Allows remote (internet based) access to user progress and account management for both
the instructor and learner.
2. There are over 20 case scenario specifi c and site specifi c simulation variables that add huge depth
and variability to the product, encompassing the variability of human anatomy and physiology.
3. Each case scenario debriefi ng is driven by the corresponding procedure, providing a very
accurate instructional environment for each case.
4. There are 8 possible cannulation sites for each model, each with individualized debriefi ng criteria.
Site availability and assessment is driven by the particular details of each case scenario. That is over
29 different models times 8 sites for a total of 232 different insertion sites, not to mention the variability that comes from the different case scenarios.
5. Updated Competency Review allows you to:
a. View individual case scenarios and cognitive test assessments.
b. View a learning curve for your entire competency training.
c. Focus in on the last 10, 25, or 50 cases to understand your current problems and overall
progress.
d. Identify specifi c skill weaknesses in an intuitive format.
6. Pre-existing conditions including in-place equipment for users to fi nd alternatives to the most desir-
able insertion sites; IV infi ltrates; and other complications add a sense of urgency to the procedure
and provide the user with an accurate portrayal of real life situations.
7. The system supports arterial palpation at the wrist, allowing the pulse to be felt by the user, defi ning
artery location.
8. Practice Mode Patient Selector: This feature allows the learner to defi ne which level, medical condi-
tion and particular case they want to practice and presents a preview of the patient arm.
www.laerdal.com
11
Page 12

Virtual I.V.
Directions for Use
Benefits, learning objectives
and features
9. Many patient complications that arise during catheterization.
a. Accidental arterial punctures and how to deal with this error. Punctured arteries will bleed
from the site until pressure is applied. Correct recovery from accidental arterial puncture is
assessed in the debriefi ng module.
b. If the needle is larger than the vein, the vein will blow. This adds signifi cant realism to the
simulation since the size of the vein becomes critical to correctly performing the procedure.
Also, many veins that are visible are not suffi ciently large enough to be cannulated.
10. Expanded Equipment items and procedure steps add depth, understanding, and a sense
of immersion to the simulation experience:
a. Hand washing is included for proper training.
b. Different 3D sized needles
i. 2 different lengths (one inch and one half and inch)
ii. Different gauges from 14 to 24 are different sizes in the simulation.
c. Bio-Hazard Container
d. T-connector (Lock w/extension tubing)
e. Different pumps for Pre-Hospital and In-Hospital careers.
f. Manual fl uid delivery of a bolus is available for Pre-Hospital cases.
g. Different equipment availability for the Pre-Hospital and In-Hospital careers.
11. Usability
a. Navigation. The user can easily go to different sites, gather equipment, and even view the
case scenario, all while performing the procedure.
b. Site selection prior to equipment selection.
c. Improved User Interface with more intuitive and consistent behavior.
d. Procedure Screen Improvements
i. Easily understood and labeled icons.
ii. Haptic Device Interact icon that tells you when to interact with the haptic device
during the procedure.
iii. Sound when the needle is successfully engaged in the haptic device.
iv. Improved model orientation.
v. Precise targeting for optimal needle positioning.
12
www.laerdal.com
Page 13

Virtual I.V.
Directions for Use
Benefits, learning objectives
and features
12. Procedure Simulation
a. Medically correct fl ushing and extension tubing application.
b. Extension tubing and locks are automatically fl ushed prior to application and come with the fl ush
attached. This allows for proper line setup and fl uid administration.
c. C-band can be removed while the needle is inserted in the site, as may be the
standard for some practitioners.
d. Flash visible along catheter (confi gurable based on the type of catheter used).
13. Anatomical Viewer
a. Anatomical viewer with stage loading reduces wait times.
14. Debriefi ng
a. More comprehensive debriefi ng ensures the learner performs the procedure
correctly, or is negatively assessed.
b. More error animations and vignettes that are more directly tied to specifi c errors.
c. Assessment of equipment usage, complications and procedure tasks.
15. Increased Instructor Confi gurability
a. Many confi gurable items tailor the product to either the Pre-Hospital, In-Hospital or
Military environment and allow the instructor to confi gure the product to meet their local require-
ments.
16. Haptic Device Calibration by the user
a. If confi gured by the instructor, the user will be allowed to calibrate the haptic device.
17. Improved Case Scenario presentation with patient image and vital signs.
www.laerdal.com
13
Page 14

Virtual I.V.
Directions for Use
14
www.laerdal.com
Page 15

Virtual I.V.
Directions for Use
Setting up the system
www.laerdal.com
15
Page 16

Virtual I.V.
Directions for Use
Setting up the system
3 SETTING UP THE SYSTEM
WARNING
Precautions when using the haptic device
• The haptic device is a precise and sensitive instrument. To ensure proper working order, please handle
with care.
• Dropping the haptic device, bending the needle or catheter, or other abuse may render the device inop-
erable.
• To ensure proper functionality, calibrate the haptic device as required.
• Although the needle and catheter are blunt, they can still cause injury if used in an improper manner. Be
careful and always replace them in the needle holder after use.
• The catheter is tethered to protect against catheter misplacement. The tether can be removed to opti-
mize use of the device.
• Before starting the procedure, make sure that the needle is completely removed from the device and
that the catheter is completely attached to the needle. Here is a schematic of the needle / catheter
confi guration:
16
• After completing procedure, remove the catheter from the device CAREFULLY and SLOWLY
www.laerdal.com
Page 17

Virtual I.V.
Directions for Use
Setting up the system
WARNING
Precautions when using the haptic device
• The Virtual I.V.™ Self-Directed Learning System has been designed to work on the computer supplied
with the product. The computer is an integral part of the system. It will not work on other computer
platforms, because of its requirements for very specifi c, high speed graphics capabilities. Do not attempt
to install and run this software on any other computer other than that which has been provided by the
manufacturer.
• No software should be installed on the computer supplied with the Virtual I.V.™ Self-Directed Learning
System, except for those products supplied by the manufacturer of the software.
• Running any program, such as anti-virus software, on the computer supplied with the simulator, may
cause the Virtual I.V.™ Self-Directed Learning System to crash or slow the simulation to an unstable condition. This is a dedicated computer and should not be used for other purposes, except those explicitly
stated by the software manufacturer.
www.laerdal.com
17
Page 18
Virtual I.V.
Directions for Use
Virtual I.V.
Directions for Use
Setting up the System
This diagram, also available as a fold-out set of instructions that is included in the
Virtual I.V.™ packaging, explains the order of unpacking and installation of the simulator. Special attention should be paid to unpacking the haptic device and plugging in
the cables in the correct order and placement.
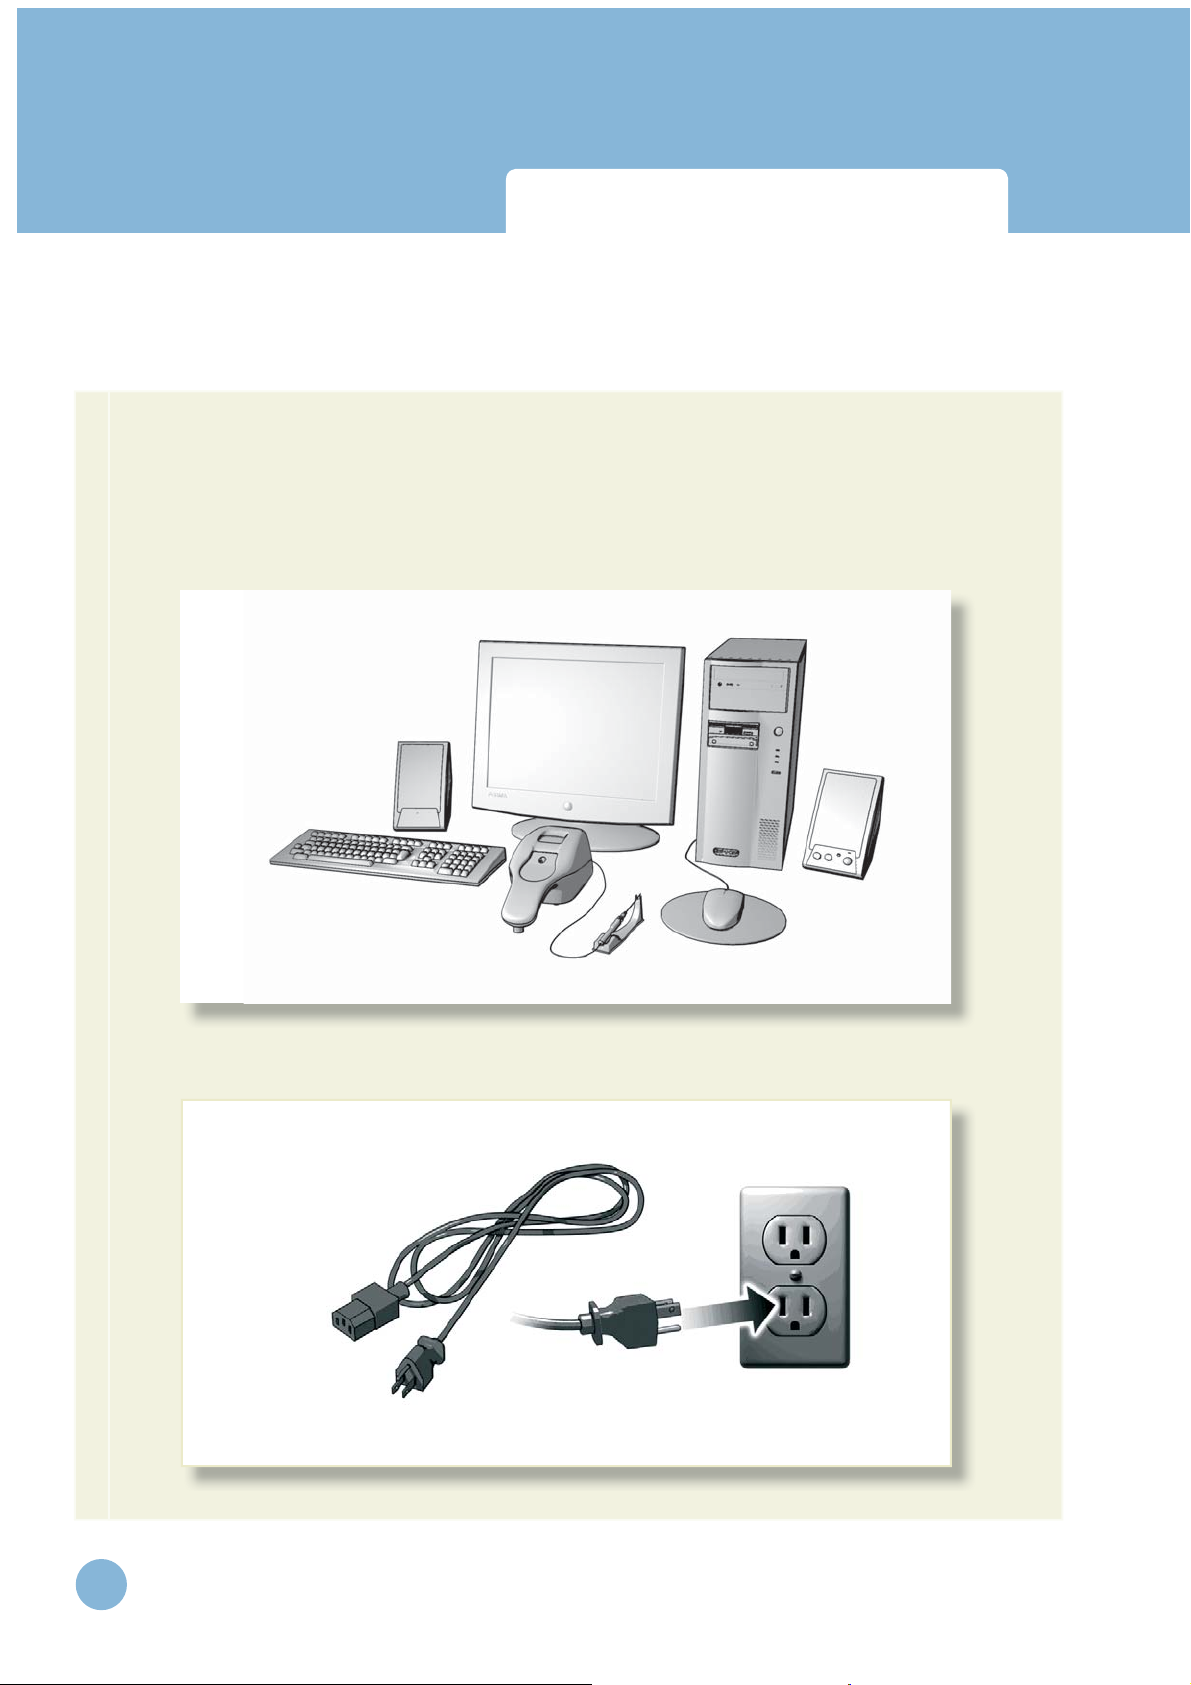
(1) Set-up and turn on the computer as indicated by the manufacturer:
Setting up the System
18
(2) Plug in the power cord of the haptic device into the wall socket, but do not connect to haptic device:
www.laerdal.com
www.laerdal.com
Page 19

Virtual I.V.
Directions for Use
Virtual I.V.
Directions for Use
Setting up the System
(3) Plug in the USB cord of the haptic device into the computer, but do not connect to haptic device:
WARNING
Do not discard your packing materials or shipping restraint.
You will need these to move/transport your device.
Setting up the System
(4) Remove the haptic device and needle holder from the packaging:
(5) Completely remove the restraining strap carefully from the haptic device:
www.laerdal.com
www.laerdal.com
19
Page 20
Virtual I.V.
Directions for Use
Virtual I.V.
Directions for Use
Setting up the System
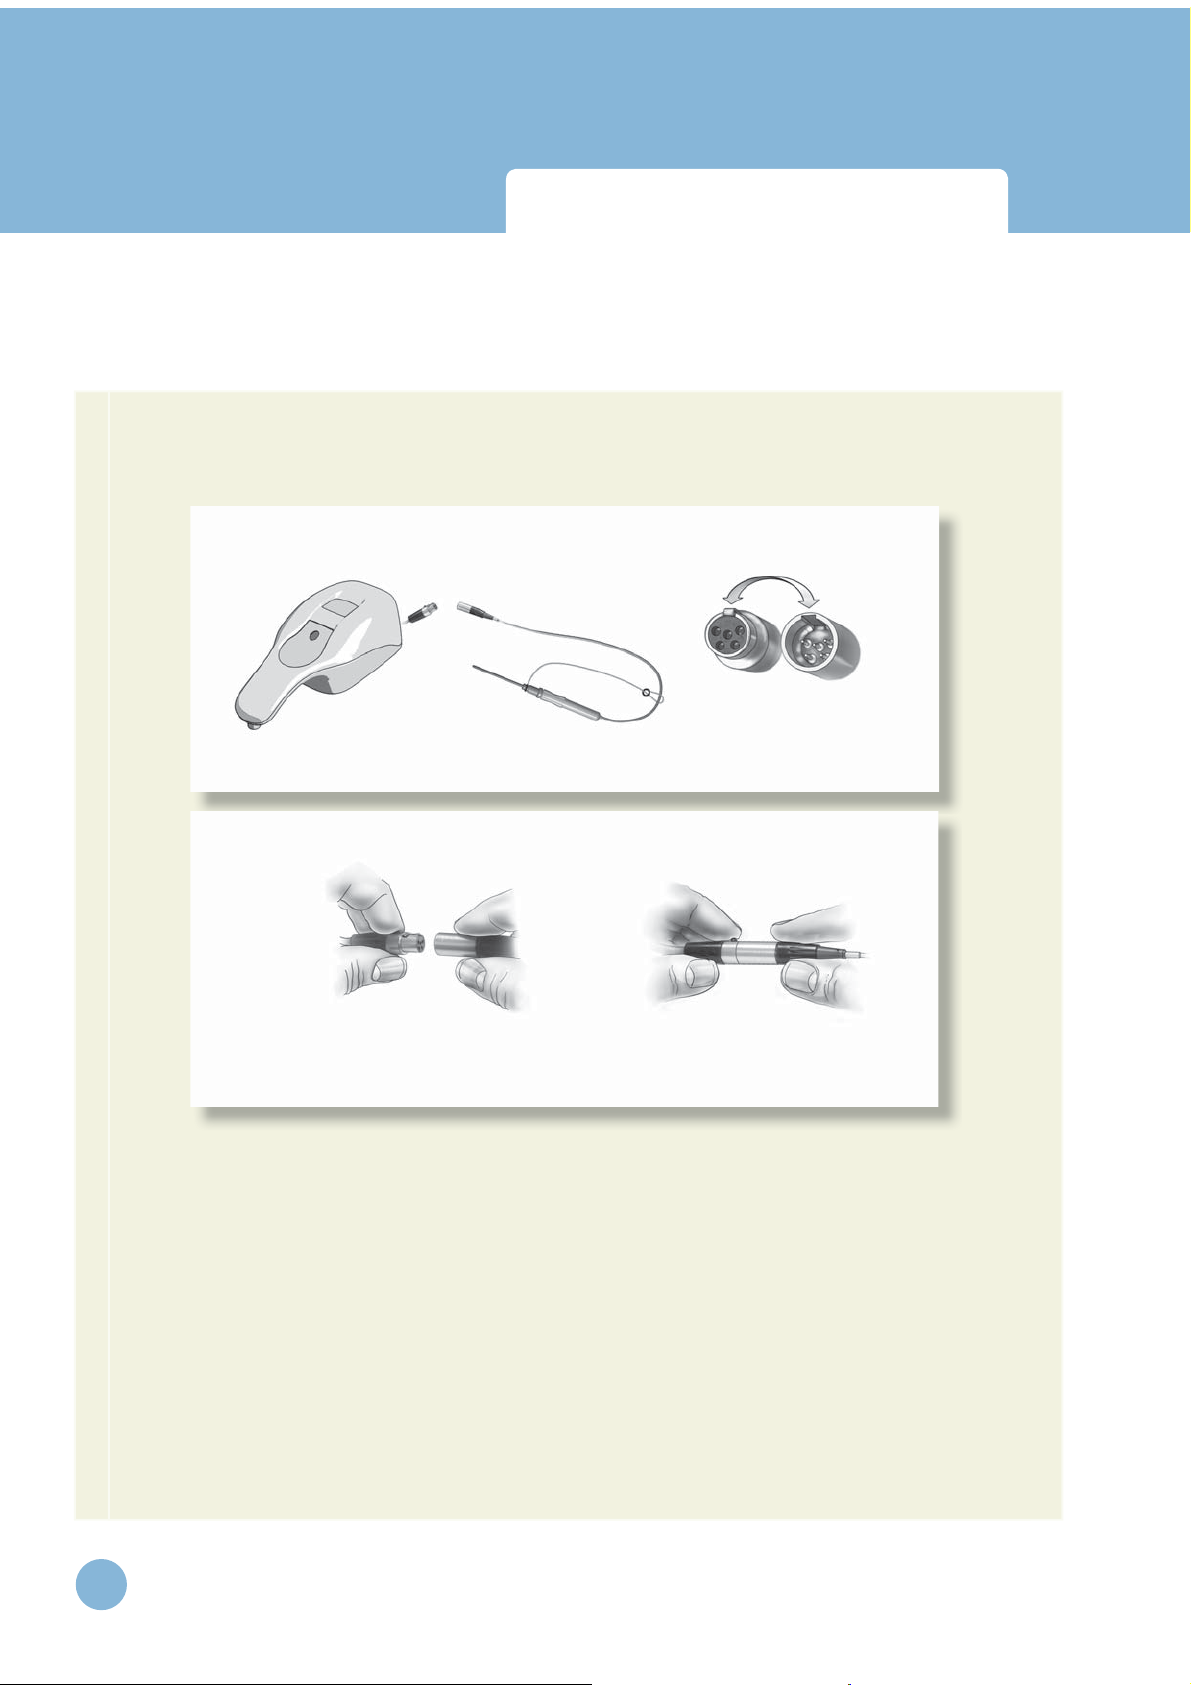
(6) Remove the haptic device needle from the software packaging and plug it into the connector at the back
of the haptic device.
Setting up the System
20
www.laerdal.com
Page 21

Virtual I.V.
Directions for Use
Setting up the System
Plug the (7) USB cord and (8) Power Cord into the back of the haptic device. (9) Plug the power cord from
the wall socket into the power brick. The haptic device, which has been pre-calibrated by the manufacturer,
is now ready to use with the simulator:
7
8
9
(10) The completed, set-up Virtual I.V.™ Self-Directed Learning System. Note the location of the haptic
device directly in front of the monitor.
www.laerdal.com
21
Page 22
Virtual I.V.
Directions for Use
Setting up the System
(11) Before using the software, you will first need to obtain license keys for the modules you have purchased.
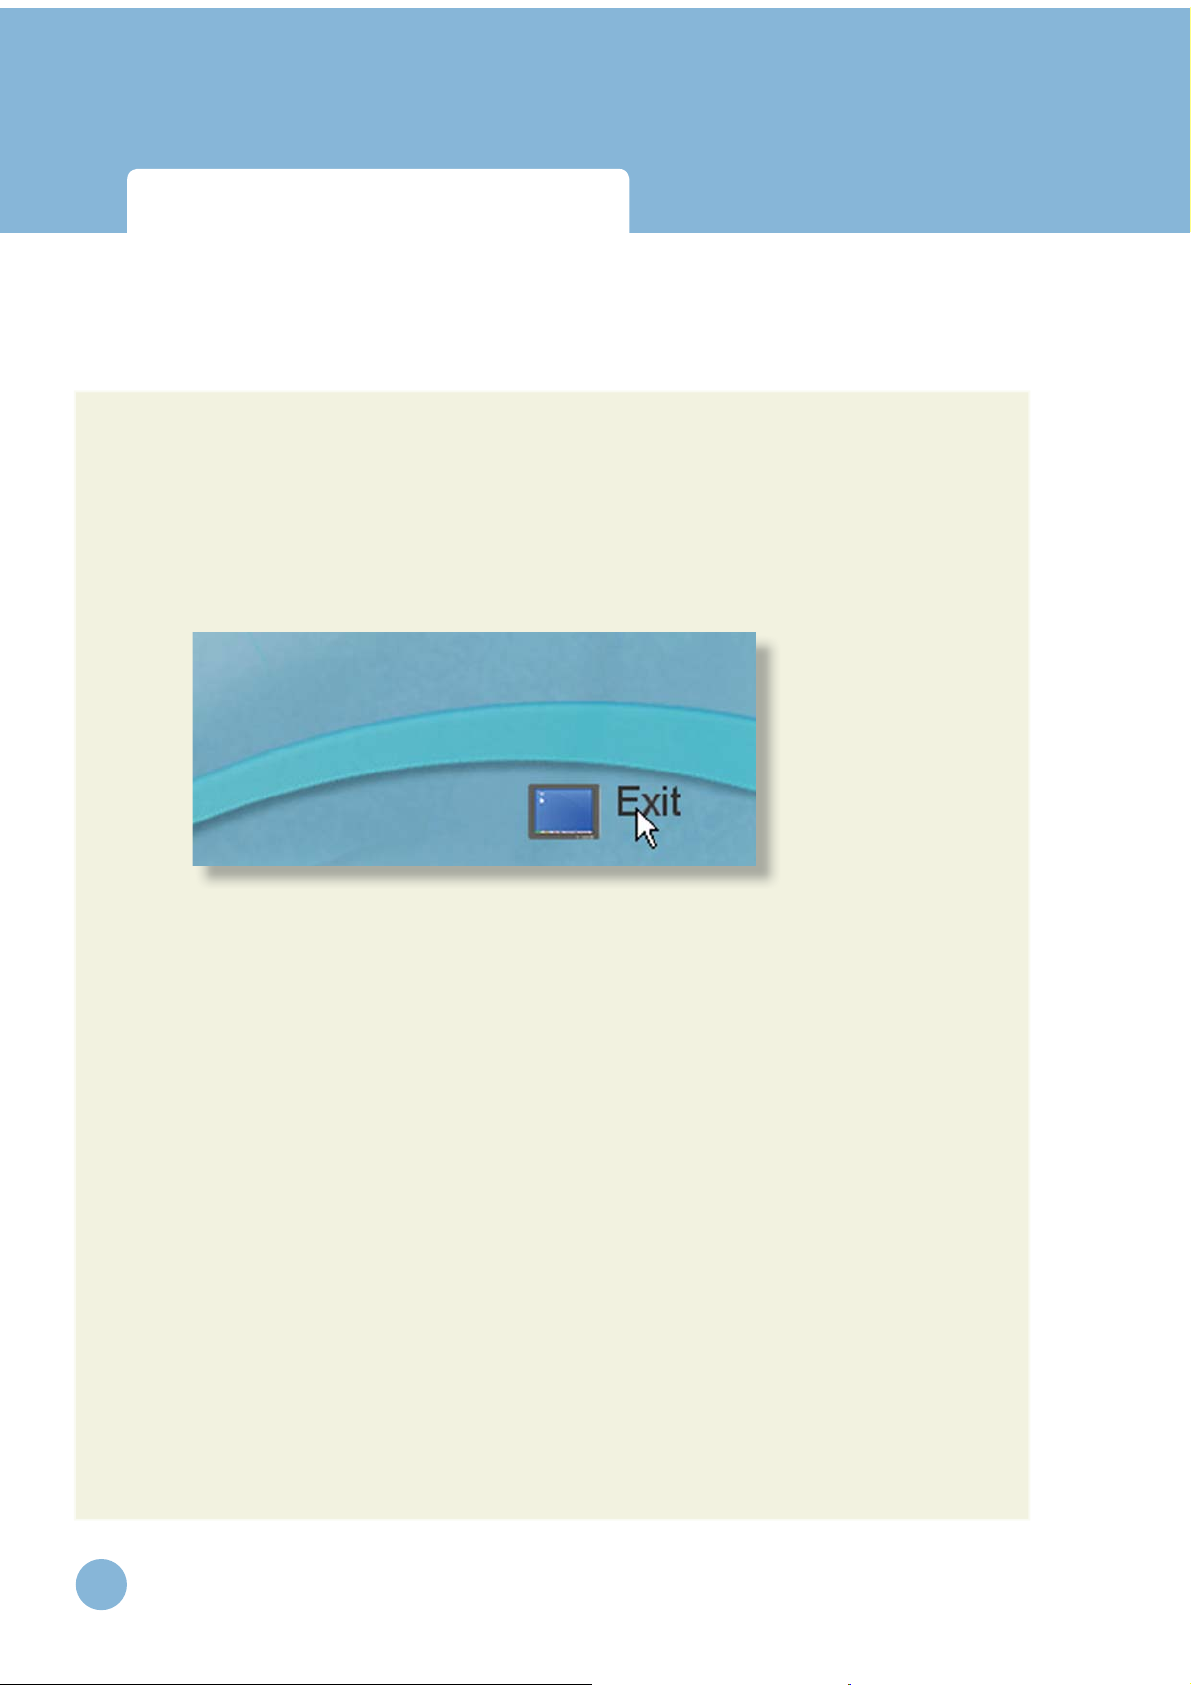
(11.1) Exit the Boot Screen
(11.2) Contact your Laerdal representative for customer service agent to obtain the license module key..
22
www.laerdal.com
Page 23

Virtual I.V.
Directions for Use
Quick start user guide
www.laerdal.com
23
Page 24
QuickStart User Guide
Virtual I.V.
Directions for Use
24
www.laerdal.com
Page 25

Virtual I.V.
Directions for Use
QuickStart User Guide
QUICK START GUIDE
Turn on the computer. To start the application, click on the Virtual I.V. section of the
boot screen.
1. Logging In
Once started, log onto the application with one of two default users:
Username: demouser1
Password: password
Username: demouser2
Password: password
Login as Administrator to access Instructor features and create accounts:
Username: Administrator
Password: <Provided on the information sheet inside your desktop computer, or by
Laerdal Technical Service at 1 (800) 431-1055 EXT. 5596. This password will always
work, even if you change the Administrator password.>
Read further instructions to learn how to create new user accounts.
www.laerdal.com
25
Page 26
Virtual I.V.
Directions for Use
QuickStart User Guide
2. Choose Career
You will be presented with a choice of Three different training careers: In-Hospital, Pre-hospital
and Military. Click on the profession that was selected by your instructor.
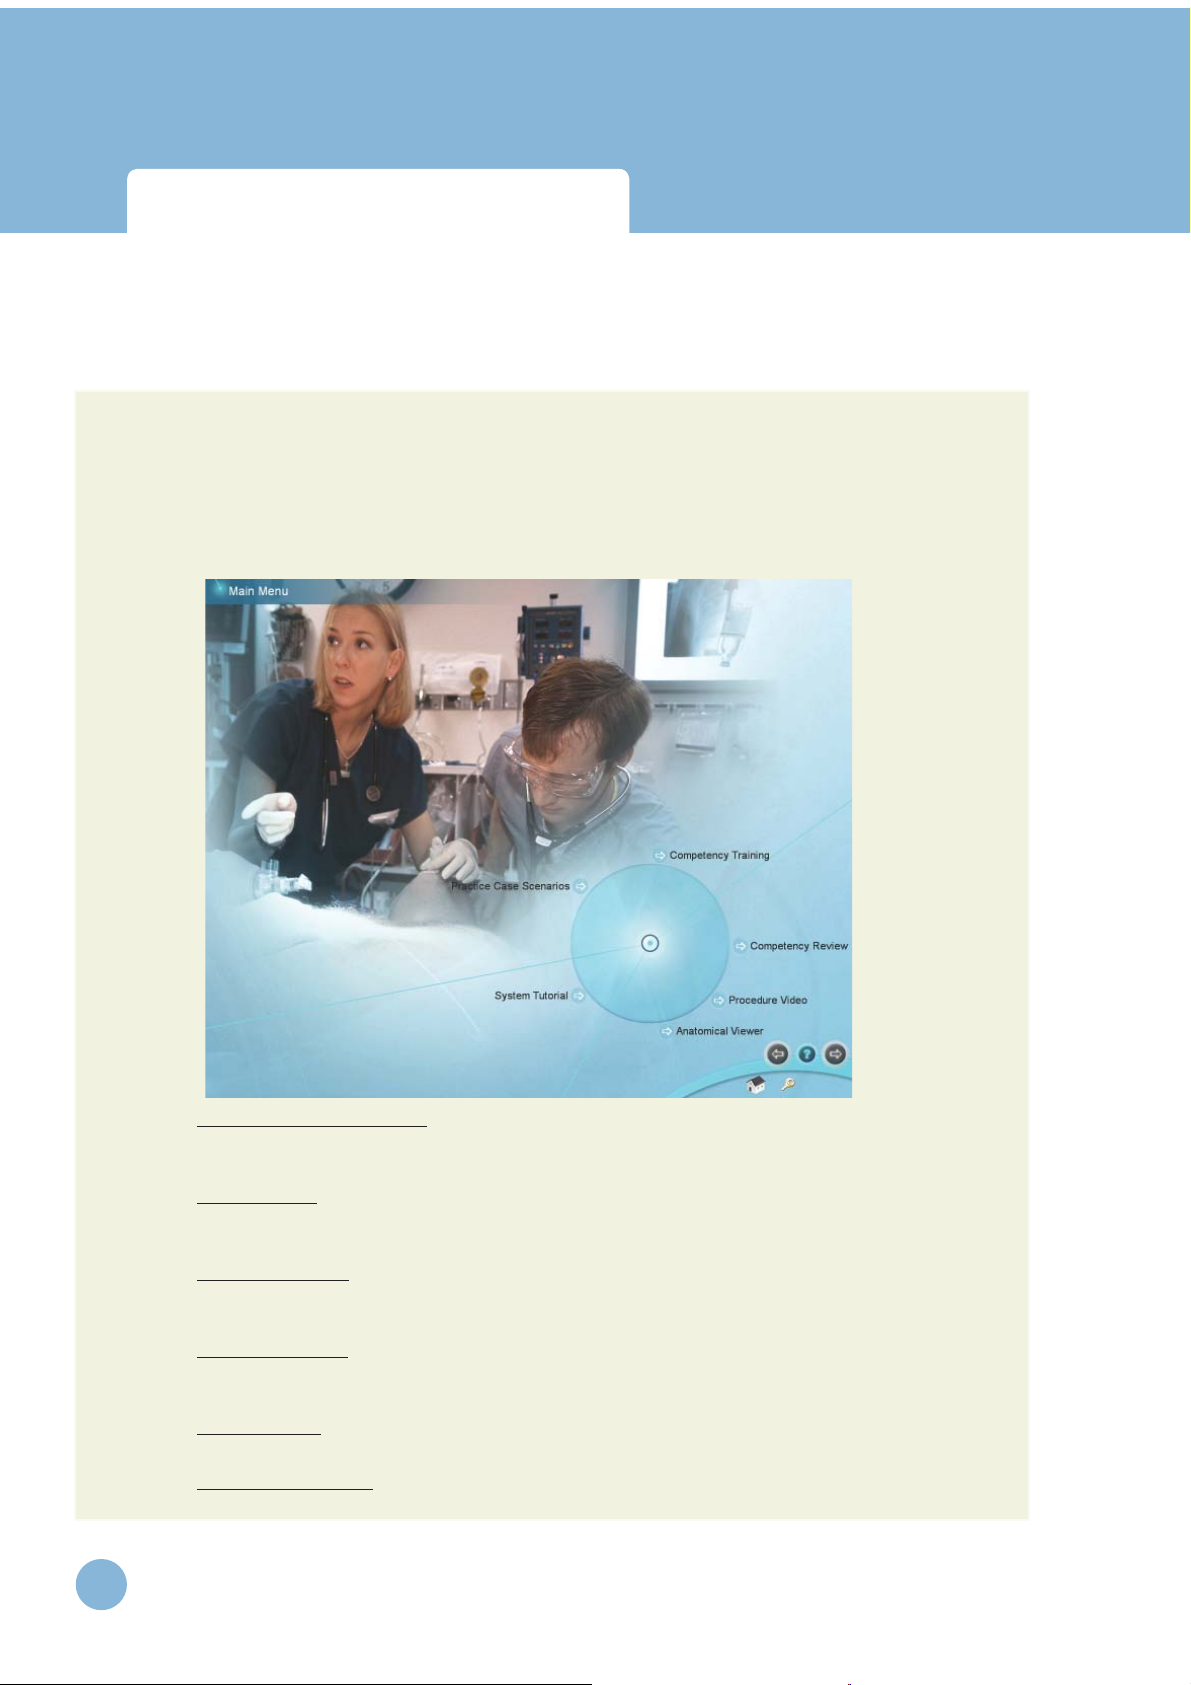
3. Main Menu
This screen presents a menu of options, including:
26
Competency Training Mode: A progressive, tiered hierarchy of case studies and required skills that
•
ranges from beginning student (S1) to advanced practitioner (P3).
• Practice Cases: Individual cases can be tried from all of the levels, for practicing skills without record-
ing assessment.
• Anatomical Viewer: This module presents a three-dimensional (3D) model of the arm that can be
used to identify structures and learn anatomy.
• Procedure Training: This video introduces the beginning student to the techniques and skills required
for intravenous catheterization.
• System Tutorial: This video shows the trainee how to use the Virtual I.V. simulator.
• Competency Review : This module shows the learner record in competency training.
www.laerdal.com
Page 27
Virtual I.V.
Directions for Use
QuickStart User Guide
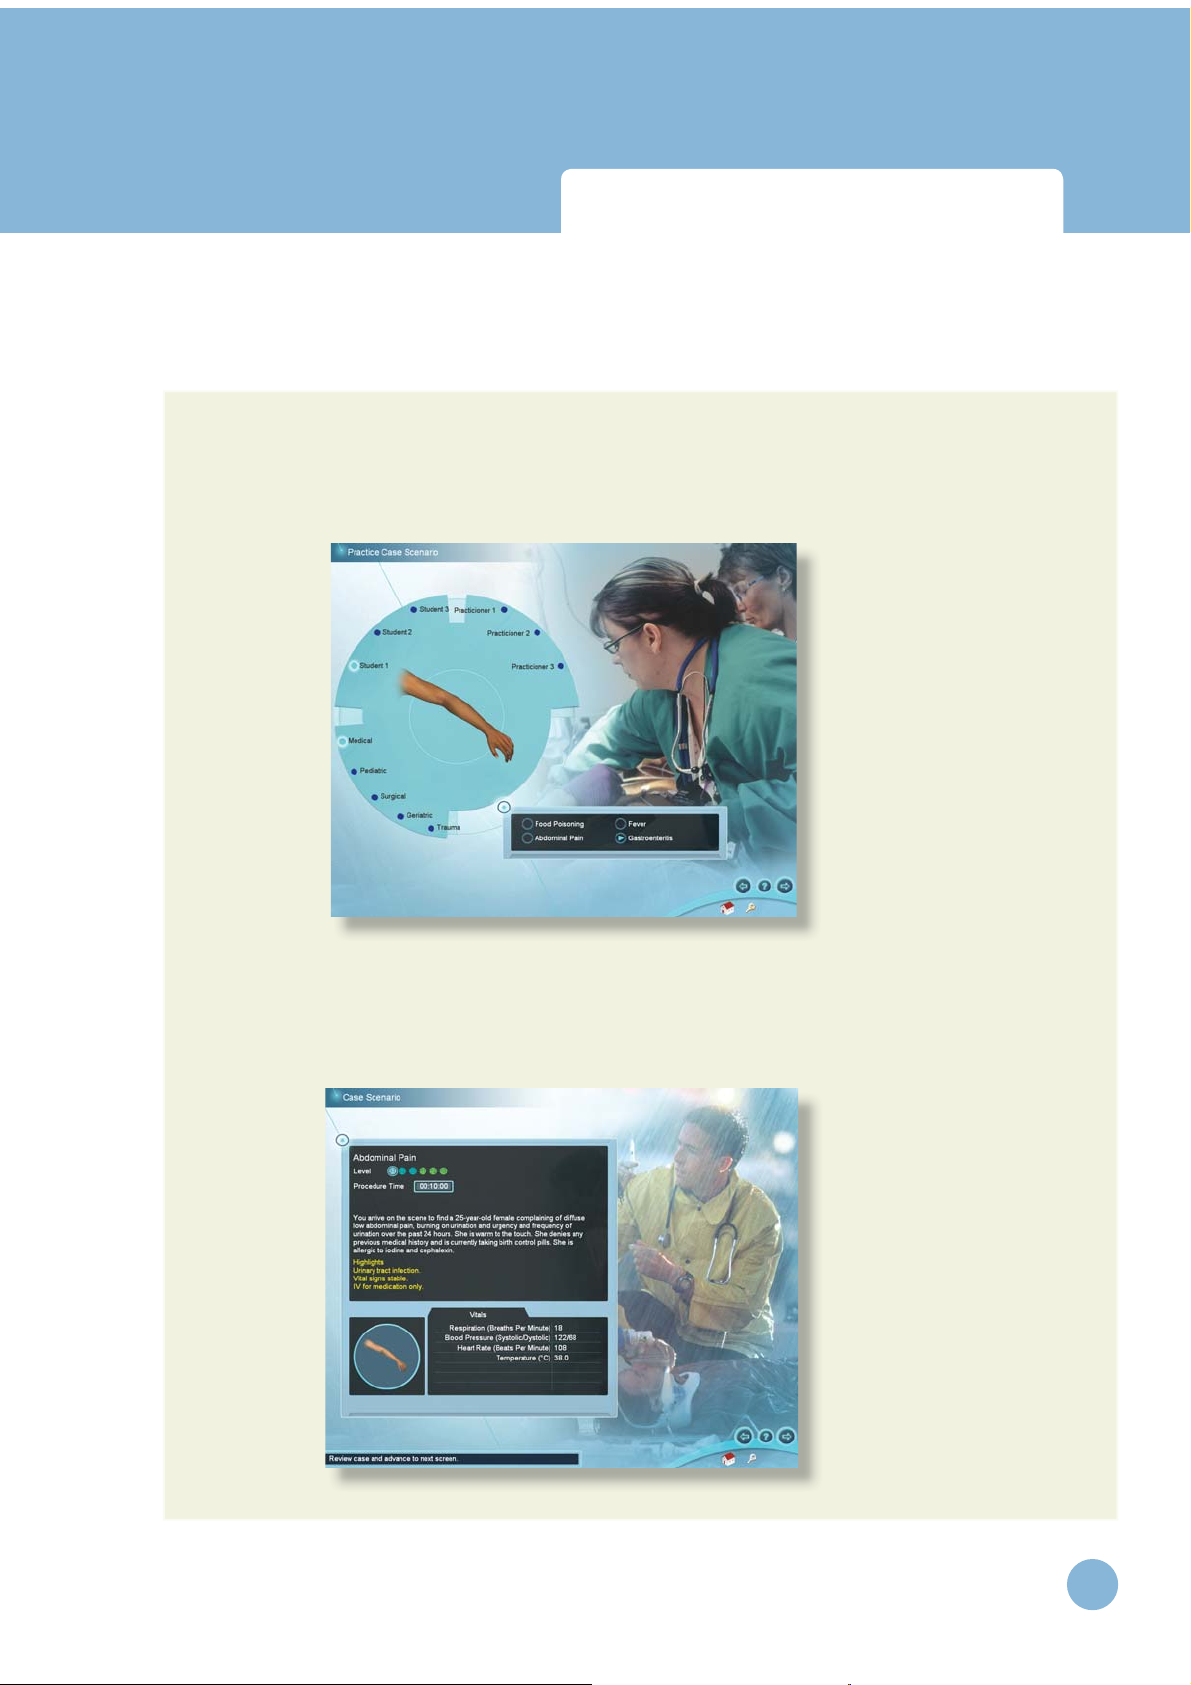
4. Select Practice Cases
Select the level of difficulty, medical specialty and the case you would like to practice. When you
select a particular case, a preview of the patient arm is displayed. Click the right arrow on the naviga-
tion toolbar to go to the selected case.
5. Read Case Scenario
The text presents an overview of the case, a preview of the patient arm and the patient vital signs. In the
Student levels, there are highlights presented as bullet points. Advance to the next screen by selecting
the right arrow at the bottom right of the screen.
www.laerdal.com
27
Page 28
Virtual I.V.
Directions for Use
QuickStart User Guide
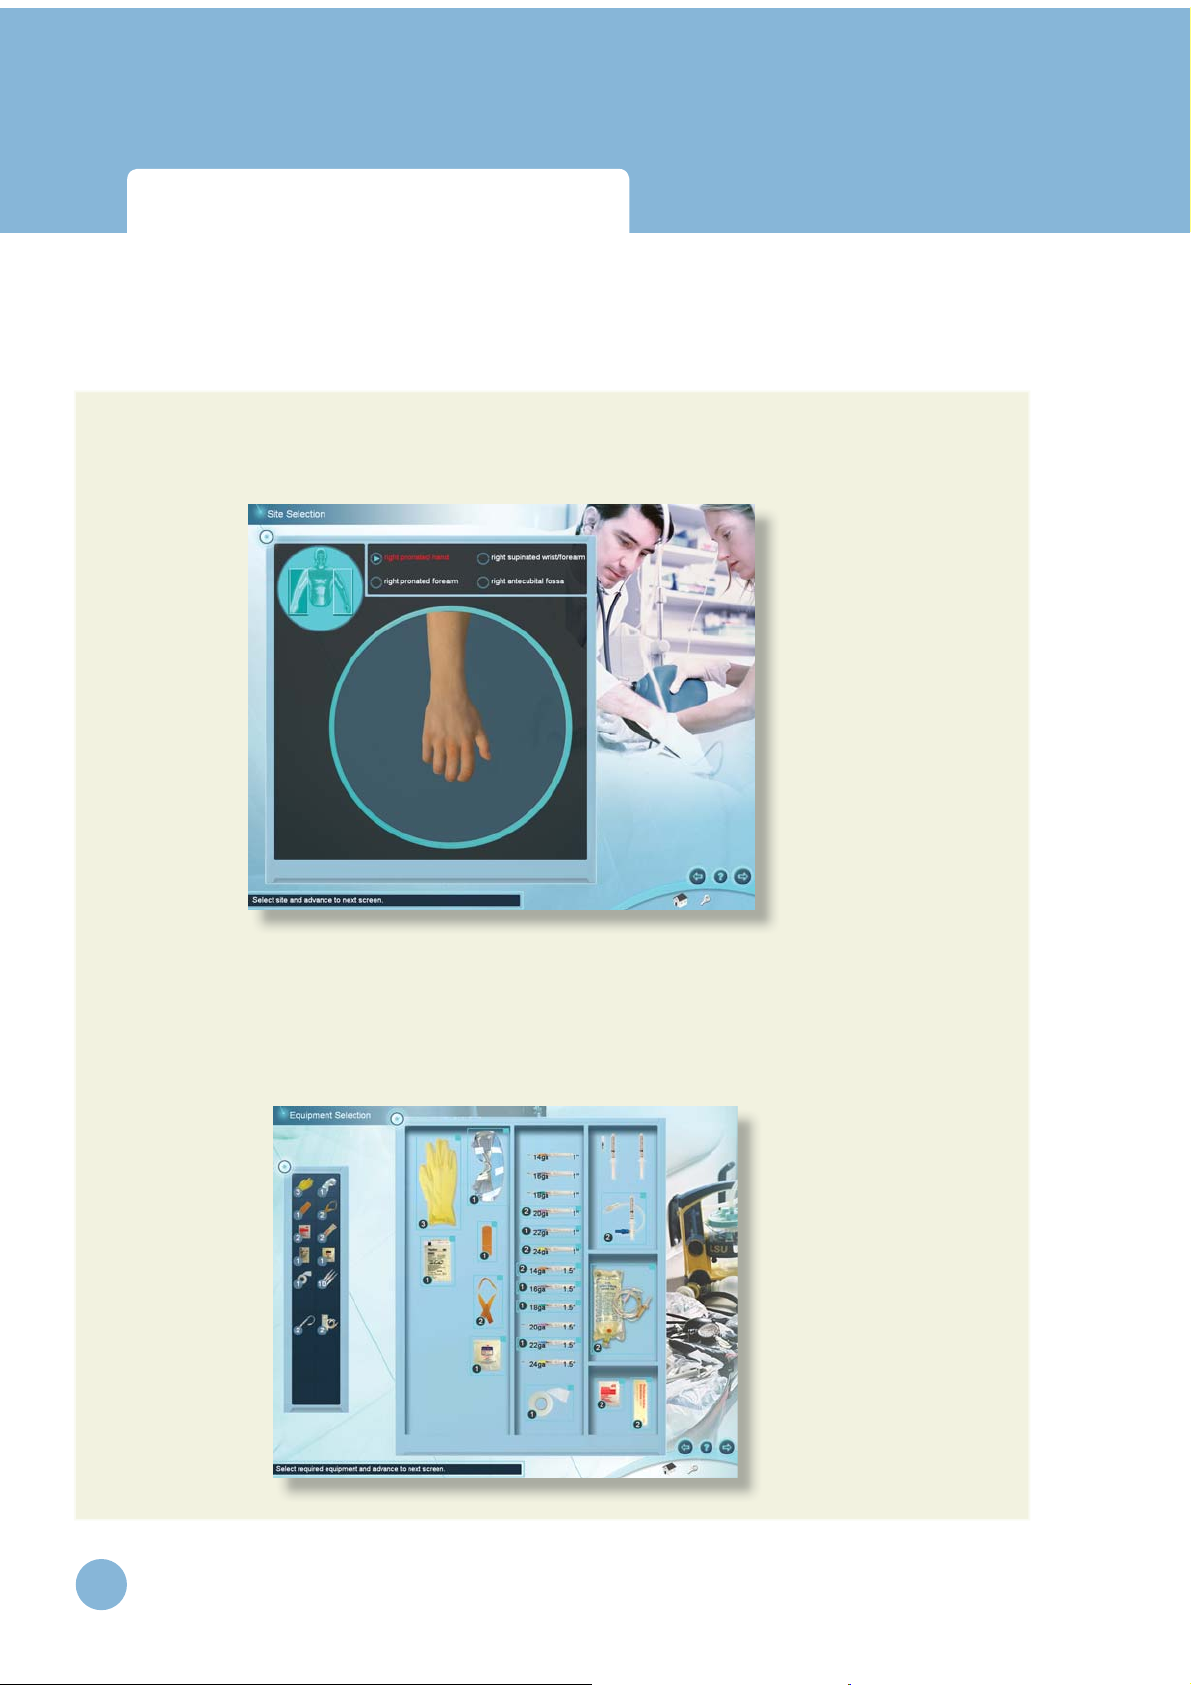
6. Site Selection
Choose from left or right arms and the most appropriate site for cannulation based on the case
scenario.
7. Equipment Selection
Click on the items that you want to collect to per form the procedure, based on the case scenario.
These items will appear in the equipment toolbar on the left hand side of the screen and will be available for use in the intravenous access procedure. Once all necessary equipment has been selected,
advance to the simulation screen by clicking the right arrow.
28
www.laerdal.com
Page 29
Virtual I.V.
Directions for Use
QuickStart User Guide
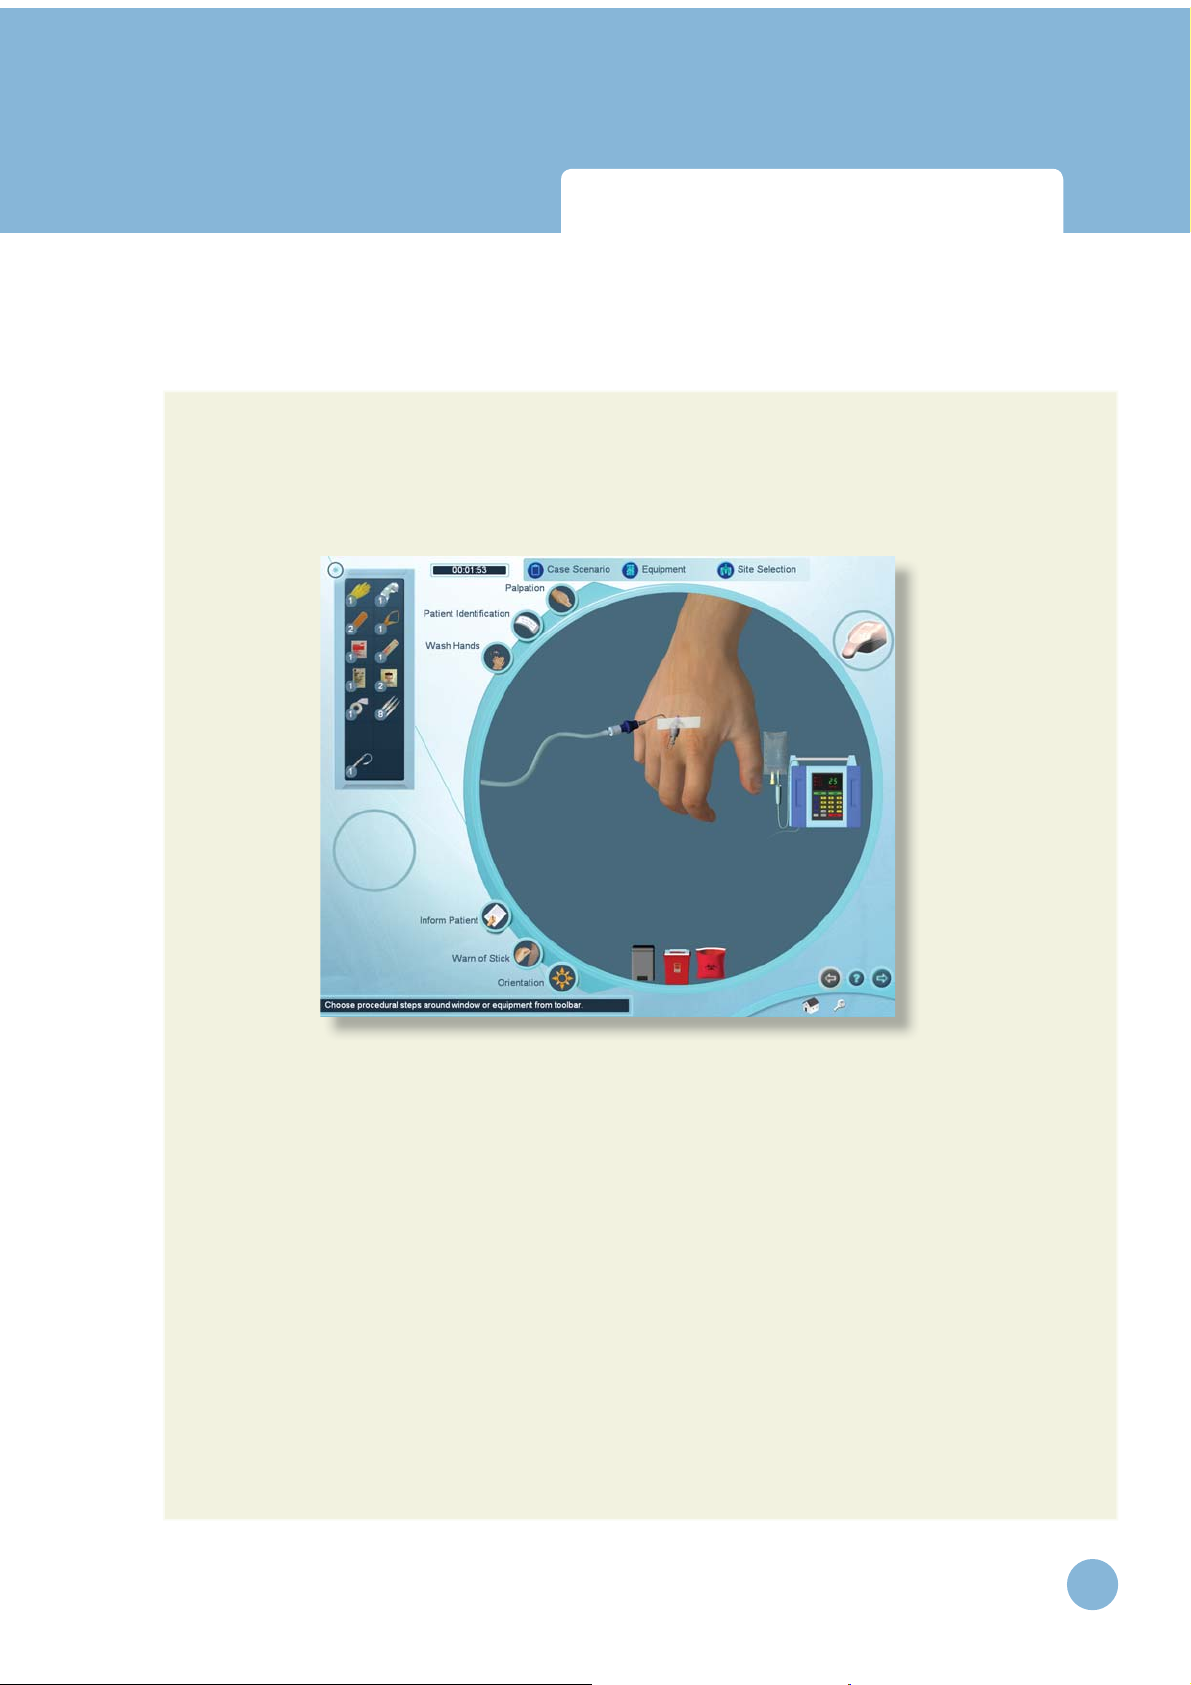
8. Simulation Screen
This screen provides the basis for per forming the cannulation procedure. It shows an arm of the
patient described in the case. When you have completed the simulation, advance to the debriefing
screen by clicking the right arrow in the navigation bar. The arm can be rotated by clicking the middle
mouse wheel and moving the mouse, and zoomed by scrolling the middle mouse button.
Overview
The equipment you have selected appears in the equipment toolbar at the left of the screen. You can
use any of these pieces of equipment at any time by clicking on the corresponding icon.
At the top of the screen are 3 buttons that allow you to review the case scenario (Case Scenario),
select more equipment (Equipment), or select a different site for catheterization (Site Selection). You
can select these throughout the procedure.
Certain procedural steps can be performed by clicking on the corresponding icons. These icons are
located around the left periphery of the circular simulation window.
At the bottom of the simulation window are three disposal containers (trash can, sharps container
and bio-hazard bag). Dispose of equipment into the appropriate receptacle once it has been used.
www.laerdal.com
29
Page 30
Virtual I.V.
Directions for Use
QuickStart User Guide
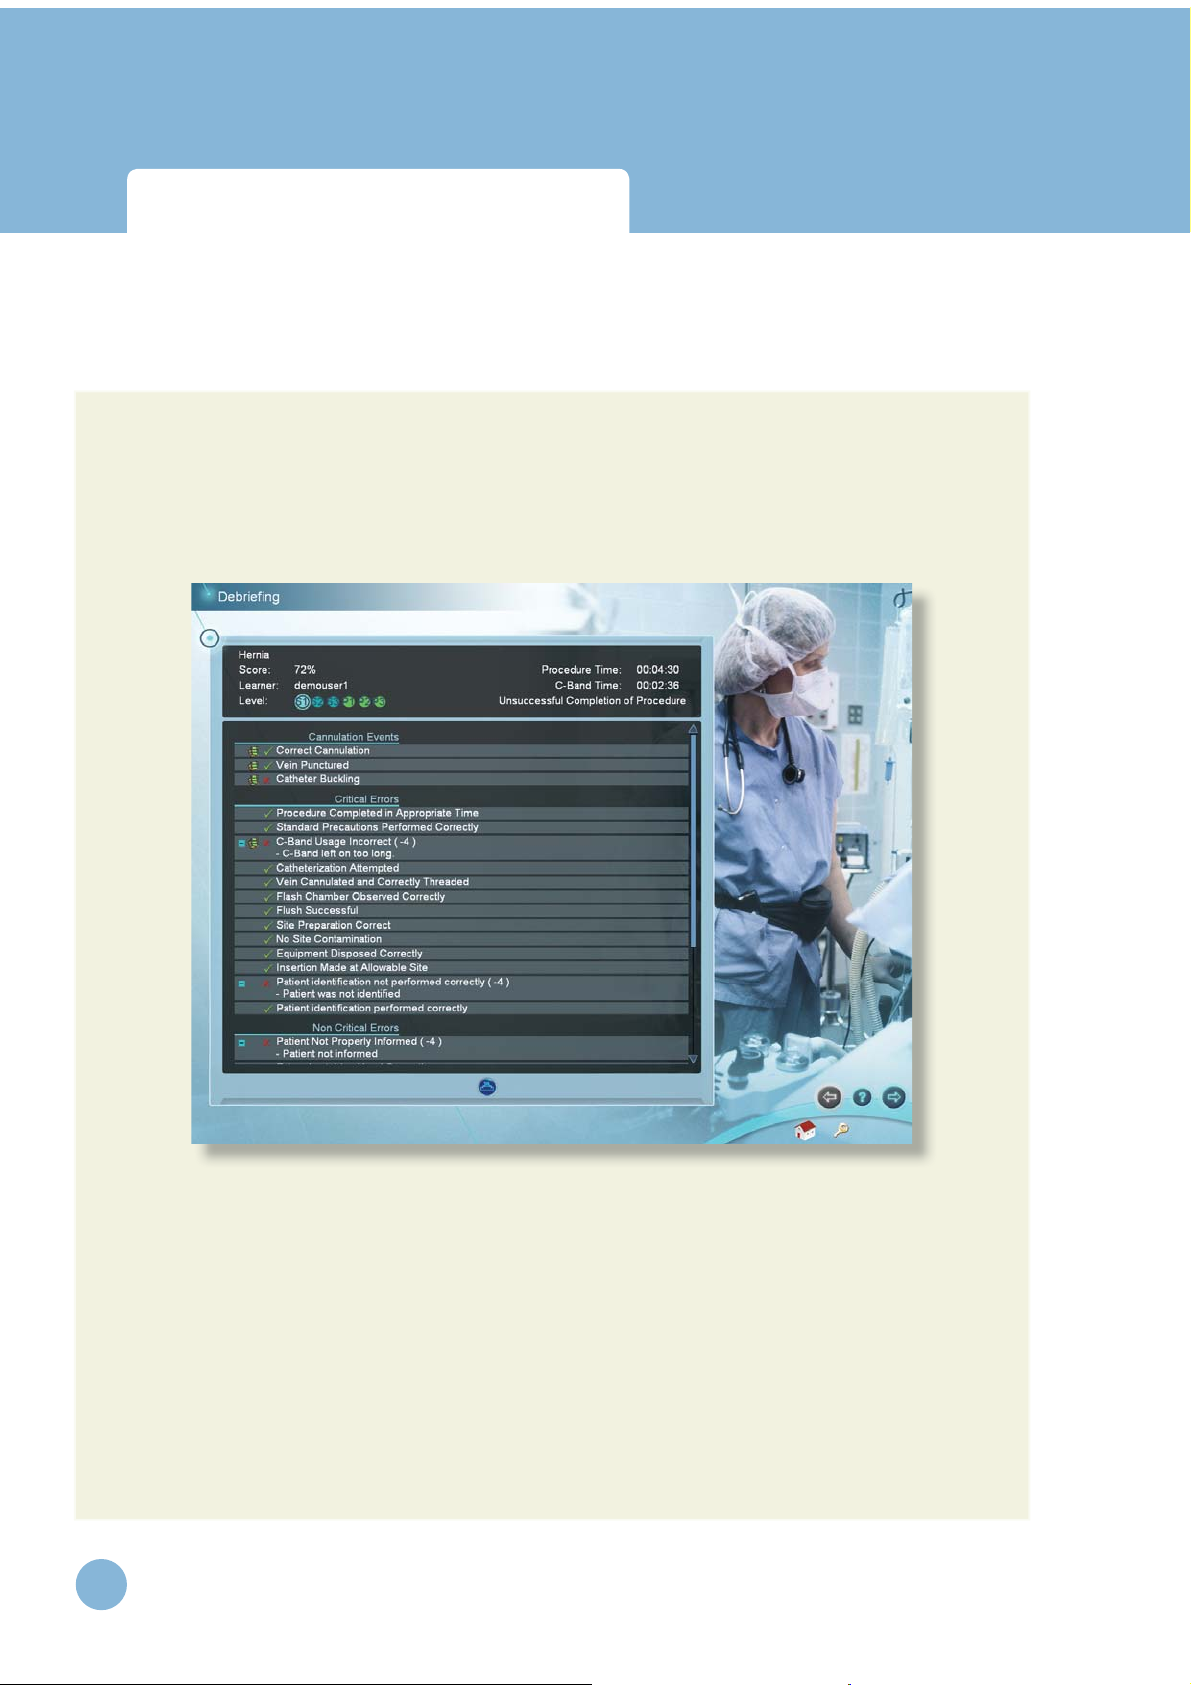
9. Debriefi ng
The top of the Debriefing screen shows your total score, the procedure and constricting band times,
whether you have successfully completed the procedure, the case level, and other information.
The rest of the Debrief ing screen displays the Cannulation Events, Critical Errors, and Non-Critical
Errors.
Cannulation events present general subcutaneous animations of what occurred during your cannulation attempts. Click on the movie icon next to the cannulation event to view the animations.
Positive and Negative critical and non-critical assessment headings and specific assessment errors are
displayed below the cannulation events.
Clicking on the movie icon next to a negative assessment heading will play a short vignette describing how to perform the relevant portion of the procedure correctly. Once you have reviewed your
debriefing advance to the next screen.
30
www.laerdal.com
Page 31

Virtual I.V.
Directions for Use
Using the Haptic Device
www.laerdal.com
31
Page 32

Using the Haptic Device
Virtual I.V.
Directions for Use
32
www.laerdal.com
Page 33

Virtual I.V.
Directions for Use
Using the Haptic Device
5 USING THE HAPTIC DEVICE
5.1 Using the Haptic Device
The haptic device simulates the basic elements of intravenous cannulation. It supports tasks such as
palpation, occlusion, skin stretch and needle inser tion. The next few pages show the basic ways to
manipulate the haptic device in the performance of the procedure.
The following schematic depicts the various par ts and functions of the haptic device, shown from
above. The device should always be placed on a flat, level surface.
www.laerdal.com
33
Page 34

Virtual I.V.
Directions for Use
Using the Haptic Device
When it is time to insert the needle into the haptic device, this icon will appear:
When it is time to palpate in the palpation area of the haptic device, this icon will
appear:
34
www.laerdal.com
Page 35

Virtual I.V.
Directions for Use
Using the Hapic Device
5.2 Needle Insertion and Skin Stretch
The device should be placed on the desktop, resting flat on the surface. The handle is gripped using
the hand and the thumb can be used to stretch the skin during the procedure. The needle and catheter are inserted into the receptacle. Initially, the learner will feel a slight tug as the device engages the
needle.
Note: Once the needle engages the haptic device, the simulated needle on the screen
will illuminate and you will hear a sound; this means you may proceed with needle
insertion.
The force feedback provided to the learner depends on the patient being cannulated, the case scenario, the actual stick, and any complications. In some cases the learner will feel a stick through both
skin and vein, in other cases the vein, or even the skin puncture may be more or less prominent. The
forces associated with catheterization are subtle at times, and the force feedback device simulates
these subtle cues and sensations.
www.laerdal.com
35
Page 36

Using the Hapic Device
Virtual I.V.
Directions for Use
36
www.laerdal.com
Page 37

Virtual I.V.
Directions for Use
System overview
www.laerdal.com
37
Page 38

Virtual I.V.
Directions for Use
System Overview
6.1 Software Overview
The Virtual I.V. Self-Directed Learning System software consists of two distinct par ts:
(1) The basic menus screens, which present the training videos, practice cases, review competencies and sup-
port other functions; and
(2) The simulation training sequence that enables interaction between the trainee inserting the
needle and the three-dimensional (3D) model of the arm.
The following section describes the Basic menu screens (Section 6.2), while the Training Sequence is
covered in Chapter 7.
WARNING
Precautions when using the simulation software
• The Virtual I.V. Self-Directed Learning System has been designed to work on the computer supplied with
the product. The computer is an integral part of the system. It will not work on other computer platforms, because of its requirements for very specifi c, high speed graphics capabilities. Do not attempt to
install and run this software on any other computer other than that which has been provided by the manufacturer.
• No software should be installed on the computer supplied with the Virtual I.V. Self-Directed Learning System,
except for those products supplied by the manufacturer of the software.
• Running any program, such as anti-virus software, on the computer supplied with the simulator, may cause the
Virtual I.V. Self-Directed Learning System to crash or slow the simulation to an unstable condition. This is
a dedicated computer and should not be used for other purposes, except those explicitly stated by the
software manufacturer.
38
www.laerdal.com
Page 39

Virtual I.V.
Directions for Use
System Overview
6.2 Basic menu screens
To start the application, click on the Vir tual I.V. section of the boot screen:
This will initially bring up a loading screen, immediately followed by the Introductory Screen (see
below) and prompt the trainee to enter their user name and password. Please note that these need
to be created by the System Administrator (usually the Instructor – see section called ‘Administration’
below).
Login
This screen prompts the trainee to enter user name and password. Click the check mark to move
to the next screen, or the No button to remove the Login pop-up screen. Click the Virtual Products
button to return to the boot screen to Vir tual Phlebotomy & Infant Vir tual I.V.
www.laerdal.com
39
Page 40

Virtual I.V.
Directions for Use
System Overview
The following section describes the Icons and Buttons, Basic menu screens, and the
Training Sequence (also covered briefly in the Quick Start Guide).
System Icons
There are a number of navigation icons that are found at the bottom right of the
screen. The icon will change color when activated by a mouse click. In other cases,
icons will become grey if they are not available. See the ‘System Tutorial’ video within
the application for more detailed information.
Examples of these icons and their definitions are shown on the pages below.
Navigation Icons
Right arrow: Proceed to the next screen
and Back arrow: Return to Previous screen
or Help for Current Screen
Help
Inactive Icon: Icons that appear grey are not
available.
Exit the application to the Virtual Products
boot screen
Return to the Main Menu
40
www.laerdal.com
Page 41

Virtual I.V.
Directions for Use
System Overview
Log Off the current user or Instructor
Information about Virtual I.V.
Interface Icons
Yes, Accept, Save
No, cancel
Make Active / Inactive
Simulation and Debriefing Icons
Haptic Device Available
Haptic Device is Not Available
Insert Needle into Haptic Device Indicator
Palpate Haptic Device Indicator
View case scenario
www.laerdal.com
41
Page 42

System Overview
Virtual I.V.
Directions for Use
Select equipment
Change site for insertion
Wash Hands
Inform Patient
Palpate Site
Warn of Stick
Learn how to orient the site
Case scenario level indicator
Movie available. Click to play movie.
42
www.laerdal.com
Page 43

Virtual I.V.
Directions for Use
System Overview
6.3 Navigation and Learning Aids
Tool T ips
By moving the mouse over any navigation or administration icon, a small pop-up “Tool Tip” will
appear, providing a brief explanation of that item. An example is presented here:
www.laerdal.com
43
Page 44

Virtual I.V.
Directions for Use
System Overview
Information Box
At the bottom of many screens, there is a rectangular box that prompts the trainee on how to proceed.
An example is presented here:
44
www.laerdal.com
Page 45

Virtual I.V.
Directions for Use
System Overview
Help Screens
Most screens in the Virtual I.V. Self-Directed Learning System have help screens that explain the
functionality of the screen.
The help screen is activated by clicking on the help button (question mark) located on the lower right
corner of the screen:
An example help screen is shown here, with call-outs showing the various components of the menu
screen. Use the scroll bar, or scroll the middle mouse button to view the complete help screen.
www.laerdal.com
45
Page 46

Virtual I.V.
Directions for Use
System Overview
Career Selection screen
This screen offers the trainee the choice of three (3) different career modules. Move the mouse over
the different career choices to identify the career chosen for you by your instructor. Click on the chosen module to begin training.
Main Menu screen
This screen presents a menu of options, including:
• Competency Training: A progressive, tiered hierarchy of case studies, cognitive tests, and required skills
that ranges from beginning student (S1) to advanced practitioner (P3).
• Practice Cases: Individual cases can be tried from all of the levels, for practicing skills, with or without
recording assessment, as this is confi gurable.
46
www.laerdal.com
Page 47

Virtual I.V.
Directions for Use
System Overview
• Anatomical Viewer: This module presents a three-dimensional (3D) model of the arm that can be used
to identify structures and learn anatomy.
• Procedure Training: This video introduces the beginning student to the techniques and skills required for
intravenous access.
• System Tutorial: This video shows the learner how to use the Virtual I.V. simulator system.
• Competency Review: This module shows achieved learner competencies during competency training and
a complete review of student performance.
For the beginning learner, it is important to view both the Procedure Training and System Tutorial
videos to understand how to perform both proper peripheral intravenous access and to best use the
Virtual I.V. Self-Directed Learning System.
www.laerdal.com
47
Page 48

Virtual I.V.
Directions for Use
System Overview
Procedure Training video
This screen presents the procedural video demonstrating:
• Equipment: Proper choice and use of equipment.
• Standard Precautions.
• Needle Insertion: Performance of needle insertion.
This video is divided into chapters, allowing the learner to select the section they wish to view by
clicking on the appropriate section. There is also a video slider, allowing the learner to choose a specific place in the video for review.
It is highly recommend that the beginning student watch the video in its entirety before attempting
the simulation.
There are play/pause and stop buttons in the video player.
48
www.laerdal.com
Page 49

Virtual I.V.
Directions for Use
System Overview
System Tutorial video
This screen presents the System Tutorial video which is divided into the following chapters:
1. Introduction to Virtual I.V. 2.0
2. System Overview
3. Training Types
4. Performing the Procedure
5. Debriefing
6. Competency Review
7. Conclusion
8. For the Instructor
This video allows the learner to select whatever section they wish to view by clicking on the appropriate section. There is also a slider, allowing the learner to choose specific place in the video they would
like to review. There are also play/pause and stop buttons in the video player.
www.laerdal.com
49
Page 50

Virtual I.V.
Directions for Use
System Overview
Anatomical Viewer
The Anatomical Viewer allows the learner to view and identify anatomical structures in the arm and
hand. The arm can be positioned in either a pronated or supinated position by selecting the corresponding buttons. To zoom in and out of the arm model, roll the middle mouse wheel. To re-orient
the arm in a different position, click and hold the middle mouse wheel and move the mouse.
Structures can be revealed through the selection and de-selection of different tissues, including:
• Skin • Arteries • Veins
• Nerves • Bones • Muscles and Connective Tissue
For identifi cation, move the mouse cursor over the anatomic structure and its name will appear in the text
box at the lower left of the screen.
50
www.laerdal.com
Page 51

Virtual I.V.
Directions for Use
Competency Review
Competency Review screen
The Competency Review screen presents your competency accomplishments in a concise and intuitive format.
Selecting the number of cases to review
Select the number of cases to display by clicking on one of the buttons under the “Show Cases”
heading on the left of the screen.
Viewing average user scores and progress
There are different ways to review the user’s general progress:
If the administrator has configured the Vir tual I.V. system to save practice cases, then additional filters
will be presented to view competency training and practice cases independently, or together.
Clicking on the “Level Averages” tab will display a graph of the cognitive test and skills (case scenario)
averages at each level of difficulty.
Clicking on the "Average Skill Scores" tab will display a list of critical and non-critical assessment errors,
the ratio of the times you performed that category correctly, and a list of specific skill errors and how
frequently they were performed incorrectly.
www.laerdal.com
51
Page 52

Virtual I.V.
Directions for Use
Competency Review
Clicking on the "Progress" graph tab will display a graph of the score on all of the selected cases
and cognitive tests in a scatter plot.
Viewing specifi c case scenario and cognitive test debriefi ngs
Click on the specific case scenario or cognitive test at the bottom of the screen to view the associated debriefing.
Once the specific case scenario is accessed, the learner is able to display the assessment in html format for printing by clicking on the print icon at the bottom of the case scenario pop-up.
Sorting
The case scenarios and cognitive tests can be sorted by clicking the column headings.
52
www.laerdal.com
Page 53

Virtual I.V.
Directions for Use
Trai ning Seque nce
7 TRAINING SEQUENCE
The learner has the option of selecting either Practice Cases (see Section 4, ‘Quick Star t Trainee
Reference Guide’ for a rapid run-through) or Competency Training Mode. In either case, the learner
will be presented a case scenario.
Case Scenario screen
The patient scenario contains information vital to the learner's successful performance of the subsequent venous cannulation. Read the paragraph, review the vital signs and look at the yellow bulleted
highlights below to ensure that you select the correct equipment and cannulation site for the case
presented.
The cases become more difficult as you progress in Competency Training Mode from Student (S) to
Practitioner (P) levels. In the P levels, yellow highlights are not provided.
www.laerdal.com
53
Page 54

Virtual I.V.
Directions for Use
Trai ning Seque nce
Site Selection
This screen shows four (4) views of each arm that corresponds to the patient presented in the Case
Scenario. Two (2) images are with the arm in the supinated position and two (2) images are with the
arm in the pronated position.
Based on the information presented in the preceding Case Scenario, choose the site which is most
suitable for intravenous cannulation. Select the site by clicking in the box associated with the anatomical descriptor of the best site. At any time during the procedure, you can change sites, review the
case scenario or obtain more equipment. Click on the right arrow to advance to the Equipment
Selection Screen.
54
www.laerdal.com
Page 55

Virtual I.V.
Directions for Use
Trai ning Seque nce
Equipment Selection
This screen presents the inventory of equipment that can be used in the simulation. Holding the
mouse over an item will present the learner with a brief description of the corresponding piece of
equipment. To select an item, click on that item and it will appear on the Equipment toolbar on the
left hand side of the screen. The learner may click on an item multiple times, and the quantity of that
piece of equipment will appear on the item in the equipment toolbar. To deselect an item, click on the
“x” at the upper right of the item in the equipment tray.
After choosing the equipment, click on the right arrow to advance to the Simulation screen. It is possible to return to the Equipment Selection screen at any time during the procedure.
www.laerdal.com
55
Page 56

Virtual I.V.
Directions for Use
Trai ning Seque nce
Simulation Screen and Performance of the Intravenous Procedure
The Simulation component of the Virtual I.V. Self-Directed Learning System allows the learner to perform the I.V. insertion procedure using the haptic device. All of the items chosen from the Equipment
Selection screen will appear on the left side of the screen and be available for use in the procedure.
If not already done, remove the needle from the haptic device, and completely attach the catheter
to the needle before beginning the procedure. To zoom in and out of the arm model, roll the middle
mouse wheel. To orient the arm differently, click and hold the middle mouse wheel and move the
mouse around.
To select a piece of equipment, click on the inventory on the left side of the screen. Once an item is
chosen, it must either be placed on the arm, or disposed of in the trashcan, biohazard bag or sharps
container.
Certain items, such as the tourniquet, catheter, needle, pump, flush, extension tubing, lock and I.V.
tubing, can be removed by clicking on them.
56
www.laerdal.com
Page 57

Virtual I.V.
Directions for Use
Trai ning Seque nce
The haptic device contains three (3) separate regions: (1) The top of the device is for
vein palpation and occlusion, (2) The middle of the device is for needle insertion, and
(3) The bottom of the device is for skin stretch:
An icon of the Haptic Device appears in the upper right corner and will show you when and how to
interact with the Haptic Device.
To begin the procedure, the catheter must be attached to the needle. Align the ridge located on the
needle with the groove on the catheter to ensure proper configuration of the needle/catheter
combination.
** Special note: Under no circumstances should any needle or catheter other than
those supplied with the Virtual I.V. Self-Directed Learning System ever be used with
the haptic device.
The tourniquet can be placed on the arm to enhance vein engorgement. However, be aware that the
learner is negatively assessed if the constricting band is left on the arm for too long.
www.laerdal.com
57
Page 58

Virtual I.V.
Directions for Use
Trai ning Seque nce
To use a needle, select the appropriate gauge from the toolbar on the left side of the screen and
move it to the arm. A target cursor will appear on the arm. Locate the insertion point on the arm
with the target cursor; click and the needle will appear. Insert the needle/catheter combination into
the needle inser tion receptacle located in the middle of the haptic device. A slight tug will be felt as
the needle is engaged by the haptic device. After engagement, the transparent needle on the screen
will be highlighted. The position of the bevel will also appear in the circle next to the arm.
To palpate the arm, select the Palpation button. Move the palpation fingers to a location on the arm,
click and feel the vein using the top part of the haptic device. To palpate a new location on the arm,
move the cursor and click a new location. The palpation fingers are automatically removed when you
select another piece of equipment, or select the palpation button a second time.
All Body Substance Isolation (BSI) techniques should be followed. These may include gloves and goggles, which can be selected and deselected by clicking on the corresponding icon.
The insertion site can be prepared using the cleansing supplies in the inventory. All items must be disposed of properly, either in the trashcan, biohazard bag or the sharps container.
Depending on the patient case, it may be more or less difficult to correctly insert the needle. During
needle insertion, stretching the skin at the bottom part of the haptic device should assist in securing the
vein for insertion. Similarly, vein occlusion can be performed using the top par t of the haptic device.
58
www.laerdal.com
Page 59

Virtual I.V.
Directions for Use
Trai ning Seque nce
There are over forty (40) different arms supplied with the Vir tual I.V. Self-Directed Learning System,
ranging from pediatric to geriatric, and include rolling veins, fragile veins and arms and hands with difficult-to-penetrate skin.
The appropriate angle for needle inser tion depends on the patient, scenario and insertion site, but is
generally between 10 and 30 degrees. A flash of red will appear in the needle if the stylet penetrates
a vein or an artery. After needle inser tion, the needle should be withdrawn and the catheter secured
in place with the appropriate equipment, such as tape. Catheter lock, syringe flush and I.V. tubing can
be placed on the catheter.
In some cases, the learner will perform the procedure in an incorrect fashion, resulting in bleeding,
bruising or swelling that will appear on the arm.
Use equipment by clicking on the equipment toolbar at the left. All pieces of equipment are prepared
and ready to use.
A number of procedure tasks appear along the left edge of the round window. It is necessary to perform some of these tasks to successfully complete the procedure.
www.laerdal.com
59
Page 60

Virtual I.V.
Directions for Use
Trai ning Seque nce
Using the Haptic Device
To insert the needle, palpate, apply pressure or stretch the skin, perform the function on the haptic
device in the corresponding area.
Needle insertion: To perform the needle insertion, select a needle from the toolbar. Move the needle
cursor to the desired location on the site and click. Then, inser t the real needle into the haptic device.
Note: Before performing the needle insertion, it is necessary to engage the haptic device needle in
the haptic device. Insert the needle into the Needle Insertion Point on the haptic device until the needle on the screen lights up. You will feel a small tug and hear a sound when the haptic device engages.
Applying Pressure: you can apply pressure to it by pressing the palpation/pressure application area of
the haptic device.
Click on the palpation icon to turn palpation on. A palpation finger will attach to the cursor. Move
fingers to the simulation window, click on the site to locate the palpation point. To turn palpation off,
click on palpation or select another piece of equipment.
Equipment Use: Specific
To apply tape or dressing, click on the corresponding icon, move to site and click on desired location.
To place the tourniquet, click on the corresponding tool bar icon, move to arm and click on desired
location.
To use an alcohol wipe, chlorhexidine wipe or povidone iodine swab, click on the corresponding icon
on the toolbar and move to the desired site on the arm. Once at the desired site, click, hold and
move the mouse to cleanse the site. Release mouse button when cleansing is complete.
Procedure Tasks: Specific
To palpate, identify the patient, wash your hands, inform the patient of the procedure, warn the
patient of the stick, or view a video about site orientation, click on the corresponding icon on the left
edge of the simulation window.
Once you have completed the procedure, advance to the next screen to review your
performance.
60
www.laerdal.com
Page 61

Virtual I.V.
Directions for Use
Trai ning Seque nce
Debriefing
Following the procedure, the learner will be assessed as to how well he or she performed the procedure. To view the debrief ing screen, click the right arrow after performing the procedure. The assessment is divided into Critical and Non-Critical errors. Critical errors are vital to proper performance of the
procedure. Depending on the configuration chosen by the administration, a quantitative score may be
displayed. This Overall Rating may be high, but the learner can still fail the procedure if Critical errors
were made. The total time of the procedure, as well as the time the constricting band was placed on
the arm is displayed.
For some Critical and Non-Critical errors, a movie icon will appear next to the error. Clicking on that
error will display a video showing the proper way to perform the procedure.
Clicking on the cannulation event video shows the learner an “under-the-skin” view of what occurred
during cannulation. For example, if the angle of inser tion was too steep, the video will display the consequences of a steep insertion.
If the learner is in Competency Training Mode and succeeds at the procedure, then the next case or a
qualification test will be automatically presented when the learner advances to the next screen. If the
learner fails the procedure, he or she may be presented with the same case scenario, a different case
scenario, the procedure training screen, or with a remediation case scenario to help the learner better
understand proper procedure.
www.laerdal.com
61
Page 62

Virtual I.V.
Directions for Use
Trai ning Seque nce
Cannulation Event Animations
These generic animations display a record of the learner’s performance in terms of the angle of
needle insertion, lateral or direct needle placement, vein behavior (rolling), needle-catheter behavior
(buckling, re-cannulation), vein puncture (vein present, vein punctured through, etc.), and whether
the learner cannulated the vein correctly. The animation is controlled using standard video control
buttons.
An example is presented here:
62
www.laerdal.com
Page 63

Virtual I.V.
Directions for Use
Trai ning Seque nce
Remediation Case Scenario
If the student fails the procedure, a remediation case with red hints may appear following advancement from the debriefing screen.
An example remediation case scenario is presented here:
www.laerdal.com
63
Page 64

Trai ning Seque nce
Trai ning Seque nce
Virtual I.V.
Virtual I.V.
Directions for Use
Directions for Use
64
www.laerdal.com
www.laerdal.com
Page 65

Virtual I.V.
Directions for Use
Administration
www.laerdal.com
65
Page 66

Virtual I.V.
Directions for Use
Administration
8 ADMINISTRATION
There are certain features only available to the instructor. These features are accessed by logging in
as:
Username: Administrator
Password : <Provided on the information sheet inside your desktop computer, or by Laerdal Technical
Service at 1 (800) 431-1055 EXT. 5596>
66
www.laerdal.com
Page 67

Virtual I.V.
Directions for Use
Administration
Instructor Main Menu
Once logged in, you can:
(1) View an instructional video on Virtual I.V. 2.0 instructor functionality;
(2) Manage user accounts (Account Management);
(3) Configure the simulation based on local protocols and preferences (Configuration);
(4) Calibrate the haptic device which occasionally requires calibration (Haptic Device Calibration);
(5) Change the Instructor password (Change Instructor Password). Note: The password originally
provided on the information sheet inside your desktop computer, or by Laerdal Technical
Support will always allow work, even if you change the Instructor password.
(6) Review achieved learner competencies (Learner Competency Review)
www.laerdal.com
67
Page 68

Administration
Learner Competency Review
Selecting a learner for review
Virtual I.V.
Directions for Use
Click on a learner at the top of the screen to review that learner’s progress. Different learners can be
selected for review at any time.
68
www.laerdal.com
Page 69

Virtual I.V.
Directions for Use
Administration
Selecting the number of cases to review
Select the number of cases to display by clicking on one of the buttons under the “Show Cases”
heading on the left of the screen.
Selectively filter the competency training and practice cases for review. The information in the competency review will change accordingly. Remember that depending on the configuration setting, user
practice cases may not be stored.
Viewing average user scores and progress
There are different ways to review the user’s general progress:
• Clicking on the “Level Averages” tab will display a graph of the cognitive test
and skills (case scenario) averages at each level of difficulty.
• Clicking on the “Average Skill Scores” tab will display a list of critical and
non-critical assessment errors, the ratio of times you performed that category
correctly, a list of specific skills and how often those skills were performed
in-correctly.
• Clicking on the “Progress Graph” tab will display a graph of the cognitive test
and skill (case scenario) scores for the shown cases.
www.laerdal.com
69
Page 70

Virtual I.V.
Directions for Use
Administration
Sorting
The learners and case scenarios can be sorted by clicking the column headings.
Viewing specific case scenario and cognitive test assessments
Click on the specific case scenario or cognitive test at the bottom of the screen to view the associated assessment.
Once the specific case scenario is accessed, the instructor is able to display the assessments in html
format for printing by clicking on the print icon at the bottom of the case scenario pop-up.
70
www.laerdal.com
Page 71

Virtual I.V.
Directions for Use
Account Management
Administration
Click on the column labels to sor t the accounts by name, class, specialty, level, average skill score or
average cognitive score.
If you will be using multiple Virtual I.V. machines and would like to configure them in a
connected Local Area Network, you will need to install Laerdal Competence Management System,
version 1.8.
This will allow students to log into any Vir tual I.V. machine and transfer their user histories between
machines.
If you experience significantly long log-on times, we recommend installing a Laerdal Competency
Management System.
Note: Do not use the Virtual I.V. account management and learner competency review functionality
after installing a Laerdal Competence Management System.
www.laerdal.com
71
Page 72

Administration
1. Click on 'Create' to add a new learner.
Virtual I.V.
Directions for Use
72
www.laerdal.com
Page 73

Virtual I.V.
Directions for Use
Administration
2. Select a learner and click 'Edit' to edit the learner’s password, career and class.
www.laerdal.com
73
Page 74

Virtual I.V.
Directions for Use
Administration
Confi guration
Select from the Pre-Hospital, In-Hospital, or Military tabs to select configuration options for that
career.
Click the “Reset to default settings” button to restore the original settings for all configuration options.
74
www.laerdal.com
Page 75

Virtual I.V.
Directions for Use
Administration
8.1 Calibration of the Haptic Device
When the haptic device requires calibration, a message will appear on the screen which looks like this:
It is important to calibrate the device at regular intervals as prompted by the system, or the system
will “drift”, potentially causing erroneous measurements.
In cases where the haptic device is not connected or does not initialize properly, the following screen
will appear. Make sure that the device is properly connected. Once properly connected log off and
then back on, or simply go to the System Tutorial screen and return to the main menu. Exiting the
application and disconnecting and reconnecting the power cord to the device will usually fix this
problem. The initialization screen is shown below:
www.laerdal.com
75
Page 76

Virtual I.V.
Directions for Use
Administration
The following pages show the series of menu screens that will lead the instructor through the
calibration process.
These menu screens show the steps of the calibration sub-routine. Follow instructions as prompted
on the screens.
76
www.laerdal.com
Page 77

Virtual I.V.
Directions for Use
Preparing the needle / catheter assembly for calibration:
Administration
www.laerdal.com
77
Page 78

Administration
Lateral calibration:
Virtual I.V.
Directions for Use
78
www.laerdal.com
Page 79

Virtual I.V.
Directions for Use
Ver tic al calibr ation :
Administration
www.laerdal.com
79
Page 80

Administration
This screen indicates that the device has been successfully calibrated.
Virtual I.V.
Directions for Use
The screen below indicates that the device has not been successfully calibrated, and the calibration
routine should be performed again. If problems persist, click on the show calibration error button
to determine at which step calibration failed and the corresponding error code. If calling Laerdal
Technical Support, please provide the error code.
80
www.laerdal.com
Page 81

Virtual I.V.
Directions for Use
Administration
Network Confi guration
Connect multiple Virtual I.V.TM systems to a local or global area network by installing
a Laerdal Competence Management System version 1.8 and following the accompanying instructions. This will link multiple systems and allow students and instructors to
access and review achieved competencies over the internet.
Change Instructor Password
Note: The password originally provided on the information sheet inside your desktop
computer, or by Laerdal Technical Service at 1 (800) 431-1055 EXT. 5596 will always
allow work, even if you change the Instructor password.
www.laerdal.com
81
Page 82

Administration
Virtual I.V.
Directions for Use
82
www.laerdal.com
Page 83

Virtual I.V.
Directions for Use
Packing up the system
www.laerdal.com
83
Page 84

Virtual I.V.
Directions for Use
Packing up the System
9 PACKING UP THE SYSTEM
WARNING
Precautions when packing and moving the haptic device
• The haptic device is a precise and sensitive instrument. To ensure proper working order, please
handle and pack with care.
• Be certain to replace the shipping restraint before moving the device.
• Dropping the haptic device, bending the needle, or other abuse may render the device
inoperable.
• To ensure proper functionality, calibrate the haptic device after moving.
• Although the needle is blunt, it can still cause injury if used in an improper manner. Be careful
when handling.
84
www.laerdal.com
Page 85

Virtual I.V.
Directions for Use
Packing up the System
This series of diagrams is also available as a fold-out set of instructions that
were included in the Virtual I.V.™ packaging. It explains the order of packing
the simulator. Special attention should be paid to unplugging the cables and packing
the haptic device.
(1) Shut down the computer as indicated by the manufacturer:
(2) Unplug the power cord of the haptic device from the wall socket:
www.laerdal.com
85
Page 86

Packing up the System
(3) Carefully unplug the needle from the haptic device:
Virtual I.V.
Directions for Use
(4) Place the restraining strap on the haptic device:
86
www.laerdal.com
Page 87

Virtual I.V.
Directions for Use
Packing up the System
(5) Carefully place the haptic device and tools in the original packaging:
www.laerdal.com
87
Page 88

Packing up the System
Virtual I.V.
Directions for Use
88
www.laerdal.com
Page 89

Virtual I.V.
Directions for Use
Frequently asked questions (FAQ)
www.laerdal.com
89
Page 90

Packing up the System
Virtual I.V.
Directions for Use
90
www.laerdal.com
Page 91

Virtual I.V.
Directions for Use
FAQ
9 FREQUENTLY ASKED QUESTIONS (FAQ)
1. Is there some kind of an introduction that shows me how to use this product?
The System Tutorial Video, accessible from the Main Menu, will show you how to use the product, along
with the text in this user manual. To access the Main Menu login as:
Username: demouser1 or demouser2
Password: password
2. Can the instructor select specifi c supplies and confi gure the training standards?
Yes, in the Administrator Module, certain supplies and assessment features are confi gurable.
3. Our local standards of practice do not call for, or restrict the use of certain
items that are available on the equipment screen or are required for successful
completion of the procedure, such as the use of goggles or application of iodine
to the arm.
Many options are configurable by the instructor using the Configuration section of the Instructor mod-
ule. By turning specific assessment items on or off, it is possible to tailor the system to train to your
local protocols.
4. Are there different types of I.V. solutions to choose from?
Not in the current product.
5. Can I fl ush the I.V. line and set the drip rate?
Although you can fl ush the I.V. line, setting the drip rate is not supported.
6. Why can’t I continue to palpate the vein as I’m inserting the needle?
Proper I.V. insertion technique specifies simultaneous skin stretch and insertion. Thus, unless you have a
helper, simultaneous skin stretch, palpation and insertion would require more then two hands. However, if you do palpate, you will palpate approximately ½” proximal to the insertion site. Furthermore,
palpation after site cleansing will contaminate the venipuncture site and may cause infection.
7. Is there audio feedback… like the patient saying something or making a noise
when I stick him?
No, it was felt by the clinical design team that this could become annoying to the user over multiple
cases, although in future versions of the product audio such as this may become a confi gurable option.
www.laerdal.com
91
Page 92

Virtual I.V.
Directions for Use
FAQ
8. Will the cleansing agents wet and taint the skin?
Yes, like in actual patients, there will be a time period in which topical agents will remain and evapo-
rate, depending on the nature of the solution applied to the arm.
9. Will blood drip out of the needle hub if the vein isn’t occluded?
Yes, under most conditions, if the procedure has been performed to elicit this problem, as in an actual
patient.
10. Will a hematoma and/or ecchymosis form if I stick through or blow a vein?
Yes, under most conditions, if the procedure has been performed to elicit these problems, as in an
actual patient.
11. Can I put together an I.V. Start Kit so I don’t need to select my supplies before
each stick?
Not in the current product. However, future upgrades may feature this option.
12. Why do I need to select a sharps container? There is one on the wall in every
room where I work.
An option can be confi gured in the Administrator module to make the sharps container always avail-
able. The goal of the standard confi guration is to reinforce the concept that sharps, contaminated gloves
and other items must be disposed of in a circumscribed fashion. We realize that, in some places, hospitals may actually have multiple disposable containers - for example, needles and gloves may be disposed of in different hazard containers. However a cognitive training goal of this product is to reinforce
the notion in the trainee’s mind that potentially contaminated or dangerous items must be disposed of
in a selective manner.
13. Is there some way to mark the selected needle entry point? I lose the spot
when I prep the skin.
As with an actual patient, there is no way to mark the point of insertion.
14. Is there a lateral transparent view so I can see my angle and depth of entry?
No, currently there is no real-time display of angle and depth of entry. Future versions may feature
this capability, but for training purposes, it was felt that, since this is not available while performing the
procedure on an actual patient, it was not a preferred method of training the technique. Also, this type
of real time coaching jeopardizes the ability to evaluate student performance and objectively advance
the student through the course of study.
92
www.laerdal.com
Page 93

Virtual I.V.
Directions for Use
FAQ
15. Although the user “Jimi” and the password “Hendrix” does not appear in the
learner list, I could not create a user with the same username and password.
Why can’t I delete users?
This will occur if you are connected to a server in a local area network confi guration. Due to integration
with the Competence Management System (CMS), you cannot create users that have been previously
deleted, or delete users from inside Virtual I.V..
16. Will the debriefi ng tell me what I did correctly and give me more specifi c
information about what I did wrong?
Yes, the assessment screen shows video, animations and textual information about errors and the way
to achieve proper performance of the procedure.
17. Can the student print out the debriefi ng?
Yes. Students and instructors can print out specifi c case scenario and cognitive test debriefi ngs from
two locations: the debriefi ng screen and the competency review screen when a specifi c debriefi ng is
accessed. Installation of a Laerdal Competence Management system will allow you to print additional
information.
18. Can the debriefi ng report be downloaded into a database?
Yes, this capability is available if the product is part of the Competence Management System (CMS)
that can be ordered as an adjunct to the product.
19. Can I access the student performance database from my offi ce computer
over a network?
Yes, this capability is available if the product is part of the Competence Management System (CMS)
that can be ordered as an adjunct to the product.
20. I keep getting the message “Put the catheter back on the device”, even
though I have already performed that function. What do I do?
This may be an indication that the device requires calibration. If you do this 3 times, you will get a
message asking you to automatically calibrate the sensor. Place the catheter completely on the
dle, and click “Auto-Calibrate.”
nee-
www.laerdal.com
93
Page 94

Virtual I.V.
Directions for Use
FAQ
21. I have installed other software on the computer, and the simulator either
slows down, crashes or disables the haptic device. What do I do?
No software should be installed on the computer supplied with the Virtual I.V.™ Self-Directed Learning
System, except for those products supplied by the manufacturer of the software. Other software, such
as anti-virus programs, may run on the machine in the background, severely limiting the performance
of the simulator. The best solution is to never install such software in the first place, turn it off or delete
it once it has been installed. An alternative solution, if you are required to run anti-virus software, is to
increase the memory on your machine. Contact Laerdal Technical Service for further guidance..
22. In the Simulation Screen, I inserted a needle through someone’s fi nger, although
the needle appears to completely penetrate the fi nger, the Haptic device
pushed the needle almost completely back out.
It is possible to over-power the device. In some cases, you may hit a bone and the device will not respond correctly with forces required to penetrate it. This is a limitation of the system.
23. The needle stays in the arm although it has been withdrawn from the device.
What is going on?
This will happen if you pull the needle out “too quickly”. This is a limitation of the hardware and is
un-avoidable. Thus, you should always remove the catheter from the haptic device in a slow manner.
Jerking the catheter out of the patient is dangerous. Jerking the catheter out of the device may cause
un-expected behavior or device failure. If the needle gets left inside the arm on the Simulation Screen,
you can also throw away that needle and select a new needle and the device will reset.
94
www.laerdal.com
Page 95

Virtual I.V.
Directions for Use
Single case model list
www.laerdal.com
95
Page 96

Single Case Model List
Virtual I.V.
Directions for Use
96
www.laerdal.com
Page 97

Virtual I.V.
Directions for Use
Single Case Model List
11 SINGLE CASE MODEL LIST
The table below lists the arm models used in each of the single cases.
Level Category Case Arm Model
S1 TRAUMA “Fall” white normal male
“Pedestrian struck” white female
“Burn” Hispanic female
“Gunshot wound” white normal male
MEDICAL “Food poisoning” white female
“Fever” white normal male
“Abdominal pain” white female
“Gastroenteritis” Hispanic female
SURGICAL “Post-surgical tumor removal” white normal male
“Post-delivery tear” white female
“Wound closure” Hispanic male
“Hernia” white normal male
PEDIATRIC “Fever of unknown origin” pediatric male
“Fracture reduction” pediatric male
“Impaled object” pediatric male
“Choking” pediatric male
GERIATRIC “Endoscopy” Hispanic geriatric female
“Upper respiratory infection” geriatric female
“Fall” geriatric male
“Post-surgical hernia repair” geriatric male
S2 TRAUMA “Bicyclist struck” white female
“Assault” white normal male
“MVA” white female
“Pedestrian struck” Hispanic male
MEDICAL “Chest pain” white normal male
“Urinary tract infection” white female
“Syncope” Hispanic male
“Deep vein thrombosis” white normal male
SURGICAL “Ectopic pregnancy” white female
“Abscess” white female
“Post oophorectomy” Hispanic female
“Post gastrectomy” white normal male
PEDIATRIC “Cyclist struck” pediatric male
“Post ear surgery” pediatric male
“Abdominal pain” pediatric male
“Headache” pediatric male
www.laerdal.com
97
Page 98

Virtual I.V.
Directions for Use
Single Case Model List
GERIATRIC “Abdominal pain” geriatric female
“MVA” geriatric male
“Post laparoscopy” geriatric male
“Chest pain” Hispanic geriatric female
S3 TRAUMA “Traumatic amputation” white male
“Burn” white female
“Snowmobile accident” white female
MEDICAL “Upper respiratory infection” white female
“Arr hy thmi a” white n or m a l male
“Altered mental status” white female
“Pulmonary embolism” Hispanic female
SURGICAL “External fixator placement” white female
“Post laminectomy” white normal male
“Post hysterectomy” Hispanic female
“Post thyroidectomy” white female
PEDIATRIC “Post hernia repair” pediatric male
“Seizure” pediatric male
“Pedestrian struck” pediatric male
“Burn” pediatric male
GERIATRIC “Burn” geriatric female
“Post hip replacement” geriatric female
“Syncope” African American geriatric obese male
“MVA” geriatric male
P1 TRAUMA “Assault” white female
“Gunshot wound” white normal male
“Fall” white female
“MVA” African American female
MEDICAL “Chest pain” white normal male
“Allergic reaction” white female
“Diverticulosis” African American male
“Stroke” white obese male
SURGICAL “Post cholecystectomy” white obese female
“Comparent syndrome” white normal male
“Post jejunostomy” white male
“Post foot amputation” African American male
PEDIATRIC “Diabetes” pediatric male
“Fall” pediatric male
“Post laparoscopic surgery” pediatric male
“Post nephrectomy” pediatric male
GERIATRIC “Post colostomy” geriatric female
“Stroke” geriatric obese female
“Burn” geriatric male
“Post craniotomy” African American geriatric female
98
www.laerdal.com
Page 99

Virtual I.V.
Directions for Use
Single Case Model List
P2 TRAUMA “Fall” African American male
“MVA” white male
“MVA” Hispanic female
“Gunshot wound” white obese male
“Burn” white female
MEDICAL “Heat stroke” white female
“Lower GI bleed” white male
“Hyper tensive crisis” African American obese female
“Allergic reaction” white female
SURGICAL “Post nephrectomy” white obese female
“Post colostomy” white obese male
“Post tracheostomy” white normal male
“Post C3-C4 fusion” white female
PEDIATRIC “Fall” pediatric male
“Burn” pediatric male
“Upper respiratory infection” pediatric male
“Leukemia” pediatric male
GERIATRIC “Diabetic ketoacidosis” geriatric obese male
“Pedestrian struck” geriatric female
“Fall” geriatric female
“Seizure” Hispanic geriatric female
P3 TRAUMA “Pedestrian struck” white female
“Motorcycle accident” African American obese male
“Stab wound” white female
“Burn” white male
MEDICAL “Overdose” white obese male
“Pancreatitis” white obese female
“Congestive heart failure” African American male
“Diabetic ketoacidosis” white male
SURGICAL Post craniotomy” African American male
“Post mastectomy” African American obese female
“Post liver dissection” white female
“CABG” African American obese female
PEDIATRIC “Post craniotomy” pediatric male
“Allergic reaction” pediatric male
“Fall” pediatric male
“MVA” pediatric male
GERIATRIC “Assault” geriatric male
“Post colon surgery” geriatric male
“Heat stroke” geriatric female
“Fall” African American geriatric male
www.laerdal.com
99
Page 100

Single Case Model List
Virtual I.V.
Directions for Use
100
www.laerdal.com
 Loading...