

Page 1
SimNewB™
ENGLISH Directions for Use
Page 2

Page 3

Table of Contents
I
NTRODUCTION
Introduction and Intended Use . . . . . . . . . . . . . . . . . . . 2
Important Information . . . . . . . . . . . . . . . . . . . . . . . . . 2
SimNewB™ Neonatal Simulator Features
ETUP GUIDE
S
. . . . . . . . . . . 3
SimNewB™ Package Contents . . . . . . . . . . . . . . . . . . . 4
Catalog no./Description. . . .
Set up of SimNewB Standard Components
. . . . . . . . . . . . . . . . . . . . . . . 5
. . . . . . . . . . 6
Set up of SimNewB Advanced Components. . . . . . . . .
Manikin Connectors
Calibration of Blood Pressure. . . . . . . . . . . . . . . . . . . .
Operation
of Compact Compressor Unit. . . . . . . . . . 10
LINICAL SIMULATION
C
. . . . . . . . . . . . . . . . . . . . . . . . . . . . 8
9
General Handling . . . . . . . . . . . . . . . . . . . . . . . . . . . . . 11
Preset Patient State Levels. . . . . . . . . . . . . . . . . . . . . . . 12
Airway Simulation Features . . . . . . . . . . . . . . . . . . . . . . 13
Breathing 15
Circulation 17
. . . . . . . . . . . . . . . . . . . . . . . . . . . . . . . . . . . . .
. . . . . . . . . . . . . . . . . . . . . . . . . . . . . . . . . . .
Drug & IV Administration . . . . . . . . . . . . . . . . . . . . . . .19
Manikin Preparation Before Use . . . . . . . . . . . . . . . . . 20
Maintenance After Use . . . . . . . . . . . . . . . . . . . . . . . . . 21
Periodic Maintenance . . . . . . . . . . . . . . . . . . . . . . . . . . 21
CLINIC AL
SIMULATIONSETUP GUIDEINTRODUCTION
.
7
OMPRESSOR
C
SPECIFICATIONS
TROUBLE-
SHOOTING
ENGLISH
ENGLISH
C
OMPACT COMPRESSOR UNIT. . . . . . . . . . . . . . . . . . . . . . . .
ROUBLE SHOOTING. . . . . . . . . . . . . . . . . . . . . . . . . . . . 23
T
22
1
Page 4

INTRODUCTION
SETUP GUIDE
SIMULATION
Introduction and Intended Use
SimNewB™ Neonatal Simulator
SimNewB™ is an interactive simulator designed by Laerdal
with the American Academy of Pediatrics to meet the training
requirements of Neonatal emergency medicine and resuscitation
courses including the Neonatal Resuscitation Program (NRP).
With realistic newborn traits and lifelike clinical feedback,
SimNewB is ideal for training for the specific needs of
neonates.
Scalable Training Solution
SimNewB is available in standard and advanced versions
enabling instructors to vary simulations from the delivery
room to the NICU. The Standard version utilizes the
SimPad System and the Advanced version can operate the
simulator from either the SimPad System or SimNewB
PC Software.
Note:
- When using the PC User Interface, the SimPad
should not be used.
- When using the SimPad, the PC User Interface
should not be connected to the Link Box.
SimNewB System Description
The Link Box connects to the manikin and
allows operation of the simulator. The Link Box can be
battery operated, allowing simulations to be performed any where. The operator controls simulations with a user-friendly
SimPad, communicating with the Link Box through
radio frequency (RF) communication. RF communication
allows the operator to move freely around the scene,
up to a distance of 10 meters (30 ft.) from the Link Box.
CLINIC AL
COMPRESSOR
SPECIFICATIONS
NOTE: This equipment has been tested and found to comply
with the limits for a Class B digital device, pursuant to Part 15
of the FCC Rules. These limits are designed to provide
reasonable protection against harmful interference in a
residential installation. This equipment generates, uses and can
radiate radio frequency energy and, if not installed and used in
accordance with the instructions, may cause harmful
interference to radio communications. However, there is no
guarantee that interference will not occur in a particular
installation. If this equipment does cause harmful interference
to radio or television reception, which can be determined by
turning the equipment off and on, the user is encouraged to
try to correct the interference by one or more of the
following measures:
- Reorient or relocate the receiving antenna.
- Increase the separation between the equipment
and receiver.
- Connect the equipment into an outlet on
a circuit different from that to which the receiver
is connected.
- Consult the dealer or an experienced
radio/TV technician for hel
Caution: Changes or modifications not expressly approved by
Laerdal could void the user's authority to operate this equipment.
Hereby, Laerdal Medical AS declares that when carrying the
CE-mark, the SimNewB system product is in compliance with
the essential requirements and other relevant
provisions of Directive 1999/5/EC.
TROUBLE-
SHOOTING
p.
Important Information
This device complies with Part 15 of the FCC Rules.
Operation is subject to the following two conditions:
(1) this device may not cause harmful interference, and (2) this
device must accept any interference received, including
interference that may cause undesired operation.
2
Page 5

INT RODUCT ION
SET UP GUIDE
SimNewB™ Neonatal Simulator Features
CLINIC AL
SIM ULATION
COMPRESSOR
SPECIFICATIONS
TRO UBLE-
SHO OTING
Airway Features:
• Anatomically accurate, realistic airway
• ET tube insertion
• LMA insertion
• Sellick Maneuver
• Positive pressure ventilation
• Right mainstem intubation
• Suctioning
• Variable lung resistance
• Gastric tube insertion
Breathing Features:
• Spontaneous breathing, with variable rate
• Bilateral and unilateral chest rise and fall with mechanical
ventilation
exhalation
• CO
2
• Normal and abnormal breath sounds
• Oxygen saturation (optional PM)
Breathing Complications:
• Central cyanosis presentation
• Pneumothorax
• Unilateral chest movement with mechanical ventilation
• Unilateral breath sounds
• Unilateral needle thoracentesis, mid-axillary
Cardiac:
• Extensive ECG library with rates from 10 – 300 /min.
• ECG monitoring via 3 lead monitor
Circulation:
• Heart sounds
• Umbilical and brachial pulse
• Blood pressure measured manually by auscultation of Korotkoff sounds
Other Features:
• Interchangeable pupils with normal, dilated and constricted pupils
• Movement in all four limbs: limp, tone, spontaneous motion
and seizure
Debriefing viewer: (Advanced version only)
• Web-camera recording
• Review event log together with synchronized recording of the
patient monitor and in-room video
• Stand alone debrief viewer for off-site review
Simulated Patient Monitor: (Optional)
• Highly configurable
• Simulates several parameters including:
• Heart rate
• NIBP
• ECG
• SPO
2
• ETCO
• Respiratory rate
• Touch screen operation
2
ENGLISH
Vascular Access:
• Patent, cuttable umbilicus with venous and arterial access for
bolus or infusion
• Intraosseous access, bilateral
• Simulated blood flashback upon cannulation
Sounds:
• Vocal: grunt breathing, crying, hiccups and others
• Lung: normal, stridor, pneumonia and others
• Heart: normal, systolic murmur and others
3
Page 6
INTRODUCTION
SETUP GUIDE
CLINIC AL
SIMULATION
COMPRESSOR
SPECIFICATIONS
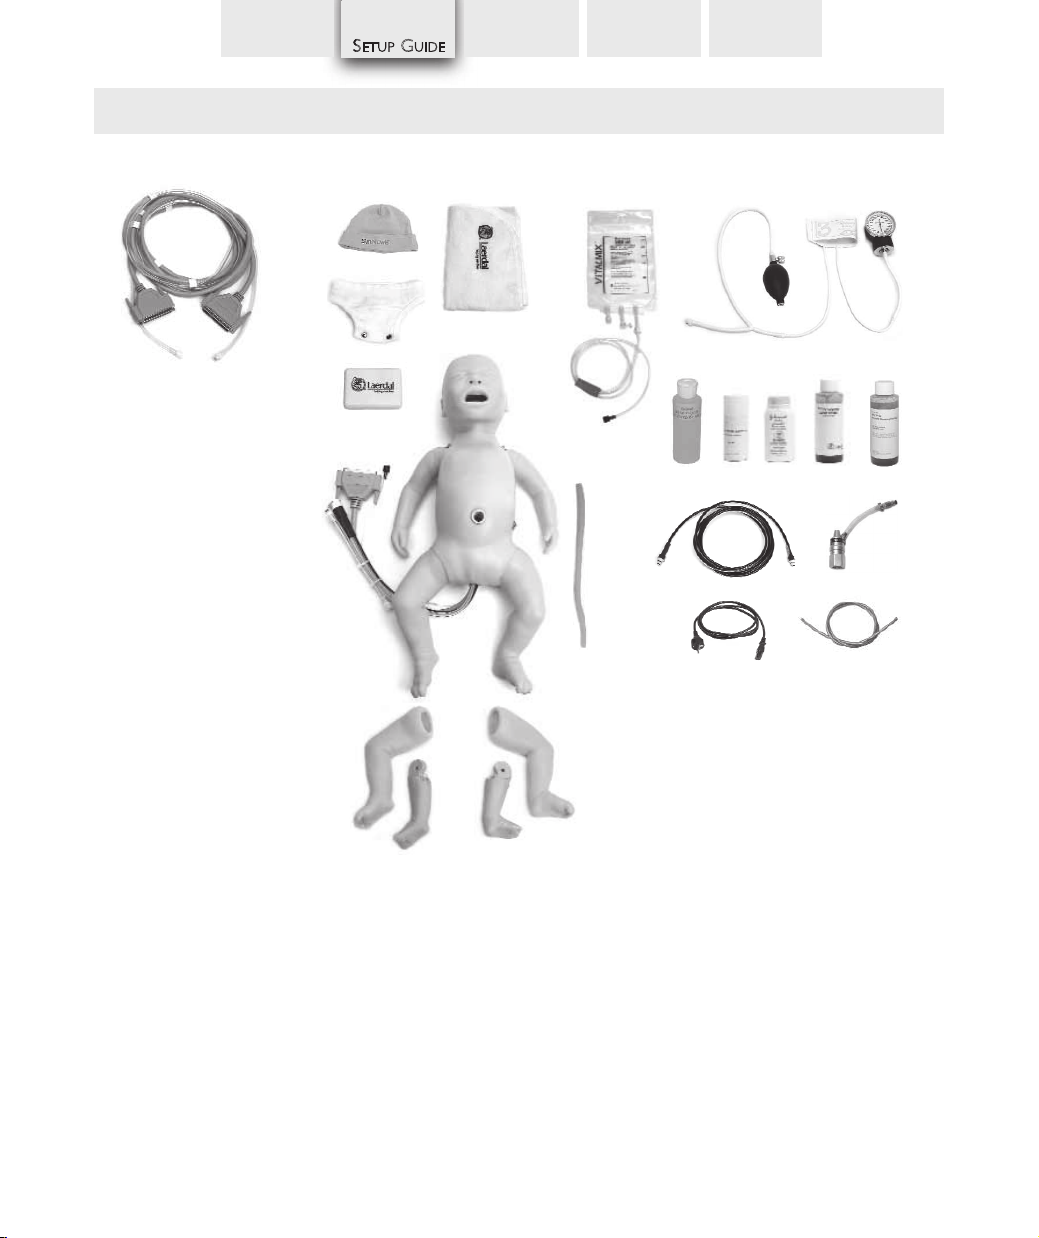
Setup Guide
SimNewB™ package contents
The following parts are included in the SimNewB shipping carton. The kit may change over time.
IV Bag and Tubing Kit
Umbilical
Cords
(4)
Manikin Cable
Baby Hat
Baby Pants
Eye Kit
Blanket
SimNewB Manikin /
SimNewB Advanced Manikin
Liquid
Soap
TROUBLE-
SHOOTING
Blood Pressure Cuff
Airway
Lubricant
Air/CO2Tube
Baby
Powder
Red
Simulated
Blood
CO2Regulator
Umbi
Simulated
Blood
Not shown:
* Laerdal Global Warranty Leaflet
* Laerdal WEEE Leaflet
* Carry Case
Right IO Mandrel
and Leg Skin
Left IO Mandrel
and Leg Skin
Power Cable
(international versions
not shown)
CO2Tube
4
Page 7

INTRODUCTION
220-00150 Umbilical Cords (4)
220-00550 Blood Pressure Cuff
220-00250 IV Bag and Tubing Kit
220-00750 Blanket
220-00650 Baby Pants
220-00450 Hat
200-03050 Eye Kit
250-21050 Airway Lubricant
300-00750 Red Simulated Blood, 4 oz
240-00250 Umbi Simulated Blood, 4 oz
276-15550 Liquid Soap
220-00350 Kit, Right IO Mandrel and Leg Skkin
277-00150 Baby Powder
1003296 CO
220-04450 CO
220-01550 Air/CO
220-19050 Directions for Use
5527 Laerdal Global Warrranty
8953 WEEE Statement
Compressor Unit and Power Cable
- Contact Laerdal sales office
SimPad System (Not Shown)
200-30001 (US)
200-30005 (JAP)
200-30033 (EUR)
200-30026 (CHI)
200-30027 (KOR)
200-30003 (UK)
200-30015 (AUS)
- Contact Laerdal Sales Office for other Language Options
Accessories: (not shown)
Optional
381850 Portability Kit
381220
Regulator
220-05350 Transportation Case (Manikin)
210-05250 Transportation Case (Peripherals)
225-09001 Peripheral Kit
225-09101 Peripheral Kit
NOTE: For additional parts provided with the
SimNewB ADVANCED, please see the
SimNewB Advanced system Installation Guide.
This is a brochure shipped with your manikin
noitpircseD .on.taC
and Left IO Mandrel and Leg Skin
Regulator
2
Connector Tube
2
Tubes
2
.
SETUP GUIDE
CLINIC AL
SIMULATION
COMPRESSOR
SPECIFICATIONS
TROUBLE-
SHOOTING
ENGLISH
5
Page 8
INTRODUCTION
SETUP GUIDE
CLINIC AL
SIMULATION
COMPRESSOR
SPECIFICATIONS
TROUBLE-
SHOOTING
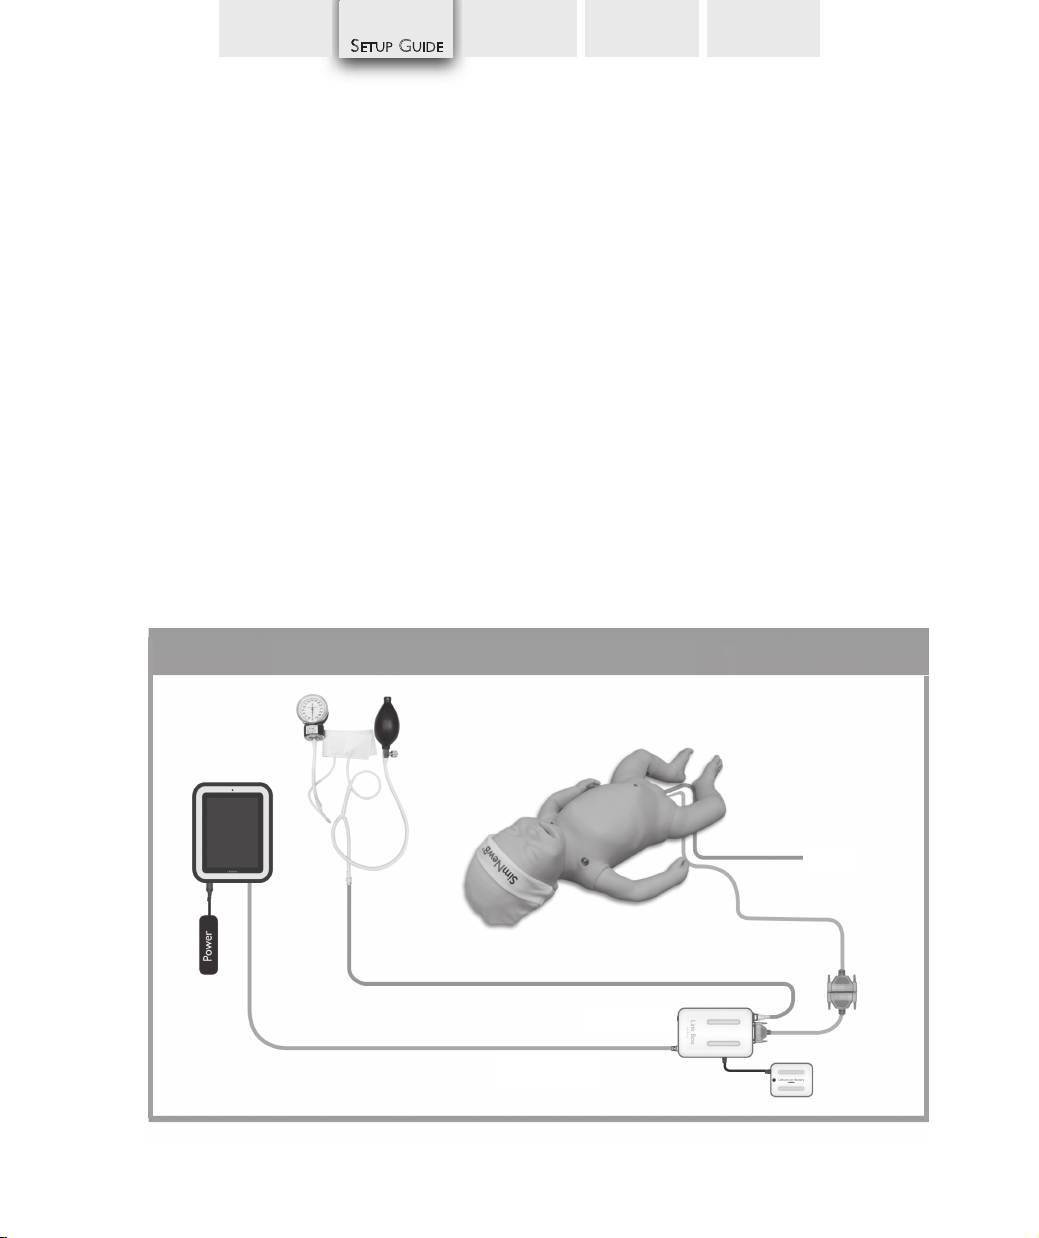
Setup of SimNewB Standard Components
Check that the Link Box and SimPad have charged batteries.
The Link Box can also be connected to external power using the DC Power Supply
External Air
- The air tube can be attached to the Compact Compressor or external air regulator.
Manikin Cable
- Connect the manikin to the Link Box, an adapter cable (included) may be required.
Link Box Power
- Power is supplied to the Link Box from battery or from the AC power adapter. The same power adapter can be used
to charge the battery. See SimPad DFU for charging instructions.
BP Cuff
- The air tube from the BP cuff is connected directly to the Link Box.
IV Bag
-
Connect the empty IV-bag set to the Umbilical Reservoir Overflow tube.
Note-The overflow tube has a valve to prevent leakage from the tube when not attached to IV-bag set.
Network
- The Link Box is connected to either the SimPad (wireless or wired) or to a PC.
See the associated DFU for connection and setup.
Setup of SimNewB Standard Components
External Air
Source
BP Tube
Network Cable
(Optional)
6
Link Box
Adapter Cable
Battery
Page 9
INTRODUCTION
SETUP GUIDE
CLINICAL
SIMULATION
SPECIFICATIONS
TROUBLE-COMPRESSOR
SHOOTING
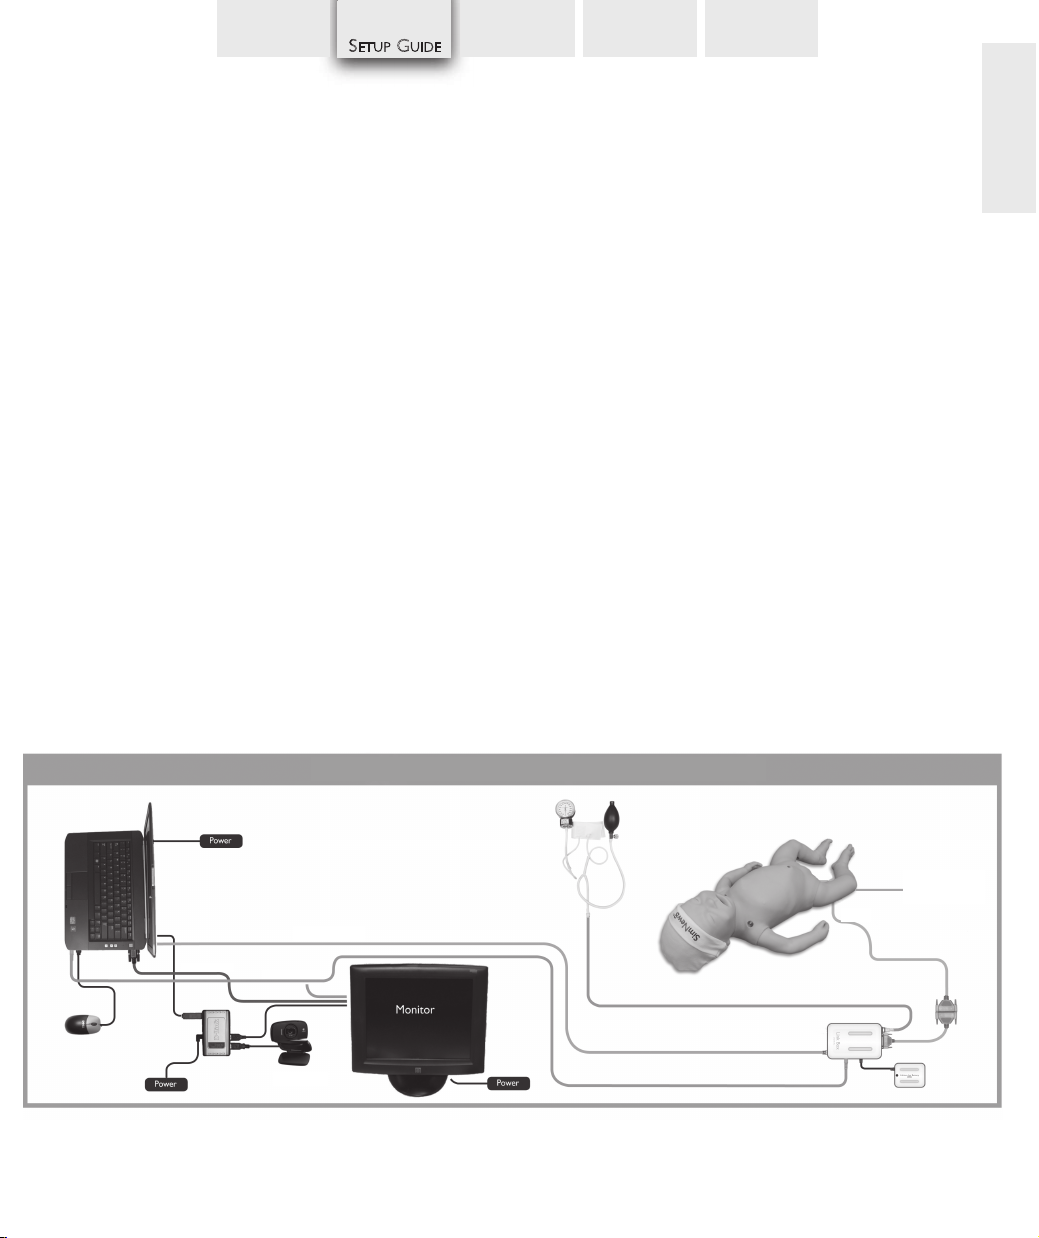
Setup of SimNewB Advanced Components
Start the Instructor Computer
- Connect the mouse and power supply
to the computer and power ON.
- Make sure that the SimNewB simulator icon
is displayed on the Instructor PC desktop.
Install the USB HUB
- Connect Power to the USB hub
- Connect smaller end of included USB
cable into the upstream port of the usb hub.
- Plug the rectangular end of the included USB
Cable into a USB port on the Instructor Computer
Connect the Patient Monitor Cables
- Put aside the software CD that comes with the monitor.
DO NOT INSTALL software CD.
- Route the cables through the Patient Monitor stand and
connect them to the corresponding outlets located
at the bottom of the screen.
- Secure the cable using the strain reliefs.
- Connect power cable to a wall outlet and power ON.
the Patient Monitor.
IMPORTANT: Do NOT connect the USB cable
to the USB hub yet.
Connect the Patient Monitor to the Instructor Computer
- Connect the Patient Monitor video cable and 3-way
audio cable (black mini jack with double wire) to the
Instructor PC.
IMPORTANT: Do NOT connect the USB cable to the
Patient Monitor yet.
Set Up the Instructor PC for Extended Desktop Display
to Support the Patient Monitor
- Right click on the instructor PC desktop
- In the drop down menu select <Screen Resolution>.
- In the <Multiple Displays> option, select <Extend these displays>.
- Click <Apply>.
- The Instructor PC (display 1) should have a resolution of
1600 x 900.
- The Patient Monitor (display 2) should have a resolution of
1280 x 1024.
- Click <OK>.
Connect the Monitor to the USB HUB
ENGLISH
IMPORTANT: Do NOT use the Patient Monitor software CD
that comes with the Manikin.
Setup of SimNewB Advanced Components
Network Cable
Video Cable
Audio Cable
USB Camera
7
BP Tube
Link Box
External Air
External Air
Source
Manikin Cable
Adapter Cable
Battery
Source
rce
Page 10

TROUBLE-COMPRESSOR
SHOOTING
INTRODUCTION
SETUP GUIDE
CLINICAL
SIMULATION
SPECIFICATIONS
Manikin Connectors
The SimNewB™ manikin is shipped ready for use. It must be connected to the Link Box and the
Compact Compressor Unit to function.
The manikin’s control cable and tube bundle has the following connectors:
A - Blood Pressure Cuff connector
B - Manikin connector
C - Manikin Blood Pressure con-
nector (to Link Box)
D - Air exhaust tube (no con-
nections)
E - Manikin Air/CO
connector
2
F - Umbilical Reservoir Overflow
tube
Extension cables are used to connect the manikin to the Link Box
and the Compressor Unit.
G - SimPad Adapter Cable
(from Manikin Connector
and Manikin Blood Pressure
connector to Link Box)
H - Air/CO
Air/CO
tube (from Manikin
2
connector to
2
Compressor Unit)
A
D
E
C
B
F
G
H
8
Page 11

INTRODUCTION
SETUP GUIDE
CLINIC AL
SIMULATION
COMPRESSOR
SPECIFICATIONS
TROUBLE-
SHOOTING
Calibrating the Touchscreen Patient Monitor
- Double click on the Elo logo in the system tray in the lower right corner of the screen
- In the menu that appears select <Elo Touchscreen Proper ties>.
- Click the <Align> button in the dialog box.
- If target indicators first appear on the Instructor PC (laptop computer) screen, press Esc , or wait until
they appear on the Patient Monitor.
- When the target indicator appears on the Patient Monitor, touch each target as it changes position.
- Follow the on screen instructions then touch the green “checkbox” button.
- Click OK.
Note:
Calibration of Blood Pressure
-
To ensure correct measurements of simulated BP,
the sphygmomanometer used with the cuff needs to be
calibrated to the pressure sensor in the SimNewB system.
This is done by selecting the Calibrate BP function, inflating
the cuff to 100 mmHg and pressing the Calibrate quick
execution key as the pressure is held at exactly 100 mmHg.
Connect the USB Camera to the USB HUB
Connect the Link Box to PC
- Connect the Network cable from the Link Box to the PC.
- Connect the audio cable (white mini jack with single wire) to the Link Box.
- Connect power supply or battery to the Link Box.
ENGLISH
Connect the Manikin to the Link Box
- Connect the 37-Pin Serial Cable from the manikin to the Cable Adapter then connect the
Cable Adapter to the Link Box.
- Place the Blood Pressure cuff on the left arm of the manikin.
- Connect the clear tubing from the Blood Pressure cuff to the Link Box.
- Power on the Link Box.
9
Page 12

INTRODUCTION
SETUP GUIDE
SIMULATION
Operation of Compact Compressor Unit
The Compact Compressor provides air for the SimNewB™
CLINIC AL
manikin’s breathing, movements and pulses, and CO
to be mixed
2
into the manikin’s expired air.
Setup procedure:
1) Check that Power switch (1) is set to OFF position.
2) Plug power supply cable into plug (4).
3) Plug power supply cable into power source.
4) Connect the Air/CO
tube to the Output to Manikin
2
connector (2).
COMPRESSOR
SPECIFICATIONS
Front side:
1
TROUBLE-
SHOOTING
Optional - this is not required for operation if CO
5) Connect the CO
6) Connect the blue CO
the Input CO
regulator to a suitable CO2tank.
2
tube between the CO2regulator and
2
connector (3) at the back of the compressor.
2
detection is not used:
2
2
Compressor start:
Press Power switch (1) to ON position.
The compressor will run continuously when turned on.
The flow of CO
to the manikin valve will begin.
2
Back side:
3
Compressor stop:
Press Power switch (1) to OFF position.
The compressor will stop and vent automatically.
The flow of CO
will stop.
2
4
Cautions:
Safety may be compromised if the System or any of its components are used in a manner other than specified by Laerdal.
• Do not open compressor housing. Dangerous voltage inside. Only to be opened by authorized personnel.
• Do not use in an explosive environment.
The Compact Compressor must be powered from a grounded outlet with the appropriate specified voltage and current.
Do not use an adapter or cord other than provided unless installed by a qualified electrician according to relevant electri-
cal codes.
• The Compact Compressor must be positioned to easily access and disconnect the power cord.
• To comply with CE Standards, the Compact Compressor must be positioned within 3 m/9 ft of the electrical
outlet.
• Position Compact Compressor to prevent blocking air vents.
No external ventilation is required to operate the system. If CO
is attached and the Compact Compressor is operated without the Output Hose connected to both compressor
If CO
2
and manikin, a substantial quantity of CO
will be released.
2
is attached, small amounts will be released during use.
2
10
Page 13

INTRODUCTION SETUP GUIDE
Clinical Simulation Using the SimNewB™ Manikin
CLINICAL
SIMULATION
COMPRESSOR
SPECIFICATIONS
TROUBLE-
SHOOTING
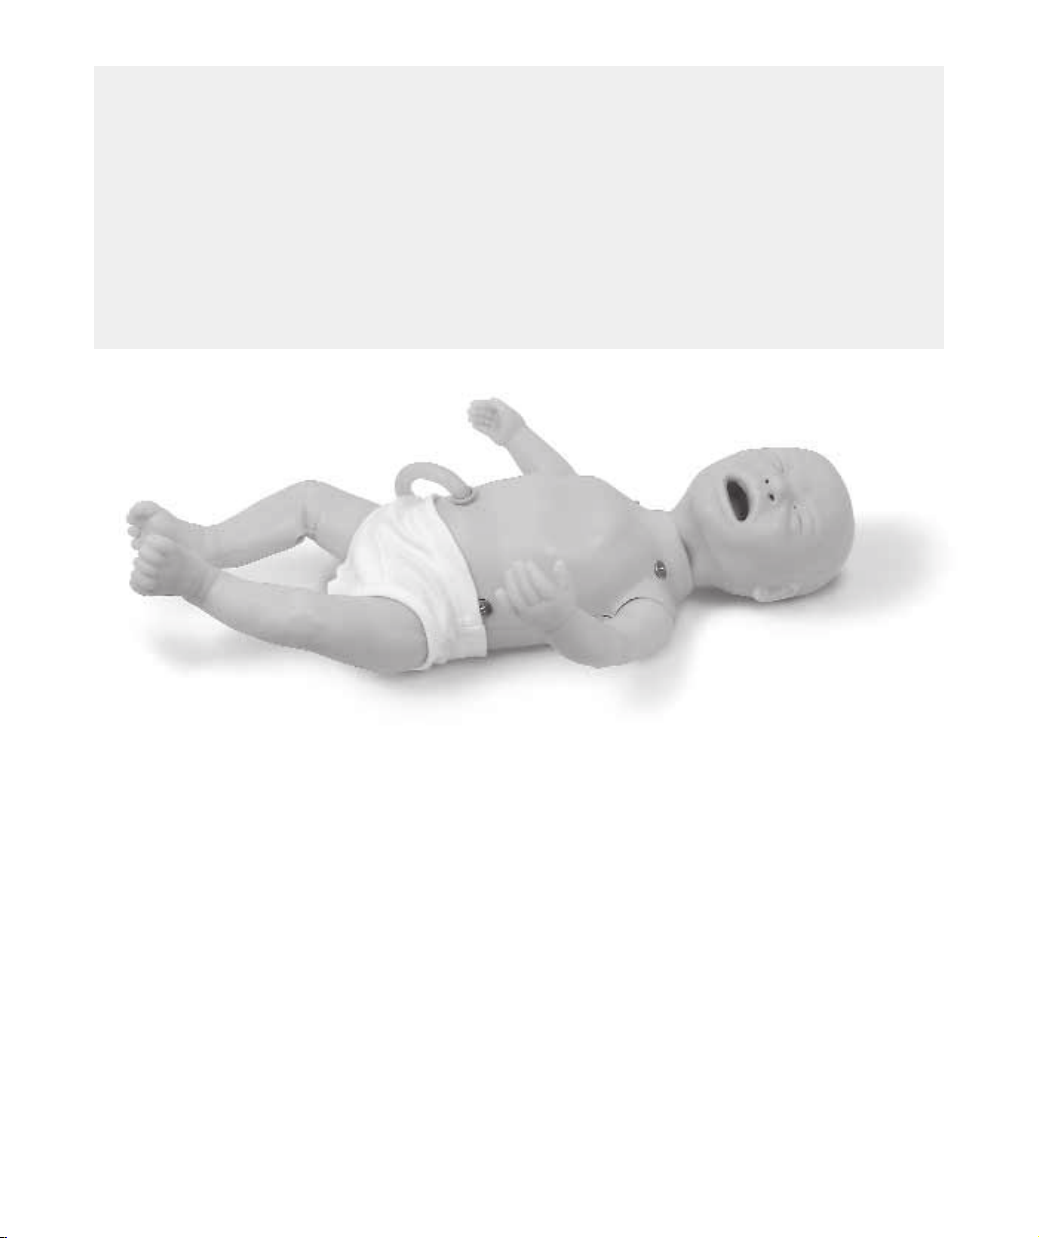
1. General Handling
The Neonatal Simulator is the size and weight of a newborn
baby girl delivered at term with approximately 3.5 kg (7 lbs)
body weight and 51 cm (21 inches) length.
The arms, legs and neck articulate realistically and encourage
care and proper handling. The simulator can be handled
appropriately for care and resuscitation of a normal newborn.
The SimNewB manikin can be carried to the resuscitation
table, for a realistic start of the resuscitation case. Ensure that
the control cables are free and do not snag.
Muscle tone and motions:
The muscle tone of the SimNewB’s limbs can be set to
represent either a limp (poor muscle tone) or a normal
newborn. The muscle tone impression can be enhanced with
spontaneous vigorous motions.
The SimNewB manikin can also be set to have seizure-like
movements of the limbs.
Umbilical cord: The SimNewB manikin has a replaceable
umbilical cord which can be clamped, tied, cut, sutured,
catheterized, or palpated for the umbilical pulse.
ENGLISH
IV fluids or medications may be injected into the vein in the
umbilical cord.
Interchangeable pupils:
The SimNewB manikin is delivered with normal pupils
mounted in the head. A separate case contains 3 sets of plastic
pupil inserts (normal, constricted and dilated pupils) for use in
simulating different patient conditions.
11
Page 14

CLINICAL
INTRODUCTION SETUP GUIDE
SIMULATION
Clothing: The SimNewB™ manikin is delivered with baby
pants with snaps at the bottom to allow cable and tubes to
pass through.
For more realism at the resuscitation table, the control cables
to the simulator can be hidden under the blanket provided
with the manikin.
2. Preset Patient State Levels
The NewSimB Neonatal Simulator system has six predefined
patient state levels, L0-L5. For each level, seven clinical
parameters are set, as defined in Table 1. Progressing between
the levels simplifies running resuscitation simulations.
COMPRESSOR
SPECIFICATIONS
TROUBLE -
SHOOTING
Table 1
PATIENT
CYANOSIS
LEVEL
L5 Off 140/min Motion
L4 On 160/min Motion
L3 On 120/min Tone
L2 On 70/min Limp
L1 On 40/min Limp 0 - - 30/20
L0 On 0 Limp 0 - - 0/0
HEART
RATE
MUSCLE
TONE
RESPIR-
ATIONS
Regular
40/min
Regular
60/min
Irregular
10/min
Gasping
4/min
VOCAL
SOUNDS
Strong
cry
Grunting
Weak
cry
-
LUNG
SOUNDS
Normal 60/40
Coarse
crackles
Coarse
crackles
Coarse
crackles
12
BLOOD
PRESSURE
60/40
45/20
30/20
Page 15

CLINICAL
INTRODUCTION SETUP GUIDE
SIMULATION
3. Airway Simulation Features
Caution:
Do not use for mouth to mouth.
Opening the airway
The neck of SimNewB™ manikin is realistically flexible, from
hyperextension to flexion. The simulation team members may
demonstrate correct head position for opening of the airway.
Clearing the upper airway
Simulated meconium (Meconium Aspiration Module) may be
suctioned from the SimNewB manikin's mouth and nose using
a bulb syringe or suction catheter.
By using the Meconium Aspiration module, the simulation team
members can assume that there is meconium in the trachea,
instigating proper procedures for removal of meconium.
The head can be turned to the side as normal.
NOTE/Warning:
Do not insert fluids into the SimNewB manikin's airways.
COMPRESSOR
SPECIFICATIONS
TROUBLE-
SHOOTING
ENGLISH
Clearing the lower airway
One can dry simulate removal of meconium from the
SimNewB manikin's mouth and trachea by laryngoscopy, using
a suction catheter to clear the mouth.
NOTE/Warning:
Do not insert fluids into the SimNewB manikin's airways.
Securing the airway
The SimNewB manikin's neck, jaw and airway is modeled to
enable a normal newborn intubation scenario. The airway can
be intubated either by direct laryngoscopy (straight blade size
No. 1 recommended) and an uncuffed ET tube (size ID 3.5
mm recommended), or with the LMA (size #1 recommended).
Nasal intubation can be done.
NOTE:
Lubricate the ET tube or LMA before insertion.
13
Page 16

CLINICAL
INTRODUCTION SETUP GUIDE
SIMULATION
The "sniffing" position aligns the trachea for the best view of
the glottis and vocal cords when properly using a laryngoscope.
Cricoid pressure may be used by the simulation team member.
The SimNewB™ manikin jaw is realistically hinged and flexible,
for airway and intubation maneuvers.
The SimNewB manikin vocal cords are realistically shaped and
at a depth of 9.5 cm from the upper lip. If the ET tube is
inserted too far, it will pass into the right main bronchus, giving
only right side chestrise during positive-pressure ventilation.
The breath sounds on the left side of the chest then disappear.
An ET tube may be secured by means suitable for a neonatal
baby. Tape residues should be cleaned off the skin with soap
and water.
To simulate airway obstructions or very low lung compliance,
the instructor can select the lungs to be partially or fully closed.
Oropharyngeal or nasal pharyngeal airways suitable for
neonates may be used.
Lubricate the oropharyngeal or pharyngeal airways before
insertion.
COMPRESSOR
SPECIFICATIONS
TROUBLE-
SHOOTING
Detection of esophageal intubation
If the esophagus is intubated instead of the trachea, the
abdomen will then visibly distend for each positive-pressure
ventilation.
Stomach ventilation is detectable with the stethoscope.
A capnographic sensor suitable for neonatal use can be used to
detect ETCO
output, for example as a means to confirm
2
tracheal intubation contrary to esophageal intubation.
14
Page 17

CLINICAL
INTRODUCTION SETUP GUIDE
SIMULATION
4. Breathing
Spontaneous breathing
The SimNewB™ manikin's breathing activity can be assessed
from visible chest movement, from vocal sounds (grunting,
crying, etc) and from breath sounds audible with a stethoscope.
The manikin’s spontaneous breathing can be initiated or
stopped by the instructor. The breathing rate can be set to 0100 breaths per minute, with 40 breaths per minute as the
default setting.
COMPRESSOR
SPECIFICATIONS
TROUBLE-
SHOOTING
ENGLISH
When connected to a CO
expire CO
SimPad
. This function can be turned on and off from the
2
or the PC Software.
source, the SimNewB manikin can
2
Central cyanosis
To simulate central cyanosis, activate the SimNewB manikin
cyanosis function, which changes the color of the face
surrounding the lips to blue.
The brightness can be controlled from the SimPad
Cyanosis is controlled from SpO2 and is turned
on and off from the SpO2 menu.
Assisted breathing
The SimNewB manikin is designed for airway devices such as
face masks, ET tubes (size ID 3.5mm recommended) and LMAs
(size 1 recommended).
The manikin is suitable for use with self-inflating bags and flowinflating bags. It is not designed for use with automatic
ventilators.
15
Page 18

CLINICAL
INTRODUCTION SETUP GUIDE
SIMULATION
Airway restrictions and different airway compliances can be
simulated for each lung in 3 settings each:
- Fully open, with no noticeable restriction when ventilating
- Partially closed, with noticeable restriction when ventilating
- Fully closed, with no air movement when ventilating
A size 0/1 face mask is recommended for mask-ventilation with
the SimNewB™ manikin. During mask ventilation with elevated
airway pressure, air may realistically leak through the esophagus
to the abdomen, visibly distending the stomach.
To vent out accumulating air from the stomach, an orogastric
tube (size 8 FR recommended) can be in place simultaneously
with mask ventilation.
Breathing sounds audible by auscultation
Breath sounds can be listened to with a stethoscope at the left
and right mid-axillary areas and the mid-clavicular sites.
NOTE:
Only use appropriate size neonate/infant stethoscope
COMPRESSOR
SPECIFICATIONS
TROUBLE-
SHOOTING
Pneumothorax decompression
The needle decompression procedure can be performed by
inserting a needle at the left chest side (fourth intercostal
space) into the pleural space. The rib structure can be palpated
through the skin. The SimNewB manikin's pleural space is
enclosed so that the needle can not damage the inner
components of the manikin.
16
Page 19

CLINICAL
INTRODUCTION SETUP GUIDE
SIMULATION
Oxygen Saturation
Optional Patient Monitor
A standard SPO
probe (not included) can be attached to the
2
SimNewB system during the simulation to add visual realism
only. There is no interface between the SPO
SimNewB system. It is up to the instructor to set the SPO
probe and the
2
2
value that shall be visible to the simulation team members on
the optional monitor:
COMPRESSOR
SPECIFICATIONS
TROUBLE-
SHOOTING
ENGLISH
5. Circulation
Heart rate and Pulse
The SimNewB manikin has a heartbeat and palpatable umbilical
and right brachial pulses. The palpatable pulses can be switched
on or off by the instructor. The heartbeat can be listened to
using a stethoscope at the left side of the chest. The heart rate
can be varied between 0 and 300 bpm.
Even if the SimPad sets the pulse to off, palpating the
brachial pulse will turn on all pulses unless the BP cuff is inflated
to 10 mmHg or more.
NOTE:
Only use appropriate size neonate/infant stethoscope
17
Page 20

CLINICAL
INTRODUCTION SETUP GUIDE
SIMULATION
Chest compressions
The SimNewB™ manikin has normal visible chest landmarks
(xyphoid process, nipples) and underlying sternum structure.
The SimNewB's maximum chest compression depth is one
third of the AP distance.
Each series of chest compressions is logged.
Blood pressure measurement
Using the blood pressure cuff supplied, the blood pressure can
be measured on SimNewB manikin's right arm. See the Setup
guide, page 8, for connecting the NewSimB blood pressure cuff
properly, and page 10 for calibration.
The Korotkoff sounds can be listened to with a stethoscope at
the anticubital area.
Heart sounds
Heart sounds can be listened to with a stethoscope at the left
side of the chest. The volume can be adjusted from level 1 to 9.
Level 8 is default.
COMPRESSOR
SPECIFICATIONS
TROUBLE-
SHOOTING
The available heart sounds are listed in the Detail Specifications
section.
NOTE:
Only use appropriate size neonate/infant stethoscope
ECG rhythms
3-lead ECG can be connected to the SimNewB manikin. ECG
can be monitored with normal ECG monitors or ECG-capable
defibrillators.
The available ECG rhythms and QRS wave types are listed in
the Detail Specifications section.
In addition, pulseless electrical activity (PEA) can be set as the
heart state.
Defibrillation
Warning: The Laerdal SimNewB must not be defibrillated or paced. The ECG electrodes are not designed to
absorb high voltage / high energy shocks. Application of
such shocks will cause a hazard and destroy the SimNewB
system's inner electronics
.
18
Page 21

CLINICAL
INTRODUCTION SETUP GUIDE
SIMULATION
6. Drug & IV Administration
IV access via the umbilical vein
IV fluids or simulated medications may be injected into the vein
in the umbilical cord. The fluids will accumulate in an abdominal
fluid reservoir (40 ml capacity), which must be emptied after
use (see page 21). More fluid may be injected if the empty
IV-bag is attached to the umbilical reservoir overflow tube
(see page 8).
Cannulation of the umbilical vein can be performed with an
umbilical catheter (size 3.5F or 5F).
Artificial blood can be added to the reservoir, so that
simulation team members can draw simulated blood when
testing the catheter for proper insertion depth.
Intraosseous access
Intraosseous access can be established bilaterally in the lower
legs.
IV fluids or medications may be injected through the I/O
needle. Each leg contains a fluid reservoir of approximately 35
ml.
To prevent leakage, it must be emptied after each use (see
page 21).
COMPRESSOR
SPECIFICATIONS
TROUBLE-
SHOOTING
ENGLISH
Stomach catherization
A feeding tube (size 8FR) can be inserted into the stomach.
NOTE/Warning:
Do not insert fluids into the SimNewB manikin's stomach!
A suction catheter (size 10FR) can be inserted into the
stomach for simulation of stomach content removal. Suction
can be applied to the catheter as normal.
19
Page 22

CLINICAL
INTRODUCTION SETUP GUIDE
SIMULATION
Manikin Preparation Before Use
Inserting fluids into the umbilical reservoir
Use a syringe to insert fluid into the abdominal reservoir. Do
not fill more than 40 ml unless the IV bag is attached to the
overflow tube.
Attaching the umbilical cord
Lubricate the end of the umbilical cord to be inserted with liquid hand soap. Squeeze and press the umbilical cord into the
umbilical opening. The cord should be pressed at least 50mm
(2 inches) into the opening, but need not be pushed further
down.
Note: Ensure that the cord is properly inserted to the min. distance.
Failure to do so will result in a moving umbilicus when pulse is on.
To remove, gently pull on the umbilical cord.
Changing eye pupils
1. Open the eyelids wide, take care not to rip the faceskin.
2. Using the suction cup provided in the kit or the edge of
your fingernail, remove the pupil from the eye.
3. Replace with the pupil of choice, using the small suction cup
provided or press into place with finger.
COMPRESSOR
SPECIFICATIONS
TROUBLE-
SHOOTING
Inserting the meconium module
1. Insert the module with a finger - do not use force.
Note: Do not add lubricant to the module.
Note: Do not insert the meconium module past uvula.
2. A suction catheter @ 100 mmHg will remove the
meconium module.
3. A tether has been added to ensure removal of the object.
For intubation following the removal of the meconium module,
add lubricant to the ET-tube before intubation.
20
Page 23

CLINICAL
INTRODUCTION SETUP GUIDE
SIMULATION
Maintenance After Use
The maintenance tasks listed below should be performed after
the training session.
For other service needs, contact your local Laerdal Technical
Service Center.
Tucking in the neck skin
If the manikin’s neck has been extended, the neck skin’s lower
edge may need to be tucked in under the body framework’s
collarline.
To extend the cleanliness of your manikin, Use a small towel
and lightly dust the manikin head and chest with a small
amount of powder (provided). Wipe away any excess.
Apply baby powder beneath the body skin at the neck, shoulder
and hip joints to prevent sticking.
Emptying the abdominal reservoir for fluids
Remove the umbilical cord, rinse and wipe it clean, and let it
dry. Suction fluids from the reservoir overflow connection. Add
clear or soapy water and suction until the reservoir is clean.
COMPRESSOR
SPECIFICATIONS
TROUBLE-
SHOOTING
ENGLISH
Emptying leg for fluid
If fluid is present in the legs, open the plug behind the knee and
remove fluid with a syringe.
NOTE: Always remove fluids from the umbilical and IO
reservoirs after use.
Periodic Maintenance
Changing Lower Leg Mandrels and Skins
After multiple uses with IO needle injections to the lower legs,
the lower leg mandrels and and skins should be replaced if fluid
leakage is prominent during use.
1. Pull the leg skin carefully off the leg.
2. Unscrew and remove the knee bolt holding the lower leg.
3. Exchange the lower leg with a new one of the same type
(right/left foot).
4. Reinsert the knee bolt and tighten carefully.
5. Apply Baby Powder to the inside surfaces of the leg skin.
6. Pull a new leg skin (same type left/right) over the foot/leg.
21
Page 24

SETUP GUIDE
CLINIC AL
SIMULATIONINTRODUCTION
COMPRESSOR
SPECIFICATIONS
TRO UBL E-
SHO OTING
Compact Compressor Unit
Specifications:
Model 1008519:
Voltage: 115VAC
Frequency: 60Hz
Max. Current: 6A
Fuse Rating: 250V, 6A, Slow Blow
Air Outlet Pressure: 15 psi
Air Flow: 9 L/min
CO
Inlet Pressure: 60-90 psi
2
CO
Outlet Pressure: 10 psi
2
Dim: 7 5/8” X 9 1/4” X 12 1/8”
19.4 cm X 23.5 cm X 30.8 cm
Weight: 18 lbs/9 kg
Model 1008537:
Voltage: 230VAC
Frequency: 50Hz
Max. Current: 3A
Fuse Rating: 250V, 3A, Slow Blow
Air Outlet Pressure: 1Bar
Air Flow: 9 L/min
CO
Inlet Pressure: 4-6 Bar
2
CO
Outlet Pressure: 0.7 Bar
2
Dim: 19.4 cm X 23.5 cm X 30.8 cm
7 5/8” X 9 1/4” X 12 1/8”
Weight: 18 lbs/9 kg
Cleaning and Decontamination: Clean Compact Compressor outside only with a soft cloth, mild soap and water. Do
not spray with liquid or immerse in liquid. The unit is not intended for use where it might require decontamination.
User is responsible for supplying the CO
. There is no preventative maintenance expected from user.
2
Environmental Conditions:
Temperature
•Operating: 10 - 40C
•Storage: 15 - 50 C
Ambient pressure range for storage and use:
•Not applicable
Humidity range for storage and use:
•Humidity - non-condensing 0-90%
22
Page 25

SETUP GUIDE
CLINIC AL
SIMULATIONINTRODUCTION
Trouble-shooting
COMPRESSOR
SPECIFICATIONS
TROUBLE-
HOOTING
S
imNewB™ manikin not breathing?
S
#1 Check that the chest rise is turned on in software.
#2 Check that the compressor is on and is connected to the
manikin.
#3 Check that there is a blood pressure - BP of 0/0 will set
the breathing rate to 0.
#4 Check that a perfusing rhythm is set.
#5 Check the batteries on the Link Box.
#6 Check that exhaust hose is not occluded or kinked.
#7 Check that lung closures are set to open or partial.
#8 Still not working, call your local Laerdal Technical Support
Office.
Link Box and SimPad not working?
#1 Check the batteries for both units.
ompressor not working?
C
#1 Check setup instructions.
#2 Check the power connection to the compressor unit.
#3 Check that the source of electrical power works with
another device.
#4 Still not working: call your local Laerdal Technical Support
Office.
anikin not making vocal sounds?
M
#1 Check that a breathing rate is set.
#2 Check that a BP is set.
#3 Check that a perfusing rhythm is set.
#4 Check that vocal sound volume is not set to 0.
ENGLISH
23
Page 26

SETUP GUIDE
CLINIC AL
SIMULATIONINTRODUCTION
COMPRESSOR
SPECIFICATIONS
Trouble-shooting
Manikin not making heart sounds?
#1 Check that hear t sound is selected.
#2 Check that hear t rate is not set to 0.
#3 Check that heart sound volume is not set to 0.
#4 Check that perfusing heart rhythm is set.
Manikin not making Lung sounds?
#1 Check that lung sound is selected.
#2 Check that lung sound volume is not set to 0.
#3 Check that breathing rate is not set to 0.
#4 Check that lung closures are open or set to partial.
Manikin not having pulse?
#1 Check that compressor is on and is connected to the
manikin.
#2 Check that pulse is enabled either through software or
brachial switch.
#3 Check that BP cuff pressure is below 10mmHg.
#4 Check that perfusing heart rhythm is not set to 0.
#5 Check that umbilical cord is inse rted all the way into
reservoir.
TROUBLE-
HOOTING
S
Manikin not having good motions?
#1 Check that compressor is on and is connected to the
manikin.
#2 Check that motion is enabled in software.
#3 Check that exhaust hose is not occluded or kinked.
#4 Check that limbs are not bound by cables or blanket.
#5 Powder limb joint areas to reduce friction.
Laptop or any other peripherals not working?
#1 Call your local technical product manufacturer for support.
24
Page 27

Page 28

© LAERDAL 2012. All rights reserved.
20-05757 rev A Printed in US.
 Loading...