

Page 1
SimJunior
Directions for Use
™
www.laerdal.com
Page 2

Page 3

Table of Contents
Introduction 2
Standard System 8
– Introduction to SimJunior Standard 8
– Setup Summary 8
Advanced System 9
– Introduction to SimJunior Advanced 9
– Setup Summary 9
– Instructor Software License 10
– Instructor PC 10
– Instructor PC Application Screen Overview 10
– Running a Scenario 12
– Patient Monitor 12
– Patient Monitor Interface 12
– Importing and Adding Media Files 13
– The Laerdal Debrief Viewer 14
– The Laerdal Advanced Video System (AVS) 14
– Customizing Scenarios 14
– Turning the Internal Compressor Off 15
– Changing Settings During Simulation 15
– Changing Default Settings 15
– Help Files 15
Manikin Setup 16
– Preparing for Simulations 16
– Using an External Compressor 16
– Preparing the IO Leg 16
– Administering IV Fluids 16
– Draining Excess IV Fluid 17
– Cleaning the IV Arm 17
– Installing Defibrillation Adapter Plates 17
– Connecting the Blood Pressure Cuff 17
– Calibrating the Blood Pressure Cuff 17
– Changing the Pupils 18
Maintenance 19
– Maintenance after each Simulation Session 19
– Installing and Upgrading SimJunior software 19
– Opening the Torso 20
– Replacing the Manikin Battery 20
– Charging the Manikin Battery 21
– Replacing Chest Rise Bladder
– Replacing Lung Bladder 21
– Replacing Manikin Skins 22
–
Replacing the Right Arm (IV Arm) 22
– Replacing the Right Leg (IO Leg) 22
21
Troubleshooting 23
Specifications 26
Spare Parts and Accessories 28
1
Page 4

Introduction
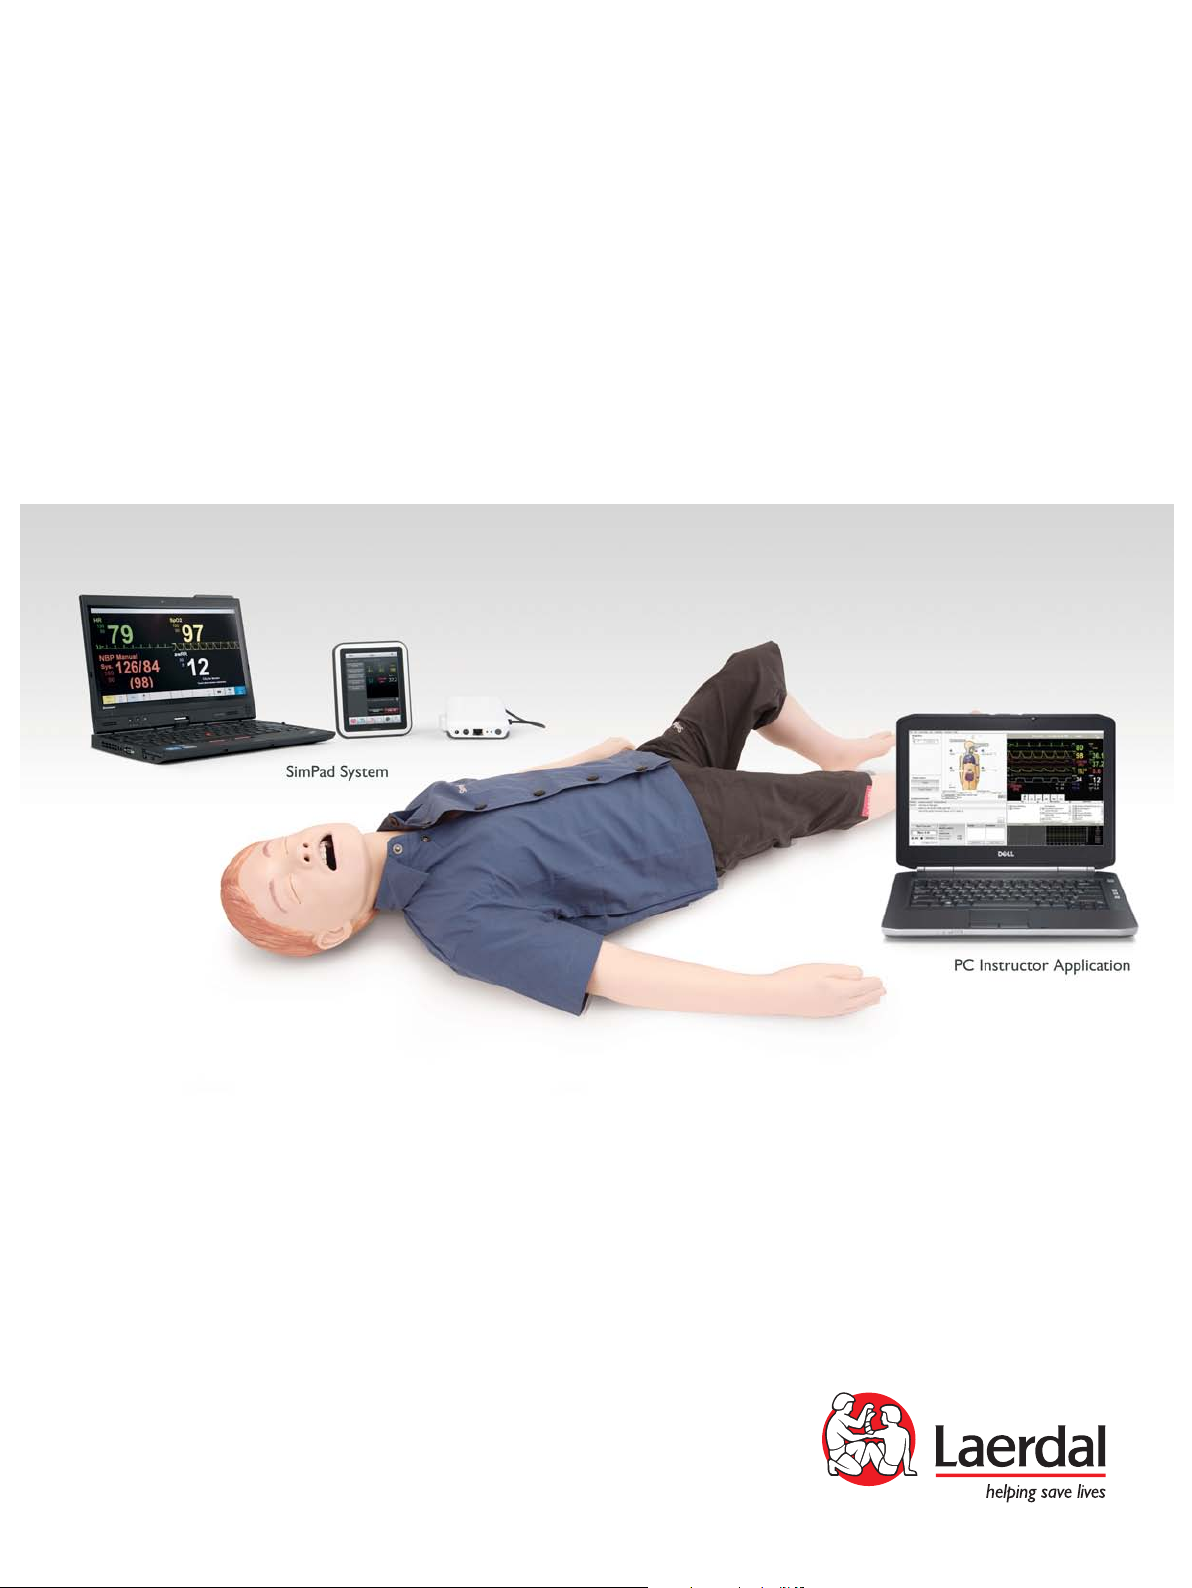
Introducing SimJunior™ Simulator
SimJunior is a realistic, life-size pediatric patient simulator designed
by Laerdal with the American Academy of Pediatrics
the education of individuals or teams of
multiple medical
from
The SimJunior Simulator comes completely assembled. There is no
need to assemble parts of the manikin.
For details on preparing SimJunior for simulation, go to “Manikin
Setup” section.
disciplines.
healthcare professionals
to be used for
SimJunior Help
Directions for Use (DFU)
Simulator.
Original Manufacturer’s User Manuals
All separate user manuals and labeling from original manufacturers
should be followed. The SimJunior Directions for Use does not
replace or supersede those from the original manufacturer.
SimJunior Quick Setup Guide
Step-by-step guide for setup of the SimJunior simulation system.
SimPad Directions for Use (DFU)
SimPad Directions for Use provides instructions for using the
Link Box and the SimPad with SimJunior.
Software Help Files
The software Help files are accessible from the SimJunior software
Help menus. Help topics include:
− Instructor Application Interface
− Debrief Viewer
− Scenario Editor
− Handlers Editor
− Trend Editor
Technical Assistance
For technical assistance, contact your local Laerdal Technical Service
Center.
Web Downloads
Visit http://www.laerdal.com to download the latest Directions for
Use and SimJunior Software.
SimCenter Content
SimCenter offers easy access to validated content from worldwide
simulation experts so you can take advantage of their experience and
get the most from every learning opportunity. You will find a wide range
of scenarios that have been developed specifically for the SimJunior.
Visit www.mysimcenter.com
learning experience.
to learn how you can fully optimize your
Regulatory Information
This device complies with Part 15 of the FCC Rules. Operation is
roinuJmiS eht gnisu rof snoitartsulli dna snoitcurtsni pets-yb-petS
subject to the following two conditions:
1. This device may not cause harmful interference.
2. This device must accept any interference received, including
interference that may cause undesired operation.
Caution
Changes or modifications not expressly approved by the party
responsible for compliance could void the user’s authority to operate
the equipment.
Laerdal Medical AS hereby declares that when carrying the
CE-mark, this product is in compliance with the essential
requirements and other relevant provisions of Directive
1999/5/EC.
Dispose of in accordance with local requirements and
regulations.
Li-ion batteries should be recycled.
Li-ion
Disclaimer
Use of the SimJunior patient simulation system to train personnel
should be undertaken under supervision of suitably trained technical
or medical personnel with an understanding of educational principles
as well as recognized medical protocols. As with all manikins or other
such training devices, there may be approximations, variations and
inaccuracies in anatomical features and the physiological modeling.
This being the case, Laerdal does not guarantee that all features are
completely accurate.
Global Warranty
See the Laerdal Global Warranty Booklet, or see www.laerdal.com.
Country of origin - SimJunior is made in USA.
Laerdal Medical
P.O. Box 38
226 FM 116
Gatesville, Texas 76528, USA
2
Page 5

Introduction
General Manikin Care
Follow the instructions below to maintain optimum performance
and longevity of the manikin and its components.
General Care
To maintain manikin skins, wash hands before use and place the
manikin on a clean surface. Laerdal recommends to:
– Use gloves during simulation scenarios. deroloc gnisu diovA
plastic gloves, as they may cause discoloration of the manikin skin.
– Do not use felt-tipped markers, ink pens, acetone, iodine, or
other staining medications near the manikin. Take care not to
place the manikin on newsprint or colored paper. Staining may
be permanent.
– Clean manikin skins with mild soap and water.
Do not attempt to perform the following techniques on this manikin
due to the inability to properly sanitize the airway:
– Mouth-to-mouth/mouth-to-mask ventilation
– Insertion of simulated vomit or fluids for suctioning
– If a training session involves the use of fluids in the IV arm, drain
the arm immediately following the training session.
– Use only Laerdal Airway Lubricant, and apply sparingly.
– Rinse, clean, and dr y manikin component modules.
– Fold the torso skin back and powder the inside of the torso skin
to decrease friction. Do not spill powder into manikin chest cavity.
General Manikin Handling
Take the following precautions to avoid personal injury or damage to
the product:
– Introduce fluids into the manikin only as directed in this document
as this may damage the manikin and its components.
− Lubricate the oral and nasal airways with the lubricant provided
prior to inser ting any instrument, tube, or airway device. Also
lubricate instruments and tubes prior to use.
− Do not introduce humidified air into the system during ventilation.
− Do not use the manikin if the internal tubing and cabling is
disconnected.
– Never use the SimJunior manikin outdoors in wet conditions, as
this may pose a shock hazard or damage the manikin.
− Using a defibrillator in temperatures over 35° C (95° F) may
cause overheating.
Warning: Do not use automated chest compression
machines on the manikin.
Caution Latex: This product contains Natural Rubber
latex, which may cause allergic reactions when in contact with
humans.
Defibrillation Hazards
SimJunior allows for defibrillation.
Introduction
Standard System
Advanced SystemManikin SetupMaintenanceSpare Parts TroubleshootingSpecifications
Environment
In cold conditions, wait until the manikin has reached room
temperature before starting up the manikin.
To avoid overheating and reduce wear:
− When using in temperatures above 40°C (104°F), always allow
the manikin to cool down between training sessions.
− When using in a bed, manikin should not be covered with heavy
bedding which prevents heat transfer from the manikin.
A conventional defibrillator may be used on the SimJunior. During
defibrillation, the defibrillator and manikin may present a shock
hazard. All standard safety precautions must be taken when using a
defibrillator on the manikin.
1. Read and follow all safety and operating instructions provided
with your defibrillator and associated equipment.
2. Follow defibrillation protocol by avoiding contact between
the external paddles and any of the electrode sites while
defibrillating. A load of up to 300 joules can be delivered.
3. Failure to follow safety measures could result in injury or death.
For more information, consult your defibrillator’s original user manual.
Warnings:
– When performing defibrillation, use the defibrillator connectors
or the zap plate mounted on the manikin’s chest. Do not use
the ECG connectors which are designed exclusively for ECG
monitoring. Defibrillation on the ECG connectors will damage
the internal electronics of the manikin and may cause personal
injury.
– Do not defibrillate the manikin when it is turned OFF or if it is not
functioning normally.
3
Page 6

Introduction
To prevent overheating during defibrillation, do not exceed a
defibrillation sequence of 3 shocks in 45 seconds followed by
1 minute of CPR. After 30 minutes, cease all shocking for at least
15 minutes before starting a new sequence. Do not repeat this for
more than a 4 hour period. Also, do not provide more than 2 x 300
defibrillator discharges per minute.
Warnings:
– The manikin must not come into contact with electrically
conductive surfaces or objects during defibrillation.
– Avoid use in all flammable environments. For example, high levels
of pure oxygen should be avoided during defibrillation. Ensure
good ventilation if concentrated oxygen is used near the manikin.
– The manikin torso must always be kept dry.
– Allow the manikin to acclimate before defibrillating. Sudden
changes in temperature may result in condensation collecting on
electronic components, which could pose a shock hazard.
– To prevent torso skin electrode pitting, do not apply conductive
gel or conductive defibrillation pads intended for patient use.
– Pressing down too hard on the defibrillation connectors during
defibrillation may also cause arcing and pitting.
– Do not defibrillate the manikin if the torso skin is not in place.
Mechanical or Electrical Hazards
Do not use the SimJunior manikin if:
appear to be leaking.
– Take extreme care to avoid direct contact with electrical, hot or
smoking parts. In case of a leaking battery, disconnect and remove
the battery when it is judged safe to do so.
– Exposure to fluids pose an explosion hazard.
– On every 30th charge cycle, drain the battery completely before
recharging. To drain the battery, run the manikin on battery
power until automatic shutdown.
– Only replace with a Laerdal SimJunior battery.
Storage and Transportation
− Never store fully charged batteries, for longer than a month.
− The manikin battery can be transpor ted in the manikin during
air freight.
− When transporting spare batteries, contact the airline or freight
company for the latest transport regulations.
Warning:
– The SimJunior manikin and accessories are heavy when combined
in the carrying case. Always ensure that SimJunior is firmly secured
during transpor tation and storage to prevent personal injur y or
damage to the product.
− Limbs are not attached to the torso.
− Skins are torn or not properly fastened.
− Internal or external cables, tubes or connectors are damaged.
− There is fluid leakage in or on the manikin.
− There are unusual sounds indicating air leakage or mechanical
damage.
− There are signs of electrical malfunction, such as an
unresponsive manikin or unusual smell or smoke.
Warning:
– Avoid pinch hazards - Do not use the manikin without the
external skins.
Battery Use and Maintenance
− Always use battery approved to power the SimJunior, Link Box,
and SimPad.
− Ensure that the batteries are properly installed. Inserting and
connecting batteries incorrectly could cause a shor t circuit.
Warnings:
– Dispose of batteries according to local regulations.
– The external battery charger is for indoor use only.
– The manikin batter y should only be charged in temperatures
ranging from 0 °C - 40°C (32 °F - 104 °F)
– Do not mistreat, disassemble, or attempt to repair the battery. Do
not use the batteries if they are visibly damaged, malfunctioning, or
4
Page 7
Introduction
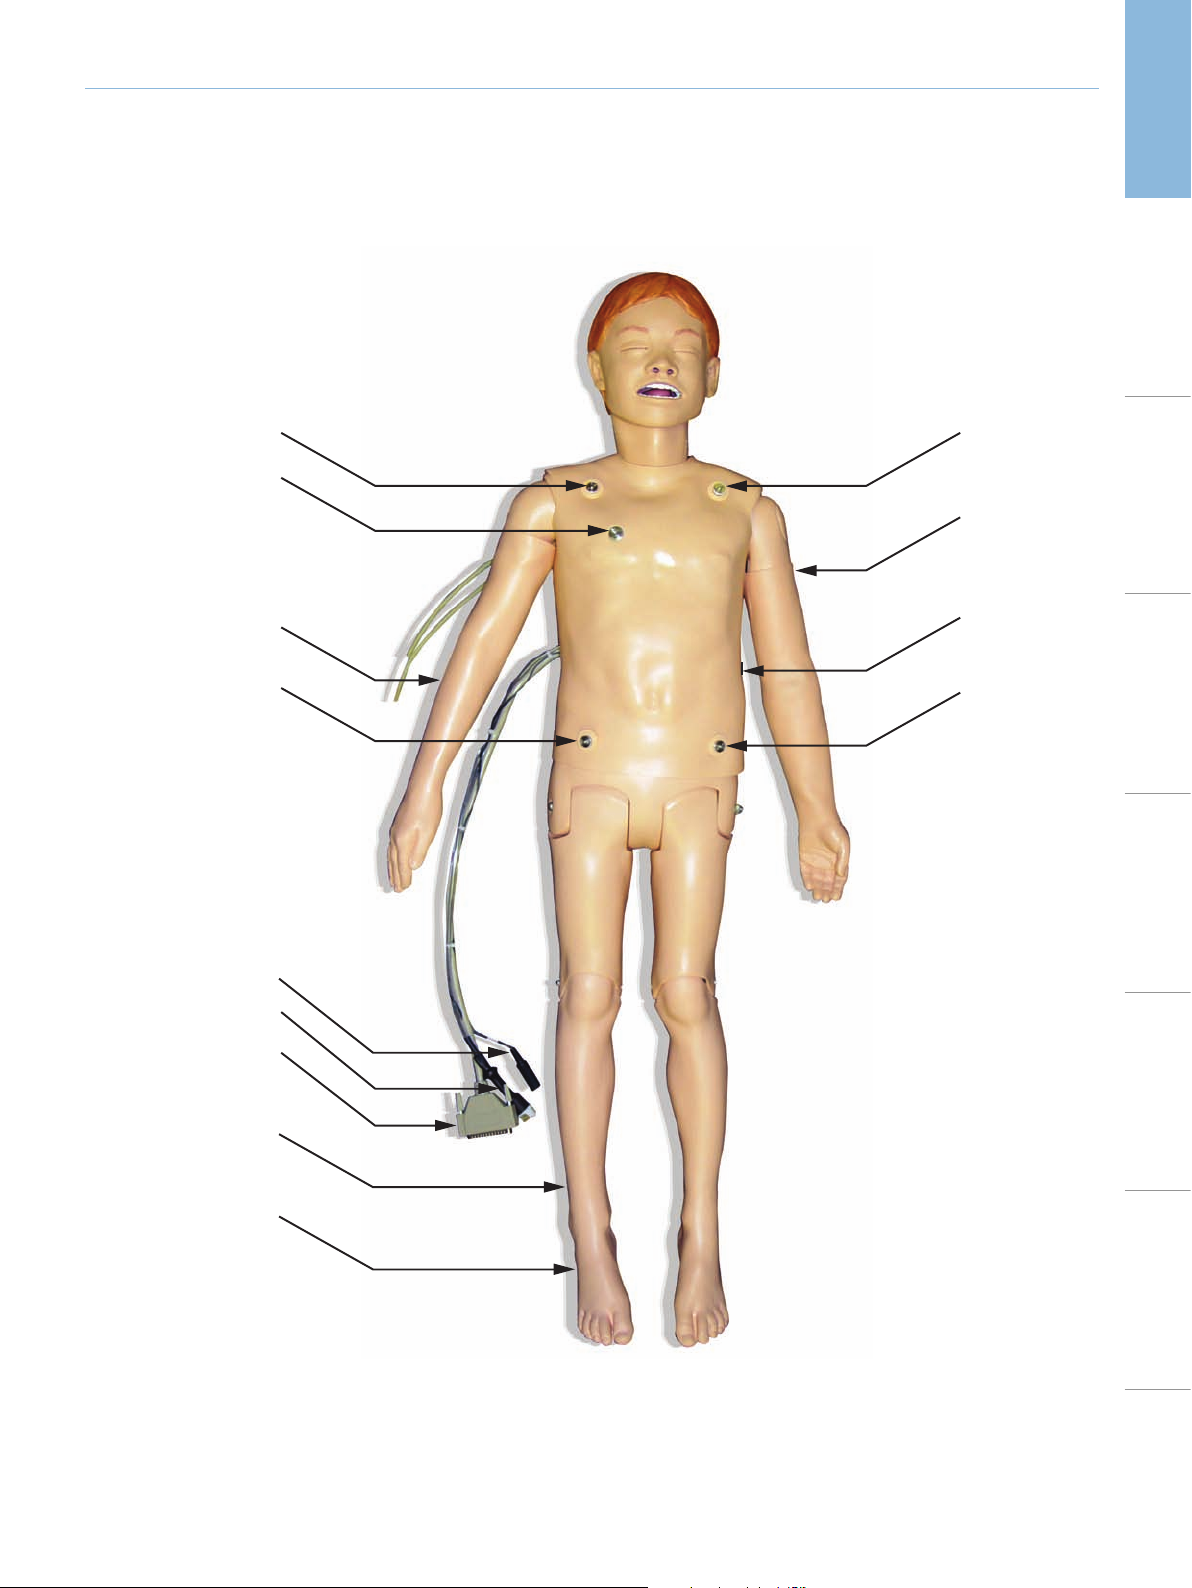
SimJunior Simulator
Introduction
Standard System
Right Arm ECG
Connector
Sternum Defib Plate
IV Arm
Right Leg ECG
Connector
Power Cable
Left Arm ECG
Connector
Blood Pressure
Arm
Advanced SystemManikin SetupMaintenanceSpare Parts TroubleshootingSpecifications
Apex Defib Plate
Left Leg ECG
Connector
External Air Connection
37 Pin Serial Cable
(Manikin to Manikin Cable
Adapter)
IO Leg
IO Leg Fill Port
5
Page 8

Introduction
SimJunior Simulator
SimJunior facilitates interactive training of life-saving skills and responds
to clinical intervention, instructor control, and pre-programmed
With spontaneous breathing, airway control, voice, sounds, ECG, and
SimJunior allows observation and recognition of most vital signs, which
enables the instructor to assess the student’s skills based on a realistic
clinical situation.
SimJunior Features
– Realistic airway for simulation of difficult airway management, oral,
and nasal intubation.
– Observable breathing.
– Cardiac features, including defibrillation and cardioversion.
– Eyes with interchangeable pupils (normal, dilated, or constricted).
– Convulsions to simulate seizures.
– Chest compressions.
– Vascular access.
rmal and abnormal hear
– No
– Automatic Simulation Control based on pre-programmed and
validated patient scenarios.
Simulations can run autonomously using scenarios on the SimPad
or Instructor Application (PC). The development of the patient’s
condition is pre-programed and automatically responds according
to the participant interventions.
t, breath, and bowel sounds.
Overall Dimensions
Length / Width (manikin only): 48 in x 9.84 in (120 cm x 42.5 cm)
Weight (manikin only): 25 lbs (11.36 kg)
SimJunior Clothing
SimJunior comes with custom designed clothing with Velcro openings
for easy removal. Washing instructions are found on the clothing label.
− Shirt
− Shorts
− Boxer Shorts
General Clinical Features
Airway Features
The airway is anatomically correct to the trachea. The airway can be
manipulated by:
− Head tilt/chin lift.
− Jaw thrust with articulated jaw.
− Cricoid pressure and manipulation.
− Suctioning (oral and nasopharyngeal)
The manikin may be ventilated by normal and emergency methods;
− Bag-mask ventilation
.tneitap a fo tnemtaert dna sisongaid fo ecitcarp evitceffe rof soiranecs
− Orotracheal intubation
− Nasotracheal intubation
.rotalumis cirtaidep lanoitcnuf ylluf a si roinuJmiS ,serutaef lacinilc rehto
Prior to using airway devices, lubricate with Laerdal Airway Lubricant.
The following equipment or methods are suitable to secure the
manikin’s airway:
− Laryngeal mask airways (size #2.5).
− Endotracheal tube intubation (size ID 4.5 cuffed, 5.5 uncuffed).
Use of a malleable stylet is recommended. Make sure it does not
extend beyond the ET tube.
The following manikin conditions indicate incorrect tube placement:
− Right main stem intubation – unilateral chest rise.
− Stomach distention.
− Lack of chest sounds (see Breathing section).
Manikin features may be configured to present various airwa
scenarios:
−
Tongue edema - normal, medium, maximum levels.
− Lungs open or closed.
Breathing Features
SimJunior can simulate spontaneous breathing with visible chest rise
and fall and variable breathing rates. The breathing is generated by an
enclosed air compressor in the manikin’s right thigh.
− Bilateral chest rise and fall with spontaneous breathing.
− Unilateral chest rise and fall with right mainstem intubation during
ventilations.
− Unilateral and bilateral lung sounds.
− Normal and abnormal breath sounds.
− Variable respiration rate (0-60 breaths per minute).
− Anterior auscultation sites (4).
The left lung and right lung can be closed independently or together
to create a partial or complete airway obstruction. The SimJunior
manikin can also be used with assisted ventilations.
Note: Lungs are not intended for use with PEEP-valves.
y
6
Page 9
Introduction
Circulatory Features
Cardiac:
− Extensive ECG library, pulses from 0-200.
− Heart sounds - anterior location (1).
− ECG rhythm monitoring (4-connector, 3-lead ECG).
− 12-lead ECG display (SimJunior Advanced only).
− Pacing.
− Defibrillation and cardioversion using live defibrillators.
Defibrillation:
− The number of shocks required for automatic conversion are set
in each simulation Patient Case.
Defibrillation Studs
CPR Features
− Compliant with 2010 Guidelines.
− Compressions generate palpable pulses, blood pressure wave
form, and ECG artifacts.
− Realistic compression depth and resistance.
− Detection of depth and rate of compressions.
Vascular Features
IV Access:
IV access is possible on the right arm and hand. The IV arm can be set
up for IV insertion, infusion, and bolus into:
– Peripheral veins of the forearm.
– Antecubital fossa and dorsum of the hand.
For use of an optional catheter, see your local Laerdal representative.
Intraosseous Access (IO):
Access for IO infusion is possible:
– Tibial Tuberosity (right)
– Medial Malleolus
Introduction
Standard System
Advanced SystemManikin SetupMaintenanceSpare Parts TroubleshootingSpecifications
3-Lead ECG Studs
Blood Pressure and Pulses:
− BP measured manually by auscultation of Korotkoff sounds.
− Bilateral carotid pulse.
− Central pulses can be set to Normal, Weak, Absent.
− Radial/Brachial pulses can be set to Normal, Weak, Absent.
− Carotid, brachial, radial, pulses synchronized with ECG.
− Pulse strength variable with BP.
− Pulse palpation is detected and logged.
Note: SimJunior does not have intra-muscular (IM) injection
sites. Do not attempt to perform IM injections.
Sound Settings for SimJunior
SimJunior suppor ts multiple sites for auscultation and recognition of
heart, lung, and bowel sounds. SimJunior also allows you to
set vocal sounds.
For information on setting sounds for SimJunior, see the sections:
– SimJunior Standard System.
– SimJunior Advanced System.
7
Page 10
Standard System
Setup Summary
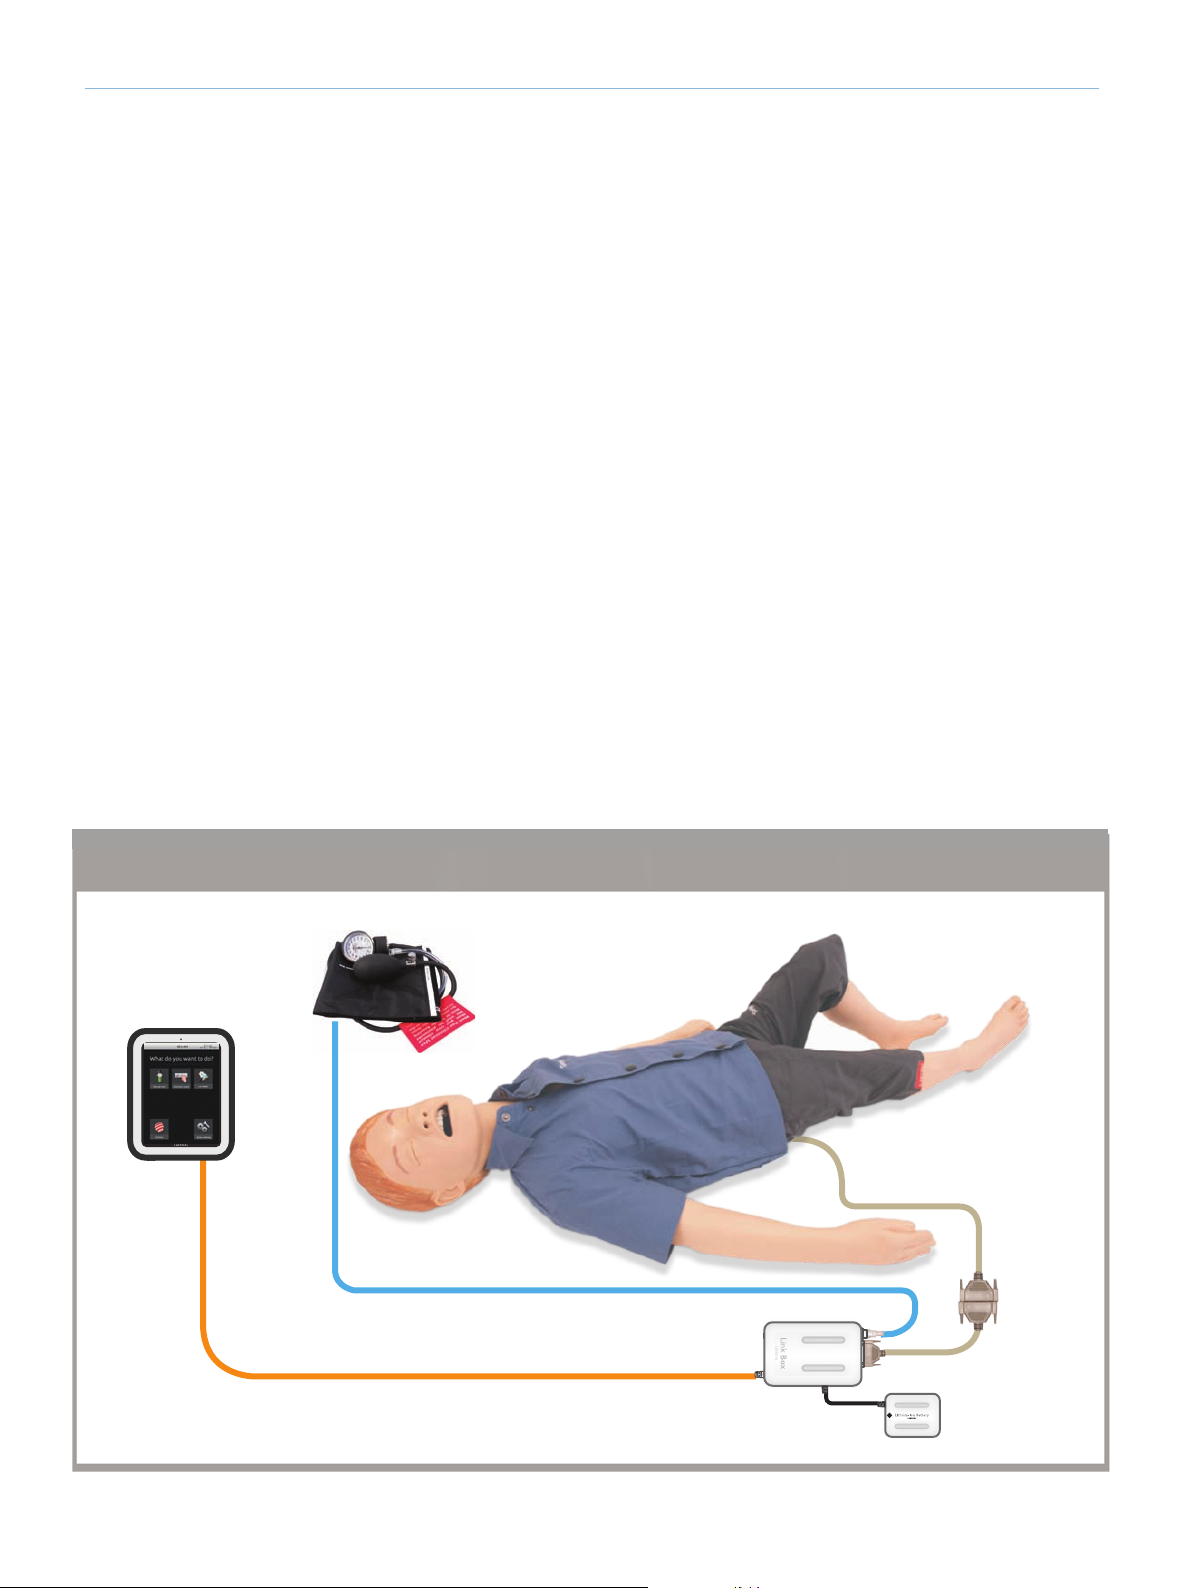
See below illustration “Setup of SimJunior Standard.”
1. Connect the SimPad to the Link Box
– Connect the Link Box to power supply or battery.
The SimPad can connect to the Link Box wirelessly or wired with a Network Cable.
–
Connect the Manikin to the Link Box
2.
– Connect the 37-Pin Serial Cable (Adapter Cable may be required) to the Link Box.
– Place the Blood Pressure cuff on the left arm of the
manikin if desired.
– Connect the clear tubing from the Blood Pressure cuff to
the SimPad Blood Pressure connector on the back of the
Link Box.
3. Connect the Manikin to a power supply.
The manikin can be powered by external power or by an internal battery.
–
The manikin battery can be charged by connecting the external power connector
–
to the manikin power adapter.
–
The manikin battery and the SimPad batter y are the same.
4. Refer to the SimPad DFU for Setup of the SimPad
Setup of SimJunior Components
SimPad
Manikin Cable
BP Tube
Network Cable
(Optional)
Link Box
LAE
R
D
A
L
Adapter Cable
Battery
8
Page 11
Advanced System
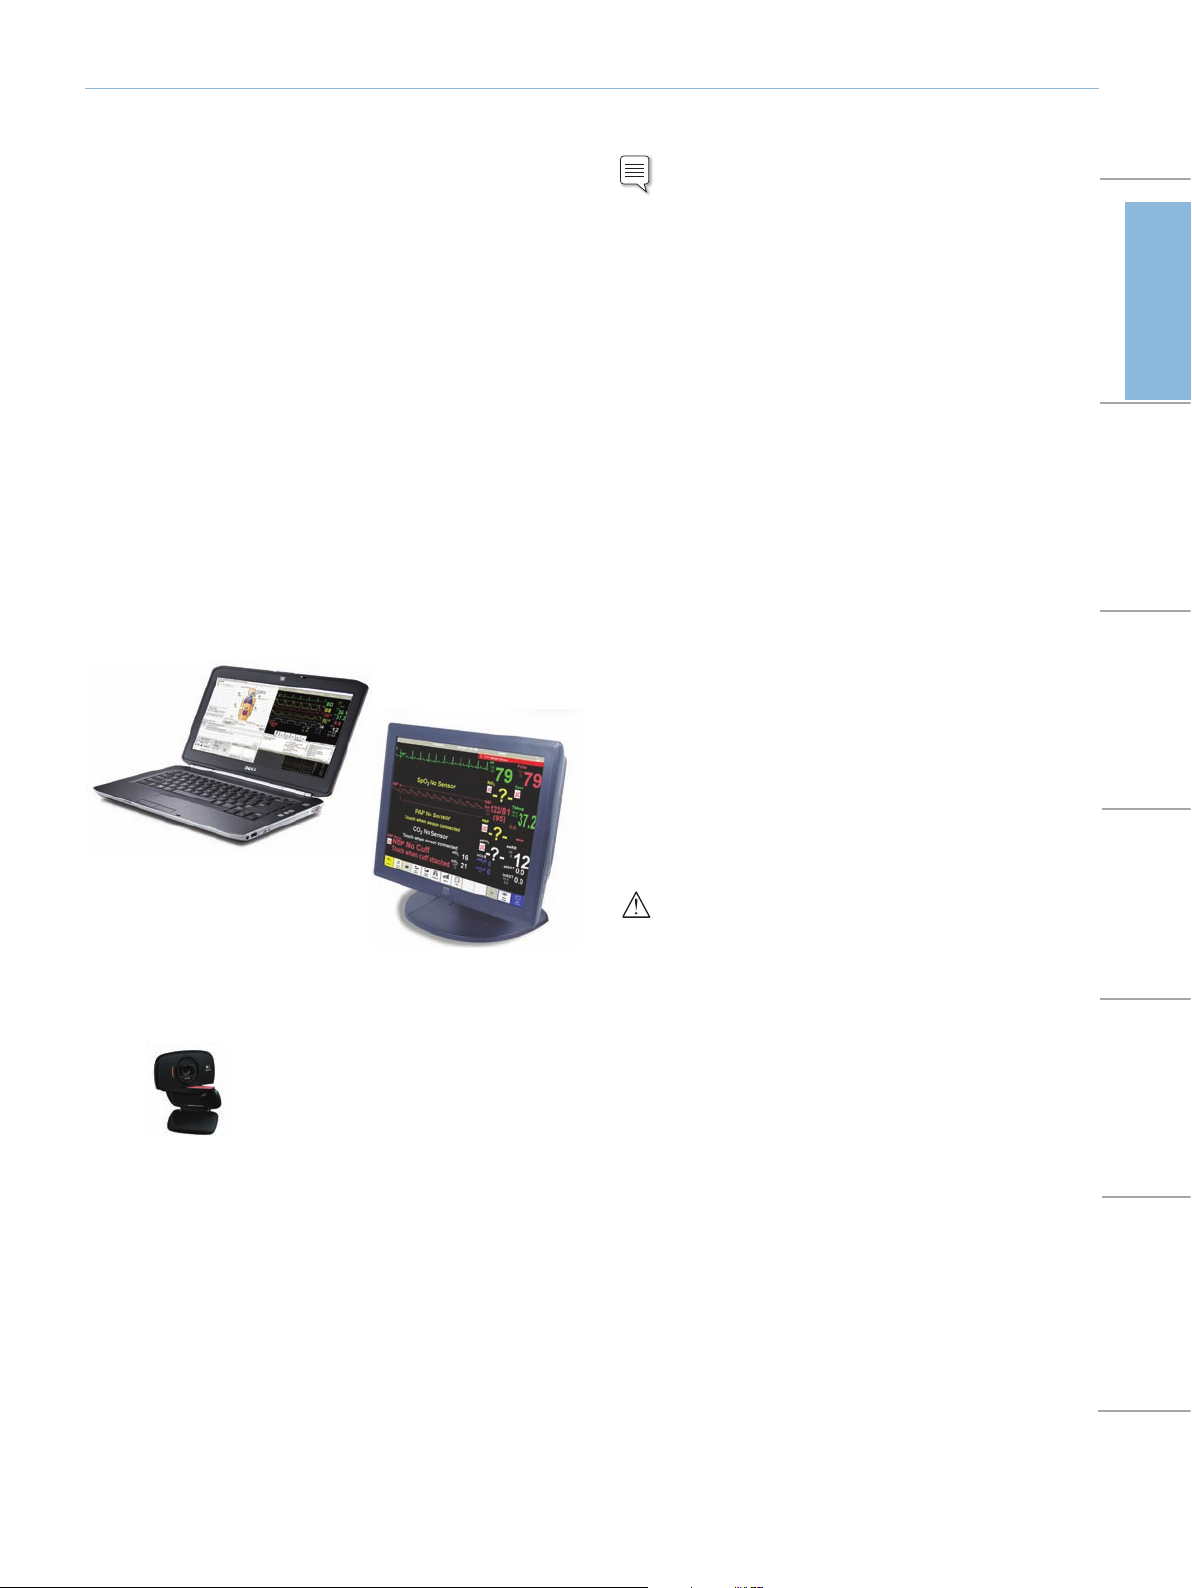
Introduction to SimJunior Advanced
SimJunior Advanced includes
– Manikin and soft carrying case
– SimJunior Quick Setup Guide
– SimPad Link Box and Accessories
– Operating Software for the SimPad System
– Instructor Laptop PC
– Operating Software for the Instructor PC
– Touchscreen Patient Monitor (Complete Peripheral Kit Only)
– USB Webcam
– USB Hub
– Blood Pressure Cuff
– Set of Consumables
– SimJunior Directions for Use (DFU)
Setup Summary
Note: Refer to the
instructions on initial simulator setup.
1. Start the Instructor PC
– Connect the mouse and power supply to the computer and
power ON.
– Make sure that the SimJunior simulator icon is displayed on the
Instructor PC desktop
2. Install the USB hub
– Connect Power to the USB hub.
– Connect USB hub to Instructor PC
3. Connect the Patient Monitor Cables
– Put aside the software CD that comes with the monitor. DO
NOT INSTALL software CD.
– Route the cables through the Patient Monitor stand and connect
them to the corresponding outlets located at the bottom of the
screen.
-- Video cable
-- USB cable
-- Audio cable ( ck labeled monitor)ja
-- Power cable
-- Secure the cables using the strain reliefs.
– Connect power cable to a wall outlet and power ON the Patient
Monitor.
SimJunior Quick Setup Guide
for detailed
Introduction
Standard System
Advanced SystemManikin SetupMaintenanceSpare Parts TroubleshootingSpecifications
INSTRUCTOR P C
OUCHSCREEN PAT IENT MON ITOR
T
Web Camera
Instructor PC controls simulations. It includes software programs for
creating and editing scenarios, as well as an application for debriefing
simulation sessions with video capture from a web camera and the
Patient Monitor.
Patient Monitor .srotinom tneitap tsom etacilper ot derugfinoc eb nac
It also doubles as a display for other functions, such as 12-lead ECG,
X-ray images, and lab results to view the patient’s case history.
Web Camera records video and sound of the simulation for use
during the debriefing session.
4. Connect the Patient Monitor video cable and 3-way audio cable
(black mini jack with double wire) to the Instructor PC.
IMPORTANT: Do NOT connect the USB cable to the Patient
Monitor yet.
5. Set Up the Instructor PC for Extended Desktop Display to
Support the Patient Monitor.
– Right click on the instructor PC desktop
– In the drop down menu select <Screen Resolution>
– In the <Multiple Displays> option, select <Extend these
displays>.
– Click <Apply>.
– The Instructor PC (display 1) should have a resolution of 1600
x 900.
– The Patient Monitor (display 2) should have a resolution of 1280
x 1024.
– Click <OK>.
6. Connect the Patient Monitor to the USB Hub.
9
Page 12

Advanced System
Network Cable
Video Cable
Audio Cable
USB Camera
7. Calibrate the Touchscreen Patient Monitor.
– Double-click on the Elo logo in the system tray in the lower
right corner of the screen.
– Click the <Align> button on the dialog box that appears.
– If target indicators first appear on the Instructor PC screen, press
<Esc>, or wait until they appear on the Patient Monitor.
– When the target indicator appears on the Patient Monitor, touch
each target as it changes position.
– When the ELO Touchscreen dialog box appears, touch the green
“check box” button.
– Click <OK>.
8. Connect the USB Camera to the USB hub.
9. Connect the Link Box.
– Connect the Network cable from the Link Box to the
PC.
– Connect the audio cable (Jack labeled control)
to the Link Box.
– Connect the Link Box to power source
(Power Adapter or Battery).
10. Connect the Manikin to the Link box.
Manikin Cable
Link BoxBP Tube
Adapter Cable
Battery
Instructor Software License
Instructor PC is shipped from Laerdal Medical with a pre-activated
license installed.
Changes or updates of the computer hardware (e.g. new hard drive
or mother board) may render the license invalid. Please contact your
local Laerdal support for assistance for re-activating the license.
Instructor PC
The Instructor PC uses the Instructor Application software to manage
simulation scenarios. The instructor can
and run the simulation in manual (on-the-fly) mode, customizing the
patient parameters as needed:
For more information on software and system setup, see the Help
files:
1. Click Windows <Start> <All programs>.
2. Select <SimJunior Instructor Application >.
3. Select <SimJunior Help File>.
Instructor PC Application Screen Overview
The Instructor PC application screen provides functional areas for
viewing and controlling patient clinical features.
pause a scenario at any time
– Connect the 37-Pin Serial Ca le b
(Adapter Cable may be required) to the Link Box.
– Place the Blood Pressure cuff on the left arm of the manikin.
– Connect the clear tubing from the Blood Pressure cuff to the
Link Box Blood Pressure connector on the back of the Link Box.
– Power on the Link Box.
The simulation system is now ready to use.
Prepare the Manikin and its components as needed for specific
simulations. See the section: Manikin Setup.
1. Program Menu Bar 7. Debrief Log
2. Respiratory Control
3. Simulator Sounds, Airway,
and Circulation Controls
4. Defibrillation and
Pacing Control
5. Instructor Monitor Control
8. Trend and Handler Contro
9. Running Trends
10. Trend Window
11. Running Handlers
12. Scenario Control
13. Seizure Control
6. Event Windows
10
l
Page 13

3. Blocked Airway
6. Radial Pulse
Advanced System
13
12
3
1
5
Introduction
2
Standard System
4
7
6
Advanced SystemManikin SetupMaintenanceSpare Parts TroubleshootingSpecifications
9
11
8
10
1. Program Menu Bar
2. Respiratory Control
3. Simulator Sounds, Airway, and Circulation
4. Defibrilation and Pacing Control
5. Instructor Monitor Control
6. Event Windows
Description of Functions:
1. Program Menu Bar
– Open and edit file.
– Set up and configure the patient monitor and the simulator.
– Access additional application such as the Scenario Editor.
2. Respiration and Seizure Control
– Adjust the simulator’s respiratory rate.
– Start and stop different types of seizures.
3. Simulator Sounds, Airway, and Circulation
– View and set body sounds for lungs, heart, stomach, and bowel.
– Set vocal sounds. (View sound volume by clicking on the speakers
displayed next to the area you want to configure).
– Set lung function (on/off) and pulse function (central, radial, and
brachial).
– Set tongue edema and stomach distention.
7. Debrief Log
8. Trend and Handler Control
9. Running Trends
10. Trend Window
11. Running Handlers
12. Scenario Control
13. Seizure Control
1
2
3
3
4
5
6
1. Tongue Edema
2. Carotid Pulse
Note: View and configure additional sounds with
the <Edit> menu located at the top of the screen.
4. Brachial Pulse
5. Stomach Distention
11
Page 14

Advanced System
4. Defibrillation and Pacing Control
– View and control shocks to conversion and pacing threshold.
Click the Running rhythm button to exchange the running rhythm
and waiting rhythm. Click the Extrasystole button to insert an extra
systole into the running rhythm.
5. Instructor Monitor Control
– View status of patient’s vital signs throughout the simulation.
The patient monitor waveforms and parameters can be set directly by
selecting and clicking the individual waveform or numeric parameter
with the mouse.
6. Event Windows (3)
– Contains checklists of events relevant for the simulation. An Event
is an action (or behavior) exhibited by the learner.
7. Debrief Log
– Shows all activities performed during the simulation.
8. Trend and Handler Control
– Trends permit physiologic changes over a period of time.
– Trends box allows the instructor to star t and stop trends.
– Event Handlers (optional) enable Events to trigger simulator
responses.
– Handlers box allows the instructor to hide trends.
9. Running Trends
– Window displays running trends. Use the <Start/Stop> button
to open the Trend and Handler Control dialogue box and make
changes, select Trends or Handlers, and star t
and Handlers.
or stop both Trends
– Click <Play> button to start.
Note: <Pause> button changes to <Play> button when the
scenario is paused.
The <Pause/Play> button is located below the <Start Scenario>
button. When a simulation is running, click this button to pause the
session.
Adjust Patient Parameters During Simulation
To manually adjust the patient parameters, click the individual graphs
or numeric parameters. Pop-up menus allow the instructor to change
the relevant parameters. Hold the cursor over a numeric parameter
for 1 second, the selected parameter’s background will turn to grey
and the mouse pointer will change appearance, indicating that the
scroll wheel can be used to increase or decrease the value.
Stop Simulation Session
When the simulation session is complete, click the Stop button
<
> below the <Start Scenario> button.
Debrief Log
The Debrief Log records information about patient responses and
Learner events that occur during simulation. Events can also be added
manually by the instructor. This information is then made available in
debrief files at the end of the simulation session.
To add a comment to the Debrief Log on learner performance, click
the <Add Comment> button.
Save Files and Laerdal Debrief Viewer
Save the Debrief Log to archive and/or review later. Click <Debrief>
to star t the Debrief Viewer. For more information, see The Laerdal
Debrief Viewer section of this manual.
.sutats tnerruc s’tneitap eht swohs rotinoM tneitaP s’rotcurtsnI ehT
10. Trend Window
– Window displays the simulation control graph, which illustrates
the trend in patient parameters of past, current, and predicted
future trends throughout the simulation.
11. Running Handlers
– Window displays currently running handlers. Use the <Hide
Trends>button to hide or show trends
12. Scenario Control
– To star t, pause, or halt scenarios. This section also contains the
Debrief button, which will end the current scenario and allows
debriefing.
13. Seizure Control
– Tonic (2-3 seconds)
– Tonic Clonic (1 minute)
Running a Scenario
– Click <Start> to launch the Instructor Application.
– Click <Start Scenario>. This will open a list of scenarios.
– Select and open.
Patient Monitor
The optional Patient Monitor has a Touchscreen display and is used to
run the Patient Monitor Application.
The Patient Monitor software simulates a real patient telemetry
monitor .
Video capture from the patient monitor display and the web camera
can be stored for use in the Debrief Viewer.
The Patient Monitor must be star ted and remain connected
throughout the simulation, in order to record video and allow screen
capture for debrief files.
Patient Monitor Interface
1. Top menu
Press <5wave> in the top menu to view and change
monitor display settings.
Press to open Alarm Volume.
12
Page 15

Advanced System
2. Parameters Readout Area
The learner may also edit scaling, alarm limits, etc. using this interface.
Clicking the parameter of interest will present a menu with available
options. Some fields will only be available while appropriate sensors
are connected to the Manikin.
3. Bottom menus
There are two bottom menus. Press the left or right
arrow key to toggle back and forth between Bottom
Menu 1 and Bottom Menu 2.
Bottom Menu 1 (in order from left to right):
Press the left double-arrow key to display Bottom Menu 1.
Selecting the <Silence Alarm> button turns active
alarm sounds OFF.
Selecting the <Pause Alarms> button turns all
sound alarms off for 3 minutes.
Cardiac Output generates a new reading of Cardiac
Output. The C.O. details will be shown in the C.O.
part of the Patient Monitor PC.
Select the <Graph Trends> button to open and
review.
Selecting the 12-lead ECG button generates a 12lead ECG strip. Select <Print> to request this ECG
strip be printed. The request will display on the
Instructor Application.
Bottom Menu 2 (In Order from left to right)
Press the right double-arrow key to display Bottom Menu 2.
Select the <Media> button to open display. Select
the <Close> button to close the Media display.
Select the Labs button to open. Select the <Close>
button to close the Labs display.
Select the <Main Setup> button to open. Options
in the <Main Setup> menu are identical to the
similar options displayed on the Menu line.
Select the <Main Screen> button to return to the
<Main Screen>, and cancels all submenus.
Submenus can also be closed by selecting the “X”
box of the submenu.
Importing and Adding Media Files
During a session, the Instructor can make media files available to
learners. Media files include Radiology, Video, and Lab reports. .
Import Media Files
To import media files to make them available for the simulation
sessions:
1. In the Instructor Application, click <File>.
2. Click <Import Media Files> in the drop-down menu. The
Instructor may import any of the existing media files or browse
to select a personal media file.
Add Media Files
To add media files:
1. In the Instructor application, click <File>.
2. Click <Add Media Files> in the drop-down menu.
3. Browse to select a file.
Introduction
Standard System
Advanced SystemManikin SetupMaintenanceSpare Parts TroubleshootingSpecifications
Select the <QRS Volume> button to open and
adjust volume (0-10).
Select the <Alarm Volume> button to open and
adjust volume (0-10).
Select the <Radiology> button to open X-ray
images which have been included in the current
scenario.
The Instructor can import and add as many media files as required.
Instant Display:
Media files show immediately when transferred.
Ordering Radiology, Media or Labs
The learner can order Radiology, Media or Labs by clicking on any of
the relevant menus in the Patient Monitor Application.
13
Page 16

1. Ensure that the main menu is displayed.
2. Click on the appropriate Radiology, Media, or Labs button.
3. Click <Order New> in the dialog box.
4. The system will then notify the Instructor of the order via the
Instructor Application.
The learner may also click on any of the relevant menus to check if the
Instructor has made any media files available for viewing.
Customizing Scenarios
SimJunior scenarios can be created and edited using a set of editors:
• Scenario Editor
• Trend Editor
• Event Handler Editor
.rotidE oiranecS eht aiv dezimotsuc eb nac tuoyal rotinoM tneitaP ehT
Select <Edit Monitor layout…> from the <Edit> menu.
Laerdal Debrief Viewer
The Debrief Viewer is a debriefing tool that allows you to open and
review a saved simulation session. The debriefing file consists of the
following information logged during a simulation:
• Session Log
Data and events are recorded and time stamped throughout the
simulation session. Instructor comments are included.
• Patient Monitor
Patient Monitor display can be recorded as a video file.
• Web camera
Video signals from a web camera connected either to the
Instructor’s computer or the Patient Monitor computer
• Microphone inputs
Voice and sound recording from the web camera’s built-in
microphone is recorded.
• Review comments
Comments can be edited or added to the <Session Log>
during review in the <Debrief Viewer>.
Note: The sources are all recorded to the same time line and
are always played back simultaneously.
Accessing the Debrief Viewer
The Laerdal Debrief Viewer can be accessed in two ways. :
1 - From the Instructor Application:
• Click the Stop button <
The Stop button is located under the Time display.
• Click the <Debrief> button in the <Start Scenario> dialog box.
• The Debrief files from the session are then transferred and
made available in the <Laerdal Debrief Viewer>.
>.
Common Learner Events can be customized via the Scenario and
Event Handlers Editors.
1. Select the <Edit> menu (located at the top of the Instructor
Application screen).
2. From the drop-down menu, select <Scenario Editor>.
3. The New Scenario (SimJunior) window opens. Select <Edit>
from the menus shown at the top of the window.
4. From the drop-down menu, select <Edit Event Menus>.
All of the SimJunior editors can be accessed through the Instructor
Application’s <Edit> menu, or directly through the Windows <Start>
menu:
1. Click the Windows <Start> button.
2. Select <Programs>.
3. Select <SimJunior Instructor Applications>.
The following list appears:
Scenario Editor
SimJunior Help file
SimJunior Instructor Application
SimJunior Program Update
Trend Editor
4. Select an editor.
Scenario Editor
The Scenario Editor allows you to define relationships between
learner events and patient response by drawing lines in a simple
graphical editor.
Trends
Trends are sets of physiological parameters pre-programmed to
increase/decrease over time.
Handlers
Note: It is important to save the debrief files for later review.
2 - From Windows Start menu:
• Click the Windows <Start> button.
• Select <All Programs>.
• Select the <Laerdal Debrief Viewer> program folder.
• Select <Laerdal Debrief Viewer>.
The system displays the Debriefing window for the session.
Handlers are pre-programmed sets of events linked to actions.
14
Page 17

Advanced System
Turning the Internal Compressor OFF
If you are using an external compressor, turn off the internal
compressor by unchecking the box next to the <Integrated
Compressor Enabled .lenap sutats tneitap eht ni noitpo >
Integrated Compressor Enabled
Changing Settings During Simulation
The Internal Compressor, Tongue Edema, and Seizure can be adjusted
during the simulation by accessing the SimJunior Dialog Menu. Any
changes made in this window will not effect the default settings of the
manikin.
1. In the Instructor Application click <Edit> in the Program Menu
Bar.
2. Select <Start SimJunior Dialog> in the drop down menu.
Tongue Edema
From the Instructor Application:
1. Select the <Edit> menu in the Instructor Application.
2. Select <Configuration> from the drop-down menu.
3. The Configuration - Default program settings window is
displayed. Click the < Tongue edema pressure> option.
Seizure
From the Instructor Application:
1. Select the <Edit> menu in the Instructor Application.
2. Select <Configuration> from the drop-down menu.
3. The Configuration - Default program settings window is
displayed. Click the < Seizure intensity > option.
Introduction
Standard System
Advanced SystemManikin SetupMaintenanceSpare Parts TroubleshootingSpecifications
3. Increase or decrease to desired values.
4. Click <Apply>.
Note: Compressor can only be set at 30-50%. Set
compressor at 30% to minimize internal noises and better
simulate shallow breathing. Set compressor at 50% to
maximize breathing density.
Changing Default Setting
Note: Once the new default settings are saved, the new
parameters will become the star t up default for future sims.
Internal Compressor
Help Files
Software Help-files can be accessed as follows:
1. Click the Windows <Start> button
2. Select <Programs>.
3. Select <SimJunior Instructor Applications>.
4. Select the <SimJunior Help File>.
You can configure the RPM setting for the internal compressor. From
the Instructor Application:
1. Select the <Edit> menu in the Instructor Application.
2. Select <Configuration> from the drop-down menu.
3. The Configuration - Default program settings window is
displayed. Click the <Compressor RPM> option under <Target
Values>
15
Page 18

Manikin Setup
Preparing for Simulations
After the SimJunior manikin is prepared and all applicable interactive
units (SimPad or Instructor PC and Patient Monitor) are
configured and made ready for use, final preparations may need to be
performed before SimJunior is ready to run simulations.
Final simulation preparations include the following activities:
• Changing Settings for the Internal Compressor
• Connecting an External Compressor
• Preparing the Intraosseous leg
• Administering IV Fluids
• Draining Excess IV Fluid
• Cleaning the IV Arm
• Connecting Defibrillation Adapter Plates
• Connecting the Blood Pressure Cuff
• Changing the Pupils
2. Open the plug at the heel.
3. With a syringe, fill the bone with approximately 240 to 250 cc of
simulated blood..
4. Attach tubing connected to an IV reservoir bag
clamp to open or close the line as needed in order to relieve
pressure build-up.)
5. Close off tubing that runs into the rese
simulated blood will remain in the bone for aspiration.
6. When the reservoir bag is filled, discontinue infusion and replace
with empty bag.
. (Use roller
rvoir bag so that
Using an External Compressor
The external compressor connects to the clear tube found in the
cable bundle exiting the right side of the manikin.
For more information on external compressors and regulator panels
compatible with SimJunior, contact your local Laerdal representative.
Preparing the IO Leg
The manikin’s right leg is designed for practicing intraosseous infusion
skills. Anatomy of the right leg includes knee, tibia, tibial tuberosity site,
and medial malleolus site. The right leg comes with IV tubing and one
IV bag for use as a reservoir during infusion.
Additional equipment needed:
• IV bag and administration set.
• Simulated blood concentrate.
• 35cc syringe and 16-gauge intraosseous needle.
To fill the IO leg and prepare it for use:
1. Raise the leg vertically.
Before storing the manikin:
– Detach the IV line and reservoir from the foot.
– Allow all fluid to drain.
– Store leg unplugged to allow it to air dry.
Note: Do not use saline solution. It may cause deterioration
of the leg. Use distilled or de-ionized water to avoid buildup of
minerals.
Administering IV Fluids
The right IV arm supports training for IV drug administration,
IV insertion, infusion, and bolus into peripheral veins of forearm,
antecubital fossa, and dorsum of the hand.
Use 20 to 22 gauge needle for IV simulation. To prevent clogging of
the IV system, use only distilled or de-ionized water to simulate IV
drugs.
16
Page 19

Manikin Setup
Draining Excess IV Fluid
The IV fluid system is an open system. IV fluids are drained as they
are administered.
Before each session:
1. Attach the IV overflow tube (in the manikin’s right arm) to an
overflow container (such as an IV bag).
2. Allow excess fluid to drain into a container during the
simulation..
Cleaning the IV Arm
Clean the IV arm after each session or day of use by flushing the IV
Arm with 60% isopropanol or 70% ethanol.
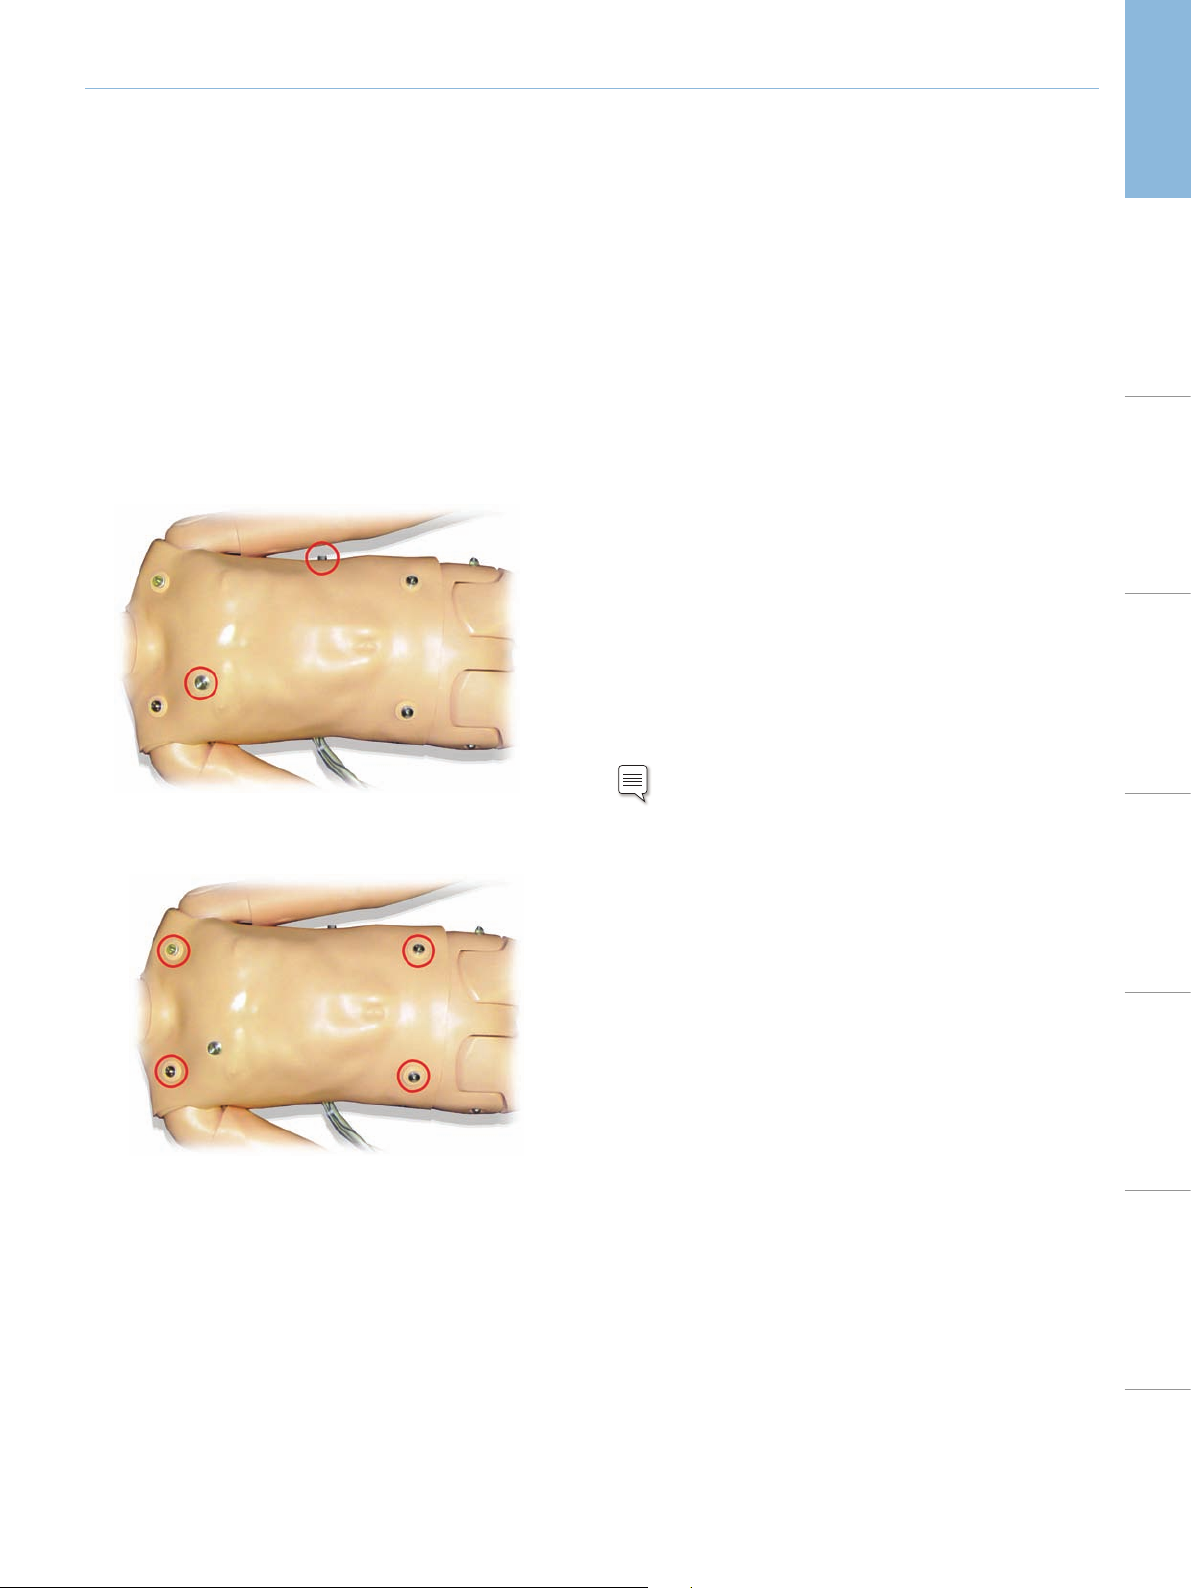
Installing Defibrillation Adapter Plates
The manikin torso is fitted with two stud connectors for defibrillator
cables. Before attempting defibrillation, you must unscrew and remove
the defibrillator stud covers.
Warnings:
– Defib
rillation must be performed on the defibrillator connectors
only.
– Do not press too hard over the defibrillation adapters as this may
cause arcing and pitting.
– Do not defibrillate the manikin without the torso skin in place.
Connecting the Blood Pressure Cuff
The manikin is delivered with a customized blood pressure cuff.
Connect the tube to the white BP connector on back of the Link Box
before use.
Introduction
Standard System
Advanced SystemManikin SetupMaintenanceSpare Parts TroubleshootingSpecifications
Two defibrillation adapter plates are packaged with the manikin. The
defibrillator adapter plates must be fitted in place before using a live
defibrillator with defibrillation paddles or adhesive pads. Screw the
adapter plates firmly into place.
During Defibrillation
A conventional defibrillator (not included) may be used on the
SimJunior. During live defibrillation, the defibrillator and manikin may
present a shock hazard. All standard safety precautions must be taken
when using the defibrillator on the manikin.
Note: The speaker for the Manikin’s blood pressure is located
in the left antecubital fossa, shown below circled. The radial
and brachial pulses are located in the rectangular areas.
Calibrating the Blood Pressure Cuff with Instructor PC
1. Select <Calibration> from the menu.
2. Select <Calibrate BP...> from the drop-down menu.
3. Follow the on screen wizard instructions to perform the
calibration.
Caution: The manikin must not be in contact with electrically
conductive surfaces or objects during defibrillation.
17
Page 20

Manikin Setup
Changing the Pupils
.seye eht ni dellatsni slipup lamron htiw dereviled si roinuJmiS
A separate kit containing plastic pupil inserts (constricted and dilated)
comes with SimJunior.
To change the pupils:
1. Carefully open the eyelids wide, taking care not to tear the
manikin face skin.
2. Using the suction cup tool provided in the kit or with the edge
of your fingernail, carefully remove the pupil from the eye.
3. Replace the pupil with the desired insert, using the suction cup
tool or by gently pressing in place.
18
Page 21

Maintenance
Maintenance After Each Simulation Session
The following preventive measures are required to ensure
longevity of the SimJunior manikin.
− Return manikin and PC to their original condition.
– Power off the SimPad, Link Box and PCs.
– Charge batteries if necessary.
– Flush the IV-arm system and drain the IO leg (leave the plug in the
bottom of the IO leg open).
– After each session where the IV-arm has been used, flush the IV
arm with 60% Isopropanol alcohol or 70% ethanol.
– Wipe the skin with a moist cloth.
– Remove wet clothes or linens.
– Remove tape residue with a moist cloth or rubbing alcohol
– Based on the use of the manikin, replace modules that are
consumed or damaged.
– Replace cables or connectors showing visible damage.
– Servicing should be performed by qualified personnel at regular
intervals.
Introduction
Standard System
Advanced SystemManikin SetupMaintenanceSpare Parts TroubleshootingSpecifications
Always perform a service:
− If liquids have been spilled in or on the manikin.
− After use in dusty environments.
For information on and spare par ts, see section: Spare Parts
and Accessories.
Before Storage or Shipping
– Flush the IV arm with 60% Isopropanol alcohol or 70% ethanol.
Open the drain valve on the bottom of the manikin’s right foot.
19
Page 22

Maintenance
Opening the Torso
Open the manikin torso to perform procedures, such as:
– Attaching or replacing limbs
− Changing the manikin battery
− Replacing the chest-rise bladder and lung bladder
− Replacing the torso skin
− For general inspection
Warning: Open the torso from left to right, gently unhook the
skin. Do not pull hard to lift the manikin skin, this could damage
the chest cables.
1. Unhook torso skin holders on left side of the torso and each
shoulder.
Replacing the Manikin Battery
1. Open the manikin torso.
2. Slide the battery out of the batter y strap.
2. Fold the torso skin over to the right side.
3. Disconnect the Defibrillation connector cable.
4. The Defibrillation connector cable must be disconnected at the
right side of the manikin below the chest form.
Note: DO NOT gnitcennoc selbac dna sebut eht tcennocsid
the stomach foam to the manikin.
5. Replace the torso skin by performing steps 1- 4 in reverse.
3. Pull the battery power connection up from inside the
manikin. Unhook the battery power connection.
4. Lift the battery out of the manikin.
5. Replace the charged battery or install a new Laerdal approved
SimJunior battery.
6. Connect the battery to the manikin.
7. Replace the torso skin.
20
Page 23

Maintenance
Charging the Manikin Battery
The manikin battery charges itself as it is operated. If necessary, the
manikin battery can be charged using an optional external power
adapter.
1. Power down the manikin via the Link Box.
2. Remove the manikin battery from the manikin.
3. Connect an approved external battery charger (with a power
cord that meets local specifications) to the bottom of the
manikin battery. Connect the battery charger’s power cord into
a wall outlet .
3. Disconnect the clear tubing from the chest rise bladder.
4. Discard the old bladder
5. Insert new bladder
6. Re-connect the tubing to the new bladder.
7. Close the torso and replace the torso skin.
4. When the battery has finished charging, replace the battery in
the manikin.
Replacing the Lung Bladder
Introduction
Standard System
Advanced SystemManikin SetupMaintenanceSpare Parts TroubleshootingSpecifications
Replacing the Chest Rise Bladder
The chest rise bladder is located in the lower end of the chest
plate, centered under the lungs.
1. Open the torso skin to expose the chest plate. See the section:
Opening the Torso.
2. Disconnect the clear tubing from the lung bladder and remove
the lung bladder. For details on removing the lung bladder, see
the section: Replacing the Lung Bladder.
If leaking occurs, the lung bladder (in the chest cavity) should be
replaced.
1. Open the torso skin.
2. Disconnect the clear tubing from under each side of the lung
bladder. Refer to step 2 illustration in "Replacing the Chest Rise
Bladder."
3. Disconnect the lung bladder clip from the top center of the lung
bladder.
4. Gently pull the top center por tion of the lung bladder up from
its socket.
5. Reverse process to install the new lung bladder.
21
Page 24

Maintenance
Replacing Manikin Skins
The manikin skins may need to be replaced if they are torn, perforated,
or stained.
Torso Skin:
To replace the manikin torso skin reference “Opening the Torso”
section
Arm Skin:
To replace the manikin arm skin:
1. Remove the old manikin arm skin by working it down over the
arm and hand or *cut the skin.
Warning: *Do not puncture or cut the mandrel arm.
2. Discard old skin.
3. Lubricate inside of new arm skin with mild liquid detergent
mixed with water.
4. Lubricate (or lather) mandrel with a mix of mild liquid soap and
water.
5. Slide manikin hand into skin.
6. Work skin over fingers (as with a glove).
7. Work skin up, over the arm mandrel.
To attach the new arm:
1. Ensure that the shoulder screw is loose enough to allow the arm
axle to slide easily into place.
2. Connect the arm to the corresponding connection points in the
torso.
3. Carefully push the arm axle into the shoulder bracket, so that
the axle is flush with the inside of the bracket.
4. Tighten the shoulder screw with an Allen wrench.
Replacing the Right IO Leg
To detach the right lower leg:
1. Ensure that any fluid in the leg has been drained.
2. Remove old IO leg by unscrewing the bolt holding it to the thigh.
3. Slide the IO lower leg out from the thigh.
4. Discard the old IO leg according to specified guidelines.
Replacing the Right IV Arm
Open the torso reference “Opening the Torso” section.
1. Remove old arm by unscrewing the bolt holding the arm to the
manikin’s shoulder.
2. Ensure that the shoulder screw is loose enough to allow the arm
axle to slide out easily.
3. Discard the old arm according to specified guidelines.
Reverse above process to attach the new IO leg.
22
Page 25

Troubleshooting
System Setup
Problem
• Lost data or total system failure (General System failure).
Possible Solution
• Should system shutdown or all data is lost or corrupted; please
contact your local Laerdal Service Center.
The Debrief Viewer
Problem
• Missing video capture - the web camera does not record video
for debriefing.
Possible Solutions
• Check that the web camera’s USB-cable is plugged into the USB
hub.
• Check the web camera settings via the Profile Editor. Ensure
settings match the web camera setup.
• Ensure you use the correct profile file.
• Ensure that there is only one USB web camera connected to the
PC.
• The video recordings will be stored on the PC connected to the
web camera. Ensure the computer connected to the webcam is
available when transferring to debrief.
Problem
• Patient Monitor video capture is not included in the debriefing.
Possible Solutions
• Check that the name of the Patient Monitor PC being used
corresponds with the setting in the profile in use.
• On the Instructor PC application main menu, click <Edit>. Select
Video Recording Configuration. Ensure that “Use web camera”
is checked.
Manikin
Problem
• Unpredictable behavior.
Possible Solutions
• Manikin malfunctions may be caused by loose cables, tubes or
connectors. Open the torso and check if any items appear to
have become disconnected or are leaking. See section: Manikin
Setup - Opening the Torso.
• In case of fluid leakage, power off the manikin and contact
Laerdal Technical Service.
Airway Contamination
Problem
• Manikin airways have become contaminated from mouth-to-
mouth rescue breathing.
Possible Solution
• Clean the outside of the manikin with manikin wipes. Clean the
inside of the oral cavity with manikin wipes. Change the lung
bladder; see section: Maintenance - Replacing Lung Bladder.
Chest Movement
Problem
• No chest rise on manikin.
Possible Solutions
• Check that power to manikin is ON.
• Check that awRR is not set to zero on Instructor Application
(Patient Case or scenario).
• Check that Manikin’s Cardiac is set to a perfusing rhythm.
• Check that airway complications like maximum air resistance or
laryngospasm are not set.
• Verify that the Integrated Compressor Enabled box is checked
on the Instructor Application screen. See section: Turning the
Internal Compressor Off.
• Check that any external compressed air source is switched off
and that the air tube is disconnected from the manikin.
• The internal compressor may be overheated. Wait approximately
20 minutes for it to cool down.
• Chest rise is set to bilateral (
too far into the bronchia).
• Chest rise bladder is leaking or tubing to chest rise bladder is
twisted kinked or disconnected. Replace chest rise bladder if it is
leaking, see Maintenance section: Replacing Chest Rise Bladder.
• Check air tubing for leakage; check that all connections are intact.
Replacing tubing section if leaking.
• Shallow chest movements and the internal compressor runs
continuously. The internal compressor may be worn. Contact
Laerdal Technical Service.
for example if ET-tube is inserted
Lungs
Problem
• Lungs not functioning properly
Possible Solutions
• Open the torso and chest plate. Check that the lungs are free to
expand and are not restricted by any cables.
• Check that the lung bladder is properly connected, and that the
tubes are not twisted.
• Check that the lung bladder is in a horizontal position and
inserted correctly.
• Check for flaws or tearing in the lung bladder.
Introduction
Standard System
Advanced SystemManikin SetupMaintenanceSpare Parts TroubleshootingSpecifications
23
Page 26

• Check that there are no obstructions inside the manikin airways
which may block air flow.
• If there is no change when adjusting lung compliance, contact
Laerdal Technical Service.
• If there is no change in lung resistance, contact Laerdal Technical
Service.
Troubleshooting
Mechanical Noise during Auscultation
In the Instructor Application, click <Auscultation focus>.
Pulses (Radial and Brachial)
Problem
• Cannot feel pulses
Possible Solutions
• Skin may be too tight over pulse units – re-adjust skin and
reboot.
• Ensure blood pressure is set to at least 60 systolic.
• Ensure compressor is ON.
Note: If the radial pulse is set below 60, peripheral pulses
may disappear.
Manikin Shutdown
Problem
• The manikin is unresponsive.
Solution
1. Power off the Link Box.
2. Turn the SimPad off.
3. Exit any SimJunior software on the optional Instructor PC and
the Patient Monitor.
4. Then restart everything.
If the manikin is still unresponsive, contact your Laerdal representative.
24
Page 27

Notes
25
Page 28

Specifications
Overall Dimensions
Length / Width (manikin only): 48 in x 9.84 in (120 cm x 42.5 cm)
Weight (manikin only): 25 lbs (11.36 kg)
Manikin Power
External power: Input voltage 9VDC, 1.5A
Internal battery: 7.4V, 4.4Ah, Lithium-Ion
Only use approved
SimJunior external power supply and batteries.
Air Pressure
Internal air tank: Max 6 psi
External air connection: Max 16 psi
Temperature Limits
Operating temperatures: +4 ºC to 40 ºC (39 ºF to 104 ºF)
Storage temperatures: -15 ºC to 50 ºC (5 ºF to 122 ºF)
Environment - Manikin only
Relative humidity: 20% -90% (non-condensing)
DO NOT use outdoors in wet conditions.
Not tested with salt spray.
RF Communication
Operation range: 10 m (30 ft) max.
Cleaning Fluids
To clean the manikin use one of the following:
– 60% Isopropanol alcohol
– 70% Ethanol
– Mild solution of liquid soap and water
IV Fluids
Only use distilled or deionized water to simulate IV and IO
fluids.
Material Chart for Manikin
Clothes: Cotton, Nylon
Skins and airways: PVC
External hard plastics: PVC, ABS
Inner plastics: Silicone, TPU, PVC, Nitrile
ABS, POM, Nylon + GF
Epoxy-Polyurethane
Metal components: Aluminum, Brass, Steel
Caution Latex: This product contains Natural Rubber latex, which
may cause allergic reactions when in contact with humans.
Minimum Computer Requirements
• Core 2 Duo or better
• 1 GB RAM (2 GB recommended)
• 1GB hard disk space,
• 1024x768, 1280x800, 1280x1024 or better
• 16bit color resolution or better
• 100% DPI required
• Optical drive required for installation
Minimum Software Requirements
• Windows XP or Windows 7
• DotNet 3.5.1
26
Page 29

Notes
27
Page 30

Spare Parts and Accessories
Catalogue Numbers
Substitute XX with your local language version number. Contact your
local Laerdal Customer Service Representative for more information.
231-01150 Pediatric Full Body Soft Case
232-05350 SimJunior Hard Case
210-05250 Peripherals Hard Case
5527 Laerdal Warranty
232-11950 SimJunior Advanced SW CD & License Key
232-11951 SimJunior Advanced License Key (1)
232-05050 SimJunior Manikin Only (Light)
200-30001 SimPad System (US)
200-30003
200-30015
200-30026
200-30027
200-30033
200-30005
200-094XX Rugged Patient Monitor
200-092XX 12” Patient Monitor
200-093XX 17” Patient Monitor
225-091XX Peripheral Kit Standard No Patient Monitor
225-090XX Peripheral Kit Advanced With Patient Monitor
200-30350 Li ion Battery (1)
200-10550 AC Adapter (Multi)
245-950XX Patient Monitor Desktop
245-980XX USB Hub
245-96050 Webcam
232-00150 Shirt
232-00250 Shorts
232-00350 Boxer Shorts
300-00750 Red Simulated Blood
220-00250 IV Bag-500ml
270-00250 IV Bag Transfer Set
232-03950 Chest Rise Bladder
375-70150 Pediatric Skin/Vein Set (Light)
200-03050 Pupil Inserts Kit (Blue)
200-03050B Pupil Inserts Kit (Brown)
375-71001 Right IV Arm
232-01150 Left BP Arm
232-00450 BP Arm Skin
231-00101 Pediatric IO Leg Kit
231-00750 Pediatric Right IO Leg (Light)
232-00950 SimJunior Chest Skin
232-00750 SimJunior Lung Bag
250-21050 Airway Lubricant 45ml
276-15550 Liquid Detergent
277-00150 Baby Powder
232-00650 SimJunior Blood Pressure Cuff
05-10100 Zoll Defibrillator Connector
05-10000 Physio-Control Quick Combo
945004 Philips Defibrillator Connector
232-19050 Directions for Use
232-00550 Quick Setup Guide
277-00001 Pediatric Trauma Wound Set (Light)
SimPad System (UK)
SimPad System (AUS)
SimPad System (CHI)
SimPad System (KOR)
SimPad System (EURO)
SimPad System (JAP)
Please contact your local Laerdal Customer Service Representative
for more information on ethnic spare parts and accessories.
28
Page 31

Notes
29
Page 32

Page 33

Page 34

© 2012 Laerdal Medical. All rights reserved
20-05754 Rev A. Printed in USA.
 Loading...