

Page 1

MamaNatalie
Birthing Simulator
Directions for Use
www.laerdalglobalhealth.com
Page 2
Contents
MamaNatalie Kit Components
……………… 3
Introduction and Features…………………………4
To Prepare for Simulation………………………… 5
To Prepare NeoNatalie. .………………………………………… 5
1 Fill NeoNatalie with Water ……………………………………… 5
2 Fit the Hard Skull with Fontanellas onto NeoNatalie’s head……5
3 Detach the Simulation Tubes ……………………………………6
4 Attach the Umbilical Cord ………………………………………6
To Prepare MamaNatalie .……………………………………… 6
1 Inflate the Uterus Air Reservoir …………………………………6
- Test for correct inflation level …………………………………7
2 Fill the Blood Tank
3 Fill the Urine Bladder.…………………………………………… 8
4 Position the Squeaker Unit ..……………………………………. 8
5 Optional: Protection against fluid spillage………………………. 8
6 Attach MamaNatalie onto your body…………………………… 8
7 Hang the Uterus over the hook ………………………………… 8
8 Optional: For Cervix Landmark ………………………………… 9
.……………………………………………… 7
To operate MamaNatalie………………………… 9
1 Preparing for simulating birth ……………………………………9
2 Simulation of fetal heart sounds.………………………………. 10
3 Delivering NeoNatalie .………………………………………… 10
4 Delivering the Placenta .………………………………………… 10
5 Controlling blood flow .…………………………………………. 11
6 Controlling Uterus conditions…………………………………… 12
7 Urine Catheterization ……………………………………………13
8 Cervix Landmark.………………………………………………. 13
9 Simulation of Baby Cries………………………………………… 13
10 Administration of medications………………………………… 13
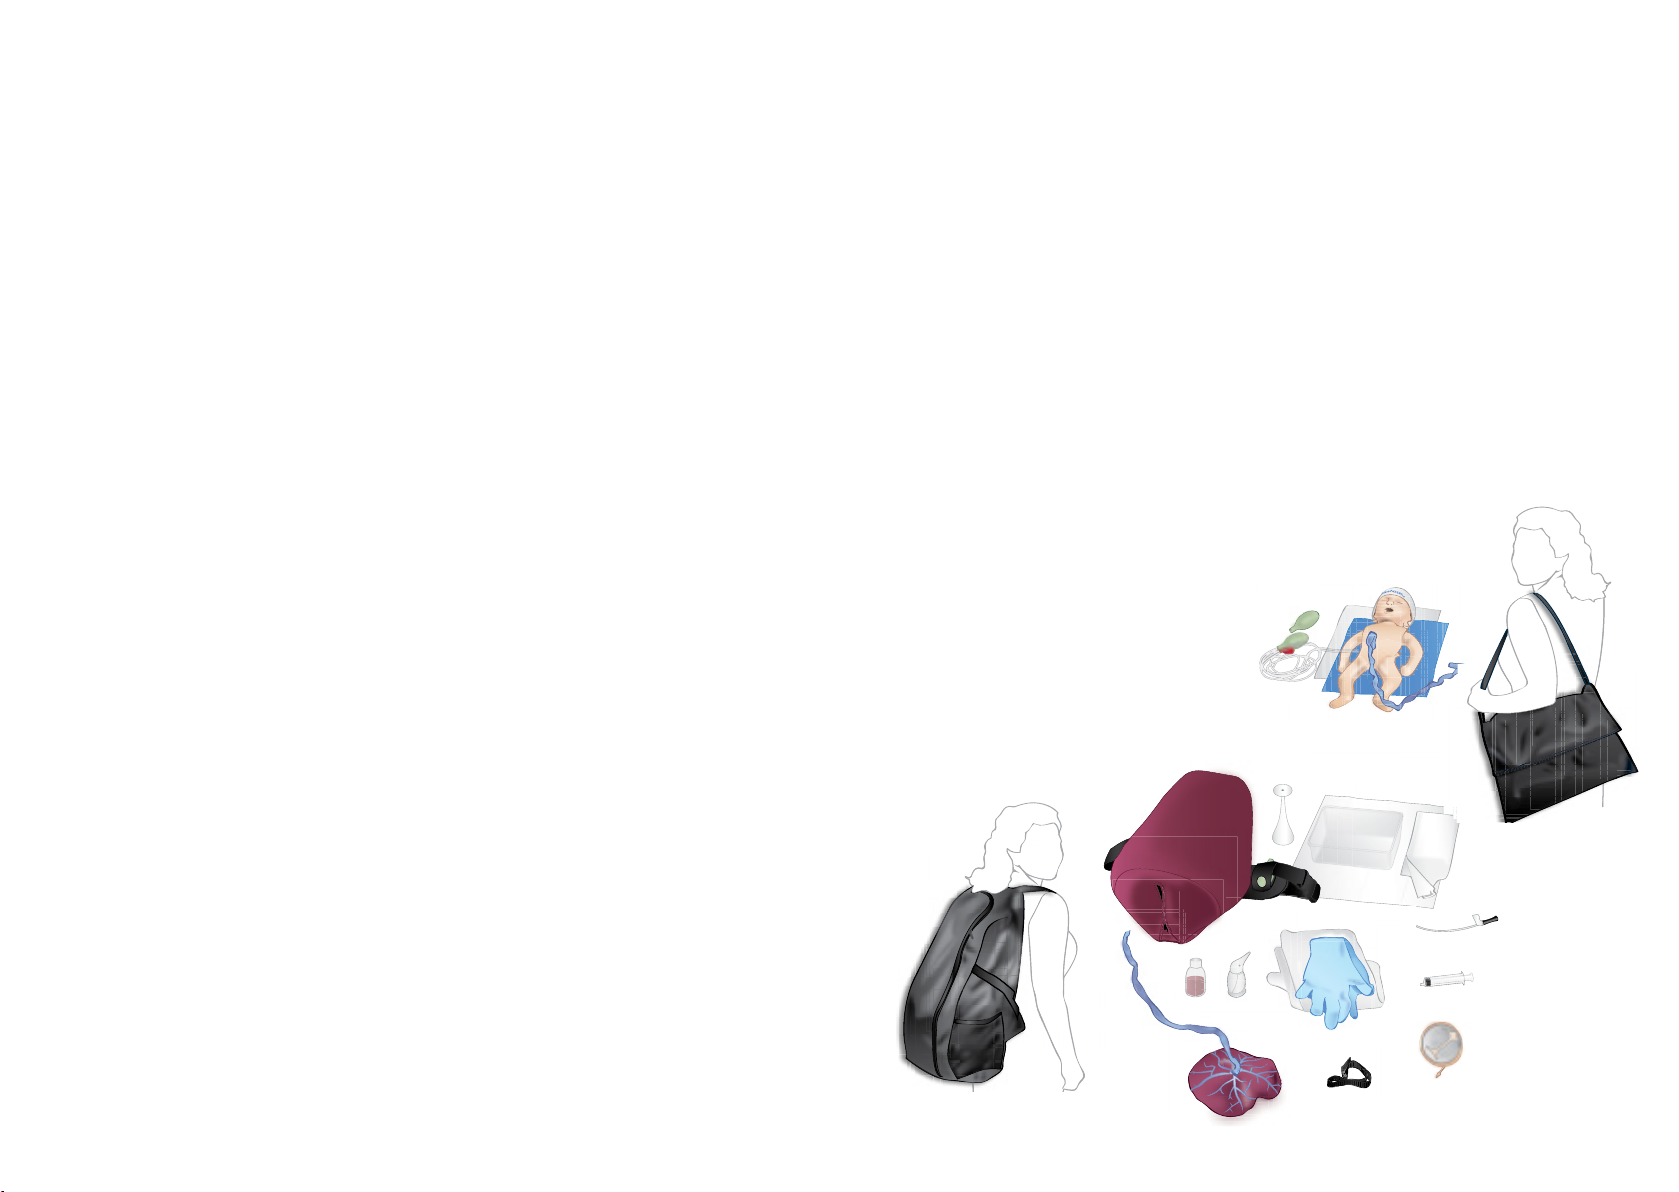
MamaNatalie Kit Components
MamaNatalie is available in two models and with NeoNatalie Newborn Simulator in either dark or
light complexion:
MamaNatalie Basic model
For users who already have a NeoNatalie
Newborn Simulator. Two versions are available
with accessories compatible with a dark or
light complexion NeoNatalie:
- MamaNatalie Birthing Simulator
(includes Uterus, Air Bag Reservoir
and Urine Bladder) [1]
- Placenta w/ Umbilical Cord [2]
- Blood Dye Concentrate [3]
- Penguin Suction [4]
- 2 pairs of Gloves (1 normal and 1 long) [5]
- Fetal Stethoscope [6]
- Fluid Collection Tray [7]
- Floor protector [8]
- Fluid Drain [9]
- Urine Catheter [10]
- Syringe - 20 ml [11]
- NeoNatalie Skull w/fontanelles [12]
- Cervix Ribbon [13]
- Backpack [14]
- Directions for Use
1
14
3 4
MamaNatalie Complete model
Comprises items included in the
MamaNatalie Basic model plus NeoNatalie
Basic kit:
- NeoNatalie Newborn Simulator
(dark or light complexion) [15]
- Squeeze Bulbs for simulation of birth cries,
spontaneous breathing and palpable
umbilical pulse [16]
- External Umbilical Cord and 2 Umbilical Ties
[17]
- 2 Sheets to simulate towels [18]
- Head Cap [19]
- Storage/Carrying Pouch [20]
- Directions for Use
16
6
5
19
18
15
7
8
17
20
9
10
11
Tips for performing simulations ……………. 13
Mama-U.……………………………………………….……. .14
Maintenance, storage and transport …… 15
Troubleshooting….……………………………………… 17
12
2 13
3
Page 3
Introduction and Features
ir
MamaNatalie is a birthing simulator that makes it easy to create very compelling simulations of
normal to more complex birthing scenarios. It is strapped onto the Operator, who is taking the role
of the mother at the same time as manually controlling the following features:
- Fetal heart sounds
- Delivery of placenta, also incomplete
- Baby positions in birth tract
- Uterine firmness
- Intensity of bleeding and volume of blood loss
MamaNatalie also allows simulation of:
- Urine Bladder catheterization
- Administration of medications.
To Prepare for Simulation
To Prepare NeoNatalie
MamaNatalie gives birth to NeoNatalie, a highly realistic newborn simulator that facilitates effective
learning of essential newborn care, including basic resuscitation measures. NeoNatalie has realistic
size and appearance, and also natural weight, feel and touch when filled with lukewarm water.
The baby’s status can be simulated as desired for effective role playing in all relevant scenarios,
from care after normal birth to treatment of emergency situations. The following features can be
simulated:
- Crying
- Spontaneous breathing
- Palpalble umbilical pulse
Stomach Skin
Placenta
Uterus Bag
Blood Tank Cap
Uterus Hook
Skeleton
Blood Tank
Uterus Air Reservoirs
Squeaker Unit
Waist Strap
Blood Valve
Rectum
Uterus Bag Strap
Umbilical Cord
Urine Bladder
NeoNatalie
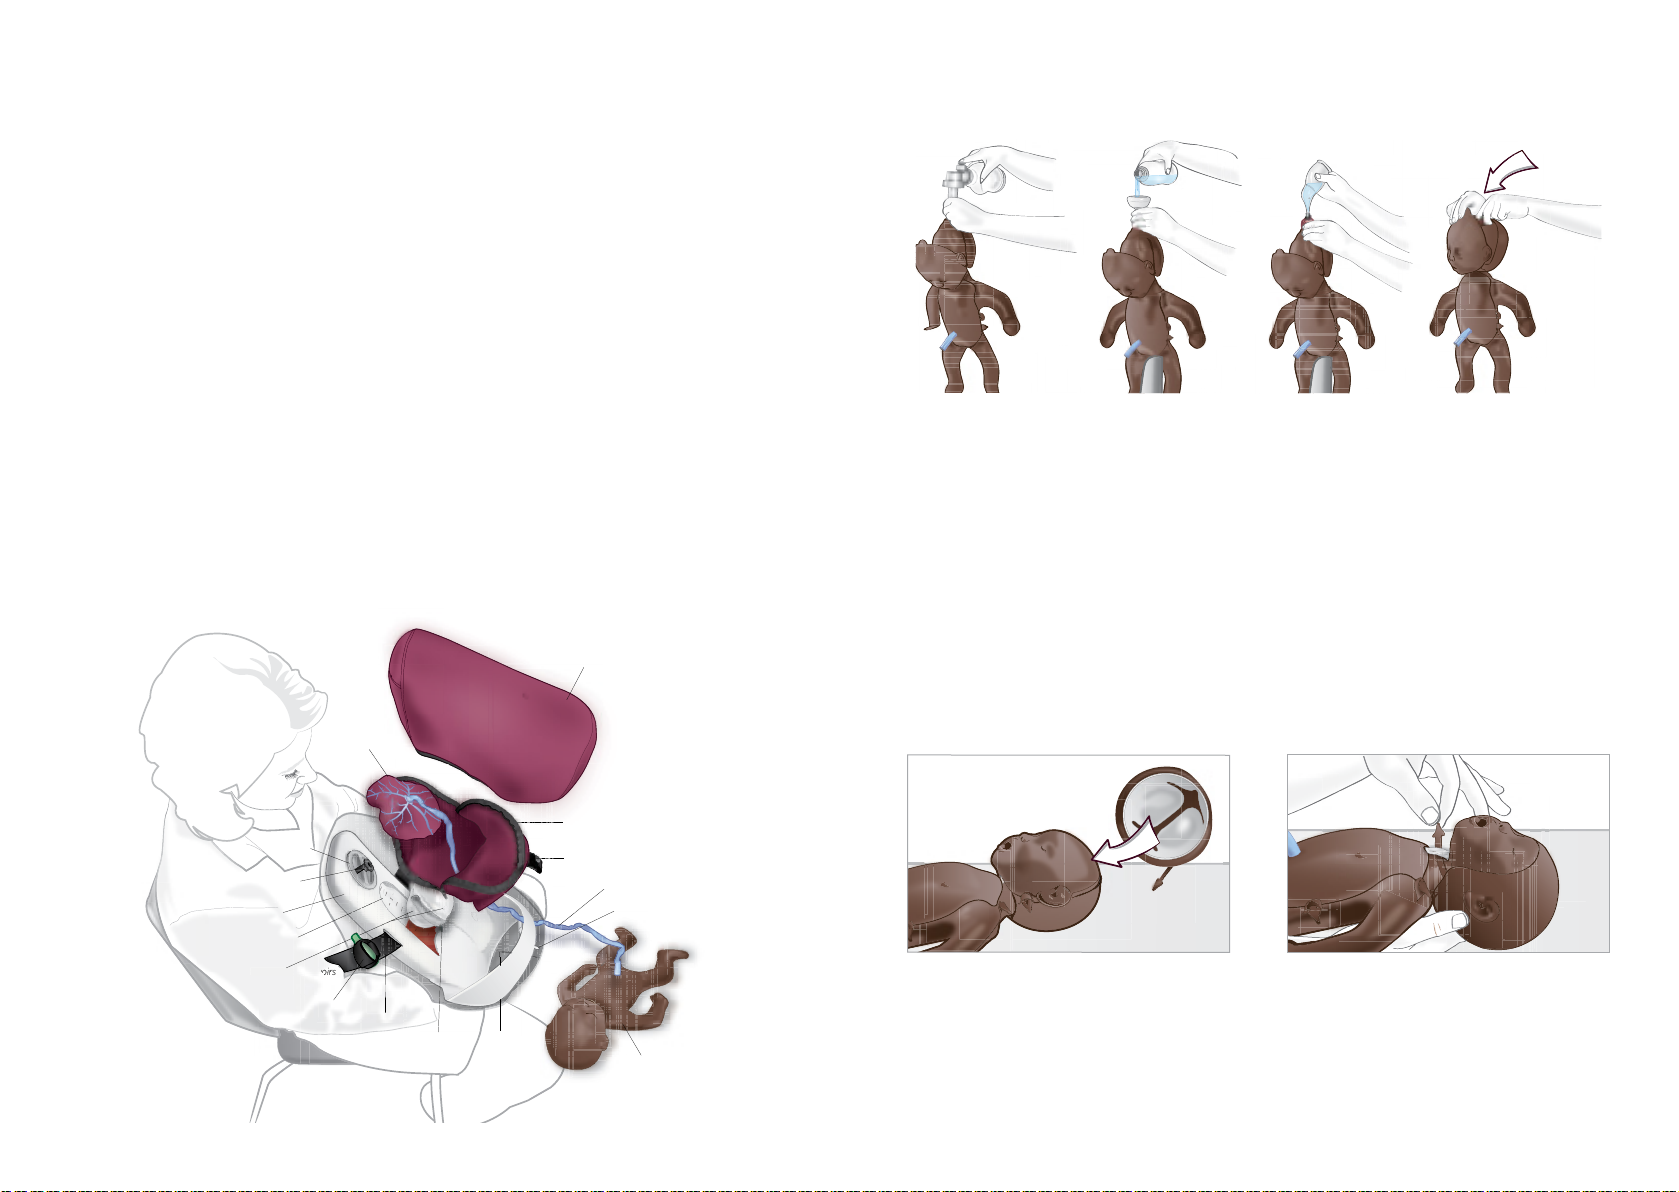
1 Fill NeoNatalie with Water
a) Pull out the filling extension from under the face skin. Open the valve. Apply your lips - or a bag mask ventilation device for improved hygiene - to the valve and inflate until the body is partially
inflated. (This will separate the foils and allow easy filling with water afterwards.)
b) Unscrew the filling cap. Place NeoNatalie across a chair or similar to provide support while
filling with approx. 2 litres of water from a tap or suitable container. It may be practical to use a
circular mask as a funnel. Return filling cap.
c) Open the valve. Fill NeoNatalie Suction - or another suitable irrigation device with water - and
use this to insert additional water into NeoNatalie’s body until the body feels firm.
d) Close the valve. Fold the filling extension forward and push it under the face skin until it clicks
into the holder.
2 Fit the Hard Skull with Fontanellas onto NeoNatalie’s Head
a) Fold the sides of the hard skull upwards.
Place the skull with the triangular frontal
fontanel on the forehead.
b) Unfold the sides of the hard skull
downwards to cover NeoNatalie’s ears.
Feed the strap under the airways and secure
the through the small hole on the other side.
Note: Do not tighten the strap over the airways as this will block free air flow and prevent successful
ventilations.
4
5
Page 4

3 Detach the Simulation Tubes
AB
The Simulation Tubes are attached to the right side
of NeoNatalie’s chest. Pull gently on the Tubes to
release them.
Tip: After delivering NeoNatalie, reattach the Simulation
Tubes to simulate spontaneous breathing and palpable
umbilical pulse.
Test for correct inflation level:
AB
4 Attach the Umbilical Cord
Connect the Umbilical Cord from the Placenta
to NeoNatalie by clicking the two connectors
together.
To Prepare MamaNatalie
1 Inflate the Uterus Air Reservoirs
The Uterus contains two reservoirs. Air can be
manipulated from one reservoir to another to
simulate various uterus conditions.
a) Open the Air Valve.
b) Use the NeoNatalie Suction to inflate the
Uterus Reservoirs with air. Adjust the amount
of air until you pass the test for correct inflation
level (as described on the next page).
c) Close the Air Valve.
Tip: To detach the cord, break the connection
point with your thumbs as shown in the
illustration above.
a) Compress Uterus Air Reservoir A with your
hand. Reservoir B should feel firm to simulate
a contracted uterus.
2 Fill the Blood Tank
a) Check that the Blood Valve of the Blood
Tank is closed.
c) Mix artificial blood according to
b) When the grip on reservoir A is relaxed, air is
distributed between both Uterus Air
Reservoirs A and B. Reservoir B should now
feel like a soft uterus.
b) Ensure that the blood tube is connected
to the blood nipple on the back side of the
Skeleton.
manufacturer’s instructions. Unscrew the
Blood Tank Cap and fill with the desired
amount of artificial blood (up to 1.5 liters).
Return the Blood Tank Cap.
6
7
Page 5

3 Fill the Urine Bladder 4 Position the Squeaker Unit
it
er
r
it
er
r
8 Optional: For Cervix Landmark
The Cervix Ribbon allows simulating a landmark for the cervix.This can be useful, for example when
training on bimanual compressions.
Fill the syringe with 25 ml of water. Inject the
water into the urethra until resistance is felt.
Note: Never inject air into the bladder.
Place the green Squeaker Unit from
NeoNatalie kit into the holder of the
MamaNatalie waist belt.
5 Optional: Protection against fluid spillage
a) To avoid spillage: Attach the Fluid Drain to
the backside of the Skeleton.
b) Place the Floor protector under the
Collection Tray. Ensure that the end of the
Fluid Drain is inside the Collection Tray.
Tip: Collect the blood in the Collection Tray for reuse by pouring it directly back into the Blood Tank.
6 Attach MamaNatalie onto your body 7 Hang the Uterus over the hook
a) Pass the Cervix Ribbon (found in
the accessories box) through the loops on
the outer side of the uterus.
To operate MamaNatalie
1 Preparing for simulating birth
a) Fold the Stomach Skin down. Open the
Uterus.
b) Insert NeoNatalie in the desired position
and attach the Placenta to the velcro
located inside the uterus.
b) Adjust the Ribbon to indicate cervix
landmark and close the buckle.
Tip: Remove the Cervix Ribbon when cervix
landmark is not needed during simulation
training.
c) Pull the Stomach Skin back, to cover the
Skeleton.
Tip: To hide NeoNatalie’s head from the birth opening: Place your hands between the Stomach Skin
and the lower part of the Uterus Bag. Hold your hands around NeoNatalie’s head and clamp the birth
opening together.
Strap MamaNatalie around your waist. Adjust
the belt so that the Simulator is secure and
snug against your body.
This will keep the Uterus in place when
delivering NeoNatalie and the Placenta.
8
9
Page 6

2 Simulation of fetal heart sounds:
Use a finger to tap on the back part of the Skeleton
to simulate the desired heart rhythm.
Placenta conditions:
Delivery of complete Placenta:
Detach the complete Placenta from the velcro inside
the uterus.
3 Delivering NeoNatalie
a) Place your thumbs into the Uterus.
b) Push down on NeoNatalie’s body.
c) Assist the delivery by gently pulling the
straps with the push of NeoNatalie (this
will open the birth opening and make it
easier to deliver).
Tips for increased realism:
- For normal delivery, push directly on NeoNatalie’s chin. Deliver the rest of NeoNatalie by pushing onto
the body.
- For easier delivery lubricate NeoNatalie’s head with a few drops of water or baby oil before putting
NeoNatalie into the Uterus.
- During delivery, manipulate NeoNatalie as in a natural birth, for example by rotating the baby after
the head is delivered. This is done simply by holding onto NeoNatalie’s body inside the uterus, while
rotating the body as desired.
Delivery of incomplete Placenta:
Detatch the Placenta from the velcro inside the
uterus, but leave the small part attached inside the
uterus.
Retained Placenta:
Do not detach the Placenta. If the learner is pulling the cord, hold onto the Placenta with your
hands to ensure it stays in place.
5 Controlling blood flow
4 Delivering the Placenta
After NeoNatalie is delivered, detach the Placenta
from the velcro inside the uterus with your hands.
Tip: To ease delivery, align the Placenta vertically.
When starting with the Blood Valve in a
closed position: Push the Blood Valve inwards
and slide it sideways to regulate blood flow.
Note: If the operator lies flat, tilt MamaNatalie
MamaNatalie forward to keep the blood
running.
Note: The handle has three positions: Closed, Half-way and Full. The maximum blood flow rate is 300 ml/
minute.
10
11
Page 7

6 Controlling Uterus conditions
Unhook the uterus.
- When simulating a soft uterus: Learners may start to palpate for the soft uterus from the pubic bone
and upwards. With the uterus off the hook; you can move the soft uterus to a lower position and move
it upwards, following the palpation from the learners into the appropriate position.
7 Urine Catheterization
Let the learner insert the urine catheter through the urethra until the bladder is empty.
Navel
B
A
B
A
To simulate
Hold the uterus air reservoir with a relaxed hand
above the navel.
Note that your hand must be open (illustration on the
right). When the Learner is palpating or massaging the
uterus, the Learner will feel a soft uterus.
To simulate uterus contraction
While moving the position of your hand forwards
and below the navel, gradually squeeze reservoir A
to simulate a uterus contracting and getting harder.
Squeezing reservoir A fully, while pressing your
hand forwards below the navel will simulate a fully
contracted uterus (illustration on the right).
Soft Uterus condition
Navel
Navel
8 Cervix Landmark
To create the cervix landmark, tighten the Cervix Ribbon to the desired level (see page 9).
9 Simulation of Baby Cries
Gently press the Squeaker Unit, located in the
waist belt, to emit the sound of a crying baby.
10 Administration of medications
MamaNatalie has a Rectum where medications can
be inserted. To simulate intramuscular administration
of medications, use the 20 ml Syringe (do not use a
needle).
B
A
Tips for performing simulations
- Pay attention to the learners!
- Respond appropriately to the treatment given.
- Play and act as a birthing mother.
For demonstration videos and updated information visit: www.laerdalglobalhealth.com
B
A
Tip:
- Before simulation of any uterus condition: Ensure that the uterus is unhooked.
- Hide your hand behind the Uterus Air Reservoir B by angling your hand as showed in the illustrations.
The learner should not feel your hand.
12
13
Page 8

Mama-U
Mama-U is a uterus training model for postpartum care designed to be compatible for use with
MamaNatalie.
Installing Mama-U in MamaNatalie
Maintenance, storage and transport
Cleaning and storage
Textile parts
For a light cleaning:
1 Use a soft cloth soaked in soapy water to clean all textile parts of MamaNatalie.
2 Rinse in clean water.
3 Hang to dry.
Note: Do not hang MamaNatalie to dry in direct sunlight.
For a more thorough cleaning:
1 Soak the MamaNatalie Stomach Skin in water for an hour (soaking the neoprene in water will
dissolve salt and chemical build-up in the material).
2 Hang to dry, avoiding direct sunlight.
1) Expand Mama-U into a ready-to-use
position.
3) Insert Mama-U into the uterus of
MamaNatalie. Be sure to push all the way in.
2) Get MamaNatalie ready by opening the
outer skin and uterus.
4) Snap the base of Mama-U into the edge of
the blood tank.
Hard parts
Use a soft cloth soaked in soapy water to wipe off dirt.
Blood and urine
- Do not store MamaNatalie with blood in the Blood Tank over longer periods.
- Flush the Blood Tank with clean water or, alternatively a 0.2 % NaClO (sodium hypoclorite)
solution.
- If improvized blood is used (hibiscus tea etc.), empty and flush the Blood Tank after every
day of use.
Warnings
- Do not use strong washing detergents for cleaning, since it may damage the product.
- Do not leave MamaNatalie in direct sun light.
- Do not leave MamaNatalie wet inside a bag. Clean it and dry it after use.
5) Close the MamaNatalie uterus and
outer skin. MamaNatalie is now ready for
postpartum simulation.
14
15
Page 9

Disassembly and reassembly
It may be practical to disassemble MamaNatalie before cleaning or other maintenance. In order to
disassemble, follow the below steps. To reassemble, follow the steps in the reverse order.
a) Remove the Stomach Skin from the top
of the Skeleton
c) Pull gently on the Blood Tube to release it
from the Blood Nipple.
Tip: When reassembling, position the blood nipple into the opening of the Skeleton with the inlet tube
pointing downwards. Twist 90 degrees to fixate.
b) Detach the Stomach Skin from the back of
the Skeleton.
d) Twist the Blood Nipple 90 degrees to
release from Skeleton.
e) Release the Uterus Strap by opening the
press-stud band. The skin is now loose and
can be removed from the Skeleton.
Note: When reassembling, make sure the urethra
is positioned well into the small opening of the
Uterus Strap before closing the Uterus Strap
around the skeleton. When correctly positioned,
the urethra should be visible for the Learner from
the outside.
Transport
MamaNatalie can be transported ready for simulation.
When transporting a water filled NeoNatalie, use the storage pouch included in the NeoNatalie kit.
Alternatively transport NeoNatalie inside the Uterus of MamaNatalie.
Troubleshooting
Artificial blood flows when it should not
- Check that the Blood Valve is in the closed position.
- Check all components for leakage.
- If the Blood Tube seems to be blocked:
a) Fill the Penguin with water and try to flush the water through the tube from the blood outlet
inside the uterus.
b) Inspect the tube from the Blood Tank. If the tube is deformed, massage the relevant point
with your fingers until the tube has opened.
Hard to push NeoNatalie’s head out of the vaginal opening
- Check that the Uterus hangs on the hook of the Blood Tank Cap.
- Check the position of the head.
- Check that the Stomach Skin is fixed with the Uterus Strap to the pubic bone.
- Try lubricating NeoNatalie’s head with a few drops of baby oil.
Urine does not work as expected
- Inspect the Urine Bladder for air. If air is present remove air by squeezing the bladder with a
urine catheter inserted into the urethra. Fill the Urine Bladder with water as instructed.
- While the Learner is catheterizing, the Operator can assist the fluid flow by gently pressing
directly onto the Urine Bladder located behind the pubic bone.
16
17
Page 10

Manufactured by Laerdal Medical in China.
Contact address:
Tanke Svilandsgate 30, P.O. Box 377
4002 Stavanger, Norway.
Tel. +47 51 51 17 00
Fax +47 51 52 35 57
E-mail: mamanatalie@laerdal.no
MamaNatalie, the Laerdal Logo, and “helping save lives” are
all trademarks of Laerdal Medical.
20-03048 Rev B
18
 Loading...