


WS-7390U
Wireless 433 MHz
Radio-controlled Weather Station
Instruction Manual
TABLE OF CONTENTS
Topic |
Page |
Inventory of Contents/Additional Equipment |
3 |
About WWVB |
4 |
Quick Set-Up Guide |
5-6 |
Detailed Set-Up Guide |
|
Battery Installation |
7-8 |
Program Mode |
|
Time and Date |
8-9 |
Function Keys |
9 |
12/24 hour Time Setting |
9 |
Time Setting |
10 |
Time Zone Setting |
10-11 |
Daylight Saving Time (DST) Setting |
11-12 |
Setting Day, Date, and Year |
12-13 |
Selecting °F or °C |
13 |
Setting the LCD Contrast |
13 |
Features |
|
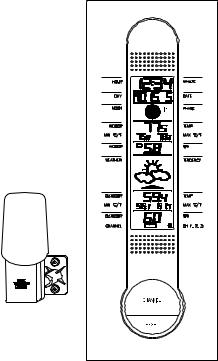
Weather Forecast Icons |
14-15 |
Indoor Temperature, Humidity, & Comfort |
15 |
Level Indicator |
|
Outdoor Temperature & Humidity |
16 |
Minimum & Maximum Records (Indoor, |
16 |
Outdoor, & Resetting) |
|
Additional Remote Thermo/hygro Sensors (Set-Up, |
17-18 |
Viewing, & Operation) |
|
Mounting |
19-21 |
Troubleshooting |
22 |
Maintenance & Care |
23 |
Specifications |
24 |
Warranty Information |
25-26 |
2
INVENTORY OF CONTENTS
1.The indoor weather station
2.Remote temperature sensor (model TX4U)
3.Instruction manual and warranty card
ADDITIONAL EQUIPMENT (not included)
1.Four fresh AA 1.5V alkaline batteries
2.Phillips screwdriver (for mounting)
3
ABOUT WWVB
The NIST (National Institute of Standards and Technology—Time and Frequency Division) radio station, WWVB, is located in Ft. Collins, Colorado and transmits the exact time signal continuously throughout the United States at 60 kHz. The signal can be received up to 2,000 miles away through the internal antenna in the indoor weather station. However, due to the nature of the Earth’s Ionosphere, reception is very limited during daylight hours. The indoor weather station will search for a signal every night when reception is best. The WWVB radio station derives its signal from the NIST Atomic clock in Boulder, Colorado. A team of atomic physicists continually measure every second of every day to an accuracy of ten billionths of a second a day. These physicists have created an international standard, measuring a second as 9,192,631,770 vibrations of a Cesium 133 atom in a vacuum. For more information about WWVB please see the NIST website at http://www.boulder.nist.gov/timefreq/stations/wwvb.htm
4
QUICK SET-UP GUIDE
Hint: Use good quality Alkaline Batteries and avoid rechargeable batteries.
1.Have the indoor weather station and remote thermo/hygro sensor 3 to 5 apart.
2.Batteries should be out of both units for 10 minutes.
3.Place the batteries into the remote thermo/hygro sensor first then into the indoor weather station. (All remote thermo/hygro sensors must be started before the indoor weather station)
4.DO NOT PRESS ANY BUTTONS FOR 10 MINUTES.
In this time the indoor weather station and remote thermo/hygro sensor will start to talk to each other and the indoor weather station will show both the indoor temperature and humidity and the outdoor temperature and humidity. If the indoor weather station does not display all values after the 10 minutes please retry the set up as stated above. After all values are displayed for 10 minutes you can place your remote thermo/hygro sensor outdoors and set your time.
The remote thermo/hygro sensor should be placed in a dry, shaded area. The remote thermo/hygro sensor has a range of 80 feet. Any walls that the signal will have to pass through will reduce distance. An outdoor wall or window will have 20 to 30 feet of resistance and an interior wall will have 10 to 20 feet of resistance. Your distance plus resistance should not exceed 80 ft. in a straight line.
NOTE: Fog and mist will not harm your remote thermo/hygro sensor but direct rain must be avoided.
5
To complete the set up of your indoor weather station after the 10 minutes have passed please follow the steps in the Detailed Set Up Guide.
Note: The remote thermo/hygro sensor transmits a signal every 3 minutes; after the batteries have been installed, the indoor weather station will search for the signal for a duration of 5 minutes. If there is no temperature reading in the OUTDOOR LCD after 5 minutes, make sure the units are within range of each other, or repeat the battery installation procedure.
6
DETAILED SET-UP GUIDE
BATTERY INSTALLATION
A.Remote Thermo/hygro Sensor
1.Pull the cylindrical rain cover off the remote thermo/hygro sensor.
2.Remove the battery cover (located on the backside of the remote thermo/hygro sensor, above the mounting post and bracket).
3.Press the arrow and slide the battery cover off.
4.Observing the correct polarity install 2 AA batteries.
5.Replace battery cover, and place rain cover snugly onto the remote thermo/hygro sensor.
B.Indoor Weather Station
1.Remove the battery cover. To do this, insert a solid object in the space provided at the lower-central position of the battery cover, then push up and pull out on the battery cover.
2.Observe the correct polarity, and install 2 AA batteries.
3.Replace the battery cover.
Note: Immediately after the batteries have been installed, each LCD (Liquid Crystal Display) will flash, and a tone will sound. Within a few seconds the indoor temperature, indoor relative humidity, and the weather icons (sun and clouds) will be displayed. If these items are not displayed remove the batteries for 10 seconds and reinstall. If the outdoor temperature is not displayed within four minutes, remove the batteries from both units, wait 10 seconds, and reinstall. The time will show -:-- and start searching for the signal. If it successfully receives the time signal (reception
7
is achieved easiest at night), it will display the correct time (factory setting is Eastern time zone).
PROGRAM MODE
Programming Note: If 20 seconds is allowed to pass during programming modes, the unit will confirm/set the last information entered—the display will stop flashing and return to normal timedate readings
TIME AND DATE
There are two methods by which the time and date can be set:
1) Automatically via WWVB reception (only need to set the time zone in section III).
This method requires you to do nothing but wait for the signal to be received, and to select a time zone (default is Eastern Time Zone). Reception usually takes approximately 6-8 minutes during optimal conditions. The best conditions for reception is at night, between midnight and 6:00 am, when there is less atmospheric interference. To keep your time as accurate as possible, the indoor weather station conducts a WWVB search every night between these hours, and overrides any time that has been set manually. The WWVB tower icon (appearing in the TIME LCD) will flash when a search is in progress, will remain steady when the signal has been received, and nothing will be displayed in all other situations. If the WWVB time has not been received after 10 minutes of battery installation, you may manually set the time or leave the time function alone (reception will occur regardless).
8
 Loading...