

Page 1
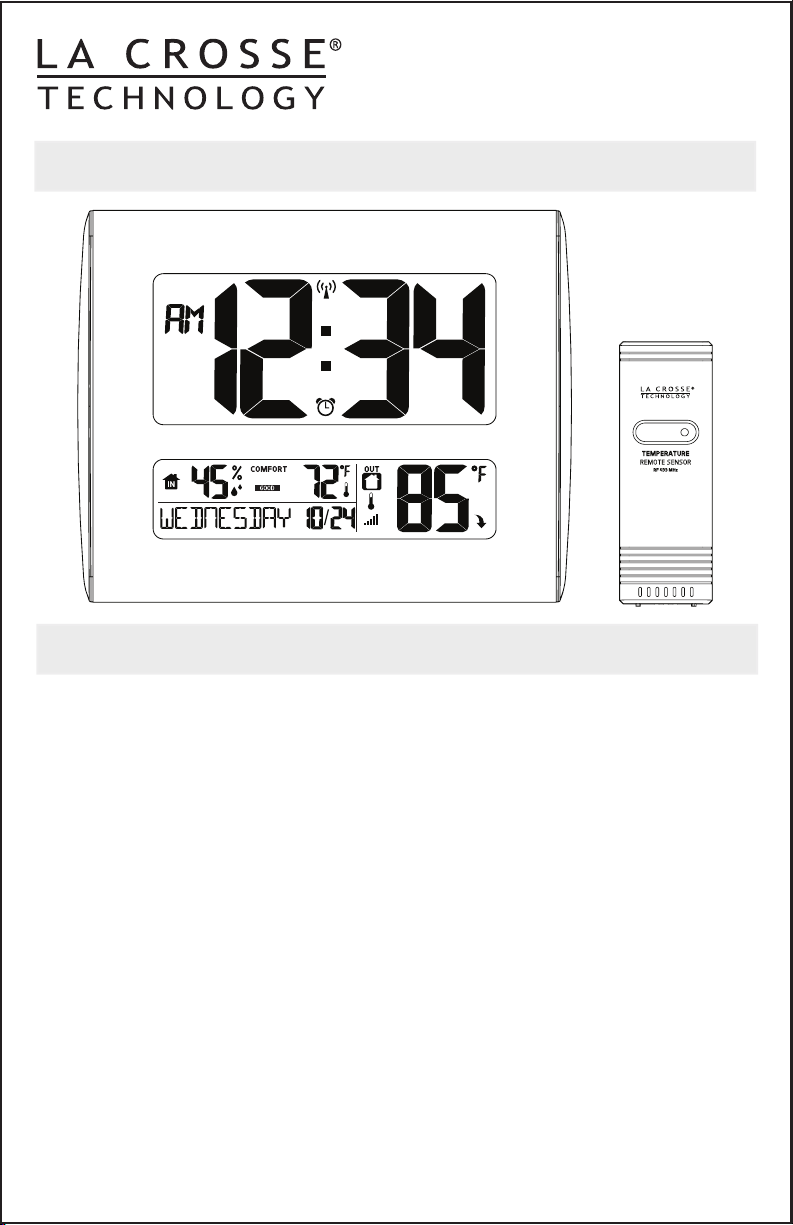
Atomic Digital Clock
Model: BBB86095
Instructional Manual
DC: 033116
Table of Contents
Display Outdoor Temperature or Seconds .............................
LCD Features ...................................................................
Setup ..............................................................................
Atomic Time Signal ...........................................................
Settings: Time, Date, etc. ..................................................
Indoor Comfort Statement .................................................
Set Time Alarm ................................................................
Snooze ............................................................................
Deactivate/Activate Alarm ..................................................
Indoor/Outdoor Temperature and Humidity ..........................
Temperature Trend Arrows .................................................
Sensor Reception ..............................................................
Low Battery Icon ..............................................................
Mount Temperature Sensor ................................................
Position Clock ..................................................................
Restart ............................................................................
Care and Maintenance .......................................................
Specifications ...................................................................
Warranty and Support .......................................................
FCC Statement .................................................................
Canada Statement ............................................................
1
1
2
2
3
5
6
6
6
7
7
7
8
8
8
8
9
9
10
11
11
Page 2

Display Outdoor Temperature or Seconds
This versatile clock allows you to display outdoor temperature or
seconds counting in the outdoor temperature area. Press the + button
to toggle between outdoor temperature, or seconds. Clock will stay on
selected option.
Outdoor Temperature Seconds Counting
LCD Features
SET + - ALARM SNOOZE
1
2
3
4
5
1
Buttons (on back)
2
Atomic Signal Reception Tower
3
Low Battery Icon (Clock)
4
Snooze Icon
Alarm Icon
5
6
AM/PM Indicator
7
Atomic Time
6
7
14
11
15
10
12
9
13
9
Indoor Comfort Statement
10
Indoor Temperature
11
Outdoor Temp or Seconds
Weekday
12
13
Month/Date
14
Sensor Reception Strength
15
Outdoor Temperature Trend
8
8
Indoor Humidity
Page 1 www.lacrossetechnology.com/support BBB86095
Page 3

Setup
1. Insert 2-AA batteries into the TX191 sensor according to polarity.
2. Insert 2-AA batteries into the clock.
3. After 5 minutes place sensor in a shaded outdoor location.
4. Set time and date.
AA
AA
AA
AA
Atomic Time Signal
• Once batteries are installed, the clock will automatically search for
the atomic time signal at UTC 7:00, 8:00, 9:00, 10:00, and 11:00.
• If there is no WWVB reception, the clock will search for the atomic
time signal every 2 hours until the WWVB time is received.
• After reception, this clock will only search for the atomic signal
after midnight.
• From normal time display, press and release the SET button to
search for the WWVB time signal.
• Please be sure you have selected your time zone from the list in the
Settings menu. When the Atomic time signal is received, the clock
will set to the time zone selected. Default is Eastern time.
• For information about WWVB visit:
www.nist.gov/pml/div688/grp40/wwvb.cfm
BBB86095 www.lacrossetechnology.com/support Page |2
Page 4
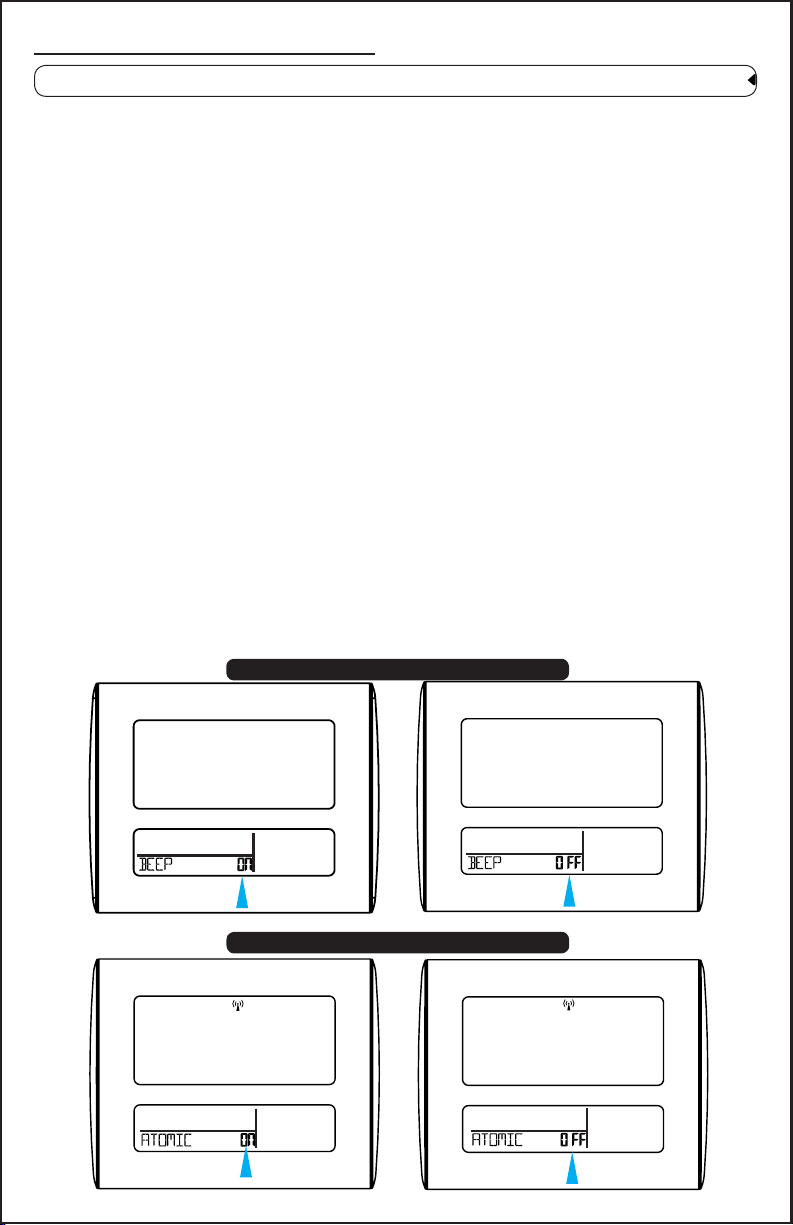
Settings: Time, Date, etc.
Note: Only press one button at a time when setting.
• Hold then release the SET button to enter time set mode.
• Press and release the + or - buttons to adjust the values. Hold to
adjust quickly.
• Press and release the SET button to conrm and move to the next
item.
• Press and release the SNOOZE button at any time to exit.
Time set order:
1. Beep ON/OFF
2. Atomic ON/OFF
3. DST ON/OFF (Daylight Saving Indicator)
4. Time Zone
5. 12/24 hour time format
6. Hour
7. Minutes
8. Year
9. Month
10. Date
11. Fahrenheit/Celsius
To begin: Hold the SET button 3 seconds, then release, to enter the
settings menu:
1. Beep ON (default) or OFF
COMFORT
COMFORT
2. Atomic ON (default) or OFF
COMFORTCOMFORT
Page 3 www.lacrossetechnology.com/support BBB86095
Page 5

Note: If Atomic OFF is selected, you will skip DST and Time Zone
and move directly to the hour.
3. DST ON (default) or OFF
COMFORT
4. Time Zone-EST (default)
Time Zone
AST
EST
CST
MST
PST
AKT
HAT
COMFORT
5. 12/24 Hour Time Format
COMFORT
COMFORT
Atlantic
Eastern
Central
Mountain
Pacific
Alaskan
Hawaiian
Note: Time Zone needs to be
set to your area for the hours
to be correct.
COMFORT
6. Hour 7. Minutes
COMFORT
BBB86095 www.lacrossetechnology.com/support Page |4
COMFORT
Page 6

8. Year 9. Month 10. Date
COMFORT
COMFORT
COMFORT
11. Fahrenheit or Celsius
COMFORT
COMFORT
• Press and release the SET button to conrm and exit the settings
menu.
• Press and release the SNOOZE button at any time to exit.
Indoor Comfort Indicator
• The indoor comfort indicator tells you at a glance if the humidity
level in your home is humid, comfortable or dry.
• With this indicator you can decide to add or remove humidity for
optimal comfort.
COMFORT
HUMID
GOOD
DRY
Page 5 www.lacrossetechnology.com/support BBB86095
Page 7

Set Time Alarm
Note: The alarm will be active when set.
Hold ALARM 3 seconds: Alarm Hour
Use the +/- button to adjust.
COMFORT
Press ALARM: Alarm Minutes
Use the +/- button to adjust.
COMFORT
• Press and release the ALARM button to conrm and exit the alarm
menu.
• Press and release the SNOOZE button at any time to exit.
• Alarm is crescendo sound alarm. When the alarm sounds, it
continues for 2 minutes and then shuts off completely.
Snooze
• When the alarm sounds, press the SNOOZE button to silence the alarm
for 10 minutes.
• The snooze icon Zz will ash.
• Press any button except SNOOZE to silence the alarm for 24 hours.
Deactivate/Activate Alarm
• The alarm is active when set.
• From normal time display, press and release the ALARM button to
deactivate or activate the alarm.
• The alarm icon (clock) will show when active.
BBB86095 www.lacrossetechnology.com/support Page |6
Page 8

Indoor/Outdoor Temperature and Humidity
• Indoor and outdoor temperature and humidity are displayed in the
lower section of the clock.
• Select Fahrenheit or Celsius in the Settings menu.
• Temperature trend arrows track temperature over the past 3 hours.
• The outdoor sensor reception signal indicates the connection strength
between sensor and clock.
Temperature/Humidity
Temperature
Trend
Arrows
Temperature Trend Arrows
The outdoor temperature (2°F / 1°C) trend indicators update every 30
minutes or less. This provides a 3 hour comparison which changes on
every ½ hour:
Example: At 3:00 - compare to 12:00 data;
at 3:30 -compare to 12:30 ….. etc.
Temperature rose over
the past 3 hours
Temperature is
unchanged over the
past 3 hours
Temperature fell over
the past 3 hours
Sensor Reception
• Hold the - button 3 seconds to search for the sensor.
• The strength signal icon will ash until the sensor signal is received
or for 3 minutes if no signal available.
• The signal will show solid when connected to the sensor.
Page 7 www.lacrossetechnology.com/support BBB86095
Page 9

Low Battery Icon
• Battery icon by Time-Change batteries in the clock.
Mount Temperature Sensor
• Mount the outdoor sensor on a north-facing wall or in any
well-shaded area. Under an eave or deck rail is preferred.
• The maximum wireless transmission range to the forecast station is
over 300 feet (91 meters) in open air; this does not include barriers
such as walls or oors.
• Be sure the outdoor sensor is mounted vertically.
Position Clock
The clock has pullout stand sit on a desk or table, or a hanging hook
to mount on the wall.
• For best Atomic time reception orientate the clock with the front or
the back facing Ft. Collins, Colorado.
• Choose a location 6 feet or more from electronics such as cordless
phones, gaming systems, televisions, microwaves, routers etc.
• Place within range of the outdoor sensor (300 feet open air).
Restart
When the outdoor readings show dashes:
• Bring the sensor in the house ve feet from the station.
• Remove batteries from the sensor, and the batteries from the clock.
• Press any button 20 times.
• After 15 minutes insert batteries into the sensor, and into the clock.
• Wait 15 minutes to establish a strong connection. Place sensor outside
in shaded location.
BBB86095 www.lacrossetechnology.com/support Page |8
Page 10

Care and Maintenance
• Do not mix old and new batteries
• Do not mix Alkaline, Standard, Lithium or Rechargeable Batteries
• Always purchase the correct size and grade of battery most suitable
for intended use.
• Replace all batteries of a set at the same time.
• Clean the battery contacts and also those of the device prior to
battery installation.
• Ensure the batteries are installed with correct polarity (+ and - ).
• Remove batteries from equipment when it is not to be used for an
extended period of time.
• Promptly remove expired batteries.
Specications
Indoor Temp Range: 32°F to 122°F (0°C to 50°C)
Indoor Humidity Range: 10% to 99% RH
Outdoor Temp Range: -40°F to 140°F (-40°C to 60°C)
Distance: Over 300 ft. (91 meters) RF 433MHz (open air)
Power Clock: 2-AA, IEC, LR6 batteries (not included)
Power TX191: 2-AA, IEC, LR6 batteries (not included)
Battery life Clock: over 18 months with reputable batteries
Battery life TX191: over 12 months with reputable batteries
Dimensions Clock: 9.51” W x 7.51” T x 1.0” D
(24.16cm W x 19.08cm T x 2.54cm D)
Dimensions TX191: 1.57” W x 4.49” T x 0.94” D
(3.98cm W x 11.40cm T x 2.39cm D)
Page 9 www.lacrossetechnology.com/support BBB86095
Page 11

Warranty and Support
La Crosse Technology, Ltd. provides a 1-year limited time warranty
(from date of purchase) on this product relating to manufacturing
defects in materials & workmanship.
Before returning a product, please contact our friendly
customer support with questions or visit our online help:
Phone: 1-608-782-1610
Online Product Support:
www.lacrossetechnology.com/support
Product Registration:
www.lacrossetechnology.com/support/register
View full warranty details online at:
www.lacrossetechnology.com/warranty_info.pdf
Warranty Address:
La Crosse Technology, Ltd
2830 S. 26th St.
La Crosse, WI 54601
Protected under U.S. Patents:
5,978,738 | 6,076,044 | RE43903
BBB86095 www.lacrossetechnology.com/support Page |10
Page 12

FCC Statement
This equipment has been tested and found to comply with the limits for a Class
B digital device, pursuant to part 15 of the FCC Rules. These limits are
designed to provide reasonable protection against harmful interference in a
residential installation. This equipment generates, uses, and can radiate radio
frequency energy, and if not installed and used in accordance with the
instructions, may cause harmful interference to radio communications.
However, there is no guarantee that interference will not occur in a particular
installation. If this equipment does cause harmful interference to radio or
television reception, which can be determined by turning the equipment off
and on, the user is encouraged to try to correct the interference by one or
more of the following measures:
• Reorient or relocate the receiving antenna.
• Increase the separation between the equipment and receiver.
• Connect the equipment into an outlet on a circuit different from that to which
the receiver is connected.
• Consult the dealer or an experienced radio/TV technician for help.
This device must not be co-located or operating in conjunction with any other
antenna or transmitter.
Operation is subject to the following two conditions:
(1) This device may not cause harmful interference, and
(2) This device must accept any interference received, including interference
that may cause undesired operation.
Caution!
The manufacturer is not responsible for any radio or TV interference caused
by unauthorized changes or modications to this equipment. Such changes or
modications could void the user authority to operate the equipment.
All rights reserved. This manual may not be reproduced in any form, even in
part, or duplicated or processed using electronic, mechanical or chemical
process without the written permission of the publisher.
This booklet may contain errors or misprints. The information it contains is
regularly checked and corrections are included in subsequent editions. We
disclaim any responsibility for any technical error or printing error, or their
consequences.
All trademarks and patents are recognized.
Canada Statement
This device complies with CNR Industry Canada license -exempt devices.
Operation is subject to the following two conditions:
(1) This device may not cause interference; and
(2) This device must accept any interference, including interference that may
cause undesired operation of the device.
Page 11 www.lacrossetechnology.com/support BBB86095
 Loading...