

La Crosse 810-163TWR Quick Manual
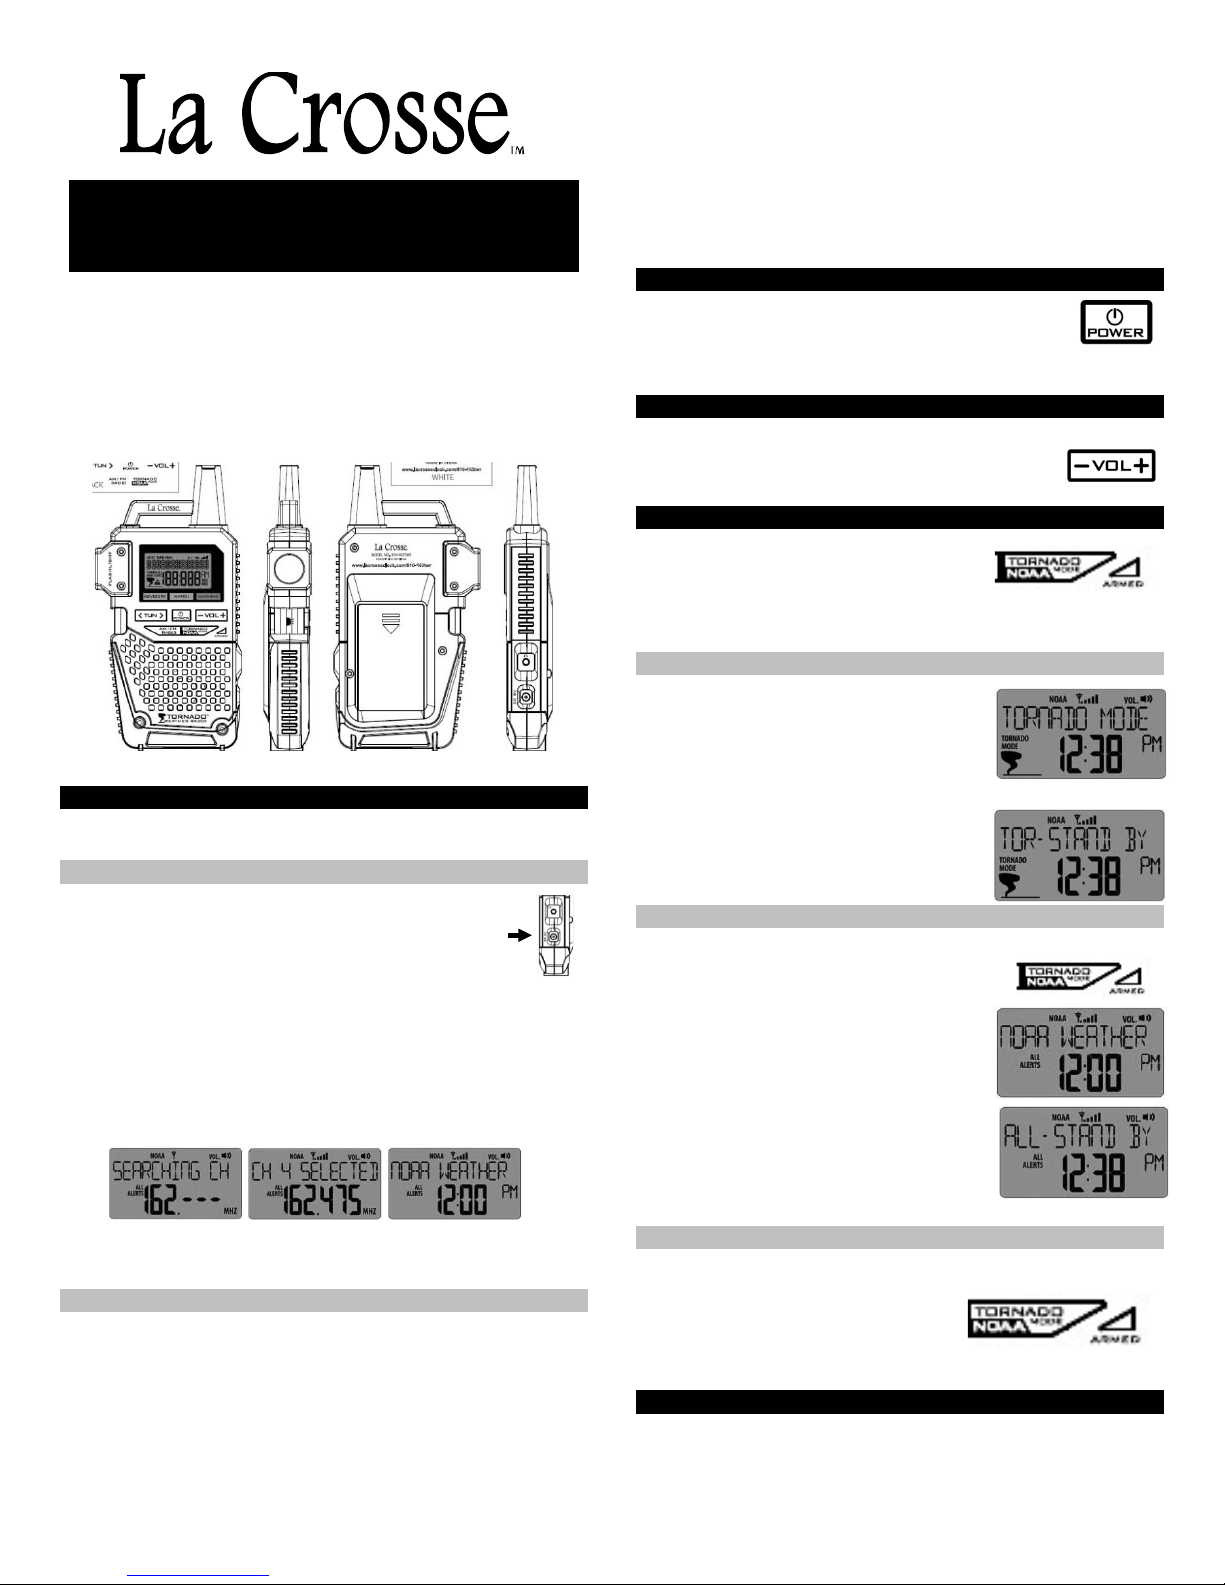
Tornado Weather Radio with
AM/FM/NOAA Weather Band
Model 810-163TWR
The revolutionary La Crosse® 810-163TWR Tornado Weather Radio is the
first ever NOAA Weather Radio to offer a simple one button tornado-mode
solution with no complicated programming. It is the newest additional to the
family’s emergency preparedness kit. One click activates the tornado mode
which filters out all other NOAA alerts except for tornados. Tornado mode is
designed to encourage standby use, without unwanted alert distractions,
especially while sleeping or working. This new technology combines the
versatility of a full-featured AM/FM/NOAA weather radio with a quick, userfriendly one button tornado-mode solution.
QUICK SETUP
OPERATION A/C power or optional batteries (sold separately).
A/C Operation
• Insert the included 6.0V adapter into the wall outlet, then into
the DC power port on the side of the radio.
• The radio will automatically turn on and search for the first
available weather band channel for 30 seconds.
• The weather band channel will start playing before the 30
seconds are complete.
• After 30 seconds or if you press the TORNADO MODE/NOAA button,
the channel will be confirmed.
THAT’S IT! Your radio is functional and will alert you to all weather
emergencies.
Convenient one click of the TORNADO MODE/NOAA button activates the
tornado mode which filters out all other NOAA alerts except for tornados.
Note: Advan c ed programming to select FIPS codes and channels is
available in the program me nu.
Optional Battery Operation
Use optional batteries during a power outage. Battery operation is not for
sustained or continual use.
• Remove battery cover from back of radio.
• Install 3 x AAA LR3 alkaline batteries (not included).
• Replace battery cover.
• The radio will automatically turn on and search for the first available
weather band channel for 30 seconds.
• The weather band channel will start playing before the 30 seconds are
complete.
• After 30 seconds or if you press the TORNADO MODE/ NOAA but to n,
the channel will be confirmed.
• THAT’S IT! Nothing else is required for the weather radio to work! There
are many op tions to us e the full fe at ures of thi s T ornado Weather Radio.
• Note: An option to select FIPS Codes is in the progr am menu (pro-
settings).
• Do not mix old and new batteries.
• Do not mix alkaline, standard, or rechar geable batteries.
POWER BUTTON
OFF: Press and release the POWER button to turn the radio
OFF. The radio will the display time when off.
Note: The radio will save the last channel, mode and volume used, when
turned off.
VOLUME BUTTON
• Default v olume is 10 .
• Use the –VOLUME+ button to adjust the volume in any
radio mode.
ONE BUTTON ALERT SETTINGS
Easy 1 button press to select:
• Tornado Only Alerts
• All Hazards Alerts
Note: The weather alert radio will always be armed regardless of type
of alert selected.
Tornado Only Alerts:
• Press and release the TORNADO/NOAA
button to select only Tornado Alerts.
• Hold the TORNADO MODE/NOAA button or 2
seconds to enter or exit Tornado Alerts
STAND BY mode.
• In Stand By mode, the radio will be muted until a Tornado alert is
received.
• Hold the TORNADO/NOAA button for 2
seconds to exit stand by mode.
• While in stand by mode, you may press the
VOL + button to exit stand by mode.
All Alerts:
Press and release the TORNADO MODE/NOAA
button to choose All Alerts Mode.
• Hold the TOR N ADO MODE/NOAA button or 2
seconds to enter or exit All Alerts STAND BY
mode.
• In Stand By mode, the radio will be muted,
until any alert (including tornado) is received.
• For all weather alerts, the red LED will flash
every 2 seconds.
• Hold the TORNADO/NOAA button for 2
seconds to exit standby mode.
• While in standby mode, press the VOL + button
to exit standby mode.
Note: The radio will always be armed regardless
of type of alert selected.
RED LED LIGHT
• For all radio modes, the red LED will be solid (ARMED) to indicate the
radio is listening for alerts.
• The red arm ed light is on in AM or FM
mode as the NOAA is s till unde r a standby
condition.
• For all weather alerts, the red LED will flash every 2 seconds.
TORNADO ALERTS
• When Tornado Alerts occur, the LCD backlight color changes to RED
1
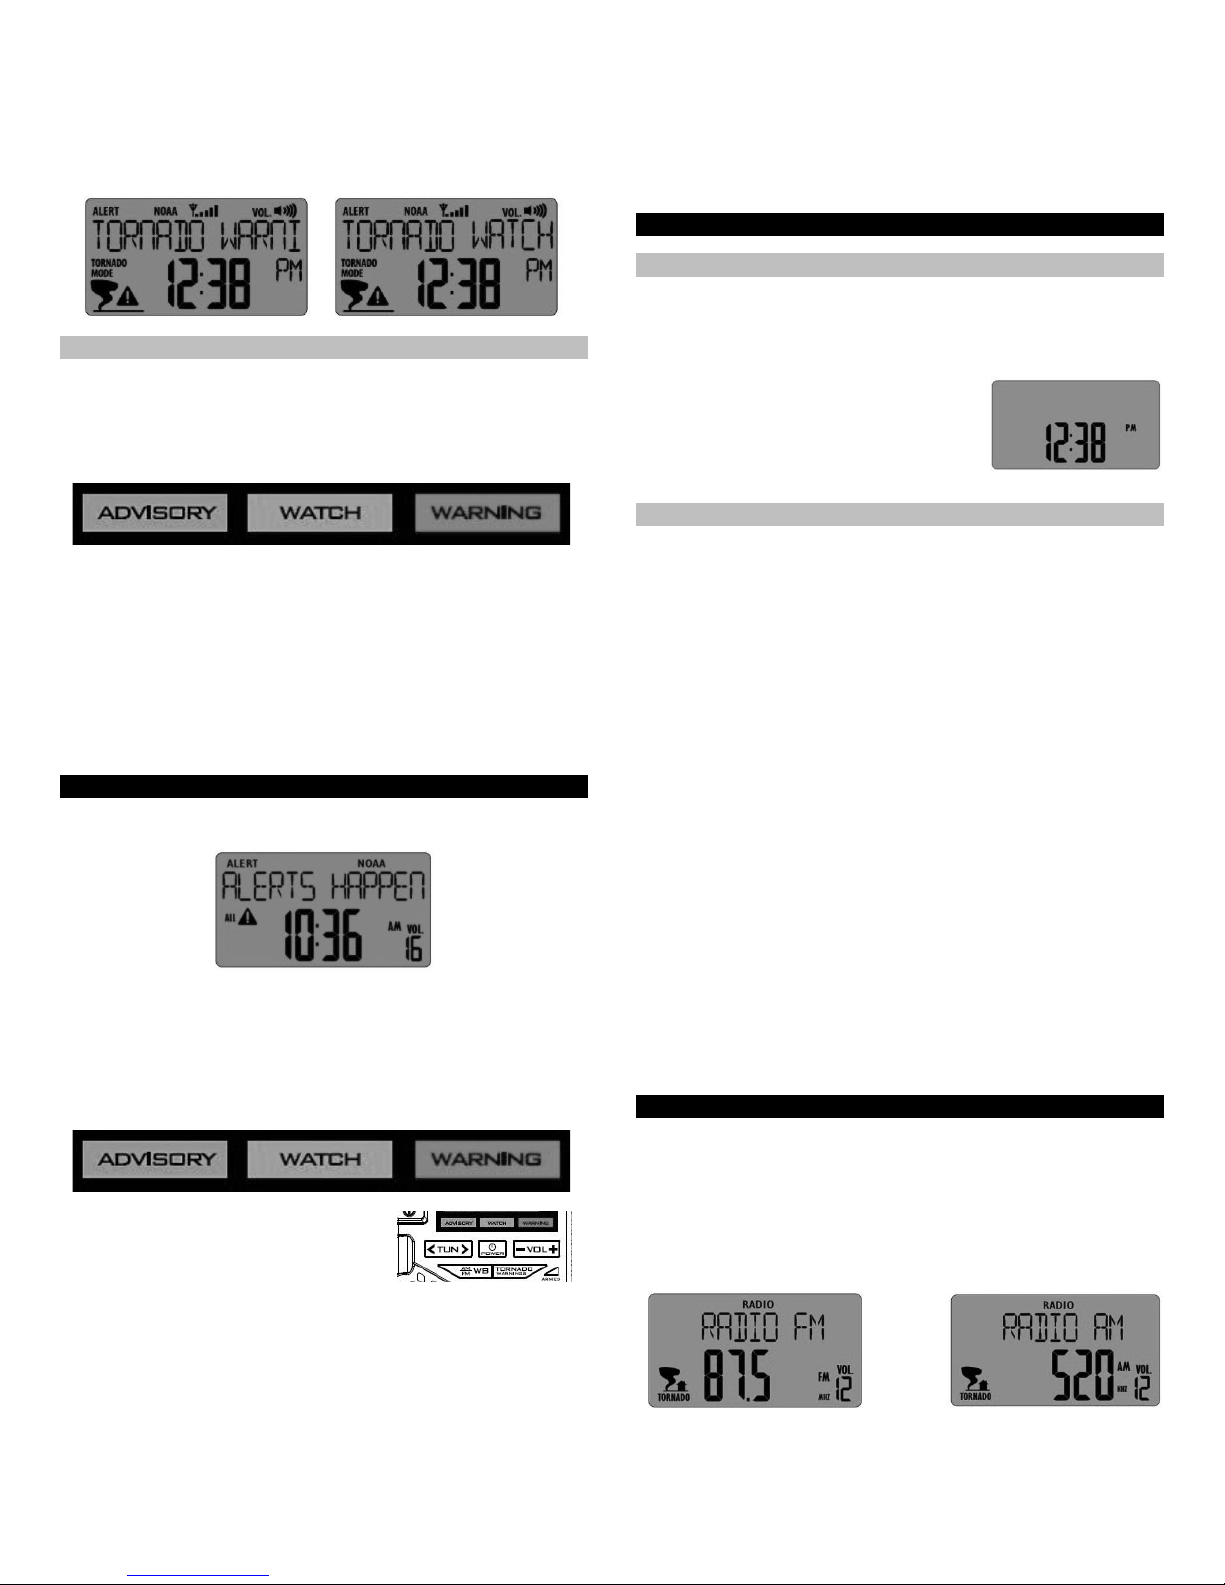
during alert.
• The icon “!” will display on the LCD.
• The Tornado Alerts include TORNADO WARNING and TORNADO
WATCH.
• TORNADO WARNING message will scroll as it is t oo lo ng to f it the L CD.
The scrolling speed approximately 2 bits per second.
ALERT TYPE STATUS INDICATOR
• The color-coded status indicator will blink for at least 60 seconds or until
the user acknowledges the alert.
• Press the TORNADO MODE/NOAA button to acknowledge the alert.
• The status indicator will blink or remain steady until the alert time
expires.
• For all weather alerts, the red LED will flash every 2 seconds.
• The volume level will increase to level 16 (the maximum sound)
automatically.
• The radio will stop broadcasting when the final tone of the message is
received.
• If a tone or audio alert is automatically activated it must remain active for
at least 8 s econds.
• When voice prog ramming from the rece iver is automatically turned on
the voice must remain on at least until the EOM code is received, or the
user turns it off.
• Press the –VOL+ button to adjust the volume as needed.
ALL ALERTS
• When the alerts happen in the ALL ALERTS MODE the LCD backlight
color changes to RED during alert.
ALERT TYPE LED (ADVISORY , WATCH, WARNING)
• Indicate s the alert typ e.
• The color-coded status indicator shall blink for at least 60 seconds or
until the user acknowledges the alert.
• Press the TORNADO MODE/WB button to acknowledge the alert.
• The status indicator will blink or remain steady until the alert time
expires.
RED LED (TORNADO ARMED LIGHT)
(Beside the TORNADO MODE/WB button):
LED will blink (0.8 seconds in every 2
seconds).
• The volume level will increase to level 16 (the maximum sound)
automatically.
• The radio will stop broadcasting when the final tone of the message is
received.
• If a tone or audio alert is automatically activated it must remain active for
at least 8 s econds or u ntil silenced by the user.
• When voic e programming from the receive r is automaticall y turned on
the voice must rem ain on at least until the EOM (end of message) code
is received, or the user turns it off.
• Press the –VOL+ button to adjust the volume as needed.
• During any alert the volume will increase to 16 (the maximum
sound) automatic ally.
• The unit will stop broadcasting when the final tone of the alert
message is receive d.
PROGRAM MENU
TIME SET
The radio must be OFF in order to set the time and other program
settings.
Hold the POWER button for two seconds to enter the program menu.
• HOUR: The hour will flash. Use the –VOL+
button to adjust the hour. Press the POWER
button to confirm and move to the minutes.
• MINUTES: The minutes will flash. Us e the –
VOL+ button to ad just the min u tes. Press the
POWER button to confirm and move to the
optional FIPS code settings.
OPTIONAL PRO-SETTINGS
These settings are not required for the alerts to function. These settings
allow you flexibility in the alerts* you wish to receive for a given location.
FIPS CODE
CHANNEL
PRO-SETTINGS: From scroll speed mode, press the 〉navigation button to
enter pro-settings.
Press the OK button to m ove to SET FIPS CODE setti ng. Press t he OK
button again to select the FIPS Code (Federal Information Processing
Standard). The first “bit” will flash.
1. FIPS CODE: Use the ︿ or ﹀ navigation buttons to adjust the first “bit”
of the code. Use the 〉button to select the second bit of the code.
2. Use the ︿ or ﹀ navigation butt ons to adjus t t he “bit”. R epeat thes e
steps for th e rest of the b i ts.
3. Press the O K b utton to confirm the se tting.
Remove FIPS Code: To rem ove a FIPS Code, s et all the „ bits‟ to “0”.
Note: Find USA FIPS Codes: http://nws.noaa.gov/nwr/indexnw.htm
SET NOAA CHANNEL:
From the FIPS Code settings press the 〉navigation button to move to
manual channel set. Press the OK button to enter the setting.
1. Use the ︿ or ﹀ navigation buttons to select a weather band channel.
2. Press the OK button to confirm. The radio will briefly show the NOAA
weather band selected.
AM/FM RADIO MODE
• Press the “AM/FM” button to enter Radio AM/FM mode.
• Press the “AM/FM” button to select AM or FM mode.
• The defau lt volume level is 10. The volume levels range is 1 to 16.
• Press the “–VOL+ button to adjust the volume.
• Press the < TUN > button to select the frequency.
• Hold the < TUN > button for 2 seconds, the radio will auto scan stations.
If the radio can scan the radio station, the unit will stop scan and the
frequency will be displayed.
2
 Loading...