


Ethernet Disk RAID
Network RAID Storage System
user manual manuel utilisateur guída utente handbuch
manual de instrucciones gebruikershandleiding ユーザー マニュアル

LaCie Ethernet Disk RAID (Firmware version 1.4)
User Manual
Table of Contents
Health and Safety Precautions 5
General Use Precautions 5
1. Introduction to the LaCie Ethernet Disk RAID 7
Table of Contents
page 1
2. About Your LaCie Ethernet Disk RAID
2.1. Package Content 8
2.2. Minimum System Requirements 9
2.2. Views of the System 10
3. Installing Your LaCie Ethernet Disk RAID 13
3.1. Connecting the Ethernet Disk RAID to the Network 13
3.2. Turning On the Ethernet Disk RAID 14
4. Configuring Your LaCie Ethernet Disk RAID 15
4.1. Installing the Ethernet Disk RAID Console 16
4.2. Starting the Console 17
4.3. Initializing the Disks 18
4.4. Configuring with the First Use Wizard 19
4.5. USB Devices 22
4.5.1. Attaching USB Devices 22
4.5.2. Disconnecting USB Devices 22
5. Managing Your LaCie Ethernet Disk RAID 2
5.1. Accessing the Web Manager 24
5.1.1. Windows Users 24
5.1.2. Mac Users with DHCP Server 24
5.1.3. Mac Users without DHCP Server 25
5.2. Logging In to the Manager 26
5.3. Navigating the Manager 27
5.3.1. Storage Status Tab 28
5.3.2. Connection Status Tab 28
5.4. Managing Users 29
5.4.1. Adding Users 29
5.4.2. Modifying Users 32
5.4.3. Removing Users 33
5.4.4. Working with Groups 34
5.4.5. Authentication Mode 39
5.5. Managing Shared Folders 45
5.5.1. Creating Shared Folders 45
5.5.2. Changing User Access to Shared Folders 47
5.5.3. Deleting a Shared Folder 49
8
3

LaCie Ethernet Disk RAID (Firmware version 1.4)
User Manual
5.6. Managing Backups 50
5.6.1. Changing the Recovery Password 50
5.6.2. Configuring Remote Boot 51
5.6.3. Deleting a Backup 52
5.6.4. Deleting a Client 53
5.7. Advanced Management 54
5.7.1. Alerts 54
5.7.2. Firmware 56
5.7.3. USB 57
5.7.4. System 58
5.7.5. Network 60
5.7.6. Reconfiguring the Disks 64
5.7.7. System Status 68
5.7.8. System Log 69
5.7.9. Shut Down 70
5.8. Logging Out of the Manager 70
Table of Contents
page 2
6. Working With Shared Folders 71
6.1. Accessing Shared Folders 71
6.1.1. Windows Users 71
6.1.2. Linux Users 75
6.1.3. Mac Users 77
6.2. Accessing Shared Folders Using FTP 78
6.3. Disconnecting from Shared Folders 79
6.3.1. Windows Users 79
6.3.2. Linux Users 80
6.3.3. Mac OS X Users 80
6.3.4. Other Mac Users 80
7. Protecting Local Disks 81
7.1. Getting Started 82
7.1.1. System Requirements 82
7.1.2. Additional Requirements 83
7.1.3. Installing the Microsoft iSCSI Initiator 83
7.1.4. Installing Windows Backup Software 84
7.1.5. Starting Windows Backup Software 88
7.1.6. Activating Your License 89
7.1.7. Activating Your License with an Internet Connection 90
7.1.8. Replacing Your Existing License 90
7.2. Protecting Your Disks 91
7.3. Manually Backing Up Your Disk 97
7.4. Stopping a Backup or Recovery in Progress 98
7.5. Changing the Backup Schedule 99
7.6. Receiving Event Notifications 100

LaCie Ethernet Disk RAID (Firmware version 1.4)
User Manual
7.7. Changing the Recovery Password 101
7.8. Enabling or Disabling Remote Boot 102
7.8.1. Enabling Remote Boot 103
7.8.2. Disabling Remote Boot 104
7.9. Recovering Data 105
7.9.1. Recovering Files or Folders 106
7.9.2. Recovering a Data Disk 108
7.9.3. Recovering a System Disk Using the Recovery CD 110
7.9.4. Recovering a System Disk Using While Booting Remotely 116
7.9.5. Removing Protection 120
8. Troubleshooting 121
8.1. Troubleshooting the Ethernet Disk RAID 121
8.2. Troubleshooting Windows Backup Software 124
8.3. Creating a Diagnostic File 126
8.3.1. Using Windows Backup Software 126
8.3.2. Using the Recovery CD 126
8.4. Resetting the Recovery Password in the Microsoft iSCSI Initiator 127
Table of Contents
page 3
9. Technical Specifications 128
9.1. Hardware Specification 128
9.2. Software Specification 129
10. Understanding RAID and Storage Policies 130
10.1. RAID 0 131
10.2. RAID 1 132
10.3. RAID 5 133
10.4. RAID 5 + Spare 134
10.5. RAID 10 (RAID 1 + 0) 135
11. Contacting Customer Support 136
11.1. LaCie Technical Support Contacts 137
12. Warranty Information 138
Glossary 131
LaCie Ethernet Disk RAID (Firmware version 1.4)
User Manual
Forward
page 4
Copyrights
Copyright © 2007 LaCie. All
rights reserved. No part of this publication may be reproduced, stored in a
retrieval system, or transmitted in any
form or by any means, electronic, mechanical, photocopying, recording or
otherwise, without the prior written
consent of LaCie.
GPL Source Code
GNU General Public License
(“GPL”) Software incorporated into
the LaCie Ethernet Disk RAID includes third party copyrighted software
licensed under the GPL (“GPL Software”). In accordance with the GPL:
1) the source code may be obtained
on the support pages of the Ethernet
Disk RAID on LaCie website, 2) you
may re-use, re-distribute and modify
the GPL software. With respect solely
to GPL Software, no warranty is provided, to the extent permitted by applicable law.
Trademarks
Apple, Mac, and Macintosh are
registered trademarks of Apple Computer, Inc. Microsoft, Windows 98,
Windows 98 SE, Windows 2000,
Windows Millennium Edition, Windows XP and Windows Vista are registered trademarks of Microsoft Corporation. Other trademarks mentioned
in this manual are the property of their
respective owners.
Changes
e material in this document is
for information only and subject to
change without notice. While reasonable efforts have been made in the
preparation of this document to assure
its accuracy, LaCie assumes no liability
resulting from errors or omissions in
this document, or from the use of the
information contained herein. LaCie
reserves the right to make changes or
revisions in the product design or the
product manual without reservation
and without obligation to notify any
person of such revisions and changes.
Canada Compliance Statement
is Class A digital apparatus
meets all requirements of the Canadian Interference-Causing Equipment
Regulations.
LaCie Ethernet Disk
RAID Storage System
Tested To Comply
With FCC standards
For Home or Office Use
FCC Statement
is device complies with Part 15
of the FCC Rules. Operation is subject
to the following conditions:
e devices may not cause harmful
1.
interference
e devices must accept any inter-
2.
ference received, including interference that may cause undesired
operation.
NOTE: is equipment has been
tested and found to comply with the
limits for a Class B digital device, pursuant to Part 15 of the FCC Rules.
ese limits are designed to provide
reasonable protection against harmful
interference in a residential installation. is equipment generates, uses
and can radiate radio frequency energy and, if not installed and used in
accordance with the instructions, may
cause harmful interference to radio
communications. However, there is no
guarantee that interference will not occur in a particular installation. If this
equipment does cause harmful interference to radio or television reception,
which can be determined by turning
the equipment off and on, the user is
encouraged to try and correct the interference by one or more of the following measures:
Reorient or relocate the receiving
❖
antenna.
Increase the separation between the
❖
equipment and receiver.
Connect the equipment into an out-
❖
let on a circuit different from that to
which the receiver is connected.
Consult the dealer or an experienced
❖
radio/TV technician for help.
Modifications to this product not
authorized by LaCie could void the
FCC & Industry Canada regulations
and negate your authority to operate
the product.
CAUTION: Modifications not
authorized by the manufacturer
may void the user’s authority to
operate this device.
Manufacturer’s Declaration
for CE Certification
We, LaCie, solemnly declare
that this product conforms to the following European standards: Class B
EN60950, EN55022, EN55024
With reference to the following conditions: 73/23/EEC Low Voltage Directive; 89/336/EEC EMC Directive
LaCie Ethernet Disk RAID (Firmware version 1.4)
User Manual
Forward
page 5
is symbol on the product or on its packaging
indicates that this prod-
uct must not be disposed
of with your other household waste.
Instead, it is your responsibility to
dispose of your waste equipment by
handing it over to a designed collection point for the recycling of waste
electrical and electronic equipment.
e separate collection and recycling
of your waste equipment at the time of
disposal will help to conserve natural
resources and ensure that it is recycled in a manner that protects human
health and the environment. For more
information about where you can drop
off your waste equipment for recycling,
Health and Safety Precautions
Only qualified persons are authorized to carry out maintenance on this
device.
Read this User Manual carefully
and follow the correct procedure when
setting up the device.
e power button DOES NOT
❖
turn off the system AC power. To
remove power from the Ethernet
Disk RAID, you must unplug the
AC power cord from the wall outlet
or the chassis.
Read this User’s Guide carefully,
❖
and follow the correct procedure
when setting up the device.
Do not open your LaCie Ethernet
❖
Disk RAID or attempt to disassemble or modify it. Never insert
any metallic object into the drive
to avoid any risk of electrical shock,
fire, short-circuiting or dangerous
emissions. Your LaCie Ethernet
Disk RAID contains no user-serviceable parts. If it appears to be
malfunctioning, have it inspected
by a qualified LaCie Technical Support representative.
Never expose your device to rain, or
❖
use it near water, or in damp or wet
conditions. Never place objects containing liquids on the LaCie Eth-
please contact your local city office,
your household waste disposal service,
or the shop where you purchased the
product.
CAUTION: e LaCie Eth-
ernet Disk RAID warranty may
be void as a result of the failure
to respect the precautions listed
above.
ernet Disk RAID, as they may spill
into its openings. Doing so increases the risk of electrical shock, shortcircuiting, fire or personal injury.
Make sure that the computer and
❖
LaCie Ethernet Disk RAID are
electrically grounded. If the devices are not grounded, there is an
increased risk of electrical shock.
Power requirements 100-240 V~,
4-2 A, 60-50 Hz, (Supply voltage
fluctuations not exceeding ± 10% of
the nominal, transient over-voltages
according to over-voltage category
II).
General Use Precautions
Do not expose the LaCie Ether-
❖ Doing so may damage the LaCie
net Disk RAID to temperatures
outside the range of 5° C to 35° C
(41° F to 95° F); or to operational
humidity beyond 5-80%, non-condensing, or non-operating humidity
beyond 10-90%, non-condensing.
Ethernet Disk RAID or disfigure
its casing. Avoid placing your LaCie
Ethernet Disk RAID near a source
of heat or exposing it to sunlight
(even through a window). Inversely,
placing your LaCie Ethernet Disk
RAID in an environment that is
too cold or humid may damage the
unit.
Always unplug the LaCie Ethernet
❖
Disk RAID from the electrical outlet if there is a risk of lightning or
if it will be unused for an extended
LaCie Ethernet Disk RAID (Firmware version 1.4)
User Manual
Forward
page 6
period of time. Otherwise, there is
an increased risk of electrical shock,
short-circuiting or fire.
Do not use the LaCie Ethernet
❖
Disk RAID near other electrical
appliances such as televisions or radios. Doing so may cause interference which will adversely affect the
operation of the other products.
ImpOrTANT INfO: 1GB = 1,000,000,000 bytes. 1TB = 1,000,000,000,000 bytes. Once formatted, the actual available
storage capacity varies depending on operating environment (typically 5-10% less). In addition, the amount of used backup
capacity will be greater than the total size of all the disks listed on the Backups page because additional storage space is needed
for the data that has changed between backups. Actual capacity depends on RAID level (see page 130).
Do not place the LaCie Ethernet
❖
Disk RAID near sources of magnetic interference, such as computer
displays, televisions or speakers.
Magnetic interference can affect
the operation and stability of your
LaCie Ethernet Disk RAID.
Do not place heavy objects on top
❖
of the LaCie Ethernet Disk RAID
or use excessive force on it.
Never use excessive force on your
LaCie Ethernet Disk RAID. If you
detect a problem, see the Troubleshooting section in this manual.
CAUTION: A shielded-type
power cord is required in order
to meet FCC emission limits
and also to prevent interference
to the nearby radio and television reception. It is essential
that only the supplied power
cord be used.
ImpOrTANT INfO: Any loss, corruption or destruction of data while using a LaCie drive is the sole responsibility of the
user, and under no circumstances will LaCie be held liable for the recovery or restoration of this data. To help prevent the loss
of your data, LaCie highly recommends that you keep TWO copies of your data; one copy on your external hard drive, for
instance, and a second copy either on your internal hard drive, another external hard drive or some other form of removable
storage media. LaCie offers a complete line of CD and DVD drives. If you would like more information on backup, please
refer to our web site.
LaCie Ethernet Disk RAID (Firmware version 1.4)
User Manual
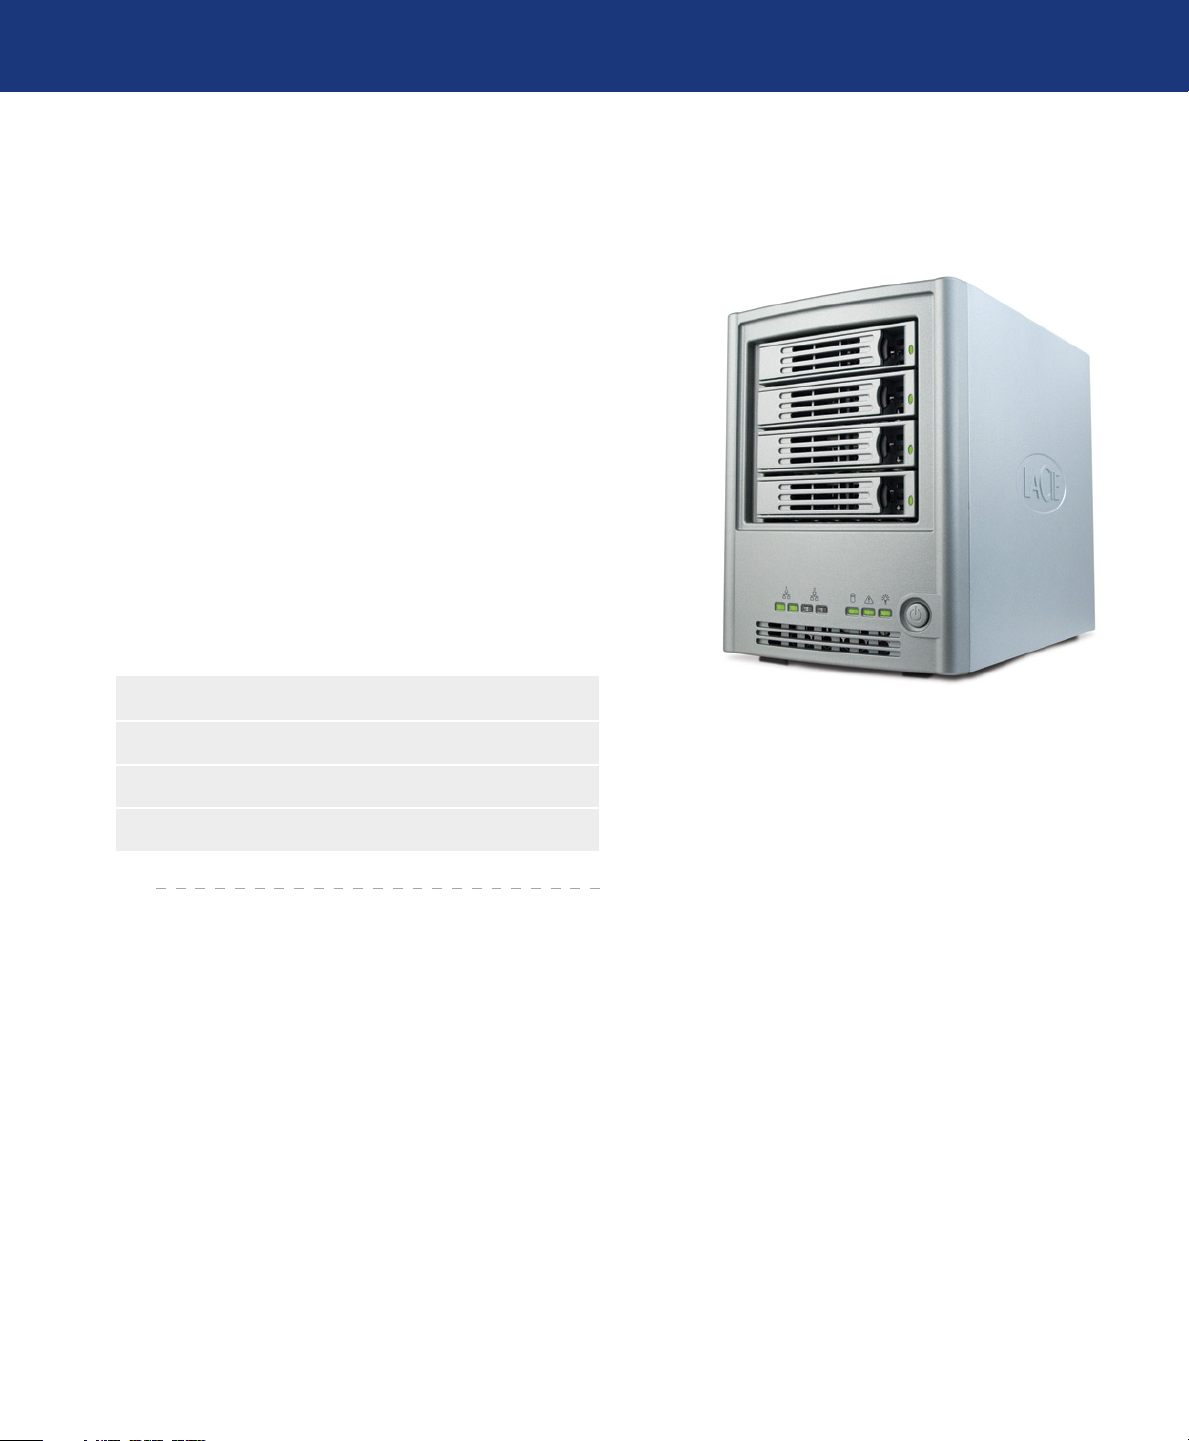
1. Introduction to the LaCie Ethernet Disk RAID
e LaCie Ethernet Disk RAID is an intelligent
network storage solution for small and medium-sized
offices and home network environments. It provides
hard disk space for both shared files and backups of your
computer hard disks, offering an ideal way to distribute
and protect important data.
e Ethernet Disk RAID features an integrated file
server with system backup, and ability to manage shared
folders by user names or groups. It can connect to a gigabit Ethernet network and support up to four serial ATA
(SATA) hard drives. e Ethernet Disk RAID’s good
performance is ideal for protecting valuable company
data, as well as quickly restoring files from a backup.
Introduction
page 7
Your LaCie Ethernet Disk RAID Capabilities■
Share huge amounts of data over gigabit ethernet❖
Fast backup with SATA connectivity❖
Create your own local network❖
LaCie Ethernet Disk RAID (Firmware version 1.4)
• User M anual
• Window s®Backup Software
©
C
o
p
y
r
i
g
h
t
2
0
0
6
,
L
a
C
i
e
.
•
w
w
w
.
l
a
c
i
e
.
c
o
m
•
7
1
0
9
2
1
Ethernet Disk RAID
1
1
1
2
1
3
1
4
1 2
• Recovery CD
©
C
o
p
y
r
i
g
h
t
2
0
0
6
,
L
a
C
i
e
.
•
w
w
w
.
l
a
c
i
e
.
c
o
m
•
7
1
0
9
6
4
•
0
6
0
9
0
1
Ethernet Disk RAID
Quick Install Guide
LaCie Ethernet Disk RAID
Professional NAS System
User Manual
2. About Your LaCie Ethernet Disk RAID
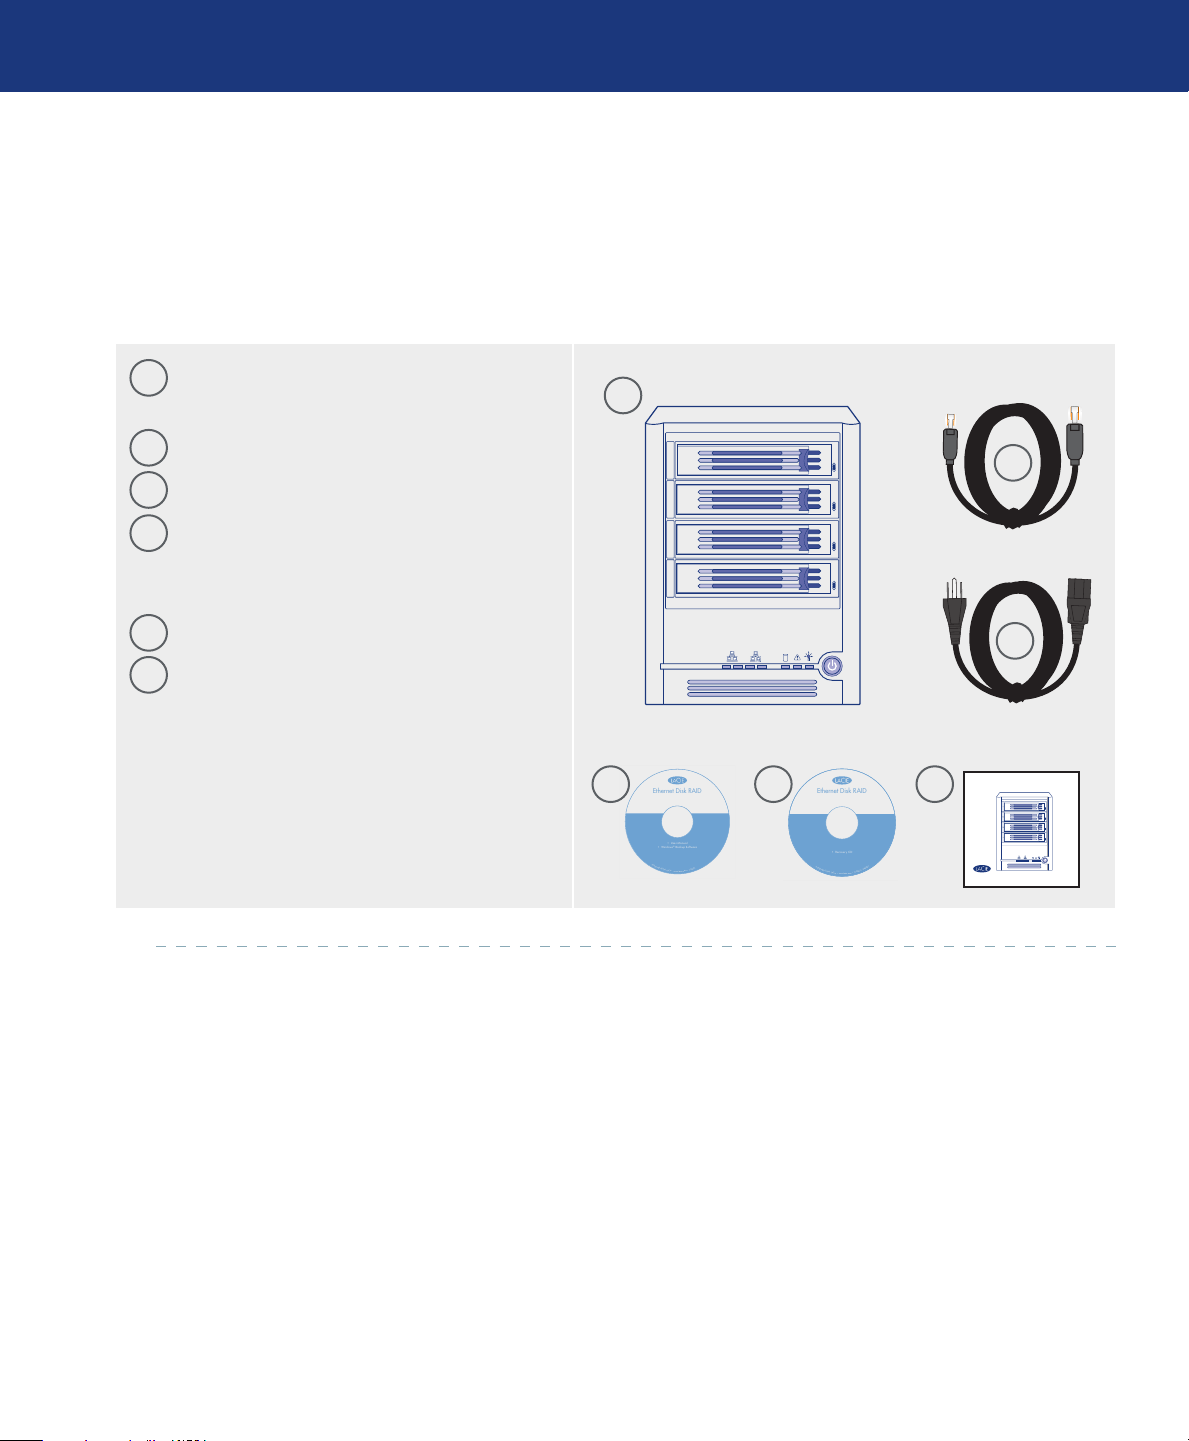
2.1. Package Content
LaCie Ethernet Disk RAID tower with 4
1
removable drive trays and hard drives
Ethernet cable
2
Power supply cable
3
LaCie Ethernet Disk RAID Utilities CD-
4
ROM (includes Windows Backup Software,
User Manual and Quick Install Guide)
1
About Your LaCie Ethernet Disk RAID
page 8
2
LaCie Ethernet Disk RAID Restore CD
5
LaCie Ethernet Disk RAID Quick Install
6
3
Guide (printed version)
4
5
6
LaCie Ethernet Disk RAID (Firmware version 1.4)
User Manual
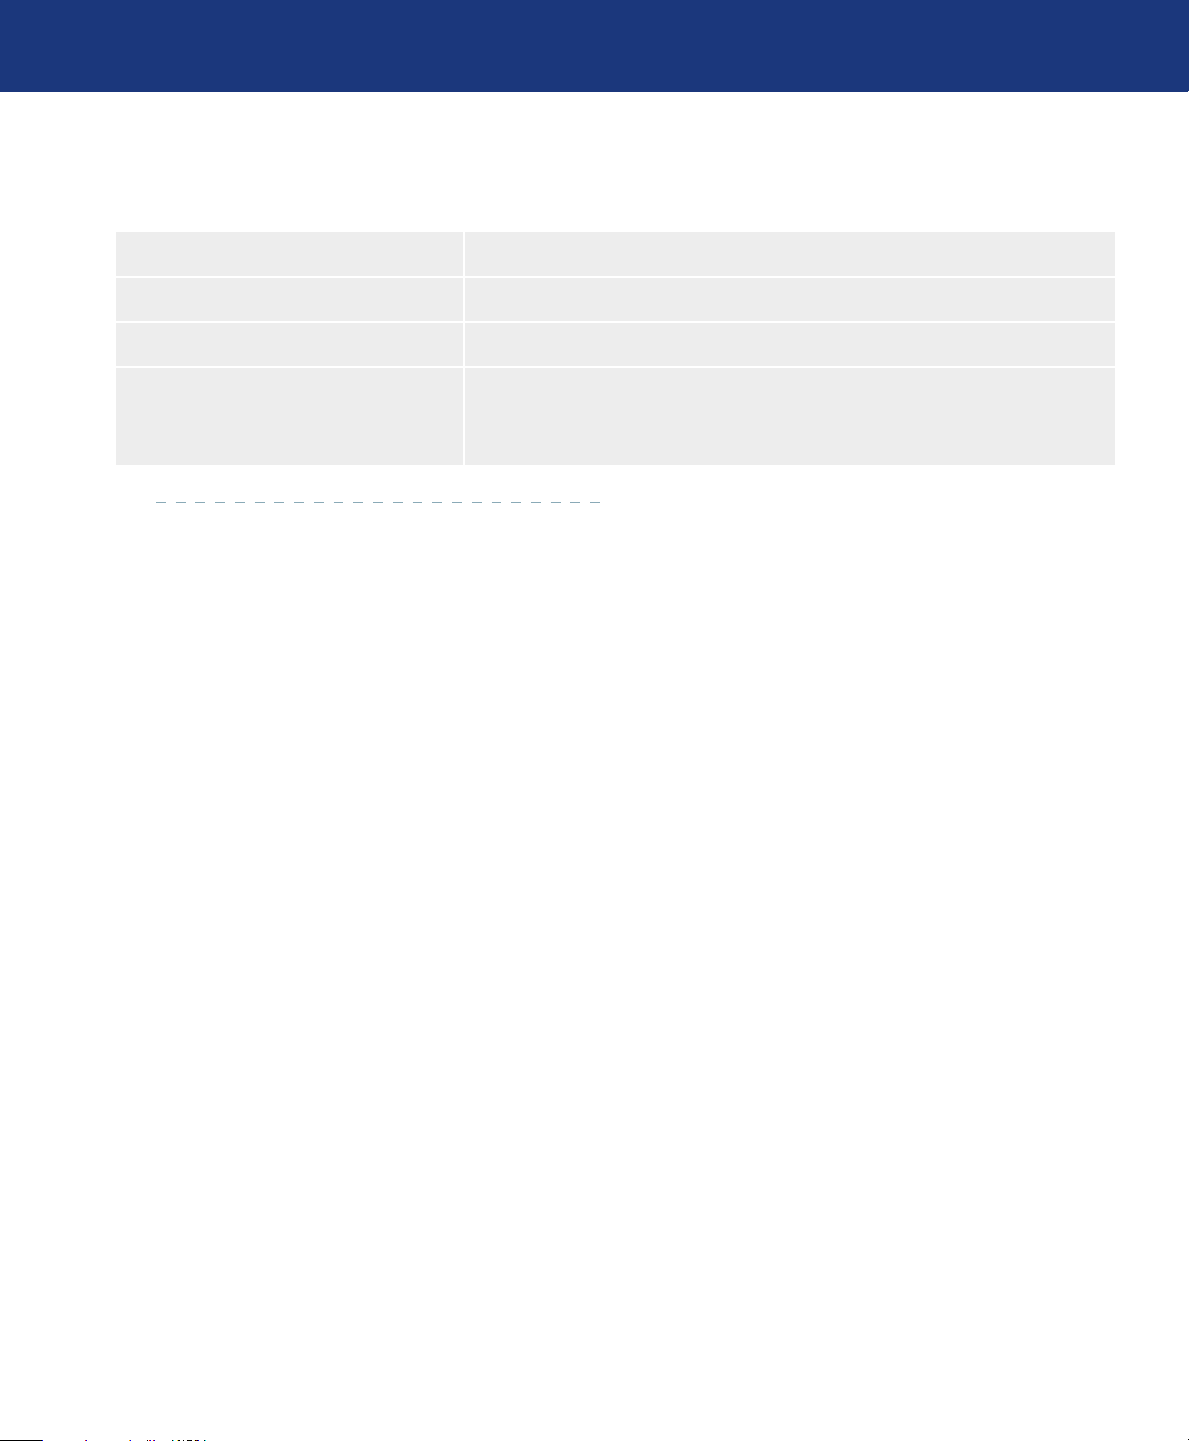
2.2. Minimum System Requirements
Component■ Requirement■
About Your LaCie Ethernet Disk RAID
page 9
Web Browser
Network Environment
Operating Systems for Folder Access
Microsoft Internet Explorer 6.0 or above, Firefox 1.06 or above
TCP/IP networking environment with smb and ftp protocols (no AFP)
Microsoft Windows Server 2003, Microsoft Windows 2000 Professional,
Microsoft Windows XP Home or Professional, Apple OS X, Linux-based
distributions
LaCie Ethernet Disk RAID (Firmware version 1.4)
1
1
1
2
1
3
1
4
1 2
User Manual
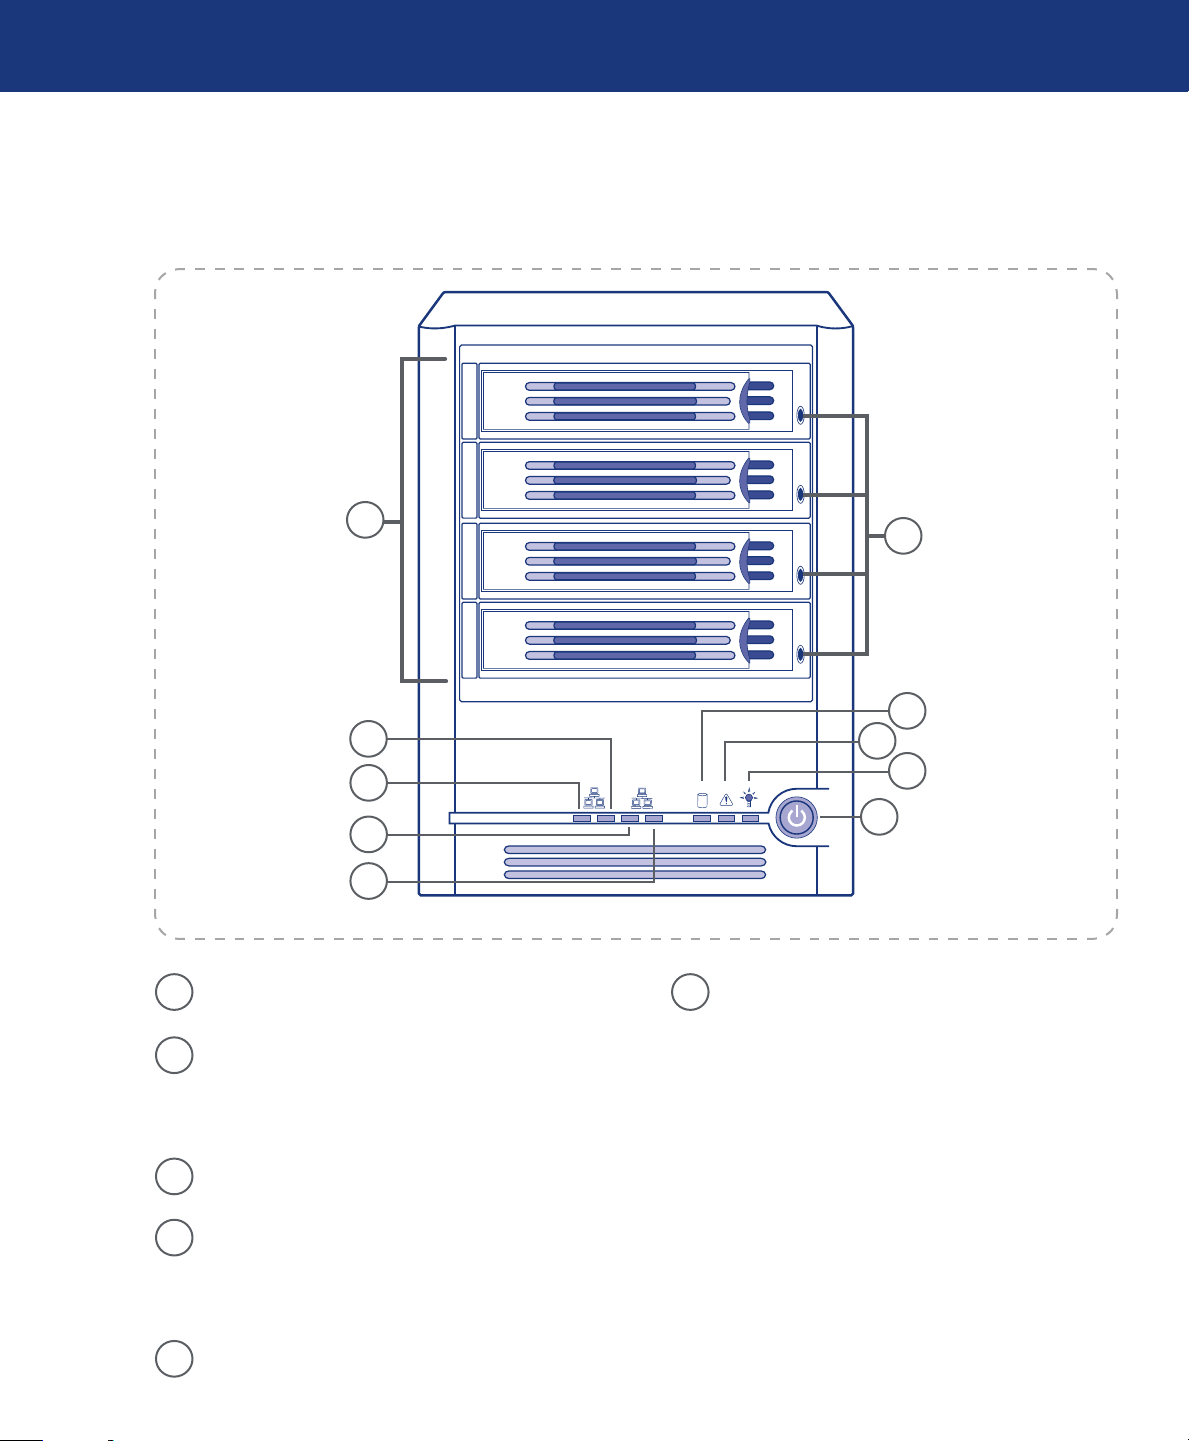
2.2. Views of the System
Front View■
About Your LaCie Ethernet Disk RAID
page 10
5
6
7
1
2
8
9
10
3
4
1
Network Connection 1 Activity LED– Blink-
ing green indicates Ethernet activity.
2
Network Connection 1 Link LED – Continu-
ous GREEN indicates an active Ethernet connection. Off indicates no active Ethernet connection.
Network Connection 2 Link LED – Blinking
3
green indicates Ethernet activity.
4
Network Connection 2 Activity LED – Con-
Hard Disk Activity LEDs –
6
Continuous GREEN indicates the drive is avail-
❖
able.
Blinking GREEN indicates drive activity.
❖
Continuous YELLOW indicates a fault condi-
❖
tion, possibly requiring the hard disk to be replaced.
Blinking YELLOW indicates the drive is cur-
❖
rently rebuilding RAID.
tinuous GREEN indicates an active Ethernet
connection. Off indicates no active Ethernet connection.
Drive Carriers 1-4 – 3.5-in. SATA drive carriers
5
(continued, next page)■
LaCie Ethernet Disk RAID (Firmware version 1.4)
1
1
1
2
1
3
1
4
1 2
User Manual
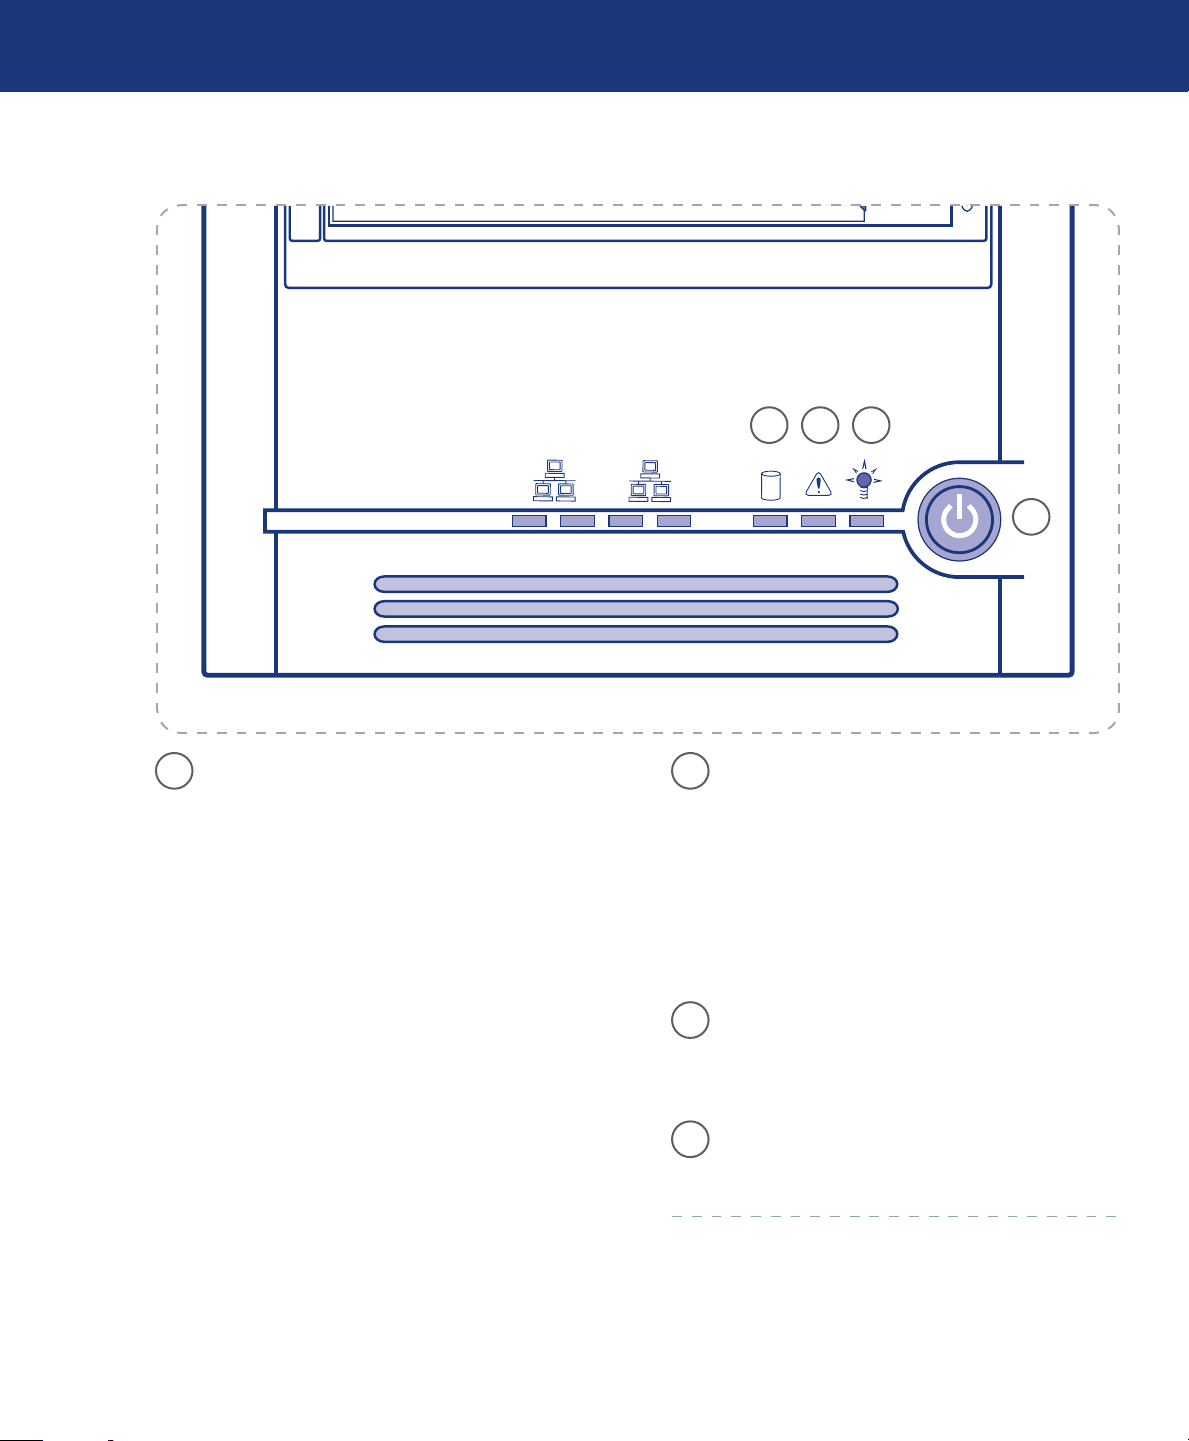
Front View (continued)■
About Your LaCie Ethernet Disk RAID
page 11
7
Global Disk Status LED –
Continuous GREEN indicates hard disk health
❖
is good (1-4 hard disks).
Continuous YELLOW indicates a critical or
❖
non-recoverable condition exists. It also indicates
the hard drives are not configured when initially
setting up the system.
Blinking YELLOW indicates (1) one or more
❖
hard disks are experiencing a fault condition or
(2) a RAID is being rebuilt.
8
❖
❖
❖
9
7 8109
System Status LED –
Continuous GREEN indicates the system is
running and operating normally.
Blinking GREEN indicates the system is in process of powering up or shutting down.
Continuous YELLOW indicates a fault is present, either a critical or non-recoverable condition.
Power LED – Continuous GREEN indicates
the system has power applied to it. No light indicates the system does not have power applied to
it.
10
Power Button – Toggles the system power on/
off.
LaCie Ethernet Disk RAID (Firmware version 1.4)
K
2 1
User Manual
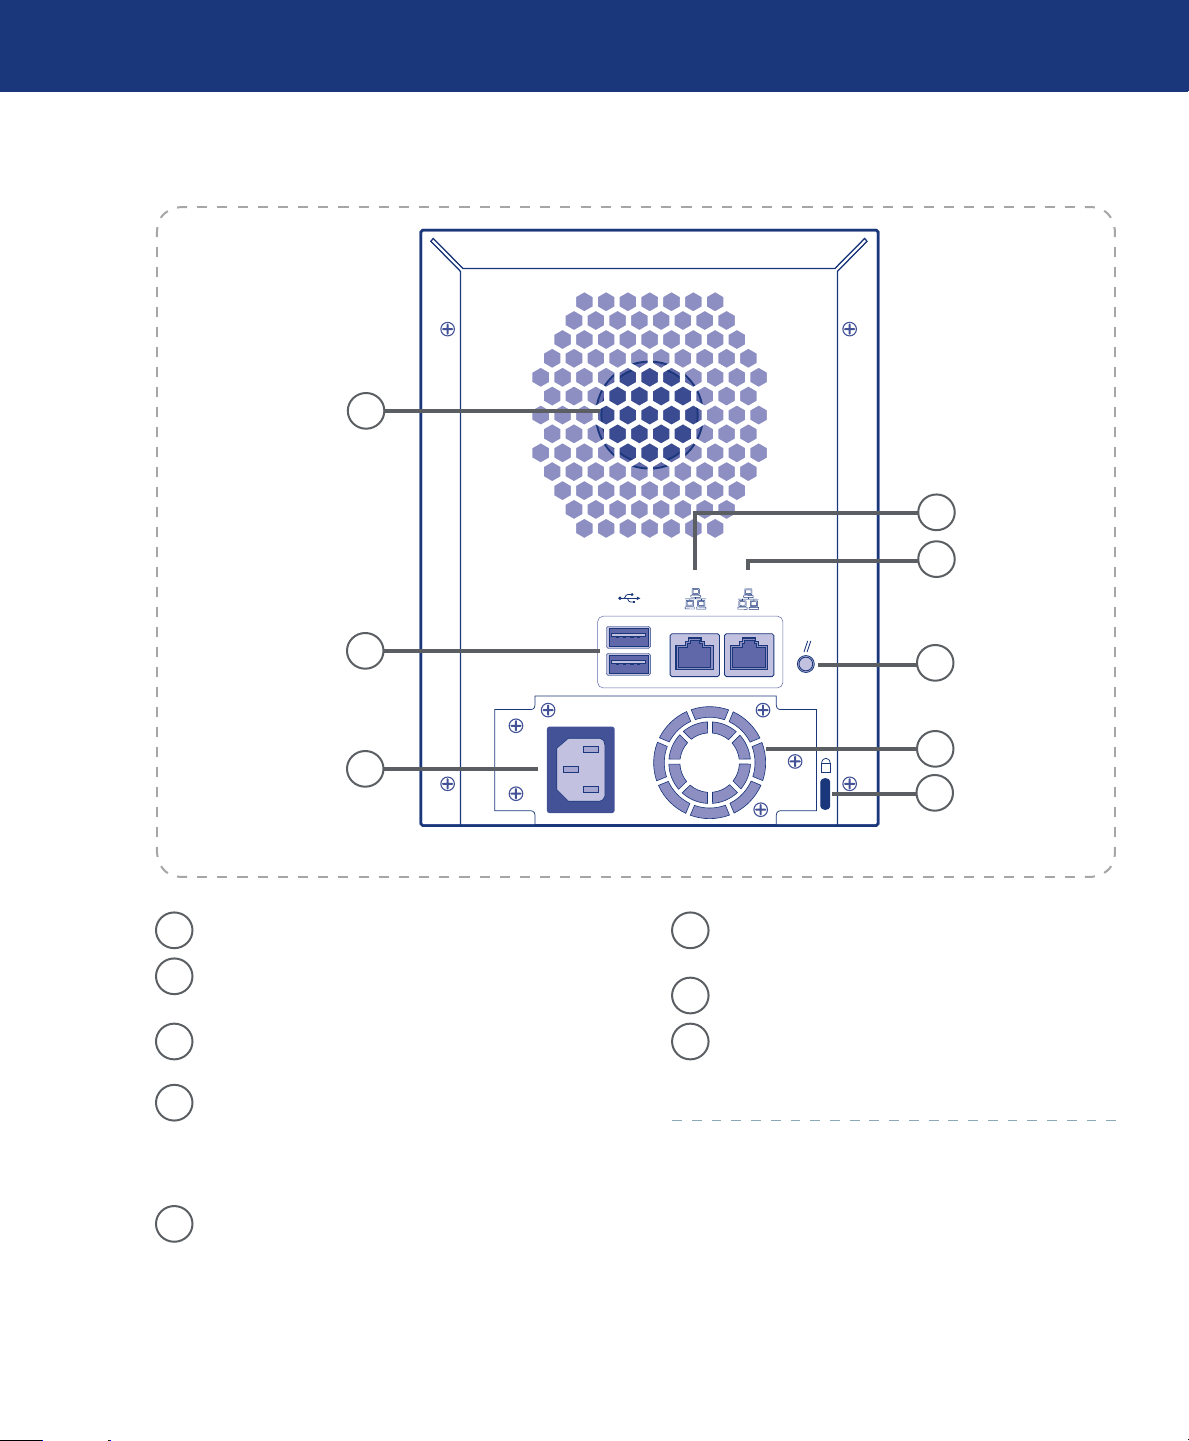
Rear View■
1
About Your LaCie Ethernet Disk RAID
page 12
4
5
2
3
1
System Fan
2
USB 2.0 Ports – e USB ports are used for con-
necting an external USB storage device.
Power Connector – Supplies power to the de-
3
vice.
4
Gigabit LAN Port 2 – Gigabit Ethernet connec-
tion. e right LED lights up GREEN when
connected to a 10/100 MB network, and ORANGE when connected to a gigabit network.
Gigabit LAN Port 1 – Gigabit Ethernet connec-
5
tion. e right LED lights up GREEN when
connected to a 10/100 MB network, and ORANGE when connected to a gigabit network.
6
7
8
6
Reset Button – Press the Reset Button for three
seconds to revert the unit to the system defaults.
Power Supply Fan
7
Security Slot – Anti-theft slot for attaching a se-
8
curity cable.
LaCie Ethernet Disk RAID (Firmware version 1.4)
K
2 1
User Manual
3. Installing Your LaCie Ethernet Disk RAID
Installation of the LaCie Ethernet Disk RAID is
easy, just follow the steps below to install it:
Step 1 Connecting the Ethernet Disk RAID to the network Page 13
Step 2 Turning on the Ethernet Disk RAID Page 14
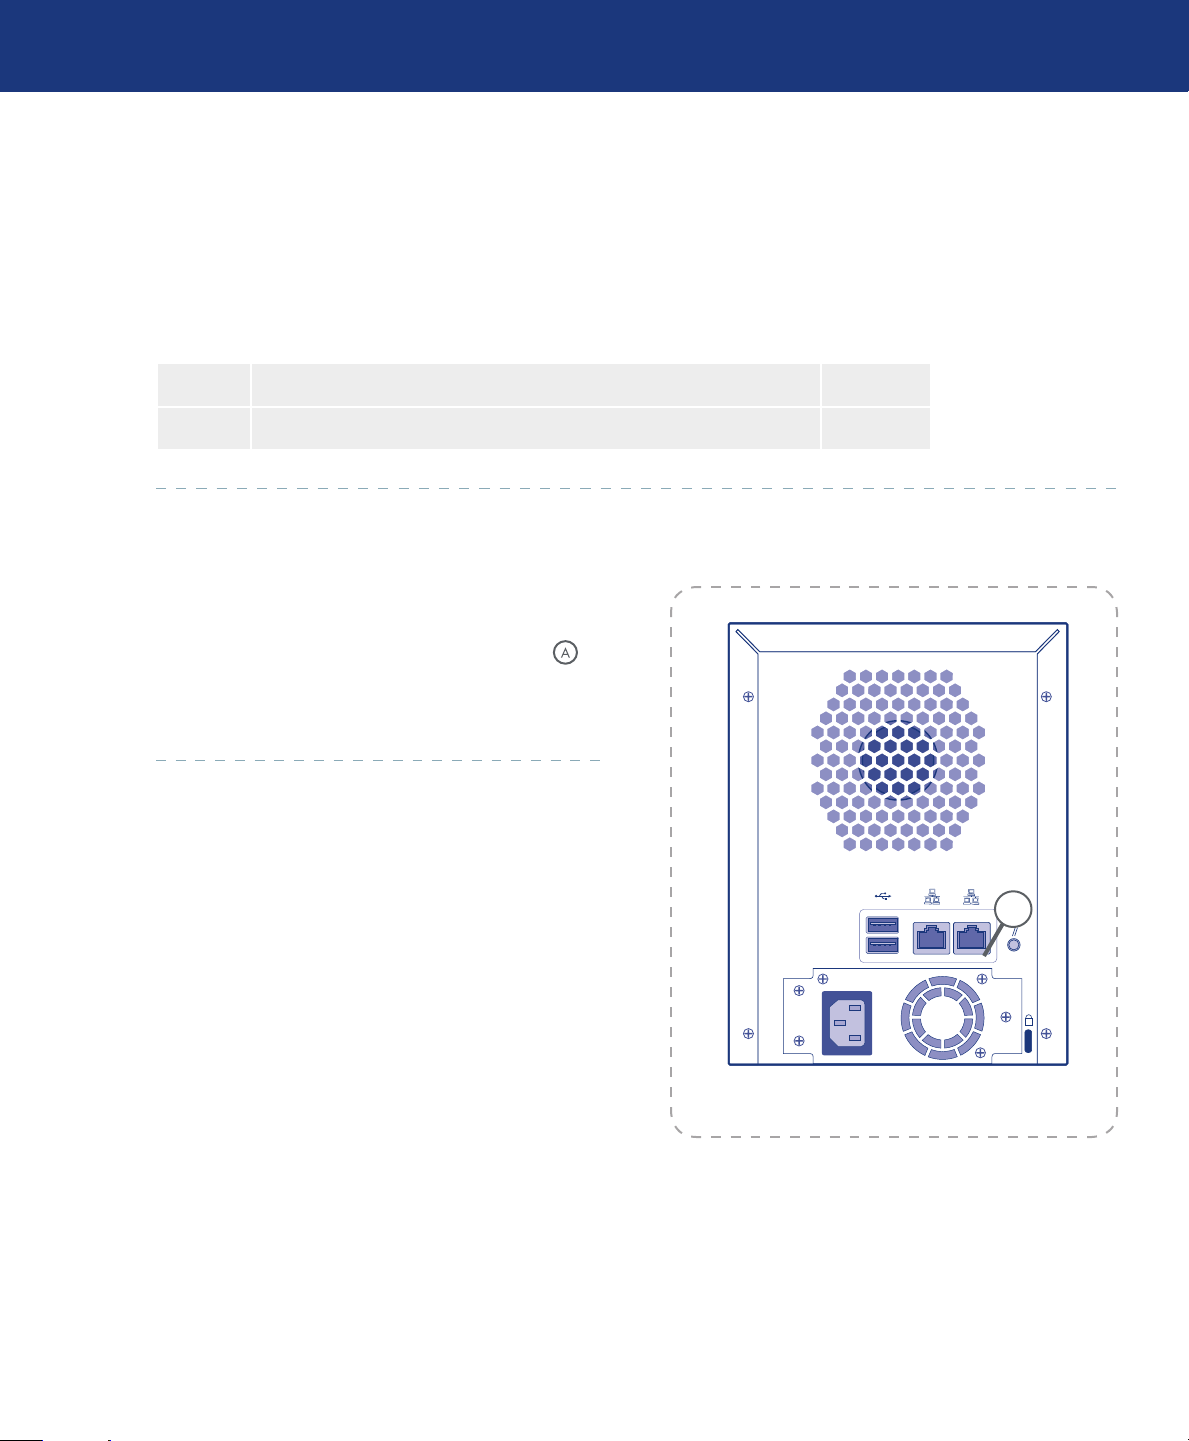
3.1. Connecting the Ethernet Disk RAID to the Network
To connect the Ethernet Disk RAID to your network, insert one end of the RJ-45 Ethernet cable into
the Ethernet port 1 on the back of the unit (see in
Fig. 3.1.). en insert the other end of the RJ-45 Ethernet cable into a network port.
Installing Your Ethernet Disk RAID
page 13
A
Fig. 3.1.
LaCie Ethernet Disk RAID (Firmware version 1.4)
1 2
User Manual
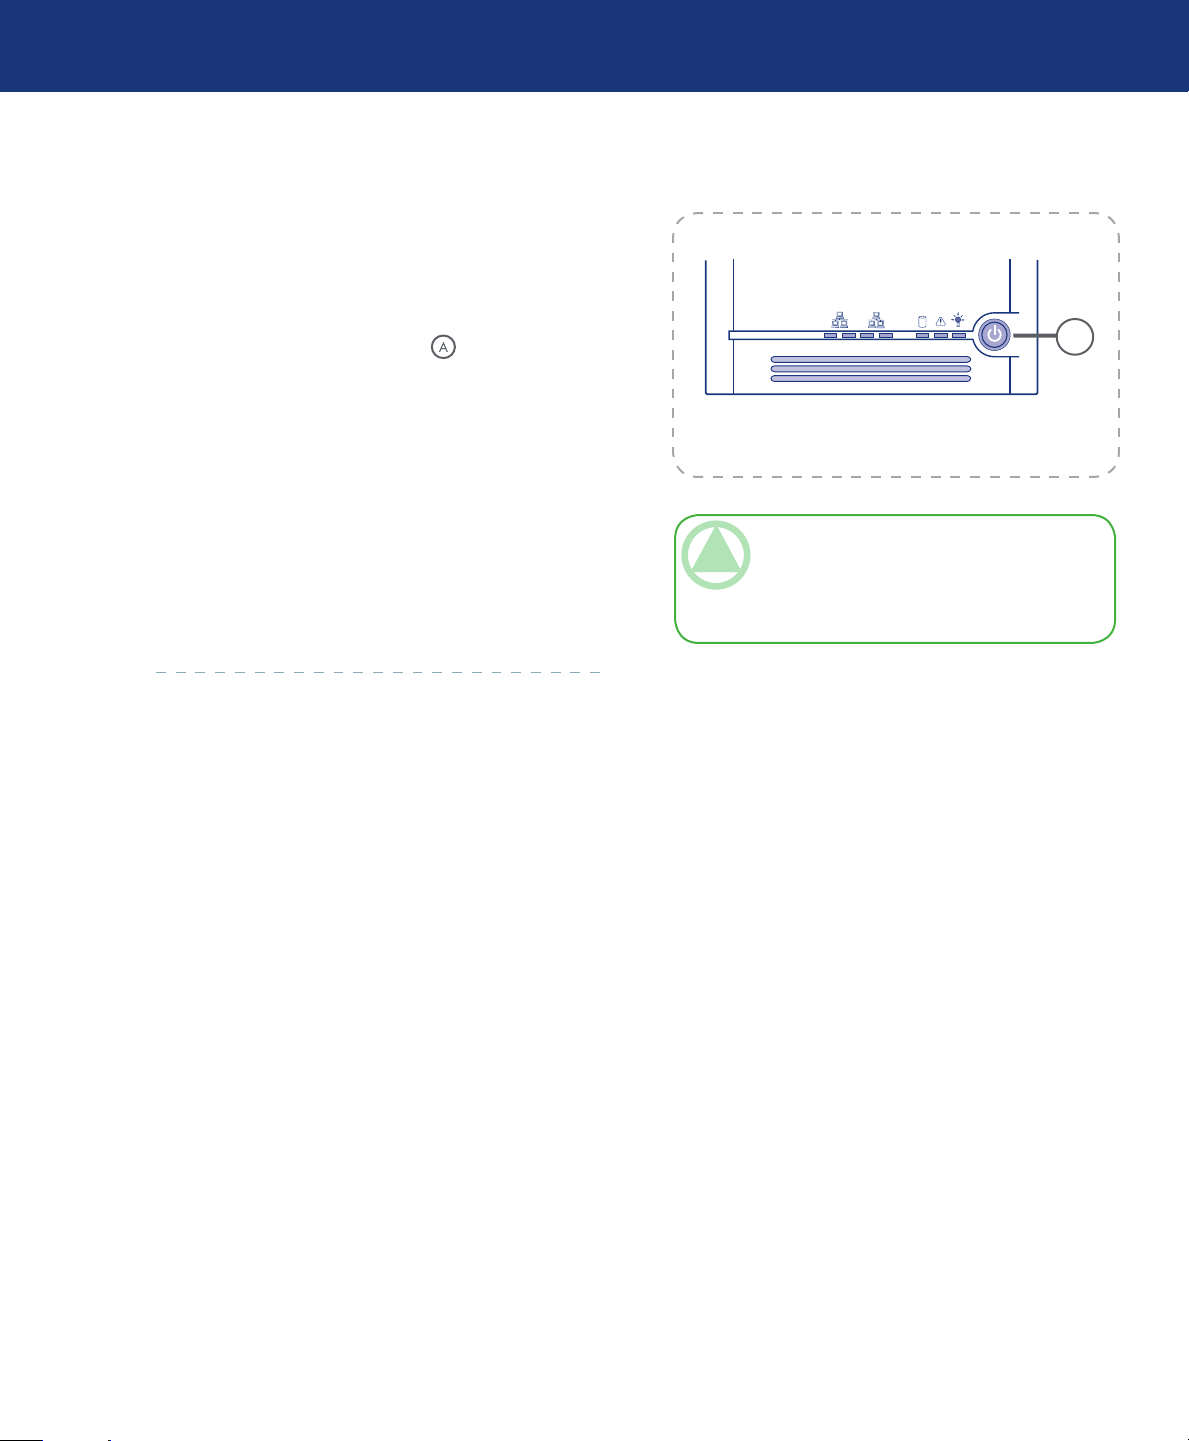
3.2. Turning On the Ethernet Disk RAID
Insert the power cable into the power outlet on the
1.
back of the unit and plug the other end into a power
socket.
Once you have connected the power cord, press the
2.
power button on the front (see in Fig. 3.2.).
e System Status LED light will blink green while
the Ethernet Disk RAID is booting up. When the system has finished booting up, the System Status LED
and Disk Status LED will remain green.
e System Status LED will turn solid yellow when
you power up the system for the first time, indicating
the hard drives are not configured with a RAID level. It
will remain yellow until the drives are configured then
the Status System LED will turn solid green.
Installing Your Ethernet Disk RAID
page 14
A
Fig. 3.2.
TeChNICAl NOTe: It is recommended that
you plug the Ethernet Disk RAID into a surge
protector or uninterruptible power supply to prevent damage to the system from power surges.
LaCie Ethernet Disk RAID (Firmware version 1.4)
User Manual
4. Configuring Your LaCie Ethernet Disk RAID
Follow the steps below to configure your Ethernet
Disk RAID:
Configuring Your Ethernet Disk RAID
page 15
Step 1 Installing the Ethernet Disk RAID
Console
Step 2 Starting the Console Page 17
Step 3 Initializing the disks Page 18
Step 4 Configuring with the First Use Wizard Page 19
Step 10 Attaching USB Devices Page 22
Page 16
LaCie Ethernet Disk RAID (Firmware version 1.4)
User Manual
4.1. Installing the Ethernet Disk RAID Console
Configuring Your Ethernet Disk RAID
page 16
Windows Users■
To install the console:
At a computer in the same subnet as your Ethernet
1.
Disk RAID, insert the installation CD into a CDROM drive.
Your default browser will open a LaCie Ethernet
2.
Disk RAID page. Select Applications from the top
menu.
Select the “Storage System Console” link to install
3.
the software.
Follow the Installation Wizard to complete installa-
4.
tion of the Console.
Mac Users■
e Storage System Console is only compatible
with Windows operating systems. To access the Ethernet Disk Raid from a Mac, please see section 5.1, Ac-
cessing the Web Manager.
ImpOrTANT INfO: e Storage System
Console is only compatible with Windows operating systems. To access the Ethernet Disk Raid
from a Mac, please see section 5.1, Accessing the
Web Manager.
TeChNICAl NOTe: To access the Ether-
net Disk RAID, the Console launches a Web
browser, so the computer where you install the
Console must have Microsoft Internet Explorer
6.0 or Firefox 1.06 or newer installed as well. In
addition, one of those browsers must be your default browser. If you’re not sure how to configure
the default browser, refer to the documentation
for your browser.
LaCie Ethernet Disk RAID (Firmware version 1.4)
User Manual
4.2. Starting the Console
Once you have installed the Console (as described
in section 4.1. Installing the Console), use the following
procedure to start it:
Click Start Programs Storage System Con-
1.
sole.
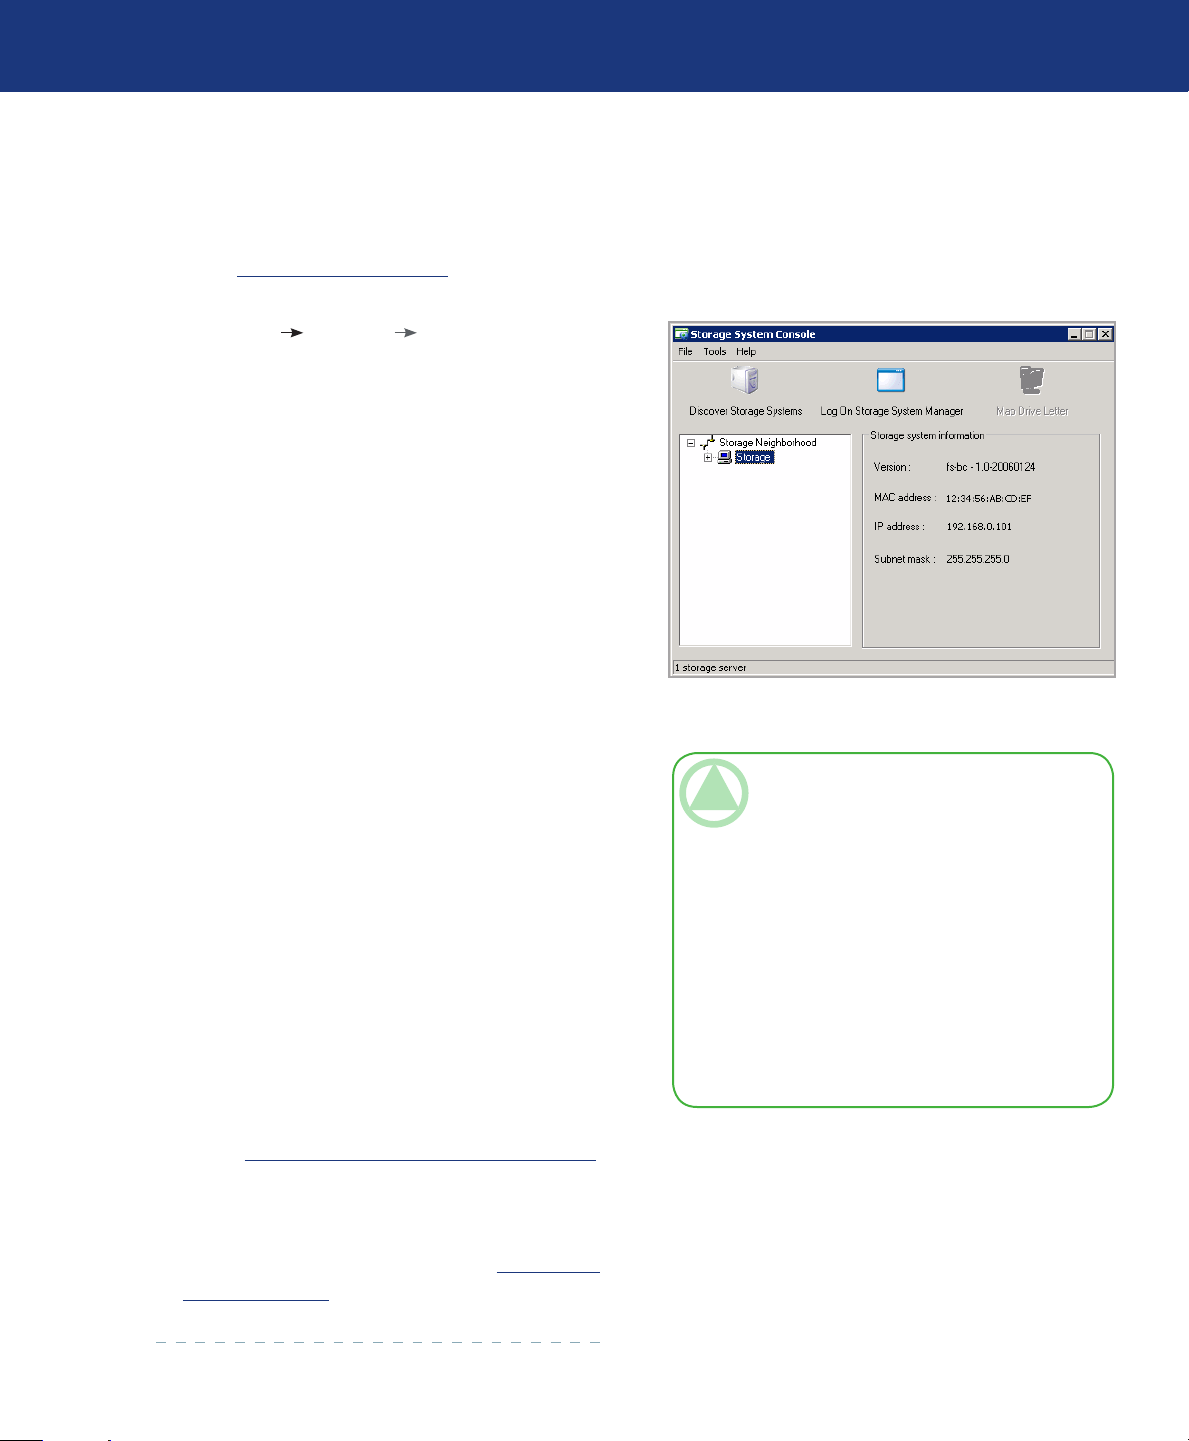
As soon as you start the Console, it automatically
scans the network for storage devices. is might
take a few minutes. As soon as the scan is complete,
the left panel displays a tree view of all the storage
devices it found.
Each Ethernet Disk RAID has two ports for connecting to the network. If your Ethernet Disk RAID
uses both ports, two items appear in the tree in the
left pane, each using the same name. You can identify
the IP address used by each port by clicking each
item in the tree and observing the IP address area in
the right pane.
Configuring Your Ethernet Disk RAID
page 17
Fig. 4.2.
2. In the left panel, select the name of the Ethernet
Disk RAID that you want to access (for example,
Storage), and then click Log On Storage System
Manager. If your Ethernet Disk RAID uses both
available ports to connect to the network, you can
select either item.
If your Ethernet Disk RAID has not yet been
initialized, the System Initialization page appears. For more information, refer to section 3.2.3.
If your Ethernet Disk RAID been initialized but not
yet configured, the welcome page for the System Set-
up Wizard appears. For more information, refer to
section 4.4. Configuring with the First Use Wizard.
If your Ethernet Disk RAID has been initialized and
configured, the login page for the Manager appears.
For more information, refer to section 5.2. Logging
In to the Manager.
TeChNICAl NOTe: If you connect an
Ethernet Disk RAID to the network after the
Console has already scanned it, or if you subsequently change the IP address of the Ethernet
Disk RAID, you must click Discover Storage
Systems to scan the network again and update
the tree in the left pane.
If no Ethernet Disk RAID appears in the left
pane, your computer might not be in the same
subnet as the Ethernet Disk RAID. Be sure to install the Console on a computer in the same sub-
net as the Ethernet Disk RAID and try again.

LaCie Ethernet Disk RAID (Firmware version 1.4)
User Manual
4.3. Initializing the Disks
Configuring Your Ethernet Disk RAID
page 18
Once you have installed the Console (as described in
section 5.2. Logging In to the Manager), started it, and
connected to the Ethernet Disk RAID (as described in
section 4.2. Starting the Console), the System Initialization page appears (Fig. 4.3.).
If not all the hard disks have been detected, or if you
want to add, remove, or re-order the disks at this time,
insert or remove the disks one at a time and click Scan
after each action.
Fig. 4.3.
To initialize the hard disks:
Click Start. e firmware is uploaded to the hard
1.
disks. When this process is complete, the Ethernet
Disk RAID will restart.
Close the browser window. After the system has
2.
restarted, you can perform initial configuration (as
described in section 4.4. Configuring the Ethernet
Disk RAID).
TeChNICAl NOTe: e operating system
and Ethernet Disk RAID software are installed
on each disk in your Ethernet Disk RAID to ensure that the failure or removal of any one disk
will not cause the entire system to fail.
LaCie Ethernet Disk RAID (Firmware version 1.4)
User Manual
4.4. Configuring with the First Use Wizard
Once your Ethernet Disk RAID has been initialized
(as described in section 4.3. Initializing the Ethernet
Disk RAID), follow these steps to run the System Setup
wizard and perform the necessary initial configuration:
If you have not already installed the Ethernet Disk
1.
RAID Console, install it (as described in section 4.1.
Installing the Ethernet Disk RAID Console) and
start it (as described in section 4.2. Starting the Con-
sole).
In the left pane, click the name of the Ethernet Disk
RAID. (If you’re using both Ethernet ports, the
name of the Ethernet Disk RAID appears twice in
the left pane. You can click either one.) en click
Log On Storage System Manager.
Configuring Your Ethernet Disk RAID
page 19
Fig. 4.4.A
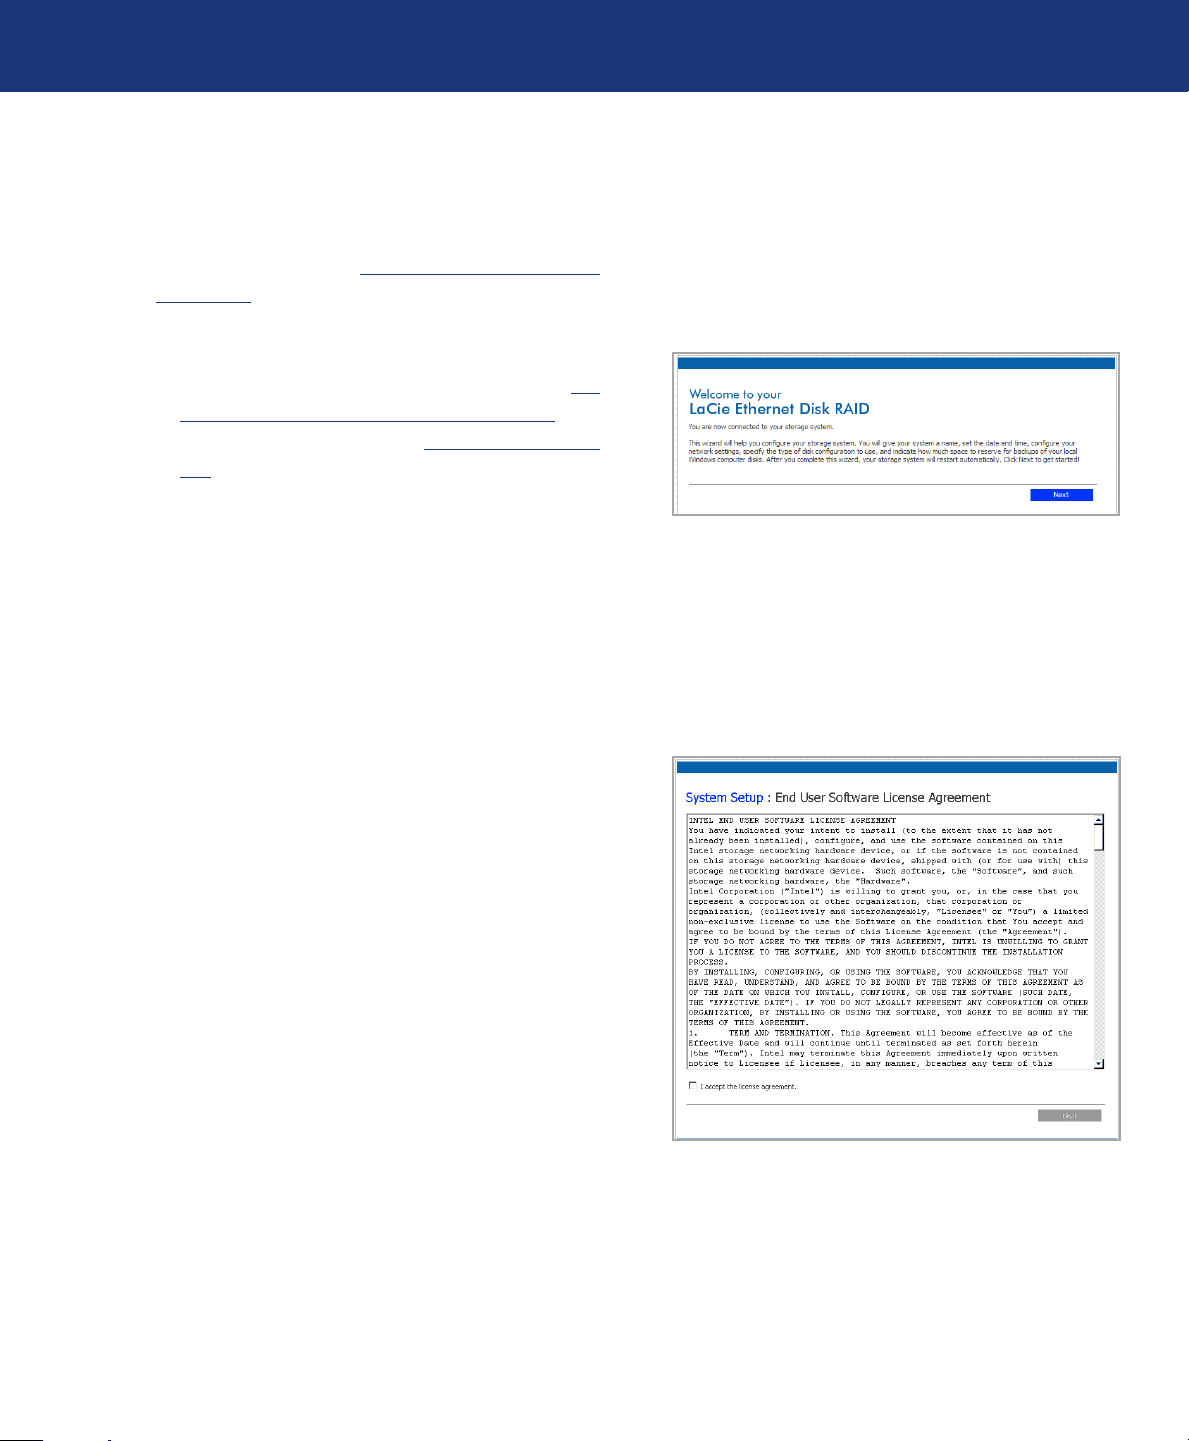
e welcome page appears (Fig. 3.3-A).
On the welcome page, click Next. e End User
2.
Software License Agreement page appears (Fig.
3.3-B).
If you agree to the terms, select the I accept the li-
3.
cense agreement check box and then click Next. e
Host Name page appears.
Fig. 4.4.B

LaCie Ethernet Disk RAID (Firmware version 1.4)
User Manual
Click Next to accept the default name (Storage), or
4.
enter a name you prefer and then click Next. e
name can be up to 15 characters long and can include
letters, numbers, and hyphens. When you click Next,
the Date/Time page appears (Fig. 4.4.C.).
Specify the current date, time, and time zone, and
5.
then click Next. e time should be expressed in
24-hour format. For example, 2:00 P.M. would be
entered as 14:00:00. When you click Next, the Net-
work Settings page appears (Fig. 4.4.D.).
By default, if your network has a DHCP server, the
6.
Ethernet Disk RAID obtains its IP address from
that server.
If your network does not have a DHCP server, the
default IP address and subnet mask are used. (e
default IP address is 192.168.0.101, and the default
subnet mask is 255.255.255.0.).
Configuring Your Ethernet Disk RAID
page 20
Fig. 4.4.C.
To accept the default settings, click Next. Otherwise,
specify the desired settings and then click Next.
When you click Next, the Disk Configuration page
appears (see Fig. 4.4.E.). (e options that appear
on this page vary, depending on the number of hard
disks that are currently installed in the system.)
If you want to add or remove hard disks, do so one at
7.
a time and click Scan after each action.
To accept the default disk configuration, RAID 5,
click Next.
RAID 5 provides the highest level of data protection, while RAID 5+ Spare provides the same protection and automatic data rebuilding in the event of
a disk failure.
If you want to change the disk configuration, select
the desired RAID level and then click Next. (For de-
tailed information about the different RAID levels,
refer to section 10. RAID and Storage Policies.)
Fig. 4.4.D.
Fig. 4.4.E.
CAUTION: RAID 0 and linear disk configu-
rations do not offer any data protection. If you
lose a hard disk, data loss will occur.
LaCie Ethernet Disk RAID (Firmware version 1.4)
User Manual
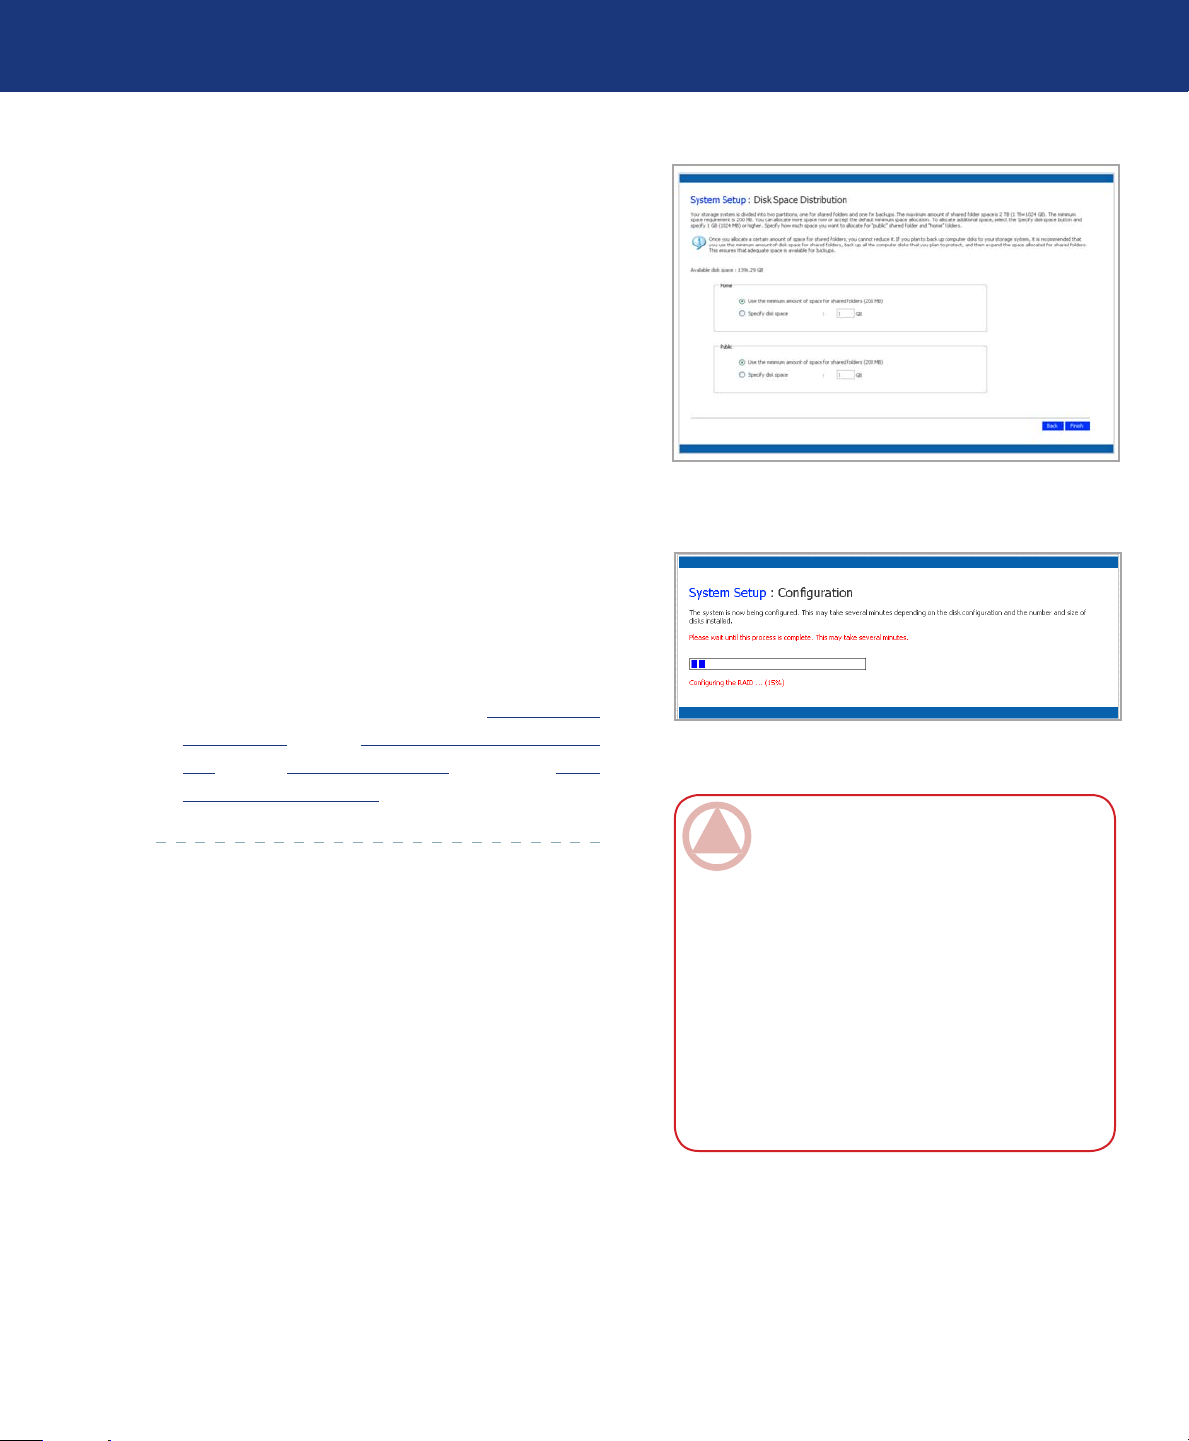
When you click Next, the Disk Space Distribution
page appears (Fig. 4.4.F.).
Capacity in your storage system is divided into par-
8.
titions: one for a shared public folder, one for user
home folders, and one for backups. To accept the defaults, click Finish. Otherwise, specify the disk space
allocations for the home user folders and the public
folders in GB. e remaining space is allocated for
backup. When you are done, click Finish.
On the confirmation message, click OK. e Con-
9.
figuration page appears (see Fig. 4.4.G.) and the sys-
tem is configured according to the settings you specified. Once the configuration is complete, the system
restarts.
After the Ethernet Disk RAID restarts, you can ac-
10.
cess the Manager, add users, and create shared folders.
Configuring Your Ethernet Disk RAID
page 21
Fig. 4.4.F.
For more information, refer to section 5.1. Accessing
the Manager, section 5.2. Logging In to the Man-
ager, section 5.4.1. Adding Users, and section 5.5.1.
Creating Shared Folders.
Fig. 4.4.G.
ImpOrTANT INfO: You can expand the
amount of disk space allocated for shared folders
later (as long as free disk space is available), but
you cannot reduce it without re-configuring your
disks and losing all your data. If you plan to back
up computer disks to your Ethernet Disk RAID,
it is recommended that you use the minimum
amount of space for shared folders, back up all
the computer disks that you plan to protect, and
then expand the space allocated for shared folders. is ensures that adequate space is available
for backups.
LaCie Ethernet Disk RAID (Firmware version 1.4)
K
2 1
User Manual
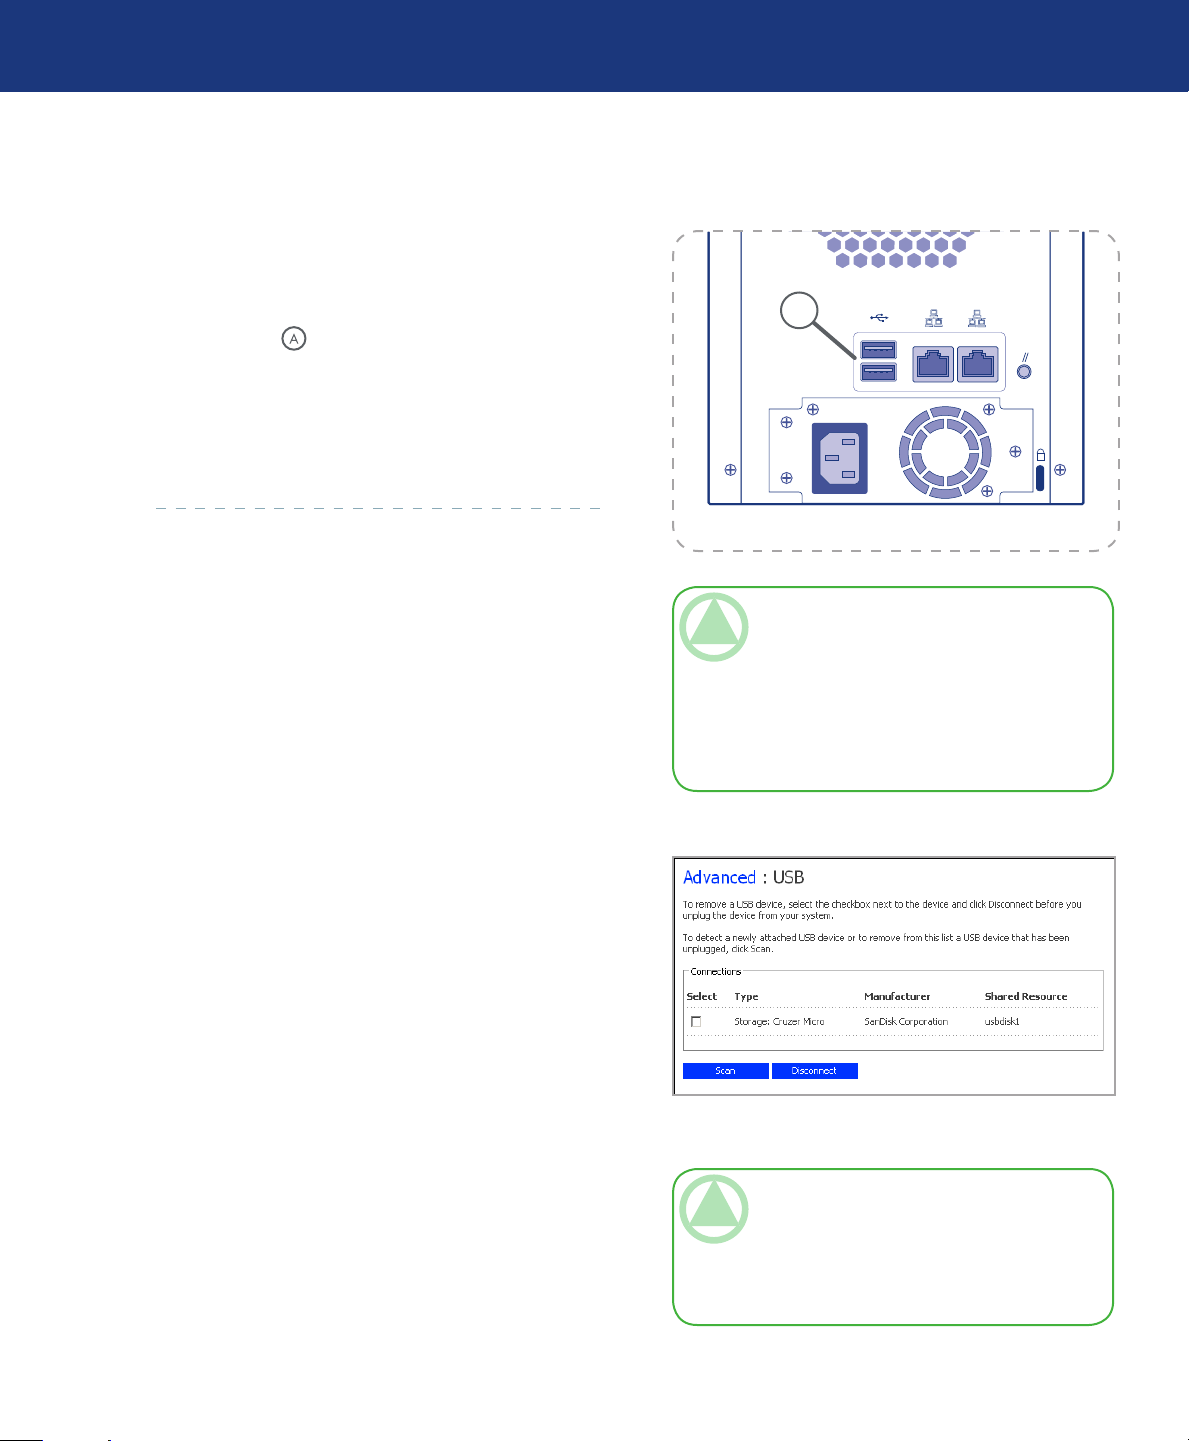
4.5. USB Devices
4.5.1. Attaching USB Devices■
If you purchased optional USB external storage devices, you can attach them to the USB ports on the back
of the unit (see in Fig. 4.5.1.).
When you plug a USB device into the Ethernet
Disk RAID, the device is automatically detected and is
added to the USB page. (You might need to click Scan
to update the display.)
Configuring Your Ethernet Disk RAID
page 22
A
Fig. 4.5.1.
TeChNICAl NOTes:
4.5.2. Disconnecting USB Devices■
e USB page displays a list of all USB devices that
are currently attached to the Ethernet Disk RAID. USB
disks are identified by the names usbdisk1 and usbdisk2.
(ese names cannot be changed.)
To unplug a USB device from the Ethernet Disk
RAID, you must first use the Manager to disconnect it.
To disconnect a USB device:
In the navigation bar, click Advanced.
1.
In the left pane, click USB.
2.
In the list of USB devices, select the device(s) that
3.
you want to disconnect.
Click Disconnect.
4.
When the confirmation message appears, click OK.
5.
USB hubs are not supported.
❖
Any USB disk must be formatted before you use
❖
it with the Ethernet Disk RAID, and only the
first partition of a FAT or FAT32 file system will
be recognized.
Fig. 4.5.2.
TeChNICAl NOTe: If you inadvertently
disconnect a USB device, unplug it from the
Ethernet Disk RAID, plug it back in, and then
click Scan. is reactivates the USB device. User
assignments are always retained.
You can now unplug the USB device.

LaCie Ethernet Disk RAID (Firmware version 1.4)
Managing Your Ethernet Disk RAID
User Manual
5. Managing Your LaCie Ethernet Disk RAID
page 23
e Web-based Manager enables you perform a
number of tasks to help you get the most from your
Ethernet Disk RAID:
Managing Users – Add, modify, or remove users, or
❖
put users into groups.
Managing Shared Folders – Create shared folders,
❖
rename existing shared folders, change which users can access existing shared folders or their access
rights, and delete shared folders that you no longer
want to keep.
Managing Backups – View which computer disks
❖
are backed up, change the password for recovering a
backup, specify which backup to remotely boot from,
or delete a backup or backup client.
Setting Up e-mail Alerts – Specify whether or not
❖
e-mail notifications should be sent when a problem
occurs, and who should receive the notifications.
Upgrading the Firmware – Upgrade your Ethernet
❖
Disk RAID firmware to the latest version.
Changing the System Settings – Change the system
❖
name or time and date settings, as well as the user
name or password for logging in to the Manager.
Changing the Network Settings – Change the
❖
workgroup name, the Ethernet Disk RAID’s IP
address(es), or the gateway or DNS server settings,
or enable the Ethernet Disk RAID to act as an FTP
server.
Reconfiguring Your Disks – Change the propor-
❖
tions of your Ethernet Disk RAID that are allocated
to shared folders and backups, or change your disk
configuration.
Viewing System Status Information – See details
❖
about CPU and memory usage, how long the Ethernet Disk RAID has been running, disk temperatures,
etc.
Logging Out of the Manager – Log out of the
❖
Manager so that no one else can use your computer
to make changes to the Ethernet Disk RAID.
Disconnecting USB Devices – If you’re using op-
❖
tional USB devices, you must disconnect them using
the Manager before you physically unplug them.
Shutting Down the Ethernet Disk RAID – Shut
❖
down using the Manager rather than pushing the
power button manually.
LaCie Ethernet Disk RAID (Firmware version 1.4)
2 1
NIC 2: 000E0CBA0A58 NIC 1: 000E0CBA0A58
User Manual
5.1. Accessing the Web Manager
5.1.1. Windows Users■
Managing Your Ethernet Disk RAID
page 24
To access the Manager using the Console:
Start the Console and connect to the Ethernet Disk
1.
RAID (see section 4.2. Starting the Console).
Log in to the Manager (see section 5.2. Logging In
2.
to the Manager).
TeChNICAl NOTe: You can use the system
name only if your computer is in the same subnet as the Ethernet Disk RAID, if you added the
Ethernet Disk RAID’s IP address and name to
your local hosts file, or if you manually registered
the name with a DNS server in your network.
5.1.2. Mac Users with DHCP Server■
ere are two methods of Accessing the Ethernet
Disk RAID Web Manager from a Mac connected to a
network with a DHCP server:
To access the Manager using a Web browser:
From any computer in your network, run Microsoft
1.
Internet Explorer 6.0 or Firefox 1.06 or newer, enter the following in the address bar, and then press
Enter:
https://storage_system – where “storage_system”
is the name or IP address of the Ethernet Disk
RAID.
When the login page appears, you can bookmark it
so that you can quickly and easily access it the next
time.
Log in to the Manager (see in section 5.2. Logging
2.
In to the Manager).
Method 1: IP Address
Open a Terminal window, type the command arp –a
1.
and press return. A list of IP addresses and MAC
addresses should appear.
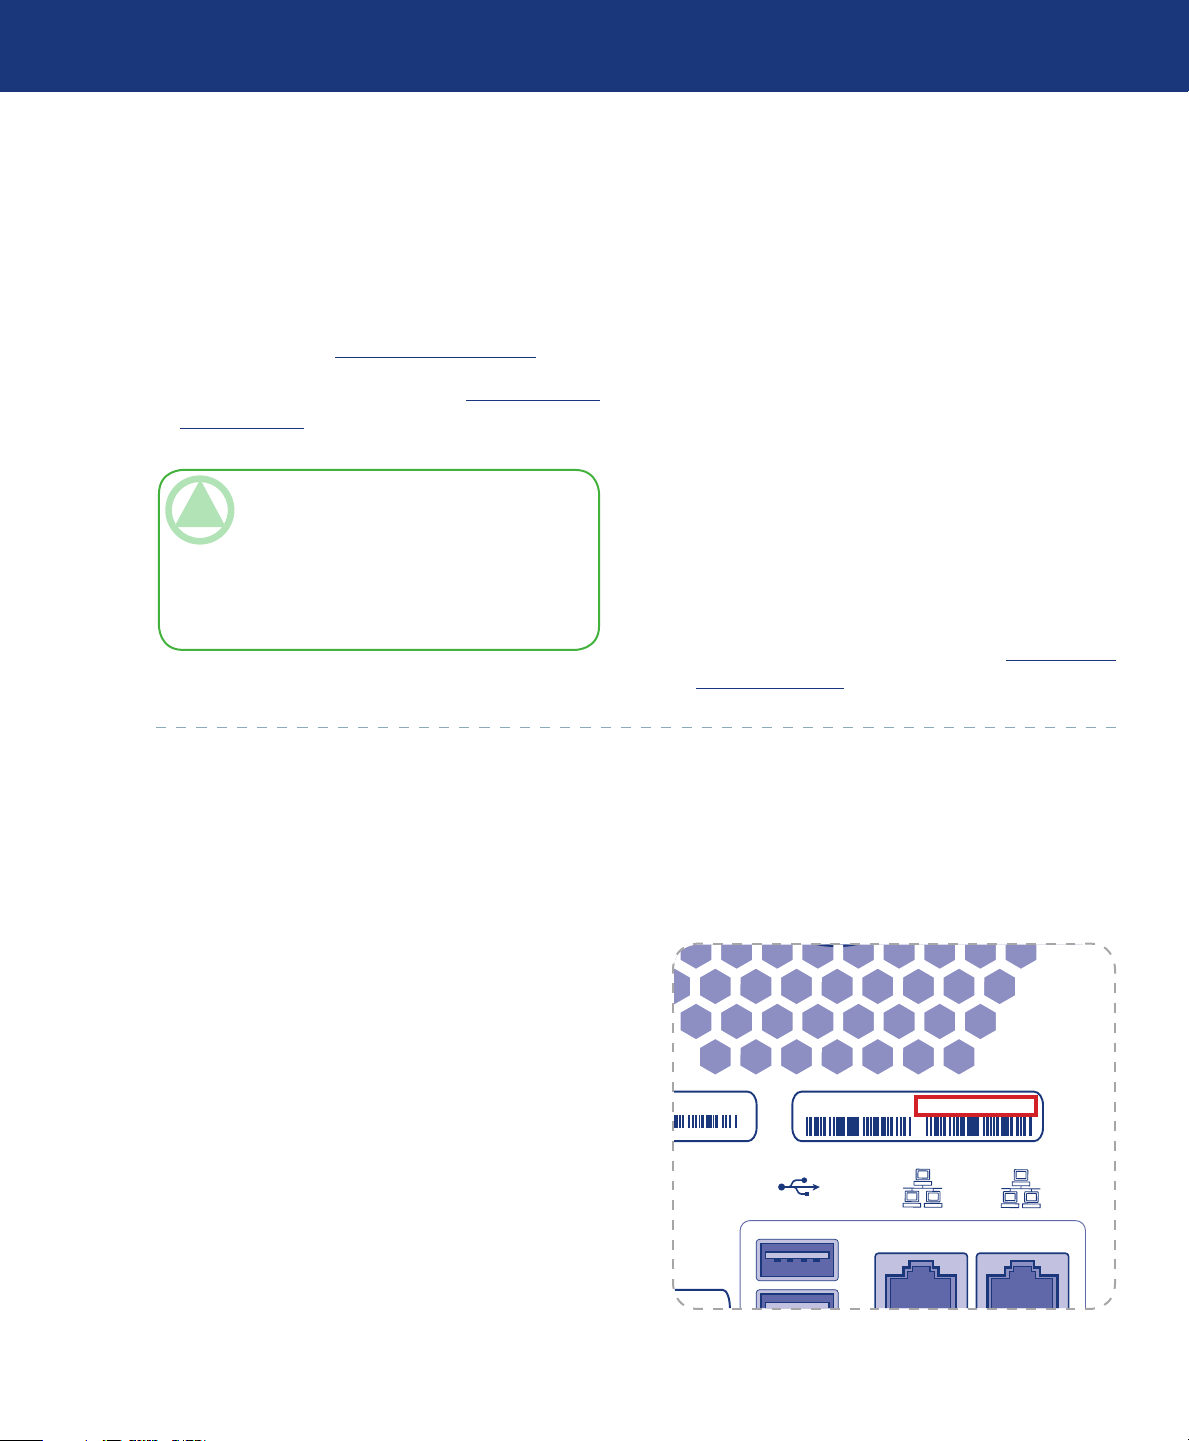
Find the 12-digit MAC address of the Ethernet Disk
2.
RAID on the label on the back panel (Fig. 5.1.2.A)
Locate the MAC address in the list of addresses in
the Terminal window and the IP address corresponding to the MAC address.
Open Safari. Enter the IP address you found in Step
3.
2 in the URL field, e.g. “https://ip_address”, and
press return.
Fig. 5.1.2.A
LaCie Ethernet Disk RAID (Firmware version 1.4)
2 1
NIC 2: 000E0CBA0A58 NIC 1: 000E0CBA0A58
User Manual
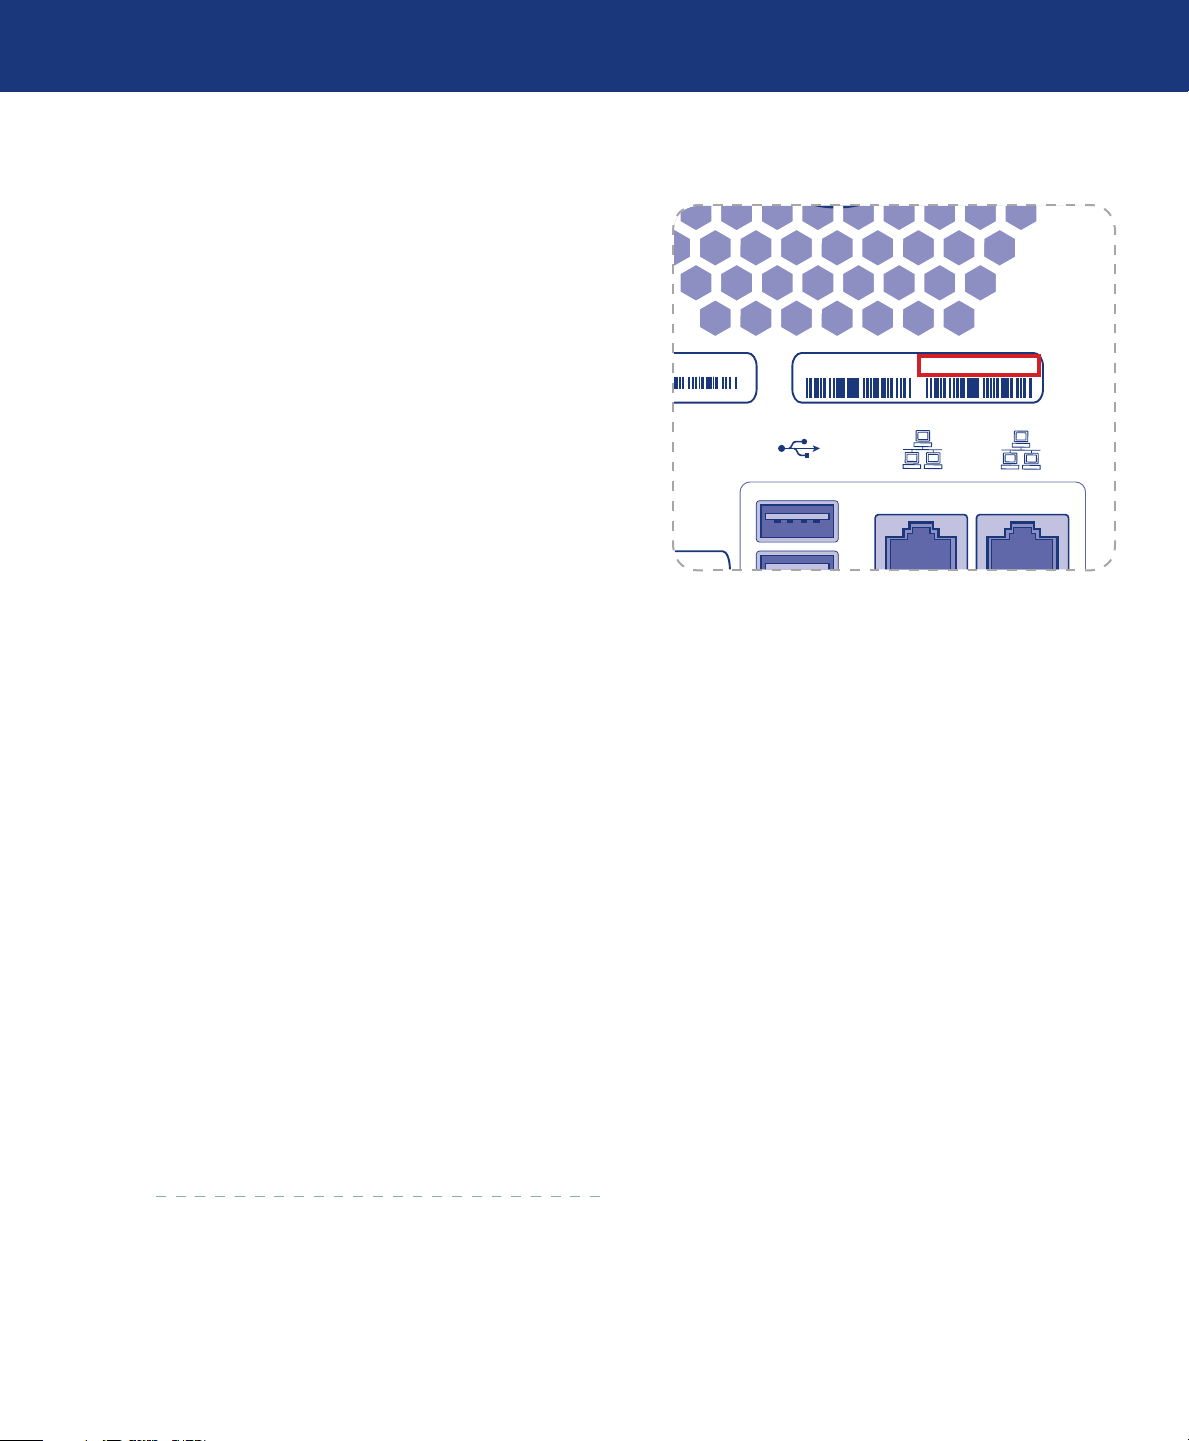
Method 2: Hostname
By default, the Ethernet Disk RAID has a hostname
corresponding to the identification number (MAC address) of Gigabit Ethernet LAN Port 1. is is a 12digit number located on the label on the back panel. See
Fig. 5.1.2.B.
To use the hostname to access the Ethernet Disk
Raid:
Open Safari.
1.
Enter the number in the URL field, e.g. https://fs_
2.
000e0cb03872/.
Press return. e Ethernet Disk RAID Web Man-
3.
ager opens in Safari.
5.1.3. Mac Users without DHCP Server■
Managing Your Ethernet Disk RAID
page 25
Fig. 5.1.2.B
e Ethernet Disk RAID is configured with a default static IP address of 192.168.1.101 with a subnet
255.255.255.0. To connect directly to the Ethernet Disk
RAID:
Open the Network panel of System Preferences.
1.
Click Configure.
2.
Select Manually from the Configure IPv4 menu.
3.
Enter an IP address compatible with the Eth-
4.
ernet Disk RAID in the IP Address field (e.g.
192.168.1.10).
Enter 255.255.255.0 in the Subnet Mask field.
5.
Click Apply Now.
6.
Open a web browser and enter https://192.168.1.101
7.
in the URL field and press return to access Ethernet
Disk RAID web manager.
LaCie Ethernet Disk RAID (Firmware version 1.4)
User Manual
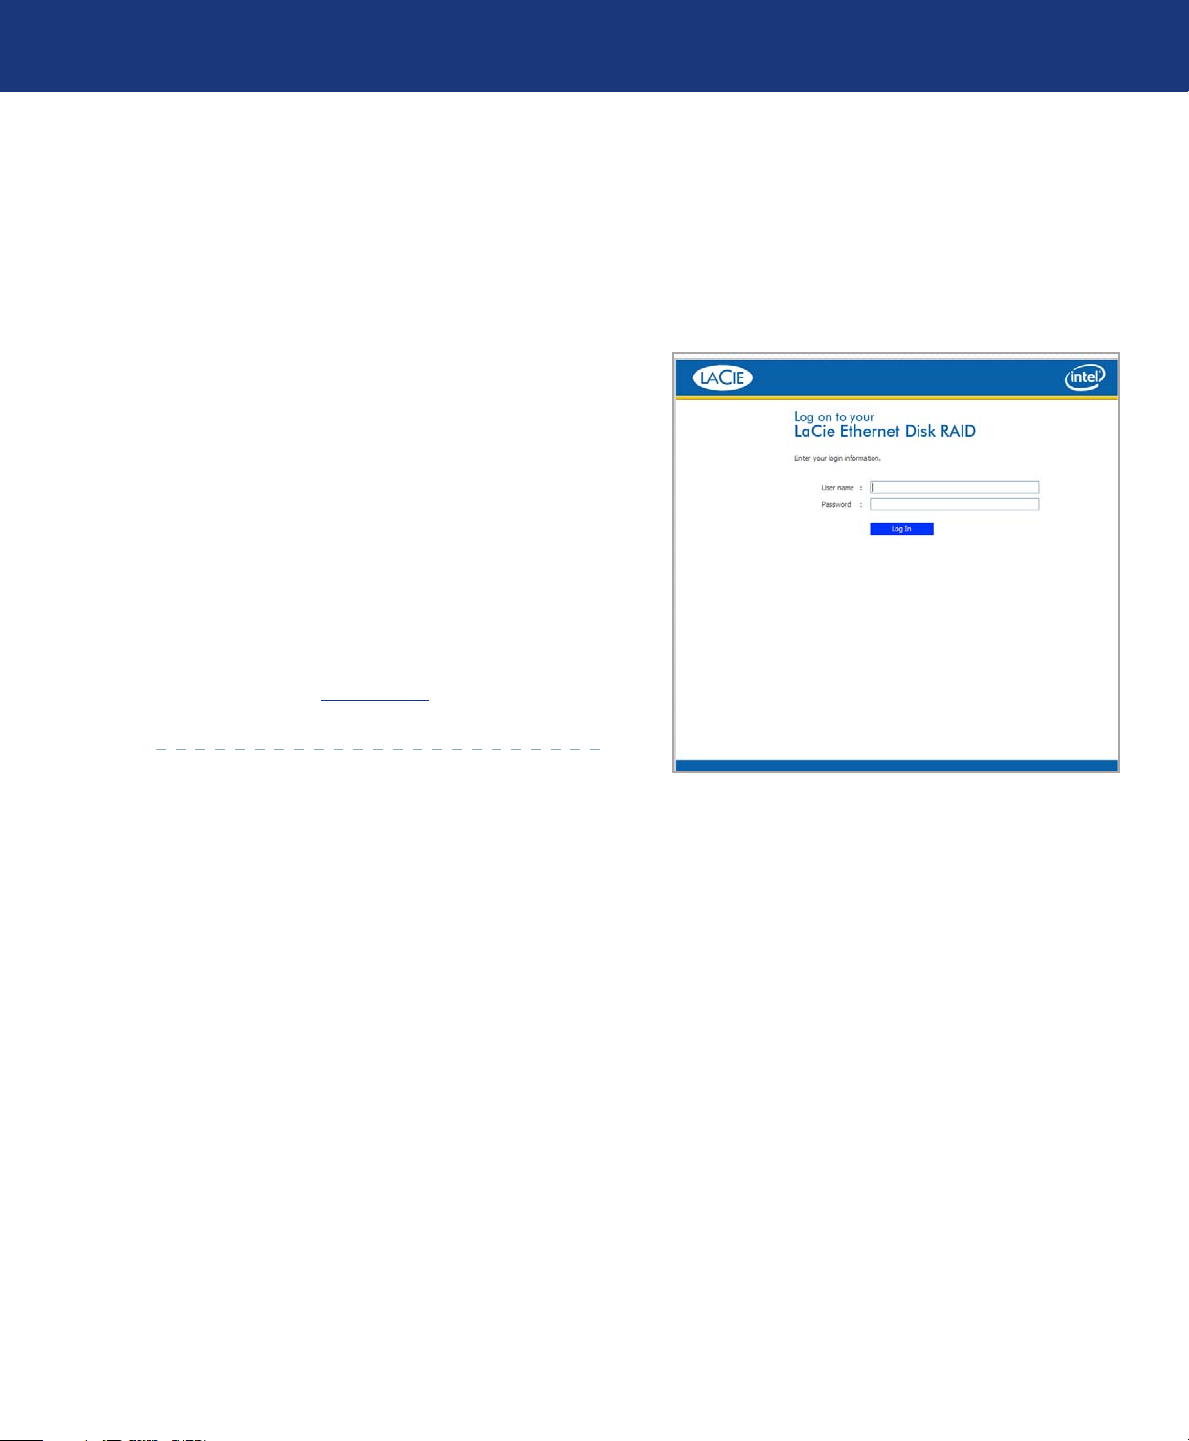
5.2. Logging In to the Manager
To ensure that your connection to the Ethernet Disk
RAID is secure, the HTTPS protocol is used, and only
individuals who know the administrator user name and
password can view or change any of the Ethernet Disk
RAID settings.
To log in to the Manager:
When the security alert appears, click Yes. e Login
1.
page appears.
Enter the administrator user name and password.
2.
Click Log In.
3.
e default administrator user name is admin, and
the default password is storage. (ese are case-sensitive.) However, you can change both the administrator
user name and password at any time. For more information, refer to section 5.7.4. System.
Managing Your Ethernet Disk RAID
page 26
Fig. 5.2.
LaCie Ethernet Disk RAID (Firmware version 1.4)
User Manual
5.3. Navigating the Manager
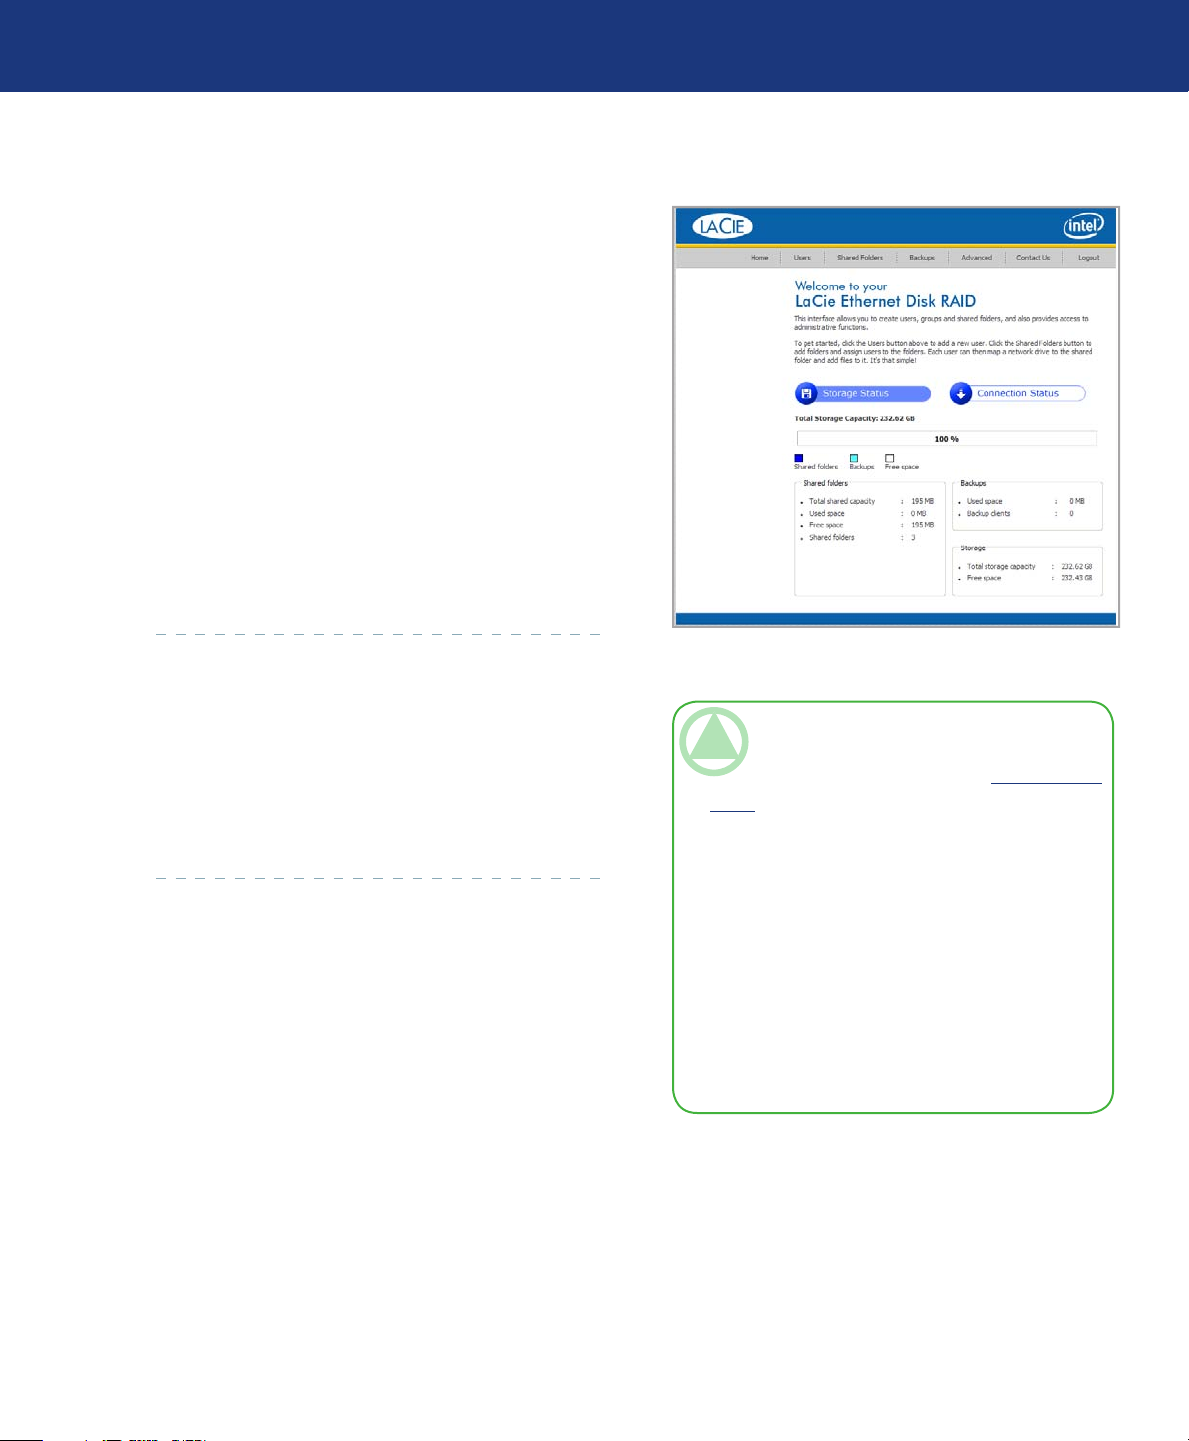
Once you log in to the Manager, the Home page ap-
pears. e top of the Home page (and every page in the
Manager) displays a navigation bar (Fig. 5.3.) that lets
you access all the features of the Ethernet Disk RAID.
Menu Bar Access■
Managing Your Ethernet Disk RAID
page 27
Fig. 5.3.
Home
Displays information about your Ethernet Disk RAID,
including how the storage space is being used and which
users are connected. For more information, refer to section 5.3.1. Storage Status Tab and section 5.3.2. Con-
nection Status Tab.
Shared Folders
Displays a list of all currently configured shared folders
and lets you add shared folders, change which users can
access them, and remove them. For more information,
refer to section 5.5.1. Creating Shared Folders and sec-
tion 5.5. Managing Shared Folders.
Advanced
Provides access to advanced Ethernet Disk RAID
configuration options, such as setting up e-mail alerts;
upgrading the firmware; removing USB devices; changing the system, network, or disk configuration settings;
viewing information about system events; and shutting
down the system remotely. For more information, refer
to section 5.7. Advanced Management.
Users
Displays a list of all currently configured users and lets you
add, modify, and remove users. For Windows and Mac OS X
users, this area also lets you add, modify, and remove groups.
For more information, refer to section 5.4.1. Adding Users
and section 5.4. Managing Users.
Backups
Displays a list of all computer disk backups that currently
exist and lets you change the recovery password, delete
backups or a backup client, and change information related
to booting remotely.
For more information, refer to section 5.6. Managing Back-
ups and Section 7. Protecting Local Disks.
Contact Us
Provides a link to the LaCie technical support web site.
Log Out
Logs you out of the Manager.
LaCie Ethernet Disk RAID (Firmware version 1.4)
User Manual
5.3.1. Storage Status Tab■
e Storage Status view displays information about
the total storage capacity on the Ethernet Disk RAID,
how much disk space is allocated for shared folders, how
much is currently used by backups, and how much is
available for either. (Initially, there is no used backup
space. e information on this page changes as each
computer backs up its hard disks to the Ethernet Disk
RAID. You might have to refresh the browser window
to reflect these changes.)
is page also indicates how much of the storage
space allocated for shared folders is actually used, the
total number of shared folders, and the number of networked computers (backup clients) that have backed up
one or more disks on the Ethernet Disk RAID.
Managing Your Ethernet Disk RAID
page 28
5.3.2. Connection Status Tab■
e Connection Status Tab Displays a list of the
Microsoft Windows and Mac OS X users who are currently connected to shared folders, including which
shared folder they are accessing and when they logged
on.
Fig. 5.3.1.
TeChNICAl NOTe: If anyone accessed a
shared folder using the guest user name (which is
described in more detail in section 5.4.1. Adding
Users), guest appears in the Users column, fol-
lowed in parentheses by the computer name.
Due to the nature of the NFS protocol, Linux
and other Mac users are not listed on this page.
Likewise, ongoing backup or recovery activities
do not appear on this page.
is page indicates only that a connection with a
shared folder has been established; this does not
necessarily mean that the user has opened any
files in the shared folder.
LaCie Ethernet Disk RAID (Firmware version 1.4)
User Manual
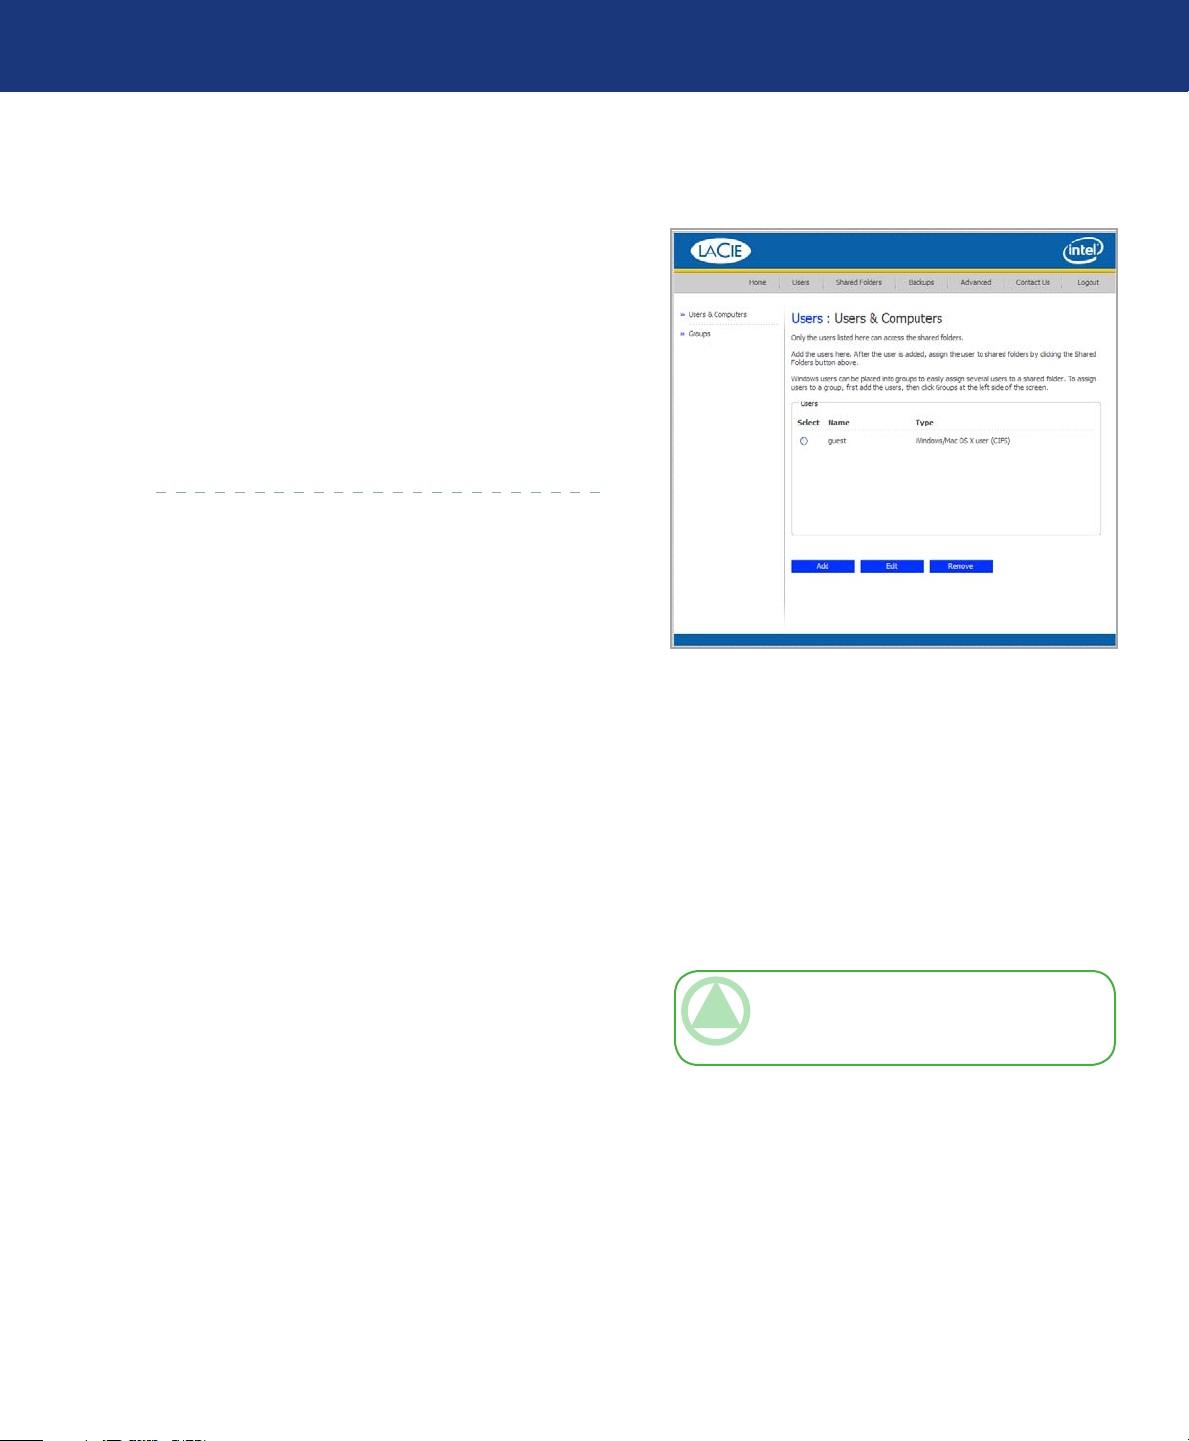
5.4. Managing Users
When you click Users in the navigation bar, the Us-
ers & Computers page appears. is page displays a list
of all currently configured Windows and Mac OS X users, as well as all Linux and other Mac computers.
Only the individuals or computers that appear on
this page can access the shared folders or back up their
local hard disks on the Ethernet Disk RAID. You can
add, modify, or remove users at any time.
Managing Your Ethernet Disk RAID
page 29
5.4.1. Adding Users■
By default, the Ethernet Disk RAID includes a user
named “guest” that has a password of “guest.” Windows
and Mac OS X users can access all shared folders that
guest is authorized to access. However, you might want
to add other users as well. For example, if you want to
restrict access to a shared folder that contains confidential information, you would add at least one user and
authorize that user to access that shared folder (and not
authorize the guest user to access it). Adding a user for
each individual or computer in your network provides
flexibility and security, enabling you to control exactly
who can access what information.
In addition, only Windows and Mac OS X users can
use the guest user name. If there are Linux users or Mac
users who aren’t using OS X in your network, you must
add users to allow those individuals to access any shared
folders.
When you add a Windows or Mac OS X user, a
folder with the same name as that person’s user name
is automatically created on the Ethernet Disk RAID.
Only that person can access that folder and that per-
Fig. 5.4.
son has full read/write access to it. (In the Console, this
folder is identified as the home folder.)
You can add up to 64 Windows or Mac OS X users,
and up to 64 Linux or other Mac users (for a total of up
to 128 users).
See the next page for instructions on adding users.
TeChNICAl NOTe: Since each Linux/other
Mac user can represent multiple users, the num-
ber of actual users can be higher.

LaCie Ethernet Disk RAID (Firmware version 1.4)
User Manual
To add a user:
In the navigation bar, click Users. e Users & Com-
1.
puters page appears (see Fig. 5.4.1.A.).
Click Add.
2.
Select the type of user you want to add, and then
3.
click Next.
e operating system used by the user determines
which option you should choose – Windows/
Mac OS X user (CIFS) or Linux/Other Mac user
(NFS).
TeChNICAl NOTe: Linux users and Mac
users who are not using OS X access shared folders using the Network File System (NFS). In this
environment, access to shared folders is given to
entire computers, not to individual users of those
computers. However, in Windows and Mac OS
X environments, each computer user can have individual access to a shared folder.
Managing Your Ethernet Disk RAID
page 30
Fig. 5.4.1.A
e page that appears next varies, depending on the
user type you selected:
Windows/Mac OS X User (CIFS)■ Linux/Other Mac User (NFS)■
Fig. 5.4.1.B

LaCie Ethernet Disk RAID (Firmware version 1.4)
User Manual
Enter the requested user information and click
4.
Done.
Windows/Mac OS X Users (CIFS)■
Managing Your Ethernet Disk RAID
page 31
Enter the user name and password for accessing the
shared folders. (You must enter the password a second
time to confirm it.)
e user name can be up to 15 characters long and
can include letters and numbers.
Linux/Other Mac Users (NFS)■
Enter a computer description and the IP address or
computer name of the person’s computer.
e Computer description can be the name of the
person who typically uses the computer, or any other
description that you want to provide to identify the
computer in the Users list. is description can be up
to 15 characters long. e IP address or computer name
is the IP address or the actual computer name in the
computer’s system configuration.
Repeat steps 2 through 4 until you have added all
5.
the users that you want to add at this time. (You can
always add more users later.)
TeChNICAl NOTe: If the user name and
password that you specify here are the same as
the person’s Windows user name and password,
the person will not be prompted to provide a user
name and password when accessing the shared
folder.
TeChNICAl NOTe: You can create a single
user that actually represents multiple users. In the
IP address or computer name text box, you can
use the wildcard characters * and ? to indicate a
range of names. For example, client* or client?
would include all computers in the subnet whose
name begins with client. *.company.com would
include all computers in the domain company.
com. However, these wildcards cannot be used
with IP addresses.
If you’d like to put Windows and Mac OS X users into groups, refer to section 5.4.4. Working with
Groups.

LaCie Ethernet Disk RAID (Firmware version 1.4)
User Manual
5.4.2. Modifying Users■
Managing Your Ethernet Disk RAID
page 32
For Windows and Mac OS X users, you can change
the password used to access the shared folders, but not
the user name. is change will not affect current connections, but will take effect the next time the person
tries to connect to a shared folder.
For Linux and other Mac users, you can change the
IP address or computer name, but not the computer description. Changing this information immediately disconnects that computer from the shared folders.
To modify a user:
In the navigation bar, click Users.
1.
Select the radio button next to the user that you want
2.
to modify.
Click Edit.
3.
e page that appears next varies, depending on the
type of user you selected.
Windows/Mac OS X User (CIFS)■ Linux/Other Mac User (NFS)■
TeChNICAl NOTe: To change the user
name or computer description, you must remove
the existing user as described in section 5.4.3. Re-
moving Users, and then add a new user with the
desired name or description as described in sec-
tion 5.4.1. Adding Users.
Make the desired change and click OK.4.
Windows/Mac OS X Users (CIFS)■
Enter the password for accessing the shared folders.
(You must enter the password a second time to confirm
it.)
TeChNICAl NOTe:If the user name and
password specified here are the same as the person’s Windows user name and password, the person will not be prompted to provide a user name
and password when accessing the shared folders.

LaCie Ethernet Disk RAID (Firmware version 1.4)
User Manual
Linux/Other Mac Users (NFS)■
Managing Your Ethernet Disk RAID
page 33
Enter the computer’s IP address or the actual computer name in the computer’s system configuration.
A single user can actually represent multiple computers. In the IP address or computer name text box,
you can use the wildcard characters * and ? to indicate
a range of names. For example, client* or client? would
include all computers in the subnet whose name begins
with client. *.company.com would include all computers
in the domain company.com. However, these wildcards
cannot be used with IP addresses.
5.4.3. Removing Users■
You can remove any user except the “guest” user.
If you remove a user who is currently connected to
the Ethernet Disk RAID, that user remains connected
until the user disconnects from the shared folder or
shuts down the computer.
To remove a user:
In the navigation bar, click Users.
1.
TeChNICAl NOTe: If the user is currently
connected to a shared folder, changing this information will disconnect the user.
CAUTION: When you remove a Windows/
Mac OS X user, that user’s personal (home) folder is automatically deleted. If you’re removing the
user simply to change the person’s user name, you
might want to have the user copy any data from
this folder to another location to ensure that it is
not lost.
Select the radio button next to the user that you want
2.
to remove.
Click Remove.
3.
When prompted to confirm the removal, click OK.
4.
e user no longer appears in the list on the Users
page.

LaCie Ethernet Disk RAID (Firmware version 1.4)
User Manual
5.4.4. Working with Groups■
Windows and Mac OS X users can be put into
groups, which makes it easier to give several users access
to the same shared folder at once.
When you click Users in the navigation bar and
click Groups in the left pane, the page displays a list
of all currently configured groups. When you select a
group in the Groups list, the members of that group
appear in the adjacent Members list.
If you are using local authentication mode, you can
add a group, modify the group membership, or remove
groups at any time. If you are using Active Directory authentication mode, you can view the group membership
but not add, modify, or remove groups. ose actions
can be done only on the Active Directory server.
Managing Your Ethernet Disk RAID
page 34
Fig. 5.4.4.
5.4.4.1. Adding a Group
In local authentication mode, when you create a
group, you typically specify which users should be members of that group, although you can create an empty
group and add users later. (You must add users as described in section 5.4.1, Adding Users before you can
add those users to a group.)
Each user can be a member of multiple groups. For
example, the user Alice might be a member of both the
Marketing and Executives groups.
You can create up to 128 groups.
To add a group:
In the navigation bar, click Users.
1.
In the left pane, click Groups.
2.
Click Add.
3.
In the Group name text box, enter a unique name
4.
for the group.
is name can be up to 15 characters long and can
include letters, numbers, hyphens, and underlines.
Fig. 5.4.4.1.

LaCie Ethernet Disk RAID (Firmware version 1.4)
Managing Your Ethernet Disk RAID
User Manual
Specify which users should belong to this group, and
5.
then click OK. See the table, below.
To accomplish this Do this
Add all users to the group Click Add All Users. All users move from the Available users list to the Group
members list.
TeChNICAl NOTe: To select multiple, con-
tiguous users, hold down the Shift key and select
the first user, then select the last user. All users
between the first and last selected user are selected. To select multiple, non-contiguous users, hold
down the Ctrl key as you select each user.
page 35
Add selected users to the
group
Remove all users from the
group
Remove selected users from
the group
In the Available users list, select the user(s) that you want to add and then click Add
Selected User(s).
Click Remove All Users. All users move from the Group members list to the Available users list.
In the Group members list, select the user(s) that you want to remove from the
group and then click Remove Selected User(s).

LaCie Ethernet Disk RAID (Firmware version 1.4)
User Manual
5.4.4.2. Changing the Group Membership
Managing Your Ethernet Disk RAID
page 36
In local authentication mode, you can change which
users are members of each group at any time. When you
add a user to a group, that user immediately has access
to all the shared folders that the group is authorized to
access. However, if you remove a user from a group, the
change does not take effect until that user disconnects
from the shared folder or shuts down the computer.
For example, the user Alice might be a member of
both the Marketing and Executives groups. e Marketing group might have read-only access to the Budget
To change the group membership:
In the navigation bar, click Users.
1.
In the left pane, click Groups.
2.
In the Groups list, select the group whose member-
3.
ship you want to change.
Click Edit.
4.
5.
Specify which users should belong to this group, and
then click OK. See the table, below.
shared folder, while the Executives group might have
read/write access. As a member of the Executives group,
Alice would have read/write access to that shared folder.
If Alice is currently connected to that shared folder and
you subsequently remove her from the Executives group,
she continues to have read/write access to that folder
until she disconnects or shuts down her computer. e
next time she connects, she continues to have access to
the shared folder (since she is still a member of the Marketing group), but she is able to only view the files there;
she cannot add, modify, or delete files.
e selected users move from one list to the other.
On the Groups page, when you select this group in
the Groups list, the adjacent Members list immediately reflects the changes you just made.
See the Group Options table on the next page.
Fig. 5.4.4.2.
TeChNICAl NOTe: To select multiple, con-
tiguous users, hold down the Shift key and select
the first user, then select the last user. All users
between the first and last selected user are selected. To select multiple, non-contiguous users, hold
down the Ctrl key as you select each user.

LaCie Ethernet Disk RAID (Firmware version 1.4)
Managing Your Ethernet Disk RAID
User Manual
Group Options■
To accomplish this Do this
Add all users to the group Click Add All Users. All users move from the Available users list to the Group
members list.
page 37
Add selected users to the
group
Remove all users from the
group
Remove selected users from
the group
In the Available users list, select the user(s) that you want to add and then click
Add Selected User(s).
Click Remove All Users.
In the Group members list, select the user(s) that you want to remove from the
group and then click Remove Selected User(s).

LaCie Ethernet Disk RAID (Firmware version 1.4)
User Manual
5.4.4.3. Removing a Group
Managing Your Ethernet Disk RAID
page 38
In local authentication mode, removing a group does
not remove the users that are members of that group; it
simply means that the group no longer displays in the
Groups list on the Groups page. e users remain listed
on the Users & Computers page. (In Active Directory
authentication mode, you cannot remove a group on the
storage system. at can be done only on the Active Directory server.)
However, removing a group can affect access to
shared folders. When you remove a group, the members
of that group no longer has access to any shared folders
that the group was authorized to access unless they were
granted individual access as well.
For example, the Executives group might include
Alice, Bob, and Carlos, and that group might have read/
write access to the Budget shared folder. If you remove
the Executives group, Alice, Bob, and Carlos remain users, but they no longer have access to that shared folder.
On the other hand, if the Executives group had
read/write access to the Budget shared folder, but Alice
had read-only access, when you remove the group, Bob
and Carlos no longer have access to the Budget shared
folder (since their access rights were determined by their
group membership), but Alice continues to have readonly access, since that access right was granted to her on
a user level.
TeChNICAl NOTe: Removing a group does
not remove the users that are members of that
group; it simply means that the group will no longer
appear in the Groups list on the Groups page. e
users remain listed on the Users & Computers page.
However, removing a group can affect access to
shared folders. When you remove a group, the
members of that group will no longer have access
to any shared folders that the group was authorized to access unless they were granted individual access as well.
To remove a group:
In the navigation bar, click Users.
1.
In the left pane, click Groups.
2.
In the Groups list, select the group that you want to
3.
remove.
Click Remove.
4.
NOTe: If the storage system uses Active Directory
authentication mode, this button displays dimmed.
When prompted to confirm the removal, click OK.
5.
e group no longer appears in the Groups list.

LaCie Ethernet Disk RAID (Firmware version 1.4)
User Manual
5.4.5. Authentication Mode■
5.4.5.1. Changing Authentication Mode
Managing Your Ethernet Disk RAID
page 39
Your LaCie Ethernet Disk RAID can operate in
one of two modes:
• Local authentication mode
• Active Directory authentication mode
In local authentication mode, the storage system authenticates all users who try to connect to shared folders, and you can add, modify, or remove all types of users (both Windows/ Mac OS X and Linux/other Mac
TeChNICAl NOTes:
❖
e authentication mode has no effect on backups performed using Windows Backup Software.
If you use Active Directory authentication mode, the User must change password at next logon check box must be
❖
cleared in the properties for each user on the Active Directory server who will be accessing shared folders on the
storage system. In addition, each user’s password can be no longer than 24 characters.
❖
If you use Active Directory authentication mode, you must add any Mac OS X users to your Active Directory server
in order to provide those users with access to shared folders on the storage system.
Active Directory authentication mode does not automatically include a guest account. However, the Active Direc-
❖
tory administrator can create one on the Active Directory server.
users). By default, the Ethernet Disk RAID uses local
authentication mode.
In Active Directory authentication mode, the Active
Directory server authenticates all Windows users who
try to connect to shared folders. You can add, modify, or
remove Linux /other Mac users, but not Windows users. In addition, you cannot create groups. All Windows
users and groups are controlled entirely by the Active
Directory server.
If you use Active Directory authentication mode, and the clocks of the storage system and the Active Directory
❖
server differ by more than five minutes, errors will occur when the storage system tries to connect to the Active
Directory server (that is, when you set the authentication mode, when synchronization between the two systems
occurs, and when users access shared folders). It is recommended that you configure both the storage system and the
Active Directory server to set their clocks from a common Network Time Protocol (NTP) server.
You can change the authentication mode at any
time, but you must provide the administrator password
to do so.
CAUTION: Changing the authentication
mode deletes all your existing user data and
shared folder assignments. However, if any users
are currently accessing shared folders, they will
remain connected until they disconnect from the
shared folders or shut down their computer.

LaCie Ethernet Disk RAID (Firmware version 1.4)
User Manual
To change the authentication mode:
In the navigation bar, click Users.
1.
In the left pane, click Authentication Mode. e
2.
Authentication Mode page displays the current authentication mode. See figure 5.4.5.1.A.
Managing Your Ethernet Disk RAID
page 40
In the Administrator password text box, enter the
3.
password for accessing the storage system (not the
active directory password).
Click Change Authentication Mode.
4.
If you are currently using Active Directory authen-
5.
tication mode, click Yes when prompted to switch
to local authentication mode. All your existing user
data and user assignments are deleted, and you can
add new users (see section 5.4.1, Adding users) and
assign them to shared folders (see section 5.5.1, Cre-
ating Shared Folders).
If you are currently using local authentication
mode, the Active Directory Server page displays.
See figure 5.4.5.1.B.
In the Primary server IP address text box, enter the
6.
IP address of your primary Active Directory server.
(You cannot use the server’s name.)
If desired, enter the IP address of a secondary Active
7.
Directory server in the Secondary server IP address
text box. (You cannot use the server’s name.) is
server will be used if the primary Active Directory
server is not available. e secondary server must be
in the same domain as the primary server.
Fig. 5.4.5.1.A
Fig. 5.4.5.1.B
Click Next. e Active Directory User Login page
8.
displays. See figure 5.4.5.1.C.
In the User name text box, enter the name of a user
9.
who has privileges to access the Active Directory
tree. When accessing the Active Directory server,
this name will be appended with the fully qualified
domain name shown on this page.
Fig. 5.4.5.1.C

LaCie Ethernet Disk RAID (Firmware version 1.4)
User Manual
In the Password text box, enter the password associ-
10.
ated with the specified user name.
If your Active Directory tree has more than 100 sub-
11.
units or more than 64 users or groups, or if you want
to specify the name of the organizational unit that
contains the users and groups that will be able to access shared folders on the storage system, enter the
name of organizational unit in the Organizational
unit name text box. e name must be preceded by
a forward slash (as in /Sales). e Active Directory
Tree page displays. See figure 5.4.5.1.D.
If you omit an organizational unit name here, you
can browse the Active Directory tree on the next
page. However, if the tree has more than 100 subunits or more than 128 users or groups, an error message displays, and you must specify an organizational
unit name.
Managing Your Ethernet Disk RAID
page 41
TeChNICAl NOTe: e name of the organi-
zational unit cannot contain a slash. For example,
if the name is Sales/Marketing, you must either
specify a different organizational unit name, leave
the name blank, or change the name of the organizational unit on the Active Directory server.
Select the organizational units that contain the users
12.
or groups that are allowed to access the shared folders on the storage system, and then click Next.
e Active Directory Administrator Login page displays. See figure 5.4.5.1.E.
TeChNICAl NOTe: Once the organizational units are entered, you cannot change them so make your
selection(s) carefully. You can select the root of all the organizational units to get a listing of every user in every
unit. If you do setup a organizational unit and need to change it, you can switch to local mode and then re-join the
domain. However, this requires setting up the user rights to all shared folders again.
You must select at least one organizational unit. Selecting the forward slash mark (/) selects everyone in the tree.
As you select units in the list, the Number of selected users and Number of selected groups areas display the
number of users and groups that will be added to the storage system. e maximum allowed number of users is
128, and the maximum allowed number of groups is 128. If your selection exceeds these maximums, you must
select a different unit.
Fig. 5.4.5.1.D
Fig. 5.4.5.1.E

LaCie Ethernet Disk RAID (Firmware version 1.4)
User Manual
In the User name text box, enter an administrator
13.
user name for accessing the Active Directory server.
is account will be used to automatically configure
the Active Directory server to allow the storage system to become a trusted member and communicate
directly with that server. It is used only when setting
up this relationship.
In the Password text box, enter the password asso-
14.
ciated with the specified user name, and then click
Finish.
All the current users and groups associated with the
selected organizational unit are imported into the
storage system and display on the Users & Computers and Groups pages. At this point, you can assign
these users and groups to shared folders (see section
5.5.1, Creating Shared Folders).
Managing Your Ethernet Disk RAID
page 42

LaCie Ethernet Disk RAID (Firmware version 1.4)
User Manual
5.4.5.2. Modifying the Active Directory Properties
Managing Your Ethernet Disk RAID
page 43
If your storage system is currently using Active
Directory authentication mode, an item called Active
Directory Properties appears in the left pane when you
click Users in the navigation bar. When you click this
item, you can change the IP address of your primary
or secondary Active Directory server, the user name or
password for browsing the Active Directory tree, and
how frequently the storage system should synchronize
with the Active Directory server.
To modify the Active Directory properties:
In the navigation bar, click Users.
1.
In the left pane, click Authentication Directory
2.
Properties.
is item displays only if you are currently using
Active Directory authentication mode. To determine which mode you are currently using, click
Authentication Mode in the left pane and ob-
serve the mode specified in the right pane. When
you click Authentication Directory Properties, the
Authentication Directory Properties page displays.
See figure 5.4.5.2.
If you add a new user or group to the Active Directory server, you can use the Active Directory Properties
page to synchronize the storage system and Active Directory server immediately. You should also do this if a
user’s password changed on the Active Directory server
and the user can no longer access shared folders on the
storage system.
Fig. 5.4.5.2.

LaCie Ethernet Disk RAID (Firmware version 1.4)
User Manual
Make the desired changes, if any, and click Apply:3.
To change this Do this
Managing Your Ethernet Disk RAID
page 44
e IP address of the primary
Active Directory server
e IP address of the secondary
Active Directory server
e user name or password for
browsing the Active Directory
tree
To immediately synchronize the storage system and
4.
the Active Directory server, click Synchronize Now.
In the Primary server IP address text box, enter the IP address of your primary Active Directory server. (You cannot use the server’s name.)
NOTe: e new server must reside in the same domain as the original server. To
change domains, you must change the authentication mode (see section 5.4.5.1,
Changing Authentication Mode).
In the Secondary server IP address text box, enter the IP address of your secondary
Active Directory server. (You cannot use the server’s name.)
NOTe: e secondary server must reside in the same domain
as the primary server.
In the User name text box, enter the name of a user who has privileges to access the
Active Directory tree.
In the Password text box, enter the password associated with that user name.
is user name and password will be used to obtain new user and group information
from the Active Directory server at every synchronization.
TeChNICAl NOTe: If the clocks of the stor-
age system and the Active Directory server differ
by more than five minutes, errors will occur when
the two systems synchronize. It is recommended
that you configure both the storage system and
the Active Directory server to set their clocks
from a common Network Time Protocol (NTP)
server.

LaCie Ethernet Disk RAID (Firmware version 1.4)
User Manual
5.5. Managing Shared Folders
Managing Your Ethernet Disk RAID
page 45
When you click Shared Folders in the navigation
bar, the page displays a list of all shared resources, including both shared folders and USB devices. When
you select an item in the Shared folders list, the users
and groups that can access that item appear in the Users
with access list. (For groups, the group name is preceded
by an @ symbol.)
By default, the Ethernet Disk RAID includes a
shared folder named public, and all Windows and Mac
OS X users can access it and create, modify, or delete
files there (unless you change the list of authorized users or their access rights as described in section 5.5.2.
5.5.1. Creating Shared Folders■
By default, the LaCie Ethernet Disk RAID includes
a shared folder named public. In local authentication
mode, all Windows and Mac OS X users are automatically assigned to this folder and can create, modify, or
delete files there unless you change the list of authorized
users or their access rights as described in 5.5.2. Chang-
ing User Access to Shared Folders. In Active Directory
authentication mode, you must manually assign users to
this folder in order to provide them with access.
You might want to create other shared folders as
well. For example, in an office environment, you might
Changing User Access to Shared Folders).
In addition, when you add a Windows/Mac OS X
user (as described in section 5.4.1. Adding Users), the
Ethernet Disk RAID automatically creates a shared
folder with the same name as the person’s user name.
However, these shared folders do not appear in the
Shared folders list.
You can create additional shared folders and delete
them at any time. For both shared folders and USB
disks, you can change which users can access them and
what they can do with the subfolders and files there.
want to create a shared folder for company policies that
everyone can only view, and separate shared folders for
confidential business files that only selected individuals
or departments can view or change. In a home environment, you might want to create separate folders for different types of files, like photos, videos, or music.
You can create up to 128 shared folders. Users who
can access and write to these shared folders can create
additional sub-folders for organizing the files they store
there.
To create a shared folder:
In the navigation bar, click Shared Folders. e
1.
Shared Folders page appears (see Fig. 5.5.1.A).
Click Add.
2.
TeChNICAl NOTe: e Shared folders list
includes usbdisk1 and usbdisk2 whether or not
any USB disks have been connected to the Ethernet Disk RAID.
Fig. 5.5.1.A.

LaCie Ethernet Disk RAID (Firmware version 1.4)
User Manual
In the Shared folder name text box, enter a unique
3.
name for the shared folder (see Fig. 5.5.1.B). is
name can be up to 64 characters long and can contain
letters, numbers, hyphens, underlines, and spaces.
Your storage system is divided into several partitions,
4.
one for shared folders, one for home folders and one
for backups. e maximum amount of a shared folder
space is 2 TB (1 TB=1024 GB). e minimum space
requirement is 200 MB. You can allocate more space
now or accept the default minimum space allocation.
To allocate additional space, select the Specify disk
space button and specify 1 GB (1024 MB) or higher.
To allocate the maximum available, select the Add
maximum available disk space” raid button. After
setting the appropriate value, hit OK. e folder is
created and the Shared Folders screen will be displayed.
Managing Your Ethernet Disk RAID
page 46
Fig. 5.5.1.B

LaCie Ethernet Disk RAID (Firmware version 1.4)
User Manual
5.5.2. Changing User Access to Shared Folders■
Managing Your Ethernet Disk RAID
page 47
You can change which users can access any folder or
USB disk and what level of access they have. (Shared
folders that are created as a result of creating Windows/
Mac OS X users do not appear in the Shared folders
list and cannot be modified. ese folders automatically
provide only the associated user with read/write access
to that folder.)
To change user access to shared folders and USB
disks:
In the navigation bar, click Shared Folders.
1.
In the Shared folders list, select the shared folder or
2.
USB disk whose user access you want to change.
Click Assign Access.
3.
If you selected a shared folder or a USB disk to which
4.
you previously assigned users, go to step 5.
If you selected a USB disk to which you did not
previously assign users, select the type of user that
you want to assign to this USB disk, and then click
Next.
When you add a user to the list of authorized users
for a shared folder or USB disk, that change takes effect immediately. However, if you remove a user from
the list of authorized users, or if you change the user’s
access rights, the change does not take effect until that
user disconnects from the shared folder or USB disk, or
shuts down the computer.
TeChNICAl NOTe: By default, all users
have read/write access to the public folder. You
can change the user assignments or access rights
for the public folder.
TeChNICAl NOTe: Linux user and Mac us-
ers who are not using OS X access shared folders using NFS. In this environment, access to
shared folders is given to entire computers, not
to individual users of those computers. However,
in Windows and Mac OS X environments, each
computer user can have individual access to a
shared folder.

LaCie Ethernet Disk RAID (Firmware version 1.4)
User Manual
e page that appears next varies, depending on
what type of users can access the shared folder you
selected.
Windows/Mac OS X User (CIFS)■ Linux/Other Mac User (NFS)■
Managing Your Ethernet Disk RAID
page 48
Specify which users should be able to access this
5.
shared folder or USB disk, and then click OK. See
the table, below.
e selected users move from one list to the other.
Shared Folder Access Options■
To accomplish this Do this
Allow selected users access to the shared folder
or USB disk
Prevent selected users from accessing the shared
folder or USB disk
In the Unauthorized users list, select the user(s) who should be
able to access the shared resource and then click Add (Read-
Only) or Add (Read/Write).
Users with read-only access can only view the files in the shared resource; users with read/write access can view, add, modify, and delete
folders and files in the shared resource.
In the Authorized users list, select the user(s) who should not be
able to access the shared resource and then click Remove.

LaCie Ethernet Disk RAID (Firmware version 1.4)
User Manual
TeChNICAl NOTe:
If you created groups (as described in section 5.4.4.1. Adding a Group), you can perform this step with groups as
❖
well.
is page shows all groups and all users. For example, if you created a group named Group1, and added User2 and
User3 to that group, the Unauthorized groups list includes Group1, and the Unauthorized users list includes
User2 and User3. If you select Group1 and click Add (Read-Only), Group1 moves to the Authorized groups list,
but User2 and User3 do not move to the Authorized users list. is allows you to specify unique access rights for
those users. For example, you could select User3 and click Add (Read/Write). is would mean that everyone in
Group1 would have read-only access to the shared folder except User3, who would have read/write access to it.
5.5.3. Deleting a Shared Folder■
Managing Your Ethernet Disk RAID
page 49
Once you have created a shared folder, you can delete it at any time. When you delete a shared folder, any
users who are currently accessing it are immediately disconnected from it.
To delete a shared folder:
In the navigation bar, click Shared Folders.
1.
In the Shared folders list, select the shared folder
2.
that you want to delete.
Click Delete.
3.
When prompted to confirm the deletion, click OK.
4.
e shared folder no longer appears in the Shared
Folders list, and all associated subfolders and files
are deleted.
CAUTION: Deleting a shared folder deletes
all the subfolders and files in that shared folder.
If you want to delete only selected subfolders or
files, access the shared folder (as described in section 6.1. Accessing Shared Folders) and delete
the desired items.
TeChNICAl NOTes:
You cannot delete the public folder or any folders
❖
created automatically as a result of adding Windows/Mac OS X users (which do not appear on
the Shared Folders page).
You cannot delete the contents of a USB disk
❖
using the Shared Folders page. To delete its contents, you must give yourself read/write access to
that disk (as described in section 5.5.2. Changing
User Access to Shared Folders), access the disk (as
described in section 6.1. Accessing Shared Fold-
ers), and then delete the desired folders and files.
To remove the USB disk from the Ethernet Disk
RAID, use the Manager to disconnect it (as described in section 4.5.2. Disconnecting USB
Devices). en physically unplug the USB disk
from the Ethernet Disk RAID. Even after you
physically unplug the USB disk, it remains in the
Shared folders list.

LaCie Ethernet Disk RAID (Firmware version 1.4)
User Manual
5.6. Managing Backups
Managing Your Ethernet Disk RAID
page 50
Once the users have used Windows Backup Software to back up their computer hard disks to the Ethernet Disk RAID (as described in section 7. Protecting
Local Disks), the Backups page displays a list of each
computer that has done this, the size of each protected
disk, the date and time of all available backups, and the
backup disk ID (the number used to identify the backup
on both the storage server and on the Status page in the
Windows Backup Software software).
If a user ever has to recover a disk using the recovery
CD or remotely boot from a backup on the Ethernet
Disk RAID, the user will be prompted for a password to
do so. e user had to provide this password when protecting the disk. However, if the user forgets it, you can
reset the password using the Manager. (For information
5.6.1. Changing the Recovery Password■
In the navigation bar, click Backups.
1.
In the Computer name list in the Recovery pass-
2.
words group box, select the name of the computer
whose recovery password you want to change.
about recovering a disk using the recovery CD, refer
to section 7.9.3. Recovering a System Disk Using the
Recovery CD. For information about booting remotely,
refer to section 7.9.4. Recovering a System Disk While
Booting Remotely.)
For booting remotely, you can also specify the MAC
address to use (if you want to remotely boot a computer
using a different computer’s backup) and the backup to
boot from.
In addition, when a user removes protection for a
disk, the existing backups are not deleted. e user can
re-use the allocated space for new backups, or you can
delete those backups manually using the Manager.
In the Recovery password text box, type the pass-
3.
word to use. is password must be 12-16 characters
long.
Click Change Password.
4.
When the confirmation message appears, click OK.
5.
e user must provide this password when recovering a disk from this Ethernet Disk RAID using the
Recovery CD or when remotely booting from a backup
on the Ethernet Disk RAID.
Fig. 5.6.1.

LaCie Ethernet Disk RAID (Firmware version 1.4)
User Manual
5.6.2. Configuring Remote Boot■
Managing Your Ethernet Disk RAID
page 51
Normally, when you enable remote boot for a client computer (as described in section 7.8.1. Enabling
Remote Boot), no additional action is necessary on the
Ethernet Disk RAID.
However, if you want to remotely boot one computer from another computer’s backup, you must change
the MAC address. For example, if Computer1 has been
infected by a virus, and all of its backups are also infected, you might want to boot Computer1 from one
To configure remote boot:
In the navigation bar, click Backups.
1.
In the Computer name list in the Remote boot
2.
group box, select the name of the computer whose
backup you want to remotely boot from.
If you’re remotely booting the computer from its
3.
own backup, do not change the MAC address. However, if you’re booting a different computer from
the selected computer’s backup, enter the MAC
address of the NIC of the computer that you want
to remotely boot in the MAC address text box.
Remote boot must have been previously enabled on
that computer.
From the Backup for booting remotely list, select
4.
the time and date of the backup that you want to
remotely boot from. To always boot from the most
recent backup, select Latest backup. An asterisk (*)
identifies the backup that will be used for booting
remotely.
of Computer2’s backups and recover that disk to Computer1. To do this, you must change the MAC address
associated with Computer2.
You can also specify which backup to remotely boot
from. By default, you always boot from the latest backup. (You can boot from an earlier backup, but no matter
which backup you boot from, you can recover only the
latest backup.)
ImpOrTANT INfO: If you try to recover
one computer from another computer’s backup,
both computers must have identical hardware.
Otherwise, the recovered files will not operate
properly.
TeChNICAl NOTes:
You can remotely boot only from backups that
❖
were created after remote boot was enabled on
the client computer.
If the selected backup is deleted to make room
❖
for newer backups, the most recent backup will be
used for booting remotely.
Click Apply Boot Info.
5.
When the confirmation message appears, click OK.
6.
If you changed the backup for booting remotely, an
asterisk now appears next to the selected backup.

LaCie Ethernet Disk RAID (Firmware version 1.4)
User Manual
5.6.3. Deleting a Backup■
Managing Your Ethernet Disk RAID
page 52
You can delete all backups of a given disk, but you
cannot delete just an individual backup from a specific
date and time.
To delete all backups of a disk:
In the navigation bar, click Backups.
1.
Select the radio button adjacent to the disk whose
2.
backups you want to delete (in the second Select
column).
Click Delete Backup.
3.
When prompted to confirm the deletion, click OK.
4.
e disk no longer appears on the Backups page,
and all backup versions are deleted.
If only one disk was protected, the computer name
disappears from the page as well.
ImpOrTANT INfO: If you delete all back-
ups of all disks for a particular computer, that
computer no longer appears on the Backups
page. However, that computer name remains in
the Ethernet Disk RAID and counts toward the
total number of computers that are allowed to
back up to the Ethernet Disk RAID. If you want
to delete all backups of all disks and the computer
name, refer to section 5.6.4. Deleting a Client.
TeChNICAl NOTe: If you delete a backup
and the user did not previously remove protection
for that disk, when the user subsequently accesses
Client Backup and Recovery, the Status page will
indicate that the backup of the protected disk is
offline. To back up the disk once again, the user
must remove protection and then protect the
disk again. For more information, refer to section
7.9.5. Removing Protection and section 7.2. Protecting Your Disks.

LaCie Ethernet Disk RAID (Firmware version 1.4)
User Manual
5.6.4. Deleting a Client■
Managing Your Ethernet Disk RAID
page 53
If you remove the Windows Backup Software software from a particular computer, or if you change the
computer name, the original computer name remains on
the Ethernet Disk RAID and counts toward the total
number of computers that are allowed to back up to the
Ethernet Disk RAID. To both delete all backups of all
disks for a particular computer and the computer name,
you must delete the client.
To delete a client:
In the navigation bar, click Backups.
1.
Select the radio button to the left of the computer
2.
whose backups and computer name you want to delete from the Ethernet Disk RAID (in the first Select column).
Click Delete Client.
3.
When prompted to confirm the deletion, click OK.
4.
All backups of all disks associated with this computer are deleted, and the computer name is also deleted
from the Ethernet Disk RAID.
TeChNICAl NOTe: If you delete a client
and the user did not previously remove protection for that disk, when the user subsequently accesses the Windows Backup Software software,
the Status page will indicate that the backup of
the protected disk is offline. To back up the disk
once again, the user must remove protection and
then protect the disk again. For more information, refer to section 7.9.5. Removing Protection
and section 7.2. Protecting Your Disks.

LaCie Ethernet Disk RAID (Firmware version 1.4)
User Manual
5.7. Advanced Management
5.7.1. Alerts■
e Alerts page allows you to set up the Ethernet
Disk RAID to notify up to three people via email if a
problem occurs—for example, if one of the disks fails, or
if insufficient space is available for creating new files or
performing a backup.
To take advantage of this feature, you must have access to an SMTP e-mail server either within your own
network or through an Internet service provider.
To set up e-mail alerts:
In the navigation bar, click Advanced.
1.
On the Advanced page, click Alerts.
2.
Managing Your Ethernet Disk RAID
page 54
Specify whether or not the Ethernet Disk RAID
3.
should send e-mail notifications when a problem occurs by selecting or clearing the Send e-mail notifi-
cations check box.
If you select this option, you must provide the fully
qualified domain name or IP address of your e-mail
server and at least one e-mail address.
If you clear this option, e-mail notifications will not
be sent, and all the related fields on this page appear
dimmed. However, if you previously entered information on this page, that information is retained so
that you can easily re-enable e-mail notifications later. If you clear this option, you do not have to complete the rest of this procedure; simply click Apply.
4. In the SMTP server name or IP address text box,
enter the fully qualified domain name or IP address
of your e-mail server.
5. Specify where or not your e-mail server requires
authentication by selecting or clearing the SMTP
server authentication check box.
Fig. 5.7.1.
ImpOrTANT INfO: e e-mail might not
be sent immediately when the problem occurs,
but will be sent within five minutes of the event.
In addition, if the problem is fixed within that
time frame - for example, if you replace the disk
that failed - the alert will not be sent.
If you select this option, you must enter a user name
and password for logging into that server in the User
name and Password text boxes. If you clear this op-

LaCie Ethernet Disk RAID (Firmware version 1.4)
User Manual
tion, no authentication will be performed.
6. If your e-mail server cannot use the default sender e-
mail address (root@localhost), or if you want the individuals who receive e-mail notifications to be able
to reply to the alert, enter the address that you want
to appear as the return address in the Sender e-mail
address text box.
For example, you could enter your own e-mail address (such as MyName@MyCompany.com).
7. In the First e-mail address text box, enter the e-mail
address of an individual who should receive e-mail
notifications when a problem occurs. e e-mail
address can be up to 128 characters long and must
include the @ symbol (for example, MyName@MyCompany.com).
Managing Your Ethernet Disk RAID
page 55
8. If you want e-mail notifications to be sent to other
individuals as well, enter the appropriate e-mail addresses in the Second e-mail address and ird e-
mail address text boxes.
9. Click Apply.
10. When the confirmation message appears, click OK.
11. To confirm that the configuration is correct, click
Test E-mail, and click OK on the confirmation mes-
sage.
is sends a test message to the specified recipients.
If they do not receive the test message, make sure
that all the entries on this page are correct. You might
also have to modify the network settings (such as the
gateway to use). For information about changing the
network settings, refer to section 5.7.5. Network .

LaCie Ethernet Disk RAID (Firmware version 1.4)
User Manual
5.7.2. Firmware■
e Firmware page displays the current version of
the firmware that is installed on your Ethernet Disk
RAID. It also allows you to upgrade it if newer firmware
becomes available.
For additional security, you must enter your administrator password in order to upgrade the firmware.
To upgrade the firmware:
In the navigation bar, click Advanced.
1.
In the left pane, click Firmware.
2.
In the Firmware file text box, enter the path and
3.
file name for the firmware package (such as D:\
fs20060921.pkg), or click Browse and select the file
from the displayed list.
In the Administrator password text box, enter the
4.
password that you use for logging in to the Manager.
Click Upgrade.
5.
When the confirmation message appears, click OK.
6.
Managing Your Ethernet Disk RAID
page 56
Fig. 5.7.2.
CAUTION: When you upgrade the firm-
ware, the Ethernet Disk RAID restarts, and access to the Manager is temporarily interrupted.
In addition, users will not be able to access the
shared folders while the system restarts. If users have shared files open, data might be lost. Be
sure to have all users save their changes and close
any open files before you upgrade the firmware.
Restarting the Ethernet Disk RAID when a
backup is occurring will not have any adverse effect; the backup will resume automatically when
the Ethernet Disk RAID resumes operation.
However, restarting when a disk is being recovered can potentially corrupt the user’s operating
system, and the user will have to recover the system disk using the recovery CD (or, if the system
disk was not protected, re-install the operating
system). Be sure to upgrade the firmware only
when recovery is not occurring.

LaCie Ethernet Disk RAID (Firmware version 1.4)
User Manual
5.7.3. USB■
e USB page displays a list of all USB devices that
are currently attached to the Ethernet Disk RAID. USB
disks are identified by the names usbdisk1 and usbdisk2.
(ese names cannot be changed.)
To unplug a USB device from the Ethernet Disk
RAID, you must first use the Manager to disconnect it.
To disconnect a USB device:
In the navigation bar, click Advanced.
1.
In the left pane, click USB.
2.
In the list of USB devices, select the device(s) that
3.
you want to disconnect.
Click Disconnect.
4.
When the confirmation message appears, click OK.
5.
Managing Your Ethernet Disk RAID
page 57
Fig. 5.7.3.
TeChNICAl NOTe: If you inadvertently
disconnect a USB device, unplug it from the
Ethernet Disk RAID, plug it back in, and then
click Scan. is reactivates the USB device. User
assignments are always retained.
You can now unplug the USB device.

LaCie Ethernet Disk RAID (Firmware version 1.4)
User Manual
5.7.4. System■
e System page displays the settings that you specified when you initially configured the Ethernet Disk
RAID, such as the system name, and the current date
and time.
Using the System page, you can also change the administrator name and password to use for logging in to
the Manager, as well as the password to use for protecting local disks.
To change any of the system settings:
In the navigation bar, click Advanced.
1.
In the left pane, click System.
2.
Managing Your Ethernet Disk RAID
page 58
(continued on next page)■
Fig. 5.7.4.
TeChNICAl NOTe: If you change the name
of the system, be sure to also change that name
in any local hosts files or on the DNS server in
your network. e Ethernet Disk RAID does not
register its name with your DNS server automatically.

LaCie Ethernet Disk RAID (Firmware version 1.4)
Managing Your Ethernet Disk RAID
User Manual
Make the desired changes:3.
System Settings Options■
To change this Do this
e system name In the Storage system name text box, enter the new name to
use for the Ethernet Disk RAID. is name can be up to 15 characters long and
can include letters, numbers, and hyphens.
page 59
e system date, time, or time
zone
Network Time Protocol (NTP)
server name or IP address
e administrator name or
password
Click Apply.
4.
When the confirmation message appears, click OK.
5.
In the Date fields, enter or select the desired month, date, and year.
❖
In the Time field, enter or select the desired hour, minute, and second.
❖
In the Time zone list, select the desired time zone.
❖
In the NTP server name or IP address text box, enter the name or IP address of
the NTP server from which the storage
system should set its time. e Ethernet Disk RAID will synchronize its time with
the NTP server every hour. You can use a name only if it is resolvable.
In the Administrator name text box, enter the user name to use for logging in to
the Manager. In the Password and Confirm password text boxes, enter the password to use for logging in to the Manager.
e user name and password are case-sensitive.

LaCie Ethernet Disk RAID (Firmware version 1.4)
User Manual
5.7.5. Network■
e Network page (Fig. 5.7.5) displays the network
settings that were set when you initially configured the
Ethernet Disk RAID. (Only the first Ethernet port was
configured during setup. e second uses its default settings unless you change them here.) You can change
these settings at any time.
You can also configure the Ethernet Disk RAID to
act as a DHCP server. In other words, the system can
assign IP addresses to other computers in your network,
simplifying the network configuration of each individual system.
In addition, your Ethernet Disk RAID can act as
an FTP server. is allows all Windows or Mac OS X
users to use a Web browser to access the public folder.
ey can also access their personal folder that was created automatically when their user name was added (as
described in section 5.4.1. Adding Users). For more
information, refer to section 5.7.6. Reconfiguring the
Disks.
Managing Your Ethernet Disk RAID
page 60
TeChNICAl NOTe: Changing the IP ad-
dress or subnet mask can have several effects:
Access to the Manager will be temporarily dis-
❖
rupted. If you access the Manager using a Web
browser and an IP address, you will need to use
the new IP address. In addition, if you added the
Ethernet Disk RAID’s IP address to a local hosts
file or DNS server, you must update the IP address in those resources.
Users who accessed the shared folders using the
❖
previous IP address will be disconnected and
must access them again using the new IP address
(as described in section 6.1. Accessing Shared
Folders).
Fig. 5.7.5.

LaCie Ethernet Disk RAID (Firmware version 1.4)
User Manual
To change any of the network settings:
In the navigation bar, click Advanced.
1.
In the left pane, click Network.
2.
Make the desired changes:
3.
Network Settings Options■
To change this Do this
Managing Your Ethernet Disk RAID
page 61
e workgroup to which the Ethernet Disk
RAID belongs
e IP address(es) used by the Ethernet Disk
RAID
e IP address of the gateway If your network includes a gateway, and if the first port on the Ether-
e DNS server to use If your network includes a DNS server, and if the first port on the Eth-
In the Workgroup name text box, enter the name of the workgroup.
is name can be up to 15 characters long.
In the Port 1 group box, either select Get an IP address automatically
to obtain the IP address from your DHCP server, or select Use this IP
address and enter the IP address and subnet mask in the subsequent
text boxes. If you’re using the second Ethernet port, do the same in the
Port 2 group box.
net Disk RAID uses a specified IP address rather than obtaining one
from the DHCP server, enter the IP address of the default router in the
Gateway IP address text boxes. (is is typically the same IP address as
the first port, with the last number being 1.)
If your network does not include a gateway, or if the first port obtains
its IP address from the DHCP server, leave these text boxes blank. (If
the first port obtains its IP address from a DHCP server, the gateway
will obtain its IP address from the DHCP server as well.)
ernet Disk RAID uses a specified IP address rather than obtaining one
from the DHCP server, enter the primary IP address in the Preferred
DNS server text boxes and the secondary IP address in the Alternate
DNS server text boxes.
If your network does not include a DNS server, or if the first port obtains its IP address from the DHCP server, leave these text boxes blank.
(If the first port obtains its IP address from a DHCP server, the DNS
server IP address will be obtained from the DHCP server as well.)

LaCie Ethernet Disk RAID (Firmware version 1.4)
User Manual
Network Settings Options■
To change this Do this
Managing Your Ethernet Disk RAID
page 62
e IP address(es) used by the Ethernet Disk
RAID
e DHCP settings If you want to use the Ethernet Disk RAID as a DHCP server, in the
In the Port 1 group box, either select Get an IP address automatically
to obtain the IP address from your DHCP server, or select Use this IP
address and enter the IP address and subnet mask in the subsequent
text boxes.
If your Ethernet Disk RAID has two Ethernet ports and you’re using
the second one, do the same in the Port 2 group box. (is group box
does not appear if your system supports only one Ethernet port.)
Port 1 group box, select Use this IP address and enter the IP address
and subnet mask in the subsequent text boxes. en select the Enable
DHCP server check box, enter the beginning IP address in the Starting IP address text boxes, and enter the last IP address in the Ending
IP address text boxes.
For example, if the Starting IP address is 192.168.0.103 and the Ending IP address is 192.168.0.107, the Ethernet Disk RAID will allocate the IP addresses 192.168.0.103, 192.168.0.104, 192.168.0.105,
192.168.0.106, and 192.168.0.107 to the first five computers that try
to obtain their IP addresses from the Ethernet Disk RAID. As soon as
one of those computers shuts down or otherwise loses its network connection, that IP address will be assigned to the next computer that tries
to obtain its IP address from the Ethernet Disk RAID.
If you do not want to use the Ethernet Disk RAID as a DHCP server,
clear the Enable DHCP server check box. (If Get an IP address
automatically is selected, you cannot use the Ethernet Disk RAID as a
DHCP server.)

LaCie Ethernet Disk RAID (Firmware version 1.4)
User Manual
Network Settings Options■
To change this Do this
Managing Your Ethernet Disk RAID
page 63
e packet size for transferring
data
e FTP settings If you want to use the Ethernet Disk RAID as an FTP server, select
Specify whether or not to transfer larger data packets between the
Ethernet Disk RAID and the computers in your network by selecting
or clearing the Jumbo Frames check box. If you clear this option, the
Ethernet Disk RAID will use 1514-byte packets.
If you select this option, you can specify a larger packet size (from 1514
to 9014 bytes).
TeChNICAl NOTe: Using jumbo frames allows you to transfer data
more quickly. However, you can select this option only if your network, Ethernet switch, and the network interface cards (NICs) on
the computers in your network support the specified packet size. To
determine whether you can use jumbo frames, refer to the documentation for those components.
the Enable FTP server check box. If you do not want to use it as an
FTP server, clear this option.
For information about accessing the Ethernet Disk RAID using FTP,
refer to section 5.2. Accessing Shared Folders Using FTP.
Click Apply.
4.
When the confirmation message appears, click OK.
5.
TeChNICAl NOTe: If you changed the IP
address of the Ethernet Disk RAID, you must
now access the Manager using the new IP address.

LaCie Ethernet Disk RAID (Firmware version 1.4)
User Manual
5.7.6. Reconfiguring the Disks■
e Disks page displays information about all the
hard disks that are currently installed in your Ethernet
Disk RAID.
is page includes the following details:
e disk configuration (that is, whether the disks use
❖
a linear or RAID configuration,
and the RAID level)
e overall status of the disks:
❖
Normal – All the disks are working properly.
•
Degraded – One or more disks have failed but all
•
the data is still available.
Failed – e Ethernet Disk RAID has stopped
•
working properly.
Managing Your Ethernet Disk RAID
page 64
e slot where each hard disk resides
❖
e model number, serial number, and size of each
❖
hard disk
e current status of each disk:
❖
Linear or RAID n – e disk is working properly
•
as part of the specified configuration.
New – e disk has been added to the Ethernet
•
Disk RAID but is not currently being used.
Spare – e disk is acting as a spare disk for the
•
RAID.
Rebuilding – e disk is being rebuilt (for exam-
•
ple, when a failed disk is replaced)
N/A – e disk is detected but not available for
•
use (for example, when it has failed)
e hot-plug indicator:
❖
RED – Removing the disk will cause the RAID
•
to fail.
YELLOW – Removing the disk will cause RAID
•
degradation.
GREEN – Removing the disk will not affect the
•
RAID.
TeChNICAl NOTe: Whenever you add or
remove a disk from the Ethernet Disk RAID,
you must click Refresh to update the hot-plug
indicator.
ImpOrTANT INfO: For detailed informa-
tion about RAIDs and how adding, removing, or
swapping disks affects the Ethernet Disk RAID,
refer to section 11. RAID and Storage Policies.
You can change the disk configuration or amount
of storage space that is allocated for shared folders
at any time. However, for additional security, you
must enter your administrator password to be able
to make these changes.

LaCie Ethernet Disk RAID (Firmware version 1.4)
User Manual
5.7.6.1. Expanding the Shared Storage
e disk space on your Ethernet Disk RAID is divided into two portions. One portion is for shared folders; the other is for backups of your computer disks.
e Storage Status view on the Home page shows how
much disk space is currently allocated for shared folders,
how much is used by backups, and how much is available for either.
You can expand the amount of disk space allocated
for shared folders (as long as free disk space is available), but you cannot reduce it without reconfiguring
your disks and losing all your data. erefore, it is recommended that you allocate the least amount of space
for shared folders until all the computer disks that you
plan to protect have been backed up.
Managing Your Ethernet Disk RAID
page 65
To expand the amount of disk space allocated for
shared folders:
In the navigation bar, click Advanced.
1.
In the left pane, click Disks.
2.
In the Administrator password text box, enter your
3.
password for logging in to the Manager.
Click Expand Shared Storage.
4.
e Expand Shared Storage page appears (see
Fig. 4.10).
Specify how much disk space to add to the space that
5.
is currently allocated for shared folders.
To allocate all available disk space, select Add all
available disk space.
To allocate a specific amount, select Add this much
disk space and enter the desired number of giga-
bytes. (e minimum is 1 GB, and the maximum is
the total amount of space currently available. You can
specify only whole numbers.)
Fig. 5.7.6.1.
Click OK.
6.
When the confirmation message appears, click OK.
7.

LaCie Ethernet Disk RAID (Firmware version 1.4)
User Manual
5.7.6.2. Reconfiguring the Disks
CAUTION: Changing the disk configuration
will delete all user information and all data on all
the disks.
Before you do this, have all the users disconnect
from all shared folders (as described in section
5.3. Disconnecting from Shared Folders Using
FTP) and remove protection from all disks (as
described in section 7.9.5. Removing Protec-
tion).
When you are done, you must re-add all users (as
described in section 4.1.1. Adding Users), create
new shared folders (as described in section 5.5.1.
Creating Shared Folders), and have all users once
again access the shared folders (as described in
section 6.1. Accessing Shared Folders) and pro-
tect their disks (as described in section 7.2. Pro-
tecting Your Disks).
Managing Your Ethernet Disk RAID
page 66
To change the disk configuration:
In the navigation bar, click Advanced.
1.
In the left pane, click Disks.
2.
In the Administrator password text box, enter your
3.
password for logging in to the Manager.
Click Reconfigure Disks.
4.
When the confirmation message appears, click OK.
5.
e Disk Configuration page appears (see Fig.
5.7.6.2.A.). e options that appear on this page vary,
depending on the number of hard disks that are currently installed in the system.
If you want to add or remove hard disks, do so one
at a time and click Scan after each action. If you’re
adding disks, wait until the disk LED is green before
you click Scan. To accept the default disk configuration (which will provide the best level of data protection available for the number of hard disks currently installed), click Next. By default, a linear disk
Fig. 5.7.6.2.A.

LaCie Ethernet Disk RAID (Firmware version 1.4)
User Manual
configuration is used for a single hard disk, RAID 1
is used for two hard disks, and RAID 5 is used for
three or four hard disks.
If you want to change the disk configuration, select
the desired RAID level and then click Next. (For
detailed information about the different RAID levels, refer to Section 11. Raid and Storage Policies)
e Disk Space Distribution page appears (see Fig.
5.7.6.2.B).
6. To accept how the disk space will be proportioned
for shared folders and backups (only 200 MB
will be allocated for shared folders), click Finish.
If you want to allocate more space for shared folders, select Allocate more space for shared folders and
then specify how much space to allocate (either All
available disk space or Specified disk space). If you
select Specified disk space, enter the number of gigabytes to allocate for shared folders (the minimum
is 1 GB). en click Finish.
Managing Your Ethernet Disk RAID
page 67
Fig. 5.7.6.2.B
7. When the confirmation message appears, click OK.
e screen displays the progress of the process (see
Fig. 5.7.6.2.C and 5.7.6.2.D). When this process is
complete, the Ethernet Disk RAID restarts.
Close the browser window. After the system has restarted, you can access the Manager and re-create
your users and shared folders (as described in section 5.4.1. Adding Users and section 5.5.1. Creating
Shared Folders).
TeChNICAl NOTe: You can expand the amount of disk space allocated for shared folders later (as long as free
disk space is available), but you cannot reduce it without reconfiguring your disks and losing all your data.
If you plan to back up computer disks to your Ethernet Disk RAID, it is recommended that you use the minimum amount of space for shared folders, back up all the computer disks that you plan to protect, and then expand
the space allocated for shared folders. is ensures that adequate space is available for backups.
Fig. 5.7.6.2.C
Fig. 5.7.6.2.D

LaCie Ethernet Disk RAID (Firmware version 1.4)
User Manual
5.7.7. System Status■
When you click Advanced in the navigation bar
and click System Status in the left pane, you can view
many of the operational parameters of your Ethernet
Disk RAID, including CPU usage, memory usage, the
amount of time that the Ethernet Disk RAID has been
running, the current fan speed, the temperatures of the
CPU and disks, the IP address of the gateway (which
you can change as described in section 5.7.5. Network ),
the IP address(es) of the DNS servers in your network,
the network settings of your ports (several of which you
can change as described in section 5.7.5. Network ), the
MAC addresses of your ports, and the speed at which
data is being sent and received.
To update the information on this page, click
Refresh.
Managing Your Ethernet Disk RAID
page 68
TeChNICAl NOTe: e fan speed changes
depending on the temperature of the unit. If the
temperature of the CPU reaches or exceeds 85º C
(185º F), or if the temperature of any of the disks
reaches or exceeds 55º C (131º F), the Ethernet
Disk RAID shuts down automatically.
Fig. 5.7.7.

LaCie Ethernet Disk RAID (Firmware version 1.4)
User Manual
5.7.8. System Log■
e System Log page displays a list of events that
have occurred on the Ethernet Disk RAID. Reviewing
this list can help you identify and resolve any problems
that you might encounter.
To view event information:
In the navigation bar, click Advanced.
1.
In the left pane, click System Log.
2.
e System Log page displays the date and time of
the event, the type of event (I for Informational, E
for error, W for warning, and C for critical), and a
brief description of the event.
If an event occurs while you’re viewing this list, click
3.
Refresh to update it.
Managing Your Ethernet Disk RAID
page 69
Fig. 5.7.8.

LaCie Ethernet Disk RAID (Firmware version 1.4)
User Manual
5.7.9. Shut Down■
To shut down the Ethernet Disk RAID, you can
press the power button on the unit itself, or you can shut
the system down remotely using the Manager.
To shut down the Ethernet Disk RAID using the
Manager:
In the navigation bar, click Advanced.
1.
In the left pane, click Shut Down.
2.
In the Administrator password text box, enter the
3.
password “Manager.”
Click Shut Down.
4.
A message appears, indicating that the system is
shutting down.
Once the Ethernet Disk RAID shuts down, if you
refresh the browser window, it will be blank. If you subsequently try to access the Manager, an error message
will appear, since the Ethernet Disk RAID will no longer be running.
Managing Your Ethernet Disk RAID
page 70
Fig. 5.7.9.
CAUTION: If you shut down the Eth-
ernet Disk RAID, users will no longer be
able to access the shared folders. If users
have shared files open, data might be lost. Be
sure to have all users save their changes and
close any open files before you shut down.
Shutting down the Ethernet Disk RAID when a
backup is occurring will not have any adverse effect; the backup will resume automatically when
the storage server is powered on again. However,
shutting down when a disk is being recovered can
potentially corrupt the user’s operating system,
and the user will have to recover the system disk
using the recovery CD (or, if the system disk was
not protected, re-install the operating system).
5.8. Logging Out of the Manager
It is recommended that you log out when not using
the manager to ensure that unauthorized individuals do
not make changes to the Ethernet Disk RAID.
To log out:
In the navigation bar, click Log Out.
1.
When the confirmation message appears, click OK.
2.
e Log Out page appears (see Fig. 5.8.).
To log back in to the Manager later, click Log In.
3.
Fig. 5.8.

LaCie Ethernet Disk RAID (Firmware version 1.4)
User Manual
6. Working With Shared Folders
6.1. Accessing Shared Folders
Working with Shared Folders
page 71
Once you have added users and created shared folders (as described in section 5.4.1. Adding Users and sec-
tion 5.5.1. Creating Shared Folders), the users need to
perform some simple steps to be able to access those
folders. e procedure for doing this varies, depending
on the user’s operating system. Each user can access only
those shared folders that the user is authorized to access.
6.1.1. Windows Users■
If you’re using Microsoft Windows*, you have two
options for accessing shared folders: you can use My
Computer or Windows Explorer to map a drive letter
to the shared folder, or you can install the Console and
use that utility to map a drive letter to the shared folder.
With the Console, you don’t have to worry about remembering the name of the storage server or the shared
folders; it displays them automatically. However, the
computer where you install the Console must be on the
same subnet as the Ethernet Disk RAID.
ImpOrTANT INfO: If you change the IP
address of the Ethernet Disk RAID, users who
accessed the shared folders using the previous IP
address will be disconnected and must repeat the
procedures described here using the new IP address.

LaCie Ethernet Disk RAID (Firmware version 1.4)
User Manual
6.1.1.1. Using My Computer or Windows Explorer
To access a shared folder using My Computer or
Windows Explorer:
Open My Computer or Windows Explorer.
1.
From the Tools menu, click Map Network Drive.
2.
e Map Network Drive dialog box appears (see Fig.
6.1.1.1.).
e exact appearance of this dialog box varies, depending on your operating system.
In the Drive list, select the drive letter that you want
3.
to assign to the shared folder.
In the Folder text box, enter the following:
4.
Working with Shared Folders
page 72
\\storage_system\shared_folder
where storage_system is the name or IP address of
the Ethernet Disk RAID and shared_folder is the
name of the shared folder. For example, if your Ethernet Disk RAID’s IP address is 192.168.0.101 and
the shared folder name is Photos, you would enter
the following:
\\192.168.0.101\Photos
Alternatively, you can click Browse and select the
shared folder from the Microsoft Windows Network.
To automatically connect to this shared folder each
5.
time you log on to Windows, select Reconnect at
logon.
If you clear this option, you must repeat this procedure each time you want to access the shared folder.
Click Finish.
6.
If prompted, enter your user name and password for
7.
accessing this shared folder, and then click OK.
Fig. 6.1.1.1.
TeChNICAl NOTe: If you connect a Ether-
net Disk RAID to the network after the Console
has already scanned it, or if you change the IP address of the Ethernet Disk RAID, you must click
Discover Storage Systems to scan the network
again and update the tree in the left pane.
TeChNICAl NOTe: If the user name and
password for accessing the shared folder are the
same as your Windows user name and password, you are not prompted to provide a user
name and password to access the shared folder.
In addition, once you provide your user name and
password for accessing one shared folder, you are
not prompted to provide it again when you access other shared folders to which you have access
rights.
If the guest user has access to this shared folder, you
can use guest as both the user name and password.
You can now access the shared folder from My Computer or Windows Explorer.

LaCie Ethernet Disk RAID (Firmware version 1.4)
User Manual
6.1.1.2. Using the Console
To access a shared folder using the Console:
Install the Console (as described in section 3.2.1. In-
1.
stalling the Console).
Click Start Programs Storage System Con-
2.
sole. e Console application window appears (see
Fig. 6.1.1.2.A).
As soon as you start the Console, it automatically
scans the network for storage devices. is might take
a few minutes. As soon as the scan is complete, the left
pane displays a tree view of all the storage devices it
found (see Fig. 6.1.1.2.B).
Working with Shared Folders
page 73
Each Ethernet Disk RAID has two ports for connecting to the network. If your Ethernet Disk RAID
uses both ports, two items appear in the tree in the left
pane, each using the same name. You can identify the
IP address used by each port by clicking each item in
the tree and observing the IP address area in the right
pane.
TeChNICAl NOTe: If you connect an Eth-
ernet Disk RAID to the network after the Console has already scanned it, or if you change the
IP address of the Ethernet Disk RAID, you must
click Discover Storage Systems to scan the network again and update the tree in the left pane.
Fig. 6.1.1.2.A
Fig. 6.1.1.2.B

LaCie Ethernet Disk RAID (Firmware version 1.4)
User Manual
In the left pane, double-click the name of the Ether-
3.
net Disk RAID that contains the shared folders that
you want to access.
If your Ethernet Disk RAID uses both available
ports to connect to the network, you can doubleclick either name.
e system name expands to display all the available
shared folders. ose shared folders that can be accessed using the guest user name and password are
listed first. See Fig. 6.1.1.2.C.
In the left pane, select the name of the shared folder
4.
that you want to access (for example, home), and
then click Map Drive Letter. To access a folder other than home, you must log in as a user with access
to that folder.
Working with Shared Folders
page 74
Fig. 6.1.1.2.C
e Map Network Drive dialog box appears with
the name of the folder installed (see Fig. 6.1.1.2.D).
e exact appearance of this dialog box varies, depending on your operating system.
In the Drive list, select the drive letter that you want
5.
to assign to the shared folder.
To automatically connect to this shared folder each
6.
time you log on to Windows, select Reconnect at
logon.
If you clear this option, you must repeat this procedure each time you want to access the shared folder.
Click Finish.
7.
If prompted, enter your user name and password for
8.
accessing this shared folder, and then click OK.
Fig. 6.1.1.2.D
TeChNICAl NOTe: If the user name and
password for accessing the shared folder are the
same as your Windows user name and password,
you are not prompted to provide a user name and
password to access the shared folder. In addition,
once you provide your user name and password for
accessing one shared folder, you are not prompted
to provide it again when you access other shared
folders to which you have access rights.

LaCie Ethernet Disk RAID (Firmware version 1.4)
User Manual
6.1.2. Linux Users■
6.1.2.1. Using NFS
To access a shared folder on a computer running
Linux:
Create a directory by entering the following com-
1.
mand at the command prompt:
mkdir /my_directory
where my_directory is the name of the directory.
Be sure to include the full path to the directory (for
example, /mnt/my_directory).
If desired, display a list of all the available shared
2.
folders by entering the following
command:
Working with Shared Folders
page 75
showmount -e storage_system
where storage_system is the IP address of the Ethernet Disk RAID.
Mount the desired shared folder by entering the fol-
3.
lowing command:
mount storage_system:/nas/NASDisk-00002/folder
/mnt/my_directory
where storage_system is the IP address of the Ethernet Disk RAID, folder is the shared folder, and
my_directory is the name of the directory that you
created step 1.
If you included a full path when creating the directory, be sure to include the with this command, for
example:
mount storage_system:/nas/NASDisk-00002/folder
/mnt/my_directory
Repeat steps 1 through 3 for each shared folder that
4.
you want to access.

LaCie Ethernet Disk RAID (Firmware version 1.4)
User Manual
6.1.2.2. Using SMBFS
On Linux, the SMBFS file system along with smbmount and smbclient tools can be used to mount remote
samba shares onto a local Linux file system. Most of the
Linux distributions include SMBFS support by default.
Working with Shared Folders
page 76
1. Create a directory by entering the following com
mand at the command prompt:
# mkdir /my_directory
where my_directory is the name of the directory. Be
sure to include the full path to the directory (for example, /mnt/my_directory).
2. If desired, display a list of all the available shares (and
services) by entering the following command:
# smbclient -L storage_system -U guest
where Hostname is “storage_system” and Username
is “guest”
3. Mount the desired shared folder by entering the fol-
lowing command:
# smbmount //storage_system/share /my_directory
-o username=guest
where Hostname is “storage_system”, Username is
“guest” and the sharename is “share” (as shown is the
above listing)
-
4. Repeat steps 1 through 3 for each shared folder that
you want to access.
5. Unmount the share directory
# smbumount /my_directory

LaCie Ethernet Disk RAID (Firmware version 1.4)
User Manual
6.1.3. Mac Users■
e procedure for accessing a shared folder on a
Mac varies, depending on whether the Mac is running
OS X or an older operating system. (Macs running OS
X can access the same shared CIFS folders as Windows
users. Macs running older operating systems can access
the same shared NFS folders as Linux users.)
6.1.3.1. Mac OS X
To access a shared folder on a Mac running OS X:
From the Go menu, click Connect to Server.
1.
In the Address text box, enter the following and click
2.
Connect:
smb://storage_system
Working with Shared Folders
page 77
where storage_system is either the name or IP address of the Ethernet Disk RAID
In the Select a share list, select the name of the shared
3.
folder that you want to access and then click OK.
Enter the user name and password for accessing this
4.
shared folder, and then click OK.
If the guest user has access to this shared folder, you
can use guest as both the user name and password.
An icon with the name of the shared folder is created
on the desktop.
Repeat steps 1 through 4 for each shared folder that
5.
you want to access.
To access the shared folder, double-click the icon on
6.
the desktop.
6.1.3.2. Other Mac Operating Systems
TeChNICAl NOTe: You can use the system
name only if your computer is in the same subnet as the Ethernet Disk RAID, if you added the
Ethernet Disk RAID’s IP address and name to
your local hosts file, or if you manually registered
the name with a DNS server in your network.
For information about accessing a shared folder using NFS on a Mac running an operating system older
than OS X, please refer to your Mac documentation.

LaCie Ethernet Disk RAID (Firmware version 1.4)
User Manual
6.2. Accessing Shared Folders Using FTP
Working with Shared Folders
page 78
If you enabled the Ethernet Disk RAID to act as an
FTP server (as described in section 5.7.5. Network ), all
Windows and Mac OS X users can use a Web browser
to access the public folder. ey can also access their
personal folder that was created automatically when
their user name was added by logging in with their user
name and password (as described in section 5.4.1. Add-
ing Users). Anonymous FTP is not supported. ey can
use “guest” as the user name and password, but they will
only be able to access the public folder.
To access shared folders using FTP:
At any Windows or Mac OS X computer, open a
1.
Web browser, enter the following in the address bar,
and press Enter:
ftp://user_name@storage_system
where user_name is the user name as defined on
the Ethernet Disk RAID and storage_system
is the name or IP address of the Ethernet Disk
RAID (for example, ftp://user1@storage or ftp://
user1@192.168.0.101).
You can use guest as the user name, but you will be
able to access only the public folder.
TeChNICAl NOTe: Even if you changed the
access rights to the public folder (for example, to
prevent a particular user from accessing it altogether or to limit a user to read-only access), all
existing users have full read/write access to the
public folder when accessing it via FTP.
TeChNICAl NOTe: You can use the system
name only if your computer is in the same subnet as the Ethernet Disk RAID, if you added the
Ethernet Disk RAID’s IP address and name to
your local hosts file, or if you manually registered
the name with a DNS server in your network.
TeChNICAl NOTe: Files copied to or from
the Ethernet Disk RAID using FTP can be no
larger than 2 GB.
If prompted, enter your user name and password
2.
for accessing shared folders, and then click OK.
If you used the guest user name, the password is also
guest.
Double-click any of the displayed folders or files to
3.
open them.
You have full read/write access to all the folders and
files in both the public folder and your personal folder, and you can create new ones.
Even if you browse to other websites, you remain
logged in until you close the browser window. (at
is, you can return to the FTP site using the Back
button in your browser window.)

LaCie Ethernet Disk RAID (Firmware version 1.4)
User Manual
6.3. Disconnecting from Shared Folders
Working with Shared Folders
page 79
If you need to reconfigure the disks in your Ethernet Disk RAID or shut it down for any reason, all users should disconnect from the shared folders to ensure
that the process proceeds smoothly. You might also want
to have users disconnect from the shared folders if you
want to change their access rights, since otherwise the
6.3.1. Windows Users■
If you are using Microsoft Windows, you have two
options for accessing shared folders: you can use My
Computer or Windows Explorer to map a drive letter
to the shared folder, or you can install the Console and
use that utility to map a drive letter to the shared folder.
6.3.1.1. Using My Computer or Windows Explorer
Close any files that you currently have open in the
1.
shared folder.
change will not take effect until the user shuts down the
computer.
e procedure for disconnecting from a shared folder varies, depending on the operating system used by the
user. (Users who connected to shared folders using FTP
can disconnect simply by closing the browser window.)
With the Console, you don’t have to worry about remembering the name of the storage server or the shared
folders; it displays them automatically. However, the
computer where you install the Console must be on the
same subnet as the Ethernet Disk RAID.
6.3.1.2. Using the Console
Close any files that you currently have open in the
1.
shared folder.
In My Computer or Windows Explorer, right-click
2.
the drive for the shared folder and then click Dis-
connect from the pop-up menu.
e shared folder no longer appears in My Computer or Windows Explorer.
Start the Console (as described in section 3.2.2.
2.
Starting the Console).
In the left pane, double-click the name of the Ether-
3.
net Disk RAID that contains the shared folder from
which you want to disconnect.
If your Ethernet Disk RAID uses both available
ports to connect to the network, you can doubleclick either name. e name expands to display all
the available shared folders.
In the left pane, select the name of the shared folder
4.
from which you want to disconnect, and then click
Unmap Drive Letter.
e shared folder no longer appears in My Computer or Windows Explorer.

LaCie Ethernet Disk RAID (Firmware version 1.4)
User Manual
6.3.2. Linux Users■
Unmount the desired shared folder by entering the following command:
umount /my_directory
where my_directory is the name of the local directory.
For example, if you mounted the shared folder using the
following command:
mount 192.168.0.101:/nas/NASDisk-00002/public /
my_directory you would unmount it using the following command:
umount /my_directory
If you included an absolute path when mounting the
shared folder (such as /mnt/my_directory), use the same
path when unmounting it.
Working with Shared Folders
page 80
6.3.3. Mac OS X Users■
On the desktop, select the shared folder from which
1.
you want to disconnect.
From the File menu, click Eject.
2.
Any open window to the shared folder closes, and the
shared folder disappears from the desktop.
6.3.4. Other Mac Users■
For information about disconnecting from a shared
folder on a Mac running an operating system older than
OS X, please refer to your Mac documentation.

LaCie Ethernet Disk RAID (Firmware version 1.4)
User Manual
7. Protecting Local Disks
Even if most of your data is stored and protected on
your Ethernet Disk RAID, your operating system files,
applications, and many other files still reside on each
individual computer in your network. If one of those local disks fails, it can take many hours to re-install and
reconfigure the operating system and applications on a
new or repaired hard disk, and some files might be completely lost.
Windows Backup Software is a software application
designed to address this issue. On each computer where
it is installed, Windows Backup Software provides reliable data protection and rapid data recovery in the event
of a system crash or disk failure.
Protecting Local Disks
page 81
Windows Backup Software protects Windows
desktops and laptops by backing up their local disks or
partitions. To make sure that you have recent copies of
your local disk, Windows Backup Software can automatically perform a backup at regularly scheduled intervals—either once a day or once a week, whichever you
prefer. (You can also disable automatic backups and just
perform backups manually at a time of your choosing.)
Once the maximum number of supported backups are
saved on the Ethernet Disk RAID, the oldest backup
is automatically deleted each time a new backup is performed.
To ensure that valuable storage space isn’t used up by
duplicate data, when Windows Backup Software performs each subsequent backup, it copies only the data
that has changed since the last time a backup was performed. is also minimized the impact on your network. Yet through unique technology on the Ethernet
Disk RAID, each backup is a complete point-in-time
image. You can view or recover the entire disk or partition exactly as it existed at a particular date and time.
Fig. 7.
to your local disk. If you need to recover an entire data
disk or partition (that is, a disk or partition that does not
contain any of the files needed to run the operating system), you can do so using Windows Backup Software.
And if you need to recover your whole system disk, you
can do so using the recovery CD. (Alternately, if your
computer does not support the recovery CD but does
support the PXE protocol, you can boot your computer
from a backup on the Ethernet Disk RAID and recover
your system disk.) When you recover a disk, it contains
exactly the same data that it contained at the time the
backup was performed—you don’t have to reinstall or
reconfigure the operating system or applications.
Whenever you want to recover data from the Ethernet Disk RAID, you can do so quickly and easily. If
you need to recover just a few files or folders, you can
access the desired backup and copy what you need back

LaCie Ethernet Disk RAID (Firmware version 1.4)
User Manual
7.1. Getting Started
7.1.1. System Requirements■
Each computer where Windows Backup Software is
installed must have the following:
Protecting Local Disks
page 82
Windows Users■
Microsoft Windows XP Home Edition or Pro-
❖
fessional (with or without Service Pack 1 or Service Pack 2), Microsoft Windows Server 2003,
Microsoft Windows 2000 Professional, Server, or
Advanced Server with Service Pack 4
An enabled network interface card.❖
A CD-ROM drive (for installation and using the
❖
recovery CD).
Microsoft iSCSI Initiator*2.x❖
20 MB free hard disk space❖
TeChNICAl NOTe: A CD-ROM drive is
not required for installation if an image of the
CD is accessible via a network server.
ImpOrTANT INfO: For information about
downloading and installing this item, refer to
the next section, “Installing the Microsoft iSCSI
Initiator.”
ImpOrTANT INfO: Windows Backup
Software requires the Intelligent Management
Agent (IMA), which is installed automatically if
it is not already installed.
IMA requires an additional 5 MB of free hard
disk space (for both the application and associated log file data).
e Microsoft .NET* Framework 1.1 is also required and installed automatically if it is not already installed. e .NET Framework requires
approximately 40 MB of additional free hard
disk space.

LaCie Ethernet Disk RAID (Firmware version 1.4)
User Manual
7.1.2. Additional Requirements■
Protecting Local Disks
page 83
In addition to the system requirements, the following criteria must be met:
You must be logged on as an administrator to install
❖
Windows Backup Software and run it for the first
time. However, after you have run the application
once as an administrator, you can subsequently run it
when logged on as a user.
If your computer name includes any characters other
❖
than letters (A-Z or a-z), numbers (0-9), hyphens (-),
colons (:), or periods (.), you must change the computer name before you use Windows Backup Software to protect a disk.
If you’re using a firewall on the computer that you
❖
plan to protect, open TCP port 11762 on the firewall. is ensures that Windows Backup Software
can communicate with the Ethernet Disk RAID. In
additon, make sure that your firewall does not block
incoming network communication to the Microsoft
iSCSI Initiator*.
ImpOrTANT INfO: Previous releases al-
lowed the use of underscores (_) in the computer
name. If your computer name included this character and you protected a disk, you must remove
protection from all disks (as described in section
7.9.5. Removing Protection), delete the client (as
described in section 5.6.4. Deleting a Client), and
protect the disks again (as described in section
7.2. Protecting Your Disks). In addition, when
you protect your disks again, you must remove
the Ethernet Disk RAID from the list of backup
locations and add it again (as described in step 4
in section 7.2. Protecting Your Disks.)
7.1.3. Installing the Microsoft iSCSI Initiator■
Before you can install Windows Backup Software,
you must download and install the Microsoft iSCSI Initiator 2.x.
To download and install the initiator:
Open a Web browser, enter the following in the ad-
1.
dress bar, and press Enter:
http://www.microsof t.com/downloads/details.
aspx?FamilyID=12cb3c1a-15d6-4585-b385-befd13
19f825&DisplayLang=en
Scroll down to the Files in is Download section
and download the item that ends in x86fre.exe.
2. Select the option to run the file (Run, Open, or Run
this program from its current location).
3. If a security warning appears, click Run. e installa-
tion wizard starts.

LaCie Ethernet Disk RAID (Firmware version 1.4)
User Manual
Protecting Local Disks
page 84
4. On the first page of the installation wizard, click
Next.
5. On the page with installation options, click Next.
(Initiator Service and Software Initiator are selected
by default.)
6. If a message box appears telling you to configure the
settings in the Control Panel, click OK.
7. If you agree to the terms of the license agreement,
select I Agree and then click Next.
8. When the installation completes, click Finish. Af-
ter your computer restarts, you can install Windows
Backup Software.
7.1.4. Installing Windows Backup Software■
You must install Windows Backup Software on
each computer whose local disks you want to protect.
A single license for the Ethernet Disk RAID is located
on the back of the unit. Additional licenses can be purchased from http://www.intel.com/design/servers/storage/offers.
TeChNICAl NOTe: You do not have to con-
figure the Microsoft iSCSI Initiator. Windows
Backup Software will configure it for you auto-
matically.
To install Windows Backup Software
Log on as an administrator and insert the installation
1.
CD into a CD-ROM drive.
Select Applications from the top menu.
2.
Select the “Windows Backup Software” link to in-
3.
stall the software.
Start the setup utility for Windows Backup Soft-
4.
ware.
If the Microsoft* iSCSI Initiator 2.0 is already in-
5.
stalled, go to the next step. If this component is not
currently installed, the prompt in Fig. 7.1.4.B appears.
Fig. 7.1.4.B

LaCie Ethernet Disk RAID (Firmware version 1.4)
User Manual
Click OK to go to the Microsoft website and then
6.
click OK to cancel the installation of Windows
Backup Software.
On the Microsoft website, click iSCSI Software
Initiator v2.0, and follow the instructions in section
7.1.3. Installing the Microsoft iSCSI Initiator.
You must install the Microsoft iSCSI Initiator 2.0
before you can install Windows Backup Software.
When you have finished installing the iSCSI initiator, re-start the installation of Windows Backup
Software.
7. If Microsoft .NET Framework 1.1 is already installed, go to step 9. If this component is not currently installed, the prompt in Fig. 7.1.4.C appears.
Protecting Local Disks
page 85
Click Yes to install this component. (You cannot
install Windows Backup Software without first installing Microsoft .NET Framework 1.1.) When
you click Yes, the setup utility for Microsoft .NET
Framework 1.1 starts.
8. If you agree to the terms of the license agreement,
select I agree and then click Install.
It might take some time to copy and configure the
associated files.
9. When a message appears, indicating that the installation of Microsoft .NET Framework 1.1 is complete,
click OK.
After you click OK, the Intelligent Management Agent is installed automatically (if it is not
already installed), and the welcome page for installing Windows Backup Software appears.
See Fig. 7.4.1.D.
Fig. 7.1.4.C
TeChNICAl NOTe: e remaining time
might be reported as 0 and it might appear that
no progress is occurring. However, configuration
is occurring in the background.
Fig. 7.1.4.D

LaCie Ethernet Disk RAID (Firmware version 1.4)
User Manual
10. On the welcome page, click Next. e license agreement appears. See Fig. 7.4.1.E.
11. If you agree to the terms of the license agreement,
select I accept the terms of the license agreement
and then click Next.
12. Click Next to install the Windows Backup Software
in the displayed location. Alternatively, you can click
Browse, select or enter a different location, click OK,
and then click Next.
Protecting Local Disks
page 86
Fig. 7.1.4.E
ImpOrTANT INfO: It is strongly recom-
mended that you install Windows Backup Software on the partition that you boot from (that
is, where Windows is installed, typically C:). If
you install it on a non-system partition of your
system disk, you will not be able to recover that
partition using the Client Backup and Recovery
application window. In addition, if you plan to remotely boot from a backup on the Ethernet Disk
RAID, you must protect the entire disk rather
than just the system partition. If you install Windows Backup Software on a different disk than
your system disk, you will not be able to remotely
boot.

LaCie Ethernet Disk RAID (Firmware version 1.4)
User Manual
13. To complete the installation and restart your com-
puter, click Finish.
If you do not want to restart your computer at this
time, select No, I will restart my computer later and
then click Finish. When the confirmation message
appears, click OK. You do not have to restart the
computer immediately after installation, but you do
have to restart it before running Windows Backup
Software.
ImpOrTANT INfO: If you do not restart
your computer and you subsequently reinstall
Windows Backup Software, serious problems
can occur with your installation. It is strongly
recommended that you restart your computer at
your earliest convenience.
Protecting Local Disks
page 87
Fig. 7.1.4.F
14. After you restart your computer, click OK on the
welcome message. e Add License dialog box appears. See Fig. 7.1.4.G.
15. Enter the key code for licensing the product and
click OK. e license key code is located on the back
of the Ethernet Disk RAID. If you have an Internet connection, the license is activated automatically.
When you click OK on the confirmation message,
the Protect a Disk wizard starts. For information
about this wizard, refer to section 7.2. Protecting
Your Disks.
If your Internet connection is temporarily down, or
if this computer doesn’t have an Internet connection,
click OK on the warning message. e Protect a Disk
wizard still starts, but after 30 days you will no longer be
able to perform backups or recovery until you activate
the license. For more information, refer to section 7.1.6.
Activating Your License.
Fig. 7.1.4.G
ImpOrTANT INfO: If you previously used
this key code on a different computer, an error
message appears, and you must re-activate your
license. For more information, refer to section
7.1.6. Activating Your License.

LaCie Ethernet Disk RAID (Firmware version 1.4)
User Manual
7.1.5. Starting Windows Backup Software■
To start Windows Backup Software, do either of
the following:
Click Start Programs Client Backup and
❖
Recovery
If the Windows Backup Software Agent is running
❖
(as indicated by the presence of the Agent icon ( )
in the system tray), double-click this icon.
If you did not protect a disk after installing Windows Backup Software and restarting your computer,
you are prompted to do so the first time you run this
application. For information about this wizard, refer to
section 7.2. Protecting Your Disks.
If you already protected a disk, the application window in Fig. 7.1.5. appears.
Protecting Local Disks
page 88
e Status page displays the name of the disk that
you protected as well as related information, such as the
size of the disk, the name of the Ethernet Disk RAID
where the backup resides, the number used to identify
the backup disk on the Ethernet Disk RAID (Backup
disk ID), the current status, information about any ongoing activity, and the date and time of the last backup
and next scheduled backup (if any).
Fig. 7.1.5.
ImpOrTANT INfO: If your license is not
currently activated, a message appears, advising
you of this. You must activate your license within
30 days of installing Windows Backup Software.
After that time, you will no longer be able to perform backups or recovery.

LaCie Ethernet Disk RAID (Firmware version 1.4)
User Manual
7.1.6. Activating Your License■
When you install Windows Backup Software and
restart your computer, you are prompted to license the
product. If your computer has an Internet connection,
the license is activated automatically. However, if your
Internet connection was temporarily down or if your
computer has no Internet connection, your license was
not activated. You must activate your license within 30
days of installing Windows Backup Software; otherwise,
you will not be able to perform backups or recovery.
If your Internet connection was temporarily down,
your license will be activated automatically the next time
you run Windows Backup Software with a restored Internet connection.
However, if your computer has no Internet connection, you must perform offline activation (as described
in the next section).
Protecting Local Disks
page 89
ImpOrTANT INfO: Activation is tied to
your computer’s hardware. Once you have activated a particular license, if your computer
hardware changes, or if you subsequently install
Windows Backup Software on a different computer using the same key code, an error message
appears. If this occurs, contact your distributor
or reseller to get a new license key through Intel
Customer Support.

LaCie Ethernet Disk RAID (Firmware version 1.4)
User Manual
7.1.7. Activating Your License with an Internet Connection■
If your license wasn’t activated because your computer has no Internet connection, you must obtain an
activation code using another computer that does have
both an Internet connection and e-mail.
To activate your license without an Internet connection:
From the Action menu, click License Offline
1.
Activation. e Offline Activation dialog box ap-
pears.
Click Export License Data.
2.
On the Save As dialog box, select one of the follow-
3.
ing locations and then click Save:
A shared folder accessible to both your computer and
❖
a computer that has Internet and e-mail access
A floppy disk
❖
A USB disk
❖
If you did not save the file to a shared folder, take the
4.
floppy disk or USB disk to a computer with Internet
and e-mail access.
From the computer that has Internet and e-mail ac-
5.
cess, e-mail the license file to the following address:
Activate.Keycode@falconstor.com
Protecting Local Disks
page 90
When you receive an e-mail response, save the re-
6.
turned license file back to the shared folder, floppy
disk, or USB disk.
If you did not save the file to a shared folder, take the
7.
floppy disk or USB disk back to the computer where
Client Backup and Recovery is installed.
From the Action menu, click License Offline
8.
Activation.
Click Import Activation Code.
9.
On the Open dialog box, browse to the location
10.
where the returned license file exists and doubleclick it.
On the confirmation message, click OK. e license
11.
is now activated and you can continue to back up and
recover your disks.
To close the dialog box, click Exit.
12.
7.1.8. Replacing Your Existing License■
1. From the Action menu, click License Add
License. e Add License dialog box displays your cur-
rent license key code.
2. In the License key code text box, enter the new
key code.
3. Click OK.
4. When the confirmation message appears, click
OK.
If your computer has an Internet connection, the
license is activated automatically. If your Internet connection is temporarily down, repeat this procedure when
your Internet connection is restored. (You do not have
to re-enter the key code.) If your Internet connection is
temporarily down, your license will be activated automatically the next time you run Windows Backup Software with a restored Internet connection.

LaCie Ethernet Disk RAID (Firmware version 1.4)
User Manual
7.2. Protecting Your Disks
Protecting Local Disks
page 91
After you install Windows Backup Software and
restart your computer, the Protect a Disk wizard runs
automatically. Using this wizard, you can specify which
disk or partition you want to back up, where the backups should be stored, when automatic backups (if any)
should occur, and what password you want to use for
the recovery CD or booting remotely. If you cancel this
wizard, you can start it again at any time using the following procedure.
To protect a disk:
Click Protect a Disk. e Protect a Disk wizard
1.
runs.
In the Available disks list, select the disk or partition
2.
that you want to protect. See Fig. 7.2.A.
Even if your computer has only one hard disk, two
items appear in this list. e first item represents the
entire hard disk, and the second item represents the
partition on that disk. (If there’s only one partition
on the disk, the partition is the same as the entire
disk.)
Before you protect a disk, it is recommended that
you confirm that sufficient space is available on the Ethernet Disk RAID. At least an additional 20% of the disk
size is required for changed data. For example, if the
disk that you want to protect is 15 GB, at least 18 GB
of space must be available on the Ethernet Disk RAID.
e Home page in the Manager (described in section
3.5. Navigating the Manager) displays the amount of
available space.
If your hard disk is divided into multiple partitions,
this list displays one item for the entire hard disk,
and one item for each partition. If your computer has
multiple hard disks, this list displays an item for each
entire disk and an item for each partition on each
disk. Each partition is identified by its drive letter.
If you select an entire disk, all the partitions on that
disk are protected as a single entity. is means that
you can’t later recover only one partition; you have to
recover the entire disk. If you select just a partition,
you can subsequently recover just that partition.
In addition, you can recover a data disk or partition
using Windows Backup Software, but you can recover a system disk or partition only using the recovery
CD or when booting remotely from a backup on the
Ethernet Disk RAID. erefore, if you have separate
partitions for your system information and your data,
you might want to protect each one separately.
Fig. 7.2.A
TeChNICAl NOTe: Dynamic disks are not
supported.

LaCie Ethernet Disk RAID (Firmware version 1.4)
User Manual
Recommendations:
If your computer has only one disk with one parti-
❖
tion, select the disk.
If any partition (such as an EISA partition) precedes
❖
your system partition, select the entire disk. is ensures that you can remotely boot from and recover
the disk.
If your disk has a system partition and a data parti-
❖
tion, select one of the partitions and complete the
What to do next■
In this case Go to this step
You never previously completed the Protect a Disk wizard 3
Protecting Local Disks
page 92
wizard. en run the wizard again and protect the
other partition. is provides complete protection
with maximum flexibility.
However, if Windows Backup Software was installed
on the data partition, protect the entire disk rather
than the individual partitions. is ensures that you
can remotely boot from that disk.
You previously completed the Protect a Disk wizard and
connected to an Ethernet Disk RAID
You previously protected this disk and removed protec-
tion (as described in section 7.9.5. Removing Protection)
When the Add Storage System dialog box appears
3.
(Fig. 7.2.B), Client Backup and Recovery automatically scans your subnet for Ethernet Disk RAIDs. Any
Ethernet Disk RAIDs that are detected appear in the
Discovered storage systems list. (It might take a few
seconds to complete the scan. You can cancel it at any
time by clicking Cancel on the scanning message box.)
From the Discovered storage systems list, select the
Ethernet Disk RAID where you want to back up the
selected disk. e name of the system automatically appears in the Storage system name or IP address text box.
If you plan to remotely boot from a backup on the
Ethernet Disk RAID, it is recommeded that you select the IP address of the first port. If the DHCP
server option is enabled on your Ethernet Disk RAID,
you can remotely boot only from the first port. If this
option is disabled and you’re using a separate DHCP
server, you can remotely boot from either port.
4
5
Fig. 7.2.B

LaCie Ethernet Disk RAID (Firmware version 1.4)
User Manual
Protecting Local Disks
page 93
4. If no Ethernet Disk RAIDs are automatically discovered, or if you want to back up your disk to a different Ethernet Disk RAID, enter the name or IP
address of the desired Ethernet Disk RAID in the
Storage system name or IP address text box. en
click OK.
5. From the Backup locations list, select the Ethernet
Disk RAID to use for backups of this disk or partition. (e first backup location in the list is selected
by default.) See Fig. 7.2.C.
If you want to scan the network for new Ethernet
Disk RAIDs, or add a new one manually, click Add
and repeat step 3.
If you want to remove a Ethernet Disk RAID that’s
not valid or that you no longer want to use, select the
Ethernet Disk RAID from the Backup locations
list, click Remove, and then click Yes to confirm the
removal. (You can remove an Ethernet Disk RAID
only if it is not currently being used to protect another disk.)
TeChNICAl NOTe: If an authentication er-
ror occurs, make sure the name or IP address of
the Ethernet Disk RAID is correct, and that your
computer is connected to the network.
Once you have selected the desired backup location,
click Next and go to step 6.
Fig. 7.2.C

LaCie Ethernet Disk RAID (Firmware version 1.4)
User Manual
6. If you previously protected this disk and removed protection, specify whether or not you want to re-use the
existing backup or create a new one. See Fig. 7.2.D.
If you select Re-use the existing backup, you must
select which backup to re-use from the list. When
you select an item from the list, the size also appears to help you identify exactly which backup to use. e word “Preferred” appears for the
backup that best matches the disk that you’re currently protecting. Once you have selected the desired backup, click Next and go to the next step.
If you select Create a new backup and click Next,
you must select the desired backup location as described in step 4.
Protecting Local Disks
page 94
Fig. 7.2.D
TeChNICAl NOTe: If the list does not dis-
play the expected information, you might need
to click Cancel, click Action Repair Con-
nection, and then try to protect the disk again.
Repairing the network connection refreshes the
information about the backups that exist on the
Ethernet Disk RAID.
CAUTION: If you select any disk other than
the preferred one, all the data associated with the
selected disk will be overwritten with the data associated with the disk that you’re protecting, and
you will not be able to recover any previous back-
ups associated with the selected disk.

LaCie Ethernet Disk RAID (Firmware version 1.4)
User Manual
Specify when you want backups to occur.
For example, if you want backups to occur every day,
select Daily from the Recurrence list. If you want back-
ups to occur once a week, select the day of the week
from the Recurrence list. en select the time.
If you don’t want backups to occur automatically,
select Not Scheduled from the Recurrence list. (e
Time list appears dimmed.) Backups will occur only
when you start one manually (as described in section
7.3. Manually Backing Up Your Disk).
ImpOrTANT INfO: Although Windows
Backup Software is specifically designed to perform backups without affecting your other computer activities, you might want to schedule backups for a time when they’ll have the least impact
on your system, like during lunch or after business hours (if you leave your computer running
overnight). If you’re protecting multiple disks or
partitions, it is recommended that you schedule
each backup to occur at a different time.
7. Specify whether or not to back up your disk as soon as
you finish the wizard by selecting or clearing the Back
up now check box, and then click Next. See Fig. 6.2-E.
If you clear this option, the disk will be backed up at
the next scheduled time or the next time you perform
a manual backup.
Protecting Local Disks
page 95
Fig. 7.2.E
ImpOrTANT INfO: Only four backups of
each protected disk or partition are saved on the
Ethernet Disk RAID, so if you back up your disk
every day, you’ll be able to recover data from only
the last four days. If you back up your disk once
a week, you’ll be able to recover data from four
weeks ago, but the most recent backup might be
as many as six days old.
ImpOrTANT INfO: Be sure to back up your
disk or partition before you try to recover it using
the recovery CD.

LaCie Ethernet Disk RAID (Firmware version 1.4)
User Manual
8. If you ever need to recover your disk using the recovery CD or remotely boot from a backup on the
Ethernet Disk RAID, you’ll be prompted for a password. In the Recovery password text box, enter the
password that you’d like to use, enter it again in the
Retype your password text box, and then click Next.
See Fig. 7.2.F.
TeChNICAl NOTe:
e recovery password must be 12–16 characters
❖
long.
e same password is used for all disks backed
❖
up to the same Ethernet Disk RAID. If you subsequently protect a second disk using the same
Ethernet Disk RAID, you will not be prompted
to provide this password again. However, if you
protect a second disk using a different Ethernet
Disk RAID, you will be prompted to provide a
password for that Ethernet Disk RAID.
Protecting Local Disks
page 96
Fig. 7.2.F
You can change this password later using Win-
❖
dows Backup Software and using the Ethernet
Disk RAID.
9. Review all your selections and click Finish. See Fig.
7.2.G.
If you selected the Back up now check box, backup
begins as soon as you click v, and you can review its
progress on the Status page in Client Backup and
Recovery. If you want to protect additional disks or
partitions, repeat this procedure for each one.
ImpOrTANT INfO: If you subsequently
change the drive letter of a protected disk or partition, you must restart Windows Backup Software to update this application.
Fig. 7.2.G

LaCie Ethernet Disk RAID (Firmware version 1.4)
User Manual
7.3. Manually Backing Up Your Disk
Once you protect a disk, it is automatically backed
up at regular intervals (unless you chose Not Sched-
uled from the Recurrence list when you completed the
schedule). You can also back up a disk manually as long
as a backup or recovery is not currently occurring. For
example, if you’re about to install a new application, you
might want to back up your disk right before you do
that so that if any problems occur, you can recover your
disk to the state it was in immediately before you installed the application
To manually back up a disk:
Click Status.
1.
Protecting Local Disks
page 97
In the Protected disk list, select the disk that you
2.
want to back up.
Click Back Up Now. e Current activity area
3.
displays information about what’s happening,
the percentage of the backup that has completed, and the speed at which the data is being sent
over the network. e Progress bar graphically
indicates how much of thebackup is complete.
To stop a backup in progress, click Stop Current
Activity.
Fig. 7.3.

LaCie Ethernet Disk RAID (Firmware version 1.4)
User Manual
7.4. Stopping a Backup or Recovery in Progress
Once a backup or recovery starts, you can stop it at
any time – for example, if you notice that your system is
not responding as quickly as you’d like, and you want to
free up processing capabilities for other tasks.
When you stop a backup in progress, that backup
won’t appear in the list of backups on the Restore page,
and any changed data that was not copied to the Ethernet Disk RAID will be copied during the next backup.
When you stop a recovery in progress, the local disk
or partition is left in an incomplete state, and you must
recover it again later before you can use it.
To stop a backup or recovery in progress:
Click Status.
1.
Protecting Local Disks
page 98
In the Protected disk list, select the disk whose
2.
backup or recovery you want to stop.
Click Stop Current Activity. If you’re stopping a
3.
backup, the backup stops immediately.
If you’re stopping a recovery, a confirmation message
appears. Click OK to stop the recovery now, or click
Cancel to proceed with it.
Fig. 7.4.

LaCie Ethernet Disk RAID (Firmware version 1.4)
User Manual
7.5. Changing the Backup Schedule
When you protect a disk, you specify when you want
backups to occur. However, you can change this schedule at any time as long as the Status page indicates that
the Status is Normal. If protection is stopped (for example, if you recovered the disk or recovered a different
partition on the same disk), you cannot change the disk
schedule until you resume protection by clicking Back
Up Now.
To change the backup schedule:
Click Schedule.
1.
In the Protected disk list, select the disk whose
2.
backup schedule you want to change.
Protecting Local Disks
page 99
Specify when you want backups to occur.
3.
For example, if you want backups to occur every
day, select Daily from the Recurrence list. If you
want backups to occur once a week, select the day
of the week from the Recurrence list. en select
the time.
If you don’t want backups to occur automatically, select Not Scheduled from the Recurrence list. (e
Time list appears dimmed.) Backups will occur only
when you start one manually (as described in section
7.3. Manually Backing Up Your Disk).
Click Apply.
4.
e schedule change takes effect immediately, and
the date and time of the next scheduled backup appears in the Next backup area.
Fig. 7.5.
 Loading...