

Page 1

Checklist after service of class
TD Mark II
C 16:4, C 28:4, C 48:4, C 68:4, C 88:4,
Modified: 2009-11-04
Page 1 of 12
FP 4000, FP 6000Q, FP 7000, FP 9000, FP 10000Q, FP 13000 & FP 14000
Created by: Patrick Bergwall
Date: 2007-04-23
THIS DOCUMENT IS CONFIDENTIAL. IT MAY NOT BE REPRODUCED WITHOUT THE WRITTEN PERMISSION OF Lab.gruppen AB
2006 Lab.gruppen AB, Faktorvägen 1, S-434 44 KUNGSBACKA, SWEDEN
Page 2

Modified: 2009-11-04
Page 2 of 12
Index
1 INTRODUCTION............................................................................................................ 3
2 CHECK LIST CLASS TD MARK II............................................................................. 3
THIS DOCUMENT IS CONFIDENTIAL. IT MAY NOT BE REPRODUCED WITHOUT THE WRITTEN PERMISSION OF Lab.gruppen AB
2006 Lab.gruppen AB, Faktorvägen 1, S-434 44 KUNGSBACKA, SWEDEN
Page 3

Modified: 2009-11-04
Page 3 of 12
1 Introduction
This checklist shall be used to make sure the amplifier is always checked in a proper way after
service has been done. It is important to follow the steps in this check list and check all points
so that the set up of parameters in the amplifier is correct adjusted. When have done all
checks and adjusted the parameters the amplifier will work properly and will have the output
power that it is designed for.
2 Check list class TD Mark II
Always clean the amplifier by blowing with compressed air through coolers and fans. Be
careful when blowing where big electrolytic capacitors are placed so that the capacitor doesn’t
get damaged.
THIS DOCUMENT IS CONFIDENTIAL. IT MAY NOT BE REPRODUCED WITHOUT THE WRITTEN PERMISSION OF Lab.gruppen AB
2006 Lab.gruppen AB, Faktorvägen 1, S-434 44 KUNGSBACKA, SWEDEN
Page 4
Modified: 2009-11-04
Page 4 of 12
1) After repair always start the amplifier with current potentiometer (VR1) located on
PWMF1-board. On is clockwise (cw) and off is counter clockwise (ccw). Check that the
switch pulse is normal. 300V line should increase some volts when relay clicks.
1.
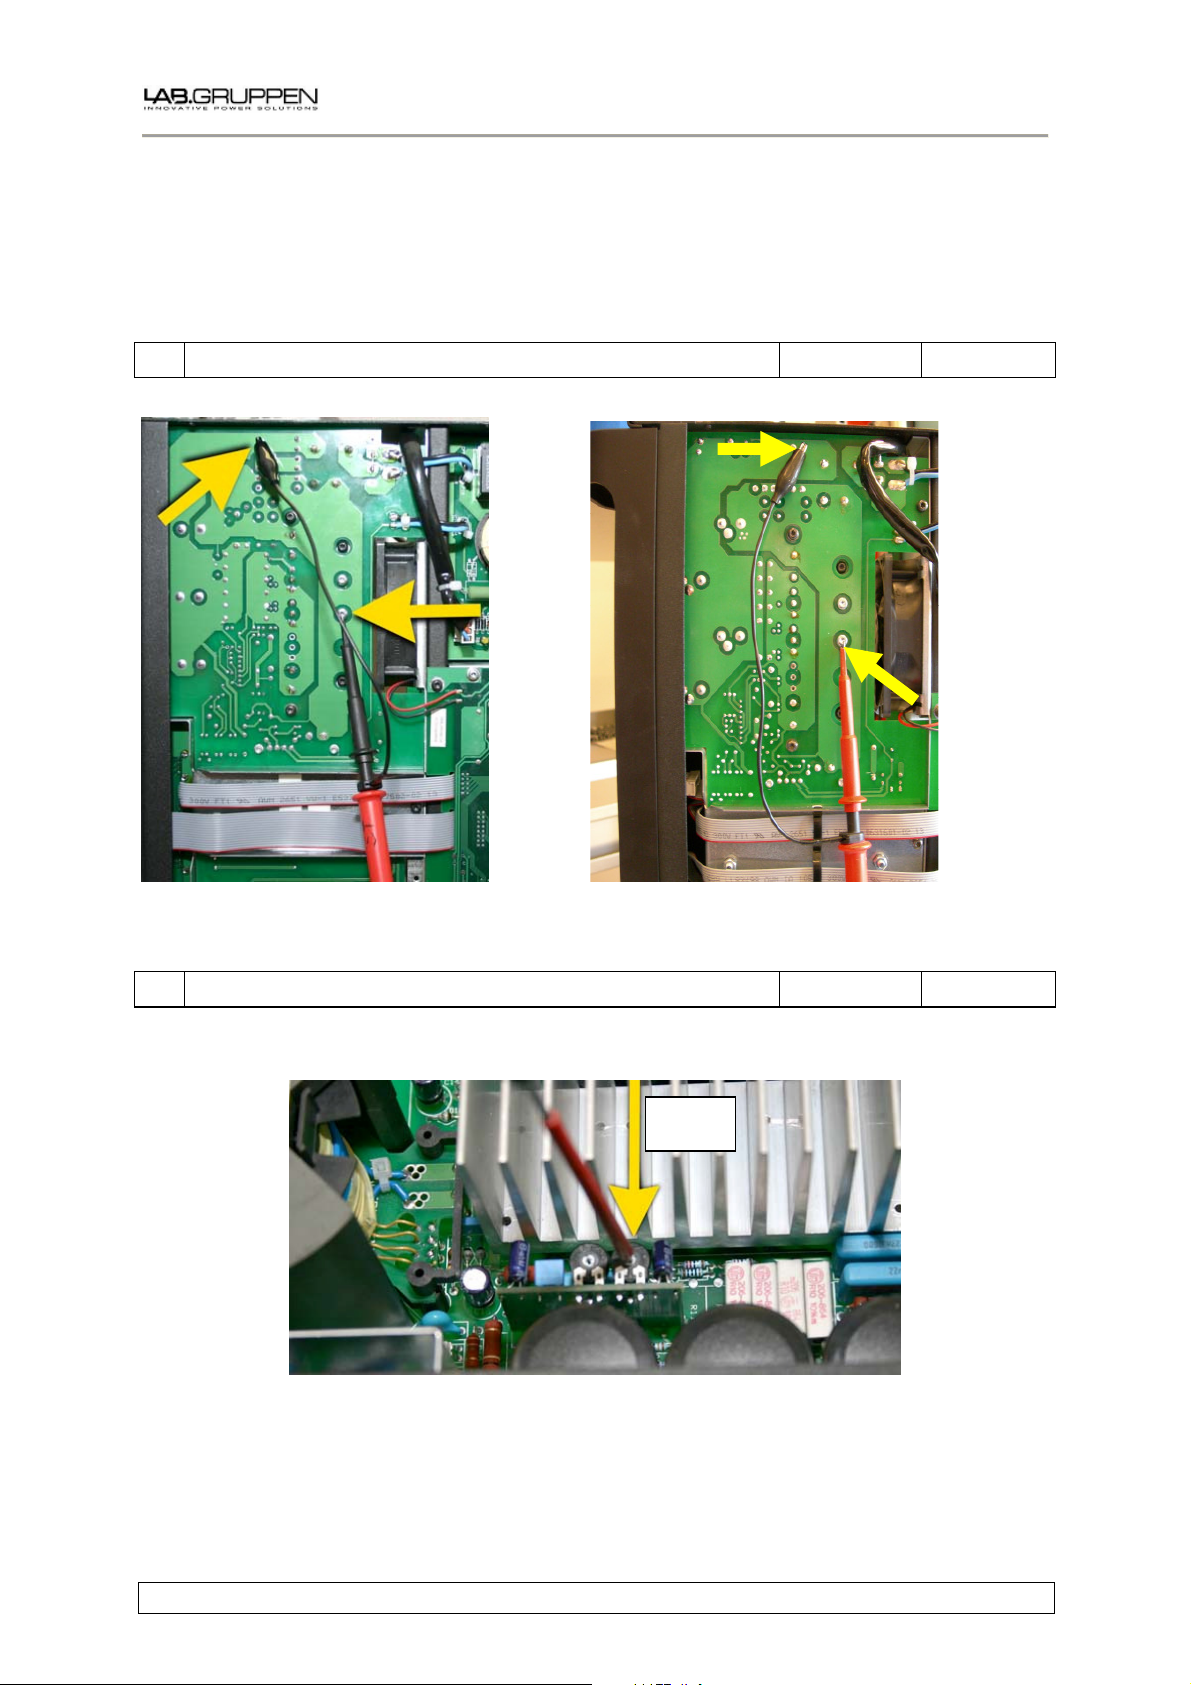
Connect an oscilloscope probe.
Measuring points (old layout). Measuring points (new layout).
2.
VR1 fully ccw.
VR1
VR1-PWMF1
THIS DOCUMENT IS CONFIDENTIAL. IT MAY NOT BE REPRODUCED WITHOUT THE WRITTEN PERMISSION OF Lab.gruppen AB
2006 Lab.gruppen AB, Faktorvägen 1, S-434 44 KUNGSBACKA, SWEDEN
Page 5

Modified: 2009-11-04
3.
Insert mains plug into variac.
4.
Mains switch ON and remote switch MANUAL
Page 5 of 12
5.
Slowly turn variac up, at the same time look at power-
supply oscilloscope.
6.
Begin turning VR1 cw.
Waveform should look like below picture.
230VAC
THIS DOCUMENT IS CONFIDENTIAL. IT MAY NOT BE REPRODUCED WITHOUT THE WRITTEN PERMISSION OF Lab.gruppen AB
2006 Lab.gruppen AB, Faktorvägen 1, S-434 44 KUNGSBACKA, SWEDEN
Page 6

7.
At a certain point, power supply will regulate.
Then, turn current potentiometer fully cw.
Modified: 2009-11-04
120-140V +/- RAIL
Page 6 of 12
8.
Power supply frequency decreases, PAL led goes out.
23kHz 43µS
THIS DOCUMENT IS CONFIDENTIAL. IT MAY NOT BE REPRODUCED WITHOUT THE WRITTEN PERMISSION OF Lab.gruppen AB
2006 Lab.gruppen AB, Faktorvägen 1, S-434 44 KUNGSBACKA, SWEDEN
Page 7

Modified: 2009-11-04
Page 7 of 12
Step 9, 10
Only for C 16:4, C 28:4, C 48:4, C 68:4, C 88:4, FP 4000, FP 6000Q, FP 7000
& FP 10000Q.
9.
Begin turning voltage adjust potentiometer.
ca +/- 174V
At 174V (+/- 2V) power supply will stop.
10.
Adjust voltage.
+/- 160V
VR1-SP100F/
VR1-SP130F
VR1-SP100F/
VR1-SP130F
Adjustment point
Measuring points
THIS DOCUMENT IS CONFIDENTIAL. IT MAY NOT BE REPRODUCED WITHOUT THE WRITTEN PERMISSION OF Lab.gruppen AB
2006 Lab.gruppen AB, Faktorvägen 1, S-434 44 KUNGSBACKA, SWEDEN
Page 8

Step 11, 12
Only for FP 9000, FP 13000 & FP 14000.
11.
Begin turning voltage adjust potentiometer.
At 220V (+/- 2V) power supply will stop.
12.
Adjust voltage.
Modified: 2009-11-04
ca +/- 220V
+/- 200V
Page 8 of 12
VR1-SP130F
VR1-SP130F
Adjustment point
Measuring points
THIS DOCUMENT IS CONFIDENTIAL. IT MAY NOT BE REPRODUCED WITHOUT THE WRITTEN PERMISSION OF Lab.gruppen AB
2006 Lab.gruppen AB, Faktorvägen 1, S-434 44 KUNGSBACKA, SWEDEN
Page 9

Modified: 2009-11-04
Page 9 of 12
Step 13
Only for C 16:4, C 28:4, C 48:4, C 68:4, C 88:4, FP 4000, FP 6000Q, FP 7000
& FP 10000Q.
13.
Measure voltages according to chart:
1 GND -
2 ca 2V Trafotemp
3 +25V 15VUnr
4 GND -
5 +58V 50VUnr
6 -18V 50VUNrR
7 +15V Pwrgood
8 +5V PAL
Step 14
Only for FP 9000, FP 13000 & FP 14000.
14.
Measure voltages according to chart:
1 GND -
2 ca 2V Trafotemp
3 +22-23V 15VUnr
4 GND -
5 +52-53V 50VUnr
6 -18V 50VUNrR
7 +15V Pwrgood
8 +5V PAL
THIS DOCUMENT IS CONFIDENTIAL. IT MAY NOT BE REPRODUCED WITHOUT THE WRITTEN PERMISSION OF Lab.gruppen AB
2006 Lab.gruppen AB, Faktorvägen 1, S-434 44 KUNGSBACKA, SWEDEN
Page 10

15.
Following tests are made for all Channels, check offset with
Modified: 2009-11-04
no input +/- 40mV.
Following tests are made for all Channels, check offset with
no input and no load +/- 2V.
Increase input signal and check output signal at clip 8Ω
Wave measured at 1.3kHz. Wave measured at 13kHz.
Page 10 of 12
THIS DOCUMENT IS CONFIDENTIAL. IT MAY NOT BE REPRODUCED WITHOUT THE WRITTEN PERMISSION OF Lab.gruppen AB
2006 Lab.gruppen AB, Faktorvägen 1, S-434 44 KUNGSBACKA, SWEDEN
Page 11

16.
Check HF-wave at 1.3kHz and 13kHz at 8Ω.
4 channel amplifier 2 channel amplifier
Modified: 2009-11-04
No input signal
No input signal
Page 11 of 12
Clip 1.3 kHz.
Clip 13 kHz.
THIS DOCUMENT IS CONFIDENTIAL. IT MAY NOT BE REPRODUCED WITHOUT THE WRITTEN PERMISSION OF Lab.gruppen AB
2006 Lab.gruppen AB, Faktorvägen 1, S-434 44 KUNGSBACKA, SWEDEN
Page 12

17.
Power supply frequency increases when loaded.
18.
Short capacitors according to pictures (Ch A=C1,
Ch B=C101, Ch C=C201, Ch D=C301).
Fans will increase speed, TEMP leds on front will light,
Signal will go out.
4 Channels
Modified: 2009-11-04
40kHz
AICO
Page 12 of 12
2 Channels
19) Check mains switch for bad contact (click noise).
20) Check gain potentiometers at front. No disturbance at output signal shall be detected when
turning the potentiometer from one end point to the other end point.
21) Check dust filter, change when needed.
THIS DOCUMENT IS CONFIDENTIAL. IT MAY NOT BE REPRODUCED WITHOUT THE WRITTEN PERMISSION OF Lab.gruppen AB
2006 Lab.gruppen AB, Faktorvägen 1, S-434 44 KUNGSBACKA, SWEDEN
 Loading...