

Page 1
Register and win!
www.kaercher.com
NT 27/1
NT 27/1 Me
Deutsch 6
English 11
Français 16
Italiano 22
Nederlands 27
Español 32
Português 37
Dansk 42
Norsk 47
Svenska 52
Suomi 57
Ελληνικά 62
Türkçe 67
Русский 72
Magyar 78
Čeština 83
Slovenščina 88
Polski 93
Româneşte 98
Slovenčina 103
Hrvatski 108
Srpski 113
Български 118
Eesti 124
Latviešu 129
Lietuviškai 134
Українська 139
59605080 02/10
Page 2

2
Page 3
16
12
1
8710
11
14
2
3
5
6
9
13
17
18
19
4
3
15
3
Page 4
1
2
1
1
2
3
4
1
2
1
5
6
2x
“Click”
7
8
4
Page 5
A
B
1.
2.
C
D
E
F
G
5
Page 6
Lesen Sie vor der ersten Benut-
zung Ihres Gerätes diese Originalbetriebsanleitung, handeln Sie danach
und bewahren Sie diese für späteren Gebrauch oder für Nachbesitzer auf.
– Vor erster Inbetriebnahme Sicherheits-
hinweise Nr. 5.956-249 unbedingt lesen!
– Bei Nichtbeachtung der Betriebsanlei-
tung und der Sicherheitshinweise können Schäden am Gerät und Gefahren
für den Bediener und andere Personen
entstehen.
– Bei Transportschaden sofort Händler
informieren.
Inhaltsverzeichnis
Umweltschutz DE - 1
Symbole in der Betriebsanlei-
tung
Bestimmungsgemäße Ver-
wendung
Geräteelemente DE - 2
Inbetriebnahme DE - 2
Bedienung DE - 2
Transport DE - 3
Lagerung DE - 3
Pflege und Wartung DE - 3
Hilfe bei Störungen DE - 3
Garantie DE - 3
Zubehör und Ersatzteile DE - 4
CE-Erklärung DE - 4
Technische Daten DE - 5
DE - 1
DE - 1
Umweltschutz
Die Verpackungsmaterialien
sind recyclebar. Bitte werfen Sie
die Verpackungen nicht in den
Hausmüll, sondern führen Sie
diese einer Wiederverwertung
zu.
Altgeräte enthalten wertvolle recyclingfähige Materialien, die einer Verwertung zugeführt
werden sollten. Batterien, Öl
und ähnliche Stoffe dürfen nicht
in die Umwelt gelangen. Bitte
entsorgen Sie Altgeräte deshalb
über geeignete Sammelsysteme.
Hinweise zu Inhaltsstoffen (REACH)
Aktuelle Informationen zu Inhaltsstoffen finden Sie unter:
http://www.karcher.de/de/unternehmen/
umweltschutz/REACH.htm
Symbole in der
Betriebsanleitung
Gefahr
Für eine unmittelbar drohende Gefahr, die
zu schweren Körperverletzungen oder zum
Tod führt.
몇 Warnung
Für eine möglicherweise gefährliche Situation, die zu schweren Körperverletzungen
oder zum Tod führen könnte.
Vorsicht
Für eine möglicherweise gefährliche Situation, die zu leichten Verletzungen oder zu
Sachschäden führen kann.
Bestimmungsgemäße
Verwendung
몇 Warnung
Das Gerät ist nicht für die Absaugung gesundheitsschädlicher Stäube geeignet.
– Dieser Sauger ist zur Nass- und Tro-
ckenreinigung von Boden- und Wandflächen bestimmt.
– Dieses Gerät ist für den gewerblichen
Gebrauch geeignet, z.B. auf Baustellen, in Industrieanlagen, in Werkstätten
und Vermietergeschäften.
6 DE
- 1
Page 7
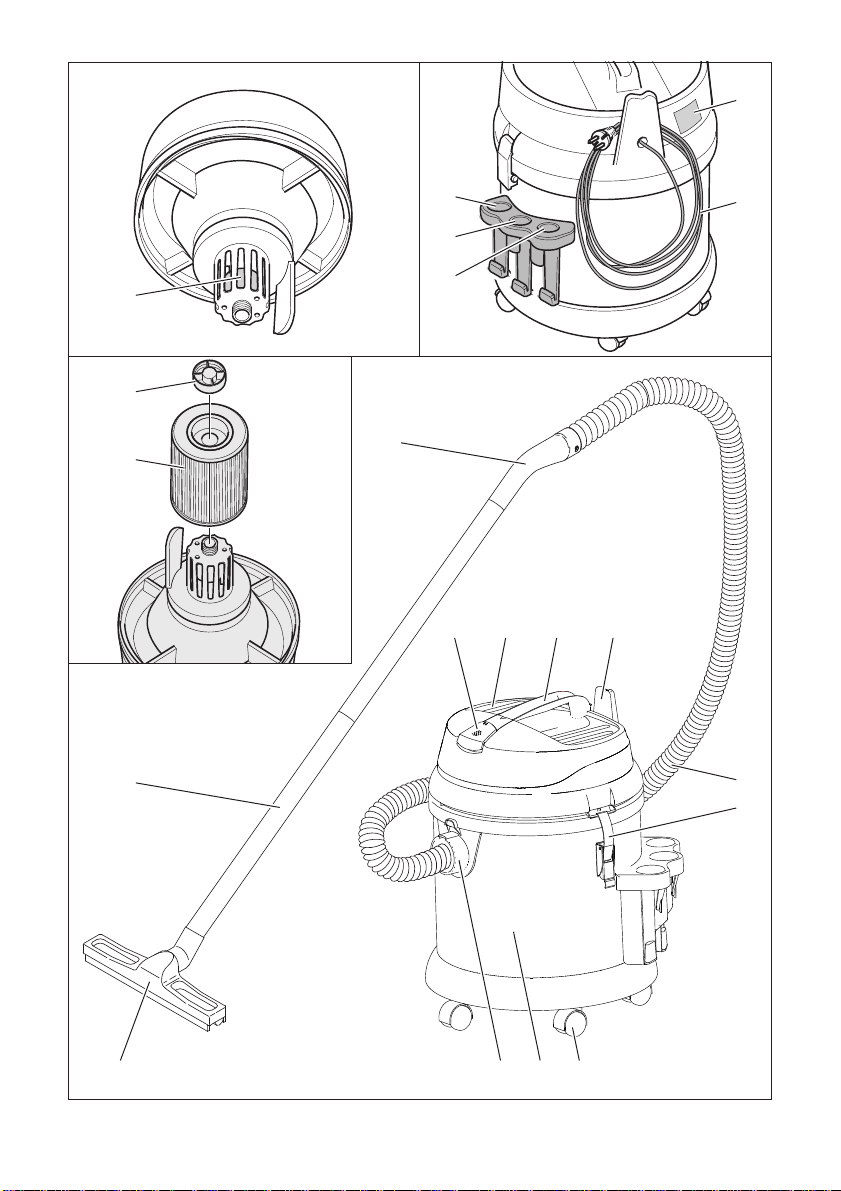
Geräteelemente
1 Typenschild
2 Netzkabel
3 Halter für Saugrohre
4 Halter für Fugendüse
5 Saugschlauch
6 Verriegelung des Saugkopfs
7 Lenkrolle
8 Schmutzbehälter
9 Saugstutzen
10 Bodendüse
11 Saugrohr
12 Hauptschalter
13 Saugkopf
14 Tragegriff
15 Kabelhaken
16 Krümmer
17 Patronenfilter
18 Befestigungsmutter
19 Schwimmer
Papierfiltertüte entfernen
– Beim Aufsaugen von Nassschmutz
muss immer die Papierfiltertüte entfernt
werden.
Zusatzfilter einbauen
Saugkopf entriegeln und abnehmen.
Saugkopf um 180° drehen und ablegen.
Befestigungsmutter herausdrehen.
Patronenfilter abnehmen.
Abbildung
Befestigungsmutter einsetzen und fest-
ziehen.
Zusatzfilter einbauen.
Saugkopf aufsetzen und verriegeln.
Clipverbindung
Abbildung
Der Saugschlauch ist mit einem Clip-System ausgestattet. Alle C-35/C-DN-35 Zubehörteile können angeschlossen werden.
Bedienung
Inbetriebnahme
Trockensaugen
Vorsicht
Beim Trockensaugen muss immer der Patronenfilter aufgesetzt sein.
– Beim Aufsaugen von Feinstaub kann
zusätzlich eine Papierfiltertüte verwendet werden.
Einbau Papierfiltertüte
Abbildung
Abbildung
Saugkopf entriegeln und abnehmen.
Papierfiltertüte aufstecken.
Saugkopf aufsetzen und verriegeln.
Nasssaugen
Einbau Gummilippen
Abbildung
Bürstenstreifen ausbauen.
Gummilippen einbauen.
Hinweis: Die strukturierte Seite der Gummilippen muss nach außen zeigen.
Gerät einschalten
Netzstecker einstecken.
Gerät am Hauptschalter einschalten.
Schmutzbehälter entleeren
– Der Saugkanal ist mit einem Schwim-
mer ausgestattet.
– Ist der höchstzulässige Schmutzwas-
serpegel im Behälter erreicht, wird der
Saugstrom unterbrochen.
Gerät am Hauptschalter ausschalten.
Schmutzbehälter entleeren.
Gerät ausschalten
Gerät am Hauptschalter ausschalten.
Netzstecker ziehen.
Nach jedem Betrieb
Schmutzbehälter entleeren.
Gerät innen und außen durch Absau-
gen und Abwischen mit einem feuchten
Tuch reinigen.
- 2
7DE
Page 8
Gerät aufbewahren
Abbildung
Saugrohre, Saugschlauch und Netzkabel
entsprechend Abbildung aufbewahren.
Gerät in einem trockenen Raum abstel-
len und vor unbefugter Benutzung sichern.
Transport
Vorsicht
Verletzungs- und Beschädigungsgefahr!
Gewicht des Gerätes beim Transport beachten.
Abbildung
Gerät entsprechend Abbildung trans-
portieren.
Beim Transport in Fahrzeugen Gerät
nach den jeweils gültigen Richtlinien
gegen Rutschen und Kippen sichern.
Lagerung
Vorsicht
Verletzungs- und Beschädigungsgefahr! Gewicht des Gerätes bei Lagerung beachten.
Dieses Gerät darf nur in Innenräumen gelagert werden.
Pflege und Wartung
Gefahr
Vor allen Arbeiten am Gerät, Gerät ausschalten und Netzstecker ziehen.
Patronenfilter wechseln
Saugkopf entriegeln und abnehmen.
Saugkopf um 180° drehen und ablegen.
Befestigungsmutter herausdrehen.
Patronenfilter abnehmen.
Neuen Patronenfilter aufsetzen.
Befestigungsmutter einsetzen und fest-
ziehen.
Saugkopf aufsetzen und verriegeln.
Hilfe bei Störungen
Gefahr
Vor allen Arbeiten am Gerät, Gerät ausschalten und Netzstecker ziehen.
Saugturbine läuft nicht
Kabel, Stecker, Sicherung und Steck-
dose überprüfen.
Gerät einschalten.
Saugturbine läuft, aber Gerät saugt
nicht
– Schwimmer verschließt Saugkanal.
Schmutzbehälter entleeren.
Saugkraft lässt nach
Verstopfungen aus Saugdüse, Saug-
rohr, Saugschlauch oder Patronenfilter
entfernen.
Papierfiltertüte wechseln.
Patronenfilter wechseln.
Staubaustritt beim Saugen
Korrekte Einbaulage des Patronenfil-
ters überprüfen.
Patronenfilter wechseln.
Garantie
In jedem Land gelten die von unserer zuständigen Vertriebsgesellschaft herausgegebenen Garantiebedingungen. Etwaige
Störungen an Ihrem Gerät beseitigen wir
innerhalb der Garantiefrist kostenlos, sofern ein Material- oder Herstellungsfehler
die Ursache sein sollte. Im Garantiefall
wenden Sie sich bitte mit Kaufbeleg an Ihren Händler oder die nächste autorisierte
Kundendienststelle.
8 DE
- 3
Page 9

Zubehör und Ersatzteile CE-Erklärung
CEO
Head of Approbation
– Es dürfen nur Zubehör und Ersatzteile
verwendet werden, die vom Hersteller
freigegeben sind. Original-Zubehör und
Original-Ersatzteile bieten die Gewähr
dafür, dass das Gerät sicher und störungsfrei betrieben werden kann.
– Eine Auswahl der am häufigsten benö-
tigten Ersatzteile finden Sie am Ende
der Betriebsanleitung.
– Weitere Informationen über Ersatzteile
erhalten Sie unter www.kaercher.com
im Bereich Service.
Hiermit erklären wir, dass die nachfolgend
bezeichnete Maschine aufgrund ihrer Konzipierung und Bauart sowie in der von uns
in Verkehr gebrachten Ausführung den einschlägigen grundlegenden Sicherheitsund Gesundheitsanforderungen der EGRichtlinien entspricht. Bei einer nicht mit
uns abgestimmten Änderung der Maschine
verliert diese Erklärung ihre Gültigkeit.
Produkt: Nass- und Trockensauger
Typ: 1.428-xxx
Einschlägige EG-Richtlinien
2006/42/EG (+2009/127/EG)
2004/108/EG
Angewandte harmonisierte Normen
EN 55014–1: 2006
EN 55014–2: 1997 + A1: 2001
EN 60335–1
EN 60335–2–69
EN 61000–3–2: 2006 + A2: 2009
EN 61000–3–3: 2008
EN 62233: 2008
Angewandte nationale Normen
-
5.957-710
Die Unterzeichnenden handeln im Auftrag
und mit Vollmacht der Geschäftsführung.
Dokumentationsbevollmächtigter:
S. Reiser
Alfred Kärcher GmbH & Co. KG
Alfred-Kärcher-Str. 28 - 40
71364 Winnenden (Germany)
Tel.: +49 7195 14-0
Fax: +49 7195 14-2212
Winnenden, 2010/07/14
- 4
9DE
Page 10

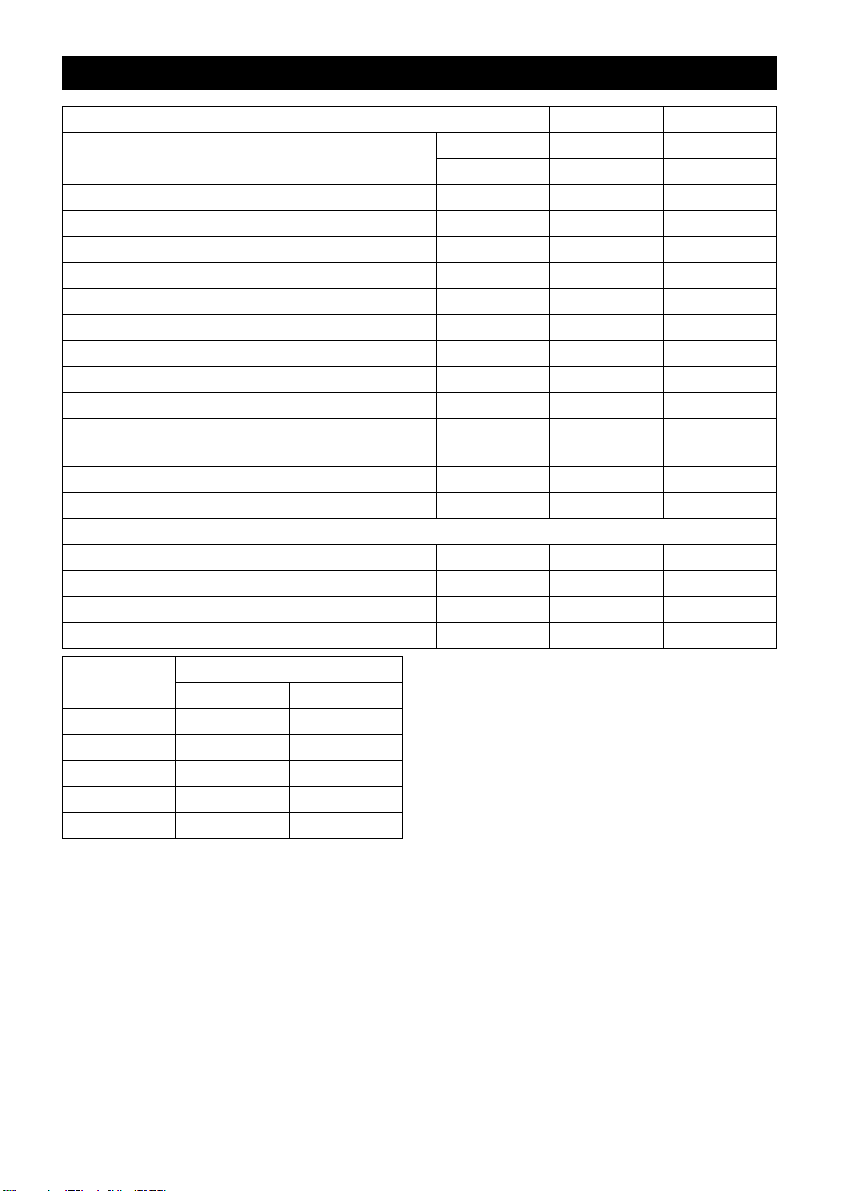
Technische Daten
NT 27/1 NT 27/1 Me
Netzspannung V 220-240 220-240
V AR: 220 AR: 220
Frequenz Hz 50/60 50/60
Max. Leistung W 1380 1380
Nennleistung W 1200 1200
Behälterinhalt l 27 27
Füllmenge Flüssigkeit l 14 14
Luftmenge (max.) l/s 67 67
Unterdruck (max.) kPa (mbar) 20,8 (208) 20,8 (208)
Schutzklasse -- II II
Saugschlauchanschluss (C-DN/C-ID) mm 35 35
Länge x Breite x Höhe mm 420 x 420 x
525
Gewicht kg 7,5 8,2
Umgebungstemperatur (max.) °C +40 +40
Ermittelte Werte gemäß EN 60335-2-69
Schalldruckpegel L
Unsicherheit K
pA
pA
Hand-Arm Vibrationswert m/s
Unsicherheit K m/s
Netzkabel H05VV-F 2x1,0 mm
2
dB(A) 77 77
dB(A) 1 1
2
2
<2,5 <2,5
0,2 0,2
Teile-Nr. Kabellänge
EUR 6.647-263.0 7,5 m
GB 6.647-264.0 7,5 m
CH 6.647-265.0 7,5 m
AUS 6.647-266.0 7,5 m
AR 6.648-233.0 7,5 m
420 x 420 x
540
10 DE
- 5
Page 11
Please read and comply with
these original instructions prior
to the initial operation of your appliance and
store them for later use or subsequent owners.
– Before first start-up it is definitely nec-
essary to read the safety indications Nr.
5.956-249!
– The non-compliance of the operating
and safety instructions may lead to
damages of the appliance and to dangers for the operator and other persons.
– In case of transport damage inform ven-
dor immediately
Contents
Environmental protection EN - 1
Symbols in the operating in-
structions
Proper use EN - 1
Device elements EN - 2
Start up EN - 2
Operation EN - 2
Transport EN - 3
Storage EN - 3
Maintenance and care EN - 3
Troubleshooting EN - 3
Warranty EN - 3
Accessories and Spare Parts EN - 4
CE declaration EN - 4
Technical specifications EN - 5
EN - 1
Environmental protection
The packaging material can be
recycled. Please do not throw
the packaging material into
household waste; please send it
for recycling.
Old appliances contain valuable
materials that can be recycled;
these should be sent for recycling. Batteries, oil, and similar
substances must not enter the
environment. Please dispose of
your old appliances using appropriate collection systems.
Notes about the ingredients (REACH)
You will find current information about the
ingredients at:
http://www.karcher.de/de/unternehmen/
umweltschutz/REACH.htm
Symbols in the operating
instructions
Danger
Immediate danger that can cause severe
injury or even death.
몇 Warning
Possible hazardous situation that could
lead to severe injury or even death.
Caution
Possible hazardous situation that could
lead to mild injury to persons or damage to
property.
Proper use
몇 Warning
The appliance is not suitable for vacuuming
dust which endangers health.
– The machine is meant for dry and wet
cleaning of floors and walls.
– This appliance is suited for the commer-
cial use, e.g. at construction sites, in industrial systems, in workshops and
rental companies.
- 1
11EN
Page 12
Device elements
1 Nameplate
2 Power cord
3 Holder for suction pipes
4 Holder for crevice nozzle
5 Suction hose
6 Suction head lock
7 Steering roller
8 Dirt receptacle
9 Suction support
10 Floor nozzle
11 Suction pipe
12 Main switch
13 Suction head
14 Carrying handle
15 Cable hook
16 Bender
17 Cartridge filter
18 Fastening nut
19 Float
Start up
Dry vacuum cleaning
Caution
For dry vacuuming, the cartridge filter must
always be installed.
– To vacuum fine dust, you can also use
an additional paper filter bag.
Inserting the paper filter bag
Illustration
Illustration
Î Release and remove the suction head.
Î Insert the paper filter bag.
Î Insert and lock the suction head.
Wet vacuum cleaning
Inserting the rubber lips
Illustration
Î Remove the brush strips.
Î Install the rubber lips.
Note: The structured side of the rubber lips
must point outwards.
Remove the paper filter bag
– To suck wet dirt, first remove the paper
filter bag.
Installing an additional filter
Î Release and remove the suction head.
Î Turn the suction basket by 180° and
keep it aside.
Î Loosen the mounting nuts
Î Remove the cartridge filter.
Illustration
Î Insert the fastening nut and tighten it.
Î Install the additional filter.
Î Insert and lock the suction head.
Clip connection
Illustration
The suction hose is equipped with a clip
system. All C-35/C-DN-35 accessories can
be connected.
Operation
Turning on the Appliance
Î Plug in the main plug.
Î Switch on the appliance at the main
switch.
Emptying the dirt container
– The vacuum channel is equipped with a
float.
– When the dirt water reaches the highest
permissible level in the container, the
suction power is interrupted.
Î Switch off the appliance at the main
switch.
Î Empty the dirt container.
Turn off the appliance.
Î Switch off the appliance at the main
switch.
Î Pull out the mains plug.
After each operation
Î Empty the dirt container.
Î Vacuum and wipe the appliance inside
and outside with a damp cloth.
12 EN
- 2
Page 13

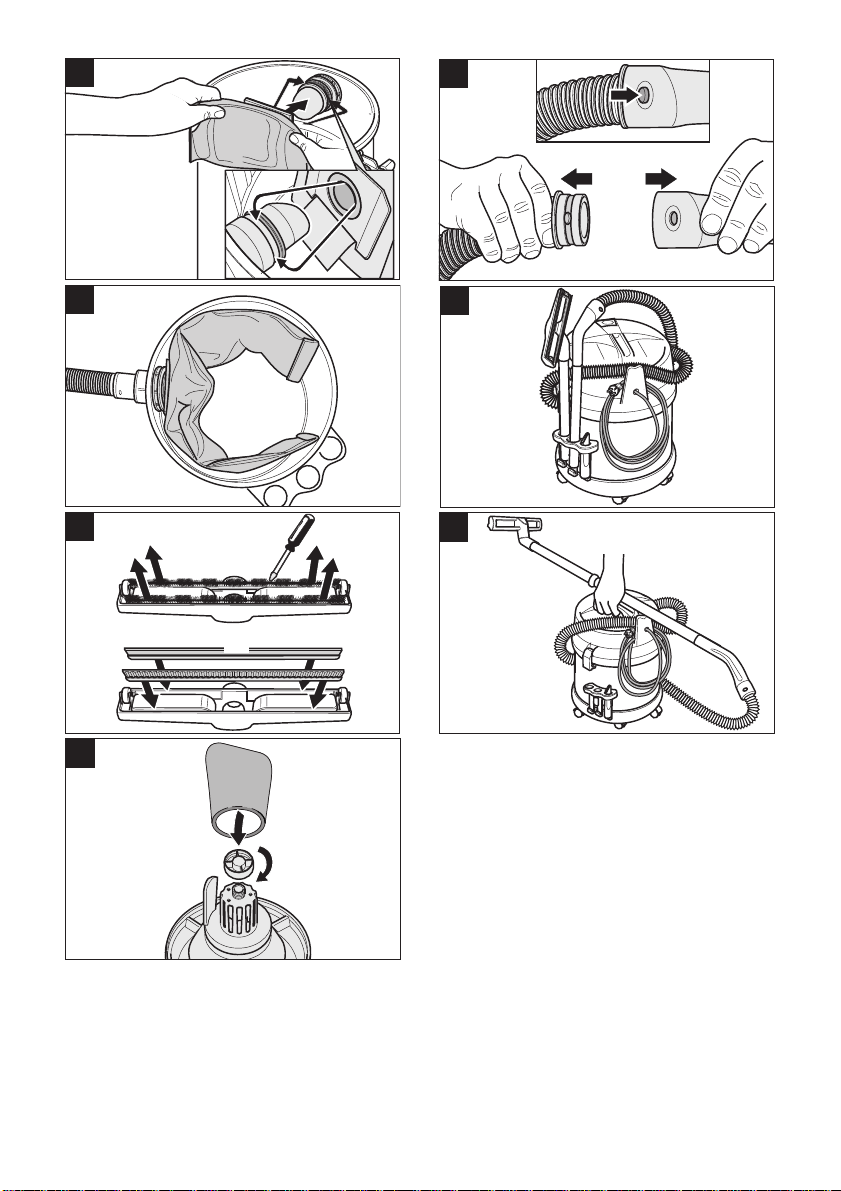
Storing the Appliance
Illustration
Î Store the suction pipes, the suction
hose and the mains cable as shown in
the illustration.
Î Place the appliance in a dry room and
secure it from unauthorized use.
Transport
Caution
Risk of injury and damage! Observe the
weight of the appliance when you transport
it.
Illustration
Î Transport the appliance as shown in the
illustration.
Î When transporting in vehicles, secure
the appliance according to the guidelines from slipping and tipping over.
Storage
Caution
Risk of injury and damage! Note the weight
of the appliance in case of storage.
This appliance must only be stored in interior rooms.
Maintenance and care
Danger
First pull out the plug from the mains before
carrying out any tasks on the machine.
Change cartridge filter
Î Release and remove the suction head.
Î Turn the suction basket by 180° and
keep it aside.
Î Loosen the mounting nuts
Î Remove the cartridge filter.
Î Insert the new cartridge filter.
Î Insert the fastening nut and tighten it.
Î Insert and lock the suction head.
Troubleshooting
Danger
First pull out the plug from the mains before
carrying out any tasks on the machine.
Suction turbine does not run
Î Check cables, plugs, fuse, and socket.
Î Turn on the appliance.
Vaccum turbine is running but the
machine is not sucking in dust/dirt
– Float is blocking the suction canal.
Î Empty the dirt container.
Suction capacity decreases
Î Remove choking of suction nozzle, suc-
tion tube, suction hose, or cartridge filter.
Î Exchange the paper filter bag.
Î Change cartridge filter.
Dust comes out while vacuuming
Î Check the proper installation of the car-
tridge filter.
Î Change cartridge filter.
Warranty
The warranty terms published by the relevant sales company are applicable in each
country. We will repair potential failures of
your appliance within the warranty period
free of charge, provided that such failure is
caused by faulty material or defects in manufacturing. In the event of a warranty claim
please contact your dealer or the nearest
authorized Customer Service centre.
Please submit the proof of purchase.
- 3
13EN
Page 14
Accessories and Spare Parts CE declaration
CEO
Head of Approbation
– Only use accessories and spare parts
which have been approved by the manufacturer. The exclusive use of original
accessories and original spare parts
ensures that the appliance can be operated safely and troublefree.
– At the end of the operating instructions
you will find a selected list of spare parts
that are often required.
– For additional information about spare
parts, please go to the Service section
at www.kaercher.com.
We hereby declare that the machine described below complies with the relevant
basic safety and health requirements of the
EU Directives, both in its basic design and
construction as well as in the version put
into circulation by us. This declaration shall
cease to be valid if the machine is modified
without our prior approval.
Product: Wet and dry vacuum cleaner
Type: 1.428-xxx
Relevant EU Directives
2006/42/EC (+2009/127/EC)
2004/108/EC
Applied harmonized standards
EN 55014–1: 2006
EN 55014–2: 1997 + A1: 2001
EN 60335–1
EN 60335–2–69
EN 61000–3–2: 2006 + A2: 2009
EN 61000–3–3: 2008
EN 62233: 2008
Applied national standards
-
5.957-710
14 EN
The undersigned act on behalf and under
the power of attorney of the company management.
Authorised Documentation Representative
S. Reiser
Alfred Kärcher GmbH Co. KG
Alfred-Kärcher-Str. 28 - 40
71364 Winnenden (Germany)
Phone: +49 7195 14-0
Fax: +49 7195 14-2212
Winnenden, 2010/07/14
- 4
Page 15
Technical specifications
NT 27/1 NT 27/1 Me
Mains voltage V 220-240 220-240
V AR: 220 AR: 220
Frequency Hz 50/60 50/60
Max. performance W 1380 1380
Rated power W 1200 1200
Container capacity l 27 27
Filling quantity (liquid) l 14 14
Air volume (max.) l/s 67 67
Negative pressure (max.) kPa (mbar) 20,8 (208) 20,8 (208)
Protective class -- II II
Suction hose connection (C-DN/C-ID) mm 35 35
Length x width x height mm 420 x 420 x
525
Weight kg 7,5 8,2
Max. ambient temperature °C +40 +40
Values determined to EN 60335-2-69
Sound pressure level L
Uncertainty K
pA
pA
Hand-arm vibration value m/s
Uncertainty K m/s
Power cord H05VV-F 2x1,0 mm
2
dB(A) 77 77
dB(A) 1 1
2
2
<2,5 <2,5
0,2 0,2
Part no.: Cable length
EUR 6.647-263.0 7,5 m
GB 6.647-264.0 7,5 m
CH 6.647-265.0 7,5 m
AUS 6.647-266.0 7,5 m
AR 6.648-233.0 7,5 m
420 x 420 x
540
- 5
15EN
Page 16

Lire ces notice originale avant la
première utilisation de votre appareil, se comporter selon ce qu'elles requièrent et les conserver pour une
utilisation ultérieure ou pour le propriétaire
futur.
– Avant la première mise en service, vous
devez impérativement avoir lu les consignes de sécurité N° 5.956-249 !
– En cas de non-respect des instructions
de service et des consignes de sécurité, l'appareil risque de subir des dommages matériel et l'utilisateur ainsi que
toute tierce personne sont exposés à
des dangers potentiels.
– Contactez immédiatement le revendeur
en cas d'avarie de transport.
Table des matières
Protection de l’environnement FR - 1
Symboles utilisés dans le
mode d'emploi
Utilisation conforme FR - 2
Éléments de l'appareil FR - 2
Mise en service FR - 2
Utilisation FR - 2
Transport FR - 3
Entreposage FR - 3
Entretien et maintenance FR - 3
Assistance en cas de panne FR - 3
Garantie FR - 4
Accessoires et pièces de re-
change
Déclaration CE FR - 5
Caractéristiques techniques FR - 6
FR - 1
FR - 4
Protection de
l’environnement
Les matériaux constitutifs de
l’emballage sont recyclables.
Ne pas jeter les emballages
dans les ordures ménagères,
mais les remettre à un système
de recyclage.
Les appareils usés contiennent
des matériaux précieux recyclables lesquels doivent être apportés à un système de
recyclage. Il est interdit de jeter
les batteries, l'huile et les substances similaires dans l'environnement. Pour cette raison,
utiliser des systèmes de collecte
adéquats afin d'éliminer les appareils hors d'usage.
Instructions relatives aux ingrédients
(REACH)
Les informations actuelles relatives aux ingrédients se trouvent sous :
http://www.karcher.de/de/unternehmen/
umweltschutz/REACH.htm
Symboles utilisés dans le
mode d'emploi
Danger
Pour un danger immédiat qui peut avoir
pour conséquence la mort ou des blessures corporelles graves.
몇 Avertissement
Pour une situation potentiellement dangereuse qui peut avoir pour conséquence des
blessures corporelles graves ou la mort.
Attention
Pour une situation potentiellement dangereuse qui peut avoir pour conséquence des
blessures légères ou des dommages matériels.
16 FR
- 1
Page 17
Utilisation conforme
Avertissement
몇
Cet appareil n'est pas conçu pour aspirer
des poussières nocives.
– Cet aapirateur est destiné au nettoyage
à sec et au nettoyage par voie humide
des sol et murs.
– Cet appareil convient à un usage indus-
triel, par exemple sur les chamtiers,
dans les installations industrielles, les
ateliers et les agences de location.
Éléments de l'appareil
1 Plaque signalétique
2 Câble d’alimentation
3 Support pour tubes d'aspiration
4 Support pour buse à joint
5 Flexible d’aspiration
6 Verrouillage de la tête d'aspiration
7 Galet de direction
8 Récipient collecteur
9 Consoles d'apiration
10 Buse pour sol
11 Tuyau d'aspiration
12 Interrupteur principal
13 Tête d'aspiration
14 Poignée de transport
15 Crochet de câble
16 Coude
17 Filtre-cartouche
18 Ecrou de fixation
19 Flotteur
Mise en service
Aspiration de poussières
Attention
Pour l'aspiration de poussières à sec, la
cartouche filtrante doit toujours être montée.
– Pour l'aspiration de poussières fines, il
est possible d'utiliser de surcroît un sachet filtre en papier.
Montage du sachet filtre en papier
Illustration
Illustration
Î Déverrouiller et retirer la tête d'aspiration.
Î Enficher le sachet filtre en papier.
Î Positionner la tête d'aspiration et la ver-
rouiller.
Aspiration humide
Montage des lèvres en caoutchouc
Illustration
Î Démonter les bandes de brosse
Î Monter les lèvres en caoutchouc.
Remarque : la face structurée des lèvres
en caoutchouc doit être dirigée vers l'extérieur.
Retirer le sachet filtre en papier.
– En cas d'aspiration de saletés humides,
il convient de toujours démonter le sachet filtre en papier.
Monter le filtre supllémentair
Î Déverrouiller et retirer la tête d'aspira-
tion.
Î Faire tourner la tête d'aspiration de
180 ° et la déposer.
Î Dévisser l'écrou de fixation.
Î Retirer la cartouche filtrante.
Illustration
Î Mettre les écrous de fixation en place et
les serrer.
Î Monter le filtre supllémentaire.
Î Positionner la tête d'aspiration et la ver-
rouiller.
Clip de fixation
Illustration
Le flexible d'aspiration est doté d'un système à clip. Il est possible de raccorder tous
les accessoires C-35/C-DN-35.
Utilisation
Mettre l'appareil en marche
Î Brancher la fiche secteur.
Î Mettre l'appareil en service au niveau
de l'interrupteur principal.
- 2
17FR
Page 18
Vider le récipient collecteur
– Le canal d'aspiration est équipé d'un
flotteur.
– Lorsque le niveau maximal admissible
d'eau sale est atteint dans le réservoir,
le débit d'aspiration est stoppé.
Î Mettre l'appareil hors service au niveau
de l'interrupteur principal.
Î Vider le réservoir collecteur.
Mise hors service de l'appareil
Î Mettre l'appareil hors service au niveau
de l'interrupteur principal.
Î Retirer le connecteur de la prise.
Après chaque mise en service
Î Vider le réservoir collecteur.
Î Nettoyer la partie intérieure et extérieu-
re de l'appareil en l'aspirant et en l'essuyant avec un chiffon humide.
Ranger l’appareil
Illustration
Î Conserver les tubes d'aspiration, le
flexible d'aspiration et le câble d'alimentation comme le montre la figure.
Î Entreposer l’appareil dans un endroit
sec et le sécuriser contre toute utilisation non autorisée.
Transport
Attention
Risque de blessure et d'endommagement !
Respecter le poids de l'appareil lors du
transport.
Illustration
Î Transporter l'appareil conne le montre
la figure.
Î Sécuriser l'appareil contre les glisse-
ments ou les basculements selon les directives en vigueur lors du transport
dans des véhicules.
Entreposage
Attention
Risque de blessure et d'endommagement !
Prendre en compte le poids de l'appareil à
l'entreposage.
Cet appareil doit uniquement être entreposé en intérieur.
Entretien et maintenance
Danger
Avant d'effectuer tout type de travaux sur
l'appareil, le mettre hors service et débrancher la fiche électrique.
Remplacement de la cartouche
filtrante
Î Déverrouiller et retirer la tête d'aspiration.
Î Faire tourner la tête d'aspiration de
180 ° et la déposer.
Î Dévisser l'écrou de fixation.
Î Retirer la cartouche filtrante.
Î Mettre la cartouche filtrante neuve en
place.
Î Mettre les écrous de fixation en place et
les serrer.
Î Positionner la tête d'aspiration et la ver-
rouiller.
Assistance en cas de panne
Danger
Avant d'effectuer tout type de travaux sur
l'appareil, le mettre hors service et débrancher la fiche électrique.
18 FR
- 3
Page 19

La turbine d'aspiration ne
fonctionne pas
Î Vérifier le câble, la fiche, le fusible et la
prise.
Î Allumer l’appareil.
La turbine d'aspiration fonctionne
mais l'appareil n'aspire pas.
– Le flotteur obture le canal d'aspiration.
Î Vider le réservoir collecteur.
La force d'aspiration diminue
Î Déboucher la buse d'aspiration, le
tuyau d'aspiration, le flexible d'aspiration ou la cartouche filtrante.
Î Remplacer le sachet filtre en papier.
Î Remplacer la cartouche filtrante.
De la poussière s'échappe lors de
l'aspiration
Î Vérifier le positionnement de la cartou-
che filtrante.
Î Remplacer la cartouche filtrante.
Garantie
Dans chaque pays, les conditions de garantie en vigueur sont celles publiées par
notre société de distribution responsable.
Les éventuelles pannes sur l’appareil sont
réparées gratuitement dans le délai de validité de la garantie, dans la mesure où celles-ci relèvent d'un défaut matériel ou d'un
vice de fabrication. En cas de recours en
garantie, adressez-vous à votre revendeur
ou au service après-vente agréé le plus
proche munis de votre preuve d'achat.
Accessoires et pièces de
rechange
– Utiliser uniquement des accessoires et
des pièces de rechange autorisés par le
fabricant. Des accessoires et des pièces de rechange d’origine garantissent
un fonctionnement sûr et parfait de l’appareil.
– Une sélection des pièces de rechange
utilisées le plus se trouve à la fin du
mode d'emploi.
– Plus information sur les pièces de rechange
vous les trouverez sous www.kaercher.com sous le menu Service.
- 4
19FR
Page 20
Déclaration CE
CEO
Head of Approbation
Nous certifions par la présente que la machine spécifiée ci-après répond de par sa
conception et son type de construction ainsi que de par la version que nous avons
mise sur le marché aux prescriptions fondamentales stipulées en matière de sécurité et d’hygiène par les directives
européennes en vigueur. Toute modification apportée à la machine sans notre accord rend cette déclaration invalide.
Produit: Aspirateur à sec et par voie
humide
Type: 1.428-xxx
Directives européennes en vigueur :
2006/42/CE (+2009/127/CE)
2004/108/CE
Normes harmonisées appliquées :
EN 55014–1: 2006
EN 55014–2: 1997 + A1: 2001
EN 60335–1
EN 60335–2–69
EN 61000–3–2: 2006 + A2: 2009
EN 61000–3–3: 2008
EN 62233: 2008
Normes nationales appliquées :
-
5.957-710
Les soussignés agissent sur ordre et sur
procuration de la Direction commerciale.
Responsable de la documentation:
S. Reiser
Alfred Kärcher GmbH Co. KG
Alfred-Kärcher-Str. 28 - 40
71364 Winnenden (Germany)
Téléphone : +49 7195 14-0
Télécopieur : +49 7195 14-2212
Winnenden, 2010/07/14
20 FR
- 5
Page 21
Caractéristiques techniques
NT 27/1 NT 27/1 Me
Tension du secteur V 220-240 220-240
V AR: 220 AR: 220
Fréquence Hz 50/60 50/60
Puissance maxi W 1380 1380
Puissance nominale W 1200 1200
Capacité de la cuve l 27 27
Plein de liquide l 14 14
Débit d'air (maxi) l/s 67 67
Dépression (maxi) kPa (mbar) 20,8 (208) 20,8 (208)
Classe de protection -- II II
Raccord du flexible d'aspiration (C-DN/C-ID) mm 35 35
Longueur x largeur x hauteur mm 420 x 420 x
525
Poids kg 7,5 8,2
Température ambiante (maxi) °C +40 +40
Valeurs définies selon EN 60335-2-69
Niveau de pression sonore L
Incertitude K
pA
pA
Valeur de vibrations bras-main m/s
Incertitude K m/s
Câble d’alimentation
H05VV-F 2x1,0 mm
Référence Longueur de
2
dB(A) 77 77
dB(A) 1 1
2
2
<2,5 <2,5
0,2 0,2
câble
EUR 6.647-263.0 7,5 m
GB 6.647-264.0 7,5 m
CH 6.647-265.0 7,5 m
AUS 6.647-266.0 7,5 m
AR 6.648-233.0 7,5 m
420 x 420 x
540
- 6
21FR
Page 22
Prima di utilizzare l'apparecchio
per la prima volta, leggere le
presenti istruzioni originali, seguirle e conservarle per un uso futuro o in caso di rivendita dell'apparecchio.
– Prima di procedere alla prima messa in
funzione leggere tassativamente le norma di sicurezza n. 5.956-249!
– La mancata osservanza delle istruzioni
d'uso e delle norme di sicurezza può
causare danni all'apparecchio e presentare pericoli per l'utilizzatore e le altre persone.
– Eventuali danni da trasporto vanno co-
municati immediatamente al proprio rivenditore.
Indice
Protezione dell’ambiente IT - 1
Simboli riportati nel manuale
d'uso
Uso conforme a destinazione IT - 1
Parti dell'apparecchio IT - 2
Messa in funzione IT - 2
Uso IT - 2
Trasporto IT - 3
Supporto IT - 3
Cura e manutenzione IT - 3
Guida alla risoluzione dei gua-
sti
Garanzia IT - 4
Accessori e ricambi IT - 4
Dichiarazione CE IT - 4
Dati tecnici IT - 5
IT - 1
IT - 3
Protezione dell’ambiente
Tutti gli imballaggi sono riciclabili. Gli imballaggi non vanno
gettati nei rifiuti domestici, ma
consegnati ai relativi centri di
raccolta.
Gli apparecchi dismessi contengono materiali riciclabili preziosi
e vanno consegnati ai relativi
centri di raccolta. Batterie, olio e
sostanze simili non devono essere dispersi nell’ambiente. Si
prega quindi di smaltire gli apparecchi dismessi mediante i sistemi di raccolta differenziata.
Avvertenze sui contenuti (REACH)
Informazioni aggiornate sui contenuti sono
disponibili all'indirizzo:
http://www.karcher.de/de/unternehmen/
umweltschutz/REACH.htm
Simboli riportati nel manuale
d'uso
Pericolo
Per un rischio imminente che determina lesioni gravi o la morte.
몇 Attenzione
Per una situazione di rischio possibile che potrebbe determinare lesioni gravi o la morte.
Attenzione
Per una situazione di rischio possibile che
potrebbe determinare danni leggeri a persone o cose.
Uso conforme a destinazione
22 IT
몇 Attenzione
L'apparecchio non si adatta all'aspirazione
di polveri dannose alla salute.
– Questo aspiratore è destinato alla puli-
zia a secco/umido di pavimenti o pareti.
– Questo apparecchio si adatta all'uso
professionale, ad esempio in cantieri,
impianti industriali, officine ed uffici.
- 1
Page 23
Parti dell'apparecchio
1 Targhetta
2 Cavo di alimentazione
3 Sostegno per tubi di aspirazione
4 Sostegno per bocchetta per fughe
5 Tubo flessibile di aspirazione
6 Dispositivo di blocco della testa di aspi-
razione
7 Ruota pivottante
8 Contenitore sporcizia
9 Raccordo di aspirazione
10 Bocchetta pavimenti
11 Tubo rigido di aspirazione
12 Interruttore principale
13 Testa aspirante
14 Maniglia trasporto
15 Gancio per cavo
16 Gomito
17 Filtro a cartuccia
18 Dado di fissaggio
19 Galleggiante
Messa in funzione
Aspirazione a secco
Attenzione
Inserire sempre il filtro a cartuccia durante
la pulizia a secco.
– L'aspirazione di polveri fini provvede la
possibilità di usare un sacchetto filtro
addizionale.
Inserimento del sacchetto filtro di carta
Figura
Figura
Î Sbloccare e staccare la testa aspirante.
Î Inserire il sacchetto filtro di carta.
Î Rimettere la testa aspirante e bloccarla.
Aspirazione ad umido
Montaggio dei labbri di gomma
Figura
Î Smontare il nastro con setole.
Î Montare i labbri di gomma.
Avviso:Il lato dei labbri in gomma con la
trama deve essere rivolto verso l'esterno.
Rimuovere il sacchetto filtro di carta
– Per l'aspirazione di liquidi occorre ri-
muovere sempre il sacchetto filtro di
carta.
Montare il filtro supplementare
Î Sbloccare e staccare la testa aspirante.
Î Ruotare la testa aspirante di 180° e de-
positarla.
Î Svitare il dado di fissaggio.
Î Togliere il filtro a cartuccia.
Figura
Î Inserire il dado di fissaggio e stringerlo.
Î Montare il filtro supplementare.
Î Rimettere la testa aspirante e bloccarla.
Collegamento a clip
Figura
Il canale di aspirazione è dotato di un sistema a clip. Tutti gli accessori C-35/C-DN-35
possono essere collegati.
Uso
Accendere l’apparecchio
Î Inserire la spina di alimentazione.
Î Attivare l'apparecchio dall'interruttore
principale.
Svuotare il contenitore dello sporco
– Il canale di aspirazione è provvisto di un
galleggiante.
– Il flusso di aspirazione si interrompe al
raggiungimento del livello massimo di
acqua sporca nel serbatoio.
Î Disattivare l'apparecchio dall'interrutto-
re principale.
Î Svuotare il serbatoio dello sporco.
- 2
23IT
Page 24

Spegnere l’apparecchio
Î Disattivare l'apparecchio dall'interrutto-
re principale.
Î Staccare la spina.
A lavoro ultimato
Î Svuotare il serbatoio dello sporco.
Î Pulire l’apparecchio all’interno e
all’esterno aspirando e passando la su-
perficie con un panno umido.
Deposito dell’apparecchio
Figura
Î Conservare i tubi di aspirazione, il tubo
flessibile di aspirazione ed il cavo di ali-
mentazione secondo quanto illustrato
nella figura.
Î Depositare l’apparecchio in un luogo
asciutto e proteggerlo contro l’uso non
autorizzato.
Trasporto
Attenzione
Pericolo di lesioni e di danneggiamento! Rispettare il peso dell'apparecchio durante il
trasporto.
Figura
Î Trasportare l'apparecchio come illustra-
to nell'immagine.
Î Per il trasporto in veicoli, assicurare
l'apparecchio secondo le direttive in vi-
gore affinché non possa scivolare e ri-
baltarsi.
Cura e manutenzione
Pericolo
Disattivare l'apparecchio ed estrarre la spina di alimentazione prima di effettuare interventi sull'apparecchio.
Sostituzione del filtro a cartuccia
Î Sbloccare e staccare la testa aspirante.
Î Ruotare la testa aspirante di 180° e de-
positarla.
Î Svitare il dado di fissaggio.
Î Togliere il filtro a cartuccia.
Î Sostituirlo con il nuovo filtro a cartuccia.
Î Inserire il dado di fissaggio e stringerlo.
Î Rimettere la testa aspirante e bloccarla.
Guida alla risoluzione dei
guasti
Pericolo
Disattivare l'apparecchio ed estrarre la spina di alimentazione prima di effettuare interventi sull'apparecchio.
Supporto
Attenzione
Pericolo di lesioni e di danneggiamento! Rispettare il peso dell'apparecchio durante la
conservazione.
Questo apparecchio può essere conservato solo in ambienti interni.
24 IT
- 3
Page 25
La turbina di aspirazione non fun-
CEO
Head of Approbation
ziona
Î Controllare il cavo, la spina, il fusibile e
la presa.
Î Accendere l’apparecchio.
La turbina di aspirazione funziona,
ma l'apparecchio non aspira
– Galleggiante ostruisce il canale di aspira-
zione.
Î Svuotare il serbatoio dello sporco.
La forza aspirante diminuisce
Î Rimuovere eventuali otturazioni dalla
bocchetta di aspirazione, dal tubo rigido
di aspirazione o dal filtro a cartuccia.
Î Sostituire il sacchetto filtro di carta.
Î Sostituire il filtro a cartuccia
Fuoriuscita di polvere durante
l'aspirazione
Î Controllare che il filtro a cartuccia sia
montato nella posizione corretta.
Î Sostituire il filtro a cartuccia
Garanzia
Le condizioni di garanzia valgono nel rispettivo paese di pubblicazione da parte
della nostra società di vendita competente.
Entro il termine di garanzia eliminiamo gratuitamente eventuali guasti all’apparecchio,
se causati da difetto di materiale o di produzione. Nei casi previsti dalla garanzia si
prega di rivolgersi al proprio rivenditore, oppure al più vicino centro di assistenza autorizzato, esibendo lo scontrino di acquisto.
Accessori e ricambi
– Impiegare esclusivamente accessori e ri-
cambi autorizzati dal produttore. Accessori
e ricambi originali garantiscono che l’appa-
recchio possa essere impiegato in modo si-
curo e senza disfunzioni.
– La lista dei pezzi di ricambio più comuni è ri-
portata alla fine del presente manuale
d'uso.
– Maggiori informazioni sulle parti di ri-
cambio sono reperibili al sito www.kaer-
cher.com alla voce “Service”.
Dichiarazione CE
Con la presente si dichiara che la macchina
qui di seguito indicata, in base alla sua concezione, al tipo di costruzione e nella versione da noi introdotta sul mercato, è
conforme ai requisiti fondamentali di sicurezza e di sanità delle direttive CE. In caso
di modifiche apportate alla macchina senza
il nostro consenso, la presente dichiarazione perde ogni validità.
Prodotto: Aspiratore solidi-liquidi
Modelo: 1.428-xxx
Direttive CE pertinenti
2006/42/CE (+2009/127/CE)
2004/108/CE
Norme armonizzate applicate
EN 55014–1: 2006
EN 55014–2: 1997 + A1: 2001
EN 60335–1
EN 60335–2–69
EN 61000–3–2: 2006 + A2: 2009
EN 61000–3–3: 2008
EN 62233: 2008
Norme nazionali applicate
-
5.957-710
I firmatari agiscono su incarico e con la procura dell’amministrazione.
Responsabile della documentazione:
S. Reiser
Alfred Kärcher GmbH & Co. KG
Alfred-Kärcher-Str. 28 - 40
71364 Winnenden (Germany)
Tel.: +49 7195 14-0
Fax: +49 7195 14-2212
Winnenden, 2010/07/14
- 4
25IT
Page 26

Dati tecnici
NT 27/1 NT 27/1 Me
Tensione di rete V 220-240 220-240
Frequenza Hz 50/60 50/60
Potenza max. W 1380 1380
Potenza nominale W 1200 1200
Capacità serbatoio l 27 27
Quantità di riempimento di liquido l 14 14
Quantità d'aria (max.) l/s 67 67
Sottopressione (max.) kPa (mbar) 20,8 (208) 20,8 (208)
Grado di protezione -- II II
Attacco per tubo di aspirazione (C-DN/C-ID) mm 35 35
Lunghezza x larghezza x Altezza mm 420 x 420 x
525
Peso kg 7,5 8,2
Temperatura ambiente (max.) °C +40 +40
Valori rilevati secondo EN 60335-2-69
Pressione acustica L
Dubbio K
pA
pA
Valore di vibrazione mano-braccio m/s
Dubbio K m/s
Cavo di alimentazione
H05VV-F 2x1,0 mm
Codice com-
ponente
2
Lunghezza
cavo
dB(A) 77 77
dB(A) 1 1
2
2
<2,5 <2,5
0,2 0,2
EUR 6.647-263.0 7,5 m
GB 6.647-264.0 7,5 m
CH 6.647-265.0 7,5 m
AUS 6.647-266.0 7,5 m
420 x 420 x
540
26 IT
- 5
Page 27
Lees vóór het eerste gebruik
van uw apparaat deze originele
gebruiksaanwijzing, ga navenant te werk
en bewaar hem voor later gebruik of voor
een latere eigenaar.
– Voor de eerste inbedrijfstelling veilig-
heidsinstructies nr. 5.956-249 in elk geval lezen!
– Bij veronachtzaming van de gebruiks-
aanwijzing en de veiligheidsaanwijzingen kan schade aan het apparaat
ontstaan, en gevaar voor gebruikers en
andere personen.
– Bij transportschade onmiddellijk de
handelaar op de hoogte brengen.
Inhoudsopgave
Zorg voor het milieu NL - 1
Symbolen in de gebruiksaan-
wijzing
Reglementair gebruik NL - 1
Apparaat-elementen NL - 2
Inbedrijfstelling NL - 2
Bediening NL - 2
Vervoer NL - 3
Opslag NL - 3
Onderhoud NL - 3
Hulp bij storingen NL - 3
Garantie NL - 4
Toebehoren en reserveonder-
delen
CE-verklaring NL - 4
Technische gegevens NL - 5
NL - 1
NL - 4
Zorg voor het milieu
Het verpakkingsmateriaal is
herbruikbaar. Deponeer het verpakkingsmateriaal niet bij het
huishoudelijk afval, maar bied
het aan voor hergebruik.
Onbruikbaar geworden apparaten bevatten waardevolle materialen die geschikt zijn voor
hergebruik. Lever de apparaten
daarom in bij een inzamelpunt
voor herbruikbare materialen.
Batterijen, olie en dergelijke
stoffen mogen niet in het milieu
belanden. Verwijder overbodig
geworden apparatuur daarom
via geschikte inzamelpunten.
Aanwijzingen betreffende de inhoudsstoffen (REACH)
Huidige informatie over de inhoudsstoffen
vindt u onder:
http://www.karcher.de/de/unternehmen/
umweltschutz/REACH.htm
Symbolen in de
gebruiksaanwijzing
Gevaar
Voor een onmiddellijk dreigend gevaar dat
leidt tot ernstige en zelfs dodelijke lichamelijke letsels.
몇 Waarschuwing
Voor een mogelijks gevaarlijke situatie die
zou kunnen leiden tot ernstige en zelfs dodelijke lichamelijke letsels.
Voorzichtig
Voor een mogelijks gevaarlijke situatie die
kan leiden tot lichte lichamelijke letsels of
materiële schade.
Reglementair gebruik
몇 Waarschuwing
Het apparaat is niet geschikt voor het opzuigen van voor de gezondheid schadelijke
stoffen.
– Deze zuiger is voor het natte en droge
reinigen van vloer- en muuroppervlakken bestemd.
– Dit apparaat is geschikt voor industrieel
gebruik, zoals bijvoorbeeld op bouwwerven, in industriële installaties, in
werkplaatsen en verhuurkantoren.
- 1
27NL
Page 28
Apparaat-elementen
1Typeplaatje
2 Netkabel
3 Houder voor zuigbuizen
4 Houder voor voegsproeier
5 Zuigslang
6 Vergrendeling van de zuigkop
7 Zwenkwiel
8 Vuilreservoir
9 Luchtinlaatleidingen
10 Vloersproeier
11 Zuigbuis
12 Hoofdschakelaar
13 Zuigkop
14 Handgreep
15 Kabelhaak
16 Elleboog
17 Patronenfilter
18 Bevestigingsmoer
19 Vlotter
Papieren filterzak wegnemen
– Bij het opzuigen van nat vuil moet de
papieren filterzak altijd verwijderd worden.
Extra filter inbouwen
Î Zuigkop ontgrendelen en wegnemen.
Î Zuigkop 180° draaien en wegleggen.
Î Bevestigingsmoer eruit draaien.
Î Patroonfilter wegnemen.
Afbeelding
Î Bevestigingsmoer aanbrengen en aan-
spannen.
Î Extra filter inbouwen.
Î Zuigkop eropzetten en vergrendelen.
Clipverbinding
Afbeelding
De zuigslang is van een clip-systeem voorzien. Alle C-35/C-DN-35 accessoires kunnen worden aangesloten.
Bediening
Inbedrijfstelling
Droogzuigen
Voorzichtig
Bij het droogzuigen moet de patronenfilter
altijd aangebracht zijn.
– Bij het opzuigen van fijn stof kan ook nog
een papieren filterzak gebruikt worden.
Inbouw papieren filterzak
Afbeelding
Afbeelding
Î Zuigkop ontgrendelen en wegnemen.
Î Papieren filterzak opzetten.
Î Zuigkop eropzetten en vergrendelen.
Natzuigen
Inbouw rubber lippen
Afbeelding
Î Borstelstrook demonteren.
Î Rubber strippen inbouwen.
Aanwijzing: De gestructueerde kant van
de rubber strippen moet naar buiten wijzen.
28 NL
- 2
Apparaat inschakelen
Î Steek de netstekker in de contactdoos.
Î Schakel het apparaat aan de hoofd-
schakelaar in.
Vuilcontainer leegmaken
– Het zuigkanaal is uitgerust met een
vlotter.
– Als het maximaal toegelaten vuilwater-
niveau in het reservoir bereikt is, wordt
de zuigstroom onderbroken.
Î Schakel het apparaat aan de hoofd-
schakelaar uit.
Î Vuilcontainer legen.
Apparaat uitschakelen
Î Schakel het apparaat aan de hoofd-
schakelaar uit.
Î Netstekker uittrekken.
Page 29
Na elk bedrijf
Î Vuilcontainer legen.
Î Apparaat aan de binnen- en buitenkant
reinigen door afzuigen en afvegen met
een vochtige doek.
Apparaat opslaan
Afbeelding
Î Zuigbuizen, zuigslang en stroomkabel
bewaren in overeenstemming met de
afbeelding.
Î Apparaat in een droge ruimte plaatsen
en beveiligen tegen onbevoegd gebruik.
Vervoer
Voorzichtig
Gevaar voor letsels en beschadigingen!
Houd bij het transport rekening met het gewicht van het apparaat.
Afbeelding
Î Apparaat transporteren zoals weerge-
geven op de afbeelding.
Î Bij het transport in voertuigen moet het
apparaat conform de geldige richtlijnen
beveiligd worden tegen verschuiven en
kantelen.
Opslag
Voorzichtig
Gevaar voor letsel en beschadiging! Het
gewicht van het apparaat bij opbergen in
acht nemen.
Het apparaat mag alleen binnen worden
opgeborgen.
Onderhoud
Gevaar
Bij alle werkzaamheden aan het apparaat,
het apparaat uitschakelen en de netstekker
uittrekken.
Patronenfilter vervangen
Î Zuigkop ontgrendelen en wegnemen.
Î Zuigkop 180° draaien en wegleggen.
Î Bevestigingsmoer eruit draaien.
Î Patroonfilter wegnemen.
Î Nieuwe patroonfilter plaatsen.
Î Bevestigingsmoer aanbrengen en aan-
spannen.
Î Zuigkop eropzetten en vergrendelen.
Hulp bij storingen
Gevaar
Bij alle werkzaamheden aan het apparaat,
het apparaat uitschakelen en de netstekker
uittrekken.
Zuigturbine start niet
Î Kabel, stekker, zekering en contact-
doos controleren.
Î Apparaat inschakelen.
Zuigturbine loopt, maar apparaat
zuigt niet
– Vlotter sluit zuigkanaal af.
Î Vuilcontainer legen.
Zuigkracht wordt minder
Î Verstoppingen uit zuigmondstuk, zuig-
buis, zuigslang of patronenfilter weghalen.
Î Papieren filterzak vervangen.
Î Patronenfilter vervangen.
Er ontsnapt stof bij het zuigen
Î Correcte inbouwpositie van de patro-
nenfilter controleren.
Î Patronenfilter vervangen.
- 3
29NL
Page 30

Garantie
CEO
Head of Approbation
In ieder land zijn de door ons bevoegde
verkoopkantoor uitgegeven garantiebepalingen van toepassing. Eventuele storingen
aan het apparaat verhelpen wij zonder kosten binnen de garantietermijn, mits een materiaal of fabrieksfout de oorzaak van deze
storing is. Neem bij klachten binnen de garantietermijn contact op met uw leverancier
of de dichtstbijzijnde klantenservicewerkplaats en neem uw aankoopbewijs mee.
Toebehoren en
reserveonderdelen
– Er mogen uitsluitend toebehoren en re-
serveonderdelen gebruikt worden die
door de fabrikant zijn vrijgegeven. Originele toebehoren en reserveonderdelen
bieden de garantie van een veilig en
storingsvrije werking van het apparaat.
– Een selectie van de meest frequent be-
nodigde reserveonderdelen vindt u achteraan in de gebruiksaanwijzing.
– Verdere informatie over reserveonder-
delen vindt u op www.kaercher.com bij
Service.
CE-verklaring
Hierbij verklaren wij dat de hierna vermelde
machine door haar ontwerp en bouwwijze
en in de door ons in de handel gebrachte
uitvoering voldoet aan de betreffende fundamentele veiligheids- en gezondheidseisen, zoals vermeld in de desbetreffende
EG-richtlijnen. Deze verklaring verliest
haar geldigheid wanneer zonder overleg
met ons veranderingen aan de machine
worden aangebracht.
Product: Droog- / natzuiger
Type: 1.428-xxx
Van toepassing zijnde EG-richtlijnen
2006/42/EG (+2009/127/EG)
2004/108//EG
Toegepaste geharmoniseerde normen
EN 55014–1: 2006
EN 55014–2: 1997 + A1: 2001
EN 60335–1
EN 60335–2–69
EN 61000–3–2: 2006 + A2: 2009
EN 61000–3–3: 2008
EN 62233: 2008
Toegepaste landelijke normen
-
5.957-710
30 NL
De ondergetekenden handelen in opdracht
en met volmacht van de bedrijfsleiding.
Gevolmachtigde voor de documentatie:
S. Reiser
Alfred Kärcher GmbH & Co. KG
Alfred Kärcher-Str. 28 - 40
71364 Winnenden (Germany)
Tel.: +49 7195 14-0
Fax: +49 7195 14-2212
Winnenden, 2010/07/14
- 4
Page 31

Technische gegevens
NT 27/1 NT 27/1 Me
Netspanning V 220-240 220-240
Frequentie Hz 50/60 50/60
Max. vermogen W 1380 1380
Nominaal vermogen W 1200 1200
Inhoud reservoir l 27 27
Vulhoeveelheid vloeistof l 14 14
Luchthoeveelheid (max.) l/s 67 67
Onderdruk (max.) kPa (mbar) 20,8 (208) 20,8 (208)
Beschermingsklasse -- II II
Zuigslangaansluiting (C-DN/C-ID) mm 35 35
Lengte x breedte x hoogte mm 420 x 420 x
525
Gewicht kg 7,5 8,2
Omgevingstemperatuur (max.) °C +40 +40
Bepaalde waarden conform EN 60335-2-69
Geluidsdrukniveau L
Onzekerheid K
pA
pA
Hand-arm vibratiewaarde m/s
Onzekerheid K m/s
Stroomkabel
H05VV-F 2x1,0 mm
Onderdeelnr. Lengte snoer
2
dB(A) 77 77
dB(A) 1 1
2
2
<2,5 <2,5
0,2 0,2
EUR 6.647-263.0 7,5 m
GB 6.647-264.0 7,5 m
CH 6.647-265.0 7,5 m
AUS 6.647-266.0 7,5 m
420 x 420 x
540
- 5
31NL
Page 32

Antes del primer uso de su apa-
rato, lea este manual original,
actúe de acuerdo a sus indicaciones y
guárdelo para un uso posterior o para otro
propietario posterior.
– ¡Antes de la primera puesta en marcha
lea sin falta las instrucciones de uso y
las instrucciones de seguridad n.°
5.956-249!
– El incumplimiento de las instrucciones
de uso y de las indicaciones de seguridad puede provocar daños en el aparato y poner en peligro al usuario y a otras
personas.
– En caso de daños de transporte infor-
me inmediatamente al fabricante.
Índice de contenidos
Protección del medio ambien-teES - 1
Símbolos del manual de instrucciones
Uso previsto ES - 1
Elementos del aparato ES - 2
Puesta en marcha ES - 2
Manejo ES - 2
Transporte ES - 3
Almacenamiento ES - 3
Cuidados y mantenimiento ES - 3
Ayuda en caso de avería ES - 3
Garantía ES - 4
Accesorios y piezas de re-
puesto
Declaración CE ES - 4
Datos técnicos ES - 5
ES - 1
ES - 4
Protección del medio ambiente
Los materiales empleados para
el embalaje son reciclables y recuperables. No tire el embalaje
a la basura doméstica y entréguelo en los puntos oficiales de
recogida para su reciclaje o recuperación.
Los aparatos viejos contienen
materiales valiosos reciclables
que deberían ser entregados
para su aprovechamiento posterior. Evite el contacto de baterías, aceites y materias
semejantes con el medioambiente. Por este motivo, entregue los aparatos usados en los
puntos de recogida previstos
para su reciclaje.
Indicaciones sobre ingredientes (REACH)
Encontrará información actual sobre los ingredientes en:
http://www.karcher.de/de/unternehmen/
umweltschutz/REACH.htm
Símbolos del manual de
instrucciones
Peligro
Para un peligro inminente que acarrea lesiones de gravedad o la muerte.
몇 Advertencia
Para una situación que puede ser peligrosa, que puede acarrear lesiones de gravedad o la muerte.
Precaución
Para una situación que puede ser peligrosa, que puede acarrear lesiones leves o
daños materiales.
Uso previsto
몇 Advertencia
El aparato no es apto para aspirar polvos
nocivos para la salud.
– Este aspirador está diseñado para la
limpieza de pisos y superficies murales.
– Este aparato es apto para el uso en
aplicaciones industriales, como en
obras, polígonos industriales, talleres y
escuelas, hospitales, fábricas, tiendas,
oficinas y negocios de alquiler.
32 ES
- 1
Page 33

Elementos del aparato
1 Placa de características
2 Cable de conexión a la red
3 Soporte para la tubería de absorción
4 Soporte para la boquilla para juntas
5 Manguera de aspiración
6 Bloqueo del cabezal de absorción
7 Rodillo de dirección
8 recipiente acumulador de suciedad
9 tubuladura de aspiración
10 Boquilla barredora de suelos
11 Tubo de aspiración
12 Interruptor principal
13 Cabezal de aspiración
14 Asa de transporte
15 Gancho portacables
16 Codo
17 Filtro de cartuchos
18 Tuerca de fijación
19 flotador
Puesta en marcha
Aspiración en seco
Precaución
Si se aspira en seco se debe colocar siempre un cartucho filtrante.
– Si se aspira polvo fino se debe utilizar
también una bolsa filtrante de papel.
Montaje de la bolsa filtrante de papel
Figura
Figura
Î Desbloquear y extraer el cabezal de as-
piración.
Î Insertar la bolsa filtrante de papel.
Î Colocar y bloquear el cabezal de aspi-
ración.
Aspiración de líquidos
Montaje del borde de goma
Figura
Î Desmontar la tira de cerdas.
Î Montar los labios de goma.
Nota: El lateral estructurado del borde de
goma tiene que estar para afuera.
Retirar la bolsa filtrante de papel
– Para aspirar suciedad líquida se debe
retirar la bolsa filtrante de papel.
Montar un filtro adicional
Î Desbloquear y extraer el cabezal de as-
piración.
Î Girar el cabezal de aspiración 180º y
depositar.
Î Desenroscar la tuerca de fijación.
Î Retirar el cartucho filtrante.
Figura
Î Colocar y apretar las tuercas.
Î Montar un filtro adicional.
Î Colocar y bloquear el cabezal de aspi-
ración.
Enganche de clip
Figura
La manguera de aspiración está equipada
con un sistema de clip. Se pueden conectar
todos los accesorios C-35/C-DN-35.
Manejo
Conexión del aparato
Î Enchufe la clavija de red.
Î Conectar el aparato con el interruptor
principal.
Vaciar el depósito acumulador de
suciedad
– El canal de aspiración está equipado
con un flotador.
– Si se alcanza el nivel máximo permitido
de agua sucia en el depósito, se interrumpe la corriente de aspiración.
Î Desconectar el aparato con el interrup-
tor principal.
Î Vacíe el depósito acumulador de sucie-
dad.
Desconexión del aparato
Î Desconectar el aparato con el interrup-
tor principal.
Î Extraer el enchufe de la red.
- 2
33ES
Page 34

Después de cada puesta en marcha
Î Vacíe el depósito acumulador de sucie-
dad.
Î Limpie el aparato por dentro y por fuera
aspirándolo y frotar con un paño húmedo.
Almacenamiento del aparato
Figura
Î Guardar las tuberías de aspiración, la
manguera de aspiración y el cable de
alimentación tal y como se indica en la
imagen.
Î Coloque el aparato en un cuarto seco y
protéjalo frente a un uso no autorizado.
Transporte
Precaución
¡Peligro de lesiones y daños! Respetar el
peso del aparato para el transporte.
Figura
Î Transportar el aparato como se indica
en la imagen.
Î Al transportar en vehículos, asegurar el
aparato para evitar que resbale y vuelque conforme a las directrices vigentes.
Almacenamiento
Precaución
¡Peligro de lesiones y daños! Respetar el
peso del aparato en el almacenamiento.
Este aparato sólo se puede almacenar en
interiores.
Cuidados y mantenimiento
Peligro
Antes de efectuar cualquier trabajo en el
aparato, hay que desconectarlo de la red
eléctrica.
Cambio del filtro de cartucho
Î Desbloquear y extraer el cabezal de as-
piración.
Î Girar el cabezal de aspiración 180º y
depositar.
Î Desenroscar la tuerca de fijación.
Î Retirar el cartucho filtrante.
Î Colocar un nuevo cartucho de filtro.
Î Colocar y apretar las tuercas.
Î Colocar y bloquear el cabezal de aspi-
ración.
Ayuda en caso de avería
Peligro
Antes de efectuar cualquier trabajo en el
aparato, hay que desconectarlo de la red
eléctrica.
La turbina de aspiración no
funciona
Î Compruebe el cable, la clavija de en-
chufe, el fusible y la toma de corriente.
Î Conexión del aparato
La turbina de aspiración funciona,
pero el aparato no aspira.
– El flotador cierra el canal de aspiración.
Î Vacíe el depósito acumulador de sucie-
dad.
La capacidad de aspiración
disminuye.
Î Eliminar las obstrucciones de la boqui-
lla, tubo o manguera de aspiración y
cartucho filtrante.
Î Cambiar la bolsa filtrante de papel.
Î Cambiar el filtro de cartucho.
Pérdida de polvo durante la
aspiración
Î Comprobar si el cartucho de filtro está
montado correctamente.
Î Cambiar el filtro de cartucho.
34 ES
- 3
Page 35

Garantía
CEO
Head of Approbation
En todos los países rigen las condiciones
de garantía establecidas por nuestra empresa distribuidora. Las averías del aparato
serán subsanadas gratuitamente dentro
del periodo de garantía, siempre que se deban a defectos de material o de fabricación.
En un caso de garantía, le rogamos que se
dirija con el comprobante de compra al distribuidor donde adquirió el aparato o al servicio al cliente autorizado más próximo a su
domicilio.
Accesorios y piezas de
repuesto
– Sólo deben emplearse accesorios y
piezas de repuesto originales o autorizados por el fabricante. Los accesorios
y piezas de repuesto originales garantizan el funcionamiento seguro y sin averías del aparato.
– Podrá encontrar una selección de las
piezas de repuesto usadas con más
frecuencia al final de las instrucciones
de uso.
– En el área de servicios de www.kaer-
cher.com encontrará más información
sobre piezas de repuesto.
Declaración CE
Por la presente declaramos que la máquina designada a continuación cumple, tanto
en lo que respecta a su diseño y tipo constructivo como a la versión puesta a la venta
por nosotros, las normas básicas de seguridad y sobre la salud que figuran en las directivas comunitarias correspondientes. La
presente declaración perderá su validez en
caso de que se realicen modificaciones en
la máquina sin nuestro consentimiento explícito.
Producto: aspirador en húmedo/seco
Modelo: 1.428-xxx
Directivas comunitarias aplicables
2006/42/CE (+2009/127/CE)
2004/108/CE
Normas armonizadas aplicadas
EN 55014–1: 2006
EN 55014–2: 1997 + A1: 2001
EN 60335–1
EN 60335–2–69
EN 61000–3–2: 2006 + A2: 2009
EN 61000–3–3: 2008
EN 62233: 2008
Normas nacionales aplicadas
-
5.957-710
Los abajo firmantes actúan con plenos poderes y con la debida autorización de la dirección de la empresa.
Persona autorizada para la documentación:
S. Reiser
Alfred Kärcher GmbH & Co. KG
Alfred-Kärcher-Str. 28 - 40
71364 Winnenden (Germany)
Tfno.: +49 7195 14-0
Fax: +49 7195 14-2212
Winnenden, 2010/07/14
- 4
35ES
Page 36

Datos técnicos
NT 27/1 NT 27/1 Me
Tensión de red V 220-240 220-240
Frecuencia Hz 50/60 50/60
Potencia Máx. W 1380 1380
Potencial nominal W 1200 1200
Capacidad del depósito l 27 27
Cantidad de líquido l 14 14
Cantidad de aire (máx.) l/s 67 67
Depresión (máx.) kPa (mbar) 20,8 (208) 20,8 (208)
Clase de protección -- II II
Toma de tubo flexible de aspiración (C-DN/C-ID) mm 35 35
Longitud x anchura x altura mm 420 x 420 x
525
Peso kg 7,5 8,2
Temperatura ambiente (máx.) °C +40 +40
Valores calculados conforme a la norma EN 60335-2-69
Nivel de presión acústica L
Inseguridad K
pA
pA
Valor de vibración mano-brazo m/s
Inseguridad K m/s
Cable de conexión a la
red
H05VV-F 2x1,0 mm
No. de pieza Longitud del
2
cable
dB(A) 77 77
dB(A) 1 1
2
2
<2,5 <2,5
0,2 0,2
EUR 6.647-263.0 7,5 m
GB 6.647-264.0 7,5 m
CH 6.647-265.0 7,5 m
AUS 6.647-266.0 7,5 m
420 x 420 x
540
36 ES
- 5
Page 37

Leia o manual de manual origi-
nal antes de utilizar o seu aparelho. Proceda conforme as indicações no
manual e guarde o manual para uma consulta posterior ou para terceiros a quem
possa vir a vender o aparelho.
– Antes de colocar em funcionamento
pela primeira vez é imprescindível ler
atentamente as indicações de segurança n.º 5.956-249!
– A não-observância deste Manual de
Instruções e dos avisos de segurança
poderá levar a danos no aparelho e perigos tanto para o utilizador como para
terceiros.
– No caso de danos provocados pelo
transporte, informe imediatamente o revendedor.
Índice
Protecção do meio-ambiente PT - 1
Símbolos no Manual de Instru-
ções
Utilização conforme o fim a
que se destina a máquina
Elementos do aparelho PT - 2
Colocação em funcionamento PT - 2
Manuseamento PT - 2
Transporte PT - 3
Armazenamento PT - 3
Conservação e manutenção PT - 3
Ajuda em caso de avarias PT - 3
Garantia PT - 4
Acessórios e peças sobressa-
lentes
Declaração CE PT - 4
Dados técnicos PT - 5
PT - 1
PT - 1
PT - 4
Protecção do meio-ambiente
Os materiais da embalagem
são recicláveis. Não coloque as
embalagens no lixo doméstico,
envie-as para uma unidade de
reciclagem.
Os aparelhos velhos contêm
materiais preciosos e recicláveis e deverão ser reutilizados.
Baterias, óleo e produtos similares não podem ser deitados fora
ao meio ambiente. Por isso, elimine os aparelhos velhos através de sistemas de recolha de
lixo adequados.
Avisos sobre os ingredientes (REACH)
Informações actuais sobre os ingredientes
podem ser encontradas em:
http://www.karcher.de/de/unternehmen/
umweltschutz/REACH.htm
Símbolos no Manual de
Instruções
Perigo
Para um perigo eminente que pode conduzir a graves ferimentos ou à morte.
몇 Advertência
Para uma possível situação perigosa que
pode conduzir a graves ferimentos ou à
morte.
Atenção
Para uma possível situação perigosa que
pode conduzir a ferimentos leves ou danos
materiais.
Utilização conforme o fim a
que se destina a máquina
몇 Advertência
O aparelho não é apropriado para a aspiração de poeiras nocivas para a saúde.
– O aspirador serve para limpar pavimen-
tos ou paredes a seco e a húmido.
– Este aparelho destina-se ao uso indus-
trial, p. ex. em estaleiros, em instalações industriais, em oficinas e em
negócios de aluguer.
- 1
37PT
Page 38

Elementos do aparelho
1 Placa de tipo
2 Cabo de rede
3 Suporte para tubos de aspiração
4 Suporte para bico de juntas
5 Tubo flexível de aspiração
6 Bloqueio da cabeça de aspiração
7 Rolo de guia
8 Recipiente de sujidades
9 Bocal de aspiração
10 Bico para o chão
11 Tubo de aspiração
12 Interruptor principal
13 Cabeçote de aspiração
14 Pega para portar
15 Gancho de cabo
16 Tubo curvado
17 Filtro de cartucho
18 Porca de fixação
19 Flutuador
Colocação em funcionamento
Aspirar a seco
Atenção
Para aspirar a seco, colocar sempre o filtro
de cartucho.
– Ao aspirar pó fino pode ser adicional-
mente utilizado um saco de filtro de papel.
Montagem do saco de filtro de papel
Figura
Figura
Î Destravar e retirar o cabeçote de aspi-
ração.
Î Colocar o saco filtro de papel.
Î Montar e travar o cabeçote de aspiração.
Aspirar a húmido
Montar os lábios de borracha
Figura
Î Desmontar as tiras da escova.
Î Montar lábios de borracha.
Aviso: a parte estruturada dos lábios de
borracha deve ser virada para fora.
Retirar o saco de papel filtrante
– Para aspirar sujidade húmida, retirar
sempre o saco de filtro de papel.
Montar filtro adicional
Î Destravar e retirar o cabeçote de aspi-
ração.
Î Girar a 180° o cabeçote de aspiração e
guardá-lo.
Î Desenroscar a porca de fixação.
Î Retirar o filtro de cartucho.
Figura
Î Inserir e fixar a porca de fixação.
Î Montar filtro adicional.
Î Montar e travar o cabeçote de aspiração.
Conexão clipe
Figura
A mangueira de aspiração está equipada
com um sistema clipe. Todos os acessórios
C-35/C-DN-35 podem ser conectados.
Manuseamento
Ligar a máquina
Î Ligar a ficha de rede.
Î Ligar o aparelho no interruptor principal.
Esvaziar o recipiente de sujidade
– O canal de aspiração está equipado
com um flutuador.
– Ao atingir o nível máximo permitido de
água suja no reservatório, o fluxo de
aspiração será interrompido.
Î Desligar o aparelho no interruptor prin-
cipal.
Î Esvaziar o recipiente de sujidade.
38 PT
- 2
Page 39

Desligar o aparelho
Î Desligar o aparelho no interruptor prin-
cipal.
Î Desligue a ficha da tomada.
Sempre depois de utilizar a
máquina
Î Esvaziar o recipiente de sujidade.
Î Aspirar e esfregar o aparelho por dentro
e por fora para limpá-lo (pano húmido).
Guardar a máquina
Figura
Î Guardar os tubos de aspiração, o tubo
flexível do aspirador e o cabo de rede
de acordo com a ilustração.
Î Colocar o aparelho num local seco e to-
mar as medidas necessárias para evitar uma utilização por parte de pessoas
não autorizadas.
Transporte
Atenção
Perigo de ferimentos e de danos! Ter atenção ao peso do aparelho durante o transporte.
Figura
Î Transportar o aparelho em conformida-
de com a figura.
Î Durante o transporte em veículos, pro-
teger o aparelho contra deslizes e tombamentos, de acordo com as directivas
em vigor.
Armazenamento
Atenção
Perigo de ferimentos e de danos! Ter atenção ao peso do aparelho durante o armazenamento.
Este aparelho só pode ser armazenado em
espaços fechados e cobertos.
Conservação e manutenção
Perigo
Desligar o aparelho e retirar a ficha de rede
antes de efectuar quaisquer trabalhos no
aparelho.
Trocar o filtro de cartucho
Î Destravar e retirar o cabeçote de aspi-
ração.
Î Girar a 180° o cabeçote de aspiração e
guardá-lo.
Î Desenroscar a porca de fixação.
Î Retirar o filtro de cartucho.
Î Colocar um novo filtro de cartucho.
Î Inserir e fixar a porca de fixação.
Î Montar e travar o cabeçote de aspiração.
Ajuda em caso de avarias
Perigo
Desligar o aparelho e retirar a ficha de rede
antes de efectuar quaisquer trabalhos no
aparelho.
A turbina de aspiração não funciona
Î Verificar o cabo, a ficha, o fusível e a to-
mada.
Î Ligar o aparelho.
A turbina de aspiração funciona,
porém, o aparelho não aspira.
– O flutuador entope o canal de aspira-
ção.
Î Esvaziar o recipiente de sujidade.
A força de aspiração diminui.
Î Desentupir o bocal de aspiração, tubo
de aspiração, mangueira de aspiração
ou o filtro de cartucho.
Î Mudar o saco filtro de papel.
Î Trocar o filtro de cartucho.
Durante a aspiração sai pó
Î Verificar se o filtro de cartucho está cor-
rectamente montado.
Î Trocar o filtro de cartucho.
- 3
39PT
Page 40

Garantia
CEO
Head of Approbation
Em cada país vigem as respectivas condições de garantia estabelecidas pelas nossas Empresas de Comercialização.
Eventuais avarias no aparelho durante o
período de garantia serão reparadas, sem
encargos para o cliente, desde que se trate
dum defeito de material ou de fabricação.
Em caso de garantia, dirija-se, munido do
documento de compra, ao seu revendedor
ou ao Serviço Técnico mais próximo.
Acessórios e peças
sobressalentes
– Só devem ser utilizados acessórios e
peças de reposição autorizados pelo
fabricante do aparelho. Acessórios e
Peças de Reposição Originais - fornecem a garantia para que o aparelho
possa ser operado em segurança e
isento de falhas.
– No final das Instruções de Serviço en-
contra uma lista das peças de substituição mais necessárias.
– Para mais informações sobre peças so-
bressalentes, consulte na página
www.kaercher.com o ponto dos serviços.
Declaração CE
Declaramos que a máquina a seguir designada corresponde às exigências de segurança e de saúde básicas estabelecidas
nas Directivas CE por quanto concerne à
sua concepção e ao tipo de construção assim como na versão lançada no mercado.
Se houver qualquer modificação na máquina sem o nosso consentimento prévio, a
presente declaração perderá a validade.
Produto: Aspirador húmido e seco
Tipo: 1.428-xxx
Respectivas Directrizes da CE
2006/42/CE (+2009/127/CE)
2004/108/CE
Normas harmonizadas aplicadas
EN 55014–1: 2006
EN 55014–2: 1997 + A1: 2001
EN 60335–1
EN 60335–2–69
EN 61000–3–2: 2006 + A2: 2009
EN 61000–3–3: 2008
EN 62233: 2008
Normas nacionais aplicadas
-
5.957-710
Os abaixo assinados têm procuração para
agirem e representarem a gerência.
40 PT
Responsável pela documentação:
S. Reiser
Alfred Kärcher GmbH & Co. KG
Alfred-Kärcher-Str. 28 - 40
71364 Winnenden (Germany)
Tel.: +49 7195 14-0
Fax: +49 7195 14-2212
Winnenden, 2010/07/14
- 4
Page 41

Dados técnicos
NT 27/1 NT 27/1 Me
Tensão da rede V 220-240 220-240
Frequência Hz 50/60 50/60
Potência máx. W 1380 1380
Potência nominal W 1200 1200
Conteúdo do recipiente l 27 27
Quantidade de enchimento do líquido l 14 14
Volume de ar (máx.) l/s 67 67
Subpressão (máx.) kPa (mbar) 20,8 (208) 20,8 (208)
Classe de protecção -- II II
Ligação do tubo flexível de aspiração (C-DN/C-ID) mm 35 35
Comprimento x Largura x Altura mm 420 x 420 x
525
Peso kg 7,5 8,2
Temperatura ambiente (máx.) °C +40 +40
Valores obtidos segundo EN 60335-2-69
Nível de pressão acústica L
Insegurança K
pA
pA
Valor de vibração mão/braço m/s
Insegurança K m/s
Cabo de
rede
H05VV-F 2x1,0 mm
Refª Comprimen-
2
dB(A) 77 77
dB(A) 1 1
2
2
<2,5 <2,5
0,2 0,2
to do cabo
EUR 6.647-263.0 7,5 m
GB 6.647-264.0 7,5 m
CH 6.647-265.0 7,5 m
AUS 6.647-266.0 7,5 m
420 x 420 x
540
- 5
41PT
Page 42

Læs original brugsanvisning in-
den første brug, følg anvisningerne og opbevar vejledningen til senere
efterlæsning eller til den næste ejer.
– Inden første ibrugtagelse skal betje-
ningsvejledningen og sikkerhedshenvisningerne nr. 5.956-249 læses!
– Hvis driftsvejledningen og sikkerheds-
anvisningerne ikke overholdes, kan der
opstå skader på apparatet og risici for
brugeren og andre personer.
– Ved transportskader skal forhandleren
informeres omgående.
Indholdsfortegnelse
Miljøbeskyttelse DA - 1
Symbolerne i driftsvejlednin-
gen
Bestemmelsesmæssig anven-
delse
Maskinelementer DA - 2
Ibrugtagning DA - 2
Betjening DA - 2
Transport DA - 3
Opbevaring DA - 3
Pleje og vedligeholdelse DA - 3
Hjælp ved fejl DA - 3
Garanti DA - 3
Tilbehør og reservedele DA - 3
Overensstemmelseserklæring DA - 4
Tekniske data DA - 5
DA - 1
DA - 1
Miljøbeskyttelse
Emballagen kan genbruges.
Smid ikke emballagen ud sammen med det almindelige husholdningsaffald, men aflever
den til genbrug.
Udtjente apparater indeholder
værdifulde materialer, der kan
og bør afleveres til genbrug.
Batterier, olie og lignende stoffer er ødelæggende for miljøet.
Aflever derfor udtjente apparater på en genbrugsstation eller
lignende.
Henvisninger til indholdsstoffer
(REACH)
Aktuelle oplysninger til indholdsstoffer finder du på:
http://www.karcher.de/de/unternehmen/
umweltschutz/REACH.htm
Symbolerne i driftsvejledningen
Risiko
En umiddelbar truende fare, som kan føre
til alvorlige personskader eller død.
몇 Advarsel
En muligvis farlig situation, som kan føre til
alvorlige personskader eller til død.
Forsigtig
En muligvis farlig situation, som kan føre til
personskader eller til materialeskader.
42 DA
- 1
Bestemmelsesmæssig
anvendelse
몇 Advarsel
Maskinen er ikke egnet til opsugning af
sundhedsskadeligt støv.
– Maskinen er til våd- og tørrensning af
gulvflader og vægge.
– Denne maskine er egnet til erhvervs-
mæssig brug, f.eks. på byggepladser,
industrianlæg, i værksteder og udlejningsvirksomheder.
Page 43

Maskinelementer
1Typeskilt
2 Netkabel
3 Holder til sugerør
4 Holder til fugedysen
5 Sugeslange
6 Sugehovedets låsemekanisme
7 Styringsrulle
8 Snavsbeholder
9 Sugestuds
10 Gulvmundstykke
11 Sugerør
12 Hovedafbryder
13 Sugehoved
14 Bæregreb
15 Kabelkrog
16 Bøjet rørstykke
17 Patronfilter
18 Fastspændingsmøtrik
19 Svømmerventil
Ibrugtagning
Tørsugning
Forsigtig
Under tørsugning skal patronfilteret altid
være sat på.
– Hvis der opsuges fintstøv, kan der yder-
ligere bruges en papirfilterpose.
Montering af papirfilterposen
Figur
Figur
Î Tag sugehovedet ud af indgreb og tag
det af.
Î Sæt papirfilterposen på.
Î Sæt sugehovedet på og lås det fast.
Vådsugning
Montering af gummilæber
Figur
Î Afmontere børstestrimlen.
Î Montere gummilæberne.
Bemærk: Struktursiden på gummilæberne
skal pege udad.
Fjern papirfilterposen.
– Papirfilterposen skal altid fjernes når
der opsuges våd snavs.
Montere ekstrafilteret
Î Tag sugehovedet ud af indgreb og tag
det af.
Î Sugehovedet drejes 180° og lægges til
siden.
Î Skru fastspændingsmøtrikken ud.
Î Fjern patronefilteret.
Figur
Î Sæt fastspændingsmøtrikken i og skru
den fast.
Î Monter ekstrafilteret.
Î Sæt sugehovedet på og lås det fast.
Klipforbindelse
Figur
Sugeslangen er udstyret med et klipsystem. Alle C-35/C-DN-35 tilbehørsdele kan
tilsluttes.
Betjening
Tænd for maskinen
Î Sæt netstikket i.
Î Tænd maskinen med hovedafbryderen.
Tømme snavsbeholderen
– Sugekanal er udstyret med en svøm-
mer.
– Sugestrømningen afbrydes, hvis den
maksimale vandlinie af forurenet vand i
beholderen opnås.
Î Sluk maskinen med hovedafbryderen.
Î Tøm smudsbeholderen.
Sluk for maskinen
Î Sluk maskinen med hovedafbryderen.
Î Træk netstikket ud.
Efter hver brug
Î Tøm smudsbeholderen.
Î Maskinen rengøres indvendigt og ud-
vendigt ved at støvsuge den og tørre
den af med en fugtet klud.
- 2
43DA
Page 44

Opbevaring af damprenseren
Figur
Î Sugerør, sugeslange og netkablet op-
bevares i henhold figuren.
Î Opbevar maskinen i et tørt rum og sørg
for at sikre den mod uvedkommendes
brug.
Transport
Forsigtig
Fare for person- og materialeskader! Hold
øje med maskinens vægt ved transporten.
Figur
Î Maskinen transporteres iht. figuren.
Î Ved transport i biler skal renseren fast-
spændes i.h.t. gældende love.
Opbevaring
Forsigtig
Fare for person- og materialeskader! Hold øje
med maskinens vægt ved opbevaring.
Denne maskine må kun opbevares indendørs.
Pleje og vedligeholdelse
Risiko
Træk netstikket og afbryd maskinen inden
der arbejdes på maskinen.
Udskiftning af patronfilter
Î Tag sugehovedet ud af indgreb og tag
det af.
Î Sugehovedet drejes 180° og lægges til
siden.
Î Skru fastspændingsmøtrikken ud.
Î Fjern patronefilteret.
Î Det nye patronfilter sættes på.
Î Sæt fastspændingsmøtrikken i og skru
den fast.
Î Sæt sugehovedet på og lås det fast.
Hjælp ved fejl
Risiko
Træk netstikket og afbryd maskinen inden
der arbejdes på maskinen.
Sugeturbine virker ikke
Î Kontroller kabel, stik, sikring og stikdåse.
Î Tænd for maskinen.
Sugeturbine kører, men maskinen
suger ikke
– Svømmeren blokerer sugekanalen.
Î Tøm smudsbeholderen.
Nedsat sugeevne
Î Fjern forstoppelser fra dysen, sugerør,
sugeslangen eller patronfilteret.
Î Udskifte papirfilterposen.
Î Udskiftning af patronfilter.
Der strømmer støv ud under
sugning
Î Kontroller, om patronfilteret er monteret
korrekt.
Î Udskiftning af patronfilter.
Garanti
I de enkelte lande gælder de af vore forhandlere fastlagte garantibetingelser.
Eventuelle fejl på apparatet afhjælpes gratis inden for garantien, såfremt fejlen kan tilskrives en materiale- eller produktionsfejl.
Hvis De ønsker at gøre garantien gældende, bedes De henvende Dem til Deres forhandler eller nærmeste kundeservice
medbringende kvittering for købet.
Tilbehør og reservedele
– Der må kun anvendes tilbehør og reser-
vedele, der er godkendt af producenten. Originaltilbehør og -reservedele er
en garanti for, at maskinen kan fungere
sikkert og uden fejl.
– Et udvalg over de reservedele som bru-
ges meget ofte finder De i slutningen af
betjeningsvejledningen
– Yderligere informationen om reserve-
dele finder De under www.kaercher.com i afsni "Service".
44 DA
- 3
Page 45

Overensstemmelseserklæring
CEO
Head of Approbation
Hermed erklærer vi, at den nedenfor nævnte maskine i design og konstruktion og i den
af os i handlen bragte udgave overholder
de gældende grundlæggende sikkerhedsog sundhedskrav i EF-direktiverne. Ved
ændringer af maskinen, der foretages uden
forudgående aftale med os, mister denne
erklæring sin gyldighed.
Produkt: Våd- og tørsuger
Type: 1.428-xxx
Gældende EF-direktiver
2006/42/EF (+2009/127/EF)
2004/108/EF
Anvendte harmoniserede standarder
EN 55014–1: 2006
EN 55014–2: 1997 + A1: 2001
EN 60335–1
EN 60335–2–69
EN 61000–3–2: 2006 + A2: 2009
EN 61000–3–3: 2008
EN 62233: 2008
Anvendte tyske standarder
-
5.957-710
Undertegnede agerer på vegne af og med
fuldmagt fra ledelsen.
Dokumentationsbefuldmægtiget:
S. Reiser
Alfred Kärcher GmbH & Co. KG
Alfred-Kärcher-Str. 28 - 40
71364 Winnenden (Germany)
Tlf.: +49 7195 14-0
Fax: +49 7195 14-2212
Winnenden, 2010/07/14
- 4
45DA
Page 46

Tekniske data
NT 27/1 NT 27/1 Me
Netspænding V 220-240 220-240
Frekvens Hz 50/60 50/60
Max. effekt W 1380 1380
Nominel ydelse W 1200 1200
Beholderindhold l 27 27
Fyldmængde væske l 14 14
Luftmængde (max.) l/s 67 67
Undertryk (max.) kPa (mbar) 20,8 (208) 20,8 (208)
Beskyttelsesklasse -- II II
Sugeslangetilslutning (C-DN/C-ID) mm 35 35
Længde x bredde x højde mm 420 x 420 x
525
Vægt kg 7,5 8,2
Omgivelsestemperatur (max.) °C +40 +40
Oplyste værdier ifølge EN 60335-2-69
Lydtryksniveau L
Usikkerhed K
pA
pA
Hånd-arm vibrationsværdi m/s
Usikkerhed K m/s
Netkabel H05VV-F 2x1,0 mm
2
dB(A) 77 77
dB(A) 1 1
2
2
<2,5 <2,5
0,2 0,2
Partnr. Kabellæng-
de
EUR 6.647-263.0 7,5 m
GB 6.647-264.0 7,5 m
CH 6.647-265.0 7,5 m
AUS 6.647-266.0 7,5 m
420 x 420 x
540
46 DA
- 5
Page 47

Før første gangs bruk av appara-
tet, les denne originale bruksanvisningen , følg den og oppbevar den for
senere bruk eller fo overlevering til neste eier.
– Det er tvingende nødvendig å lese sik-
kerhetsinstruksene nr. 5.956-249 før
maskinen settes i drift!
– Hvis bruksanvisningen og sikkerhets-
anvisningene ikke følges, kan dette
medføre skader på apparatet og fare for
brukeren og andre personer.
– Informer straks forhandleren ved trans-
portskader.
Innholdsfortegnelse
Miljøvern NO - 1
Symboler i bruksanvisningen NO - 1
Forskriftsmessig bruk NO - 1
Maskinorganer NO - 1
Ta i bruk NO - 2
Betjening NO - 2
Transport NO - 2
Lagring NO - 3
Pleie og vedlikehold NO - 3
Feilretting NO - 3
Garanti NO - 3
Tilbehør og reservedeler NO - 3
CE-erklæring NO - 4
Tekniske data NO - 5
Miljøvern
Materialet i emballasjen kan resirkuleres. Ikke kast emballasjen i husholdningsavfallet, men
lever den inn til resirkulering.
Gamle apparater inneholder
verdifulle materialer som kan resirkuleres. Disse bør leveres inn
til gjenvinning. Batterier, olje og
lignende stoffer må ikke komme
ut i miljøet. Gamle maskiner
skal derfor avhendes i egnede
innsamlingssystemer.
Anvisninger om innhold (REACH)
Aktuell informasjon om stoffene i innholdet
finner du under:
http://www.karcher.de/de/unternehmen/
umweltschutz/REACH.htm
Symboler i bruksanvisningen
Fare
For en umiddelbar truende fare som kan
føre til store personskader eller til død.
몇 Advarsel
For en mulig farlig situasjon som kan føre til
store personskader eller til død.
Forsiktig!
For en mulig farlig situasjon som kan føre til
mindre personskader eller til materielle
skader.
Forskriftsmessig bruk
몇 Advarsel
Maskinen er ikke egnet til oppsuging av
helsefarlig støv.
– Denne maskinen er beregnet for våt- og
tørr-rengjøring av gulv- og veggflater.
– Denne maskinen er egnet til bruk i nærings-
livet, f.eks. på byggeplasser, i industrianlegg, verksteder og utleieforretninger.
Maskinorganer
1 Typeskilt
2 Nettledning
3 Holder for sugerør
4 Holder for fugedyse
5 Sugeslange
6 Låsing av sugehode
7 Styrerulle
8 Smussbeholder
9 Sugestusser
10 Gulvmunnstykke
11 Sugerør
12 Hovedbryter
13 Sugehode
14 Bærehåndtak
15 Kabelkroker
16 Bøyd rørstykke
17 Patronfilter
18 Festemutter
19 Flottør
- 1
47NO
Page 48

Ta i bruk
Betjening
Støvsuging
Forsiktig!
Ved tørrsuging må alltid filterpatronen være
påsatt.
– Ved suging av fint støv kan man i tillegg
bruke en papirfilterpose.
Montering av papirfilterpose
Figur
Figur
Î Avlås og ta av sugehodet.
Î Sette på papirfilterpose.
Î Sett på sugehodet og lås det.
Våtsuging
Montering av gummiliepper
Figur
Î Demontere børstestriper.
Î Monter gummilepper.
Merk:Den strukturert siden av gummileppene skal peke utover.
Ta av papirfilterposen
– Ved suging av våt smuss må papirfilter-
posen alltid tas av.
Montere ekstrafilter
Î Avlås og ta av sugehodet.
Î Drei sugehodet 180° og ta det av.
Î Skru ut festemutter.
Î Ta av patronfilter.
Figur
Î Sett på festemutter og trekk til.
Î Montere ekstrafilter.
Î Sett på sugehodet og lås det.
Clipforbindelse
Figur
Sugeslangen er utstyrt med et clip-system. Alle
C-35/C-DN-35-tilbehørsdeler kan tilkobles.
Slå apparatet på
Î Sett i støpselet.
Î Slå på apparatet ved hjelp av hovedbryter.
Tømming av beholderen
– Sugekanalen må alltid være utstyrt med
flottør.
– Når det maksimalt tillatte spillvannsni-
vået i beholderen er nådd, brytes sugestrømmen.
Î Slå av apparatet ved hjelp av hovedbryter.
Î Tøm smussbeholderen.
Slå maskinen av
Î Slå av apparatet ved hjelp av hovedbry-
ter.
Î Trekk ut nettstøpselet.
Etter hver bruk
Î Tøm smussbeholderen.
Î Rengjør maskinen innvendig og utven-
dig ved å tørke av den med en fuktig
klut, og ved å bruke sugefunksjonen.
Oppbevaring av apparatet
Figur
Î Oppbevar sugerør, sugeslange og
strømkabel i henhold til figuren.
Î Sett maskinen til oppbevaring i et tørt
rom, utilgjengelig for uvedkommende.
Transport
Forsiktig!
Fare for personskader og materielle skader! Pass på vekten av apparatet ved transport.
Figur
Î Transporter apparatet som vist.
Î Ved transport i kjøretøyer skal appara-
tet sikres mot å skli eller velte etter de til
enhver tid gjeldende regler.
48 NO
- 2
Page 49

Lagring
Forsiktig!
Fare for personskader og materielle skader!
Pass på vekten av apparatet ved lagring.
Dette apparatet skal kun lagres innendørs.
Pleie og vedlikehold
Fare
Før alt arbeide på apparatet skal apparatet
slås av og strømkabelen trekkes ut.
Skifting av patronfilter
Î Avlås og ta av sugehodet.
Î Drei sugehodet 180° og ta det av.
Î Skru ut festemutter.
Î Ta av patronfilter.
Î Sett på det nye patronfilteret.
Î Sett på festemutter og trekk til.
Î Sett på sugehodet og lås det.
Feilretting
Fare
Før alt arbeide på apparatet skal apparatet
slås av og strømkabelen trekkes ut.
Sugeturbinen går ikke
Î Kontroller kabel, plugg, sikring og stikk-
kontakt.
Î Slå apparatet på.
Sugeturbinen går, men maskinen
suger ikke
– Flottøren sperrer sugekanalen.
Î Tøm smussbeholderen.
Sugekraften avtar.
Î Fjern blokkeringer fra børstehodet, sugerø-
ret, sugeslangen eller patronfilteret.
Î Bytt papirfilterpose.
Î Bytt patronfilter
Støvutslipp ved suging
Î Kontroller korrekt monteringsposisjon
for patronfilteret.
Î Bytt patronfilter
Garanti
Vår ansvarlige salgsorganisasjon for det
enkelte land har utgitt garantibetingelsene
som gjelder i det aktuelle landet. Eventuelle
feil på maskinen blir reparert gratis i garantitiden dersom disse kan føres tilbake til
material- eller produksjonsfeil. Ved behov
for garantireparasjoner, vennligst henvend
deg med kjøpskvitteringen til din forhandler
eller nærmeste autoriserte kundeservice.
Tilbehør og reservedeler
– Det er kun tillatt å anvende tilbehør og
reservedeler som er godkjent av produsenten. Originalt tilbehør og originale
reservedeler garanterer for sikker og
problemfri drift av apparatet.
– Et utvalg av de vanligste reservedelene
finner du bak i denne bruksanvisningen.
– Mer informasjon om reservedeler finner
du under www.kaercher.com i området
Service.
- 3
49NO
Page 50

CE-erklæring
CEO
Head of Approbation
Vi erklærer hermed at maskinen angitt nedenfor oppfyller de grunnleggende sikkerhets- og helsekravene i de relevante EFdirektivene, med hensyn til både design,
konstruksjon og type markedsført av oss.
Ved endringer på maskinen som er utført
uten vårt samtykke, mister denne erklæringen sin gyldighet.
Produkt: Våt- og tørrsuger
Type: 1.428-xxx
Relevante EU-direktiver
2006/42/EF (+2009/127/EF)
2004/108/EF
Anvendte overensstemmende normer
EN 55014–1: 2006
EN 55014–2: 1997 + A1: 2001
EN 60335–1
EN 60335–2–69
EN 61000–3–2: 2006 + A2: 2009
EN 61000–3–3: 2008
EN 62233: 2008
Anvendte nasjonale normer
-
5.957-710
De undertegnede handler på oppdrag fra,
og med fullmakt fra selskapsledelsen.
Dokumentasjonsansvarlig:
S. Reiser
Alfred Kärcher GmbH & Co. KG
Alfred-Kärcher-Str. 28 - 40
71364 Winnenden (Germany)
Tlf: +49 7195 14-0
Faks: +49 7195 14-2212
Winnenden, 2010/07/14
50 NO
- 4
Page 51

Tekniske data
NT 27/1 NT 27/1 Me
Nettspenning V 220-240 220-240
Frekvens Hz 50/60 50/60
Maks. effekt W 1380 1380
Nominell effekt W 1200 1200
Beholderinnhold l 27 27
Fyllingsmengde væske l 14 14
Luftmengde (maks.) l/s 67 67
Undertrykk (maks.) kPa (mbar) 20,8 (208) 20,8 (208)
Beskyttelsesklasse -- II II
Sugeslangekobling (C-DN/C-ID) mm 35 35
Lengde x bredde x høyde mm 420 x 420 x
525
Vekt kg 7,5 8,2
Omgivelsestemperatur maks. °C +40 +40
Registrerte verdier etter EN 60335-2-69
Støytrykksnivå L
Usikkerhet K
pA
pA
Hånd-arm vibrasjonsverdi m/s
Usikkerhet K m/s
Nettledning H05VV-F 2x1,0 mm
2
dB(A) 77 77
dB(A) 1 1
2
2
<2,5 <2,5
0,2 0,2
Best.nr. Kabellengde
EUR 6.647-263.0 7,5 m
GB 6.647-264.0 7,5 m
CH 6.647-265.0 7,5 m
AUS 6.647-266.0 7,5 m
420 x 420 x
540
- 5
51NO
Page 52

Läs bruksanvisning i original
innan aggregatet används första
gången, följ anvisningarna och spara
driftsanvisningen för framtida behov, eller
för nästa ägare.
– Före första ibruktagning måste Säker-
hetsanvisningar nr. 5.956-249 läsas!
– Om bruksanvisningen och säkerhets-
anvisningarna inte följs kan apparaten
skadas och faror uppstå för användaren
och andra personer.
– Informera inköpsstället omgående vid
transportskador.
Innehållsförteckning
Miljöskydd SV - 1
Symboler i bruksanvisningen SV - 1
Ändamålsenlig användning SV - 1
Aggregatelement SV - 1
Idrifttagning SV - 2
Handhavande SV - 2
Transport SV - 2
Förvaring SV - 2
Skötsel och underhåll SV - 3
Åtgärder vid störningar SV - 3
Garanti SV - 3
Tillbehör och reservdelar SV - 3
CE-försäkran SV - 4
Tekniska data SV - 5
Miljöskydd
Emballagematerialen kan återvinnas. Kasta inte emballaget i
hushållssoporna utan lämna det
till återvinning.
Kasserade apparater innehåller
återvinningsbart material som
bör gå till återvinning. Batterier,
olja och liknande ämnen får inte
komma ut i miljön. Överlämna
skrotade aggregat till ett lämpligt återvinningssystem.
Upplysningar om ingredienser (REACH)
Aktuell information om ingredienser finns på:
http://www.karcher.de/de/unternehmen/
umweltschutz/REACH.htm
Symboler i bruksanvisningen
Fara
För en omedelbart överhängande fara som
kan leda till svåra skador eller döden.
몇 Varning
För en möjlig farlig situation som kan leda
till svåra skador eller döden.
Varning
För en möjlig farlig situation som kan leda
till lätta skador eller materiella skador.
Ändamålsenlig användning
몇 Varning
Maskinen är inte lämplig för uppsugning av
hälsovådligt damm.
– Maskinen är avsedd att användas till
våt och torr rengöring av golv- och
väggytor.
– Denna maskin är avsedd för yrkesmäs-
sigt bruk, t ex för byggplatser, i industrianläggningar, verkstäder och
uthyrningsverksamheter.
Aggregatelement
1 Typskylt
2 Nätkabel
3 Fäste till sugrör
4 Fäste till fogmunstycke
5 Sugslang
6 Spärr av sughuvud
7 Styrrulle
8 Smutsbehållare
9 Sugfästen
10 Golvmunstycke
11 Sugrör
12 Huvudströmbrytare
13 Sughuvud
14 Bärhandtag
15 Kabelkrok
16 Krök
17 Patronfilter
18 Fästmutter
19 Flottör
52 SV
- 1
Page 53

Idrifttagning
Handhavande
Torrsugning
Varning
Vid torrsugning måste alltid patronfiltret sitta på plats.
– Vid uppsugning av fint damm kan en fil-
terpåse av papper användas som komplettering.
Montering av pappersfilterpåse
Bild
Bild
Î Lossa spärr på sughuvudet och ta av
det.
Î Sätt på pappersfilterpåsen.
Î Sätt på sughuvudet och lås fast.
Våtsugning
Montering gummiläppar
Bild
Î Montera av borstavstrykaren.
Î Montera gummiläpparna.
Observera:Gummiläpparnas strukturerade sida måste peka utåt.
Ta bort pappersfilterpåsen.
– Vid uppsugning av våt smuts måste fil-
terpåsen alltid avlägsnas.
Sätt i tillsatsfilter
Î Lossa spärr på sughuvudet och ta av det.
Î Vrid sughuvudet 180° och tag av det.
Î Skruva ur fästmuttern.
Î Lyft bort patronfilter.
Bild
Î Sätt i fästmuttern och dra fast den.
Î Sätt i tillsatsfilter
Î Sätt på sughuvudet och lås fast.
Clipanslutning
Bild
Sugslangen är utrustad med ett clip-system. Alla C-35/C-DN-35 tillbehörsdelar kan
anslutas.
Koppla till aggregatet
Î Stick i nätkontakten.
Î Starta maskinen med huvudbrytaren.
Töm smutsbehållaren
– Sugkanalen är utrustad med en flottör.
– Har smutsvattnet i behållaren nått den öv-
re, tillåtna gränsen bryts sugfunktionen.
Î Stäng av maskinen med huvudbrytaren.
Î Töm smutsbehållaren.
Koppla från aggregatet
Î Stäng av maskinen med huvudbrytaren.
Î Drag ur nätkontakten.
Efter varje användning
Î Töm smutsbehållaren.
Î Rengör apparaten invändigt och utvän-
digt genom uppsugning och torka med
en fuktig trasa.
Förvara aggregatet
Bild
Î Förvara sugrör, sugslang och nätkabel
enligt bilden.
Î Förvara apparaten i ett torrt rum och
säkra den mot obehörig användning.
Transport
Varning
Risk för person och egendomsskada! Observera vid transport maskinens vikt.
Bild
Î Transportera maskinen på det sätt som
bilden visar.
Î Vid transport i fordon ska maskinen
säkras enligt respektive gällande bestämmelser så den inte kan tippa eller
glida.
Förvaring
Varning
Risk för person och egendomsskada! Observera maskinens vikt vid lagring.
Denna maskin får endast lagras inomhus.
- 2
53SV
Page 54

Skötsel och underhåll
Fara
Stäng alltid av aggregatet och lossa nätkontakten innan arbeten på aggregatet utförs.
Byte av patronfilter
Î Lossa spärr på sughuvudet och ta av det.
Î Vrid sughuvudet 180° och tag av det.
Î Skruva ur fästmuttern.
Î Lyft bort patronfilter.
Î Sätt i nytt patronfilter.
Î Sätt i fästmuttern och dra fast den.
Î Sätt på sughuvudet och lås fast.
Åtgärder vid störningar
Fara
Stäng alltid av aggregatet och lossa nätkontakten innan arbeten på aggregatet utförs.
Sugturbinen fungerar inte
Î Kontrollera säkring, kabel, kontakt och
vägguttag.
Î Slå på apparaten.
Sugturbinen arbetar men apparaten
suger inte.
– Flottören täpper igen sugkanalen.
Î Töm smutsbehållaren.
Sugkraften nedsatt
Î Avlägsna stopp i sugdysa, sugrör, sug-
slang eller patronfilter.
Î Byt pappersfilterpåse.
Î Byte av patronfilter.
Damm tränger ut under sugning
Î Kontrollera att patronfiltret är rätt isatt.
Î Byte av patronfilter.
Garanti
I respektive land gäller de garantivillkor
som publicerats av våra auktoriserade distributörer. Eventuella fel på aggregatet repareras utan kostnad under förutsättning
att det orsakats av ett material- eller tillverkningsfel. I frågor som gäller garantin ska du
vända dig med kvitto till inköpsstället eller
närmaste auktoriserade serviceverkstad.
Tillbehör och reservdelar
– Endast av tillverkaren godkända tillbe-
hör och reservdelar får användas. Original-tillbehör och original-reservdelar
garanterar att apparaten kan användas
säkert och utan störning.
– I slutet av bruksanvisningen finns ett urval
av de reservdelar som oftast behövs.
– Ytterligare information om reservdelar
hittas under service på www.kaercher.com.
54 SV
- 3
Page 55

CE-försäkran
CEO
Head of Approbation
Härmed försäkrar vi att nedanstående betecknade maskin i ändamål och konstruktion samt i den av oss levererade versionen
motsvarar EU-direktivens tillämpliga grundläggande säkerhets- och hälsokrav. Vid
ändringar på maskinen som inte har godkänts av oss blir denna överensstämmelseförklaring ogiltig.
Produkt: Våt- och torrdammsugare
Typ: 1.428-xxx
Tillämpliga EU-direktiv
2006/42/EG (+2009/127/EG)
2004/108/EG
Tillämpade harmoniserade normer
EN 55014–1: 2006
EN 55014–2: 1997 + A1: 2001
EN 60335–1
EN 60335–2–69
EN 61000–3–2: 2006 + A2: 2009
EN 61000–3–3: 2008
EN 62233: 2008
Tillämpade nationella normer
-
5.957-710
Undertecknade agerar på order av och
med fullmakt från företagsledningen.
Dokumentationsbefullmäktigad:
S. Reiser
Alfred Kärcher GmbH & Co. KG
Alfred-Kärcher-Str. 28 - 40
71364 Winnenden (Germany)
Tel.: +49 7195 14-0
Fax: +49 7195 14-2212
Winnenden, 2010/07/14
- 4
55SV
Page 56

Tekniska data
NT 27/1 NT 27/1 Me
Nätspänning V 220-240 220-240
Frekvens Hz 50/60 50/60
Max. effekt W 1380 1380
Normeffekt W 1200 1200
Behållarvolym l 27 27
Påfyllnadsmängd vätska l 14 14
Luftmängd (max.) l/s 67 67
Undertryck (max.) kPa (mbar) 20,8 (208) 20,8 (208)
Skyddsklass -- II II
Sugslanganslutning (C-DN/C-ID) mm 35 35
Längd x Bredd x Höjd mm 420 x 420 x
525
Vikt kg 7,5 8,2
Omgivningstemperatur (max.) °C +40 +40
Beräknade värden enligt EN 60335-2-69
Ljudtrycksnivå L
Osäkerhet K
pA
pA
Hand-Arm Vibrationsvärde m/s
Osäkerhet K m/s
Nätkabel H05VV-F 2x1,0 mm
2
dB(A) 77 77
dB(A) 1 1
2
2
<2,5 <2,5
0,2 0,2
Artikelnr. Kabellängd
EUR 6.647-263.0 7,5 m
GB 6.647-264.0 7,5 m
CH 6.647-265.0 7,5 m
AUS 6.647-266.0 7,5 m
420 x 420 x
540
56 SV
- 5
Page 57

Lue tämä alkuperäisiä ohjeita
ennen laitteesi käyttämistä, säilytä käyttöohje myöhempää käyttöä tai
mahdollista myöhempää omistajaa varten.
– Turvaohje nro 5.956-249 on ehdotto-
masti luettava ennen laitteen ensimmäistä käyttökertaa!
– Käyttöohjeen ja turvaohjeiden huomiot-
ta jättäminen voi aiheuttaa vaurioita laitteeseen ja vaaroja käyttäjälle ja muille
henkilöille.
– Jos havaitset kuljetusvaurioita, ota välit-
tömästi yhteys jälleenmyyjään.
Sisällysluettelo
Ympäristönsuojelu FI - 1
Käyttöohjeessa esiintyvät
symbolit
Käyttötarkoitus FI - 1
Laitteen osat FI - 2
Käyttöönotto FI - 2
Käyttö FI - 2
Kuljetus FI - 3
Säilytys FI - 3
Hoito ja huolto FI - 3
Häiriöapu FI - 3
Takuu FI - 3
Varusteet ja varaosat FI - 3
CE-todistus FI - 4
Tekniset tiedot FI - 5
FI - 1
Ympäristönsuojelu
Pakkausmateriaalit ovat kierrätettäviä. Älä käsittelee pakkauksia kotitalousjätteenä, vaan
toimita ne jätteiden kierrätykseen.
Käytetyt laitteet sisältävät arvokkaita kierrätettäviä materiaaleja, jotka tulisi toimittaa
kierrätykseen. Paristoja, öljyjä
ja samankaltaisia aineita ei saa
päästää ympäristöön. Tästä
syystä toimita kuluneet laitteet
asianmukaisiin keräyspisteisiin.
Huomautuksia materiaaleista (REACH)
Ajantasaisia tietoja ainesosista löytyy osoitteesta:
http://www.karcher.de/de/unternehmen/
umweltschutz/REACH.htm
Käyttöohjeessa esiintyvät
symbolit
Vaara
Välittömästi uhkaava vaara, joka aiheuttaa
vakavan ruumiinvamman tai johtaa kuolemaan.
몇 Varoitus
Mahdollisesti vaarallinen tilanne, joka voi
aiheuttaa vakavan ruumiinvamman tai voi
johtaa kuolemaan.
Varo
Mahdollisesti vaarallinen tilanne, joka voi
aiheuttaa lievän ruumiinvamman tai aineellisia vahinkoja.
Käyttötarkoitus
몇 Varoitus
Laite ei sovellu terveydelle haitallisten pölyjen imurointiin.
– Tämä imuri on suunniteltu lattioiden ja
seinäpintojen märkä- ja kuivapuhdistukseen.
– Tämä laite soveltuu ammattimaiseen
käyttöön, esim. rakennuksilla, teollisuuslaitoksissa, verstaissa ja laitevuokrausliikkeissä.
- 1
57FI
Page 58

Laitteen osat
1 Tyyppikilpi
2 Verkkokaapeli
3 Pidike imuputkille
4 Pidike rakosuulakkeelle
5Imuletku
6 Imupään lukitus
7 Ohjausrulla
8 Pölysäiliö
9 Imukaulus
10 Lattiasuutin
11 Imuputki
12 Pääkytkin
13 Imupää
14 Kantokahva
15 Kaapelikoukku
16 Kahva
17 Patruunasuodatin
18 Kiinnitysmutteri
19 Uimuri
Paperisuodatinpussi poistaminen
– Imuroitaessa märkää likaa paperisuo-
datinpussi on aina ensin poistettava.
Lisäsuodattimen asennus
Î Vapauta imupää lukituksesta, poista
imupää.
Î Käännä imupäätä 180° ja irrota se.
Î Kierrä kiinnitysmutteri irti.
Î Poista suodatinpatruuna.
Kuva
Î Kierrä kiinnitysmutteri paikalleen ja kiristä.
Î Asenna lisäsuodatin.
Î Aseta imupää paikalleen ja lukitse se.
Puristinliitos
Kuva
Imuletku on varustettu puristinliitoslukituksella. Kaikki C-35/C-DN-35:n saatavavissa
olevat lisävarusteet voidaan liittää puristinliitokseen.
Käyttö
Käyttöönotto
Kuivaimu
Varo
Käytettäessä kuivaimua patruunasuodattimen on aina oltava asetettuna paikalleen.
– Imuroitaessa hienojakoista pölyä voidaan
lisäksi käyttää paperisuodatinpussia.
Paperisuodatinpussin asennus
Kuva
Kuva
Î Vapauta imupää lukituksesta, poista
imupää.
Î Aseta paperisuodatinpussi paikalleen.
Î Aseta imupää paikalleen ja lukitse se.
Märkäimu
Kumihuulten asennus
Kuva
Î Irrota harjakaistaleet.
Î Aseta kumihuulet paikalleen.
Huomautus: Kumihuulien rakenteellisen
puolen on osoitettava ulospäin.
58 FI
Laitteen käynnistys
Î Työnnä virtapistoke pistorasiaan.
Î Kytke laite pääkytkimellä päälle.
Lika-astian tyhjentäminen
– Imukanava on varustettu uimurilla.
– Kun likaveden pinta likavesisäiliössä
nousee korkeimmalle sallitulle tasolle,
imeminen keskeytyy.
Î Kytke laite pääkytkimellä pois päältä.
Î Tyhjennä lika-astia.
Laitteen kytkeminen pois päältä
Î Kytke laite pääkytkimellä pois päältä.
Î Vedä verkkopistoke irti.
Jokaisen käyttökerran jälkeen
Î Tyhjennä lika-astia.
Î Puhdista laite sisältä ja ulkoa imuroi-
malla ja kostealla liinalla pyyhkimällä.
- 2
Page 59

Laitteen säilytys
Kuva
Î Säilytä imuputkia, imuletkua ja verkko-
kaapelia kuvan mukaisella tavalla.
Î Säilytä laite kuivassa tilassa ja suojaa
se asiattomalta käytöltä.
Kuljetus
Varo
Loukkaantumis- ja vahingoittumisvaaravaara! Huomioi kuljetettaessa laitteen paino.
Kuva
Î Kuljeta laitetta, kuten kuvassa on esitetty.
Î Kun kuljetat laitetta ajoneuvoissa, var-
mista laite liukumisen ja kaatumisen varalta kulloinkin voimassa olevien
ohjesääntöjen mukaisesti.
Säilytys
Varo
Loukkaantumis- ja vahingoittumisvaaravaara! Huomioi säilytettäessä laitteen paino.
Tätä laitetta saa säilyttää vain sisätiloissa.
Hoito ja huolto
Vaara
Virtapistoke on vedettävä irti pistorasiasta
ennen kaikkia laitteeseen kohdistuvia töitä.
Patruunasuodattimen vaihto
Î Vapauta imupää lukituksesta, poista
imupää.
Î Käännä imupäätä 180° ja irrota se.
Î Kierrä kiinnitysmutteri irti.
Î Poista suodatinpatruuna.
Î Aseta uusi patruunasuodatin paikal-
leen.
Î Kierrä kiinnitysmutteri paikalleen ja ki-
ristä.
Î Aseta imupää paikalleen ja lukitse se.
Häiriöapu
Vaara
Virtapistoke on vedettävä irti pistorasiasta
ennen kaikkia laitteeseen kohdistuvia töitä.
Imuturbiini ei pyöri.
Î Tarkasta kaapeli, pistoke, sulake ja pis-
torasia.
Î Kytke laite päälle.
Imuturbiini on käynnissä, mutta
laite ei ime
– Uimuri lukitsee imukanavan.
Î Tyhjennä lika-astia.
Imuvoima vähenee
Î Poista tukokset imusuuttimesta, imu-
putkesta, imuletkusta tai patruunasuodattimesta.
Î Vaihda paperisuodatinpussi.
Î Vaihda patruunasuodatin.
Pöly pääsee ulos imuvaiheessa
Î Tarkasta patruunasuodattimen oikea
asennus.
Î Vaihda patruunasuodatin.
Takuu
Kussakin maassa ovat voimassa valtuuttamamme myyntiorganisaation julkaisemat
takuuehdot. Materiaali- ja valmistusvirheistä aiheutuvat virheet laitteessa korjaamme
takuuaikana maksutta. Takuutapauksessa
ota yhteys ostotositteen kanssa jälleenmyyjään tai lähimpään valtuutettuun huoltoon.
Varusteet ja varaosat
– Vain sellaisten lisävarusteiden ja vara-
osien käyttö on sallittua, jotka valmistaja on hyväksynyt. Alkuperäiset
lisävarusteet ja varaosat takaavat, että
laitetta voidaan käyttää turvallisesti ja
häiriöttömästi.
– Tärkeimpien osien varaosaluettelo löy-
tyy tämän käyttöohjeen lopusta.
– Saat lisätietoja varaosista osoitteesta
www.karcher.fi, osiosta Huolto.
- 3
59FI
Page 60

CE-todistus
CEO
Head of Approbation
Vakuutamme, että alla mainitut tuotteet
vastaavat suunnittelultaan ja rakenteeltaan
sekä valmistustavaltaan EU-direktiivien
asianomaisia turvallisuus- ja terveysvaatimuksia. Jos tuotteeseen/tuotteisiin tehdään muutoksia, joista ei ole sovittu
kanssamme, tämä vakuutus ei ole enää
voimassa.
Tuote: Märkä- ja kuivaimuri
Tyyppi: 1.428-xxx
Yksiselitteiset EU-direktiivit
2006/42/EY (+2009/127/EY)
2004/108/EY
Sovelletut harmonisoidut standardit
EN 55014–1: 2006
EN 55014–2: 1997 + A1: 2001
EN 60335–1
EN 60335–2–69
EN 61000–3–2: 2006 + A2: 2009
EN 61000–3–3: 2008
EN 62233: 2008
Sovelletut kansalliset standardit
-
5.957-710
Allekirjoittaneet toimivat yrityksen johton
puolesta ja sen valtuuttamina.
Dokumentointivaltuutettu:
S. Reiser
Alfred Kärcher GmbH & Co. KG
Alfred-Kärcher-Str. 28 - 40
71364 Winnenden (Germany)
Puh.: +49 7195 14-0
Faksi: +49 7195 14-2212
Winnenden, 2010/07/14
60 FI
- 4
Page 61

Tekniset tiedot
NT 27/1 NT 27/1 Me
Verkkojännite V 220-240 220-240
Taajuus Hz 50/60 50/60
Maks. teho W 1380 1380
Nimellisteho W 1200 1200
Säiliön tilavuus l 27 27
Täyttömäärä neste l 14 14
Ilmamäärä (maks.) l/s 67 67
Alipaine (maks.) kPa (mbar) 20,8 (208) 20,8 (208)
Kotelointiluokka -- II II
Imuletkuliitin (C-DN/C-ID) mm 35 35
Pituus x leveys x korkeus mm 420 x 420 x
525
Paino kg 7,5 8,2
Ympäristön lämpötila (maks.) °C +40 +40
Mitatut arvot EN 60335-2-69 mukaisesti
Äänenpainetaso L
Epävarmuus K
pA
pA
Käsi-käsivarsi tärinäarvo m/s
Epävarmuus K m/s
Verkkokaapeli
H05VV-F 2x1,0 mm
Osa-nro Johdon pi-
2
dB(A) 77 77
dB(A) 1 1
2
2
<2,5 <2,5
0,2 0,2
tuus
EUR 6.647-263.0 7,5 m
GB 6.647-264.0 7,5 m
CH 6.647-265.0 7,5 m
AUS 6.647-266.0 7,5 m
420 x 420 x
540
- 5
61FI
Page 62

Πριν χρησιμοποιήσετε τη
συσκευή σας για πρώτη φορά,
διαβάστε αυτές τις πρωτότυπες οδηγίες
χρήσης, ενεργήστε σύμφωνα με αυτές και
κρατήστε τις για μελλοντική χρήση ή για τον
επόμενο ιδιοκτήτη.
– Πριν από την πρώτη χρήση διαβάστε
οπωσδήποτε τις υποδείξεις ασφαλείας
αρ. 5.956-249!
– Η μη τήρηση των οδηγιών χρήσης,
καθώς και των υποδείξεων ασφαλείας,
μπορεί να προκαλέσει βλάβες στη
συσκευή ή κινδύνους για τον χρήστη ή
άλλα άτομα.
– Σε περίπτωση βλαβών κατά τη
μεταφορά ειδοποιήστε αμέσως τον
αντιπρόσωπό σας.
Πίνακας περιεχομένων
Προστασία περιβάλλοντος EL - 1
Σύμβολα στο εγχειρίδιο
οδηγιών
Χρήση σύμφωνα με τους
κανονισμούς
Στοιχεία συσκευής EL - 2
Έναρξη λειτουργίας EL - 2
Χειρισμός EL - 2
Μεταφορά EL - 3
Αποθήκευση EL - 3
Φροντίδα και συντήρηση EL - 3
Αντιμετώπιση βλαβών EL - 3
Εγγύηση EL - 4
Εξαρτήματα και ανταλλακτικά EL - 4
Δήλωση συμμόρφωσης CE EL - 4
Τεχνικά χαρακτηριστικά EL - 5
EL - 1
EL - 1
Προστασία περιβάλλοντος
Τα υλικά συσκευασίας είναι
ανακυκλώσιμα. Μην πετάτε τις
συσκευασίες στα οικιακά
απορρίμματα, αλλά σε ειδικό
σύστημα
επαναχρησιμοποίησης.
Οι παλιές συσκευές περιέχουν
ανακυκλώσιμα υλικά, τα οποία
θα πρέπει να μεταφέρονται σε
σύστημα
επαναχρησιμοποίησης. Οι
μπαταρίες, τα λάδια και
παρόμοια υλικά δεν επιτρέπεται
να καταλήγουν στο περιβάλλον.
Για το λόγο αυτόν η διάθεση
παλιών συσκευών πρέπει να
γίνεται σε κατάλληλα
συστήματα συλλογής.
Υποδείξεις για τα συστατικά (REACH)
Ενημερωμένες πληροφορίες για τα συστατικά
μπορείτε να βρείτε στη διεύθυνση:
http://www.karcher.de/de/unternehmen/
umweltschutz/REACH.htm
Σύμβολα στο εγχειρίδιο
οδηγιών
Κίνδυνος
Για άμεσα επαπειλούμενο κίνδυνο, ο οποίος
μπορεί να οδηγήσει σε σοβαρό τραυματισμό ή
θάνατο.
몇 Προειδοποίηση
Για ενδεχόμενη επικίνδυνη κατάσταση, η οποία
μπορεί να οδηγήσει σε σοβαρό τραυματισμό ή
θάνατο.
Προσοχή
Για ενδεχόμενη επικίνδυνη κατάσταση, η οποία
μπορεί να οδηγήσει σε ελαφρό τραυματισμό ή
υλικές βλάβες.
Χρήση σύμφωνα με τους
κανονισμούς
몇 Προειδοποίηση
Η συσκευή δεν ενδείκνυται για την
αναρρόφηση επιβλαβών για την υγεία
σκονών.
– Αυτή η ηλεκτρική σκούπα προορίζεται για
τον υγρό και τον ξηρό καθαρισμό
επιφανειών δαπέδων και τοίχων.
– Η συσκευή αυτή είναι κατάλληλη για
επαγγελματική χρήση, π.χ. σε εργοτάξια,
εργοστασιακές εγκαταστάσεις, συνεργεία
και επιχειρήσεις ενοικίασης.
62 EL
- 1
Page 63

Στοιχεία συσκευής
1 Πινακίδα τύπου
2 Καλώδιο τροφοδοσίας
3 Στήριγμα για σωλήνα αναρρόφησης
4 Στήριγμα για ακροφύσιο αρμών
5 Εύκαμπτος σωλήνας αναρρόφησης
6 Ασφάλιση της κεφαλής αναρρόφησης
7 Τροχίσκος οδήγησης
8 Δοχείο ρύπων
9 Στόμιο αναρρόφησης
10 Μπεκ δαπέδου
11 Σωλήνας αναρρόφησης
12 Κύριος διακόπτης
13 Κεφαλή αναρρόφησης
14 Λαβή μεταφοράς
15 Άγκιστρο καλωδίου
16 Γωνία σωλήνα
17 Φίλτρο φυσιγγίου
18 Περικόχλιο στερέωσης
19 Φλοτέρ
Έναρξη λειτουργίας
Ξηρή αναρρόφηση
Προσοχή
Κατά την ξηρή αναρρόφηση πρέπει πάντα
να είναι εγκαταστημένη η κασέτα φίλτρου.
– Για την αναρρόφηση λεπτής σκόνης
μπορεί να χρησιμοποιηθεί επιπλέον μία
χάρτινη σακούλα φίλτρου.
Εγκατάσταση χάρτινης σακούλας
φίλτρου
Εικόνα
Εικόνα
Î Απασφαλίστε και αφαιρέστε την κεφαλή
αναρρόφησης.
Î Τοποθετήστε τη χάρτινη σακούλα του
φίλτρου.
Î Τοποθετήστε και ασφαλίστε και πάλι
την κεφαλή αναρρόφησης.
Υγρή αναρρόφηση
Εγκατάσταση πλαστικών χειλέων
Εικόνα
Î Αποσυναρμολογήστε τη λωρίδα
βουρτσών.
Î Τοποθετήστε τα λαστιχένια χείλη.
Υπόδειξη: Η ανάγλυφη πλευρά του
λαστιχένιου χείλους πρέπει να είναι
στραμμένη προς τα έξω.
Αφαιρέστε τη χάρτινη σακούλα φίλτρου
– Κατά την αναρρόφηση υγρών
ακαθαρσιών πρέπει να αφαιρείται
πάντοτε η χάρτινη σακούλα φίλτρου.
Εγκατάσταση του πρόσθετου φίλτρου
Î Απασφαλίστε και αφαιρέστε την κεφαλή
αναρρόφησης.
Î Περιστρέψτε την κεφαλή αναρρόφησης
κατά 180° και αποθέστε την.
Î Ξεβιδώστε το περικόχλιο στερέωσης.
Î Αφαιρέστε το φίλτρο κασέτας.
Εικόνα
Î Τοποθετήστε και σφίξτε το περικόχλιο
στερέωσης.
Î Τοποθετήστε το πρόσθετο φίλτρο.
Î Τοποθετήστε
την κεφαλή αναρρόφησης.
και ασφαλίστε και πάλι
Σύνδεσμος κλιπ
Εικόνα
Ο εύκαμπτος σωλήνας αναρρόφησης είναι
εξοπλισμένος με σύστημα κουμπωτού
συνδέσμου. Παρέχεται η δυνατότητα
σύνδεσης όλων των εξαρτημάτων C-35/C-
DN-35.
Χειρισμός
Ενεργοποίηση της μηχανής
Î Συνδέστε το ρευματολήπτη στην πρίζα.
Î Θέστε τη συσκευή σε λειτουργία από το
γενικό διακόπτη.
- 2
63EL
Page 64

Άδειασμα του κάδου
απορριμμάτων
– Το κανάλι αναρρόφησης είναι
εξοπλισμένο με πλωτήρα.
– Το ρεύμα αναρρόφησης διακόπτεται,
όταν η στάθμη ακάθαρτου νερού στο
δοχείο φτάσει στο ανώτατο επιτρεπτό
όριο.
Î Απενεργοποιήστε τη συσκευή από το
γενικό διακόπτη.
Î Αδειάστε τον κάδο απορριμμάτων.
Απενεργοποίηση της μηχανής
Î Απενεργοποιήστε τη συσκευή από το
γενικό διακόπτη.
Î Βγάλτε το ρευματολήπτη.
Έπειτα από κάθε λειτουργία
Î Αδειάστε τον κάδο απορριμμάτων.
Î Καθαρίστε τη συσκευή εσωτερικά και
εξωτερικά με αναρρόφηση και
σκούπισμα με ένα υγρό πανί.
Φύλαξη της συσκευής
Εικόνα
Î Φυλάξτε τους σωλήνες αναρρόφησης,
τον ελαστικό σωλήνα αναρρόφησης και
το καλώδιο τροφοδοσίας σύμφωνα με
την εικόνα.
Î Τοποθετήστε τη συσκευή σε στεγνό
χώρο και ασφαλίστε την ώστε να μην
μπορεί να χρησιμοποιηθεί από
αναρμόδια άτομα.
Μεταφορά
Προσοχή
Κίνδυνος τραυματισμού και βλάβης! Κατά
τη μεταφορά
συσκευής.
Εικόνα
Î Μεταφέρετε τη συσκευή σύμφωνα με
την εικόνα.
Î Κατά τη μεταφορά με οχήματα,
ασφαλίστε τη συσκευή έναντι
ενδεχόμενης ολίσθησης και
ανατροπής, σύμφωνα με τις εκάστοτε
ισχύουσες κατευθυντήριες οδηγίες.
64 EL
λάβετε υπόψη το βάρος της
- 3
Αποθήκευση
Προσοχή
Κίνδυνος τραυματισμού και βλάβης! Κατά
την αποθήκευση λάβετε υπόψη το βάρος
της συσκευής.
Η συσκευή
μόνο σε εσωτερικούς χώρους.
αυτή μπορεί να αποθηκεύεται
Φροντίδα και συντήρηση
Κίνδυνος
Πριν από όλες τις εργασίες στη συσκευή,
απενεργοποιήστε τη συσκευή και τραβήξτε
το φις από την πρίζα.
Αντικατάσταση κασέτας φίλτρου
Î Απασφαλίστε και αφαιρέστε την κεφαλή
αναρρόφησης.
Î Περιστρέψτε την κεφαλή αναρρόφησης
κατά 180° και αποθέστε την.
Î Ξεβιδώστε το περικόχλιο στερέωσης.
Î Αφαιρέστε το φίλτρο κασέτας.
Î Εγκαταστήστε μια νέα κασέτα φίλτρου.
Î Τοποθετήστε και σφίξτε
στερέωσης.
Î Τοποθετήστε και ασφαλίστε και πάλι
την κεφαλή αναρρόφησης.
το περικόχλιο
Αντιμετώπιση βλαβών
Κίνδυνος
Πριν από όλες τις εργασίες στη συσκευή,
απενεργοποιήστε τη συσκευή και τραβήξτε
το φις από την πρίζα.
Η τουρμπίνα αναρρόφησης δεν
λειτουργεί
Î Ελέγξτε το καλώδιο, το βύσμα, την
ασφάλεια και την πρίζα.
Î Θέστε τη συσκευή σε λειτουργία.
Η τουρμπίνα αναρρόφησης
λειτουργεί, αλλά η συσκευή δεν
αναρροφά
– Το φλοτέρ φράζει το κανάλι
αναρρόφησης.
Î Αδειάστε τον κάδο απορριμμάτων.
Page 65

Η αναρροφητική ισχύς μειώνεται
CEO
Head of Approbation
Î Αντιμετωπίστε την απόφραξη στο μπεκ
αναρρόφησης, στο σωλήνα
αναρρόφησης, στον εύκαμπτο σωλήνα
αναρρόφησης ή στην κασέτα φίλτρου.
Î Αντικαταστήστε τη χάρτινη σακούλα
φίλτρου.
Î Αντικαταστήστε την κασέτα φίλτρου.
Διαρροή σκόνης κατά την
αναρρόφηση
Î Ελέγξτε εάν έχει εγκατασταθεί στη
σωστή θέση το φίλτρο.
Î Αντικαταστήστε την κασέτα φίλτρου.
Εγγύηση
Σε κάθε χώρα ισχύουν οι όροι εγγύησης
που εκδόθηκαν
μας προώθησης πωλήσεων.
Αναλαμβάνουμε τη δωρεάν αποκατάσταση
οποιασδήποτε βλάβης στη συσκευή σας,
εφόσον οφείλεται σε αστοχία υλικού ή
κατασκευαστικό σφάλμα, εντός της
προθεσμίας που ορίζεται στην εγγύηση. Σε
περίπτωση που επιθυμείτε να κάνετε
χρήση της εγγύησης, παρακαλούμε
απευθυνθείτε με την απόδειξη αγοράς στο
κατάστημα από το οποίο
τη συσκευή ή στην πλησιέστερη
εξουσιοδοτημένη υπηρεσία τεχνικής
εξυπηρέτησης πελατών μας.
από την αρμόδια εταιρία
προμηθευτήκατε
Εξαρτήματα και ανταλλακτικά
– Επιτρέπεται να χρησιμοποιούνται μόνο
εξαρτήματα και ανταλλακτικά, τα οποία
έχουν την έγκριση του κατασκευαστή
Τα γνήσια αξεσουάρ και ανταλλακτικά
παρέχουν την εγγύηση της ασφαλούς
και άψογης λειτουργίας της μηχανής
– Μία επιλογή των ανταλλακτικών που
χρειάζονται συχνότερα θα βρείτε στο
τέλος των οδηγιών χρήσης.
– Περισσότερες πληροφορίες σχετικά με
τα ανταλλακτικά μπορείτε να λάβετε στη
διεύθυνση www.kaercher.com, τομέας
Εξυπηρέτησης.
Δήλωση συμμόρφωσης CE
Δια της παρούσης δηλώνουμε ότι το
μηχάνημα που χαρακτηρίζεται παρακάτω,
με βάση τη σχεδίαση και την κατασκευή
του, υπό τη μορφή που διατίθεται στην
αγορά, πληροί στις σχετικές βασικές
απαιτήσεις ασφαλείας και υγιεινής των
οδηγιών της ΕΚ. Η
να ισχύει σε περίπτωση τροποποιήσεων
του μηχανήματος χωρίς προηγούμενη
συνεννόηση μαζί μας.
Προϊόν: Ηλεκτρική σκούπα υγρής και
Τύπος: 1.428-xxx
Σχετικές οδηγίες των Ε.Κ.
2006/42/EK (+2009/127/EK)
2004/108/EΚ
Εφαρμοσθέντα εναρμονισμένα
πρότυπα
EN 55014–1: 2006
EN 55014–2: 1997 + A1: 2001
EN 60335–1
EN 60335–2–69
EN 61000–3–2: 2006 + A2: 2009
EN 61000–3–3: 2008
EN 62233: 2008
Εφαρμοσθέντα εθνικά πρότυπα
-
5.957-710
Οι υπογράφοντες ενεργούν κατ' εντολή του
και με εξουσιοδότηση της διεύθυνσης της
επιχείρησης.
Υπεύθυνος τεκμηρίωσης:
S. Reiser
Alfred Karcher GmbH & Co. KG
Alfred-Karcher-Str. 28 - 40
71364 Winnenden (Germany)
Τηλ.: +49 7195 14-0
Φαξ: +49 7195 14-2212
Winnenden, 2010/07/14
παρούσα δήλωση παύει
ξηρής αναρρόφησης
- 4
65EL
Page 66

Τεχνικά χαρακτηριστικά
NT 27/1 NT 27/1 Me
Τάση ηλεκτρικού δικτύου V 220-240 220-240
Συχνότητα Hz 50/60 50/60
Μέγ. ισχύς W 1380 1380
Ονομαστική ισχύς W 1200 1200
Χωρητικότητα κάδου l2727
Ποσότητα πλήρωσης υγρού l1414
Ποσότητα αέρα (μέγ.) l/s 67 67
Υποπίεση (μέγ.) kPa (mbar) 20,8 (208) 20,8 (208)
Κατηγορία προστασίας -- II II
Σύνδεση ελαστικού σωλήνα αναρρόφησης (C-
DN/C-ID)
Μήκος x Πλάτος x Ύψος mm 420 x 420 x
Βάρος kg 7,5 8,2
Θερμοκρασία περιβάλλοντος (μέγ.) °C +40 +40
Μετρούμενες τιμές κατά EN 60335-2-69
Επιτρεπόμενη στάθμη ηχητικής ισχύος L
Αβεβαιότητα K
pA
Κραδασμοί στο χέρι/στο βραχίονα m/s
Αβεβαιότητα Km/s
Καλώδιο
τροφοδοσία
ς δικτύου
H05VV-F 2x1,0 mm
Αριθ. ανταλλ. Μήκος
2
καλωδίου
EUR 6.647-263.0 7,5 m
GB 6.647-264.0 7,5 m
CH 6.647-265.0 7,5 m
AUS 6.647-266.0 7,5 m
mm 35 35
525
dB(A) 77 77
pA
dB(A) 1 1
2
2
<2,5 <2,5
0,2 0,2
420 x 420 x
540
66 EL
- 5
Page 67

Cihazın ilk kullanımından önce
bu orijinal kullanma kılavuzunu
okuyun, bu kılavuza göre davranın ve daha
sonra kullanım veya cihazın sonraki
sahiplerine vermek için bu kılavuzu
saklayın.
– İlk kullanımdan önce, 5.956-249
numaralı güvenlik uyarılarını mutlaka
okuyun!
– Kullanım kılavuzunun ve emniyet
uyarılarının dikkate alınmaması halinde
cihazda hasar, kullanıcıda ve diğer
kişilerde tehlike oluşabilir.
– Nakliye hasarlarını hemen yetkili
satıcıya bildirin.
İçindekiler
Çevre koruma TR - 1
Kullanım kılavuzundaki
semboller
Kurallara uygun kullanımTR -1
Cihaz elemanları TR - 2
İşletime alma TR - 2
Kullanımı TR - 2
Taşıma TR - 3
Depolama TR - 3
Koruma ve BakımTR -3
Arızalarda yardımTR -3
Garanti TR - 3
Aksesuarlar ve yedek parçalar TR - 4
CE Beyanı TR - 4
Teknik Bilgiler TR - 5
TR - 1
Çevre koruma
Ambalaj malzemeleri geri
dönüştürülebilir. Ambalaj
malzemelerini evinizin çöpüne
atmak yerine lütfen tekrar
kullanılabilecekleri yerlere
gönderin.
İçindekiler hakkında uyarılar (REACH)
İçindekiler hakkında ayrıntılı bilgileri
bulabileceğiniz adres:
http://www.karcher.de/de/unternehmen/
umweltschutz/REACH.htm
Kullanım kılavuzundaki
Tehlike
Ağır bedensel yaralanmalar ya da ölüme
neden olan direkt bir tehlike için.
몇 Uyarı
Ağır bedensel yaralanmalar ya da ölüme
neden olabilecek olası tehlikeli bir durum
için.
Dikkat
Hafif bedensel yaralanmalar ya da maddi
hasarlara neden olabilecek olası tehlikeli
bir durum için.
Kurallara uygun kullanım
몇 Uyarı
Cihaz, zararlı tozların emilmesi için uygun
değildir.
– Bu süpürge, zemin ve duvar
yüzeylerinin ıslak ve kuru temizlenmesi
için belirlenmiştir.
– Bu cihaz, Örn; şantiyeler, sanayi
tesisleri, atölyeler ve kiralık
mağazalarda mesleki kullanım için
uygundur.
Eski cihazlarda, yeniden
değerlendirme işlemine tabi
tutulması gereken değerli geri
dönüşüm malzemeleri
bulunmaktadır. Aküler, yağ ve
benzeri maddeler doğaya
ulaşmamalıdır. Bu nedenle eski
cihazları lütfen öngörülen
toplama sistemleri aracılığıyla
imha edin.
semboller
- 1
67TR
Page 68

Cihaz elemanları
1 Tip levhası
2 Elektrik kablosu
3 Süpürme boruları tutucusu
4 Derz memesi tutucusu
5 Emme hortumu
6 Süpürge kafasının kilidi
7 Yönlendirme makarası
8 Zbiornik na zanieczyszczenia
9Emme ağzı
10 Taban memesi
11 Vakum borusu
12 Ana şalter
13 Emme başlığı
14 Taşıma kolu
15 Kablo kancası
16 Manifold
17 Kartuş Filtre
18 Sabitleme somunu
19 Şamandıra
İşletime alma
Kuru emme
Dikkat
Kuru süpürme sırasında, kartuşlu filtre her
zaman yerleştirilmiş olmalıdır.
– İnce tozun emilmesi sırasında, ek
olarak bir kağıt filtre torbası
kullanılabilir.
Kağıt filtre torbasının takılması
Şekil
Şekil
Î Emme kafasının kilidini açın ve kafayı
çıkartın.
Î Kağıt filtre torbasını takın.
Î Emme kafasını yerleştirin ve kilitleyin.
68 TR
- 2
Islak temizlik
Lastik dudakların takılması
Şekil
Î Fırça şeridini sökün.
Î Lastik dudakları takın.
Not: Lastik dudakların şekil verilmiş tarafı
dışarıyı göstermelidir.
Kağıt filtre poşetinin çıkartılması
– Islak kirin emilmesi sırasında, kağıt filtre
torbası her zaman çıkartılmalıdır.
Ek filtrenin takılması
Î Emme kafasının kilidini açın ve kafayı
çıkartın.
Î Emme kafasını 180° döndürün ve
çıakrtıp bir yere bırakın.
Î Sabitleme somunlarını sökün.
Î Kartuşlu filtreyi çıkartın.
Şekil
Î Sabitleme somununu yerleştirin ve sıkın.
Î Ek filtreyi takın.
Î Emme kafasını yerleştirin ve kilitleyin.
Klips bağlantısı
Şekil
Emme hortumu, bir klips sistemi ile
donatılmıştır. Tüm C-35/C-DN-35 aksesuar
parçaları bağlanabilir.
Kullanımı
Cihazı açın
Î
Şebeke fişini takın.
Î Cihazı ana şalterden açın.
Toz haznesinin boşaltılması
– Süpürme kanalı bir şamandırayla
donatılmıştır.
– Depo içinde izin verilen maksimum pis
su seviyesine ulaşılması durumunda,
emme akımı kesilir.
Î Cihazı ana şalterden kapatın.
Î Çöp deposunu boşaltın.
Cihazın kapatılması
Î Cihazı ana şalterden kapatın.
Î Şebeke fişini prizden çekiniz.
Page 69

Her çalışmadan sonra
Î Çöp deposunu boşaltın.
Î Cihazın dışını ve içini tozunu alarak ve
silerek nemli bir bezle temizleyin.
Cihazın saklanması
Şekil
Î Süpürme boruları, süpürme hortumu
şebeke kablosunu şekle uygun olarak
saklayın.
Î Cihazı kuru bir odada muhafaza edin ve
yetkisiz kullanıma karşı emniyete alın.
Taşıma
Dikkat
Yaralanma ve hasar tehlikesi! Taşıma
sırasında cihazın ağırlığına dikkat edin.
Şekil
Î Cihazı şekle uygun olarak taşıyın.
Î Araçlarda taşıma sırasında, cihazı
geçerli yönetmeliklere göre kaymaya ve
devrilmeye karşı emniyete alın.
Depolama
Dikkat
Yaralanma ve hasar tehlikesi! Depolama
sırasında cihazın ağ
Bu cihaz sadece iç mekanlarda
depolanmalıdır.
ırlığına dikkat edin.
Koruma ve Bakım
Tehlike
Cihazdaki tüm çalışmalardan önce cihazı
kapatın ve elektrik fişini çekin.
Kartuş filtresinin değiştirilmesi
Î Emme kafasının kilidini açın ve kafayı
çıkartın.
Î Emme kafasını 180° döndürün ve
çıakrtıp bir yere bırakın.
Î Sabitleme somunlarını sökün.
Î Kartuşlu filtreyi çıkartın.
Î Yeni kartuş filtresini oturtun.
Î Sabitleme somununu yerleştirin ve sıkın.
Î Emme kafasını yerleştirin ve kilitleyin.
Arızalarda yardım
Tehlike
Cihazdaki tüm çalışmalardan önce cihazı
kapatın ve elektrik fişini çekin.
Emme türbini çalışmıyor
Î Kablo, soket, sigorta ve prizi kontrol
edin.
Î Cihazı açın.
Emme türbini çalışıyor fakat cihaz
emmiyor
– Şamandıra, emme kanalını kapatıyor.
Î Çöp deposunu boşaltın.
Emme gücü dü
Î Emme memesi, emme borusu, emme
hortumu ya da kartuş filtresindeki
tıkanmaları giderin.
Î Kağıt filtre torbasını değiştirin.
Î Kartuş filtresini değiştirin.
Emme sırasında dışarı toz çıkıyor
Î Kartuş filtresinin montaj konumunun
doğru olup olmadığını kontrol edin.
Î Kartuş filtresini değiştirin.
Garanti
Her ülkede yetkili distribütörümüz
tarafından verilmiş garanti şartları
geçerlidir. Garanti süresi içinde cihazınızda
oluşan muhtemel hasarları, arızanın
kaynağı üretim veya malzeme hatası
olduğu sürece ücretsiz olarak kar
Garanti hakkınızdan yararlanmanızı
gerektiren bir durum olduğu zaman, ilgili
faturanız ile birlikte satıcınıza veya size en
yakın yetkili servisimize başvurunuz.
şılıyoruz.
- 3
69TR
Page 70

Aksesuarlar ve yedek
CEO
Head of Approbation
parçalar
– Sadece üretici tarafından onaylanmış
aksesuar ve yedek parçalar
kullanılmalıdır. Orijinal aksesuar ve
orijinal yedek parçalar, cihazın güvenli
ve arızasız bir biçimde çalışmasının
güvencesidir.
– En sık kullanılan yedek parça çeşitlerini
kullanım kılavuzunun sonunda
bulabilirsiniz.
– Yedek parçalar hakkında diğer bilgileri,
www.kaercher.com adresindeki Servis
bölümünden alabilirsiniz.
CE Beyanı
İşbu belge ile aşağıda tanımlanan
makinenin konsepti ve tasarımı ve
tarafımızdan piyasaya sürülen modeliyle
AB yönetmeliklerinin temel teşkil eden ilgili
güvenlik ve sağlık yükümlülüklerine uygun
olduğunu bildiririz. Onayımız olmadan
cihazda herhangi bir değişiklik yapılması
durumunda bu beyan geçerliliğini yitirir.
Ürün: Kuru ve yaş elektrikli
süpürge
Tip: 1.428-xxx
İlgili AB yönetmelikleri
2006/42/EG (+2009/127/EG)
2004/108/EG
Kullanılmış olan uyumlu standartlar
EN 55014–1: 2006
EN 55014–2: 1997 + A1: 2001
EN 60335–1
EN 60335–2–69
EN 61000–3–2: 2006 + A2: 2009
EN 61000–3–3: 2008
EN 62233: 2008
Kullanılmış ulusal standartlar
-
70 TR
5.957-710
İmzası bulunanlar, işletme yönetimi adına
ve işletme yönetimi tarafından verilen
vekalete dayanarak işlem yapar.
Dokümantasyon yetkilisi:
S. Reiser
Alfred Kärcher GmbH & Co. KG
Alfred-Kärcher-Str. 28 - 40
71364 Winnenden (Germany)
Tel.: +49 7195 14-0
Faks: +49 7195 14-2212
Winnenden, 2010/07/14
- 4
Page 71

Teknik Bilgiler
NT 27/1 NT 27/1 Me
Şebeke gerilimi V 220-240 220-240
Frekans Hz 50/60 50/60
Maks. güç W 1380 1380
Nominal güç W 1200 1200
Kap içeriği l 27 27
Sıvı doldurma miktarı l1414
Hava miktarı (maks.) l/s 67 67
Vakum (maks.) kPa (mbar) 20,8 (208) 20,8 (208)
Koruma sınıfı -- II II
Süpürme hortumu bağlantısı (C-DN/C-ID) mm 35 35
Uzunluk x Genişlik x Yükseklik mm 420 x 420 x
525
Ağırlıkkg7,58,2
Çevre sıcaklığı (maks.) °C +40 +40
60335-2-69'a göre belirlenen değerler
Ses basıncı seviyesi L
Güvensizlik K
pA
pA
El-kol titreşim değeri m/s
Güvensizlik K m/s
Elektrik
kablosu
H05VV-F 2x1,0 mm
Parça No. Kablo
2
dB(A) 77 77
dB(A) 1 1
2
2
<2,5 <2,5
0,2 0,2
uzunluğu
EUR 6.647-263.0 7,5 m
GB 6.647-264.0 7,5 m
CH 6.647-265.0 7,5 m
AUS 6.647-266.0 7,5 m
420 x 420 x
540
- 5
71TR
Page 72

Перед первым применением
вашего прибора прочитайте
эту оригинальную инструкцию по
эксплуатации, после этого действуйте
соответственно и сохраните ее для
дальнейшего пользования или для
следующего владельца.
– Перед первым вводом в
эксплуатацию обязательно прочтите
указания по технике безопасности №
5.956-249!
– При несоблюдении инструкции и
указаний по технике безопасности
пылесос может выйти из строя, а для
оператора и других лиц возникает
риск получения травмы.
– При повреждениях, полученных во
время транспортировки, немедленно
свяжитесь с продавцом.
Оглавление
Защита окружающей среды RU - 1
Символы в руководстве по
эксплуатации
Использование по
назначению
Элементы прибора RU - 2
Начало работы RU - 2
Управление RU - 3
Транспортировка RU - 3
Хранение RU - 3
Уход и техническое
обслуживание
Помощь в случае неполадок RU - 4
Гарантия RU - 4
Принадлежности и запасные
детали
Заявление о соответствии
требованиям СЕ
Технические данные RU - 6
RU - 1
RU - 2
RU - 3
RU - 4
RU - 5
Защита окружающей среды
Упаковочные материалы
пригодны для вторичной
переработки. Пожалуйста, не
выбрасывайте упаковку
вместе с бытовыми отходами,
а сдайте ее в один из пунктов
приема вторичного сырья.
Старые приборы содержат
ценные перерабатываемые
материалы, подлежащие
передаче в пункты приемки
вторичного сырья.
Аккумуляторы, масло и иные
подобные материалы не
должны попадать в
окружающую среду. Поэтому
утилизируйте
приборы через
соответствующие системы
приемки отходов.
Инструкции по применению
компонентов (REACH)
Актуальные сведения о компонентах
приведены на веб-узле по следующему
адресу:
http://www.karcher.de/de/unternehmen/
umweltschutz/REACH.htm
старые
Символы в руководстве по
эксплуатации
Опасность
Для непосредственно грозящей
опасности, которая приводит к
тяжелым увечьям или к смерти.
몇 Предупреждение
Для возможной потенциально опасной
ситуации, которая может привести к
тяжелым увечьям или к смерти.
Внимание!
Для возможной потенциально опасной
ситуации, которая может привести к
легким травмам или повлечь
материальный ущерб.
72 RU
- 1
Page 73

Использование по
назначению
몇
Предупреждение
Прибор не предназначен для сбора
вредной для здоровья пыли.
– Этот пылесос предназначен для
влажной и сухой очистки
поверхностей полов и стен.
– Это устройство предназначено для
использования на предприятиях и
организациях, например, на
строительных площадках, в
заводских корпусах, мастерских и на
фирмах, занимающихся сдачей в
аренду.
Элементы прибора
1 Заводская табличка с данными
2 Сетевой шнур
3 Держатель для всасывающей трубки
4 Держатель насадки для стыков
5 Всасывающий шланг
6 Блокировка всасывающей головки
7 Направляющий ролик
8 Мусорный бак
9 Всасывающий патрубок
10 Форсунка
11 всасывающая трубка,
12 Главный выключатель
13 Всасывающая головка
14 рукоятка для ношения прибора
15 Крючки для кабеля
16 Колено
17 Фильтровальный патрон
18 Крепежная гайка
19 Поплавок
для чистки пола
Начало работы
Сухая чистка
Внимание!
При чистке в сухом режиме всегда
должен быть надет фильтровальный
патрон.
– При сборе мелкой пыли
дополнительно может
использоваться бумажный
фильтровальный пакет.
Установка бумажного
фильтровального пакета
Рисунок
Рисунок
Î Разблокировать и снять
всасывающий элемент.
Î Наденьте бумажный
фильтровальный мешок.
Î Надеть и зафиксировать
всасывающий элемент.
Влажная чистка
Установка резиновых кромок
Рисунок
Î Снять щетки.
Î Установить резиновые кромки (5).
Указание: Структурированная сторона
резиновых кромок должна быть
обращена наружу.
Удаление бумажного
фильтровального пакета
– При сборе влажной пыли бумажный
фильтровальный пакет необходимо
снимать.
Установка дополнительного фильтра
Î Разблокировать и снять
всасывающий элемент.
Î Повернуть всасывающий элемент на
180° и снять его.
Î Выкрутить крепежную гайку.
Î Снять патронный фильтр.
Рисунок
Î Установить и затянуть крепежную
гайку.
Î Установить дополнительный
фильтр.
Î Надеть и зафиксировать
всасывающий элемент.
- 2
73RU
Page 74

Клипсовое соединение
Рисунок
Всасывающий шланг оснащен системой
клипсового соединения. Могут быть
подсоединены все комплектующие
изделия C-35/C-DN-35.
Управление
Включение прибора
Î Вставьте штепсельную вилку в
электророзетку.
Î Прибор отключается при помощи
главного выключателя.
Опорожнение резервуара для
грязи
– Впускной канал оснащен поплавком.
– При достижении максимально
допустимого уровня грязной воды в
емкости всасывание прекращается.
Î Выключить прибор при помощи
главного выключателя.
Î Слейте воду из емкости с грязной
водой.
Выключение прибора
Î Выключить прибор при помощи
главного выключателя.
Î Отсоедините пылесос от
электросети.
После каждой эксплуатации
Î Слейте воду из емкости с грязной
водой.
Î Очистить прибор снаружи и внутри
пылесосом и протереть его влажным
полотенцем.
Хранение прибора
Рисунок
Î Хранить всасывающие трубы, шланг
и сетевой шнур в соответствии с
рисунками.
Î Хранить прибор в сухом помещении,
приняв при этом меры от
несанкционированного
использования.
Транспортировка
Внимание!
Опасность получения травм и
повреждений! При транспортировке
следует обратить внимание на вес
устройства.
Рисунок
Î Транспортировку прибора
осуществлять в соответствии с
рисунком.
Î При перевозке аппарата в
транспортных средствах следует
учитывать действующие местные
государственные нормы,
направленные на защиту от
скольжения и опрокидывания.
Хранение
Внимание!
Опасность получения травм и
повреждений! При хранении следует
обратить внимание на вес
устройства.
Это устройство разрешается хранить
только во внутренних помещениях.
Уход и техническое
обслуживание
Опасность
Перед проведением любых работ с
прибором, выключить прибор и
вытянуть штепсельную вилку.
Замена фильтровального
патрона
Î Разблокировать и снять
всасывающий элемент.
Î Повернуть всасывающий элемент на
180° и снять его.
Î Выкрутить крепежную гайку.
Î Снять патронный фильтр.
Î Установить новый фильтровальный
патрон.
Î Установить и затянуть крепежную
гайку.
Î Надеть и зафиксировать
всасывающий элемент.
74 RU
- 3
Page 75

Помощь в случае
неполадок
Опасность
Перед проведением любых работ с
прибором, выключить прибор и
вытянуть штепсельную вилку.
Всасывающая турбина не
работает
Î Проверить шнур, вилку,
предохранитель и розетку.
Î Включить аппарат.
Всасывающая турбина работает,
но аппарат не сосет
– Поплавок перекрыл впускной канал.
Î Слейте воду из емкости с грязной
водой.
Мощность всасывания упала
Î Произошло засорение
фильтровального патрона,
форсунки, всасывающего шланга
или всасывающей трубки.
Î Заменить бумажный
фильтровальный пакет.
Î Заменить фильтровальный патрон.
Во время чистки из прибора
выделяется пыль
Î Проверить правильность установки
фильтровального патрона.
Î Заменить фильтровальный патрон.
Гарантия
В каждой стране действуют
соответственно гарантийные условия,
изданные уполномоченной
организацией сбыта нашей
данной стране. Возможные
неисправности прибора в течение
гарантийного срока мы устраняем
бесплатно, если причина заключается в
дефектах материалов или ошибках при
изготовлении. В случае возникновения
претензий в течение гарантийного срока
просьба обращаться, имея при себе чек
о покупке, в торговую организацию,
продавшую вам прибор или в
ближайшую уполномоченную
сервисного обслуживания.
продукции в
службу
Принадлежности и
запасные детали
– Разрешается использовать только те
принадлежности и запасные части,
использование которых было
одобрено изготовителем.
Использование оригинальных
принадлежностей и запчастей
гарантирует Вам надежную и
бесперебойную работу прибора.
– Выбор наиболее часто необходимых
запчастей вы найдете в конце
инструкции по эксплуатации.
– Дальнейшую информацию о
запчастях вы найдете на сайте
www.kaercher.com в разделе Service.
- 4
75RU
Page 76

Заявление о соответствии
CEO
Head of Approbation
требованиям СЕ
Настоящим мы заявляем, что
нижеуказанный прибор по своей концепции
и конструкции, а также в осуществленном и
допущенном нами к продаже исполнении
отвечает соответствующим основным
требованиям по безопасности и здоровью
согласно директивам ЕС. При внесении
изменений, не согласованных с нами,
данное заявление теряет свою силу.
Продукт Пылесос для мокрой и
сухой чистки
Тип: 1.428-xxx
Основные директивы ЕС
2006/42/EC (+2009/127/EC)
2004/108/ЕС
Примененные гармонизированные
нормы
EN 55014–1: 2006
EN 55014–2: 1997 + A1: 2001
EN 60335–1
EN 60335–2–69
EN 61000–3–2: 2006 + A2: 2009
EN 61000–3–3: 2008
EN 62233: 2008
Примененные
внутригосударственные нормы
-
5.957-710
Нижеподписавшиеся лица действуют по
поручению и
руководства предприятия.
уполномоченный по документации:
S. Reiser
Alfred Kaercher GmbH & Co. KG
Alfred-Kaercher-Str. 28 - 40
71364 Winnenden (Germany)
Тел.: +49 7195 14-0
Факс: +49 7195 14-2212
Winnenden, 2010/07/14
76 RU
по доверенности
- 5
Page 77

Технические данные
NT 27/1 NT 27/1 Me
Напряжение сети V 220-240 220-240
Частота Hz 50/60 50/60
Макс. мощность W 1380 1380
Номинальная мощность W 1200 1200
Емкость бака l2727
Заправочный объем жидкости l1414
Количество воздуха (макс.) l/s 67 67
Нижнее давление (макс.) kPa (mbar) 20,8 (208) 20,8 (208)
Класс защиты -- II II
Гнездо для подключения шланга(C-DN/C-ID) mm 35 35
Длина х ширина х высота mm 420 x 420 x
525
Вес kg 7,5 8,2
Температура окружающей среды (макс.) °C +40 +40
Значение установлено согласно стандарту EN 60335-2-69
Уровень шума дб
Опасность K
а
pA
Значение вибрации рука-плечо m/s
Опасность Km/s
Сетевой
шнур
H05VV-F 2x1,0 mm
№ детали Длина
2
dB(A) 77 77
dB(A) 1 1
2
2
<2,5 <2,5
0,2 0,2
шнура
EUR 6.647-263.0 7,5 m
GB 6.647-264.0 7,5 m
CH 6.647-265.0 7,5 m
AUS 6.647-266.0 7,5 m
420 x 420 x
540
- 6
77RU
Page 78

A készülék első használata előtt
olvassa el ezt az eredeti
használati utasítást, ez alapján járjon el és
tartsa meg a későbbi használatra vagy a
következő tulajdonos számára.
– Az első üzembevétel előtt
mindenképpen olvassa el az 5.956-249
sz. biztonsági utasításokat!
– A gépkönyv és a biztonságtechnikai
utasítások be nem tartása esetén a
készülék megrongálódhat és veszélybe
kerülhet annak kezelője, illetve más
személyek.
– Szállítási sérülések esetén azonnal
tájékoztassa a kereskedőt.
Tartalomjegyzék
Környezetvédelem HU - 1
Szimbólumok az üzemeltetési
útmutatóban
Rendeltetésszerű használat HU - 1
Készülék elemek HU - 2
Üzembevétel HU - 2
Használat HU - 2
Transport HU - 3
Tárolás HU - 3
Ápolás és karbantartás HU - 3
Segítség üzemzavar esetén HU - 3
Garancia HU - 3
Tartozékok és alkatrészek HU - 4
CE-Nyilatkozat HU - 4
Műszaki adatok HU - 5
HU - 1
Környezetvédelem
A csomagolási anyagok
újrahasznosíthatók. Kérjük, ne
dobja a csomagolást a házi
szemétbe, hanem vigye el egy
újrahasznosító helyre.
A használt készülékek értékes
újrahasznosítható anyagokat
tartalmaznak, amelyeket
újrahasznosító helyen kell
elhelyezni. Az elemeknek,
olajnak és hasonló anyagoknak
nem szabad a környezetbe
kerülni. Ezért kérjük, a használt
készülékeket megfelelő
gyűjtőrendszeren keresztül
távolítsa el.
Megjegyzések a tartalmazott
anyagokkal kapcsolatban (REACH)
Aktuális információkat a tartalmazott
anyagokkal kapcsolatosan a következő
címen talál:
http://www.karcher.de/de/unternehmen/
umweltschutz/REACH.htm
Szimbólumok az üzemeltetési
útmutatóban
Balesetveszély
Azonnal fenyegető veszély, amely súlyos
testi sérüléshez vagy halálhoz vezet.
몇 Figyelem!
Esetlegesen veszélyes helyzet, amely
súlyos testi sérüléshez vagy halálhoz
vezethet.
Vigyázat
Esetlegesen veszélyes helyzet, amely
könnyű sérüléshez vagy kárhoz vezethet.
Rendeltetésszerű használat
몇 Figyelem!
A készülék nem alkalmas egészségre
káros por felszívására.
– A porszívó padló- és falfelületek nedves
és száraz tisztítására szolgál.
– Ez a készülék iparszerű használatra
alkalmas, pl. építkezéseken,
ipartelepeken, műhelyekben és
kölcsönző boltokban.
78 HU
- 1
Page 79

Készülék elemek
1 Típustábla
2 Hálózati kábel
3 Szívócsövek tartója
4 Réstisztítófej tartója
5Szívótömlő
6 Szívófej zárja
7 Kormánygörgő
8 Hulladéktartály
9 Szívótámasztékok
10 Padló szórófej
11 Szívócső
12 Főkapcsoló
13 Szívófej
14 Fogantyú
15 Kábel tartó
16 Könyökcső
17 Patron szűrő
18 Rögzítő anya
19 Úszó
Üzembevétel
Száraz porszívózás
Vigyázat
Száraz porszívózás esetén mindig fel kell
helyezni a patronszűrőt.
– Finom por szívásához kiegészítőleg
egy papírzacskót lehet használni.
A papírszűrő behelyezése
Ábra
Ábra
Î Oldja ki és vegye le szívófejet.
Î Papír szűrőzacskót felhelyezni.
Î Helyezze vissza és biztosítsa a
szívófejet.
Nedves porszívózás
Gumiél felhelyezése
Ábra
Î Kefecsík kivétele.
Î Gumiajkakat beépíteni.
Megjegyzés: A gumiélek strukturált
oldalának kifelé kell nézni.
Papírszűrő eltávolítása
– Ha nedves piszkot fognak felszívni,
mindig le kell venni a papír
szűrőtasakot.
További szűrő behelyezése
Î Oldja ki és vegye le szívófejet.
Î Fordítsa el a szívófejet 180°-kal és
tegye le.
Î Csavarja ki a rögzítő anyát.
Î Vegye le a patronszűrőt.
Ábra
Î Helyezze be a rögzítő anyát és húzza meg.
Î Helyezze be a további szűrőt.
Î Helyezze vissza és biztosítsa a
szívófejet.
Clip-csatlakozás
Ábra
A szívótömlő bilincsrendszerrel van
felszerelve. Valamennyi C-35/C DN-35
tartozék csatlakoztatható.
Használat
A készülék bekapcsolása
Î Dugja be a hálózati csatlakozót.
Î A készüléket a főkapcsolón keresztül
bekapcsolni.
A szeméttartály kiürítése
– A szívócsatorna úszóval van
felszerelve.
– Ha a tartályban a szennyvíz eléri a
megengedhető legmagasabb szintet,
akkor a szívóáram megszakad.
Î A készüléket a főkapcsolón keresztül
kikapcsolni.
Î Szennytartály kiürítése.
A készülék kikapcsolása
Î A készüléket a főkapcsolón keresztül
kikapcsolni.
Î Húzza ki a hálózati dugót.
- 2
79HU
Page 80

Minden üzem után
Î Szennytartály kiürítése.
Î A készüléket kívül-belül porszívóval és
nedves ronggyal kell megtisztítani.
A készülék tárolása
Ábra
Î A szívócsöveket, szívótömlőt és a
hálózati kábelt az ábrának megfelelően
tárolja.
Î A készüléket száraz helyiségben állítsa le
és biztosítsa illetéktelen használat ellen.
Transport
Vigyázat
Sérülés- és rongálódásveszély! Szállítás
esetén vegye figyelembe a készülék súlyát.
Ábra
Î A készüléket az ábrának megfelelő módon
szállítsa.
Î Járművel történő szállítás esetén a
készüléket az adott irányelveknek
megfelelően kell csúszás és borulás ellen
biztosítani.
Tárolás
Vigyázat
Sérülés- és rongálódásveszély! Tárolás
esetén vegye figyelembe a készülék súlyát.
Ezt a készüléket csak beltéri helyiségben
szabad tárolni.
Ápolás és karbantartás
Balesetveszély
A készüléken történő bármiféle munka előtt
kapcsolja ki a készüléket és húzza ki a
hálózati csatlakozót.
Patronszűrő cseréje
Î Oldja ki és vegye le szívófejet.
Î Fordítsa el a szívófejet 180°-kal és tegye le.
Î Csavarja ki a rögzítő anyát.
Î Vegye le a patronszűrőt.
Î Új szűrőpatront ráhelyezni.
Î Helyezze be a rögzítő anyát és húzza
meg.
Î Helyezze vissza és biztosítsa a
szívófejet.
Segítség üzemzavar esetén
Balesetveszély
A készüléken történő bármiféle munka előtt
kapcsolja ki a készüléket és húzza ki a
hálózati csatlakozót.
A szívóturbina nem megy
Î Ellenőrizze a kábelt, a dugós kapcsolót,
a biztosítékot és a dugaljat.
Î Kapcsolja be a készüléket.
A szívóturbina megy, de a gép nem
szív
– Az úszó elzárja a szívócsatornát.
Î Szennytartály kiürítése.
Szívóerő alábbhagy
Î Távolítsa el az elzáródást a szívófejből,
szívócsőből, szívótömlőből vagy a
patronszűrőből.
Î Cserélje ki a papírszűrőt.
Î Cserélje ki a patronszűrőt.
Porszívózásnál por áramlik ki
Î Ellenőrizze a patronszűrő helyes
behelyezését.
Î Cserélje ki a patronszűrőt.
Garancia
Minden országban az illetékes
forgalmazónk által kiadott garancia
feltételek érvényesek. Az esetleges
üzemzavarokat az Ön készülékén a
garancia lejártáig költségmentesen
elhárítjuk, amennyiben anyag- vagy
gyártási hiba az oka. Garanciális esetben
kérjük, forduljon a vásárlást igazoló
bizonylattal kereskedőjéhez vagy a
legközelebbi hivatalos szakszervizhez.
80 HU
- 3
Page 81

Tartozékok és alkatrészek CE-Nyilatkozat
CEO
Head of Approbation
– Csak olyan tartozékokat és
alkatrészeket szabad használni,
amelyeket a gyártó jóváhagyott. Az
eredeti tartozékok és az eredeti
alkatrészek, biztosítják azt, hogy a
készüléket biztonságosan és
zavartalanul lehessen üzemeltetni.
– Az üzemeltetési útmutató végén talál
egy válogatást a legtöbbször
szükséges alkatrészekről.
– További információkat az
alkatrészekről a www.kaercher.com
címen talál a 'Service' oldalakon.
Ezennel tanúsítjuk, hogy az alábbiakban
megnevezett gép tervezése és építési
módja alapján az általunk forgalomba
hozott kivitelben megfelel az EK irányelvek
vonatkozó, alapvető biztonsági és
egészségügyi követelményeinek. A gép
jóváhagyásunk nélkül történő módosítása
esetén ez a nyilatkozat elveszti
érvényességet.
Termék: Nedves- és szárazporszívó
Típus: 1.428-xxx
Vonatkozó európai közösségi
irányelvek:
2006/42/EK (+2009/127/EK)
2004/108/EK
Alkalmazott harmonizált szabványok:
EN 55014–1: 2006
EN 55014–2: 1997 + A1: 2001
EN 60335–1
EN 60335–2–69
EN 61000–3–2: 2006 + A2: 2009
EN 61000–3–3: 2008
EN 62233: 2008
Alkalmazott összehangolt normák:
-
5.957-710
Alulírottak az ügyvezetés megbízásából és
felhatalmazásával lépnek fel.
A dokumentációért felelős személy:
S. Reiser
Alfred Kärcher GmbH & Co. KG
Alfred-Kärcher-Str. 28 - 40
71364 Winnenden (Germany)
Tel.: +49 7195 14-0
Fax: +49 7195 14-2212
Winnenden, 2010/07/14
- 4
81HU
Page 82

Műszaki adatok
NT 27/1 NT 27/1 Me
Hálózati feszültség V 220-240 220-240
Frekvencia Hz 50/60 50/60
Max. teljesítmény W 1380 1380
Névleges teljesítmény W 1200 1200
Tartály űrtartalom l 27 27
Folyadék töltési szintje l 14 14
Légmennyiség (max.) l/s 67 67
Nyomáshiány (max.) kPa (mbar) 20,8 (208) 20,8 (208)
Védelmi osztály -- II II
Szívótömlő csatlakozása (C-DN/C-ID) mm 35 35
hosszúság x szélesség x magasság mm 420 x 420 x
525
tömeg kg 7,5 8,2
Környezeti hőmérséklet (max.) °C +40 +40
Az EN 60335-2-69 szerint megállapított értékek
Hangnyomás szint L
Bizonytalanság K
pA
pA
Kéz-kar vibrációs kibocsátási érték m/s
Bizonytalanság K m/s
Hálózati
kábel
H05VV-F 2x1,0 mm
Alkatrész
szám
2
Kábelhosszú
ság
dB(A) 77 77
dB(A) 1 1
2
2
<2,5 <2,5
0,2 0,2
EUR 6.647-263.0 7,5 m
GB 6.647-264.0 7,5 m
CH 6.647-265.0 7,5 m
AUS 6.647-266.0 7,5 m
420 x 420 x
540
82 HU
- 5
Page 83

Před prvním použitím svého
zařízení si přečtěte tento
původní návod k používání, řiďte se jím a
uložte jej pro pozdější použití nebo pro
dalšího majitele.
– Před prvním uvedením do provozu
bezpodmínečně čtěte bezpečnostní
pokyny č. 5.956-249!
– V případě nedodržování provozních a
bezpečnostních pokynů mohou
vzniknout škody na přístroji a může
dojít k ohrožení osob přístroj
obsluhujících i ostatních.
– Při přepravních škodách ihned
informujte obchodníka.
Obsah
Ochrana životního prostředí CS - 1
Symboly použité v návodu k
obsluze
Používání v souladu s určením CS - 1
Prvky přístroje CS - 2
Uvedení do provozu CS - 2
Obsluha CS - 2
Transport CS - 3
Ukládání CS - 3
Ošetřování a údržba CS - 3
Pomoc při poruchách CS - 3
Záruka CS - 3
Příslušenství a náhradní díly CS - 3
ES prohlášení o shodě CS - 4
Technické údaje CS - 5
CS - 1
Ochrana životního prostředí
Obalové materiály jsou
recyklovatelné. Obal
nezahazujte do domovního
odpadu, ale odevzdejte jej k
opětovnému zužitkování.
Přístroj je vyroben z hodnotných
recyklovatelných materiálů,
které je třeba znovu využít.
Baterie, olej a podobné látky se
nesmějí dostat do okolního
prostředí. Použitá zařízení proto
odevzdejte na příslušných
sběrných místech
Informace o obsažených látkách
(REACH)
Aktuální informace o obsažených látkách
naleznete na adrese:
http://www.karcher.de/de/unternehmen/
umweltschutz/REACH.htm
Symboly použité v návodu k
obsluze
Pozor!
Pro bezprostředně hrozící nebezpečí, které
vede k těžkým fyzickým zraněním nebo k
smrti.
몇 Upozornění
Pro potencionálně nebezpečnou situaci,
která by mohla vést k těžkým fyzickým
zraněním nebo k smrti.
Pozor
Pro potencionálně nebezpečnou situaci,
která může vést k lehkým fyzickým
zraněním nebo k věcným škodám.
Používání v souladu s
určením
몇 Upozornění
Zařízení není vhodné k odsávání prachů
škodících zdraví.
– Vysavač je určen k vlhkému i mokrému
čištění ploch podlah a zdí.
– Přístroj je vhodný k použití v
průmyslových i jiných velkých
zařízeních, např. na stavbách,
průmyslových areálech,v dílnách a
půjčovnách.
- 1
83CS
Page 84

Prvky přístroje
1 typový štítek
2 Sít'ový kabel
3 Držák na sací trubku
4Držák na štěrbinovou hubici
5 Sací hadice
6 Uzamčení sací hlavy
7 Řídicí válec
8 Nádoba na nečistoty
9 Sací hrdlo
10 Hubice na čištění podlah
11 Sací hubice
12 Hlavní spínač
13 Vysávací hlavice
14 Držadlo
15 Kabelový hák
16 Násadka
17 Patronový filtr
18 Upevňovací matice
19 Plovák
Uvedení do provozu
Vysávání za sucha
Pozor
Při suchém vysávání je nezbytné vždy
nasadit patronový filtr.
– Při vysávání jemného prachu lze navíc
použít papírový filtrační sáček.
Vložení papírového filtračního sáčku
ilustrace
ilustrace
Î Odjistěte vysávací hlavici a sejměte ji.
Î Nasuňte papírový filtrační sáček.
Î Nasaďte vysávací hlavici a zajistěte ji.
Vysávání za mokra
Vložení pryžových chlopní
ilustrace
Î Demontáž kartáčových pruhů.
Î Vložte pryžové chlopně.
Upozornění: Strukturovaná strana
gumových chlopní musí směřovat ven.
Vyjměte papírový filtrační sáček
– Při vysávání mokrých nečistot je třeba
vždy papírový filtrační sáček vyjmout.
Vložení dalšího filtru
Î Odjistěte vysávací hlavici a sejměte ji.
Î Otočte sací hlavici o 180° a odložte.
Î Vyšroubujte upevňovací matice.
Î Patronový filtr sundejte.
ilustrace
Î Nasaďte upevňovací matice a utáhněte je.
Î Vložte další filtr.
Î Nasaďte vysávací hlavici a zajistěte ji.
Klipové spojení
ilustrace
Sací hadice je vybavena klipovým
systémem. Všechny díly příslušenství C35/C-DN-35 lze připojit.
Obsluha
Zapnutí přístroje
Î Zasuňte sít'ovou zástrčku do zásuvky.
Î Zapněte přístroj hlavním spínačem.
Vyprázdnění nádrže na nečistoty
– Sací kanál je vybaven plovákem.
– Při dosažení nejvyšší přípustné úrovně
špinavé vody se sání přeruší.
Î Vypněte přístroj hlavním spínačem.
Î Nádrž na nečistoty vyprázdněte.
Vypnutí zařízení
Î Vypněte přístroj hlavním spínačem.
Î Vytáhněte zástrčku ze sítě.
Po každém použití
Î Nádrž na nečistoty vyprázdněte.
Î Přístroj odsajte a utřete uvnitř i vně
vlhkým hadrem.
84 CS
- 2
Page 85

Uložení přístroje
ilustrace
Î Sací trubici, sací hadici a síťový kabel
skladujte podle vyobrazení.
Î Přístroj uložte v suché místnosti a
zabezpečte jej proti používání
nepovolanými osobami.
Transport
Pozor
Nebezpečí úrazu a nebezpečí poškození!
Dbejte na hmotnost přístroje při přepravě.
ilustrace
Î Přístroj přepravujte podle obrázku.
Î Při přepravě v dopravních prostředcích
zajistěte zařízení proti skluzu a
překlopení podle platných předpisů.
Ukládání
Pozor
Nebezpečí úrazu a nebezpečí poškození!
Dbejte na hmotnost přístroje při jeho
uskladnění.
Toto zařízení smí být uskladněno pouze v
uzavřených prostorách.
Ošetřování a údržba
Pozor!
Před každou prací na zařízení vždy zařízení
vypněte a vytáhněte síťovou zástrčku.
Výměna patronového filtru
Î Odjistěte vysávací hlavici a sejměte ji.
Î Otočte sací hlavici o 180° a odložte.
Î Vyšroubujte upevňovací matice.
Î Patronový filtr sundejte.
Î Nasaďte nové patronové filtry.
Î Nasaďte upevňovací matice a utáhněte
je.
Î Nasaďte vysávací hlavici a zajistěte ji.
Pomoc při poruchách
Pozor!
Před každou prací na zařízení vždy
zařízení vypněte a vytáhněte síťovou
zástrčku.
Sací čerpadlo neběží
Î Zkontrolujte kabel, zástrčku, pojistky a
zásuvku.
Î Přístroj zapněte.
Sací turbína běží, aale přístroj
nenasává
– Plovák uzavírá sací kanál.
Î Nádrž na nečistoty vyprázdněte.
Sací síla slábne
Î Odstraňte případná ucpání ze sací
hubice i trubice nebo patronového filtru.
Î Vyměňte papírový filtrační sáček.
Î Výměňte patronový filtr.
Při vysávání dochází k emisi prachu
Î Zkontrolujte správné usazení
patronového filtru.
Î Výměňte patronový filtr.
Záruka
V každé zemi platí záruční podmínky
vydané příslušnou distribuční společností.
Případné poruchy zařízení odstraníme
během záruční lhůty bezplatně, pokud byl
jejich příčinou vadný materiál nebo výrobní
závady. V případě uplatňování nároku na
záruku se s dokladem o zakoupení obraťte
na prodejce nebo na nejbližší oddělení
služeb zákazníkům.
Příslušenství a náhradní díly
– Smí se používat pouze příslušenství a
náhradní díly schválené výrobcem.
Originální příslušenství a originální
náhradní díly skýtají záruku
bezpečného a bezporuchového
provozu přístroje.
– Výběr nejčastěji vyžadovaných
náhradních díků najdete na konci
návodu k obsluze.
– Další informace o náhradních dílech
najdete na www.kaercher.com v části
Service.
- 3
85CS
Page 86

ES prohlášení o shodě
CEO
Head of Approbation
Tímto prohlašujeme, že níže označené
stroje odpovídají jejich základní koncepcí a
konstrukčním provedením, stejně jako
námi do provozu uvedenými konkrétními
provedeními, příslušným zásadním
požadavkům o bezpečnosti a ochraně
zdraví směrnic ES. Při jakýchkoli na stroji
provedených změnách, které nebyly námi
odsouhlaseny, pozbývá toto prohlášení
svou platnost.
Výrobek: Vysavač za mokra a vysavač
za sucha
Typ: 1.428-xxx
Příslušné směrnice ES:
2006/42/ES (+2009/127/ES)
2004/108/ES
Použité harmonizační normy
EN 55014–1: 2006
EN 55014–2: 1997 + A1: 2001
EN 60335–1
EN 60335–2–69
EN 61000–3–2: 2006 + A2: 2009
EN 61000–3–3: 2008
EN 62233: 2008
Použité národní normy
-
5.957-710
Podepsaní jednají v pověření a s plnou
mocí jednatelství
Osoba zplnomocněná sestavením
dokumentace:
S. Reiser
Alfred Kärcher GmbH & Co. KG
Alfred-Kärcher-Str. 28 - 40
71364 Winnenden (Germany)
Tel.: +49 7195 14-0
Fax: +49 7195 14-2212
Winnenden, 2010/07/14
86 CS
- 4
Page 87

Technické údaje
NT 27/1 NT 27/1 Me
Napětí sítě V 220-240 220-240
Frekvence Hz 50/60 50/60
Max. výkon W 1380 1380
Jmenovitý výkon W 1200 1200
Obsah nádoby l 27 27
Objem nádoby na kapalinu l 14 14
Množství vzduchu (max.) l/s 67 67
Podtlak (max.) kPa (mbar) 20,8 (208) 20,8 (208)
Ochranná třída -- II II
Přípojka sací hadice (C-DN/C-ID) mm 35 35
Délka x Šířka x Výška mm 420 x 420 x
525
Hmotnost kg 7,5 8,2
Okolní teplota (max.) °C +40 +40
Zjištěné hodnoty dle EN 60335-2-69
Hladina akustického tlaku L
Kolísavost K
pA
pA
Hodnota vibrace ruka-paže m/s
Kolísavost K m/s
Síťový
kabel
H05VV-F 2x1,0 mm
Č. dílu Délka kabelu
2
dB(A) 77 77
dB(A) 1 1
2
2
<2,5 <2,5
0,2 0,2
EUR 6.647-263.0 7,5 m
GB 6.647-264.0 7,5 m
CH 6.647-265.0 7,5 m
AUS 6.647-266.0 7,5 m
420 x 420 x
540
- 5
87CS
Page 88

Pred prvo uporabo Vaše
naprave preberite to originalno
navodilo za uporabo, ravnajte se po njem in
shranite ga za morebitno kasnejšo uporabo
ali za naslednjega lastnika.
– Pred prvim zagonom obvezno preberite
varnostna navodila št. 5.956-249!
– V primeru neupoštevanja navodila za
uporabo in varnostnih napotkov lahko
pride do poškodb na stroju in nevarnosti
za uporabnika in druge osebe.
– V primeru transportnih poškodb takoj
obvestite trgovca.
Vsebinsko kazalo
Varstvo okolja SL - 1
Simboli v navodilu za uporabo SL - 1
Namenska uporaba SL - 1
Elementi naprave SL - 2
Zagon SL - 2
Uporaba SL - 2
Transport SL - 3
Skladiščenje SL - 3
Nega in vzdrževanje SL - 3
Pomoč pri motnjah SL - 3
Garancija SL - 3
Pribor in nadomestni deli SL - 3
CE izjava SL - 4
Tehnični podatki SL - 5
Varstvo okolja
Embalaža je primerna za
recikliranje. Prosimo, da
embalaže ne odvržete med
gospodinjske odpadke, temveč
jo odložite v zbiralnik za
ponovno obdelavo.
Stare naprave vsebujejo
dragocene reciklirne materiale,
ki jih je treba odvajati za
ponovno uporabo. Baterije, olje
in podobne snovi ne smejo priti
v okolje. Zato stare naprave
zavrzite v ustrezne zbiralne
sisteme.
Opozorila k sestavinam (REACH)
Aktualne informacije o sestavinah najdete na:
http://www.karcher.de/de/unternehmen/
umweltschutz/REACH.htm
Simboli v navodilu za
uporabo
Nevarnost
Za neposredno grozečo nevarnost, ki vodi
do težkih telesnih poškodb ali smrti.
몇 Opozorilo
Za možno nevarno situacijo, ki bi lahko
vodila do težkih telesnih poškodb ali smrti.
Pozor
Za možno nevarno situacijo, ki lahko vodi
do lahkih poškodb ali materialne škode.
88 SL
- 1
Namenska uporaba
몇 Opozorilo
Aparat ni primeren za sesanje zdravju
škodljivega prahu.
– Ta sesalnik je namenjen mokremu in
suhemu čiščenju talnih in stenskih
površin.
– Ta naprava je primerna za obrtno
uporabo npr. na gradbiščih, v
industrijskih objektih, v delavnicah in
najemnih trgovinah.
Page 89

Elementi naprave
1 Tipska tablica
2 Omrežni kabel
3 Držalo za sesalne cevi
4 Držalo za šobo za čiščenje fug
5 Gibka sesalna cev
6 Blokiranje sesalne glave
7 Vrtljiva kolesca
8 Zbiralnik umazanije
9 Sesalni nastavek
10 Šoba za pranje tal
11 Sesalna cev
12 Glavno stikalo
13 Sesalna glava
14 Nosilni ročaj
15 Kljuka za kabel
16 Koleno
17 Patronski filter
18 Pritrditvena matica
19 Plovec
Odstranitev papirnate filtrske vrečke
– Pri sesanju mokre umazanije vedno
odstranite papirnato filtrsko vrečko.
Vstavljanje dodatnega filtra
Deblokirajte in snemite sesalno glavo.
Sesalno glavo zasukajte za 180° in jo
odložite.
Izvijte pritrditvene matice.
Odstranite patronski filter.
Slika
Vstavite pritrditveno matico in jo
pritegnite.
Vstavite dodatni filter.
Namestite sesalno glavo in jo blokirajte.
Spoj
Slika
Sesalna cev je opremljena s spojko. Na njo
lahko priklopite ves dodatni pribor z oznako
C-35/C-DN-35.
Uporaba
Zagon
Suho sesanje
Pozor
Pri suhem sesanju mora biti vedno
nataknjen patronski filter.
– Pri sesanju drobnega prahu lahko
dodatno uporabite papirnato vrečko.
Vstavljanje papirnate filtrske vrečke
Slika
Slika
Deblokirajte in snemite sesalno glavo.
Nataknite papirnato filtrsko vrečko.
Namestite sesalno glavo in jo blokirajte.
Mokro sesanje
Vstavljanje gumijastih brisalcev
Slika
Odstranite ščetine.
Vstavite gumijaste brisalce.
Opozorilo: Strukturirana stran gumijastih
nastavkov mora kazati navzven.
Vklop naprave
Vtaknite omrežni vtič.
Vklopite napravo na glavnem stikalu.
Praznjenje zbiralnika umazanije
– Sesalni kanal je opremljen s plovcem.
– Ko je v zbiralniku dosežen najvišji
dopusten nivo umazane vode, se
sesalni tok prekine.
Izklopite napravo na glavnem stikalu.
Zbiralnik umazanije izpraznite.
Izklop stroja
Izklopite napravo na glavnem stikalu.
Izvlecite omrežni vtič.
Po vsakem obratovanju
Zbiralnik umazanije izpraznite.
Napravo od znotraj in od zunaj
posesajte in obrišite z vlažno krpo.
- 2
89SL
Page 90

Shranjevanje naprave
Slika
Sesalne cevi, gibko sesalno cev in
omrežni kabel shranite v skladu s sliko.
Napravo pospravite v suh prostor in jo
zavarujte pred nepooblaščeno
uporabo.
Transport
Pozor
Nevarnost poškodbe in škode! Pri
transportu upoštevajte težo naprave.
Slika
Napravo transportirajte v skladu s sliko.
Pri transportu v vozilih napravo zavarujte
proti zdrsu in prevrnitvi v skladu z
vsakokratnimi veljavnimi smernicami.
Skladiščenje
Pozor
Nevarnost poškodbe in škode! Pri
shranjevanju upoštevajte težo naprave.
Ta naprava se sme shraniti le v notranjih
prostorih.
Nega in vzdrževanje
Nevarnost
Pred vsemi deli na napravi, izklopite
napravo in izvlecite omrežni vtič iz vtičnice.
Zamenjava patronskega filtra
Deblokirajte in snemite sesalno glavo.
Sesalno glavo zasukajte za 180° in jo
odložite.
Izvijte pritrditvene matice.
Odstranite patronski filter.
Nataknite nov patronski filter.
Vstavite pritrditveno matico in jo
pritegnite.
Namestite sesalno glavo in jo blokirajte.
Pomoč pri motnjah
Nevarnost
Pred vsemi deli na napravi, izklopite
napravo in izvlecite omrežni vtič iz vtičnice.
Sesalna turbnina ne teče
Preverite kabel, vtič, varovalko in
vtičnico.
Vklopite napravo.
Sesalna turbina obratuje, vendar
naprava ne sesa
– Plovec zapira sesalni kanal.
Zbiralnik umazanije izpraznite.
Sesalna moč upada
Odstranite zamašitev iz sesalne šobe,
sesalne cevi, sesalne gibke cevi ali
patronskega filtra.
Zamenjajte papirnato filtrsko vrečko.
Zamenjajte patronski filter.
Izstopanje prahu med sesanjem
Preverite pravilen položaj patronskega
filtra.
Zamenjajte patronski filter.
Garancija
V vsaki državi veljajo garancijski pogoji, ki
jih določa naše prodajno predstavništvo.
Morebitne motnje na napravi, ki so
posledica materialnih ali proizvodnih
napak, v času garancije brezplačno
odpravljamo. V primeru uveljavljanja
garancije, se z originalnim računom obrnite
na prodajalca oziroma najbližji uporabniški
servis.
Pribor in nadomestni deli
– Uporabljati se smejo le pribor in
nadomestni deli, ki jih dopušča
proizvajalec. Originalni pribor in
originalni nadomestni deli zagotavljajo
varno in nemoteno obratovanje
naprave.
– Izbor najpogosteje potrebnih
nadomestnih delov najdete na koncu
navodila za obratovanje.
– Dodatne informacije o nadomestnih
delih najdete na strani
www.kaercher.com v območju
"Service".
90 SL
- 3
Page 91

CE izjava
CEO
Head of Approbation
S to izjavo potrjujemo, da spodaj omenjeni
stroj zaradi svoje zasnove in načina
izdelave ustreza temeljnim varnostnim in
zdravstvenim zahtevam EU-standardov.
Ta izjava izgubi svojo veljavnost, če kdo
napravo spremeni brez našega soglasja.
Proizvod: Sesalnik za mokro in suho
Tip: 1.428-xxx
Zadevne ES-direktive:
2006/42/ES (+2009/127/ES)
2004/108/ES
Uporabljene usklajene norme:
EN 55014–1: 2006
EN 55014–2: 1997 + A1: 2001
EN 60335–1
EN 60335–2–69
EN 61000–3–2: 2006 + A2: 2009
EN 61000–3–3: 2008
EN 62233: 2008
Uporabni nacionalni standardi:
-
5.957-710
Podpisniki ravnajo po navodilih in s
pooblastilom vodstva podjetja.
sesanje
Pooblaščenec za dokumentacijo:
S. Reiser
Alfred Kärcher GmbH & Co. KG
Alfred-Kärcher-Str. 28 - 40
71364 Winnenden (Germany)
Tel.: +49 7195 14-0
Faks: +49 7195 14-2212
Winnenden, 2010/07/14
- 4
91SL
Page 92

Tehnični podatki
NT 27/1 NT 27/1 Me
Omrežna napetost V 220-240 220-240
Frekvenca Hz 50/60 50/60
Max. moč W 1380 1380
Nazivna moč W 1200 1200
Vsebina zbiralnika l 27 27
Količina polnjenja tekočine l 14 14
Količina zraka (max.) l/s 67 67
Podtlak (max.) kPa (mbar) 20,8 (208) 20,8 (208)
Razred zaščite -- II II
Priključek gibke sesalne cevi (C-DN/C-ID) mm 35 35
Dolžina x širina x višina mm 420 x 420 x
525
Teža kg 7,5 8,2
Okoljska temperatura (max.) °C +40 +40
Ugotovljene vrednosti v skladu z EN 60335-2-69
Nivo hrupa L
Negotovost K
pA
pA
Vrednost vibracij dlan-roka m/s
Negotovost K m/s
Omrežni
kabel
H05VV-F 2x1,0 mm
Št. delov Dolžina
2
dB(A) 77 77
dB(A) 1 1
2
2
<2,5 <2,5
0,2 0,2
kabla
EUR 6.647-263.0 7,5 m
GB 6.647-264.0 7,5 m
CH 6.647-265.0 7,5 m
AUS 6.647-266.0 7,5 m
420 x 420 x
540
92 SL
- 5
Page 93

Przed pierwszym użyciem
urządzenia należy przeczytać
oryginalną instrukcję obsługi, postępować
według jej wskazań i zachować ją do
późniejszego wykorzystania lub dla
następnego użytkownika.
– Przed pierwszym uruchomieniem
należy koniecznie przeczytać zasady
bezpieczeństwa nr 5.956-249!
– Nieprzestrzeganie wskazówek
zawartych w niniejszej instrukcji obsługi
i wskazówek bezpieczeństwa może
prowadzić do uszkodzenia urządzenia
oraz sytuacji niebezpiecznych dla
obsługującego lub innych osób.
– Ewentualne uszkodzenia transportowe
należy niezwłocznie zgłosić
sprzedawcy.
Spis treści
Ochrona środowiska PL - 1
Symbole w instrukcji obsługi PL - 1
Użytkowanie zgodne z
przeznaczeniem
Elementy urządzenia PL - 2
Uruchamianie PL - 2
Obsługa PL - 2
Transport PL - 3
Przechowywanie PL - 3
Czyszczenie i konserwacja PL - 3
Usuwanie usterek PL - 3
Gwarancja PL - 4
Wyposażenie dodatkowe i
części zamienne
Deklaracja UE PL - 4
Dane techniczne PL - 5
PL - 2
PL - 4
Ochrona środowiska
Materiał, z którego wykonano
opakowanie nadaje się do
powtórnego przetworzenia.
Prosimy nie wyrzucać
opakowania do śmieci z
gospodarstw domowych, lecz
oddać do recyklingu.
Zużyte urządzenia zawierają
cenne surowce wtórne, które
powinny być oddawane do
utylizacji. Akumulatory, olej i
tym podobne substancje nie
powinny przedostać się do
środowiska naturalnego.
Prosimy o utylizację starych
urządzeń w odpowiednich
placówkach zbierających
surowce wtórne.
Wskazówki dotyczące składników
(REACH)
Aktualne informacje dotyczące składników
znajdują się pod:
http://www.karcher.de/de/unternehmen/
umweltschutz/REACH.htm
Symbole w instrukcji obsługi
Niebezpieczeństwo
Przy bezpośrednim niebezpieczeństwie,
prowadzącym do ciężkich obrażeń ciała lub
do śmierci.
몇 Ostrzeżenie
Na możliwie niebezpieczną sytuację,
mogącą prowadzić do ciężkich obrażeń
ciała lub śmierci.
Uwaga
Na możliwie niebezpieczną sytuację,
mogącą prowadzić do lekkich obrażeń
ciała lub szkód materialnych.
- 1
93PL
Page 94

Użytkowanie zgodne z
przeznaczeniem
몇
Ostrzeżenie
Urządzenie nie nadaje się do odsysania
pyłów szkodliwych dla zdrowia.
– Odkurza przeznaczony jest do
czyszczenia na mokro i na sucho
powierzchni podłóg i ścian.
– Urządzenie przeznaczone jest do
zastosowania profesjonalnego, np. na
budowach, w instalacjach
przemysłowych, w warsztatach i
pomieszczeniach wynajmowanych.
Elementy urządzenia
1 Tabliczka identyfikacyjna
2 kabel sieciowy
3 Uchwyt na rury ssące
4 Uchwyt na dyszę szczelinową
5Wąż ssący
6 Ryglowanie głowicy ssącej
7Kółko skrętne
8 Zbiornik na zanieczyszczenia
9 Króciec ssący
10 Ssawka podłogowa
11 Rura ssąca
12 Wyłącznik główny
13 Głowica ssąca
14 uchwyt do noszenia
15 Hak kablowy
16 Krzywak
17 Nabój filtrujący
18 Nakrętka mocująca
19 Pływak
Uruchamianie
Odkurzanie na sucho
Uwaga
Przy odsysaniu na sucho zawsze musi być
nałożony nabój filtrujący.
– Przy odsysaniu drobnego kurzu można
dodatkowo używać papierowego
wkładu filtra.
Zakładanie papierowego wkładu filtra
Rysunek
Rysunek
Î Odblokować i zdjąć głowicę ssącą.
Î Włożyć papierowy wkład filtra.
Î Nałożyć i zablokować głowicę ssącą.
Odkurzanie na mokro
Zakładanie listew gumowych
Rysunek
Î Wymontować listwę szczotkową.
Î Zamontować ściągacz.
Wskazówka: Karbowana strona ściągacza
powinna być skierowana na zewnątrz.
Usuwanie wkładu filtra papierowego
– Przy odsysaniu mokrych zabrudzeń,
zawsze trzeba usunąć papierowy wkład
filtra.
Montaż filtra dodatkowego
Î Odblokować i zdjąć głowicę ssącą.
Î Przekręcić głowicę ssącą o 180° i
odłożyć.
Î Wykręcić nakrętki mocujące.
Î Wyjąć filtr naboju.
Rysunek
Î Założyć nakrętki mocujące i je dokręcić.
Î Założyć filtr dodatkowy.
Î Nałożyć i zablokować głowicę ssącą.
Złącze klipów
Rysunek
Wąż ssący zaopatrzony jest w system
zatrzaskowy. Podłączyć można wszystkie
elementy wyposażenia C-35/C-DN-35.
Obsługa
Włączenie urządzenia
Î Podłączyć urządzenie do zasilania.
Î Włączyć urządzenie za pomocą
wyłącznika głównego.
94 PL
- 2
Page 95

Opróżnić zbiornik na
zanieczyszczenia
– Kanał ssący wyposażony jest w pływak.
– Gdy osiągnięty zostaje najwyższy
dopuszczalny poziom brudnej wody,
ssanie zostaje przerwane.
Î Wyłączyć urządzenie przy użyciu
wyłącznika głównego.
Î Opróżnić zbiornik na zanieczyszczenia.
Wyłączanie urządzenia
Î Wyłączyć urządzenie przy użyciu
wyłącznika głównego.
Î Wyciągnąć wtyczkę z gniazda
zasilającego.
Po każdym użyciu
Î Opróżnić zbiornik na zanieczyszczenia.
Î Wyczyścić urządzenie od wewnątrz i od
zewnątrz poprzez odkurzenie i wytarcie
wilgotną szmatką.
Przechowywanie urządzenia
Rysunek
Î Rurę ssącą, wężyk do zasysania i kabel
sieciowy zachować zgodnie z
rysunkiem.
Î Odstawić urządzenie do suchego
pomieszczenia i zabezpieczyć przed
użytkowaniem przez osoby
nieuprawnione.
Transport
Uwaga
Niebezpieczeństwo zranienia i
uszkodzenia! Zwrócić uwagę na ciężar
urządzenia w czasie transportu.
Rysunek
Î Urządzenie transportować zgodnie z
rysunkiem.
Î W trakcie transportu w pojazdach
należy urządzenie zabezpieczyć przed
poślizgiem i przechyleniem zgodnie z
obowiązującymi przepisami.
Przechowywanie
Uwaga
Niebezpieczeństwo zranienia i
uszkodzenia! Zwrócić uwagę na ciężar
urządzenia przy jego przechowywaniu.
Urządzenie może być przechowywane
jedynie w pomieszczeniach wewnętrznych.
Czyszczenie i konserwacja
Niebezpieczeństwo
Przed przystąpieniem do wszelkich prac w
obrębie urządzenia należy wyłączyć
urządzenie i odłączyć przewód sieciowy od
zasilania.
Wymiana naboju filtrującego
Î Odblokować i zdjąć głowicę ssącą.
Î Przekręcić głowicę ssącą o 180° i
odłożyć.
Î Wykręcić nakrętki mocujące.
Î Wyjąć filtr naboju.
Î Założyć nowy filtr wkładkowy.
Î Założyć nakrętki mocujące i je dokręcić.
Nałożyć i zablokować głowicę ssącą.
Î
Usuwanie usterek
Niebezpieczeństwo
Przed przystąpieniem do wszelkich prac w
obrębie urządzenia należy wyłączyć
urządzenie i odłączyć przewód sieciowy od
zasilania.
Turbina ssąca nie pracuje
Î Należy skontrolować przewód,
wtyczkę, bezpieczniki i gniazdko.
Î Włączyć urządzenie.
Turbina ssąca funkcjonuje, ale
urządzenie nie ssie.
– Pływak zamyka kanał ssący.
Î Opróżnić zbiornik na zanieczyszczenia.
Moc ssania słabnie
Î Odetkać dyszę ssącą, rurę ssącą, wąż
ssący oraz filtr wkładkowy.
Î Wymienić papierowy wkład filtra.
Î Wymienić filtr wkładkowy.
- 3
95PL
Page 96

Podczas odsysania wydostaje
CEO
Head of Approbation
się pył
Î Sprawdzić poprawną pozycję
montażową filtra wkładkowego.
Î Wymienić filtr wkładkowy.
Gwarancja
W każdym kraju obowiązują warunki
gwarancji określone przez odpowiedniego
lokalnego dystrybutora. Ewentualne usterki
urządzenia usuwane są w okresie
gwarancji bezpłatnie, o ile spowodowane
są błędem materiałowym lub
produkcyjnym. W sprawach napraw
gwarancyjnych prosimy kierować się z
dowodem zakupu do dystrybutora lub do
autoryzowanego punktu serwisowego.
Wyposażenie dodatkowe i
części zamienne
– Stosować wyłącznie wyposażenie
dodatkowe i części zamienne
dopuszczone przez producenta.
Oryginalne wyposażenie i oryginalne
części zamienne gwarantują
bezpieczną i bezusterkową pracę
urządzenia.
– Wybór najczęściej potrzebnych cześci
zamiennych znajduje się na końcu
instrukcji obsługi.
– Dalsze informacje o częściach
zamiennych dostępne na stronie
internetowej www.kaercher.com w
dziale Serwis.
Deklaracja UE
Niniejszym oświadczamy, że określone
poniżej urządzenie odpowiada pod
względem koncepcji, konstrukcji oraz
wprowadzonej przez nas do handlu wersji
obowiązującym wymogom dyrektyw UE
dotyczącym wymagań w zakresie
bezpieczeństwa i zdrowia. Wszelkie nie
uzgodnione z nami modyfikacje urządzenia
powodują utratę ważności tego
oświadczenia.
Produkt: Odkurzacz do pracy na
mokro i sucho
Typ: 1.428-xxx
Obowiązujące dyrektywy WE
2006/42/WE (+2009/127/WE)
2004/108/WE
Zastosowane normy zharmonizowane
EN 55014–1: 2006
EN 55014–2: 1997 + A1: 2001
EN 60335–1
EN 60335–2–69
EN 61000–3–2: 2006 + A2: 2009
EN 61000–3–3: 2008
EN 62233: 2008
Zastosowane normy krajowe
-
5.957-710
Z upoważnienia zarządu przedsiębiorstwa.
Pełnomocnik dokumentacji:
S. Reiser
96 PL
Alfred Kärcher GmbH & Co. KG
Alfred-Kärcher-Str. 28 - 40
71364 Winnenden (Germany)
tel.: +49 7195 14-0
faks: +49 7195 14-2212
Winnenden, 2010/07/14
- 4
Page 97

Dane techniczne
NT 27/1 NT 27/1 Me
Napięcie zasilające V 220-240 220-240
Częstotliwość Hz 50/60 50/60
Moc maksymalna W 1380 1380
Moc znamionowa W 1200 1200
Pojemność zbiornika l 27 27
Pojemność cieczy l 14 14
Ilość powietrza (maks.) l/s 67 67
Podciśnienie (maks.) kPa (mbar) 20,8 (208) 20,8 (208)
Klasa ochrony -- II II
Przyłącze wężyka do zasysania (C-DN/C-ID) mm 35 35
Dług. x szer. x wys. mm 420 x 420 x
525
Masa kg 7,5 8,2
Temperatura otoczenia (maks.) °C +40 +40
Wartości określone zgodnie z EN 60335-2-69
Poziom ciśnienie akustycznego L
Niepewność pomiaru K
pA
pA
Drgania przenoszone przez kończyny górne m/s
Niepewność pomiaru K m/s
dB (A) 77 77
dB (A) 1 1
2
2
<2,5 <2,5
0,2 0,2
420 x 420 x
540
Kabel
sieciowy
H05VV-F 2x1,0 mm
Nr części Długość
kabla
EUR 6.647-263.0 7,5 m
GB 6.647-264.0 7,5 m
CH 6.647-265.0 7,5 m
AUS 6.647-266.0 7,5 m
2
- 5
97PL
Page 98

Înainte de prima utilizare a
aparatului dvs. citiţi acest
instrucţiunil original, respectaţi
instrucţiunile cuprinse în acesta şi păstraţil pentru întrebuinţarea ulterioară sau pentru
următorii posesori.
– Înainte de prima utilizare citiţi neapărat
măsurile de siguranţă nr. 5.956-249!
– În cazul nerespectării instrucţiunilor de
utilizare şi a măsurilor de siguranţă,
aparatul poate fi deteriorat şi siguranţa
persoanei care utilizează aparatul,
respectiv a altor persoane, poate fi
pusă în pericol.
– În cazul în care aparatul a fost
deteriorat în timpul transportului,
informaţi imediat comerciantul.
Cuprins
Protecţia mediului înconjurător RO - 1
Simboluri din manualul de
utilizare
Utilizarea corectă RO - 1
Elementele aparatului RO - 2
Punerea în funcţiune RO - 2
Utilizarea RO - 2
Transport RO - 3
Depozitarea RO - 3
Îngrijirea şi întreţinerea RO - 3
Remedierea defecţiunilor RO - 3
Garanţie RO - 4
Accesorii şi piese de schimb RO - 4
Declaraţia CE RO - 4
Date tehnice RO - 5
RO - 1
Protecţia mediului
înconjurător
Materialele de ambalare sunt
reciclabile. Ambalajele nu
trebuie aruncate în gunoiul
menajer, ci trebuie duse la un
centru de colectare şi
revalorificare a deşeurilor.
Aparatele vechi conţin materiale
reciclabile valoroase, care pot fi
supuse unui proces de
revalorificare. Bateriile, uleiul şi
substanţele asemănătoare nu
trebuie să ajungă în mediul
înconjurător. Din acest motiv, vă
rugăm să apelaţi la centrele de
colectare abilitate pentru
eliminarea aparatelor vechi.
Observaţii referitoare la materialele
conţinute (REACH)
Informaţii actuale referitoare la materialele
conţinute puteţi găsi la adresa:
http://www.karcher.de/de/unternehmen/
umweltschutz/REACH.htm
Simboluri din manualul de
utilizare
Pericol
Pericol iminet, care duce la vătămări
corporale grave sau moarte.
몇 Avertisment
Posibilă situaţie periculoasă, care ar putea
duce la vătămări corporale grave sau
moarte.
Atenţie
Posibilă situaţie periculoasă, care ar putea
duce la vătămări corporale uşoare sau
pagube materiale.
Utilizarea corectă
몇 Avertisment
Aparatul nu este prevăzut pentru aspirarea
pulberilor nocive.
– Aspiratorul este proiectat pentru
curăţarea umedă şi uscată a podelelor
şi a pereţilor.
– Acest aparat poate fi folosit în domeniul
comercial, de exemplu pe şantiere, în
domeniul industrial, în ateliere şi
magazine de închiriat aparatură.
98 RO
- 1
Page 99

Elementele aparatului
1Plăcuţa de tip
2 Cablu de reţea
3 Suport tuburi de aspiraţie
4 Suport duză pentru rosturi
5 Furtun pentru aspirare
6Zăvor cap de aspirare
7Rolă de ghidare
8 Recipient pentru murdărie
9 Ştuţul de aspirare
10 Duză pentru sol
11 Tub de aspirare
12 Întrerupător principal
13 Cap de aspirare
14 Mâner pentru transport
15 Cârlig pentru cablu
16 Cot
17 Filtru-cartuş
18 Piuliţă de fixare
19 Plutitorul
Punerea în funcţiune
Aspirarea uscată
Atenţie
În timpul operaţiunii de aspirare uscată,
filtrul-cartuş trebuie să fie montat.
– Când se aspiră praf fin, se poate folosi
în plus şi un sac de filtrare din hârtie.
Montarea sacului de filtrare din hârtie
Figura
Figura
Î Deblocaţi capul de aspirare şi
îndepărtaţi-l.
Î Aplicaţi sacul de filtrare din hârtie.
Î Puneţi capul de aspirare la loc şi
blocaţi-l.
Aspirarea umedă
Montarea lamelor de cauciuc
Figura
Î Demontaţi peria.
Î Montaţi lamelele de cauciuc.
Notă: Porţiunea texturată a lamelei de
cauciuc trebuie să fie spre exterior.
Scoaterea sacului de filtrare din hârtie
– Când aspiraţi murdărie umedă, scoateţi
întotdeauna sacul filtrant din hârtie.
Montarea filtrului suplimentar
Î Deblocaţi capul de aspirare şi
îndepărtaţi-l.
Î Rotiţi capul de aspirare cu 180° şi
puneţi-l deoparte.
Î Deşurubaţi piliţa de fixare.
Î Scoateţi filtrul-cartuş.
Figura
Î Puneţi piuliţa de fixare la loc şi
străngeţi-o.
Î Montaţi filtrul suplimentar.
Î Puneţi capul de aspirare la loc şi
blocaţi-l.
Sistemul de prindere
Figura
Furtunul de aspirare este prevăzut cu un
sistem de prindere cu cleme. Toate
accesoriile C-35/C-DN-35 pot fi prinse.
Utilizarea
Pornirea aparatului
Î Introduceţi ştecherul în priză.
Î Porniţi aparatul de la întrerupătorul
principal.
Golirea rezervorului de mizerie
– Canalul de aspirare este prevăzut cu un
plutitor.
– Când apa murdară atinge nivelul maxim
în rezervor, procesul de aspirare este
întrerupt.
Î Opriţi aparatul de la întrerupătorul
principal.
Î Goliţi recipientul în care este colectată
mizeria.
- 2
99RO
Page 100

Oprirea aparatului
Î Opriţi aparatul de la întrerupătorul
principal.
Î Scoateţi ştecherul din priză.
După fiecare utilizare
Î Goliţi recipientul în care este colectată
mizeria.
Î Interiorul şi exteriorul aparatului se
curăţă prin aspirare şi ştergere cu o
cârpă umedă.
Depozitarea aparatului
Figura
Î Ţevile de aspirare, furtunul de aspirare
şi cablul de alimentare se depozitează
conform prezentării din imagine.
Î Aparatul se va depozita într-o încăpere
uscată. În plus, se va asigura că acesta
nu poate fi folosit de persoane
neautorizate.
Transport
Atenţie
Pericol de rănire şi deteriorare a aparatului!
La transport ţineţi cont de greutatea
aparatului.
Figura
Î Transportaţi aparatul conform
ilustraţiei.
Î În cazul transportării în vehicule
asiguraţi aparatul contra derapării şi
răsturnării conform normelor în vigoare.
Depozitarea
Atenţie
Pericol de r
La depozitare ţineţi cont de greutatea
aparatului.
Aparatul poate fi depozitat doar în spaţiile
interioare.
ănire şi deteriorare a aparatului!
Îngrijirea şi întreţinerea
Schimbarea filtrului-cartuş
Î Deblocaţi capul de aspirare şi
îndepărtaţi-l.
Î Rotiţi capul de aspirare cu 180° şi
puneţi-l deoparte.
Î Deşurubaţi piliţa de fixare.
Î Scoateţi filtrul-cartuş.
Î Aplicaţi filtrul-cartuş nou.
Î Puneţi piuliţa de fixare la loc şi
străngeţi-o.
Î Puneţi capul de aspirare la loc şi
blocaţi-l.
Remedierea defecţiunilor
Pericol
Înaintea tuturor lucrărilor la aparat, opriţi
aparatul şi scoateţi ştecherul din priză.
Turbina aspiratoare nu
funcţionează
Î Verificaţi siguranţa, cablul, ştecherul şi
priza.
Î Porniţi aparatul.
Turbina aspiratoare funcţionează,
dar aparatul nu aspiră
– Plutitorul obturează canalul de aspirare.
Î Goliţi recipientul în care este colectată
mizeria.
Puterea de aspirare scade
Î Desfundaţi filtrul-cartuş, duza, furtunul
sau tubul de aspirare.
Î Schimbaţi sacul de filtrare din hârtie.
Î Schimbaţi filtrul-cartuş.
În timpul aspirării iese praf
Î Verificaţi dacă filtrul-cartuş este montat
corect.
Î Schimbaţi filtrul-cartuş.
Pericol
Înaintea tuturor lucrărilor la aparat, opriţi
aparatul şi scoateţi ştecherul din priză.
100 RO
- 3
 Loading...