

Page 1
DE
EN
MC 6580D
DAB+/UKW-Radio, CD/MP3, BT, USB | Bedienungsanleitung
DAB+/FM Radio, CD/MP3, BT, USB | User Manual
Page 2

Page 3

Vorwort
Vielen Dank, dass Sie sich für dieses Produkt entschieden haben. Bitte lesen Sie diese
Bedienungsanleitung sorgfältig, damit Sie in der Lage sind, die maximale Leistungsfähigkeit dessen
auszuschöpfen und die Sicherheit bei Installation, Verwendung und Wartung gewährleistet wird.
Bewahren Sie diese Bedienungsanleitung so auf, dass Sie sie immer griffbereit haben.
DE
Unsere Hotline für technische Fragen: 07082 / 925420
(Mo. – Do.: 8.00 – 16.30 Uhr | Fr.: 8.00 – 15.00 Uhr)
Bitte machen Sie von dieser Hotline Gebrauch, da technische Probleme meist hier schon behoben werden können, ohne dass Sie Ihr Gerät einsenden müssen.
Internet: www.karcher-products.de
E-Mail: service@karcher-products.de
Karcher AG | Gewerbestr. 19 | 75217 Birkenfeld
DE | 3
Page 4

Sicherheitshinweise
1. Bedienungsanleitung lesen – Lesen Sie die Bedienungsanleitung aufmerksam, um sich mit der
Bedienung des Gerätes vertraut zu machen.
2. Bedienungsanleitung aufbewahren – Bewahren Sie die Bedienungsanleitung sorgfältig auf.
3. Hinweise beachten – Beachten Sie alle Hinweise und Anweisungen in der Bedienungsanlei-
tung.
4. Wasser und Feuchtigkeit – Das Gerät darf nicht in der Nähe von Wasser (z. B. einer Bade-
wanne, einem Waschbecken, einem Schwimmbecken, etc.) oder an feuchten Orten, bzw. in
tropischem Klima verwendet werden. Stellen Sie keine mit Flüssigkeiten befüllten Objekte oder
Gefäße (z. B. Vasen) auf das Gerät. Setzen Sie das Gerät weder Tropf- noch Spritzwasser aus.
5. Aufstellung – Das Gerät darf nur auf einer stabilen, ebenen Oberäche aufgestellt werden. Plat-
zieren Sie das Gerät so, dass es keinen Erschütterungen ausgesetzt werden kann.
6. Wandmontage – Eine Wand- oder Deckenmontage darf nur dann erfolgen, wenn das Gerät
dafür vorgesehen ist.
7. Belüftung – Stellen Sie das Gerät immer so auf, dass die Lüftungsöffnungen nicht blockiert oder
verdeckt (z. B. von einem Vorhang, einer Decke, einer Zeitung, etc.) werden. Das Gerät darf z.
B. nicht auf einem Bett, Sofa, Teppich, etc. aufgestellt werden. Für eine ausreichende Belüftung
sollte ein Freiraum von mindestens 5 cm um das Gerät herum eingehalten werden.
8. Hitze – Das Gerät darf nicht in die Nähe von Hitzequellen, wie z. B. einer Heizung, einem Herd
oder anderen Geräten gelangen.
9. Stromversorgung – Das Gerät darf nur mit der auf der Geräterückseite angegebenen Span-
nung betrieben werden.
10. Kabel & Stecker – Das Netzkabel und der Netzstecker müssen immer in einwandfreiem Zustand
sein. Der Netzstecker muss jederzeit erreichbar sein, um das Gerät vom Netz trennen zu können.
Sämtliche Kabel sollten immer so ausgelegt werden, dass diese keine Stolperfalle darstellen und
nicht beschädigt werden können. Stellen Sie keine Objekte auf Kabel. Wandsteckdosen, Verlängerungskabel und Mehrfachsteckerleisten dürfen niemals überbelegt werden.
11. Reinigung – Reinigen Sie das Gerät ausschließlich mit einem trockenen, weichen und sauberen
Tuch. Verwenden Sie niemals chemische Reinigungsmittel. Ziehen Sie vor dem Reinigen den
Netzstecker.
12. Nichtverwendung – Wenn Sie das Gerät für längere Zeit nicht verwenden, ziehen Sie den
Netzstecker.
13. Eintritt von Objekten oder Flüssigkeiten – Es dürfen keine Objekte in das Gehäuse des Ge-
rätes gelangen. Das Gerät darf niemals in Kontakt mit irgendwelchen Flüssigkeiten gelangen.
14. Wann Sie eine Servicestelle aufsuchen sollten – Ziehen Sie umgehend den Netzstecker und
suchen Sie eine qualizierte Servicestelle auf, wenn einer der folgenden Ereignisse eintritt:
a) Wenn der Netzstecker oder das Netzkabel beschädigt ist.
b) Wenn Objekte in das Gehäuse eingedrungen sind oder das Gerät in Kontakt mit einer Flüs-
sigkeit war.
c) Wenn das Gerät nicht ordnungsgemäß funktioniert. Nehmen Sie selbst nur solche Einstel-
lungen vor, die in dieser Bedienungsanleitung erklärt werden.
d) Wenn das Gerät heruntergefallen ist oder in sonstiger Weise einer Erschütterung ausge-
15. Reparaturen – Reparaturen und Wartungsarbeiten dürfen nur von qualiziertem Fachpersonal
16. Offenes Feuer – Halten Sie das Gerät fern von offenem Feuer. Stellen Sie keine brennenden
17. Gewitter – Während eines Gewitters sollten Sie den Netzstecker ziehen.
18. Sicherheitscheck – Nach einer Reparatur sollte der durchführende Techniker einen Sicherheits-
19. Batterien – Setzen Sie Batterien immer richtig gepolt in elektrische Geräte ein. Explosionsge-
setzt war.
durchgeführt werden. Versuchen Sie niemals, das Gerät selbst zu reparieren. Öffnen Sie niemals
das Gehäuse.
Kerzen oder ähnliches auf das Gerät.
check des Gerätes vornehmen, um zu versichern, dass das Gerät einwandfrei funktioniert.
fahr wenn Batterien falsch eingesetzt werden. Ersetzen Sie alte Batterien stets mit neuen des
gleichen Typs. Verwenden Sie alte und neue Batterien nie gleichzeitig. Alte Batterien gehören
nicht in den Hausmüll, sondern müssen separat in den dafür vorgesehenen Behältern entsorgt
4 | DE
Page 5
werden. Batterien dürfen nicht übermäßiger Hitze, wie z. B. durch Sonnenschein, Feuer o. ä.
ausgesetzt werden.
20. Lautstärke – Um Hörschäden vorzubeugen, vermeiden Sie es, zu lange bei hohen Lautstärken
zu hören.
21. Kopfhörer (sofern anwendbar) – Eine zu hohe Lautstärke bei Verwendung von Ohr- oder Kopf-
hörern kann zu Hörschäden führen.
WARNUNG: Um die Gefahr eines
VORSICHT
GEFAHR EINES ELEKTRO-
SCHOCKS
WARNUNG: Um das Risiko eines Feuers oder
elektrischen Schlags zu verringern, setzen Sie dieses
Gerät niemals Wasser, Regen oder Feuchtigkeit aus.
elektrischen Schlags zu verringern, öffnen
Sie niemals das Gehäuse dieses Gerätes.
Versuchen Sie niemals, das Gerät selbst
zu reparieren. Wartungsarbeiten und
Reparaturen dürfen ausschließlich von
qualiziertem Fachpersonal durchgeführt
werden.
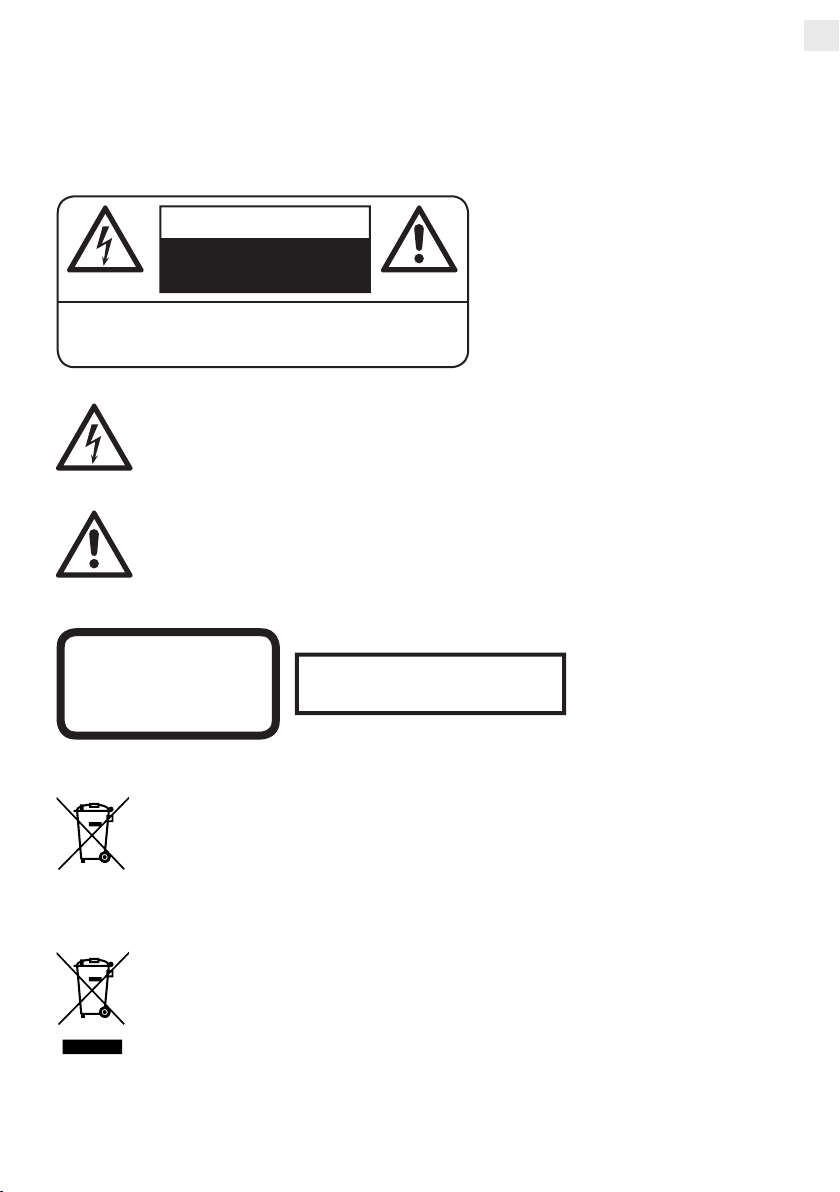
Dieses Symbol weist den Benutzer auf gefährliche Spannung innerhalb des Gerätes hin.
Es besteht die Gefahr eines elektrischen Schlags.
Dieses Symbol weist den Benutzer auf Teile hin, deren Funktion und Wartung genauestens
beschrieben sind.
DE
CLASS 1 LASER PRODUCT
LASER KLASSE 1
APPAREIL A LASER DE CLASS 1
LUOKAN 1 CLASSLAITE
KLASS 1 LASERAPPARAT
Batterien und Akkus
Batterien und Akkus dürfen nicht mit dem normalen Hausmüll entsorgt werden. Jeder Ver-
braucher ist verpichtet, alte Batterien und Akkus bei einer Sammelstelle seiner Gemeinde,
seines Stadtteils oder im Handel abzugeben, so dass sie einer umweltschonenden Entsorgung zugeführt werden können.
Entsorgung von Elektro- und Elektronikaltgeräten
Dieses Symbol auf dem Produkt weist darauf hin, dass dieses nicht zusammen mit
dem normalen Hausmüll entsorgt werden darf. Für zu entsorgende Elektro- und
Elektronikaltgeräte gibt es ein besonderes, kostenfreies Entsorgungssystem. Weitere
Informationen erhalten Sie von Ihrem lokalen Entsorgungsunternehmen oder von dem
Händler, bei dem Sie dieses Produkt erworben haben. Mit der getrennten Entsorgung
helfen Sie, die Umwelt und Gesundheit Ihrer Mitmenschen zu schützen.
SEHEN SIE NIEMALS DIREKT IN
DEN LASERSTRAHL!
DE | 5
Page 6
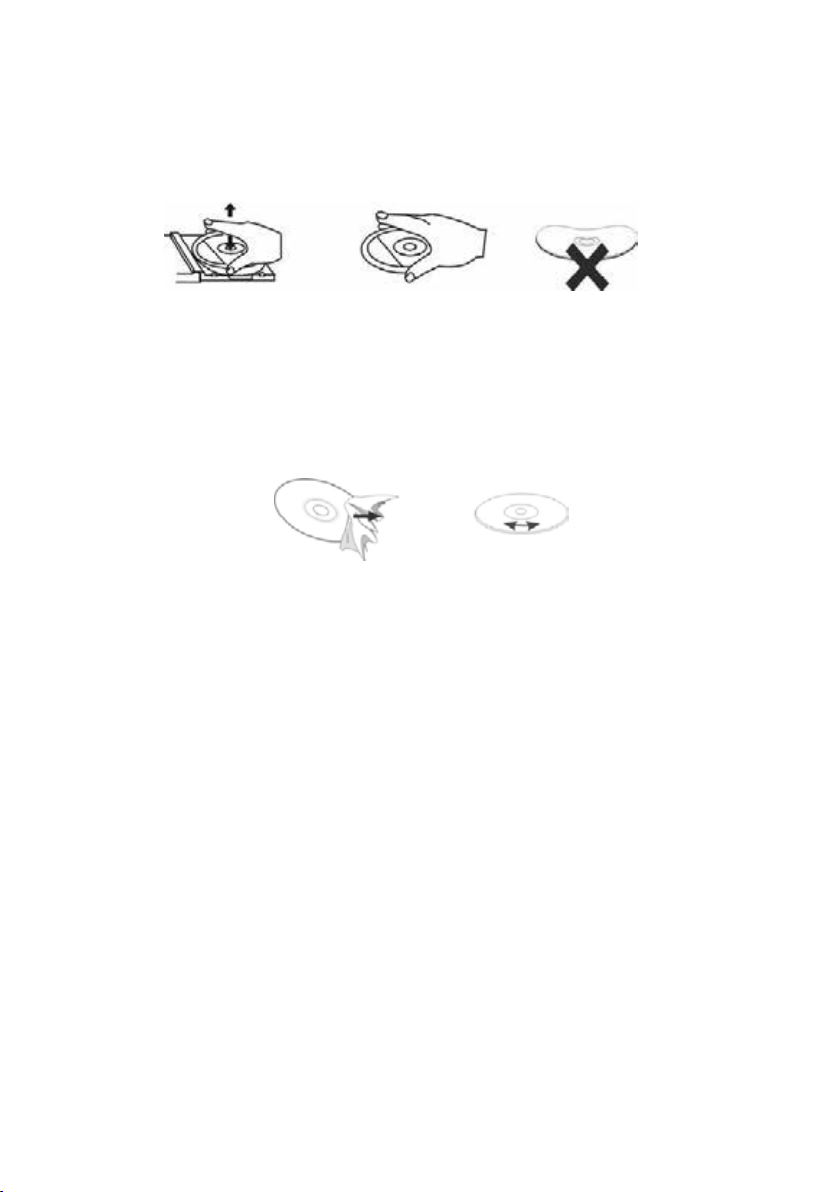
1. Umgang mit Disks
• Das Disk-Fach Ihres Gerätes muss stets geschlossen sein, sodass kein Staub und Schmutz eindringen können, die die Linse beschädigen würden.
• Berühren Sie niemals die bespielte Seite einer Disk.
• Bekleben und beschreiben Sie niemals eine Disk.
• Biegen Sie Disks nicht.
• Halten Sie Disks immer an deren äußeren Kanten.
2. Aufbewahrung von Disks
• Bewahren Sie Disks stets in ihren jeweiligen Schutzhüllen auf.
• Setzen Sie Disks niemals dem direkten Sonnenlicht, Staub, Schmutz, hohen Temperaturen, hoher
Luftfeuchtigkeit oder Nässe aus.
3. Reinigen von Disks
• Sollte eine Disk einmal verschmutzt sein, so verwenden Sie zum Säubern ein sauberes, trockenes
Tuch.
• Ziehen Sie das Tuch vorsichtig von der Mitte der Disk zur äußeren Kante:
Richtig Falsch
• Verwenden Sie niemals chemische Reinigungsmittel, Wasser, Verdünnungsmittel oder antistatisches Spray.
4. Kompatibilität
• Aufgrund der Vielzahl von Komprimierungsverfahren kann es vorkommen, dass vereinzelte Disks
nicht wiedergegeben werden können.
HINWEISE ZU DIESER BEDIENUNGSANLEITUNG
1. Diese Bedienungsanleitung wird vom Hersteller ohne jegliche Gewährleistung veröffentlicht. Korrekturen und Änderungen dieser Bedienungsanleitung zur Beseitigung typographischer Fehler
und redaktioneller Ungenauigkeiten sowie aufgrund von (technischen) Verbesserungen (Änderungen) der Geräte können vom Hersteller jederzeit ohne Ankündigung vorgenommen werden.
Änderungen dieser Art werden in zukünftigen Ausgaben dieser Bedienungsanleitung berücksichtigt. Alle Rechte vorbehalten.
2. Alle Abbildungen dienen ausschließlich der Illustration und zeigen nicht immer die exakte Darstellung des Artikels.
3. Dieses Gerät ist nicht dafür bestimmt, durch Personen (einschließlich Kinder) mit eingeschränkten physischen, sensorischen oder geistigen Fähigkeiten oder mangels Erfahrung und / oder
mangels Wissen benutzt zu werden, es sei denn, sie werden durch eine für ihre Sicherheit
zuständige Person beaufsichtigt oder erhielten von ihr Anweisung, wie das Gerät zu benutzen ist.
Kinder sollten beaufsichtigt werden, um sicherzustellen, dass sie nicht mit dem Gerät spielen.
WEITERE HINWEISE ZUM GERÄT
Einstellen einer sicheren Lautstärke
• Beim ständigen Hören lauter Musik gewöhnt sich Ihr Gehör daran und lässt die Lautstärke geringer erscheinen.
• Was normal erscheint, kann schon lange zu laut und gesundheitsschädlich sein.
• Stellen Sie zu Ihrer eigenen Sicherheit die Lautstärke niedrig ein.
• Erhöhen Sie die Lautstärke langsam.
6 | DE
Page 7
• Die Hörschäden können weitreichend und nicht heilbar sein.
• Wenden Sie sich bei Hörproblemen bitte unverzüglich an Ihren Hausarzt.
Kondensation
• Beim Umsetzen des Geräts von einer kalten in eine warme Umgebung kann es zu Kondensationsbildung kommen. In diesem Fall sind Fehlfunktionen nicht auszuschließen. Schalten Sie das
Gerät nicht ein und benutzen es für etwa 1 Stunde nicht, bis es ausgetrocknet ist.
Energie sparen
• Bei längerer Nichtbenutzung den Netzstecker aus der Steckdose ziehen.
• Wenn in irgendeinem Modus (außer Radio) etwa 15 Minuten lang keine Wiedergabe stattndet
und keine Taste gedrückt wird, schaltet sich das Gerät automatisch in den Standby-Modus. Um
das Gerät wieder einzuschalten, drücken Sie die Taste POWER.
Auspacken
• Nehmen Sie Ihr Gerät vorsichtig aus der Verpackung. Sie sollten die Verpackung zur weiteren
Verwendung aufheben.
• Entfernen Sie vorsichtig etwaige Schutzkartons und Schutzfolien.
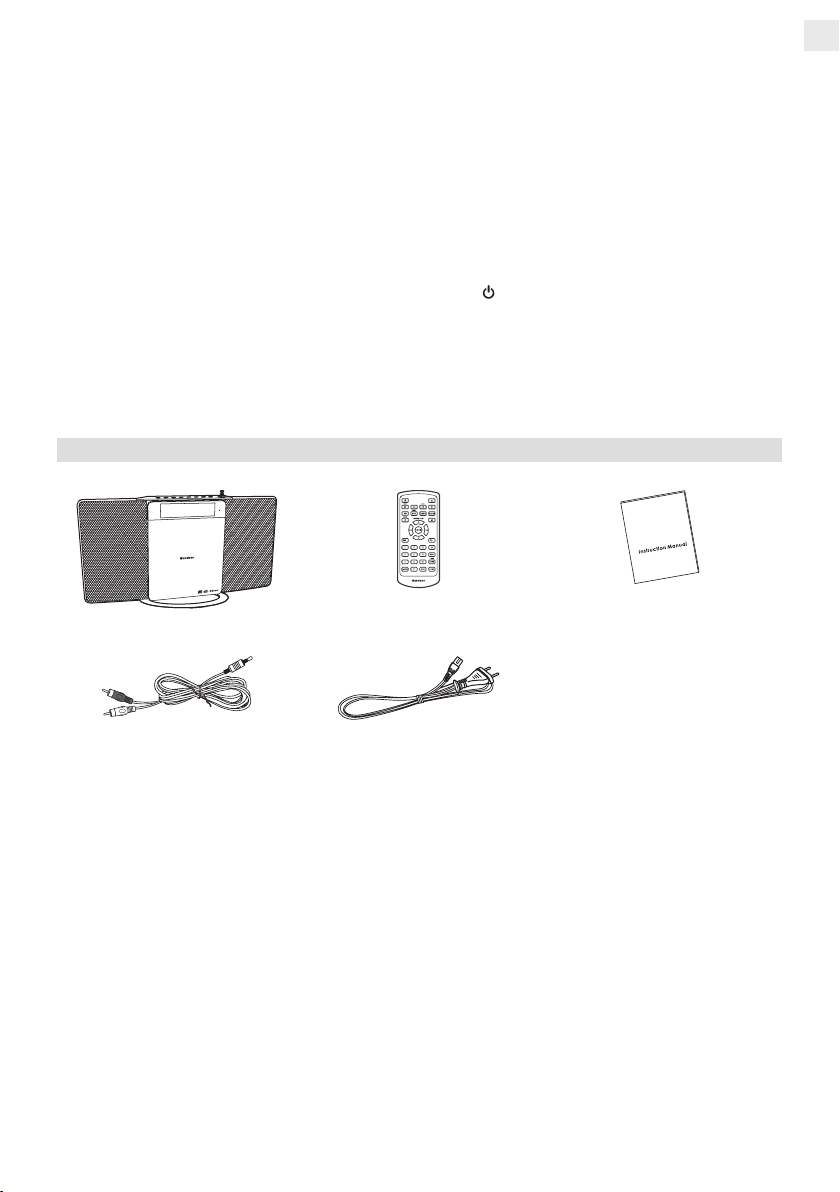
Lieferumfang
DE
Anlage Fernbedienung Bedienungsanleitung
RCA auf 3,5 mm Audiokabel Netzkabel
DE | 7
Page 8
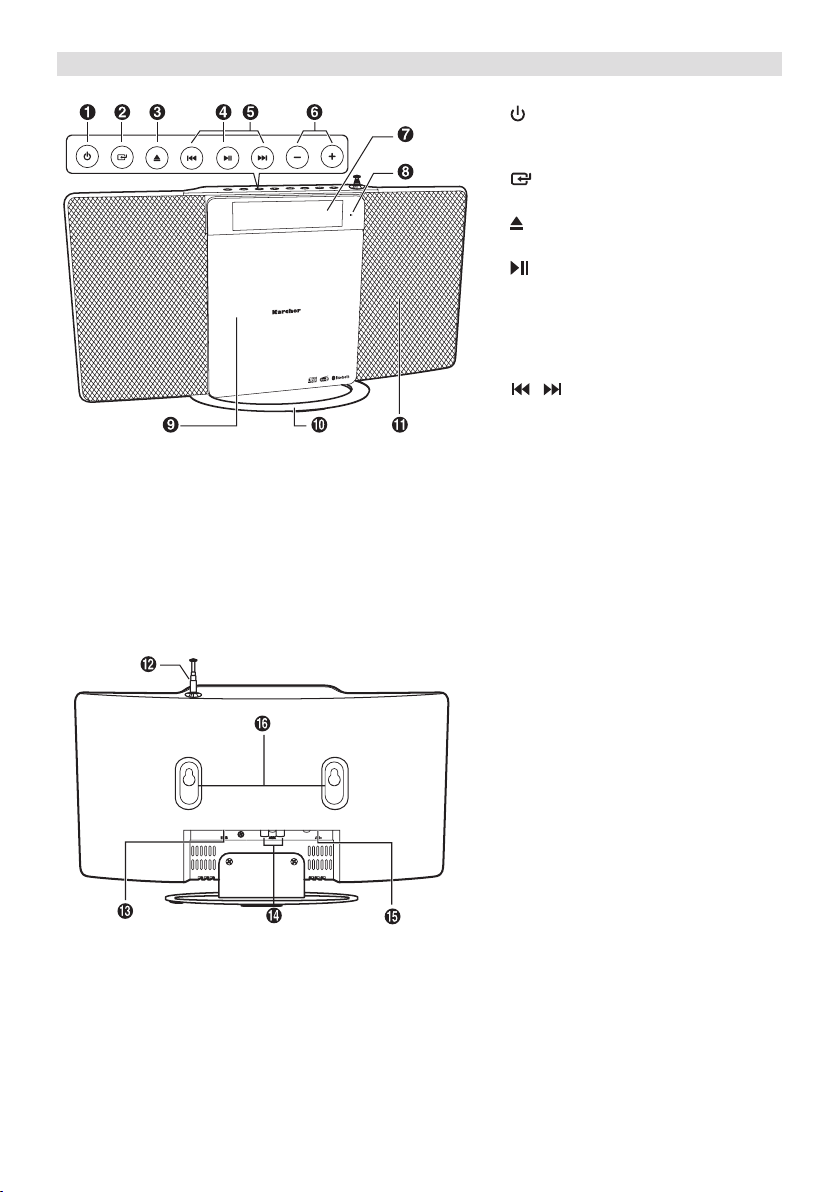
Bedienelemente
1.
POWER
Ein-/ausschalten des Gerätes
(Standby-Modus).
2.
SOURCE
Auswahl der Funktion.
3.
Öffnen und schließen des CD-Fachs.
4.
Wiedergabe starten/pausieren/for-
setzen.
Eine Auswahl bestätigen.
Im Bluetooth-Modus gedrückt halten,
um zu koppeln.
5.
/
Im CD/USB/Bluetooth-Modus vorherigen/nächsten Titel springen.
Im CD/USB-Modus gedrückt halten
für Schnellvorlauf/Schnellrücklauf.
Im FM-Modus die Frequenz einstellen.
6. VOL+/VOL-
Lautstärke erhöhen/verringern.
7. Display
8. Fernbedienungssensor
9. CD-Fach
10. Standfuß
11. Lautsprecher
12. Antenne
13. USB-Anschluss
Wiedergabe von MP3-Dateien von
USB.
14. AUX (L/R)-Anschluss
Anschließen externer Audiogeräte.
15. Netzanschluss
Anschließen des Netzsteckers.
16. Wandaufhängung
8 | DE
Page 9
Fernbedienung
1.
POWER
Ein-/ausschalten des Gerätes (StandbyModus).
2. FUNKTIONSTASTEN
Auswahl der Funktion.
3. INFO
Anzeigen von Informationen
4. INTRO/SCAN
Intro-Funktion ein-/ausschalten.
Im FM-/DAB-Modus nach Sendern suchen.
5.
/ MENU
Wiedergabe beenden.
Im Standby-Modus gedrückt halten, um das
Menü zur Uhrzeitsynchronisation zu öffnen.
Menü im DAB/FM-Modus öffnen.
6. ▲, ▼
Auf/ab navigieren.
Vorherigen/nächsten Sender aufrufen.
Uhrzeit einstellen.
Zum nächsten/vorherigen Album springen.
7. Zifferntasten (0-9)
Im CD/USB-Modus Direktauswahl eines
Titels.
Im FM/DAB-Modus Auswahl eines gespeicherten Senders.
8. DIMMER
Einstellen der Display-Helligkeit.
9.
Öffnen und schließen des CD-Fachs.
10. SHUFFLE
Zufallswiedergabe ein-/ausschalten.
11. REPEAT
Zwischen Wiederholmodi wählen.
12.
Ton aus-/einschalten.
13.
/ PAIR
Wiedergabe starten/pausieren/forsetzen.
Im Bluetooth-Modus gedrückt halten, um zu
koppeln.
14.
/
Im CD/USB/Bluetooth-Modus vorherigen/
nächsten Titel springen.
Im CD/USB-Modus gedrückt halten für
Schnellvorlauf/Schnellrücklauf.
Im FM-Modus die Frequenz einstellen.
Im Menü Optionen auswählen.
DE
15. VOL+/VOL-
Lautstärke erhöhen/verringern.
16. EQ
Equalizer-Voreinstellung auswählen
17. BASS
Extra-Bass ein-/ausschalten.
18. SLEEP/TIMER
Sleep-Timer einstellen.
Im Standby-Modus gedückt halten, um den
Wecker einzustellen.
19. CLOCK
Im Standby-Modus gedrückt halten, um die
Uhrzeit manuell einzustellen.
Während der Wiedergabe drücken, um die
Uhrzeit anzuzeigen.
20. PROG
Titelreihenfolge programmieren.
Radiosender speichern.
DE | 9
Page 10
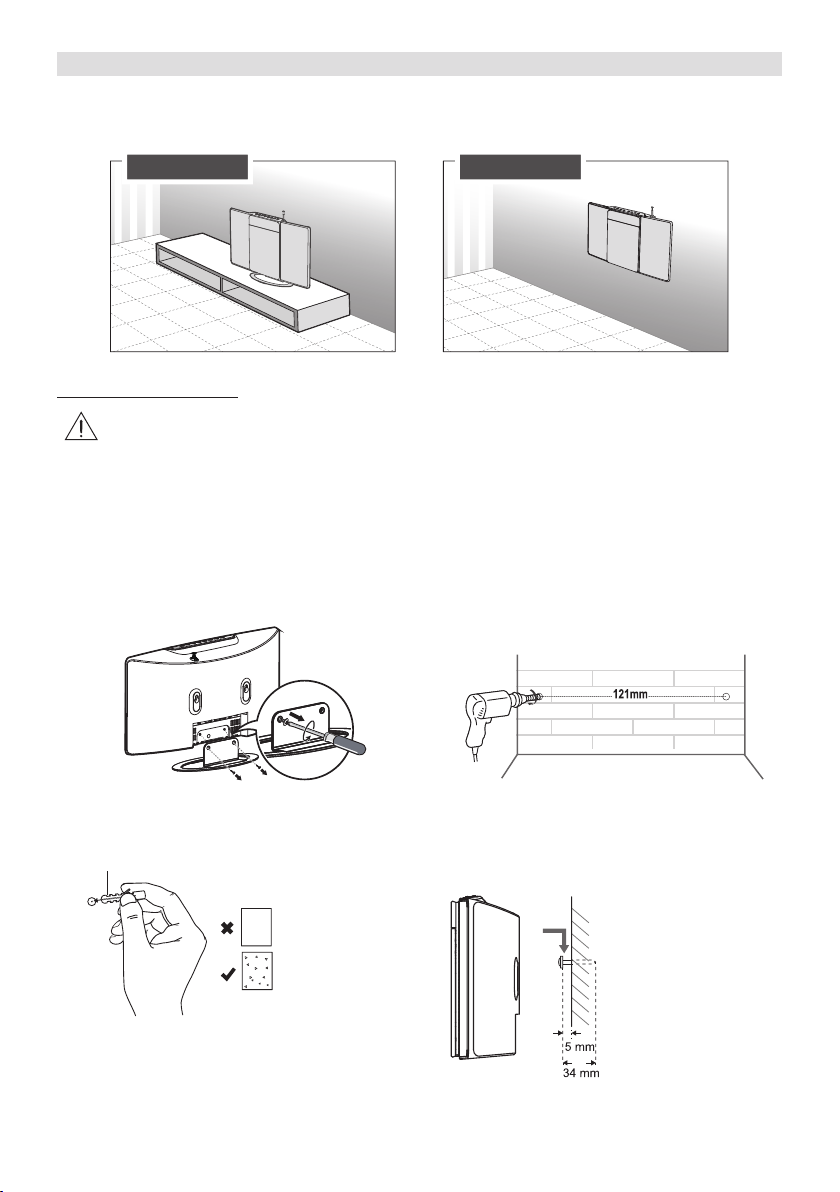
Aufstellung & Wandmontage
result in severe personal injury and property damage (if you intend to install this product
yourself, you must check for installations such as electrical wiring and plumbing that
may be buried inside the wall). It is the installer’s responsibility to verify that the wall will
safely support the total load of the unit.
• Additional tools (not included) are required for the installation.
• Do not overtighten screws.
2. Drill 2 parallel holes (Ø 3-8 mm each accord-
ing to wall type) in the wall. The distance
between the holes should be 121 mm.
Wall
Option - A Option - B
Sie können Sie Anlage entweder mit dem mitgelieferten Standfuß aufstellen (Option A) oder diese an
einer geeigneten Wand montieren (Option B):
Option - A Option - B
Wandmontage (Option B)
• Die Montage an einer Wand sollte durch qualiziertes Fachpersonal durchgeführt werden. Eine falsche Montage kann zu Beschädigungen und Personenschäden führen (vor
der Montage muss die Wand auf darin verlaufende Kabel, Leitungen und Rohre geprüft
werden). Es liegt in der Verantwortung des Nutzers, sicherzustellen, dass die Wand, an
der das Gerät montiert werden soll, hierfür auch geeignet ist.
• Die Wandmontage erfordert Werkzeug (nicht im Lieferumfang enthalten).
• Schrauben nicht überziehen.
1. Lösen Sie die Schrauben und nehmen Sie
den Standfuß ab.
3. Falls notwendig, verwenden Sie Dübel.
Dübel
10 | DE
Trockenbauwand,
Gips, Putz, etc.
Solide Wand (z. B.
Stein, Beton, Holz)
2. Bohren Sie 2 parallele Löcher (Ø 3-8 mm, je
nach Wandart) in die Wand. Der Abstand zwischen den Löchern sollte 121 mm betragen.
4. Lassen Sie die Schrauben ca. 5 mm aus der
Wand herausragen und hängen Sie das Gerät
an die Schrauben.
Wand
Page 11
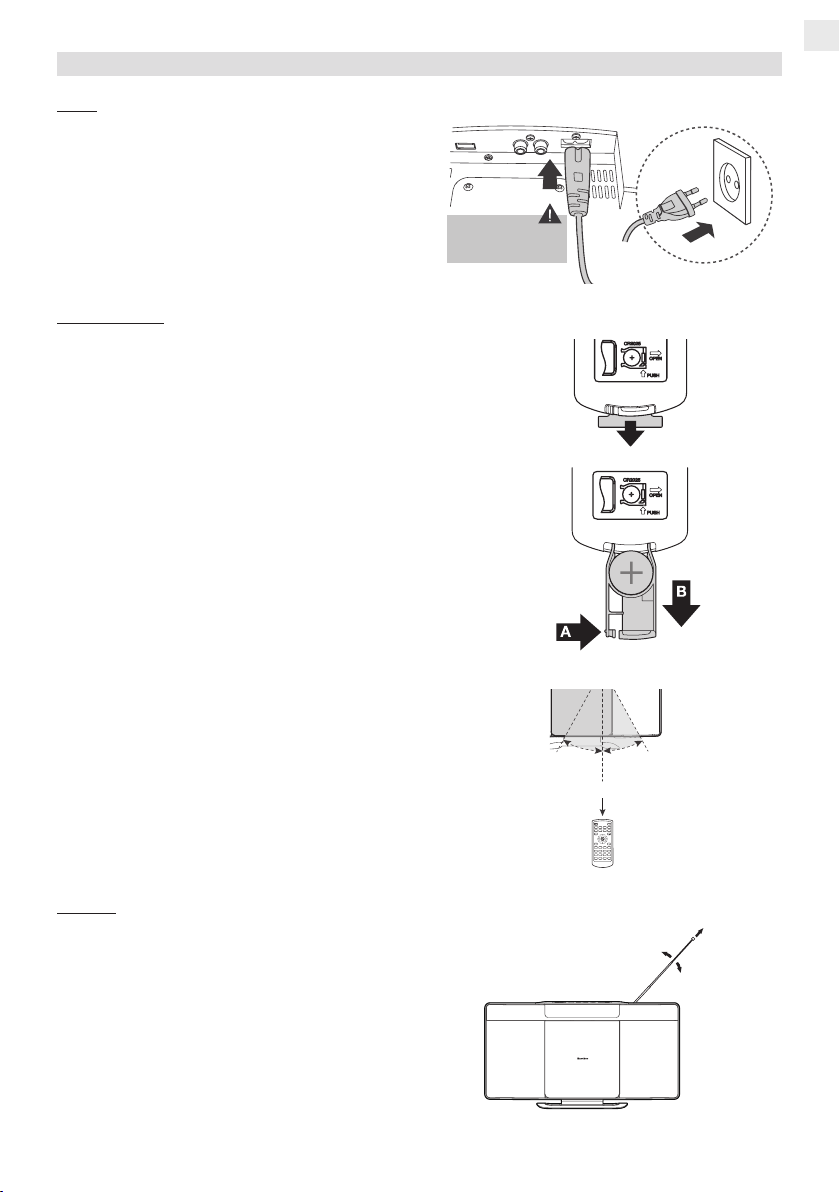
Stromversorgung & Vorbereitungen
Gerät
• Verbinden Sie den kleinen Stecker des
Netzkabels mit dem Netzanschluss an der
Geräterückseite und den Stecker mit einer
geeigneten Haushaltssteckdose.
• Versichern Sie sich, dass die Spannung der
Steckdose mit der auf dem Gerät angegebenen Spannung übereinstimmt.
Fernbedienung
Erste Verwendung:
Die Fernbedienung wird mit einer eingelegten Knopfzelle
(CR2025) ausgeliefert. Ziehen Sie das Schutzplättchen heraus,
um die Batterie zu aktivieren.
Batterie austauschen:
1. Drücken Sie die kleine Verriegelung in Richtung Batteriefach
(A).
2. Ziehen Sie nun das Batteriefach aus der Fernbedienung
heraus (B).
3. Entnehmen Sie die alte Batterie.
4. Legen Sie eine neue Knopfzelle (CR2025) in das Batteriefach unter Beachtung der angegebenen Polarität (+/-).
5. Schieben Sie das Batteriefach wieder in die Fernbedienung
so dass dieses einrastet.
Die Stecker
müssen richtig eingesteckt sein.
DE
Hinweis:
• Die Fernbedienung funktioniert bis zu einer Entfernung von
etwa 6 m und in einem Winkel links/rechts von jeweils 30°.
• Beachten Sie die Sicherheitshinweise auf S. 4ff.
• Wenn die Fernbedienung für längere Zeit nicht verwendet
wird, sollte die Batterie herausgenommen werden.
Antenne
Ziehen Sie die Antenne vor der ersten Inbetriebnahme
komplett aus, um einen optimalen Suchlauf bei DAB+
und UKW zu ermöglichen.
Justieren Sie die Antenne gegebenenfalls.
。
30
Max. 6 m
。
30
BT
CD
DOCK
FM LINE IN
INTRO
INFO
SHUFFLE
REPEAT
MENU
ALBUM/PRESET
VOL
VOL
EQ
1
23
BASS
6
45
TIMER
SLEEP
789
DIMMERCLOCK
PROG
0
DE | 11
Page 12

Grundfunktionen
Ein- & Ausschalten des Gerätes (Standby-Modus)
1. Versorgen Sie das Gerät mit Strom wie oben beschrieben. Das Gerät bendet sich nun im
Standby-Modus.
2. Um das Gerät einzuschalten, drücken Sie die Taste POWER. Das Gerät startet im zuletzt
eingestellten Modus.
3. Um das Gerät auszuschalten (Standby-Modus), drücken Sie die Taste POWER.
Funktionsauswahl
• Um zwischen den verschiedenen Funktionen (DAB, FM, DISC, USB, AUX, BT) zu wählen, drücken Sie wiederholt die Taste
der Fernbedienung.
Lautstärkeregelung
• Um die Lautstärke zu erhöhen, drücken Sie die Taste VOL+ auf der Fernbedienung oder am
Gerät.
• Um die Lautstärke zu verringern, drücken Sie die Taste VOL- auf der Fernbedienung oder am
Gerät.
SOURCE am Gerät oder die entsprechende Funktionstaste auf
Stummschaltung (Mute)
• Um den Ton stummzuschalten, drücken Sie die Taste
Sie die Taste erneut, um den Ton wieder einzuschalten.
Equalizer (EQ)
• Dieses Gerät verfügt über Equalizer-Voreinstellungen (AUS, POP, CLASSIC, JAZZ, ROCK).
• Um zwischen diesen zu wählen, drücken Sie wiederholt die Taste EQ auf der Fernbedienung.
Bass
• Drücken Sie die Taste BASS auf der Fernbedienung, um Extra-Bass ein- oder auszuschalten.
Display-Dimmer
• Die Helligkeit des Displays kann in 3 Stufen (hoch, mittel, niedrig) verändert und ganz ausgeschaltet werden.
• Um zwischen diesen Stufen auszuwählen, drücken Sie wiederholt die Taste DIMMER auf der
Fernbedienung.
Sleep-Timer
Die Sleep-Funktion ermöglicht es Ihnen, einen Timer einzustellen, nach dessen Ablauf sich das Gerät
automatisch abschaltet (Standby-Modus).
• Drücken Sie in einem beliebigen Wiedergabemodus wiederholt die Taste SLEEP auf der Fernbe-
dienung, um die gewünschte Zeit einzustellen, nach der sich das Gerät automatisch ausschaltet.
• Sie können zwischen 90, 60, 30 und 15 Minuten wählen
• Um die verbleibende Zeit zu prüfen, drücken Sie einmal die Taste SLEEP.
• Um die Funktion abzubrechen, drücken Sie wiederholt die Taste SLEEP, bis „SLEEP 00“ im
Display angezeigt wird.
MUTE auf der Fernbedienung. Drücken
Uhrzeit & Wecker
Uhrzeit-Synchronisation
Die Uhr kann so eingestellt werden, dass sich die Zeit automatisch über das Radiosignal synchronisiert:
1. Halten Sie Im Standby-Modus die Taste / MENU auf der Fernbedienung gedrückt, um die
Uhrzeit zu synchronisieren.
2. Wählen Sie anhand der Tasten ▲, ▼ auf der Fernbedienung zwischen den Modi:
12 | DE
Page 13

- RADIO/RDS: Synchronisation über das Radiosignal.
- OFF: Keine automatische Synchronisation; Uhrzeit muss manuell gestellt werden.
3. Drücken Sie dann die Taste am Gerät oder auf der Fernbedienung zum Bestätigen.
Uhrzeit manuell einstellen
Die Uhrzeit muss im Standby-Modus eingestellt werden.
1. Halten Sie die Taste CLOCK 2 Sekunden lang gedrückt, um die Uhrzeiteinstellung aufzurufen.
Die Stunde blinkt nun. Stellen Sie anhand der Tasten ▲ / ▼ die aktuelle Stunde ein.
2. Drücken Sie erneut die Taste CLOCK. Die Minute blinkt nun. Stellen Sie anhand der Tasten ▲ /
▼ die aktuelle Minute ein.
3. Um während dem 24h- oder 12h- Uhrzeitformat zu wählen, drücken Sie während der Uhrzeiteinstellung die Taste .
4. Drücken Sie erneut die Taste CLOCK. Die Uhrzeit ist nun eingestellt und wird angezeigt.
5. Um während der Wiedergabe die Uhrzeit einzublenden, drücken Sie währenddessen die Taste
CLOCK einmal.
Wecker
Der Wecker muss im Standby-Modus eingestellt werden.
Damit der Wecker richtig funktionieren kann, muss zunächst die Uhrzeit eingestellt werden.
1. Während sich das Gerät im Standby-Modus bendet, halten Sie die Taste TIMER auf der Fernbedienung 2 Sekunden lang gedrückt. Die Stunde blinkt nun. Stellen Sie anhand der Tasten ▲ / ▼
die gewünschte Stunde ein.
2. Drücken Sie erneut die Taste TIMER. Die Minute blinkt nun. Stellen Sie anhand der Tasten ▲ / ▼
die gewünschte Stunde ein.
3. Drücken Sie erneut die Taste TIMER. Der Weckmodus blinkt nun. Wählen Sie anhand der Tasten
▲ / ▼ den gewünschten Modus (BUZZER, DISC, USB, DAB, FM).
4. Drücken Sie erneut die Taste TIMER. Die Weckerlautstärke blinkt nun. Stellen Sie anhand der
Tasten ▲ / ▼ die gewünschte Lautstärke ein.
5. Drücken Sie erneut die Taste TIMER, um Ihre Einstellungen zu speichern. Der Wecker ist nun
eingestellt und ertönt zur eingestellten Uhrzeit. wird im Display angezeigt.
DE
Wecker aktivieren/deaktivieren
• Wenn Sie im Standby-Modus einmal die Taste TIMER drücken, zeigt das Display die Details zum
aktuell eingestellten Wecker an. Drücken Sie die Taste TIMER erneut, bis das Symbol aus
dem Display erlischt. Der Wecker ist nun deaktiviert. Um den Wecker wieder zu aktivieren, gehen
Sie genauso vor.
Aktiven Wecker ausschalten
• Wenn der Wecker ertönt, drücken Sie die Taste POWER, um diesen auszuschalten. Der We-
cker ertönt erneut zur eingestellten Uhrzeit am nächsten Tag.
DAB+ Radio
1. Schalten Sie das Gerät wie zuvor beschrieben ein.
2. Wählen Sie den DAB-Radiomodus, indem Sie die Taste
auf der Fernbedienung wiederholt drücken, bis „DAB“ im Display angezeigt wird.
3. Wenn das Gerät zum ersten Mal in den DAB-Modus geschaltet wird, so sucht dieses automatisch
nach verfügbaren Sendern. Im Display wird [FULL SCAN] angezeigt.
Alternativ: Drücken Sie die Taste / MENU, um in das DAB-Menü zu gelangen. [FULL SCAN]
wird im Display angezeigt. Drücken Sie die Taste PLAY/PAUSE, um den Sendersuchlauf zu
starten.
Oder drücken Sie die Taste INTRO/SCAN, um nach Sendern zu suchen.
Ein Sendersuchlauf überschreibt die zuvor gefundenen Sender.
4. Sobald der Sendersuchlauf beendet ist, wird der zuerst gefundene Sender gespielt.
5. Wählen Sie anhand der Tasten / zwischen den gefundenen Sendern.
SOURCE am Gerät oder DAB/FM
DE | 13
Page 14
Sender manuell speichern
Sie können bis zu 20 Radiosender speichern:
1. Wählen Sie einen beliebigen Radiosender.
2. Halten Sie die Taste PROG 2 Sekunden lang gedrückt.
3. Wählen Sie anhand der Tasten / einen Speicherplatz (1 - 20), auf welchem Sie den aktuellen Sender speichern möchten.
4. Drücken Sie die Taste PROG, um den Sender zu speichern. STORED wird im Display angezeigt.
5. Wiederholen Sie die Schritte 1 - 4, um bis zu 20 Sender zu speichern.
6. Um einen gespeicherten Radiosender aufzurufen, drücken Sie die Taste ▲ oder ▼, bis Sie den
entsprechenden Speicherplatz erreichen. Alternativ können Sie den gewünschten Sender direkt
anhand der Zifferntasten aufrufen.
DAB+-Menü
Drücken Sie im DAB-Modus die Taste / MENU, um das DAB-Menü zu öffnen. Innerhalb des Menüs
können Sie anhand der Tasten / navigieren (um Menüpunkte zu öffnen oder eine Auswahl zu
bestätigen, drücken Sie die Taste PLAY/PAUSE; um das Menü zu verlassen, drücken Sie die
Taste / MENU):
Menüpunkt Funktion
Full Scan Vollständiger Sendersuchlauf.
Manual Einen bestimmten Sender/Frequenz manuell suchen.
DRC Wenn Sie Musik mit einem hohen Dynamikbereich in lauter Umgebung hören, kön-
System Software-Version anzeigen und auf Werkseinstellungen zurücksetzen (Reset).
Anzeige von Senderinfos
Um von einem Sender gesendete Informationen anzuzeigen, drücken Sie wiederholt die Taste INFO
auf der Fernbedienung.
nen Sie den Audio-Dynamikbereich komprimieren. Dies macht die leisen Töne lauter
und die lauten Töne leiser.
Hinweis: DRC funktioniert nur, wenn die Funktion vom jeweiligen Sender unterstützt
wird.
UKW-Radio (FM)
1. Schalten Sie das Gerät wie zuvor beschrieben ein.
2. Wählen Sie den FM-Radiomodus, indem Sie die Taste
der Fernbedienung wiederholt drücken, bis „FM“ im Display angezeigt wird.
3. Wählen Sie anhand der Tasten / eine beliebige Frequenz.
4. Um automatisch nach dem nächsten verfügbaren Sender zu suchen, halten Sie die Taste
oder 2 Sekunden lang gedrückt.
Sender manuell speichern
Sie können bis zu 20 Radiosender speichern:
1. Wählen Sie einen beliebigen Radiosender.
2. Halten Sie die Taste PROG 2 Sekunden lang gedrückt. Im Display blinkt die Speichernummer
und die Frequenz wird angezeigt.
3. Wählen Sie anhand der Tasten ▲ / ▼ einen Speicherplatz (1 - 20), auf welchem Sie den aktuellen Sender speichern möchten.
4. Drücken Sie die Taste PROG, um den Sender zu speichern. STORED wird im Display angezeigt.
5. Wiederholen Sie die Schritte 1 - 4, um bis zu 20 Sender zu speichern.
6. Um einen gespeicherten Radiosender aufzurufen, drücken Sie die Taste ▲ oder ▼, bis Sie den
entsprechenden Speicherplatz erreichen. Alternativ können Sie den gewünschten Sender direkt
anhand der Zifferntasten aufrufen.
14 | DE
SOURCE am Gerät oder DAB/FM auf
Page 15

Sender automatisch speichern
Anstatt Sender manuell zu speichern, können Sie die auch automatisch vornehmen lassen:
1. Drücken Sie im Radiomodus die Taste INTRO/SCAN.
2. Das Gerät sucht und speichert nun nacheinander die gefunden Sender (bis zu 20).
Nach dem Suchlauf wird der zuerst gefundene Sender gespielt.
3. Um einen gespeicherten Radiosender aufzurufen, drücken Sie die Taste ▲ oder ▼, bis Sie den
entsprechenden Speicherplatz erreichen. Alternativ können Sie den gewünschten Sender direkt
anhand der Zifferntasten aufrufen.
RDS (Radio Data System)
Dieses Gerät kann RDS-Informationen empfangen und anzeigen. RDS ermöglicht Radiosendern die
Übertragung von Textinformationen, wie z. B. Sendername, Programm- oder Musikinformationen. Die
gesendeten RDS-Informationen können von Sender zu Sender unterschiedlich sein.
Um RDS-Informationen anzuzeigen, drücken Sie wiederholt die Taste INFO.
Hinweise:
• Nicht alle Sender übertragen RDS-Informationen. In einem solchen Fall zeigt das Gerät auch
keine Infos an.
• Gesendete RDS-Informationen können von Sender zu Sender unterschiedlich sein.
• Bei einem schwachen Signal kann es vorkommen, dass die Textinformationen nicht richtig oder
nicht vollständig angezeigt werden.
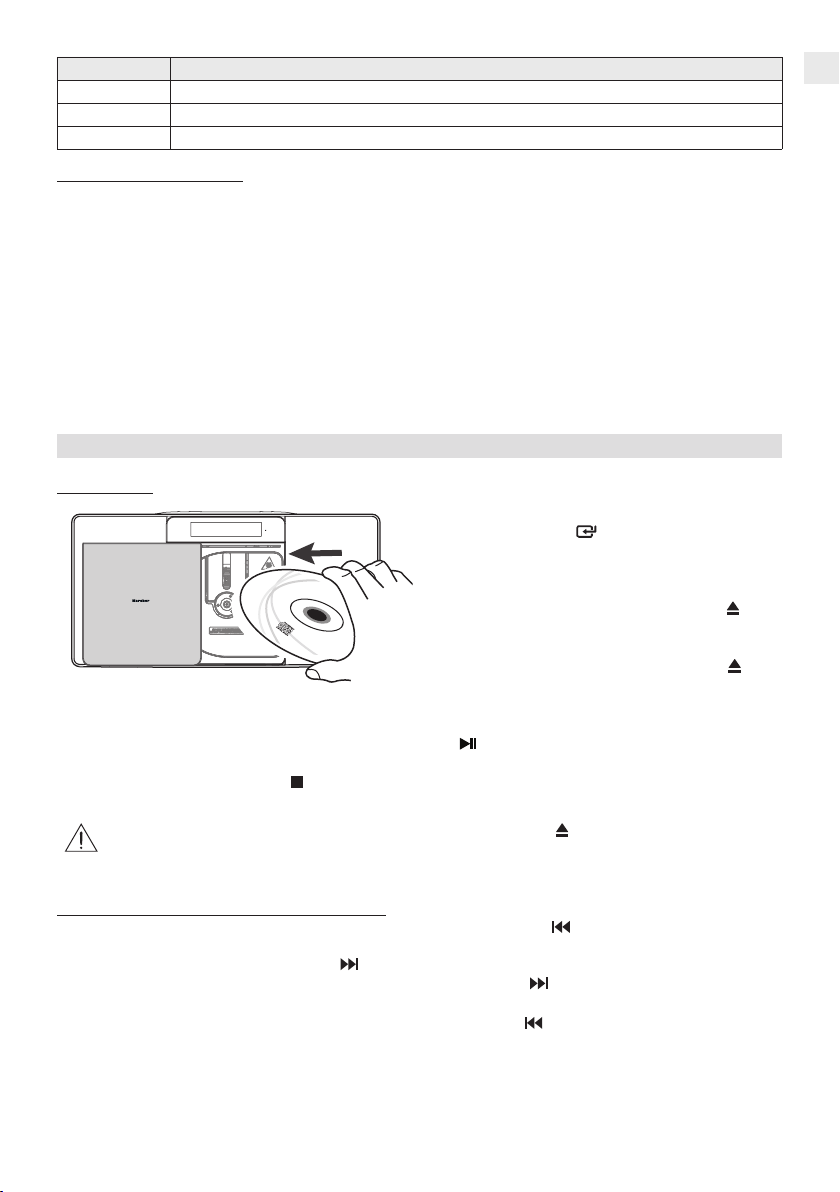
CD-Player
Disks abspielen
1. Schalten Sie das Gerät ein und wählen
Sie den CD-Modus, indem Sie die Taste
SOURCE am Gerät oder CD/USB auf
der Fernbedienung wiederholt drücken, bis
„CD“ im Display angezeigt wird.
2. Öffnen Sie das CD-Fach, indem Sie die
Taste OPEN/CLOSE drücken. Legen
Sie eine CD mit der bedruckten Seite nach
außen zeigend ein.
3. Schließen Sie das CD-Fach, indem Sie
erneut die Taste OPEN/CLOSE drücken.
Die CD wird eingelesen.
4. Die Wiedergabe beginnt automatisch mit dem ersten Titel.
5. Um die Wiedergabe zu pausieren, drücken Sie die Taste PLAY/PAUSE einmal. Drücken Sie
die Taste erneut, um die Wiedergabe fortzusetzen.
6. Um die Wiedergabe zu beenden, drücken Sie die Taste STOP.
DE
Das CD-Fach stets anhand der Taste OPEN/CLOSE öffnen und schließen! Versuchen Sie
nicht, dieses manuell zu öffnen oder zu schließen, da dies den Mechanismus beschädigt
(Garantieverlust)!
Schnellvorlauf/Schnellrücklauf & Titel überspringen
• Um an den Anfang des aktuellen Titels zu springen, drücken Sie die Taste einmal. Drücken
Sie die Taste ein zweites Mal, um zum vorherigen Titel zu springen.
• Um zum nächsten Titel zu springen, drücken Sie die Taste .
• Um beim aktuellen Titel einen Schnellvorlauf durchzuführen, halten Sie die Taste gedrückt.
Wenn Sie die gewünschte Stelle im Titel erreichen, lassen Sie die Taste los und der Titel wird
wieder normal wiedergegeben.
• Um beim aktuellen Titel einen Schnellrücklauf durchzuführen, halten Sie die Taste gedrückt.
DE | 15
Page 16

Wenn Sie die gewünschte Stelle im Titel erreichen, lassen Sie die Taste los und der Titel wird
wieder normal wiedergegeben.
• MP3-Disks können verschiedene Ordner („Alben“) enthalten. Bei der Wiedergabe einer solchen,
können Sie anhand der Taste ▲ oder ▼ zwischen den Alben wählen.
Wiederholmodi / Zufallswiedergabe
Drücken Sie während der Wiedergabe wiederholt die Taste REPEAT auf der Fernbedienung, um
zwischen den folgenden Optionen zu wählen:
• Titel wiederholen - der aktuelle Titel wird wiederholt, im Display wird
• Album wiederholen (vorausgesetzt, die CD oder das USB-Medium enthalten Ordner) - das aktu-
elle Album wird wiederholt, im Display wird blinkend
• Alle wiederholen - Alle Titel der CD oder auf dem USB-Medium werden wiederholt, im Display
wird
Hinweis:
• Um den Wiederholmodus zu beenden, drücken Sie wiederholt die Taste REPEAT, bis „RPT OFF”
angezeigt wird.
Zufallswiedergabe
Um alle Titel in zufälliger Reihenfolge abzuspielen, drücken Sie die Taste SHUFFLE auf der Fernbe-
dienung einmal. Im Display wird
die Taste SHUFFLE.
Intro-Modus
Um jeden Titel 10 Sekunden lang anzuspielen, drücken Sie die Taste INTRO auf der Fernbedienung.
Drücken Sie die Taste INTRO erneut, um die Intro-Funktion zu beenden.
Wiedergabereihenfolge festlegen
Sie können eine Reihenfolge von bis zu 20 Titeln festlegen, in welcher diese abgespielt werden sollen.
1. Drücken Sie im CD-Stopp-Modus die Taste PROG. „P01” und „T001“ werden im Display angezeigt.
2. Wählen Sie anhand der Tasten / den Titel, der in der Reihenfolge zuerst abgespielt werden
soll.
Drücken Sie erneut die Taste PROG. „T002” blinkt nun im Display.
3. Wiederholen Sie die Schritte 2 - 3, um bis zu 20 Titel in Ihrer Reihenfolge zu speichern.
4. Drücken Sie die Taste Play/Pause, um die Wiedergabe der Reihenfolge zu starten.
5. Um die Wiedergabe zu beenden, drücken Sie die Taste Stop. Drücken Sie die Taste ein zweites Mal, um die Reihenfolge zu löschen („PRG CLR“ wird im Display angezeigt).
konstant angezeigt.
angezeigt. Um diese Funktion zu beenden, drücken Sie erneut
angezeigt.
angezeigt.
ID3-Tags
Wenn die Dateien auf der eingelegten Disk über ID3-Tags verfügen (z. B. Interpret, Titel, Albumname),
werden diese im Display angezeigt, wenn Sie die Taste INFO auf der Fernbedienung drücken. Um die
Funktion zu beenden, drücken Sie erneut die Taste INFO.
16 | DE
Page 17

USB
MP3-Dateien über USB wiedergeben
1. Stecken Sie einen USB-Stick in den USB-Anschluss am
Gerät.
2. Schalten Sie das Gerät ein und wählen Sie den USB-Modus, indem Sie die Taste
USB auf der Fernbedienung wiederholt drücken, bis „USB“
im Display angezeigt wird.
3. Der USB-Stick wird eingelesen und die Wiedergabe beginnt automatisch mit dem ersten Titel.
4. Um die Wiedergabe zu pausieren, drücken Sie die Taste PLAY/PAUSE einmal. Drücken Sie
die Taste erneut, um die Wiedergabe fortzusetzen.
5. Um die Wiedergabe zu beenden, drücken Sie die Taste STOP.
Wiedergabemodi
Titel überspringen, Schnellvorlauf, Schnellrücklauf, Wiederholmodi und Zufallswiedergabefunktionen
sowie Anzeige von ID3-Tags sind identisch mit denen bei der MP3-CD-Wiedergabe. Beschrieben
werden diese Funktionen im Abschnitt zuvor.
Hinweise:
• Ein USB-Stick muss stets direkt an den USB-Anschluss am Gerät angeschlossen werden. Die
Verwendung eines USB-Verlängerungskabels wird vom Gerät nicht unterstützt. Der USB-Anschluss des Gerätes kann nicht mit einem Computer kommunizieren.
• Die Einlesedauer eines USB-Speichersticks hängt von der Geschwindigkeit des Speichermedi-
ums und der darauf bendlichen Anzahl von Titeln/Verzeichnissen ab. In manchen Fällen kann
die Einlesedauer bis zu 60 Sekunden betragen.
• Schalten Sie das Gerät aus (Standby-Modus) bevor Sie einen USB-Speicherstick herausziehen.
Der Hersteller ist für Datenverlust oder -beschädigung nicht verantwortlich.
• Aufgrund unterschiedlicher Komprimierungsverfahren kann es vorkommen, dass vereinzelte
Dateien oder USB-Sticks nicht wiedergegeben werden können.
SOURCE am Gerät oder CD/
DE
Bluetooth
Mit der Bluetooth®-Funktion können Sie Musik von Ihrem Smartphone, Tablet oder anderen
Bluetooth®-fähigen Gerät über die Lautsprecher des MC 6580D streamen.
1. Schalten Sie zunächst das Radio in den Bluetooth
SOURCE am Gerät oder die Taste BT auf der Fernbedienung drücken, bis „BT“ im Display
angezeigt wird.
2. Öffnen Sie das Bluetooth
3. Sobald Ihr externes Gerät MC 6580D anzeigt, koppeln und verbinden Sie dieses.
Hinweis: Wenn Ihr Gerät das MC 6580D nicht ndet, so halten Sie die Taste
Fernbedienung 2 Sekunden lang gedrückt, um erneut danach zu suchen.
4. Wenn die Bluetooth®-Verbindung hergestellt worden ist, hören Sie „PAIRED“.
5. Sie können nun Musik von Ihrem gekoppelten Gerät über die Lautsprecher des MC 6580D hören.
Verwenden Sie die Lautstärkeregelung des Gerätes wie oben beschrieben.
Sie können alle Wiedergabefunktionen über die Tastatur des Bluetooth®-Gerätes steuern. Zum
nächsten/vorherigen Titel können Sie auch anhand der Fernbedienung des MC 6580D springen.
Hinweise:
• Wenn Sie nach einem Passwort gefragt werden, geben Sie „0000“ ein.
• Bluetooth® funktioniert am besten innerhalb einer Reichweite von 8 bis 10 Metern. Abhängig von
den verschiedenen Bluetooth
• Das Gerät kann nur an ein Bluetooth
®
-Menü Ihres externen Gerätes und suchen Sie nach MC 6580D.
®
-Geräten.
®
-Gerät auf einmal angeschlossen werden.
®
-Modus, indem Sie wiederholt die Taste
PAIR auf der
DE | 17
Page 18

• Die Musikübertragung kann durch Hindernisse zwischen dem Lautsprecher und dem Bluetooth®-
Gerät unterbrochen werden, wie beispielsweise Wände, Metallgehäuse, die das Gerät umschließen, oder andere Geräte in der Nähe, welche die gleiche Frequenz nutzen.
• Wenn das verbundene Bluetooth®-Gerät aus dem Empfangsbereich entfernt wird, wird die
Bluetooth®-Verbindung automatisch wieder hergestellt, wenn das Bluetooth®-Gerät wieder in den
Empfangsbereich zurück gelangt.
• Beim Zurückstellen in den Bluetooth®-Modus beginnt das Gerät automatisch, sich wieder mit dem
zuletzt gekoppelten Gerät (falls vorhanden) zu verbinden.
• Um zu vermeiden, dass sich ein zuvor gekoppeltes Gerät automatisch mit MC 6580D verbindet,
entkoppeln Sie das Gerät in dessen Bluetooth®-Einstellungen.
Die Bluetooth-Wortmarke und das Logo sind
eingetragene Marken von Bluetooth SIG, Inc.
AUX
An den AUX-Anschluss am Gerät können Sie ein externes Gerät, wie z. B. einen MP3-Player anschließen, um dessen Sound über die Gerätelautsprecher wiederzugeben.
1. Stellen Sie wie folgt eine Verbindung her:
Verwenden Sie ein RCA-RCA-Stereo-Audiokabel
(nicht im Lieferumfang enthalten), um den Audioausgang eines TV-Gerätes mit den AUX-(L/R)Anschlüssen am Gerät zu verbinden.
Verwenden Sie ein RCA-3,5mm-Audiokabel (im
Lieferumfang enthalten), um den Kopfhörerausgang
eines externen Audiogerätes mit den AUX-(L/R)Anschlüssen am Gerät zu verbinden.
TV
2. Schalten Sie das Gerät ein und in den AUX-Modus, indem Sie wiederholt die Taste
am Gerät oder einmal die Taste AUX auf der Fernbedienung drücken.
3. Schalten Sie das externe Gerät (z. B. MP3-Player) ein.
4. Starten Sie die Wiedergabe am externen Gerät und stellen Sie die gewünschte Lautstärke ein.
5. Wenn Sie das Gerät ausschalten, schaltet sich das externe Gerät nicht ebenfalls aus. Sie müssen das externe Gerät separat ausschalten.
TV
Mp3 PlayerPhone
SOURCE
Technische Daten
Stromversorgung: AC 220-240V ~ 50/60Hz
USB: 5V 500mA
Frequenzbereiche: DAB+ 174 - 240 MHz
Übertragene Frequenzleistung BT: < 5 dBm
Gerätemaße (BxTxH) ca.: 375 x 85 x 210 mm
Technische und optische Änderungen jederzeit vorbehalten.
UKW 87,5 - 108 MHz
Bluetooth 2,4 - 2,48 GHz
18 | DE
Page 19

Notizen
DE
Wir, Karcher AG (Inverkehrbringer), bestätigen hiermit, dass dieses Gerät mit den grundlegenden
Anforderungen der Richtlinie 2014/53/EU sowie der weiteren relevanten Richtlinien übereinstimmt.
Eine Kopie der Konformitätserklärung kann unter der folgenden Adresse bezogen werden:
Karcher AG | Gewerbestr. 19 | 75217 Birkenfeld
Oder im Internet unter folgendem Link:
http://www.karcher-products.de/index.php/Konformitaetserklaerungen.html
DE | 19
Page 20

Safety Information
1. Read Instructions - All the safety and operating instructions should be read before the appliance
is operated.
2. Retain Instructions - The safety and operating instructions should be retained for future reference.
3. Heed Warnings - All warnings on the appliance and in the operating instructions should be
adhered to.
4. Water and Moisture – Do not use the apparatus near water (e.g. bath tub, sink, swimming pool)
or in wet places or tropical climates. Do not place objects lled with liquids, such as vases, on top
of the apparatus. Do not expose the apparatus to dripping or splashing.
5. Setup – The apparatus should only be placed on a stable, at surface. Do not let the apparatus fall
down or expose it to shock.
6. Wall or Ceiling Mounting - The appliance should be mounted to a wall or ceiling only as
recommended by the manufacturer.
7. Ventilation - The appliance should be situated so that its location or position does not interfere
with its proper ventilation. For example, the appliance should not be situated on a bed, sofa,
rug, or similar surface that may block the ventilation openings; or, placed in a built-in installation,
such as a bookcase or cabinet that may impede the ow of air through the ventilation openings.
Ensure a minimum distance of 5 cm around the apparatus for sufcient ventilation. Ensure that the
ventilation is not impeded by covering the ventilation openings with items such as newspapers,
table-cloths, curtains, etc.
8. Heat - The appliance should be situated away from heat sources such as radiators, heat registers,
stoves, or other appliances (including ampliers) that produce heat.
9. Power Sources - The appliance should be connected to a power supply only of the type described
in the operating instructions or as marked on the appliance.
10. Cables and Plugs – The mains plug shall remain readily operable. All cables should be routed so
that they are not likely to be walked on or pinched by items placed upon or against them, paying
particular attention to cords at plugs, convenience receptacles, and the point where they exit from
the appliance.
11. Cleaning - The appliance should be cleaned only as recommended by the manufacturer. Clean
by wiping with a dry and clean cloth. Do not use chemical cleaners or detergents. Always pull the
mains plug before cleaning the unit.
12. Non-use Periods - The power cord of the appliance should be unplugged from the outlet when left
unused for a long period of time.
13. Object and Liquid Entry - Care should be taken so that objects do not fall and liquids are not
spilled into the enclosure through openings.
14. Damage Requiring Service - The appliance should be serviced by qualied service personnel
when:
a) The power-supply cord or the plug has been damaged; or
b) Objects have fallen, or liquid has been spilled into the appliance; or
c) The appliance has been exposed to rain; or
d) The appliance does not appear to operate normally or exhibits a marked change in
e) The appliance has been dropped, or the enclosure damaged.
15. Servicing - The user should not attempt to service the appliance beyond that described in the
operating instructions. All other servicing should be referred to qualied service personnel.
16. Open Fire – Keep the apparatus away from open res. Do not place naked ame sources, such
as lighted candles on the apparatus.
17. Thunderstorms – During a thunderstorm the mains plug should be unplugged.
18. Safety Check – After servicing the technician should conduct a safety check in order to ensure that
the apparatus is working properly and safely.
19. Batteries – Always place batteries in the correct polarization into electrical components. Danger of
explosion if battery is incorrectly replaced. Replace only with the same or equivalent type. Do not
mix old and new batteries. Take attention to the environmental aspects of battery disposal. Batteries
shall not be exposed to excessive heat such as sunshine, re or the like. Remove batteries before
disposing of the product.
performance; or
20 | EN
Page 21

20. Volume Levels – To prevent possible hearing damage, do not listen at high volume levels for long
periods.
21. Headphones (if applicable) – Excessive sound pressure from earphones and headphones can
cause hearing loss.
WARNING: To reduce the risk of electric
CAUTION
RISK OF ELECTRO SHOCK
shock, do not remove cover (or back).
No user serviceable parts inside. Refer
servicing to qualied service personnel.
DO NOT OPEN
WARNING: To reduce the risk of re or electric shock, do
not expose this appliance to dripping or splashing.
The lightning ash with arrowhead symbol within an equilateral triangle is intended to alert
the user to the presence of uninsulated dangerous voltage within the product’s enclosure
that may be of sufcient magnitude to constitute a risk of electric shock to persons.
The exclamation point within an equilateral triangle is intended to alert the user to the
presence of important operating and maintenance (servicing) instructions in the literature
accompanying the appliance.
EN
CLASS 1 LASER PRODUCT
LASER KLASSE 1
APPAREIL A LASER DE CLASS 1
LUOKAN 1 CLASSLAITE
KLASS 1 LASERAPPARAT
Batteries
Batteries may not be disposed of in regular house hold trash. Every consumer has the
obligation to return batteries to special disposal locations.
Disposal of Used Electrical & Electronic Equipment
The meaning of the symbol on the product, its accessory or packaging indicates that this
product shall not be treated as household waste. Please, dispose of this equipment at your
applicable collection point for the recycling of electrical & electronic equipments waste. By
ensuring the correct disposal of this product, you will help prevent potential hazards to the
environment and to human health, which could otherwise be caused by unsuitable waste
handling of this product. The recycling of materials will help conserve natural resources.
For more detailed information about recycling of this product, please contact your local
city ofce, your household waste disposal service or the shop where you purchased the
product.
DO NOT STARE INTO BEAM –
INVISIBLE LASER RADIATION
EN | 21
Page 22

1. Handling discs
• Always keep the CD compartment shut to prevent dust or dirt from getting into the CD mechanism.
• Do not touch the recorded surface.
• Do not stick paper or write on either side of the CD.
• Do not bend the CD.
• Only handle a disc on its outer edges.
2. Storing discs
• To avoid scratches/damages always put CDs back into their cases after use.
• Do not expose CDs to direct sunlight, dust, dirt, high temperatures, high humidity or water.
3. Cleaning discs
• Use a soft cloth to wipe ngerprints and dust from the disc surface.
• Carefully move the cloth from the center of the disc to its edge:
Correct False
• Never use benzene, thinners, record cleaner uid or antistatic spray to clean CDs.
4. Compatibility
• Due to the numerous compression methods, some discs may not play.
22 | EN
Page 23

NOTES ABOUT THIS INSTRUCTION MANUAL
1. This instruction manual is published by the manufacturer without any warranty. Corrections and
changes of this instruction manual for the removal of typographic mistakes and editorial inaccuracies as well as due to (technical) improvements (changes) of the devices can be done by the
manufacturer at any time without announcement. Changes of this kind are considered in future
versions of this user manual. All rights reserved.
2. All gures are only for illustration and do not always show the exact representation of the product.
3. This unit is not intended for use by persons (including children) with reduced physical, sensory, or
mental capacities, or lack of experience and knowledge, unless they have been given supervision
or instruction concerning use of the appliance by a person responsible for their safety. Children
should be supervised to ensure that they do not play with the unit.
FURTHER NOTES ON THE DEVICE
Setting a safe volume level
• If you continually listen to loud music, your hearing gradually adapts to it and gives you the impression that the volume is lower.
• What seems normal to you can be already for long time too loud and unhealthy.
• To protect yourself from this, set the volume to a low level.
• Increase the volume slowly.
• Damage to your hearing can be extensive and cannot be reversed.
• If you notice a hearing problem, please consult a doctor.
Condensation
• Condensation may occur when moving the device from a cold to a warm environment. If there is
moisture inside the player, it may not operate properly. Don’t turn on the device and wait about
one hour for the moisture to evaporate.
Saving energy
• If the unit is not used for a long period of time, it should be unplugged from the AC socket.
• If there is no playback in any mode (except radio) for approximately 15 minutes and no button is
pressed, then the unit will switch into standby mode automatically. To turn the unit back on, press
the POWER button.
EN
Unpacking
• Take out carefully the unit from the packing. Please keep the packing for further use.
• Carefully remove possible protection cardboards and slipcovers.
What’s in the Box
Main Unit Remote Control Instruction Manual
RCA to 3.5 mm Audio Cable AC Power Cable
EN | 23
Page 24

Location of Controls
1.
POWER
Switch the unit between ON and
Standby mode.
2.
SOURCE
Select the input source.
3.
Open and close the disc compart-
ment.
4.
Play/pause/resume playback.
Conrm a selection.
Press and hold to activate the pairing
function in BLUETOOTH mode and
disconnect the existing paired Bluetooth device.
5.
/
In CD/USB/Bluetooth mode, skip to
previous/next audio track.
In CD/USB mode, press and hold the
button to search backward/forward
within a track/disc.
In FM mode, search radio stations
manually, press and hold the button
to search automatically.
6. VOL+/VOL-
Increase/decrease the volume level.
7. Display
Show current status.
8. IR
Remote Control Sensor
9. Disc Compartment
10. Stand
11. Speakers
12. FM ANT
13. USB Socket
Insert a USB device to play music.
14. AUX (L/R) Sockets
Connect to an external audio device.
15. AC~ Socket
To connect power cord.
16. Wall Hanging Points
24 | EN
Page 25

Remote Control
1.
Switch the unit between ON and Standby.
2. SOURCE buttons
Select the input source.
3. INFO
Displays playback information.
4. INTRO/SCAN
In CD/USB mode, every track will be played
for 10 seconds.
In FM/DAB mode, scan for radio stations.
5.
/ MENU
Stop play.
In standby mode, press and hold to switch
to the CLOCK SYNC mode.
Display menu screen in DAB/FM mode.
6. ▲, ▼
Navigate up/down through.
Select a previous/next preset station.
Adjust time.
Skip to the previous/next album.
7. Numeric keypad (0-9)
In CD/USB mode, select a track number for
playback.
In FM/DAB mode, choose the preset radio
station.
8. DIMMER
Adjust display brightness.
9.
Open and close the disc compartment.
10. SHUFFLE
Select shufe play mode.
11. REPEAT
Select repeat play modes.
12.
Mute or resume the sound.
13.
/ PAIR
Play/pause/resume playback.
Press and hold to activate the pairing function in Bluetooth mode and disconnect the
existing paired Bluetooth device.
14.
/
In CD/USB/Bluetooth mode, skip to previous/next track.
In CD/USB mode, press and hold search
backward/forward within a track/disc.
In FM/DAB mode, search radio stations
manually, press and hold the button to
search automatically.
Navigate to select an item on a menu
screen (DAB).
EN
15. VOL+/VOL-
Increase/decrease the volume level.
16. EQ
Select the preset equalizer.
17. BASS
Turn the bass ON/OFF.
18. SLEEP/TIMER
Set the sleep timer.
In standby mode, press and hold to set the
alarm timer.
19. CLOCK
In standby mode, press and hold to activate
clock setup.
Display current clock.
20. PROG
Programme track order.
Presets radio stations.
EN | 25
Page 26

Placement & Wall Mounting
result in severe personal injury and property damage (if you intend to install this product
yourself, you must check for installations such as electrical wiring and plumbing that
may be buried inside the wall). It is the installer’s responsibility to verify that the wall will
safely support the total load of the unit.
• Additional tools (not included) are required for the installation.
• Do not overtighten screws.
2. Drill 2 parallel holes (Ø 3-8 mm each accord-
ing to wall type) in the wall. The distance
between the holes should be 121 mm.
Wall
Option - A Option - B
You can either set up the unit on the supplied stand (option A) or mount it on a suitable wall (option B):
Option - A Option - B
Wall Mounting (Option B)
• Installation must be carried out by qualied personnel only. Incorrect assembly can
result in severe personal injury and property damage (if you intend to install this product
yourself, you must check for installations such as electrical wiring and plumbing that
may be buried inside the wall). It is the installer’s responsibility to verify that the wall will
safely support the total load of the unit.
• Additional tools (not included) are required for the installation.
• Do not overtighten screws.
1. Remove the screws from the main unit.
3. Firmly x 1 dowel into each hole in the wall
if necessary.
Dowel
Drywall, plaster wall,
lath wall, etc.
Solid wall (e.g. brick,
concrete, wood)
2. Drill 2 parallel holes (Ø 3-8 mm each accord-
ing to wall type) in the wall. The distance
between the holes should be 121 mm.
4. Leave a 5 mm gap between the wall and the
screw’s head. Lift the unit with the attached
wall brackets over the heads of the screws
and slot into place.
Wall
26 | EN
Page 27

Power Supply & Preparations
Main Unit
• Connect the small end of the supplied power
cable to the AC Power Input socket on the
back of the unit and the other end into a suitable wall socket.
• Make sure that the output power of the wall
outlet matches the required power of the unit.
Remote Control
First-time use:
The unit has a pre-installed lithium CR2025 battery. Remove the
protective tab to activate the remote control battery.
Replacing the Remote Control Battery:
1. Push the tab on the side of the battery tray towards the tray
(A).
2. Now slide the battery tray out of the remote control (B).
3. Remove the old battery.
4. Place a new CR2025 battery into the battery tray with the
correct polarity (+/-) as indicated.
5. Slide the battery tray back into the slot in the remote control.
Ensure that
power cord and plug
are fully inserted.
EN
Notes:
• The remote control works within a distance of approximately
6 metres from the sensor and within an angle of about 30°
from the left and right side.
• Pay attention to the safety information on page 20.
• If the remote control is not used for a longer period of time,
the battery should be removed.
Antenna
The rst time you use FM/DAB, make sure the aerial is
fully extended before selecting FM mode, because your
radio will automatically scan for FM radio stations. If the
aerial is not fully extended your radio will not tune in
properly.
。
30
Max. 6 m
。
30
BT
CD
DOCK
FM LINE IN
INTRO
INFO
SHUFFLE
REPEAT
MENU
ALBUM/PRESET
VOL
VOL
EQ
1
23
BASS
6
45
TIMER
SLEEP
789
DIMMERCLOCK
PROG
0
EN | 27
Page 28

Basic Functions
Switching the Unit On & Off (Standby Mode)
1. Power the unit as described above. The unit is now in standby mode.
2. To switch the unit on, press the
3. To switch the unit off (standby mode), press the
Function Selection (Source)
• To select between modes (DAB, FM, DISC, USB, AUX, BT), repeatedly press the
button on the unit or the according button remote control.
Volume Control
• Increase the volume by pressing the VOL+ button on the remote control or on the unit.
• Decrease the volume by pressing the VOL- button on the remote control or on the unit.
POWER button. The unit will switch to the last mode used.
POWER button.
SOURCE
Mute
• To mute the sound, press the
turn the sound back on.
Equalizer (EQ)
• This unit is equipped with different equalizer presets (OFF, POP, CLASSIC, JAZZ, ROCK).
• To select between these presets, repeatedly press the EQ button on the remote control.
Bass
• Press the BASS button on the remote control to turn on or off extra bass.
Display Dimmer
• The display brightness can be adjusted in 3 levels (high, medium, low) and switched off completely.
• To select between these levels, repeatedly press the DIMMER button on the remote control.
Sleep Timer
The sleep function enables you to set a timer after which the unit will turn itself into standby mode
automatically.
• While in any playback mode, press the SLEEP button on the remote control repeatedly to set the
desired time.
• You can select 90, 60, 30 or 15 minutes.
• To check how much time is left on the set timer, press the SLEEP button once.
• To cancel the sleep function, press the SLEEP button repeatedly until “ SLEEP 00” appears in
the display.
MUTE button on the remote control. Press the button again to
Time & Alarm
Clock Synchronization
The clock can be set to synchronize automatically with radio signals:
1. When in STANDBY mode, press and hold the / MENU button on the remote control to synchronize the clock.
2. Press the ▲, ▼ buttons on the remote to switch the clock synchronization modes:
- RADIO/RDS: Only synchronize with the radio station.
- OFF: Turn off the clock synchronization function, only adjust the clock manually.
3. Then press the button on the unit or on the remote control to conrm.
Manual Time Setting
Time must be set while the unit is in standby mode.
1. Press and hold the CLOCK button for 2 seconds to enter the clock setting mode. The hour starts
28 | EN
Page 29

ashing. Select the current hour using the buttons ▲ / ▼.
2. Press the CLOCK button again. The minute starts ashing. Select the current minute using the
buttons ▲ / ▼.
3. To select between 24h or 12h format, press the button during the time setting.
4. Press the CLOCK button again. The time is now set and will be displayed.
5. To show the time while in any playback mode, press the CLOCK button once.
Alarm
An alarm can only be set while the unit is in standby mode.
For the alarm to function properly, the time must be set rst.
1. While the unit is in standby mode, press and hold for 2 seconds the TIMER button on the remote
control. The hour will start ashing. Set the desired hour using the buttons ▲ / ▼.
2. Press the TIMER button again. The minutes will start ashing. Set the desired minutes using the
buttons ▲ / ▼.
3. Press the TIMER button again. The alarm mode will be ashing. Select the desired mode
(BUZZER, DISC, USB, DAB, FM) using the buttons ▲ / ▼.
4. Press the TIMER button again. The alarm volume will start ashing. Set the desired volume using
the buttons ▲ / ▼.
5. Press the TIMER button again to conrm your settings. The alarm is now set and will sound at
the set time. will be shown in the display.
Activating/Deactivating an Alarm
• When pressing the TIMER button once while in standby mode, the display will show the currently
set alarm details. Press the TIMER button again until disappears from the display. The alarm is
now deactivated. Follow the same procedure to activate the alarm again.
Stopping an Active Alarm
• When the alarm is sounding, press the POWER button to turn it off. The alarm will come on
again on the next day at the set time.
EN
DAB+ Radio
1. Switch the unit on as described previously.
2. Select the DAB mode by pressing the
the remote control repeatedly until the display shows “DAB”.
When the unit is switched into DAB mode for the rst time, it will automatically tune for available
stations.
Alternatively: Press the / MENU button to enter the DAB menu. [FULL SCAN] is shown in the
display. Press the PLAY/PAUSE button to start the scan.
Or press the INTRO/SCAN button to automatically scan for radio stations.
Running a full scan will clear all stations previously found.
3. Once the scan is completed the radio will play the rst station in the station list.
4. Select a desired radio station by pressing the / buttons.
Manually Store Radio Stations
This unit enables you to store up to 20 radio stations:
1. Tune to a radio station which you would like to store.
2. Press and hold for 2 seconds the PROG button.
3. Select a desired preset (1 - 20) on which you want to store the current station by pressing the
or button.
4. Press the PROG button to conrm your setting. STORED will be shown in the display.
5. Repeat steps 1 - 4 to store up to 20 frequencies.
6. To recall a stored frequency, press the ▲ / ▼ buttons until you reach the desired preset. Alterna-
tively you can use the number buttons to select the desired preset.
SOURCE button on the unit or the DAB/FM button on
EN | 29
Page 30

DAB+ Menu
Press the / MENU button while in DAB+ mode to enter the DAB+ menu. Inside the menu you can
select between the following menu items and functions by pressing the / buttons (to enter menu
items and to conrm a selection, press the PLAY/PAUSE button; to exit menu items and the menu
press the / MENU button):
Menu Item Function
Full Scan Full scan for all available radio stations.
Manual Manually tune to a specic channel/frequency.
DRC This function reduces the difference between the loudest and quietest audio being
System View software version and reset the unit.
Info Display
To display information (if broadcast by station) repeatedly press the INFO button on the remote control.
broadcast. Effectively, this makes quiet sounds comparatively louder, and loud
sounds comparatively quieter.
Note: DRC only works if it is enabled by the broadcaster for a specic station.
FM Radio
1. Switch the unit on as described previously.
2. Select the FM mode by pressing the
the remote control repeatedly until the display shows “FM”.
3. Select a desired radio station by pressing the or button repeatedly.
4. To automatically search for the next available radio station, press and hold for 2 seconds the
or button.
SOURCE button on the unit or the DAB/FM button on
Manually Store Radio Stations
This unit enables you to store up to 20 radio stations:
1. Tune to a radio station which you would like to store.
2. Press the PROG button. The display will show the program number ashing and “EMPTY”.
3. Select a desired preset (1 - 20) on which you want to store the current frequency by pressing the
▲ or ▼ button.
4. Press the PROG button once again to conrm your setting. “STORED” will be shown in the
display.
5. Repeat steps 1 - 4 to store up to 20 frequencies.
6. To recall a stored frequency, press the ▲ or ▼ button until you reach the desired preset or the
number button.
Automatically Store Radio Stations
Rather than manually storing stations, you can also let the unit automatically store found stations:
1. While in radio mode press the INTRO/SCAN button.
2. The unit will consecutively store found stations (up to 20 stations).
Once nished, the unit will play the station which was rst available.
3. To recall a stored frequency, press the ▲ or ▼ button until you reach the desired preset or the
number button.
FM Menu
Press the / MENU button while in FM mode to enter the FM menu. Inside the menu you can select
between the following menu items and functions by pressing the / buttons (to enter menu items
and to conrm a selection, press the PLAY/PAUSE button; to exit menu items and the menu press
the / MENU button):
30 | EN
Page 31
Menu Item Function
Scan Select to scan for weak or strong stations only.
Audio Select to scan for mono or stereo stations.
System Same as in DAB+ menu.
RDS (Radio Data System)
This product is equipped with an RDS decoder. RDS allows text information to be transmitted by a radio station together with the audio broadcast. This text information can include name of the radio station, name of the current program or song, news headlines, etc. and may vary from station to station.
To view RDS info press the INFO button repeatedly.
Notes:
• Not all radio stations transmit RDS information. In such cases the unit will not show any information.
• RDS information broadcast may vary from station to station.
• If the radio signal is weak, transmission of RDS information may be disturbed or not shown
properly.
CD Player
Playing Discs
1. Switch the unit on and select the CD mode
2. Open the CD drawer by pressing the
3. Close the CD drawer by pressing the
4. Playback starts automatically with the rst track.
5. To temporarily stop the playback (pause), press the
ton again to resume playback.
6. To stop playback, press the Stop button.
by pressing the
unit or the CD/USB button on the remote
control repeatedly until the display shows
“CD”.
OPEN/CLOSE button. Insert a disc with the
printed side facing out.
OPEN/CLOSE button once again. The CD
is being read.
PLAY/PAUSE button once. Press the but-
SOURCE button on the
EN
The CD door must always be opened and closed by using the OPEN/CLOSE button! Do
not try to open or close the CD door manually as this may damage the mechanism (loss of
warranty)!
Fast Forward / Fast Rewind & Skipping Tracks
• To jump to the beginning of the currently playing track, press the button once. Press it a sec-
ond time to skip to the previous track.
• To skip to the next track, press the button once.
• To fast forward the currently playing track, press and hold the button. Once you reach the
desired section of the track, release the button to resume normal playback.
• To fast rewind the currently playing track, press and hold the button. Once you reach the
desired section of the track, release the button to resume normal playback.
• When playing an MP3 disc which may include different folders (“albums”) select those by press-
ing the ▲ or ▼ button.
EN | 31
Page 32

Repeat / Random Modes
At any time during playback press the REPEAT button on the remote control repeatedly to select
between
• Repeat Track - the current track will be repeated, the display will show
• Repeat Album (if the CD or USB contains albums) - the current album will be repeated, the dis-
play will show
• Repeat All - All tracks on the CD or USB will be repeated, the display will show
Note:
• To disable the Repeat functions, press the REPEAT button repeatedly until “RPT OFF” is shown.
Random Playback
To play all tracks in random order, press the SHUFFLE button on the remote control. The display will
show
Intro Mode
To play only the rst 10 seconds of each song, press the INTRO button on the remote control. To dis-
able this feature, press the INTRO button once again.
Programming Track Order
You can store up to 20 tracks in a desired sequence.
1. While in CD stop mode, press the PROG button. “P01” and “T001” will be shown in the display.
2. Using the / buttons, select the track to be played rst in the sequence.
3. Press the PROG button again. “T002” will be ashing in the display.
4. Repeat the steps 2 - 3 to select up to 20 tracks for your sequence.
5. Press the Play/Pause button to start the playback of your sequence.
6. To stop playback, press the STOP button. To delete your sequence press this button a second
ID3 Tags
When the les on the inserted disc are equipped with ID3 tags (e.g. artist, track and album names)
these will be shown in the display when you press the INFO button on the remote control. To disable
this feature, press the INFO button again.
. To disable this feature, press the SHUFFLE button once again.
time (“PRG CLR” will be shown in the display).
ashing.
.
steadily.
USB
Playing MP3 les from USB
1. Insert a USB stick into the USB port on the unit.
2. Switch the unit on and select the USB mode by pressing
the
SOURCE button on the unit or the CD/USB button
on the remote control repeatedly until the display shows
“USB”.
3. The USB is being read and the playback will start auto-
4. To temporarily stop the playback (pause), press the PLAY/PAUSE button once. Press the but-
ton again to resume playback.
5. To stop playback, press the STOP button.
Playback modes
Skipping, fast forwarding and fast rewinding tracks, repeat modes and random function as well as ID3
tag display in USB mode are the same as for MP3-CD playback. Please see the previous chapter for
the instructions.
32 | EN
matically with the rst track.
Page 33

Notes:
• A USB device must always be connected directly to the USB port of this product. The use of a
USB extension cord is not supported by this product. The USB port of this product cannot communicate with a computer directly.
• The reading time for a USB drive varies depending on the speed of the memory device and the
number of songs and folders. In some cases the reading time may be as long as 60 seconds.
• Always switch off the unit before removing a USB ash drive to prevent damage to your USB
device. The manufacturer is not responsible for the loss or damage of data.
• Due to numerous methods of compression it could be that some les or USB ash drives cannot
be played.
Bluetooth
The Bluetooth® function let’s you stream music from your smartphone, tablet or any other Bluetooth
enabled device through the speakers of MC 6580D.
1. Switch the unit on and select the Bluetooth® mode by pressing the
unit repeatedly or the BT button on the remote control until the display shows “BT”.
2. Go to your device’s Bluetooth® settings and search for MC 6580D.
3. Once your device shows MC 6580D, connect and pair it.
Note: If your device does not nd MC 6580D, press and hold for 2 seconds the PAIR button
on the remote control and scan again on your device.
4. When the Bluetooth® connection has been established “PAIRED” will be heard, indicating a successful pairing.
5. You can now enjoy music from your device through the speakers of MC 6580D.
Use the volume control of the appliance as well as your paired device to set the desired volume.
All playback functions can be managed through the Bluetooth® device’s controls. Previous/Next
track can also be selected with the unit’s remote control.
Notes:
• If asked for a password, enter “0000“.
• Bluetooth® works best within a range of up to 8 to 10 metres. Distance varies depending on differ-
ent Bluetooth® devices and local conditions (e.g. walls, metallic casing that covers the device, or
other devices nearby that operate in the same frequency).
• The appliance can be connected only to one Bluetooth® device at a time.
• If the connected device goes out of Bluetooth® range, the appliance will reconnect automatically
when the device comes back into range.
• When switched back to Bluetooth® mode, the appliance automatically starts reconnecting with
last paired device, if available.
• To avoid your previously paired device automatically connecting to MC 6580D, unpair it in your
device’s settings.
SOURCE button on the
®
EN
The Bluetooth word mark and logos are registered trademarks owned by Bluetooth SIG, Inc.
AUX
You can connect the audio output of an external device such as an MP3 player to this unit to listen to
the sound of that device through the amplier of this music system.
1. Connect an external device as follows:
Use an RCA to RCA stereo audio cable (not
included) to connect a TV’s audio output sockets
to the AUX (L/R) sockets on the unit.
Use an RCA to 3.5 mm audio cable (included) to
connect an audio player’s headphone socket to the
AUX (L/R) sockets on the unit.
EN | 33
Page 34

TV
TV
Mp3 PlayerPhone
2. Switch the unit on and select the AUX mode by pressing the
repeatedly or the AUX button on the remote control until the display shows “AUX”.
3. Switch the external device (e.g. MP3 player) on.
4. Start playback of the external device and adjust the volume control of the main unit to the desired
level.
5. Remember to switch off the unit when you are nished using the external device.
SOURCE button on the unit
Specications
Power Supply: AC 220-240V ~ 50/60Hz
USB: 5V 500mA
Frequency Range: DAB+ 174 - 240 MHz
BT Transmitted Power: < 5 dBm
Dimensions (WxDxH) ca.: 375 x 85 x 210 mm
Technicalspecicationsanddesignmaychangewithoutnotice.
FM 87.5 - 108 MHz
Bluetooth 2.4 - 2.48 GHz
We, Karcher AG, herewith conrm that this product is in line with the basic requirements of regulation
2014/53/EU and further relevant regulations.
A copy of the declaration of conformity can be obtained at the following address:
Karcher AG | Gewerbestr. 19 | 75217 Birkenfeld
Or online at the following link:
http://www.karcher-products.de/index.php/Konformitaetserklaerungen.html
34 | EN
Page 35

Page 36

v1 / 14.08.2018
www.karcher-audio.de
 Loading...