

Page 1
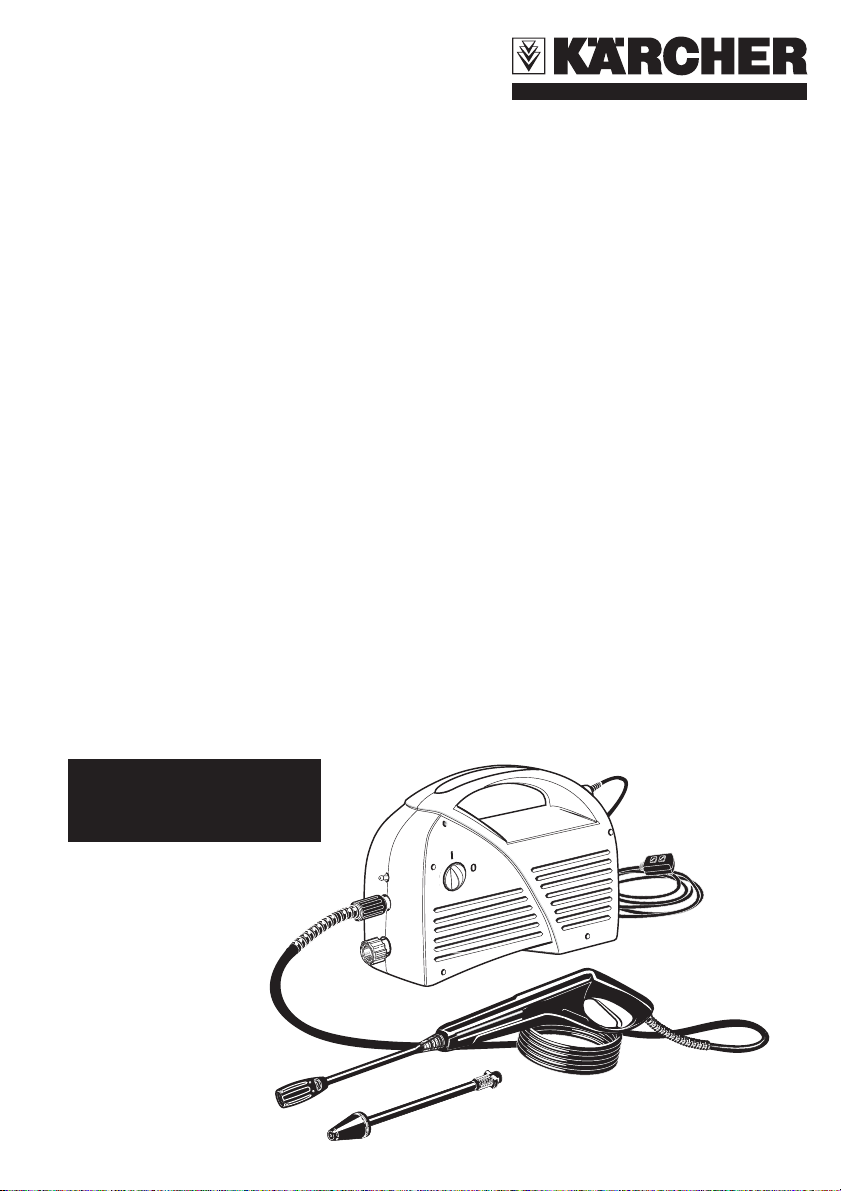
Model K 1.302
High Pressure Washer Operator Manual
Overview ........................................................................ 2
Precautions ................................................................. 2-4
Assembly Instructions .................................................... 4
Operating Instructions ................................................... 5
GFCI Instructions ........................................................... 6
Using the Accessories ................................................... 6
Working with Detergents ................................................ 7
Shut Down and Clean-Up .............................................. 8
Taking a Break................................................................ 8
Winterizing and Long-Term Storage .............................. 8
Cleaning Tips ............................................................ 9-10
Optional Cleaning Accessories .................................... 10
Troubleshooting ...................................................... 11-12
Specifications
Operating pressure 1300 PSI
Water volume 1.3 GPM
Voltage 120 V
Amp draw 14 AMPS
In USA Call:
1-800-537-4129
or visit our website:
www.karcher-usa.com
5.961-055 (2006403-08/03)
Page 2
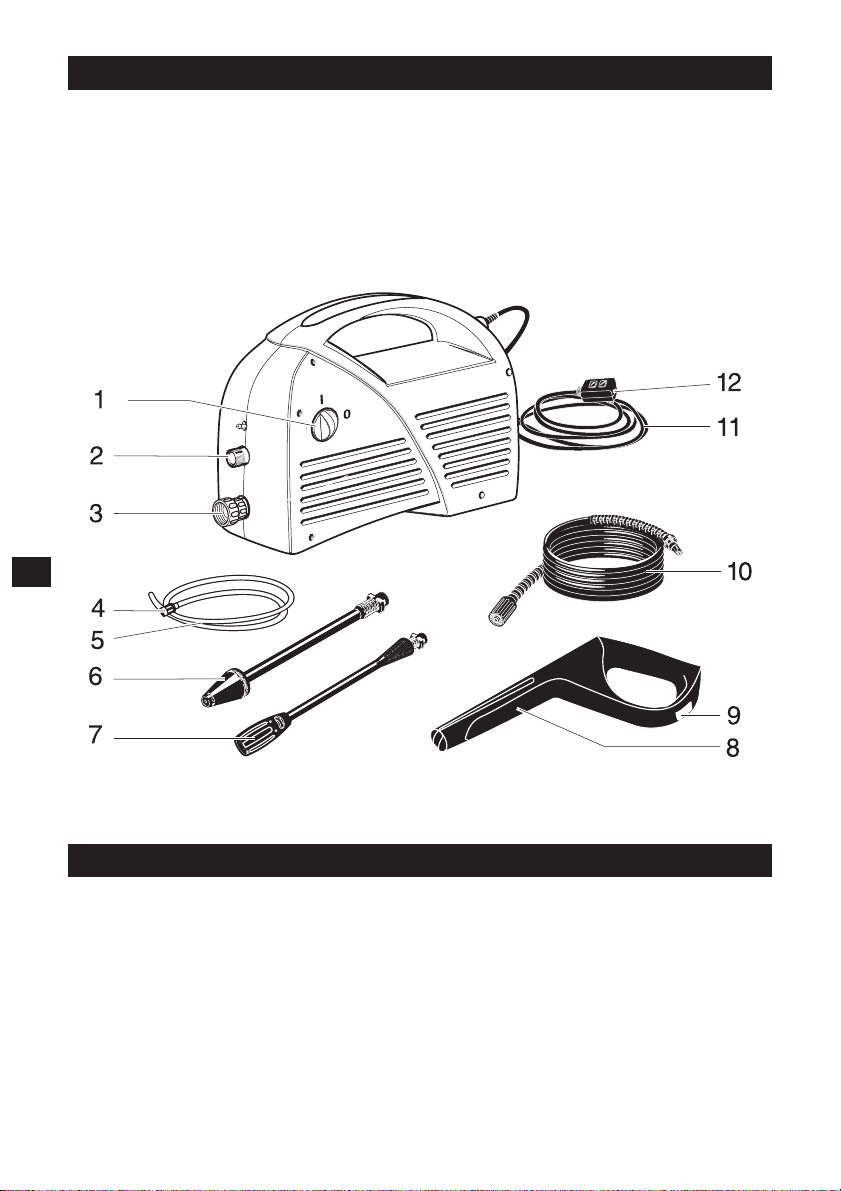
Model K 1.302 OVERVIEW
Item Description
1. On/Off switch
2. High pressure outlet
3. Water inlet with internal water filter
4. Detergent filter
5. Detergent suction tube
6. Dirtblaster wand
2
Item Description
7. Vario spray wand
8. Trigger gun
9. Trigger gun safety lock
10. High pressure hose
11. Power cord
12. Ground fault Circuit Interrupter (GFCI)
NEVER!
Never point nozzle at people or animals.
Never drink alcohol or use drugs while operating this equipment.
Never operate while standing in water.
Never touch plug with wet hands.
Never let electrical connections rest in water.
Never operate pressure washer without the water turned on
Never use hot water
Page 3

IMPORTANT PRECAUTIONS – Read First!
IMPORT ANT SAFETY INSTRUCTIONS
WARNING – When using this product basic
precautions should always be followed,
including the following:
• Read all the instructions before using the
product.
• To reduce the risk of injury, close supervision
is necessary when a product is used near
children.
• Know how to stop the pressure washer and
bleed pressures quickly. Be thoroughly
familiar with the controls.
• Stay alert — watch what you are doing.
• Do not operate the product when fatigued or
under the influence of alcohol or drugs.
• Keep operating area clear of all persons.
• Do not overreach or stand on unstable
support. Keep good footing and balance at
all times.
• Follow the maintenance instructions specified in the manual.
• This Pressure Washer Is Provided With A
Ground Fault Circuit Interrupter Built Into The
Power Cord Plug. If Replacement Of The Plug
Or Cord Is Needed, Use Only Identical
Replacement Parts.
WARNING – Risk of Injection or Injury –
Do Not Direct Discharge Stream At Persons.
• High pressure jets can be dangerous if
subject to misuse. The jet must not be
directed at persons, animals, electrical
devices, or the machine itself.
• Wear safety goggles.
• Do not use acids, solvents, or any other
flammable material in this product. These
products can cause physical injuries to the
operator and irreversible damage to the
machine.
• This machine has been designed for use with
cleaning detergent supplied or recommended by the manufacturer. The use of other
cleaning detergents may affect the operation
of the machine and void the warranty.
• The Gun Safety Lock prevents the trigger from
accidentally being engaged. This safety
feature does not lock trigger in the on
position.
- SAVE THESE INSTRUCTIONS -
GROUND FAULT CIRCUIT
INTERRUPTER PROTECTION
This pressure washer is provided with a
ground-fault circuit-interrupter (GFCI) built into
the plug of the power-supply cord. This device
provides additional protection from the risk of
electric shock. Should replacement of the plug
or cord become necessary, use only identical
replacement parts that include GFCI
protection.
SERVICING OF A
DOUBLE-INSULATED APPLIANCE
In a double-insulated product, two systems of
insulation are provided instead of grounding.
No grounding means is provided on a doubleinsulated product, nor should a means for
grounding be added to the product. Servicing
a double-insulated product requires extreme
care and knowledge of the system, and should
be done only by qualified service personnel.
Replacement parts for a double-insulated
product must be identical to the parts they
replace.
A double-insulated product is marked with the
words “DOUBLE-INSULATION” or “DOUBLEINSULATED”. The symbol “ ” may also be
marked on the product.
EXTENSION CORDS
Use a sufficient gauge:Up to 25 ft = 12/2 AWG
25 to 50 ft =10/2 AWG
Use only extension cords that are intended for
outdoor use. These extension cords are
identified by a marking “Acceptable for use with
outdoor appliances; store indoors while not in
use.” Use only extension cords having an
electrical rating not less than the rating of the
product. Do not use damaged extension cords.
Examine extension cord before using and
replace if damaged. Do not abuse extension
cord and do not yank on any cord to disconnect.
Keep cord away from heat and sharp edges.
Always disconnect the extension cord from the
receptacle before disconnecting the product
from the extension cord. If you are using an
extension cord, it should always be completely
unwound from the cable drum.
WARNING – To reduce the risk of electrocution,
keep all connections dry and off the ground.
Do not touch plug with wet hands.
3
Page 4
IMPORTANT PRECAUTIONS – continued
Water Supply
(Cold Water Only)
• Water hose must be at least 3/4 inch in
diameter.
• Flow rate of water supply must not fall
below 2.5 GPM (gallons per minute).
• Flow rate can be determined by running the
water for one minute into an empty“ 5gallon container.
ASSEMBLY INSTRUCTIONS
4
• The water supply temperature must not
exceed 104°F/40°C.
• Never use the pressure washer to draw in
water contaminated with solvents, e.g.
paint thinners, gasoline, oil, etc.
• Always prevent debris from being drawn
into the unit by using a clean water source.
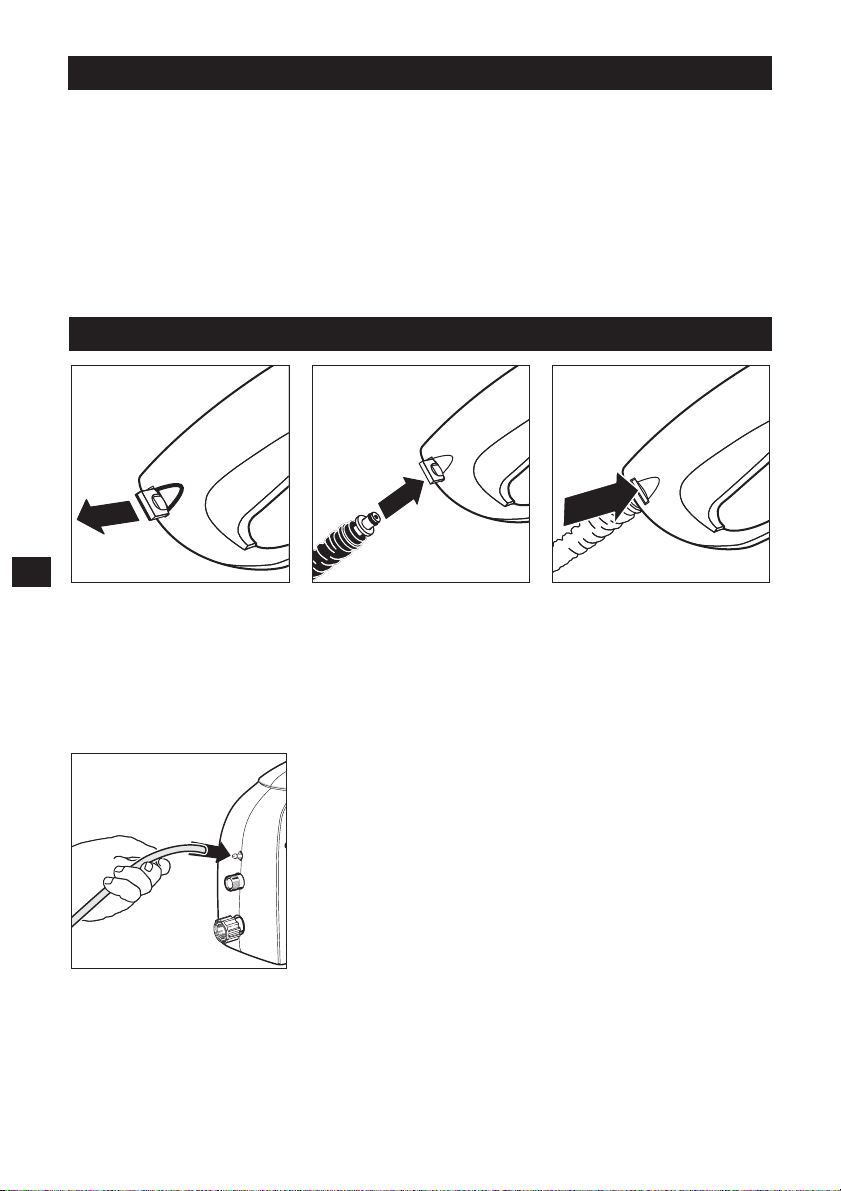
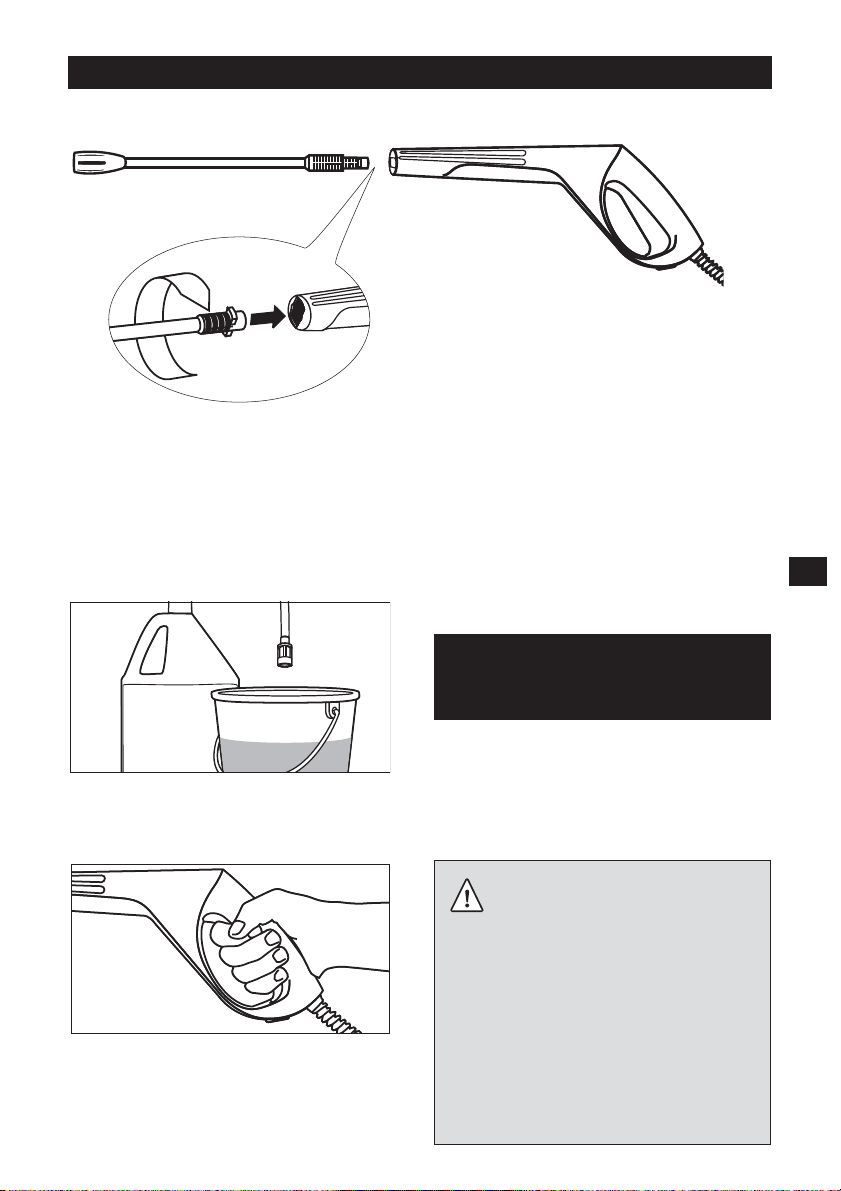
Step 1
Pull out the locking slide from
the right side of the trigger
gun handle.
Step 4
Connect the detergent suction
tube to the pressure washer.
Step 2
Insert the small end of the
high pressure hose into place.
Step 3
Push the locking slide back into
the trigger gun to lock the hose
in position.
Page 5
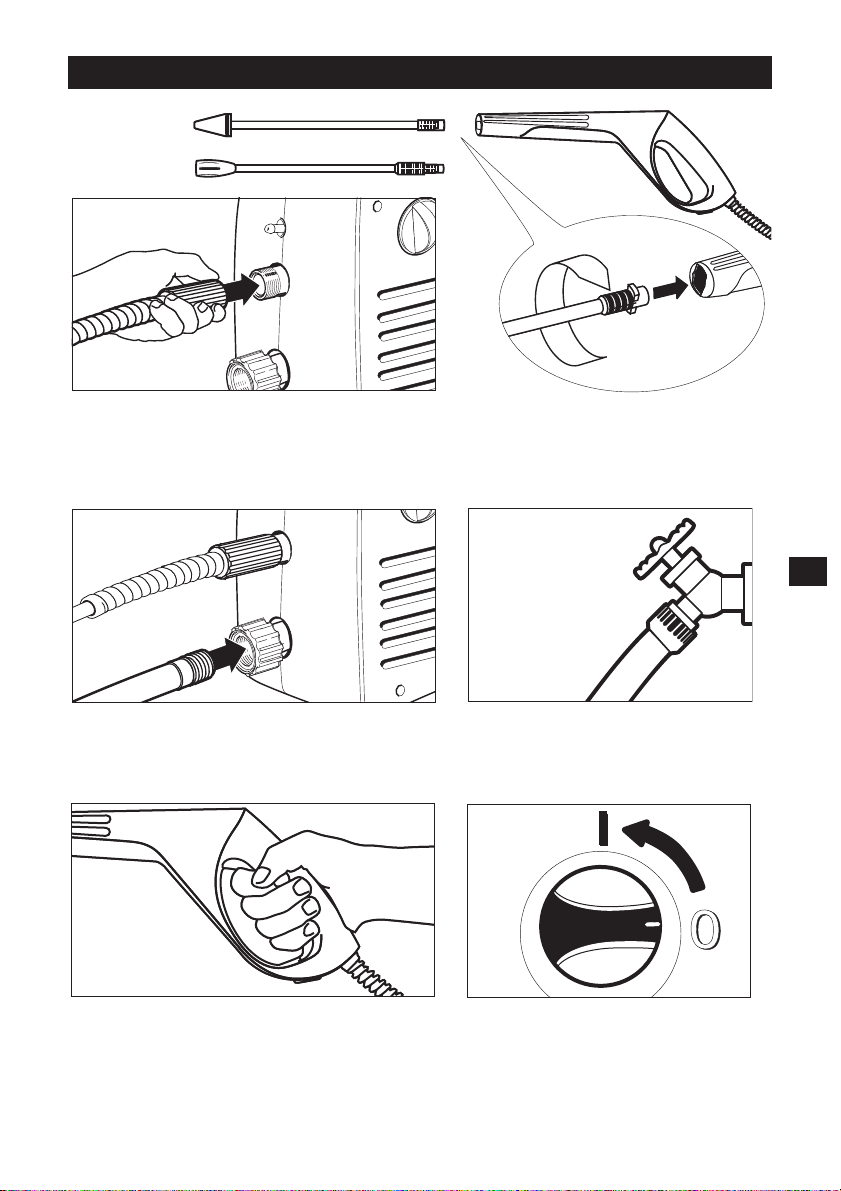
OPERATING INSTRUCTIONS
Step 1
Connect the high pressure hose to the unit’s high
pressure outlet.
Step 3
Connect garden hose to unit’s water inlet.
Step 2 Insert the spray wand of your
choice into the trigger gun. Push in and
turn clockwise to lock spray wand in
place.
5
Step 4
Connect garden hose to the cold water
source and turn water on completely.
Step 5
Plug the power cord into the power outlet. Unlock
the lock of the trigger gun. Press “TEST”, then
press “RESET” to assure proper connection to
power. Trigger the gun to eliminate trapped air,
wait for a steady flow of water to emerge from the
spray nozzle.
Step 6
Turn on the pressure washer (I).
The motor starts only if the trigger
of the gun is pulled and shuts off
when the trigger is released.
Page 6
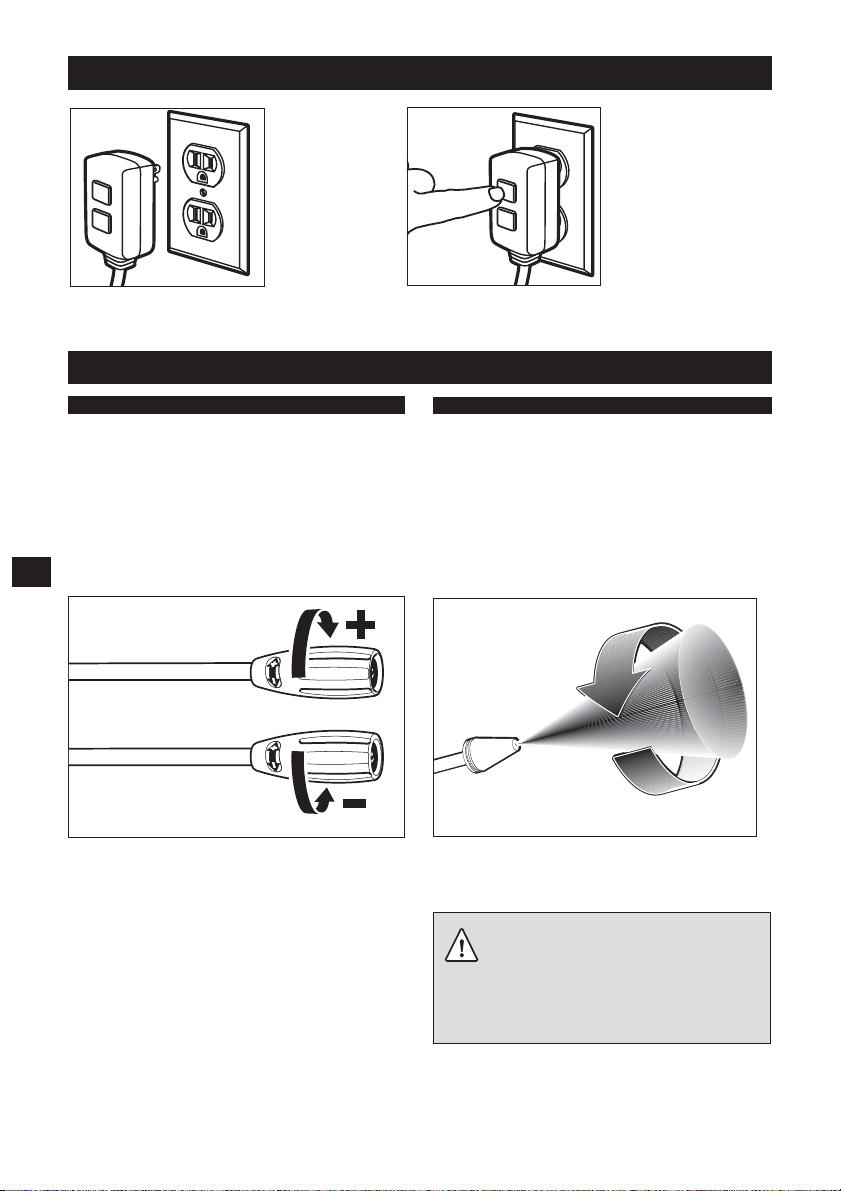
GFCI INSTRUCTIONS
Note:
The actual
appearance
of the GFCI
may be
different
from this
illustration.
Step 1 Plug the Ground Fault Circuit
Interrupter (GFCI) into a working outlet
USING THE ACCESSORIES
Vario spray wand
The Vario spray wand allows you to adjust the
cleaning pressure. To clean at maximum
pressure, the Vario wand must be positioned
to the high pressure setting (+). To apply
detergent, the wand must be positioned to the
low pressure setting (-).
6
For higher pressure turn wand
collar in the plus (+) direction.
For lower pressure turn wand
collar in the minus (-) direction.
Step 2 Press “TEST”, then press “RESET” to
assure proper connection to power.
Dirtblaster® spray wand
This wand features a 0º pencil jet which
rotates 360º for maximum dirt cutting action,
effectively increasing cleaning performance up
to 50%. This wand combines the cleaning
performance of a 0º pencil jet with the surface
coverage of a wide angle nozzle. Not
recommended for soft materials, siding,
painted surfaces, decks or autos.
Warning
TO AVOID SERIOUS INJURY, NEVER
POINT SPRAY NOZZLE AT YOURSELF,
OTHER PERSONS OR ANIMALS
Page 7
WORKING WITH DETERGENTS
Detergents can only be applied at low pressure (-).
For best results see Cleaning
Tips on pages 8 & 9 for specific
information on how to clean
different surfaces.
Step 1 To apply detergents install the
Vario spray wand. Set the Vario spray wand
to the low pressure setting (-) by turning the
wand collar. The wand must be set in the low
pressure (-) position to apply detergents.
Step 2 Fill a container with Karcher
detergent. Place the filter end of detergent
suction tube into the container.
Step 3 Turn on the pressure washer.
Pull trigger to operate unit: Liquid detergent
is drawn into the unit and mixed with water.
Apply detergent to work area. Do not allow
detergent to dry on surface.
Always Use Karcher
Detergents for Best Results.
Karcher biodegradable detergents
are“specially formulated to protect the
environment and your pressure washer.
Special formula won’t clog the suction tube
filter and will protect the internal parts of the
pressure washer for a longer life. For Karcher
Detergents, check your retailer
or call:
In USA Call:
1-800-537-4129
or visit our website:
www.karcher-usa.com
The following Karcher detergents are
available:
• Vehicle Wash • House Wash
• Degreaser • Deck Wash
• All Purpose Cleaner
Caution
Never use:
• Bleach, Chlorine products and other
corrosive chemicals
• Liquids containing solvents
(i.e., paint thinners, gasoline, oils)
• Tri-sodium phosphate products
• Ammonia products
• Acid-based products
These chemicals will harm the unit and
will damage the surface being cleaned.
7
Page 8
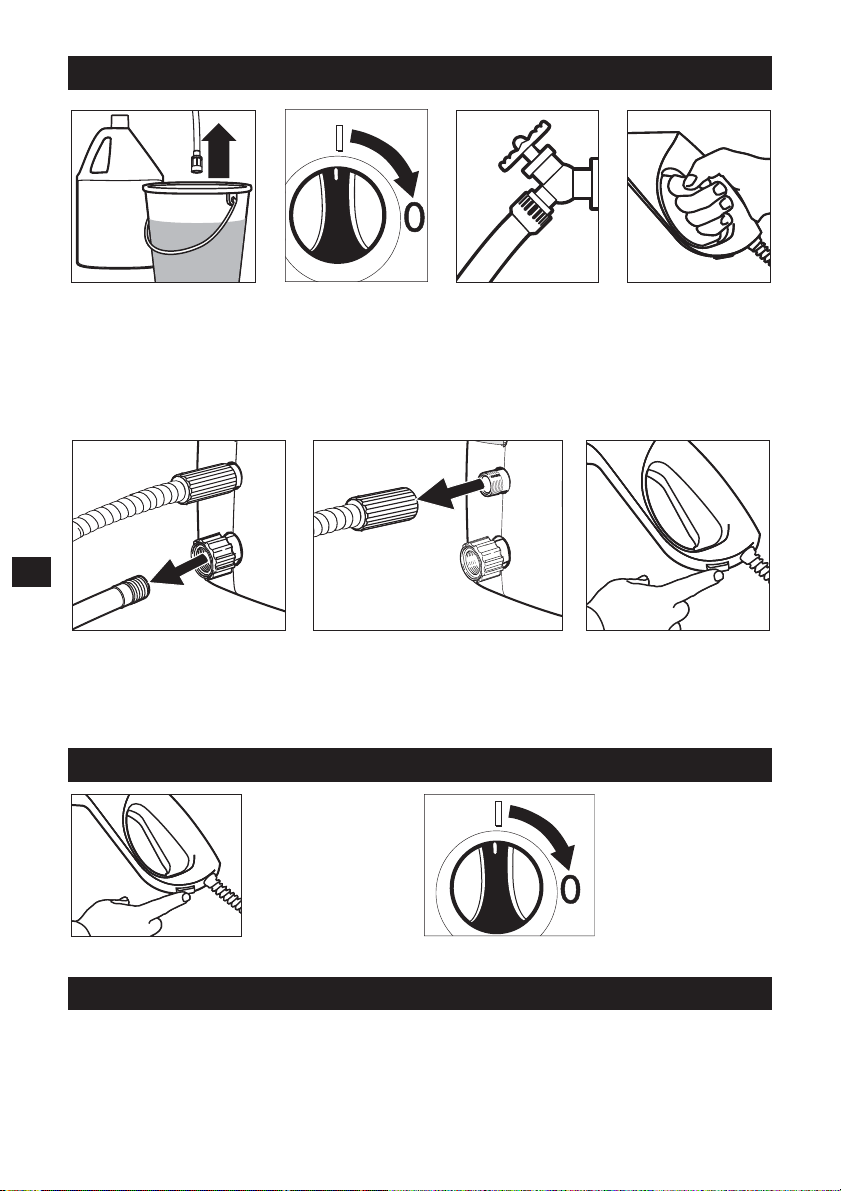
SHUTTING DOWN & CLEAN-UP
Step 1
Remove detergent
suction tube from
container and insert into
1 gallon of fresh water.
Siphon water at low
pressure for one minute.
8
Step 5
Disconnect the garden hose
from the water inlet on the unit.
Step 2
Turn the switch to “0”
position and unplug
cord from outlet.
Step 6
Disconnect the high pressure hose from the high pressure
outlet and engage the gun safety lock.
TAKING A BREAK... five minutes or more
Step 1
Engage gun
safety lock.
Step 3
Turn off the water
source.
Step 4
Press trigger to
release water
pressure.
Step 2
Turn pressure
washer to “0”
position.
WINTERIZING AND LONG-TERM STORAGE
1.Disconnect all water connections.
2. Turn on the machine for a few seconds,
until the water which had remained in
the pump exits. Turn off immediately.
3.Do not allow high pressure hose to
become kinked.
4. Store the machine and accessories in
a room which does not reach freezing
temperatures.
Caution: Failure to follow the above
directions will result in damage to the
pump assembly and accessories.
Page 9

CLEANING TIPS
Deck Cleaning
(with or without detergent)
Pre-rinse deck and surrounding area with
fresh water. If using Kärcher Deck Wash,
place detergent suction tube directly into
cleaning solution and apply to surface at low
pressure. For best results, limit your work
area to smaller sections of approximately 25
square feet. Allow Kärcher Deck Wash to
remain on surface 1-3 minutes. Do not allow
detergent to dry on surface. Rinse at high
pressure in a long sweeping motion keeping
the spray nozzle approximately 3-6 inches
from the cleaning surface. Always clean from
top to bottom and from left to right. When
moving on to a new section of the cleaning
surface, be sure to overlap the previous
section to eliminate stop marks and ensure a
more even cleaning result. Caution: Do not
use rotating nozzle spray wand on wood
surface as it may cause damage.
House Siding
(with or without detergent)
Pre-rinse cleaning surface with fresh water. If
using Kärcher House Wash, place detergent
suction tube directly into cleaning solution and
apply to surface at low pressure (for best
results, limit your work area to sections of
approximately 6 feet and always apply
detergent from bottom to top). Allow Karcher
House Wash to remain on surface 1-3
minutes. Do not allow detergent to dry on
surface, if surface appears to be drying,
simply wet down surface with fresh water. If
needed, use special Wash Brush Attachment
to remove stubborn dirt. Rinse at high
pressure from top to bottom in an even
sweeping motion keeping the spray nozzle
approximately 6 inches from the cleaning
surface.
Caution: Do not use rotating nozzle spray
wand on siding as it may cause damage.
Cement Patios,
Brick and Stone
(with or without detergent)
Pre-rinse cleaning surface with fresh water. If
using Karcher All Purpose Cleaner, place
detergent suction tube directly into cleaning
solution and apply to surface at low pressure.
For best results, limit your work area to
smaller sections of approximately 25 square
feet. Allow Kärcher All Purpose Cleaner to
remain on surface 1-3 minutes. Do not allow
detergent to dry on surface. Rinse at high
pressure in a sweeping motion keeping the
spray nozzle approximately 3-6 inches from
the cleaning surface. Always clean from top to
bottom and from left to right. For removing
extremely stubborn stains, use Kärcher
Rotating Nozzle Spray Wand.
Cars, Boats & Motorcycles
(with or without detergent)
Pre-rinse vehicle with fresh water. If using
Karcher Vehicle Wash, place detergent
suction tube directly into cleaning solution and
apply to surface at low pressure. For best
results, clean one side of vehicle at a time
and always apply detergent from bottom to
top, do not allow detergent to dry on surface.
If needed, use special Wash Brush
Attachment to remove stubborn dirt. Rinse at
high pressure in a sweeping motion keeping
the spray nozzle approximately 6-8 inches
from the cleaning surface (distance should
increase when rinsing pin-striping or other
sensitive surfaces). Always clean from top to
bottom and from left to right. For best results,
wipe surface dry with a chamois or soft dry
cloth.
Caution: Do not use rotating nozzle spray
wand on vehicles as it may “cause damage.
9
Page 10

CLEANING TIPS – continued
Barbecue Grills, Outdoor
Power Equipment & Gardening
Tools
(with or without detergent)
Pre-rinse cleaning surface with fresh water.
If using Kärcher All Purpose Cleaner or
Degreaser, place detergent suction tube
directly into cleaning solution and apply
detergent at low pressure. Allow Kärcher
detergent to remain on surface 1-3 minutes.
Do not allow detergent to dry on surface.
Rinse at high pressure keeping the spray
nozzle approximately 3-6 inches from the
cleaning surface. For removing extremely
stubborn dirt, it may be necessary to move
the spray nozzle even closer to the surface
for greater dirt cutting action. To remove
caked on mud from garbage cans, lawn
mower blades, wheel barrels or other
non-sensitive metal surfaces, you may want
to use the Karcher Rotating Nozzle Spray
Wand.
Caution: Do not use rotating nozzle spray
wand on cloth, plastic or other sensitive
10
surfaces as it may cause damage.
Patio & Lawn Furniture
(with or without detergent)
Pre-rinse furniture and surrounding area
with fresh water. If using Kärcher All
Purpose Cleaner, place detergent suction
tube directly into cleaning solution and
apply to surface at low pressure. Allow
Kärcher All Purpose Cleaner to remain on
surface 1-3 minutes. Do not allow detergent
to dry on surface. If needed use special
Wash Brush Attachment to remove stubborn
dirt. Rinse at high pressure in a sweeping
motion keeping the spray nozzle
approximately 3-6 inches from the cleaning
surface. For best results, clean from top to
bottom and from left to right.
Caution: Do not use rotating nozzle spray
wand on patio or lawn furniture as it may
cause damage.
Recommendations
• Before cleaning any surface an
inconspicuous area should be cleaned to
test spray pattern and distance for
maximum cleaning results.
• If painted surfaces are pealing or chipping,
use extreme caution as pressure washer
may remove the loose paint from the
surface.
OPTIONAL CLEANING
Optional cleaning accessories are available to further enhance your cleaning capabilities:
See accessories order form for product descriptions and ordering instructions.
• Rotating Wash Brush
• Wash Brush
• House Washing Wand
• Extension Wand
• Rotating Spray Wand
• Flexible Spray Wand
• Underbody Spray Wand
• Telescopic Spray Wand
• Pipe Drain Cleaner
• Floor Washing Tool
• Sandblasting Attachment
• Detergent Foamer Attachment
• Water Pumping Kit
• Water Suction Hose
• Extension Hose 25’
Page 11

TROUBLESHOOTING
Disconnect the machine from the power source before making any repair.
Symptom
Motor will not start
Unit does not reach high
pressure.
Output pressure varies
high and low.
Cause
On/Off switch is in the “OFF”
position.
Power cord is not plugged in.
Extension cord is too long.
Extension cord is not proper gauge.
Extension cord is damaged.
Electrical outlet does not supply
adequate power.
Tripped circuit breaker
Diameter of garden hose is too
small.
Water supply is restricted.
Not enough inlet water supply.
Water inlet filter is clogged.
Spray wand is in low pressure
position.
Not enough inlet water supply.
Solution
Turn switch to the “ON” position
Plug in power cord.
Replace extension cord with either
a 25 ft. 12/2 gauge cord or a 50
ft. 10/2 gauge cord.
Try a different outlet.
Reset breaker (power supply) or
ground fault circuit interrupter.
Replace with a 3/4 inch garden
hose.
Check garden hose for kinks,
leaks and blockage.
Open water source full force.
Remove filter and rinse out in
warm water.
Turn spray wand to high pressure
position.
Turn water on full force. Check
garden hose for kinks, leaks or
blockage.
11
Pump is sucking air.
Water inlet filter is clogged.
Discharge nozzle is obstructed.
Calcified gun, hose or spray wand.
Check that hoses and fittings are
air tight. Turn off machine and
purge pump by squeezing trigger
gun until a steady flow of water
emerges through the nozzle.
Remove filter and rinse out in
warm water.
Blow out or remove debris with a
fine needle.
Run distilled vinegar through
detergent suction tube.
Page 12

TROUBLESHOOTING – continued
12
Symptom
No detergent.
Garden hose
connection leaks.
Spray wand or Spray
wand extension leaks.
Cause
Detergent suction tube not properly
connected to the machine.
Detergent is too thick.
Filter on detergent suction tube is
clogged.
Damaged or clogged detergent
suction tube.
Spray wand is in high pressure
position.
Discharge nozzle is obstructed.
Loose fittings.
Missing/worn rubber washer.
Spray wand not properly attached.
Broken o-ring or plastic insert.
Solution
Check connection.
Dilute detergent, for best results
use Kärcher detergent.
Run warm water through filter to
remove debris.
Remove obstruction or replace
detergent suction tube.
Turn spray wand tip to low
pressure position.
Blow out or remove debris with
fine needle.
Tighten fittings.
Insert new washer.
Insert the spray wand into the gun.
Carefully press in against the
spring tension and twist into the
locked position.
Call Kärcher customer service
hotline and order repair kit (part
no. 2.883-111.0).
Pump is noisy.
Water leaks from pump (up
to 10 drops per minute is
permissible).
Oil Drip.
In USA Call:
1-800-537-4129
or visit our website:
www.karcher-usa.com
Pump is sucking air.
Loose fittings.
Water seals are damaged or worn.
Oil seals are damaged or worn.
If you encounter any additional
difficulties not listed, please call our
service center for help.
Karcher Customer Support USA
Check that hoses and fittings are
air tight. Turn off machine and
purge pump by squeezing trigger
gun until a steady flow of water
emerges through the nozzle.
Check that all fittings are tight.
Call service center.
Call service center.
1-800-537-4129
Page 13

Modelo K 1.302
Manual del Operador para la Lavadora de Alta Presión
Generalidades................................................................................ 2
Precauciones .............................................................................. 2-4
Instrucciones de Ensamblaje ........................................................ 4
Instrucciones de Operación .......................................................... 5
Instrucciones del Interruptor de Circuito por Falla de
corriente a Tierra (GFCI) ................................................................ 6
Uso de Accesorios ........................................................................ 6
Uso de Detergentes ....................................................................... 7
Apagado y Limpieza ...................................................................... 8
Tomando un Descanso .................................................................. 8
Preparación para Invierno o Almacenaje por Largo Tiempo ........ 8
Sugerencias para Lavar ............................................................ 9-10
Accesorios Opcionales para Lavado .......................................... 10
Diagnóstico y Solución de Fallas Mecánicas ........................ 11-12
Especificaciones
Presión de operación 1300 PSI
Volumen de agua 1.3 GPM
Voltaje 120 V
Amperaje 14 AMPS
En USA llame al:
01-800-537-4129
o visite nuestro sitio web:
www.karcher-usa.com
5.961-055 (2006403-08/03)
Page 14

MODELO K 1.302 GENERALIDADES
Artículo Description
1. Interruptor On/Off
2. Salida de alta presión
3. Entrada de agua con filtro interior
4. Filtro de detergente
5. Tubo de succión de detergente
6. Lanza Dirtblaster
7. Lanza vario
2
Artículo Description
8. Pistola rociadora
9. Seguro del gatillo de la pistola
10. Manguera de alta presión
11. Cable eléctrico
12. Interruptor de circuito por falla de
corriente a tierra (GFCI)
¡NUNCA !
Nunca apunte la manguera a personas o animales.
Nunca beba alcohol o utilice drogas mientras opera este equipo.
Nunca opere mientras esté de pie en agua.
Nunca toque el enchufe con las manos mojadas.
Nunca permita que las conexiones eléctricas estén dentro de agua.
Nunca opere la lavadora de presión sin abrir la llave suministro de agua.
Nunca utilice agua caliente.
Page 15

PRECAUCIONES IMPORTANTES - ¡Lea Primero!
PRECAUCIONES DE SEGURIDAD
Cuando utilice este producto siempre debe seguir
estas precauciones básicas:
• Lea todas las instrucciones antes de utilizar
este artefacto.
• Para reducir el riesgo de lesiones, se debe
ejercer supervisión estrecha cuando se opere
este artefacto cerca de niños.
• Aprenda cómo detener la lavadora y aliviar la
presión rápidamente. Familiarícese bien con los
controles.
• Manténgase alerta - observe lo que esté
haciendo.
• No opere el artefacto cuando se encuentre
cansado o bajo la influencia de alcohol o
drogas.
• Mantener a las personas alejadas del área de
operación.
• No se estire ni se pare sobre un soporte
inestable. Pararse siempre sobre los dos pies y
mantener el equilibrio en todo momento.
• Siga las instrucciones de mantenimiento
especificadas en este manual.
• Esta lavadora tiene un interruptor de circuito
por falla de corriente a tierra incorporado en el
cable. Si se necesita cambiar el cable o el
enchufe, hacerlo únicamente con piezas
idénticas.
ADVERTENCIA: Riesgo de inyección o de
lesiones. No dirigir el chorro de alta presión
hacia las personas ni hacia los animales.
• El chorro de alta presión puede ser peligroso si
no se emplea adecuadamente. No dirigir el
chorro hacia personas, animales, aparatos
eléctricos o hacia la misma lavadora.
• Use gafas de seguridad.
• No use ácidos, solventes ni cualquier otro
material inflamable en este artefacto porque
pueden ocasionar lesiones físicas al operador y
daños irreversibles al artefacto.
• Esta lavadora está diseñada para usar el
detergente suministrado o recomendado por el
fabricante. El uso de otros detergentes podría
afectar la operación de la lavadora y anular la
garantía.
• El seguro de la pistola IMPIDE que el gatillo se
accione accidentalmente; pero NO mantiene
activado el gatillo.
INTERRUPTOR DE CIRCUITO POR
FALLA DE CORRIENTE A TIERRA
Esta lavadora de presión tiene un interruptor de
circuito por falla de corriente a tierra (GFCI)
incorporado en el cable de suministro de
corriente. Este dispositivo provee protección
adicional contra el riesgo de choque eléctrico.
Si se necesita cambiar el cable o el enchufe,
hacerlo únicamente con piezas idénticas que
incluyan un interruptor GFCI.
MANTENIMIENTO A UN ARTEFACTO
QUE TIENE DOBLE AISLAMIENTO
Los artefactos con doble aislamiento tienen dos
sistemas de aislamiento en vez de conexión a
tierra. Esto significa que no trae medios de
conexión a tierra y que tampoco se le debe
agregar uno. El mantenimiento de estos artefactos
exige mucho cuidado y conocimiento del sistema
y sólo debe hacerlo personal calificado de
servicio. Las piezas de repuesto deben ser
idénticas a las originales.
Los artefactos con doble aislamiento están
marcados "DOUBLE INSULATION" o "DOUBLE
INSULATED". También podría tener el símbolo .
CABLES DE EXTENSIÓN
Utilice las medidas adecuadas:
Hasta 7,5m (25’) = CAL12/2;
De 7,5m (25’) a 15m (50’) = CAL 12/2
Utilice solamente cables de extensión para uso en
exteriores. Estos cables de extensión se
identifican porque tienen grabado la siguiente
inscripción: "Acceptable for use with outdoor
appliances: store indoors while not in use". Utilice
solamente cables de extensión con una capacidad
mínima igual a la del artefacto. No utilice cables
de extensión dañados. Revise el cable de
extensión antes de utilizarlo y reemplácelo si está
dañado. No someter el cable o la extensión a
abuso ni jale el cable para desconectarlo.
Mantenga el cable lejos del calor y de bordes
filosos. Siempre desconecte el cable de extensión
del tomacorriente antes de desconectar el
artefacto de la extensión. Si está utilizando un
cable de extensión, siempre desenróllelo
completamente del carrete
ADVERTENCIA: Para reducir el riesgo de
electrocución, mantenga todas las conexiones
eléctricas secas y lejos del suelo. No toque el
enchufe con las manos mojadas.
3
3
Page 16

PRECAUCIONES IMPORTANTES - (Continuación)
Suministro de Agua (Solamente Agua Fría)
• La manguera de agua debe tener un
diámetro mínimo de 19mm (3/4").
• La velocidad de flujo del agua no debe caer
por debajo de 9,5 L/min (2,5 Gal/min).
• La velocidad de flujo puede determinarse
haciendo correr el agua durante un minuto
hacia un recipiente vacío de 19 L (5 Gal) de
capacidad.
• La temperatura del agua suministrada no
debe exceder de 40°C/104°F.
• Nunca utilice la lavadora de presión para
succionar agua contaminada con solventes,
p. ej.: diluyente de pintura, gasolina, aceite,
etc.
• Siempre evite que entren escombros en la
unidad utilizando siempre una fuente de
agua limpia.
INSTRUCCIONES DE ENSAMBLAJE
4
Paso 1
Tire del seguro corredizo en el
costado derecho del mango
del gatillo de la pistola.
Paso 4
Conecte el tubo de succión
de detergente a la lavadora
de presión.
Paso 2
Coloque el extremo pequeño
de la manguera de alta presión
en su lugar.
Paso 3
Empuje el seguro corredizo de
vuelta en el mango del gatillo
de la pistola para asegurar la
manguera en su lugar.
Page 17

INSTRUCCIONES DE OPERACION
Paso 1
Conecte la manguera de alta presión a la salida
de alta presión de la lavadora.
Paso 3
Conecte la manguera de jardín a la entrada de agua
en la lavadora..
Paso 2
Inserte la lanza con boquilla que usted
elija en el cañón de la pistola. Presiónelo
contra la tensión del resorte y gírelo para
engancharlo en posición.
Paso 4
Conecte la manguera de jardín al
suministro de agua fría y abra
completamente la llave de agua.
5
5
Paso 5
Conecte el cable eléctrico al tomacorriente. Quite
el seguro al gatillo. Oprima "TEST" (Prueba),
después oprima "RESET" (Restablecer) para
asegurarse que la conexión al tomacorriente es
adecuada. Oprima el gatillo de la pistola para
eliminar el aire atrapado, espere a que salga un
flujo continuo de agua por la boquilla.
Paso 6
Gire la perilla a la posición de presión
alta (I). El motor arranca solamente
si el gatillo de la pistola está
presionado y se apaga cuando se
suelta el gatillo.
Page 18

Instrucciones del Interruptor de Circuito por Falla de corriente a Tierra (GFCI)
Paso1
Conecte el interruptor de circuito
por falla de corriente a tierra
(GFCI) a un tomacorriente vivo.
Paso2
Oprima "TEST" (Prueba), después oprima
"RESET" (Restablecer) para asegurarse
de tener una buena conexión al
tomacorriente.
USO DE ACCESORIOS
Lanza Vario
La extensión de lanza Vario le permite ajustar
la presión de limpieza. Para limpiar a presión
máxima, la lanza Vario debe ser colocada en
la puesta de alta presión (+). Para aplicar
detergente, la lanza debe ser colocada en la
puesta de baja presión (-).
6
Lanza Dirtblaster
Esta lanza ejecuta un chorro de lápiz fino de
0° que rota 360° para una acción cortante de
suciedad máxima, aumenta de forma efectiva
la limpieza hasta un 50%. Esta lanza combina
la limpieza de un chorro de lápiz fino de 0°
con la cobertura de superficie de una boquilla
de ángulo amplio. No se recomienda para
materiales suaves, flancos de casas,
superficies pintadas, cubiertas o
automóviles.
Nota: La
apariencia del
interruptor de
circuito por falla
de corriente a
tierra (GFCI)
provisto puede
ser diferente a
esta ilustración.
Para la puesta en alta presión dele
vuelta al collar de la lanza en la
dirección de más (+).
Para la puesta en baja presión
dele vuelta al collar de la lanza
en la dirección de menos (-).
ADVERTENCIA:
PARA EVITAR LESIONES SERIAS,
NUNCA APUNTE LA BOQUILLA
HACIA USTED MISMO, A OTRAS
PERSONAS O ANIMALES.
Page 19

USO DE DETERGENTES
Los detergentes solamente pueden aplicarse en presión baja (-).
Para obtener mejores resultados
vea las Sugerencias de Limpieza en
las páginas 9 y 10 con información
específica para lavar diferentes
superficies.
Paso1
Para aplicar detergentes, instale la lanza
Vario. Coloque la lanza Vario en la puesta de
baja presión (-) dándole vuelta al collar de la
lanza. La lanza debe estar colocada en la
posición de presión baja (-) para aplicar
detergentes.
Siempre utilice detergentes Kärcher
para obtener mejores resultados.
Los detergentes biodegradables Kärcher se
formulan especialmente para proteger el
medio ambiente y su lavadora de presión. Su
fórmula especial no obstruye el filtro del tubo
de succión y protege las partes internas de su
lavadora a presión por más tiempo. Para los
Detergentes Kärcher, pregunte a su
distribuidor o llame:
En USA llame al:
01-800-537-4129
o visite nuestro sitio web:
www.karcher-usa.com
7
7
Paso 2
Llene el recipiente con detergente Kärcher.
Coloque el extremo con filtro del tubo de
succión de detergente dentro del recipiente.
Paso 3
Encienda la lavadora a presión. Oprima el
gatillo de la pistola para hacer funcionar la
máquina: el detergente líquido es aspirado
hacia la máquina y se mezcla con el agua.
Aplique el detergente al área de trabajo. No
permita que el detergente se seque sobre la
superficie.
Se disponen de los siguientes detergentes
Karcher para:
• Lavar automóviles
• Uso general
• Lavar terrazas
• Desengrasar
• Lavar casas
Precaución
Nunca utilice:
• Blanqueadores, productos con cloro ni
otros químicos corrosivos.
• Líquidos que contengan solventes (p.
ej.: diluyentes de pintura, gasolina,
aceites).
• Productos con trisodio de fosfato.
• Productos con amoníaco.
• Productos a base de ácidos.
Estos productos químicos dañarán
la unidad y la superficie a lavar.
Page 20

APAGADO Y LIMPIEZA
Paso 1
Quite el tubo de succión
de detergente del
recipiente e insértelo en
otro con 4L (1 Gal) de
agua limpia. Aspire el
agua a baja presión por
un minuto.
8
Paso 5
Desconecte la manguera de
jardín de la entrada de agua a la
lavadora.
Paso 2
Coloque el
interruptor en
posición apagado "O"
y desconecte el cable
del tomacorriente.
Paso 6
Desconecte la manguera de alta presión de la salida de alta
presión y asegure la aldaba de seguridad de la pistola.
Paso 3
Cierre el
suministro de agua
TOMANDO UN DESCANSO.......de 5 minutos o más
Paso 1
Enganche el
seguro de la
pistola
Paso 4
Oprima el gatillo
de la pistola para
liberar la presión
del agua.
Paso 2
Coloque la lavadora
de alta presión en la
posición de apagado
"0"
PREPARANDO PARA EL INVIERNO Y ALMACENAJE LARGO
1.Desconecte todas las conexiones de agua.
2. Arranque la lavadora por unos cuantos
segundos hasta que salga el agua que
haya quedado en la bomba. Apáguela
inmediatamente.
3. No permita que la manguera de alta
presión se acode.
4.Guarde la lavadora y los accesorios en un
cuarto donde la temperatura no baje al
punto de congelación.
Precaución: No seguir las instrucciones
previas puede causar daños a la bomba y
a los accesorios.
Page 21

SUGERENCIAS PARA LAVAR
Lavado de Terrazas o
Plataformas de Madera
(con o sin detergente)
Pre-enjuague la terraza y el área circundante
con agua limpia. Si utiliza el detergente para
terrazas de Kärcher, coloque el tubo de
succión de detergente directamente en la
solución y aplíquela a la superficie a presión
baja. Para obtener mejores resultados, limite
su área de trabajo a secciones pequeñas de
aproxima-damente 2m2 (25p2). Permita que el
detergente para terrazas de Kärcher
permanezca sobre la superficie durante 1 a 3
minutos. No permita que el detergente se
seque sobre la superficie. Enjuague a presión
alta con un movimiento amplio de barrido
manteniendo la boquilla del tubo aplicador a
una distancia aproximada de 7 a 15cm (3" a
6") de la superficie a lavar. Lave siempre de
arriba hacia abajo y de izquierda a derecha.
Cuando prosiga hacia una sección nueva de
la superficie a lavar, asegúrese de hacerlo
traslapando sobre la sección previa para
eliminar marcas y asegurar un lavado más
uniforme.
Precaución: No utilice el tubo aplicador
con boquilla rotante en superficies de
madera ya que puede ocasionar daños.
Recubrimientos de Paredes
Exteriores de Casas
(con o sin detergente)
Pre-enjuague la superficie a lavar con agua
limpia. Si utiliza el detergente para casas de
Kärcher, coloque el tubo de succión de
detergente directamente en la solución y
aplíquela a la superficie a baja presión (para
obtener mejores resultados, limite su área de
trabajo a secciones de aproximadamente
0,5m2 (6p2) y aplique siempre el detergente
de arriba hacia abajo). Permita que el
detergente para casas de Kärcher
permanezca sobre la superficie durante 1 a 3
minutos. No permita que el detergente se
seque sobre la superficie, si parece que la
superficie se está secando, simplemente
mójela con agua limpia. Si es necesario,
utilice el aditamento especial de cepillo de
lavar para eliminar la suciedad persistente.
Enjuague a presión alta de arriba hacia abajo
con un movimiento de barrido uniforme,
manteniendo la boquilla del tubo aplicador a
una distancia aproximada de 15cm (6") de la
superficie a lavar.
Precaución: No utilice el tubo aplicador
con boquilla de chorro rotante en el
recubrimiento de la pared ya que puede
ocasionar daños.
Patios de Cemento, Losetas,
Ladrillo y Piedra
(con o sin detergente)
Pre-enjuague la superficie a lavar con agua
limpia. Si utiliza el detergente para uso
general de Kärcher, coloque el tubo de
succión de detergente directamente en la
solución y aplíquela a la superficie a presión
baja. Para obtener mejores resultados, limite
su área de trabajo a secciones pequeñas de
aproximadamente 2m2 (25p2). Permita que el
detergente para uso general de Kärcher
permanezca sobre la superficie durante 1 a 3
minutos. No permita que el detergente se
seque sobre la superficie. Enjuague a presión
alta con un movimiento de barrido
manteniendo la boquilla del tubo aplicador a
una distancia aproximada de 7 a 15 cm (3" a
6") de la superficie a lavar. Limpie siempre de
arriba hacia abajo y de izquierda a derecha.
Para eliminar manchas muy persistentes,
utilice el tubo aplicador con boquilla de chorro
rotante de Kärcher.
Automóviles, Botes y
Motocicletas
(con o sin detergente)
Pre-enjuague el vehículo con agua limpia. Si
utiliza el detergente para vehículos de
Kärcher, coloque el tubo de succión de
detergente directamente en la solución y
aplíquela a la superficie a presión baja. Para
obtener mejores resultados, limpie todo un
lado del vehículo a la vez y aplique siempre el
detergente de abajo hacia arriba, no permita
que el detergente se seque sobre la
superficie. Si es necesario, utilice el accesorio
de cepillo de lavar para eliminar la suciedad
persistente. Enjuague a presión alta con un
movimiento de barrido manteniendo la
boquilla del tubo aplicador a una distancia
aproximada de 15 a 20 cm (6" a 8") de la
superficie a lavar (esta distancia debe
aumentar cuando enjuague superficies que
tienen aplicaciones de líneas u otras
superficies sensibles). Lave siempre de arriba
hacia abajo y de izquierda a derecha. Para
obtener mejores resultados, seque la
superficie con una gamuza o paño suave y
seco.
Precaución: No utilice el tubo aplicador
con boquilla de chorro rotante en el
recubrimiento en vehículos ya que puede
ocasionar daños.
9
9
Page 22

SUGERENCIAS PARA LAVAR - (continuación)
Parrillas de Asadores, Equipos
Motorizados para Exteriores y
Herramientas de Jardinería
(con o sin detergente)
Pre-enjuague la superficie a lavar con agua
limpia. Si utiliza el detergente para uso
general o el desengrasante de Kärcher,
coloque el tubo de succión de detergente
directamente en la solución y aplique el
detergente a presión baja. Permita que el
detergente Kärcher permanezca sobre la
superficie durante 1 a 3 minutos. No permita
que el detergente se seque sobre la superficie
Enjuague a presión alta manteniendo la
boquilla del tubo aplicador a una distancia
aproximada de 7 a 15cm (3" a 6") de la
superficie a lavar. Para eliminar suciedad muy
persistente, puede ser necesario acercar aún
más la boquilla del tubo aplicador a la
superficie para lograr una acción cortante de
grasa más eficiente. Para quitar varias capas
de lodo de latas de basura, hojas de
cortadoras de pasto, barriles u otras
superficies metálicas no sensibles, puede
utilizar el tubo aplicador con boquilla de
10
chorro rotante de Kärcher
Precaución: No utilice tubo aplicador con
boquilla de chorro rotante en superficies
de tela, plástico u otras superficies
sensibles, ya que puede ocasionar daños.
Muebles de Patio y Jardín
(con o sin detergente)
Pre-enjuague los muebles y el área
circundante con agua limpia. Si utiliza el
detergente para uso general de Kärcher,
coloque el tubo de succión de detergente
directamente en la solución limpiadora y
aplíquela a la superficie a presión baja.
Permita que el detergente para uso general
de Kärcher permanezca sobre la superficie
durante 1 a 3 minutos. No permita que el
detergente se seque sobre la superficie. Si es
necesario, utilice el aditamento especial de
cepillo de lavar para eliminar suciedad
persistente. Enjuague a presión alta con un
movimiento de barrido manteniendo la
boquilla del tubo aplicador a una distancia
aproximada de 7 a 15cm (3" a 6") de la
superficie a lavar. Para obtener mejores
resultados, limpie de arriba hacia abajo y de
izquierda a derecha.
Precaución: No utilice tubo aplicador con
boquilla de chorro rotante en muebles de
patio o jardín ya que puede ocasionar
daños.
Recomendaciones
• Antes de lavar cualquier superficie, debe
hacerse una prueba en un lugar oculto para
probar el patrón de rociado y distancia para
obtener los mejores resultados de lavado.
• Si la pintura de las superficies se encuentra
levantada o quebrada, extreme
precauciones, ya que la lavadora a presión
puede desprender la pintura suelta de la
superficie
ACCESORIOS OPCIONALES PARA LAVADO
Se dispone de accesorios opcionales para mejorar la capacidad de lavado:
• Cepillo rotante para lavar
• Cepillo para lavar
• Tubo aplicador para lavar casas
• Extensión de tubo aplicador
• Tubo aplicador con boquilla de chorro rotante
• Tubo aplicador flexible
• Tubo aplicador para debajo de la
carrocería
• Tubo aplicador telescópico
• Limpiador de tuberías de drenaje
• Herramienta para lavado de pisos
• Accesorio para limpieza con chorro de arena
• Accesorio espumador de detergente
• Juego para bombear agua
• Manguera para succión de agua
• Extensión de manguera de 7,5m (25’).
Page 23

DIAGNÓSTICO Y SOLUCIÓN DE PROBLEMAS
Desconecte la máquina de la toma de corriente antes de realizar cualquier reparación.
Síntoma
El motor no arranca
La lavadora no alcanza la
presión alta.
La presión de salida varía
de alta a baja.
Causa
El interruptor On/Off está en posición "OFF"
(apagado).
El cable eléctrico no está conectado.
El cable de extensión es demasiado largo.
El cable de extensión no es del calibre
adecuado
El cable de extensión está dañado.
El tomacorriente no proporciona electricidad.
El cortacircuitos está abierto.
El diámetro de la manguera de jardín es
demasiado pequeño.
La entrada de agua está restringida.
No hay suficiente suministro de agua.
El filtro de entrada de agua está obstruido.
La lanza está en posición de baja presión.
No hay suficiente suministro de agua.
Solución
Coloque el interruptor en posición “ON”
(encendido).
Conecte el cable eléctrico.
Reemplace el cable de extensión ya sea con
un cable de 7,5m (25’) de 2 alambres calibre
12, ó uno de 15m (50’) de 2 alambres calibre
10.
Pruebe otro tomacorriente.
Reposicione el cortacircuitos (fuente de
corriente) o el interruptor de circuito por falla de
corriente a tierra (GFCI).
Reemplace con una manguera de jardín de 3/4
de pulgada.
Revise que la manguera de jardín no esté
torcida, tenga fugas o esté obstruida.
Abra la llave de suministro de agua al máximo.
Quite el filtro y enjuáguelo con agua tibia.
Dele vuelta al extremo de la lanza hacia la
posición de alta presión.
Abra la llave de suministro de agua al máximo.
Revise que la manguera de jardín no esté
acodada, tenga fugas o esté obstruida.
11
11
La bomba está aspirando aire.
El filtro de entrada de agua está obstruido.
La boquilla de descarga está obstruida.
Calcificación en la pistola, manguera o tubo
aplicador.
Revise que las mangueras y conexiones no
permitan la entrada de aire. Apague la
lavadora y purgue la bomba apretando el
gatillo de la pistola hasta que salga un flujo
continuo de agua por la boquilla .
Quite el filtro y enjuáguelo en agua tibia.
Sople o quite la obstrucción con una aguja fina.
Haga correr vinagre a través del tubo de
succión de detergente.
Page 24

DIAGNÓSTICO Y SOLUCIÓN DE PROBLEMAS (continuación)
Síntoma
No hay detergente.
Fuga en la conexión de la
manguera de jardín.
Fuga en el tubo aplicador
12
e en el adaptador.
La bomba hace
mucho ruido.
Causa
El tubo de succión de detergente no está
conectado adecuadamente a la lavadora..
El detergente está muy espeso.
El filtro del tubo de succión de detergente
está obstruido.
El tubo de succión de detergente está
dañado u obstruido.
La lanza está en posición de alta presión.
La boquilla de descarga está obstruida.
Las piezas de conexión están flojas.
Faltan las rondanas o están gastadas.
El tubo aplicador no está conectada
adecuadamente..
El anillo "O" o la inserción de plástico están
rotas.
La bomba está aspirando aire.
Solución
Revise la conexión.
Diluya el detergente, para obtener mejores
resultados utilice el detergente Kärcher.
Haga correr agua tibia a través del filtro para
eliminar la obstrucción.
Quite la obstrucción o reemplace el tubo de
succión de detergente.
Dele vuelta al extremo de la lanza hacia la
posición de baja presión.
Sople o quite la obstrucción con una aguja
fina.
Ajuste las piezas de conexión.
Inserte rondanas nuevas.
Inserte el tubo aplicador en la pistola. Presione
cuidadosamente hacia adentro contra la tensión
del resorte y gírelo para engancharlo en posición.
Llame a la línea de servicio al cliente de
Kärcher y solicite el juego de reparación (parte
no. 2.883-111.0).
Revise que las mangueras y piezas de
conexión no permitan el paso de aire. Apague
la lavadora y purgue la bomba oprimiendo el
gatillo de la pistola hasta que salga un flujo
constante de agua por la boquilla
Fuga de agua de la
bomba (se permiten hasta
3 gotas por minuto)
Goteo de aceite.
En USA llame al:
01-800-537-4129
o visite nuestro sitio web:
www.karcher-usa.com
Las piezas de conexión están sueltas.
Los sellos de agua están dañados o
gastados.
Los sellos de aceite están dañados o
gastados.
Revise que todas las piezas de conexión estén
apretadas.
Llame al centro de servicio.
Llame al centro de servicio.
Si encuentra dificultades adicionales que no se han
mencionado, favor de llamar al centro de servicio para
recibir ayuda.
Servicio de Atención al Cliente Kärcher en EE.UU.
 Loading...