

Register
your product
www.kaercher.com/welcome
IVC 60/30 Tact² Lp
001
Deutsch 6
English 12
Français 18
Italiano 24
Nederlands 30
Español 36
Português 42
Dansk 48
Norsk 54
Svenska 60
Suomi 66
Ελληνικά 72
Türkçe 79
Русский 85
Magyar 92
Čeština 98
Slovenščina 104
Polski 110
Româneşte 116
Slovenčina 122
Hrvatski 128
Srpski 134
Български 140
Eesti 146
Latviešu 152
Lietuviškai 158
Українська 164
59673510 02/19

2
16 1517
14
3
21
23
1
1
3
1
2
5
7
8
9
24 27
2625
1819
11
4
20
6
10
13
12
22
3
A
1.
2.
3.
B
C
D
E
4
3.
2.
1.
F
1.
G
H
5
Lesen Sie vor der ersten Benut-
zung Ihres Gerätes diese Originalbetriebsanleitung, handeln Sie danach
und bewahren Sie diese für späteren Gebrauch oder für Nachbesitzer auf.
– Vor erster Inbetriebnahme Sicherheits-
hinweise Nr. 5.956-249.0 unbedingt lesen!
– Bei Nichtbeachtung der Betriebsanlei-
tung und der Sicherheitshinweise können Schäden am Gerät und Gefahren
für den Bediener und andere Personen
entstehen.
– Bei Transportschaden sofort Händler
informieren.
Inhaltsverzeichnis
Umweltschutz . . . . . . . . . . . . . DE 1
Gefahrenstufen . . . . . . . . . . . . DE 1
Bestimmungsgemäße Verwen-
dung . . . . . . . . . . . . . . . . . . . . DE 1
Geräteelemente . . . . . . . . . . . DE 2
Inbetriebnahme. . . . . . . . . . . . DE 2
Bedienung. . . . . . . . . . . . . . . . DE 2
Transport. . . . . . . . . . . . . . . . . DE 4
Lagerung. . . . . . . . . . . . . . . . . DE 4
Pflege und Wartung . . . . . . . . DE 4
Hilfe bei Störungen . . . . . . . . . DE 4
Garantie . . . . . . . . . . . . . . . . . DE 5
Zubehör und Ersatzteile . . . . . DE 5
EU-Konformitätserklärung. . . . DE 5
Technische Daten . . . . . . . . . . DE 6
Umweltschutz
Die Verpackungsmaterialien
sind recyclebar. Bitte werfen Sie
die Verpackungen nicht in den
Hausmüll, sondern führen Sie
diese einer Wiederverwertung
zu.
Altgeräte enthalten wertvolle recyclingfähige Materialien, die einer Verwertung zugeführt werden sollten. Batterien, Öl und
ähnliche Stoffe dürfen nicht in die
Umwelt gelangen. Bitte entsorgen Sie Altgeräte deshalb über
geeignete Sammelsysteme.
Hinweise zu Inhaltsstoffen (REACH)
Aktuelle Informationen zu Inhaltsstoffen finden Sie unter:
www.kaercher.de/REACH
Gefahrenstufen
GEFAHR
Hinweis auf eine unmittelbar drohende Gefahr, die zu schweren Körperverletzungen
oder zum Tod führt.
몇 WARNUNG
Hinweis auf eine möglicherweise gefährliche Situation, die zu schweren Körperverletzungen oder zum Tod führen kann.
몇 VORSICHT
Hinweis auf eine möglicherweise gefährliche Situation, die zu leichten Verletzungen
führen kann.
ACHTUNG
Hinweis auf eine möglicherweise gefährliche Situation, die zu Sachschäden führen
kann.
Bestimmungsgemäße
Verwendung
몇 WARNUNG
Das Gerät ist nicht für die Absaugung gesundheitsschädlicher Stäube geeignet.
– Dieses Entsorgungssystem ist zur stau-
barmen Entsorgung von trockenem
oder leicht feuchtem Sauggut unter
Verwendung eines in der Länge zuschneidbaren Abfallschlauchs bestimmt.
– Dieses Gerät ist für den industriellen
Gebrauch geeignet, z.B. in Lager- und
Fertigungsbereichen und an Produktionsmaschinen.
– Das Gerät ist für Kranverladung nicht
zugelassen.
6 DE
– 1
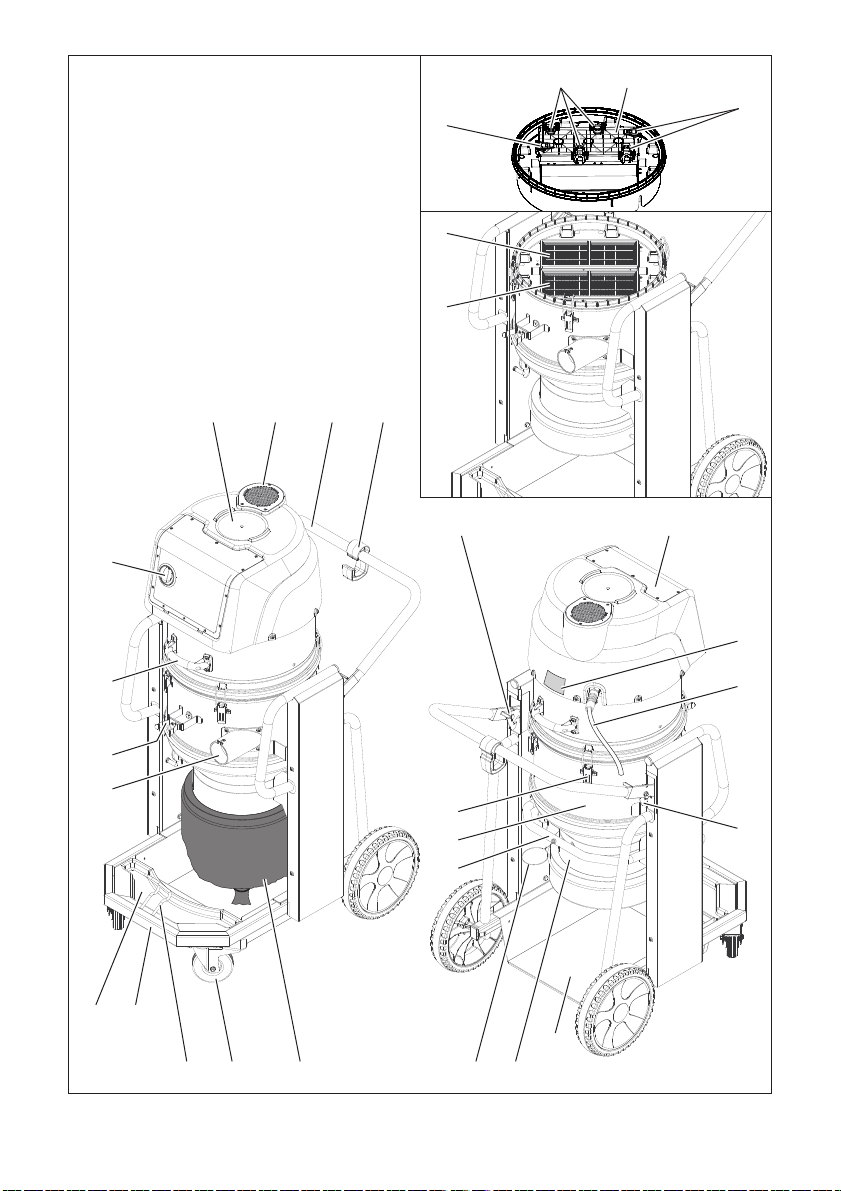
Geräteelemente
1 Spannhebel
2 Filterabdeckung
3 Flachfaltenfilter
4 Linke Entriegelung der Absetzmechanik
5 Saugkopf
6 Typenschild
7 Netzkabel
8 Rechte Entriegelung der Absetzmecha-
nik
9 Blechwanne
10 Entsorgungssystem
11 Seilzug
12 Handgriff des Entsorgungssystems
13 Zwischenring
14 Verriegelung des Saugkopfs
15 Abfallschlauch
16 Lenkrolle des Fahrgestells mit Feststell-
bremse
17 Halter für Bodendüse
18 Fahrgestell
19 Auffangwanne
20 Saugstutzen
21 Halter für Saugrohr
22 Handgriff des Saugkopfs
23 Drehschalter
24 Drehstrommotor
25 Abluftschalldämpfer
26 Schubbügel
27 Kabelhaken
Inbetriebnahme
Das Gerät in Arbeitsposition bringen,
wenn nötig mit Feststellbremsen sichern.
Saugschlauch (nicht im Lieferumfang)
in den Saugstutzen einstecken.
Sicherstellen, dass das Entsorgungs-
system ordnungsgemäß eingesetzt ist.
Gewünschtes Zubehör (nicht im Liefer-
umfang) aufstecken.
Stromanschluss
ACHTUNG
Bei jedem Steckdosenwechsel, Drehrichtung des Motors überprüfen.
Hinweis: Bei richtiger Drehrichtung ist ein
starker Luftstrom aus der Öffnung des Abluftschalldämpfers zu spüren. Bei falscher
Drehrichtung wird Luft angesaugt.
Abbildung
Drehrichtung des Motors überprüfen.
Bei falscher Drehrichtung, Pole am Gerätestecker tauschen.
Abfallschlauch einsetzen
Alle 4 Schlaufen des Abfallschlauchs
(Länge: 22 m) entfernen.
Abbildung
Aufnahme durch Linksdrehung öffnen
und nach unten herausziehen.
Abfallschlauch gemäß Abbildung ein-
setzen.
Aufnahme einschieben und durch
Rechtsdrehung verschließen.
Abbildung
Abfallschlauch 40-50 cm herunterzie-
hen.
Ende des Abfallschlauchs mit Kabelbin-
der verschließen.
Bedienung
ACHTUNG
Beschädigungsgefahr! Zu- und Abluftöffnungen auf dem Saugkopf nicht abdecken.
ACHTUNG
Beim Saugen dürfen niemals die beiden
Flachfaltenfilter entfernt werden.
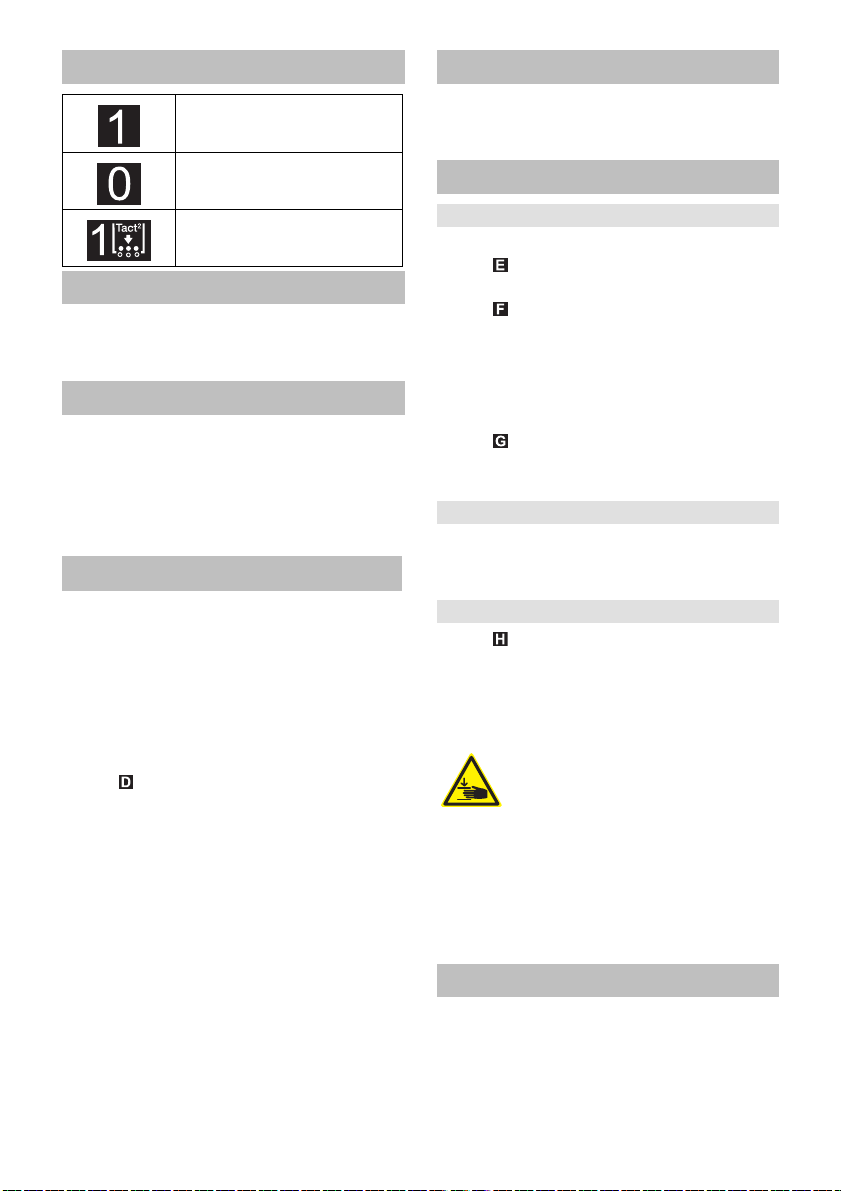
Drehschalter
–Gerät EIN
– Filterabreinigung AUS
– 2
–Gerät AUS
–Gerät EIN
– Filterabreinigung EIN
7DE
Gerät einschalten
Netzstecker einstecken.
Gerät am Drehschalter einschalten.
Automatische Filterabreinigung
Das Gerät verfügt über eine neuartige,
doppelte Filterabreinigung, besonders
wirksam bei feinem Staub. Dabei werden
die Flachfaltenfilter alle 15 Sekunden durch
einen Luftstoß automatisch gereinigt (pulsierendes Geräusch).
Saugvorgang
Saugvorgang durchführen.
Das Sauggut fällt erst bei ausgeschaltetem Gerät in den Abfallschlauch.
Füllstand im Abfallschlauch regelmäßig kontrollieren, da das Gerät nicht au-
tomatisch abschaltet.
Abbildung
Bei leichtem Sauggut oder Verstop-
fung: Seilzug herausziehen, um die
Klappe am Auslass zu öffnen (nur bei
ausgeschaltetem Gerät möglich).
Abfallschlauch etwas herunterziehen,
mit 2 Kabelbindern im Abstand von
10 cm verschließen und zwischen den
Kabelbindern durchschneiden.
Abfallsack gemäß den gesetzlichen Be-
stimmungen entsorgen.
Hinweis: Bei leichtem Sauggut kann die
Länge des Abfallsacks bis zu 2 m betragen, ohne dass dieser reißt.
Gerät ausschalten
Gerät am Drehschalter ausschalten.
Netzstecker ziehen.
Nach jedem Betrieb
Entsorgungssystem entnehmen
Feststellbremsen arretieren.
Abbildung
Blechwanne herausnehmen.
Abbildung
Entriegelungen der Absetzmechanik
nach oben ziehen.
Schubbügel nach oben ziehen. Entsor-
gungssystem wird entriegelt und abge-
senkt.
Abbildung
Entsorgungssystem am Handgriff her-
ausziehen.
Gerät reinigen
Gerät innen und außen durch Absau-
gen und Abwischen mit einem feuchten
Tuch reinigen.
Entsorgungssystem einsetzen
Abbildung
Entsorgungssystem wieder einsetzen
und mit Schubbügel verriegeln.
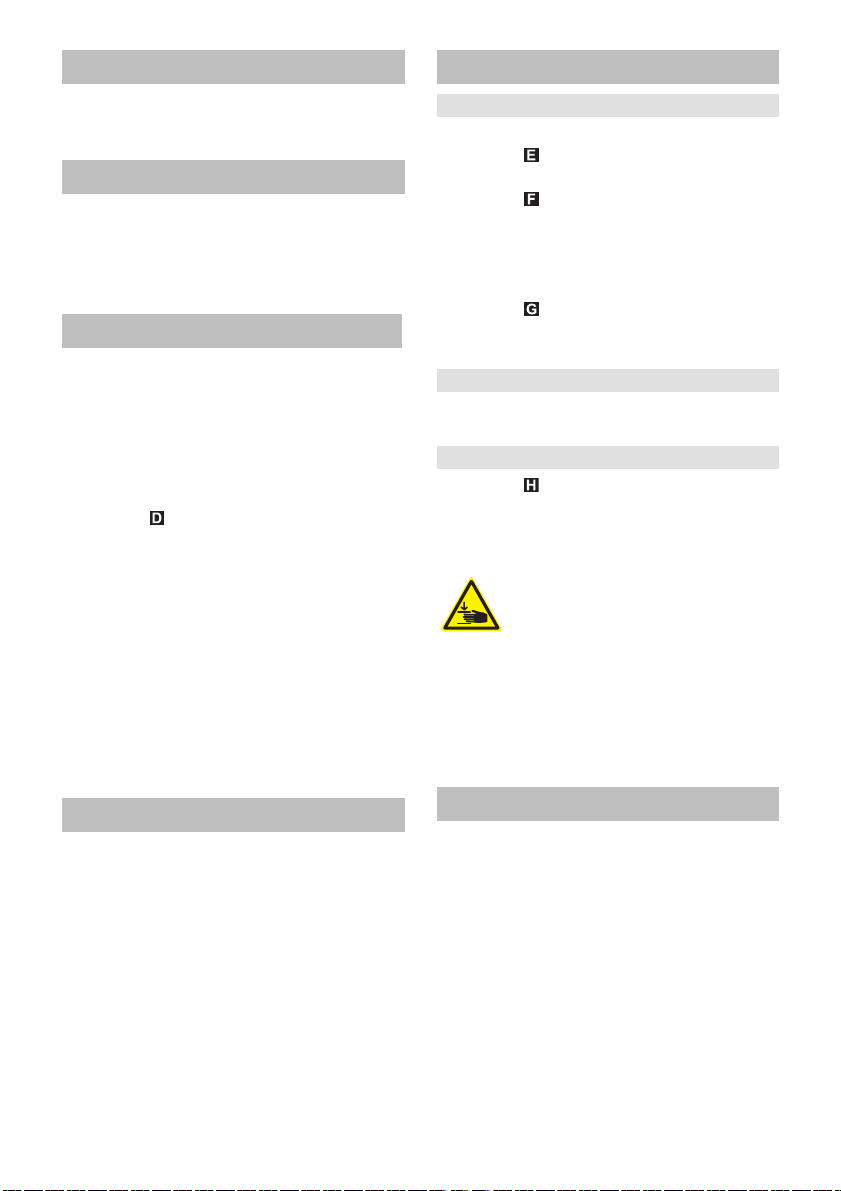
몇 WARNUNG
Quetschgefahr! Während der
Verriegelung keinesfalls die
Hände zwischen Entsorgungssystem und Zwischenring halten oder in die
Nähe der Hebemechanik bringen. Entsorgungssystem am Handgriff mit der einen
Hand halten und durch Betätigung des
Schubbügels mit der anderen Hand verriegeln.
Blechwanne einsetzen.
Gerät aufbewahren
Netzkabel aufwickeln und in den Kabel-
haken einhängen.
Saugschlauch um den Schubbügel wi-
ckeln.
Bodendüse und Saugrohr in die jeweili-
gen Halter stecken.
Gerät in einem trockenen Raum abstel-
len und vor unbefugter Benutzung sichern.
8 DE
– 3
Transport
몇 VORSICHT
Verletzungs- und Beschädigungsgefahr!
Gewicht des Gerätes beim Transport beachten.
Feststellbremsen lösen und Gerät am
Schubbügel schieben.
Gerät zum Verladen am Fahrgestell
fassen, nicht am Schubbügel.
Beim Transport in Fahrzeugen Gerät
nach den jeweils gültigen Richtlinien
gegen Rutschen und Kippen sichern.
Lagerung
몇 VORSICHT
Verletzungs- und Beschädigungsgefahr!
Gewicht des Gerätes bei Lagerung beachten.
Dieses Gerät darf nur in Innenräumen gelagert werden.
Pflege und Wartung
GEFAHR
Vor allen Arbeiten am Gerät, Gerät ausschalten und Netzstecker ziehen.
Flachfaltenfilter wechseln
Hinweis: Zum Abnehmen des Saugkopfs
werden 2 Personen benötigt.
Saugkopf entriegeln und abnehmen.
Filterabdeckung entriegeln und abneh-
men.
Flachfaltenfilter wechseln.
Filterabdeckung aufsetzen und verrie-
geln.
Saugkopf vorsichtig aufsetzen, ausrich-
ten und verriegeln.
Hilfe bei Störungen
GEFAHR
Vor allen Arbeiten am Gerät, Gerät ausschalten und Netzstecker ziehen.
Saugturbine läuft nicht
Steckdose und Sicherung der Strom-
versorgung überprüfen.
Netzkabel und Netzstecker des Gerä-
tes überprüfen.
Gerät einschalten.
Saugturbine läuft, aber Gerät saugt
nicht
Hinweis: Bei richtiger Drehrichtung ist ein
starker Luftstrom aus der Öffnung des Abluftschalldämpfers zu spüren. Bei falscher
Drehrichtung wird Luft angesaugt.
Abbildung
Drehrichtung des Motors überprüfen.
Bei falscher Drehrichtung, Pole am Gerätestecker tauschen.
Saugkraft lässt nach
Verstopfungen aus Saugdüse, Saug-
rohr, Saugschlauch oder Flachfaltenfilter entfernen.
Saugkopf und Entsorgungssystem auf
richtigen Sitz prüfen.
Flachfaltenfilter wechseln.
Staubaustritt beim Saugen
Filterabdeckung richtig verriegeln.
Korrekte Einbaulage der Flachfaltenfil-
ter überprüfen.
Flachfaltenfilter wechseln.
Automatische Filterabreinigung
arbeitet nicht
Saugschlauch nicht angeschlossen.
Verwendeter Saugschlauch ist zu kurz
(< 3m) oder hat einen zu großen Durchmesser.
Kundendienst benachrichtigen.
Automatische Filterabreinigung
lässt sich nicht abschalten
Kundendienst benachrichtigen.
– 4
9DE

Kundendienst
Chairman of the Board of Management
Director Regulatory Affairs & Certification
Kann die Störung nicht behoben werden, muss das Gerät vom Kundendienst
überprüft werden.
Garantie
In jedem Land gelten die von unserer zuständigen Vertriebsgesellschaft herausgegebenen Garantiebedingungen. Etwaige
Störungen an Ihrem Gerät beseitigen wir
innerhalb der Garantiefrist kostenlos, sofern ein Material- oder Herstellungsfehler
die Ursache sein sollte. Im Garantiefall
wenden Sie sich bitte mit Kaufbeleg an Ihren Händler oder die nächste autorisierte
Kundendienststelle.
Zubehör und Ersatzteile
Nur Original-Zubehör und Original-Ersatzteile verwenden, sie bieten die Gewähr für
einen sicheren und störungsfreien Betrieb
des Gerätes.
Informationen über Zubehör und Ersatzteile finden Sie unter www.kaercher.com.
– Im Lieferumfang ist kein Zubehör ent-
halten. Das Zubehör muss je nach Anwendung separat bestellt werden.
– Die einwandfreie Funktion des Gerätes
wird nur durch die Saugschlauch-Nennweiten DN42 und DN52 gewährleistet.
– Ersatzteile und Zubehör erhalten Sie
bei ihrem Händler oder bei ihrer
KÄRCHER-Niederlassung.
EU-Konformitätserklärung
Hiermit erklären wir, dass die nachfolgend
bezeichnete Maschine aufgrund ihrer Konzipierung und Bauart sowie in der von uns
in Verkehr gebrachten Ausführung den einschlägigen grundlegenden Sicherheitsund Gesundheitsanforderungen der EURichtlinien entspricht. Bei einer nicht mit
uns abgestimmten Änderung der Maschine
verliert diese Erklärung ihre Gültigkeit.
Produkt: Nass- und Trockensauger
Typ: 1.576-xxx
Einschlägige EU-Richtlinien
2006/42/EG (+2009/127/EG)
2014/30/EU
Angewandte harmonisierte Normen
EN 55014–1: 2006+A1: 2009+A2: 2011
EN 55014–2: 2015
EN 60335–1
EN 60335–2–69
EN 61000–3–2: 2014
EN 61000–3–3: 2013
EN 62233: 2008
Angewandte nationale Normen
-
5.966-010
Die Unterzeichnenden handeln im Auftrag
und mit Vollmacht des Vorstands.
Dokumentationsbevollmächtigter:
S. Reiser
10 DE
Alfred Kärcher SE & Co. KG
Alfred-Kärcher-Straße 28-40
71364 Winnenden (Germany)
Tel.: +49 7195 14-0
Fax: +49 7195 14-2212
Winnenden, 2018/10/01
– 5

Technische Daten
IVC 60/30 Tact2 Lp
Netzspannung V 400
Frequenz Hz 3~ 50
Nennleistung W 3000
Luftmenge (max.) l/s 68
Unterdruck (max.) kPa (mbar) 28,6 (286)
Schutzart -- IPX4
Schutzklasse -- I
Saugschlauchanschluss (C-DN/C-ID) DN 72
Saugschlauch-Nennweite DN 42/52
Länge x Breite x Höhe mm 970 x 690 x 1240
Filterfläche m
2
Typisches Betriebsgewicht kg 108
Umgebungstemperatur (max.) °C +40
Ermittelte Werte gemäß EN 60335-2-69
Schalldruckpegel L
Unsicherheit K
pA
pA
Hand-Arm Vibrationswert m/s
Unsicherheit K m/s
Netzkabel H07RN-F 5x1,5 mm
2
dB(A) 77
dB(A) 1
2
2
Teile-Nr. Kabellänge
EU 6.649-826.0 7,5 m
1,9
<2,5
0,2
– 6
11DE
Please read and comply with
these original instructions prior
to the initial operation of your appliance and
store them for later use or subsequent owners.
– Before first start-up it is definitely nec-
essary to read the safety indications Nr.
5.956-249.0!
– The non-compliance of the operating
and safety instructions may lead to
damages of the appliance and to dangers for the operator and other persons.
– In case of transport damage inform ven-
dor immediately.
Contents
Environmental protection . . . . EN 1
Danger or hazard levels . . . . . EN 1
Proper use . . . . . . . . . . . . . . . EN 1
Device elements . . . . . . . . . . . EN 2
Start up . . . . . . . . . . . . . . . . . . EN 2
Operation . . . . . . . . . . . . . . . . EN 2
Transport. . . . . . . . . . . . . . . . . EN 4
Storage . . . . . . . . . . . . . . . . . . EN 4
Care and maintenance . . . . . . EN 4
Troubleshooting . . . . . . . . . . . EN 4
Warranty . . . . . . . . . . . . . . . . . EN 5
Accessories and Spare Parts . EN 5
EU Declaration of Conformity . EN 5
Technical specifications . . . . . EN 6
Environmental protection
The packaging material can be
recycled. Please do not throw
the packaging material into
household waste; please send it
for recycling.
Old appliances contain valuable
materials that can be recycled;
these should be sent for recycling. Batteries, oil, and similar
substances must not enter the
environment. Please dispose of
your old appliances using appropriate collection systems.
Notes about the ingredients (REACH)
You will find current information about the
ingredients at:
www.kaercher.com/REACH
Danger or hazard levels
DANGER
Pointer to immediate danger, which leads
to severe injuries or death.
몇 WARNING
Pointer to a possibly dangerous situation,
which can lead to severe injuries or death.
몇 CAUTION
Pointer to a possibly dangerous situation,
which can lead to minor injuries.
ATTENTION
Pointer to a possibly dangerous situation,
which can lead to property damage.
Proper use
몇 WARNING
The appliance is not suitable for vacuuming
dust which endangers health.
– This disposal system is intended for the
low-dust disposal of dry or slightly moist
vacuumed material while using a waste
hose that can be cut to length.
– This appliance is suited for commercial
and industrial use, e.g. in storage and
assembly areas and on production machines.
– The appliance is not approved for crane
loading.
12 EN
– 1
Device elements
1 Tension lever
2 Filter cover
3 Flat fold filter
4 Left unlocking of the placement me-
chanics
5 Suction head
6 Nameplate
7 Power cord
8 Right unlocking of the placement me-
chanics
9Tin tub
10 Disposal system
11 Sheathed cable
12 Handle of the disposal system
13 Intermediate ring
14 Suction head lock
15 Waste hose
16 Steering roller of the chassis with park-
ing brake
17 Floor nozzle holder
18 Chassis
19 Drain pan
20 Suction support
21 Holder for suction pipe
22 Handle of the suction head
23 Rotating knob
24 Torque motor
25 Exhaust muffler
26 Push handle
27 Cable hook
Start up
Bring the appliance to working position
- secure it, if required, with parking
brakes.
Insert the suction hose (not included)
into the suction hose connection.
Ensure that the disposal system has
been inserted properly.
Attach the desired accessories (not in-
cluded).
Power connection
ATTENTION
Check direction of rotation of the engine at
every socket change.
Note: With correct direction of rotation a
strong airflow can be felt out of the opening
of the exhaust muffler. Air is suctioned with
incorrect rotation direction.
Illustration
Check the direction of rotation of the
motor. Exchange the poles on the appliance plug if the rotation direction is
wrong.
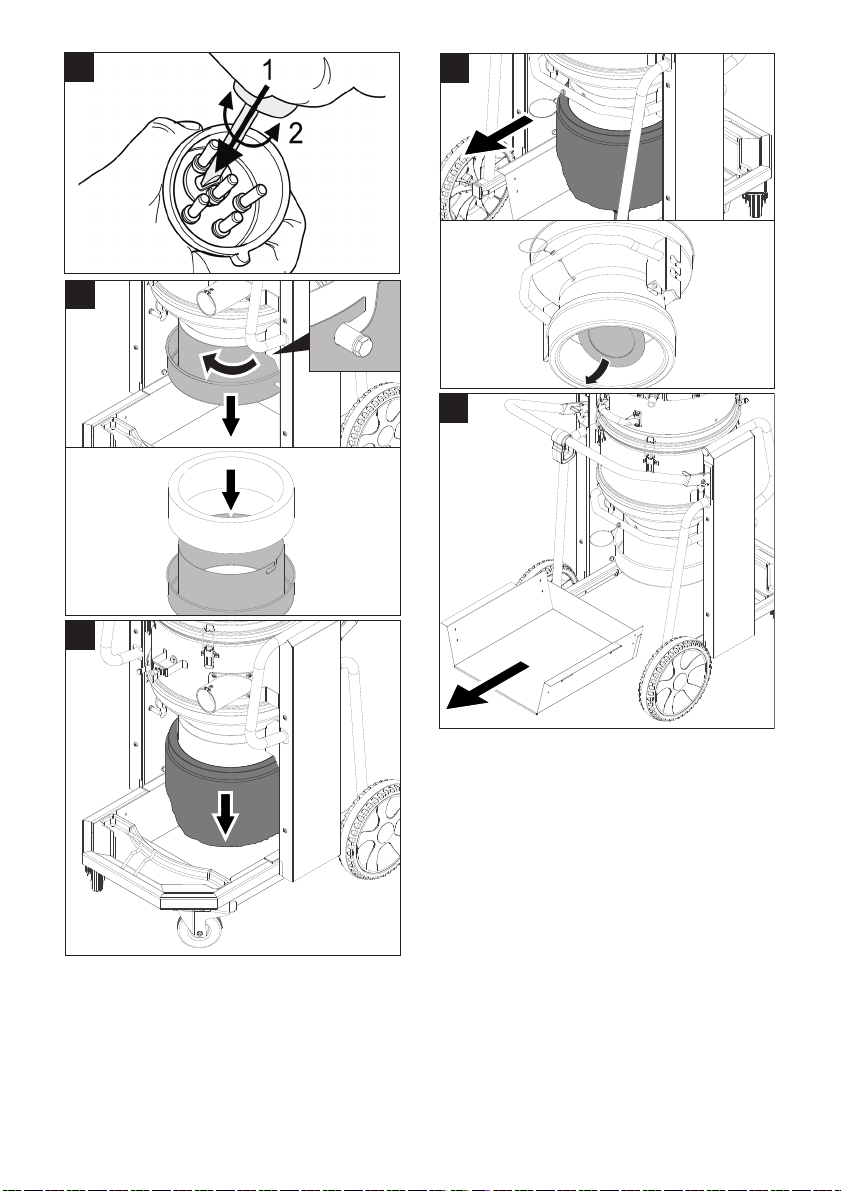
Inserting the waste hose
Remove all 4 loops of the waste hose
(length: 22 m).
Illustration
Open the intake by a rotation to the left
and pull it out towards the bottom.
Insert the waste hose as shown in the il-
lustration.
Insert the intake and lock it by clockwise
rotation.
Illustration
Pull down the waste hose 40-50 cm.
Close the end of the waste hose by
means of a cable tie.
Operation
ATTENTION
Risk of damage! Do not cover the supply
and exhaust air openings on the suction
head.
ATTENTION
The two flat fold filters must never be removed during vacuuming.
Rotating knob
– Appliance ON
– Filter dedusting OFF
– Appliance OFF
– 2
– Appliance ON
– Filter dedusting ON
13EN
Turning on the Appliance
Plug in the mains plug.
Switch on the appliance at the rotating
knob.
Automatic filter cleaning
The appliance has an innovative double filter dedusting that is particularly effective
with fine dust. The flat folded filters are automatically cleaned every 15 secods
through an air jet (pulsating sound).
Suction process
Perform the suction process.
The vacuumed material only falls into
the waste hose when the device is
switched off.
Check the filling level of the waste hose
at regular intervals, as the device does
not shut off automatically.
Illustration
With light waste or in case of clogging:
Pull out the sheathed cable to open the
flap on the outlet (only possible when
the device is switched off).
Slightly pull down the waste hose, close
it with 2 cable ties at a distance of 10 cm
and cut it between the cable ties.
Dispose of the waste sack in accord-
ance with the legal requirements.
Note: With light waste the length of the
waste sack can be up to 2 m without it
bursting.
Turn off the appliance
Switch off the appliance at the rotating
knob.
Pull out the mains plug.
After each operation
Remove the disposal system
Lock parking brakes.
Illustration
Remove the tin tub.
Illustration
Pull the locks of the placement mechan-
ics up.
Pull the push handle upward. The dis-
posal system is unlocked and lowered.
Illustration
Pull the disposal system out by the han-
dle.
Cleaning the device
Vacuum and wipe the appliance inside
and outside with a damp cloth.
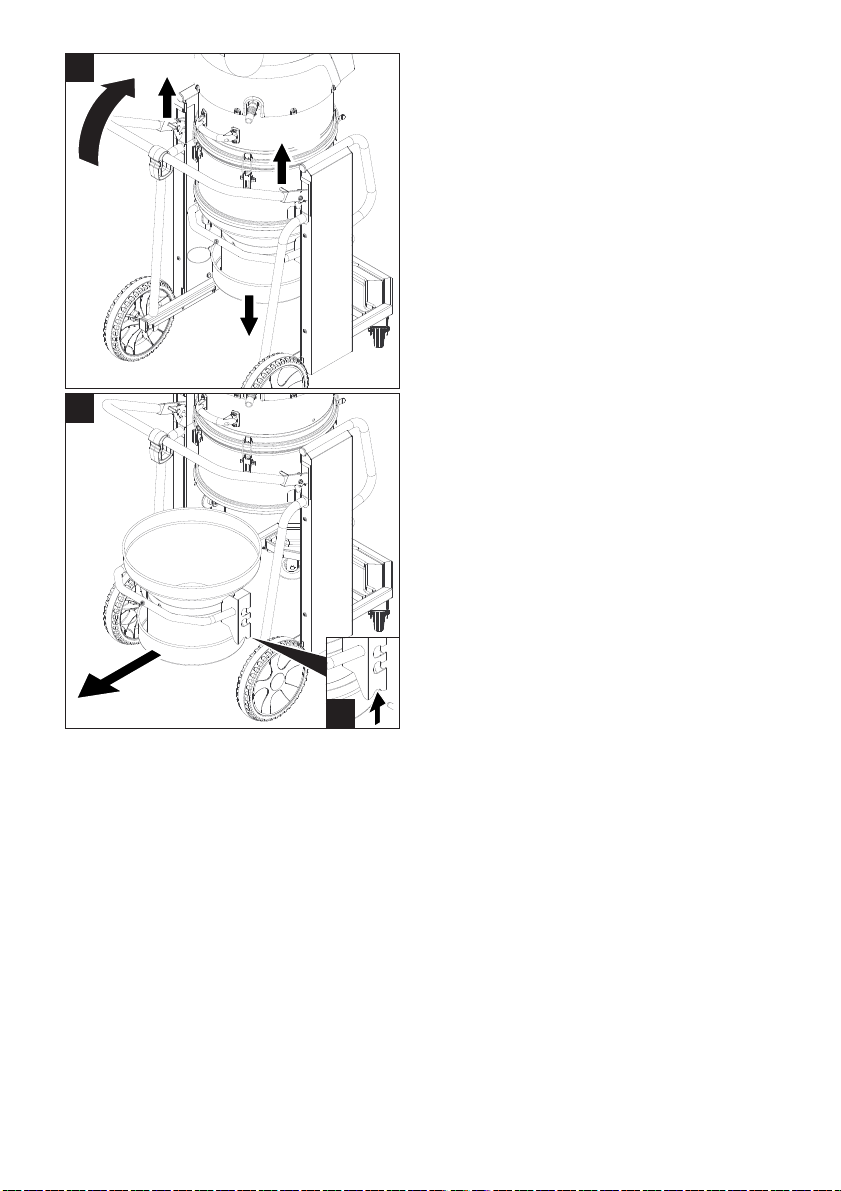
Insert the disposal system
Illustration
R einsert the disp osa l system and lock it
with the push handle.
몇 WARNING
Crush hazard. Never hold your
hands between the disposal
system and the intermediate
ring or put them near the lifting mechanism
while locking. Hold the disposal system on
the handle with one hand and lock it by operating the push handle with the other
hand.
Insert the tin tub.
Storing the Appliance
Wind up the mains cable and hook it
into the cable hook.
Wind the suction hose around the slid-
ing bow.
Insert the floor nozzle and the suction
pipe into their respective holder.
Place the appliance in a dry room and
secure it from unauthorized use.
14 EN
– 3
Transport
몇 CAUTION
Risk of injury and damage! Observe the
weight of the appliance when you transport
it.
Release the park brakes and push the
appliance by the push handle.
Grab the appliance by the chassis, not
by the sliding bow to load it.
When transporting in vehicles, secure
the appliance according to the guidelines from slipping and tipping over.
Storage
몇 CAUTION
Risk of injury and damage! Note the weight
of the appliance in case of storage.
This appliance must only be stored in interior rooms.
Care and maintenance
DANGER
First pull out the plug from the mains before
carrying out any tasks on the machine.
Exchanging the flat pleated filter
Note: 2 persons are required to remove the
suction head.
Release and remove the suction head.
Release and remove the filter cover.
Replace the flat pleated filter.
Insert and lock the filter cover.
Insert the suction head carefully, align
and lock it.
Troubleshooting
DANGER
First pull out the plug from the mains before
carrying out any tasks on the machine.
Suction turbine does not run
Check the receptacle and the fuse of
the power supply.
Check the power cable and the power
plug of the device.
Turn on the appliance.
Vacuum turbine is running but the
machine is not sucking in dust/dirt
Note: With correct direction of rotation a
strong airflow can be felt out of the opening
of the exhaust muffler. Air is suctioned with
incorrect rotation direction.
Illustration
Check the direction of rotation of the
motor. Exchange the poles on the appliance plug if the rotation direction is
wrong.
Suction capacity decreases
Remove blockages in the suction noz-
zle, suction tube, suction hose, or flat
pleated filter.
Check the suction head and the dispos-
al system for proper seating.
Replace the flat pleated filter.
Dust comes out while vacuuming
Lock the filter cover.
Check the proper installation position of
the flat fold filters.
Replace the flat pleated filter.
Automatic filter cleaning is not
working
Suction hose is not connected.
Suction hose used is too short (< 3m) or
the diameter is too large.
Inform Customer Service.
Automatic filter cleaning cannot be
switched off
Inform Customer Service.
– 4
15EN

Customer Service
Chairman of the Board of Management
Director Regulatory Affairs & Certification
If malfunction can not be fixed, the device must be checked by customer service.
Warranty
The warranty terms published by the relevant sales company are applicable in each
country. We will repair potential failures of
your appliance within the warranty period
free of charge, provided that such failure is
caused by faulty material or defects in manufacturing. In the event of a warranty claim
please contact your dealer or the nearest
authorized Customer Service centre.
Please submit the proof of purchase.
Accessories and Spare Parts
Only use original accessories and spare
parts, they ensure the safe and trouble-free
operation of the device.
For information about accessories and
spare parts, please visit www.kaercher.com.
– Accessories are not included in the de-
livery. The accessories for the device
must be ordered separately, depending
on the application.
– The proper functioning of the unit is only
ensured when a suction hose of a nominal width of DN42 or DN52 is used.
– You can procure the spare parts and
the attachments from your dealer or
your KÄRCHER branch office.
EU Declaration of Conformity
We hereby declare that the machine described below complies with the relevant
basic safety and health requirements of the
EU Directives, both in its basic design and
construction as well as in the version put
into circulation by us. This declaration shall
cease to be valid if the machine is modified
without our prior approval.
Product: Wet and dry vacuum cleaner
Type: 1.576-xxx
Relevant EU Directives
2006/42/EC (+2009/127/EC)
2014/30/EU
Applied harmonized standards
EN 55014–1: 2006+A1: 2009+A2: 2011
EN 55014–2: 2015
EN 60335–1
EN 60335–2–69
EN 61000–3–2: 2014
EN 61000–3–3: 2013
EN 62233: 2008
Applied national standards
-
5.966-010
The signatories act on behalf of and with
the authority of the company management.
Documentation supervisor:
S. Reiser
16 EN
Alfred Kärcher SE & Co. KG
Alfred-Kärcher-Straße 28-40
71364 Winnenden (Germany)
Tel.: +49 7195 14-0
Fax: +49 7195 14-2212
Winnenden, 2018/10/01
– 5
Technical specifications
IVC 60/30 Tact2 Lp
Mains voltage V 400
Frequency Hz 3~ 50
Rated power W 3000
Air volume (max.) l/s 68
Negative pressure (max.) kPa (mbar) 28,6 (286)
Type of protection -- IPX4
Protective class -- I
Suction hose connection (C-DN/C-ID) DN 72
Nominal width of suction hose DN 42/52
Length x width x height mm 970 x 690 x 1240
Filter area m
2
Typical operating weight kg 108
Max. ambient temperature °C +40
Values determined to EN 60335-2-69
Sound pressure level L
Uncertainty K
pA
pA
Hand-arm vibration value m/s
Uncertainty K m/s
Power cord H07RN-F 5x1,5 mm
2
dB(A) 77
dB(A) 1
2
2
Part no.: Cable
length
EU 6.649-826.0 7,5 m
1,9
<2,5
0,2
– 6
17EN
Lire ce manuel d'utilisation origi-
nal avant la première utilisation
de votre appareil, le respecter et le conserver pour une utilisation ultérieure ou pour le
futur propriétaire.
– Avant la première mise en service, vous
devez impérativement avoir lu les
consignes de sécurité N° 5.956-249.0 !
– En cas de non-respect des instructions
de service et des consignes de sécurité, l'appareil risque de subir des dommages matériels et l'utilisateur ainsi
que toute tierce personne sont exposés
à des dangers potentiels.
– Contactez immédiatement le revendeur
en cas d'avarie de transport.
Table des matières
Protection de l’environnement FR 1
Niveaux de danger . . . . . . . . . FR 1
Utilisation conforme . . . . . . . . FR 1
Éléments de l'appareil. . . . . . . FR 2
Mise en service. . . . . . . . . . . . FR 2
Utilisation . . . . . . . . . . . . . . . . FR 2
Transport. . . . . . . . . . . . . . . . . FR 4
Entreposage . . . . . . . . . . . . . . FR 4
Entretien et maintenance . . . . FR 4
Assistance en cas de panne . . FR 4
Garantie . . . . . . . . . . . . . . . . . FR 5
Accessoires et pièces de re-
change . . . . . . . . . . . . . . . . . . FR 5
Déclaration UE de conformité . FR 5
Caractéristiques techniques . . FR 6
Protection de
l’environnement
Les matériaux constitutifs de
l’emballage sont recyclables. Ne
pas jeter les emballages dans
les ordures ménagères, mais les
remettre à un système de recyclage.
Les appareils usés contiennent
des matériaux précieux recyclables lesquels doivent être apportés à un système de recyclage. Il est interdit de jeter les
batteries, l'huile et les substances similaires dans l'environnement. Pour cette raison, utiliser des systèmes de collecte
adéquats afin d'éliminer les appareils hors d'usage.
Instructions relatives aux ingrédients
(REACH)
Les informations actuelles relatives aux ingrédients se trouvent sous :
www.kaercher.com/REACH
Niveaux de danger
DANGER
Signale la présence d'un danger imminent
entraînant de graves blessures corporelles
et pouvant avoir une issue mortelle.
몇 AVERTISSEMENT
Signale la présence d'une situation éventuellement dangereuse pouvant entraîner
de graves blessures corporelles et même
avoir une issue mortelle.
몇 PRÉCAUTION
Remarque relative à une situation potentiellement dangereuse pouvant entraîner
des blessures légères.
ATTENTION
Remarque relative à une situation éventuellement dangereuse pouvant entraîner
des dommages matériels.
Utilisation conforme
몇 AVERTISSEMENT
Cet appareil n'est pas conçu pour aspirer
des poussières nocives.
– Ce système d'élimination est destiné à
l'élimination faible en poussières de déchets aspirés secs ou légèrement humides en utilisant un flexible à déchets
sectionnable à la bonne longueur.
18 FR
– 1
– Cet appareil convient à un usage indus-
triel, par ex. dans le secteur entrepôt et
fabrication et sur des machines de production.
– L'appareil n'est pas homologué pour un
chargement par grue.
Éléments de l'appareil
1 Levier de serrage
2 Recouvrement du filtre
3 Filtre plat de plis
4 Déverrouillage gauche du mécanisme
de pose
5 Tête d'aspiration
6 Plaque signalétique
7 Câble d’alimentation
8 Déverrouillage droit du mécanisme de
pose
9 Cuve en tôle
10 Système d'élimination
11 Commande par câble
12 Poignée du système d'élimination
13 Bague intermédiaire
14 Verrouillage de la tête d'aspiration
15 Flexible à déchets
16 Roulette du châssis avec frein d'arrêt
17 Support pour buse de sol
18 Châssis
19 Cuve de récupération
20 Raccord d'aspiration
21 Support pour tube d'aspiration
22 Poignée de la tête d'aspiration
23 Interrupteur rotatif
24 Moteur triphasé
25 Silencieux d'échappement d'air
26 Guidon de poussée
27 Crochet de câble
Mise en service
Amener l'appareil en position de travail,
si nécessaire le bloquer au moyen des
freins d'immobilisation.
Insérer le flexible d'aspiration (ne fai-
sant pas partie de la fourniture) dans la
tubulure d'aspiration.
S'assurer que le système d'élimination
est positionné correctement.
Insérer les accessoires voulus (ne fai-
sant pas partie de la fourniture).
Raccordement électrique
ATTENTION
Lors de chaque changement de prise,
contrôler la direction de rotation du moteur.
Remarque : Lorsque le sens de rotation
est correct, on sent un fort courant d'air sortir de l'ouverture d'échappement du silencieux. Si le sens de rotation est incorrect,
de l'air est aspiré.
Illustration
Contrôler le sens de rotation du moteur.
Si le sens de rotation est incorrect, inverser les pôles sur la fiche de l'appareil.
Mettre en place le flexible à déchets
Retirer les 4 boucles du tuyau à dé-
chets (longueur : 22 m).
Illustration
Ouvrir le logement par une rotation à
gauche et l'extraire par le bas.
Mettre en place le tuyau à déchets
conformément à la figure.
Insérer le logement et le fermer par une
rotation à droite.
Illustration
Retirer le tuyau à déchets de 40-50 cm.
Fermer l'extrémité du tuyau à déchets
avec un serre-câble.
Utilisation
ATTENTION
Risque d'endommagement ! Ne pas obturer les ouvertures d'arrivée et d'échappement d'air sur la tête d'aspiration.
ATTENTION
Lors de l'aspiration, les deux filtres à plis
plats ne doivent jamais être retirés.
Interrupteur rotatif
– Appareil MARCHE
– Nettoyage de filtre
ARRÊT
– Appareil ARRÊT
– Appareil MARCHE
– Nettoyage de filtre
MARCHE
– 2
19FR
Mettre l'appareil en marche
Brancher la fiche secteur.
Enclencher l'appareil à l'aide de l'inter-
rupteur rotatif.
Nettoyage automatique du filtre
L'appareil est équipé d'un nouveau type de
nettoyage double de filtre particulièrement
efficace pour les poussières fines. Avec ce
procédé, les filtres à plis plats sont automatiquement nettoyés par un courant d'air
(bruit pulsant) toutes les 15 secondes.
Processus d'aspiration
Effectuer le processus d'aspiration.
Les déchets aspirés arrivent dans le
tuyau à déchets uniquement lorsque
l'appareil est éteint.
Vérifier régulièrement le niveau de remplissage dans le tuyau à déchets, étant
donné que l'appareil ne se coupe pas
automatiquement.
Illustration
En cas de déchets aspirés légers ou en
cas de bourrages : Extraire le tirant à
câble pour ouvrir le clapet au niveau de
la sortie (uniquement possible avec un
appareil éteint).
Abaisser le tuyau à déchets, fermer
avec 2 serre-câbles espacés de 10 cm
et coupez le tuyau entre les deux serre-
câbles.
Éliminer le sac à déchets selon les dis-
positions légales.
Remarque : Si les déchets aspirés sont légers, la longueur du sac à déchets peut aller jusqu'à 2 m sans qu'il se déchire.
Mise hors service de l'appareil
Couper l'appareil à l'aide de l'interrup-
teur rotatif.
Retirer la fiche secteur.
Après chaque mise en service
Enlever le système d'élimination
Bloquer le frein de stationnement.
Illustration
Retirer la cuve en tôle.
Illustration
Tirer les déverrouillages du mécanisme
de pose vers le haut.
Tirer le guidon de poussée vers le haut.
Le système d'élimination est déverrouil-
lé et s'abaisse.
Illustration
Retirer le système d'élimination de la
poignée.
Nettoyage de l’appareil
Nettoyer la partie intérieure et exté-
rieure de l'appareil en l'aspirant et en
l'essuyant avec un chiffon humide.
Positionner le système d'élimination
Illustration
Remettre le système d'élimination en
place et le verrouiller avec le levier.
몇 AVERTISSEMENT
Risque d'écrasement ! Ne
mettre en aucun cas les mains
entre le système d'élimination et
la bague intermédiaire ou à la proximité du
mécanisme de levage pendant le verrouillage. Tenir le système d'élimination d'une
main au niveau de la poignée et verrouiller
avec l'autre main en activant le guidon.
Positionner la cuve en tôle.
Ranger l’appareil
Enrouler le câble secteir et l'accrocher
au crochet de câble.
Enrouler le flexible d'aspiration autour
du guidon de poussée.
Insérer la buse de sol et le tube d'aspi-
ration dans le support correspondant.
Entreposer l’appareil dans un endroit
sec et le sécuriser contre toute utilisation non autorisée.
20 FR
– 3

Transport
몇 PRÉCAUTION
Risque de blessure et d'endommagement !
Respecter le poids de l'appareil lors du
transport.
Desserrer le frein d'arrêt et pousser
l'appareil au niveau du guidon de poussée.
Pour porter l’appareil, toujours le saisir
au niveau du châssis et jamais au niveau du guidon de poussée.
Sécuriser l'appareil contre les glisse-
ments ou les basculements selon les directives en vigueur lors du transport
dans des véhicules.
Entreposage
몇 PRÉCAUTION
Risque de blessure et d'endommagement !
Prendre en compte le poids de l'appareil à
l'entreposage.
Cet appareil doit uniquement être entreposé en intérieur.
Entretien et maintenance
DANGER
Avant d'effectuer tout type de travaux sur
l'appareil, le mettre hors service et débrancher la fiche électrique.
Remplacement du filtre à plis plats
Remarque : le retrait de la tête d'aspiration
nécessite la présence de 2 personnes.
Déverrouiller et retirer la tête d'aspira-
tion.
Déverrouiller et retirer le recouvrement
du filtre.
Remplacer le filtre à plis plats.
Positionner le recouvrement du filtre et
le verrouiller.
Positionner correctement la tête d'aspi-
ration, l'aligner et la verrouiller.
Assistance en cas de panne
DANGER
Avant d'effectuer tout type de travaux sur
l'appareil, le mettre hors service et débrancher la fiche électrique.
La turbine d'aspiration ne
fonctionne pas
Vérifier la prise et le fusible de l'alimen-
tation électrique.
Vérifier le câble d'alimentation et la
fiche secteur de l'appareil.
Allumer l’appareil.
La turbine d'aspiration fonctionne
mais l'appareil n'aspire pas
Remarque : Lorsque le sens de rotation
est correct, on sent un fort courant d'air sortir de l'ouverture d'échappement du silencieux. Si le sens de rotation est incorrect,
de l'air est aspiré.
Illustration
Contrôler le sens de rotation du moteur.
Si le sens de rotation est incorrect, inverser les pôles sur la fiche de l'appareil.
La force d'aspiration diminue
Déboucher la buse d'aspiration, le
tuyau d'aspiration, le flexible d'aspiration ou le filtre plat à plis.
Vérifier la bonne assise de la tête d'as-
piration et du système d'élimination.
Remplacer le filtre à plis plats.
De la poussière s'échappe lors de
l'aspiration
Verrouiller correctement le recouvre-
ment de filtre.
Vérifier la position de montage correcte
du filtre à plis plats.
Remplacer le filtre à plis plats.
Le nettoyage automatique de filtre
ne fonctionne pas
Le flexible d'aspiration n'est pas raccor-
dé.
Le flexible d'aspiration utilisé est trop
court (< 3m) ou a un diamètre trop important.
Informer le service après-vente.
Le nettoyage automatique ne se
laisse pas mettre hors service
Informer le service après-vente.
– 4
21FR

Service après-vente
Chairman of the Board of Management
Director Regulatory Affairs & Certification
Si la panne ne peut être réparée, l'appareil doit être contrôlé par le service
après-vente.
Garantie
Dans chaque pays, les conditions de garantie en vigueur sont celles publiées par
notre société de distribution responsable.
Les éventuelles pannes sur l’appareil sont
réparées gratuitement dans le délai de validité de la garantie, dans la mesure où
celles-ci relèvent d'un défaut matériel ou
d'un vice de fabrication. En cas de recours
en garantie, adressez-vous à votre revendeur ou au service après-vente agréé le
plus proche munis de votre preuve d'achat.
Accessoires et pièces de
rechange
N'utiliser que des accessoires et pièces de
rechange d'origine, ils garantissent le bon
fonctionnement de l'appareil.
Vous trouverez des informations relatives
aux accessoires et pièces de rechange sur
www.kaercher.com.
– Aucun accessoire inclus dans la fourni-
ture. Les accessoires doivent être commandés séparément, en fonction de
l'application.
– Le fonctionnement irréprochable de
l'appareil n'est garanti qu'vec les largeurs nominales de flexible d'aspiration
de DN42 et DN52.
– Vous obtiendrez des pièces détachées
et des accessoires chez votre revendeur ou auprès d'une filiale Kärcher
®
.
Déclaration UE de conformité
Nous certifions par la présente que la machine spécifiée ci-après répond de par sa
conception et son type de construction ainsi que de par la version que nous avons
mise sur le marché aux prescriptions fondamentales stipulées en matière de sécurité et d’hygiène par les directives européennes en vigueur. Toute modification apportée à la machine sans notre accord rend
cette déclaration invalide.
Produit : Aspirateur à sec et par voie
humide
Type : 1.576-xxx
Directives européennes en vigueur :
2006/42/CE (+2009/127/CE)
2014/30/UE
Normes harmonisées appliquées :
EN 55014–1: 2006+A1: 2009+A2: 2011
EN 55014–2: 2015
EN 60335–1
EN 60335–2–69
EN 61000–3–2: 2014
EN 61000–3–3: 2013
EN 62233: 2008
Normes nationales appliquées :
-
5.966-010
Les signataires agissent sous ordre et avec
le pouvoir de la direction.
Responsable de la documentation :
S. Reiser
22 FR
Alfred Kärcher SE & Co. KG
Alfred-Kärcher-Straße 28-40
71364 Winnenden (Germany)
Tel.: +49 7195 14-0
Fax: +49 7195 14-2212
Winnenden, 2018/10/01
– 5

Caractéristiques techniques
IVC 60/30 Tact2 Lp
Tension du secteur V 400
Fréquence Hz 3~ 50
Puissance nominale W 3000
Débit d'air (max.) l/s 68
Dépression (max.) kPa (mbar) 28,6 (286)
Type de protection -- IPX4
Classe de protection -- I
Raccord du flexible d'aspiration (C-DN/C-ID) DN 72
Largeur nominale de flexible d'aspiration DN 42/52
Longueur x largeur x hauteur mm 970 x 690 x 1240
Surface du filtre m
2
Poids de fonctionnement typique kg 108
Température ambiante (max.) °C +40
Valeurs définies selon EN 60335-2-69
Niveau de pression acoustique L
Incertitude K
pA
pA
Valeur de vibrations bras-main m/s
Incertitude K m/s
Câble d’alimentation
H07RN-F 5x1,5 mm
Référence Longueur
2
dB(A) 77
dB(A) 1
2
2
de câble
EU 6.649-826.0 7,5 m
1,9
<2,5
0,2
– 6
23FR
Prima di utilizzare l'apparecchio
per la prima volta, leggere le
presenti istruzioni originali, seguirle e conservarle per un uso futuro o in caso di rivendita dell'apparecchio.
– Prima di procedere alla prima messa in
funzione leggere tassativamente le norma di sicurezza n. 5.956-249.0!
– La mancata osservanza delle istruzioni
d'uso e delle norme di sicurezza può
causare danni all'apparecchio e presentare pericoli per l'utilizzatore e le altre persone.
– Eventuali danni da trasporto vanno co-
municati immediatamente al proprio rivenditore.
Indice
Protezione dell’ambiente. . . . . IT 1
Livelli di pericolo . . . . . . . . . . . IT 1
Uso conforme a destinazione . IT 1
Parti dell'apparecchio . . . . . . . IT 2
Messa in funzione. . . . . . . . . . IT 2
Uso . . . . . . . . . . . . . . . . . . . . . IT 2
Trasporto. . . . . . . . . . . . . . . . . IT 4
Supporto . . . . . . . . . . . . . . . . . IT 4
Cura e manutenzione . . . . . . . IT 4
Guida alla risoluzione dei guastiIT 4
Garanzia . . . . . . . . . . . . . . . . . IT 5
Accessori e ricambi. . . . . . . . . IT 5
Dichiarazione di conformità UE IT 5
Dati tecnici . . . . . . . . . . . . . . . IT 6
Protezione dell’ambiente
Tutti gli imballaggi sono riciclabili. Gli imballaggi non vanno gettati nei rifiuti domestici, ma consegnati ai relativi centri di raccolta.
Gli apparecchi dismessi contengono materiali riciclabili preziosi
e vanno consegnati ai relativi
centri di raccolta. Batterie, olio e
sostanze simili non devono essere dispersi nell’ambiente. Si
prega quindi di smaltire gli apparecchi dismessi mediante i sistemi di raccolta differenziata.
Avvertenze sui contenuti (REACH)
Informazioni aggiornate sui contenuti sono
disponibili all'indirizzo:
www.kaercher.com/REACH
Livelli di pericolo
PERICOLO
Indica un pericolo imminente che determina lesioni gravi o la morte.
몇 AVVERTIMENTO
Indica una probabile situazione pericolosa
che potrebbe determinare lesioni gravi o la
morte.
몇 PRUDENZA
Indica una probabile situazione pericolosa
che potrebbe causare lesioni leggere.
ATTENZIONE
Indica una probabile situazione pericolosa
che potrebbe determinare danni alle cose.
Uso conforme a destinazione
몇 AVVERTIMENTO
L'apparecchio non si adatta all'aspirazione
di polveri dannose alla salute.
– Questo sistema di smaltimento è desti-
nato per lo smaltimento di materiale
aspirato povero di polvere asciutto o
leggermente bagnato, utilizzando un
tubo flessibile di scarto tagliabile in lunghezza.
– Questo apparecchio si adatta all'uso in-
dustriale, ad esempio in depositi e settori di produzione e su macchine di produzione.
– L'apparecchio non è omologato per es-
sere utilizzato come gru.
24 IT
– 1
Parti dell'apparecchio
1 Piastra di bloccaggio
2 Coperchio del filtro
3 Filtro plissettato piatto
4 Sbloccaggio sinistro del meccanismo di
abbassamento
5 Testa aspirante
6 Targhetta
7 Cavo di alimentazione
8 Sbloccaggio destro del meccanismo di
abbassamento
9 Vaschetta in lamiera
10 Sistema di smaltimento
11 Comando a cavo
12 Impugnatura del sistema di smaltimento
13 Anello intermedio
14 Dispositivo di blocco della testa di aspi-
razione
15 Tubo flessibile di scarto
16 Ruota pivottante del telaio con freno di
stazionamento
17 Sostegno per bocchetta per pavimenti
18 Telaio
19 vasca di raccolta
20 Raccordo di aspirazione
21 Sostegno per tubo di aspirazione
22 Manico della testa di aspirazione
23 Interruttore
24 Motore trifase
25 Sistema di scarico per aria di scarico
26 Archetto di spinta
27 Gancio per cavo
Messa in funzione
Collocare l’apparecchio in posizione di
lavoro, se necessario bloccarlo median-
te i freni.
Inserire il tubo di aspirazione (non com-
preso nella fornitura) nell'attacco di
aspirazione.
Accertarsi che il sistema di smaltimento
sia impiegato correttamente.
Infilare l'accessorio (non compreso nel-
la fornitura) desiderato.
Allacciamento alla rete elettrica
ATTENZIONE
Verificare sempre il senso di rotazione del
motore al momento del cambio della presa
di corrente.
Avviso: Se il senso di rotazione è corretto,
si percepisce un forte flusso di aria derivante dall'apertura del sistema di scarico per
aria di scarico. Se il senso di rotazione è
scorretto si aspira aria.
Figura
Verificare il senso di rotazione del mo-
tore. In caso di senso di rotazione errato, invertire i poli sulla spina dell'apparecchio.
Inserimento del tubo flessibile di
scarto
Rimuovere tutti e 4 i cappi del tubo fles-
sibile di scarto (lunghezza: 22 m).
Figura
Aprire l’alloggiamento con rotazione si-
nistrorsa ed estrarre verso il basso.
Inserire il tubo flessibile di scarto secon-
do la figura.
Infilare l’alloggiamento e chiuderlo con
rotazione destrorsa.
Figura
Sfilare il tubo flessibile di scarto per 40-
50 cm.
Chiudere l’estremità del tubo flessibile
di scarto con serracavo.
Uso
ATTENZIONE
Rischio di danneggiamento. Non coprire le
aperture di mandata e di scarico sulla testa
di aspirazione.
ATTENZIONE
Non rimuovere mai i due filtri plissettati piatti durante l'aspirazione.
– 2
25IT
Interruttori
– Apparecchio ON
– Pulizia filtro OFF
– Apparecchio OFF
Spegnere l’apparecchio
Disattivare l'apparecchio dall'interrutto-
re girevole.
Staccare la spina.
A lavoro ultimato
– Apparecchio ON
– Pulizia filtro ON
Accendere l’apparecchio
Inserire la spina di alimentazione.
Attivare l'apparecchio dall'interruttore
girevole.
Pulizia automatica del filtro
L'apparecchio dispone di un innovativo dispositivo di pulizia del filtro doppio, particolarmente efficace per la polvere fina. In
questo modo i filtri plissettati piatti vengono
puliti ogni 15 secondi con un getto d'aria
(rumore di pulsazione).
Procedura di aspirazione
Eseguire l'aspirazione.
Il materiale aspirato cade nel tubo flessibile di scarto solo con apparecchio
spento.
Controllare regolarmente il livello di riempimento nel tubo flessibile di scarto
poiché l'apparecchio non si spegne au-
tomaticamente.
Figura
In caso di materiale aspirato leggero o
otturazione: Estrarre il comando a cavo
per aprire lo sportello in uscita (possibi-
le solo con apparecchio spento).
Sfilare un poco il tubo flessibile di scar-
to, chiudere con 2 serracavo a una di-
stanza di 10 cm e tagliare il tubo tra i
serracavo.
Smaltire il sacchetto rifiuti usato secon-
do le disposizioni legali.
Indicazione: Con materiale aspirato leggero la lunghezza del sacchetto rifiuti può essere fino a 2 m, senza che questo si strappi.
Rimozione del sistema di smaltimento
Bloccare il freno di stazionamento.
Figura
Estrarre la vaschetta in lamiera.
Figura
Tirare verso l'alto gli sbloccaggi del
meccanismo di abbassamento.
Sollevare l'archetto di spinta. Il sistema
di smaltimento viene sbloccato ed ab-
bassato.
Figura
Estrarre il sistema di smaltimento con
l'impugnatura.
Pulizia dell’apparecchio
Pulire l’apparecchio all’interno e
all’esterno aspirando e passando la su-
perficie con un panno umido.
Inserimento del sistema di smaltimento
Figura
Inserire nuovamente il sistema di smal-
timento e bloccare con l'archetto di
spinta.
몇 AVVERTIMENTO
Pericolo di schiacciamento! Durante il bloccaggio, non tenere le
mani in nessun caso tra il sistema di smaltimento e l'anello intermedio e
non avvicinarle al meccanismo di sollevamento. Tenere il sistema di smaltimento dal
manico con una mano e azionando l’archetto di spinta bloccarlo con l’altra mano.
Inserire la vaschetta in lamiera.
Deposito dell’apparecchio
Avvolgere il cavo di rete ed agganciarlo
nel gancio del cavo.
Avvolgere il tubo flessibile di aspirazio-
ne attorno all'archetto di spinta.
26 IT
– 3
Inserire la bicchetta per pavimenti ed il
tubo di aspirazione nei relativi sostegni.
Depositare l’apparecchio in un luogo
asciutto e proteggerlo contro l’uso non
autorizzato.
Trasporto
몇 PRUDENZA
Pericolo di lesioni e di danneggiamento! Rispettare il peso dell'apparecchio durante il
trasporto.
Sbloccare i freni di stazionamento e
spingere l'apparecchio tenendo l’appostito archetto di spinta.
Per scaricare l’apparecchio tenere il te-
laio e non l’archetto di spinta.
Per il trasporto in veicoli, assicurare
l'apparecchio secondo le direttive in vigore affinché non possa scivolare e ribaltarsi.
Supporto
몇 PRUDENZA
Pericolo di lesioni e di danneggiamento! Rispettare il peso dell'apparecchio durante la
conservazione.
Questo apparecchio può essere conservato solo in ambienti interni.
Cura e manutenzione
PERICOLO
Disattivare l'apparecchio ed estrarre la spina di alimentazione prima di effettuare interventi sull'apparecchio.
Sostituzione del filtro plissettato
piatto
Avviso: Per sollevare la testa di aspirazio-
ne sono necessarie 2 persone.
Sbloccare e staccare la testa aspirante.
Sbloccare e staccare la copertura del
filtro.
Sostituire il filtro plissettato piatto.
Posizionare la copertura del filtro e
bloccarla.
Rimettere attentamente la testa aspi-
rante, posizionarla e bloccarla.
Guida alla risoluzione dei
guasti
PERICOLO
Disattivare l'apparecchio ed estrarre la spina di alimentazione prima di effettuare interventi sull'apparecchio.
La turbina di aspirazione non
funziona
Controllare la presa e il fusibile dell'ali-
mentazione di corrente.
Controllare il cavo e la spina di rete
dell'apparecchio.
Accendere l’apparecchio.
La turbina di aspirazione funziona,
ma l'apparecchio non aspira
Avviso: Se il senso di rotazione è corretto,
si percepisce un forte flusso di aria derivante dall'apertura del sistema di scarico per
aria di scarico. Se il senso di rotazione è
scorretto si aspira aria.
Figura
Verificare il senso di rotazione del mo-
tore. In caso di senso di rotazione errato, invertire i poli sulla spina dell'apparecchio.
La forza aspirante diminuisce
Rimuovere eventuali otturazioni dalla
bocchetta di aspirazione, dal tubo rigido
di aspirazione o dal filtro plissettato
piatto.
Accertarsi che la testa di aspirazione ed
il sistema di smaltimento siano posizionati correttamente.
Sostituire il filtro plissettato piatto.
Fuoriuscita di polvere durante
l'aspirazione
Agganciare correttamente il coperchio
del filtro.
Accertarsi che i filtri plissettati piatti sia-
no montati nella posizione corretta.
Sostituire il filtro plissettato piatto.
– 4
27IT
Il dispositivo di pulizia automatico
Chairman of the Board of Management
Director Regulatory Affairs & Certification
del filtro non funziona
Tubo flessibile di aspirazione non colle-
gato.
Il tubo flessibile di aspirazione utilizzato
è troppo corto (< 3m) o è di un diametro
troppo grande.
Informare il servizio assistenza clienti.
Impossibile disattivare la pulizia
automatica del filtro
Informare il servizio assistenza clienti.
Servizio assistenza
Se il guasto persiste, rivolgersi al servizio di assistenza clienti per un controllo.
Garanzia
Le condizioni di garanzia valgono nel rispettivo paese di pubblicazione da parte
della nostra società di vendita competente.
Entro il termine di garanzia eliminiamo gratuitamente eventuali guasti all’apparecchio,
se causati da difetto di materiale o di produzione. Nei casi previsti dalla garanzia si
prega di rivolgersi al proprio rivenditore, oppure al più vicino centro di assistenza autorizzato, esibendo lo scontrino di acquisto.
Accessori e ricambi
Utilizzando solamente accessori e ricambi
originali, si garantisce un funzionamento sicuro e privo di disturbi dell'apparecchio.
Si possono trovare informazioni riguardo
ad accessori e ricambi su
www.kaercher.com.
– La fornitura non comprende alcun ac-
cessorio. Gli accessori devono essere
acquistati separatamente in base
all'uso previsto.
– Il funzionamento perfetto dell'apparec-
chio è garantito solo con dei diametri
nominali del tubo flessibile di DN42 e
DN52.
– I ricambi e gli accessori sono reperibili
presso il rivenditore di fiducia o una filiale KÄRCHER.
Dichiarazione di conformità
UE
Con la presente si dichiara che la macchina
qui di seguito indicata, in base alla sua concezione, al tipo di costruzione e nella versione da noi introdotta sul mercato, è conforme ai requisiti fondamentali di sicurezza
e di sanità delle direttive UE. In caso di modifiche apportate alla macchina senza il nostro consenso, la presente dichiarazione
perde ogni validità.
Prodotto: Aspiratore solidi-liquidi
Modello: 1.576-xxx
Direttive UE pertinenti
2006/42/CE (+2009/127/CE)
2014/30/UE
Norme armonizzate applicate
EN 55014–1: 2006+A1: 2009+A2: 2011
EN 55014–2: 2015
EN 60335–1
EN 60335–2–69
EN 61000–3–2: 2014
EN 61000–3–3: 2013
EN 62233: 2008
Norme nazionali applicate
-
5.966-010
I firmatari agiscono per incarico e con delega della direzione.
Responsabile della documentazione:
S. Reiser
Alfred Kärcher SE & Co. KG
Alfred-Kärcher-Straße 28-40
71364 Winnenden (Germany)
Tel.: +49 7195 14-0
Fax: +49 7195 14-2212
Winnenden, 2018/10/01
28 IT
– 5

Dati tecnici
IVC 60/30 Tact2 Lp
Tensione di rete V 400
Frequenza Hz 3~ 50
Potenza nominale W 3000
Quantità d'aria (max.) l/s 68
Sotto pressione (max.) kPa (mbar) 28,6 (286)
Protezione -- IPX4
Grado di protezione -- I
Attacco per tubo di aspirazione (C-DN/C-ID) DN 72
Diametro nominale tubo flessibile DN 42/52
Lunghezza x larghezza x Altezza mm 970 x 690 x 1240
Superficie attiva del filtro m
2
Peso d'esercizio tipico kg 108
Temperatura ambiente (max.) °C +40
Valori rilevati secondo EN 60335-2-69
Pressione acustica L
Dubbio K
pA
pA
Valore di vibrazione mano-braccio m/s
Dubbio K m/s
Cavo di alimentazione
H07RN-F 5x1,5 mm
Codice com-
ponente
2
Lunghezza
cavo
dB(A) 77
dB(A) 1
2
2
EU 6.649-826.0 7,5 m
1,9
<2,5
0,2
– 6
29IT
Lees vóór het eerste gebruik
van uw apparaat deze originele
gebruiksaanwijzing, ga navenant te werk
en bewaar hem voor later gebruik of voor
een latere eigenaar.
– Voor de eerste inbedrijfstelling veilig-
heidsinstructies nr. 5.956-249.0 in elk
geval lezen!
– Bij veronachtzaming van de gebruiks-
aanwijzing en de veiligheidsaanwijzingen kan schade aan het apparaat ontstaan, en gevaar voor gebruikers en andere personen.
– Bij transportschade onmiddellijk de
handelaar op de hoogte brengen.
Inhoudsopgave
Zorg voor het milieu . . . . . . . . NL 1
Gevarenniveaus . . . . . . . . . . . NL 1
Reglementair gebruik . . . . . . . NL 1
Apparaat-elementen . . . . . . . . NL 2
Inbedrijfstelling . . . . . . . . . . . . NL 2
Bediening . . . . . . . . . . . . . . . . NL 2
Vervoer . . . . . . . . . . . . . . . . . . NL 4
Opslag. . . . . . . . . . . . . . . . . . . NL 4
Onderhoud . . . . . . . . . . . . . . . NL 4
Hulp bij storingen . . . . . . . . . . NL 4
Garantie . . . . . . . . . . . . . . . . . NL 5
Toebehoren en reserveonderde-
len . . . . . . . . . . . . . . . . . . . . . . NL 5
EU-conformiteitsverklaring . . . NL 5
Technische gegevens . . . . . . . NL 6
Zorg voor het milieu
Het verpakkingsmateriaal is herbruikbaar. Deponeer het verpakkingsmateriaal niet bij het huishoudelijk afval, maar bied het
aan voor hergebruik.
Onbruikbaar geworden apparaten bevatten waardevolle materialen die geschikt zijn voor hergebruik. Lever de apparaten
daarom in bij een inzamelpunt
voor herbruikbare materialen.
Batterijen, olie en dergelijke stoffen mogen niet in het milieu belanden. Verwijder overbodig geworden apparatuur daarom via
geschikte inzamelpunten.
Aanwijzingen betreffende de inhoudsstoffen (REACH)
Huidige informatie over de inhoudsstoffen
vindt u onder:
www.kaercher.com/REACH
Gevarenniveaus
GEVAAR
Verwijzing naar een onmiddellijk dreigend
gevaar dat tot ernstige en zelfs dodelijke lichaamsverwondingen leidt.
몇 WAARSCHUWING
Verwijzing naar een mogelijke gevaarlijke
situatie die tot ernstige en zelfs dodelijke lichaamsverwondingen kan leiden.
몇 VOORZICHTIG
Verwijzing naar een mogelijk gevaarlijke situatie die tot lichte verwondingen kan leiden.
LET OP
Verwijzing naar een mogelijke gevaarlijke
situatie die tot materiele schade kan leiden.
Reglementair gebruik
몇 WAARSCHUWING
Het apparaat is niet geschikt voor het opzuigen van voor de gezondheid schadelijke
stoffen.
– Dat afvoersysteem is bestemd voor de
stofarme verwijdering van droog of licht
vochtig zuiggoed, met gebruik van een
lange op maat te snijden afvalslang.
– Dit apparaat is geschikt voor industrieel
gebruik, bv. in opslag- en productieplaatsen en bij productiemachines.
– Het apparaat mag niet met een kraan
verladen worden.
30 NL
– 1

Apparaat-elementen
1 Spanhefboom
2 Filterafdekking
3 Vlak harmonicafilter
4 Ontgrendeling links van het zakmecha-
nisme
5 Zuigkop
6Typeplaatje
7 Netkabel
8 Ontgrendeling rechts van het zakme-
chanisme
9 Metalen bak
10 Afvoersysteem
11 Kabelloop
12 Handgreep van het afvoersysteem
13 Tussenring
14 Vergrendeling van de zuigkop
15 Afvalslang
16 Zwenkwiel van het onderstel met par-
keerrem
17 Houder voor vloersproeier
18 Gestel
19 Opvangbak
20 Luchtinlaatleidingen
21 Houder voor zuigbuis
22 Handgreep van de zuigkop
23 Draaischakelaar
24 Draaistroommotor
25 Geluidsdemper afvoerlucht
26 Duwbeugel
27 Kabelhaak
Inbedrijfstelling
Het apparaat in de werkpositie bren-
gen, indien nodig met parkeerrem zeke-
ren.
Zuigslang (niet meegeleverd) in het
aansluitstuk voor zuigen steken.
Controleren of het afvoersysteem vol-
gens de voorschriften aangebracht is.
Gewenst toebehoren (niet meegele-
verd) erop doen.
Stroomaansluiting
LET OP
Bij iedere wisseling van stopcontact draairichting van de motor controleren.
Hint: Bij juiste draairichting is een sterke
luchtstroom uit de opening van de geluidsdemper van de afvoerlucht voelbaar. Bij
verkeerde draairichting wordt lucht aangezogen.
Afbeelding
Draairichting van de motor controleren.
Bij verkeerde draairichting, de polen
van de apparaatstekker verwisselen.
Afvalzak aanbrengen
Verwijder alle 4 lussen van de afval-
slang (lengte: 22 m).
Afbeelding
Open de opname door naar links te
draaien en trek deze er naar beneden
uit.
Plaats de afvalzak conform de afbeel-
ding.
Schuif de opname erin en vergrendel ze
door naar rechts te draaien.
Afbeelding
Trek de afvalslang 40-50 cm naar om-
laag.
Sluit het einde van de afvalslang af met
een kabelklem.
Bediening
LET OP
Gevaar voor beschadiging! Toevoer- en afvoeropeningen op de zuigkop niet afdekken.
LET OP
Bij het zuigen mogen nooit de beide vlakvouwfilters verwijderd worden.
Draaischakelaar
– Apparaat AAN
– Filterreiniging UIT
– 2
– Apparaat UIT
– Apparaat AAN
– Filterreiniging AAN
31NL

Apparaat inschakelen
Steek de netstekker in de contactdoos.
Apparaat met de draaischakelaar in-
schakelen.
Automatische filterreiniging
Het apparaat beschikt over een nieuwe,
dubbele filterreiniging, bijzonder effectief bij
fijn stof. Daarbij worden de vlakvouwfilters
om de 15 seconde automatisch gereinigd
door een luchtstoot (pulserend geluid).
Zuigproces
Zuigproces uitvoeren.
Het zuiggoed valt pas in de afvoerslang
als het apparaat uitgeschakeld is.
Controleer regelmatig het vulniveau in
de afvalslang aangezien het apparaat
niet automatisch uitschakelt.
Afbeelding
Bij licht zuiggoed of verstopping: Trek
de kabelloop eruit, om de klep aan de
uitlaat te openen (enkel mogelijk bij een
uitgeschakeld apparaat).
Trek de afvalslang een beetje naar om-
laag, sluit ze af met 2 kabelklemmen op
een afstand van 10 cm en snijd ze tus-
sen de kabelklemmen door.
Verwijder de afvalzak volgens de wette-
lijke bepalingen.
Instructie: Bij licht zuiggoed kan de lengte
van de afvalzak tot 2 m bedragen, zonder
dat deze scheurt.
Apparaat uitschakelen
Apparaat met de draaischakelaar uit-
schakelen.
Netstekker uittrekken.
Na elk bedrijf
Afvoersysteem wegnemen
Parkeerrem vastzetten.
Afbeelding
Metalen bak verwijderen.
Afbeelding
Ontgrendeling van het afzetmechanis-
me naar boven trekken.
Duwbeugel omhoog trekken. Afvoersy-
steem wordt ontgrendeld en naar bene-
den gelaten.
Afbeelding
Afvoersysteem aan de handgreep eruit
trekken.
Reiniging van het apparaat
Apparaat aan de binnen- en buitenkant
reinigen door afzuigen en afvegen met
een vochtige doek.
Afvoersysteem plaatsen
Afbeelding
Afvoersysteem weer inzetten en met
duwbeugel vergrendelen.
몇 WAARSCHUWING
Knelgevaar! Houd tijdens het
vergrendelen in geen geval de
handen tussen het afvoersysteem en de tussenring of in de buurt van
het hefmechanisme. Houd het afvoersysteem met de ene hand vas en vergrendel
het door de duwbeugel met de andere hand
te bedienen.
Metalen bak plaatsen.
Apparaat opslaan
Stroomkabel opwikkelen en in de kabel-
haak hangen.
Zuigslang rond de schuifbeugel wikke-
len.
Vloersproeier en zuigbuis in de desbe-
treffende houders steken.
Apparaat in een droge ruimte plaatsen
en beveiligen tegen onbevoegd gebruik.
32 NL
– 3

Vervoer
몇 VOORZICHTIG
Gevaar voor letsels en beschadigingen!
Houd bij het transport rekening met het gewicht van het apparaat.
Parkeerremmen loszetten en apparaat
aan de duwbeugel verschuiven.
Apparaat bij het verladen bij het onder-
stel pakken, niet bij de schuifbeugel.
Bij het transport in voertuigen moet het
apparaat conform de geldige richtlijnen
beveiligd worden tegen verschuiven en
kantelen.
Opslag
몇 VOORZICHTIG
Gevaar voor letsel en beschadiging! Het
gewicht van het apparaat bij opbergen in
acht nemen.
Het apparaat mag alleen binnen worden
opgeborgen.
Onderhoud
GEVAAR
Bij alle werkzaamheden aan het apparaat,
het apparaat uitschakelen en de netstekker
uittrekken.
Vlakvouwfilter vervangen
Hint: Voor het afnemen van de zuigkop zijn
2 personen nodig.
Zuigkop ontgrendelen en wegnemen.
Filterafdekking ontgrendelen en afne-
men.
Vlakvouwfilter vervangen.
Filterafdekking eropzetten en vergren-
delen.
Zuigkop voorzichtig erop zetten, richten
en vergrendelen.
Hulp bij storingen
GEVAAR
Bij alle werkzaamheden aan het apparaat,
het apparaat uitschakelen en de netstekker
uittrekken.
Zuigturbine start niet
Stekker en zekering van de stroom-
voorziening controleren.
Stroomkabel en stekker van het appa-
raat controleren.
Apparaat inschakelen.
Zuigturbine loopt, maar apparaat
zuigt niet
Hint: Bij juiste draairichting is een sterke
luchtstroom uit de opening van de geluidsdemper van de afvoerlucht voelbaar. Bij
verkeerde draairichting wordt lucht aangezogen.
Afbeelding
Draairichting van de motor controleren.
Bij verkeerde draairichting, de polen
van de apparaatstekker verwisselen.
Zuigkracht wordt minder
Verstoppingen uit zuigmondstuk, zuig-
buis, zuigslang of vlakvouwfilter weghalen.
Controleren of zuigkop en afvoersy-
steem correct zijn gepositioneerd.
Vlakvouwfilter vervangen.
Er ontsnapt stof bij het zuigen
Filterafdekking juist vergrendelen.
Controleren of vlakvouwfilters correct
zijn aangebracht.
Vlakvouwfilter vervangen.
Automatische filterreiniging werkt
niet
Zuigslang niet aangesloten.
Gebruikte zuigslang is te kort (< 3m) of
heeft een te grote doorsnede.
Klantendienst contacteren.
Automatische filterreiniging kan
niet uitgeschakeld worden
Klantendienst contacteren.
– 4
33NL

Klantenservice
Chairman of the Board of Management
Director Regulatory Affairs & Certification
Indien de storing niet kan worden opgelost, moet het toestel door de klantendienst gecontroleerd worden.
Garantie
In ieder land zijn de door ons bevoegde
verkoopkantoor uitgegeven garantiebepalingen van toepassing. Eventuele storingen
aan het apparaat verhelpen wij zonder kosten binnen de garantietermijn, mits een materiaal of fabrieksfout de oorzaak van deze
storing is. Neem bij klachten binnen de garantietermijn contact op met uw leverancier
of de dichtstbijzijnde klantenservicewerkplaats en neem uw aankoopbewijs mee.
Toebehoren en
reserveonderdelen
Gebruik alleen origineel toebehoren en originele reserveonderdelen. Deze garanderen dat het apparaat veilig en zonder storingen functioneert.
Informatie over het toebehoren en de reserveonderdelen vindt u op
www.kaercher.com.
– In de standaardaflevering zit geen toe-
behoren. Het toebehoren moet naargelang aanwending apart besteld worden.
– De perfecte functie van het apparaat
wordt enkel gegarandeerd bij nominale
zuigslangwijdten van DN42 en DN52.
– Reserveonderdelen en toebehoren zijn
verkrijgbaar bij uw handelaar of uw
KÄRCHER-filiaal.
EU-conformiteitsverklaring
Hierbij verklaren wij dat de hierna vermelde
machine door haar ontwerp en bouwwijze
en in de door ons in de handel gebrachte
uitvoering voldoet aan de betreffende fundamentele veiligheids- en gezondheidseisen, zoals vermeld in de desbetreffende
EU-richtlijnen. Deze verklaring verliest haar
geldigheid wanneer zonder overleg met
ons veranderingen aan de machine worden
aangebracht.
Product: Droog- / natzuiger
Type: 1.576-xxx
Van toepassing zijnde EU-richtlijnen
2006/42/EG (+2009/127/EG)
2014/30/EU
Toegepaste geharmoniseerde normen
EN 55014–1: 2006+A1: 2009+A2: 2011
EN 55014–2: 2015
EN 60335–1
EN 60335–2–69
EN 61000–3–2: 2014
EN 61000–3–3: 2013
EN 62233: 2008
Toegepaste landelijke normen
-
5.966-010
De ondergetekenden handelen in opdracht
en met volmacht van de directie.
Documentatieverantwoordelijke:
S. Reiser
34 NL
Alfred Kärcher SE & Co. KG
Alfred-Kärcher-Straße 28-40
71364 Winnenden (Germany)
Tel.: +49 7195 14-0
Fax: +49 7195 14-2212
Winnenden, 2018/10/01
– 5

Technische gegevens
IVC 60/30 Tact2 Lp
Netspanning V 400
Frequentie Hz 3~ 50
Nominaal vermogen W 3000
Luchthoeveelheid (max.) l/s 68
Onderdruk (max.) kPa (mbar) 28,6 (286)
Beveiligingsklasse -- IPX4
Beschermingsklasse -- I
Zuigslangaansluiting (C-DN/C-ID) DN 72
Nominale zuigslangwijdte DN 42/52
Lengte x breedte x hoogte mm 970 x 690 x 1240
Filteroppervlak m
2
Typisch bedrijfsgewicht kg 108
Omgevingstemperatuur (max.) °C +40
Bepaalde waarden conform EN 60335-2-69
Geluidsdrukniveau L
Onzekerheid K
pA
pA
Hand-arm vibratiewaarde m/s
Onzekerheid K m/s
Stroomkabel H07RN-F 5x1,5 mm
2
dB(A) 77
dB(A) 1
2
2
Onderdeelnr. Lengte
snoer
EU 6.649-826.0 7,5 m
1,9
<2,5
0,2
– 6
35NL

Antes del primer uso de su apa-
rato, lea este manual original,
actúe de acuerdo a sus indicaciones y
guárdelo para un uso posterior o para otro
propietario posterior.
– ¡Antes de la primera puesta en marcha
lea sin falta las instrucciones de uso y
las instrucciones de seguridad n.°
5.956-249.0!
– El incumplimiento de las instrucciones
de uso y de las indicaciones de seguridad puede provocar daños en el aparato y poner en peligro al usuario y a otras
personas.
– En caso de daños de transporte infor-
me inmediatamente al fabricante.
Índice de contenidos
Protección del medio ambiente ES 1
Niveles de peligro . . . . . . . . . . ES 1
Uso previsto . . . . . . . . . . . . . . ES 1
Elementos del aparato . . . . . . ES 2
Puesta en marcha. . . . . . . . . . ES 2
Manejo . . . . . . . . . . . . . . . . . . ES 2
Transporte. . . . . . . . . . . . . . . . ES 4
Almacenamiento . . . . . . . . . . . ES 4
Cuidados y mantenimiento . . . ES 4
Ayuda en caso de avería . . . . ES 4
Garantía . . . . . . . . . . . . . . . . . ES 5
Accesorios y piezas de repuestoES 5
Declaración UE de conformidadES 5
Datos técnicos . . . . . . . . . . . . ES 6
Protección del medio
ambiente
Los materiales empleados para
el embalaje son reciclables y recuperables. No tire el embalaje a
la basura doméstica y entréguelo en los puntos oficiales de recogida para su reciclaje o recuperación.
36 ES
Los aparatos viejos contienen
materiales valiosos reciclables
que deberían ser entregados
para su aprovechamiento posterior. Evite el contacto de baterías,
aceites y materias semejantes
con el medio ambiente. Por este
motivo, entregue los aparatos
usados en los puntos de recogida previstos para su reciclaje.
Indicaciones sobre ingredientes
(REACH)
Encontrará información actual sobre los ingredientes en:
www.kaercher.com/REACH
Niveles de peligro
PELIGRO
Aviso sobre un riesgo de peligro inmediato
que puede provocar lesiones corporales
graves o la muerte.
몇 ADVERTENCIA
Aviso sobre una situación propablemente
peligrosa que puede provocar lesiones corporales graves o la muerte.
몇 PRECAUCIÓN
Indicación sobre una situación que puede
ser peligrosa, que puede acarrear lesiones
leves.
CUIDADO
Aviso sobre una situación probablemente
peligrosa que puede provocar daños materiales.
Uso previsto
몇 ADVERTENCIA
El aparato no es apto para aspirar polvos
nocivos para la salud.
– Este sistema de eliminación está dise-
ñado para eliminación de desechos sin
polvo, de suciedad seca o ligeramente
húmeda, usando una manguera de residuos cuyo largo se puede cortar.
– Este aparato está diseñado para el uso
industrial, p.ej.en zonas de almacenamiento y fabricación y el máquinas de
producción.
– El aparato no está autorizado para car-
gar con grúa.
– 1

Elementos del aparato
1 palanca de sujeción
2 Cubierta del filtro
3 Filtro plano de papel plegado
4 Desbloqueo izquierdo de la mecánica
de atascado
5 Cabezal de aspiración
6 Placa de características
7 Cable de conexión a la red
8 Desbloqueo derecho de la mecánica de
atascado
9 Tina de chapa
10 Sistema de eliminación
11 cable de mando
12 Asa del sistema de eliminación
13 Anillo intermedio
14 Bloqueo del cabezal de absorción
15 Manguera de residuos
16 Rueda de dirección del chasis con fre-
no de estacionamiento
17 Soporte para boquilla para suelos
18 Chasis
19 Cubeta colectora
20 Tubuladura de aspiración
21 Soporte para la tubería de absorción
22 Asa del cabezal de aspiración
23 interruptor giratorio
24 Motor de corriente trifásica
25 Amortiguador de ventilación
26 Estribo de empuje
27 Gancho porta cables
Puesta en marcha
Coloque el aparato en la posición de
trabajo; si fuera necesario, fíjelo me-
diante el freno de estacionamiento.
Insertar la manguera en el manguito de
aspiración (no incluida).
Asegurarse de que el sistema de elimi-
nación está correctamente instalado.
Insertar el accesorio deseado (no in-
cluido).
Toma de corriente
CUIDADO
Cada vez que cambie de toma de corriente,
verifique el sentido de giro del motor.
Indicación: Si el sentido de giro es correcto se notará una fuerte corriente de aire saliendo del orificio del amortiguador de ventilación. Si la dirección de giro es errónea
se aspirará aire.
Figura
Comprobar la dirección de giro del mo-
tor. Si se gira incorrectamente, cambiar
los polos en el enchufe.
Colocar la manguera de residuos
Quitar los 4 bucles de la manguera de
residuos (largo: 22 m).
Figura
Abrir el alojamiento girando hacia la iz-
quierda y extraer hacia abajo.
Colocar la manguera de residuos con-
forme a la ilustración.
Introducir el alojamiento y girar hacia la
derecha para cerrarlo.
Figura
Tirar hacia abajo de la manguera de re-
siduos 40-50 cm.
Cerrar el extremo de la manguera de
residuos con la abrazadera de cables.
Manejo
CUIDADO
¡Peligro de daños en la instalación! No tapar los orificios de entrada y salida de aire
en el cabezal de aspiración.
CUIDADO
Al aspirar no retirar nunca los dos filtros de
papel plegado plano.
Interruptor giratorio
– Aparato ENCENDIDO
– Limpieza de filtro APA-
GADA
– Aparato APAGADO
– 2
– Aparato ENCENDIDO
– Limpieza de filtro EN-
CENDIDA
37ES

Conexión del aparato
Enchufe la clavija de red.
Conectar el aparato en el interruptor gi-
ratorio.
Limpieza automática de filtro
El aparato dispone de un novedoso y doble
sistema de limpieza de filtro, especialmente efectivo con el polvo fino. Los filtros planos de papel plegado se limpian automáticamente cada 15 segundos con un soplo
de aire (ruido vibrante).
Proceso de aspiración
Ejecutar proceso de aspiración.
La suciedad aspirada cae primero en la
manguera de residuos con el equipo
desconectado.
Comprobar el nivel de llenado de la
manguera de residuos regularmente,
ya que el aparato no se desconecta au-
tomáticamente.
Figura
Si la suciedad es ligera o hay atasco:
extraer el cable de mando para abrir la
tapa de a salida (solo es posible con el
aparato desconectado).
Tirar hacia abajo de la manguera de re-
siduos, cerrar con 2 abrazaderas de ca-
bles a una distancia de 10 cm y cortar
entre las abrazaderas.
Eliminar la bolsa de desechos de
acuerdo con las normativas vigentes.
Indicación: Si la suciedad es ligera, el largo de la bolsa de desechos puede ser de
hasta 2 m sin que se rompa.
Desconexión del aparato
Desconectar el aparato en el interruptor
giratorio.
Extraer el enchufe de la red.
Después de cada puesta en marcha
Extracción del sistema de eliminación
Active los frenos de estacionamiento.
Figura
Extraer la tina de chapa.
Figura
Tirar hacia arriba de los desbloqueos
de la mecánica de atascado.
Mover hacia arriba el estribo de empu-
je. El sistema de eliminación se desblo-
quea y baja.
Figura
Extraer el sistema de eliminación por el
asa.
Limpieza del aparato
Limpie el aparato por dentro y por fuera
aspirándolo y frotar con un paño húme-
do.
Montaje del sistema de eliminación
Figura
Colocar de nuevo el sistema de elimi-
nación y bloquear con el estribo de em-
puje.
몇 ADVERTENCIA
Peligro de aplastamiento No colocar las manos entre el sistema
de eliminación y el anillo intermedio durante el bloqueo bajo ningún concepto ni introducirlas cerca de la mecánica
de elevación. Sujetar el sistema de eliminación por el asa con una mano y bloquear
con la otra mano para accionar el estribo
de empuje.
Colocar la tina de chapa.
Almacenamiento del aparato
Enrollar el cable de alimentación y col-
gar del gancho del cable.
Enrollar la manguera de aspiración en-
torno al estribo de empuje.
Insertar la boquilla para suelos y la tu-
bería de aspiración en los soportes correspondientes.
Coloque el aparato en un cuarto seco y
protéjalo frente a un uso no autorizado.
38 ES
– 3

Transporte
몇 PRECAUCIÓN
¡Peligro de lesiones y daños! Respetar el
peso del aparato para el transporte.
Soltar los frenos de estacionamiento y
desplazar el aparato con el estribo de
empuje.
Para cargar el aparato, agárrelo por el
chasis, no del estribo de empuje.
Al transportar en vehículos, asegurar el
aparato para evitar que resbale y vuelque conforme a las directrices vigentes.
Almacenamiento
몇 PRECAUCIÓN
¡Peligro de lesiones y daños! Respetar el
peso del aparato en el almacenamiento.
Este aparato sólo se puede almacenar en
interiores.
Cuidados y mantenimiento
PELIGRO
Antes de efectuar cualquier trabajo en el
aparato, hay que desconectar de la red
eléctrica.
Cambiar el filtro plano de papel
plegado
Indicación: Para quitar el cabezal de aspi-
ración son necesarias 2 personas.
Desbloquear y extraer el cabezal de as-
piración.
Desbloquear y extraer la cubierta del fil-
tro.
Cambiar el filtro plano de papel plegado.
Colocar y bloquear la cubierta del filtro.
Colocar con cuidado, orientar y blo-
quear el cabezal de aspiración.
Ayuda en caso de avería
PELIGRO
Antes de efectuar cualquier trabajo en el
aparato, hay que desconectar de la red
eléctrica.
La turbina de aspiración no
funciona
Comprobar la clavija y el seguro del su-
ministro de corriente.
Comprobar el cable y el enchufe del
aparato.
Conexión del aparato
La turbina de aspiración funciona,
pero el aparato no aspira
Indicación: Si el sentido de giro es correc-
to se notará una fuerte corriente de aire saliendo del orificio del amortiguador de ventilación. Si la dirección de giro es errónea
se aspirará aire.
Figura
Comprobar la dirección de giro del mo-
tor. Si se gira incorrectamente, cambiar
los polos en el enchufe.
La capacidad de aspiración
disminuye
Eliminar las obstrucciones de la boqui-
lla, tubo o manguera de aspiración o el
filtro plano de papel plegado.
Comprobar si el cabezal de aspiración
y el sistema de eliminación están bien
colocados.
Cambiar el filtro plano de papel plegado.
Pérdida de polvo durante la
aspiración
Bloquear correctamente la cubierta del
filtro.
Comprobar si el cartucho de filtro plano
de papel plegado está montado correctamente.
Cambiar el filtro plano de papel plegado.
La limpieza automática de filtro no
funciona
La manguera de aspiración no está no
conectada.
La manguera de aspiración utilizada es
demasiado corta (< 3m) o tiene un diámetro demasiado grande.
Avisar al servicio técnico.
– 4
39ES

La limpieza automática de filtro no
Chairman of the Board of Management
Director Regulatory Affairs & Certification
se puede apagar
Avisar al servicio técnico.
Servicio de atención al cliente
Si la avería no se puede solucionar el
aparato debe ser revisado por el servicio técnico.
Garantía
En todos los países rigen las condiciones
de garantía establecidas por nuestra empresa distribuidora. Las averías del aparato
serán subsanadas gratuitamente dentro
del periodo de garantía, siempre que se deban a defectos de material o de fabricación.
En un caso de garantía, le rogamos que se
dirija con el comprobante de compra al distribuidor donde adquirió el aparato o al servicio al cliente autorizado más próximo a su
domicilio.
Accesorios y piezas de
repuesto
Utilice solamente accesorios y recambios
originales, ya que garantizan un funcionamiento correcto y seguro del equipo.
Puede encontrar información acerca de los
accesorios y recambios en
www.kaercher.com.
– No viene incluido ningún accesorio. El
accesorio se puede pedir por separado
según la aplicación.
– Solo se garantiza el funcionamiento co-
rrecto del aparato con mangueras de
aspiración de DN42 y DN52 de ancho
nominal.
– En su distribuidor o en la sucursal de
KÄRCHER podrá adquirir piezas de repuesto y accesorios.
Declaración UE de
conformidad
Por la presente declaramos que la máquina designada a continuación cumple, tanto
en lo que respecta a su diseño y tipo constructivo como a la versión puesta a la venta
por nosotros, las normas básicas de seguridad y sobre la salud que figuran en las directivas comunitarias correspondientes. La
presente declaración perderá su validez en
caso de que se realicen modificaciones en
la máquina sin nuestro consentimiento explícito.
Producto: aspirador en húmedo/seco
Modelo: 1.576-xxx
Directivas comunitarias aplicables
2006/42/CE (+2009/127/CE)
2014/30/UE
Normas armonizadas aplicadas
EN 55014–1: 2006+A1: 2009+A2: 2011
EN 55014–2: 2015
EN 60335–1
EN 60335–2–69
EN 61000–3–2: 2014
EN 61000–3–3: 2013
EN 62233: 2008
Normas nacionales aplicadas
-
5.966-010
Los abajo firmantes actúan en nombre y
con la autorización de la junta directiva.
Responsable de documentación:
S. Reiser
Alfred Kärcher SE & Co. KG
Alfred-Kärcher-Straße 28-40
71364 Winnenden (Germany)
Tel.: +49 7195 14-0
Fax: +49 7195 14-2212
40 ES
Winnenden, 2018/10/01
– 5

Datos técnicos
IVC 60/30 Tact2 Lp
Tensión de red V 400
Frecuencia Hz 3~ 50
Potencial nominal W 3000
Cantidad de aire (máx.) l/s 68
Depresión (máx.) kPa (mbar) 28,6 (286)
Categoria de protección -- IPX4
Clase de protección -- I
Toma de tubo flexible de aspiración (C-DN/C-ID) DN 72
Ancho nominal de la manguera de aspiración DN 42/52
Longitud x anchura x altura mm 970 x 690 x 1240
Superficie activa del filtro m
2
Peso de funcionamiento típico kg 108
Temperatura ambiente (máx.) °C +40
Valores calculados conforme a la norma EN 60335-2-69
Nivel de presión acústica L
Inseguridad K
pA
pA
Valor de vibración mano-brazo m/s
Inseguridad K m/s
Cable de conexión a la
red
H07RN-F 5x1,5 mm
No. de pieza Longitud del
2
cable
dB(A) 77
dB(A) 1
2
2
EU 6.649-826.0 7,5 m
1,9
<2,5
0,2
– 6
41ES

Leia o manual de manual origi-
nal antes de utilizar o seu aparelho. Proceda conforme as indicações no
manual e guarde o manual para uma consulta posterior ou para terceiros a quem
possa vir a vender o aparelho.
– Antes de colocar em funcionamento
pela primeira vez é imprescindível ler
atentamente as indicações de segurança n.º 5.956-249.0!
– A não-observância deste Manual de
Instruções e dos avisos de segurança
poderá levar a danos no aparelho e perigos tanto para o utilizador como para
terceiros.
– No caso de danos provocados pelo
transporte, informe imediatamente o revendedor.
Índice
Proteção do meio-ambiente . . PT 1
Níveis de perigo . . . . . . . . . . . PT 1
Utilização conforme o fim a que
se destina a máquina . . . . . . . PT 1
Elementos do aparelho . . . . . . PT 2
Colocação em funcionamento PT 2
Manuseamento . . . . . . . . . . . . PT 2
Transporte. . . . . . . . . . . . . . . . PT 4
Armazenamento . . . . . . . . . . . PT 4
Conservação e manutenção . . PT 4
Ajuda em caso de avarias. . . . PT 4
Garantia . . . . . . . . . . . . . . . . . PT 5
Acessórios e peças sobressa-
lentes . . . . . . . . . . . . . . . . . . . PT 5
Declaração UE de conformida-
de . . . . . . . . . . . . . . . . . . . . . . PT 5
Dados técnicos . . . . . . . . . . . . PT 6
Proteção do meio-ambiente
Os materiais da embalagem são
recicláveis. Não coloque as embalagens no lixo doméstico, envie-as para uma unidade de reciclagem.
Os aparelhos velhos contêm
materiais preciosos e recicláveis
e deverão ser reutilizados. Baterias, óleo e produtos similares
não podem ser deitados fora ao
meio ambiente. Por isso, elimine
os aparelhos velhos através de
sistemas de recolha de lixo adequados.
Avisos sobre os ingredientes (REACH)
Informações actuais sobre os ingredientes
podem ser encontradas em:
www.kaercher.com/REACH
Níveis de perigo
PERIGO
Aviso referente a um perigo eminente que
pode conduzir a graves ferimentos ou à
morte.
몇 ATENÇÃO
Aviso referente a uma possível situação
perigosa que pode conduzir a graves ferimentos ou à morte.
몇 CUIDADO
Aviso referente a uma situação potencialmente perigosa que pode causar ferimentos leves.
ADVERTÊNCIA
Aviso referente a uma situação potencialmente perigosa que pode causar danos
materiais.
Utilização conforme o fim a
que se destina a máquina
몇 ATENÇÃO
O aparelho não é apropriado para a aspiração de poeiras nocivas para a saúde.
– Este sistema de eliminação destina-se
para a eliminação de material aspirado
seco ou húmido com uma mangueira
de resíduos que possa ser cortada em
comprimento.
– Este aparelho é adequado para a utili-
zação industrial como, por exemplo, em
áreas de armazenamento e de fabricação e em máquinas de produção.
– O aparelho não é adequado para o
transporte por guindaste.
42 PT
– 1

Elementos do aparelho
1 Alavanca de tensionamento
2 Tampa do filtro
3 Filtro de pregas
4 Desbloqueio esquerdo do mecanismo
de depositação
5 Cabeçote de aspiração
6 Placa de tipo
7 Cabo de rede
8 Desbloqueio direito do mecanismo de
depositação
9 Tina de chapa
10 Sistema de eliminação
11 Cabo de tracção
12 Manípulo do sistema de eliminação
13 Anel intermédio
14 Bloqueio da cabeça de aspiração
15 Mangueira de resíduos
16 Rolo guia do quadro com travão de
imobilização
17 Suporte do bocal de chão
18 Chassis
19 Tina de recolha
20 Bocal de aspiração
21 Suporte para tubo de aspiração
22 Manípulo da cabeça de aspiração
23 Interruptor rotativo
24 Motor trifásico
25 Silenciador do ar de exaustão
26 Alavanca de avanço
27 Gancho de cabo
Conexão de energia eléctrica
ADVERTÊNCIA
A cada vez que se muda de tomada, verifique o sentido de rotação do motor.
Aviso: Quando o sentido de rotação do
motor está correcto, sente-se uma forte
corrente de ar na abertura do silenciador
do ar de exaustão. No caso de um sentido
de rotação errado é aspirado ar.
Figura
Controlar o sentido de rotação do mo-
tor. No caso de um sentido de rotação
errado, deve-se inverter os pólos na ficha do aparelho.
Inserir a mangueira de resíduos
Remover todos os 4 laços da manguei-
ra de resíduos (comprimento: 22 m).
Figura
Abrir o encaixe rodando para a esquer-
da e remover (puxar) para baixo.
Inserir a mangueira de resíduos confor-
me ilustrado na figura.
Inserir o encaixe e fechar rodando para
a direita.
Figura
Puxar a mangueira de resíduos 40-
50 cm para baixo.
Conectar a extremidade da mangueira
de resíduos com uma braçadeira de ca-
bos.
Colocação em funcionamento
Colocar o aparelho em posição de tra-
balho; quando necessário, proteger
com o travão de imobilização.
Inserir o tubo de aspiração (não incluí-
do no volume de fornecimento) no bocal de aspiração.
Assegurar que o sistema de eliminação
está correctamente instalado.
Encaixar os acessórios pretendidos
(não incluídos no volume de fornecimento).
Manuseamento
ADVERTÊNCIA
Perigo de danos! Não cobrir as aberturas
do ar de admissão e de exaustão na cabeça de aspiração.
ADVERTÊNCIA
Durante a aspiração, nunca podem ser retirados os dois filtros de pregas planos.
– 2
43PT

Interruptor rotativo
– Aparelho LIG
– Limpeza do filtro DESL
–Aparelho DESL
Desligar o aparelho
Desligar o aparelho no interruptor rota-
tivo.
Desligue a ficha da tomada.
Sempre depois de utilizar a máquina
– Aparelho LIG
– Limpeza do filtro LIG
Ligar a máquina
Ligar a ficha de rede.
Ligar o aparelho no interruptor rotativo.
Limpeza automática do filtro
O aparelho dispõe de um dispositivo inovador de dupla limpeza do filtro, particularmente eficaz para poeira fina. Neste processo os filtros de pregas planos são automaticamente limpos por um jacto de ar (ruído pulsante) em intervalos de 15
segundos.
Aspiração
Executar a aspiração.
O material aspirado apenas entra na
mangueira de resíduos quando o aparelho for desligado.
Controlar regularmente o nível de enchimento na mangueira de resíduos,
visto que o aparelho não desliga auto-
maticamente.
Figura
No caso de material aspirado ligeiro ou
obstrução: retirar o cabo de tracção
para abrir a tampa na saída (apenas é
possível com o aparelho desligado).
Puxar a mangueira de resíduos ligeira-
mente para baixo, fechar com 2 braça-
deiras de cabos a uma distância de 10
cm, e cortar entre as braçadeiras de ca-
bos.
Eliminar o saco de resíduos em confor-
midade com a legislação em vigor.
Aviso: No caso de material aspirado ligeiro, o comprimento do saco de resíduos
pode ser de até 2 m, sem que este rasgue.
Retirar o sistema de eliminação
Fixar os travões de imobilização.
Figura
Retirar a tina de chapa.
Figura
Puxar o dispositivo de destravamento
do mecanismo de depositação para cima.
Puxar o arco de impulsão para cima. O
sistema de eliminação é desbloqueado
e baixado.
Figura
Retirar o sistema de eliminação no ma-
nípulo.
Limpeza do aparelho
Aspirar e esfregar o aparelho por den-
tro e por fora para limpá-lo (pano húmi-
do).
Posicionar o sistema de eliminação
Figura
Voltar a inserir o sistema de eliminação
e bloquear com a alavanca de avanço
(arco de impulsão).
몇 ATENÇÃO
Perigo de esmagamento! Durante o bloqueio não se deve
manter as mãos entre o sistema
de eliminação e o anel intermédio ou na
proximidade do mecanismo de elevação.
Com uma mão, segurar o sistema de eliminação no punho; com a outra mão, accionar a alavanca de avanço para o bloquear.
Posicionar a tina de chapa.
Guardar a máquina
Enrolar o cabo de rede e engatar no
gancho do cabo.
Enrolar o cabo de aspiração à volta da
alavanca de avanço.
44 PT
– 3

Encaixar o bico para pavimentos e o
tubo de aspiração no respectivo suporte.
Colocar o aparelho num local seco e to-
mar as medidas necessárias para evitar uma utilização por parte de pessoas
não autorizadas.
Transporte
몇 CUIDADO
Perigo de ferimentos e de danos! Ter atenção ao peso do aparelho durante o transporte.
Soltar os travões de imobilização e em-
purrar o aparelho na alavanca de avanço.
Para transportar o aparelho deve-se
agarrá-lo no quadro e nunca na alavanca de avanço.
Durante o transporte em veículos, pro-
teger o aparelho contra deslizes e tombamentos, de acordo com as directivas
em vigor.
Armazenamento
몇 CUIDADO
Perigo de ferimentos e de danos! Ter atenção ao peso do aparelho durante o armazenamento.
Este aparelho só pode ser armazenado em
espaços fechados e cobertos.
Conservação e manutenção
PERIGO
Desligar o aparelho e retirar a ficha de rede
antes de efectuar quaisquer trabalhos no
aparelho.
Mudar o filtro de pregas plano
Aviso: Para a desmontagem da cabeça de
aspiração são necessárias 2 pessoas.
Destravar e retirar o cabeçote de aspi-
ração.
Destravar e retirar a tampa do filtro.
Mudar o filtro de pregas plano.
Montar e travar a tampa do filtro.
Posicionar cuidadosamente a cabeça
de aspiração, alinhar e bloquear.
Ajuda em caso de avarias
PERIGO
Desligar o aparelho e retirar a ficha de rede
antes de efectuar quaisquer trabalhos no
aparelho.
A turbina de aspiração não funciona
Verificar a tomada e o fusível da ali-
mentação eléctrica.
Verificar o cabo e a ficha do aparelho.
Ligar o aparelho.
A turbina de aspiração funciona,
porém, o aparelho não aspira
Aviso: Quando o sentido de rotação do
motor está correcto, sente-se uma forte
corrente de ar na abertura do silenciador
do ar de exaustão. No caso de um sentido
de rotação errado é aspirado ar.
Figura
Controlar o sentido de rotação do mo-
tor. No caso de um sentido de rotação
errado, deve-se inverter os pólos na ficha do aparelho.
A força de aspiração diminui
Retirar entupimentos do bocal de aspi-
ração, tubo de aspiração, mangueira de
aspiração ou filtro de dobras planas.
Controlar o encaixe correcto da cabeça
de aspiração e do sistema de eliminação.
Mudar o filtro de pregas plano.
Durante a aspiração sai pó
Bloquear bem a cobertura do filtro.
Verificar a posição correcta dos filtros
de pregas planos.
Mudar o filtro de pregas plano.
A limpeza automática do filtro não
funciona
Tubo flexível de aspiração não está co-
nectado.
Mangueira de aspiração utilizada é
muito curta (< 3m) ou tem um diâmetro
excessivo.
Avisar o serviço de assistência técnica.
– 4
45PT

A limpeza automática do filtro não
Chairman of the Board of Management
Director Regulatory Affairs & Certification
desliga
Avisar o serviço de assistência técnica.
Serviço de assistência técnica
Quando o defeito não puder ser consertado, a máquina deverá ser verificada
pelo serviço de assistência técnica.
Garantia
Em cada país vigem as respectivas condições de garantia estabelecidas pelas nossas Empresas de Comercialização. Eventuais avarias no aparelho durante o período de garantia serão reparadas, sem encargos para o cliente, desde que se trate
dum defeito de material ou de fabricação.
Em caso de garantia, dirija-se, munido do
documento de compra, ao seu revendedor
ou ao Serviço Técnico mais próximo.
Acessórios e peças
sobressalentes
Utilizar apenas acessórios e peças sobressalentes originais. Só assim poderá garantir uma operação do aparelho segura e sem
avarias.
Para mais informações sobre acessórios e
peças sobressalentes, consulte
www.kaercher.com.
– No volume de fornecimento não estão
incluídos nenhuns acessórios. Os
acessórios têm que ser encomendados
separadamente para as respectivas
aplicações.
– O funcionamento correcto do aparelho
é apenas assegurado pelos diâmetros
nominais da mangueira de aspiração
de DN42 e de DN52.
– As peças sobressalentes e acessórios
podem ser adquiridos junto do seu revendedor ou em cada filial da
KÄRCHER.
Declaração UE de
conformidade
Declaramos que a máquina a seguir designada corresponde às exigências de segurança e de saúde básicas estabelecidas
nas Directivas UE por quanto concerne à
sua concepção e ao tipo de construção assim como na versão lançada no mercado.
Se houver qualquer modificação na máquina sem o nosso consentimento prévio, a
presente declaração perderá a validade.
Produto: Aspirador húmido e seco
Tipo: 1.576-xxx
Respectivas Directrizes da UE
2006/42/CE (+2009/127/CE)
2014/30/UE
Normas harmonizadas aplicadas
EN 55014–1: 2006+A1: 2009+A2: 2011
EN 55014–2: 2015
EN 60335–1
EN 60335–2–69
EN 61000–3–2: 2014
EN 61000–3–3: 2013
EN 62233: 2008
Normas nacionais aplicadas
-
5.966-010
Os signatários actuam em nome e em procuração do Conselho de Administração.
Responsável pela documentação:
S. Reiser
Alfred Kärcher SE & Co. KG
Alfred-Kärcher-Straße 28-40
71364 Winnenden (Germany)
Tel.: +49 7195 14-0
Fax: +49 7195 14-2212
Winnenden, 2018/10/01
46 PT
– 5

Dados técnicos
IVC 60/30 Tact2 Lp
Tensão da rede V 400
Frequência Hz 3~ 50
Potência nominal W 3000
Volume de ar (máx.) l/s 68
Subpressão (máx.) kPa (mbar) 28,6 (286)
Tipo de protecção -- IPX4
Classe de protecção -- I
Ligação do tubo flexível de aspiração (C-DN/C-ID) DN 72
Diâmetro nominal da mangueira DN 42/52
Comprimento x Largura x Altura mm 970 x 690 x 1240
Superfície filtrante m
2
Peso de funcionamento típico kg 108
Temperatura ambiente (máx.) °C +40
Valores obtidos segundo EN 60335-2-69
Nível de pressão acústica L
Insegurança K
pA
pA
Valor de vibração mão/braço m/s
Insegurança K m/s
Cabo de rede H07RN-F 5x1,5 mm
2
dB(A) 77
dB(A) 1
2
2
Refª Compri-
mento do
cabo
EU 6.649-826.0 7,5 m
1,9
<2,5
0,2
– 6
47PT

Læs original brugsanvisning in-
den første brug, følg anvisningerne og opbevar vejledningen til senere
efterlæsning eller til den næste ejer.
– Inden første ibrugtagelse skal betje-
ningsvejledningen og sikkerhedshenvisningerne nr. 5.956-249.0 læses!
– Hvis driftsvejledningen og sikkerheds-
anvisningerne ikke overholdes, kan der
opstå skader på apparatet og risici for
brugeren og andre personer.
– Ved transportskader skal forhandleren
informeres omgående.
Indholdsfortegnelse
Miljøbeskyttelse . . . . . . . . . . . DA 1
Faregrader . . . . . . . . . . . . . . . DA 1
Bestemmelsesmæssig anven-
delse . . . . . . . . . . . . . . . . . . . . DA 1
Maskinelementer. . . . . . . . . . . DA 2
Ibrugtagning . . . . . . . . . . . . . . DA 2
Betjening. . . . . . . . . . . . . . . . . DA 2
Transport. . . . . . . . . . . . . . . . . DA 4
Opbevaring . . . . . . . . . . . . . . . DA 4
Pleje og vedligeholdelse . . . . . DA 4
Hjælp ved fejl . . . . . . . . . . . . . DA 4
Garanti . . . . . . . . . . . . . . . . . . DA 5
Tilbehør og reservedele . . . . . DA 5
EU-overensstemmelseserklæ-
ring . . . . . . . . . . . . . . . . . . . . . DA 5
Tekniske data . . . . . . . . . . . . . DA 6
Miljøbeskyttelse
Emballagen kan genbruges.
Smid ikke emballagen ud sammen med det almindelige husholdningsaffald, men aflever den
til genbrug.
Udtjente apparater indeholder
værdifulde materialer, der kan og
bør afleveres til genbrug. Batterier, olie og lignende stoffer er
ødelæggende for miljøet. Aflever
derfor udtjente apparater på en
genbrugsstation eller lignende.
Henvisninger til indholdsstoffer
(REACH)
Aktuelle oplysninger til indholdsstoffer finder du på:
www.kaercher.com/REACH
Faregrader
FARE
Henviser til en umiddelbar fare, der fører til
alvorlige kvæstelser eller til døden
몇 ADVARSEL
Henviser til en mulig farlig situation, der kan
føre til alvorlige kvæstelser eller til døden.
몇 FORSIGTIG
Henviser til en mulig farlig situation, der kan
føre til lette personskader.
BEMÆRK
Henviser til en mulig farlig situation, der kan
føre til materiel skade.
Bestemmelsesmæssig
anvendelse
몇 ADVARSEL
Maskinen er ikke egnet til opsugning af
sundhedsskadeligt støv.
– Dette bortskaffelsessystem er beregnet
til støvfattig bortskaffelse af tørt eller lidt
fugtigt støv ved at bruge en affaldsslange, som kan tilskæres i længden.
– Maskinen er beregnet til industriel brug,
f.eks. i lager- og produktionsområder og
på produktionsmaskiner.
– Maskinen er ikke egnet til læsning med
kran.
48 DA
– 1

Maskinelementer
1 Spændehåndtag
2 Filterdæksel
3 Fladt foldefilter
4 Afsætningsmekanikkens venstre åb-
ningsmekaniske
5 Sugehoved
6Typeskilt
7 Netkabel
8 Afsætningsmekanikkens højre åb-
ningsmekaniske
9 Metalkar
10 Bortskaffelsessystem
11 Kabeltræk
12 Bortskaffelsessystemets håndtag
13 Mellemring
14 Sugehovedets låsemekanisme
15 Affaldsslange
16 Understellets styrerulle med stopbremse
17 Holder til gulvdyse
18 Understel
19 Opsamlingsbeholder
20 Sugestuds
21 Holder til sugerør
22 Sugehovedets håndtag
23 Drejekontakt
24 Drejestrømsmotor
25 Udsugningens lyddæmper
26 Bøjle
27 Kabelkrog
Ibrugtagning
Stil apparatet i arbejdspositionen, sørg
for at sikre med stopbremsen om nød-
vendigt.
Sæt sugeslangen (kommer ikke med le-
verancen) ind i sugestudsen.
Sørg for, at bortskaffelsessystemet er
monteret korrekt.
Sæt det ønskede tilbehør (kommer ikke
med leverancen) på.
Strømtilslutning
BEMÆRK
Hver gang du skifter stikdåsen bør du kontrollere motorens omdrejningsretning.
Bemærk: Ved korrekt omdrejningsretning
kan du føle en stærk luftstrømning komme
ud af udsugningens lyddæmper. Ved ukorrekt omdrejningsretning indsuges luft.
Figur
Kontroller motorens omdrejningsret-
ning. Ved ukorrekt omdrejningsretning
skal polen på maskinens stik skiftes.
Sæt affaldsslangen i
Fjern alle 4 stropper på affaldsslangen
(længde: 22 m).
Figur
Åbn holderen ved at dreje til venstre og
træk den ud nedad.
Sæt affaldsslangen i som vist på bille-
det.
Skub holderen i og luk ved at dreje til
højre.
Figur
Træk affaldsslangen 40-50 cm ned.
Luk affaldsslangens ende med kabel-
bånd.
Betjening
BEMÆRK
Risiko for beskadigelse! Ind- og udsugningsåbningerne på sugehovedet må ikke
tildækkes.
BEMÆRK
Under sugningen må begge flade foldefiltre
aldrig fjernes.
Drejekontakt
– Maskine TIL
– Filterensning FRA
– Maskinen FRA
– 2
– Maskine TIL
– Filterensning TIL
49DA

Tænd for maskinen
Sæt netstikket i.
Tænd maskinen med drejekontakten.
Automatisk filterrengøring
Maskinen er udstyret med et nyudviklet,
dobbelt filterrensesystem, særdeles effektivt til fint støv. Derved rengøres det flade
foldefiltre hver 15. sekund automatisk med
et luftstød (pulserende lyd).
Sugeproces
Gennemfør sugeprocessen.
Støvet falder først ned i affaldsslangen,
når maskinen slukkes.
Kontrollér påfyldningsstanden i affaldsslangen regelmæssigt, da maskinen
ikke slukkes automatisk.
Figur
Ved let støv eller tilstopning: Træk ka-
beltrækket ud, for at åbne klappen på
udløbet (kun muligt ved frakoblet ma-
skine).
Træk affaldsslangen lidt ned, luk den
med 2 kabelbånd i en afstand på 10 cm,
og skær imellem kabelbåndene.
Affaldsposen bortskaffes iht. de gæl-
dende love.
Bemærk: Ved let støv kan affaldsposens
længde være op til 2 m, uden at den går i
stykker.
Sluk for maskinen
Sluk maskinen med drejekontakten.
Træk netstikket ud.
Efter hver brug
Udtagning af bortskaffelsessystemet
Aktiver stopbremsen.
Figur
Tag metalkaret ud.
Figur
Træk afsætningsmekanikkens åbnings-
mekanisme opad.
Træk skubbebøjlen opad. Bortskaffel-
sessystemet åbnes og sænkes.
Figur
Træk bortskaffelsessystemet ud med
håndtaget.
Rengøring af apparatet
Maskinen rengøres indvendigt og ud-
vendigt ved at støvsuge den og tørre
den af med en fugtet klud.
Isætning af bortskaffelsessystem
Figur
Isæt bortskaffelsessystemet igen, og
lås den med skubbebøjlen.
몇 ADVARSEL
Risiko for kvæstelser! Grib aldrig ind imellem bortskaffelses-
systemet og mellemringen eller i
nærheden af løftemekanismen medens du
låser beholderen. Hold bortskaffelsessystemet på håndtaget med den ene hånd, og
lås ved at aktivere skubbebøjlen med den
anden hånd.
Isæt metalkar.
Opbevaring af apparatet
Netkablet vikles op og hænges i kabel-
holderen.
Sugeslangen vikles omkring skubbe-
bøjlen.
Sæt gulvdysen og sugerøret i de re-
spektive holdere.
Opbevar maskinen i et tørt rum og sørg
for at sikre den mod uvedkommendes
brug.
50 DA
– 3

Transport
몇 FORSIGTIG
Fare for person- og materialeskader! Hold
øje med maskinens vægt ved transporten.
Løsn parkeringsbremsen og skub ma-
skinen vha. skubbebøjlen.
Tag fat i understellet og ikke i bøjlen,
når maskinen skal læsses.
Ved transport i biler skal renseren fast-
spændes i.h.t. gældende love.
Opbevaring
몇 FORSIGTIG
Fare for person- og materialeskader! Hold
øje med maskinens vægt ved opbevaring.
Denne maskine må kun opbevares indendørs.
Pleje og vedligeholdelse
FARE
Træk netstikket og afbryd maskinen inden
der arbejdes på maskinen.
Udskiftning af det flade foldefilter
Bemærk: Sugehovedet skal fjernes med 2
personer.
Tag sugehovedet ud af indgreb og tag
det af.
Åbn filterdækslet og tag det af.
Skift det flade foldefilter ud.
Sæt filterdækslet på og lås det fast.
Sæt sugehovedet forsigtigt på, juster
det og lås det fast.
Hjælp ved fejl
FARE
Træk netstikket og afbryd maskinen inden
der arbejdes på maskinen.
Sugeturbine virker ikke
Kontroller stikdåsen og strømforsynin-
gens sikring.
Kontroller strømledningen og maski-
nens netstik.
Tænd for maskinen.
Sugeturbine kører, men maskinen
suger ikke
Bemærk: Ved korrekt omdrejningsretning
kan du føle en stærk luftstrømning komme
ud af udsugningens lyddæmper. Ved ukorrekt omdrejningsretning indsuges luft.
Figur
Kontroller motorens omdrejningsret-
ning. Ved ukorrekt omdrejningsretning
skal polen på maskinens stik skiftes.
Nedsat sugeevne
Fjern forstoppelser fra dysen, sugerør,
sugeslangen eller det flade foldefilter.
Kontrollér om sugehovedet og bortskaf-
felsessystemet sidder rigtigt.
Skift det flade foldefilter ud.
Der strømmer støv ud under
sugning
Sørg for, at filterafdækningen går rigtigt
i indgreb.
Kontroller, om de flade foldefiltre er
monteret korrekt.
Skift det flade foldefilter ud.
Automatisk filterrengøring fungerer
ikke
Sugeslange ikke tilsluttet.
Den brugte sugeslange er for kort
(< 3m) eller har en for stor diameter.
Kontakt kundeservice.
Den automatiske filterrengøring kan
ikke slås fra
Kontakt kundeservice.
– 4
51DA

Kundeservice
Chairman of the Board of Management
Director Regulatory Affairs & Certification
Hvis fejlen ikke kan fjernes skal maskinen kontrolleres fra kundeservice.
Garanti
I de enkelte lande gælder de af vore forhandlere fastlagte garantibetingelser.
Eventuelle fejl på apparatet afhjælpes gratis inden for garantien, såfremt fejlen kan tilskrives en materiale- eller produktionsfejl.
Hvis De ønsker at gøre garantien gældende, bedes De henvende Dem til Deres forhandler eller nærmeste kundeservice medbringende kvittering for købet.
Tilbehør og reservedele
Anvend kun originaltilbehør og -reservedele. De er en garanti for en sikker og fejlfri
drift af maskinen.
Informationer om tilbehør og reservedele
findes www.kaercher.com
– Tilbehøret kommer ikke med maskinen.
Afhængigt af anvendelsen skal tilbehøret bestilles separat.
– Maskinens upåklagelige funktion kan
kun garanteres med sugeslangen med
en nominel bredde på DN42 og DN52.
– Reservedele og tilbehør får du ved din
forhandler eller i din KÄRCHER-afdeling.
EU-
overensstemmelseserklæring
Hermed erklærer vi, at den nedenfor nævnte maskine i design og konstruktion og i den
af os i handlen bragte udgave overholder
de gældende grundlæggende sikkerhedsog sundhedskrav i EU-direktiverne. Ved
ændringer af maskinen, der foretages uden
forudgående aftale med os, mister denne
erklæring sin gyldighed.
Produkt: Våd- og tørsuger
Type: 1.576-xxx
Gældende EU-direktiver
2006/42/EF (+2009/127/EF)
2014/30/EU
Anvendte harmoniserede standarder
EN 55014–1: 2006+A1: 2009+A2: 2011
EN 55014–2: 2015
EN 60335–1
EN 60335–2–69
EN 61000–3–2: 2014
EN 61000–3–3: 2013
EN 62233: 2008
Anvendte tyske standarder
-
5.966-010
Underskriverne handler på bestyrelsens
vegne og med dennes fuldmagt.
52 DA
Dokumentationsbefuldmægtiget:
S. Reiser
Alfred Kärcher SE & Co. KG
Alfred-Kärcher-Straße 28-40
71364 Winnenden (Germany)
Tel.: +49 7195 14-0
Fax: +49 7195 14-2212
Winnenden, 2018/10/01
– 5

Tekniske data
IVC 60/30 Tact2 Lp
Netspænding V 400
Frekvens Hz 3~ 50
Nominel ydelse W 3000
Luftmængde (max.) l/s 68
Undertryk (max.) kPa (mbar) 28,6 (286)
Kapslingsklasse -- IPX4
Beskyttelsesklasse -- I
Sugeslangetilslutning (C-DN/C-ID) DN 72
Nominel slangebredde DN 42/52
Længde x bredde x højde mm 970 x 690 x 1240
Filterflade m
2
Typisk driftsvægt kg 108
Omgivelsestemperatur (max.) °C +40
Oplyste værdier ifølge EN 60335-2-69
Lydtryksniveau L
Usikkerhed K
pA
pA
Hånd-arm vibrationsværdi m/s
Usikkerhed K m/s
Netkabel H07RN-F 5x1,5 mm
2
dB(A) 77
dB(A) 1
2
2
Partnr. Kabellæng-
de
EU 6.649-826.0 7,5 m
1,9
<2,5
0,2
– 6
53DA

Før første gangs bruk av appa-
ratet, les denne originale bruksanvisningen, følg den og oppbevar den for
senere bruk eller for overlevering til neste
eier.
– Det er tvingende nødvendig å lese sik-
kerhetsinstruksene nr. 5.956-249.0 før
maskinen settes i drift!
– Hvis bruksanvisningen og sikkerhets-
anvisningene ikke følges, kan dette
medføre skader på apparatet og fare for
brukeren og andre personer.
– Informer straks forhandleren ved trans-
portskader.
Innholdsfortegnelse
Miljøvern . . . . . . . . . . . . . . . . . NO 1
Risikotrinn . . . . . . . . . . . . . . . . NO 1
Forskriftsmessig bruk . . . . . . . NO 1
Maskinorganer . . . . . . . . . . . . NO 2
Ta i bruk . . . . . . . . . . . . . . . . . NO 2
Betjening. . . . . . . . . . . . . . . . . NO 2
Transport. . . . . . . . . . . . . . . . . NO 4
Lagring . . . . . . . . . . . . . . . . . . NO 4
Pleie og vedlikehold . . . . . . . . NO 4
Feilretting . . . . . . . . . . . . . . . . NO 4
Garanti . . . . . . . . . . . . . . . . . . NO 5
Tilbehør og reservedeler. . . . . NO 5
EU-samsvarserklæring . . . . . . NO 5
Tekniske data . . . . . . . . . . . . . NO 6
Risikotrinn
FARE
Anvisning om en umiddelbar truende fare
som kan føre til store personskader eller til
død.
몇 ADVARSEL
Anvisning om en mulig farlig situasjon som
kan føre til store personskader eller til død.
몇 FORSIKTIG
Anvisning om en mulig farlig situasjon som
kan føre til mindre personskader.
OBS
Anvisning om en mulig farlig situasjon som
kan føre til materielle skader.
Forskriftsmessig bruk
몇 ADVARSEL
Maskinen er ikke egnet til oppsuging av
helsefarlig støv.
– Dette avhendingssystemet er ment for
fjerning av tørt eller litt fuktig masse som
suges opp sammen med en avfallsslange som kan skjæres til i lengden.
– Denne maskinen er egnet for industriell
bruk, f.eks. for lager- og produksjonsområdet og ved produksjonsmaskiner.
– Maskinen er ikke godkjent for løfting
med kran.
Miljøvern
Materialet i emballasjen kan resirkuleres. Ikke kast emballasjen
i husholdningsavfallet, men lever den inn til resirkulering.
Gamle apparater inneholder verdifulle materialer som kan resirkuleres. Disse bør leveres inn til
gjenvinning. Batterier, olje og lignende stoffer må ikke komme ut
i miljøet. Gamle maskiner skal
derfor avhendes i egnede innsamlingssystemer.
Anvisninger om innhold (REACH)
Aktuell informasjon om stoffene i innholdet
finner du under:
www.kaercher.com/REACH
54 NO
– 1

Maskinorganer
1 Spennhendel
2 Filterdeksel
3 Foldefilter
4 Venstre låsing av senkemekanismen
5 Sugehode
6Typeskilt
7 Nettledning
8 Høyre låsing av senkemekanismen
9 Blikkbeholder
10 Avfallsoppsamlingssystem
11 Wiretrekk
12 Håndtak til avfallsoppsamlingssystemet
13 Mellomring
14 Låsing av sugehode
15 Avfallsslange
16 Styrerulle på understell med parke-
ringsbrems
17 Holder for gulvdyse
18 Understell
19 Oppsamlingskar
20 Sugestusser
21 Holder for sugerør
22 Håndtak på sugehode
23 Dreiebryter
24 3-fase motor
25 Lyddemper ut-luft.
26 Skyvebøyle
27 Kabelkroker
Ta i bruk
Sett maskinen i arbeidsstilling, og sett
om nødvendig på parkeringsbremsen.
Sugeslangen (ikke del av leveransen)
settes på sugestussen.
Pass på at avfallsoppsamlingssystemet
er satt inn korrekt.
Sett på ønsket tilbehør (ikke del av le-
veransen).
Strømtilkobling
OBS
Ved hvert skifte av stikkontakt skal motorens dreieretning kontrolleres.
Merk: Ved riktig dreieretning skal det merkes en sterk luftstrøm ut fra ut-luft åpingen.
Ved feil rotasjonsretning suges det luft inn.
Figur
Kontroller rotasjonsretningen på moto-
ren. Ved feil rotasjonsretning, bytt om
polene på støpselet.
Sette på avfallsslangen
Fjern de fire løkkene på avfallsslangen
(lengde: 22 m).
Figur
Åpne mottaket ved å vri til venstre og
trekk det ut nedover.
Sett inn avfallsslangen i henhold til figu-
ren.
Skyv inn mottaket og vri til høyre for å
lukke det.
Figur
Trekk avfallsslangen 40-50 cm ned.
Bruk kabelstrips til å lukke enden av av-
fallsslangen.
Betjening
OBS
Fare for skade! Ikke dekk til åpningene for
inn- og utluft på sugehodet.
OBS
Ved suging må de to foldefilterne aldri fjernes.
Dreiebryter
– Apparat PÅ
– Filterrengjøring AV
– Apparat AV
– 2
– Apparat PÅ
– Filterrengjøring PÅ
55NO

Slå apparatet på
Sett i støpselet.
Slå på apparatet med dreiebryteren.
Automatisk filterrensing
Apparatet har en ny type dobbel filterrengjøring som er spesielt virksomt for fint
støv. Derved renses det flate foldefilteret
automatisk hvert 15. sekund ved hjelp av
luftstøt (pulsenrende støy).
Sugeprosess
Gjennomfør sugeprosessen.
Massen som suges opp faller først ned
i avfallsslangen når apparatet slås av.
Kontroller fyllnivået i avfallsslangen regelmessig, da apparatet ikke slår seg
av automatisk.
Figur
Ved lett masse som suges opp eller
blokkering: Trekk ut wiretrekket for å
åpne klaffen på avløpet (kun mulig når
apparatet er slått på).
Trekk avfallsslangen litt ned, lukk den
med 2 kabelstrips med en avstand på
10 cm og skjær den gjennom mellom
kabelstripsene.
Kast avfallssekken i henhold til gjelden-
de regler.
Merknad: Ved lett masse som suges opp
kan lengden til avfallssekken være opp til
2 m, uten at den revner.
Slå maskinen av
Slå av apparatet med dreiebryteren.
Trekk ut nettstøpselet.
Etter hver bruk
Ta ut avfallsoppsamlingssystemet.
Trekk til holdebremsen.
Figur
Ta ut blikkbeholderen.
Figur
Lås opp senkemekanismen, trekk opp-
over.
Trekk skyvebøylen oppover. Avfalls-
oppsamlingssystemet frigjøres og sen-
kes.
Figur
Trekk i håndtaket for å ta ut avfallsopp-
samlingssystemet.
Rengjøring av apparatet
Rengjør maskinen innvendig og utven-
dig ved å tørke av den med en fuktig
klut, og ved å bruke sugefunksjonen.
Sett inn avfallsoppsamlingssystemet.
Figur
Sett inn avfallsoppsamlingssystemet
igjen og lås med skyvebøylen.
몇 ADVARSEL
Klemfare! Ved låsing må du ikke
holde hånden mellom avhen-
dingssystemet og mellomringen, heller ikke stikkes inn i nærheten av
løftemekanikken. Hold avhendingssystemet med en hånd på håndtaket og lås den
ved å betjene skyvebøylen med den andre
hånden.
Sett inn blikkbeholderen.
Oppbevaring av apparatet
Vikle opp strømkabelen og heng den på
kabelkrokene.
Vikle sugeslangen rundt skyvebøylen.
Sett gulvdysen og sugerør i sine holdere.
Sett maskinen til oppbevaring i et tørt
rom, utilgjengelig for uvedkommende.
56 NO
– 3

Transport
몇 FORSIKTIG
Fare for personskader og materielle skader! Pass på vekten av apparatet ved transport.
Løsne parkeringsbrems og skyv maski-
nen med skyvebøylen.
Hvis maskinen skal bæres, grip i under-
stellet og ikke i skyvebøylen.
Ved transport i kjøretøyer skal appara-
tet sikres mot å skli eller velte etter de til
enhver tid gjeldende regler.
Lagring
몇 FORSIKTIG
Fare for personskader og materielle skader! Pass på vekten av apparatet ved lagring.
Dette apparatet skal kun lagres innendørs.
Pleie og vedlikehold
FARE
Før alt arbeide på apparatet skal apparatet
slås av og strømkabelen trekkes ut.
Skifte foldefilter
Merk: For å ta av sugehodet er det nødven-
dig med 2 personer.
Avlås og ta av sugehodet.
Åpne og ta av filterdekselet.
Skifte foldefilter.
Sett på filterdekselet og lås det.
Sett forsiktig på sugehodet, rett inn og
lås det.
Feilretting
FARE
Før alt arbeide på apparatet skal apparatet
slås av og strømkabelen trekkes ut.
Sugeturbinen går ikke
Kontroller stikkontakt og sikring på
strømforsyningen.
Kontroller strømkabel og støpsel på ap-
paratet.
Slå apparatet på.
Sugeturbinen går, men maskinen
suger ikke
Merk: Ved riktig dreieretning skal det mer-
kes en sterk luftstrøm ut fra ut-luft åpingen.
Ved feil rotasjonsretning suges det luft inn.
Figur
Kontroller rotasjonsretningen på moto-
ren. Ved feil rotasjonsretning, bytt om
polene på støpselet.
Sugekraften avtar
Fjern blokkeringer fra børstehodet, su-
gerøret, sugeslangen eller foldefilteret.
Sett inn sugehode og avfallsoppsam-
lingssystem og kontroller at de sitter
godt.
Skifte foldefilter.
Støvutslipp ved suging
Lås filterdekselet korrekt.
Kontroller korrekt monteringsposisjon
for foldefilteret.
Skifte foldefilter.
Automatisk filterrens fungerer ikke
Sugeslange ikke korrekt tilkoblet.
Anvendt sugeslange er for kort (< 3m)
eller har for stor diameter.
Kontakt kundetjenesten.
Automatisk filterrengjøring lar seg
ikke slå av
Kontakt kundetjenesten.
– 4
57NO

Kundetjeneste
Chairman of the Board of Management
Director Regulatory Affairs & Certification
Dersom feilen ikke kan rettes opp, må
apparatet kontrolleres av kundeservice.
Garanti
Vår ansvarlige salgsorganisasjon for det
enkelte land har utgitt garantibetingelsene
som gjelder i det aktuelle landet. Eventuelle
feil på maskinen blir reparert gratis i garantitiden dersom disse kan føres tilbake til
material- eller produksjonsfeil. Ved behov
for garantireparasjoner, vennligst henvend
deg med kjøpskvitteringen til din forhandler
eller nærmeste autoriserte kundeservice.
Tilbehør og reservedeler
Bruk bare originalt tilbehør og originale reservedeler; de garanterer for en sikker og
problemfri drift av maskinen.
Informasjon om tilbehør og reservedeler
finner du på www.kaercher.com.
– Det er ikke inkludert noe tilbehør i leve-
ransen. Tilbehøret må bestilles separat
alt etter bruk.
– Feilfri funksjon av apparatet er kun sik-
ret ved bruk av sugeslange med diameter DN42 og DN52.
– Reservedeler og tilbehør får du hos din
forhandler eller ved en KÄRCHER-avdeling.
EU-samsvarserklæring
Vi erklærer hermed at maskinen angitt nedenfor oppfyller de grunnleggende sikkerhets- og helsekravene i de relevante EU-direktivene, med hensyn til både design, konstruksjon og type markedsført av oss. Ved
endringer på maskinen som er utført uten
vårt samtykke, mister denne erklæringen
sin gyldighet.
Produkt: Våt- og tørrsuger
Type: 1.576-xxx
Relevante EU-direktiver
2006/42/EF (+2009/127/EF)
2014/30/EU
Anvendte overensstemmende normer
EN 55014–1: 2006+A1: 2009+A2: 2011
EN 55014–2: 2015
EN 60335–1
EN 60335–2–69
EN 61000–3–2: 2014
EN 61000–3–3: 2013
EN 62233: 2008
Anvendte nasjonale normer
-
5.966-010
Undertegnede handler på vegne av og med
fullmakt fra styret.
58 NO
Ansvarlig for dokumentasjon:
S. Reiser
Alfred Kärcher SE & Co. KG
Alfred-Kärcher-Straße 28-40
71364 Winnenden (Germany)
Tel.: +49 7195 14-0
Fax: +49 7195 14-2212
Winnenden, 2018/10/01
– 5

Tekniske data
IVC 60/30 Tact2 Lp
Nettspenning V 400
Frekvens Hz 3~ 50
Nominell effekt W 3000
Luftmengde (maks.) l/sek. 68
Undertrykk (maks.) kPa (mbar) 28,6 (286)
Beskyttelsestype -- IPX4
Beskyttelsesklasse -- I
Sugeslangekobling (C-DN/C-ID) DN 72
Sugeslange, nominell diameter DN 42/52
Lengde x bredde x høyde mm 970 x 690 x 1240
Filterflate m
2
Typisk driftsvekt kg 108
Omgivelsestemperatur maks. °C +40
Registrerte verdier etter EN 60335-2-69
Støytrykksnivå L
Usikkerhet K
pA
pA
Hånd-arm vibrasjonsverdi m/s
Usikkerhet K m/s
Nettledning H07RN-F 5x1,5 mm
2
dB(A) 77
dB(A) 1
2
2
Best.nr. Kabelleng-
de
EU 6.649-826.0 7,5 m
1,9
<2,5
0,2
– 6
59NO

Läs bruksanvisning i original
innan aggregatet används första
gången, följ anvisningarna och spara driftsanvisningen för framtida behov, eller för
nästa ägare.
– Före första ibruktagning måste Säker-
hetsanvisningar nr. 5.956-249.0 läsas!
– Om bruksanvisningen och säkerhets-
anvisningarna inte följs kan apparaten
skadas och faror uppstå för användaren
och andra personer.
– Informera inköpsstället omgående vid
transportskador.
Innehållsförteckning
Miljöskydd . . . . . . . . . . . . . . . . SV 1
Risknivåer . . . . . . . . . . . . . . . . SV 1
Ändamålsenlig användning. . . SV 1
Aggregatelement. . . . . . . . . . . SV 2
Idrifttagning . . . . . . . . . . . . . . . SV 2
Handhavande . . . . . . . . . . . . . SV 2
Transport. . . . . . . . . . . . . . . . . SV 4
Förvaring. . . . . . . . . . . . . . . . . SV 4
Skötsel och underhåll . . . . . . . SV 4
Åtgärder vid störningar . . . . . . SV 4
Garanti . . . . . . . . . . . . . . . . . . SV 5
Tillbehör och reservdelar. . . . . SV 5
EU-försäkran om överensstäm-
melse . . . . . . . . . . . . . . . . . . . SV 5
Tekniska data . . . . . . . . . . . . . SV 6
Miljöskydd
Risknivåer
FARA
Varnar om en omedelbart överhängande
fara som kan leda till svåra personskador
eller dödsfall.
몇 VARNING
Varnar om en möjligen farlig situation som
kan leda till svåra personskador eller döden.
몇 FÖRSIKTIGHET
Varnar om en möjligen farlig situation som
kan leda till lättare personskador.
OBSERVERA
Varnar om en möjligen farlig situation som
kan leda till materiella skador.
Ändamålsenlig användning
몇 VARNING
Maskinen är inte lämplig för uppsugning av
hälsovådligt damm.
– Detta avfallshanteringssystem är avsett
för avfallshantering med låga dammnivåer av torrt eller något fuktigt suggods
med hjälp av en avfallsslang vars längd
kan skäras till.
– Apparaten är lämplig för och industriell
användning, t.ex. i lokaler för lager och
tillverkningsindustri och på produktionsmaskiner.
– Maskinen är inte godkänd för transport
med kran.
Emballagematerialen kan återvinnas. Kasta inte emballaget i
hushållssoporna utan lämna det
till återvinning.
Kasserade apparater innehåller
återvinningsbart material som
bör gå till återvinning. Batterier,
olja och liknande ämnen får inte
komma ut i miljön. Överlämna
skrotade aggregat till ett lämpligt
återvinningssystem.
Upplysningar om ingredienser (REACH)
Aktuell information om ingredienser finns
på:
www.kaercher.com/REACH
60 SV
– 1

Aggregatelement
1 Spännarm
2 Filterskydd
3 Plattfilter
4 Vänster spärr till nedsättningsmekanik
5 Sughuvud
6 Typskylt
7 Nätkabel
8 Höger spärr till nedsättningsmekanik.
9 Plåtbehållare
10 Avfallshanteringssystem
11 Vajer
12 Handtag för avfallshanteringssystemet
13 Mellanring
14 Spärr av sughuvud
15 Avfallsslang
16 Styrrulle för underredet med parke-
ringsbroms
17 Fäste till golvmunstycke
18 Chassi
19 Uppsamlingsbehållare
20 Sugfästen
21 Hållare för sugrör
22 Handtag för sughuvudet
23 Vridbrytare
24 Trefasmotor
25 Frånluftsljuddämpare
26 Skjuthandtag
27 Kabelkrok
Idrifttagning
Ställ apparaten i arbetsläge och säkra
den vid behov med parkeringsbromsar.
Anslut sugslangen (medföljer ej) till
sugfästet.
Säkerställ att avfallshanteringssyste-
met är anslutet enligt anvisningarna.
Sätt på önskat tillbehör (medföljer ej).
Elanslutning
OBSERVERA
Kontrollera motorns rotationsriktning varje
gång som du byter väggkontakt.
Observera: Vid rätt rotationsriktning kommer en kraftig luftström ut ur frånluftsljuddämparens öppning. Vid felaktig rotationsriktning sugs luften in.
Bild
Kontrollera motorns rotationsriktning.
Vid felaktig rotationsriktning ska polerna på aggregatets nätkontakt växlas.
Sätt in avfallsslangen
Ta bort avfallsslangens samtliga 4 öglor
(längd: 22 m).
Bild
Öppna upptagningen genom att vrida åt
vänster och dra ut nedåt.
Sätt in avfallsslangen enligt bilden.
Skjut in upptagningen och stäng genom
att vrida åt höger.
Bild
Dra ner avfallsslangen 40-50 cm.
Stäng avfallsslangen med kabelindare.
Handhavande
OBSERVERA
Risk för skada! Till- och frånluftslöppningarna på sughuvudet får inte täckas över.
OBSERVERA
Vid sugning får de båda plattveckade filtren
absolut inte avlägsnas.
Vridbrytare
–Maskin PÅ
– Filterrengöring FRÅN
–Maskin FRÅN
– 2
–Maskin PÅ
– Filterrengöring TILL
61SV

Koppla till aggregatet
Stick i nätkontakten.
Starta maskinen med vridbrytaren.
Automatisk filterrengöring
Apparaten har en ny typ av dubbel filterrengöring som är särskilt effektiv för fint damm.
Funktionen gör att det plattveckade filtret
rengörs automatiskt (pulserande ljud) var
15:de sekund med hjälp av en luftstöt.
Sugning
Genomför en sugning.
Det uppsugna godset faller ner i avfallsslangen först när apparaten stängts av.
Kontrollera regelbundet nivån i avfallsslangen eftersom apparaten inte stäng-
er av automatiskt.
Bild
Vid lätt suggods eller igensättning: Dra
ut linan för att öppna luckan vid utlop-
pet (går endast vid avstängd apparat).
Dra ner avfallslangen något, stäng den
med 2 kabelbindare med 10 cm av-
stånd och klipp igenom mellan kabel-
bindarna.
Avfallashantera avfallssäcken enligt
gällande föreskrifter.
Anmärkning: Vid lätt suggods kan längden på avfallssäcken uppgå till 2 m utan att
den går sönder.
Koppla från aggregatet
Stäng av maskinen med vridbrytaren.
Drag ur nätkontakten.
Efter varje användning
Ta ut avfallshanteringssystemet
Spärra parkeringsbromsen.
Bild
Ta ut plåtbehållaren.
Bild
Dra spärren till avsättningsmekaniken
uppåt.
Dra skjutbygeln uppåt. Avfallshante-
ringssystemet spärras upp och sänks
ner.
Bild
Dra ut avfallshanteringssystemet i
handtaget.
Rengöra apparaten
Rengör apparaten invändigt och utvän-
digt genom uppsugning och torka med
en fuktig trasa.
Sätta in avfallshanteringssystemet
Bild
Sätt tillbaka avfallshanteringssystemet
och spärra det med skjutbygeln.
몇 VARNING
Klämningsrisk! Håll aldrig händerna mellan avfallshanterings-
system och mellanring, eller i
närheten av lyftmekaniken när behållaren
ska spärras. Håll i avfallshanteringssystemet med ena handen och lås med andra
handen genom att manövrera skjutbygeln.
Sätt in plåtbehållaren.
Förvara aggregatet
Linda upp nätsladden och häng den på
kabelkrokarna.
Linda sugslangen kring skjutbygeln.
Sätt in golvmunstycket och sugröret i
sina respektive hållare.
Förvara apparaten i ett torrt rum och
säkra den mot obehörig användning.
62 SV
– 3

Transport
몇 FÖRSIKTIGHET
Risk för person och egendomsskada! Observera vid transport maskinens vikt.
Lossa parkeringsbromsen och skjut
maskinen med hjälp av skjutbygeln.
Fatta om underredet, inte i skjutbygeln,
när maskinen ska lastas.
Vid transport i fordon ska maskinen
säkras enligt respektive gällande bestämmelser så den inte kan tippa eller
glida.
Förvaring
몇 FÖRSIKTIGHET
Risk för person och egendomsskada! Observera maskinens vikt vid lagring.
Denna maskin får endast lagras inomhus.
Skötsel och underhåll
FARA
Stäng alltid av aggregatet och lossa nätkontakten innan arbeten på aggregatet utförs.
Byta plattveckat filter
Observera: Det behövs 2 personer för att
demontera sughuvudet.
Lossa spärr på sughuvudet och ta av
det.
Regla upp filterskyddet och ta loss det-
ta.
Byt plattveckat filter.
Sätt fast filterskyddet och regla fast det-
ta.
Sätt varsamt fast sughuvudet, rikta och
spärra det.
Åtgärder vid störningar
FARA
Stäng alltid av aggregatet och lossa nätkontakten innan arbeten på aggregatet utförs.
Sugturbinen fungerar inte
Kontrollera eluttaget och strömförsörj-
ningens säkring.
Kontrollera apparatens nätkabel och
nätkontakt.
Slå på apparaten.
Sugturbinen arbetar men apparaten
suger inte
Observera: Vid rätt rotationsriktning kom-
mer en kraftig luftström ut ur frånluftsljuddämparens öppning. Vid felaktig rotationsriktning sugs luften inåt.
Bild
Kontrollera motorns rotationsriktning.
Vid felaktig rotationsriktning ska polerna på aggregatets nätkontakt växlas.
Sugkraften nedsatt
Avlägsna stopp i sugmunstycke, sug-
rör, sugslang eller plattvecksfilter.
Kontrollera att sughuvudet och avfalls-
hanteringssystemet sitter ordentligt.
Byt plattveckat filter.
Damm tränger ut under sugning
Sätt fast filterskyddet ordentligt.
Kontrollera att det plattveckade filtret är
rätt installerat.
Byt plattveckat filter.
Automatiska filterrengöringen
arbetar inte
Sugslang ej ansluten.
Den använda sugslangen är för kort
(< 3m) eller har för stor diameter.
Informera kundservice.
Det går inte att stänga av den
automatiska fiterrengöringen
Informera kundservice.
– 4
63SV

Kundservice
Chairman of the Board of Management
Director Regulatory Affairs & Certification
Kan störningen inte åtgärdas måste aggregatet kontrolleras av auktoriserad
serviceverkstad.
Garanti
I respektive land gäller de garantivillkor
som publicerats av våra auktoriserade distributörer. Eventuella fel på aggregatet repareras utan kostnad under förutsättning
att det orsakats av ett material- eller tillverkningsfel. I frågor som gäller garantin ska du
vända dig med kvitto till inköpsstället eller
närmaste auktoriserade serviceverkstad.
Tillbehör och reservdelar
Använd endast originaltillbehör och originalreservdelar, så att en säker och störningsfri drift av maskinen är garanterad.
Information om tillbehör och reservdelar
finns på www.kaercher.com.
– Inget tillbehör ingår i leveransen. Tillbe-
höret måste beställas separat beroende
av användning.
– Apparaten fungerar felfritt endast om
sugslangens märkdiametrar DN42 och
DN52 garanteras.
– Reservdelar och tillbehör finns att få på
inköpsstället, eller från närmaste
KÄRCHER-filial.
EU-försäkran om
överensstämmelse
Härmed försäkrar vi att nedanstående betecknade maskin i ändamål och konstruktion samt i den av oss levererade versionen
motsvarar EU-direktivens tillämpliga grundläggande säkerhets- och hälsokrav. Vid
ändringar på maskinen som inte har godkänts av oss blir denna överensstämmelseförklaring ogiltig.
Produkt: Våt- och torrdammsugare
Typ: 1.576-xxx
Tillämpliga EU-direktiv
2006/42/EG (+2009/127/EG)
2014/30/EU
Tillämpade harmoniserade normer
EN 55014–1: 2006+A1: 2009+A2: 2011
EN 55014–2: 2015
EN 60335–1
EN 60335–2–69
EN 61000–3–2: 2014
EN 61000–3–3: 2013
EN 62233: 2008
Tillämpade nationella normer
-
5.966-010
Undertecknande agerar på uppdrag av och
med styrelsens godkännande.
64 SV
Dokumentationsbefullmäktigad:
S. Reiser
Alfred Kärcher SE & Co. KG
Alfred-Kärcher-Straße 28-40
71364 Winnenden (Germany)
Tel.: +49 7195 14-0
Fax: +49 7195 14-2212
Winnenden, 2018/10/01
– 5

Tekniska data
IVC 60/30 Tact2 Lp
Nätspänning V 400
Frekvens Hz 3~ 50
Normeffekt W 3000
Luftmängd (max.) l/s 68
Undertryck (max.) kPa (mbar) 28,6 (286)
Skydd -- IPX4
Skyddsklass -- I
Sugslanganslutning (C-DN/C-ID) DN 72
Sugslang-märkdiameter DN 42/52
Längd x Bredd x Höjd mm 970 x 690 x 1240
Filteryta m
2
Typisk driftvikt kg 108
Omgivningstemperatur (max.) °C +40
Beräknade värden enligt EN 60335-2-69
Ljudtrycksnivå L
Osäkerhet K
pA
pA
Hand-Arm Vibrationsvärde m/s
Osäkerhet K m/s
Nätkabel H07RN-F 5x1,5 mm
2
dB(A) 77
dB(A) 1
2
2
Artikelnr. Kabellängd
EU 6.649-826.0 7,5 m
1,9
<2,5
0,2
– 6
65SV

Lue tämä alkuperäisiä ohjeita
ennen laitteesi käyttämistä, säilytä käyttöohje myöhempää käyttöä tai
mahdollista myöhempää omistajaa varten.
– Turvaohje nro 5.956-249.0 on ehdotto-
masti luettava ennen laitteen ensimmäistä käyttökertaa!
– Käyttöohjeen ja turvaohjeiden huomiot-
ta jättäminen voi aiheuttaa vaurioita laitteeseen ja vaaroja käyttäjälle ja muille
henkilöille.
– Jos havaitset kuljetusvaurioita, ota välit-
tömästi yhteys jälleenmyyjään.
Sisällysluettelo
Ympäristönsuojelu . . . . . . . . . FI 1
Vaarallisuusasteet. . . . . . . . . . FI 1
Käyttötarkoitus . . . . . . . . . . . . FI 1
Laitteen osat . . . . . . . . . . . . . . FI 2
Käyttöönotto . . . . . . . . . . . . . . FI 2
Käyttö . . . . . . . . . . . . . . . . . . . FI 2
Kuljetus . . . . . . . . . . . . . . . . . . FI 4
Säilytys . . . . . . . . . . . . . . . . . . FI 4
Hoito ja huolto. . . . . . . . . . . . . FI 4
Häiriöapu. . . . . . . . . . . . . . . . . FI 4
Takuu . . . . . . . . . . . . . . . . . . . FI 5
Varusteet ja varaosat . . . . . . . FI 5
EY-vaatimusten-mukaisuusva-
kuutus . . . . . . . . . . . . . . . . . . . FI 5
Tekniset tiedot. . . . . . . . . . . . . FI 6
Ympäristönsuojelu
Pakkausmateriaalit ovat kierrätettäviä. Älä käsittelee pakkauksia kotitalousjätteenä, vaan toimita ne jätteiden kierrätykseen.
Käytetyt laitteet sisältävät arvokkaita kierrätettäviä materiaaleja,
jotka tulisi toimittaa kierrätykseen. Paristoja, öljyjä ja samankaltaisia aineita ei saa päästää
ympäristöön. Tästä syystä toimita kuluneet laitteet asianmukaisiin keräyspisteisiin.
Huomautuksia materiaaleista (REACH)
Ajantasaisia tietoja ainesosista löytyy osoitteesta:
www.kaercher.com/REACH
Vaarallisuusasteet
VAARA
Huomautus välittömästi uhkaavasta vaarasta, joka voi aiheuttaa vakavan ruumiinvamman tai johtaa kuolemaan.
몇 VAROITUS
Huomautus mahdollisesta vaarallisesta tilanteesta, joka voi aiheuttaa vakavan ruumiinvamman tai voi johtaa kuolemaan.
몇 VARO
Huomautus mahdollisesta vaarallisesta tilanteesta, joka voi aiheuttaa vähäisiä vammoja.
HUOMIO
Huomautus mahdollisesta vaarallisesta tilanteesta, joka voi aiheuttaa aineellisia vahinkoja.
Käyttötarkoitus
몇 VAROITUS
Laite ei sovellu terveydelle haitallisten pölyjen imurointiin.
– Tämä hävitysjärjestelmä on tarkoitettu
kuivan tai hieman kostean aineksen vähäpölyiseen hävittämiseen oikeaan pituuteen leikattavaa jäteletkua käyttäen.
– Tämä laite soveltuu teolliseen käyttöön,
esim. varastointi- ja valmistustiloissa ja
tuotantokoneilla.
– Laitetta ei ole hyväksytty nosturilla nos-
tettavaksi.
66 FI
– 1

Laitteen osat
1 Kiristyskahva
2 Suodattimen kansi
3 Poimusuodatin
4 Laskumekanismin vasemmanpuolisen
lukituksen vapautus
5Imupää
6 Tyyppikilpi
7 Verkkokaapeli
8 Laskumekanismin oikeanpuolisen luki-
tuksen vapautus
9 Peltiallas
10 Hävitysjärjestelmä
11 Köysiveto
12 Hävitysjärjestelmän käsikahva
13 Välirengas
14 Imupään lukitus
15 Jäteletku
16 Kuljetusalustan seisontajarrullinen oh-
jauspyörä.
17 Lattiasuuttimen pidike
18 Kuljetusalusta
19 Keräysallas
20 Imukaulus
21 Pidike imuputkelle
22 Imupään käsikahva
23 Kiertokytkin
24 Vaihtovirtamoottori
25 Poistoilman äänenvaimennin
26 Työntökahva
27 Kaapelikoukku
Käyttöönotto
Aseta laite toiminta-asentoon ja varmis-
ta laite tarvittaessa seisontajarruilla.
Pistä imuletku (ei kuulu toimitukseen)
imuliittimeen.
Varmista, että hävitysjärjestelmä on
asennettu oikein paikalleen.
Kiinnitä letkuun haluttu varuste (ei kuulu
toimitukseen).
Sähköliitäntä
HUOMIO
Tarkista moottorin pyörimissuunta aina pistorasiaa vaihtaessasi.
Huomautus: Pyörimissuunta on oikea, kun
poistoilman äänenvaimentimen aukosta
purkautuu voimakas ilmavirta. Kun pyörimissuunta on väärä, aukosta imetään ilmaa.
Kuva
Tarkasta moottorin pyörimissuunta. Jos
pyörimissuunta on väärä, vaihda laitteen sähköpistokkeen napaisuus.
Jäteletkun asettaminen paikalleen
Poista kaikki 4 silmukkaa jäteletkusta
(pituus: 22 m).
Kuva
Avaa vastaanotto vasemmalle kiertä-
mällä ja vedä alaspäin ulos.
Aseta jäteletku kuvan mukaisesti sisään.
Työnnä vastaanotto sisään ja sulje oi-
kealle kiertämällä.
Kuva
Vedä jäteletkua 40-50 cm alas.
Sulje nippusiteellä jäteletkun pää.
Käyttö
HUOMIO
Vaurioitumisvaara! Älä peitä imupäässä
olevia ilman sisäänmeno- ja ulostuloaukkoja.
HUOMIO
Imuroitaessa ei koskaan saa poistaa molempia poimusuodattimia.
Kiertokytkin
– Laite ON
– Suodatinpuhdistus OFF
– Laite OFF
– Laite ON
– Suodatinpuhdistus ON
– 2
67FI

Laitteen käynnistys
Työnnä virtapistoke pistorasiaan.
Kytke laite päälle kiertokytkimellä.
Automaattinen suodattimen
puhdistus
Imuri on varustettu uudenlaisella, kaksinkertaisella suodattimen puhdistuksella,
joka on erityisen tehokas hienolla pölyllä.
Poimusuodattimet puhdistetaan tällöin automaattisesti 15 sekunnin väliajoin ilmansysäyksellä (kuuluu sykkivä ääni).
Imutoimenpide
Tee imutoimenpide.
Imetty aines putoaa jäteletkuun vasta,
kun laite on kytketty pois päältä.
Tarkasta jäteletkun täyttömäärä säännöllisin väliajoin, koska laite ei kytkeydy
automaattisesti pois päältä.
Kuva
Imettävän aineksen ollessa kevyttä tai
tai tukoksen ilmetessä: Vedä vaijeri
ulos ulospäästöläpän avaamiseksi
(mahdollista vain laitteen ollessa kytket-
tynä pois päältä).
Vedä jäteletkua hieman alas, sulje kah-
della nippusiteella 10 cm etäisyydellä
toisistaan ja katkaise nippusiteiden vä-
listä.
Hävitä jätepussi lain määräysten mu-
kaisesti.
Huomautus: Imetyn aineksen ollessa kevyttä, jätepussin pituus voi olla jopa 2 m ilman, että se repeää.
Laitteen kytkeminen pois päältä
Kytke laite kiertokytkimellä pois päältä.
Vedä verkkopistoke irti.
Jokaisen käyttökerran jälkeen
Hävitysjärjestelmän poistaminen
Lukitse seisontajarrut.
Kuva
Poista peltiallas.
Kuva
Vedä laskumekaniikan lukituksen va-
pauttimia ylöspäin.
Vedä työntöaisaa ylöspäin. Hävitysjär-
jestelmä vapautuu ja laskeutuu alas.
Kuva
Vedä hävitysjärjestelmä käsikahvasta
irti.
Laitteen puhdistus
Puhdista laite sisältä ja ulkoa imuroi-
malla ja kostealla liinalla pyyhkimällä.
Hävitysjärjestelmän asetus paikalleen
Kuva
Aseta hävitysjärjestelmä takaisin pai-
kalleen ja lukitse työntöaisaan.
몇 VAROITUS
Sormien puristumisvaara! Älä
missään tapauksessa pidä
käsiäsi hävitysjärjestelmän ja
välirenkaan välissä tai nostomekanismin
läheisyydessä lukitsemista suorittaessasi.
Pidä yhdellä kädellä kiinni hävitysjärjestelmän kahvasta ja lukitse toisella kädellä
työntösankaa käyttäen.
Aseta peltiallas paikalleen.
Laitteen säilytys
Kelaa verkkokaapeli ja ripusta kaapeli-
koukkuihin.
Kierrä imuletku työntöaisan ympärille.
Pistä lattiasuulake ja imuputki omaan
kannattimeensa.
Säilytä laite kuivassa tilassa ja suojaa
se asiattomalta käytöltä.
68 FI
– 3

Kuljetus
몇 VARO
Loukkaantumis- ja vahingoittumisvaaravaara! Huomioi kuljetettaessa laitteen paino.
Irrota seisontajarru ja työnnä laitetta
työntöaisasta.
Kun lastaat laitteen autoon, pidä kiinni
kuljetusalustasta, ei työntökahvasta.
Kun kuljetat laitetta ajoneuvoissa, var-
mista laite liukumisen ja kaatumisen varalta kulloinkin voimassa olevien ohjesääntöjen mukaisesti.
Säilytys
몇 VARO
Loukkaantumis- ja vahingoittumisvaaravaara! Huomioi säilytettäessä laitteen paino.
Tätä laitetta saa säilyttää vain sisätiloissa.
Hoito ja huolto
VAARA
Virtapistoke on vedettävä irti pistorasiasta
ennen kaikkia laitteeseen kohdistuvia töitä.
Poimusuodattimen vaihto
Huomautus: Imupään poistamiseen tarvi-
taan 2 henkilöä.
Vapauta imupää lukituksesta, poista
imupää.
Vapauta suodattimen kansi lukitukses-
ta ja poista se.
Vaihda poimusuodatin.
Aseta suodattimen kansi paikalleen ja
lukitse se.
Aseta imupää varovasti paikalleen,
kohdista ja lukitse.
Häiriöapu
VAARA
Virtapistoke on vedettävä irti pistorasiasta
ennen kaikkia laitteeseen kohdistuvia töitä.
Imuturbiini ei pyöri
Tarkasta virransyötön pistorasia ja su-
lake.
Tarkasta laitteen verkkokaapeli ja verk-
kopistoke.
Kytke laite päälle.
Imuturbiini on käynnissä, mutta
laite ei ime
Huomautus: Pyörimissuunta on oikea, kun
poistoilman äänenvaimentimen aukosta
purkautuu voimakas ilmavirta. Kun pyörimissuunta on väärä, aukosta imetään ilmaa.
Kuva
Tarkasta moottorin pyörimissuunta. Jos
pyörimissuunta on väärä, vaihda laitteen sähköpistokkeen napaisuus.
Imuvoima vähenee
Poista tukokset imusuuttimesta, imu-
putkesta, imuletkusta tai poimusuodattimesta.
Tarkasta imupään ja hävitysjärjestel-
män kunnollinen istuvuus.
Vaihda poimusuodatin.
Pöly pääsee ulos imuvaiheessa
Lukitse suodattimen kansi oikein.
Tarkasta poimusuodattimien oikea
asennus.
Vaihda poimusuodatin.
Automaattinen suodattimen
puhdistus ei toimi
Imuletku ei ole liitettynä.
Käytössä oleva imuletku on liian lyhyt
(< 3m) tai sen läpimitta on liian suuri.
Ota yhteyttä asiakaspalveluun.
Automaattista suodatinpuhdistusta
ei voi kytkeä pois päältä
Ota yhteyttä asiakaspalveluun.
– 4
69FI

Asiakaspalvelu
Chairman of the Board of Management
Director Regulatory Affairs & Certification
Jos häiriötä ei voida poistaa, laite täytyy
tarkastuttaa asiakaspalvelussa.
Takuu
Kussakin maassa ovat voimassa valtuuttamamme myyntiorganisaation julkaisemat
takuuehdot. Materiaali- ja valmistusvirheistä aiheutuvat virheet laitteessa korjaamme
takuuaikana maksutta. Takuutapauksessa
ota yhteys ostotositteen kanssa jälleenmyyjään tai lähimpään valtuutettuun huoltoon.
Varusteet ja varaosat
Käytä vain alkuperäisiä tarvikkeita ja varaosia. Ne takaavat laitteen turvallisen ja häiriöttömän toiminnan.
Tietoja tarvikkeista ja varaosista on sivustolla www.kaercher.com.
– Toimitukseen ei kuulu varusteita. Va-
rusteet on tilattava erikseen käyttötarkoituksen perusteella.
– Laitteen moitteeton toiminta on taattu
vain DN42 ja DN52 nimellisläpimitan
omaavia imuletkuja käytettäessä.
– Varaosat ja erityisvarusteet saat kaup-
piaaltasi tai lähimmältä KÄRCHER tytäryhtiöltä.
EY-vaatimusten-
mukaisuusvakuutus
Vakuutamme, että alla mainitut tuotteet
vastaavat suunnittelultaan ja rakenteeltaan
sekä valmistustavaltaan EU-direktiivien asianomaisia turvallisuus- ja terveysvaatimuksia. Jos tuotteeseen/tuotteisiin tehdään
muutoksia, joista ei ole sovittu kanssamme,
tämä vakuutus ei ole enää voimassa.
Tuote: Märkä- ja kuivaimuri
Tyyppi: 1.576-xxx
Yksiselitteiset EU-direktiivit
2006/42/EY (+2009/127/EY)
2014/30/EU
Sovelletut harmonisoidut standardit
EN 55014–1: 2006+A1: 2009+A2: 2011
EN 55014–2: 2015
EN 60335–1
EN 60335–2–69
EN 61000–3–2: 2014
EN 61000–3–3: 2013
EN 62233: 2008
Sovelletut kansalliset standardit
-
5.966-010
Allekirjoittaneet toimivat yrityksen johtokunnan puolesta ja sen valtakirjalla.
70 FI
Dokumentointivastaava:
S. Reiser
Alfred Kärcher SE & Co. KG
Alfred-Kärcher-Straße 28-40
71364 Winnenden (Germany)
Tel.: +49 7195 14-0
Fax: +49 7195 14-2212
Winnenden, 2018/10/01
– 5

Tekniset tiedot
IVC 60/30 Tact2 Lp
Verkkojännite V 400
Taajuus Hz 3~ 50
Nimellisteho W 3000
Ilmamäärä (maks.) l/s 68
Alipaine (maks.) kPa (mbar) 28,6 (286)
Suojatyyppi -- IPX4
Kotelointiluokka -- I
Imuletkuliitin (C-DN/C-ID) DN 72
Imuletkun nimellisläpimitta DN 42/52
Pituus x leveys x korkeus mm 970 x 690 x 1240
Suodatinpinta m
2
Tyypillinen käyttöpaino kg 108
Ympäristön lämpötila (maks.) °C +40
Mitatut arvot EN 60335-2-69 mukaisesti
Äänenpainetaso L
Epävarmuus K
pA
pA
Käsi-käsivarsi tärinäarvo m/s
Epävarmuus K m/s
Verkkokaape-liH07RN-F 5x1,5 mm
2
dB(A) 77
dB(A) 1
2
2
Osa-nro Johdon pi-
tuus
EU 6.649-826.0 7,5 m
1,9
<2,5
0,2
– 6
71FI

Πριν χρησιμοποιήσετε τη συ-
σκευή σας για πρώτη φορά, διαβάστε αυτές τις πρωτότυπες οδηγίες χρήσης, ενεργήστε σύμφωνα με αυτές και κρατήστε τις για μελλοντική χρήση ή για τον
επόμενο ιδιοκτήτη.
– Πριν από την πρώτη χρήση διαβάστε
οπωσδήποτε τις υποδείξεις ασφαλείας
αρ. 5.956-249.0!
– Η μη τήρηση των οδηγιών χρήσης, κα-
θώς και των υποδείξεων ασφαλείας,
μπορεί να προκαλέσει βλάβες στη συσκευή ή κινδύνους για τον χρήστη ή
άλλα άτομα.
– Σε περίπτωση βλαβών κατά τη μεταφο-
ρά ειδοποιήστε αμέσως τον αντιπρόσωπό σας.
Πίνακας περιεχομένων
Προστασία περιβάλλοντος . . . EL 1
Διαβάθμιση κινδύνων . . . . . . . EL 1
Χρήση σύμφωνα με τους κανο-
νισμούς . . . . . . . . . . . . . . . . . . EL 1
Στοιχεία συσκευής. . . . . . . . . . EL 2
Έναρξη λειτουργίας. . . . . . . . . EL 2
Χειρισμός . . . . . . . . . . . . . . . . EL 2
Μεταφορά . . . . . . . . . . . . . . . . EL 4
Αποθήκευση . . . . . . . . . . . . . . EL 4
Φροντίδα και συντήρηση. . . . . EL 4
Αντιμετώπιση βλαβών. . . . . . . EL 4
Εγγύηση . . . . . . . . . . . . . . . . . EL 5
Εξαρτήματα και ανταλλακτικά . EL 5
Δήλωση Συμμόρφωσης των ΕEEL 6
Τεχνικά χαρακτηριστικά. . . . . . EL 7
Προστασία περιβάλλοντος
Τα υλικά συσκευασίας είναι ανακυκλώσιμα. Μην πετάτε τις συσκευασίες στα οικιακά απορρίμματα, αλλά σε ειδικό σύστημα
επαναχρησιμοποίησης.
Οι παλιές συσκευές περιέχουν
ανακυκλώσιμα υλικά, τα οποία
θα πρέπει να μεταφέρονται σε
σύστημα επαναχρησιμοποίησης. Οι μπαταρίες, τα λάδια και
παρόμοια υλικά δεν επιτρέπεται
να καταλήγουν στο περιβάλλον.
Για το λόγο αυτόν η διάθεση παλιών συσκευών πρέπει να γίνεται σε κατάλληλα συστήματα
συλλογής.
Υποδείξεις για τα συστατικά (REACH)
Ενημερωμένες πληροφορίες για τα συστατικά μπορείτε να βρείτε στη διεύθυνση:
www.kaercher.com/REACH
Διαβάθμιση κινδύνων
ΚΙΝΔΥΝΟΣ
Υποδείξεις για άμεσα επαπειλούμενο κίνδυνο, ο οποίος μπορεί να έχει ως συνέπεια
σοβαρό ή θανάσιμο τραυματισμό.
몇 ΠΡΟΕΙΔΟΠΟΙΗΣΗ
Υποδείξεις για μια δυνητικά επικίνδυνη κατάσταση, η οποία μπορεί να έχει ως συνέπεια σοβαρό ή θανάσιμο τραυματισμό
몇 ΠΡΟΣΟΧΗ
Υπόδειξη για μια ενδεχομένως επικίνδυνη
κατάσταση, η οποία μπορεί να οδηγήσει σε
ελαφρό τραυματισμό.
ΠΡΟΣΟΧΗ
Υπόδειξη για μια δυνητικά επικίνδυνη κατάσταση, η οποία μπορεί να έχει ως συνέπεια
υλικές ζημίες.
.
Χρήση σύμφωνα με τους
κανονισμούς
몇 ΠΡΟΕΙΔΟΠΟΙΗΣΗ
Η συσκευή δεν ενδείκνυται για την αναρρόφηση επιβλαβών για την υγεία σκονών.
– Αυτό το σύστημα διάθεσης αποβλήτων
προορίζεται για τη διάθεση ξηρών ή
ελαφρώς υγρών αναρροφούμενων ρύπων που δεν περιέχουν πολλή σκόνη,
με χρήση ενός εύκαμπτου σωλήνα
αποβλήτων με δυνατότητα κοπής κατά
μήκος.
72 EL
– 1

– Η συσκευή αυτή είναι κατάλληλη για βι-
ομηχανική χρήση, π.χ. σε αποθήκες και
εργοστάσια, καθώς και σε μηχανήματα
παραγωγής.
– Η συσκευή δεν διαθέτει έγκριση για με-
ταφορά με γερανό.
Στοιχεία συσκευής
1Μοχλός σύσφιξης
2 Κάλυμμα φίλτρου
3 Επίπεδο πτυχωτό φίλτρο
4 Αριστερή διάταξη απασφάλισης του μη-
χανισμού απόθεσης
5 Κεφαλή αναρρόφησης
6 Πινακίδα τύπου
7 Καλώδιο τροφοδοσίας
8 Δεξιά διάταξη απασφάλισης του μηχα-
νισμού απόθεσης
9 Μεταλλική σκάφη
10 Σύστημα αποβλήτων
11 Συρματόσχοινο
12 Χειρολαβή του συστήματος αποβλήτων
13 Ενδιάμεσος δακτύλιος
14 Ασφάλιση της κεφαλής αναρρόφησης
15 Εύκαμπτος σωλήνας αποβλήτων
16 Τροχίσκος πλαισίου με φρένο ακινητο-
ποίησης
17 Στήριγμα για ακροφύσιο δαπέδου
18 Τροχήλατη βάση
19 Δοχείο συλλογής
20 Στόμιο αναρρόφησης
21 Στήριγμα για σωλήνα αναρρόφησης
22 Χειρολαβή της κεφαλής αναρρόφησης
23 Περιστροφικός διακόπτης
24 Κινητήρας τριφασικού ρεύματος
25 Σιγαστήρας απαερίων
26 Λαβή μεταφοράς
27 Άγκιστρο καλωδίου
Έναρξη λειτουργίας
Τοποθετήστε τη σ υσκευή σε θέση εργα-
σίας, εάν χρειάζεται ασφαλίστε την με
το φρένο ακινητοποίησης.
Τοποθετήστε τον ελαστικό σωλήνα
αναρρόφησης (δεν περιλαμβάνεται στη
συσκευασία) στο στόμιο αναρρόφησης.
Βεβαιωθείτε ότι το σύστημα αποβλήτων
είναι τοποθετημένο σωστά.
Συνδέστε το επιθυμητό εξάρτημα (δεν
περιλαμβάνεται στη συσκευασία).
Ηλεκτρολογικές συνδέσεις
ΠΡΟΣΟΧΗ
Κάθε φορά που αλλάζετε ρευματοδότη
ελέγχετε την σωστή φορά περιστροφής του
κινητήρα.
Υπόδειξη: Όταν η φορά περιστροφής είναι
σωστή, γίνεται αισθητό ένα έντονο ρεύμα
αέρος από την έξοδο του σιγαστήρα απαερίων. Σε περίπτωση λανθασμένης κατεύθυνσης περιστροφής παρατηρείται αναρρόφηση αέρα.
Εικόνα
Ελέγξτε την κατεύθυνση περιστροφής
του κινητήρα. Σε περίπτωση λανθασμένης φοράς περιστροφής αλλάξτε τους
πόλους στο βύσμα της συσκευής.
Τοποθέτηση του εύκαμπτου
σωλήνα αποβλήτων
Αφαιρέστε και τις 4 θηλιές του εύκα-
μπτου σωλήνα αποβλήτων (μήκος: 22
m).
Εικόνα
Ανοίξτε την υποδοχή περιστρέφοντας
προς τα αριστερά και τραβήξτε προς τα
κάτω.
Τοποθετήστε τον εύκαμπτο σωλήνα
αποβλήτων σύμφωνα με την εικόνα.
Σπρώξτε προς τα μέσα την υποδοχή
και σφραγίστε την περιστρέφοντας
προς τα δεξιά.
Εικόνα
Τραβήξτε προς τα κάτω τον εύκαμπτο
σωλήνα αποβλήτων 40-50 cm.
Σφραγίστε το άκρο του εύκαμπτου σω-
λήνα αποβλήτων με μια δέστρα καλωδί-
ου.
Χειρισμός
ΠΡΟΣΟΧΗ
Κίνδυνος βλάβης! Μην καλύπτετε τις εισόδους και τις εξόδους απαερίων στην κεφαλή αναρρόφησης.
ΠΡΟΣΟΧΗ
Κατά την αναρρόφηση δεν επιτρέπεται σε
καμία περίπτωση να απομακρυνθούν τα
δύο επίπεδα πτυχωτά φίλτρα.
– 2
73EL

Περιστροφικός διακόπτης
– Συσκευή ΟΝ
– Kαθαρισμός φίλτρου
OFF
– Συσκευή ΟFF
Απενεργοποίηση της μηχανής
Απενεργοποιήστε τη συσκευή από τον
περιστροφικό διακόπτη.
Βγάλτε το ρευματολήπτη.
Έπειτα από κάθε λειτουργία
– Συσκευή ΟΝ
– Καθαρισμός φίλτρου ΟΝ
Ενεργοποίηση της μηχανής
Συνδέστε το ρευματολήπτη στην πρίζα.
Ενεργοποιήστε τη συσκευή από τον πε-
ριστροφικό διακόπτη.
Αυτόματος καθαρισμός του φίλτρου
Η συσκευή διαθέτει νέου τύπου, διπλό σύστημα καθαρισμού φίλτρου, ιδιαίτερα αποτελεσματικό για λεπτή σκόνη. Τα επίπεδα
πτυχωτά φίλτρα καθαρίζονται αυτόματα με
ρεύμα αέρα (παλμικός ήχος) ανά 15 δευτερόλεπτα.
Διαδικασία αναρρόφησης
Εκτελέστε τη διαδικασία αναρρόφησης.
Οι αναρροφούμενοι ρύποι πέφτουν
στον εύκαμπτο σωλήνα αποβλήτων
μόνο όταν απενεργοποιηθεί η συσκευή.
Ελέγχετε τακτικά τη στάθμη πλήρωσης
στον εύκαμπτο σωλήνα αποβλήτων,
επ ει δή η σ υσκ ευ ή δ εν απ εν ερ γο πο ιε ίτ αι
αυτόματα.
Εικόνα
Σε περίπτωση ελαφρών αναρροφούμε-
νων ρύπων ή φραγής: Τραβήξτε έξω το
παλάγκο, για να ανοίξετε το κλαπέτο
της εξόδου (μόνο σε απενεργοποιημέ-
νη συσκευή).
Τραβήξτε λίγο έξω τον εύκαμπτο σωλή-
να αποβλήτων, σφραγίστε τον με 2 δέ-
στρες καλωδίων σε απόσταση 10 cm
και κόψτε ανάμεσα στις δέστρες,
Διαθέστε τη σακούλα αποβλήτων σύμ-
φωνα με τις νομικές διατάξεις.
Υπόδειξη: Σε περίπτωση ελαφρών αναρροφούμενων ρύπων, το μήκος της σακούλας αποβλήτων μπορεί να φτάσει έως 2 m,
χωρίς να σχιστεί.
74 EL
Αφαίρεση συστήματος αποβλήτων
Ασφαλίστε το φρένο ακινητοποίησης.
Εικόνα
Αφαιρέστε τη μεταλλική σκάφη.
Εικόνα
Τραβήξτε προς τα πάνω τις διατάξεις
απασφάλισης του μηχανισμού απόθεσης.
Τραβήξτε τη λαβή προώθησης προς τα
επάνω. Το σύστημα αποβλήτων θα
απασφαλιστεί και θα χαμηλώσει.
Εικόνα
Βγάλτε το σύστημα αποβλήτων τραβώ-
ντας το από τη χειρολαβή.
Καθαρισμός συσκευής
Καθαρίστε τη συσκευή εσωτερικά και
εξωτερικά με αναρρόφηση και σκούπι-
σμα με ένα υγρό πανί.
Τοποθέτηση συστήματος αποβλήτων
Εικόνα
Τοποθετήστε ξανά το σύστημα απο-
βλήτων και ασφαλίστε το με τη λαβή
προώθησης.
몇 ΠΡΟΕΙΔΟΠΟΙΗΣΗ
Κίνδυνος σύνθλιψης! Κατά το
κλείδωμα, μην τοποθετείτε ποτέ
τα χέρια σας ανάμεσα στο
στημα διάθεσης αποβλήτων και τον ενδιάμεσο δακτύλιο ή κοντά στο μηχανισμό ανύψωσης. Κρατήστε το σύστημα διάθεσης
αποβλήτων με το ένα χέρι από τη χειρολαβή και σφραγίστε το με το άλλο χέρι χρησιμοποιώντας τη λαβή οδήγησης.
Τοποθετήστε τη μεταλλική σκάφη.
– 3
σύ-

Φύλαξη της συσκευής
Τυλίξτε το καλώδιο τροφοδοσίας και
κρεμάστε το στο ειδικό άγκιστρο.
Τυλίξτε τον ελαστικό σωλήνα αναρρό-
φησης γύρω από τη λαβή ώθησης.
Τοποθετήστε το ακροφύσιο δαπέδου
και το σωλήνα αναρρόφησης στις αντίστοιχες υποδοχές.
Τοποθετήστε τη συσκευή σε στεγνό
χώρο και ασφαλίστε την ώστε να μην
μπορεί να χρησιμοποιηθεί από αναρμόδια άτομα.
Μεταφορά
몇 ΠΡΟΣΟΧΗ
Κίνδυνος τραυματισμού και βλάβης! Κατά
τη μεταφορά λάβετε υπόψη το βάρος της
συσκευής.
Απασφαλίστε το φρένο ακινητοποίησης
και σπρώξτε τη συσκευή από τη λαβή
ώθησης.
Για να μεταφορτώσετε τη συσκευή,
κρατήστε την από το τροχήλατο πλαίσιο
και όχι από τη λαβή ώθησης.
Κατά τη μεταφορά με οχήματα, ασφαλί-
στε τη συσκευή έναντι ενδεχόμενης ολίσθησης και ανατροπής, σύμφωνα με τις
εκάστοτε ισχύουσες κατευθυντήριες
οδηγίες.
Αποθήκευση
몇 ΠΡΟΣΟΧΗ
Κίνδυνος τραυματισμού και βλάβης! Κατά
την αποθήκευση λάβετε υπόψη το βάρος
της συσκευής.
Η συσκευή αυτή μπορεί να αποθηκεύεται
μόνο σε εσωτερικούς χώρους.
Φροντίδα και συντήρηση
ΚΙΝΔΥΝΟΣ
Πριν από όλες
απενεργοποιήστε τη συσκευή και τραβήξτε
το φις από την πρίζα.
τις εργασίες στη συσκευή,
Αντικατάσταση του επίπεδου
πτυχωτού φίλτρου
Υπόδειξη: Για την αφαίρεση της κεφαλής
αναρρόφησης απαιτούνται 2 άτομα.
Απασφαλίστε και αφαιρέστε την κεφαλή
αναρρόφησης.
Απασφαλίστε και αφαιρέστε το κάλυμ-
μα του φίλτρου.
Αντικαταστήστε το επίπεδο πτυχωτό
φίλτρο.
Τοποθετήστε και ασφαλίστε και πάλι το
κάλυμμα του φίλτρου.
Τοποθετήστε, ευθυγραμμίστε και
ασφαλίστε προσεκτικά την κεφαλή
αναρρόφησης.
Αντιμετώπιση βλαβών
ΚΙΝΔΥΝΟΣ
Πριν από όλες τις εργασίες στη συσκευή,
απενεργοποιήστε τη συσκευή και τραβήξτε
το φις από την πρίζα.
Η τουρμπίνα αναρρόφησης δεν
λειτουργεί
Ελέγξτε την πρίζα και την ασφάλεια της
παροχής ρεύματος.
Ελέγξτε το καλώδιο τροφοδοσίας και το
φις της συσκευής.
Θέστε τη συσκευή σε λειτουργία.
Η τουρμπίνα αναρρόφησης
λειτουργεί, αλλά η συσκευή δεν
αναρροφά
Υπόδειξη: Όταν η φορά περιστροφής είναι
σωστή, γίνεται αισθητό ένα έντονο ρεύμα
αέρος από την έξοδο του σιγαστήρα απαερίων. Σε περίπτωση λανθασμένης κατεύθυνσης περιστροφής παρατηρείται αναρρόφηση αέρα.
Εικόνα
Ελέγξτε την κατεύθυνση περιστροφής
του κινητήρα. Σε περίπτωση λανθασμένης φοράς περιστροφής αλλάξτε τους
πόλους στο βύσμα της συσκευής.
– 4
75EL

Η αναρροφητική ισχύς μειώνεται
Απομακρύνετε τις εμπλοκές του ακρο-
φυσίου αναρρόφησης, του σωλήνα
αναρρόφησης, του ελαστικού σωλήνα
αναρρόφησης ή του επίπεδου πτυχωτού φίλτρου
Ελέγξτε τη σωστή έδραση της κεφαλής
αναρρόφησης και του συστήματος αποβλήτων.
Αντικαταστήστε το επίπεδο πτυχωτό
φίλτρο.
Διαρροή σκόνης κατά την
αναρρόφηση
Μην ασφαλίζετε το κάλυμμα φίλτρου.
Ελέγξτε εάν έγινε σωστή τοποθέτηση
του επίπεδου πτυχωτού φίλτρου.
Αντικαταστήστε το επίπεδο πτυχωτό
φίλτρο.
Ο αυτόματος καθαρισμός του
φίλτρου δεν λειτουργεί
Ο ελαστικός σωλήνας αναρρόφησης
δεν είναι συνδεδεμένος.
Ο χρησιμοποιούμενος ελαστικός σωλή-
νας αναρρόφησης είναι πολύ κοντός
(< 3m) ή έχει πολύ μεγάλη διατομή.
Ειδοποιήστε την υπηρεσία εξυπηρέτη-
σης πελατών.
Ο αυτόματος καθαρισμός φίλτρου
δεν απενεργοποιείται
Ειδοποιήστε την υπηρεσία εξυπηρέτη-
σης πελατών.
Υπηρεσία εξυπηρέτησης πελατών
Αν δεν διορθωθεί η βλάβη, πρέπει να γίνει έλεγχος της συσκευής από την υπηρεσία εξυπηρέτησης πελατών.
Εγγύηση
Σε κάθε χώρα ισχύουν οι όροι εγγύησης
που εκδόθηκαν από την αρμόδια εταιρία
μας προώθησης πωλήσεων. Αναλαμβάνουμε τη δωρεάν αποκατάσταση οποιασδήποτε βλάβης στη συσκευή σας, εφόσον
οφείλεται σε αστοχία υλικού ή κατασκευαστικό σφάλμα, εντός της προθεσμίας που
ορίζεται στην εγγύηση. Σε περίπτωση που
επιθυμείτε να κάνετε χρήση της εγγύησης,
παρακαλούμε απευθυνθείτε με την απόδειξη αγοράς στο κατάστημα από το οποίο
προμηθευτήκατε τη συσκευή ή στην πλησιέστερη εξουσιοδοτημένη υπηρεσία τεχνικής εξυπηρέτησης πελατών μας.
Εξαρτήματα και ανταλλακτικά
Χρησιμοποιείτε μόνο γνήσια παρελκόμενα
και ανταλλακτικά τα οποία διασφαλίζουν
την ασφαλή και απρόσκοπτη λειτουργία
της συσκευής.
Πληροφορίες για παρελκόμενα και ανταλλακτικά θα βρείτε στη διεύθυνση
www.kaercher.com.
– Στο παραδοτέο υλικό δεν περιλαμβάνε-
ται κανένα εξάρτημα. Τα εξαρτήματα
πρέπει να παραγγελθούν ξεχωριστά
ανάλογα με τη χρήση.
– Η άψογη λειτουργία της συσκευής εξα-
σφαλίζεται μόνο με τους ελαστικούς
σωλήνες αναρρόφησης πλάτους DN42
και DN52.
– Μπορείτε να προμηθευθείτε ανταλλα-
κτικά και εξαρτήματα από τον αρμόδιο
έμπορο ή από το υποκατάστημα της
KÄRCHER της περιοχής σας.
76 EL
– 5

Δήλωση Συμμόρφωσης των
Chairman of the Board of Management
Director Regulatory Affairs & Certification
ΕE
Δια της παρούσης δηλώνουμε ότι το μηχάνημα που χαρακτηρίζεται παρακάτω, με
βάση τη σχεδίαση και την κατασκευή του,
υπό τη μορφή που διατίθεται στην αγορά,
πληροί στις σχετικές βασικές απαιτήσεις
ασφαλείας και υγιεινής των οδηγιών της
ΕE . Η παρούσα δήλ ωση παύε ι να ισχύ ει σ ε
περίπτωση τροποποιήσεων του μηχανήματος χωρίς προηγούμενη συνεννόηση
μαζί μας.
Προϊόν: Ηλεκτρική σκούπα υγρής και
ξηρής αναρρόφησης
Τύπος: 1.576-xxx
Σχετικές οδηγίες των ΕE
2006/42/EK (+2009/127/EK)
2014/30/EE
Εφαρμοσθέντα εναρμονισμένα πρότυπα
EN 55014–1: 2006+A1: 2009+A2: 2011
EN 55014–2: 2015
EN 60335–1
EN 60335–2–69
EN 61000–3–2: 2014
EN 61000–3–3: 2013
EN 62233: 2008
Εφαρμοσθέντα εθνικά πρότυπα
-
5.966-010
Οι υπογράφοντες ενεργούν κατ’ εντολή και
με πληρεξούσιο από το διοικητικό συμβούλιο.
Υπεύθυνος εγγράφων τεκμηρίωσης:
S. Reiser
Alfred Kärcher SE & Co. KG
Alfred-Kärcher-Straße 28-40
71364 Winnenden (Germany)
Tel.: +49 7195 14-0
Fax: +49 7195 14-2212
Winnenden, 2018/10/01
– 6
77EL

Τεχνικά χαρακτηριστικά
IVC 60/30 Tact2 Lp
Τάση ηλεκτρικού δικτύου V 400
Συχνότητα Hz 3~ 50
Ονομαστική ισχύς W 3000
Ποσότητα αέρα (μέγ.) l/s 68
Υποπίεση (μέγ.) kPa (mbar) 28,6 (286)
Είδος προστασίας -- IPX4
Κατηγορία προστασίας -- I
Σύνδεση ελαστικού σωλήνα αναρρόφησης (C-DN/C-
ID)
Ονομαστικό πλάτος ελαστικού σωλήνα αναρρόφησης DN 42/52
Μήκος x Πλάτος x Ύψος mm 970 x 690 x 1240
Επιφάνεια φίλτρου m
Τυπικό βάρος λειτουργίας kg 108
Θερμοκρασία περιβάλλοντος (μέγ.) °C +40
Μετρούμενες τιμές κατά EN 60335-2-69
Επιτρεπόμενη στάθμη ηχητικής ισχύος L
Αβεβαιότητα K
pA
pA
Κραδασμοί στο χέρι/στο βραχίονα m/s
Αβεβαιότητα K m/s
Καλώδιο τροφοδοσίας δικτύου
H07RN-F 5x1,5 mm
Αριθ. ανταλλ. Μήκος κα-
2
λωδίου
EU 6.649-826.0 7,5 m
DN 72
2
1,9
dB(A) 77
dB(A) 1
2
2
<2,5
0,2
78 EL
– 7

Cihazın ilk kullanımından önce
bu orijinal kullanma kılavuzunu
okuyun, bu kılavuza göre davranın ve daha
sonra kullanım veya cihazın sonraki sahiplerine vermek için bu kılavuzu saklayın.
– İlk kullanımdan önce, 5.956-249.0 nu-
maralı güvenlik uyarılarını mutlaka okuyun!
– Kullanım kılavuzunun ve emniyet uyarı-
larının dikkate alınmaması halinde cihazda hasar, kullanıcıda ve diğer kişilerde tehlike oluşabilir.
– Nakliye hasarlarını hemen yetkili satıcı-
ya bildirin.
İçindekiler
Çevre koruma . . . . . . . . . . . . . TR 1
Tehlike kademeleri . . . . . . . . . TR 1
Kurallara uygun kullanım . . . . TR 1
Cihaz elemanları. . . . . . . . . . . TR 2
İşletime alma. . . . . . . . . . . . . . TR 2
Kullanımı. . . . . . . . . . . . . . . . . TR 2
Taşıma . . . . . . . . . . . . . . . . . . TR 4
Depolama . . . . . . . . . . . . . . . . TR 4
Koruma ve Bakım . . . . . . . . . . TR 4
Arızalarda yardım . . . . . . . . . . TR 4
Garanti . . . . . . . . . . . . . . . . . . TR 5
Aksesuarlar ve yedek parçalar TR 5
AB uygunluk bildirisi . . . . . . . . TR 5
Teknik Bilgiler . . . . . . . . . . . . . TR 6
Çevre koruma
Ambalaj malzemeleri geri dönüştürülebilir. Ambalaj malzemelerini evinizin çöpüne atmak
yerine lütfen tekrar kullanılabilecekleri yerlere gönderin.
Eski cihazlarda, yeniden değerlendirme işlemine tabi tutulması
gereken değerli geri dönüşüm
malzemeleri bulunmaktadır.
Aküler, yağ ve benzeri maddeler
doğaya ulaşmamalıdır. Bu nedenle eski cihazları lütfen öngörülen toplama sistemleri aracılığıyla imha edin.
İçindekiler hakkında uyarılar (REACH)
İçindekiler hakkında ayrıntılı bilgileri bulabileceğiniz adres:
www.kaercher.com/REACH
Tehlike kademeleri
TEHLIKE
Ağır bedensel yaralanmalar ya da ölüme
neden olan direkt bir tehlikeye yönelik uyarı.
몇 UYARI
Ağır bedensel yaralanmalar ya da ölüme
neden olabilecek olası tehlikeli bir duruma
yönelik uyarı.
몇 TEDBIR
Hafif yaralanmalara neden olabilecek olası
tehlikeli bir duruma yönelik uyarı.
DIKKAT
Maddi hasarlara neden olabilecek olası
tehlikeli bir duruma yönelik uyarı.
Kurallara uygun kullanım
몇 UYARI
Cihaz, zararlı tozların emilmesi için uygun
değildir.
– Bu tasfiye sistemi, uzunluğu kesilerek
ayarlanabilen bir atık hortumu kullanılarak kuru veya hafif nemli süpürülecek
malzemenin tozsuz şekilde tasfiye edilmesi için belirlenmiştir.
– Bu cihaz, örn. depolama ve üretim bö-
lümleri ve üretim makineleri gibi sanayi
amaçlı kullanım için uygundur.
– Cihaz vinçle yükleme için onaylanma-
mıştır.
– 1
79TR

Cihaz elemanları
1 Gergi kolu
2 Filtre kapağı
3 Yatık filtre
4 Oturtma mekanizmasının sol kilit açma
mekanizması
5 Emme başlığı
6 Tip levhası
7 Elektrik kablosu
8 Oturtma mekanizmasının sağ kilit açma
mekanizması
9 Sac tekne
10 Atık sistemi
11 Napięcie liny
12 Atık sisteminin tutamağı
13 Ara halka
14 Süpürge kafasının kilidi
15 Atık hortumu
16 Park freniyle birlikte şasinin manevra
tekerleği
17 Zemin memesi tutucusu
18 Şasi
19 Toplama kabı
20 Emme ağzı
21 Süpürme borusu tutucusu
22 Süpürme kafası tutamağı
23 Döner şalter
24 Trifaze akım motoru
25 Atık hava susturucusu
26 İtme yayı
27 Kablo kancası
İşletime alma
Cihazı çalışma pozisyonuna getirin, ge-
rekirse park frenleri ile emniyete alın.
Süpürme hortumunu (teslimat kapsa-
mına dahil değildir) süpürme ağzına ta-
kın.
Atık sisteminin kurallara uygun olarak
yerleştirilmiş olduğundan emin olun.
İstediğiniz aksesuarı (teslimat kapsa-
mında değildir) takın.
Akım bağlantısı
DIKKAT
Her priz değişiminde, motorun dönme yönünü kontrol edin.
Not: Dönme yönü doğruysa, atık hava susturucusunun deliğinden çıkan güçlü bir
hava akımı hissedilir. Dönme yönü yanlışsa
hava emilir.
Şekil
Motorun dönme yönünü kontrol edin.
Dönme yönünün yanlış olması durumunda, cihaz soketindeki kutupları değiştirin.
Atık torbasının takılması
Atık hortumunun 4 ilmiğini (uzunluk:
22 m) çıkartın.
Şekil
Bağlantıyı sola döndürerek açın ve aşa-
ğı doğru dışarı çekin.
Atık hortumunu şekle uygun olarak ta-
kın.
Bağlantıyı içeri itin ve sağa döndürerek
kapatın.
Şekil
Atık hortumunu 40-50 cm aşağı çekin.
Atık hortumunun ucunu kablo bağıyla
kapatın.
Kullanımı
DIKKAT
Hasar tehlikesi! Cihaz kafasındaki hava
besleme ve tahliye deliklerinin üstünü örtmeyin.
DIKKAT
Süpürme sırasında her iki yassı katlama filtresini kesinlikle çıkartmayın.
Döner şalter
– Cihaz AÇIK
– Filtre temizleme KAPALI
– Cihaz KAPALI
80 TR
– Cihaz AÇIK
– Filtre temizleme AÇIK
– 2

Cihazı açın
Şebeke fişini takın.
Cihazı döner şalterden açın.
Otomatik filtre temizleme
Cihaz, özellikle ince tozda etkili olan yeni
bir çift filtre temizleme sistemine sahiptir.
Bu sırada, yassı katlama filtresi her 15 saniyede bir hava darbesiyle otomatik olarak
temizlenir (titreşimli ses).
Süpürme işlemi
Emme işlemini gerçekleştirin.
Süpürülecek malzeme ancak cihaz kapalıyken atık hortumunun içine düşer.
Atık hortumunun dolum seviyesini düzenli olarak kontrol edin, aksi takdirde
cihaz otomatik olarak kapatılmaz.
Şekil
Hafif süpürülecek malzemede veya tı-
kanma durumunda: Çıkıştaki kapağı
açmak için teli dışarı çekin (sadece ci-
haz kapalıyken mümkündür).
Atık hortumunu biraz aşağı çekin, 10
cm mesafede iki kablo bağıyla kapatın
ve kablo bağlarının arasında kesin.
Atık torbasını yasal düzenlemelere göre
tasfiye edin.
Not: Hafif süpürülecek malzemede, torba
kopmadan atık torbasının uzunluğu maksimum 2 metre olabilir.
Cihazın kapatılması
Cihazı döner şalterden kapatın.
Şebeke fişini prizden çekiniz.
Her çalışmadan sonra
Atık sisteminin çıkarılması
Park frenlerini kilitleyin.
Şekil
Sac tekneyi çıkartın.
Şekil
Oturtma mekanizmasının kilit açma me-
kanizmalarını yukarı çekin.
İtme kolunu yukarı çekin. Atık sistemi
açılır ve indirilir.
Şekil
Atık sistemini tutamaktan tutarak dışarı
çekin.
Cihazın temizlenmesi
Cihazın dışını ve içini tozunu alarak ve
silerek nemli bir bezle temizleyin.
Atık sisteminin takılması
Şekil
Atık sistemini yerine yerleştirin ve itme
koluyla kilitleyin.
몇 UYARI
Ezilme tehlikesi! Kilitleme sıra-
sında elinizi kesinlikle tasfiye
sistemi ve ara halka arasında
tutmayın ya da kaldırma mekanizmasına
yaklaştırmayın. Tasfiye sistemini bir elinizle
tutamaktan tutun ve diğer elinizle itme kolunu bastırarak kilitleyin.
Sac tekneyi takın.
Cihazın saklanması
Şebeke kablosunu sarın ve kablo kan-
casına asın.
Süpürme hortumunu itme koluna sarın.
Taban memesi ve süpürme borusunu il-
gili tutucuya takın.
Cihazı kuru bir odada muhafaza edin ve
yetkisiz kullanıma karşı emniyete alın.
– 3
81TR

Taşıma
몇 TEDBIR
Yaralanma ve hasar tehlikesi! Taşıma sırasında cihazın ağırlığına dikkat edin.
Park frenlerini çözün ve cihazı itme ko-
lundan itin.
Yüklemek için şasiden tutun, itme ko-
lundan tutmayın.
Araçlarda taşıma sırasında, cihazı ge-
çerli yönetmeliklere göre kaymaya ve
devrilmeye karşı emniyete alın.
Depolama
몇 TEDBIR
Yaralanma ve hasar tehlikesi! Depolama
sırasında cihazın ağırlığına dikkat edin.
Bu cihaz sadece iç mekanlarda depolanmalıdır.
Koruma ve Bakım
TEHLIKE
Cihazdaki tüm çalışmalardan önce cihazı
kapatın ve elektrik fişini çekin.
Yassı katlama filtresinin
değiştirilmesi
Not: Süpürme kafasını çıkartmak için 2 kişi
gereklidir.
Emme kafasının kilidini açın ve kafayı
çıkartın.
Filtre kapağının kilidini açın ve kapağı
çıkartın.
Yassı katlama filtresini değiştirin.
Filtre kapağını yerleştirin ve kilitleyin.
Süpürme kafasını yerleştirin, hizalayın
ve kilitleyin.
Arızalarda yardım
TEHLIKE
Cihazdaki tüm çalışmalardan önce cihazı
kapatın ve elektrik fişini çekin.
Emme türbini çalışmıyor
Akım beslemesinin prizini ve sigortasını
kontrol edin.
Cihazın elektrik kablosunu ve elektrik fi-
şini kontrol edin.
Cihazı açın.
Emme türbini çalışıyor fakat cihaz
emmiyor
Not: Dönme yönü doğruysa, atık hava sus-
turucusunun deliğinden çıkan güçlü bir
hava akımı hissedilir. Dönme yönü yanlışsa
hava emilir.
Şekil
Motorun dönme yönünü kontrol edin.
Dönme yönünün yanlış olması durumunda, cihaz soketindeki kutupları değiştirin.
Emme gücü dü
Vakum memesi, vakum borusu, vakum
hortumu ya da yassı katlama filtresindeki tıkanmaları giderin.
Süpürme kafası ve atık sisteminin doğ-
ru oturup oturmadığını kontrol edin.
Yassı katlama filtresini değiştirin.
Emme sırasında dışarı toz çıkıyor
Filtre kapağını doğru şekilde kilitleyin.
Yassı katlama filtrelerinin montaj konu-
munun doğru olup olmadığını kontrol
edin.
Yassı katlama filtresini değiştirin.
Otomatik filtre temizleme çalışmıyor
Vakum hortumu bağlı değil.
Kullanılan süpürge hortumu çok kısa
(< 3m) veya çapı çok büyük.
Müşteri hizmetlerine haber verin.
Otomatik filtre temizleme
kapatılamıyor
Müşteri hizmetlerine haber verin.
82 TR
– 4

Müşteri hizmeti
Chairman of the Board of Management
Director Regulatory Affairs & Certification
Arızanın giderilememesi durumunda, cihaz müşteri hizmetleri tarafından kontrol edilmelidir.
Garanti
Her ülkede yetkili distribütörümüz tarafından verilmiş garanti şartları geçerlidir. Garanti süresi içinde cihazınızda oluşan muhtemel hasarları, arızanın kaynağı üretim
veya malzeme hatası olduğu sürece ücretsiz olarak karşılıyoruz. Garanti hakkınızdan
yararlanmanızı gerektiren bir durum olduğu
zaman, ilgili faturanız ile birlikte satıcınıza
veya size en yakın yetkili servisimize başvurunuz.
Aksesuarlar ve yedek
parçalar
Sadece orijinal aksesuarlar ve orijinal yedek parçalar kullanın; cihazın güvenli şekilde ve arızasız işletilmesini garantilerler.
Aksesuarlar ve yedek parçalar hakkında
bilgi için sitemizi ziyaret edin:
www.kaercher.com.
– Teslimat kapsamında hiçbir aksesuar
bulunmamaktadır. Aksesuarlar, uygulamaya göre ayrı olarak sipariş edilmelidir.
– Cihazın kusursuz çalışması, sadece
DN42 ve DN52 süpürme hortumu nominal genişlikleri ile sağlanır.
– Yedek parçalar ve aksesuarları yetkili
satıcınız ya da KÄRCHER temsilciliğinden temin edebilirsiniz.
AB uygunluk bildirisi
İşbu belge ile aşağıda tanımlanan makinenin konsepti ve tasarımı ve tarafımızdan piyasaya sürülen modeliyle AB yönetmeliklerinin temel teşkil eden ilgili güvenlik ve sağlık yükümlülüklerine uygun olduğunu bildiririz. Onayımız olmadan cihazda herhangi
bir değişiklik yapılması durumunda bu beyan geçerliliğini yitirir.
Ürün: Kuru ve yaş elektrikli süpür-
ge
Tip: 1.576-xxx
İlgili AB yönetmelikleri
2006/42/EG (+2009/127/EG)
2014/30/EU
Kullanılmış olan uyumlu standartlar
EN 55014–1: 2006+A1: 2009+A2: 2011
EN 55014–2: 2015
EN 60335–1
EN 60335–2–69
EN 61000–3–2: 2014
EN 61000–3–3: 2013
EN 62233: 2008
Kullanılmış ulusal standartlar
-
5.966-010
Aşağıda imzası olan kişiler, yönetim kurulu
adına ve yönetim kurulunun yetkisine sahip
olarak hareket eder.
Dokümantasyon sorumlusu:
S. Reiser
Alfred Kärcher SE & Co. KG
Alfred-Kärcher-Straße 28-40
71364 Winnenden (Germany)
Tel.: +49 7195 14-0
Fax: +49 7195 14-2212
Winnenden, 2018/10/01
– 5
83TR

Teknik Bilgiler
IVC 60/30 Tact2 Lp
Şebeke gerilimi V 400
Frekans Hz 3~ 50
Nominal güç W 3000
Hava miktarı (maks.) l/s 68
Vakum (maks.) kPa (mbar) 28,6 (286)
Koruma şekli -- IPX4
Koruma sınıfı -- I
Süpürme hortumu bağlantısı (C-DN/C-ID) DN 72
Süpürme hortumu nominal genişliği DN 42/52
Uzunluk x Genişlik x Yükseklik mm 970 x 690 x 1240
Filtre yüzeyi m
2
Tipik çalışma ağırlığı kg 108
Çevre sıcaklığı (maks.) °C +40
60335-2-69'a göre belirlenen değerler
Ses basıncı seviyesi L
Güvensizlik K
pA
pA
El-kol titreşim değeri m/s
Güvensizlik K m/s
Elektrik kablosu
H07RN-F 5x1,5 mm
Parça No. Kablo uzun-
2
dB(A) 77
dB(A) 1
2
2
luğu
EU 6.649-826.0 7,5 m
1,9
<2,5
0,2
84 TR
– 6

Перед первым применением
вашего прибора прочитайте
эту оригинальную инструкцию по эксплуатации, после этого действуйте соответственно и сохраните ее для дальнейшего пользования или для следующего
владельца.
– Перед первым вводом в эксплуата-
цию обязательно прочтите указания
по технике безопасности № 5.956-
249.0!
– При несоблюдении инструкции и ука-
заний по технике безопасности пылесос может выйти из строя, а для оператора и других лиц возникает риск
получения травмы.
– При повреждениях, полученных во
время транспортировки, немедленно
свяжитесь с продавцом.
Оглавление
Защита окружающей среды . RU 1
Степень опасности . . . . . . . . RU 1
Использование по назначе-
нию . . . . . . . . . . . . . . . . . . . . . RU 1
Элементы прибора . . . . . . . . RU 2
Начало работы . . . . . . . . . . . RU 2
Управление . . . . . . . . . . . . . . RU 2
Транспортировка . . . . . . . . . . RU 4
Хранение . . . . . . . . . . . . . . . . RU 4
Уход и техническое обслужи-
вание . . . . . . . . . . . . . . . . . . . RU 4
Помощь в случае неполадок RU 4
Гарантия. . . . . . . . . . . . . . . . . RU 5
Принадлежности и запасные
детали . . . . . . . . . . . . . . . . . . RU 5
Заявление о соответствии ЕU RU 6
Технические данные . . . . . . . RU 7
Защита окружающей среды
Упаковочные материалы пригодны для вторичной переработки. Пожалуйста, не выбрасывайте упаковку вместе с бытовыми отходами, а сдайте ее
в один из пунктов приема вторичного сырья.
Старые приборы содержат
ценные перерабатываемые
материалы, подлежащие передаче в пункты приемки вторичного сырья. Аккумуляторы,
масло и иные подобные материалы не должны попадать в
окружающую среду. Поэтому
утилизируйте старые приборы
через соответствующие системы приемки отходов.
Инструкции по применению компонентов (REACH)
Актуальные сведения о компонентах
приведены на веб-узле по следующему
адресу:
www.kaercher.com/REACH
Степень опасности
ОПАСНОСТЬ
Указание относительно непосредственно грозящей опасности, которая
приводит к тяжелым увечьям или к
смерти.
몇 ПРЕДУПРЕЖДЕНИЕ
Указание относительно возможной потенциально опасной ситуации, которая может привести к тяжелым увечьям или к смерти.
몇 ОСТОРОЖНО
Указание на потенциально опасную
туацию, которая может привести к
получению легких травм.
ВНИМАНИЕ
Указание относительно возможной потенциально опасной ситуации, которая
может повлечь материальный ущерб.
Использование по
назначению
몇 ПРЕДУПРЕЖДЕНИЕ
Прибор не предназначен для сбора
вредной для здоровья пыли.
– Данная система утилизации пред-
назначена для устранения с малым
образованием пыли сухого или слегка влажного всосанного материала
при использовании рукава для отходов, нарезаемого по длине.
– 1
си-
85RU

– Прибор предназначен для примене-
ния в промышленных условиях, например, в складских цехах и производственных участках, а также в серийных машинах.
– Прибор не предназначен для погруз-
ки с помощью крана.
Элементы прибора
1 Рукоятка зажима
2 Крышка фильтра
3 Плоский складчатый фильтр
4 Левое устройство разблокировки ме-
ханизма отвала
5 Всасывающая головка
6 Заводская табличка с данными
7 Сетевой шнур
8 Правое устройство разблокировки
механизма отвала
9 Жестяной поддон
10 Система утилизации
11 Трос
12 Ручка системы утилизации
13 Прокладочное кольцо
14 Блокировка всасывающей головки
15 Рукав для отходов
16 Направляющий ролик шасси со сто-
порным устройством
17 Держатель насадки для пола
18 Шасси
19 Сливная ванна
20 Всасывающий патрубок
21 Держатель для всасывающей трубки
22 Ручка всасывающего элемента
23 Поворотный переключатель
24 Двигатель трехфазного тока
25 Глушитель отходящего воздуха
26 ведущая дуга
27 Крючки для кабеля
Начало работы
Поставить прибор в рабочую пози-
цию, при необходимости зафиксиро-
вать стояночным тормозом.
Вставить всасывающий шланг (не
входит в объем поставки) во всасы-
вающий патрубок.
Убедиться, что система утилизации
установлена надлежащим образом.
Подключить желаемые принадлеж-
ности (не входят в объем поставки).
Подключение к источнику тока
ВНИМАНИЕ
При каждой замене розетки проверить
направление вращения двигателя.
Указание: При правильно выбранном направлении вращения чувствуется сильный поток воздуха, выходящего из отверстия глушителя отходящего воздуха. При
не правильно выбранном направлении
воздух начинает всасываться.
Рисунок
Проверить направление вращения
двигателя. При неправильном направлении вращения поменять местами полюсы на штепсельной вилке
прибора.
Вставка рукава для отходов
Убрать все 4 петли рукава для отхо-
дов (длиной 22 м).
Рисунок
Открыть крепление, повернув влево,
и стянуть его вниз.
Рукав для отходов вставить в соот-
ветствии с рисунком.
Вставить крепление и зафиксиро-
вать его, повернув вправо.
Рисунок
Рукав для отходов стянуть вниз на
40-50 см.
Закрепить конец рукава для отходов
кабельной стяжкой.
Управление
ВНИМАНИЕ
Опасность повреждения! Не закрывать отверстия для входа и выхода
воздуха на всасывающем элементе.
ВНИМАНИЕ
Запрещено удаление складчатого
фильтра во время работы.
86 RU
– 2

Поворотный переключатель
– Прибор ВКЛ
– Система очистки
фильтра ВЫКЛ
– Прибор ВЫКЛ
– Прибор ВКЛ
– Система очистки
фильтра ВКЛ
Включение прибора
Вставьте штепсельную вилку в элек-
тророзетку.
Включить прибор с помощью пово-
ротного переключателя.
Автоматическая чистка фильтра
Прибор оснащен новой, двойной системой очистки фильтра, особенно эффективной при работе с мелкой пылью. При
этом, благодаря подаче воздуха, каждые 15 секунд происходит автоматическая очистка складчатого фильтра
(пульсирующий звук).
Процесс всасывания
Выполнить всасывание.
Всосанный материал падает в рукав
для отходов только при выключенном устройстве.
Регулярно контролировать уровень
заполнения в рукаве для отходов, поскольку устройство не отключается
автоматически.
Рисунок
При легком всосанном материале
или засорении: Вытянуть тросовый
привод, чтобы открыть заслонку на
выпуске (возможно только при от-
ключенном устройстве).
Немного спустить вниз рукав для от-
ходов, закрепить 2 кабельными стяж-
ками на расстоянии 10 см и разре-
зать между кабельными стяжками.
Мешок для отходов утилизировать
согласно законодательным предпи-
саниям.
Примечание: При легком всосанном материале длина мешка для отходов может составлять до 2 м, чтобы он не порвался.
Выключение прибора
Выключить прибор с помощью пово-
ротного переключателя.
Отсоедините прибор от электросети.
После каждой эксплуатации
Снятие системы утилизации
Зафиксировать стопорные устройст-
ва.
Рисунок
Извлечь жестяной поддон.
Рисунок
Потянуть разблокировку механизма
отвала вверх.
Потянуть дугообразную ручку на-
верх. Произойдет разблокировка и
опускание системы утилизации.
Рисунок
Вынуть систему утилизации за ручку.
Чистка прибора
Очистить прибор снаружи и внутри
пылесосом и протереть его влажным
полотенцем.
Установка системы утилизации
Рисунок
Установить систему утилизации на
место и зафиксировать с помощью
дугообразной скобы.
몇 ПРЕДУПРЕЖДЕНИЕ
Опасность раздавливания!
Во время фиксации ни в коем
случае не держать руки меж
ду системой утилизации и прокладочным кольцом или не подносить их близко к подъемному механизму. Систему
утилизации держать за рукоятку одной рукой, а второй рукой зафиксировать, приведя в действие буксирную
скобу.
Установить жестяной поддон.
-
– 3
87RU

Хранение прибора
Смотать сетевой кабель и повесить
на крючки.
Обмотать всасывающий шланг во-
круг буксирной скобы.
Поместить насадку для пола и вса-
сывающую трубку в соответствующие держатели.
Хранить прибор в сухом помещении,
приняв при этом меры от несанкционированного использования.
Транспортировка
몇 ОСТОРОЖНО
Опасность получения травм и повреждений! При транспортировке следует обратить внимание на вес устройства.
Опустить стояночный тормоз и уста-
новить устройство на буксирную скобу.
Для погрузки прибор следует брать
за шасси, а не за буксирную скобу.
При перевозке аппарата в транспор-
тных средствах следует учитывать
действующие местные государственные нормы, направленные на защиту
от скольжения и опрокидывания.
Хранение
몇 ОСТОРОЖНО
Опасность получения травм и повреждений! При хранении следует обратить внимание на вес устройства.
Это устройство разрешается хранить
только во внутренних помещениях.
Уход и техническое
обслуживание
ОПАСНОСТЬ
проведением любых работ с при-
Перед
бором, выключить прибор и вытянуть
штепсельную вилку.
Замена складчатого фильтра
Указание: Для того, чтобы снять всасы-
вающий элемент потребуется два человека.
Разблокировать и снять всасываю-
щий элемент.
Разблокировать и снять крышку
фильтра.
Заменить складчатый фильтр.
Надеть и зафиксировать крышку
фильтра.
Осторожно надеть, выровнять и за-
фиксировать всасывающий элемент.
Помощь в случае неполадок
ОПАСНОСТЬ
Перед проведением любых работ с прибором, выключить прибор и вытянуть
штепсельную вилку.
Всасывающая турбина не
работает
Проверить штепсельную розетку и
предохранитель системы электропитания.
Проверить сетевой кабель и штеп-
сельную вилку устройства.
Включить аппарат.
Всасывающая турбина работает,
но аппарат не сосет
Указание: При правильно выбранном на-
правлении вращения чувствуется сильный поток воздуха, выходящего из отверстия глушителя отходящего воздуха. При
не правильно выбранном направлении
воздух начинает всасываться.
Рисунок
Проверить направление вращения
двигателя. При неправильном направлении вращения поменять местами полюсы на штепсельной вилке
прибора.
88 RU
– 4

Мощность всасывания упала
Удалить мусор из всасывающего со-
пла, всасывающей трубки, всасывающего шланга или складчатого
фильтра.
Проверить правильность посадки
всасывающей головки и системы
утилизации.
Заменить складчатый фильтр.
Во время чистки из прибора
выделяется пыль
Правильно закрыть крышку фильтра.
Проверить правильность установки
складчатого фильтра.
Заменить складчатый фильтр.
Автоматическая чистка фильтра
не выполняется
Всасывающий шланг не подключен.
Удлинитель для всасывающего
шланга слишком короткий (< 3 м) или
слишком широкий.
Поставить в известность сервисную
службу.
Автоматическая чистка фильтра
не выключается
Поставить в известность сервисную
службу.
Сервисная служба
Если неисправность не удается
устранить, прибор необходимо отправить на проверку в сервисную
службу.
Гарантия
В каждой стране действуют соответственно гарантийные условия, изданные
уполномоченной организацией сбыта
нашей продукции в данной стране. Возможные неисправности прибора в течение гарантийного срока мы устраняем
бесплатно, если причина заключается в
дефектах материалов или ошибках при
изготовлении. В случае возникновения
претензий в течение гарантийного срока
просьба обращаться, имея при себе чек
о покупке, в торговую организацию, продавшую вам прибор или в ближайшую
уполномоченную службу сервисного обслуживания.
Принадлежности и
запасные детали
Используйте оригинальные принадлежности и запчасти — только они гарантируют безопасную и бесперебойную работу устройства.
Информацию о принадлежностях и запчастях вы можете найти на сайте
www.kaercher.com.
– Принадлежности в объем поставки
не входят. Необходимые в зависимости от предполагаемой работы принадлежности следует заказывать отдельно.
– Безупречность работы прибора до-
стигается исключительно при использовании всасывающего шланга
номинальным диаметром DN42 или
DN52.
– Запасные части и принадлежности
Вы можете получить у Вашего дилера или в филиале фирмы KÄRCHER.
– 5
89RU

Заявление о соответствии
Chairman of the Board of Management
Director Regulatory Affairs & Certification
ЕU
Настоящим мы заявляем, что нижеуказанный прибор по своей концепции и конструкции, а также в осуществленном и
допущенном нами к продаже исполнении
отвечает соответствующим основным
требованиям по безопасности и здоровью согласно директивам ЕU. При внесении изменений, не согласованных с нами,
данное заявление теряет свою силу.
Продукт Пылесос для мокрой и су-
хой чистки
Тип: 1.576-xxx
Основные директивы ЕU
2006/42/EC (+2009/127/EC)
2014/30/EU
Примененные гармонизированные
нормы
EN 55014–1: 2006+A1: 2009+A2: 2011
EN 55014–2: 2015
EN 60335–1
EN 60335–2–69
EN 61000–3–2: 2014
EN 61000–3–3: 2013
EN 62233: 2008
Примененные внутригосударственные нормы
-
5.966-010
Нижеподписавшиеся лица действуют от
имени и по доверенности Правления.
Уполномоченный сотрудник по ведению
документооборота:
S. Reiser
Alfred Kärcher SE & Co. KG
Alfred-Kärcher-Straße 28-40
71364 Winnenden (Germany)
Tel.: +49 7195 14-0
Fax: +49 7195 14-2212
Winnenden, 2018/10/01
90 RU
– 6

Технические данные
IVC 60/30 Tact2 Lp
Напряжение сети В 400
Частота Гц 3~ 50
Номинальная мощность Вт 3000
Количество воздуха (макс.) л/с 68
Нижнее давление (макс.) кПа (мбар) 28,6 (286)
Тип защиты -- IPX4
Класс защиты -- I
Гнездо для подключения шланга (C-DN/C-ID) DN 72
Номинальный диаметр всасывающего шланга DN 42/52
Длина х ширина х высота мм 970 x 690 x 1240
Активная поверхность фильтра м
2
Типичный рабочий вес кг 108
Температура окружающей среды (макс.) °C +40
Значение установлено согласно стандарту EN 60335-2-69
Уровень шума дб
Опасность K
а
pA
Значение вибрации рука-плечо м/с
Опасность K м/с
Сетевой
шнур
H07RN-F 5x1,5 mm
№ детали Длина шну-
2
дБ(А) 77
дБ(А) 1
2
2
ра
EU 6.649-826.0 7,5 м
1,9
<2,5
0,2
– 7
91RU

A készülék első használata előtt
olvassa el ezt az eredeti használati utasítást, ez alapján járjon el és tartsa meg a későbbi használatra vagy a következő tulajdonos számára.
– Az első üzembevétel előtt mindenkép-
pen olvassa el az 5.956-249.0 sz. biztonsági utasításokat!
– A gépkönyv és a biztonságtechnikai
utasítások be nem tartása esetén a készülék megrongálódhat és veszélybe
kerülhet annak kezelője, illetve más
személyek.
– Szállítási sérülések esetén azonnal tá-
jékoztassa a kereskedőt.
Tartalomjegyzék
Környezetvédelem . . . . . . . . . HU 1
Veszély fokozatok. . . . . . . . . . HU 1
Rendeltetésszerű használat . . HU 1
Készülék elemek. . . . . . . . . . . HU 2
Üzembevétel. . . . . . . . . . . . . . HU 2
Használat . . . . . . . . . . . . . . . . HU 2
Szállítás . . . . . . . . . . . . . . . . . HU 4
Tárolás . . . . . . . . . . . . . . . . . . HU 4
Ápolás és karbantartás . . . . . . HU 4
Segítség üzemzavar esetén . . HU 4
Garancia . . . . . . . . . . . . . . . . . HU 5
Tartozékok és alkatrészek. . . . HU 5
EU konformitási nyiltakozat. . . HU 5
Műszaki adatok. . . . . . . . . . . . HU 6
Környezetvédelem
A csomagolási anyagok újrahasznosíthatók. Kérjük, ne dobja a csomagolást a házi szemétbe, hanem vigye el egy újrahasznosító helyre.
A használt készülékek értékes
újrahasznosítható anyagokat
tartalmaznak, amelyeket újrahasznosító helyen kell elhelyezni. Az elemeknek, olajnak és hasonló anyagoknak nem szabad
a környezetbe kerülni. Ezért kérjük, a használt készülékeket
megfelelő gyűjtőrendszeren keresztül távolítsa el.
Megjegyzések a tartalmazott anyagokkal kapcsolatban (REACH)
Aktuális információkat a tartalmazott anyagokkal kapcsolatosan a következő címen
talál:
www.kaercher.com/REACH
Veszély fokozatok
VESZÉLY
Közvetlenül fenyegető veszélyre való figyelmeztetés, amely súlyos testi sérüléshez vagy halálhoz vezet.
몇 FIGYELMEZTETÉS
Lehetséges veszélyes helyzetre való figyelmeztetés, amely súlyos testi sérüléshez vagy halálhoz vezethet.
몇 VIGYÁZAT
Figyelmeztetés esetlegesen veszélyes
helyzetre, amely könnyű sérüléshez vezethet.
FIGYELEM
Lehetséges veszélyes helyzetre való figyelmeztetés, amely anyagi kárhoz vezethet.
Rendeltetésszerű használat
몇 FIGYELMEZTETÉS
A készülék nem alkalmas egészségre káros por felszívására.
– Ez a mentesítő rendszer száraz és eny-
hén nedves szemét porszegény mentesítésére szolgál egy megfelelő hosszúságra vágható szeméttömlő használatával.
– Ez a készülék ipari használatra alkal-
mas, l. raktár- és gyártási területeken
és gyártógépeken.
– A készüléket nem szabad daruval meg-
emelni.
92 HU
– 1

Készülék elemek
1 Feszítőkar
2 Szűrőfedél
3 Lapos harmonikaszűrő
4 Az ülepítő mechanika bal oldali kioldása
5 Szívófej
6 Típustábla
7 Hálózati kábel
8 Az ülepítő mechanika jobb oldali kioldá-
sa
9 Lemezkád
10 Mentesítő rendszer
11 Bowden huzal
12 A mentesítő rendszer fogantyúja
13 Gyűrűbetét
14 Szívófej zárja
15 Szeméttömlő
16 Az alváz görgője rögzítőfékkel
17 Padlófej tartó
18 Alváz
19 Felfogóteknő
20 Szívótámasztékok
21 Szívócső tartója
22 A szívófej fogantyúja
23 Forgókapcsoló
24 Váltakozó áramú motor
25 Távozó levegő hangtompító
26 Tolókengyel
27 Kábel tartó
Üzembevétel
A készüléket helyezze munkapozíció-
ba, ha szükséges biztosítsa rögzítőfék-
kel.
Szívócsövet (nem része a szállítási ter-
jedelemnek) helyezze be a szívócső
csatlakozójába.
Győződjön meg róla, hogy a mentesítő
rendszer szabályszerűen van behe-
lyezve.
A kívánt tartozékot (nem része a szállí-
tási terjedelemnek) felhelyezni.
Áram csatlakozás
FIGYELEM
Minden dugós kapcsoló cseréjekor, ellenőrizze a motor forgási irányát.
Megjegyzés: Helyes forgási iránynál a távozó levegő hangtompító nyílásából erős
légáramot lehet érezni. Helytelen forgási
irány esetén a levegőt beszívja.
Ábra
Ellenőrizze a motor forgási irányát.
Helytelen forgatási irány esetén cserélje meg a pólusokat a készülék dugós
csatlakozóján.
Szeméttömlő behelyezése
A szeméttömlő mind a 4 hurkát (hos-
szúság: 22 m) el kell távolítani.
Ábra
A befogót balra fordítással kinyitni és le-
felé kihúzni.
Szeméttömlőt az ábrának megfelelően
behelyezni.
A befogót betolni és jobbra fordítással
bezárni.
Ábra
A szeméttömlőt 40-50 cm-re lehúzni.
A szeméttömlő végét kábelkötözővel el-
zárni.
Használat
FIGYELEM
Sérülésveszély! A szívófejen található bemenő- és távozó levegő nyílásokat ne takarja le.
FIGYELEM
Porszívózáskor sohasem szabad eltávolítani a két összehajtható szűrőt.
Forgókapcsoló
– Készülék BE
– Szűrőtisztítás KI
– Készülék KI
– 2
– Készülék BE
– Szűrőtisztítás BE
93HU

A készülék bekapcsolása
Dugja be a hálózati csatlakozót.
A készüléket a forgókapcsolónál kap-
csolja be.
Automatikus szűrő letisztítás
A készülék újfajta, kettős szűrőtisztítással
rendelkezik, ez különösen finom por esetén
hatékony. Eközben az összehajtható szűrők minden 15 másodpercben léglökés által automatikusan tisztulnak (pulzáló zaj).
Felszívási eljárás
Végezze el a porszívózást.
A szemét csak kikapcsolt készülék esetén esik bele a szeméttömlőbe.
A szeméttömlő feltöltési szintjét rendszeresen ellenőrizni kell, mivel a készü-
lék nem kapcsol ki automatikusan.
Ábra
Könnyű szemét vagy elzáródás esetén:
Csörlőt kihúzni, hogy az indítónál lévő
fedelet ki lehessen nyitni (csak kikap-
csolt készülék esetén lehetséges).
A szeméttömlőt egy kicsit kihúzni, 2 ká-
belkötözővel 10 cm-es távolságban el-
zárni és a két kábelkötöző között átvág-
ni.
A szemeteszsákot a törvényi előírások-
nak megfelelően távolítsa el.
Megjegyzés: Könnyű szemét esetén a
szemeteszsák hossza egészen 2 m lehet,
anélkül, hogy elszakadna.
A készülék kikapcsolása
A készüléket a forgókapcsolónál kap-
csolja ki.
Húzza ki a hálózati dugót.
Minden üzem után
A mentesítő rendszer kivétele
Rögzítőfékeket rögzíteni.
Ábra
Vegye ki a lemezkádat.
Ábra
Az ülepítő mechanika kioldását felfele
húzni.
Húzza fel a tolókengyelt. A mentesítő
rendszer kiold és leeresztődik.
Ábra
A mentesítő rendszert a fogantyúnál
fogva húzza ki.
A készülék tisztítása
A készüléket kívül-belül porszívóval és
nedves ronggyal kell megtisztítani.
Mentesítő rendszer behelyezése
Ábra
Helyezze be ismét a mentesítő rend-
szert, és reteszelje a tolókengyelt.
몇 FIGYELMEZTETÉS
Zúzódásveszély! A bezárás
alatt semmi esetre se tartsa ke-
zét a mentesítő rendszer és a
gyűrűbetét között vagy nyúljon az emelő-
mechanika közelébe. Egyik kézzel fogja a
mentesítő rendszert a kézi markolatnál és a
tolókengyel működtetésével a másik kézzel
zárja be.
Helyezze be a lemezkádat.
A készülék tárolása
A hálózati kábelt feltekerni és a kábel-
tartóra akasztani.
A szívótömlőt tekerje fel a tolókengyelre.
A padlófejet és a szívócsövet tegye a
megfelelő tartóba.
A készüléket száraz helyiségben állítsa
le és biztosítsa illetéktelen használat ellen.
94 HU
– 3

Szállítás
몇 VIGYÁZAT
Sérülés- és rongálódásveszély! Szállítás
esetén vegye figyelembe a készülék súlyát.
A rögzítőféket kioldani és a készüléket
a tolókengyelnél tolni.
A készüléket berakodáskor az alváznál
kell megfogni és nem a tolókengyelnél.
Járművel történő szállítás esetén a ké-
szüléket az adott irányelveknek megfelelően kell csúszás és borulás ellen biztosítani.
Tárolás
몇 VIGYÁZAT
Sérülés- és rongálódásveszély! Tárolás
esetén vegye figyelembe a készülék súlyát.
Ezt a készüléket csak beltéri helyiségben
szabad tárolni.
Ápolás és karbantartás
VESZÉLY
A készüléken történő bármiféle munka előtt
kapcsolja ki a készüléket és húzza ki a hálózati csatlakozót.
Összehajtható szűrő cseréje
Megjegyzés: A szívófej levételéhez 2 sze-
mély szükséges.
Oldja ki és vegye le szívófejet.
Oldja ki és vegye le a szűrőfedelet.
Cserélje ki az összehajtható szűrőt.
Helyezze vissza és biztosítsa a szűrő-
fedelet.
Óvatosan helyezze vissza a szívófejet,
igazítsa meg és biztosítsa.
Segítség üzemzavar esetén
VESZÉLY
A készüléken történő bármiféle munka előtt
kapcsolja ki a készüléket és húzza ki a hálózati csatlakozót.
A szívóturbina nem megy
A dugaljat és az áramellátás biztosíté-
kát ellenőrizni.
A készülék hálózati kábelét és hálózati
csatlakozóját ellenőrizni.
Kapcsolja be a készüléket.
A szívóturbina megy, de a gép nem
szív
Megjegyzés: Helyes forgási iránynál a tá-
vozó levegő hangtompító nyílásából erős
légáramot lehet érezni. Helytelen forgási
irány esetén a levegőt beszívja.
Ábra
Ellenőrizze a motor forgási irányát.
Helytelen forgatási irány esetén cserélje meg a pólusokat a készülék dugós
csatlakozóján.
Szívóerő alábbhagy
Távolítsa el a dugulásokat a szívófúvó-
kából, szívócsőből, szívótömlőből vagy
összehajtható szűrőből.
Ellenőrizze a szívófej és a mentesítő
rendszer helyes illeszkedését.
Cserélje ki az összehajtható szűrőt.
Porszívózásnál por áramlik ki
Helyesen biztosítsa a szűrőfedelet.
Az összehajtható szűrő helyes beépíté-
si helyzetét ellenőrizni.
Cserélje ki az összehajtható szűrőt.
Az automatikus szűrőletisztítás nem
működik
A szívócső nincs csatlakoztatva.
A használt szívótömlő túl rövid (< 3m)
vagy nagy az átmérője.
Értesítse a szervizt.
Az automatikus szűrőletisztítást
nem lehet kikapcsolni
Értesítse a szervizt.
– 4
95HU

Szerviz
Chairman of the Board of Management
Director Regulatory Affairs & Certification
Ha a hibát nem lehet elhárítani, akkor a
készüléket a szervizzel kell ellenőriztetni.
Garancia
Minden országban az illetékes forgalmazónk által kiadott garancia feltételek érvényesek. Az esetleges üzemzavarokat az
Ön készülékén a garancia lejártáig költségmentesen elhárítjuk, amennyiben anyagvagy gyártási hiba az oka. Garanciális esetben kérjük, forduljon a vásárlást igazoló bizonylattal kereskedőjéhez vagy a legközelebbi hivatalos szakszervizhez.
Tartozékok és alkatrészek
Kizárólag eredeti tartozékokat és eredeti
pótalkatrészeket alkalmazzon, mivel ezek
szavatolják a készülék biztonságos és zavarmentes üzemét.
A tartozékokkal és pótalkatrészekkel kapcsolatos információkat a www.kaercher.com
oldalon olvashatja.
– A szállítmány nem tartalmaz tartozéko-
kat. A konkrét alkalmazási esettől függően a tartozékokat külön kell megrendelni.
– A készülék kifogástalan működését
csak a DN42 és DN52 névleges átmérőjű szívócső biztosítja.
– Alkatrészeket és tartozékokat kereske-
dőjénél vagy KÄRCHER-telephelyen
kaphat.
EU konformitási nyiltakozat
Ezennel tanúsítjuk, hogy az alábbiakban
megnevezett gép tervezése és építési
módja alapján az általunk forgalomba hozott kivitelben megfelel az EU irányelvek
vonatkozó, alapvető biztonsági és egészségügyi követelményeinek. A gép jóváhagyásunk nélkül történő módosítása esetén
ez a nyilatkozat elveszti érvényességet. A
készülék megfelel az EU-ban és Magyarországon (HU) harmonizált szabványoknak.
Termék: Nedves- és szárazporszívó
Típus: 1.576-xxx
Vonatkozó európai közösségi irányelvek:
2006/42/EK (+2009/127/EK)
2014/30/EU
Alkalmazott harmonizált szabványok:
EN 55014–1: 2006+A1: 2009+A2: 2011
EN 55014–2: 2015
EN 60335–1
EN 60335–2–69
EN 61000–3–2: 2014
EN 61000–3–3: 2013
EN 62233: 2008
Alkalmazott összehangolt normák:
-
5.966-010
Az aláírók az igazgatóság megbízásából
és teljes körű meghatalmazásával járnak
el.
96 HU
A dokumentáció összeállításáért felelős:
S. Reiser
Alfred Kärcher SE & Co. KG
Alfred-Kärcher-Straße 28-40
71364 Winnenden (Germany)
Tel.: +49 7195 14-0
Fax: +49 7195 14-2212
Winnenden, 2018/10/01
– 5

Műszaki adatok
IVC 60/30 Tact2 Lp
Hálózati feszültség V 400
Frekvencia Hz 3~ 50
Névleges teljesítmény W 3000
Légmennyiség (max.) l/s 68
Nyomáshiány (max.) kPa (mbar) 28,6 (286)
Védelmi fokozat -- IPX4
Védelmi osztály -- I
Szívótömlő csatlakozása (C-DN/C-ID) DN 72
Szívócső névleges átmérője DN 42/52
hosszúság x szélesség x magasság mm 970 x 690 x 1240
Szűrőfelület m
2
Tipikus üzemi súly kg 108
Környezeti hőmérséklet (max.) °C +40
Az EN 60335-2-69 szerint megállapított értékek
Hangnyomás szint L
Bizonytalanság K
pA
pA
Kéz-kar vibrációs kibocsátási érték m/s
Bizonytalanság K m/s
Hálózati kábel H07RN-F 5x1,5 mm
Alkatrész
szám
2
Kábelhosszúság
dB(A) 77
dB(A) 1
2
2
EU 6.649-826.0 7,5 m
1,9
<2,5
0,2
– 6
97HU

Před prvním použitím svého za-
řízení si přečtěte tento původní
návod k používání, řiďte se jím a uložte jej
pro pozdější použití nebo pro dalšího majitele.
– Před prvním uvedením do provozu bez-
podmínečně čtěte bezpečnostní pokyny č. 5.956-249.0!
– V případě nedodržování provozních a
bezpečnostních pokynů mohou vzniknout škody na přístroji a může dojít k
ohrožení osob přístroj obsluhujících i
ostatních.
– Při přepravních škodách ihned infor-
mujte obchodníka.
Obsah
Ochrana životního prostředí . . CS 1
Stupně nebezpečí . . . . . . . . . . CS 1
Používání v souladu s určením CS 1
Prvky přístroje. . . . . . . . . . . . . CS 2
Uvedení do provozu . . . . . . . . CS 2
Obsluha. . . . . . . . . . . . . . . . . . CS 2
Přeprava . . . . . . . . . . . . . . . . . CS 4
Ukládání . . . . . . . . . . . . . . . . . CS 4
Ošetřování a údržba . . . . . . . . CS 4
Pomoc při poruchách . . . . . . . CS 4
Záruka. . . . . . . . . . . . . . . . . . . CS 5
Příslušenství a náhradní díly. . CS 5
EU prohlášení o shodě . . . . . . CS 5
Technické údaje . . . . . . . . . . . CS 6
Ochrana životního prostředí
Obalové materiály jsou recyklovatelné. Obal nezahazujte do
domovního odpadu, ale odevzdejte jej k opětovnému zužitkování.
Přístroj je vyroben z hodnotných
recyklovatelných materiálů, které je třeba znovu využít. Baterie,
olej a podobné látky se nesmějí
dostat do okolního prostředí. Použitá zařízení proto odevzdejte
na příslušných sběrných místech
Informace o obsažených látkách (REACH)
Aktuální informace o obsažených látkách
naleznete na adrese:
www.kaercher.com/REACH
Stupně nebezpečí
NEBEZPEČÍ
Upozornění na bezprostředně hrozící nebezpečí, které vede k těžkým fyzickým zraněním nebo k usmrcení.
몇 VAROVÁNÍ
Upozornění na potencionálně nebezpeč-
nou situaci, která by mohla vést k těžkým
fyzickým zraněním nebo usmrcení.
몇 UPOZORNĚNÍ
Upozornění na případnou nebezpečnou situaci, která může vést k lehkým fyzickým
zraněním.
POZOR
Upozornění na potenciálně nebezpečnou
situaci, která může mít za následek poškození majetku.
Používání v souladu s
určením
몇 VAROVÁNÍ
Zařízení není vhodné k odsávání prachů
škodících zdraví.
– Tento systém likvidace je určen pro mír-
ně prašnou likvidaci suchého nebo mírně vlhkého materiálu pomocí odpadní
hadice, kterou lze uříznutím zkrátit na
potřebnou délku.
– Tento přístroj je vhodný k průmyslové-
mu použití, např. ve skladech a výrobních prostorách a na výrobních strojích.
– Není povoleno nakládat přístroj pomocí
jeřábu.
98 CS
– 1

Prvky přístroje
1 Upínací páčka
2 Kryt filtru
3 Plochý skládaný filtr
4 Levé odjištění sedimentační mechaniky
5 Vysávací hlavice
6 typový štítek
7 Sít'ový kabel
8 Pravé odjištění sedimentační mechani-
ky
9 Plechová vana
10 Kanalizační systém
11 Tažné lanko
12 Rukojeť kanalizačního systému
13 Mezikroužek
14 Uzamčení sací hlavy
15 Odpadní hadice
16 Vodicí kladka podvozku s ruční brzdou
17 Držák na podlahovou hubici
18 Podvozek
19 Jímka
20 Sací hrdlo
21 Držák na sací trubku
22 Rukojeť sací hlavy
23 Otočný spínač
24 Třífázový motor
25 Tlumič odpadního vzduchu
26 Posuvné rameno
27 Kabelový hák
Uvedení do provozu
Uveďte přístroj do pracovní polohy, po-
kud je to nutné, zajistěte brzdou.
Zasuňte sací hadici (není součástí do-
dávky) do sacího hrdla.
Zajistěte správné připojení kanalizační-
ho systému.
Nasaďte požadované příslušenství (ne-
ní součástí dodávky).
Přívod el. proudu
POZOR
Při každé výměně zásuvky zkontrolujte
směr otáčení motoru.
Upozornění: Při správném směru otáčení
ucítíte silný proud vzduchu z tlumiče odpadního vzduchu. Při nesprávném směru
otáčení je vzduch nasáván.
ilustrace
Zkontrolujte směr otáčení motoru. Po-
kud je směr otáčení motoru nesprávný,
zaměňte póly na přístrojové zástrčce.
Vložte odpadní hadici
Odstraňte všechny 4 smyčky odpadní
hadice (délka: 22 m).
ilustrace
Úchyt otevřete otáčením doleva a vyta-
žením směrem dolů.
Nasaďte odpadní hadici dle zobrazení.
Zasuňte úchyt a uzavřete jej otočením
ve směru doprava.
ilustrace
Vytáhněte odpadní hadici o 40-50°cm.
Uzavřete konec odpadní hadice vázací
páskou.
Obsluha
POZOR
Nebezpečí poškození! Nezakrývejte přívodní a odpadní vzduchové otvory na sací
hlavě.
POZOR
Oba ploché skládané filtry se nesmějí bě-
hem sání nikdy vyjímat.
Otočný spínač
– ZAP přístroje
– VYP očišťování filtru
– 2
– VYP přístroje
– ZAP přístroje
– ZAP očišťování filtru
99CS

Zapnutí přístroje
Zasuňte sít'ovou zástrčku do zásuvky.
Zapněte přístroj otočným spínačem.
Automatické čištění filtru
Vysavač je vybaven nekonvenčním zařízením na dvojité očišťování filtru, obzvlášť
účinným na jemný prach. Filtrační skládané
filtry jsou při tom každých 15 vteřin samočinně vyčištěny nárazem vzduchu (doprovázeným charakteristickým zvukem).
Vysávání
Proveďte sání.
Vysávaný materiál padá do odpadní hadice až po vypnutí přístroje.
Pravidelně kontrolujte stav naplnění odpadní hadice, protože se přístroj nevy-
píná automaticky.
ilustrace
V případě lehkého vysávaného materi-
álu nebo při ucpání: Vytáhněte tažné
lanko za účelem otevření výpusti (mož-
né pouze při vypnutém přístroji).
Mírně vytáhněte odpadní hadici, uza-
vřete ji ve vzdálenosti 10 cm pomocí 2
vázacích pásek a mezi vázacími páska-
mi ji prořízněte.
Odpadní sáček zlikvidujte dle platných
zákonných předpisů.
Upozornění: V případě, že je vysávaný
materiál lehký, může být délka odpadního
sáčku až 2 m, aniž by došlo k jeho přetržení.
Vypnutí zařízení
Vypněte přístroj otočným spínačem.
Vytáhněte zástrčku ze sítě.
Po každém použití
Odpojení kanalizačního systému
Aretujte ruční brzdu.
ilustrace
Vyjměte plechovou vanu.
ilustrace
Vytáhněte odblokování sedimentační
mechaniky směrem nahoru.
Posuvné madlo vytáhněte nahoru. Ka-
nalizační systém se odjistí a poklesne.
ilustrace
Vysuňte kanalizační systém za rukojeť.
Čištění přístroje
Přístroj odsajte a utřete uvnitř i vně vlh-
kým hadrem.
Připojení kanalizačního systému
ilustrace
Opět nasaďte kanalizační systém a za-
jistěte posuvným madlem.
몇 VAROVÁNÍ
Nebezpečí pohmoždění! V žádném případě nepokládejte při
zamykání ruce mezi systém
likvidace a mezikroužek ani do blízkosti
zvedací mechaniky. Systém likvidace
uchopte jednou rukou za rukojeť a druhou
rukou jej zamkněte aktivací posuvného ramene.
Nasaďte plechovou vanu.
Uložení přístroje
Naviňte síťový kabel a zahákněte jej na
hák pro kabely.
Sací hadici naviňte kolem posuvného
ramene.
Zasuňte podlahovou trysku a sací trub-
ku do příslušného držáku.
Přístroj uložte v suché místnosti a za-
bezpečte jej proti používání nepovolanými osobami.
100 CS
– 3
 Loading...