

Page 1

IVC 60/24-2 Tact²
Register and win!
www.kaercher.com
Deutsch 6
English 12
Français 18
Italiano 25
Nederlands 32
Español 38
Português 45
Dansk 51
Norsk 57
Svenska 63
Suomi 69
Ελληνικά 75
Türkçe 82
Русский 88
Magyar 95
Čeština 101
Slovenščina 107
Polski 113
Româneşte 120
Slovenčina 127
Hrvatski 133
Srpski 139
Български 145
Eesti 152
Latviešu 158
Lietuviškai 164
Українська 170
59639490 05/12
Page 2

234
Page 3

Page 4
Page 5
A
1.
B
1.
2.
3.
5
Page 6
Lesen Sie vor der ersten Benut-
zung Ihres Gerätes diese Originalbetriebsanleitung, handeln Sie danach
und bewahren Sie diese für späteren Gebrauch oder für Nachbesitzer auf.
– Vor erster Inbetriebnahme Sicherheits-
hinweise Nr. 5.956-249 unbedingt lesen!
– Bei Nichtbeachtung der Betriebsanlei-
tung und der Sicherheitshinweise können Schäden am Gerät und Gefahren
für den Bediener und andere Personen
entstehen.
– Bei Transportschaden sofort Händler
informieren.
Inhaltsverzeichnis
Umweltschutz. . . . . . . . . . . DE . . 1
Symbole in der Betriebsanleitung DE . . 1
Bestimmungsgemäße Verwen-
dung . . . . . . . . . . . . . . . . . . DE . . 2
Geräteelemente . . . . . . . . . DE . . 2
Inbetriebnahme . . . . . . . . . DE . . 2
Bedienung . . . . . . . . . . . . . DE . . 2
Transport . . . . . . . . . . . . . . DE . . 4
Lagerung . . . . . . . . . . . . . . DE . . 4
Pflege und Wartung . . . . . . DE . . 4
Hilfe bei Störungen. . . . . . . DE . . 4
Garantie . . . . . . . . . . . . . . . DE . . 5
Zubehör und Ersatzteile . . . DE . . 5
EG-Konformitätserklärung . DE . . 5
Technische Daten. . . . . . . . DE . . 6
Umweltschutz
Die Verpackungsmaterialien
sind recyclebar. Bitte werfen Sie
die Verpackungen nicht in den
Hausmüll, sondern führen Sie
diese einer Wiederverwertung
zu.
Altgeräte enthalten wertvolle recyclingfähige Materialien, die einer Verwertung zugeführt
werden sollten. Batterien, Öl
und ähnliche Stoffe dürfen nicht
in die Umwelt gelangen. Bitte
entsorgen Sie Altgeräte deshalb
über geeignete Sammelsysteme.
Hinweise zu Inhaltsstoffen (REACH)
Aktuelle Informationen zu Inhaltsstoffen finden Sie unter:
www.kaercher.de/REACH
Symbole in der Betriebsanlei-
tung
Gefahr
Für eine unmittelbar drohende Gefahr, die
zu schweren Körperverletzungen oder zum
Tod führt.
몇 Warnung
Für eine möglicherweise gefährliche Situation, die zu schweren Körperverletzungen
oder zum Tod führen könnte.
Vorsicht
Für eine möglicherweise gefährliche Situation, die zu leichten Verletzungen oder zu
Sachschäden führen kann.
6 DE
– 1
Page 7

Bestimmungsgemäße Ver-
wendung
몇 Warnung
Das Gerät ist nicht für die Absaugung gesundheitsschädlicher Stäube geeignet.
– Dieser Sauger ist zur Nass- und Tro-
ckenreinigung von Boden- und Wandflächen bestimmt.
– Dieses Gerät ist für den industriellen
Gebrauch geeignet, z.B. in Lager- und
Fertigungsbereichen und an Produktionsmaschinen.
– Das Gerät ist für Kranverladung nicht
zugelassen.
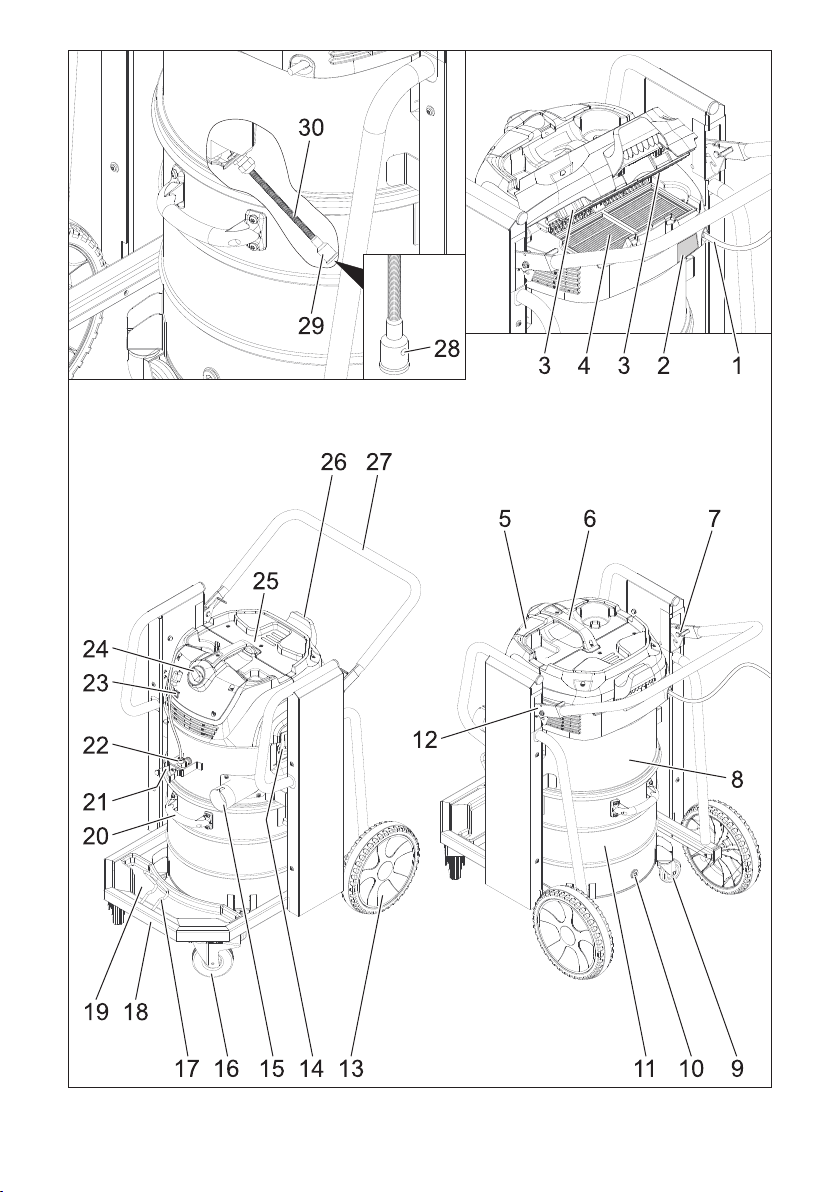
Geräteelemente
1 Netzkabel
2 Typenschild
3 Filterabreinigung
4 Flachfaltenfilter
5 Saugkopf
6 Handgriff des Saugkopfs
7 Rechte Entriegelung der Absetzmechanik
8 Zwischenring
9 Lenkrolle des Schmutzbehälters
10 Verschlussstopfen
11 Schmutzbehälter
12 Linke Entriegelung der Absetzmechanik
13 Rad
14 Verriegelung des Saugkopfs
15 Saugstutzen
16 Lenkrolle des Fahrgestells mit Feststell-
bremse
17 Halter für Bodendüse
18 Fahrgestell
19 Auffangwanne
20 Handgriff des Schmutzbehälters
21 Halter für Saugrohr
22 Anschlussstecker der Thermosonde
23 Kontrolllampe „Betriebsbereitschaft“
24 Drehschalter
25 Filterabdeckung
26 Kabelhalter
27 Schubbügel
28 Öffnung der Schutzkappe
29 Schutzkappe
30 Thermosonde
Inbetriebnahme
Das Gerät in Arbeitsposition bringen, wenn
nötig mit Feststellbremsen sichern.
Saugschlauch (nicht im Lieferumfang)
in den Saugstutzen einstecken.
Füllstand im Schmutzbehälter vor Ar-
beitsbeginn kontrollieren und Behälter
gegebenenfalls entleeren.
Sicherstellen, dass der Schmutzbehäl-
ter ordnungsgemäß eingesetzt ist.
Gewünschtes Zubehör (nicht im Liefer-
umfang) aufstecken.
Bedienung
Vorsicht
Beim Saugen darf niemals der Flachfaltenfilter entfernt werden.
Trockensaugen
Vorsicht
Beim Wechsel von Nass- auf Trocken-
saugen beachten:
Saugen von trockenem Staub bei nassem
Filterelement setzt den Filter zu und kann
ihn unbrauchbar machen.
Nassen Filter vor Benutzung gut trock-
nen oder durch trockenen ersetzen.
Bei Bedarf Filter wechseln, wird unter
Punkt "Pflege und Wartung" beschrieben.
Hinweis: Der Schmutzbehälter muss entleert werden, wenn er bis ca. 3 cm unter
dem oberen Rand gefüllt ist.
– Füllstand im Schmutzbehälter regelmä-
ßig kontrollieren, da das Gerät beim
Trockensaugen nicht automatisch abschaltet.
– 2
7DE
Page 8
Nasssaugen
Vorsicht
Örtliche Vorschriften zur Abwasserbehandlung beachten.
– Achtung! Wird das Gerät mit vollem
Schmutzbehälter in Betrieb genom-
men besteht die Möglichkeit, dass
die Abschaltung zu spät reagiert und
das Gerät überfüllt wird.
– Beim Aufsaugen von Nassschmutz mit
der Fugendüse, beziehungsweise
wenn überwiegend hohe Flüssigkeits-
mengen eingesaugt werden, empfiehlt
es sich, die Funktion „Filterabreinigung“
abzuschalten.
– Bei Erreichen des max. Flüssigkeitsstands
schaltet das Gerät automatisch ab.
– Nach Beendigung des Nasssaugens:
Flachfaltenfilter trocknen. Thermoson-
de und Schutzkappe mit einem feuch-
ten Tuch reinigen. Behälter mit einem
feuchten Tuch reinigen und trocknen.
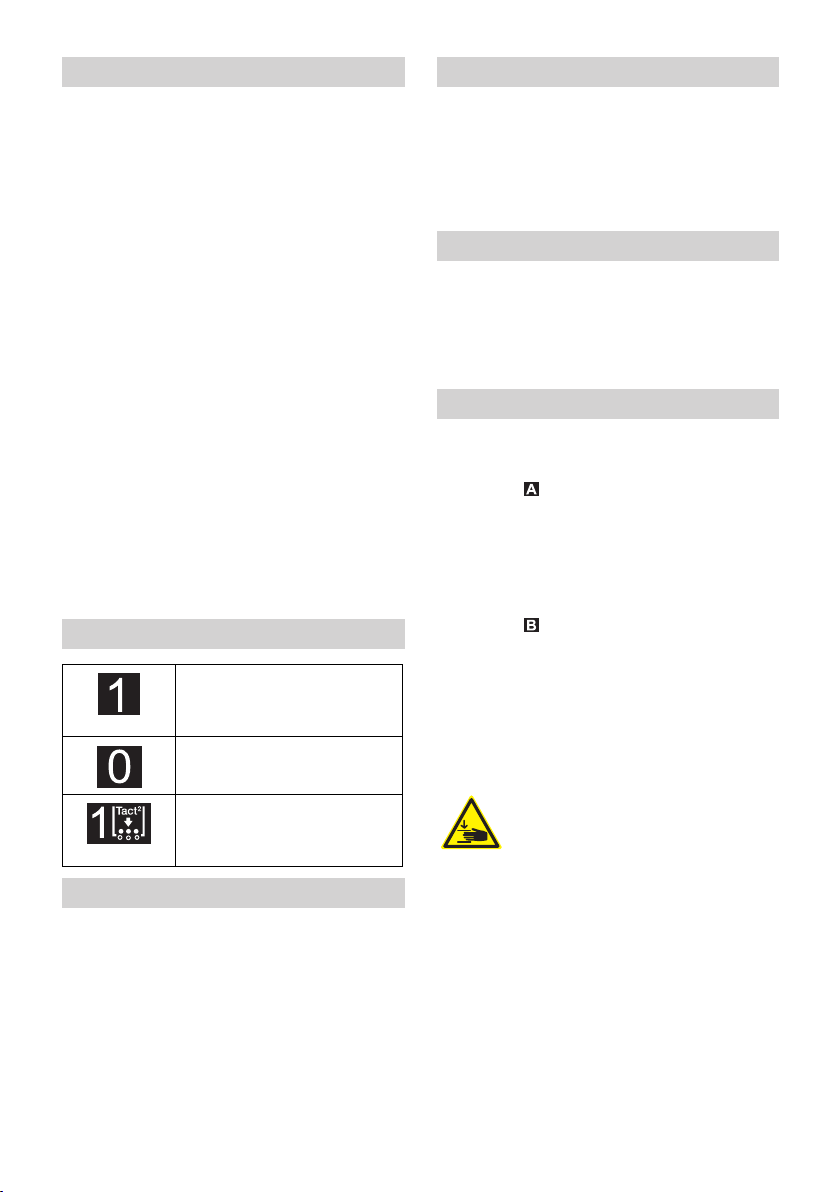
Drehschalter
– Gerät EIN
– Filterabreinigung AUS
– Gerät AUS
– Gerät EIN
– Filterabreinigung EIN
Gerät einschalten
Netzstecker einstecken.
Kontrolllampe „Betriebsbereitschaft“
leuchtet.
Gerät am Drehschalter einschalten.
Automatische Filterabreinigung
Das Gerät verfügt über eine neuartige,
doppelte Filterabreinigung, besonders
wirksam bei feinem Staub. Dabei wird der
Flachfaltenfilter alle 7,5 Sekunden durch einen Luftstoß automatisch gereinigt (pulsierendes Geräusch).
Gerät ausschalten
Gerät am Drehschalter ausschalten.
Netzstecker ziehen.
Kontrolllampe „Betriebsbereitschaft“ erlischt.
Nach jedem Betrieb
Behälter entleeren
Feststellbremsen arretieren.
Abbildung
Entriegelungen der Absetzmechanik
nach oben ziehen.
Schubbügel nach oben ziehen. Behäl-
ter wird entriegelt und abgesenkt.
Abbildung
Behälter am Handgriff herausziehen.
Behälter entleeren.
Behälter wieder einsetzen und mit
Schubbügel verriegeln.
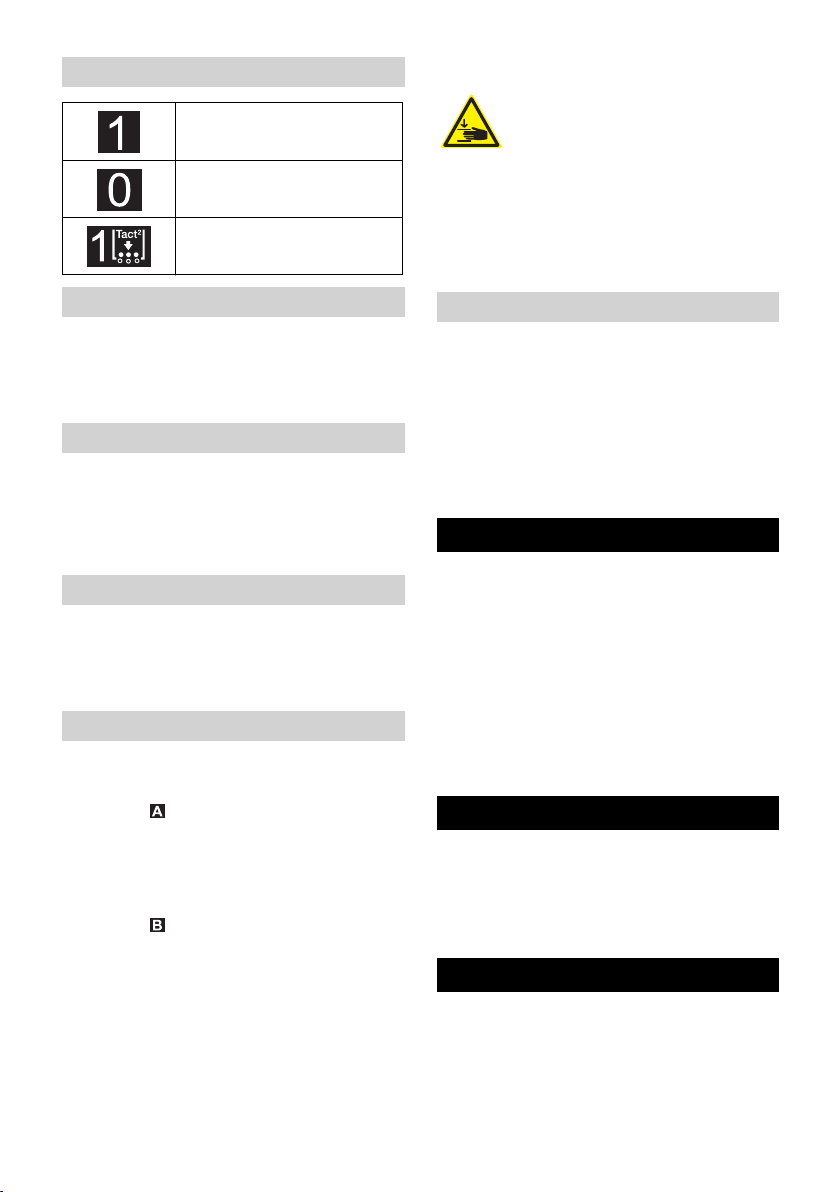
몇 Warnung
Quetschgefahr! Während der
Verriegelung keinesfalls die
Hände zwischen Schmutzbehäl-
ter und Zwischenring halten
oder in die Nähe der Hebemechanik bringen. Behälter durch Betätigung des Schubbügels mit beiden Händen verriegeln.
Gerät reinigen
Gerät innen und außen durch Absau-
gen und Abwischen mit einem feuchten
Tuch reinigen.
Gerät aufbewahren
Netzkabel um den Kabelhalter wickeln.
Saugschlauch um den Schubbügel wi-
ckeln.
Bodendüse und Saugrohr in die jeweili-
gen Halter stecken.
Gerät in einem trockenen Raum abstel-
len und vor unbefugter Benutzung sichern.
8 DE
– 3
Page 9

Transport
Hilfe bei Störungen
Vorsicht
Verletzungs- und Beschädigungsgefahr!
Gewicht des Gerätes beim Transport beachten.
Feststellbremsen lösen und Gerät am
Schubbügel schieben.
Gerät zum Verladen am Fahrgestell
fassen, nicht am Schubbügel.
Beim Transport in Fahrzeugen Gerät
nach den jeweils gültigen Richtlinien
gegen Rutschen und Kippen sichern.
Lagerung
Vorsicht
Verletzungs- und Beschädigungsgefahr! Gewicht des Gerätes bei Lagerung beachten.
Dieses Gerät darf nur in Innenräumen gelagert werden.
Pflege und Wartung
Gefahr
Vor allen Arbeiten am Gerät, Gerät ausschalten und Netzstecker ziehen.
Flachfaltenfilter wechseln
Filterabdeckung öffnen.
Flachfaltenfilter wechseln.
Filterabdeckung schließen, muss hör-
bar einrasten.
Thermosonde reinigen
Entriegelungen der Absetzmechanik
nach oben ziehen.
Schubbügel nach oben ziehen. Behäl-
ter wird entriegelt und abgesenkt.
Behälter am Handgriff herausziehen.
Thermosonde und Schutzkappe mit ei-
nem feuchten Tuch reinigen.
Behälter wieder einsetzen und mit
Schubbügel verriegeln.
Gefahr
Vor allen Arbeiten am Gerät, Gerät ausschalten und Netzstecker ziehen.
Saugturbine läuft nicht
Steckdose und Sicherung der Strom-
versorgung überprüfen.
Netzkabel, Netzstecker und Thermo-
sonde des Gerätes überprüfen.
Gerät einschalten.
Saugturbine schaltet ab
Behälter entleeren.
Kontrollieren, ob die Schutzkappe vor-
handen ist und die seitliche Öffnung der
Schutzkappe in Richtung der rechten
Absetzmechanik zeigt (siehe Geräteabbildung).
Thermosonde und Schutzkappe mit ei-
nem feuchten Tuch reinigen.
Saugturbine läuft nach Behälterent-
leerung nicht wieder an
Gerät ausschalten und wieder einschalten.
Thermosonde und Schutzkappe mit ei-
nem feuchten Tuch reinigen.
Saugkraft lässt nach
Verstopfungen aus Saugdüse, Saug-
rohr, Saugschlauch oder Flachfaltenfilter entfernen.
Saugkopf und Behälter auf richtigen
Sitz prüfen.
Filterabdeckung richtig einrasten.
Flachfaltenfilter wechseln.
Staubaustritt beim Saugen
Korrekte Einbaulage des Flachfaltenfil-
ters überprüfen.
Flachfaltenfilter wechseln.
Abschaltautomatik (Nasssaugen)
spricht nicht an
Thermosonde und Schutzkappe mit ei-
nem feuchten Tuch reinigen.
– 4
9DE
Page 10
Automatische Filterabreinigung ar-
beitet nicht
Saugschlauch nicht angeschlossen.
Verwendeter Saugschlauch ist zu kurz
(< 3m) oder hat einen zu großen Durchmesser.
Kundendienst benachrichtigen.
Automatische Filterabreinigung
lässt sich nicht abschalten
Kundendienst benachrichtigen.
Garantie
In jedem Land gelten die von unserer zuständigen Vertriebsgesellschaft herausgegebenen Garantiebedingungen. Etwaige
Störungen an Ihrem Gerät beseitigen wir
innerhalb der Garantiefrist kostenlos, sofern ein Material- oder Herstellungsfehler
die Ursache sein sollte. Im Garantiefall
wenden Sie sich bitte mit Kaufbeleg an Ihren Händler oder die nächste autorisierte
Kundendienststelle.
Zubehör und Ersatzteile
– Es dürfen nur Zubehör und Ersatzteile
verwendet werden, die vom Hersteller
freigegeben sind. Original-Zubehör und
Original-Ersatzteile bieten die Gewähr
dafür, dass das Gerät sicher und störungsfrei betrieben werden kann.
– Eine Auswahl der am häufigsten benö-
tigten Ersatzteile finden Sie am Ende
der Betriebsanleitung.
– Weitere Informationen über Ersatzteile
erhalten Sie unter www.kaercher.com
im Bereich Service.
– Im Lieferumfang ist kein Zubehör ent-
halten. Das Zubehör muss je nach Anwendung separat bestellt werden.
– Die einwandfreie Funktion des Gerätes
wird nur durch die Saugschlauch-Nennweiten DN42 und DN52 gewährleistet.
– Ersatzteile und Zubehör erhalten Sie
bei ihrem Händler oder bei ihrer KÄRCHER-Niederlassung.
EG-Konformitätserklärung
Hiermit erklären wir, dass die nachfolgend
bezeichnete Maschine aufgrund ihrer Konzipierung und Bauart sowie in der von uns
in Verkehr gebrachten Ausführung den einschlägigen grundlegenden Sicherheitsund Gesundheitsanforderungen der EGRichtlinien entspricht. Bei einer nicht mit
uns abgestimmten Änderung der Maschine
verliert diese Erklärung ihre Gültigkeit.
Produkt: Nass- und Trockensauger
Typ: 1.576-xxx
Einschlägige EG-Richtlinien
2006/42/EG (+2009/127/EG)
2004/108/EG
Angewandte harmonisierte Normen
EN 55014–1: 2006 + A1: 2009
EN 55014–2: 1997 + A2: 2008
EN 60335–1
EN 60335–2–69
EN 61000–3–2: 2006 + A2: 2009
EN 61000–3–3: 2008
EN 62233: 2008
Angewandte nationale Normen
-
5.966-010
Die Unterzeichnenden handeln im Auftrag
und mit Vollmacht der Geschäftsführung.
CEO
Dokumentationsbevollmächtigter:
S. Reiser
Alfred Kärcher GmbH & Co. KG
Alfred-Kärcher-Str. 28 - 40
71364 Winnenden (Germany)
Tel.: +49 7195 14-0
Fax: +49 7195 14-2212
Winnenden, 2010/07/14
Head of Approbation
10 DE
– 5
Page 11
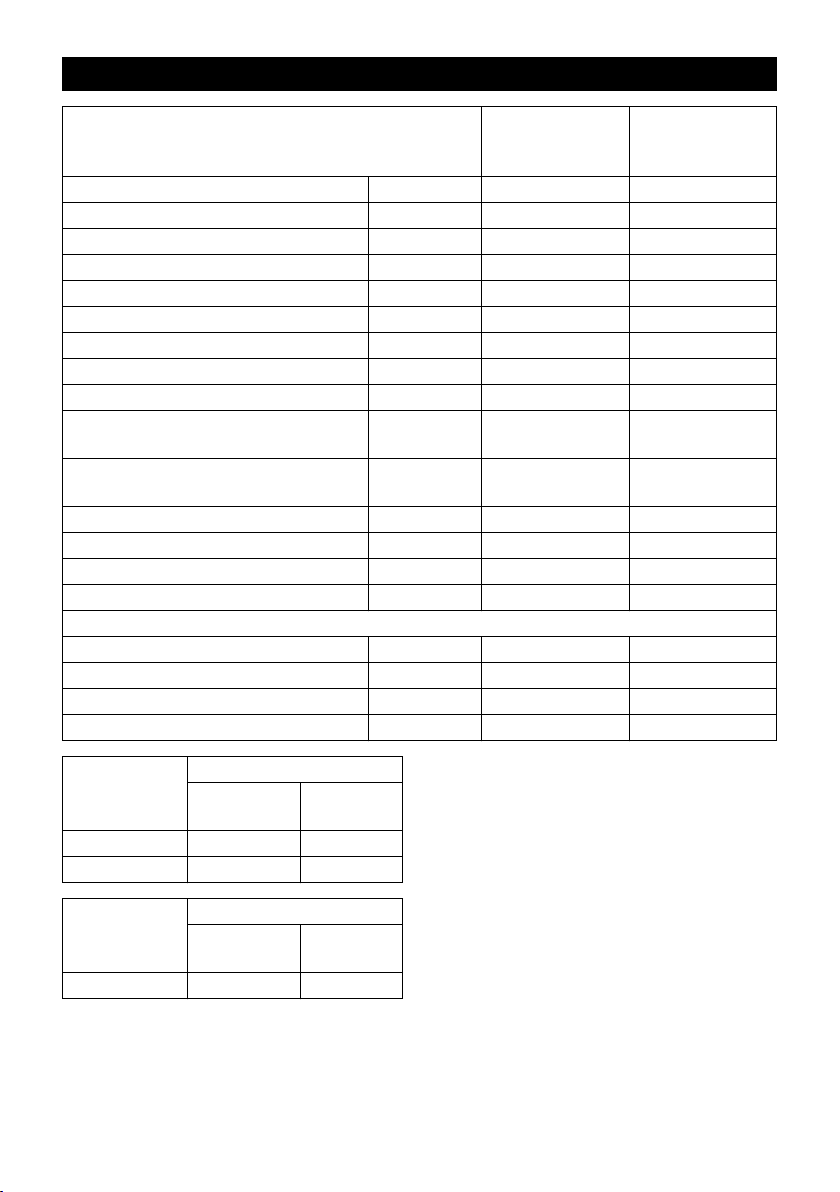
Technische Daten
IVC 60/24-2
*EU
IVC 60/24-2
*GB
*CH
Netzspannung V 220-240 110
Frequenz Hz 1~ 50/60 1~ 50/60
Max. Leistung W 2760 2450
Nennleistung W 2400 2150
Behälterinhalt l 60 60
Luftmenge (max.) l/s 2x 74 2x 66
Unterdruck (max.) kPa (mbar) 25,4 (254) 22,0 (220)
Schutzart -- IP X4 IP X4
Schutzklasse -- I I
Saugschlauchanschluss (C-DN/C-ID) DN 72 72
Saugschlauch-Nennweite DN 42/52 42/52
Länge x Breite x Höhe mm 970 x 690 x 995 970 x 690 x 995
Filterfläche m
2
0,95 0,95
Typisches Betriebsgewicht kg 60 60
Umgebungstemperatur (max.) °C +40 +40
Ermittelte Werte gemäß EN 60335-2-69
Schalldruckpegel L
Unsicherheit K
pA
pA
Hand-Arm Vibrationswert m/s
Unsicherheit K m/s
Netzkabel H07RN-F 3x1,5 mm
dB(A) 73 73
dB(A) 1 1
2
2
2
<2,5 <2,5
0,2 0,2
Teile-Nr. Kabellänge
EU 6.649-915.0 10 m
CH 6.650-168.0 10 m
Netzkabel H07RN-F 3x2,5 mm
2
Teile-Nr. Kabellänge
GB 6.650-169.0 10 m
– 6
11DE
Page 12
Please read and comply with
these original instructions prior
to the initial operation of your appliance and
store them for later use or subsequent owners.
– Before first start-up it is definitely nec-
essary to read the safety indications Nr.
5.956-249!
– The non-compliance of the operating
and safety instructions may lead to
damages of the appliance and to dangers for the operator and other persons.
– In case of transport damage inform ven-
dor immediately
Contents
Environmental protection . . EN . . .1
Symbols in the operating in-
structions . . . . . . . . . . . . . . EN . . .1
Proper use . . . . . . . . . . . . . EN . . .1
Device elements. . . . . . . . . EN . . .2
Start up. . . . . . . . . . . . . . . . EN . . .2
Operation . . . . . . . . . . . . . . EN . . .2
Transport . . . . . . . . . . . . . . EN . . .3
Storage. . . . . . . . . . . . . . . . EN . . .3
Maintenance and care . . . . EN . . .3
Troubleshooting . . . . . . . . . EN . . .4
Warranty. . . . . . . . . . . . . . . EN . . .4
Accessories and Spare Parts EN . . .5
EC Declaration of Conformity EN . . .5
Technical specifications . . . EN . . .6
Environmental protection
The packaging material can be
recycled. Please do not throw
the packaging material into
household waste; please send it
for recycling.
Old appliances contain valuable
materials that can be recycled;
these should be sent for recycling. Batteries, oil, and similar
substances must not enter the
environment. Please dispose of
your old appliances using appropriate collection systems.
Notes about the ingredients (REACH)
You will find current information about the
ingredients at:
www.kaercher.com/REACH
Symbols in the operating
instructions
Danger
Immediate danger that can cause severe
injury or even death.
몇 Warning
Possible hazardous situation that could
lead to severe injury or even death.
Caution
Possible hazardous situation that could
lead to mild injury to persons or damage to
property.
12 EN
Proper use
몇 Warning
The appliance is not suitable for vacuuming
dust which endangers health.
– The machine is meant for dry and wet
cleaning of floors and walls.
– This appliance is suited for commercial
and industrial use, e.g. in storage and
assembly areas and on production machines.
– The appliance is not approved for crane
loading.
– 1
Page 13

Device elements
1 Power cord
2 Nameplate
3 Filter dedusting
4 Flat fold filter
5 Suction head
6 Handle of the suction head
7 Right unlocking of the placement me-
chanics
8 Intermediate ring
9 Steering roller of the dirt container
10 Stopper
11 Dirt receptacle
12 Left unlocking of the placement mechanics
13 Wheel
14 Suction head lock
15 Suction support
16 Steering roller of the chassis with park-
ing brake
17 Floor nozzle holder
18 Chassis
19 Drain pan
20 Handle of the dirt container
21 Holder for suction pipe
22 Connection plug of the thermal probe
23 ”Ready for use” indicator lamp
24 Rotating knob
25 Filter cover
26 Cable clamp
27 Push handle
28 Opening of the protective cover
29 Protective cover
30 Thermal probe
Start up
Bring the appliance to working position
- secure it, if required, with parking
brakes.
Insert the suction hose (not included)
into the suction hose connection.
Check the fill level in the dirt container
prior to starting work and empty the
container if necessary.
Ensure that the dirt container has been
inserted properly.
Attach the desired accessoried (not in-
cluded).
Operation
Caution
The flat pleated filter must always be in
place while vacuuming.
Dry vacuum cleaning
Caution
Please note the following when switch-
ing from wet to dry vacuum cleaning:
If you vacuum dry dust while the filter element is still wet the filter will become obstructed and may be damaged beyond
repair.
Dry the wet filter properly before use or
replace it with a dry one.
Change the filter, if required, according
to instructions under the section "Maintenance and Care".
Note: The dirt container needs to be emptied if it is full until about 3 cm below the upper rim.
– Check the fill level of the dirt container
at regular intervals, as the appliance
does not shut off automatically during
dry vacuuming.
Wet vacuum cleaning
Caution
Please observe the local provisions regarding the wastewater treatment.
– Caution! If the appliance is used
while the dirt container is full, there
is a chance that the shut-off mechanism will respond late and the appliance might become overfilled.
– If wet dirt is vacuumed with the crevice
nozzle or if high volumes of liquid are
sucked up from a container, it is recommended to deactivate the "Filter Dedusting" function.
– If the maximum liquid level is reached
the appliance will turn off automatically.
– After the wet vacuuming: Clean the flat-
fold filter. Clean the thermal probe and
the protective cover with a moist cloth.
Clean the container with a damp rag
and dry it.
– 2
13EN
Page 14
Rotating knob
– Appliance ON
– Filter dedusting OFF
– Appliance OFF
– Appliance ON
– Filter dedusting ON
Turning on the Appliance
Plug in the main plug.
Indicator lamp "Ready for use" lights up.
Switch on the appliance at the rotating
knob.
Automatic filter cleaning
The appliance has an innovative dual filter
cleaning system that is particularly effective
with fine dust. The flat pleated filter is automatically cleaned every 7.5 seconds
through an air jet (pulsating sound).
Turn off the appliance
Switch off the appliance at the rotating
knob.
Pull out the mains plug.
Indicator lamp "Ready for use" turns off.
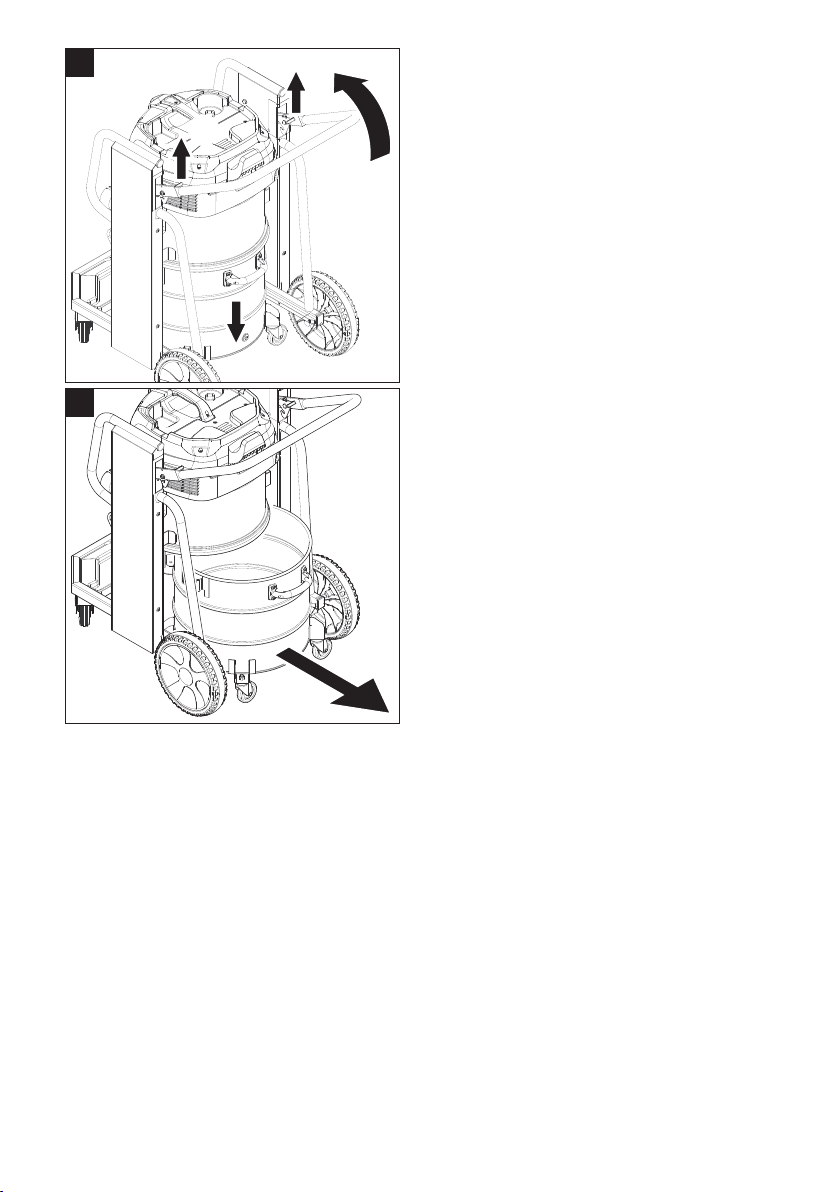
After each operation
Empty the container
Lock parking brakes.
Illustration
Pull the locks of the placement mechan-
ics up.
Pull the push handle upward. The con-
tainer is unlocked and lowered.
Illustration
Pull the container out by the handle.
Empty the container.
Replace the battery and lock it with the
sliding bow.
몇 Warning
Crush hazard. Never hold your
hands between the dirt container and the intermediate ring or
put them near the lifting mechanism while locking. Lock the container by
pressing the sliding bow with both hands.
Cleaning the device
Vacuum and wipe the appliance inside
and outside with a damp cloth.
Storing the Appliance
Wrap the mains cord around the cable
holder.
Wind the suction hose around the slid-
ing bow.
Insert the floor nozzle and the suction
pipe into their respective holder.
Place the appliance in a dry room and
secure it from unauthorized use.
Transport
Caution
Risk of injury and damage! Observe the
weight of the appliance when you transport it.
Release the park brakes and push the
appliance by the push handle.
Grab the appliance by the chassis, not
by the sliding bow to load it.
When transporting in vehicles, secure
the appliance according to the guidelines from slipping and tipping over.
Storage
Caution
Risk of injury and damage! Note the weight
of the appliance in case of storage.
This appliance must only be stored in interior rooms.
Maintenance and care
Danger
First pull out the plug from the mains before
carrying out any tasks on the machine.
14 EN
– 3
Page 15

Exchanging the flat pleated filter
Open filter door.
Replace the flat pleated filter.
Close the filter door, it must lock into
place.
Clean the thermal probe
Pull the locks of the placement mechan-
ics up.
Pull the push handle upward. The con-
tainer is unlocked and lowered.
Pull the container out by the handle.
Clean the thermal probe and the protec-
tive cover with a moist cloth.
Replace the battery and lock it with the
sliding bow.
Troubleshooting
Danger
First pull out the plug from the mains before
carrying out any tasks on the machine.
Suction turbine does not run
Check the receptacle and the fuse of
the power supply.
Check the power cable, the power plug
and the thermal probe of the device.
Turn on the appliance.
Suction turbine turns off
Empty the container.
Check whether the protective cover is
available and the side opening of the
protective cover points to the right
placement mechanics (see illustration
of appliance).
Clean the thermal probe and the protec-
tive cover with a moist cloth.
Suction turbine does not start again
after the container has been
emptied
Turn the appliance off and back on.
Clean the thermal probe and the protec-
tive cover with a moist cloth.
Suction capacity decreases
Remove blockages in the suction noz-
zle, suction tube, suction hose, or flat
pleated filter.
Check the suction head and the recep-
tacle for proper seating.
Ensure the filter cover properly locks
into place.
Replace the flat pleated filter.
Dust comes out while vacuuming
Check for proper installation of the flat
pleated filter.
Replace the flat pleated filter.
Automatic shut-off (wet vacuum
cleaning) does not react
Clean the thermal probe and the protec-
tive cover with a moist cloth.
Automatic filter cleaning is not
working
Suction hose is not connected.
Suction hose used is too short (< 3m) or
the diameter is too large.
Inform Customer Service
Automatic filter cleaning cannot be
switched off
Inform Customer Service
Warranty
The warranty terms published by the relevant sales company are applicable in each
country. We will repair potential failures of
your appliance within the warranty period
free of charge, provided that such failure is
caused by faulty material or defects in manufacturing. In the event of a warranty claim
please contact your dealer or the nearest
authorized Customer Service centre.
Please submit the proof of purchase.
– 4
15EN
Page 16
Accessories and Spare Parts EC Declaration of Conformity
– Only use accessories and spare parts
which have been approved by the manufacturer. The exclusive use of original
accessories and original spare parts
ensures that the appliance can be operated safely and trouble free.
– At the end of the operating instructions
you will find a selected list of spare parts
that are often required.
– For additional information about spare
parts, please go to the Service section
at www.kaercher.com.
– Accessories are not included in the de-
livery. The accessories for the device
must be ordered separately, depending
on the application.
– The proper functioning of the unit is only
ensured when a suction hose of a nominal width of DN42 or DN52 is used.
– You can procure the spare parts and
the attachments from your dealer or
your KÄRCHER branch office.
We hereby declare that the machine described below complies with the relevant
basic safety and health requirements of the
EU Directives, both in its basic design and
construction as well as in the version put
into circulation by us. This declaration shall
cease to be valid if the machine is modified
without our prior approval.
Product: Wet and dry vacuum cleaner
Type: 1.576-xxx
Relevant EU Directives
2006/42/EC (+2009/127/EC)
2004/108/EC
Applied harmonized standards
EN 55014–1: 2006 + A1: 2009
EN 55014–2: 1997 + A2: 2008
EN 60335–1
EN 60335–2–69
EN 61000–3–2: 2006 + A2: 2009
EN 61000–3–3: 2008
EN 62233: 2008
Applied national standards
-
5.966-010
16 EN
The undersigned act on behalf and under
the power of attorney of the company management.
CEO
Head of Approbation
Authorised Documentation Representative
S. Reiser
Alfred Kärcher GmbH Co. KG
Alfred-Kärcher-Str. 28 - 40
71364 Winnenden (Germany)
Phone: +49 7195 14-0
Fax: +49 7195 14-2212
Winnenden, 2010/07/14
– 5
Page 17
Technical specifications
IVC 60/24-2
*EU
IVC 60/24-2
*GB
*CH
Mains voltage V 220-240 110
Frequency Hz 1~ 50/60 1~ 50/60
Max. performance W 2760 2450
Rated power W 2400 2150
Container capacity l 60 60
Air volume (max.) l/s 2x 74 2x 66
Negative pressure (max.) kPa (mbar) 25,4 (254) 22,0 (220)
Type of protection -- IP X4 IP X4
Protective class -- I I
Suction hose connection (C-DN/C-ID) DN 72 72
Nominal width of suction hose DN 42/52 42/52
Length x width x height mm 970 x 690 x 995 970 x 690 x 995
Filter area m
2
0,95 0,95
Typical operating weight kg 60 60
Max. ambient temperature °C +40 +40
Values determined to EN 60335-2-69
Sound pressure level L
Uncertainty K
pA
pA
Hand-arm vibration value m/s
Uncertainty K m/s
dB(A) 73 73
dB(A) 1 1
2
2
<2,5 <2,5
0,2 0,2
Power cord H07RN-F 3x1,5 mm
Part no.: Cable
length
EU 6.649-915.0 10 m
CH 6.650-168.0 10 m
Power cord H07RN-F 3x2,5 mm
Part no.: Cable
length
GB 6.650-169.0 10 m
2
2
– 6
17EN
Page 18
Lire ces notice originale avant la
première utilisation de votre appareil, se comporter selon ce qu'elles requièrent et les conserver pour une
utilisation ultérieure ou pour le propriétaire
futur.
– Avant la première mise en service, vous
devez impérativement avoir lu les
consignes de sécurité N° 5.956-249 !
– En cas de non-respect des instructions
de service et des consignes de sécurité, l'appareil risque de subir des dommages matériel et l'utilisateur ainsi que
toute tierce personne sont exposés à
des dangers potentiels.
– Contactez immédiatement le revendeur
en cas d'avarie de transport.
Table des matières
Protection de l’environnement FR . . .1
Symboles utilisés dans le mode
d'emploi . . . . . . . . . . . . . . . FR . . .1
Utilisation conforme . . . . . . FR . . .2
Éléments de l'appareil . . . . FR . . .2
Mise en service . . . . . . . . . FR . . .2
Utilisation . . . . . . . . . . . . . . FR . . .2
Transport . . . . . . . . . . . . . . FR . . . 4
Entreposage. . . . . . . . . . . . FR . . . 4
Entretien et maintenance . . FR . . .4
Assistance en cas de panne FR . . .4
Garantie . . . . . . . . . . . . . . . FR . . .5
Accessoires et pièces de re-
change . . . . . . . . . . . . . . . . FR . . .5
Déclaration de conformité CE FR . . . 6
Caractéristiques techniques FR . . .7
Protection de
l’environnement
Les matériaux constitutifs de
l’emballage sont recyclables.
Ne pas jeter les emballages
dans les ordures ménagères,
mais les remettre à un système
de recyclage.
Les appareils usés contiennent
des matériaux précieux recyclables lesquels doivent être apportés à un système de
recyclage. Il est interdit de jeter
les batteries, l'huile et les substances similaires dans l'environnement. Pour cette raison,
utiliser des systèmes de collecte
adéquats afin d'éliminer les appareils hors d'usage.
Instructions relatives aux ingrédients
(REACH)
Les informations actuelles relatives aux ingrédients se trouvent sous :
www.kaercher.com/REACH
Symboles utilisés dans le
mode d'emploi
Danger
Pour un danger immédiat qui peut avoir
pour conséquence la mort ou des blessures corporelles graves.
몇 Avertissement
Pour une situation potentiellement dangereuse qui peut avoir pour conséquence des
blessures corporelles graves ou la mort.
Attention
Pour une situation potentiellement dangereuse qui peut avoir pour conséquence des
blessures légères ou des dommages matériels.
18 FR
– 1
Page 19

Utilisation conforme
몇 Avertissement
Cet appareil n'est pas conçu pour aspirer
des poussières nocives.
– Cet aspirateur est destiné au nettoyage
à sec et au nettoyage par voie humide
des sol et murs.
– Cet appareil convient à un usage indus-
triel, par ex. dans le secteur entrepôt et
fabrication et sur des machines de production.
– L'appareil n'est pas homologué pour un
chargement par grue.
Éléments de l'appareil
1 Câble d’alimentation
2 Plaque signalétique
3 Nettoyage du filtre
4 Filtre plat de plis
5 Tête d'aspiration
6 Poignée de la tête d'aspiration
7 Déverrouillage droit du mécanisme de
pose
8 Bague intermédiaire
9 Roulette du collecteur de saletés
10 Obturateurs
11 Récipient collecteur
12 Déverrouillage gauche du mécanisme
de pose
13 Roue
14 Verrouillage de la tête d'aspiration
15 Consoles d'aspiration
16 Roulette du châssis avec frein d'arrêt
17 Support pour buse de sol
18 Bâti de transport
19 Cuve de récupération
20 Poignée du collecteur de saletés
21 Support pour tube d'aspiration
22 Connecteur de la sonde thermique
23 Témoin de contrôle d’état de service
24 Interrupteur rotatif
25 Recouvrement du filtre
26 Attache-câble
27 Guidon de poussée
28 Ouverture du capuchon de protection
29 Bouchon de protection
30 Sonde thermique
Mise en service
Amener l'appareil en position de travail,
si nécessaire le bloquer au moyen des
freins d'immobilisation.
Insérer le flexible d'aspiration (ne fai-
sant pas partie de la fourniture) dans la
tubulure d'aspiration.
Avant de commencer le travail, vérifier
le niveau de remplissage dans le collecteur de saletés et vider le cas échéant le
collecteur.
S'assurer que le collecteur de saletés
est positionné correctement.
Insérer les accessoires voulus (ne fai-
sant pas partie de la fourniture).
Utilisation
Attention
Le filtre à plis plats ne doit jamais être retiré
durant l'aspiration.
Aspiration de poussières
Attention
Avant de passer de l’aspiration humide
à l’aspiration à sec, il faut noter que :
aspirer de la poussière sèche avec une cartouche de filtre mouillée peut boucher le
filtre et le rendre inutilisable.
Il faut donc bien sécher un filtre mouillé
avant de l'utiliser ou bien le remplacer
par un filtre sec.
Le cas échéant, remplacer le filtre (se
référer au point 'Entretien et maintenance').
Remarque : le collecteur de saletés doit
être vidé, lorsqu'il est plein jusqu'à env. 3
cm sous le bord supérieur.
– Vérifier régulièrement le niveau de rem-
plissage dans le collecteur de saletés,
vu que l'appareil ne se coupe pas automatiquement lors de l'aspiration à sec.
– 2
19FR
Page 20
Aspiration humide
Attention
Tenir compte des prescriptions locales
pour le traitement des eaux usées.
– Attention ! Si l'appareil est mis en
service avec un collecteur de saletés
plein, il est possible que la coupure
réagisse trop tard et que l'appareil
soit trop rempli.
– Pour l'aspiration de saletés humides
avec le petit suceur, ou bien si l'aspira-
tion consiste surtout à aspirer de
grandes quantités d'eau, il est recom-
mandé de désactiver la fonction "Net-
toyage du filtre".
– L'appareil se met automatiquement
hors marche lorsque le niveau de li-
quide maxi est atteint.
– À la fin de l'aspiration humide : sécher
le filtre à plis plat. Nettoyer la sonde
thermique et le capuchon de protection
avec un chiffon humide. Nettoyer le ré-
servoir avec un chiffon humide et le sé-
cher.
Interrupteur rotatif
– Appareil MARCHE
– Nettoyage de filtre AR-
RÊT
– Appareil ARRÊT
– Appareil MARCHE
– Nettoyage de filtre
MARCHE
Mettre l'appareil en marche
Brancher la fiche secteur.
Le témoin de contrôle d'état de service
s'allume.
Enclencher l'appareil à l'aide de l'inter-
rupteur rotatif.
Nettoyage automatique du filtre
L'appareil est équipé d'un nouveau type de
nettoyage double de filtre particulièrement
efficace pour les poussières fines. Avec ce
procédé, le filtre à plis plats est automatiquement nettoyé par un souffle (bruit pulsant) toutes les 7,5 secondes.
Mise hors service de l'appareil
Couper l'appareil à l'aide de l'interrup-
teur rotatif.
Retirer le connecteur de la prise.
Le témoin de contrôle d’état de service
s'éteint
Après chaque mise en service
Vider le réservoir
Bloquer le frein de stationnement.
Illustration
Tirer les déverrouillages du mécanisme
de pose vers le haut.
Tirer le guidon de poussée vers le haut.
Le collecteur est déverrouillé et
s'abaisse.
Illustration
Retirer le collecteur au niveau de la poi-
gnée.
Vider le réservoir.
Remettre le collecteur en place et le
verrouiller avec le guidon de poussée.
몇 Avertissement
Risque d'écrasement ! Ne
mettre en aucun cas les mains
entre le collecteur de saletés et
la bague intermédiaire ou à la
proximité mécanisme de levage pendant le
verrouillage. Verrouiller le collecteur en actionnant le guidon de poussée des deux
mains.
Nettoyage de l’appareil
Nettoyer la partie intérieure et exté-
rieure de l'appareil en l'aspirant et en
l'essuyant avec un chiffon humide.
20 FR
– 3
Page 21

Ranger l’appareil
Enrouler le câble secteur autour de l'at-
tache-câbles.
Enrouler le flexible d'aspiration autour
du guidon de poussée.
Insérer la buse de sol et le tube d'aspi-
ration dans le support correspondant.
Entreposer l’appareil dans un endroit
sec et le sécuriser contre toute utilisation non autorisée.
Transport
Attention
Risque de blessure et d'endommagement !
Respecter le poids de l'appareil lors du
transport.
Desserrer le frein d'arrêt et pousser
l'appareil au niveau du guidon de poussée.
Pour porter l’appareil, toujours le saisir
au niveau du châssis et jamais au niveau du guidon de poussée.
Sécuriser l'appareil contre les glisse-
ments ou les basculements selon les directives en vigueur lors du transport
dans des véhicules.
Entreposage
Attention
Risque de blessure et d'endommagement !
Prendre en compte le poids de l'appareil à
l'entreposage.
Cet appareil doit uniquement être entreposé en intérieur.
Entretien et maintenance
Danger
Avant d'effectuer tout type de travaux sur
l'appareil, le mettre hors service et débrancher la fiche électrique.
Remplacement du filtre à plis plats
Ouvrir le recouvrement du filtre.
Remplacer le filtre à plis plats.
Fermer le recouvrement du filtre, il faut
l'entendre s'enclencher.
Nettoyer la sonde thermique
Tirer les déverrouillages du mécanisme
de pose vers le haut.
Tirer le guidon de poussée vers le haut.
Le collecteur est déverrouillé et
s'abaisse.
Retirer le collecteur au niveau de la poi-
gnée.
Nettoyer la sonde thermique et le capu-
chon de protection avec un chiffon humide.
Remettre le collecteur en place et le
verrouiller avec le guidon de poussée.
Assistance en cas de panne
Danger
Avant d'effectuer tout type de travaux sur
l'appareil, le mettre hors service et débrancher la fiche électrique.
La turbine d'aspiration ne
fonctionne pas
Vérifier la prise et le fusible de l'alimen-
tation électrique.
Vérifier le câble d'alimentation, la fiche
secteur et la thermosonde de l'appareil.
Allumer l’appareil.
Turbine d'aspiration se met hors
marche
Vider le réservoir.
Vérifier si le capuchon de protection est
présent et si l'ouverture latérale du capuchon de protection est dirigée en direction du mécanisme de pose droit
(voir l'illustration de l'appareil).
Nettoyer la sonde thermique et le capu-
chon de protection avec un chiffon humide.
– 4
21FR
Page 22

Turbine d'aspiration ne se remet
pas en marche après avoir vidé la
cuve
Arrêter et redémarrer l'appareil.
Nettoyer la sonde thermique et le capu-
chon de protection avec un chiffon humide.
La force d'aspiration diminue
Déboucher la buse d'aspiration, le
tuyau d'aspiration, le flexible d'aspiration ou le filtre plat à plis.
Vérifier la bonne assise de la ventouse
et du récipient.
Enclencher correctement le recouvre-
ment de filtre.
Remplacer le filtre à plis plats.
De la poussière s'échappe lors de
l'aspiration
Vérifier la position de montage du filtre
à plis plats.
Remplacer le filtre à plis plats.
Dispositif automatique de coupure
(aspiration humide) ne se
déclenche pas
Nettoyer la sonde thermique et le capu-
chon de protection avec un chiffon humide.
Le nettoyage automatique de filtre
ne fonctionne pas
Le flexible d'aspiration n'est pas raccordé.
Le flexible d'aspiration utilisé est trop
court (< 3m) ou a un diamètre trop important.
Informer le service après-vente.
Le nettoyage automatique ne se
laisse pas mettre hors service
Informer le service après-vente.
Garantie
Dans chaque pays, les conditions de garantie en vigueur sont celles publiées par
notre société de distribution responsable.
Les éventuelles pannes sur l’appareil sont
réparées gratuitement dans le délai de validité de la garantie, dans la mesure où
celles-ci relèvent d'un défaut matériel ou
d'un vice de fabrication. En cas de recours
en garantie, adressez-vous à votre revendeur ou au service après-vente agréé le
plus proche munis de votre preuve d'achat.
Accessoires et pièces de
rechange
– Utiliser uniquement des accessoires et
des pièces de rechange autorisés par le
fabricant. Des accessoires et des
pièces de rechange d’origine garantissent un fonctionnement sûr et parfait de
l’appareil.
– Une sélection des pièces de rechange
utilisées le plus se trouve à la fin du
mode d'emploi.
– Plus information sur les pièces de re-
change vous les trouverez sous
www.kaercher.com sous le menu Service.
– Aucun accessoire inclus dans la fourni-
ture. Les accessoires doivent être commandés séparément, en fonction de
l'application.
– Le fonctionnement irréprochable de
l'appareil n'est garanti qu'vec les largeurs nominales de flexible d'aspiration
de DN42 et DN52.
– Vous obtiendrez des pièces détachées
et des accessoires chez votre revendeur ou auprès d'une filiale Kärcher
®
.
22 FR
– 5
Page 23

Déclaration de conformité CE
Nous certifions par la présente que la machine spécifiée ci-après répond de par sa
conception et son type de construction ainsi que de par la version que nous avons
mise sur le marché aux prescriptions fondamentales stipulées en matière de sécurité et d’hygiène par les directives
européennes en vigueur. Toute modification apportée à la machine sans notre accord rend cette déclaration invalide.
Produit: Aspirateur à sec et par voie
Type: 1.576-xxx
Directives européennes en vigueur :
2006/42/CE (+2009/127/CE)
2004/108/CE
Normes harmonisées appliquées :
EN 55014–1: 2006 + A1: 2009
EN 55014–2: 1997 + A2: 2008
EN 60335–1
EN 60335–2–69
EN 61000–3–2: 2006 + A2: 2009
EN 61000–3–3: 2008
EN 62233: 2008
Normes nationales appliquées :
-
humide
5.966-010
Les soussignés agissent sur ordre et sur
procuration de la Direction commerciale.
CEO
Head of Approbation
Responsable de la documentation:
S. Reiser
Alfred Kärcher GmbH Co. KG
Alfred-Kärcher-Str. 28 - 40
71364 Winnenden (Germany)
Téléphone : +49 7195 14-0
Télécopieur : +49 7195 14-2212
Winnenden, 2010/07/14
– 6
23FR
Page 24
Caractéristiques techniques
IVC 60/24-2
*EU
IVC 60/24-2
*GB
*CH
Tension du secteur V 220-240 110
Fréquence Hz 1~ 50/60 1~ 50/60
Puissance maxi W 2760 2450
Puissance nominale W 2400 2150
Capacité de la cuve l 60 60
Débit d'air (maxi) l/s 2x 74 2x 66
Dépression (maxi) kPa (mbar) 25,4 (254) 22,0 (220)
Type de protection -- IP X4 IP X4
Classe de protection -- I I
Raccord du flexible d'aspiration
DN 72 72
(C-DN/C-ID)
Largeur nominale de flexible
DN 42/52 42/52
d'aspiration
Longueur x largeur x hauteur mm 970 x 690 x 995 970 x 690 x 995
Surface du filtre m
2
0,95 0,95
Poids de fonctionnement typique kg 60 60
Température ambiante (maxi) °C +40 +40
Valeurs définies selon EN 60335-2-69
Niveau de pression sonore L
Incertitude K
pA
pA
Valeur de vibrations bras-main m/s
Incertitude K m/s
dB(A) 73 73
dB(A) 1 1
2
2
<2,5 <2,5
0,2 0,2
Câble d’alimentation
H07RN-F 3x1,5 mm
Référence Longueur
2
de câble
EU 6.649-915.0 10 m
CH 6.650-168.0 10 m
Câble d’alimentation
H07RN-F 3x2,5 mm
Référence Longueur
2
de câble
GB 6.650-169.0 10 m
24 FR
– 7
Page 25

Prima di utilizzare l'apparecchio
per la prima volta, leggere le
presenti istruzioni originali, seguirle e conservarle per un uso futuro o in caso di rivendita dell'apparecchio.
– Prima di procedere alla prima messa in
funzione leggere tassativamente le norma di sicurezza n. 5.956-249!
– La mancata osservanza delle istruzioni
d'uso e delle norme di sicurezza può
causare danni all'apparecchio e presentare pericoli per l'utilizzatore e le altre persone.
– Eventuali danni da trasporto vanno co-
municati immediatamente al proprio rivenditore.
Indice
Protezione dell’ambiente . . IT . . .1
Simboli riportati nel manuale
d'uso. . . . . . . . . . . . . . . . . . IT . . .1
Uso conforme a destinazione IT . . . 1
Parti dell'apparecchio. . . . . IT . . .2
Messa in funzione . . . . . . . IT . . . 2
Uso. . . . . . . . . . . . . . . . . . . IT . . .2
Trasporto . . . . . . . . . . . . . . IT . . .4
Supporto. . . . . . . . . . . . . . . IT . . .4
Cura e manutenzione. . . . . IT . . .4
Guida alla risoluzione dei guasti IT . . .4
Garanzia. . . . . . . . . . . . . . . IT . . .5
Accessori e ricambi . . . . . . IT . . .5
Dichiarazione di conformità CE IT . . .6
Dati tecnici . . . . . . . . . . . . . IT . . .7
Protezione dell’ambiente
Tutti gli imballaggi sono riciclabili. Gli imballaggi non vanno
gettati nei rifiuti domestici, ma
consegnati ai relativi centri di
raccolta.
Gli apparecchi dismessi contengono materiali riciclabili preziosi
e vanno consegnati ai relativi
centri di raccolta. Batterie, olio e
sostanze simili non devono essere dispersi nell’ambiente. Si
prega quindi di smaltire gli apparecchi dismessi mediante i sistemi di raccolta differenziata.
Avvertenze sui contenuti (REACH)
Informazioni aggiornate sui contenuti sono
disponibili all'indirizzo:
www.kaercher.com/REACH
Simboli riportati nel manuale
d'uso
Pericolo
Per un rischio imminente che determina lesioni gravi o la morte.
몇 Attenzione
Per una situazione di rischio possibile che potrebbe determinare lesioni gravi o la morte.
Attenzione
Per una situazione di rischio possibile che
potrebbe determinare danni leggeri a persone o cose.
Uso conforme a destinazione
몇 Attenzione
L'apparecchio non si adatta all'aspirazione
di polveri dannose alla salute.
– Questo aspiratore è destinato alla puli-
zia a secco/umido di pavimenti o pareti.
– Questo apparecchio si adatta all'uso in-
dustriale, ad esempio in depositi e settori di produzione e su macchine di
produzione.
– L'apparecchio non è omologato per es-
sere utilizzato come gru.
– 1
25IT
Page 26

Parti dell'apparecchio Messa in funzione
1 Cavo di alimentazione
2 Targhetta
3 Pulizia del filtro
4 Filtro plissettato piatto
5 Testa aspirante
6 Manico della testa di aspirazione
7 Sbloccaggio destro del meccanismo di
abbassamento
8 Anello intermedio
9 Ruota pivottante del contenitore dello
sporco
10 Tappo di chiusura
11 Contenitore sporcizia
12 Sbloccaggio sinistro del meccanismo di
abbassamento
13 Ruota
14 Dispositivo di blocco della testa di aspi-
razione
15 Raccordo di aspirazione
16 Ruota pivottante del telaio con freno di
stazionamento
17 Sostegno per bocchetta per pavimenti
18 Telaio
19 vasca di raccolta
20 Maniglia del serbatoio dello sporco
21 Sostegno per tubo di aspirazione
22 Spina di collegamento della sonda ter-
mica
23 Lampada spia "funzionamento"
24 Interruttore
25 Coperchio del filtro
26 Reggicavo
27 Archetto di spinta
28 Apertura del coperchio di protezione
29 Cappuccio di protezione
30 Sonda termica
Collocare l’apparecchio in posizione di
lavoro, se necessario bloccarlo mediante i freni.
Inserire il tubo di aspirazione (non com-
preso nella fornitura) nell'attacco di
aspirazione.
Prima di procedere con il lavoro control-
lare il livello di riempimento nel serbatoio dello sporco ed eventualmente
svuotare il serbatoio.
Accertarsi che il serbatoio dello sporco
sia inserito correttamente.
Infilare l'accessorio (non compreso nel-
la fornitura) desiderato.
Uso
Attenzione
Non rimuovere mai il filtro plissettato piatto
durante l'aspirazione.
Aspirazione a secco
Attenzione
Al cambio da aspirazione di liquidi ad
aspirazione a secco tenere presente
quanto segue:
L'aspirazione di polvere secca quando la
cartuccia del filtro è bagnata ottura il filtro e
può renderlo inutilizzabile.
Far asciugare bene il filtro bagnato pri-
ma dell'uso oppure sostituirlo con uno
asciutto.
Sostituire il filtro quando necessario se-
guendo le istruzioni riportate al punto
"Cura e manutenzione".
Avviso: Svuotare il serbatoio dello sporco
quando è pieno fino a circa 3 cm sotto il
bordo superiore.
– Controllare regolarmente il livello di ri-
empimento nel serbatoio dello sporco
poiché durante l'aspirazione a secco
l'apparecchio non si spegne automaticamente.
26 IT
– 2
Page 27

Aspirazione ad umido
Attenzione
Rispettare le norme vigenti locali sul trattamento delle acque di scarico.
– Attenzione! Se l'apparecchio viene
messo in funzione con il serbatoio
dello sporco pieno sussiste il rischio
che la disattivazione reagisca troppo
tardi e che l'apparecchio venga riem-
pito troppo.
– Per l'aspirazione di liquidi con la boc-
chetta fughe oppure per aspirare so-
prattuto grandi quantità di acqua, si
consiglia di disinserire la funzione "Puli-
zia filtro".
– Appena raggiunto il livello massimo di
liquido, l'apparecchio si disinserisce au-
tomaticamente.
– l termine dell'aspirazione di liquidi:
Asciugare il filtro plissettato piatto. Puli-
re la sonda termica ed il coperchio di
protezione con un panno umido. Pulire
il serbatoio con un panno umido ed
asciugare.
Interruttori
– Apparecchio ON
– Pulizia filtro OFF
– Apparecchio OFF
– Apparecchio ON
– Pulizia filtro ON
Accendere l’apparecchio
Inserire la spina di alimentazione.
La spia luminosa "Stato di pronto" si ac-
cende.
Attivare l'apparecchio dall'interruttore
girevole.
Pulizia automatica del filtro
L'apparecchio dispone di un innovativo dispositivo di pulizia del filtro doppio, particolarmente efficace per la polvere fina. In
questo modo il filtro plissettato piatto viene
pulito ogni 7.5 secondi con un colpo d'aria
(rumore di pulsazione).
Spegnere l’apparecchio
Disattivare l'apparecchio dall'interrutto-
re girevole.
Staccare la spina.
La spia luminosa "stato di pronto" si
spegne.
A lavoro ultimato
Svuotare il contenitore
Bloccare il freno di stazionamento.
Figura
Tirare verso l'alto gli sbloccaggi del
meccanismo di abbassamento.
Sollevare l'archetto di spinta. Il serbato-
io viene sbloccato ed abbassato.
Figura
Estrarre il serbatoio con l'impugnatura.
Svuotare il serbatoio.
Inserire nuovamente il serbatoio e bloc-
care con l'archetto di spinta.
몇 Attenzione
Pericolo di schiacciamento! Durante il bloccaggio, non tenere le
mani in nessun caso tra il serba-
toio dello sporco e l'anello intermedio e non avvicinarle al meccanismo di
sollevamento. Bloccare il contenitore azionando l'archetto di spinta con entrambe le
mani.
Pulizia dell’apparecchio
Pulire l’apparecchio all’interno e
all’esterno aspirando e passando la superficie con un panno umido.
Deposito dell’apparecchio
Avvolgere il cavo di rete attorno al reg-
gicavo.
Avvolgere il tubo flessibile di aspirazio-
ne attorno all'archetto di spinta.
Inserire la bicchetta per pavimenti ed il
tubo di aspirazione nei relativi sostegni.
Depositare l’apparecchio in un luogo
asciutto e proteggerlo contro l’uso non
autorizzato.
– 3
27IT
Page 28

Trasporto
Attenzione
Pericolo di lesioni e di danneggiamento! Rispettare il peso dell'apparecchio durante il
trasporto.
Sbloccare i freni di stazionamento e
spingere l'apparecchio tenendo l’appostito archetto di spinta.
Per scaricare l’apparecchio tenere il te-
laio e non l’archetto di spinta.
Per il trasporto in veicoli, assicurare
l'apparecchio secondo le direttive in vigore affinché non possa scivolare e ribaltarsi.
Supporto
Attenzione
Pericolo di lesioni e di danneggiamento! Rispettare il peso dell'apparecchio durante la
conservazione.
Questo apparecchio può essere conservato solo in ambienti interni.
Cura e manutenzione
Pericolo
Disattivare l'apparecchio ed estrarre la spina di alimentazione prima di effettuare interventi sull'apparecchio.
Sostituzione del filtro plissettato
piatto
Aprire il coperchio del filtro.
Sostituire il filtro plissettato piatto.
Chiudere il coperchio del filtro; bisogna
sentire lo scatto.
Pulire la sonda termica
Tirare verso l'alto gli sbloccaggi del
meccanismo di abbassamento.
Sollevare l'archetto di spinta. Il serbato-
io viene sbloccato ed abbassato.
Estrarre il serbatoio con l'impugnatura.
Pulire la sonda termica ed il coperchio
di protezione con un panno umido.
Inserire nuovamente il serbatoio e bloc-
care con l'archetto di spinta.
Guida alla risoluzione dei
guasti
Pericolo
Disattivare l'apparecchio ed estrarre la spina di alimentazione prima di effettuare interventi sull'apparecchio.
La turbina di aspirazione non
funziona
Controllare la presa e il fusibile dell'ali-
mentazione di corrente.
Verificare il cavo e la spina di rete e la
termosonda dell'apparecchio.
Accendere l’apparecchio.
La turbina di aspirazione si spegne
Svuotare il serbatoio.
Accertarsi che sia presente il coperchio
di protezione e che l'apertura laterale
del coperchio di protezione sia rivolta in
direzione del meccanismo di abbassamento destro (vedi figura apparecchio).
Pulire la sonda termica ed il coperchio
di protezione con un panno umido.
La turbina di aspirazione non si
reinserisce dopo aver svuotato il
serbatoio
Spegnere e riaccendere l’apparecchio.
Pulire la sonda termica ed il coperchio
di protezione con un panno umido.
La forza aspirante diminuisce
Rimuovere eventuali otturazioni dalla
bocchetta di aspirazione, dal tubo rigido
di aspirazione o dal filtro plissettato
piatto.
Accertarsi che la testa di aspirazione ed
il serbatoio siano posizionati correttamente.
Far innestare correttamente il coper-
chio del filtro.
Sostituire il filtro plissettato piatto.
28 IT
– 4
Page 29

Fuoriuscita di polvere durante
l'aspirazione
Controllare che il filtro plissettato piatto
sia montato nella posizione corretta.
Sostituire il filtro plissettato piatto.
Il dispositivo automatico di
disinserimento (aspirazione di
liquidi) è difettoso
Pulire la sonda termica ed il coperchio
di protezione con un panno umido.
Il dispositivo di pulizia automatico
del filtro non funziona
Tubo flessibile di aspirazione non colle-
gato.
Il tubo flessibile di aspirazione utilizzato
è troppo corto (< 3m) o è di un diametro
troppo grande.
Informare il servizio assistenza clienti.
Impossibile disattivare la pulizia
automatica del filtro
Informare il servizio assistenza clienti.
Garanzia
Le condizioni di garanzia valgono nel rispettivo paese di pubblicazione da parte
della nostra società di vendita competente.
Entro il termine di garanzia eliminiamo gratuitamente eventuali guasti all’apparecchio,
se causati da difetto di materiale o di produzione. Nei casi previsti dalla garanzia si
prega di rivolgersi al proprio rivenditore, oppure al più vicino centro di assistenza autorizzato, esibendo lo scontrino di acquisto.
Accessori e ricambi
– Impiegare esclusivamente accessori e ri-
cambi autorizzati dal produttore. Accessori
e ricambi originali garantiscono che l’apparecchio possa essere impiegato in modo sicuro e senza disfunzioni.
– La lista dei pezzi di ricambio più comuni
è riportata alla fine del presente manuale d'uso.
– Maggiori informazioni sulle parti di ri-
cambio sono reperibili al sito www.kaercher.com alla voce “Service”.
– La fornitura non comprende alcun ac-
cessorio. Gli accessori devono essere
acquistati separatamente in base
all'uso previsto.
– Il funzionamento perfetto dell'apparec-
chio è garantito solo con dei diametri
nominali del tubo flessibile di DN42 e
DN52.
– I ricambi e gli accessori sono reperibili
presso il rivenditore di fiducia o una filiale KÄRCHER.
– 5
29IT
Page 30
Dichiarazione di conformità
CE
Con la presente si dichiara che la macchina
qui di seguito indicata, in base alla sua concezione, al tipo di costruzione e nella versione da noi introdotta sul mercato, è
conforme ai requisiti fondamentali di sicurezza e di sanità delle direttive CE. In caso
di modifiche apportate alla macchina senza
il nostro consenso, la presente dichiarazione perde ogni validità.
Prodotto: Aspiratore solidi-liquidi
Modelo: 1.576-xxx
Direttive CE pertinenti
2006/42/CE (+2009/127/CE)
2004/108/CE
Norme armonizzate applicate
EN 55014–1: 2006 + A1: 2009
EN 55014–2: 1997 + A2: 2008
EN 60335–1
EN 60335–2–69
EN 61000–3–2: 2006 + A2: 2009
EN 61000–3–3: 2008
EN 62233: 2008
Norme nazionali applicate
-
5.966-010
I firmatari agiscono su incarico e con la procura dell’amministrazione.
CEO
Responsabile della documentazione:
S. Reiser
Alfred Kärcher GmbH & Co. KG
Alfred-Kärcher-Str. 28 - 40
71364 Winnenden (Germany)
Tel.: +49 7195 14-0
Fax: +49 7195 14-2212
Winnenden, 2010/07/14
30 IT
Head of Approbation
– 6
Page 31

Dati tecnici
IVC 60/24-2
*EU
IVC 60/24-2
*GB
*CH
Tensione di rete V 220-240 110
Frequenza Hz 1~ 50/60 1~ 50/60
Potenza max. W 2760 2450
Potenza nominale W 2400 2150
Capacità serbatoio l 60 60
Quantità d'aria (max.) l/s 2x 74 2x 66
Sottopressione (max.) kPa (mbar) 25,4 (254) 22,0 (220)
Protezione -- IP X4 IP X4
Grado di protezione -- I I
Attacco per tubo di aspirazione
DN 72 72
(C-DN/C-ID)
Diametro nominale tubo flessibile DN 42/52 42/52
Lunghezza x larghezza x Altezza mm 970 x 690 x 995 970 x 690 x 995
Superficie attiva del filtro m
2
0,95 0,95
Peso d'esercizio tipico kg 60 60
Temperatura ambiente (max.) °C +40 +40
Valori rilevati secondo EN 60335-2-69
Pressione acustica L
Dubbio K
pA
pA
Valore di vibrazione mano-braccio m/s
Dubbio K m/s
dB(A) 73 73
dB(A) 1 1
2
2
<2,5 <2,5
0,2 0,2
Cavo di alimentazione
H07RN-F 3x1,5 mm
Codice com-
ponente
Lunghezza
cavo
EU 6.649-915.0 10 m
CH 6.650-168.0 10 m
Cavo di alimentazione
H07RN-F 3x2,5 mm
Codice com-
ponente
Lunghezza
cavo
GB 6.650-169.0 10 m
2
2
– 7
31IT
Page 32

Lees vóór het eerste gebruik
van uw apparaat deze originele
gebruiksaanwijzing, ga navenant te werk
en bewaar hem voor later gebruik of voor
een latere eigenaar.
– Voor de eerste inbedrijfstelling veilig-
heidsinstructies nr. 5.956-249 in elk geval lezen!
– Bij veronachtzaming van de gebruiks-
aanwijzing en de veiligheidsaanwijzingen kan schade aan het apparaat
ontstaan, en gevaar voor gebruikers en
andere personen.
– Bij transportschade onmiddellijk de
handelaar op de hoogte brengen.
Inhoudsopgave
Zorg voor het milieu . . . . . . NL . . .1
Symbolen in de gebruiksaanwij-
zing. . . . . . . . . . . . . . . . . . . NL . . .1
Reglementair gebruik . . . . . NL . . .2
Apparaat-elementen. . . . . . NL . . .2
Inbedrijfstelling . . . . . . . . . . NL . . .2
Bediening . . . . . . . . . . . . . . NL . . .2
Vervoer. . . . . . . . . . . . . . . . NL . . .4
Opslag . . . . . . . . . . . . . . . . NL . . .4
Onderhoud . . . . . . . . . . . . . NL . . .4
Hulp bij storingen . . . . . . . . NL . . .4
Garantie . . . . . . . . . . . . . . . NL . . .5
Toebehoren en reserveonder-
delen . . . . . . . . . . . . . . . . . NL . . .5
EG-conformiteitsverklaring. NL . . .5
Technische gegevens. . . . . NL . . .6
Zorg voor het milieu
Het verpakkingsmateriaal is
herbruikbaar. Deponeer het verpakkingsmateriaal niet bij het
huishoudelijk afval, maar bied
het aan voor hergebruik.
Onbruikbaar geworden apparaten bevatten waardevolle materialen die geschikt zijn voor
hergebruik. Lever de apparaten
daarom in bij een inzamelpunt
voor herbruikbare materialen.
Batterijen, olie en dergelijke
stoffen mogen niet in het milieu
belanden. Verwijder overbodig
geworden apparatuur daarom
via geschikte inzamelpunten.
Aanwijzingen betreffende de inhoudsstoffen (REACH)
Huidige informatie over de inhoudsstoffen
vindt u onder:
www.kaercher.com/REACH
Symbolen in de
gebruiksaanwijzing
Gevaar
Voor een onmiddellijk dreigend gevaar dat
leidt tot ernstige en zelfs dodelijke lichamelijke letsels.
몇 Waarschuwing
Voor een mogelijks gevaarlijke situatie die
zou kunnen leiden tot ernstige en zelfs dodelijke lichamelijke letsels.
Voorzichtig
Voor een mogelijks gevaarlijke situatie die
kan leiden tot lichte lichamelijke letsels of
materiële schade.
32 NL
– 1
Page 33

Reglementair gebruik
몇 Waarschuwing
Het apparaat is niet geschikt voor het opzuigen van voor de gezondheid schadelijke
stoffen.
– Deze zuiger is voor het natte en droge
reinigen van vloer- en muuroppervlakken bestemd.
– Dit apparaat is geschikt voor industrieel
gebruik, bv. in opslag- en productieplaatsen en bij productiemachines.
– Het apparaat mag niet met een kraan
verladen worden.
Apparaat-elementen
1 Netkabel
2 Typeplaatje
3 Filterreiniging
4 Vlak harmonicafilter
5 Zuigkop
6 Handgreep van de zuigkop
7 Ontgrendeling rechts van het zakme-
chanisme
8 Tussenring
9 Zwenkwiel van het vuilreservoir
10 Afsluitstop
11 Vuilreservoir
12 Ontgrendeling links van het zakmecha-
nisme
13 Wiel
14 Vergrendeling van de zuigkop
15 Luchtinlaatleidingen
16 Zwenkwiel van het onderstel met par-
keerrem
17 Houder voor vloersproeier
18 Gestel
19 Opvangbak
20 Handgreep van het vuilreservoir
21 Houder voor zuigbuis
22 Aansluitstekker van de thermische sonde
23 Controlelampje "Gebruiksgereedheid"
24 Draaischakelaar
25 Filterafdekking
26 Kabelhouder
27 Duwbeugel
28 Opening van de beschermkap
29 Beschermkap
30 Thermische sonde
Inbedrijfstelling
Het apparaat in de werkpositie brengen,
indien nodig met parkeerrem zekeren.
Zuigslang (niet meegeleverd) in het
aansluitstuk voor zuigen steken.
Niveau in het vuilreservoir voor het be-
gin van het werk controleren en reservoir indien nodig leegmaken.
Verzeker u ervan, dat het vuilreservoir
volgens de voorschriften aangebracht is.
Gewenst toebehoren (niet meegele-
verd) erop doen.
Bediening
Voorzichtig
Bij het zuigen mag de vlakvouwfilter nooit
verwijderd worden.
Droogzuigen
Voorzichtig
Opletten bij wisselen van nat- naar
droogzuigen:
zuigen van droog stof met nat filterelement
verstopt de filter en kan deze onbruikbaar
maken.
Nat filter vóór gebruik goed drogen of
door een droog vervangen.
Indien nodig de filter vervangen zoals
beschreven in punt "Instandhouding en
onderhoud".
Hint: Het vuilreservoir dient leeggemaakt
te worden, wanneer het tot ca. 3 cm. onder
de bovenrand gevuld is.
– Niveau in het vuilreservoir geregeld
controleren, omdat het apparaat bij het
droogzuigen niet automatisch uitschakelt.
– 2
33NL
Page 34

Natzuigen
Voorzichtig
Lokale voorschriften inzake de behandeling van afvalwater in acht nemen.
– Let op! Wanneer het apparaat met
vol vuilreservoir in gebruik genomen
wordt, bestaat de kans, dat de uit-
schakeling te laat reageert en het ap-
paraat te vol raakt.
– Bij het opzuigen van nat vuil met de
voegkop resp. indien er overwegend
water opgezogen wordt, raden wij u aan
om de functie 'Filterreiniging' uit te
schakelen.
– Bij het bereiken van de max. vulstand
schakelt het apparaat automatisch uit.
– Na stoppen van het natzuigen: Vlak-
vouwfilter drogen. Thermische sonde
en beschermkap met een vochtige
doek reinigen. Reservoir met een voch-
tige doek schoonmaken en drogen.
Draaischakelaar
– Apparaat AAN
– Filterreiniging UIT
– Apparaat UIT
– Apparaat AAN
– Filterreiniging AAN
Apparaat inschakelen
Steek de netstekker in de contactdoos.
Controlelampje "Gebruiksgereedheid"
licht op.
Apparaat met de draaischakelaar in-
schakelen.
Automatische filterreiniging
Het apparaat beschikt over een nieuwe,
dubbele filterreiniging, bijzonder effectief bij
fijn stof. Daarbij wordt de vlakvouwfilter om
de 7,5 seconde automatisch gereinigd door
een luchtstoot (pulserend geluid).
Apparaat uitschakelen
Apparaat met de draaischakelaar uit-
schakelen.
Netstekker uittrekken.
Controlelampje "Gebruiksgereedheid"
gaat uit.
Na elk bedrijf
Reservoir ledigen
Parkeerrem vastzetten.
Afbeelding
Ontgrendeling van het afzetmechanis-
me naar boven trekken.
Schuifbeugel omhoog trekken. Reser-
voir wordt ontgrendeld en naar beneden gelaten.
Afbeelding
Reservoir aan de handgreep eruit trekken.
Reservoir leegmaken.
Reservoir weer inzetten en met schuif-
beugel vergrendelen.
몇 Waarschuwing
Gevaar voor kneuzing! Bij het
vergrendelen in ieder geval niet
de handen tussen vuilreservoir
en tussenring houden of in de
buurt van het hefmechanisme houden. Reservoir door middel van de schuifbeugel
met beide handen vergrendelen.
Reiniging van het apparaat
Apparaat aan de binnen- en buitenkant
reinigen door afzuigen en afvegen met
een vochtige doek.
Apparaat opslaan
Stroomkabel rond de kabelhouder wik-
kelen.
Zuigslang rond de schuifbeugel wikkelen.
Vloersproeier en zuigbuis in de desbe-
treffende houders steken.
Apparaat in een droge ruimte plaatsen
en beveiligen tegen onbevoegd gebruik.
34 NL
– 3
Page 35

Vervoer
Hulp bij storingen
Voorzichtig
Gevaar voor letsels en beschadigingen!
Houd bij het transport rekening met het gewicht van het apparaat.
Parkeerremmen loszetten en apparaat
aan de duwbeugel verschuiven.
Apparaat bij het verladen bij het onder-
stel pakken, niet bij de schuifbeugel.
Bij het transport in voertuigen moet het
apparaat conform de geldige richtlijnen
beveiligd worden tegen verschuiven en
kantelen.
Opslag
Voorzichtig
Gevaar voor letsel en beschadiging! Het
gewicht van het apparaat bij opbergen in
acht nemen.
Het apparaat mag alleen binnen worden
opgeborgen.
Onderhoud
Gevaar
Bij alle werkzaamheden aan het apparaat,
het apparaat uitschakelen en de netstekker
uittrekken.
Vlakvouwfilter vervangen
Filterafdekking openen.
Vlakvouwfilter vervangen.
Filterafdekking sluiten, moet hoorbaar
in elkaar sluiten.
Thermische sonde reinigen
Ontgrendeling van het afzetmechanis-
me naar boven trekken.
Schuifbeugel omhoog trekken. Reser-
voir wordt ontgrendeld en naar beneden gelaten.
Reservoir aan de handgreep eruit trek-
ken.
Thermische sonde en beschermkap
met een vochtige doek reinigen.
Reservoir weer inzetten en met schuif-
beugel vergrendelen.
Gevaar
Bij alle werkzaamheden aan het apparaat,
het apparaat uitschakelen en de netstekker
uittrekken.
Zuigturbine start niet
Stekker en zekering van de stroom-
voorziening controleren.
Stroomkabel, stekker en thermische
sensor van het apparaat controleren.
Apparaat inschakelen.
Zuigturbine schakelt uit
Reservoir leegmaken.
Controleren of de beschermkap voor-
handen is en de zijdelingse opening
van de beschermkap in de richting van
het zakmechanisme rechts wijst (zie afbeelding apparaat).
Thermische sonde en beschermkap
met een vochtige doek reinigen.
Zuigturbine start na het legen van
de container niet opnieuw
Apparaat uit- en opnieuw inschakelen.
Thermische sonde en beschermkap
met een vochtige doek reinigen.
Zuigkracht wordt minder
Verstoppingen uit zuigmondstuk, zuigbuis,
zuigslang of vlakvouwfilter weghalen.
Zuigkop en reservoir aanbrengen en
controleren op correcte positionering.
Filterafdekking goed vastklikken.
Vlakvouwfilter vervangen.
Er ontsnapt stof bij het zuigen
Controleren of de vlakvouwfilter correct
geplaatst is.
Vlakvouwfilter vervangen.
Uitschakelmechanisme (natzuigen)
springt niet aan
Thermische sonde en beschermkap
met een vochtige doek reinigen.
– 4
35NL
Page 36

Automatische filterreiniging
werkt niet
Zuigslang niet aangesloten.
Gebruikte zuigslang is te kort (< 3m) of
heeft een te grote doorsnede.
Klantendienst contacteren.
Automatische filterreiniging kan
niet uitgeschakeld worden
Klantendienst contacteren.
Garantie
In ieder land zijn de door ons bevoegde
verkoopkantoor uitgegeven garantiebepalingen van toepassing. Eventuele storingen
aan het apparaat verhelpen wij zonder kosten binnen de garantietermijn, mits een materiaal of fabrieksfout de oorzaak van deze
storing is. Neem bij klachten binnen de garantietermijn contact op met uw leverancier
of de dichtstbijzijnde klantenservicewerkplaats en neem uw aankoopbewijs mee.
Toebehoren en
reserveonderdelen
– Er mogen uitsluitend toebehoren en re-
serveonderdelen gebruikt worden die
door de fabrikant zijn vrijgegeven. Originele toebehoren en reserveonderdelen
bieden de garantie van een veilig en
storingsvrije werking van het apparaat.
– Een selectie van de meest frequent be-
nodigde reserveonderdelen vindt u achteraan in de gebruiksaanwijzing.
– Verdere informatie over reserveonder-
delen vindt u op www.kaercher.com bij
Service.
– In de standaardaflevering zit geen toe-
behoren. Het toebehoren moet naargelang aanwending apart besteld worden.
– De perfecte functie van het apparaat
wordt enkel gegarandeerd bij nominale
zuigslangwijdten van DN42 en DN52.
– Reserveonderdelen en toebehoren zijn
verkrijgbaar bij uw handelaar of uw KÄRCHER-filiaal.
EG-conformiteitsverklaring
Hierbij verklaren wij dat de hierna vermelde
machine door haar ontwerp en bouwwijze
en in de door ons in de handel gebrachte
uitvoering voldoet aan de betreffende fundamentele veiligheids- en gezondheidseisen, zoals vermeld in de desbetreffende
EG-richtlijnen. Deze verklaring verliest
haar geldigheid wanneer zonder overleg
met ons veranderingen aan de machine
worden aangebracht.
Product: Droog- / natzuiger
Type: 1.576-xxx
Van toepassing zijnde EG-richtlijnen
2006/42/EG (+2009/127/EG)
2004/108//EG
Toegepaste geharmoniseerde normen
EN 55014–1: 2006 + A1: 2009
EN 55014–2: 1997 + A2: 2008
EN 60335–1
EN 60335–2–69
EN 61000–3–2: 2006 + A2: 2009
EN 61000–3–3: 2008
EN 62233: 2008
Toegepaste landelijke normen
-
5.966-010
De ondergetekenden handelen in opdracht
en met volmacht van de bedrijfsleiding.
CEO
Gevolmachtigde voor de documentatie:
S. Reiser
Alfred Kärcher GmbH & Co. KG
Alfred Kärcher-Str. 28 - 40
71364 Winnenden (Germany)
Tel.: +49 7195 14-0
Fax: +49 7195 14-2212
Winnenden, 2010/07/14
Head of Approbation
36 NL
– 5
Page 37

Technische gegevens
IVC 60/24-2
*EU
IVC 60/24-2
*GB
*CH
Netspanning V 220-240 110
Frequentie Hz 1~ 50/60 1~ 50/60
Max. vermogen W 2760 2450
Nominaal vermogen W 2400 2150
Inhoud reservoir l 60 60
Luchthoeveelheid (max.) l/s 2x 74 2x 66
Onderdruk (max.) kPa (mbar) 25,4 (254) 22,0 (220)
Beveiligingsklasse -- IP X4 IP X4
Beschermingsklasse -- I I
Zuigslangaansluiting (C-DN/C-ID) DN 72 72
Nominale zuigslangwijdte DN 42/52 42/52
Lengte x breedte x hoogte mm 970 x 690 x 995 970 x 690 x 995
Filteroppervlak m
2
0,95 0,95
Typisch bedrijfsgewicht kg 60 60
Omgevingstemperatuur (max.) °C +40 +40
Bepaalde waarden conform EN 60335-2-69
Geluidsdrukniveau L
Onzekerheid K
pA
pA
Hand-arm vibratiewaarde m/s
Onzekerheid K m/s
dB(A) 73 73
dB(A) 1 1
2
2
<2,5 <2,5
0,2 0,2
Stroomkabel H07RN-F 3x1,5 mm
Onderdeelnr. Lengte
snoer
EU 6.649-915.0 10 m
CH 6.650-168.0 10 m
Stroomkabel H07RN-F 3x2,5 mm
Onderdeelnr. Lengte
snoer
GB 6.650-169.0 10 m
2
2
– 6
37NL
Page 38

Antes del primer uso de su apa-
rato, lea este manual original,
actúe de acuerdo a sus indicaciones y
guárdelo para un uso posterior o para otro
propietario posterior.
– ¡Antes de la primera puesta en marcha
lea sin falta las instrucciones de uso y
las instrucciones de seguridad n.°
5.956-249!
– El incumplimiento de las instrucciones
de uso y de las indicaciones de seguridad puede provocar daños en el aparato y poner en peligro al usuario y a otras
personas.
– En caso de daños de transporte infor-
me inmediatamente al fabricante.
Índice de contenidos
Protección del medio ambiente ES . . 1
Símbolos del manual de instruc-
ciones. . . . . . . . . . . . . . . . . ES . . 1
Uso previsto . . . . . . . . . . . . ES . . 2
Elementos del aparato . . . . ES . . 2
Puesta en marcha . . . . . . . ES . . 2
Manejo . . . . . . . . . . . . . . . . ES . . 2
Transporte . . . . . . . . . . . . . ES . . 4
Almacenamiento . . . . . . . . ES . . 4
Cuidados y mantenimiento. ES . . 4
Ayuda en caso de avería . . ES . . 4
Garantía . . . . . . . . . . . . . . . ES . . 5
Accesorios y piezas de repuesto ES . . 5
Declaración de conformidad CE ES . . 6
Datos técnicos . . . . . . . . . . ES . . 7
Protección del medio
ambiente
Los materiales empleados para
el embalaje son reciclables y recuperables. No tire el embalaje
a la basura doméstica y entréguelo en los puntos oficiales de
recogida para su reciclaje o recuperación.
Los aparatos viejos contienen
materiales valiosos reciclables
que deberían ser entregados
para su aprovechamiento posterior. Evite el contacto de baterías, aceites y materias
semejantes con el medioambiente. Por este motivo, entregue los aparatos usados en los
puntos de recogida previstos
para su reciclaje.
Indicaciones sobre ingredientes (REACH)
Encontrará información actual sobre los ingredientes en:
www.kaercher.com/REACH
Símbolos del manual de
instrucciones
Peligro
Para un peligro inminente que acarrea lesiones de gravedad o la muerte.
몇 Advertencia
Para una situación que puede ser peligrosa, que puede acarrear lesiones de gravedad o la muerte.
Precaución
Para una situación que puede ser peligrosa, que puede acarrear lesiones leves o
daños materiales.
38 ES
– 1
Page 39

Uso previsto
몇 Advertencia
El aparato no es apto para aspirar polvos
nocivos para la salud.
– Este aspirador está diseñado para la
limpieza de pisos y superficies murales.
– Este aparato está diseñado para el uso
industrial, p.ej.en zonas de almacenamiento y fabricación y el máquinas de
producción.
– El aparato no está autorizado para car-
gar con grúa.
Elementos del aparato
1 Cable de conexión a la red
2 Placa de características
3 Limpieza de filtro
4 filtro plano de papel plegado
5 Cabezal de aspiración
6 Asa del cabezal de aspiración
7 Desbloqueo derecho de la mecánica de
atascado
8 Anillo intermedio
9 Rueda de dirección del depósito de su-
ciedad
10 Tapón de cierre
11 Recipiente acumulador de suciedad
12 Desbloqueo izquierdo de la mecánica
de atascado
13 Rueda
14 Bloqueo del cabezal de absorción
15 Tubuladura de aspiración
16 Rueda de dirección del chasis con fre-
no de estacionamiento
17 Soporte para boquilla para suelos
18 Chasis
19 Cubeta colectora
20 Asa del depósito de suciedad
21 Soporte para la tubería de absorción
22 Enchufe de conexión de la termosonda
23 Piloto de control de "Disponibilidad de
servicio"
24 interruptor giratorio
25 Cubierta del filtro
26 Portacables
27 Estribo de empuje
28 Apertura de la tapa protectora
29 Tapa protectora
30 Termosonda
Puesta en marcha
Coloque el aparato en la posición de
trabajo; si fuera necesario, fíjelo mediante el freno de estacionamiento.
Insertar la manguera en el manguito de
aspiración (no incluida).
Comprobar el nivel de llenado del depó-
sito de suciedad antes de comenzar el
trabajo y vaciar el depósito si es necesario.
Asegúrese de insertar correctamente el
depósito de suciedad.
Insertar el accesorio deseado (no in-
cluido).
Manejo
Precaución
Al aspirar no retirar nunca el filtro plano de
papel plegado.
Aspiración en seco
Precaución
Cuando cambie de la aspiración de lí-
quidos a la aspiración en seco, tenga en
cuenta lo siguiente:
La aspiración de polvo seco con un elemento filtrante húmedo puede dañar el filtro haciendo que quede inservible.
Secar bien el filtro húmedo antes de uti-
lizarlo o sustituirlo por una seco.
Si es necesario cambiar el filtro, se des-
cribe en el punto "Cuidados y mantenimiento".
Indicación: Se debe vaciar el depósito de
suciedad cuando está lleno hasta aprox. 3
cm por debajo del borde superior.
– Comprobar el nivel de llenado del depó-
sito de suciedad regularmente, porque
el aparato no se desconecta automáticamente al aspirar en seco.
– 2
39ES
Page 40

Aspiración de líquidos
Precaución
Respetar la normativa local vigente en materia de tratamiento de aguas residuales.
– ¡Atención! Si el aparato se pone en
funcionamiento con el depósito de
suciedad lleno es posible que la des-
conexión reaccione demasiado tar-
de y el aparato se llene en exceso.
– Al aspirar suciedad húmeda con la bo-
quilla para ranuras, o cuando se aspira
principalmente grandes cantidades de
líquido, se recomienda desactivar la
función "Limpieza del filtro“.
– Al alcanzar el máx. nivel de líquido se
apaga automáticamente el aparato.
– Tras finalizar la aspiración de líquidos:
Secar el filtro plano de papel. Limpiar la
termosonda y el tapón protector con un
paño húmedo. Limpiar y secar el reci-
piente con un paño húmedo.
Interruptor giratorio
– Aparato ENCENDIDO
– Limpieza de filtro APA-
GADA
– Aparato APAGADO
– Aparato ENCENDIDO
– Limpieza de filtro EN-
CENDIDA
Conexión del aparato
Enchufe la clavija de red.
El piloto de control de "Disposición de
servicio" se enciende.
Conectar el aparato en el interruptor gi-
ratorio.
Limpieza automática de filtro
El aparato dispone de un novedoso y doble
sistema de limpieza de filtro, especialmente efectivo con el polvo fino. El filtro plano
de papel plegado se limpia automáticamente cada 7,5 segundos con un soplo de
aire (ruido vibrante).
Desconexión del aparato
Desconectar el aparato en el interruptor
giratorio.
Extraer el enchufe de la red.
El piloto de control de "Disposición de
servicio" se apaga.
Después de cada puesta en marcha
Vacíe el depósito
Active los frenos de estacionamiento.
Figura
Tirar hacia arriba de los desbloqueos
de la mecánica de atascado.
Mover hacia arriba el estribo de empu-
je. El depósito se desbloquea y se baja.
Figura
Extraer el depósito por el asa.
Vacíe el recipiente.
Colocar de nuevo el depósito y blo-
quear con el estribo de empuje.
몇 Advertencia
Peligro de aplastamiento No colocar las manos entre el depósito de suciedad y el anillo
intermedio durante el bloqueo
bajo ningún concepto ni introducirlas cerca
de la mecánica de elevación. Bloquear el
depósito accionando el estribo de empuje
con ambas manos.
Limpieza del aparato
Limpie el aparato por dentro y por fuera as-
pirándolo y frotar con un paño húmedo.
Almacenamiento del aparato
Enrollar el cable de conexión alrededor
del soporte para cables.
Enrollar la manguera de aspiración en-
torno al estribo de empuje.
Insertar la boquilla para suelos y la tu-
bería de aspiración en los soportes correspondientes.
Coloque el aparato en un cuarto seco y
protéjalo frente a un uso no autorizado.
40 ES
– 3
Page 41

Transporte
Ayuda en caso de avería
Precaución
¡Peligro de lesiones y daños! Respetar el
peso del aparato para el transporte.
Soltar los frenos de estacionamiento y
desplazar el aparato con el estribo de
empuje.
Para cargar el aparato, agárrelo por el
chasis, no del estribo de empuje.
Al transportar en vehículos, asegurar el
aparato para evitar que resbale y vuelque conforme a las directrices vigentes.
Almacenamiento
Precaución
¡Peligro de lesiones y daños! Respetar el
peso del aparato en el almacenamiento.
Este aparato sólo se puede almacenar en
interiores.
Cuidados y mantenimiento
Peligro
Antes de efectuar cualquier trabajo en el
aparato, hay que desconectarlo de la red
eléctrica.
Cambiar el filtro plano de papel
plegado
Abrir la cubierta del filtro.
Cambiar el filtro plano de papel plegado.
Cerrar la cubierta del filtro, se debe oír
cómo encaja.
Limpiar la termosonda
Tirar hacia arriba de los desbloqueos
de la mecánica de atascado.
Mover hacia arriba el estribo de empu-
je. El depósito se desbloquea y se baja.
Extraer el depósito por el asa.
Limpiar la termosonda y el tapón pro-
tector con un paño húmedo.
Colocar de nuevo el depósito y blo-
quear con el estribo de empuje.
Peligro
Antes de efectuar cualquier trabajo en el
aparato, hay que desconectarlo de la red
eléctrica.
La turbina de aspiración no
funciona
Comprobar la clavija y el seguro del su-
ministro de corriente.
Comprobar el cable, enchufe y la ter-
mosonda del aparato.
Conexión del aparato
La turbina de aspiración se
desconecta
Vacíe el recipiente.
Comprobar si está la tapa protectora y la
apertura de la tapa protectora señala en la
dirección de la mecánica de atascado derecha (véase imagen del aparato).
Limpiar la termosonda y el tapón pro-
tector con un paño húmedo.
La turbina de aspiración no
funciona tras vaciar el recipiente
Apagar y encender el aparato de nuevo.
Limpiar la termosonda y el tapón pro-
tector con un paño húmedo.
La capacidad de aspiración
disminuye
Eliminar las obstrucciones de la boqui-
lla, tubo o manguera de aspiración o el
filtro plano de papel plegado.
Comprobar si el cabezal de aspiración
y el recipiente están bien colocados.
Encajar correctamente la cubierta del
filtro.
Cambiar el filtro plano de papel plegado.
Pérdida de polvo durante
la aspiración
Comprobar si el filtro plano de papel
plegado está montado correctamente.
Cambiar el filtro plano de papel plegado.
– 4
41ES
Page 42

El sistema automático de
desconexión (aspiración en
húmedo) no arranca
Limpiar la termosonda y el tapón pro-
tector con un paño húmedo.
La limpieza automática de filtro no
funciona
La manguera de aspiración no está no
conectada
La manguera de aspiración utilizada es
demasiado corta (< 3m) o tiene un diámetro demasiado grande.
Avisar al servicio técnico.
La limpieza automática de filtro no
se puede apagar
Avisar al servicio técnico.
Garantía
En todos los países rigen las condiciones
de garantía establecidas por nuestra empresa distribuidora. Las averías del aparato
serán subsanadas gratuitamente dentro
del periodo de garantía, siempre que se deban a defectos de material o de fabricación.
En un caso de garantía, le rogamos que se
dirija con el comprobante de compra al distribuidor donde adquirió el aparato o al servicio al cliente autorizado más próximo a su
domicilio.
Accesorios y piezas de
repuesto
– Sólo deben emplearse accesorios y
piezas de repuesto originales o autorizados por el fabricante. Los accesorios
y piezas de repuesto originales garantizan el funcionamiento seguro y sin averías del aparato.
– Podrá encontrar una selección de las
piezas de repuesto usadas con más
frecuencia al final de las instrucciones
de uso.
– En el área de servicios de www.kaer-
cher.com encontrará más información
sobre piezas de repuesto.
– No viene incluido ningún accesorio. El
accesorio se puede pedir por separado
según la aplicación.
– Solo se garantiza el funcionamiento co-
rrecto del aparato con mangueras de
aspiración de DN42 y DN52 de ancho
nominal.
– En su distribuidor o en la sucursal de
KÄRCHER podrá adquirir piezas de repuesto y accesorios.
42 ES
– 5
Page 43

Declaración de conformidad
CE
Por la presente declaramos que la máquina designada a continuación cumple, tanto
en lo que respecta a su diseño y tipo constructivo como a la versión puesta a la venta
por nosotros, las normas básicas de seguridad y sobre la salud que figuran en las directivas comunitarias correspondientes. La
presente declaración perderá su validez en
caso de que se realicen modificaciones en
la máquina sin nuestro consentimiento explícito.
Producto: aspirador en húmedo/seco
Modelo: 1.576-xxx
Directivas comunitarias aplicables
2006/42/CE (+2009/127/CE)
2004/108/CE
Normas armonizadas aplicadas
EN 55014–1: 2006 + A1: 2009
EN 55014–2: 1997 + A2: 2008
EN 60335–1
EN 60335–2–69
EN 61000–3–2: 2006 + A2: 2009
EN 61000–3–3: 2008
EN 62233: 2008
Normas nacionales aplicadas
-
5.966-010
Los abajo firmantes actúan con plenos poderes y con la debida autorización de la dirección de la empresa.
CEO
Persona autorizada para la documentación:
S. Reiser
Alfred Kärcher GmbH & Co. KG
Alfred-Kärcher-Str. 28 - 40
71364 Winnenden (Germany)
Tfno.: +49 7195 14-0
Fax: +49 7195 14-2212
Winnenden, 2010/07/14
Head of Approbation
– 6
43ES
Page 44

Datos técnicos
IVC 60/24-2
*EU
IVC 60/24-2
*GB
*CH
Tensión de red V 220-240 110
Frecuencia Hz 1~ 50/60 1~ 50/60
Potencia Máx. W 2760 2450
Potencial nominal W 2400 2150
Capacidad del depósito l 60 60
Cantidad de aire (máx.) l/s 2x 74 2x 66
Depresión (máx.) kPa (mbar) 25,4 (254) 22,0 (220)
Categoria de protección -- IP X4 IP X4
Clase de protección -- I I
Toma de tubo flexible de aspiración
DN 72 72
(C-DN/C-ID)
Ancho nominal de la manguera de as-
DN 42/52 42/52
piración
Longitud x anchura x altura mm 970 x 690 x 995 970 x 690 x 995
Superficie activa del filtro m
2
0,95 0,95
Peso de funcionamiento típico kg 60 60
Temperatura ambiente (máx.) °C +40 +40
Valores calculados conforme a la norma EN 60335-2-69
Nivel de presión acústica L
Inseguridad K
pA
pA
Valor de vibración mano-brazo m/s
Inseguridad K m/s
dB(A) 73 73
dB(A) 1 1
2
2
<2,5 <2,5
0,2 0,2
Cable de conexión a la
red
H07RN-F 3x1,5 mm
No. de pieza Longitud
2
del cable
EU 6.649-915.0 10 m
CH 6.650-168.0 10 m
Cable de conexión a la
red
H07RN-F 3x2,5 mm
No. de pieza Longitud
2
del cable
GB 6.650-169.0 10 m
44 ES
– 7
Page 45

Leia o manual de manual origi-
nal antes de utilizar o seu aparelho. Proceda conforme as indicações no
manual e guarde o manual para uma consulta posterior ou para terceiros a quem
possa vir a vender o aparelho.
– Antes de colocar em funcionamento
pela primeira vez é imprescindível ler
atentamente as indicações de segurança n.º 5.956-249!
– A não-observância deste Manual de
Instruções e dos avisos de segurança
poderá levar a danos no aparelho e perigos tanto para o utilizador como para
terceiros.
– No caso de danos provocados pelo
transporte, informe imediatamente o revendedor.
Índice
Protecção do meio-ambiente PT . . 1
Símbolos no Manual de Instru-
ções . . . . . . . . . . . . . . . . . . PT . . 1
Utilização conforme o fim a que
se destina a máquina . . . . . PT . . 1
Elementos do aparelho . . . PT . . 2
Colocação em funcionamento PT . . 2
Manuseamento . . . . . . . . . PT . . 2
Transporte . . . . . . . . . . . . . PT . . 3
Armazenamento. . . . . . . . . PT . . 4
Conservação e manutenção PT . . 4
Ajuda em caso de avarias . PT . . 4
Garantia . . . . . . . . . . . . . . . PT . . 5
Acessórios e peças sobressa-
lentes . . . . . . . . . . . . . . . . . PT . . 5
Declaração de conformidade CE PT . . 5
Dados técnicos. . . . . . . . . . PT . . 6
Protecção do meio-ambiente
Os materiais da embalagem
são recicláveis. Não coloque as
embalagens no lixo doméstico,
envie-as para uma unidade de
reciclagem.
Os aparelhos velhos contêm materiais preciosos e recicláveis e deverão ser reutilizados. Baterias, óleo
e produtos similares não podem
ser deitados fora ao meio ambiente. Por isso, elimine os aparelhos
velhos através de sistemas de recolha de lixo adequados.
Avisos sobre os ingredientes (REACH)
Informações actuais sobre os ingredientes
podem ser encontradas em:
www.kaercher.com/REACH
Símbolos no Manual de
Instruções
Perigo
Para um perigo eminente que pode conduzir a graves ferimentos ou à morte.
몇 Advertência
Para uma possível situação perigosa que pode
conduzir a graves ferimentos ou à morte.
Atenção
Para uma possível situação perigosa que
pode conduzir a ferimentos leves ou danos
materiais.
Utilização conforme o fim a
que se destina a máquina
몇 Advertência
O aparelho não é apropriado para a aspiração de poeiras nocivas para a saúde.
– O aspirador serve para limpar pavimen-
tos ou paredes a seco e a húmido.
– Este aparelho é adequado para a utili-
zação industrial como, por exemplo, em
áreas de armazenamento e de fabricação e em máquinas de produção.
– O aparelho não é adequado para o
transporte por guindaste.
– 1
45PT
Page 46

Elementos do aparelho
1 Cabo de rede
2 Placa de tipo
3 Limpeza do filtro
4 Filtro de pregas
5 Cabeçote de aspiração
6 Manípulo da cabeça de aspiração
7 Desbloqueio direito do mecanismo de
depositação
8 Anel intermédio
9 Rolo guia do recipiente de sujidade
10 Tampão de fecho
11 Recipiente de sujidades
12 Desbloqueio esquerdo do mecanismo
de depositação
13 Roda
14 Bloqueio da cabeça de aspiração
15 Bocal de aspiração
16 Rolo guia do quadro com travão de
imobilização
17 Suporte do bocal de chão
18 Chassis
19 Tina de recolha
20 Manípulo do recipiente de sujidade
21 Suporte para tubo de aspiração
22 Conector da sonda térmica
23 Lâmpada de controlo "Operacionalidade"
24 Interruptor rotativo
25 Tampa do filtro
26 Braçadeira para cabo
27 Alavanca de avanço
28 Abertura da capa de protecção
29 Capa de protecção
30 Sonda térmica
Colocação em funcionamento
Colocar o aparelho em posição de tra-
balho; quando necessário, proteger
com o travão de imobilização.
Inserir o tubo de aspiração (não incluí-
do no volume de fornecimento) no bo-
cal de aspiração.
Controlar o nível de sujidade no reci-
piente de sujidade antes de iniciar os
trabalhos e, se necessário, esvaziar.
46 PT
Assegurar que o recipiente de sujidade
está correctamente instalado.
Encaixar os acessórios pretendidos
(não incluídos no volume de fornecimento).
Manuseamento
Atenção
Nunca retirar o filtro de pregas plano durante a aspiração.
Aspirar a seco
Atenção
Observar antes de mudar da aspiração
em húmido para a aspiração em seco:
A aspiração de poeiras secas com o elemento de filtro húmido danifica o filtro e
pode torná-lo inútil.
Deixe secar bem o filtro húmido antes da
utilização ou substitua-o por um seco.
Caso necessário, mudar o filtro como
descrito em "Conservação e manutenção".
Aviso: O recipiente de sujidade deve ser
esvaziado se o nível de detritos estiver
aprox. 3 cm abaixo da margem superior.
– Controlar regularmente o nível no reci-
piente de sujidade, visto que o aparelho
não desliga automaticamente durante a
aspiração a seco.
Aspirar a húmido
Atenção
Respeitar as normas locais sobre tratamento de esgotos.
– Atenção! Se o aparelho for colocado
em funcionamento com o recipiente
de sujidade cheio, existe a possibilidade de a desactivação reagir demasiado tarde e o aparelho ficar
demasiado cheio.
– Na aspiração de sujidade molhada,
com o bocal para juntas, e quando pretender aspirar maioritariamente grandes quantidades líquidas, recomendase a desactivação da função "Limpeza
do filtro".
– 2
Page 47

– Ao atingir o nível de líquido máximo, o
aparelho desliga automaticamente.
– Após terminar a aspiração a húmido:
Secar o filtro de pregas. Limpar a sonda
térmica e a capa de protecção com um
pano húmido. Limpar o recipiente com
um pano húmido e secar.
Interruptor rotativo
– Aparelho LIG
– Limpeza do filtro DESL
– Aparelho DESL
– Aparelho LIG
– Limpeza do filtro LIG
Ligar a máquina
Ligar a ficha de rede.
A lâmpada de controlo "Operacionali-
dade" brilha.
Ligar o aparelho no interruptor rotativo.
Limpeza automática do filtro
O aparelho dispõe de um dispositivo inovador de dupla limpeza do filtro, particularmente eficaz para poeira fina. Neste
processo o filtro de pregas plano é automaticamente limpo por um jacto de ar (ruído
pulsante) em intervalos de 7,5 segundos.
Desligar o aparelho
Desligar o aparelho no interruptor rotativo.
Desligue a ficha da tomada.
A lâmpada de controlo "Operacionali-
dade" apaga.
Sempre depois de utilizar a
máquina
Esvaziar o recipiente
Fixar os travões de imobilização.
Figura
Puxar o dispositivo de destravamento do
mecanismo de depositação para cima.
Puxar o arco de impulsão para cima. O
recipiente é desbloqueado e baixado.
Figura
Retirar o recipiente no manípulo.
Esvaziar o recipiente.
Voltar a inserir o recipiente e bloquear
com a alavanca de avanço (arco de impulsão).
몇 Advertência
Perigo de esmagamento! Durante o travamento não se deve
manter as mãos entre o reci-
piente de sujidade e o anel intermédio ou na proximidade do mecanismo
de elevação. Bloquear o recipiente, accionando a alavanca de avanço com as duas
mãos.
Limpeza do aparelho
Aspirar e esfregar o aparelho por dentro
e por fora para limpá-lo (pano húmido).
Guardar a máquina
Enrolar o cabo de rede em torno do su-
porte do cabo.
Enrolar o cabo de aspiração à volta da
alavanca de avanço.
Encaixar o bico para pavimentos e o tubo
de aspiração no respectivo suporte.
Colocar o aparelho num local seco e to-
mar as medidas necessárias para evitar uma utilização por parte de pessoas
não autorizadas.
Transporte
Atenção
Perigo de ferimentos e de danos! Ter atenção ao peso do aparelho durante o transporte.
Soltar os travões de imobilização e em-
purrar o aparelho na alavanca de avanço.
Para transportar o aparelho deve-se
agarrá-lo no quadro e nunca na alavanca de avanço.
Durante o transporte em veículos, pro-
teger o aparelho contra deslizes e tombamentos, de acordo com as directivas
em vigor.
– 3
47PT
Page 48

Armazenamento
Atenção
Perigo de ferimentos e de danos! Ter atenção ao peso do aparelho durante o armazenamento.
Este aparelho só pode ser armazenado em
espaços fechados e cobertos.
Conservação e manutenção
Perigo
Desligar o aparelho e retirar a ficha de rede
antes de efectuar quaisquer trabalhos no
aparelho.
Mudar o filtro de pregas plano
Abrir a cobertura do filtro.
Mudar o filtro de pregas plano.
Fechar a cobertura do filtro; deve enga-
tar de forma audível.
Limpar a sonda térmica
Puxar o dispositivo de destravamento do
mecanismo de depositação para cima.
Puxar o arco de impulsão para cima. O
recipiente é desbloqueado e baixado.
Retirar o recipiente no manípulo.
Limpar a sonda térmica e a capa de
protecção com um pano húmido.
Voltar a inserir o recipiente e bloquear
com a alavanca de avanço (arco de impulsão).
Ajuda em caso de avarias
Perigo
Desligar o aparelho e retirar a ficha de rede
antes de efectuar quaisquer trabalhos no
aparelho.
A turbina de aspiração não funciona
Verificar a tomada e o fusível da ali-
mentação eléctrica.
Verificar o cabo de rede, ficha e a son-
da térmica do aparelho.
Ligar o aparelho.
A turbina de aspiração desliga
Esvaziar o recipiente.
Controlar se a capa de protecção existe
e se a abertura lateral da capa de protecção aponta na direcção do mecanismo de depositação direito (ver figura do
aparelho).
Limpar a sonda térmica e a capa de
protecção com um pano húmido.
A turbina de aspiração não torna a
arrancar depois de esvaziar o
recipiente
Desligar e voltar a ligar o aparelho.
Limpar a sonda térmica e a capa de
protecção com um pano húmido.
A força de aspiração diminui
Retirar entupimentos do bocal de aspi-
ração, tubo de aspiração, mangueira de
aspiração ou filtro de dobras planas.
Controlar o encaixe correcto da cabeça
de aspiração e do recipiente.
Encaixar bem a cobertura do filtro.
Mudar o filtro de pregas plano.
Durante a aspiração sai pó
Verificar a posição correcta do filtro de
pregas plano.
Mudar o filtro de pregas plano.
A desconexão automática
(aspiração a húmido) não actua
Limpar a sonda térmica e a capa de
protecção com um pano húmido.
A limpeza automática do filtro não
funciona
Tubo flexível de aspiração não está co-
nectado.
Mangueira de aspiração utilizada é
muito curta (< 3m) ou tem um diâmetro
excessivo.
Avisar o serviço de assistência técnica.
48 PT
– 4
Page 49

A limpeza automática do filtro não
desliga
Avisar o serviço de assistência técnica.
Garantia
Em cada país vigem as respectivas condições de garantia estabelecidas pelas nossas Empresas de Comercialização.
Eventuais avarias no aparelho durante o
período de garantia serão reparadas, sem
encargos para o cliente, desde que se trate
dum defeito de material ou de fabricação.
Em caso de garantia, dirija-se, munido do
documento de compra, ao seu revendedor
ou ao Serviço Técnico mais próximo.
Acessórios e peças
sobressalentes
– Só devem ser utilizados acessórios e
peças de reposição autorizados pelo
fabricante do aparelho. Acessórios e
Peças de Reposição Originais - fornecem a garantia para que o aparelho
possa ser operado em segurança e
isento de falhas.
– No final das Instruções de Serviço en-
contra uma lista das peças de substituição mais necessárias.
– Para mais informações sobre peças so-
bressalentes, consulte na página www.kaercher.com o ponto dos serviços.
– No volume de fornecimento não estão
incluídos nenhuns acessórios. Os
acessórios têm que ser encomendados
separadamente para as respectivas
aplicações.
– O funcionamento correcto do aparelho
é apenas assegurado pelos diâmetros
nominais da mangueira de aspiração
de DN42 e de DN52.
– As peças sobressalentes e acessórios
podem ser adquiridos junto do seu revendedor ou em cada filial da KÄRCHER.
Declaração de conformidade
CE
Declaramos que a máquina a seguir designada corresponde às exigências de segurança e de saúde básicas estabelecidas
nas Directivas CE por quanto concerne à
sua concepção e ao tipo de construção assim como na versão lançada no mercado.
Se houver qualquer modificação na máquina sem o nosso consentimento prévio, a
presente declaração perderá a validade.
Produto: Aspirador húmido e seco
Tipo: 1.576-xxx
Respectivas Directrizes da CE
2006/42/CE (+2009/127/CE)
2004/108/CE
Normas harmonizadas aplicadas
EN 55014–1: 2006 + A1: 2009
EN 55014–2: 1997 + A2: 2008
EN 60335–1
EN 60335–2–69
EN 61000–3–2: 2006 + A2: 2009
EN 61000–3–3: 2008
EN 62233: 2008
Normas nacionais aplicadas
-
5.966-010
Os abaixo assinados têm procuração para
agirem e representarem a gerência.
CEO
Responsável pela documentação:
S. Reiser
Alfred Kärcher GmbH & Co. KG
Alfred-Kärcher-Str. 28 - 40
71364 Winnenden (Germany)
Tel.: +49 7195 14-0
Fax: +49 7195 14-2212
Winnenden, 2010/07/14
Head of Approbation
– 5
49PT
Page 50

Dados técnicos
IVC 60/24-2
*EU
IVC 60/24-2
*GB
*CH
Tensão da rede V 220-240 110
Frequência Hz 1~ 50/60 1~ 50/60
Potência máx. W 2760 2450
Potência nominal W 2400 2150
Conteúdo do recipiente l 60 60
Volume de ar (máx.) l/s 2x 74 2x 66
Subpressão (máx.) kPa (mbar) 25,4 (254) 22,0 (220)
Tipo de protecção -- IP X4 IP X4
Classe de protecção -- I I
Ligação do tubo flexível de aspiração
DN 72 72
(C-DN/C-ID)
Diâmetro nominal da mangueira DN 42/52 42/52
Comprimento x Largura x Altura mm 970 x 690 x 995 970 x 690 x 995
Superfície filtrante m
2
0,95 0,95
Peso de funcionamento típico kg 60 60
Temperatura ambiente (máx.) °C +40 +40
Valores obtidos segundo EN 60335-2-69
Nível de pressão acústica L
Insegurança K
pA
pA
Valor de vibração mão/braço m/s
Insegurança K m/s
dB(A) 73 73
dB(A) 1 1
2
2
<2,5 <2,5
0,2 0,2
Cabo de rede H07RN-F 3x1,5 mm
2
Refª Compri-
mento do
cabo
EU 6.649-915.0 10 m
CH 6.650-168.0 10 m
Cabo de rede H07RN-F 3x2,5 mm
2
Refª Compri-
mento do
cabo
GB 6.650-169.0 10 m
50 PT
– 6
Page 51

Læs original brugsanvisning in-
den første brug, følg anvisningerne og opbevar vejledningen til senere
efterlæsning eller til den næste ejer.
– Inden første ibrugtagelse skal betje-
ningsvejledningen og sikkerhedshenvisningerne nr. 5.956-249 læses!
– Hvis driftsvejledningen og sikkerheds-
anvisningerne ikke overholdes, kan der
opstå skader på apparatet og risici for
brugeren og andre personer.
– Ved transportskader skal forhandleren
informeres omgående.
Indholdsfortegnelse
Miljøbeskyttelse . . . . . . . . . DA . . 1
Symbolerne i driftsvejledningen DA . . 1
Bestemmelsesmæssig anvendelse DA . . 1
Maskinelementer . . . . . . . . DA . . 2
Ibrugtagning . . . . . . . . . . . . DA . . 2
Betjening . . . . . . . . . . . . . . DA . . 2
Transport . . . . . . . . . . . . . . DA . . 3
Opbevaring. . . . . . . . . . . . . DA . . 3
Pleje og vedligeholdelse . . DA . . 3
Hjælp ved fejl . . . . . . . . . . . DA . . 4
Garanti . . . . . . . . . . . . . . . . DA . . 4
Tilbehør og reservedele . . . DA . . 5
EU-overensstemmelseserklæring DA . . 5
Tekniske data . . . . . . . . . . . DA . . 6
Miljøbeskyttelse
Emballagen kan genbruges.
Smid ikke emballagen ud sammen med det almindelige husholdningsaffald, men aflever
den til genbrug.
Udtjente apparater indeholder
værdifulde materialer, der kan
og bør afleveres til genbrug.
Batterier, olie og lignende stoffer er ødelæggende for miljøet.
Aflever derfor udtjente apparater på en genbrugsstation eller
lignende.
Henvisninger til indholdsstoffer
(REACH)
Aktuelle oplysninger til indholdsstoffer finder du på:
www.kaercher.com/REACH
Symbolerne i
driftsvejledningen
Risiko
En umiddelbar truende fare, som kan føre
til alvorlige personskader eller død.
몇 Advarsel
En muligvis farlig situation, som kan føre til
alvorlige personskader eller til død.
Forsigtig
En muligvis farlig situation, som kan føre til
personskader eller til materialeskader.
Bestemmelsesmæssig
anvendelse
몇 Advarsel
Maskinen er ikke egnet til opsugning af
sundhedsskadeligt støv.
– Maskinen er til våd- og tørrensning af
gulvflader og vægge.
– Maskinen er beregnet til industriel brug,
f.eks. i lager- og produktionsområder og
på produktionsmaskiner.
– Maskinen er ikke egnet til læsning med
kran.
– 1
51DA
Page 52

Maskinelementer
1 Netkabel
2 Typeskilt
3 Rengøring af filter
4 Fladt foldefilter
5 Sugehoved
6 Sugehovedets håndtag
7 Afsætningsmekanikkens højre åb-
ningsmekaniske
8 Mellemring
9 Smudsbeholderens styrerulle
10 Låseprop
11 Snavsbeholder
12 Afsætningsmekanikkens venstre åb-
ningsmekaniske
13 Hjul
14 Sugehovedets låsemekanisme
15 Sugestuds
16 Understellets styrerulle med stopbremse
17 Holder til gulvdyse
18 Understel
19 Opsamlingsbeholder
20 Smudsbeholderens håndtag
21 Holder til sugerør
22 Tilslutningsstik af den termiske sonde
23 Kontrollampe "Klar til brug"
24 Drejekontakt
25 Filterdæksel
26 Kabelholder
27 Bøjle
28 Åbning af beskyttelsesdækslet
29 Beskyttelseshætte
30 Termisk sonde
Ibrugtagning
Stil apparatet i arbejdspositionen, sørg
for at sikre med stopbremsen om nød-
vendigt.
Sæt sugeslangen (kommer ikke med le-
verancen) ind i sugestudsen.
Kontroller påfyldningsstanden i smuds-
beholderen før arbejdets start og tøm
evt. beholderen.
Sørg for, at smudsbeholderen sættes
korrekt i.
Sæt det ønskede tilbehør (kommer ikke
med leverancen) på.
Betjening
Forsigtig
Under sugningen må det flade foldefilter aldrig fjernes.
Tørsugning
Forsigtig
Vær opmærksom på følgende ved skift
fra våd- til tørsugning:
Sugning af tørt støv med vådt filterelementet stopper filteret til og kan gøre det ubrugeligt.
Et vådt filter skal tørres godt før brugen
eller udskiftes med et tørt filter.
Udskift filteret efter behov, beskrives
under punkt "Pleje og vedligeholdelse".
Bemærk: Smudsbeholderen skal tømmes
hvis den er fyldt til ca. 3 cm under den øverste kant.
– Kontroller påfyldningsstanden i smuds-
beholderen regelmæssigt, siden maskinen ved tørsugningen ikke slukkes
automatisk.
Vådsugning
Forsigtig
Følg de lokale bestemmelser vedrørende
behandling af spildevand.
– OBS! Hvis maskinen tages i brug
med fyldt smudsbeholderen er det
muligt, at maskinen slukkes for sent
og overfyldes.
– Ved opsugning af våd snavs med fuge-
dyse, eller hvis der fortrinsvis suges
vand op af en beholder, anbefales det
at slå funktionen "Filterrengøring" fra.
– Når det maksimale væskeniveau er nå-
et, slukker apparatet automatisk.
– Efter opsugning af våd snavs er afslut-
tet: Flade foldefilteret tørres. Rens den
termiske sonde og beskyttelsesdækslet
med en fugtig klud. Rens beholderen
med en fugtet klud og tør beholderen.
52 DA
– 2
Page 53

Drejekontakt
– Maskine TIL
– Filterensning FRA
– Maskinen FRA
– Maskine TIL
– Filterensning TIL
Tænd for maskinen
Sæt netstikket i.
Kontrollampen "Klar til brug" lyser.
Tænd maskinen med drejekontakten.
Automatisk filterrengøring
Maskinen er udstyret med et nyudviklet,
dobbelt filterrensesystem, særdeles effektivt til fint støv. Derved rengøres det flade
foldefilter hver 7.5. sekund automatisk med
et luftstød (pulserende lyd).
Sluk for maskinen
Sluk maskinen med drejekontakten.
Træk netstikket ud.
Kontrollampe "Klar til brug" slukkes
Efter hver brug
Tøm beholderen
Aktiver stopbremsen.
Figur
Træk afsætningsmekanikkens åbnings-
mekanisme opad.
Træk skubbebøjlen opad. Beholderen
åbnes og sænkes.
Figur
Træk beholderen ud med håndtaget.
Tøm beholderen
Sæt beholderen tilbage og lås den med
skubbebøjlen.
몇 Advarsel
Risiko for kvæstelser! Grib aldrig ind imellem smudsbeholderen og mellemringen eller i
nærheden af løftemekanismen
medens du låser beholderen. Lås beholderen med begge hænder vha. skubbebøjlen.
Rengøring af apparatet
Maskinen rengøres indvendigt og ud-
vendigt ved at støvsuge den og tørre
den af med en fugtet klud.
Opbevaring af damprenseren
Tilslutningskablet vikles omkring kabel-
holderen.
Sugeslangen vikles omkring skubbe-
bøjlen.
Sæt gulvdysen og sugerøret i de re-
spektive holdere.
Opbevar maskinen i et tørt rum og sørg
for at sikre den mod uvedkommendes
brug.
Transport
Forsigtig
Fare for person- og materialeskader! Hold
øje med maskinens vægt ved transporten.
Løsn parkeringsbremsen og skub ma-
skinen vha. skubbebøjlen.
Tag fat i understellet og ikke i bøjlen,
når maskinen skal læsses.
Ved transport i biler skal renseren fast-
spændes i.h.t. gældende love.
Opbevaring
Forsigtig
Fare for person- og materialeskader! Hold
øje med maskinens vægt ved opbevaring.
Denne maskine må kun opbevares indendørs.
Pleje og vedligeholdelse
Risiko
Træk netstikket og afbryd maskinen inden
der arbejdes på maskinen.
Udskiftning af det flade foldefilter
Åbn filterafdækningen.
Skift det flade foldefilter ud.
Luk filterafdækningen. Den skal gå hør-
bart i indgreb.
– 3
53DA
Page 54

Rense den termiske sonde
Træk afsætningsmekanikkens åbnings-
mekanisme opad.
Træk skubbebøjlen opad. Beholderen
åbnes og sænkes.
Træk beholderen ud med håndtaget.
Rens den termiske sonde og beskyttel-
sesdækslet med en fugtig klud.
Sæt beholderen tilbage og lås den med
skubbebøjlen.
Hjælp ved fejl
Risiko
Træk netstikket og afbryd maskinen inden
der arbejdes på maskinen.
Sugeturbine virker ikke
Kontroller stikdåsen og strømforsynin-
gens sikring.
Kontroller strømledningen, netstikket
og maskinens termiske sonde.
Tænd for maskinen.
Sugeturbinen slukker
Tøm beholderen
Kontroller, om beskyttelsesdækslet er
til stede og om åbningen på beskyttelsesdækslets side peger i retning af den
højre afsætningsmekanik (se maskinfiguren).
Rens den termiske sonde og beskyttel-
sesdækslet med en fugtig klud.
Sugeturbinen starter ikke igen efter
tømning af beholderen
Afbryd maskinen og tænd den igen.
Rens den termiske sonde og beskyttel-
sesdækslet med en fugtig klud.
Nedsat sugeevne
Fjern forstoppelser fra dysen, sugerør,
sugeslangen eller det flade foldefilter.
Kontroller om sugehoved og beholder
sidder korrekt.
Sørg for, at filterafdækningen går rigtigt
i indgreb.
Skift det flade foldefilter ud.
Der strømmer støv ud under
sugning
Kontroller, at det flade foldefilter er
monteret korrekt.
Skift det flade foldefilter ud.
Frakoblingsautomatikken
(vådsugning) virker ikke
Rens den termiske sonde og beskyttel-
sesdækslet med en fugtig klud.
Automatisk filterrengøring fungerer
ikke
Sugeslange ikke tilsluttet.
Den brugte sugeslange er for kort
(< 3m) eller har en for stor diameter.
Kontakt kundeservice.
Den automatiske filterrengøring kan
ikke slås fra
Kontakt kundeservice.
Garanti
I de enkelte lande gælder de af vore forhandlere fastlagte garantibetingelser.
Eventuelle fejl på apparatet afhjælpes gratis inden for garantien, såfremt fejlen kan tilskrives en materiale- eller produktionsfejl.
Hvis De ønsker at gøre garantien gældende, bedes De henvende Dem til Deres forhandler eller nærmeste kundeservice
medbringende kvittering for købet.
54 DA
– 4
Page 55

Tilbehør og reservedele EU-overensstemmelseser-
– Der må kun anvendes tilbehør og reser-
vedele, der er godkendt af producenten. Originaltilbehør og -reservedele er
en garanti for, at maskinen kan fungere
sikkert og uden fejl.
– Et udvalg over de reservedele som bru-
ges meget ofte finder De i slutningen af
betjeningsvejledningen
– Yderligere informationen om reserve-
dele finder De under www.kaercher.com i afsni "Service".
– Tilbehøret kommer ikke med maskinen.
Afhængigt af anvendelsen skal tilbehøret bestilles separat.
– Maskinens upåklagelige funktion kan
kun garanteres med sugeslangen med
en nominel bredde på DN42 og DN52.
– Reservedele og tilbehør får du ved din
forhandler eller i den KÄRCHER-afdeling.
Hermed erklærer vi, at den nedenfor nævnte maskine i design og konstruktion og i den
af os i handlen bragte udgave overholder
de gældende grundlæggende sikkerhedsog sundhedskrav i EF-direktiverne. Ved
ændringer af maskinen, der foretages uden
forudgående aftale med os, mister denne
erklæring sin gyldighed.
Produkt: Våd- og tørsuger
Type: 1.576-xxx
Gældende EF-direktiver
2006/42/EF (+2009/127/EF)
2004/108/EF
Anvendte harmoniserede standarder
EN 55014–1: 2006 + A1: 2009
EN 55014–2: 1997 + A2: 2008
EN 60335–1
EN 60335–2–69
EN 61000–3–2: 2006 + A2: 2009
EN 61000–3–3: 2008
EN 62233: 2008
Anvendte tyske standarder
-
5.966-010
klæring
Undertegnede agerer på vegne af og med
fuldmagt fra ledelsen.
CEO
Head of Approbation
Dokumentationsbefuldmægtiget:
S. Reiser
Alfred Kärcher GmbH & Co. KG
Alfred-Kärcher-Str. 28 - 40
71364 Winnenden (Germany)
Tlf.: +49 7195 14-0
Fax: +49 7195 14-2212
Winnenden, 2010/07/14
– 5
55DA
Page 56

Tekniske data
IVC 60/24-2
*EU
IVC 60/24-2
*GB
*CH
Netspænding V 220-240 110
Frekvens Hz 1~ 50/60 1~ 50/60
Max. effekt W 2760 2450
Nominel ydelse W 2400 2150
Beholderindhold l 60 60
Luftmængde (max.) l/s 2x 74 2x 66
Undertryk (max.) kPa (mbar) 25,4 (254) 22,0 (220)
Kapslingsklasse -- IP X4 IP X4
Beskyttelsesklasse -- I I
Sugeslangetilslutning (C-DN/C-ID) DN 72 72
Nominel slangebredde DN 42/52 42/52
Længde x bredde x højde mm 970 x 690 x 995 970 x 690 x 995
Filterflade m
2
0,95 0,95
Typisk driftsvægt kg 60 60
Omgivelsestemperatur (max.) °C +40 +40
Oplyste værdier ifølge EN 60335-2-69
Lydtryksniveau L
Usikkerhed K
pA
pA
Hånd-arm vibrationsværdi m/s
Usikkerhed K m/s
dB(A) 73 73
dB(A) 1 1
2
2
<2,5 <2,5
0,2 0,2
Netkabel H07RN-F 3x1,5 mm
2
Partnr. Kabellængde
EU 6.649-915.0 10 m
CH 6.650-168.0 10 m
Netkabel H07RN-F 3x2,5 mm
2
Partnr. Kabellængde
GB 6.650-169.0 10 m
56 DA
– 6
Page 57

Før første gangs bruk av apparatet,
les denne originale bruksanvisningen , følg den og oppbevar den for senere bruk
eller fo overlevering til neste eier.
– Det er tvingende nødvendig å lese sik-
kerhetsinstruksene nr. 5.956-249 før
maskinen settes i drift!
– Hvis bruksanvisningen og sikkerhets-
anvisningene ikke følges, kan dette
medføre skader på apparatet og fare for
brukeren og andre personer.
– Informer straks forhandleren ved trans-
portskader.
Innholdsfortegnelse
Miljøvern. . . . . . . . . . . . . . . NO . . .1
Symboler i bruksanvisningen NO . . .1
Forskriftsmessig bruk . . . . . NO . . .1
Maskinorganer . . . . . . . . . . NO . . .1
Ta i bruk . . . . . . . . . . . . . . . NO . . .2
Betjening . . . . . . . . . . . . . . NO . . .2
Transport . . . . . . . . . . . . . . NO . . .3
Lagring . . . . . . . . . . . . . . . . NO . . .3
Pleie og vedlikehold . . . . . . NO . . .3
Feilretting . . . . . . . . . . . . . . NO . . .3
Garanti . . . . . . . . . . . . . . . . NO . . .4
Tilbehør og reservedeler . . NO . . .4
EU-samsvarserklæring. . . . NO . . .5
Tekniske data . . . . . . . . . . . NO . . .6
Miljøvern
Materialet i emballasjen kan resirkuleres. Ikke kast emballasjen i husholdningsavfallet, men
lever den inn til resirkulering.
Gamle apparater inneholder
verdifulle materialer som kan resirkuleres. Disse bør leveres inn
til gjenvinning. Batterier, olje og
lignende stoffer må ikke komme
ut i miljøet. Gamle maskiner
skal derfor avhendes i egnede
innsamlingssystemer.
Anvisninger om innhold (REACH)
Aktuell informasjon om stoffene i innholdet
finner du under:
www.kaercher.com/REACH
Symboler i bruksanvisningen
Fare
For en umiddelbar truende fare som kan
føre til store personskader eller til død.
몇 Advarsel
For en mulig farlig situasjon som kan føre til
store personskader eller til død.
Forsiktig!
For en mulig farlig situasjon som kan føre til
mindre personskader eller til materielle
skader.
Forskriftsmessig bruk
몇 Advarsel
Maskinen er ikke egnet til oppsuging av
helsefarlig støv.
– Denne maskinen er beregnet for våt- og
tørr-rengjøring av gulv- og veggflater.
– Denne maskinen er egnet for industriell
bruk, f.eks. for lager- og produksjonsområdet og ved produksjonsmaskiner.
– Maskinen er ikke godkjent for løfting
med kran.
Maskinorganer
1 Nettledning
2 Typeskilt
3 Rensing av filter
4 Foldefilter
5 Sugehode
6 Håndtak på sugehode
7 Høyre låsing av senkemekanismen
8 Mellomring
9 Styrerulle for smussbeholder
10 Plugger
11 Smussbeholder
12 Venstre låsing av senkemekanismen
13 Hjul
14 Låsing av sugehode
15 Sugestusser
16 Styrerulle på understell med parke-
ringsbrems
17 Holder for gulvdyse
18 Understell
– 1
57NO
Page 58

19 Oppsamlingskar
20 Håndtak på smussbeholder
21 Holder for sugerør
22 Stikkontakt på termosonde
23 Kontrollampe "Driftsklar"
24 Dreiebryter
25 Filterdeksel
26 Kabelholder
27 Skyvebøyle
28 Åpning av beskyttelseskappe
29 Vernekappe
30 Termosonde
Ta i bruk
Sett maskinen i arbeidsstilling, og sett
om nødvendig på parkeringsbremsen.
Sugeslangen (ikke del av leveransen)
settes på sugestussen.
Kontroller fyllingsgrad i smussbeholder
før du begynner arbeidet, og tøm eventuelt beholderen.
Pass på at smussbeholderen er satt inn
korrekt.
Sett på ønsket tilbehør (ikke del av le-
veransen).
Betjening
Våtsuging
Forsiktig!
Ta hensyn til de lokale utslippsforskrifter.
– Advarsel! Dersom maskinen brukes
med full smussbeholder er det mulit
at utkoblingen reagerer for sent og at
maskinen blir overfylt.
– Ved oppsuging av våt smuss med mø-
bel- eller fugemunnstykket, eller hvis
det overveiende suges opp store væs-
kemengder, anbefales det at funksjo-
nen "Filterrengjøring" slås av av.
– VEd oppnådd maks. væskenivå slår ap-
paratet seg automatisk av.
– Etter avsluttet våtsuging: Tørke foldefil-
teret. Tørk av termosonden og beskyt-
telsehetten med en fuktig klut. Rengjør
beholderen med en fuktig klut og tørk
den.
Dreiebryter
– Apparat PÅ
– Filterrengjøring AV
– Apparat AV
Forsiktig!
Ved suging skal aldri det flate foldefilteret
fjernes.
Støvsuging
Forsiktig!
Ta hensyn til følgende ved skifting fra
våt- til tørrsuging:
Oppsuging av tørt støv når filterinnsatsen
er fuktig, vil føre til at filteret tetter seg og
ikke er brukbart lenger.
La et fuktig filter tørke helt før bruk, eller
bytt det ut med et tørt filter.
Bytt filter etter behov. Se "Service og
vedlikehold".
Merk: Smussbeholderen må tømmes når
den er fylt til ca 3 cm under øvre kant.
– Kontroller fyllingsnivå av smussbehol-
der regelmessig, da maskinen ikke slår
seg av automatisk.
58 NO
– Apparat PÅ
– Filterrengjøring PÅ
Slå apparatet på
Sett i støpselet.
Kontrollampen "Driftsklar" lyser.
Slå på apparatet med dreiebryteren.
Automatisk filterrensing
Apparatet har en ny type dobbel filterrengjøring som er spesielt virksomt for fint
støv. Derved renses det flate foldefilteret
automatisk hvert 7,5. sekund ved hjelp av
luftstøt (pulsenrende støy).
Slå maskinen av
Slå av apparatet med dreiebryteren.
Trekk ut nettstøpselet.
Kontrollampe "Driftsklar" slukker.
– 2
Page 59

Etter hver bruk
Lagring
Tøm beholderen
Trekk til holdebremsen.
Figur
Lås opp senkemekanismen, trekk opp-
over.
Trekk opp skyvebøyle. Beholderen lå-
ses og og senkes.
Figur
Trekk i håndtaket for å ta ut beholderen.
Tøm beholderen.
Sett inn igjen beholderen og lås med
skyvebøylen.
몇 Advarsel
Klemfare! Ved låsing må du ikke
holde hånden mellom smussbeholderen og mellomringen, hel-
ler ikke stikkes inn i nærheten av
løftemekanikken. Lås beholderen ved å
betkene skyvebøylem med begge hendene.
Rengjøring av apparatet
Rengjør maskinen innvendig og utven-
dig ved å tørke av den med en fuktig
klut, og ved å bruke sugefunksjonen.
Oppbevaring av apparatet
Vikle strømkabelen rundt kabelholderen.
Vikle sugeslangen rundt skyvebøylen.
Sett gulvdysen og sugerør i sine holdere.
Sett maskinen til oppbevaring i et tørt
rom, utilgjengelig for uvedkommende.
Transport
Forsiktig!
Fare for personskader og materielle skader! Pass på vekten av apparatet ved transport.
Løsne parkeringsbrems og skyv maski-
nen med skyvebøylen.
Hvis maskinen skal bæres, grip i under-
stellet og ikke i skyvebøylen.
Ved transport i kjøretøyer skal appara-
tet sikres mot å skli eller velte etter de til
enhver tid gjeldende regler.
Forsiktig!
Fare for personskader og materielle skader! Pass på vekten av apparatet ved lagring.
Dette apparatet skal kun lagres innendørs.
Pleie og vedlikehold
Fare
Før alt arbeide på apparatet skal apparatet
slås av og strømkabelen trekkes ut.
Skifte foldefilter
Åpne filterdeksel.
Skifte foldefilter.
Lukk filterdeksel, du skal høre det går i lås.
Rengjøre termosonde
Lås opp senkemekanismen, trekk opp-
over.
Trekk opp skyvebøyle. Beholderen lå-
ses og og senkes.
Trekk i håndtaket for å ta ut beholderen.
Tørk av termosonden og beskyttelse-
hetten med en fuktig klut.
Sett inn igjen beholderen og lås med
skyvebøylen.
Feilretting
Fare
Før alt arbeide på apparatet skal apparatet
slås av og strømkabelen trekkes ut.
Sugeturbinen går ikke
Kontroller stikkontakt og sikring på
strømforsyningen.
Kontroller strømkabel, støpsel og ter-
mosonde på apparatet.
Slå apparatet på.
– 3
59NO
Page 60

Sugeturbinen kobler ut
Tøm beholderen.
Kontroller om beskyttelseshetten er på
plass og at den sideveis åpningen på beskyttelseshetten peker mot høyre senkemekansime (se bilde av maskinen)
Tørk av termosonden og beskyttelse-
hetten med en fuktig klut.
Sugeturbinen slår seg ikke på etter
at beholderen er tømt
Slå maskinen av og på igjen.
Tørk av termosonden og beskyttelse-
hetten med en fuktig klut.
Sugekraften avtar
Fjern blokkeringer fra børstehodet, su-
gerøret, sugeslangen eller foldefilteret.
Sett inn sugehode og beholder og kon-
troller at de sitter godt.
Sett inn filterdekselet korrekt.
Skifte foldefilter.
Støvutslipp ved suging
Pass på korrekt innføring av foldefilteret.
Skifte foldefilter.
Utkobligsautomatikk (våtsuging)
slår ikke inn
Tørk av termosonden og beskyttelse-
hetten med en fuktig klut.
Automatisk filterrens fungerer ikke
Sugeslange ikke korrekt tilkoblet.
Anvendt sugeslange er for kort (< 3m)
eller har for stor diameter.
Kontakt kundetjenesten.
Automatisk filterrengjøring lar seg
ikke slå av
Kontakt kundetjenesten.
Garanti
Vår ansvarlige salgsorganisasjon for det
enkelte land har utgitt garantibetingelsene
som gjelder i det aktuelle landet. Eventuelle
feil på maskinen blir reparert gratis i garantitiden dersom disse kan føres tilbake til
material- eller produksjonsfeil. Ved behov
for garantireparasjoner, vennligst henvend
deg med kjøpskvitteringen til din forhandler
eller nærmeste autoriserte kundeservice.
Tilbehør og reservedeler
– Det er kun tillatt å anvende tilbehør og
reservedeler som er godkjent av produsenten. Originalt tilbehør og originale
reservedeler garanterer for sikker og
problemfri drift av apparatet.
– Et utvalg av de vanligste reservedelene
finner du bak i denne bruksanvisningen.
– Mer informasjon om reservedeler finner
du under www.kaercher.com i området
Service.
– Det er ikke inkludert noe tilbehør i leve-
ransen. Tilbehøret må bestilles separat
alt etter bruk.
– Feilfri funksjon av apparatet er kun sik-
ret ved bruk av sugeslange med diameter DN42 og DN52.
– Reservedeler og tilbehør får du hos din
forhandler eller ved en KÄRCHER-avdeling.
60 NO
– 4
Page 61

EU-samsvarserklæring
Vi erklærer hermed at maskinen angitt nedenfor oppfyller de grunnleggende sikkerhets- og helsekravene i de relevante EFdirektivene, med hensyn til både design,
konstruksjon og type markedsført av oss.
Ved endringer på maskinen som er utført
uten vårt samtykke, mister denne erklæringen sin gyldighet.
Produkt: Våt- og tørrsuger
Type: 1.576-xxx
Relevante EU-direktiver
2006/42/EF (+2009/127/EF)
2004/108/EF
Anvendte overensstemmende normer
EN 55014–1: 2006 + A1: 2009
EN 55014–2: 1997 + A2: 2008
EN 60335–1
EN 60335–2–69
EN 61000–3–2: 2006 + A2: 2009
EN 61000–3–3: 2008
EN 62233: 2008
Anvendte nasjonale normer
-
5.966-010
De undertegnede handler på oppdrag fra,
og med fullmakt fra selskapsledelsen.
CEO
Head of Approbation
Dokumentasjonsansvarlig:
S. Reiser
Alfred Kärcher GmbH & Co. KG
Alfred-Kärcher-Str. 28 - 40
71364 Winnenden (Germany)
Tlf: +49 7195 14-0
Faks: +49 7195 14-2212
Winnenden, 2010/07/14
– 5
61NO
Page 62

Tekniske data
IVC 60/24-2
*EU
IVC 60/24-2
*GB
*CH
Nettspenning V 220-240 110
Frekvens Hz 1~ 50/60 1~ 50/60
Maks. effekt W 2760 2450
Nominell effekt W 2400 2150
Beholderinnhold l 60 60
Luftmengde (maks.) l/s 2x 74 2x 66
Undertrykk (maks.) kPa (mbar) 25,4 (254) 22,0 (220)
Beskyttelsestype -- IP X4 IP X4
Beskyttelsesklasse -- I I
Sugeslangekobling (C-DN/C-ID) DN 72 72
Sugeslange, nominell diameter DN 42/52 42/52
Lengde x bredde x høyde mm 970 x 690 x 995 970 x 690 x 995
Filterflate m
2
0,95 0,95
Typisk driftsvekt kg 60 60
Omgivelsestemperatur maks. °C +40 +40
Registrerte verdier etter EN 60335-2-69
Støytrykksnivå L
Usikkerhet K
pA
pA
Hånd-arm vibrasjonsverdi m/s
Usikkerhet K m/s
dB(A) 73 73
dB(A) 1 1
2
2
<2,5 <2,5
0,2 0,2
Nettledning H07RN-F 3x1,5 mm
2
Best.nr. Kabellengde
EU 6.649-915.0 10 m
CH 6.650-168.0 10 m
Nettledning H07RN-F 3x2,5 mm
2
Best.nr. Kabellengde
GB 6.650-169.0 10 m
62 NO
– 6
Page 63

Läs bruksanvisning i original
innan aggregatet används första
gången, följ anvisningarna och spara driftsanvisningen för framtida behov, eller för
nästa ägare.
– Före första ibruktagning måste Säker-
hetsanvisningar nr. 5.956-249 läsas!
– Om bruksanvisningen och säkerhets-
anvisningarna inte följs kan apparaten
skadas och faror uppstå för användaren
och andra personer.
– Informera inköpsstället omgående vid
transportskador.
Innehållsförteckning
Miljöskydd . . . . . . . . . . . . . SV . . .1
Symboler i bruksanvisningen SV . . .1
Ändamålsenlig användning SV . . .1
Aggregatelement . . . . . . . . SV . . . 2
Idrifttagning . . . . . . . . . . . . SV . . .2
Handhavande. . . . . . . . . . . SV . . . 2
Transport . . . . . . . . . . . . . . SV . . . 3
Förvaring . . . . . . . . . . . . . . SV . . .3
Skötsel och underhåll. . . . . SV . . . 3
Åtgärder vid störningar. . . . SV . . . 4
Garanti . . . . . . . . . . . . . . . . SV . . .4
Tillbehör och reservdelar . . SV . . .5
Försäkran om EU-överens-
stämmelse . . . . . . . . . . . . . SV . . . 5
Tekniska data . . . . . . . . . . . SV . . .6
Miljöskydd
Emballagematerialen kan återvinnas. Kasta inte emballaget i
hushållssoporna utan lämna det
till återvinning.
Kasserade apparater innehåller
återvinningsbart material som
bör gå till återvinning. Batterier,
olja och liknande ämnen får inte
komma ut i miljön. Överlämna
skrotade aggregat till ett lämpligt återvinningssystem.
Upplysningar om ingredienser (REACH)
Aktuell information om ingredienser finns på:
www.kaercher.com/REACH
Symboler i bruksanvisningen
Fara
För en omedelbart överhängande fara som
kan leda till svåra skador eller döden.
몇 Varning
För en möjlig farlig situation som kan leda
till svåra skador eller döden.
Varning
För en möjlig farlig situation som kan leda
till lätta skador eller materiella skador.
Ändamålsenlig användning
몇 Varning
Maskinen är inte lämplig för uppsugning av
hälsovådligt damm.
– Maskinen är avsedd att användas till
våt och torr rengöring av golv- och
väggytor.
– Apparaten är lämplig för och industriell
användning, t.ex. i lokaler för lager och
tillverkningsindustri och på produktionsmaskiner.
– Maskinen är inte godkänd för transport
med kran.
– 1
63SV
Page 64

Aggregatelement
1 Nätkabel
2 Typskylt
3 Filterrengöring
4 Plattfilter
5 Sughuvud
6 Handtag för sughuvudet
7 Höger spärr till nedsättningsmekanik.
8 Mellanring
9 Styrrulle för smutsbehållaren
10 Täckpropp
11 Smutsbehållare
12 Vänster spärr till nedsättningsmekanik
13 Hjul
14 Spärr av sughuvud
15 Sugfästen
16 Styrrulle för underredet med parke-
ringsbroms
17 Fäste till golvmunstycke
18 Chassi
19 Uppsamlingsbehållare
20 Handtag för smutsbehållaren
21 Hållare för sugrör
22 Nätkontakt för temperaturgivaren
23 Kontrollampa "Driftsberedskap"
24 Vridbrytare
25 Filterskydd
26 Kabelfäste
27 Skjuthandtag
28 Öppning skyddskåpa
29 Skyddskåpa
30 Temperaturgivare
Idrifttagning
Ställ apparaten i arbetsläge och säkra
den vid behov med parkeringsbromsar.
Anslut sugslangen (medföljer ej) till
sugfästet.
Kontrollera nivån i smutsbehållaren före
arbetets början och töm eventuellt be-
hållaren.
Kontrollera att smutsbehållaren är or-
dentligt isatt.
Sätt på önskat tillbehör (medföljer ej).
Handhavande
Varning
Under sugning får platveckfiltret aldrig tas
bort.
Torrsugning
Varning
Observera följande vid växling från våt-
till torrsugning :
Sugning av torrt damm när filterelementet
är fuktigt gör att filtret blir tilltäppt och därigenom oanvändbart.
Våta filter ska torkas ordentligt före an-
vändning eller bytas ut mot torra.
Byt filter vid behov, beskrivs i avsnitt
"Underhåll och service".
Observera: Smutsbehållaren måste tömmas när den är fylld upp till ca. 3 cm under
den övre kanten.
– Kontrollera regelbundet nivån i smuts-
behållaren eftersom apparaten inte
stänger av automatiskt vid torrsugning.
Våtsugning
Varning
Beakta lokala föreskrifter för smutsvattenshantering.
– Varning! Om apparaten tas i drift
med full smutsbehållare kan det hända att avstängningen reagerar för
sent och att apparaten blir överfull.
– Vid uppsugning av vår smuts med fog-
munstycket, eller om huvudsakligen
större vätskemängder sugs upp, rekommenderas att funktionen "Filterrengöring" kopplas bort.
– När max. vätskenivå har uppnåtts
stängs apparaten automatiskt av.
– Efter avslutad våtsugning: Torka de
plattveckade filtren. Rengör temperaturgivaren och skyddskåpan med en
fuktig trasa. Rengör behållaren med en
fuktig trasa och låt den torka.
64 SV
– 2
Page 65

Vridbrytare
– Maskin PÅ
– Filterrengöring FRÅN
– Maskin FRÅN
– Maskin PÅ
– Filterrengöring TILL
Koppla till aggregatet
Stick i nätkontakten.
Kontrollampan för driftberedskap lyser.
Starta maskinen med vridbrytaren.
Automatisk filterrengöring
Aggregatet förfogar över en nyartad, dubbel filterrengöring som är särskilt verksam med fint
damm. Funktionen gör att plattvecksfiltret renas
automatiskt (pulserande ljud) var 7,5:de sekund
med hjälp av en luftstöt.
Koppla från aggregatet
Stäng av maskinen med vridbrytaren.
Drag ur nätkontakten.
Kontrollampan för driftberedskap
släcks.
Efter varje användning
Töm behållaren
Spärra parkeringsbromsen.
Bild
Dra spärren till avsättningsmekaniken
uppåt.
Dra skjutbygeln uppåt. Behållaren låses
upp och sänks.
Bild
Dra ut behållaren i handtaget.
Töm behållaren.
Sätt tillbaka behållaren och spärra den
med skjutbygeln.
몇 Varning
Klämningsrisk! Håll aldrig händerna mellan smutsbehållaren
och mellanringen eller i närheten av lyftmekaniken när behål-
laren ska spärras. Spärra behållaren
genom att manövrera skjutbygeln med
båda händerna.
Rengöra apparaten
Rengör apparaten invändigt och utvän-
digt genom uppsugning och torka med
en fuktig trasa.
Förvara aggregatet
Rulla upp sladden kring sladdhållaren.
Linda sugslangen kring skjutbygeln.
Sätt in golvmunstycket och sugröret i
sina respektive hållare.
Förvara apparaten i ett torrt rum och
säkra den mot obehörig användning.
Transport
Varning
Risk för person och egendomsskada! Observera vid transport maskinens vikt.
Lossa parkeringsbromsen och skjut
maskinen med hjälp av skjutbygeln.
Fatta om underredet, inte i skjutbygeln,
när maskinen ska lastas.
Vid transport i fordon ska maskinen
säkras enligt respektive gällande bestämmelser så den inte kan tippa eller
glida.
Förvaring
Varning
Risk för person och egendomsskada! Observera maskinens vikt vid lagring.
Denna maskin får endast lagras inomhus.
Skötsel och underhåll
Fara
Stäng alltid av aggregatet och lossa nätkontakten innan arbeten på aggregatet utförs.
Byta plattveckat filter
Öppna filterlocket.
Byt plattveckat filter.
Tillslut filterskyddet, det hakas hörbart
fast.
– 3
65SV
Page 66

Rengöra temperaturgivaren
Dra spärren till avsättningsmekaniken
uppåt.
Dra skjutbygeln uppåt. Behållaren låses
upp och sänks.
Dra ut behållaren i handtaget.
Rengör temperaturgivaren och skydds-
kåpan med en fuktig trasa.
Sätt tillbaka behållaren och spärra den
med skjutbygeln.
Åtgärder vid störningar
Fara
Stäng alltid av aggregatet och lossa nätkontakten innan arbeten på aggregatet utförs.
Sugturbinen fungerar inte
Kontrollera eluttaget och strömförsörj-
ningens säkring.
Kontrollera apparatens nätkabel, nät-
kontakt och termosond.
Slå på apparaten.
Sugturbinen stängs av
Töm behållaren.
Kontrollera att skyddskåpan finns och
att öppningen på sidan av skyddskåpan
är vänd i riktning mot höger nedsätt-
ningsmekanik (se bild).
Rengör temperaturgivaren och skydds-
kåpan med en fuktig trasa.
Sugturbinen startar inte efter att
behållaren har tömts
Koppla från apparaten och koppla in
den igen.
Rengör temperaturgivaren och skydds-
kåpan med en fuktig trasa.
Sugkraften nedsatt
Avlägsna stopp i sugmunstycke, sug-
rör, sugslang eller plattvecksfilter.
Kontrollera att sughuvudet och behålla-
ren sitter ordentligt.
Haka fast filterskyddet ordentligt.
Byt plattveckat filter.
Damm tränger ut under sugning
Kontrollera plattveckfiltrets monterings-
läge.
Byt plattveckat filter.
Frånkopplingsautomatiken
(våtsugning) fungerar inte
Rengör temperaturgivaren och skydds-
kåpan med en fuktig trasa.
Automatiska filterrengöringen
arbetar inte
Sugslang ej ansluten.
Den använda sugslangen är för kort
(< 3m) eller har för stor diameter.
Informera kundservice.
Det går inte att stänga av den
automatiska fiterrengöringen
Informera kundservice.
Garanti
I respektive land gäller de garantivillkor
som publicerats av våra auktoriserade distributörer. Eventuella fel på aggregatet repareras utan kostnad under förutsättning
att det orsakats av ett material- eller tillverkningsfel. I frågor som gäller garantin ska du
vända dig med kvitto till inköpsstället eller
närmaste auktoriserade serviceverkstad.
66 SV
– 4
Page 67

Tillbehör och reservdelar Försäkran om
– Endast av tillverkaren godkända tillbe-
hör och reservdelar får användas. Origi-
nal-tillbehör och original-reservdelar
garanterar att apparaten kan användas
säkert och utan störning.
– I slutet av bruksanvisningen finns ett urval
av de reservdelar som oftast behövs.
– Ytterligare information om reservdelar
hittas under service på www.kaer-
cher.com.
– Inget tillbehör ingår i leveransen. Tillbe-
höret måste beställas separat beroende
av användning.
– Apparaten fungerar felfritt endast om
sugslangens märkdiametrar DN42 och
DN52 garanteras.
– Reservdelar och tillbehör finns att få på
inköpsstället, eller från närmaste KÄR-
CHER-filial.
EU-överensstämmelse
Härmed försäkrar vi att nedanstående betecknade maskin i ändamål och konstruktion samt i den av oss levererade versionen
motsvarar EU-direktivens tillämpliga grundläggande säkerhets- och hälsokrav. Vid
ändringar på maskinen som inte har godkänts av oss blir denna överensstämmelseförklaring ogiltig.
Produkt: Våt- och torrdammsugare
Typ: 1.576-xxx
Tillämpliga EU-direktiv
2006/42/EG (+2009/127/EG)
2004/108/EG
Tillämpade harmoniserade normer
EN 55014–1: 2006 + A1: 2009
EN 55014–2: 1997 + A2: 2008
EN 60335–1
EN 60335–2–69
EN 61000–3–2: 2006 + A2: 2009
EN 61000–3–3: 2008
EN 62233: 2008
Tillämpade nationella normer
-
5.966-010
Undertecknade agerar på order av och
med fullmakt från företagsledningen.
CEO
Head of Approbation
Dokumentationsbefullmäktigad:
S. Reiser
Alfred Kärcher GmbH & Co. KG
Alfred-Kärcher-Str. 28 - 40
71364 Winnenden (Germany)
Tel.: +49 7195 14-0
Fax: +49 7195 14-2212
Winnenden, 2010/07/14
– 5
67SV
Page 68

Tekniska data
IVC 60/24-2
*EU
IVC 60/24-2
*GB
*CH
Nätspänning V 220-240 110
Frekvens Hz 1~ 50/60 1~ 50/60
Max. effekt W 2760 2450
Normeffekt W 2400 2150
Behållarvolym l 60 60
Luftmängd (max.) l/s 2x 74 2x 66
Undertryck (max.) kPa (mbar) 25,4 (254) 22,0 (220)
Skydd -- IP X4 IP X4
Skyddsklass -- I I
Sugslanganslutning (C-DN/C-ID) DN 72 72
Sugslang-märkdiameter DN 42/52 42/52
Längd x Bredd x Höjd mm 970 x 690 x 995 970 x 690 x 995
Filteryta m
2
0,95 0,95
Typisk driftvikt kg 60 60
Omgivningstemperatur (max.) °C +40 +40
Beräknade värden enligt EN 60335-2-69
Ljudtrycksnivå L
Osäkerhet K
pA
pA
Hand-Arm Vibrationsvärde m/s
Osäkerhet K m/s
dB(A) 73 73
dB(A) 1 1
2
2
<2,5 <2,5
0,2 0,2
Nätkabel H07RN-F 3x1,5 mm
2
Artikelnr. Kabellängd
EU 6.649-915.0 10 m
CH 6.650-168.0 10 m
Nätkabel H07RN-F 3x2,5 mm
2
Artikelnr. Kabellängd
GB 6.650-169.0 10 m
68 SV
– 6
Page 69

Lue tämä alkuperäisiä ohjeita
ennen laitteesi käyttämistä, säilytä käyttöohje myöhempää käyttöä tai
mahdollista myöhempää omistajaa varten.
– Turvaohje nro 5.956-249 on ehdotto-
masti luettava ennen laitteen ensimmäistä käyttökertaa!
– Käyttöohjeen ja turvaohjeiden huomiot-
ta jättäminen voi aiheuttaa vaurioita laitteeseen ja vaaroja käyttäjälle ja muille
henkilöille.
– Jos havaitset kuljetusvaurioita, ota välit-
tömästi yhteys jälleenmyyjään.
Sisällysluettelo
Ympäristönsuojelu . . . . . . . FI . . 1
Käyttöohjeessa esiintyvät symbolit FI . . 1
Käyttötarkoitus . . . . . . . . . . FI . . 1
Laitteen osat. . . . . . . . . . . . FI . . 2
Käyttöönotto . . . . . . . . . . . . FI . . 2
Käyttö . . . . . . . . . . . . . . . . . FI . . 2
Kuljetus . . . . . . . . . . . . . . . FI . . 3
Säilytys. . . . . . . . . . . . . . . . FI . . 3
Hoito ja huolto . . . . . . . . . . FI . . 3
Häiriöapu . . . . . . . . . . . . . . FI . . 4
Takuu . . . . . . . . . . . . . . . . . FI . . 4
Varusteet ja varaosat . . . . . FI . . 5
EU-standardinmukaisuustodistus FI . . 5
Tekniset tiedot . . . . . . . . . . FI . . 6
Ympäristönsuojelu
Pakkausmateriaalit ovat kierrätettäviä. Älä käsittelee pakkauksia
kotitalousjätteenä, vaan toimita
ne jätteiden kierrätykseen.
Käytetyt laitteet sisältävät arvokkaita kierrätettäviä materiaaleja, jotka tulisi toimittaa
kierrätykseen. Paristoja, öljyjä
ja samankaltaisia aineita ei saa
päästää ympäristöön. Tästä
syystä toimita kuluneet laitteet
asianmukaisiin keräyspisteisiin.
Huomautuksia materiaaleista (REACH)
Ajantasaisia tietoja ainesosista löytyy osoitteesta:
www.kaercher.com/REACH
Käyttöohjeessa esiintyvät
symbolit
Vaara
Välittömästi uhkaava vaara, joka aiheuttaa
vakavan ruumiinvamman tai johtaa kuolemaan.
몇 Varoitus
Mahdollisesti vaarallinen tilanne, joka voi
aiheuttaa vakavan ruumiinvamman tai voi
johtaa kuolemaan.
Varo
Mahdollisesti vaarallinen tilanne, joka voi
aiheuttaa lievän ruumiinvamman tai aineellisia vahinkoja.
Käyttötarkoitus
몇 Varoitus
Laite ei sovellu terveydelle haitallisten pölyjen imurointiin.
– Tämä imuri on suunniteltu lattioiden ja
seinäpintojen märkä- ja kuivapuhdistukseen.
– Tämä laite soveltuu teolliseen käyttöön,
esim. varastointi- ja valmistustiloissa ja
tuotantokoneilla.
– Laitetta ei ole hyväksytty nosturilla nos-
tettavaksi.
– 1
69FI
Page 70

Laitteen osat
1 Verkkokaapeli
2 Tyyppikilpi
3 Suodattimen puhdistus
4 Poimusuodatin
5 Imupää
6 Imupään käsikahva
7 Laskumekanismin oikeanpuolisen luki-
tuksen vapautus
8 Välirengas
9 Likasäiliön ohjausrulla
10 Sulkutulppa
11 Pölysäiliö
12 Laskumekanismin vasemmanpuolisen
lukituksen vapautus
13 Pyörä
14 Imupään lukitus
15 Imukaulus
16 Kuljetusalustan seisontajarrullinen oh-
jauspyörä.
17 Lattiasuuttimen pidike
18 Kuljetusalusta
19 Keräysallas
20 Likasäiliön käsikahva
21 Pidike imuputkelle
22 Lämpötila-anturin liitäntäpistoke
23 Merkkivalo "Käyttövalmius"
24 Kiertokytkin
25 Suodattimen kansi
26 Johdon pidike
27 Työntökahva
28 Suojakuvun aukko
29 Suojus
30 Lämpötila-anturi
Käyttöönotto
Aseta laite toiminta-asentoon ja varmis-
ta laite tarvittaessa seisontajarruilla.
Pistä imuletku (ei kuulu toimitukseen)
imuliittimeen.
Tarkasta likasäiliön täyttömäärä ennen
töiden aloittamista ja tyhjennä säiliö tar-
vittaessa.
Varmista, että likasäiliö on asennettu oi-
kein paikalleen.
Kiinnitä letkuun haluttu varuste (ei kuulu
toimitukseen).
Käyttö
Varo
Imuroinnin aikana ei saa koskaan poistaa
poimusuodatinta.
Kuivaimu
Varo
Huomioi märkäimuroinnista kuivaimu-
rointiin vaihdettaessa:
Kuivan pölyn imurointi märkää suodatinelementtiä käyttäen tukkii suodattimen ja voi
tehdä suodattimen käyttökelvottomaksi.
Kuivaa märkä suodatin hyvin ennen
käyttöä tai vaihda se kuivaan suodattimeen.
Vaihda suodatin tarvittaessa, toimenpi-
de kuvataan kohdassa "Hoito ja huolto".
Huomautus: Likasäiliö on tyhjennettävä,
kun se on täyttynyt noin 3 cm etäisyydelle
säiliön yläreunasta.
– Tarkasta säännöllisin väliajoin likasäili-
ön täyttömäärä, koska laite ei kuivaimuroitaessa kytkeydy automaattisesti pois
päältä.
Märkäimu
Varo
Noudata jäteveden käsittelyä koskevia paikallisia määräyksiä.
– Huomio! Jos laite otetaan käyttöön
likasäiliön ollessa täynnä, on mahdollista, että poiskytkentä reagoi liian myöhään ja laite ylitäyttyy.
– Imuroitaessa märkää likaa rakosuutti-
mella tai, jos imuroidaan pääasiassa
suuria nestemääriä, on suositeltavaa
kytkeä "Suodattimenpuhdistus"-toiminta pois päältä.
– Kun maksimi nestetäyttötaso on saavu-
tettu, laite kytkeytyy automaattisesti
pois päältä.
– Märkäimuroinnin päätyttyä: Kuivaa poi-
musuodatin. Puhdista kostealla liinalla
lämpötila-anturi ja suojuskate. Puhdista
säiliö kostealla liinalla ja anna kuivua.
70 FI
– 2
Page 71

Kiertokytkin
– Laite ON
– Suodatinpuhdistus OFF
– Laite OFF
– Laite ON
– Suodatinpuhdistus ON
Laitteen käynnistys
Työnnä virtapistoke pistorasiaan.
Merkkivalo "Käyttövalmius" palaa.
Kytke laite päälle kiertokytkimellä.
Automaattinen suodattimen
puhdistus
Imuri on varustettu uudenlaisella, kaksinkertaisella suodattimen puhdistuksella,
joka on erityisen tehokas hienolla pölyllä.
Poimusuodatin puhdistetaan tällöin joka
7,5 sekunti automaattisesti ilmansysäyksellä (kuuluu sykkivä ääni).
Laitteen kytkeminen pois päältä
Kytke laite kiertokytkimellä pois päältä.
Vedä verkkopistoke irti.
Merkkivalo "Käyttövalmius" sammuu.
Jokaisen käyttökerran jälkeen
Säiliön tyhjennys
Lukitse seisontajarrut.
Kuva
Vedä laskumekaniikan lukituksen va-
pauttimia ylöspäin.
Vedä työntöaisaa ylöspäin. Säiliö va-
pautuu ja laskeutuu alas.
Kuva
Vedä säiliö käsikahvasta ulos.
Tyhjennä säiliö.
Aseta säiliö takaisin paikalleen ja lukit-
se työntöaisaan.
몇 Varoitus
Puristumisvaara! Älä missään
tapauksessa pidä käsiäsi likasäiliön ja välirenkaan välissä tai
nostomekanismin läheisyydessä lukitsemista suorittaessasi. Lukitse säiliö molemmilla käsillä työntöaisaa käyttäen.
Laitteen puhdistus
Puhdista laite sisältä ja ulkoa imuroi-
malla ja kostealla liinalla pyyhkimällä.
Laitteen säilytys
Kierrä verkkokaapeli kaapelikannattimi-
en ympärille.
Kierrä imuletku työntöaisan ympärille.
Pistä lattiasuulake ja imuputki omaan
kannattimeensa.
Säilytä laite kuivassa tilassa ja suojaa
se asiattomalta käytöltä.
Kuljetus
Varo
Loukkaantumis- ja vahingoittumisvaaravaara!
Huomioi kuljetettaessa laitteen paino.
Irrota seisontajarru ja työnnä laitetta
työntöaisasta.
Kun lastaat laitteen autoon, pidä kiinni
kuljetusalustasta, ei työntökahvasta.
Kun kuljetat laitetta ajoneuvoissa, var-
mista laite liukumisen ja kaatumisen varalta kulloinkin voimassa olevien
ohjesääntöjen mukaisesti.
Säilytys
Varo
Loukkaantumis- ja vahingoittumisvaaravaara! Huomioi säilytettäessä laitteen paino.
Tätä laitetta saa säilyttää vain sisätiloissa.
Hoito ja huolto
Vaara
Virtapistoke on vedettävä irti pistorasiasta
ennen kaikkia laitteeseen kohdistuvia töitä.
– 3
71FI
Page 72

Poimusuodattimen vaihto
Avaa suodattimen kansi.
Vaihda poimusuodatin.
Sulje suodattimen kansi, sen on lukitut-
tuva kuuluvasti.
Lämpötila-anturin puhdistus
Vedä laskumekaniikan lukituksen va-
pauttimia ylöspäin.
Vedä työntöaisaa ylöspäin. Säiliö va-
pautuu ja laskeutuu alas.
Vedä säiliö käsikahvasta ulos.
Puhdista kostealla liinalla lämpötila-an-
turi ja suojuskate.
Aseta säiliö takaisin paikalleen ja lukit-
se työntöaisaan.
Häiriöapu
Vaara
Virtapistoke on vedettävä irti pistorasiasta
ennen kaikkia laitteeseen kohdistuvia töitä.
Imuturbiini ei pyöri
Tarkasta virransyötön pistorasia ja su-
lake.
Tarkasta laitteen verkkokaapeli, verk-
kopistoke ja lämpöanturi.
Kytke laite päälle.
Imuturbiini kytkeytyy pois päältä
Tyhjennä säiliö.
Tarkasta, onko suojakupu paikallaan ja
suojakuvun sivulla oleva aukko osoittaa
kohti oikeanpuolista laskumekanismia
(katso laitekuvaa).
Puhdista kostealla liinalla lämpötila-an-
turi ja suojuskate.
Imuturbiini ei käynnisty astian
tyhjentämisen jälkeen
Kytke laite pois päältä ja uudelleen
päälle.
Puhdista kostealla liinalla lämpötila-an-
turi ja suojuskate.
Imuvoima vähenee
Poista tukokset imusuuttimesta, imu-
putkesta, imuletkusta tai poimusuodattimesta.
Tarkasta imupään ja säiliön kunnollinen
istuvuus.
Lukitse suodattimen kansi oikein.
Vaihda poimusuodatin.
Pöly pääsee ulos imuvaiheessa
Tarkasta poimusuodattimen oikea
asennus.
Vaihda poimusuodatin.
Katkaisuautomatiikka (märkäimu)
ei reagoi
Puhdista kostealla liinalla lämpötila-an-
turi ja suojuskate.
Automaattinen suodattimen
puhdistus ei toimi
Imuletku ei ole liitettynä.
Käytössä oleva imuletku on liian lyhyt (<
3m) tai sen läpimitta on liian suuri.
Ota yhteyttä asiakaspalveluun.
Automaattista suodatinpuhdistusta
ei voi kytkeä pois päältä
Ota yhteyttä asiakaspalveluun.
Takuu
Kussakin maassa ovat voimassa valtuuttamamme myyntiorganisaation julkaisemat
takuuehdot. Materiaali- ja valmistusvirheistä aiheutuvat virheet laitteessa korjaamme
takuuaikana maksutta. Takuutapauksessa
ota yhteys ostotositteen kanssa jälleenmyyjään tai lähimpään valtuutettuun huoltoon.
72 FI
– 4
Page 73

Varusteet ja varaosat EU-standardinmukaisuusto-
– Vain sellaisten lisävarusteiden ja vara-
osien käyttö on sallittua, jotka valmistaja on hyväksynyt. Alkuperäiset
lisävarusteet ja varaosat takaavat, että
laitetta voidaan käyttää turvallisesti ja
häiriöttömästi.
– Tärkeimpien osien varaosaluettelo löy-
tyy tämän käyttöohjeen lopusta.
– Saat lisätietoja varaosista osoitteesta
www.karcher.fi, osiosta Huolto.
– Toimitukseen ei kuulu varusteita. Va-
rusteet on tilattava erikseen käyttötarkoituksen perusteella.
– Laitteen moitteeton toiminta on taattu
vain DN42 ja DN52 nimellisläpimitan
omaavia imuletkuja käytettäessä.
– Varaosat ja erityisvarusteet saat kaup-
piaaltasi tai lähimmältä KÄRCHER tytäryhtiöltä.
Vakuutamme, että alla mainitut tuotteet
vastaavat suunnittelultaan ja rakenteeltaan
sekä valmistustavaltaan EU-direktiivien
asianomaisia turvallisuus- ja terveysvaatimuksia. Jos tuotteeseen/tuotteisiin tehdään muutoksia, joista ei ole sovittu
kanssamme, tämä vakuutus ei ole enää
voimassa.
Tuote: Märkä- ja kuivaimuri
Tyyppi: 1.576-xxx
Yksiselitteiset EU-direktiivit
2006/42/EY (+2009/127/EY)
2004/108/EY
Sovelletut harmonisoidut standardit
EN 55014–1: 2006 + A1: 2009
EN 55014–2: 1997 + A2: 2008
EN 60335–1
EN 60335–2–69
EN 61000–3–2: 2006 + A2: 2009
EN 61000–3–3: 2008
EN 62233: 2008
Sovelletut kansalliset standardit
-
5.966-010
distus
Allekirjoittaneet toimivat yrityksen johton
puolesta ja sen valtuuttamina.
CEO
Head of Approbation
Dokumentointivaltuutettu:
S. Reiser
Alfred Kärcher GmbH & Co. KG
Alfred-Kärcher-Str. 28 - 40
71364 Winnenden (Germany)
Puh.: +49 7195 14-0
Faksi: +49 7195 14-2212
Winnenden, 2010/07/14
– 5
73FI
Page 74

Tekniset tiedot
IVC 60/24-2
*EU
IVC 60/24-2
*GB
*CH
Verkkojännite V 220-240 110
Taajuus Hz 1~ 50/60 1~ 50/60
Maks. teho W 2760 2450
Nimellisteho W 2400 2150
Säiliön tilavuus l 60 60
Ilmamäärä (maks.) l/s 2x 74 2x 66
Alipaine (maks.) kPa (mbar) 25,4 (254) 22,0 (220)
Suojatyyppi -- IP X4 IP X4
Kotelointiluokka -- I I
Imuletkuliitin (C-DN/C-ID) DN 72 72
Imuletkun nimellisläpimitta DN 42/52 42/52
Pituus x leveys x korkeus mm 970 x 690 x 995 970 x 690 x 995
Suodatinpinta m
2
0,95 0,95
Tyypillinen käyttöpaino kg 60 60
Ympäristön lämpötila (maks.) °C +40 +40
Mitatut arvot EN 60335-2-69 mukaisesti
Äänenpainetaso L
Epävarmuus K
pA
pA
Käsi-käsivarsi tärinäarvo m/s
Epävarmuus K m/s
dB(A) 73 73
dB(A) 1 1
2
2
<2,5 <2,5
0,2 0,2
Verkkokaapeli H07RN-F 3x1,5 mm
2
Osa-nro Johdon pi-
tuus
EU 6.649-915.0 10 m
CH 6.650-168.0 10 m
Verkkokaapeli H07RN-F 3x2,5 mm
2
Osa-nro Johdon
pituus
GB 6.650-169.0 10 m
74 FI
– 6
Page 75

– 1
Πριν χρησιμοποιήσετε τη συ-
σκευή σας για πρώτη φορά, διαβάστε αυτές τις πρωτότυπες οδηγίες
χρήσης, ενεργήστε σύμφωνα με αυτές και
κρατήστε τις για μελλοντική χρήση ή για τον
επόμενο ιδιοκτήτη.
– Πριν από την πρώτη χρήση διαβάστε
οπωσδήποτε τις υποδείξεις ασφαλείας
αρ. 5.956-249!
– Η μη τήρηση των οδηγιών χρήσης, κα-
θώς και των υποδείξεων ασφαλείας,
μπορεί να προκαλέσει βλάβες στη συσκευή ή κινδύνους για τον χρήστη ή
άλλα άτομα.
– Σε περίπτωση βλαβών κατά τη μεταφο-
ρά ειδοποιήστε αμέσως τον αντιπρόσωπό σας.
Υποδείξεις για τα συστατικά (REACH)
Ενημερωμένες πληροφορίες για τα συστατικά μπορείτε να βρείτε στη διεύθυνση:
www.kaercher.com/REACH
Κίνδυνος
Για άμεσα επαπειλούμενο κίνδυνο, ο οποίος μπορεί να οδηγήσει σε σοβαρό τραυματισμό ή θάνατο.
몇 Προειδοποίηση
Για ενδεχόμενη επικίνδυνη κατάσταση, η
οποία μπορεί να οδηγήσει σε σοβαρό τραυματισμό ή θάνατο.
Προσοχή
Για ενδεχόμενη επικίνδυνη κατάσταση, η
οποία μπορεί να οδηγήσει σε ελαφρό τραυματισμό ή υλικές βλάβες.
Πίνακας περιεχομένων
Προστασία περιβάλλοντος . EL . . .1
Σύμβολα στο εγχειρίδιο οδηγι-
ών. . . . . . . . . . . . . . . . . . . . EL . . .1
Χρήση σύμφωνα με τους κανο-
νισμούς. . . . . . . . . . . . . . . . EL . . .2
Στοιχεία συσκευής . . . . . . . EL . . .2
Έναρξη λειτουργίας . . . . . . EL . . . 2
Χειρισμός . . . . . . . . . . . . . . EL . . .2
Μεταφορά. . . . . . . . . . . . . . EL . . .4
Αποθήκευση. . . . . . . . . . . . EL . . .4
Φροντίδα και συντήρηση . . EL . . .4
Αντιμετώπιση βλαβών . . . . EL . . .4
Εγγύηση . . . . . . . . . . . . . . . EL . . .5
Εξαρτήματα και ανταλλακτικά EL . . .5
Δήλωση Συμμόρφωσης των
Ε.Κ. . . . . . . . . . . . . . . . . . . EL . . .6
Τεχνικά χαρακτηριστικά . . . EL . . .7
Προστασία περιβάλλοντος
Τα υλικά συσκευασίας είναι
ανακυκλώσιμα. Μην πετάτε τις
συσκευασίες στα οικιακά απορρίμματα, αλλά σε ειδικό σύστημα επαναχρησιμοποίησης.
Οι παλιές συσκευές περιέχουν
ανακυκλώσιμα υλικά, τα οποία
θα πρέπει να μεταφέρονται σε
σύστημα επαναχρησιμοποίησης. Οι μπαταρίες, τα λάδια και
παρόμοια υλικά δεν επιτρέπεται
να καταλήγουν στο περιβάλλον.
Για το λόγο αυτόν η διάθεση παλιών συσκευών πρέπει να γίνεται σε κατάλληλα συστήματα
συλλογής.
Σύμβολα στο εγχειρίδιο
οδηγιών
75EL
Page 76

Χρήση σύμφωνα με τους
κανονισμούς
몇 Προειδοποίηση
Η συσκευή δεν ενδείκνυται για την αναρρόφηση επιβλαβών για την υγεία σκονών.
– Αυτή η ηλεκτρική σκούπα προορίζεται
για τον υγρό και τον ξηρό καθαρισμό
επιφανειών δαπέδων και τοίχων.
– Η συσκευή αυτή είναι κατάλληλη για βι-
ομηχανική χρήση, π.χ. σε αποθήκες και
εργοστάσια, καθώς και σε μηχανήματα
παραγωγής.
– Η συσκευή δεν διαθέτει έγκριση για με-
ταφορά με γερανό.
Στοιχεία συσκευής
1 Καλώδιο τροφοδοσίας
2 Πινακίδα τύπου
3 Καθάρισμα φίλτρου
4 Επίπεδο πτυχωτό φίλτρο
5 Κεφαλή αναρρόφησης
6 Χειρολαβή της κεφαλής αναρρόφησης
7 Δεξιά διάταξη απασφάλισης του μηχα-
νισμού απόθεσης
8 Ενδιάμεσος δακτύλιος
9 Τροχίσκος δοχείου ρύπων
10 Σφράγιστρο
11 Δοχείο ρύπων
12 Αριστερή διάταξη απασφάλισης του μη-
χανισμού απόθεσης
13 Τροχός
14 Ασφάλιση της
15 Στόμιο αναρρόφησης
16 Τροχίσκος πλαισίου με φρένο ακινητοποίη-
σης
17 Στήριγμα για ακροφύσιο δαπέδου
18 Τροχήλατη βάση
19 Δοχείο συλλογής
20 Χειρολαβή δοχείου ρύπων
21 Στήριγμα για σωλήνα αναρρόφησης
22 Βύσμα σύνδεσης αισθητήρα θερμότητας
23 Ενδεικτική λυχνία "Λειτουργική ετοιμότητα"
24 Περιστροφικός διακόπτης
25 Κάλυμμα φίλτρου
26 Συγκρατητής καλωδίου
κεφαλής αναρρόφησης
27 Λαβή μεταφοράς
28 Άνοιγμα του προστατευτικού πώματος
29 Προστατευτικό πώμα
30 Αισθητήρας θερμότητας
Έναρξη λειτουργίας
Τοποθετήστε
σίας, εάν χρειάζεται ασφαλίστε την με
το φρένο ακινητοποίησης.
Τοποθετήστε τον ελαστικό σωλήνα
αναρρόφησης (δεν περιλαμβάνεται στη
συσκευασία) στο στόμιο αναρρόφησης.
Ελέγξτε τη στάθμη πλήρωσης στο δο-
χείο ρύπων πριν την έναρξη της εργασίας και αδειάστε το δοχείο κατά
περίπτωση.
Βεβαιωθείτε ότι το
σωστά τοποθετημένο.
Συνδέστε το επιθυμητό εξάρτημα (δεν
περιλαμβάνεται στη συσκευασία).
τη συσκευή σε θέση εργα-
δοχείο ρύπων είναι
Χειρισμός
Προσοχή
Κατά την αναρρόφηση δεν επιτρέπεται να
απομακρύνεται ποτέ το επίπεδο πτυχωτό
φίλτρο
Ξηρή αναρρόφηση
Προσοχή
Κατά την αλλαγή από υγρή σε ξηρή
αναρρόφηση, προσέξτε τα ακόλουθα:
Η αναρρόφηση ξηρής σκόνης όταν το στοιχείο φιλτραρίσματος είναι υγρό μπορεί να
επιβαρύνει
Πριν από τη χρήση στεγνώστε καλά το
Εάν χρειαστεί, αντικαταστήστε το φίλ-
Υπόδειξη: Το δοχείο ρύπων πρέπει να
αδειάζει, όταν είναι γεμάτο έως και 3 εκ.
κάτω από
– Ελέγχετε συχνά τη στάθμη πλήρωσης
το φίλτρο και να το αχρηστέψει.
υγρό φίλτρο ή αντικαταστήστε το με
στεγνό.
τρο όπως περιγράφεται στο σημείο
"Φροντίδα και συντήρηση".
το άνω χείλος του.
του δοχείου ρύπων, επειδή η συσκευή
δεν απενεργοποιείται αυτόματα κατά
την ξηρή αναρρόφηση.
76 EL
– 2
Page 77

Υγρή αναρρόφηση
Προσοχή
Δώστε προσοχή στις τοπικές προδιαγραφές για την επεξεργασία λυμάτων.
– Προσοχή! Εάν η συσκευή τεθεί σε
λειτουργία με γεμάτο δοχείο ρύπων,
ενδέχεται να αντιδράσει καθυστερη-
μένα το σύστημα απενεργοποίησης
και να υπάρξει υπερπλήρωσης της
συσκευής.
– Κατά την αναρρόφηση υγρών ακαθαρ
σιών με το ακροφύσιο αρμών ή κατά
την αναρρόφηση κατά κύριο λόγο μεγά
λων ποσοτήτων υγρών, συνιστούμε την
απενεργοποίηση της λειτουργίας "Κα-
θαρισμού φίλτρου".
– Όταν σημειωθεί η μέγιστη στάθμη
υγρών, η συσκευή απενεργοποιείται
αυτόματα.
– Μετά το πέρας της υγρής αναρρόφη
σης: Στεγνώστε το επίπεδο πτυχωτό
φίλτρο. Καθαρίστε το εσωτερικό τον αι-
σθητήρα θερμότητας και το προστατευ
τικό πώμα με ένα υγρό πανί. Καθαρίστε
και στεγνώστε το δοχείο με ένα υγρό
πανί.
Περιστροφικός διακόπτης
– Συσκευή ΟΝ
– Kαθαρισμός φίλτρου
OFF
– Συσκευή ΟFF
– Συσκευή ΟΝ
– Καθαρισμός φίλτρου
ΟΝ
Ενεργοποίηση της μηχανής
Συνδέστε το ρευματολήπτη στην πρίζα.
Η ενδεικτική λυχνία "Λειτουργική ετοι-
μότητα" ανάβει.
Ενεργοποιήστε τη
ριστροφικό διακόπτη.
συσκευή από τον πε-
Αυτόματος καθαρισμός του φίλτρου
Η συσκευή διαθέτει νέου τύπου, διπλό σύστημα καθαρισμού φίλτρου, ιδιαίτερα αποτελεσματικό για λεπτή σκόνη. Το επίπεδο
πτυχωτό φίλτρο καθαρίζεται αυτόματα με
ρεύμα αέρα (παλμικός ήχος) ανά 7,5 δευτερόλεπτα.
Απενεργοποίηση της μηχανής
Απενεργοποιήστε τη συσκευή από τον
περιστροφικό διακόπτη.
Βγάλτε το ρευματολήπτη.
Η ενδεικτική λυχνία "
Λειτουργική ετοι-
μότητα" σβήνει.
Έπειτα από κάθε λειτουργία
Εκκένωση του δοχείου
Ασφαλίστε το φρένο ακινητοποίησης.
Εικόνα
Τραβήξτε προς τα πάνω τις διατάξεις
απασφάλισης του μηχανισμού απόθεσης.
Τραβήξτε τη λαβή μεταφοράς προς τα
επάνω. Το δοχείο θα απασφαλιστεί και
θα κατέβει.
Εικόνα
Τραβήξτε το δοχείο από τη χειρολαβή.
Αδειάστε τον κάδο.
Τοποθετήστε ξανά το δοχείο
και ασφα
λίστε το με τη λαβή ώθησης.
몇 Προειδοποίηση
Κίνδυνος σύνθλιψης! Κατά το
κλείδωμα, μην τοποθετείτε ποτέ
τα χέρια σας ανάμεσα στο δο
χείο ρύπων και τον ενδιάμεσο
δακτύλιο ή κοντά στο μηχανισμό ανύψω
σης. Ασφαλίστε το δοχείο με τις δύο λαβές
ώθησης χρησιμοποιώντας και τα δύο χέρια
σας.
Καθαρισμός συσκευής
Καθαρίστε τη συσκευή εσωτερικά και
εξωτερικά με αναρρόφηση και σκούπισμα
με ένα υγρό πανί.
– 3
77EL
Page 78

Φύλαξη της συσκευής
Τυλίξτε το καλώδιο τροφοδοσίας γύρω
από το στήριγμα καλωδίου.
Τυλίξτε τον ελαστικό σωλήνα αναρρό
φησης γύρω από τη λαβή ώθησης.
Τοποθετήστε το ακροφύσιο δαπέδου
και το σωλήνα αναρρόφησης στις αντίστοιχες υποδοχές.
Τοποθετήστε τη συσκευή σε στεγνό
χώρο και ασφαλίστε την ώστε να μην
μπορεί να χρησιμοποιηθεί από αναρ
μόδια άτομα.
-
Μεταφορά
Προσοχή
Κίνδυνος τραυματισμού και βλάβης! Κατά
τη μεταφορά λάβετε υπόψη το βάρος της
συσκευής.
Απασφαλίστε το φρένο ακινητοποίησης
και σπρώξτε τη συσκευή από τη λαβή
ώθησης.
Για να μεταφορτώσετε τη συσκευή,
κρατήστε την από το τροχήλατο πλαίσιο
και όχι από τη λαβή ώθησης.
Κατά τη μεταφορά με
στε τη συσκευή έναντι ενδεχόμενης ολίσθησης και ανατροπής, σύμφωνα με τις
εκάστοτε ισχύουσες κατευθυντήριες
οδηγίες.
οχήματα, ασφαλί-
Αποθήκευση
Προσοχή
Κίνδυνος τραυματισμού και βλάβης! Κατά
την αποθήκευση λάβετε υπόψη το βάρος
της συσκευής.
Η συσκευή αυτή μπορεί να αποθηκεύεται
μόνο σε εσωτερικούς χώρους.
Φροντίδα και συντήρηση
Κίνδυνος
Πριν από όλες τις εργασίες στη συσκευή,
απενεργοποιήστε τη συσκευή και τραβήξτε
το φις από την πρίζα.
Αντικατάσταση του επίπεδου
πτυχωτού φίλτρου
Ανοίξτε το κάλυμμα του φίλτρου.
Αντικαταστήστε το επίπεδο πτυχωτό
φίλτρο.
Κλείστε το κάλυμμα του φίλτρου. Θα
ακούσετε τον ήχο ασφάλισης.
Καθαρισμός αισθητήρα θερμότητας
Τραβήξτε προς τα πάνω τις διατάξεις απα-
σφάλισης του μηχανισμού απόθεσης.
Τραβήξτε τη λαβή μεταφοράς προς τα
επάνω. Το δοχείο θα απασφαλιστεί και
θα κατέβει.
Τραβήξτε το δοχείο από τη χειρολαβή.
Καθαρίστε το εσωτερικό τον αισθητήρα
θερμότητας και το προστατευτικό πώμα
με ένα υγρό πανί.
Τοποθετήστε ξανά το δοχείο και ασφα-
λίστε το με τη λαβή ώθησης.
Αντιμετώπιση βλαβών
Κίνδυνος
Πριν από όλες τις εργασίες στη συσκευή,
απενεργοποιήστε τη συσκευή και τραβήξτε
το φις από την πρίζα.
Η τουρμπίνα αναρρόφησης δεν
λειτουργεί
Ελέγξτε την πρίζα και την ασφάλεια της
παροχής ρεύματος.
Ελέγξτε το καλώδιο τροφοδοσίας, το
φις και τον αισθητήρα θερμότητας της
συσκευής.
Θέστε τη συσκευή σε λειτουργία.
Η τουρμπίνα απενεργοποιείται
Αδειάστε τον κάδο.
Ελέγξτε εάν
πώμα κι εάν το πλευρικό άνοιγμα του
προστατευτικού πώματος δείχνει προς
την κατεύθυνση του δεξιού μηχανισμού
απόθεσης (βλ. εικόνα συσκευής).
Καθαρίστε το εσωτερικό τον αισθητήρα
θερμότητας και το προστατευτικό πώμα
με ένα υγρό πανί.
υπάρχει προστατευτικό
78 EL
– 4
Page 79

Η τουρμπίνα αναρρόφησης δεν
ενεργοποιείται μετά το άδειασμα
του κάδου
Απενεργοποιήστε τη συσκευή και ενερ-
γοποιήστε την ξανά.
Καθαρίστε το εσωτερικό τον αισθητήρα
θερμότητας και το προστατευτικό πώμα
με ένα υγρό πανί.
Η αναρροφητική ισχύς μειώνεται
Απομακρύνετε τις εμπλοκές του ακρο-
φυσίου αναρρόφησης, του σωλήνα
αναρρόφησης, του ελαστικού σωλήνα
αναρρόφησης ή του επίπεδου πτυχωτού φίλτρου
Ελέγξτε τη σωστή έδραση της κεφαλής
αναρρόφησης
Ασφαλίστε καλά το κάλυμμα φίλτρου.
Αντικαταστήστε το επίπεδο πτυχωτό
φίλτρο.
και του δοχείου.
Διαρροή σκόνης κατά την
αναρρόφηση
Ελέγξτε εάν έγινε σωστή τοποθέτηση
του επίπεδου πτυχωτού φίλτρου.
Αντικαταστήστε το επίπεδο πτυχωτό
φίλτρο.
Ο αυτοματισμός απενεργοποίησης
(υγρή αναρρόφηση) δεν
ενεργοποιείται
Καθαρίστε το εσωτερικό τον αισθητήρα
θερμότητας και το προστατευτικό πώμα
με ένα υγρό πανί.
Ο αυτόματος καθαρισμός του
φίλτρου δεν λειτουργεί
Ο ελαστικός σωλήνας αναρρόφησης
δεν είναι
Ο χρησιμοποιούμενος ελαστικός σωλή-
νας αναρρόφησης είναι πολύ κοντός
(< 3m) ή έχει πολύ μεγάλη διατομή.
Ειδοποιήστε την υπηρεσία εξυπηρέτη-
σης πελατών.
συνδεδεμένος.
Ο αυτόματος καθαρισμός φίλτρου
δεν απενεργοποιείται
Ειδοποιήστε την υπηρεσία εξυπηρέτη-
σης πελατών.
Εγγύηση
Σε κάθε χώρα ισχύουν οι όροι εγγύησης
που εκδόθηκαν από την αρμόδια εταιρία
μας προώθησης πωλήσεων. Αναλαμβάνουμε τη δωρεάν αποκατάσταση οποιασ
δήποτε βλάβης στη συσκευή σας, εφόσον
οφείλεται σε αστοχία υλικού ή κατασκευαστικό σφάλμα, εντός της προθεσμίας που
ορίζεται στην εγγύηση. Σε περίπτωση που
επιθυμείτε να κάνετε χρήση της εγγύησης,
παρακαλούμε απευθυνθείτε με την απόδειξη αγοράς στο κατάστημα από το οποίο
προμηθευτήκατε τη συσκευή ή στην πλησιέστερη εξουσιοδοτημένη
κής εξυπηρέτησης πελατών μας.
υπηρεσία τεχνι-
-
Εξαρτήματα και ανταλλακτικά
– Επιτρέπεται να χρησιμοποιούνται μόνο
εξαρτήματα και ανταλλακτικά, τα οποία
έχουν την έγκριση του κατασκευαστή
Τα γνήσια αξεσουάρ και ανταλλακτικά
παρέχουν την εγγύηση της ασφαλούς
και άψογης λειτουργίας της μηχανής
– Μία επιλογή των ανταλλακτικών που
χρειάζονται συχνότερα θα βρείτε στο τέλος των οδηγιών χρήσης.
– Περισσότερες πληροφορίες σχετικά με
τα ανταλλακτικά μπορείτε να λάβετε στη
διεύθυνση www.kaercher.com, τομέας
Εξυπηρέτησης.
– Στο παραδοτέο υλικό δεν περιλαμβάνε-
ται κανένα εξάρτημα. Τα εξαρτήματα
πρέπει να παραγγελθούν ξεχωριστά
ανάλογα με τη χρήση.
– Η άψογη λειτουργία της συσκευής εξα-
σφαλίζεται μόνο με τους ελαστικούς
σωλήνες αναρρόφησης πλάτους DN42
και DN52.
– Μπορείτε να προμηθευθείτε ανταλλα-
κτικά και εξαρτήματα από τον αρμόδιο
έμπορο ή από το υποκατάστημα της
KÄRCHER της περιοχής σας.
– 5
79EL
Page 80

Δήλωση Συμμόρφωσης των
Ε.Κ.
Δια της παρούσης δηλώνουμε ότι το μηχάνημα που χαρακτηρίζεται παρακάτω, με
βάση τη σχεδίαση και την κατασκευή του,
υπό τη μορφή που διατίθεται στην αγορά,
πληροί στις σχετικές βασικές απαιτήσεις
ασφαλείας και υγιεινής των οδηγιών της
ΕΚ. Η παρούσα δήλωση παύει να ισχύει σε
περίπτωση τροποποιήσεων του μηχανήματος
χωρίς προηγούμενη συνεννόηση
μαζί μας.
Προϊόν: Ηλεκτρική σκούπα υγρής και
Τύπος: 1.576-xxx
Σχετικές οδηγίες των Ε.Κ.
2006/42/EK (+2009/127/EK)
2004/108/EΚ
Εφαρμοσθέντα εναρμονισμένα πρότυπα
EN 55014–1: 2006 + A1: 2009
EN 55014–2: 1997 + A2: 2008
EN 60335–1
EN 60335–2–69
EN 61000–3–2: 2006 + A2: 2009
EN 61000–3–3: 2008
EN 62233: 2008
Εφαρμοσθέντα εθνικά πρότυπα
-
ξηρής αναρρόφησης
5.966-010
Οι υπογράφοντες ενεργούν κατ' εντολή του
και με εξουσιοδότηση της διεύθυνσης της
επιχείρησης.
CEO
Υπεύθυνος τεκμηρίωσης:
S. Reiser
Alfred Karcher GmbH & Co. KG
Alfred-Karcher-Str. 28 - 40
71364 Winnenden (Germany)
Τηλ.: +49 7195 14-0
Φαξ: +49 7195 14-2212
Winnenden, 2010/07/14
80 EL
Head of Approbation
– 6
Page 81

Τεχνικά χαρακτηριστικά
IVC 60/24-2
*EU
IVC 60/24-2
*GB
*CH
Τάση ηλεκτρικού δικτύου V 220-240 110
Συχνότητα Hz 1~ 50/60 1~ 50/60
Μέγ. ισχύς W 2760 2450
Ονομαστική ισχύς W 2400 2150
Χωρητικότητα κάδου l6060
Ποσότητα αέρα (μέγ.) l/s 2x 74 2x 66
Υποπίεση (μέγ.) kPa (mbar) 25,4 (254) 22,0 (220)
Είδος προστασίας -- IP X4 IP X4
Κατηγορία προστασίας -- I I
Σύνδεση ελαστικού σωλήνα αναρρό-
DN 72 72
φησης (C-DN/C-ID)
Ονομαστικό πλάτος ελαστικού σωλή-
DN 42/52 42/52
να αναρρόφησης
Μήκος x Πλάτος x Ύψος mm 970 x 690 x 995 970 x 690 x 995
Επιφάνεια φίλτρου m
2
0,95 0,95
Τυπικό βάρος λειτουργίας kg 60 60
Θερμοκρασία περιβάλλοντος (μέγ.) °C +40 +40
Μετρούμενες τιμές κατά EN 60335-2-69
Επιτρεπόμενη στάθμη ηχητικής ισχύος L
pA
Αβεβαιότητα K
pA
Κραδασμοί στο χέρι/στο βραχίονα m/s
Αβεβαιότητα K m/s
dB(A) 73 73
dB(A) 1 1
2
2
<2,5 <2,5
0,2 0,2
Καλώδιο τροφοδοσίας δικτύου
H07RN-F 3x1,5 mm
Αριθ. ανταλλ. Μήκος κα-
λωδίου
EU 6.649-915.0 10 m
CH 6.650-168.0 10 m
Καλώδιο τροφοδοσίας δικτύου
H07RN-F 3x2,5 mm
Αριθ. ανταλλ. Μήκος κα-
λωδίου
GB 6.650-169.0 10 m
2
2
– 7
81EL
Page 82

Cihazın ilk kullanımından önce
bu orijinal kullanma kılavuzunu
okuyun, bu kılavuza göre davranın ve daha
sonra kullanım veya cihazın sonraki sahiplerine vermek için bu kılavuzu saklayın.
– İlk kullanımdan önce, 5.956-249 numa-
ralı güvenlik uyarılarını mutlaka okuyun!
– Kullanım kılavuzunun ve emniyet uyarı-
larının dikkate alınmaması halinde cihazda hasar, kullanıcıda ve diğer
kişilerde tehlike oluşabilir.
– Nakliye hasarlarını hemen yetkili satıcı-
ya bildirin.
İçindekiler
Çevre koruma. . . . . . . . . . . TR . . .1
Kullanım kılavuzundaki semboller TR . . .1
Kurallara uygun kullanım . . TR . . .1
Cihaz elemanları . . . . . . . . TR . . .2
İşletime alma . . . . . . . . . . . TR . . .2
Kullanımı . . . . . . . . . . . . . . TR . . .2
Ta şıma . . . . . . . . . . . . . . . . TR . . .3
Depolama. . . . . . . . . . . . . . TR . . .3
Koruma ve Bakım. . . . . . . . TR . . .3
Arızalarda yardım. . . . . . . . TR . . .4
Garanti . . . . . . . . . . . . . . . . TR . . .4
Aksesuarlar ve yedek parçalar TR . . .5
AB uygunluk bildirisi . . . . . . TR . . .5
Teknik Bilgiler . . . . . . . . . . . TR . . .6
Çevre koruma
Ambalaj malzemeleri geri dönüştürülebilir. Ambalaj malzemelerini evinizin çöpüne atmak
yerine lütfen tekrar kullanılabile-
cekleri yerlere gönderin.
Eski cihazlarda, yeniden değerlendirme işlemine tabi tutulması
gereken değerli geri dönüşüm
malzemeleri bulunmaktadır.
Aküler, yağ ve benzeri maddeler
doğaya ulaşmamalıdır. Bu nedenle eski cihazları lütfen öngörülen toplama sistemleri
aracılığıyla imha edin.
İçindekiler hakkında uyarılar (REACH)
İçindekiler hakkında ayrıntılı bilgileri bulabi-
leceğiniz adres:
www.kaercher.com/REACH
Kullanım kılavuzundaki
semboller
Tehlike
Ağır bedensel yaralanmalar ya da ölüme
neden olan direkt bir tehlike için.
몇 Uyarı
Ağır bedensel yaralanmalar ya da ölüme neden
olabilecek olası tehlikeli bir durum için.
Dikkat
Hafif bedensel yaralanmalar ya da maddi
hasarlara neden olabilecek olası tehlikeli
bir durum için.
82 TR
Kurallara uygun kullanım
몇 Uyarı
Cihaz, zararlı tozların emilmesi için uygun
değildir.
– Bu süpürge, zemin ve duvar yüzeyleri-
nin ıslak ve kuru temizlenmesi için belirlenmiştir.
– Bu cihaz, örn. depolama ve üretim bö-
lümleri ve üretim makineleri gibi sanayi
amaçlı kullanım için uygundur.
– Cihaz vinçle yükleme için onaylanma-
mıştır.
– 1
Page 83

Cihaz elemanları
1 Elektrik kablosu
2 Tip levhası
3 Filtre temizliği
4 Yatık filtre
5 Emme başlığı
6 Süpürme kafası tutamağı
7 Oturtma mekanizmasının sağ kilit açma
mekanizması
8 Ara halka
9 Kir haznesinin manevra tekerleği
10 Kapak tapası
11 Zbiornik na zanieczyszczenia
12 Oturtma mekanizmasının sol kilit açma
mekanizması
13 Tekerlek
14 Süpürge kafasının kilidi
15 Emme ağzı
16 Park freniyle birlikte şasinin manevra
tekerleği
17 Zemin memesi tutucusu
18 Şasi
19 Toplama kabı
20 Kir haznesinin tutamağı
21 Süpürme borusu tutucusu
22 Termik sonda bağlantı soketi
23 "Kullanıma hazır" kontrol lambası
24 Döner şalter
25 Filtre kapağı
26 Kablo tutucu
27 İtme yayı
28 Koruyucu başlık deliği
29 Koruma başlığı
30 Termik sonda
İşletime alma
Cihazı çalışma pozisyonuna getirin, gere-
kirse park frenleri ile emniyete alın.
Süpürme hortumunu (teslimat kapsamı-
na dahil değildir) süpürme ağzına takın.
Çalışmaya başlamadan önce kir hazne-
sindeki doluluk seviyesini kontrol edin
ve gerekirse hazneyi boşaltın.
Kir haznesinin kurallara uygun olarak
yerleştirilmiş olduğundan emin olun.
İstediğiniz aksesuarı (teslimat kapsa-
mında değildir) takın.
Kullanımı
Dikkat
Emme sırasında yassı katlama filtresi kesinlikle çıkartılmamalıdır.
Kuru emme
Dikkat
Islak süpürmeden kuru süpürmeye ge-
çerken dikkat edilmesi gerekenler:
Filtre ıslakken kuru tozun emilmesi, filtrede
yığılmaya neden olur ve filtreyi kullanılamaz duruma getirebilir.
Islak filtreyi kullanmadan önce iyice te-
mizleyin veya kuru yerleştirin.
Gerektiğinde filtreyi değiştirin, "Bakım
ve Onarım" maddesinde açıklanır.
Not: Kenarın yaklaşık 3 cm altına kadar
dolu olması durumunda kir haznesi boşaltılmalıdır.
– Kuru süpürme sırasında cihaz otomatik
olarak kapanacağı için, kir haznesindeki doluluk seviyesini düzenli olarak kontrol edin.
Islak temizlik
Dikkat
Yerel atık su işleme talimatlarına uyun.
– Dikkat! Cihaz kir haznesi doluyken
çalıştırılırsa, kapatma mekanizmasının geç tepki vermesi ve cihazın aşırı
dolması olasılığı bulunmaktadır.
– Sulu kirin tabanca ek yeri memesi ile
emilmesi sırasında ya da ağırlıklı olarak
su emilmesi durumunda, "Filtre temizleme" fonksiyonunun kapatılması önerilir.
– Maksimum sıvı seviyesine ulaşılması
durumunda cihaz otomatik olarak kapatılır.
– Sulu süpürmenin tamamlanmasından
sonra: Yassı katlama filtresini kurutun.
Termik sondayı ve koruma başlığını
nemli bir bezle temizleyin. Hazneyi
nemli bir bezle temizleyin ve kurutun.
– 2
83TR
Page 84

Döner şalter
– Cihaz AÇIK
– Filtre temizleme KAPA-
LI
– Cihaz KAPALI
– Cihaz AÇIK
– Filtre temizleme AÇIK
Cihazı açın
Şebeke fişini takın.
Çalışmaya hazır kontrol lambası yanar.
Cihazı döner şalterden açın.
Otomatik filtre temizleme
Cihaz, özellikle ince tozda etkili olan yeni
bir çift filtre temizleme sistemine sahiptir.
Bu sırada, yassı katlama filtresi her 7,5 saniyede bir hava darbesiyle otomatik olarak
temizlenir (titreşimli ses).
Cihazın kapatılması
Cihazı döner şalterden kapatın.
Şebeke fişini prizden çekiniz.
Kullanıma hazır kontrol lambası söndü.
Her çalışmadan sonra
Kabı boşaltınız
Park frenlerini kilitleyin.
Şekil
Oturtma mekanizmasının kilit açma me-
kanizmalarını yukarı çekin.
İtme kolunu yukarı çekin. Haznenin kili-
di açılır ve hazne indirilir.
Şekil
Hazneyi tutamaktan tutarak dışarı çekin.
Kabı boşaltın.
Hazneyi yerine yerleştirin ve itme koluy-
la kilitleyin.
몇 Uyarı
Ezilme tehlikesi! Kilitleme sırasında elinizi kesinlikle kir haznesi ve ara halka arasında
tutmayın ya da kaldırma mekanizmasına yaklaştırmayın. İtme koluna basarak iki elinizle hazneyi kilitleyin.
Cihazın temizlenmesi
Cihazın dışını ve içini tozunu alarak ve
silerek nemli bir bezle temizleyin.
Cihazın saklanması
Elektrik kablosunu kablo tutucusuna sarın.
Süpürme hortumunu itme koluna sarın.
Taban memesi ve süpürme borusunu il-
gili tutucuya takın.
Cihazı kuru bir odada muhafaza edin ve
yetkisiz kullanıma karşı emniyete alın.
Taşıma
Dikkat
Yaralanma ve hasar tehlikesi! Taşıma sıra-
sında cihazın ağırlığına dikkat edin.
Park frenlerini çözün ve cihazı itme ko-
lundan itin.
Yüklemek için şasiden tutun, itme ko-
lundan tutmayın.
Araçlarda taşıma sı
çerli yönetmeliklere göre kaymaya ve
devrilmeye karşı emniyete alın.
rasında, cihazı ge-
Depolama
Dikkat
Yaralanma ve hasar tehlikesi! Depolama
sırasında cihazın ağırlığına dikkat edin.
Bu cihaz sadece iç mekanlarda depolanmalıdır.
Koruma ve Bakım
Tehlike
Cihazdaki tüm çalışmalardan önce cihazı
kapatın ve elektrik fişini çekin.
84 TR
– 3
Page 85

Yassı katlama filtresinin
değiştirilmesi
Filtre kapağını açın.
Yassı katlama filtresini değiştirin.
Filtre kapağını kapatın; duyulur bir şe-
kilde kilitlenmelidir.
Termik sondanın temizlenmesi
Oturtma mekanizmasının kilit açma me-
kanizmalarını yukarı çekin.
İtme kolunu yukarı çekin. Haznenin kili-
di açılır ve hazne indirilir.
Hazneyi tutamaktan tutarak dışarı çekin.
Termik sondayı ve koruma başlığını
nemli bir bezle temizleyin.
Hazneyi yerine yerleştirin ve itme koluy-
la kilitleyin.
Arızalarda yardım
Tehlike
Cihazdaki tüm çalışmalardan önce cihazı
kapatın ve elektrik fişini çekin.
Emme türbini çalışmıyor
Akım beslemesinin prizini ve sigortasını
kontrol edin.
Cihazın elektrik kablosunu, elektrik fişi-
ni ve termik probunu kontrol edin.
Cihazı açın.
Vakum türbini kapanıyor
Kabı boşaltın.
Koruyucu başlığın mevcut olup olmadı-
ğını ve koruyucu başığın yanındaki de-
liğin sağ oturtma mekanizmasını
gösterip göstermediğini kontrol edin
(bkz. Cihaz resmi).
Termik sondayı ve koruma başlığını
nemli bir bezle temizleyin.
Hazne boşaldıktan sonra vakum
türbini tekrar çalışmaya başlıyor
Cihazı kapatın ve tekrar açın.
Termik sondayı
nemli bir bezle temizleyin.
ve koruma başlığını
Emme gücü dü
Vakum memesi, vakum borusu, vakum
hortumu ya da yassı katlama filtresindeki tıkanmaları giderin.
Süpürme kafası ve haznenin doğru otu-
rup oturmadığını kontrol edin.
Filtre kapağını doğru şekilde kilitleyin.
Yassı katlama filtresini değiştirin.
Emme sırasında dışarı toz çıkıyor
Yassı katlama filtresinin montaj konu-
munun doğru olup olmadığını kontrol
edin.
Yassı katlama filtresini değiştirin.
Kapatma otomatiği (sulu süpürme)
tepki vermiyor
Termik sondayı ve koruma başlığını
nemli bir bezle temizleyin.
Otomatik filtre temizleme çalışmıyor
Vakum hortumu bağlı değil.
Kullanılan süpürge hortumu çok kısa (<
3m) veya çapı çok büyük.
Müşteri hizmetlerine haber verin.
Otomatik filtre temizleme
kapatılamıyor
Müşteri hizmetlerine haber verin.
Garanti
Her ülkede yetkili distribütörümüz tarafından verilmiş garanti şartları geçerlidir. Garanti süresi içinde cihazınızda oluşan
muhtemel hasarları, arızanın kaynağı üretim veya malzeme hatası olduğu sürece ücretsiz olarak karşılıyoruz. Garanti
hakkınızdan yararlanmanızı gerektiren bir
durum olduğu zaman, ilgili faturanız ile birlikte satıcınıza veya size en yakın yetkili
servisimize başvurunuz.
– 4
85TR
Page 86

Aksesuarlar ve yedek
parçalar
– Sadece üretici tarafından onaylanmış
aksesuar ve yedek parçalar kullanılma-
lıdır. Orijinal aksesuar ve orijinal yedek
parçalar, cihazın güvenli ve arızasız bir
biçimde çalışmasının güvencesidir.
– En sık kullanılan yedek parça çeşitlerini
kullanım kılavuzunun sonunda bulabilirsiniz.
– Yedek parçalar hakkında diğer bilgileri,
www.kaercher.com adresindeki Servis
bölümünden alabilirsiniz.
– Teslimat kapsamında hiçbir aksesuar bu-
lunmamaktadır. Aksesuarlar, uygulamaya
göre ayrı olarak sipariş edilmelidir.
– Cihazın kusursuz çalışması, sadece
DN42 ve DN52 süpürme hortumu nominal genişlikleri ile sağlanır.
– Yedek parçalar ve aksesuarları yetkili
satıcınız ya da KÄRCHER temsilciliğinden temin edebilirsiniz.
AB uygunluk bildirisi
İşbu belge ile aşağıda tanımlanan makine-
nin konsepti ve tasarımı ve tarafımızdan piyasaya sürülen modeliyle AB
yönetmeliklerinin temel teşkil eden ilgili güvenlik ve sağlık yükümlülüklerine uygun olduğunu bildiririz. Onayımız olmadan
cihazda herhangi bir değişiklik yapılması
durumunda bu beyan geçerliliğini yitirir.
Ürün: Kuru ve yaş elektrikli süpür-
ge
Tip: 1.576-xxx
İlgili AB yönetmelikleri
2006/42/EG (+2009/127/EG)
2004/108/EG
Kullanılmış olan uyumlu standartlar
EN 55014–1: 2006 + A1: 2009
EN 55014–2: 1997 + A2: 2008
EN 60335–1
EN 60335–2–69
EN 61000–3–2: 2006 + A2: 2009
EN 61000–3–3: 2008
EN 62233: 2008
Kullanılmış ulusal standartlar
-
5.966-010
86 TR
İmzası bulunanlar, işletme yönetimi adına
ve işletme yönetimi tarafından verilen vekalete dayanarak işlem yapar.
CEO
Head of Approbation
Dokümantasyon yetkilisi:
S. Reiser
Alfred Kärcher GmbH & Co. KG
Alfred-Kärcher-Str. 28 - 40
71364 Winnenden (Germany)
Tel.: +49 7195 14-0
Faks: +49 7195 14-2212
Winnenden, 2010/07/14
– 5
Page 87

Teknik Bilgiler
IVC 60/24-2
*EU
IVC 60/24-2
*GB
*CH
Şebeke gerilimi V 220-240 110
Frekans Hz 1~ 50/60 1~ 50/60
Maks. güç W 2760 2450
Nominal güç W 2400 2150
Kap içeriği l 60 60
Hava miktarı (maks.) l/s 2x 74 2x 66
Vakum (maks.) kPa (mbar) 25,4 (254) 22,0 (220)
Koruma şekli -- IP X4 IP X4
Koruma sınıfı -- I I
Süpürme hortumu bağlantısı
DN 72 72
(C-DN/C-ID)
Süpürme hortumu nominal genişliği DN 42/52 42/52
Uzunluk x Genişlik x Yükseklik mm 970 x 690 x 995 970 x 690 x 995
Filtre yüzeyi m
2
0,95 0,95
Tipik çalışma ağırlığı kg 60 60
Çevre sıcaklığı (maks.) °C +40 +40
60335-2-69'a göre belirlenen değerler
Ses basıncı seviyesi L
Güvensizlik K
pA
pA
El-kol titreşim değeri m/s
Güvensizlik K m/s
dB(A) 73 73
dB(A) 1 1
2
2
<2,5 <2,5
0,2 0,2
Elektrik kablosu
H07RN-F 3x1,5 mm
Parça No. Kablo
uzunluğu
EU 6.649-915.0 10 m
CH 6.650-168.0 10 m
Elektrik kablosu
H07RN-F 3x2,5 mm
Parça No. Kablo
uzunluğu
GB 6.650-169.0 10 m
2
2
– 6
87TR
Page 88

– 1
Перед первым применением
вашего прибора прочитайте
эту оригинальную инструкцию по эксплуатации, после этого действуйте соответственно и сохраните ее для
дальнейшего пользования или для следующего владельца.
– Перед первым вводом в эксплуата-
цию обязательно прочтите указания
по технике безопасности № 5.956-
249!
– При несоблюдении инструкции и ука-
заний по технике безопасности пылесос может выйти из строя, а для
оператора и других лиц возникает
риск получения травмы.
– При повреждениях, полученных во
время транспортировки, немедленно
свяжитесь с продавцом.
Инструкции по применению компонентов (REACH)
Актуальные сведения о компонентах
приведены на веб-узле по следующему
адресу:
www.kaercher.com/REACH
Опасность
Для непосредственно грозящей опасности, которая приводит к тяжелым
увечьям или к смерти.
몇 Предупреждение
Для возможной потенциально опасной
ситуации, которая может привести к
тяжелым увечьям или к смерти.
Внимание!
Для возможной потенциально опасной
ситуации, которая может привести к
легким травмам или повлечь материальный ущерб.
Оглавление
Защита окружающей среды RU . . .1
Символы в руководстве по эк-
сплуатации . . . . . . . . . . . . RU . . .1
Использование по назначе-
нию. . . . . . . . . . . . . . . . . . . RU . . . 2
Элементы прибора. . . . . . RU . . .2
Начало работы . . . . . . . . . RU . . .2
Управление. . . . . . . . . . . . RU . . .2
Транспортировка . . . . . . . RU . . .4
Хранение. . . . . . . . . . . . . . RU . . .4
Уход и техническое обслужи-
вание . . . . . . . . . . . . . . . . . RU . . .4
Помощь в случае неполадок RU . . .4
Гарантия . . . . . . . . . . . . . . RU . . .5
Принадлежности и запасные
детали . . . . . . . . . . . . . . . . RU . . .6
Заявление о соответствии ЕС RU . . .6
Технические данные. . . . . RU . . .7
Защита окружающей среды
Упаковочные материалы пригодны для вторичной переработки. Пожалуйста, не
выбрасывайте упаковку вместе с бытовыми отходами, а
сдайте ее в один из пунктов
приема вторичного сырья.
Старые приборы содержат
ценные перерабатываемые
материалы, подлежащие передаче в пункты приемки вторичного сырья.
Аккумуляторы, масло и иные
подобные материалы не
должны попадать в окружающую среду. Поэтому утилизируйте старые приборы через
соответствующие системы
приемки отходов.
Символы в руководстве по
эксплуатации
88 RU
Page 89

Использование по
назначению
몇 Предупреждение
Прибор не предназначен для сбора
вредной для здоровья пыли.
– Этот пылесос предназначен для
влажной и сухой очистки поверхностей полов и стен.
– Прибор предназначен для примене-
ния в промышленных условиях, например, в складских цехах и
производственных участках, а также
в серийных машинах.
– Прибор не предназначен для погруз-
ки с помощью крана.
Элементы прибора
1 Сетевой шнур
2 Заводская табличка с данными
3 Чистка фильтра
4 Плоский складчатый фильтр
5 Всасывающая головка
6 Ручка всасывающего элемента
7 Правое устройство разблокировки
механизма отвала
8 Прокладочное кольцо
9 Направляющие ролики мусорного
бака
10 Пробка
11 Мусорный бак
12 Левое устройство разблокировки ме-
ханизма отвала
13 Колесо
14 Блокировка всасывающей головки
15 Всасывающий
16 Направляющий ролик шасси со сто-
порным устройством
17 Держатель насадки для пола
18 Шасси
19 Сливная ванна
20 Рукоятка мусорного бака
21 Держатель для всасывающей трубки
22 Штепсельная вилка термозонда
23 Контрольная лампа готовности к экс-
плуатации
патрубок
24 Поворотный переключатель
25 Крышка фильтра
26 Держатель кабеля
27 ведущая дуга
28 Отверстие в защитном колпачке
29 Защитная крышка
30 Термозонд
Начало работы
Поставить прибор в рабочую пози
цию, при необходимости зафиксировать стояночным тормозом.
Вставить всасывающий шланг (не
входит в объем поставки) во всасывающий патрубок.
Перед началом работы проверить уро-
вень заполнения мусорного бака и
опорожнить его при необходимости.
Убедиться, что мусорный бак уста-
новлен надлежащим образом.
Подключить желаемые принадлеж-
ности (не входят в
объем поставки).
Управление
Внимание!
Удаление складчатого фильтра во
время работы запрещается.
Сухая чистка
Внимание!
При переходе от влажной чистки к
сухой учитывать:
Всасывание сухой пыли при влажном
фильтре может привести к возникно
вению засора и вывести фильтр из
строя.
Перед использованием влажный
фильтр следует хорошо просушить
или заменить на сухой.
В случае необходимости
следует заменять, следуя указаниям
в разделе "Уход и техническое обслуживание".
– 2
фильтр
-
89RU
Page 90

Указание: Мусорный бак необходимо
опорожнить тогда, когда он заполнен до
уровня примерно 3 см. от верхнего края.
– Регулярно проверять уровень запол-
нения мусорного бака, поскольку
прибор не отключается автоматичес-
ки во время чистки в сухом режиме.
Влажная чистка
Внимание!
Соблюдайте местные предписания по
обращению со сточными водами.
– Внимание! При вводе в эксплуата-
цию прибора с полным мусорным
баком может возникнуть задержка
отключения и переполнение при
бора.
– При засасывании влажной грязи на-
садкой для стыков, а также в тех слу-
чаях, когда преимущественно
отсасывается большое количество
воды, рекомендуется отключение
функции "Чистка фильтра".
– При достижении максимального
уровня жидкости прибор автомати-
чески отключается.
– После завершения чистки во влаж-
ном режиме: Просушить складчатый
фильтр. Очистить термозонд и за-
щитную крышку при помощи влажной
тряпки. Резервуар очистить с помо-
щью влажной тряпки и высушить.
Поворотный переключатель
– Прибор ВКЛ
– Система очистки
фильтра ВЫКЛ
– Прибор ВЫКЛ
– Прибор ВКЛ
– Система очистки
фильтра ВКЛ
Включение прибора
Вставьте штепсельную вилку в элек-
тророзетку.
Горит контрольная лампа готовности
к эксплуатации.
Включить прибор с помощью пово
ротного переключателя.
Автоматическая чистка фильтра
Прибор оснащен
мой очистки фильтра, особенно эффективным при работе с мелкой пылью. При
этом с помощью подачи воздуха каждые
7,5 секунд происходит автоматическая
очистка складчатого фильтра (пульсирующий звук).
новой, двойной систе-
Выключение прибора
Выключить прибор с помощью пово
ротного переключателя.
Отсоедините пылесос от электросети.
Контрольная лампа готовности к эксплуатации гаснет.
После каждой эксплуатации
Опорожнить резервуар
Зафиксировать
Рисунок
Потянуть разблокировку механизма
отвала вверх.
Передвинуть наверх буксирную ско-
бу. Произойдет разблокировка и
опускание резервуара.
Рисунок
Снять резервуар с рукоятки.
Опустошить бак.
Заново установить резервуар и за-
фиксировать с помощью буксирной
скобы.
стопорные устройства.
90 RU
– 3
Page 91

몇 Предупреждение
Опасность сдавливания! Во
время блокирования ни в коем
случае не держать руки меж
ду мусорным баком и прокла
дочным кольцом или рядом с механизмом подъемника. Зафиксировать резервуар посредством нажатия двумя
руками на буксирную скобу.
Чистка прибора
Очистить прибор снаружи и внутри
пылесосом и протереть его влажным
полотенцем.
Хранение прибора
Обмотать сетевой кабель
ржателя кабеля.
Обмотать всасывающий шланг вок-
руг буксирной скобы.
Поместить насадку для пола и вса-
сывающую трубку в соответствующие держатели.
Хранить прибор в сухом помещении,
приняв при этом меры от несанкционированного использования.
вокруг де-
Транспортировка
Внимание!
Опасность получения травм и повреждений! При транспортировке следует
обратить внимание на
тва.
Опустить стояночный тормоз и уста-
новить устройство на буксирную скобу.
Для погрузки прибор следует брать
за шасси, а не за буксирную скобу.
При перевозке аппарата в транспор-
тных средствах следует учитывать
действующие местные государственные нормы, направленные на
защиту от скольжения и опрокидывания.
вес устройс-
Хранение
Внимание!
Опасность получения травм и повреждений! При хранении следует обратить внимание на вес устройства.
Это устройство разрешается хранить
только во внутренних помещениях.
Уход и техническое
обслуживание
Опасность
Перед проведением любых работ с прибором, выключить прибор и вытянуть
штепсельную вилку.
Замена складчатого фильтра
Открыть крышку фильтра.
Заменить складчатый фильтр.
Закрыть крышку фильтра так, чтобы
был слышен щелчок.
Очистка термозонда
Потянуть разблокировку механизма
отвала вверх.
Передвинуть наверх буксирную ско-
бу. Произойдет разблокировка и
опускание резервуара.
Снять резервуар с рукоятки.
Очистить
крышку при помощи влажной тряпки.
Заново установить резервуар и за
фиксировать с помощью буксирной
скобы.
термозонд и защитную
Помощь в случае
неполадок
Опасность
Перед проведением любых работ с прибором, выключить прибор и вытянуть
штепсельную вилку.
– 4
91RU
Page 92

Всасывающая турбина не
работает
Проверить штепсельную розетку и
предохранитель системы электропи
тания.
Проверить сетевой кабель, штепсель-
ную вилку и термозонд устройства.
Включить аппарат.
Всасывающая турбина
отключается
Опустошить бак.
Убедиться в том, что защитный кол-
пачок находится на месте, а отверстие в колпачке повернуто в сторону
правой части механизма отвала (см.
изображение прибора).
Очистить термозонд
крышку при помощи влажной тряпки.
и защитную
После опустошения бака
всасывающая турбина не
запускается
Выключить прибор и снова включить.
Очистить термозонд и защитную
крышку при помощи влажной тряпки.
Мощность всасывания упала
Удалить мусор из всасывающего со-
пла, всасывающей трубки, всасывающего шланга или складчатого
фильтра.
Проверить правильность расположе-
ния всасывающей головки и бака.
Правильно закрыть крышку фильтра
так
, чтобы она зафиксировалась.
Заменить складчатый фильтр.
Во время чистки из прибора
выделяется пыль
Проверить правильность установки
складчатого фильтра.
Заменить складчатый фильтр.
Автоматическое отключение
(чистка во влажном режиме) не
срабатывает
Очистить термозонд и защитную
крышку при помощи влажной тряпки.
Автоматическая чистка фильтра
не выполняется
Всасывающий шланг не подключен.
Удлинитель для всасывающего
шланга слишком короткий (< 3 м) или
слишком широкий.
Поставить в известность сервисную
службу.
Автоматическая чистка фильтра
не выключается
Поставить в известность сервисную
службу.
Гарантия
В каждой стране действуют соответственно гарантийные условия, изданные
уполномоченной организацией сбыта
нашей продукции в данной стране. Возможные неисправности прибора в течение гарантийного срока мы устраняем
бесплатно, если причина заключается в
дефектах материалов или ошибках при
изготовлении. В случае возникновения
претензий в течение гарантийного срока
просьба обращаться, имея
о покупке, в торговую организацию, продавшую вам прибор или в ближайшую
уполномоченную службу сервисного об
служивания.
при себе чек
92 RU
– 5
Page 93

Принадлежности и
запасные детали
– Разрешается использовать только те
принадлежности и запасные части, использование которых было одобрено
изготовителем. Использование оригинальных принадлежностей и запчастей гарантирует Вам надежную и
бесперебойную работу прибора.
– Выбор наиболее часто необходимых
запчастей вы найдете в конце инструкции по эксплуатации.
– Дальнейшую информацию о запчас-
тях вы найдете на сайте
www.kaercher.com в разделе Service.
– Принадлежности в объем поставки
не входят. Необходимые в зависимости от предполагаемой работы
принадлежности следует заказывать
отдельно.
– Безупречность работы прибора до-
стигается исключительно при использовании всасывающего шланга
номинальным диаметром DN42 или
DN52.
– Запасные части и принадлежности
Вы можете получить у Вашего дилера или в филиале фирмы KÄRCHER.
Заявление о соответствии
ЕС
Настоящим мы заявляем, что нижеуказанный прибор по своей концепции и
конструкции, а также в осуществленном
и допущенном нами к продаже исполне
нии отвечает соответствующим основ
ным требованиям по безопасности и
здоровью согласно директивам ЕС. При
внесении
с нами, данное заявление теряет свою
силу.
Продукт Пылесос для мокрой и су-
Тип: 1.576-xxx
Основные директивы ЕС
2006/42/EC (+2009/127/EC)
2004/108/EC
Примененные гармонизированные
нормы
EN 55014–1: 2006 + A1: 2009
EN 55014–2: 1997 + A2: 2008
EN 60335–1
EN 60335–2–69
EN 61000–3–2: 2006 + A2: 2009
EN 61000–3–3: 2008
EN 62233: 2008
Примененные внутригосударственные нормы
-
5.966-010
изменений, не согласованных
хой чистки
Нижеподписавшиеся лица действуют по
поручению и по доверенности руководс
тва предприятия.
CEO
уполномоченный по документации:
S. Reiser
Alfred Kaercher GmbH & Co. KG
Alfred-Kaercher-Str. 28 - 40
71364 Winnenden (Germany)
Тел.: +49 7195 14-0
Факс: +49 7195 14-2212
Winnenden, 2010/07/14
– 6
Head of Approbation
93RU
Page 94

Технические данные
IVC 60/24-2
*EU
IVC 60/24-2
*GB
*CH
Напряжение сети V 220-240 110
Частота Hz 1~ 50/60 1~ 50/60
Макс. мощность W 2760 2450
Номинальная мощность W 2400 2150
Емкость бака l6060
Количество воздуха (макс.) l/s 2x 74 2x 66
Нижнее давление (макс.) kPa (mbar) 25,4 (254) 22,0 (220)
Тип защиты -- IP X4 IP X4
Класс защиты -- I I
Гнездо для подключения шланга
DN 72 72
(C-DN/C-ID)
Номинальный диаметр всасываю-
DN 42/52 42/52
щего шланга
Длина х ширина х высота mm 970 x 690 x 995 970 x 690 x 995
Активная поверхность фильтра m
2
0,95 0,95
Типичный рабочий вес kg 60 60
Температура окружающей среды
°C +40 +40
(макс.)
Значение установлено согласно стандарту EN 60335-2-69
Уровень шума дб
Опасность K
а
pA
Значение вибрации рука-плечо m/s
Опасность K m/s
dB(A) 73 73
dB(A) 1 1
2
2
<2,5 <2,5
0,2 0,2
Сетевой
шнур
H07RN-F 3x1,5 mm
№ детали Длина
2
шнура
EU 6.649-915.0 10 m
CH 6.650-168.0 10 m
Сетевой
шнур
H07RN-F 3x2,5 mm
№ детали Длина
2
шнура
GB 6.650-169.0 10 m
94 RU
– 7
Page 95

A készülék első használata előtt
olvassa el ezt az eredeti használati utasítást, ez alapján járjon el és tartsa meg a későbbi használatra vagy a
következő tulajdonos számára.
– Az első üzembevétel előtt mindenkép-
pen olvassa el az 5.956-249 sz. biztonsági utasításokat!
– A gépkönyv és a biztonságtechnikai
utasítások be nem tartása esetén a készülék megrongálódhat és veszélybe
kerülhet annak kezelője, illetve más
személyek.
– Szállítási sérülések esetén azonnal tá-
jékoztassa a kereskedőt.
Tartalomjegyzék
Környezetvédelem . . . . . . . HU . . .1
Szimbólumok az üzemeltetési
útmutatóban . . . . . . . . . . . . HU . . .1
Rendeltetésszerű használat HU . . .1
Készülék elemek . . . . . . . . HU . . .2
Üzembevétel . . . . . . . . . . . HU . . .2
Használat . . . . . . . . . . . . . . HU . . .2
Transport . . . . . . . . . . . . . . HU . . .3
Tárolás . . . . . . . . . . . . . . . . HU . . .3
Ápolás és karbantartás . . . HU . . .3
Segítség üzemzavar esetén HU . . .4
Garancia. . . . . . . . . . . . . . . HU . . .4
Tartozékok és alkatrészek . HU . . .5
EK konformitási nyiltakozat HU . . .5
Műszaki adatok . . . . . . . . . HU . . .6
Környezetvédelem
A csomagolási anyagok újrahasznosíthatók. Kérjük, ne dobja a csomagolást a házi
szemétbe, hanem vigye el egy
újrahasznosító helyre.
A használt készülékek értékes
újrahasznosítható anyagokat
tartalmaznak, amelyeket újrahasznosító helyen kell elhelyezni. Az elemeknek, olajnak és
hasonló anyagoknak nem szabad a környezetbe kerülni. Ezért
kérjük, a használt készülékeket
megfelelő gyűjtőrendszeren keresztül távolítsa el.
Megjegyzések a tartalmazott anyagokkal kapcsolatban (REACH)
Aktuális információkat a tartalmazott anyagokkal kapcsolatosan a következő címen talál:
www.kaercher.com/REACH
Szimbólumok az üzemeltetési
útmutatóban
Balesetveszély
Azonnal fenyegető veszély, amely súlyos
testi sérüléshez vagy halálhoz vezet.
몇 Figyelem!
Esetlegesen veszélyes helyzet, amely súlyos
testi sérüléshez vagy halálhoz vezethet.
Vigyázat
Esetlegesen veszélyes helyzet, amely könnyű sérüléshez vagy kárhoz vezethet.
Rendeltetésszerű használat
몇 Figyelem!
A készülék nem alkalmas egészségre káros por felszívására.
– A porszívó padló- és falfelületek nedves
és száraz tisztítására szolgál.
– Ez a készülék ipari használatra alkal-
mas, l. raktár- és gyártási területeken
és gyártógépeken.
– A készüléket nem szabad daruval meg-
emelni.
– 1
95HU
Page 96

Készülék elemek
1 Hálózati kábel
2 Típustábla
3Szűrőtisztítás
4 Lapos harmonikaszűrő
5 Szívófej
6 A szívófej fogantyúja
7 Az ülepítő mechanika jobb oldali kioldása
8Gyűrűbetét
9 A szeméttartály kormánygörgője
10 Zár dugója
11 Hulladéktartály
12 Az ülepítő mechanika bal oldali kioldása
13 Kerék
14 Szívófej zárja
15 Szívótámasztékok
16 Az alváz görgője rögzítőfékkel
17 Padlófej tartó
18 Alváz
19 Felfogóteknő
20 A szennytartály fogantyúja
21 Szívócső tartója
22 A hőérzékelő csatlakozó dugója
23 „Üzemkészenlét“ jelzőlámpa
24 Forgókapcsoló
25 Szűrőfedél
26 Kábel tartó
27 Tolókengyel
28 Védőkupak nyílása
29 Védősapka
30 Hőérzékelő
Üzembevétel
A készüléket helyezze munkapozícióba,
ha szükséges biztosítsa rögzítőfékkel.
Szívócsövet (nem része a szállítási ter-
jedelemnek) helyezze be a szívócső
csatlakozójába.
A szennyvíztartály feltöltési szintjét a mun-
ka megkezdése előtt ellenőrizni kell és
adott esetben a tartályt ki kell üríteni.
Győződjön meg róla, hogy a szennytar-
tály szabályszerűen van-e behelyezve.
A kívánt tartozékot (nem része a szállí-
tási terjedelemnek) felhelyezni.
Használat
Vigyázat
Porszívózáskor sohasem szabad eltávolítani az összehajtható szűrőt.
Száraz porszívózás
Vigyázat
Nedvesrő
láskor vegye figyelembe a következőket:
Száraz por felszívásakor nedves szűrőelem esetén a szűrő eltömődik és használhatatlanná válhat.
A nedves szűrőt használat előtt jól szá-
Szükség esetén cserélje ki a szűrőt , az
Megjegyzés: A szennytartályt ki kell üríteni, ha a felső szegély alatt kb. 3 cm-re megtelt.
– A szennytartály feltöltési szintjét rend-
Vigyázat
Vegye figyelembe a szennyvíz kezelésével
kapcsolatos helyi előírásokat.
– Figyelem! Ha a készüléket megtelt
– Nedves piszok felszívása esetén a rés-
– Amikor eléri a max. folyadékszintet, a
– A nedves porszívózás befejezése után:
l szárazporszívózásra kapcso-
rítsa meg vagy cserélje ki szárazra.
"Ápolás és karbantartás" pont alatt van
leírva.
szeresen ellenőrizni kell, mivel a készülék száraz porszívózás esetén nem
kapcsol ki.
Nedves porszívózás
szennytartállyal veszik üzembe, akkor fennáll a veszélye annak, hogy a
kikapcsolás túl későn reagál és a készülék túlságosan megtelik.
szívófejjel, illetve ha döntően nagy folyadékmennyiséget szív fel, ajánlott a
„Szűrőtisztító“ funkció kikapcsolása.
készülék automatikusan lekapcsol.
Szárítsa meg az összehajtható szűrőt.
A hőérzékelőt és a védőkupakot nedves ronggyal kell tisztítani. A tartályt
nedves ronggyal tisztítsa ki és szárítsa
meg.
96 HU
– 2
Page 97

Forgókapcsoló
– Készülék BE
– Szűrőtisztítás KI
– Készülék KI
– Készülék BE
– Szűrőtisztítás BE
A készülék bekapcsolása
Dugja be a hálózati csatlakozót.
Az „Üzemkészenlét“ jelzőlámpa világít.
A készüléket a forgókapcsolónál kap-
csolja be.
Automatikus szűrő letisztítás
A készülék újfajta, kettős szűrőtisztítással
rendelkezik, ez különösen finom por esetén
hatékony. Eközben az összehajtható szűrő
minden 7,5 másodpercben léglökés által
automatikusan tisztul (pulzáló zaj).
A készülék kikapcsolása
A készüléket a forgókapcsolónál kap-
csolja ki.
Húzza ki a hálózati dugót.
Az „Üzemkészenlét“ jelzőlámpa kialszik.
Minden üzem után
A tartályt ürítse ki
Rögzítőfékeket rögzíteni.
Ábra
Az ülepítő mechanika kioldását felfele
húzni.
Húzza fel a tolókengyelt. A tartály kiold
és leeresztődik.
Ábra
A tartályt a fogantyúnál fogva húzza ki.
Ürítse ki a tartályt.
Helyezze be ismét a tartályt és reteszel-
je el a tolókengyelt.
몇 Figyelem!
Összenyomásveszély! A bezárás alatt semmi esetre se tartsa
kezét a hulladéktartály és a gyű-
rűbetét között vagy nyúljon az
emelőmechanika közelébe. A tartályt a tolókengyel megnyomásával mindkét kézzel
zárja el.
A készülék tisztítása
A készüléket kívül-belül porszívóval és
nedves ronggyal kell megtisztítani.
A készülék tárolása
A hálózati kábelt tekerje fel a kábeltar-
tóra.
A szívótömlőt tekerje fel a tolókengyelre.
A padlófejet és a szívócsövet tegye a
megfelelő tartóba.
A készüléket száraz helyiségben állítsa le
és biztosítsa illetéktelen használat ellen.
Transport
Vigyázat
Sérülés- és rongálódásveszély! Szállítás
esetén vegye figyelembe a készülék súlyát.
A rögzítőféket kioldani és a készüléket
a tolókengyelnél tolni.
A készüléket berakodáskor az alváznál
kell megfogni és nem a tolókengyelnél.
Járművel történő szállítás esetén a ké-
szüléket az adott irányelveknek megfelelően kell csúszás és borulás ellen
biztosítani.
Tárolás
Vigyázat
Sérülés- és rongálódásveszély! Tárolás
esetén vegye figyelembe a készülék súlyát.
Ezt a készüléket csak beltéri helyiségben
szabad tárolni.
Ápolás és karbantartás
Balesetveszély
A készüléken történő bármiféle munka előtt
kapcsolja ki a készüléket és húzza ki a hálózati csatlakozót.
– 3
97HU
Page 98

Összehajtható szűrő cseréje
Nyissa ki a szűrőfedelet.
Cserélje ki az összehajtható szűrőt.
Zárja be a szűrőfedelet, amelynek hall-
hatóan helyére kell kattannia.
A hőérzékelő tisztítása
Az ülepítő mechanika kioldását felfele
húzni.
Húzza fel a tolókengyelt. A tartály kiold
és leeresztődik.
A tartályt a fogantyúnál fogva húzza ki.
A hőérzékelőt és a védőkupakot ned-
ves ronggyal kell tisztítani.
Helyezze be ismét a tartályt és reteszel-
je el a tolókengyelt.
Segítség üzemzavar esetén
Balesetveszély
A készüléken történő bármiféle munka előtt
kapcsolja ki a készüléket és húzza ki a hálózati csatlakozót.
A szívóturbina nem megy
A dugaljat és az áramellátás biztosíté-
kát ellenőrizni.
A készülék hálózati kábelét, hálózati
csatlakozóját és hőérzékelőjét ellenőrizni.
Kapcsolja be a készüléket.
A szívóturbina kikapcsolódik
Ürítse ki a tartályt.
Ellenőrizze, hogy a védőkupak meg-
van-e és, hogy a védőkupak oldalsó
nyílása a jobb oldali ülepítő mechanika
felé mutat-e (lásd a készülék ábrát).
A hőérzékelőt és a védőkupakot ned-
ves ronggyal kell tisztítani.
A tartály kiürítése után a
szívóturbina nem indul el újból
Kapcsolja ki és ismét be a készüléket.
A hőérzékelőt és a védőkupakot ned-
ves ronggyal kell tisztítani.
Szívóerő alábbhagy
Távolítsa el a dugulásokat a szívófúvó-
kából, szívócsőből, szívótömlőből vagy
összehajtható szűrőből.
Ellenőrizze a szívófej és a tartály helyes
illeszkedését.
Kattintsa be helyesen a szűrőfedelet.
Cserélje ki az összehajtható szűrőt.
Porszívózásnál por áramlik ki
Ellenőrizze, hogy az összehajtható szű-
rő
helyesen van-e behelyezve.
Cserélje ki az összehajtható szűrőt.
Lekapcsoló automata
(nedves szívásnál) nem lép
működésbe
A hőérzékelőt és a védőkupakot ned-
ves ronggyal kell tisztítani.
Az automatikus szűrőletisztítás
nem működik
A szívócső nincs csatlakoztatva.
A használt szívótömlő túl rövid (< 3m)
vagy nagy az átmérője.
Értesítse a szervizt.
Az automatikus szűrőletisztítást
nem lehet kikapcsolni
Értesítse a szervizt.
Garancia
Minden országban az illetékes forgalmazónk által kiadott garancia feltételek érvényesek. Az esetleges üzemzavarokat az
Ön készülékén a garancia lejártáig költségmentesen elhárítjuk, amennyiben anyagvagy gyártási hiba az oka. Garanciális esetben kérjük, forduljon a vásárlást igazoló bizonylattal kereskedőjéhez vagy a
legközelebbi hivatalos szakszervizhez.
98 HU
– 4
Page 99

Tartozékok és alkatrészek EK konformitási nyiltakozat
– Csak olyan tartozékokat és alkatrésze-
ket szabad használni, amelyeket a
gyártó jóváhagyott. Az eredeti tartozékok és az eredeti alkatrészek, biztosítják azt, hogy a készüléket
biztonságosan és zavartalanul lehessen üzemeltetni.
– Az üzemeltetési útmutató végén talál
egy válogatást a legtöbbször szükséges alkatrészekről.
– További információkat az alkatrészek-
ről a www.kaercher.com címen talál a
'Service' oldalakon.
– A szállítmány nem tartalmaz tartozéko-
kat. A konkrét alkalmazási esettől függően a tartozékokat külön kell
megrendelni.
– A készülék kifogástalan működését
csak a DN42 és DN52 névleges átmérőjű szívócső biztosítja.
– Alkatrészeket és tartozékokat kereske-
dőjénél vagy KÄRCHER-telephelyen
kaphat.
Ezennel tanúsítjuk, hogy az alábbiakban
megnevezett gép tervezése és építési
módja alapján az általunk forgalomba hozott kivitelben megfelel az EK irányelvek
vonatkozó, alapvető biztonsági és egészségügyi követelményeinek. A gép jóváhagyásunk nélkül történő módosítása esetén
ez a nyilatkozat elveszti érvényességet.
Termék: Nedves- és szárazporszívó
Típus: 1.576-xxx
Vonatkozó európai közösségi irányelvek:
2006/42/EK (+2009/127/EK)
2004/108/EK
Alkalmazott harmonizált szabványok:
EN 55014–1: 2006 + A1: 2009
EN 55014–2: 1997 + A2: 2008
EN 60335–1
EN 60335–2–69
EN 61000–3–2: 2006 + A2: 2009
EN 61000–3–3: 2008
EN 62233: 2008
Alkalmazott összehangolt normák:
-
5.966-010
Alulírottak az ügyvezetés megbízásából és
felhatalmazásával lépnek fel.
CEO
Head of Approbation
A dokumentációért felelős személy:
S. Reiser
Alfred Kärcher GmbH & Co. KG
Alfred-Kärcher-Str. 28 - 40
71364 Winnenden (Germany)
Tel.: +49 7195 14-0
Fax: +49 7195 14-2212
Winnenden, 2010/07/14
– 5
99HU
Page 100

Műszaki adatok
IVC 60/24-2
*EU
IVC 60/24-2
*GB
*CH
Hálózati feszültség V 220-240 110
Frekvencia Hz 1~ 50/60 1~ 50/60
Max. teljesítmény W 2760 2450
Névleges teljesítmény W 2400 2150
Tartály űrtartalom l 60 60
Légmennyiség (max.) l/s 2x 74 2x 66
Nyomáshiány (max.) kPa (mbar) 25,4 (254) 22,0 (220)
Védelmi fokozat -- IP X4 IP X4
Védelmi osztály -- I I
Szívótömlő csatlakozása
DN 72 72
(C-DN/C-ID)
Szívócső névleges átmérője DN 42/52 42/52
hosszúság x szélesség x magasság mm 970 x 690 x 995 970 x 690 x 995
Szűrőfelület m
2
0,95 0,95
Tipikus üzemi súly kg 60 60
Környezeti hőmérséklet (max.) °C +40 +40
Az EN 60335-2-69 szerint megállapított értékek
Hangnyomás szint L
Bizonytalanság K
pA
pA
Kéz-kar vibrációs kibocsátási érték m/s
Bizonytalanság K m/s
dB(A) 73 73
dB(A) 1 1
2
2
<2,5 <2,5
0,2 0,2
Hálózati kábel H07RN-F 3x1,5 mm
Alkatrész
szám
2
Kábelhos-
szúság
EU 6.649-915.0 10 m
CH 6.650-168.0 10 m
Hálózati kábel H07RN-F 3x2,5 mm
Alkatrész
szám
2
Kábelhos-
szúság
GB 6.650-169.0 10 m
100 HU
– 6
 Loading...