

Page 1
FC 5
FC 5 Premium
OPERATOR MANUAL
Floor Cleaner . . . . . . . . . . . . . . . . . 2
MANUAL DE USUARIO
Limpiador de piso . . . . . . . . . . . .22
MANUEL D’UTILISATION
Nettoyant pour sols . . . . . . . . . . .44
59682960 2018.03
Page 2
FLOOR CLEANER OPERATOR MANUAL
FLOOR CLEANER OPERATOR
MANUAL . . . . . . . . . . . . . . . .
IMPORTANT SAFETY IN-
STRUCTIONS . . . . . . . . . . . .
READ ALL INSTUCTIONS BEFORE USING THIS APPLIANCE
SAVE THESE INSTRUCTIONS
GROUNDING INSTRUCTIONS
MODEL OVERVIEW . . . . . . .
ASSEMBLY INSTRUCTIONS
OPERATING INSTRUCTIONS
CARE AND MAINTENANCE IN-
STRUCTIONS . . . . . . . . . . . .
TROUBLESHOOTING . . . . . .
16
20
Safety Alert Symbols
DANGER
Pointer to immediate danger, which
leads to severe injuries or death.
몇 WARNING
Pointer to a possibly dangerous situation, which can lead to severe injuries
or death.
몇 CAUTION
Pointer to a possibly dangerous situation, which can lead to minor injuries.
ATTENTION
Pointer to a possibly dangerous situation, which can lead to property damage.
2
Symbols on the machine
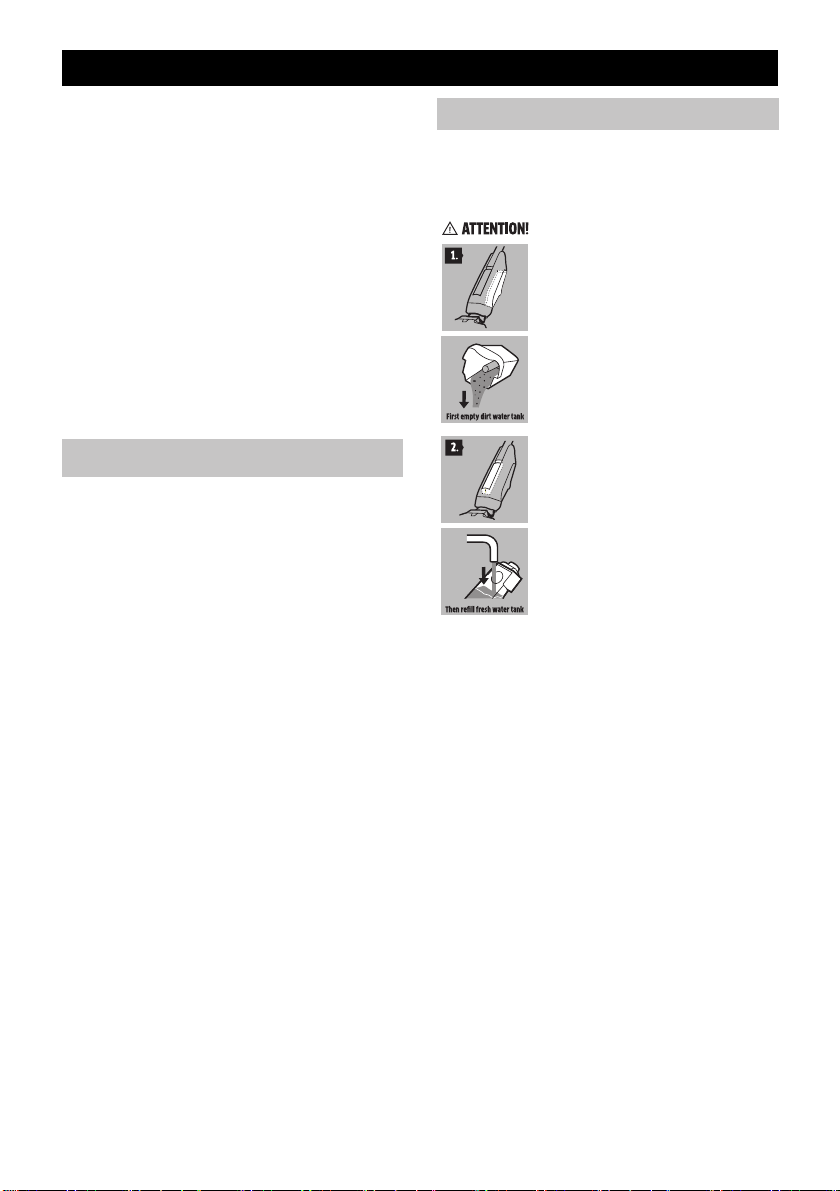
ATTENTION
Do not exceed MAX fill line on the
5
waste water tank to avoid overflowing.
5
6
6
6
7
8
Please observe the following procedure:
1.
Ensure waste water tank is
empty.
2.
Fill fresh water tank not exceeding MAX level to
avoid overflowing.
2 English
Page 3

Specifications
Power connection
Voltage 120
~60VHz
Protective class II
Protection class IPX4
Performance data
Intake performance 0.46 kW
Roller revolutions per
minute
Filling quantity
Fresh water tank 13.5
Cleaning station 6.7
Dimensions
Cable length 275.59
Weight (without cleaning liquids)
Length 12.60
Width 10.63
Height 48.03
Part No. 1.055-507.0
Subject to technical modifications!
500 rpm
(0.4)ozl
(0.2)ozl
(7.0inm
11.02
(5.0)
lbs
kg
(320)inmm
(270)inmm
(1220)inmm
1.055-521.0
Proper use
– This device is designed for cleaning
sealed hard floors only in household applications.
– Do not clean unsealed floors such
as untreated cork floors (the moisture could penetrate and damage
the floor).
– The device is suitable for cleaning
PVC, linoleum, tiled, stone, oiled
and waxed parquet, laminate and
all sealed floor coverings.
Any use extending beyond what is listed above is not considered as proper
use. The manufacturer is not liable for
any losses resulting from improper
use.
Owner/User Responsibility
The owner and/or user must have an
understanding of the manufacturer’s
operating instructions and warnings
before using this appliance.
Warning information should be emphasized and understood.
If the operator is not fluent in English,
the manufacturer’s instructions and
warnings shall be read to and discussed with the operator in the operator’s native language by the purchaser/
owner, making sure that the operator
comprehends its contents.
Owner and/or user must study and
maintain for future reference the manufacturers’ instructions.
English 3
Page 4

Scope of delivery
Customer Support Mexico
The scope of delivery of the device is illustrated on the packaging. Check the
contents of the device for completeness when unpacking.
In the event of missing accessories or
any transport damage, please contact
your dealer.
Customer Support
USA and Canada
To register this product, please visit:
www.karcher-register.com
For technical support, go to:
www.karcher-help.com
If you need to file a warranty claim,
please call: 1-800-537-4129
You will need to fax or email your receipt to a customer service agent. All
other information can be found at:
www.karcherresidential.com
Call: 01-800-024-13-13 for help or visit
our website: www.karcher.com.mx
4 English
Page 5

IMPORTANT SAFETY INSTRUCTIONS
When using this device basic precautions should always be followed, including the following:
READ ALL
INSTUCTIONS
BEFORE USING
THIS APPLIANCE
For household use only!
몇 WARNING
To reduce the risk of fire, electric
shock, or injury:
DO NOT LEAVE appliance unat-
tended when plugged in. Unplug
from outlet when not in use and before servicing.
– Do not expose to rain. Store in-
doors.
– Do not allow to be used as a toy.
Close attention is necessary when
used by or near children.
– Use only as described in this manu-
al. Use only manufacturer’s recommended attachments.
– Do not use with damaged cord or
plug. If device is not working as it
should, has been dropped, damaged, left outdoors, or dropped into
water, return it to a service center.
– Repairs must only be performed by
an authorized service agent in accordance with national and local
safety regulations. Unauthorized
repairs could cause injury or machine damage.
– The voltage indicated on the type
plate must correspond to the supply
voltage.
– Do not pull or carry by the cord, do
not use cord as a handle, do not
close a door on the cord, or pull
cord around sharp edges or cor-
ners. Do not run device over cord.
Keep cord away from heated sur-
faces.
– Do not unplug by pulling cord. To
unplug, grasp plug.
– Never touch the mains plug with
wet hands.
– Use extra care when cleaning on
stairs.
– Turn off all controls before unplug-
ging.
– Never fill solvents, solvent-contain-
ing liquids or undiluted acids (e.g.
detergents, petrol, paint thinner,
and acetone) into the water reser-
voir as these substances corrode
the materials used in the device.
– Do not put any objects into open-
ings. Do not use with any opening
blocked.
– Never immerse the device in water
or other liquids.
– Never use the device in pools con-
taining water.
– Do not service the device when it is
plugged in.
– Do not clean over floor electrical
outlets.
– Create stability for the device prior
to any work on or with the device to
prevent accidents or damage.
– Keep hair, loose clothing, fingers
and all parts of body away from
openings and moving parts.
English 5
Page 6

– Keep your hands protected while
cleaning the suction head- risk of injury from sharp objects (e.g. splinters).
– The device may not be operated in
explosive atmospheres.
– The air vents on the device must
not be blocked up.
– Do not add acetic acids, descaling
agents, essential oils or similar substances to the fresh water tank.
Also ensure that the substances
are not drawn in.
– Only use this device on sealed hard
floors (e. g. varnished parquet,
enamelled tiles, Linoleum).
– Store the steam cleaner indoors in
a cool, dry place.
– Only carry the device by the carry-
ing handle.
– The device must not be used for the
intake of sharp or large objects (e.g.
shards, pebbles, toy parts).
– Do not use the device for cleaning
of carpets or carpeted floors.
– Do not use the device over the floor
vents of convector heaters. The device is not able to take in the water
discharged when used above
vents.
– Do not overfill the tank. Do not ex-
ceed the maximum filling level.
– Only switch on the device when the
fresh water tank and waste water
tank are fitted.
– Do not store and operate the device
at temperatures below 32 °F (0 °C).
– Do not let the device operate in the
same spot too long, as this may
damage the floor.
PROP 65 WARNING
This product may contain one or more
chemicals known to the state of California to cause cancer and birth defects or other reproductive harm.
Was hands after handling.
SAVE THESE
INSTRUCTIONS
6 English
Page 7
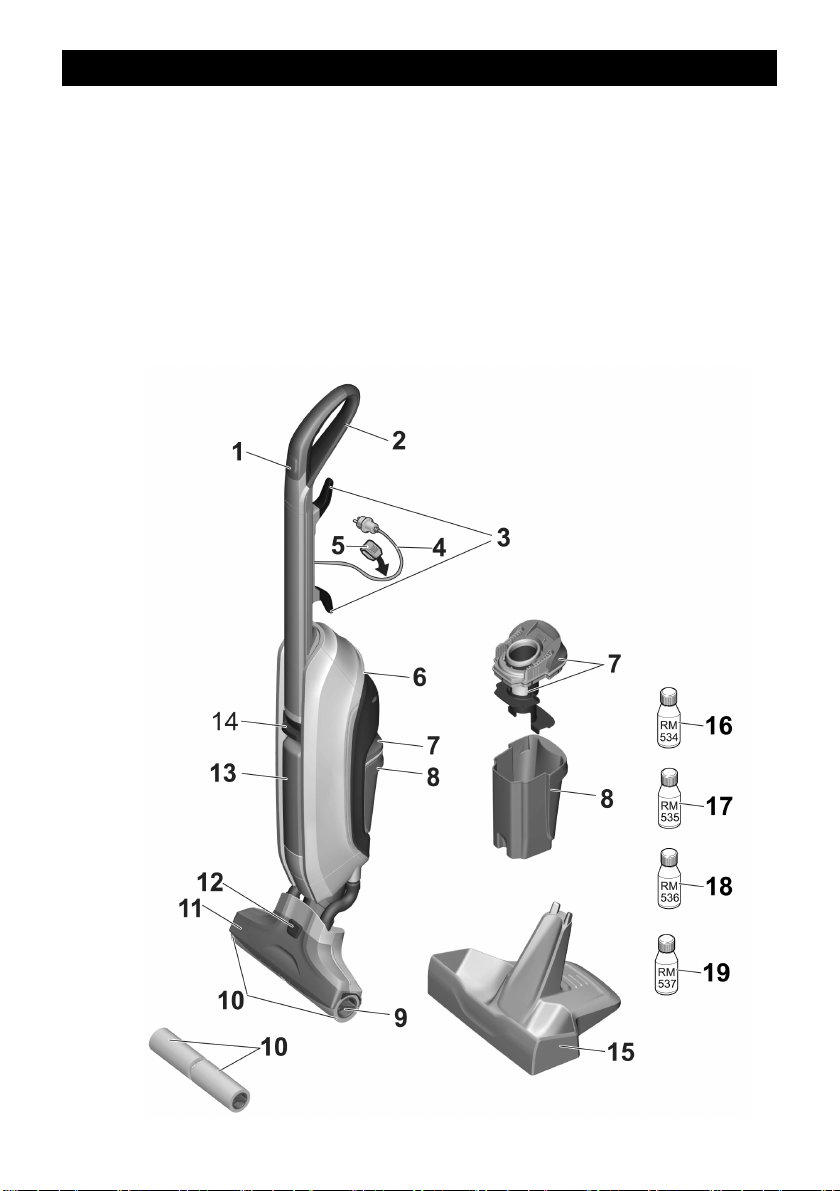
MODEL OVERVIEW
1 ON/OFF switch
2 Handle
3 Cord release
4 Power Cord
5 Cord clip
6 Carrying handle
7 Waste water tank/separator lid
8 Waste water tank
9 Roller release grip
10 Cleaning rollers
11 Suction head cover
12 Lock suction head
13 Fresh water tank
14 Handle fresh water tank
15 Storage station
16 Detergent RM 534
17 Detergent RM 535
18 Detergent RM 536
19 Detergent RM 537
10 **Cleaning rollers 2 x
** FC 5 Premium
English 7
Page 8
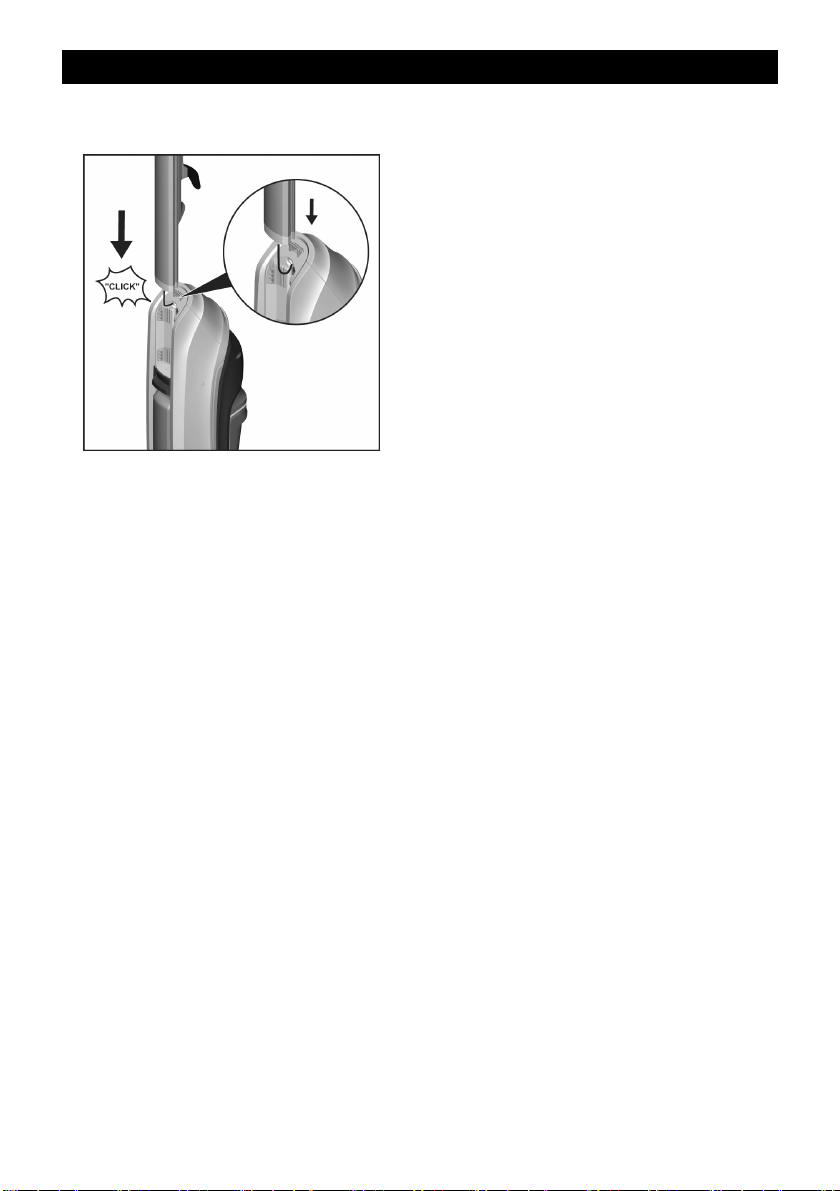
ASSEMBLY INSTRUCTIONS
Insert handle into the basic unit as
far as it goes until you hear it click.
8 English
Page 9

OPERATING INSTRUCTIONS
General operating information
CAUTION
To avoid tripping on cord, hold device
in one hand and cord in the other.
ATTENTION
This device must only be used for the
intake of dirt and fluids (max. 8,5 oz /
0.25 L).
Before cleaning, remove larger ob-
jects from the floor that could damage the device.
Before use, check the floor for wa-
ter consistency at suspect areas.
Do not clean unsealed floors, such
as untreated cork floors where
moisture can penetrate and dam-
age floor.
Hold device at approximately 60-
degree angle.
Clean floor by moving device back
and forth similar to vacuum clean-
ing until floor is clean.
English 9
Page 10
Fill fresh water reservoir
ATTENTION
Store device in storage station when
not in use. A lack of stability can cause
device to tip over leaking fluid and
causing floor damage.
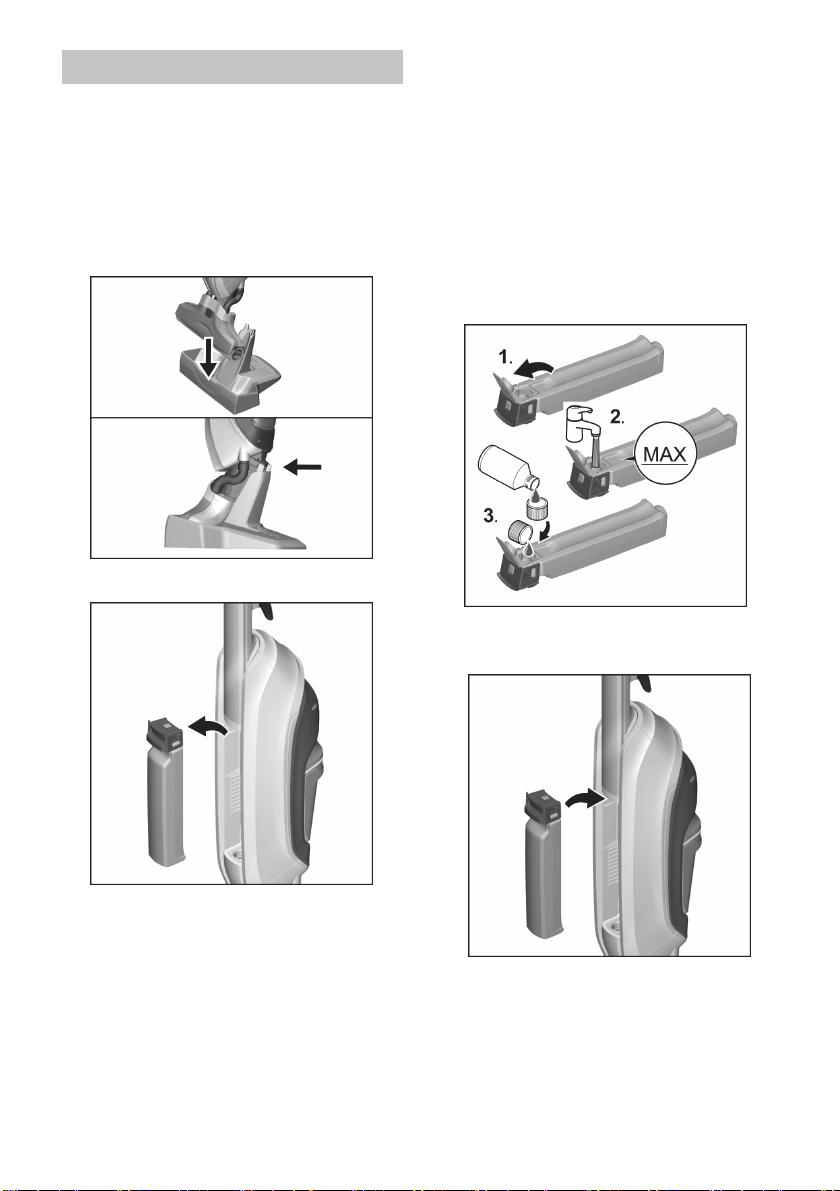
Store device in storage station
when not in use.
Remove fresh water tank.
ATTENTION
*Follow recommended dosage instructions on the detergent.
1 Open fresh water tank lock.
2 Fill fresh water tank with cold or
lukewarm tap water.
Do not exceed "MAX" fill line.
3 KÄRCHER detergents can be add-
ed to fresh water tank as required.*
See chapter Using detergents.
Close tank lock.
Insert fresh water tank until you
hear a click.
10 English
Page 11
Operating device
CAUTION
Cleaning rollers will start to rotate
when device is powered on. Hold the
handle tight to prevent the device from
moving forward by itself.
ATTENTION
The device should only be operated
with water. Before operating, ensure
fresh water tank is full and waste water
tank is empty.
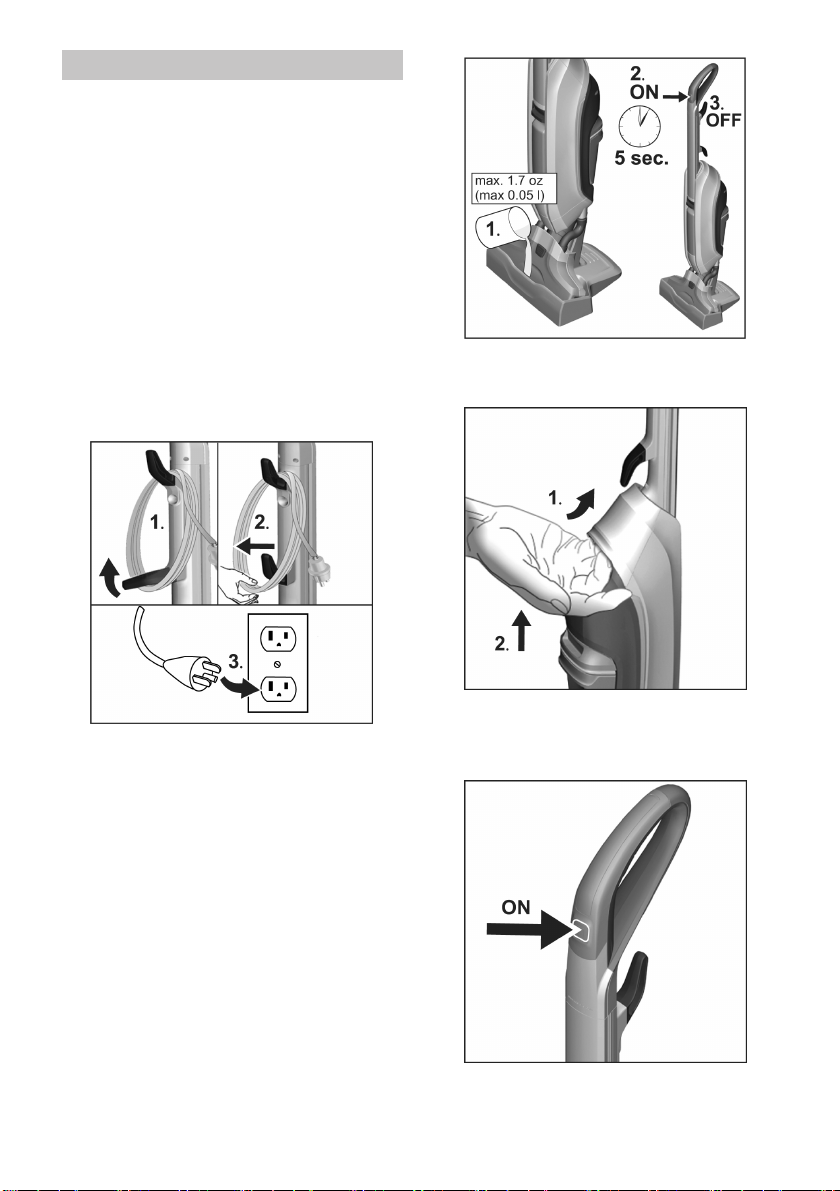
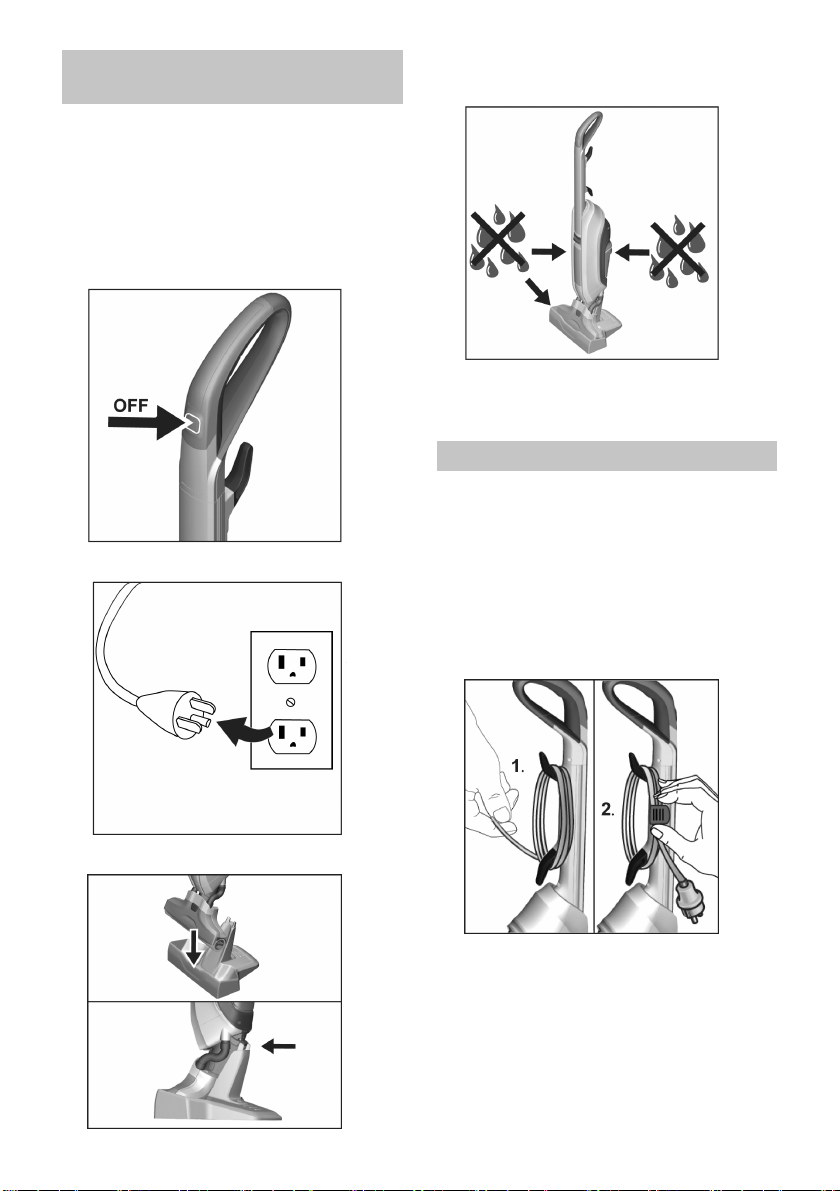
1 Remove the power cord by swive-
ling cord releases and plug into an
outlet.
Remove the device from storage
station and place on floor.
1 To quickly wet rollers, use measur-
ing cup to fill the storage station
with 1,7 oz (0.05 l) of fresh water.
2 Press On/Off button to power ON
device and place in storage station
for 5 seconds.
The device now has correct level of
moisture to allow for cleaning.
3 Press On/Off button to power OFF
device.
Firmly hold device using handle.
Press On/Off button to power ON
device.
English 11
Page 12
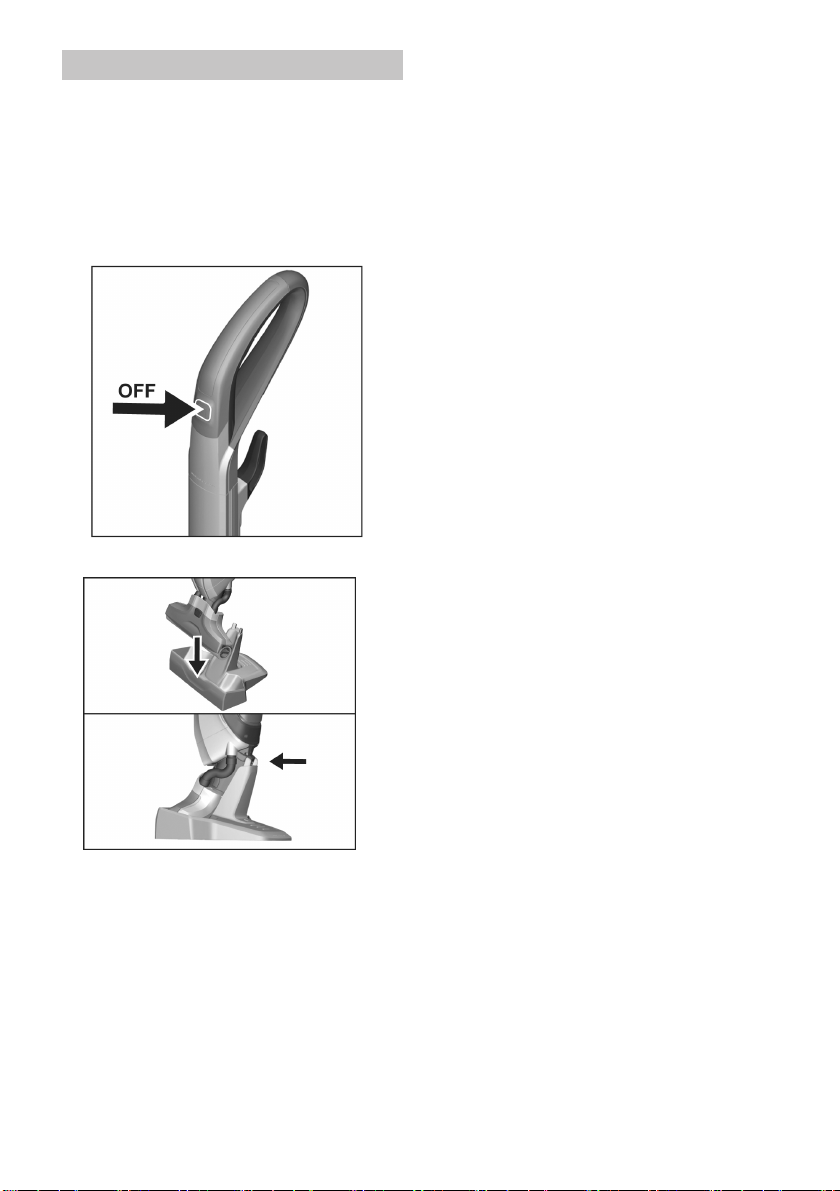
When Not Operating
ATTENTION
Store device in storage station when
not in use. A lack of stability can cause
device to tip over leaking fluid and
causing floor damage.
Press On/Off button to power OFF
device.
Place device into storage station.
12 English
Page 13
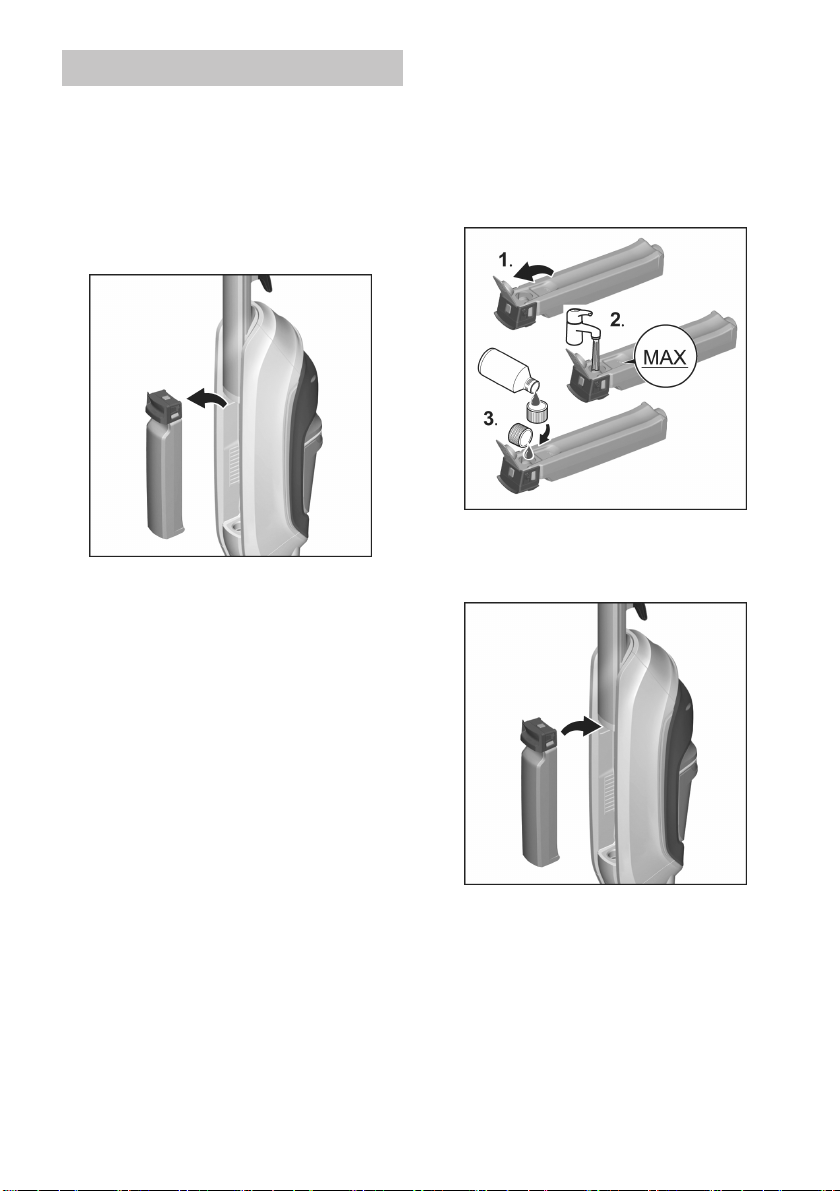
Refill detergent
ATTENTION
Before filling the fresh water tank, empty waste water tank to avoid overflowing.
See Chapter "Emptying the waste water tank".
Remove fresh water tank.
1 Remove tank cap.
2 Fill the fresh water tank with cold or
lukewarm tap water.
Do not exceed "MAX" fill line.
3 KÄRCHER detergents can be add-
ed to fresh water tank as required.*
See chapter Using detergents.
Close tank lock.
Insert fresh water tank until you
hear a click.
English 13
Page 14
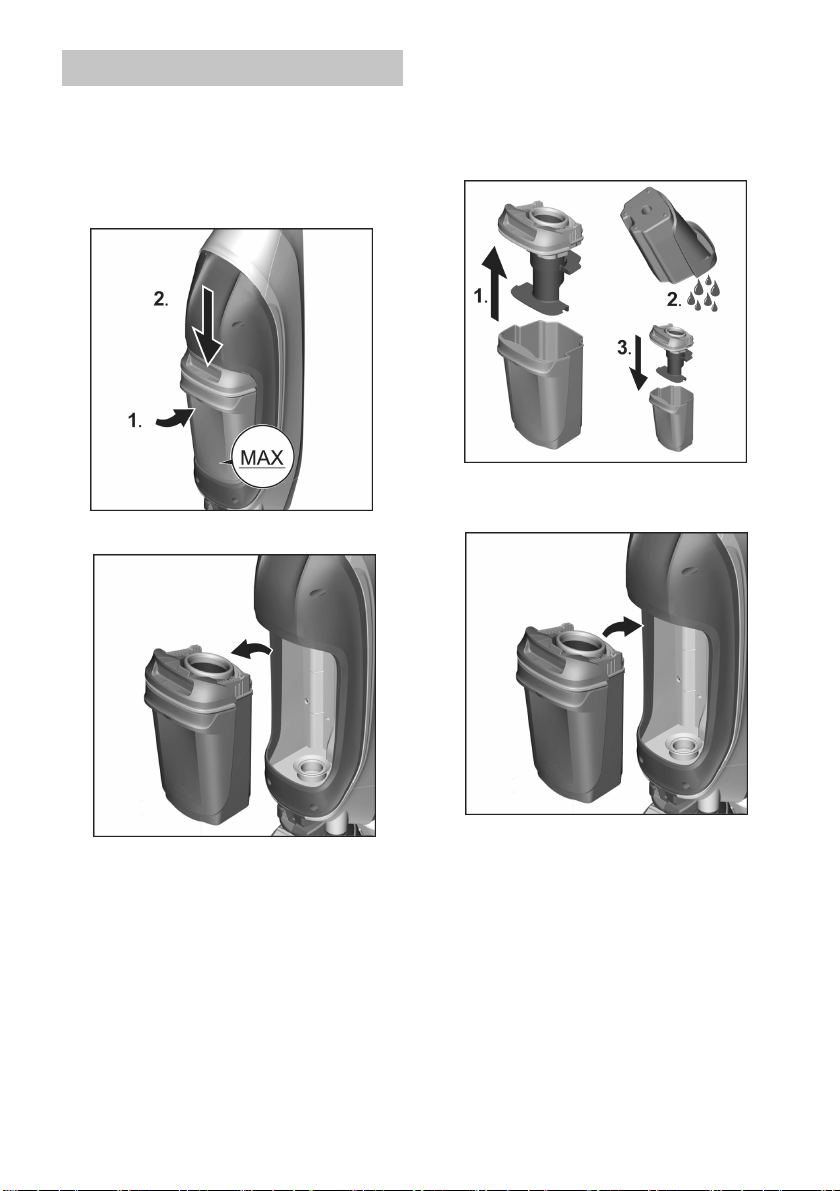
Emptying waste Water tank
ATTENTION
After cleaning is finished, clean device
in rinse cycle. See "Cleaning device"
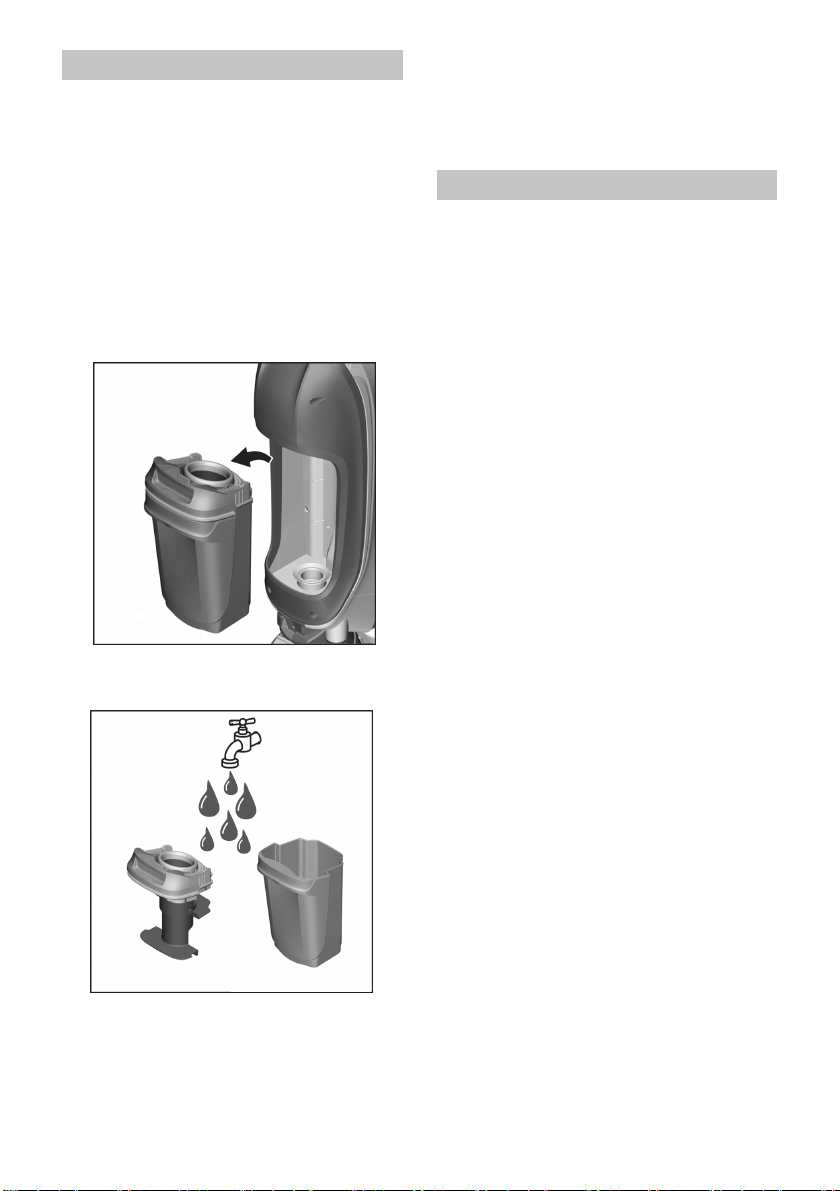
To remove waste water tank,
squeeze upper lid while pulling out.
Remove waste water tank.
1 Remove lid from waste water tank.
2 Empty waste water tank and rinse
with tap water.
3 To secure lid, place on waste water
tank and press until it clicks.
Insert waste water tank into device
until it clicks.
14 English
Page 15
Press On/Off button to power
OFF.
ATTENTION
After completing the work, clean the
appliance by applying a rinse cycle.
See "Cleaning the appliance by rinsing".
Press On/Off button to power OFF
device.
Unplug from socket.
Empty both fresh and waste water
tanks.
Empty waste water tank.
See Chapter "Emptying waste wa-
ter tank".
Storing the Device
ATTENTION
To prevent odors empty and rinse the
fresh water and waste water tanks before storing.
Move device using the handle and
store in the storage station.
Store the device indoors in a cool,
dry place.
Place device into storage station.
English 15
Page 16

CARE AND MAINTENANCE INSTRUCTIONS
Cleaning device
ATTENTION
Rinse the device with fresh water in the
storage station when finished using.
Press On/Off button to power OFF
device.
Place device into storage station.
Empty any remaining liquid in fresh
water tank.
1 Empty the waste water tank.
See Chapter "Emptying the waste
water tank".
Re-insert waste water tank.
2 Fill the measuring cup with 6,7 oz
(0.2 l) water.
Fill storage station with water.
If necessary, add appropriate
KÄRCHER detergents
3 Press On/Off button to power ON
device.
4 Allow device to run for 30-60 sec-
onds until water is completely
drawn out of storage station.
The rinsing procedure is now complete.
5 Press On/Off button to power OFF
device.
Note
Continue running the device to reduce
the amount of moisture left in rollers.
Empty fresh and waste water tanks.
See Chapters "Emptying fresh wa-
ter tank" or "Emptying waste water
tank."
Unplug from socket.
16 English
Page 17
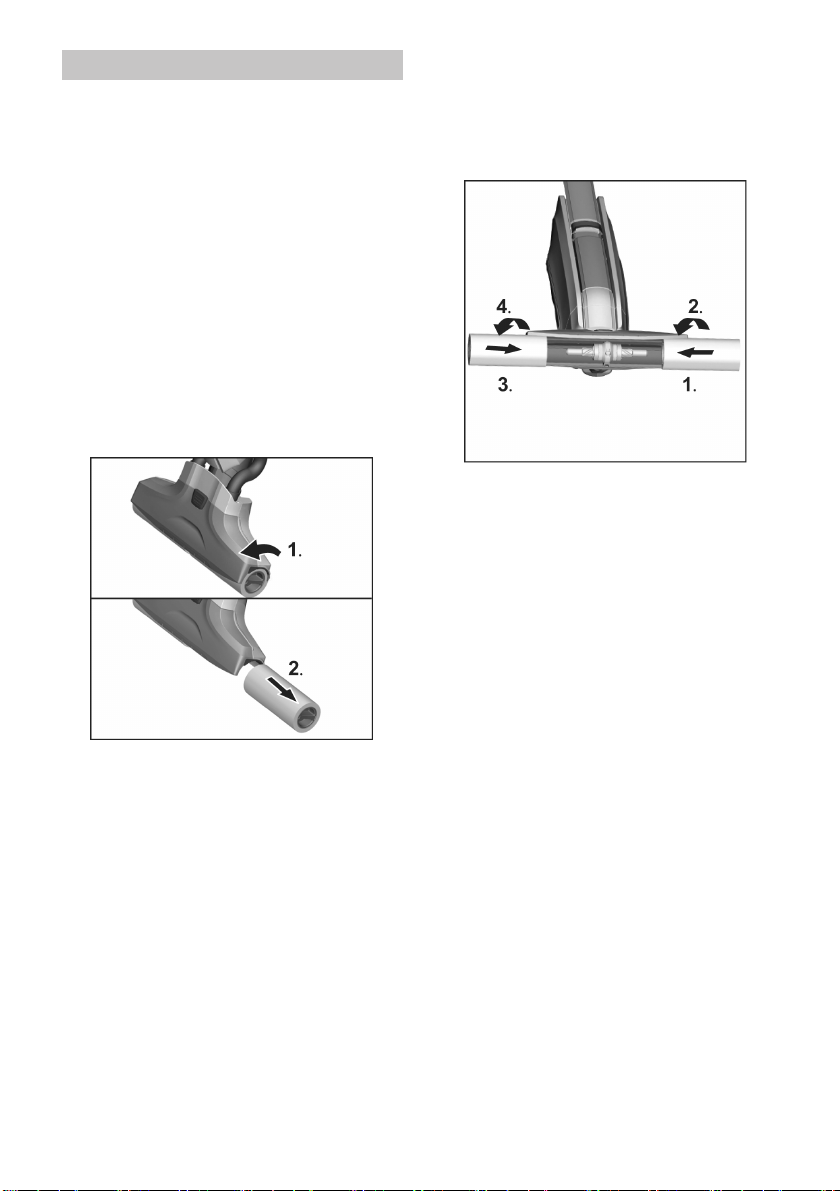
Cleaning rollers
ATTENTION
To prevent liquid from leaking from
tanks, empty fresh and waste water
tanks before laying device on ground.
Note
If rollers are excessively dirty, remove
from device and clean.
Press On/Off button to power OFF
device.
Unplug from socket.
Empty fresh and waste water tanks.
See Chapters "Emptying fresh water tank" and "Emptying waste water tank."
Remove cleaning rollers.
ATTENTION
Do not use:
After cleaning, allow the rollers to
air-dry.
Screw cleaning rollers in until tight
Match colour coding between roller
and holder (e.g., connect blue with
blue), and ensure rollers are se-
cure.
Clean rollers under running water.
or
Wash rollers in washing machine
up to 140 °F (60 °C).
English 17
Page 18
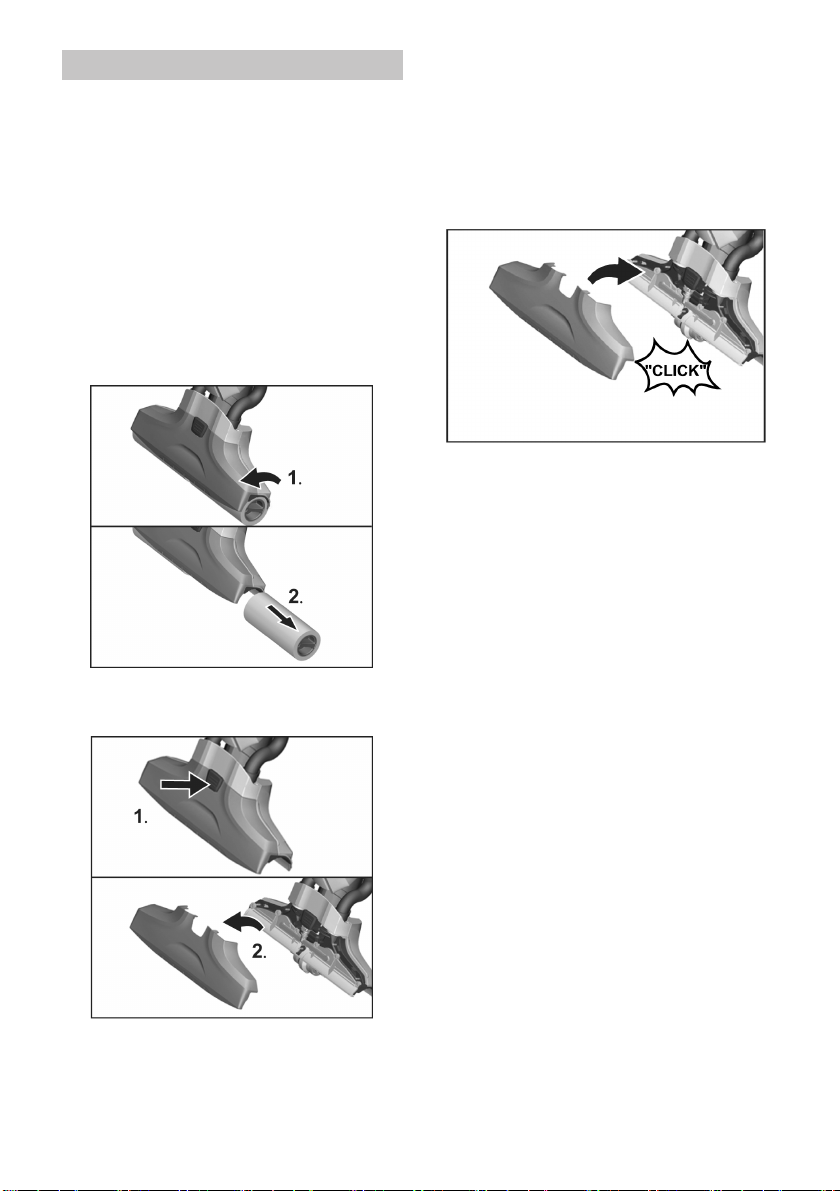
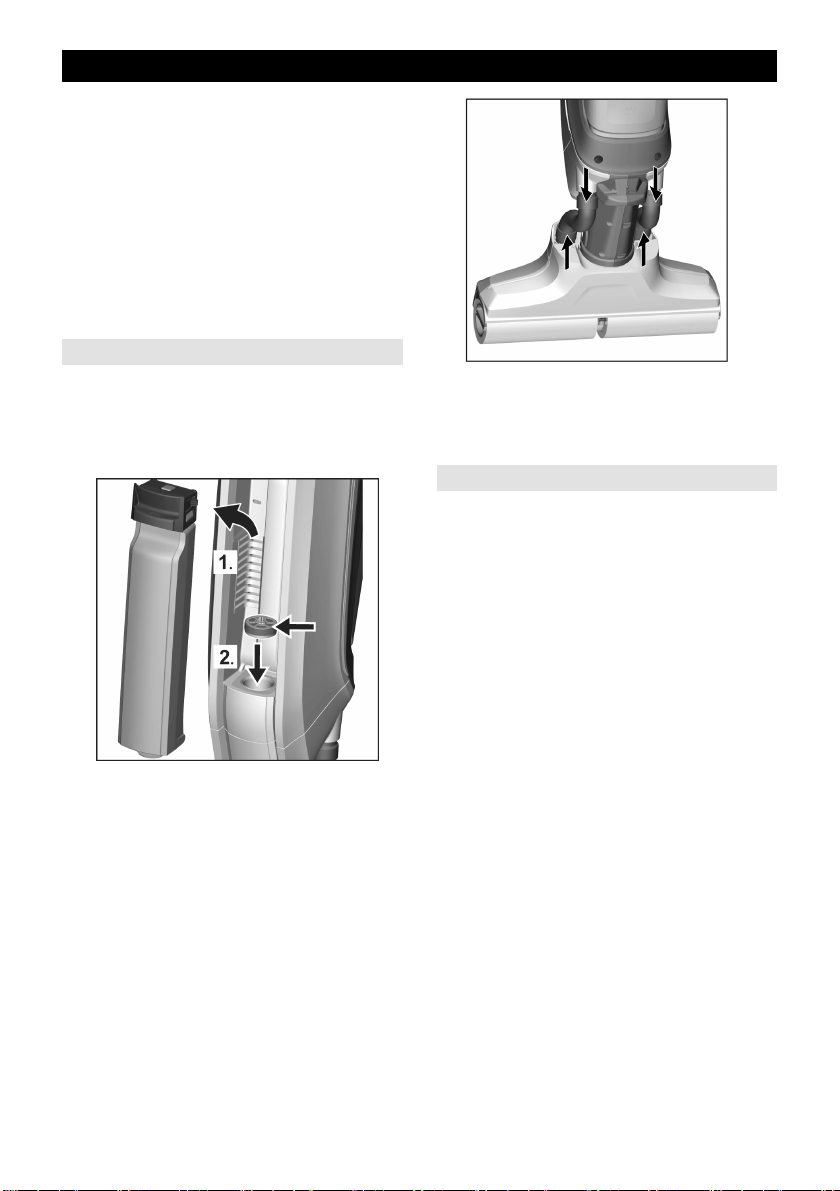
Cleaning the suction head
ATTENTION
To avoid performance issues, clean
device if large debris. While the appliance is working, these parts will cause
a rattling noise or will block up the suction ducts, diminishing suction performance.
Press On/Off button to power OFF
device.
Unplug from socket.
Remove the cleaning rollers.
See "Cleaning the rollers".
If necessary, remove particle de-
posits from suction ducts and slits in
the suction head cover.
Clean the suction head with a damp
cloth.
Fix the suction head lid onto the
suction head.
Screw cleaning rollers onto the
threaded rod until secure.
See "Cleaning the rollers".
1 Press the suction head lock.
2 Take off the suction head lid.
Clean suction head cover under
running water.
18 English
Page 19
Clean waste water tank
ATTENTION
Regularly clean waste water tank to
prevent blockage to separator and to
prevent dirt from building in tank.
Press On/Off button to power OFF
device.
Place device into storage station.
Unplug from socket.
Remove waste water tank.
See Chapter "Emptying the waste
water tank".
Note
The waste water tank can also be
cleaned in the dishwasher.
After cleaning, attach lid and insert
waste water tank into device.
Using detergents
ATTENTION
The use of non-approved detergents
can damage the appliance and will
void the warranty.
Note
Add detergent as required.
When dosing detergent, follow the
manufacturer's instructions.
To prevent foaming, fill fresh water
tank with water then add detergent.
To avoid overfilling, leave room for
detergent when filling with water.
Clean waste water tank lid and tank
tank with tap water.
English 19
Page 20
TROUBLESHOOTING
DANGER
Turn off the appliance and remove the
mains plug prior to any care and maintenance work.
Failures are often simple and can be
fixed using the following guidelines. If
the issue is not listed here, please contact customer service.
Rollers not wet
Filter inlay is not inserted.
Remove fresh water tank and insert
filter inlay with rubber pin facing upwards.
Filter inlay is inserted wrong way .
Remove filter inlay and insert with
pin facing upwards.
The suction hose is blocked.
Carefully remove suction hoses
from the suction head.
Place the suction hoses in cold wa-
ter for 10–20 minutes.
Clean suction hoses with a dull ob-
ject and/or under running water.
Do dirt pick up
No water in fresh water tank.
Fill the fresh water tank with cold or
lukewarm tap water.
Fresh water tank does not fit properly
in the device.
Insert fresh water tank until you
hear a click.
Cleaning rollers missing or not fitted
correctly.
Fit the cleaning rollers or turn them
onto the roller holder until secure.
See "Cleaning the rollers".
Cleaning rollers are dirty or worn.
Clean the cleaning rollers.
or
Replace the cleaning rollers.
20 English
Page 21
Rollers do not turn
Rollers are blocked.
Remove rollers and check if an ob-
ject is blocking rollers.
See "Cleaning the rollers".
Loud rattling when powered on
Rollers are too dry.
Moisten rollers with 1,7 oz (0.05 l) of
water in storage station.
See „Start working“.
Noise in suction head
There are parts (e.g. stones or splinters).
Remove suction head lid and clean
the suction head.
See Chapter "Cleaning the suction
head".
Suction power decreases
The suction ducts and slits on the suction head are blocked.
Remove suction head lid and clean
the suction head.
See Chapter "Cleaning the suction
head".
Appliance leaking waste water
Waste water tank is overfilled.
Empty waste water tank.
See Chapter "Cleaning the waste
water tank".
Waste water tank does not fit properly.
Check whether cover is secure on
waste water tank.
See Chapter "Cleaning the waste
water tank".
Separator is blocked.
Remove cover from waste water
tank and clean separator.
See Chapter "Cleaning the waste
water tank".
The filter net of the waste water tank
separator was damaged during cleaning.
Replace separator.
Streaks on floor
Detergent used was not effective or improperly used.
Only use detergents approved by
KÄRCHER.
See chapter "Using detergents".
Follow the manufacturer's dosage
instructions.
Initial moistening of rollers.
Completely moisten rollers.
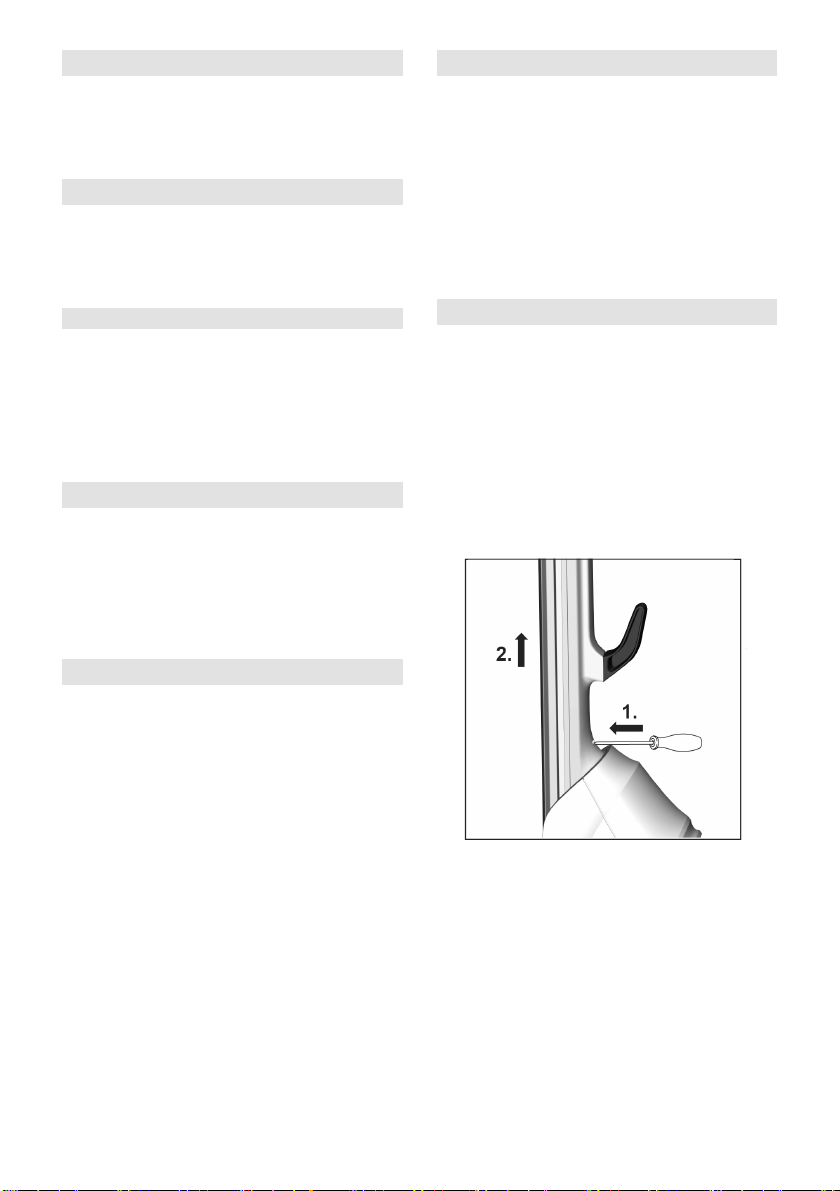
Removing handle from device
ATTENTION
Do not remove handle from the device
once assembled.
The handle may only be removed if
shipping service purposes.
Insert screwdriver at a 90 degree
angle in small opening at rear of device and simultaneously pull handle
up until it slides off.
ATTENTION
Please ensure cord between body and
handle are not damaged.
English 21
Page 22

MANUAL DEL OPERADOR DEL LIMPIADOR DE SUELO
INSTRUCCIONES IMPORTAN-
TES DE SEGURIDAD . . . . . .
LEA TODAS LAS INSTRUCCIONES ANTES DE UTILIZAR EL
PRODUCTO. . . . . . . . . . . . . .
CONSERVE ESTAS INSTRUC-
CIONES . . . . . . . . . . . . . . . . .
VISTA GENERAL DEL MODELO
INSTRUCCIONES DE MONTAJE
INSTRUCCIONES DE FUNCIO-
NAMIENTO . . . . . . . . . . . . . .
INSTRUCCIONES DE CONSERVACIÓN Y MANTENIMIENTO
LOCALIZACIÓN Y REPARACIÓN
DE AVERÍASG . . . . . . . . . . . .
Símbolos de aviso de seguridad
PELIGRO
Aviso sobre un riesgo de peligro inmediato que puede provocar lesiones corporales graves o la muerte.
몇 ADVERTENCIA
Aviso sobre una situación propablemente peligrosa que puede provocar
lesiones corporales graves o la muerte.
몇 PRECAUCIÓN
Indicación sobre una situación que
puede ser peligrosa, que puede acarrear lesiones leves.
CUIDADO
Aviso sobre una situación probablemente peligrosa que puede provocar
daños materiales.
25
Símbolos en el aparato
CUIDADO
Para evitar desbordamientos, no deje
25
que se supere la línea de llenado
«MAX» del depósito de agua sucia.
26
27
28
29
37
41
Respetar el siguiente procedimiento:
1.
Asegúrese de que el depósito de agua sucia esté
vacío.
2.
Llene el depósito de agua
fresca sin superar el nivel
«MAX» para que no se
desborde.
22 Español
Page 23

Datos técnicos
Uso previsto
Toma de corriente
Tensión 120
~60VHz
Clase de protección II
Grado de protección IPX4
Potencia y rendimiento
Potencia de absorción 0.46 kW
Revoluciones por mi-
500 rpm
nuto de los rodillos
Cantidad de llenado
Depósito de agua limpia
13.5
(0.4)ozl
Estación de limpieza 6.7
(0.2)ozl
Medidas
Longitud del cable 275.5
9
in
m
(7.0
Peso (sin líquido de
limpieza)
11.02
(5.0)
lbs
kg
Longitud 12.60
(320)inmm
Anchura 10.63
(270)inmm
Altura 48.03
(1220)inmm
Nº de pieza 1.055-507.0
1.055-521.0
Reservado el derecho a realizar modificaciones técnicas.
– Este dispositivo ha sido diseñado
para la limpieza de suelos resistentes sellados únicamente en entornos domésticos.
– No limpie suelos que no estén se-
llados, como los suelos de corcho
sin tratar (podría penetrar humedad
y dañarse el suelo).
– Este dispositivo está indicado para
la limpieza de superficies de PVC,
linóleo, de azulejos, de piedra, parqué encerado y aceitado, suelos laminados y todo tipo de coberturas
para suelo selladas.
Cualquier uso diferente a éstos se considererá un uso no previsto. El fabricante no se hace responsable de los
daños causados por un uso no previsto; el usuario será el único que correrá
con este riesgo.
Responsabilidades del
propietario/usuario
El propietario y/o el usuario deben
comprender bien las instrucciones de
servicio y advertencias del fabricante
antes de empezar a utilizar el aparato.
Debe prestarse especial atención y tener muy claras las advertencias.
Si el operador no habla bien el español, el propietario/comprador debe responsabilizarse de leer y comentar las
instrucciones y las advertencias en su
lengua natal, y asegurarse de que entienda a la perfección su contenido.
El propietario y/o el usuario deben leer
y guardar como referencia para el futuro las instrucciones del fabricante.
Español 23
Page 24

Volumen del suministro
Soporte México
En el embalaje se incluye una ilustración del alcance del suministro del dispositivo. Al desembalarlo, compruebe
que no falta ninguna pieza.
En caso de detectar que faltan accesorios o o que han surgido daños durante
el transporte, informe a su distribuidor.
Ayuda a clientes
EE.UU. y Canadá
Para registrar este producto, visite:
www.karcher-register.com
Para ayuda técnica, visite:
www.karcher-help.com
Si necesita presentar un reclamación
de la garantía, llame a: 1-800-537-
4129
Tendrá que enviar su recibo por fax o
correo electrónico a un agente de
atención al cliente. Encontrará toda la
información en:
www.karcherresidential.com
Llame al: 01-800-024-13-13 si necesita ayuda o visite nuestra página Web:
www.karcher.com.mx
24 Español
Page 25

INSTRUCCIONES IMPORTANTES DE
SEGURIDAD
Al utilizar este dispositivo, es necesario adoptar determinadas precauciones básicas de seguridad, entre las
que se incluyen las siguientes:
LEA TODAS LAS
INSTRUCCIONES
ANTES DE
UTILIZAR EL
PRODUCTO
Sólo para uso doméstico.
몇 ADVERTENCIA
Para reducir el riesgo de fuegos, descarga eléctrico o lesiones:
NO ABANDONAR la unidad mien-
tras esté enchufada. Desenchufar
cuando no esté en uso y antes de
revisar.
– No exponga la herramienta a la llu-
via. Guárdela en un luger seco.
– No permita que se use como jugue-
te. Prestar mucha atención cuando
sea usado por y cerca de niños.
– Usar exclusivamente como se des-
cribe en este manual. Usar solamente con los complementos recomendados por el fabricante.
– No lo utilice si el enchufe o el cable
están dañados. En caso de que el
dispositivo no funcione correctamente, de que se haya caído, estropeado, dejado al aire libre o se
haya sumergido en agua, llévelo a
un centro de servicio.
– Las reparaciones solo las deben
realizar técnicos autorizados con-
forme a los reglamentos de seguri-
dad nacio-nales y locales. Las re-
paraciones no autorizadas podrían
ocasionar lesiones o dañar el apa-
rato.
– La tensión de alimentación tiene
que coincidir con la indicada en la
placa de características.
– No tire del dispositivo ni lo transpor-
te por el cable; no utilice el cable
como empuñadura; no deje que el
cable quede atrapado al cerrar una
puerta; ni tire del cable en torno a
bordes cortantes o esquinas. No
deje que el dispositivo pase por en-
cima del cable. Mantenga el cable
alejado de las superficies con calor.
– No tirar del cable para desenchufar
el aparato. Para desenchufar, co-
ger el enchufe.
– No toque nunca la clavija con las
manos mojadas.
– Usar con especial cuidado cuando
limpie escaleras.
– Apagar los mandos de control an-
tes de desenchufar.
– No introduzca nunca disolventes, lí-
quidos que contengan disolventes
o ácidos sin diluir (p. ej., detergen-
tes, gasolina, disolvente y acetona)
en el depósito de agua, ya que es-
tas sustancias pueden corroer los
materiales del dispositivo.
– No introducir objetos en los orifi-
cios. No usar con aberturas blo-
queadas.
– No sumerja nunca el dispositivo en
agua ni en otros líquidos.
Español 25
Page 26

– No utilice nunca el dispositivo en
piscinas llenas de agua.
– No realice el mantenimiento del dis-
positivo cuando este se encuentre
enchufado.
– No limpiar por encima de enchufes
de suelo.
– Antes de utilizar o realizar cualquier
tarea en el dispositivo, asegúrese
de que se encuentre en una posición estable para evitar accidentes
y que no se dañe.
– Mantener el cabello, la ropa floja,
los dedos y todas las partes del
cuerpo alejadas de los orificios y
partes móviles.
– Proteger las manos durante la lim-
pieza del cabezal de aspiración ya
que existe riesgo de lesiones causadas por objetos afilados (p. ej.
astillas).
– El dispositivo no se puede utilizar
en entornos explosivos.
– Los orificios de ventilación del dis-
positivo no pueden estar bloqueados.
– No llenar el depósito de agua fresca
con ácidos acéticos, descalcificadores, aceites esenciales o sustancias similares. Procurar no aspirar
dichas sustancias.
– Este dispositivo solo se puede utili-
zar en suelos resistentes sellados
(p. ej., parqué barnizado, azulejos
esmaltados o linóleo).
– Guardar el limpiador de vapor en un
lugar interior fresco y seco.
– Transporte el dispositivo por su em-
puñadura.
– Este dispositivo no se debe utilizar
para introducir objetos grandes o
puntiagudos (p. ej., fragmentos
suelos, piedras pequeñas o piezas
de juguetes).
– No utilice este dispositivo para lim-
piar alfombras o suelos enmoque-
tados.
– No utilice este dispositivo por enci-
ma de los orificios de ventilación del
suelo de calentadores por convec-
ción. Este dispositivo no puede re-
coger el agua descargada cuando
se utiliza sobre los orificios de ven-
tilación.
– No llenar en exceso el depósito. No
exceder el nivel de llenado máximo.
– Encienda únicamente el dispositivo
cuando estén instalados los depó-
sitos de agua fresca y de agua su-
cia.
– No guarde ni utilice el dispositivo a
temperaturas inferiores a 32 ° F
(0 ° C).
– No permita que se utilice el disposi-
tivo durante demasiado tiempo en
el mismo lugar, ya que esto podría
dañar el suelo.
PROP 65 AVERTENCIA
Este producto puede contener determinadas sustancias químicas que
pueden provocar cáncer, enfermedades congénitas y otros problemas en
la salud reproductora de acuerdo con
el estado de California.
Lávese las manos antes de manipularlo.
CONSERVE
ESTAS
INSTRUCCIONES
26 Español
Page 27

VISTA GENERAL DEL MODELO
1 Interruptor ON/OFF
2 Mango
3 Salientes para soltar el cable
4 Power Cord
5 Presilla para el cable
6 Asa de transporte
7 Tapa del depósito de agua sucia/
separador
8 Depósito de agua sucia
9 Empuñadura para soltar el rodillo
10 Rodillos de limpieza
11 Cubierta del cabezal de aspiración
12 Bloqueo del cabezal de aspiración
13 Depósito de agua limpia
14 Asa del depósito de agua fresca
15 Estación de almacenamiento
16 Detergente RM 534
17 Detergente RM 535
18 Detergente RM 536
19 Detergente RM 537
10 ** Rodillos de
limpieza
** FC 5 Premium
2 x
Español 27
Page 28

INSTRUCCIONES DE MONTAJE
Introduzca la empuñadura en la
unidad básica hasta que escuche
un clic.
28 Español
Page 29

INSTRUCCIONES DE FUNCIONAMIENTO
Información general sobre
funcionamiento
PRECAUCIÓN
Para no tropezar con el cable, sujete el
dispositivo con una mano y el cable
con la otra.
CUIDADO
Este dispositivo solo se puede utilizar
para introducir suciedad y líquidos
(máx. 0,25 l/8,5 oz).
Antes de utilizarlo, compruebe la
resistencia al agua del suelo en las
zonas que le generen dudas. No
limpie suelos que no estén sellados, como los suelos de corcho sin
tratar en los cuales podría penetrar
humedad y estropear el suelo.
Sujete el dispositivo en un ángulo
de 60 grados, aproximadamente.
Limpie el suelo moviendo el dispo-
sitivo hacia atrás y hacia delante,
como si estuviera utilizando una aspiradora, hasta que el suelo esté
limpio.
Antes de comenzar la limpieza, sa-
que del suelo los objetos más grandes que podrían estropear el dispositivo.
Español 29
Page 30

Rellenar el depósito de agua
limpia
CUIDADO
Guarde el dispositivo en la estación de
almacenamiento cuando no lo esté utilizando. De no colocarse en una superficie estable, el dispositivo podría volcarse y derramar el líquido, lo que estropearía el suelo.
Guarde el dispositivo en la estación
de almacenamiento cuando no lo
esté utilizando.
CUIDADO
*Siga las instrucciones de dosificación
del detergente recomendadas.
1 Abra el cierre del depósito de agua
fresca.
2 Llene el depósito de agua fresca
con agua corriente fría o templada.
No sobrepase la línea de llenado
«MAX».
3 En el depósito de agua fresca se
pueden añadir detergentes KÄRCHER en función de las necesidades.*
Consulte el capítulo Uso de detergentes.
Cerrar la tapa del depósito.
Saque el depósito de agua fresca.
30 Español
Introduzca el depósito de agua
fresca hasta que escuche un clic.
Page 31

Manejo del dispositivo
PRECAUCIÓN
Cuando se encienda el dispositivo, los
rodillos de limpieza comenzarán a girar. Mantenga bien sujetada la empuñadura para que el dispositivo no
avance por sí solo.
CUIDADO
El dispositivo solo se puede utilizar con
agua. Antes de utilizarlo, compruebe
que el depósito de agua fresca esté lleno y el depósito de agua sucia, vacío.
1 Saque el cable de alimentación gi-
rando los salientes y enchúfelo en
una toma eléctrica.
Saque el dispositivo de la estación
de almacenamiento y colóquelo en
el suelo.
1 Para humedecer con rapidez los ro-
dillos, utilice el vaso medidor para
llenar la estación de almacenamiento con 0,05 l (1,7 oz) de agua
fresca.
2 Pulse el botón on/off para encender
el dispositivo y colóquelo en la estación de almacenamiento durante 5
segundos.
Una vez transcurrido ese tiempo, el
dispositivo tendrá el nivel adecuado
de humedad para poder empezar
con la limpieza.
3 Presione el botón on/off para apa-
gar el dispositivo.
Sujete bien el dispositivo por la em-
puñadura.
Presione el botón on/off para en-
cender el dispositivo.
Español 31
Page 32

Cuando no esté en uso
CUIDADO
Guarde el dispositivo en la estación de
almacenamiento cuando no lo esté utilizando. De no colocarse en una superficie estable, el dispositivo podría volcarse y derramar el líquido, lo que estropearía el suelo.
Presione el botón on/off para apa-
gar el dispositivo.
Coloque el dispositivo en la esta-
ción de almacenamiento.
32 Español
Page 33

Llenado de detergente líquido
CUIDADO
Antes de llenar el depósito de agua
fresca, vacíe el depósito de agua sucia
para que no se desborde.
Véase el capítulo "Vaciado del depósito de agua sucia".
Saque el depósito de agua fresca.
1 Saque la tapa de cierre del depósito.
2 Llenar el depósito de agua fresca
con agua del grifo fría o tibia.
No sobrepase la línea de llenado
«MAX».
3 En el depósito de agua fresca se
pueden añadir detergentes KÄRCHER en función de las necesidades.*
Consulte el capítulo Uso de detergentes.
Cerrar la tapa del depósito.
Introduzca el depósito de agua
fresca hasta que escuche un clic.
Español 33
Page 34

Vaciado del depósito de agua sucia
CUIDADO
Una vez terminada la limpieza, limpie
el dispositivo con el ciclo de aclarado.
Consulte «Limpieza del dispositivo»
Para sacar el depósito de agua su-
cia, apriete la tapa de arriba mientras tira hacia fuera.
Extraiga el depósito de agua sucia.
Introduzca el depósito de agua sucia
en el dispositivo hasta que haga clic.
1 Saque la tapa del depósito de agua
sucia.
2 Vacíe el depósito de agua sucia y
aclárelo con agua.
3 Para fijar la tapa, colóquela en el
depósito de agua sucia y presiónela hasta que haga clic.
34 Español
Page 35

Presione el botón on/off para
apagarlo.
CUIDADO
Al finalizar el trabajo, limpiar el equipo
mediante un proceso de enjuague.
Véase el capítulo "Limpieza de equipos mediante proceso de enjuague".
Presione el botón on/off para apa-
gar el dispositivo.
Desenchúfelo de la corriente.
Coloque el dispositivo en la esta-
ción de almacenamiento.
Vacíe los depósitos de agua fresca
y de agua sucia.
Vaciado del depóito de agua sucia.
Véase el capítulo "Vaciado del depósito de agua sucia".
Español 35
Page 36

Almacenamiento del dispositivo
CUIDADO
Para evitar malos olores, vacíe y aclare los depósitos de agua fresca y de
agua sucia antes de almacenar el dispositivo.
Mueva el dispositivo por la empu-
ñadura y almacénelo en la estación
de almacenamiento.
Guarde el dispositivo resguardado
en un lugar fresco y seco.
36 Español
Page 37

INSTRUCCIONES DE CONSERVACIÓN Y MANTENIMIENTO
Limpieza del dispositivo
CUIDADO
Cuando haya terminado de utilizarlo,
aclare el dispositivo con agua fresca
en la estación de almacenamiento.
Presione el botón on/off para apa-
gar el dispositivo.
Coloque el dispositivo en la esta-
ción de almacenamiento.
Vacíe todos los líquidos que que-
den en el depósito de agua fresca.
1 Vaciado del depóito de agua sucia.
Véase el capítulo "Vaciado del depósito de agua sucia".
Vuelva a introducir el depósito de
agua sucia.
2 Llene el vaso medidor con 0,2 l (6,7
oz) de agua.
Llene de agua la estación de almacenamiento.
De ser necesario, añada los detergentes de KÄRCHER que sean
adecuados.
3 Presione el botón on/off para en-
cender el dispositivo.
4 Deje en marcha el dispositivo entre
30 y 60 segundos hasta que se extraiga todo el agua de la estación
de almacenamiento.
El proceso de enjuague ha finalizado.
5 Presione el botón on/off para apa-
gar el dispositivo.
Nota
Deje en marcha el dispositivo para reducir la cantidad de humedad que queda en los rodillos.
Vacíe los depósitos de agua fresca
y de agua sucia. Consulte los capítulos «Vaciado del depósito de
agua fresca» o «Vaciado del depósito de agua sucia».
Desenchúfelo de la corriente.
Español 37
Page 38

Limpieza de rodillos
CUIDADO
Para que no se vierta el líquido de los
depósitos, vacíe los depósitos de agua
fresca y de agua sucia antes de tender
el dispositivo en el suelo.
Nota
En caso de que los rodillos estén demasiado sucios, quítelos del dispositivo y límpielos.
Presione el botón on/off para apa-
gar el dispositivo.
Desenchúfelo de la corriente.
Vacíe los depósitos de agua fresca
y de agua sucia. Consulte los capítulos «Vaciado del depósito de
agua fresca» y «Vaciado del depósito de agua sucia».
Saque los rodillos de limpieza.
CUIDADO
No los utilice:
Tras limpiar los rodillos, dejarlos
secar al aire.
Enrosque los rodillos de limpieza
en el dispositivo hasta que estén
bien sujetos.
Junte el rodillo con el soporte co-
rrespondiente del mismo color
(p. ej., el azul con el azul) y asegúrese de que los rodillos se encuentren bien sujetos.
Limpie los rodillos con agua co-
rriente.
o
Lave los rodillos en un lavavajillas a
60 °C (140 °F).
38 Español
Page 39

Limpieza del cabezal de
aspiración
CUIDADO
Para evitar problemas de rendimiento,
limpie el dispositivo cuando haya restos grandes. Cuando el aparato esté
en marcha, estos restos provocarán un
golpeteo o bloquearán los conductos
de aspiración, lo que reducirá el rendimiento de la aspiración.
Presione el botón on/off para apa-
gar el dispositivo.
Desenchúfelo de la corriente.
Retirar los rodillos de limpieza.
Véase el capítulo "Limpieza de rodillos".
1 Presionar el bloqueo del cabezal de
aspiración.
2 Desmontar la cubierta del cabezal
de aspiración.
Limpie la cubierta del cabezal de
aspiración con agua corriente.
De ser necesario, retire las acumu-
laciones de partículas de los conductos de aspiración y las rendijas
de la cubierta del cabezal de aspiración.
Limpiar el cabezal de aspiración del
equipo con un paño húmedo.
Fijar la cubierta del cabezal de as-
piración al cabezal de aspiración.
Atornille los rodillos de limpieza en
la varilla roscada hasta que estén
bien sujetos.
Véase el capítulo "Limpieza de rodillos".
Español 39
Page 40

Limpieza del depósito de agua
sucia
CUIDADO
Limpie con frecuencia el depósito de
agua sucia para que no se bloquee el
separador y evitar la acumulación de
suciedad en el depósito.
Presione el botón on/off para apa-
gar el dispositivo.
Coloque el dispositivo en la esta-
ción de almacenamiento.
Desenchúfelo de la corriente.
Extraiga el depósito de agua sucia.
Véase el capítulo "Vaciado del depósito de agua sucia".
Nota
El depósito de agua sucia también
puede lavarse en el lavavajillas.
Una vez limpios, coloque la tapa e
introduzca el depósito de agua sucia en el dispositivo.
Uso de detergentes
CUIDADO
El uso de detergentes no autorizados
podría dañar el aparato y anular su garantía.
Nota
Añada el detergente que sea necesario.
A la hora de dosificar el detergente,
siga las instrucciones del fabricante.
Para evitar la formación de espu-
ma, rellene el depósito de agua
fresca con agua y, a continuación,
añada detergente.
Para que no se desborde, deje es-
pacio para el detergente cuando
añada el agua.
Limpie el depósito de agua sucia y
su tapa y aclárelos con agua corriente.
40 Español
Page 41

LOCALIZACIÓN Y REPARACIÓN DE AVERÍASG
PELIGRO
Apague el aparato y desenchufe la clavija de red antes de efectuar los trabajos de cuidado y mantenimiento.
Normalmente, las averías son sencillas y se pueden arreglar siguiendo estas directrices. Si el problema no aparece recogido en este apartado, póngase en contacto con el servicio de
atención al cliente.
Los rodillos no se humedecen
Acoplamiento de filtro no colocado.
Retirar el depósito de agua fresca y
colocar el acoplamiento de filtro
con un perno hacia arriba.
El acoplamiento de filtro no se ha introducido correctamente.
Retirar el acoplamiento de filtro e
introducir hacia arriba con un per-
no.
La manguera de aspiración está obstruida.
Extraiga con cuidado las mangue-
ras de aspiración del cabezal de as-
piración.
Colocar las mangueras de aspira-
ción entre 10 y 20 minutos en agua
fría.
Limpiar las mangueras de aspira-
ción con un objeto obtuso y/o bajo
agua corriente.
Extracción de suciedad
No hay agua en el depósito de agua
fresca.
Llenar el depósito de agua fresca
con agua del grifo fría o tibia.
El depósito de agua fresca no se encuentra correctamente colocado en el
equipo.
Introduzca el depósito de agua
fresca hasta que escuche un clic.
Faltan rodillos de limpieza o no están
correctamente insertados.
Introduzca los rodillos de limpieza o
gírelos hacia el soporte del rodillo
hasta que estén bien sujetos.
Véase el capítulo "Limpieza de ro-
dillos".
Los rodillos de limpieza están sucios o
gastados.
Limpiar los rodillos de limpieza.
o
Sustituir los rodillos de limpieza.
Español 41
Page 42

Los rodillos no giran
Los rodillos se bloquean.
Quite los rodillos y compruebe si
hay algún objeto obstruyendo los
rodillos.
Véase el capítulo "Limpieza de rodillos".
Fuerte golpeteo al encender el
dispositivo.
Los rodillos están demasiado secos.
Humedezca los rodillos con 0,05 l
(1,7 oz) de agua en la estación de
almacenamiento.
Véase el capítulo „Comenzar con el
trabajo“.
Ruido en el cabezal de
aspiración.
Presencia de piezas (p. ej. piedras o
astillas) en el cabezal de aspiración.
Extraer la cubierta del cabezal de
aspiración y limpiar el cabezal.
Véase el capítulo "Limpieza del cabezal de aspiración".
La potencia de absorción
disminuye
Los canales de aspiración y las ranuras del cabezal de aspiración están
obstruidos.
Extraer la cubierta del cabezal de
aspiración y limpiar el cabezal.
Véase el capítulo "Limpieza del cabezal de aspiración".
El aparato vierte agua sucia
El depósito de agua sucia está lleno.
Vacíe el depósito de agua sucia.
Véase el capítulo "Limpieza del de-
pósito de agua sucia".
El depósito de agua sucia no encaja
bien.
Compruebe que la cubierta esté
bien colocada en el depósito de
agua sucia.
Véase el capítulo "Limpieza del de-
pósito de agua sucia".
42 Español
El separador está atascado.
Saque la cubierta del depósito de
agua sucia y limpie el separador.
Véase el capítulo "Limpieza del de-
pósito de agua sucia".
El filtro del separador del depósito de
agua sucia se ha dañado con la limpieza.
Sustituya el separador.
Presencia de vetas en el suelo
El detergente utilizado no es lo suficientemente eficaz o se ha utilizado de
forma incorrecta.
Utilice únicamente detergentes au-
torizados por KÄRCHER.
Consulte el capítulo «Uso de deter-
gentes».
Tener en cuenta la información de
dosificación del fabricante.
Humectación inicial de los rodillos.
Humedecer los rodillos por completo.
Page 43

Extracción de la empuñadura del
dispositivo
CUIDADO
No extraiga la empuñadura del dispositivo una vez se encuentre montada.
La empuñadura solo se podrá extraer
en caso de que se vaya a enviar para
realizar tareas de mantenimiento.
Introduzca un destornillador en un
ángulo de 90 grados por una pequeña abertura situada en la parte
trasera del dispositivo y tire a la vez
de la empuñadura hacia arriba hasta que se desprenda.
CUIDADO
Compruebe que el cable situado entre
el cuerpo y la empuñadura no se haya
estropeado.
Español 43
Page 44

MANUEL OPERATEUR NETTOYEUR DE SOL
CONSIGNES DE SÉCURITÉ IM-
PORTANTES . . . . . . . . . . . . .
47
LIRE TOUTES LES INSTRUCTIONS AVANT D'UTILISER LE
PRODUIT . . . . . . . . . . . . . . . .
47
CONSERVER CES
CONSIGNES . . . . . . . . . . . . .
GÉNÉRALITÉS . . . . . . . . . . .
INSTRUCTIONS DE MONTAGE
MODE D'EMPLOI. . . . . . . . . .
48
49
50
51
INSTRUCTIONS D'ENTRETIEN
ET DE MAINTENANCE . . . . .
DÉPANNAGE . . . . . . . . . . . . .
59
63
Symboles d'alerte de sécurité
DANGER
Signale la présence d'un danger imminent entraînant de graves blessures
corporelles et pouvant avoir une issue
mortelle.
몇 AVERTISSEMENT
Signale la présence d'une situation
éventuellement dangereuse pouvant
entraîner de graves blessures corporelles et même avoir une issue mortelle.
몇 PRÉCAUTION
Remarque relative à une situation potentiellement dangereuse pouvant entraîner des blessures légères.
ATTENTION
Remarque relative à une situation
éventuellement dangereuse pouvant
entraîner des dommages matériels.
Symboles sur l'appareil
ATTENTION
Ne pas dépasser la ligne de remplissage MAX sur le bac d'eau sale pour
éviter tout débordement.
Veuillez respecter le procédé suivant :
1.
S’assurer que le bac
d'eau sale est vide.
2.
Remplir le réservoir d'eau
propre sans dépasser le
niveau MAX pour éviter
tout débordement.
44 Français
Page 45

Caractéristiques techniques
Utilisation conforme
Alimentation électrique
Tension 120
~60VHz
Classe de protection II
Degré de protection IPX4
Performances
Puissance absorbée 0.46 kW
Rotations des rou-
500 tr/min
leaux par minute
Contenance
Réservoir d'eau
propre
13.5
(0.4)ozl
Station de nettoyage 6.7
(0.2)ozl
Dimensions
Longueur de câble 275.5
9
in
m
(7.0
Poids (sans détergent) 11.02
(5.0)
lbs
kg
Longueur 12.60
(320)inmm
Largeur 10.63
(270)inmm
Hauteur 48.03
(1220)inmm
N° de pièce 1.055-507.0
1.055-521.0
Sous réserve de modifications
techniques !
– Cet appareil est conçu pour le net-
toyage de sols durs scellés, pour
les utilisations ménagères uniquement.
– Ne pas nettoyer de sols non scellés
tels que les sols en liège non traités
(l’humidité pourrait pénétrer en endommager le sol).
– L’appareil est adapté pour le net-
toyage du PVC, du linoléum, du
carrelage, de la pierre, du parquet
huilé et ciré, du stratifié et de tous
les revêtements de sol scellés.
Toute utilisation sortant du cadre donné est considérée comme non
conforme. Le constructeur décline
toute responsabilité pour des dommages en résultant, seul l'utilisateur en
assume le risque.
Responsabilité du propriétaire/de
l'utilisateur
Avant d'utiliser cet l'appareil, le propriétaire et/ou l'utilisateur doit impérativement avoir pris connaissance des
consignes d'utilisation et mises en
garde du fabricant.
Il est nécessaire d'insister sur les avertissements et de les comprendre.
Si l'utilisateur ne parle pas couramment l'anglais, l'acheteur/le propriétaire doit lire les consignes et mises en
garde du fabricant avec l'utilisateur
dans la langue maternelle de ce dernier et s'assurer qu'il en comprend bien
le contenu.
Le propriétaire et/ou l'utilisateur doit se
familiariser avec les consignes du fabricant et les conserver afin de pouvoir
s'y référer ultérieurement.
Français 45
Page 46

Contenu de livraison
Assistance Mexique
L’étendue de livraison de l’appareil est
illustrée sur l’emballage. Contrôler l’intégralité du contenu de l’appareil lors
du déballage.
S'il manque des accessoires ou en cas
de dommages imputables au transport, informer immédiatement le revendeur.
Service client
USA et Canada
Pour enregistrer ce produit, veuillez visiter :
www.karcher-register.com
Pour l'assistance technique, aller à :
www.karcher-help.com
Pour faire valoir une demande en garantie, appeler : 1-800-537-4129
Il vous faudra faxer votre reçu, ou l'envoyer par courriel, à un agent du service après-vente. Tous les autres informations sont disponibles sous :
www.karcherresidential.com
Appeler : 01-800-024-13-13 pour obtenir de l'aide ou visitez notre site Web :
www.karcher.com.mx
46 Français
Page 47

CONSIGNES DE SÉCURITÉ
IMPORTANTES
Respecter, lors de l’utilisation de l’appareil, les précautions de base, y compris les suivantes :
LIRE TOUTES LES
INSTRUCTIONS
AVANT
D'UTILISER LE
PRODUIT
À usage domestique seulement!
몇 AVERTISSE-
MENT
Afin de réduire les risques d'incendie,
d'électrocution et de blessures,
prendre les précautions suivantes :
NE PAS LAISSER l'appareil sans
surveillance lorsqu'il est branché.
Débrancher l'appareil lorsqu'il n'est
pas utilisé et avant de procéder à
l'entretien.
– Ne pas laisser l’appareil sous la
pluie. Le stocker à l’intérieur.
– Ne pas permettre une utilisation
comme jouet. Ne jamais le laisser
sans surveillance attentive lorsqu'il
est utilisé par ou à proximité d'enfants.
– Respecter imperativement les
consignes d'utilisation de ce manuel. Utiliser uniquement les accessoires recommandés par le fabricant.
– Ne pas l’utiliser si le cordon ou la
fiche sont endommagés. Si l’appa-
reil ne fonctionne pas correcte-
ment, est tombé, endommagé, a
été laissé à l’extérieur ou est tombé
dans l’eau, le renvoyer vers un
centre de maintenance.
– Les réparations doivent être effec-
tuées uniquement par un technicien
au-torisé, conformément aux
normes de sécurité nationales et lo-
cales. Les répa-rations effectuées
par des personnes non qualifiées
pourraient causer des blessures ou
endommager l’appareil.
– La tension indiquée sur la plaque si-
gnalétique doit correspondre à la
tension d'alimentation.
– Ne pas tirer ou porter l’appareil par
le cordon, ne pas utiliser le cordon
comme une poignée, ne pas coin-
cer le cordon dans une porte fer-
mée, ne pas le tirer sur des bords
ou coins acérés. Ne pas rouler l’ap-
pareil sur le cordon. Tenir le cordon
éloigné de surfaces chauffées.
– Ne pas tirer sur le cordon électrique
pour débrancher l'appareil. Pour
débrancher, saisir la fiche élec-
trique.
– Ne jamais saisir le câble d’alimen-
tation avec des mains mouillées.
– Faire particulièrement attention lors
du nettoyage d'escaliers.
– Désactiver toutes les commandes
avant de débrancher l'appareil.
– Ne jamais remplir de solvant, li-
quide contenant du solvant, ni
d’acide non dilué (p.ex. détergent,
essence, diluant pour peinture et
Français 47
Page 48

acétone) dans le réservoir d'eau car
ces substances font rouiller les matériaux utilisés dans l’appareil.
– Ne pas placer d'objets dans les ou-
vertures. Ne pas utiliser avec une
ouverture bloquée.
– Ne jamais immerger l’appareil dans
de l’eau ou un autre liquide.
– Ne jamais utiliser l’appareil dans
des bassins contenant de l’eau.
– Ne pas réaliser la maintenance de
l’appareil tant qu’il est branché.
– Ne pas nettoyer au-dessus de
prises électriques de sol.
– Assurer la stabilité de l’appareil
avant tout travail sur ou avec lui
pour éviter les accidents et dommages.
– Veiller à ne pas approcher les che-
veux, vêtements larges, doigts ou
toute autre partie du corps des orifices et composants mobiles de
l’appareil.
– Protéger ses mains lors du net-
toyage de la tête d'aspiration en raison du risque de blessures causées par la projection d'objets tranchants (p. ex. éclats).
– Ne pas utiliser l’appareil dans des
atmosphères explosives.
– Ne pas obstruer les fentes d’aéra-
tion sur l’appareil.
– Ne pas remplir le réservoir d'eau
propre avec de l'acide acétique, du
détartrant, des huiles essentielles
ou d'autres substances similaires.
Veiller également à ne pas aspirer
ces substances.
– Utiliser l’appareil exclusivement sur
des sols durs scellés (p.ex. parquet
vernis, carrelage émaillé, linoléum).
– Stocker le nettoyeur vapeur à l'inté-
rieur dans un endroit frais et sec.
– Porter l’appareil exclusivement par
la poignée de transport.
– Ne pas utiliser l’appareil pour ra-
masser des objets acérés ou volu-
mineux (p.ex. des tessons, cailloux,
pièces de jouets).
– Ne pas utiliser l’appareil pour le net-
toyage de tapis ou de moquettes.
– Ne pas utiliser l’appareil sur les aé-
rations de sol des radiateurs à
convection. L’appareil ne peut pas
absorber l’eau provenant des aéra-
tions ci-dessus.
– Ne pas trop remplir le réservoir. Ne
pas dépasser le niveau de remplis-
sage maximum.
– N’allumer l’appareil qu’après avoir
fixé le réservoir d'eau propre et le
bac d'eau sale.
– Ne stockez pas et n'utilisez pas
l'appareil à des températures infé-
rieures à 32 ° F (0 ° C).
– Ne pas faire fonctionner l’appareil
trop longtemps au même endroit
car cela peut endommager le sol.
PROP 65 AVERTISSEMENT
Ce produit peut contenir un ou plusieurs produits chimiques reconnus
dans l’état de Californie comme potentiels déclencheurs de cancer, d’anomalies congénitales ou d’autres lésions de l’appareil reproducteur.
Se laver les mains après la manipulation.
CONSERVER
CES CONSIGNES
48 Français
Page 49

GÉNÉRALITÉS
1 Interrupteur Marche/Arrêt
2 Poignée
3 Dégagement du cordon
4 Power Cord
5 Clip du cordon
6 Poignée de transport
7 Couvercle du bac d'eau sale/sépa-
rateur
8 Réservoir d'eau sale
9 Poignée de déclenchement à ga-
let de guidage
10 Rouleaux de nettoyage
11 Capot de la tête d'aspiration
12 Verrouillage de la tête d'aspiration
13 Réservoir d'eau propre
14 Poignée du réservoir d'eau propre
15 Station de rangement
16 Produit détergent RM 534
17 Produit détergent RM 535
18 Produit détergent RM 536
19 Produit détergent RM 537
10 ** Rouleaux de
nettoyage 2 x
** FC 5 Premium
Français 49
Page 50

INSTRUCTIONS DE MONTAGE
Insérer la poignée assez loin dans
l’appareil de base jusqu’à l’audition
d’un clic.
50 Français
Page 51

MODE D'EMPLOI
Information générale de
fonctionnement
PRÉCAUTION
Pour éviter de trébucher sur le cordon,
tenir l’appareil d’une main et le cordon
de l’autre.
ATTENTION
Utiliser l’appareil exclusivement pour
absorber des salissures et des fluides
(max. 8,5 oz / 0,25 L).
Contrôler, avant l’utilisation, la ré-
sistance à l'eau dans des zones
sensibles. Ne pas nettoyer de sols
non scellés tels que les sols en
liège non traités ou l’humidité pourrait pénétrer en endommager le sol.
Maintenir l’appareil à un angle d’en-
viron 60 degrés.
Nettoyer le sol en déplaçant l’appa-
reil d’avant en arrière, comme un
aspirateur, jusqu’à ce que le sol soit
propre.
Avant le nettoyage, débarrasser le
sol des objets volumineux pouvant
endommager l’appareil.
Français 51
Page 52

Remplir le réservoir d'eau
fraîche
ATTENTION
Ranger l’appareil dans la station de
rangement lorsqu’il n’est pas utilisé.
Un manque de stabilité peut faire basculer l’appareil, entraîner une fuite et
endommager le sol.
Ranger l’appareil dans la station de
rangement lorsqu’il n’est pas utilisé.
Retirer le réservoir d'eau propre.
ATTENTION
* Respecter les instructions de dosage
indiquées sur le détergent.
1 Ouvrir le verrouillage du réservoir
d'eau propre.
2 Remplir le réservoir d’eau propre
avec de l’eau potable froide ou
tiède.
Ne pas dépasser la ligne de remplissage « MAX ».
3 Il est possible d’ajouter les déter-
gents KÄRCHER dans le réservoir
d'eau propre, si besoin.*
Voir le chapitre Utilisation de détergents.
Fermer le couvercle du réservoir.
52 Français
insérer le réservoir d'eau propre
jusqu’à entendre un clic.
Page 53

Fonctionnement de l’appareil
PRÉCAUTION
Les rouleaux de nettoyage commencent à tourner dès la mise sous
tension de l’appareil. Maintenir la poignée pour empêcher l’appareil d’avancer de lui-même.
ATTENTION
Ne pas utiliser l’appareil sans eau.
S’assurer, avant le fonctionnement,
que le réservoir d'eau propre est rempli
et que le bac d'eau sale est vide.
1 Retirer le cordon de puissance en
faisant pivoter les dégagements de
cordon et le brancher dans une sortie.
Retirer l’appareil de la station de
rangement et le poser au sol.
1 Pour humidifier plus rapidement les
rouleaux, utiliser un gobelet de mesure pour remplir la station de rangement de 1,7 oz (0,05 l) d’eau
douce.
2 Appuyer sur la touche On/Off pour
ALLUMER l’appareil et le placer 5
secondes dans la station de rangement.
L’appareil a alors le bon niveau
d’humidité pour le nettoyage.
3 Appuyer sur la touche on/off pour
COUPER l’appareil.
Maintenir fermement l’appareil par
la poignée.
Appuyer sur la touche on/off pour
ALLUMER l’appareil.
Français 53
Page 54

Lorsqu’il n’est pas en
fonctionnement
ATTENTION
Ranger l’appareil dans la station de
rangement lorsqu’il n’est pas utilisé.
Un manque de stabilité peut faire basculer l’appareil, entraîner une fuite et
endommager le sol.
Appuyer sur la touche on/off pour
COUPER l’appareil.
Placer l’appareil dans la station de
rangement.
54 Français
Page 55

Ajout de détergent
ATTENTION
Avant de remplir le réservoir d'eau
propre, vider le bac d'eau sale, pour
éviter tout débordement.
Cf. le chapitre « Vidage du bac d'eau
sale ».
Retirer le réservoir d'eau propre.
1 Retirer le capuchon de fermeture
du réservoir.
2 Remplir le réservoir d'eau propre à
l'eau potable froide ou tiède.
Ne pas dépasser la ligne de remplissage « MAX ».
3 Il est possible d’ajouter les déter-
gents KÄRCHER dans le réservoir
d'eau propre, si besoin.*
Voir le chapitre Utilisation de détergents.
Fermer le couvercle du réservoir.
insérer le réservoir d'eau propre
jusqu’à entendre un clic.
Français 55
Page 56

Vidange du réservoir d'eau sale
ATTENTION
Une fois le nettoyage terminé, nettoyer
l’appareil avec le cycle de rinçage. Voir
« Nettoyage de l’appareil »
Pour retirer le bac d'eau sale, ap-
puyer sur le couvercle supérieur en
le tirant.
Enlever le bac d'eau sale.
1 Retirer le couvercle du bac d'eau
sale.
2 Vider le bac d'eau sale et le rincer à
l’eau potable.
3 Pour bloquer le couvercle, le poser
sur le bac d'eau sale et le presser
jusqu’à ce qu’il s’enclenche.
Insérer le bac d'eau sale dans l’ap-
pareil jusqu’à ce qu’il s’enclenche.
56 Français
Page 57

Appuyer sur la touche on/off
pour COUPER la puissance.
ATTENTION
Nettoyage de l'appareil par un processus de rinçage une fois les travaux terminés.
Cf. le chapitre « Nettoyage de l'appareil par un processus rinçage ».
Appuyer sur la touche on/off pour
COUPER l’appareil.
Débrancher de la prise.
Placer l’appareil dans la station de
rangement.
Vider le réservoir d’eau propre et le
bac d'eau sale.
Vidange du réservoir d'eau sale.
Cf. le chapitre « Vidage du bac
d'eau sale ».
Français 57
Page 58

Rangement de l’appareil
ATTENTION
Pour éviter les odeurs, vider et rincer
l’eau douce et le bac d'eau sale avant
le rangement.
Déplacer l’appareil par la poignée
et le ranger dans la station de rangement.
Stocker l’appareil à l’intérieur à un
endroit frais et sec.
58 Français
Page 59

INSTRUCTIONS D'ENTRETIEN ET DE MAINTENANCE
Nettoyage de l’appareil
ATTENTION
Rincer l’appareil à l’eau douce dans la
station de rangement après son utilisation.
Appuyer sur la touche on/off pour
COUPER l’appareil.
Placer l’appareil dans la station de
rangement.
Vider le liquide restant dans le ré-
servoir d'eau propre.
1 Vidange du réservoir d'eau sale.
Cf. le chapitre « Vidage du bac
d'eau sale ».
Remettre le bac d'eau sale en
place.
2 Remplir le gobelet de mesure de
6,7 oz (0,2 l) d’eau.
Remplir la station de rangement
d’eau.
Si besoin, ajouter des détergents
KÄRCHER adaptés
3 Appuyer sur la touche on/off pour
ALLUMER l’appareil.
4 Laisser fonctionner l’appareil pen-
dant 30-60 secondes jusqu’à ce
que l’eau soit complètement évacuée de la station de rangement.
Le processus de rinçage est à présent terminé.
5 Appuyer sur la touche on/off pour
COUPER l’appareil.
Remarque
Laisser fonctionner l’appareil pour réduire le taux d’humidité dans les rouleaux.
Vider le réservoir d’eau propre et le
bac d'eau sale. Voir les chapitres
« Vider le réservoir d'eau propre »
ou « Vider le bac d'eau sale »
Débrancher de la prise.
Français 59
Page 60

Nettoyage des rouleaux
ATTENTION
Pour empêcher les fuites de liquide
hors des réservoirs, vider le réservoir
d’eau propre et le bac d'eau sale avant
de poser l’appareil sur le sol.
Remarque
Si les rouleaux sont très sales, les retirer de l’appareil et les nettoyer.
Appuyer sur la touche on/off pour
COUPER l’appareil.
Débrancher de la prise.
Vider le réservoir d’eau propre et le
bac d'eau sale. Voir les chapitres
« Vider le réservoir d'eau propre »
et « Vider le bac d'eau sale »
Retirer les rouleaux de nettoyage.
ATTENTION
Ne pas utiliser :
Après le nettoyage, laisser les rou-
leaux sécher à l'air libre.
Visser les rouleaux de nettoyage à
fond
Respecter les codes couleur entre
le rouleau et le manche (p.ex. raccorder le bleu au bleu) et s’assurer
que les rouleaux sont bloqués.
Nettoyer les rouleaux sous l’eau
courante.
ou
Laver les rouleaux à la machine jus-
qu’à 140 °F (60 °C).
60 Français
Page 61

Nettoyage de la tête d'aspiration
ATTENTION
Pour éviter les problèmes de performance, nettoyer l’appareil en cas de
présence de gros résidus. En fonctionnement, ces débris entraîneraient des
claquements ou bloqueraient les
tuyaux d’aspiration, réduisant ainsi la
puissance d’aspiration.
Appuyer sur la touche on/off pour
COUPER l’appareil.
Débrancher de la prise.
Retirer les rouleaux de nettoyage.
Cf. le chapitre « Nettoyage des
rouleaux ».
Nettoyer le capot de la tête d'aspi-
ration sous l’eau courante.
Si besoin, retirer les dépôts de par-
ticules des tuyaux d’aspiration et
les fentes dans le capot de la tête
d'aspiration.
Nettoyer la tête d'aspiration de l'ap-
pareil avec un chiffon humide.
Fixer le couvercle de la tête d'aspi-
ration sur la tête d'aspiration.
Visser à fond les rouleaux de net-
toyage sur la tige filetée.
Cf. le chapitre « Nettoyage des
rouleaux ».
1 Appuyer sur le verrouillage de la
tête d'aspiration.
2 Retirer le couvercle de la tête d'as-
piration.
Français 61
Page 62

Nettoyage du bac d'eau sale
ATTENTION
Nettoyer régulièrement le bac d'eau
sale pour éviter tout blocage vers la séparation et empêcher les salissures de
s’accumuler dans le réservoir.
Appuyer sur la touche on/off pour
COUPER l’appareil.
Placer l’appareil dans la station de
rangement.
Débrancher de la prise.
Enlever le bac d'eau sale.
Cf. le chapitre « Vidage du bac
d'eau sale ».
Remarque
Le bac d'eau sale peut également être
nettoyé dans le lave-vaisselle.
Après le nettoyage, fixer le cou-
vercle et insérer le bac d'eau sale
dans l’appareil.
Utilisation de détergents
ATTENTION
L’utilisation de détergents non adaptés
peut endommager le dispositif et annule la garantie.
Remarque
Ajouter des détergents conformément
au besoin.
Pour doser le détergent, suivre les
instructions du fabricant.
Pour éviter la formation de mousse,
remplir le réservoir d'eau propre en
eau, puis ajouter le détergent.
Pour éviter le trop-plein, laisser de
la place pour le détergent lors du
remplissage en eau.
Nettoyer le couvercle du bac d'eau
sale et du réservoir à l’eau potable.
62 Français
Page 63

DÉPANNAGE
DANGER
Avant tout travail d'entretien et de
maintenance, mettre l'appareil hors
tension et débrancher la fiche secteur.
Les défauts sont souvent simples et
peuvent être résolus à l’aide des
normes suivantes. Si le défaut n’apparaît pas dans la liste, contacter le service après-vente.
Rouleaux non humides
L'élément filtrant n'a pas été inséré.
Retirer le réservoir d'eau propre et
placer l'élément filtrant avec le pion
vers le haut.
L’insert de filtre est mis en place dans
le mauvais sens.
Retirer l'élément filtrant et le placer
avec le pion vers le haut.
Le tuyau d’aspiration est bloqué.
Retirer avec précaution le tuyau
d’aspiration de la tête d'aspiration.
Mettre les tuyaux d'aspiration dans
de l'eau froide pendant 10 à
20 minutes.
Nettoyer les tuyaux d'aspiration
avec un objet contondant et/ou
sous l'eau courante.
Pas de retrait des salissures
Manque d’eau dans le réservoir d'eau
propre.
Remplir le réservoir d'eau propre à
l'eau potable froide ou tiède.
Le réservoir d’eau propre n'est pas positionné correctement dans l'appareil.
insérer le réservoir d'eau propre
jusqu’à entendre un clic.
Les rouleaux de nettoyage sont absents ou ne sont pas insérés correctement.
Fixer les rouleaux de nettoyage ou
les tourner sur le manche de rou-
leau jusqu’à ce qu’ils soient fixés.
Cf. le chapitre « Nettoyage des
rouleaux ».
Les rouleaux de nettoyage sont sales
ou usés.
Nettoyer les rouleaux de nettoyage.
ou
Remplacer les rouleaux de net-
toyage.
Français 63
Page 64

Les rouleaux ne tournent pas
Les rouleaux sont bloqués.
Retirer les rouleaux et contrôler si
un objet les bloque.
Cf. le chapitre « Nettoyage des
rouleaux ».
Claquement fort lors de la mise
sous tension
Les rouleaux sont trop secs.
Humidifier les rouleaux avec 1,7 oz
(0,05 l) d’eau dans la station de rangement.
Cf. le chapitre « Commencer le
travail ».
Bruit dans la tête d'aspiration
Des pièces (p. ex. cailloux ou éclats)
se trouvent dans la tête d'aspiration.
Retirer le couvercle de la tête d'aspi-
ration et nettoyer la tête d'aspiration.
Cf. le chapitre « Nettoyage de la
tête d'aspiration ».
La puissance d'aspiration
diminue
Les canaux d'aspiration et les fentes
de la tête d'aspiration sont obturés.
Retirer le couvercle de la tête d'aspi-
ration et nettoyer la tête d'aspiration.
Cf. le chapitre « Nettoyage de la
tête d'aspiration ».
Fuite d’eau sale dans le
dispositif
Le bac d'eau sale est trop rempli.
Vider le bac d'eau sale.
Cf. le chapitre « Nettoyage du bac
d'eau sale ».
Le bac d'eau sale n’est pas mis correctement en place.
Contrôler que le capot est bien fixé
sur le bac d'eau sale.
Cf. le chapitre « Nettoyage du bac
d'eau sale ».
Le séparateur est bouché.
Retirer le capot du bac d'eau sale et
nettoyer la séparation.
64 Français
Cf. le chapitre « Nettoyage du bac
d'eau sale ».
Le filet filtrant du séparateur du bac
d'eau sale a été endommagé lors du
nettoyage.
Remplacer la séparation.
Traces au sol
Le détergent utilisé n’est pas efficace
ou mal utilisé.
Utiliser exclusivement les déter-
gents autorisés par KÄRCHER.
Voir le chapitre « Utilisation de
détergents ».
Tenir compte des recommanda-
tions de dosage du fabricant.
Première humidification des rouleaux.
Humidifier entièrement les rou-
leaux.
Retrait de la poignée de
l’appareil
ATTENTION
Ne pas retirer la poignée de l’appareil
lorsqu’il est assemblé.
La poignée ne peut être retirée que
pour le transport.
Insérer un tournevis à un angle de
90 degrés dans la petite ouverture à
l’arrière de l’appareil tout en tirant la
poignée jusqu’à ce qu’elle sorte.
ATTENTION
S’assurer que le cordon entre le corps
et la poignée ne soit pas endommagé.
Page 65

Page 66

Page 67

Page 68

 Loading...