

Kyocera TASKALFA 250CI, TASKALFA 500CI, TASKALFA 300CI, TASKALFA 420I, TASKALFA 520I User Manual
...Page 1

Page 2

LegalNotes
Unauthorizedreproductionofallorpartofthisguideisprohibited.
Theinformationinthisguideissubjecttochangeforimprovementwithoutnotice.
Wecannotbeheldliableforanyproblemsarisingfromtheuseofthisproduct,regardlessoftheinformationherein.
RegardingTrademarks
•MicrosoftWindowsisaregisteredtrademarkofMicrosoftCorporationintheU.S.and/orothercountries.KPDLisa
trademarkofKyoceraCorporation.PCLisatrademarkofHewlett-PackardCompany.TrueTypeisaregistered
trademarkofAppleComputer,Inc.
•Allotherbrandandproductnameshereinareregisteredtrademarksortrademarksoftheirrespectivecompanies.
ExamplesoftheoperationsgiveninthisguidesupporttheWindowsXPprintingenvironment.Essentiallythesame
operationsareusedforMicrosoftWindowsVista,WindowsServer2008andWindows2000environments.
Copyright©2009KYOCERAMITACorporation
©2009Allrightsreserved.
TCRev.1.0
Page 3

TableofContents
Chapter1QuickStart
StartingandLoggingin.................................................................................................................1-1
EditingAuthenticationOptions......................................................................................................1-1
DeviceDiscovery..........................................................................................................................1-2
UserInterface...............................................................................................................................1-4
ClosingtheViewerWindow...........................................................................................................1-7
Chapter2ViewManagement
ViewAs.........................................................................................................................................2-1
DefaultViews................................................................................................................................2-1
MyViews.......................................................................................................................................2-3
AddingaNewFoldertoMyViews.................................................................................................2-3
RenamingaFolderorView...........................................................................................................2-3
DeletingaFolder,View,orDevice................................................................................................2-3
Searches.......................................................................................................................................2-4
DynamicView...............................................................................................................................2-5
ManualView.................................................................................................................................2-5
UpdatingaView............................................................................................................................2-6
DuplicatingaView.........................................................................................................................2-6
RenamingaView..........................................................................................................................2-6
DeletingaView.............................................................................................................................2-7
ResizingtheViewAreas...............................................................................................................2-7
Refresh.........................................................................................................................................2-7
AddingDevices.......................................................................................................................1-2
AutomaticDiscovery................................................................................................................1-3
ExcludedDevices....................................................................................................................1-3
ApplicationMenu.....................................................................................................................1-4
ApplicationToolbar..................................................................................................................1-5
MyViewsPane........................................................................................................................1-5
DefaultViewsPane.................................................................................................................1-5
DeviceListPane......................................................................................................................1-5
MapView.................................................................................................................................2-2
QuickSearching......................................................................................................................2-4
AdvancedSearching...............................................................................................................2-4
AddingaDynamicView...........................................................................................................2-5
AddingaManualViewUsingSelection...................................................................................2-6
Chapter3Device
KMnetViewer
DeviceProperties..........................................................................................................................3-1
DisplayingDeviceProperties...................................................................................................3-2
DisplayingDeviceHomePage......................................................................................................3-2
AddressBook................................................................................................................................3-2
AddingContacts......................................................................................................................3-2
AddingGroups........................................................................................................................3-3
AddingaContacttoaGroup...................................................................................................3-3
i
Page 4

DeletingaContactFromaGroup............................................................................................3-3
DeletingContactsandGroups................................................................................................3-4
EditingContactsandGroups...................................................................................................3-4
CopyingContactsandGroups................................................................................................3-4
SearchingtheAddressBook...................................................................................................3-5
DeviceUsers.................................................................................................................................3-5
AddingDeviceUsers...............................................................................................................3-5
RemovingDeviceUsers..........................................................................................................3-5
SearchingtheDeviceUserList...............................................................................................3-6
Jobs..............................................................................................................................................3-6
ShowingJobDetail..................................................................................................................3-6
ExportingtheJobLog..............................................................................................................3-6
SearchingaJobList................................................................................................................3-7
DocumentBox..............................................................................................................................3-7
AddingaDocumentBox..........................................................................................................3-7
DeletingaDocumentBox........................................................................................................3-7
DocumentProperties...............................................................................................................3-8
DocumentViews.....................................................................................................................3-8
DownloadingaDocument.......................................................................................................3-8
SearchingaDocumentBox.....................................................................................................3-8
MovingDocumentsBetweenDocumentBoxes.......................................................................3-8
NotificationSettings......................................................................................................................3-9
SettingaNotification................................................................................................................3-9
CommunicationSettings.............................................................................................................3-10
SettingDeviceCommunications............................................................................................3-10
TCP/IPPort...........................................................................................................................3-11
Polling....................................................................................................................................3-11
AdvancedMenu..........................................................................................................................3-11
TCPSendData.....................................................................................................................3-12
Chapter4Multi-Set
Chapter5FirmwareUpgrade
Chapter6Workspaces
SettingMultipleDevices................................................................................................................4-1
SelectingSettingsinMulti-Set......................................................................................................4-1
CreatingSettingsFromaDevice..................................................................................................4-2
CreatingSettingsFromaFile........................................................................................................4-2
CreatingNewSettings..................................................................................................................4-3
OverwritingSettings......................................................................................................................4-3
FirmwareUpgradeRisks...............................................................................................................5-1
FirmwareUpgradeRisksandRecoveryOptions.....................................................................5-1
PerformingFirmwareUpgrade......................................................................................................5-2
AcknowledgementofRisks.....................................................................................................5-3
SelectingaFirmwareUpgradeFile.........................................................................................5-3
VerifyingUpgradeSettings......................................................................................................5-3
AuthorizingFirmwareUpgrade.....................................................................................................5-4
IB-2xNetworkFirmware..........................................................................................................5-4
SystemandFaxFirmware.......................................................................................................5-4
BeginningFirmwareUpgrade.......................................................................................................5-4
CancelingFirmwareUpgrade.......................................................................................................5-4
SavingtheFirmwareUpgradeExportFile.....................................................................................5-5
AddingaNewWorkspace.............................................................................................................6-1
OpeninganExistingWorkspace...................................................................................................6-1
ii
UserGuide
Page 5

ImportingandExportingaWorkspace..........................................................................................6-2
ImportingaFiletoaNewWorkspace......................................................................................6-2
ExportingaWorkspacetoaFile..............................................................................................6-2
ExportingDeviceInformationtoaFile...........................................................................................6-2
Chapter7ViewerOptions
EditingE-mailOptions...................................................................................................................7-1
EditingAuthenticationOptions......................................................................................................7-2
EditingDevicePollingOptions......................................................................................................7-2
EditingSNMPTrapOptions..........................................................................................................7-3
Glossary..................................................................................................................................................................iv
Index.........................................................................................................................................................................vi
KMnetViewer
iii
Page 6

1QuickStart
KMnetViewerhasmanyfeaturestohelpyouorganizeandmonitornetwork
deviceinformation.
Thesefeaturesareavailableforstartingtheviewer,discoveringdevices,and
gettingfamiliarwiththeuserinterface:
StartingandLogginginonpage1-1
EditingAuthenticationOptionsonpage7-2
DeviceDiscoveryonpage1-2
UserInterfaceonpage1-4
ClosingtheViewerWindowonpage1-7
StartingandLoggingin
InMicrosoftWindowsVistaorWindowsXP,clickStart>AllPrograms>
1
Kyocera>KMnetViewer.
Ifyouhaveadministratorrights,yourlastsavedworkspaceappearsandyou
2
canproceedwithyourviewertasks.Ifyouhaveadministratorrights,andyou
arestartingKMnetViewerforthefirsttime,proceedtostep4.
EditingAuthenticationOptions
Ifyoudonothaveadministratorrights,thenetworkadministratormustsetupa
3
userloginpasswordforyou.Ifnopasswordhasbeensetup,KMnetViewer
doesnotstart,andanaccesserrormessageappears.
Typeyourpasswordinthelogintextbox,andclickSubmit.Apasswordisa
maximumof32characters.Ablankpasswordisallowed.
Ifyoursubmittedpasswordisaccepted,yourlastsavedworkspaceappears,
unlessitisyourfirsttimestartingtheapplication.Ifitisthefirsttime,proceedto
step4.
Ifthepasswordisnotcorrect,theapplicationdisplaysthedialogboxandasks
youtoenterthepasswordagain.Ifyouincorrectlyenterthepasswordthree
times,anerrormessageappears,andtheapplicationsdoesnotstart.Ifthis
happensseethenetworkadministratoraboutyourpassword.
IfyoujustinstalledKMnetViewer,anditisthefirsttimeyouarestartingit,a
4
dialogboxappearsafteryouhavestartedandsuccessfullyloggedintothe
application.Youareaskedtospecifyaworkspacefile.Afteryouspecifyyour
workspacefile,thevieweropensanddisplaystheAddDevicewizardtohelp
yousearchfornetworkdevicesandcreatethedevicelist.
Ifauserdoesnothaveadministratorrightsonthecomputerwiththeviewer
installed,thenetworkadministratorcansetupauserloginpassword.Ifno
1-1
UserGuide
Page 7

QuickStart
passwordhasbeensetupforauserwithoutadministratorrights,theapplication
doesnotstart,andanaccesserrormessageappears.
Inthemenubaratthetopleftofthescreen,clickEdit>Options>
1
Authentication.
SelectEnablelocalpassword.
2
IntheNewpasswordtextbox,typeapasswordforalocaluser.Apasswordis
3
amaximumof32characters.Ablankpasswordisallowed.
InConfirmpassword,typethesamepasswordagain.
4
ClickOKtosavethepassword.
5
DeviceDiscovery
Discoveryisaprocessthatchecksnetworksforprintingdevices.Ifnew
devicesarefound,thenKMnetViewerupdatesitsdatabasewithinformation
aboutthedevice.Thisprocesscanbeperformedmanuallyforsingleormultiple
devices,oritcanbescheduledtorunautomaticallyaccordingtoasetschedule.
Itisalsopossibletoexcludedevicesfrombeingdiscovered.
WhenKMnetViewerislaunchedforthefirsttime,orwhenanewworkspaceis
opened,theAddDevicewizardautomaticallylaunches.
AddingDevices
YoucanusetheAddDeviceswizardtoadddevicestotheviewlist.
ClickDevice>Discovery>AddDevices.
1
IntheAddDevicewizard,selectamethodforaddingdevices:
2
Express
Usespredefinedcommunicationsettingstofinddevicesinthelocalnetwork.
Custom
Letsyouselectsettingstofinddevicesonanynetwork.
Fortheselectedmethod,completethewizardandclickFinishtobegin
3
discovery.
CustomOptionsforAddingDevices
CustomoptionsareavailablewhenCustomisselectedintheAddDevice
Wizard.Youcanselectthediscoveryprocesstorunonyourlocalnetwork,a
specificIPaddress,orarangeofIPaddresses.Continuethroughthewizardto
selectthefollowingoptions:
Onyourlocalnetwork
Selectdiscoverytype,TCP/IPport,SNMPoptions,anddiscoverystarttime.
ByIPaddress
TypespecificIPaddressesorhostnamesandclickAddtoaddthemtothe
Selectedtargetslist.YoucanalsoclickImporttosearchforavalidIP
KMnetViewer
1-2
Page 8

QuickStart
addresslist(.CSVor.TXT).AnentrycanberemovedfromtheSelected
targetslistbyselectingitandclickingRemove.ClickNexttocontinue
throughthewizardandselectTCP/IPport,SNMPoptions,anddiscovery
starttime.
ByIPaddressrange
TypevalidstartingandendingIPaddressesandclickAddtoaddthemto
theSelectednetworksegmentslist.Anentrycanberemovedfromthe
SelectednetworksegmentslistbyselectingitandclickingRemove.Click
NexttocontinuethroughthewizardandselectTCP/IPport,SNMPoptions,
anddiscoverystarttime.
AutomaticDiscovery
Youcansetuparegularscheduleforperformingthediscoveryprocess.If
devicesarefrequentlyaddedtoorremovedfromthenetwork,performing
discoveryonaregularbasiswillkeepthedevicedatabaseuptodate.
SchedulingAutomaticDiscovery
ClickDevice>Discovery>AutomaticDiscovery.TheScheduledDiscovery
1
dialogboxopens.
Ifthereisanexistingdiscoverymodeyouwouldliketoedit,selectitandclick
2
Properties,otherwiseclickAddtocreateanewdiscoverymode.
IntheAddDeviceWizard,makeyourselectionsineachwindowtosetupa
3
recurringschedule.IntheConfirmDiscoverywindow,clickFinish.
Thenewdiscovermodeisaddedtothelist.ClickClosetosaveyourchanges
4
andexittheScheduledDiscoverydialogbox.
ExcludedDevices
Aprintingdevicecanbedeleted,whichexcludesthedevicefromthediscovery
process.ThismaybedoneifthedeviceisnotmanagedbythecentralIT
department,orifthedeviceistobemadenotvisibleforsecurityreasons.
DevicescanberestoredtothedevicelistbyperformingIncludeDevice.
ExcludingaDevicefromDiscovery
Thisoptionremovesthedevicefromthedevicelist,anddisplaysitinthe
ExcludedDeviceswindow.Informationaboutthedeviceisnotdeletedfrom
theapplication.
Inthedevicelist,selectthedevicetoexclude.
1
Right-clickontheselecteddevice,andclickDeleteDevice.
2
IncludingaDevice
AprintingdevicethatwasplacedintheExcludedDeviceswindowcanbe
includedagain.Whenadeviceisincluded,itisavailabletobefoundthenext
timeDiscoveryisperformed.
ClickDevice>Discovery>ExcludedDevices.
1
1-3
UserGuide
Page 9
QuickStart
Inthelist,selectanexcludeddevicetoinclude.
2
ClickIncludeDevice.
3
UserInterface
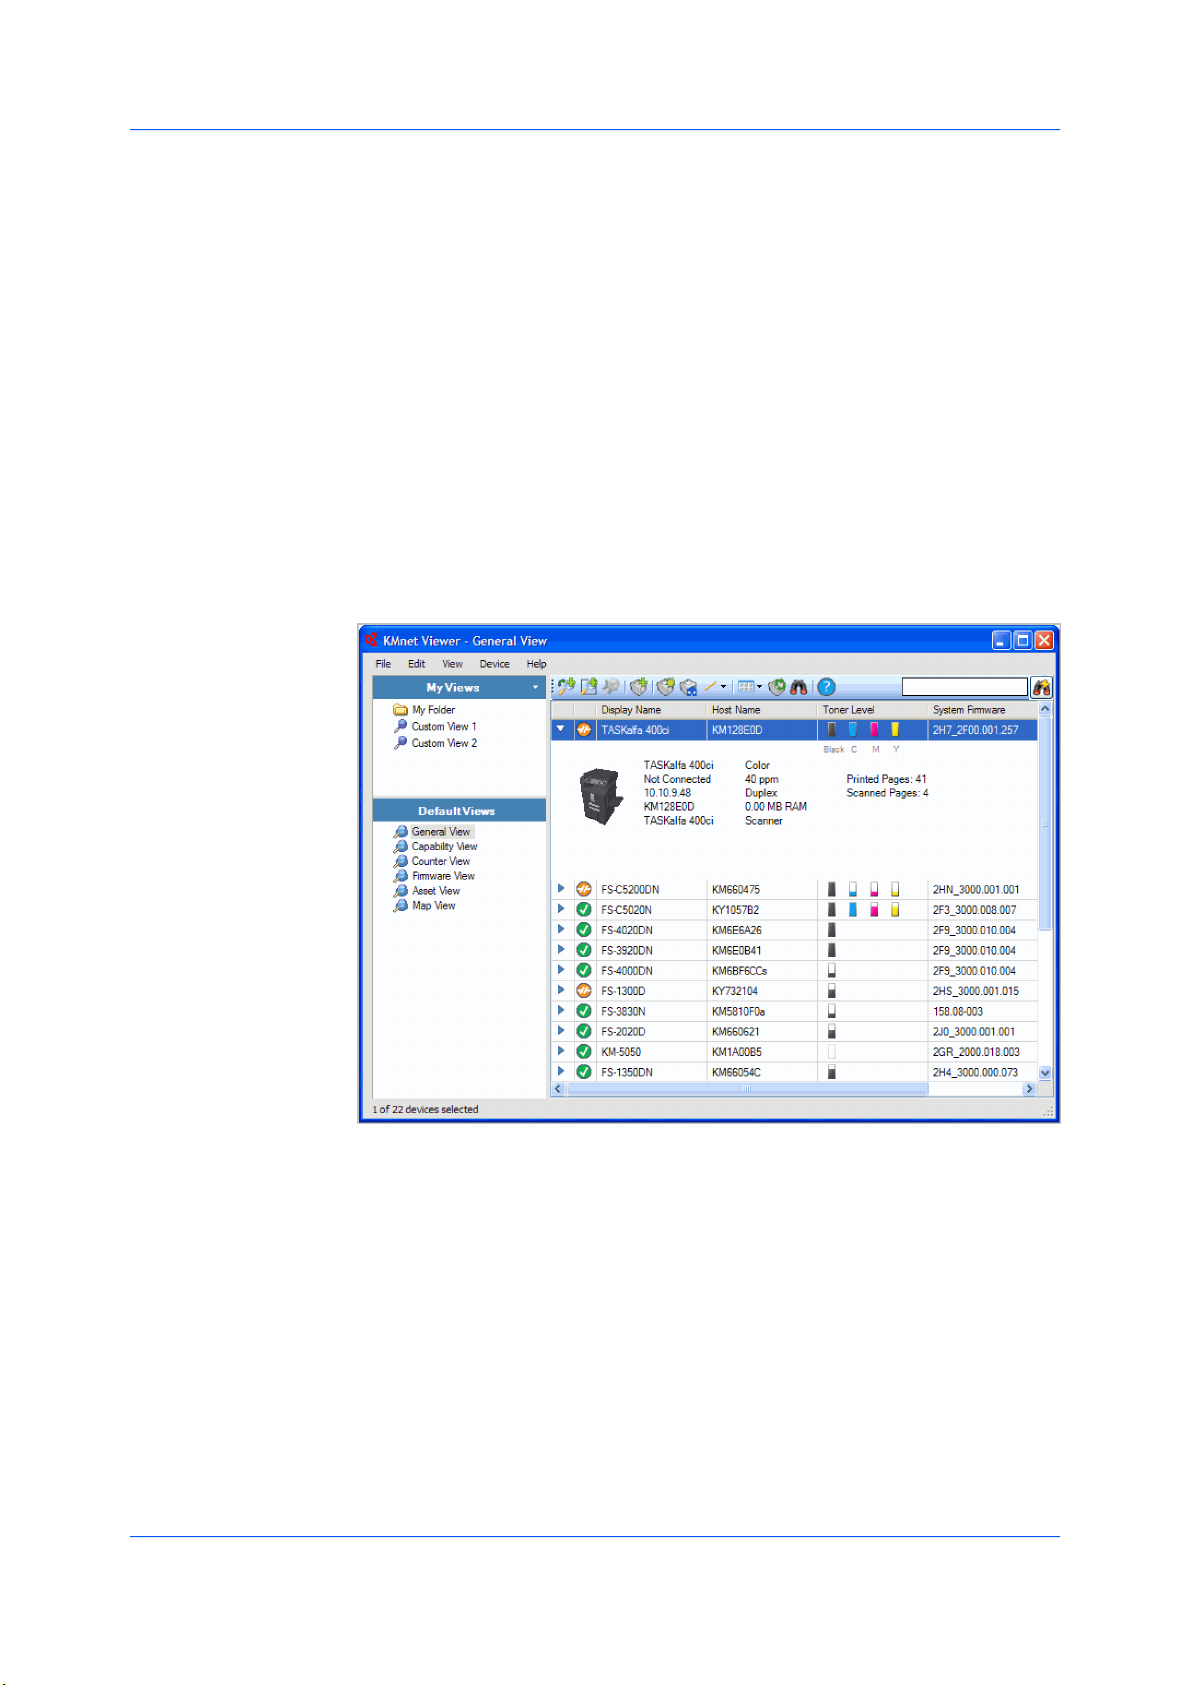
TheKMnetVieweruserinterfaceisdesignedtohelpyouquicklygetthe
informationyouneedaboutyournetworkdevices.
Thescreenisdividedbetweenleftandrightpanes.Ontheleftpane,youcan
selectwhichviewappearsinthedevicelistintherightpane.Aviewisa
specifiedorganizationofcolumnsandrows(list),oralayout(map)ofthedevice
data.
Theapplicationofferstwotypesofviews:userdefinedviewsthatarelisted
undertheMyViewsheading,andsixstandardviewsdefinedbyKMnetViewer
thatarelistedunderDefaultViews.
Thedevicelistintherightpanedisplaysalldevicesfoundduringnetwork
discovery.Thereisonerowofinformationperdevice.
ApplicationMenu
TheapplicationmenuislocatedintheupperleftcorneroftheKMnetViewer
screen.Basicoperationsthataffecttheviewerareinthismenu.Theapplication
menuoperateslikeastandardMicrosoftWindowsapplicationmenu.Themain
menutitlesare:
File
Edit
View
Device
Help
KMnetViewer
1-4
Page 10

QuickStart
ApplicationToolbar
Theapplicationtoolbarappearsabovethedevicelistandprovidesbuttonsfor
commonlyusedfeatures.Movethecursoroverthebuttontoseeadescription
ofthefeature.Clicktousethefeature.Ifafeatureisnotavailable,thebuttonis
disabled.Thetoolbarcontainsbuttonsforthefollowingfeatures:
AddDynamicView
AddManualViewUsingSelection
UpdateView
AddDevices
Properties
DeviceHomepage
Edit
ViewAs
RefreshDevice
AdvancedSearch
Help
ForMapView,thetoolbaralsocontainsbuttonsforthefollowingfeatures:
ImportMapBackground
ZoomIn
ZoomOut
ZoomtoFit
Zoom%
MyViewsPane
MyViewsarelocatedintheleftpaneofthescreen.MyViewsarelistsormaps
youcancreatefromDefaultViewsorotherMyViews.Thisletsyoucustomize
thetypeofinformationyouwanttosee.MyViewsareorganizedinatree
structurethatdisplaysfoldersandMyViewsnodes.WhenyouselectaMy
Viewsnode,KMnetViewerdisplaystheview(listormap)intherightpane.
YoucancreatefolderstoorganizeandmanageMyViews.Adddevice
informationtoaviewbyclickingView>AddDynamicView,orView>Add
ManualViewUsingSelection.
DefaultViewsPane
DefaultViewsarelocatedintheleftpaneofthescreen.DefaultViewsare
standardlistormapviewsshippedwithKMnetViewer.Sixstandardviewsare
availableunderDefaultViewsthatcannotberemoved.Whenyouselecta
particulardefaultview,KMnetViewerdisplaystheview(listormap)intheright
pane.
DeviceListPane
Thedevicelistislocatedintherightpaneofthescreen.Itprovidesdevice
informationinacustomizablelistorinamapformat.Informationcanbe
organizedandsortedtotheuser’spreference.Eachrowrepresentsadevice
andcolumnsrepresentcategories.Eachdevicerowcanbeexpandedtodisplay
moreinformation.
1-5
UserGuide
Page 11

IdentifyingStatusIcons
Inthedevicelist,statusiconsprovidequickinformationabouttheconditionof
eachdevice.Clickthetriangleicontoexpandtherowandseeadescriptionof
thecondition.
Ready
Greeniconwithawhitecheckmark.Thisiconindicatesthedeviceisready
toprint,orisintheprocessofprinting.
Error
Rediconwithwhite“X”.Thisiconmeansthedeviceisunabletoprintand
needsimmediateattention.Itmaybeapaperjam,coveropen,notoner,no
paper,orthedevicehasgoneoffline.
Warning
Yellowiconwithawhiteexclamationmark.Thisiconindicatesthedevice
canprint,butisapproachingerrorstatus.Itmaymeanlowtonerorlow
paper.
Disconnected
Orangeiconwithawhitebrokencircuit.Thisiconmeansthevieweris
unabletocommunicatewiththedevice.Thedevicemaybepoweredoff,or
theremaybeaproblemwiththenetworkconnections.
Busy
Grayiconwithawhitearrow.Thisiconindicatesthedeviceisoperational,
butoccupiedwithatask.Itmaybeundergoinganupgradeorconfiguration.
QuickStart
CustomizingtheDeviceList
KMnetViewerprovidestheabilitytoarrangetheinformationinthedevicelistto
suityourneeds.ChangesmadetoMyViewsaresavedwiththeview.Youcan
updatechangestoMyViewsbyclickingUpdateViewinthetoolbar.Changes
madetoDefaultViewsarenotsavedafteryouleavetheview.
ShowingorHidingColumns
Findthecolumntotherightofwhereyouwantanewcolumntoappear.
Right-clickonthecolumnheadingtoopentheselectionlistofcolumns.A
columnthatappearsintheviewhasacheckmarknexttoitintheselection
list.Selectanewcolumnfortheviewbyclickingonthedesiredcolumn
name.Thecolumnwillnowappearintheview.
Tohideacolumnfromtheview,clickanycolumnheadingtoopenthe
selectionlistofcolumns.Clickonacolumnnamethathasacheckmarknext
toitthatyouwanttohide.Thecolumnwillnolongerappearintheview.
ChangingtheWidthofaColumn
Toadjustthewidthofacolumn,positionthecursoroverthecolumndivider
untilyouseethedouble-headedarrow.Left-click,andthendragthearrow
leftorrightuntilyouhavethedesiredcolumnsize.Releasethemouse
button.
ChangingthePositionofaColumn
Tomoveacolumntoanotherpositionintheview,left-clickonthedesired
columnheading,andthendragthecursortoacolumnheadingnamethatis
totheleftofwhereyouwantthemovedcolumntoappear.Releasethe
mousebutton.
SortingRowsintheDeviceList
Youcansorttheinformationinthedevicelist.Clickthecolumnheadingto
changethesortorderoftherowsintheview,usingthedatainthatcolumnas
KMnetViewer
1-6
Page 12

QuickStart
ClosingtheViewerWindow
thesortcriteria.Anupwardtriangleindicatesrowssortedinascendingorder;a
downwardtriangleindicatesrowssortedinadescendingorder.
ExpandingaRowintheDeviceList
Youcanexpandarowinthedevicelisttorevealmoreinformationabouta
device.Clicktheright-pointingtriangleiconintherowofthedeviceforwhich
youwanttoseeadditionalinformation.Therowexpandstodisplaya3–D
pictureofthedevicewithallinstalledoptions.Otherinformationaboutthe
deviceisalsodisplayed,suchasmodel,status,IPaddress,andprintspeed.
Tocollapsetherowbacktoregulardevicelistsize,clickthetriangleiconagain.
Youcanclosejusttheviewerwindowsothatthedevicelistisnolongervisible
onthescreen,buttheapplicationcontinuestoruninthesystemtray.Thisis
usefulifyouwanttoreducethenumberofopenwindowsonyourdesktop,orif
youarerunningaviewertaskthatdoesnotneedvisualmonitoring.Inthemenu
baratthetopleftofthescreen,clickFile>CloseWindow.Toreopenthe
window,double-clicktheviewericoninthesystemtray;orright-clicktheicon,
andthenclickRestore.
Toexittheapplication,clickFile>Exit.Theapplicationsavesthecurrently
displayedworkspacebeforeexiting.Thissavedworkspaceappearsthenext
timethesameuseropenstheapplication.
1-7
UserGuide
Page 13

2ViewManagement
KMnetViewerofferstwotypesofviews:userdefinedviewsthatarelisted
undertheMyViewsheading,andsixstandardviewsdefinedbyKMnetViewer
thatarelistedunderDefaultViews.ThedefaultviewsareGeneralView,
CapabilityView,CounterView,FirmwareView,AssetView,andMapView.
Youcancreate,change,ordeleteviewsinMyViews.IntheDefaultViews,
youcancustomizetheappearanceofthelists,butthechangesarenotsaved
afteryouleavetheview.Youcannotmakepermanentchangestotheviewsin
DefaultViews.
Theseviewfeaturesareavailable:
DefaultViewsonpage2-1
ImportingaMapBackgroundonpage2-2
MyViewsonpage2-3
Searchesonpage2-4
AddingaDynamicViewonpage2-5
AddingaManualViewUsingSelectiononpage2-6
ResizingtheViewAreasonpage2-7
Refreshonpage2-7
ViewAs
DefaultViews
YoucanswitchtoadifferentviewbyusingtheViewAsfeatureintheView
menu.Selecttheviewyouwanttochange,clickView>ViewAs,andclickthe
newviewfromthelist.
•IftheoriginalviewisunderDefaultViews,theviewswitchestotheselected
defaultview.
•IftheoriginalviewisunderMyViews,theviewitselfchangestotheselected
view.Tosavetheview,clickUpdateView.
KMnetViewerprovidessixstandardviewsunderDefaultViewsthatcannotbe
removedoredited.DisplayName,IPAddressandHostNameareincludedin
allviews.
InanyviewexceptMapView,youcanaddorremovecolumnsfromthetable
temporarily.Right-clickonthecolumnheadingandselectorclearthedesired
itemoritems.Themodifiedviewsarenotsavedwhenyouswitchtoadifferent
view.
Thefollowingdefaultviewsareavailable:
GeneralView
Displaysgeneralinformation,suchasdisplayname,IPaddress,hostname,
tonerlevel,description,location,andmodelname.
KMnetViewer
2-1
Page 14

ViewManagement
CapabilityView
Displayssupportforvariousdevicecapabilities,suchascolororblack&
white,printspeed,duplex,totalmemory,scan,fax,staple,punch,address
book,documentbox,userlist,andjoblog.
CounterView
Displaysthedevicecountersfortotalprintedpage,printedpagecopier,
printedpageprinter,printedpageFAX/i-FAX,printedpageblack&white,
printedpagesinglecolor,printedpagefullcolor,totalscannedpages,
scannedpagecopier,andscannedpageother.
FirmwareView
Displaysfirmwareinformation,includingsystemfirmware,enginefirmware,
scannerfirmware,FAXfirmware,panelfirmware,andNICversion.
AssetView
Displaysassetinformation,includingMACaddress,serialnumber,and
assetnumber.
MapView
Displaysprintingdevicesonabackgroundmapofyouroffice.
MapView
UseMapViewtodisplayprintingdevicesonabackgroundmapofyouroffice.
PrintingdevicepropertiescanbeviewedandmanagedfromMapView.Theuse
ofanofficemaphelpstovisualizethelocationofdevicesthroughoutanoffice.
UnderDefaultViews,clickMapView.Theinitialmapviewdisplaysalldevices
asiconsagainstawhitebackground.Youcanimportanimageofyouroffice
layouttoappearinthebackground,thenclickanddrageachdeviceicontoits
officelocation.Themapissharedbyallmapviewsinthecurrentworkspace.
Informationaboutadevicecanbeviewedbymovingthepointerovertheicon.
ImportingaMapBackground
Youcanimportanimageofyourofficelayouttoappearinthemapview
background.Afteranimageisimported,youcanreplaceitwithanotherimage
byfollowingthesameprocedure.
UnderDefaultViews,selectMapView.
1
ClickView>ImportMapBackground.
2
ClickBrowsetoselectanimagefile(.BMPor.JPG).
3
ClickOKintheImportMapBackgrounddialogbox.
4
AdjustingtheMapSize
Youcanchangethesizeofthemapimagewithintheviewwindow.
Useanyofthefollowingmethodstochangetheimagesize:
•ClickZoomIntoincreasethesizeoftheimageonestep.
•ClickZoomOuttodecreasethesizeoftheimageonestep.
•ClickZoomtoFittoplacetheentireimagewithinthescreen.Ifyouchange
thescreensize,clickZoomtoFitagain.
2-2
UserGuide
Page 15

•Typeapercentagebetween50%and300%intheZoomboxandpress
Enter.
ClearingaMapBackground
Youcanremovethebackgroundimagefromthemapview.Alldeviceiconswill
retaintheirpositionafterthemapimageisremoved.
•IntheViewmenu,clickClearMapBackground.
MyViews
Youcansetupcustomviewsinadditiontothedefaultviews.Customviews
appearontheleftsideofthescreenunderMyViews.Dynamicormanualviews
canbecreatedordeleted.Ifdesired,viewscanbeplacedinfolders.
MyViewsletsyoucustomizethedevicesbeingdisplayed,aswellascolumn
order,numberofcolumns,andotherviewsettings.Tosavetheview,click
UpdateView.
AddingaNewFoldertoMyViews
Inthemenubaratthetopleftofthescreen,clickFile>NewFolder.Afolder
1
withthetemporarynameofNewFolderiscreatedintheMyViewspaneforthe
activeWorkspace.
ViewManagement
Clickinthetextbox,andtypeanameforthefolder.Thenamecannotbethe
2
sameasthatofanalreadyexistingfolder.
Tosavethenewfoldername,clickoutsidethetextbox,orpressEnter.
3
RenamingaFolderorView
IntheMyViewspaneattheleftofthescreen,clicktohighlighttheviewor
1
folderyouwanttorename.
Inthemenubaratthetopleftofthescreen,clickEdit>Rename.
2
Typethenewname,replacingtheoldnameinthetextbox.
3
Tosavethenewname,clickoutsidethetextbox,orpressEnter.
4
DeletingaFolder,View,orDevice
ThedeletefeaturedeletesitemsbasedonwhatisselectedintheKMnet
Viewerscreen.
IntheMyViewspaneattheleftofthescreen,clicktoselectthevieworfolder
1
youwanttodelete;orinthedevicelist,clicktoselectthedeviceyouwantto
delete.MultipledevicescanbeselectedusingCtrlorShift.Deletingafolder
alsodeletesallfoldersandviewscontainedinthatfolder.
KMnetViewer
2-3
Page 16
ViewManagement
Inthemenubaratthetopofthescreen,clickEdit>Delete.
2
Warning:Thereisnoconfirmationdialogboxafteryouclickdeleteforafolder
orview.Adeletedfolderorviewcannotberestored.Adeleteddevicecanbe
restoredtothedevicelistbyclicking,inthemenubaratthetopleftofthe
screen,Device>Discovery>ExcludedDevices.Thenselectyourdevice
fromthelistandclickIncludeDevice.
Searches
Twotypesofsearchesareavailableforfindingdeviceswithparticular
characteristics.QuickSearchsearchestextcolumnsinthecurrentlydisplayed
devicelist.QuickSearchentriesarenotsavedwhenyoumovefromviewto
view,orchangetoAdvancedSearch.AdvancedSearchsearchesalldevices
inthedatabaseforthevaluesselectedinthesearchdialogbox.
QuickSearching
TheQuickSearchfeatureislocatedattheupperrightofthescreen.TheQuick
Searchtextboxacceptsinputinallsupportedlanguages.Typeasearchterm
(64charactermaximum),thenclickthebinocularsandlightningbolticon,to
performafulltextsearchonthetextcolumns(DisplayName,IPAddress,
HostName,andModelName)forthedevicesinthecurrentlydisplayedlist.On
completionofthesearch,thedevicelistonlyshowsitemsthatmatchthesearch
term.
ToclearaQuickSearch,deleteanysearchtermintheQuickSearchtextbox,
thenclicktheQuickSearchicon.
QuickSearchtermsarenotsavedwhenyoumovefromviewtoview,orperform
anAdvancedSearch.QuickSearchdoesnotsearchthetextintheexpanded
rowarea.
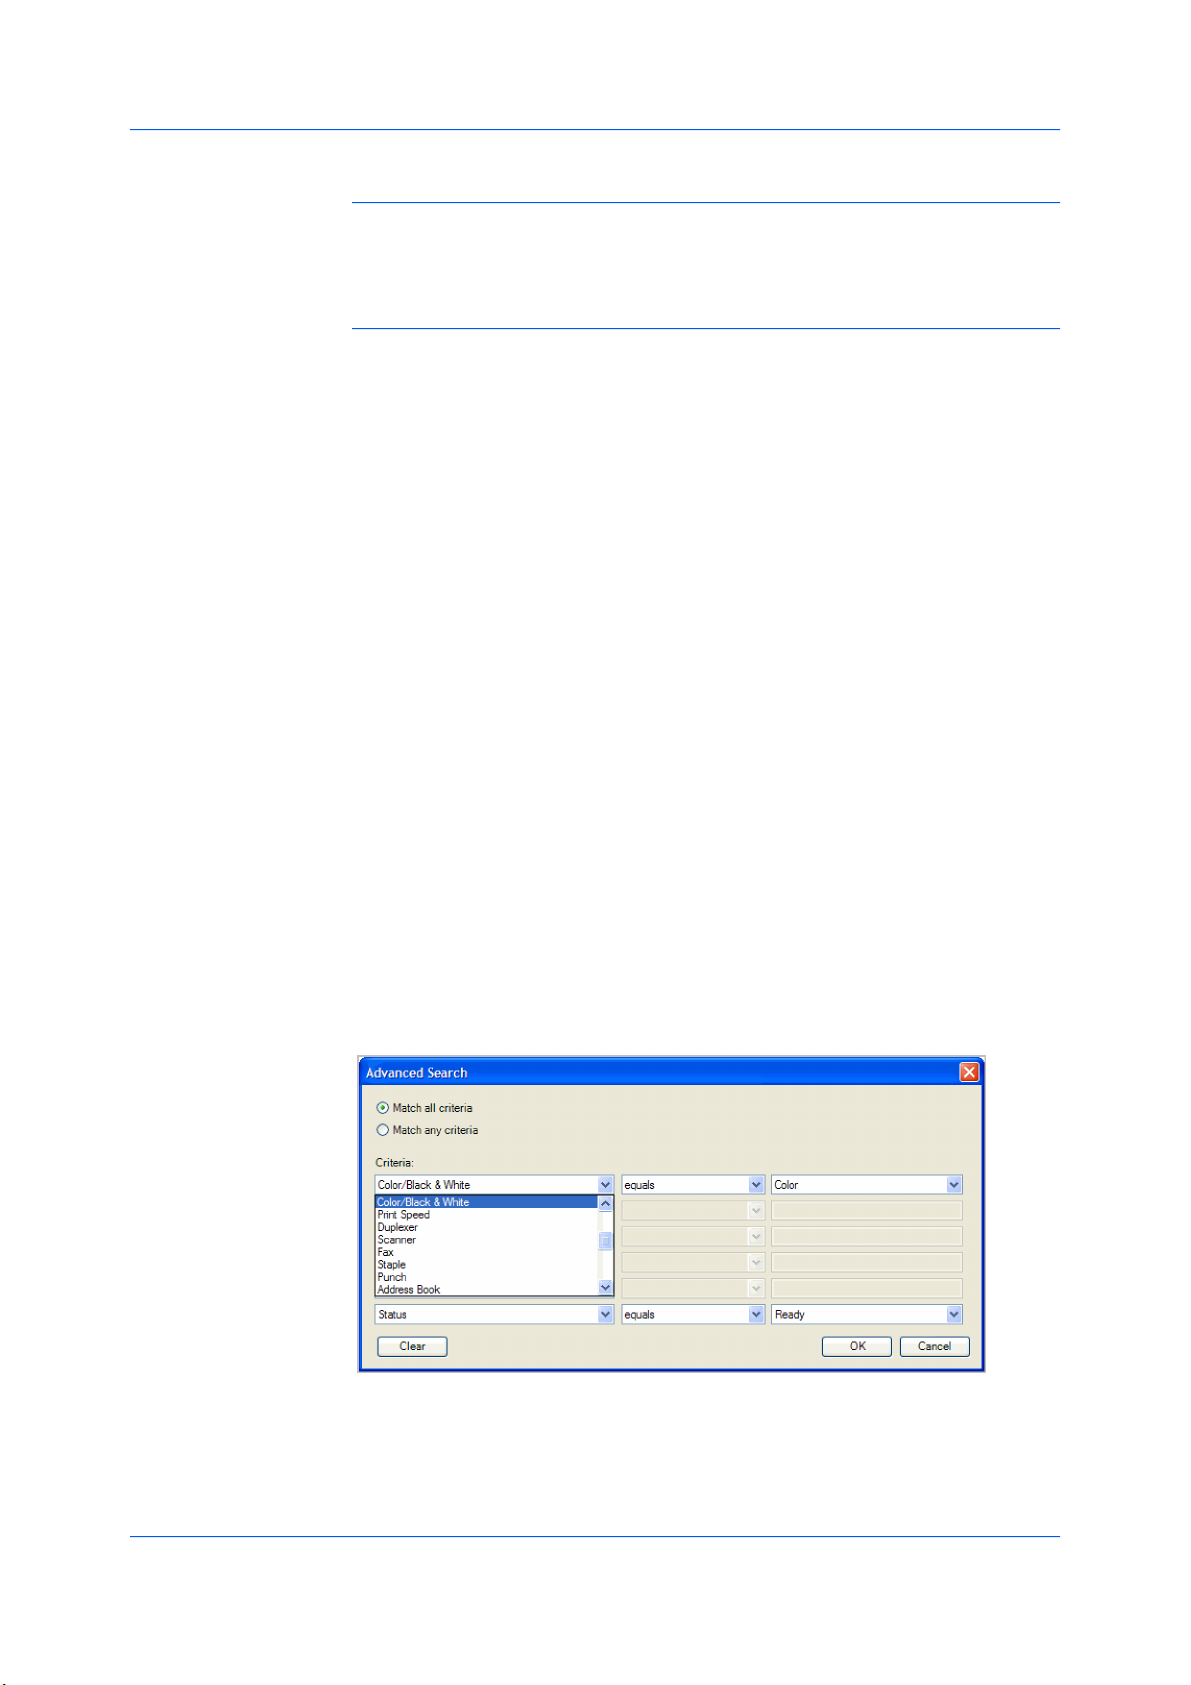
AdvancedSearching
TheAdvancedSearchfeatureisavailableforDefaultViews.Itfindsallprinting
devicesinthedatabasethatmatchtheselectedcriteria.Uptosixpropertiescan
bedefinedforthesearch.Thesearchresultsaredisplayeduntilyouchangeto
anotherview,orperformanotherAdvancedSearch.
SelectaDefaultView.
1
ClickEdit>AdvancedSearch,orclickthebinocularsiconintheapplication
2
toolbarabovethedevicelist.TheAdvancedSearchdialogboxopens.
2-4
UserGuide
Page 17

ViewManagement
Selectasearchlogic:
3
Matchallcriteria
Thisoptionsearchesfordevicesthatmeetallthesearchtermsspecified
underCriteria.
Matchanycriteria
Thisoptionsearchesfordevicesthatmeetatleastoneofthesearchterms
specifiedunderCriteria.
UnderCriteria,selectdevicefeaturesorpropertiestofindinthesearch.
4
Property
Selectonedevicepropertyperpropertylist.Therearesixpropertylists
available.Propertiesvarybydevicemodel.
Condition
Availableconditionsdependontheselectedproperty.
Value
Selectavaluefromthelist,ortypeavalueinthebox.
ClickOK.KMnetViewersearchesthroughalldevices,anddisplaysthosethat
5
matchtheselectedCriteria.InMapView,thesearchresultdevicesappearin
theirsavedpositionintheofficemap.
DynamicView
ManualView
AdynamicviewisacopyofadefaultorcustomviewthatyoucreateunderMy
Views.Adynamicviewwillmatchthecurrentdisplayintherightpane:General
View,CapabilityView,CounterView,FirmwareView,AssetView,orMap
View.Oncecreated,youcannameandmodifythedynamicviewasdesired.
AdynamicviewcannotbecreatedwhenamanualviewisselectedunderMy
Views.
AddingaDynamicView
YoucanmodifyanexistingviewandsaveitasacustomviewunderMyViews.
SelectaviewunderDefaultViewsorMyViews,exceptamanualview.
1
Modifytheviewasdesired,thenclickView>AddDynamicView.
2
Typethenameofthenewview,upto64characters.
3
Amanualviewisacustomviewthatincludesdevicesselectedfromanexisting
view.Amanualviewwillmatchthecurrentviewintherightpane:General
View,CapabilityView,CounterView,FirmwareView,AssetView,orMap
View.Oncecreated,youcannameandmodifythemanualviewasdesired.
AdvancedSearchisunavailableforamanualview.Adevicecanbeaddedtoa
manualviewbyselectingitinanotherviewanddraggingittothemanualview.
KMnetViewer
2-5
Page 18

ViewManagement
UpdatingaView
AddingaManualViewUsingSelection
YoucancreateaviewofselecteddevicesandsaveitunderMyViews.
Withanyviewdisplayed,selectoneormoredevicesfromthelistormap.Use
1
CtrlorShifttoselectmultipledevices.
ClickView>AddManualViewUsingSelection.
2
Typethenameofthenewview,upto64characters.
3
Ifdesired,modifytheview,thenclickUpdateView.
4
WhenanyviewunderMyViewsischanged,anasteriskappearsafteritsname
untilitissaved.YoucansavetheupdatedviewbyclickingView>Update
View.Usethisfeatureafteranyofthefollowing:
•ModifyingthedisplayeddeviceswithSearchorAdvancedSearch.
•Changingthecolumnwidthorcolumnorder,addingorremovingcolumns.
•UsingView>ViewAstochangetheviewtype.
•Sortingtheinformationindevicelistcolumns.
•Removingadevicefromview.
DuplicatingaView
RenamingaView
YoucancreateacopyofaviewinMyViews.Thisisusefulifyouwanttocreate
anewviewthatisonlyslightlydifferentfromanexistingview.
UnderMyViews,selecttheviewtobecopied.
1
ClickthearrowbuttonnexttoMyViews,andclickDuplicate.
2
Typethenewname,upto64characters,replacingtheoldnameinthetextbox.
3
Tosavethenewname,clickoutsidethetextbox,orpressEnter.
4
Modifythenewviewasneeded.
5
YoucanchangethenameofaviewinMyViews.Defaultviewscannotbe
renamed.
UnderMyViews,selecttheviewtoberenamed.
1
ClickEdit>Rename.
2
Typethenewname,upto64characters,replacingtheoldnameinthetextbox.
3
2-6
UserGuide
Page 19

DeletingaView
ResizingtheViewAreas
Tosavethenewname,clickoutsidethetextbox,orpressВвод.
4
YoucandeleteacustomviewfromMyViews.Adeletedviewcannotbe
restored.Defaultviewscannotbedeleted.
UnderMyViews,selecttheviewtobedeleted.
1
ClickEdit>DeleteView.Thereisnoconfirmationdialogboxafteryouclick
2
DeleteView.
IfmanyviewshavebeensavedunderMyViews,orifyourviewshavelong
names,youcanseetheviewlistmoreeasilybychangingthesizeofthe
viewingareaintheleftpane.
•Tochangethewidthoftheleftpane,clicktheborderbetweentheleftand
rightpanesanddragitrightorleft.
•TochangetheheightoftheMyViewsarea,clickthetopoftheDefault
Viewsborderanddragitupordown.
ViewManagement
Refresh
Printingdeviceinformation,suchascountersandtonerlevels,isautomatically
updatedaccordingtothepollingschedule.Atanytime,youcanmanually
updatethisinformationforoneormoredevices.ThefollowingRefreshoptions
areavailable:
RefreshDevice
SelectoneormoredevicesandclickView>RefreshDevicetoupdatethe
selecteddevices.
RefreshAll
ClickView>RefreshAlltoupdatealldisplayeddevices.
KMnetViewer
2-7
Page 20

3Device
TheDevicemenuisusedforfindingdevicesandmanagingdevicesettings.
Thesedevicefeaturesareavailable:
DisplayingDevicePropertiesonpage3-2
AddingContactsonpage3-2
AddingGroupsonpage3-3
AddingaContacttoaGrouponpage3-3
AddingDeviceUsersonpage3-5
ShowingJobDetailonpage3-6
AddingaDocumentBoxonpage3-7
SettingaNotificationonpage3-9
SettingDeviceCommunicationsonpage3-10
DeviceProperties
TheDevicePropertieswindowdisplayssettingsandstatusinformationabout
theselecteddevice.ToopenDeviceProperties,selectadevice,andselect
Device>Properties.Settingsmaydifferdependingonyourselecteddevice.
Thesettingscaninclude:
BasicDeviceSettings
ThisareashowstheDisplayname,Model,Status,IPAddress,Host
name,Location,andDescriptionoftheprintingdevice.ThePanel
messageboxshowstheinformationcurrentlydisplayedonthedevice
operationpanel.Displayname,Location,andDescriptioncanbeedited.
DeviceAlert
Thisareadescribesalertsthatarecurrentlyoccurring,andany
troubleshootingmeasuresthatcanbetaken.
MediaInput
Thisareashowsthetraysandcassettesthatarecurrentlyinstalled,their
capacity,androughlyhowmuchtheycurrentlycontain.
Capabilities
Thisareashowssomeofthekeyspecificationsofthecurrentlyselected
device.
Counters
Thisareashowsavarietyofcountersfordifferenttypesofpaperormedia
andoutput.
FirmwareVersions
Thisarealiststheversionsoffirmwareforvariouspartsofthesystem.
Memory
3-1
UserGuide
Page 21

DisplayingDeviceProperties
Youcanviewthepropertiesofaprintingdevice.
Selectadeviceintheviewpane.
1
ClickDevice>Propertiestodisplayinformationabouttheselecteddevice.
2
ClickRefreshtoupdateanysettingsthatmighthavebeenchangedonthe
3
devicewhilethiswindowwasopen.
DisplayingDeviceHomePage
Printingdevicesthatcontainwebserverscandisplayawebpagecontaining
informationaboutthedevice'scurrentstatusandsettings.Thelayoutand
informationshownonthispagediffersbyprintingdevicemodel.ClickDevice>
DeviceHomepagetodisplaythiswebpage.
Device
Thisareashowsthespaceavailableontheharddisk,memorycard,optional
ROM,andintheRAMdisk.
Asset
ThisareashowstheMACaddressofthenetworkadapterinthedevice,the
Serialnumberofthedeviceitself,andtheAssetnumberwhichmaybe
assignedbyyourorganization.
AddressBook
TheAddressBookisalistofindividualsandtheircontactinformationthatis
storedonthedevice.EachentryforanindividualiscalledaContact,and
ContactscanbeorganizedintoGroups.ThisContactandGroupinformationis
storedonthedevice,andisusedforfaxingandscanningoperations.
ToopentheAddressBook,selectadeviceinthedevicelist,andselect
Device>AddressBook.
Note:Toloadtheaddressbookfromadevice,thecorrectUserlistUser
nameandUserlistpasswordmustbeenteredinCommunicationsSettings
forthedevice.
Theinformationthatcanbestoredforeachcontactincludes:
Number
Name(andfurigana,ifapplicable)
Coverpageinformation(recipient,company,department.)Thisinformation
istransmittedonaNetworkFAX.
E-mail
FTP(FileTransferProtocol)
SMB(ServerMessageBlock)
FAXNumber
InternetFAXAddress
AddingContacts
Youcanaddindividualstotheaddressbookstoredonadevice.
KMnetViewer
3-2
Page 22

Device
Inthemenubaratthetopleftofthescreen,clickAddcontact.TheContact
1
Settingswindowappears.
EnterthenameofthecontactintheNamefield.Thisinformationisrequired.
2
Enterotherinformationthatisneeded.
3
ClickOKtosavethenewaddressbookentry.
4
AddingGroups
Contactsintheaddressbookcanbeorganizedintogroups.Thisisusefulwhen
thedevicesendsoutnotificationsofcertaintypesofevents,forexample.
Inthemenubaratthetopleftofthescreen,double-clickAddGroup.The
1
GroupSettingswindowappears.
Enterthenameofthenewgroup.Thenamedoesnothavetobeunique.
2
ClickOK.Theinformationisthensenttothedevice.Aprogressbarwillappear,
3
showingtheprogressofcommunicationwiththedevice.
AddingaContacttoaGroup
YoucansearchforContactsandaddthemtoanexistingGroup.Eachstep
requirescommunicationwiththedevice,whichmaybeslowdependingon
networkconditions.
ClickonanexistinggrouptoopentheGroupSettingswindow.Alternatively,
1
selectthegroup,thenclickthePropertiesicontoopenthewindow.
Inthemenubaratthetopleftofthewindow,clickAddmembers.Theuserlist
2
isdownloadedfromthedeviceanddisplaysinthewindow.
Searchtheuserlistandfindausertoadd.
3
Selectoneormoreuserstoadd,andclickAdd.Waitforthecommunication
4
progressbartodisappear.
ClickOK.
5
ClickOKtoclosetheGroupSettingswindow.
6
DeletingaContactFromaGroup
ClickonanexistinggrouptoopentheGroupSettingswindow.Alternatively,
1
selectthegroup,thenclickthePropertiesicontoopenthewindow.
Selectoneormorecontactstodelete.
2
Inthemenubaratthetopleftofthewindow,clickRemovemembers.
3
3-3
UserGuide
Page 23

ClickYeswhenyouareaskedtoconfirm.
4
Thecontactisremovedfromthegroup.
Afterthedevicecommunicationprogressbardisappears,clickOKtoexitthe
5
window.
DeletingContactsandGroups
Contactsandgroupscanbedeletedwhentheyarenolongerneeded.
Selectoneormorecontactsorgroups.
1
Inthemenubaratthetopleftofthewindow,clickRemove.Aconfirmation
2
messageappears.
ClickYes.Theupdatedinformationissenttothedevice,andaprogressbaris
3
displayeduntiltheprocessiscomplete.
EditingContactsandGroups
TheinformationsavedintheAddressBook(AddContactorAddGroup)
windowforeachcontactorgroupcanbeeditedifnecessary.
Device
Selectacontactorgroupitem.
1
Right-clickandselectProperties.TheContactSettingsorGroupSettings
2
windowfortheselectedcontactorgroupopens.
Edittheinformationinthewindow,andclickOKtosavethechanges.
3
CopyingContactsandGroups
Contactsandgroupscanbecopied.Thiscansavetimewhencreatingaddress
bookentriesthatareverysimilartoexistingentries.
Note:Whenperformingthiscopyandpasteoperation,youshouldbeaware
thatthemodificationswillbeappliedafterthecopycommand.Changeswill
takeeffectonlyafterthepastecommandisexecuted.
Selectthecontactorgrouptocopy,andinthemenubaratthetopleftofthe
1
window,clickCopy.
Modifythenewcontactorgroupasneeded.
2
ClickPaste.
3
Eachtimeacontactorgroupiscopied,thenameischangedasfollows:
Firsttime:"Copy"isaddedtothename
Secondtime:"Copy1"isaddedtothelist.
Thirdtime:"Copy2"isaddedtothelist.
Thenamingcontinuestofollowthispattern.
KMnetViewer
3-4
Page 24

Device
DeviceUsers
SearchingtheAddressBook
Youcansearchthedeviceaddressbookinordertoupdatecontactorgroup
information.AddressbookinformationcanbesearchedbyNumber,Name,
E-mail,FTP,SMB,FAXnumberorInternetFAXaddress.
IntheSearchablefieldsdrop-downmenu,choosethefieldtosearch.
1
Enterthenameorpartofaname(orfurigana,ifapplicable)tofindinthe
2
adjacentSearchtextbox.
ClicktheQuicksearchicon.Theprogressbarshowsthestateof
3
communicationwiththedevice.
Toclearthesearchresultsanddisplaytheentireaddressbookagain,clearthe
4
SearchtextboxandclicktheQuicksearchicon.
Deviceuserswhoareauthorizedtouseadeviceareonauserlistwiththeir
logininformationandpasswords.Whenuserauthenticationisenabled,only
userswhoaresetupasadministratorsonthedeviceareabletousethevarious
functionsofthedevice.
Note:Toloadtheuserlistfromadevice,thecorrectUserlistUsernameand
UserlistpasswordmustbeenteredinCommunicationSettingsforthe
device.Ifanadministratorpasswordissetforthedevice,thenonlyan
administratorcanchangetheuserlist.
AddingDeviceUsers
YoucanadduserstotheUserlistlocatedonthedevice.TheDeviceUserList
canbeusedtocontrolwhichusersareabletooperateoraccessthedevice.
Rightclickonadevice.
1
SelectUsersonthecontextmenu.
2
TheDeviceUserswindowopens.
ClickontheAddUsericon.TheUsers-AddUserwindowopens.
3
Entertheinformationabouttheuserintothedialogbox.
4
Whenfinished,clickOKtosavetheinformationandcreatethenewuser.
5
RemovingDeviceUsers
Toremoveadeviceuserfromadevice:
IntheUsers-AddUserwindow,selecttheusertoremove.
1
ClickRemoveUser,orright-clickandselectRemoveuser.
2
3-5
UserGuide
Page 25

Device
Intheconfirmationdialog,clickYestodeletetheuser.
3
SearchingtheDeviceUserList
YoucansearchtheDeviceUserListinordertoupdatedeviceuser
information.UserlistinformationcanbesearchedbyLoginusernameorUser
name.
IntheSearchablefieldsdrop-downmenu,selectLoginUsernameorUser
1
name.
Enterthenameorpartofanametosearchintheadjacenttextbox.
2
ClicktheApplyFiltericon.
3
Tocleartheresultinglist,clearthesearchtextboxandclicktheApplyFilter
4
icon.
Jobs
TheJobscommandopenstheJobswindow.Thiswindowdisplaysinformation
aboutjobscurrentlyinthequeueforthedevice.JobLogsshowsinformation
aboutrecentjobsthatwereprocessed.Threetypesoflogsareavailable:Print,
Send,andStore.
ShowingJobDetail
Youcanviewdetailedinformationaboutaparticularjob.Thetypesof
informationdisplayeddependonthetypeofjob.
Rightclickonthedevice.
1
SelectJobsinthecontextmenu.
2
IntheJoblist,selectajob.
3
Right-clickandselectDetails.AJobDetailwindowappears.
4
ExportingtheJobLog
Joblogscanbeexportedtofilesforuseinotherapplications.
Inthemenubaratthetopleftofthewindow,clickExportJobLogs.
1
TheJobsLogExportdialogappears.
Selectthejoblogtoexport.
2
ClickBrowsetoselectthefilenameandlocationtosavethefile.
3
Selectorenterthenumberoflinestosaveinthelog.
4
KMnetViewer
3-6
Page 26

Device
DocumentBox
ClickOKtosavethelog.
5
SearchingaJobList
YoucansearchaJoblistbyJobnameorUsernametofindaspecificjob.
Enterthejobnameorpartialnameinthesearchtextbox,selectJobnameor
1
Username,andinthemenubaratthetopleft,clickApplyFilter.Standard
wildcardsaresupported.
Afterviewingthejobinformation,clearthesearchtextboxandclickApply
2
Filter.
ADocumentBoxisatypeofvirtualmailboxonadevice.Itisusedby
individualsandgroupstomanagefilesthatarestoredonthedevice.
TocheckifadevicesupportstheDocumentBoxfeature,switchtothe
CapabilityViewandlookintheDocumentBoxcolumninthedevicelist.
Note:ToaccesstheDocumentBox,thecorrectUserlistUsernameand
UserlistpasswordmustbesetintheCommunicationSettingsforthe
device.
AddingaDocumentBox
Ifsupportedbythedevice,anewdocumentboxcanbecreated.
Rightclickonadevice.
1
SelectDevice>DocumentBox.
2
ClickontheAddBoxicon.
3
TheAddBoxwidowopens.
SpecifytheNameforthenewbox.Thisinformationisrequired.
4
ThedefaultboxtypeisCustom.SomedevicesalsosupportaFAXboxfor
5
receivingfaxes.TheFAXoptiononlyappearswhenitissupported.
Specifythepasswordifyouwanttocreateapasswordprotecteddocumentbox.
6
Specifyvaluesorusethedefaultvaluesfortheothersettings.
7
ClickOKtoaddthenewbox.
8
DeletingaDocumentBox
Ifadocumentboxisnolongerneeded,itcanbedeleted.
Ensurethatthedocumentboxisempty.
1
3-7
UserGuide
Page 27

Selectthedocumentboxinthelist,andclickDelete.
2
Youcanalsoright-clickontheboxinthelist,andselectDelete.
DocumentProperties
SelectadocumentinthedocumentboxandclickDocumentpropertiesto
displayinformationaboutthedocument.Thefollowinginformationisshown:
Name
Note:YoucanchangethenameofthedocumentintheProperties
window.
DateandTime
NumberofPages
DocumentSize
Resolution
Color
StoringSize
DocumentViews
Device
Animageofadocumentinthedocumentboxcanbedisplayedasathumbnail,
orinapreviewpanebyselectingadocumentandclickingontheViewicon.
Whenadocumentisdisplayedinthepreviewplane,youcanzoomandrotate
theimageofeachpage,onepageattime.Youcanusethearrowsorthemenu
tomovetothenextorthepreviouspage.
DownloadingaDocument
Youcandownloadadocumentfromadocumentboxtoyourlocalcomputer.
RightclickonthedocumenttodownloadandselecttheDownloadicon.
1
IntheSaveAsdialogbox,selectalocationtosavethefile,enterafilename,
2
selectPDF,TIF,orJPGfiletype,andclickOK.
SearchingaDocumentBox
Inadocumentbox,youcansearchbynametofindaspecificfile.
Enterthenameorpartialnameinthesearchtextbox,andclickApplyFilter.
1
Afterviewingtheinformation,clearthesearchtextbox,andclickApplyFilter.
2
MovingDocumentsBetweenDocumentBoxes
Youcandraganddropdocumentsbetweendocumentboxesonthesame
device.
Intheleft-sidetreeview,selectthedocumentboxcontainingthefiletomove.
1
Selectoneormorefiles,andmovethembydraggingfromtheright-sideviewto
2
thedestinationdocumentbox.Aconfirmationdialogboxappears.
KMnetViewer
3-8
Page 28

Device
NotificationSettings
ClickOKintheconfirmationboxtofinish.
3
TheNotificationfunctionisusedtoinformusersofchangesinthestatusofthe
printingdevice.Therearethreetypesofnotificationsavailable:apop-up
window,openingoftheWindowseventlog,oranemailtoaspecifiedlistof
emailaddresses.Severaltypesofeventscantriggeranotification,includingthe
following:
Offline
Notconnected
Needsattention
Coveropen
Paperjam
Lowpaper
Lowtoner
Addpaper
Addtoner
Notifywhen20%tonerremains
Notifywhen10%tonerremains
Tosendnotificationsbye-mail,thee-mailsendingfeaturemustbeconfigured.
Ifitisnotconfigured,thenthisoptionwillbeunavailable.Formoreinformation,
seeEditingE-mailOptions.
SettingaNotification
Youcanselectdevicesfromthedevicelistfordisplayingalertsaboutprinting
deviceactivity.TheNotificationSettingsdialogboxprovidesthealertoptionfor
theselecteddevices.
Inthedevicelist,right-clickadevice,orright-clickandpresstheCTLkeyto
1
selectseveraldevicesthatyouwanttosetthesamenotificationsfor.
3-9
UserGuide
Page 29

CommunicationSettings
Inthemenuatthetopofthescreen,clickDevice>NotificationSettings.The
2
NotificationsSettingsdialogboxopens.Youcanalsoopenthedialogboxby
right-clickingontheselecteddevicesinthedevicelist,thenselecting
NotificationsSettingsfromthelist.
UnderAction,selecthowthenotificationwillbecommunicated.
3
IfyouselectSende-mail,enteroneormoree-mailaddresses.E-mail
4
addressesmustfirstbesetupintheAddressBook.
UnderNotifications,selecttheeventsthatwilltriggeranotification.
5
Tosaveyourselectionsandclosethedialogbox,clickOK.
6
CommunicationSettingscontrolthenetworkcommunicationswitheach
device.Availablesettingsinclude:
Networkcard
TCP/IPPort
SNMPcommunicationtimeout
SNMPcommunicationretries
Commandcenteradministratorpassword
UseSNMPv1/2
Readcommunity
Writecommunity
UseSNMPv3
Username
Password
Authentication
Encryption
Polling
TheUsernameandPasswordmustbesetcorrectlyinordertoaccessseveral
functionsofthedevice,suchasAddressBook,UserList,orDocumentBox.
Device
SettingDeviceCommunications
Youcanchangethevariouscommunications-relatedsettingsintheDevice
CommunicationSettingswindowfortheselecteddevice.Toaccessthis
window,clickDevice>CommunicationSettings.
Inthefieldnexttothecommunicationsettingtobechanged,enterthenew
1
value.Youmaybeabletouseaselectorordrop-downmenuifavailable.
ClickOKtosavetheupdatedvalue.Thereisnoconfirmationmessage;the
2
changesaresavedimmediately.
KMnetViewer
3-10
Page 30

Device
TCP/IPPort
Someoperationssendacommandorcommandfileviaalogicalprinterport.
Thedefaultlogicalprinterportnumbersbeginwith9100.MostKyoceradevices
supportfourormorelogicalprinterports.Thevalidrangeforportnumbersis
1024to65534.ThenumbermustmatchtheportnumberofoneoftheLogical
Printersdefinedforadevice.Todeterminetheportnumber,seetheLogical
PrinterswebpageintheKyoceraCommandCenter.
SNMPcommunicationtimeout(seconds)
Enterthenumberofsecondstheservershouldwaitfortheprintingdeviceto
respondtoanSNMPrequest.Theavailablerangeisfrom5to60seconds.
SNMPcommunicationretries
Enterthenumberoftimes,afteraninitialfailure,theapplicationshould
attempttoestablishSNMPcommunicationwiththeprintingdevice.The
availablerangeisfrom1to5retries.Ahighernumberwillincreasenetwork
traffic,whilealowernumbercanimproveperformance.
SettingthePortNumberinCommandCenter
ToaccesstheCommandCenter,selectadeviceinthedevicelist.Right-click
1
andselectDeviceHomepage,orclickDevice>DeviceHomepageinthe
menubar.
ClicktheAdvancedtabatthetopoftheKyoceraCommandCenterpage.
2
Totheleftofthepage,selectAdvanced,thenselectTCP/IP,andthenselect
3
LogicalPrinters.TheTCP/IPPortNumberisdisplayedforeachlogical
printer.Oneoftheselogicalprinterportsmustmatchtheportnumberenteredin
DeviceCommunicationSettings.
Aresetmayberequiredforlogicalprinterchangestotakeeffect.Usethereset
pageintheCommandCenterBasictab.
Polling
Printingdevicesareinterrogatedatspecificintervalstocheckforerror
conditions,operationalstatus,andlowtonerlevels.Thefollowingpollingmodes
areprovided.
StatusPolling
Informationisgatheredaboutthecurrentoperationalstateofthedevice,
suchaserrorconditions,panelmessages,andoperatingmode.The
availablerangeisbetween5and300seconds.
CounterPolling
Informationisgatheredaboutthevaluesheldbyvariouscountersinthe
device,suchasnumberofcolorpagesprinted,numberofblackandwhite
pages,numberoffaxesreceived,andsoon.Theavailablerangeisbetween
1and10000minutes.
TonerLevelPolling
Informationisgatheredaboutthecurrentleveloftonerinthedevice.The
availablerangeisbetween1and10000minutes.
AdvancedMenu
3-11
IntheDevicemenu,clickAdvanced.Thefollowingselectionsappear.
Advancedcanalsobeaccessedbyright-clickingonadeviceinthedevicelist.
UserGuide
Page 31

SetMultipleDevices
Thissendsconfigurationparameterstomultipledevicesatthesametime.For
moreinformation,seetheMulti-Setchapter.
FirmwareUpgrade
Thiswizardguidesyouininstallingthemostcurrentfirmwareondevices.For
moreinformation,seetheFirmwareUpgradechapter.
DeviceDefaultSettings
Thissetsthedefaultsettingsoftheselecteddevice.Onlyonedevicemaybe
selectedatatime.
SystemSettings
Thissetsthesystemsettingsoftheselecteddevice.Onlyonedevicemaybe
selectedatatime.
NetworkSettings
Thissetsthenetworksettingsoftheselecteddevice.Onlyonedevicemaybe
selectedatatime.
TCPSendData
Usethiswindowtosenddata(files,text,ordevicecommands)directlytothe
interfaceofoneormoreselecteddevices.Toaccessthiswindow,clickDevice
>Advanced.
Device
Warning:Thisisanadvancedfeature.Incorrectusecancausethedeviceto
beinoperable.
SendingTCPData
Tosenddatatothedeviceinterface:
IntheTCPSendDatawindow,selecttheTCPportorIPPSpath.Youcan
1
selectthedefaultoraspecificTCPportonthedevice.Theportnumbermust
matchthatofoneoftheLogicalPrintersdefinedintheKyoceraCommand
Centerforthedevice.
Tosenddatafromafile,clicktheBrowsebutton.AnOpenFiledialogbox
2
appears.Tosendapreviouslysentfile,clickthedownarrowtoselectafilefrom
ahistoryofupto10previouslysentfiles.
Tosenddataastext,typethetextinthewindow.ClickHistorytoretrievea
3
previouslysenttextstring.TheHistoryfeatureretainsupto10previouslysent
textstrings.
ClickSendtosendthedata.
4
KMnetViewer
3-12
Page 32

SettingMultipleDevices
4Multi-Set
Multi-Setletsyousendconfigurationparameterstomultipledevices
simultaneously.
TheseMulti-Setfeaturesareavailable:
SettingMultipleDevicesonpage4-1
SelectingSettingsinMulti-Setonpage4-1
CreatingSettingsFromaDeviceonpage4-2
CreatingSettingsFromaFileonpage4-2
CreatingNewSettingsonpage4-3
OverwritingSettingsonpage4-3
ToinitiateMulti-Set:
Inthedevicelist,presstheCTLkeyandright-clicktoselectseveraldevices.
1
SelectingSettingsinMulti-Set
Inthemenuatthetopofthescreen,clickDevice>Advanced>SetMultiple
2
Devices.TheMulti-SetWizardopens.Youcanalsoopenthewizardby
right-clickingontheselecteddevicesinthedevicelist,thenselecting
Advanced>SetMultipleDevicesfromthelist.
TheMulti-SetWizardopenswiththeDeviceGrouppagedisplayingthe
3
devicesthatsupportMulti-Set.
Selectthedestinationdevicegroupwhosesettingswillbeappliedtoyour
sourcedevice,andclickNext.
OntheSettingspage,youcanselectoptionsofsettingstocopyfromyour
sourcedevicetoyourdestinationdevice.Onlyonegroupofsettingscanbe
definedatonetimeonthispage.
•Makeyourselection,andclickNext.
Note:Thedestinationandsourcedevicesmaybepasswordprotected.To
ensurethatyoudonothaveanauthenticationfailurewithMulti-Setprocesses,
aloginandpasswordneedstobeenteredinDevice>Communication
Settings>Loginbyanadministrator.InthecaseoftheDeviceUserList
option,youwillbepromptedfortheadministrator’sloginandpassword,ifthey
havenotalreadybeensetintheCommunicationSettingsoption.All
CommunicationSettingsandpasswordsforthesourcedeviceandthe
destinationdevicesneedtobesetcorrectlyinCommunicationsSettingsfor
therespectivedevices.
4-1
UserGuide
Page 33

TheSettingspagecanincludethefollowingoptions:
DeviceSystemSettings
Basicdevicesettingsincludingoperationpanellanguage,assetnumber,
timers,andsecurityoptionsincludingpanelandinterfacelocks.
DeviceNetworkSettings
BasicsettingsforTCP/IP,securityandnetworkprotocols,includingFTP,
SMB,Netware,IPP,AppleTalk,SMTP,NetBEUI.
DeviceDefaultSettings
Settingsthatdefinedefaultbehaviorforprint,copy,scanandFAXjobs
includingpapersize,printandscanquality,anddefaultmediatypes.
DeviceUserList
Loginusersandgroups,includingLoginusername,username,password,
E-mailaddress,Accountname,AccountIDonthedevice.
DeviceAddressBook
Name,Furigana,E-mail,FTPaddresses,SMBaddresses,FAX,Internet
FAXaddressesandaddressgroupsstoredonthedevice.
DocumentBoxList
Users'CustomandFAXboxes.
Multi-Set
CreatingSettingsFromaDevice
Tocopysettingsfromthesourcedevice:
ClickCreatefromDevice,andclickNext.
1
Selectthesourcedevice,andclickNext.
2
OntheConfirmationpage,youcaneditorsaveyoursettingstoafile,andclick
3
Finish.
Whenthisprocesscompletessuccessfully,clickClose.Thepropertiesor
settingsfromthesourcedevicearecopiedtoyourdestinationdevice.
Whenthisprocessisnotsuccessful,theerrorsappearinaDetailslist.Youcan
clickExportandsavetheerrorstoa.CSVlogfile.ThenclickSave,andClose.
CreatingSettingsFromaFile
Tocreateasettingstemplatefromanexistingfile:
ClickCreatefromFile,andclickNext.
1
Browseforthelocationofthefileyouwanttouse.Selectit,clickOpen,and
2
Next.
OntheConfirmationpage,youcaneditorsaveyoursettingstothesamefile,
3
oradifferentfile,andclickFinish.
Whenthisprocesscompletessuccessfully,clickClose.Thepropertiesor
settingsfromthesourcedevicearecopiedtoyourdestinationdevice.
KMnetViewer
4-2
Page 34

Multi-Set
CreatingNewSettings
Whenthisprocessisnotsuccessful,theerrorsappearinaDetailslist.Youcan
clickExportandsavetheerrorstoa.CSVlogfile.ThenclickSave,andClose.
Tocreateanewsettingstemplate:
ClickCreateNew,thenclickNext.
1
Bydefault,theSystemSettingswindowopens.Ifselectedinthepreviousstep,
theNetworkSettingswindowortheDefaultSettingswindowopens.
Changethesettingsasneeded.
2
ClickApply.
3
ClickOK.
4
OntheConfirmationpage,youcaneditorsaveyoursettingstoafile,andclick
5
Finish.
Whenthisprocesscompletessuccessfully,clickClose.Thepropertiesor
settingsarecopiedtoyourdestinationdevice.
Whenthisprocessisnotsuccessful,theerrorsappearinaDetailslist.Youcan
clickExportandsavetheerrorstoa.CSVlogfile.ThenclickSave,andClose.
OverwritingSettings
Thecheckbox,Overwritesettingsontargetdeviceappearswhenyouhave
selectedDeviceUserList,DeviceAddressBook,orDocumentBoxListon
theSettingspage.
Warning:Selectingthischeckboxoverwritesanysettingsonthetarget,or
destinationdevicewiththesourcedevice'ssettings.
4-3
UserGuide
Page 35

FirmwareUpgradeRisks
5FirmwareUpgrade
TheKMnetViewerFirmwareUpgradeWizardprovidesaquickandeasy
meansofinstallingthemostcurrentfirmwareondevices.Theupgradewillbe
performedonlyonmodelsthatmatchtheselectedfirmwarefile.
FirmwareUpgradeisnotavailableforallmodels.Foralistofsupported
models,seetheReadmefile.
TheFirmwareUpgradefeaturesavailableare:
FirmwareUpgradeRisksonpage5-1
PerformingFirmwareUpgradeonpage5-2
AuthorizingFirmwareUpgradeonpage5-4
BeginningFirmwareUpgradeonpage5-4
CancelingFirmwareUpgradeonpage5-4
SavingtheFirmwareUpgradeExportFileonpage5-5
TherearepotentialrisksassociatedwithusingtheFirmwareUpgradeWizard.
Beforeyouselectanyoptionsfortheupgrade,thebeginningpageinthe
upgradewizardrequiresthatyouacknowledgeunderstandingandacceptance
oftherisks.Whenpreparingafirmwareupgrade,itisrecommendedthatyou
reviewtheprocesswithyourdealerorserviceorganizationandbesurethat
contingencyplansareinplace.
Warning:Ifadeviceisturnedofforlosespoweratacriticalpointduringthe
upgrade,thedevicecouldbecomeinoperableandrequireaservicevisitto
replacedamagedcomponents.
Risksandrecoveryoptionscandifferdependingonthetypeofupgrade.The
FirmwareUpgradeRisksandRecoveryOptionssectiondescribessomeof
theissuesinvolved.
FirmwareUpgradeRisksandRecoveryOptions
Thefollowingsectionsdescribedifferentstatesofthesystemwhenerrorscan
occurandtheirrecoveryoptionsforthedeviceandthewarningoranactionto
betaken.
Dangerperiodduringanupgrade
AnyDevice
DonotturnoffthedevicewhentheStatusinFirmwareViewdisplaysthe
deviceasUpgrading.CheckforthenewfirmwareversionintheFirmware
Viewtoensurethedevicehascompletedtheupgrade.
System/FAX
DonotturnoffthedevicewhenthedeviceoperationpaneldisplaysErasing,
Writing,orDownloading.FortheSystem,processingtimeisabout3to5
minutes;forFAX,processingtimeis1to2minutes.
KMnetViewer
5-1
Page 36

FirmwareUpgrade
IB-2x
Noindicationoftheupgradeisdisplayedonthedeviceoperationpanel.
CheckforthenewfirmwareversioninFirmwareViewtoensurewhetherthe
upgradehascompletedforeachdevice.Processingtimeisabout30
seconds.
Upgradecompletionindicators
Anydevice
Useanyofthefollowingmethods:
Checkthelogfile.
LookfortheappropriatefirmwareinFirmwareView.Ifthenewfirmware
versionappears,theupgradeiscomplete.
Toopenthedevicehomepage,rightclickonthedeviceinthelist.Select
DeviceHomepagefromthecontextmenu.Ifthenewfirmwareversion
appearsonthehomepage,theupgradeiscomplete.
System/FAX
Thedeviceoperationpaneldisplaysthenewversionnumber,ortheword
Completed.
Upgradeerrorindicators
Anydevice
TheresultofthedeviceupgradeisrecordedinthelogfileasFailed.
System
Thedevicedoesnotpassthepower-onself-test.
FAX
Faxingdoesnotoperate.
IB-2x
Nolinklightappears,andOption(oronsomemodelsNetwork)doesnot
appearontheInterfacemenuontheoperationpanel.
PerformingFirmwareUpgrade
5-2
Upgradeerrorrecovery
System
TheDIMMinthedevicemustbereplaced.TheoldDIMM,however,isnot
physicallydamaged,andcanbeerasedandreloadedusingaDIMMwriter.
FAX
TheFAXboardmustbereplaced.
IB-2x
ThereisaspecialrecoverymodefortheIB-2xcalledBootLoadermode.
TheIB-2xissettoBootLoadermodewithajumpersetting:SW1on
IB-20/21andIB-21E,orJ2-1onIB-22.OnceinBootLoadermode,a
specialWindowsutilitynamedIBVERUPcanbeusedtoloadanew
firmwarefile.
TheKMnetViewerFirmwareUpgradeWizardinitiatesthefirmwareupgrade.
Theupgradewizardguidesyouwithstep-by-stepinstructions.
Thereareseveralwaysyoucanstarttheupgradewizard:
UserGuide
Page 37

FirmwareUpgrade
•Right-clickonadevice.Onthemenuthatappears,clickAdvanced>
UpgradeFirmware.
•IntheDevicetoolbar,selectAdvanced>UpgradeFirmware.
Tocontinuethewizardprocess,ineachpage,clickNext.Togobacktoa
previouspage,clickBack.TocancelthewizardandreturntotheDevice,click
Cancel.
AcknowledgementofRisks
Thefirstpageofthewizardcontainscautionarystatementsandrequiresan
acknowledgementoftherisks.Tocontinuetotheselectionpages,selectthe
Acknowledgementcheckbox,thenclickNext.Ifyoudonotselectthe
Acknowledgementcheckbox,theNextbuttonremainsunavailable,andthe
wizardwillnotcontinue.ToexitthewizardatthispointandreturntoDevice,
clickCancel.
SelectingaFirmwareUpgradeFile
TheFirmwareUpgradeWizardletsyouaccessafirmwarefilethatmatches
themodelbeingupgraded.Inthecaseofagroup,theremustbeatleastone
matchingmodelinthegroup.Whenmultipledevicesareselectedforafirmware
upgrade,anydevicesinthatsetthatdonotmatchtheselectedfirmwarefiles
willnotbeupgraded.
Typethepathforthefirmwarefile,orbrowsetofindthefileonyourlocal
system.ClickNext.
VerifyingUpgradeSettings
Whenupgradingmultipledevices,theprocessbypassesanydevicesthatdo
notmatchthemodelsfortheselectedfirmware.Ifthefirmwarecannotbe
validatedforanyofthedevicesyouhaveselected,youwillreceiveamessage
informingyou.
Note:FirmwarefilesarenotprovidedwithKMnetViewer.Consultyour
dealer.
TheFirmwareInformationpagedisplaysasummaryofthesettingsyouhave
chosenforthefirmwareupgradebeforetheupgradebegins.Thesummarycan
include:
Type
Displaysthefirmwaretypefortheupgrade.ForIB-2x,Typeshouldbe,for
example,IB-21ENetworkInterface.
Version
Displaystheversionofthenewsoftware.KMnetViewerdoesnotallow
upgradingtotheidenticalversionastheselectedfirmware.Whenupgrading
multipledevices,theprocessbypassesanydeviceswiththesamefirmware
version.
ModelList
Displaysthedevicemodelbeingupgraded.ForIB-2x,Modelshouldbe,for
example,AnywithanIB-21E.
Reviewthesummaryofsettingsforaccuracyandcompleteness.
ClickBackandreturntothepageofyourchoiceifthereisanythinginthe
settingsyouwanttochange.
KMnetViewer
5-3
Page 38

FirmwareUpgrade
AuthorizingFirmwareUpgrade
ClickCancelifyouwanttostartthewizardoverfromthebeginningand
reentersettings.
ClickUpgradeifthesummaryofsettingsiscorrect.
Thefirmwareupgradecannotbeperformedwithoutproperauthorizationfrom
eachdevice.Authorizationoccursjustbeforetheupgradeoneachdevice.
IB-2xNetworkFirmware
AuthorizationforIB-2xfirmwareisprovidedbytheAdminpasswordseton
eachdevice.TypetheAdminpasswordinthetextboxinCommunication
Settings.Forgroupupgrades,theAdminpasswordmustbethesameoneach
device.
SystemandFaxFirmware
AuthorizationforSystemandFAXfirmwareisprovidedbytheSNMPWrite
Community.
•UsetheWriteCommunityenteredforeachdevicefromDevice>
CommunicationSettings.
BeginningFirmwareUpgrade
CancelingFirmwareUpgrade
Duringtheupgrade,theWriteCommunitywillbecomparedwiththeWrite
Communityvaluestoredoneachdevice.
Ifthereisanythinginthesettingsyouwanttochange,clickBackandreturnto
thepageofyourchoice.Ifyouwanttostartthewizardoverfromthebeginning
andreentersettings,clickCancel.Ifyouaresureyouwanttostarttheupgrade
process,clickUpgrade.
OnceyouclicktheUpgradebutton,theWizardcloses,andtheupgrade
processiscontrolledfromtheKMnetserver.
Note:TheBannerPagemustbeOff,andStartofJobStringmustbeblank
forthelogicalprinterusedforthefirmwareupgrade.
Warning:Ifadeviceisturnedofforlosespoweratacriticalpointduringthe
upgrade,thedevicecouldbecomeinoperableandrequireaservicevisitto
replacedamagedcomponents.
Youhavetheoptiontoaborttheupgradeprocessbetweenactualdevice
upgrades.Iftherearenodevicesremainingtobeupgradedaftertheone
currentlyprocessing,awarningmessagedirectsyoutotryagainlater.
Note:Abortinganactiveupgradesessiondoesnotstopupgradesthatare
currentlyprocessing,forexample,downloadingfirmwaretoadevice.
Therefore,abortinganupgrademaytakeseveralminutesuntildownloadingto
thecurrentdeviceordevicesiscompleted.
5-4
UserGuide
Page 39

SavingtheFirmwareUpgradeExportFile
Allfirmwareupgradeinformationisdisplayed.Theexportfilecontainsthe
resultsforeachdevice.Iftheupgradeforthatdevicefailed,thereasonforthe
failureisnoted.Thefirmwareversionsbeforeandaftertheupgradearealso
recorded.Inthecaseoffailures,theFirmwareVersionboxwillbeblank.
Note:Firmwareforcertainnewermodelsalwaysprocessesallthefirmware
versionsinthemasterfile.Therewillbemultiplelinesintheexportfile,onefor
eachfirmwaretype.
WhentheUpgradeWizardcompletestheupgrade,clickSaveLogtoalocation
ofyourchoice.ThefileformatisaCommaSeparatedValue(.CSV)file,thatcan
beopenedwithaspreadsheetapplicationforeasyviewingandsorting.When
openingtheexportfilewithaspreadsheetapplication,choosecommaasthe
delimiter,ormakeacopyofthefileandgiveita.CSVextension.ClickClose.
FirmwareUpgrade
KMnetViewer
5-5
Page 40

6Workspaces
AworkspaceinKMnetViewerisacollectionoffilesincludingdevice
informationandviewsettings.Theworkspacedataappearsinthedevicelistor
map,andtheleftpaneofthescreen.
Aworkspaceisidentifiedwithausernameandpassword.Whenauseropens
KMnetViewer,thelastworkspacefromthatuser'shistoryisautomatically
opened.Whentheuserclosestheapplication,theworkspaceisautomatically
saved.Normallyauserneedsonlyoneworkspace,butifthereismorethanone
location,withalistofdifferentdevices,additionalworkspacescanbedefined.
Youcanimportafileintoaworkspace,orexportaworkspaceordevicelisttoa
file.Aworkspacecanalsobeexportedtoanotherfilenameforbackup
purposes.
Theseworkspacemanagementfeaturesareavailable:
AddingaNewWorkspaceonpage6-1
OpeninganExistingWorkspaceonpage6-1
ImportingaFiletoaNewWorkspaceonpage6-2
ExportingaWorkspacetoaFileonpage6-2
ExportingDeviceInformationtoaFileonpage6-2
AddingaNewWorkspace
OpeninganExistingWorkspace
Inthemenubaratthetopleftofthescreen,clickFile>NewWorkspace.
1
Browsetothedesiredlocationforthenewworkspacefolder.
2
ClickMakeNewFolder.
3
Typeanameforthenewfolder,andclickOK.Ifanotherworkspacewasalready
4
open,KMnetViewerautomaticallysavesandclosesitbeforeopeningthenew
workspace.
Inthemenubaratthetopleftofthescreen,clickFile>OpenWorkspace.
1
Browsetothelocationofanexistingworkspaceandclickthatworkspacefolder.
2
ClickOK.Ifanotherworkspacewasalreadyopen,KMnetViewerautomatically
3
savesandclosesitbeforeopeningtheselectedworkspace.
6-1
UserGuide
Page 41

ImportingandExportingaWorkspace
ImportingaFiletoaNewWorkspace
1
Workspaces
AworkspaceinKMnetViewerisacollectionoffilesincludingdeviceandUI
information.YoucanbringinaworkspacefromadifferentKMnetViewer
versionoranotheruser.ThefileextensionofaworkspaceexportedfromKMnet
Viewerversion4.xis.KV3.Thefileextensionofaworkspaceexportedfrom
KMnetViewerversion5orlateris.KVX.Tomakeitpossibletoreusethe
devicedataandUIinformationcreatedintheolderversion,youcanimportand
converttheolderworkspacetothenewworkspace.
Youcanalsoshareaworkspacewithanotheruser.Forintegrityofthedata,a
user—evenanadministrator—cannotaccessanotheruser'sworkspace.To
copyaworkspacetoanotheruser,youmustexporttheworkspace,thenthe
otheruserimportsit.Aworkspaceisidentifiedwithausernameandpassword,
butpersonalinformation,isnotexportedwiththefile.
YoucanbringinaworkspaceexportedfromanotheruserorfromKMnet
Viewer4.xversion.
Inthemenubaratthetopleftofthescreen,clickFile>ImporttoNew
Workspace.TheImporttoNewWorkspacedialogboxopens.
UnderFile,typeafilepathorclickBrowsetoselectaworkspacefile.Thefile
2
musthaveanextensionof.KVXor.KV3.
UnderWorkspacefolder,typeafilepathorclickBrowsetoselectafolderto
3
savetheworkspacefilein.
ClickOK.KMnetViewerautomaticallysavesthepreviousworkspace,and
4
openstheimportedone.
ExportingaWorkspacetoaFile
YoucancopyaworkspacefromauserorfromKMnetViewerversion3.xtoa
filethatcanbeimportedtoanotheruseroranewerversion.
Inthemenubaratthetopleftofthescreen,clickFile>Export>Workspace.
1
TheExportWorkspacedialogboxopens.
TypeafilepathorclickBrowsetoselectafile.Thefilemusthaveanextension
2
of.KVX.
ClickSave.Amessageappears:“Workspaceexportfinished.”ClickOK.
3
ExportingDeviceInformationtoaFile
KMnetViewerexportsalldeviceinformation(allavailableviewcolumns)tothe
specifiedfile.
Inthemenubaratthetopleftofthescreen,clickFile>Export>ListtoCSV,
1
forafilecompatiblewithMicrosoftExcel,orListtoXML,foranExtensible
MarkupLanguagefile.TheExporttoCSVorExporttoXMLdialogboxopens.
KMnetViewer
6-2
Page 42

Workspaces
Typeorselectafilepath.Thefilemusthaveanextensionof.CSVor.XML.
2
ClickSave.
3
6-3
UserGuide
Page 43

EditingE-mailOptions
7ViewerOptions
InKMnetVieweryoucanchoosesettingsforcertainsystemauthenticationand
communicationsoptions.Youcansetorchangealocalpasswordforuserswho
donothaveadministratorrightsonacomputer.Youcanconfiguretheviewerto
sende-mailnotificationstousersaboutcertaindeviceconditions.Theviewer
alsoletsyousetdefaultdevicepollingsettingsfornewdevices.Youcanalso
choosesettingsforthetrapserver,theSNMPtrappacketreceiverwhichrunsin
theapplication.
Theseeditingfeaturesareavailable:
EditingE-mailOptionsonpage7-1
EditingAuthenticationOptionsonpage7-2
EditingDevicePollingOptionsonpage7-2
EditingSNMPTrapOptionsonpage7-3
Youcanconfiguretheviewertosende-mailnotificationstousersaboutcertain
deviceconditions,suchascoveropen,paperjam,orlowpaper.IntheE-mail
Optionsdialogbox,youcansetthemailserver,authentication,andsenderfor
thenotifications.
Inthemenubaratthetopleftofthescreen,clickEdit>Options.TheOptions
1
dialogboxopens.
IntheOptionslist,clickE-mail.
2
IntheHosttextbox,typetheSMTP(e-mail)servername,andinPort,typethe
3
portnumber.
IntheUserIDtextbox,typetheusernameneededtologintotheSMTP
4
server,andinPassword,typetheuserpasswordneededtologintotheSMTP
server.
IntheSenderNametextbox,typethenametoshowwhothee-mailisfrom,
5
andinSenderAddress,typethee-mailaddresstoshowwhataddressthe
e-mailisfrom.
TotesttheconnectiontotheSMTPserver,clickTestConnection.Amessage
6
appearstoindicatewhethertheapplicationwasabletosuccessfullyconnectto
theSMTPserver.Ifnecessarycorrectanyofthee-mailconfiguration,andtest
theconnectionagain.
TosaveyoursettingsandclosetheOptionsdialogbox,clickOK.
7
KMnetViewer
7-1
Page 44

ViewerOptions
EditingAuthenticationOptions
EditingDevicePollingOptions
Ifauserdoesnothaveadministratorrightsonthecomputerwiththeviewer
installed,thenetworkadministratorcansetupauserloginpassword.Ifno
passwordhasbeensetupforauserwithoutadministratorrights,theapplication
doesnotstart,andanaccesserrormessageappears.
Inthemenubaratthetopleftofthescreen,clickEdit>Options>
1
Authentication.
SelectEnablelocalpassword.
2
IntheNewpasswordtextbox,typeapasswordforalocaluser.Apasswordis
3
amaximumof32characters.Ablankpasswordisallowed.
InConfirmpassword,typethesamepasswordagain.
4
ClickOKtosavethepassword.
5
Theviewerletsyousetdefaultdevicepollingsettingsfornewdevices.The
settingsdonotaffectdevicesthatalreadyhavebeenadded.
Inthemenubaratthetopleftofthescreen,clickEdit>Options.TheOptions
1
dialogboxopens.
IntheOptionslist,clickDevicePolling.
2
SelectStatusPollingifyouwanttotracktheconditionofdevices,suchas
3
whetheradeviceisoffline,orhasacoveropen.Typeorusetheupanddown
arrowstoselectapollingInterval(seconds).Theavailablerangeisbetween5
and300seconds.Thedefaultvalueis60seconds.
SelectCounterPollingifyouwanttocountpages,suchastotalprintedpages,
4
orprintedcolorpages.Typeorusetheupanddownarrowstoselectapolling
7-2
UserGuide
Page 45

EditingSNMPTrapOptions
ViewerOptions
Interval(minutes).Theavailablerangeisbetween1and10000minutes.The
defaultvalueis60minutes.
SelectTonerLevelPollingifyouwanttotracktheamountoftoneravailablein
5
thedevices.Thetonerlevelcolumninthedevicelistsshowstherelative
amountoftonerinarectangularicon.Ifthetonerisempty,anexclamationmark
showsintheicon.TonerLevelPollingshowstheamountofblacktonerfor
Black&Whitedevices.ForColordevicesthepollingshowstheamountsof
black,cyan,magenta,andyellowtoners.
TypeorusetheupanddownarrowstoselectapollingInterval(minutes).The
availablerangeisbetween1and10000minutes.Thedefaultvalueis1440
minutes.
TosaveyoursettingsandclosetheOptionsdialogbox,clickOK.
6
TheSNMPprotocolisusedforprovidingandtransferringmanagement
informationwithinthenetworkenvironment.ShouldanerroroccursuchasAdd
Paper,thedeviceautomaticallygeneratesatrap,anerrormessagesenttoup
totwopredeterminedtraprecipients.ThetrapserveristheSNMPtrappacket
receiverwhichrunsintheapplication.Toreceivetrappackets,theuserhasto
startthetrapserverandthenconfiguretheSNMPtraponthedevicesas
describedintheAdvanced>Management>SNMPsectionoftheCommand
Centermanualthatcomeswiththedevice.
Inthemenubaratthetopleftofthescreen,clickEdit>Options.TheOptions
1
dialogboxopens.
IntheOptionslist,clickSNMPTrap.
2
Serverstatusshowswhetherthetrapserverisrunningornot.Ifthetrapserver
3
isnotrunning,youcanclickStart.Theserverstatuswillchangetoindicateitis
running.
Ifthestartofthetrapserverisnotsuccessful,amessageappears:“Unableto
startSNMPtrapserver.”Seethelogfileunderthelogfolderforanerror
messageastowhythetrapserverfailedtostart.Correcttheerror,andtryagain
tostartthetrapserver.
Ifthetrapserverisrunning,youcanclickStoptohaltit.Theserverstatuswill
changetoindicateitisnotrunning.
IfyouwanttoallowthereceiptofSNMPtrappacketsthathavethesame
4
communitynameasthetrapcommunity(whichisstoredintheapplication),
typethetrapcommunitynameintheTrapCommunitytextbox.Thedefaultis
public.
Ifyouwanttostartthetrapserverwhenevertheviewerisstarted,select
5
Automaticallyrunthetrapserverwhentheprogramstarts.Thedefaultis
fortheoptiontobecleared:tonotallowthetrapservertostartautomatically.
TosaveyoursettingsandclosetheOptionsdialogbox,clickOK.
6
KMnetViewer
7-3
Page 46

Glossary
A
C
D
advancedsearchAsearchfeaturethatfindsallprintingdevicesinthedatabase
matchingtheselectedcriteria.Uptosixpropertiescanbedefinedforthesearch.The
searchresultsaredisplayeduntilyouchangetoanotherview,orperformanother
AdvancedSearch.
authenticationTheprocessofensuringintegrityofthemessagedataanddata
origin.Itpreventsaccesstothesoftwarefromdataalteredinanunauthorizedmanner.
Theadministratormustestablishitforusers.
counterAvariableusedtokeeptrackofanythingthatmustbetotaled.Counters
canincludekeepingtrackofhowmanycopies,prints,faxes,andscanshavebeen
processedbyeachmanagednetworkprintingdevice.
counterpollingControlshowfrequentlytheintervalcountersonthedevicesare
queriedandstatisticsaccumulated.Counterpollingcanbesetbytheusertotrack
suchthingsaspagecountsandscancountsondevices.
devicehomepageWebpagethatshowsdetaileddeviceinformationandlets
youchangedevicesettings,suchasprintresolutionorpageorientation.Thehome
pagecanbeaccessedbytypingthedevice’sIPaddressintotheaddressbarofaWeb
browser.Forsomedevices,thehomepageisreferredtoastheCommandCenter.
DeviceUserList(DeviceUsers)Alistoflogininformationandpasswordsof
usersthatareauthorizedtousethedevice.
DisplayNameThedescriptivenamegiventoadeviceforeasieridentificationby
users.Thedefaultvalueisthedevicemodelname,butitcanbeeasilychangedin
Properties.
E
F
M
N
excludeddevicesTheDiscoveryprocesscanbeinstructedtonotinclude
specificdevicesintheresults.Devicescanbeexcludedfromdiscoveryforsecurity
reasons,orbecausetheywillbemanagedseparately.
firmwareDeviceandnetworkcardfirmwaresupportthedevice'sinternalsoftware.
Themanufacturermayupgradefirmwaretocorrectincompatibilitywiththirdparty
softwareormechanicalproblemsinthecomputer.Firmwareisprovidedinacomputer
filefordownloadtothedevice.Becauseachangeinfirmwarehasthepotentialto
damageadevice,youmustbeverycarefulwhenusingafirmwareupgrade.
Multi-SetLetsyouapplyconfigurationsettingstooneormoredevicesonthe
networksimultaneously.Settingscanbecreatedfromscratch,fromatemplate,or
copiedfromasourcedevice.
NotificationsNotificationscanbeestablishedfordeviceconditionslikethedevice
isofflineordevicehasapaperjam.UnderNotificationSettings,youcansetthe
methodofnotification,(email,pop-upwindoworWindowseventlog)andthedevice
iv
UserGuide
Page 47

conditionfornotification(coveropen,notconnected).Singleormultipleuserscanbe
setuptoreceiveemailnotifications.Notificationscanbecustomizedforeachdevice.
O
P
Q
S
operationpanelAflat,rectangular,illuminatedscreenusuallylocatedonthetop
frontofadevice.Thepanelmaybeatouchscreen,orhavebuttoncontrolstoselect
differentdeviceoptions.
PDLPageDescriptionLanguage.Thisisthelanguageusedbyyourcomputerto
telltheprintingdevicehowtoprintadocument.Availabilityofsomeprintingoptions
dependsontheselectedPDL.
pollingAprocessforcontinuallycheckingandrequestinginformationfrommultiple
devices.Pollingistypicallyperformedatuserdefinedschedulesorintervals.
pollingintervalAmountoftimethatpassesbetweenpollingsessions.Intervals
forstatus,counterandtonerpollingcanbesetatDevice>CommunicationSettings
>Polling.
quicksearchAsearchfeaturethatfindsdevicesinthecurrentlydisplayeddevice
list.QuickSearchentriesarenotsavedwhenyoumovefromviewtovieworchange
toAdvancedSearch.
SNMPSimpleNetworkManagementProtocol.ThestandardTCP/IPprotocolfor
managingIPnetworkdevices,includingprintingdevices.SNMPsettingsdetermine
thelevelofsecurityandpreventunauthorizedprintingtotheSNMPv3printingdevice.
SNMPtrapCommandusedtocaptureeventsfromadeviceandreportthemback
toKMnetViewer,Aneventisanyunsolicitedalerttriggeredbyaspecificdevice
condition,suchasapaperjam.
SNMPtrapcommunityThiscommunitynamestringfunctionsasapasswordfor
sendingtrapnotificationstothetargetSNMPmanager,verifyingthattheSNMP
managerbelongstoanSNMPcommunitywithaccessprivilegestotheagent.
statuspollingMonitorstheoperatingconditionofdevicesatsetintervals.
T
W
tonerlevelpollingTechniqueusedbyKMnetViewertoregularlydeterminethe
amountoftoneravailableinthedevices.Thetonerlevelcolumninthedevicelist
showstherelativeamountoftonerinarectangularicon.Ifthetonerisempty,an
exclamationmarkshowsintheicon.TonerLevelPollingshowstheamountofblack
tonerforBlack&Whitedevices.ForColordevicesthepollingshowstheamountsof
black,cyan,magenta,andyellowtoners.
workspaceAworkspaceisacollectionoffilesincludingdeviceinformationand
viewsettings.Theworkspacedataappearsinthedevicelistandtheleftpanelofthe
screen.Aworkspaceisidentifiedwithausernameandpassword.
KMnetViewer
v
Page 48

KYOCERA MIT A AMERICA, INC.
Headquarters:
225 Sand Road
Fairfield, New Jersey 07004-0008
Telephone: (973) 808-8444
Fax: (973) 882-6000
New York Branch:
1410 Broadway, 23rd Floor
New York, NY 10018
Telephone: (917) 286-5400
Fax: (917) 286-5402
Northeastern Region:
225 Sand Road
Fairfield, New Jersey 07004-0008
Telephone: (973) 808-8444
Fax: (973) 882-4401
Midwestern Region:
201 Hansen Court, Ste 119
Wood Dale, Illinois 60191
Telephone: (630) 238-9982
Fax: (630) 238-9487
Southeastern Region:
1500 Oakbrook Drive
Norcross, Georgia 30093
Telephone: (770) 729-9786
Fax: (770) 729-9873
Southwestern Region:
2825 West Story Road
Irving, Texas 75038-5299
Telephone: (972) 550-8987
Fax: (972) 252-9786
National Operation Center &
National Training Center:
2825 West Story Road
Irving, Texas 75038-5299
Telephone: (972) 659-0055
Fax: (972) 570-5816
Latin America Division:
8240 NW 52nd
Terrace Dawson Building, Suite 108
Miami, Florida 33166-7766
Telephone: (305) 421-6640
Fax: (305) 421-6666
Western Region:
14101 Alton Parkway
Irvine, CA 92618-7006
Telephone: (949) 457-9000
Fax: (949) 457-9119
KYOCERA MIT A CANADA, L TD.
6120 Kestrel Road, Mississauga,
Ontario L5T 1S8, Canada
Telephone: (905) 670-4425
Fax: (905) 670-8116
KYOCERA MIT A AMERICA MEXICO, S.A. DE C.V .
Av. 16 de Septiembre #407
Col. Santa Inés
Azcapotzalco México,
D.F. 02130, México
Telephone: (55) 5383-2741
Fax: (55) 5383-7804
Page 49

KYOCERA MIT A EUROPE B.V .
Hacksteen 40, 2132 MS Hoofddorp
The Netherlands
Telephone: +31.20.654.0000
Home page: http://www.kyoceramita-europe.com
Email: Info@kyoceramita-europe.com
Kyocera Mita Nederland B.V.
Beechavenue 25, 1119RA Schiphol-Rijk
The Netherlands
Telephone: +31.20.58.77.200
Kyocera Mita (UK) LTD
8 Beacontree Plaza
Gillette Way Reading Berks RG2 0BS
U.K.
Telephone: +44.1189.311.500
Kyocera Mita Italia S.p.A.
Via G. Verdi, 89/91, 20063 Cernusco s/N
Milano, Italy
Telephone: +39.02.92179.1
S.A. Kyocera Mita Belgium N.V.
Hermesstraat 8A, 1930 Zaventem
Belgium
Telephone: +32.2.720.9270
Kyocera Mita (Schweiz)
Hohlstrasse 614, 8048 Zürich
Switzerland
Telephone: +41.1.908.4949
Kyocera Mita Deutschland GMBH
Otto-Hahn-Str. 12, D-40670 Meerbusch,
Germany
Telephone: +49.2159.918.0
Kyocera Mita GMBH Austria
Eduard-Kittenberger-Gasse 95,
1230 Wein
Austria
Telephone: +43.1.86338.210
Kyocera Mita Svenska AB
Esbogatan 16B 164 75 Kista
Sweden
Telephone: +46.8.546.55000
Kyocera Mita Norge
Postboks 150 Oppsal, NO 0619 Oslo
Olaf Helsetsvei 6, NO 0694 Oslo,
Norway
Telephone: +47.22.62.73.00
Kyocera Mita France S.A.
Parc Les Algorithmes Saint Aubin
91194 GIF-SUR-YVETTE
France
Telephone: +33.1.6985.2600
Kyocera Mita España, S.A.
Edificio Kyocera, Avda de Manacor No. 2
28290 Las Matas (Madrid)
Spain
Telephone: +34.91.631.8392
Kyocera Mita Finland OY
Atomitie 5C, 00370 Helsinki
Finland
Telephone: +358.9.4780.5200
Kyocera Mita Danmark A/S
Ejby Industrivej 1, DK-2600 Glostrup
Denmark
Telephone: +45.5687.1100
Kyocera Mita Portugal, IDA.
Rua do Centro Cultural, 41 (Alvalade) 1700-106
Lisbon,
Portugal
Telephone: +351.21.842.9100
Kyocera Mita South Africa (PTY) LTD.
527 Kyalami Boulevard
Kyalami Business Park Midrand
South Africa
Telephone: +27.(0) 11.540.2600
Page 50

KYOCERA MIT A Corporation
Headquarters:
2-28, 1-chome, Tamatsukuri, Chuo-ku
Osaka 540-8585, Japan
Telephone: (06) 6764-3555
http://www.kyoceramita.com
Kyocera Mita Australia Pty, LTD.
Level 3, 6-10 Talavera Road, North Ryde,
N.S.W. 2113 Australia
Telephone: (02) 9888.9999
Kyocera Mita New Zealand LTD.
1-3 Parkhead Place, Albany
P.O. BOX 302 125 NHPC
Auckland, New Zealand
Telephone: (09) 415.4517
Kyocera Mita (Thailand) Corp., LTD.
9/209 Ratchada-Prachachem Road
Bang Sue, Bangkok 10800, Thailand
Telephone: (02) 586.0320
Kyocera Mita Singapore PTE, LTD.
121 Genting Lane, 3rd Level
Singapore 349572
Telephone: 67418733
Kyocera Mita Hong Kong, LTD.
11/F., Mita Centre
552-566, Castle Peak Road
Tsuen Wan, New Territories,
Hong Kong
Telephone: 24297422
Kyocera Mita Taiwan Corporation
7F-1~2, No. 41, Lane 221, Gangchi Rd.
Neihu District, Taipei, Taiwan, 114, R.O.C.
Telephone: (02) 87511560
Page 51

Rev. 1.0_090320
 Loading...